

Page 1

USER GUIDE
LG Digital
Signage
(MONITOR SIGNAGE)
Please read this manual carefully before operation and retain it for future
reference.
L18
www.lg.com
Page 2

2
CONTENTS
ENGLISH
SETTINGS ......................................4
- Home ....................................................................................... 4
Global Buttons
Dashboard
[Content Manager]
- Ez Setting ............................................................................. 5
[Video Wall]
[On/Off Scheduler]
[Server Setting]
[Fail Over]
[Data Cloning]
[Sync Mode]
- General ................................................................................... 8
[Language]
[System Information]
[Set ID]
[Time & Date]
[Power]
[Network]
[Safety Mode]
[Advanced Setting]
- Display .................................................................................18
[Picture Mode Settings]
[Aspect Ratio]
[Rotation]
[Advanced Setting]
- Sound ................................................................................... 22
[Sound Mode Settings]
[Audio Out]
[AV Sync Adjustment]
[Digital Audio Input]
- Admin ................................................................................... 24
[Admin Lock]
[Change Password]
[Lock Mode]
[Reset to Initial Settings]
[Ez Download]
[Factory Reset]
- Picture ID ............................................................................26
Page 3

CONTENT MANAGER ................ 27
- Content Manager ..........................................................27
[Player]
[Scheduler]
[Playlist]
IR CODE ...................................... 36
CONTROLLING MULTIPLE
PRODUCTS .................................. 38
- Connecting cables .........................................................38
- Communication Parameter ......................................39
- Command Reference List ..........................................40
- Transmission/Reception Protocol .........................44
3
ENGLISH
To obtain the source code under GPL, LGPL, MPL,
and other open source licenses, that is contained
in this product, please visit
http://opensource.lge.com.
In addition to the source code, all referred license
terms, warranty disclaimers and copyright notices
are available for download.
LG Electronics will also provide open source code
to you on CD-ROM for a charge covering the
cost of performing such distribution (such as the
cost of media, shipping, and handling) upon email
request to [email protected].
This offer is valid for a period of three years after
our last shipment of this product. This offer is
valid to anyone in receipt of this information.
Page 4
4
ENGLISH
NOTE
• Software-related content may be changed without prior notice due to upgrades of the product functions.
• Some features described in the User Manual may not be supported in certain models and countries.
• SNMP 2.0 is supported.
SETTINGS
Home
Global Buttons
• [Position]: You can set the location of the rotated OSD as Top/Center/Bottom.
• [Input]: Navigate to the external input selection screen.
• [Settings]: Navigate to the Settings screen.
NOTE
• When the OSD rotation is set to 90/270, [Position] appears.
Dashboard
• This feature displays key information about your Signage monitor in the center of the home screen. In the Dashboard,
you can manually change settings by selecting the corresponding items.
NOTE
• If the dashboard is locked, the focus does not move.
[Content Manager]
• [Player]: Play a variety of content including images, videos, music and SuperSign content.
• [Scheduler]: Manage schedules for content that will be played at different times.
• [Playlist]: Create a playlist with photos and videos.
Page 5

5
Ez Setting
[Video Wall]
[Ez Setting] [Video Wall]
Set Video Wall options to create a wide visual canvas.
• [Tile Mode]: Turn [Tile Mode] on or off. Display a single integrated screen on multiple Signage monitors.
• [Natural Mode]: Display the image excluding the area that overlaps with the monitor's bezel so that the image
displayed has a more natural feel to it.
• [Scan Inversion]: This function reduces the differences in image sync between screens adjacently installed above and
below to each other when the high-speed screen is enabled.
• [White Balance Setting]: Set the white balance. (menu position, picture mode, white pattern, color temperature, RGB
gain and backlight)
• [Reset]: Reset to initial settings.
[On/Off Scheduler]
[Ez Setting] [On/Off Scheduler]
Set a schedule to use your signage by time and day of the week.
• [On/Off Time Setting]: Set on/off times for each day of the week.
• [Holiday Setting]: Set holidays by date and by day of the week.
[Server Setting]
[Ez Setting] [Server Setting]
Set up to connect your signage to a SuperSign server.
• [CMS Server]
• [Control Server]
ENGLISH
Page 6

6
[Fail Over]
ENGLISH
This feature enables automatically switching to other input sources in order of priority if the primary signal is
interrupted. It also enables the automatic playback of the photo and video content stored on your device.
• [Off]: Turn off the Fail Over function.
• [Auto]: Switch to other input sources in the predetermined order if there is no signal from the current input.
• [Manual]: Set switching priorities for inputs when there is no signal. In case there are multiple video signals, the
current input switches to the input with the highest priority.
• [Reset]: Reset to initial settings.
• [USB]: You can set this option to [Off], [Movie], or [Photo].
- [Off]: Disable the Fail Over USB function.
- [Movie]: If you set this feature to [Auto], a video is played back when there is no input signal. If you set this feature
to [Manual], a movie is played back when there is no signal from any of the prioritized inputs.
- [Photo]: If you set this feature to [Auto], a photo slideshow is played back when there is no input signal. If you set
this feature to [Manual], a photo slideshow is played back when there is no signal from any of the prioritized inputs.
[Ez Setting] [Fail Over]
NOTE
• The number of priorities may vary depending on the model.
• When [Mode] is set to [Off], all of its sub-menus are disabled.
• When [Mode] is set to [Auto], the Priority menu is disabled.
• When [USB Lock] in [Lock Mode] is turned on, the menu items of the USB [Fail Over] feature are disabled, and the
feature stops working.
• For the USB [Fail Over] feature to normally work, your USB drive must have a folder named “FAIL_OVER” or “fail_
over”, as well as valid content (a video or an image).
• If your USB drive does not have a folder named “FAIL_OVER” or “fail_over” or the folder has no content, the default
USB pop-up menu appears when the operation of the USB [Fail Over] feature starts.
• The USB [Fail Over] feature will be disabled after the distribution of content (or the scheduled playback of the
content). However, if a [Fail Over] event (input signal connection / changes in the USB [Fail Over] feature menus /
USB reconnection) occurs, the USB [Fail Over] feature will be enabled again.
• The USB [Fail Over] feature is disabled during the playback of content or while in standby for the scheduled playback.
• The USB [Fail Over] feature is disabled during software updates (including [EZ Download]).
• If both USB 1 and USB 2 have a USB storage device connected to them, the content stored in USB 1 will be played
back.
Page 7

7
[Data Cloning]
[Ez Setting] [Data Cloning]
This feature is used to copy and import the settings of the device to other devices.
• [Export Setting Data]: Export the settings of the device to another device.
• [Import Setting Data]: Import the settings of another device into the device.
[Sync Mode]
[Ez Setting] [Sync Mode]
Sync up time and content among multiple signage.
• [Sync Mode]: Sync up time and content among multiple signages.
- [Master]: Select as the Master.
- [Slave]: Play content at the same time as the Master monitor.
• [Contents Sync]: Sync the start times of content (videos or images that have been distributed by SuperSign
Software) played back on the Master and Slave monitors.
- On/Off: Enable or disable Content Sync feature.
• [Time Sync]: Sync the Slave monitors' clocks to the Master monitor's at a specified time via RS-232C.
- [Off](0:00 - 23:00): Set the sync time.
ENGLISH
Page 8

8
General
ENGLISH
[Language]
[General] [Language]
You can select the menu language to be displayed on the screen.
• [Menu Language]: Sets the language of your Signage monitor.
[System Information]
[General] [System Information]
This feature displays information such as the device name, software version, and storage space.
[Set ID]
[General] [Set ID]
• [Set ID] (1-1000): Assigns a unique Set ID number to each product when several products are connected via RS-
232C. Assign numbers ranging from 1 to 1000 and exit the option. You can control each product separately by using
the Set ID you assigned to each product. (For some models, the range of assign numbers is 1-255.)
• [Auto Set ID]: Automatically assigns a unique Set ID number to each product when several products are connected
for display.
• [Reset Set ID]: Reset the Set ID of the product to 1.
[Time & Date]
[General] [Time & Date]
This feature enables you to view and change the time and date on the device.
• [Set Automatically]: Set [Time] and [Date].
• [Daylight Saving Time]: Set the start and end times for Daylight Saving Time. The DST start/end times function only
when you set them more than one day apart from each other.
• [Time Zone]: Configure the continent, country/region and city.
- Select manual in [City] to set [Custom Time Zone].
Page 9
9
[Power]
[General] [Power]
Power-related feature settings
[No Signal Power Off](15 min.)
Set whether to use the 15 Min Auto Off feature.
• You can set this option to [On] or [Off].
• If you set this feature to [On], the product turns off when it has remained in No Signal status for 15 minutes.
• If you set this feature to [Off], the 15 Min Force Off feature is disabled.
• It is recommended that you set this feature to [Off] if you intend to use the product for long periods of time as the
feature turns the power of the product off.
[No IR Power Off]
Set whether to use the No IR Power Off feature.
• You can set this option to [Off], [2 hours], [4 hours], [6 hours], or [8 hours].
• If you set this feature to [2 hours], [4 hours], [6 hours] or [8 hours], the product turns off if there is no input from
the remote control for the corresponding period.
• If you set this feature to [Off], the No IR Power Off feature is disabled.
• It is recommended that you set this feature to [Off] if you intend to use the product for long periods of time as the
feature turns the power of the product off.
[DPM]
Set the Display Power Management (DPM) mode.
• If this feature is not set to [Off], the monitor will enter DPM mode when there is no input signal.
• If you set this feature to [Off], [DPM] is disabled.
• You can set this feature to [Off], [5 sec.], [10 sec.], etc.
ENGLISH
[DPM Wake Up Control]
Set conditions for releasing the DPM status according to the digital signal processing of the connected DVI/HDMI port.
• When set to [Clock], the set checks for digital clock signals and releases the DPM status once it finds the clock
signal.
• When set to [Clock+DATA], the set releases the DPM status when both the clock signal and data of the digital signal
are entered.
Page 10

10
[PM Mode]
ENGLISH
• [Power Off](Default): Sets the normal DC off mode.
• [Sustain Aspect Ratio]: Identical to normal DC off mode except that the Switching IC remains on. On certain models,
this applies only to a specific input mode (DisplayPort) and has the same effect as [Screen Off Always] in other input
modes.
• [Screen Off]: Switches to [Screen Off] status when entering DPM, Auto Power Off (15 min, 4 hours), or Abnormal
Shut Down mode.
• [Screen Off Always]: Switches to [Screen Off] status when entering DPM, Auto Power Off (15 min, 4 hours), Off
Time Scheduling, or Abnormal Shut Down mode, or when there is input from the remote control's Power button or
the monitor's Off button.
NOTE
• In order for the screen to switch from [Screen Off] to On status, there must be input from the remote control's
Power or Input button, or the monitor's On button.
[Power On Delay](0-250)
• This feature prevents overload by implementing a power-on delay when multiple monitor sets turn on.
• You can set the delay interval in the range of 0 to 250 seconds.
[Power On Status]
• Select the operating status of the monitor when the main power has turned on.
• You can choose from among PWR (Power On), STD (Standby), and LST (Last Status).
• PWR (Power On) keeps the monitor powered on when the main power has turned on.
• STD (Standby) switches the monitor to Standby status when the main power has turned on.
• LST (Last Status) switches the monitor back to its previous status.
[Wake On LAN]
• Set whether to use [Wake On LAN].
• You can set the feature to On or Off for wired network.
• Wired Network: When set to [On], the Wake On LAN feature is enabled, letting you turn the product on remotely
through a wired network.
[Power On/Off History]
Display the device's power on/off history.
Page 11

11
[Network]
[General] [Network]
[Wired Connection (Ethernet)]
• Wired Connection: Connects the monitor to a local area network (LAN) via the LAN port and configures wired
network settings. Only wired network connections are supported. After setting up a physical connection, the display
will automatically connect without any adjustments on most networks. A small number of networks may require the
display settings to be adjusted. For detailed information, contact your Internet provider or consult your router manual.
[Wi-Fi Connection]
If you have set your monitor up for a wireless network, you can view and connect to available wireless Internet
networks.
• [Input the new SSID]: You can add a wireless network by manually typing in its name.
• [Access Point Search]: Search access point again.
• [WPS PBC]: Press the button on the wireless router that supports PBC to easily connect to the router.
NOTE
• When connected to a network that supports IPv6, you can select IPv4/IPv6 in the advanced wired/wireless network
setting. But, IPv6 connection only supports automatic connection.
Tips for Network Settings
• Use a standard LAN cable (Cat5 or higher with an RJ45 connector) with this display.
• Many network connection problems during set up can often be fixed by re-setting the router or modem. After
connecting the display to the home network, quickly power off and/or disconnect the power cable of the home
network router or cable modem, Then power on and/or connect the power cable again.
• Depending on the Internet service provider (ISP), the number of devices that can receive INTERNET service may be
limited by the applicable terms of service. For details, contact your ISP.
• LG is not responsible for any malfunction of the display or Internet connection failures due to communication errors/
malfunctions associated with your Internet connection or other connected equipment.
• LG is not responsible for problems within your INTERNET connection.
• You may experience undesired results if the network connection speed does not meet the requirements of the
content being accessed.
• Some INTERNET connection operations may not be possible due to certain restrictions set by the Internet service
provider (ISP) supplying your Internet connection.
• Any fees charged by an ISP including, without limitation, connection charges are your responsibility.
ENGLISH
Page 12
12
ENGLISH
NOTE
• If you want to access the Internet directly on your display, the INTERNET connection should always be on.
• If you cannot access the Internet, check the network conditions from a PC on your network.
• When you use Network Setting, check the LAN cable or check if DHCP in the router is turned on.
• If you do not complete the network settings, the network may not function correctly.
CAUTION
• Do not connect a modular phone cable to the LAN port.
• Since there are various connection methods, please follow the specifications of your telecommunication carrier or
INTERNET service provider.
• Network setting menu will not be available until the display connected to physical network.
• When a Wi-Fi dongle is used with a model that has only one USB input port, the distribution or content schedule via
the SuperSign software is not available.
Tips for When Configuring Wireless Network Settings
• The wireless network may be affected by interference from a device that uses 2.4 GHz frequency, such as a wireless
telephone, Bluetooth device or microwave. Interference may also be caused by a device that uses 5 GHz frequency
such as Wi-Fi devices.
• The wireless network service may run slowly depending on the surrounding wireless environment.
• Some devices may have a network traffic jam if any local home networks are turned on.
• To connect to a wireless router, a router that supports wireless connection is necessary; the wireless connection
function of the corresponding router must also be activated. Ask the router manufacturer whether the router
supports wireless connection.
• To connect to a wireless router, verify the SSID and security settings of the wireless router. Please refer to the user
guide of the corresponding router regarding SSID and security settings of the wireless router.
• The monitor may not work properly if network devices (wire/wireless router or hub, etc.) are incorrectly set up. Be
sure to install the devices correctly by referring to their user guides before configuring the network connection.
• The connection method may vary according to the manufacturer of the wireless router.
Page 13

13
[Safety Mode]
[General] [Safety Mode]
Set to this function for safe performance.
[ISM Method]
If a still image is displayed on the screen for an extended period of time, image sticking can occur. The ISM method is a
feature that prevents image sticking.
[Mode]
• Sets the [ISM Method] mode.
• [Normal]: Disables the ISM Method.
• [Orbiter]: Moves the image's position on the screen by 3 pixels in a certain order to remove image sticking.
• [Inversion]: Inverts screen colors to remove image sticking.
• [Color Wash]: Alternately displays a white pattern and a color pattern to remove image sticking.
• [White Wash]: Displays a white pattern to remove image sticking.
• [Washing Bar]: Displays a bar on the screen to make the image move smoothly. You can download a desired image
and display it on the bar.
• [User Image]: Plays your photos or movies using a USB storage device.
[Timer]
• [Immediately]: Performs the ISM function immediately.
• [Repeat]: Performs the ISM function for the amount of time set in [Time] if the still image is maintained for the
period set in [Period].
• [Scheduling]: Performs the ISM function according to settings in [Repeat Day], [Start Time] and [End Time].
[Period]
ENGLISH
• This option is available only when [Timer] is set to [Repeat].
• You can set the period between 1 and 24 hours.
• The ISM function is performed if the still image is maintained for the set period.
Page 14

14
[Time]
ENGLISH
• This option is available only when [Timer] is set to [Repeat].
• You can select from among 1 - 10 min / 20 min / 30 min / 60 min / 90 min / 120 min / 180 min / 240 min.
• The ISM function is performed for the set time.
[Bar Image]
• This option is only available when [Washing Bar] is selected.
• [Off]: Displays a bar with a fixed resolution of 300 x 1080, then moves the bar.
• [On]: Displays a user-downloaded image, and moves the image. The image height is fixed at 1080 and the original
width is maintained. However, the width is fixed at 300 if the original width is less than 300.
• If you download only 1 image, the image is displayed alone and the bar moves.
• If multiple images are downloaded, up to 4 images are consecutively displayed per cycle.
[Bar Color]
• This option is applied when [Bar Image] is [Off].
• This option is only available when [Washing Bar] is selected.
• You can choose from 6 colors: [Red] / [Green] / [Blue] / [White] / [Black] / [Gray]
[Bar Transparency]
• This option is only available when [Washing Bar] is selected.
• [Off]: Displays the bar opaquely.
• [On]: Displays the bar translucently. (Transparency: 50 %)
[Bar Direction]
• This option is only available when [Washing Bar] is selected.
• [Left to Right]: The bar moves from left to right.
• [Right to Left]: The bar moves from right to left.
[User Image]
• This option is only available when [User Image] is selected.
• You can choose [Movie] or [Photo].
[Repeat Day]
• This option is available only when [Timer] is set to [Scheduling].
• [None]: When it is set to None, the ISM function is not performed.
• Monday-Sunday: The ISM function is performed on scheduled days and for scheduled period.
Page 15

15
[Start Time]
• This option is available only when [Timer] is set to [Scheduling].
• Sets the start time of the ISM function.
[End Time]
• This option is available only when [Timer] is set to [Scheduling].
• Sets the end time of the ISM function.
How to Download an ISM Bar Image in Ez Download
1 In order to download an image in Ez Download, there must be an image file in an ‘ism_bar’ or ‘ISM_BAR’ folder on
your USB storage device.
2 Delete the existing content stored on the internal memory before downloading a new image file.
3 Add “ISMBAR” as a prefix to the name of a file to distinguish the file from others (EPK, Logo, No Signal, etc.).
4 Download an ISM Bar Image in Ez Download.
NOTE
• You can download multiple images up to 5 MB in total.
• The total bit size of images must be under 50 MB for the images to be downloaded.
For example, in the case of a 500 KB image with a resolution of 1920 x 1080, its bit size calculated by image
decoding is about 7.91 MB (1920 * 1080 * 32 bit/1024/1024/8). Therefore, if you download 7 images of the same
size, the total size of the images is about 3.5 MB, which falls within 5 MB. However, their total bit size is 7.91 MB * 7
= 55.3 MB, which exceeds the maximum bit size of 50 MB, so they cannot be downloaded.
How to Download an ISM Photo/Movie in Ez Download
1 In order to download a user image in Ez Download, there must be an user image file in an “ism or ISM” folder on
your USB storage device.
2 Delete the existing content stored on the internal memory before downloading a new image file.
3 Add [ISMPHO] as a prefix to the name of a file for photos or [ISMMOV] if the file contains movies to distinguish the
file from others (EPK, Logo, No Signal, etc).
4 Download ISM photos or movies in Ez Download.
ENGLISH
Page 16

16
[Advanced Setting]
ENGLISH
[General] [Advanced Setting]
[PC/OPS Control]
• [PC/OPS Power Control]: Enable you to control the power of the OPS as you turn on/off the display.
- [Disable]: Disable OPS Power Control.
- [Sync (On)]: Synchronize the monitor's power status only when the monitor is on.
- [Sync (On/Off)]: Synchronize the monitor's power status with the OPS.
• [Control Interface Selection]: This feature enables you to configure communication with the OPS connected to your
monitor.
- [Display]: Enable communication with external serial ports.
- [OPS]: Enable communication with the OPS connected to your monitor.
[Background Image]
This feature enables you to set the default background image.
• [Booting Logo Image]: Change the logo image that appears when the device boots up. If you set this feature to [Off],
the Booting Logo does not appear.
- [Image Download]: Download Booting Logo Image files onto your monitor. In order to download a Booting Logo
Image, there must be a Booting Logo Image file in a “LG_MONITOR” on your USB storage device.
NOTE
• The feature to update the Booting Logo Image only supports JPEG files of 1 MB or smaller can be used as Booting
Logo Images.
• Progressively encoded JPEG files are not applicable.
• Make sure that Booting Logo Images have a resolution suitable for the screen resolution of the monitor.
• The maximum resolution for a Booting Logo Image is Full HD (1920 x 1080) and HD (1360 x 768). The minimum
resolution for a Booting Logo Image is 64 x 64.
• [No Signal Image]: Change the image that appears when there is no signal. If you set this option to [Off], no image
appears when there is no signal.
- [Image Download]: Download No Signal Image files onto your monitor. In order to download an image, there must
be an No Signal Image file in a “lg_sig” or “LG_SIG” folder on your USB storage device. The maximum total size of
images to be downloaded: The total size should not exceed 10240KB (10MB).
NOTE
• The feature to update No Signal Images only supports JPEG files of 1 MB or smaller.
• Progressively encoded JPEG files are not applicable.
• The maximum resolution for a No Signal Image is Full HD (1920 x 1080) and HD (1360 x 768). The minimum
resolution for a Booting Logo Image is 64 x 64.
• No Signal Image files with a resolution of Full HD (1920 x 1080) can cause image sticking.
• Only No Signal Image files with English names are displayed correctly.
Page 17
17
[Input Manager]
Specify a label for each input source.
[SIMPLINK Setup]
• When the [SIMPLINK Setup] is set to [On], you can use the SIMPLINK provided by LG Signage.
• [Device ID]: Set the ID of the device connected via CEC wiring. You can choose a value between [All] and E.
• [Standby]: Sets the scenarios for sending and receiving the OpStandBy (0x0c) command. Detailed scenarios are as
follows:
Transmission Reception
[All] O O
[Send Only] O X
[Receive Only] X O
[Off] X X
[Crestron]
• This function enables synchronization with applications provided by Crestron.
• [Server]: This menu sets the server's IP address for the network connection with the server (equipment provided by
Crestron).
• [Port (1024~65535)]: This menu sets the port for the network connection with the server. The default port number
is 41794.
• [IP ID (3~254)]: This menu sets a unique ID for synchronizing with the application.
ENGLISH
Page 18
18
Display
ENGLISH
[Picture Mode Settings]
[Display] [Picture Mode Settings]
[Picture Mode]
This feature enables you to choose the optimal picture mode for your installation environment.
• [Mall/QSR], [Transportation], [Education], [Gov./Corp.]: Display the picture optimally for your installation environment.
• [General]: Display the picture at normal contrast, brightness, and sharpness.
• [APS]: Adjust the screen brightness to reduce power consumption.
• [Expert], [Calibration]: Allow an expert, or anyone who loves picture quality, to manually tune to the best picture
quality.
NOTE
• The kinds of [Picture Mode] you can select may vary depending on the input signal.
• [Expert] is an option that allows a picture quality expert to fine-tune the picture quality using a specific image. Thus,
it may not be effective for a normal picture.
Page 19

19
[Customize]
• [Backlight]: Adjust the brightness of the screen by adjusting the brightness of the backlight. The closer the value is to
100, the brighter the screen is.
• [Contrast]: Adjust the difference between the light and dark areas of the picture. The closer the value is to 100, the
greater the difference is.
• [Brightness]: Adjust the overall brightness of the screen. The closer the value is to 100, the brighter the screen is.
• [Sharpness]: Adjust the sharpness of the edges of objects. The closer the value is to 50, the clearer and the sharper
the edge becomes.
• [Color]: Soften or deepen the tints on the screen. The closer the value is to 100, the deeper the colors become.
• [Tint]: Adjust the balance between red and green levels displayed on the screen. The closer to Red 50, the redder the
color will be. The closer to Green 50, the greener the color will be.
• [Color Temperature]: The higher you set the color temperature, the cooler the colors on the screen will feel. The lower
you set the color temperature, the warmer the colors on the screen will feel.
• [Advanced Setting]: Customize the advanced options.
- [Dynamic Contrast]: Optimize the difference between the light and dark parts of the screen according to the
brightness of the image.
- [Color Gamut]: Select the range of colors available.
- [Dynamic Color]: Adjust the tint and saturation of the image for a more vivid and lively display.
- [Color Filter]: Accurately adjust color and tint by filtering a specific color area of RGB space.
- [Preferred Color]: Adjust the skin tint, grass tint, and sky tint to your preference.
- [Gamma]: Adjust gamma settings to compensate for the brightness of the input signal.
- [White Balance]: Adjust the overall color fidelity of the screen to your liking. In Expert mode, you can fine-tune the
picture using the Method/Pattern options.
- [Color Management System]: Experts use the color management system when they adjust the colors by using the
test pattern. The color management system allows you to make an adjustment by selecting from among 6 different
color spaces (Red/Yellow/Blue/Cyan/Magenta/Green) without affecting other colors. In a normal picture, you may
not notice the color changes you have made.
ENGLISH
Page 20
20
• [Picture Option]: Customize the picture options.
ENGLISH
- [Noise Reduction]: Remove randomly popping dots to make the picture look clearer.
- [MPEG Noise Reduction]: Reduce the noise generated in the process of creating a digital video signal.
- [Black Level]: Adjust the brightness and contrast of the screen by adjusting the black level of the screen.
(Recommended settings according to input signal: RGB 0–255: High, RGB 16–235: Low, YCbCr: Low)
- [Real Cinema]: Optimize the video image for a cinematic look.
• [Apply to All Inputs]: Copies the current value of the detailed setting menu to the entire input, and applies only to the
selected picture mode. Copying the detailed settings is available only for inputs set as the DTV labels.
• [Picture Reset]: Reset the picture settings. Because the picture settings are reset according to the monitor's picture
mode, please select the picture mode before resetting the picture settings.
[Aspect Ratio]
[Display] [Aspect Ratio]
This feature enables you to change the picture size to view the picture at its optimal resolution.
• [Full]: Stretch the picture to fill the screen.
• [Original]: Display the picture at its original resolution.
[Rotation]
[Display] [Rotation]
[OSD Rotation]
• This feature rotates the screen clockwise.
• You can set this feature to Off/90/270.
• When set to off, this feature is deactivated.
• It is recommended that you use content designed to be used in Portrait mode.
[Position]
• You can set the location of the rotated OSD as Top/Center/Bottom.
[Pivot Mode]
• This feature pivots the screen 180°.
Page 21
21
[Advanced Setting]
[Display] [Advanced Setting]
[Energy Saving]
• [Smart Energy Saving]: Automatically adjust the brightness of the screen according to the brightness of the picture
to save energy.
- [On]: Enable the Smart Energy Saving feature.
- [Off]: Disable the Smart Energy Saving feature.
• [Brightness Control]: Adjust the brightness of the screen to save energy.
- [Off]: Disable the Brightness Control function.
- [Minimum/Medium/Maximum]: Use energy saving according to the energy saving level set for the monitor.
- [Screen Off]: Turn off the screen after 3 seconds.
• [Brightness Scheduling]: Adjust the backlight at specified times.
- You can set this feature to [On]/[Off].
- Add schedule by setting the schedule time and backlight value.
- If the current time has not been set, [Brightness Scheduling] is disabled.
- You can add up to six schedules, and they are sorted in ascending order by time.
- You can delete a schedule by selecting it from the list and pressing the [OK] button.
• Return to default settings by clicking [Admin] [Reset to Initial Settings] or [Admin] [Factory Reset].
[Adjust (RGB-PC)]
This feature enables you to configure the PC display options in RGB mode.
• [Auto Config.]: Automatically adjust the screen position, time, and phase. The image displayed on the screen can be
unstable for a few seconds in the process of the configuration.
• [Resolution]: Enabled when the V resolution is 768, 900/960 or 1050. The detailed resolution options are available.
(The range of the available resolution is shown in the table below.)
768 900/960 1050
1024 x 768 1280 x 960 1400 x 1050
1280 x 768 1440 x 900 1680 x 1050
1360 x 768 1600 x 900
1366 x 768
• [Position]/[Size]/[Phase]: Adjust the options when the picture is not clear, especially when characters are shaky, after
the auto configuration.
• [Reset to Initial Settings]: Resets the options to default.
ENGLISH
Page 22
22
Sound
ENGLISH
[Sound Mode Settings]
[Sound] [Sound Mode Settings]
[Sound Mode]
The best sound quality will be selected automatically depending on the video type currently being watched.
• [Standard]: This sound mode works well for content of all types.
• [Cinema]: Optimize sound for watching movies.
• [Clear Voice]: Enhance voices so they can be heard more clearly.
• [Sports]: Optimize sound for watching sports.
• [Music]: Optimize sound for listening to music.
• [Game]: Optimize sound for playing video games.
[Balance]
• [Balance]: Adjust the output volume for the left speaker and the right speaker.
[Equalizer]
• [Equalizer]: Manually adjust sound by using the equalizer.
[Reset]
• [Reset]: Resets sound settings.
Page 23
23
[Audio Out]
[Sound] [Audio Out]
• [Off]: Disables the use of Audio Out. (No audio outputted.)
• [Variable]: You can specify an output range for the external audio device connected to the monitor and adjust the
volume within the range. You can change the volume of an external audio device within the range of 0 to 100 (the
same as the Signage speaker volume). However, there may be a difference in the actual volume level outputted.
• [Fixed]: Set a fixed audio output level for the external audio device.
- If there is no external input, no external audio is outputted.
- The variable audio output level 100 is the same as the fixed audio output level.
[AV Sync Adjustment]
[Sound] [AV Sync Adjustment]
This feature adjusts audio timing to synchronize video and audio.
• [Internal Monitor Speaker] (-5~15): Adjust the sync of sound from the internal speakers. Moving closer to – speeds
up the audio output, while moving closer to + slows down the audio output, compared to the default value.
• [Bypass]: Output the broadcast signals or the sound from external devices without any audio delay. Audio may be
outputted earlier than video due to the processing time for video that is inputted into the monitor.
[Digital Audio Input]
[Sound] [Digital Audio Input]
This feature enables you to choose an input source for audio output.
• [Digital]: Output the audio contained in the digital signal inputted from the connected digital input source (HDMI,
DISPLAYPORT, or OPS).
• [Analog]: Output audio from the digital input source (HDMI, DISPLAYPORT, or OPS) connected to the monitor
through the Audio In port.
ENGLISH
Page 24
24
Admin
ENGLISH
[Admin Lock]
[Admin] [Admin Lock]
It keeps the existing settings because the Off/On button in the User menu only affects the active/inactive status of the
submenu.
[Change Password]
[Admin] [Change Password]
This feature enables you to set the password you use to enter the Installation menu.
1 Enter the current password.
2 Enter a new 4-digit password.
3 Enter the same password again in the Confirm Password field for confirmation.
[Lock Mode]
[Admin] [Lock Mode]
[Home Dashboard Lock]
This feature enables you to restrict changes made to dashboard lock settings on the Home screen.
[USB Lock]
This feature restricts you from using a USB.
[OSD Lock]
This feature restricts you from using the OSD interface.
Page 25
25
[IR Operation Lock]
• If you set this feature to [Off (Normal)], you can use your remote control.
• If you set this feature to [On (Power Key Only)], you can only use the power key.
• If you set this feature to [On (Block All)], you cannot use your remote control.
[Local Key Operation Lock]
• This feature enables you to configure the Local Key Operation Lock feature so that settings or content cannot be
changed.
• If you set this feature to [Off (Normal)], you can use the local keys on the monitor.
• If you set this feature to [On (Power Key Only)], you can only use the power key.
• If you set this feature to [On (Block All)], you cannot use the local keys.
NOTE
• If [IR Operation Lock] and [Local Key Operation Lock] are both set to [On (Block All)], [General] > [Power] > [Power
On Status] value switches to ‘PWR.’ Changing this value is not impossible to ensure the correct powering on
operation. (To prevent mistakes by the user)
• If [IR Operation Lock] is set to [On] (Power Key Only, Block All), you can go to the menu screen by pressing and
holding the Settings key for more than 5 seconds and entering the password.
[Reset to Initial Settings]
[Admin] [Reset to Initial Settings]
Reset all data except for the items (languages, screen direction, inputs, time and power)
[Ez Download]
[Admin] [Ez Download]
Users can easily download Software Update, Logo Image, No Signal Image, Data Cloning and etc. from Ez Download.
ENGLISH
[Factory Reset]
[Admin] [Factory Reset]
This feature resets the items applicable for Reset to Initial Settings, Date, Time, Language, Network IP, and the Input
Label Internal Storage files.
However, Calibration mode's RGB gain is an exception.
Page 26
26
AUDIO
(RGB/DVI)
REMOTE
CONTROL IN
RS-232C OUT
RS-232C IN
RS-232C OUT
RS-232C IN
RS-232C OUT
RS-232C IN
Picture ID
ENGLISH
• This only applies to certain models.
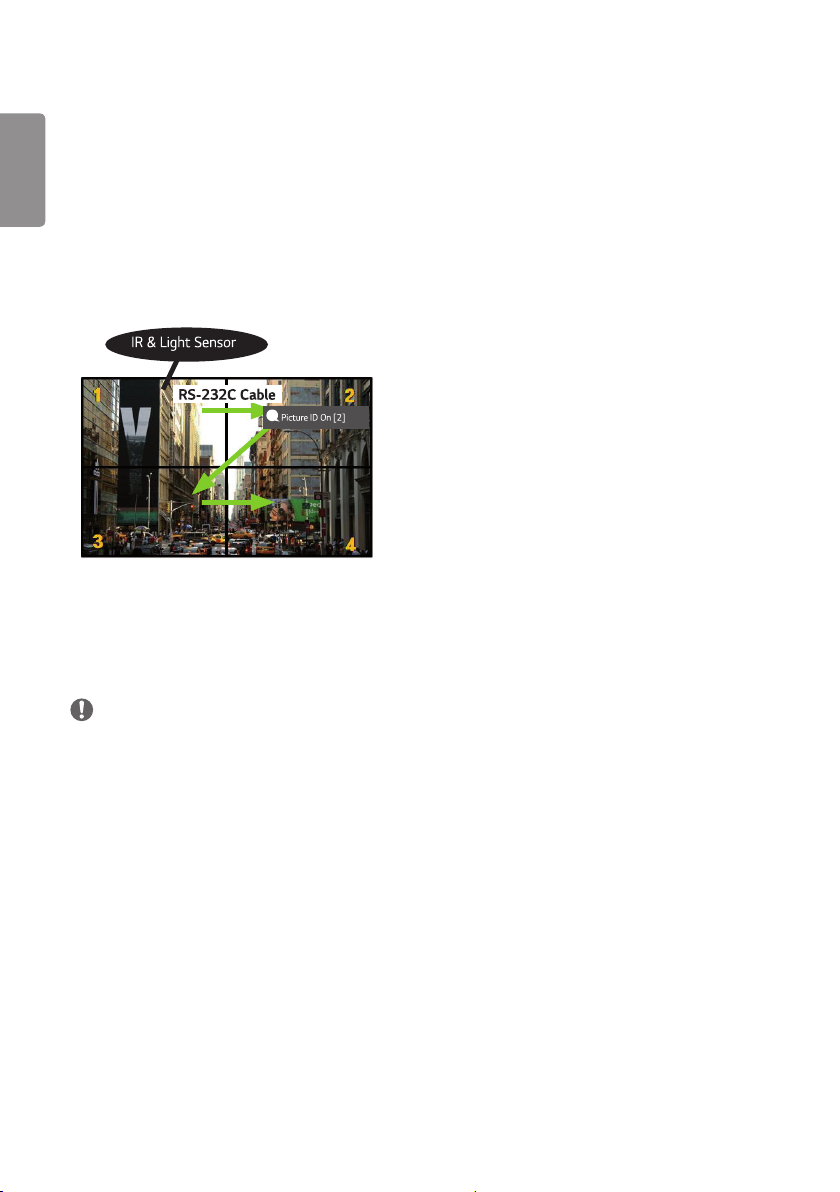
[Picture ID] is used to change the settings of a specific set (display) using a single IR receiver for multi-vision.
Communication is possible between a monitor with an IR receiver and other monitors using RS-232C cables. Each
monitor is identified by a Set ID. Setting [Picture ID] allows you to only use the remote control with monitors with a
[Set ID] that matches the [Picture ID].
1 Assign [Set ID] to the installed monitors as shown below:
2
Press the red [Picture ID] [On] button on the remote control.
3
Make sure that the Picture ID you set is identical to the [Set ID] of the monitory you wish to control.
• A set with a [Set ID] that is different from the [Picture ID] cannot be controlled by IR signals.
NOTE
• If [Picture ID] has been set to 2, only the upper right monitor, which has a [Set ID] of 2, can be controlled by IR signals.
• If you press the green [Picture ID] [Off] button on your remote control, the [Picture ID] for all monitors are turned
off. If you then press any button on the remote control, all monitors can be controlled by IR signals regardless of their
[Set ID]’s.
Page 27
27
CONTENT MANAGER
Content Manager
[Player]
([Player])
The Content Manager app's player feature enables you to play video content, image content, template content and
playlist content in an integrated way.
[Play]
1 Select your desired type of content from the tab on the left and then select your desired content.
2 Click [Play] in the upper right-hand corner of the screen and enjoy the content you have selected.
[Scheduler]
([Scheduler])
The Content Manager app's scheduler feature enables certain content to be played at a scheduled time through a
playlist or external input.
[Creating a Schedule]
1 Click [Add New Schedule] in the upper right-hand corner of the screen.
2 Choose between [Playlist] and [Input].
3 1) If you have selected [Playlist], select the playlist you wish to schedule the playback of.
1-1) You can cancel schedule creation by clicking the Cancel button.
2) If you have selected [Input], select the external input source you wish to schedule the playback of.
2-1) You can cancel schedule creation by clicking the Cancel button.
4 Enter schedule information and create a new schedule.
1) You can go back to the [Playlist] / [Inputs] screen by clicking the Back button.
2) You can go back to the Scheduler screen by clicking the Cancel button.
5 Watch the playlist or external input you selected play back at its scheduled time.
ENGLISH
Page 28
28
[Deleting a Schedule]
ENGLISH
1 Click [Delete] in the upper right-hand corner of the screen.
2 Select the schedules you wish to delete.
3 Click [Delete].
4 Check that the schedules have been deleted.
[Playing a Schedule Now]
1 On the Scheduler screen, select the schedule you wish to play.
2 After selecting the desired schedule, select [Play Now] on the bottom right corner of the screen.
3 Watch the playlist or external input you selected plays back.
[Editing a Schedule]
1 On [Scheduler], select the schedule you wish to edit.
2 After selecting the desired schedule, select [Edit] on the bottom right corner of the screen.
3 If the selected schedule is a playlist, playlist edit window will appear. If it is an external input, external input edit
window will appear. Select the [Playlist] / [Input] you wish to edit.
1) You can cancel schedule editing by clicking the Cancel button.
4 Enter schedule information to edit a schedule.
1) You can go back to the [Playlist] / [Inputs] screen by clicking the Back button.
2) You can go back to the Scheduler screen by clicking the Cancel button.
5 Check the edited Scheduler.
6 Watch the playlist or external input you selected play back at its scheduled time.
NOTE
• When creating and editing a schedule, you cannot include characters that cannot be used in file names on Windows
— such as \, /, :, *, ?, “, <, >, and | — in the name of the schedule file. You cannot create a schedule if file names include
such characters.
• In addition, if the playlist linked to the schedule contains content files whose names include such characters, you
cannot move or copy the playlist.
• If the schedule creation time overlaps, the previously created schedule is deleted.
• If there is an existing schedule with the same name, change the name to create a schedule.
• Schedule does not work while Scheduling list app is running.
Page 29
29
[Playlist]
([Playlist])
This feature creates playlist using content in a USB and automatically plays back the created playlist when the monitor
is turned on.
Create Playlist
1 Click [Create New Playlist] in the upper right-hand corner of the screen.
2 Select the desired content and click [Complete].
3 Check the created playlist.
[Power On Play] Setting
1 Click [Power On Play] in the upper right-hand corner of the screen.
2 Select the desired playlist and click [Complete].
3 Check the selected playlist play back when the monitor is turned on.
[Delete Playlist]
1 Click [Delete] in the upper right-hand corner of the screen.
2 Select the desired playlists and click [Delete].
3 Check that the playlists have been deleted.
Photo Playback Speed Setting
1 Click [Settings] in the upper right-hand corner of the screen.
2 Select the desired time and click [Save]. (You can set this feature to 5/10/20/30.)
3 Check the playback speed when the playlist plays back.
ENGLISH
Page 30

30
[Edit Playlist]
ENGLISH
1 Select the playlist you wish to edit.
Add Content
1 Click [Add Content] in the upper right-hand corner of the screen.
2 Select the desired content and click [Complete].
3 Check that the content has been added.
Change Content Order
1 Click [Change Order] in the upper right-hand corner of the screen.
2 Select and move the desired content.
3 After moving the content to the desired location, click [Complete].
4 Check that the content order has been changed.
Delete Content
1 Click [Delete] in the upper right-hand corner of the screen.
2 Select the desired content and click [Delete].
3 Check that the content has been deleted.
Page 31
31
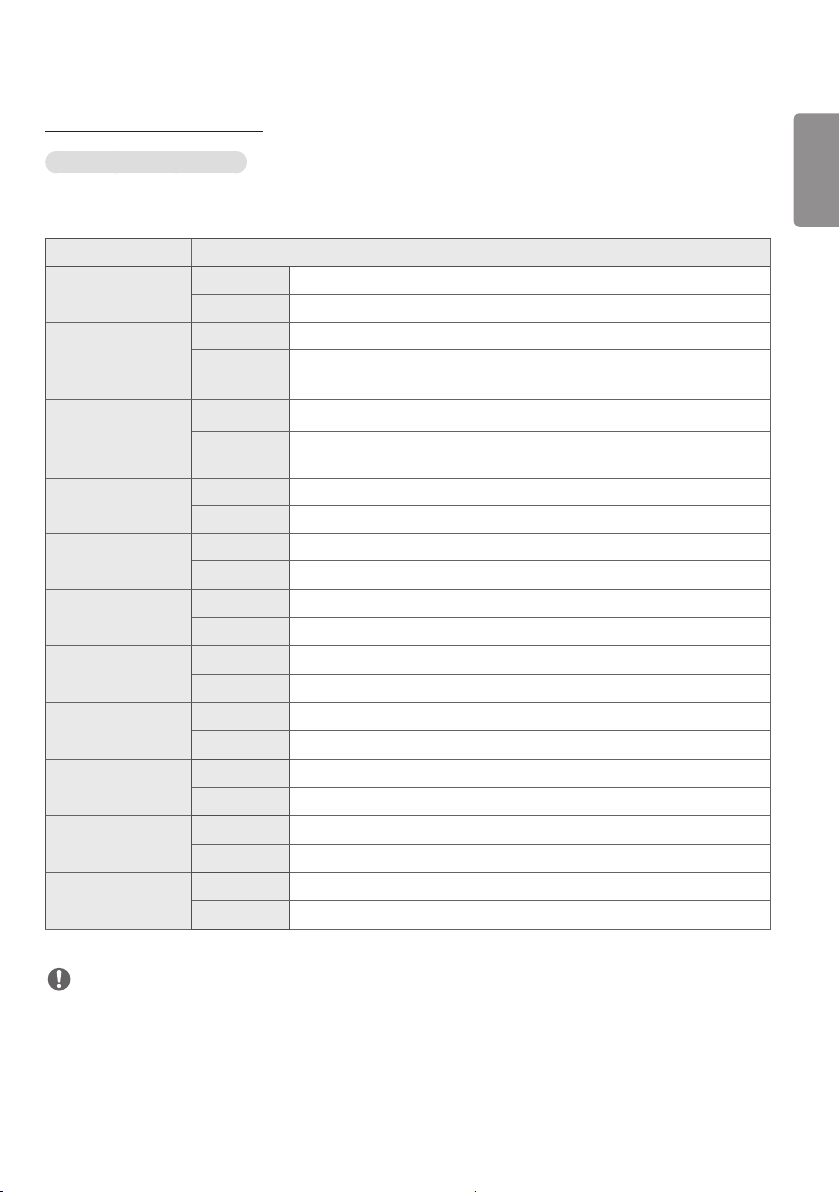
Supported Media File Formats
Supported Video File Formats
• Maximum data transfer rate: 20 Mbps (Megabits per second)
• Maximum supported resolution: 1920 x 1080 @ 30p (only Motion JPEG 640 x 480 @ 30p)
Extension Codec
.asf, .wmv Video MPEG-4 Part2, Xvid, H.264/AVC, VC1(WMV3, WVC1), MP43
Audio WMA Standard, WMA9(Pro), MP3, AAC, AC3
.avi Video MPEG-2, MPEG-4 Part2, Xvid, H.264/AVC
Audio HE-AAC, LPCM, ADPCM, MPEG-1 Layer I, MPEG-1 Layer II, Dolby Digital,
MPEG-1 Layer III (MP3)
.ts, .trp, .tp, .mts,
.m2ts
.vob Video MPEG-1, MPEG-2
.mp4, .m4v, .mov Video MPEG-2, MPEG-4 Part2, Xvid, H.264/AVC
.mkv Video MPEG-2, MPEG-4 Part2, Xvid, H.264/AVC
motion JPEG Video MJPEG
.mpg, .mpeg, .mpe Video MPEG-1, MPEG-2
.dat Video MPEG-1, MPEG-2
.flv Video Sorenson H.263, H.264/AVC
.3gp Video H.264/AVC, MPEG-4 Part2
Video H.264/AVC, MPEG-2, H.265/HEVC
Audio MPEG-1 Layer I, MPEG-1 Layer II, MPEG-1, Layer III (MP3), Dolby Digital,
Dolby Digital, Plus, AAC, HE-AAC
Audio Dolby Digital, MPEG-1 Layer I, MPEG-1, Layer II, DVD-LPCM
Audio AAC, MPEG-1 Layer III (MP3)
Audio HE-AAC, Dolby Digital, MPEG-1 Layer III (MP3), LPCM
Audio LPCM, ADPCM
Audio MPEG-1 Layer I, MPEG-1 Layer II, Dolby Digital, LPCM
Audio MP2
Audio MP3, AAC, HE-AAC
Audio AAC, AMR(NB/WB)
ENGLISH
NOTE
• Dolby is not supported for a specific model such as 49KE5E.
Page 32
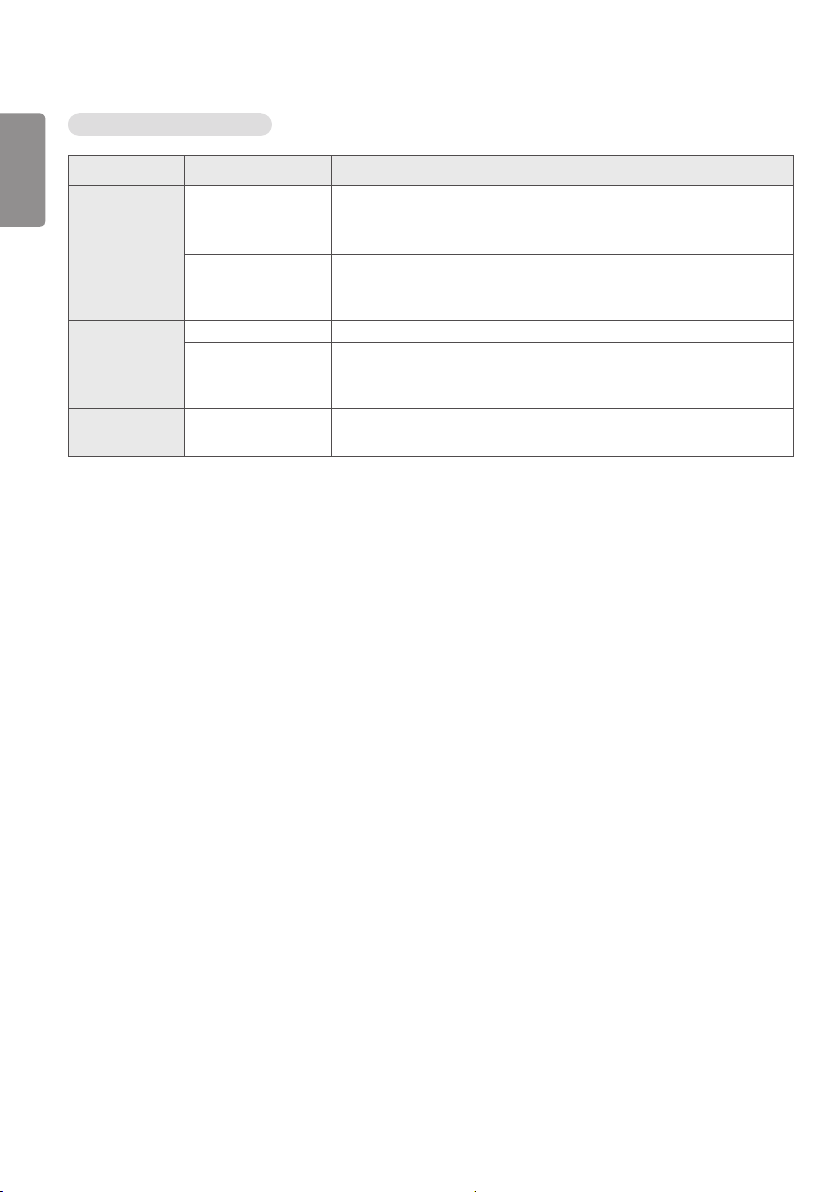
32
Supported Photo File Formats
ENGLISH
File type Format Resolution
.jpeg, .jpg, .jpe Supported file format SOF0: Baseline
SOF1: Extend Sequential
SOF2: Progressive
Photo size Minimum: 64 (W) x 64 (H)
Maximum: Normal Type: 15360 (W) x 8640 (H)
Progressive Type: 1920 (W) x 1440 (H)
.png Supported file format Interlace, Non-Interlace
Photo size Minimum: 64 (W) x 64 (H)
Maximum: Interlace: 1200 (W) x 800 (H)
Non-Interlace: 9600 (W) x 6400 (H)
.bmp Photo size Minimum: 64 (W) x 64 (H)
Maximum: 9600 (W) x 6400 (H)
Page 33
33
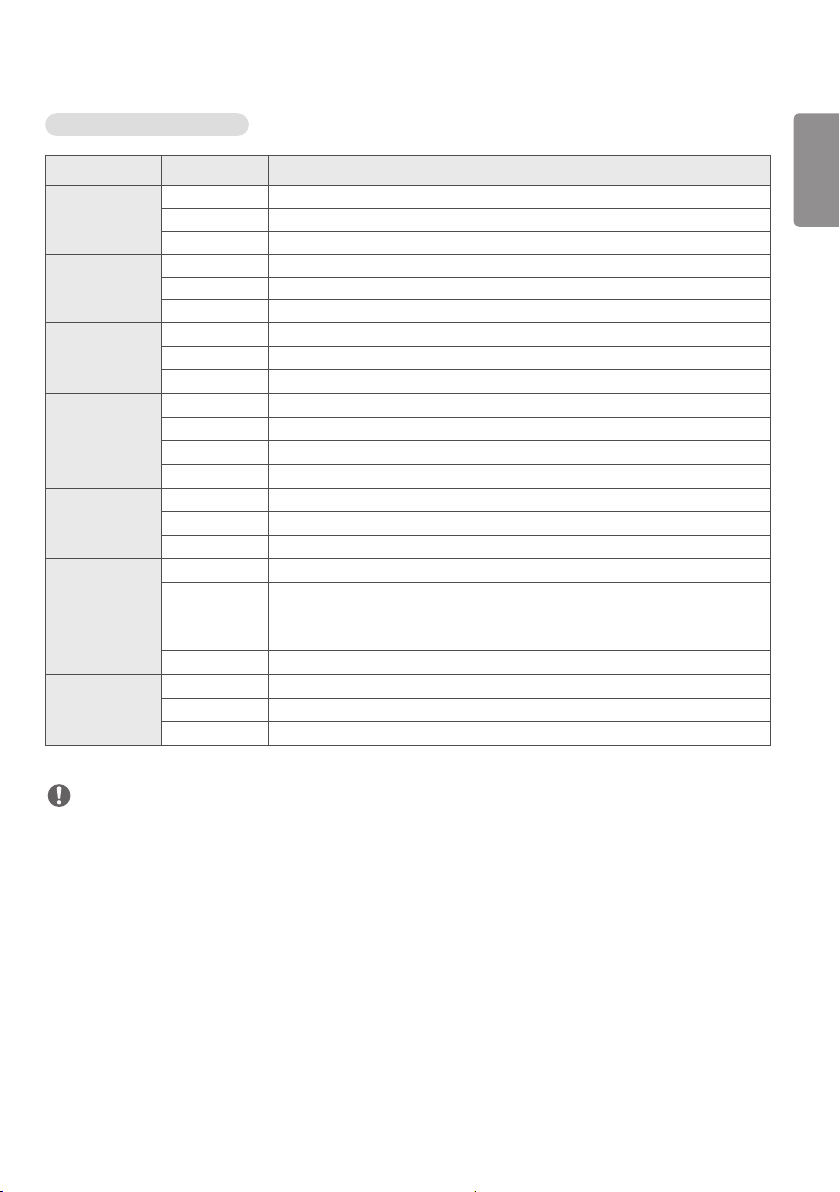
Supported Music File Formats
File type Format Info
MP3 Bit rate 32 Kbps - 320 Kbps
Sample freq. 16 kHz - 48 kHz
Support MPEG-1, MPEG-2, Layer2, Layer3
AAC Bit rate Free Format
Sample freq. 8 kHz - 48 kHz
Support ADIF, ADTS
M4A Bit rate Free Format
Sample freq. 8 kHz - 48 kHz
Support MPEG-4
WAV Bit rate 64 kbps - 1.5 Mbps
Sample freq. 8 kHz - 48 kHz
Support LPCM
Bit depth 8 bit / 16 bit / 24 bit
WMA Bit rate 128 Kbps - 320 Kbps
Sample freq. 8 kHz - 48 kHz
Support WMA7, WMA8, WMA9 Standard
WMA 10 Pro Bit rate - 768 Kbps
Sample freq. M0: up to 2 Channel @ 48 kHz (Except LBR mode)
M1: up to 5.1 Channel @ 48 kHz
M2: up to 5.1 Channel @ 96 kHz
Support WMA 10 Pro
OGG Bit rate Free Format
Sample freq. 8 kHz - 48 kHz
Support OGG Vorbis
ENGLISH
NOTE
• The playback speed of BMP and PNG files can be slower than JPEG.
Page 34

34
Tips for using USB storage devices
ENGLISH
• Only USB storage devices are recognized.
• USB storage devices connected to the monitor through a USB hub may not work properly.
• USB storage devices that use an automatic recognition program may not be recognized.
• USB storage devices that use their own drivers may not be recognized.
• The recognition speed of a USB storage device may depend on each device.
• Please do not turn off the display or unplug the USB device when the connected USB storage device is working.
When the device is suddenly separated or unplugged, the stored files or the USB storage device may be damaged.
• Please do not connect the USB storage device which was artificially maneuvered on the PC. The device may cause
the product to malfunction or fail to be played. Remember to only use USB storage devices that store normal music,
image, and/or movie files.
• Storage devices formatted with utility programs that are not supported by Windows may not be recognized.
• Please connect power to a USB storage device (over 0.5 A) which requires an external power supply. Otherwise, the
device may not be recognized.
• Please connect a USB storage device with the cable offered by the device maker.
• Some USB storage devices may not be supported or operated smoothly.
• Some models do not support USB external hard disks.
• File alignment methods of the USB storage device is similar to Windows XP and filenames can include up to 100
English characters.
• Be sure to back up important files since data stored in a USB memory device may be damaged. We will not be
responsible for any data loss.
• If the USB HDD does not have an external power source, the USB device may not be detected. So make sure to
connect it to an external power source.
- Please use a power adapter for an external power source. No USB cable is provided for an external power source.
Page 35

35
• If your USB storage device has multiple partitions, or if you use a USB multi-card reader, you can use up to four
partitions or USB memory devices.
• If a USB storage device is connected to a USB multi-card reader, its volume data may not be detected.
• If the USB storage device does not work properly, remove it and connect it again.
• The speed at which a USB storage device is detected differs from device to device.
• If the USB storage device is connected in Standby Mode, a specific hard disk will automatically be loaded when the
display is turned on.
• The recommended capacity is 1 TB or less for a USB external hard disk and 32 GB or less for USB memory.
• Any device with more than the recommended capacity may not work properly.
• If a USB external hard disk with an energy saving feature does not work, turn the hard disk off and on again to make
it work properly.
• USB storage devices (USB 2.0 or below) are also supported. However, they may not work properly in the videos list.
• A maximum of 999 folders or files can be recognized under one folder.
• Only use USB storage devices that have been formatted with the FAT32 file system. Storage devices formatted with
utility programs that are not supported by Windows may not be recognized.
• USB 3.0 may not work properly.
• For some USB storage devices, data may be damaged under high temperature.
• Playing back content using 2 or more USB ports is not recommended.
ENGLISH
Page 36
36
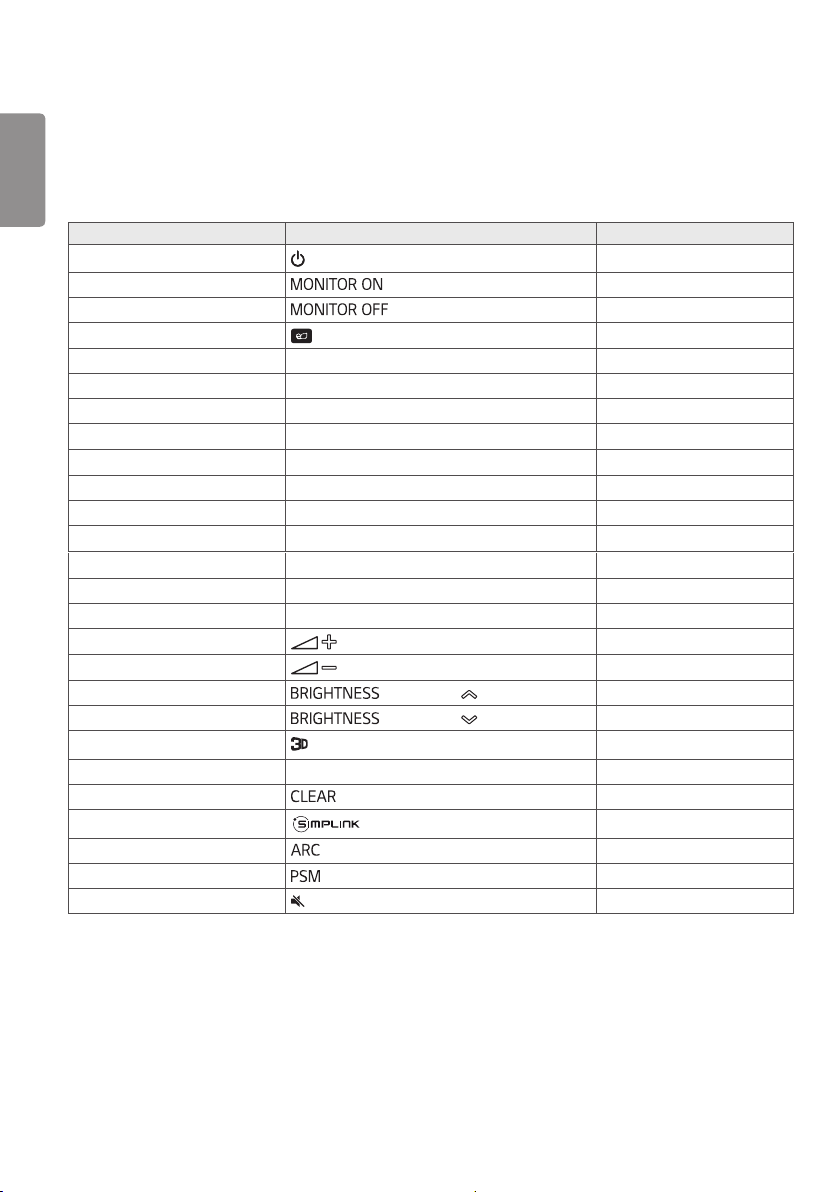
IR CODE
ENGLISH
• All models do not support the HDMI/USB function.
• Some key codes may not be supported depending on the model.
Code (Hex) Function Remarks
08
C4
C5
95 (Energy Saving) Remote control button
0B INPUT (Select input) Remote control button
10 Number Key 0
11 Number Key 1 Remote control button
12 Number Key 2
13 Number Key 3
14 Number Key 4 Remote control button
15 Number Key 5 Remote control button
16 Number Key 6
17 Number Key 7 Remote control button
18 Number Key 8 Remote control button
19 Number Key 9 Remote control button
02
03
E0
E1
DC (3D) Remote control button
32 1/a/A Remote control button
2F Remote control button
7E Remote control button
79
4D
09 (MUTE) Remote control button
(Power)
(Monitor On)
(Monitor Off)
(Vol +)
(Vol -)
(Brightness) (Page Up)
(Brightness) (Page Down)
(Aspect Ratio)
(Picture Mode)
Remote control button
Remote control button
Remote control button
Remote control button
Remote control button
Remote control button
Remote control button
Remote control button
Remote control button
Remote control button
Remote control button
Remote control button
Remote control button
Page 37
37
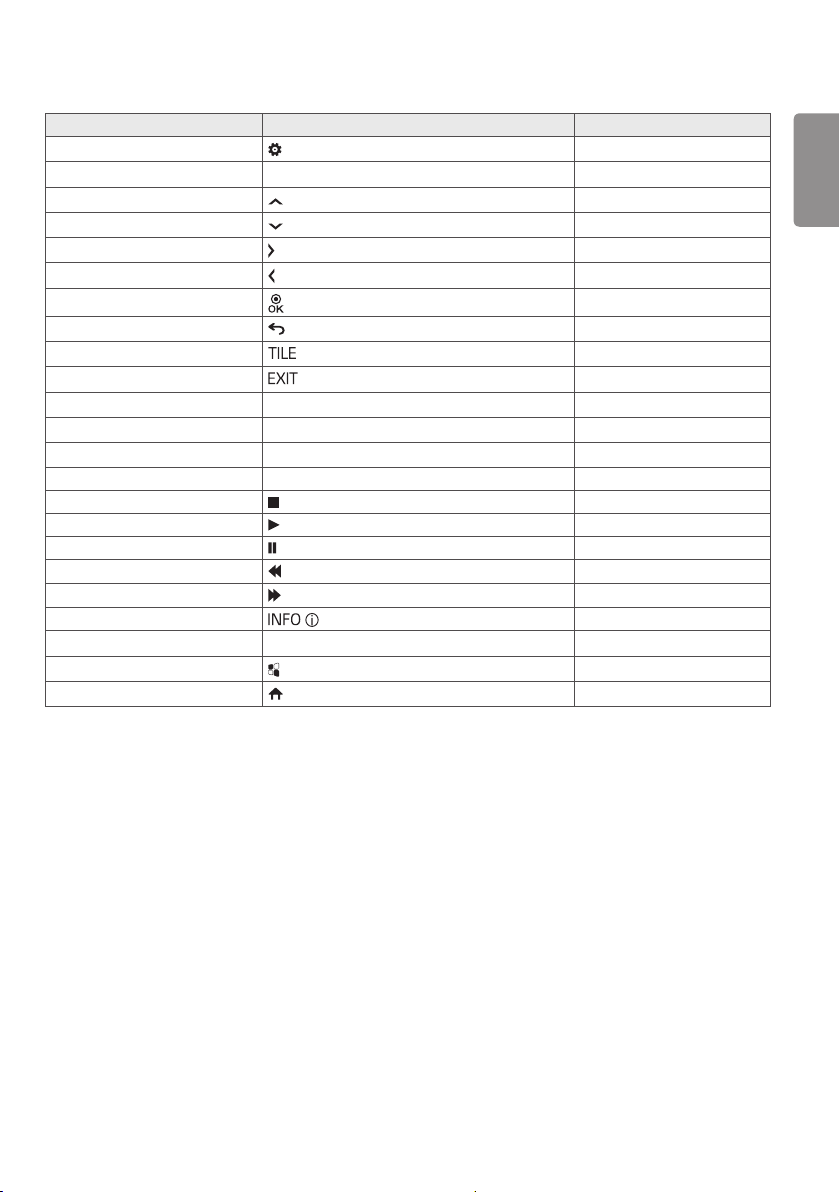
Code (Hex) Function Remarks
43 (Settings/Menu) Remote control button
99 Auto Configuration Remote control button
40 (Up) Remote control button
41 (Down) Remote control button
06
07
44
28 (BACK) Remote control button
7B
5B
72
71
63
61 Blue Remote control button
B1 Remote control button
B0 Remote control button
BA Remote control button
BF
BE
AA
5F
3F
7C
(Right)
(Left)
(OK)
(Tile)
(Exit)
Picture ID On (red) Remote control button
Picture ID Off (green) Remote control button
Yellow Remote control button
W.Bal Remote control button
(S.Menu) Remote control button
(Home) Remote control button
Remote control button
Remote control button
Remote control button
Remote control button
Remote control button
Remote control button
Remote control button
Remote control button
ENGLISH
Page 38
38
CONTROLLING MULTIPLE PRODUCTS
ENGLISH
• This only applies to certain models.
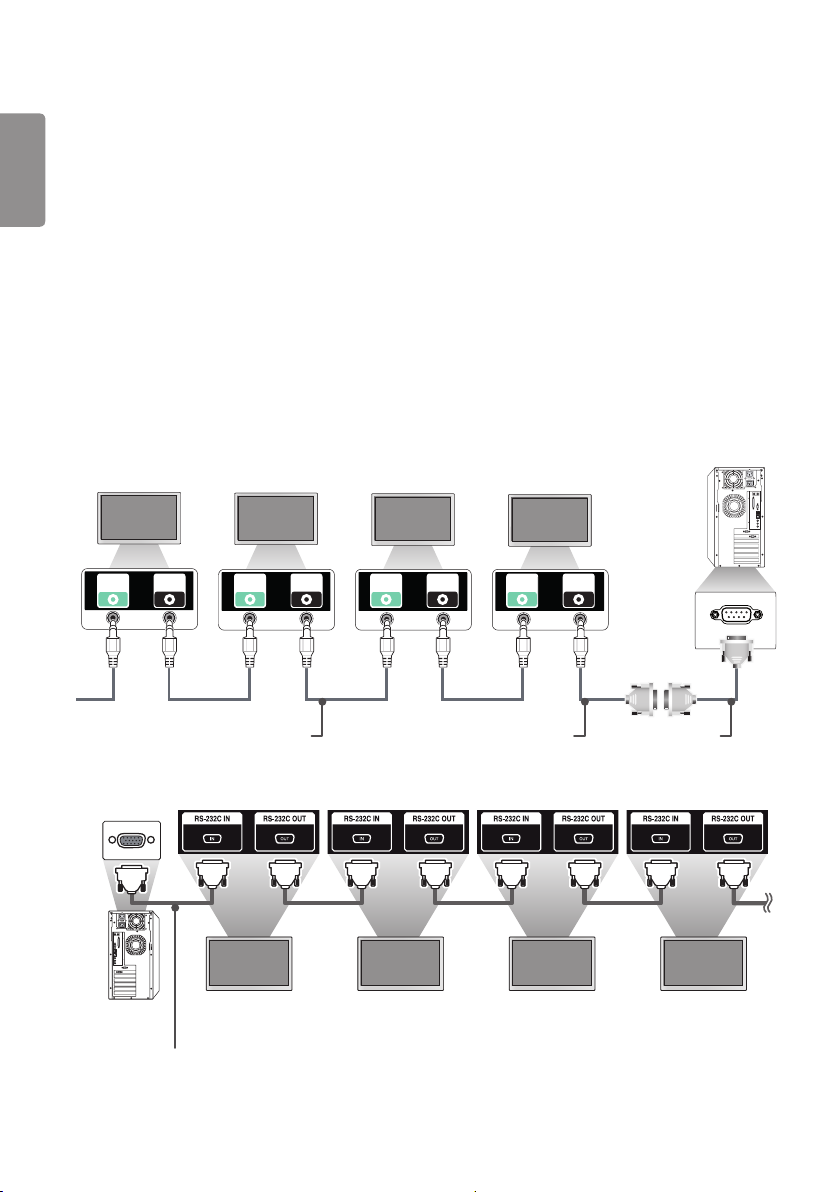
Use this method to connect several products to a single PC. You can control several products at a time by connecting
them to a single PC.
In the Option menu, the Set ID must be between 1 and 1000 without being duplicated.
Connecting cables
• The image may be different according to the model.
Connect the RS-232C cable as shown in the picture.
The RS-232C protocol is used for communication between the PC and product. You can turn the product on/off, select
an input source and adjust the OSD menu from your PC.
RS-232C
RS-232C
OUT
IN
4P Cable (sold separately)
PC
Monitor 1 Monitor 2 Monitor 3Monitor 4
RS-232C
RS-232C
OUT
IN
RS-232C
OUT
RS-232C
IN
RS-232C Gender
RS-232C
OUT
RS-232C
IN
RS-232C Cable
(sold separately)
Monitor 1 Monitor 2 Monitor 3 Monitor 4
PC
RS-232C Cable (sold separately)
Page 39
39
Communication Parameter
Baud Rate: 9600 bps
Data Length: 8 bits
Parity Bit: None
Stop Bit: 1 bit
Flow Control: None
Communication Code: ASCII
NOTE
• When using 3-wire connections (non-standard), an IR
daisy chain cannot be used.
• Be sure to only use the provided gender to connect
properly.
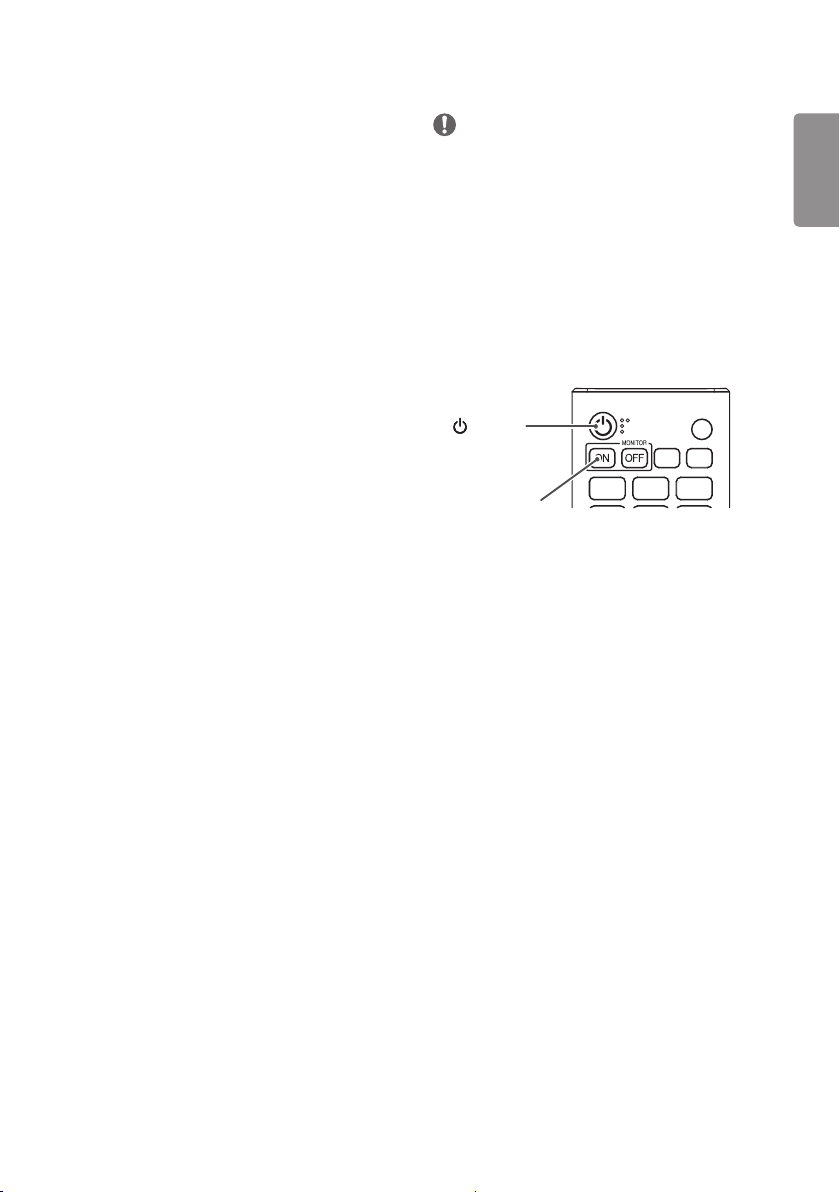
• When you have daisy-chained multiple Signage
products to control them simultaneously, if you
attempt to turn on/off the master device in a
continuous manner, some products may not turn
on. In this case, you can turn those monitors on by
pressing the MONITOR ON button, not the Power
button.
(Power)
MONITOR ON
ENGLISH
Page 40
40
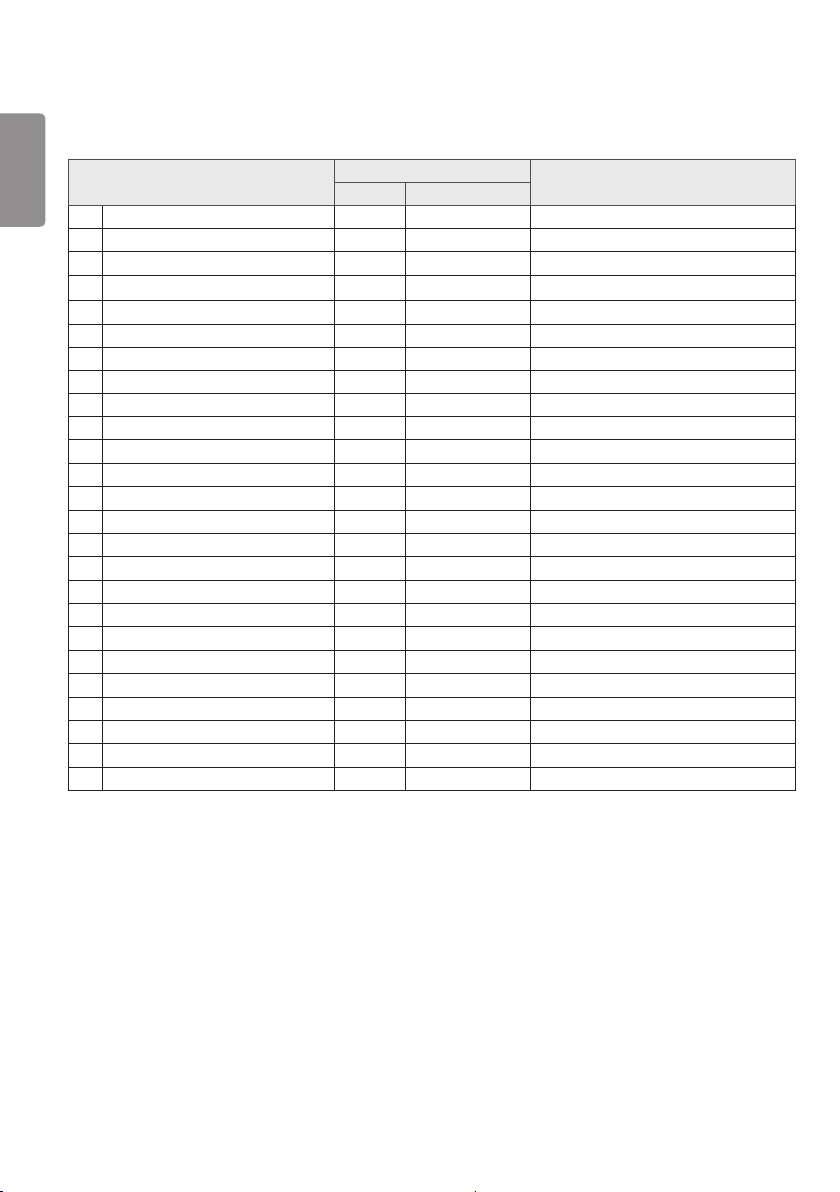
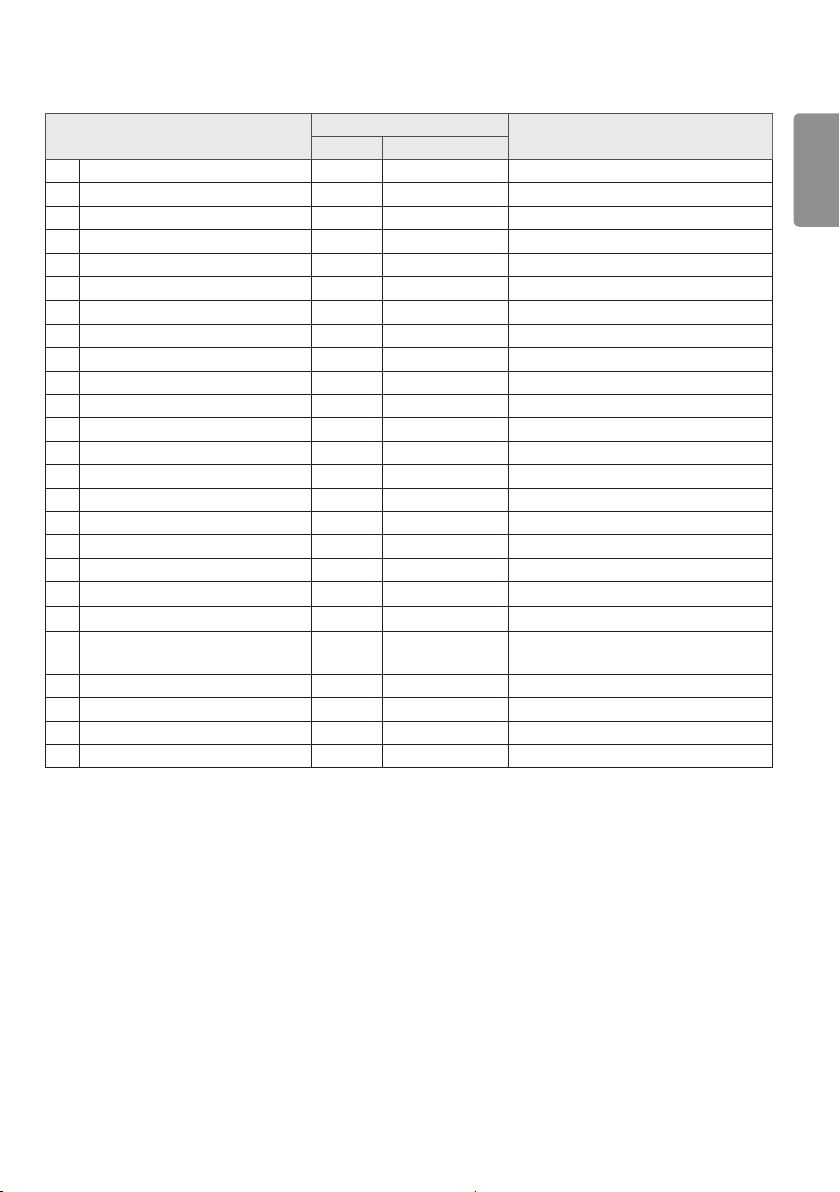
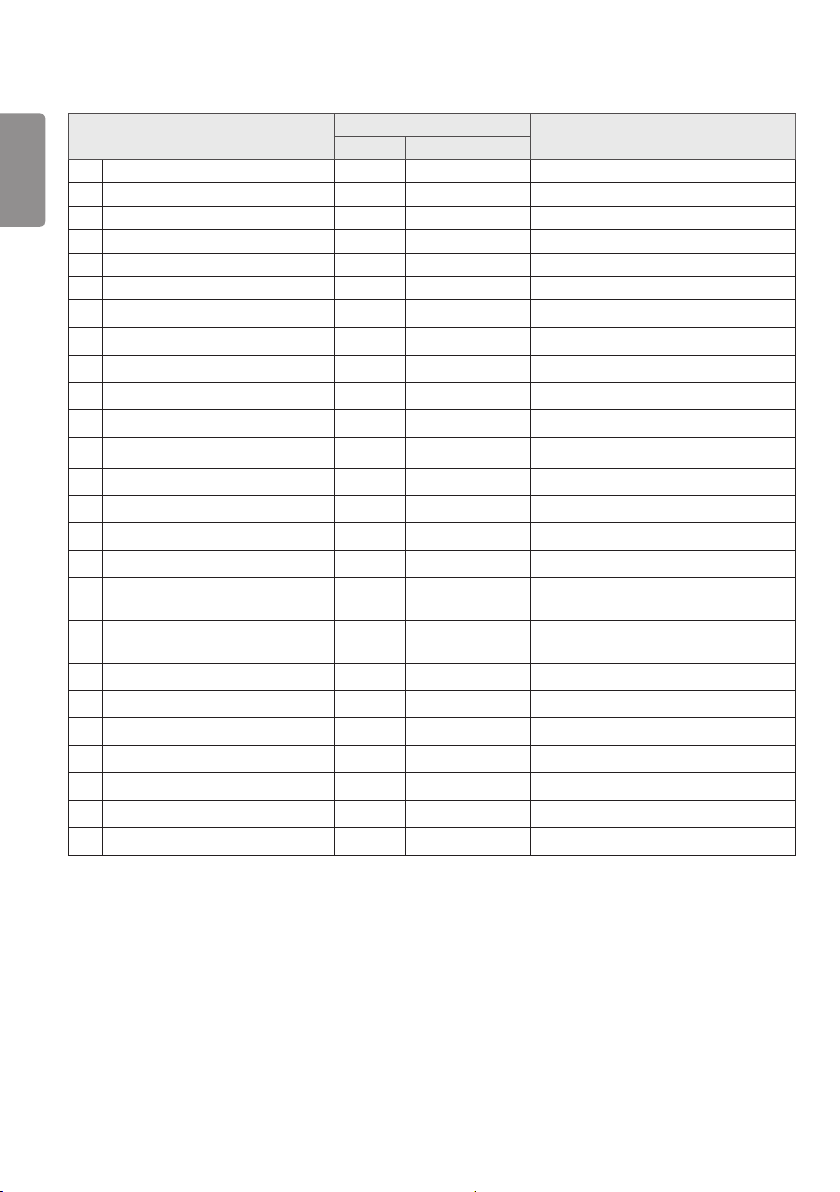
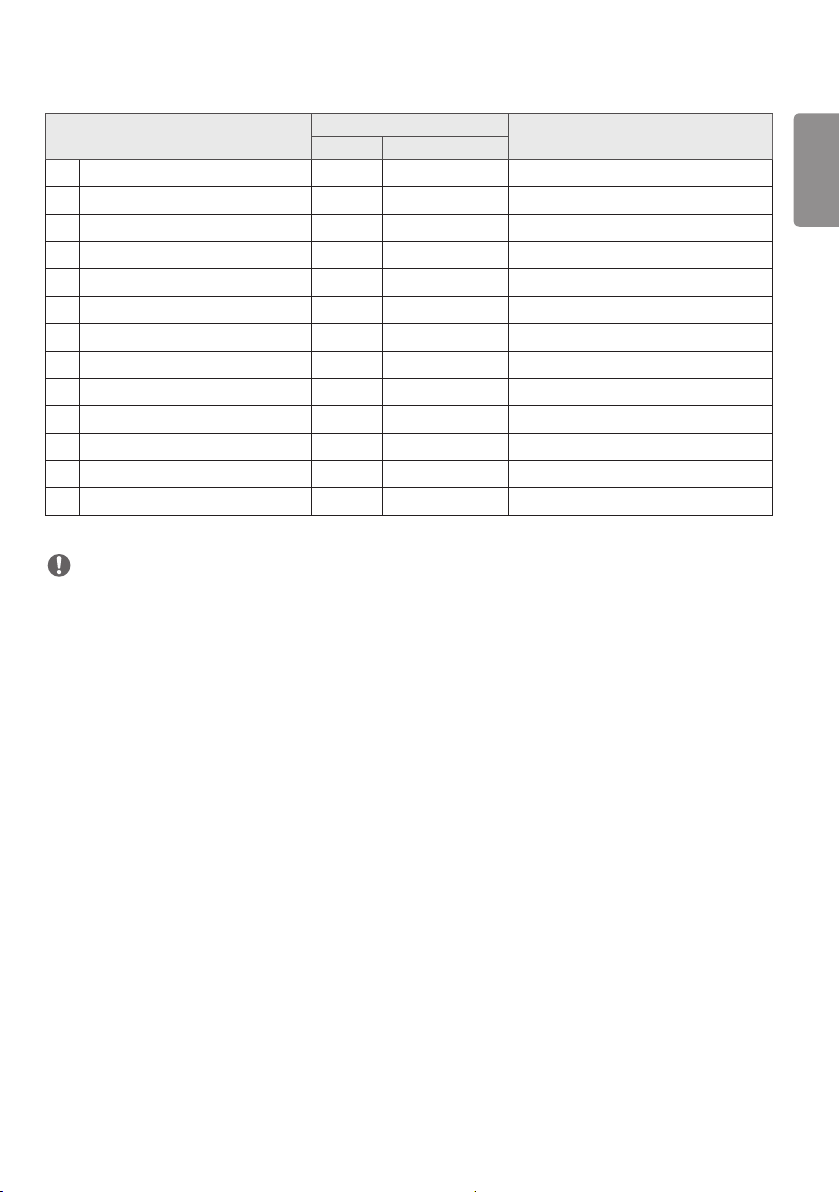
Command Reference List
ENGLISH
Command Data
1 2
01 [Power] k a 00 to 01
02 Select Input x b See Select Input
03 [Aspect Ratio] k c See [Aspect Ratio]
04 [Brightness Control] j q See [Energy Saving]
05 [Picture Mode] d x See [Picture Mode]
06 [Contrast] k g 00 to 64
07 [Brightness] k h 00 to 64
08 [Sharpness] k k 00 to 32
09 [Color] k i 00 to 64
10 [Tint] k j 00 to 64
11 [Color Temperature] x u 70 to D2
12 [Balance] k t 00 to 64
13 [Sound Mode] d y See [Sound Mode]
14 [MUTE] k e 00 to 01
15 Volume Control k f 00 to 64
16 Clock 1 (year/month/day) f a See [Clock 1]
17 Clock 2 (hour/minute/second) f x See [Clock 2]
18 [Daylight Saving Time] s d See [Daylight Saving Time]
19 [Auto Power Off] f g 00 to 01
20 [No IR Power Off] m n 00 to 04
21 [Language] f i See [Language]
22 Set Default f k 00 to 02
23 Current Temperature d n FF
24 Key m c See Key
25 Time Elapsed d l FF
(Hexadecimal)
Page 41
41
Command Data
1 2
26 Check product serial number f y FF
27 Software Version f z FF
28 [White Balance] Red Gain j m 00 to FE
29 [White Balance] Green Gain j n 00 to FE
30 [White Balance] Blue Gain j o 00 to FE
31 [White Balance] Red Offset s x 00 to 7F
32
[White Balance] Green Offset
33 [White Balance] Blue Offset s z 00 to 7F
34 [Backlight] m g 00 to 64
35 [Screen Off] k d 00 to 01
36 [Tile Mode] d d 00 to FF
37 Check [Tile Mode] d z FF
38 [Tile ID] d i See [Tile ID]
39 [Natural Mode] (In Tile Mode) d j 00 to 01
40 Tile H Position d e 00 to 32
41 Tile V Position d f 00 to 32
42 Tile H Size d g 00 to 32
43 Tile V Size d h 00 to 32
44 DPM Mode Settings f j 00 to 07
45 [DPM Wake Up Control] s n, 0b 00 to 01
Remote Control/[Local Key
46
Operation Lock]
47 [Power On Delay] f h 00 to FA
48 Select [Fail Over] Mode m i 00 to 02
49 Select [Fail Over] Input m j See Select [Fail Over] Input
50 Remote Control Key Lock t p 00 to 02
s y 00 to 7F
k m 00 to 01
(Hexadecimal)
ENGLISH
Page 42
42
ENGLISH
51 [Local Key Operation Lock] t o 00 to 02
52 Status Check s v See Status Check
53 [Screen Fault Detection] t z 00 to 01
54 [PM Mode] s n, 0c 00 to 04
55 [Screen Off Always] s n, 0d 00 to 01
56 [Auto Config.] j u 01
57 [Digital Audio Input] s n, 04 00 to 01
58 [Audio Out] s n, aa 00 to 02
59 [OSD Rotation] t h 00 to 02
60 [Pivot Mode] t a 00 to 01
61 [Brightness Scheduling] Mode s m 00 to 01
62 [Brightness Scheduling] s s See [Brightness Scheduling]
63 [Contents Sync] t g 00 to 01
64 [Time Sync] Settings s n, 16 00 to 18
65 Timer Power On Scheduling f b 00 to 01
66 Timer Power Off Scheduling f c 00 to 01
[Timer Power Off] (Repeat Mode
67
/ Time)
[Timer Power On] (Repeat Mode
68
/ Time)
69 [Holiday Setting] Mode s n, 1a 00 to 01
70 [Holiday Setting] s n, 1b See [Holiday Setting]
71 [Power On Status] t r 00 to 02
72 [Wake On LAN] f w 00 to 01
73 [ISM Method] j p See [ISM Method]
74 [Booting Logo Image] s n, a3 00 to 01
75 [No Signal Image] s n, a9 00 to 01
Command Data
1 2
f e See [Timer Power Off]
f d See [Timer Power On]
(Hexadecimal)
Page 43
43
Command Data
1 2
76 H Position f q 00 to 64
77 V Position f r 00 to 64
78 H Size f s 00 to 64
79 [Home Dashboard Lock] s n, 9d 00 to 01
80 [USB Lock] s n, 9e 00 to 01
81 [OSD Lock] k l 00 to 01
82 [Change Password] s n, a7 See [Change Password]
83 [Apply to all inputs] s n, 52 01
84 OSD Location s n, ac 00 to 02
85 Fail Over USB Input s n, 0a 00 to 02
86 Check Fan Failure d w 00 to 01
87 [Network Settings] s n, 80(81)(82) See [Network Settings]
88 [Natural Size] s n, a5 00 to 64
(Hexadecimal)
NOTE
• Commands may not work when there is no external input used.
• Some commands may not be supported on some models.
• During USB operations such as DivX or EMF, all commands except Power (ka) and Key (mc) are not executed and
treated as NG.
ENGLISH
Page 44

44
Transmission/Reception Protocol
ENGLISH
Transmission
(Command1)(Command2)( )(Set ID)( )(Data)(Cr)
* (Command1): Identifies between the factory setting and the user setting modes.
* (Command2): This command is used to control the monitor.
* (Set ID): Used for selecting a set you want to control. A unique Set ID can be assigned to each set ranging from 1 to
255 (01H to FFH) or from 1 to 1000 (001H to 3e8H) under Settings in the OSD menu. Selecting '00H' or ‘000H’ for
Set ID allows the simultaneous control of all connected monitors (The maximum value may differ depending on the
model.)
* (Data): Transmits command data. Data count may increase depending on the command.
* (Cr): Carriage Return. This parameter corresponds to '0 x 0D' in ASCII code.
* ( ): White Space. This parameter corresponds to '0 x 20' in ASCII code.
Acknowledgment
(Command2)( )(Set ID)( )(OK/NG)(Data)(x)
* The product transmits an ACK (acknowledgment) based on this format when receiving normal data. At this point,
if the data is FF, it indicates the present status data. If the data is in data write mode, it returns the data of the PC
computer.
* If a command is sent with Set ID '00' (=0 x 00) or ‘000’(= 0 x 000), the data is reflected to all monitors and they do
not send an acknowledgment (ACK).
* If you send "FF" as the value of the data in control mode via RS-232C, you can check the value currently set for the
relevant feature (not applicable to some features)
* Some commands may not be supported on some models.
Page 45

45
01. [Power] (Command: k a)
Controls the power on/off status of the monitor.
Transmission
(k)(a)( )(Set ID)( )(Data)(Cr)
Data 00: Off
01: On
Acknowledgment
(a)( )(Set ID)( )(OK/NG)(Data)(x)
* The Acknowledgment signal is returned properly only when the monitor
is fully powered on.
* There may be a delay between the Transmission and Acknowledgment
signals.
* This feature may not be available for all models.
02. Select Input (Command: x b)
Selects an input signal.
Transmission
(x)(b)( )(Set ID)( )(Data)(Cr)
Data 20: AV
40: Component
60: RGB
70: DVI-D (PC)
80: DVI-D (DTV)
90: HDMI (HDMI1) (DTV)
A0: HDMI (HDMI1) (PC)
91: HDMI2/OPS (DTV)
A1: HDMI2/OPS (PC)
C0: DISPLAYPORT (DTV)
D0: DISPLAYPORT (PC)
98: OPS (DTV)
A8: OPS (PC)
Acknowledgment
(b)( )(Set ID)( )(OK/NG)(Data)(x)
* Some input signals may not be available for all models.
04. [Power Saving] (Command: j q)
Configures the Power Saving mode.
Transmission
(j)(q)( )(Set ID)( )(Data)(Cr)
Data 00: [Off]
01: [Minimum]
02: [Medium]
03: [Maximum]
05: [Screen Off]
Acknowledgment
(q)( )(Set ID)( )(OK/NG)(Data)(x)
* This feature may not be available for all models.
05. [Picture Mode] (Command: d x)
Selects a picture mode.
Transmission
(d)(x)( )(Set ID)( )(Data)(Cr)
Data 00: [Mall/QSR]
01: [General]
02: [Gov./Corp.]
03: [Transportation]
04: [Education]
05: [Expert] (Expert 1)
06: [Expert] (Expert 2)
08: [APS]
11: [Calibration]
Acknowledgment
(x)( )(Set ID)( )(OK/NG)(Data)(x)
* Some picture modes may not be available for all models.
ENGLISH
03. [Aspect Ratio] (Command: k c)
Adjusts the aspect ratio of your monitor.
Transmission
(k)(c)( )(Set ID)( )(Data)(Cr)
Data 02: [Full Screen]
06: [Original]
Acknowledgment
(c)( )(Set ID)( )(OK/NG)(Data)(x)
* The aspect ratio may differ depending on the model's input
configuration.
06. [Contrast] (Command: k g)
Adjusts the screen contrast.
Transmission
(k)(g)( )(Set ID)( )(Data)(Cr)
Data 00-64: Contrast 0-100
Acknowledgment
(g)( )(Set ID)( )(OK/NG)(Data)(x)
Page 46

46
07. [Brightness] (Command: k h)
ENGLISH
Adjusts the screen brightness.
Transmission
(k)(h)( )(Set ID)( )(Data)(Cr)
Data 00-64: Brightness 0-100
Acknowledgment
(h)( )(Set ID)( )(OK/NG)(Data)(x)
08. [Sharpness] (Command: k k)
Adjusts the screen sharpness.
Transmission
(k)(k)( )(Set ID)( )(Data)(Cr)
Data 00-32: Sharpness 0-50
Acknowledgment
(k)( )(Set ID)( )(OK/NG)(Data)(x)
09. [Color] (Command: k i)
Adjusts the screen colors.
Transmission
(k)(i)( )(Set ID)( )(Data)(Cr)
Data 00-64: Color 0-100
Acknowledgment
(i)( )(Set ID)( )(OK/NG)(Data)(x)
10. [Tint] (Command: k j)
Adjusts the screen tints.
Transmission
(k)(j)( )(Set ID)( )(Data)(Cr)
Data 00-64: Tint Red 50-Green 50
Acknowledgment
(j)( )(Set ID)( )(OK/NG)(Data)(x)
11. [Color Temperature] (Command: x u)
Adjusts the screen color temperature.
Transmission
(x)(u)( )(Set ID)( )(Data)(Cr)
Data 70-D2: 3200K-13000K
Acknowledgment
(u)( )(Set ID)( )(OK/NG)(Data)(x)
* The range of color temperature may be different on some
models.
12. [Balance] (Command: k t)
Adjusts the sound balance.
Transmission
(k)(t)( )(Set ID)( )(Data)(Cr)
Data 00-64: Left 50-Right 50
Acknowledgment
(t)( )(Set ID)( )(OK/NG)(Data)(x)
* This feature may not be available for all models.
13. [Sound Mode] (Command: d y)
Selects a sound mode.
Transmission
(d)(y)( )(Set ID)( )(Data)(Cr)
Data 01: [Standard]
02: [Music]
03: [Cinema]
04: [Sports]
05: [Game]
07: [Clear Voice]
Acknowledgment
(y)( )(Set ID)( )(OK/NG)(Data)(x)
* This feature may not be available for all models.
Page 47

47
14. [Mute] (Command: k e)
Mutes/unmutes audio.
Transmission
(k)(e)( )(Set ID)( )(Data)(Cr)
Data 00: Mute on (Volume off)
01: Mute off (Volume on)
Acknowledgment
(e)( )(Set ID)( )(OK/NG)(Data)(x)
* This feature may not be available for all models.
15. Volume Control (Command: k f)
Adjusts the playback volume.
Transmission
(k)(f)( )(Set ID)( )(Data)(Cr)
Data 00-64: Volume 0-100
Acknowledgment
(f)( )(Set ID)( )(OK/NG)(Data)(x)
* This feature may not be available for all models.
16. Clock 1 (year/month/day) (Command: f a)
Sets the Clock 1 (year/month/day) values and Auto Time.
Transmission
1. (f)(a)( )(Set ID)( )(Data1)( )(Data2)( )(Data3)(Cr)
2. (f)(a)( )(Set ID)( )(0)(0)( )(Data1)(Cr)
1. When setting Clock 1 (year/month/day)
Data1 00-: 2010 Data2 01-0C: January - December
Data3 01-1F: 1-31
* The minimum and maximum values for Data1 differ depending on the
product's release year.
* Enter "fa [Set ID] ff" to view Clock 1 (year/month/day) settings.
2. When Setting Auto Time
Data1 00: [Auto]
01: [Manual]
* To view the set value of the Auto time, enter “fa [Set ID] 00 ff”.
Acknowledgment
1. (a)( )(Set ID)( )(OK/NG)(Data1)(Data2)(Data3)(x)
2. (a)( )(Set ID)( )(OK/NG)(0)(0)(Data1)(x)
17. Clock 2 (Hour/Minute/Second) (Command: f x)
Sets the Clock 2 values (hour/minute/second).
Transmission
(f)(x)( )(Set ID)( )(Data1)( )(Data2)( )(Data3)(Cr)
Data1 00-17: 00-23 hours
Data2 00-3B: 00-59 minutes
Data3 00-3B: 00-59 seconds
* Enter "fx [Set ID] ff" to view the Time 2 (hour/minute/second) settings.
* This feature is only available when Clock 1 (year/month/day) has been
set.
Acknowledgment
(x)( )(Set ID)( )(OK/NG)(Data1)(Data2)(Data3)(x)
18. [Daylight Saving Time] (Command: s d)
Sets Daylight Savings Time.
Transmission
(s)(d)( )(Set ID)( )(Data1)( )(Data2)( )
(Data3)( ) (Data4)( )(Data5)( )(Cr)
Data1 00: Off (Data2-5: FF)
01: Start Time
02: End Time
Data2 01~0C: January - December
Data3 01-06: Week 1 - 6
* The maximum value of [Data3] may vary depending on the date.
Data4 00-06: (Sunday - Saturday)
Data5 00-17: 00 - 23 hours
If you wish to read the start/end times,
enter FF for parameters [Data2] through [Data5].
(Example 1: sd 01 01 ff ff ff ff - Checks the start time.
Example 2: sd 01 02 ff ff ff ff - Checks the end time.)
* This feature only works when Clock 1 (year/month/day) and Clock 2
(hour/minute/second) have been set.
Acknowledgment
(d)( )(Set ID)( )(OK/NG)(Data1)(Data2)
(Data3)(Data4)(Data5)(x)
* This feature may not be available for all models.
ENGLISH
Page 48

48
19. [No Signal Power Off] (Command: f g)
ENGLISH
Sets the No Signal Power Off function.
Transmission
(f)(g)( )(Set ID)( )(Data)(Cr)
Data 00: Off (Not turned off after 15 minutes)
01: On (Turned off after 15 minutes)
Acknowledgment
(g)( )(Set ID)( )(OK/NG)(Data)(x)
20. [No IR Power Off] (Command: m n)
Activates Auto Power Off when there is no IR signal.
Transmission
(m)(n)( )(Set ID)( )(Data)(Cr)
Data 00: Off (Not turned off after 2/4/6/8 hours)
01: 2 hours (Turned off after 2 hours)
02: 4 hours (Turned off after 4 hours)
03: 6 hours (Turned off after 6 hours)
04: 8 hours (Turned off after 8 hours)
Acknowledgment
(n)( )(Set ID)( )(OK/NG)(Data)(x)
21. [Language] (Command: f i)
Sets the OSD language.
Transmission
(f)(i)( )(Set ID)( )(Data)(Cr)
Data 00: Czech
01: Danish
02: German
03: English
04: Spanish (Europe)
05: Greek
06: French
07: Italian
08: Dutch
09: Norwegian
0A: Portuguese
0B: Portuguese (Brazil)
0C: Russian
0D: Finnish
0E: Swedish
0F: Korean
10: Chinese (Cantonese)
11: Japanese
12: Chinese (Mandarin)
13: Arabic
Acknowledgment
(i)( )(Set ID)( )(OK/NG)(Data)(x)
* Some languages may not be available for all models.
22. Initial Value Settings (Command: f k)
Executes Reset.
(Initialize Screen can only be executed in RGB input mode.)
Transmission
(f)(k)( )(Set ID)( )(Data)(Cr)
Data 00: [Picture Reset]
01: Initialize Screen
02: [Reset to Initial Settings]
Acknowledgment
(k)( )(Set ID)( )(OK/NG)(Data)(x)
* This feature may not be available for all models.
23. Current Temperature (Command: d n)
Checks the current temperature of the product.
Transmission
(d)(n)( )(Set ID)( )(Data)(Cr)
Data FF: Status Check
Acknowledgment
(n)( )(Set ID)( )(OK/NG)(Data)(x)
* The temperature is displayed in hexadecimal.
24. Key (Command: m c)
Sends a key code for the IR remote control.
Transmission
(m)(c)( )(Set ID)( )(Data)(Cr)
Data IR_KEY_CODE
Acknowledgment
(c)( )(Set ID)( )(OK/NG)(Data)(x)
* For key codes, see IR Codes.
* Some key codes may not be supported depending on the model.
Page 49

49
25. Time Elapsed (Command: d l)
Displays the time that has elapsed after your monitor has
turned on.
Transmission
(d)(l)( )(Set ID)( )(Data)(Cr)
Data FF: Read status
Acknowledgment
(l)( )(Set ID)( )(OK/NG)(Data)(x)
* The data received is displayed in hexadecimal.
26. Product Serial Number Check (Command: f y)
Checks the serial number of the product.
Transmission
(f)(y)( )(Set ID)( )(Data)(Cr)
Data FF: Check product serial number
Acknowledgment
(y)( )(Set ID)( )(OK/NG)(Data)(x)
* Data is in ASCII format.
27. Software Version (Command: f z)
Checks the software version of the product.
Transmission
(f)(z)( )(Set ID)( )(Data)(Cr)
Data FF: Check the software version
Acknowledgment
(z)( )(Set ID)( )(OK/NG)(Data)(x)
29. [White Balance] Green Gain (Command: j n)
Adjusts the green gain value for white balance.
Transmission
(j)(n)( )(Set ID)( )(Data)(Cr)
Data 00-FE: Green Gain 0-254
FF: Checks green gain value
Acknowledgment
(n)( )(Set ID)( )(OK/NG)(Data)(x)
30. [White Balance] Blue Gain (Command: j o)
Adjusts the blue gain value for white balance.
Transmission
(j)(o)( )(Set ID)( )(Data)(Cr)
Data 00-FE: Blue Gain 0-254
FF: Checks blue gain value
Acknowledgment
(o)( )(Set ID)( )(OK/NG)(Data)(x)
31. [White Balance] Red Offset (Command: s x)
Adjusts the red offset value for white balance.
Transmission
(s)(x)( )(Set ID)( )(Data)(Cr)
Data 00-7F: Red Offset 0-127
FF: Checks red offset value
Acknowledgment
(x)( )(Set ID)( )(OK/NG)(Data)(x)
ENGLISH
28. [White Balance] Red Gain (Command: j m)
Adjusts the red gain value for white balance.
Transmission
(j)(m)( )(Set ID)( )(Data)(Cr)
Data 00-FE: Red Gain 0-254
FF: Checks red gain value
Acknowledgment
(m)( )(Set ID)( )(OK/NG)(Data)(x)
32. [White Balance] Green Offset (Command: s y)
Adjusts the green offset value for white balance.
Transmission
(s)(y)( )(Set ID)( )(Data)(Cr)
Data 00-7F: Green Offset 0-127
FF: Checks green offset value
Acknowledgment
(y)( )(Set ID)( )(OK/NG)(Data)(x)
Page 50

50
33. [White Balance] Blue Offset (Command: s z)
ENGLISH
Adjusts the blue offset value for white balance.
Transmission
(s)(z)( )(Set ID)( )(Data)(Cr)
Data 00-7F: Blue Offset 0-127
FF: Checks blue offset value
Acknowledgment
(z)( )(Set ID)( )(OK/NG)(Data)(x)
34. [Backlight] (Command: m g)
Adjusts the backlight brightness.
Transmission
(m)(g)( )(Set ID)( )(Data)(Cr)
Data 00-64: Backlight 0-100
Acknowledgment
(g)( )(set ID)()(OK/NG)(Data)(x)
35. [Screen Off] (Command: k d)
Turns off/off the screen.
Transmission
(k)(d)( )(Set ID)( )(Data)(Cr)
Data 00: Screen On
01: Screen Off
Acknowledgment
(d)( )(Set ID)( )(OK/NG)(Data)(x)
* This feature may not be available for all models.
36. [Tile Mode] (Command: d d)
Sets a tile mode and values for the tile rows and columns.
Transmission
(d)(d)( )(Set ID)( )(Data)(Cr)
Data 00-FF: The first byte - tile column
The second byte - tile row
* 00, 01, 10, and 11 mean that the tile mode is off.
* The maximum value may differ depending on the model.
* When the OSD rotation is set to 90° or 270°, the columns
and rows work reversely.
Acknowledgment
(d)( )(Set ID)( )(OK/NG)(Data)(x)
* This feature may not be available for all models.
37. [Tile Mode] Check (Command: d z)
Checks the tile mode.
Transmission
(d)(z)( )(Set ID)( )(Data)(Cr)
Data FF: Check Tile Mode
Acknowledgment
(z)( )(Set ID)( )(OK/NG)(Data1)(Data2)(Data3)(x)
Data1 00: Tile Mode of f
01: Tile Mode on
Data2 00-0F: Tile column
Data3 00-0F: Tile row
* This feature may not be available for all models.
38. [Tile ID] (Command: d i)
Sets the tile ID value of the product.
Transmission
(d)(i)( )(Set ID)( )(Data)(Cr)
Data 01-E1: Tile ID 1-225
FF: Checks the Tile ID
* The data value cannot exceed the value of row x column.
Acknowledgment
(i)( )(Set ID)( )(OK/NG)(Data)(x)
* If you enter a value that exceeds the value of row x column for the Data
parameter (except for 0xFF), Ack becomes NG.
* This feature may not be available for all models.
Page 51

51
39. [Natural Mode] (In Tile Mode) (Command: d j)
To display the image naturally, the part of the image that
would normally be displayed in the gap between the monitors
is omitted.
Transmission
(d)(j)( )(Set ID)( )(Data)(Cr)
Data 00: Off
01: On
Acknowledgment
(j)( )(Set ID)( )(OK/NG)(Data)(x)
* This feature may not be available for all models.
40. Tile H Position (Command: d e)
Adjusts the H Position in Tile Mode. (This function is only
available when Tile Mode is set to On and Natural Mode is set
to Off.)
Transmission
(d)(e)( )(Set ID)( )(Data)(Cr)
Data 00 - 32: -50(Left) - 0(Right)
* Left/Right values vary depending on the tile H Size.
Acknowledgment
(e)( )(Set ID)( )(OK/NG)(Data)(x)
* This feature may not be available for all models.
42. Tile H Size (Command: d g)
Adjusts the H Size in Tile Mode. (Before adjusting the Tile H
Size, set the Tile H Position as 0 X 32. This function is only
available when Tile Mode is set to On and Natural Mode is set
to Off.)
Transmission
(d)(g)( )(Set ID)( )(Data)(Cr)
Data 00 - 32: 0 - 50
Acknowledgment
(g)( )(Set ID)( )(OK/NG)(Data)(x)
* This feature may not be available for all models.
43. Tile V Size (Command: d h)
Adjusts the V Size in Tile Mode. (Before adjusting the Tile V
Size, set the Tile V Position as 0 X 00. This function is only
available when Tile Mode is set to On and Natural Mode is set
to Off.)
Transmission
(d)(h)( )(Set ID)( )(Data)(Cr)
Data 00 - 32: 0 - 50
Acknowledgment
(h)( )(Set ID)( )(OK/NG)(Data)(x)
* This feature may not be available for all models.
ENGLISH
41. Tile V Position (Command: d f)
Adjusts the V Position in Tile Mode. (This function is only
available when Tile Mode is set to On and Natural Mode is set
to Off.)
Transmission
(d)(f)( )(Set ID)( )(Data)(Cr)
Data 00 - 32: 0(Down) - 50(Top)
* Vertical values vary depending on the tile V Size.
Acknowledgment
(f)( )(Set ID)( )(OK/NG)(Data)(x)
* This feature may not be available for all models.
44. [DPM] (Command: f j)
Sets the DPM(Display Power Management) function.
Transmission
(f)(j)( )(Set ID)( )(Data)(Cr)
Data 00: [Off]
01: 5 seconds
02: 10 seconds
03: 15 seconds
04: 1 minute
05: 3 minute
06: 5 minute
07: 10 minute
Acknowledgment
(j)( )(Set ID)( )(OK/NG)(Data)(x)
* This feature may not be available for all models.
Page 52

52
45. [DPM Wake Up Control] (Command: s n, 0b)
ENGLISH
Sets the DPM deactivation Control mode.
Transmission
(s)(n)( )(Set ID)( )(0)(b)( )(Data)(Cr)
Data 00: Sets the clock mode
01: Sets the clock + data mode
Acknowledgment
(n)( )(Set ID)( )(OK/NG)(0)(b)(Data)(x)
* This feature may not be available for all models.
46. Remote Control/[Local Key Operation Lock]
(Command: k m)
Adjusts the remote control/local key (front) lock.
Transmission
(k)(m)( )(Set ID)( )(Data)(Cr)
Data 00: Off (Lock Off)
01: On (Lock On)
Acknowledgment
(m)( )(Set ID)( )(OK/NG)(Data)(x)
* This feature may not be available for all models.
47. [Power On Delay] (Command: f h)
Sets the schedule delay for when the power turns on. (Unit:
seconds)
Transmission
(f)(h)( )(Set ID)( )(Data)(Cr)
Data 00-FA: Min 0- Max 250 (sec)
Acknowledgment
(h)( )(Set ID)( )(OK/NG)(Data)(x)
* The maximum value may differ depending on the model.
* This feature may not be available for all models.
48. [Fail Over] Mode (Command: m i)
Sets an input mode for fail over.
Transmission
(m)(i)( )(Set ID)( )(Data)(Cr)
Data 00: [Off]
01: [Auto]
02: [User Setting]
Acknowledgment
(i)( )(Set ID)( )(OK/NG)(Data)(x)
* This feature may not be available for all models.
49. [Fail Over] Input Select (Command: m j)
Selects an input source for fail over. (This feature is only
available when Fail Over is set to Custom.)
Transmission
(m)(j)( )(Set ID)( )(Data1)( )(Data2)( )(Data3)( )(Data4)
… ( )(DataN)(Cr)
Data1-N (Input priority 1-N)
60: RGB
80: DVI-D
90: HDMI
C0: Display Port
91: HDMI2/SDI/OPS
98: OPS
Acknowledgment
(j)( )(SetID)( )(OK/NG)(Data1)(Data2)(Data3)(Data4)
…(DataN) (x)
* Some input signals may not be available for all models.
* The data number (N) may vary depending on the model. (The data
number depends on the number of supported input signals.)
50. Remote Control Key Lock (Command: t p)
Configures the settings of the product's remote control key.
Transmission
(t)(p)( )(Set ID)( )(Data)(Cr)
Data 00: Unlocks all keys
01: Locks all keys except Power key
02: Locks all keys
Acknowledgment
(p)( )(Set ID)( )(OK/NG)(Data)(x)
* This feature may not be available for all models.
Page 53

53
51. [Local Key Operation Lock] (Command: t o)
Configures the local key operation settings of the product.
Transmission
(t)(o)( )(Set ID)( )(Data)(Cr)
Data 00: Unlocks all keys
01: Locks all keys except Power key
02: Locks all keys
Acknowledgment
(o)( )(Set ID)( )(OK/NG)(Data)(x)
* This feature may not be available for all models.
52. Status Check (Command: s v)
Checks the current signal of the product.
Transmission
(s)(v)( )(Set ID)( )(Data)( )(FF)(Cr)
Data 02: Check whether there is a signal
10: RGB Sensor OK/NG(Check Screen)
Acknowledgment
(v)( )(Set ID)( )(OK/NG)(Data)(Data1)(x)
Data 02 (when a signal is found)
Data1 00: No signal
01: Signal present
Data 10 (Check Screen)
Data1 00: Check Screen result NG
07: Check Screen result OK
* When Check Screen is set to Off or not supported, execution results
are rendered "NG."
54. [PM Mode] (Command: s n, 0c)
Sets the PM mode.
Transmission
(s)(n)( )(Set ID)( )(0c)( )(Data)(Cr)
Data 00: [Power Off]
01: [Sustain Aspect Ratio]
02: [Screen Off]
03: [Screen Off Always]
04: [Screen Off & Backlight On]
Acknowledgment
(n)( )(Set ID)( )(OK/NG)(0c)(Data)(x)
* This feature may not be available for all models.
55. [Screen Off Always] (Command: j p)
If you activate the Screen Off Always feature, the monitor
enters Screen Off mode regardless of whether or not you have
activated PM mode.
Transmission
(j)(p)( )(Set ID)( )(Data)(Cr)
Data 00: On (Screen on)
01: Off (Screen off)
* This feature may not be available for all models.
Acknowledgment
(n)( )(Set ID)( )(OK/NG)(0d)(Data)(x)
ENGLISH
53. [Screen Fault Detection] (Command: t z)
Sets the Screen Fault Detection feature.
Transmission
(t)(z)( )(Set ID)( )(Data)(Cr)
Data 00: Off
01: On
Acknowledgment
(z)( )(Set ID)( )(OK/NG)(Data)(x)
* This feature may not be available for all models.
56. [Auto Config.] (Command: j u)
Automatically corrects the position and shaking of the picture.
(Works only in RGB-PC input mode.)
Transmission
(j)(u)( )(Set ID)( )(Data)(Cr)
Data 01: Execute
Acknowledgment
(u)( )(Set ID)( )(OK/NG)(Data)(x)
Page 54

54
57. [Digital Audio Input] (Command: s n, 04)
ENGLISH
Sets Digital Audio Input.
Transmission
(s)(n)( )(Set ID)( )(04) ( ) (Data)(Cr)
Data 00: Digital
01: Analog
Acknowledgment
(n)( )(Set ID)( )(OK/NG)(04)(Data)(x)
58. [Audio Out] (Command: s n, aa)
Controls the Audio Out mode.
Transmission
(s)(n)( )(Set ID)( )(a)(a)( )(Data)(Cr)
Data 00: [Off]
01: [Variable]
02: [Fixed]
Acknowledgment
(n)( )(Set ID)( )(OK/NG)(a)(a)(Data)(x)
* This feature may not be available for all models.
59. [OSD Rotation] (Command: t h)
Sets the OSD Rotation mode.
Transmission
(t)(h)( )(Set ID)( )(Data) (Cr)
Data 00: Off
01: 90 degrees
02: 270 degrees
Acknowledgment
(h)( )(Set ID)( )(OK/NG)(Data) (x)
* This feature may not be available for all models.
60. [Pivot Mode] (Command: t a)
Controls Pivot Mode.
Transmission
(t)(a)( )(Set ID)( )(Data)(Cr)
Data 00: Off
01: On
Acknowledgment
(a)( )(Set ID)( )(OK/NG)(Data)(x)
* This feature may not be available for all models.
61. [Brightness Scheduling] Mode (Command: s m)
Selects a Brightness Scheduling mode.
Transmission
(s)(m)( )(Set ID)( )(Data)(Cr)
Data 00: Off
01: On
Acknowledgment
(m)( )(Set ID)( )(OK/NG)(Data)(x)
* This feature does not work if the current time is not set.
* This feature may not be available for all models.
Page 55

55
62. [Brightness Scheduling] (Command: s s)
Sets Brightness Scheduling.
Transmission
(s)(s)( )(Set ID)( )(Data1)( )(Data2)( )(Data3)(Cr)
Data1
1. f1 to f6 (data reading)
F1: Reads the 1st quick brightness control's data
F2: Reads the 2nd quick brightness control's data
F3: Reads the 3rd quick brightness control's data
F4: Reads the 4th quick brightness control's data
F5: Reads the 5th quick brightness control's data
F6: Reads the 6th quick brightness control's data
2. FF: Reads all stored lists
3. e1 to e6 (Deletes one index), e0 (Deletes all indexes)
E0: Deletes all quick brightness controls
E1: Deletes the 1st quick brightness control
E2: Deletes the 2nd quick brightness control
E3: Deletes the 3rd quick brightness control
E4: Deletes the 4th quick brightness control
E5: Deletes the 5th quick brightness control
E6: Deletes the 6th quick brightness control
4. 00-17: 00 - 23 hours
Data2 00-3B: 00 - 59 minutes
Data3 00-64: Backlight 0 - 100
* To read or delete a list of quick brightness controls you have set,
[Data2][Data3] must be set to FF.
* If you want to read a complete list of quick brightness controls you have
set through FF, do not enter any values in [Data2][Data3].
* If you want to read a complete list of quick brightness controls you have
set through FF, NG is acknowledged if there is no stored list.
Example 1: ss 01 f1 ff ff - Reads the 1st index data from the
quick brightness control.
Example 2: ss 01 ff – Reads all index data from the quick
brightness control.
Example 3: ss 01 e1 ff ff - Deletes the 1st index data from the
quick brightness control.
Example 4: ss 01 07 1E 46 - Adds a schedule whose time is
07:30 and whose backlight is 70.
Acknowledgment
(s)( )(Set ID)( )(OK/NG)(Data1)(Data2)(Data3)(x)
* This feature may not be available for all models.
63. [Contents Sync] (Command: t g)
Selects a Contents Sync settings.
Transmission
(f)(g)( )(Set ID)( )(Data)(Cr)
Data 00: Off
01: On
Acknowledgment
(g)( )(Set ID)( )(OK/NG)(Data)(x)
* This feature may not be available for all models.
64. [Time Sync] (Command: s n, 16)
Sets the time to synchronize.
Transmission
(s)(n)( )(Set ID)( )(1)(6)( )(Data)(Cr)
Data 00: Off
01: Sets to 00:00
02: Sets to 1:00 AM
…
18: Sets to 11:00 PM
Acknowledgment
(n)( )(Set ID)( )(OK/NG)( )(1)(6)( )(Data)(x)
* This feature does not work if there is no Master monitor.
* The settings screen is displayed only on the Master monitor.
* This feature does not work if the current time is not set.
* This feature may not be available for all models.
ENGLISH
Page 56

56
65. Timer Power On Scheduling (Command: f b)
ENGLISH
Sets the Timer Power On Scheduling function.
Transmission
(f)(b)( )(Set ID)( )(Data)(Cr)
Data 00: Off
01: On
Acknowledgment
(b)( )(Set ID)( )(OK/NG)(Data)(x)
66. Timer Power Off Scheduling (Command: f c)
Sets the Timer Power Off Scheduling function.
Transmission
(f)(c)( )(Set ID)( )(Data)(Cr)
Data 00: Off
01: On
Acknowledgment
(c)( )(Set ID)( )(OK/NG)(Data)(x)
67. [Timer Power On] (Repeat Mode / Time)
(Command: f d)
Sets the Timer Power On (Repeat Mode / Time) function.
Transmission
(f)(d)( )(Set ID)( )(Data1)( )(Data2)( )(Data3)(Cr)
Data1
1. f1h to f7h (data reading)
F1: Reads the 1st Timer Power On’s data
F2: Reads the 2nd Timer Power On’s data
F3: Reads the 3rd Timer Power On’s data
F4: Reads the 4th Timer Power On’s data
F5: Reads the 5th Timer Power On’s data
F6: Reads the 6th Timer Power On’s data
F7: Reads the 7th Timer Power On’s data
2. e1h to e7h (Deletes one index), e0h (Deletes all indexes)
E0: Delete all Timer Power On’s
E1: Delete the 1st Timer Power On
E2: Delete the 2nd Timer Power On
E3: Delete the 3rd Timer Power On
E4: Delete the 4th Timer Power On
E5: Delete the 5th Timer Power On
E6: Delete the 6th Timer Power On
E7: Delete the 7th Timer Power On
3. 01h to 0ch (Timer Power On days setting)
01: Repeat Once
02: Repeat Daily
03: Repeat from Monday to Friday
04: Repeat from Monday to Saturday
05: Repeat from Saturday to Sunday
06: Repeat on Sunday
07: Repeat on Monday
08: Repeat on Tuesday
09: Repeat on Wednesday
0A: Repeat on Thursday
0B: Repeat on Friday
0C: Repeat on Saturday
Data2 00-17: 00 - 23 hours
Data3 00-3B: 00 - 59 minutes
* To read or delete a Timer Power On you have set, [Data2][Data3] must
be set to FFH.
Example 1: fd 01 f1 ff ff - Reads the 1st index data in Timer
Power On.
Example 2: fd 01 e1 ff ff - Reads the 1st index data in Timer
Power On.
Example 3: fd 01 04 02 03 - Sets the Timer Power On as
Monday - Saturday 02:03.
* This feature only works when Clock 1 (year/month/day) and Clock 2
(hour/minute/second) have been set.
Acknowledgment
(d)( )(Set ID)( )(OK/NG)(Data1)(Data2)(Data3)(x)
Page 57

57
68. [Timer Power Off] (Repeat Mode / Time)
(Command: f e)
Sets the Timer Power Off (Repeat Mode / Time) function.
Transmission
(f)(e)( )(Set ID)( )(Data1)( )(Data2)( )(Data3)(Cr)
Data1
1. f1h to f7h (data reading)
F1: Reads the 1st Timer Power Off’s data
F2: Reads the 2nd Timer Power Off’s data
F3: Reads the 3rd Timer Power Off’s data
F4: Reads the 4th Timer Power Off’s data
F5: Reads the 5th Timer Power Off’s data
F6: Reads the 6th Timer Power Off’s data
F7: Reads the 7th Timer Power Off’s data
2. e1h to e7h (Deletes one index), e0h (Deletes all indexes)
E0: Delete all Timer Power Off’s
E1: Delete the 1st Timer Power Off
E2: Delete the 2nd Timer Power Off
E3: Delete the 3rd Timer Power Off
E4: Delete the 4th Timer Power Off
E5: Delete the 5th Timer Power Off
E6: Delete the 6th Timer Power Off
E7: Delete the 7th Timer Power Off
3. 01h to 0ch (Timer Power Off days setting)
01: Repeat Once
02. Repeat Daily
03: Repeat from Monday to Friday
04: Repeat from Monday to Saturday
05: Repeat from Saturday to Sunday
06: Repeat on Sunday
07: Repeat on Monday
08: Repeat on Tuesday
09: Repeat on Wednesday
0A: Repeat on Thursday
0B: Repeat on Friday
0C: Repeat on Saturday
Data2 00-17: 00 - 23 hours
Data3 00-3B: 00 - 59 minutes
* To read or delete a Timer Power Off you have set, [Data2][Data3] must
be set to FFH.
Example 1: fe 01 f1 ff ff - Reads the 1st index data in Timer
Power Off.
Example 2: fe 01 e1 ff ff - Reads the 1st index data in Timer
Power Off.
Example 3: fe 01 04 02 03 - Sets the Timer Power Off as
Monday - Saturday 02:03.
* This feature only works when Clock 1 (year/month/day) and Clock 2
(hour/minute/second) have been set.
Acknowledgment
(e)( )(Set ID)( )(OK/NG)(Data1)(Data2)(Data3)(x)
69. [Holiday Setting] Mode (Command: s n, 1a)
Sets the Holiday Schedule mode to On or Off.
Transmission
(s)(n)( )(Set ID)( )(1)(a)( )(Data)(Cr)
Data 00: Holiday Schedule Off
01: Holiday Schedule On
Acknowledgment
(n)( )(Set ID)( )(OK/NG)( )(1)(a)( )(Data)(x)
* This feature does not work if the current time is not set.
* This feature may not be available for all models.
70. [Holiday Setting] (Command: s n, 1b)
Sets holiday schedules.
Transmission
(s)(n)( )(Set ID) )( )(1)(a)
( )(Data1)( )(Data2)( )(Data3) ( )(Data4) (Cr)
Data1
1. f1 to f7 (data reading)
f1: Reads the 1st Holiday Schedule's data
f2: Reads the 2nd Holiday Schedule's data
f3: Reads the 3rd Holiday Schedule's data
f4: Reads the 4th Holiday Schedule's data
f5: Reads the 5th Holiday Schedule's data
f6: Reads the 6th Holiday Schedule's data
f7: Reads the 7th Holiday Schedule's data
2. FF: Reads all stored lists
3. e1 to e7 (Deletes one index), e0 (Deletes all indexes)
e0: Deletes all holiday schedules
e1: Deletes the 1st holiday schedule
e2: Deletes the 2nd holiday schedule
e3: Deletes the 3rd holiday schedule
e4: Deletes the 4th holiday schedule
e5: Deletes the 5th holiday schedule
e6: Deletes the 6th holiday schedule
e7: Deletes the 7th holiday schedule
4. 01 - 0c: Januar y - December (Start Month)
Data2 01~1F: 01 - 31 (Start Day)
Data3 01 - 0c: January - December (End Month)
Data4 01~1F: 01 - 31 (End Day)
ENGLISH
Page 58

58
* To read or delete a Holiday Schedule you have set, [Data2][Data3]
[Data4] must be set to FF.
ENGLISH
* To read all Holiday Schedules you have set, [Data1][Data2][Data3]
[Data4] must be set to FF.
Example 1: sn 01 1b f1 ff ff ff - Reads the 1st index data in
Holiday Schedule.
Example 2: sn 01 1b ff ff ff ff - Reads all index data in Holiday
Schedule.
Example 3: sn 01 1b e1 ff ff ff - Deletes the 1st index data in
Holiday Schedule.
Example 4: sn 01 1b 01 07 0c 18 - Sets and adds the holiday
schedule from January 7 to December 24.
* Schedules that have been set in advance are not added.
* This feature does not work if the current time is not set.
* This feature may not be available for all models.
Acknowledgment
(s)( )(Set ID)( )(OK/NG)(Data1)(Data2)(Data3)(x)
71. [Power On Status] (Command: t r)
Sets the Power On status of the monitor.
Transmission
(t)(r)( )(Set ID)( )(Data)(Cr)
Data 00: LST (Maintains the previous power status)
01: STD (Keeps the power off)
02: PWR (Keeps the power on)
Acknowledgment
(r)( )(Set ID)( )(OK/NG)(Data)(x)
73. [ISM Method] (Command: j p)
Sets the ISM Method function.
Transmission
(j)(p)( )(Set ID)( )(Data)(Cr)
Data 01: [Inversion]
02: [Orbiter]
04: [Remove (white pattern)]
08: [Standard]
20: [Remove (colored pattern)]
80: [Washing Bar]
90: [User Image]
* If Timer is set to Immediately, the jp command operates.
Acknowledgment
(p)( )(Set ID)( )(OK/NG)(Data)(x)
74. [Booting Logo Image] (Command: s n, a3)
Sets the Booting Logo Image mode.
Transmission
(s)(n)( )(Set ID)( )(a)(3)( )(Data)(Cr)
Data 00: Off
01: On
Acknowledgment
(n)( )(Set ID)( )(OK/NG)(a)(3)(Data)(x)
* This feature may not be available for all models.
72. [Wake On LAN] (Command: f w)
Selects a Wake On LAN option.
Transmission
(f)(w)( )(Set ID)( )(Data)(Cr)
Data 00: Off
01: On
Acknowledgment
(w)( )(Set ID)( )(OK/NG)(Data)(x)
75. [No Signal Image] (Command: s n, a9)
Turns on/off No Signal Image.
Transmission
(s)(n)( )(Set ID)( )(a)(9)( )(Data)(Cr)
Data 00: Off
01: On
Acknowledgment
(n)( )(Set ID)( )(OK/NG)(a)(9)(Data)(x)
* This feature may not be available for all models.
Page 59

59
76. H Position (Command: f q)
Adjusts the horizontal position of the screen. (This feature only
works when Tile Mode is set to Off.)
* The operational range varies depending on the RGB input resolution.
(Works only in RGB-PC input mode.)
Transmission
(f)(q)( )(Set ID)( )(Data)(Cr)
Data 00-64: Minimum -50 (Left) - Maximum 50 (Right)
Acknowledgment
(q)( )(Set ID)( )(OK/NG)(Data)(x)
77. V Position (Command: f r)
Adjusts the vertical position of the screen. (This feature only
works when Tile Mode is set to Off.)
* The operational range varies depending on the RGB input resolution.
(Works only in RGB-PC input mode.)
Transmission
(f)(r)( )(Set ID)( )(Data)(Cr)
Data 00 - 64: Minimum -50 (Down) - Maximum 50 (Up)
Acknowledgment
(r)( )(Set ID)( )(OK/NG)(Data)(x)
78. H Size (Command: f s)
Adjusts the horizontal size of the screen. (This feature only
works when Tile Mode is set to Off.)
* The operational range varies depending on the RGB input resolution.
(Works only in RGB-PC input mode.)
Transmission
(f)(s)( )(Set ID)( )(Data)(Cr)
Data 00 - 64: Minimum -50 (Small) - Maximum 50 (Large)
Acknowledgment
(s)( )(Set ID)( )(OK/NG)(Data)(x)
79. [Home Dashboard Lock] (Command: s n, 9d)
Sets Home Dashboard Lock.
Transmission
(s)(n)( )(Set ID)( )(9)(d)( )(Data)(Cr)
Data 00: Off
01: On
Acknowledgment
(n)( )(Set ID)( )(OK/NG)(9)(d)(Data)(x)
* This feature may not be available for all models.
80. [USB Lock] (Command: s n, 9e)
Sets USB Lock.
Transmission
(s)(n)( )(Set ID)( )(9)(e)( )(Data)(Cr)
Data 00: Off
01: On
Acknowledgment
(n)( )(Set ID)( )(OK/NG)(9)(e)(Data)(x)
* This feature may not be available for all models.
81. [OSD Lock] (Command: k l)
Selects an OSD Display option.
Transmission
(k)(l)( )(Set ID)( )(Data)(Cr)
Data 00: Off (OSD Lock: Off)
01: On (OSD Lock: On)
Acknowledgment
(l)( )(Set ID)( )(OK/NG)(Data)(x)
ENGLISH
Page 60

60
82. [Change Password] (Command: s n, a7)
ENGLISH
Changes password.
Transmission
(s)(n)( )(Set ID)( )(a)(7)( )(Data1)(Data2)(Data3)
(Data4)( )(Data5)(Data6)(Data7)(Data8)(Cr)
Data 1-4: 0-9 (Previously set password)
Data 5-8: 0-9 (New password)
Acknowledgment
(n)( )(Set ID)( )(OK/NG)(a)(7)( )(Data1)(Data2)
(Data3) (Data4)( )(Data5)(Data6)(Data7)(Data8)(x)
* This feature may not be available for all models.
83. [Apply to all inputs] (Command: s n, 52)
Applies the picture mode and low value of the current input to
the same video value of all inputs.
Transmission
(s)(n)( )(Set ID)( )(5)(2)( )(Data)(Cr)
Data 01: Apply
Acknowledgment
(n)( )(Set ID)( )(OK/NG)(5)(2)(Data)(x)
* This feature may not be available for all models.
84. OSD Position (Command: s n, ac)
Changes the screen position when the OSD Rotation function
is set to On.
Transmission
(s)(n)( )(Set ID)( )(a)(c)( )(Data)(Cr)
Data 00: Top
01: Medium
02: Bottom
Acknowledgment
(n)( )(Set ID)( )(OK/NG)(a)(c)(Data)(x)
* This feature may not be available for all models.
85. Fail Over USB Input (Command: s n, 0a)
Selects a USB status for fail over.
Transmission
(s)(n)( )(Set ID)( )(0a)( )(Data) (Cr)
Data 00: [Off]
01: [Picture]
02: [Photos]
Acknowledgment
(n)( )(Set ID)( )(OK/NG)(0a)(Data) (x)
86. Fan Failure Check (Command: d w)
Check the fan malfunction.
Transmission
(d)(w)( )(Set ID)( )(Data)(Cr)
Data FF: Read status
Acknowledgment
(w)( )(Set ID)( )(OK/NG)(Data)(x)
Data 00: Fan failure
01: Fan normal
* This feature may not be available for all models.
Page 61

61
87. [Network Setting] (Command: s n, 80 or 81 or
82)
Configures network and DNS settings.
Transmission
(s)(n)( )(Set ID)( )(Data1)( )(Data2)( )
(Data3)( )(Data4)( )(Data5)(Cr)
Data1 80: Configures/views the temporary IP mode (Auto/
81: Configures/views the temporary DNS address.
82: Saves temporary settings and views information about
* If Data1 is 80,
Data2 00: Auto
01: Manual
FF: Views the temporary IP mode (Auto/Manual), subnet
** If Data2 is 01 (Manual),
Data3: Manual IP address
Data4: Subnet mask address
Data5: Gateway address
* If Data1 is 81,
Data2 DNS address
FF: Displays the temporary DNS address.
* If Data1 is 82,
Data2 80: Applies the temporary IP mode (Auto/Manual), subnet
81: Applies the temporary DNS address
FF: Information on the current network (IP, subnet
*** An example of settings,
1. Auto: sn 01 80 00
2. Manual: sn 01 80 01 010177223241 255255254000
010177222001(IP:10.177.223.241, subnet: 255.255.254.0,
gateway: 10.177.222.1)
3. Network read: sn 01 80 ff
4. DNS setting: sn 01 81 156147035018 (DNS: 156.147.35.18)
5. Applying the settings: sn 01 82 80 (applies the saved IP mode
(auto/manual), subnet mask, and gateway), sn 01 82 81 (applies
the saved DSN)
* Each IP address contains 12 decimal digits.
Acknowledgment
(n)( )(Set ID)( )(OK/NG)(Data1)(Data)(x)
* This feature is available only for wired networks.
* This feature may not be available for all models.
Manual), subnet mask, and gateway.
the current network.
mask, and gateway.
mask, and gateway.
gateway and DNS)
88. [Natural Size] (Command: s n, a5)
Sets the Natural Size feature.
Transmission
(s)(n)( )(Set ID)( )(a)(5)( )(Data)(Cr)
Data 00 - 64: Natural Size 0 - 100
Acknowledgment
(n)( )(Set ID)( )(OK/NG)(a)(5)(Data)(x)
* This feature may not be available for all models.
ENGLISH
Page 62

 Loading...