

LG 49VH7C-B, 43SM5B-B INSTALLATION INSTRUCTIONS

INSTALLATION MANUAL
LG Digital
Signage
(MONITOR SIGNAGE)
Please read this manual carefully before operating your set and retain it
for future reference.
webOS 2.0
www.lg.com

2
TABLE OF CONTENTS
ENGLISH
ACCESSING
INSTALLATION MENU ..................4
INSTALLATION MENU ..................5
- Signage Setup Menu ....................................................... 5
Power On Status
IR Operation
Local Key Operation
Wake On LAN
LAN Daisy Chain
No Signal Power Off (15 Min)
Auto Power Off
Beacon
DPM
DPM Wakeup Control
Baudrate (9600/115200)
OSD Portrait Mode (Off, 90, 270)
Power On Delay (0 ~ 250)
Check Screen
Digital Audio Input
Speaker
USB Auto Playback
Set ID
PM Mode
Interface Selection
OPS Power Control, OPS/PC Power Control
Master/Slave Mode
Sync Mode
Content Rotation
Aspect Ratio(Rotation)
Intelligent Auto
Studio Mode
Pivot Mode
Scan Inversion
White Balance
Applications
Crestron
Factory Reset
Status Message
SIMPLINK Setup
Multi-screen Resolution
Guide to Using Content Rotation/Pivot Mode/
Scan Inversion
- USB Cloning Menu ........................................................ 16
Send To USB
Receive From USB
Logo Image Download
- Password Change Menu ............................................16
- Tile Mode Menu .............................................................. 17
Row (1-15)
Column (1-15)
Tile ID (1-225)
Natural
Reset

3
ENGLISH
- Fail Over Menu ................................................................19
Off
Auto
Manual
- ISM Method Menu ........................................................ 20
Mode
Repeat
Wait
Duration
Action Cycle
Bar Image
Bar Color
Transparency
Direction
Bar Image Download
User Image Download
User Video Download
* How to reset or delete downloaded bar
images/user images/user videos
- Server Menu .....................................................................23
Set Automatically
Server IP
Server Status
Link Server IP
Link Server Port
Link Server Status
- Lock Mode Menu ........................................................... 24
USB
OSD
Reset to Initial Settings
WiFi
4
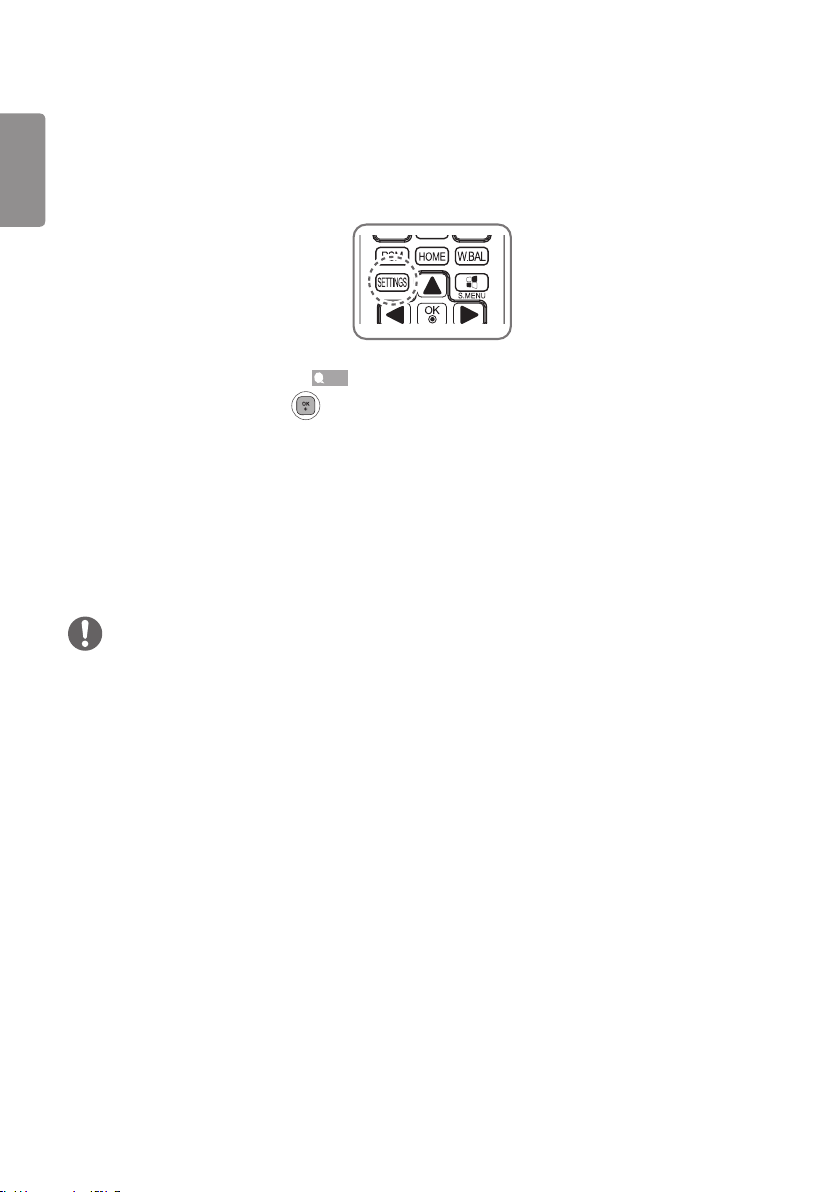
ACCESSING INSTALLATION MENU
ENGLISH
1 Press and hold the SETTINGS button for 5 seconds.
2 When Input ID (The top right corner ) is displayed, enter your password.
(The default value is 0, 0, 0, 0 • )
3 When the Installation Menu is displayed, select the desired option.
- Signage Setup
- USB Cloning
- Password Change
- Tile Mode
- Fail Over
- ISM Method
- Server
- Lock Mode
NOTE
• Images in the manual may look different from the actual product.

5
INSTALLATION MENU
NOTE
• Some features described in the Installation manual may not be supported in certain models.
Signage Setup Menu
Use this menu to configure the digital signage after installation.
Power On Status
• You can select the operating status of the monitor when the main power is switched on.
• You can select from among PWR, STD, and LST.
• PWR sets the status of the monitor to On whenever the main power is switched on.
• STD sets the status of the monitor to Standby when the main power is switched on.
• LST sets the status of the monitor back to its previous status.
IR Operation
• If you set IR Operation to Normal, you can use the remote control.
• If you set IR Operation to Power Key Only, you can only use the Power Key.
• If you set IR Operation to Block All, you cannot use the remote control. (Power On feature is available.)
Local Key Operation
• If you set Local Key Operation to Normal, you can use the Local Key.
• If you set Local Key Operation to Power Key Only, you can only use the Power Key.
• If you set Local Key Operation to Block All, you cannot use the Local Key. (Power On feature is available.)
ENGLISH
Wake On LAN
• You can set whether to use the Wake On LAN feature.
• You can set this option to On or Off.
• If you set this option to On, the Wake On LAN feature is enabled and you can turn on the product remotely via LAN.
• If you set this option to Off, the Wake On LAN feature is disabled.
LAN Daisy Chain
• LAN Daisy Chain forms a daisy chain of LAN ports so that even if you connect only one monitor set to a network, the
other sets in the daisy are connected to the network.
• The first set in the daisy chain must be connected to a network through a port that is not being used for the daisy
chain.

6
No Signal Power Off (15 Min)
ENGLISH
• You can choose whether to use the 15 Min Force Off feature.
• You can set this option to On or Off.
• If you set this option to On, the product turns off when it has remained in No Signal status for 15 minutes.
• If you set this option to Off, the 15 Min Force Off feature is disabled.
• Set this option to Off when you use the product for a long period of time.
Auto Power Off
• You can choose whether to use the 4 Hours Off feature.
• You can set this option to 4 Hours or Off.
• If you set this option to 4 Hours, the product turns off when you have not pressed any buttons on the remote control
for 4 hours.
• If you set this option to Off, the 4 Hours Off feature becomes disabled.
• Set this option to Off when you use the product for a long period of time.
Beacon
• Enables BLE Beacon, one of Bluetooth 4.0's features.
• Beacon Mode (on/off toggle): Enables the Beacon feature.
• Beacon UUID (hex): Sets the universally unique identifier (UUID) that will be used for Beacon. A UUID consists of 32
digits, and each digit has a hexadecimal value (0–FF) converted from a decimal number ranging from 0 to 255.
• Major (0–65535): Sets the main category value that matches the UUID.
• Minor (0–65535): Sets the subcategory value that matches the Major value.
• OK: Confirmation button to apply the four values above once they are set.
• Some models do not support background scanning services in iOS.
DPM
• You can configure the DPM (Display Power Management) function.
• Off: you can set this option to Off, 5 sec./10 sec./15 sec./1 min./3 min./5 min./10 min.
• If this option is not set to Off, the monitor set enters the DPM mode when there is no input signal.
• If you set this option to Off, the DPM function is disabled.
• In the cases below, 5 sec. and 10 sec. options will be disabled for DPM. If DPM is already set to 5 sec. or 10 sec., it
will be changed to 15 sec.
- When USB Auto Playback is set to Photo or Movie
- When Fail Over is set to Auto or Manual
• If you set this option to 10 sec. or less, the monitor set enters the DPM mode before automatic play of SuperSign
contents.

7
DPM Wakeup Control
• Turns on the monitor set according to the digital signal processing of the connected DVI/HDMI port.
• Setting this option to Clock only checks for the signals from the digital clock. If there is a clock signal, the monitor set
is turned on.
• Setting this option to Clock+DATA turns on the monitor set only when there are both digital clock signal and data
signal inputs.
Baudrate (9600/115200)
• You can change the RS-232 communication speed for controlling your monitor.
• You can choose 9600 or 115200.
• If you set this option to 9600, the RS-232 communication speed is set at 9600 bps.
• If you set this option to 115200, the RS-232 communication speed is set at 115200 bps.
OSD Portrait Mode (Off, 90, 270)
• This feature allows you to rotate the OSD clockwise.
• You can set this feature to Off/90/270.
• If you set this feature to Off, the feature is disabled.
• If you set this feature to 90, the OSD rotates 90 degrees clockwise. In this case, the mouse cannot be used.
• If you set this feature to 270, the OSD rotates 270 degrees clockwise. In this case, the mouse cannot be used.
• Depending on the model, you can set this feature to Off/On. If you set this feature to On, the OSD rotates 90 degrees
clockwise.
• The set must be restarted for the changed settings to be applied in some models.
Power On Delay (0 ~ 250)
• This feature delays power on in order to prevent overload when multiple monitor sets are turned on simultaneously.
• You can set the delay interval in the range of 0 to 250 seconds.
ENGLISH
Check Screen
• The Check Screen feature judges whether there are abnormalities at the edges of the screen. R, G, and B OSDs are
formed on the screen at one second intervals and an RGB Sensor tests the areas.
• If set to On, the Check Screen feature is enabled.
• If set to Off, the Check Screen feature is disabled.
• If Portrait mode or Pivot mode is set to On, Check Screen is changed to Off and disabled.
Digital Audio Input
• HDMI/DISPLAYPORT/OPS: You can hear the sounds of the digital signals carried by HDMI, DISPLAYPORT, or OPS
through the monitor speakers.
• Audio In: you can hear sounds through the monitor speaker by connecting HDMI, or OPS or DISPLAYPORT ports to
the Audio In port.
• If Digital is selected in DVI-D when using OPS/HDMI3/DVI-D or OPS/DVI-D input, there will be no sound.
• Models that do not support internal speakers require external speakers.

8
Speaker
ENGLISH
• If you set this option to On, you can hear sounds through the monitor speaker. (* The monitor speaker is sold
separately.)
• If you set this option to Off, you cannot hear sounds through the monitor speaker.
USB Auto Playback
• This is a feature that auto-playbacks photos and videos when a USB device is connected. You can view photos and
videos without manually selecting the View Photos/Movies menu. However, this feature is unavailable while the
SuperSign contents are played.
• If you select Movie for USB Auto Playback, then the video files in the top level folder on the USB device will
automatically play in sequence. When switched on, Signage automatically searches and plays video files from a USB.
• If you select Photo for USB Auto Playback, then the image files in the top level folder on the USB device will
automatically play in sequence. When switched on, Signage automatically searches and plays photos from a USB.
Set ID
• Set ID (1 ~ 1000) : When several products are connected for display, you can assign a unique Set ID No. to each
product. Assign numbers ranging from 1 to 1000 and exit the option. You can control each product separately by
using the Set ID you assigned to each product.
• Auto Set ID : Automatically assigns a unique set ID number to each set when several products are connected for
display.
• Reset Set ID :You can reset the Set ID of the product to 1.
PM Mode
• Power Off : Normal DC off status.
• Sustain Aspect Ratio : Normal DC off status except that Switching IC stays on. On certain models, this applies only to
a specific input mode (DisplayPort) and has the same effect as Screen Off Always in other input modes.
• Screen Off : Automatically changes to Screen Off status when entering the DPM mode, Auto Off (15 mins, 4 hours),
or Abnormal Shut Down.
• Screen Off Always : Automatically changes to Screen Off status when entering the DPM mode, Auto Off (15 mins,
4 hours), Off Timer, Abnormal Shut Down, or when there is input from the remote control's Power button or the
monitor's Off button.
• To change the screen from Off to On status, there must be input from the remote control's Power or Input button, or
the monitor's On button.
Interface Selection
• You can set communication with the connected OPS.
• DISPLAY : Enables communication with external devices via the serial port.
• OPS : Enables communication via the OPS connected to the product.
 Loading...