

LG 32LV340C INSTALLATION MANUAL
INSTALLATION MANUAL
LED TV*
* LG LED TV applies LCD screen with LED backlights.
Please read this manual carefully before operating your set and retain it for future reference.
LV3*** |
LV5*** |
www.lg.com

TABLE OF CONTENTS
3 EZ-MANAGER
3EZ-Manager 2.1 - Introduction
3EZ-MANAGER WIZARD
4EZ-Manager Wizard - Automatically for Setup
5EZ-Manager Wizard - Automatically for Setup (USB Configuration)
6EZ-Manager Wizard - Manually for Setup
8 INSTALLATION MENU
8Introduction
9Public Display Settings
17TV Manager
17- 1. USB
23- 2. Diagnostics
25Password Change
26Set ID Setup
27Configuration setup
29Time Scheduler
30Lock Mode
31External Speaker
32HCEC Setup
34Insert Image
35Welcome Video
36Home Menu
38Pro:Centric
40Network Setup
41 EXTERNAL CONTROL DEVICE SETUP
41KEY CODES
42EXTERNAL CONTROL DEVICE SETUP
51 IR OUT USING GUIDE
2
EZ MANAGER
(* Only for LV5**H series)
EZ-Manager 2.1 - Introduction
The default Domain “procentric.local” and IP Server Address are needed to be registered in DNS.
TV will contact the IP Server using the default Domain “procentric.local” via IP on server search page. If TV doesn’t contact the Server, TV will search the pre-defined channel earlier than all channels.
The pre-defined channels are 10, 20, 30, 40, 50, 60.
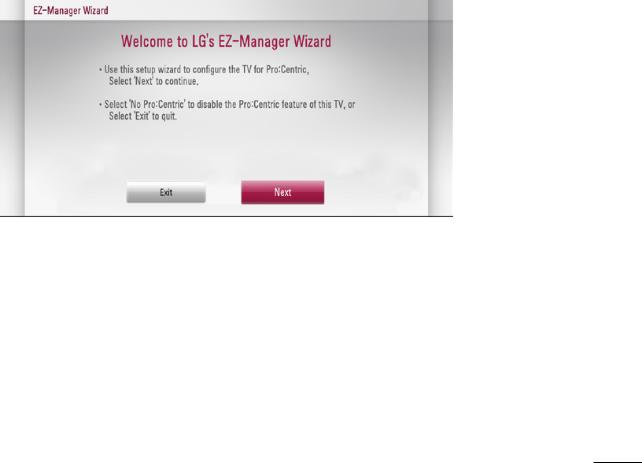
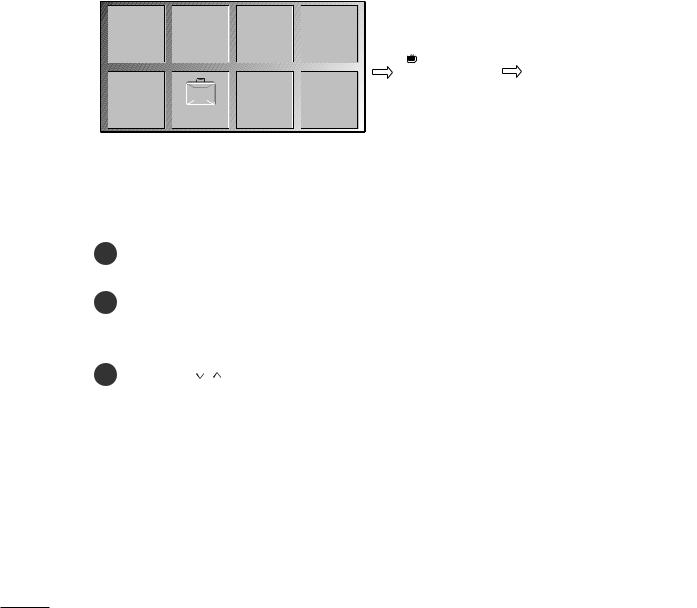
EZ-MANAGER WIZARD
yyImage shown may differ from your TV.
If you are using Pro:Centric, this setup wizard till help you easily set up the TV.
Select ‘Next’ to continue.
Otherwise, you may select ‘Exit’ to quit.
3

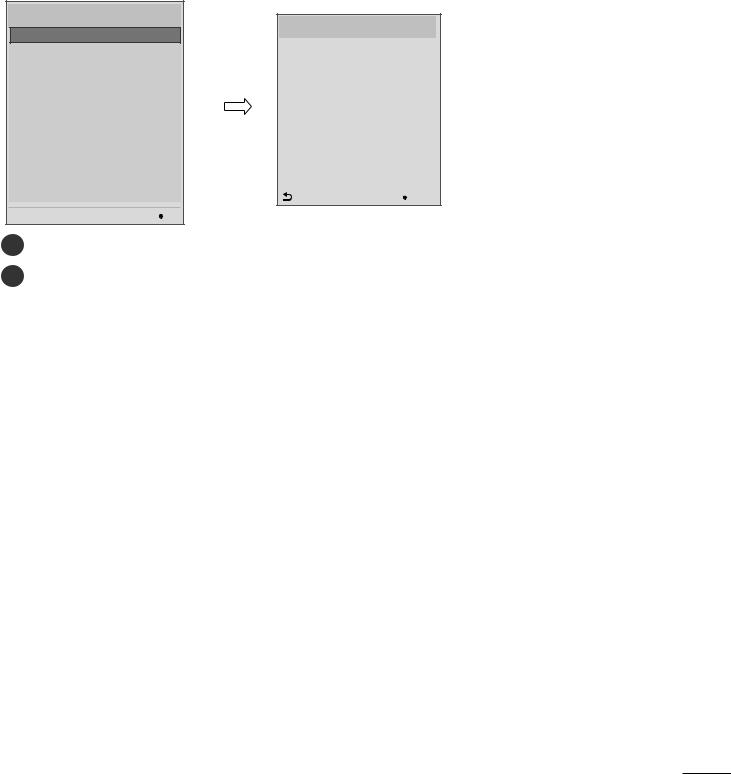
EZ-Manager Wizard - Automatically for Setup
yyImage shown may differ from your TV.
1. Select a Label and/or enter the Room Number using the numeric keypad on the remotes. To continue, move and select ‘Next’.
2. This step automatically searches for the Pro:Centric Server. If was found the Pro:Centric data channel, select the “Next”.
3-1. Downloading the Pro:Centric application files takes few minutes.
3-2. After the installation is completed, the following screen will be displayed.
4
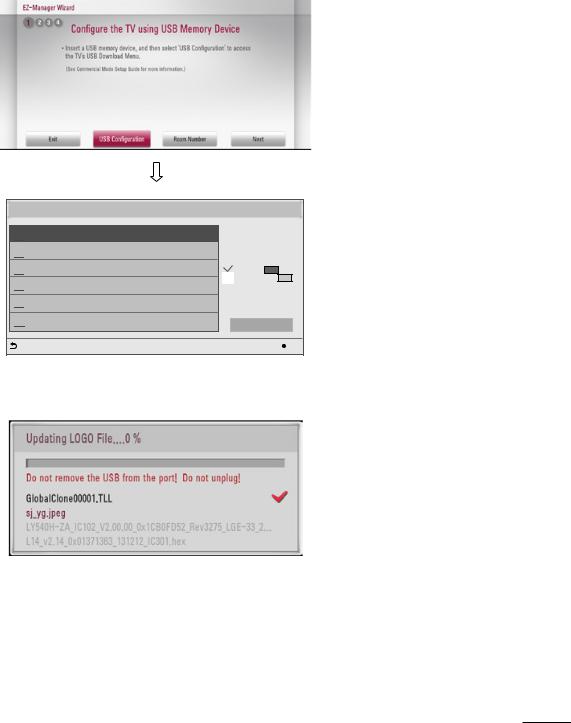
EZ-Manager Wizard - Automatically for Setup (USB Configuration)
yyImage shown may differ from your TV.
1. Select the ‘USB Configuration → Ez Download’.
Ez Download (USB Port1)

 [TLL] GlobalClone00001.TLL
 [LOGO] 1024X768.jpg
 [EPK] M1A_DVB_CN_RevNo1539_v00.00...
 [NOSIG] 1360X768.jpg
 [NOSIG] InsertImage.jpg
 [MOV] Welcome Video.avi
[ TV Software Version ]
Current : 02.00.00.01
EPK : 02.00.00.01
[ Forced Update Option ]

 SPI Boot
 LG Boot Logo
[ Insert Image ] Max Size : 10000KB Total size : 5000KB
Apply
Previous |
OK |
2. Downloading the software/jpeg/TLL files takes few minutes.
3. After the installation is completed, turn off.
5
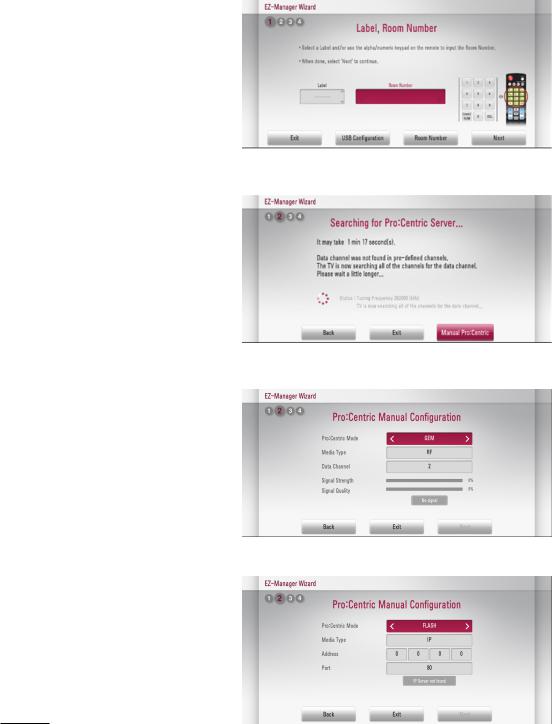
EZ-Manager Wizard - Manually for Setup
yyImage shown may differ from your TV.
1. Select a Label and/or enter the Room Number using the numeric keypad on the remotes. To continue, move and select ‘Next’.
2. Please select the ‘Manual Pro:Centric’.
3. Select the Pro:Centric Mode “Configuration Only”, “GEM” or “Flash”.
or
6
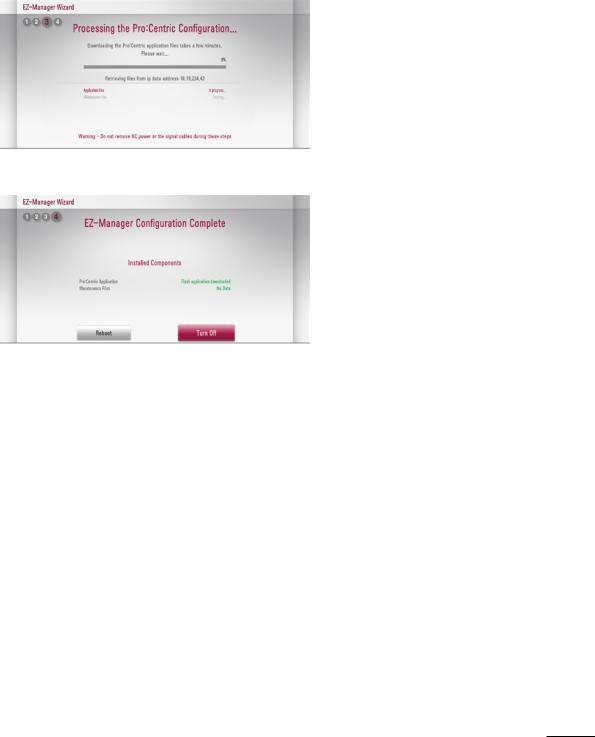
4. Downloading the Pro:Centric application files takes few minutes.
5. After the installation is completed, the following screen will be displayed.
7
INSTALLATION MENU
Introduction
The abundant functions for Hotel TV linked with software installation can be projected on OSD as ‘Installation Menu’.
The wide range of hotel features can be performed simply on additional window to enhance the LG hotel TV’s easy installation and convenient operation for Hotelier and System Integrators.
yyImage shown may differ from your TV.
|
|
|
|
|
|
|
Installation Menu (V 3.0) |
|
|
|
|
|
|
|
|
|
|
|
|
|
|
|
|
|
LG Hotel Mode Setup |
|
|
|
|
|
|
|
|
Public Display Settings |
|
|
|
|
|
|
|
|
TV Manager |
|
|
|
|
|
|
|
|
Password Change |
|
PICTURE |
AUDIO |
SETUP |
TIME |
TV |
7 |
|
Set ID Setup |
|
|
|
|
|
|||||
|
|
|
|
|
|
|
Configuration Setup |
|
|
|
|
|
C05 |
|
|
Time Scheduler |
|
|
|
|
|
|
|
|
Lock Mode |
|
LOCK |
OPTION |
INPUT |
Smart Share |
|
|
|
External Speaker |
|
|
|
|
|
|
|
|
HCEC Setup |
|
|
|
|
|
|
|
|
Insert Image |
|
|
|
|
|
|
|
|
Welcome Video |
|
|
|
|
|
|
|
|
|
|
|
|
|
|
|
|
|
S/W : 02.00.00.01 Micom : 0.00.84 |
OK |
1 |
Press the Home button for more than 5 seconds using the user remote control, channel |
|
|
information will appear at top left on the screen. |
|
2 |
Enter a four digit password and press OK button. |
|
|
• The TV is set with the initial password “1-1-0-5”. |
|
3 |
Use the |
button to select the desired menu. |
8
Public Display Settings
yyImage shown may differ from your TV.
Installation Menu (V 3.0)
LGPublicHotelDisplayMode SetupSettings
TV Manager
Password Change
Set ID Setup
Configuration Setup
Time Scheduler
Lock Mode
External Speaker
HCEC Setup
Insert Image
Welcome Video
S/W : 02.00.00.01 Micom : 0.00.84 |
OK |
Public Display Settings (V 3.0)
▲ |
|
Public Display Mode |
◄ Yes ► |
• Power On Status |
STD |
• Volume |
|
No |
|
• Start Volume |
|
Off |
|
• Maximum Volume |
100 |
• Minimum Volume |
|
0 |
|
• Key Operation |
No |
• IR Operation |
|
Normal |
|
• Local Key Operation |
|
Normal |
|
▼ |
|
Previous |
OK |
1
2
Use the 
 button to select the Public Display Settings.
Use the OK button and then 
 button to select Public Display Mode.
*When 'Public Display Mode' is set to Yes(Work), all functions of Public Display apply.
(1 ) Public Display Mode (ATSC)
yyDecide to work all functions of ‘Public Display Mode’ or not by setting 'Public Display Mode’ as Yes(Work) or No(Do Not Work)
yyWhen ‘Public Display Mode’ is set to Yes(Work), all functions of Public Display apply.
yyWhen ‘Public Display Mode’ is set to No(Do Not Work), all functions of Public Display Do Not apply. yyWhen it is set to ‘Yes’, ‘Key Lock’ item of the User menu is disabled and the OSD is displayed same to
the Local Key Operation setting of the Public Display.
yyWhen it is set to ‘Yes’, all items reserved at the Schedule list are deleted and the reservation function is not supported. (applied for the model offering the reservation function)
yyThe TV triggered by the external device (ex: SIMPLINK, TVLink-Tuner, etc.) operates separately from the Public Display.
yyWhen it is set to ‘Yes’, User Menu-> Option -> ‘Factory Reset’ is disabled.
(2) Power On Status
yyDecide to select working status of TV Set when turn on main power. yyYou can set with PWR, STD, LST.
yyPWR always make TV set On status when turn on main power . yySTD make Stand-by status when turn on main power.
yyLST make TVSet work like previous power status. As same concept as Power Backup mode; If main power were turned off in Power On status, TVSet would work in On status. If main power were turned off in Stand-by status, TVSet would work in Stand-by status.
9

(3) Volume (0 ≤ Min ≤ Start ≤ Max ≤ 100)
yyDecide to apply volume policy of ‘Start Volume’, ‘Maximum Volume’ and ‘Minimum Volume’ as Yes(Work) or No(Do Not Work).
(3-1) Start Volume
This entry sets the start volume level when is power on.
yyThe level is specified as a number between minimum volume to maximum value. (Min ≤ Start ≤ Max) yyThe default setting is ‘Off’ (disabled).
yyWhen enabled, if the value is lower then the minimum specified in the minimum volume entry, the minimum volume entry must be used.
yyWhen enabled, if the value is larger then the maximum specified in the maximum volume entry, the maximum volume value must be used.
yyAccess to a volume in ‘On Timer’ must be fixed to start volume when ‘Public Display Mode’ (Yes) and ‘Start Volume’ (Off, 0 ~ 100) were set simultaneously.
(3-2) Maximum Volume
This entry sets the maximum volume level the set. The level is specified as a number between
‘Minimum Volume’ to 100. (Min ≤ Max ≤ 100)
yyIf the command volume up to higher than maximum volume’ is received, that should be ignored. yyThe default value is 100.
(3-3) Minimum Volume
This entry sets the minimum volume level the set will produce.
yyThe level is specified as a number between 0 to ‘Maximum Volume’. (0 ≤ Min ≤ Max)
yyIf the command volume down to lower than minimum volume is received, that should be ignored. yyThe default value is 0.
(4) Key Operation
yyManage key usability of Local(Front) Key and Remote Control. When selected to ‘Yes’, following ‘IR Operation’ and ‘Local Key Operation’ will be worked by below.
(4-1) IR Operation
Decide whether work the LG remote control or not. yyAble to set Normal, Use PWR Only, Block All
yyWhen ‘IR Operation’ is set to Block All, all normal remote keys don’t work. Use PWR Only (Block except power) makes block all remote keys except power key.
yyAlthough ‘IR Operation’ value is Use PWR Only or Block All.
--It can work in ‘Service mode’. (In-Start, In-Stop, Power-Only, ADJ, Hotel-Mode, Hotel-Mode-Ready, P-Check, S-check, In-Time, FMode-Init, FMode-Start, FMode-AV, FMode-F1) --Menu key action to enter the ‘Installation Menu’ and key action with
‘Special menu(In-Start / EZ-Adjust …)’ are still available.
yyWhen ‘IR Operation’ is set to 0 (Work), all remote keys are available.
10
(4-2) Local Key Operation
Decide to operate 'Local/Front Key' working behavior by setting ‘Local Key Operation’ as Normal, Block All. yyWhen 'Local Key Operation' is set to Block All, all local keys don’t work.
yyWhen 'Local Key Operation' is set to Normal, all local key are available.
Exception)
In case of power off condition with all key are blocked, ‘Power On Status’ value turns to ‘PWR’, and disabled status to fix value for power on operation. (fool-proof routine)
• Power On Status |
|
|
◄ |
STD ► |
|
• Key Operation |
◄ |
Yes ► |
• IR Operation |
◄ Block All ► |
|
• Local Key Operation |
◄ Block All ► |
|
|
|
|
• Power On Status |
|
◄ PWR ► |
|
• Key Operation |
◄ No ► |
• IR Operation |
◄ Block All ► |
• Local Key Operation |
◄ Block All ► |
|
|
(5) Limited Mode
Configure TV function’s limitation. When selected to ‘Yes’, following sub-menus will be worked by below.
(5-1) Setup Menu
Decide to enter 'Setup’ Menu’ as ‘Yes’(Enter possible) or ‘No’(Enter impossible)
(5-2) Input Source Change
Decide to change input source or not by setting 'Input Source Change' as Yes(Change possible) or No (Change impossible).
yyWhen ‘Input Source Change’ is set to ‘No’ (Change impossible)
--‘INPUT key’ doesn't work, and Input Source Changing via ‘TV D/A’ key, ‘TV/RADIO’ key aren’t possible (ex. Press TV/RADIO Key in HDMI source to view TV channel)
--User's input (pressing Channel key, numeral key, List key, Q.View key in all Input source except TV source) doesn't work.
--Entering 'Setup Menu' item in the 'Main Menu OSD' except TV mode doesn't accepted. Because entering 'Setup Menu' item makes present mode as TV mode even though present mode is not TV. Change to TV mode isn’t allowed.
--TV set always turns on fixed input source and volume information regardless of already set information.
--Entering 'Setup Menu' except TV mode is impossible regardless of ‘Channel Change' or 'Setup Menu' items’ value.
--TV can be only turned on with the input source which is irrelevant from the channel related information set (volume, input) in ‘On Time’ Menu.
--Auto AV and HDMI-CEC still work regardless of Input Source Change’s value.
--When 'Input Source Change' is set to Yes(Change possible), changing input source is available.
11

(5-3) Channel Change
Decide to change channel or not by setting ‘Channel Change' as ‘Yes’(Change Possible) or ‘No’(Change Impossible) when present source is TV.
yyWhen ‘Channel Change' is set to No (Change Impossible)
--Channel Key, Numeral Key, List Key, Q.View Key don't work and entering 'Channel Menu' in the Main Menu OSD is impossible.
--‘Channel' item in 'On Time' menu will be fixed.
--Entering ‘Setup Menu' in the 'Main Menu’ OSD is impossible regardless of ‘Setup Menu' item. yyWhen 'Channel Change’ is set to Yes(Change Possible), ‘Channel Key’, ‘Numeric Key’, ‘List Key’,
‘Q.View’ Key does work and entering ‘Channel Menu' in the Main Menu OSD is possible.
(5-4) Menu Display
Function to decide whether work with menu (including relevant menus too) of control key (Yes – Enter possible) or not (No – Enter Impossible).
yyAlthough select No(Enter impossible), the action that press a Menu button for 5 seconds to enter ‘Installation Menu’ is available.
yyWhen select Yes(Enter possible), Menu works.
(5-5) OSD Display
Decide to display OSD or not by setting ‘OSD Display’ as Yes(Display) or No(Do not Display).
yyWhen ‘OSD Display’ is set to ‘No’(Do not Display), all OSD is not displayed except some exception. yyAlthough select ‘No’ (Do not Display), the action that press a Menu button for 5 seconds to enter
‘Installation Menu’ and entering service menu are available. (In-Start, Power-Only, Adjust, Installation Menu …)
(5-6) System Provider Mode
‘System Provider Mode’ allows access to the menu system from the front panel or remote control but access is controlled as follows:
yyWhen value is ‘Yes’, Accessible Items on the menu system, others are not permissible. --Input select screens
--Sleep timer --Aspect Ratio --Closed Caption
--‘Lock’ / ‘My Media’ / ‘Network’ / ‘Customer Support’ Menu yy‘Q.menu’, which is related to ‘Setup’ Menu, is not accessible.
yyIf the channel map is empty, ‘Auto-tuning’ guide dialog should be blocked by pressing ‘List’, ‘Fav’, ‘CH+’, ‘CH-’ keys.
12

(6) Power Management
The Power Management feature will turn off the television receiver if no input control command is received from either the Local or IR Key within a selected hours.
yyActivity on either of these inputs shall restart the ‘Power Management’ timer and check key time interval again.
yyThis entry can be set to a value which is corresponding to the desired hours (1 to 7). yyDefault value is ‘Off(disabled)’.
yyTV should off and on after apply this setting.
(7) DTV Channel Update
It is a mode to set whether to update DTV channel information automatically or not.
yyWhen DTV Channel Update is set to ’Auto’, the function to update TV’s channel map according to DTV channel’s stream information
yyDTV Channel Update is set to ‘Manual’, the function to keep TV’s channel map even though DTV channel’s information is changed.
(8) Power On Default
Set the input source or channel to display and. A/V settings when turn on power in AC Power On or Standby status.
(8-1) Input Source
Set whether it is turned on by the set input source or by the last stored input source. yyIt is turned on by the Last Memory Input if the Input source is turned off.
yyIt is turned on by the Last Pr. If the Input source is turned off and the last memory Input is the RF. yyThe available Input Source values should be rotated.
yyIf both the Input source and the ‘On Time’ menu are set, the Input source takes the priority. yyWhen the Input source is changed to the TV, Channel menu is available.
yyWhen the Input source is changed to the ATV, the Program No. is set to 0. (If the channel map structure does not support this, it depends on model’s channel handling.)
yyAccess to an input source item and a channel in ‘On Timer’ menu must be disabled when Power On Default is activated.
(8-2) Tune Mode
Tune the selected start channel with physical or virtual method. Usually, digital channel uses virtual channel and analog channel uses physical channel.
(8-3) Major
Select major part of start channel number if Input source value is TV. (in case of ATV, it means physical channel number.)
(8-4) Minor
Select minor part of start channel number if Input source value is TV.
13

(8-5) A/V Setting
If ‘A/V Setting’ is changed from ‘No’ to ‘Yes’, parameters that are set before entering ‘Installation Menu’ are applied whenever turn on power.
yyFollowing Parameters are applied to basic.
--Picture section - PSM mode, Picture Data (Contrast, Brightness, Color, Sharpness, Tint) --Sound section - SSM mode, Sound Data (Balance, Equalizer Data)
--AVL (Auto Volume Level) and Language, Teletext language, ARC Data. Except these, other parameters are applied differently according to the TV set.
(8-6) Aspect Ratio
The aspect ratio determines the default aspect ratio that the set returns to on power up. yyThe modes are as follows:
--Aspect ratio = “Disable(0)” stays at previous state, same as consumer model. --Aspect ratio = “Set by Program(1)”
--Aspect ratio = “4:3 ratio (2)” --Aspect ratio = “16:9 ratio (3)”
yyIf enabled, upon power up the television resets the aspect ratio to the specified state regardless of how the user has previously changed the aspect ratio.
(If "Set By Program" is not supported, the television sets the aspect ratio to "16:9".)
(9) Aux Source Setting
The Auxiliary (Input) Source Setting feature will enable or disable for each external input. When ‘Aux Source Setting’ is set to Yes(Work), the RJP or HDMI-CEC / HTNG will not operate.
(9-1) Input Source
yyAvailable Input Source List
(9-2) Setting
yyDecide whether selected ‘Input Source’ is usable (Enable) or not (Disable). yyUser cannot disable the current input’s ‘Aux Source Setting’.
14

(10) Factory Reset
Factory reset returns all the parameters to the default settings.
• Factory Reset |
|
Confirm |
|
|
|
yyPress ‘Enter key’ to proceed factory reset. and confirmation message window will be shown.
All user settings and channel settings will be reset. Still Continue?
Yes No
yyWhen select ‘Yes’, all television settings except UTT value should write to the default settings.
15

Public Display Settings (Value Range Table)
Item |
Enable |
|
Disable |
|
Initial |
Public Display Mode |
Yes |
|
No |
|
No |
|
|
|
|
|
|
Power On Status |
- |
|
- |
|
*STD |
|
|
|
|
|
|
Volume |
Yes |
|
No |
|
No |
|
|
|
|
|
|
Start Volume |
Off, Minimum Volume ~ Maximum Volume |
|
Off |
||
Maximum Volume |
Minimum Volume ~ 100 |
|
100 |
||
Minimum Volume |
|
0 ~ Maximum Volume |
|
0 |
|
|
|
|
|
|
|
Key Operation |
Yes |
|
No |
|
No |
|
|
|
|
|
|
IR Operation |
Normal / Use PWR Only / Block All |
|
Normal |
||
|
|
|
|
|
|
Local Key Operation |
|
Normal / Block All |
|
Normal |
|
|
|
|
|
|
|
Limited Mode |
Yes |
|
No |
|
No |
Setup Menu |
Yes |
|
No |
|
Yes |
Input Source Change |
Yes |
|
No |
|
Yes |
Channel Change |
Yes |
|
No |
|
Yes |
|
|
|
|
|
|
Menu Display |
Yes |
|
No |
|
Yes |
|
|
|
|
|
|
OSD Display |
Yes |
|
No |
|
Yes |
|
|
|
|
|
|
System Provider Mode |
Yes |
|
No |
|
No |
Power Management |
|
Off, 1 ~ 7 |
|
Off |
|
DTV Channel Update |
Auto |
|
Manual |
|
Auto |
|
|
|
|
|
|
Power On Default |
Yes |
|
No |
|
No |
|
|
|
|
|
|
Input Source |
|
Off, TV, DTV, ... |
|
TV |
|
|
|
|
|
|
|
Tune Mode |
|
Physical / Virtual |
|
Physical |
|
|
|
|
|
|
|
Major |
|
Subject to Ch. Type |
|
2 |
|
Minor |
|
Subject to Ch. Type |
|
0 |
|
A/V Setting |
Yes |
|
No |
|
No |
Aspect Ratio |
Disable (0) / Set by Program (1) / 4:3 (2) / 16:9 (3) |
|
Disable |
||
|
|
|
|
|
|
Aux Source Setting |
Yes |
|
No |
|
No |
|
|
|
|
|
|
Input Source |
Aux Input(AV1 ~ MAX_INPUT) |
|
AV1 |
||
|
|
|
|
|
|
Settng |
Enable |
|
Disable |
|
Enable |
Factory Reset |
|
Confirmation window (Yes / No) |
|
||
16
 Loading...