

LG 22MT45VP, 24MT45D, 24MT40D, 28MT45D, 29MT45D User Manual
...
OWNER’S MANUAL
LED TV*
* LG LED TVs are LCD TVs with LED backlighting.
Please read this manual carefully before operating your set and
retain it for future reference.
MN43* MT45* MT40*
MT44* MT46*
www.lg.com
2
TABLE OF CONTENTS
ENGLISH
TABLE OF CONTENTS
3 LICENSES
3 OPEN SOURCE SOFTWARE
NOTICE
4 ASSEMBLING AND PREPARING
4 Unpacking
6 Parts and buttons
6 - Using the Joystick button
10 Lifting and moving the TV
10 Setting up the TV
10 - Attaching the Stand
13 - Detaching the Stand
15 Mounting on a table
16 Mounting on a wall
17 Tidying cable
18 MAKING CONNECTIONS
18 Antenna Connection
18 Satellite dish Connection
19 Euro Scart Connection
20 Other Connections
22 - Connecting to a PC
23 REMOTE CONTROL
24 NETWORK SETTING
24 Wired Network Connection
31 TROUBLESHOOTING
32 SPECIFICATIONS
25 SETTINGS
29 TO SEE WEB MANUAL
30 MAINTENANCE
30 Cleaning Your TV
30 - Screen, frame, cabinet and stand
30 - Power cord
30 Preventing “Image burn” or “Burn-in” on your
TV screen
WARNING
If you ignore the warning message, you may
be seriously injured or there is a possibility of
accident or death.
CAUTION
If you ignore the caution message, you may be
slightly injured or the product may be damaged.
NOTE
The note helps you understand and use the
product safely. Please read the note carefully
before using the product.

LICENSES / OPEN SOURCE SOFTWARE NOTICE
3
LICENSES
Supported licenses may differ by model. For more information of the licenses, visit
Manufactured under license from Dolby Laboratories. Dolby and the double-D symbol are
trademarks of Dolby Laboratories.
The terms HDMI and HDMI High-Definition Multimedia Interface, and the HDMI logo are
trademarks or registered trademarks of HDMI Licensing LLC in the United States and
other countries.
ABOUT DIVX VIDEO: DivX® is a digital video format created by DivX, LLC, a subsidiary
of Rovi Corporation. This is an ofcial DivX Certied® device that has passed rigorous
testing to verify that it plays DivX video. Visit divx.com for more information and software
tools to convert your les into DivX videos.
ABOUT DIVX VIDEO-ON-DEMAND: This DivX Certified® device must be registered
in order to play purchased DivX Video-on-Demand (VOD) movies. To obtain your
registration code, locate the DivX VOD section in your device setup menu. Go to vod.
divx.com for more information on how to complete your registration.
“DivX Certied® to play DivX® video up to HD 1080p, including premium content.”
“DivX®, DivX Certied® and associated logos are trademarks of Rovi Corporation or its
subsidiaries and are used under license.”
“Covered by one or more of the following U.S. patents :
7,295,673; 7,460,668; 7,515,710; 7,519,274”
www.lg.com
ENGLISH
.
OPEN SOURCE SOFTWARE NOTICE
To obtain the source code under GPL, LGPL, MPL and other open source licenses, that is contained in this product,
please visit
In addition to the source code, all referred license terms, warranty disclaimers and copyright notices are available for
download.
LG Electronics will also provide open source code to you on CD-ROM for a charge covering the cost of performing
such distribution (such as the cost of media, shipping and handling) upon email request to opensource@lge.com.
This offer is valid for three (3) years from the date on which you purchased the product.
http://opensource.lge.com
.

4
ASSEMBLING AND PREPARING
ENGLISH
NOTE
Image shown may differ from your TV.
Your TV’s OSD (On Screen Display) may differ slightly from that shown in this manual.
The available menus and options may differ from the input source or product model that you are using.
New features may be added to this TV in the future.
The TV can be placed in standby mode in order to reduce the power consumption. And the TV should be
turned off if it will not be watched for some time, as this will reduce energy consumption.
The energy consumed during use can be significantly reduced if the level of brightness of the picture is
reduced, and this will reduce the overall running cost.
ASSEMBLING AND PREPARING
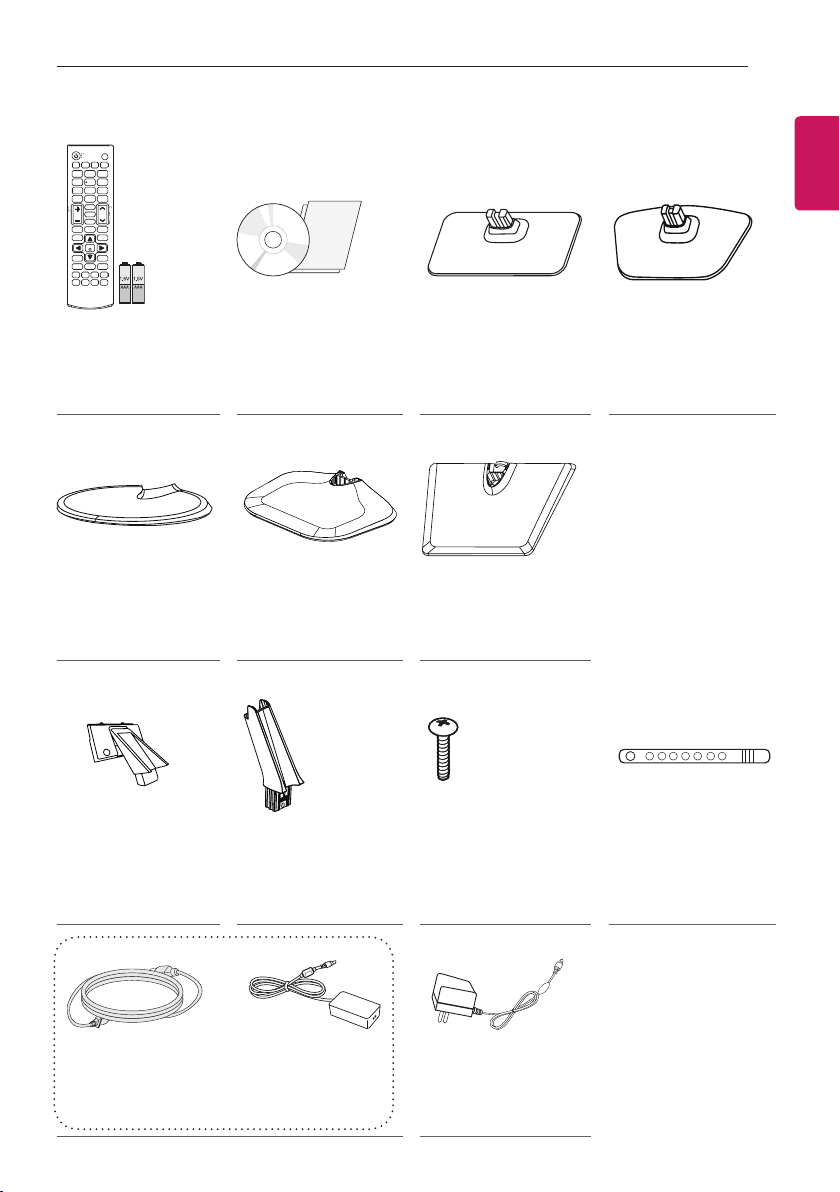
Unpacking
Check your product box for the following items. If there are any missing accessories, contact the local dealer where
you purchased your product. The illustrations in this manual may differ from the actual product and item.
CAUTION
Do not use any pirated items to ensure the safety and product life span.
Any damages or injuries by using pirated items are not covered by the warranty.
Some models have a thin film attached on to the screen and this must not be removed.
NOTE
The items supplied with your product may vary depending on the model.
Product specifications or contents of this manual may be changed
without prior notice due to upgrade of product functions.
For an optimal connection, HDMI cables and USB devices should have
bezels less than 10 mm thick and 18 mm width. Use an extension cable
that supports USB 2.0 if the USB cable or USB memory stick does not fit
into your TV’s USB port.
Use a certified cable with the HDMI logo attached. If you do not use a certified HDMI cable, the screen may
not display or a connection error may occur.
Recommended HDMI cable types
- High-Speed HDMI®/™ cable
- High-Speed HDMI®/™ cable with Ethernet
A
B
A
*A 10 mm
*B 18 mm
B
ASSEMBLING AND PREPARING
5
ENGLISH
Remote control,
Batteries (AAA)
(See p.23)
Stand Base
(Only 19MN43*)
(See p.12, 14)
Stand Body
(Only 29MT40*, 29MT45*)
(See p.11, 13)
CD (Owner’s Manual),
Cards
Stand Base
(Only 24/27MT46*)
(See p.12, 14)
Stand Body
(Only 19MN43*,
24/27MT46*)
(See p.12, 14)
Stand Base
(Only 22/29MT44*)
(See p.10, 13)
Stand Base
(Only 29MT40*, 29MT45*)
(See p.11, 13)
Stand Screws
2 EA, M4 x L16
(Only 29MT40*, 29MT45*)
(See p.11, 13)
Stand Base
(Only 24MT40*,
20/22/24/28MT45*)
(See p.10, 13)
Cable Holder
(Only 19MN43*,
24/27MT46*)
(See p.17)
Power Cord
(See p.15)
AC-DC Adapter
(Depending on model)
(See p.15)
or
AC-DC Adapter
(Depending on model)
(See p.15)
6
ASSEMBLING AND PREPARING
ENGLISH
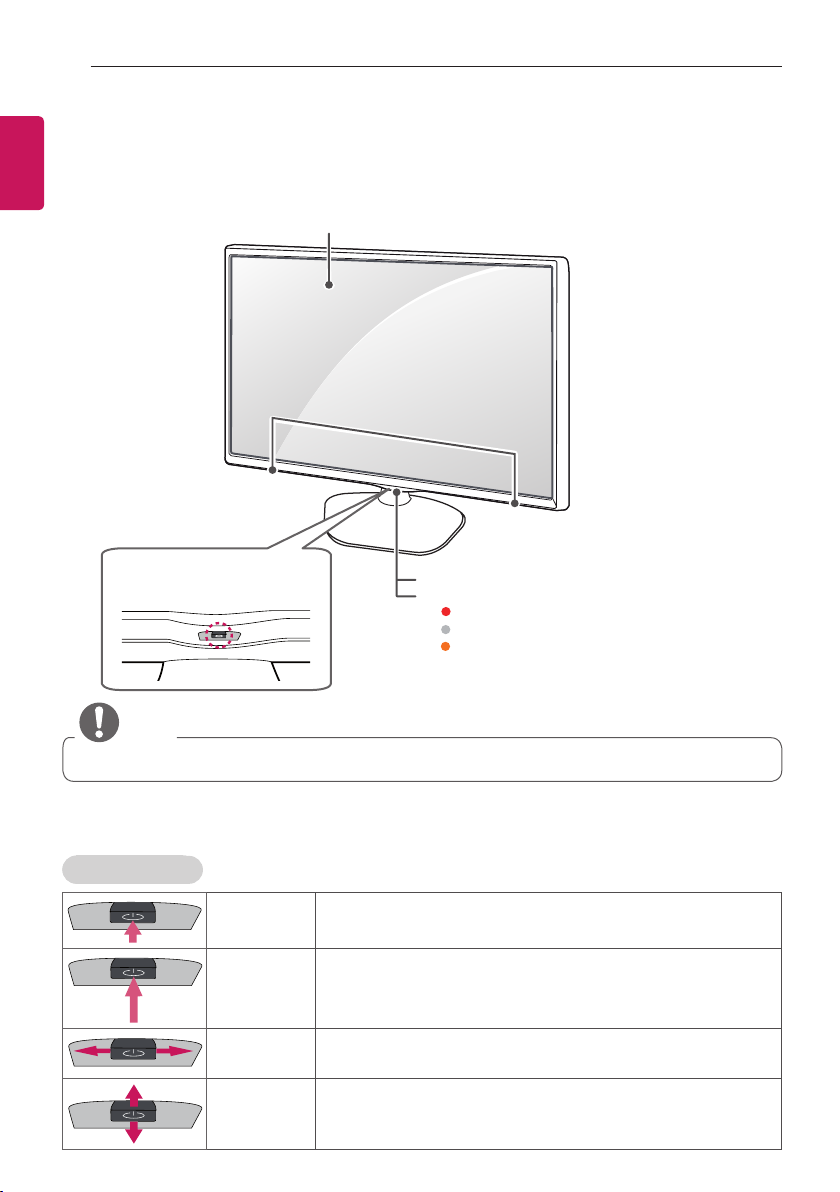
Parts and buttons
Image shown may differ from your TV.
(Only 24MT40*, 22/29MT44*, 20/22/24/28MT45*)
Screen
Speakers
Joystick button
(* This button is located below the TV
screen.)
Remote control sensor
Power Indicator
Off :
Amber :
When the power is turned off
Red :
When the power is turned on
When the power is in power saving mode
NOTE
You can set the power indicator light to on or off by seleting
OPTION
in the main menus.
Using the Joystick button
You can simply operate the TV functions, pressing or moving the joystick button up, down, left or right.
Basic Functions
Power On
Power Off
Volume Control
Programmes
Control
When the TV is turned off, place your finger on the joystick button and
press it once and release it.
When the TV is turned on, place your finger on the joystick button and
press it once for a few seconds and release it.
(However, if the Menu button is on the screen, pressing and holding the
joystick button will let you exit the Menu.)
If you place your finger over the joystick button and move it left or right,
you can adjust the volume level you want.
If you place your finger over the joystick button and move it up or down,
you can scrolls through the saved programmes what you want.
ASSEMBLING AND PREPARING
NOTE
When your finger over the joystick button and push it to the up, down, left or right, be careful not to press
the joystick button. If you press the joystick button first, you may not be able to adjust the volume level and
saved programmes.
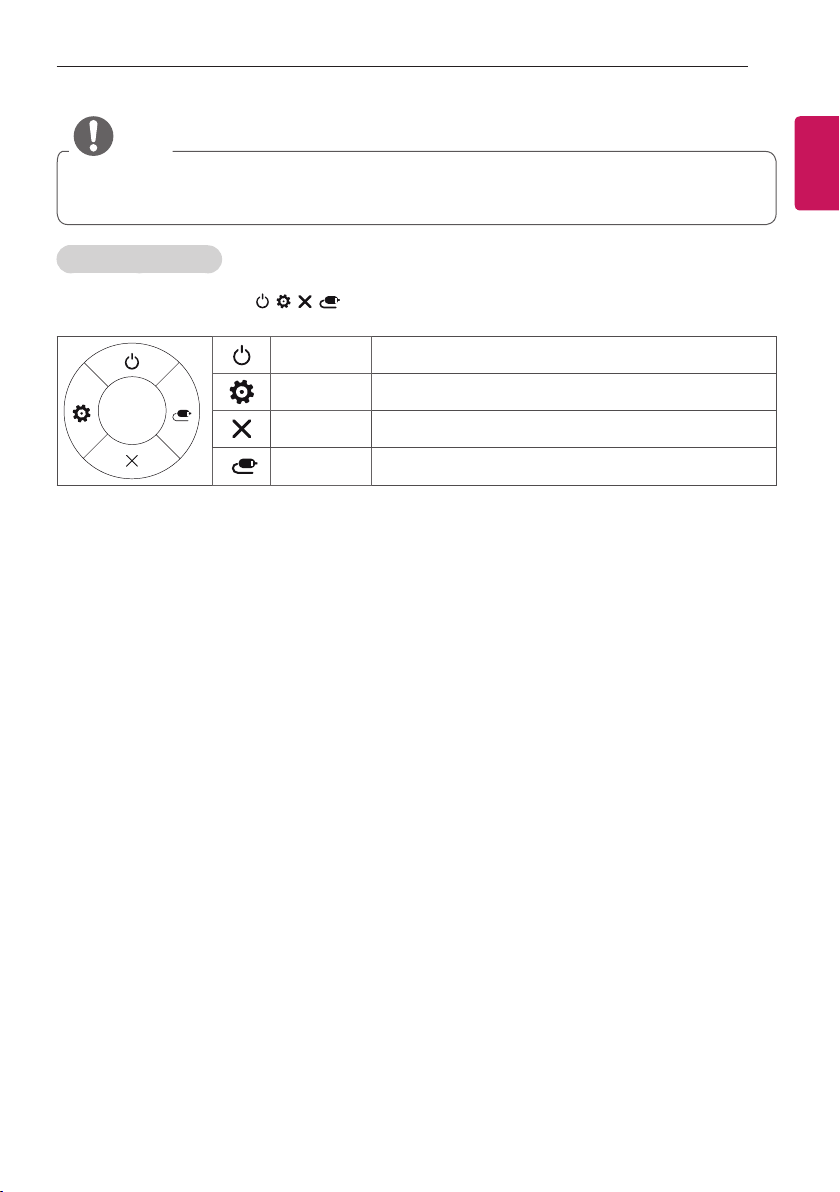
Adjusting the Menu
When the TV is turned on, press the joystick button one time.
You can adjust the Menu items ( , , , ) moving the joystick button up, down, left or right.
TV off
Turns the power off.
7
ENGLISH
Settings
Close
Input List
Accesses the main menu.
Clears on-screen displays and returns to TV viewing.
Changes the input source.

8
(Only 19MN43*)
ENGLISH
ASSEMBLING AND PREPARING
Screen
(Only 29MT40*, 29MT45*)
Speakers
Speakers
Remote control sensor
Power Indicator
Red : When the power is turned off
Off : When the power is turned on
Amber : When the power is in power saving mode
Touch buttons
Screen
Remote control sensor
Power Indicator
Red : When the power is turned off
Off : When the power is turned on
Amber : When the power is in power saving mode
Touch buttons

ASSEMBLING AND PREPARING
9
(Only 24/27MT46*)
Speakers
Screen
Remote control sensor
Power Indicator
Red : When the power is turned off
Off : When the power is turned on
Amber : When the power is in power saving mode
Touch buttons
ENGLISH
NOTE
All of the buttons are touch sensitive and can be operated through simple touch with your finger.
You can set the power indicator light to on or off by selecting
Touch button Description
Scrolls through the saved programmes.
Adjusts the volume level.
OK
SETTINGS
INPUT
Selects the highlighted menu option or confirms an input.
Accesses the main menus, or saves your input and exits the menus.
Changes the input source.
Turns the power on or off.
OPTION
in the main menus.

10
ASSEMBLING AND PREPARING
ENGLISH
Lifting and moving the TV
Please note the following advice to prevent the
TV from being scratched or damaged and for safe
transportation regardless of its type and size.
CAUTION
Avoid touching the screen at all times, as this
may result in damage to the screen.
It is recommended to move the TV in the box or
packing material that the TV originally came in.
Before moving or lifting the TV, disconnect the
power cord and all cables.
When holding the TV, the screen should face
away from you to prevent the screen from
scratches.
Hold the top and bottom of the TV frame firmly.
Make sure not to hold the transparent part,
speaker, or speaker grill area.
CAUTION
When handling the TV, be careful not to damage the
protruding joystick button. (Depending on model)
Setting up the TV
Image shown may differ from your TV.
Attaching the Stand
24MT40*, 22/29MT44*, 20/22/24/28MT45*
1
When transporting the TV, do not expose the
TV to jolts or excessive vibration.
When transporting the TV, keep the TV upright,
never turn the TV on its side or tilt towards the
left or right.
Do not apply excessive pressure to cause
flexing /bending of frame chassis as it may
damage screen.
Stand Base
2
CAUTION
When attaching the stand to the TV set, place
the screen facing down on a cushioned table
or flat surface to protect the screen from
scratches.

ASSEMBLING AND PREPARING
11
29MT40*, 29MT45*
1
2
Stand Body
3
2 EA
M4 x L16
NOTE
If you don`t fasten the screw tightly, TV will fall
down and get damaged.
Tighten the screws firmly to prevent the TV
from tilting forward. Do not over tighten.
4
ENGLISH
Locker
Stand Base
 Loading...