

LG 22MN42B-PT Owner’s Manual

ENGLISH
OWNER’S MANUAL
LED TV
LG LED TV applies LCD screen with LED backlights.
Please read this manual carefully before operating the your TV
and retain it for future reference.
22MN42B
www.lg.com

2
CONTENTS
ENGLISH
CONTENTS
4 ASSEMBLING AND
4 Unpacking
5 Parts and buttons
6 Lifting and moving the TV
6 Setting up the TV
6 - Attaching the Stand Base
6 - Detaching the Stand Base and Body
7 - Mounting on a table
12 - Mounting on a wall
14 REMOTE CONTROL
16 WATCHING TV
16 Connecting an antenna or cable
16 - Connecting an antenna or basic cable
16 - Connecting with a cable box
17 Accessing the TV for the first time
18 Watching TV
18 Managing programmes
18 - Automatically setting up programmes
18 - Manually setting up programmes
18 - Editing your programme list
19 - Selecting the programme list
19 - Favourite programme setup
20 Using additional options
20 - Adjusting aspect ratio
21 - Using the input list
21 - On-screen menu language
21 - Locking the buttons on the TV
PREPARING
24 - Customizing PC display options
24 Adjusting the sound
24 - Selecting an sound mode
24 - Customizing sound options
25 ENTERTAINMENT
25 Using integrated media features
25 - Connecting USB storage devices
26 - Browsing files
27 - Viewing Photos
28 - Listening to Music
30 CUSTOMIZING SETTINGS
30 Accessing main menus
31 Customizing settings
31 - SETUP settings
32 - PICTURE settings
34 - AUDIO settings
36 - TIME settings
37 - OPTION settings
38 - USB settings
39 MAKING CONNECTIONS
39 Connection overview
41 Connecting to a Camcorder, Camera, HD
receiver, DVD, VCR player or Gaming
device
41 - HDMI connection
41 - Composite connection
41 Connecting to a USB
22 CONNECTING TO A PC
22 RGB connection
23 Adjusting the screen
23 - Selecting an image mode
23 - Customizing image options
42 TELETEXT
42 Switch On/Off
42 Simple Text
42 - Page selection
42 - Programming a colour button in LIST
mode

43 Top Text
43 - Block / Group / Page Selection
43 - Direct Page Selection
43 Fastext
43 - Page selection
44 Special Teletext Function
45 MAINTENANCE
45 Screen and frame
45 Cabinet and stand
45 Power cord
46 TROUBLESHOOTING
CONTENTS
3
ENGLISH
46 General
47 PC mode
49 SPECIFICATIONS
51 LICENSES
ASSEMBLING AND PREPARING
DC-IN
HDMI
RGB IN (PC)
AV IN
VIDEO
(MONO)
AUDIO
L
R
USB 5 V
0.5 A
4
ENGLISH
ASSEMBLING AND PREPARING
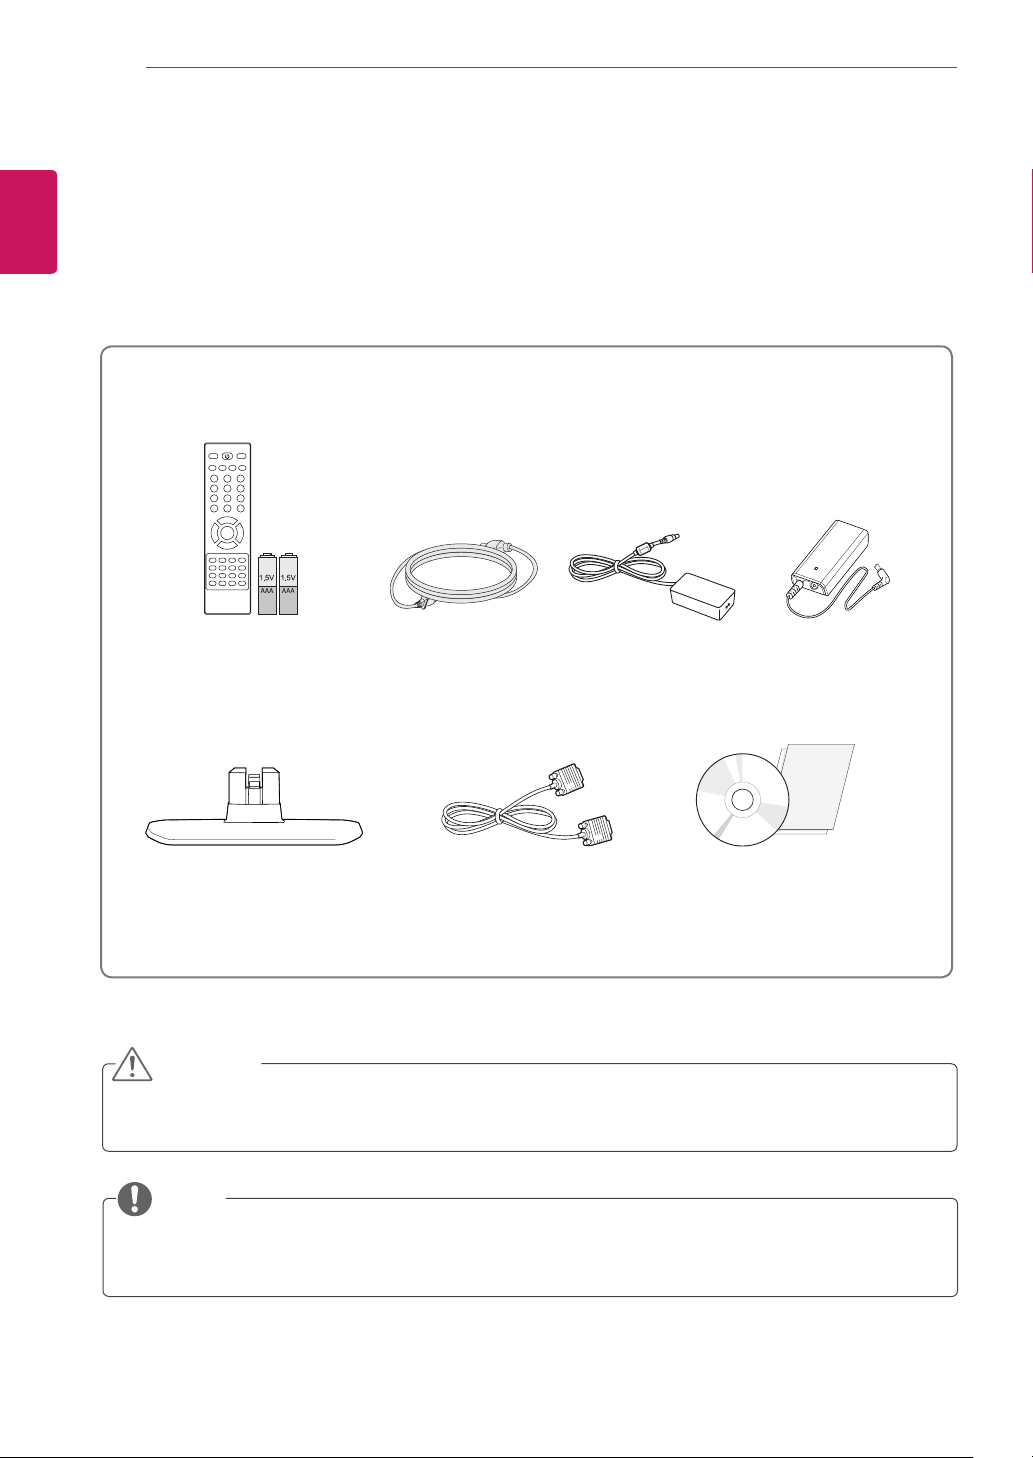
Unpacking
Check your product box for the following items. If there are any missing accessories, contact the local
dealer where you purchased your product. The illustrations in this manual may differ from the actual product
and accessories.
Remote control and Batteries
Power Cord
AC-DC Adapter
External Battery
(see.p 8)(see.p 8)(see.p 8)
Stand base
D-SUB Cable
CD(Owner's Manual) / Card
CAUTION
Do not use any pirated items to ensure the safety and product life span.
y
Any damages or injuries by using pirated items are not covered by the warranty.
y
NOTE
The accessories supplied with your product may vary depending on the model.
y
Product specifications or contents in this manual may be changed without prior notice due to upgrade
y
of product functions.
ASSEMBLING AND PREPARING
5
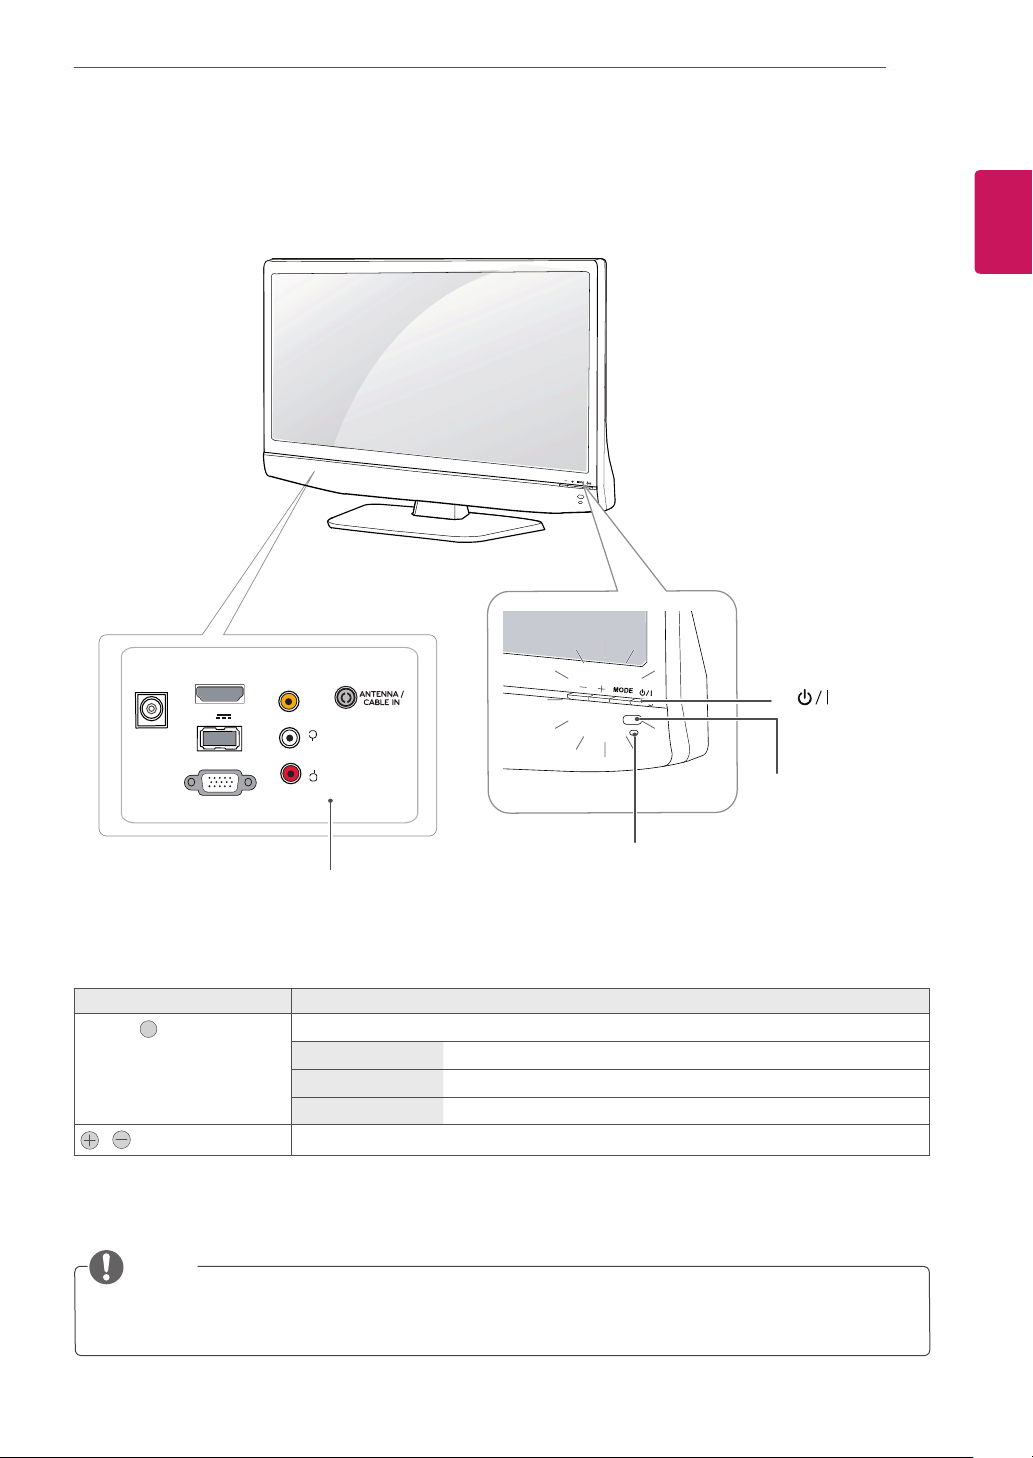
Parts and buttons
DC-IN
HDMI
USB 5 V
RGB IN (PC)
0.5 A
AV IN
VIDEO
(MONO)
L
AUDIO
R
(Power Button)
y
Remote Control
Sensor
ENGLISH
Standby Light
y
Connection panel (see.p 39)
» Lighting On: Turned off
» Lighting Off: Turned on
button Description
MODE " "
Selects the mode.(Programme ☞ Volume ☞ INPUT)
Programme Scrolls through the saved programmes.
Volume Adjust the volume level.
INPUT Changes the input source.
,
Adjusts the mode button level.
NOTE
You can set the Standby Light to on or off by selecting OPTION in the main menus.
y
Local keys work on Power, Programme, Volume and Input only.
y
ASSEMBLING AND PREPARING
6
ENGLISH
Lifting and moving the TV
When moving or lifting the TV, read the following to
prevent the TV from being scratched or damaged
and for save transportation regardless of its type
and size.
CAUTION
Avoid touching the screen at all times, as this
may result in damage to the screen or some
of the pixels used to create images.
It is recommended to move the TV in the
y
box or packing material that the TV originally
came in.
Before moving or lifting the TV, disconnect
y
the power cord and all cables.
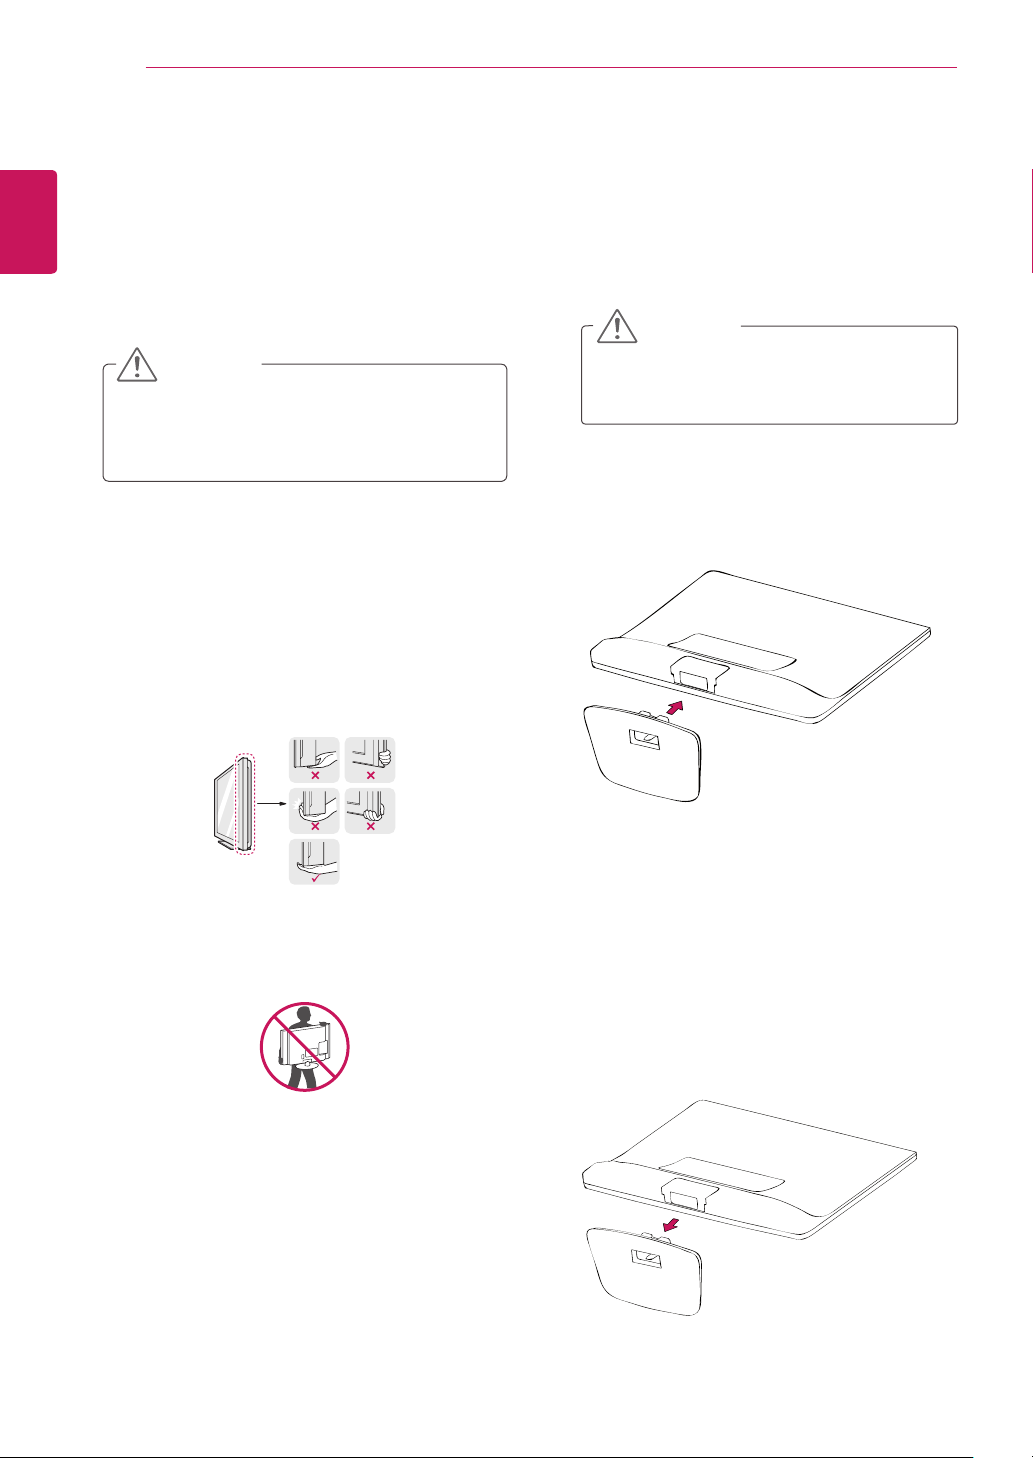
Hold the top and bottom of the TV frame
y
firmly. Make sure not to hold the transparent
part, speaker, or speaker grill area.
Setting up the TV
Attaching the Stand Base
Place the TV with the screen side down on a
1
flat and cushioned surface.
CAUTION
Lay a foam mat or soft protective cloth
on the surface to protect the screen from
damage.
Insert the Stand Base into the product.
2
When holding the TV, the screen should face
y
away from you to prevent the screen from
scratches.
When transporting the TV, do not expose the
y
TV to jolts or excessive vibration.
When transporting the TV, keep the TV
y
upright, never turn the TV on its side, or tilt
towards the left or right.
Detaching the Stand Base and Body
Place the TV with the screen side down on a
1
flat and cushioned surface.
Lift up the latch at the bottom of the Stand
2
Base and detach the Stand Base from the TV.
ASSEMBLING AND PREPARING
7
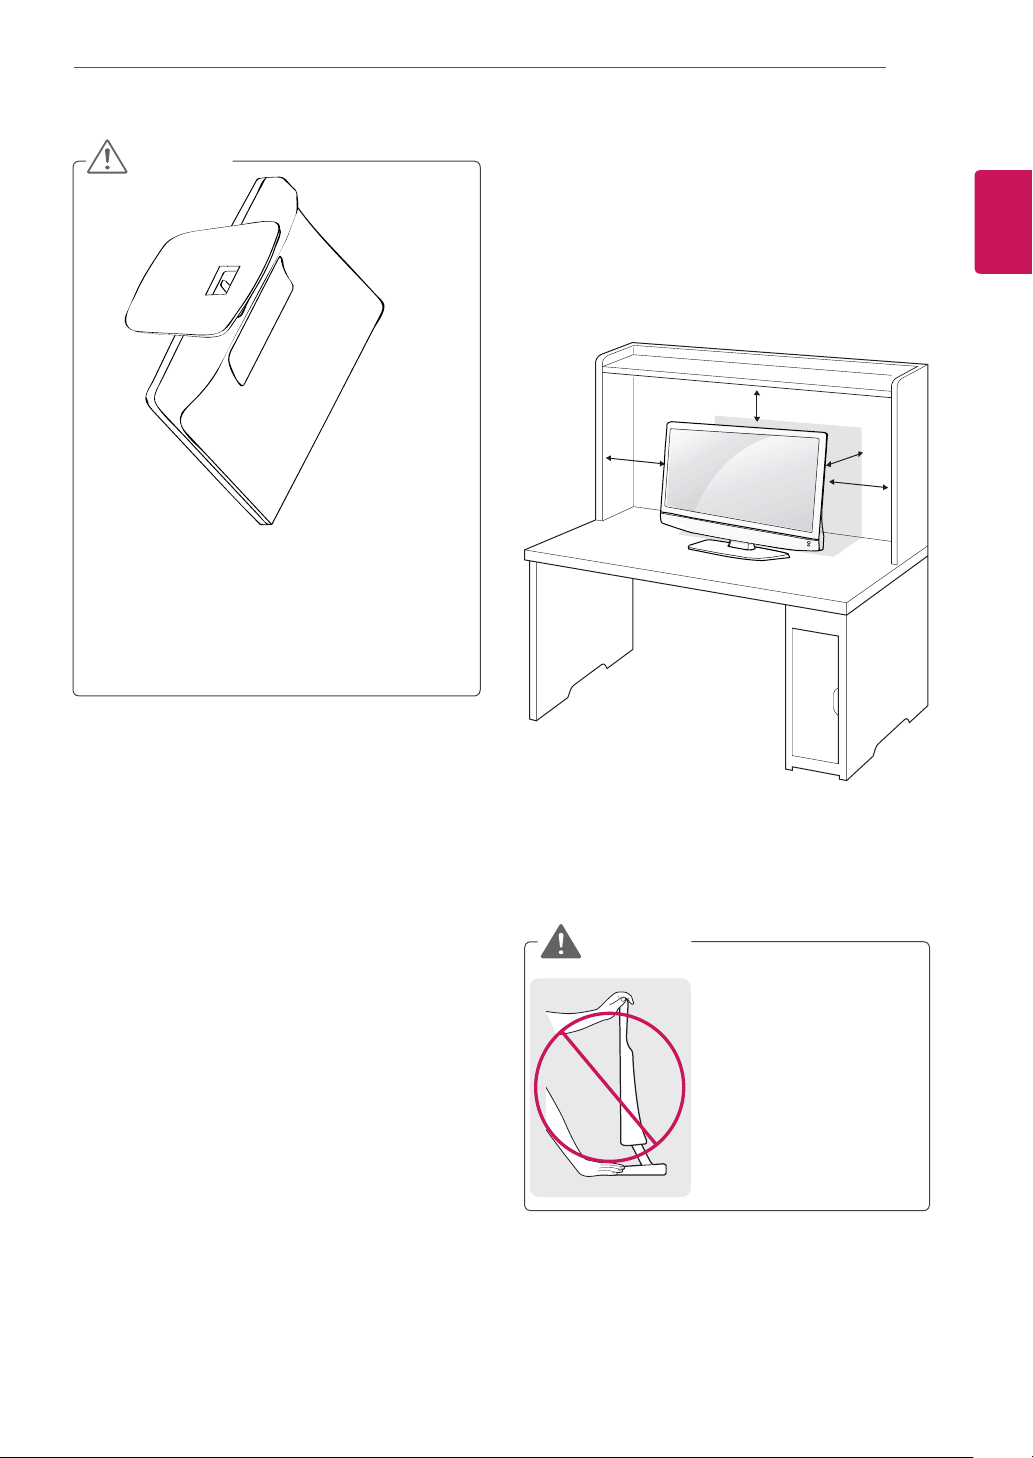
CAUTION
Do not carry the monitor upside-down
y
as this may cause it to fall off its stand,
resulting in damage or injury.
The illustration shows a general example
y
of installation and may look different from
the actual product.
Mounting on a table
Lift and tilt the TV into its upright position on a
1
table.
Leave a 10 cm (minimum) space from the wall
for proper ventilation.
10 cm
10 cm
10 cm
10 cm
ENGLISH
WARNING
It's a head fixed model
y
and prohibited from
adjusting the angle.
If you try to adjust the
y
angle forcibly, It can be
damaged.
ASSEMBLING AND PREPARING
8
2
ENGLISH
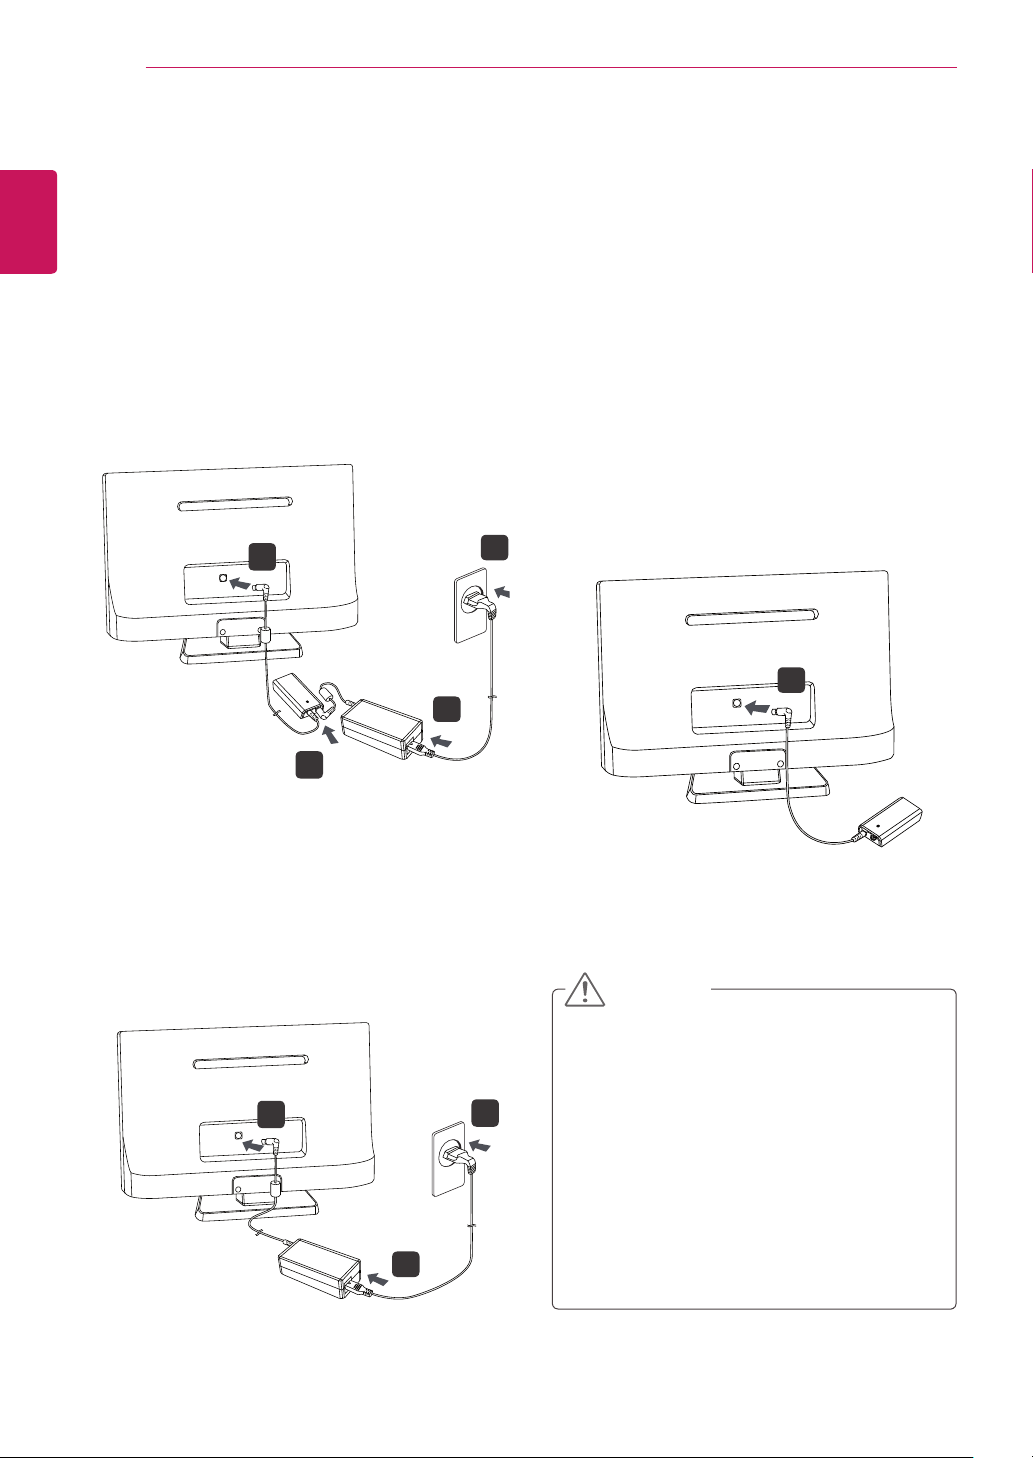
(1) AC-DC Adapter with Battery Mode
Battery Connection Method.
Connect AC-DC Adapter output Cable to
y
Battery input Jack and connect Battery
Output Cable to Monitor System Power input
Jack.
During Charging, indicator LED turn on with
y
Orange color.
The required charging time is about 5hr at
y
room temperature.
After Charging done, indicator LED turn on
y
with Green color to show it full charged state.
3
1
(3) Battery Only Mode
Before first-using with “Battery only mode”, it
y
is recommend to connect AC-DC adapter to
charge the battery.
Disconnect AC-DC Adapter output Cable
y
from Battery input Jack and connect Battery
Output Cable to Monitor System Power input
Jack.
During discharging, indicator LED turn on
y
with Orange color.
The using time is about 1hr at room
y
temperature from full charged state.
If the system go into Power saving mode, the
y
indicator LED turn off.
4
1
2
(2) AC-DC Adapter Only Mode
Connect AC-DC Adapter output Cable to
y
Monitor System Power input Jack directly.
2
CAUTION
Use batteries certified and acknowledged by LG
Electronics Inc
Uncertified batteries may explode.
y
Ensure the power is off before changing the
3
1
y
battery pack.
Danger of explosion if battery is incorrectly
y
replaced.
Replace only with the same or equivalent
type.
Battery shall not be exposed to excessive
y
heat such as sunshine, fire or the like.
TM
.

ASSEMBLING AND PREPARING
9
WARNING
The battery may explode due to excessive heat,
causing fire. For a safe and efficient use of
battery, follow the below directions.
Do not short-circuit the battery.
y
Keep the battery out of reach of children.
y
A visible swelling of the battery pack
y
indicates a possible danger. When this
occurs, contact your local vendor or service
centre immediately.
Use only a certified and designated
y
recharger.
Keep the battery pack away from heat.
y
(Never put it in a microwave.)
Do not leave inside a car under the summer
y
heat.
Do not leave or use at a hot and humid place
y
like a sauna.
Do not use the machine placed on a heating
y
blanket or other heat reserving materials.
Do not leave the machine turned on inside a
y
closed space.
Make sure that the power ports are not
y
touched by any metallic objects like a key,
coin, necklace, and watch.
Use only a lithium secondary battery
y
certified and guaranteed by mobile device
manufactures.
Do not disassemble or modify the battery. Do
y
not compress or pierce the battery.
Do not apply shock to the battery. For
y
example, do not drop the battery from a high
place.
Maintain the room temperature between
y
32.00 oF and 140.00 oF. Do not expose the
LCD TV to temperature that exceed more
than 140.00 oF.
Keep the machine dry.
y
When you are not using the battery, remove
y
it from the LCD TV. When you haven't used
the battery for a long time, discharge and
recharge it a few times before using it.
Do not discard the battery arbitrarily as you
y
are requested to follow the local procedure
for discarding the battery.
Before using this machine, read this guide
y
carefully.
ENGLISH
10
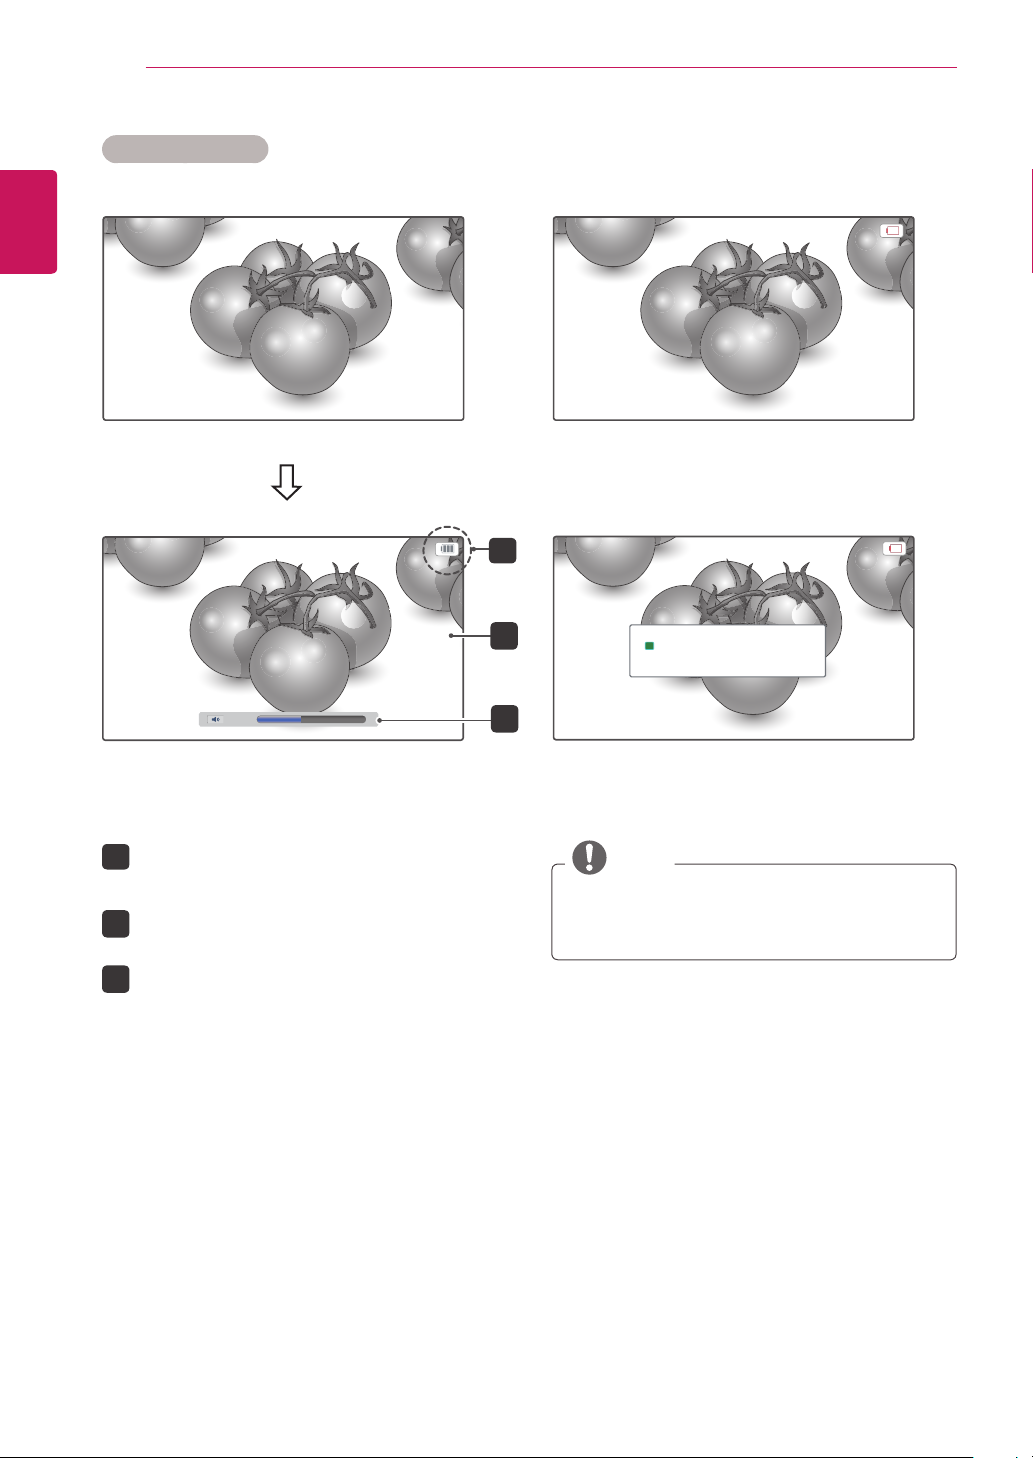
In the battery mode
ENGLISH
ASSEMBLING AND PREPARING
Enter the Battery mode
1
50
When power supply is unavailable, power is
supplied from the battery automatically.
The battery icon disappears after 5 seconds.
1
It reappears when the battery level changes.
2
The brightness of the screen is adjusted.
The volume is limited to 50.
3
2
Battery is discharged.
i
TV will turn off.
3
NOTE
In battery mode, the Picture Mode is disabled.
y
ASSEMBLING AND PREPARING
11
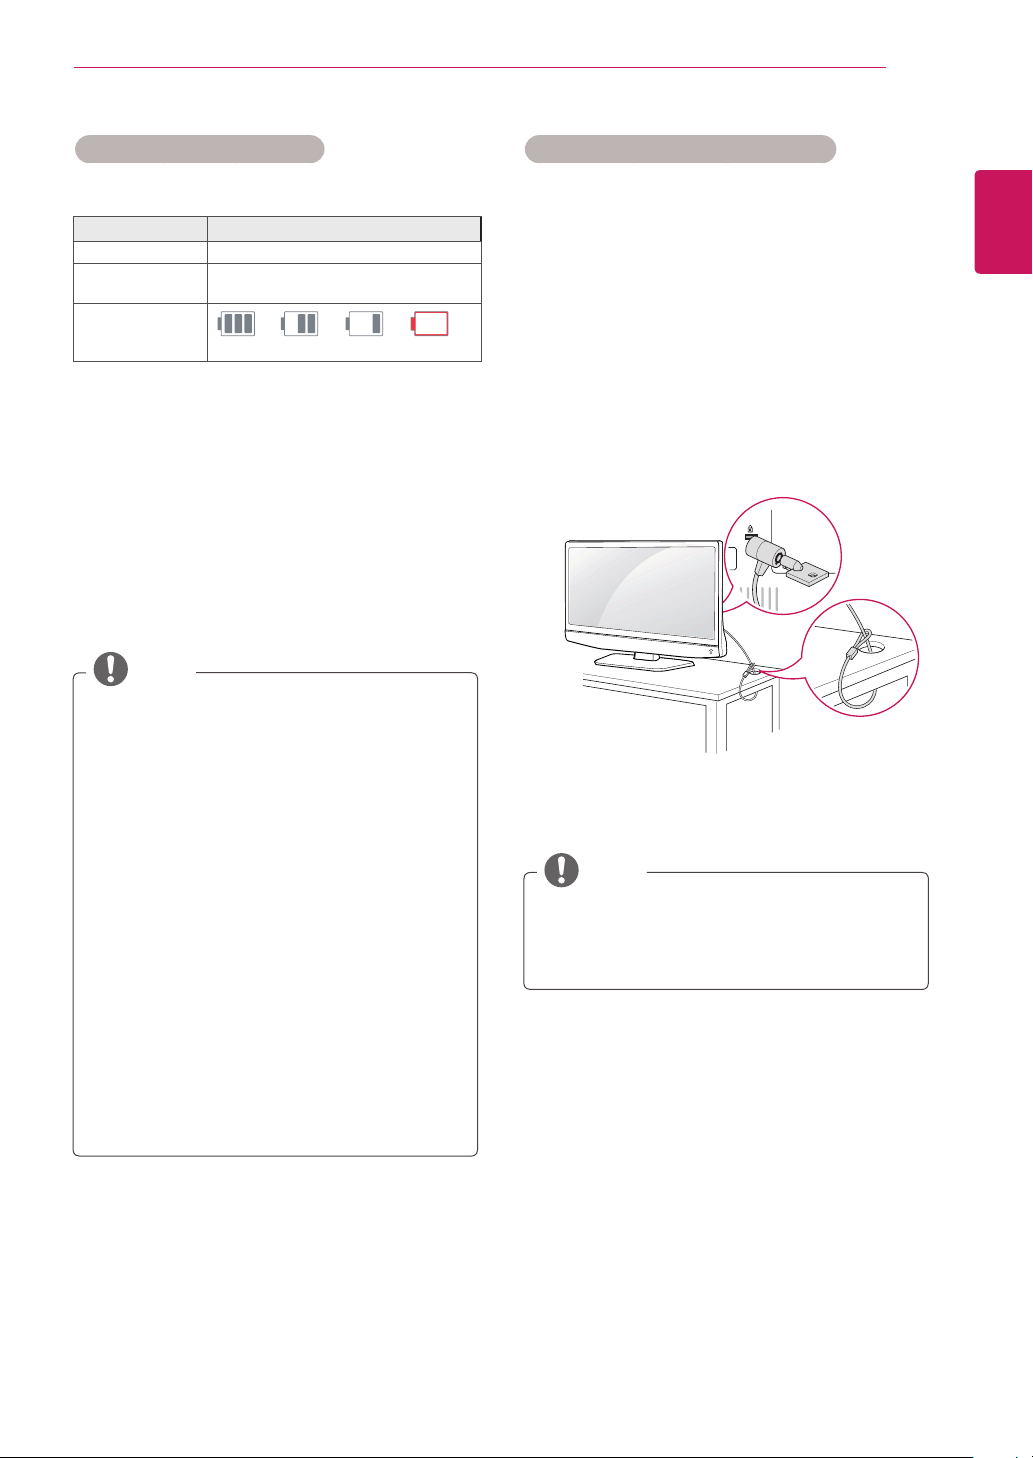
Using the Kensington security system Battery using time information
ENGLISH
Status Time and Display
Charging
Standard Usage
Hours
Battery Level
Indicator
1
1
2
About 5 hours (at Room Temperature)
About 1 hour (at Room Temperature)
Step 1 Step 2 Step 3 Step 4
The battery is automatically recharged when it
is connected to AC-DC Adapter.
The battery level can be checked in battery
2
mode.
It shows that 1-3 minutes are left. (Actual time
3
may vary.)
NOTE
Charge the battery fully when you first use
y
the TV.
Standard usage hours given in the manual
y
is based on measurements taken by LG; the
actual time may vary depending on usage.
Battery usage time may vary depending
y
on broadcast type, operating temperature,
period of use and user preferences.
As the battery is consumable, its lifetime
y
gradually decreases. When the battery’s
life is reduced by half, replace it with a new
battery from an LG Electronics customer
center.
The battery charging can be stopped if the
y
battery inside temperature is out of range of
0~45°C. The battery inside temperature can
be different with atmosphere temperature.
The Kensington security system connector is
located at the back of the TV. For more information
of installation and using, refer to the manual
supplied with the Kensington security system or
visit
http://www.kensington.com
3
.
Connect the Kensington security system cable
between the TV and a table.
NOTE
The Kensington security system is optional.
You can obtain additional accessories from
most electronics stores.
12
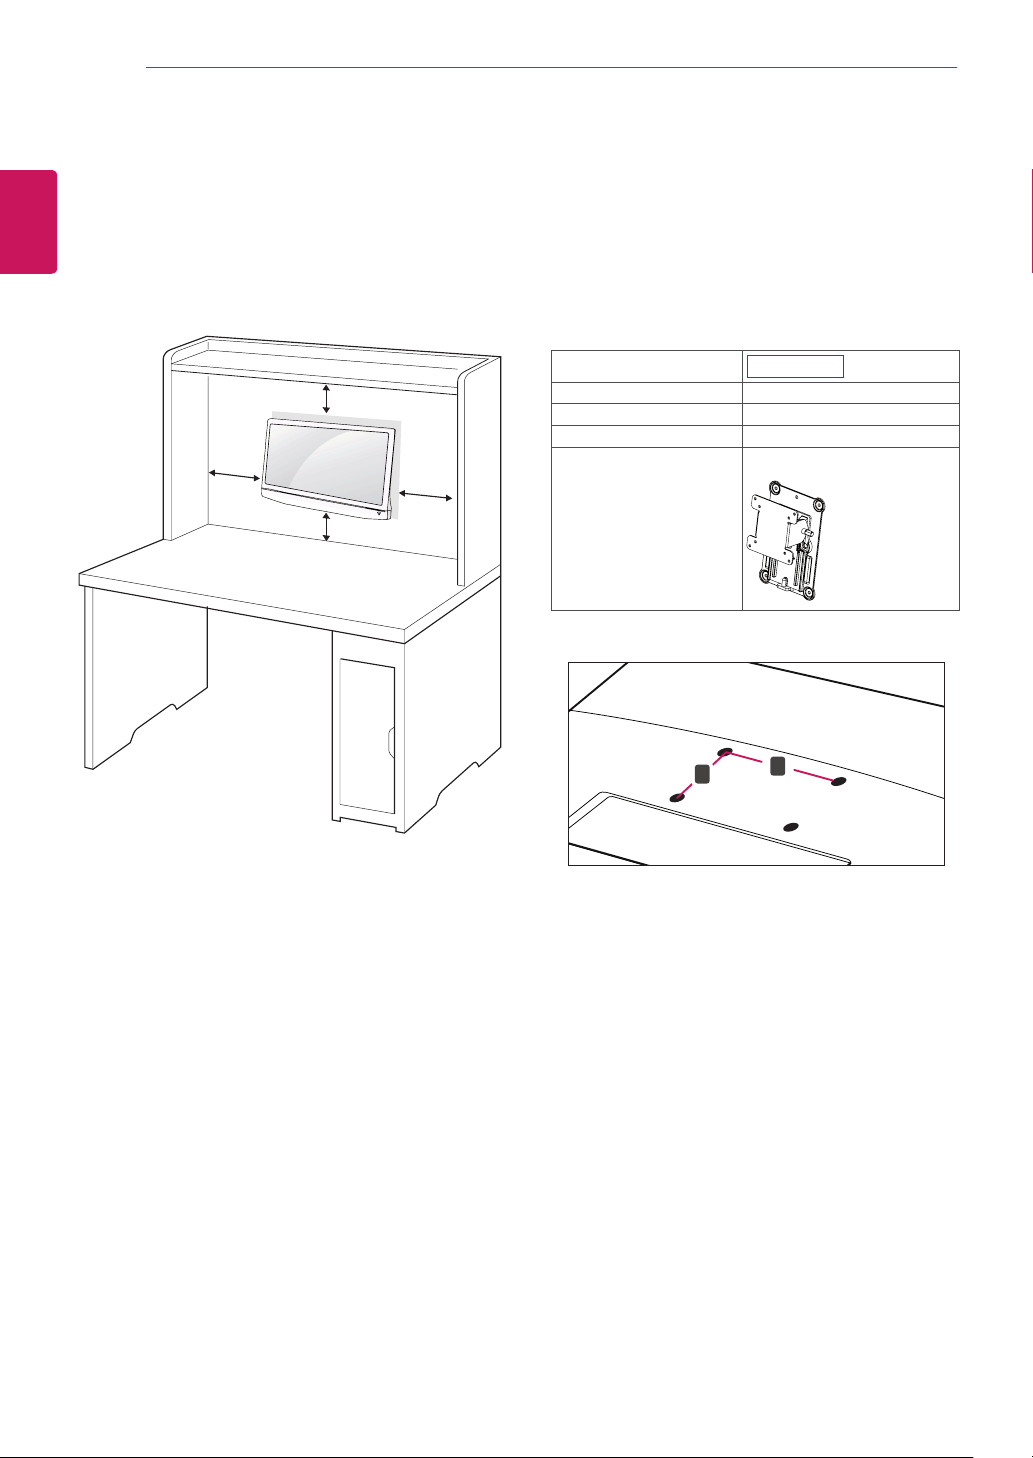
Mounting on a wall
ENGLISH
For proper ventilation, allow a clearance of 10
cm on each side and from the wall. Detailed
installation instructions are available from your
dealer, see the optional Tilt Wall Mounting Bracket
Installation and Setup Guide.
ASSEMBLING AND PREPARING
Please use VESA standard as below.
5
784.8 mm (30.9 inch) and under
y
* Wall Mount Pad Thickness : 2.6 mm
* Screw : Φ 4.0 mm x Pitch 0.7 mm x
Length 10 mm
787.4 mm (31.0 inch) and above
y
* Please use VESA standard wall mount pad
and screws.
10 cm
10 cm
10 cm
10 cm
If you intend to mount the TV to a wall, attach Wall
mounting interface (optional parts) to the back of
the set.
When you install the TV using the wall mounting
interface (optional parts), attach it carefully so it
will not drop.
Model
VESA (A x B) 75 x 75
Standard screw M4
Number of screws 4
Wall mount bracket
(optional)
VESA (A x B)
y
B
22MN42B
RW120
A
Please, Use the screw and wall mount interface
1
in accordance with VESA Standards.
If you use screw longer than standard, the TV
2
might be damaged internally.
If you use incorrect screw, the product might be
3
damaged and drop from mounted position. In
this case, LG Electronics is not responsible for
it.
VESA compatible only with respect to screw
4
mounting interface dimensions and mounting
screw specifications.
ASSEMBLING AND PREPARING
13
CAUTION
Disconnect the power cord first, and then
y
move or install the TV. Otherwise electric
shock may occur.
If you install the TV on a ceiling or slanted
y
wall, it may fall and result in severe
injury. Use an authorized LG wall mount
and contact the local dealer or qualified
personnel.
Do not over tighten the screws as this may
y
cause damage to the TV and void your
warranty.
Use the screws and wall mounts that
y
meet the VESA standard. Any damages
or injuries by misuse or using an improper
accessory are not covered by the warranty.
NOTE
Use the screws that are listed on the VESA
y
standard screw specifications.
The wall mount kit includes an installation
y
manual and necessary parts.
The wall mount bracket is optional. You can
y
obtain additional accessories from your local
dealer.
The length of screws may differ depending
y
on the wall mount. Be sure to use the proper
length.
For more information, refer to the
y
instructions supplied with the wall mount.
ENGLISH
REMOTE CONTROL
14
ENGLISH
REMOTE CONTROL
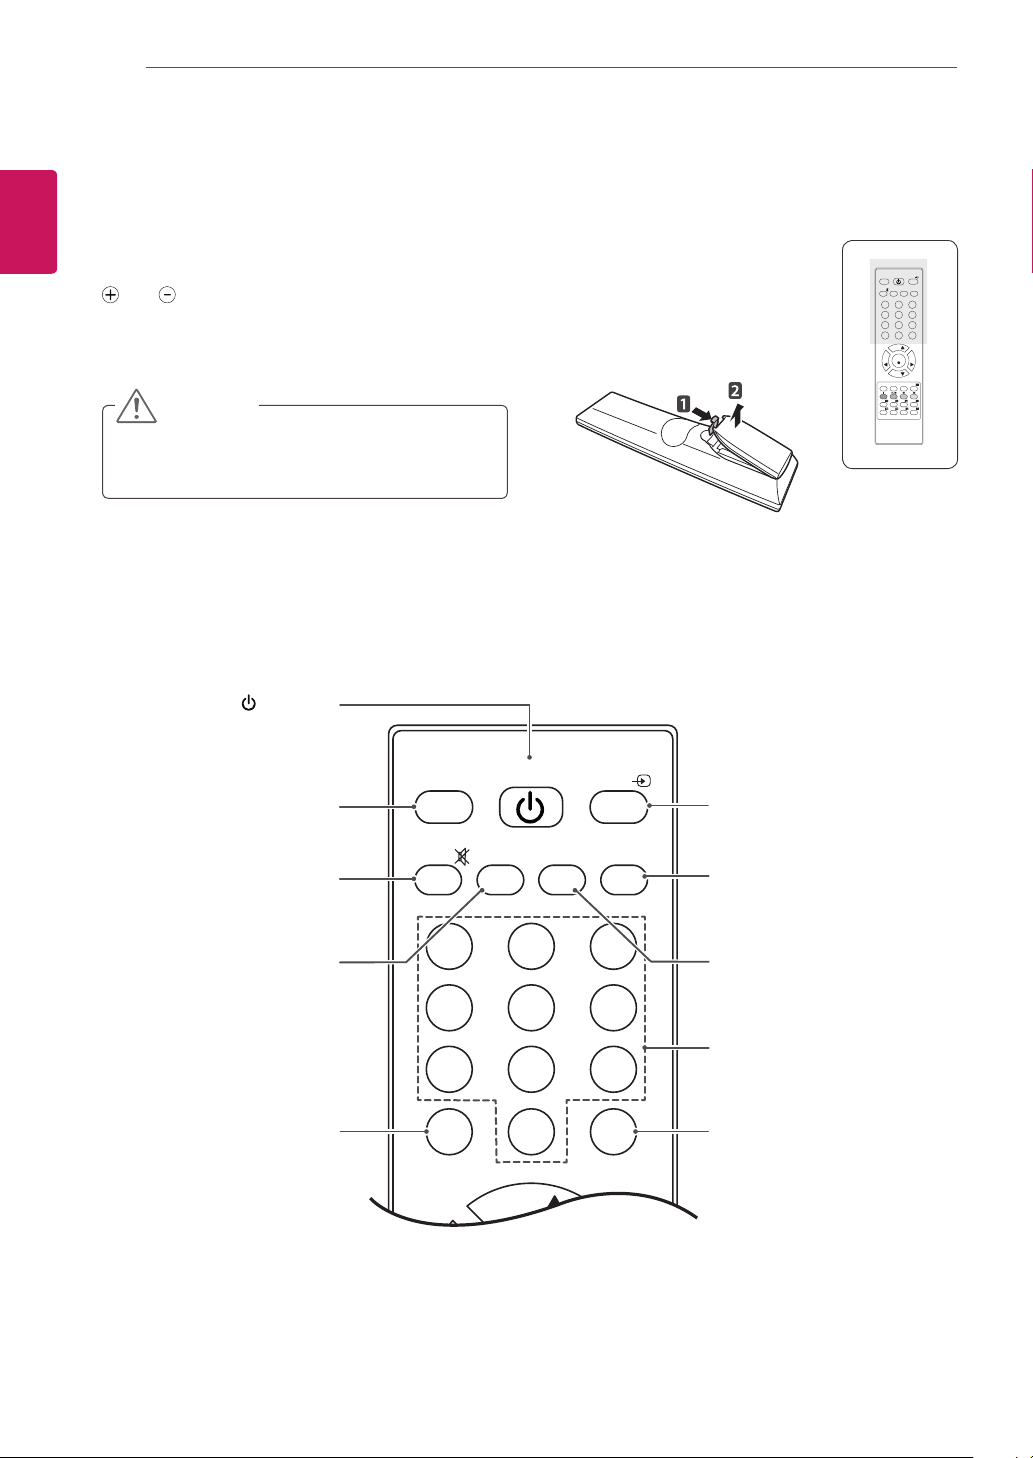
The descriptions in this manual are based on the buttons of the remote control.
Please read this manual carefully and use the TV correctly.
To replace batteries, open the battery cover, replace batteries (1.5 V AAA) matching
To remove the batteries, perform the installation actions in reverse.
Make sure to point the remote control to the remote control sensor on the TV.
and ends to the label inside the compartment, and close the battery cover.
CAUTION
Do not mix old and new batteries, as this may
damage the remote control.
(POWER)
Turns the TV on or off.
POWER
TV/PC
MUTE PSM
1 2 3
4 5 6
7 8 9
LIST Q.VIEW
PR
VOL VOL
PR
MENU EXIT
HOLD
SIZE MIX TIME
REVEAL
INDEX
0
OK
SSM I/II
ARC/MARK
MODE
USB VOL -USB VOL +
INPUT
TEXT
UPDATE
TV/PC
Selects TV or PC mode.
MUTE
Mutes all sounds.
PSM
Recalls your preferred picture
setting.
LIST (see.p 19)
Displays the programme
table.
TV/PC
MUTE PSM
POWER
SSM I/II
1 2 3
4 5 6
7 8 9
0
LIST Q.VIEW
PR
INPUT
INPUT (see.p 21)
Selects the input mode.
I/II (see.p 35)
Selects the sound output.
SSM
Recalls your preferred sound
setting.
Number buttons
Enters numbers.
Q.VIEW
Returns to the previously
viewed programme.
INPUT
POWER
TV/PC
MUTE PSM
SSM I/II
1 2 3
4 5 6
7 8 9
0
Q
MENU
XIT
D
K
US
OK
PR
PR
OL
VOL
S
MIX
TIME
TEXT
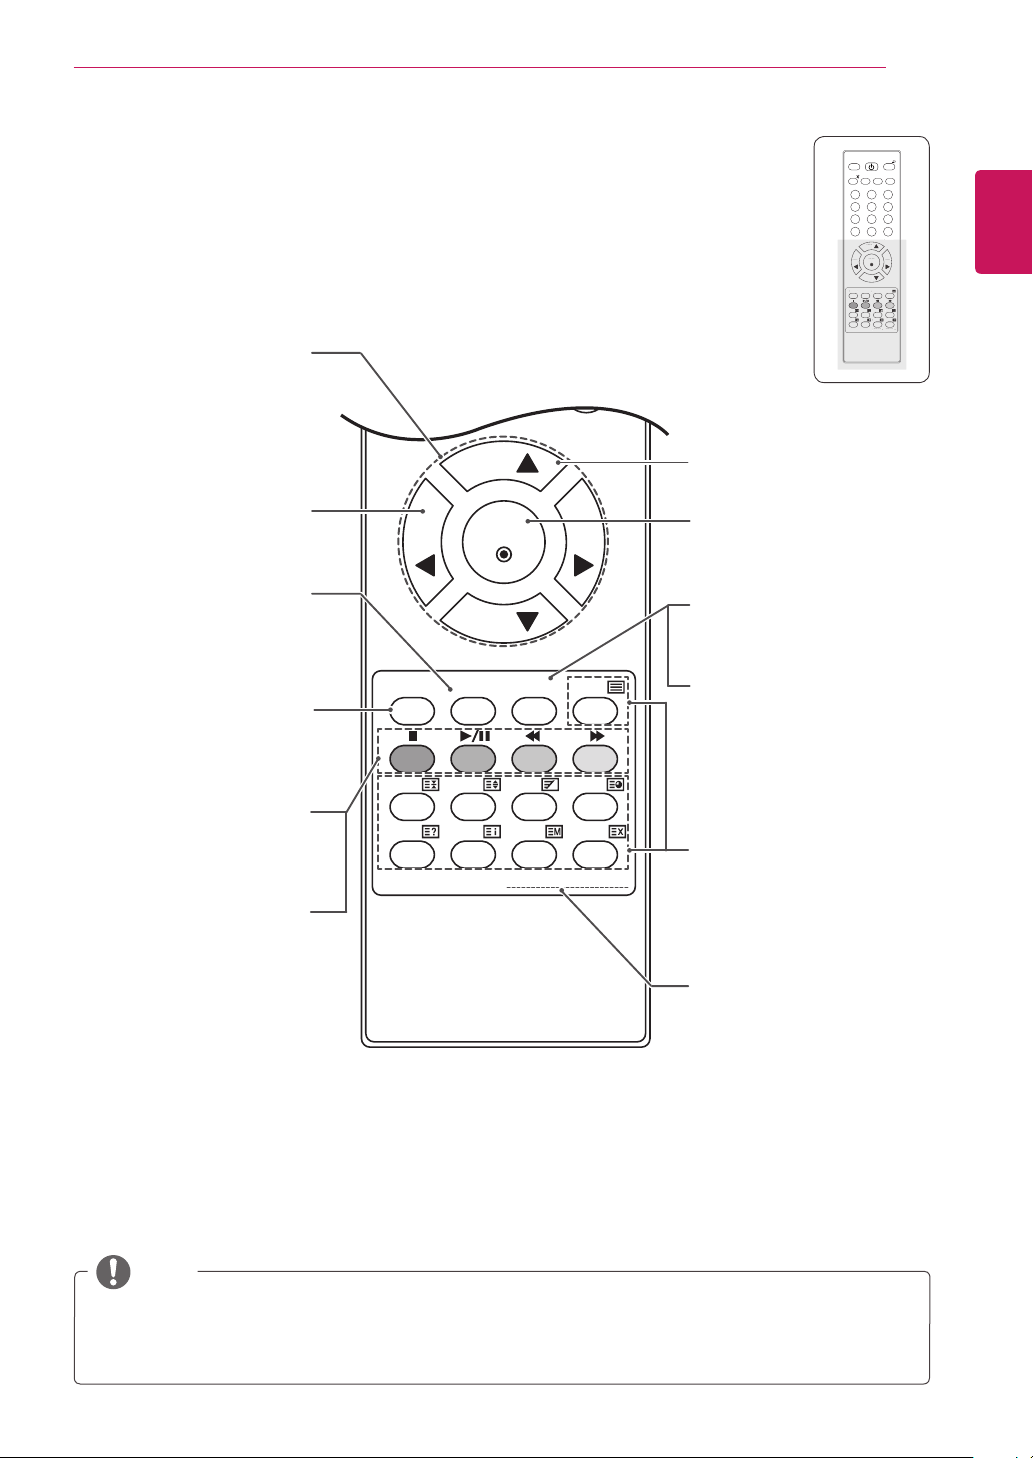
Navigation buttons
Scrolls through menus or
Adjusts the volume level.
Clears all on-screen displays
and returns to TV viewing
from any menu.
MENU (see.p 30)
Accesses the main menus
or saves your input and exit
Coloured buttons
These buttons are used for
teletext (on TELETEXT
models only) , Programme edit.
USB Menu control buttons
USB menu(Music List).
options.
VOL
EXIT
menus.
LIST Q.VIEW
PR
VOL VOL
OK
PR
MENU EXIT
HOLD
REVEAL
ARC/MARK
SIZE MIX TIME
INDEX
MODE
USB VOL -USB VOL +
TEXT
UPDATE
REMOTE CONTROL
MUTE PSM
HOLD
HOL
REVEAL
REVEAL
POWER
TV/PC
1 2 3
4 5 6
7 8 9
0
LIST Q.VIEW
PR
OK
VOL VOL
V
PR
MENU EXIT
ARC/MARK
E
ARC/MAR
SIZE MIX TIME
IZE
INDEX
MODE
INDEX
MODE
USB VOL -USB VOL +
SSM I/II
B VOL USB VOL
15
INPUT
TEXT
UPDATE
UPDATE
Programme
Selects a programme.
OK
Selects menus or options and
confirms your input.
ARC(see.p 20)
Selects your desired picture
format.
MARK
Check and un-check files in
the USB menu.
Teletext buttons (see.p 42)
These buttons are used for
teletext. For further details,
see the ‘Teletext’ section.
ENGLISH
USB VOL(Only USB Mode)
Adjusts the USB volume
level.
NOTE
If you lose Remote Control then you need to purchase replacement unit as only the POWER/
y
CHANNEL/VOLUME and INPUT keys operate on Front TV Panel.
WATCHING TV
16
ENGLISH
WATCHING TV
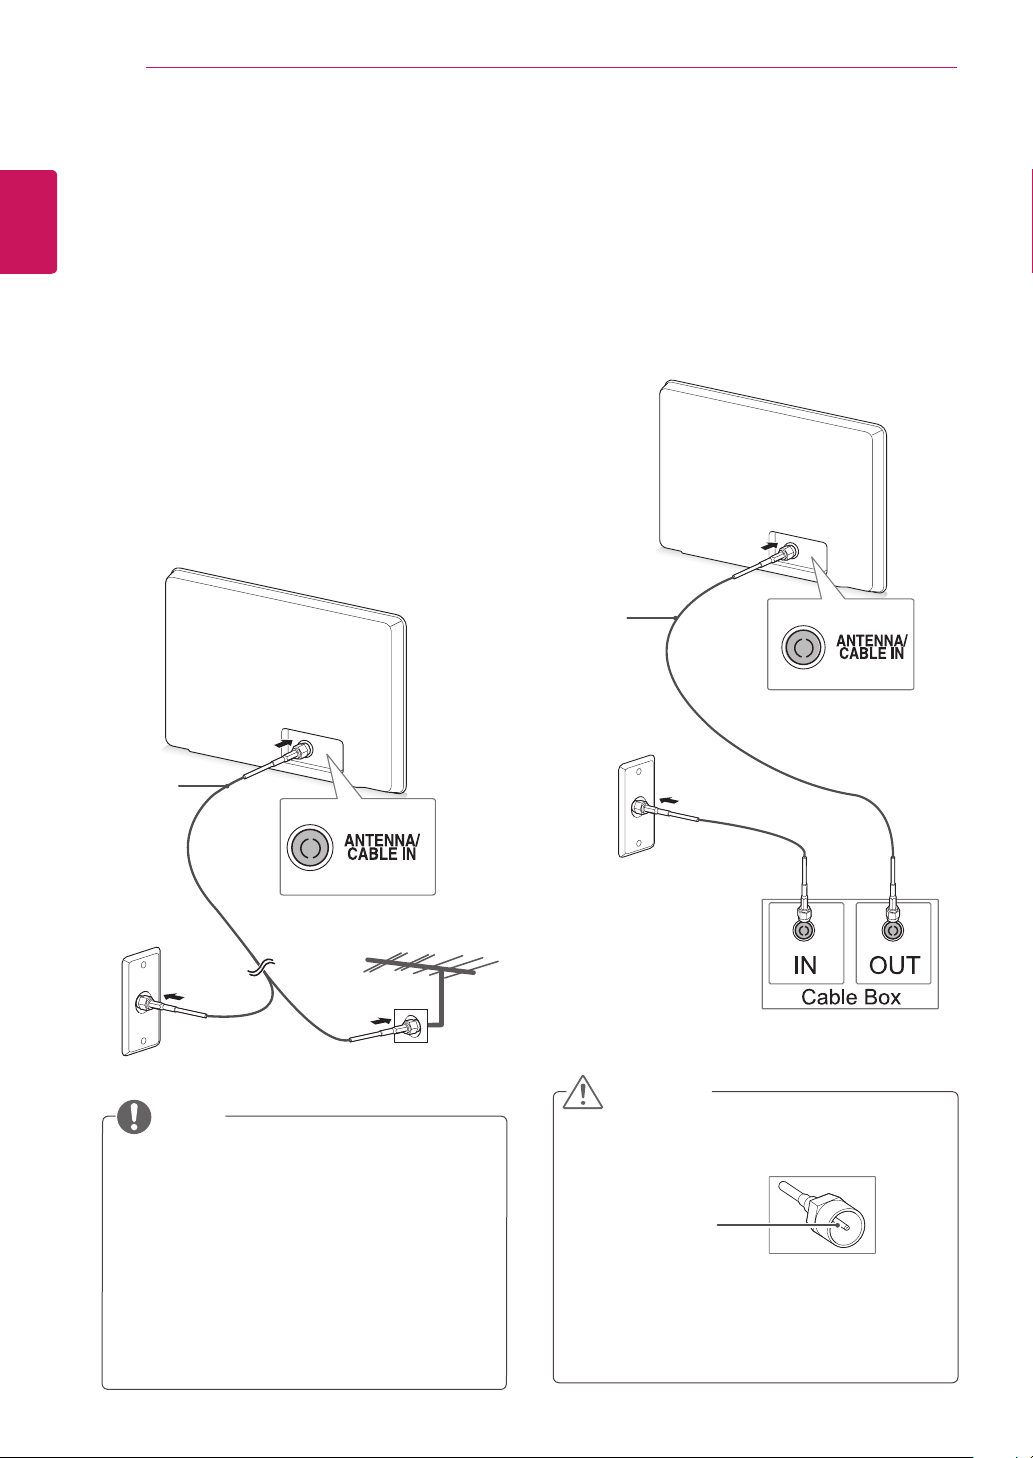
Connecting an antenna or cable
Connect an antenna, cable, or cable box to watch
TV referring to the following. The illustrations may
differ from the actual accessories and an RF cable
is optional.
Connecting an antenna or basic cable
Connect the TV to a wall antenna socket with an
RF cable (75 ohm).
Connecting with a cable box
Connect the TV to a cable box and the cable box
to a wall antenna socket with 2 RF cables (75
ohm).
Not Provided
(
)
Not Provided
(
Use a signal splitter to use more than 2 TVs.
y
If the image quality is poor, install a signal
y
amplifier properly to improve the image
quality.
If the image quality is poor with an antenna
y
connected, aim the antenna to the proper
direction.
Visit
y
information about the antenna and cable
connection.
)
NOTE
http://AntennaWeb.org
for more
CAUTION
Make sure not to bend the copper wire of
y
the RF cable.
Copper wire
Complete all connections instructions
y
between devices, and then connect the
power cord to the power outlet to prevent
damages to your TV.
 Loading...