

Page 1
Installation Guide
LG Chromebase
Read the safety precautions carefully before using the product.
LG Chromebase Model List
22CV241
*MFL68300502*
P/NO : MFL68300502(1404-REV01)
Printed in Korea
www.lg.com
Page 2
ENGLISH
ENGLISH
한국어
2
CONTENTS
3 Instruction and Notices
3 Using the Product Correctly
3 Replacing Flash Memory Battery
4 Important Safety Precautions
12 Assembling and Preparing
12 Product Components
13 Product Operating Environment
13 Installation
17 Moving the Product and Precautions
18 Component Names and Functions
21 Connecting the Power
21 Connecting the Keyboard / Mouse
22 Turning on Power
22 Turning off Power
23 Front Panel of the Product
38 Product Specifications
41 Troubleshooting
41 Chrome OS Troubleshooting
42 Monitor Troubleshooting
24 Using Chrome OS
24 What is Google Chrome?
25 Initial Setting and Logging In
29 Start Screen
30 Set up Wake On LAN (WOL)
36 Power Management
37 Using the Monitor
37 Connecting the HDMI Cable
37
To Read the User's Guide
WARNING: This product contains chemicals known to the State of California to cause cancer and birth defects or
other reproductive harm. Wash hands after handling.
Page 3
Instruction and Notices
3
Instruction and Notices
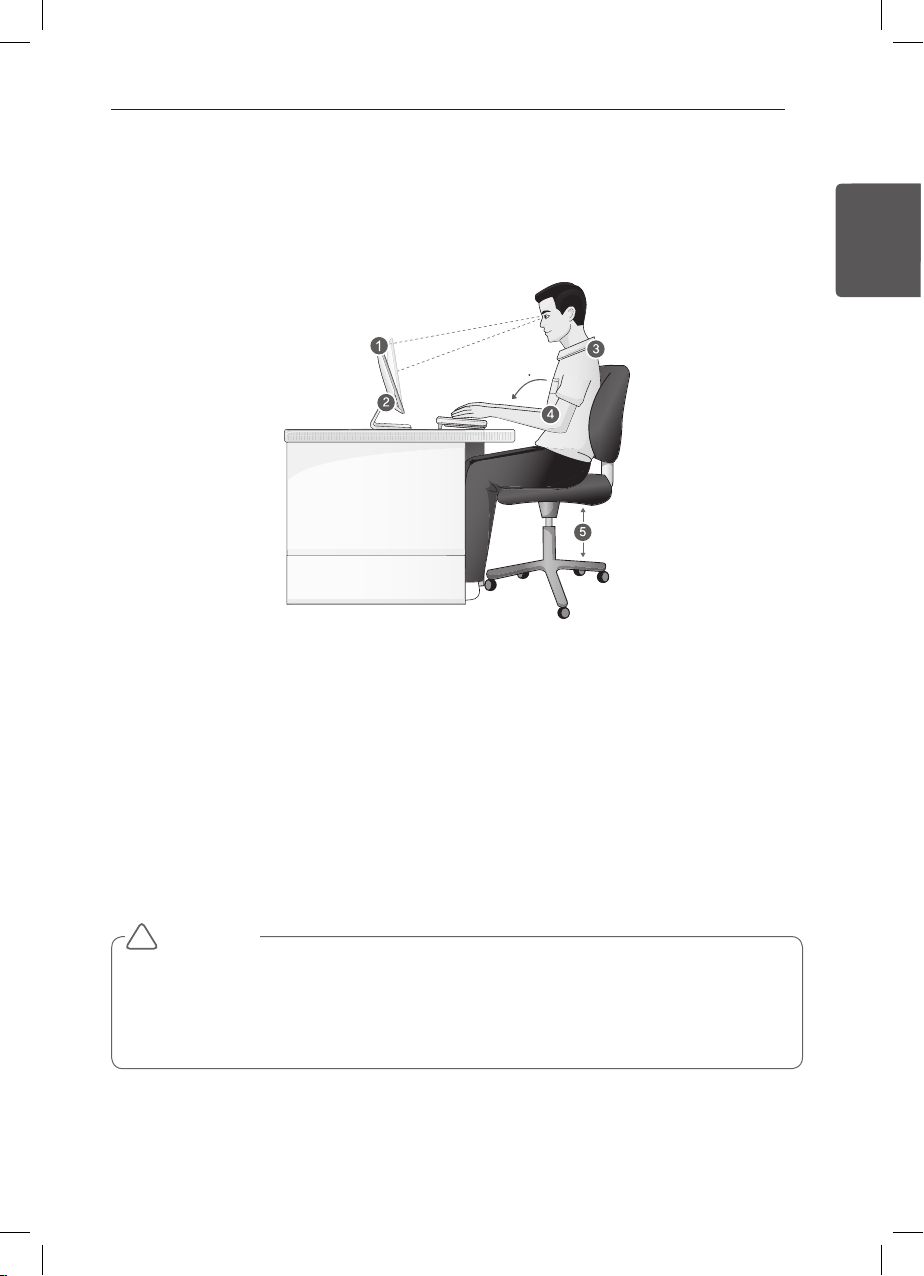
Using the Product Correctly
Maintaining the correct posture while using this product can alleviate eye strain and allow more comfortable use.
Refer to the following to use the product in the correct posture.
1. The screen should be slightly below eye level. (The monitor angle may be adjusted from -5 ° to 25 °.)
2. Adjust the screen to eliminate glare.
3. Straighten your neck and back.
4. Keep your hands, wrists, and arms level.
5. Adjust the height of your chair to have your hands and arms at a suitable position for using the keyboard.
ENGLISH
ENGLISH
Replacing Flash Memory Battery
The flash memory battery, when LG Chromebase is turned off, works to keep the date and time data. The flash
memory battery is a consumable part.
CAUTION
!
y
y It is recommended that the ash memory battery should be replaced at LG Electronics Service Center.
y Using a non-compliant battery may cause a failure.
y If a failure is caused by the user who replaced the part, it is excluded from the warranty service.
y If you leave the product disconnected to the power for a long time, the ash memory may be discharged.
This case is excluded from the warranty service.
Page 4
ENGLISH
ENGLISH
한국어
4
Instruction and Notices
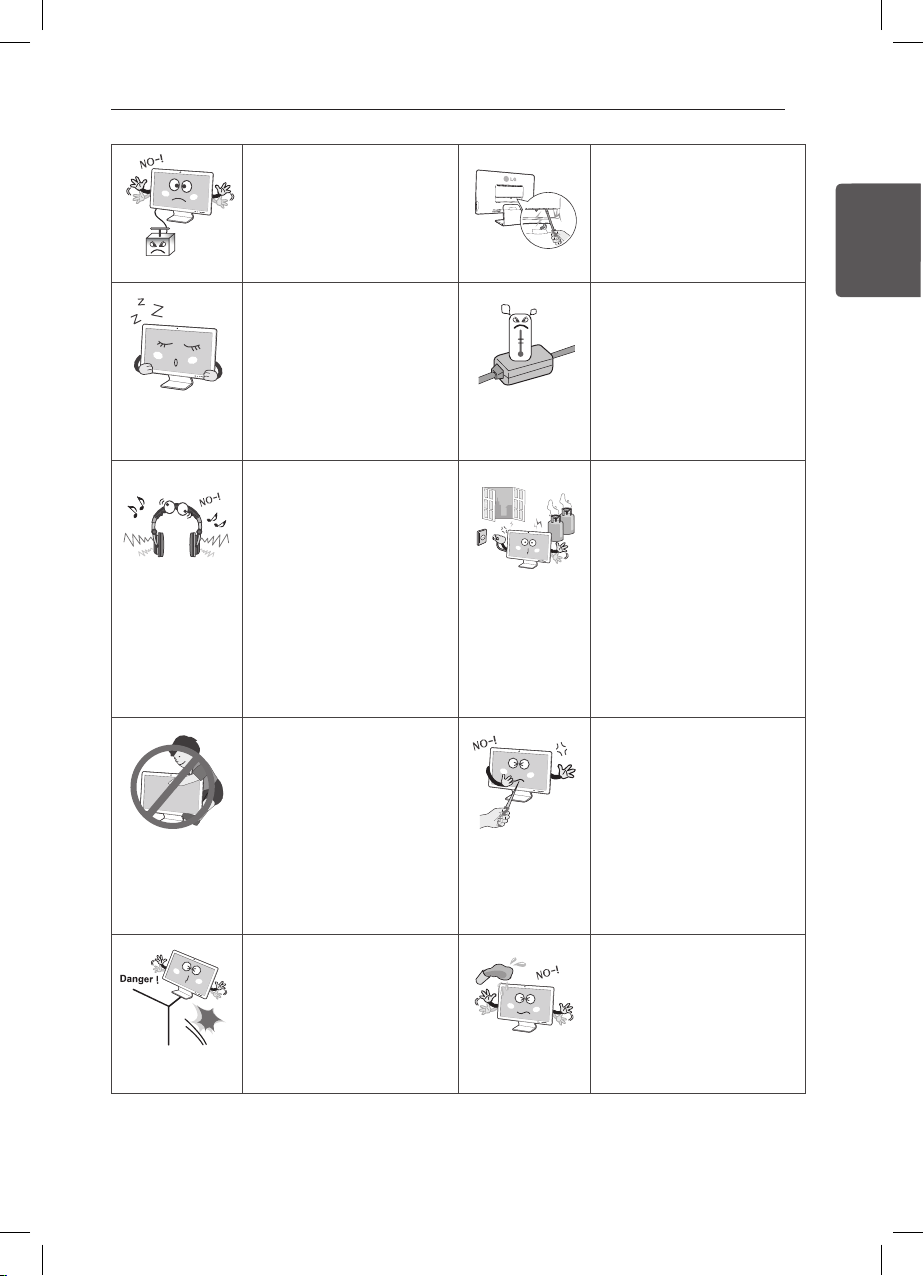
Important Safety Precautions
Please avoid any undesirable environmental factor that shortens the machine’s life span. Use the machine in a safe
and stable place.
Installation
WARNING
!
Do not use the LG
Chromebase in damp places
like a laundry room or
bathroom.
y Moisture may cause a glitch
or an electric shock.
Ensure that the end of the
LG Chromebase bottom will
not protrude towards the
front, when installing it on a
cabinet or shelf.
y The LG Chromebase may get
out of the center of gravity
and fall, resulting in injury or
destruction.
y The cabinet or self should t
the size of the product.
Do not place the LG
Chromebase in a closed
place, such as bookshelf or
closet, on a carpet or sitting
cushion.
y The product may get heated
from the inside and result
in a re.
Use the LG Chromebase in a
dust-free environment.
y Otherwise, the system may
not function properly.
Dispose of the wrapping
plastic properly.
y The wrapping plastic may
cause suocation.
y If a child eats it by mistake,
force him/her to vomit immediately and take him/her to
the hospital.
Do not leave any object
nearer than 6 inches (15 cm)
FT
DN
from the LG Chromebase.
y Otherwise, lack of ventila-
FT
DN
tion could overheat the LG
Chromebase from inside and
you could get a burn from
the heat.
y The LG Chromebase may
cause a burn. (especially,
babies, infants, aged and
patients need to be more
careful.)
Do not place the LG
Chromebase on a place
which can be reached by oil
or steam, such as cooking
table or humidifier.
y An electric shock or re may
occur.
Page 5
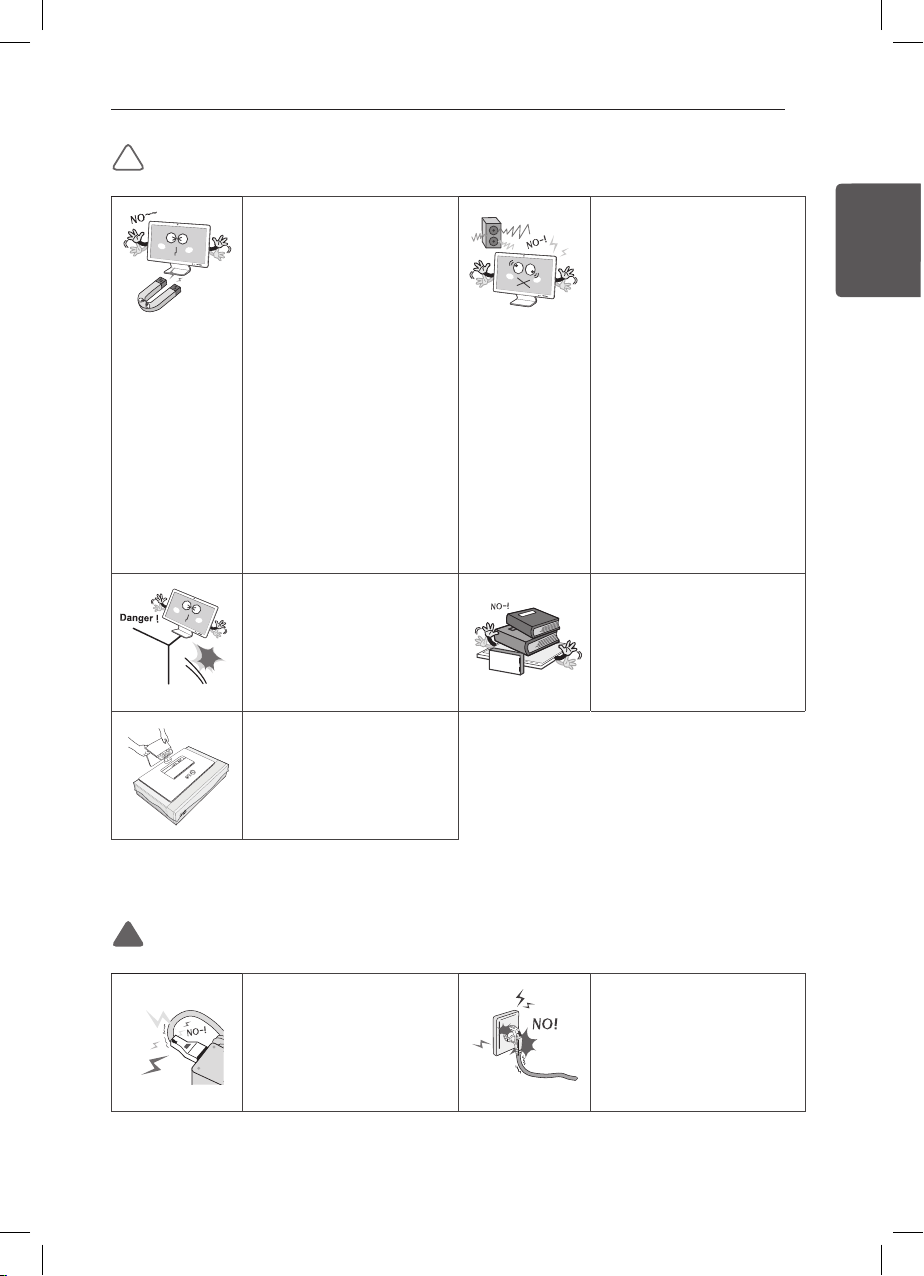
CAUTION
!
Do not store or use the LG
Chromebase near a magnetic
object (i.e. a bag with a
magnetic object, a diary, a
wallet, a memo board, highpowered speakers, a bracelet,
or etc.).
y Otherwise, the SSD and the
system may be damaged and
fail to operate properly.
Never place the LG
Chromebase on a bag with
magnetic objects including
magnetic buttons.
y Otherwise, the SSD and the
system may be damaged and
fail to operate properly.
Place the LG Chromebase in
a safe place so that it does
not fall.
y If dropped, the machine
could be damaged and even
cause an injury.
y Spread a soft cloth on the
oor to protect the screen
(panel) when connecting the
stand base.
Instruction and Notices
5
Operate the LG Chromebase
in a place without
electromagnetic interference.
y Keep a proper distance
between the LG Chromebase
and such electronic appliances as speakers that generate strong magnetic elds.
y Otherwise, data may be lost
from the SSD or the LCD may
show impaired coloration.
Do not put any heavy object
on the LG Chromebase.
y If falling, the object could
damage the LG Chromebase
and cause an injury.
ENGLISH
ENGLISH
Using an AC Adapter
WARNING
!
Do not bend the power cable
for AC adaptor too much.
y Otherwise, the wires inside
the cable may break and
cause an electric shock or an
electrical re.
y Do not use loose plugs or
damaged power cords.
y An electric shock or re may
occur.
Page 6
6
Instruction and Notices
ENGLISH
ENGLISH
한국어
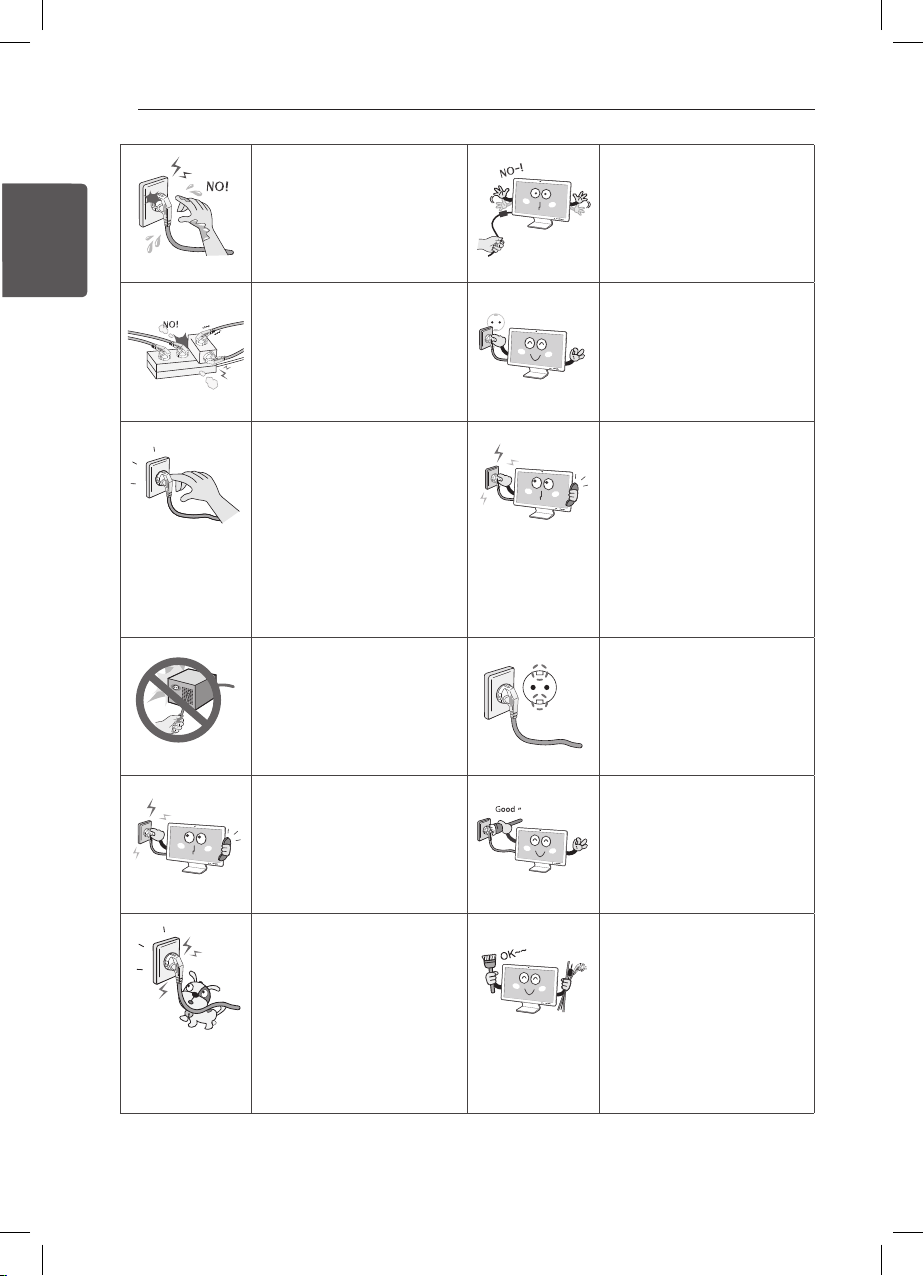
Do not touch the power cord
with your hands wet.
y Otherwise, an electric shock
may occur.
Operate the product at the
proper voltage.
y Excessive voltage may result
in damage on the product,
electric shock or re.
Plug the power cord tightly
into the outlet.
y Loose connection of the
power cord could cause a re.
y If the cord pins are wet or
dusted, dry them suciently
or remove the dust before
use.
y If the holes of the electric
outlet are loose, do not use it.
Never disassemble the power
supply and adapter.
y A damaged power cord may
cause an electric shock or re.
Pull the plug, not the cord,
to disconnect the power.
y Otherwise, a re may occur
or the LG Chromebase may
get damaged.
Use power outlets with
an earth pin installed and
proper supply of rated
electricity.
y An electric leakage may
cause an electric shock or re.
In the case that a strange
noise is heard from the
cord or plug, disconnect the
power cord from the outlet
immediately and contact the
service center.
y A re or electric shock may
occur.
Use a socket with an earth
pin equipped.
y If not earthed, the product
may cause an electric shock
and get damaged.
Ensure that the power outlet
is earthed before plugging
in.
y Otherwise, an electric shock
from power leakage may
occur.
Do not impair the cord by
bending or pressing it too
hard. Keep children and pets
from damaging the power
cord.
y An impaired cord could dam-
age the LG Chromebase parts
causing a re or an electric
shock.
Always keep the power cord
and the outlet clean.
y A re may occur.
Disconnect the LG
Chromebase completely from
others before cleaning it.
y Otherwise, an electric shock
may occur.
Page 7
Instruction and Notices
7
Do not insert a metal
chopstick or other
conductors into a hole of the
outlet when the power cable
is connected to the outlet.
Do not touch the plug right
after disconnecting it from
the outlet.
y Otherwise, an electric shock
may occur.
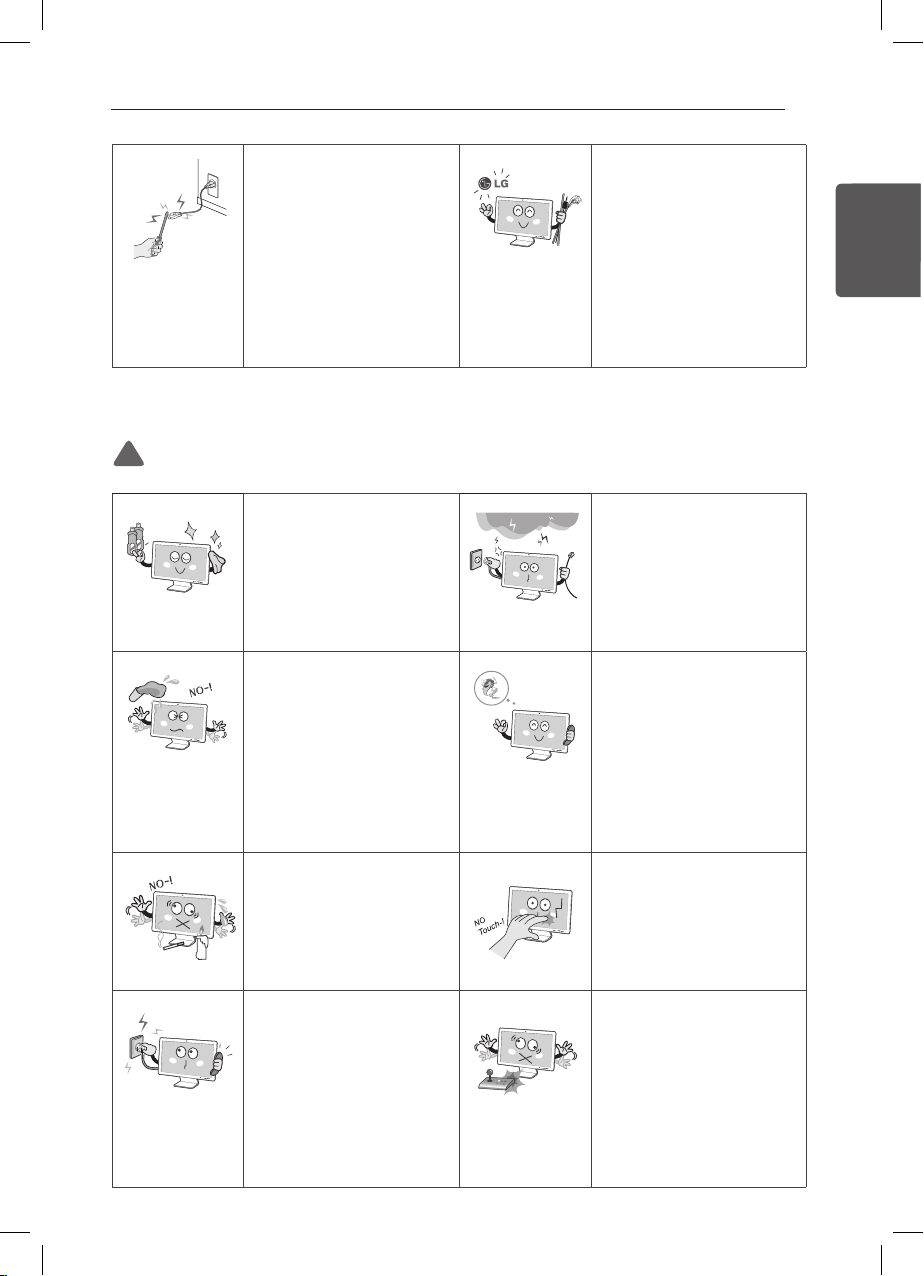
Using the LG Chromebase
WARNING
!
Clean the LG Chromebase
with a proper agent and dry
it completely before using it
again.
y If the LG Chromebase is wet
while used, an electric shock
or re may occur.
Do not leave a cup or other
containers filled with liquids
near the LG Chromebase.
y In the case that liquid goes
inside the LG Chromebase,
a re or electric shock may
occur.
Do not put a lit candle or
live cigarette on the LG
Chromebase.
y A re may occur.
Please use the power
adapter and cord certified by
LG Electronics.
y Using a non-certied product
may result in a re and
electric shock.
y Disconnect the power cable
if you want zero power consumption.
y The system may malfunction.
When lightning flashes
in your area, disconnect
the power, LAN and other
connections.
y An electric shock or re may
occur.
If you have dropped
or damaged the LG
Chromebase, disconnect the
power and contact the local
service center for a safety
check.
y If a damaged LG Chromebase
remains in service, an electric
shock or re may occur.
y If you have contacted the
liquid from the LCD panel,
immediately wash the substance away with water and
consult a physician.
ENGLISH
ENGLISH
If you smell or see smoke
from the LG Chromebase,
stop using the LG
Chromebase and disconnect
the power before contacting
the local service center.
y A re may occur.
Do not play online games
excessively.
y Playing an online game for
an extensive time may cause
a mental disorder. It could
even inict physical impairments on invalids, children,
and the elderly.
Page 8
8
Instruction and Notices
ENGLISH
ENGLISH
한국어
CAUTION
!
If you use the LG
Chromebase for a long
period of time, you may be
stressed physically.
y You should rest for 10 min-
utes per hour of usage.
y Do not use the LG Chrome-
base more than two hours a
day (recommended).
y Take a rest regularly and relax
your muscles by stretching
lightly.
Do not press or scratch
the LCD panel with a sharp
object.
y It may cause impairment.
To clean the LCD screen
and the front frame, use
designated agents and soft
cloth and rub the screen to
one side.
y Too much force may damage
the screen.
y If the cloth is too wet, you
may have strains.
For minors, we recommend a
program that blocks access
to illegal or pornographic
web sites.
y Minors’ exposure to adult-
only contents may inict
psychological instability or
even trauma on them. Take
an extra precaution for your
children if the whole family is
using this machine.
y Flickering or patterned
images may cause a seizure.
If you have a history of
epilepsy or seizure, consult
your doctor before watching
3D video.
Ensure the power is off
before shutting the LCD.
y The machine may be
deformed due to temperature rise.
Please ask one of our service
technicians to check the
operational state after your
LG Chromebase has been
repaired.
y Otherwise, an electric shock
or re may occur.
Keep the LG Chromebase
away from heat-emitting
devices such as a heater.
y The LG Chromebase may be
deformed or catch on re.
Page 9
Instruction and Notices
9
Do not insert other devices
than designated ones in the
ports.
y Otherwise, the LG Chrome-
base may be damaged.
Turn off the LG Chromebase
if you are not going to use it
for an extended time period.
y Due to heating, spark and/
or insulation deterioration
caused by stacked dust,
you may have short circuit,
electrical shock, and re.
Before using the headset,
check if the volume is too
high.
y Do not use the headset too
long.
y A headphone that has a
resistance higher than 20 Ω
can cause electromagnetic
interference. Therefore, we
recommend you to use a
headphone that has a resistance less than 20 Ω.
Ensure that no child will
hang or ride on the installed
product.
y They could fall or tumble,
resulting in an injury.
If you drop the product, or
the case is destroyed, turn
off and unplug the product.
y An electric shock or re may
occur.
y Contact the service center.
Do not block the ventilation
hole with any object.
y Otherwise, an electric shock
may occur.
y As the adapter can be hot,
do not touch it with bare skin
while using it.
If you smell gas, never touch
the electric outlet and open
the window for ventilation.
y An electric shock or re may
occur.
Do not disassemble, repair,
or revamp the product.
y An electric shock or re may
occur.
y If you need a checking,
adjustment, or repair, contact
the service center.
y If you replace a part yourself,
the product may not work
properly.
Do not spray water directly
on the body nor use the
combustible substances
(thinner or benzene) to clean
the product.
y An electric shock or re may
occur.
ENGLISH
ENGLISH
Page 10
10
Instruction and Notices
ENGLISH
ENGLISH
한국어
y The main power cut-o de-
vice is the power cord, which
should be placed in a location you can easily access.
If the product is out of order,
for example, with blank
screen or no sound, do not
use it.
y Turn o and unplug the
product immediately and
contact the service center.
y An electric shock or re may
occur.
Contact the seller or service
center once a year to consult
with them regarding the
internal cleaning.
Refer to the guide to set up
the resolution and frequency
to fit the product.
y You may have poor eyesight.
y If dust builds up over time
inside the product, it may
result in a re or failure.
y The LCD is a product
composed of millions of
pixels and requires highly
advanced technologies. You
may have a few pixel spots
(red, green, white and black)
on the screen. This is usual
on the LCD and unrelated to
the product performance. It is
y The LCD may have dierent
level of brightness and tones
of color on the right, left,
upper and lower parts of
it, depending the viewing
angle. This is usual on the
LCD and unrelated to the
product performance. It is
not a defect.
not a defect.
To minimize data loss
resulting from Solid State
l
p}
y
Gk
o
z
h
s
m
Disk damage, back up
important data frequently.
y The manufacturer is not
responsible for any data loss.
Do not plug or unplug the
product to turn on or off the
Do not disconnect the power
cord while using the LG
Chromebase.
y The LG Chromebase may be
damaged by an electrical
shock.
y Avoid touching the screen. It
can be easily damaged.
product (do not use the plug
as a power switch.).
y Otherwise, an electric shock
or impairment may occur.
Page 11
Instruction and Notices
11
y Spilling a liquid like coee or
juice on the keyboard may
cause a fault, malfunction, or
electric shock.
y The keys may not work prop-
erly when you use several
keys at the same time while
playing a PC game. (Please
change the key combination
settings according to the
combinations necessary for
the game play.)
Do not use the product
near other electronics such
as microwave, TV set or
refrigerator.
y Connectivity and screen qual-
ity may be aected.
Carrying the LG Chromebase
CAUTION
!
Before carrying the machine,
turn off the power and
disconnect all the cables.
y Otherwise, you may trip over
the wire, damaging the LG
Chromebase and getting an
injury.
y Save the box.
y When you move the product,
use this box.
Do not put in metals, such as
coins, hair pins, or other iron,
and combustible substances
such as paper or matches.
y Especially, warn the children
against the above behavior.
y An electric shock or re may
occur.
y If a foreign substance gets in
the product, disconnect the
power cord and contact the
service center.
Solid State Disk damage and
data loss may occur when:
y External shocks are inicted
on the machine while disassembling or installing it.
Protect the machine from
any shock while carrying it.
y System damage or an injury
may result.
y The product is heavy. To
unpack or move the product,
do not do it by yourself. You
must do it with another
person at least.
y Otherwise, the product
would result in an injury or
be damaged.
y Before using the product that
was once dropped, contact
the service center as it may
result in an electric shock
or a re.
ENGLISH
ENGLISH
Page 12
ENGLISH
ENGLISH
한국어
12
Assembling and Preparing
Assembling and Preparing
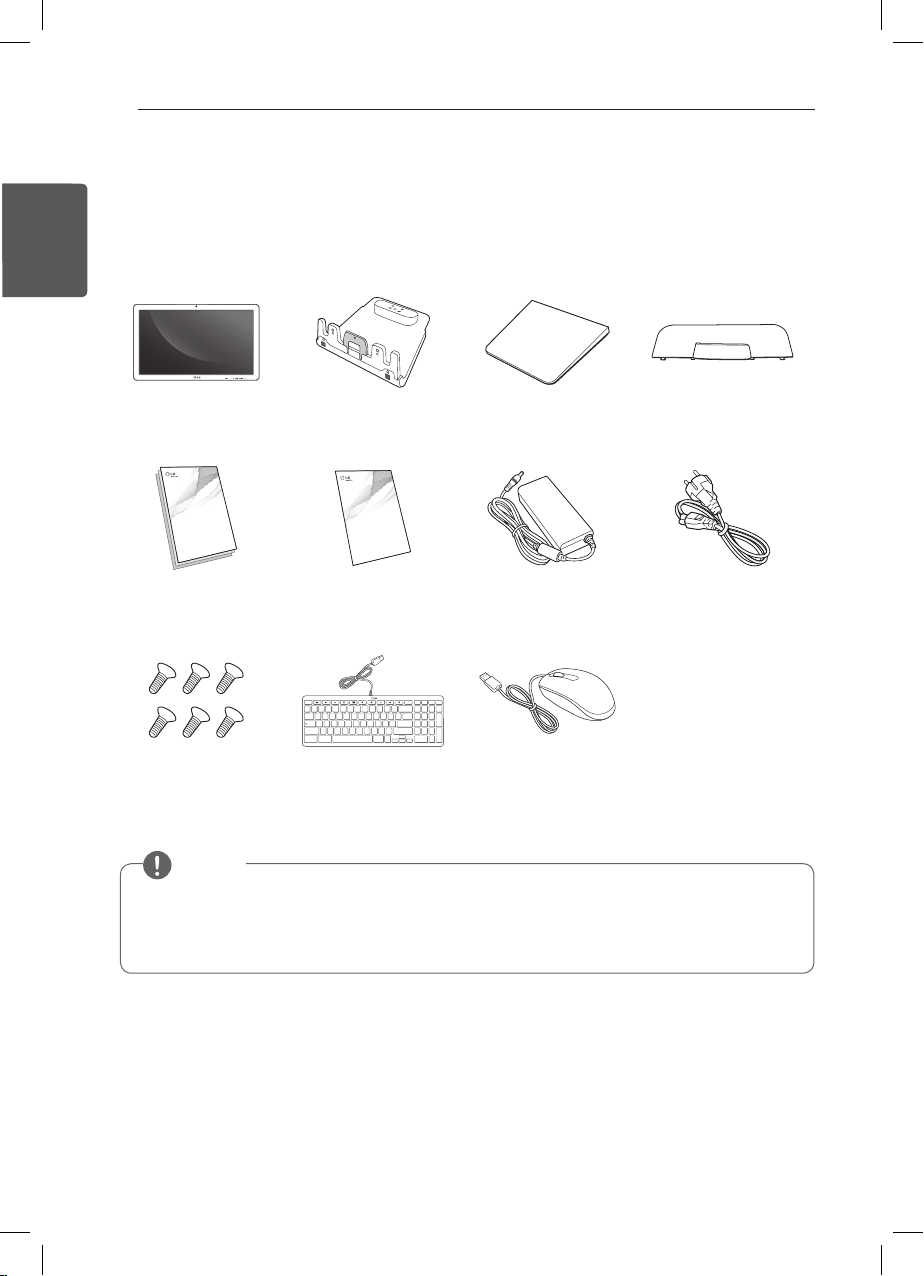
Product Components
Before using the product, check that it comes with all the specified components.
LG Chromebase
Stand body
Stand base
Stand cap
Main body
Installation Guide
LG Chromebase
Read the safety precautions carefully before using the product.
LG Chromebase Model List
22CV241
www.lg.com
P/NO : MFL68300501
Installation guide
and Cards
6 Screws
Regulations and Safety
Notices
LG Chromebase Model List
22CV241
P/NO : MFL68300521
Regulations and
Safety Notices
esc
@#$%^&*()
!`~
1
23
4567890
tab
qwertyuio
asdfgh jkl
zxcvbnm
<>
,
shift
ctrl alt
Keyboard
www.lg.com
AC Adapter
page up
page dn
home end
-=+
_
delete
backspace
/
*
_
{}
\
p
7
8
9
\
[]
+
:
enter
456
;“‘
?
123
shift
.
/
enter
>
.
0
ctrlalt
>
>
>
Power cable
Mouse
(M4x10)
NOTE
y
y The product color and components may vary depending upon the model and are subject to change without
prior notice for performance improvement.
y The power cable and AC adapter may dier depending upon your country.
y HDMI cables are not provided with the product.
Page 13
Assembling and Preparing
13
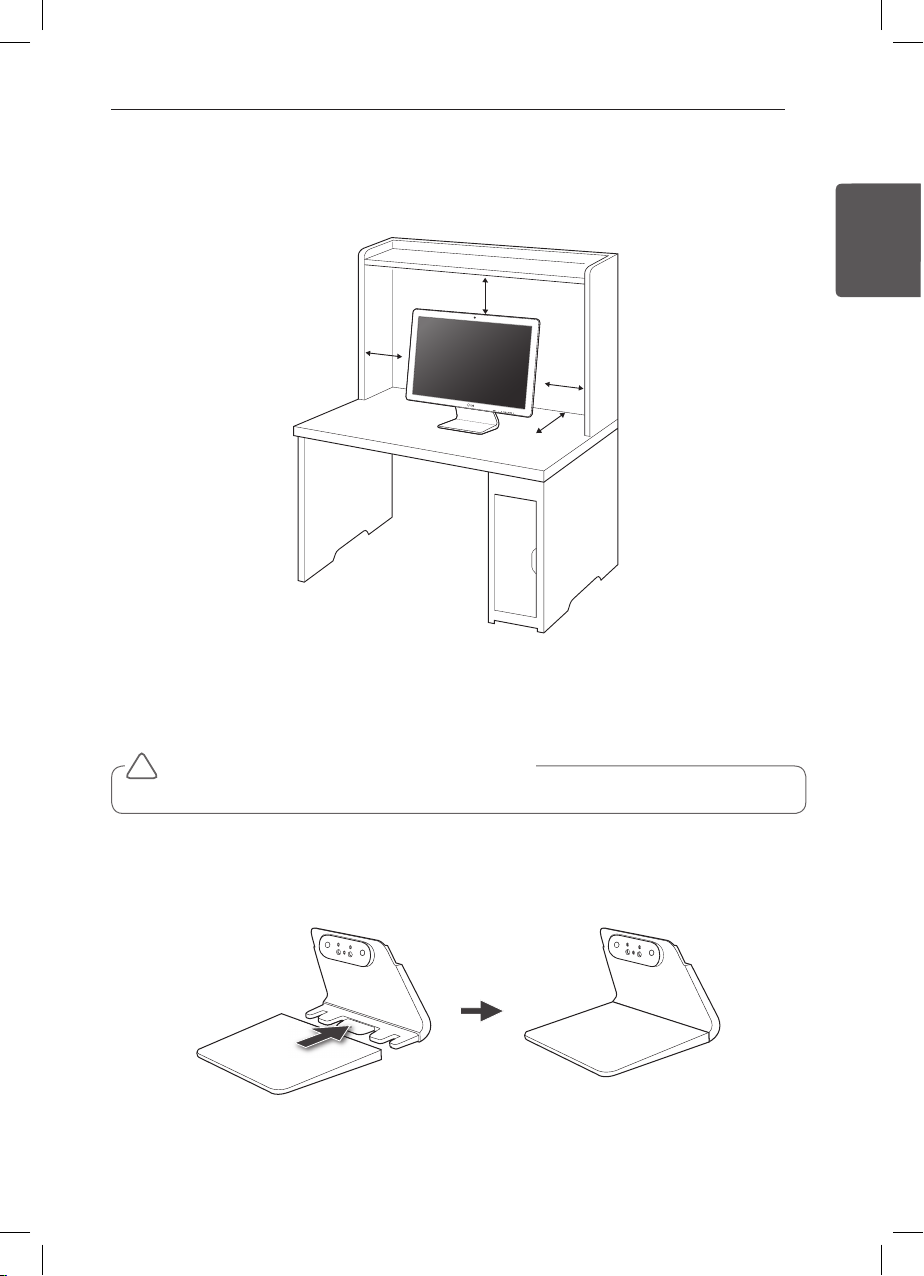
Product Operating Environment
The monitor must be installed on a flat surface. It is recommended to leave space around the product as shown
below.
6 inches
(15 cm)
6 inches
(15 cm)
6 inches
(15 cm)
6 inches
(15 cm)
ENGLISH
ENGLISH
Installation
PRECAUTIONS BEFORE INSTALLATION
!
y
y Wear gloves to protect your hands while installing the product.
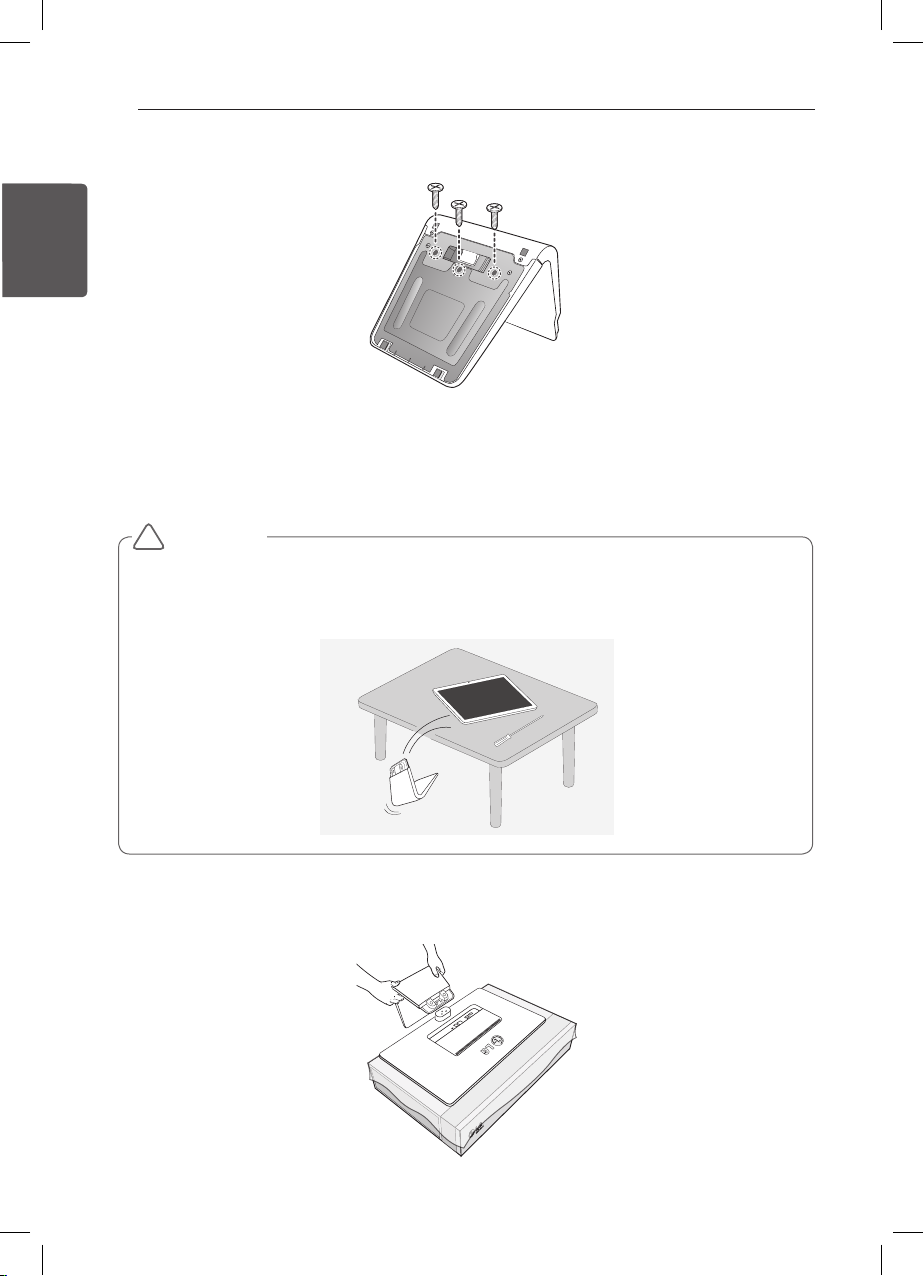
Assembling the Stand
1. Slide and attach the stand base into the stand body in the direction pointed by an arrow.
Page 14
ENGLISH
ENGLISH
한국어
14
Assembling and Preparing
2. Tighten the 3 screws provided in the package to secure the Stand Body and Stand Base in place.
size: M4x10
3. To disassemble the stand, repeat the process in reversed order.
Assembling the Body with the Stand
CAUTION
!
y
y Assembling the body and stand on the desk or other high places can run the risk of dropping the product on
the oor.
y Watch out for any dust or debris where you assemble the product, as the screen may be scratched or dam-
aged.
1. Spread a soft cloth on the packaging box or a low table to protect the screen (panel).
2. Place the body on the packaging box or low table, align them at the edge, and make sure the screen is facing
downward.
Page 15

Assembling and Preparing
3. Connect the stand by aligning it with the hinges behind the body.
4. Tighten the 3 screws provided in the package to secure the body to the Stand in place.
15
ENGLISH
ENGLISH
Page 16

ENGLISH
ENGLISH
한국어
16
Assembling and Preparing
Assembling the Stand Cap
1. Place the product properly as shown in the following figure and align the bottom of stand cap with the groove.
2. Push the stand cap in the direction of the arrow until you hear a click sound.
3. To disassemble the body and stand, repeat the process in reversed order.
CAUTION
!
y
y While assembling the stand cap, please be careful as your nger may be caught between the stand and the
body.
Page 17

Assembling and Preparing
17
Moving the Product and Precautions
When you pick up or move the product, please keep the followings in mind so that the product is not scratched or
damaged.
• Do not touch the monitor screen as this may damage the screen of the pixels within it.
• It would be better to put the product into the original box or pack it before moving it.
• Be sure to shut down the system and disconnect the power cable and all other cables before picking up or
moving the product.
• Hold the product at the top and bottom frame rmly.
• When you hold the product, turn the screen to the opposite direction to prevent scratches.
• When you are moving the product, make sure that the product will not be exposed to excessive impact or vibra-
tion.
• When you are moving the product, keep the product upright.
• Make sure that the product is not at or tilted left or right.
ENGLISH
ENGLISH
WARNING
!
y
y When controlling the screen angle, do not hold the product at the stand.
y Your ngers may be stuck in the stand.
Page 18

ENGLISH
ENGLISH
한국어
18
Assembling and Preparing
Component Names and Functions
Front / Right View
Rear View
Page 19

Assembling and Preparing
No. Name No. Name
Web Camera USB Port (USB 3.0)
Webcam Status Lamp
Built-in Microphone Air holes
Run OSD / Menu Navigation / MUTE Button Power Port
OSD Menu Navigation and Settings
Adjustment / Volume Control Button
READER mode Switch Button USB Port (USB 2.0)
Screen Switch (Chrome OS / Monitor) / OSD
Exit Button
Power Button
Power Lamp
NOTE
y
y Use the 4-pole jack.
Headphone / External Microphone Port
(Φ3.5mm 4 pole)
LAN Port
Kensington Lock / Recovery Button
HDMI Input Port
19
ENGLISH
ENGLISH
NOTE
y
y Do not place radios or other devices using specic frequencies within 4 inches (10 cm) of the front side buttons
and power button.
Page 20

ENGLISH
ENGLISH
한국어
20
Assembling and Preparing
Keyboard View
LG Chromebase Keyboard provides the following function keys that can help you use LG Chromebase more
conveniently.
The keyboard may differ depending on your country.
page up
esc
@# $%^&*()
!`~
23
1
tab
qwer tyuio
asdf gh j
shift
ctrl alt
456789 0
zxcvbnm
k
-=+
_
p
:
l
;“‘
<>
.
,
ctrlalt
{}
[]
?
/
>
>
backspace
>
\
\
enter
shift
>
Icon Function Description
Previous Go to the Previous page.
page dn
delete
/
7
8
5
4
123
0
home end
*
9
6
.
_
+
enter
Next Go to the next page.
Reload Reload the current page.
Full-screen Open the page in full-screen mode.
Next window Switch to the next window.
Brightness down Decreases the screen brightness.
Brightness up Increases the screen brightness.
Mute Turns o audio output.
Volume down Decreases the volume.
Volume up Increases the volume.
Lock Screen Switch to the locked screen.
Search Search from the Apps panel.
Page 21

Assembling and Preparing
Connecting the Power
Connect the AC adapter to the product and connect the power cord to a wall outlet.
NOTE
y
y To ensure safety when using the product, connect the system to a multi-tap or wall outlet tted with an earth
terminal.
CAUTION
!
y
y Unplug the power cord before moving or installing a product. (There is a risk of receiving an electric shock.)
21
ENGLISH
ENGLISH
Connecting the Keyboard / Mouse
To use Chrome OS, connect the keyboard and mouse to the USB ports on the back of the product.
Page 22

ENGLISH
ENGLISH
한국어
22
Assembling and Preparing
Turning on Power
1. When you have connected the AC adapter and the HDMI cable, press the button to turn the power on.
(If the monitor is stored in a cool place, the screen may flicker briefly when you turn the power on.)
2. Press the
y If you turn the product on for the rst time, it starts with Chrome OS. After that, the product starts with the last
$)30.&
button to switch between Chrome OS or Monitor mode.
NOTE
y
mode you used. However, if you reconnected the AC adapter, it starts with Chrome OS.
Turning off Power
Chrome OS Mode
On the Chrome OS mode, you can turn off the power as follows.
y System Default Settings Menu: on the Chrome OS screen, press the at bottom right corner to display
the System Default Settings Menu. Press the icon to turn o the power.
y Front power button: press the front power button until the account is signed out and the power is turned o
(press the power button for a half second to sign out of Chrome OS and keep pressing the button for another
half second to turn o the power.). If any error occurs while using Chrome OS, press the power button and hold
for 6 seconds or longer to turn the power o.
CAUTION
!
y
y If you turn the power o while using Chrome OS, you may lose any data not stored.
Monitor Mode
Press the power button for half a second or longer to turn the power off.
NOTE
y
y If you are using Chrome OS, the power is turned o with the following message:
Please wait while LG Chromebase is turned o
Page 23

Front Panel of the Product
No. Button Description
Provides the screen adjustment and settings menu for the OSD (On Screen Display).
1
2
3
4
5
$)30.&
y Use it to move from a OSD (On Screen Display) sub menu to the main menu.
- It works as a MUTE button while controlling the volume.
y For more information on the screen adjustment and settings menu, refer to User’s
Guide > Using the Monitor > OSD Settings Menu.
y In the Monitor mode or Chrome OS mode, it is used as a volume control button.
- On the OSD menu screen, it is used as a navigation or control (decrease/increase)
button.
y Switches the screen to the READER mode. The Reader mode controls the brightness
and color of the LCD screen to look similar to the printed paper to protect the user
from eyestrain.
- On the OSD (On Screen Display) menu screen, it is used as a navigation or control
(decrease/increase) button.
y Switches the product to the Chrome OS mode or Monitor mode.
- On the OSD (On Screen Display) menu screen, it is used as an Exit button.
y Press the Turn Power On
- button to turn on the monitor.
y Turn Power O
- Chrome OS mode: press the front power button until the account is signed out
and the power is turned off (press the power button for a half second to sign out
of Chrome OS and keep pressing the button for another half second to turn off the
power.). If any error occurs while using Chrome OS, press the power button and
hold for 6 seconds or longer to turn the power o. (
using Chrome OS, you may lose any data not stored.)
- Monitor Mode: If you press the button, the power is turned off. If you are using
Chrome OS, the message Please wait while LG Chromebase is turned off is displayed
and then the power is turned off.
y If the power is turned on, the white indicator lamp is also turned on or blinks when
the LG Chromebase is in the energy savings mode.
y In the standby mode, you can press the power button once to turn on the screen.
y If any error occurs while using the LG Chromebase, press the power button for 6
seconds or longer to turn the power o.
Assembling and Preparing
If you turn the power off while
23
ENGLISH
ENGLISH
Page 24

ENGLISH
ENGLISH
한국어
24
Using Chrome OS
Using Chrome OS
What is Google Chrome?
Google Chrome operating system (hereinafter is all one word called Chrome OS) is suitable for the user who use a PC
mainly for internet surfing.
Chrome OS has removed the complicated functions of the existing operating systems so that the user can access
Internet quickly and easily and use the Web Store to install various apps.
As Chrome OS is a different OS from Windows and Mac OS, you need to check the following before you use it.
Classication Windows, Mac O/S Chrome OS
Drive Installation Dierent drivers are required for each
device.
Program (app) Installation Users install programs that they want. The Google Web Store provides
OS Update Users have to set up update details. Updates automatically.
Security Update Users have to set up update details. Updates automatically.
Printing Prints from the product directly. Uses Cloud Print
Device Connection Connects devices to various extension ports Connects devices to USB ports
External ODD (CD/DVD ROM) Supported Not supported
Drivers are installed automatically.
Programs (apps).
CAUTION
!
y
y LG Chromebase is optimized for Chrome OS. If you install any other operating system other than Chrome OS,
you cannot have the technical support.
y In Chrome OS, you are not allowed to install Active-X and Plug-in software, and any web that uses these
software may not work properly.
y Your new or existing peripheral devices may not work with Chrome OS. Refer to the provided user manuals or
contact the manufactures to check the compatibility of those devices.
NOTE
y
Be aware of the following for Chrome OS:
y Chrome OS supports standard codecs and may not play other videos and music formats except the standard
codecs.
y Chrome OS updates the system automatically and keeps the system latest.
y A system update may start without the consent of the user.
y The screen and method to use may be dierent depending on the OS version.
y For more information on Chrome, visit the Chrome web site at http://www.google.com/chromeos.
Page 25

Using Chrome OS
Initial Setting and Logging In
Before you can use Chrome OS, you need a connection to a network and a Google account.
NOTE
y
y The Chrome OS Start screen, Chrome Browser screen and Web Store screen may look dierent depending on
the Chrome OS version.
y If you don’t have a Google account, you may use a Guest account, but you may be limited in using some of
the features.
y LG Chromebase does not support the PPPoE protocol or Gigabit LAN. It needs a connection to 10 base-T or
100 base-TX LAN port.
y Use a standard Internet cable to use the product properly. (Cat5 LAN cable or above with a RJ45 connector)
y Proper services may not be provided if the Internet connection speed is too slow or the content is not sup-
ported by Chrome OS.
y LG Electronics is not responsible for any problem related with the Internet services (e.g. connection error) not
caused by the product itself.
y Contact your Internet service provider if there are any problems with the Internet connection.
1. To use a wired network, connect the wired network cable to the back of the LG Chromebase.
25
ENGLISH
ENGLISH
2. Press the
button on the front of the LG Chromebase to turn the power on.
Page 26

ENGLISH
ENGLISH
한국어
26
Using Chrome OS
3. On the Chrome initial setting screen, select the language and keyboard type.
4. If connected to a wired network, Ethernet is automatically selected for Select a network.
NOTE
y
y To connect to a wireless network, press the button in Select a network and continue the connec-
tion procedures as guided.
Page 27

Using Chrome OS
5. If you press the Continue button and agree on the information for the user, the system checks for any OS
update automatically and the Google the Sign in screen appears.
27
ENGLISH
ENGLISH
6. If you have a Google account, type your email address and password and click the Sign in button.
NOTE
y
y If you select browse as Guest, you can use Chrome with a Guest account, but may be limited in using
some functions.
y If you use your existing Google account to sign in, the actual screen may look dierent from the screen
on the manual due to the synchronization of Google account.
Page 28

ENGLISH
ENGLISH
한국어
28
Using Chrome OS
7. To create a Google account, click the Create Google Account link.
8. When the page for creating a Google account appears, register a new Google account as guided.
9. Press the icon at the right bottom of the screen and select Exit guest.
10. On the Sign in screen, type the email and password of the created Google account and click the Sign in
button.
11. When the following screen appears, select a sign-in image and press the OK button.
12. At the right bottom of the screen, the selected image is registered as the sign-in screen and Chrome OS starts.
Page 29

Using Chrome OS
Start Screen
When the initial setting and login are completed, the Chrome OS start screen appears.
NOTE
y
y The basic apps shown on the Start Screen may be dierent depending on the version of Chrome OS.
y For details on how to use Chrome OS, refer to User’s Guide.
29
ENGLISH
ENGLISH
1 Background
2 App List The list of apps installed in the system is displayed.
3 Browser Runs the browser.
4 Gmail Runs Google Gmail.
5 Google Search Runs the Google Search engine.
6 Google Docs Runs Google Docs with which you can create documents easily.
7 YouTube Runs YouTube that plays various videos for you.
8 Time Shows the current time.
9 Wireless Network Status
10 Sign-in image Shows the sign-in image of the user.
The Chrome background, on which you can right-click to use Set wallpa-
per... or Autohide shelf menu.
Shows the connection status to wireless network. (Not shown when connected to a wired network)
Page 30

l
C
3
3E
ENGLISH
ENGLISH
한국어
30
Using Chrome OS
Set up Wake On LAN (WOL)
You can set up and use Wake On LAN (WOL) if you want.
Before you can change the Wake On LAN settings, you should turn Verification Off (Developer Mode) as follows:
Turn Verification Off
CAUTION
!
y
y All data stored in the system including account information, photos, apps and downloaded les as well as data
synched with your Google account will be deleted.
1. Turn off the LG Chromebase.
2. While keep pressing the recovery button inside the Kensington lock, press the
Chromebase. (You may need a flat-head driver to press the recovery button.)
button to turn on LG
3. When the power is turned on and the following screen is displayed.
English
Chrome OS is missing or damaged.
Please insert a recovery USB stick or SD card.
For help visit http://google.com/chromeos/recovery
e.com/chromeos/re
ROE
A-B
Model MONROE C3A-B3E
Page 31

4. Press Ctrl + D to display the following screen.
To turn OS verication OFF, press the RECOVERY button.
Your system will reoot and local data will be cleared.
To go back, press ESC.
Model MONROE C3A-B3E
5. Press Recovery button to reboot the system and turn Verification off.
English
English
Using Chrome OS
31
ENGLISH
ENGLISH
OS verication is OFF
Press SPACE to re-enable.
For help visit http://google.com/chromeos/recovery
.com/chromeos/rec
E C3A-B3E
Model MONROOE C3A-B3E
Page 32

ENGLISH
ENGLISH
한국어
32
Using Chrome OS
6. After about thirty seconds, the following screen appears.
Your System is transitioning to Developer Mode.
Local data has been cleared.
Modications you make to the system are not supported by Google, may cause
hardware issues and may void warranty.
To cancel, turn your computer o now.
7. After about five minutes, the Chrome OS setup screen appears as follows:
Page 33

Using Chrome OS
Turn Wake On LAN On/Off
To use this function, turn Verification Off (Developer Mode).
1. Log on to Chrome OS and press Alt + Ctrl + T on the keyboard to display the following console screen.
2. Type Shell at the Crosh > prompt and press the Enter key.
3. Type sudo bash at the Chromos@localhost > prompt and press the Enter key.
33
ENGLISH
ENGLISH
Page 34

ENGLISH
ENGLISH
한국어
34
Using Chrome OS
4. To turn on Wake On LAN, type ethtool –s eth0 wol g.
5. To turn off Wake On LAN, type ethtool –s eth0 wol d.
Page 35

Using Chrome OS
Turn Verification On
CAUTION
!
y
y All data stored in the system including account information, photos, apps, and downloaded les as well as
data synched with your Google account will be deleted.
35
ENGLISH
ENGLISH
1. Press the
button to turn it on and press the Space key in the following screen.
OS verication is OFF
Press SPACE to re-enable.
For help visit http://google.com/chromeos/recovery
.com/chromeos/rec
E C3A-B3E
Model MONROOE C3A-B3E
2. Press the Enter key in the following screen to turn Verification On.
OS verication is OFF
Press ENTER to cinrm you wish to turn OS verication on.
Your system will reboot and local data will be cleared.
To go back, press ESC.
English
English
Model MONROOE C3A-B3E
Page 36

ENGLISH
ENGLISH
한국어
36
Using Chrome OS
3. Once Verification is set to On, the system reboots and the following Chrome OS setup screen appears.
Power Management
Without user activity, the display goes to dim in 7 minutes, screen off in 8 minutes and sleep mode in 30 minutes
(default timeouts).
Based upon individual user activity, Chrome OS tries to optimize these timeouts. Therefore, users may find that the
actual timeouts vary slightly from the default timeouts listed above.
To restore the default timeouts for power management, please run Powerwash.
CAUTION
!
y
y If you run Powerwash, the registered account and stored data will be all deleted. Please back up the data to
exterior storage such as USB HDD, or other memory devices.
Page 37

Using the Monitor
37
Using the Monitor
Connecting the HDMI Cable
You can connect various devices (PC, DVD player, or game console) to the HDMI port on the back of the product to
use it as a monitor.
Use the HDMI cable to connect external devices as shown below.
NOTE
y
y HDMI cables are not provided with the product.
y For details on how to use the monitor functions, refer to User's Guide.
y Use a High Speed HDMI
TM
Cable.
ENGLISH
ENGLISH
)%.*
)%.*
To Read the User's Guide
Please read the User’s Guide to learn how to use the product.
1. Visit http://www.lg.com and select your region.
2. Select Support or Service and search for the model name (22CV241) to read the User’s Guide.
Page 38

ENGLISH
ENGLISH
한국어
38
Product Specifications
Product Specifications
CPU Intel® Celeron® processor
OS Chrome OS
Memory 2 GB DDR3L
Storage 16 GB iSSD
Input / Output
Network
Webcam / MIC
Audio 5 W x 2 built-in Stereo Speakers
LCD Screen
Video Signal (HDMI)
Power
AC/DC adaptor
Stand Angle Adjustment Forwards/Backwards: -5 ° to 25 ° (Head)
Environmental Conditions
Dimension
Weight (With Stand) 4.3 kg
※
The product specifications are subject to change without prior notice for performance improvement.
Display Rear: USB 2.0 x 3, HDMI In x 1, Dc-In
Display Side: USB 3.0 x 1, HP out/Mic In combo
WiFi: 801.11 a/b/g/n (2.4 G / 5 G, Dual Band)
LAN: Ethernet 10/100/1000 mbps
Bluetooth: 4.0
Web CAM: 1.0 M / HD with Webcam LED(include indicator)
built-in MIC
21.5 inches (54.61 cm) TFT (Thin Film Transistor)
Type
Pixel Pitch 0.08265 mm x 0.24795 mm
Maximum Resolution 1920 x 1080 @ 60 Hz
Recommended Resolution 1920 x 1080 @ 60 Hz
Horizontal Frequency 30 kHz to 83 kHz
Vertical Frequency 50 Hz to 75 Hz
Voltage 19 V 3.42 A
Power consumption (Typ.)
DA-65G19 manufactured by ASIAN POWER DEVICES INC.
Output: 19 V DC 3.42 A
Operating Condition
Storing Condition
Monitor Size (Width x Height x Depth)
With Stand 528.6 mm x 396.8 mm x 189.2 mm
Without Stand 528.6 mm x 320.4 mm x 43.5 mm
IPS LCD (Liquid Crystal Display) Screen
Diagonal length of the screen: 21.5 inch (54.61 cm)
On mode: 32 W (Typ)
Power Saving Mode ≤ 2.5 W
Off Mode ≤ 0.5 W
Temperature: 10 °C to 35 °C, Humidity: 10 % to 80 %
Temperature: -20 °C to 60 °C, Humidity: 5 % to 90 %
Page 39

Product Specifications
Factory Preset Mode
MODE CLASSIFICATION Polarity Frequency [kHz] / [Hz] Resolution
1
2
3
4
5
6
7
8
9
H (Pixels) - 31.469
V (Lines) - 59.94
H (Pixels) + 37.879
V (Lines) + 60.317
H (Pixels) - 48.363
V (Lines) - 60.0
H (Pixels) + 45.00
V (Lines) + 60.00
H (Pixels) + 63.981
V (Lines) + 60.02
H (Pixels) + 55.935
V (Lines) - 59.887
H (Pixels) + 60.00
V (Lines) + 60.00
H (Pixels) - 65.290
V (Lines) + 59.954
H (Pixels) + 67.50
V (Lines) + 60
640 x 480
800 x 600
1024 x 768
1280 x 720
1280 x 1024
1440 x 900
1600 x 900
1680 x 1050
1920 x 1080
39
ENGLISH
ENGLISH
Supported file types and codec
Microsoft Office document doc, .docx, .xls, .xlsx, .ppt (read-only), .pptx (read-only).
Media .3gp, .avi, .mov, .mp4, .m4v, .m4a, .mp3, .mkv, .ogv, .ogm, .ogg, .oga, .webm, .wav
Image .bmp, .gif, .jpg, .jpeg, .png, .webp
Compressed files .zip, .rar, .tar, .tar.gz (.tgz), .tar.bz2 (.tbz2)
Other .txt (read-only), .pdf
Video Codec ogv, webm, mp4, mov, avi, 3gp
Audio Codec MP3, AAC, AMR-NB
Page 40

ENGLISH
ENGLISH
한국어
40
Product Specifications
Supported external storage devices
This product can use the external storages (USB memory, HDD, etc.) of the following file systems:
- Ext2, Ext3, Ext4, FAT, HFS+(read-only on journaled HFS+), ISO9660 (read-only), NTFS, UDF(read-only)
NOTE
y
y The supported le type, codec, and le system may dier depending upon the Chrome OS version.
y USB port supports 0.5A electric current. If you need more electric current in case of HDD, use the separate
power adaptor.
System Limitations Guide
y Copyright protected contents or those with limited access authority cannot be played back using this device.
y This device does not support the USB printer and ODD (CD/DVD ROM drive).
y This device supports the USB memory and hard disks of the following le systems: Ext2, Ext3,
Ext4, FAT, HFS+ (read-only on journaled HFS+), ISO9660 (read-only), NTFS, and UDF (read-only).
The compatibility of other le systems or external devices is not guaranteed.
y If a USB memory or hard disk with insucient free space is inserted, some applications may not work properly
due to the slower system response.
Guide on open source licenses for customers
y The Software included in this product contains copyrighted software that is licensed under the GPL/LGPL.
You may obtain the complete Corresponding Source from website: http://git.chromium.org/gitweb/ and Notice
from website: chrome://credits/
This oer is valid to anyone in receipt of this information.
Copyright (c) 2014 The Chromium OS Authors. All rights reserved.
Use of this source code is governed by a BSD-style license that can be found in the LICENSE le.
Page 41

Troubleshooting
Troubleshooting
Chrome OS Troubleshooting
When the Web Browser Screen is not properly displayed.
Does a message appear saying
No network connection when trying to
visit a website?
Have you verified your network settings? • Settings > Network select Settings from the Network screen.
Is a screen asking for personal information? • When you try to connect to the internet for the rst time
Is a web page asking to download and
install Adobe Flash Player?
Are you unable to use ActiveX? • The web browser installed on the internet monitor does not sup-
Does the web browser stop only on certain
sites?
• Verify that your LAN cable is properly connected.
• Verify in your task bar that Network connect is activated.
• Check LAN items.
• Select Ethernet from Settings and select DHCP or Static IP.
• If you have been assigned a static IP from your internet service
provider, enter your IP address.
through a LAN cable, certain internet service providers will
request your personal information.
• The user information screen is to verify the internet subscription
of the user.
• This message appears when the Adobe Flash Player plug-in is
not enabled on your system.
• Open your web browser settings and check Enable plug-ins.
port ActiveX. Only Internet Explorer supports ActiveX.
• If a web page contains multiple instances of Flash content, the
web browser may stop working.
41
ENGLISH
ENGLISH
Malfunction of the external storage device (USB memory)
Are you unable to open files on the
external storage device?
Is the photo viewer slow? • If your external storage device has more than 1,000 les, the
Is the mouse not responding? • Verify that the mouse is connected to the USB port on the rear
Does the keyboard display jumbled letters? • Dierent types of keyboards are used for dierent languages.
Are the speakers not producing any
sound?
• Check if your external storage device has enough free space.
• If not, remove some of the les to free up space on the device.
media player may perform slowly.
• Remove some of the les and try again.
Malfunction in Peripheral Devices
of the monitor.
• Verify that your keyboard matches the language used by the
program.
• The keyboard is set when the user selects the country.
• Make sure that nothing is connected to the headphone/micro-
phone port on the right side of the product.
• Make sure that the volume is NOT set to 0 or Muted.
Page 42

42
Troubleshooting
Monitor Troubleshooting
ENGLISH
ENGLISH
한국어
Is the product's power cord connected
correctly?
Is the power lamp on? • Check the Power button.
Is the power on and the power lamp is lit
either blue or green?
Is the power lamp blinking? • The power lamp blinks when the Internet Monitor is in standby
Do you see the Monitor Frequency
Range Exceeded message on the screen?
Do you see the Check Signal Cable
Connection message on the screen?
Are there afterimages on the screen even
after turning the monitor off?
The screen is blank
• Check if the power cord is connected correctly to a wall outlet.
• Adjust the screen brightness and contrast.
mode. When you press the power button, the monitor turns on
again within 2 to 3 seconds. Using a keyboard or mouse does
not exit standby mode.
• This occurs when the signal sent by the PC (video card) exceeds
the range of horizontal or vertical frequency supported by the
monitor, so check the Product Specications of this manual
and change the settings.
• This occurs when the signal cable between the PC and the
monitor is not correctly connected or unplugged, so check and
reconnect the signal cable.
There are afterimages on the screen
• Please be careful as displaying a xed image on the screen for
a prolonged period of time can damage the monitor and leave
afterimages on the screen. Use screen savers to extend your
monitor’s working life.
NOTE
y
Vertical Frequency
y A monitor screen must be refreshed dozens of times every second like a uorescent lamp to allow users to
see the picture.
y This rate of screen refresh is called the Vertical Frequency or Refresh Rate, and is measured in Hz.
Horizontal Frequency
y The time taken to display the full length of a single horizontal line on the screen is called the horizontal cycle.
The Horizontal Frequency, measured in kHz, is the inverse of the horizontal cycle and shows the number of
horizontal lines displayed on the screen every second.
Did you set the correct screen resolution? • Refer to Using the Monitor > Setting the Resolution and set the
The screen is unstable and shakes. / The screen shows ghost images.
screen to the recommended resolution.
Page 43

Troubleshooting
NOTE
y
y Check if the video card resolution or frequency is set within the range usable by the monitor, and go to
Control Panel -> Display -> Settings to change the resolution to the recommended resolution (optimum
resolution).
y Set the resolution to the recommended resolution (optimum resolution) to prevent the occurrences of text
smearing, screen blurring, screen truncation or screen slanting.
y The setting procedures may vary depending on the PC and O/S (operating system), and the recommended
resolution may not be supported by some video cards. In such cases, please consult the PC or video card
manufacturer.
The screen color is strange
Is the screen displayed in 16 colors? • Change the color to 24 bit (True Color) or higher. In Windows,
select Control Panel -> Display -> Settings -> Color Quality.
Does the screen color seem unstable or
look monochromatic?
Are there spots on the screen? • The screen may display a few pixel spots (red, green, blue, white
After connecting the monitor, the Unknown Monitor is displayed on the screen
Have you installed the device driver for the
monitor?
• Check the connection of signal cable and connect it properly. Or,
pull out and insert the video card in the PC again.
and black) during operation. This is caused by the inherent
characteristics of LCD panels. This is not a fault and unrelated to
the monitor’s performance.
• Visit the homepage of LG Electronics (http://www.lg.com) to
download and install the driver.
• Check the user’s manual for the video card and see if it fully sup-
ports the Plug and Play function.
43
ENGLISH
ENGLISH
Page 44

Declaration of Conformity
Trade Name: LG
Model: 22CV241
Responsible Party: LG Electronics lnc.
Address: 1000 Sylvan Ave.
Englewood Cliffs NJ 07632
U.S.A
TEL: 201-266-2534
To get source codes developed under GPL, LGPL, MPL, and other open source licenses used in this
product, visit http://opensource.lge.com. All licenses including source codes, copyright notice and warranty
disclaimer may be downloaded. When you request open source codes of the software embedded in this
product by sending e-mail to opensource@lge.com within three years after purchasing this product, the
codes recorded in a CD-ROM will be provided to you for minimal costs, including media costs, transport
fee, etc.
 Loading...