

Page 1

Colour Television
OWNER'S MANUAL
Please read this manual carefully before operating your set.
Retain it for future reference.
Record model number and serial number of the set.
See the label attached on the back cover and quote this
information to your dealer when you require service.
Chassis : CP-079B/C
P/No. : MFL62616801 (02)
Page 2

CONTENTS
Important Precautions 3
Location and function of controls 5
Remote control handset / Front panel
Basic operation 7
On and Off / Programme selection
Volume adjustment / Quick View / Mute function
On screen menus 8
Menu selection
Setting up TV stations 9
Auto programme tuning / Manual programme tuning
Assigning a programme name / Fine tuning
Programme edit / Deleting a programme / Copying a programme
Moving a programme / Skipping a programme number
Favourite programme (option) / Calling The Programme list
Selecting programme in the programme table
Paging through a programme table
Picture adjustment 14
XDP Demo (option) / PSM (Picture Status Memory) /
Picture adjustment / Eye (option) / Excellent digital picture selection (option)
Picture format (option)
Sound adjustment (option) 16
Sound adjustment / AVL (option) /
Woofer Gain (option) / Woofer On/Off (option) / XD/Turbo Sound (option)
Stereo/Dual reception (option) Mono sound selection
Language selection for dual language broadcast /
Equalizer (option)
Other functions 18
Time functions / On/Off Time / Auto sleep / Sleep timer
X-SORT (option) /
TV and AV modes (option) / Child lock / Blue back / Music Mode
Connection of external equipment 21
Aerial socket / Audio Video in/out sockets (option)
Euro scart socket (option) /
Component in sockets (option) / Headphone socket (option)
Troubleshooting check list 23
(Auto Volume Leveler)
On screen language selection (option)
S-video / Audio in sockets (S-AV) (option
CSM (Colour Status Memory)
Balance adjustment (option)
Sound output selection (option)
2
Page 3
Important Precautions
This unit has been engineered and manufactured to assure your personal safety,
however improper use may result in potential electrical shock or fire hazards. In order
to allow the proper operation of all safeguards incorporated in this TV set, observe
the following basic rules for its installation, use and servicing. Keep it in an accessible
place for future reference. (TV operating voltage is : 110V ~ 240V AC)
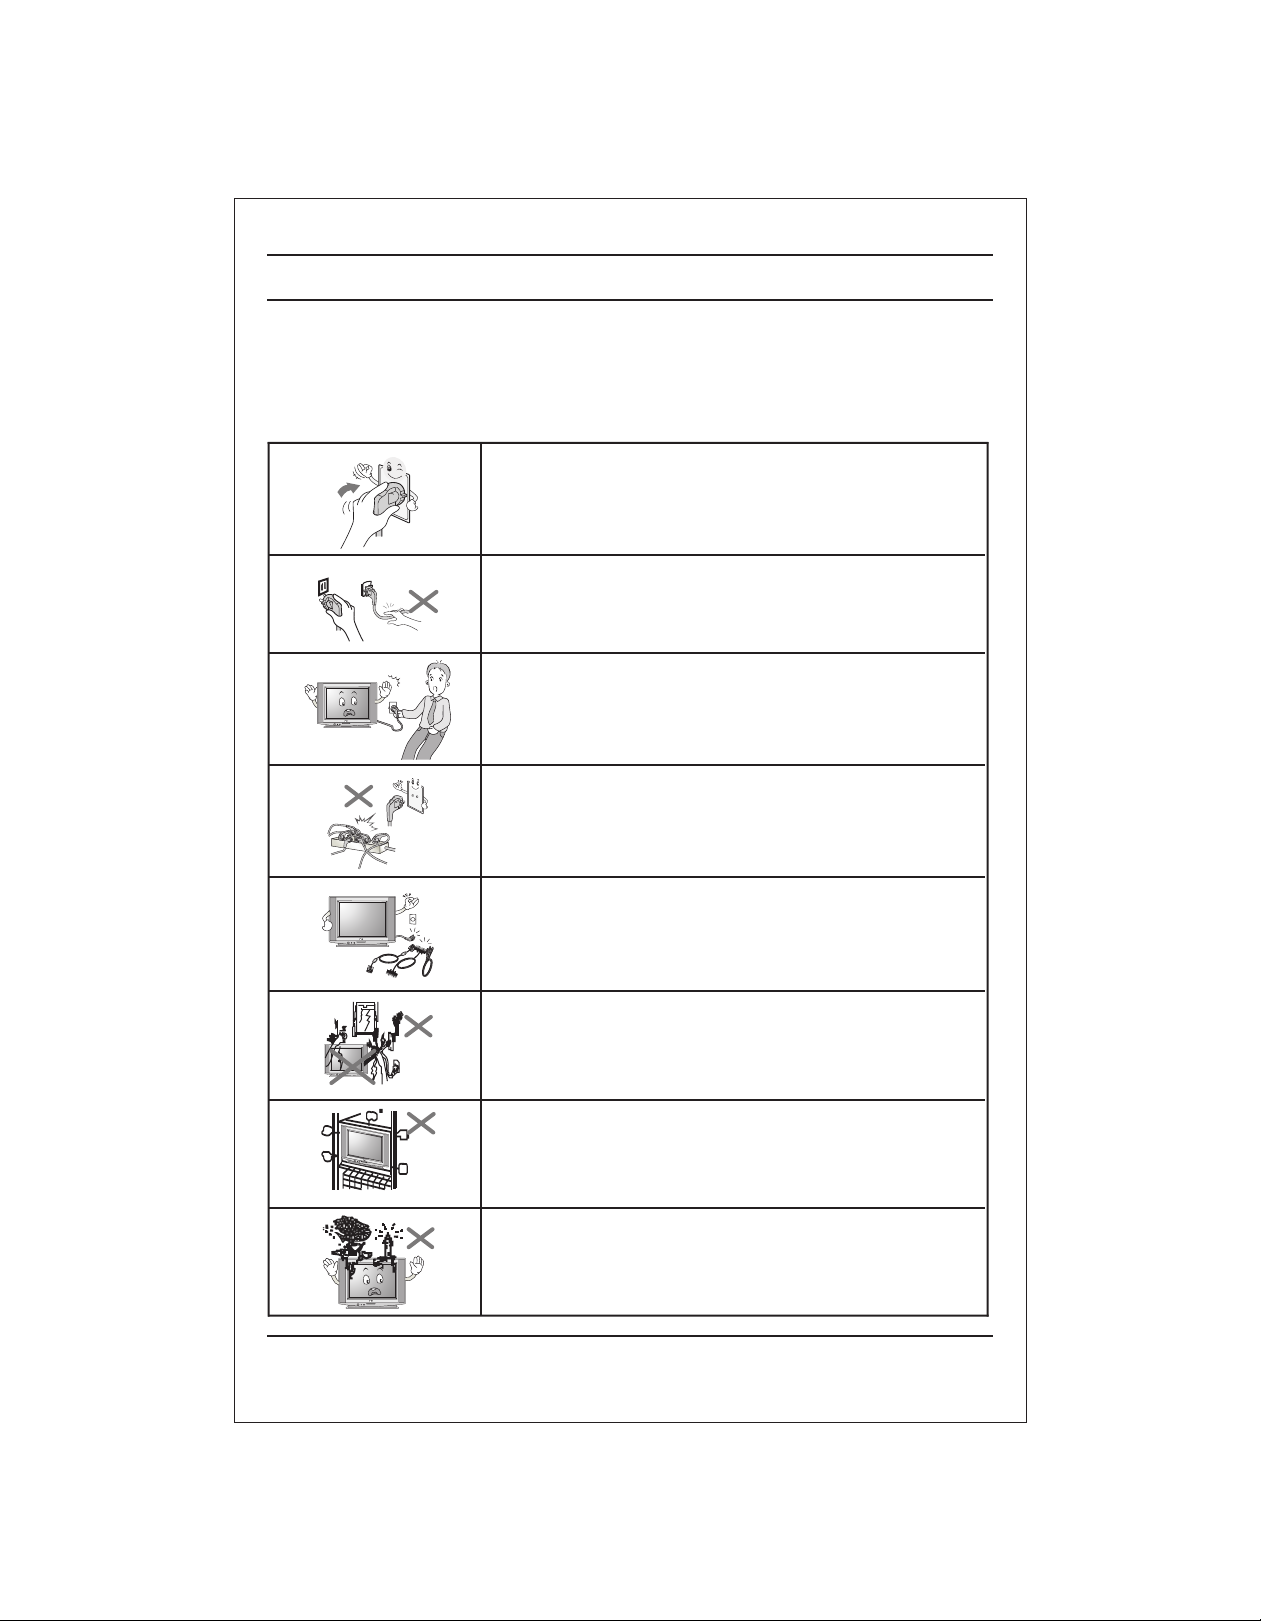
Make sure to insert the power plug completely. If power
cable is not fixed completely, a fire can break out .
Do not pull out the power cord. Always Pull out by the
power plug. Do not touch the plug with wet hands. Do
not damage the power cord.
Do not unplug the power cord while the product is in
use. Do not use the power plug to turn the product
ON/OFF. Electric shock can damage the product.
Do not overload AC outlets by plugging too many
appliances in the same socket or extension cords.
They may result in a shock or fire hazard.
Never leave the TV set “ON” standby when leaving the
house. Unplug the TV before moving it or if you are not
going to use it for several days or during lightning
storms.
For Own safety, Never touch any part of product, the
power cord, and the antenna cable during lightning
storms. You may be electrocuted.
TV set are provided with ventilation holes to allow the
release of heat generated.Make sure that these holes
are not blocked. Do not install the product in a confined
place, such as book case or built in cabinet .
Do not place any object filled with liquid such as Vases,
cup, glass etc on the TV set. Do not place the lighted
candles on the TV set. This may cause fire or an
electric shock hazard.
3
Page 4
Important Precautions
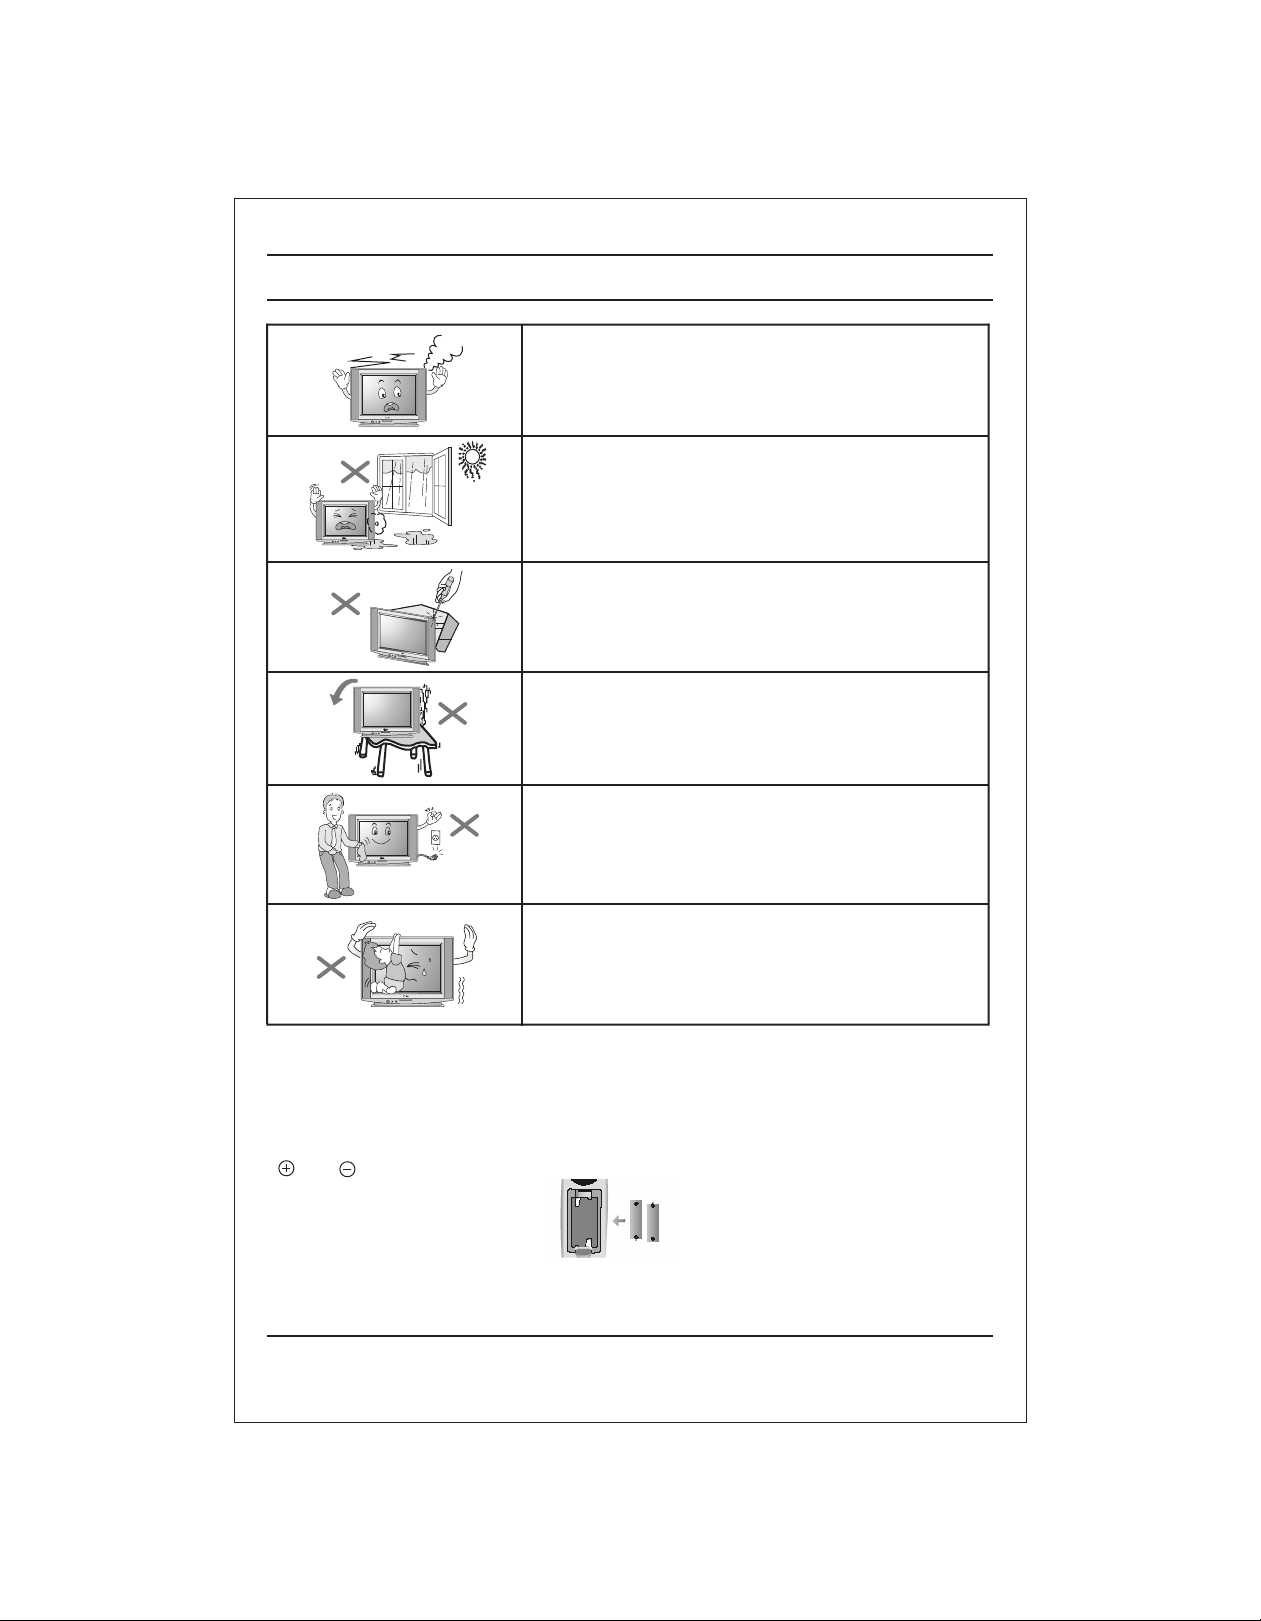
If you can smell a smoke or other odors or hear a
strange sound unplug the power cord and contact
the service center. If you continue to use, electric
shock can occur.
Do not place the product where it might be
exposed to excessive heat, sunlight, rain or
moisture.
Do not attempt to open the product. There are
dangerous High Voltages inside. Refer to
Servicing through Qualified Personnel if the TV is
not operating properly.
Avoid personal injury / set damage by Installing
the product on a flat and stable place that can
support the weight of the set and has no risk of
dropping the product.
While cleaning the product, Unplug the Power
cord and clean with dry & soft cloth. Do not use
thinner, aerosol or any other chemical to clean .
Do not allow children to climb over it. If the
product falls / collapses, you may be hurt. Do not
drop or push objects (like coins, hair pins etc) into
the TV cabinet openings. Some internal parts
carry hazardous voltages.
Do Not use the stabilizer, as this set has a In built stabilizer. Use of External
•
Inferior Quality stabilizer may damage your product .
Battery Installation: The remote control Handset is powered by two AA/ AAA
batteries. To Load the Batteries, turn the remote control handset over and open
the battery compartment. Install two batteries as per the polarity symbols
( and ) marked inside the battery compartment .
•
To avoid battery leakage and damage to the remote, remove the batteries from
the remote if you are not going to use it for several days. If any liquid leaks from
the batteries and touch your skin, immediately wash it away with water.
4
Page 5
16
13
1
9
18
2
3
5
6
Location and function of controls
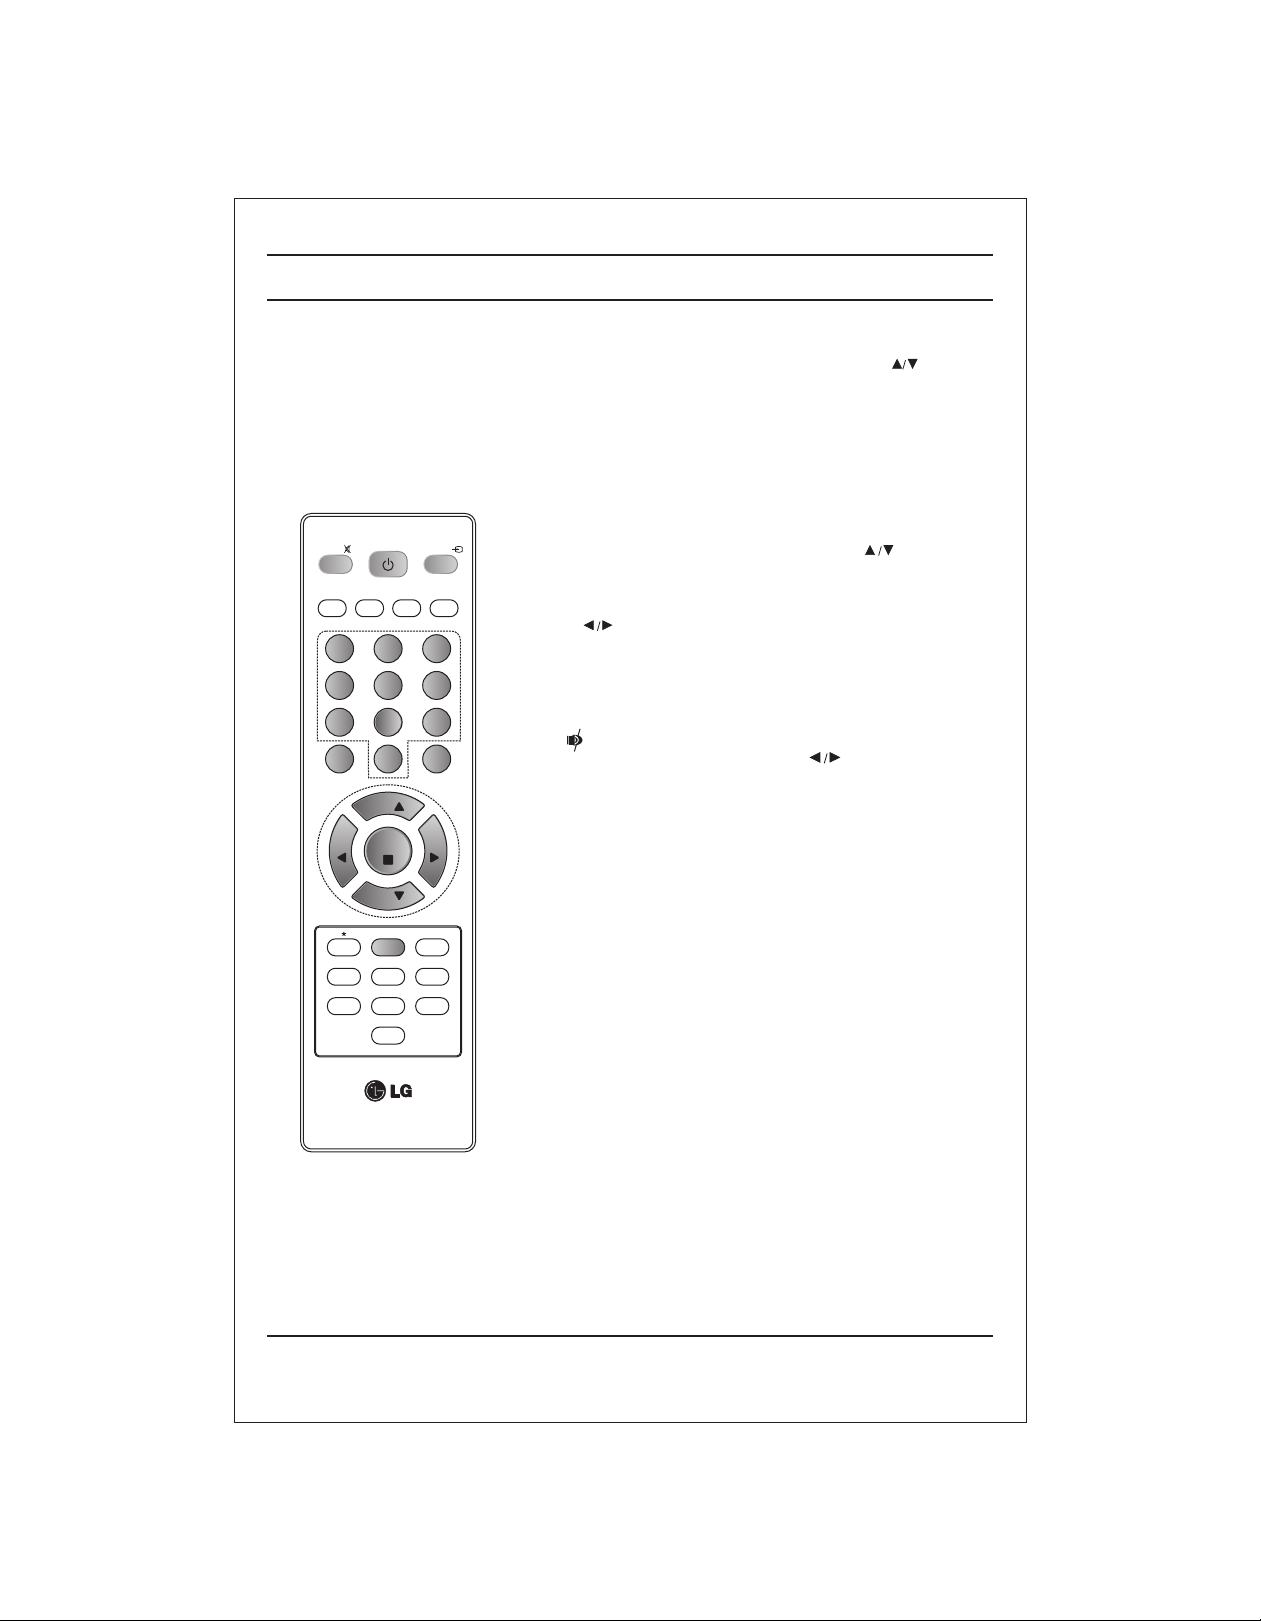
All the functions can be controlled with the remote control handset. Some
functions can also be adjusted with the buttons on the front panel of the set.
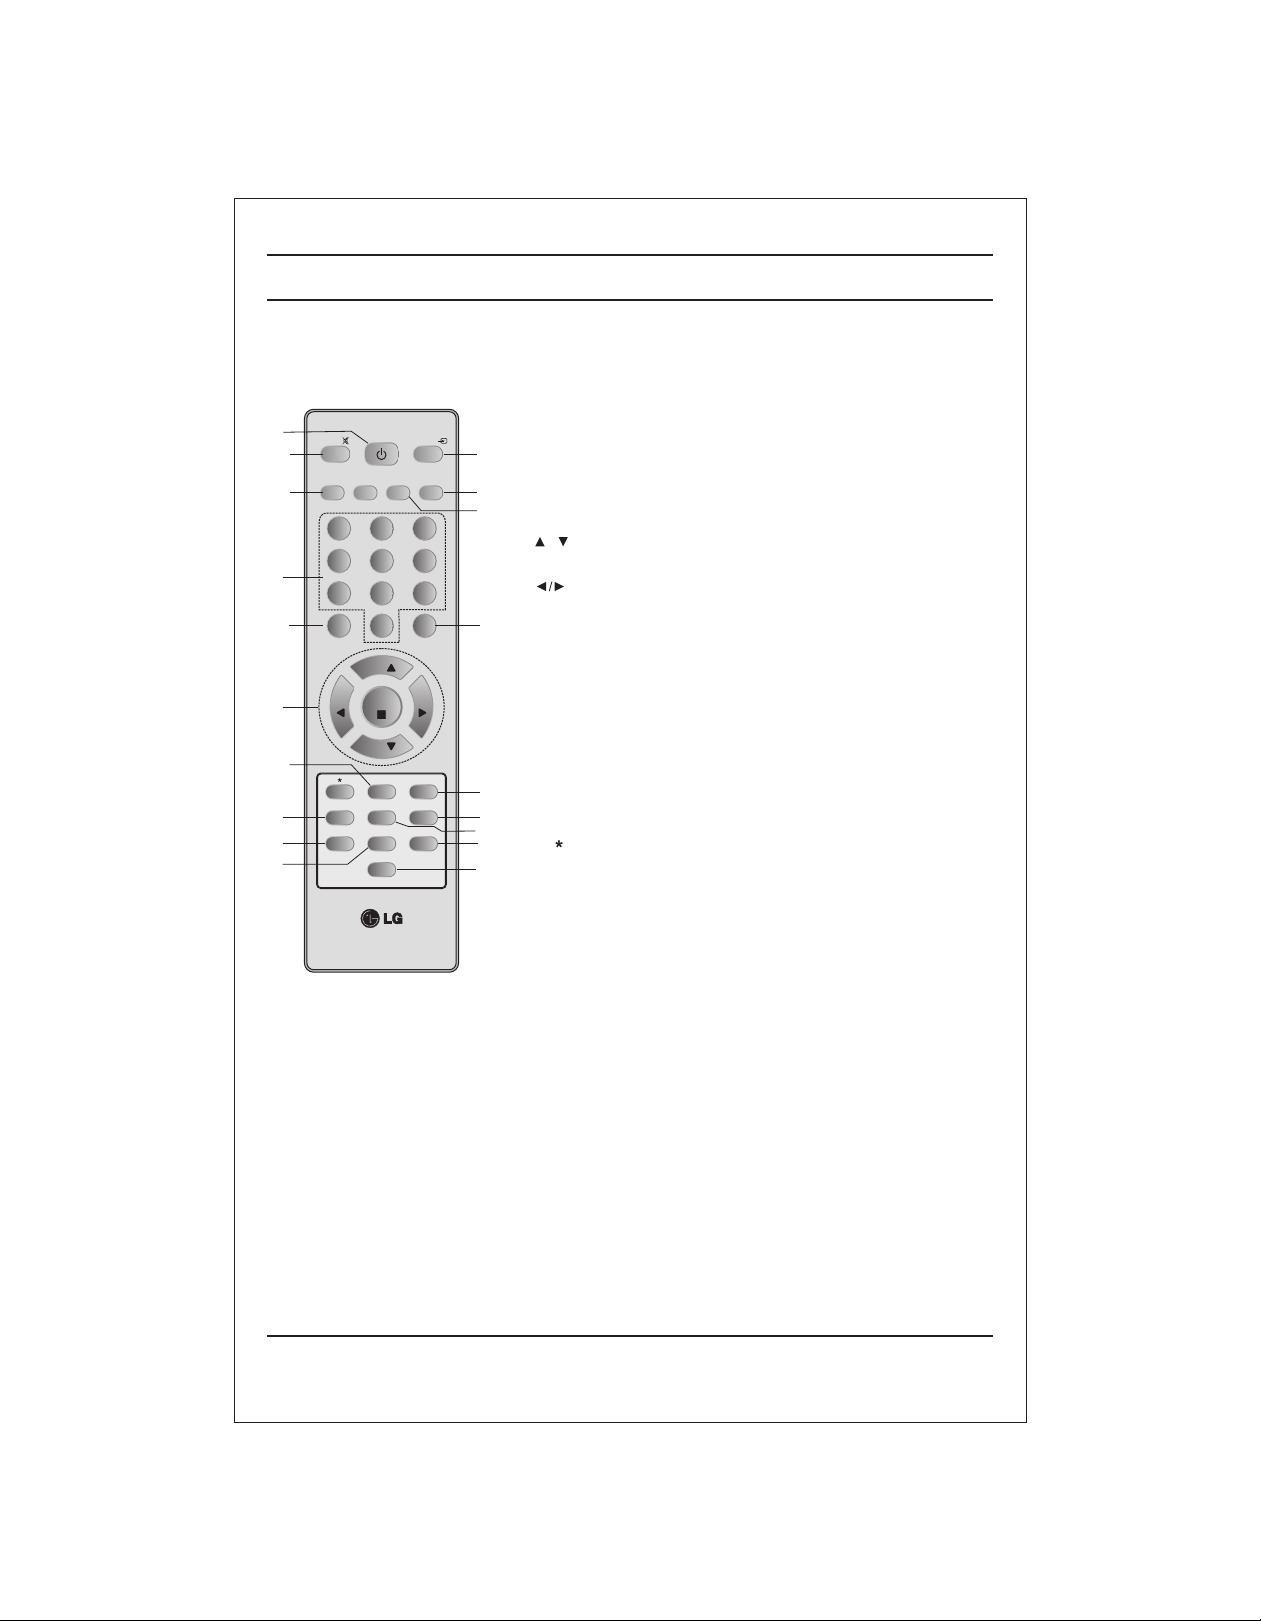
Remote control handset
Before you use the remote control handset, please install the batteries. See
the previous page.
1. POWER
switches the set from On to standby or standby to On.
POWER
MUTE
MUSIC
MOVIES
EQ/*
1 2
4
7
MENU
VOL
X-SORT
PSM
7
NEWS
5
8
0
PR
OK
PR
Q-VIEW
TURBO SOUND/*
SLEEP
I/II*
MM/*
TV/AV
SPORTS
ARC
3
6
9
EYE/*
VOL
X-LIST
XDP/*
SSM/*
2. NUMBER BUTTONS
10
15
17
12
switches the set On from standby or directly select a Programme
number.
3. MENU
selects a menu.
4. EYE/ (option)
5. / (Programme Up/Down)
(Volume Up/Down)
4
OK accepts your selection or displays the current mode.
6. Q. VIEW
7. PSM (Picture Status Memory)
8. XDP/*
9. MUTE
10. TV/AV
8
19
14
11. I/II/ (option)
11
*
switches the eye function On or Off.
selects a programme or a menu item.
switches the set On from standby.
adjusts the volume.
adjusts menu settings.
returns to the previously viewed programme.
recalls your preferred picture setting.
Select Excellent Digital Picture.
switches the sound On or Off.
selects TV or AV mode.
switches the set On from Standby.
selects the language during dual language broadcast. (option)
selects the sound output in AV mode.
12. X-LIST (option)
displays the programme table. press LIST / X-LIST key again to clear
the LIST / X-LIST table from the screen.
13. SLEEP
sets the sleep timer.
14. SSM/* (option) (Sound Status Memory)
recalls your preferred sound setting.
15. ARC
change picture format (Normal/Zoom).
16. X-SORT (option)
X-SORT switches X- SORT (option) On/Off.
17. MM/*
select music mode.
18. EQ/* (option)
direct access key to select EQ (Graphics Equalizer).
19 XD/TURBO SOUND (option). /*
selects Turbo Sound.
COLOURED BUTTONS : When Menu is On some of these buttons are used
for programme edit.
Remarks : 1. Some keys in remote can be non-functional, these keys
are used in other models & marked with *.
2. Colour keys will not work as direct access keys during X-Sort on mode.
# Remote Design / Aesthetic may vary from model to model.
5
Page 6
Location and function of controls
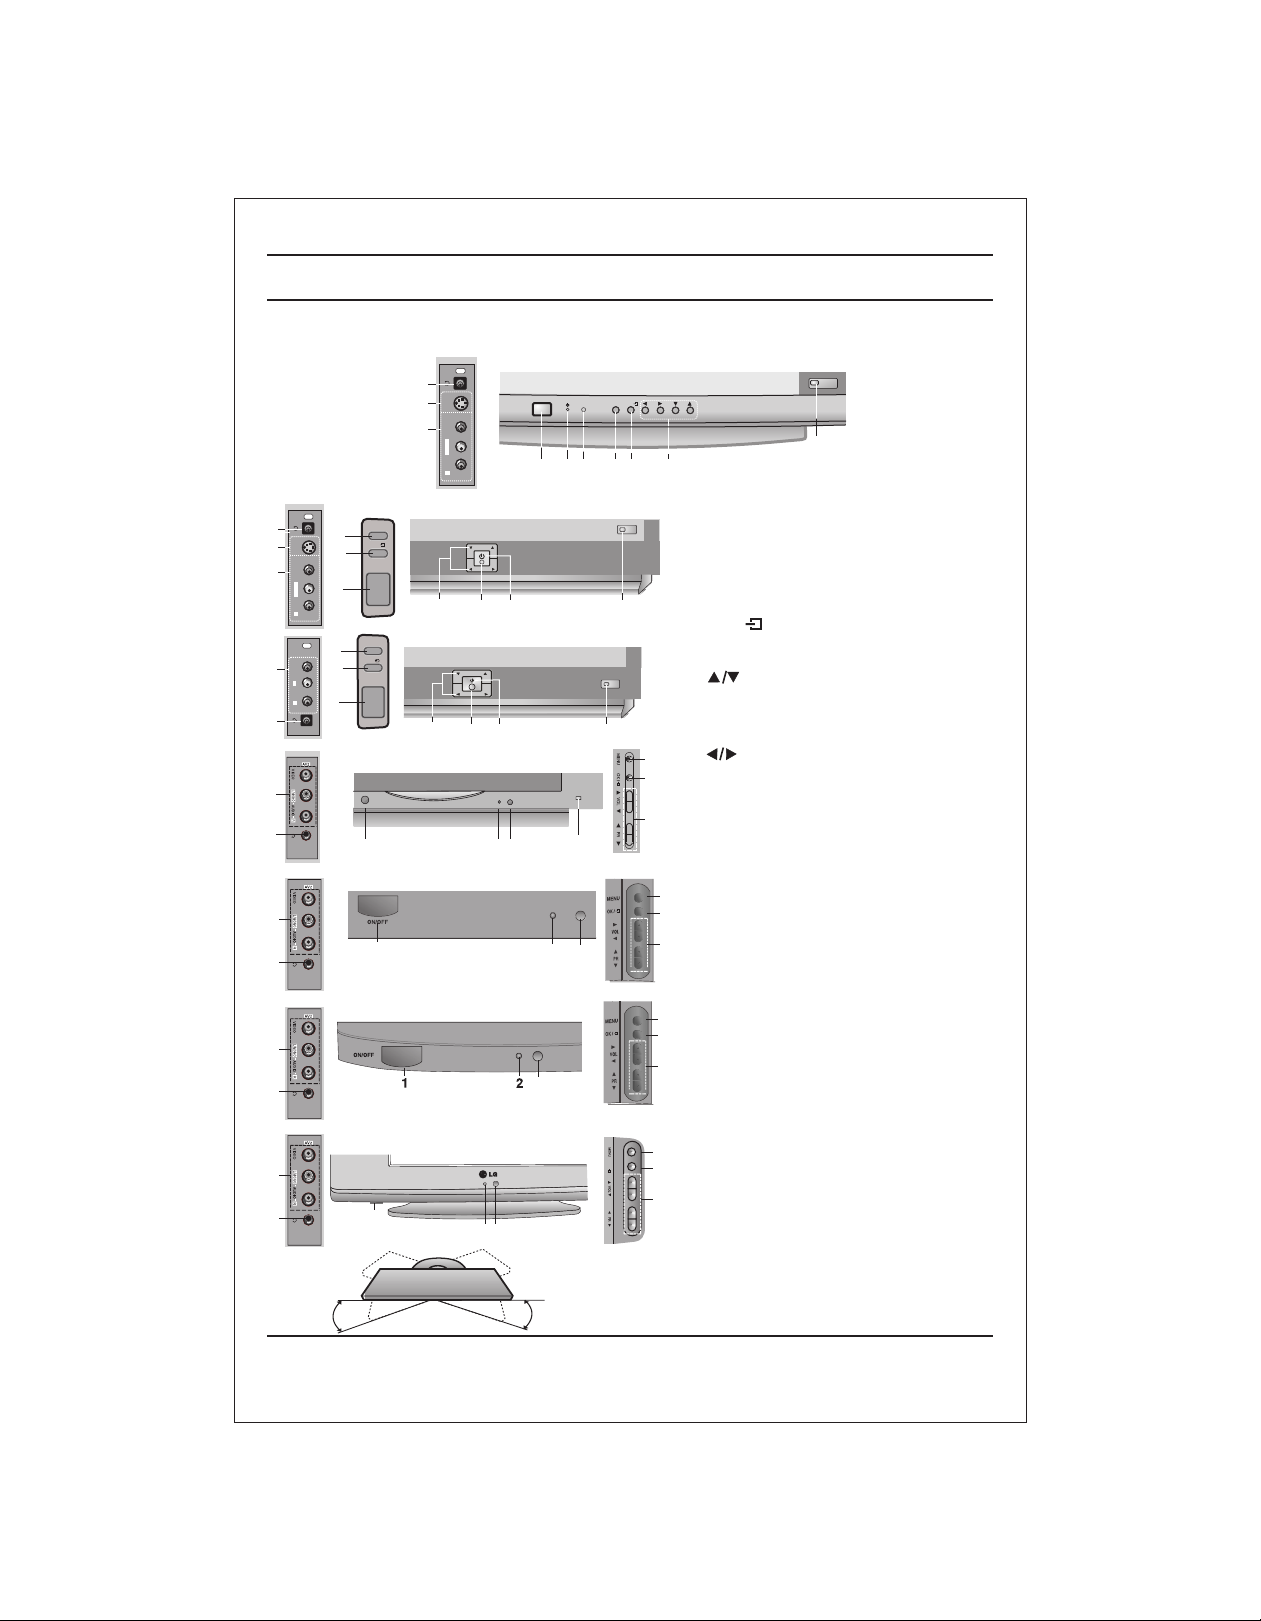
FRONT PANEL / SIDE PANEL
Shown below is a simplified representation of front or side panel, here shown may be somewhat different from your set.
AV3
7
S VIDEO
9
8
L/MONOVIDEO
AUDIO
R
AV3
7
9
8
8
3
S VIDEO
4
L/MONOVIDEO
1
AUDIO
R
AV2
3
4
LVIDEO
AUDIO
R
1
7
MENU
OK/
ON/OFF
MENU
OK/
ON/OFF
21FD5 series
5 2
21FE4 series
5 2
ON/OFF
1 2 3 4 56
PR
VOL
PR
VOL
6
21FU8 series
8
7
1
2
6
21FU1 series
8
7
1
21FU3 series
8
7
6
21SA4 series
8
7
1
2 6
MENU
OK/
VOL
PR
10
1. MAIN POWER
switches the set On or Off.
2. POWER/STANDBY INDICATOR
illuminates brightly when the set is in
standby mode.
dims when the set is switched On.
3. MENU
106
selects a menu.
4. OK /
accepts your selection of current mode
or to select AV/Component / RF mode.
5 (Programme Up/Down)
selects a programme or a menu item.
switches the set on from standby.
10
3
4
5
10
If X-Sort is on, switch to the next prog.
in same group.
(Volume Down/Up)
adjusts the volume.
adjusts menu settings.
6. REMOTE CONTROL SENSOR
Note : Only use the supplied remote
control handset. (When you use other,
they'll be not able to function).
7. HEADPHONE SOCKET (option)
3
Connect the headphone plug to this
4
socket.
5
2
6
8. AUDIO/VIDEO IN SOCKETS (AV2/AV3)
(option)
Connect the audio/video out sockets of
External equipment to these sockets.
3
9. S-VIDEO/AUDIO IN SOCKETS (S-AV)
4
(option)
Connect the video out socket of an S
5
VIDEO VCR to the S-VIDEO socket.
Connect the audio out sockets of the
S-VIDEO VCR to the audio sockets as
in AV3.
10. EYE (option)
3
OK/
adjusts picture according to the Surroun-
4
ding conditions.
5
Note : Do not place any heavy objects on
the TV set.
SWIVEL STAND
This feature is available with 21SA4 model only.
After installing the TV, you can adjust the TV
set manually to the left or right direction by
15 degrees to suit your viewing position.
6
Page 7
Basic operation
On and Off
1. Press the main power button at front side of set to switch On.
2. If the set is in standby mode, press the POWER, , TV/AV or
NUMBER buttons on the remote control handset to switch it On
fully.
3. Press the POWER button on the remote control handset.
The set reverts to standby mode.
4. Press the main power button again to switch the set Off.
Note : while the set is switched On and mains plug is disconnected,
if mains plugged again then set will switch to standby or power On.
MUTE
MUSIC
EQ/*
1 2
4
7
MENU
VOL
X-SORT
PSM
POWER
MOVIES
PR
PR
TURBO SOUND/*
5
8
0
OK
Q-VIEW
SLEEP
I/II/*
NEWS
MM/*
TV/AV
SPORTS
3
6
9
EYE/*
VOL
X-LIST
XDP/*
SSM/*
ARC
Programme selection
You can select a programme number with the or NUMBER
Buttons.
Volume adjustment
Press the button to adjust the volume.
Quick view
Press the Q.VIEW button to view the last viewed programme.
Mute function
Press the MUTE button. The sound is switched Off and the
display appears.
You can cancel it by pressing the MUTE, , SSM, XD / TURBO
SOUND, Woofer (option) button.
7
Page 8
MUTE
MUSIC
EQ/*
1 2
4
7
MOVIES
POWER
5
8
NEWS
MM/*
TV/AV
SPORTS
ARC
3
6
9
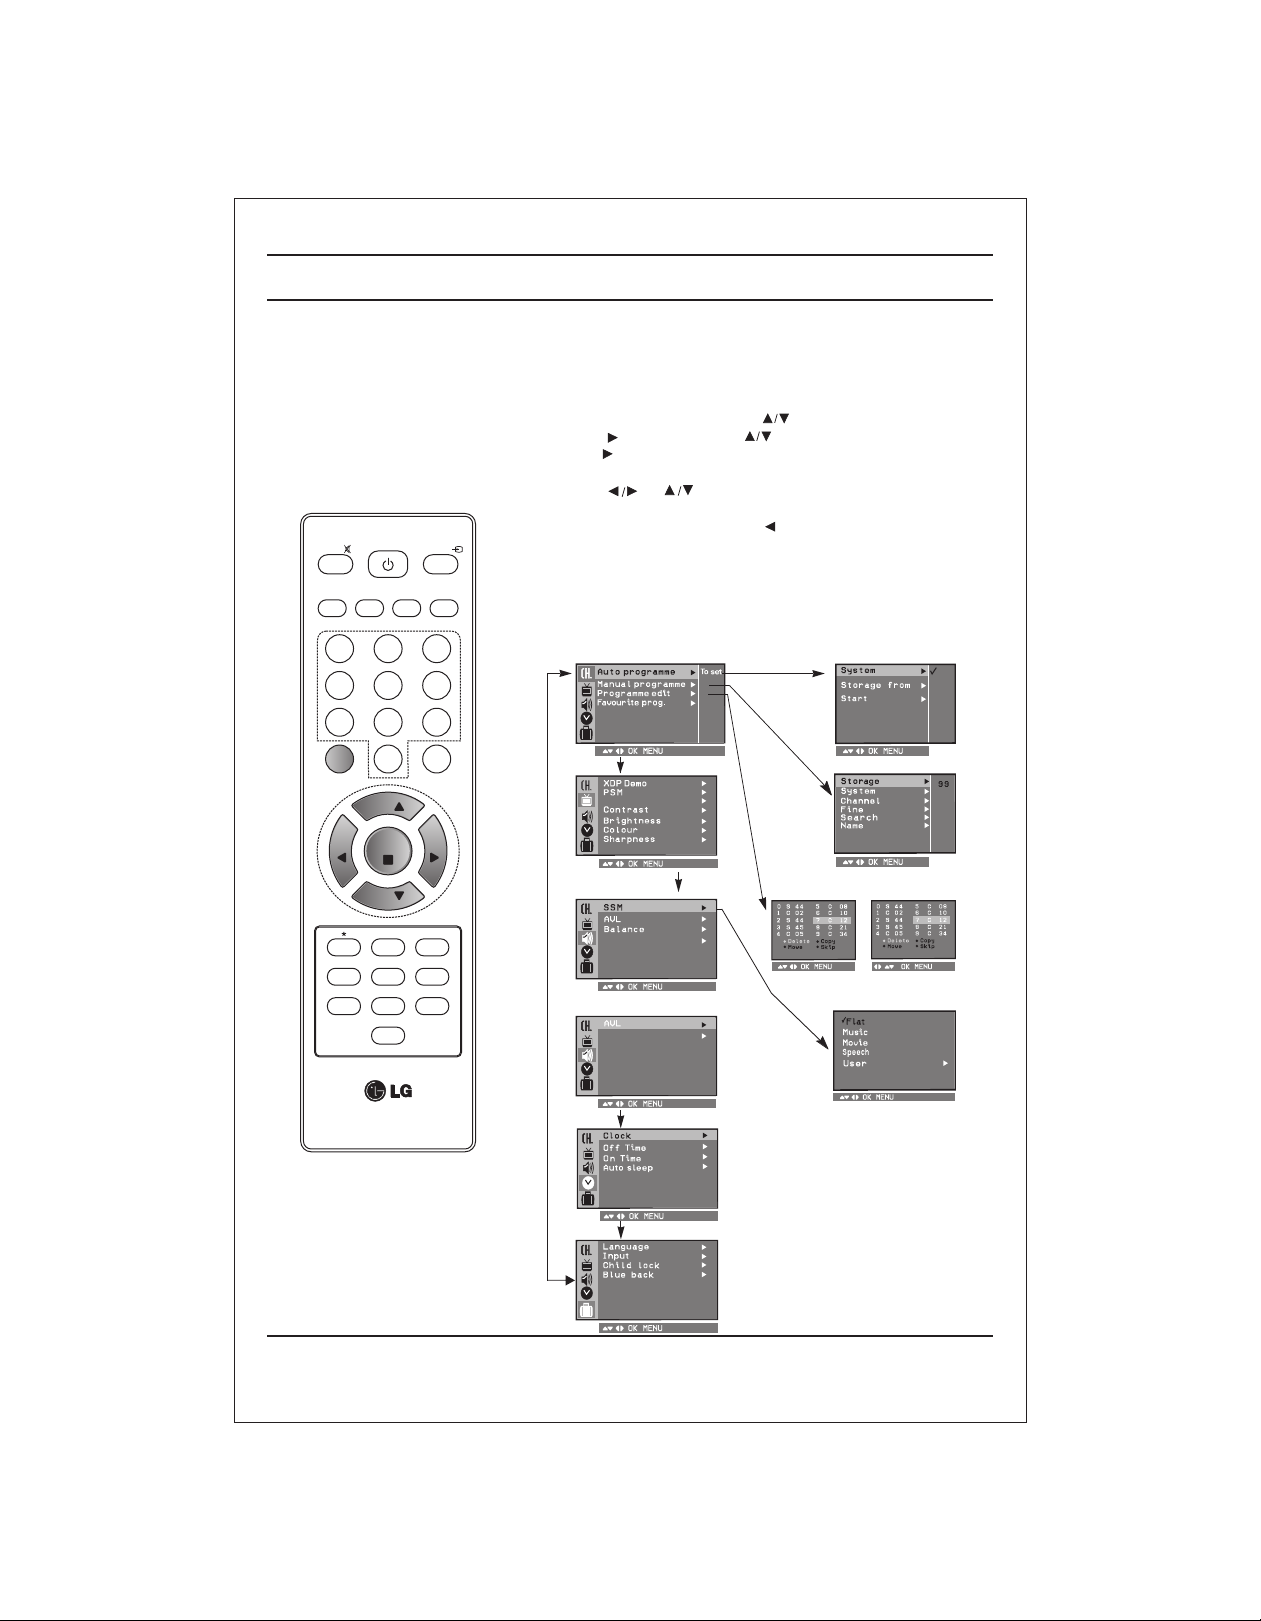
On screen menus
The dialogue between you and your set takes place on screen with
an operator menu. The buttons required for the operating steps are
also displayed.
Menu selection
1. Press the MENU button and then button to display each menu.
2. Press the button and then button to select a menu item.
3. Press the button to display the sub menu or the pull-down menu.
4 Change the setting of an item in the sub or pull-down
menu with or .
5. Press OK button to save the setting mode.
6. Repeatedly press the MENU or button to return to normal TV
viewing.
Note :
a. In the AV mode the Programme Menu is not displayed.
b. In sound menu woofer gain & AVL is optional (In some models)
c. In programme menu favourite is optional (In some models)
d. In picture menu, XDP demo is optional in some models.
Programme
Auto programme
BG
I
DK
M
MENU
VOL
X-SORT
PSM
0
PR
OK
PR
Q-VIEW
TURBO SOUND/*
SLEEP
I/II/*
EYE/*
VOL
X-LIST
XDP/*
SSM/*
Picture
CSM
Sound
(For Stereo Models)
Sound
(For Mono Models)
Volume
Time
Special
Manual programme
Programme edit
or
8
Page 9
Setting up TV stations
Programme
MUTE
MUSIC
MOVIES
EQ/*
1 2
4
7
MENU
VOL
X-SORT
PSM
POWER
NEWS
5
8
0
PR
OK
PR
Q-VIEW
TURBO SOUND/*
SLEEP
I/II/*
MM/*
TV/AV
SPORTS
3
6
9
EYE/*
VOL
X-LIST
XDP/*
SSM/*
ARC
Up to 200 programmes can be stored by programme numbers
(0 to199). Once you have preset the stations you will be able to use the
or NUMBER buttons to scan the stations you programmed.
Programmes can be tuned using automatic or manual modes.
Note : In some models up to 100 TV stations can be stored.
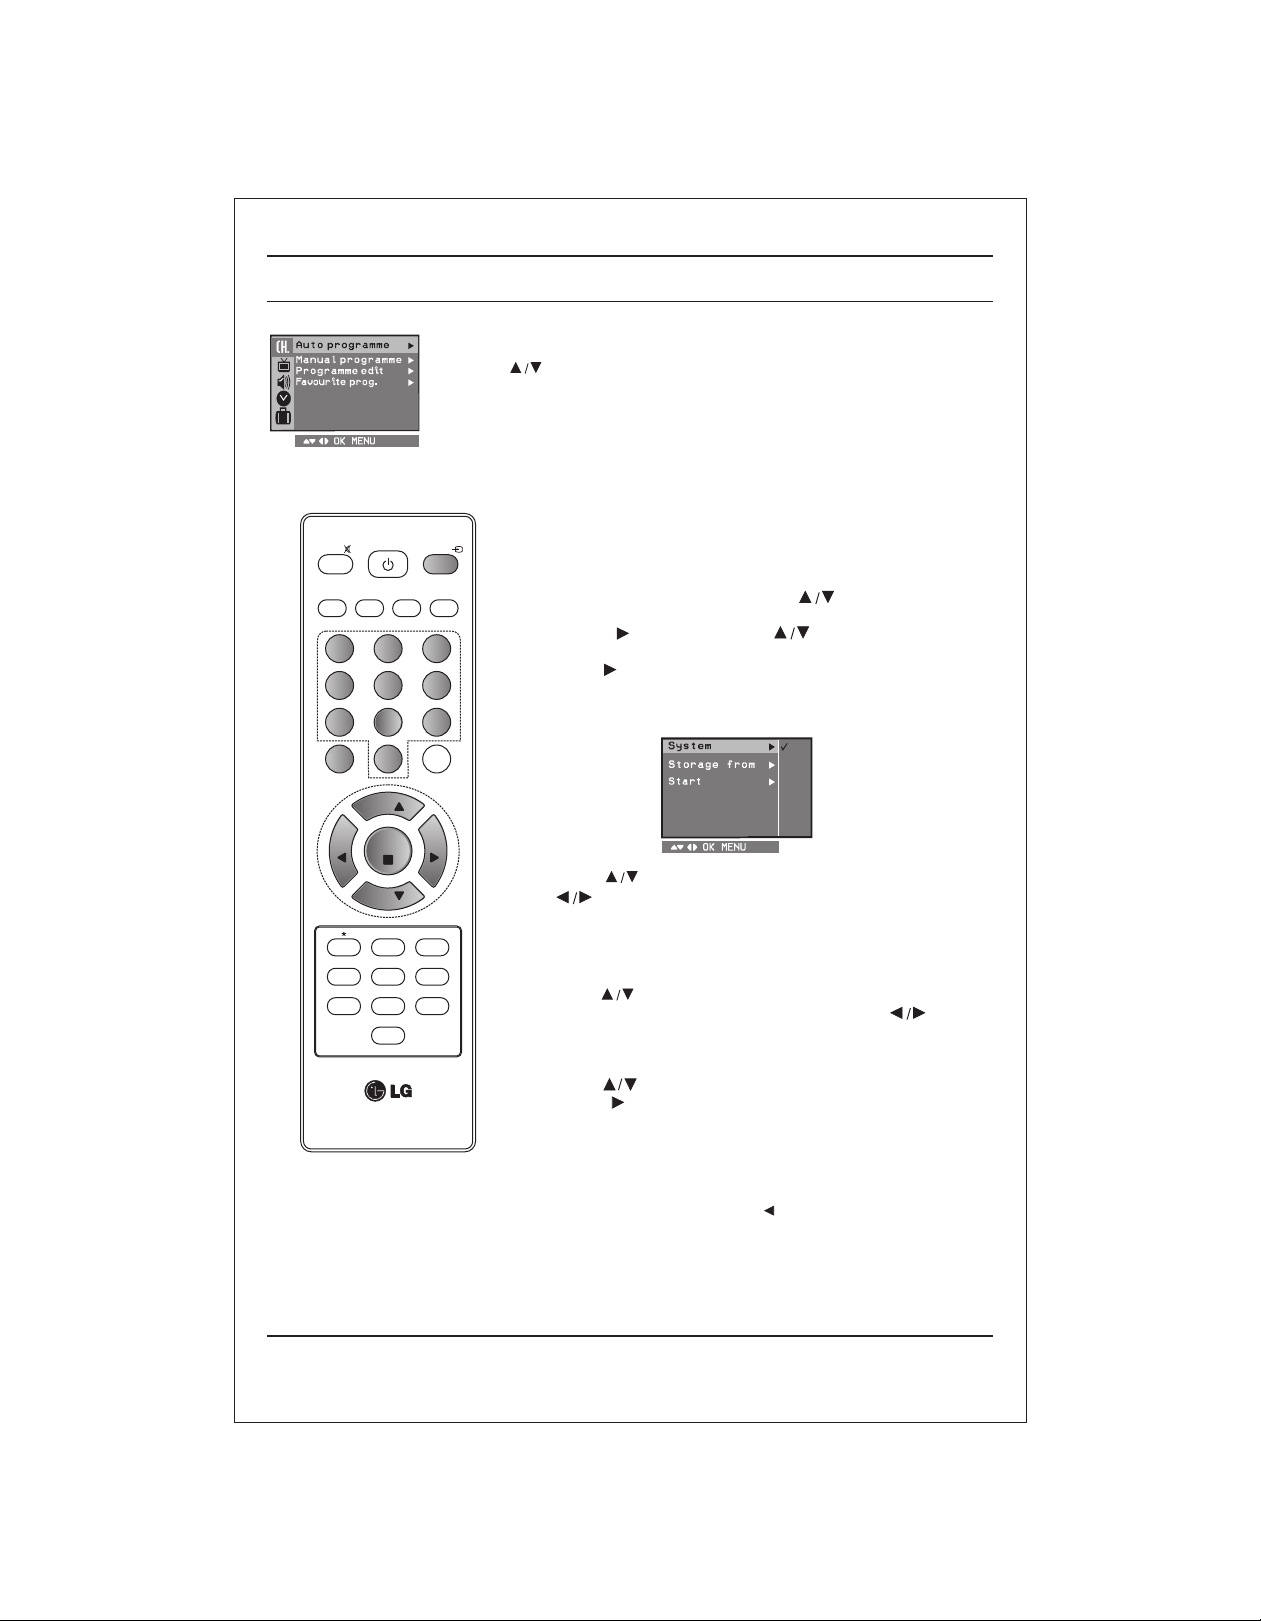
Auto programme tuning
All channel that can be received are stored by this method.
It is recommended that you use auto programme during installation of
this set.
1 . Press the MENU button and then button to select the
Programme menu.
2. Press the button and then button to select Auto
programme.
3. Press the button to display the Auto programme menu.
Auto programme
BG
I
DK
M
4. Press the button to select System. Select TV system with
the .
BG : (India/New Zealand/M.East/Africa/Australia)
I : (Hong Kong/South Africa)
DK : (East Europe/China/Africa/CIS)
M : (USA/Korea/Philippines) (option)
5. Press the button to select Storage from.
6. Select the beginning programme number with the button or
NUMBER buttons on the Storage from pull-down menu. Any
number under 10 is entered with a numeric '00' in front of it, i.e. '005'
for5. Press OK to store / save.
7. Press the button to select the start.
8. Press the button to begin auto programming. All receivable
stations are stored. To stop auto programming, press the MENU
button.
When auto programming is comp leted the Programme
edit menu appears on the screen. See the 'Programme edit' section
to edit the stored programme.
9. Repeatedly press the MENU or button to return to normal TV
viewing.
9
Page 10

Setting up TV stations
Programme
MUTE
MUSIC
EQ/*
MENU
X-SORT
MOVIES
1 2
4
7
VOL
TURBO SOUND/*
PSM
POWER
5
8
0
PR
OK
PR
Q-VIEW
SLEEP
I/II/*
NEWS
MM/*
TV/AV
SPORTS
3
6
9
EYE/*
VOL
X-LIST
XDP/*
SSM/*
ARC
Manual programme tuning
Manual programme offer you to manually tune and arrange the
programme in whatever order you desire. Also you can assign a
programme name with five characters to each.
1. Press the MENU button and select the Programme menu.
2. Press the button and then button to select Manual
programme.
3. Press the button to display the Manual programme menu.
Manual programme
4. Press the button to select Search. Press the button to
commence searching on the Search pull-down menu. If a
programme is found the search will stop. Press OK button to
store the programme. If programme reception is poor go for
fine tunning.
5. If this station is the one required, press the button to select
Storage. Select the desired programme number (0 to
199) with the button or NUMBER buttons on the Storage. pull-
down menu. Any number under 10 is entered with a numeric '00' in
front of it, i.e. '005' for 5. Press OK button to store the programme.
6. Press the button to select System. Select a TV system with the
button on the System pull-down menu;
BG : (India/New Zealand/M.East/Africa/Australia)
I : (Hong Kong/South Africa)
DK : (East Europe/China/Africa/CIS)
M : (USA/Korea/Philippines) (option)
7. Press the button to select Channel. Press button and
then to select V/UHF or Cable on the Channel pull-downmenu.
If possible, select the channel number 1 to 69 (V/UHF) and 1
to 47 (cable) directly with the number buttons, Any number
under 10 is entered with a numeric '0' in front of it i.e. '05 'for5.
8. Press the OK button to store it. The display Stored will appear.
9. To store another station, repeat steps 4 &5.
10
Page 11

Setting up TV stations
Programme
MUTE
MUSIC
EQ/*
MENU
MOVIES
1 2
4
7
VOL
POWER
5
8
0
PR
OK
PR
NEWS
MM/*
TV/AV
SPORTS
ARC
3
6
9
EYE/*
VOL
Assigning a programme name
1. Repeat the 'Manual programme tuning' steps 1 to 3.
2. Press the button to select Name.
3. Press the button on the Name pull-down menu. You can use a
blank, +, -, the numeric 0 to 9 and the alphabet A to Z.
With the button you can select in the opposite direction.
4. Select the next position by pressing the button and then take your
choice of the second character, then press OK button.
5. Repeatedly press the MENU or button to return to normal TV
viewing.
Fine tuning
Normally fine tuning is only necessary if reception is poor.
1. Repeat the 'Manual programme tuning' steps 1 to 3.
2. Press the button to select Fine.
3. Press the button to fine tune for the best picture and sound on
the Fine pull-down menu, then press OK button to store the setting.
4. Repeatedly press the MENU or button to return to normal TV
viewing.
5. Change of “ ” from Yellow to red indicates tuning is proper.
X-SORT
PSM
Q-VIEW
TURBO SOUND/*
SLEEP
I/II*
X-LIST
XDP/*
SSM/*
11
Page 12

Setting up TV stations
Programme
G
MUTE
MUSIC
EQ/*
1 2
4
7
MENU
VOL
X-SORT
PSM
MOVIES
TURBO SOUND/*
POWER
5
8
0
PR
OK
PR
Q-VIEW
SLEEP
I/II/*
NEWS
MM/*
TV/AV
SPORTS
3
6
9
EYE/*
VOL
X-LIST
XDP/*
SSM/*
Programme edit
This function enables you to delete or skip or copy the stored
programmes. Also you can move some stations to other programme
numbers.
1. Press the MENU button and then button to select the
Programme menu.
2. Press the button and then button to select programme
edit.
3. Press the button to display the Programme edit menu.
Programme edit
ARC
Deleting a programme
1. Select a programme to be deleted with the or button.
2. Press the RED button twice.
The selected programme is deleted, all the following programmes
are shifted up one position.
Copying a programme
1 . Select a programme to be copied with the or button.
2. Press the GREEN button.
All the following programmes are shifted down one position.
Moving a programme
1. Select a programme to be moved with the or button.
2. Press the YELLOW button.
3. Move the programme to the desired programme number with the
or button.
4. Press the YELLOW button again to release this function.
Programme edit
Skipping a programme number
1. Select a programme number to be skipped with the or
button.
2. Press the BLUE button. The skipped programme turns
to blue.
3. Press the BLUE button again to release the skipped programme.
When a programme number is skipped it means that
you will be unable to select it using the button during normal
TV viewing. If you want to select the skipped programme, directly
enter the programme number with the NUMBER buttons or select it
in the programme edit or list menu. Skipped prog. No. appears
BLUE.
4. Skipped programmes can be selected in X-List.
Repeatedly press the MENU to return to normal TV viewing.
12
Page 13

Setting up TV stations
Setting up TV stations
Favourite Prog. (option)
This function lets you select your favourite programmes directly.
1. Press the MENU button and then button to select the
Programme menu
2. Press the button and then button to select Favourite
Prog.
3. Press the OK button to display the Favourite Prog. menu.
Programme
MUTE
MUSIC
EQ/*
1 2
4
7
MENU
VOL
X-SORT
PSM
MOVIES
TURBO SOUND/*
POWER
5
8
0
PR
OK
PR
Q-VIEW
SLEEP
I/II/*
NEWS
MM/*
TV/AV
SPORTS
EYE/*
VOL
X-LIST
XDP/*
SSM/*
G
ARC
3
6
9
4. Press the button to select Favourite Prog. location.
5. Select a desired programme with the button or NUMBER
buttons. Any number under 10 is entered with a numeric '00' in front
of it i.e '005' for 5.
6. To store another programme repeat steps 4 to 5.
You can store up to 8 programmes.
7. Repeatedly press the MENU or button to return to normal TV
viewing.
Repeatedly press the FAVOURITE KEY button on remote to select
stored favourite programmes.
(option)
List
list.
list
List
List
list
list
13
list
list
list
Page 14

MUTE
MUSIC
EQ/*
1 2
4
7
MENU
VOL
MOVIES
POWER
5
8
0
PR
OK
NEWS
MM/*
TV/AV
SPORTS
ARC
3
6
9
EYE/*
VOL
Picture adjustment
XDP Demo (option)
1. Press the MENU button and to select the picture menu.
2. Press the to select XDP Demo.
3. Screen splits for Demo.
4. Press any button for XDP Demo exit.
PSM (Picture Status Memory)
1. Press the PSM button on the remote to change for desired
PSM setting.
Note: PSM status change to user automatically when contrast,
brightness, colour and sharpness set manually.
You can also recall a desired picture (Dynamic, Standard,
Mild, Game, or User) with PSM button on the remote control.
The pic t ure Dyn a mic , St anda rd, Mild and Gam e ar e
programed for good picture reproduction at the factory and
cannot be changed.
CSM (Colour Status Memory)
.
and
CSM
CSM
CSM.
Reddish
Greenish
Bluish
X-SORT
PSM
PR
Q-VIEW
TURBO SOUND/*
SLEEP
I/II/*
X-LIST
XDP/*
SSM/*
Picture adjustment
You can adjust picture contrast, brightness, colour, sharpness and Tint
(NTSC input only) to the levels you prefer.
1. Press the MENU button and then button to select the Picture
menu.
2. Press the button and then button to select Contrast, Brightness,
Colour, Sharpness or Tint.
Picture
CSM
3. Press the button to make appropriate adjustments on each
sub menu.
CONTRAST
You can also select User or standard PSM setting by directly
pressing PSM button.
4. Press the OK button to store it for the picture User.
5. Repeatedly press the MENU or button to return to normal
TV viewing.
14
Page 15

MUTE
MUSIC
EQ/*
1 2
4
MOVIES
POWER
5
NEWS
MM/*
TV/AV
SPORTS
ARC
3
6
Picture adjustment
Eye (option)
In some models, the set will automatically adjust the picture according to
the surrounding conditions. This will enable you to enjoy the most suitable
picture according to the surroundings.
Press the EYE/ button on remote to switch the eye function On or Off.
When the eye function is On, the most suitable picture is automatically
adjusted according to the surrounding.
At this time the display in green does not appear continuously but
the display in yellow appears each time the picture condition
changes.
Note : If PSM key is pressed or any of the picture setting are varied,
then EYE automatically switches Off.
Excellent digital picture selection (option)
When this function is On, picture quality will be enhanced.
Repeatedly press the XDP/* button to switch On or Off.
7
MENU
VOL
X-SORT
PSM
8
0
PR
OK
PR
Q-VIEW
TURBO SOUND/*
SLEEP
I/II/*
EYE/*
VOL
X-LIST
XDP/*
SSM/*
9
Note : If you press the PSM or EYE /* button with the XDP/* function, the
excellent digital picture function is automatically switched Off.
ARC
You can watch TV in various picture formats; Normal, Zoom.
Repeatedly press the ARC button to select your desired picture
format.
Normal (4:3)
This picture format is 4 : 3 of general TV.
Zoom (14:9)
You can enjoy the cinema in a vast screen through the Zoom mode.
The screen 4:3 is magnified to the upper/lower sides so that the
screen 16:9 is full. The bottom and top of the picture may be lost.
Note :
a. When you switch the set to Off, the Zoom picture format is reset
to the Normal (4:3).
b. This OSD will appear only in English.
15
Page 16

Sound adjustment
Sound
MUTE
MUSIC
EQ/*
1 2
4
7
MENU
VOL
X-SORT
PSM
MOVIES
TURBO SOUND/*
POWER
5
8
0
PR
OK
PR
Q-VIEW
SLEEP
I/II/*
NEWS
MM/*
TV/AV
SPORTS
EYE/*
VOL
X-LIST
XDP/*
SSM/*
Sound adjustment
You can select your preferred sound setting: Flat, Music, Movie,
User, Speech and you can also adjust the sound frequency of
equalizers and balance.
If you switch AVL (option) to On, the set automatically keeps on an
volume level even if you change programmes.
equal
1. Press the MENU button and then button to select the
Sound menu
2. Press the button and then button to select the desired
sound item; SSM, AVL, Balance.
3. Press the button in SSM
Press to select Flat, Music, Movie, Speech or User.
ARC
3
6
9
a. Select User by pressing the /OK button.
b. Select a sound band by pressing the button.
c. Make appropriate sound level with the button.
d. Press the OK button to store it for the sound User.
O.1
5 Band (option) 3 Band (option)
KHz
KHz
1.0 10
O.1O.4 1.2 4.0 10
It will auto store.
To recall your preferred setting press the SSM/* button until the
desired sound (Flat, Music, Movie, Speech or User) appears.
The sound Flat, Music, Movie, and Speech are programmed for
good sound reproduction at the factory and cannot be changed.
Notes :
1. If you press the SSM/* button after making appropriate
adjustment in Sound menu, the display User automatically
appears even though you have already set a factory preset
setting, Flat, Music, Movie or Speech.
2. AVL options will not be available in some models.
AVL (Auto volume leveler ) (option)
IF you select AVL on, set automatically keeps on an equal volume
level even if you change programmes.
1. Press the MENU button and select the Sound menu.
2. Press the button and then button to select AVL.
3. Press the button to select on or off the AVL pull-down menu.
4. Repeatedly press the MENU or button to return to normal TV
viewing.
Balance adjustment (option)
You can adjust balance.
1. Press the MENU button and select the Sound menu.
2. Press the button and then button to select Balance.
3. Make desired adjustment with the on the Balance pull-
down menu.
4. Repeatedly press the MENU or button to return to normal TV
viewing.
Woofer Gain (option)
select woofer gain from sound menu and press to adjust
woofer gain.
Woofer On / Off (option)
Press GREEN key on remote to switch Off/On Woofer.
16
Page 17

Sound adjustment
XD / Turbo Sound (option)
When this function is On, it will give surround effect as well as
loudness will be increased.
Repeatedly press the XD/Turbo sound/* button to switch On or Off.
MUTE
MUSIC
EQ/*
1 2
4
7
MENU
VOL
X-SORT
PSM
MOVIES
TURBO SOUND/*
POWER
5
8
0
PR
OK
PR
Q-VIEW
SLEEP
I/II/*
NEWS
MM/*
TV/AV
SPORTS
EYE/*
VOL
X-LIST
XDP/*
SSM/*
Xd/Turbo Sound on
XD/Turbo Sound Off
XD/Turbo Sound On XD/Turbo Sound Off
Stereo/Dual reception (option)
Stereo/dual is an optional function.
When a programme is selected, the sound information for the
station appears after the programme number and station name
disappear.
ARC
3
6
9
Mono sound selection
In stereo reception, if the stereo signal is weak, you can switch to
mono by pressing the I/II/* button twice. In mono reception the depth
of sound is improved. To switch back to stereo, press the I/II/* button
twice again.
Language selection for dual language broadcast
If a programme received in two languages (dual language), you can
switch to DUAL I, DUAL II or DUAL I+II by pressing the I/II/* button
repeatedly.
DUAL I sends the primary broadcast language to the speakers.
DUAL II sends the secondary broadcast language to the speakers.
DUAL I+II sends a separate language to each speaker.
Sound output selection (option)
In AV mode, you can select output sound for the left and right
speakers. Repeatedly press the I/II/ on remote button to select
the sound output.
L+R : Audio signal from audio L input is sent to left speaker and
audio
signal from audio R input is sent to right speaker.
L+L : Audio signal from audio L input is sent to left and right
R+R : Audio signal from audio R input is sent to left and right
Broadcast On Screen Display
Mono MONO
Stereo STEREO
Dual DUAL I
speakers.
speakers.
Equalizer(option)(Red Button)
Equalizer is displayed on the screen by pressing red button.
O.1
KHz
KHz
1.0 10
O.1O.4 1.2 4.0 10
5 Band (option) 3 Band (option)
17
Page 18

Other functions
Time
MUTE
MUSIC
EQ/*
1 2
4
7
MENU
VOL
X-SORT
PSM
MOVIES
TURBO SOUND/*
POWER
5
8
0
PR
OK
PR
Q-VIEW
SLEEP
I/II/*
NEWS
MM/*
TV/AV
SPORTS
3
6
9
EYE/*
VOL
X-LIST
XDP/*
SSM/*
--:--
ARC
Time functions
The time uses 24 hrs. system and must be set to the correct time
before operating the set.
1. Press MENU and to select time menu .
2. Press button to select time menu.
3. After selecting ‘Time Function’ press key to enter ‘Time’.
4. Set Time using and keys.
5. Press OK to store.
6. Repeatedly press MENU or to return to normal TV viewing.
Note :
a. In the event of power interruption, time will be reset.
b. Time resets if mains is unplugged.
c. Timer accuracy is 15 sec.
±
On/Off Time
On/Off time function is used to automatically On/Off the set at
preferred time.
Off Time
1. Press the MENU button and then button to select the Time
menu.
2. Press the button and then button to select Off Time.
3. Press OK
4. Select and adjust hour and minute by pressing the , button.
5. Repeatedly press the button to select Off Time.
6. Press the button repeatedly to set Off Time On /Off.
7. Repeatedly press the MENU or button to return to normal
viewing.
On Time
1. Press the MENU button and then button to select the Time
menu.
2. Press the button and then button to select On Time.
3. Press OK
4. Select and adjust hour and minute by pressing the , button.
5. Press the button to select On Time.
6. Press the button repeatedly to set On Time On /Off.
7. Repeatedly press the MENU or button to return to normal
viewing.
Auto sleep
If you select Auto Sleep On the set will automatically switch itself to
standby mode approximately ten minutes after a TV station stops
Broadcasting.
1. Press the MENU button and then button. to select the Time
menu.
2. Press the button and then button to select Auto Sleep.
3. Press the and button to select On/Off.
4. Repeatedly press the MENU or button to return to normal TV
viewing.
Note :
a. ON time function works only in standby mode.
b. To cancel the set On/Off time, set the On/Off timer off.
c To view the remaining On/Off time select the Time menu.
d. When you switch the main power Off, the Time is reset
and the On/Off time is Off.
e. Timer accuracy is 15 sec.
18
Page 19

MUTE
MUSIC
EQ/*
1 2
4
7
MENU
VOL
X-SORT
PSM
MOVIES
TURBO SOUND/*
POWER
5
8
0
PR
OK
PR
Q-VIEW
SLEEP
I/II/*
NEWS
MM/*
TV/AV
SPORTS
EYE/*
VOL
X-LIST
XDP/*
SSM/*
Other functions
Sleep timer
You don't have to remember to switch the set Off before you go to
sleep. The sleep timer automatically switches the set to standby after
the preset time elapses.
Press the SLEEP button to select the number of minutes.
The display ---- will appear on the screen, followed by 10, 20, 30, 60,
90,120, 180 and 240. The timer begins to count down from the number
of minutes selected.
Note :
a. To view the remaining sleep time, press the SLEEP button once.
b. To cancel the sleep time repeatedly press the SLEEP button
until the display ---- appears.
c. When you switch the set off, the set releases the preset sleep time.
X-SORT (option)
ARC
3
6
9
You can select the different programmes and add them into different
categories (Music, Movies, News, Sports).
Press X-SORT button on the remote to switch On/Off the X-SORT
function.
X-Sort On Sel: Music
Adding a program to a desired category
1. Press the X- LIST button to display the list of the programme on the
screen.
2. Use or buttons to scrolls between the programmes and
then press OK to select the desired programme.
3. Press appropriate coloured key to add the selected programme
in the desired category. Press again the coloured buttons to F R EE
the programme from the X-Sort Categories.
X-Sort List
10 C 05 15 C 07
11 C 04 16 C 23
12 C 09 17 C 24
13 C 11 18 S 40
14 C 16 19 S 45
MUSIC
NEWS
FREE
MOVIES
SPORTS
4. Red button-For MUSIC programmes category.
5. Green button- MOVIES programmes category.
6. Yellow button- NEWS programmes category.
7. Blue button- programmes category.
For
For
For SPORTS
If X-Sort is On, Press the coloured key repeatedly to switch to the
next programme in the same group.
When X-SORT is On:
MUSIC (RED KEY) : Selects MUSIC channels group.
MOVIES (GREEN KEY) : Selects MOVIES channels group.
NEWS (YELLOW KEY) : Selects NEWS channels group.
SPORTS (BLUE KEY) SPORTS
PR+/- keys also change the channel for selected group only.
: Selects channels group.
Note: X- LIST, X-SORT keys works only in RF mode (TV mode).
19
Page 20

Other functions
Special
MUTE
MUSIC
EQ/*
1 2
4
7
MENU
VOL
X-SORT
PSM
MOVIES
TURBO SOUND/*
POWER
5
8
0
PR
OK
PR
Q-VIEW
SLEEP
I/II/*
NEWS
MM/*
TV/AV
SPORTS
EYE/*
VOL
X-LIST
XDP/*
SSM/*
On screen language selection (option)
The menu can be displayed on the screen in desired language.
First select your language.
1. Press the MENU button and then button to select the Special
menu.
2. Press the button and then the button to select language in
pull down menu.
3. Press OK button.
All the On screen displayed will appear in the selected language.
4. Repeatedly press the MENU or Button to return normal TV
viewing.
TV and AV Input (option)
Input can be set to TV or AV mode. AV mode is used when a videocassette
recorder (VCR), or other equipment connected to the set.
Note: When a VCR is connected via the aerial socket; the set is used
in TV mode. See the connection of external equipment’ section.
ARC
3
6
9
1. Press the menu button and then button to select the special menu.
2. Press the button and then button to select Input.
3. Press the button and to select TV, AV1, AV2 (option),
Component (option)
Note: Avoid giving input at Lout or Rout socket on the back of the set.
To return TV mode, press the or NUMBER button.
Alternatively you can select th TV or AV mode by pressing the TV/AV
button on remote or by pressing OK / button on front panel of TV set.
Child lock
The child lock can be set so that the remote control handset is needed to
control. This feature can be used prevent unauthorized viewing.
1. Press the MENU button and the button to select the special
menu.
2. Press the button and then button to select the child lock.
3. Press the and button on the remote control handset to
select On.
4. Repeatedly press the MENU or button to return to normal
TV viewing.
With the lock On, the display Child Lock On appears on the screen if any
button on the front panel is pressed while viewing the TV.
Note: The display Child Lock On will appear on the screen if any button
on the front panel is pressed while displaying the menus.
Blue Back
If you select On on the blue back pull-down menu, the blue background
appears on the screen when there is no or poor signal.
1. Press the MENU button and the button to select the special
menu.
2. Press the button and then button to select the Blue back.
3. Press the and button on the remote control handset to
select On.
4. Repeatedly press the MENU or button to return to normal TV
viewing.
Music Mode(Yellow Button) (option)
You can hear music while the tv screen is off using this function.
1. Press the yellow button to start the music mode.
2. Press any key to exit from music mode except vol. keys and yellow key.
3. Volume levels can be changed (Vol+/Vol-) in music mode.
Music Mode On
20
Page 21

Connection of external equipment
You can connect additional equipment, such as VCRs, camcorders
OK
INPUT
VCR
OK
INPUT
OK
VCR
VCR
VCR
B VIDEO
L/MONOVIDEO
AUDIO
R
VCR
VCR
S-VIDEO VCR
S-VIDEO VCR
OK
OK
AV3
B VIDEO
L/MONOVIDEO
AUDIO
R
AV3
etc. to your set.
Here shown may be some what different from your set.
Aerial socket
1. Connect the RF out socket of the VCR to the aerial socket on the
back of the set.
2. Connect the aerial cable to the RF aerial in socket of the VCR.
3. Store the VCR channel on the programme number 0 using the
‘Manual programme tuning’ section.
4. Select the programme number where the VCR channel is
stored.
5. Press the PLAY button on the VCR.
Audio / Video in / out sockets (option)
1. Connect the audio/video out sockets of the VCR to audio/video
in sockets of the set and in sockets of the VCR to out sockets of
the set.
2. If the VCR is connected to the AV sockets on the set, press the
TV/AV button to select AV1, AV2 (option) or AV3 (option).
3. Press the PLAY button on the VCR.
The VCR playback picture appears on the screen.
You can also record programme received by the TV on video
tape via audio/video out sockets.
Euro scart socket (option)
1. Connect the Euro scart socket of the VCR to the Euro scart
socket of the set.
2. Press the PLAY button on the VCR.
If your VCR outputs a switching voltage when connected to Euro
scart socket, the set will switch to AV 1 mode automatically. But
if you want to keep on watching TV mode, press the or
NUMBER buttons.
Otherwise press the TV/AV button on the remote control
handset to select AV1. The VCR playback picture appears on
the screen.
You can also record programme received by the TV on video
tape.
Note : Signal type RGB, i.e. the signals red, green and blue can only
be selected for the Euro scart socket, These signals are transmitted,
for example, by a pay TV decoder, game machine or photo CD unit,
etc.
S-video / Audio in sockets (S-AV) (option)
When connecting an S-VIDEO VCR to the S-VIDEO socket, the
picture quality will be further improved.
1. Connect the S-VIDEO socket of the VCR to the S-VIDEO socket
of the set.
2. Connect the audio cable from the S-VIDEO VCR to the AUDIO
sockets of the set.
3. Select S-VIDEO by pressing the TV/AV button repeatedly.
4. Press the PLAY button on the VCR.
The VCR playback picture appears on the screen.
21
Page 22

Connection of external equipment
Component in sockets (option)
1. Connect the COMPONENT video output sockets (Y Cb Cr/ Y
Pb Pr) of the COMPONENT to the COMPONENT INPUT
sockets (Y Pb Pr) on the set.
COMPONENT
B VIDEO
L/MONOVIDEO
AUDIO
R
AV3
2. Connect the audio cable from the COMPONENT to AUDIO
IN socket of AV1.
3. Press the TV/AV button to select COMPONENT.
4. Press the PLAY button on the COMPONENT.
The COMPONENT playback picture appears on the screen.
Headphone socket (option)
Some models which have a headphone socket can perform this
function.
Insert the headphone plug to the headphone socket of the set.
You can listen to the sound through the headphone. In this case
main speaker sound will cut off. In woofer models when you plug
headphone, woofer speaker is On.
If you press the MUTE button, the sound from the headphone is
switched Off.
22
Page 23

Symptoms
No picture, no sound
Sound OK, poor picture
Picture OK, poor sound
Troubleshooting check list
Picture blurred
Lines or streaks in picture
Poor reception on some channels
No colour
Poor colour
Remote control does not work
Check following items and try
to adjust these
The mains plug-(plugged in and
switched On)
Is the TV switched On
Try another channel (weak signal)
Check aerial (plugged into TV?)
Check aerial (broken lead?)
Check aerial
Check for local interference
Adjust contrast
Adjust brightness
Adjust colour
Adjust volume
Check the batteries in remote control
Check Audio/Video sockets (VCR only)
NOTE :
i) Colour patch might appear in your TV set if you rotate or shift the position of the set while it is On or in
standby mode. If patch appears in your TV set try the following before calling your service centre or
dealer. Place the TV set in desired position and switch it Off by the main power switch. Allow the set to
cool down for at least 30 minutes and then switch it On. The degaussing circuit (inbuilt) in your set will
remove the patch automatically. Please call service only in case this operation does not help.
23
Page 24

 Loading...