

Page 1

OWNER’S MANUAL
Colour Television
Please read this manual carefully before operating your set.
Retain it for future reference.
Record model number and serial number of the set.
See the label attached on the back cover and quote this information to your dealer when you require service.
Model number :
Serial number :
P/NO : MFL66987114-EN (MC059D)(1301-REV00)
www.lg.com
Page 2
Contents
2
Power
This set operates on an AC mains supply, the voltage is as indicated on the label on the back cover.
Never apply DC power to the set. In the event of
thunderstorms or powercuts, please pull out the
aerial and mains plugs.
Press the POWER button on the front panel or side panel
to turn off the TV when the TV set is not being used for a
long time.It is recommended to remove the plug from the
wall outlet(Power point).
Disconnecting device from mains
Mains plug is the disconnecting device. The plug
must remain readily operable
Warning
To prevent fire or shock hazard, do not expose the
set to rain or moisture.
Do not place anything containing liquid on top of
the set, this may cause a fire or could give an
electric shock.
Service
Never remove the back cover of the set as this
can expose you to very high voltage and other
hazards. If the set does not operate properly,
unplug it and call your dealer.
Aerial
Connect the aerial cable to the socket on the back
cover. For the best reception an outdoor aerial
should be used.
Location
Position your set so that no bright light or sunlight
falls directly onto the screen. Care should be
taken not to expose the set to any unnecessary
vibration, moisture, dust or heat. Also ensure that
the set is placed in a position to allow a free flow
of air. Do not cover the ventilation openings on the
back cover.
Installation
Installation.........................................................2
Connection of external equipment..................2
Location and function of controls...................3
Basic operation.................................................4
Other functions.................................................4
On screen menus..............................................5
Setting up TV stations......................................5
Picture adjustment............................................6
Time setting.......................................................6
Troubleshooting check list..............................7
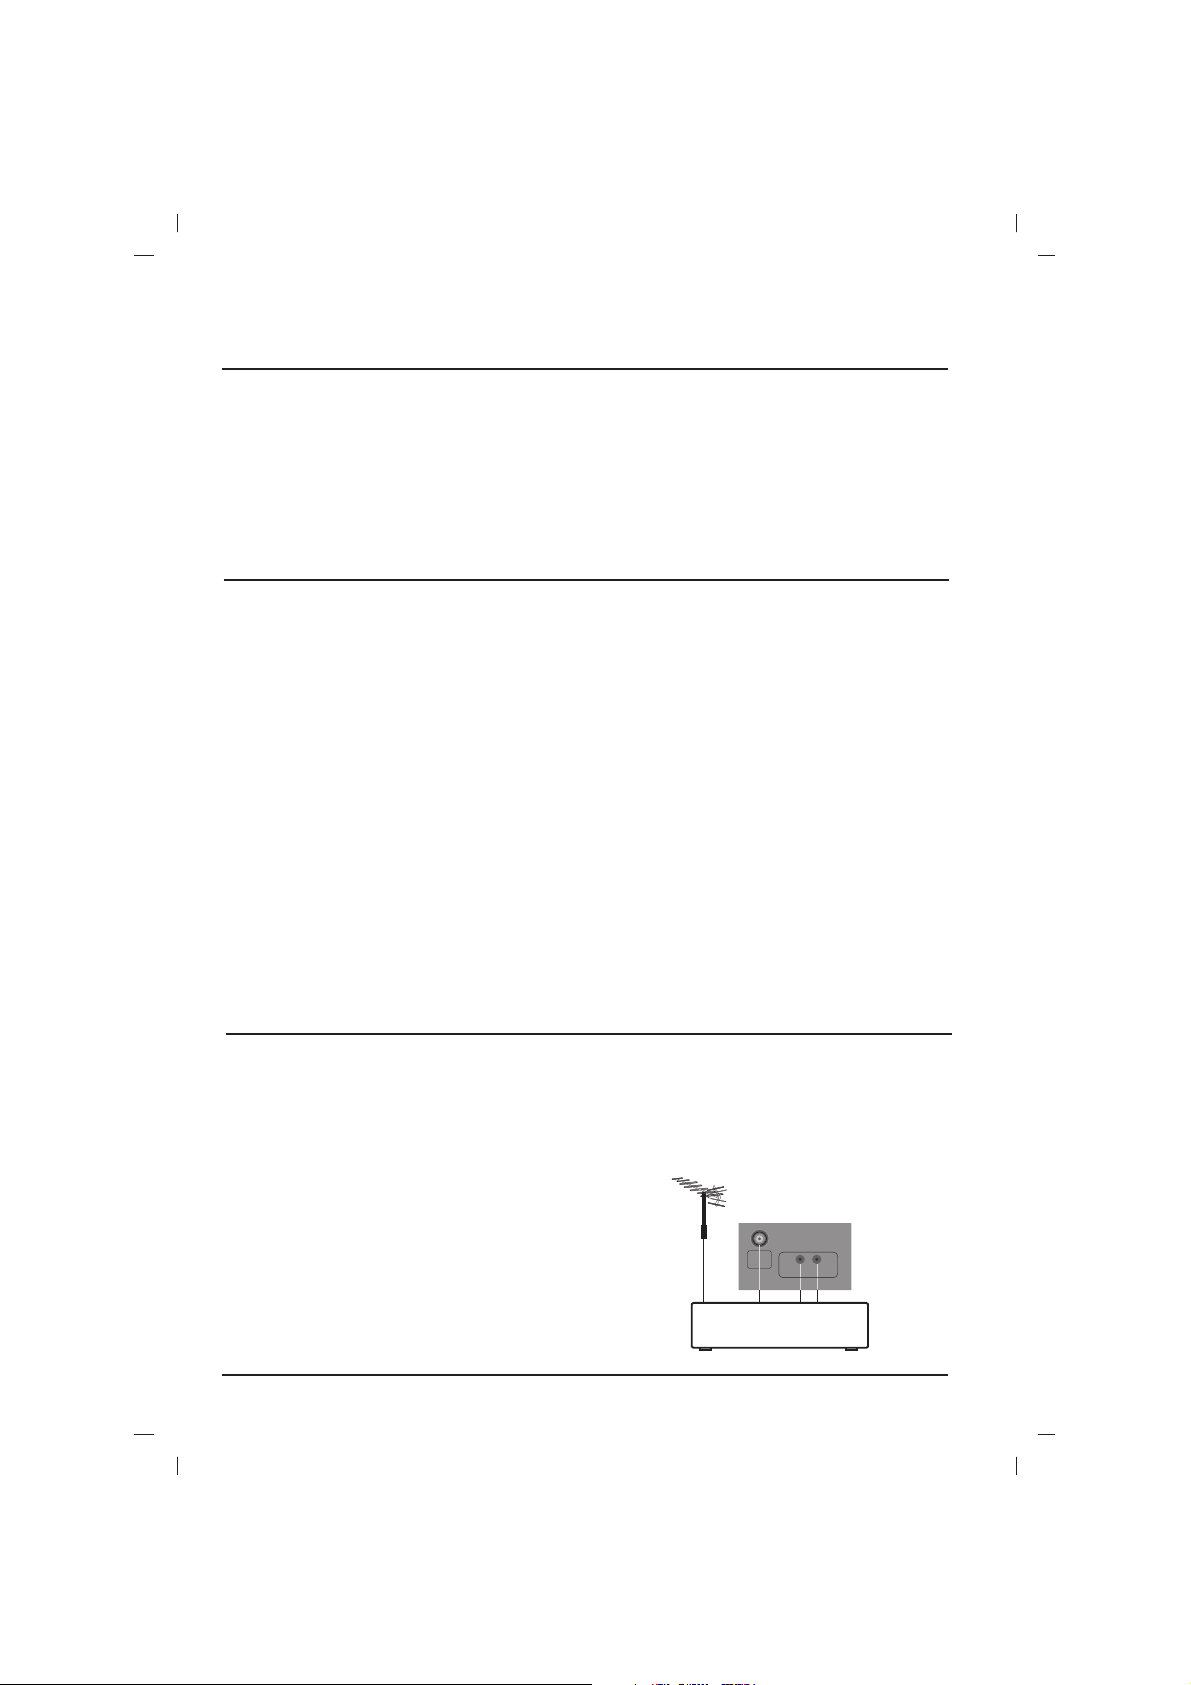
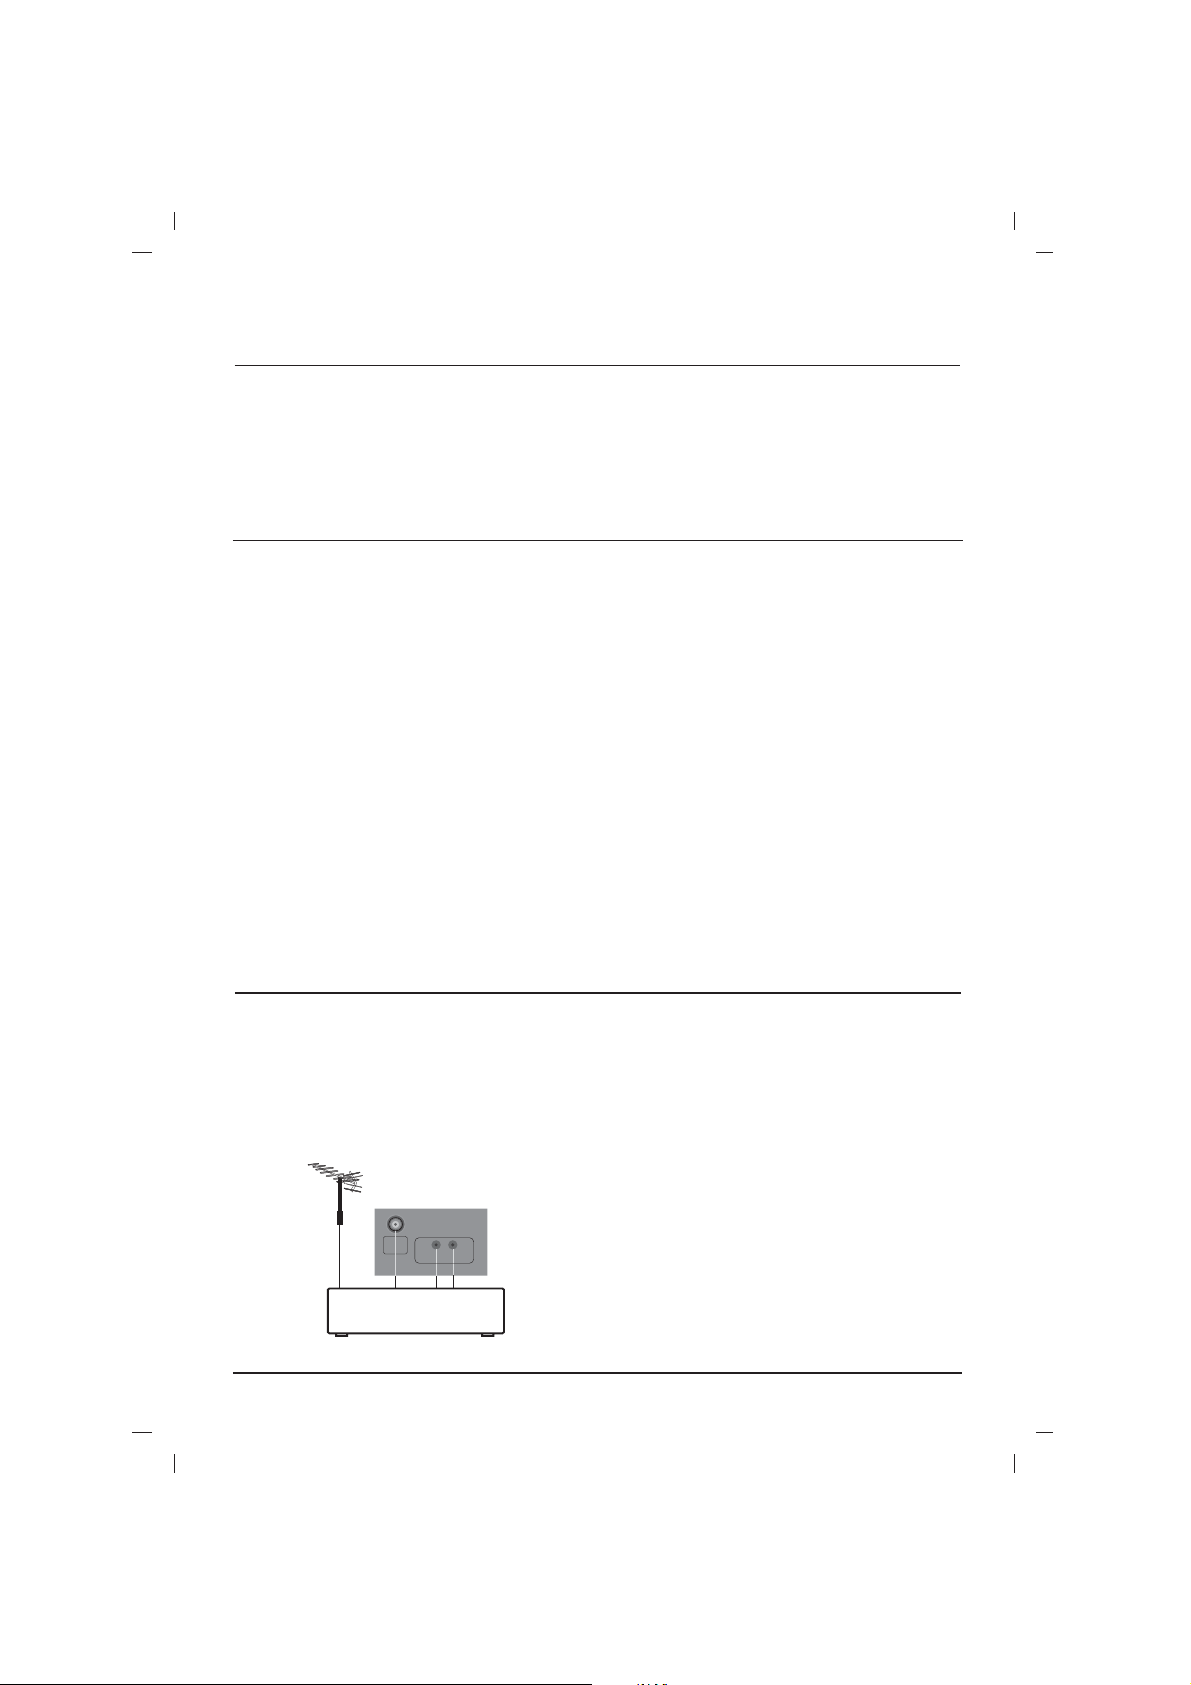
Connection of external equipment
Aerial socket
1. Connect the RF out socket of the VCR to the
aerial socket on the back of the set.
2. Connect the aerial cable to the RF aerial in
socket of the VCR.
3. Store the VCR channel on a desired programme number using the ‘Manual programme tuning’ section.
4. Select the programme number where the
VCR channel is stored.
5. Press the PLAY button on the VCR.
Audio/Video in/out sockets (option)
1. Connect the audio/video out sockets of the
VCR to audio/video in sockets of the set and
in sockets of the VCR to out sockets of the
set.
2. If the VCR is connected to the AV sockets on
the set, press the TV/AV button to select
AV
(or AV1)
.
3. Press the PLAY button on the VCR.
The VCR playback picture appears on the
screen.
ANTEN NA
IN
IN
AUDIO
VIDEO
VCR
Page 3
3
MUTE
MENU
TV/AV
EYE /
POWER
123
4
5
6
7
8
9
0
OK
FAVOURITE
Q.VIEW LIST
SLEEP
VOL
VOL
PR
PR
I/II/
1
2
3
5
6
8
9
11
10
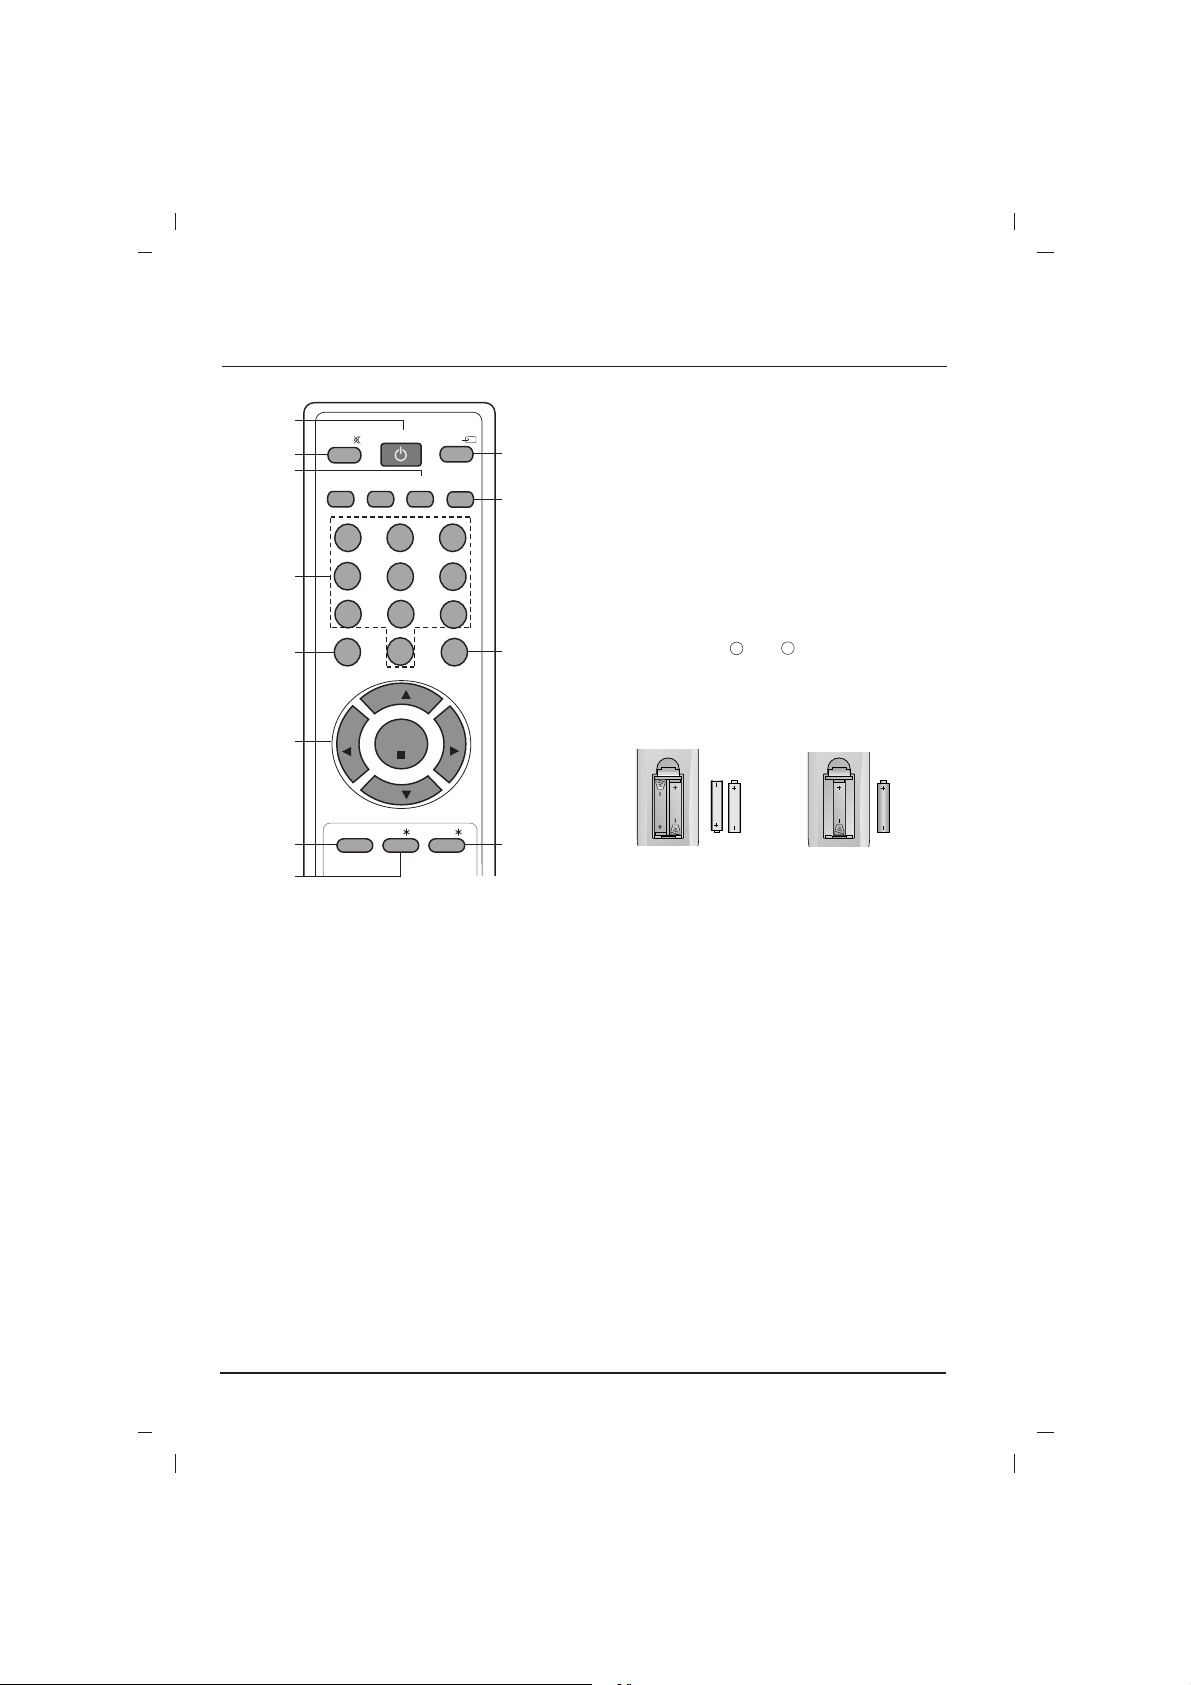
Location and function of controls
Remote control handset
4
7
12
1. POWER
switches the set on from standby or off to
standby.
2. NUMBER BUTTONS (option)
switches the set on from standby or directly
select a number.
3. MENU
selects a menu.
4.
(Programme Up/Down)
DD / EE
selects a programme or a menu item.
switches the set on from standby.
scans programmes automatically.
FF / GG
(Volume Up/Down)
adjusts the volume.
adjusts menu settings.
OK
accepts your selection or displays the current
mode.
5. Q.VIEW
returns to the previously viewed programme.
6. EYE/ (option)
switches the eye function on or of*f.
7. SLEEP (option)
sets the sleep timer.
8. MUTE
switches the sound on or off.
9. TV/AV
selects TV or AV mode.
switches the set on from standby.
10. LIST or LIST/*(option)
displays the programme table.
11. FAVOURITE or FAVOURITE/*(option)
selects a favorite programme.
12. I/II/*(option)
selects the language during dual language
broadcast.
selects the sound output.
Battery installation
The remote control handset is powered by AAA
type batteries. To load the batteries, turn the
remote control handset over and open the battery
compartment. Install batteries as indicated by the
+
polarity symbols ( and ) marked inside the
-
compartment.
Note : To avoid damage from possible battery
leakage, remove the batteries if you do not plan to
use the remote control handset for an extended
period of time.
or
Front panel
- MAIN POWER (ON/OFF)
switches the set on or off.
- REMOTE CONTROL SENSOR
Note : Only use the supplied remote control
handset. (When you use others, they’ll be
not able to function.)
- POWER/STANDBY INDICATOR
illuminates brightly when the set is in standby
mode.
dims when the set is switched on.
- MENU
selects a menu.
- OK (option)
accepts your selection or displays the current
mode.
FF / GG
(Volume Up/Down)
adjusts the volume.
adjusts menu settings.
(Programme Up/Down)
DD / EE
selects a programme or a menu item.
switches the set on from standby.
Note :
What is shown here may be somewhat different from your set or can not be supplied
on your area.
Page 4

Basic operation
On and off
1. Press the main power button to switch the set on.
2. If the set is in standby mode, press the
POWER,
DD / EE
, TV/AV or NUMBER buttons on
the remote control handset to switch it on fully.
3. Press the POWER button on the remote control handset.
The set reverts to standby mode.
4. Press the main power button again to switch
the set off.
Note : If, while the set is switched on, the mains
plug is disconnected the set will switch to standby
or power on when the mains plug is replaced in
the mains power socket.
Mute function
Press the MUTE button. The sound is switched off
and the display appears.
You can cancel it by pressing the MUTE,
FF / GG
,
I/II/*(option) button.
On screen language selection (option)
The menu can be displayed on the screen in
desired language. First select your language.
1. Press the MENU button and then
DD / EE
but-
ton to select the Special menu .
2. Press the GGbutton to select Language.
3. Press the GGbutton and then
DD / EE
button to
select your desired language.
All the on screen displays will appear in the
selected language.
Press the OK or
FF
button to select the Special
menu.
4. Repeatedly press the MENU button to return
to normal TV viewing.
4
Other functions
TV and AV modes
Inputs can be set for TV or AV mode. AV mode is
used when a video cassette recorder (VCR), or
other equipment is connected to the set.
Note : When a VCR is connected via the aerial
socket the set is used in TV mode. See the
‘Connection of external equipment’ section.
Alternatively you can select the TV or AV mode by
pressing the TV/AV button.
In AV mode, to return to TV mode, press the
DD / EE
or NUMBER buttons.
Auto AV switching (option)
If your VCR outputs switching voltage when it is
switched to playback with the VCR connected to the
Euro scart socket. The set is automatically switched
to
AV or AV1 mode when an AV signal is input. But
if you want to keep on watching TV mode, press the
DD / EE
or NUMBER buttons. Press the TV/AV but-
ton to return to AV modes.
Child lock
The TV can be set so that the remote control
handset is needed to control it. This feature can
be used to prevent unauthorized viewing.
With the lock on, the display Child lock on
appears on the screen if any button on the panel
is pressed while viewing the TV.
Note : The display
Child lock on
will not appear
on the screen if any button on the panel is
pressed while displaying the menus.
Blue back (option)
If you select On on the Blue back pull-down
menu, the blue background appears on the
screen when there is no or poor signal.
Note : In the AV mode, Component mode, the
blue background doesn’t appear on the screen.
Sleep timer
You don’t have to remember to switch the set off
before you go to sleep. The sleep timer automatically switches the set to standby after the preset
time elapses.
Press the SLEEP button to select the number of
minutes. The display - - - will appear on the
screen, followed by 10, 20, 30, 60, 90, 120, 180
and 240.The timer begins to count down from the
number of minutes selected.
Note :
a. To view the remaining sleep time, press the
SLEEP button once.
b. To cancel the sleep time, repeatedly press the
SLEEP button until the display
- - -
appears.
c. When you switch the set off, the set releases
the preset sleep time.
Page 5
5
Setting up TV stations
Auto programme tuning
All stations that can be received are stored by this
method. It is recommended that you use auto programme during installation of this set.
BG : (Asia/New Zealand/M.East/Africa/
Australia)
I : (Hong Kong/South Africa)
DK : (East Europe/China/Africa/CIS)
M : (USA/Korea/Philippines) (option)
Option: In some models, you can only select
Start.
Note : a.
Turbo
is faster than
Normal
and in
some models, these searches will automatically s
tore all receivable stations.
b.If the programmed station has poor quality
sound, select the system again in the
Manual
menu.
Auto programme scan
To automatically scan the pictures of stored programmes, press the
DD
or EEbutton for about 3
seconds. The picture of stored programmes
appears on the screen one by one.
To stop auto programme scanning, press any button except VCR buttons.
Manual programme tuning
Manual programme lets you manually tune and
arrange the stations in whatever order you desire.
Also you can assign a station name with five characters to each programme number.
Booster (option)
If the reception is poor at the fringe area of TV
signal, select Booster to On. When the picture
condition is good, do not select Booster to On.
Programme edit
Deleting a programme
1. Select a programme to be deleted with the
DD / EE
or
FF / GG
button.
2. Press the RED button twice.
The selected programme is deleted, all the following programmes are shifted up one position.
Copying a programme
1. Select a programme to be copied with the
DD / EE
or
FF / GG
button.
2. Press the GREEN button.
All the following programmes are shifted down
one position.
Moving a programme
1. Select a programme to be moved with the
DD / EE
or
FF / GG
button.
2. Press the YELLOW button.
3. Move the programme to the desired programme
number with the
DD / EE
or
FF / GG
button.
4. Press the YELLOW button again to release
this function.
Skipping a programme number
1. Select a programme number to be skipped
with the
DD / EE
or
FF / GG
button.
2. Press the BLUE button. The skipped programme turns to blue.
3. Press the BLUE button again to release the
skipped programme. When a programme
number is skipped it means that you will be
unable to select it using the
DD / EE
button during normal TV viewing. If you want to select
the skipped programme, directly enter the programme number with the NUMBER buttons or
select it in the programme edit or table menu.
Repeatedly press the MENU button to return to
normal TV viewing.
Favourite programme
This function lets you select your favourite programmes directly.
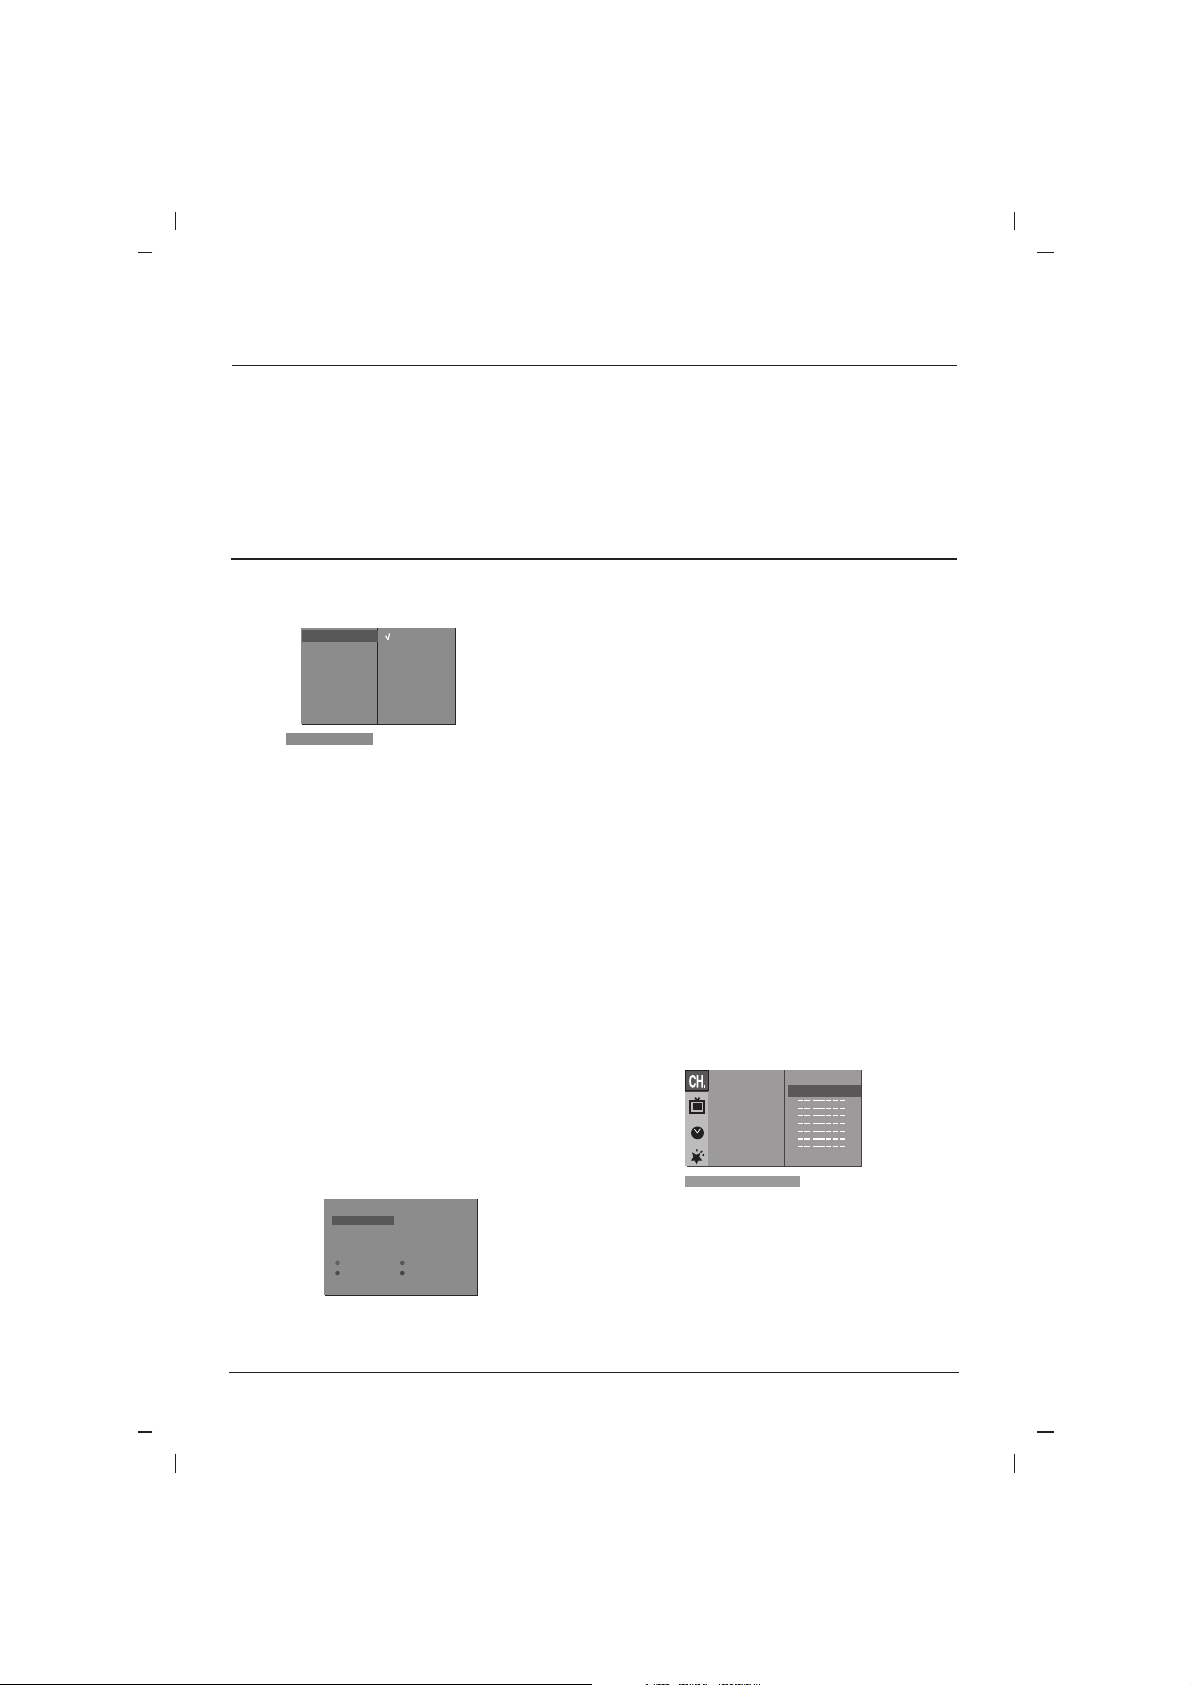
Calling the programme table
You can check the programmes stored in the
memory by displaying the programme table.
Note :
a.You may find some blue programmes.
They have been set up to be skipped by auto pro
gramming or in the programme edit mode.
b.Some programmes with the channel number
shown in the programme table indicate there is
no station name assigned.
On screen menus
The dialogue between you and your set takes place
on screen with an operator menu. The buttons
required for the operating steps are also displayed.
Menu selection
1. Press the MENU button and then
DD / EE
button to
display each menu.
2. Press the
GG
button and then
DD / EE
button to
select a menu item.
3. Press the
GG
button to display the sub menu or
the pull-down menu.
4. Change the setting of an item in the sub or
pull-down menu with
FF / GG
or
DD / EE
.
You can move to the higher level menu with
OK or
FF
button and to move to the lower level
menu press the
GG
button.
Note : In some models,
Language, Blue back
,
Game,Booster
will not display in the Special menu.
System {
Storage {
Normal {
Turbo {
System {
BG
I
DK
M
)
O}i{OOKOMENU
(
Delete Copy
Move Skip
O C 1D 5 S 69
1 C 03 6 S 17
2 C 12 7 S 22
3 S 66 8 C 09
4 S 67 9 C 11
)
}{ OK NU
(
AutoOprog.{
Manual {
Prog.Oedit
{
Favourite
{
560 C0 05
)
O}i{O0_9OOKOMENU
(
ME
Page 6

6
Picture adjustment
Note: Picture menu options are not available for
RGB input source.
PSM (Picture Status Memory)
1. Press the MENU button and then
DD / EE
but-
ton to select the Picture menu .
2. Press the
GG
button to select PSM.
3. Press the
GG
button and then
DD / EE
button to
select a picture setting on the
PSM pull-down
menu.
4. Press the OK or
FF
button.
5. Repeatedly press the MENU button to return
to normal TV viewing.
You can also recall a desired picture (
Dynamic,
Standard, Mild, Game or User) with PSM but-
ton on the remote control. The picture
Dynamic,
Standard, Mild and Game are programmed for
good picture reproduction at the factory and cannot be changed.
CSM (Colour Status Memory)
You can select the picture colour status; standard,
reddish, greenish or bluish, as you prefer.
1. Press the MENU button and then
DD / EE
but-
ton to select the Picture menu.
2. Press the
GG
button and then
DD / EE
button to
select
CSM.
3. Press the
GG
button and then
DD / EE
button to
select
Standard, Reddish, Greenish or
Bluish on the CSM pull-down menu.
4. Repeatedly press the MENU button to return
to normal TV viewing.
Picture adjustment
You can adjust picture contrast, brightness,
colour intensity, sharpness and tint (NTSC input
only) to the levels you prefer.
1. Press the MENU button and then
DD / EE
but-
ton to select the Picture menu.
2. Press the
GG
button and then
DD / EE
button to
select
Contrast, Brightness, Colour or
Sharpness.
3. Press the
GG
button and then
FF / GG
button to
make appropriate adjustments on the each
sub menu.
4. Press the OK button to store it for the picture
user.
5. Repeatedly press the MENU button to return
to normal TV viewing.
PSM {
CSM {
Contrast {
Brightness{
Colour
{
Sharpness
{
PSM {
Dynamic
Standard
Mild
Game
User
)
O}i{OOKOMENU
(
Time Setting
Setting the clock
1. Press the MENU button and then
DD / EE
but-
ton to select the Time menu .
2. Press the
GG
button to select Clock.
3. Press the GGbutton and then
DD / EE
button to
adjust the hour.
4. Press the GGbutton and then
DD / EE
button to
adjust the minute.
5. Press the OK button.
6. Repeatedly press the MENU button to return to
normal TV viewing.
Setting the On/Off timer
By using this function, the set automatically
switches on or off at a preset time. You must set
the time correctly before using on/off time function.
1. Press the MENU button and then
DD / EE
but-
ton to select the Time menu.
2. Press the GGbutton and then
DD / EE
button to
select Off time/On time.
3. Press the GGbutton and then
DD / EE
button to
adjust the hour.
4. Press the GGbutton and then
DD / EE
button to
adjust the minute.
5.
Only
On time
function
; Press the GGbutton
and then
DD / EE
button to adjust programme
number and volume level.
6. Press the OK button.
7. Repeatedly press the MENU button to return to
normal TV viewing.
Note :
a.
On time
works only in standby mode.
b. To view the remaining on/off time, select the
Time menu.
c. When you switch the main power off, the
Clock
is reset .
d. Two hours after the set is switched on by the
on time function it will automatically switch
back to standby mode unless a button has
been pressed.
Auto sleep
If you select On on the Auto off pull-down menu,
the set will automatically switch itself to standby
mode approximately ten minutes after a TV station stops broadcasting.
1. Press the MENU button and then
DD / EE
but-
ton to select the Time menu.
2. Press the GGbutton and then
DD / EE
button to
select Auto sleep.
3. Press the GGbutton and then
DD / EE
button to
select On or Off on the Auto sleep pull-down
menu.
4. Press the OK or
FF
button.
5. Repeatedly press the MENU button to return to
normal TV viewing.
Page 7
7
Troubleshooting check list
Symptoms
No picture, no sound
Sound OK, poor picture
Picture OK, poor sound
Picture blurred
Lines or streaks in picture
Poor reception on some channels
No colour
Poor colour
Remote control does not work
The mains plug-(plugged in and
switched on)
Is the TV switched on
Try another channel (weak signal)
Check aerial (plugged into TV?)
Check aerial (broken lead?)
Check aerial
Check for local interference
Adjust contrast
Adjust brightness
Adjust colour
Adjust volume
Check the batteries in remote control
Check Audio/Video sockets (VCR only)
Check these items and try to
adjust these
Page 8

Page 9

Page 10
7
|AôÜé EUP ‡¬dë… ¿ΩpkAq
ÖnAã\ ¿ΩpkAq
ºKèQZ dèÕfl ‡º dèΔ
¿ÇeèΔ ïqÜÑ ‡¿ÇeèÕfl gqñwé
¿ÇeèÕfl KqÜÑ ‡¿ÇeèΔ gqñx
¿ÇeèÕfl Öbèaé
Wkè” ¡‡ WZ‡– vó ¿ÇeèÕfl
¬^L}FAq gqñx ÇFqi ¿Ç}âè¿Δ
º KèQZ ¡Çè¿›
¿ΩÇè¿› gqñwé
¿Ç\ïÜèΔ úèàL\‡q º ïqÜÑ
¿Çwñbé ¿Ç\ôñ_ñé )KèdñÑ ¿Çwñbé ‡vLV ¿ÇRåAŒ(
ãÑ QåAŒ ¿ÇLÉñw]ïè› Ká vLV ÖwLATç
Q\ƒ |âAfl ¡W\„ )¬aAÕfl gqñwé(
¬vUf ¿æï\ïAq )ÖOFM vó QåAŒ ¿ÇLÉñw]ïè›?(
¬vUf ¿ΩÕïAq )^ÉÅ Öweèq(
¬vUf ¿ΩÕïAq
¬vUf EXeè— ¿ÇLZ¿WÑ ‡¿Çbèa\fl ¿ÇÜUÉñé
¿gFl ¿ÇÄèàL\¿^M )KFAïä ¿ÇeèÕfl(
¿gFl ¿ægAÂfl
¿gFl ¿ÇÉè›
¿gFl ÀÕQé ¿ÇeèΔ
¬vUf ¿ÇFkAÕïAΔ vó ¿Ç\ïÜèΔ úèàL\‡q
¬vUf ÖXAÕ» ¿ÇeèΔ ‡¿ÇeèÕfl )QåAŒ ¿ÇvñZïè v}l(
¬vUf ã[fi ¿ÇqâAd\ ‡TA‡q gFkåA
Page 11

gFl ¿ÇeèÕfl
6
MMSS PP
)ÿú\fl TAÇé ¿ÇeèÕfl(
1 - ¿gtl ŒÕ ¿Ç}AôÜé UNEM Ná ¿gtl ¿Ç]Õ
DD
/
EE
ºWLñAÕ
|AôÜé ¿ÇeèÕfl .
2 - ¿gtl ¿Ç]Õ ¿ΩïÜä Ná ¿Ç]Õ ΩpÉó ‡¿^wÑ ºWLñAÕ MSP.
3 - ¿gtl ¿Ç]Õ
FF
Ná ¿Ç]Õ
DD
/
EE
ºWLñAÕ gFl ¿ÇeèÕfl pÉó
|AôÜé ¿Ç_UG MSP.
4
- ¿gtl ¿Ç]Õ KO ¡‡ ¿Ç]Õ
GG
.
5 - ¿gtl Eewé ÖLÄ\Õfl pÉò ŒÕ ¿Ç}AôÜé UNEM ÇÉ\Qè’ ¬Çò
¿ÇÜbAãZfl ¿ÇqAÀïé ÇÉLÉñw]ïè›.
пЬДвЕ ¡пhA ¿^LZpAВ ¿ЗeиХfl ¿ЗЬkЙиEй )АпвAЦсДсй ¡‡ |сA^сй ¡‡
ЦqLZЗй ¡‡ ¡ЗqAƒ ¿ЗДЬFсиK\ ¡‡ ¿ЗЬ_LXZ‹ EA^LXZ¿‹ ŒХ MSP Öä
Wëq ‡TZfl ¿ÇLUÄá pä EqZ )ÕïÜèΔ úâL\‡q(.
‡¿ÇeèÕ
¿З}сA^сй ‡¿ЗZпвAЦсДсй ‡¿ЗЬqLZЗй ‡dиХfl ¿ΩЗqAƒ пLб
E\ЦRLеA vу ¿ЗЬeвr Зt\“ K}Zпб dиХfl QсZfl ‡º пЬДд
KqZпЙеA.
MMSS CC
) ÿú\fl TAÇé ¿ΩÇè¿› (
пЬДвЕ ¿WLсAХ ¡Зи¿› ¿ЗeиХfl ¿З}сA^сй ‡¿ЗЬAфЙй ¬Зт ¿ΩTЬ\ ¡‡ ¿ΩWh\ ¡‡
¿ΩŒХŸ EU_G ЦA KwhС.
1
- ¿gtl ŒÕ ¿Ç}AôÜé UNEM Ná ¿gtl ¿Ç]Õ
DD
/
EE
ºWLñAÕ
|AôÜé ¿ÇeèÕfl.
2 - ¿gtl ŒÕ ¿ÇF\àAÖS ºWLñAÕ Ã¿ú\fl TAÇé ¿ΩÇè¿›.
3 - ¿gtl ŒÕ ÀÕQé ¿ÇeèΔ ºWLñAÕ ¿ΩÇè¿› ¿Ç}ñA^ñé ¡‡ ¿ÇÜAôÉé ¬Çò
¿ΩTÜ\ ¡‡ ¿ΩWh\ ¡‡ ¿ΩŒÕŸ.
4 - ¿gtl Eewé ÖLÄ\Õfl pÉò ŒÕ ¿Ç}AôÜé UNEM ÇÉ\Qè’ ¬Çò
¿ÇÜbAãZfl ¿ÇqAÀïé ÇÉLÉñw]ïè›.
gFl ¿ÇeèÕfl
пЬДвЕ gFl ¿ЗeиХfl Цд TсP ¿ЗLFAпд ‡¿жgAВfl ‡АХQй
¿ΩЗи¿› ‡АХQй KUZпZ ¿ΩЗи¿› ‡dFtAKеA )ЗЙЬZWлΔ CSTN
v}l( EAÇÜ_LèïAΔ ¿ÇLó KwhÉåA.
1 -
¿gtl ŒÕ ¿Ç}AôÜé UNEM Ná ¿gtl ¿Ç]Õ
DD
/
EE
ºWLñAÕ
|AôÜé ¿ÇeèÕfl.
2 - ¿gtl ¿Ç]Õ
FF
Ná ¿Ç]Õ
DD
/
EE
ºWLñAÕtsartnoC ËssenthgirB
ËruoloC Ë ssenprahS .
3 - ¿gtl ¿Ç]Õ ¿ΩïÜä Ná ¿Ç]Õ
FF
/
GG
æQÕAÂ ÇÉLqÀïë
Δ
‡¿ÇgEl ¿ÇÜâA_G pÉ
ó
úÑ |AôÜé
v
Õ pïé.
4 - ¬gtl ¿Ç]Õ Öè¿v~ ÇL}è‹ ELX]ïâåA ÇeèÕfl ¿ÇÜ_LXZ‹.
5 -
¿gtl Eewé ÖLÄ\Õfl pÉò ŒÕ ¿Ç}AôÜé UNEM ÇÉ\Qè’ ¬Çò
¿ÇÜbAãZfl ¿ÇqAÀïé ÇÉLÉñw]ïè›.
PSM {
SM {
Contrast {
Brightness{
Colour
{
Sharpness
{
PSM {
Dynamic
Standard
Mild
Game
User
)
O}i{OOKOMENU
(
gFl ¿Çè|M
gFl ¿Ç_Apé
1 - ¿gtl ŒÕ ¿Ç}AôÜé UNEM Ná ¿gtl ¿Ç]Õ
DD
/
EE
ºWLñAÕ
|AôÜé ¿Çè|M .
2 - ¿gtl ŒÕ ¿Ç}AôÜé
FF
Ná ¿gtl ¿Ç]Õ
DD/ EE
ºWLñAÕ kcolC.
3 -
¿gtl ¿Ç]Õ
FF
£r «∞e¸
DD/ EE
Ç
gFl ¿Ç_Apé.
4 -
¿gtl ¿Ç]Õ
FF
£r «∞e¸
DD/ EE
Ç
gFl ¿ÇZ|ñ}é.
5 - ¿gtl ¿Ç]Õ KO.
6 - ¿gtl Eewé ÖLÄ\Õfl pÉò ŒÕ ¿Ç}AôÜé UNEM ÇÉ\Qè’ ¬Çò
¿ÇÜbAãZfl ¿ÇqAÀïé ÇÉLÉñw]ïè›.
gFl KAïÜ\ ¿ÇLbtñÑ / ¿æï}A◊
EA^LXZ¿‹ ã[fi ¿Çèmñwé vó ‡gr ¿ÇLbtñÑ NO, vC› ¿ÇRåAŒ ï}è‹
EAÇLUèïÑ ¿‡KèÖAKñÄñA ¬Çò ‡gr ¿ÇLbtñÑ ¡‡ ¿æï}A◊ pâZ ‡|M
^AE~ ¿ÇLUZïZ. ïRG ¡› KhFl ¿Çè|M EeèÕfl dUñUé |FÑ
¿^LXZ¿‹ ‡mñwé ¿ÇLè|ñM ÇÉLbtñÑ / ¿æï}A◊.
1 - ¿gtl ŒÕ ¿Ç}AôÜé UNEM Ná ¿gtl ¿Ç]Õ
DD
/
EE
ºWLñAÕ
|AôÜé ¿Çè|M.
2 - ¿gtl ŒÕ ¿Ç}AôÜé
FF
Ná ¿gtl ¿Ç]Õ
DD
/
EE
ºWLñAÕ emiT
nO ¡‡ emiT ffO.
3 -
¿gtl ¿Ç]Õ
FF
£r «∞e¸
DD/ EE
Ç
gFl ¿Ç_Apé.
4 -
¿gtl ¿Ç]Õ
FF
£r «∞e¸
DD/ EE
Ç
gFl ¿ÇZ|ñ}é.
5 - Ë™OHW «∞∑AGOq ≠w «∞uÆX ≠Ij ! «{Gj «∞e¸
FF
£r «∞e¸
DD
/
EE
∞C∂j ±º∑uÍ œ¸§W «∞Bu‹.
6 - ¿gtl ¿Ç]Õ KO.
7 - ¿gtl Eewé ÖLÄ\Õfl pÉò ŒÕ ¿Ç}AôÜé UNEM ÇÉ\Qè’ ¬Çò
¿ÇÜbAãZfl ¿ÇqAÀïé ÇÉLÉñw]ïè›.
ÖëTné:
¡ - KqÜÑ ã[fi ¿Çèmñwé v}l vó ‡gr ¿ºàLnAÕ.
ƒ- ÇÜbAãZfl ‡|M ¿ÇLbtñÑ / ¿æï}A◊ ¿ÇFA|ò, ïLá ¿WLñAÕ |AôÜé
¿Çè|M.
» - pâZ veÑ ¿ÇÄå\EAÂ Öä ÖwLA… ¿ÇÄå\EAÂ ¿Ç\ôñ_ò, ïqAÀ gFl
¿Çè|M ‡ïLUè
q
‡|M ¿ÇLbtñÑ / ¿æï}A◊ ¬Çò ‡gr ¿ÇweÑ.
À - EqZ KbtñÑ ¿ÇRåAŒ EÜZfl ^ApLñä Eèmñwé KbtñÑ ¿Çè|M vCÃ
ç
ïLUè
q
KÉ}AôñA ÕQèpA ¬Çó ‡gr ¿ºàLnAÕ ¬º ¬Ã¿ Ká ¿Çhtl
pÉó ¡TZ ¿ΩŒÕ¿Õ.
¿æï}A◊ ¿ΩKèÖAKñÄó EAÇLè|ñM
¬Ã¿ |ÜM ELbtñÑ ‡gr ¿æàLnAÕ ¿º‡KèÖAKñÄó )PEELSOTUA(
Öä Wëq |AôÜé ¿Ç_UG Ω^wÑ vC› ¿ÇRåAŒ ïLUèq ¡‡KèÖAKñÄñA
¬Çó ‡gr ¿ºàLnAÕ EqZ 01 À|Aô~ K}\ïFA EqZ Kè|x ¬Õ^Aq ÖUké
¿ÇLÉñw]ïè› ¬Ã¿ Çá KÄä ãâA⁄ ¡‚ ¬aAÕ¿Δ.
1 - ¿gtl ŒÕ ¿Ç}AôÜé UNEM Ná ¿gtl ¿Ç]Õ
DD
/
EE
ºWLñAÕ
|AôÜé ¿Çè|M.
2 - ¿gtl ¿Ç]Õ ¿ΩïÜä Ná ¿Ç]Õ ΩpÉó ‡¡^wÑ ºWLñAÕ ‡gr
¿ºàLnAÕ ¿º‡KèÖAKñÄó )PEELS OTUA(.
3 - ¿gОООtl ¿З]Х ¿ΩпЬд Nб ¿З]Х ΩpЙу ‡¡^wС ºWLсAХ ‡gr
¿ЗLbОООООtсС ¡‡ ¿жп}A◊ З}AфЬй ¿З_ОООООUG Ω^wС ЗиgООООООr
¿ºаLnAХ ¿º‡KиЦAKсООООООДу )PEELS OTUA(.
4 - ¿gtl ¿Ç]Õ KO ¡‡ ¿Ç]Õ
GG
.
5 - ¿gtl Eewé ÖLÄ\Õfl pÉò ŒÕ ¿Ç}AôÜé UNEM ÇÉ\Qè’ ¬Çò
¿ÇÜbAãZfl ¿ÇqAÀïé ÇÉLÉñw]ïè›.
C
Page 12

5
gFl ÖUkAΔ ¿ÇLÉñw]ïè›
gFl KèÇñx ¿Ç}âè¿Δ ‡¿ÇF\¿ÖS ¡KèÖAKñÄñA
QÜñr ¿ÇÜUkAΔ ¿ÇLó ïÜÄä ¬^L}FAÇåA ïLá KX]ïâåA ECKFA’ ã[¿
¿Ω^Éèƒ. ‡¬àâA àèdó EC^LXZ¿‹ ¿ÇF\ÖRé ¿ΩKèÖAKñÄñé ¡NâAÂ
K\úñG ã[¿ ¿ÇRåAŒ.
GB : )√^ñA / àñèŒïëàZ¿ / ¿Çb\Ÿ ¿Ω‡^l / ¿v\ï}ñA / ¿^L\¿ÇñA(
I : )ãèàS úèàS / Qâèƒ ¡v\ï}ñA(
KD : )a\Ÿ ¡‡Х‡EA / ¿Зeсд / ¡v\п}сA / ъиЦиаиЗP ¿жKUAА
¿Ç_èvñLó ¿Ç_AE~(
M : )¿ÇèºïAΔ ¿ÇÜLUZfl ¿ΩÖ\ïÄñé / úèÕïA / ¿ÇwÉFñä(
)¬WLñAÕ‚(
ÖëTné :
¡ - ‡gr ¿ЗFUP ¿З_\пr ¡^\’ Цд ‡gr ¿ЗFUP ¿ЗqAА‚ vу Eqi
¿ЗЬиАплΔ vC› г[fi ¿ЗqЬЙсAΔ ЗЙFUP K}и‹ KЙ}AфсA ELX]пд QЬсr
¿ЗЬUkAΔ ‡¿З}ви¿Δ ¿ЗLу пЬДд ¬^L}FAЗеA.
ƒ - ¬Ã¿ úAàM ¿ÇÜUké ¿ÇLó Ká E\ÖRLåA Ã¿Δ dèΔ gqñx, ïLá
¬WLñAÕ¿ÇânA‹ Ö\fl ¡W\‚ vó |AôÜé ¿ÇF\ÖRé ¿ÇñZ‡ïé.
Ö_V ¿ÇF\àAÖS ¡KèÖAKñÄñA.
ÇÉÜ_V ¿æ‡KèÖAKñÄó ÇeèÕfl ¿ÇF\àAÖS ¿ÇÜXL]› ¿gtl ŒÕ
¿ÇF\àAÖS ÇUè¿Çò 3 Nè¿àó.
Knå\ dèÕfl ¿ÇF\àAÖS ¿ÇÜXL]› pÉò ¿ÇbAaé ‡¿TZfl vè¿TZfl.
ºï}A◊ Ö_V ¿ÇF\àAÖS ¿Ω‡KèÖAKñÄó ¿gtl ¡‚ ¡ŒÕ¿Õ ÖA pZ¿
¡ŒÕ¿Õ ¿ÇwñZïè.
gFl KèÇñx ¿Ç}âè¿Δ ïZ‡ïA
¿Çt\“ Öä ã[fi ¿ÇF\ÖRé ¿ÇñZ‡ïé ãè gFl KèÇñx ¿Ç}âè¿Δ ïZ‡ïA
‡Kвnсб ¿ЗЬUkAΔ EAЗL\KсG ¿З[‚ K\sG vсз. ‡¡пhA пЬДвЕ Kqссд
¬^á ÖUké EXÜ_é T\‡◊ ÇÄÑ Õ|á E\àAÖS.
‡mñwé ¿ÇÎ retsooB )¬WLñAÕ‚(
¬Ã¿ úA› ¿æ^L}FAq gqñwA æÕ^Aq ¿ÇLÉñw]ïè›, |á ECWLñAÕ ‡mñwé
¿ÇÎ retsooB vò ‡gr ¿ÇLbtñÑ. ¬Ã¿ úAàM TAÇé ¿ÇeèÕfl QñZfl, vë
K}á ELbtñÑ ¿ÇÎ retsooB.
KqZïÑ ¿ÇF\àAÖS
T[◊ E\¿ÖS
1
-
ïLá ¬WLñAÕ ¿ÇF\àAÖS ¿ÇÜkÉèƒ T[vç EBŒÕ¿Õ ¿æKRAãAΔ ¬Çò
¡pЙт ‡¬Зт ¡^wС ¡‡ ¬Зт ¿ЗсЬсд ‡¿Зс_AХ.
2
-
¬gtl ¿Ç]Õ ¿ΩTÜ\ Ö\Kñä.
ïLá T[◊ ¿ÇF\àAÖS ¿ÇÜXLAÕ ‡QÜñr ¿ÇF\¿ÖS ¿ÇLAÇñé ïLá ¬Œ¿TLåA
¬Çó ¡pÉó ÇÜ_Avé ‡¿TZfl.
à_Y E\àAÖS
1 - пLб ¬WLсAХ ¿ЗF\аAЦS ¿ЗЬkЙиƒ а_Xй EC^LXZ¿‹ ¡ŒХ¿Х
¿жWLсAХ vу ¿жKRAfi ¬Зу ¡pЙт ¡‡ ¬Зт ¡^wС ¡‡ ¬Зт ¿ЗсЬсд
‡¿Зс_AХ.
2 - ¬gtl ¿Ç]Õ ¿ΩWh\.
QÜñr ¿ÇF\¿ÖS ¿ÇLAÇñé ïLá ¬Œ¿TLåA ¬Çò ¡pÉó Wkèfl ‡¿TZfl.
KU\ïÅ E\àAÖS
1 - пLб ¬WLсAХ ¿ЗF\аAЦS ¿ЗЬkЙиƒ KU\пДй EBŒХ¿Х ¿жKRAгAΔ ¬Зу
¡pЙу ‡¬Зт ¡^wС ¡‡ ¬Зт ¿ЗсЬсд ‡¿Зс_AХ.
2 - ¬gtl ¿Ç]Õ ¿Ωdw\.
3 - T\⁄ ¿ЗF\аAЦS ¬Зу Х|б ¿ЗF\аAЦS ¿ЗЬkЙиƒ EA^LXZ¿‹ ŒХ
¿ЗU\ъй ΩpЙу ‡¡^wС ¡‡ ¬Зт ¿ЗсЬсд ‡¿Зс_AХ.
4 - ¬gtl ¿Ç]Õ ¿Ωdw\ Ö\fl ¡W\„ ΩàåAÂ ã[fi ¿ÇXAdñé.
KXkó Õ|á E\àAÖS
1 - пLб ¬WLсAХ Х|б ¿ЗF\аAЦS ¿ЗЬ\¿А KXkсз EC^LXZ¿‹ ¿ΩŒХ¿Х
¿ЗXAdй EAжKRAгAΔ ¬Зт ¡pЙу ‡¬Зт ¡^wС ¡‡ ¬Зт ¿ЗсЬсд
‡¿Зс_AХ.
2 - ¬gtl ¿Ç]Õ ¿ΩŒÕŸ. ‡pâZô[ ïLUèq ¿ÇF\àAÖS ¿Ç[‚ Ká KXkñç
¬Çò ¿ÇÉè› ¿ΩŒÕŸ.
3 - ¬gtl ¿Ç]Õ ¿ΩŒÕŸ Ö\fl ¡W\„ æjëŸ ¿ÇF\àAÖS ¿Ç[‚ Ká
KXkñç. ‡pâZ KXkó Õ|á E\àAÖS vC› ã[¿ ^ñqâó ¡àç Çä ïÄè›
ECÖÄAàÅ ¬WLñAÕfi EC^LXZ¿‹ ŒÕ T\úé ¿Ç}âè¿Δ ¬Çò ¡pÉò ‡¬Çò
¡^wÑ Wëq ¿ÇÜbAãZfl ¿ÇqAÀïé ÇÉLÉñw]ïè›. ‡¬Ã¿ úâM K\sG
vó ¬WLñAÕ ¿ÇF\àAÖS ¿Ç[‚ Ká KXkñç ïLá ¬ÀWAq Õ|á ¿ÇF\àAÖS
ÖFAa\fl EC^LXZ¿‹ ¡ŒÕ¿Õ ¿ΩÕ|A‹ ¡‡ ïLá ¬WLñAÕfi vó KqZïÑ
¿ÇF\àAÖS ¡‡ |AôÜé ¿ÇRZ‡
q
.
¿gtl Eewé ÖLÄ\Õfl pÉò ŒÕ ¿Ç}AôÜé UNEM ÇÉ\Qè’ ¬Çò
¿ÇÜbAãZfl ¿ÇqAÀïé ÇÉLÉñw]ïè›.
¿ÇF\àAÖS ¿ÇÜwhÑ
ã[fi ¿Çèmñwé KLñV ÇÅ ¿WLñAÕ E\¿ÖRÅ ¿ÇÜwhÉé ÖFAa\fl.
¬^LZpAÂ QZ‡q ¿ÇF\¿ÖS
пЬДвЕ vUf ¿ЗF\¿ЦS ¿ЗЬXL]ай vу ¿З[¿ъ\fl Eq\“ QZ‡q
¿ÇF\¿ÖS.
ÖëTné:
¡ - пЬДвЕ ¡› KUeС pЙт Eqi ¿ЗF\¿ЦS EAЗЙи› ¿ΩŒХŸ. ‡|Z ¡pZΔ
г[fi ¿ЗF\¿ЦS ЗLXkсеA EAЗF\ЦRй ¿ΩKиЦAKсДсй ¡‡ vу ‡gr
KqZпС ¿ЗF\аAЦS.
ƒ - Eqi ¿ÇF\¿ÖS ¿ÇÜ]‡Àfl E\|á ¿Ç}âAfl ¿ÇÜFñä vó QZ‡
q
¿ÇF\¿ÖS
KègV pZ‹ KUZïZ ¡‚ ¬^á ÇÉÜUké.
System {
Storage {
Normal {
Turbo {
System {
BG
I
DK
M
)
}{ OK MENU
(
Mov Skip
O C 1D 5 S 69
1 C 03 6 S 17
2 C 12 7 S 22
3 S 66 8 C 09
4 S 67 9 C 11
)
}{ OK MENU
(
AutoOprog.{
Manual {
Prog.Oedit
{
Favourite
{
560 C0 05
)
O}i{O0_9OOKOMENU
(
¿Ç}è¿ôá pÉò ¿ÇbAaé
ïLá ¿ÇUè¿Õ EñâÅ ‡Eñä ¿ÇRåAŒ ÇZïÅ pÉò ¿ÇbAaé Ör |AôÜé
¿ÇÜbtÑ.‡¿ΩŒÕ¿Õ ¿ÇÜkÉèEé ÇXkè¿Δ ¿ÇLbtñÑ ïLá p\gåA ¡ïhA.
¬WLñAÕ ¿Ç}AôÜé.
1 - ¿gtl ŒÕ ¿Ç}AôÜé UNEM Ná ¿gtl ¿Ç]Õ
DD/ EE
Çq\“ úÑ
|AôÜé.
2 - ¿gtl ¿Ç]Õ ¿ΩïÜä Ná ¿Ç]Õ ΩpÉó ‡¡^wÑ ºWLñAÕ EâZ ¿Ç}AôÜé.
3 - ¿gtl ¿Ç]Õ ¿ΩïÜä Çq\“ ¿Ç}AôÜé ¿Çw\pñé ¡‡ |AôÜé ^UG
Ω^wÑ.
4 - ïLá KqZïÑ ‡gr ¿ÇhFl ÇÉFâèÀ vó ¿Ç}AôÜé ¿Çw\pñé ¡‡ |AôÜé
¿З_UG Ω^wС EA^LXZ¿‹ ŒХ ¿ЗU\ъй ΩpЙООООООу ‡¡^wС.
пЬДвЕ ¿ЗU\ъй ¬Зу |AфЬй ¿ЗЬ_Lи‚ ¿ΩpЙу EA^LXZ¿‹ ¿З]Х
Ци¿v~ ¡‡ ¿З]Х
GG
‡ÇÉUÎ\úé ¬Çó |AôÜÎé ¿ÇÜ_ÎÎLè‚ ¿Ω^wÑ
¿gÎÎtl ¿Ç]Õ ¿ΩïÜä.
ÖëTné:
≠w °Fi «∞Luœ¥ö‹ ≠SÊ «∞KGW ô ¥∑r ´d{NU.
e
Delet opy
C
e
Page 13

¿ÇLbtñÑ ¿Ω^A^ò
¿ÇLbtñÑ ‡¿æï}A◊
1 - ¬gtl ŒÕ ¿ÇÄå\EA ¿Ç\ôñ_ó ÇLUèïÑ ¿ÇRåAŒ ¬Çò ‡gr
¿ÇLbtñÑ.
2 - ¬Ã¿ úA› ¿ÇRåAŒ vó ¿Çègr ¿æTLñAjó, ¬gtl pÉó ŒÕ
¿ÇÄå\EA ¡‡ ŒÕ ¬WLñAÕ ¿ÇF\¿ÖS ¡‡ ŒÕ ¿ÇLÉñw]ïè› ‡¿ÇeèΔ
‡¿ÇeèÕfl ¡‡ ¡ŒÕ¿Õ ¿ΩÕ|A‹ pÉò ¿Ç\ïÜèΔ úâL\‡q Çt\“
¿ÇLbtñÑ ¿ÇÄAÖÑ.
3 - ¬gtl ŒÕ ¿ÇÄå\EA pÉó ¿Ç\ïÜèΔ úâL\‡q.
‡pâZô[ ïqèÀ ¿ÇRåAŒ ¬Çò ¿Çègr ¿ºTLñAjó.
4 - ¬gtl ŒÕ ¿ÇÄå\EA ¿Ç\ôñ_ó Ö\fl ¡W\‚ æjwA ¿ÇRåAŒ.
ÖëTné: ¬Ã¿ TZ« ¡NâA KbtñÑ ¿ÇRåAŒ ‡Ká veÑ |AE` ¿ÇÄå\EAÂ
¿Ç\ôñ_ó, vC› ¿ÇRåAŒ ^è◊ ïLUè
q
¬Çó ‡gr ¿æàLkAÕ ¡‡ ‡gr
¿ÇLbtñÑ pâZ ¬pAÀfl ‡gr |AE` ¿ÇÄå\EA vó Ö}F` ¿ÇÄå\EAÂ.
‡mñwé ¿æ^ÄAΔ
EE TT UU MM
¬gtl ŒÕ ¿æ^ÄAΔ. ‡pâZô[ ïLá ¬jwA ¿ÇeèΔ ‡Knå\ pëÖé
¬jwAВ ¿ЗeиΔ. ‡пЬДвЕ ¬ЗtAВ ГЗЕ EAЗhto pЙт ŒХ ¿ж^ДAΔ ¡‡ ŒХ
ÀÕQé ¿ÇeèΔ ¡‡ ¡‡ 1/2
/
*
¿ÇeèΔ ¿Ç_\ïr.
¬WLñAÕ¿ÇÉté pÉò ¿ÇbAaé )¬WLñAÕ‚(
ïÜÄä p\“ ¿Ç}AôÜé pÉò ¿ÇbAaé EAÇÉté ¿ÇÜkÉèEé. ‡pÉñÅ ¿WLñAÕ
ÇtLÅ ¡‡º.
1 - ¿gtl ŒÕ ¿Ç}AôÜé UNEM Ná ¿gtl ¿Ç]Õ
DD
/
EE
ºWLñAÕ
¿Ç}AôÜé ¿ÇXAdé .
2 - ¿gtl ¿Ç]Õ ¿ΩïÜä Ná ŒÕ ¿ÇU\úé ΩpÉó ‡¡^wÑ ºWLñAÕ ¿ÇÉté.
3 - ¿gtl ¿Ç]Õ ¿ΩïÜä Ná ŒÕ ¿ÇU\úé ΩpÉó ‡¡^wÑ ºWLñAÕ ¿ÇÉté
¿ÇLó K\sFåA.
QÜñr ¿Çq\‡“ ¿ÇÜFñâé pÉó ¿ÇbAaé ^Lnå\ EAÇÉté ¿ÇÜXLAÕfl.
¿gtl ¿Ç]Õ KO ¡‡ ¿Ç]Õ
GG
ºWLñAÕ ¿Ç}AôÜé ¿ÇXAdé.
4 - ¿gtl Eewé ÖLÄ\Õfl pÉò ŒÕ ¿Ç}AôÜé UNEM ÇÉ\Qè’ ¬Çò
¿ÇÜbAãZfl ¿ÇqAÀïé ÇÉLÉñw]ïè›.
4
¿ÇèmAôx ¿ΩW\„
¡‡gA’ ¿ÇLÉñw]ïè› ‡¿ÇeèΔ ‡¿ÇeèÕfl
ïÜÄä gFl ¿ÇÜZWëΔ ÇÄÑ Öä ‡gr ¿ÇLÉñw]ïè› ¡‡ ‡gr ¿ÇeèΔ
‡¿ÇeèÕfl.
‡ïLá ¬^LXZ¿‹ ‡gr ¿ÇeèΔ ‡¿ÇeèÕfl pâZ KèdñÑ Ö_RÑ vñZïè
úA^ñM ¡‡ ÖqZ¿Δ ¡W\‚ EAÇRåAŒ.
ÖëTné: pâZ KèdñÑ QåAŒ
vñZïè
pä j\ï~ ÖX\» ¿ΩÕïA
q
, vC›
¿ÇRåAŒ ïLá ¬^LXZ¿Öç vó ‡gr ¿ÇLÉñw]ïè›. ¡àn\ ¿ÇR]¿ÇXA—
ELèdñÑ ¿ÇÜqZ¿Δ ¿ÇXAÕQñé.
‡pÉò ¿ÇLFAÀq пЬДвЕ ¬WLсAХ ‡gr ¿ЗLЙсw]пи› ¡‡ ‡gr ¿ЗeиΔ
‡¿ЗeиХfl EAЗhtl pЙт ŒХ ¿ЗLЙсw]пи›/ ¿ЗeиΔ ‡¿ЗeиХfl.
ÇÉ\Qè’ ¬Çó ‡gr ¿ÇLÉñw]ïè›, ¬gtl ŒÕ ¿Ç}âè¿Δ ¬Çó ¡pÉò ¡‡ ¬Çò
¡^wÑ ¡‡ ¡ŒÕ¿Õ ¿ΩÕ|A‹.
¿ÇLUèïÑ ¿Ω‡KèÖAKñÄó ÇÉeèΔ ‡¿ÇeèÕfl )¬WLñAÕ‚(
¬Ã¿ |A‹ QåAŒ ¿ÇwñZïè ÇZïÅ ECW\¿» vèÇM ¿ÇLUèïÑ pâZ KbtñÉç
Çñq\“ Öä QåAŒ ¿ÇwñZïè ¿ÇÜèdÑ EÜX\» ¿ÇÎ ïèÕ‡^ÄAÕΔ
^èúM, vC› ¿ÇRåAŒ ^è◊ ïLUèq ¬Çò ¿Çègr VA ¡‡ 1VA
¡‡KèÖAKñÄñA vó TAÇé ¬ÀWAq ¬aAÕfl ¿ÇeèΔ ‡¿ÇeèÕfl.
‡ÇÄä ¬Ã¿ ¡ÕÀΔ ¡› K_LÜ\ vó ÖbAãZfl ‡gr ¿ÇLÉñw]ïè›, vqÉñÅ
EAÇhtl pÉò ¡ŒÕ¿Õ ¿ÇU\úé ¬Çò ¡pÉó ‡¬Çò ¡^wÑ ¡‡ pÉò ¡ŒÕ¿Õ
¿ΩÕ|A‹.
¬gtl ŒÕ ¿ÇLÉñw]ïè› / ¿ÇeèΔ ‡¿ÇeèÕÕfl ÇÉqèÀfl ¬Çó ‡gr
¿ÇeèΔ ‡¿ÇeèÕfl.
ÖwLA… Öâr ¿ÇLbtñÑ Öä |FÑ ¿ΩjwAq
ïÜÄä gFl QåAŒ ¿ÇLÉñw]ïè› EUñP ïÉ]‹ ¬^LXZ¿‹ ¿Ç\ïÜèΔ
úâL\‡q Çt\“ ¿ÇLUÄá vñç. ‡ã[fi ¿ÇXAdñé ïÜÄä ¬^LXZ¿ÖåA
ÇÜâr ¿ΩjwAq Öä ÖbAãZfl ¿ÇLÉñw]ïè› EZ‡› ¬Ã›.
Ör ‡QèÀ ¿Ç}wÑ vó ‡gr ¿ÇLbtñÑ, Knå\ aAaé ¿Çq\“ )ÖwLA…
Öâr ¿ÇLbtñÑ ïqÜÑ( pÉó ¿ÇbAaé, ‡ÃÇÅ pâZ ¿Çhtl pÉò ¡‚ ŒÕ
pÉó ¿ÇÉèTé ¿ΩÖAÖñé ¡NâAÂ ÖbAãZfl ¿ÇLÉñw]ïè›.
ÖëTné: Çä Knå\ aAaé EñA› KbtñÑ |wÑ TÜAïé ¿ΩjwA
q
pÉó
¿ÇbAaé vó TAÇé ¿Çhtl pÉó ¡‚ ŒÕ vó ¿Ç}AôÜé ¿ΩÖAÖñé pâZ
p\“ ¿Ç}è¿ôá.
¿ÇXÉwñé ¿Ç]Õ|AÂ )¬WLñAÕ‚(
¬Ã¿ |ÜM EAWLñAÕ ‡gr ¿ÇLbtñÑ ÇÉXÉwñé ¿Ç]Õ|A KCAB EULB
E}AôÜé ¿Ç_UG Ω^wÑ ^Lnå\ WÉwñé ŒÕ|A pÉó ¿ÇbAaé pâZÖA
KÄè› ãâA⁄ ¬aAÕ¿Δ gqñwé ¡‡ º KèQZ ¬aAÕfl.
QåAŒ ¿ÇLè|ñM Çt\“ ¿Çâè‹
¬àÅ º KULA» Ω› KL[ú\ ¬jwA ¿ÇRåAŒ |FÑ ¡› K[ãG ÇÉâè‹. vRåAŒ
¿ÇLè|ñM pâZ ¿Çâè‹ ï}è‹ EAÇLUèïÑ ¡‡KèÖAKñÄñA ÇLUèïÑ ¿ÇRåAŒ ¬Çò
‡gr ¿æàLnAÕ EqZ ¬à}hA ÖZfl ŒÖâñé Öqñâé.
¬gtl ŒÕ QåAŒ ¿ÇLè|ñM )¿Çâè‹( æWLñAÕ pZÀ ¿ÇZ|Aô~. ïnå\
p\“ ¿Ç_Apé pÉò ¿ÇbAaé ïLFqç ¿Ç}ñÜé :
01, 02, 03, 06, 09, 021,
081
‡ 042 ‡ïFZ¡ ¿ÇLAïÜ\ vò ¿ÇU_Aƒ Öä pZÀ ¿ÇZ|Aô~ ¿ÇÜXLAÕfl.
ÖëTné:
¡ - ÇÜbAãZfl ‡|M ¿Çâè‹ ¿ÇÜLF}ó vó QåAŒ ¿ÇLè|ñM, ¬gtl ŒÕ
¿ÇLè|ñM Ö\fl.
ƒ - æÇtA Kè|ñM ¿Çâè‹, ïLá KÄ\¿Õ ¿Çhtl pÉò ŒÕ ¿ÇLè|ñM TLó
Knå\ ¿ÇbAaé ¿ÇÜFñâé.
» - pâZ ¬jwA QåAŒ ¿ÇLè|ñM, vC› ¿ÇRåAŒ ïÉtó ¿ÇÜZfl ¿Ç]Öâñé
¿ÇÜ_F}é ÇÉLè|ñM.
Page 14

3
¡ÖAúä ‡‡mAôx ¡ŒÕ¿\ ¿ÇLUÄá
QÜñr ¿ÇèmAôx ïÜÄä ¿ÇLUÄá vñåA EC^LXZ¿‹ ¿ÇèTZfl ¿ÇñZ‡ïé
ÇÉLUÄá pä EqZ )¿Ç\ïÜèΔ úâL\‡q( ‡Eqi ¿ÇèmAôx ïÜÄä gFkåA
¡ïhA Öä ¿ΩŒÕ¿Õ pÉò ¿ÇÉèTé vò Ö}ZÖé ¿ÇRåAŒ.
¿ÇèTZfl ¿ÇñZ‡ïé ÇÉLUÄá pä EqZ )¿Ç\ïÜèΔ úâL\‡q(.
1 - ÖwLA… ¿ÇÄå\EAÂ
‡ãè ï}è‹ ELbtñÑ ¿ÇqZfl Öä ¿Çègr ¿æTLñAjó ¡‡ ‡gr
¿ÇweÑ ¬Çò ‡gr ¿æTLñAjó )QAã] ÇÉLbtñÑ(.
2 - ¡ŒÕ¿Õ ¿ΩÕ|A‹ )¬WLñAÕïé(
‡ãó K}è‹ ELUèïÑ ¿ÇRåAŒ Öä ‡gr ¿æTLñAjó ¬Çò ‡gr
¿ÇLbtñÑ ¡‡ æWLñAÕ Õ|á ÖFAa\fl.
3 - |AôÜé ¿æWLñAÕ¿Δ
ï}è‹ EAæWLñAÕ Öä ¿Ç}AôÜé.
4 - ŒÕ KbtñÑ ¿ÇF\àAÖS ¬Çò ¡pÉò / ¬Çò ¿^wÑ
ÇLUèïÑ ¿ÇRåAŒ ÇÉLbtñÑ Öä ‡gr ¿æï}A◊ ‡¬WLñAÕ E\àAÖS
¡‡ EâZ vó ¿Ç}AôÜé.
EAægAvé ¬Çò ¿àç ï}è‹ EÜ_V aAÖÑ ÇÉF\ ¿ÖS ¿KèÖAKñÄñA.
QåAÕfl ¿ÇeèΔ
FF / GG
ÇLqZïÑ QåAÕfl ¿ÇeèΔ.
ÇhFl ¬WLñAÕ¿Δ ¿Ç}AôÜé.
Öè¿v~
Ç}Fèq ¬WLñAÕ⁄ ¡‡ Çq\“ ¿Çègr ¿ÇUAÇò.
5 - Õ·ïé ¿ÇF\àAÖS ¿Ç_AE~
ï}è‹ ECÕQA’ ¿ÇF\àAÖS ¿Ç[‚ ^F~ ÖbAãZKç.
‡ãè ¿Ç]Õ ¿Ç[‚ ï}è‹ ECWLñAÕ ¿ÇeèÕfl ¿ÇL\Eè ¡‡ ¿ÇeèΔ
¿ÇL\Eè.
6 - ¿Çqñä/
*
)¬WLñAÕïé(
‡ãó K}è‹ ELUèïÑ ‡mñwé ¿Çqñä Kbtñë ¡‡ ¬ï}AvA.
7 - ŒÕ ¿ÇLè|ñM Çìï}A◊ ¿ÇLÉ}Aôó )¬WLñAÕïé(
æ^LZpA ¿Çègr ¿ÇÜwhÑ ÇZïÅ ÇhFl ¿ÇeèΔ.
8 - ŒÕ ¿æ^ÄAΔ
‡ãè ï}è‹ ELbtñÑ ¡‡ ¬ï}A◊ ¿ÇeèΔ.
9 - ¿ÇLÉñw]ïè› / ¡j\¿◊ ¿ÇeèΔ ‡¿ÇeèÕfl
ï}è‹ EAæWLñAÕ Eñä ‡gr KbtñÑ ¿ÇLÉñw]ïè› ¡‡ ¿Çègr ¡‡Àïè
wñZïè æWë ¿Ç}AôÜé Öä ¿ÇbAaé.
01 -
ïq\“ QZ‡q ¿ÇF\àAÖS.
11 -
ï}è‹ ECÕQA’ ¿ÇF\àAÖS ¿Ç[‚ ^F~ ÖbAãZKç.
21 - 1/2/
*
)¿WLñAÕ‚(
‡ãè ï}è‹ EAWLñAÕ ¿ÇÉté ¬Ã¿pé Çté Ö]À‡Qé ‡ï}è‹ EAWLñAÕ
ÖqZq ¬W\¿» ¿ÇeèΔ. )¿WLñAÕ‚(
K\úñG ¿ÇFkAÕïAΔ
ïLá KbtñÑ QåAŒ ¿Ç\ïÜ‡Δ úâL\‡ EC^LXZ¿‹ ElAÕïAΔÖ› ¿ÇÜ}Aœ AAA.
ïLá K\úñG EkAÕïAΔ úÜA ãè ÖI› EAÇ\ÖèŒ ¿Ç}”Ié ) ‡ ( EAÇqëÖAΔ
À¿XÑ TR\ fl ¿ÇFlAÕïAΔ.
ÖëTné: Çt\“ KRâG ¿ÇLÉx Öä ¬TLÜAºΔ K_\ƒ ¿ÇFkAÕïé, ïLá
vÅ ¿ÇFkAÕïAΔ ¬Ã¿ úâM º Kâè‚ ¬^LXZ¿‹ ¿Ç\ïÜèΔ úâL\‡ ÇÜZfl
ŒÖâñé ÖÜLZfl.
¿¿ÇÇ ÉÉèèTTéé ¿¿ææÖÖAAÖÖññéé
1 ÖwLA… ¿ÇÄå\EAÂ ¿Ç\ôñ_ó
‡ãè ï}è ELUèïÑ ¿ÇRåAŒ Kbtñë ¡‡ ¬ï}AvA.
2 T_Aœ ¿ÇLUÄá pä EqZ
3 ÖFñä ¿ÇÄå\EA / ¿ºTLñAjò
‡ãè ïhõ ECgAÂfl ºÖqé pâZÖA ïÄè› ¿ÇRåAŒ vó ¿Çègr.
¿ºTLñAjò ‡ïqLá pâZ KbtñÑ ¿ÇRåAŒ.
4 |AôÜé ¿æWLñAÕ¿Δ )¿WLñAÕïé(
ï}è‹ EAæWLñAÕ Öä ¿Ç}AôÜé.
5 ÖkAE~ )¿WLñAÕïé(
Ç}Fè ¿WLñAÕúá ¡‡ Çq\“ ¿Çègr ¿ÇUAÇò.
ÀÕQé ¿ÇeèΔ )¬Çò ¡pÉò / ¬Çò ¡^wÑ( )¿WLñAÕïé(
ÇhFl ÀÕQé ¿ÇeèΔ. / ÇhFl ¿Ç}è¿ôá.
)¿ÇF\àAÖS ¬Çò ¡pÉò / ¬Çò ¡^wÑ( )¿WLñAÕïé(
ºWLñAÕ E\àAÖS ¡‡ EâZ vó ¿Ç}AôÜé.
ÇLUèïÑ ¿ÇRåAŒ ÇÉLbtñÑ Öä ‡gr ¿ºTLñAjò.
ÖëTné:
ÖFñä vñÜA ïÉò aÄÑ ÖF_l ÇÉèTé ¿ΩÖAÖñé ¡‡ ¿ÇRAàFñé. ‡¿ÇbÄÑ
¿ÇÜFñä |Z ïXLÉx |Éñë pä QåAŒ ¿ÇLÉñw]ïè› ÇZïÅ.
+
-
¡‡
MUTE
MENU
TV/AV
EYE /
POWER
123
4
5
6
7
8
9
0
OK
FAVOURITE
Q.VIEW LIST
SLEEP
VOL
VOL
PR
PR
I/II/
99
1100
FFAAVVOOUURRIITTEE
/*)¬WLñAÕïé(
)¬WLñAÕïé( ¿Ç}AôÜé
/
*
¡‡
FFAAVVOOUURRIITTEE
¡‡
¿Ç}AôÜé
11
8
5
22
33
44
7
1122
1111
6
Page 15
2
¿ÇÜULèïAΔ
¿ÇL\úñG
¿ÇkA|é ¿ÇÄå\EAôñé
ã[¿ ¿ÇRåAŒ ïqÜÑ pÉò ¿ÇÜeZÕ ¿Ç\ôñ_ó ÇÉLñAÕ ¿ÇÜL\ÀÀ. ‡¿ÇwèÇM
úÜA ãè ÖFñä pÉò ¿ÇFkA|é pÉò ¿ÇtkA ¿ÇXÉwó. ‡º K_LXZ‹ ¿ÇLñAÕ
¿ÇÜ_LÜ\ ¡EZ¿ vó ¿ÇRåAŒ. ‡vó TAÇé ¿Çqè¿dx ¡‡ ¬à}kA’ ¿ÇLñAÕ,
à\Qè ^UG ¿Çåè¿ôó ‡¿ÇLèdñëΔ ¿Ç\ôñ_ñé.
¬gtk p¶ ŒÕ ¿ÇÄå\EA )
RR EE WW OO PP
( p¶ ¿ÇÉèTé ¿ΩÖAÖñé ¡‡
¿ÇRAàIé ÇtÉ~ ¿ÇLÉwAŒ pâZÖA ïÄè › QåAŒ ¿ÇLÉwAŒ sñ\ Ö_LqÜÑ
ÇwL\ fl jèïÉé.
ïèdò ECŒ¿Çé ¿ÇÜ}F` Öä Öâw[ ¿ÇUAôk )à}lé ¿ÇLñAÕ(.
≠Bq «∞πNU“ ±s ±Bb¸ «∞DUÆW «∞dzOºw
±I∂f ±Bb¸ «∞DUÆW «∞dzOºw ≥u §NU“ «∞HBq. |πV √Ê
|Eq «∞πNU“ ±º∑FbΫ ∞K∑AGOq.
KU[ï\
ÇÜâr ÖXAj\ ¿ÇU\¿ô~ ‡¿ÇeZÖAΔ ¿ÇÄå\EAôñé, º Kq\“ ¿ÇRåAŒ
ÇÉÜk\ ¡‡ ¿Ç\jèEé.
¿ÇXZÖé
KRâG vÅ ¿ÇtkA vó ¿ÇRåAŒ Ω› ã[¿ ïq\gÅ ÇwèÇM pAÇó QZ¿
‡ÖXAj\ ¡W\‚. ‡¬Ã¿ úA› ¿ÇRåAŒ º ïqÜÑ EeèÕfl ^ÉñÜé, ¬veÉç
Öä ¿ÇÄå\EA ‡¬KeÑ EAÇFAôr j\vÄá.
¿Çåè¿ôó
ïLá KèdñÑ úAEÑ ¿Çåè¿ôó EAÇÜ}F` EAÇqëÖé 57 ¡‡‹ pÉó ¿ÇtkAÂ
¿ÇXÉwó.
‡ÇLU}ñ~ ¡vhÑ ¬^L}FAq ïwhÑ ¬^LXZ¿‹ ãè¿ôó WAÕQó.
¿ÇÜè|r
¡gFl Öè|qÅ EUñP º ï_}l gè ¿ÇbÜ` ¡‡ ¿Ωaqé ¿ÇÜFAa\fl
pÉò ¿ÇbAaç. ‡ïRG ¡› KLX[ ¿æTLñAjAΔ ÇÜâr Kq\“ ¿ÇRåAŒ Ω‚
ÃE[EAΔ EZ‡› À¿pó ¡‡ ¿Ç\jèEé ¡‡ ¿ΩK\Eé ¡‡ ¿ÇU\¿Õfl. ‡KBúZ ¡ïhA
¡› ¿ÇRåAŒ Öègè’ vó ‡gr ï_ÜV EAÇLZv~ ¿ÇU\ ÇÉåè¿Â. ‡KRâG
Ktkñé vLUAΔ ¿ÇLåèïé pÉó ¿ÇtkAÂ ¿ÇXÉwó.
KèdñÑ ¿ÇÜqZ¿Δ ¿ÇXAÕQñé
пЬДвЕ KиdсС ¿ЗЬqZ¿Δ ¿жgAvсй ЦOС ¡Qе]fl ¿ЗwсZпи ‡ъAЦс\¿Δ
¿ЗwсZпи ‡sс\гA EAЗRеAŒ. ‡¿ΩaДAq ¿ÇÜFñâé |Z KXLÉx pä ¿ÇRåAŒ
ÇZïÅ.
Ö}F` ¿Çåè¿ôó
1 - ïLá KèdñÑ Ö}F` ÖX\» ¿Çåè¿ôó vó QåAŒ ¿ÇwñZïè Ör Ö}F`
¿Çåè¿ôó vó må\ QåAŒ ¿ÇLÉñw]ïè›.
2 - ïLá KèdñÑ úAEÑ ¿Çåè¿ôó Eåè¿ôó ¿ÇL\ÀÀ ¿Çë^ÉÄó vó Ö}F`
¿ÇwñZïè.
3 - ïLá KX]ïä |âAfl ¿ÇwñZïè pÉó Õ|á ¿ÇF\àAÖS 0 EC^LXZ¿‹ ¿ÇR]Â
¿ÇXA— ELèÇñx ¿ÇF\àAÖS ïZ‡ïA.
4 - ïLá ¬WLñAÕ Õ|á ¿ÇF\àAÖS TñP ïLá KX]ïä |âAfl ¿ÇwñZïè.
5 - ¬gtl ŒÕ ¿ÇLbtñÑ vó QåAŒ ¿ÇwñZïè.
ÖXAÕ» ¿ÇeèΔ / ¿ÇeèÕfl, ¿ÇÜZWÑ / ¿ÇÜX\» )
¿WLñAÕïé (
1 - ïLá KèdñÑ ÖXAÕ» ¿ÇeèΔ ‡¿ÇeèÕfl vó QåAŒ ¿ÇwñZïè Ör
ÖXAÕ» ¿ÇeèΔ ‡¿ÇeèÕfl vó QåAŒ ¿ÇLÉñw]ïè› ‡vó ¿ÇÜ}AE`
vó QåAŒ ¿ÇwñZïè ) Ö}AE` ¿ÇÜZWÑ ( Ör Ö}AE` ¿ÇÜX\» vó
¿ÇRåAŒ.
2 - ¬Ã¿ úA› QåAŒ ¿ÇwñZïè ÖLeÑ EÜXAÕ» ¿ÇeèΔ ‡¿ÇeèÕfl vó
¿ÇRåAŒ ¬gtl ŒÕ ¿ÇLÉñw]ïè› / ¿ÇeèΔ ‡¿ÇeèÕfl ºWLñAÕ
VV AA ))
¡‡
11 VV AA ((
.
3 - ¬gtl ŒÕ ¿ÇLbtñÑ vó QåAŒ ¿ÇwñZïè.
Knå\ dèÕfl ¿Çq\“ Öä QåAŒ ¿ÇwñZïè pÉò ¿ÇbAaé.
¿ÇL\úñG.................................................................2
KèdñÑ ¿ÇÜqZ¿Δ ¿ÇXAÕQñé.............................................2
¡ÖAúä ‡‡mAôx ¡ŒÕ¿\ ¿ÇLUÄá....................................3
¿ÇLbtñÑ ¿Ω^A^ò..................................................4
¿ÇèmAôx ¿ΩW\„....................................................4
¿Ç}è¿ôá pÉò ¿ÇbAaé...............................................5
gFl ÖUkAΔ ¿ÇLÉñw]ïè›........................................5
gFl ¿ÇeèÕfl.........................................................6
gFl ¿ÇeèΔ ......................................................
6
|AôÜé EUP ‡¬dë… ¿ΩpkAq....................................7
ANTENNA
IN
VCR
IN
AUDIO
VIDEO
Page 16

KÉñw]ïè› ÖÉè›
úLñG ¿æÕaAÀ¿Δ ÇÉÜAÇÅ
в\Qи |\¿Вfl г[¿ ¿ЗДLсG EZ|й |FС KbtсС ¿ЗRеAŒ. ‡¿TLwo Eз ЗЙ\Qи’ ¬Зсз Ц_L}Fл
^RС Х|б ¿ЗЬиАпС ‡¿З\|б ¿ЗЬ_Й_С ЗЙRеAŒ. ¡аn\ ¿ЗFkA|й ¿ЗЬ\v}й pЙт ¿ЗtkAВ WЙx ¿ЗRеAŒ Цr K_RсС г[fi ¿ЗЬqЙиЦAΔ
‡K}ZпЬеA ЗЙFAфr j\vДб pвZ ¿жTLсA» ЗЙXZЦй.
Х|б ¿ЗЬООООиАпС :
Х|б ¿ЗЬ_Й_С :
www.lg.com
P/NO : MFL66987114-AR (MC059D)(1301-REV00)
 Loading...