

Page 1

Introduction
Thank you for your purchase of the Navigation System. Please read
this manual carefully to ensure proper use. Keep this manual in your
vehicle at all times.
The Navigation System is one of the most technologically advanced vehicle accessories ever developed. The system receives satellite signals
from the Global Positioning System (GPS) operated by the U.S. Department of Defense. Using these signals and other vehicle sensors, the system indicates your present position and assists in locating a desired destination.
The navigation system is designed to select efficient routes from your
present starting location to your destination. The system is designed to
direct you to a destination that is unfamiliar to you in an efficient manner.
The system uses the maps of DENSO. The calculated routes may not be
the shortest nor the least traffic congested. Your own personal local
knowledge or “short cut” may at times be faster than the calculated routes.
The navigation system’s database includes about 75 Point of Interest
categories to allow you to easily select destinations such as restaurants
and banks. If a destination is not in the database, you can enter the street
address or a major intersection close to it and the system will guide you
there. The system will provide both a visual map and audio instructions.
The audio instructions will announce the distance remaining and the direction to turn in approaching a fork or intersection. These voice instructions will help you keep your eyes on the road and are timed to provide
enough time to allow you to maneuver, change lanes or slow down.
i
Page 2

Please be aware that all current vehicle navigation systems have
certain limitations that may affect their ability to perform properly.
The accuracy of the vehicle’s position depends on the satellite condition, road configuration, vehicle condition or other circumstances. For more information on the limitations of the system, refer to
pages 9 through 12.
ii
Page 3
Important information abo
ut
this manual
For safety reasons, this manual indicates
items requiring particular attention with the
following marks.
CAUTION
This is a warning against anything
which may cause injury to people if
the warning is ignored. You are informed about what you must or
must not do in order to reduce the
risk of injury to yourself and others.
NOTICE
This is a warning against anything
which may cause damage to the vehicle or its equipment if the warning
is ignored. You are informed about
what you must or must not do in order to avoid or reduce the risk of damage to your vehicle and its equipment.
Initial screen
When you start the engine or turn the
ignition switch to the “ACC” position, the
initial screen appears and the system
begins operating.
CAUTION
When the vehicle is stopped with the
engine running, always apply the
parking brake for safety.
After a few seconds, the “CAUTION”
screen appears.
INFORMATION
This provides additional information.
iii
Page 4

Safety Instruction
Touch either “English” or
“Français” to select a language.
Read and follow the instructions.
When you touch the
on the screen, the map screen appears.
Y ou can access this screen when you push
the
“OPTION” button and touch the
“I Agree” switch
“Language” switch on the “Information
Menu” screen. Then you can select a language.
To use your system in the safest possible
manner, follow all the safety tips shown below.
This system is intended to assist you in
reaching your destination and, if used
properly, can do so. Y ou, as the driver, are
solely responsible for the safe operation of
your vehicle and the safety of your passengers.
Do not use any feature of this system to the
extent it distracts you from safe driving.
Your first priority while driving should always be the safe operation of your vehicle.
While you are driving, be sure to observe
all traffic regulations.
Prior to the actual use of this system, learn
how to use it and become thoroughly familiar with it. Read the entire Navigation System Owner’s Manual to make sure you understand the system. Do not allow others
to use this system until they have read and
understood the instructions in this manual.
For your safety, some functions may become inoperable when you start driving.
Unavailable switches are dimmed. You
can input your destination and select your
route only when the vehicle is not moving.
iv
Page 5

CAUTION
D For safety, the driver should not
operate the navigation system
while he/she is driving. Inattention
to the road and traffic may cause
an accident.
D While you are driving, be sure to
obey the traffic regulations and
maintain awareness of the road
conditions. If a traffic sign on the
road has been changed, route
guidance may provide wrong
information such as the direction
of a one way street.
While you are driving, listen to the voice instructions as much as possible and glance
at the screen briefly and only when it is
safe. However, do not totally rely on voice
guidance. Use it just for your information.
If the system cannot determine your current position correctly , there is a possibility
of incorrect, late or non−voice guidance.
The data in the system may occasionally
be incomplete. Road conditions, including
driving restrictions (no left turns, street closures, etc.) frequently change. Therefore,
before you follow any instruction from the
system, look to see whether you can comply with the instruction safely and legally.
This system cannot warn you about such
things as the safety of an area, condition of
streets, and availability of emergency services. If you are unsure about the safety
of an area, do not drive into it. Under no
circumstances is this system a substitute for the driver’s personal judgement.
Use this system only in locations where it
is legal to do so. Some states/provinces
may have laws prohibiting video screens
within sight of the driver.
v
Page 6

vi
Page 7
Quick guide —
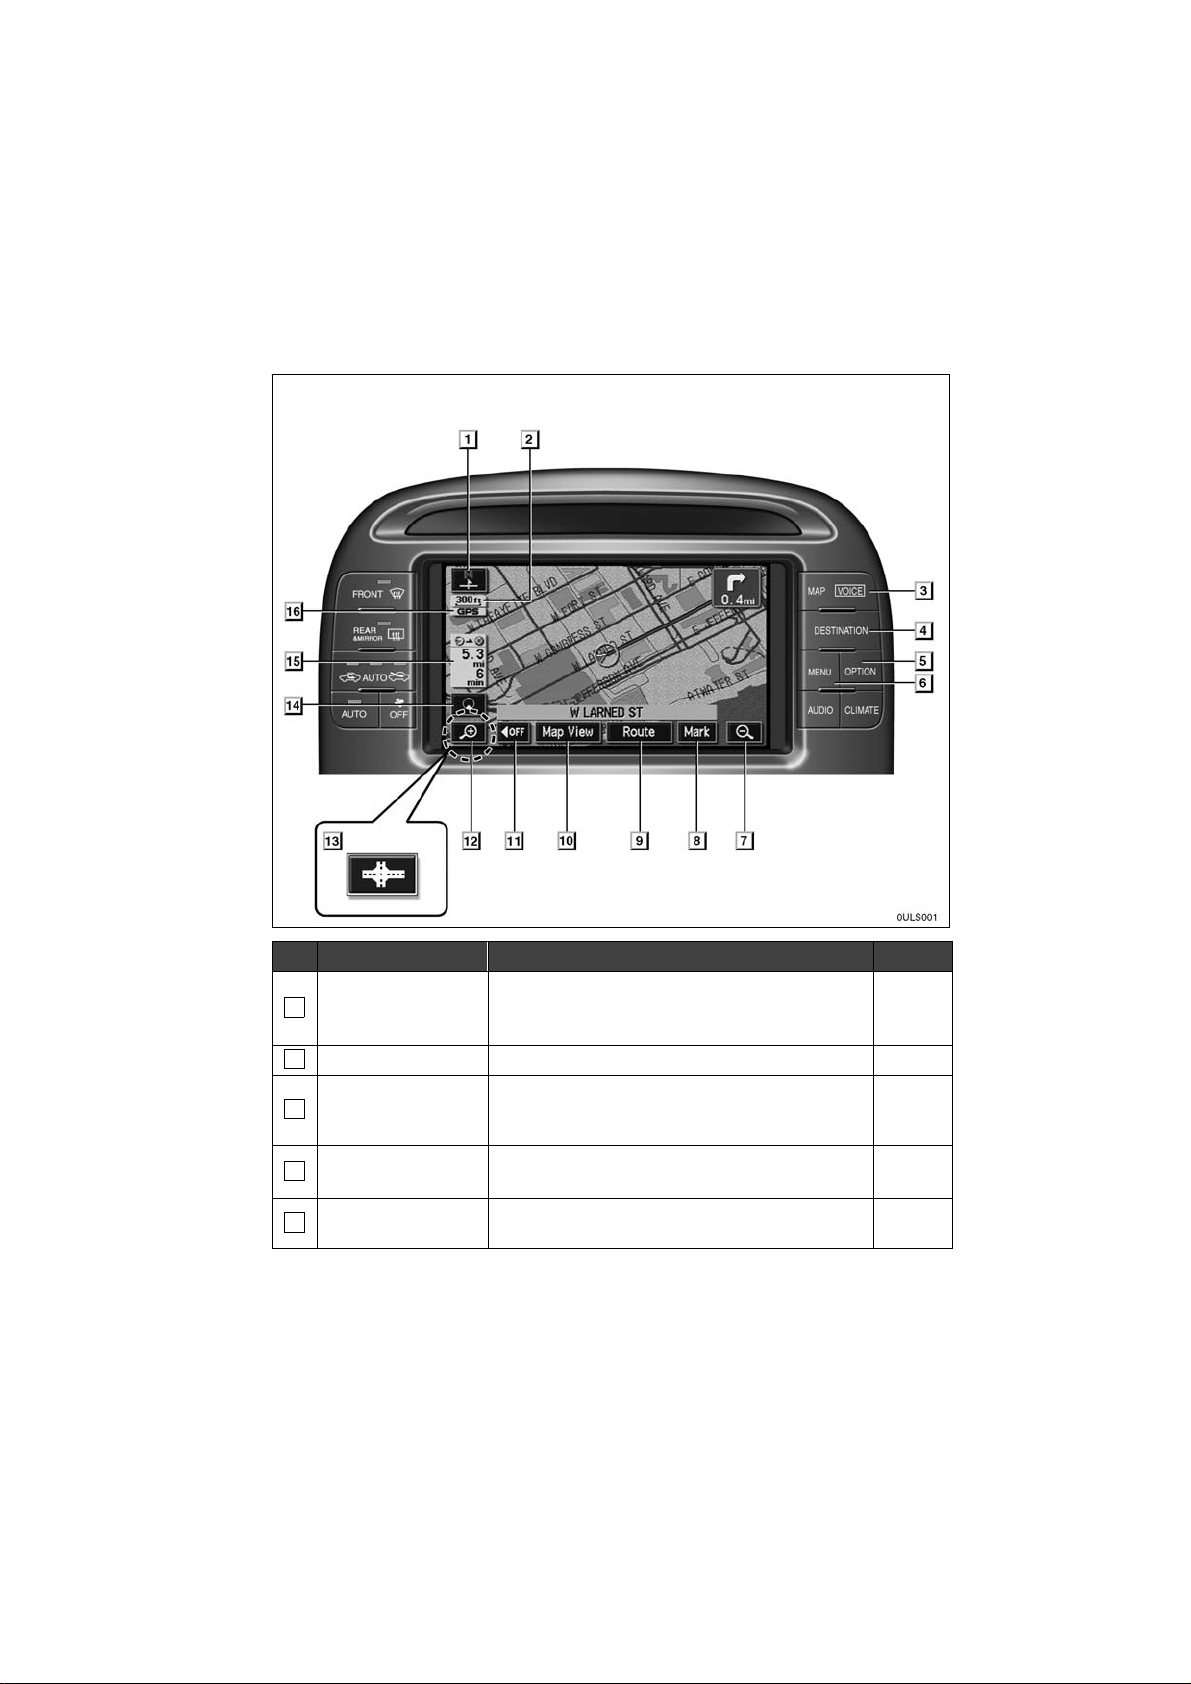
— Overview switches and guidance screen
0ULS001
No. Name Function Page
North−up or
1
heading−up
symbol
2
Scale indicator This figure indicates the map scale. 8
“MAP/VOICE”
3
button
“DESTINATION”
4
button
5
“OPTION” button
This symbol indicates a map view with north−up
or heading−up. Touching this symbol changes
the map orientation.
Push this button to repeat a voice guidance,
cancel one touch scroll, start guidance and display the current position.
Push this button to display the “Destination”
screen.
Push this button to display the “OPTION”
screen.
9
4, 5, 57
26, 28
iv,139,
169
vii
Page 8

No. Name Function Page
6
“MENU” button Push this button to display the “Menu” screen.
7
Zoom out switch Touch this switch to reduce the map scale. 8
8
“Mark” switch
9
“Route” switch Touch this switch to change the route. 58, 60
Touch this switch to register the cursor position
as a memory point.
82, 24,
81
6
Touch this switch to obtain information regard-
“Map View”
10
switch
ing the route to the destination and information
about the POI (Points of Interest) on the map
67, 70,
71
screen.
Touch this switch to obtain a broader view.
11
“AOFF” switch
Some of the switches on the screen are not displayed. They are displayed again by touching
114
the “ON "” switch.
12
Zoom in switch Touch this switch to magnify the map scale. 8
Foot print map
13
switch
Touch this switch to display the foot print map
and the building information.
79
Screen
14
configuration
Touch this switch to change the screen mode. 72
switch
Distance and time
15
to destination
Displays the distance and the estimated travel
time to the destination.
78
“GPS” mark
(Global
16
Positioning
Whenever the vehicle is receiving signals from
the GPS, this mark is displayed.
9
System)
viii
Page 9
06QG02
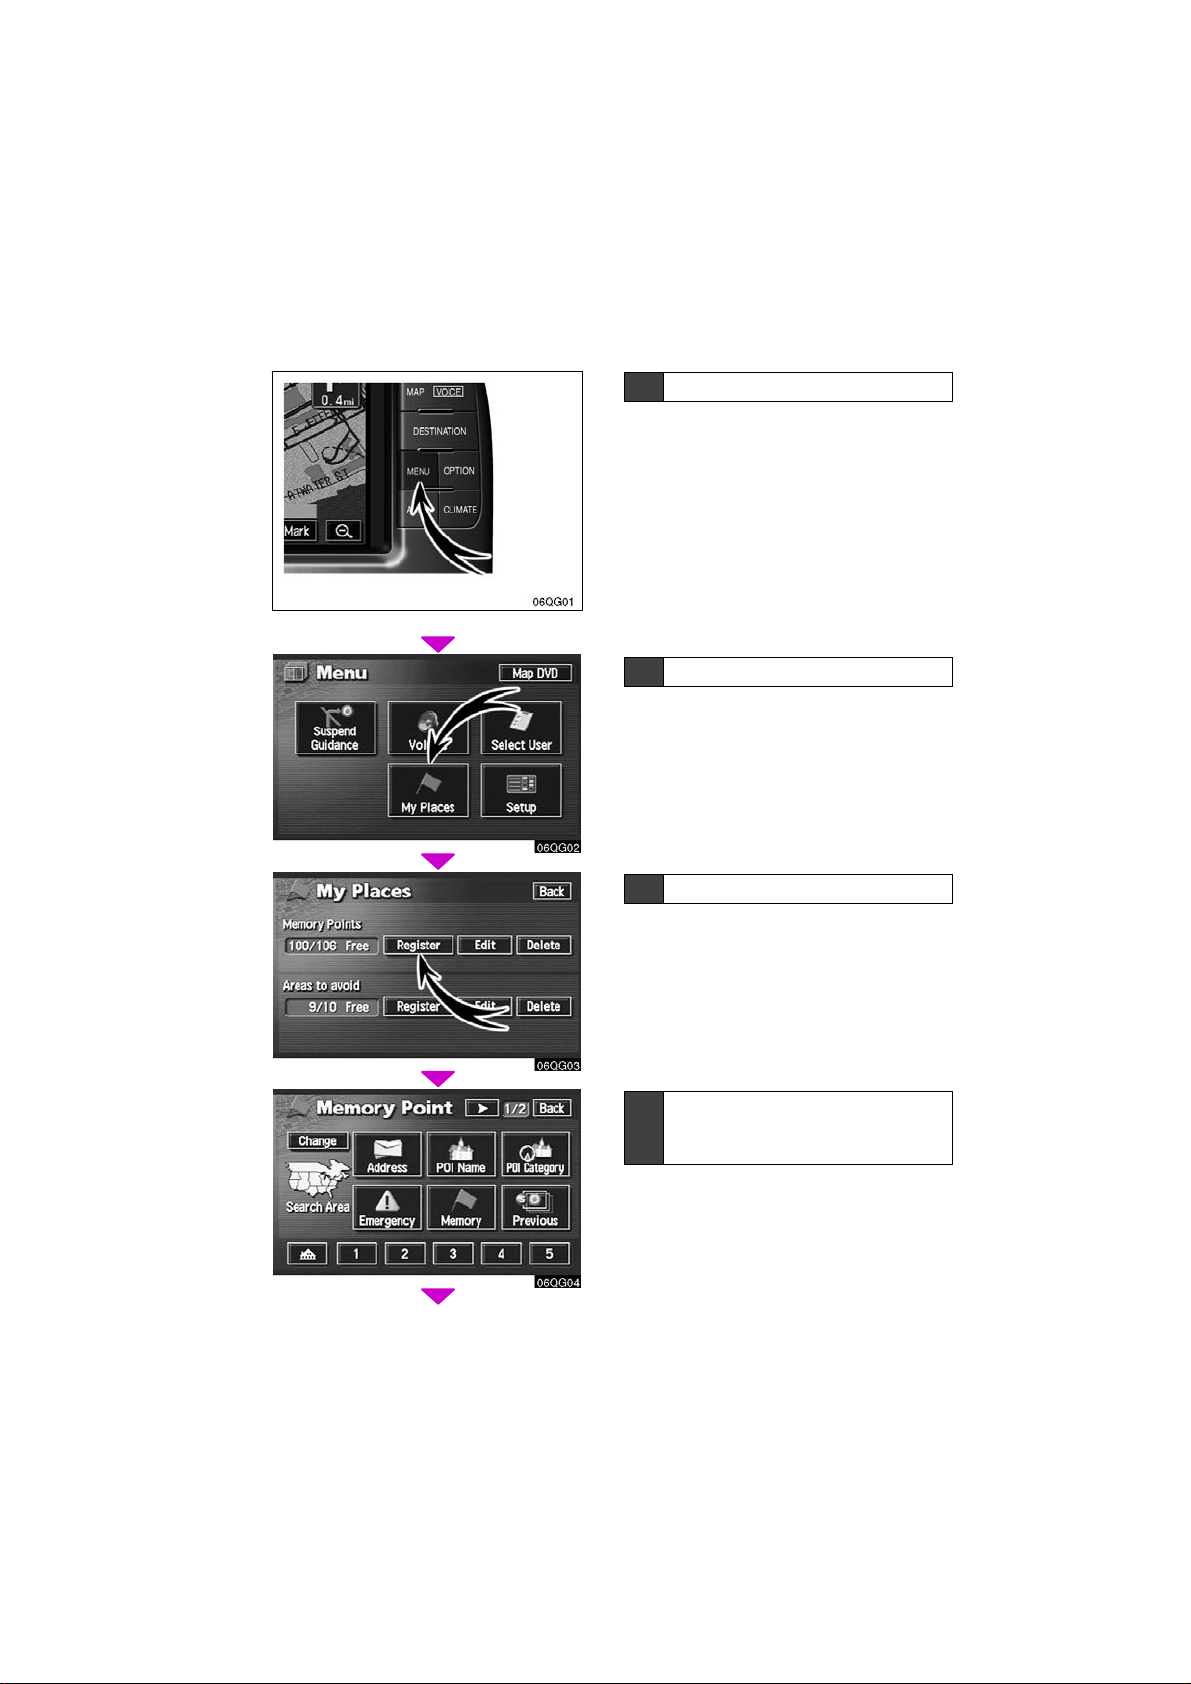
— Registering home or preset destinations
1 Push “MENU” button.
2 Touch “My Places”.
3 Touch “Register”.
06QG03
06QG04
4 There are 13 different methods t o
search your home or preset destinations.
See “Destination input” on page 28.
ix
Page 10
06QG05
06QG06
06QG07
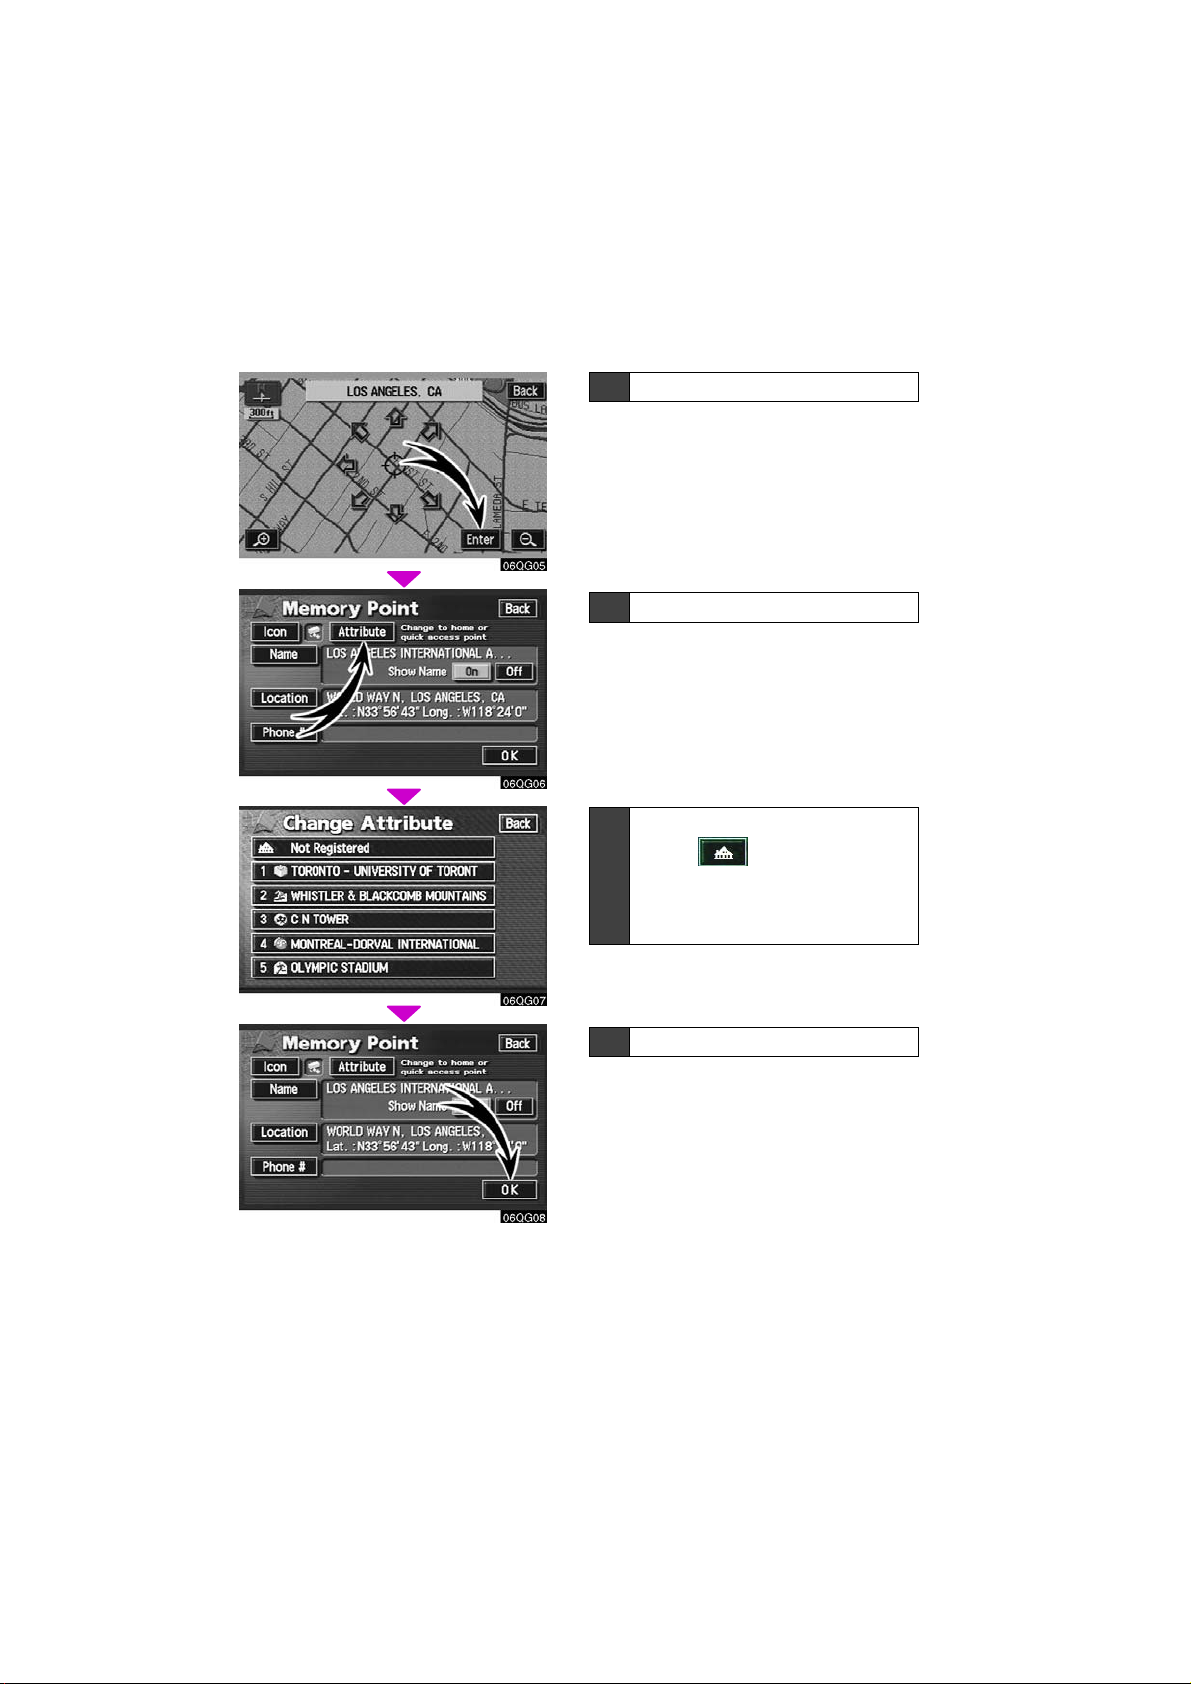
5 T ouch “Enter”.
The “Memory Point” screen is displayed.
6 Touch “Attribute”.
7 Registering home:
Touch .
Registering preset destinations:
Touch one of preset switches 1
to 5.
06QG08
8 Touch “OK”.
Registration of home or preset destinations is complete.
You can change the icon, quick access,
name, location and phone number. (See “
— Editing memory points” on page 90.)
x
Page 11
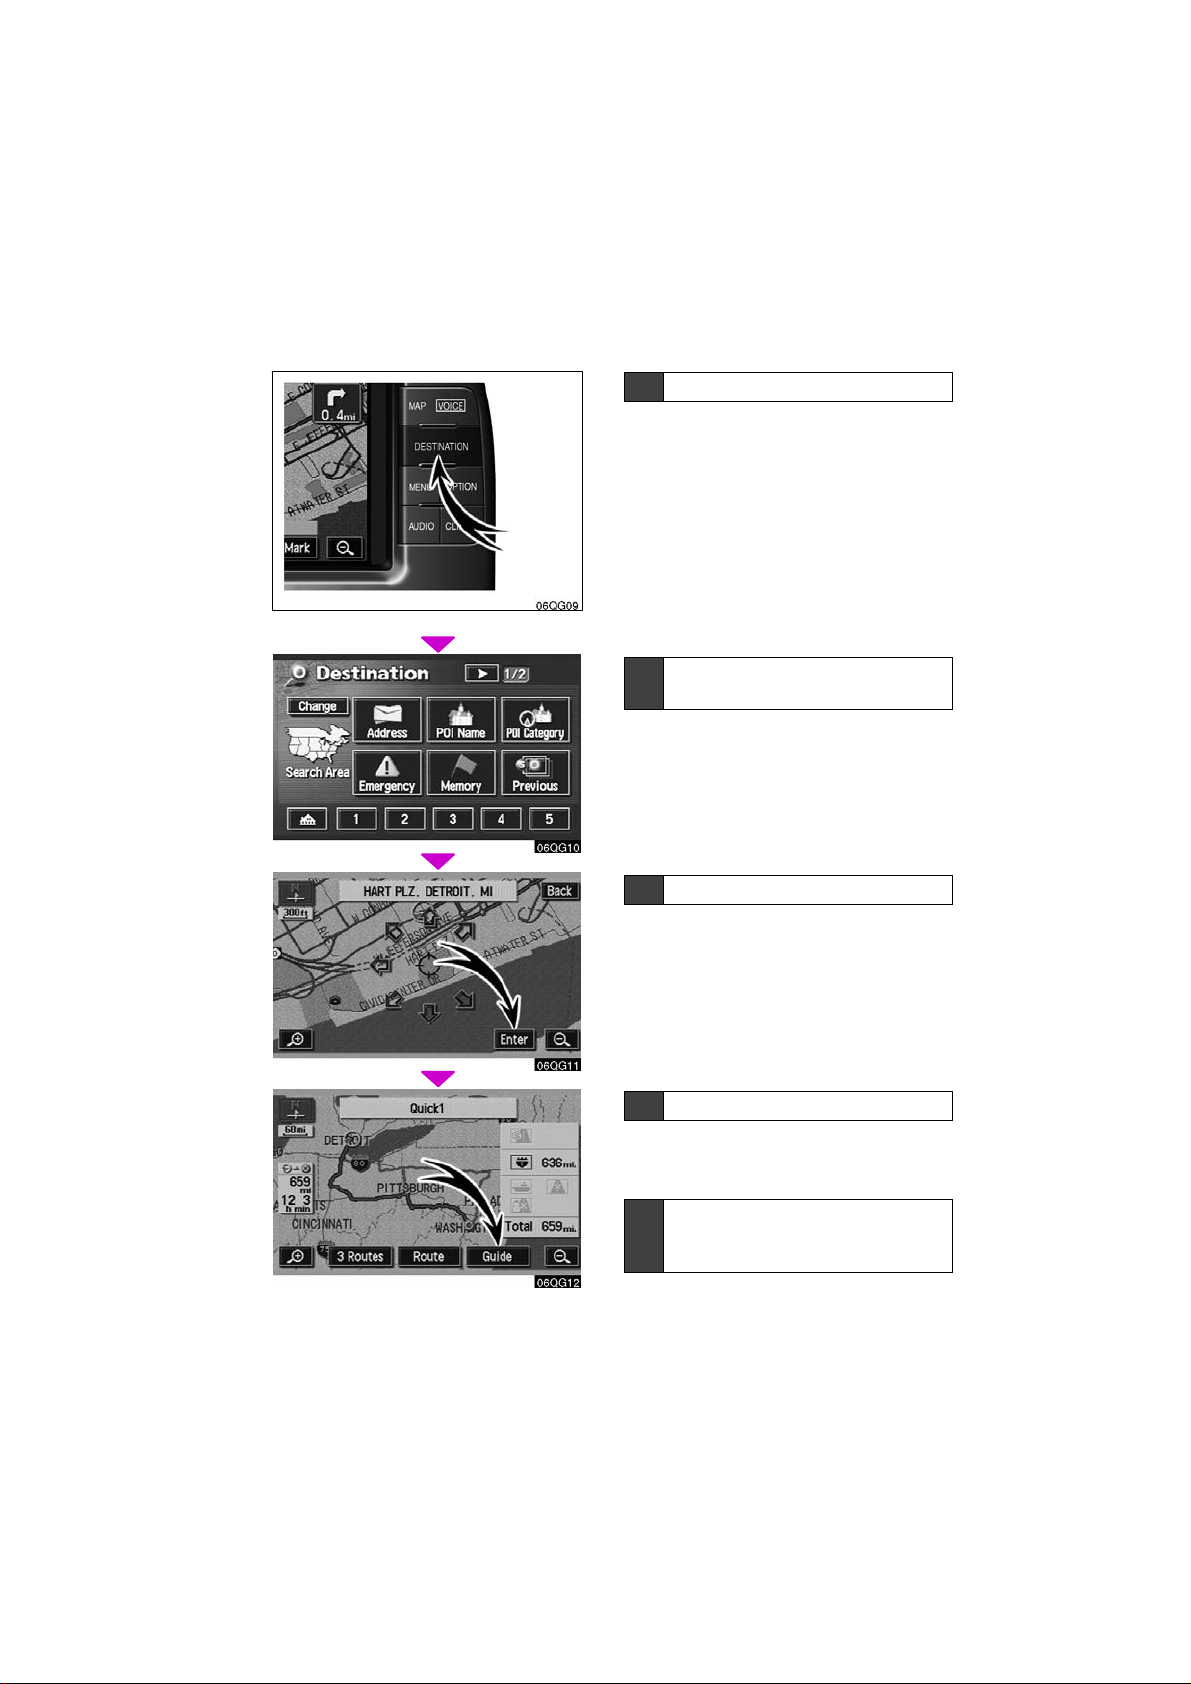
06GQ09
— Operation flow: guiding the route
06GQ10
1 Push “DESTINATION” button.
2 There are 13 different methods t o
search destinations.
See “Destination input” on page 28.
3 Touch “Enter”.
The navigation system performs a search
for the route.
06GQ11
06QG12
4 Touch “Guide”, and start driving.
Routes other than the one recommended
can also be selected. (See “ — Entering
destination” on page 53.)
5 Guidance to the destination is
given via voice and on the guidance screen.
xi
Page 12
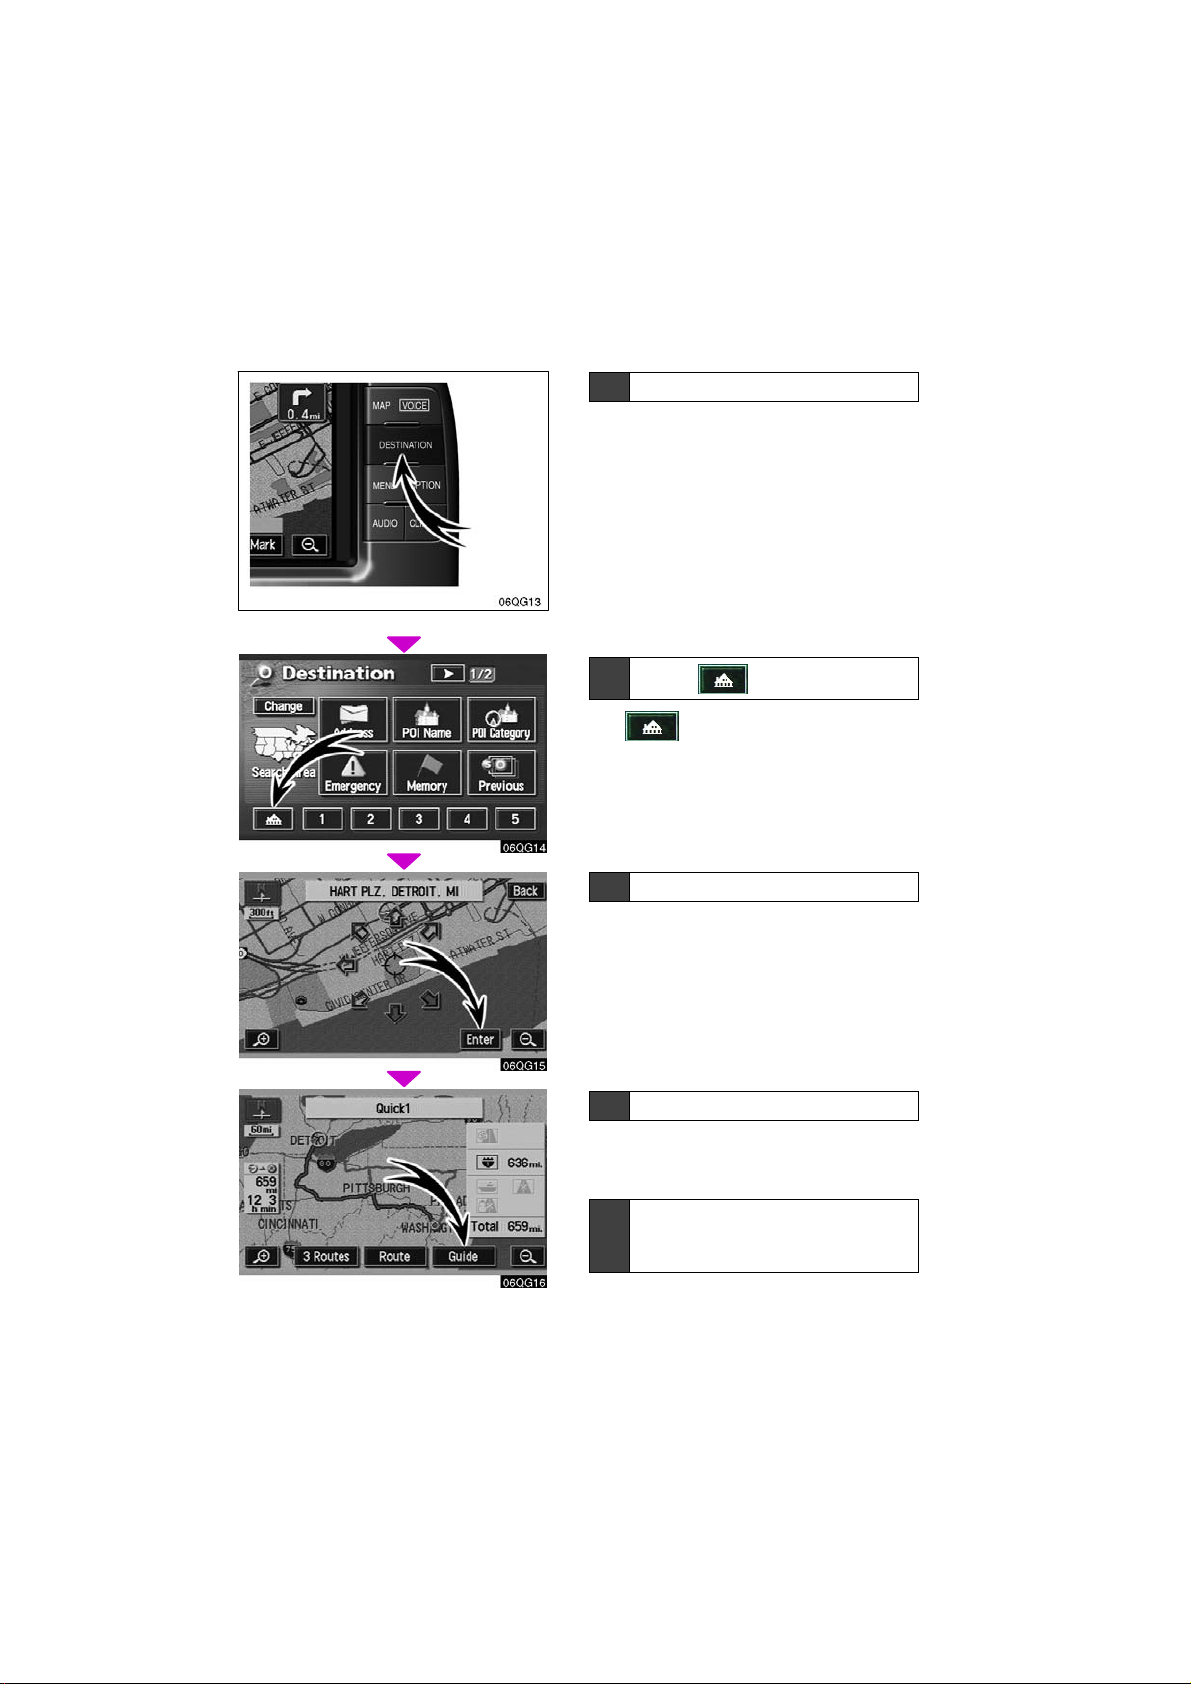
06QG13
— Setting home as the destination
06QG14
1 Push “DESTINATION” button.
2
Touch .
The can be used if your home has
been registered.
3 Touch “Enter”.
The navigation system performs a search
for the route.
06QG15
06QG16
4 Touch “Guide”, and start driving.
Routes other than the one recommended
can also be selected. (See “ — Entering
destination” on page 53.)
5 Guidance to the destination is
given via voice and on the guidance screen.
xii
Page 13

SECTION I
BASIC FUNCTIONS
Basic information before operation
D Touch switch operation 2
D Inputting letters and numbers 2
D Current position display 4
D Screen scroll operation (one−touch scroll) 5
D Map scale 8
D Orientation of the map 9
D Limitations of the navigation system 9
D Map database information and updates 12
. . . . . . . . . . . . . . . . . . . . . . . . . . . . . . . . . . . . . . . . . . . . . . .
. . . . . . . . . . . . . . . . . . . . . . . . . . . . . . . . . . . .
. . . . . . . . . . . . . . . . . . . . . . . . . . . . . .
. . . . . . . . . . . . . . . . . . . . . . . . . . . . . . . . . . .
. . . . . . . . . . . . . . . . . . .
. . . . . . . . . . . . . . . . . . . . . . . . . . . . . . . . . . . .
. . . . . . . . . . . . . . . . . . . . . . . .
. . . . . . . . . . . . . . . . . . . .
1
Page 14
Touch switch operation
Inputting letters and
This system is operated mainly by the
switches on the screen. To prevent
damage to the screen, lightly touch
switches on the screen with your finger.
When you touch a switch on the screen,
a beep sounds.
Do not use objects other than your finger to touch the screen.
INFORMATION
D If the system does not respond to
a touch of a switch, move your finger away from the screen and then
touch it again.
D You cannot operate dimmed
switches.
D Wipe off fingerprints on the sur-
face of the display using a glass
cleaning cloth.
D The displayed image may become
darker and moving images may be
slightly distorted when the display
is cold.
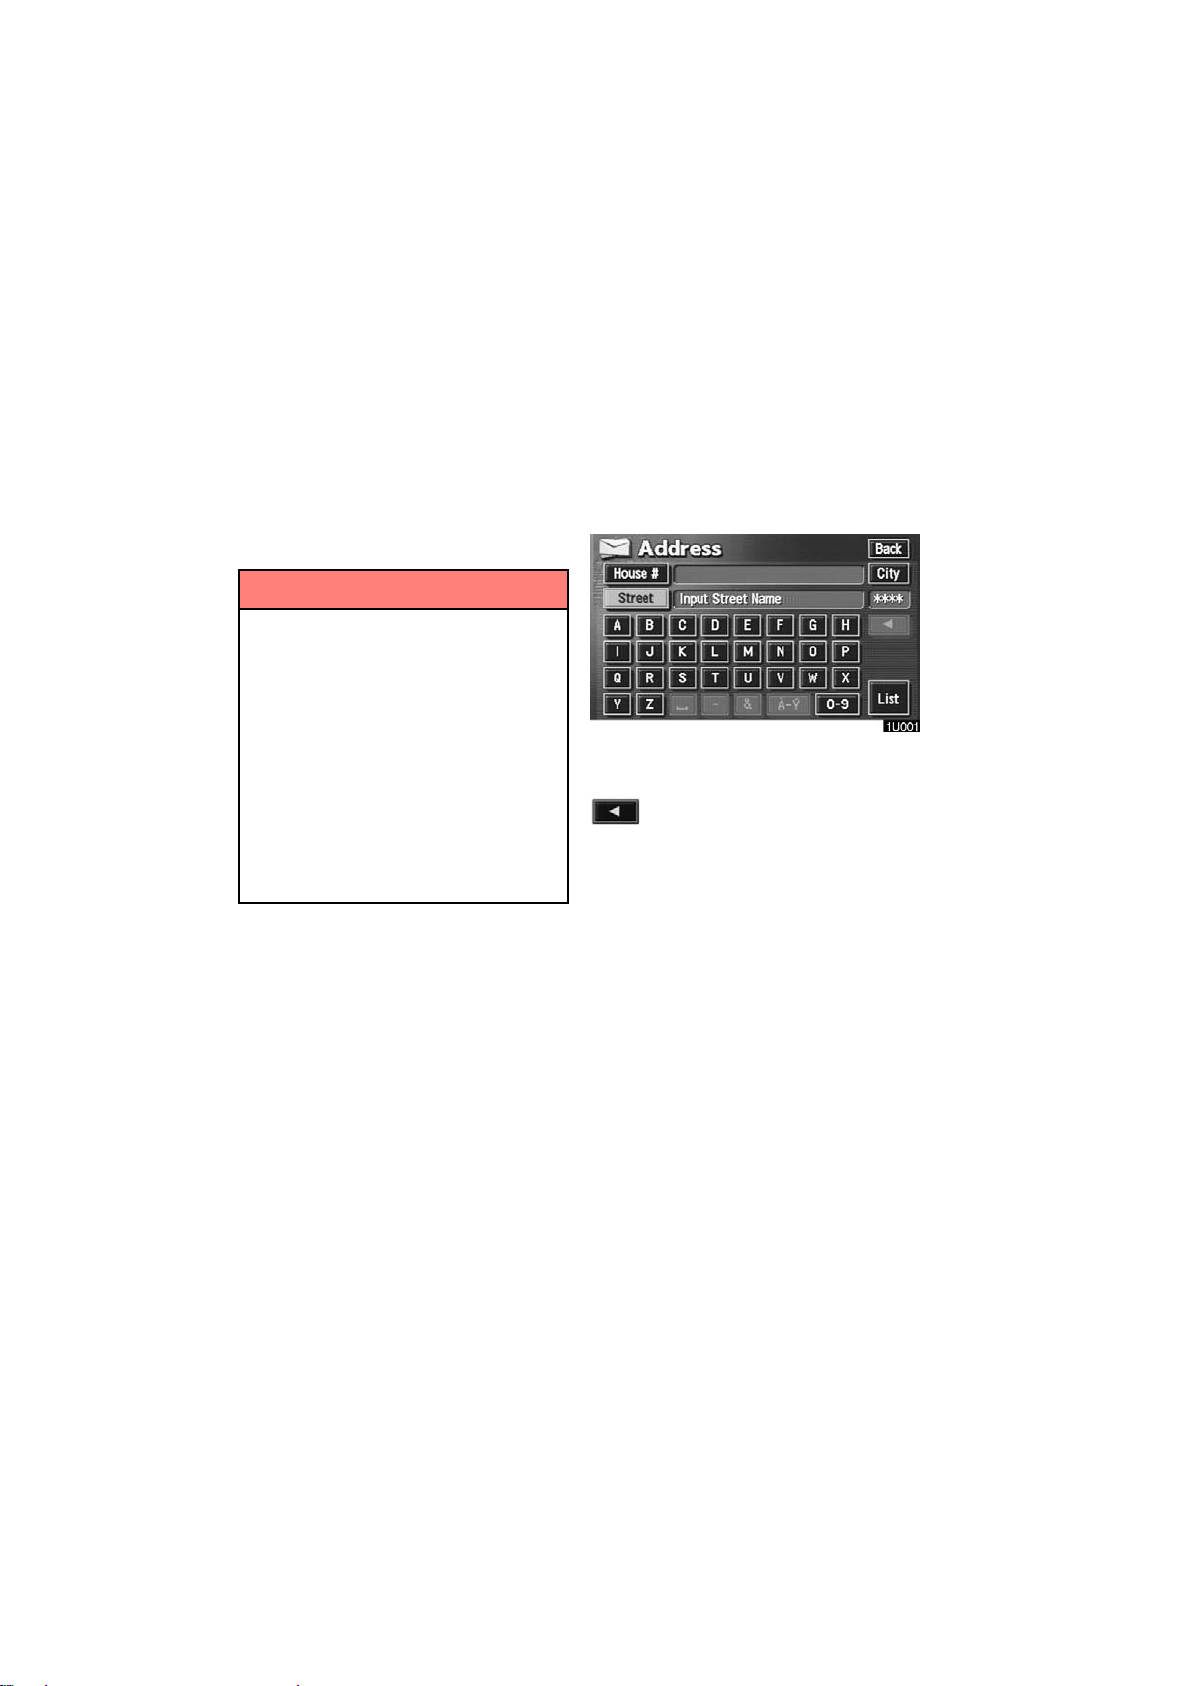
numbers
When searching for an address or a name,
or entering a memo, you can input letters
and numbers via the touch screen.
D To input letters
To display the alphabet keys, touch the
“A−Z” switch or the “À−Ý” switch.
Enter letters by touching the alphabet keys
directly.
: Touching this switch erases one
letter. Holding this switch will
continue to erase letters.
2
Page 15

To input numerals and symbols
D
To display the number keys and symbol
keys, touch the
Enter numerals and symbols by touching
the number keys and symbol keys directly.
: Touching this switch erases one
: Touching this switch displays oth-
er symbols.
“0−9” switch.
letter. Holding this switch will
continue to erase letters.
D To display the list
To search for an address or a name, touch
“List” switch. Matching items from
the
the database are listed even if the entered
address or name is incomplete.
If the number of matches is four or less, the
list is displayed without touching the
“List” switch.
INFORMATION
The number of matching items is
shown to the right side of the screen.
If the number of matching items is
more than 9,999, the system displays
∗∗∗∗” on the screen.
“
3
Page 16
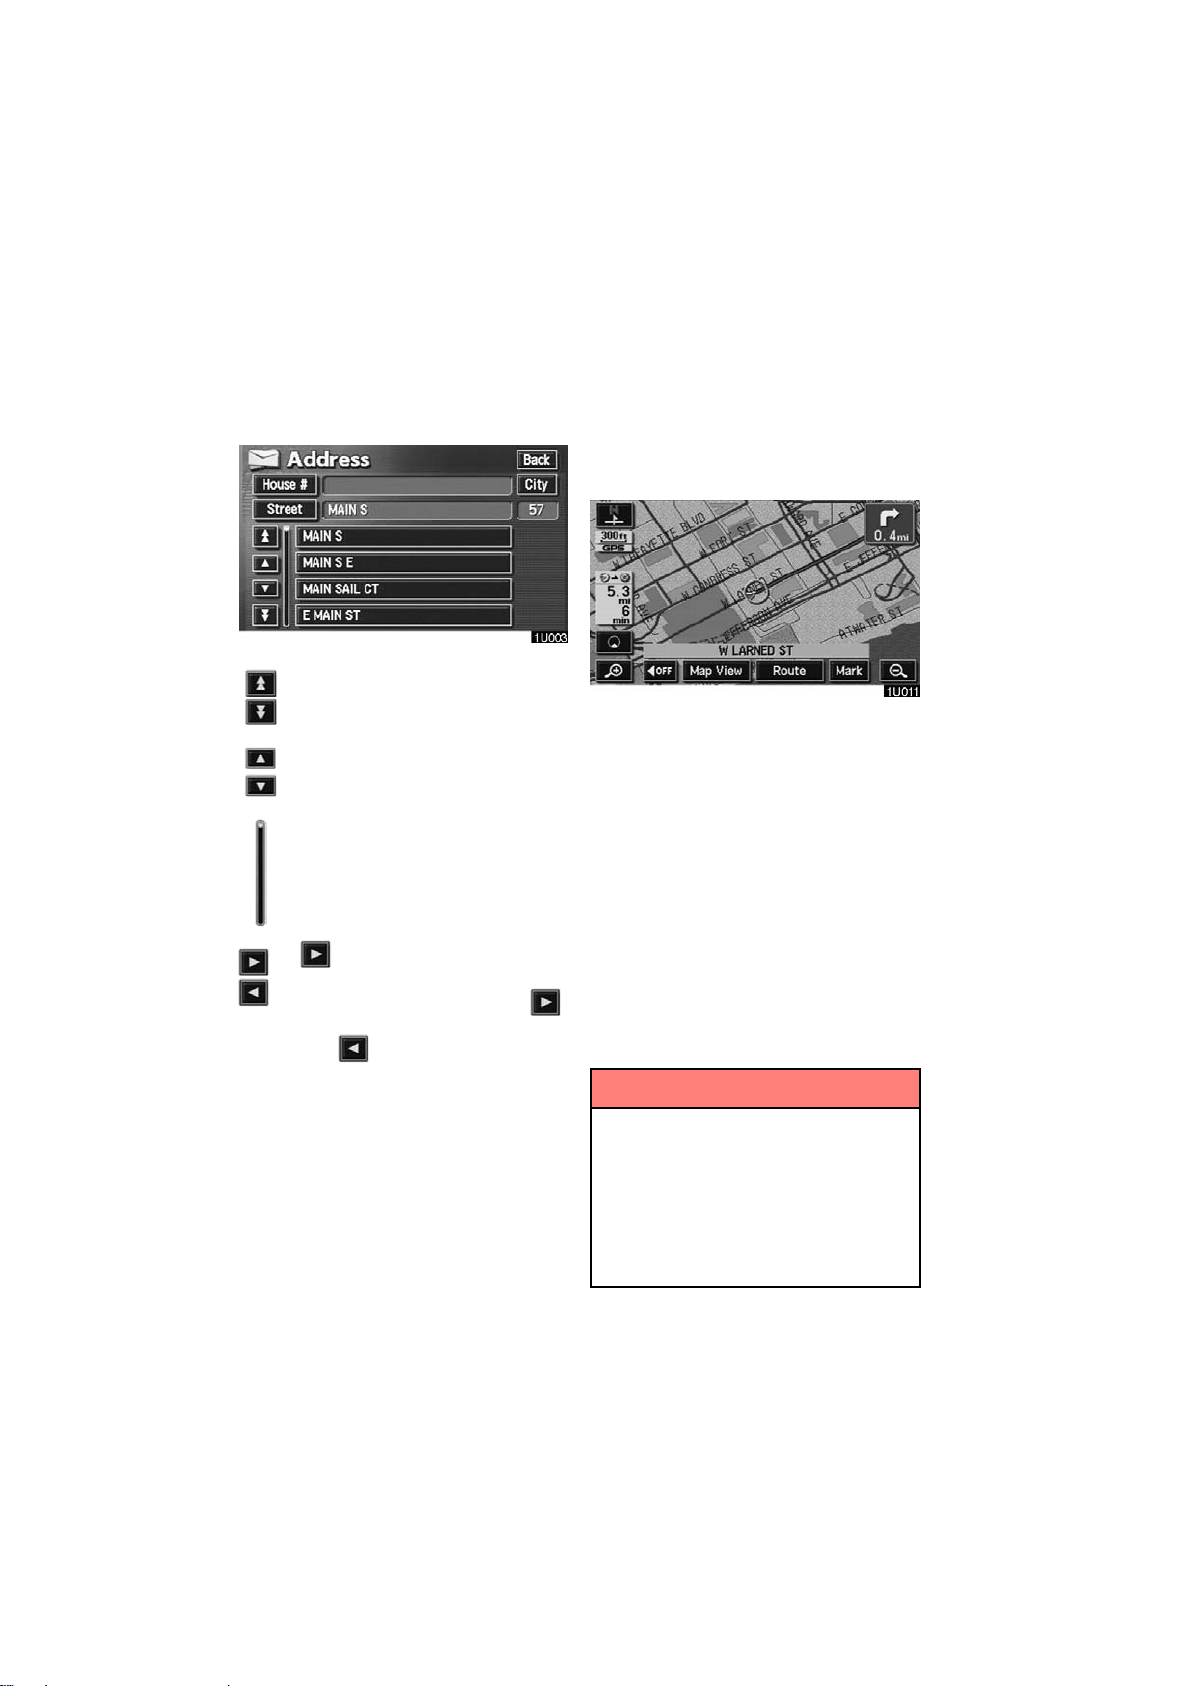
List screen operation
D
When a list is displayed, you can scroll or
page through the list by using the appropriate switch.
To shift to the next or previous
page.
To scroll up or down one item at a
time.
This expresses a displayed
screen position.
If appears to the right of the
item name, the complete name is
too long for the display. Touch
to scroll to the end of the name.
Touch to scroll to the
beginning of the name.
Current position display
When starting the navigation system, the
current position is displayed first.
This screen displays the current vehicle
position and a map of the surrounding local
area.
The current vehicle position mark appears
in the center or bottom center of the map
screen. You can return to this map screen
showing your current position at any time
from any screen by touching the
VOICE”
During driving, the current vehicle position
mark is fixed in the screen and the map
moves.
The current position is automatically set as
your vehicle receives signals from the
GPS (Global Positioning System). If your
current position is not correct, it is automatically corrected after your vehicle receives
signals from the GPS.
button.
INFORMATION
D After the battery disconnection, or
on a new vehicle, the current position may not be correct. As soon
as the system receives signals
from the GPS, the correct current
position is displayed.
D To correct the current position
manually, see page 101.
“MAP/
4
Page 17
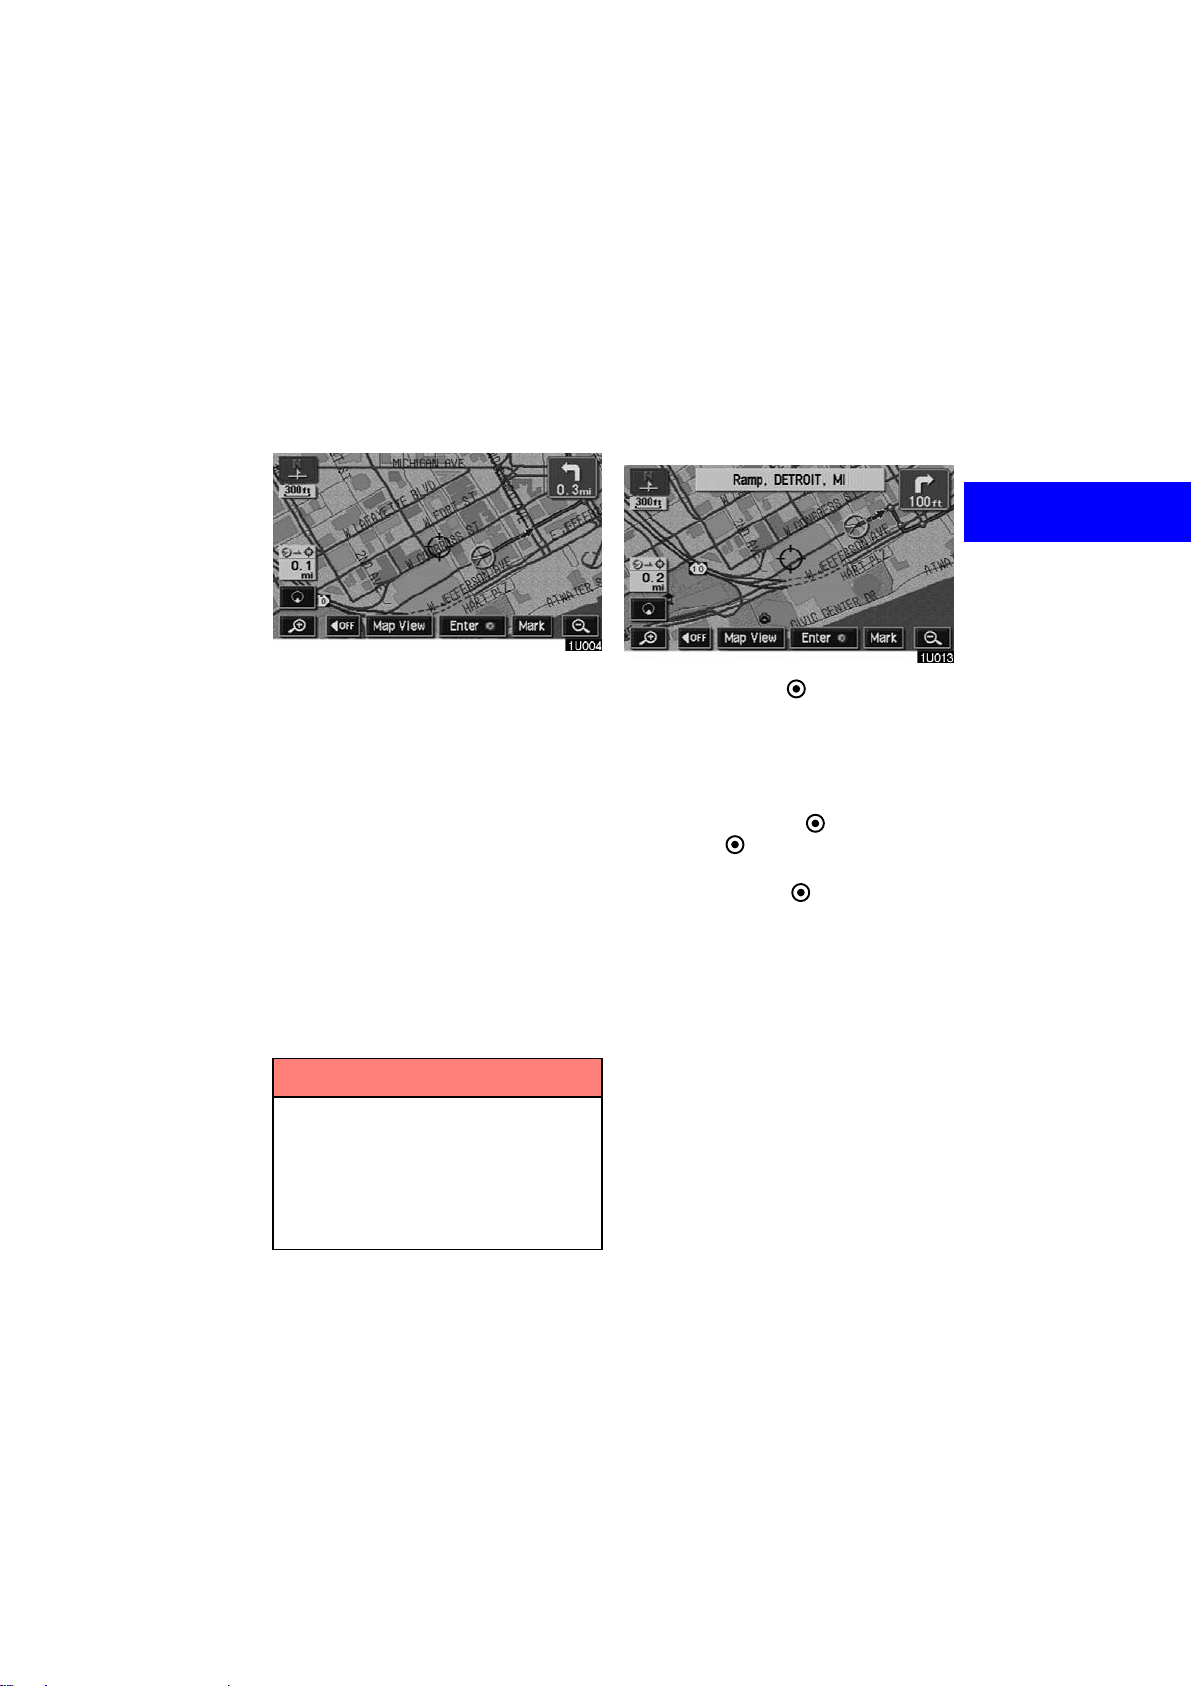
Screen scroll operation
(one−touch scroll)
Touch any point on the map and that
point moves to the center of the screen
and is shown by the cursor mark.
D To set the cursor position as a des-
tination
Y ou can set a specific point on the map as
a destination using the one−touch scroll
function.
If you wish to look at a point on the map
which is different to your current vehicle
position, you can bring the desired point to
the center of the screen by using the scroll
feature.
If you continue to hold your finger on the
screen, the map will continue scrolling in
that direction until you lift your finger.
After you scroll the screen, the map remains centered at the selected location
until you activate another function. The
current vehicle position mark will continue
to move along your actual route and may
move off the screen. When you touch the
“MAP/VOICE” button, the current ve-
hicle position mark returns to the center of
the screen and the map moves as you proceed along the designated route.
INFORMATION
When you use the one−touch scroll
feature, the current vehicle position
mark may disappear from the screen.
Move the map with a one−touch scroll
again or push the
button to return to the current vehicle
position map location display.
“MAP/VOICE”
Touch the “Enter ” switch.
The screen changes and displays the
map location of the selected destination and the route preference. (See “ —
Entering destination” on page 53.)
If there is already a preset destination,
touch the
“Add to ” switch or the
“Replace ” switch.
When there is already a preset destination,
using the
additional destination, will set the new one
as the first point of arrival.
“Add to ” switch to set an
5
Page 18
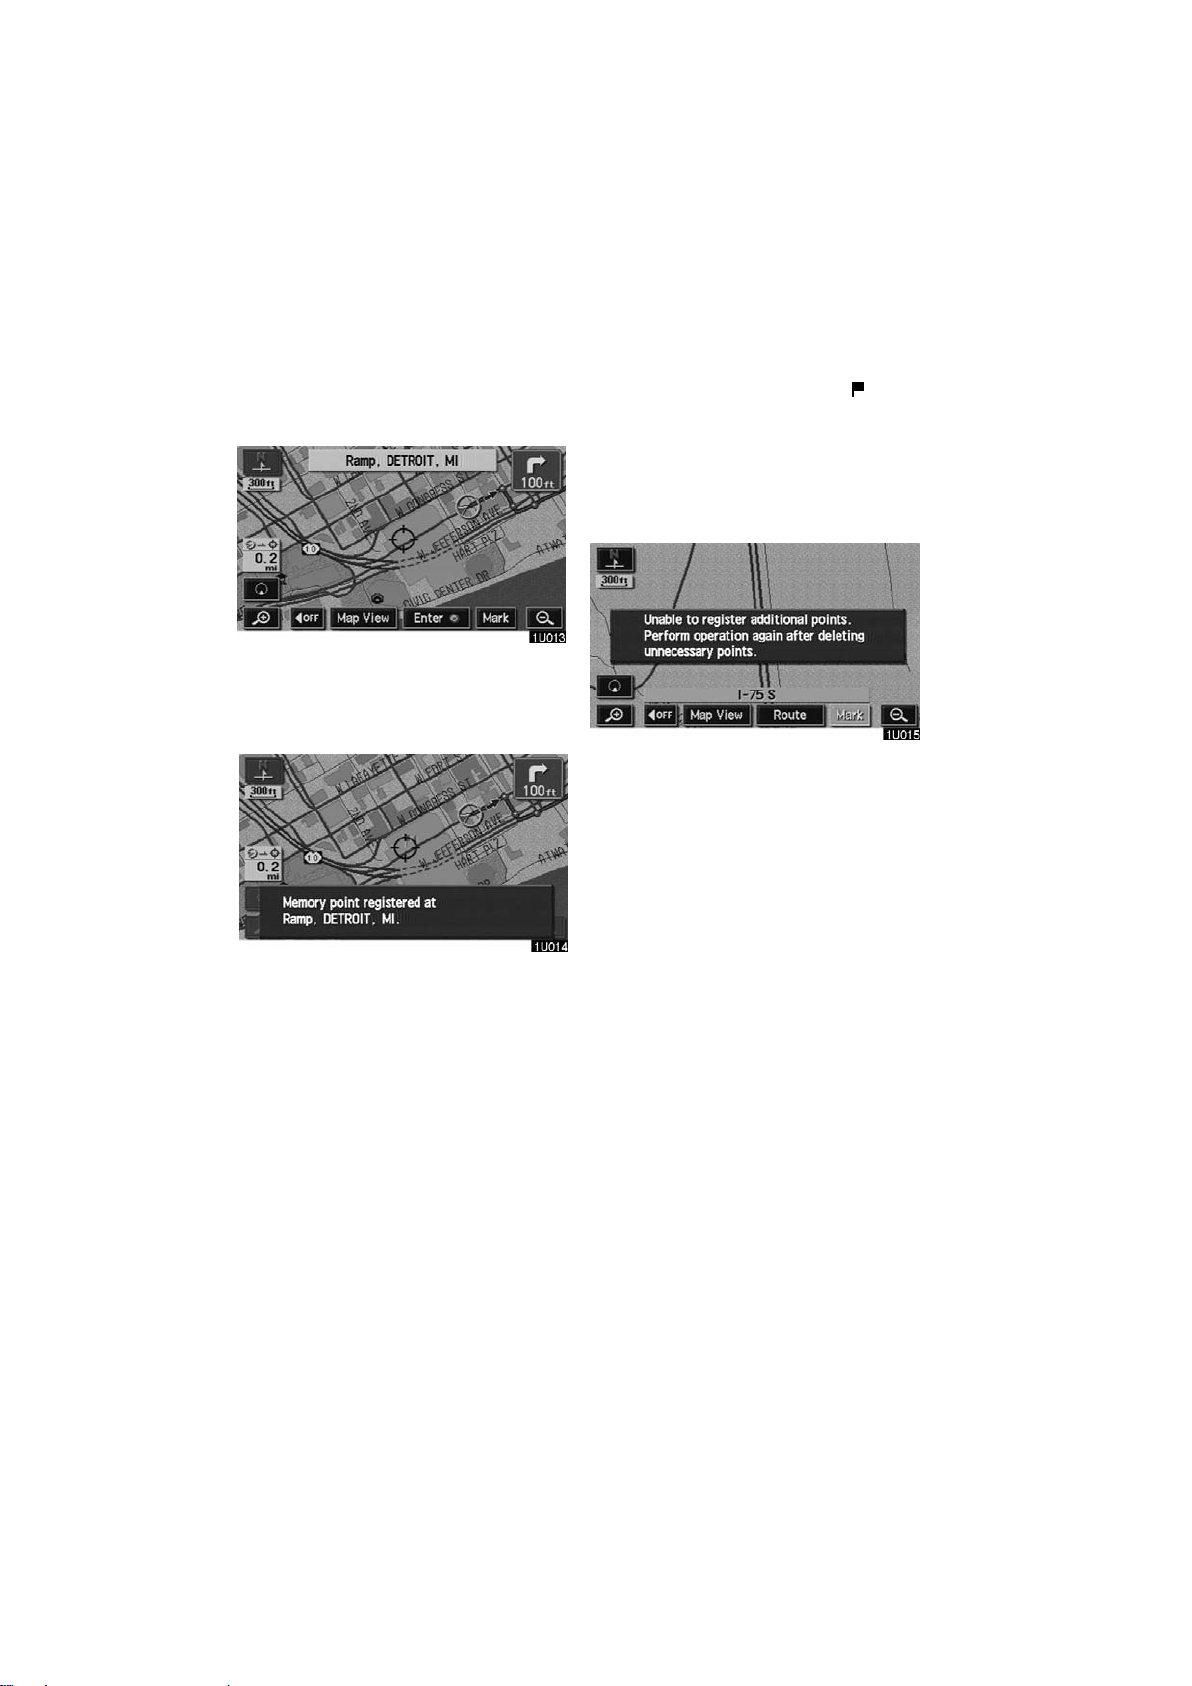
To register the cursor position as a
D
memory point
Memory point registration enables easy
access to a specific point.
Touch the “Mark” switch.
When you touch the
following screen appears for a few seconds, and then the map screen returns.
“Mark” switch, the
The registered point is shown by on the
map.
T o change the icon or name, etc., see page
90.
Y ou can register up to 106 memory points.
If you attempt to register more than 106, a
message appears for confirmation.
6
Page 19
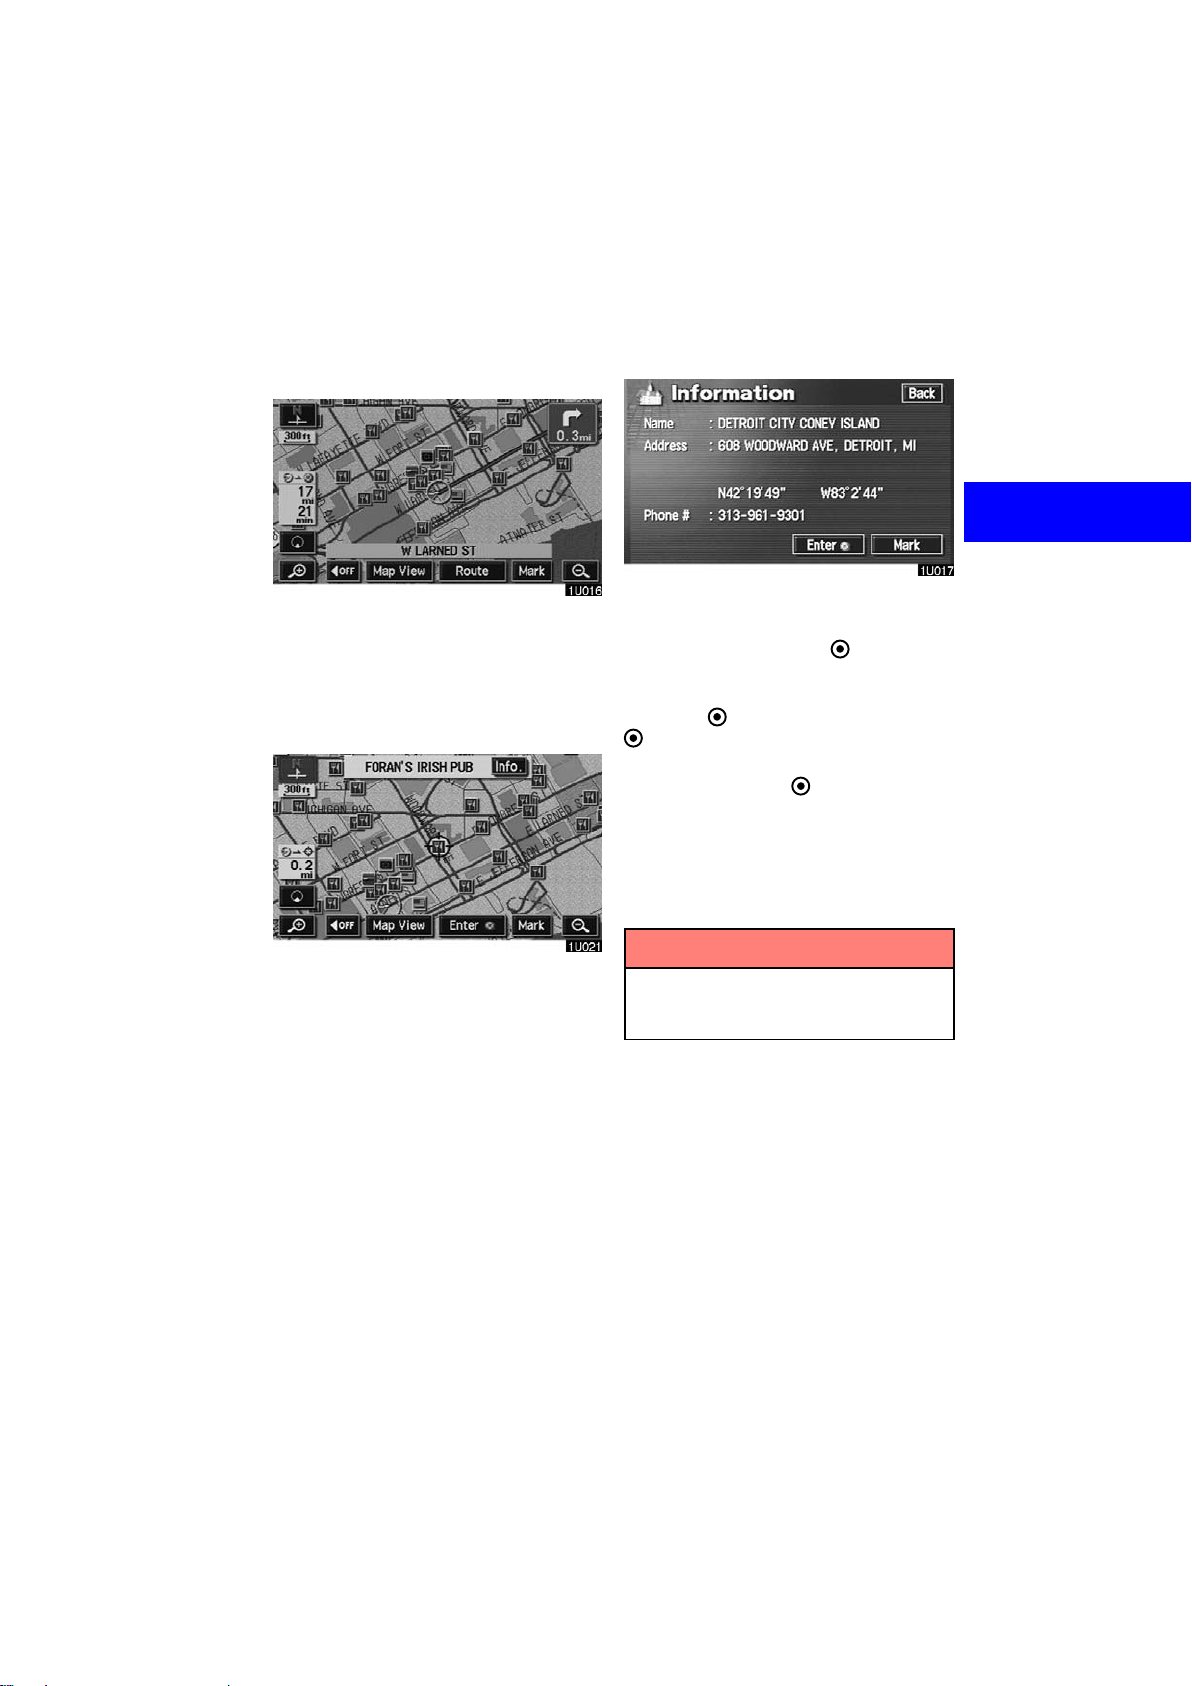
To see information about the icon
D
where the cursor is set
Touch the “Info.” switch.
To display information about an icon, set
the cursor on it.
POI INFORMATION
When the cursor is set on a POI icon, the
name and
on the top of the screen.
“Info.” switch are displayed
Information such as the name, address,
and phone number are displayed.
If you touch the
position of cursor is set as a destination.
If there is already a preset destination, the
“Enter ” switch, the
“Add to ” switch and the “Replace
” switch are displayed.
When there is already a preset destination,
using the
additional destination, will set the new one
as the first point of arrival.
To register this POI as a memory point,
touch the
see page 88.)
“Add to ” switch to set an
“Mark” switch. (For details,
INFORMATION
The desired Point of Interest can be
displayed on the map screen. (For
details, see page 67.)
7
Page 20
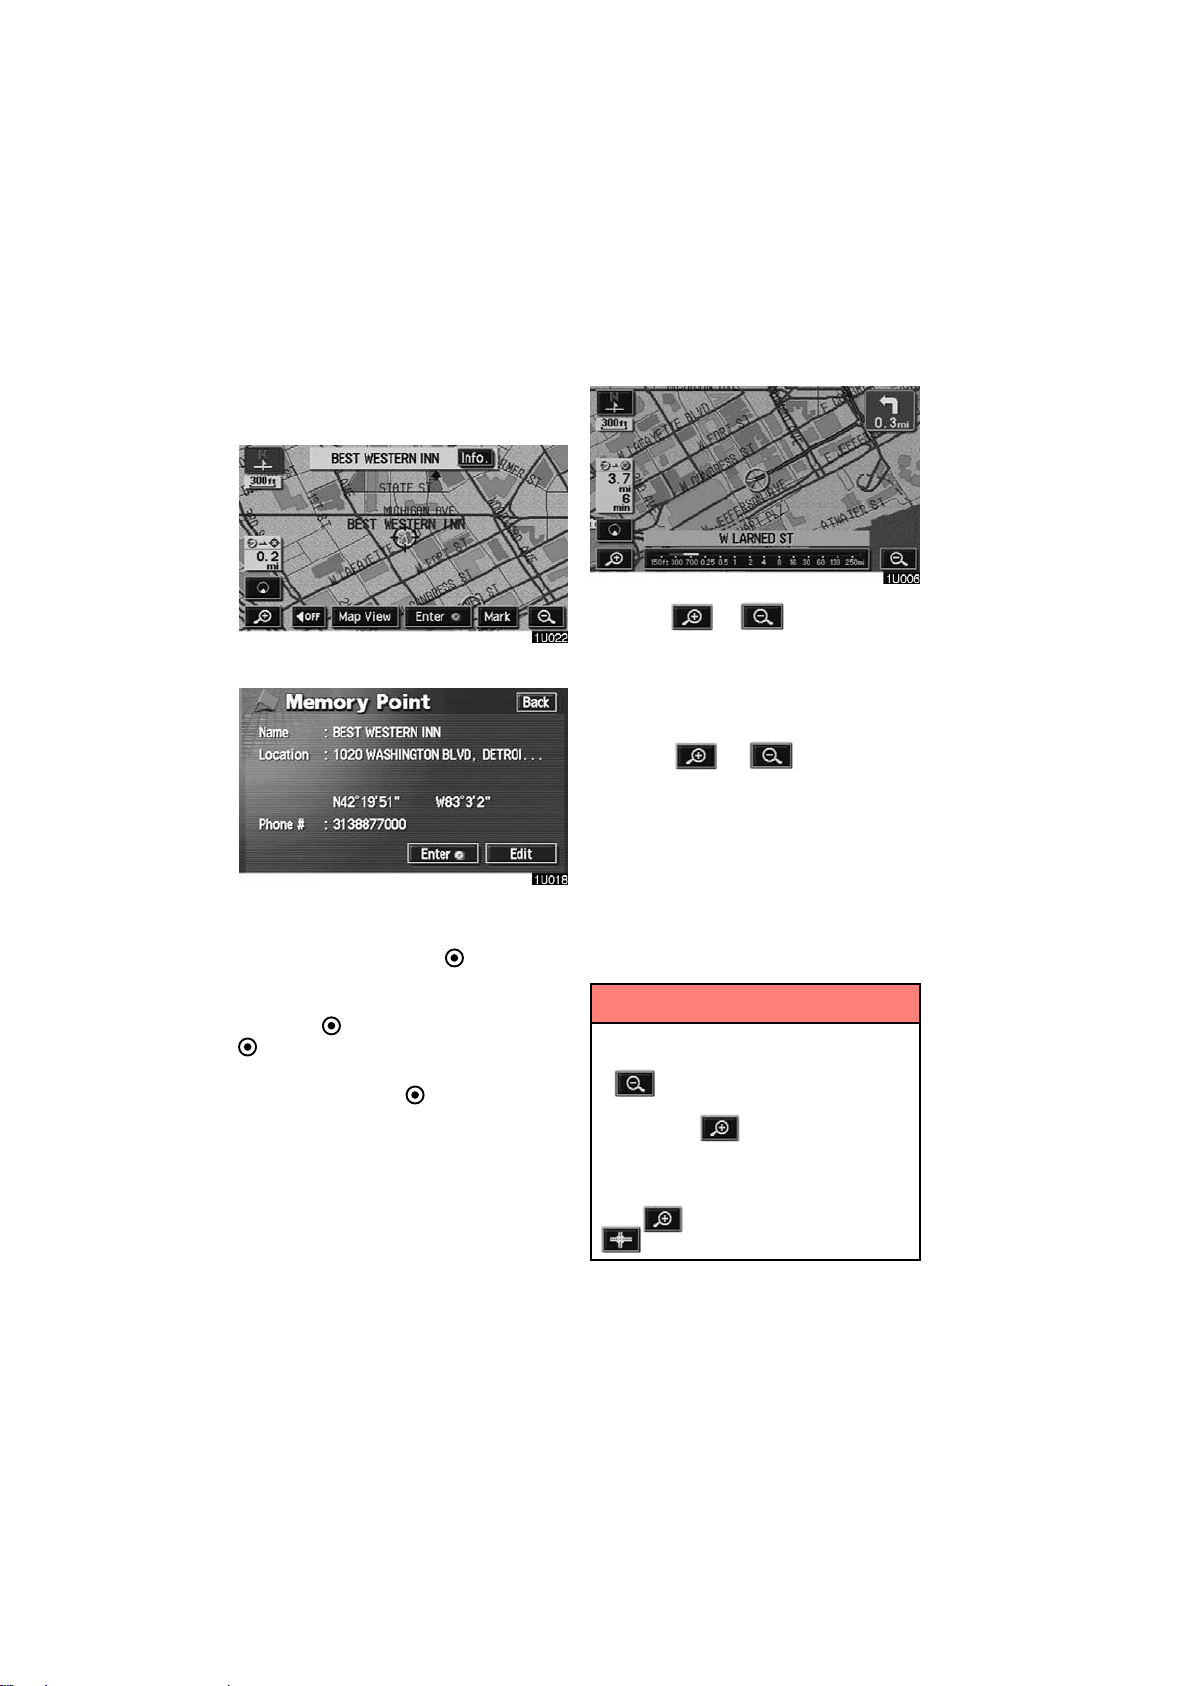
MEMORY POINT INFORMATION
Map scale
When the cursor is set on a memory point
icon, the name and
displayed on the top of screen.
Touch the “Info.” switch.
“Info.” switch are
Touch the or switch to change
the scale of the map display. The scale bar
and indicator at the bottom of the screen
indicates the map scale menu. The scale
ranges 150 feet (50 m) to 250 miles (400
km).
Information such as the name, location,
and phone number are displayed.
If you touch the
position of cursor is set as a destination.
If there is already a set destination, the
“Enter ” switch, the
“Add to ” switch and the “Replace
” switch are displayed.
When there is already a preset destination,
using the
additional destination, will set the new one
as the first point of arrival.
To edit a memory point, touch the
switch. (For details, see page 90.)
“Add to ” switch to set an
“Edit”
Touch the
scale bar changes normally. I f you contin-
ue to touch on the switch, the scale bar
changes smoothly.
You can change the scale of the map display by touching the scale bar directly. It is
not available during driving.
The map scale is displayed under the
north−up symbol or heading−up symbol at
the top left of the screen.
or switch until the
INFORMATION
When the map scale is at the maximum range of 250 miles (400 km),
is not shown. When the map
scale is at the minimum range of 150
feet (50 m), is not shown. However, in the area where the foot print
map is contained, when the map
scale is changed to 150 feet (50 m),
the switch changes to the
switch.
8
Page 21
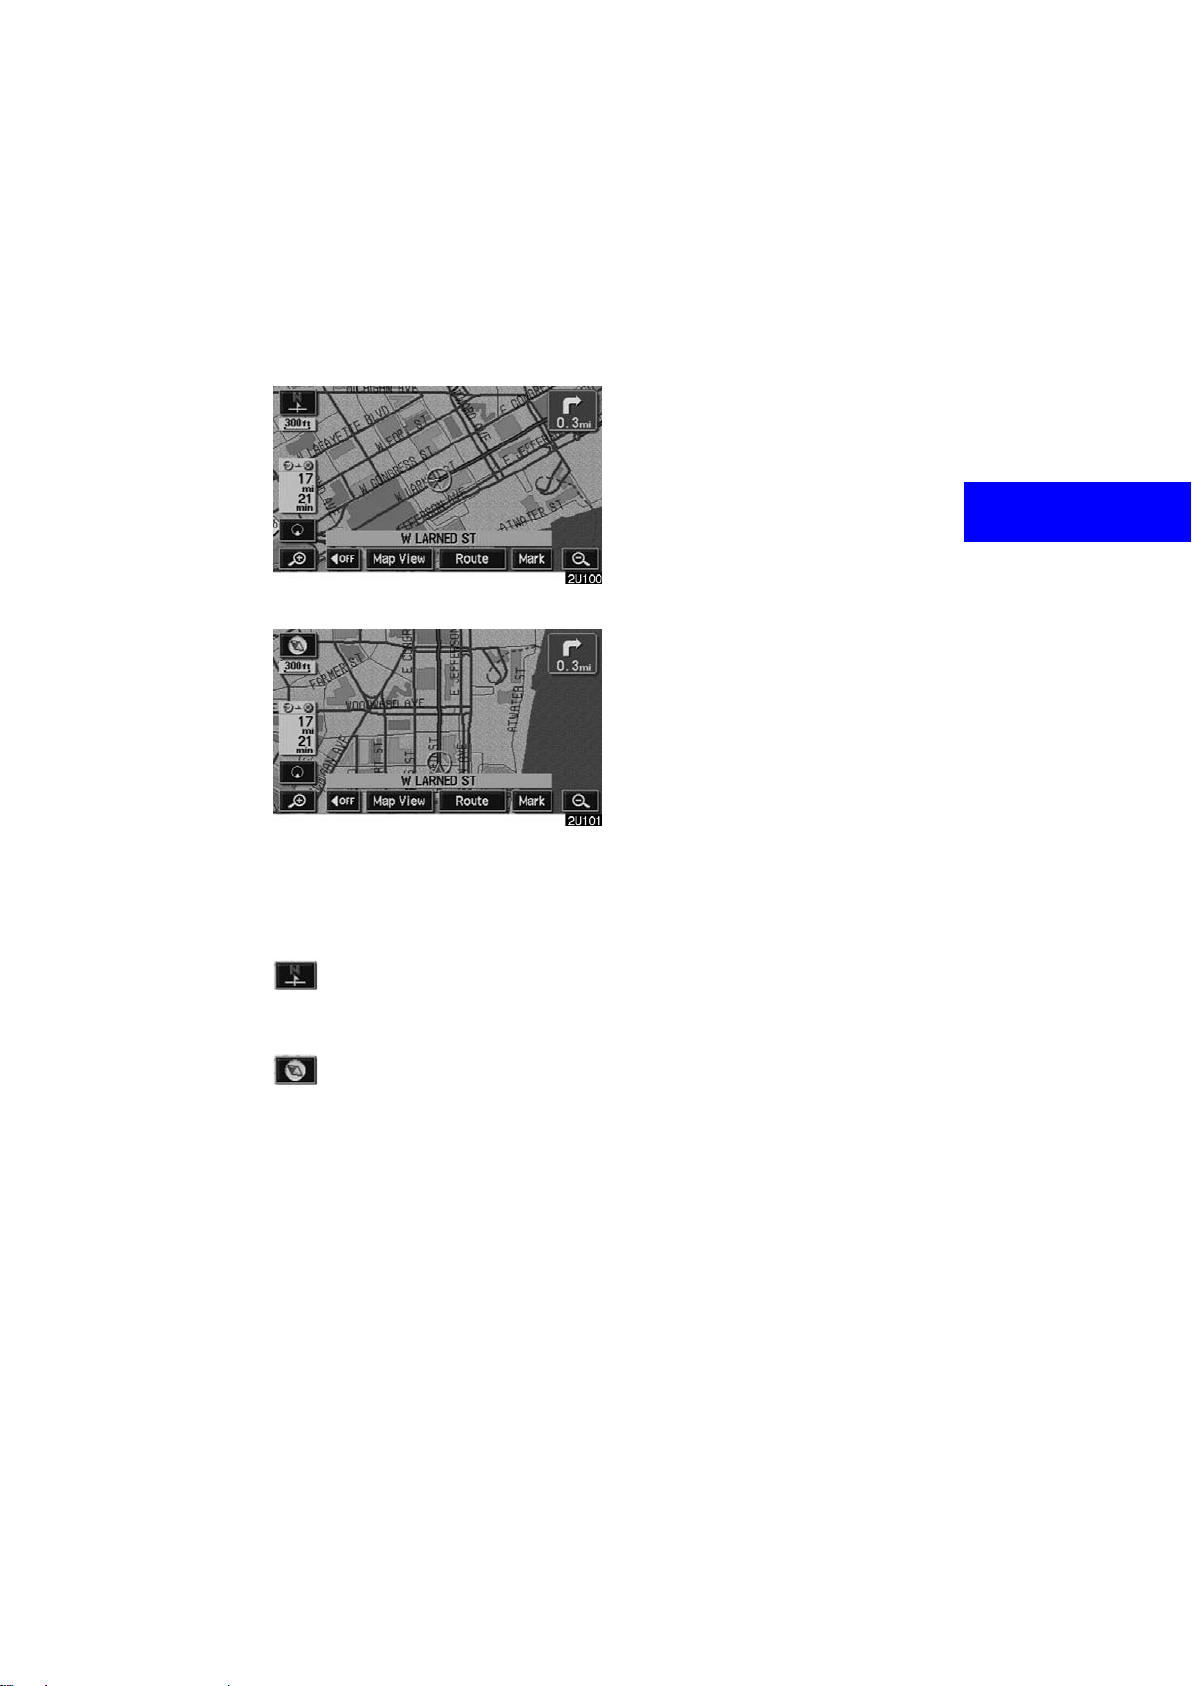
Orientation of the map
Limitations of the navigation
North−up screen
Heading−up screen
You can change the orientation of the
map from North−up to Heading−up by
touching the orientation symbol at the
top left of the screen.
system
This navigation system calculates the
current vehicle position using satellite
signals, various vehicle signals, map
data, etc. However, the accurate position may not be shown depending on
the satellite condition, road configuration, vehicle condition or other circumstances.
The Global Positioning System (GPS) developed and operated by the U.S. Department of Defense provides an accurate current vehicle position using 3 to 4 satellites.
The GPS system has a certain level of inaccuracy. While the navigation system will
compensate for this most of the time, occasional positioning errors of up to 300 feet
(100 m) can and should be expected.
Generally, position errors will be corrected
within a few seconds.
North−up symbol
Regardless of the direction of vehicle travel, North is always up.
Heading−up symbol
The direction of vehicle travel is always up.
A red arrow indicates North.
9
Page 22

When your vehicle is receiving signals
from the satellites, the “GPS” mark appears at the top left of the screen.
The GPS signal may be physically obstructed, leading to inaccurate vehicle
position on the map display. Tunnels, tall
buildings, trucks, or even the placement of
objects on the instrument panel may obstruct the GPS signals.
The installation of window tinting may also
obstruct the GPS signals. Most window
tinting contains some metallic content that
will interfere with the GP S si gna l re cep ti on.
We advice against the use of window tinting on vehicles equipped with navigation
systems.
The GPS satellites may not send signals
due to repairs or improvements being
made to them.
Even when the navigation system is receiving clear GPS signals, the vehicle
position may not be shown accurately or
inappropriate route guidance may occur in
some cases.
(a) Accurate current vehicle
position may not be shown in
the following cases:
D When driving on a small angled Y−
shaped road.
D When driving on a winding road.
D When driving on a slippery road such
as in sand, gravel, snow, etc.
D When driving on a long straight road.
D When freeway and surface streets run
in parallel.
D After moving by ferry or vehicle carrier.
D When a long route is searched during
high speed driving.
D When driving without setting the cur-
rent position calibration correctly.
D After repeating a change of direction by
going forward and backward, or turning
on a turntable in the parking lot.
D When leaving a covered parking lot or
parking garage.
D When a roof carrier is installed.
D When driving with tire chains installed.
D When the tires are worn.
D After replacing a tire or tires.
D When using tires that are smaller or
larger than the factory specifications.
D When the tire pressure in any of the
four tires is not correct.
10
Page 23

INFORMATION
If your vehicle cannot receive GPS
signals, you can correct the current
position manually. For information
on setting the current position calibration, see page 101.
(b) Inappropriate route guidance may occur in the following
cases:
D When turning at an intersection off the
designated route guidance.
D If you set more than one destination but
skip any of them, auto reroute will display a route returning to the destination
on the previous route.
D When turning at an intersection for
which there is no route guidance.
D When passing through an intersection
for which there is no route guidance.
D During auto reroute, the route guid-
ance may not be available for the next
turn to the right or left.
D It may take a long time to operate auto
reroute during high speed driving. In
auto reroute, a detour route may be
shown.
D After auto reroute, the route may not be
changed.
D An unnecessary U−turn may be shown
or announced.
D A location may have multiple names
and the system will announce one or
more.
D Some routes may not be searched.
D If the route to your destination includes
gravel, unpaved roads or alleys, the
route guidance may not be shown.
D Your destination point might be shown
on the opposite side of the street.
D When a portion of the route has regula-
tions prohibiting the entry of the vehicle
that vary by time or season or other
reason.
D The road and map data stored in your
navigation system may not be complete or may not be the latest version.
11
Page 24

After replacing the tire, implement the
Map database information
operation described in the “D Tire
change calibration”. (For details, see
page 103.)
This navigation system uses the tire turning data and is designed to work with factory−specified tires for your vehicle. Installing tires that are larger or smaller than the
originally equipped diameter may cause
inaccurate display of the vehicle’s position.
The tire pressure also affects the diameter
of the tires so please make sure the tire
pressure of all four tires is correct.
© GDT, Geographic Data Technology,
Inc.
Data by infoUSA Copyright ©2002, All
Rights Reserved.
© 2002 VISA Corporation
National Research Bureau ©2002
END USER LICENSE AGREEMENT
PLEASE READ THIS AGREEMENT
CAREFULLY BEFORE USING THE
NAVIGATION SYSTEM
THIS IS A LICENSE AGREEMENT
FOR YOUR COPY OF THE MAP
DATABASE (“The DATABASE”),
ORIGINALLY MADE BY Geographic
Data Technology, Inc. (“GDT”), USED IN
THE NAVIGATION SYSTEM. BY
USING THE DATABASE, YOU
ACCEPT AND AG R EE TO ALL TERMS
AND CONDITIONS SET FORTH
BELOW.
OWNERSHIP
The DATABASE and the copyrights and
intellectual property or neighboring
rights therein are owned by GDT or its
licensors.
and updates
This system uses the maps of DENSO.
© GDT, Geographic Data Technology,
Inc.
© 2004 NAVTEQ. All rights reserved.
Data by infoUSA Copyright ©2004, All
Rights Reserved.
© 2004 VISA Corporation
National Research Bureau ©2004
The Bullseye Design is a registered
trademark of Target Brands, Inc.
END USER LICENSE AGREEMENT
PLEASE READ THIS AGREEMENT
CAREFULLY BEFORE USING THE
NAVIGATION SYSTEM
THIS IS A LICENSE AGREEMENT
FOR YOUR COPY OF THE MAP DATABASE (“The DATABASE”), ORIGINALLY MADE BY Geographic Data
Technology, Inc. (“GDT”), USED IN
THE NAVIGATION SYSTEM. BY USING THE DATABASE, YOU ACCEPT
AND AGREE TO ALL TERMS AND
CONDITIONS SET FORTH BELOW.
12
Page 25

OWNERSHIP
The DATABASE and the copyrights and
intellectual property or neighboring
rights therein are owned by GDT or its
licensors.
LICENSE GRANT
GDT grants you a non−exclusive license to use your copy of the DATABASE for your personal use or for use in
your business’ internal operations. This
license does not include the right to
grant sub−licenses.
LIMITATIONS ON USE
The DATABASE is restricted for use in
the specific system for which it was
created. Except to the extent explicitly
permitted by mandatory laws, you may
not extract or re−utilize any portion of
the contents of the DATABASE, nor reproduce, copy , modify, adapt, translate,
disassemble, decompile, or reverse engineer any portion of the DATABASE.
TRANSFER
You may not transfer the DATABASE to
third parties, except together with the
system for which it was created, provided that you do not retain any copy of
the DATABASE, and provided that the
transferee agrees to all terms and conditions of this AGREEMENT.
DISCLAIMER OF WARRANTY
GDT does not warrant or make any representations regarding, either express
or implied, regarding the use or results
of the use of the DATABASE in terms of
its correctness, accuracy, reliability, or
otherwise, and expressly disclaims any
implied warranties of quality, performance, merchantability, fitness for a
particular purpose or non−infringement.
GDT does not warrant that the DATABASE is or will be error free. No oral or
written information or advice provided
by GDT, your supplier or any other person shall create a warranty.
13
Page 26

LIMITATION OF LIABILITY
The price of the DA TABASE does not include any consideration for assumption
of risk of consequential, indirect or unlimited direct damages which may arise
in connection with your use of the DAT ABASE. Accordingly, in no event shall
GDT or supplier of the navigation system using the DATABASE (“Supplier”)
be liable for any consequential, special,
incidental or indirect damages, including without limitation, loss of revenue,
data, or use, incurred by you or any third
party arising out of your use of the DATABASE, whether in an action in contract or tort or based on a warranty, even
if GDT or the Supplier has been advised
of the possibility of such damages. In
any event GDT’s liability for direct damages is limited to the price of your copy
of the DATABASE.
THE DISCLAIMER OF WARRANTY
AND LIMITATION OF LIABILITY, SET
FORTH IN THIS AGREEMENT, DO
NOT AFFECT OR PREJUDICE YOUR
STATUTORY RIGHTS WHERE YOU
HAVE ACQUIRED THE DATABASE
OTHERWISE THAN IN THE COURSE
OF A BUSINESS. Some states and
laws do not allow the exclusion of implied warranties, so the above disclaimer may not apply to you.
WARNINGS
The DATABASE reflects reality as existing before you received the DATABASE
and it comprises data and information
from government and other sources,
which may contain errors and omissions. Accordingly, the DATABASE may
contain inaccurate or incomplete information due to the passage of time,
changing circumstances, and due to the
nature of the sources used. The DATABASE does not include or reflect information on − inter alia − neighborhood
safety; law enforcement; emergency
assistance; construction work; road or
lane closures; vehicle or speed restrictions; road slope or grade; bridge
height, weight or other limits; road or
traffic conditions; special events; traffic
congestion; or travel time.
14
Page 27

GOVERNMENT END USERS
If the DAT ABASE is for a region of North
America and is being acquired by or on
behalf of the United States government
or any other entity seeking or applying
rights similar to those customarily
claimed by the United States government, the DATABASE is licensed with
“limited rights.” Utilization of the DATABASE is subject to the restrictions
specified in the “Rights in Technical
Data and Computer Database” clause
at DFARS 252.227−7013, or the
equivalent clause for non−defense
agencies. Manufacturer of the
DATABASE for North America is
Geographic Data Technology, Inc., at 11
Lafayette Street, Lebanon, New Hampshire 03766, USA.
END USER NOTICE
PLEASE READ THIS NOTICE CAREFULLY BEFORE USING THIS NAVIGATION SYSTEM
The Point Of Interest Data (“POI” Data)
in the navigation system is in part provided by infoUSA Inc. (“infoUSA”). By
using the POI Data, you accept and
agree to all terms and conditions set
forth below.
1. Ownership
All rights, title and interest to the infoUSA POI Data shall be retained by infoUSA.
2. Limitations on use
Except to the extent explicitly permitted
by mandatory laws, you may not extract
or re−utilize any portion of the contents
of the POI Data, nor reproduce, copy,
modify, adapt, translate, disassemble,
decompile, or reverse engineer any portion of the POI Data.
3. Transfer
You may not transfer the POI Data to
third parties, except together with the
system for which it was created, provided that you do not retain any copy of
the POI Data.
15
Page 28

4. Disclaimer of warranty
EXCEPT AS STATED HEREIN,
INFOUSA MAKES NO EXPRESS OR
IMPLIED WARRANTIES, INCLUDING,
WITHOUT LIMITATION, ANY
EXPRESS OR IMPLIED WARRANTY
OF FITNESS FOR A PARTICULAR
PURPOSE OR WARRANTY OF
MERCHANTABILITY.
5. Limitation of Liability
EITHER INFOUSA OR SUPPLIER OF
POI DATA SHALL NOT BE LIABLE
FOR ANY INDIRECT, CONSEQUENTIAL OR INCIDENTAL DAMAGES
MADE OR ALLEGED IN CONNECTION WITH YOUR USE OF THE POI
DATA.
END USER LICENSE AGREEMENT
Personal Use Only. You agree to use
this information for solely personal,
non−commercial purposes, and not for
service bureau, time−sharing or other
similar purposes. You may not modify
the information or remove any copyright
notices that appear on the information in
any way. You may not decompile, disassemble or reverse engineer any portion
of this information, and may not transfer
or distribute it in any form, for any purpose. Without limiting the foregoing,
you may not use this information with
any products, systems, or applications
installed or otherwise connected to or in
communication with vehicles, capable
of vehicle navigation, positioning, dispatch, real time route guidance, fleet
management or similar applications.
16
Page 29

No Warranty. This information is provided to you “as is,” and you agree to
use it at your own risk. DENSO and its
licensors (and their licensors and suppliers, collectively “DENSO”) make no
guarantees, representations or warranties of any kind, express or implied, arising by law or otherwise, including but not
limited to, and DENSO expressly disclaims any warranties regarding content, quality, accuracy, completeness,
effectiveness, reliability, fitness for a
particular purpose, non−infringement,
usefulness, use or results to be obtained from this information, or that the
information or server will be uninterrupted or error−free. Some states, territories and countries do not allow certain
warranty exclusions, so to that extent,
the above exclusion may not apply to
you.
Disclaimer of Liability: DENSO SHALL
NOT BE LIABLE TO YOU FOR ANY
CLAIM, DEMAND OR ACTION, IRRESPECTIVE OF ITS NATURE, ALLEGING ANY LOSS, INJURY OR
DAMAGES, WHETHER DIRECT, INDIRECT, INCIDENTAL, SPECIAL OR
CONSEQUENTIAL DAMAGES, INCLUDING ANY LOSS OF PROFIT,
REVENUE OR CONTRACTS ARISING OUT OF YOUR POSSESSION,
USE OF OR INABILITY TO USE THIS
INFORMATION, ANY DEFECT IN THE
INFORMATION, OR THE BREACH OF
THESE TERMS OR CONDITIONS,
WHETHER IN AN ACTION IN CONTRACT OR TORT OR BASED ON A
WARRANTY, EVEN IF DENSO OR ITS
LICENSORS HAVE BEEN ADVISED
OF THE POSSIBILITY OF SUCH DAMAGES. Some states, territories and
countries do not allow certain liability exclusions or damages limitations, so to
that extent the above may not apply to
you.
17
Page 30

Indemnity. You agree to indemnify, defend and hold DENSO and its licensors
(including their respective licensors,
suppliers, assignees, subsidiaries, affiliated companies, and the respective officers, directors, employees, shareholders, agents and representatives of each
of them) free and harmless from and
against any liability, loss, injury (including injuries resulting in death), demand,
action, cost, expense, or claim of any
kind or character , including but not limited to attorney’s fees, arising out of or in
connection with any use or possession
by you of this information.
END USER NOTICE
The marks of companies displayed by
this product to indicate business locations are the marks of their respective
owners. The use of such marks in this
product does not imply any sponsorship, approval, or endorsement by such
companies of this product.
END−USER TERMS
The Map Data Disc (“Data”) is provided
for your personal, internal use only and
not for resale. It is protected by copyright, and is subject to the following
terms and conditions which are agreed
to by you, on the one hand, and DENSO
CORPORATION (“[LICENSEE]”) and
its licensors (including their licensors
and suppliers) on the other hand. Such
licensors include NAVTEQ North America, LLC. Without limiting the foregoing,
you agree that NAVTEQ North America,
LLC shall have the right to enforce these
Terms directly against you.
© 2004 NAVTEQ. All rights reserved.
The Data for areas of Canada includes
information taken with permission from
Canadian authorities, including: © Her
Majesty the Queen in Right of Canada,
© Queen’s Printer for Ontario, © Canada Post Corporation, Geobase R.
18
Page 31

TERMS AND CONDITIONS
Personal Use Only. You agree to use
this Data for the solely personal, non
commercial purposes for which you
were licensed, and not for service bureau, time−sharing or other similar pur-
poses. Accordingly, but subject to the
restrictions set forth in the following
paragraphs, you may copy this Data
only as necessary for your personal use
to (i) view it, and (ii) save it, provided that
you do not remove any copyright notices that appear and do not modify the
Data in a n y w a y. You agree not to otherwise reproduce, copy, modify, decompile, disassemble or reverse engineer
any portion of this Data, and may not
transfer or distribute it in any form, for
any purpose, except to the extent permitted by mandatory laws. You may
transfer the Data and all accompanying
materials on a permanent basis if you
retain no copies and the recipient
agrees to these End−User Terms. Multi−disc sets may not be transferred on a
divided basis.
Restrictions. Except where you have
been specifically licensed to do so by
[LICENSEE] and without limiting the
preceding paragraph, you may not (a)
use this Data with any products, systems, or applications installed or otherwise connected to or in communication
with vehicles, capable of vehicle navigation, positioning, dispatch, real time
route guidance, fleet management or
similar applications; or (b) with or in
communication with any positioning devices or any mobile or wireless−con-
nected electronic or computer devices,
including without limitation cellular
phones, palmtop and handheld computers, pagers, and personal digital assistants or PDAs.
19
Page 32

No Warranty. This Data is provided to
you “as is,” and you agree to use it at
your own risk. [LICENSEE] and its licensors (and their licensors and suppliers) make no guarantees, representations or warranties of any kind, express
or implied, arising by law or otherwise,
including but not limited to, content,
quality, accuracy, completeness, effectiveness, reliability, fitness for a particular purpose, usefulness, use or results
to be obtained from this Data, or that the
Data or server will be uninterrupted or
error−free.
Disclaimer of Warranty:
AND ITS LICENSORS (INCLUDING
THEIR LICENSORS AND SUPPLIERS) DISCLAIM ANY WARRANTIES,
EXPRESS OR IMPLIED, OF QUALITY,
PERFORMANCE, MERCHANTABILITY, FITNESS FOR A PARTICULAR
PURPOSE OR NON−INFRINGE-
MENT.
Some States, Territories and Countries
do not allow certain warranty exclusions, so to that extent the above exclusion may not apply to you.
[LICENSEE]
Disclaimer of Liability: [LICENSEE]
AND ITS LICENSORS (INCLUDING
THEIR LICENSORS AND SUPPLIERS) SHALL NOT BE LIABLE TO YOU
IN RESPECT OF ANY CLAIM, DEMAND OR ACTION, IRRESPECTIVE
OF THE NATURE OF THE CAUSE OF
THE CLAIM, DEMAND OR ACTION
ALLEGING ANY LOSS, INJURY OR
DAMAGES, DIRECT OR INDIRECT,
WHICH MAY RESULT FROM THE USE
OR POSSESSION OF THE INFORMATION; OR FOR ANY LOSS OF PROFIT, REVENUE, CONTRACTS OR SAVINGS, OR ANY OTHER DIRECT, INDIRECT, INCIDENTAL, SPECIAL OR
CONSEQUENTIAL DAMAGES ARISING OUT OF YOUR USE OF OR INABILITY TO USE THIS INFORMATION, ANY DEFECT IN THE INFORMATION, OR THE BREACH OF
THESE TERMS OR CONDITIONS,
WHETHER IN AN ACTION IN CONTRACT OR TORT OR BASED ON A
WARRANTY, EVEN IF [LICENSEE] OR
ITS LICENSORS HAVE BEEN ADVISED OF THE POSSIBILITY OF
SUCH DAMAGES.
Some States, Territories and Countries
do not allow certain liability exclusions
or damages limitations, so to that extent
the above may not apply to you.
20
Page 33

Export Control. You agree not to export
from anywhere any part of the Data provided to you or any direct product thereof except in compliance with, and with
all licenses and approvals required under, applicable export laws, rules and
regulations.
Entire Agreement.
conditions constitute the entire agreement between [LICENSEE] (and its licensors, including their licensors and
suppliers) and you pertaining to the subject matter hereof, and supersedes in
their entirety any and all written or oral
agreements previously existing between us with respect to such subject
matter.
Governing Law.
conditions shall be governed by the
laws of the Illinois, without giving effect
to (i) its conflict of laws provisions, or (ii)
the United Nations Convention for Contracts for the International Sale of
Goods, which is explicitly excluded.
Y ou agree to submit to the jurisdiction of
Illinois for any and all disputes, claims
and actions arising from or in connection with the Data provided to you hereunder.
These terms and
The above terms and
Government End Users. If t h e Licensed
Data is being acquired by or on behalf of
the United States government or any
other entity seeking or applying rights
similar to those customarily claimed by
the United States government, (i) for acquisitions conducted by the Department
of Defense, the Licensed Data is licensed with “Limited Rights” in accordance with the rights set forth at DF ARS
252.227−7013(b)(3), TECHNICAL
DATA−NONCOMMERCIAL ITEMS,
and Licensed Data delivered or otherwise furnished with “Limited Rights”
shall be marked with the following “Limited Rights Notice” set forth at DFARS
252.227−7013(f)(3), and shall be
treated in accordance with such Notice:
21
Page 34

LIMITED RIGHTS
CONTRACTOR (MANUFACTURER/
SUPPLIER) NAME:
NAVTEQ North America, LLC
CONTRACTOR (MANUFACTURER/
SUPPLIER) ADDRESS:
222 Merchandise Mart Plaza,
Suite 900, Chicago, Illinois 60654
The Government’s rights to use,
modify, reproduce, release, perform,
display, or disclose these technical
data are restricted by paragraph (b)(3)
of the Rights in Technical Data−Non-
commercial Items clause contained in
the above identified contract. Any reproduction of technical data or portions thereof marked with this legend
must also reproduce the markings.
Any person, other than the Government, who has been provided access
to such data must promptly notify the
above named Contractor.
and; (ii) for civilian agency acquisitions,
the Licensed Data is licensed in accordance with the rights set forth at FAR
52.227−14(g)(1), RIGHTS IN DATA−
GENERAL (Protection of limited rights
data and computer software). In the
event that the Contracting Officer requires the delivery of limited rights Licensed Data that has been withheld or
would otherwise be withholdable in accordance with FAR 52.227−14(g)(1),
the Licensed Data is licensed with “Limited Rights” as set forth in the following
“Limited Rights Notice” at FAR
52.227−14(g)(2) (Alternate II), which
shall be affixed to the Licensed Data
and the Licensed Data shall be treated
in accordance with such Notice (which
shall be marked on any reproduction of
these data, in whole or in part):
22
Page 35

LIMITED RIGHTS NOTICE
(JUN 1987)
These data may be reproduced and
used by the Government with the express limitation that they will not, without written permission of the Contractor, be used for purposes of manufacture nor disclosed outside the Government; except that the Government
may disclose these data outside the
Government for the following purposes, if any, provided that the Government makes such disclosure subject to prohibition against further use
and disclosure: There are no addition-
al purposes permitting disclosure of
such Data.
The manufacturer/supplier of the
Data is N AVTEQ North America, LLC,
222 Merchandise Mart Plaza, Suite
900, Chicago, Illinois 60654.
If the Contracting Officer refuses to use
either of the licenses provided in (i) or
(ii), herein, the Contracting Officer must
notify NAVTEQ North America, LLC
prior to seeking additional or alternative
rights in the Licensed Data.
There are two types of areas available
for route guidance. In one type of area,
primarily around metropolitan centers,
detailed route guidance is available for
the entire area. In the other type of area,
all roads are displayed on the map but
route guidance is limited. The navigation route might lack precision because
the data (no right turns, one−way traffic, etc.) is not complete. It is still possible to reach the destination by following the arrow direction and distance as
shown on the bottom left of the screen.
The arrow points in the direction of the
destination. The distance shown is as
measured in a straight line from the current vehicle position to the destination
area.
In order to provide you with as accurate
map information as possible, we are always gathering information such as on
road repairs and carrying out on−site in-
vestigations. However, the names of
roads, streets, facilities, and their locations
are often changed. In some places,
construction on roads may be in progress.
For that reason, information on some
areas in this system might be different from
the actual location.
23
Page 36

The map database is normally updated
once a year. Contact your dealer for updating a map database.
D To confirm the database version
and disc coverage area
1. Push the
2. Touch the “Map DVD” switch.
Make sure the version of the database on
this screen. (The database version on the
screen above may be different from the actual screen.)
To display the disc coverage area, touch
“Covered Area” switch. Confirm
the
the covered area on the screen.
Contact your dealer to find out if there is a
more recent update released.
“MENU” button.
24
Page 37

SECTION II
DESTINATION INPUT AND ROUTE GUIDANCE
Basic functions in frequent use
D Quick reference for the “Destination” screen 26
D Destination input 28
Selecting the search area 29. . . . . . . . . . . . . . . . . . . . . . . . . . . . .
Destination input by Home 31. . . . . . . . . . . . . . . . . . . . . . . . . . . .
Destination input by Quick access 31. . . . . . . . . . . . . . . . . . . . . .
Destination input by “Address” 32. . . . . . . . . . . . . . . . . . . . . . . . .
Destination input by “POI Name” 37. . . . . . . . . . . . . . . . . . . . . . .
Destination input by “POI Category” 41. . . . . . . . . . . . . . . . . . . .
Destination input by “Emergency” 46. . . . . . . . . . . . . . . . . . . . . .
Destination input by “Memory” 47. . . . . . . . . . . . . . . . . . . . . . . . .
Destination input by “Previous” 47. . . . . . . . . . . . . . . . . . . . . . . . .
Destination input by “Map” 48. . . . . . . . . . . . . . . . . . . . . . . . . . . . .
Destination input by “Intersection” 48. . . . . . . . . . . . . . . . . . . . . .
Destination input by “Freeway Ent./Exit” 50. . . . . . . . . . . . . . . . .
Destination input by “Coordinates” 51. . . . . . . . . . . . . . . . . . . . . .
Destination input by “Phone #” 52. . . . . . . . . . . . . . . . . . . . . . . . .
D Starting route guidance 53
Entering destination 53. . . . . . . . . . . . . . . . . . . . . . . . . . . . . . . . . .
Route guidance screen 55. . . . . . . . . . . . . . . . . . . . . . . . . . . . . . .
Typical voice guidance prompts 56. . . . . . . . . . . . . . . . . . . . . . . .
D Setting and deleting destination 58
D Setting and deleting route 60
D Show POI icons 67
D Route overview 70
D Route preview 71
D Screen configuration 72
D Distance and time to destination 78
D Foot print map
. . . . . . . . . . . . . . . . . . . . . . . . . . . . . . . . . . . . . . .
. . . . . . . . . . . . . . . . . . . . . . . . . . . . . . . . .
. . . . . . . . . . . . . . . . . . . . . . . . . .
. . . . . . . . . . . . . . . . . . . . . . . . . . . . . . .
. . . . . . . . . . . . . . . . . . . . . . . . . . . . . . . . . . . . . . .
. . . . . . . . . . . . . . . . . . . . . . . . . . . . . . . . . . . . . . . .
. . . . . . . . . . . . . . . . . . . . . . . . . . . . . . . . . . . . . . . . .
. . . . . . . . . . . . . . . . . . . . . . . . . . . . . . . . . . .
. . . . . . . . . . . . . . . . . . . . . . . . .
. . . . . . . . . . . . . . . . . . . . . . . . . . . . . . . . . . . . . . . . .
. . . . . . . . . . . . . . .
79
25
Page 38
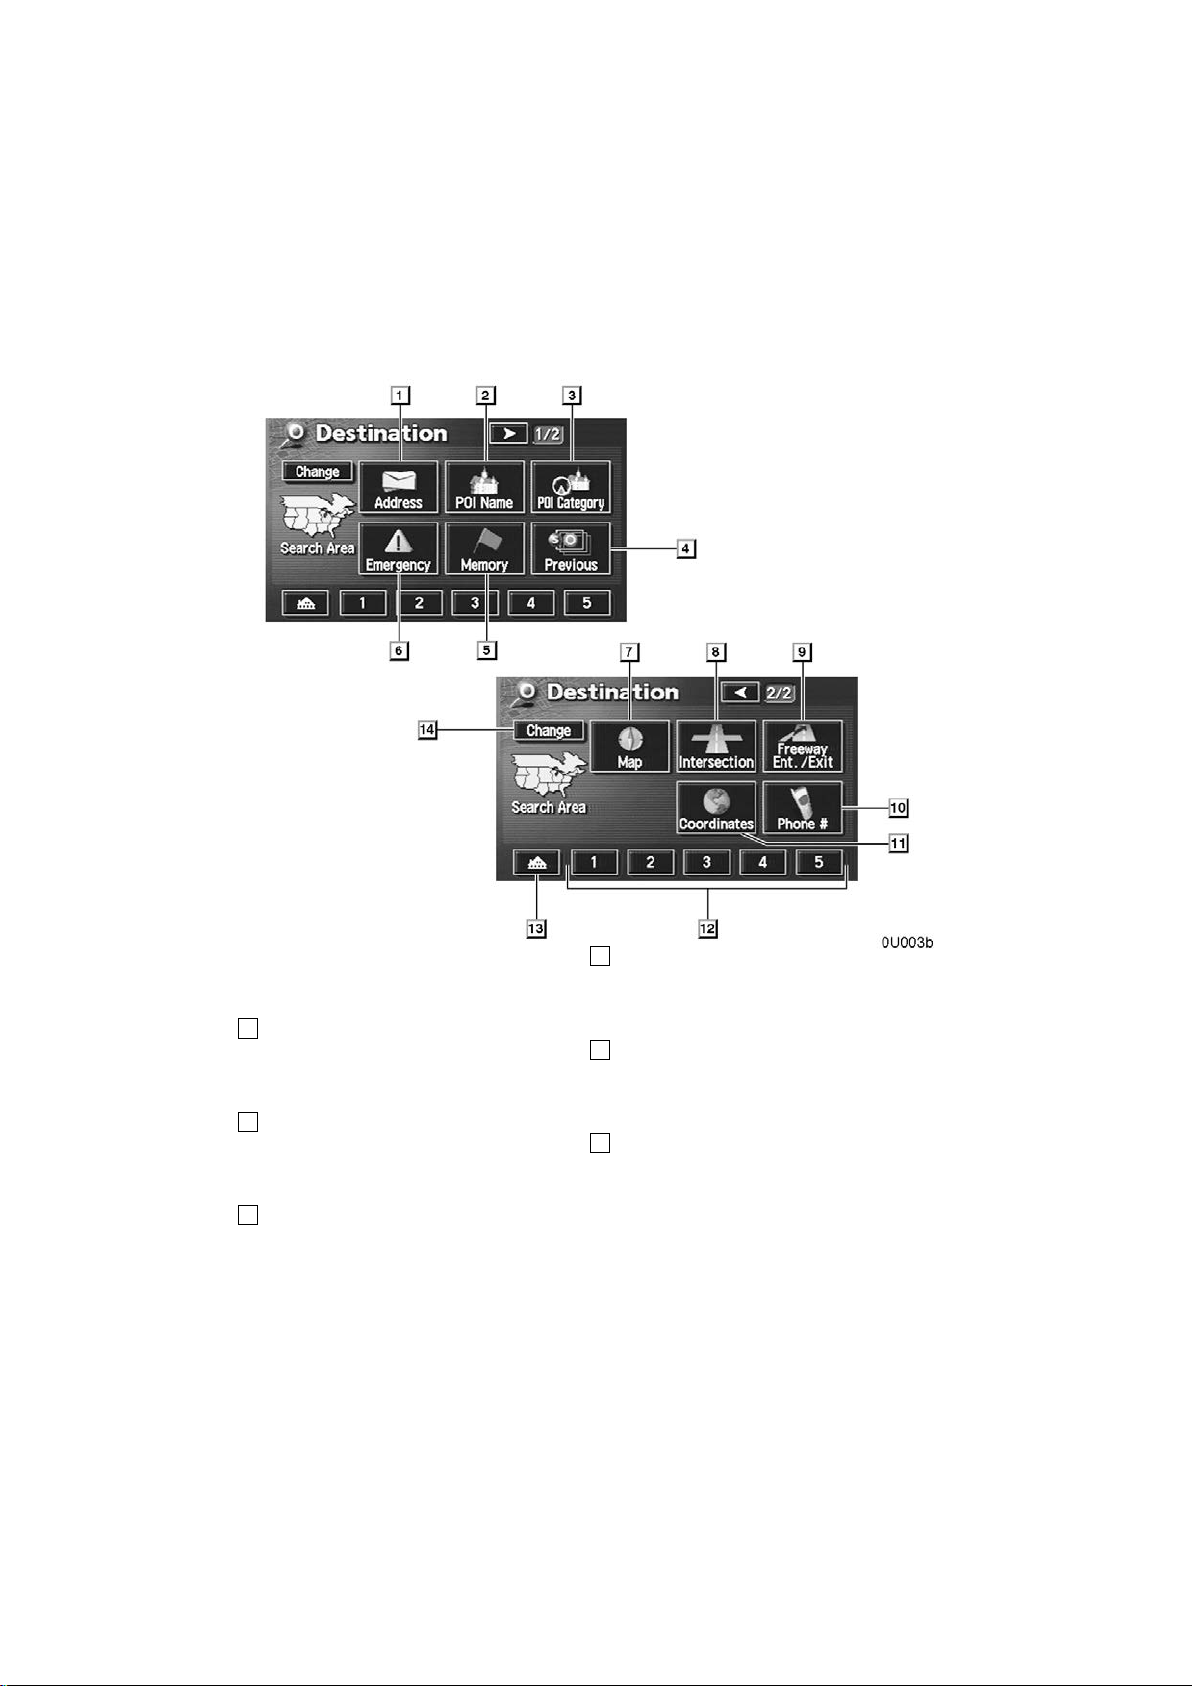
To search for a destination, the
Quick reference for the “Destination” screen
switches below perform the following
operations.
1
“Address” switch
You can input the house number and the
street address by using the input keys.
2
“POI Name” switch
You can select one of the many POIs
(Points of Interest) that have already been
stored in the system’s database. 37. . . . .
3
“POI Category” switch
You can select a destination from the POI
category. 41. . . . . . . . . . . . . . . . . . . . . . . . .
32. . . . . . . . . . . . . . . . . . . . . . . . . . . . . . . . . .
4
“Previous” switch
You can select a destination from any of
the last 99 previously set destinations and
from the previous starting point. 47. . . . .
5
“Memory” switch
Y ou can select the location from those registered as “Memory points”. (To register
memory points, see page 89.) 47. . . . . . .
6
“Emergency” switch
You can select one of the three categories
of emergency service points that have
been already stored in the system’s database.
46. . . . . . . . . . . . . . . . . . . . . . . . . . . . . . . . . .
26
Page 39

7
“Map” switch
You can select a destination simply by
touching the location on the displayed
map.
48. . . . . . . . . . . . . . . . . . . . . . . . . . . . . . . . . .
8
“Intersection” switch
You can enter the names of two intersecting streets. This is helpful if you do not
know the specific street address of your
destination but know the general vicinity.
48
9
“Freeway Ent./Exit” switch
You can enter the name of a freeway (inter-
state) entrance or exit. 50. . . . . . . . . . . . .
10
“Phone #” switch
You can enter a destination by the tele-
phone number. 52. . . . . . . . . . . . . . . . . . . .
11
“Coordinates” switch
You can set a destination using latitude
and longitude as coordinates. 51. . . . . . .
12
Quick access switch
Y ou can select one of 5 preset destinations
directly. To use this function, it is necessary to set the “Attribute” for each memory
point. (To register a “Quick Access”, see
page 92.)
31. . . . . . . . . . . . . . . . . . . . . . . . . . . . . . . . . .
13
Home switch
Y ou can select your own home without e n tering the address each time. To use this
function, it is necessary to set the “Attribute” for the memory point. (To register
“Home”, see page 92.) 31. . . . . . . . . . . . .
14
“Change” switch
To change the search area, touch this
switch.
29. . . . . . . . . . . . . . . . . . . . . . . . . . . . . . . . . .
27
Page 40

Destination input —
Push the “DESTINATION” button
and the “Destination” screen appears.
D To select an “Address”, “POI
Name”
, “Freeway Ent./Exit”,
“Intersection” or “Phone #”
in a different area, it is necessary to
change the search area.
D If you enter a destination, the road
nearest to the point you selected is
set as the destination.
You can use one of 13 different methods to
enter your destination. (See pages 31
through 52.)
INFORMATION
D When inputting the destination,
the response to the switch may be
slow.
D The route for returning may not be
the same as that for going.
D The route guidance to the destina-
tion may not be the shortest route
nor a route without traffic congestion.
D Route guidance may not be avail-
able if there is no road data for the
specified location.
D When setting the destination on a
map with a scale larger than 0.5
mile (800 m), the map scale
changes to 0.5 mile (800 m) automatically. Set the destination
again.
CAUTION
While you a r e d r i v i n g , b e s u r e t o obey
traffic regulations and keep the road
conditions in mind. If a traffic sign on
the road has been changed, the route
guidance may provide wrong information.
28
Page 41

— Selecting the search area
The “Destination” screen allows you to select the area to search for your destination.
Touch the
“Destination” screen to display a map
of the United States and Canada divided into 11 areas. See page 12 for map
database information and updates.
Touch one of the “US1” through
“CAN” switches to select a search
area. Touch the
“Destination” screen returns.
“Change” switch on the
“OK” switch and the
Switch
“US1”
“US2”
“US3”
“US4”
“US5”
“US6”
U.S.A.
States included in the search
area
Idaho
Oregon
Washington
California
Nevada
Arizona
Colorado
Montana
New Mexico
Utah
Wyoming
Iowa
Kansas
Minnesota
Missouri
North Dakota
Nebraska
South Dakota
Oklahoma
Texas
Illinois
Indiana
Kentucky
Michigan
Ohio
Wisconsin
29
Page 42

“US7”
“US8”
“US9”
“US10”
Arkansas
Alabama
Louisiana
Mississippi
Tennessee
Connecticut
Massachusetts
Maine
New Hampshire
New Jersey
New York
Rhode Island
Vermont
Washington, D.C.
Delaware
Maryland
New Jersey
Pennsylvania
Virginia
West Virginia
Florida
Georgia
North Carolina
South Carolina
Switch
“CAN”
Canada
Provinces and regions included in the search area
All provinces and regions in
Canada included in this
switch.
30
Page 43

— Destination input by
Home
— Destination input by
Quick access
Touch the home switch on the “Destination” screen.
The screen changes and displays the
map location of your home and the
route preference. (See “ — Entering
destination” on page 53.)
To use this function, it is necessary to set
the “Attribute” for the memory point. (To
register the “Home”, see page 92.)
INFORMATION
Guidance starts from your current
position to your home if you touch the
“Enter” switch even while driving.
Touch any of the quick access switches
on the “Destination” screen.
The screen changes and displays the
map location of the quick access point
and the route preference. (See “ — Entering destination” on page 53.)
To use this function, it is necessary to set
the “Attribute” for each memory point. (To
register the “Quick Access”, see page 92.)
INFORMATION
Guidance starts from your current
position to the quick access point if
you touch the
while driving.
“Enter” switch even
31
Page 44

— Destination input by
“Address”
There are 2 ways to input a destination
by address.
Touch the
“Destination” screen.
“Address” switch on the
(a) Inputting a house number and a street name
Touch numerals directly on the screen
to input a house number.
After inputting a house number, touch the
“OK” switch to display the screen for in-
putting a street name.
It is possible to input a street name first.
Touch the
screen for inputting a street name.
“Street” switch to display the
32
Page 45

Input the street name. When you find your desired street
name, touch the corresponding switch.
The screen changes and displays the
map location of the selected destination and the route preference. (See “ —
Entering destination” on page 53.)
If the same address exists in more than
one city, the current screen changes to the
city list screen.
33
Page 46

Select or enter your desired city.
“Input Name”: To narrow down the listed
items by inputting the city name.
If you input a street name first, the screen
changes. You can then input the house
number.
If the above screen appears, you can select an address range on the screen.
34
Page 47

(b)Selecting a c ity to search
Touch the “City” switch.
To search by city, the following three methods are possible.
1. Selecting from the last 5 cities
2. Selecting from the nearest 5 cities
3. Inputting the city name
INFORMATION
To cancel the city setting, touch the
“Any City” switch.
SELECTING FROM THE LAST 5 CITIES
Touch the switch of the desired city
name.
If you have not used the navigation yet, no
cities will be displayed on the screen.
The current screen changes to the
screen for inputting a house number or
a street name. (See page 32.)
35
Page 48

SELECTING FROM THE NEAREST 5
CITIES
Touch the
switch.
“Nearest 5 Cities”
INPUTTING THE CITY NAME
Touch the
switch.
“Input City Name”
Touch the switch of the desired city
name from the displayed list.
The current screen changes to the
screen for inputting a house number or
a street name. (See page 32.)
Input a city name.
36
Page 49

Touch the switch of the desired city
name from the displayed list.
“Map”: To display the selected destination
and the route preference. (See “ — Entering destination” on page 53.)
The current screen changes to the
screen for inputting a house number or
a street name. (See page 32.)
— Destination input by “POI
Name”
Touch the “POI Name” switch on the
“Destination” screen.
Input the name of Point of Interest.
37
Page 50
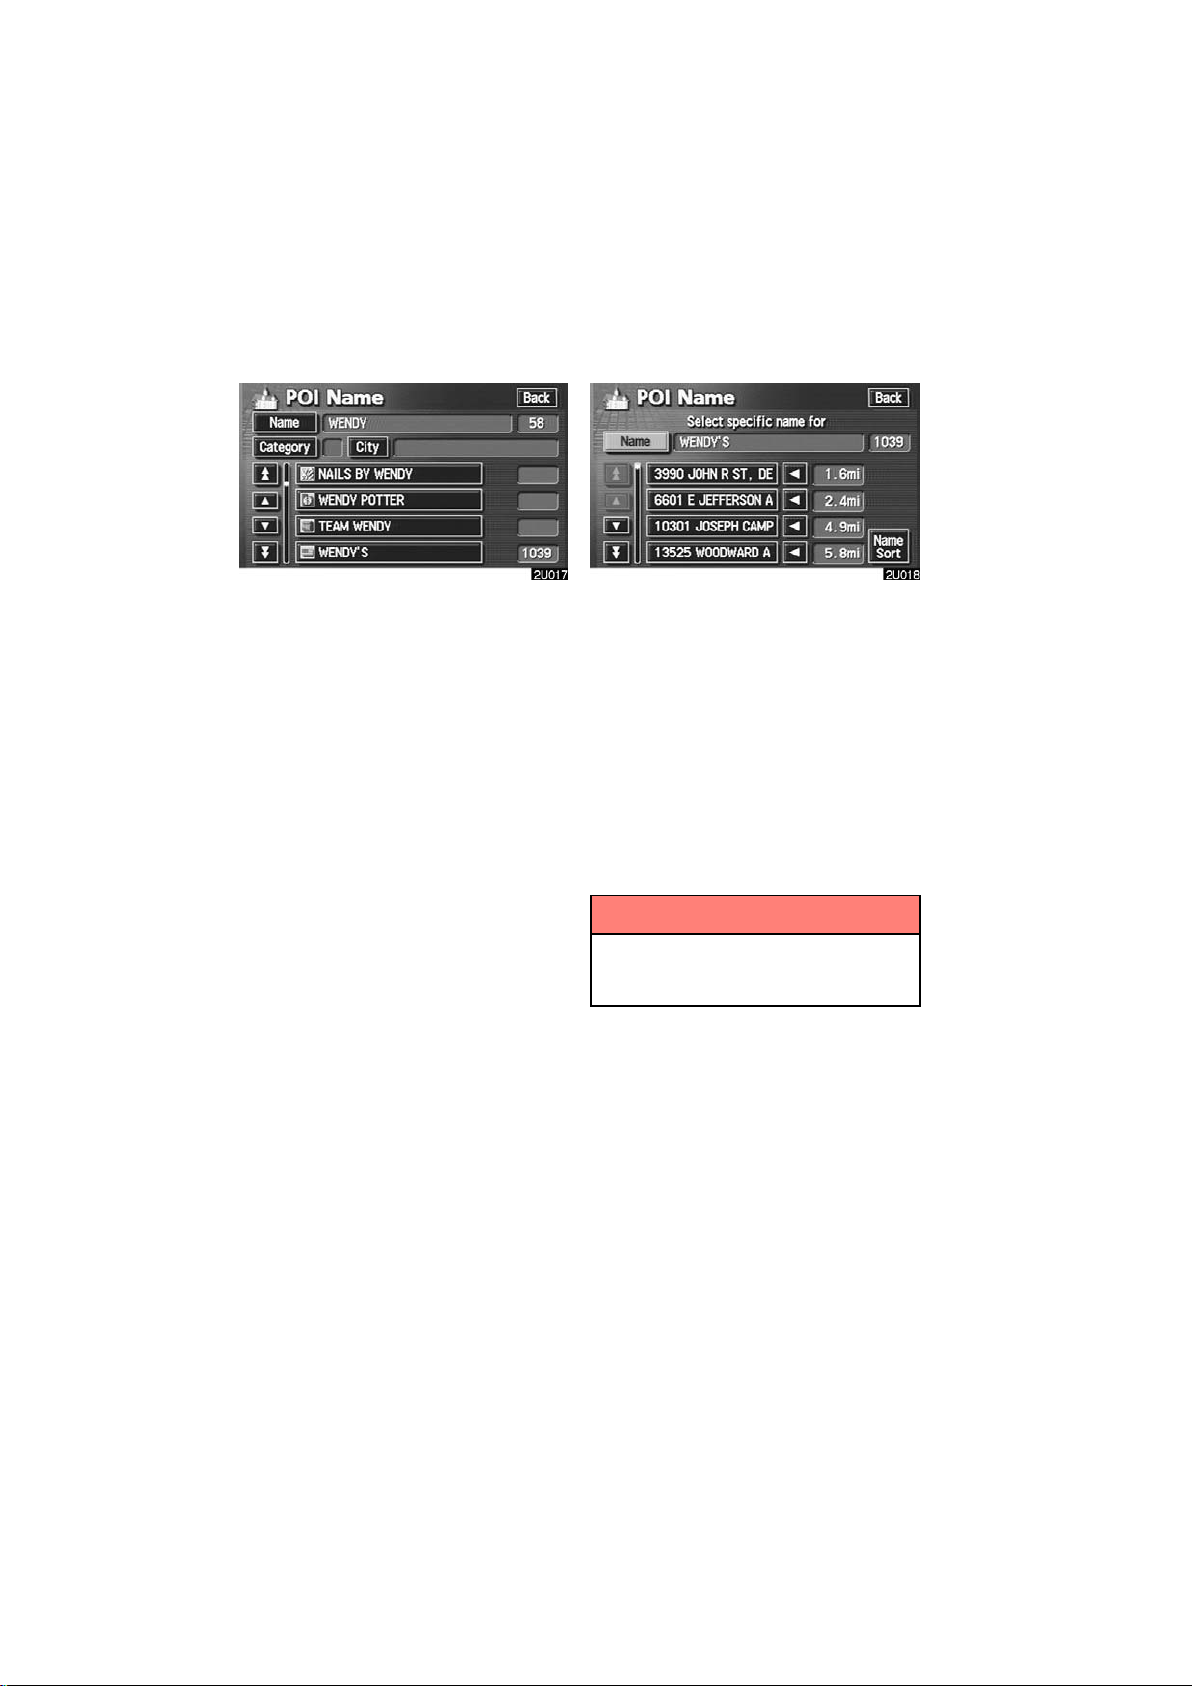
Touch the switch of the desired destination. The screen changes and displays the map location of the selected
destination and the route preference.
(See “ — Entering destination” on page
53.)
If you input the name of a specific Point of
Interest and there are more than two sites
with the same name, the list screen appears.
Touch the switch of the desired destination.
“Dist. Sort”: In the order of distance from
your current position. The distance from
your current position up to the destination
is displayed on the right of the name.
“Name Sort”: In alphabetical order by
name.
If the same name exists in more than one
city, you can search for it more easily with
“City” and “Category” switches.
the
(See “(a) Selecting a city to search” and
“(b) Selecting from the categories”.)
INFORMATION
The desired Point of Interest can be
displayed on the map screen. (For
details, see page 67.)
38
Page 51

(a)Selecting a c ity to search
Touch the “City” switch.
To search by city, the following three methods are possible.
1. Selecting from the last 5 cities
2. Selecting from the nearest 5 cities
3. Inputting the city name
INFORMATION
To cancel the city setting, touch the
“Any City” switch.
SELECTING FROM THE LAST 5 CITIES
Touch the switch of the desired city
name.
If you have not used the navigation yet, no
cities will be displayed on the screen.
39
Page 52
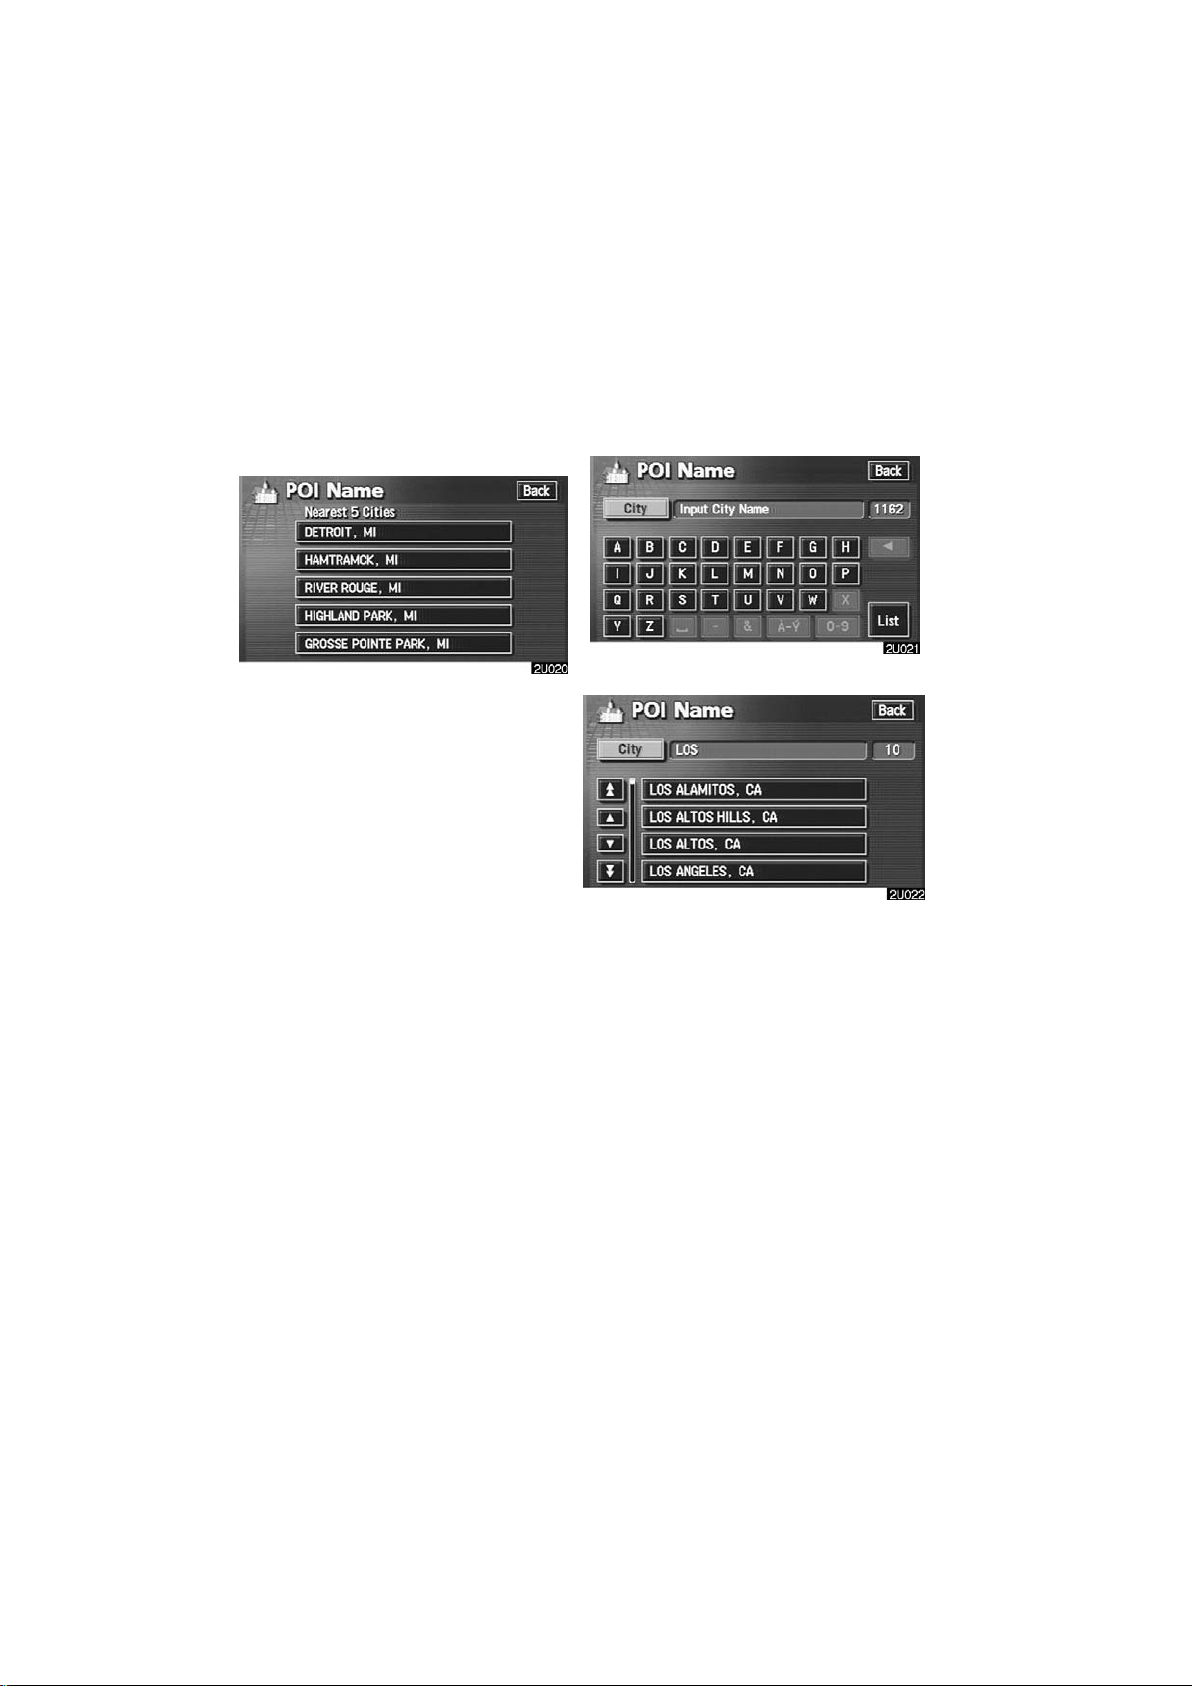
SELECTING FROM THE NEAREST 5
CITIES
Touch the
switch.
“Nearest 5 Cities”
INPUTTING THE CITY NAME
Touch the
switch.
“Input City Name”
Touch the switch of the desired city
name.
Input the city name.
Touch the switch of the desired city
name from the displayed list.
40
Page 53
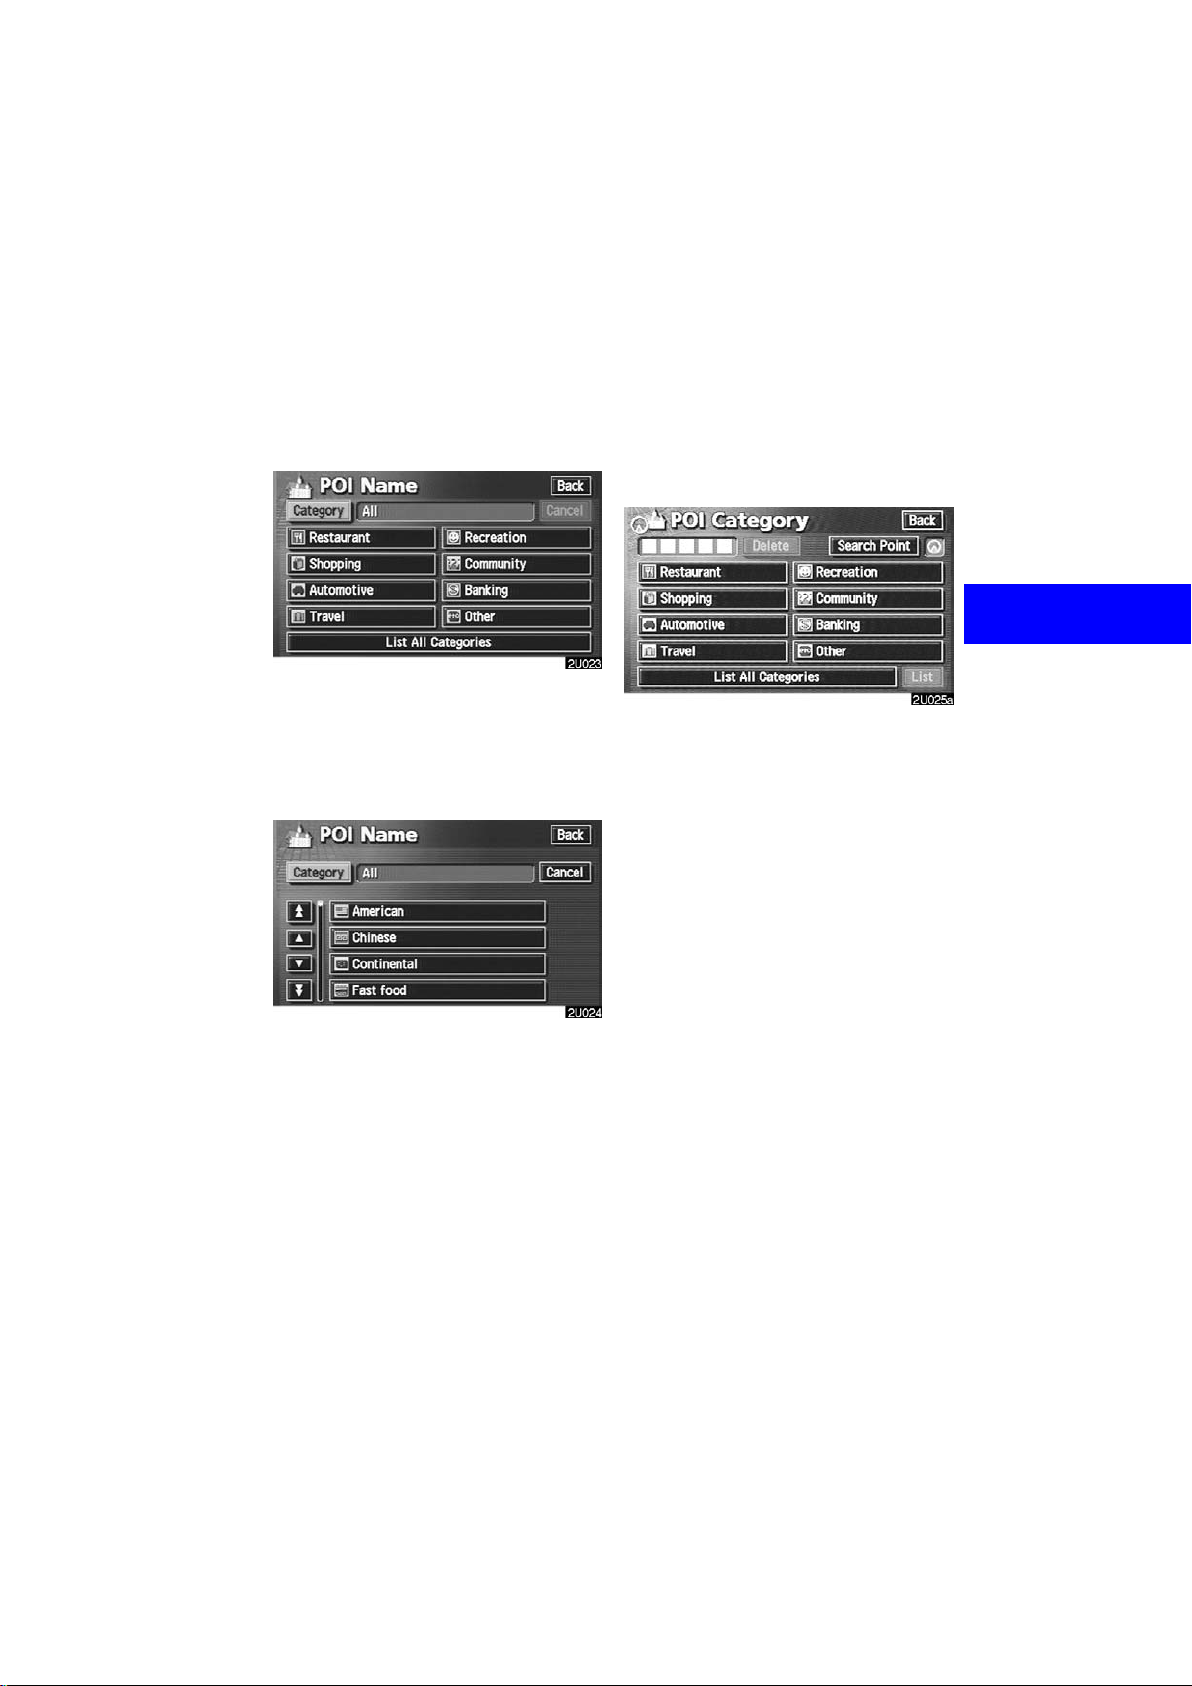
(b) Selecting from the categories
Touch the “Category” switch.
If the desired POI category is on the
screen, touch the name to display a detailed list of the POI category.
If the desired POI category is not on the
screen, touch the
ries”
switch to list all POI categories.
“List All Catego-
— Destination input by “POI
Category”
The destination can be set by selecting
the POI category and the search point.
Touch the
the “Destination” screen.
“POI Category” switch on
When you touch the desired category,
the POI name list screen appears.
41
Page 54

(a)Selecting the POI category
If the desired POI category is on the
screen, touch the name to display a detailed list of the POI category.
If the desired POI category is not on the
screen, touch the
ries”
switch to list all POI categories.
Touch the desired POI category from
the list.
The selected category icon appears on the
top left of the screen.
If you wish to delete the selected category,
touch the
If you wish to select another category,
touch the
vious screen.
If you wish to select a destination from the
category displayed by the icon, touch the
“Delete” switch.
“OK” switch to return the pre-
“List” switch.
“List All Catego-
(b)Setting a search point
It is possible to display the names of POIs
located within approximately 20 miles (30
km) from the selected search point.
Touch the
To set search points, the following four
methods are possible.
1. Inputting city center
2. Setting the current position as the
3. Setting the search point via the map
4. Setting the search point from the des-
“Search Point” switch.
search point
screen
tinations
42
Page 55
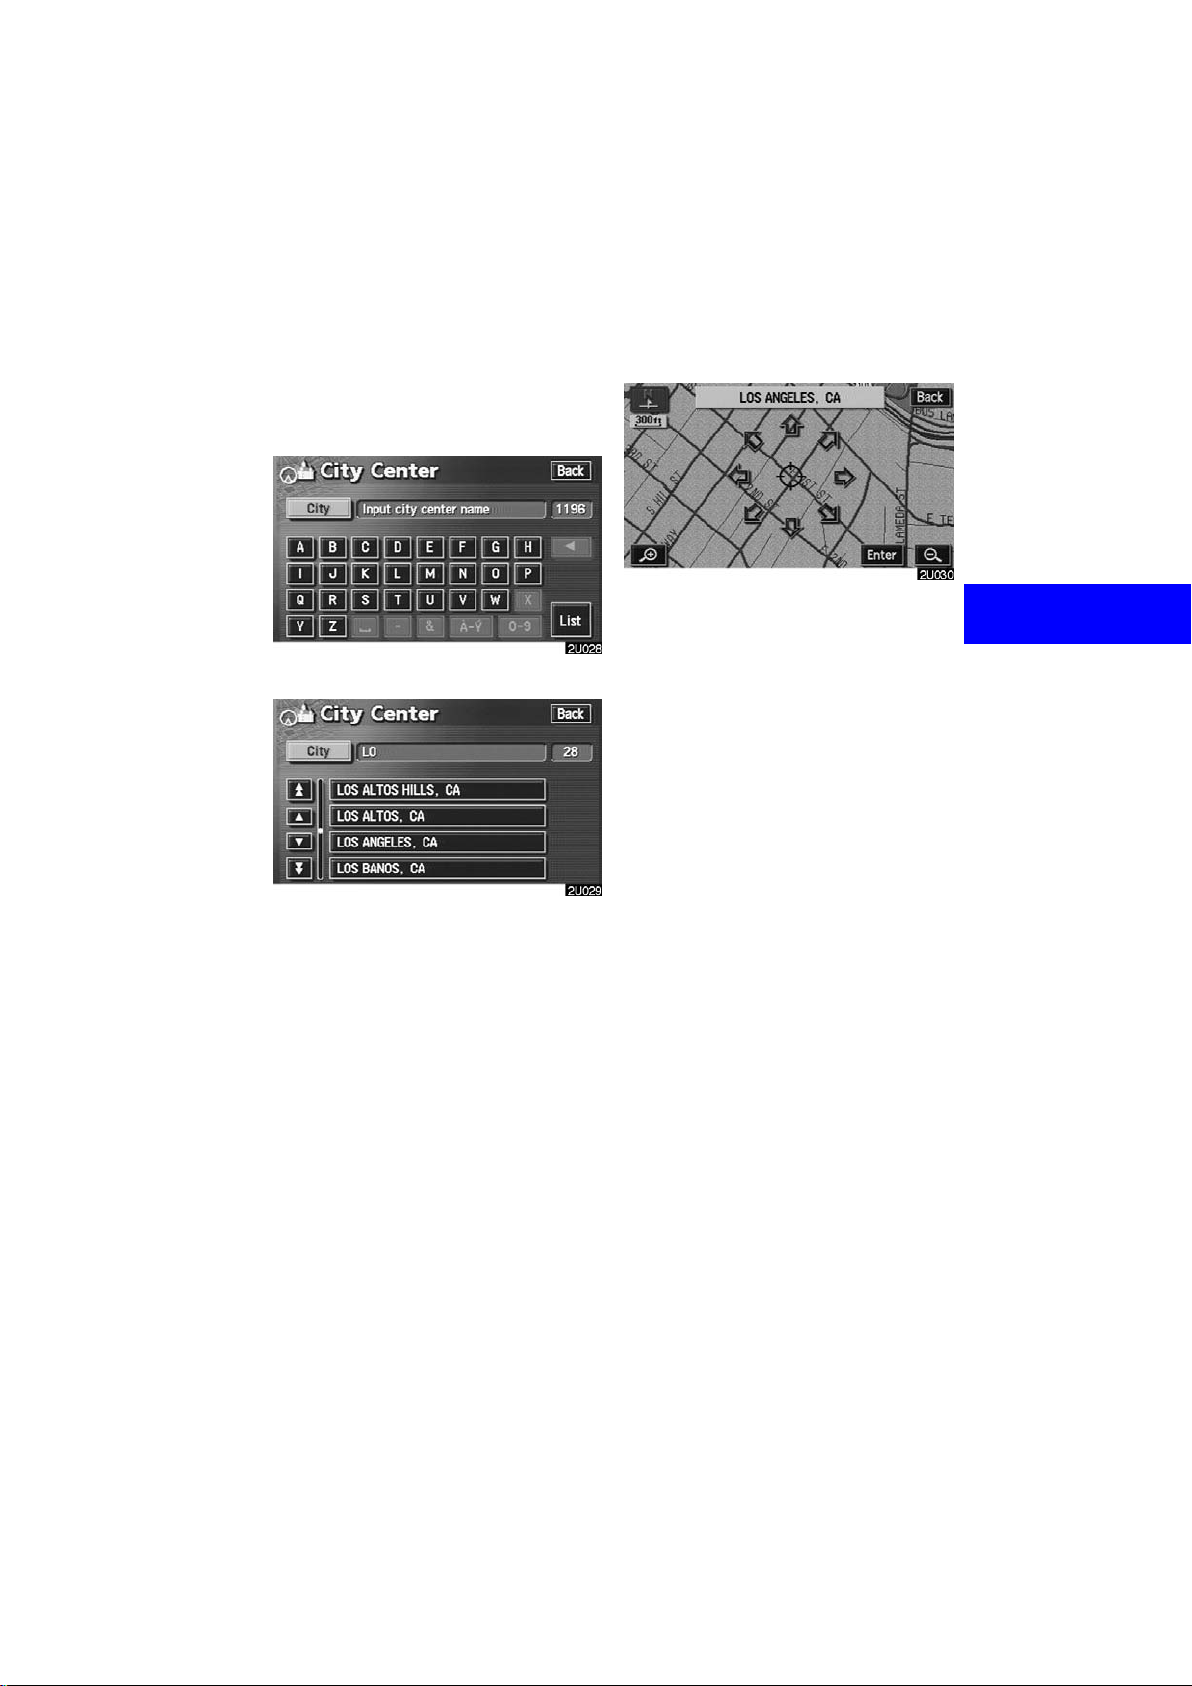
INPUTTING CITY CENTER
Touch the
switch.
Input the city center name.
Touch the switch of the desired city
center name.
“Input City Center”
When you touch an arrow facing the desired point, the map scrolls in that direction. When you release your finger, scrolling stops.
To set the position of the cursor, touch the
“Enter” switch.
43
Page 56
SETTING THE CURRENT POSITION AS
THE SEARCH POINT
Touch the
switch.
“Current Position”
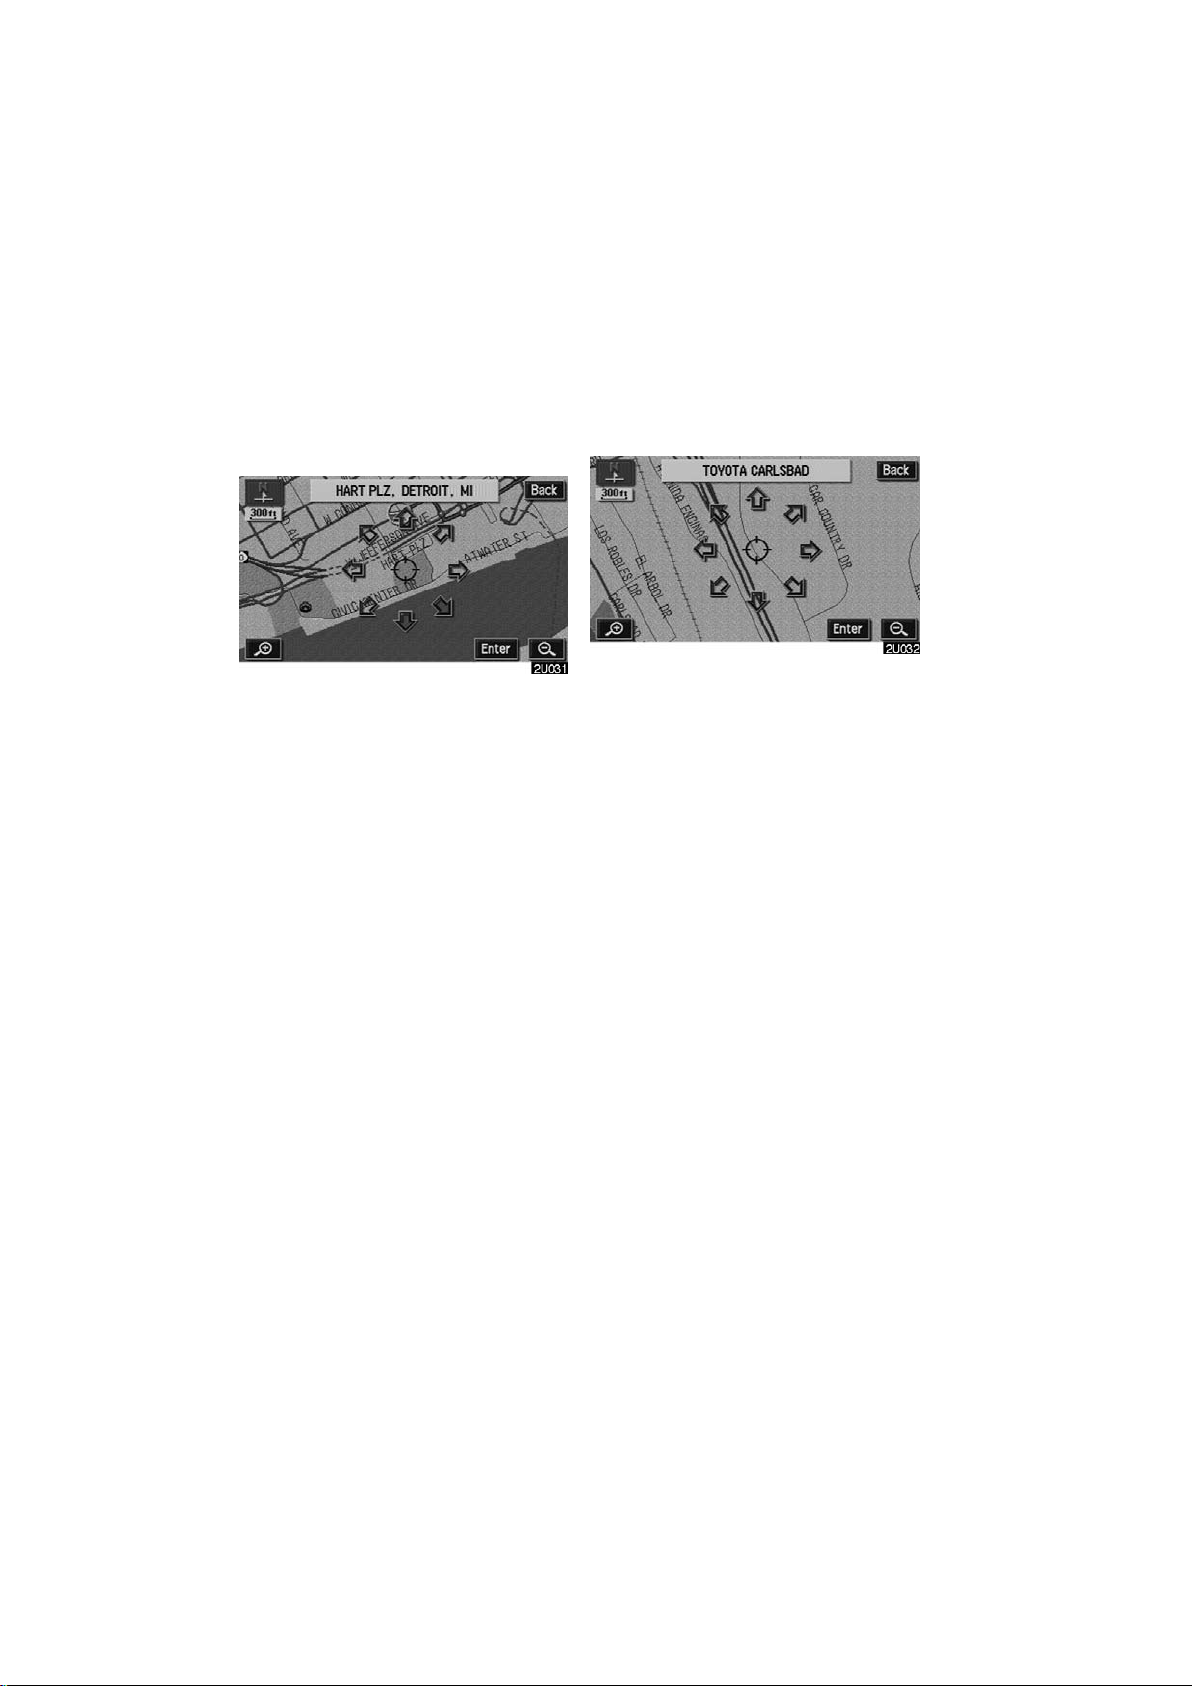
SETTING THE SEARCH POINT VIA THE
MAP SCREEN
Touch the
“Map” switch.
When you touch an arrow facing the desired point, the map scrolls in that direction. When you release your finger, scrolling stops.
To set the position of the cursor, touch the
“Enter” switch.
When you touch an arrow facing the desired point, the map scrolls in that direction. When you release your finger, scrolling stops.
To set the position of the cursor, touch the
“Enter” switch.
44
Page 57
SETTING THE SEARCH POINT FROM
THE DESTINATIONS
Touch the destination switches at the
bottom of the screen.
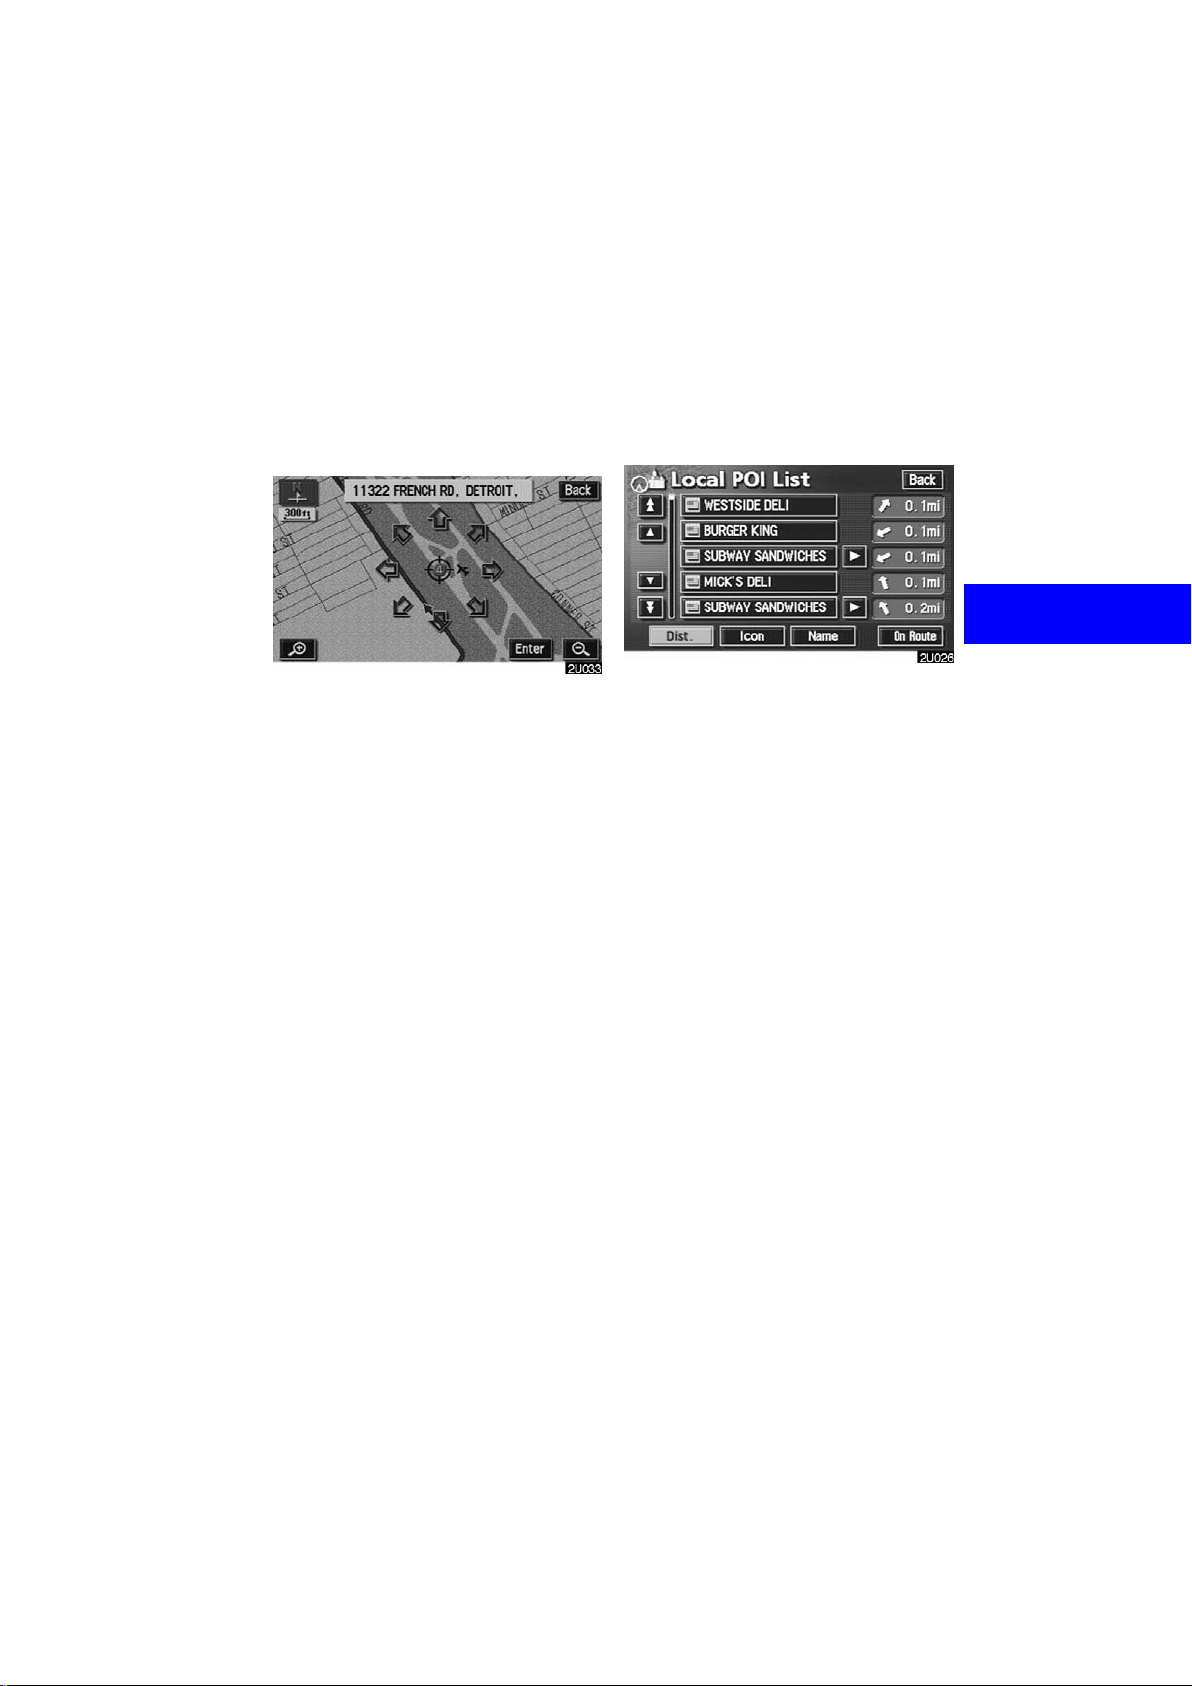
(c)Selecting from a list
You can select the desired destination
from the listed POI names.
When you touch an arrow facing the desired point, the map scrolls in that direction. When you release your finger, scrolling stops.
To set the position of the cursor, touch the
“Enter” switch.
When you touch the switch of the desired item, the screen changes and displays the map location of the selected
destination and the route preference.
“ — Entering destination” on page
(See
53.)
“Dist.”: To sort in the order of distance
from your current location.
“Icon”: To sort in the order of the POI
icons.
“Name”: To sort in alphabetical order by
name.
“On Route”: When the indicator is illumi-
nated by touching this switch, the list of the
items searched along the route is displayed.
45
Page 58

— Destination input by
“Emergency”
By touching the “Emergency”
switch on the “Destination” screen, the
display changes to a screen to select
dealers, hospitals or police stations.
During driving, only nearby police stations, hospitals or dealers are shown.
The current position is shown with an
address, the latitude and the longitude
at the top of the screen.
When you touch the desired emergency
category, the selected emergency category list is displayed.
Touch the switch of the desired destination. The screen changes and displays the map location of the selected
destination and the route preference.
“ — Entering destination” on page
(See
53.)
“Dist. Sort”: To sort in the order of dis-
tance from your current position. The distance from your current position up to the
destination is displayed on the right of the
name.
“Name Sort”: To sort in alphabetical order
by name.
INFORMATION
The navigation system does not
guide in areas where route guidance
is unavailable. (See page 11.)
46
Page 59

— Destination input by
“Memory”
Touching the “Memory” switch on
the “Destination” screen displays your
list of registered memory points. See
page 88 for registering and editing
memory points.
When you touch the switch of your desired memory point, the screen
changes and displays the map location
of the selected destination and the
route preference. (See “ — Entering
destination” on page 53.)
There are 4 ways to list the memory
point by touching switches on the bottom of the screen.
“Date”: To list the memory points in order
of registered date.
“Icon”: To list the memory points by the
registered icon.
“Name”: To list the memory points in al-
phabetical order.
“Attribute”: To list the memory points by
the registered attribute.
— Destination input by
“Previous”
Touch the “Previous” switch on the
“Destination” screen.
The previous starting point and up to 99
previously set destinations are displayed
on the screen.
Touch the switch of the desired destination. The screen changes and displays the map location of the selected
destination and the route preference.
(See “ — Entering destination” on page
53.)
“Date”: To list the previous destinations in
order of registered date.
“Name”: To list the previous destinations
in alphabetical order.
INFORMATION
You can delete the list of previous
destinations while your vehicle is
stopped, if you no longer need them.
(See page 116.)
47
Page 60

— Destination input by
“Map”
Touch the “Map” switch on the “Destination” screen.
— Destination input by
“Intersection”
Touch the “Intersection” switch on
the “Destination” screen.
The screen changes and displays the
map location that was previously displayed just before the destination input
operation and the route preference.
(See “ — Entering destination” on page
53.)
INFORMATION
Guidance starts if you touch the
“Enter” switch even while driving.
However, the cursor cannot be
moved.
Input the name of the two intersecting
streets which are located near the destination to be set.
48
Page 61
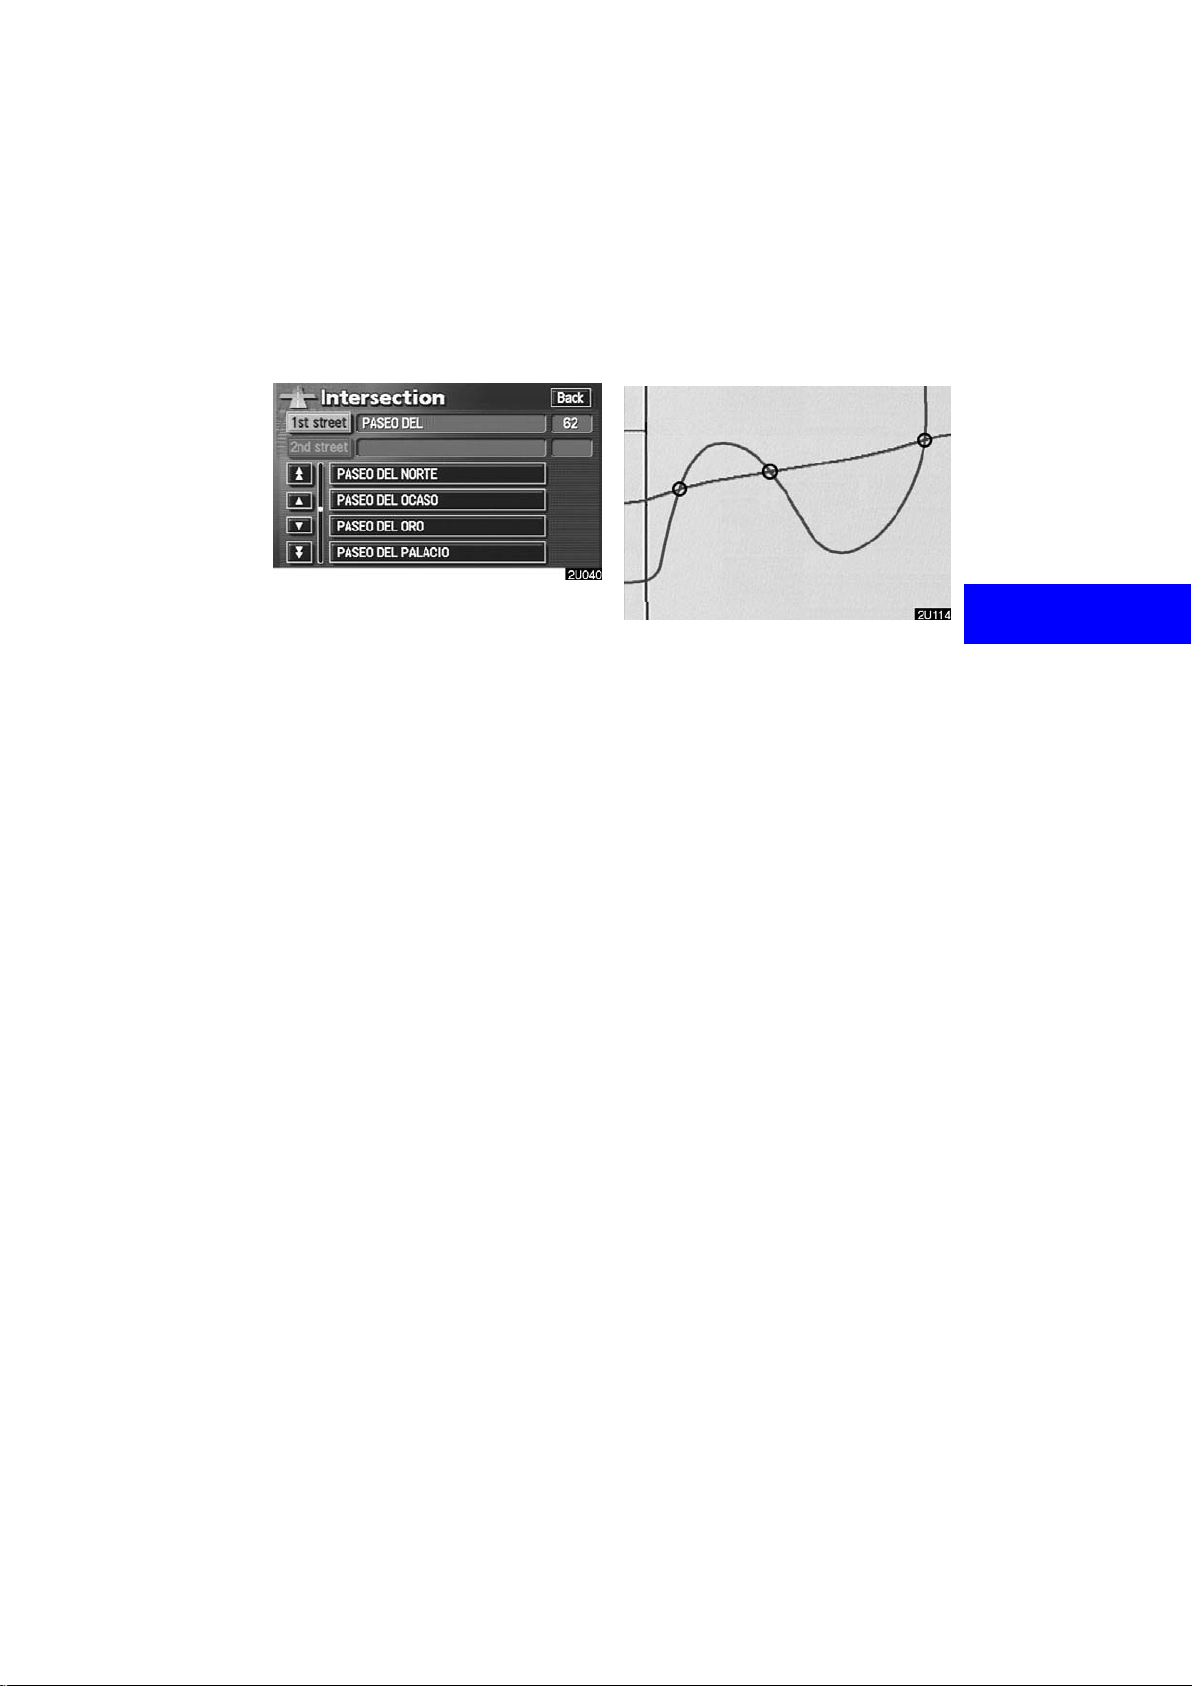
Touch the switch of the desired item.
After inputting the two intersecting
streets, the screen changes and displays the map location of the selected
destination and the route preference.
(See “ — Entering destination” on page
53.)
If the same two streets cross at more than
one intersection, the screen changes and
displays the menu to select the city name
where the streets intersect. Select the city,
and the map location of the selected destination and the route preference. (See “
— Entering destination” on page 53.)
49
Page 62

— Destination input by
“Freeway Ent./Exit”
To input a freeway entrance or exit,
touch the
switch on the “Destination” screen.
Be sure to use the complete name of the
freeway or highway , including the hyphen,
when entering the destination. Freeways
and interstates use an “I” (I−405). US highways use the state designation before the
number (CA−118).
“Freeway Ent./Exit”
Select the desired freeway by touching
the switch.
You can then select either a freeway
“Entrance” or “Exit”.
50
Page 63

Touch the switch of the desired entrance or exit name. The screen
changes and displays the map location
of the selected destination and the
route preference. (See
“ — Entering destination” on page 53.)
“Dist. Sort”: In the order of distance from
your current position. The distance from
your current position up to the destination
is displayed on the right of the name.
“Name Sort”: In alphabetical order by
name.
“Input Name”: An applicable list is displayed by touching this switch and inputting name.
— Destination input by
“Coordinates”
Touch the “Coordinates” switch on
the “Destination” screen.
Input the latitude and the longitude.
When the input is finished, touch the
“OK” switch.
When you touch the switch of the desired point, the screen changes and
displays the map location of the selected destination and the route preference. (See “ — Entering destination”
on page 53.)
51
Page 64

— Destination input by
“Phone #”
Touch the “Phone #” switch on the
“Destination” screen.
Input a telephone number.
After inputting a telephone number,
touch the
changes and displays the map location
of the selected destination and the road
preference. (See “ — Entering destination” on page 53.)
If there is more than one site having the
same number, the following screen appears.
“OK” switch, and the screen
INFORMATION
D If there is no match for the tele-
phone number inputted, a list of
identical numbers but with different area codes will be displayed.
D To set a memory point as a destina-
tion using the phone number, the
number must be registered previously. (See page 94.)
52
Page 65

Starting route guidance —
— Entering destination
After you input the destination, the
screen changes and displays the map
location of the selected destination and
the route preference.
SCREEN A
1. When you touch an arrow facing the
desired point, the map scrolls in that
direction. When you release your finger, scrolling stops.
2. To set the destination and display
SCREEN B, touch the
When the destination is already set, the
“Add to ” switch and the “Replace
” switch are displayed.
“Add to
”: To add a destination.
“Enter” switch.
“Replace
tinations and set a new one.
“Change”: To change the route prefer-
ence. (See page 54.)
“Info.”: If this switch is displayed on the
top of the screen, touch the switch to see
name, address, and phone number, etc.
SCREEN B
3. To start guidance, touch the
”: To delete the existing des-
“Guide” switch.
“3 Routes”: To select the desired route
from three possible routes. (See page 54.)
“Route”: To change the route. (See
pages 58 and 60.)
INFORMATION
D Guidance can be suspended or re-
sumed. (See page 83.)
D If you keep touching the
switch until a beep sounds, Demo
mode will start.
“Guide”
53
Page 66

D
To change the route before starting
guidance
ROUTE PREFERENCE
You can change route preference by
touching the
SCREEN A.
You can turn the indicator on or off by
touching the switch.
When searching for a route, the system
avoids routes where the indicator is
dimmed as much as possible.
After choosing conditions, touch the
“Change” switch on
“OK” switch.
INFORMATION
D Even if the “Allow Freeway” in-
dicator is dimmed, the route cannot avoid including a freeway in
some cases.
D If the calculated route includes a
trip by ferry, the route guidance
shows a sea route. After you travel
by ferry, the current vehicle position may be incorrect. Upon reception of GPS signals, it is automatically corrected.
3 ROUTES SELECTION
To select the desired route from three
routes, touch the
SCREEN B.
Touch the “Quick1”, “Quick2” or
“3 Routes” switch on
“Short” switch to select the desired
route.
“Quick1”: Recommended route.
This route is indicated by an orange line.
“Quick2”: Other route.
This route is indicated by a purple line.
“Short”: A route by which you can reach
the destination in the shortest distance.
This route is indicated by a green line.
“Info.”: To display the following information about each of the 3 routes.
54
Page 67

1
Time necessary for entire trip
2
Distance of entire trip
3
Toll road
4
Freeway
5
Ferry
— Route guidance screen
When starting route guidance, the following screen is displayed.
This screen displays the route that guides
the driver to the destination.
The route to the destination is indicated by
a highlighted line. Drive along the guided
route.
When the vehicle approaches a guidance
point such as an intersection or a freeway,
the screen automatically divides in two to
display the guidance screen. (For details,
see page 72.)
The current street name will be displayed
at the bottom of the screen.
In some areas, the roads have not been
completely digitized in our database yet.
For this reason, the route guidance may
guide the road that is not allowed to pass.
55
Page 68
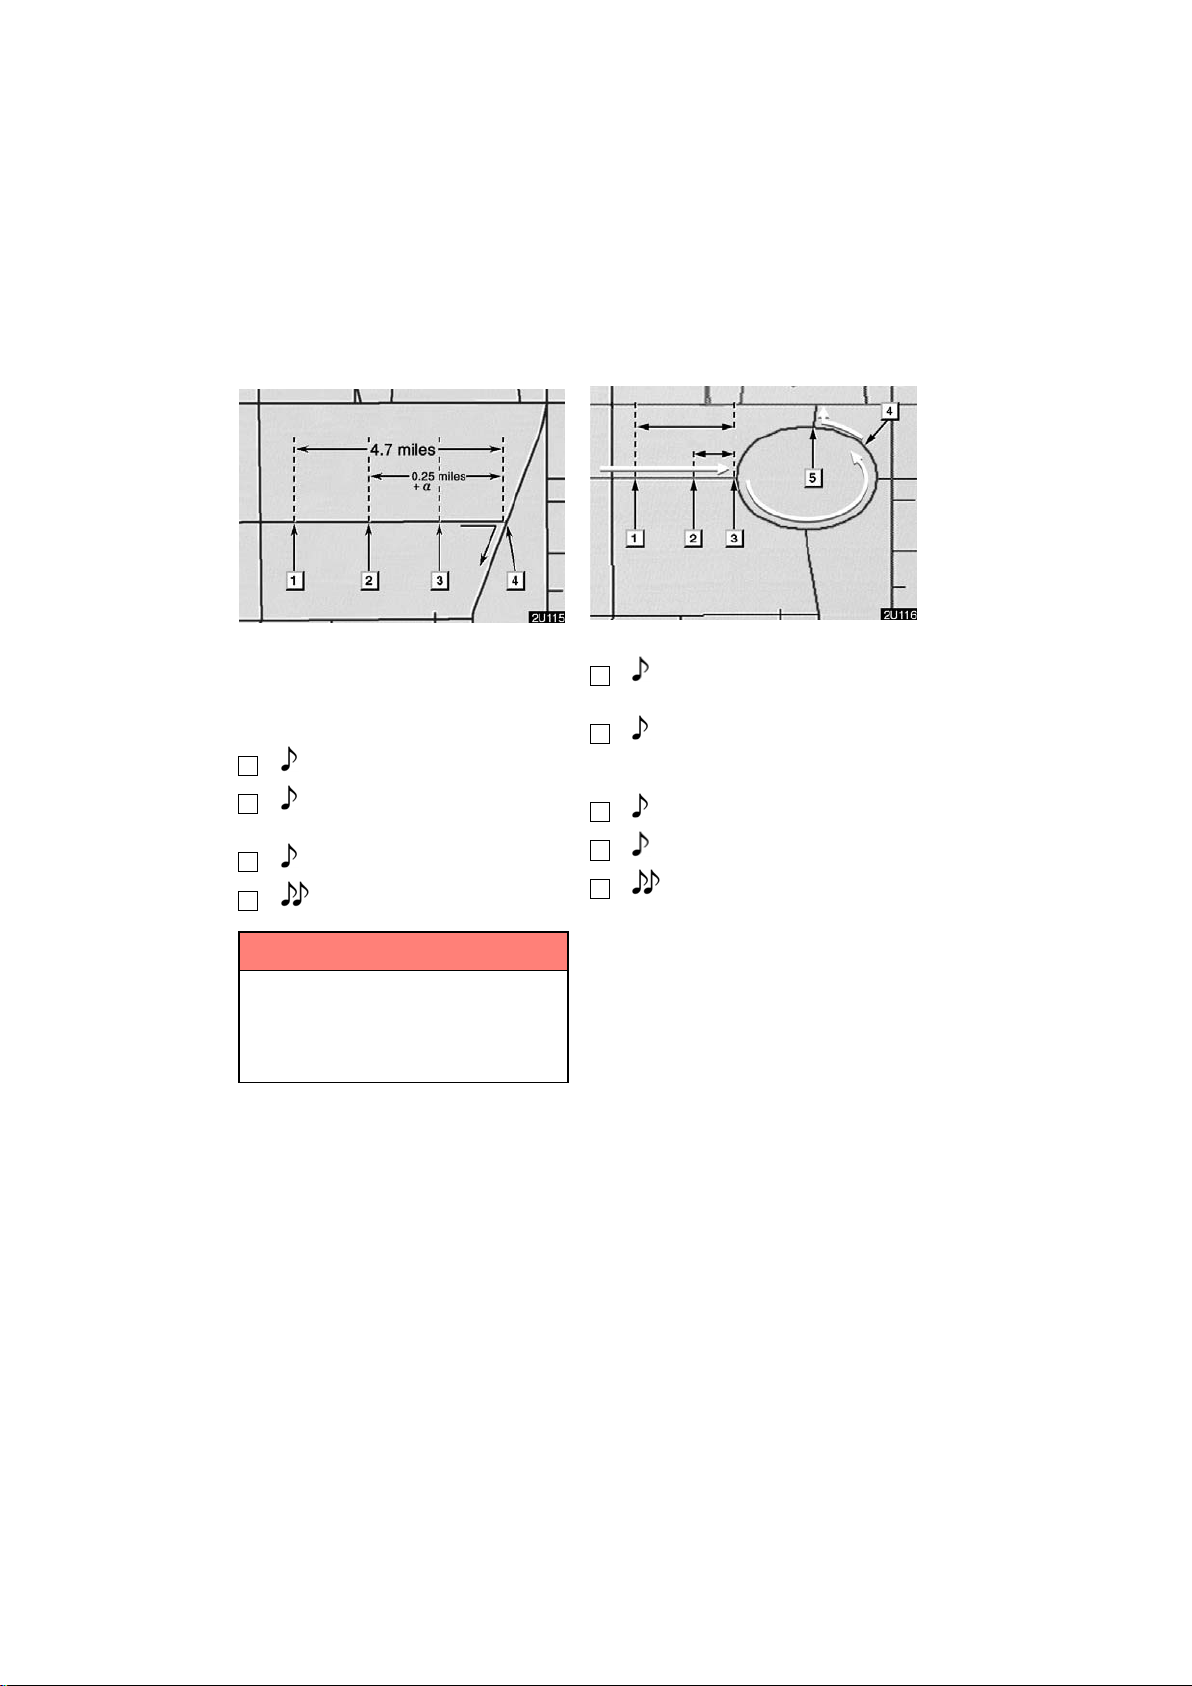
— Typical voice guidance
prompts
4.2 miles
0.25 miles
The voice guidance provides various messages as you approach an intersection, or
other point where you need to maneuver
the vehicle.
1
2
“Proceed about 5 miles.”
“In a quarter of a mile, right
turn.”
3
4
“Right turn.”
(Beep sound only)
INFORMATION
On freeways, interstates or other
highways with higher speed limits,
the voice guidance will be made at
earlier points than on city streets in
order to allow time to maneuver.
1
“Proceed about 4 miles to the
traffic circle.”
2
“In a quarter of a mile, traffic
circle ahead, and then 3rd exit
ahead.”
3
4
5
“The 3rd exit ahead.”
“The exit ahead.”
(Beep sound only)
56
Page 69
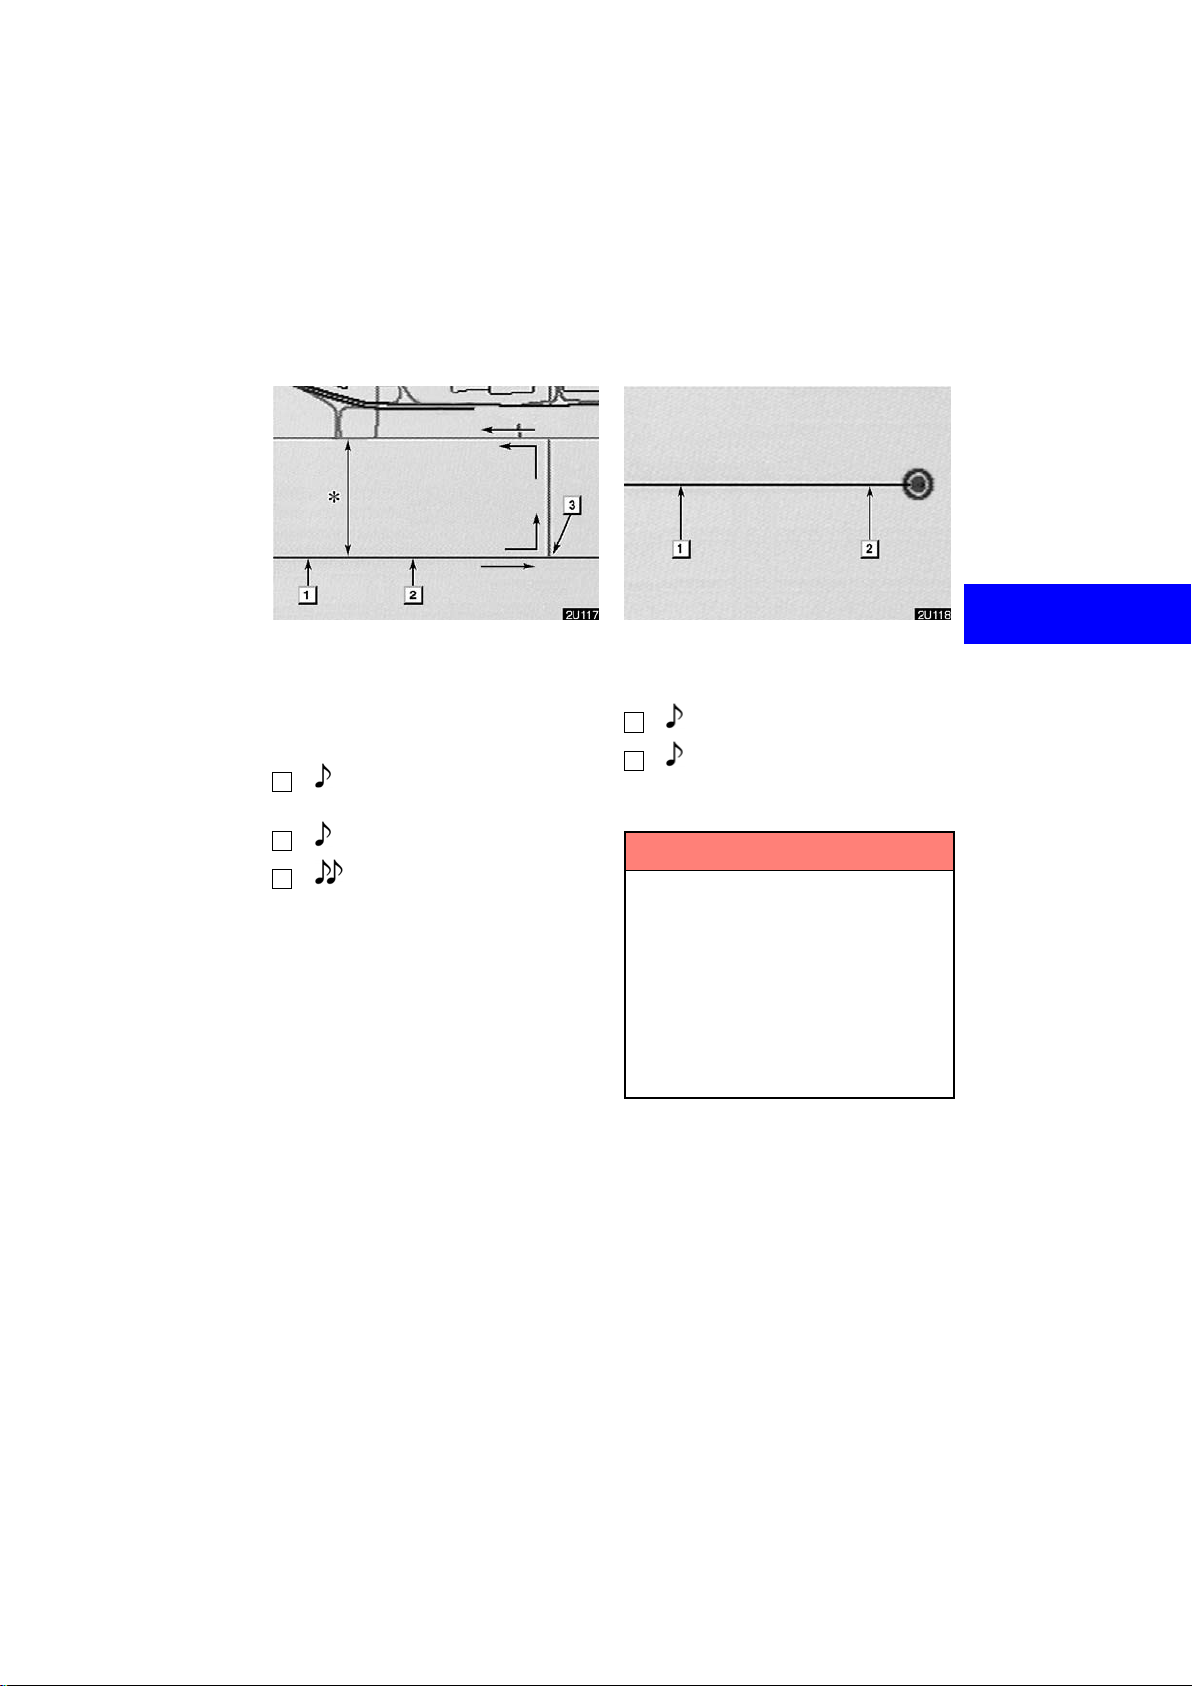
One−way road
One−way road
∗
: The system indicates a U−turn if the distance between two one−way roads (of opposite directions) is less than 50 feet (15
m) in residential areas or 164 feet (50 m)
in non−residential areas.
1
“In half of a mile, make a legal
U−turn.”
The system announces your approach to
the final destination.
1
2
“Your destination is ahead.”
“You have arrived at your des-
tination. The route guidance is
now finished.”
2
3
“Make a legal U−turn ahead.”
(Beep sound only)
INFORMATION
D If the system cannot determine the
current vehicle position correctly
(in cases of poor GPS signal reception), the voice guidance may be
made early or delayed.
D If you did not hear the voice guid-
ance command, touch the
VOICE”
button to hear it again.
“MAP/
D To adjust the voice guidance vol-
ume, see page 84.
57
Page 70

Setting and deleting
destination
(a)Adding destinations
You can add destinations and search
again for the routes.
1. Touch the “Route” switch.
3. Input an additional destination in
the same way as the destination input.
(See page 28.)
4. Touch the desired “Add” switch to
determine the arrival order of the additional destination.
2. Touch the “Add” switch of “Des-
tination”.
58
Page 71
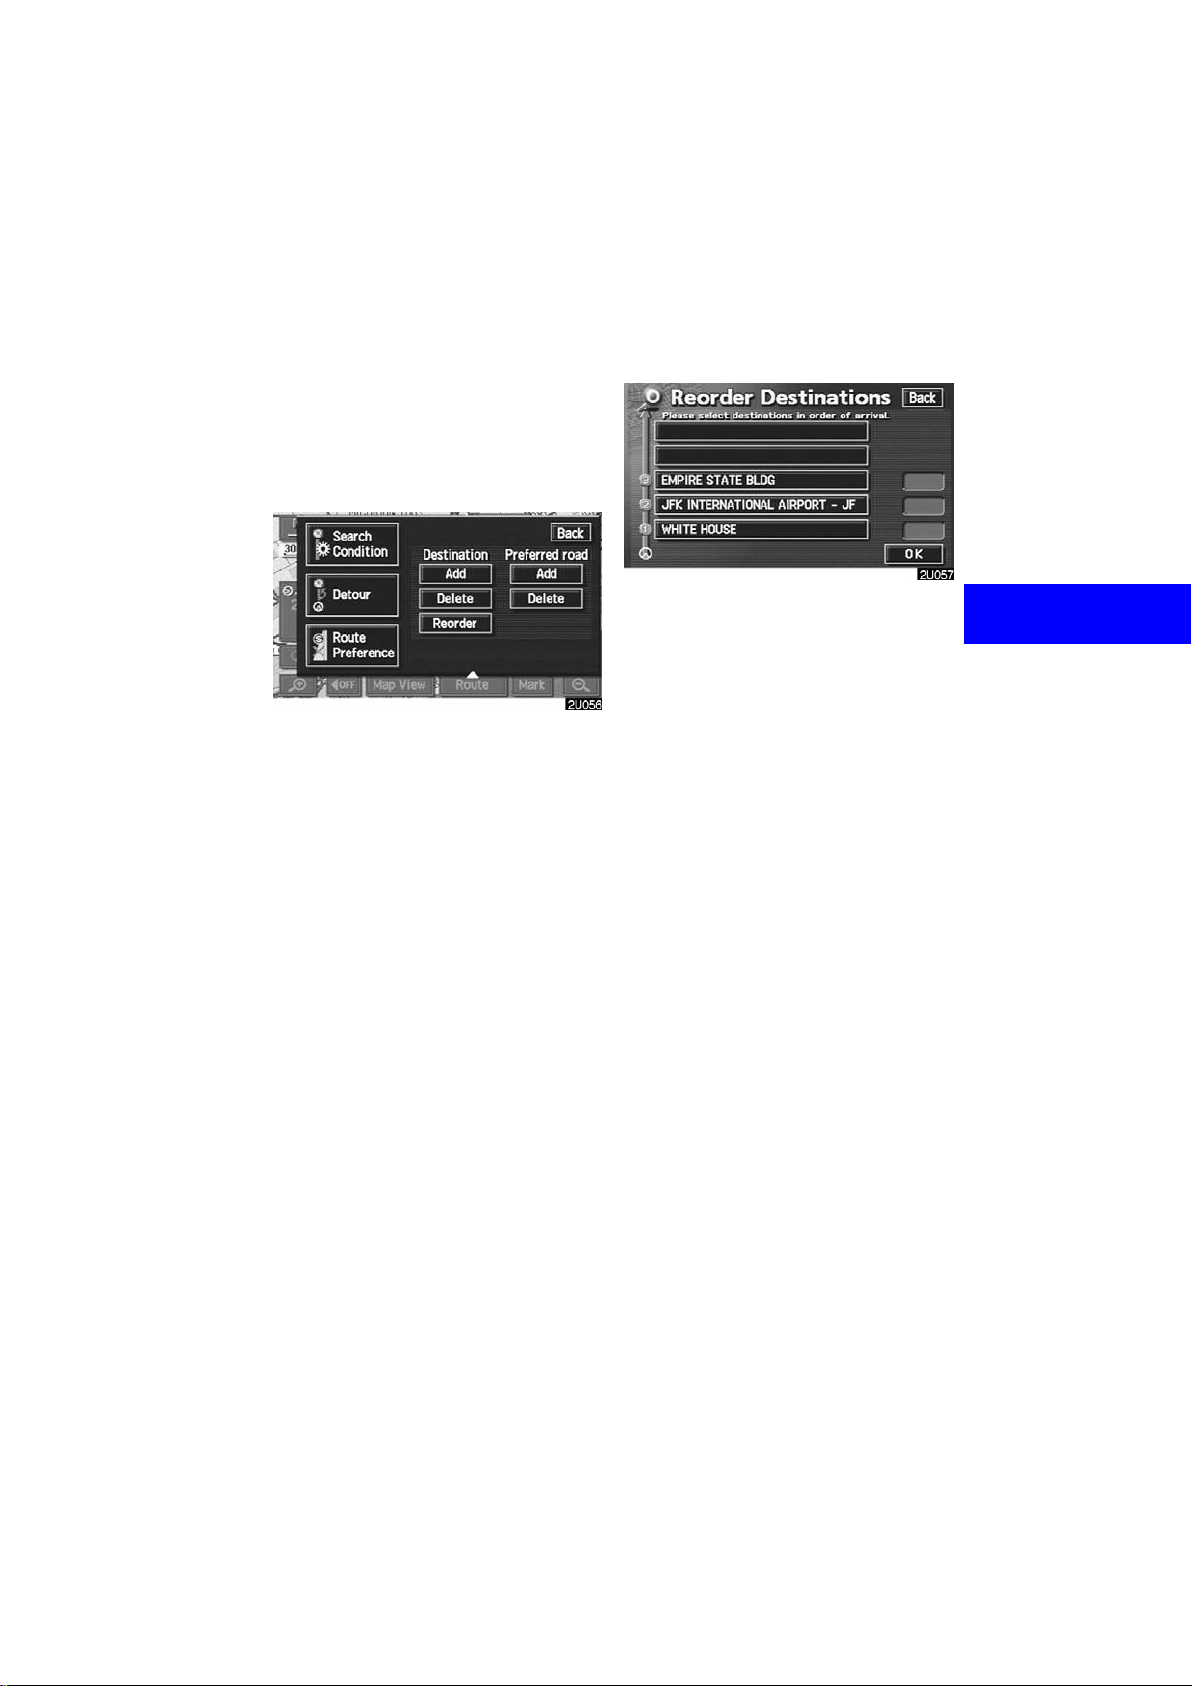
(b)Reordering destinations
When more than one destination is set,
you can change the arrival order of the
destinations.
1. Touch the
2. Touch the “Reorder” switch of
“Destination”.
“Route” switch.
3. Select the destination in the order of
arrival by touching the switch of destinations.
Reordered number of arrival is displayed
on the right side of the screen.
When you finish selecting the destinations,
touch the
searches for the guidance route again, and
displays the entire route. Even if you do
not touch the
route is displayed automatically within a
few seconds when order is fixed.
“OK” switch. The system
“OK” switch, the entire
59
Page 72

(c)Deleting destination
You can delete a set destination.
1. Touch the
“Route” switch.
Setting and deleting route
(a)Adding preferred road
You can add points you wish to pass
through.
2. Touch the “Delete” switch of
“Destination”.
3. When more than one destination is
set, a list will appear on the screen.
Touch the destination on the screen
you wish to delete.
“Delete All”: To delete all destinations on
the list.
4. A message appears to confirm your
request to delete. To delete the destination(s), touch the
If you touch the
cannot be recovered.
If you touch the
screen will return.
5. If more than one destination is set,
touch the
the destinations. The system searches
for the guidance route again, and displays the entire route.
“OK” switch after deleting
“Yes” switch.
“Yes” switch, the data
“No” switch, the previous
1. Touch the “Route” switch.
2. Touch the “Add” switch of “Pre-
ferred road”.
60
Page 73

3. Select the preferred road which you
wish to modify and touch the
z”
switch.
4. A message appears to confirm your
request. To add the preferred road,
touch the
Touch the “Next” switch to use another
road.
“OK” switch.
“Enter
5. If more than one destination is set,
the “Add Preferred Road” screen appears. Touch the
you wish to add a preferred road.
“Add” switch where
61
Page 74

(b)Deleting preferred road
You can delete a set preferred road.
1. Touch the
2. Touch the “Delete” switch of “Preferred road”.
3. When more than one preferred road
is set, a list will appear on the screen.
Touch the switch of the preferred road
to be deleted.
“Delete All”: To delete all the listed pre-
ferred road.
“Route” switch.
4. A message appears to confirm your
request to delete. To delete the preferred road, touch the
If you touch the
cannot be recovered.
If you want to try again or cancel deletion,
touch the
screen will return.
5. If more than one preferred road is
set, touch the
ing the preferred road. The system
searches for the guidance route again,
and displays entire route.
“No” switch. The previous
“OK” switch after delet-
“Yes” switch.
“Yes” switch, the data
62
Page 75
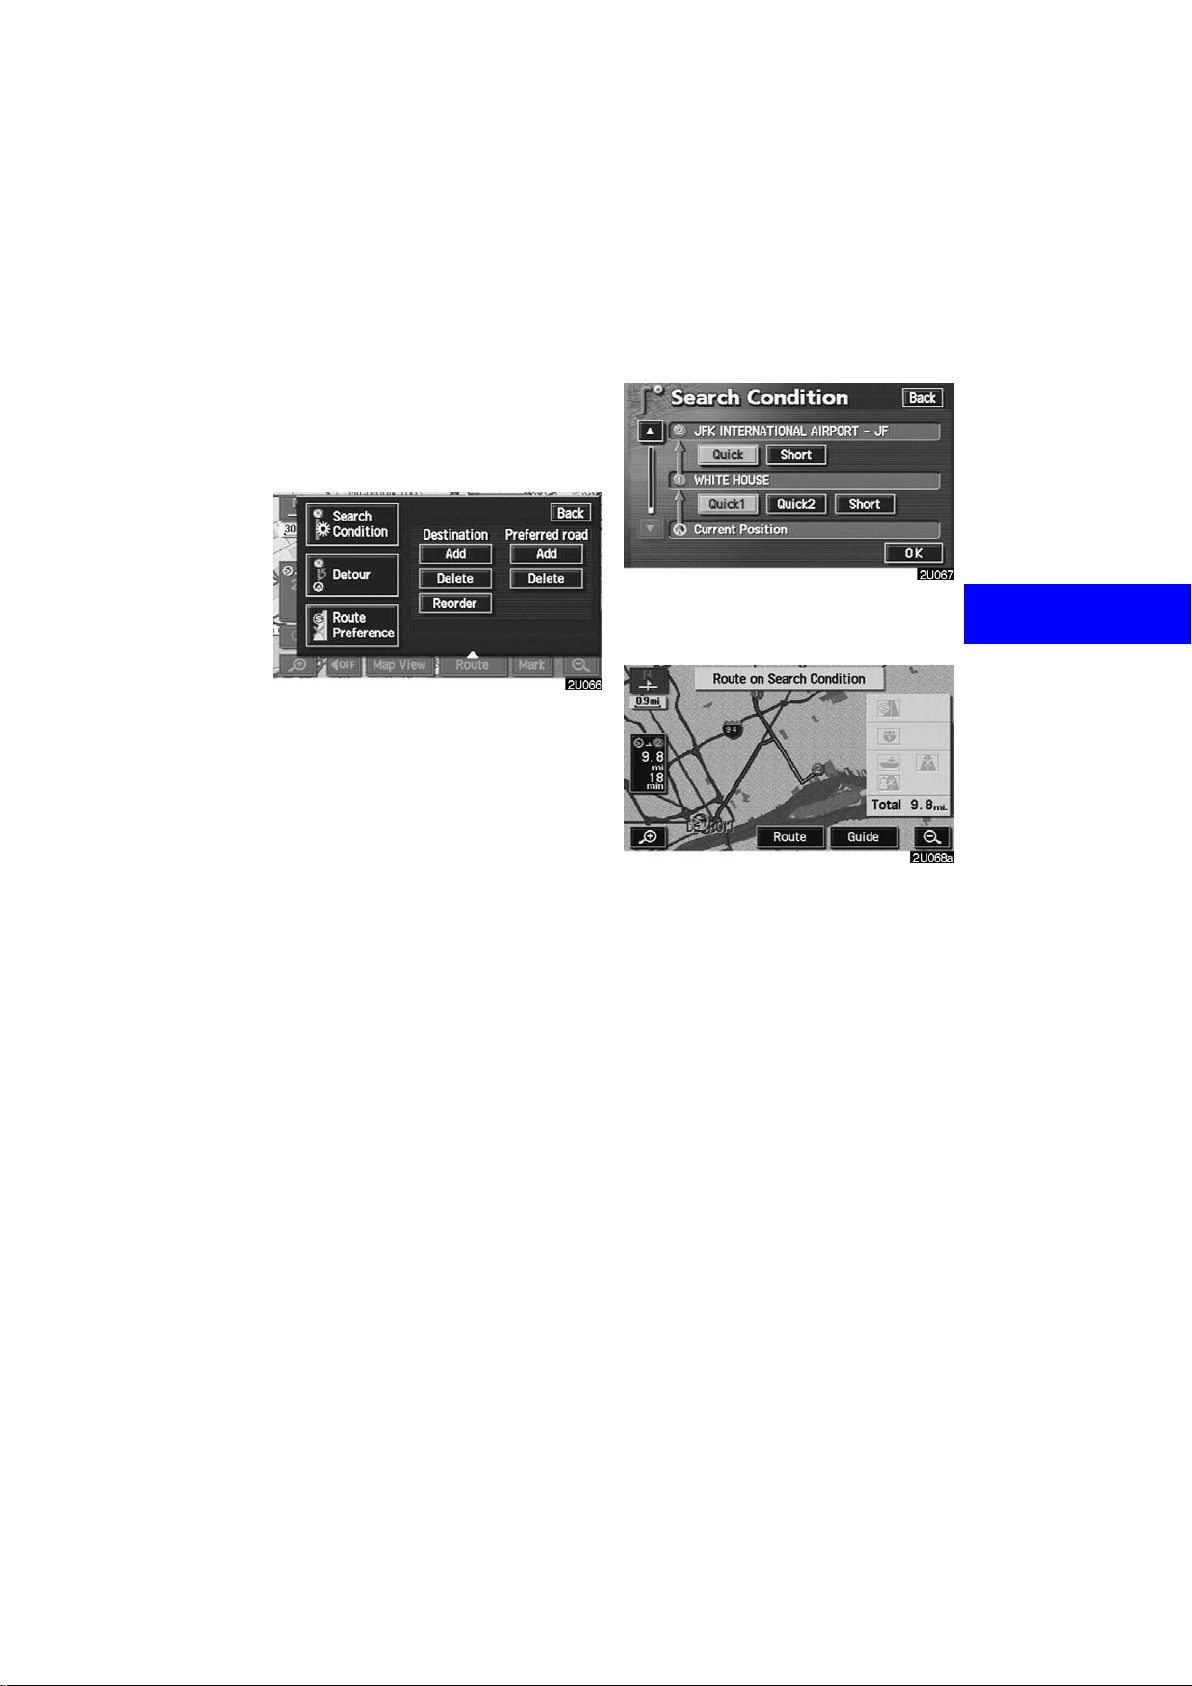
(c)Search condition
You can designate the route conditions
of the route to the destination.
1. Touch the
2. Touch the “Search Condition”
switch. The “Search Condition” screen
appears.
“Route” switch.
3. Touch the “Quick”, “Quick1”,
“Quick2” or “Short” switch and
touch the
The entire route from the starting point to
the destination is displayed.
“Guide”: To start guidance.
“Route”: To add or change a route. (For
details, see pages 58 and 60.)
“OK” switch.
63
Page 76

(d)Detour setting
While the route guidance is operating,
you can change the route to detour
around a section of the route where a
delay is caused by road repairs, an accident, etc.
1. Touch the
2. Touch the “Detour” switch.
“Route” switch.
3. Select the switch below to select the
desired detour distance.
“1 mile (km)”, “3 miles (km)” or “5 miles
(km)”: Touch one of these switches to start
the detour process. After detouring, the
system returns to the original guidance
route.
“Whole Route”: If you touch this switch,
the system will calculate an entire new
route to the destination.
64
Page 77
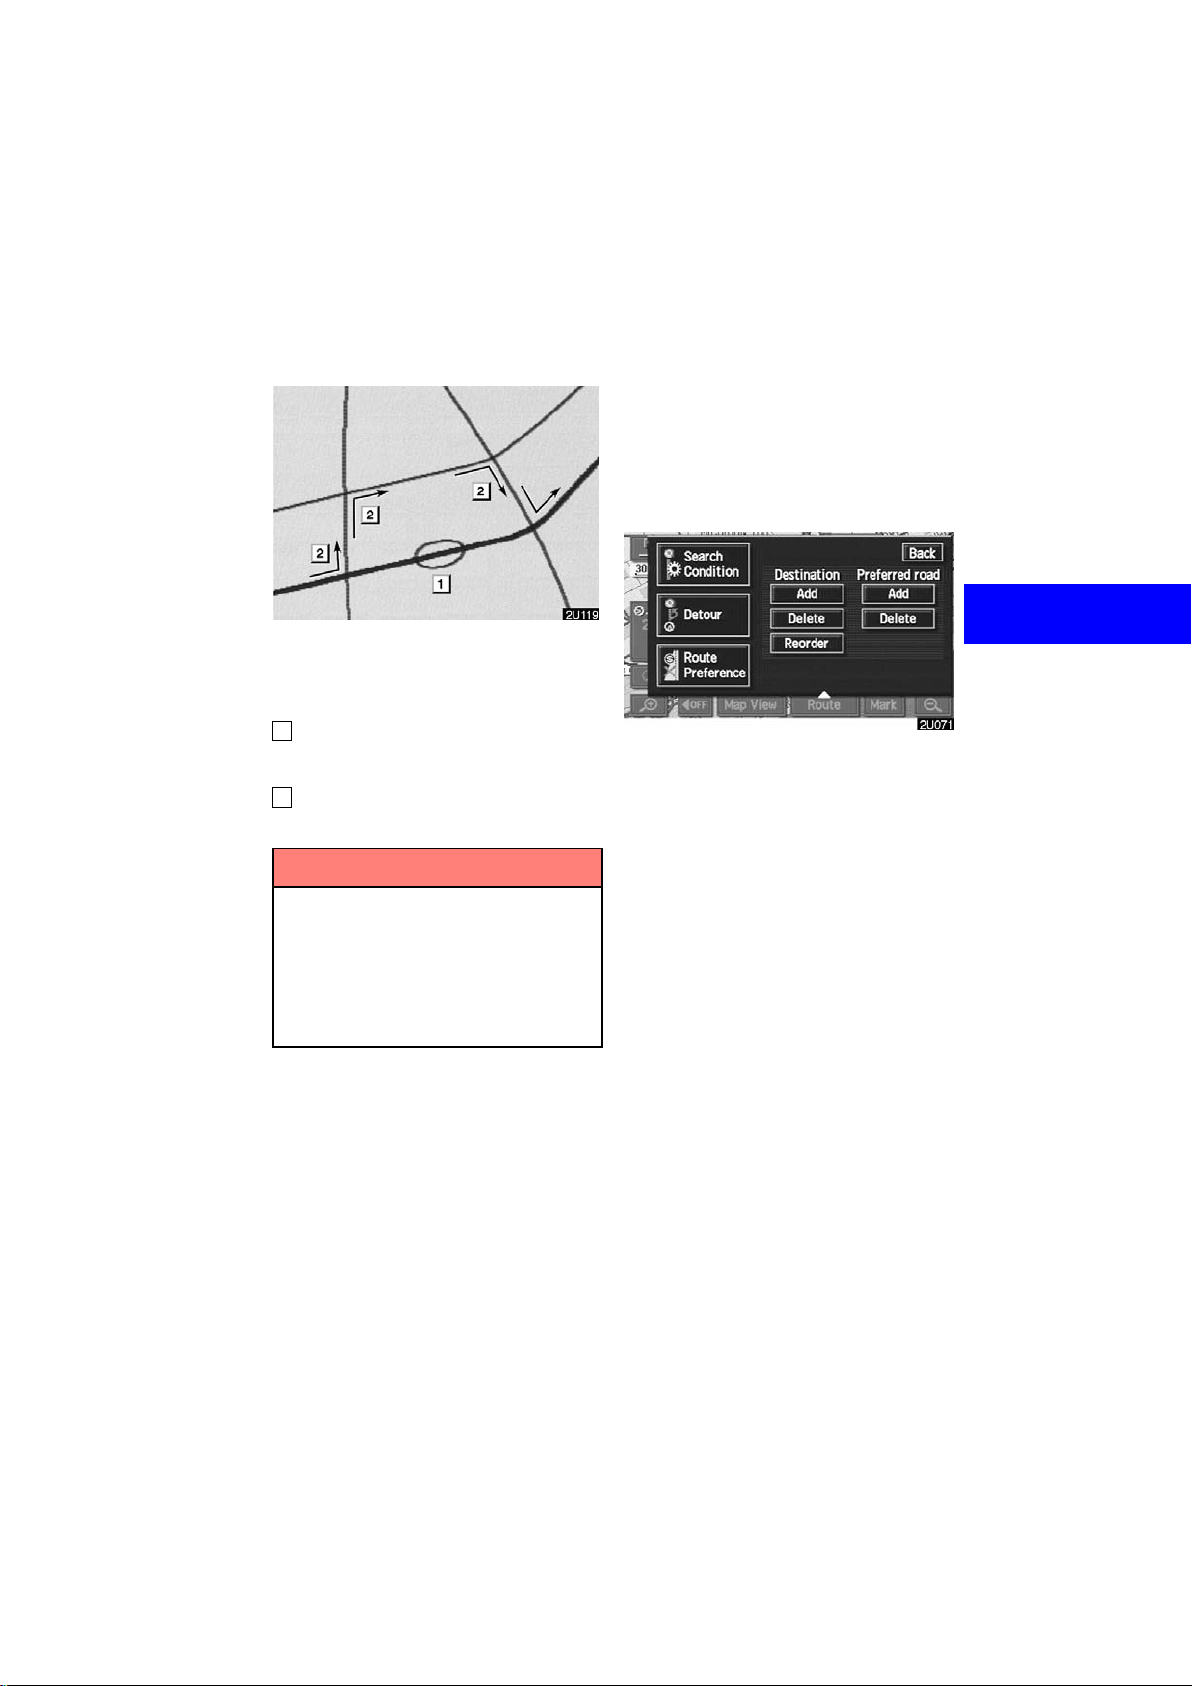
This picture shows an example of how the
system would guide you around a delay
caused by a traffic jam.
1
This position indicates the location of
a traffic jam caused by road repairs or
an accident.
2
This route indicates the detour suggested by the system.
INFORMATION
D When your vehicle is on a freeway,
the detour distance selections are
5, 15, and 25 miles (km).
D The system may not be able to cal-
culate a detour route depending on
the selected distance and surrounding road conditions.
(e)Route preference
You are given a number of choices on
the conditions which the system uses
to determine the route to your destination.
1. Touch the
2. Touch the “Route Preference”
switch to change the conditions which
are to determine the route to your destination.
“Route” switch.
65
Page 78

3. You can turn the indicator on or off
by touching the switch.
When searching for a route, the system
avoids routes where the indicator is
dimmed as much as possible.
After choosing the conditions, touch
“OK” switch.
the
(f) Starting route f rom adjacent road
You can start the route guidance from
the adjacent road.
(ex. When the route guidance guides the
route on the freeway , but you drive on the
parallel way along a freeway.)
1. Touch the
2. Touch the “Start from Adjacent
Road”
When there is no adjacent road, this switch
will not appear.
“Route” switch.
switch.
66
Page 79

Show POI icons
Points of Interest such as gas stations
and restaurants can be displayed on
the map screen. Y ou can also set their
location as a destination and use them
for route guidance.
1. Touch the “Map View” switch.
2. Touch the “Show POI Icon”
switch to display a particular type of
Point of Interest on the screen.
67
Page 80

A screen with a limited choice of Points of
Interest will be displayed. (To change the
displayed POI, see page 115.) When you
touch the desired Point of Interest category, symbols will appear on the map screen
indicating where the POI addresses are located.
To turn off the symbols of the Points of
Interest on the map screen, touch the
“POI Off” switch.
“More”: If you cannot find your desired
Point of Interest on the limited choice
screen, touch this switch. The screen then
displays the complete POI listing screen.
You can display up to 5 categories of icons
on the screen.
When you select a Point of Interest type
from either the limited list or the complete
list, the screen will display symbols at
those locations on the map screen.
Touching the
the last selected icon.
“Local POI List”: If you want to search for
the nearest Point of Interest, touch this
switch. Then choose one of the categories. The system will list the points within
20 miles (30 km).
“Delete” switch will delete
68
Page 81

Touch the switch of your desired Point of
Interest. Selected Points of Interest are
displayed on the map screen.
“Dist.”: To sort in the order of distance
from your current location.
“Icon”: To sort in the order of the POI
icons.
“Name”: To sort in alphabetical order by
name.
“On Route”: When the indicator is illuminated by touching this switch, the list of the
items searched along the route is displayed.
D To set a POI as a destination
Y ou can select one of the Points of Interest
icons on the map screen as a destination
and use it as route guidance.
Directly touch the Point of Interest icon
that you wish to set as a destination.
The map will shift so that the icon is centered on the screen and overlaps with the
cursor
your current position can be displayed on
the screen. The distance shown is measured as a straight line from the current v e hicle position to the POI.
When your desired Point of Interest
overlaps with the cursor, touch the
. At this time, the distance from
“Enter ” switch. The screen
changes and displays the map location
of the selected destination and route
preference. (See “ — Entering destination” on page 53.)
69
Page 82
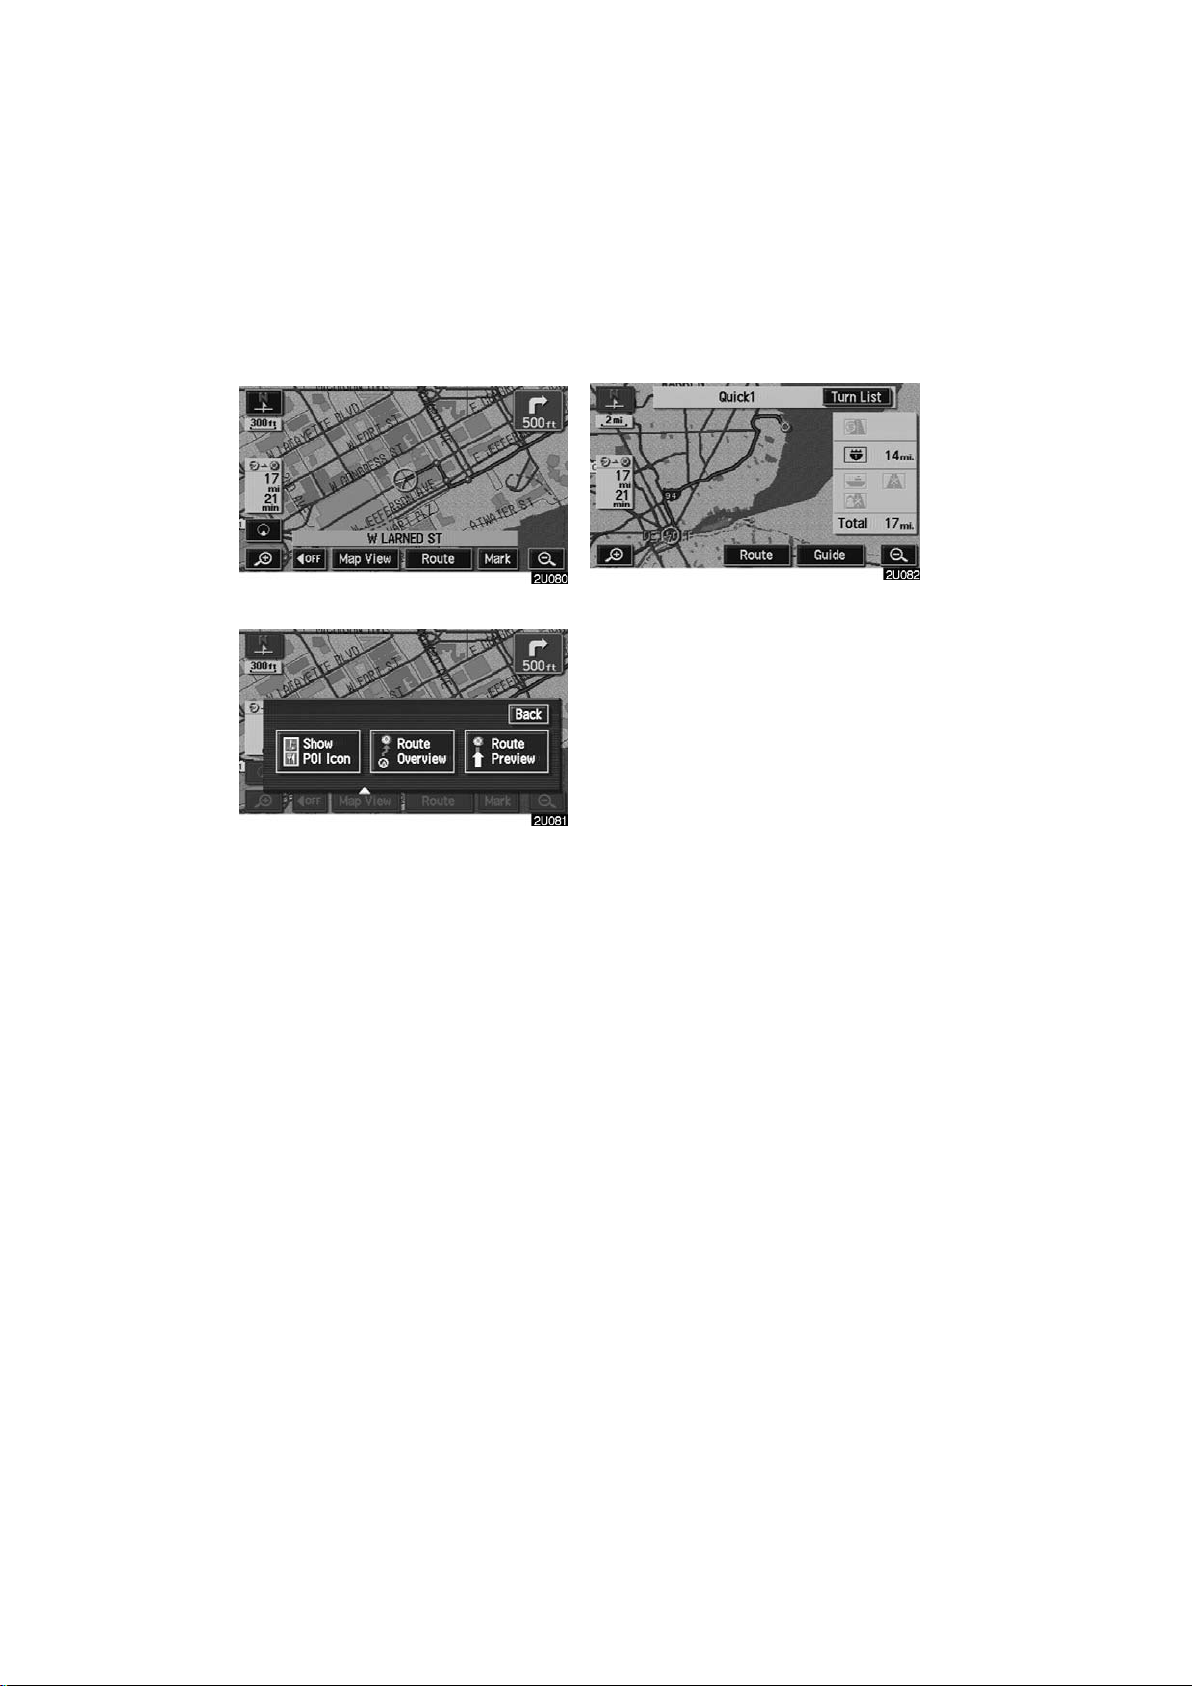
Route overview
1. Touch the “Map View” switch.
2. Touch the “Route Overview”
switch.
The entire route from the current position
to the destination is displayed.
“Guide”: To start guidance.
“Route”: To change the route. (For de-
tails, see pages 58 and 60.)
“Turn List”: The following screen displays
the list of the roads up to your destination.
70
Page 83
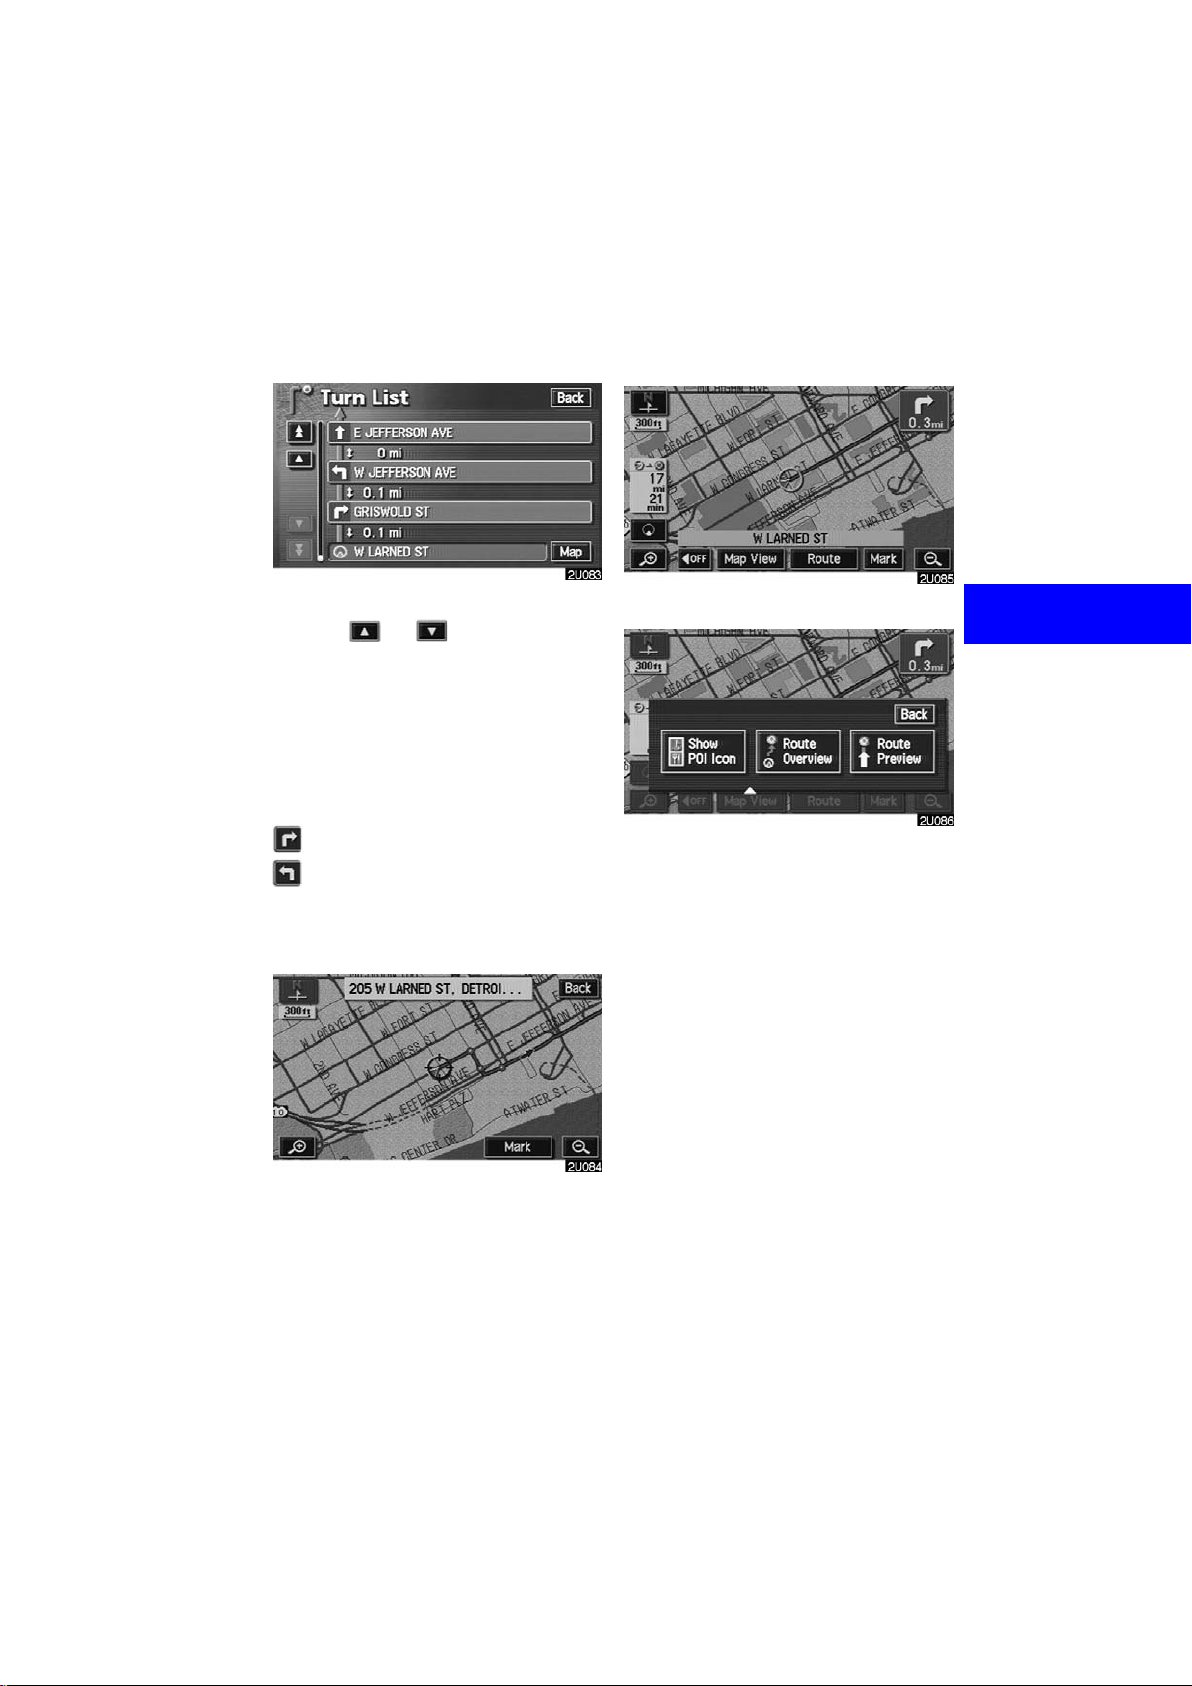
n
Route preview
You can scroll through the list of roads by
touching
road names in the route may appear on the
list. If a road changes its name without requiring a turn (such as on a street that runs
through two or more cities), the name
change will not appear on the list. The
street name closest to the starting point will
be displayed with a mileage to the next
turn.
Touch the “Map” switch of your de-
sired point. The point which you
choose is displayed on the map screen.
or . However, not all
These marks indicate the
direction in which you should tur
at an intersection.
1. Touch the “Map View” switch.
2. Touch the “Route Preview”
switch.
71
Page 84
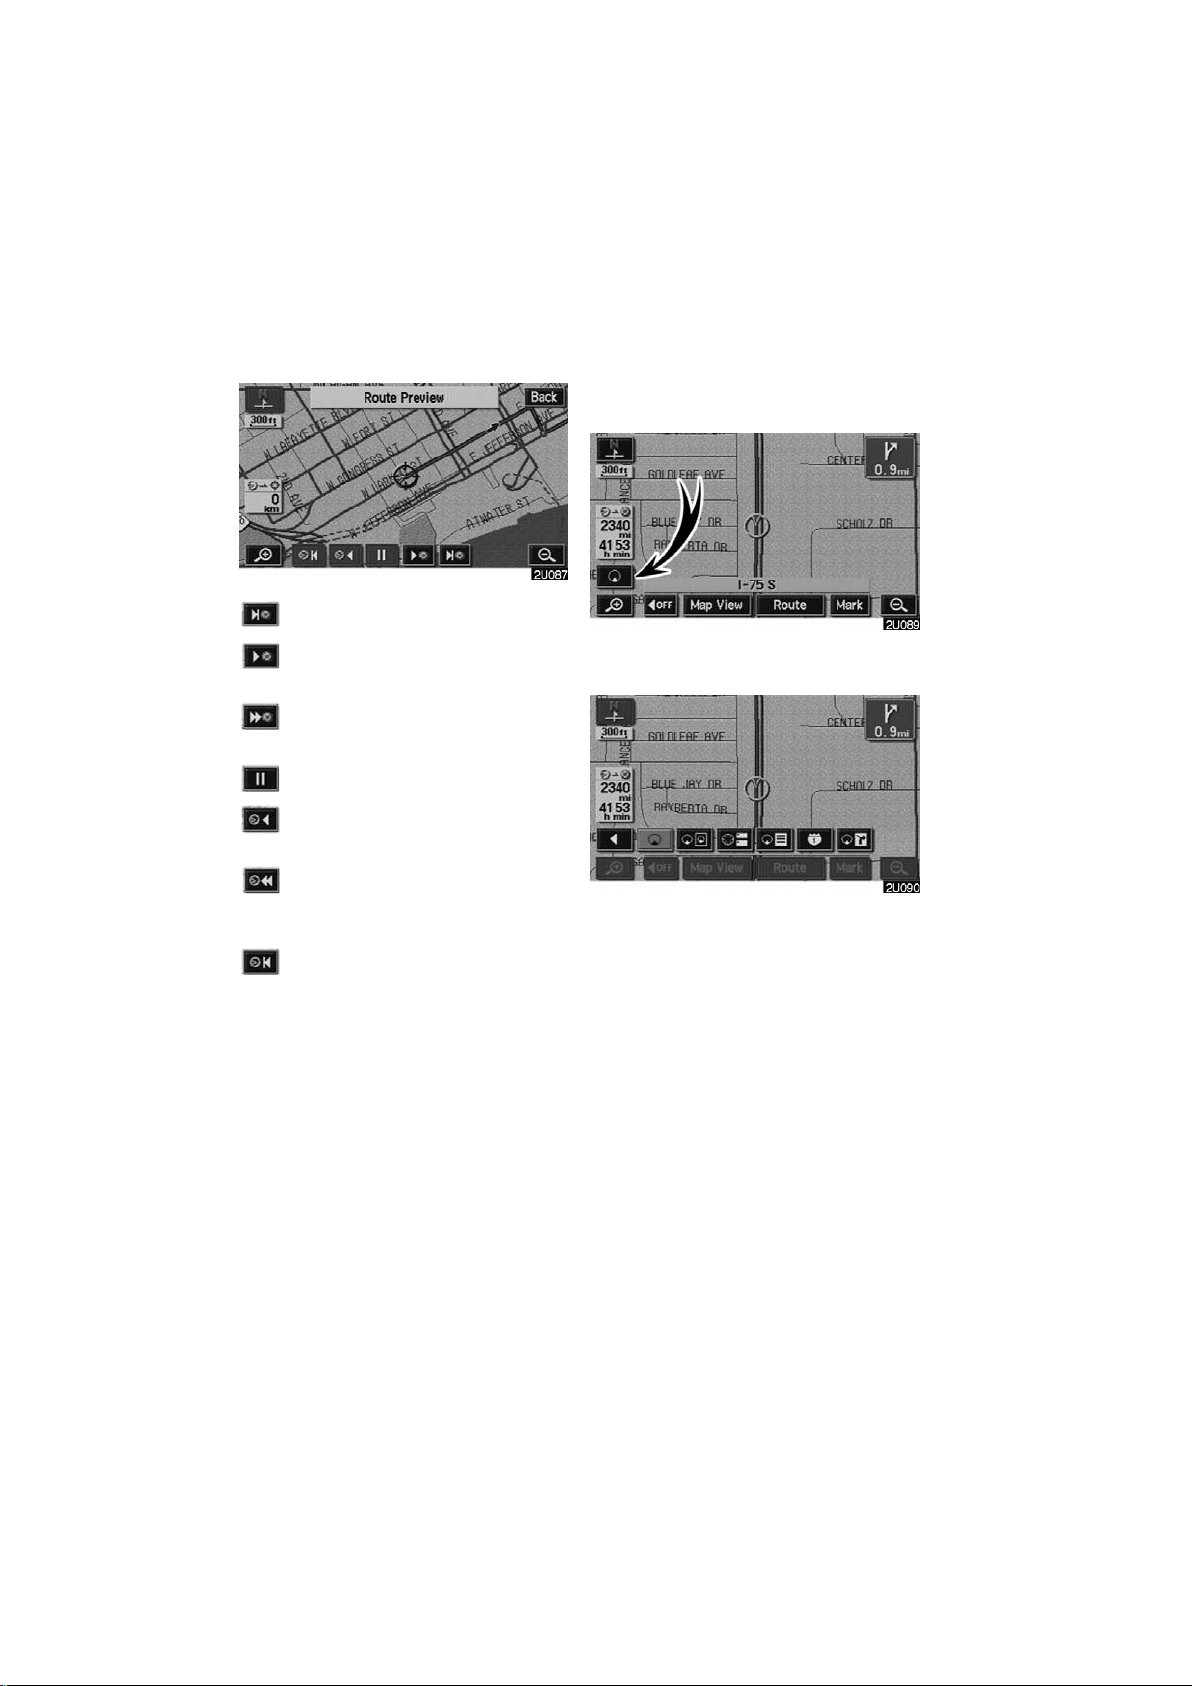
:To indicate the next destination.
Screen configuration
You can choose any one of the screen
configurations.
:To preview the route to the next
destination.
:To preview the route to the next
destination in fast−forward mode.
:To stop the preview.
:To review the route to the previous
destination or starting point.
:To review the route to the previous
destination or starting point in fast−
forward mode.
:To indicate the previous destination
or starting point.
1. Touch this switch to display the following screen.
2. To select the desired screen configuration, touch one of the following
switches.
72
Page 85

Depending on the conditions, it may not be
possible to select certain screen configuration switches.
:To display single map screen. (See
page 73.)
:To display dual map screen. (See
page 74.)
:To display compass mode screen.
(See page 75.)
:To display turn list screen. (See
page 75.)
:To display arrow screen. (See page
76.)
:To display freeway information
screen. (See page 76.)
:To display intersection guidance
screen or guidance screen on freeway. (See page 77.)
(a)Single map
The screen shows the single map.
73
Page 86
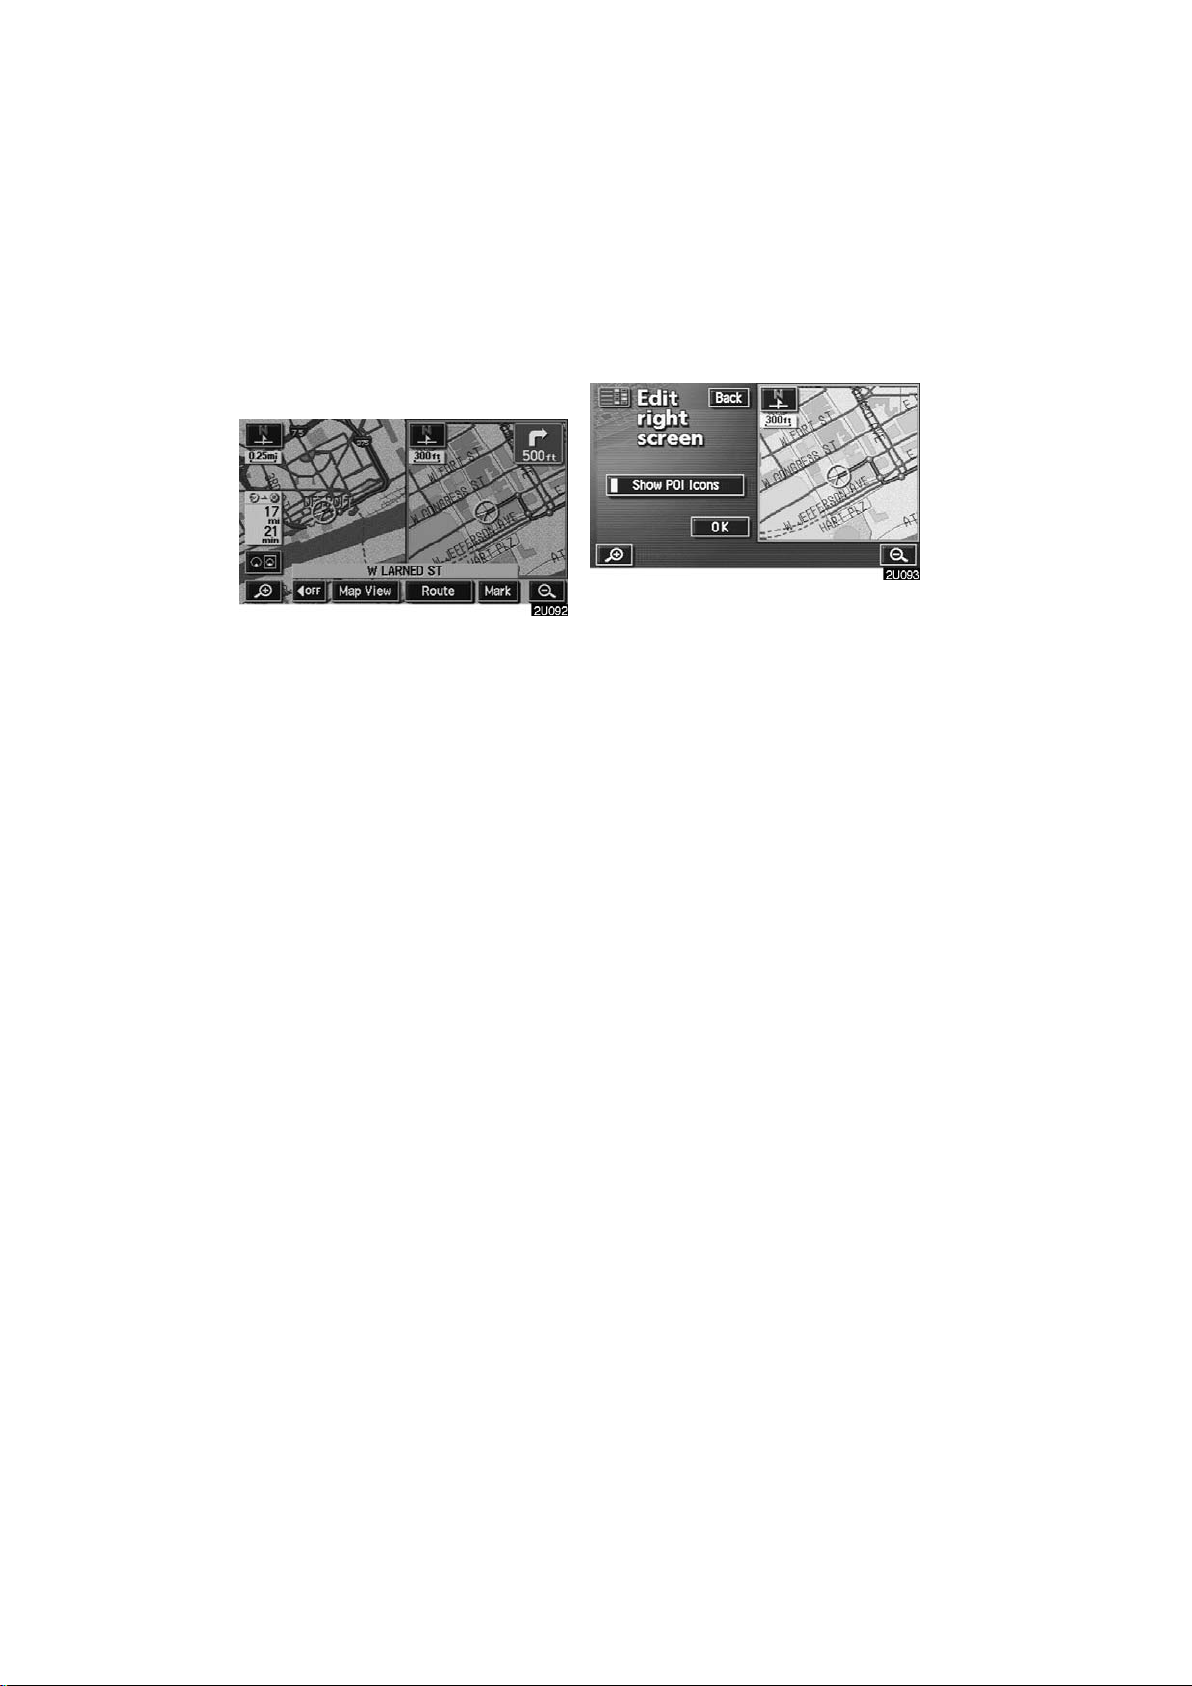
(b)Dual map
The screen shows the dual map. The map
on the left is the main map.
You can edit the right side map by touching
any specific point on the right side map.
This screen can perform the following
procedures.
D Changing the map scale
D Displaying the POI icon
D Changing the orientation of the map
Touch the
plete editing. The screen returns to the
dual map screen.
“OK” switch when you com-
74
Page 87

(c)Compass mode
(d)Turn list screen
Information about the destination and current position, as well as a compass, is displayed on the screen.
The destination mark is displayed in the direction of the destination. When driving,
refer to the longitude and latitude coordinates and the compass, to make sure that
your vehicle is headed in the direction of
the destination.
INFORMATION
When the vehicle goes out of the disc
area, the guidance screen changes
into compass mode.
The screen shows the turn list. You cannot
scroll through the list of roads.
75
Page 88

(e)Arrow screen
The screen shows the current road name
and the distance to the next corner.
(f) Freeway information
screen
This screen displays the distance to the
next junction and exit, or POIs in the vicinity of the freeway exit.
“Map”: To display the selected map of the
exit vicinity.
On the left side of the
to five POIs around the selected exit are
displayed.
: T o scroll for farther junctions or exits.
: To scroll for closer junctions or exits.
: To scroll for the closest three junc-
tions or exits.
“Map” switch, up
INFORMATION
When you drive on a freeway, the
screen is automatically divided into
two parts, with freeway information
screen on the right side.
76
Page 89

(g)Intersection guidance
screen/guidance screen on
freeway
D Intersection guidance screen
This screen automatically appears when
the vehicle approaches an intersection on
the road.
The distance to the intersection is shown
at the bottom of the screen.
“AOFF”: The intersection guidance
screen disappears and the map screen appears.
D Guidance screen on freeway
This screen automatically appears when
the vehicle approaches a junction or exit
on a freeway.
The distance to the junction or exit is
shown at the bottom of the screen.
“AOFF”: The guidance screen on freeway disappears and the map screen appears.
When touching the
“MAP/VOICE” button, the guid-
ing the
ance screen on freeway reappears.
switch or push-
When touching the
ing the
tersection guidance screen reappears.
“MAP/VOICE” button, the in-
switch or push-
INFORMATION
Intersection guidance can be turned
on or off. (See page 110.)
INFORMATION
Guidance screen on freeway can be
turned on or off. (See page 111.)
77
Page 90
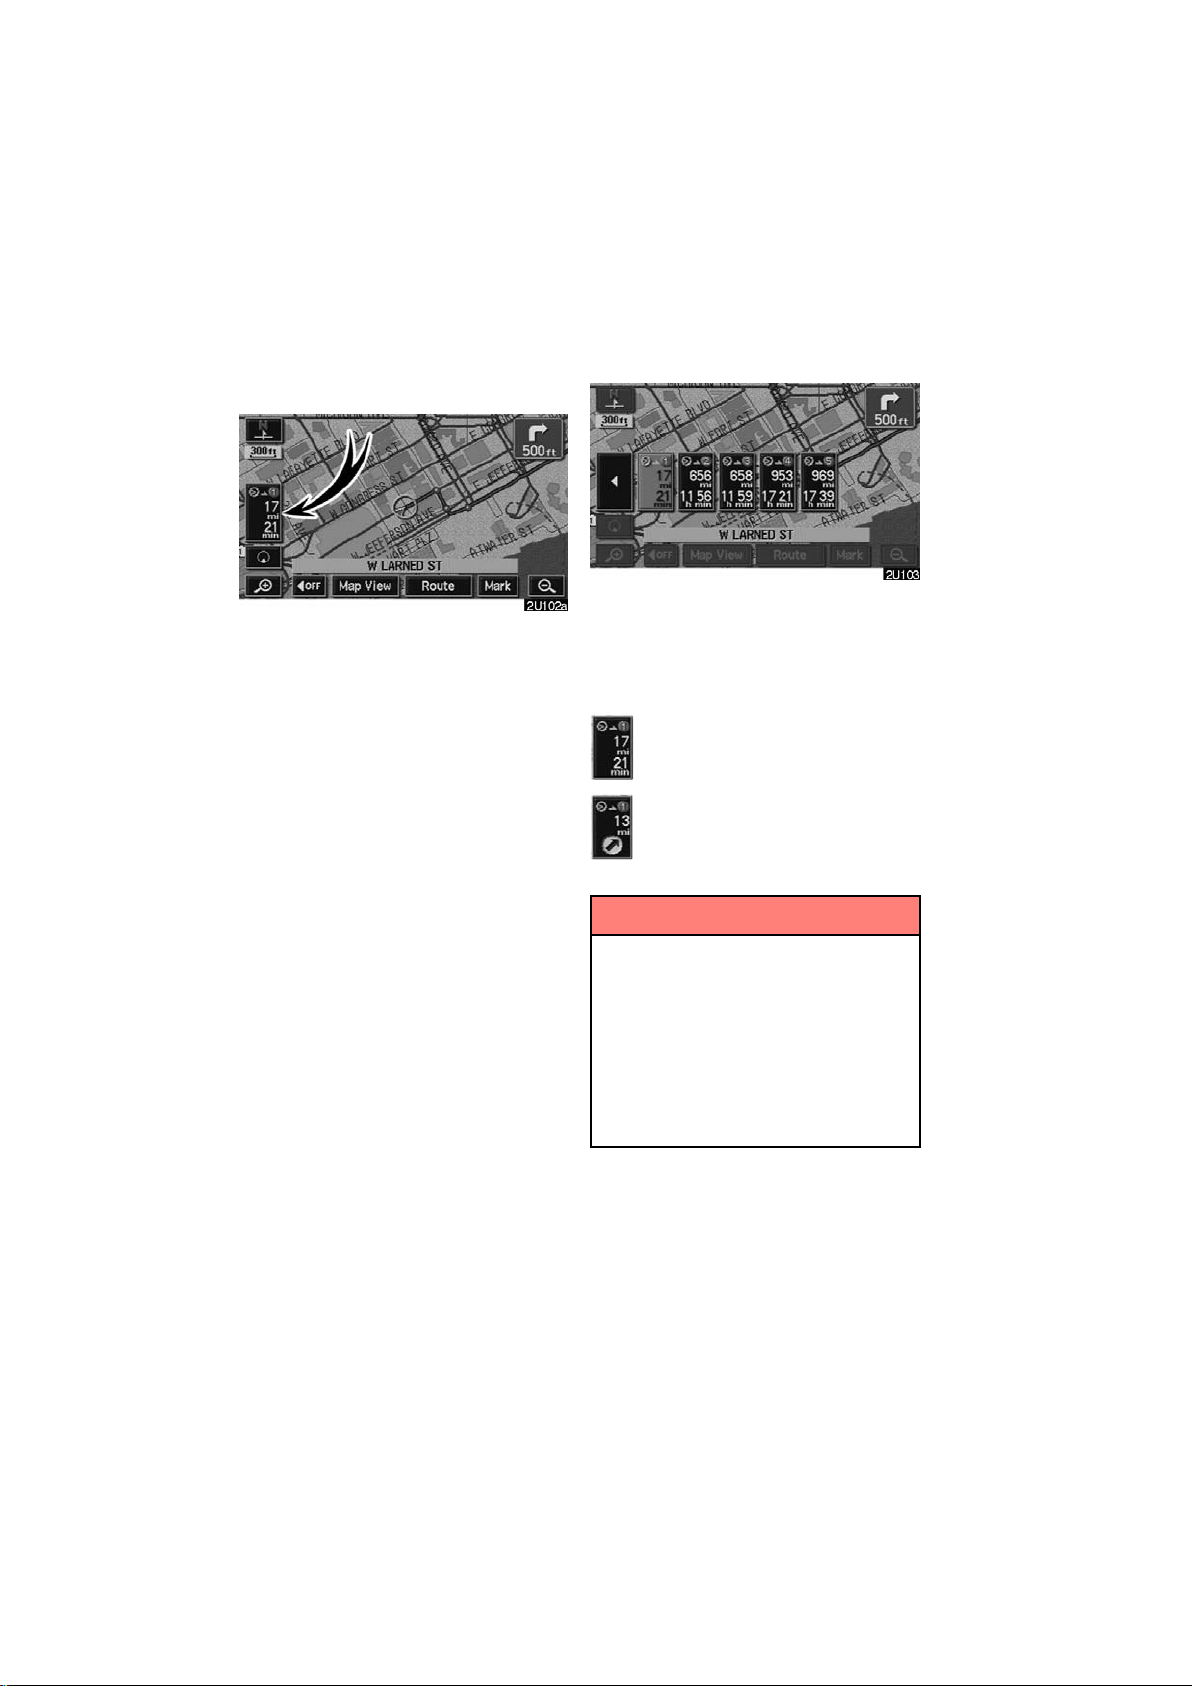
Distance and time to
destination
When the vehicle is on the guidance
route, the distance and the estimated
travel time to the destination are displayed. When the vehicle is not on the
guidance route, the distance to and the
direction of the destination are displayed.
When driving on the guidance route and
more than one destination is set, the distance and the estimated travel time from
current position to each destination are
displayed.
1. Touch this switch to display the following screen.
2. Touch the number switch of the destination you wish to display.
The distance and the estimated travel time
from the current position to the selected
destination are displayed.
Displayed while driving along
the guidance route.
Displayed while driving off the
guidance route. The destination direction is indicated by an
arrow.
INFORMATION
When the vehicle is on the guidance
route, the distance measured along
the route is displayed. Travel time is
calculated based on the set vehicle
speed information. (For details, see
page 104.) However, when the vehicle
is not on the guidance route, the distance is the linear distance between
the current position and the destination.
78
Page 91
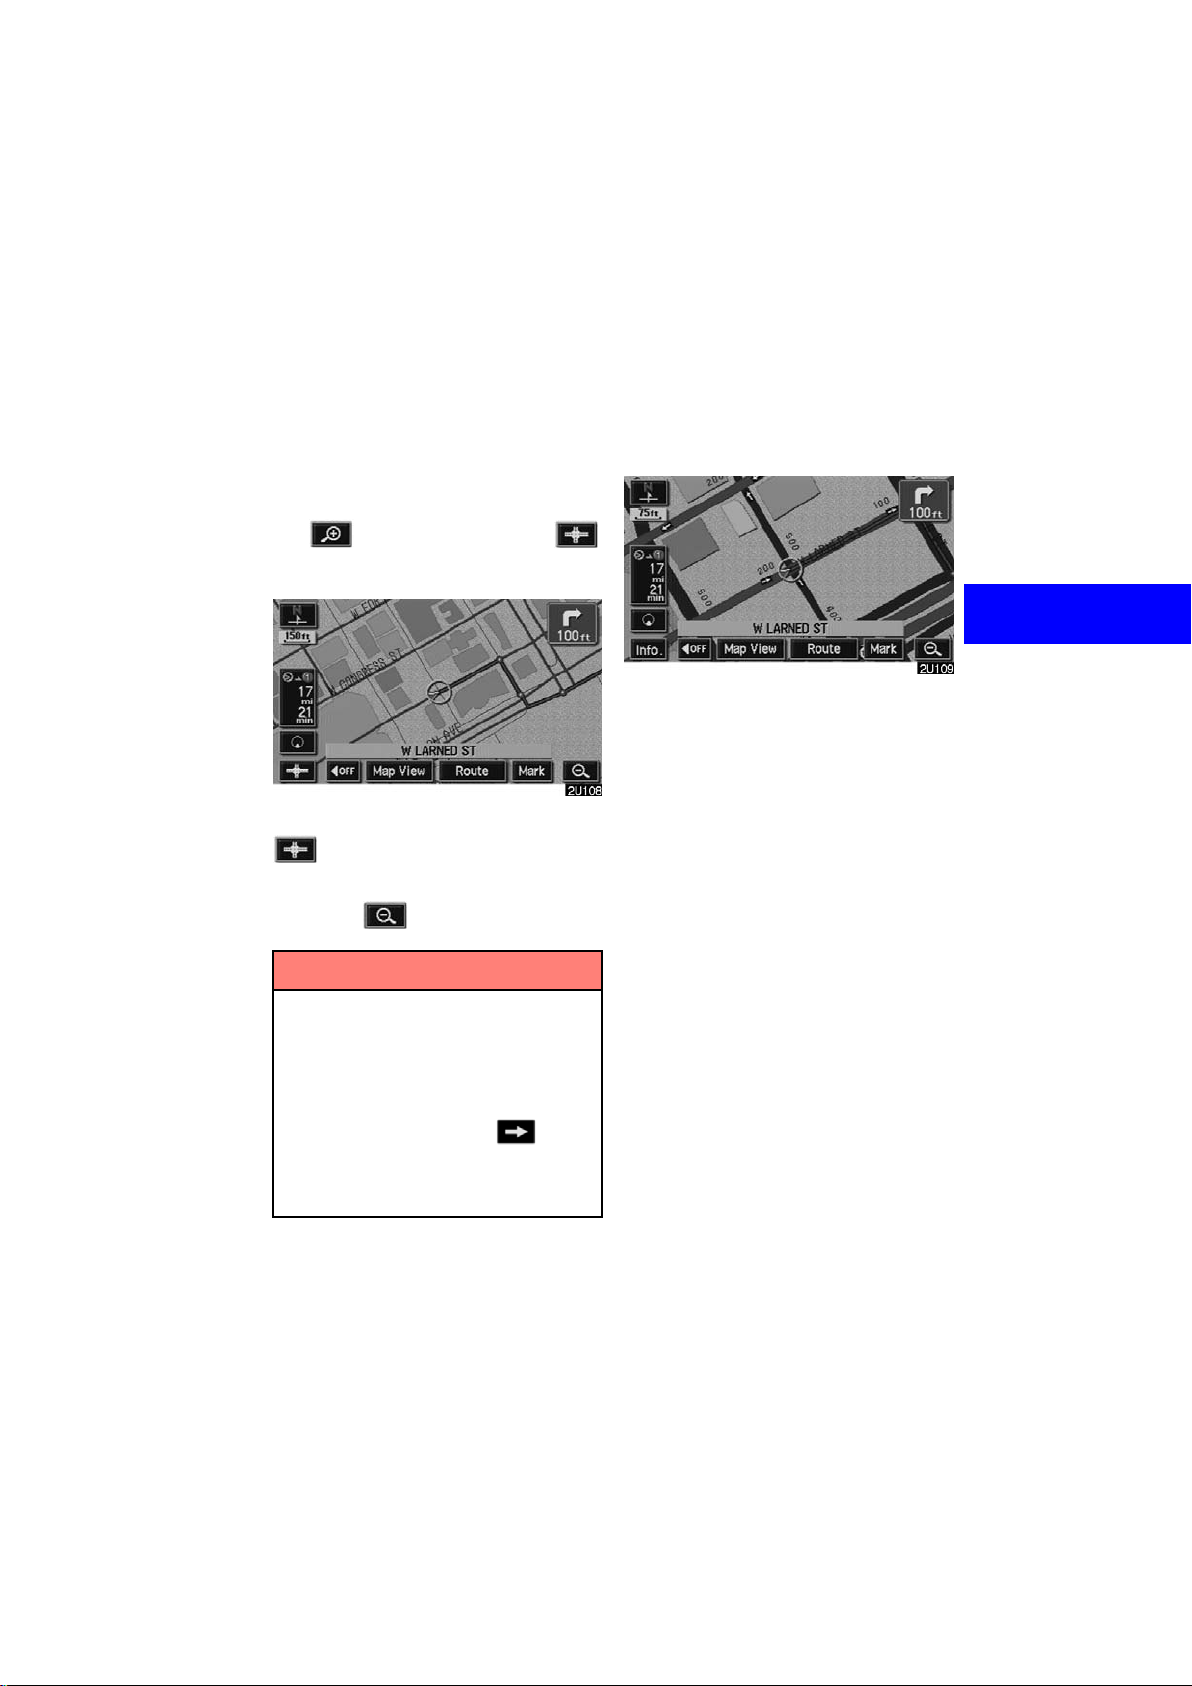
Foot print map
For the area which is covered by the foot
print map (Some areas in the following cities; Detroit, Chicago, N.Y., L.A), you can
switch to the foot print map on a scale of 75
feet (25 m).
D To switch to the foot print map
The
switch when the map is scaled down to 150
feet (50 m).
To display the foot print map, touch the
D To delete the foot print map display
Touch the
switch changes into the
switch.
switch.
D To display building information
Information is available only for buildings
for which information is recorded on the
map disc.
1. Touch the “Info.” switch while the
foot print map is displayed.
If the map is displayed in split screen, it
turned into a single map display.
INFORMATION
D If the map or the current position is
moved to the area which is not covered by the foot print map, the
screen scale automatically
changes to 150 feet (50 m).
D On the foot print map, a one way
street is displayed by .
D It is not possible to perform scroll-
ing on the foot print map (one−
touch scroll) while driving.
79
Page 92
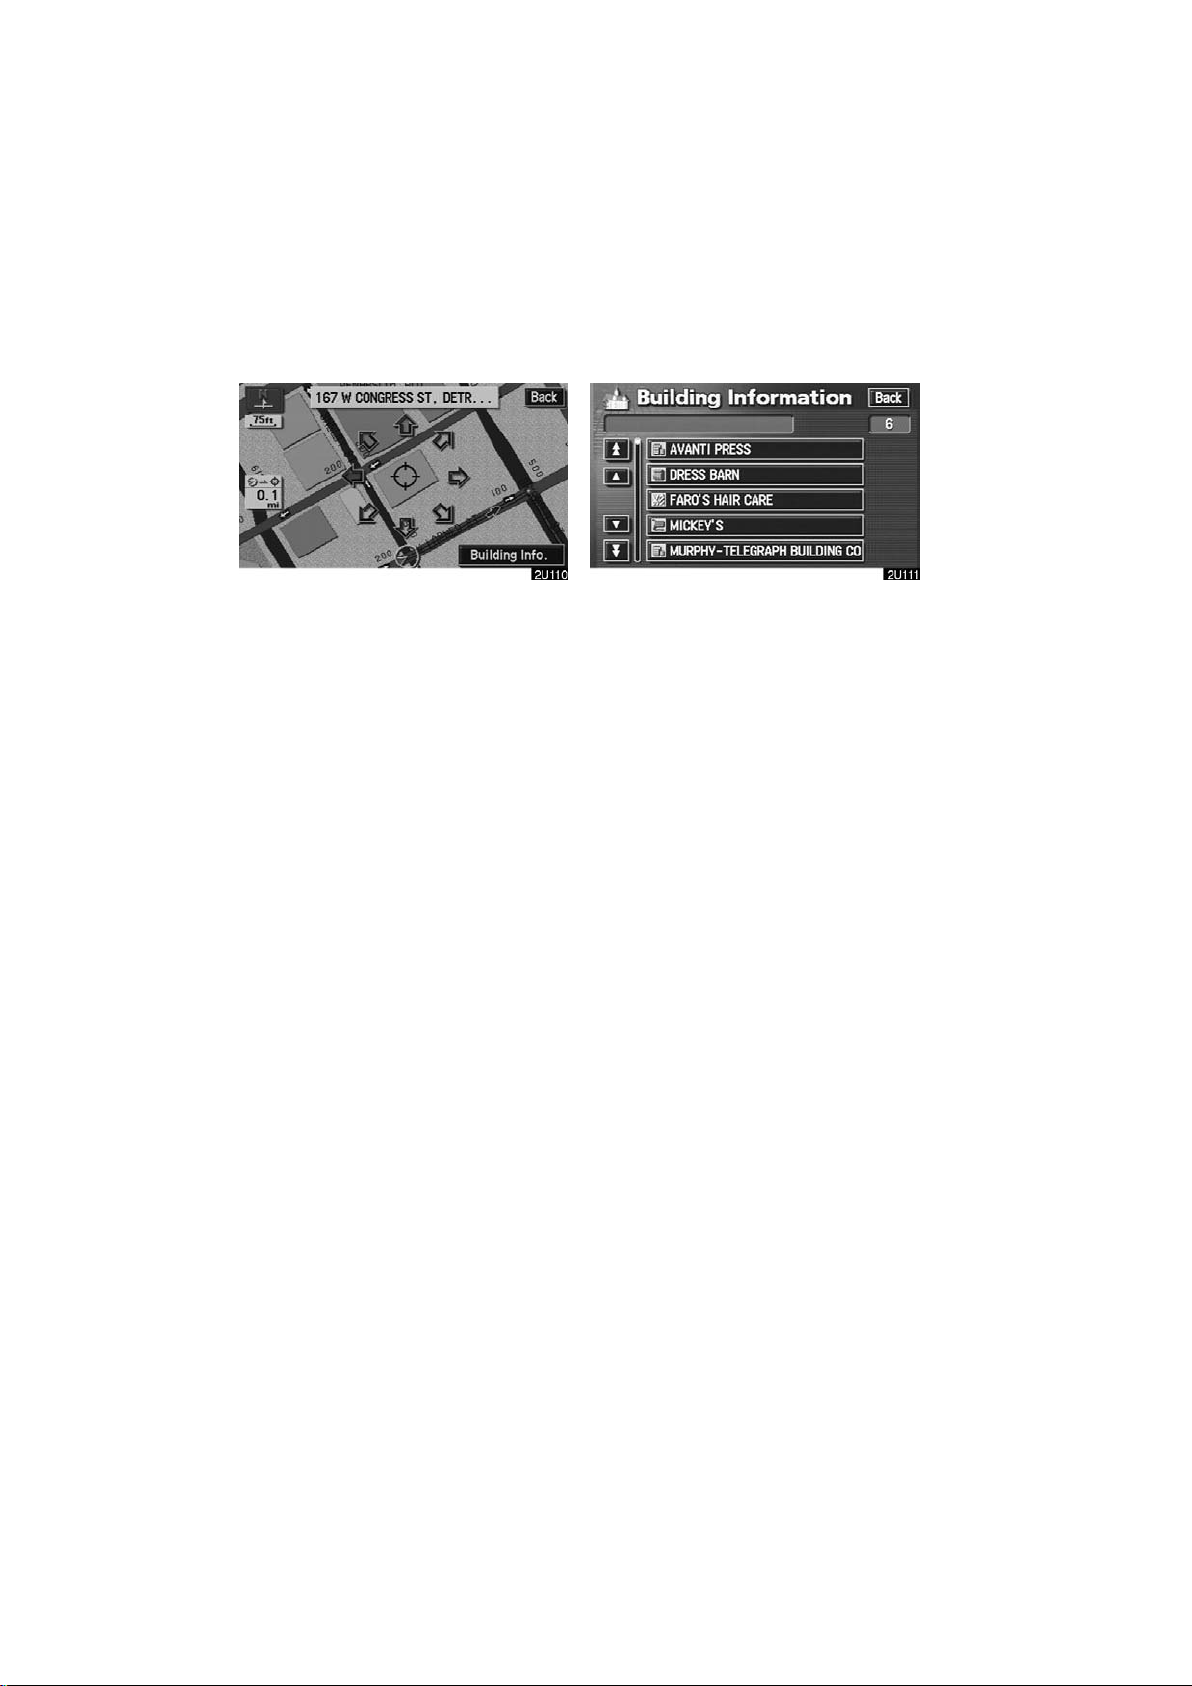
2. Using an eight−direction arrow,
move the cursor to the position of the
building you wish to display information.
3. Touch the
switch.
“Building Info.”
4. Details of POIs in some buildings
may be displayed. If you wish to see detailed POI information, touch the building name. You can see the detail of the
selected POIs.
80
Page 93

SECTION III
ADVANCED FUNCTIONS
Descriptions of functions for more effective use
D Quick reference for the “Menu” screen 82
D Suspending and resuming guidance 83
D Volume 84
D User selection 85
D My places 88
D Area to avoid 96
D Setup 100
D Current position calibration 101
D Distance unit 103
D Estimated travel time 104
D Auto reroute 105
D Adjusting time zone 106
D Auto voice guidance 107
D Voice guidance in all modes 108
D Notifying traffic restriction 109
D Intersection guidance 110
D Guidance screen on freeway 111
D Street name on scroll map 112
D Display of building shape 113
D Screen layout function ( Function) 114
D POI category change (Show POI Icons) 115
D Delete previous point 116
D Map color 117
D Screen animation 118
. . . . . . . . . . . . . . . . . . . . . . . . . . . . . . . . . . . . . . . . . . . . . . . .
. . . . . . . . . . . . . . . . . . . . . . . . . . . . . . . . . . . . . . . . . .
. . . . . . . . . . . . . . . . . . . . . . . . . . . . . . . . . . . . . . . . . . . . . .
. . . . . . . . . . . . . . . . . . . . . . . . . . . . . . . . . . . . . . . . . . .
. . . . . . . . . . . . . . . . . . . . . . . . . . . . . . . . . . . . . . . . . . . . . . . .
. . . . . . . . . . . . . . . . . . . . . . . . . . . . . .
. . . . . . . . . . . . . . . . . . . . . . . . . . . . . . . . . . . . . . . . . .
. . . . . . . . . . . . . . . . . . . . . . . . . . . . . . . . . . .
. . . . . . . . . . . . . . . . . . . . . . . . . . . . . . . . . . . . . . . . . . .
. . . . . . . . . . . . . . . . . . . . . . . . . . . . . . . . . . . .
. . . . . . . . . . . . . . . . . . . . . . . . . . . . . . . . . . . .
. . . . . . . . . . . . . . . . . . . . . . . . . . . . .
. . . . . . . . . . . . . . . . . . . . . . . . . . . . . . .
. . . . . . . . . . . . . . . . . . . . . . . . . . . . . . . . . . .
. . . . . . . . . . . . . . . . . . . . . . . . . . . .
. . . . . . . . . . . . . . . . . . . . . . . . . . . . . .
. . . . . . . . . . . . . . . . . . . . . . . . . . . . . . . .
. . . . . . . . . . . . . . . . . . . . . . . . . . . . . . . . . . .
. . . . . . . . . . . . . . . . . . . . . . . . . . . . . . . . . . . . . . . . . . . . .
. . . . . . . . . . . . . . . . . . . . . . . . . . . . . . . . . . . . . .
. . . . . . . . . . . . . . . . . . . . . . .
. . . . . . . . . . . . . . . . . . . . . . .
. . . . . . . . . . . . . . . . . . . . . . . .
. . . . . . . . . . . . . . . . . .
81
Page 94

The switches below perform the follow-
Quick reference for the “Menu” screen
ing operations.
1
“Map DVD” switch
Displays information regarding the disc
version or covered area. 12. . . . . . . . . . .
2
“Select User” switch
Enables recall of up to three memorized
user setting patterns. 85. . . . . . . . . . . . . .
3
“Setup” switch
Enables various settings for the navigation
system. 100. . . . . . . . . . . . . . . . . . . . . . . .
4
“My Places” switch
Enables changes to “Memory points” and
“Areas to avoid”. 88. . . . . . . . . . . . . . . . . .
5
“Suspend Guidance” and “Resume Guidance” switch
Suspends or resumes guidance.
83. . . . . . . . . . . . . . . . . . . . . . . . . . . . . . . . .
6
“Volume” switch
Sets the volume for voice guidance.
84. . . . . . . . . . . . . . . . . . . . . . . . . . . . . . . . .
82
Page 95
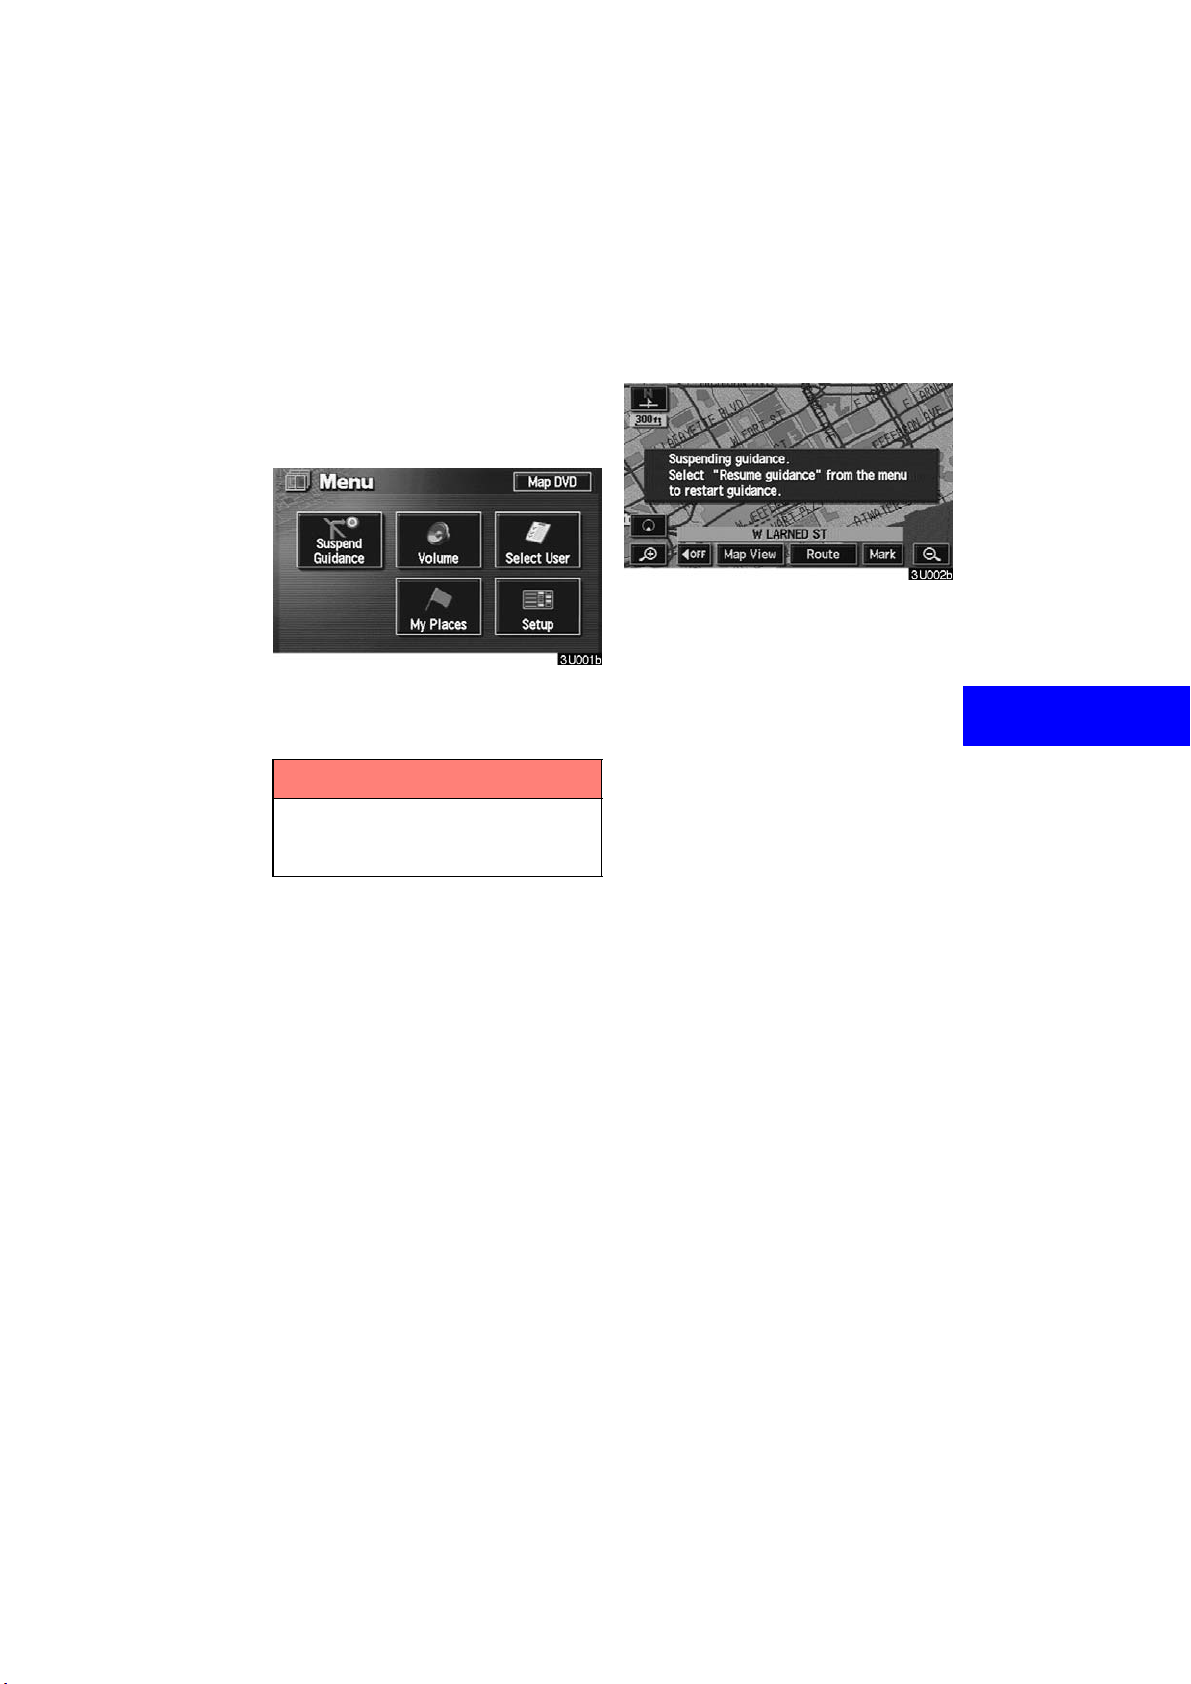
Suspending and resuming
guidance
D To suspend guidance
You can suspend route guidance.
Push the “MENU” button to display
the “Menu” screen and touch the
“Suspend Guidance” switch.
INFORMATION
When you do not have route guid-
ance, the “Suspend Guidance”
switch cannot be used.
The screen will return to the current
position map without route guidance.
83
Page 96

D To resume guidance
You can resume the suspended route
guidance.
Push the “MENU” button to display
the “Menu” screen and touch the “Re-
sume Guidance”
switch.
Volume
You can use voice guidance when approaching a destination.
You can adjust the volume of the voice or
turn off voice guidance.
Push the “MENU” button to display
the “Menu” screen, and touch the
“Volume” switch.
The screen will change to the current
position map with route guidance.
84
Page 97

To adjust the volume, select the desired
level by touching the appropriate number.
If you do not need voice guidance, touch
the
“Off” switch.
The selected item is highlighted in green.
INFORMATION
During route guidance, the voice
guidance continues even if the navi-
gation screen is changed to other
screens.
“Adaptive Volume Control”: If you turn
the “Adaptive Volume Control” on, the volume is turned up automatically when the
vehicle speed exceeds 50 mph (80 km/h).
To turn the “Adaptive Volume Control”
system on, touch the switch. The indicator
will be highlighted.
User selection
The system can memorize the following
settings for up to three users.
D Map direction
D Map scale
D Guidance mode
D Setup
D Volume
D Language
Push the “MENU” button to display
the “Menu” screen. Then touch the
“Select User” switch.
85
Page 98

D T o register
Touch the “Memorize” switch of
your desired “User number”.
The confirmation screen will appear. To
register, touch the “Yes” switch. To re-
turn to the previous screen, touch the
“No” or “Back” switch.
When you touch the switch already registered, this screen appears. To replace, touch the
cel the replacement, touch the “No” or
“Yes” switch. To can-
“Back” switch.
86
Page 99

D To change user
Push the “MENU” button to display
the “Menu” screen. Then touch the
“Select User” switch.
Touch the “User number” switch
you wish to change.
The above message appears, then the
map screen will be displayed.
87
Page 100

D To delete user
Touch the “Delete” switch of “User
number” you wish to delete.
The confirmation screen appears. To
delete, touch the “Yes” switch. To re-
turn to the previous screen, touch the
“No” or “Back” switch.
My places
You can register and keep your own
memory points (like restaurants, sports
facilities, etc.) and use the memory
points to input a destination.
88
 Loading...