

Lexus LS400 2006, LS430 2006, LS460 2006, LS600H 2006 Owner Manual
Customizing Your Lexus
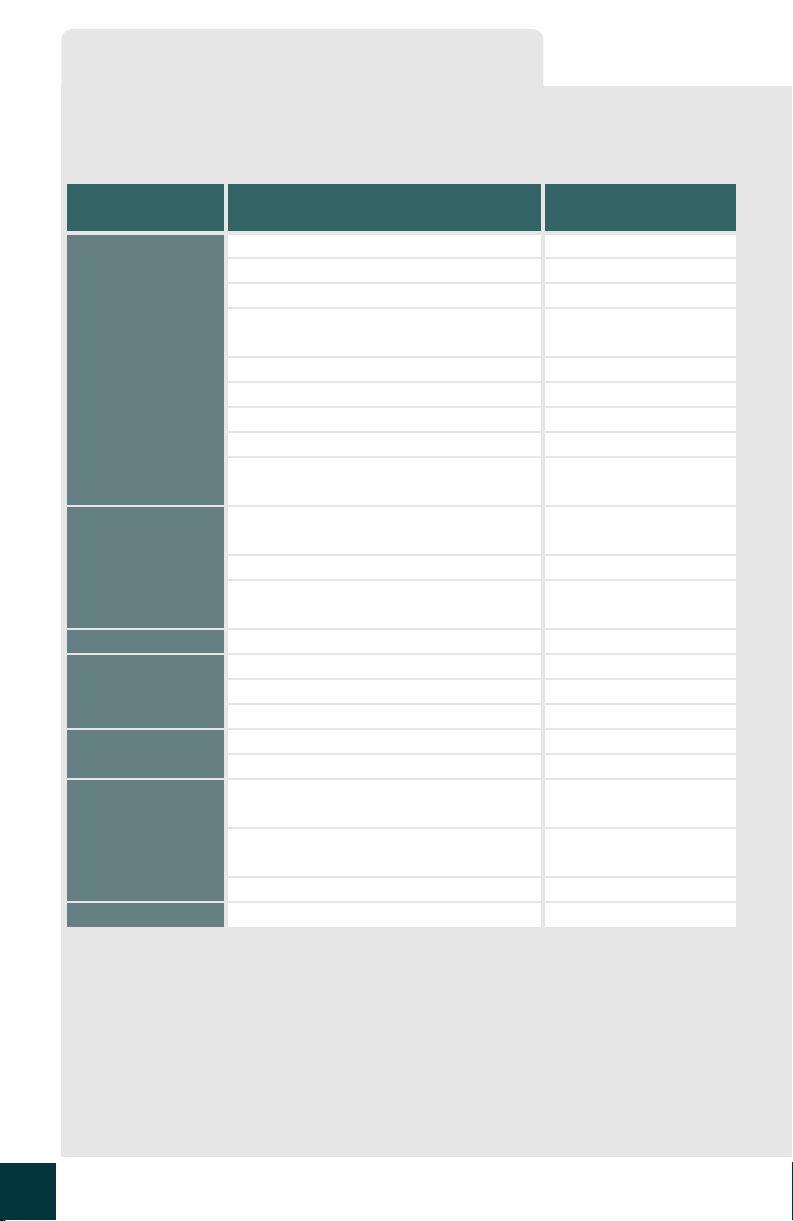
Your vehicle includes a variety of electronic features that can be personalized to your preferences. Programming these preferences requires specialized equipment and may be performed by an authorized Lexus dealership.
Setting
Item Description
Wireless remote
control
Remote control operation Enable/Disable
Lights flash when operation is complete Enable/Disable
(default setting at left)
Open door warning function Enable/Disable
Automatic door locking function if a
30 sec/60 sec
door is not opened after being unlocked
Trunk opening function Enable/Disable
Unlocking the trunk Ask your Lexus dealer
Unlocking the doors Ask your Lexus dealer
Panic button alarm function Enable/Disable
Link with power window/
Enable/Disable
moon roof operation
Door lock Unlocking the vehicle using a
Ask your Lexus dealer
mechanical key
Auto door lock Ask your Lexus dealer
Link with power window/
Enable/Disable
moon roof operation
Alarm Horn Enable/Disable
Illuminated entry
system
Illumination period 15 sec/7 sec/30 sec
Synchronize with door unlock Enable/Disable
Footlights Enable/Disable
Headlights
("AUTO" mode)
Windshield wiper
operation
Illumination period Standard/Longer
Sensor sensitivity Desired levers
Switch to intermittent operation when
Enable/Disable
the vehicle is stopped.
After using the washer, wipers make
another single wipe following a delay
Enable/ Disable/
Adjust interval
Rain-sensing wiper mode Rain-sensing/Interval
Steering Column Automatic tilt-away function Enable/Disable
67

Your Lexus dealer
Your Lexus dealer will provide quality maintenance and any other assistance
you may require.
If there is not a Lexus dealer near you, please call the following number:
nU.S . OWNE RS
lIn the U.S. mainland or Canada:
Lexus Roadside Assistance
1-800-25-LEXUS or 1-800-255-3987 (Toll-Free)
lIn Hawaii:
Servco Automotive Roadside Assistance/Customer Services
1-800-25-LEXUS or 1-800-255-3987 (Toll-Free)
nCANADIAN OWNERS
lIn Canada or the U.S. mainland:
Lexus Roadside Assistance/Customer Service
1-800-26-LEXUS or 1-800-265-3987 (Toll-Free)
Entering and Exiting
Before Driving When Driving
Night Driving
Rain and
Driving Comfort
Opening and Closing
What to do if ...
Please access our websites for further information.
lThe U.S. mainland: www.lexus.com
lHawaii: www.servcolexus.com
lCanada : www.lexus.ca
©2 005 TOYOTA MOTO R CORP ORATI ON
All rights reserved. This material may not be reproduced or copied, in whole or in part, without the written permission of Toyota Motor Corporation.
Yo u r L e x u s
68
Customizing
What to do if ...
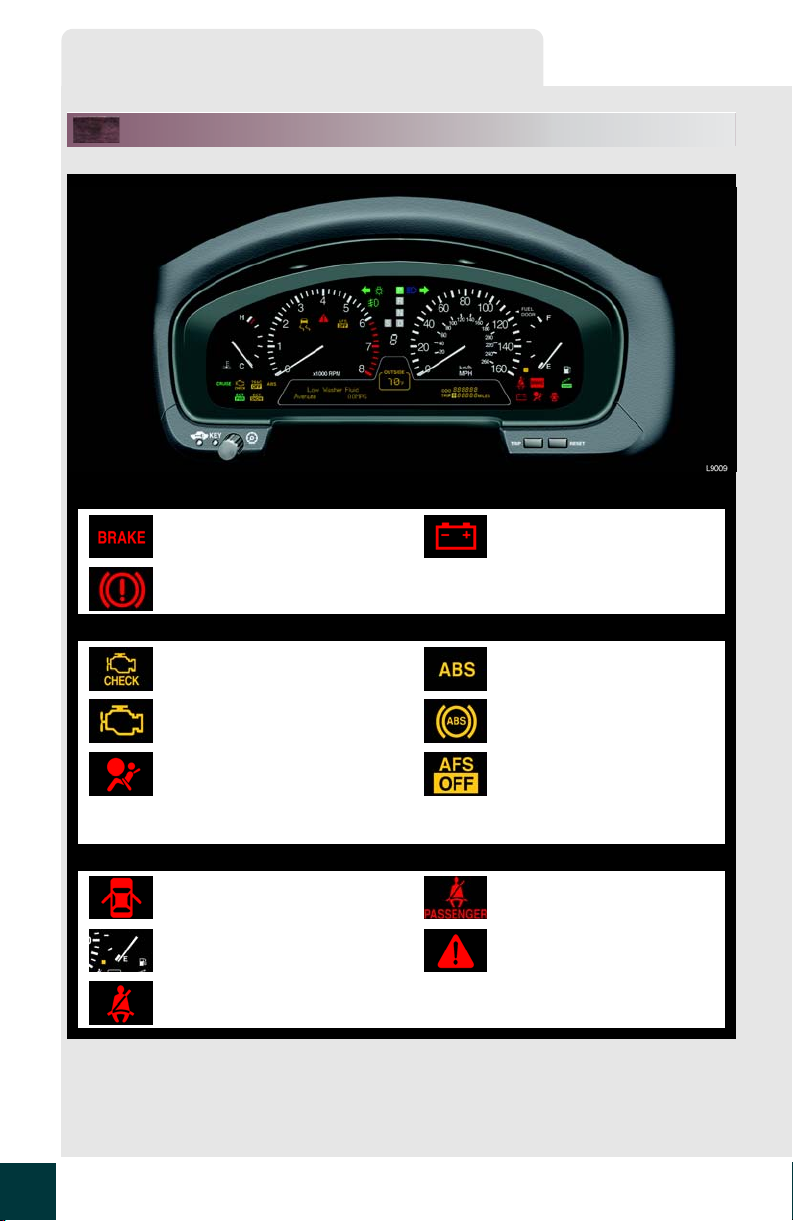
If the following warning lights comes on . . .
Stop the vehicle immediately
Brake system warning light
(U.S.A.)
Brake system warning light
(Canada)
Have the vehicle checked at Lexus dealer immediately
Malfunction indicator lamp
(U.S.A.)
Malfunction indicator lamp
(Canada)
SRS warning light
Have the malfunction repaived immediately
Open door warning light
Discharge warning light
ABS & brake assist warning
light (U.S.A.)
ABS & brake assist warning
light (Canada)
Automatic hedlight leveling
system/Adaptive front
lighting sytem warning light
(when flashing)
Front passenger’s seat belt
reminder light
59
Low fuel level warning light Master warning light
Driver’s seat belt reminder
light
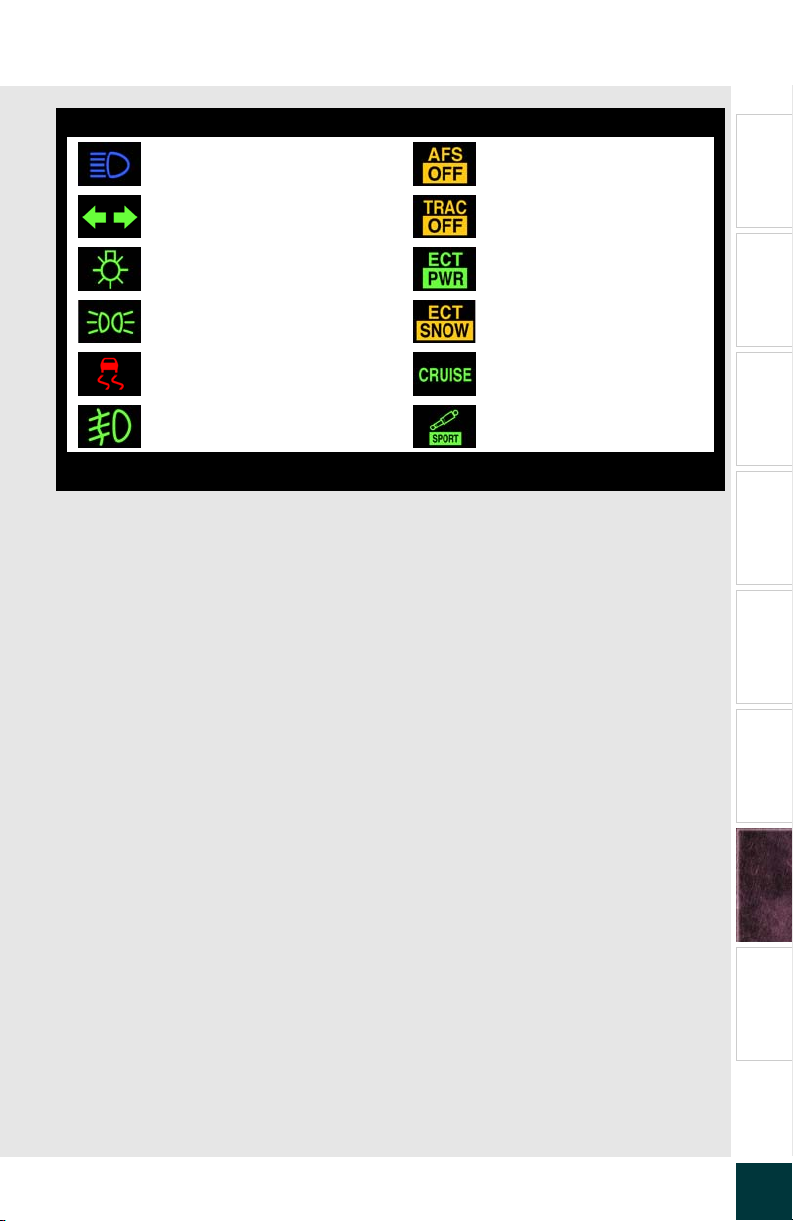
See the owner’s manual
Headlight high beam
indicator light
Turn signal indicator light TRAC off indicator light
Tail light indicator light
Tail light indicator light
Slip indicator light Cruise control indicator light
Front fog light indicator light Damping mode indicator light
(U.S.A.)
(Canada)
Entering and Exiting
AFS off indicator light
Before Driving When Driving
ETC PWR indicator light
ETC SNOW indicator light
For further information , refer to the owner’s manual.
Night Driving
Rain and
Driving Comfort
Opening and Closing
What to do if ...
Customizing
Yo u r L e x u s
60
What to do if ...
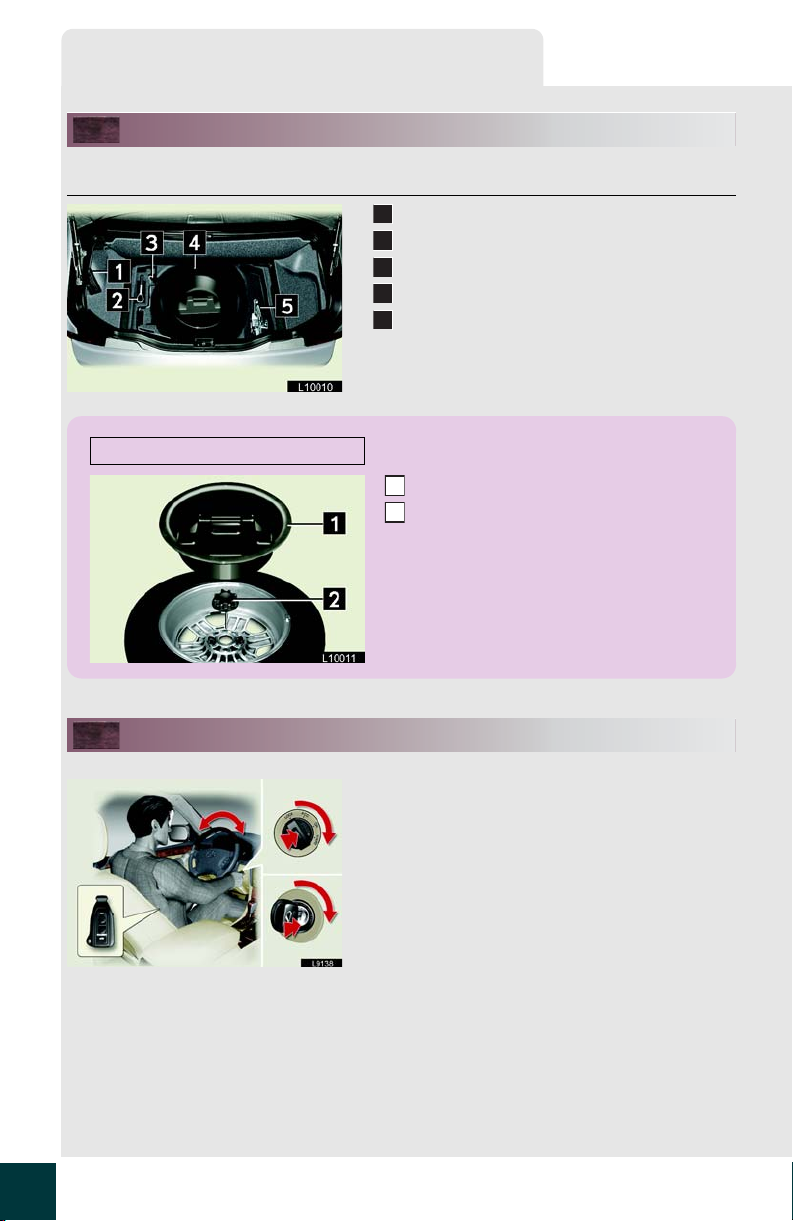
Location of Emergency Equipment
n Jack, tools, and spare tire
Removing the spare tire
Tool box
1
Towing eyelet
2
Jack handle
3
Spare tire
4
Jack
5
Remove the spare tire cover.
1
Loosen the bolt and remove the spare tire.
2
If the ignition switch does not turn easily. . .
Turn the ignition switch while lightly moving the
steering wheel from left to right.
61
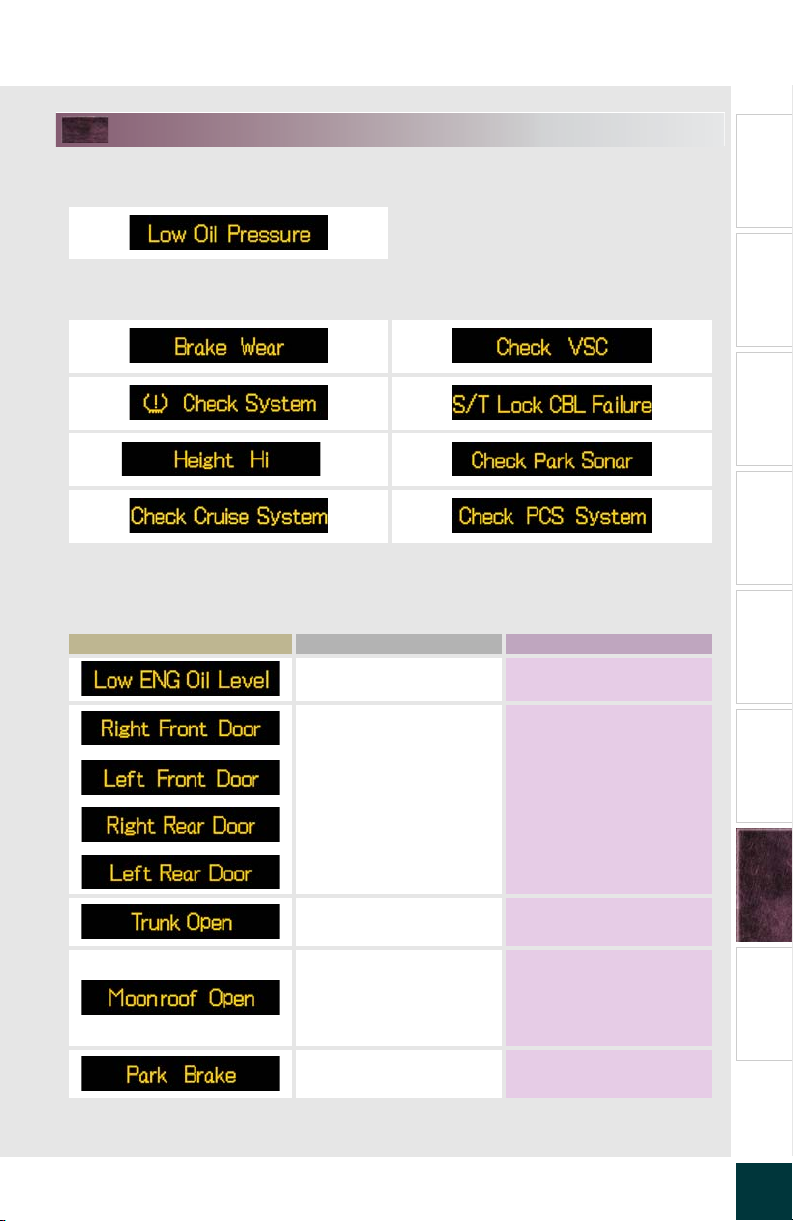
If a warning message appears. . .
Stop the vehicle immediately
Have the vehicle checked at your Lexus dealer as soon as possible
*
*: When the master warning light comes on and buzzer sounds.
Correct immediately
Message Cause Solution
Low level of engine oil. Fill the engine oil
Door is not fully closed.
Check that all the doors
are closed
Entering and Exiting
Before Driving When Driving
Night Driving
Rain and
Driving Comfort
Opening and Closing
Trunk-lid is not fully
closed.
If the driver’s door is
opened with the ignition
switch turned off and the
moon roof is left open.
Parking brake is not
released.
Check that the trunk-lid is
closed
Close the moon roof
when you leave your vehicle.
Release the parking
brake.
What to do if ...
Yo u r L e x u s
62
Customizing
What to do if ...
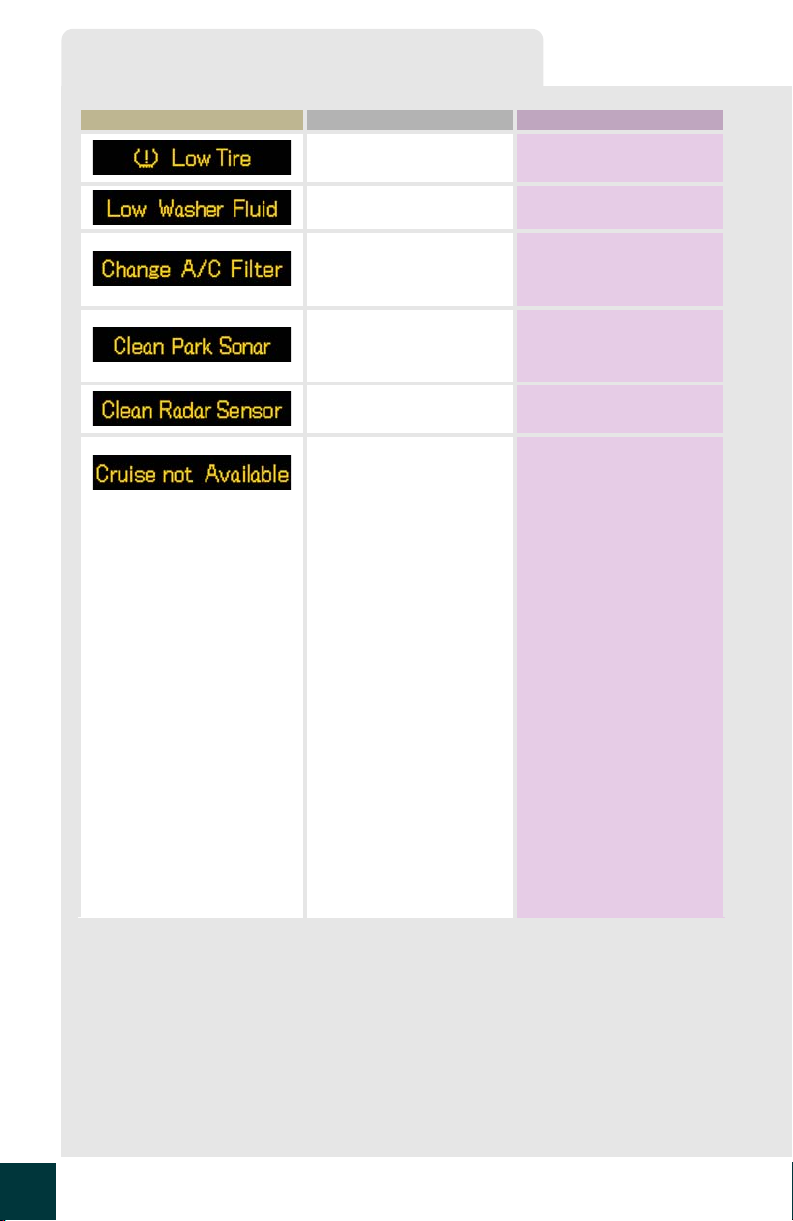
Message Cause Solution
Low level of tire inflation
pressure.
Adjust the tire inflation to
the specified pressure.
Low level of washer fluid. Fill the washer fluid tank.
Air conditioning filter is
clogged enough to
require replacement.
Foreign matter (ice, snow,
mud, etc.,) has adhered to
the sonar.
Foreign matter has
adhered to the sensor.
• Measurement is difficult
in adverse weather conditions.
•Driving pattern selector
is in SNOW mode
Dynamic radar cruise
control -
• The wipers are at HI
speed with the AUTO
position selected.
Dynamic laser cruise control -
• Wipers are at HI or
LOW speed with the
AUTO position
selected.
• Direct sunlight from the
front.
Change the air conditioning filter.
Remove the foreign matter or deice the sonar.
Clean the sensor and try
setting again.
Change the driving pattern selector to Normal or
Powe r mode.
Stop or switch wipers to
Low or Intermittent position.
Stop or switch wipers to
Intermittent position
63
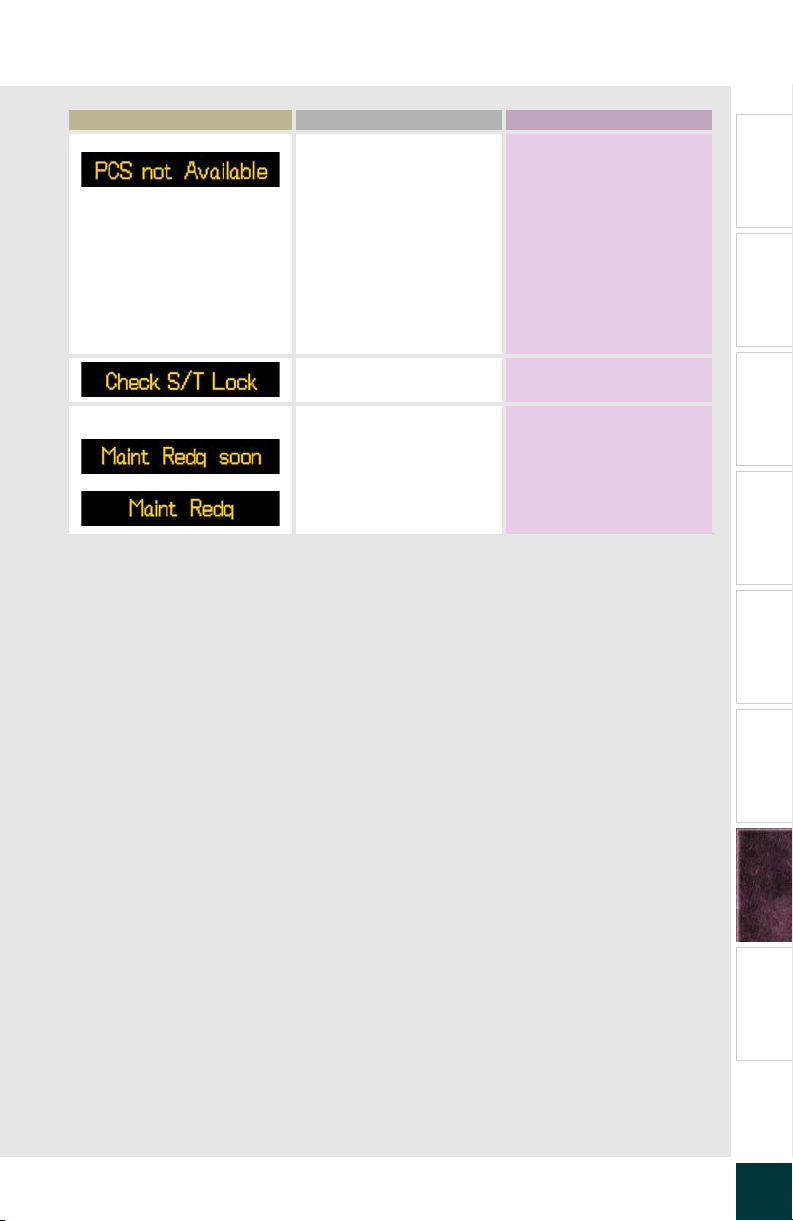
Message Cause Solution
(U.S.A. only)
• The millimeter radar
sensor or the grill cover
Clean the sensor cover
with a soft cloth.
is dirty.
• System turned off for
overheat protection
Wait for a while for the
system to reactivate.
because pre-collision
seat belts have activated
repeatedly within a short
time.
Steering lock engaged. (→P. 6 1 )
The engine oil should be
replaced soon.
The engine oil needs to be
replaced.
Replace the engine oil as
soon as possible.
For further information, refer to the owner’s manual.
Entering and Exiting
Before Driving When Driving
Night Driving
Rain and
Driving Comfort
Opening and Closing
What to do if ...
Yo u r L e x u s
64
Customizing
What to do if ...
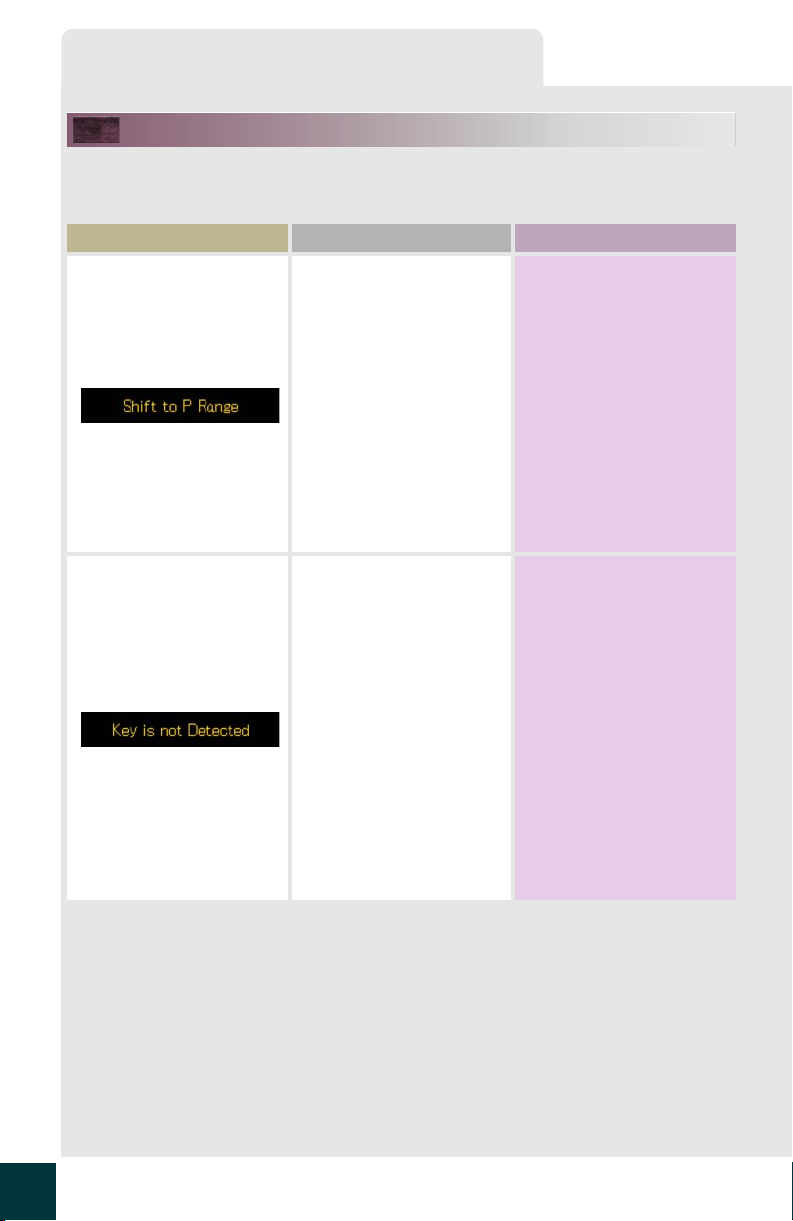
Smart access system filure warnings
The vehicle will issue a message certain conditions, such as forgetting master key in the vehicle or carrying it away from the vehicle with the engine running.
Probl em Cause Solution
• Opening the driver’s
door with the ignition
switch on or with the
selector lever in a position other than “P”
• Closing the driver’s door
while carrying the master key outside of the
vehicle with the ignition
switch on or the selector
lever in a position other
than “P”
• Pressing the door lock
button while carrying the
master key outside of the
vehicle with the ignistion
switch on.
• Pressing the door lock
button with the master
key still in the vehicle and
the ignition switch turned
off.
• Closing a passenger's
door with the ignition
switch on and the master
key outside of the vehicle
The shift lever is in the “P”
position
l The ignition switch is
turned off
l You are carrying the
master key with you
65

Probl em Cause Solution
An attempt is made to use
a key that does not match
the vehicle
Always carry the master
key when starting the
engine
Entering and Exiting
Master key battery is low
Replace the master key
battery
For further information, refer to the owner’s manual.
Before Driving When Driving
Night Driving
Rain and
Driving Comfort
Opening and Closing
What to do if ...
Yo u r L e x u s
66
Customizing
Topic 6
Opening and Closing
Doors
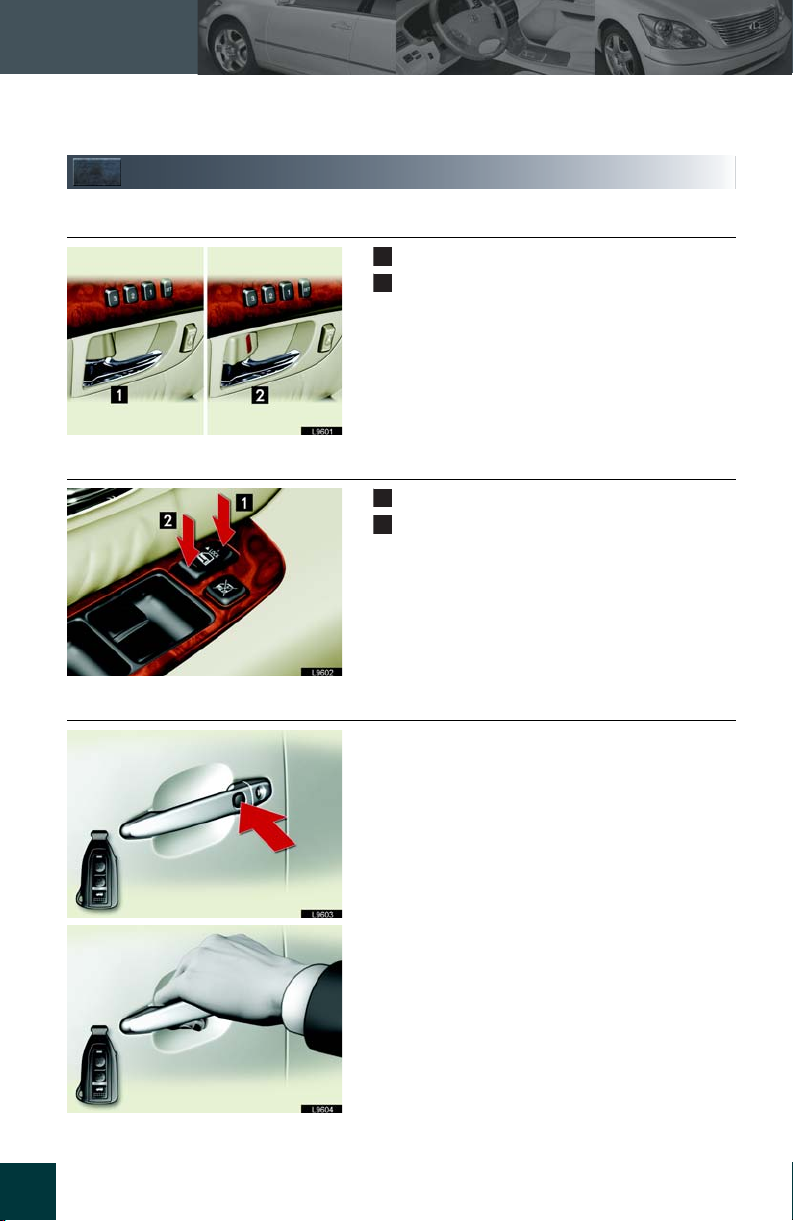
n Using the lock button
n Using the power door lock switch
1
2
1
2
Lock
Unlock
Lock
Unlock
n Using the smart access function (if eqipped)
53
Lock
Unlock
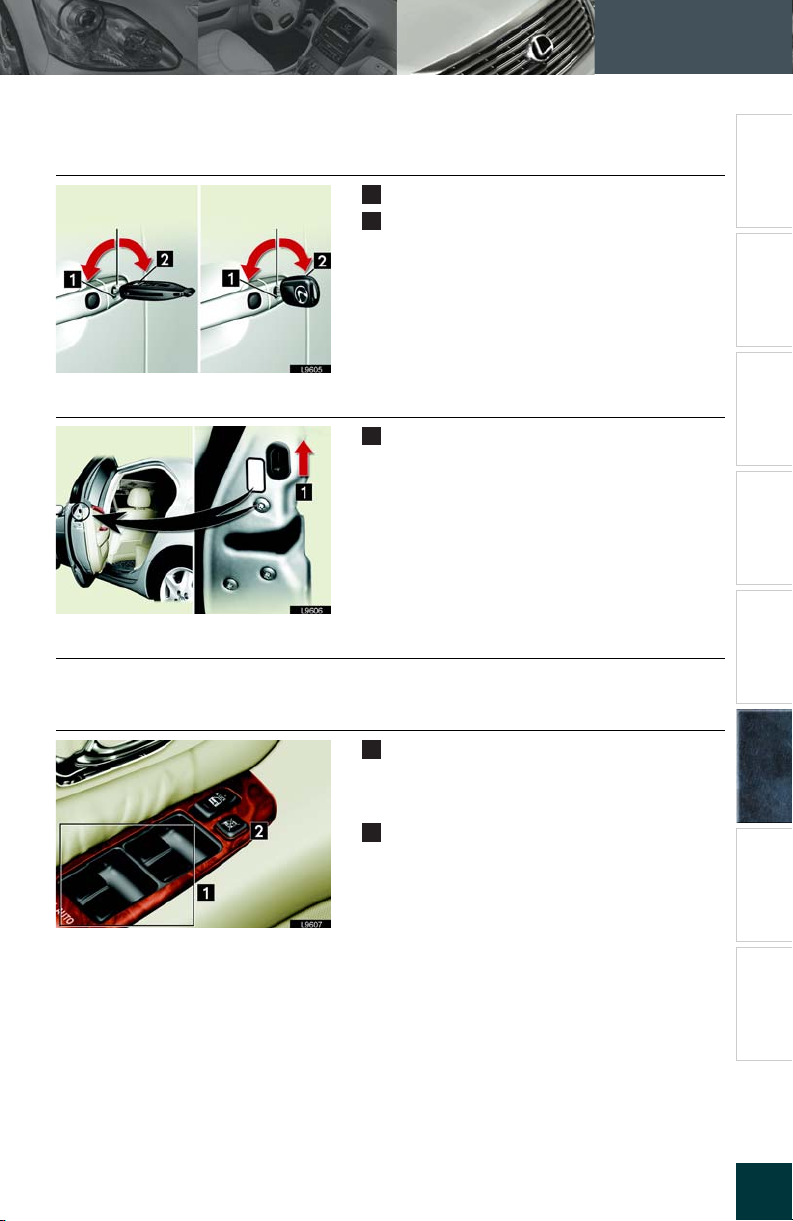
n Using the mechanical key
Ty pe A Ty pe B
n Child door protectors
Use this function whenever small children are in the vehicle.
Opening and Closing
Lock
1
Unlock
2
Lock
1
Turning the knob to the “LOCK” position
prevents the rear door from being opened
from the inside.
Use this function whenever small children
are in the vehicle.
Topic 6
Entering and Exiting
Before Driving When Driving
Night Driving
Driving Comfort
Rain and
n Door closer (if equipped)
If any door is partially latched, it will close automatically.
n Po wer Wi nd ows
Pow er window switches
1
To lower the window, push the switch
down.To raise the window, pull the switch up.
Window lock switch
2
When the window lock switch is pressed in,
only the driver's window can be raised or
lowered.
Fully lifting pulling or pressing the power window switch make the window open fully or lower fully automatically.
Opening and Closing
What to do if ...
Yo u r L e x u s
54
Customizing
Topic 6
Opening and Closing
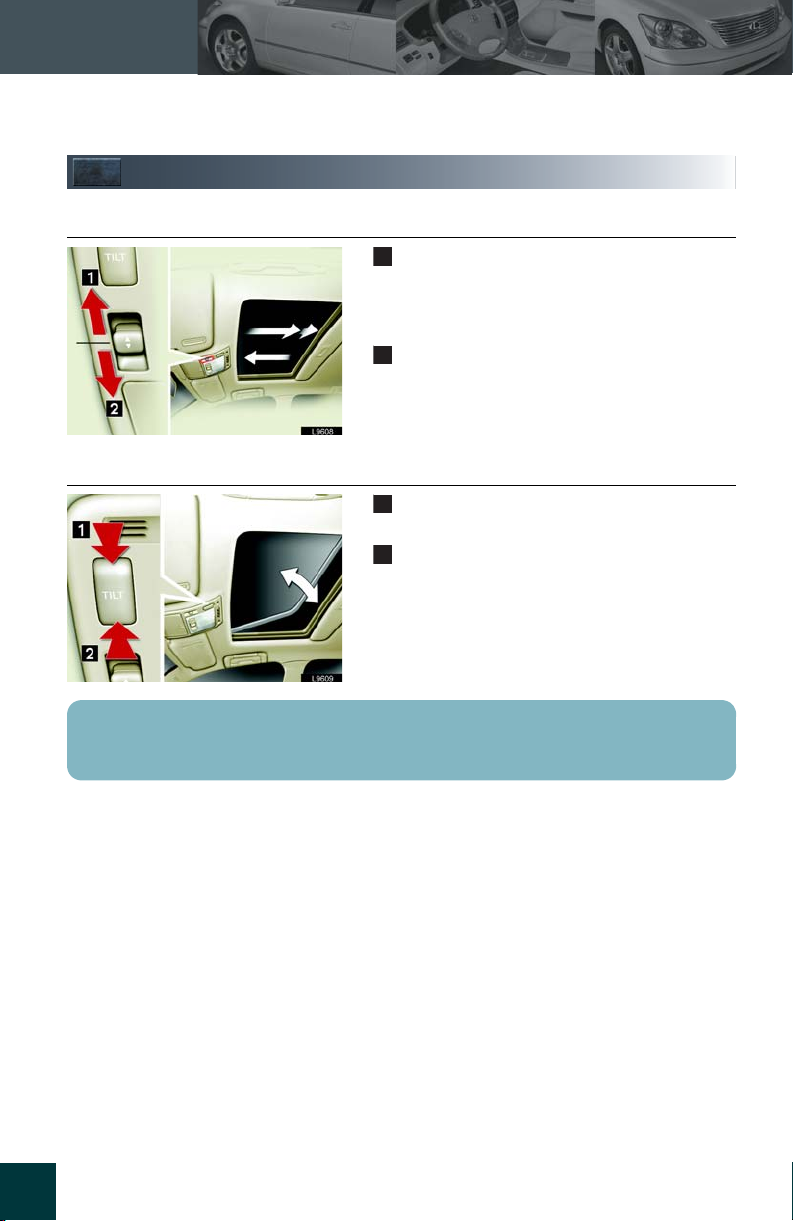
Moon Roof
n Opening and closing
n Ti lt
Pushing the “OPEN” button for about 1 sec-
1
ond causes the moon roof to open and stop
about 3 cm(1 in.) from the fully opened position. Push again to open completely.
Push and hold the “CLOSE” button for about
2
1 second to close completely.
To tilt up the moon roof, push and hold the
1
“UP” button for about 1 second.
To lower the moon roof, push and hold the
2
“CLOSE” button for about 1 second.
To open the moonroof partially, push the switch in the opposite direction when the desired position is reached.
55

Fuel Tank Cap
Opening and Closing
Pull the fuel filler door opener.
Remove the cap by slowly turning it counterclockwise.
The removed cap can be stored on the fuel filler
door.
Use premium (91 octane or higher) unleaded
gasoline.
Topic 6
Entering and Exiting
Before Driving When Driving
Night Driving
Driving Comfort
Rain and
The display indicates that the fuel filler door is on the left side of the vehicle.
Opening and Closing
What to do if ...
Yo u r L e x u s
56
Customizing
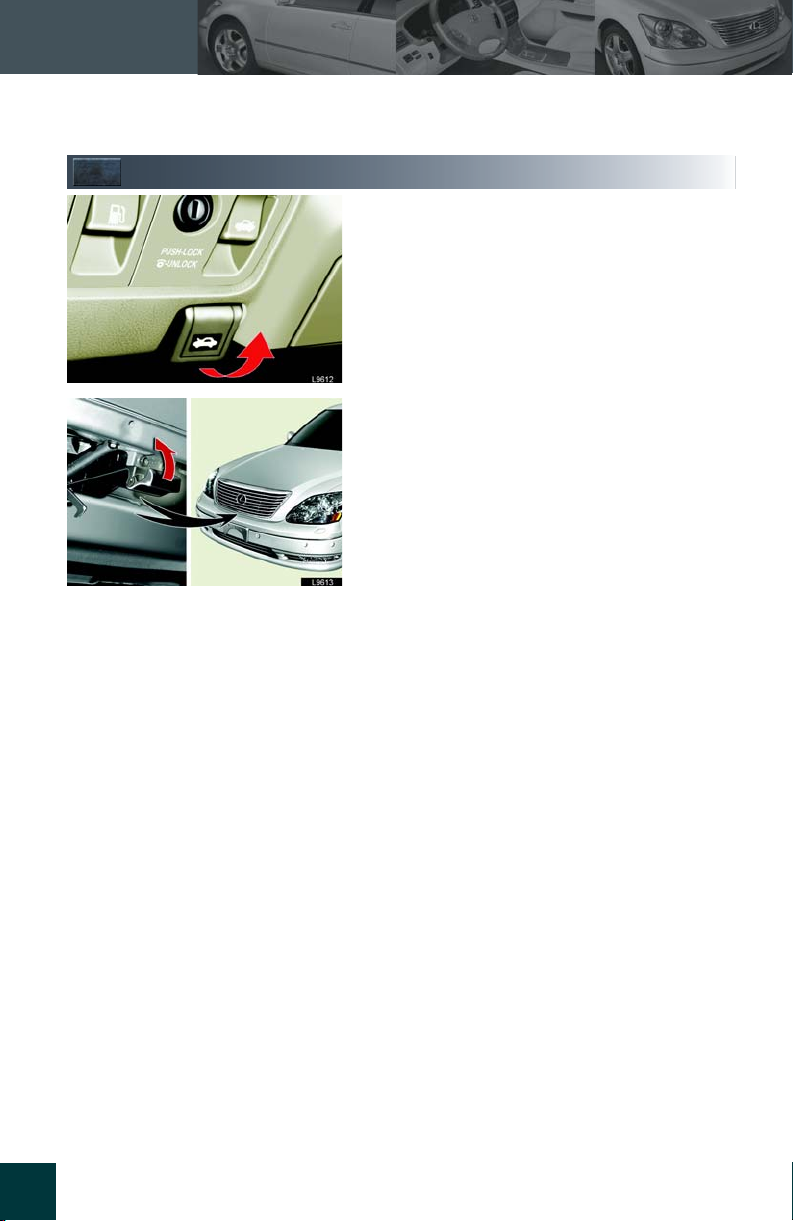
Topic 6
Opening and Closing
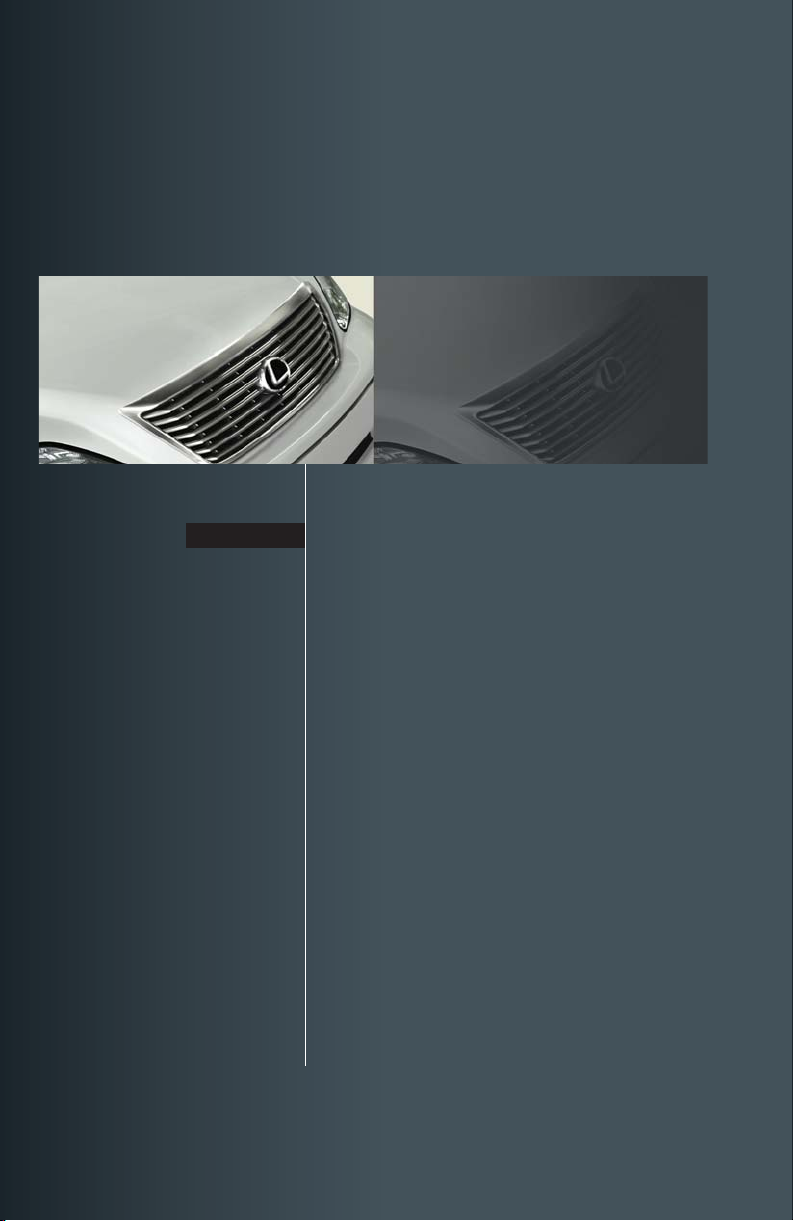
Hood
Pull the hood lock release lever under the instrument panel.
Inserting your fingers under the hood, push up the
auxiliary catch lever and lift.
57
Tr u nk
Topic 6
Opening and Closing
Entering and Exiting
n Trunk lid opener switch
Off (inactivate)
On (activate)
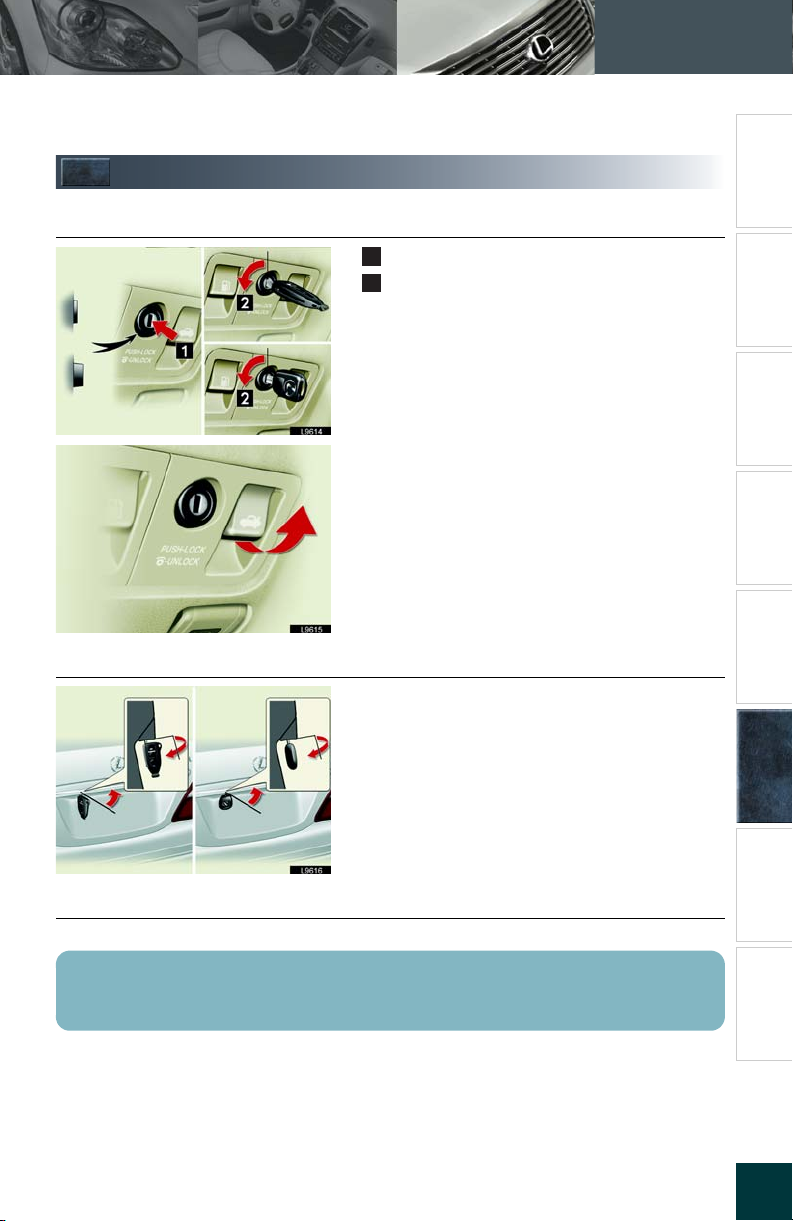
n Mechanical key
Ty pe A Ty pe B
Make sure the main switch is on.
1
To activate the insert the masterkey and turn
2
it to the left.
Pull the lever to open the trunk.
Turn the key clockwise to open.
Only the master key can be used to open the
trunk.
Before Driving When Driving
Night Driving
Rain and
Driving Comfort
Opening and Closing
n Trunk lid closer
If the trunk lid is partially latched, it will close automatically.
The trunk can also be opened with the smart access system and the wireless remote control. See pages 8 and 9.
What to do if ...
Yo u r L e x u s
58
Customizing
Topic 6
Opening and Closing
Doors........................................................................ 53
Moon Roof .............................................................. 55
Fuel Tank Cap........................................................ 56
Hood ......................................................................... 57
Trunk......................................................................... 58
Topic 5
Driving Comfort
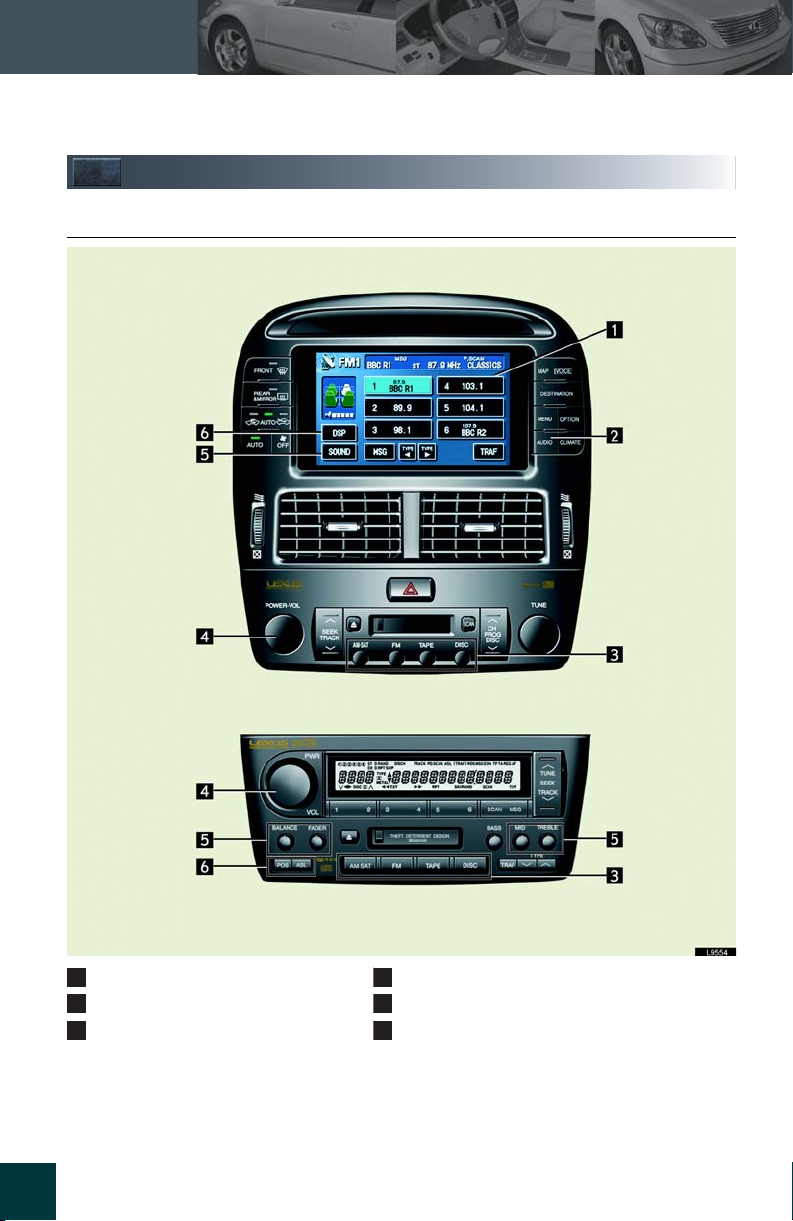
Audio System
n Basic Operation
With Navigation System
39
Function switch display
1
Changes screen display
2
Mode selectors
3
Without Navigation System
4
5
6
Power ON/OFF, volume adjustmen t
Adjusts sound quality
Adjusts sound level

•Switching modes
or
or
Radio mode
(AM, satellite radio)
Radio mode
(FM)
n Rear switches
Some audio features can be controlled from the rear seat.
Volume adjustment
1
Radio mode: Selects radio station
2
Tape mode: Selects other side of cassette
CD mode: Selects desired CD
Radio mode: tuner
3
Tape mode: fast forward / rewind
CD mode: Selects desired track or disc
Power ON / OFF
4
Mode Selector / Child lock
5
or Tape mode
or CD mode
tape
Topic 5
Driving Comfort
Entering and Exiting
Before Driving When Driving
Night Driving
Driving Comfort
Rain and
n Audio remote control (steering switches)
It is possible to operate the audio system without removing your hands from the steering wheel.
Switch modes
1
RADIO mode: select station / tuner
2
TAPE m ode : fas t fo rwa rd / rewi nd
CD mode: select disc or track
Volume adjustment
3
Opening and Closing
What to do if ...
Yo u r L e x u s
40
Customizing
Topic 5
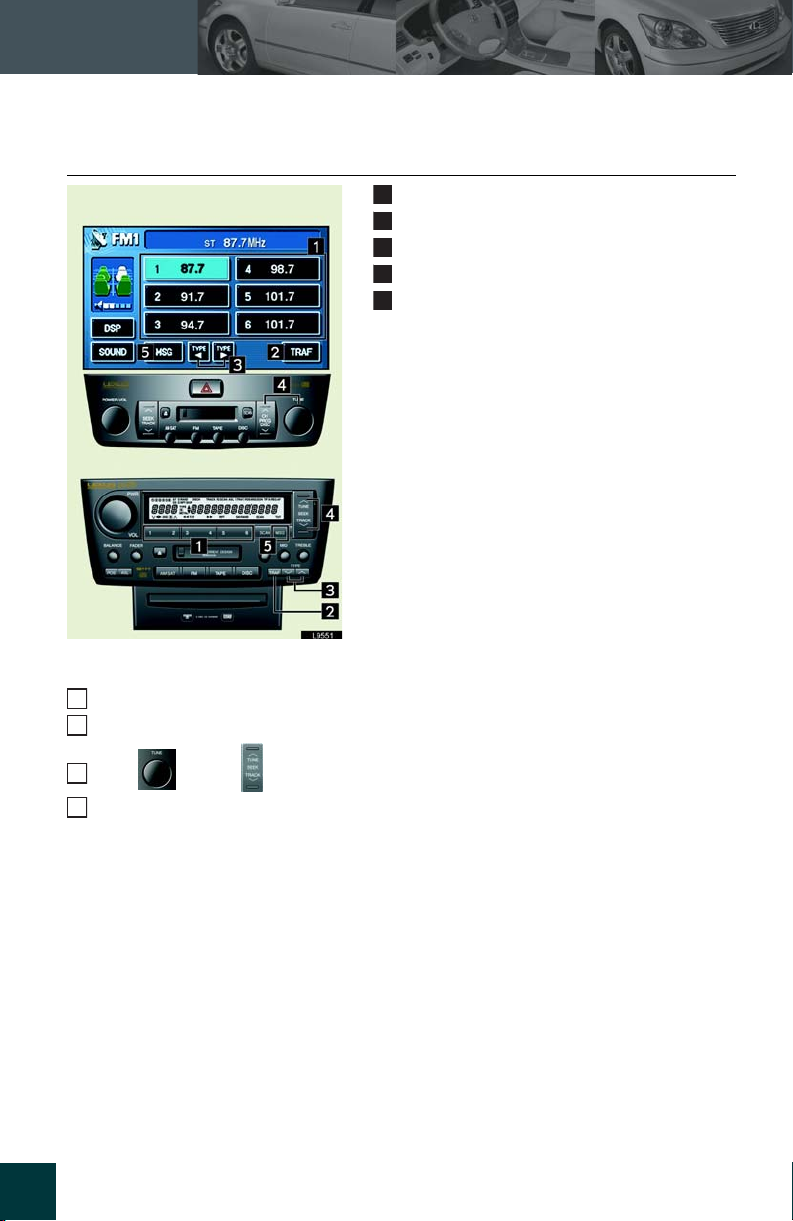
Driving Comfort
n Radio mode
With Navigation System
Without Navigation System
Enter or select preset stations
1
Receive traffic information
2
Display - radio text messages
3
Tu n i n g
4
Receive radio text messages
5
• Entering station presets
Turn the power on
1
Switch to radio modes
2
Turn or push to select the desired station
3
Hold down one of the buttons “1” through “6” until you hear a beep.
4
41
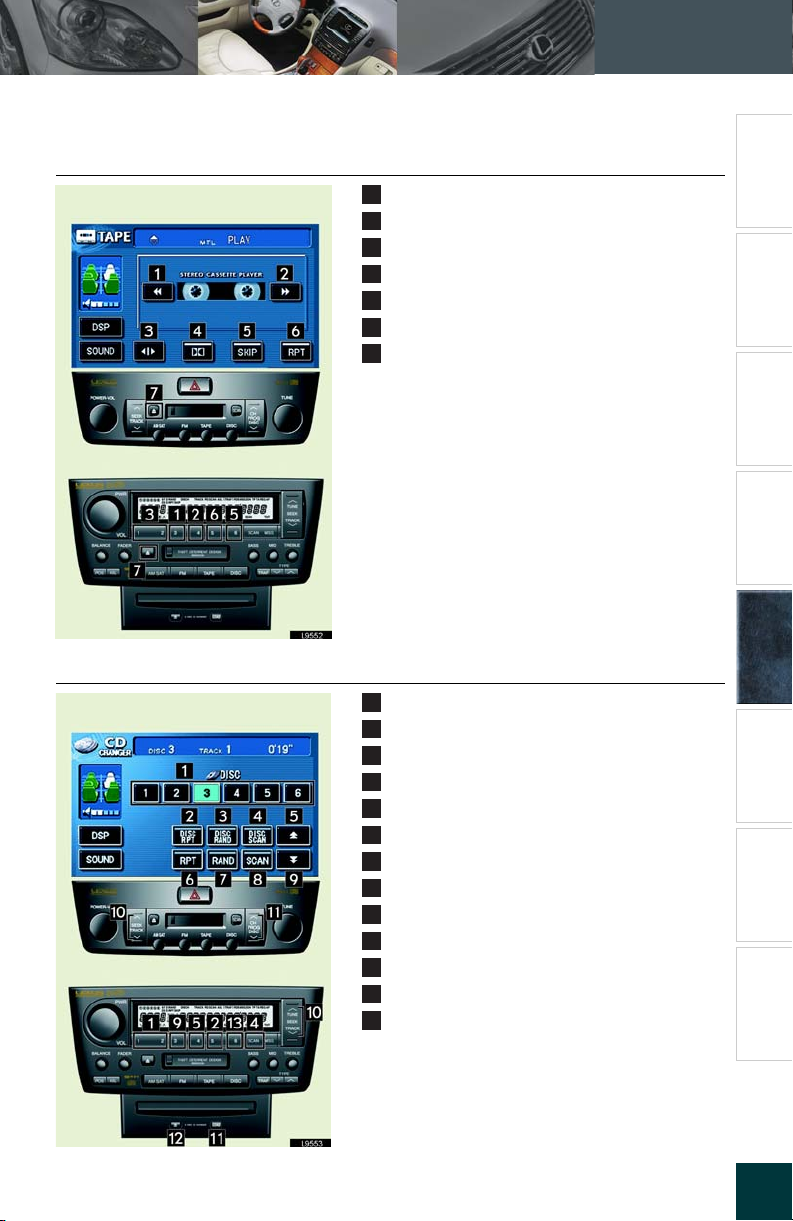
n Ta p e mo d e
With Navigation System
Without Navigation System
Rewin d
1
Fast foward
2
Reverse playback direction
3
DOLBY NR ON/OFF
4
Skip to next track
5
Repeat current track
6
Eject
7
Topic 5
Driving Comfort
Entering and Exiting
Before Driving When Driving
Night Driving
Driving Comfort
Rain and
n CD mode
With Navigation System
Without Navigation System
Select disc
1
Repeat current disc
2
Random playback (all discs)
3
Play beginning of the first track of each disc
4
Fast forward
5
Repeat current track
6
Random playback (current disc only)
7
Play beginning of each track on current disc
8
Rewin d
9
Select track
10
Load disc
11
Eject
12
Rondom playback
13
Opening and Closing
What to do if ...
Yo u r L e x u s
42
Customizing
Topic 5
Driving Comfort
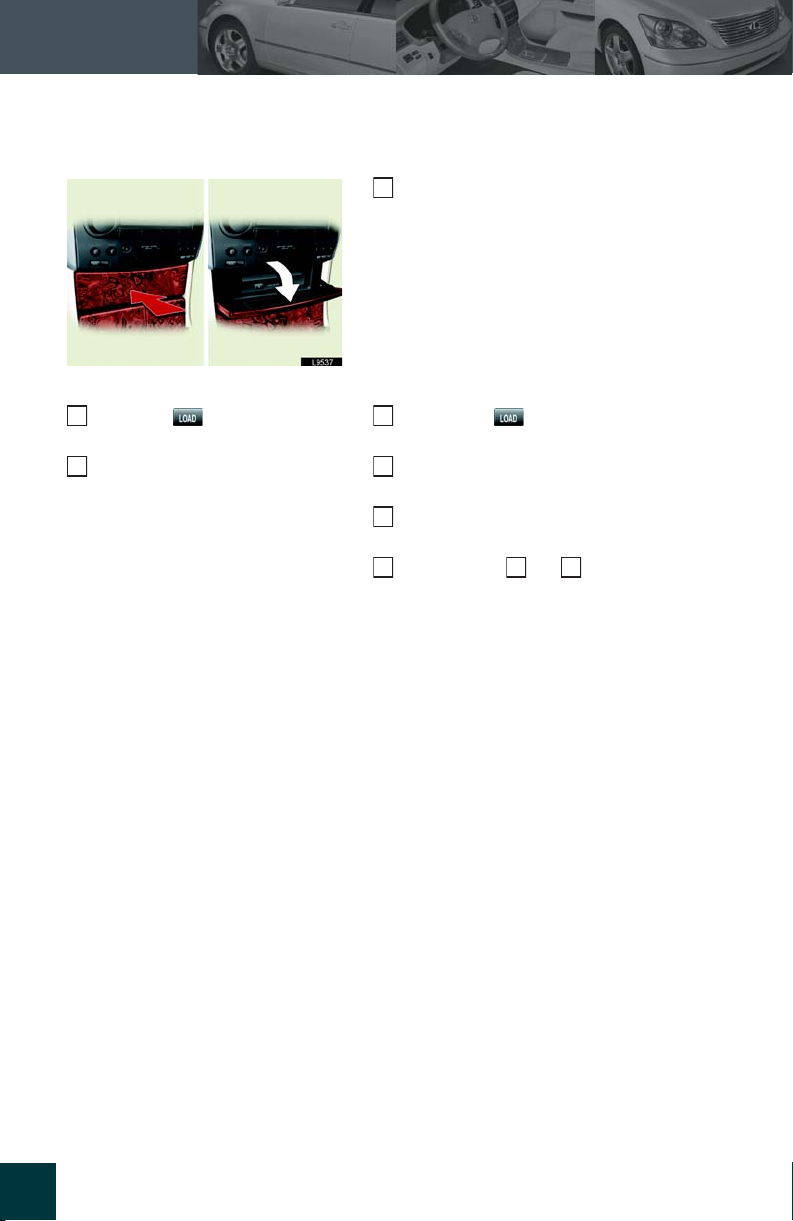
•Loading CD(s)
Open the CD door
1
• Loading a single CD
Press the button.
2
“WAIT” appears on the display.
When the “WAIT” display
3
changes to “LOAD”, insert the
disc.
• Loading multiple CDs
Hold down until you hear a beep.
2
“WAIT” appears on the display.
When the “WAIT” display changes to
3
“LOAD”, insert one disc.
Once the disc is inserted, “WAIT” appears
4
again on the display.
Repeat steps and .
5 3 4
43
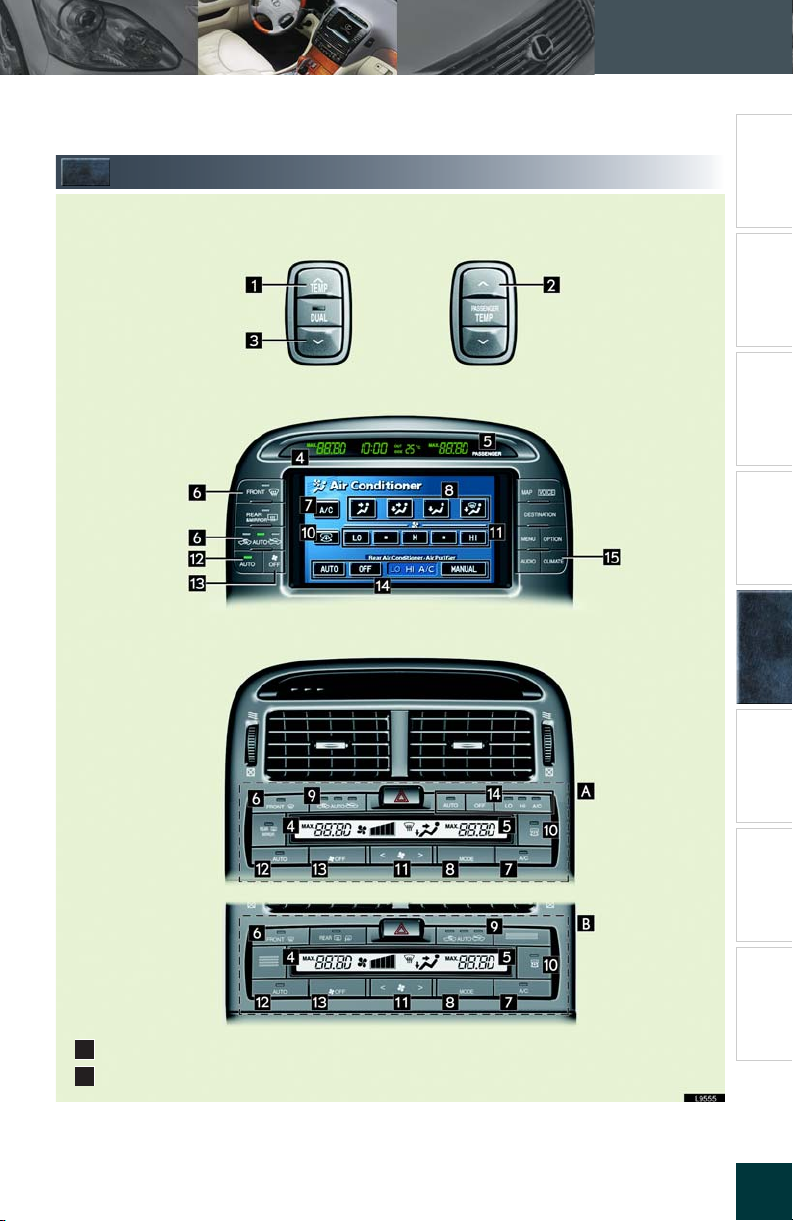
Climate Control
With Navigation System
Topic 5
Driving Comfort
Entering and Exiting
Before Driving When Driving
Night Driving
Driving Comfort
Rain and
Without Navigation System
With rear air conditioning control
A
Without rear air conditioning control
B
Opening and Closing
What to do if ...
Yo u r L e x u s
44
Customizing
Topic 5
Driving Comfort
Drivers side temperature control
1
Passengers side temperature
2
control
Switch to “DUAL” mode
3
Driver side temperature display
4
Passenger side temperature dis-
5
play
Wind shield defog / defrost
6
“A /C ” sw i t ch
7
Air flow controls
8
Air intake controls
9
Swing center vent
10
Fan speed controls
11
Switch to “AUTO” mode
12
“OFF” button
13
Rear air conditioning control switches (if
14
equipped)
n “A U T O ” m o d e
Push the “AUTO” button.
1
Adjust the temperature with the “TEMP” buttons.
2
n “DUAL” mode
In “DUAL” mode, driver and passenger side temperature settings can be controlled separately.
Push the “DUAL” button.
1
Adjust the driver side temperature with the “TEMP” buttons, and the passenger side
2
temperature with the “PASSENGER TEMP” buttons.
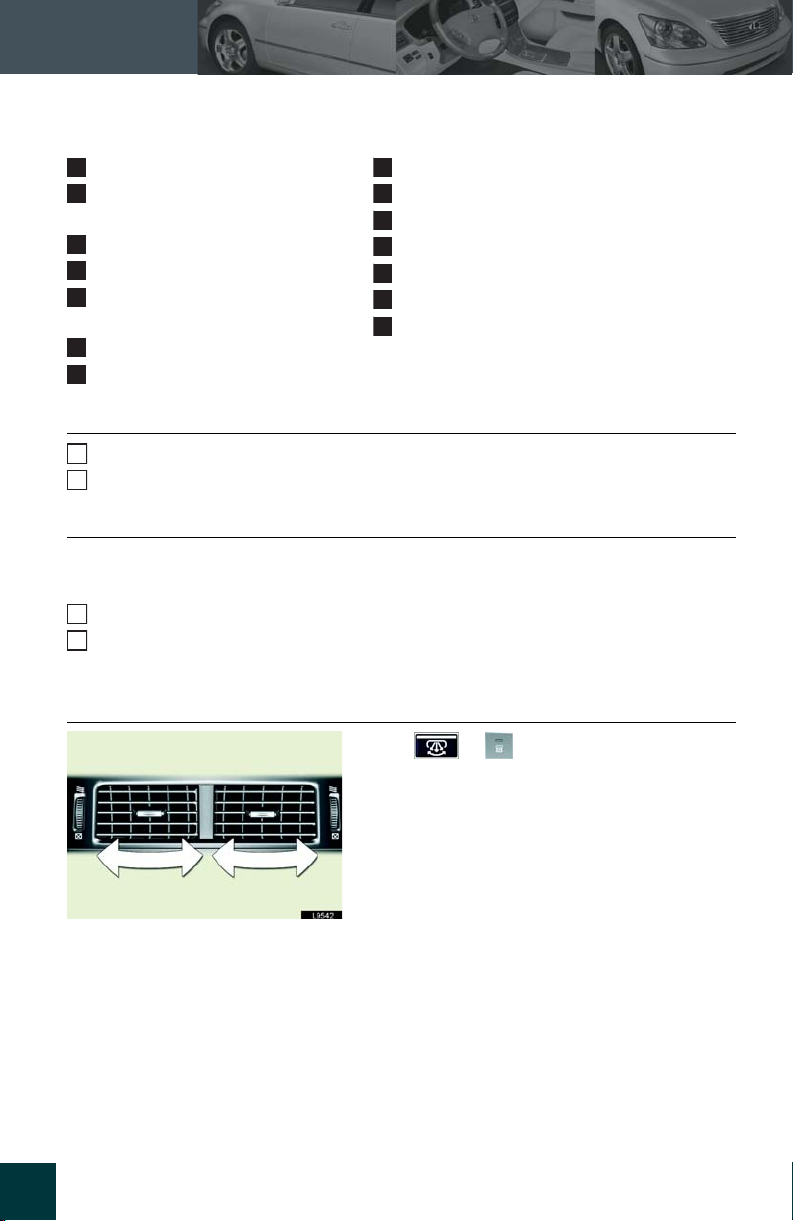
n Swinging the center vents
45
Push or .
Pushing the “DUAL” button changes movement of the vanes when no passengers in the
front seat.
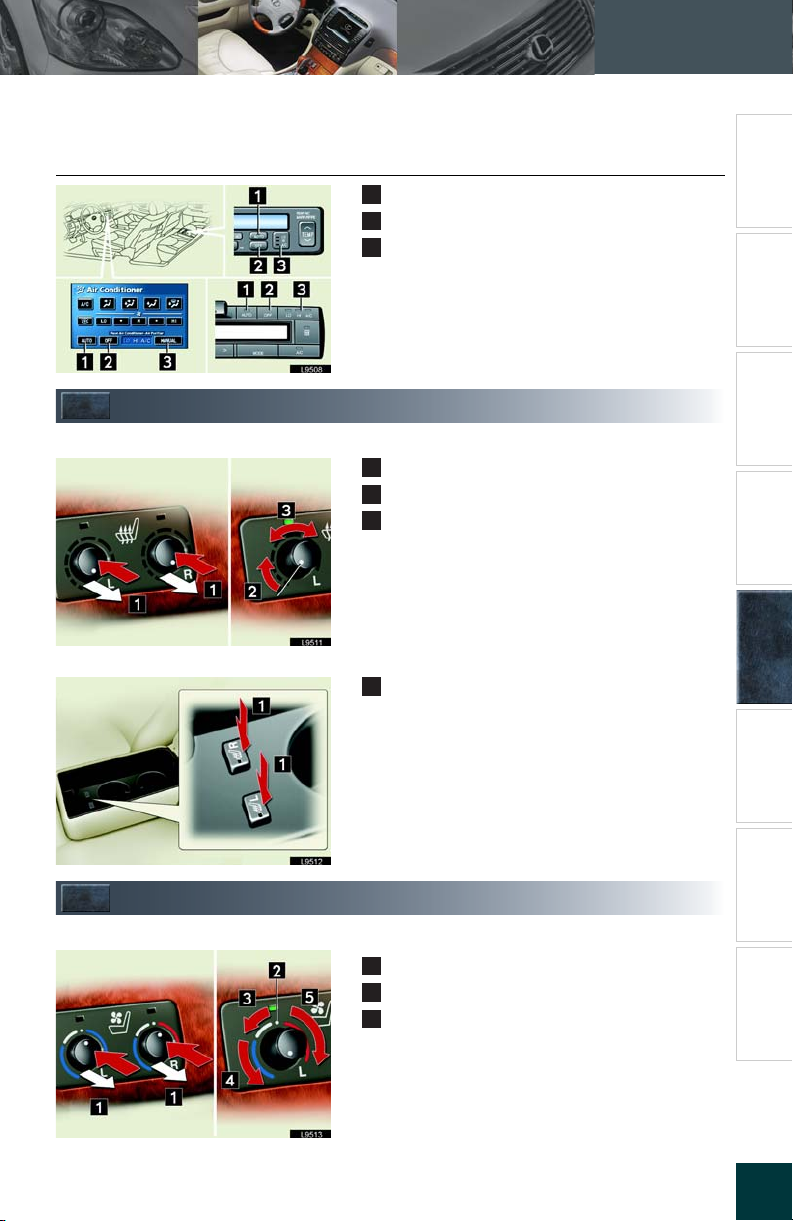
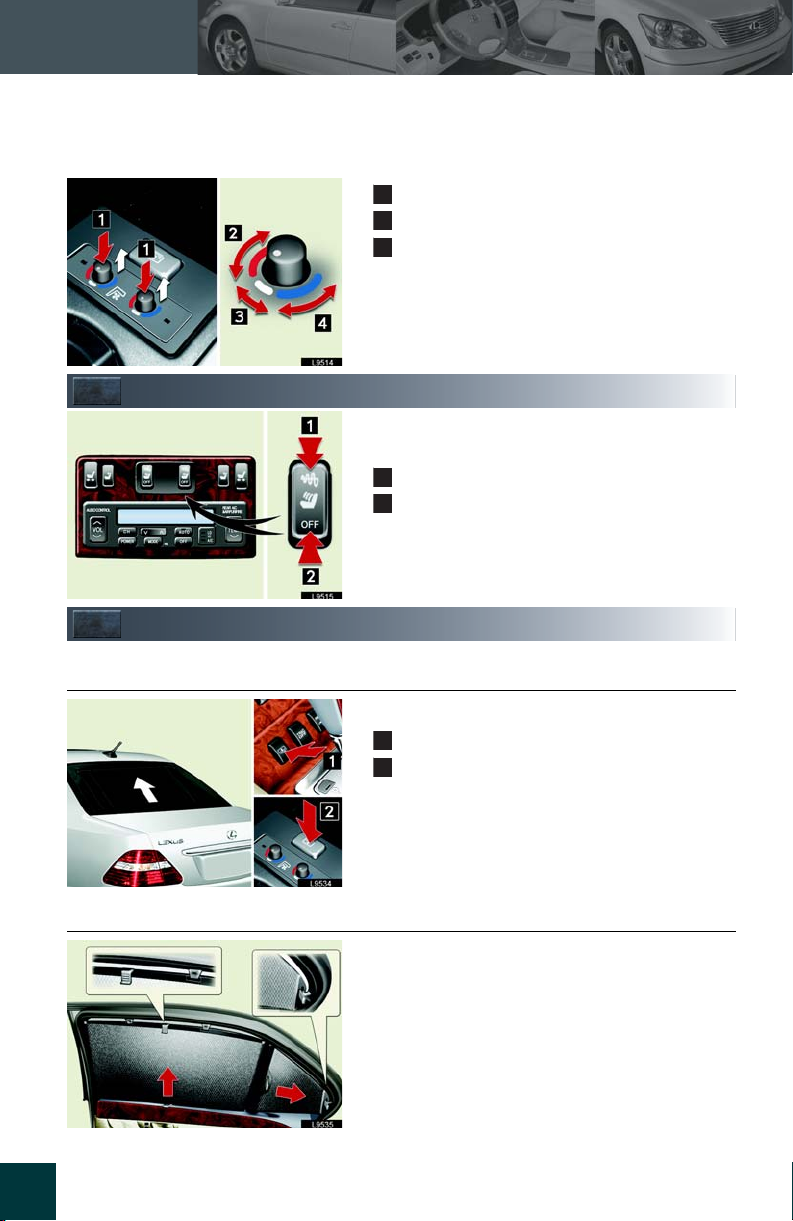
n Rear air conditioning controls (if equipped)
Switch to “AUTO” mode
1
“OFF” button
2
Change air flow mode
3
Seat Heater Switches
Front seats
Activate / inactivate
1
Tu rn on
2
Adjusting
3
Topic 5
Driving Comfort
Entering and Exiting
Before Driving When Driving
Night Driving
Driving Comfort
Rain and
Rear seats
Climate Control Seat Switches
Front seats
ON / OFF
1
Push the button.
Activate / inactivate
1
Tu rn on
2
Adjusting
3
Opening and Closing
What to do if ...
Yo u r L e x u s
46
Customizing
Topic 5
Driving Comfort
Rear seats
Refleshing Rear Seat Switches
Activate / inactivate
1
Tu rn on
2
Adjusting
3
Built-in lumbar vibrators reduce lumber fatigue
for the occupant.
ON / changes vibration speed
1
OFF
2
Sun Shades
n Rear electric sun shade
n Manual sun shade (if equipped)
47
Raise or lower, push the button.
From front
1
From rear
2
Pull the tab and hook.
Console Boxes
Topic 5
Driving Comfort
Entering and Exiting
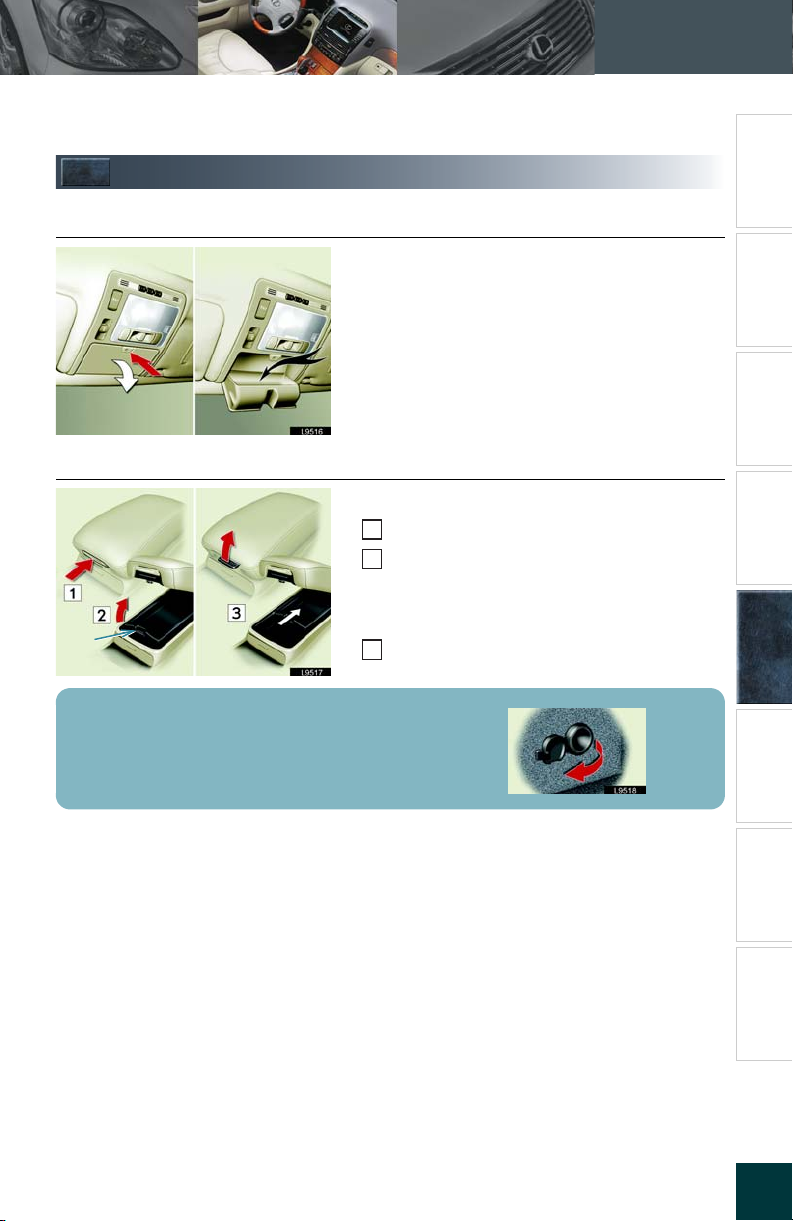
n Over bead console box
Push the lid gently to open and close.
n Rear console box
Upper box
Push the tab to release the lock.
1
Lift the armrest to open.
2
Lower box
Lock
release button
There is an accessory 10 A / 12 V power outlet located inside the rear consol box.
Push the lockrelease button and side open.
3
Before Driving When Driving
Night Driving
Rain and
Driving Comfort
Opening and Closing
What to do if ...
Yo u r L e x u s
48
Customizing
Topic 5
Driving Comfort
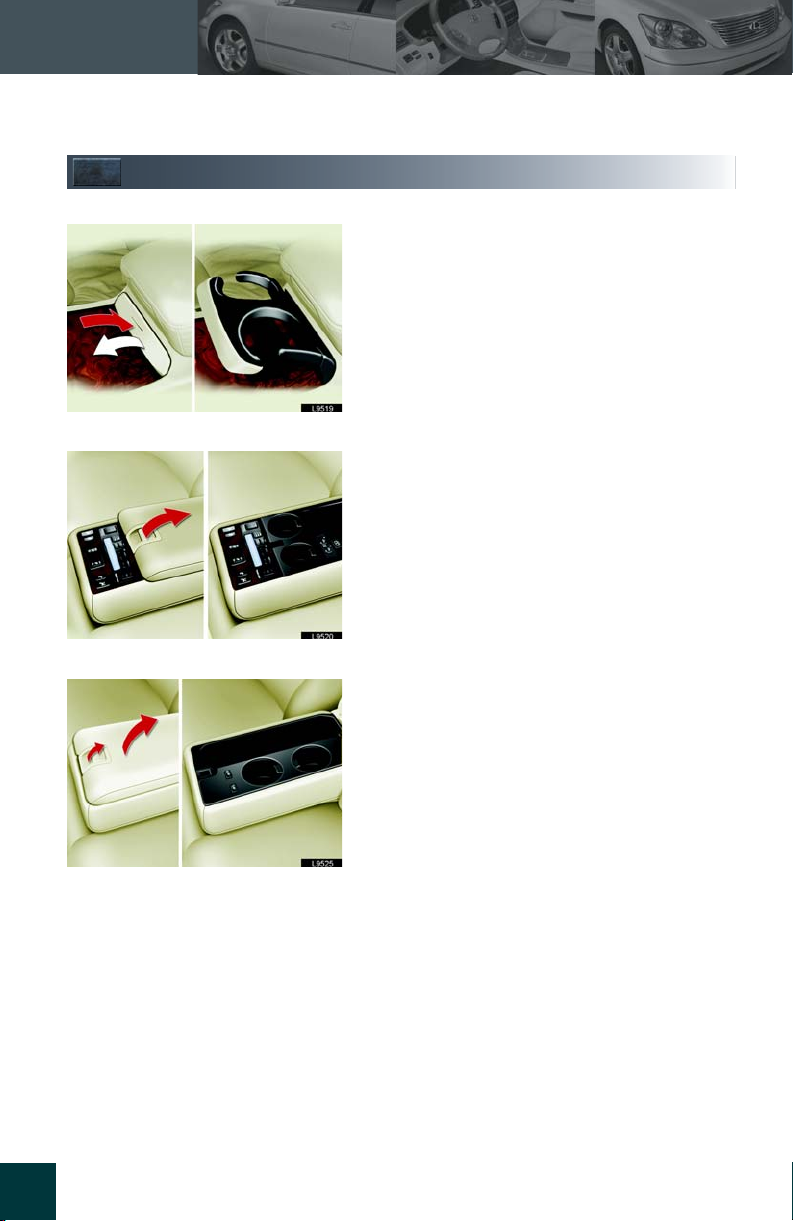
Cup Holders
Front
Rear (With powered seats)
Push the cup holder gently to extend.
Release the lock and lift the armrest.
Rear (with manual seats)
49

Cigarette Lighter and Ashtray
Front
To remove the ashtray, raise the lid and pull it out.
Rear
To remove the ashtray, raise the lid and pull it out.
Topic 5
Driving Comfort
Entering and Exiting
Before Driving When Driving
Night Driving
Driving Comfort
Rain and
Glove Box
1
2
3
Open
Lock
Unlock
Opening and Closing
What to do if ...
Yo u r L e x u s
50
Customizing
Topic 5
Driving Comfort
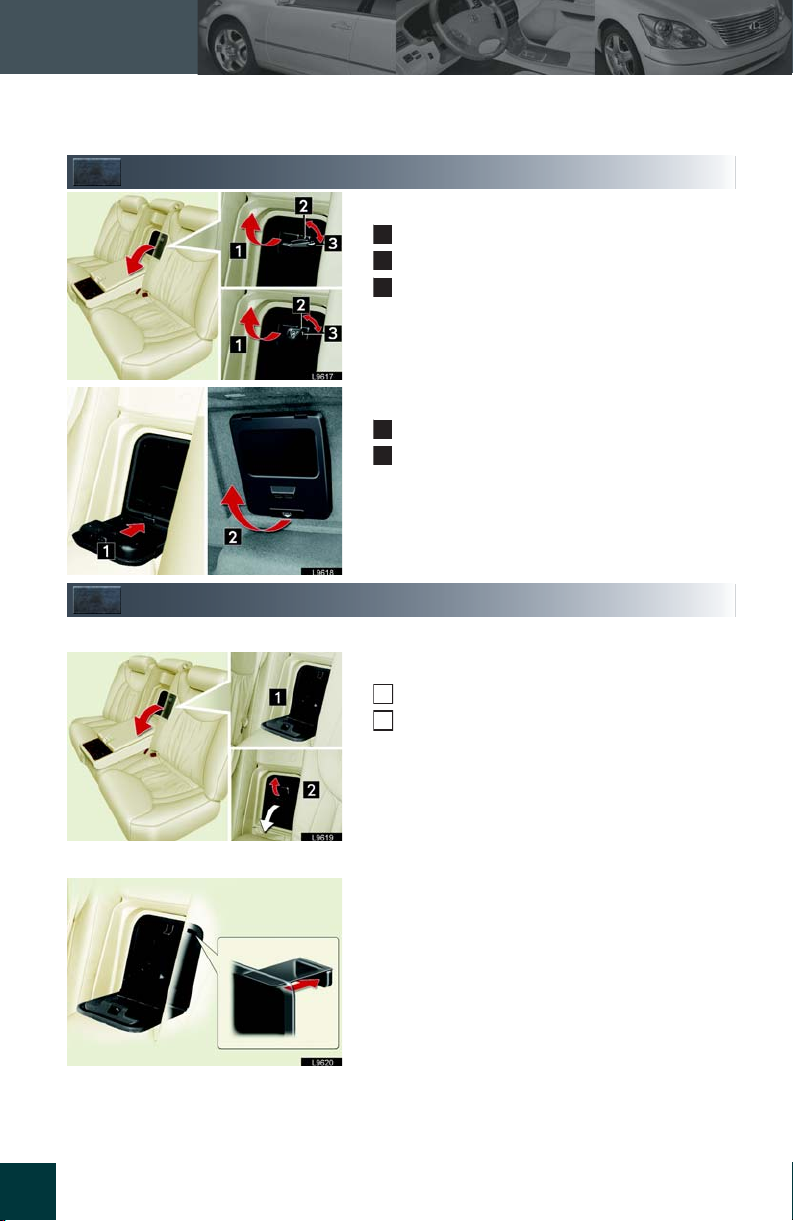
Trunk Storage Extension
Pull down the armrest in the rear seat.
Open
1
Lock
2
Unlock
3
Open the inner lid
From Passenger compartment side
1
From truck side
2
Cool Box
Keeps canned drinks cool whenever the rear air conditioning system is on.
Pull down the armrest in the rear seat.
To use as luggage compartment
Close the cool air intake lid to turn off the cool box system.
51
Open the inner lid.
1
Pull the lever to open.
2
Close the cool air intake lid to turn off the cool
box system.
 Loading...