

Page 1
Introduction Safety Instructions
Thank you for your purchase of the Navigation System. Please read this manual
carefully to ensure proper use. Keep this
manual stored in your vehicle at all times.
For safety reasons, this manual indicates
items requiring particular attention with the
following marks.
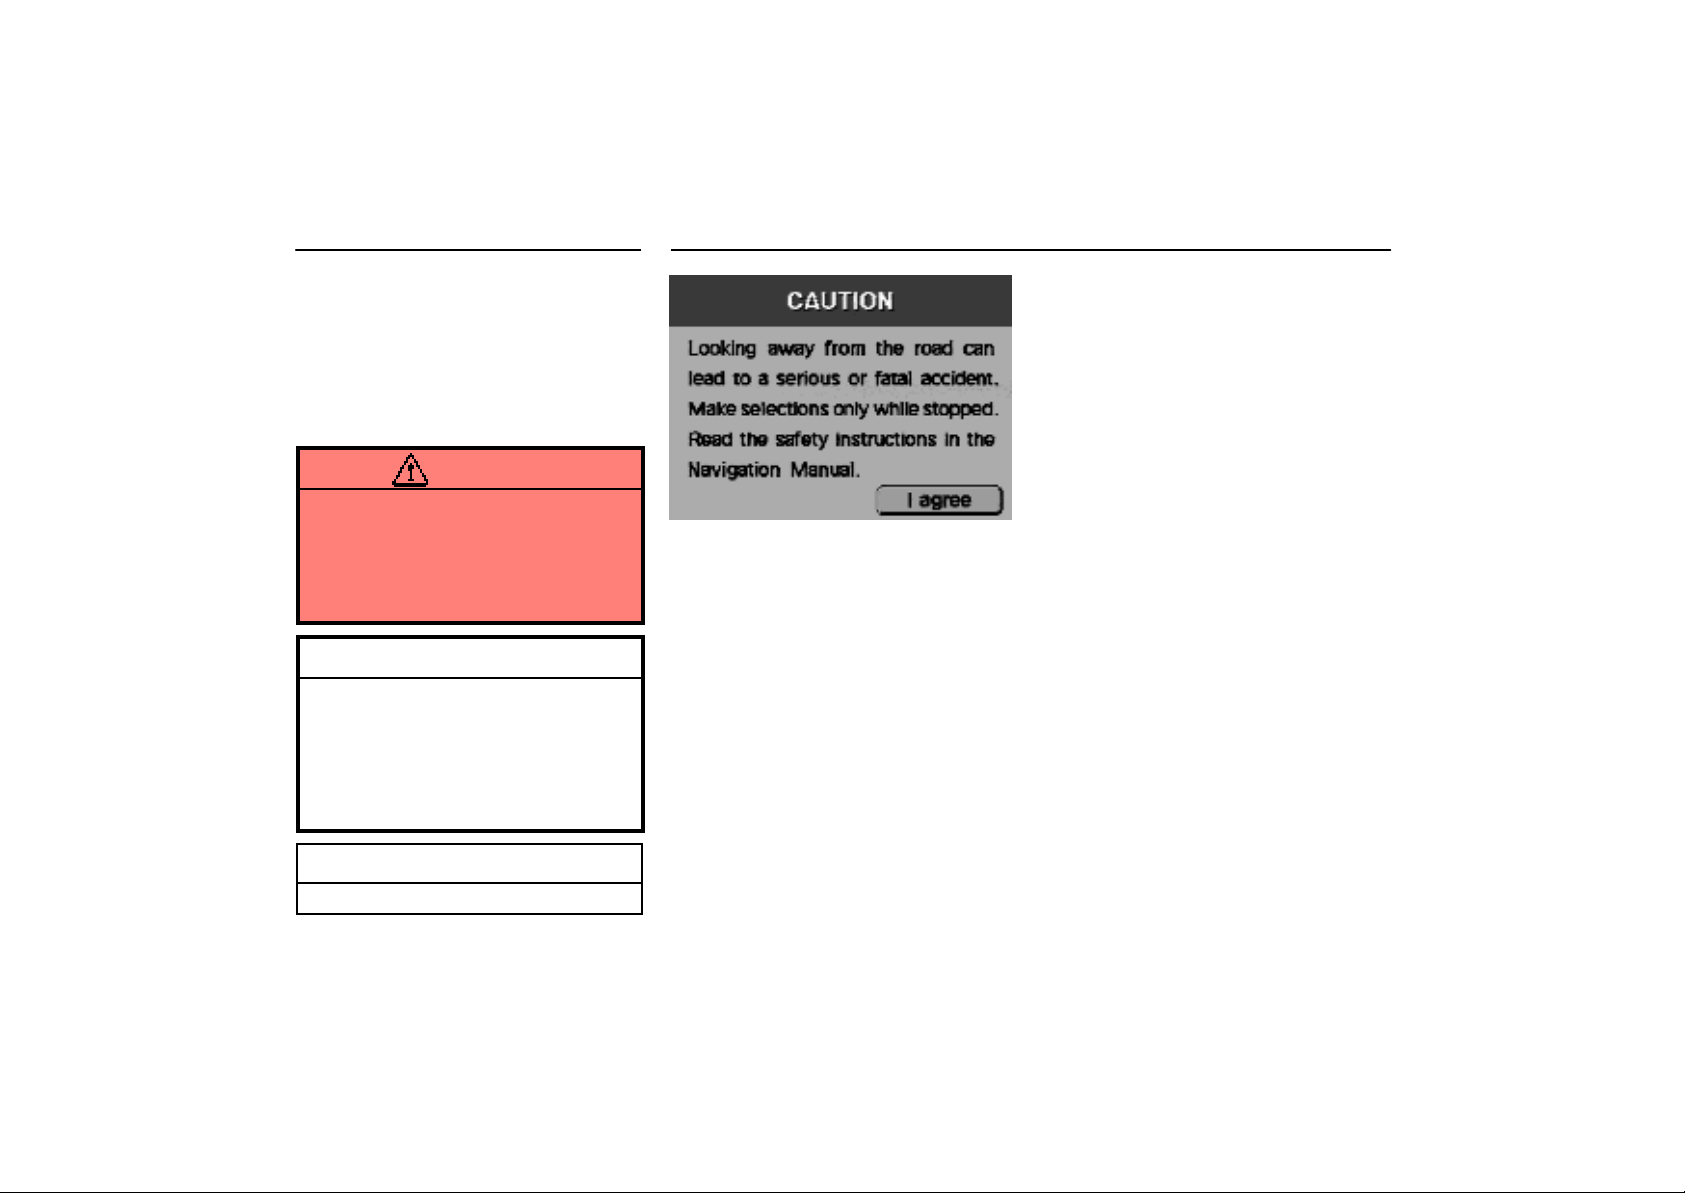
CAUTION
This is a warning against something
which may cause injury to people if
the warning is ignored. You are informed what you must or must not do
in order to avoid or reduce the risk to
yourself and other people.
NOTICE
This is a warning against something
which may cause damage to the
vehicle or its equipment if the warning
is ignored. You are informed what you
must or must not do in order to avoid or
reduce the risk of damage to your
Lexus and its equipment.
INFORMATION
This provides additional information.
0001u
To use your system as safely as possible,
follow all safety tips shown below.
This system is intended to assist you in
reaching your destination and, if used
properly, can do so. You, as the driver, are
solely responsible for the safe operation of
your vehicle and the safety of your passengers.
Do not use any feature of this system to
the extent it distracts you from safe
driving. Your first priority while driving
should always be the safe operation of
your vehicle.
Before attempting to use this system while
driving, learn how to use it and become
thoroughly familiar with it. Read the entire
Navigation System Manual to make sure
you understand the system. Do not allow
others to use this system until they have
read and understand these and other
instructions in this manual.
You can input your destination and select
your route only when the vehicle is not
moving. While driving, listen to the voice
instructions as much as possible and
glance at the screen briefly and only when
safe.
The data in the system may occasionally
be incomplete. Road conditions, including
driving restrictions (no left turns, street closures, etc.) frequently change. Therefore,
before you follow any instruction from the
system, look to see whether you can comply with the instruction safely and legally.
This system cannot warn you about such
things as the quality of a neighborhood,
condition of streets, and availability of
emergency services. If you are unsure
about the safety of an area, don’t drive into
it. Under no circumstances is this sys-
tem a substitute for the driver’s personal judgement.
i
1.
Page 2
Safety Instructions Precautions on use
We recommend that you obtain updated
map data as it becomes available in order
to help use the system as effectively and
safely as possible.
Use this system only in locations where it
is legal to do so. Some states/provinces
may have laws prohibiting video screens
within sight of the driver.
GPS voice navigation system
This navigation system calculates the current vehicle position using satellite signals,
various vehicle signals, map data, etc.
However, the accurate position may not
be shown depending on the satellite
condition, road configuration, vehicle
condition or other circumstances.
The GPS (Global Positioning System) developed and operated by the U.S. Department of Defense provides an accurate current vehicle position using 3 to 4 satellites.
EMV0001U
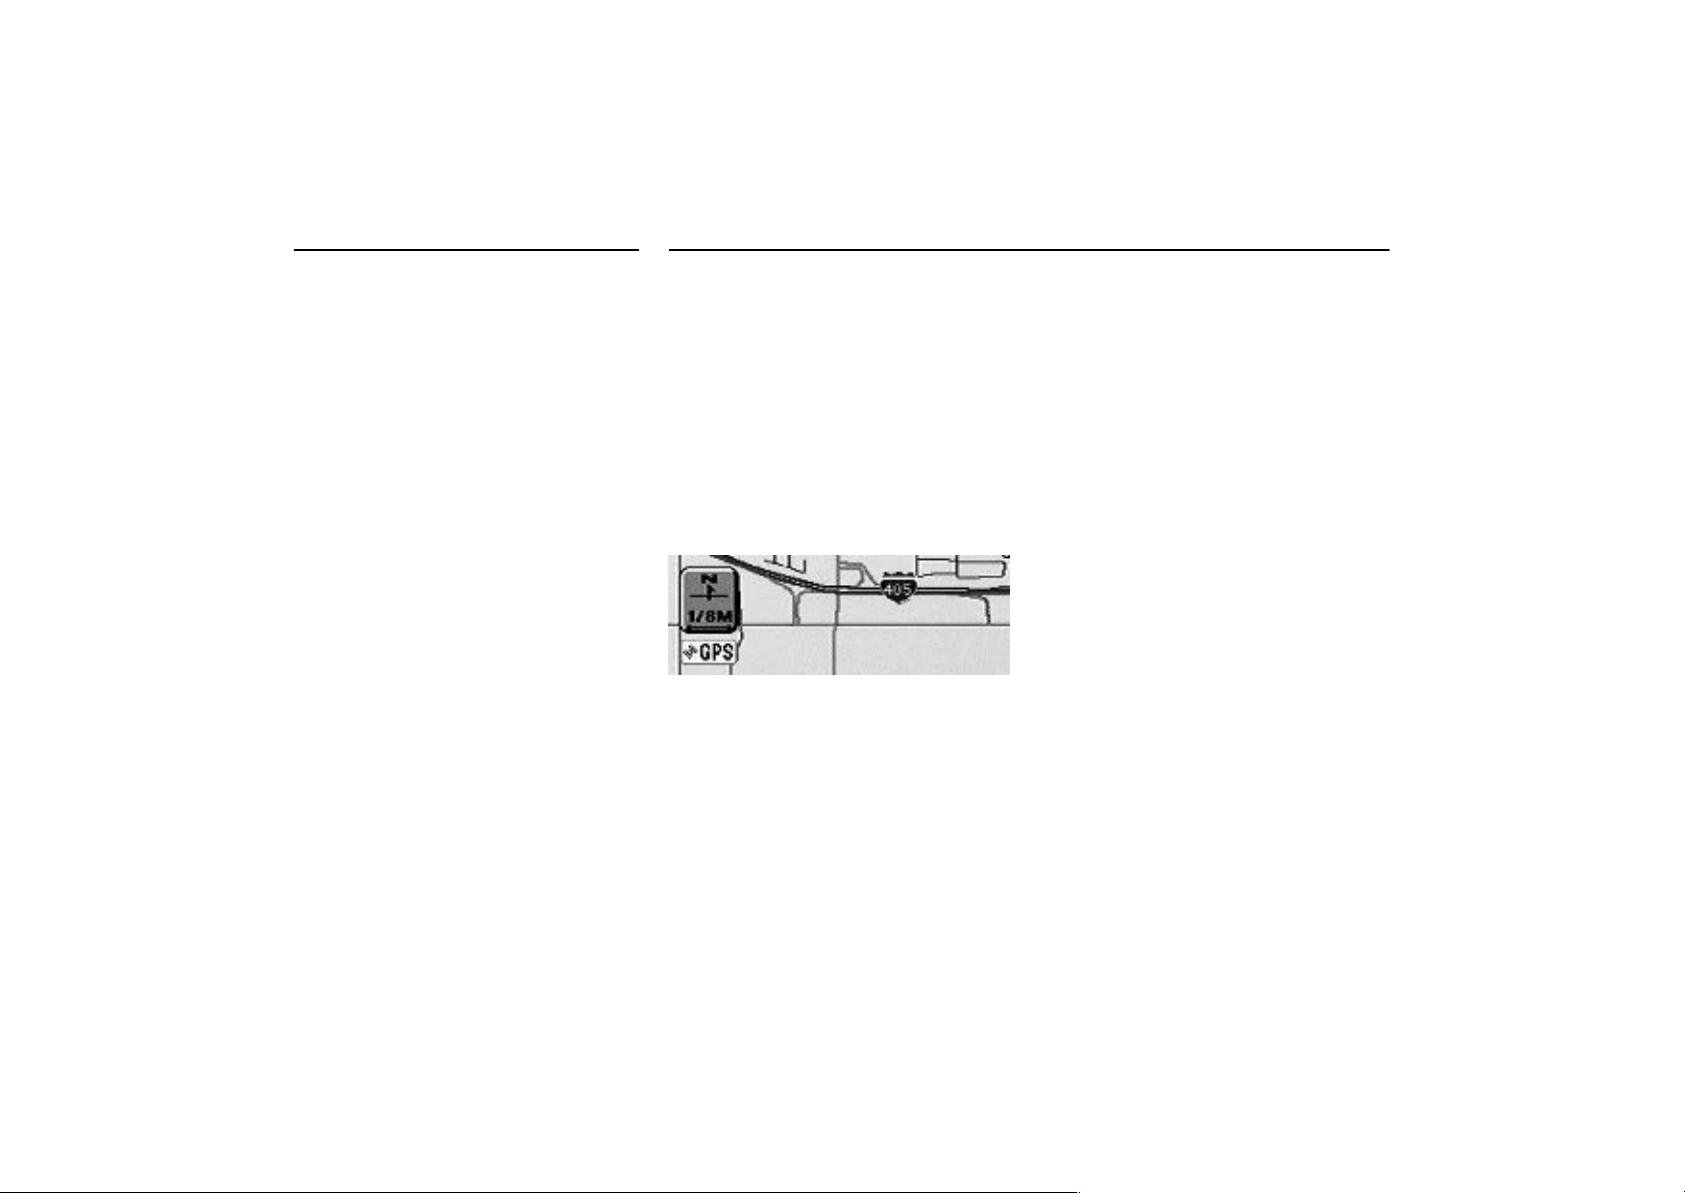
When your vehicle is receiving signals
from the satellites, the ”GPS” mark appears at the top left of the screen.
The GPS is not available in the following cases:
Signal obstructions are caused by tun-
nels, tall buildings, trucks, or even the
placement of objects on the instrument
panel.
The satellites do not send signals due to
the improvement or repair of them.
When driving, be sure to observe traffic
regulations.
Route guidance shows a reference
route up to the destination surrounding
area.
It is neither a shortest route nor a route
without a traffic congestion.
Do not totally rely on voice guidance.
Use it just for your information.
If the system cannot determine the current
position correctly, there is a possibility of
incorrect, late or non–voice guidance.
The road and map data stored in your
navigation system may not be latest or
complete.
When replacing the tire(s), contact your
Lexus dealer.
ii
2.
Page 3

Precautions on use Accurate Operation Tips
This navigation system uses the tire turning data. So, replacing the tire may cause
a positioning error.
Make sure tire pressures of 4 wheels
should be correct.
For your safety, some functions may
become inoperable when you start driving.
Unavailable switches are dimmed.
CAUTION
For safety, the driver should not
operate the navigation system
during driving. Incorrect
maneuvering of steering wheel
may cause an accident.
When driving, be sure to follow
traffic regulations and keep the
road condition in mind. If a traffic
sign on the road is changed by the
regulation, route guidance may
provide wrong information such as
the route prohibiting the entry of
the vehicle.
This navigation system calculates the
current vehicle position using satellite
signals, various vehicle signals, map
data, etc. However, the accurate position may not be shown or inappropriate
route guidance may occur in some
cases.
(a) The accurate current vehicle
position may not be shown in
the following cases:
When driving on a small angled Y–
shaped road.
When driving on a spiral road.
When driving on a slippery road such as
in sand, gravel, snow, etc.
When driving on a long straight road.
When the freeway and surface streets
run in parallel.
When the long route is searched during
high speed driving.
When approaching a tall building or
large vehicle.
After moving by ferry or vehicle carrier.
After repeating a change of directions by
going forward and backward, or turning
on the turn table in the parking lot.
When going out from the parking lot with
roof.
When driving with the tire chains
installed.
When replacing the tire(s).
When using the tire other than specified.
When tire pressures of 4 wheels are not
correct.
When driving without setting the current
position calibration correctly.
When the roof carrier is installed.
When the tires are worn. (i.e., studless
tires used in the previous season)
INFORMATION
After your vehicle receives signals
from the GPS, the current vehicle
position, if it is not placed in correct position or on the wrong road,
will be corrected automatically.
If your vehicle cannot receive GPS
signals, you can correct it manually. For the information on current
position calibration, see page 63.
iii
3.
Page 4

Accurate Operation Tips
(b) Inappropriate route guidance
may occur in the following
cases:
When turning at a wrong intersection off
route guidance.
In some cases, plural names of places
are announced.
In automatic rerouting, route guidance
may not be available for the next turning
to the right or left.
It may take a long time to operate auto-
matic rerouting during high speed driving.
In automatic rerouting, the detour route
may be shown.
If you are heading for the destination
without passing through a set way point,
automatic rerouting may display a route
returning to the set way point.
When turning at an intersection, there is
no route guidance.
When passing through the intersection,
there is no route guidance.
The route in a U–turn may be shown or
announced.
The route prohibiting the entry of the ve-
hicle due to the regulation by time or
season or any other regulation may be
given.
In automatic rerouting, the route may
not be changed.
Some route may not be searched.
If there are only narrow streets up to the
destination, the route up to the destination may not be shown.
The destination might be shown oppo-
site to the actual street.
iv
4.
Page 5

SECTION
I
BEFORE OPERATION
Before operation 2. . . . . . . . . . . . . . . . . . . . . . . . . . . . . . . . . . . . . . . . . . . . . . . . . . .
Symbols and switches on map screen 6. . . . . . . . . . . . . . . . . . . . . . . . . . . . . . . .
Map database 7. . . . . . . . . . . . . . . . . . . . . . . . . . . . . . . . . . . . . . . . . . . . . . . . . . . . .
1
Page 6
Before Operation
This section describes basic operations
which are frequently used in the navigation system. You should learn how to
use each operation and become thoroughly familiar with it.
Switch operation
This system operates mainly by the
switches on the screen.
1–001u
To protect the screen, lightly touch
switches on the screen by your finger.
When you touch switches (on the
screen and out of the screen), a beep
sounds.
INFORMATION
If the system does not respond to a
touch of a switch, keep your finger
away from the screen and touch it
again.
You cannot operate the dimmed
switches.
Wipe off fingerprints on the surface
of the display using a glasses
cleaning cloth. Use isopropyl alcohol as cleaning solution.
1–002ua
Name input screen
Directly touch alphabet keys on the
screen to input a name.
If you touch a wrong letter, delete it using
””. Touching ”” erases one character.
When you input numerals, touch ”09”
switch to display the screen for numeral
input.
List: The list screen appears. The num-
ber of item is shown at the left of the “List”
switch.
2
Page 7
Before Operation
1–003u
Touching ”AZ” changes to the screen for
inputting a name shown on the previous
page.
1–004u
List selection screen
Touch of your desired item for selection.
PAGE
Shifts to the item beginning
with the next or previous page.
PAGE
Scrolls the item up or down.
Scrolls to the end of a long
item which cannot be shown
on the screen or returns to the
beginning.
1–005u
If it takes longer to change to the next
screen after a touch of the switch on the
screen, a sandglass icon appears at the
center of the screen.
3
Page 8
Before Operation
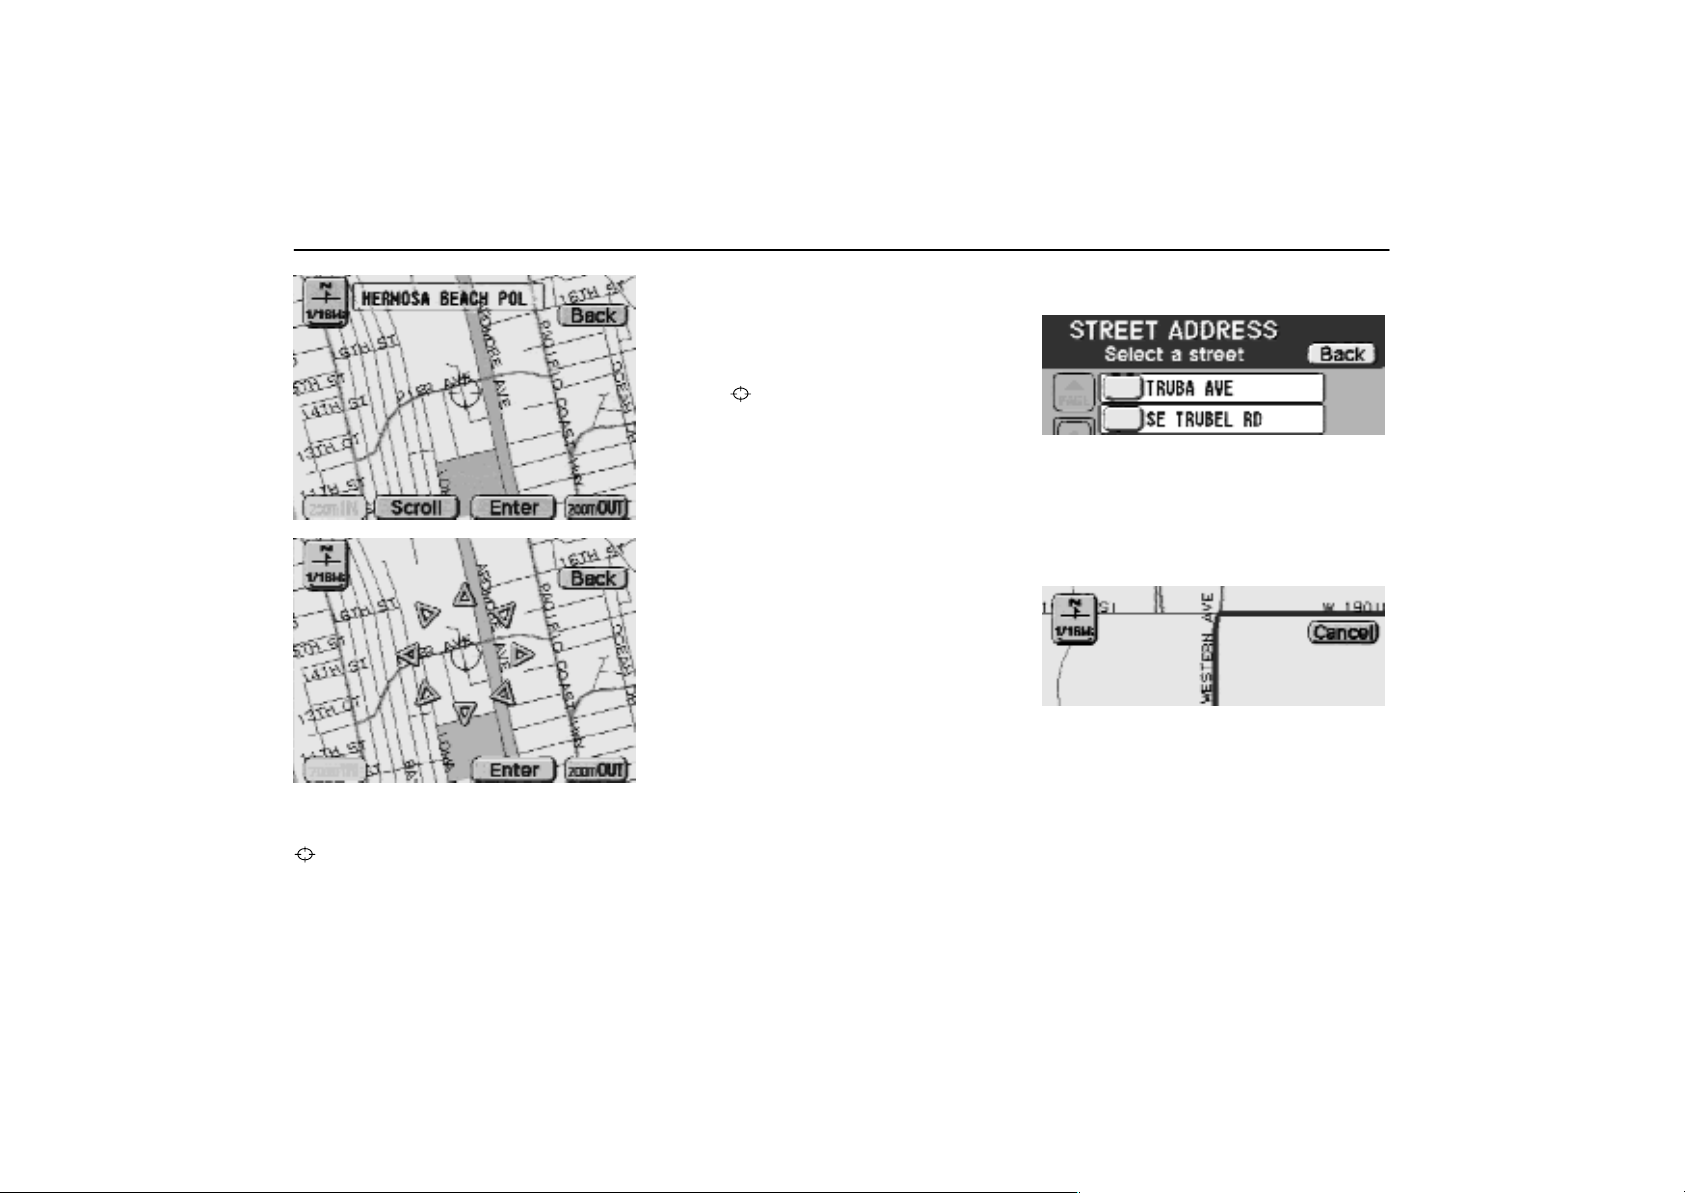
1–006u
1–007u
Position locating screen on the map
1. Touch ”Scroll” to move the cursor
.
2. When you touch an arrow facing your
desired point, the map scrolls in that
direction. When you release your finger, scrolling stops.
3. If you touch ”Enter”, the position of
cursor
is set.
”Back” switch
1–008u
To return to the nearest previous screen
during the setting of destination or other functions, touch ”Back” at the top
right of the screen.
”Cancel” switch
1–009u
If you touch ”Cancel” at the top right of
the map screen in the route guidance
mode, the route guidance cancel mode
screen appears. (For details, see page
39.)
4
Page 9
Before Operation
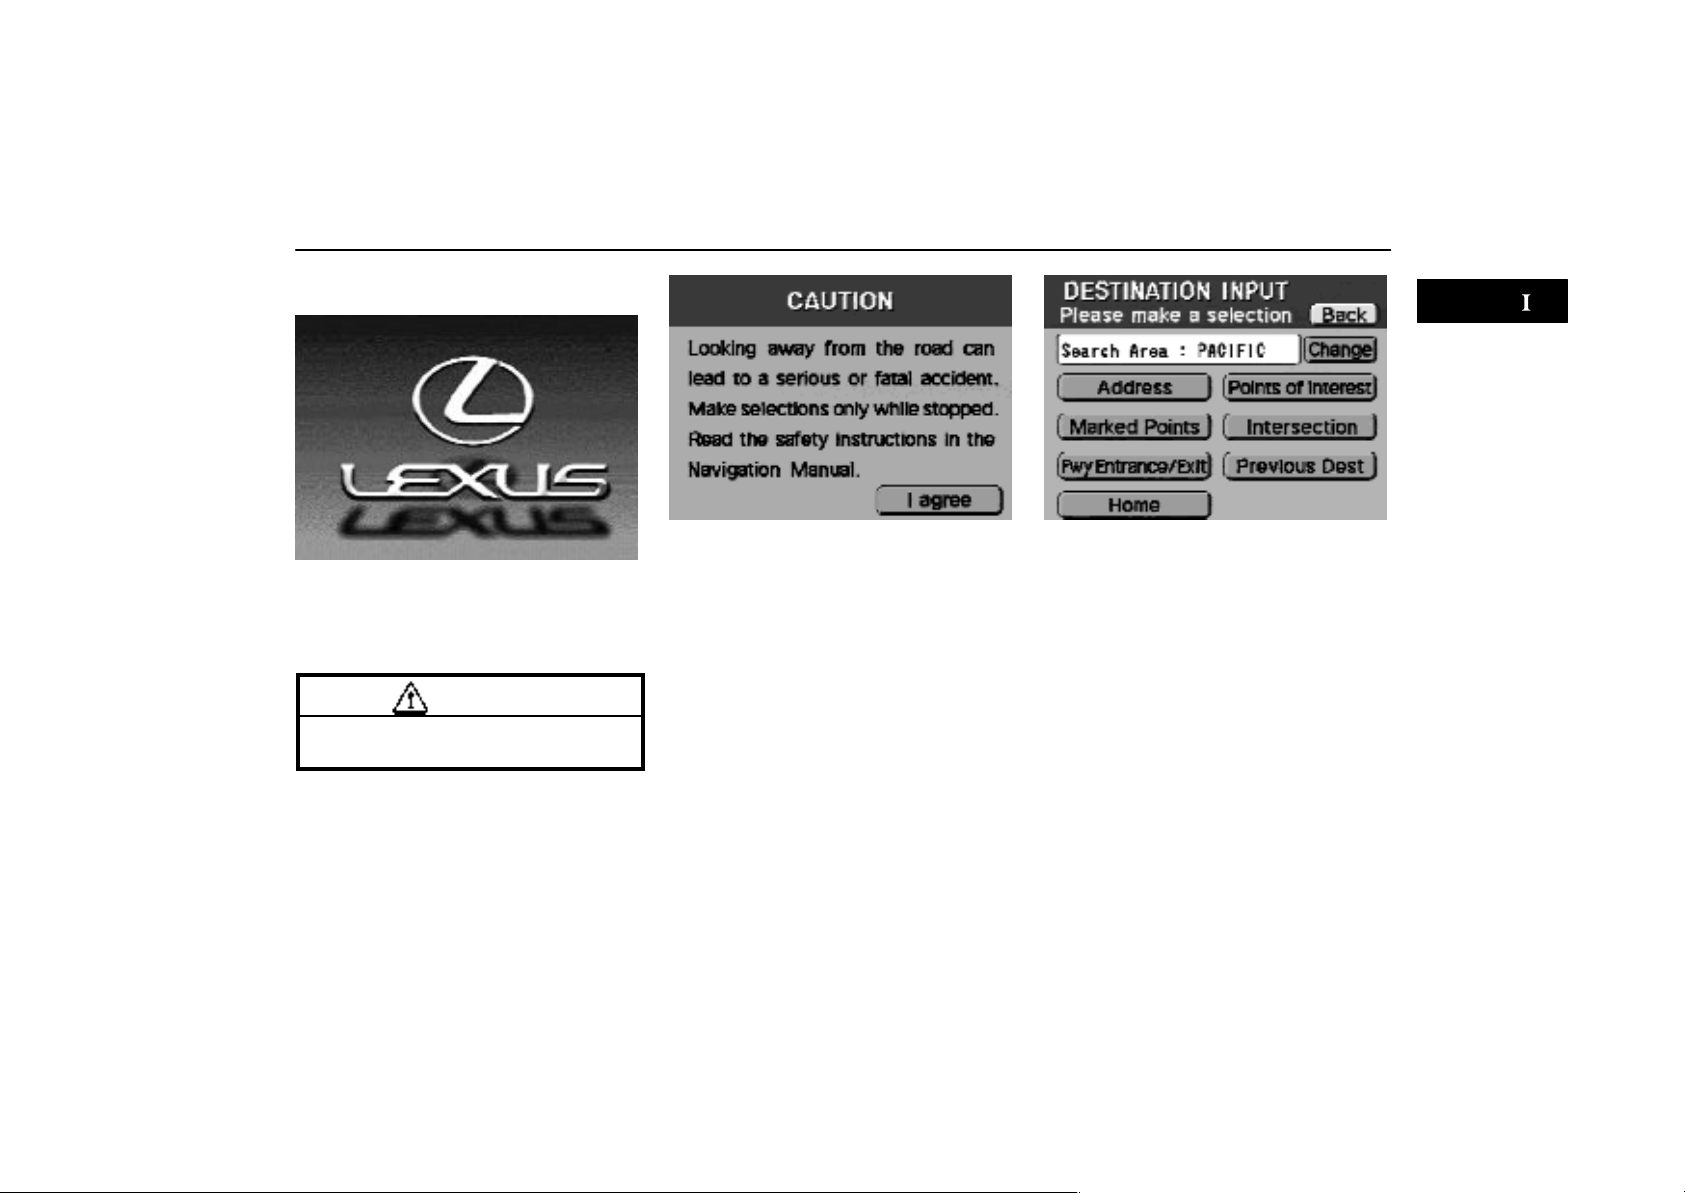
Initial screen
1–010u
When the engine is started (or the ignition key is turned to ”ACC”), the initial
”LEXUS” screen appears and the system begins operating.
CAUTION
When the engine is running, always
apply the parking brake for safety.
0–001u
After a few seconds, the ”CAUTION”
screen appears.
Please read it and follow the instructions.
When you touch ”I agree” on the screen,
the next screen appears.
If you turned off the ignition when a screen
other than for the navigation system (i.e.,
for the audio system or air conditioning) is
displayed, the initial screen shown on the
previous page reappears when the ignition
is turned on. Then the audio or air conditioning screen appears. When you push
the ”MAP/GUIDE”, ”DESTINATION” or
”MENU” switch to change to the navigation
system screen, the ”CAUTION” screen appears.
1–001u
If the destination is not input, the ”DESTINATION INPUT” screen appears.
If you want to input your destination, fol-
low the steps shown in ”Destination input”on page 24.
If you want to display your current posi-
tion without inputting a destination, push
the ”MAP/GUIDE” switch.
5
Page 10
Symbols and Switches on Map Screen
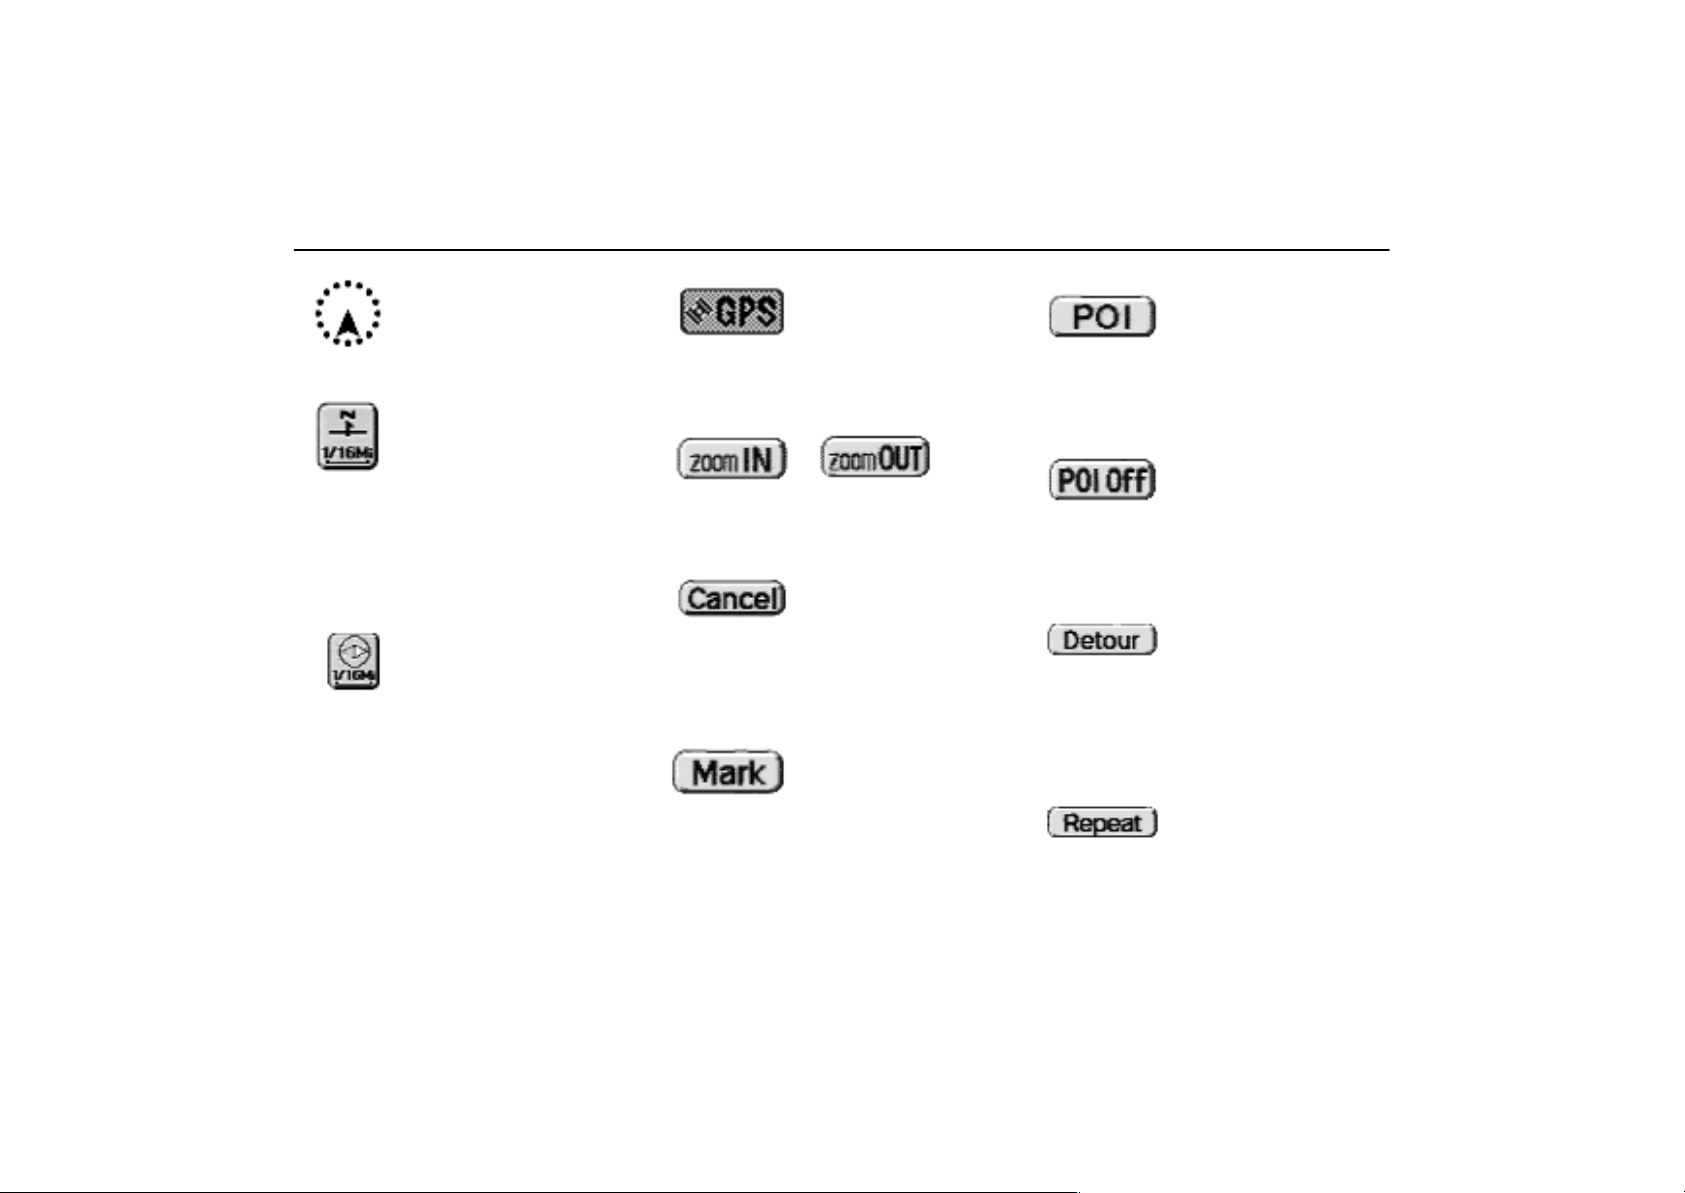
s–001u
Indicates the current position.
s–002u
Indicates the map with North up. Touching
this symbol directly on the screen changes
to the map with heading–up.
The figure indicates the map scale.
For details, see page 49.
s–003u
Indicates the map with the vehicle travel
direction up. The red triangle shows North.
Touching this symbol directly on the screen
changes to the map with North–up.
Current Vehicle
Position Mark
North–Up Symbol
and Scale of Map
Heading–Up Symbol
and Scale of Map
s–004u
On reception of signals from the GPS, this
mark is displayed.
s–005u s–006u
Magnification or reduction of the map
scale. For details, see page 48.
s–007u
(on the map screen)
The screen displays the ”CANCEL GUID-
ANCE” mode. For details, see page 39.
s–008u
Registers the current vehicle position as a
marked point.
For details, see page 56.
GPS Mark
(Global Positioning
System)
Canceling the Route
Guidance
One – Touch Registration of Marked Point
s–009u
Symbols such as restaurants and hotels,
etc. can be displayed on the screen. For
details, see page 45.
s–010u
Symbols such as restaurants and hotels,
etc. displayed on the screen can be deleted. For details, see page 45.
A detour can be set in the route guidance
mode to avoid a traffic jam caused by road
repairs or an accident. For details, see
page 44.
If you cannot hear voice guidance, you can
hear it once again.
Display of Point of
Interest
Deletion of Point of
Interest
Setting of Detours–011u
V oice Guidances–012u
6
Page 11
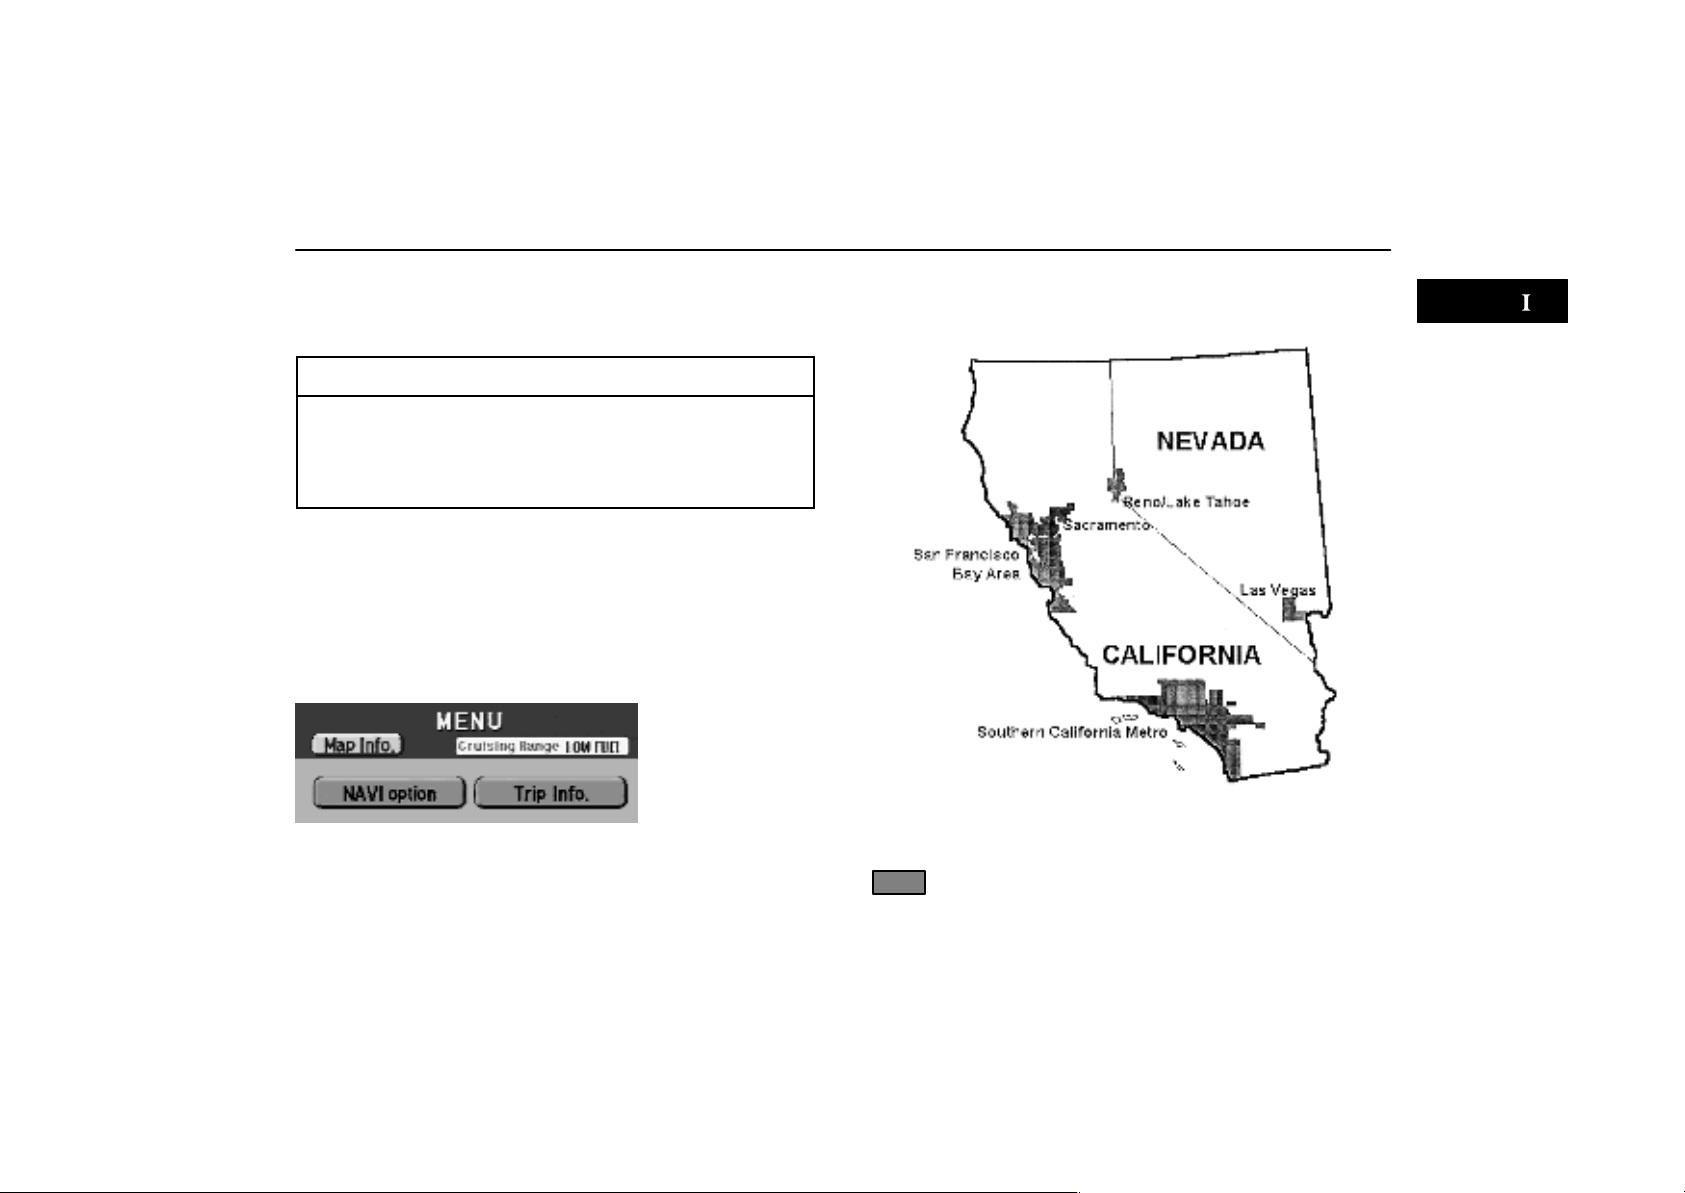
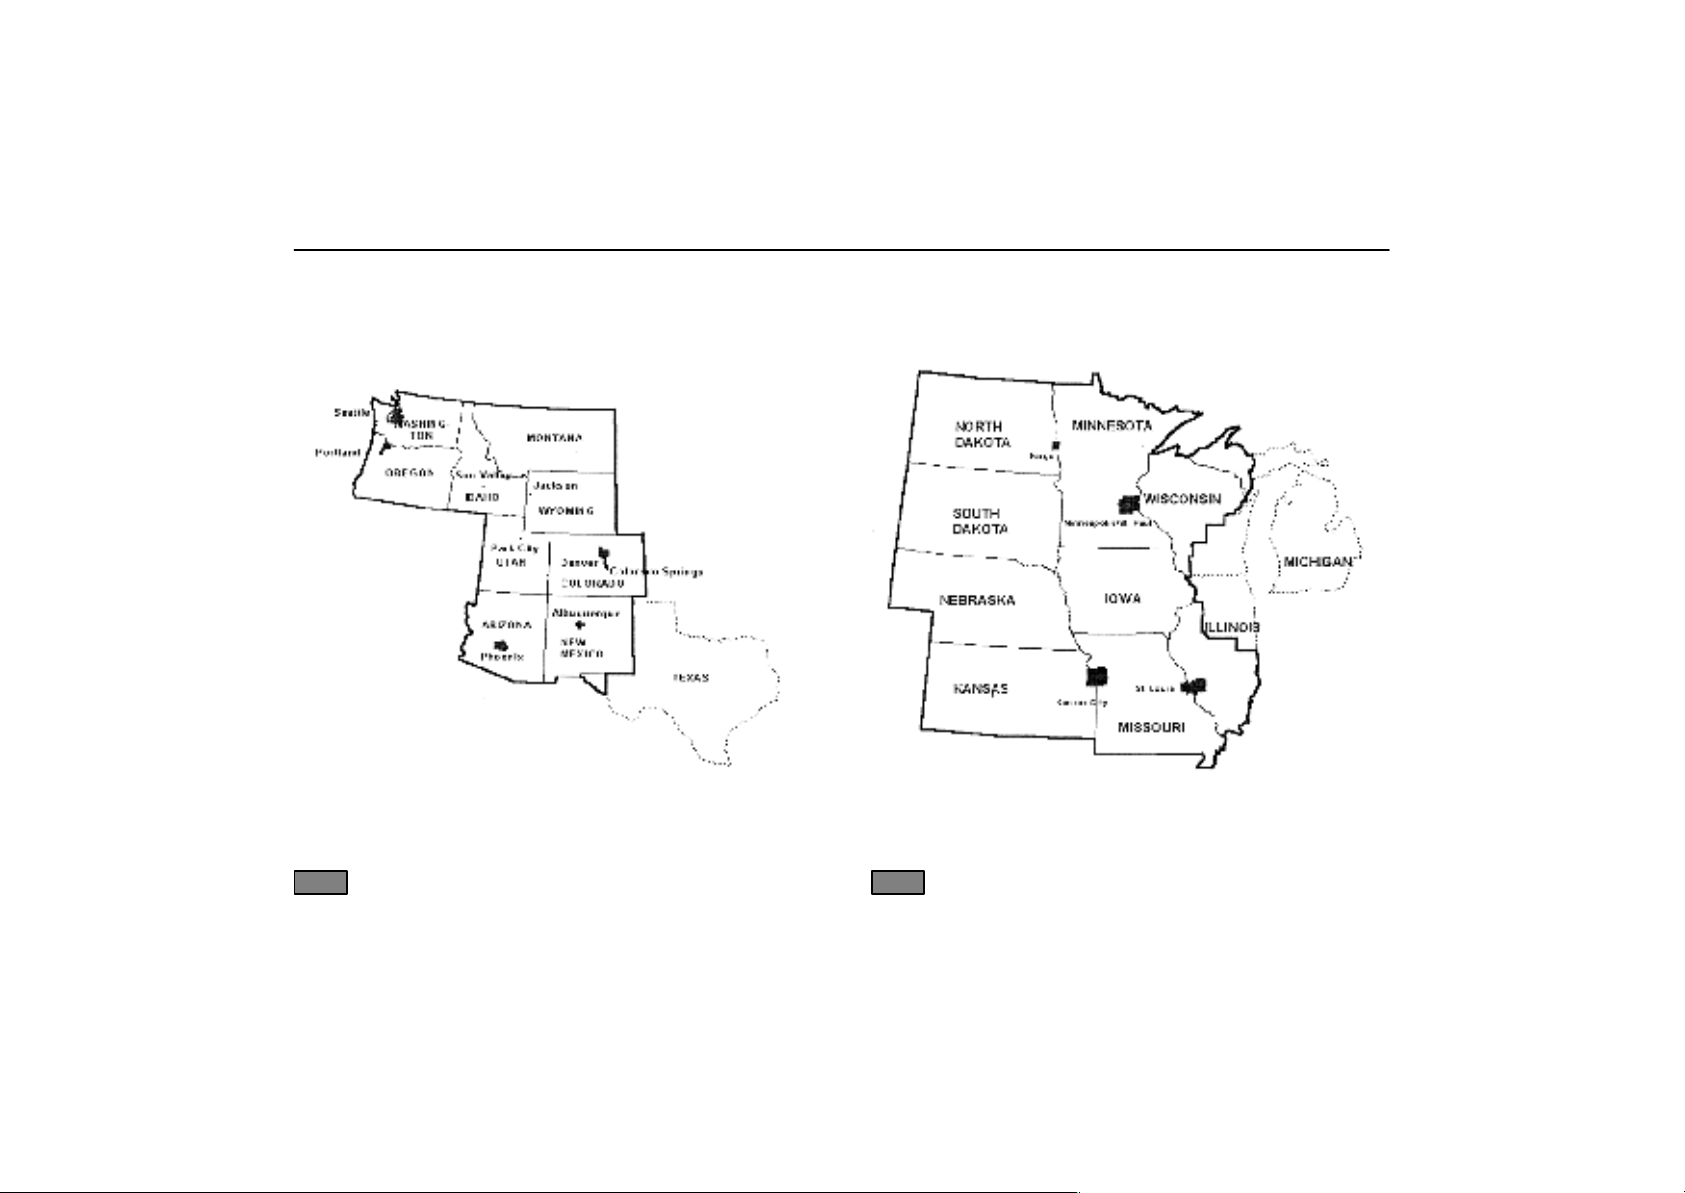
Map Database
Map database is made based on the maps in June, 1998 edition of DENSO, whose information source comes from Nav
T ech maps.
INFORMATION
Nav Tech map data includes 2 types of areas: ”Detailed
map coverage areas” providing all detailed road data and
other areas showing main roads only. The route calculation may not be made on the border of the detailed map
coverage area and the other area.
In order to provide you with accurate map information as much
as possible, we are always gathering information such as road
repairs and doing site investigation. However, the names of
roads, streets, facilities, and their locations are changed so
often. In some places, the construction on roads may be in
progress. For that reason, information on some parts in this system might be different from the actual one.
For the map information, contact your Lexus dealer.
1–011u
When you touch ”Map Info.”, the ”Map Database Version”screen appears and displays the map database version. The screen goes out 6 seconds later.
Detailed map coverage area
DCA01
September, 1998 by Nav Tech
Detailed map coverage area
(Major cities and their environs only)
7
Page 12
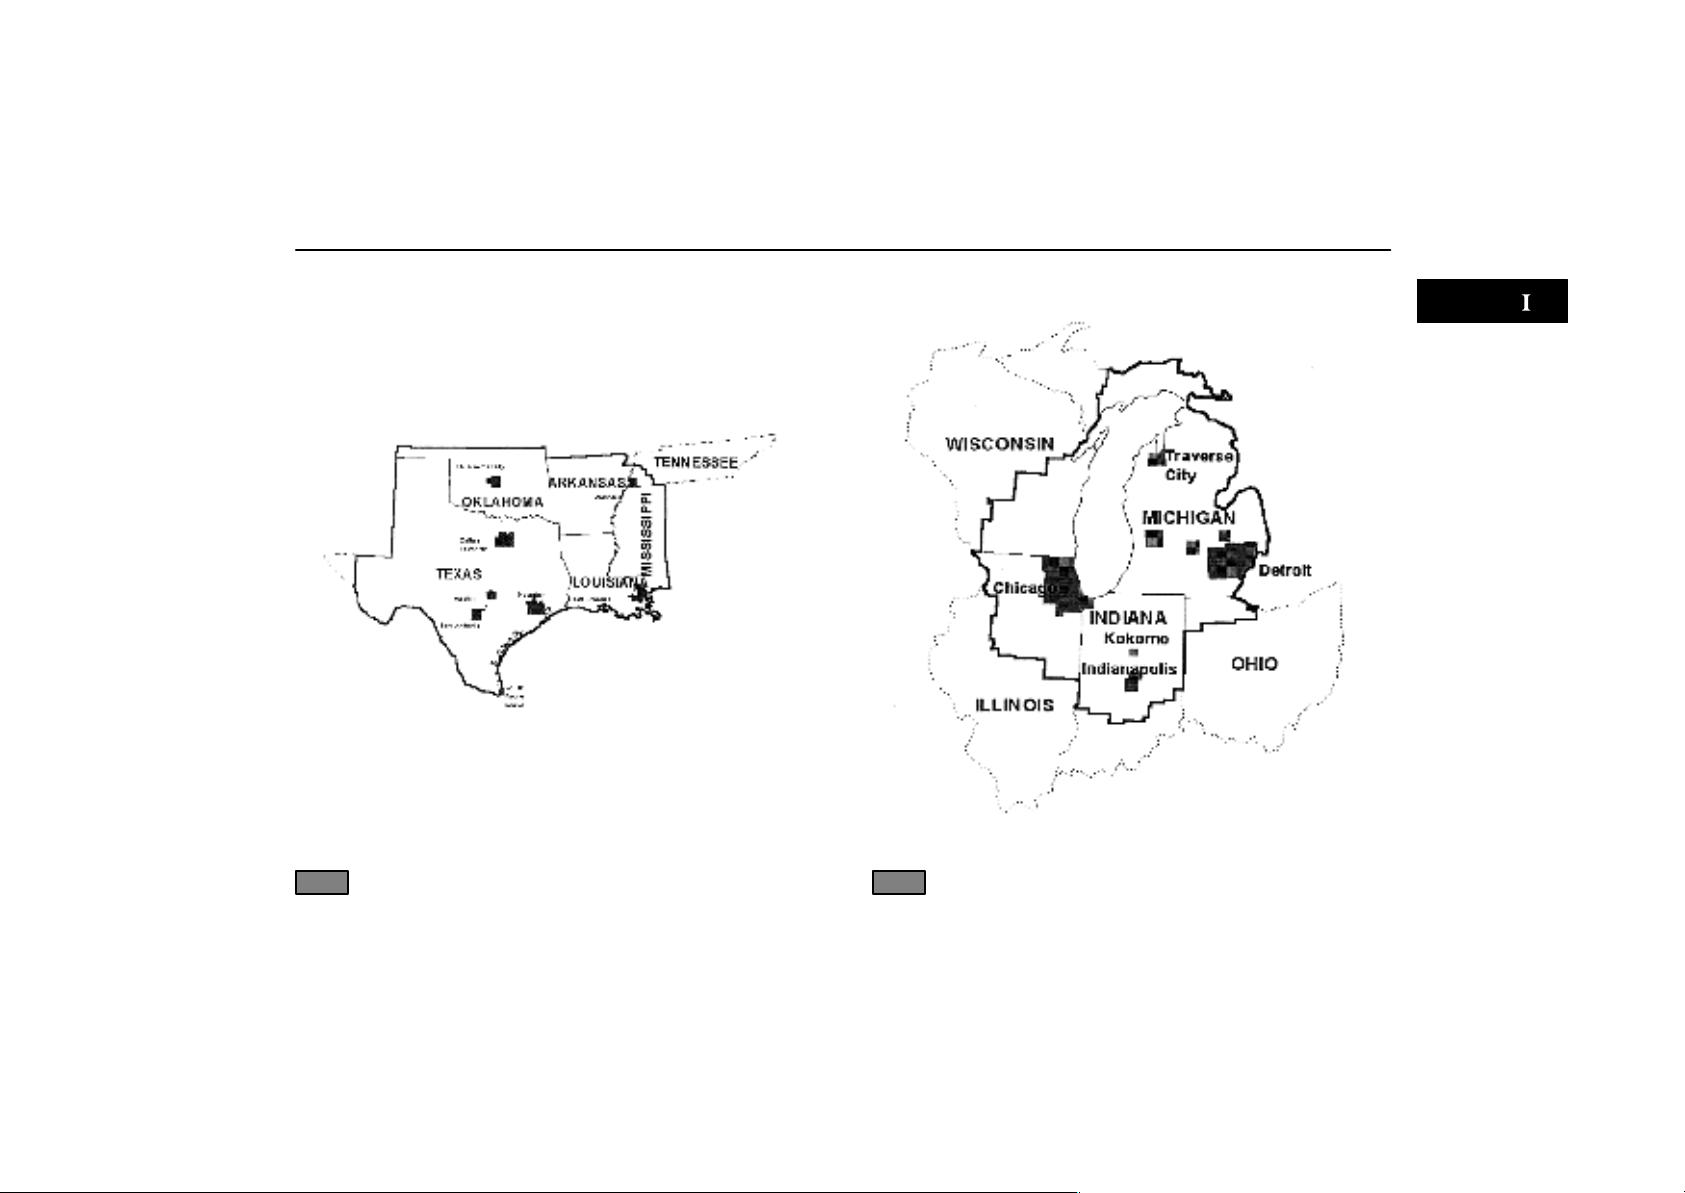
Map Database
Detailed map coverage area
DCA02
August, 1998 by Nav Tech
Detailed map coverage area
(Major cities and their environs only)
Detailed map coverage area
DCA03
July, 1998 by Nav Tech
Detailed map coverage area
(Major cities and their environs only)
8
Page 13
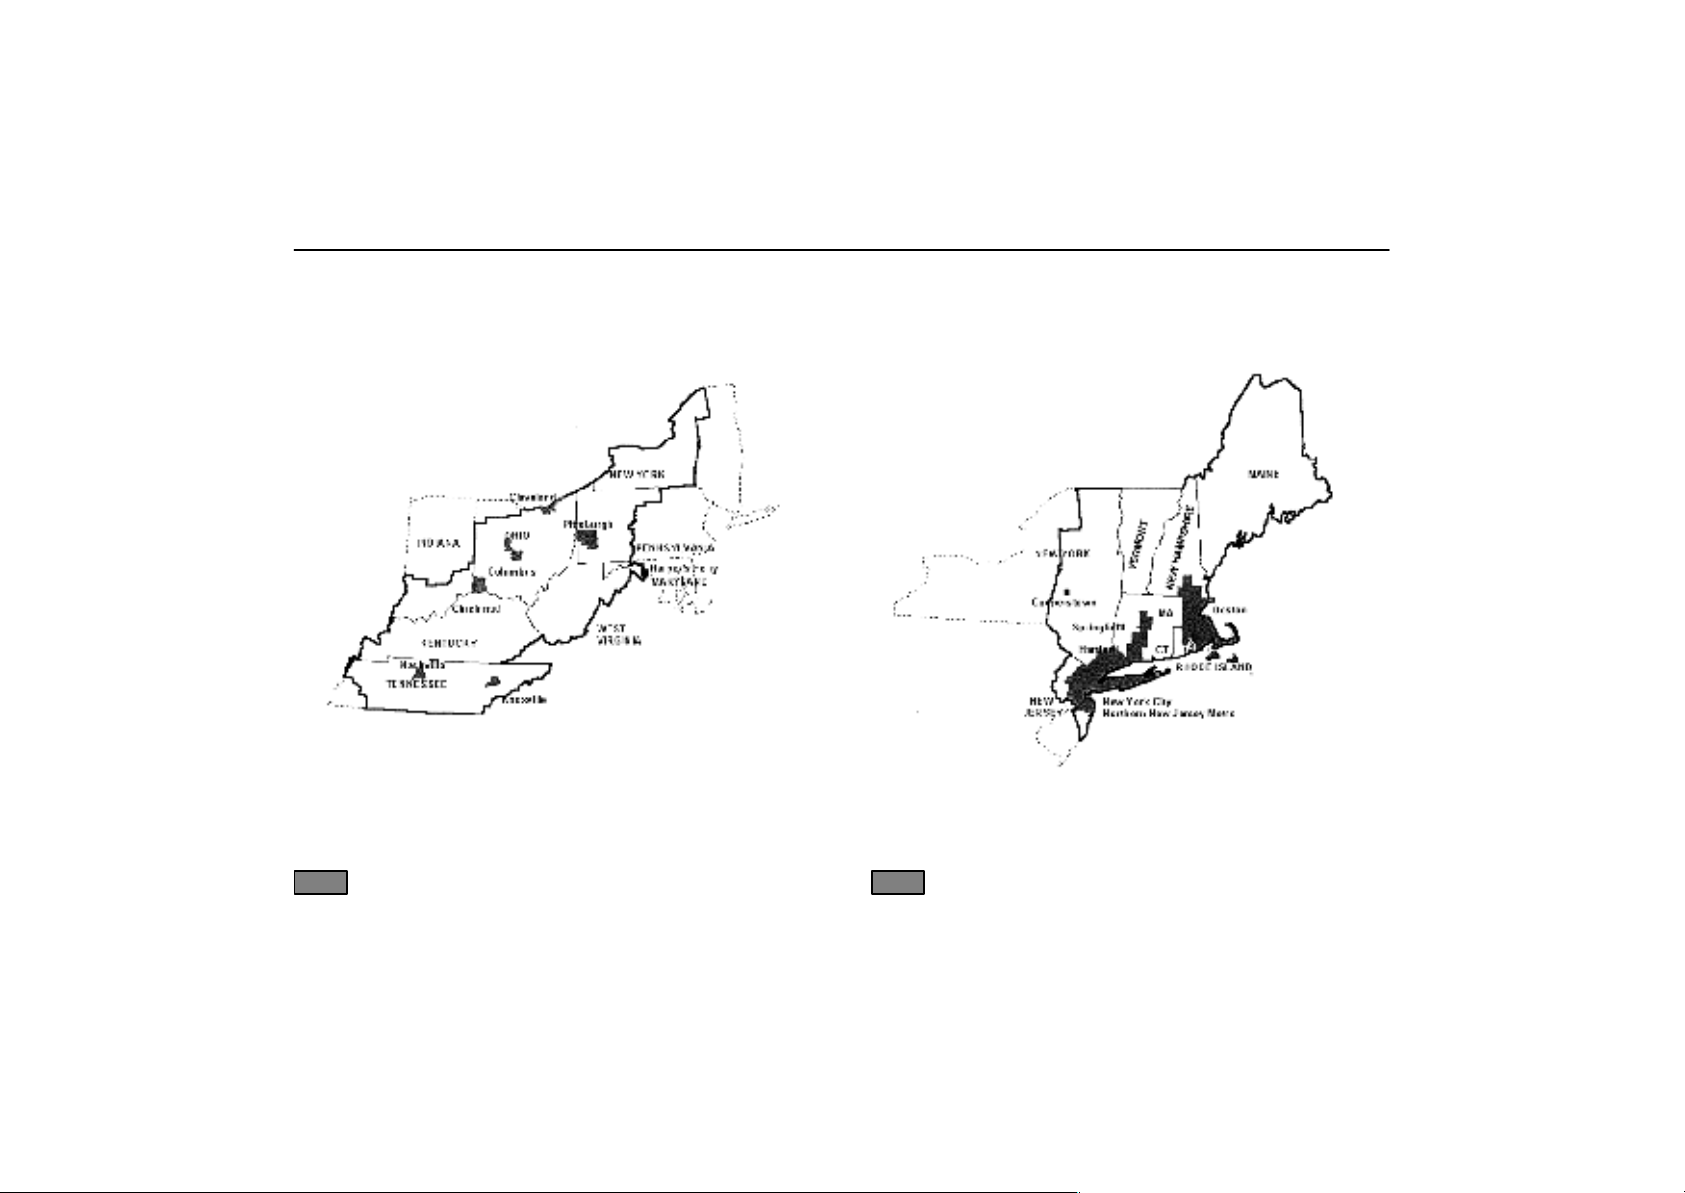
Map Database
Detailed map coverage area
DCA04
August, 1998 by Nav Tech
Detailed map coverage area
(Major cities and their environs only)
Detailed map coverage area
DCA05
July, 1998 by Nav Tech
Detailed map coverage area
(Major cities and their environs only)
9
Page 14
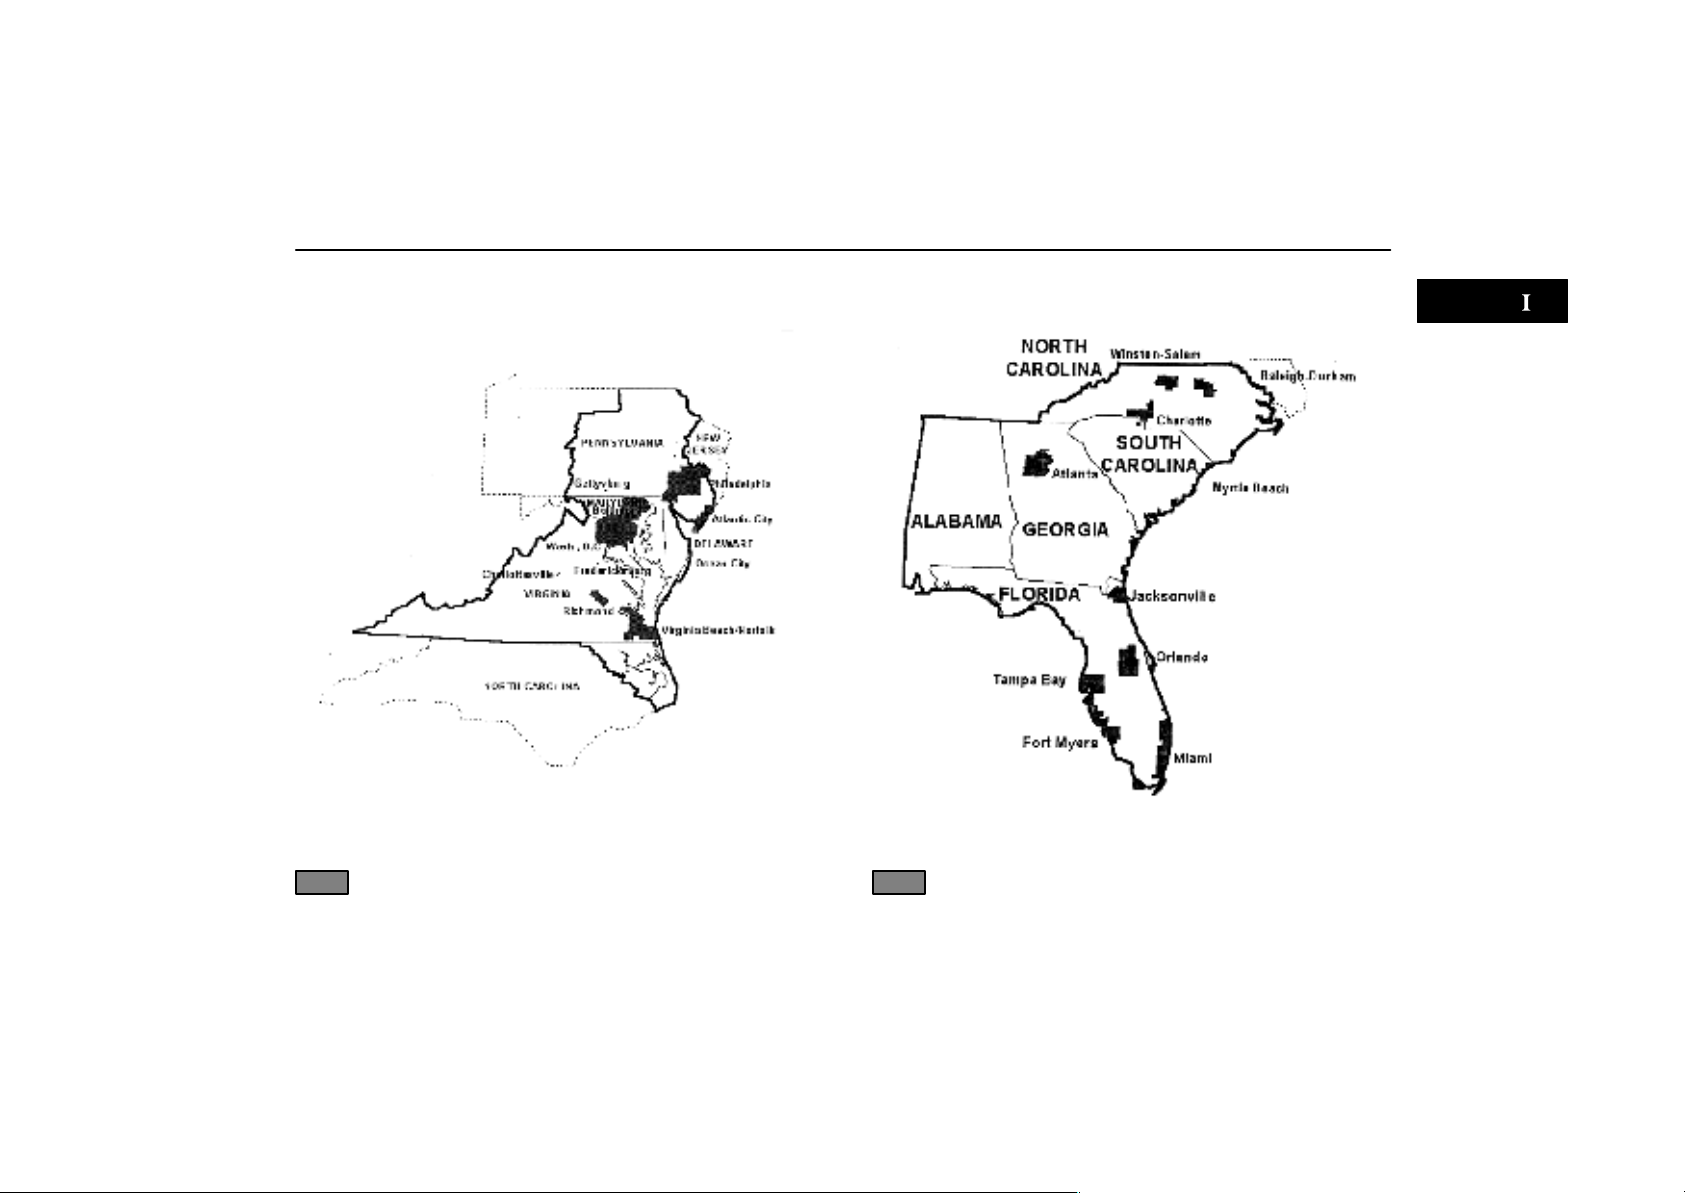
Map Database
Detailed map coverage area
DCA06
September, 1998 by Nav Tech
Detailed map coverage area
(Major cities and their environs only)
Detailed map coverage area
DCA07
September, 1998 by Nav Tech
Detailed map coverage area
(Major cities and their environs only)
10
Page 15
Map Database
Detailed map coverage area
DCA08
August, 1998 by Nav Tech
Detailed map coverage area
(Major cities and their environs only)
Detailed map coverage area
DCA09
August, 1998 by Nav Tech
Detailed map coverage area
(Major cities and their environs only)
11
Page 16

12
Page 17

SECTION
III
BASIC FUNCTIONS
Description of basic operations in frequent use
”MAP/GUIDE” switch 14. . . . . . . . . . . . . . . . . . . . . . . . . . . . . . . . . . . . . . . . . . . . . .
”DESTINATION” switch 15. . . . . . . . . . . . . . . . . . . . . . . . . . . . . . . . . . . . . . . . . . . .
”MENU” switch 16. . . . . . . . . . . . . . . . . . . . . . . . . . . . . . . . . . . . . . . . . . . . . . . . . . .
Current position display 18. . . . . . . . . . . . . . . . . . . . . . . . . . . . . . . . . . . . . . . . . . . .
Registration of your house 19. . . . . . . . . . . . . . . . . . . . . . . . . . . . . . . . . . . . . . . . .
Destination input 24. . . . . . . . . . . . . . . . . . . . . . . . . . . . . . . . . . . . . . . . . . . . . . . . . .
Route search 37. . . . . . . . . . . . . . . . . . . . . . . . . . . . . . . . . . . . . . . . . . . . . . . . . . . . .
Route guidance screen 39. . . . . . . . . . . . . . . . . . . . . . . . . . . . . . . . . . . . . . . . . . . .
Voice guidance 40. . . . . . . . . . . . . . . . . . . . . . . . . . . . . . . . . . . . . . . . . . . . . . . . . . .
Typical voice guidance prompts 41. . . . . . . . . . . . . . . . . . . . . . . . . . . . . . . . . . . . .
Detour setting 44. . . . . . . . . . . . . . . . . . . . . . . . . . . . . . . . . . . . . . . . . . . . . . . . . . . .
POI (display of points of interest) 45. . . . . . . . . . . . . . . . . . . . . . . . . . . . . . . . . . . .
Turn list 47. . . . . . . . . . . . . . . . . . . . . . . . . . . . . . . . . . . . . . . . . . . . . . . . . . . . . . . . .
Map scale 48. . . . . . . . . . . . . . . . . . . . . . . . . . . . . . . . . . . . . . . . . . . . . . . . . . . . . . .
Screen scrolling 49. . . . . . . . . . . . . . . . . . . . . . . . . . . . . . . . . . . . . . . . . . . . . . . . . .
Orientation of map 49. . . . . . . . . . . . . . . . . . . . . . . . . . . . . . . . . . . . . . . . . . . . . . . .
Advance view 50. . . . . . . . . . . . . . . . . . . . . . . . . . . . . . . . . . . . . . . . . . . . . . . . . . . .
13
Page 18
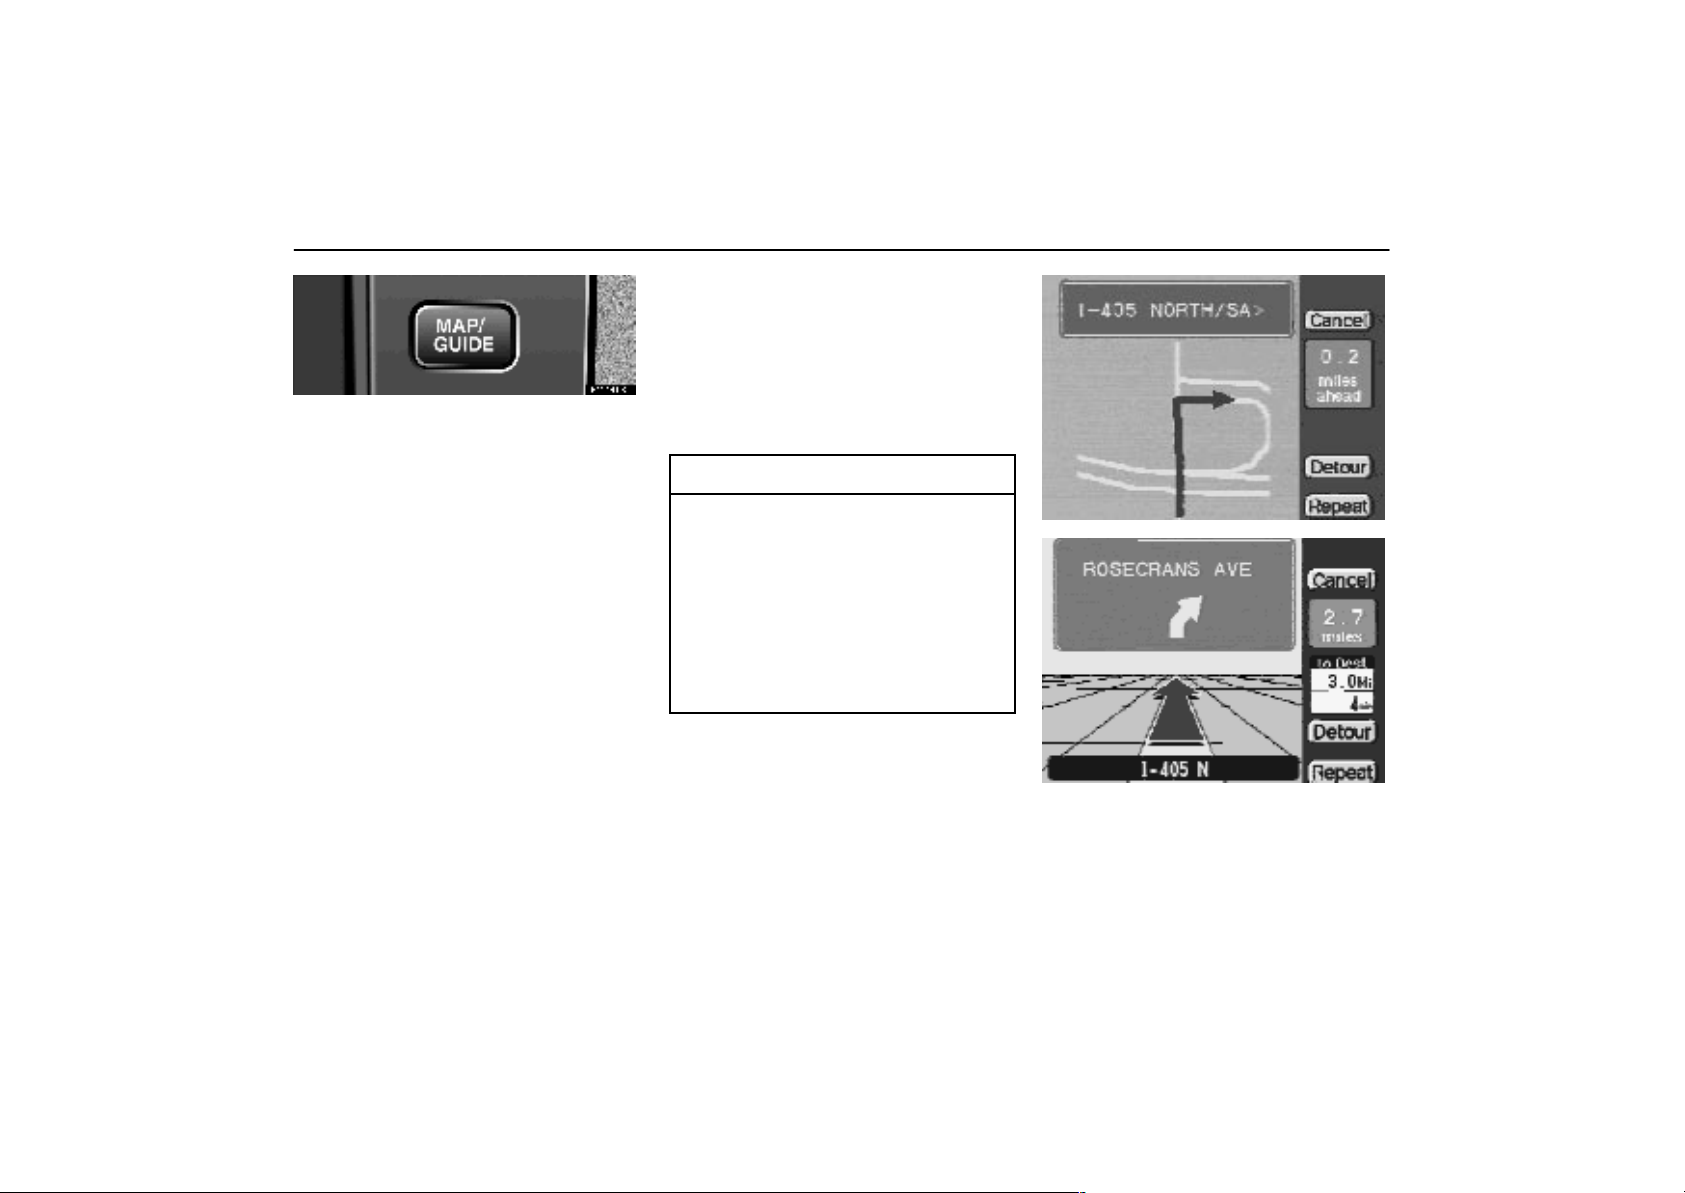
”MAP/GUIDE” Switch
EMV3003U
The following features are available with
the ”MAP/GUIDE” switch.
(a) Displaying the current position
The screen displays the current position.
The current vehicle position mark is displayed in the center of the screen.
Even after you move the map by a ”one–
touch” scroll (see page 49 for details),
pushing the ”MAP/GUIDE” switch displays
the screen with the current vehicle position
mark in the center of the screen.
(b) Displaying the magnified intersection or freeway exit
When you are approaching an intersection
or freeway exit, the intersection or freeway
exit display is magnified automatically. The
name of the street on which you will run is
displayed at the top of the screen.
INFORMATION
Immediately after the beginning of
route guidance, the magnified intersection may not be displayed on
the screen. If this is a case, push
the ”MAP/GUIDE” switch.
In some cases, depending on the
map data used, the magnified freeway exit screen may display the
freeway exit number above the
street name.
3–001u
3–002u
Pushing the ”MAP/GUIDE” switch alternates the screens shown above.
Repeat: Voice guidance repeats.
Detour: Sets the detour. (For details, see
page 44.)
14
Page 19
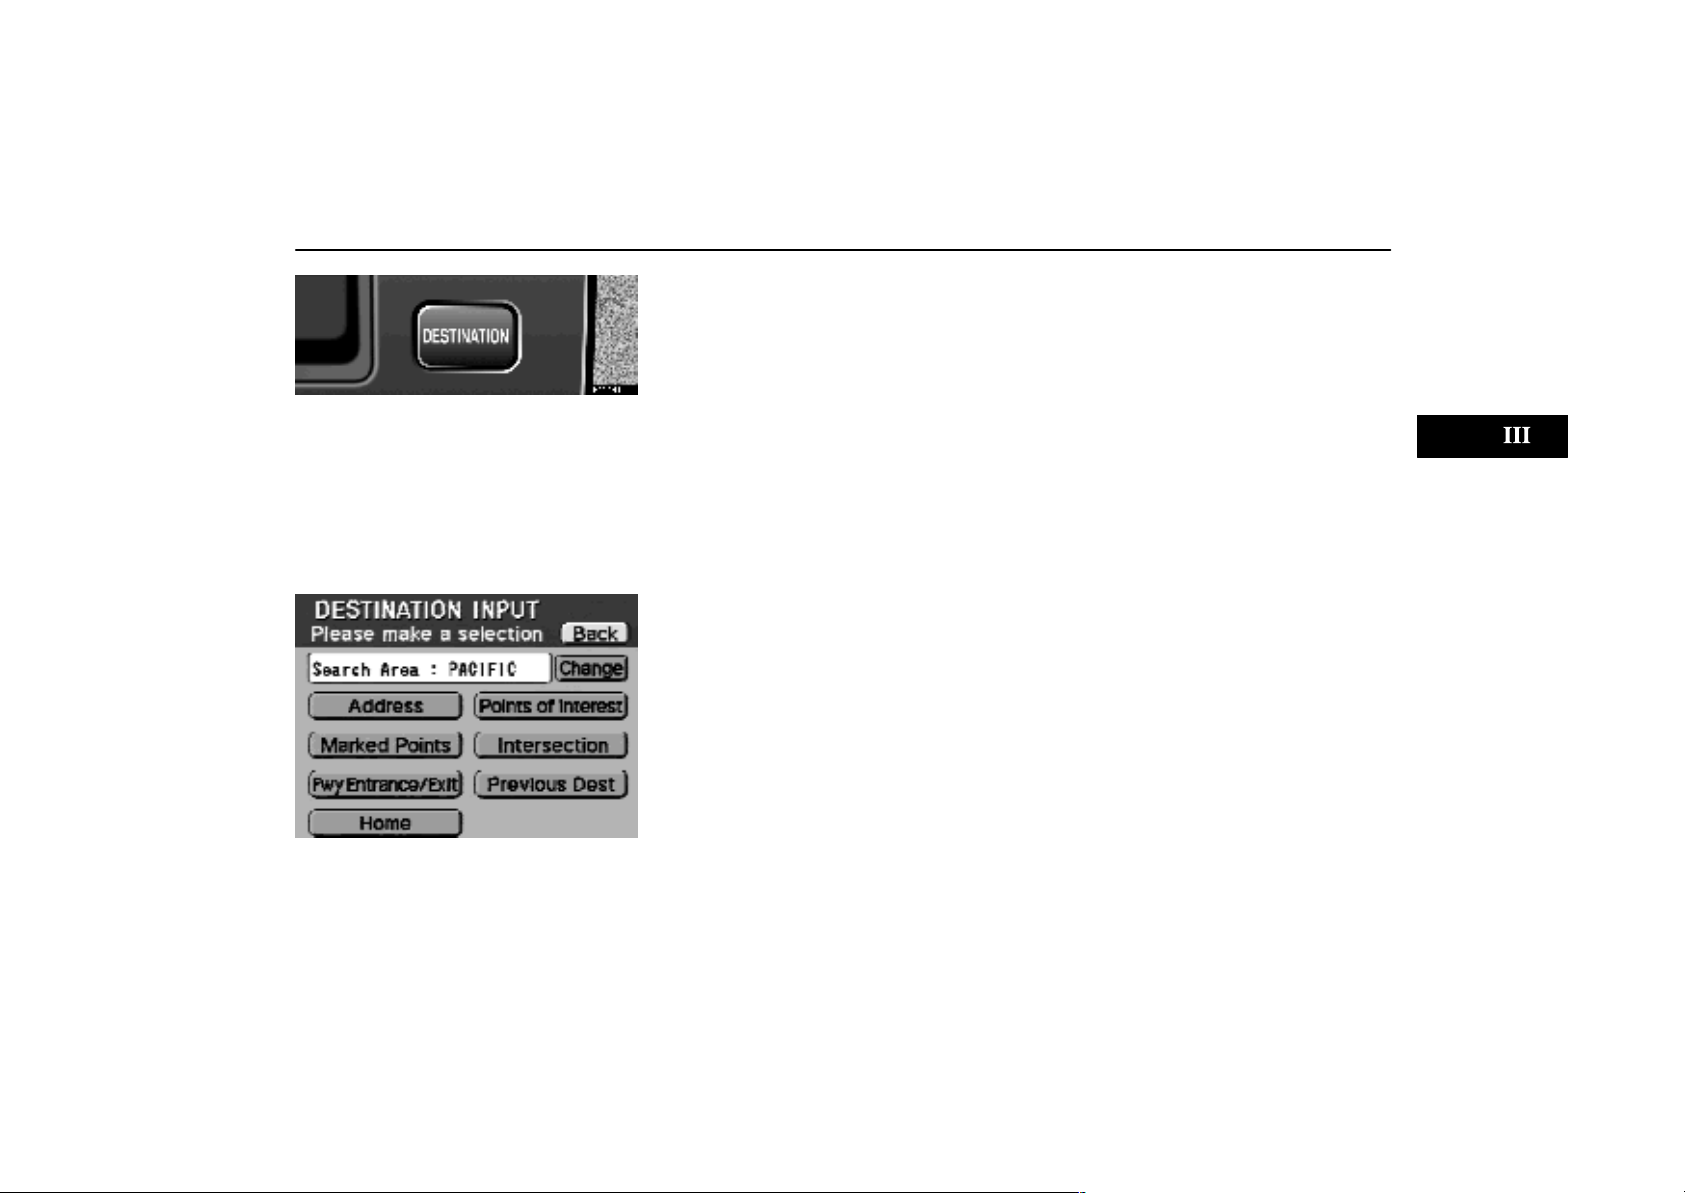
”DESTINATION” Switch
EMV3001U
Push the ”DESTINATION” switch to display the screen for inputting your destination.
If you push the ”DESTINATION” switch
during route guidance, the ”CANCEL
GUIDANCE” screen appears. Touch ”Cancel Guidance” to display the following destination input screen.
1–001u
For the steps to input your destination, see
the part ”Destination input” on page 24.
15
Page 20
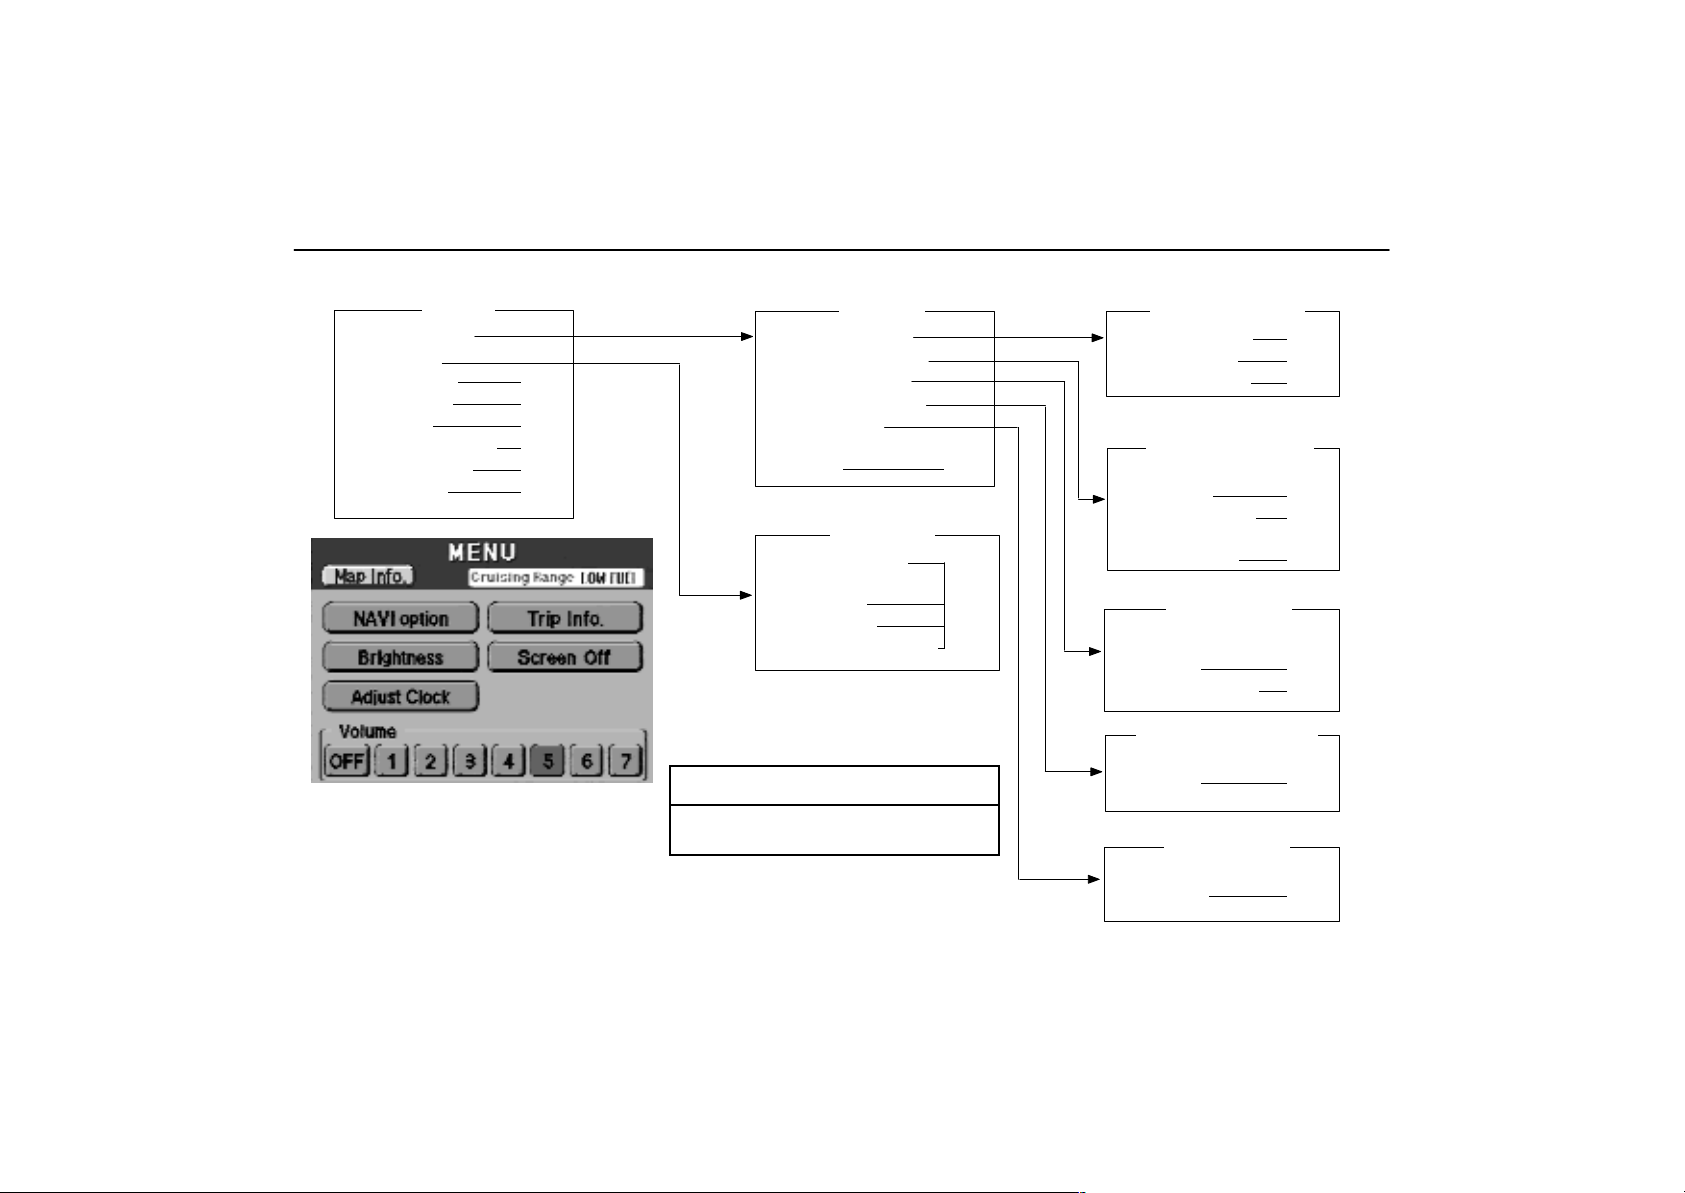
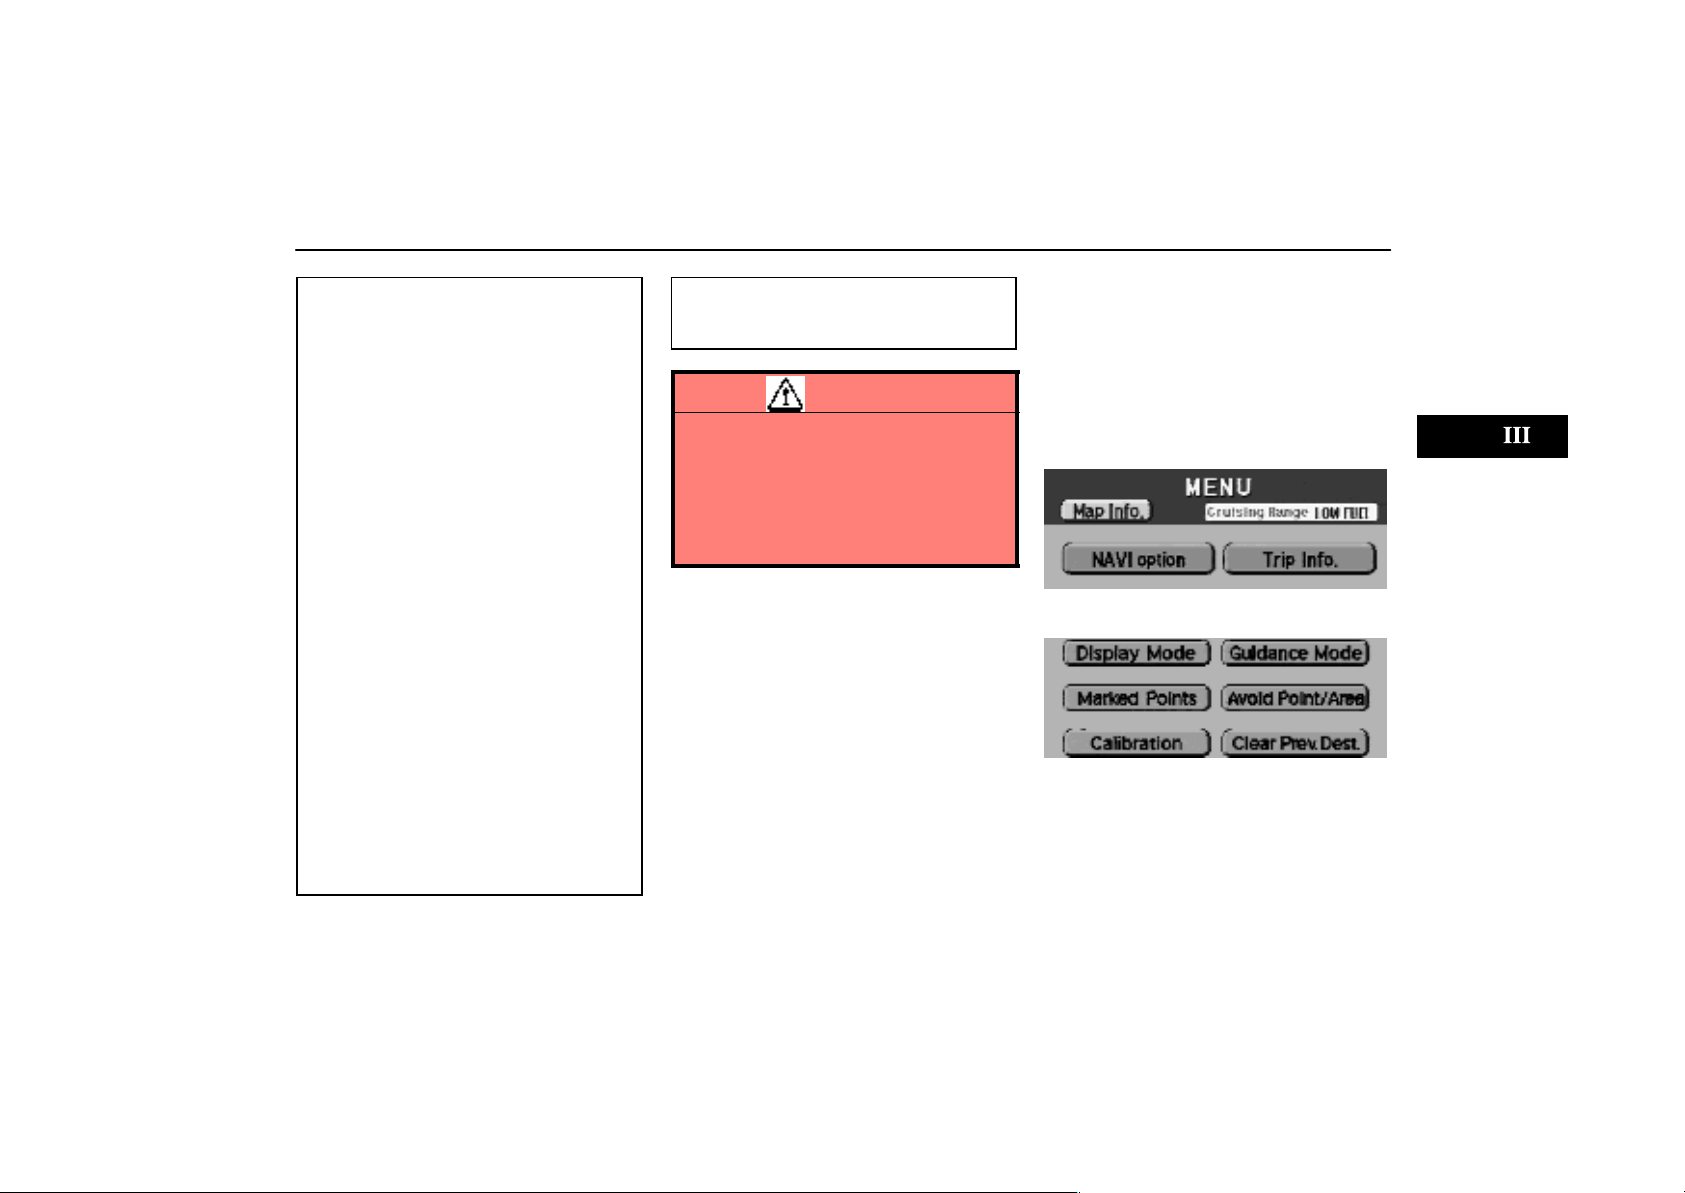
”MENU” Switch
MENU
NAVI option
Trip Info.
Brightness (a)
Screen Off (b)
Volume (c)
Cruising Range (d)
Adjust Clock (e)
Map Info. (f)
3–063ua
Push the ”MENU” switch to display the
menu screen.
The settings on this page are available
with the switches shown in the above illustration.
OPTION
Display Mode
Guidance Mode
Marked Points
Avoid Point/Area
Calibration
Clear Prev.
Dest. (g)
TRIP INFO.
Running Time
Distance After
Refueling (h)
Av. Speed
Fuel consumption
INFORMATION
”Adjust Clock” switch is provided
on LS400 only.
DISPLAY MODE
Advance View (i)
Route Trace (j)
Route Display (k)
GUIDANCE MODE
Automatic
Reroute (l)
Route Preview (m)
Time to
Destination (n)
EDIT MARKED
POINTS
Register / Edit
/ Delete (o)
Register Home (p)
AVOID POINT/AREA
Register / Edit
/ Delete (q)
CALIBRATION
Position /
Distance (r)
16
Page 21

”MENU” Switch
(a) Brightness 75. . . . . . . . . . . . . . . . .
Adjustment of brightness or contrast of the
screen
(b) Screen Off 76. . . . . . . . . . . . . . . . . .
Turning off the screen display
(c) Volume 40. . . . . . . . . . . . . . . . . . . . .
Volume adjustment of voice guidance
(d) Cruising Range 70. . . . . . . . . . . . .
Display of available cruising range
(e) Adjust Clock 74. . . . . . . . . . . . . . . .
Adjustment of the clock. Setting or canceling Daylight Saving Time (LS400 only)
(f) Map Info. 7. . . . . . . . . . . . . . . . . . .
Showing the map database version
(g) Clear Prev. Dest. 25. . . . . . . . . . . .
Deletion of all previous destinations
(h) Trip Info. 70. . . . . . . . . . . . . . . . . . .
Display of the values of driving distance,
driving distance after being refueled, average vehicle speed, fuel consumption, etc.
(i) Advance View 50. . . . . . . . . . . . . .
Setting or canceling the front wide display
(j) Route Trace 68. . . . . . . . . . . . . . . .
Memorizing the driving route
(k) Route Display 68. . . . . . . . . . . . . .
Display of the memorized route
(l) Automatic Reroute 66. . . . . . . . . .
Automatic route re–setting in case the vehicle runs off the route
(m)Route Preview 67. . . . . . . . . . . . . .
Display of the entire route
(n) Time to Destination 69. . . . . . . . .
Display of the time up to the destination
(o) Register/Edit/Delete 52. . . . . . . . .
Registration/editing/deletion of the marked
point
(p) Register Home 19. . . . . . . . . . . . . .
Registration of your house
(q) Register/Edit/Delete 60. . . . . . . . .
Registration/editing/deletion of the point to
be avoided
(r) Position/Distance 63. . . . . . . . . . .
Calibration of the current vehicle position
and distance
For details, see the page number given
for each item.
17
Page 22
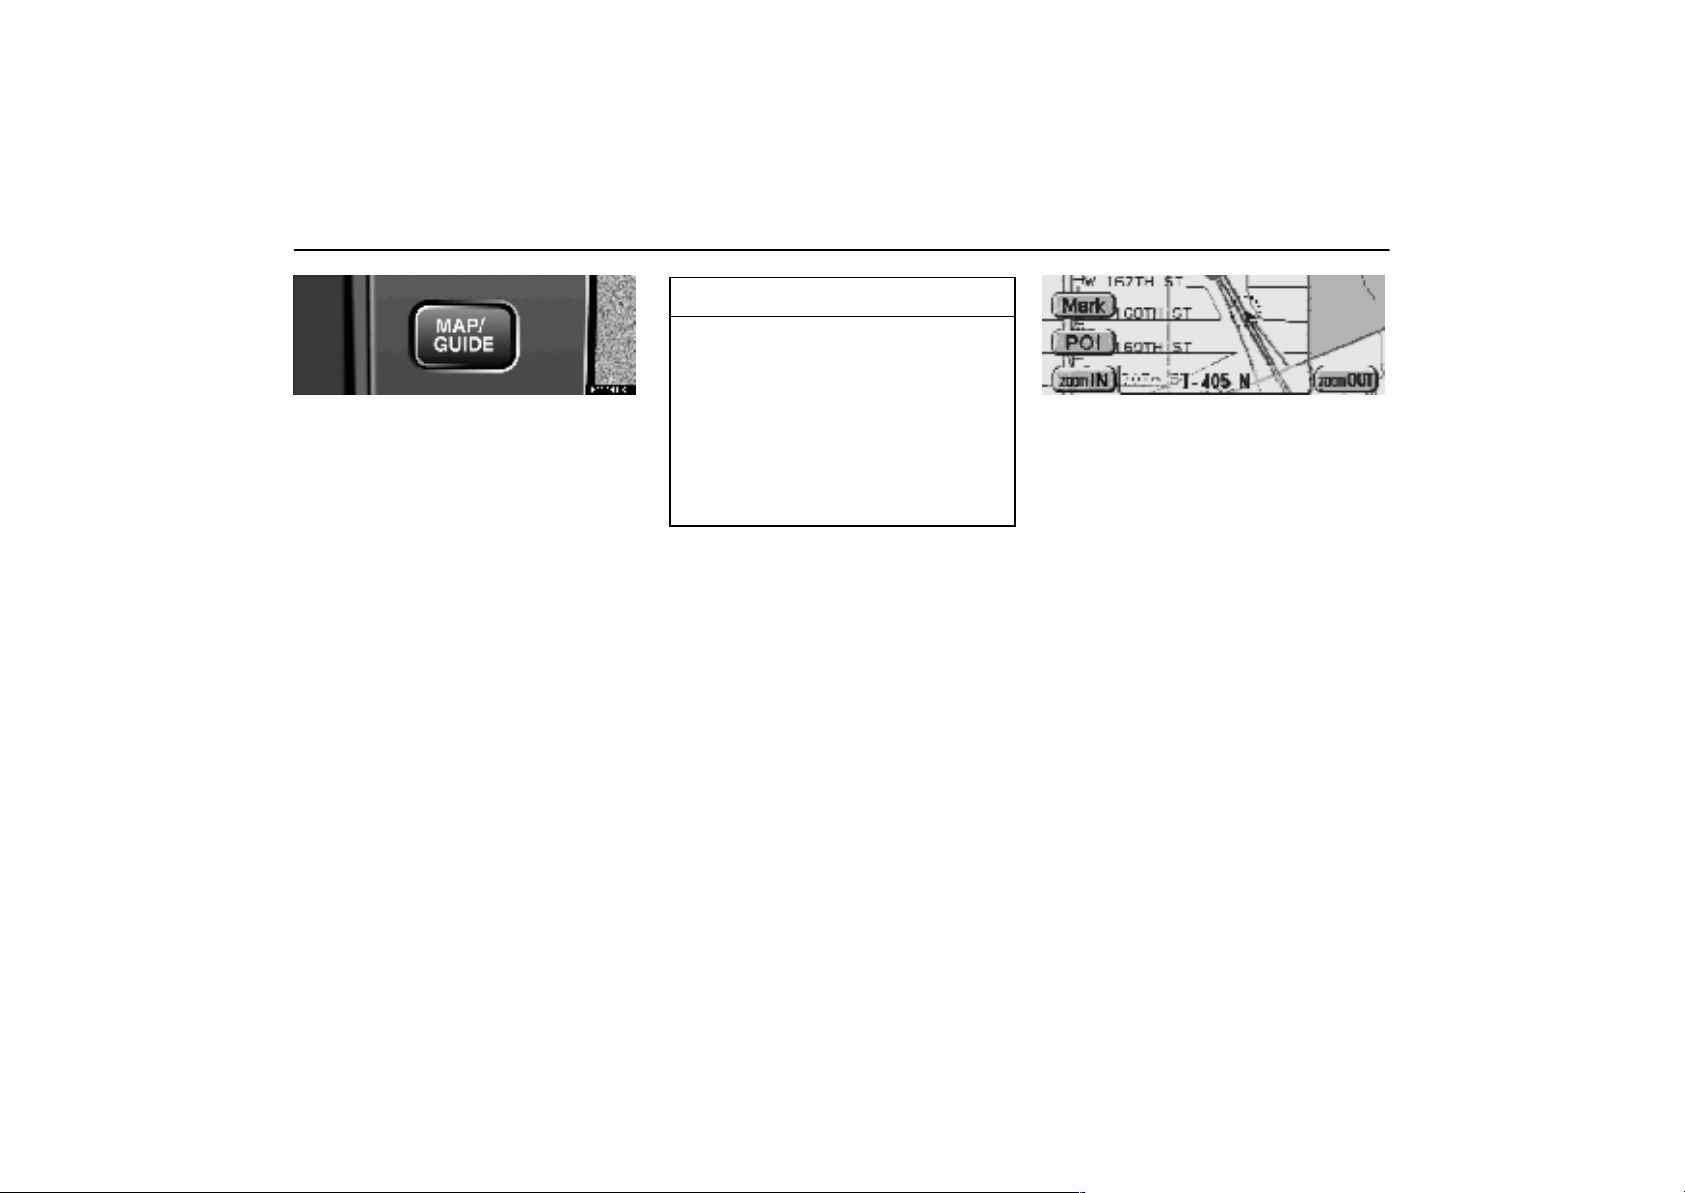
Current Position Display
EMV3003U
Push the ”MAP/GUIDE” switch.
The current vehicle position mark appears
in the center of the screen.
During driving, the current vehicle posi-
tion mark is fixed in the center and the
map moves.
If you select the advance view display
(see page 50 for details), display of the
part where your vehicle is heading for is
enlarged.
When you move the map with a ”one–
touch” scroll (see page 49 for details) to
check the road condition, the map is
fixed and the current vehicle position
mark is movable.
INFORMATION
Because the map is fixed and the current vehicle position mark moves with
a ”one–touch” scroll, the current vehicle position mark may disappear
from the screen during driving. Move
the map with a ”one–touch” scroll
again or push the ”MAP/GUIDE”
switch to display the current vehicle
position mark in the center of the
screen.
3–003ua
The name of the street on which you are
now driving appears at the bottom of
the screen.
zoom IN / zoom OUT: The map can be
magnified or reduced on scale. (For details, see page 48.)
Mark: One–touch registration of the
marked point. (For details, see page 56.)
POI: The symbols of points of interest
such as restaurants and gas stations, etc.
can be displayed on the map screen. (For
details, see page 45.)
18
Page 23
Current Position Display Registration of Your House
If you register your home address beforehand, you can easily set the route
back to your house.
3–004u
3–006u
[GPS] means your vehicle is receiving
signals from the GPS
The current position is automatically set
as your vehicle receives signals from
the GPS (Global Positioning System).
If your current position is not correct, it is
automatically corrected after your vehicle
receives signals from the GPS.
INFORMATION
After disconnection of the battery, or
on a new vehicle, the current position
may not be correct. After receiving
signals from the GPS, the correct current position is displayed.
If you must correct the current position
manually, follow the steps on page 63.
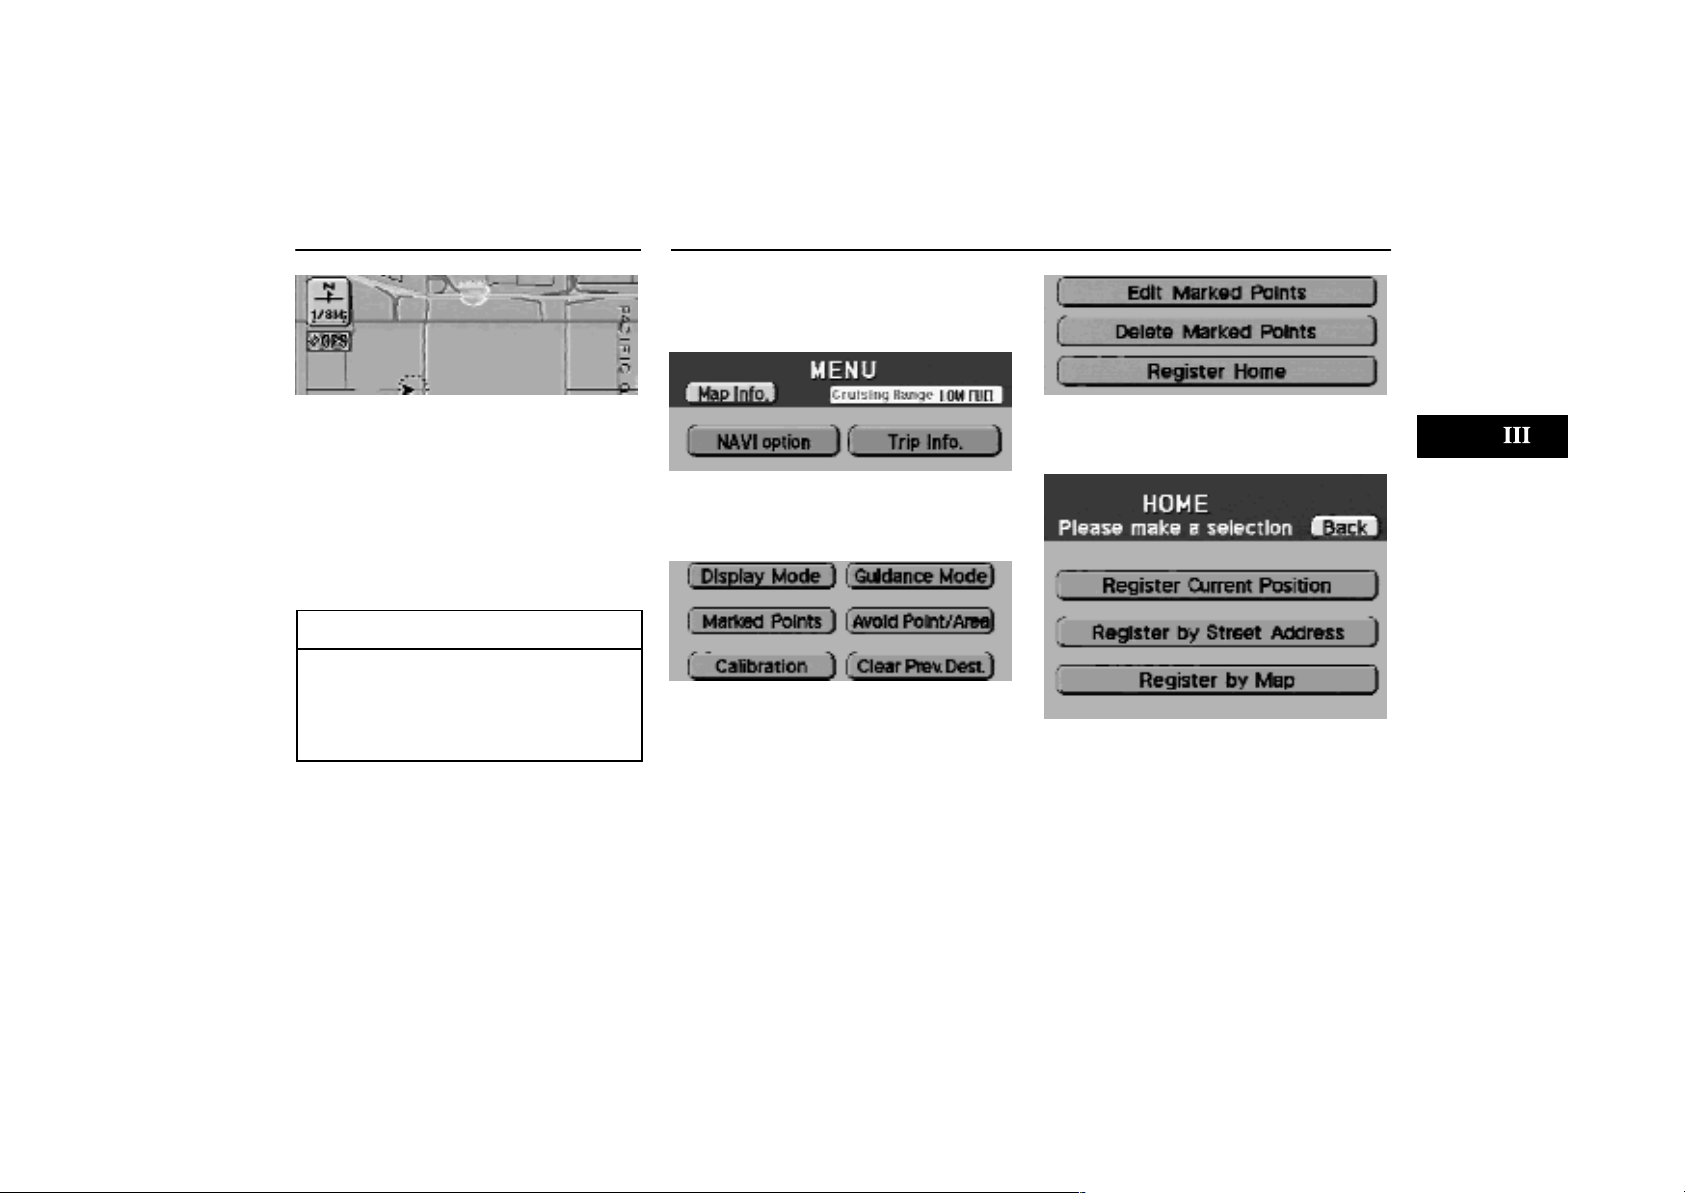
1–011u
1. Push the ”MENU” switch to display
the menu screen and touch ”NAVI option.”
3–005u
2. Touch ”Marked Points”.
Marked points screen
3. Touch ”Register Home”.
3–007u
4. T ouch and select your desired item
from the 3 items on the menu.
19
Page 24
Registration of Your House
(a) Registering current position
If your vehicle is at your house, the current position is registered as your
house.
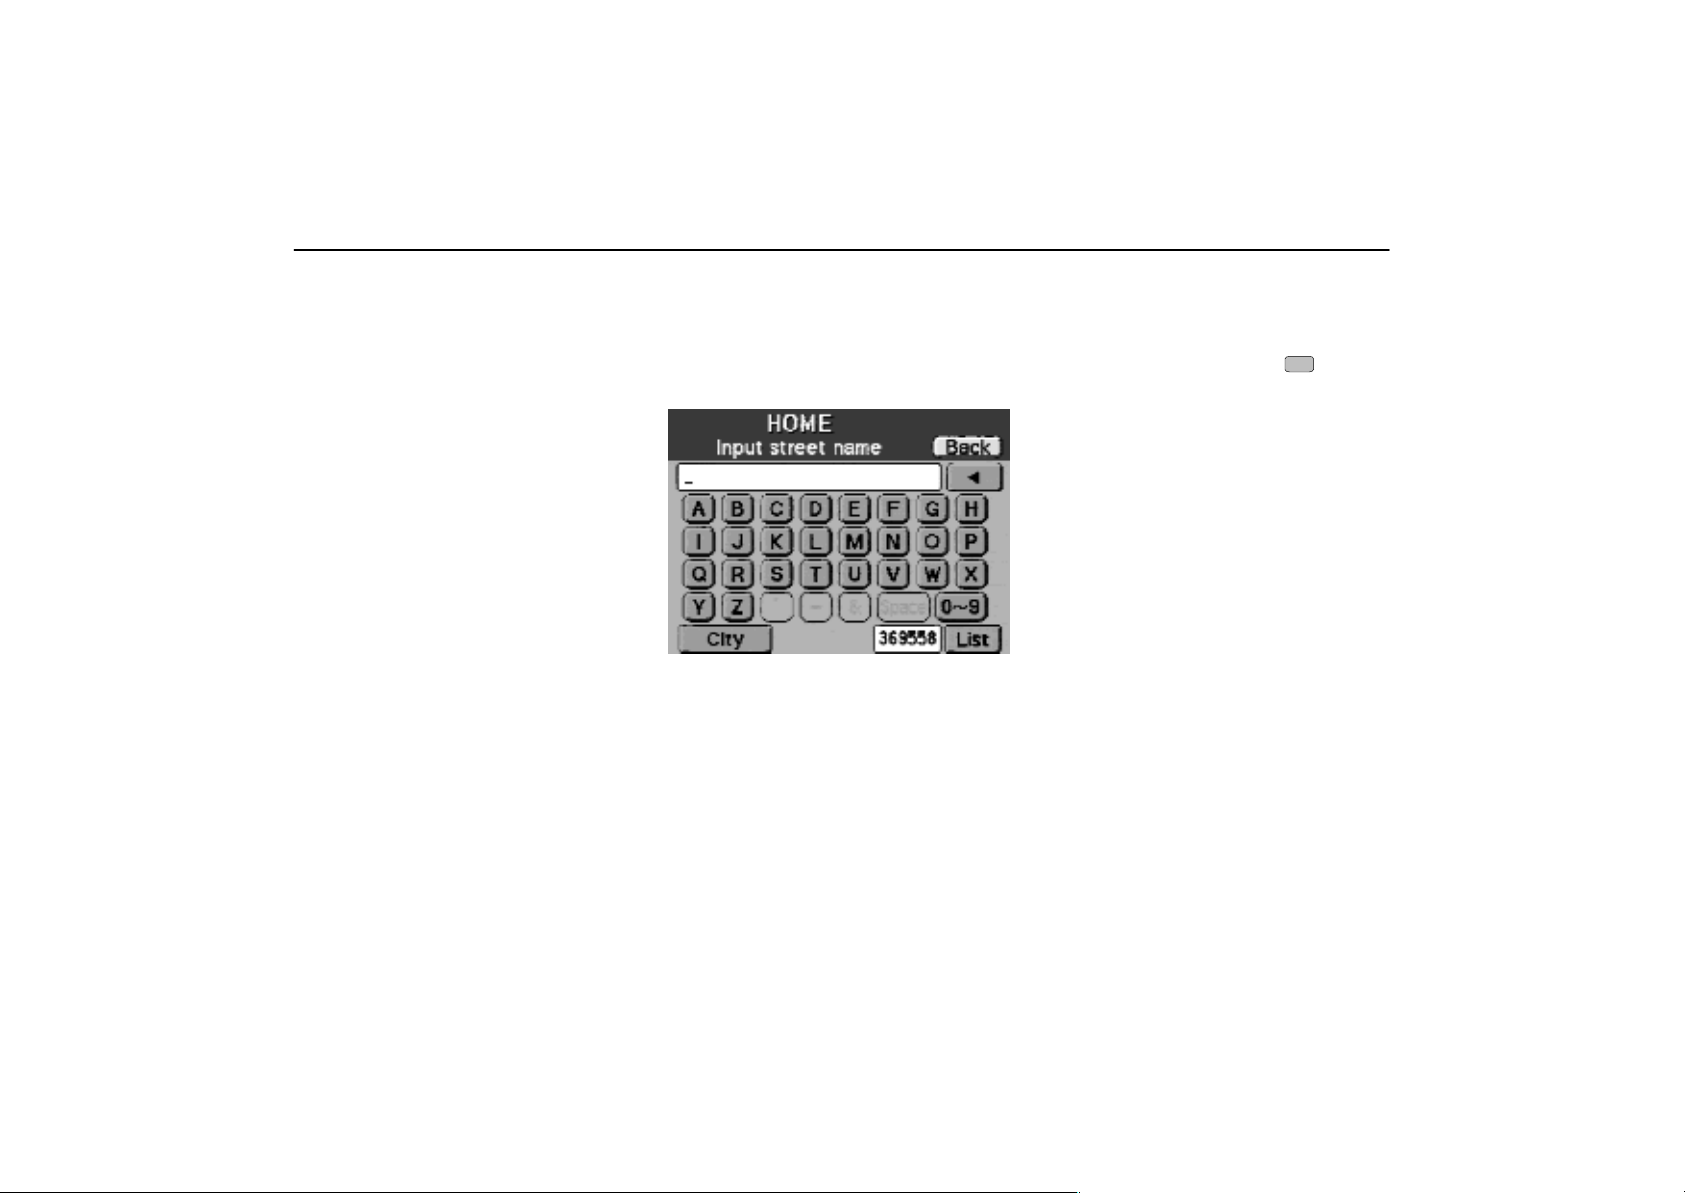
(b) Registering by street address
If you are far away from your house, input your home address to display the
map around your house.
3–008ua
1. Input a street name.
If you touch a wrong letter, delete it using
””.
When you input numerals, touch ”09”
switch to display the screen for numeral
input.
Based on the input letters, the number of
sites appears next to ”List” at the bottom
right of the screen. After the number decreases to some extent, touch ”List” to display the street names. Touch
desired street name.
After finishing your entry, the screen for
inputting a house number appears.
City: The screen for inputting a city name
appears. See step ”4.” on page 22.
of the
20
Page 25
Registration of Your House
3–009ua
3. Touch ”Map” to display the map
screen and determine the position.
If the street input at step ”4” is in plural cities, the screen changes and displays the
menu to select an applicable city. Select a
city in which your house is.
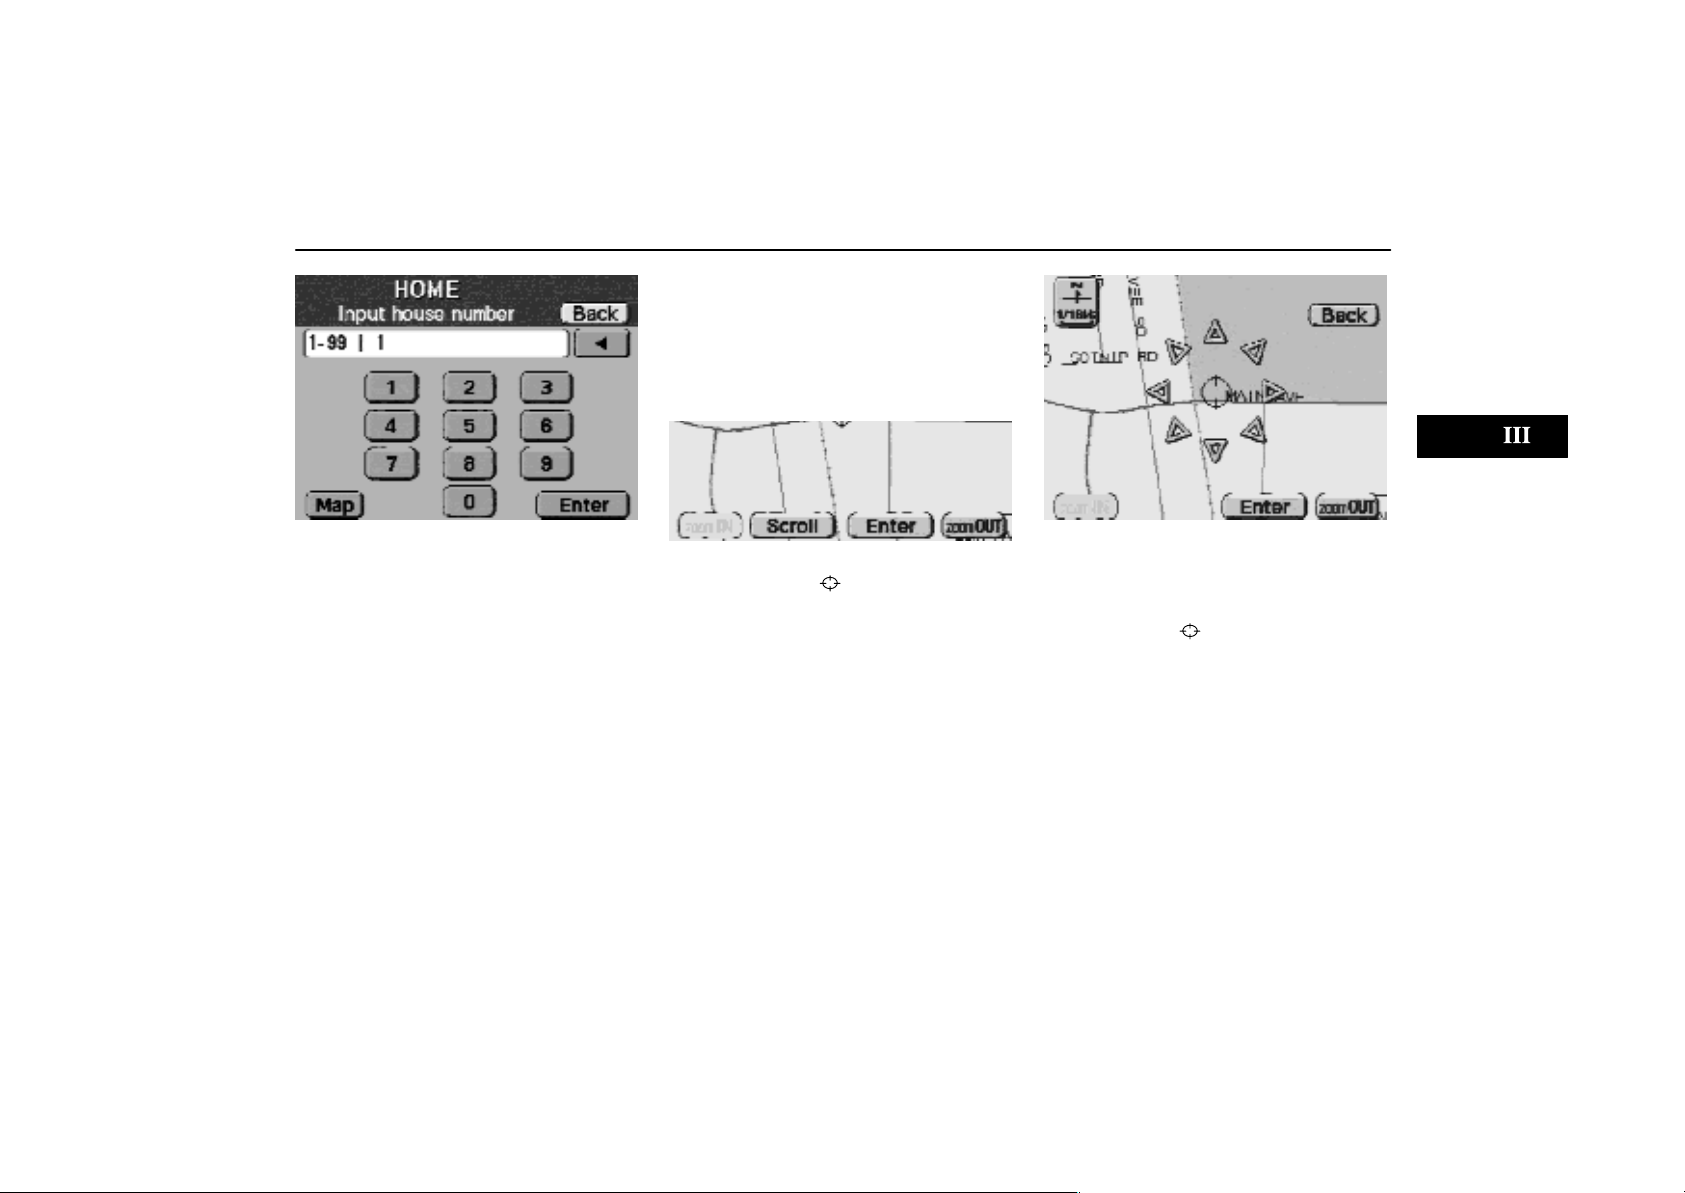
3–010u
3–011u
2. Touch numeral keys to input a house
number.
After finishing your entry, touch ”Enter”.
The screen changes and displays the
menu to determine the condition of the set
route. (See page 37.)
If the input house number exists in more
than 2 cities, the screen changes and displays the menu of the applicable cities.
Touch ”Scroll” to display the screen on
which the cursor
can be moved.
Touch an arrow facing your desired
point. The map scrolls in that direction.
When you release your finger, scrolling
stops.
Move the cursor
and touch ”Enter”.
to the desired position,
21
Page 26

Registration of Your House
3–018ua
4. T ouch alphabet keys directly on the
screen to input a city name.
If you touch a wrong letter, delete it using
””.
When you input numerals, touch ”09”
switch to display the screen for numeral
input.
Based on the input letters, the number of
sites appears next to ”List” at the bottom
right of the screen. After the number decreases to some extent, touch ”List” to display the street names. Touch
desired city name.
5. After entering the city name, input a
street name and house number. Follow
the same procedure on the previous
page.
of the
(c) Registering by map
If you are not so far away from your
house, you can make a registration directly on the map.
3–066
The map indicating the current position
is displayed. Touch one of the arrows
to move the cursor to your house.
(For the method of how to move the
cursor, see page 4.)
(d) Changing the registration of
your house
1. Push the ”MENU” switch.
1–011u
2. Touch ”NAVI option” on the ”MENU”
screen.
3–005u
3. Touch ”Marked Points” on the ”Option” screen.
22
Page 27
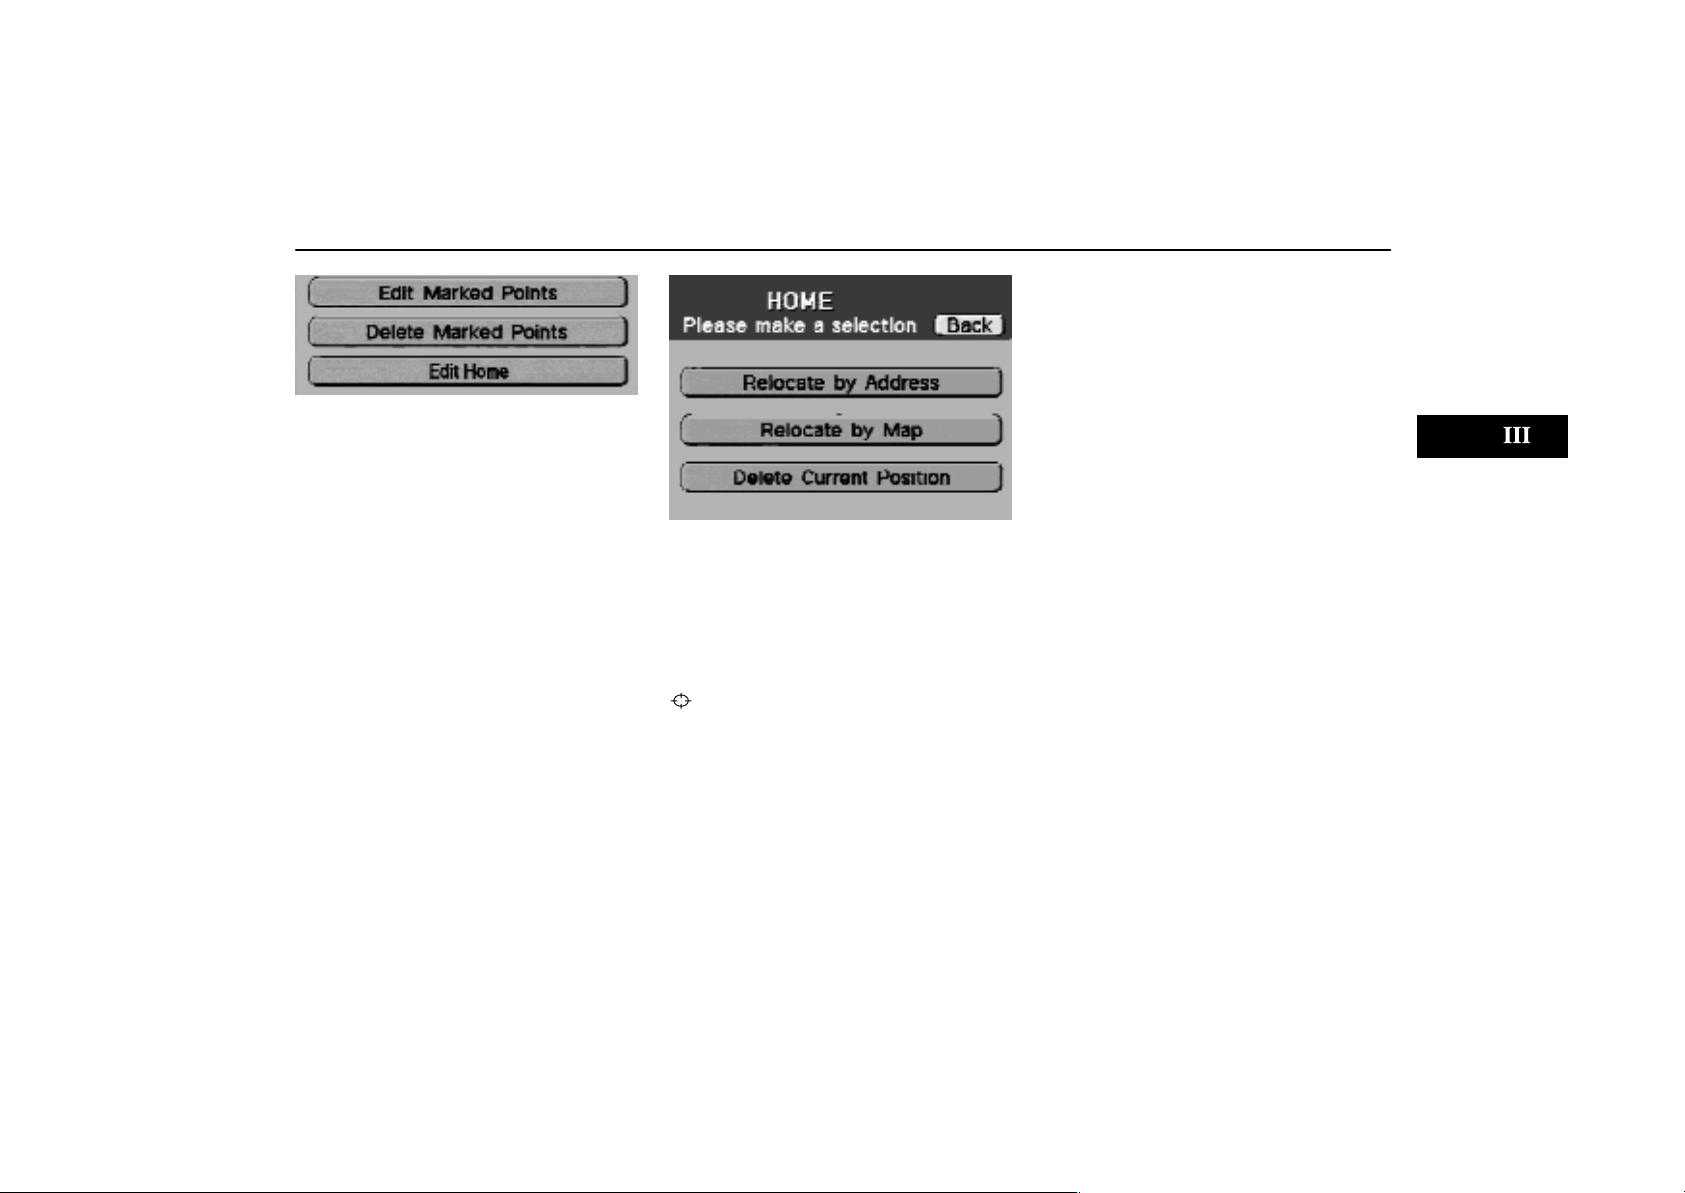
Registration of Your House
3–063
4. Touch ”Edit Home”.
3–013u
5. Touch your desired item.
Relocate by Address: Input your new
home address. See page 26 for the detailed steps.
Relocate by Map: If your house is not so
far away, display the map screen and re–
register your house by moving the cursor
.
Delete Current Position: The current
position is deleted.
23
Page 28

Destination Input
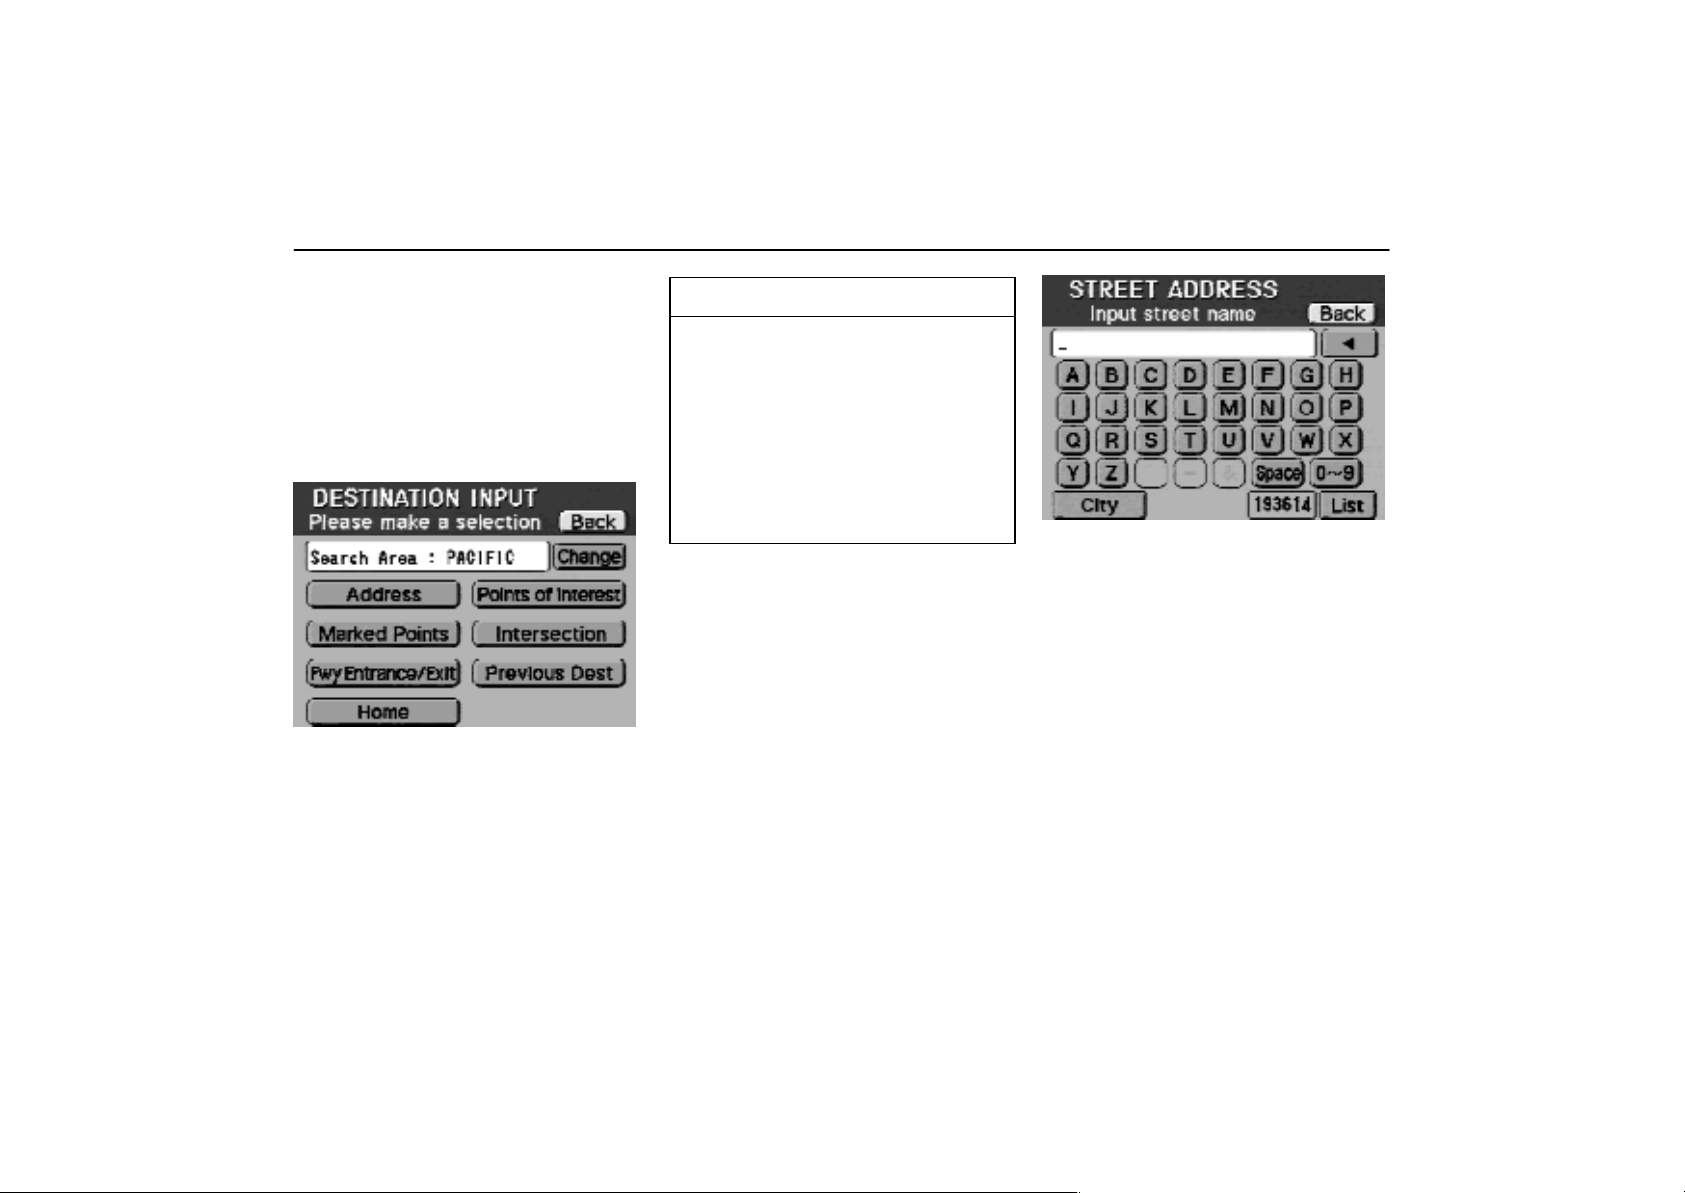
(a) Destination input
1–001u
1. Push the ”DESTINATION” switch.
The destination input screen appears.
2. Select a way of displaying the map of
the destination surrounding area.
Address: From an address, the surround-
ing area map is displayed. See page 26
for the detailed steps.
Points of Interest: From a point of interest, the surrounding area map is displayed.
See page 28 for the detailed steps.
Marked Points: From the registered
marked point, the surrounding area map is
displayed. See page 33 for the detailed
steps.
Intersection: From an intersection, the
surrounding area map is displayed. See
page 36 for the detailed steps.
Fwy Entrance/Exit: From a freeway entrance or exit, the surrounding area map is
displayed. See page 34 for the detailed
steps.
Previous Dest: From the previously set
destination, the surrounding area map is
displayed. See page 35 for the detailed
steps.
Home: Route guidance up to your house
is available. See page 35. In this case, it
is necessary to register your house beforehand. See page 20 for the detailed steps.
Change: On the screen, the name of
state/province to be searched is shown in
abbreviation. When you touch ”Change”,
the search area can be changed on the
next screen.
3–014u
Touch to change the search area and
the previous screen returns.
INFORMATION
When inputting the destination, the
response to the switch may be
slow.
Destination input by address can
be made in ”Detailed map coverage
areas” only. (See page 7 for details.)
24
Page 29
Destination Input
”Points of Interests” are mainly
registered in ”Detailed map coverage areas”. The registration is
made based on the Nav Tech ”Standard POI Inclusion List”.
If there is no point registered,
switches such as ”Marked Points”
or ”Previous Dest.” are dimmed
and not available.
The route for returning may not be
the same as that for going.
Route guidance shows a reference
route up to the destination surrounding area.
shortest route nor a route without a
traffic congestion.
Route guidance may not be available depending on the distance up
to the destination surrounding
area, or if there is no road data for
specific locations.
When setting the destination, you
should use the map on a scale of
1/80000 or smaller.
The detour route may be set in
areas other than ”Detailed map
coverage areas”. (See page 7 for
details.)
It is neither a
To set the ”Points of Interests” in
the different time zone, the area
change is necessary.
CAUTION
When driving, be sure to follow traffic
regulations and keep the road condition in mind. If a traffic sign on the
road is changed by the regulation, the
route guidance may provide wrong
information such as the route prohibiting the entry of the vehicle.
(b) Clearing the previous destination
Y ou can delete the old destination
whose route guidance is already finished.
Follow the steps below.
1. Push the ”MENU” switch.
1–011u
2. Touch ”NAVI option”.
3–005u
Option screen
3. Touch ”Clear Prev. Dest.”.
4. The message appears for confirmation. If you are sure to delete the previous destination, touch ”YES”. If not,
touch ”NO”.
25
Page 30
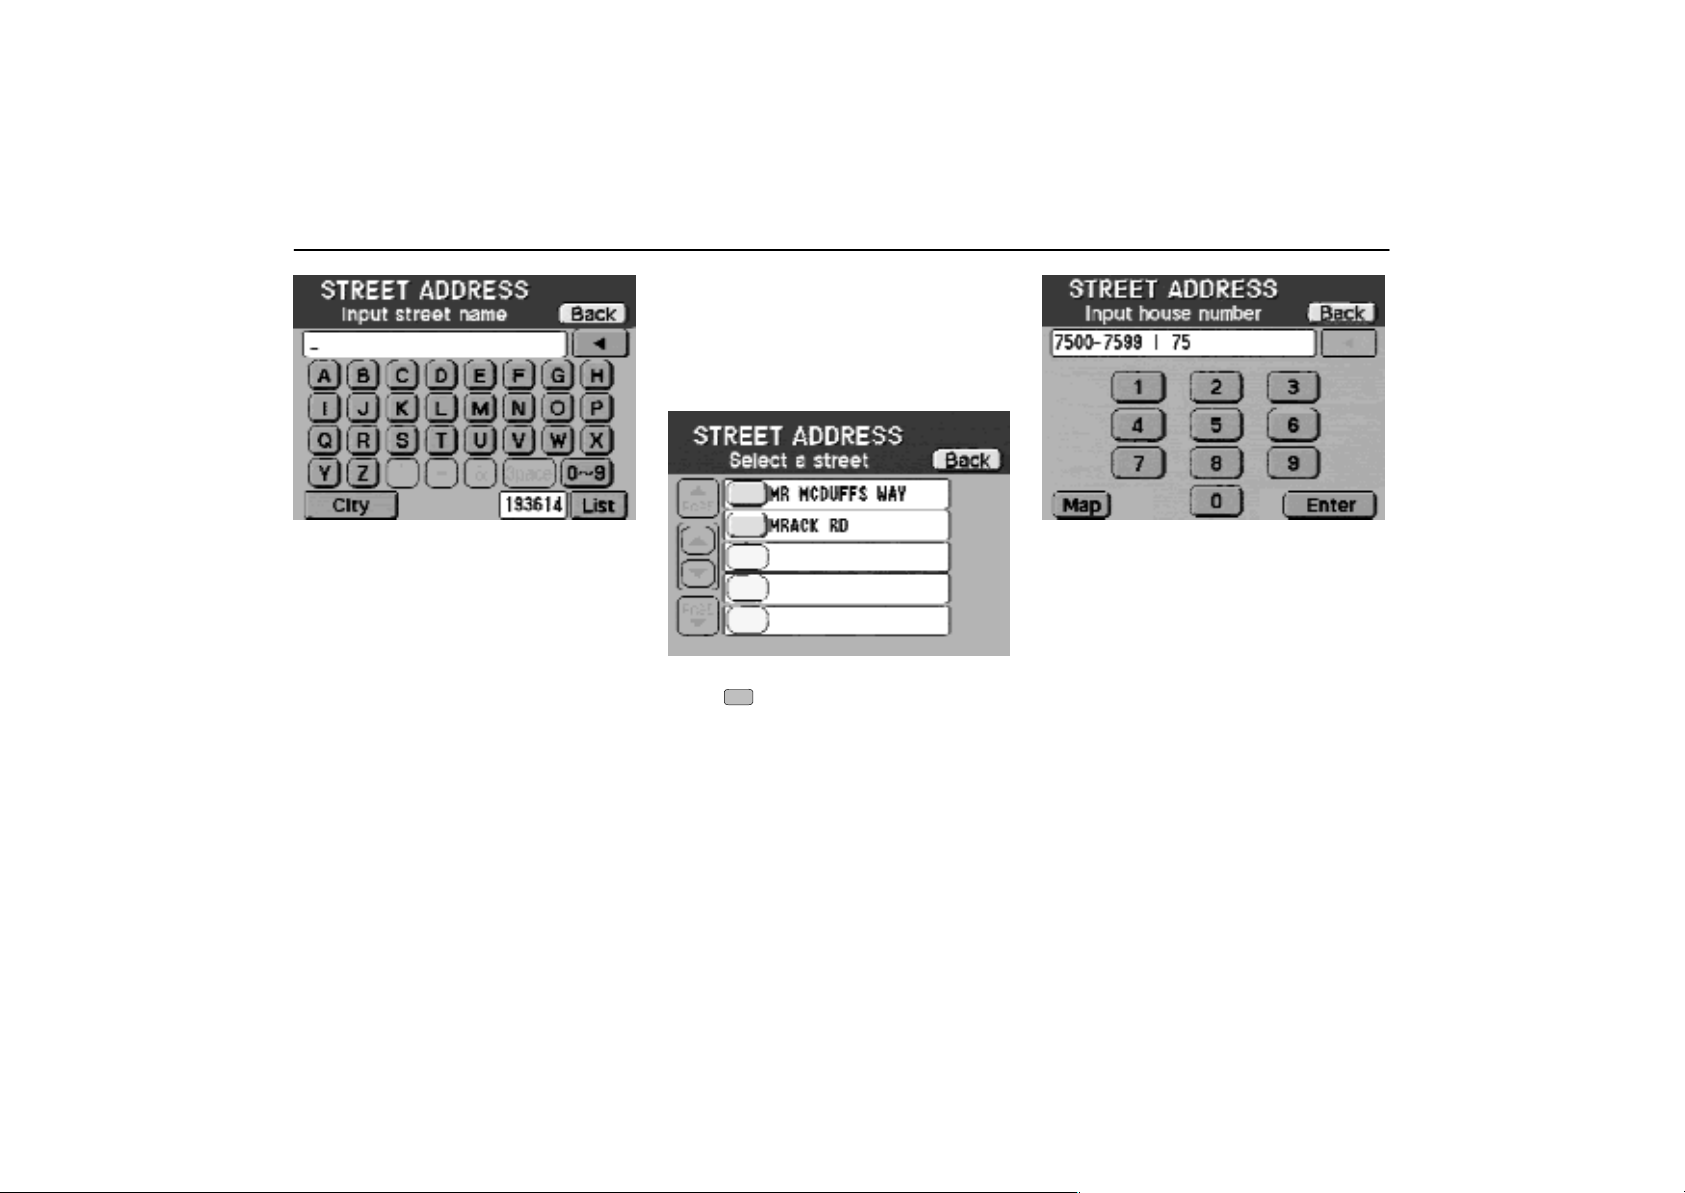
Destination Input [ADDRESS]
3–015ua
Based on the input characters, the number
of sites appears next to ”List” at the bottom
right of the screen. After the number decreases to some extent, touch ”List” to display the site names. (See the following
illustration.)
3–017ua
There are 2 ways to input a route.
(a) Inputting a street name directly using alphabet keys.
1. Touch letters directly on the screen
to input a street name.
As the result of searching memorized
names in the system, unavailable characters are dimmed.
When you input numerals, touch ”09”
switch to display the screen for numeral
input.
26
3–016u
If you find your desired street name,
touch
house number” screen appears.
of the item. The ”Input
2. Input a house number.
After input, touch ”Enter” to start ”Route
searching”.
Map: If you touch this switch, you can
confirm the location or determine the location on the map screen.
Page 31

Destination Input [ADDRESS]
If the same house number exists in more
than one city, the screen changes and displays the menu of the applicable cities.
Select your desired city name.
After setting, the ”Route Searching
Condition” screen (see page 37) and
then the ”Route Guidance” screen (see
page 39) appears. Follow each step.
(b) Inputting a city name
The city name input screen appears if
you touch the ”City” switch on the
”STREET ADDRESS” screen on page
26.
3–018ua
1. Input a city name using alphabet
keys.
When the number of sites becomes 100 or
less, you can also select the desired city
using the ”List” function.
3–015ua
2. The ”STREET ADDRESS” screen appears. Input a street name, and then
house number. The succeeding steps
are the same as in ”(a) Inputting a street
name directly using alphabet keys” on
the previous page.
27
Page 32

Destination Input [POINTS OF INTEREST]
(a) Inputting a name of points of
interest directly
3–019ua
There are 3 ways to input a route.
(a) Inputting a name of points of inter-
est directly.
(b) Inputting a city name first.
See page 29.
(c) Selection from the category
See page 29.
1. Touch letters directly on the above
screen to input a name.
When you input numerals, touch ”09”
switch to display the screen for numeral
input.
If the number of sites becomes 5 or less,
or if you touch ”List” at the bottom right of
the screen, the screen changes and displays a list of sites.
3–020u
2. Touch of your desired item.
When you touch
the screen changes and displays the menu
to determine the route searching condition.
(See page 37.)
3. When you touch ”INFO”, the information such as points–of–interests name
and address, etc., are shown on the
map screen.
4. If you want to change the location of
the destination, touch ”Scroll” and
move the cursor.
of your desired item,
28
Page 33

Destination Input [POINTS OF INTEREST]
(b) Inputting a city name
Touch ”City” on the first screen on page
28.
3–021ua
1. T ouch alphabet keys directly on the
screen to input a city name.
If you touch a wrong letter, delete it using
””.
When you input numerals, touch ”09”
switch to display the screen for numeral
input.
Based on the input letters, the number of
sites appears next to ”List” at the bottom
right of the screen. After the number decreases to some extent, touch ”List” to display the street names. Touch
desired city name.
of the
2. After entering the city name, input
the name of the points of interest. (Follow the same procedure described on
the previous page.)
(c) Selection from the category
Touch ”Category” on the first screen on
page 28.
3–022u
1. Touch of your desired point of
interest. The screen changes and displays the menu to input a name.
Emergency: See page 30.
Name Input: The screen for inputting a
name appears. See page on the previous
page.
3–023ua
2. Touch letters directly on the screen
to input a name.
When you input numerals, touch ”09”
switch to display the screen for numeral
input.
If the number of sites becomes 5 or less,
or if you touch ”List” at the bottom right of
the screen, the screen changes and displays a list of sites.
Sort by Dist; Nearby places from the current position are displayed.
29
Page 34

Destination Input [POINTS OF INTEREST]
3–024ua
”Sort by Name” screen
3–025u
”Sort by Distance” screen
3. Touch of your desired item.
When you touch
the screen changes and displays the menu
to determine the route searching condition.
(See page 37.)
4. When you touch ”INFO”, the information such as points–of–interest name
and address, etc., are shown.
of your desired item,
3–026u
Map: The map screen appears.
Enter: The screen changes and displays
the menu to determine the route searching
condition. (See page 37.)
(d) Touching ”Emergency”
A hospital, police station and Lexus
dealer, etc. can be set as a destination.
This feature is helpful in case of an
emergency.
3–027u
1. Touch your desired item.
With a touch of your desired item, a sandglass icon is shown at the center of the
screen before the next screen appears.
30
Page 35

Destination Input [POINTS OF INTEREST]
3–028u
2. The distance from the current position up to the destination is displayed at
the right of the name. Touch of
your desired item. The screen changes
and displays the menu to determine the
route searching condition. (See page
37.)
INFO: The points–of–interest name and
address, etc., are displayed.
When you touch ”Map” on the information
screen, the map screen appears. When
you touch ”Enter”, the screen changes and
displays the menu to determine the route
searching condition. (See page 37.)
Sort by Name: The names are displayed
in the alphabetical order.
LIST OF POINTS OF INTEREST
A
Airport
Amusement Park
ATM
Automobile Club
B
Bank
Bus Station
Business Facility
C
City Center
City Hall
Civic /Community Ctr (Center)
Commuter Rail Station
Convention Center
Court House
E
Entertainment
F
Ferry Terminal
G
Gas Station
Golf Course
Grocery Store
H
Higher Education
Historical Monument
Hospital
Hotel
L
Lexus Dealer*
Library
M
Marina
Museum
P
Park and Ride
Park/Recreation Area
Parking Garage/House
Parking Lot
Performing Arts
Police Station
*: See next page.
31
Page 36

Destination Input [POINTS OF INTEREST]
R
Recreation
Rental Car Agency
Rest Area
Restaurant
S
School
Shopping
Sports Complex
T
Tourist Attraction
Tourist Information
Toyota Dealer
Train Station
INFORMATION
If you select the “Lexus Dealer” on the
“Emergency” screen, Lexus dealers
are listed. If there is a dimmed switch
at the left of the dealer name, route
guidance up to the destinations may
not be available. In this case, follow the
procedures shown on the screen.
32
Page 37

Destination Input [MARKED POINT]
3–029u
The list is displayed according to the
date when the mark was registered.
Select your desired point. The screen
changes and displays the menu to determine the route searching condition.
Map: If you touch this switch, the map
screen appears. Move and set the cursor
at the desired point. (For the method of
how to move the cursor, see page 4.)
Then, touch ”Enter” to display the menu to
determine the route searching condition.
Sort by Mark: Searches based on the
registered symbol. The following screen
appears.
3–030u
The places indicated by the same symbol are listed.
Select your desired point. The screen
changes and displays the menu to determine the route searching condition.
Sort by Date: The previous screen returns and displays a list of marked points
by date.
After setting, the ”Route Searching
Condition” screen (see page 37) and
then the ”Route Guidance” screen (see
page 39) appears. Follow each step.
33
Page 38

Destination Input [FWY ENTRANCE/EXIT]
3–031u
3–033u
Sort by Distance: The screen lists the
places in the order of nearby entrance or
exit from your current position.
1. Input a freeway name.
When you input numerals, touch ”09”
switch to display the screen for numeral
input.
Touch ”List” to change the following
screen. When the number of sites becomes 5 or less, the list screen appears
automatically.
3–032u
Touch of the desired name.
34
Freeway Entrance/Exit screen
2. Select ”Entrance” or ”Exit”.
3–034u
Freeway Entrance/Exit screen
3. Touch of the desired entrance or
exit name. The screen changes and displays the menu to determine the route
searching condition.
Map: If you touch this switch, the map
screen appears. Move and set the cursor
at the desired point. (For the method of
how to move the cursor, see page 4.)
Then, touch ”Enter” to display the menu to
determine the route searching condition.
3–035u
Freeway Entrance/Exit screen
4. Touch of the desired name. The
screen changes and displays the menu
to determine the route searching condition.
Map: If you touch this switch, the map
screen appears. Move and set the cursor
at the desired point. (For the method of
how to move the cursor, see page 4.)
Then, touch ”Enter” to display the menu to
determine the route searching condition.
Sort by Name: The previous screen returns.
After setting, the ”Route Searching
Condition” screen (see page 37) and
then the ”Route Guidance” screen (see
page 39) appears. Follow each step.
Page 39

Destination Input [HOME] Destination Input [PREVIOUS DEST]
Touch ”Home” on the ”DESTINATION
INPUT” screen.
If your house is already registered, the
system starts searching for a route from
your current position to your house. To set
the route searching condition, see ”Route
Search” on page 37.
If your house is not registered yet, the
following screen appears for a few seconds and then the screen displays the
menu to register your house.
3–036u
For the steps to register your house , see
”Registration of your house” on page 19.
3–037ua
The screen lists up to 10 destinations
previously set.
Lists the destinations from the
PAGE
1st to the 5th one or from the
6th to 10th one.
PAGE
Select your desired destination. The
screen changes and displays the menu
to determine the route searching condition.
Map: If you touch this switch, the map
screen appears. Move and set the cursor
at the desired point. (For the method of
how to move the cursor, see page 4.)
Then, touch ”Enter” to display the menu to
determine the route searching condition.
After setting, the ”Route Searching
Condition” screen (see page 37) and
then the ”Route Guidance” screen (see
page 39) appears. Follow each step.
35
Page 40

Destination Input [INTERSECTION]
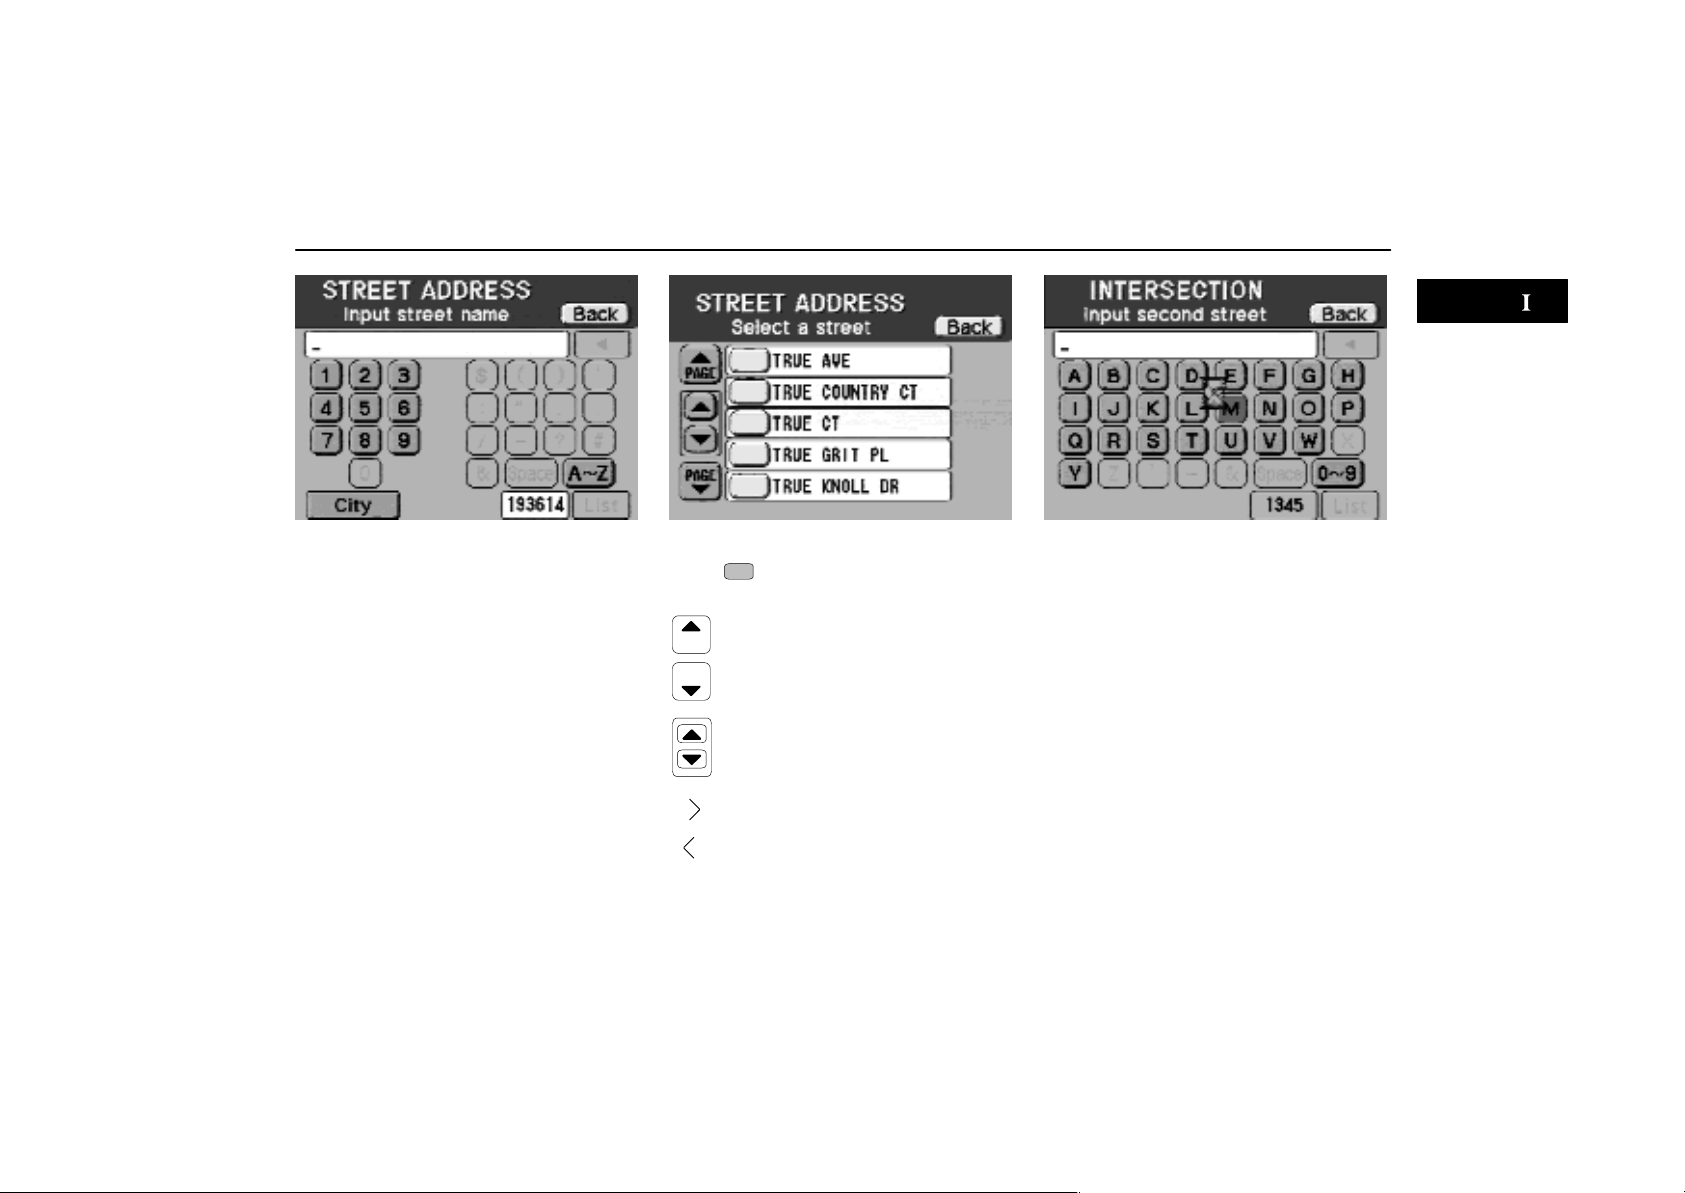
3–038u
1. Input the name of one of the streets
crossing at the intersection, which is
located near the destination to be set.
When you input numerals, touch ”09”
switch to display the screen for numeral
input.
When you touch ”List” or the number of
sites becomes 5 or less, the following
screen appears.
3–039u
2. Select the desired street name.
The screen for inputting the cross street
name appears.
3. Input a cross street name in the
same way as step ”1”.
3–040u
4. Select the desired street name. The
screen changes and displays the menu
to determine the route searching condition.
Map: If you touch this switch, the map
screen appears. Move and set the cursor
at the desired point. (For the method of
how to move the cursor, see page 4.)
Then, touch ”Enter” to display the menu to
determine the route searching condition.
EMV3111U
If the same 2 streets cross at more than
one intersection, the screen changes and
displays the menu to select the city name
where the 2 streets intersect.
After setting, the ”Route Searching
Condition” screen (see page 37) and
then the ”Route Guidance” screen (see
page 39) appears. Follow each step.
36
Page 41

Route Search
After the destination input, the screen
changes and displays the menu to determine the condition of the route up to
the destination.
3–041u
1. Select your desired item.
Minimize Dist.
Searches for a short route.
Minimize Time
Searches for a route on which you can
reach the destination in the shortest time.
Minimize Freeway Use
Searches for a route which avoids freeways as much as possible. (In some
cases, the route running on the freeway
cannot be avoided.)
Minimize Toll Road Use
Searches for a route which avoids toll
roads as much as possible.
The selected item is highlighted in green.
2. When you touch ”Enter”, the system
starts searching for a route up to the
destination.
3–042u
3. During the route search, ”Searching
Route” at the top of the screen changes
color from the left. When the search is
completed, route guidance starts.
If the route preview mode is set to ”ON”
(see page 67 for setting), the ”Route preview” screen appears.
37
Page 42

Route Search
3–043u
Route preview screen
4. When you touch ”Start”, the route
guidance starts.
Even if you do not touch ”Start”, when your
vehicle moves for 15 seconds, the route
guidance screen appears automatically.
Set Way Pt.: If you want to set a way
point between the starting point and the
destination, touch this switch and follow the
steps to set a way point on page 57. If the
set way point is already registered, ”Add
Way Pt.” is displayed on the screen.
INFORMATION
The distance up to your destination is
shown at the right of the screen.
38
Page 43

Route Guidance Screen
3–044u
3–045u
[GPS]: Upon reception of signals from the
GPS (Global Positioning System), this
mark appears. (For details, see page ii.)
Repeat: When you cannot hear the message, touch this switch to listen again.
Detour: The detour can be set to avoid a
traffic jam which may be caused by road
repairs or an accident. (For details, see
page 44.)
zoom IN / zoom OUT: Magnifying or reduction of the map scale. (For details, see
page 48.)
Mark: One–touch registration of the
marked point. (For details, see page 56.)
POI: Symbols of points of interest are
shown on the screen. (For details, see
page 45.)
INFORMATION
The distance up to your destination
appears at the right of the screen.
The time up to your destination can
also be displayed. For the setting
steps, see page 69.
Cancel: The ”CANCEL GUIDANCE”
screen appears and the following settings
are available.
3–046ua
Cancel Guidance: Changes the destination. When you touch this switch, the destination input screen appears. (For details,
see page 24.)
Change Search Condition: Changes the
condition of the route. (For details, see
page 37.)
Set Way Point: Sets a way point. (For
details, see page 57.) If the set way point
is already registered, ”Add Way Point” is
shown on the screen.
Delete Way Point: Deletes way points.
(For details, see page 59.) You can delete
only the next way point during driving. In
this case, the “Delete Next Way Point”
instead of “Delete Way Point” is shown.
39
Page 44

Route Guidance Screen Voice Guidance
Turn List: Instead of the map screen, if
you want to display the list of roads on
which you will run, and use it for route
guidance, touch this switch. (See page
47.)
INFORMATION
If the route by ferry is included up to
the destination, the route guidance
shows a sea route. After moving by
ferry, the current vehicle position may
be incorrect. Upon reception of GPS
signals, it is automatically corrected.
Route guidance by voice up to the destination surrounding area is available in
the map screen during route guidance.
Use voice guidance just for your reference.
(See page iii for accurate operation tips.)
Y ou can adjust the volume of the voice
or turn off voice guidance.
3–063ua
1. Push the ”MENU” switch to display
the menu screen.
2. Touch any number at the bottom of
the screen to select the desired volume.
The selected item is highlighted in green.
3. If you do not need voice guidance,
touch ”OFF”.
40
Page 45

Voice Guidance Typical Voice Guidance Prompts
INFORMATION
Voice guidance is continued after the
navigation screen is changed to the
audio or air conditioning screen.
EMV3112U
EMV3113U
1
2
3
”Proceed about 5 miles to the T–
intersection.”
”In a quarter of a mile, right turn at
the T–intersection.”
”At the T–intersection, right turn.”
INFORMATION
Even if the surface street and freeway
have a similar configuration, voice
guidance will be made at the different
point.
1
2
3
”Proceed about 4 miles to the traf-
fic circle.”
”In a quarter of a mile, traffic circle
ahead, and then right turn 3rd exit
ahead.”
”Next exit right.”
41
Page 46

Typical Voice Guidance Prompts
EMV3114U
: The width of the road is less than 15 m
(50 ft.) in residential area or 50 m (164
ft.) except residential area.
1
2
42
”In half of a mile, make a legal U–
turn.”
”Make a legal U–turn.”
EMV3115U
1
2
”Your destination is ahead.”
”Y ou have arrived at your destination. Your route guidance is now finished.”
EMV3116U
1
2
”In 2 miles, 405 freeway on the
right.”
”405 freeway on the right and then
keep right onto 405 freeway south.”
Page 47

Typical Voice Guidance Prompts
INFORMATION
Voice guidance may be made early
or delayed.
If the system cannot determine the
current position correctly, you may
not hear voice guidance or may not
see the magnified intersection on
the screen.
If you cannot hear voice guidance,
touch ”Repeat” on the screen to
listen again.
43
Page 48

Detour Setting
During route guidance, you can set the
route which avoids a traffic jam caused
by road repairs, an accident, etc.
3–045u
1. Touch ”Detour”.
EMV3065U
1
Traffic jam is occurring due to
road repairs or an accident
2
Detour
3–048u
After detouring, your vehicle returns to the
set route.
Recalculate Whole Route: Changes the
entire route from the current position to the
destination.
INFORMATION
If you do not touch the screen for 6
seconds, the previous screen returns.
When your vehicle is on a freeway,
the detour distance displayed for
setting is 5, 10, 15, 20 and 25.
The detour route may not be set depending on the selected distance
and surrounding road conditions.
44
2. T ouch numeral keys according to the
distance you want to detour.
Page 49

POI
If you cannot find your desired point of interest on this screen, touch ”Others”. The
screen displays the ”POINTS OF INTEREST” screen.
3–049u
Points of interest such as gas stations
and restaurants can be displayed on the
map screen. You can also set their
mark as a destination and use them for
route guidance.
(a) Displaying on the screen
3–050u
1. Touch ”POI” on the map screen.
3–051u
2. Touch your desired type of point of
interest.
INFORMATION
After touching your desired type of
point of interest, if there is no desired
point of interest on the current map
screen, the map is automatically
magnified up to ”8 scale map” to display at least one point of interest.
3–052u
For the steps to input the destination, see
page 28.
3–054u
To turn off the symbols of points of interest on the map screen, touch ”POI
Off”.
45
Page 50

POI
(b) Setting as a destination
Y ou can set one of the points of interest
on the screen as a destination and use
it for route guidance.
3–053u
1. Directly touch the mark of the point
of interest which you want to set as a
destination.
Its mark moves to the center of the screen
and overlaps with the cursor
The name of the point of interest and the
distance from your current position can be
displayed at the top of the screen.
.
3–054u
If the marks of 2 close points of interest
overlap each other, touch ”Next” to bring
your desired mark in front of the other.
2. If your desired point of interest overlaps with the cursor, touch ”Ent. Dest.”.
The screen changes and displays the
menu to determine the route searching
condition. (See page 37.)
46
Page 51

Turn List
Indicates which direction you
should turn at an intersection.
3–064u
3–055u
Instead of the map screen, the list of
roads up to your destination can be displayed and used for route guidance.
To confirm in advance which road to drive
on, touch
may not be shown in advance.
. However, some set route
Dest
A horizontal line indicates your
approximate position from the
starting point to the destination.
INFORMATION
When you are driving on the set
route up to the destination, the current vehicle position mark appears
on the screen, however, it is not
movable.
If your vehicle is not on the set
route, the name of the street on the
off–route is shown on the list.
Each section is divided at an interchange, fork or point where the
road type is changed.
The distance up to a certain point
is displayed in miles. If it is 1.6 km
(1 mile) or longer, it is rounded off
to the nearest whole number. If it is
less than 1.6 km (1 mile), it is
rounded off to one decimal place.
It may take a long time to display
the turn list when the long route is
searched.
1. Touch ”Cancel” at the top right of the
route guidance screen.
3–065u
Cancel guidance screen
2. Touch ”Turn List”.
INFORMATION
Push the ”MAP/GUIDE” switch to display the map with route guidance.
47
Page 52

Map Scale
3–056u
Touch ”zoom IN” or ”zoom OUT” to display the map at the size you want.
A detailed or magnified map is shown with
the current vehicle position mark at the
center of the screen.
The horizontal bar at the bottom of the
screen indicates the map scale menu. The
figure indicates the scale. Touch ”zoom
IN” or ”zoom OUT” until the desired figure
is highlighted.
The map scale is displayed under the
North–up symbol or heading–up symbol at
the top left of the screen.
INFORMATION
When the map is magnified, ”zoom
OUT” is dimmed. When the map
shown on the display cannot be reduced in more detailed scale, ”zoom
IN” is dimmed.
48
Page 53

Screen Scrolling Orientation of Map
INFORMATION
3–057u
With the destination input by screen
scrolling, the nearest road from the
point you touch is set as a destination. At this time, if there is longer
than 5 km (3 miles) up to the nearest
road, the route up to the destination
may not be set.
3–058u
3–059u
You can bring the desired point to the
center of the screen.
The part you touch with your finger moves
in to the center of the screen and is shown
by the mark
a destination. Touch ”Ent. Dest.” on the
screen.
If you touch switches like ”Mark”, ”POI”,
etc., the screen does not scroll and the respective function operates.
After the screen scrolls, the map is fixed
and the current vehicle position mark is
movable. When you push the ”MAP/
GUIDE” switch, the current vehicle position
mark is fixed at the center of the screen
and the map is movable.
. You can set this place as
Touch the symbol directly at the top left
of the screen to change the orientation
of the map.
North–up symbol
Regardless of the direction of vehicle travel, North is always up.
Heading–up symbol
The direction of vehicle travel is always up.
A red arrow indicates North.
49
Page 54

Front Wide Display
3–061u
3–060u
Y ou can have a wide view of the part
where your vehicle is heading for.
1–011u
1. Push the ”MENU” switch to display
the menu screen.
2. Touch ”NAVI option”.
50
3. Touch ”Display Mode” on the option
screen.
3–062u
4. Touch ”ON” at the right of ”Advance
View”.
The set item is highlighted in green.
To display the current vehicle position mark
in the center of the screen, turn ”Advance
View” to ”OFF”.
5. When you touch ”Enter”, the route
guidance screen returns.
INFORMATION
On this screen, you can also set
”Route Trace” and ”Trace Display ”
(See page 68.).
Page 55

SECTION
IV
ADVANCED FUNCTIONS
Description of functions for more effective use
Marked points 52. . . . . . . . . . . . . . . . . . . . . . . . . . . . . . . . . . . . . . . . . . . . . . . . . . . .
Way points 57. . . . . . . . . . . . . . . . . . . . . . . . . . . . . . . . . . . . . . . . . . . . . . . . . . . . . . .
Avoid points 60. . . . . . . . . . . . . . . . . . . . . . . . . . . . . . . . . . . . . . . . . . . . . . . . . . . . . .
Current position calibration 63. . . . . . . . . . . . . . . . . . . . . . . . . . . . . . . . . . . . . . . . .
51
Page 56

Marked Points
If you register some points which you
like (restaurants, sports facilities, etc.),
you can display the map quickly from
the marked point to input a destination.
(a) Registering marked points
Display the registration screen in accordance with the following steps.
1–011u
1. Push the ”MENU” switch to display
the menu screen and touch ”NAVI option”.
3–005u
2. Touch ”Marked Points”.
4–001u
3. Touch ”Register Marked Points”.
4–002u
A screen similar to that for destination input
appears. Display the map on which you
want to set the marked point in the same
way as in the destination input. See page
24.
4–003u
When you finish registration of the
marked point, the above screen appears.
4. Touch ”Done”.
To change a symbol in ”ICON”, name in
”NAME”, etc., see ”(b) Editing marked
points.”
Some information may not be shown depending on the location which is registered
as a marked point.
When you set ”Sound” to ”ON”, the buzzer
sounds as your vehicle approaches the
marked point.
52
Page 57

Marked Points
INFORMATION
Up to 100 points can be registered.
(b) Editing marked points
Y ou can register an icon, name or telephone number.
Display the screen below following steps
similar to those for registration of the
marked points.
4–004u
4–005u
4–001u
Touch ”Edit Marked Points”.
The screen lists the marked points in
the order of registration date.
Touch
to display the next screen.
Map: If you touch this switch, the map
screen appears. You can confirm the position on this screen. You can move the map
only with a ”one–touch” scroll. (For ”one–
touch” scroll, see page 49.)
Sort by Mark: To search for the marked
point to be edited according to the type of
symbol, touch this switch.
of the desired marked point
Touch of the desired marked point
to display the next screen.
Map: If you touch this switch, the map
screen appears. You can confirm the position on this screen. You can move the map
only with a ”one–touch” scroll. (For ”one–
touch” scroll, see page 49.)
Sort by Date: The previous screen returns and displays a list of marked points
according to the registered date.
53
Page 58

Marked Points
4–006u
Touch the item to be edited (on the left
side of the screen).
Editing an ”ICON”
4–007u
Touch your desired symbol.
When you touch the desired symbol or
”Back”, the previous screen returns.
Editing a ”NAME”
4–008ua
Touch alphabet keys directly to input a
name.
When you input numerals, touch ”09”
switch to display the screen for numeral
input.
If you touch a wrong letter, delete it using
””.
After you finish your entry, touch ”Enter” at
the bottom of the screen.
The previous screen will return.
Editing a ”TELE”
4–009ua
Touch numeral keys directly.
After you finish your entry, touch ”Enter” at
the bottom of the screen.
The previous screen will return.
Editing a ”POS”
4–010u
Touch an arrow facing your desired
point and scroll the screen.
Touch ”Enter” when the cursor
to your desired point.
The previous screen will return.
moves
54
Page 59

Marked Points
Finishing editing
4–040u
After you finish any editing, touch
”Done”.
(c) Deleting marked points
Display the screen below following steps
similar to those for the registration of the
marked points.
3–006u
Marked points screen
1. Touch ”Delete Marked Points”.
4–011u
4–012u
Delete marked points screen
2. T o delete only specified marked
points, use ”Sort by Mark” or ”Sort by
Date” to display the screen so that you
can easily find the marked points.
Touch
leted. If you want to delete all of the
marked points, touch ”Delete ALL”.
of the marked point to be de-
4–013u
4–014u
Either of the above messages appears depending on the type of deletion. If you
want to delete, touch ”YES”. If you cancel
the deletion, touch ”NO”.
55
Page 60

Marked Points
(d) One–touch registration
You can register the position where the
current vehicle position mark is placed
on the current position screen.
4–015u
Touch ”Mark”.
4–016u
The registered point is shown by on
the map.
To change the icon or name, etc., see ”(b)
Editing marked points”.
4–017u
After the registration is made, the above
screen appears for a few seconds, and
then the map screen returns.
Y ou can register up to 100 marked
points. If you attempt to register more
than 100, the message appears for confirmation.
If you want to register a new point, touch
”YES” and delete several old points. See
”(c) Deleting marked points” for deletion.
If you do not want to delete the points already registered, touch ”NO”.
56
Page 61

Way Points
60–1
1. To set a way point during route guidance, touch ”Cancel” at the top right of
the screen to display the following
screen.
4–018ua
2. Touch ”Set Way Point”.
You can set up to 5 way points.
INFORMATION
If some way points are already registered on the route, ”Add Way Point”
instead of ”Set Way Point” is displayed .
If adding a way point, see ”(b) Adding a
way point”.
(a) Setting a way point
4–019u
3. Display the map where you want to
set a way point in the same way as you
input the destination.
If you touch ”Map”, the map screen appears. Move the cursor
position and touch ”Enter”.
For the steps how to display the map, see
page 24.
The set way point is indicated by W.
at your desired
The screen changes and displays the
menu to determine the route searching
condition. (See page 37.)
The system starts searching for a route
and the following screen appears.
INFORMATION
If the input set way point is inappropriate, a message appears. According to the instruction on the
screen, reset the set way point.
57
Page 62

Way Points
(b) Adding a way point
4–020u
The ”Searching Route” displayed at the top
of the screen changes color progressively
from the left.
To set another way point, touch ”Add Way
Pt.”. For the succeeding steps, see ”(b)
Adding a way point”.
When the search is completed, route guidance starts.
If the route preview mode is set to ”ON”
(see page 67.), the following screen appears.
58
4–021u
Touching ”Add Way Pt.” on this screen
also can add a way point. For the
succeeding steps, see ”(b) Adding a
way point”.
Touch ”Start” to start route guidance.
Even if you do not touch ”Start”, when your
vehicle moves for 15 seconds, the route
guidance screen appears automatically.
4–022ua
1. Select the section in which you want
to add a way point and touch ”Set This
Section”.
If several way points are already registered, touch
section in which you want to add and touch
”Set This Section”.
Map: If you touch this switch, you can
confirm the set way points already registered on the map screen.
Dest
or
Start
to display the
Page 63

Way Points
4–019u
2. Add a way point in the same way as
you input the destination.
3. After adding a way point, the system
starts searching for a route and route
guidance starts.
(c) Deleting a way points
Display the ”CANCEL GUIDANCE”
screen with the same steps on page 57,
touch ”Delete Way Point”.
4–023u
Select the way point you want to delete
and touch ”Delete”.
The system searches for a route and route
guidance screen returns.
(d) Deleting the next way point
Only the next way point can be deleted
even while you are driving.
1. Touch the “Cancel” switch during
route guidance.
4–024u
2. Touch the “Delete Next Way Point”
on the “CANCEL GUIDANCE” screen.
4–025u
3. The next screen asks for your confirmation. If O.K., the system searches
for a new route after about 6 seconds.
To cancel the deletion, touch the “Cancel” within 6 seconds.
59
Page 64

Avoid Point/Area
The points which you want to avoid due
to traffic jams and construction work,
etc. can be registered as avoid points.
INFORMATION
Some areas and freeways may not
be able to be set as an avoid point.
If the destination is input in the
avoid area or the route calculation
cannot be made without running on
the avoid area, the route passing
through the avoid area may be
shown.
(a) Registering avoid point/area
1. Push the ”MENU” switch.
1–011u
3–005u
Option screen
3. Touch ”Avoid Point/Area”.
4–026u
4. Touch ”Register Avoid Point/Area”.
4–027u
5. Display the map of the area you want
to avoid in the same way as you input
the destination. (See pages 24 through
36.)
4–028u
2. Touch ”NAVI option”.
60
6. Touch an arrow facing your desired
point and move the cursor
sired position.
When you touch ”Enter”, the following message appears.
to the de-
Page 65

Avoid Point/Area
4–029u
After a few seconds, the screen at step ”4.”
returns.
7. To change the range to be set as an
avoid point, touch ”Enlarge” or ”Reduce”.
Touch ”Enter”. The message appears. After a few seconds, the screen at step ”4.”
returns.
(b) Editing avoid points
4–030u
Avoid points screen
1. In accordance with the similar steps
in ”(a) Registering avoid point/area”,
touch ”Edit Avoid Point/Area” on the
screen at step ”4.” on page 60.
4–031u
4–032u
3. Depending on the contents to be
edited, touch either ”Reduce” or ”Enlarge” or one of the arrows.
When editing is completed, touch ”Enter”.
Reset: When you touch ”Reset”, the size
of the area to be avoided is reset.
2. Find the point you want to edit from
the list and touch the number of the
item.
INFORMATION
If you try to change the map on an inappropriate scale, the message appears. For the enlargement or reduction of the map scale, see page 48.
61
Page 66

Avoid Point/Area
(c) Deleting avoid point/area
4–030u
Avoid Point/Area screen
1. In accordance with the similar steps
in ”(a) Registering avoid point/area”,
touch ”Delete Avoid Point/Area” on the
screen at step ”4.” on page 60.
4–033u
Delete Avoid Point/Area screen
2. Select the point you want to delete
from the list and touch the number of
the item.
Delete ALL: All avoid points registered in
the system are deleted.
4–034u
4–035u
3. Either of the above messages appears.
To delete the point(s), touch ”YES”.
If you touch ”YES”, the data cannot be re-
covered.
If you want to try again or cancel deletion,
touch ”NO”. The previous screen will return.
62
Page 67

Current Position Calibration
The incorrect current position will be
automatically corrected during driving
on reception of GPS signals. If your vehicle cannot receive GPS signals, you
can correct it manually.
4–036u
INFORMATION
For the information on incorrect current position, see page iii.
1–011u
1. Push the ”MENU” switch to display
the ”MENU” screen, and then touch
”NAVI option”.
3–005u
Option screen
2. Touch ”Calibration” on the ”OPTION”
screen.
3. Touch ”Position” or ”Distance”.
Position
4–037u
1. Touch an arrow facing your desired
point and scroll the screen.
Touch ”Enter” when the cursor
to your desired point. The next screen appears.
moves
4–038u
2. Touch either the left or right arrow to
correct the direction of the current vehicle position mark on the road.
Touch ”Enter” on the screen and the map
screen returns.
Distance
4–039u
The above message appears and the
fast distance calibration is automatically started. A few seconds later, the map
screen returns.
63
Page 68

64
Page 69

SECTION
V
MORE ADVANCED FUNCTIONS
Convenient features
Automatic rerouting 66. . . . . . . . . . . . . . . . . . . . . . . . . . . . . . . . . . . . . . . . . . . . . . .
Route preview 67. . . . . . . . . . . . . . . . . . . . . . . . . . . . . . . . . . . . . . . . . . . . . . . . . . . .
Display of route trace 68. . . . . . . . . . . . . . . . . . . . . . . . . . . . . . . . . . . . . . . . . . . . . .
Time to destinationn69. . . . . . . . . . . . . . . . . . . . . . . . . . . . . . . . . . . . . . . . . . . . . . .
Cruising range display 70. . . . . . . . . . . . . . . . . . . . . . . . . . . . . . . . . . . . . . . . . . . . .
Trip information 70. . . . . . . . . . . . . . . . . . . . . . . . . . . . . . . . . . . . . . . . . . . . . . . . . . .
65
Page 70

Automatic Rerouting
When your vehicle is off the route during driving, the route to the destination
is automatically searched. However if
you are driving on a road where the
guidance is not available, you cannot
use this feature.
According to the following steps, turn ”Automatic Reroute” mode to ”ON”.
1. Push the ”MENU” switch.
5–001u
4. Touch ”ON” at the right of ”Automatic Reroute”.
The set item is highlighted in green.
5. Touch ”Enter”.
1–011u
2. Touch ”NAVI option”.
3–061u
3. Touch ”Guidance Mode”.
66
INFORMATION
If your vehicle is largely off the
route, the system searches for a
new route up to the destination.
The route returning to the previous
route is not searched.
On this screen, you can also set
”Route Preview” (see page 67) or
”Time to Destination” (see page
69).
Page 71

Route Preview
3–061u
5–002u
The entire route from the starting point
to the destination can be displayed after
the destination is set and the route is
searched.
Take the following steps.
1. Push the ”MENU” switch.
1–011u
2. Touch ”NAVI option”.
3. Touch ”Guidance Mode”.
5–009u
Guidance mode screen
4. Touch ”ON” at the right of ”Route
Preview” on the ”GUIDANCE MODE”
screen.
The set item is highlighted in green.
5. Touch ”Enter”.
INFORMATION
On this screen, you can also set ”Automatic Reroute” (see page 66) or
”Time to Destination” (see page 69).
67
Page 72

Display of Route Trace
5–003ua
Y ou can display the route trace when
you want to see which route you actually took. This function is helpful when
you are returning along a complicated
route.
The points your vehicle actually passed
are indicated by blue dots on the map.
1. Push the ”MENU” switch.
1–011u
2. Touch ”NAVI option”.
3–061u
3. Touch ”Display Mode”.
5–004u
Display mode screen
4. Touch ”ON” at the right of ”Route
Trace”.
From the point where you set ”Route
Trace” at ”ON”, the route is memorized up
to about 50 km (about 30 miles).
INFORMATION
On this screen, you can also set ”Advance View” (see page 50).
5. When you want to display blue dots
on the memorized route, touch ”ON” at
the right of ”Trace Display”.
6. To turn off the blue dots on the
route, touch ”OFF” of the ”Trace Display”.
When you touch ”OFF” at the right of
”Route Trace”, the memory will be deleted.
If you cancel the deletion, touch ”NO” on
the message screen for confirmation.
68
Page 73

Time to Destination
The time required to reach the destination can be displayed on the route guidance screen.
5–010u
Follow the steps below.
1. Push the ”MENU” switch.
1–011u
2. Touch ”NAVI option”.
3–061u
3. Touch ”Guidance Mode”.
5–009u
Guidance mode screen
4. Touch ”Set Ave. Speed” on the
”GUIDANCE MODE” screen.
INFORMATION
On the guidance mode screen, you
can also set ”Automatic Reroute” (see
page 66) and ”Route Preview” (see
page 67).
5–005u
5. Touch or to set the average
vehicle speeds for driving on a freeway,
main street and residential area.
If you touch ”Reset”, the default speed is
set at each item.
6. After you finish setting, touch ”Enter”.
7. The guidance mode screen returns.
Touch ”ON” for ”Time to Destination”
and then ”Enter”.
The set item is highlighted in green.
INFORMATION
The display of the time up to the destination is the approximate time for
driving which is calculated based on
the data input at step 5. It may differ
largely depending on the road condition such as traffic jams, construction
work, etc. Up to 99 hours 59 minutes
can be displayed.
69
Page 74

Cruising Range Display Trip Information
This function tells you how far you can
drive with the remaining fuel.
Push the ”MENU” switch.
1–011u
Available cruising range appears at the
top right of the screen.
Even though the display indicates sufficient
miles to run, if the fuel level on the fuel
gauge approaches ”E” or the low fuel level
warning light comes on, fill the fuel tank as
soon as possible. ”LOW FUEL” appears
on the screen.
INFORMATION
In the beginning of driving on a
new vehicle, the correct cruising
range may not be shown.
Because the cruising range displayed is calculated based on the
past fuel expenses, it may vary according to the way of driving and
road condition.
Trip information such as driving time,
driving distance, average vehicle speed,
fuel expenses, etc. can be displayed on
the screen.
1. Push the ”MENU” switch.
1–011u
2. Touch ”Trip Info”.
73–1
The screen displays trip information on the
same 6 items as shown in the multi information display of the instrument cluster.
To reset the value:
GS300: Touch ”Reset” at the right of each
item.
LS400: Display the desired item in the
multi information display and touch the
”Reset” switch on the instrument cluster.
(For details, see ”Section 1–3” on the separate Owner’s Manual.)
After resetting, the measurement starts
again from the reset point.
When you touch ”List” on the screen,
the screen changes and displays the
menu.
73–2
Touch your desired item.
70
Page 75

Trip Information
73, 4a
Up to 10 records indicating the date of reset, refueled date and measurement value
are listed. To display the data from the 6th
one, touch ”PAGE 2”.
If the 11th measurement is started, the oldest record is deleted.
INFORMATION
If it is detected that more than 10 L
(2.6 gal, 2.2 lmp. gal.) of gasoline is
increased in the fuel tank, the values
for “Distance after refuleing” and “Average consumption after refueling”
are reset automatically to start new
measurement.
71
Page 76

72
Page 77

SECTION
VI
OTHER FUNCTIONS
Clock adjustment 74. . . . . . . . . . . . . . . . . . . . . . . . . . . . . . . . . . . . . . . . . . . . . . . . .
Screen adjustment 75. . . . . . . . . . . . . . . . . . . . . . . . . . . . . . . . . . . . . . . . . . . . . . . .
73
Page 78

Clock Adjustment (LS400 only)
The clock in this system can be corrected using signals from the GPS.
Daylight Saving Time setting or your
desired time setting is available.
1. Push the ”MENU” switch.
6–007ua
75–2
75–3
2. Touch ”Adjust Clock”.
74
Auto Adjust: When you touch this switch,
the time is set to the GPS clock, and this
switch is highlighted in green.
Daylight Saving Time: Daylight saving
time can be set or canceled.
While daylight saving time is set, this
switch is highlighted in green.
You can adjust the clock with the
switches on the left.
Time Zone: You can select the time zone.
Touching this switch changes to the next
screen.
Touch of your desired area. The
time zone for its area is set and the previous screen returns.
Page 79

Screen Adjustment
Y ou can adjust the brightness or contrast of the screen depending on the
brightness of your surroundings, or
turn off the display.
(a) Adjustment of brightness
and contrast
1. Push the ”MENU” switch
1–011ua
MENU screen
2. Touch ”Brightness” on the screen.
The following adjustment screen appears on the lower part of the map
screen.
76–1
Brightness: Adjusts the brightness of the
screen.
Contrast: Adjusts the contrast of the
screen.
Touch ”+” or ”–” for adjustment.
”–”: The screen becomes dark or its con-
trast becomes weak.
”+”: The screen becomes bright or its
contrast becomes strong.
INFORMATION
The adjustment screen display goes
off in the following cases:
When you do not touch any switch
on the screen for 6 seconds after
the change to the screen adjustment screen.
When 3 seconds have passed after
screen adjustment.
Depending on the position of the headlight switch, the screen changes to the
day mode or night mode.
76–2
Day mode (with the headlight switch
off)
76–3
Night mode (with the headlight switch
on)
75
Page 80

Screen Adjustment
To display the screen in the day mode
even at night, touch ”Day mode” on the adjustment screen for brightness and contrast control. (In the opposite case, touch
”Night mode”.)
However, if the instrument panel light control switch is turned fully to the right, mode
switching cannot be done. It remains in
the day mode. In this case, ”Day mode” or
”Night mode” is not shown on the screen.
If the screen is set in the day mode with
the headlight switch turned to on, this
condition is memorized in the system even
with the engine turned off.
(b) Turning off the screen display
Touch ”Screen Off” on the ”MENU”
screen.
EMV6005E
GS300 only
GS300: Temperature indication for the
outside temperature remains on when the
outside temperature is set ”ON”.
When you push any switch such as ”DESTINATION” or ”MAP/GUIDE”, etc., the selected screen appears.
76
Page 81

SECTION
VII
AIR CONDITIONING
Automatic air conditioning controls 78. . . . . . . . . . . . . . . . . . . . . . . . . . . . . . . . . .
77
Page 82

Automatic Air Conditioning Controls
Type A
EMV7001U
1
Driver side temperature
display 81. . . . . . . . . . . . . . . . . . . . . . . .
2
Automatic control button 81. . . . . . . .
3
OFF button 81. . . . . . . . . . . . . . . . . . . . .
4
Air intake control button 84. . . . . . . .
5
Outside temperature display 86. . . .
6
Front windshield button 85. . . . . . . . .
7
Passenger side temperature
display 81. . . . . . . . . . . . . . . . . . . . . . . .
8
Passenger side temperature
control button 81. . . . . . . . . . . . . . . . . .
9
Separate/dual control button 82. . . .
10
Air flow control switch 83. . . . . . . . . .
11
Air conditioning on–off switch 85. . .
12
Fan speed control switch 83. . . . . . .
13
Air conditioning operation
screen display button 81. . . . . . . . . . .
14
Driver side temperature
control button 81. . . . . . . . . . . . . . . . . .
Page
78
Page 83

Automatic Air Conditioning Controls
Type B
EMV7017U
1
Automatic control button 81. . . . . . . .
2
OFF button 81. . . . . . . . . . . . . . . . . . . . .
3
Air intake control button 84. . . . . . . .
4
Front windshield button 85. . . . . . . . .
5
Passenger side temperature
control button 81. . . . . . . . . . . . . . . . . .
6
Separate/dual control button 82. . . .
7
Driver side temperature
display 81. . . . . . . . . . . . . . . . . . . . . . . .
8
Outside temperature display 86. . . .
9
Passenger side temperature
display 81. . . . . . . . . . . . . . . . . . . . . . . .
10
Air conditioning on–off switch 85. . .
11
Air flow control switch 83. . . . . . . . . .
12
Fan speed control switch 83. . . . . . .
13
Outside temperature display
”ON/OFF” switch 86. . . . . . . . . . . . . . .
14
Air conditioning operation
screen display button 81. . . . . . . . . . .
15
Driver side temperature
control button 81. . . . . . . . . . . . . . . . . .
Page
79
Page 84

Automatic Air Conditioning ControlsAutomatic Air Conditioning Controls
EMV7002U
Air flow selection
80
Page 85

Automatic Air Conditioning Controls
The automatic air conditioning auto-
matically maintains the set temperature.
This air conditioning features automatic
fan speed and air flow control which automatically selects the most suitable fan
speed and air flow to control the temperature. The ignition key must be in the ”ON”
position.
CLIMATE: Push this button to display
switches for automatic air conditioning controls.
NOTICE
To prevent the battery from being discharged, do not leave the air conditioning on longer than necessary
when the engine is not running.
(a) Climate control
SETTING OPERATION – automatic control
EMV7003U
1. Push the ”AUTO” button.
Air flow quantity, switching of the diffusers,
on–off of the air conditioning, and switching
of the air intake between RECIRCULATED
AIR and OUTSIDE AIR are automatically
adjusted. The operation status is shown
by each indicator.
When one of the manual control buttons is
depressed while operating in automatic
mode, the operation corresponding to the
button depressed is set. Other conditions
continue to be adjusted automatically.
Push the ”OFF” button to turn the air conditioning off.
EMV7004U
2. Use the ”TEMP” or ”PASSENGER
TEMP” button to set the desired temperature.
The ”TEMP” or ”PASSENGER TEMP” button is used to set the desired temperature.
The temperature will be controlled on the
driver and passenger sides simultaneously
or individually.
”TEMP” button – Changes the temperature on the driver and passenger sides simultaneously or the driver side only.
”PASSENGER TEMP” button – Changes
the temperature on the passenger side
only.
81
Page 86

Automatic Air Conditioning Controls
”DUAL” button – Changes the mode of
the temperature setting.
The indicator on the ”DUAL” button has
two modes:
With the indicator on – For individual
temperature setting
With the indicator off – For simulta-
neous temperature setting
Driver side setting
Passenger side setting
Mixed setting
EMV7005U
82
Page 87

Automatic Air Conditioning Controls
SETTING OPERATION – manual control
If manual air flow selection is desired –
EMV7006U
The outlets from which air is delivered can
be selected manually by touching the
switch. The function of each mode is as
follows:
1
Panel – Air flows mainly from the instru-
ment panel vents.
2
Bi–level – Air flows from both the floor
vents and the instrument panel vents.
3
Floor – Air flows mainly from the floor
vents.
4
Floor/Windshield – Air flows mainly
from the floor vents and windshield
vents.
The selected mode is highlighted in green.
If quick heating or cooling is desired –
EMV7007U
Type A: Push the ”TEMP” or ”PASSENGER TEMP” button on either side and
hold it until ”MAX. HOT” or ”MAX. COLD”
appears on the display.
Type B: Push the ”TEMP” or ”PASSENGER TEMP” button on either side and
hold it until the maximum figure or minimum figure appears.
If manual fan speed control is desired –
EMV7008U
1
Fan speed at low 2Fan speed at
high
The fan speed can be set to your desired
speed by touching the appropriate air flow
control switch. The higher the fan speed
is, the more air is delivered. Pushing the
”OFF” button turns off the fan.
To remove exterior windshield frost, use
the high speed setting.
The selected mode is highlighted in green.
83
Page 88

Automatic Air Conditioning Controls
If manual switching of air intake is desired –
EMV7009U
Each time you push the air intake control
button, the mode changes in order from the
RECIRCULATED AIR mode to AUTOMATIC mode to OUTSIDE AIR mode, then
back to the RECIRCULATED AIR mode.
Each indicator light shows which mode is
now selected.
1
RECIRCULATED AIR mode – If quick
circulation of cooled air is desired, select this mode.
2
AUTOMATIC mode – When driving
where the outside air is dirty (i.e., when
the vehicle running in front of your vehicle accelerates rapidly), the system
changes automatically from the OUTSIDE AIR mode to the RECIRCULATED AIR mode.
3
OUTSIDE AIR mode – The system will
take fresh outside air into the vehicle.
For normal use, it is best to keep the air
intake control button set to OUTSIDE AIR
mode. If recirculated air is used during
heating, the windows will fog up more easily.
To change the sensitivity of the sensor
switching between the RECIRCULATED
and OUTSIDE AIR in the AUTOMATIC
mode, push the air intake control button
for a few seconds. The display changes
as illustrated below.
The sensitivity of the sensor can be adjusted only while the vehicle has been
stopped.
7018U
Touch the desired switch.
When you push any button except the air
intake control button, the above screen disappears.
84
Page 89

Automatic Air Conditioning Controls
If manual on–off of the air conditioning
is desired –
Touch the ”A/C” switch to turn the air
conditioning on and touch it again to turn
the air conditioning off.
The air conditioning does not work if the
outside temperature is lowered down to
around 0C (32F).
If the system is used for ventilation, heating
in dry weather or removing frost or exterior
fog on the windshield, turn the air conditioning off once it is no longer required.
This will improve fuel economy. The air
conditioning can be used for year–round
automatic temperature control including
cooling and dehumidifying operation.
If the air conditioning compressor does not
operate, the indicator of the ”A/C” button
will blink. If the indicator of the ”A/C” button blinks even when the ”A/C” button is
pushed again, have the compressor
checked by your nearest Lexus dealer.
(b) Windshield defogging and
defrosting
EMV7010U
To remove interior fog on the windshield –
Push the”FRONT WINDSHIELD” button.
To remove frost or exterior fog on the
windshield –
1. Push the upper side of the temperature
control button until ”MAX. HOT” or maximum
figure appears on the temperature display.
2. Push the ”FRONT WINDSHIELD” button.
3. Push the ”HI ” o f t h e a i r f l o w c o n t r o l s w itch
to obtain a maximum air flow.
4. Leave the air conditioning on–off button
off.
When the ”FRONT WINDSHIELD” button
is pushed while operating in automatic
mode, the air conditioning is set to operate
and the OUTSIDE AIR mode is set.
If you push the ”FRONT WINDSHIELD”
button once again while in the FRONT
WINDSHIELD mode, the mode then returns to the last mode used.
CAUTION
Do not use the ”FRONT WINDSHIELD” button during cooled air operation in extremely humid weather.
The difference between the temperature of the outside air and that of the
windshield could cause the outer surface of the windshield to fog up
blocking your vision.
When you turn the ignition switch on after
the removal and installation of the battery
terminal, the indicator light may flash and
the operating sound of the motor may be
heard. This does not indicate a malfunction.
85
Page 90

Automatic Air Conditioning Controls
You may hear the operating sound of the
motor about 70 seconds after the ignition
switch is turned off. This is not also a malfunction.
(c) Outside temperature display
7019U
Type A: This display shows the outside
temperature when the ignition switch is
on.
Type B: Outside temperature is displayed on the screen when you touch
the ”ON/OFF” switch.
The displayed temperature ranges from
–30C (–22F) up to 50C (122F). If the
temperature does not appear on the display or it shows ”– – –”, take your vehicle
to your Lexus dealer.
(d) Air filter
The air filter may clog after long use and
reduce air flow. You can inspect the filter
easily.
When you inspect and replace the air filter,
be sure to turn off the fan.
EMV7011U
1. Open the glove box and remove the
two covers.
EMV7012U
2. Take out the air filter.
For LS400 only: Inspect the lower surface
of the filter. If it is just moderately dusty, it
may be cleaned by blowing compressed
air from the lower surface. Do not wash or
oil the filter.
For all models: If it is dirty, it should be
replaced. To maintain the air conditioning
efficiency, replace the air filter according to
the maintenance schedule. (For scheduled
maintenance information, please refer to
the separate ”Owner’s Manual Supplement/Maintenance Schedule”.)
86
Page 91

Automatic Air Conditioning Controls
NOTICE
Do not drive with the air filter removed, or the efficiency of air conditioning may be lost.
(e) Operating tips
Make sure the air inlet grilles in front of
the windshield are not blocked by
leaves or other obstructions.
If air flow control is not satisfactory,
check the dashboard vents. (See ”Center vents”, ”Side vents”, ”Lower vent”
and ”Rear vents”.)
To help cool down the interior after park-
ing in the hot sun, drive for the first few
minutes with the windows open. After
the excess heat has blown away, close
the windows.
When driving on dusty roads, close all
windows. If dust thrown up by the vehicle is still drawn into the vehicle after
closing the windows, it is recommended
that the air intake control button be left
to the OUTSIDE AIR mode and the air
flow control switch be selected to anywhere except the ”OFF” button.
If following another vehicle on a dusty
road, or driving in windy and dusty
conditions, it is recommended that the
air intake control button be temporarily
pressed in to the RECIRCULATED AIR
mode, which will close off the outside
passage and prevent outside air and
dust from entering the vehicle interior.
Center vents
EMV7013U
The center vents may be opened or
closed as shown.
Side vents
EMV7014U
The side vents may be opened or
closed as shown.
87
Page 92

Automatic Air Conditioning Controls
Lower vent
EMV7015U
The lower vent may be opened or
closed as shown.
Rear vents
EMV7016U
The rear vents may be opened or closed
as shown.
88
Page 93

SECTION
VIII
AUDIO SYSTEM
Audio system 90. . . . . . . . . . . . . . . . . . . . . . . . . . . . . . . . . . . . . . . . . . . . . . . . . . . . .
89
Page 94

Audio System
Quick reference for your audio system
EMV8001U
The ”CD” button works only when your Lexus is equipped with an automatic
changer.
1
Audio operation screen display
button 91. . . . . . . . . . . . . . . . . . . . . . . . .
2
Function switch display
screen 92. . . . . . . . . . . . . . . . . . . . . . . . .
3
Cassette tape slot 96. . . . . . . . . . . . . .
4
Tone and balance adjustment
screen display button 93. . . . . . . . . . .
5
[Radio mode] Scan tuning 96. . . . . .
[Tape mode] Fast forwarding or
rewinding a tape 97. . . . . . . . . . . . . . .
[CD mode] Disc selection 101. . . . . .
6
Side change of cassette tape 97. . . .
7
Mode selectors 91. . . . . . . . . . . . . . . . .
8
Stopping and ejecting a
cassette tape 96. . . . . . . . . . . . . . . . . . .
9
[Radio mode] Frequency tuning 95.
[Tape mode] Direct access to
a desired program 98. . . . . . . . . . . . .
10
Turning the system on and
adjusting volume 91. . . . . . . . . . . . . . .
Page
90
Page 95

Audio System
Using your audio system: some
basics
This section describes some of the basic
features of the Lexus audio system. Some
information may not pertain to your system.
Your audio system works when the ignition
key is in the ”ACC” or ”ON” position.
NOTICE
To prevent the battery from being
discharged, do not leave the car
audio on longer than necessary when
the engine is not running.
(a) Turning the system on and off
EMV8002U
POWER–VOL: Push this knob to turn the
audio system on and off. Turn this knob to
adjust the volume. The system turns on in
the last mode used.
AUDIO: Push this button to display
switches for audio system.
EMV8003U
Push ”AM”, ”FM1/2”, ”TAPE” or ”CD” to
turn on that mode. The selected mode
turns on directly.
Push these buttons if you want to switch
from one mode to another.
If the tape or disc is not set, the cassette
player or compact disc player does not turn
on.
You can turn off the cassette player by
ejecting the cassette tape. If the audio
system was previously off, then the entire
audio system will be turned off when you
eject the cassette tape. If another function
was previously playing, it will come on
again.
91
Page 96

Audio System
95–1
95–2
95–3
The switches for radio, cassette tape
and compact disc player operation are
displayed on the liquid crystal display.
Touch them lightly and directly on the
screen.
The selected switch is highlighted in green.
(b) Automatic sound levelizer
When the audio sound becomes difficult to
be heard due to road noise, wind noise,
etc. during driving, touch the ”ASL” switch.
The system adjusts to the optimum volume
and tone quality according to the noise level.
(c) Tone and balance
How good an audio program sounds to you
is largely determined by the mix of the
treble, mid–range, and bass levels. In fact,
different kinds of music and vocal programs usually sound better with different
mixes of treble, mid–range, and bass.
A good balance of the left and right stereo
channels and of the front and rear sound
levels is also important.
Keep in mind that if you are listening to a
stereo recording or broadcast, changing
the right/left balance will increase the volume of one group of sounds while decreasing the volume of another.
92
Page 97

Audio System
(d) Your radio antenna
The wire antenna is mounted inside the
rear window.
EMV8006U
Pushing the ”AUDIO CONTROL” button
displays the sound adjustment screen.
A–1
Each time you push the ”AUDIO CONTROL” knob, the mode changes. The
available adjustment mode is highlighted in green. To adjust the tone and
balance, turn the knob.
BASS: Adjusts low–pitched tones.
MID: Adjusts mid–pitched tones.
TREBLE: Adjusts high–pitched tones.
As the orange display goes up, each tone
is more emphasized.
FADER: Adjusts the sound balance between the front and rear speakers.
BALANCE: Adjusts the sound balance
between the right and left speakers.
NOTICE
When cleaning the inside of the
rear window, be careful not to
scratch or damage the wire antenna.
Putting a window tint (especially,
conductive or metallic type) on the
rear window may affect the reception of radio. For the installation of
the window tint, consult with your
Lexus dealer.
93
Page 98

Audio System
(e) Your cassette player
When you insert a cassette, the exposed
tape should be to the right.
NOTICE
Do not oil any part of the cassette
player, and do not insert anything
except a cassette tape into the slot.
(f) Your automatic changer
EMV8008U
If your Lexus is equipped with an automatic
changer, it can play selected discs or continuously play all the discs set in the magazine.
When you set discs into the magazine,
make sure they face the correct way. If
not, the player will display ”Err” and the
disc number.
NOTICE
Never try to disassemble or oil any
part of the compact disc player. Do
not insert anything except a compact
disc into the magazine.
The player is intended for use with 12 cm
(4.7 in.) discs only.
Radio operation
(a) Listening to the radio
EMV8009U
Push these buttons to choose either an
AM or FM station.
”AM”, ”FM1” or ”FM2” appears on the display.
94
Page 99

Audio System
EMV8010U
Push this button on the upper side to
step up the station band or on the lower
side to step down.
Your radio automatically changes to stereo
reception when a stereo broadcast is received. ”ST” appears on the display. If the
signal becomes weak, the radio reduces
the amount of channel separation to prevent the weak signal from creating noise.
If the signal becomes extremely weak, the
radio switches from stereo to mono reception. In this case, ”ST” disappears from the
display.
(b) Presetting a station
95–1
1. Tune in the desired station.
2. Touch one of the station selector
switches (1–6) and hold it until a beep is
heard. This sets the station to the switch
and the frequency appears on the switch
Each switch can store one AM station and
two FM stations. To change the preset station to a different one, follow the same procedure.
The preset station memory is cancelled
when the power source is interrupted by
battery disconnection or a blown fuse.
(c) Selecting a station
Your Lexus has an electronic tuning radio
(ETR). Tune in the desired station using
one of the following methods.
Preset tuning: Touch the switch (1–6 ) for
the station you want. The switch is highlighted in green and station frequency appears on the display.
Manual tuning: Push the ”TUNE SEEK”
button briefly. Each time you push the button, the radio will step up or down to another frequency.
Seek tuning: Push the ”TUNE SEEK” button and hold it until you hear a beep. The
radio will begin seeking up or down for a
station of the nearest frequency and will
stop on reception. Each time you push the
button, the stations will be searched out
one after another.
95
Page 100

Audio System
Cassette tape player operation
(a) Playing a cassette tape
EMV8013U
To scan all the frequencies: Push the
”SCAN” button on the upper or lower side
briefly. ”SCAN” appears on the display.
The radio will find the next station up or
down the band, stay there for a few seconds, and then scan again. To select a
station, push the ”SCAN” button a second
time.
To scan the preset stations: Push the
”SCAN” button on the upper or lower side
for longer than 2 seconds. ”P. SCAN” appears on the display. The radio will tune in
the next preset station up or down the
band, stay there for a few seconds, and
then move to the next preset station. To
select a station, push the ”SCAN” button a
second time.
96
EMV8014U
When you insert a cassette tape, the exposed tape should be to the right.
The player will automatically start when
you insert a cassette tape. At this time,
”T APE” appears on the display.
If a metal or chrome equivalent cassette
tape is put in the cassette player, the player will automatically adapt to it and ”METAL” appears on the display.
To stop or eject the cassette tape, push the
”EJECT” button.
95–2
If a cassette is already in the slot, push
the ”TAPE” button.
Dolby Noise Reduction* feature: If you
are listening to a tape that was recorded
with Dolby* B or C Noise Reduction, push
the Dolby* B or C switch.
The Dolby B NR mode reduces tape noise
by about 10 dB. The Dolby C NR mode
reduces tape noise by another 10 dB or
about 20 dB total. For best sound reproduction, select the same NR mode that
was used to record the tape.
To play a tape recorded without Dolby NR,
push the switch once again.
 Loading...