

Page 1

X790 Series
Maintenance Guide
August 2011 www.lexmark.com
Page 2

Contents
Maintaining the printer................................................................................3
Cleaning the exterior of the printer..........................................................................................................3
Cleaning the scanner glass........................................................................................................................4
Cleaning the ADF parts..............................................................................................................................5
Cleaning the printhead lenses...................................................................................................................7
Storing supplies.........................................................................................................................................8
Checking the status of supplies.................................................................................................................8
Checking the status of supplies from the printer control panel ......................................................................... 8
Checking the status of supplies from a network computer................................................................................ 8
Ordering supplies......................................................................................................................................9
Ordering a print cartridge................................................................................................................................... 9
Ordering a fuser or a transfer module................................................................................................................ 9
Ordering a waste toner bottle .......................................................................................................................... 10
Ordering staple cartridges ................................................................................................................................10
Ordering an ADF kit........................................................................................................................................... 10
Ordering a cleaning kit...................................................................................................................................... 10
Replacing supplies...................................................................................................................................11
Replacing a print cartridge................................................................................................................................ 11
Replacing the waste toner bottle ..................................................................................................................... 14
Moving the printer..................................................................................................................................15
Before moving the printer ................................................................................................................................15
Moving the printer to another location............................................................................................................ 16
Shipping the printer.......................................................................................................................................... 16
Contents
2
Page 3

Maintaining the printer
Periodically, certain tasks are required to maintain optimum print quality.
Cleaning the exterior of the printer
1 Make sure that the printer is turned off and unplugged from the wall outlet.
CAUTION—SHOCK HAZARD: To avoid the risk of electric shock when cleaning the exterior of the printer,
unplug the power cord from the wall outlet and disconnect all cables to the printer before proceeding.
Remove paper from the standard exit bin.
2
3 Dampen a clean, lint‑free cloth with water.
Warning—Potential Damage: Do not use household cleaners or detergents, as they may damage the finish of
the printer.
4 Wipe only the outside of the printer, making sure to include the standard exit bin.
Warning—Potential Damage:
5 Make sure the paper support and standard exit bin are dry before beginning a new print job.
Using a damp cloth to clean the interior may cause damage to your printer.
Maintaining the printer
3
Page 4
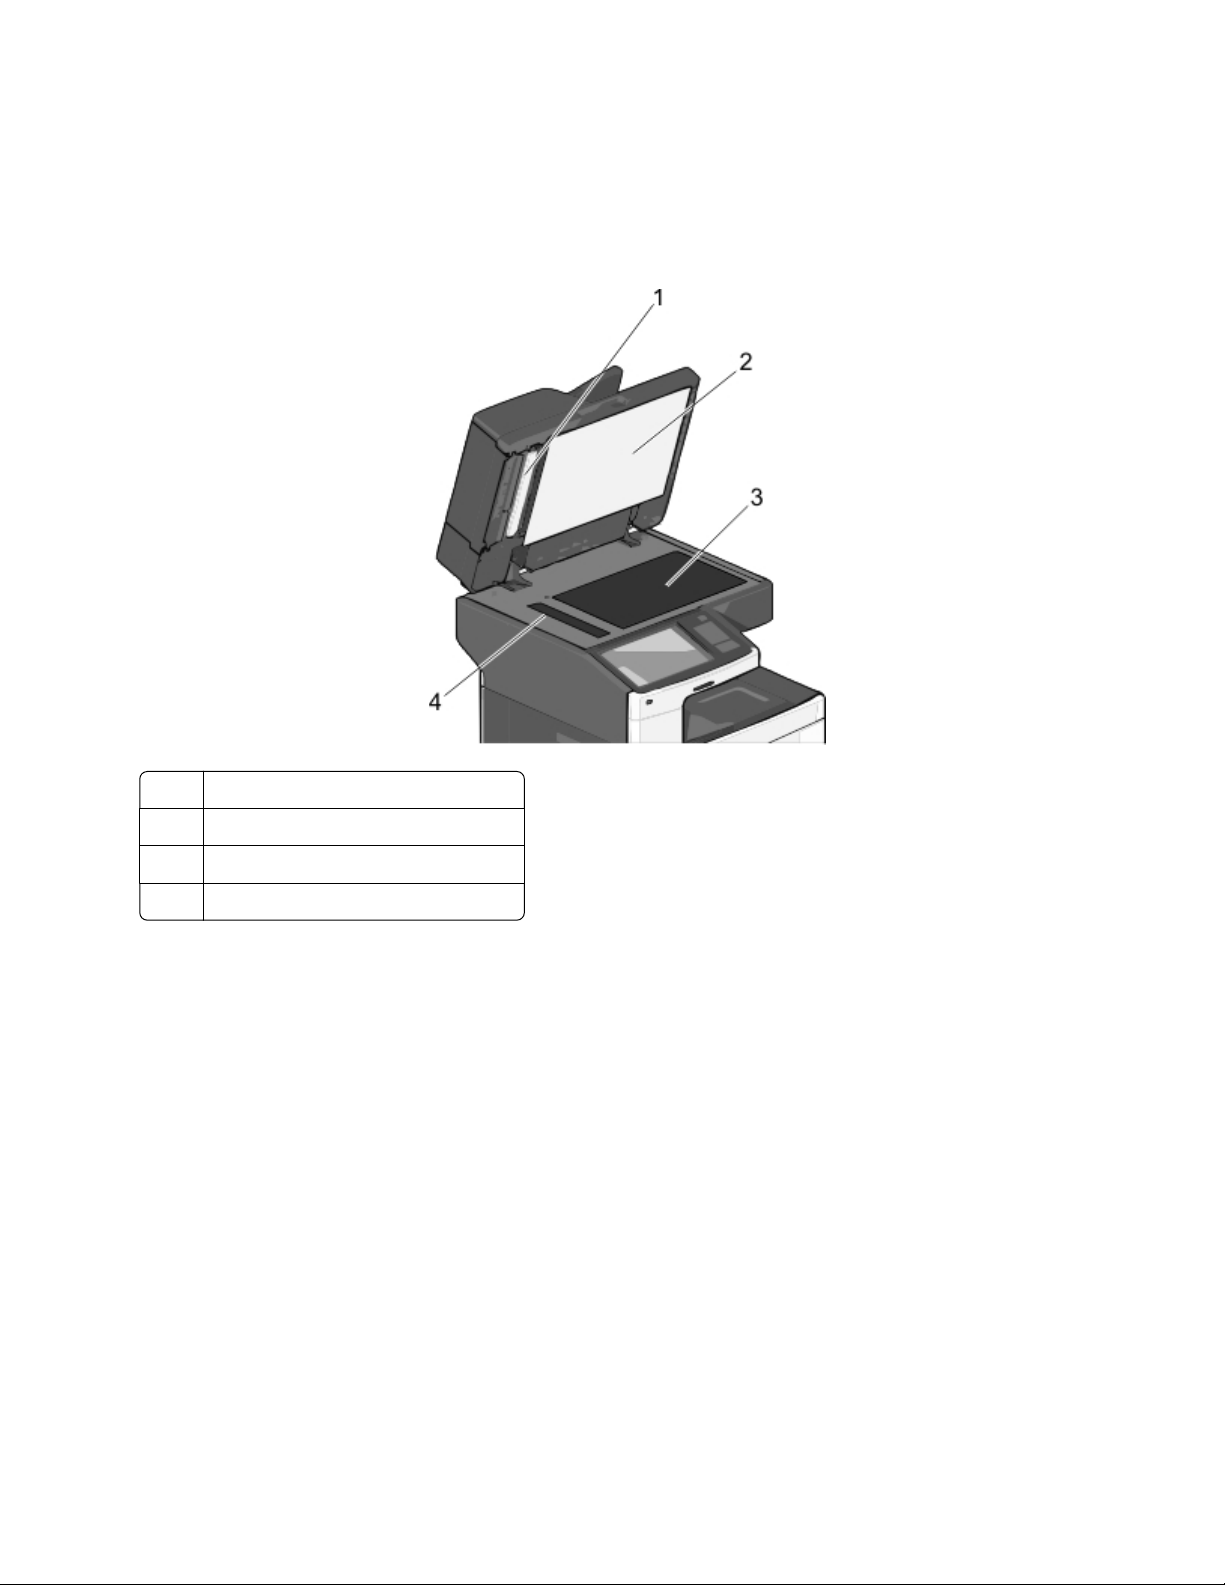
Cleaning the scanner glass
Clean the scanner glass if you encounter print quality problems, such as streaks on copied or scanned images.
1
Slightly dampen a soft, lint-free cloth or paper towel with water.
Open the scanner cover.
2
1 White underside of the ADF cover
2 White underside of the scanner cover
3 Scanner glass
4 ADF glass
3
Wipe the areas shown and let them dry.
Maintaining the printer
4
Page 5
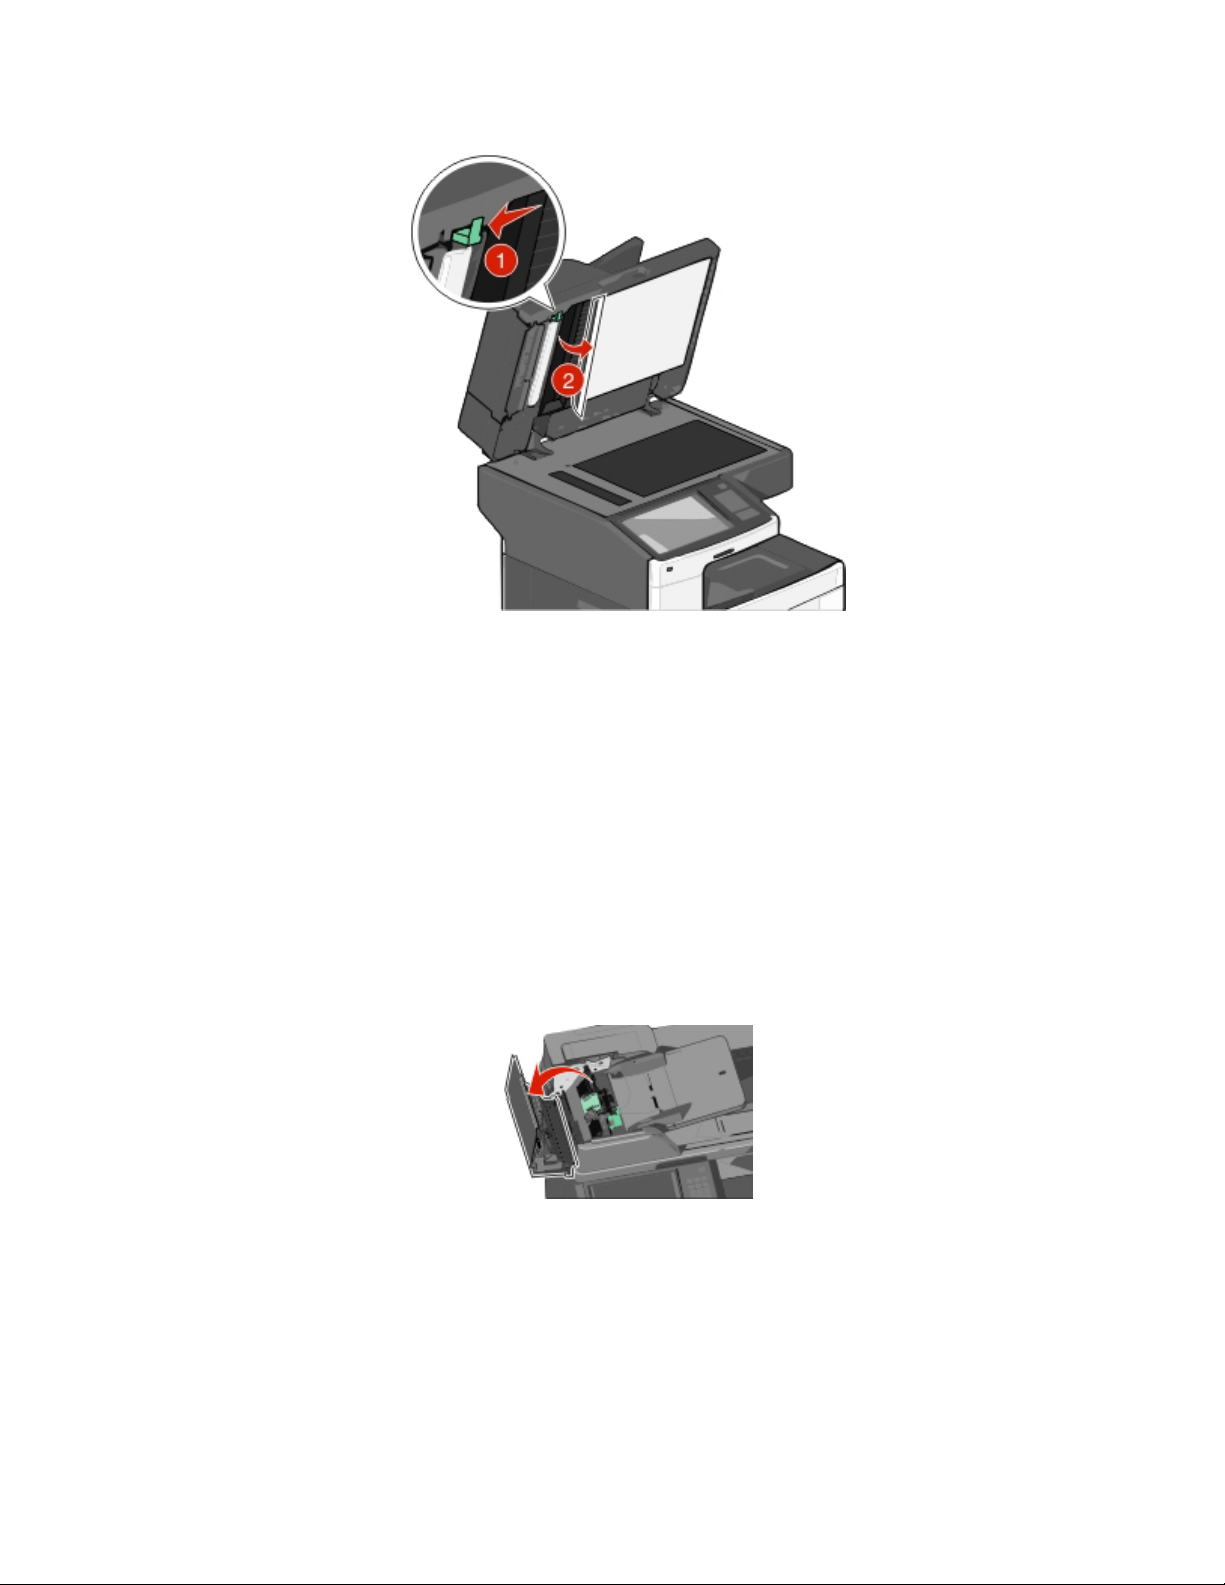
4 Open the bottom ADF door.
5 Wipe the ADF scanner glass under the ADF door.
6
Close the bottom ADF door.
7
Close the scanner cover.
Cleaning the ADF parts
Clean the ADF parts periodically to maintain optimal printing performance. Residue on the ADF parts may cause print
quality issues and false 280–299 paper jam messages.
1 Turn the printer off.
Slightly dampen a soft, lint-free cloth with water.
2
Open the ADF cover.
3
Maintaining the printer
5
Page 6

4 Remove the pick roller assembly.
5 Wipe the surface of both pick rollers.
6 Replace the pick roller assembly.
7 Wipe the entire surface under the ADF cover.
8
Close the ADF cover.
Maintaining the printer
6
Page 7

Cleaning the printhead lenses
Clean the printhead lenses when you encounter print quality problems.
1
Open the front door.
2 Remove all print cartridges.
Warning—Potential Damage:
the photoconductor.
3
Locate the four printhead lenses.
Do not touch the shiny area on the photoconductor drum. Doing so can damage
4 Clean the lenses using compressed air.
Warning—Potential Damage:
Do not touch the printhead lenses.
5 Reinstall the print cartridges.
Maintaining the printer
7
Page 8

6 Close the front door.
Storing supplies
Choose a cool, clean storage area for the printer supplies. Store supplies right side up in their original packing until you
are ready to use them.
Do not expose supplies to:
Direct sunlight
•
Temperatures above 35°C (95°F)
•
High humidity above 80%
•
• Salty air
Corrosive gases
•
Heavy dust
•
Checking the status of supplies
A message appears on the display when a replacement supply item is needed or when maintenance is required.
Checking the status of supplies from the printer control panel
From the home screen, touch Status/Supplies > View Supplies.
Checking the status of supplies from a network computer
Note: The computer must be connected to the same network as the printer.
1
Type the printer IP address into the address field of your Web browser.
If you do not know the IP address of the printer, you can:
View the IP address on the printer control panel in the TCP/IP section under the Networks/Ports menu.
•
Print a network setup page or the menu settings pages and locate the IP address in the TCP/IP section.
•
2 Click Device Status.
The Device Status page appears, displaying a summary of supply levels.
Maintaining the printer
8
Page 9

Ordering supplies
To order supplies in the U.S., contact Lexmark at 1-800-539-6275 for information about Lexmark authorized supplies
dealers in your area. In other countries or regions, visit the Lexmark Web Site at www.lexmark.com or contact the
place where you purchased the printer.
Notes:
The toner gauge is an estimate of how much toner is left in your cartridge.
•
All life estimates for printer supplies assume printing on letter‑ or A4‑size plain paper.
•
Ordering a print cartridge
When 88 [color] cartridge low or 88 [color] cartridge nearly low appears, order a new
cartridge.
Estimated cartridge yield is based on the ISO/IEC 19798 standard. Extremely low print coverage (less than 1.25%) for
extended periods of time may negatively affect actual yield and may cause cartridge parts to fail prior to exhaustion
of toner.
Recommended print cartridge and part number
Part name Lexmark Return Program Cartridge Regular cartridge
Cyan Print Cartridge
Cyan Extra High Yield Print Cartridge
Magenta Print Cartridge
Magenta Extra High Yield Print Cartridge
Yellow Print Cartridge
Yellow Extra High Yield Print Cartridge
Black Print Cartridge
Black Extra High Yield Print Cartridge
C792A1CG
C792X1CG
C792A1MG
C792X1MG
C792A1YG
C792X1YG
C792A1KG
C792X1KG
C792A2CG
C792X2CG
C792A2MG
C792X2MG
C792A2YG
C792X2YG
C792A2KG
C792X2KG
Ordering a fuser or a transfer module
When 80 Fuser Life Warning or 83 Transfer Module Life Warning appears, order a replacement
fuser or a transfer module.
When 80 Replace Fuser or 83 Replace Transfer Module appears, install the new fuser or the new
transfer module. For installation information, see the documentation that came with the part.
Part name Part number
Fuser 40X7102 (100 volts)
40X7100 (115 volts)
40X7101 (230 volts)
Transfer Module 40X7103
Maintaining the printer
9
Page 10

Ordering a waste toner bottle
When 82 Waste toner bottle nearly full appears, order a replacement waste toner bottle.
When 82 Replace waste toner bottle appears, replace the waste toner bottle.
Note: Waste toner bottle reuse is not recommended.
Part name Part number
Waste toner bottle C792X77G
Ordering staple cartridges
When Staples Low or Staples Empty appears, order the specified staple cartridge.
For more information, see the illustrations inside the stapler door.
Part name Part number
Staple Cartridges–3 pack
(Since a pack contains 5,000 staples, a 3‑pack contains 15,000 staples.)
25A0013
Ordering an ADF kit
Order an ADF kit if you experience problems with paper double-feeding or paper failing to feed through the ADF.
Part name Part number
ADF kit 40X7220
Ordering a cleaning kit
Use the wet and dry wipes from the cleaning kit to clean the touch screen.
Part name Part number
Cleaning kit (wet and dry wipes) 40X0392
Maintaining the printer
10
Page 11

Replacing supplies
Replacing a print cartridge
1 Open the front door.
2 Lift the green handle and pull the print cartridge. Grasp the top handle and lift the cartridge out of the machine.
3 Place the old cartridge in the replacement cartridge shipping box, and then attach the return label to the box for
shipping.
Maintaining the printer
11
Page 12

4 Unpack a new print cartridge.
Warning—Potential Damage: Be careful not to touch the photoconductor drum. Doing so may affect the print
quality of future print jobs.
5 Shake the new cartridge front‑to‑back and side‑to‑side to evenly distribute the toner.
Maintaining the printer
12
Page 13

6 Remove the red packing strip from the new cartridge.
7 Insert the new cartridge into the printer, and then push the green handle back in place.
Note:
Make sure the cartridge is fully pushed in.
8
Close the front door.
Maintaining the printer
13
Page 14

Replacing the waste toner bottle
Replace the waste toner bottle when 82.xx Replace waste toner bottle appears. The printer will not
continue printing until the waste toner bottle is replaced.
1 Remove the replacement waste toner bottle from its shipping box, and then unpack it.
2 Open the printer front door, and then open tray 1.
3 Pull the green tabs sideways, and then grasp and pull the tabs with both hands to remove the waste toner bottle.
4
Place the waste toner bottle in the recycling bag.
5
Place the bag into the shipping box you removed the replacement part from.
Maintaining the printer
14
Page 15

6 Peel the recycling label off, and place it on the shipping box.
7 Insert the new waste toner bottle into the printer.
8 Close tray 1, and then close the front door.
Moving the printer
Before moving the printer
CAUTION—POTENTIAL INJURY: The printer weight is greater than 18 kg (40 lb) and requires two or more
trained personnel to lift it safely.
CAUTION—POTENTIAL INJURY: Before moving the printer, follow these guidelines to avoid personal injury or
printer damage:
Turn the printer off using the power switch, and then unplug the power cord from the wall outlet.
•
Disconnect all cords and cables from the printer before moving it.
•
• Lift the printer off of the optional drawer and set it aside instead of trying to lift the drawer and printer at the same
time.
Note:
Use the handholds located on both sides of the printer to lift it off the optional drawer.
Warning—Potential Damage: Damage to the printer caused by improper moving is not covered by the printer
warranty.
Maintaining the printer
15
Page 16

Moving the printer to another location
The printer and options can be safely moved to another location by following these precautions:
• Any cart used to move the printer must have a surface able to support the full footprint of the printer. Any cart
used to move the options must have a surface able to support the dimensions of the options.
Keep the printer in an upright position.
•
• Avoid severe jarring movements.
Shipping the printer
When shipping the printer, use the original packaging or call the place of purchase for a relocation kit.
Maintaining the printer
16
 Loading...