

Page 1
Quick Reference
3
1
2
4
7
0
Learning about the printer
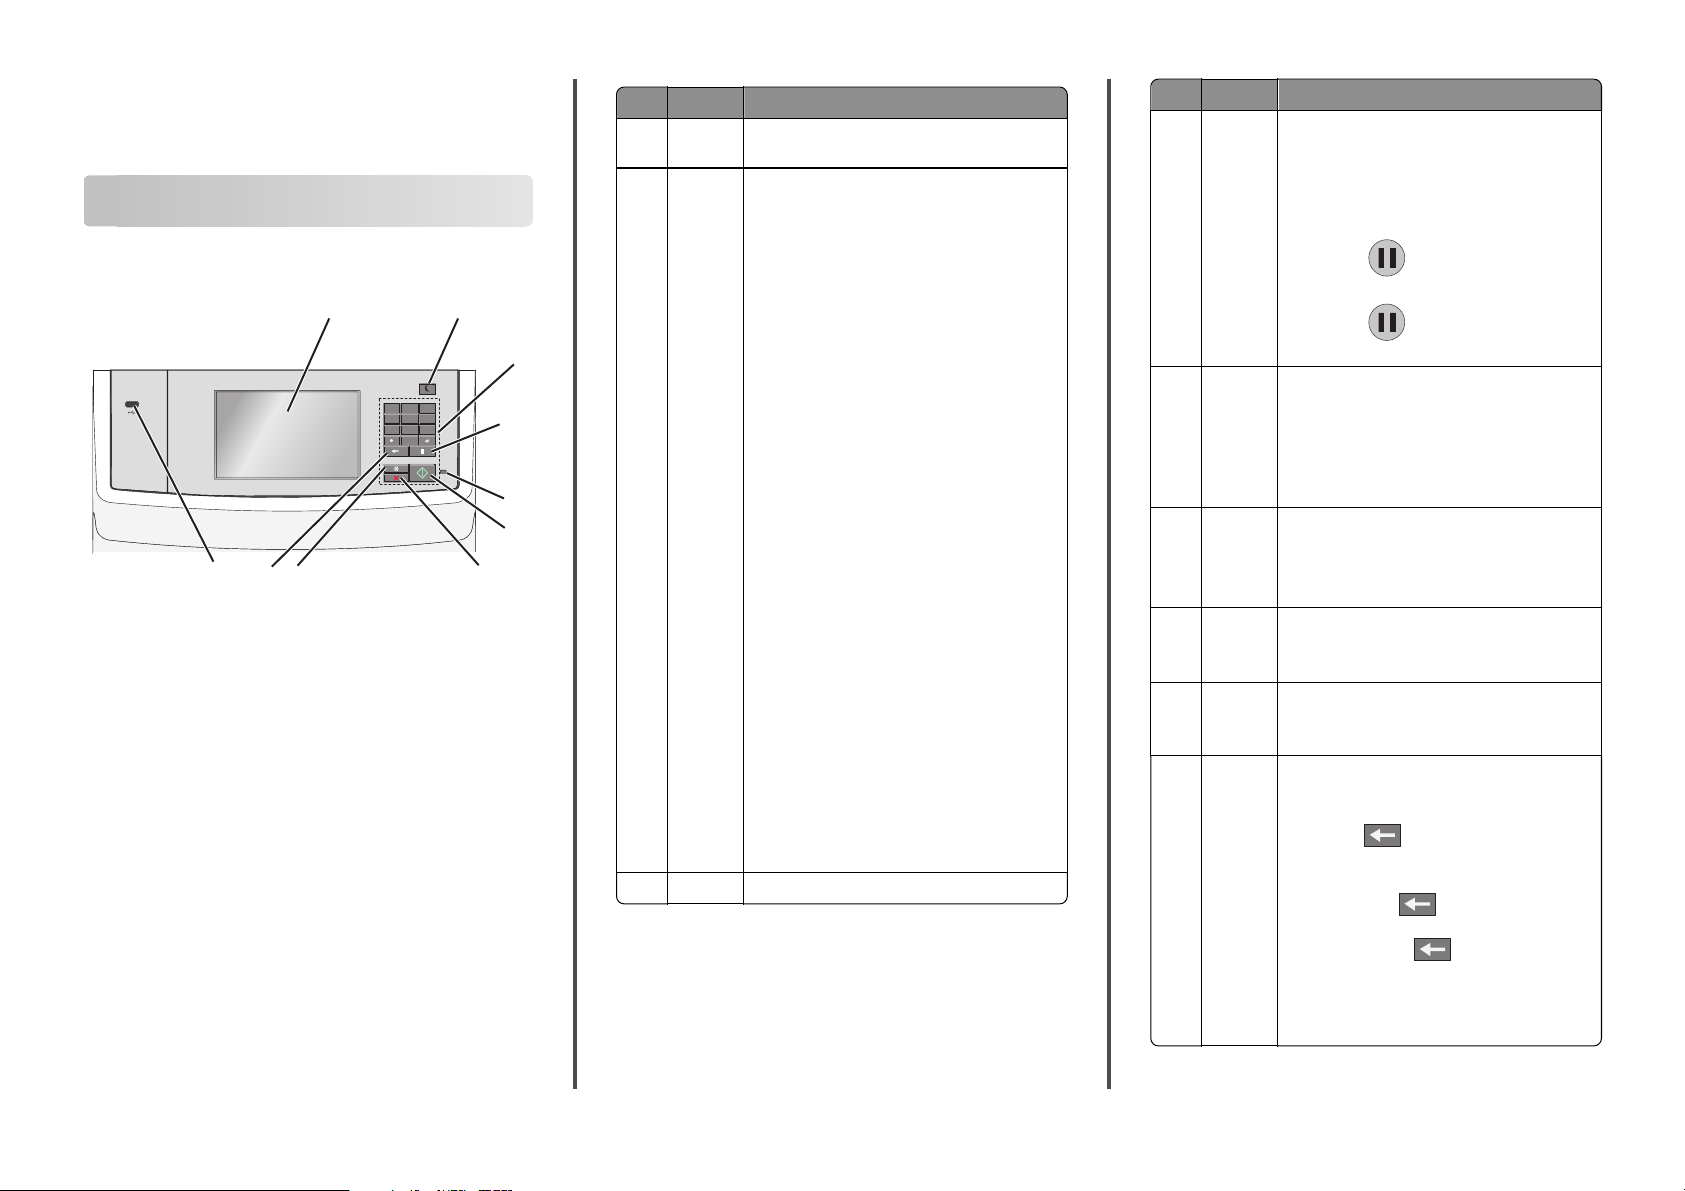
Using the printer control panel
1
ABC3DEF
GHI5JKL6MNO
PQR8STU9WXYZ
10
8
9
Use the To
1 Display View printing, e‑mailing, copying, and faxing
2 Sleep
button
options, as well as status and error messages.
Enable Sleep Mode or Hibernate Mode.
The following are the statuses of the indicator light
and the Sleep button:
Use the To
4 Dial pause
button
• Cause a two- or three-se cond dial pause in a fax
number. In the Fax To field, a dial pause is
represented by a comma (,).
• Redial a fax number.
Notes:
• Entering or waking from Sleep mode
– The indicator light is illuminated solid green.
2
– The Sleep button is illuminated.
• Operating in Sleep mode
– The indicator light is illuminated solid green.
– The Sleep butt on is illuminated solid amber.
• Entering or waking from Hibernate mode
4
– The indicator light is unilluminated.
5 Indicator
light
– The Sleep button is blinking amber for 0.10
of a second, then goes completely
unilluminated for 1.9 seconds in pulsing
5
6
7
pattern.
• Operating in Hibernate mode
– The indicator light is unilluminated.
– The Sleep button is blinking amber for 0.10
of a second, then goes completely
unilluminated for 1.9 seconds in pulsing
pattern.
The following actions wake the printer from Sleep
mode:
• Touching the screen or pressing any hard
button
• Opening an input tray, cover, or door
6 Start
button
7 Stop
button
8 Home
button
• Loading paper into the automatic document
feeder (ADF)
• Opening the scanner glass cover or lid.
9 Back
button
• Sending a print job from the computer
• Performing a power‑on reset (POR) with the
main power switch
3 Keypad Enter numbers, letters, or symbols.
• Pressing outside of the Fax menu
causes an error beep.
• Pressing from the home screen redials
the most recent fax number.
• Off—The printer is off.
• Blinking green—The printer is warming up,
processing data, or printing.
• Solid green—The printer is on, but idle.
• Blinking red— Operator intervention is
needed.
• Initiate the current job i ndicated on the display.
• Start a copy job with the default settings.
Note: Pressing the button while scanning has no
effect.
Stop all printer activity.
Note: A list of options is displayed once
Stopped appears on the display.
Return to the home screen.
Note: Pressing the Home button from the home
screen resets all workflow factory defaults.
• Delete the right-most digit of the value in the
Copy Count field. The factory default value of 1
appears if the entire number is deleted by
pressing
numerous times.
• Delete the right-most di git of a number entered
manually in the Fax Destination List field. You
can also press
shortcut entry. When an entire line is deleted,
another press of
move up one line.
to delete an entire
causes the cursor to
• Delete the character to the left of the cursor in
the E-mail Destination List field. If the character
is in a shortcut, then the shortcut is deleted.
1
Page 2
Use the To
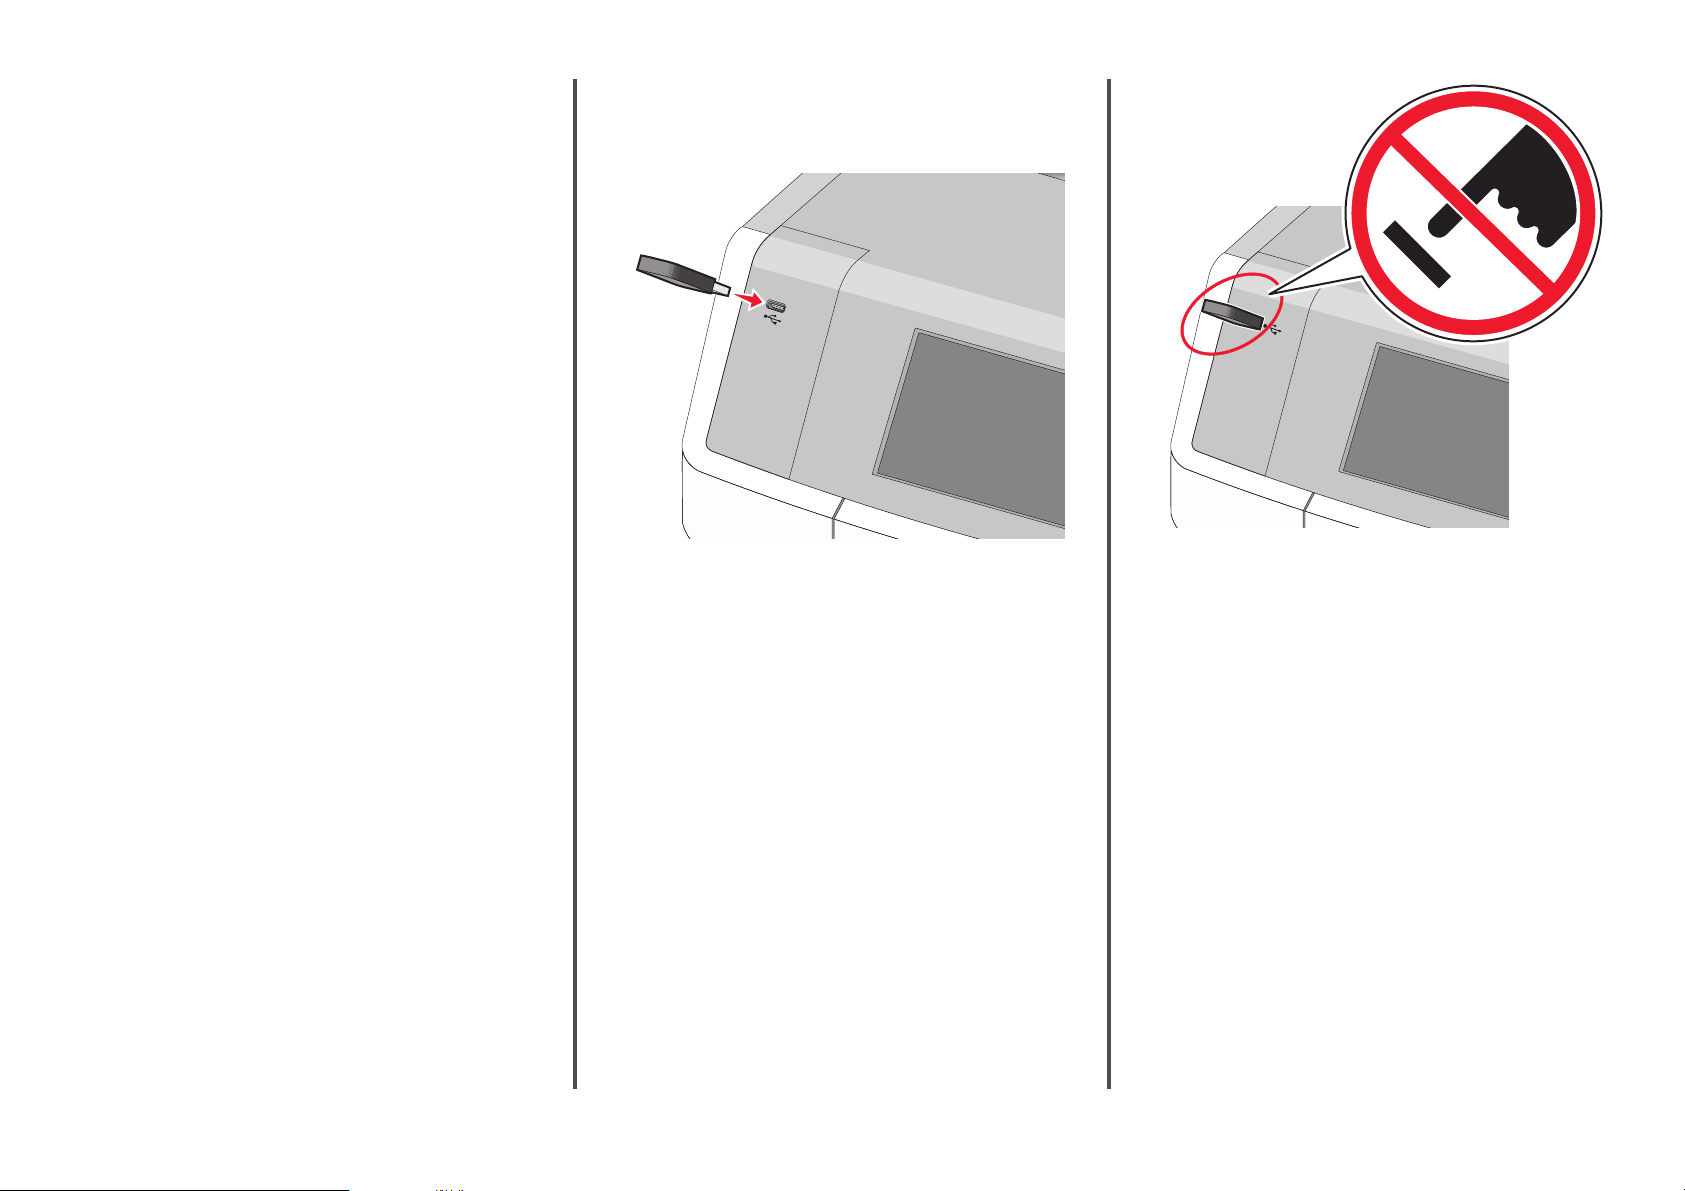
10 USB port Connect a flash drive to the printer.
Note: Only the front USB port supports flash
drives.
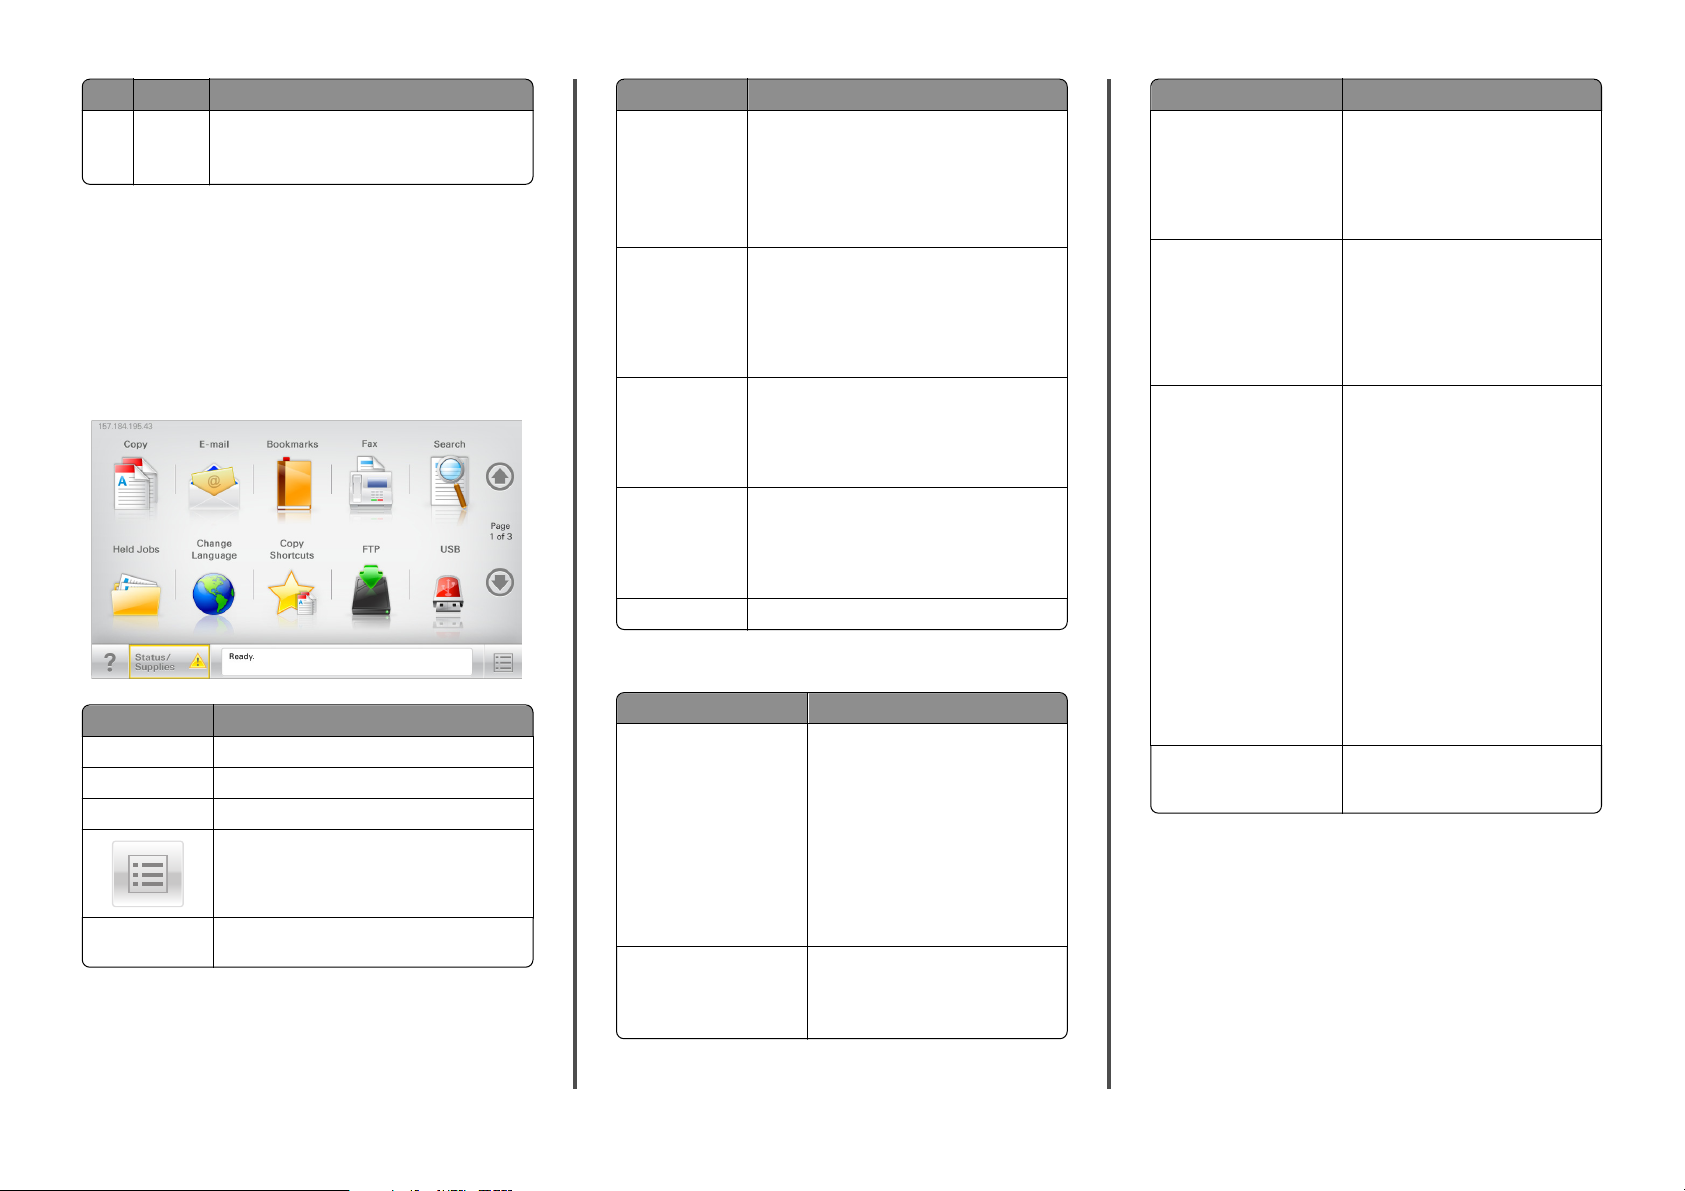
Understanding the home screen
When the printer is turned on, the display shows a basic screen,
referred to as the home screen. Touch the home screen buttons and
icons to initiate an action such as copying, faxing, or scanning; to open
the menu screen; or to respond to messages.
Note: Your home screen, icons, and buttons may vary depending on
your home screen customization settings, administrative setup, and
active embedded solutions.
Touch To
Copy Access the Copy menus and make copies.
E-mail Access the E-mail menus and send e‑mails.
Fax Access the Fax menus and send fax.
Access the printer menus.
Note: These menus are available only when the
printer is in the Ready state.
FTP Access the File Transfer Protocol (FTP) menus and
scan documents directly to an FTP server.
Touch To
Status message bar
• Show the current printer status such as Ready
or Busy.
• Show printer conditions such as Toner Low
or Cartridge Low.
• Show intervention message s so the printer can
continue processing.
Status/Supplies
• Display a warning or error message whenever
the printer requires intervention to continue
processing.
• Access the messages screen for more
information on the message, and how to clear
it.
USB or USB
Thumbdrive
Bookmarks Create, organize, and save a set of bookmarks
Held Jobs Display all current held jobs.
View, select, print, scan, or e‑mail photos and
documents from a flash drive.
Note: This button appears only when you return
to the home screen while a memory card or flash
drive is connected to the printer.
(URL) into a tree view of folders and file links.
Note: The tree view supports only bookmarks
created from this function, and not from any
other application.
Other buttons that may appear on the home screen:
Touch To
Search held jobs Search on any of the following items:
• User name for held or confidential
print jobs
• Job names for held jobs, excluding
confidential print jobs
• Profile names
• Bookmark container or print job
names
• USB container or print job names for
supported file types
Release Held Fax Access the list of held faxes.
Note: This button appears only when
there are held faxes with a scheduled
hold time previously set.
Touch To
Lock D evice Open a password entr y screen. Enter the
correct password to lock the printer
control panel.
Note: This button appears only when
the printer is unlocked and password
has been set.
Unlock Device Open a password entr y screen. Enter the
correct password to unlock the printer
control panel.
Note: This button appears only when
the printer is locked. The printer
control panel buttons and shortcuts
cannot be used while this appears.
Cancel Jobs Op en the Cancel Jobs screen. The Cancel
Jobs screen shows three headings: Print,
Fax, and Network.
The following options are available
under the Print, Fax, and Network
headings:
• Print job
• Copy job
• Fax profile
• FTP
• E-mail send
Each heading has a list of jobs shown in
a column under it which can show only
three jobs per screen. If more than three
jobs exist in a column, then an arrow
appears enabling you to scroll through
the jobs.
Change Language Launch the Change Language pop‑up
window that lets you change the primary
language of the printer.
2
Page 3
Features
Feature Description
Menu trail line
Sample:
Menus >
Settings > Copy
Settings > Number of
Copies
Attendance message
alert
A menu trail line is located at the top of each
menu screen. This feature shows the path taken
to arrive at the current menu.
Touch any of the underlined words to return to
that menu.
Number of Copies is not underlined since this is
the current screen. If you touch an underlined
w or d o n t h e N um b er of C op ie s sc re e n b ef o re th e
Number of Copies is set and saved, then the
selection is not saved, and it does not become
the default setting.
If an attendance message affects a function,
then this icon appears and the red indicator light
blinks.
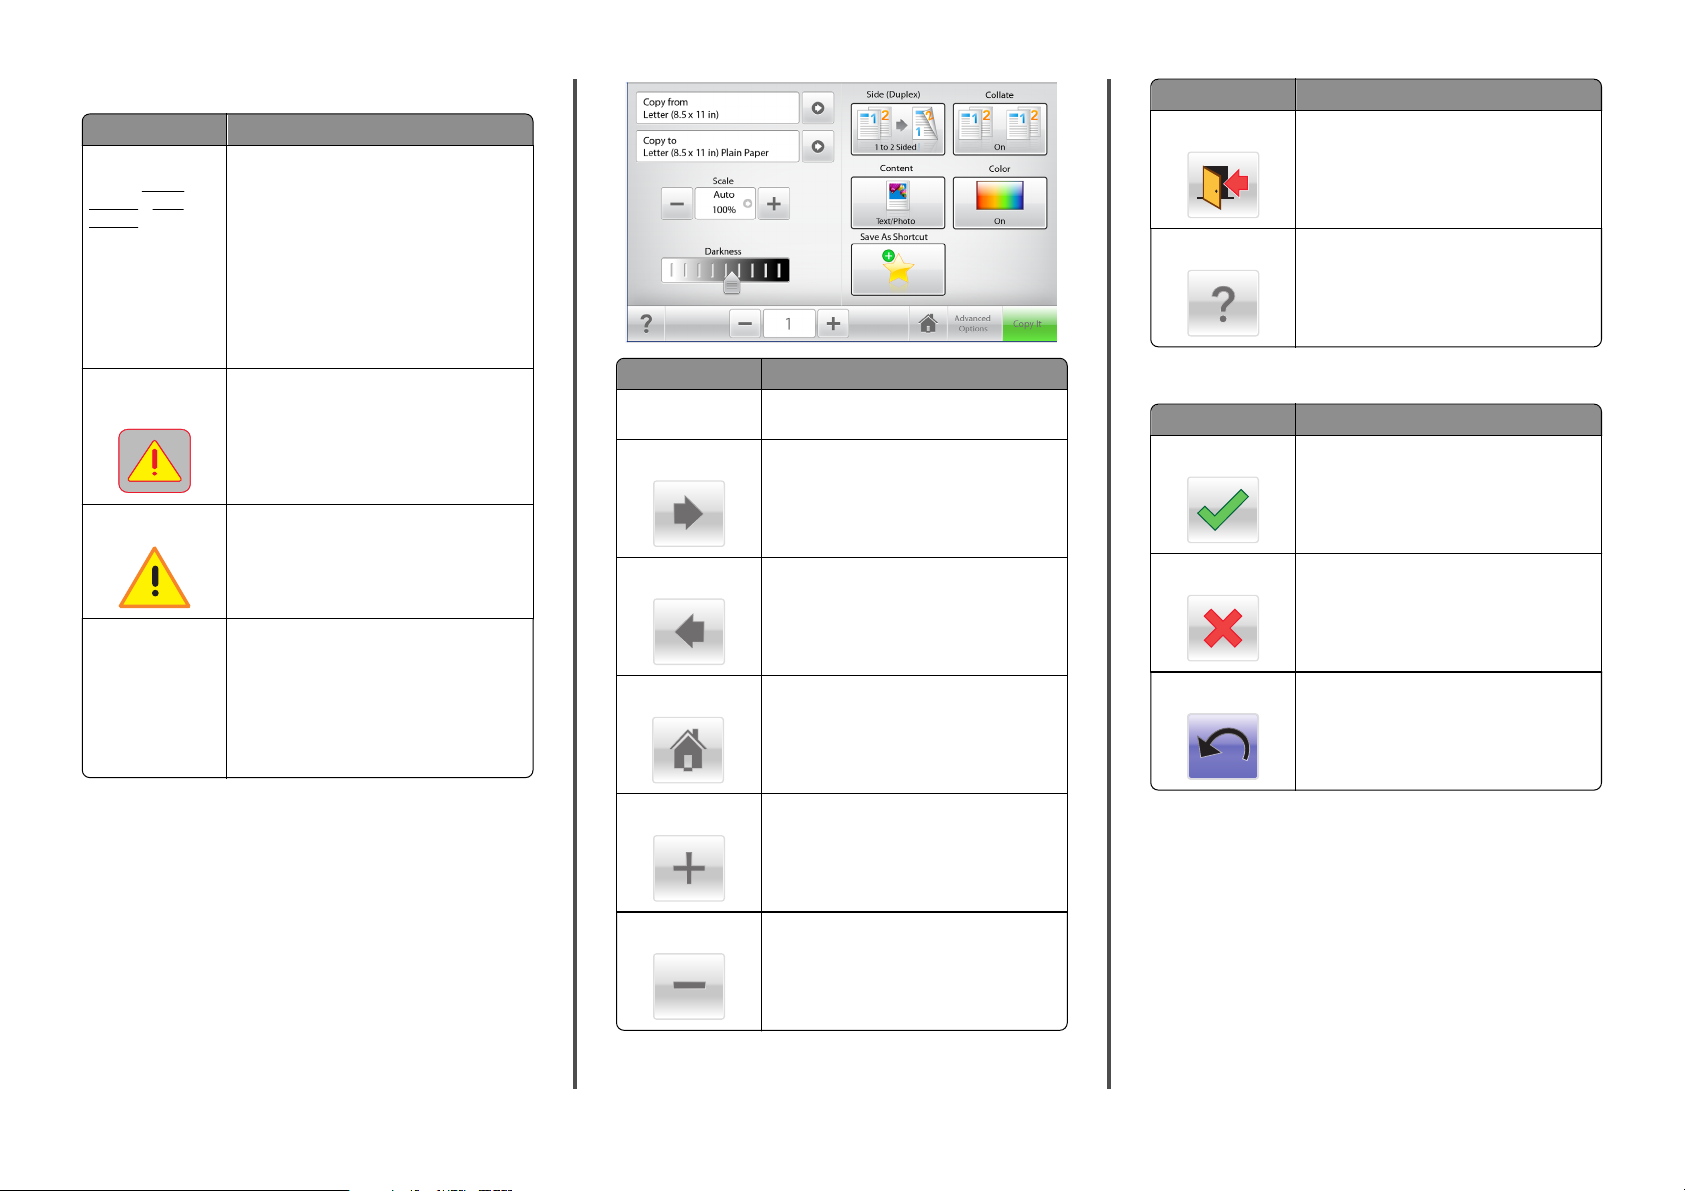
Touch To
Copy It Submit changes made in the copy settings and
Right arrow
start the copy job.
Scroll to the right.
Touch To
Exit
Tips
Exit from the current screen.
Open a context-sensitive help dialog.
Other touch-screen buttons
Touch To
Accept
Save a setting.
Warning
Printer IP address
Sample:
123.123.123.12
3
If an error condition occurs, then this icon
appears.
The IP address of your network printer is locat ed
at the top left corner of the home screen and
appears as four sets of numbers separated by
periods. You can use the IP address when
accessing the Embedded Web Server so you can
view and remotely configure printer settings
even when you are not physically near the
printer.
Using the touch-screen buttons
Note: Your home screen, icons, and buttons may vary depending on
your home screen customization settings, administrative setup, and
active embedded solutions.
Left arrow
Home
Right increase
Left decrease
Scroll to the left.
Return to the home screen.
Select a higher value.
Select a lower value.
Cancel
Reset
• Cancel an action or a selection.
• Exit a screen and return to the previous
screen without saving changes.
Reset values on the screen.
3
Page 4
Setting up and using the home
4 Click Submit.
Setting up Scan to Network
screen applications
Notes:
• Your home screen, icons, and buttons may vary depending on
your home screen customization settings, administrative setup,
and active embedded applications. Some applications are
supported only in select printer models.
• There may be additional solutions and applications available for
purchase. To learn more, inquire at your point of purchase.
Accessing the Embedded Web Server
The Embedded Web Server is the printer Web page that lets you view
and remotely configure printer settings even when you are not
physically near the printer.
1 Obtain the printer IP address:
• From the printer control panel home screen
• From the TCP/IP section in the Network/Ports menu
• By printing a network setup page or menu settings page, and
then finding the TCP/IP section
Note: An IP address appears as four sets of numbers separated
by periods, such as 123.123.123.123.
2 Open a Web browser, and then type the printer IP address in the
address field.
The Embedded Web Server page appears.
Showing or hiding icons on the home screen
1 Open a Web browser, and then type the printer IP address in the
address field.
Note: View the printer IP address on the printer control panel
home screen. The IP address appears as four sets of numbers
separated by periods, such as 123.123.123.123.
2 Click Settings > General Settings > Home screen customization.
A list of basic printer functions appears.
3 Select the check boxes to specify which icons appear on the printer
home screen.
Note: Cleared check box items are hidden.
Activating the home screen applications
Your printer comes with preinstalled home screen applications. To use
these applications, activate and set up these applications using the
Embedded Web Server. For more information about accessing the
Embedded Web Server, see “Accessing the Embedded Web Server” on
page 4.
For detailed information about configuring and using the home screen
applications, contact the place where you bought the printer.
Setting up Forms and Favorites
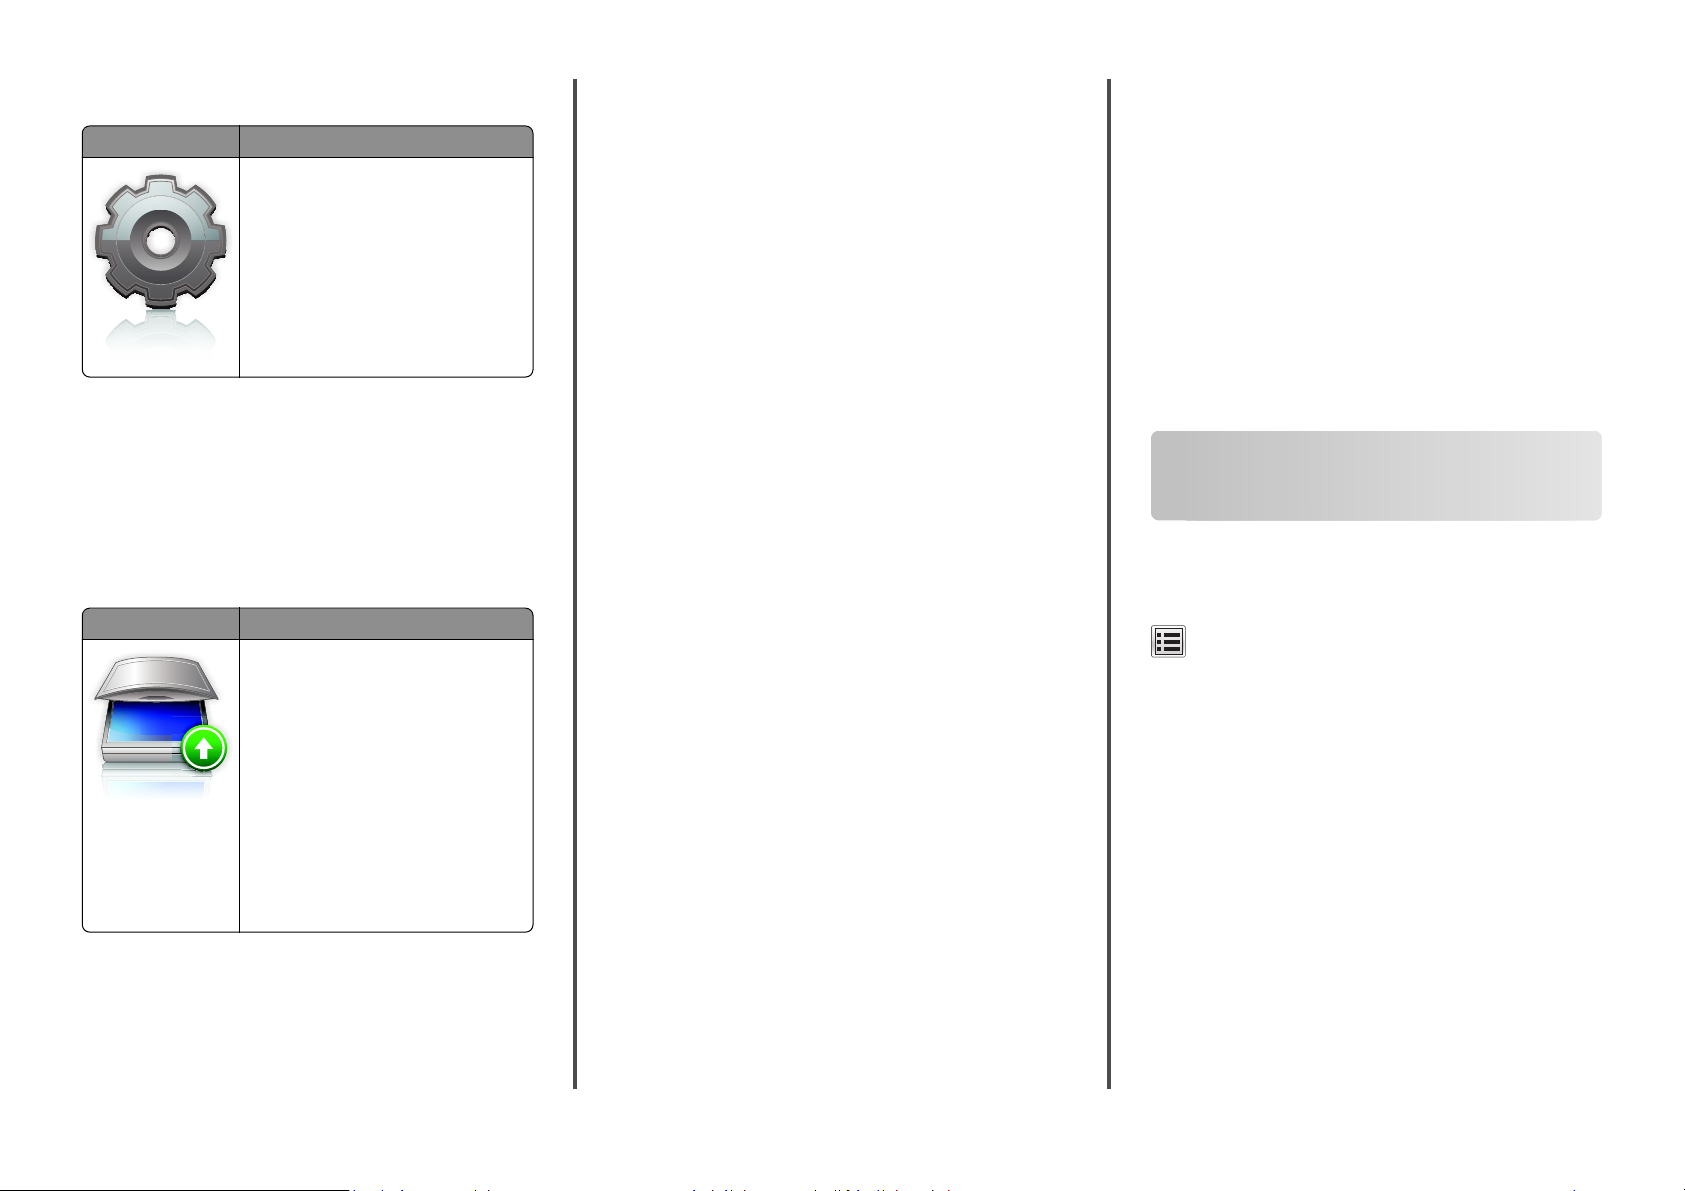
Icon Description
The application helps you simplify and
streamline work processes by letting you
quickly find and print frequently used online
forms directly from the home screen.
Note: The printer must have permission to
access the network folder, FTP site, or Web
site where the bookmark is stored. From the
computer where the bookmark is stored,
use sharing, security, and firewall settings to
allow the printer at least a read access. For
help, see the documentation that came with
your operating system.
1 Open a Web browser, and then type the printer IP address in the
address field.
Note: View the printer IP address on the printer control panel
home screen. The IP address appears as four sets of numbers
separated by periods, such as 123.123.123.123.
2 Click Settings > Device Solutions > Solutions (eSF) > Forms and
Favorites.
3 Define the bookmarks, and then customize the settings.
4 Click Apply.
To use the application, touch Forms and Favorites on the pri nter home
screen, and then navigate through form categories, or search for forms
based on a form number, name, or description.
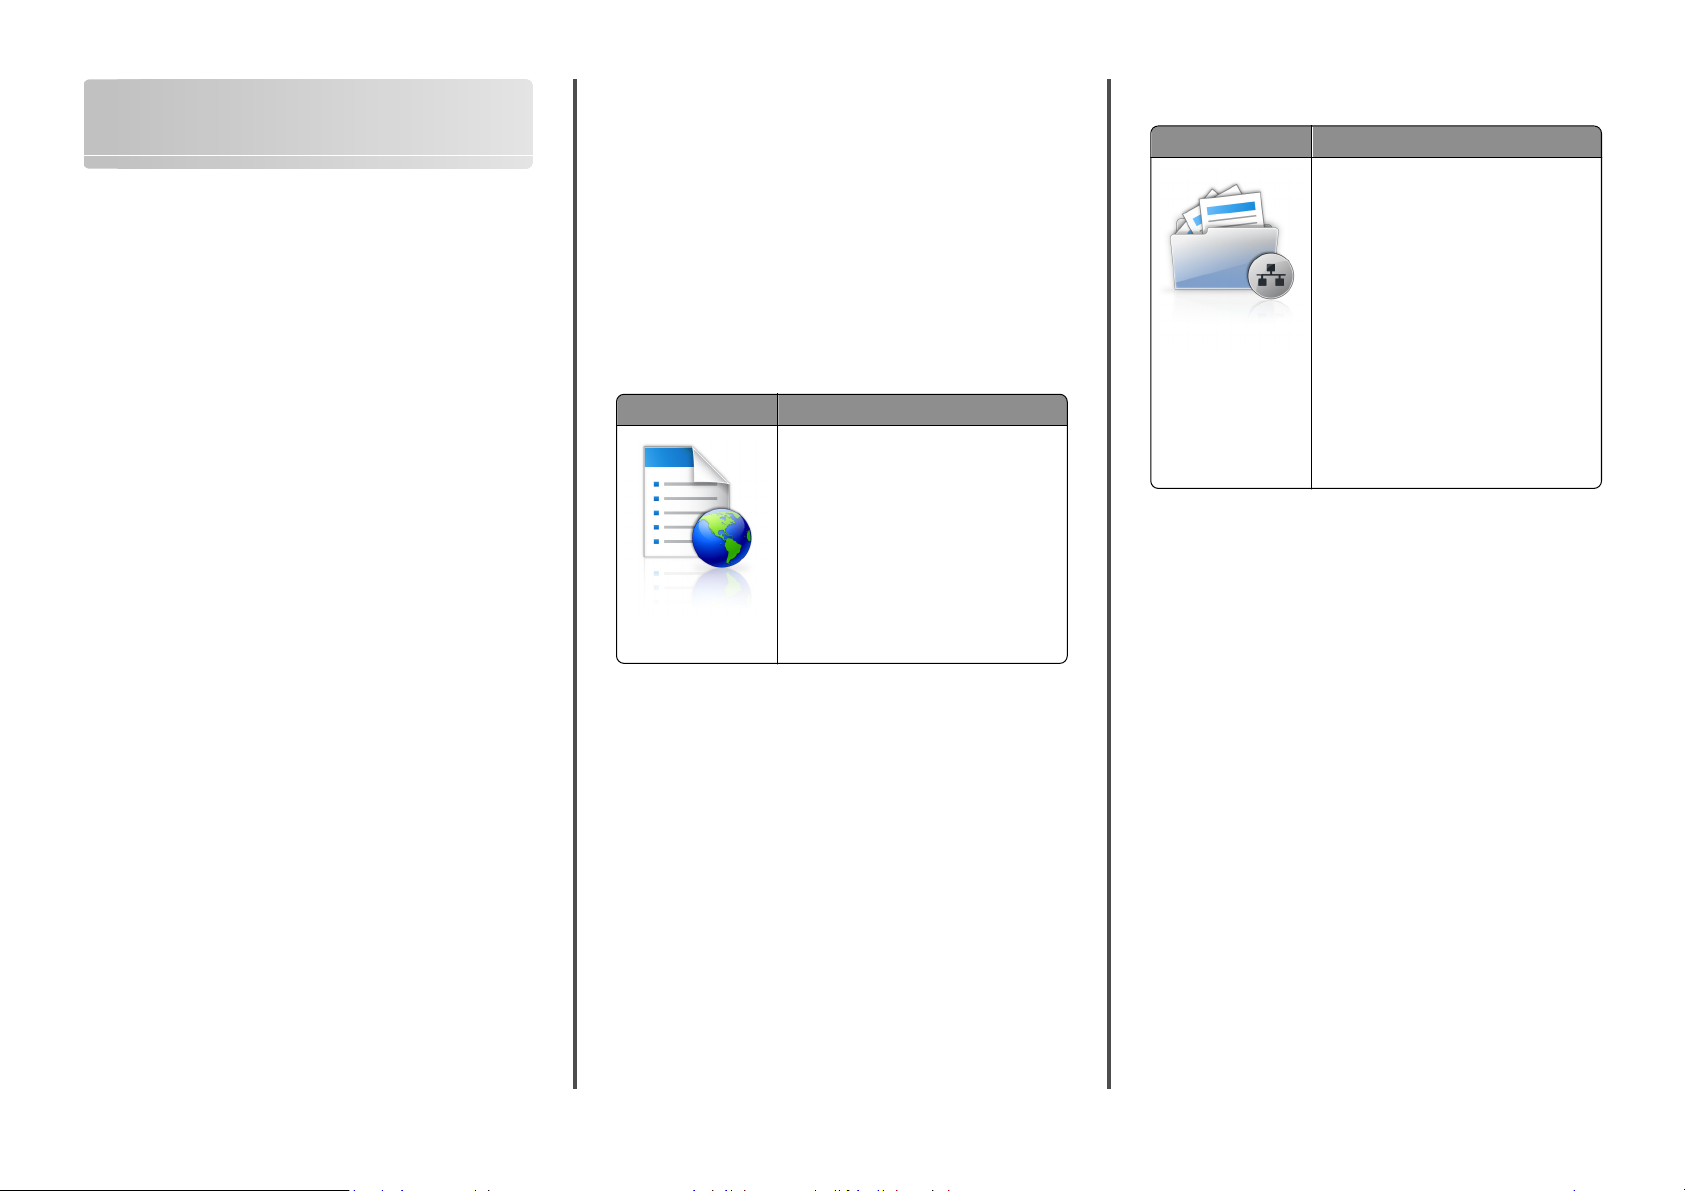
Icon Description
The application lets you capture a digital
image of a hard‑copy document and route it
to a shared network folder. You can define up
to 30 unique folder destinations.
Notes:
• The printer must have permission to
write to the destinations. From the
computer where the destination is
specified, use sharing, security, and
firewall settings to allow the printer at
least a write access. For help, see the
documentation that came with your
operating system.
• The Scan to Network icon appears only
when one or more destinations are
defined.
1 Open a Web browser, and then type the printer IP address in the
address field.
Note: View the printer IP address on the printer control panel
home screen. The IP address appears as four sets of numbers
separated by periods, such as 123.123.123.123.
2 Click Settings > Device Solutions > Solutions (eSF) > Scan to
Network.
3 Specify the destinations, and then customize the settings.
4 Click Apply.
To use the application, touch Scan to Network on the printer home
screen, and then follow the instructions on the printer display.
4
Page 5
Setting up My MFP
Icon Description
The application lets you customize your
touch‑screen settings and store those
preferences in a flash drive. Each time you
want to copy, fax, or scan, insert the flash drive
into the USB port of the printer. All your
personal preferences are automatically
uploaded, including job settings, home screen
preferences, and address book.
Note: The icon appears only when a flash
drive with My MFP settings is inserted into
the USB port of the printer.
To set up My MFP, insert a flash drive into the USB port of the printer,
and then follow the instructions on the printer display to run the setup
wizard.
To use My MFP, insert the flash drive into the USB port of the printer
when you want to copy, fax, or scan.
bookmarks, and do other print-related tasks you might normally do
while standing at the network printer.
1 Open a Web browser, and then type the printer IP address in the
address field.
Note: View the printer IP address on the printer control panel
home screen. The IP address appears as four sets of numbers
separated by periods, such as 123.123.123.123.
2 Click Settings > Device Solutions > Solutions (eSF) > Remote
Operator Panel.
3 Select the Enabled check box, and then customize the settings.
4 Click Apply.
To use the application, from the Embedded Web Server, click
Applications > Remote Operator Panel > Launch VNC Applet.
Exporting and importing a configuration
You can export configuration settings into a text file, and then import
it to apply the settings to other printers.
Note: View the printer IP address on the printer control panel
home screen. The IP address appears as four sets of numbers
separated by periods, such as 123.123.123.123.
2 Click Settings or Configuration.
3 Click Device Solutions > Solutions (eSF), or click Embedded
Solutions.
4 From Installed Solutions, click the name of the application you want
to configure.
5 Click Configure > Import.
6 Browse to the saved configuration file that was exported from a
previously configured printer, and then load or preview it.
Note: If a timeout occurs and a blank screen appears, then
refresh the Web browser, and then click Apply.
Loading paper and specialty media
Understanding WS‑Scan
A WS‑Scan icon and its description
Icon Description
The Web Services‑Scan application lets you
scan documents at the network printer, and
then send the scanned image to your
computer. WS‑Scan is a Microsoft application
that is similar to Scan to Network, but has the
capability of sending the scanned image to a
Windows‑based application. To learn more
about WS‑Scan, see the Microsoft
documentation.
Note: The icon appears on the printer home
screen only when there is a computer
registered with the network printer. The
computer must have either Windows 8,
Windows 7, or Windows Vista operating
system installed.
Setting up Remote Operator Panel
This application shows the printer control panel on your computer
screen and lets you interact with the printer control panel, even when
you are not physically near the network printer. From your computer
screen, you can view the printer status, release held print jobs, create
Exporting a configuration to a file
1 Open a Web browser, and then type the printer IP address in the
address field.
Note: View the printer IP address on the printer control panel
home screen. The IP address appears as four sets of numbers
separated by periods, such as 123.123.123.123.
2 Click Settings or Configuration.
3 Click Device Solutions > Solutions (eSF), or click Embedded
Solutions.
4 From Installed Solutions, click the name of the application you want
to configure.
5 Click Configure > Export.
6 Follow the instructions on the computer screen to save the
configuration file, and then type a unique file name or use the
default name.
Note: If a JVM Out of Memory error occurs, then repeat the
export process until the configuration file is saved.
Importing a configuration from a file
1 Open a Web browser, and then type the printer IP address in the
address field.
Setting the paper size and type
From the home screen, navigate to:
> Paper Menu > Paper Size/Type > select a tray > select the paper
size or type > Submit
Notes:
• The Paper Size setting is automatically set according to the
position of the paper guides in each tray except the standard
550‑sheet tray (Tray 1) and the multipurpose feeder.
• The Paper Size setting for Tray 1 and the multipurpose feeder
must be set manually in the Paper Size menu.
• The factory default Paper Type setting is Plain Paper.
• The Paper Type setting must be set manually for all trays.
Configuring Universal paper settings
The Universal Paper Size is a user‑defined setting that lets you print on
paper sizes that are not preset in the printer menus. Set the Paper Size
for the specified tray to Universal when the size you want is not
available from the Paper Size menu. Then, specify all of the following
Universal size settings for your paper:
• Units of Measure
5
Page 6
• Portrait Width
• Portrait Height
Note: The smallest supported Universal size is 76 x 127 mm (3
x 5 in.); the largest size is 216 x 356 mm (8.5 x 14 in.).
1 From the home screen, navigate to:
> Paper Menu > Universal Setup > Units of Measure > select
a unit of measure
2 Touch Portrait Width or Portrait Height > select the width or
height > Submit.
Loading the standard or optional
550‑sheet tray
The printer has one standard 550‑sheet tray (Tray 1) and may have up
to four optional 550‑sheet trays including the special media tray. For
narrow paper sizes such as A6 and envelopes, use the special media
tray. For more information, see “Loading the optional 550‑sheet special
media tray” on page 7.
CAUTION—POTENTIAL INJURY: To reduce the risk of
equipment instability, load each paper drawer or tray
separately. Keep all other trays closed until needed.
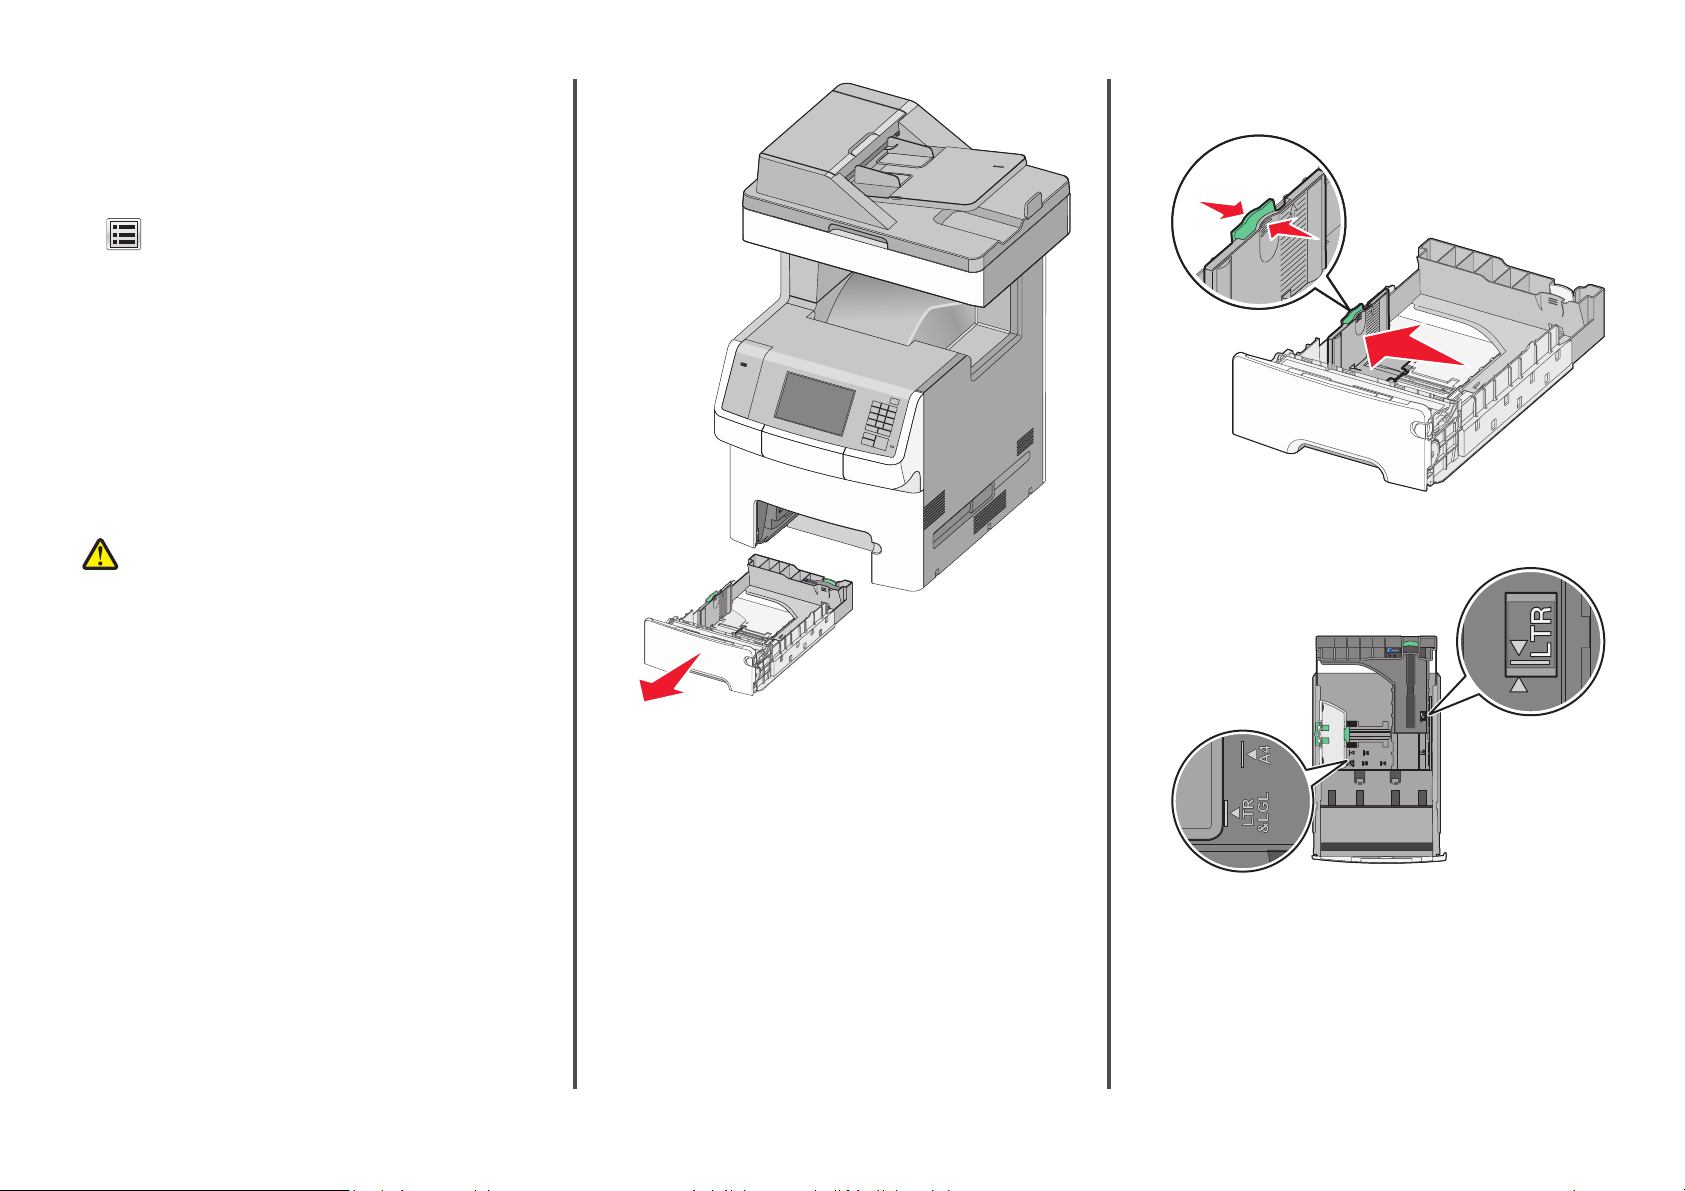
1 Pull the tray completely out.
Note: Do not remove trays while a job prints or while Busy
appears on the display. Doing so may cause a jam.
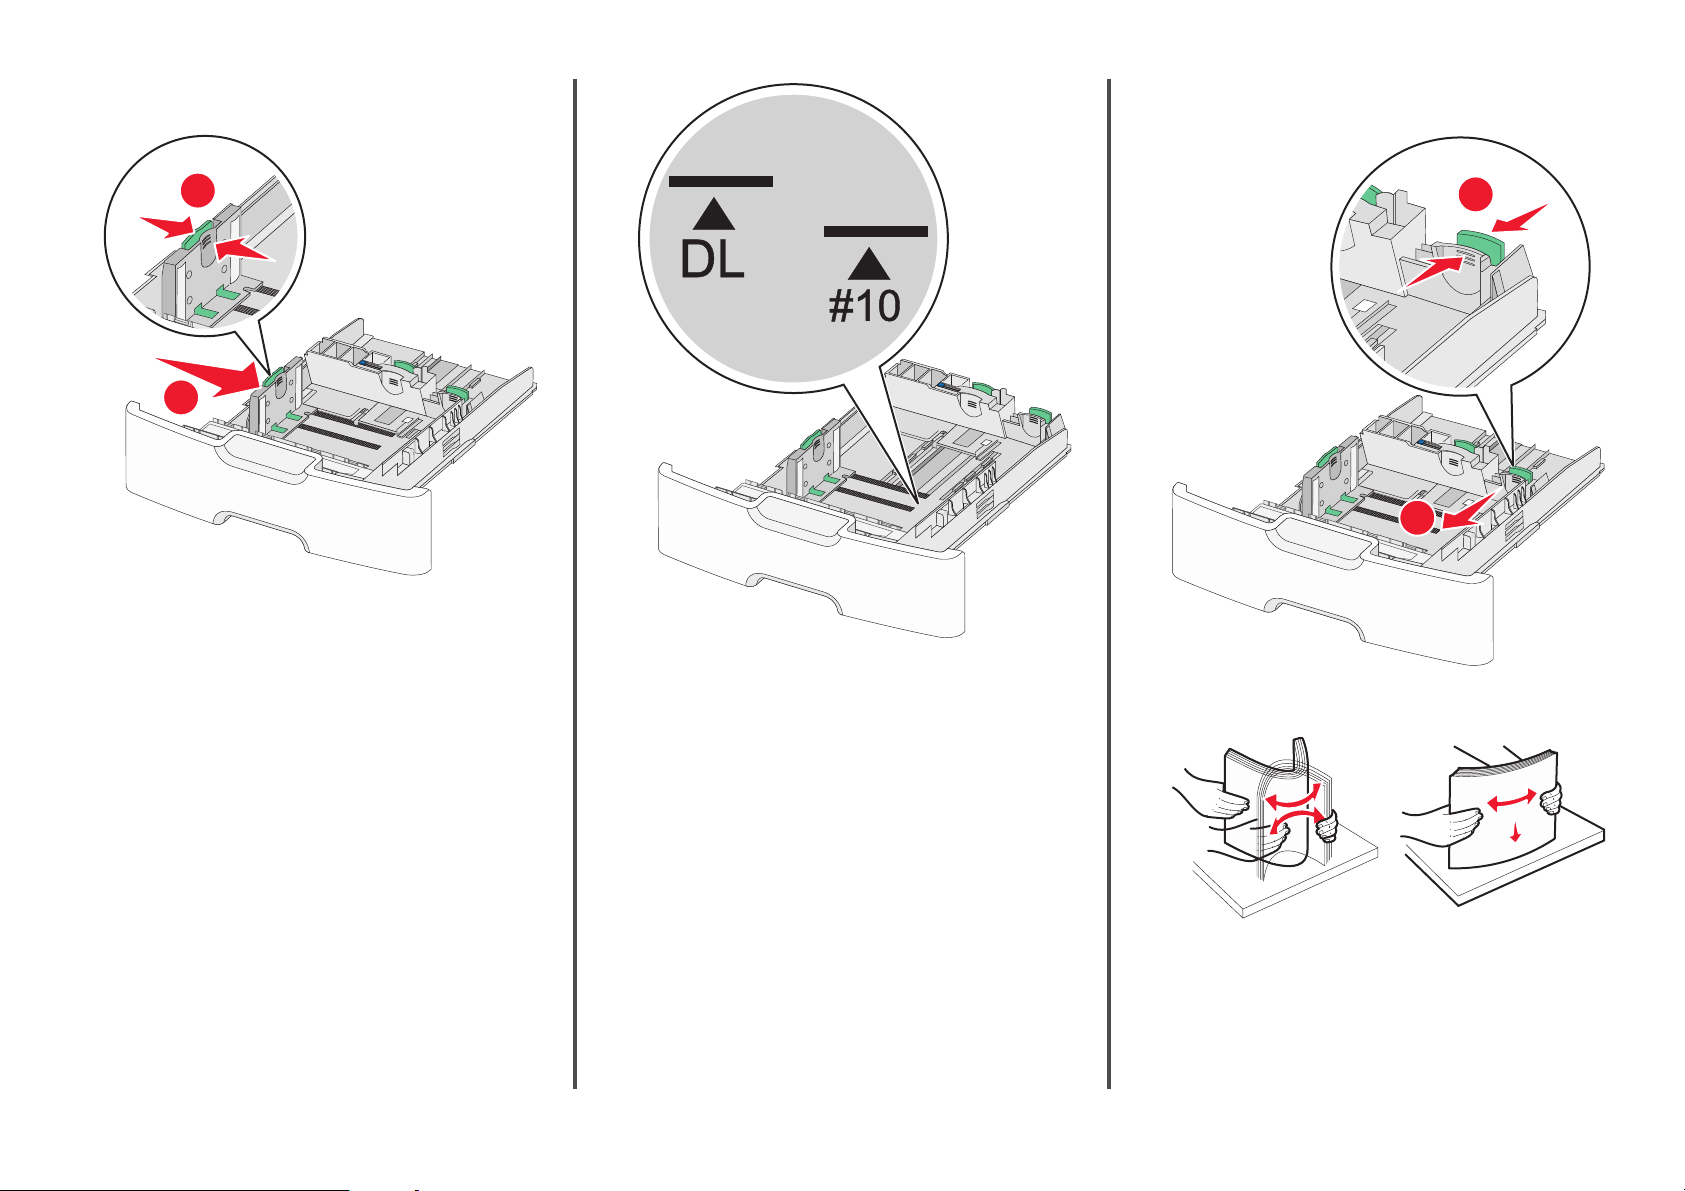
2 Squeeze and slide the width guide to the correct position for the
paper size you are loading.
Note: Use the paper size indicators at the bottom of the tray to
help position the length and width guides.
3 Squeeze and slide the length guide to the correct position for the
paper size you are loading.
Notes:
• For some paper sizes like letter, legal, and A4, squeeze and
slide the length guide backward to accommodate their
length.
• The length guide has a locking device. To unlock the length
guide, slide to the left the button on top of the length guide.
6
Page 7
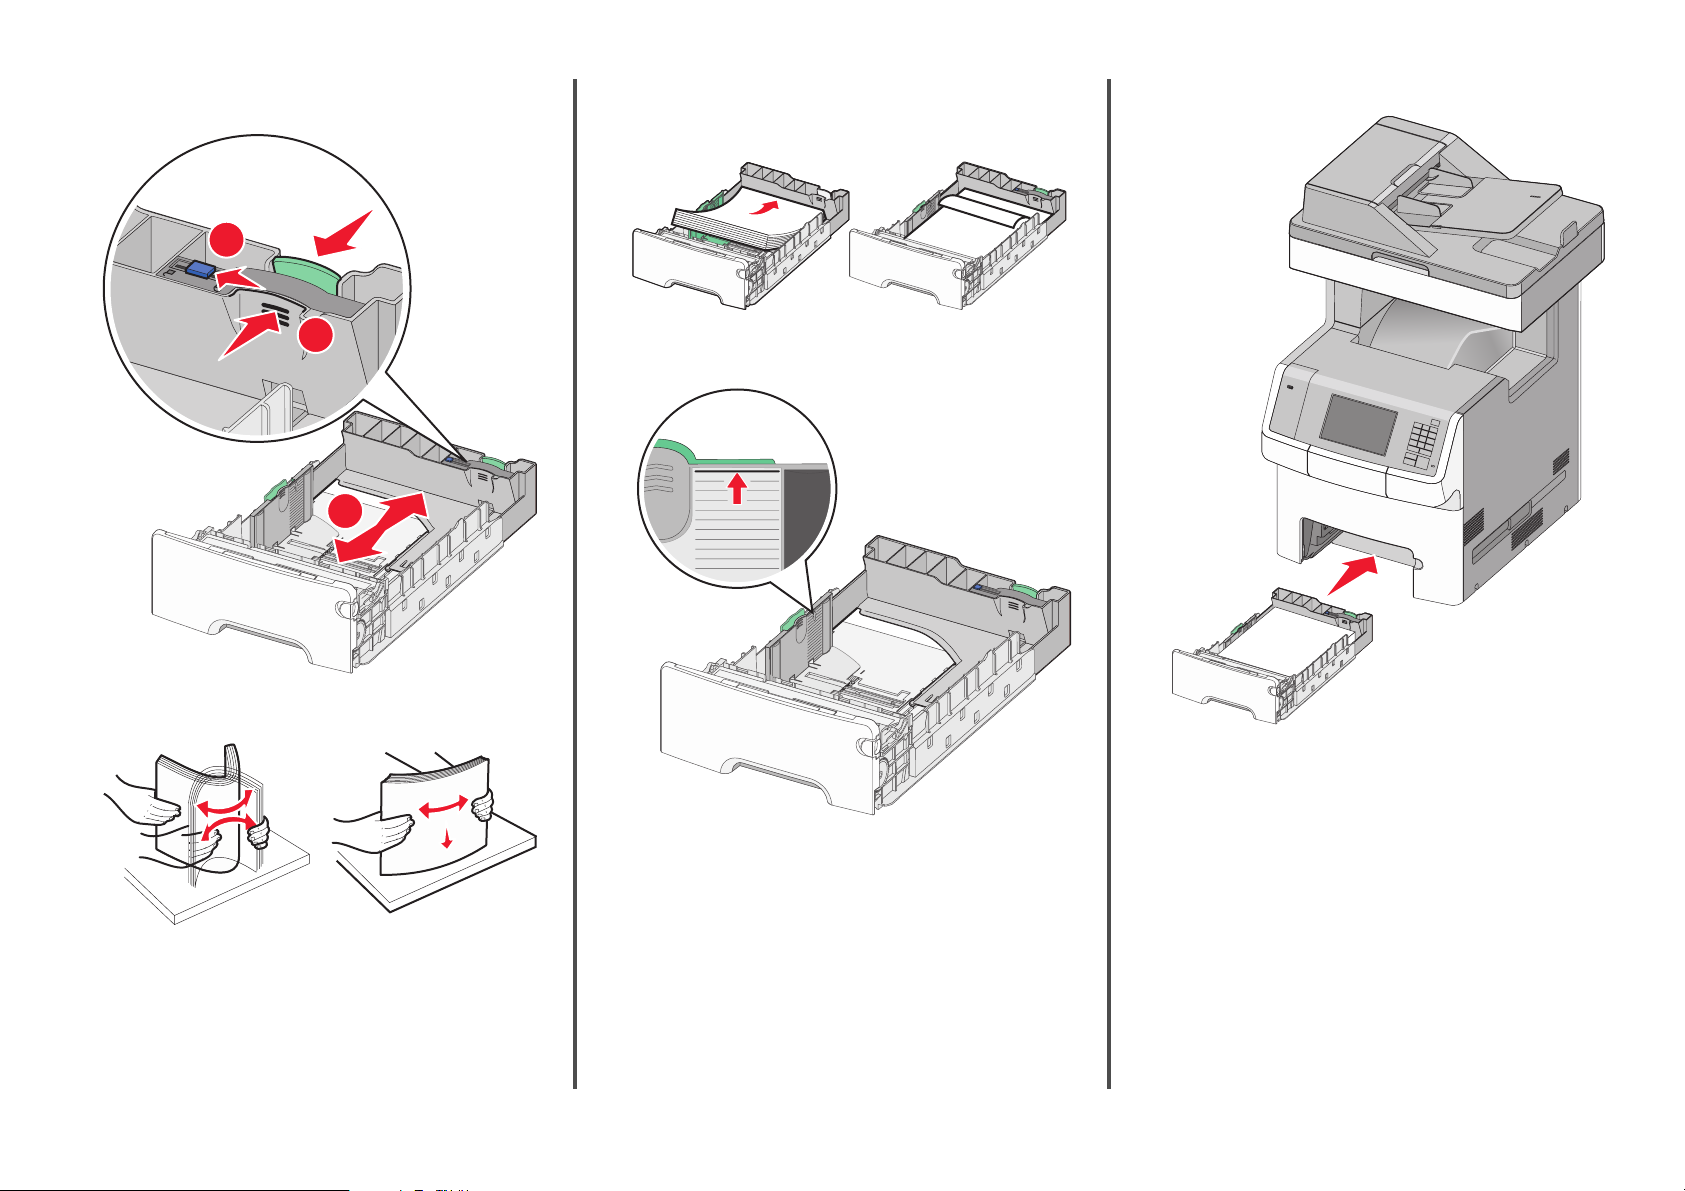
To lock, slide the button to the right when a length has been
selected.
• When loading preprinted letterhead for two‑sided printing,
place the header facedown toward the rear of the tray.
One‑sided printing Two‑sided (Duplex) printing
6 Insert the tray.
1
2
3
4 Flex the sheets back and f orth to loosen them. Do not fold or crease
the paper. Straighten the edges on a level surface.
LETTERHEAD
Note: Make sure paper does not exceed the maximum paper fill
indicator located on the left side of the tray.
LETTERHEAD
7 From the printer control panel, verify the paper size and paper type
setting for the tray based on the paper you loaded.
5 Load the paper stack toward the back of the tray with the
recommended printable side faceup.
Notes:
• When loading preprinted letterhead for one‑sided printing,
place the header faceup toward the front of the tray.
Warning—Potential Damage: Overloading the tray can cause
paper jams and possible printer damage.
7
Loading the optional 550‑sheet special
media tray
The optional 550‑sheet special media tray (Tray 2) supports narrow
paper sizes such as envelopes and A6.
Page 8
2
1
4
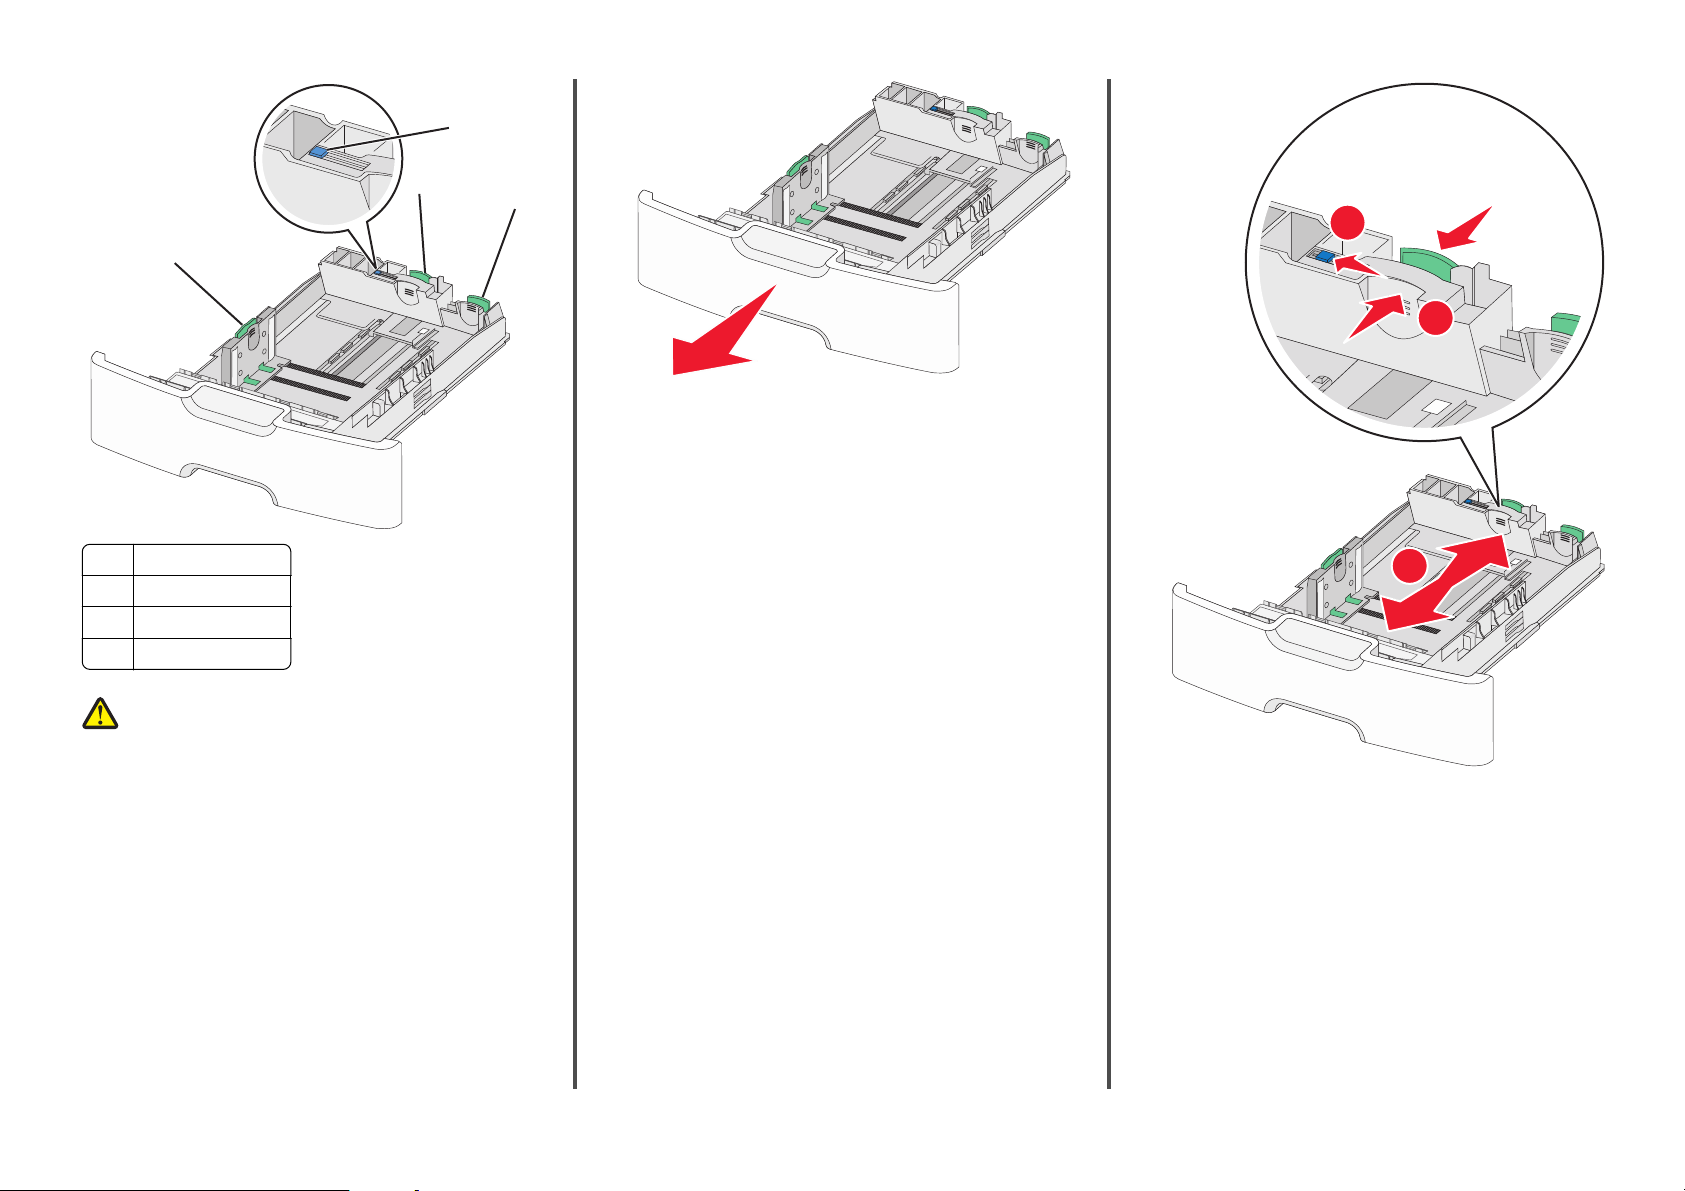
1 Primary length guide
2 Length guide lock
3 Secondary length guide
4 Width guide
CAUTION—POTENTIAL INJURY: To reduce the risk of
equipment instability, load each paper drawer or tray
separately. Keep all other trays closed until needed.
3
1
2
2 Squeeze and slide the primary length guide toward you until it
stops.
Notes:
• The length has a locking device. To unlock the length guide,
slide to the left the button on top of the length guide. To
lock, slide the button to the right when a length has been
selected.
• You can only slide the secondary length guide when the
primary length guide reaches the edge of the width guide.
3
Notes:
• For instructions on loading paper sizes larger than A6 and
envelopes, see “Loading the standard or optional 550‑sheet
tray” on page 6.
• For a complete list of supported paper sizes, see the "Supported
paper sizes, types, and weights" section in the User's Guide.
Loading narrow paper sizes such as envelopes and A6
1 Pull the tray completely out.
Note: Do not remove trays while a job prints or while Busy
appears on the display. Doing so may cause a jam.
8
Page 9
3 Squeeze and slide the width guide to the correct position for the
paper size you are loading.
4 Squeeze and slide the secondary length guide to the correct
position for the paper size you are loading.
1
2
Note: Use the paper size indicators at the bottom of the tray to
help position the width guide.
1
2
5 Flex the sheets back and forth to loosen them. Do not fold or crease
the paper. Straighten the edges on a level surface.
6 Load the paper stack with the recommended pri ntable side faceup.
Notes:
• Load envelopes with the stamp side entering the printer
first.
• Make sure the paper does not exceed the maximum paper
fill indicator located on the side of the width guide.
9
Page 10

Warning—Potential Damage: Overloading the tray can cause
paper jams and possible printer damage.
7 Insert the tray.
Loading the 2,000‑sheet high‑capacity
feeder
CAUTION—POTENTIAL INJURY: To reduce the risk of
equipment instability, load each paper tray separately. Keep all
other trays closed until needed.
1 Pull the tray out.
2 Pull up and slide the width guide to the correct position for the
paper size you are loading.
3 Unlock the length guide.
8 From the printer control panel, verify the paper size and paper type
setting for the tray based on the paper you loaded.
Note: Return the secondary length guide to its original position when
loading long papers such as legal, letter, and A4. Squeeze and slide
the guide until it clicks into place.
10
Page 11

4 Push the length guide release latch to raise the length guide. Slide
the guide to the correct position for the paper size you are loading,
and then lock the guide.
One‑sided printing Two‑sided printing
LETTERHEAD
LETTERHEAD
• Make sure paper does not exceed the maximum paper fill
indicator located on the side of the tray.
Warning—Potential Damage: Overloading the tray may
cause paper jams and possible printer damage.
Loading the multipurpose feeder
The multipurpose feeder can hold approximately:
• 100 sheets of 75‑g/m
• 10 envelopes
• 75 transparencies
Note: Do not add or remove paper or specialty media while the
printer prints from the multipurpose feeder or when the printer
control panel indicator light is blinking. Doing so may cause a jam.
6
5
4
LTR&LG
L
A4
2
(20‑lb) paper
EXEC A5
B5
5 Flex the sheets back and f orth to loosen them. Do not fold or crease
the paper. Straighten the edges on a level surface.
6 Load the paper stack:
• Printable side faceup for one‑sided printing
• Printable side facedown for two‑sided printing
7 Insert the tray.
11
3
2
1
1 Maximum paper fill indicator
2 Tray release latch
3 Paper release lever
4 Paper size indicators
5 Paper width guide
6 Width guide release tab
Page 12

1 Press the tray release latch to the left, and then pull the
multipurpose feeder down.
2 Gently pull the extension out until it is fully extended.
Paper
Envelopes
Transparencies*
Notes:
• Make sure paper or specialty media does not exceed the
maximum paper fill indicator.
• Load only one size and type of paper or specialty media at a
time.
• Paper or specialty media should lie flat and fit loosely in the
multipurpose feeder.
• If the paper or specialty media is pushed too far into the
multipurpose feeder, then press the paper release lever to
remove it.
• Load envelopes with the flap on the right side up and the
stamp edge entering the printer first.
Warning—Potential Damage: Never use envelopes with stamps,
clasps, snaps, windows, coated linings, or self‑stick adhesives.
These envelopes may severely damage the printer.
3 Flex the sheets back and f orth to loosen them. Do not fold or crease
the paper. Straighten the edges on a level surface.
* Avoid touching the printable side of transparencies. Be careful not
to scratch them.
4 Load the paper or specialty media. Slide the stack into the
multipurpose feeder until it comes to a stop.
12
5 From the printer control panel, verify the paper size and paper type
setting for the feeder based on the paper you loaded.
Linking and unlinking trays
When the paper size and paper type for any trays are the same, the
printer will link those trays. When one linked tray becomes empty,
paper will feed from the next linked tray. It is recommended to give all
unique paper, such as letterhead and different colored plain papers, a
different custom type name so that the trays they are in will not
automatically link.
Unlinking trays
1 Open a Web browser, and then type the printer IP address in the
address field.
Page 13

Notes:
• View the printer IP address on the printer home screen. The
IP address appears as four sets of numbers separated by
periods, such as 123.123.123.123.
• If you are using a proxy server, then temporarily disable it to
load the Web page correctly.
2 Click Settings > Paper Menu.
3 Change the paper size and type settings of the tray so that they do
not match the settings of any other tray, and then click Submit.
Warning—Potential Damage: Paper loaded in the tray should match
the paper type name assigned in the printer. The temperature of the
fuser varies according to the specified paper type. Printing issues
may occur if settings are not properly configured.
Linking trays
1 Open a Web browser, and then type the printer IP address in the
address field.
Notes:
• View the printer IP address on the printer home screen. The
IP address appears as four sets of numbers separated by
periods, such as 123.123.123.123.
• If you are using a proxy server, then temporarily disable it to
load the Web page correctly.
2 Click Settings > Paper Menu.
3 Change the paper type and size settings of the tray so that they
match the settings of any other tray, and then click Submit.
Creating a custom name for a paper type
If the printer is on a network, then use the Embedded Web Server to
define a name other than Custom Type [x] for each of the custom paper
types loaded into the printer.
1 Open a Web browser, and then type the printer IP address in the
address field.
Notes:
• View the printer IP address on the printer home screen. The
IP address appears as four sets of numbers separated by
periods, such as 123.123.123.123.
• If you are using a proxy server, then temporarily disable it to
load the Web page correctly.
2 Navigate to:
Settings > Paper Menu > Custom Name > type a name > Submit
Note: The custom name will replace Custom Type [x] under the
Custom Types and Paper Size and Type menus.
3 Navigate to:
Custom Types > select a paper type > Submit
Assigning a custom paper type name
Assign a custom paper type name to a tray when linking or unlinking
trays.
1 Open a Web browser, and then type the printer IP address in the
address field.
Notes:
• View the printer IP address on the printer home screen. The
IP address appears as four sets of numbers separated by
periods, such as 123.123.123.123.
• If you are using a proxy server, then temporarily disable it to
load the Web page correctly.
2 Click Settings > Paper Menu > Custom Names.
3 Type a name for the paper type, and then click Submit.
4 Select a custom type, and then verify that the correct paper type
is associated with the custom name.
Note: Plain Paper is the factory default paper type for all
user‑defined custom names.
Configuring a custom name
If the printer is on a network, then you can use the Embedded Web
Server to define a name other than Custom Type [x] for each of the
custom paper types loaded into the printer.
1 Open a Web browser, and then type the printer IP address in the
address field.
Notes:
• View the printer IP address on the printer home screen. The
IP address appears as four sets of numbers separated by
periods, such as 123.123.123.123.
• If you are using a proxy server, then temporarily disable it to
load the Web page correctly.
2 Click Settings > Paper Menu > Custom Types.
3 Select a custom name you want to configure, select a paper or
specialty media type, and then click Submit.
Printing
Printing forms
Use the Forms and Favorites application to quickly and easily access
frequently used forms or other information that is regularly printed.
Before you can use this application, first set it up on the printer. For
more information, see “Setting up Forms and Favorites” on page 4.
1 From the printer home screen, navigate to:
Forms and Favorites > select the form from the list > enter the
number of copies > adjust other settings
2 Depending on your printer model, touch , , or Submit.
Printing a document
Printing a document
1 From the Paper menu on the printer control panel, set the paper
type and size to match the paper loaded.
2 Send the print job:
For Windows users
With a document open, click File > Print.
a
b Click Properties, Preferences, Options, or Setup.
c Adjust the settings, if necessary.
d Click OK > Print.
For Macintosh users
Customize the settings in the Page Setup dialog:
a
1 With a document open, choose File > Page Setup.
2 Choose a paper size or create a custom size to match the
paper loaded.
3 Click OK.
b Customize the settings in the Print dialog:
1 With a document open, choose File > Print.
If necessary, click the disclosure triangle to see more
options.
13
Page 14
2 From the Print di alog and pop‑up menus, adjust the settings
if necessary.
Note: To print on a specific paper type, adjust the
paper type setting to match the paper loaded, or select
the appropriate tray or feeder.
3 Click Print.
Adjusting toner darkness
1 Open a Web browser, and then type the printer IP address in the
address field.
Notes:
• View the printer IP address on the printer home screen. The
IP address appears as four sets of numbers separated by
periods, such as 123.123.123.123.
• If you are using a proxy server, then temporarily disable it to
load the Web page correctly.
2 Click Settings > Print Settings > Quality Menu > Toner Darkness.
3 Adjust the toner darkness setting.
4 Click Submit.
Printing from a flash drive
Printing from a flash drive
Notes:
• Before printing an encrypted PDF file, you will be prompted to
enter the file password from the printer control panel.
• You cannot print files for which you do not have printing
permissions.
1 Insert a flash drive into the USB port.
Notes:
• A flash drive icon appears on the home screen and in the
held jobs icon when a flash drive is installed.
• If you insert the flash drive when the printer requires
attention, such as when a jam has occurred, then the printer
ignores the flash drive.
• If you insert the flash drive while the printer is processing
other print jobs, then Busy appears. After these print jobs
are processed, you may need to view the held jobs list to
print documents from the flash drive.
Warning—Potential Damage: Do not touch the USB cable, any
network adapter, any connector, the memory device, or the
printer in the areas shown while actively printing, reading, or
writing from the memory device. A loss of data can occur.
2 From the printer control panel, touch the document you want to
print.
3 Touch the arrows to specify the number of copies for printing, and
then touch Print.
Notes:
• Do not remove the flash drive from the USB port until the
document has finished printing.
• If you leave the flash drive in the printer after leaving the
initial USB menu screen, then you can still print files from the
flash drive as held jobs.
14
Page 15

Supported flash drives and file types
Flash drive File type
Many flash drives are tested and approved for use with
the printer. For more information, contact the place
where you purchased the printer.
Notes:
• Hi‑Speed USB flash drives must support the
full‑speed standard. Devices supporting only USB
low‑speed capabilities are not supported.
• USB flash drives must support the File Allocation
Table (FAT) system. Devices formatted with New
Technology File System (NTFS) or any other file
system are not supported.
Documents:
• .pdf
• .xps
Images:
• .dcx
• .gif
• .JPEG
or .jpg
• .bmp
• .pcx
• .TIFF
or .tif
• .png
• .fls
3 Select the print job you want to cancel.
4 Click Delete.
For Macintosh users
1 From the Apple menu, navigate to either of the following:
• System Preferences > Print & Scan > select your printer > Open
Print Queue
• System Preferences > Print & Fax > select your printer > Open
Print Queue
2 From the printer window, select the print job you want to cancel,
and then delete it.
Copying
Making copies
Copying using the scanner glass
1 Place an original document facedown on the scanner glass in the
upper left corner.
2 From the home screen, navigate to:
Copy > change the copy settings > Copy It
3 If you have more pages to scan, then place the next document on
the scanner glass, and then touch Scan the Next Page.
4 Touch Finish the Job to return to the home screen.
Copying film photos
1 Place a photo facedown on the upper left corner of the scanner
glass.
2 From the home screen, navigate to:
Copy > Content > Photo >
Scan the Next Page or Finish the Job
> Photo/Film > > Copy It >
Canceling a print job
Canceling a print job from the printer control panel
1 Touch Cancel Jobs on the touch screen, or press on the keypad.
2 Touch the job you want to cancel, and then touch Delete Selected
Jobs.
Canceling a print job from the computer
For Windows users
1 Open the printers folder.
In Windows 8
From the Search charm, type run, and then navigate to:
Apps list > Run > type control printers > OK
In Windows 7 or earlier
a Click or click Start, and then click Run.
b In the Start Search or Run dialog, type control printers.
c Press Enter, or click OK.
2 Double‑click the printer icon.
Making a quick copy
1 Load an original document faceup, short edge first into the ADF or
facedown on the scanner glass.
Notes:
• When loading a document into the ADF, adjust the paper
guides.
• Make sure the size of the original document and the copy
paper size are the same. Failure to set the proper size may
result in a cropped image.
• Do not load postcards, photos, small items, transparencies,
photo paper, or thin media (such as magazine clippings) into
the ADF. Place these items on the scanner glass.
2 From the printer control panel, press to start copying.
Copying using the ADF
1 Load an original document faceup, short edge first into the ADF.
Note: Do not load postcards, photos, small items,
transparencies, photo paper, or thin media (such as magazine
clippings) into the ADF. Place these items on the scanner glass.
2 Adjust the paper guides.
3 From the home screen, navigate to:
Copy > change the copy settings > Copy It
Canceling a copy job
Canceling a copy job while the document is in the ADF
When the ADF begins processing a document, the scanning screen
appears. To cancel the copy job, touch Cancel Job on the touch screen.
A “Canceling scan job” screen appears. The ADF clears all pages in the
ADF and cancels the job.
Canceling a copy job while copying pages using the scanner glass
Touch Cancel Job on the touch screen.
A “Canceling scan job” screen appears. Once the job is canceled, the
copy screen appears.
Canceling a copy job while pages are being printed
1 From the home screen, touch Cancel Job, or press on the
keypad.
2 Touch the job you want to cancel.
15
Page 16

3 Touch Delete Selected Jobs.
E-mailing
Getting ready to e-mail
Setting up the e-mail function
1 Type the printer IP address into the address field of your Web
browser.
If you do not know the IP address of the printer, you can:
• View the IP address on the printer control panel in the TCP/IP
section under the Networks/Ports menu.
• Print a network setup page or the menu settings pages and
locate the IP address in the TCP/IP section.
2 Click Settings.
3 Under Default Settings, click E-mail/FTP Settings.
4 Click E-mail Settings > Setup E-mail Server.
5 Fill in the fields with the appropriate information.
6 Click Submit.
Configuring e‑mail settings
1 Type the printer IP address into the address field of your Web
browser.
If you do not know the IP address of the printer, you can:
• View the IP address on the printer control panel in the TCP/IP
section under the Networks/Ports menu.
• Print a network setup page or the menu settings pages and
locate the IP address in the TCP/IP section.
2 Click Settings > E-mail/FTP Settings > E-mail Settings.
3 Fill in the fields with the appropriate information.
4 Click Submit.
Creating an e-mail shortcut
Creating an e-mail shortcut using the Embedded Web Server
1 Type the printer IP address into the address field of your Web
browser.
If you do not know the IP address of the printer, you can:
• View the IP address on the printer control panel in the TCP/IP
section under the Networks/Ports menu.
• Print a network setup page or the menu settings pages and
locate the IP address in the TCP/IP section.
2 Click Settings.
3 Under Other Settings, click Manage Shortcuts > E-mail Shortcut
Setup.
4 Type a unique name for the recipient, and then enter the e-mail
address.
Note: If you are entering multiple addresses, then separate each
address with a comma (,).
5 Select the scan settings (Format, Content, Color, and Resolution).
6 Enter a shortcut number, and then click Add.
If you enter a number that is already in use, then you are prompted
to select another number.
Creating an e-mail shortcut using the printer control panel
1 From the home screen, navigate to:
E-mail > Recipient > type an e‑mail address
To create a group of recipients, touch Next address, and then type
the next recipient’s e-mail address.
2 Touch .
3 Type a unique name for the shortcut, and then touch Done.
4 Verify that the shortcut name is correct, and then touch OK.
If the shortcut name is incorrect, then touch Cancel, and then
reenter the information.
Canceling an e-mail
• When using the ADF, touch Cancel Job while Scanning appears.
• When using the scanner glass, touch Cancel Job while Scanning
appears, or while Scan the Next Page / Finish the
Job appears.
Faxing
Sending a fax
Sending a fax using the printer control panel
1 Load an original document faceup, short edge first into the ADF or
facedown on the scanner glass.
Note: Do not load postcards, photos, small items,
transparencies, photo paper, or thin media (such as magazine
clippings) into the ADF. Place these items on the scanner glass.
2 If you are loading a document into the ADF, then adjust the paper
guides.
3 From the home screen, touch Fax.
4 Enter the fax number or a shortcut using the touch screen or
keypad.
To add recipients, touch Next Number and then enter the
recipient's telephone number or shortcut number, or search the
address book.
Note: To place a dial pause within a fax number, press
The dial pause appears as a comma in the “Fax to” field. Use this
feature if you need to dial an outside line first.
5 Touch Fax It.
Sending a fax using the computer
The printer driver fax option lets you send a print job to the printer,
which sends the job as a fax. The fax option works as a normal fax
machine, but is controlled through the printer driver instead of the
printer control panel.
1 With a document open, click File > Print.
2 Select the printer, and then click Properties, Preferences,
Options, or Setup.
3 Navigate to:
Fax tab > Enable fax
.
16
Page 17
4 Enter the recipient fax number or numbers in the “Fax number(s)”
field.
Note: Fax numbers can be entered manually or by using the
Phone Book feature
5 If necessary, enter a prefix in the “Dialing prefix” field.
6 Select the appropriate paper size and page orientation.
7 If you want to include a cover page with the fax, t hen select Include
cover page with fax, and then enter the appropriate information.
8 Click OK.
Notes:
• The Fax option is available for use only with the PostScript driver
or the Universal Fax Driver. For information on installing these
drivers, see the Software and Documentation CD.
• The Fax option must be configured and enabled in the PostScript
driver under the Configuration tab before it can be used.
• If the Always display settings prior to faxing check box is
selected, then you are prompted to verify the recipient
information before the fax is sent. If this check box is cleared,
then the queued document is sent automatically as a fax when
you click OK on the Fax tab.
Sending a fax using shortcuts
Fax shortcuts are just like the speed dial numbers on a telephone or
fax machine. A shortcut number (1–99999) can contain a single
recipient or multiple recipients.
1 Load an original document faceup, short edge first into the ADF or
facedown on the scanner glass.
Note: Do not place postcards, photos, small items,
transparencies, photo paper, or thin media (such as magazine
clippings) into the ADF. Place these items on the scanner glass.
2 If you are loading a document into the ADF, then adjust the paper
guides.
3 Press , and then enter the shortcut number using the keypad.
4 Touch Fax It.
Sending a fax using the address book
The address book enables you to search for bookmarks and network
directory servers.
Note: If the address book feature is not enabled, then contact your
system support person.
1 Load an original document faceup, short edge first into the ADF or
facedown on the scanner glass.
Notes:
• If you are loading a document into the ADF, then adjust the
paper guides.
• Do not load postcards, photos, small items, transparencies,
photo paper, or thin media (such as magazine clippings) into
the ADF. Place these items on the scanner glass.
2 From the home screen, navigate to:
Fax >
3 Touch Browse shortcuts or, using the virtual keyboard, type the
name or part of the name of the person whose fax number you
want to find.
Note: Do not attempt to search for multiple names at the same
time.
4 Touch the name of the person you want to send the fax to, and
then touch Done > Fax It.
Creating shortcuts
Creating a fax destination shortcut using the Embedded Web Server
Instead of entering the entire phone number of a fax recipient on the
printer control panel each time you want to send a fax, you can create
a permanent fax destination and assign a shortcut number. A shortcut
can be created to a single fax number or a group of fax numbers.
1 Type the printer IP address into the address field of your Web
browser.
If you do not know the IP address of the printer, you can:
• View the IP address on the printer control panel in the TCP/IP
section under the Networks/Ports menu.
• Print a network setup page or the menu settings pages and
locate the IP address in the TCP/IP section.
2 Click Settings > Manage Shortcuts > Fax Shortcut Setup.
Note: A password may be required. If you do not have an ID and
password, get one from your system support person.
3 Type a unique name for the shortcut, and then enter the fax
number.
To create a multiple‑number shortcut, enter the fax numbers for
the group.
Note: Separate each fax number in the group with a semicolon
(;).
4 Assign a shortcut number.
If you enter a number that is already in use, then you are prompted
to select another number.
5 Click Add.
Creating a fax destination shortcut using the printer control panel
1 From the home screen, touch Fax, and then enter the fax number.
To create a group of fax numbers, touch Next number, and then
enter the next fax number.
2 Touch .
3 Type a unique name for the shortcut, and then touch Done.
4 Verify that the shortcut name and number are correct, and then
touch OK.
If the name or number is incorrect, then touch Cancel, and then
reenter the information.
Scanning
Using Scan to Network
Scan to Network lets you scan your documents to network desti nations
specified by your system support person. After the destinations
(shared network folders) have been established on the network, the
setup process for the application involves inst alling and configuring the
application on the appropriate printer using its Embedded Web Server.
For more information, see “Setting up Scan to Network” on page 4.
17
Page 18

Scanning to an FTP address
Scanning to an FTP address
Scanning to an FTP address using the printer control panel
1 Load an original document faceup, short edge first into the ADF or
facedown on the scanner glass.
Note: Do not load postcards, photos, small items,
transparencies, photo paper, or thin media (such as magazine
clippings) into the ADF. Place these items on the scanner glass.
2 If you are loading a document into the ADF, then adjust the paper
guides.
3 From the home screen, navigate to:
FTP > FTP > type the FTP address > Send It
Scanning to an FTP address using a shortcut number
1 Load an original document faceup, short edge first into the ADF or
facedown on the scanner glass.
Note: Do not load postcards, photos, small items,
transparencies, photo paper, or thin media (such as magazine
clippings) into the ADF. Place these items on the scanner glass.
2 If you are loading a document into the ADF, then adjust the paper
guides.
3 Press , and then enter the FTP shortcut number.
4 Touch Send It.
Scanning to an FTP address using the address book
1 Load an original document faceup, short edge first into the ADF or
facedown on the scanner glass.
Note: Do not load postcards, photos, small items,
transparencies, photo paper, or thin media (such as magazine
clippings) into the ADF. Place these items on the scanner glass.
2 If you are loading a docum ent into the ADF, adjust the paper guides.
3 From the home screen, navigate to:
FTP > FTP >
shortcuts > name of recipient > Search
> enter the name of recipient > Browse
Scanning to a computer or flash drive
Scanning to a computer
1 Type the printer IP address into the address field of your Web
browser.
If you do not know the IP address of the printer, you can:
• View the IP address on the printer control panel in the TCP/IP
section under the Networks/Ports menu.
• Print a network setup page or the menu settings pages and
locate the IP address in the TCP/IP section.
2 Click Scan Profile > Create.
3 Select your scan settings, and then click Next.
4 Select a location on your computer where you want to save the
scanned output file.
5 Enter a scan name.
The scan name is the name that appears in the Scan Profile list on
the display.
6 Click Submit.
7 Review the instructions on the Scan Profile screen.
A shortcut number was automatically assigned when you clicked
Submit. You can use this shortcut number when you are ready to
scan your documents.
a Load an original document fa ceup, short edge first into the ADF
or facedown on the scanner glass.
Note: Do not load postcards, photos, small items,
transparencies, photo paper, or thin media (such as
magazine clippings) into the ADF. Place these items on the
scanner glass.
b If you are loading a document into the ADF, then adjust the
paper guides.
c Press , and then enter the shortcut number using the
keypad, or touch Held Jobs on the home screen, and then touch
Profiles.
d After entering the shortcut number, the scanner scans and
sends the document to the directory or program you specified.
If you touched Profiles on the home screen, then locate your
shortcut on the list.
8 Return to the computer to view the file.
The output file is saved in the location or launched in the program
you specified.
Scanning to a flash drive
1 Load an original document faceup, short edge first into the ADF or
facedown on the scanner glass.
Note: Do not load postcards, photos, small items,
transparencies, photo paper, or thin media (such as magazine
clippings) into the ADF. Place these items on the scanner glass.
2 If you are loading a document into the ADF, then adjust the paper
guides.
3 Insert the flash drive into the USB port on the front of the printer.
The USB Drive home screen appears.
4 Select the destination folder, and then touch Scan to USB drive.
5 Adjust the scan settings.
6 Touch Scan It.
Clearing jams
Carefully select paper and specialty media and load it pro perly to avoid
most jams. For more information, see “Avoiding jams” on page 18. If
jams do occur, follow the steps outlined in this chapter.
Note: Jam recovery is set to Auto by default. The printer reprints
jammed pages unless the memory required to hold the pages is
needed for other printer tasks.
Avoiding jams
Load paper properly
• Make sure paper lies flat in the tray.
Correct paper loading Incorrect paper loading
18
Page 19
• Do not remove a tray while the printer is printing.
• Do not load a tray while the printer is printing. Load it before
printing, or wait for a prompt to load it.
• Do not load too much paper. Make sure the stack height does not
exceed the maximum paper fill indicator.
• Make sure the guides in the tray or the multipurpose feeder are
properly positioned and are not pressing too tightly against the
paper or envelopes.
• Push the tray in firmly after loading paper.
Use recommended paper
• Use only recommended paper or specialty media.
• Do not load wrinkled, creased, damp, bent, or curled paper.
• Flex and straighten paper before loading it.
• Do not use paper that has been cut or trimmed by hand.
• Do not mix paper sizes, weights, or types in the same stack.
• Make sure all paper sizes and types are set correctly in the printer
control panel menus.
• Store paper per manufacturer recommendations.
Understanding jam numbers and locations
When a jam occurs, a message indicating the jam location appears on
the printer display. Open doors and covers, and remove trays to access
jam locations. To resolve any paper jam message, you must clear all
jammed papers from the paper path.
Area name Jam numbers What to do
Inside the printer 200–201 Open the front door, and then
Inside the printer 202–203 Open the front door, and then
Inside the printer 230 Open the front door, and th en
Standard output bin 202–203 Remove all paper from the
Tray [x] 24x Open each tray, and then
Multipurpose feeder 250 Remove all paper from the
Automatic Document
Feeder (ADF)
Scanner cover Open the scanner cover, and
29y.xx Open the ADF cover, and then
remove the jammed paper
from behind the toner
cartridge area.
Open the front door, and th en
remove the jammed paper
from under the
photoconductor units.
Open the front door, and th en
remove the jammed paper
from under the fuser.
remove the jammed paper
from fuser area.
Open the top access cover,
and then remove the jammed
paper.
remove the jammed paper
located between the front
door and Tray 1.
standard output bin, and then
remove the jammed paper.
remove any jams.
multipurpose feeder, and
then remove the jammed
paper.
remove any jammed paper.
Open the duplex cover, and
then remove the jammed
paper.
then remove any jammed
paper.
200–201 paper jams
Paper jam in the toner cartridge area
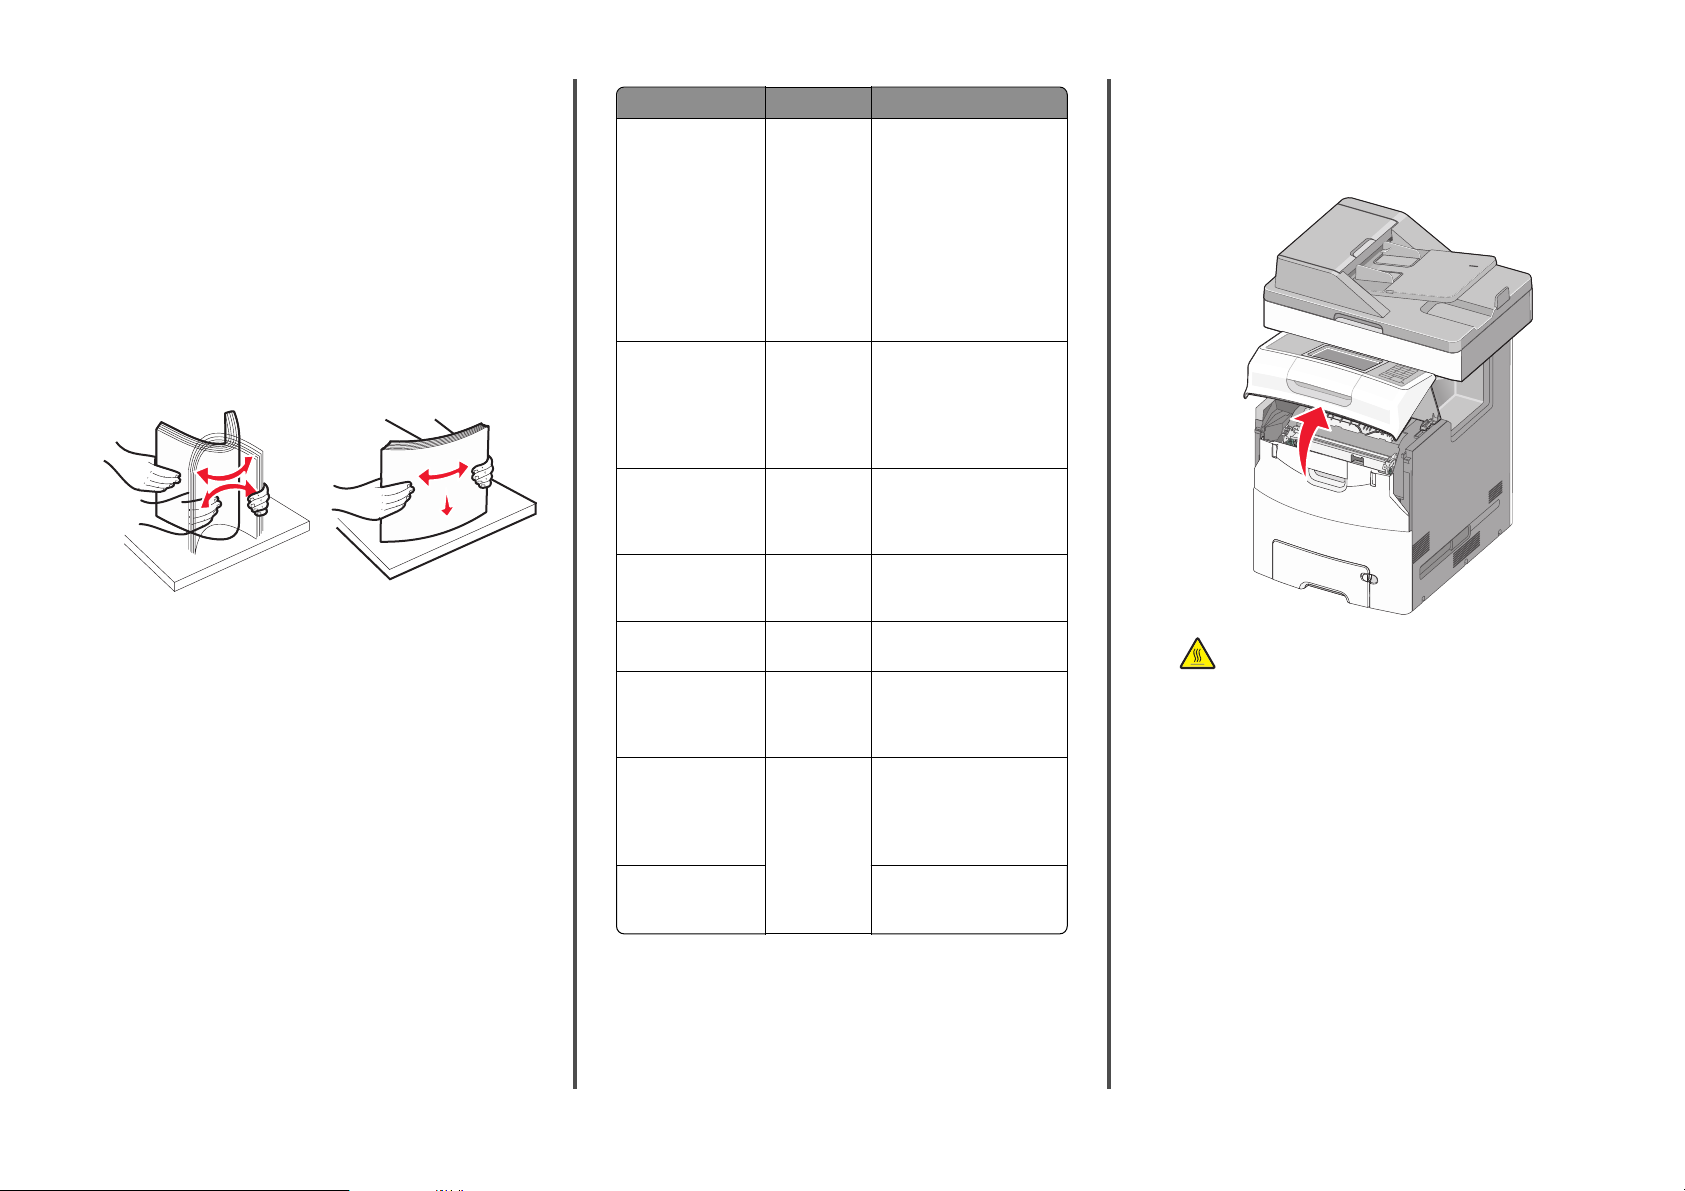
1 Open the printer top access cover.
CAUTION—HOT SURFACE: The inside of the printer might
be hot. To reduce the risk of injury from a hot component,
allow the surface to cool before touching it.
19
Page 20

2 Open the front door.
Warning—Potential Damage: To avoid overexposing the
photoconductor units, do not leave the front door open for
more than 10 minutes.
3 Firmly grasp the jammed paper on each side, and then gently pull
the paper up and out to remove it from behind the toner cartridge
area.
Note: Make sure all paper fragments are removed.
4 Close the front door, and then close the top access cover.
5 From the printer control panel, touch Continue, jam cleared.
CAUTION—HOT SURFACE: The inside of the printer might
be hot. To reduce the risk of injury from a hot component,
allow the surface to cool before touching it.
2 Open the front door.
Warning—Potential Damage: To avoid overexposing the
photoconductor units, do not leave the front door open for
more than 10 minutes.
3 If lodged under the photoconductor units, then firmly grasp the
jammed paper on each side, and then gently pull it out .
Note: Make sure all paper fragments are removed.
4 If the jammed paper is lodged too tightly under the photo conductor
units, then remove the photoconductor units and place them on a
flat surface.
Warning—Potential Damage: Be careful not to touch the
photoconductor drum. Doing so may affect the print quality of
future print jobs.
1
2
5 Firmly grasp the jammed paper on each side, and then gently pull
it out.
Note: Make sure all paper fragments are removed.
6 Reinstall each photoconductor unit.
7 Close the front door, and then close the printer top access cover.
8 From the printer control panel, touch Continue, jam cleared.
Paper jam in the fuser area
1 Open the printer top access cover.
CAUTION—HOT SURFACE: The inside of the printer might
be hot. To reduce the risk of injury from a hot component,
allow the surface to cool before touching it.
2 Open the front door.
Warning—Potential Damage: To avoid overexposing the
photoconductor units, do not leave the front door open for
more than 10 minutes.
3 Determine where the jammed paper is located, and then remove
it:
a If the jammed paper is visible under the fuser, then firmly grasp
the paper on each side, and then gently pull it out.
Note: Make sure all paper fragments are removed.
Paper jam under the photoconductor units
1 Ope the printer top access cover.
20
Page 21

f Press the green arrow tab to the left, and then lift the to p paper
guide.
1
b If the jammed paper paper is visible at the top paper guide in
the fuser assembly, then firmly grasp the paper on each side,
and then gently pull it out.
Note: Make sure all paper fragments are removed.
c If the jammed paper is not visible, then remove the fuser unit:
Warning—Potential Damage: Do not touch the roller at the
center of the fuser unit. Doing so may damage the fuser.
1 Turn the screws on the fuser counterclockwise to loosen
them.
d Place the fuser on a flat surface with the blue thumb screws
facing you.
e Pull and then rotate the green rectangular knob clockwise to
unlock the top paper guide.
1
2
2
g Firmly grasp the jammed paper on each side, and then gently
pull it out.
Note: Make sure all paper fragments are removed.
h Close the top paper guide. Make sure both sides of the paper
guide are firmly seated.
2 Using the handholds on each side, lift and pull the fuser out
of the printer.
CAUTION—HOT SURFACE: The fuser might be
hot. To reduce the risk of injury from a hot
component, allow the surface to cool before
touching it.
21
Page 22

i Pull and then rotate the green rectangular knob
counterclockwise to firmly secure the top paper guide.
1
b If the jammed paper is visible at the top paper guide in the fuser
assembly, then firmly grasp the paper on each side, and then
gently pull it out.
Note: Make sure all paper fragments are removed.
2
j Reinstall the fuser unit:
1 Align the fuser unit using the handholds on each side, and
then place it back into the printer.
2 Turn the screws clockwise to fasten the fuser securely.
4 Close the front door, and then close the top access cover.
5 From the printer control panel, touch Continue, jam cleared.
202–203 paper jams
If the jammed paper is visible in the standard exit bin, then firmly grasp
the paper on each side, and then gently pull it out.
Note: Make sure all paper fragments are removed.
Paper jam in the fuser area
1 Open the printer top access cover.
CAUTION—HOT SURFACE: The inside of the printer might
be hot. To reduce the risk of injury from a hot component,
allow the surface to cool before touching it.
2 Open the front door.
Warning—Potential Damage: To avoid overexposing the
photoconductor units, do not leave the front door open for
more than 10 minutes.
3 Determine where the jammed paper is located, and then remove
it:
a If the jammed paper is visible under the fuser, then firmly grasp
the paper on each side, and then gently pull it out.
Note: Make sure all paper fragments are removed.
c If the jammed paper is not visible, then remove the fuser unit:
1 Turn the screws on the fuser counterclockwise to loosen
them.
2 Using the handholds on each side, lift and pull the fuser out
of the printer.
CAUTION—HOT SURFACE: The fuser might be
hot. To reduce the risk of injury from a hot
component, allow the surface to cool before
touching it.
22
Page 23

d Place the fuser on a flat surface with the blue thumb screws
facing you.
e Pull and then rotate the green rectangular knob clockwise to
unlock the top paper guide.
1
2
f Press the green arrow tab to the left, and then lift the top paper
guide.
Note: Make sure all paper fragments are removed.
h Close the top paper guide. Make sure both sides of the paper
guide are firmly seated.
i Pull and then rotate the green rectangular knob
counterclockwise to firmly secure the top paper guide.
1 Align the fuser unit using the handholds on each side, and
then insert it back into the printer.
2 Turn the screws clockwise to fasten the fuser securely.
4 Close the front door, and then close the top access cover.
5 From the printer control panel, touch Continue, jam cleared.
1
2
g Firmly grasp the jammed paper on each side, and then gently
pull it out.
1
2
j Reinstall the fuser unit:
23
Page 24

Paper jam inside the printer top access cover
1 Open the printer top access cover.
Warning—Potential Damage: To avoid overexposing the
photoconductors, do not leave the front door open for more
than 10 minutes.
CAUTION—HOT SURFACE: The inside of the printer might
be hot. To reduce the risk of injury from a hot component,
allow the surface to cool before touching it.
2 Open the front door.
3 Firmly grasp the jammed paper on each side, and then gently pull
it out.
Note: Make sure all paper fragments are removed.
4 Close the front door, and then close the top access cover.
5 From the printer control panel, touch Continue, jam cleared.
24x paper jam
Paper jam in Tray 1
1 Open Tray 1.
2 Firmly grasp the jammed paper on each side, and then gently pull
it out.
Note: Make sure all paper fragments are removed.
24
3 Close Tray 1.
4 From the printer control panel, touch Continue, jam cleared.
Paper jam in one of the optional trays
1 Open the specified tray.
2 Firmly grasp the jammed paper on each side, and then gently pull
it out.
Note: Make sure all paper fragments are removed.
Page 25

3 Close the tray.
4 From the printer control panel, touch Continue, jam cleared.
2 Open the ADF cover, firmly grasp the jammed paper on each side,
and then gently pull it out.
Note: Make sure all paper fragments are removed.
2
1
250 paper jam
1 Press the paper release lever, and then remove any jammed pages
from the multipurpose feeder.
Note: Make sure all paper fragments are removed.
1
2
2 Load new paper into the multipurpose feeder.
3 From the printer control panel, touch Continue, jam cleared.
29y.xx paper jams
1 Remove all original documents from the Automatic Document
Feeder (ADF).
5 Open the scanner cover, firmly grasp the jammed paper on each
side, and then gently pull it out.
Note: Make sure all paper fragments are removed.
3 Close the ADF cover.
4 Open the duplex cover, firmly grasp the jammed paper on each
side, and then gently pull it out.
Note: Make sure all paper fragments are removed.
25
Page 26

6 Close the scanner cover.
7 Reload original documents into the ADF, straighten the stack, and
then adjust the paper guide.
26
 Loading...