

Page 1
裝入普通噴墨紙張。
載入㆒般噴墨專用紙。
Load plain inkjet paper.
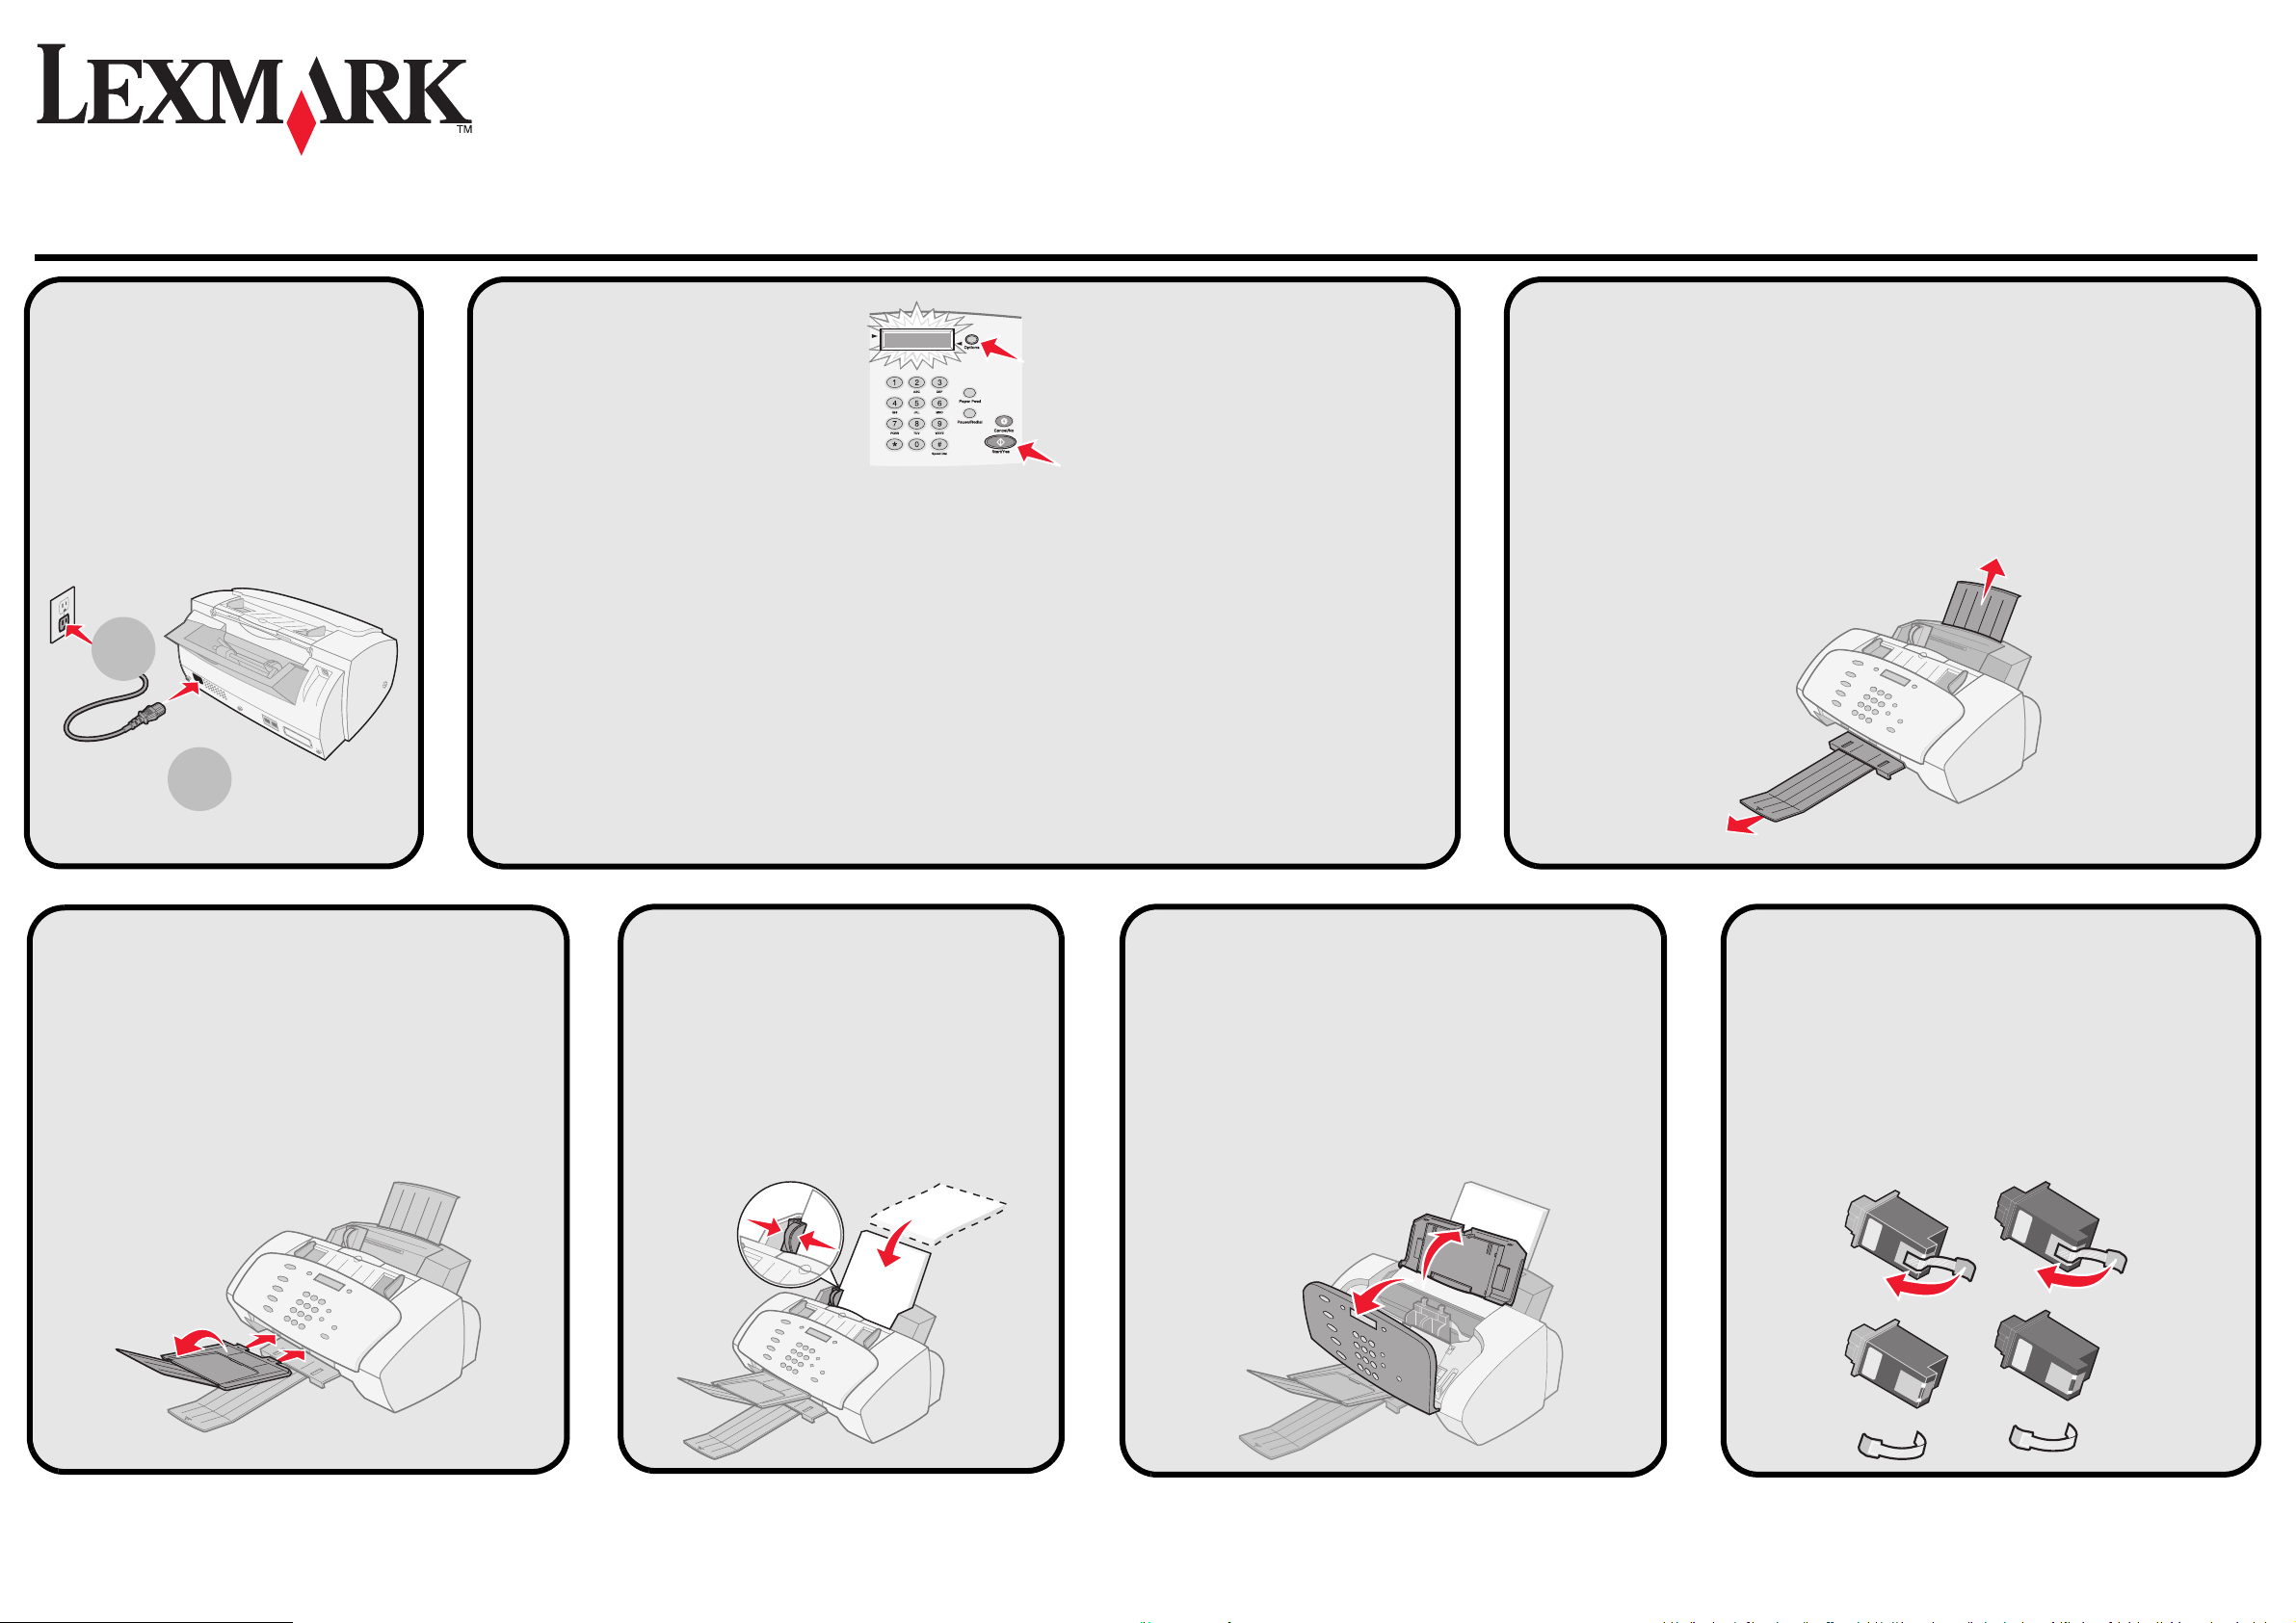
在您開始安裝之前,請首先閱讀此安裝指南背面的安全信息。
在您開始安裝之前,請先閱讀本指南背面的安全㈾訊。
Before you begin, read the safety information on the back of this sheet.
拉開出紙托盤和紙張支架。
將出紙拖盤和紙張托架拉出展開。
Extend the paper exit tray and the paper support.
www.lexmark.com
1
按
Options (
選項) 按鈕找到您希望的語言。
2
按
Start/Yes (
開始/是) 按鈕選擇語言。
連接電源線。
連接電源線。
Connect the power cord.
安裝並打開文檔托盤。
將文件退出拖盤連接在多功能複合機,
然後將它展開。
Attach and extend the document
exit tray.
2
1
X125
多功能一體機
/
X125
多功能複合機
/
X125 All-In-One
1
按㆘
Options (
選㊠) 來尋找您要使用的語言。
2
按㆘
Start/Yes (
開始/是) 來選取語言。
打開墨盒保護門。
打開墨㈬匣存取門。
Open the cartridge access doors.
1
Press
Options
to find the language.
2
Press
Start/Yes
to select the language.
安裝指南 / 安裝指南 /
Setup Sheet
4
5
6
3
2
1
撕掉墨盒上的透明封條。
撕㆘貼紙與膠帶。
Remove the sticker and tape.
7
Page 2
關閉墨盒保護門。
關閉墨㈬匣存取門。
Close the cartridge access doors.
安裝打印墨盒。
安裝兩個墨㈬匣。
Install the cartridges.
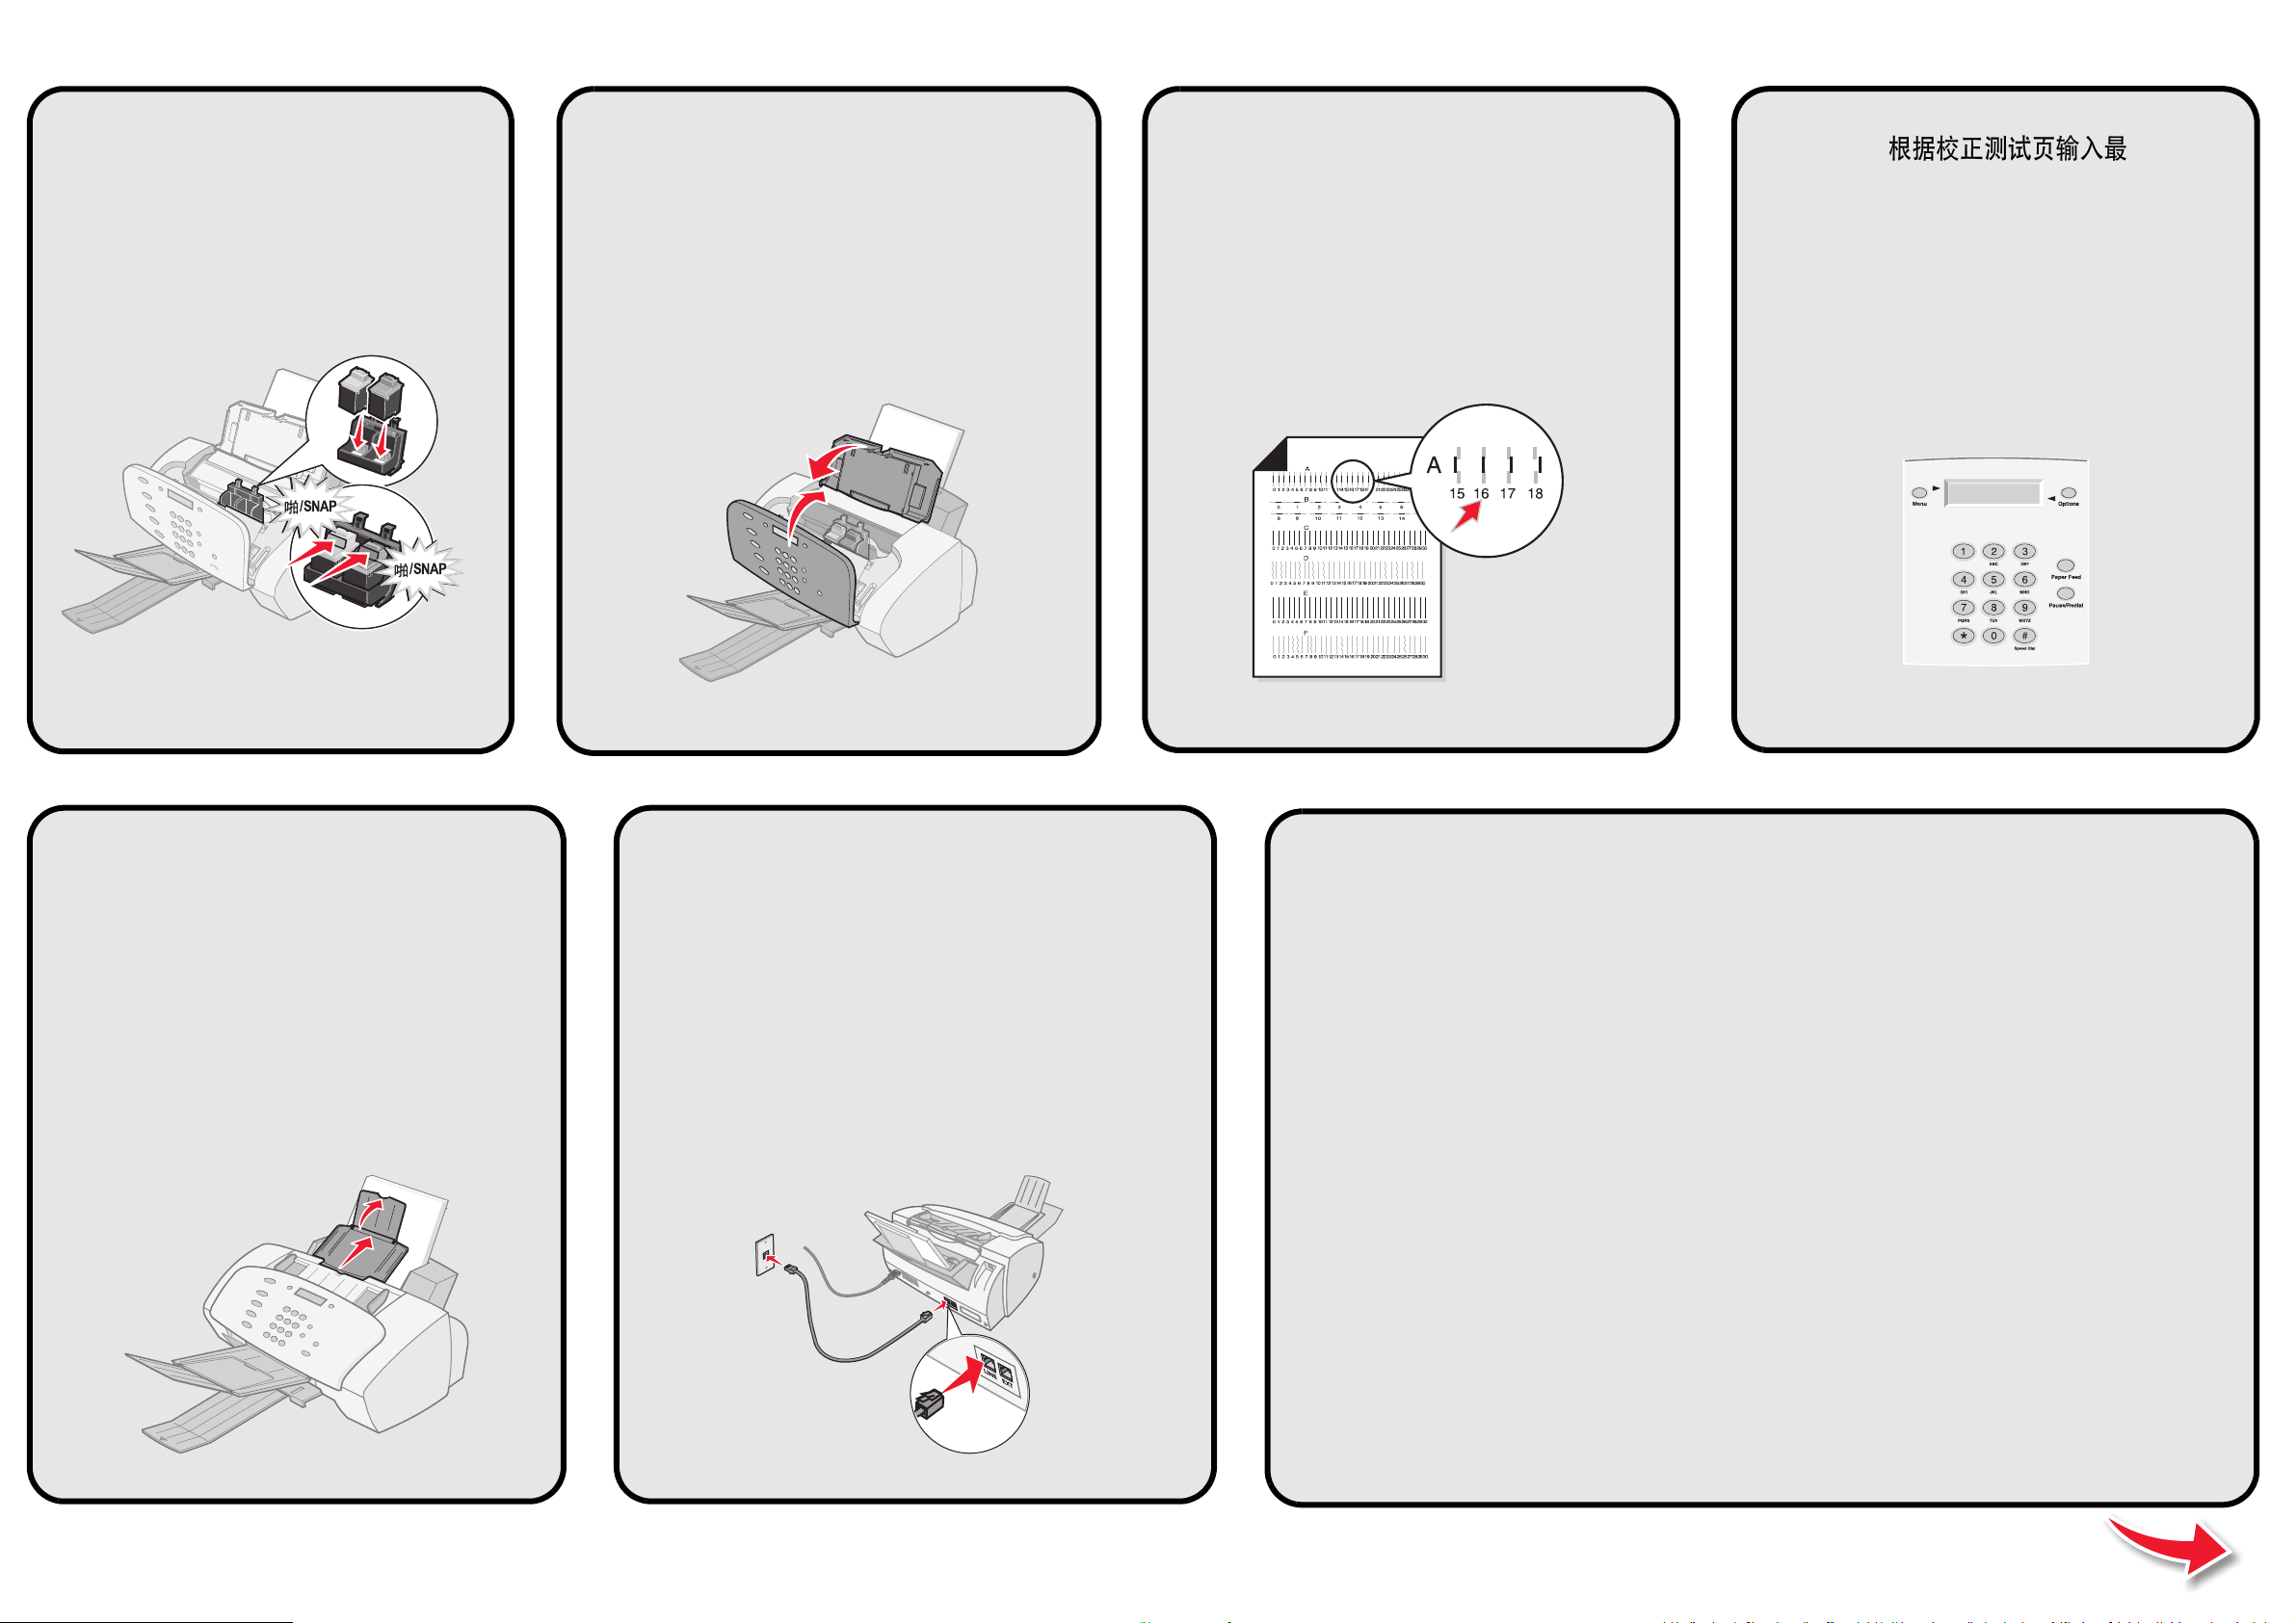
等待打印校正測試頁。
等候列㊞校正頁。
Wait for the alignment page
to print.
/SNAP
/SNAP
根據校正測試頁輸入最佳的
數值。
參考校正頁,輸入最㊜合的
數值。
Enter the best values
from the alignment page.
連接電話線。
連接電話線。
Connect the telephone cord.
•
如要通過計算機使用您的多功能一體機,請繼續進行下麵的
步驟。
•
如要不通過計算機單獨使用您的多功能一體機,您已經完成了
安裝。
•
如果您與電腦㆒同使用 「多功能複合機」,請繼續㆘㆒步驟。
•
如果您不使用電腦而單獨使用 「多功能複合機」,那麼您已經完成所㈲
步驟。
拉開文檔支架。
展開文件托架。
Extend the document support.
•
If you are using your All-In-One with your computer, continue to the next step.
•
If you are using your All-In-One without a computer, you are finished.
1
2
1
3
1
4
11
1
0
9
8
Page 3

連接
USB
電纜。
連接
USB
電纜。
Connect the USB cable.
插入軟件安裝光盤。
插入光碟。
Insert the CD.
點擊“
取消
”。
按㆒㆘
取消
。
Click
Cancel
.
點擊“
下一步
”。
按㆒㆘
㆘㆒步
。
Click
Next
.
按照您的計算機屏幕上的步驟安裝:
•
多功能一體機軟件,
快速參考手冊
,和
用戶手冊
•
照片編輯軟件
•
OCR 掃描軟件
請遵循電腦㆖的步驟來安裝:
•
多功能複合機軟體、
快速參考手冊
以及
用戶手冊
•
照片編輯軟體
•
OCR (光㈻文字辨識系統)掃描軟體
Follow the steps on your computer to install:
•
Printer software, Quick Reference, and User’s Guide
•
Photo editing software
•
OCR scanning software
1
6
1
5
Page 4

安裝過程中有問題嗎
?
首先檢查以下的內容
如果您的多功能一體機出現了問題,首先請確認:
• 電源線一端牢固地連接在您的多功能一體機上,另一端連接在正確
接地的電源插座上。
• 電話線一端牢固地連接在您的多功能一體機的line插口上,另一端
連接在牆壁的電話線插座上。
• 您的電話有撥號音。
• 打印墨盒保護門已經完全關閉。
• 顯示屏上出現Ready(準備就緒)信息。
• 覆蓋打印墨盒底部的透明封條已經撕掉。
插入軟件安裝光盤後,計算機沒有反應。
1 關閉所有的應用程序。
2 重新啟動您的計算機。
3 請確認您在任何類似於安裝指南的步驟17所示的界面中點擊了
“取消”。
4 取出並重新插入軟件安裝光盤。
5 從您的計算機桌面上雙擊“我的電腦”。
6 雙擊您的光盤驅動器的圖標。如有必要,再雙擊setup.exe。
7 繼續進行安裝指南的步驟19。
P/N 13H0078 EC 3H0024
© Copyright 2002 Lexmark International, Inc. All rights reserved.
安全信息
• 請當心: 不要在雷雨天氣時連接任何的電纜或電線。
• 請將電源線連接在距離產品儘量近,便於使用,且正確接地的電源
插座上。
請參閱
快速參考手冊
獲取其他的安裝和安全信息。
請參閱
快速參考手冊
以取得其他安裝與安全㈾訊。
Refer to the
Quick Reference
for other setup and safety information.
安裝㈲疑問嗎?
請先檢查重要的事㊠
如果 「多功能複合機」發生問題,請先確定:
• 電源線已插入 「多功能複合機」,並插入妥善接㆞的電源插座。
• 電話線已妥善連接㉃ 「多功能複合機」的電話線插孔以及牆㆖的
電話插孔。
• 電話㈲撥號音。
• 墨㈬匣存取門完全關閉。
• 顯示幕㆖顯示為 Ready (備妥)。
• 已撕㆘墨㈬匣底端的貼紙與透明膠帶。
當我插入安裝軟體光碟時,沒㈲得到任何回應。
1 關閉所㈲開啟的程式。
2 重新啟動電腦。
3 請確定您在和安裝指南㆗步驟 17 類似的畫面㆖按㆒㆘取消。
4 將安裝軟體光碟退出,然後重新插入。
5 在桌面㆖,按兩㆘我的電腦。
6 按兩㆘光碟機圖示。如果需要的話,請按兩㆘ setup.exe。
7 繼續安裝指南㆗的步驟 19。
Setup questions?
Checking first things first
If your All-In-One has a problem, first make sure:
• The power cord is plugged into your All-In-One and into a properly
grounded electrical outlet.
• Your telephone cord is securely attached to the line jack on your
All-In-One and to the wall jack.
• Your telephone has a dial tone.
• The cartridge access door are both completely closed.
• Ready appears on the display.
• The sticker and transparent tape covering the bottom of the
cartridges are removed.
When I inserted the installation software CD,
nothing happened.
1 Close all open programs.
2 Restart your computer.
3 Make sure you click Cancel on any screens similar to the one in
step 17 on the setup sheet.
4 Eject, and then reinsert the installation software CD.
5 From your desktop, double-click My Computer.
6 Double-click your CD-ROM drive icon. If necessary, double-click
setup.exe.
7 Continue with step 19 on the setup sheet.
安全㈾訊
• 請當心:請勿在閃電時連接電纜。
• 電源線必須連接到妥善接㆞的電源插座,電源插座與產品的距離不可
太遠,且必須方便使用。
Safety information
• CAUTION: Do not make any cabling connections during a
lightning storm.
• Connect the power cord to properly grounded electrical outlet that
is near the product and easily accessible.
 Loading...