

Page 1

X125 All-In-One
Quick Reference
June 2002
www.lexmark.com
Page 2

Safety Information
• Connect the power cord to a properly grounded electrical outlet that is near the product and easily
accessible.
• Refer service or repairs, other than those described in the operating instructions, to a professional
service person.
• Use only Lexmark replacement parts to maintain the safety of this product.
• Do not use the fax function during a lightning storm.
Page 3

Contents
Installing the software .......................................................1
Additional setup instructions ...........................................3
Connecting to a telephone ............................................................3
Connecting to an answering machine ........................................... 4
Connecting to a computer modem ................................................5
Learning about your All-In-One ........................................7
Understanding the All-In-One .......................................................7
Using the operator panel ...............................................................8
Loading specialty paper ..............................................................10
Loading a document ................................................................... 11
Using the All-In-One software .....................................................12
Additional software ...................................................................... 13
Faxing ...............................................................................14
Sending a fax ..............................................................................14
Receiving a fax ........................................................................... 17
Copying .............................................................................19
Changing the copy settings ..... ....... ...... ....... ...... ....... ...... ....... ...... 19
Printing .............................................................................20
Changing the print settings ..... ....... ...... ....... ................................ 20
iii
Page 4

Scanning ...........................................................................21
Changing the scan settings ..... ....... ...... ....... ...... ....... ...... ....... ...... 22
OCR (Optical Character Recognition) ......................................... 22
Troubleshooting ...............................................................23
Checking first things first .............................................................23
Setup troubleshooting .................................................................23
Solving fax problems ...................................................................26
Solving copy problems ................................................................27
Contacting Lexmark ....................................................................27
Appendix ...........................................................................28
Federal Communications Commission (FCC) compliance
information statement ................................................................. 28
Copyright advisory ..... ....... ...... ....... ...... ....... ...... ....... ...................28
Ringer Equivalence Number ....................................................... 28
Canadian regulations governing the use of modems ..................28
Statement of Limited Warranty .......................................29
iv
Page 5
Installing the software
Your All-In-One is set up to fax and copy without a computer according to
the steps listed in your setup documentation. In order to set up your
All-In-One to fax, copy, print, and scan with a computer, follow these
installation steps:
1 Make sure you have completed all of the steps in the setup
documentation.
2 Make sure your computer is on.
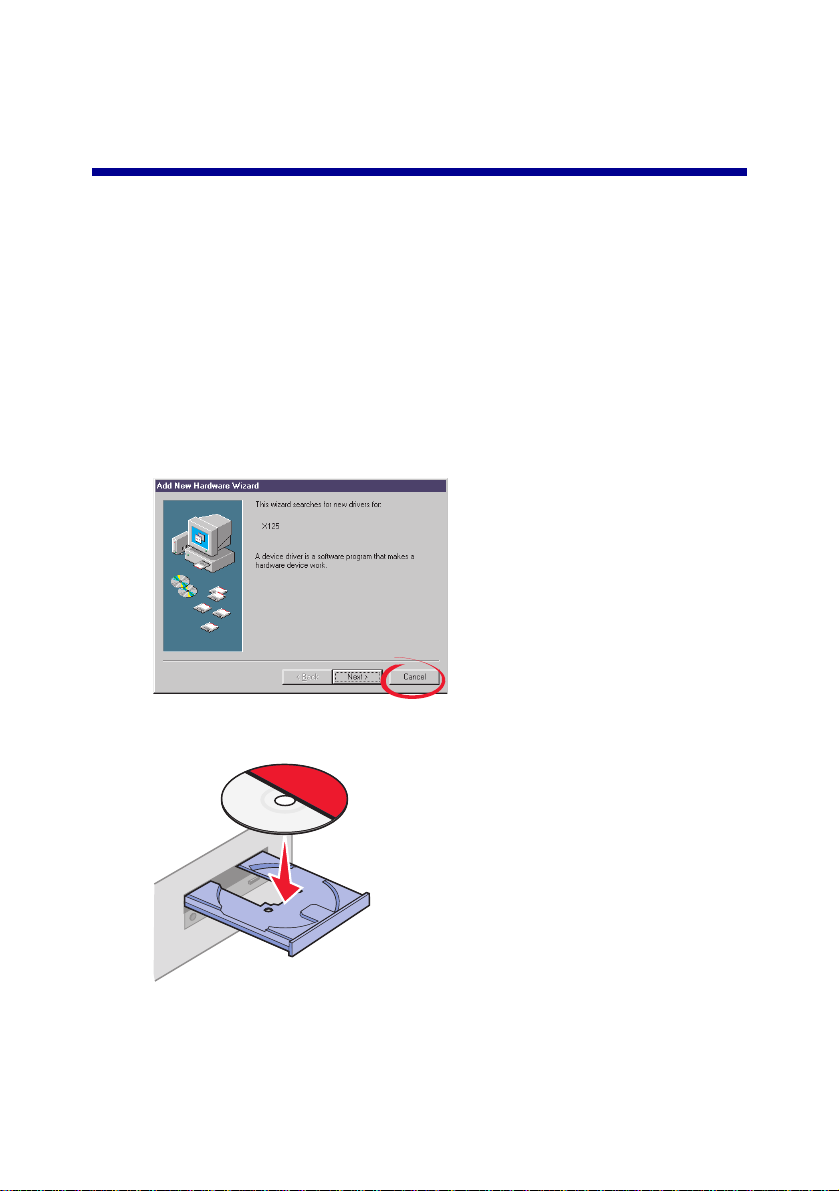
3 Click Cancel on any screens similar to the one shown.
4 Insert the CD.
1
Page 6

5
Wait for the Lexmark All-In-One software installation screen to
appear, and then click Next.
Note: If this screen does not appear, see page 23.
6 Continue with the installation steps on your computer screen.
2
Page 7
Additional setup instructions
You can connect your All-In-One with a telephone, an answering machine,
and a computer modem.
CAUTION: Do not make these connections during an electrical
storm.
Connecting to a telephone
Your All-In-One is set up according to the steps listed in your setup
documentation. To use the fax line as a normal telephone line, connect a
telephone to your All-In-One. There are two different ways to do this.
Choose the method that you prefer.
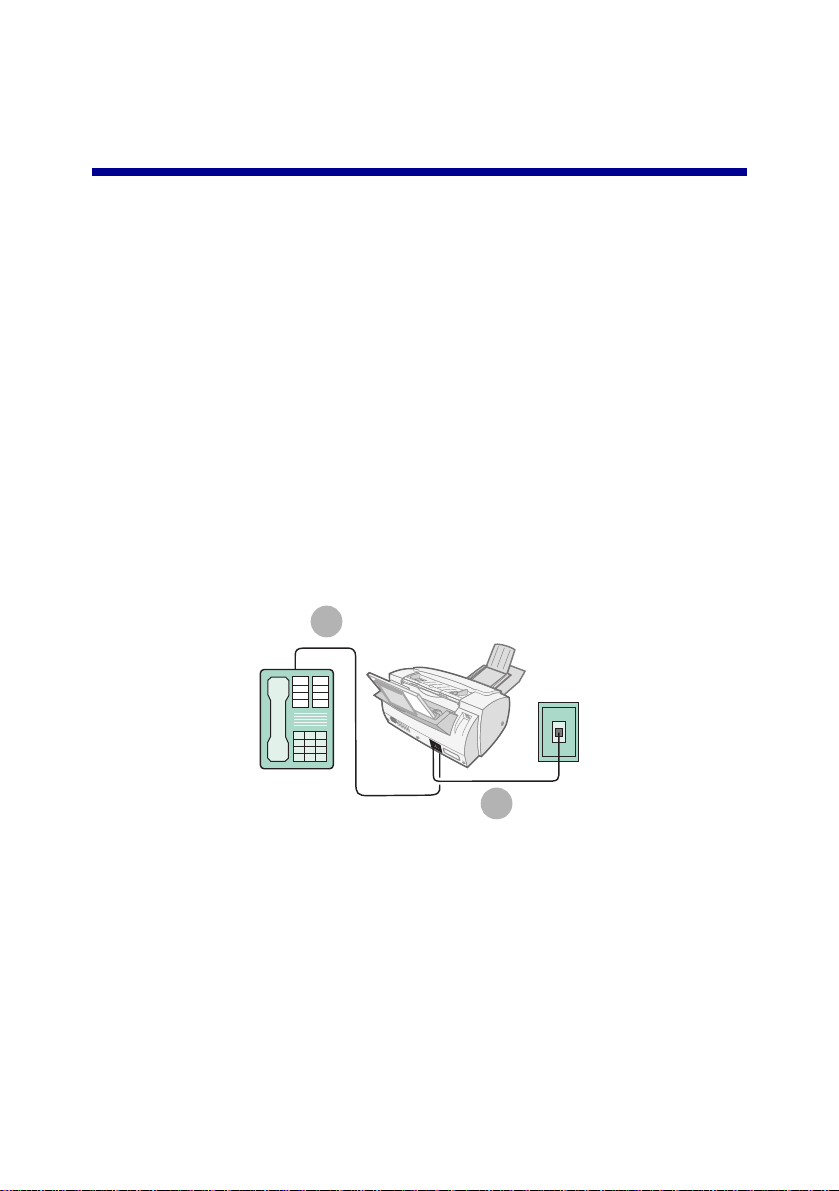
Connecting to the EXT outlet
1
2
1 Connect a phoneline from the telephone to the EXT outlet on the
All-In-One.
2 Connect a phoneline from the LINE outlet on the All-In-One to the
telephone wall jack.
Use the Fax mode or the Tel mode. For help selecting these modes, see
page 17.
3
Page 8
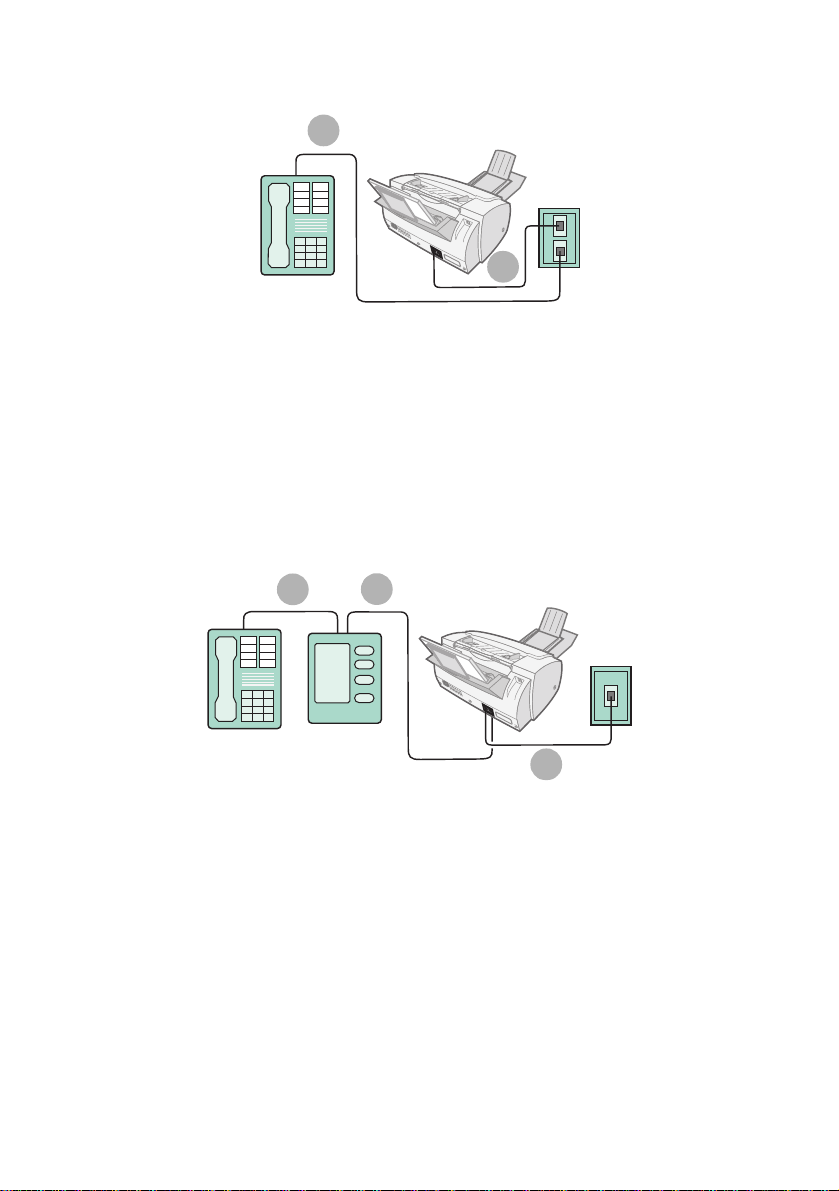
Connecting to the wall jack
1
2
1
Connect a phoneline from the telephone to a telephone wall jack.
2 Connect a phoneline from the LINE outlet on the All-In-One to a
telephone wall jack.
Use the Fax mode or the Tel mode. For help selecting these modes, see
page 17.
Connecting to an answering machine
1
2
3
1 Connect a phoneline from the telephone to the answering machine.
2 Connect a phoneline from the answering machine to the EXT outlet
on the All-In-One.
3 Connect a phoneline from the LINE outlet on the All-In-One to the
telephone wall jack.
Use the Fax mode or the Tel mode. For help selecting these modes, see
page 17.
4
Page 9

Connecting to a computer modem
Set up without an answering machine
1
2
3
1 Connect a phoneline from the telephone to the computer modem.
2 Connect a phoneline from the computer modem to the EXT outlet
on the All-In-One.
3 Connect a phoneline from the LINE outlet on the All-In-One to the
telephone wall jack.
Use the Fax mode, the Tel mode, or the Ans/Fax mode. For help selecting
these modes, see page 1 7.
5
Page 10

Set up with an answering machine
1
1
Connect a phoneline from the telephone to the answering machine.
2
3
4
2 Connect a phoneline from the answering machine to the computer
modem.
3 Connect a phoneline from the computer modem to the EXT outlet
on the All-In-One.
4 Connect a phoneline from the LINE outlet on the All-In-One to the
telephone wall jack.
Use the Tel mode or the Ans/Fax mode. For help selecting these modes,
see page 17.
6
Page 11
Learning about your All-In-One
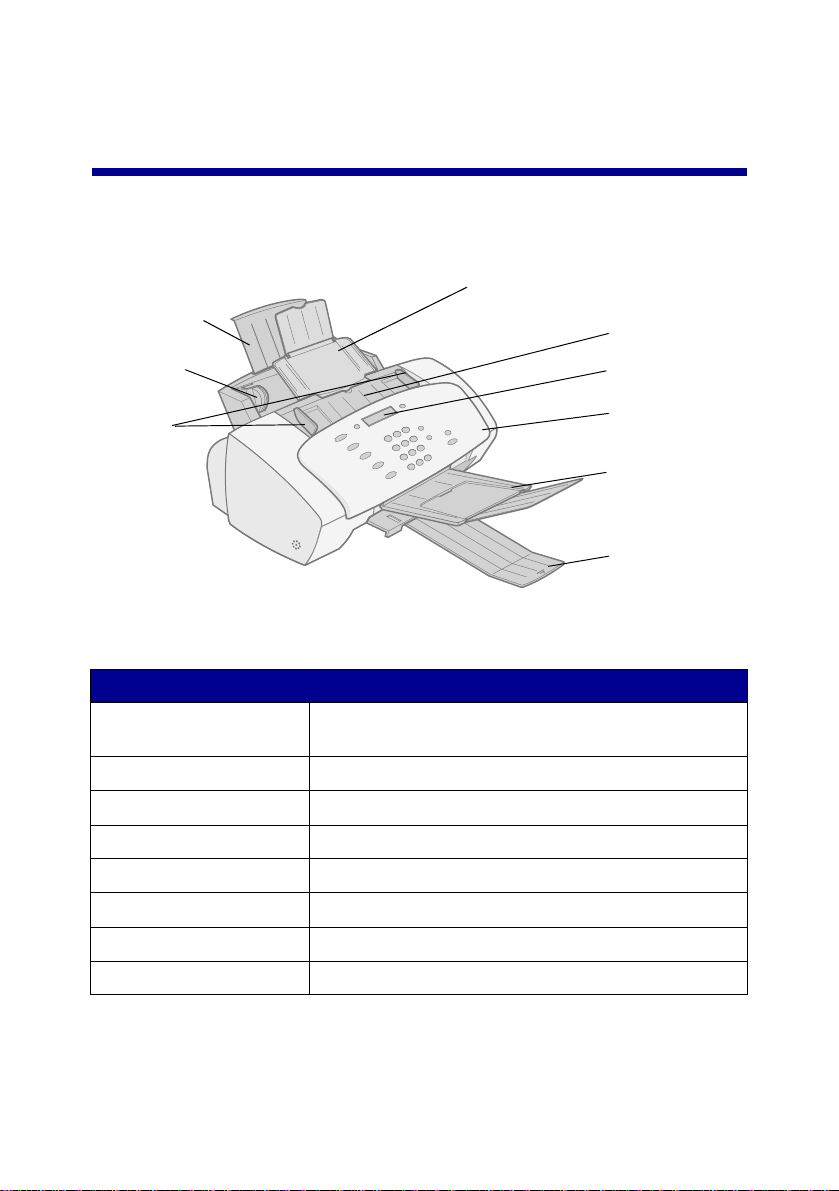
Understanding the All-In-One
Document support
Paper support
Paper guide
Document
guides
Use this... When you want to...
Document support Keep documents straight during copying, scanning,
and faxing.
Cartridge access door Install or replace the cartridges.
Display Check the status of the All-In-One.
Document exit tray Stack paper after copying, scanning, or faxing.
Paper exit tray Stack paper after printing.
Cartridge access
door
Display
Operator panel
Document exit
tray
Paper exit tray
Document guides Make sure documents feed correctly.
Paper guide Make sure paper feeds correctly.
Paper support Keep paper straight during printing.
7
Page 12

Using the operator panel
The following table describes what each button does. Messages and errors
appear on the display when your All-In-One is on.
Press... When you want to...
Menu Scroll through available features on the display.
Options Scroll through the settings for the feature you select.
Setup Access the system setup, maintain your cartridges, and
Fax Initiate sending a fax.
Copy Initiate a copy job.
Scan Initiate a scan job.
Speaker Listen as you manually dial and connect to another fax
The keypad
buttons
Speed Dial (# key) Access the speed dial menu.
Paper Feed • Continue printing after reloading the paper support.
Pause/R edial • Add a three-second pause when y ou di al a tele phone o r
print reports.
machine.
Dial a fax number or select a num ber of copies.
• Remove paper if it does not exit after printing.
fax number to access an outside telephone or fax line.
• Dial the last number called.
8
Page 13

Press... When you want to...
Cancel/No Cancel an action or clear an incorrect value, or provide a
Start/Yes Start a copy or scan job, or provide a Yes response when
No response when answering questions.
answering questions.
Adjusting the All-In-One settings
Use the Menu, Options, and Setup buttons to navigate the All-In-One
menus and to change the settings on your All-In-One.
Settings menus
To display the settings menus press Fax, Copy, Scan, or Setup, and then
press Menu. Use your settings menus to adjust:
• Copy type, contrast, size, and paper type.
• Scan type, contrast, size, and file type.
• Fax type, resolution, and contrast.
Setup menu
To display the Setup menu, press Setup and then press Menu. Press
Menu to display each menu feature. To navigate the menu features, press
Options. Use the Setup menu to:
• Set the date and time
• Print a report
• Maintain your printer
• Set the paper size
• Set the ringer volume
• Set the fax print quality
• Set up fax forwarding
• Set the fax receive mode
• Set up distinctive ringing support
• Select a language to appear on the display.
9
Page 14

Loading specialty paper
Follow these guidelines when loading specialty paper:
Load up to: Make sure:
10 envelopes • The print side faces you.
• The envelopes are loaded
vertically against the right
side of the paper support.
• The stamp location is in the
upper left corner.
• The paper guide is against
the left edge of the
envelopes.
10 greeting cards,
index cards,
postcards, or photo
cards
25 sheets of
coated, photo, or
glossy paper
10 transparencies • The rough side faces you.
100 sheets of
custom size paper
25 iron-on transfers • You follow the loading instructions on the iron-on
• The print side faces you.
• The cards are loaded vertically against th e right s ide of
the paper support.
• The paper guide is against the left edge of the cards.
• The glossy or coated side faces you.
• The paper guide is against the left edge of the photo
paper.
• The paper guide is against the left edge of the
transparencies.
• The print side faces you.
• Your paper size fits within these dimensions:
Width
76 mm to 216 mm
3.0 in. to 8.5 in.
Length
127 mm to 432 mm
5.0 in. to 17.0 in.
• The paper guide is against the left edge of the paper.
packaging.
• The print (blank) side faces you.
• The paper guide is against the left edge of the iron-on
transfers.
10
Page 15

Loading a document
Load documents that you want to fax, copy, or scan in the document
support. You can load up to 30 sheets of paper at a time.
You can use your All-In-One to fax, copy, or scan documents that are
printed on plain A4, letter, or legal size paper.
Before you load a document into your All-In-One, make sure:
• Your document is at least 76 mm (3.0 in.) long and 140 mm (5.5 in.)
wide.
• You remove all staples and paper clips.
• You let ink and correction fluid dry completely.
• You load paper in the paper support.
1 Place your document face down and top down in the document
support.
2 Slide the document guides toward the paper until they rest against
both sides of the paper.
11
Page 16

Using the All-In-One software
In addition to changing the settings from the operator panel, you can also
change them using the Settings Util it y.
To access the Settings Utility, click Start Programs Lexmark X125
Lexmark X125 Settings Utility.
Select... When you want to...
print Set up the default printer properties.
fax Change the fax settings or set up your speed-dial list with
copy Change the default copy settings, including copy type,
scan Change the default scan settings or scan to:
close Close the Settings Utility.
frequently dialed numbers.
contrast, and size.
• A folder on your computer
• Your e-mail program
• A software application.
12
Page 17

To learn more about how to customize your All-In-One settings, refer to the
Online User’s Guide. To view the guide, click Start Programs Lexmark
X125 Online User’s Guide.
Additional software
To access the scanning and image editing software that came with your
All-In-One, click Start Programs Lexmark X125. Use the software to
explore the capabilities of your All-In-One.
13
Page 18

Faxing
This section takes you step-by-step through the basics of sending and
receiving faxes. It also teaches you the advanced faxing features of your
All-In-One, such as speed-dialing, using the speaker, and fax forwarding.
Sending a fax
Use your All-In-One to fax documents that are printed on A4, letter, or legal
size paper.
To send a fax with the default settings:
1 Load paper in the paper support.
2 Load your document. For help, see page 11.
3 Press Fax.
4 Enter the fax number using the operator panel keypad, or press
Pause/Redial to send the fax to the last number you dialed.
5 Press Start/Y es.
14
Page 19

Changing the fax settings
Use the operator panel or the software to change the fax type, resolution,
and contrast.
Using the operator panel Using the software
1 Press FAX, and then press Menu
repeatedly to review the fax setting s .
2 Press Options to change the
settings.
1 Make sure you have installed the
All-In-One software. For help, see
page 1.
2 Click Start Programs Lexmark
X125 Lexmark X125 Settings
Utility.
3 Click fax.
4 Adjust the settings, and then click
OK.
Speed-dialing
You can program up to 70 speed-dial numbers using the Settings Utility.
You can store up to 59 individual names and numbers, ten small-group
numbers to speed-dial a fax to groups of people on your individual list, and
one large-group number to speed-dial a fax to all of the individuals and
groups listed. Each speed-dial entry can be a fax number or an e-mail
address. To program speed-dial entries for your All-In-One, click
Start Programs Lexmark X125 Lexmark X125 Settings
Utility fax Setup.
To send a fax using a programmed speed-dial entry:
1 Press Speed Dial (the # button).
2 Press Options to select the speed-dial destination, or enter a
speed-dial number using the operator panel keypad.
3 Press Start/Y es.
To print a list of all the speed-dial entries available on your system, first
press Setup, and then press Menu repeatedly until you see Print Report.
Press Options until you see Speed Dial List. Press Start/Yes to print the
report.
15
Page 20

Using the speaker
Use the speaker to dial a fax number, respond to an automated answering
system, and then send a fax.
To use the speaker:
1 Load the document.
2 Press Speaker.
3 Dial the number using the operator panel keypad.
4 Listen to the answering message when your call is answered.
Note: To adjust the volume of the speaker, press Speaker,
and then press Menu repeatedly until Speaker Volume
appears. Press Options to select the desired volume.
5 Press Start/Y es when you hear the fax tones.
Note: The speaker is not available when faxes are waiting for
automatic redial.
Redial
If a number you dial is busy or there is no answer, your All-In-One
automatically disconnects, pauses, and then redials the number. You can
use the Settings Utility to set the number of redialing attempts and the
interval between attempts. To redial immediately, press Start/Yes on the
operator panel during the interval between attempts. To stop redialing,
press Cancel/No.
Press Pause/Redial to recall the last number dialed. You can modify the
number by pressing Cancel/No to clear digits and use the operator panel
keypad to add new ones.
16
Page 21

Receiving a fax
Your All-In-One has four modes for receiving faxes.The current receive
mode appears in the upper right of the display.
Mode: Function:
Fax Receive faxes automatically without using your telephone
Ans/Fax Connect your All-In-One and an answering machine to
Tel Manually receive faxes by pressing either *9* on your telephone
To change the fax receive mode:
handset. Your All-In-One receives all incoming calls as faxes.
automatically receive both incoming voice messages and faxes.
keypad or by pressing Start/Yes twice on your All-In-One
operator panel.
1 Press Setup, and then press Menu until you see Fax Receive Mode
on the display.
2 Press Options until you see the mode you want to select.
3 Press Start/Y es.
Using Distinctive Ring Pattern Detection (DRPD)
Distinctive ring is a service provided by some telephone companies that
assigns two phone numbers to one phoneline, each of which makes your
phone ring differently. If you subscribe to this service, you can program
your All-In-One to have a distinctive ring pattern and phone number for
incoming faxes:
1 Press Setup, and then press Menu until you see Setup DRPD on
the display.
2 Press Options until you see Learn, and then press Start/Yes.
3 Dial the telephone number that you will use as a fax number.
4 Press Setup.
5 Press Menu until you see Fax Receive Mode on the display.
17
Page 22

6
Press Options until you see DRPD, and then press Start/Yes.
Your All-In-One detects the ring pattern and answers all incoming faxes on
the second ring.
Note: DRPD now appears as a fourth option in the Fax
Receive Mode menu.
Fax forwarding
To forward any faxes you receive to another fax machine:
1 Press Setup.
2 Press Menu until Fax Forwarding a ppears on the display.
3 Press Options until Forward appears.
4 If you want to both print a copy of the fax and forward it, press
Options until Print/Forward appears.
5 Press Start/Y es.
6 Enter the fax number you want your faxes forwarded to.
7 Enter the starting month, day, hour, and minute you want Fax
Forwarding to begin. If you want to begin immediately, press Start/
Yes.
8 Enter the ending month, day, hour, and minute you want Fax
Forwarding to end.
Canceling fax forwarding
1 Press Setup.
2 Press Menu until Fax Forwarding a ppears on the display.
3 Press Options until Off appears on the bottom line of the display.
4 Press Start/Y es.
18
Page 23

Copying
You can make copies both when your All-In-One is connected to a
computer and when it is not connected to a computer.
To copy a document:
1 Load paper in the paper support.
2 Load your document in the document support. For help, see
page 11.
3 Press Copy.
4 Press the keypad buttons to select the number of copies.
Note: You can make up to 100 copies at a time using your
All-In-One. The default is one copy.
5 Press Start/Y es.
Changing the copy settings
Use the operator panel or the software to change the quantity, copy type,
contrast, size, and paper type.
Using the operator panel Using the software
1 Press Copy, and then press Menu
repeatedly to review the copy
settings.
2 Press Options to change the
settings.
1 Make sure you have installed the
All-In-One software. For help, see
page 1.
2 Click Start Programs Lexmark
X125 Lexmark X125 Settings
Utility.
3 Click copy.
4 Adjust the settings, and then click
OK.
19
Page 24

Printing
Use your All-In-One to print basic or custom jobs.
To print a document:
1 Make sure you have installed the All-In-One software. For help, see
page 1.
2 Load paper in the paper support.
3 With your document open, select File Print.
4 To change the All-In-One settings, click Properties or Preferences in
the Print dialog box.
5 From the Print dialog box, click OK or Print (depending on the
program).
Changing the print settings
Use the Lexmark X125 Settings to customize the print settings. To access
the Lexmark X125 Settings from an open docume n t, click File Print
Properties or Preferences.
Use the Paper, Quality/Color, and Layout tabs to adjust the print settings.
20
Page 25

Scanning
Scan documents when your All-In-One is connected to a computer.
To scan a document:
1 Make sure you have installed the All-In-One software. For help, see
page 1.
2 Load paper in the paper support.
3 Load the document in the document support. For help, see
page 11.
4 Press Scan.
5 Press Options to select the destination of your scan.
Select... When you want to...
Folder Scan to a folder on your computer.
E-mail Scan a document directly into your e-mail program.
Custom applications Scan a document to a program where you can alter
the original.
Note: You can define up to six programs as scan-to
destinations.
6 Press Start/Y es.
Note: You can scan a document while your All-In-One is
printing, but not while you are faxing or making copies.
21
Page 26

Changing the scan settings
You can use the operator panel and the software to change the scan type,
contrast, size, and file type:
Using the operator panel Using the software
1 Press Scan, and then press Menu
repeatedly to review the settings.
2 Press Options to change the
settings.
1 Make sure you have installed the
All-In-One software. For help, see
page 1.
2 Click Start Programs Lexmark
X125 Lexmark X125 Settings
Utility.
3 Click scan.
4 Adjust the settings, and then click
OK.
OCR (Optical Character Recognition)
Your All-In-One includes OCR software that converts a scanned document
into a file you can edit with a word processor. Access the OCR software
from your computer, or press Scan on the operator panel.
Here is an example of how to use OCR:
1 From the Settings Utility, select a Scan To application, such as
WordPad.
2 Select.txt as your file type.
3 Load your document into the document support.
4 Press Scan on the operator panel.
Your document is scanned, converted to text by the OCR software, and
loaded into your selected word processing program.
Note: You can use the OCR software to convert typed
documents, but not handwritten ones.
22
Page 27

Troubleshooting
Checking first things first
If your All-In-One has a problem, first make sure:
• The power cord is plugged into your All-In-One and into a properly
grounded electrical outlet.
• Your telephone cord is securely attached to the line jack on your
All-In-One and to the wall jack.
• Your telephone has a dial tone.
• The operator panel and the cartridge access door are both
completely closed.
• Ready appears on the display.
• The sticker and transparent tape covering the bottom of the
cartridges are removed.
Setup troubleshooting
When I inserted the installation software CD, nothing
happened.
1 Close all open programs.
2 Restart your computer.
3 Make sure you click Cancel on any screens similar to the one in
step 3 on page 1.
4 Eject, and then reinsert the installation software CD.
5 From your desktop, double-click My Computer.
6 Double-click your CD-ROM drive icon. If necessary, double-click
setup.exe.
7 Continue with step 4 on page 1.
23
Page 28

The printer or scanner is not working.
1 Check the printer status:
Windows 98/Me/200 0 Windows XP
1 Click Start Settings
2 From the Printers folder,
double-click the Lexmark X125
printer icon.
3 From the Printer menu, make
sure:
• Default Printer is selected.
• Pause Printing is not selected.
Printers.
1 Click Start
Printers and Other Hardware
Printers and Faxes.
2 From the Printers folder,
double-click the Lexmark X125
printer icon.
3 From the Printer menu, make
sure:
• Default Printer is selected.
• Pause Printing is not selected.
Control Pane l
2 Check the printer port:
Windows 98/Me Windows 2000 Windows XP
1 Click Start
Settings Printers.
2 Right-click the
Lexmark X125
printer icon, and then
click Properties.
3 Click the Details tab.
4 From the Ports
drop-down menu,
check the printer
port.
If the USB port is not
listed, uninstall and
then reinstall the
printer software. For
help, see page 25.
5 Click OK.
1 Click Start
Settings Printers.
2 Right-click the
Lexmark X125
printer icon, and then
click Properties.
3 Click the Ports tab.
4 From the list of ports,
select the USB
printer port.
If the USB port is not
listed, uninstall and
then reinstall the
printer software. For
help, see page 25.
5 Click Apply.
6 Click OK.
1 Click Start Control
Panel Printers and
Other Hardware
Printers and Faxes.
2 Click the Ports tab.
3 From the list of ports,
select the USB
printer port.
If the USB port is not
listed, uninstall and
then reinstall the
printer software. For
help, see page 25.
4 Click Apply.
5 Click OK.
24
Page 29

3
Make sure you have not installed multiple copies of the printer
software:
a Open the Printers folder for your operating system.
Windows 98/Me/2000: From the Start menu, click Settings
Printers.
Windows XP: From the Start menu, click Control Panel
Printers and Other Hardware Printers and Faxes.
b In the Printers folder, make sure there is only one
Lexmark X125 printer icon.
If you have installed multiple copies of the printer software,
uninstall each copy. Then, restart the computer and reinstall the
printer software.
Uninstalling and reinstalling the pri nter software
If the printer port is incorrect or you have installed multiple copies of the
printer software, uninstall and then reinstall the printer software:
1 From the Start menu, click Programs or All Programs Lexmark
X125 Uninstall.
2 Follow the instructions on your screen to uninstall the printer
software.
3 Restart your computer.
4 Reinstall the printer software. For help, see page 1.
25
Page 30

Solving fax problems
The numbers stored in the Speed-dial memory do not dial
correctly.
Make sure the numbers are stored in the speed-dial memory correctly. To
print a speed-dial list:
1 Press Setup.
2 Press Menu until you see Print Report.
3 Press Options until you see Speed Dial List.
4 Press Start/Y es to print the list.
The All-In-One cannot receive faxes automatically.
Make sure your fax receive mode is set to either Ans/Fax or Fax. For help,
see page 17.
The All-In-One cannot receive faxes manually.
Make sure you do one of the following:
• Press Start/Y es twice on the All-In-One operator panel.
• Press *9* on your telephone, and then hang up.
Other fax transmission problems
The machine sending you a fax or the machine you are sending a fax to
may be turned off, out of paper, or disabled. Contact the owner of that
machine if you experience the following problems:
• Your All-In-One will not send a fax.
• Incoming faxes are incomplete.
• Incoming faxes have blank spaces.
• Incoming faxes have spots.
• Incoming faxes are of poor quality.
• Incoming faxes have stretched words.
• Your All-In-One dials a number, but cannot make a connection with
another fax machine.
26
Page 31

Solving copy problems
PC Not Available appears on the operator panel display
Most of the time, when PC Not Available appears on your operator panel
display, you are attempting to make multiple copies while your All-In-One is
set to a color copy mode.
If you would like to make multiple black and white copies without a
computer, you can change the color mode to Black Draft, Black Normal, or
Black Photo using the menus on your operator panel display.
If you would like to make multiple color copies, you must attach your
All-In-One to your computer using a USB cable.
• If you have installed the All-In-One software on your computer, click
Start Programs Lexmark X125 Settings Utility. Use the
Lexmark X125 Settings Utility to change the copy settings.
• For All-In-One CD software installation instructions, see page 1.
Contacting Lexmark
Visit our Web site at www.lexmark.com to:
• Register your printer.
• Access publications for your printer.
• Check for upgrades.
• Create and print fun computer projects.
Visit our Web site at http://support.lexmark.com to receive technical
support.
27
Page 32

Appendix
Federal Communications Commission (FCC) compliance information statement
The Lexmark X125 complies
with the limits for a Class B
digital device, pursuant to
Part 15 of the FCC Rules.
Operation is subject to the
following two conditions:
(1) this device may not
cause harmful interference,
and
(2) this device must accept
any interference received,
including interference that
may cause undesired
operation.
Any questions on this
statement should be directed
to:
Director of Lexmark
Tec hnology & Serv ices
Lexmark International, Inc.
740 West New Circle Road
Lexington, KY 40550
(859) 232-3000
Refer to the online
documentation for additional
compliance information.
Copyright advisory
It may be illegal to copy
certain materials without
permission or license,
including documents,
images, and currency. If you
are not sure whether you
have permission, seek legal
advice.
Ringer Equivalence Number
The Ringer Equivalence
Number (REN) assigned to
each terminal device
provides an indication of the
maximum number of
terminals allowed to be
connected to the telephone
interface. The termination on
an interface may consist of
any combination of devices,
subject only to the
requirement that the sum of
the Ringer Equivalence
Numbers of all the devices
does not exceed 6.
The Ringer Equivalence
Number (6) for this device is
0.6B.
Canadian regulations governing the use of modems
The Industry Canada label
identifies certified
equipment. This certification
means that the equipment
meets certain
telecommunications network
protective, operations, and
safety requirements. The
Department does not
guarantee the equipment will
operate to the user's
satisfaction.
Before installing the
equipment, users should
ensure that it is permissible
to be connected to the
facilities of the local
Telecommunications
Company. The equipment
must also be installed using
an acceptable method of
connection. In some cases,
the companies inside wiring
associated with a single line
individual service may be
extended by means of a
certified connector assembly
(telephone extension cord).
The customer should be
aware that compliance with
the above conditions might
not prevent degradation of
service in some situations.
Repairs to certified
equipment should be made
by an authorized Canadian
maintenance facility
designed by the supplier.
Any repairs or alterations
made by the user to this
equipment, or equipment
malfunctions, may give the
telecommunications
company cause to request
the user to disconnect the
equipment.
Users should ensure for their
own protection that the
electrical ground
connections of the power
utility, telephone lines, and
internal metallic water pipe
system, if present are
connected together. This
precaution may be
particularly important in rural
areas.
CAUTION: User should not
attempt to make such
connections themselves, but
should contact the
appropriate electric
inspection authority or an
electrician.
Notice: This equipment
meets the applicable
Industry Canada Terminal
Equipment Technical
Specifications. This is
confirmed by the registration
number. The abbreviation,
IC, before the registration
number signifies that
registration was performed
based on a Declaration of
Conformity indicating that
Industry Canada technical
specifications were met. It
does not imply that Industry
Canada approved the
equipment.
28
Page 33

Statement of Limited Warranty
Lexmark International, Inc.
Lexington, KY
This limited warranty applies
to the United States. For
customers outside the U.S.,
refer to the country-specific
warranty information that
came with your product.
This limited warranty applies
to this product only if it was
originally purchased for your
use, and not for resale, from
Lexmark or a Lexmark
remarketer, referred to in this
statement as “Remarketer.”
Limited warranty
Lexmark warrants that this
product:
• Is manufactured from new
parts, or new and
serviceable used parts,
which perform like new
parts
• Is, during normal use, free
from defects in material
and workmanship
If this product does not
function as warranted during
the warranty period, contact
a Remarketer or Lexmark for
repair or replacement (at
Lexmark's option).
If this product is a feature or
option, this statement
applies only when that
feature or option is used with
the product for which it was
designed. T o obtain warranty
service, you may be required
to present the feature or
option with the product.
If you transfer this product to
another user, warranty
service under the terms of
this statement is available to
that user for the remainder of
the warranty period. You
should transfer proof of
original purchase and this
statement to that user.
Limited warranty service
The warranty period starts
on the date of original
purchase as shown on the
purchase receipt. The
warranty period ends 12
months later.
To obtain warranty service
you may be required to
present proof of original
purchase. You may be
required to deliver your
product to the Remarketer or
Lexmark, or ship it prepaid
and suitably packaged to a
Lexmark designated
location. Y ou are responsible
for loss of, or damage to, a
product in transit to the
Remarketer or the
designated location.
When warranty service
involves the exchange of a
product or part, the item
replaced becomes the
property of the Remarketer
or Lexmark. The
replacement may be a new
or repaired item. The
replacement item assumes
the remaining warranty
period of the original
product.
Replacement is not available
to you if the product you
present for exchange is
defaced, altered, in need of
a repair not included in
warranty service, damaged
beyond repair, or if the
product is not free of all legal
obligations, restrictions,
liens, and encumbrances.
Before you present this
product for warranty service,
remove all print cartridges,
programs, data, and
removable storage media
(unless directed otherwise
by Lexmark).
For further explanation of
your warranty alternatives
and the nearest Lexmark
authorized servicer in your
area, contact Lexmark at
(407) 563-4600, or on the
World Wide Web at
www.lexmark.com.
Remote technical support is
provided for this product
throughout its warranty
period. For products no
longer covered by a Lexmark
warranty, techn ical support
may not be available or only
be available for a fee.
Extent of limited warr a nty
We do not warrant
uninterrupted or error-free
operation of any product.
Warranty service does not
include repair of failures
caused by:
• Modification or
attachments
• Accidents or misuse
• Unsuitable physical or
operating environment
• Maintenance by anyone
other than Lexmark or a
Lexmark authorized
servicer
• Operation of a product
beyond the limit of its duty
cycle
• Use of printing media
outside of Lexmark
specifications
• Supplies (such as ink) not
furnished by Lexmark
• Products, components,
parts, materials, softw are,
or interfaces not
furnished by Lexmark
29
Page 34

TO THE EXTENT
PERMITTED BY
APPLICABLE LAW,
NEITHER LEXMARK NOR
ITS THIRD PARTY
SUPPLIERS OR
REMARKETERS MAKE
ANY OTHER WARRANTY
OR CONDITION OF ANY
KIND, WHETHER
EXPRESS OR IMPLIED,
WITH RESPECT TO THIS
PRODUCT, AND
SPECIFICALLY DISCLAIM
THE IMPLIED
WARRANTIES OR
CONDITIONS OF
MERCHANTABILITY,
FITNESS FOR A
PARTICULAR PURPOSE,
AND SATISFACTORY
QUALITY. ANY
WARRANTIES THAT MAY
NOT BE DISCLAIMED
UNDER APPLICABLE LAW
ARE LIMITED IN
DURATION TO THE
WARRANTY PERIOD. NO
WARRANTIES, EXPRESS
OR IMPLIED, WILL APPLY
AFTER THIS PERIOD. ALL
INFORMATION,
SPECIFICATIONS,
PRICES, AND SERVICES
ARE SUBJECT TO
CHANGE AT ANY TIME
WITHOUT NOTICE.
Limitation of liability
Your sole remedy under this
limited warranty is set forth
in this document. For any
claim concerning
performance or
nonperformance of Lexmark
or a Remarketer for this
product under this limited
warranty, you may recover
actual damages up to the
limit set forth in the following
paragraph.
Lexmark's liability for actual
damages from any cause
whatsoever will be limited to
the amount you paid for the
product that caused the
damages. This limitation of
liability will not apply to
claims by you for bodily
injury or damage to real
property or tangible personal
property for which Lexmark
is legally liable. IN NO
EVENT WILL LEXMARK BE
LIABLE FOR ANY LOST
PROFITS, LOST SAVINGS,
INCIDENTAL DAMAGE, OR
OTHER ECONOMIC OR
CONSEQUENTIAL
DAMAGES. This is true e ven
if you advise Lexmark or a
Remarketer of the possibility
of such damages. Lexmark
is not liable for any claim by
you based on a third party
claim.
This limitation of remedies
also applies to claims
against any Suppliers and
Remarketers of Lexmark.
Lexmark's and its Suppliers'
and Remarketers' limitations
of remedies are not
cumulative. Such Suppliers
and Remarketers are
intended beneficiaries of this
limitation.
Additional rights
Some states do not allow
limitations on how long an
implied warranty lasts, or do
not allow the exclusion or
limitation of incidental or
consequential damages, so
the limitations or exclusions
contained above may not
apply to you.
This limited warranty gives
you specific legal rights. You
may also have other rights
that vary from state to state.
30
Page 35

Lexmark and Lexmark with diamond design are trademarks of Lexmark International, Inc.,
registered in the United States and/or other countries.
© 2002 Lexmark International, Inc.
740 West New Circle Road
Lexington, Kentucky 40550
www.lexmark.com
 Loading...