

Page 1

Optra T
High-Capacity Output Stacker
Installation Instructions
Optra T
Instruções de instalação do
empilhador de saída de alta capacidade
Optra T
Instructions pour l'installation
du réceptacle haute capacité
Optra T
Installationsanweisungen für das
Ablagefach mit hoher Kapazität
Optra T
Istruzioni per l'installazione del
raccoglitore ad alta capacità
Instrucciones de instalación de la
unidad de salida de alta
capacidad Optra T
Page 2

English
Optra T High-Capacity Output Stacker
Installation Instructions
Page 3

First Edition (June 1999)
The following paragraph does not apply to any country where such provisions are
inconsistent with local law: LEXMARK INTERNATIONAL, INC., PROVIDES THIS PUBLICATION
“AS IS” WITHOUT WARRANTY OF ANY KIND, EITHER EXPRESS OR IMPLIED, INCLUDING,
BUT NOT LIMITED TO, THE IMPLIED WARRANTIES OF MERCHANTABILITY OR FITNESS FOR
A PARTICULAR PURPOSE. Some states do not allow disclaimer of express or implied warranties in
certain transactions; therefore, this statement may not apply to you.
This publication could include technical inaccuracies or typographical errors. Changes are
periodically made to the information herein; these changes will be incorporated in later editions.
Improvements or changes in the products or the programs described may be made at any time.
References in this publication to products, programs, or services do not imply that the manufacturer
intends to make these available in all countries in which it operates. Any reference to a product,
program, or service is not intended to state or imply that only that product, program, or service may
be used. Any functionally equivalent product, program, or service that does not infringe any existing
intellectual property right may be used instead. Evaluation and verification of operation in
conjunction with other products, programs, or services, except those expressly designated by the
manufacturer, are the user’s responsibility.
Lexmark, Lexmark with diamond design and Optra are trademarks of Lexmark Internation, Inc.,
registered in the United States and/or other countries.
© Copyright 1999 Lexmark International, Inc.
All rights reserved.
UNITED STATES GOVERNMENT RESTRICTED RIGHTS
This software and documentation are provided with RESTRICTED RIGHTS. Use, duplication or
disclosure by the Government is subject to restrictions as set forth in subparagraph (c)(1)(ii) of the
Rights in Technical Data and Computer Software clause at DFARS 252.227-7013 and in applicable
FAR provisions: Lexmark International, Inc., Lexington, KY 40550.
Page 4

Introduction
The Lexmark Optra™ T High-Capacity Output Stacker gives your printer
additional output capacity by allowing you to print and stack up to
approximately 1,500 sheets of 20 lb paper.
To ensure reliable paper feeding, it is important that you select paper
recommended for use with the printer and that you load it properly.
Refer to the Reference section of your printer
pertaining to safety and warranty.
User’s Guide
for information
High-Capacity Output Stacker Installation Instructions
5
Page 5
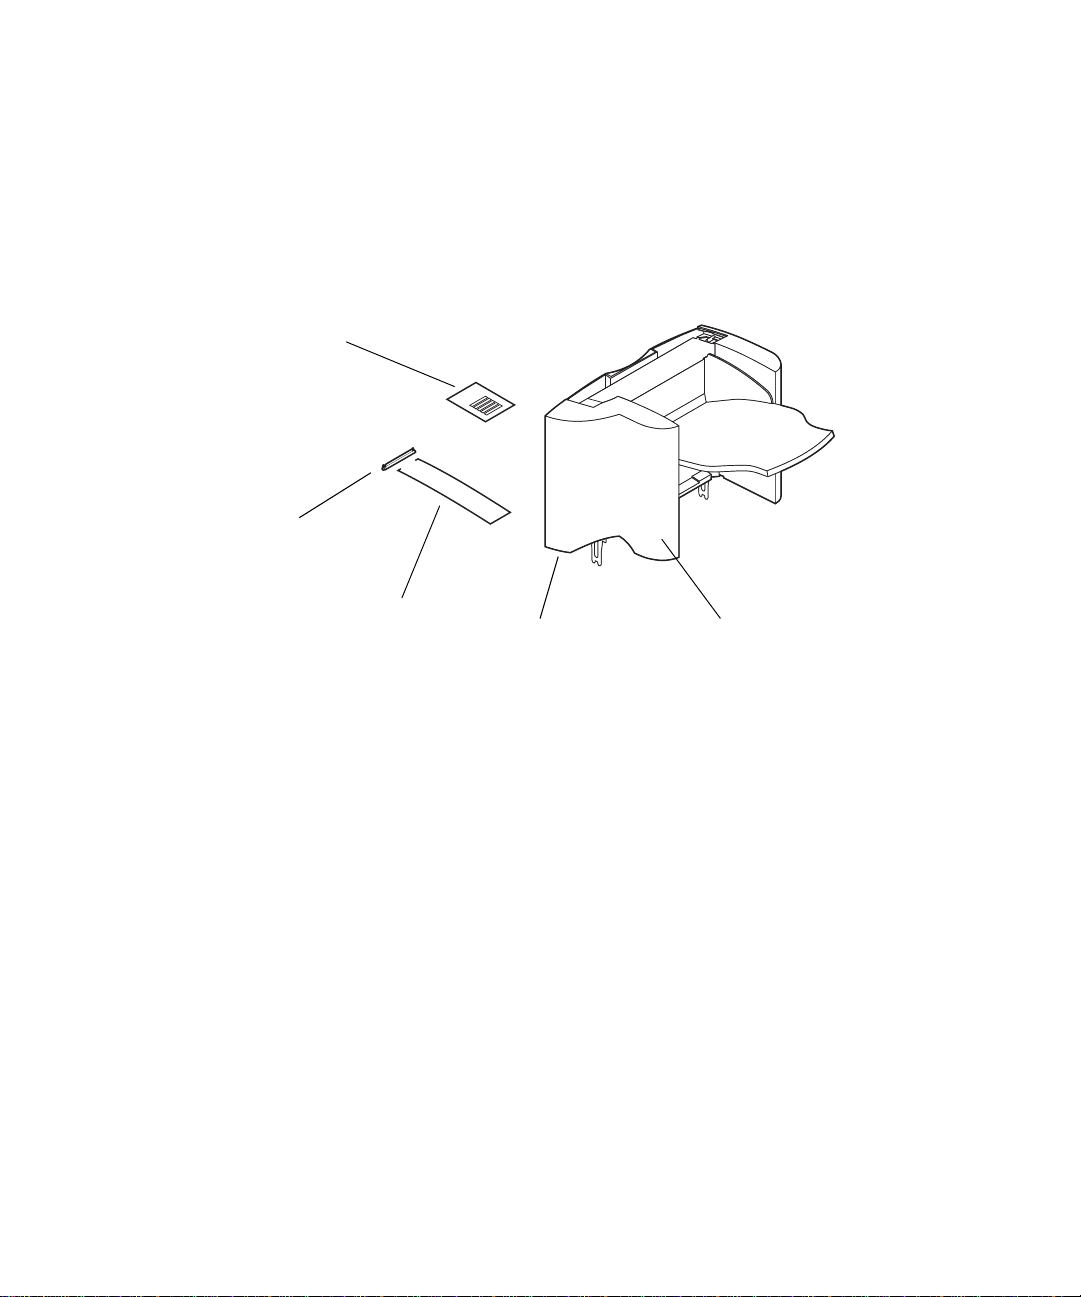
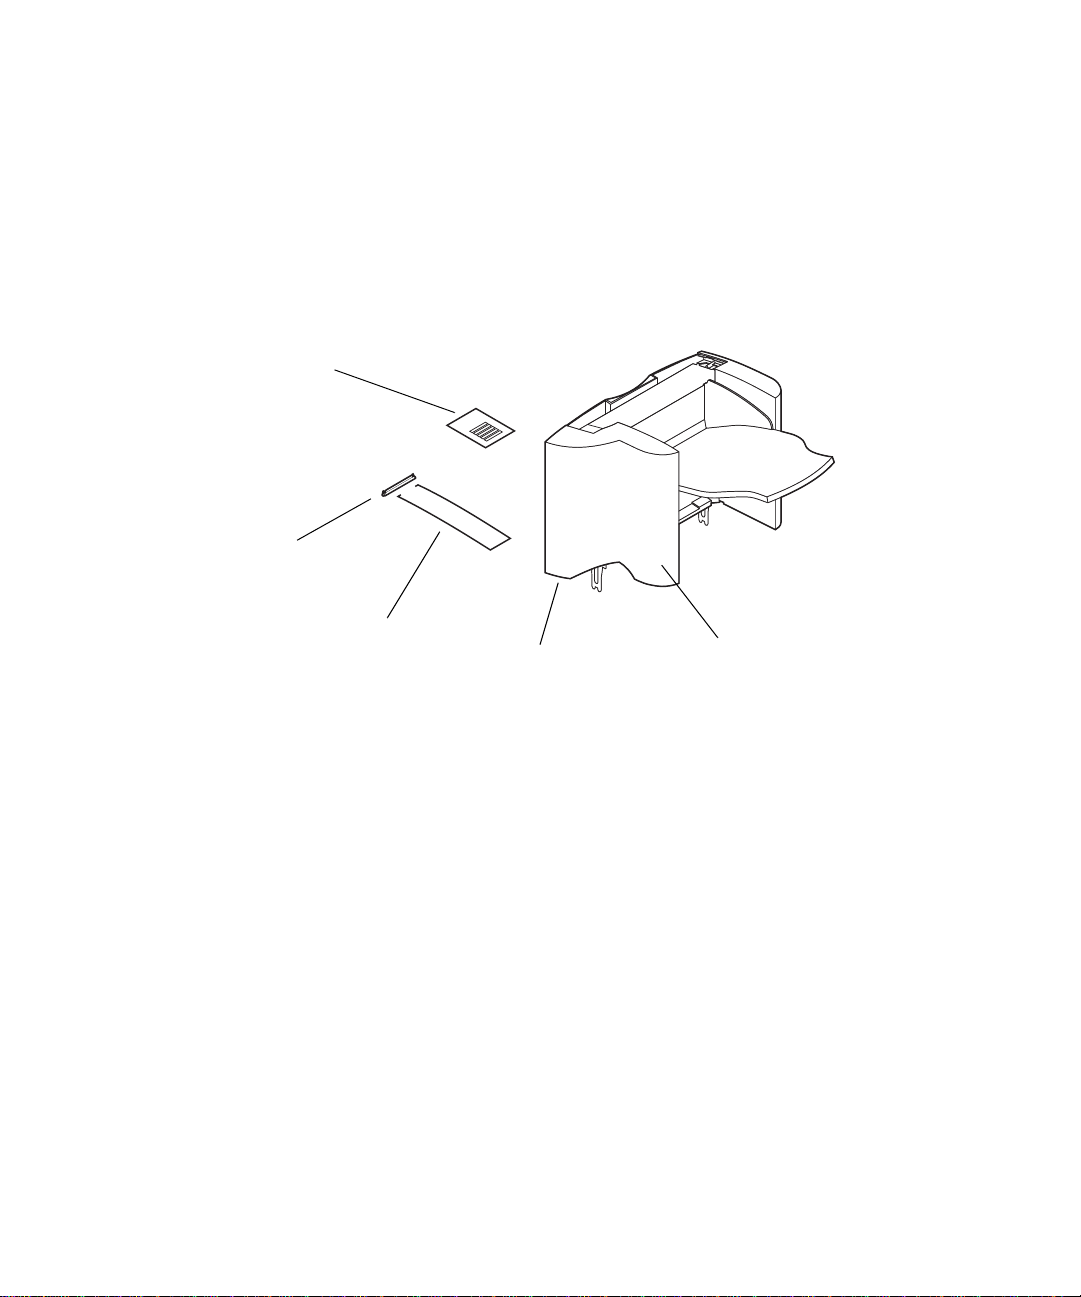
Unpacking the high-capacity output
stacker
Remove all items from the bo x as sho wn. If an y items are missing, contact
1
the place where you bought the high-capacity output stacker.
Labels
Bracket
Paper
bail
Optra T label
(colored triangle)
bottom side
High-capacity
output stacker
Remove all packing material and tape from each item.
2
Note: Save the carton and packing material in case you need to repack
the option for service or storage.
Install the high-capacity output stacker immediately; otherwise, the edges
3
of the mounting brackets could damage tabletops or fabrics.
High-Capacity Output Stacker Installation Instructions
6
Page 6

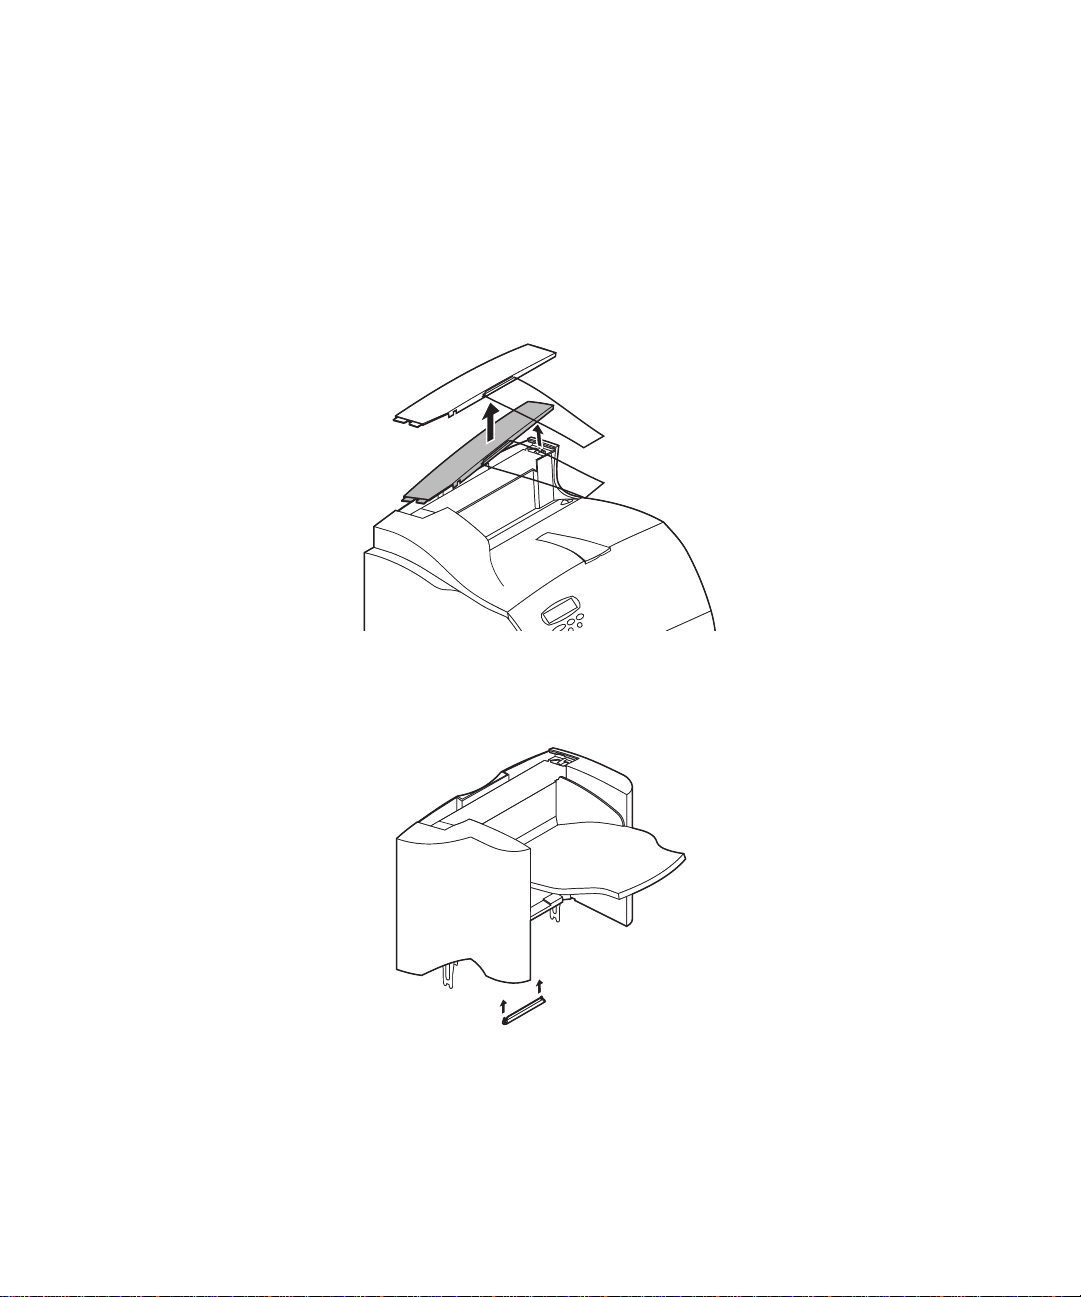
Installing the high-capacity output
stacker
Turn the printer power off and unplug the power cord.
1
Remove any previously installed output options or the top cover from the
2
printer.
Slide the plastic bracket onto the static brush holder located near the
3
bottom of the high-capacity output stacker.
High-Capacity Output Stacker Installation Instructions
7
Page 7
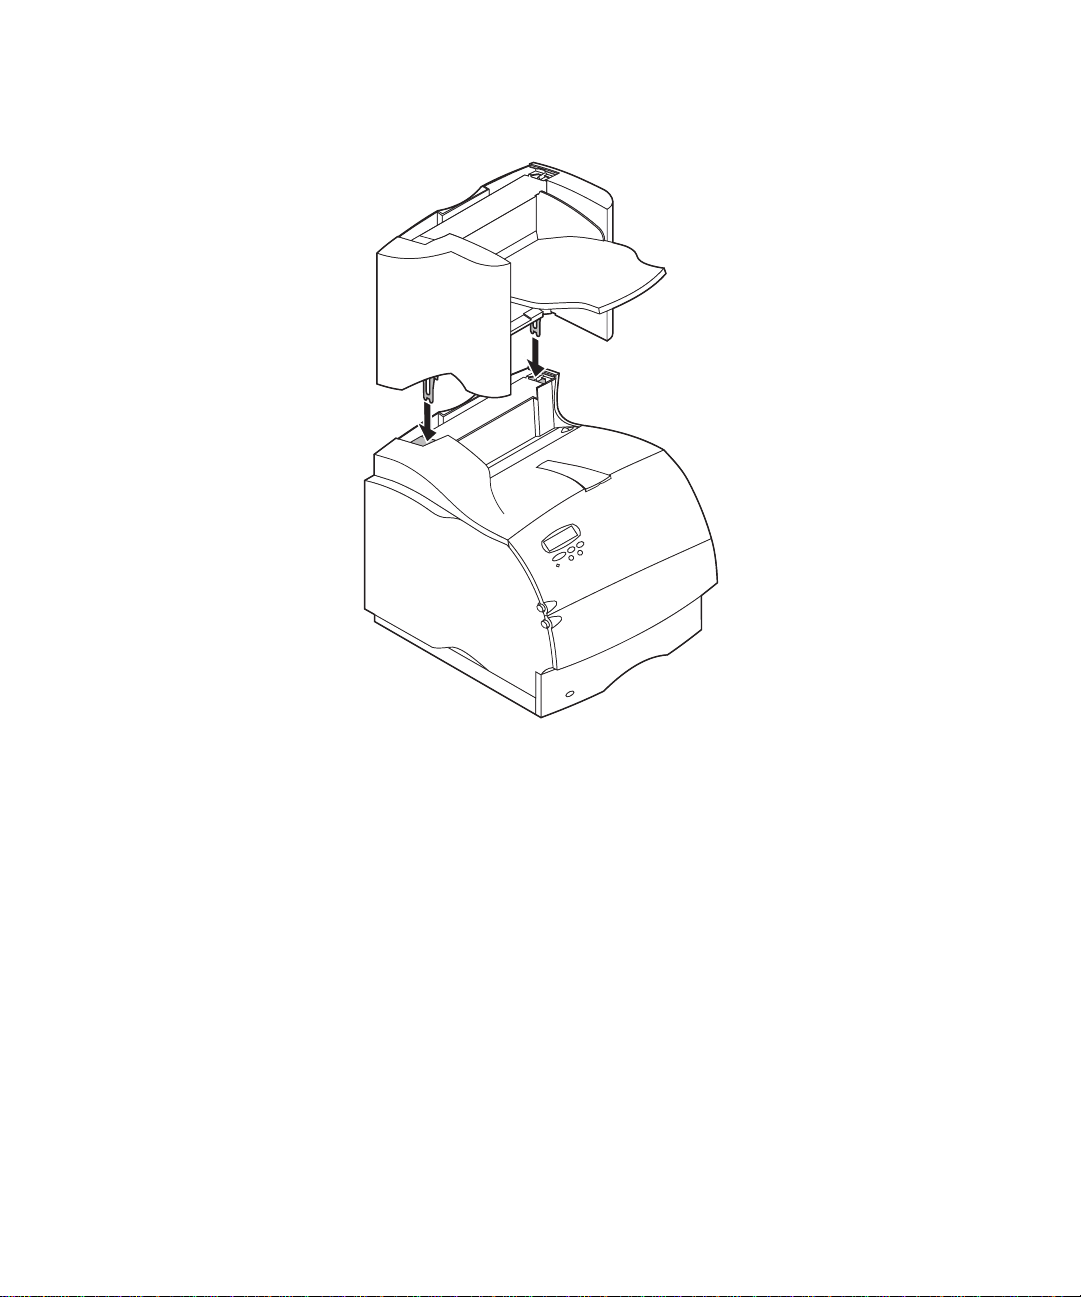
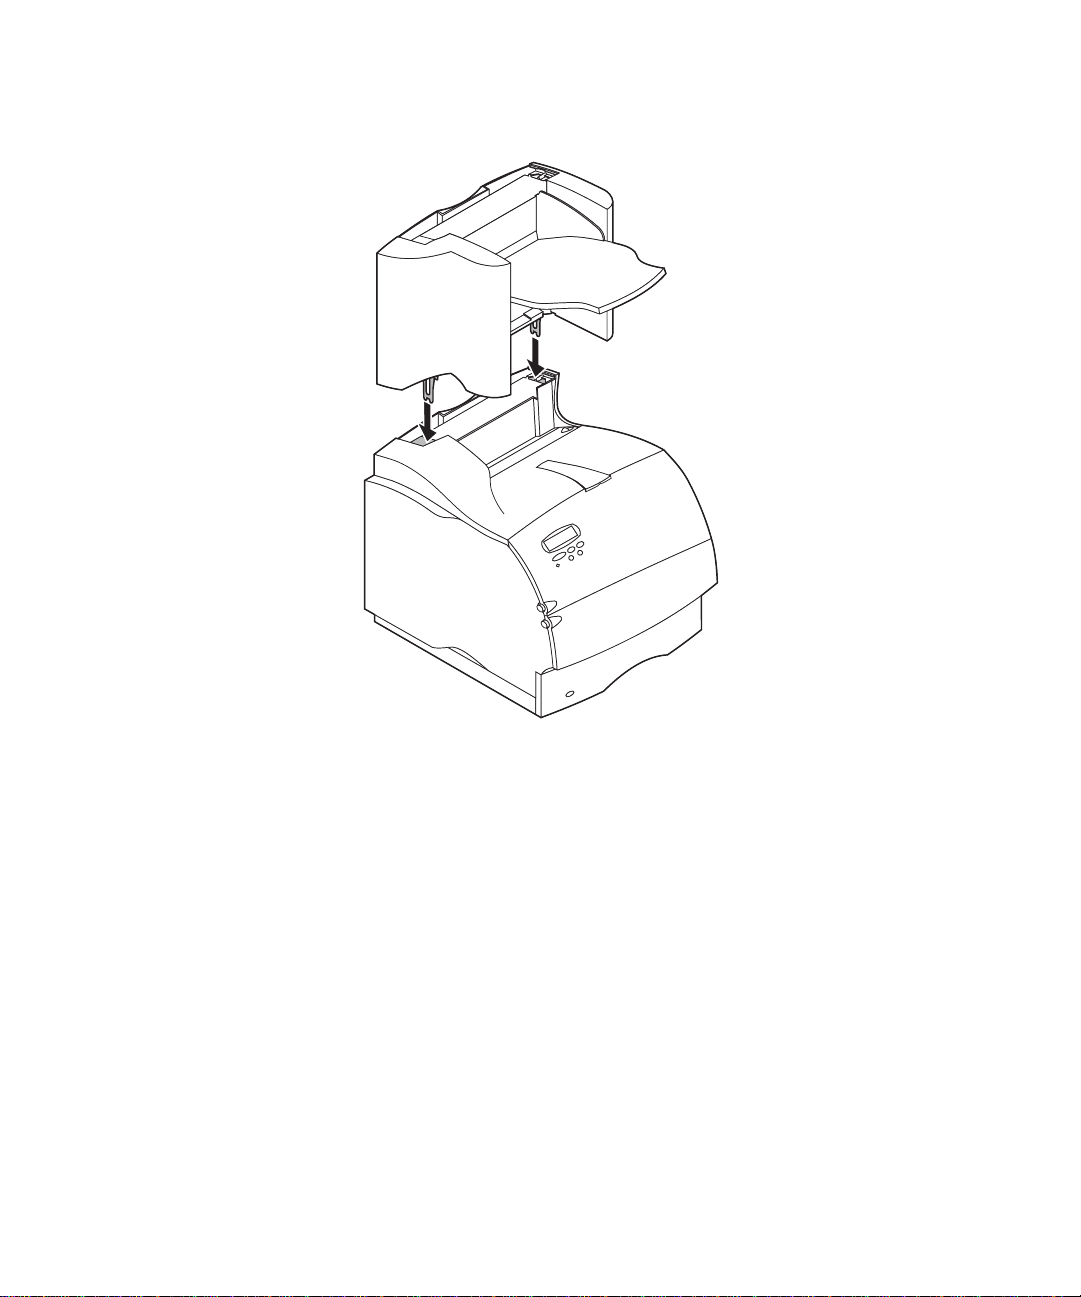
Install the high-capacity output stacker on the printer.
4
Note: The high-capacity output stacker
printer, below any other output options.
Reinstall any output options previously removed.
5
Attach the top cover to the topmost output option.
6
High-Capacity Output Stacker Installation Instructions
8
must
be installed directly onto the
Page 8
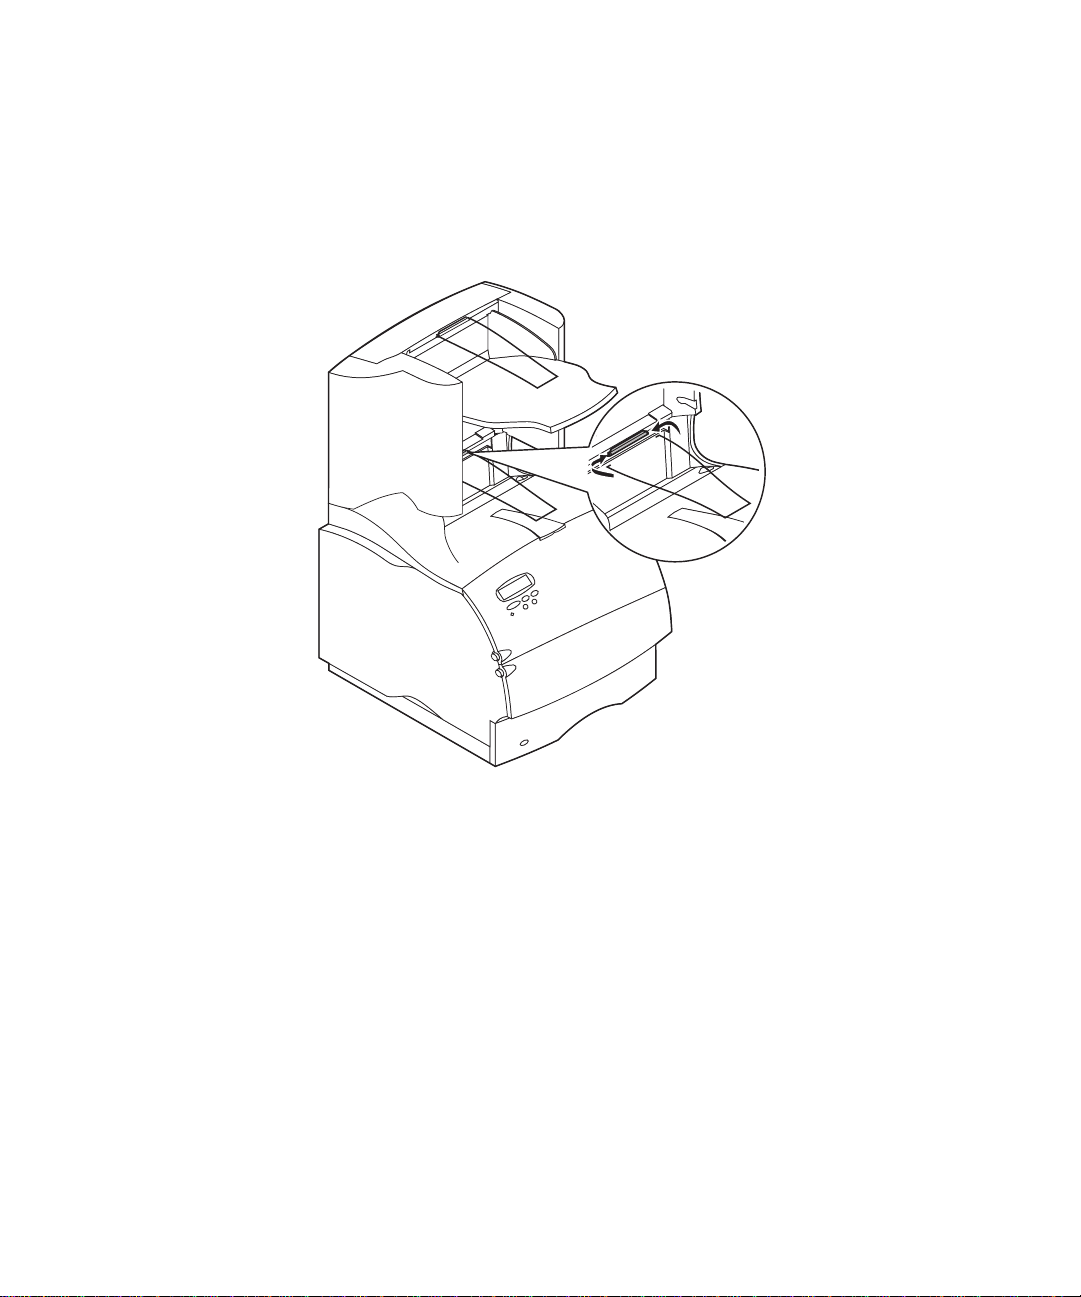
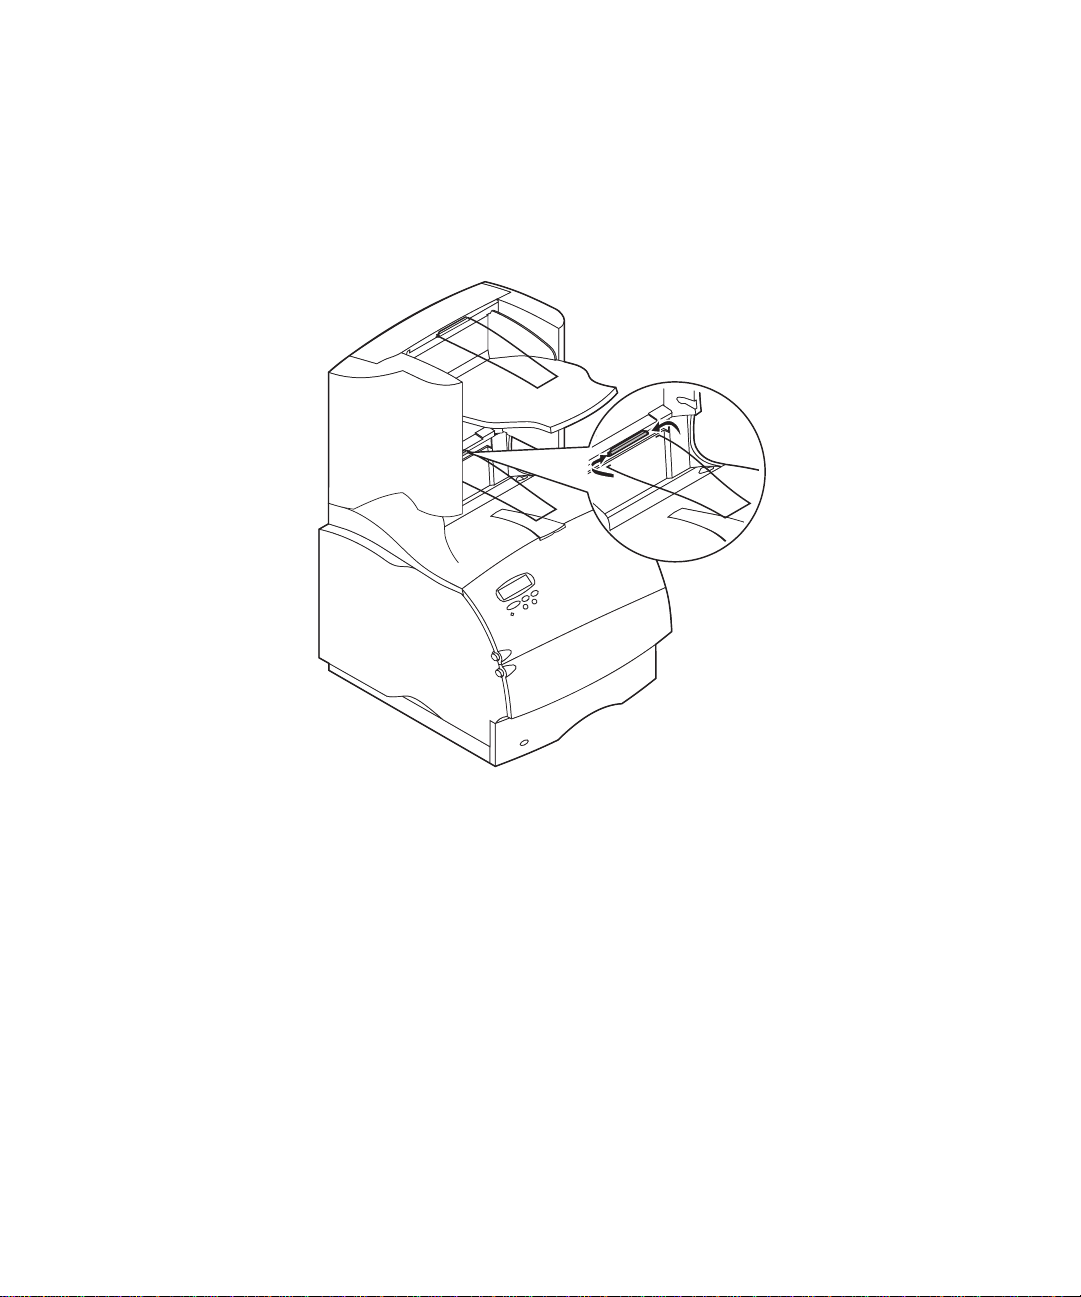
Installing the wire paper bail
Place the tips of the wire paper bail into the ends of the plastic bracket so that
the bail curves downward. The bail should rest in the approximate center of
the printer output bin.
High-Capacity Output Stacker Installation Instructions
9
Page 9

Attaching labels to the high-capacity
output stacker
Labels are provided so that you may identify your various output bins. You
may attach the labels to the output bin tray, side cover, or wherever best suits
your application. For easy identification, you may write your own personal
output bin designation onto the label before attaching.
Side cover
Output bin tray
10
High-Capacity Output Stacker Installation Instructions
Page 10

Verifying installation
Once the high-capacity output stacker has been installed, verify that it is
installed properly by printing a menu settings page. To print a menu settings
page:
Make sure the printer power is on and the
1
on the display.
On the operator panel, press
2
Continue to press and release
3
MENU
Press
4
MENU
Press
5
Press
6
page prints, and then the printer returns to the
Note: If you receive a message, such as:
Verify that the high-capacity output stacker you installed is listed on the
7
menu settings page under “Installed Features.” If it does not appear on the
page, turn the printer off, unplug the power cord, and reinstall the option.
appear on the display.
Select
.
Menu>
Select
to show the list of av ailable menu items for the
Print Menus
until
. The message
201 Paper Jam
Remove Cartridge
refer to the
information.
User’s Guide
Menu> or <Menu
Menu> or <Menu
appears on the second line of the display.
Printing Menu Settings
on the Publications CD for more
Ready
status message appears
to enter the menus.
until you see
appears until the
Ready
UTILITIES
UTILITIES
state.
High-Capacity Output Stacker Installation Instructions
11
Page 11

Troubleshooting
Problem Action
Service Messages A service message indicates printer failure that may require
service.
Turn the printer off, wait about 10 seconds, and then turn the
printer on.
If the error recurs, write down the error number, the problem,
and a detailed description. Call service.
12
High-Capacity Output Stacker Installation Instructions
Page 12
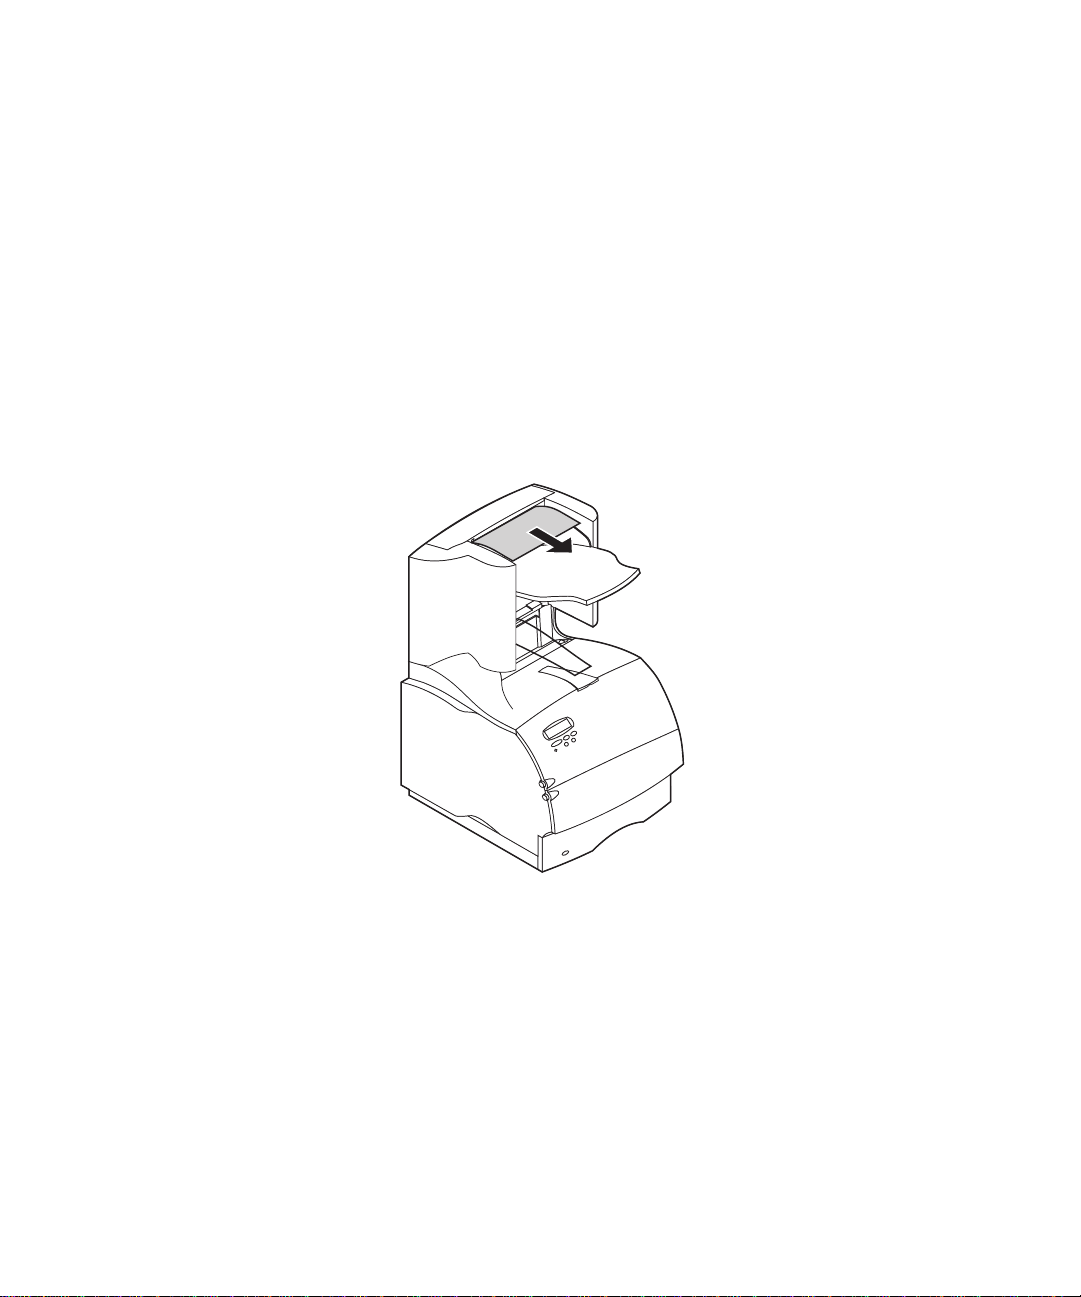
Clearing a paper jam
Paper jams in the high-capacity output stacker may be at the exit of the
stacker. To avoid tearing print materials, pull the jammed print material out
gently and slowly.
At the exit of the stacker
Paper jams as it exits to the stacker and a portion of the paper is visible.
Pull the paper straight out. If the paper does not give immediately when
1
you pull, stop pulling. Continue with the ne xt step.
High-Capacity Output Stacker Installation Instructions
13
Page 13
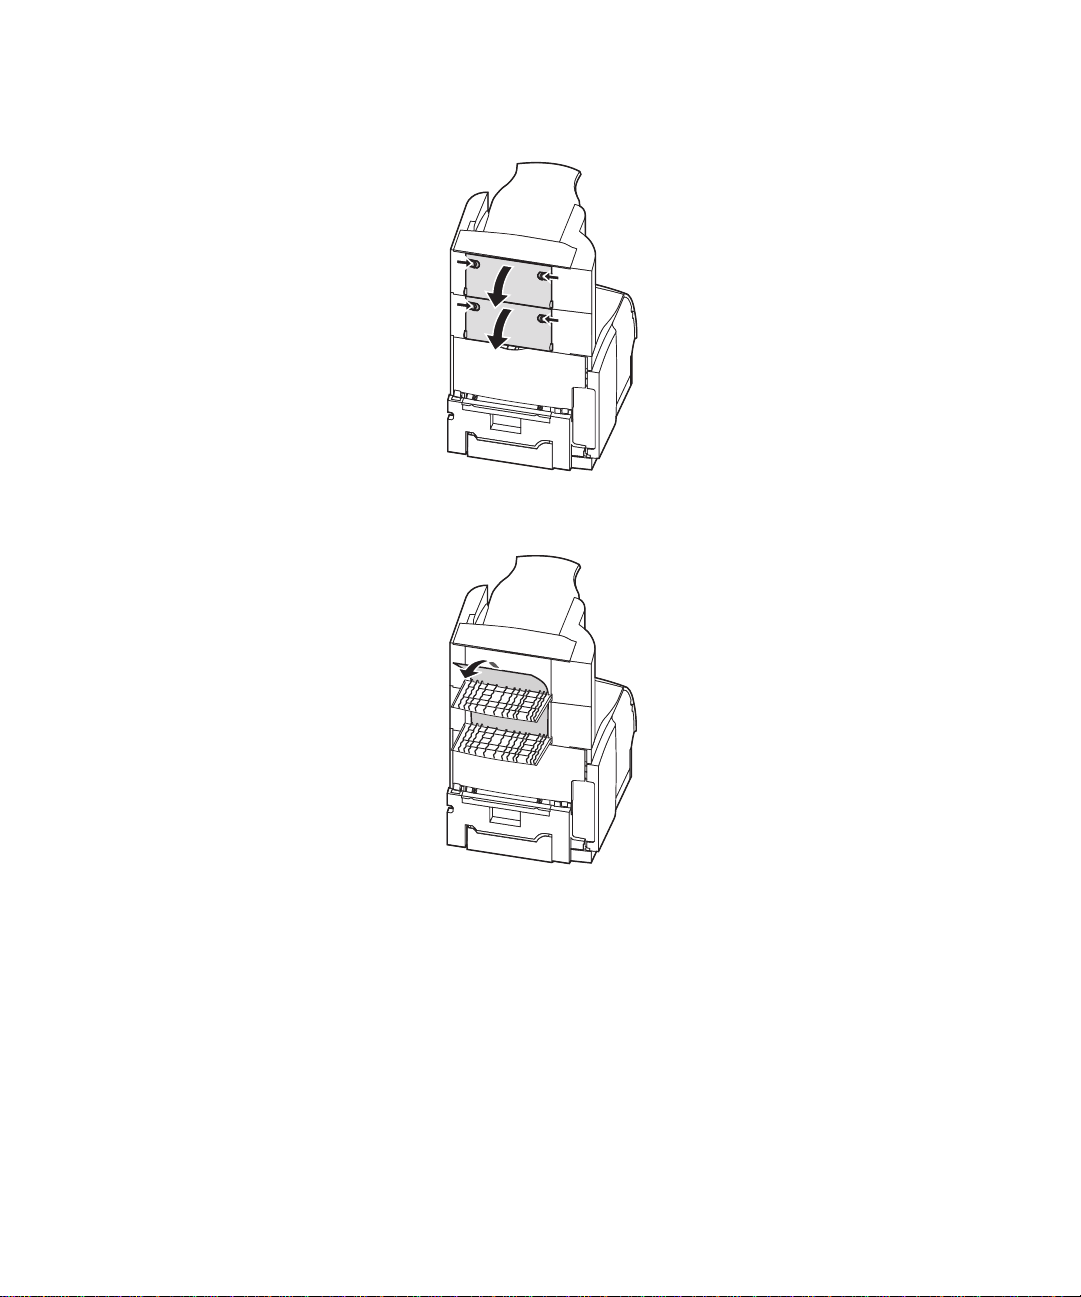
Open the stacker rear doors.
2
Loosen the paper if it is caught in the feeder rollers. Pull the paper straight
3
out.
14
Close the stacker rear doors.
4
Refer to your printer
jams.
High-Capacity Output Stacker Installation Instructions
User’s Guide
if you need additional help in clearing paper
Page 14

Português
Optra T Instrções de instalação do empilhador
de saída de alta capacidade
Page 15

Primeira edição (junho de 1999)
O parágrafo seguinte não se aplica a países nos quais tais disposições sejam contrárias às
leis locais: A LEXMARK INTERNATIONAL, INC. FORNECE ESTA PUBLICAÇÃO EM SUA
FORMA PRESENTE, SEM GARANTIAS DE QUALQUER TIPO, SEJAM EXPRESSAS OU
IMPLÍCITAS, INCLUINDO (SEM LIMITAR-SE A) AS GARANTIAS IMPLÍCITAS DE
COMERCIALIZAÇÃO OU ADEQUAÇÃO A UM DETERMINADO PROPÓSITO. Alguns estados não
permitem a anulação de garantias expressas ou implícitas em determinadas transações; portanto,
essa declaração pode não se aplicar a você.
Esta publicação pode conter imprecisões técnicas ou erros tipográficos. Periodicamente, são feitas
alterações nas informações aqui contidas; essas alterações serão incorporadas em edições
posteriores. Aperfeiçoamentos ou alterações nos produtos ou programas descritos podem ser feitos
a qualquer momento.
Comentários sobre esta publicação podem ser endereçados à Lexmark International, Inc.,
Department F95/035-3, 740 New Circle Road N.W., Lexington, Kentucky 40550, U.S.A. No Reino
Unido e na Irlanda, envie para Lexmark International Ltd., Marketing and Services Department,
Westhorpe House, Westhorpe, Marlow Bucks SL7 3RQ. A Lexmark se reserva o direito de usar ou
distribuir, integral ou parcialmente, de qualquer forma que julgue apropriada, as informações
fornecidas por você sem incorrer com isso em quaisquer obrigações. Você pode adquirir cópias
adicionais das publicações relacionadas a este produto ligando para 1-800-553-9727. No Reino
Unido e na Irlanda, ligue para 0628-481500. Em outros países, entre em contato com o local de
aquisição.
Lexmark, Lexmark com design de diamante, MarkNet e MarkVision são marcas comerciais da
Lexmark International, Inc., registradas nos Estados Unidos e/ou em outros países. PostScript é
uma marca comercial ou registrada da Adobe Systems Incorporated. Outras marcas comerciais
pertencem a seus respectivos proprietários.
© Copyright 1999 Lexmark International, Inc.
Todos os direitos reservados.
Page 16

Introdução
O empilhador de saída de alta capacidade da Lexmark Optra™ T oferece à
sua impressora capacidade de saída adicional, permitindo imprimir e empilhar
cerca de 1.500 folhas de papel de 20 lb. (80 gsm).
Para garantir alimentação de papel confiável, é importante que você
selecione o papel recomendado para a sua impressora e carregue-o
corretamente.
Consulte a seção Referência do
obter informações relacionadas à segurança e garantia.
Guia do Usuário
da sua impressora para
Instruções de instalação do empilhador de saída de alta capacidade
1
Page 17
Desembalar o empilhador de saída de
alta capacidade
Remova todos os itens da caixa como mostrado. Se alguns itens
1
estiverem ausentes, entre em contato com o local em que adquiriu o
empilhador de saída de alta capacidade.
Etiquetas
Suporte
Prendedor
de papel
Etiqueta Optra T
(triângulo colorido)
lado inferior
Empilhador de
saída de alta
capacidade
Remova todo o material e fita de embalagem de cada item.
2
Nota: Guarde a caixa e o material de embalagem no caso de precisar
reembalar o produto para ser armazenado ou levado ao serviço de
assistência.
Instale o empilhador de saída de alta capacidade imediatamente. Caso
3
contrário, as bordas dos suportes de montagem poderão danificar tampos
de mesa ou tecidos.
Instruções de instalação do empilhador de saída de alta capacidade
2
Page 18
Instalar o empilhador de saída de alta
capacidade
Desative a impressora e desconecte o cabo de alimentação.
1
Remova qualquer opção de saída anteriormente instalada ou a tampa
2
superior da impressora.
Empurre o suporte plástico para dentro do suporte de escova estática
3
localizado próximo à parte inferior do empilhador de saída de alta
capacidade.
Instruções de instalação do empilhador de saída de alta capacidade
3
Page 19
Instale o empilhador de saída de alta capacidade na impressora.
4
Nota: O empilhador de saída de alta capacidade
diretamente na impressora, abaixo de qualquer outra opção de
saída.
Reinstale todas as opções de saída removidas anteriormente.
5
Anexe a tampa superior sobre a opção de saída mais alta.
6
Instruções de instalação do empilhador de saída de alta capacidade
4
deve
ser instalado
Page 20
Instalar o Prendedor de papel
Encaixe as pontas do prendedor de papel nas extremidades do suporte
plástico para que o prendedor fique inclinado para baixo. O prendedor deve
permanecer no centro da bandeja de saída da impressora.
Instruções de instalação do empilhador de saída de alta capacidade
5
Page 21

Anexar etiquetas ao empilhador de
saída de alta capacidade
As etiquetas são fornecidas para que você possa identificar as diversas
bandejas de saída. Você pode anexar as etiquetas à bandeja de saída, à
tampa lateral ou ao local que melhor se adequar à sua aplicação. Para
facilitar a identificação, escreva na etiqueta a sua própria designação da
bandeja de saída antes de anexá-la.
Tampa lateral
Bandeja de saída
Instruções de instalação do empilhador de saída de alta capacidade
6
Page 22

Verificar a instalação
Depois do empilhador de saída de alta capacidade ter sido instalado, verifique
se a instalação está correta, imprimindo uma página de configurações de
menu. Para imprimir uma página de configurações de menu:
V erifique se a impressora está ativ ada e se a mensagem de status
1
aparece na tela.
No painel do operador, pressione
2
menus.
Continue a pressionar e soltar a opção
3
MENU UTILITÁRIOS
Pressione
4
MENU UTILITÁRIOS
o
Pressione
5
Pressione
6
menu
retorna ao status
Nota: Se você receber uma mensagem como:
Verifique se o empilhador de saída de alta capacidade instalado está
7
listado na página de configurações de menu em “Recursos instalados”. Se
ele não aparecer na página, desative a impressor a, desconecte o cabo de
alimentação e reinstale a opção.
Selecionar
Menu>
Selecionar
aparece até a página ser impressa e, em seguida, a impressora
201 Atolamento de papel
Remover cartucho
consulte o
informações.
na tela.
para exibir a lista de itens de menu disponív eis para
.
Imprimir menus
até
. A mensagem
Pronta
Guia do Usuário
.
Menu> ou <Menu
Menu> ou <Menu
aparecer na segunda linha da tela.
Imprimindo configurações de
no CD de Publicações para obter mais
para acessar os
até aparecer
Pronta
Instruções de instalação do empilhador de saída de alta capacidade
7
Page 23

Solução de problemas
Problema Ação
Mensagens de
manutenção
Uma mensagem de manutenção indica uma falha da
impressora que pode exigir atendimento.
Desative a impressora, aguarde cerca de 10 segundos e, em
seguida, reative-a.
Se o erro persistir, escreva o número do erro, o problema e uma
descrição detalhada. Entre em contato com o serviço de
manutenção.
Instruções de instalação do empilhador de saída de alta capacidade
8
Page 24

Solucionar um atolamento de papel
Os atolamentos de papel no empilhador de saída de alta capacidade podem
estar na saída do empilhador. Para evitar que materiais de impressão
atolados sejam rasgados, puxe-os devagar e com cuidado.
Na saída do empilhador
O papel atola quando sai do empilhador e parte dele fica visível.
Puxe o papel para fora. Se o papel não sair imediatamente, não insista.
1
Continue na próxima etapa.
Instruções de instalação do empilhador de saída de alta capacidade
9
Page 25

Abra as portas traseiras do empilhador.
2
Solte o papel se ele estiver preso nos rolos do alimentador. Puxe o papel
3
para fora.
10
Feche as portas traseiras do empilhador.
4
Consulte o
adicional para eliminar atolamentos de papel.
Instruções de instalação do empilhador de saída de alta capacidade
Guia do Usuário
da sua impressora se precisar obter ajuda
Page 26

Français
Optra T Instructions pour l'installation
du réceptacle haute capacité
Page 27

Première édition (juin 1999)
Le paragraphe suivant ne s’applique pas aux pays pour lesquels de telles clauses ne sont
pas conformes à la législation en vigueur : LEXMARK INTERNATIONAL, INC., FOURNIT
CETTE PUBLICATION «TELLE QUELLE» SANS GARANTIE D’AUCUNE SORTE, EXPLICITE OU
IMPLICITE, Y COMPRIS, MAIS SANS SE LIMITER AUX GARANTIES IMPLICITES DE
COMMERCIALISATION OU DE CONFORMITE A UN USAGE SPECIFIQUE. Certains états
n’admettent pas la renonciation aux garanties explicites ou implicites pour certaines transactions ;
c’est pourquoi il se peut que cette déclaration ne vous concerne pas.
Cette publication peut contenir des imprécisions techniques ou des erreurs typographiques. Des
modifications sont périodiquement apportées aux informations contenues ici ; ces modifications
seront intégrées dans les éditions ultérieures de la publication. Des améliorations ou modifications
des produits ou des programmes décrits dans cette publication peuvent intervenir à tout moment.
Les commentaires relatifs à cette publication peuvent être adressés à Lexmark International, Inc.,
Department F95/035-3, 740 New Circle Road N.W., Lexington, Kentucky 40550, Etats-Unis. Au
Royaume-Uni et en République d’Irlande, adressez vos commentaires à Le xmark International Ltd.,
Marketing and Services Department, Westhorpe House, Westhorpe, Marlow Bucks SL7 3RQ.
Lexmark peut utiliser ou distribuer les informations que vous fournissez, de la manière qu’il estime
être appropriée, sans que cela constitue une obligation vis-à-vis de vous. Vous pouvez vous
procurer des exemplaires supplémentaires des publications relatives à ce produit en appelant le 1800-553-9727. Au Royaume-Uni et en République d’Irlande, appelez le 0628-481500. Dans les
autres pays, contactez votre revendeur.
Lexmark et Lexmark avec le symbole du diamant, MarkNet et MarkVision sont des marques de
Lexmark International, Inc., déposées aux Etats-Unis et/ou dans d’autres pays. PostScript est une
marque ou une marque déposée d’Adobe Systems Incorporated. Les autres marques appartiennent
à leurs propriétaires respectifs.
© Copyright 1999 Lexmark International, Inc.
Tous droits réservés.
Page 28

Introduction
Le réceptacle haute capacité Lexmark Optra™ T vous offre la possibilité
d'imprimer et d'empiler jusqu'à 1500 feuilles de papier 75 g.
Afin d'éviter tout problème d'alimentation des feuilles, il est important de
sélectionner un papier adéquat et de veiller à le charger correctement.
Vous trouverez dans la section Références du
l'imprimante toutes les informations relatives à la sécurité et à la garantie.
Manuel d'utilisation
de
Instructions pour l'installation du réceptacle haute capacité
1
Page 29

Déballage du réceptacle haute
capacité
Sortez tous les éléments du carton comme indiqué. S'il manque un
1
élément, contactez votre point de vente.
Etiquettes
Crochet
Levier de
commande
d'avance
papier
Etiquette Optra T
(triangle de couleur)
en dessous
Réceptacle haute
capacité
Retirez tous les emballages et le ruban adhésif des différents éléments.
2
Remarque : Conservez le carton et le matériel d'emballage afin de pouvoir
remballer cette option si nécessaire.
Installez le réceptacle haute capacité immédiatement ; sinon, les bords
3
des supports de fixation pourraient endommager la table ou les tissus de
revêtement.
Instructions pour l'installation du réceptacle haute capacité
2
Page 30

Installation du réceptacle haute
capacité
Mettez l'imprimante hors tension et débranchez le cordon d'alimentation.
1
Retirez les options de sortie déjà installées ou le carter supérieur de
2
l'imprimante.
Faites glisser le crochet en plastique sur le support de brosse statique
3
situé dans la partie inférieure du réceptacle haute capacité.
Instructions pour l'installation du réceptacle haute capacité
3
Page 31

Installez le réceptacle haute capacité sur l'imprimante.
4
Remarque : Le réceptacle haute capacité
l'imprimante, sous les autres options de sortie.
Réinstallez les options que vous aviez retirées.
5
Fixez le carter supérieur sur la dernière option installée.
6
Instructions pour l'installation du réceptacle haute capacité
4
doit
être placé directement sur
Page 32

Installation du levier métallique
d'avance du papier
Insérez les pointes du levier métallique dans les extrémités du crochet en
plastique de manière à ce qu'il soit incurvé vers le bas. Le levier doit se
trouver à peu près au centre du réceptacle de l'imprimante.
Instructions pour l'installation du réceptacle haute capacité
5
Page 33

Fixation des étiquettes sur le
réceptacle haute capacité
Des étiquettes vous ont été fournies pour vous permettre d’identifier les
différents réceptacles. Collez-les sur le tiroir, sur le cache latéral ou à l'endroit
qui vous paraît le plus pratique. Inscrivez-y le nom que vous donnez au
réceptacle.
Cache latéral
Tiroir du réceptacle
Instructions pour l'installation du réceptacle haute capacité
6
Page 34

Vérification de l'installation
Une fois le réceptacle haute capacité installé, vérifiez que l'installation est
correcte en imprimant la page des paramètres de menus. Pour imprimer la
page des paramètres de menus :
Assurez-vous que l'imprimante est sous tension et que le message d'état
1
Prêt
apparaît sur l'affichage.
Sur le panneau de commandes, appuyez sur
2
accéder aux menus.
Continuez à appuyer sur
3
UTILITAIRES
Appuyez sur
4
MENU UTILITAIRES
du
Appuyez sur
5
la seconde ligne de l'affichage.
Appuyez sur
6
apparaît jusqu'à ce que la page s'imprime, puis l'imprimante retrouve l'état
Prêt
.
Remarque : Si vous recevez un message du type :
Vérifiez que le réceptacle haute capacité figure sur la page menu
7
paramètres dans la liste des options installées. S'il n'apparaît pas, mettez
l'imprimante hors tension, débranchez le cordon d'alimentation, et
réinstallez-le.
s'affiche.
Sélectionner
Menu>
Sélectionner
201 Bourrage papier
Retirer la cartouche
reportez-vous au Manuel d'utilisation sur le CD des
publications pour de plus amples informations.
Menu>
pour afficher la liste des éléments disponibles
.
jusqu'à ce que
. Le message
<Menu
ou
Impression menus
Menu> ou <Menu
jusqu'à ce que
apparaisse sur
Impression paramètres menus
pour
MENU
Instructions pour l'installation du réceptacle haute capacité
7
Page 35
Résolution des problèmes
Problème Procédure
Messages
d'entretien
Un message d'entretien apparaît à la suite d'un problème pour
indiquer que l'imprimante nécessite une intervention.
Mettez l'imprimante hors tension, attendez environ 10
secondes, puis remettez-la sous tension.
Si l'erreur se reproduit, notez le numéro d'erreur, le problème
et les détails. Appelez les services d'entretien.
Instructions pour l'installation du réceptacle haute capacité
8
Page 36

Dégagement d'un bourrage de papier
Les bourrages peuvent se produire à la sortie du réceptacle. Retirez les
supports d'impression lentement et avec précaution afin d'éviter de les
déchirer.
A la sortie du réceptacle
Le papier est resté coincé alors qu'il arrivait dans le réceptacle et seule une
partie est visible.
Tirez directement sur la feuille. Si elle résiste, n'insistez pas et passez à
1
l'étape suivante.
Instructions pour l'installation du réceptacle haute capacité
9
Page 37

Ouvrez les portes arrière du réceptacle haute capacité.
2
Débloquez le papier s'il est coincé dans les galets d'alimentation et tirez
3
dessus pour le sortir.
10
Refermez les portes arrière du réceptacle haute capacité
4
Reportez-vous au
informations sur le dégagement des bourrages papier.
Instructions pour l'installation du réceptacle haute capacité
Manuel d'utilisation
de l'imprimante pour de plus amples
Page 38

Deutsch
Optra T Installationsanweisungen für
das Ablagefach mit hoher Kapazität
Page 39

Auflage (Juni 1999)
Die im folgenden Abschnitt genannten Bestimmungen gelten nicht in den Ländern, in denen
sie nicht mit dem geltenden Recht übereinstimmen. LEXMARK INTERNATIONAL, INC.
LIEFERT DIESE PUBLIKATION OHNE MÄNGELGEWÄHR. JEDE GEWÄHRLEISTUNG, OB
AUSDRÜCKLICH ODER KONKLUDENT, WIRD AUSGESCHLOSSEN, EINSCHLIESSLICH, ABER
NICHT BESCHRÄNKT AUF DIE GESETZLICHEN GARANTIEN DER HANDELBARKEIT ODER
DIE EIGNUNG FÜR EINEN BESTIMMTEN ZWECK. In einigen Ländern ist der Ausschluß
ausdrücklicher oder konkludenter Garantien bei bestimmten Verträgen unzulässig; daher ist diese
Bestimmung in Ihrem Land möglicherweise ungültig.
Die vorliegende Publikation enthält möglicherweise technische Ungenauigkeiten oder
typographische Fehler. Die Publikation wird in regelmäßigen Abständen überarbeitet, wobei die
vorgenommenen Änderungen in nachfolgende Auflagen übernommen werden. Es können jederzeit
Verbesserungen oder Änderungen an den beschriebenen Produkten oder Programmen
vorgenommen werden.
Senden Sie Ihre Hinweise zu dieser Publikation an Lexmark International, Inc., Department F95/
035-3, 740 New Circle Road N.W., Lexington, Kentucky 40550, USA (Großbritannien und Irland:
Lexmark International Ltd., Marketing and Services Department, Westhorpe House, Westhorpe,
Marlow Bucks SL7 3RQ). Lexmark behält sich vor , Ihre Anmerkungen gegebenenfalls nach eigenem
Ermessen zu verwenden oder zu vertreiben, ohne Ihnen gegenüber eine Verpflichtung einzugehen.
Unter der Telefonnummer 1-800-553-9727 können Sie weitere Publikationen zu diesem Produkt
bestellen (Großbritannien und Irland: 0628-481500). Kunden in anderen Ländern wenden sich bitte
an ihren Lexmark-Händler.
Lexmark und Lexmark mit Diamant-Design, MarkNet und MarkVision sind in den USA und/oder
anderen Ländern eingetragene Warenzeichen von Lexmark International, Inc. PostScript ist ein
Warenzeichen oder eingetragenes Warenzeichen von Adobe Systems Incorporated. Andere
Warenzeichen sind Eigentum des jeweiligen Inhabers.
© Copyright 1999 Lexmark International, Inc.
Alle Rechte vorbehalten.
Page 40

Einführung
Durch das Ablagefach mit hoher Kapazität für den Lexmark Optra™ T können
Sie die Ablagekapazität Ihres Druckers erweitern. Sie können nun bis zu
1.500 Blatt Papier mit einem Gewicht von 75 g/m² bedrucken und in der
Ablage stapeln.
Ein zuverlässiger Papiereinzug ist nur dann gewährleistet, wenn Sie eine für
den Drucker empfohlene Papiersorte verwenden und das Papier richtig
einlegen.
Im Referenzkapitel des
Informationen zu Sicherheit und Garantieleistungen.
Benutzerhandbuchs
Ihres Druckers finden Sie
Installationsanweisungen für das Ablagefach mit hoher Kapazität
1
Page 41

Auspacken des Ablagefachs mit
hoher Kapazität
Nehmen Sie alle Teile aus der V erpackung (siehe Ab bildung). Sollten Teile
1
fehlen, wenden Sie sich an den Händler, bei dem Sie das Ablagefach mit
hoher Kapazität gekauft haben.
Etiketten
Halterung
Papierbügel
Optra T-Etikett
(farbiges Dreieck)
Unterseite
Ablagefach mit
hoher Kapazität
Entfernen Sie sämtliches Verpackungsmaterial und Klebeband von den
2
Teilen.
Hinweis: Bewahren Sie den Karton und das Verpackungsmaterial für den
Fall auf, daß Sie das optionale Zubehörteil zur Lagerung oder
zum Transportieren zur Wartung wieder verpacken müssen.
Installieren Sie das Ablagefach sofort, da ansonsten die Kanten der
3
Halterungen Tischoberflächen oder Stoffe beschädigen können.
Installationsanweisungen für das Ablagefach mit hoher Kapazität
2
Page 42

Installieren des Ablagefachs mit
hoher Kapazität
Schalten Sie den Drucker aus, und ziehen Sie den Netzstecker.
1
Entfernen Sie alle zuvor installierten Ausgabeoptionen beziehungsweise
2
die obere Abdeckung des Druck ers.
Schieben Sie die Plastikhalterung auf die Statikbürstenhalterung unten am
3
Ablagefach mit hoher Kapazität.
Installationsanweisungen für das Ablagefach mit hoher Kapazität
3
Page 43

Installieren Sie das Ablagefach mit hoher Kapazität auf dem Drucker.
4
Hinweis: Das Ablagefach mit hoher Kapazität
(vor allen anderen Ausgabeoptionen) aufgesetzt werden.
Bringen Sie alle zuvor entfernten Ausgabeoptionen wieder an.
5
Bringen Sie die obere Abdeckung an der obersten Ausgabeoption an.
6
Installationsanweisungen für das Ablagefach mit hoher Kapazität
4
muß
direkt auf den Drucker
Page 44

Installieren des Draht-Papierbügels
Stecken Sie die Enden des Draht-Papierbügels in die Enden der
Plastikhalterung, so daß sich der Bügel nach unten wölbt. Der Bügel sollte
sich ungefähr in der Mitte der Druckerablage befinden.
Installationsanweisungen für das Ablagefach mit hoher Kapazität
5
Page 45

Anbringen der Etiketten am
Ablagefach mit hoher Kapazität
Mit Hilfe der Etiketten können Sie die verschiedenen Papierablagen
kennzeichnen. Sie können die Etiketten am Ablagefach, an der seitlichen
Abdeckung oder an einer beliebigen anderen Stelle anbringen. Sie können
das Etikett auch mit einer individuellen Ablagebezeichnung versehen, um die
Ablagen leichter unterscheiden zu können.
Seitliche
Abdeckung
Ablagefach
Installationsanweisungen für das Ablagefach mit hoher Kapazität
6
Page 46

Überprüfen der Installation
Nachdem Sie das Ablagefach mit hoher Kapazität installiert haben, drucken
Sie eine Seite mit Menüeinstellungen, um die ordnungsgemäße Installation zu
überprüfen. So drucken Sie eine Seite mit Menüeinstellungen:
Vergewissern Sie sich, daß der Drucker eingeschaltet ist und daß die
1
Statusmeldung
Bereit
in der Anzeige zu sehen ist.
, bis
Bereit
Menü>
MENÜ DIENSTPROG.
Menüeinstellungen werden
versetzt.
Drücken Sie an der Bedienerkonsole
2
aufzurufen.
Drücken Sie
3
Bedienerkonsole angezeigt wird.
Drücken Sie
4
MENÜ DIENSTPROG.
das
Drücken Sie
5
erscheint
Drücken Sie
6
gedruckt
Drucker wieder in den Zustand
Hinweis: Wenn eine Meldung wie zum Beispiel
Überprüfen Sie, ob das von Ihnen installierte Ablagefach mit hoher
7
Kapazität auf der Seite mit den Menüeinstellungen unter „Installierte
Optionen“ aufgeführt ist. Ist das Ablagefach nicht aufgeführt, schalten Sie
den Drucker aus, ziehen Sie das Netzkabel ab, und installieren Sie die
Option erneut.
Menü>
Auswählen
Menü>
.
Auswählen
wird angezeigt, bis die Seite gedruckt wird, dann wird der
201 Papierstau
Kassette entnehmen
angezeigt wird, finden Sie weitere Informationen im
Benutzerhandbuch
<Menü
oder
, um eine Liste der verfügbaren Menüoptionen für
anzeigen zu lassen.
, bis in der zweiten Zeile der Anzeige
. Die Meldung
auf der Dokumentations-CD.
oder
<Menü
, um die Menüs
an der
Menüs drucken
Installationsanweisungen für das Ablagefach mit hoher Kapazität
7
Page 47

Problemlösung
Problem Vorgehensweise
Wartungsmeldungen Wartungsmeldungen weisen auf Druckerfehler hin, die unter
Umständen eine Wartung des Geräts erforderlich machen.
Schalten Sie den Drucker aus, warten Sie etwa 10 Sekunden,
und schalten Sie den Drucker wieder ein.
Wenn der Fehler erneut auftritt, notieren Sie sich die
Fehlernummer, das Problem und eine ausführliche
Beschreibung des Fehlers. Wenden Sie sich an den
Kundendienst.
Installationsanweisungen für das Ablagefach mit hoher Kapazität
8
Page 48

Beheben von Papierstaus
Im Ablagefach mit hoher Kapazität können Papierstaus an der Papierausgabe
auftreten. Ziehen Sie das gestaute Druckmaterial langsam und vorsichtig
heraus, um es nicht zu zerreißen.
An der Papierausgabe des Ablagefachs
Das Papier staut sich an der Ausgabe des Ablagefachs, und ein Teil des
Papiers ist sichtbar.
Ziehen Sie das Papier gerade heraus. Wenn sich das Papier nicht einfach
1
herausziehen läßt, ziehen Sie nicht weiter. Fahren Sie mit dem nächsten
Schritt fort.
Installationsanweisungen für das Ablagefach mit hoher Kapazität
9
Page 49

Öffnen Sie die hinteren Klappen des Ablagefachs.
2
Lösen Sie das Papier gegebenenfalls aus den Einzugsrollen. Ziehen Sie
3
das Papier gerade heraus.
10
Schließen Sie die hinteren Klappen des Ablagefachs.
4
Weitere Hilfe zum Beseitigen von Papierstaus finden Sie im
Benutzerhandbuch
Installationsanweisungen für das Ablagefach mit hoher Kapazität
Ihres Druckers.
Page 50

Italiano
Optra T Instruzioni per l'installazione
del raccoglitore ad alta capacità
Page 51

Prima edizione (Giugno 1999)
Il paragrafo seguente non è applicabile in quei paesi la cui legislazione sia in contrasto con le
disposizioni in esso contenute: LEXMARK INTERNATIONAL, INC. FORNISCE QUESTA
PUBBLICAZIONE “COSÍ COM’È” SENZA GARANZIE DI ALCUN TIPO, ESPRESSE O IMPLICITE,
COMPRESE TRA L’ALTRO LE GARANZIE IMPLICITE DI COMMERCIABILITÀ O IDONEITÀ A
SCOPI SPECIFICI. Alcuni paesi non consentono il disconoscimento di garanzie espresse o implicite
in alcune transazioni; di conseguenza questa dichiarazione potrebbe non essere applicabile.
La presente pubblicazione potrebbe contenere imprecisioni tecniche o errori tipografici. Le
informazioni in essa contenute vengono periodicamente modificate; tali modifiche verranno incluse
nelle edizioni successive. I prodotti o i programmi descritti possono essere soggetti a migliorie o
modifiche in qualsiasi momento.
Negli Stati Uniti, inviare commenti sul presente documento a Lexmark International, Inc. Department
F95/035-3, 740 New Circle Road N.W., Lexington, Kentucky 40550, U.S.A. Nel Regno Unito e in
Irlanda, utilizzare l’indirizzo Lexmark International Ltd., Marketing and Services Department,
Westhorpe House, Westhorpe, Marlow Bucks SL7 3RQ. Lexmark può utilizzare o distribuire tali
commenti senza alcun obbligo nei confronti dell’utente. In caso di componenti danneggiati o
mancanti, o se si desidera ottenere copie delle pubblicazioni, contattare Lexmark al numero 1-800-
4. È possibile acquistare altre pubblicazioni relative al prodotto in questione chiamando il numero 1800-553-9727. Nel Regno Unito e in Irlanda, chiamare il numero 0628-481500. Negli altri paesi,
contattare il rivenditore locale.
Lexmark e Lexmark con il simbolo del diamante, MarkNet e MarkVision sono marchi della Lexmark
International, Inc., registrati negli Stati Uniti e/o in altri paesi. PostScript è un marchio o un marchio
registrato della Adobe Systems Incorporated. Gli altri marchi appartengono ai rispettivi produttori.
© Copyright 1999 Lexmark International, Inc.
Tutti i diritti riservati.
Page 52

Introduzione
Il raccoglitore ad alta capacità Optra™ T aumenta la capacità di consegna
della stampante consentendo di stampare e raccogliere fino a circa 1.500 fogli
di carta da 20 libbre.
Per garantire una corretta alimentazione della carta, è importante utilizzare la
carta consigliata per l'uso con la stampante e caricarla correttamente.
Per informazioni sulla sicurezza e sulla garanzia, consultare la relativa
sezione della
Guida per l'utente
fornita con la stampante.
Istruzioni per l'installazione del raccoglitore ad alta capacità
1
Page 53

Disimballaggio del raccoglitore ad
alta capacità
Estrarre tutti i componenti dalla confezione, come illustrato nella figura.
1
Qualora un componente risultasse mancante, rivolgersi al rivenditore
presso cui è stato acquistato il raccoglitore ad alta capacità.
Etichette
Staffa
Sostegno
carta
Etichetta Optra T
(triangolo colorato)
lato inferiore
Raccoglitore ad alta
capacità
Rimuovere il materiale di imballaggio e il nastro da ciascun componente.
2
Nota: Conservare il materiale di imballaggio in modo da poter reimballare
l'opzione per eventuali riparazioni o per riporla.
Installare immediatamente il raccoglitore ad alta capacità. In caso
3
contrario, è possibile che i bordi delle staffe di montaggio danneggino le
superfici di appoggio o i tessuti.
Istruzioni per l'installazione del raccoglitore ad alta capacità
2
Page 54

Installazione del raccoglitore ad alta
capacità
Spegnere la stampante e scollegare il cavo di alimentazione.
1
Rimuovere dalla stampante le eventuali opzioni installate o il coperchio
2
superiore.
Far scorrere la staff a in plastica sulla custodia della spazz ola statica vicino
3
al fondo del raccoglitore ad alta capacità.
Istruzioni per l'installazione del raccoglitore ad alta capacità
3
Page 55

Installare il raccoglitore ad alta capacità sulla stampante.
4
Nota: Il raccoglitore ad alta capacità
sulla stampante, al di sotto di altre eventuali opzioni di uscita.
Reinstallare le eventuali opzioni precedentemente rimosse.
5
Collegare il coperchio superiore all'opzione di uscita situata più in alto.
6
Istruzioni per l'installazione del raccoglitore ad alta capacità
4
deve
essere installato direttamente
Page 56

Installazione del sostegno per la carta
Inserire le punte del sostegno per la carta nelle estremità della staffa in
plastica in modo che il sostegno sia inclinato verso l'interno. Installare il
sostegno al centro del raccoglitore di uscita della stampante.
Istruzioni per l'installazione del raccoglitore ad alta capacità
5
Page 57

Applicazione delle etichette al
raccoglitore ad alta capacità
Per identificare i diversi raccoglitori di uscita, vengono fornite delle etichette.
È possibile applicare le etichette al vassoio del raccoglitore di uscita, al
coperchio laterale o in altre posizioni più adatte. Per comodità, prima di
applicare l'etichetta è possibile scrivere su di essa la designazione scelta per il
raccoglitore di uscita.
Coperchio
laterale
Vassoio del raccoglitore
di uscita
Istruzioni per l'installazione del raccoglitore ad alta capacità
6
Page 58

Verifica dell'installazione
Dopo aver installato il raccoglitore ad alta capacità, verificarne la corretta
installazione stampando la pagina delle impostazioni dei menu. Per stampare
la pagina delle impostazioni dei menu:
Verificare che la stampante sia accesa e che sullo schermo sia
1
visualizzato il messaggio di stato
Pronta
.
Sul pannello operatore, premere
2
Premere e rilasciare
3
sul pannello operatore.
Premere
4
nel
Premere
5
dello schermo.
Premere
6
messaggio
ritorna allo stato
Nota: Se viene visualizzato un messaggio simile al seguente:
Verificare che il raccoglitore ad alta capacità sia elencato nella pagina
7
delle impostazioni dei menu alla voce "Funzioni installate". In caso
contrario, spegnere la stampante, scollegare il cavo di alimentazione,
quindi reinstallare l’opzione.
Seleziona
MENU UTILITÀ
Menu>
Seleziona
Stampa impostaz. menu in corso
201 Incep. carta
Rimuovere cart.
consultare la guida per l'utente contenuta nel CD delle
pubblicazioni.
Menu> o <Menu
per visualizzare l'elenco delle voci di menu disponibili
.
fino a visualizzare
. Durante la stampa della pagina viene visualizzato il
Pronta
.
Menu> o <Menu
fino a visualizzare
Stampa menu
, quindi la stampante
per accedere ai menu.
MENU UTILITÀ
sulla seconda riga
Istruzioni per l'installazione del raccoglitore ad alta capacità
7
Page 59

Risoluzione dei problemi
Problema Soluzione
Messaggi di
intervento
Tali messaggi indicano un malfunzionamento della stampante
che può richiedere l'intervento di un tecnico dell'assistenza.
Spegnere la stampante, attendere alcuni secondi, quindi
accendere la stampante.
Se l'errore si verifica nuovamente, prendere nota del numero
dell'errore e del tipo di problema riscontrato. Rivolgersi al
servizio di assistenza.
Istruzioni per l'installazione del raccoglitore ad alta capacità
8
Page 60

Eliminazione di un inceppamento
carta
Gli inceppamenti carta possono verificarsi all'uscita del raccoglitore ad alta
capacità. Per evitare di strappare il supporto di stampa, estrarlo con
delicatezza.
Uscita del raccoglitore
La carta si inceppa mentre fuoriesce dal raccoglitore e una parte di essa è
visibile.
Estrarre la carta. Se la carta non cede immediatamente, interrompere
1
l'operazione. Andare al passo successivo.
Istruzioni per l'installazione del raccoglitore ad alta capacità
9
Page 61

Aprire gli sportelli posteriori del raccoglitore.
2
Liberare la carta inceppata nei rulli di alimentazione. Estrarre la carta.
3
10
Chiudere gli sportelli posteriori del raccoglitore.
4
Per ulteriori informazioni sull'eliminazione degli inceppamenti, consultare la
Guida per l'utente
Istruzioni per l'installazione del raccoglitore ad alta capacità
fornita con la stampante.
Page 62

Español
Instrucciones de instalación
de la unidad de salida de alta capacidad Optra T
Page 63

Primera edición (junio de 1999)
El siguiente párrafo no es aplicable a aquellos países en los que las disposiciones
detalladas a continuación entran en conflicto con las leyes nacionales: LEXMARK
INTERNATIONAL, INC., OFRECE ESTA PUBLICACIÓN “TAL CUAL” SIN GARANTÍA DE NINGÚN
TIPO, EXPRESA O IMPLÍCITA, INCLUIDAS, PERO SIN LIMITARSE A ELLAS, LAS GARANTÍAS
IMPLÍCITAS DE COMERCIABILIDAD O IDONEIDAD PARA UN PROPÓSITO CONCRETO.
Algunos Estados no aceptan la renuncia de las garantías expresas o implícitas en ciertas
transacciones y, por lo tanto, es posible que esta declaración no le interese.
Esta publicación puede incluir imprecisiones técnicas y errores tipográficos. La información
contenida en este documento está sometida a cambios periódicos que podrían aparecer en
ediciones posteriores. Las mejoras o cambios realizados a los productos y programas descritos
pueden tener efecto en cualquier momento.
Puede remitir comentarios sobre esta publicación a Lexmark International, Inc., Department F95/
035-3, 740 New Circle Road N.W., Lexington, K entuc ky 40550, EE.UU. En el Reino Unido e Irlanda,
diríjase a Lexmark International Ltd., Marketing and Services Department, Westhorpe House,
Westhorpe, Marlow Bucks SL7 3RQ. Lexmark puede utilizar o distribuir la información recibida de la
manera que estime conveniente sin contraer ninguna obligación con usted. Puede comprar copias
adicionales de publicaciones relacionadas con este producto llamando al 1-800-553-9727. En el
Reino Unido e Irlanda diríjase al 0628-481500. En otros países, póngase en contacto con el
establecimiento donde adquirió el producto.
Lexmark y Lexmark con diseño de diamante, MarkNet y MarkVision son marcas comerciales de
Lexmark International, Inc., registradas en los Estados Unidos y/o en otros países. PostScript es
una marca comercial o marca comercial registrada de Adobe Systems Incorporated. Otras marcas
comerciales son propiedad de sus propietarios respectivos.
© Copyright 1999 Lexmark International, Inc.
Todos los derechos reservados.
Distribuido en Europa por
LEXMARK INTERNATIONAL SA
RN 152
45760 BOIGNY-SUR-BIONNE
FRANCIA
Page 64

Introducción
La unidad de salida de alta capacidad de la Optra™ T ofrece a la impresora
capacidad de salida adicional ya que permite imprimir y apilar
aproximadamente 1.500 hojas de papel de 75 g/m2.
Para asegurar una alimentación del papel fiable, es importante que
seleccione el papel recomendado para su uso con la impresora y que lo
cargue correctamente.
Consulte el apartado de referencia de la
para obtener información relativa a seguridad y garantía.
Guía del usuario
de la impresora
Instrucciones de instalación de la unidad de salida de alta capacidad
1
Page 65

Desembalaje de la unidad de salida
de alta capacidad
Extraiga todos los elementos de la caja tal como se muestra en la
1
ilustración. Si falta algún elemento, póngase en contacto con el
establecimiento donde adquirió la unidad de salida de alta capacidad.
Etiquetas
Abrazadera
Barra
portapapeles
Etiqueta de Optra T
(triángulo de color)
parte inferior
Unidad de salida de
alta capacidad
Retire el material de embalaje y la cinta adhesiva de cada elemento.
2
Nota: Guarde la caja y los materiales de embalaje por si alguna vez
necesita volver a embalar la opción para llevarla a reparar o
almacenarla.
Instale inmediatamente la unidad de salida de alta capacidad; de no
3
hacerlo así, los bordes de las abrazaderas de montaje podrían dañar la
mesa o la ropa.
Instrucciones de instalación de la unidad de salida de alta capacidad
2
Page 66

Instalación de la unidad de salida de
alta capacidad
Apague la impresora y desenchufe el cable de alimentación.
1
Retire las opciones de salida previamente instaladas o la cubierta superior
2
de la impresora.
Deslice la abrazadera de plástico hacia el soporte para cepillo estático,
3
que se encuentra cerca de la parte inferior de la unidad de salida de alta
capacidad.
Instrucciones de instalación de la unidad de salida de alta capacidad
3
Page 67

Instale la unidad de salida de alta capacidad en la impresora.
4
Nota: La unidad de salida de alta capacidad se
directamente encima de la impresora, debajo de cualquier opción
de salida.
Vuelva a instalar las opciones de salida que haya retirado anteriormente.
5
Coloque la cubierta superior en la opción de salida que esté más arriba.
6
Instrucciones de instalación de la unidad de salida de alta capacidad
4
debe
instalar
Page 68

Instalación de la barra portapapeles
Coloque los extremos de la barra portapapeles dentro de los extremos de la
abrazadera de plástico de modo que la barra se curve hacia abajo. La barra
debería apoyarse en el centro aproximado de la bandeja de salida de la
impresora.
Instrucciones de instalación de la unidad de salida de alta capacidad
5
Page 69

Colocación de las etiquetas en la
unidad de salida de alta capacidad
Se proporcionan etiquetas para que pueda identificar las distintas bandejas
de salida. Puede colocar las etiquetas en la bandeja de salida, cubierta lateral
o donde mejor convenga. Para facilitar la identificación, escriba su propia
designación de bandeja de salida en la etiqueta antes de pegarla.
Cubierta
lateral
Bandeja de salida
Instrucciones de instalación de la unidad de salida de alta capacidad
6
Page 70

Verificación de la instalación
Una vez instalada la unidad de salida de alta capacidad, verifique que se ha
instalado correctamente mediante la impresión de una página de parámetros
de menús. Para imprimir una página de parámetros de menús:
Asegúrese de que la impresora está encendida y de que el mensaje de
1
estado
Lista
aparece en la pantalla.
En el panel del operador, pulse
2
menús.
Continúe pulsando
3
UTILIDADES
Pulse
4
disponibles para el
Pulse
5
de la pantalla.
Pulse
6
menús
vuelve al estado
Nota: Si aparece un mensaje como el siguiente:
Compruebe que la unidad de salida de alta capacidad que ha instalado
7
aparece en la página de parámetros de menús bajo el apartado “Caract.
instaladas”. Si no aparece en la página, apague la impresora, desenchufe
el cable de alimentación y vuelva a instalar la opción.
Seleccionar
Menú>
Seleccionar
hasta que se termine de imprimir la página; después, la impresora
201 Atasco de papel
Retirar cartucho
consulte la
más información.
Menú> o <Menú
en la pantalla.
para mostrar la lista de los elementos de menú
MENÚ UTILIDADES
hasta que aparezca
. Aparece el mensaje
Lista
.
Guía del usuario
Menú> o <Menú
hasta que aparezca
.
Imprimir menús
Imprimiendo parámetros de
del CD de publicaciones para obtener
para acceder a los
MENÚ
en la segunda línea
Instrucciones de instalación de la unidad de salida de alta capacidad
7
Page 71

Solución de problemas
Problema Acción
Mensajes de
servicio
Los mensajes de servicio indican un error de la impresora que
puede requerir la intervención del servicio técnico.
Apague la impresora, espere unos 10 segundos y vuelva a
encenderla.
Si se vuelve a producir el error, anote el número de error, el
problema y una descripción detallada. A continuación, llame
al servicio técnico.
Instrucciones de instalación de la unidad de salida de alta capacidad
8
Page 72

Eliminación de un atasco de papel
Los atascos de papel en la unidad de salida de alta capacidad se pueden
producir en la salida de la unidad.Para evitar romper los materiales de
impresión, saque el papel atascado suavemente y despacio.
En la salida de la unidad
El papel se atasca a medida que sale a la unidad y una parte del papel es
visible.
Saque recto el papel. Si al estirar el papel no saliera inmediatamente, deje
1
de tirar. Siga con el paso siguiente.
Instrucciones de instalación de la unidad de salida de alta capacidad
9
Page 73

Abra las puertas posteriores de la unidad.
2
Extraiga el papel si se ha enganchado en los rodillos del alimentador.
3
Saque recto el papel.
10
Cierre las puertas traseras de la unidad.
4
Consulte la
eliminar los atascos de papel.
Instrucciones de instalación de la unidad de salida de alta capacidad
Guía del usuario
de la impresora si necesita ayuda adicional para
Page 74

Page 75

P/N 11K1515
E.C. 1K0208
Printed in USA
6/99
This publication
is printed on
recycled paper.
 Loading...