

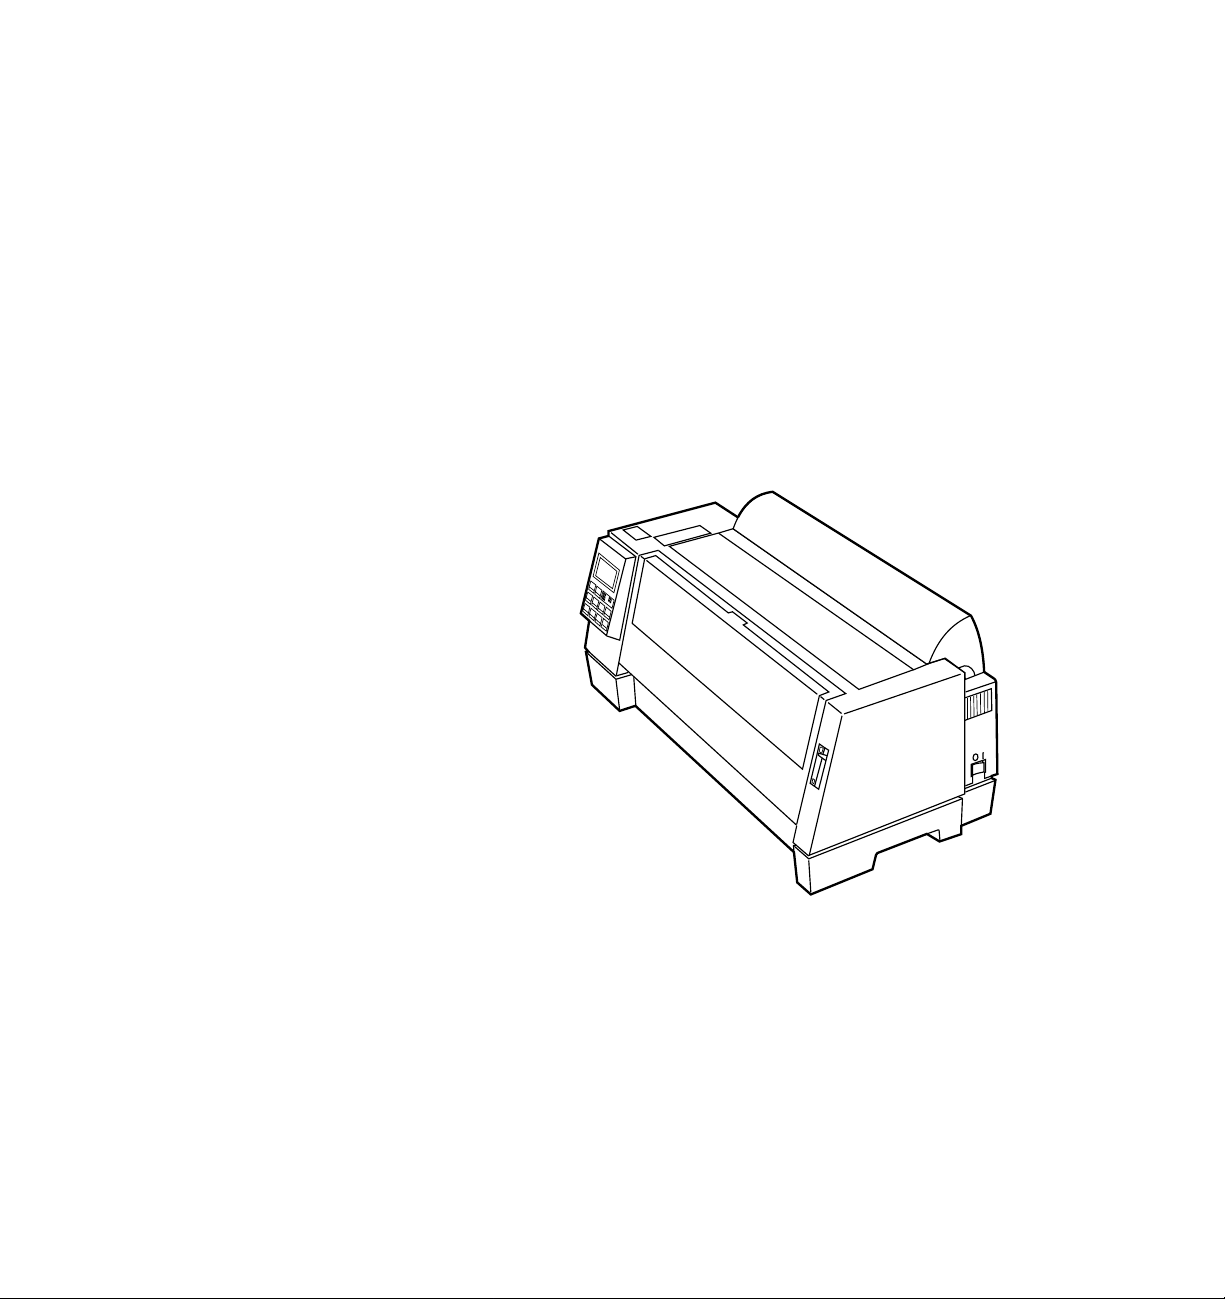
Page 1
4227
User’s Guide
Page 2

First Edition (June 1996)
The following paragraph does not apply to the United Kingdom or any country where such
provisions are inconsistent with local law:
PUBLICATION "AS IS" WITHOUT WARRANTY OF ANY KIND, EITHER EXPRESS OR IMPLIED,
INCLUDING, BUT NOT LIMITED TO, THE IMPLIED WARRANTIES OF MERCHANTABILITY OR
FITNESS FOR A PARTICULAR PURPOSE. Some states do not allow disclaimer of express or
implied warranties in certain transactions, therefore, this statement may not apply to you.
This publication could include technical inaccuracies or typographical errors. Changes are periodically made to the information herein; these changes will be incorporated in later editions of the publication. Improvements and/or changes in the product(s) and/or the program(s) described in this
publication may be made at any time.
Publications are not stocked at the address given below; requests for publications should be made
to your point of purchase.
A form for reader's comments is provided at the back of this publication. If the form has been
removed, comments may be addressed to Lexmark International, Inc., Department F95/035-3, 740
New Circle Road N.W., Lexington, Kentucky 40511-1876, U.S.A. In the United Kingdom and Eire,
send to Lexmark International, Ltd., Marketing and Services Department, Westhorpe House,
Westhorpe, Marlow Bucks SL73RQ. Lexmark may use or distribute any of the information you supply in any way it believes appropriate without incurring any obligation to you.
Lexmark is a trademark of Lexmark International, Inc.
Other trademarks are the property of their respective owners.
Copyright Lexmark International, Inc. 1996.
©
All rights reserved.
LEXMARK INTERNATIONAL, INC. PROVIDES THIS
UNITED STATES GOVERNMENT RESTRICTED RIGHTS
This software and documentation are provided with RESTRICTED RIGHTS. Use duplication or disclosure by the Government is subject to restrictions as set forth in subparagraph (c)(1)(ii) of the
Rights in Technical Data and Computer Software clause at DFARS 252.227-7013 and in applicable
FAR provisions: Lexmark International, Inc., Lexington, KY 40511.
Page 3

Contents
Chapter 1 - Getting Started. . . . . . . . . . . . . . . . . . . . 1
Unpacking . . . . . . . . . . . . . . . . . . . . . . . . . . . . . . . . . . . . . . . . . . . . . . . . . 1
Installing the Ribbon Cartridge . . . . . . . . . . . . . . . . . . . . . . . . . . . . . . . . 4
Connecting the Power Cord . . . . . . . . . . . . . . . . . . . . . . . . . . . . . . . . . . 9
Connecting the Parallel Cable . . . . . . . . . . . . . . . . . . . . . . . . . . . . . . . . 10
Connecting the Serial Cable . . . . . . . . . . . . . . . . . . . . . . . . . . . . . . . . . . 12
Changing the Serial Settings . . . . . . . . . . . . . . . . . . . . . . . . . . . . . . . . . 14
Verifying Serial Interface Settings . . . . . . . . . . . . . . . . . . . . . . . . 15
Printing the Demonstration Page . . . . . . . . . . . . . . . . . . . . . . . . . . . . . 16
Setting the Language of the Operator Panel Messages . . . . . . . . . . . 21
Installing Your Application Software . . . . . . . . . . . . . . . . . . . . . . . . . . 23
PPDS Mode . . . . . . . . . . . . . . . . . . . . . . . . . . . . . . . . . . . . . . . . . . . 23
Epson Emulation Mode . . . . . . . . . . . . . . . . . . . . . . . . . . . . . . . . . 24
What to do Next . . . . . . . . . . . . . . . . . . . . . . . . . . . . . . . . . . . . . . . . . . . . 24
Chapter 2 - Features and Functions . . . . . . . . . . . 25
Front View of Printer . . . . . . . . . . . . . . . . . . . . . . . . . . . . . . . . . . . . . . . 27
Rear View of Printer . . . . . . . . . . . . . . . . . . . . . . . . . . . . . . . . . . . . . . . . 29
Supplies . . . . . . . . . . . . . . . . . . . . . . . . . . . . . . . . . . . . . . . . . . . . . . . . . . . 30
Contents
Chapter 3 - Using the Operator Panel . . . . . . . . . . 31
Buttons . . . . . . . . . . . . . . . . . . . . . . . . . . . . . . . . . . . . . . . . . . . . . . . . . . . 32
Lights . . . . . . . . . . . . . . . . . . . . . . . . . . . . . . . . . . . . . . . . . . . . . . . . . . . . . 34
Using the Function Menus . . . . . . . . . . . . . . . . . . . . . . . . . . . . . . . . . . . 35
Overview of Function Menus . . . . . . . . . . . . . . . . . . . . . . . . . . . . 36
Menu Options . . . . . . . . . . . . . . . . . . . . . . . . . . . . . . . . . . . . . . . . . 38
Setting the Printer Online or Offline . . . . . . . . . . . . . . . . . . . . . . . . . . . 46
Stopping the Printer . . . . . . . . . . . . . . . . . . . . . . . . . . . . . . . . . . . . . . . . 46
Advancing the Paper . . . . . . . . . . . . . . . . . . . . . . . . . . . . . . . . . . . . . . . 46
Using Tear-Off . . . . . . . . . . . . . . . . . . . . . . . . . . . . . . . . . . . . . . . . . . . . . 47
Auto Tear-Off Set to On. . . . . . . . . . . . . . . . . . . . . . . . . . . . . . . . . 47
Contents
iii
Page 4

Contents
One Second Tear-Off . . . . . . . . . . . . . . . . . . . . . . . . . . . . . . . . . . . 48
Manual Tear-Off (Auto Tear-Off Set to Off). . . . . . . . . . . . . . . . 48
Setting AutoGap . . . . . . . . . . . . . . . . . . . . . . . . . . . . . . . . . . . . . . . . . . . 48
AutoGap Set to On . . . . . . . . . . . . . . . . . . . . . . . . . . . . . . . . . . . . . 48
Manual AutoGap (AutoGap Set to Off) . . . . . . . . . . . . . . . . . . . 49
AutoGap Set to Single . . . . . . . . . . . . . . . . . . . . . . . . . . . . . . . . . . 50
Selecting or Locking a Font or Pitch . . . . . . . . . . . . . . . . . . . . . . . . . . . 51
Setting and Using a Macro . . . . . . . . . . . . . . . . . . . . . . . . . . . . . . . . . . . 52
Disabling/Enabling the Operator Panel . . . . . . . . . . . . . . . . . . . . . . . 53
Chapter 4 - Selecting and Loading Paper. . . . . . . 55
Paper Types and Sizes . . . . . . . . . . . . . . . . . . . . . . . . . . . . . . . . . . . . . . 55
Single Sheets . . . . . . . . . . . . . . . . . . . . . . . . . . . . . . . . . . . . . . . . . . 56
Multiple Part Single Sheets . . . . . . . . . . . . . . . . . . . . . . . . . . . . . . 56
Single Continuous Forms . . . . . . . . . . . . . . . . . . . . . . . . . . . . . . . 57
Multiple Part Continuous Forms . . . . . . . . . . . . . . . . . . . . . . . . . 57
Envelopes. . . . . . . . . . . . . . . . . . . . . . . . . . . . . . . . . . . . . . . . . . . . . 58
Multiple Part Forms . . . . . . . . . . . . . . . . . . . . . . . . . . . . . . . . . . . . 58
Loading a Single Sheet or Envelope . . . . . . . . . . . . . . . . . . . . . . . . . . . 59
Loading a Single Sheet or Envelope into the Manual Feed . . . 59
Setting Auto Cut Sheet Load. . . . . . . . . . . . . . . . . . . . . . . . . . . . . 64
Loading a Single Sheet or Envelope With Continuous Forms
Already Loaded . . . . . . . . . . . . . . . . . . . . . . . . . . . . . . . . . . . . . . . 65
Loading Continuous Forms . . . . . . . . . . . . . . . . . . . . . . . . . . . . . . . . . . 70
Aligning the Left Margin . . . . . . . . . . . . . . . . . . . . . . . . . . . . . . . . . . . . 74
Top-Of-Form (TOF) . . . . . . . . . . . . . . . . . . . . . . . . . . . . . . . . . . . . . . . . . 76
Setting TOF for Continuous Forms . . . . . . . . . . . . . . . . . . . . . . . 76
Setting TOF for Single Sheets and Envelopes. . . . . . . . . . . . . . . 78
Setting TOF in a Macro . . . . . . . . . . . . . . . . . . . . . . . . . . . . . . . . . 78
Auto Tear-Off (Set to On) . . . . . . . . . . . . . . . . . . . . . . . . . . . . . . . 79
Auto Tear-Off (Set to Off) . . . . . . . . . . . . . . . . . . . . . . . . . . . . . . . 80
Auto Tear-Off (Set to One Second). . . . . . . . . . . . . . . . . . . . . . . . 80
Adjusting Bidirectional Alignment . . . . . . . . . . . . . . . . . . . . . . . . . . . . 81
iv
Contents
Page 5

Chapter 5 - Printer Options . . . . . . . . . . . . . . . . . . 83
Auto Sheet Feeder . . . . . . . . . . . . . . . . . . . . . . . . . . . . . . . . . . . . . . . . . . 85
Installing the Auto Sheet Feeder . . . . . . . . . . . . . . . . . . . . . . . . . 87
Loading Paper in the Auto Sheet Feeder. . . . . . . . . . . . . . . . . . . 90
Tractor 2 Feeder . . . . . . . . . . . . . . . . . . . . . . . . . . . . . . . . . . . . . . . . . . . . 96
Installing the Tractor 2 Feeder . . . . . . . . . . . . . . . . . . . . . . . . . . . 97
Loading Paper in the Tractor 2 Feeder . . . . . . . . . . . . . . . . . . . 102
Parking Continuous Forms and Changing Tractor Feeders. . 111
Removing the Tractor 2 Feeder. . . . . . . . . . . . . . . . . . . . . . . . . . 113
Chapter 6 - Solving Printer Problems . . . . . . . . . 115
Testing the Printer . . . . . . . . . . . . . . . . . . . . . . . . . . . . . . . . . . . . . . . . . 116
Clearing Paper Jams . . . . . . . . . . . . . . . . . . . . . . . . . . . . . . . . . . . . . . . 117
Problem Conditions . . . . . . . . . . . . . . . . . . . . . . . . . . . . . . . . . . . . . . . 118
Problems Indicated by Error Codes or Messages . . . . . . . . . . 118
Paper Feed Problems . . . . . . . . . . . . . . . . . . . . . . . . . . . . . . . . . . 121
Printing and Print Quality Problems. . . . . . . . . . . . . . . . . . . . . 122
Alarm and Abnormal Noise . . . . . . . . . . . . . . . . . . . . . . . . . . . . 124
Power Problems . . . . . . . . . . . . . . . . . . . . . . . . . . . . . . . . . . . . . . 125
Operator Panel Button Problem . . . . . . . . . . . . . . . . . . . . . . . . . 125
Display Messages . . . . . . . . . . . . . . . . . . . . . . . . . . . . . . . . . . . . . . . . . 126
Contents
Chapter 7 - Maintaining Your Printer. . . . . . . . . . 129
Cleaning the Printer . . . . . . . . . . . . . . . . . . . . . . . . . . . . . . . . . . . . . . . 129
Cleaning the Auto Sheet Feeder Rollers . . . . . . . . . . . . . . . . . . . . . . 130
Removing the Ribbon Cartridge . . . . . . . . . . . . . . . . . . . . . . . . . . . . . 131
Appendix A - Notices . . . . . . . . . . . . . . . . . . . . . . 133
Appendix B - Statement of Limited Warranty. . . 141
Contents
v
Page 6

Contents
Glossary. . . . . . . . . . . . . . . . . . . . . . . . . . . . . . . . . 145
Index. . . . . . . . . . . . . . . . . . . . . . . . . . . . . . . . . . . . 149
vi
Contents
Page 7
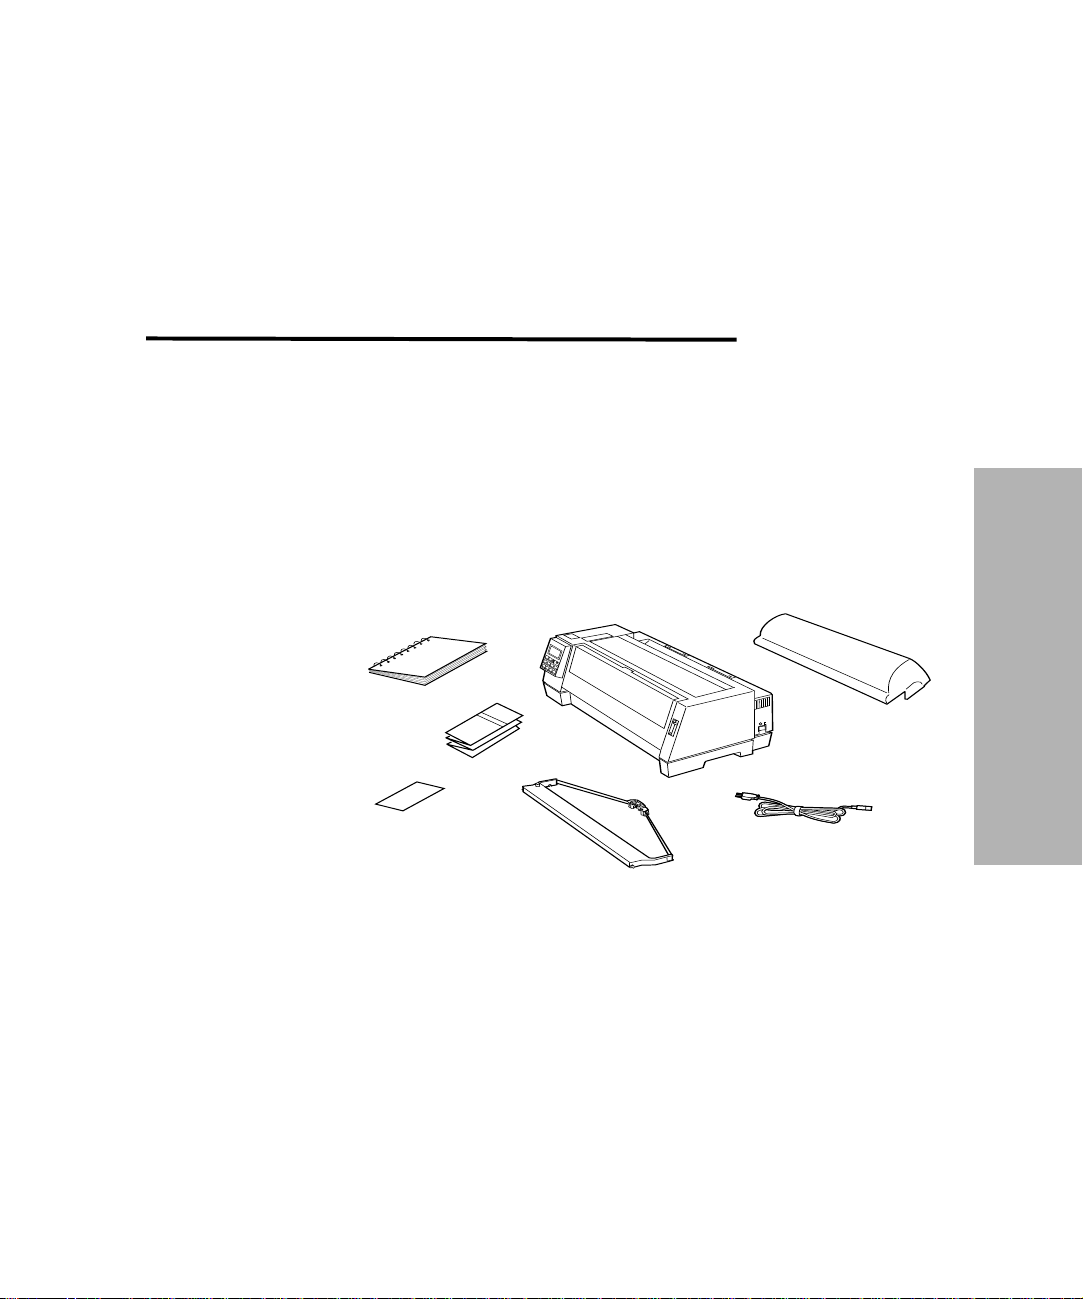
Getting Started
Unpacking
Remove the printer from the carton.
1
Caution:
Reference Card
Do not lift the printer by yourself; it weighs
21 kilograms (46 pounds).
User’s Guide
Printer
Registration
Card
Ribbon Cartridge
Chapter
Acoustic Cover
Power Cord
1
Getting Started
If any items are missing or damaged, contact your point of
purchase.
If you need to purchase a parallel printer cable, we
recommend Lexmark part number 1329605 (3.05 m or 10 ft.) or
1427498 (6.1 m or 20 ft.).
If you need to purchase an RS-232 serial cable, we recommend
Lexmark part number 1180786 (6.1 m or 20 ft.).
Chapter 1: Getting Started
1
Page 8
2 Place the printer so that the front of the printer aligns with the
edge of the desk or table.
Note: If you want to print more than 100 forms, make sure
they stack up below the printer (on the floor) when they
are finished printing in order to prevent jams.
Remove all packing tape from the printer.
3
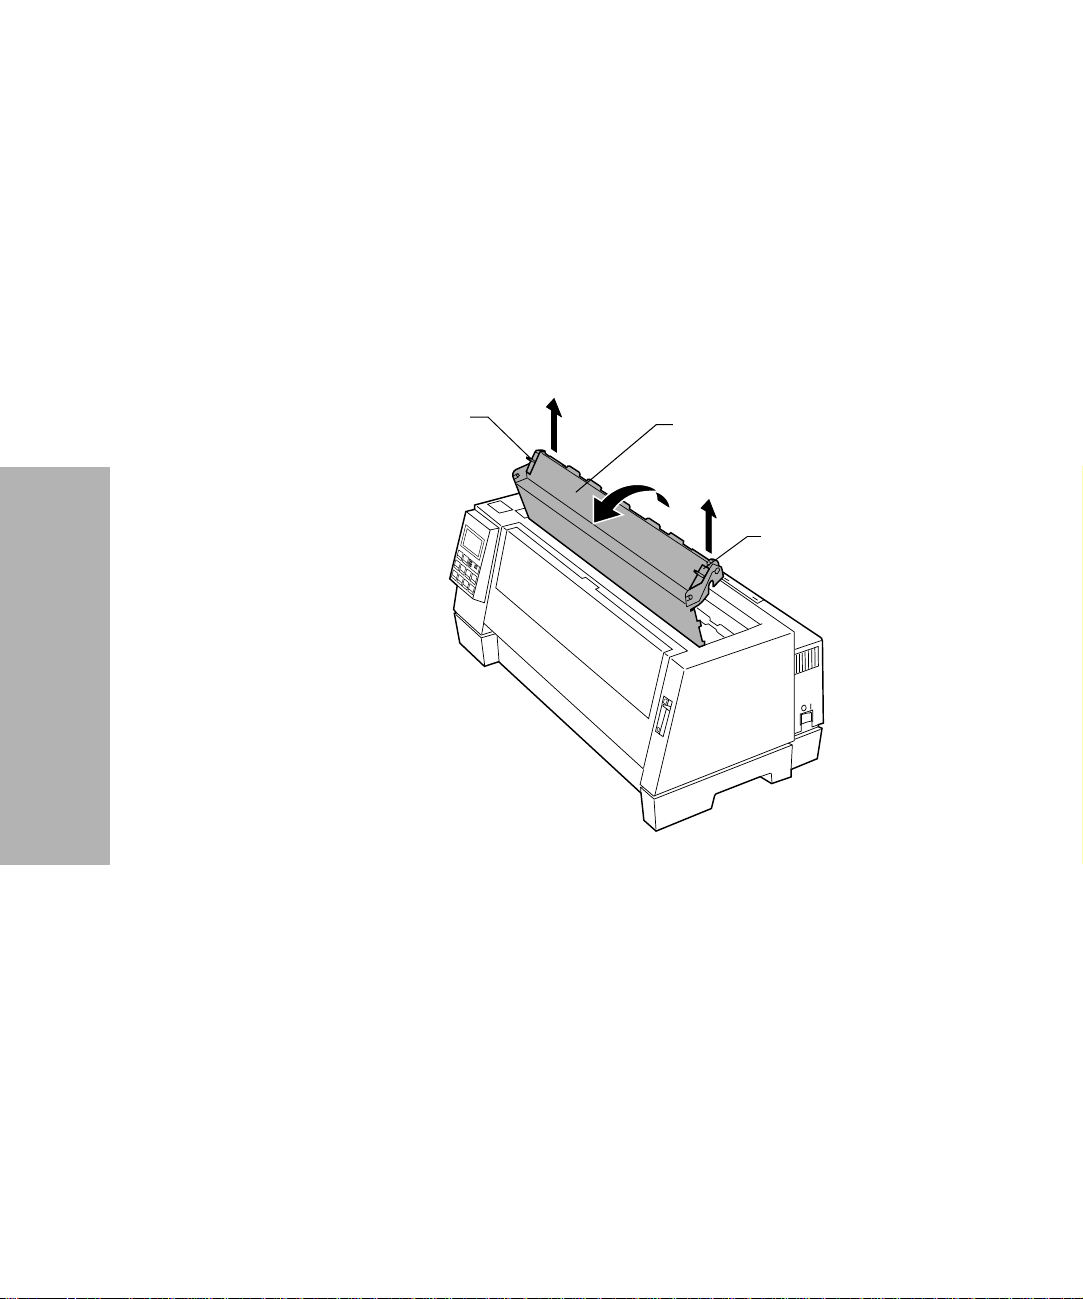
4 Pull up the left and right latches on the top cover and lift the
top cover to remove it.
Getting Started
Left Latch
Top Cover
Right Latch
Chapter 1: Getting Started
2
Page 9
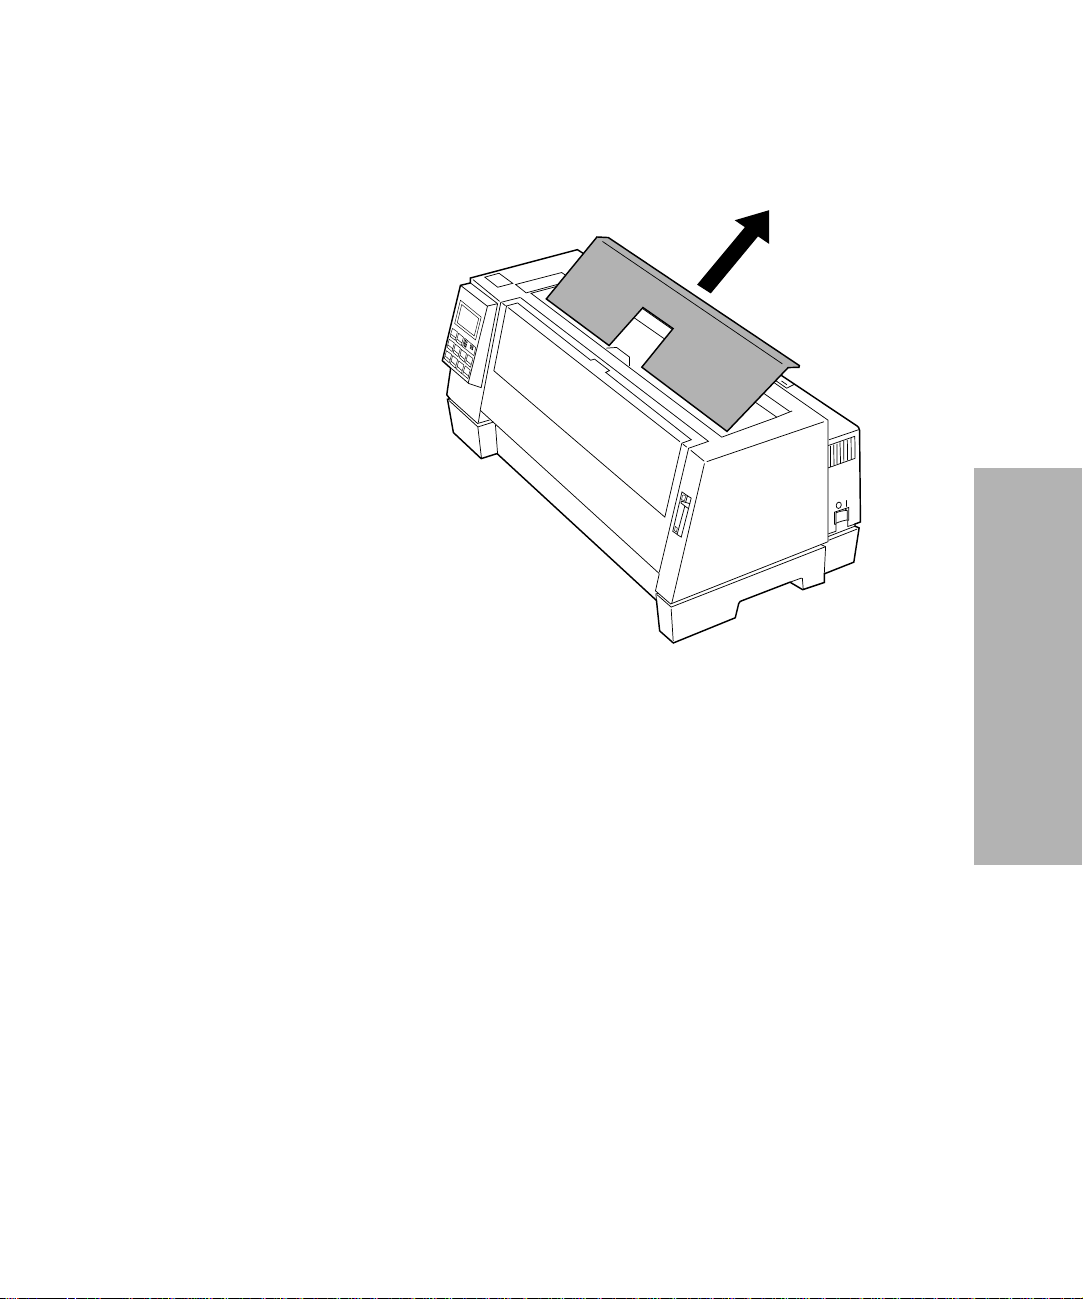
5 Remove the protective cardboard.
Getting Started
Chapter 1: Getting Started
3
Page 10
Installing the Ribbon Cartridge
Make sure the printer is Off.
1
Make sure the top cover is removed. If you need help, see
2
step 4 on page 2.
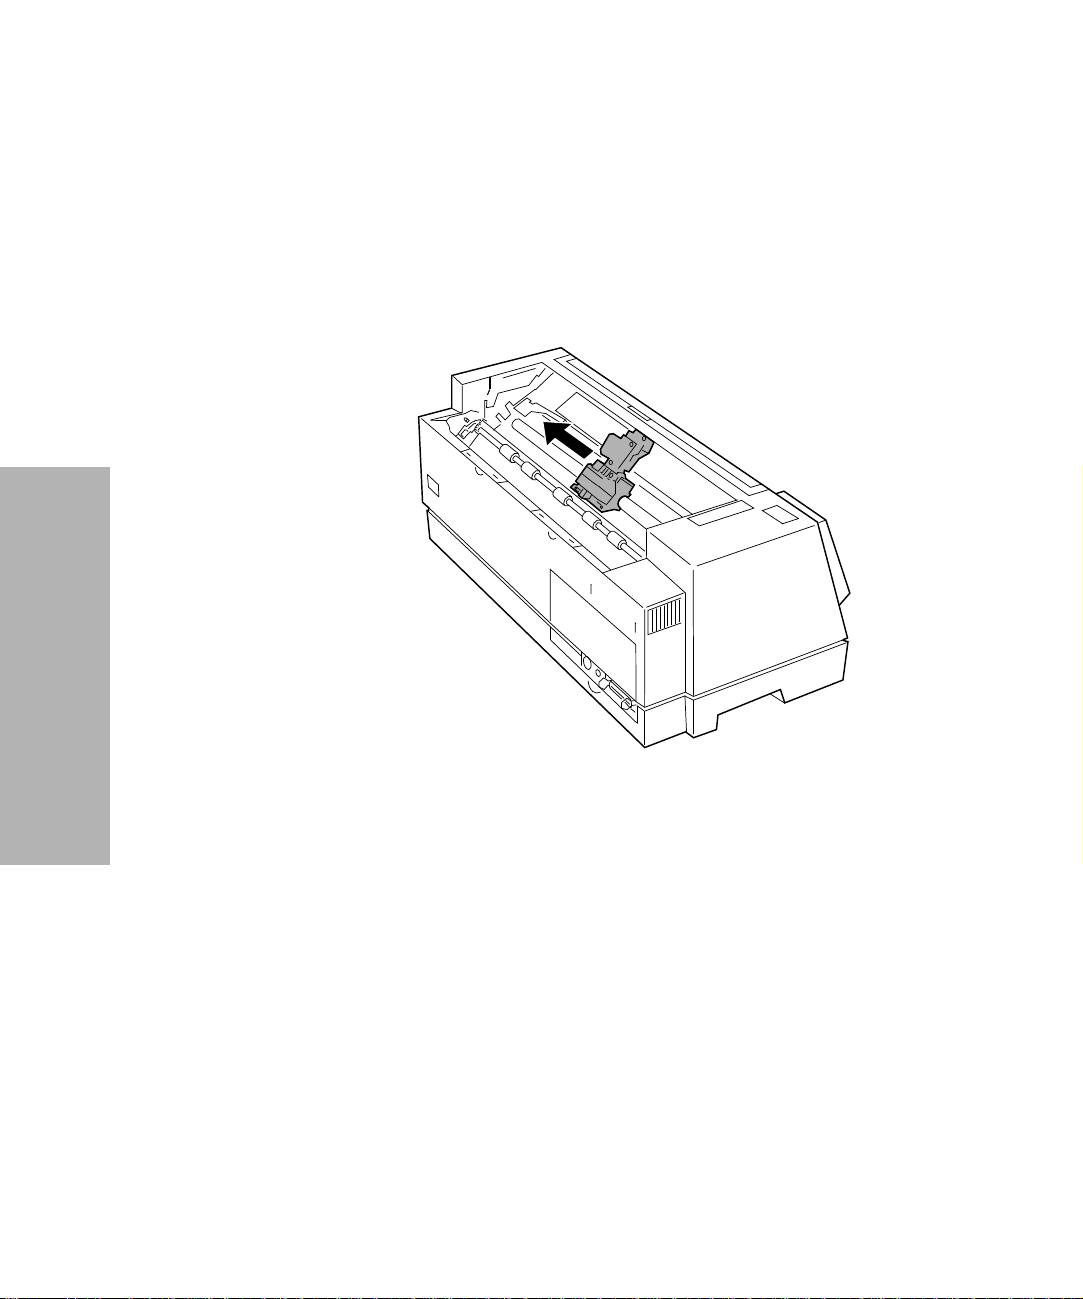
Manually move the printhead to the far side of the printer.
3
Getting Started
4
Chapter 1: Getting Started
Page 11
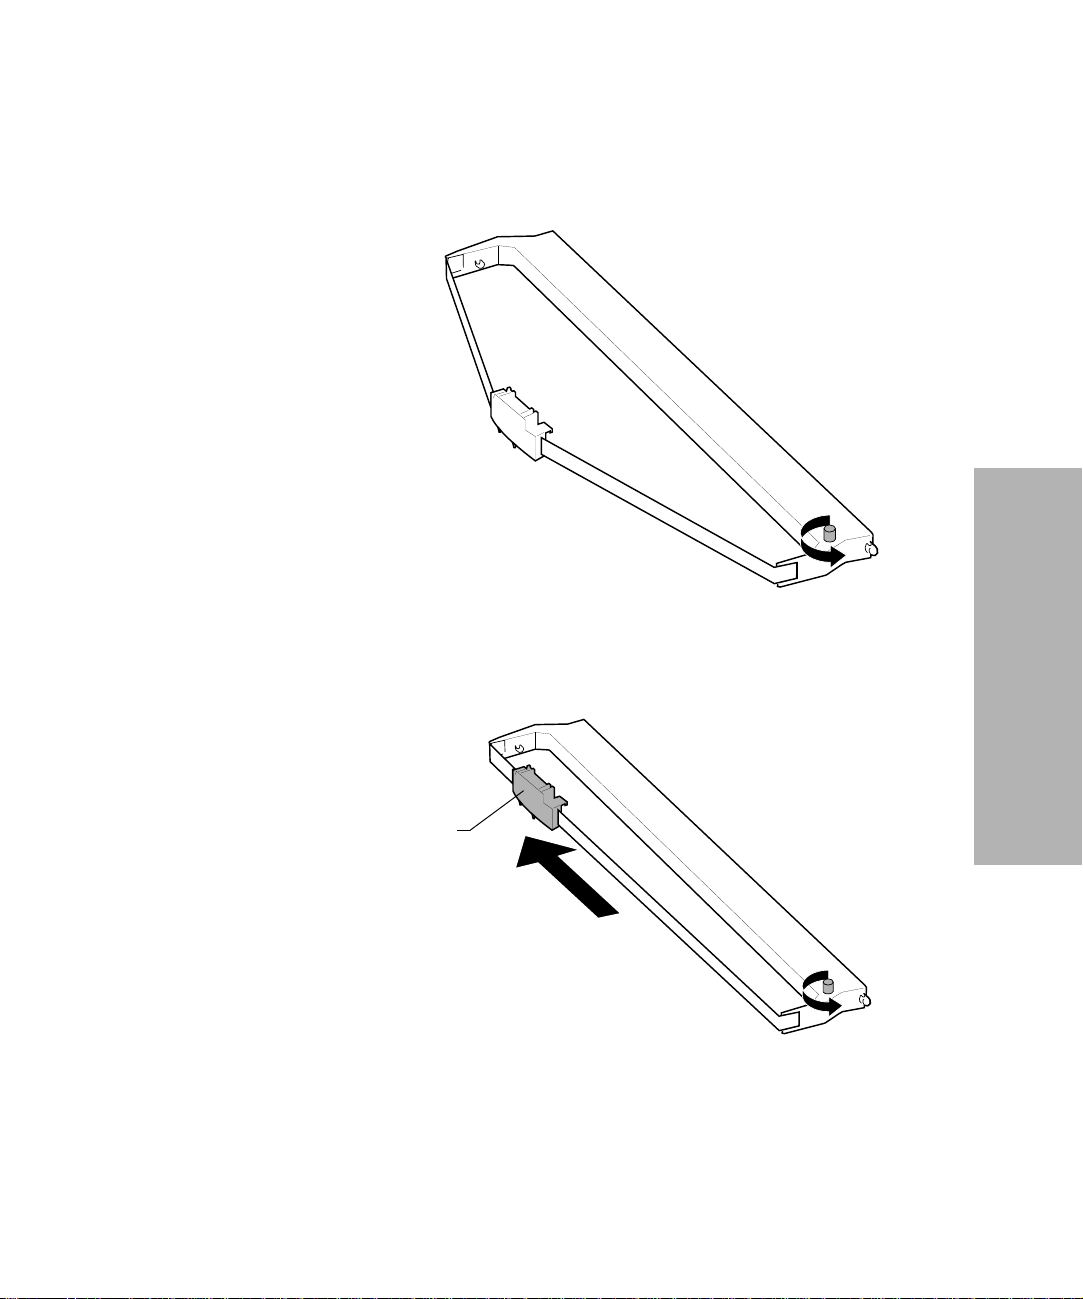
4 Rotate the ribbon advance knob on the ribbon cartridge
counterclockwise to ensure that the ribbon feeds smoothly. If
necessary, untwist the ribbon.
5 Manually move the ribbon guide to the far side of the
cartridge, as shown below, then rotate the ribbon advance
knob to take up any slack in the ribbon.
Getting Started
Ribbon Guide
Chapter 1: Getting Started
5
Page 12
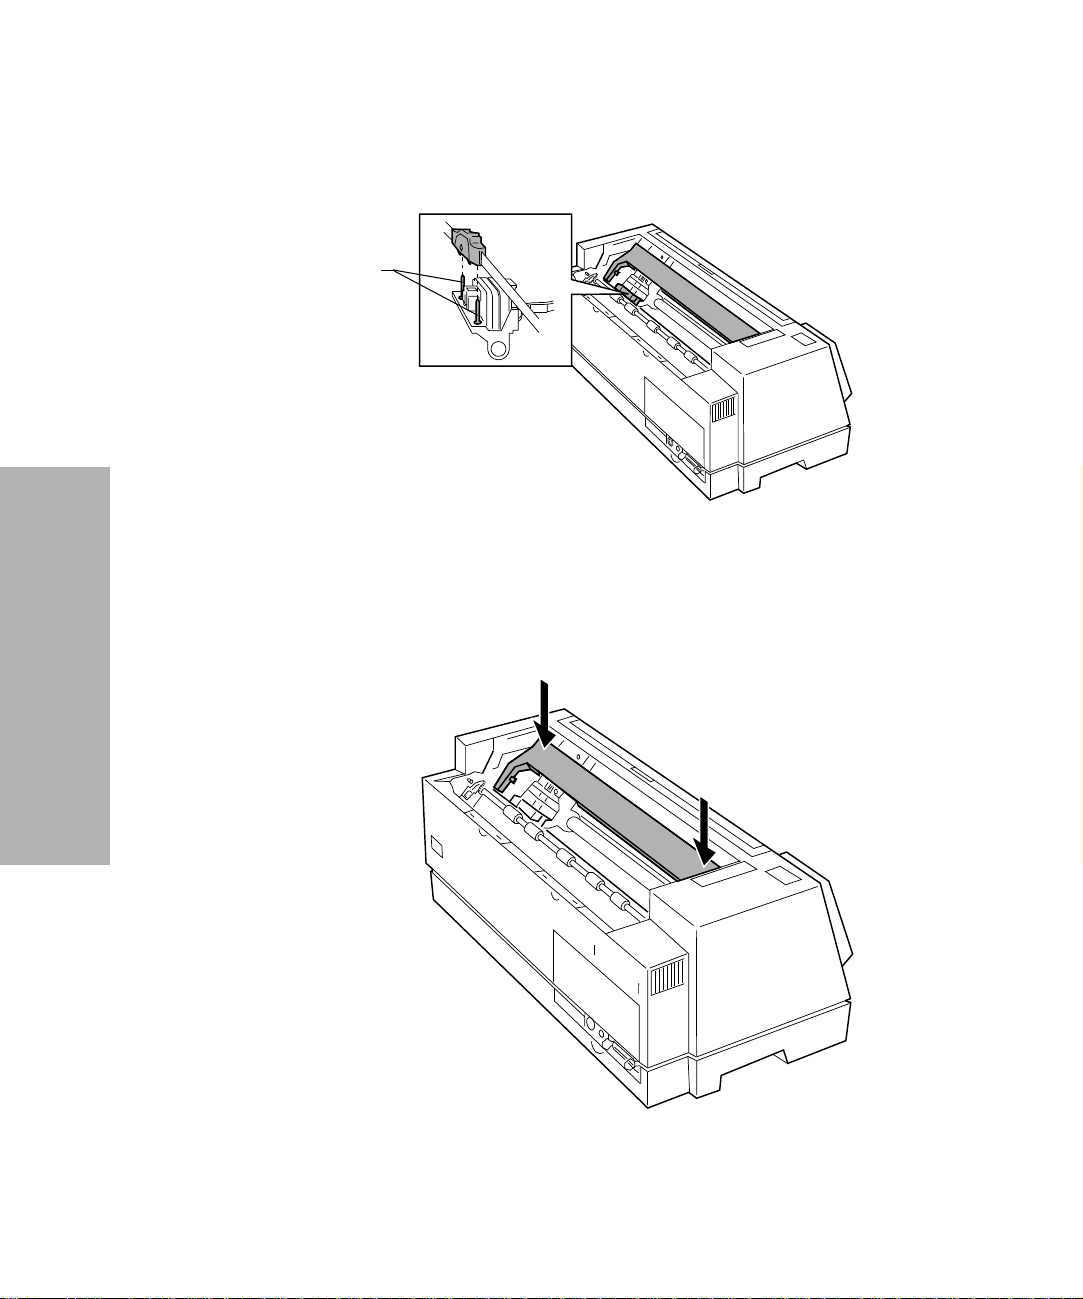
6 Insert the ribbon guide over the metal pins on each side of the
printhead.
Pins
7 Manually move the printhead to the center position.
Align and insert the left and right side tabs of the ribbon
8
cartridge into the slots in the side frames.
Press down firmly on the ribbon cartridge to snap it into place.
Getting Started
6
Chapter 1: Getting Started
Page 13
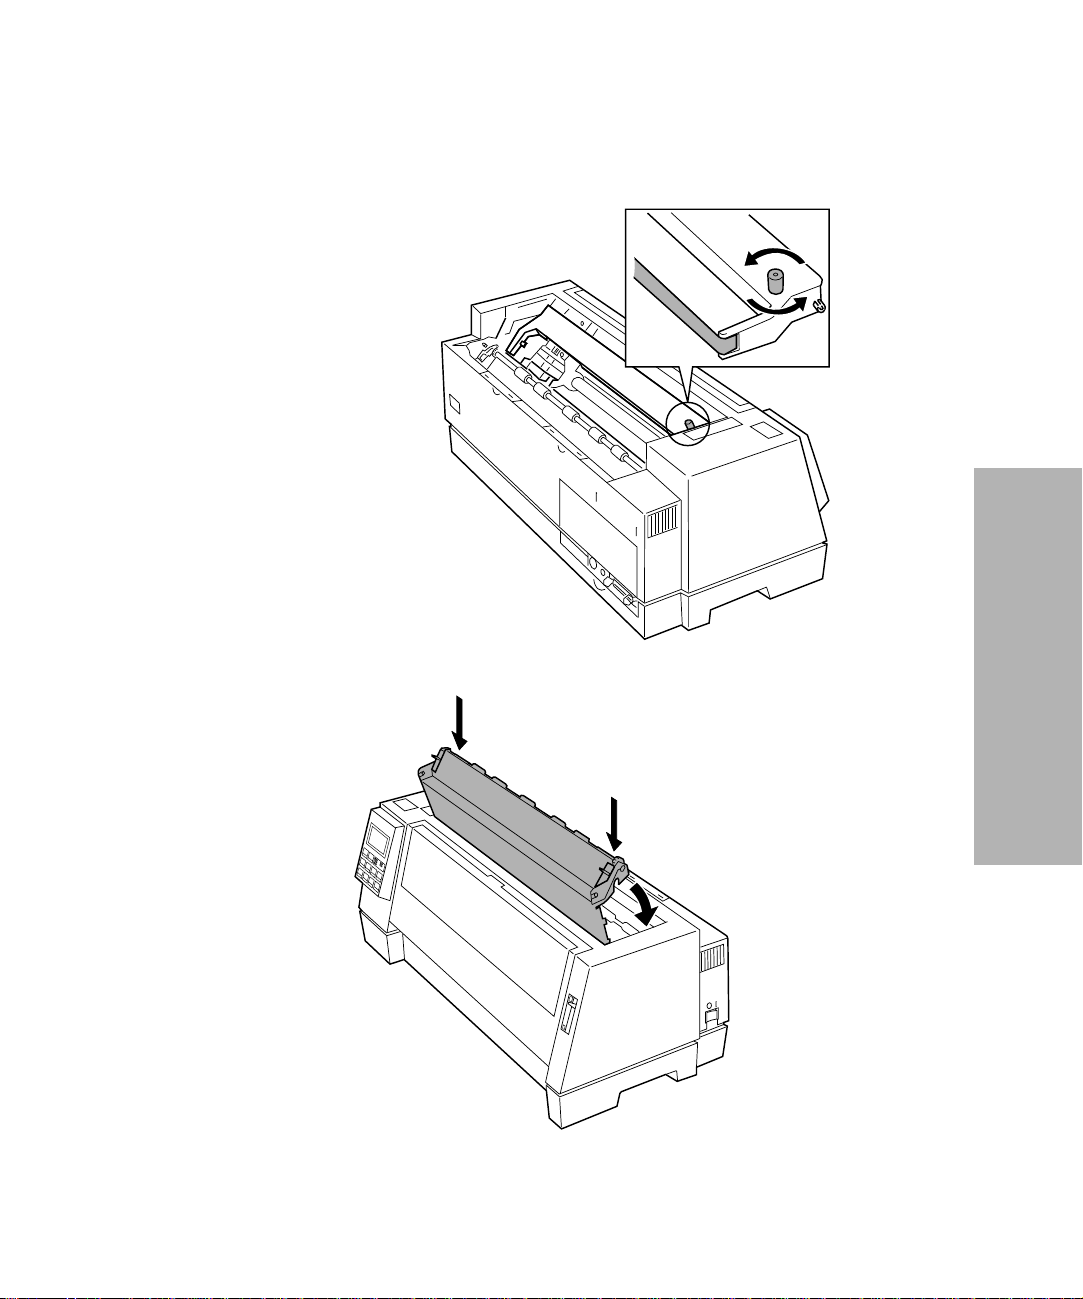
9 Make sure the ribbon feeds smoothly by rotating the ribbon
advance knob counterclockwise.
10 Replace the top cover.
Getting Started
Chapter 1: Getting Started
7
Page 14
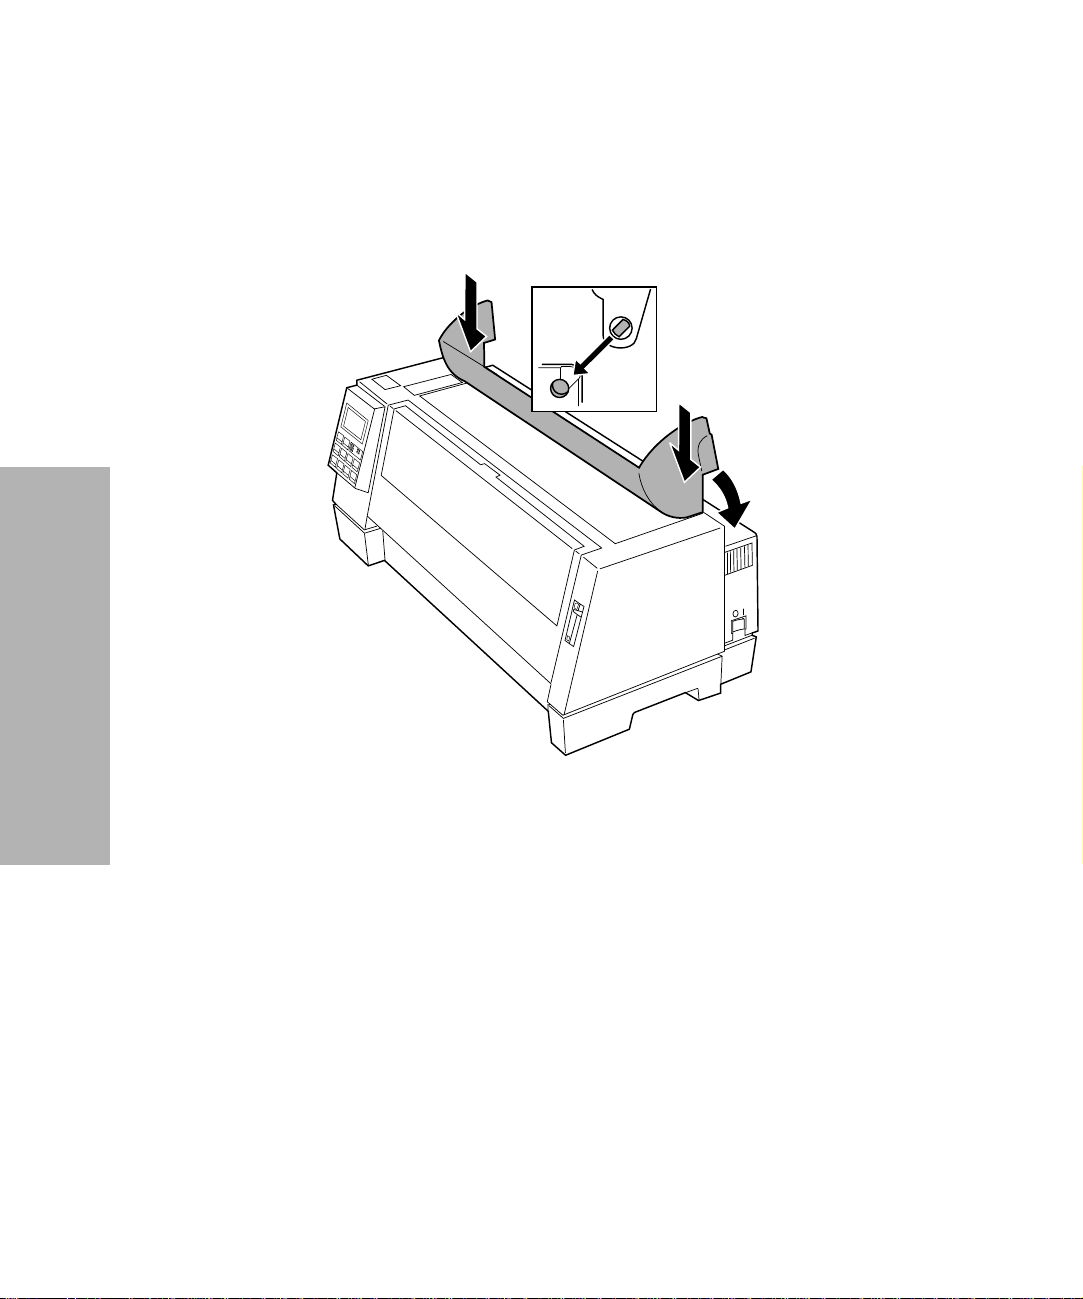
11 Attach the acoustic cover.
Align the notches on the acoustic cover with the slots on the
a
top cover.
Snap the acoustic cover into place.
b
Getting Started
8
c Close the acoustic cover.
Chapter 1: Getting Started
Page 15
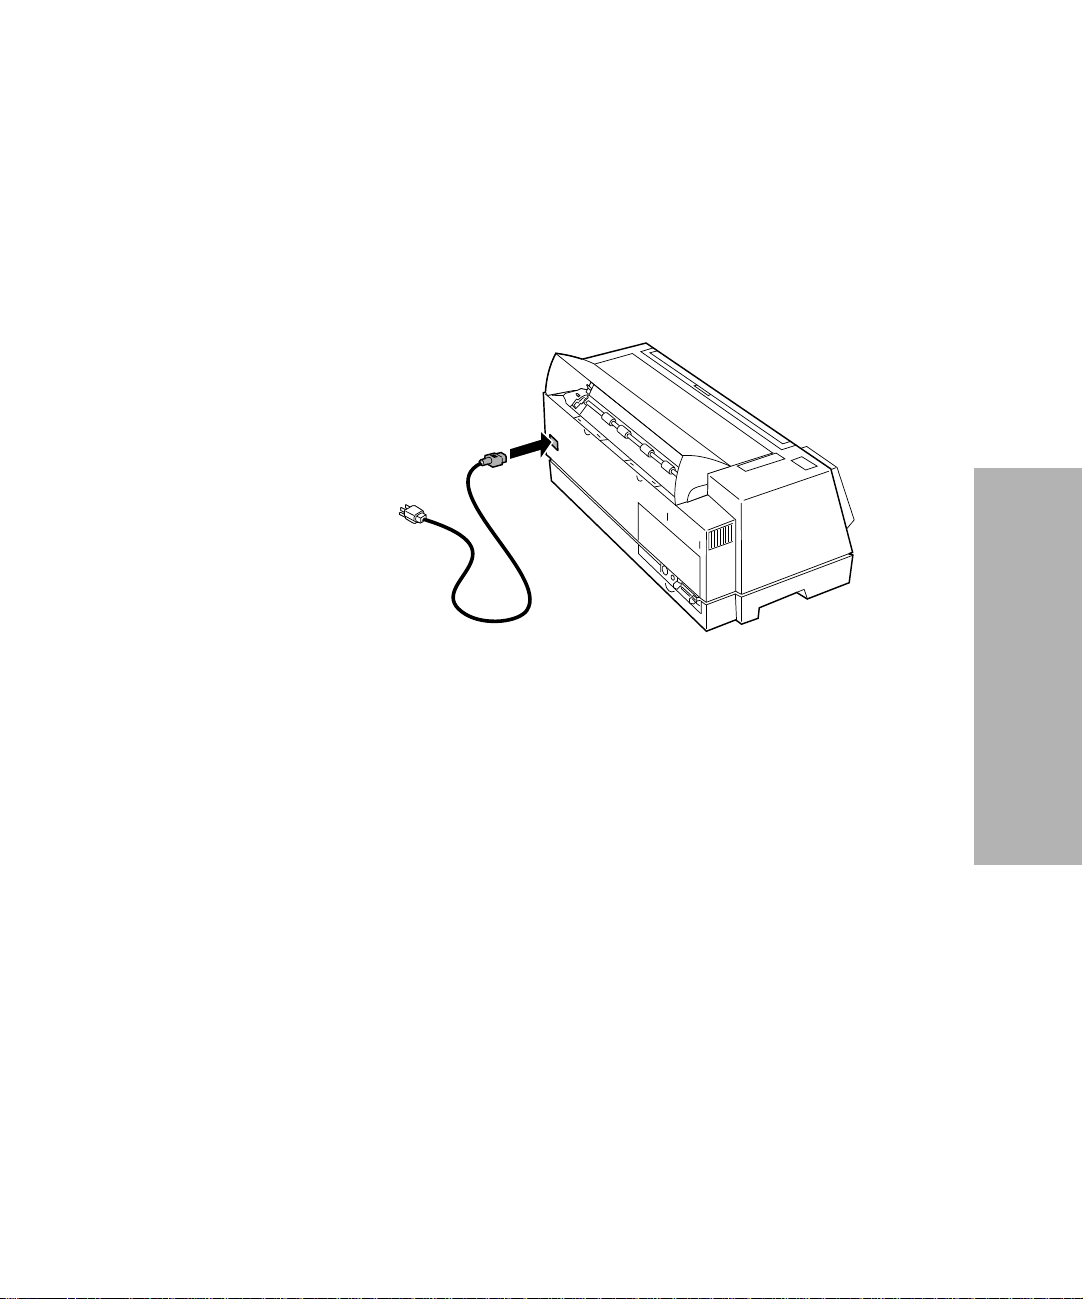
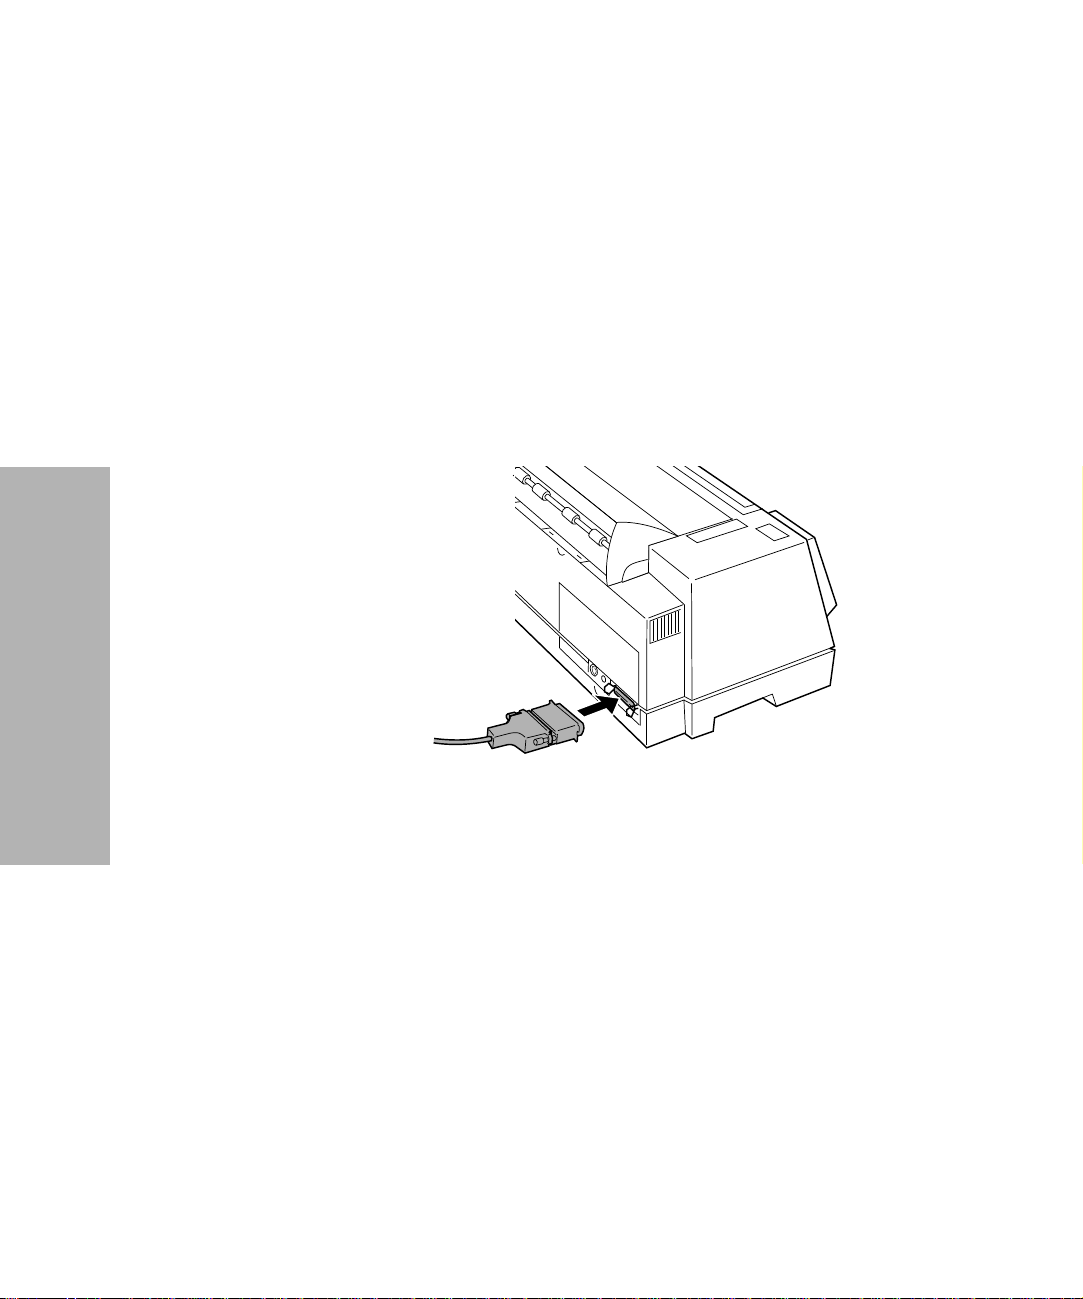
Connecting the Power Cord
Make sure the printer is Off.
1
Connect the smaller end of the power cord to the printer.
2
3 Connect the other end of the power cord to a properly
grounded electrical outlet.
Getting Started
Chapter 1: Getting Started
9
Page 16
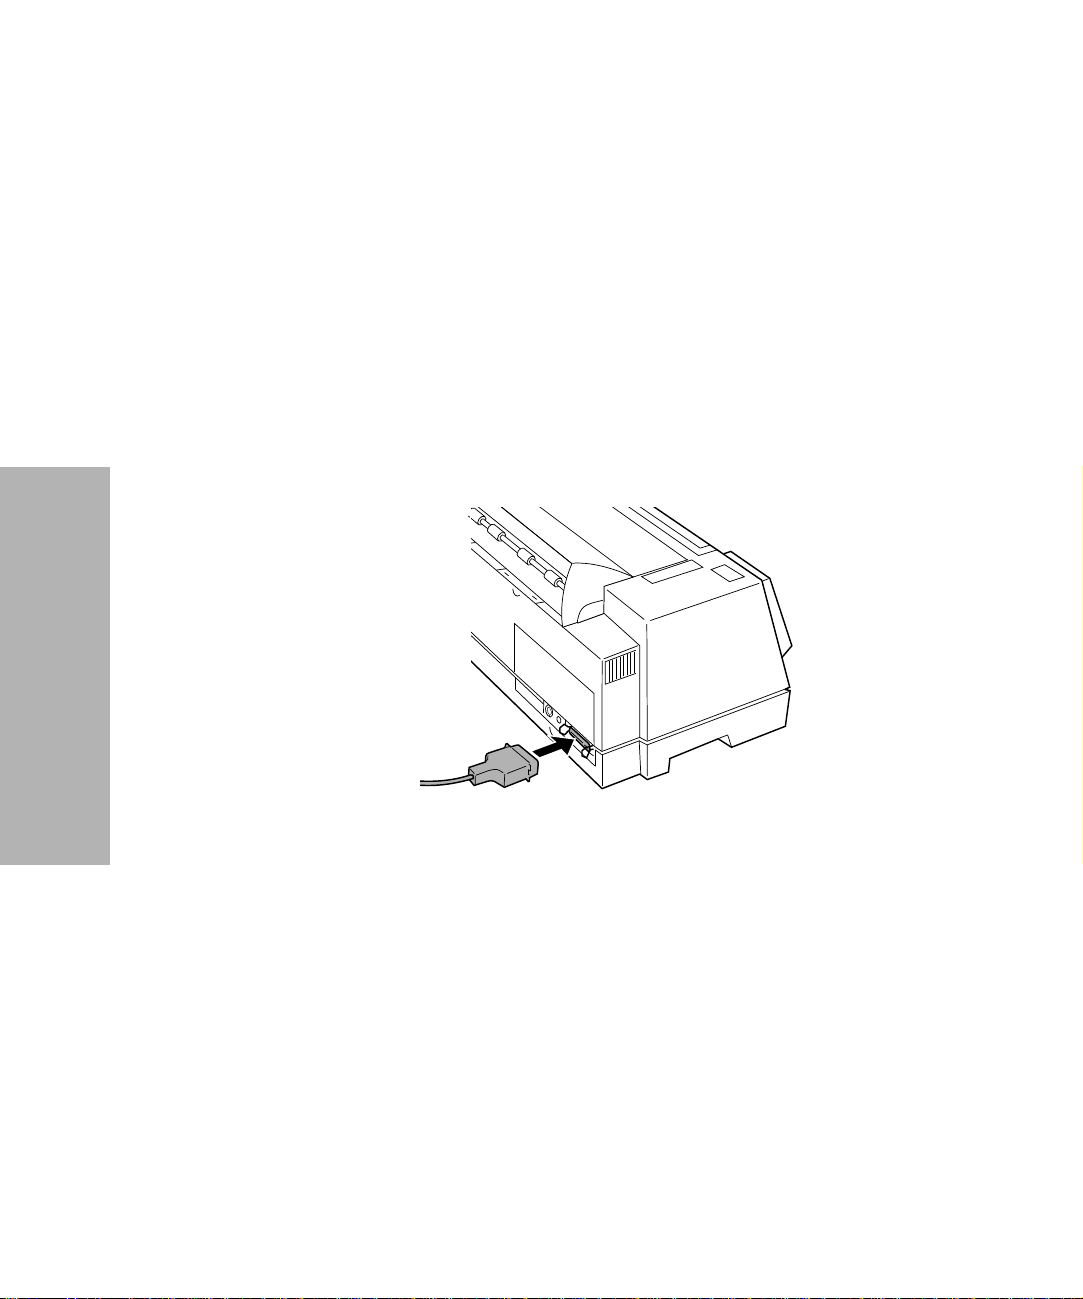
Connecting the Parallel Cable
You will either need to connect a parallel cable or a serial cable to
the printer. If you are installing a serial cable, see “Connecting the
Serial Cable” on page 12 for help.
1 Make sure the printer is Off.
Turn off the power on your computer.
2
3 Connect the parallel cable. This cable is not supplied with
your printer. An IEEE 1284-compliant parallel cable such as
Lexmark part number 1329605 (3.05 m or 10 ft.) or 1427498
(6.1 m or 20 ft.) is recommended.
Getting Started
10
Note: You do not need to attach a grounding wire to the
computer.
Chapter 1: Getting Started
Page 17
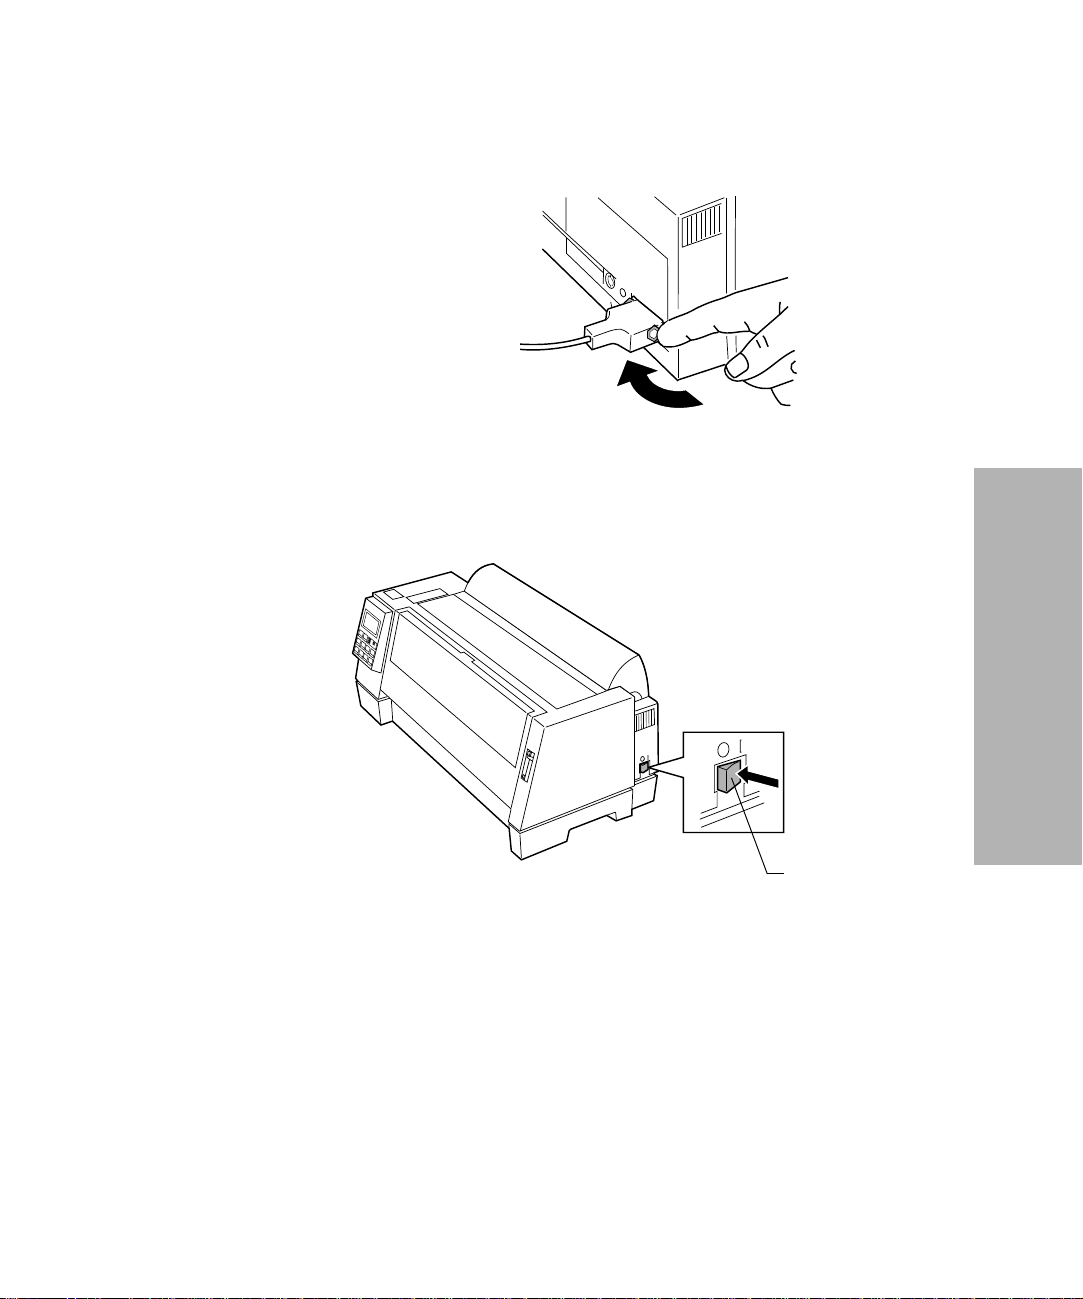
4 Fasten the clip wires to the parallel cable. You will hear a click.
5 Connect the other end of the parallel cable to your computer.
6 Turn the printer On.
Getting Started
Power Switch
Continue with “Printing the Demonstration Page” on page 16.
7
Chapter 1: Getting Started
11
Page 18
Connecting the Serial Cable
Turn the printer Off.
1
Turn off the power on your computer.
2
3 Connect the serial cable and adapter. The cable and adapter
are not supplied with your printer. We recommend either one
of Lexmark’s null modem RS 232 (DB 25 Female to DB 25
Male) serial cables, part numbers 1180786 (20 ft.) or 1038693
(50 ft.) along with the Serial Interface Adapter, part number
1319143 (DB 25 Female to Centronics 36 pin Male).
Getting Started
12
If you do not wish to use our recommended DB 25 to DB 25
null modem cables, or if you already have a similar RS 232
null modem cable, you may only need to attach Lexmark’s DB
25 to Centronics 36 Serial Adapter (part number 1319143) to
your existing cable.
Note: You do not need to attach a grounding wire to the
computer.
Chapter 1: Getting Started
Page 19
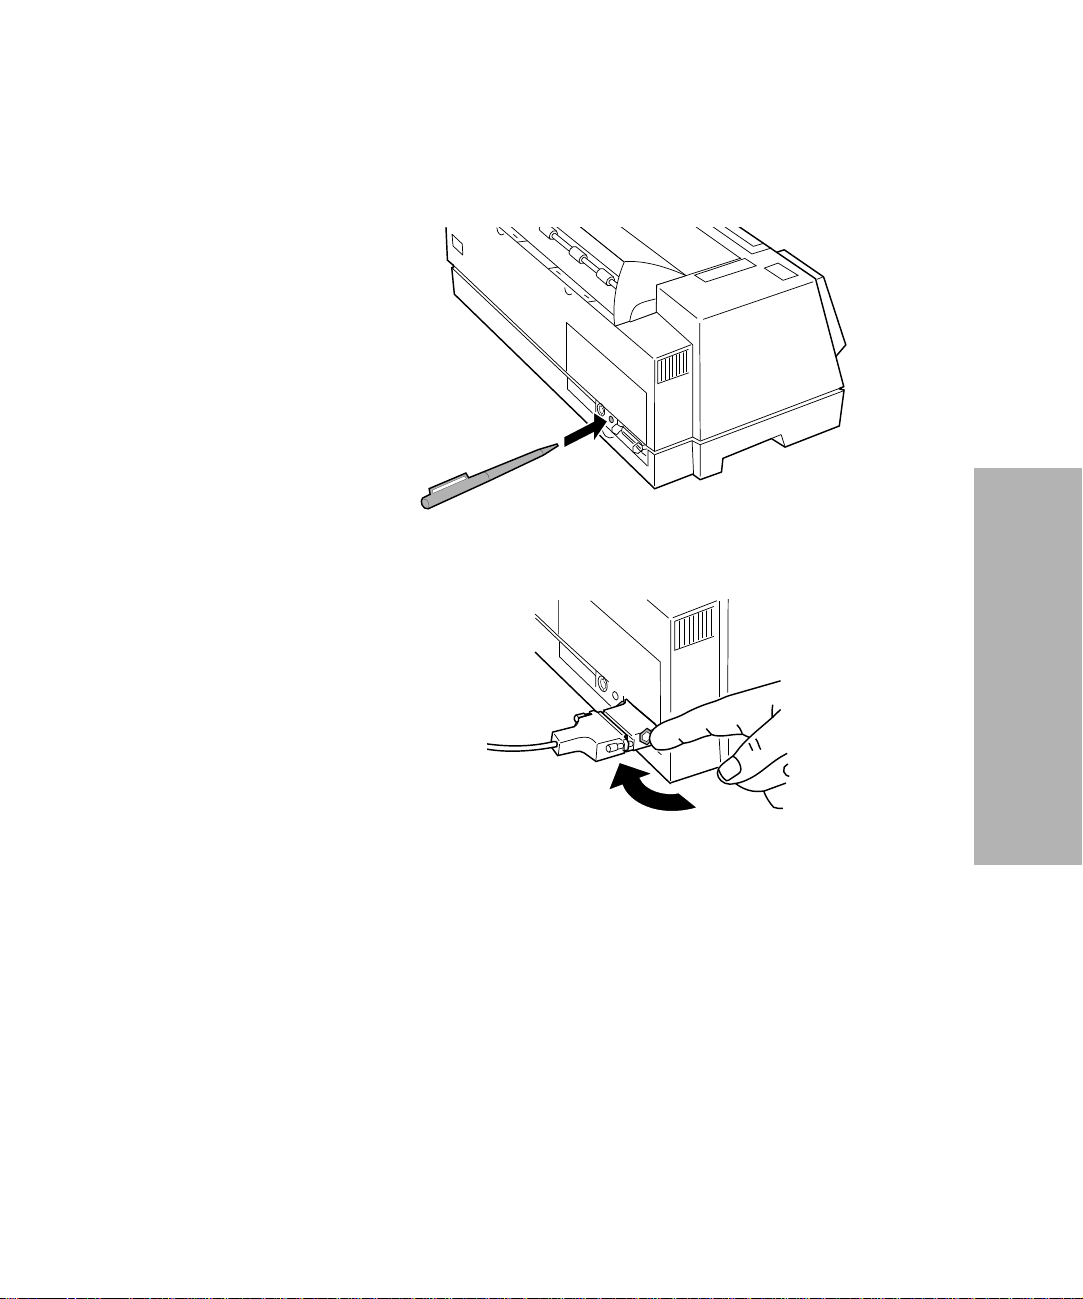
4 If needed, use a ballpoint pen to push the interface mode
switch to the On position for RS-422 interface. The default is
RS-232 interface.
Fasten the clip wires to the serial cable. You will hear a click.
5
Getting Started
Connect the other end of the serial cable to your computer.
6
Chapter 1: Getting Started
13
Page 20
Changing the Serial Settings
Turn the printer On.
1
Press Menu to enter the function menu.
2
3 Press Item ↓ until Interface Opt. appears on the display.
Interface Opt.
Getting Started
Menu/
Quit
Font
Item
Start/
Stop
Press Next → and the default interface setting appears.
4
5 To change the default, press Next
interface option you want appears. Press Store.
Press Prev. ← to go back to the interface level.
6
Tear Off
Store
Pitch
Item
Load
Unload
Power
Ready
AutoGap
Micro
Next
LineFeed
→
Tractor2
Check
Micro
Prev.
FormFeed
and then Item ↓ until the
7 To change the serial settings:
Press Item ↓ until Data speed (baud rate) appears.
a
b Press Next →.
Press Item ↓ until the appropriate data speed setting
c
appears.
Chapter 1: Getting Started
14
Page 21

d Press Store to save the setting. An asterisk (*) appears next
to the setting you selected.
e Repeat steps a through d for each serial setting.
Press Quit to exit the function menu.
8
Verifying Serial Interface Settings
1 On the operator panel, press Menu.
Press Item ↓ or Item ↑ until Print Settings appears.
2
Make sure that forms are loaded.
3
4 Press Start to print the current printer-function settings.
Press Item ↓ or Item ↑ until the menu item you want appears.
5
6 Press Next
appears.
Press Store to save the selected value. An asterisk (*) appears
7
next to the selected value.
Press Quit to exit the function menu.
8
or Prev. ← until the setting value you want
→
Getting Started
Chapter 1: Getting Started
15
Page 22
Printing the Demonstration Page
The following steps explain how to load a single sheet of paper so
you can print the demonstration page. If you want to load
continuous forms, see “Loading Continuous Forms” on page 70.
1 Turn the printer On.
Move the paper select lever up to the single sheets position.
2
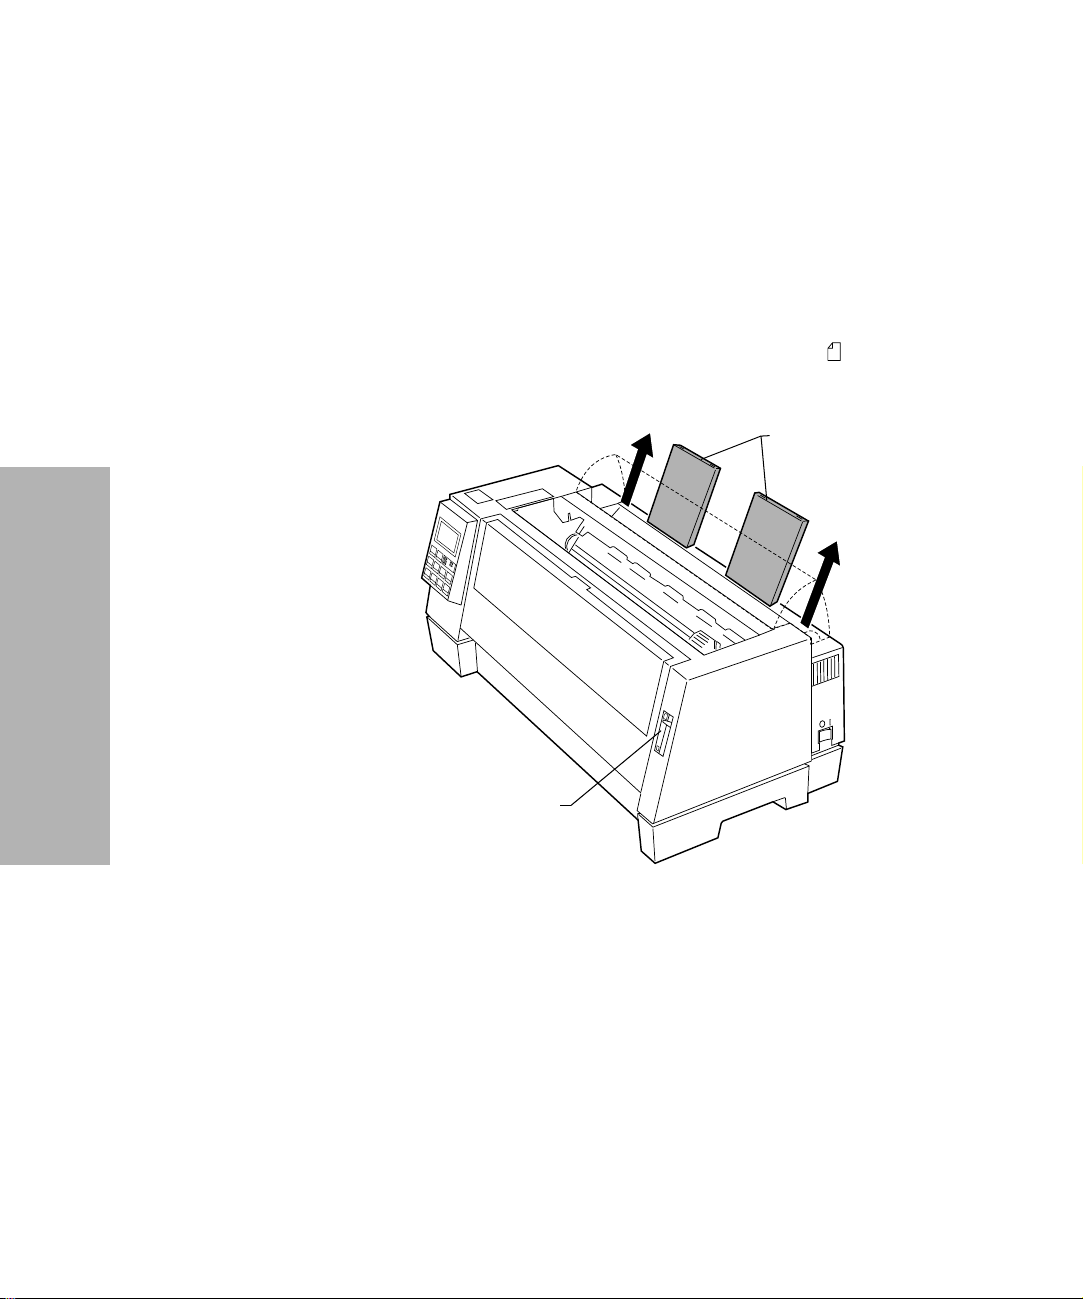
3 Pull the paper supports up.
Paper Supports
Getting Started
16
Paper Select Lever
Chapter 1: Getting Started
Page 23
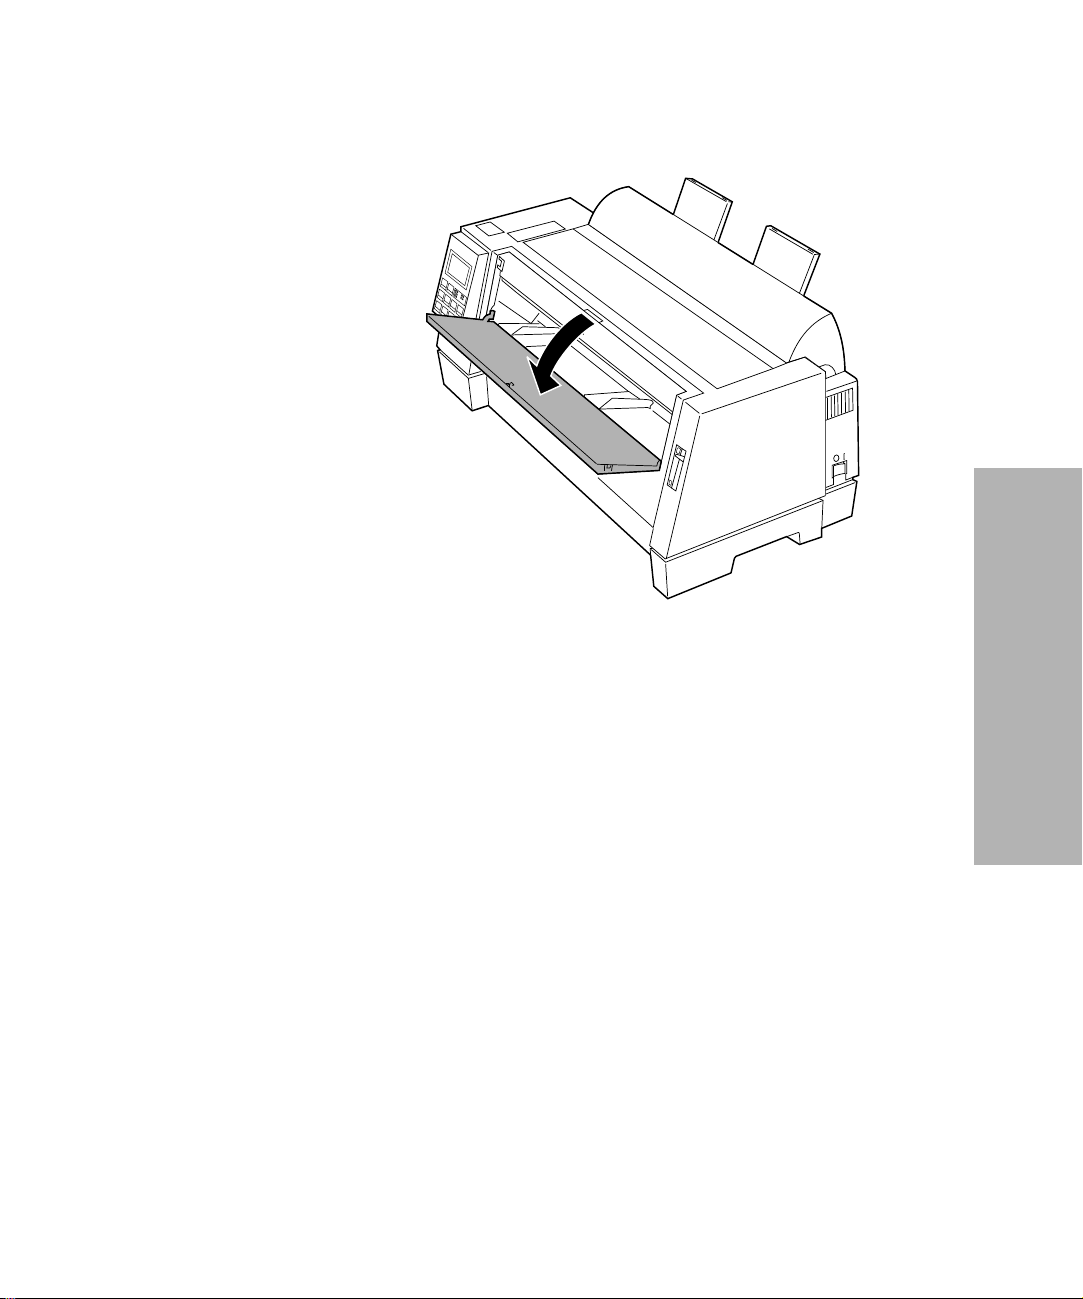
4 Open the manual feed door.
Getting Started
Chapter 1: Getting Started
17
Page 24
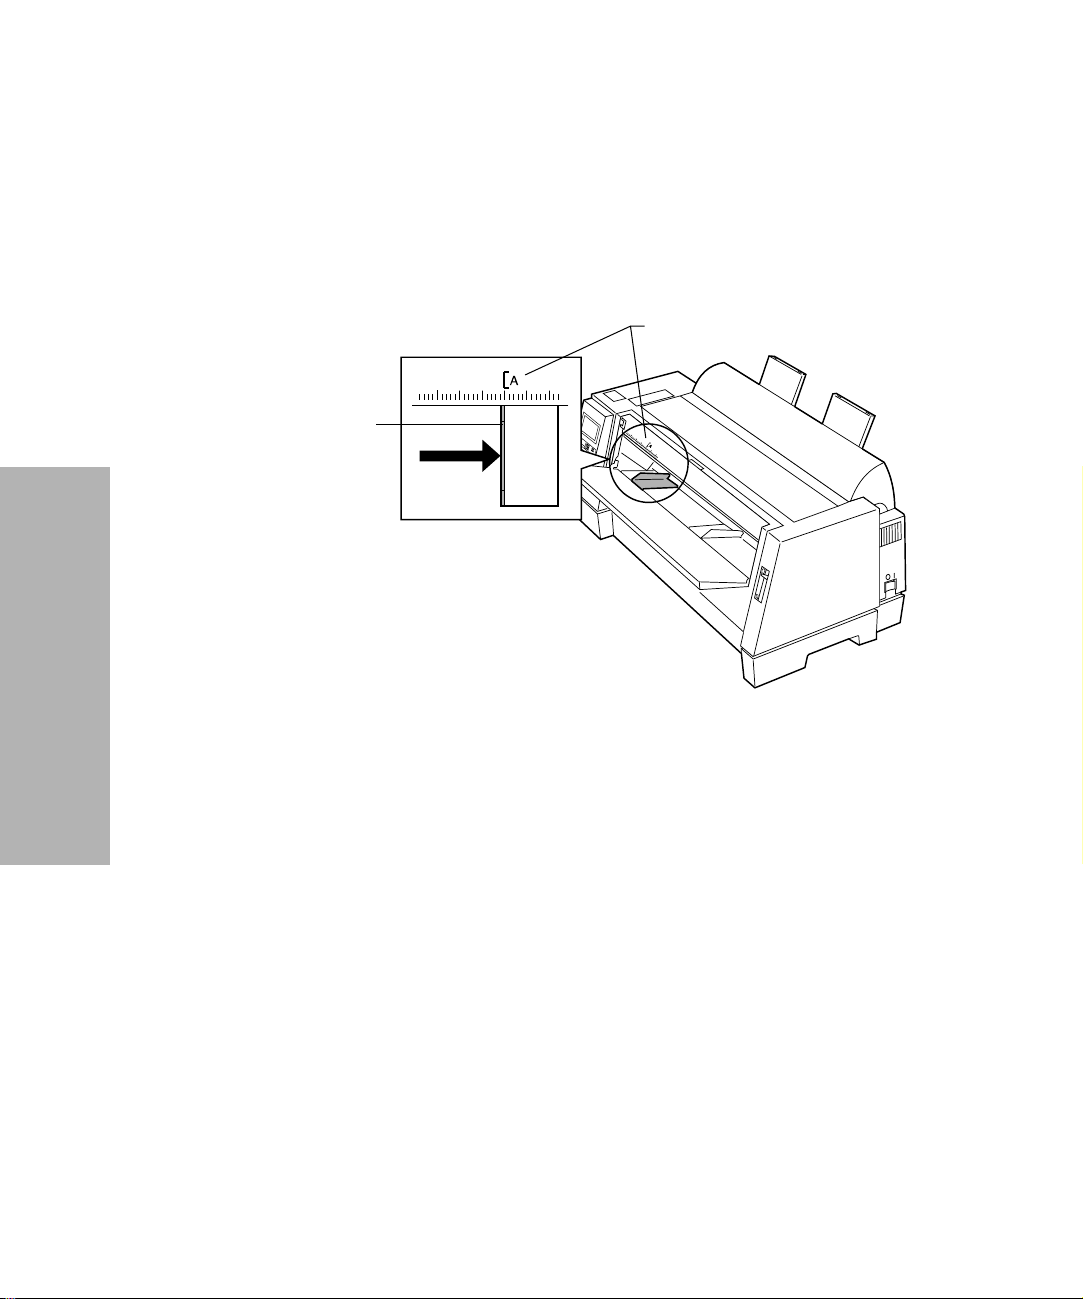
5 Set the left margin. For help, see “Aligning the Left Margin”
on page 74.
Before inserting paper, make sure that the left paper guide is
aligned flush with the [A symbol printed on the margin guide.
If the paper guide is not properly aligned, the Demo page
prints incorrectly.
Margin guide
Left Paper Guide
Getting Started
18
Chapter 1: Getting Started
Page 25
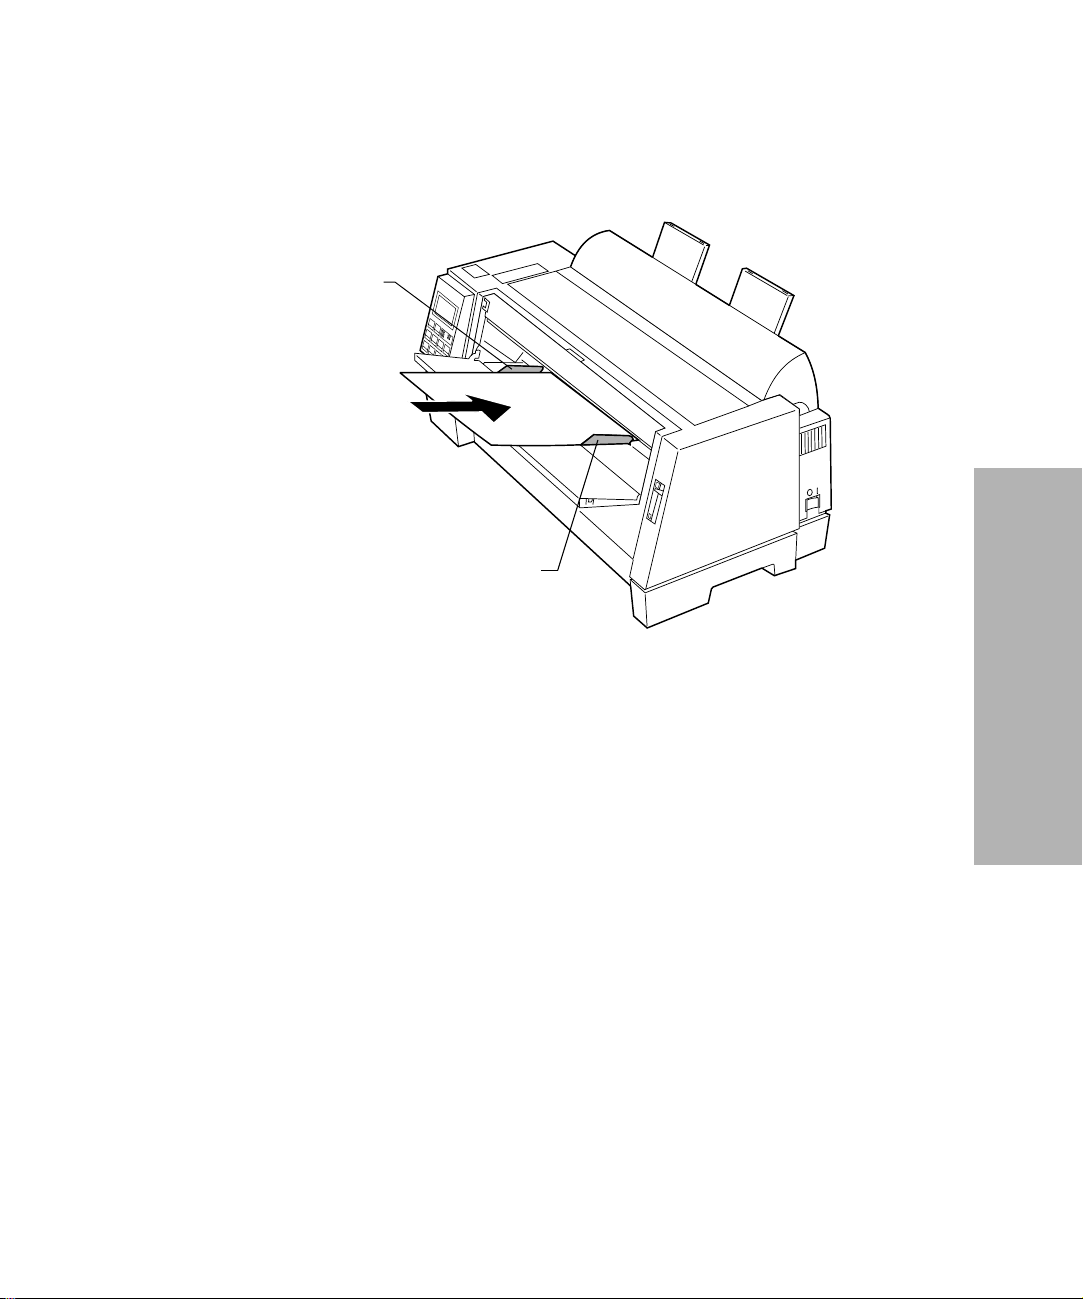
6 Place a single sheet against the left paper guide. Move the
right paper guide so that the guide aligns with the right edge
of the paper.
Left Paper Guide
Right Paper Guide
The Paper Empty/Add Paper message disappears.
a If Auto Cut Sheet Load is On (factory default), the paper
feeds automatically to the Top-Of-Form (TOF). For more
information about setting TOF, see “Setting TOF for Single
Sheets and Envelopes” on page 78.
b If Auto Cut Sheet Load is Off, press FormFeed.
Make sure the printer is online (Ready light is on solid). If it is
7
not, press Start/Stop until the Ready light is on solid. You are
now ready to print.
Press Menu to enter the function menu.
8
Getting Started
Chapter 1: Getting Started
19
Page 26
9 Press Item ↓ until Print Demo is displayed.
Print Demo
Press Start
Getting Started
Menu/
Quit
Font
Item
Start/
Stop
Press Start to start print demo. One demo page prints.
10
Tear Off
Store
Pitch
Item
Load
Unload
Power
Ready
AutoGap
Micro
Next
LineFeed
Tractor2
Check
Micro
Prev.
FormFeed
11 Press Quit to exit the function menu.
Chapter 1: Getting Started
20
Page 27
Setting the Language of the Operator
Panel Messages
To set up your printer in a language other than English:
Turn the printer On.
1
2 Press Menu to enter the function menu.
Press Item ↓ or Item ↑ until Control Options appears on the
3
display.
Menu/
Quit
Font
Item
Start/
Stop
Control Options
Tear Off
Store
Pitch
Item
Load
Unload
Micro
Next
LineFeed
Power
Ready
AutoGap
Getting Started
Tractor2
Check
Micro
Prev.
FormFeed
Chapter 1: Getting Started
21
Page 28

Getting Started
4 Press Next .
Press Item ↓ or Item ↑ until Menu Language appears on the
5
display.
Press Next .
6
7 Press Item ↓ or Item ↑ until the desired language appears on
the display.
Note: The message displayed appears in English until the
selected language is saved. The following figure
provides the corresponding language to help you.
Displayed Language
English (English)
French (Français)
German (Deutsch)
Italian (Italiano)
Spanish (Español)
8 Press Store to save the selected language. The selected
language is displayed with an asterisk (*) and the message on
the display changes to the selected language.
Chapter 1: Getting Started
22
To change the selected language, repeat steps 2-8.
Press Quit to exit the function menu.
9
Page 29

Installing Your Application Software
Now that you have set up your printer, make sure that it works
with the application software (program) you want to use. Most
application software programs let you specify the type of printer
you are using so the program can take full advantage of the
printer’s features.
Follow the instructions that came with your application software
to see what printer drivers are available with that specific
program.
PPDS Mode
If your printer is configured for PPDS Mode (the factory default),
select a printer from the printer selection menu of your application
software, in the following preferred order.
4227
1
2 Forms Printer 2381 Plus
2381 Plus
3
Getting Started
4 2381
4226
5
6 IBM Proprinter III XL
The printer driver you select in your software application must
match the emulation mode you select for your printer. If your
software does not allow you to select the 4227 Printer driver, you
may need to customize your printer for the Epson emulation
mode.
Chapter 1: Getting Started
23
Page 30

Epson Emulation Mode
If your printer is configured for Epson mode, select the Epson
FX-1050 or DFX-5000 printer from the printer selection menu of
your application software.
See your application’s user documentation for more information.
What to do Next
You have completed printer setup. To learn more about your
printer, continue with “Using the Operator Panel” on page 31.
Getting Started
24
Chapter 1: Getting Started
Page 31
Features and Functions
Your printer has many features to help you perform your work
efficiently. The printer combines excellent print quality along with
the ability to print several print styles and graphics.
The following table describes the features and functions of your
printer.
Feature Function
Multi-speed
Printing
Character Spacing
Line Spacing
Resident Fonts
Forms Handling
FastDraft—533 characters per second (cps)
Draft—400 cps
Courier and Gothic (near-letter quality)—100 cps
Prints in 10, 12, 15, 17.1, and 20 pitch characters per inch (cpi),
as well as proportional spacing.
Increments of 1/144 inch (n/216″ increments emulation)
FastDraft, Draft, Courier, and Gothic
• Forms (straight paper path)
• Automatic tear-off
• Automatic paper loading/unloading
Chapter
2
Features and Functions
Form Width
Print Width
Maximum 16 inches
Maximum 13.6 inches
Chapter 2: Features and Functions
25
Page 32

Feature Function
Multiple-part
Forms Printing
Code Pages Your printer supports the following code pages: 437, 437G, 813,
Software
Compatibility
Interface
Connection
AutoGap When AutoGap is set to On, the printer automatically adjusts to
6-part forms (carbon and carbonless)
850, 851, 853T, 857, 860, 861, 863, 865, 869, 920, 1004, and 1053.
Compatible with all IBM and IBM-compatible computers.
For Parallel, RS-422, and RS-232 cables
the thickness of the paper you are using.
Features and Functions
Chapter 2: Features and Functions
26
Page 33

Front View of Printer
Top Cover
Operator Panel
Manual Feed Door
Paper Guides
Paper Supports
Acoustic Cover
Features and Functions
Front Cover
Paper Select Lever
Part Name Function
Acoustic cover Lowers noise level produced by the printer.
Front cover Covers the continuous forms tractor.
Manual feed door Manual feed of cut forms.
Operator panel Indicates printer status and makes control of printer
functions simple and convenient.
Chapter 2: Features and Functions
Power Switch
27
Page 34

Part Name Function
Paper guides Aligns the margins of a cut form sheet.
Paper select lever Selects the paper type:
• Cut form sheets ( )
• Continuous forms ( )
Paper supports Supports cut forms when they are ejected from the printer.
Power switch Switches power On or Off.
Top cover Covers the ribbon cartridge and internal components.
Features and Functions
Chapter 2: Features and Functions
28
Page 35

Rear View of Printer
Tear-Off Bar
Power
Connector
Tractor Connector
Interface Mode Switch
Parallel or Serial Connector
Features and Functions
Part Name Function
Parallel or serial connector Connects the parallel or serial cable.
Interface mode switch Switches to RS-232c or RS-422 mode.
Tear-Off bar Allows you to tear off continuous forms.
Tractor connector Supplies power to the optional Tractor 2 Feeder.
Power connector Connects power from the power cord to the printer.
Chapter 2: Features and Functions
29
Page 36

Supplies
A parallel or serial cable, ribbon cartridges, and paper are the only
supplies you need for your printer.
You can order a parallel cable from Lexmark. Order part number
1329605 (3.05 m or 10 ft.) or part number 1427498 (6.1 m or 20 ft.).
When you need a new ribbon cartridge, order Lexmark part
number 11A6150.
You can order a serial cable from Lexmark. Order Lexmark part
number 1180786 (6.1 m or 20 ft.) and part number 1319143.
See “Paper Types and Sizes” on page 55 for the types and sizes of
paper you can use with your printer.
Features and Functions
Chapter 2: Features and Functions
30
Page 37

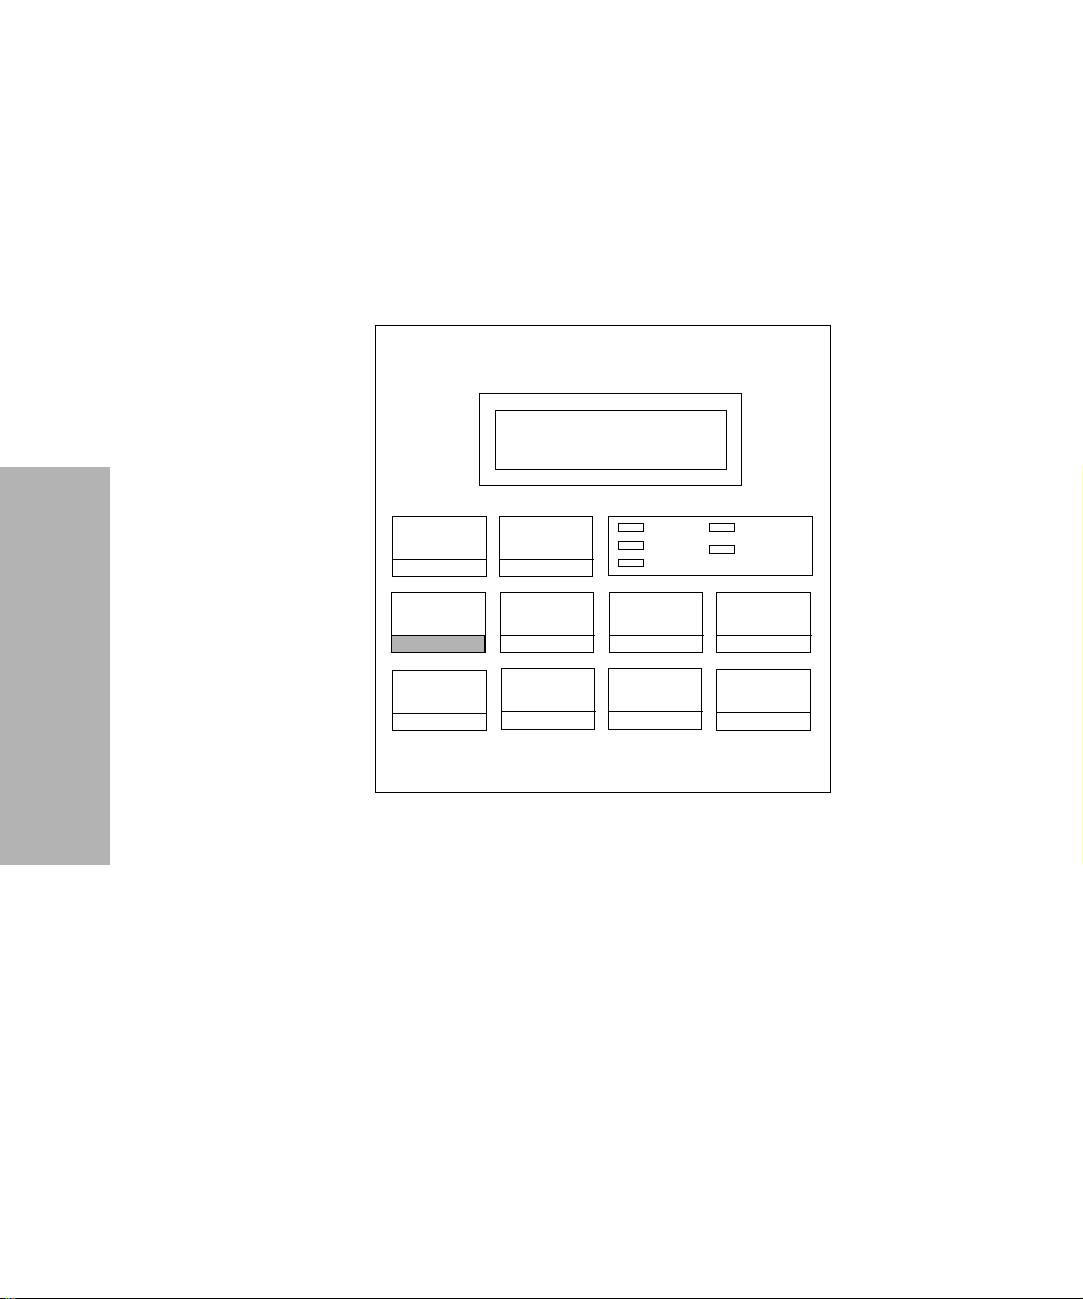
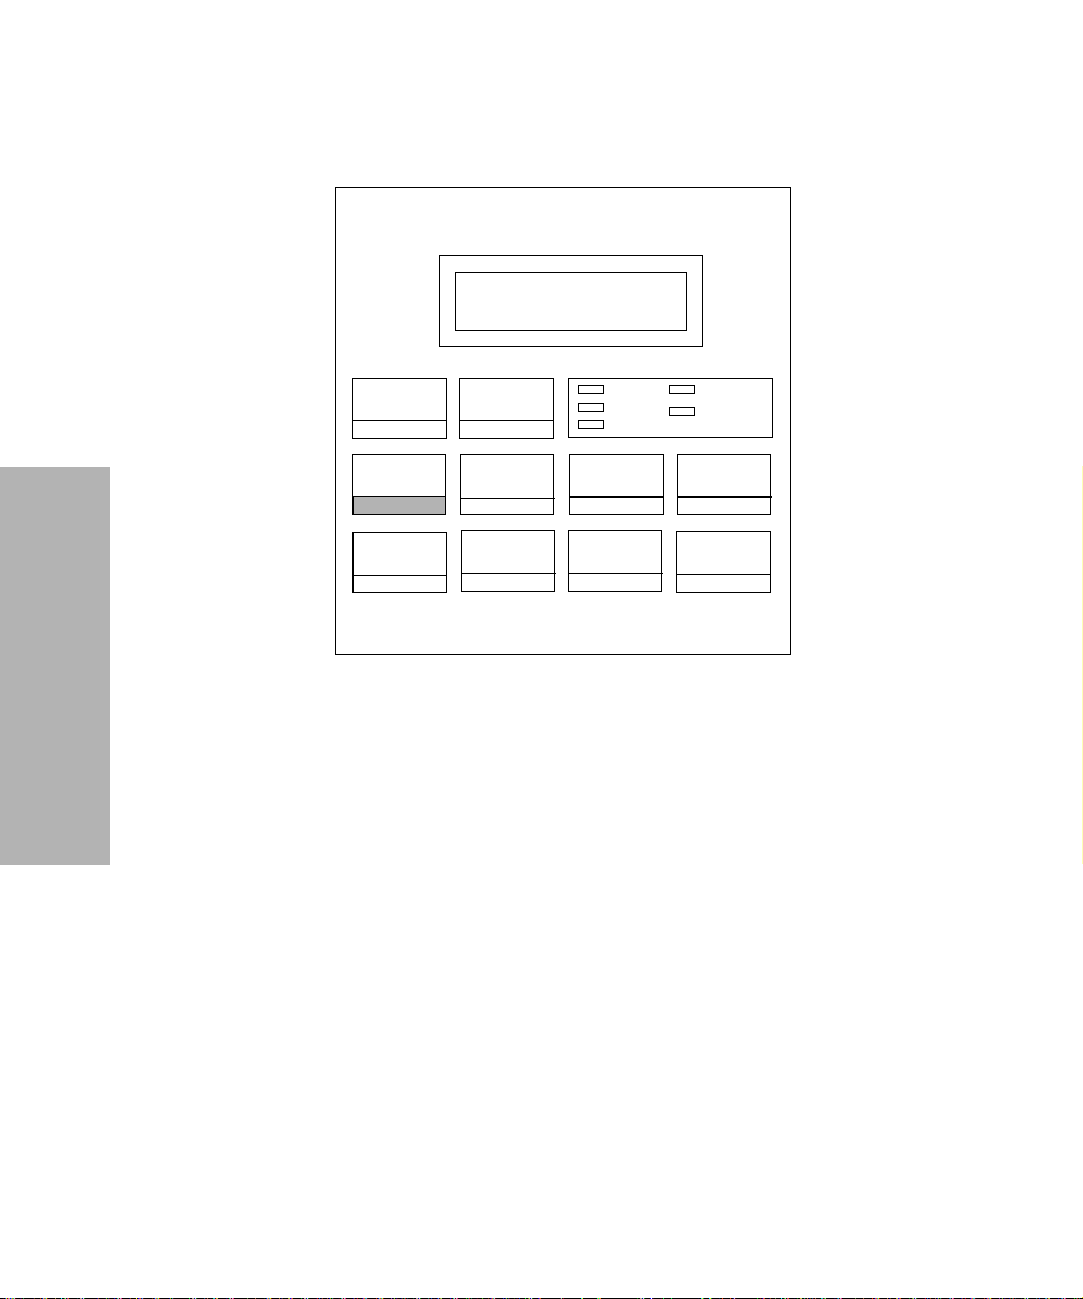
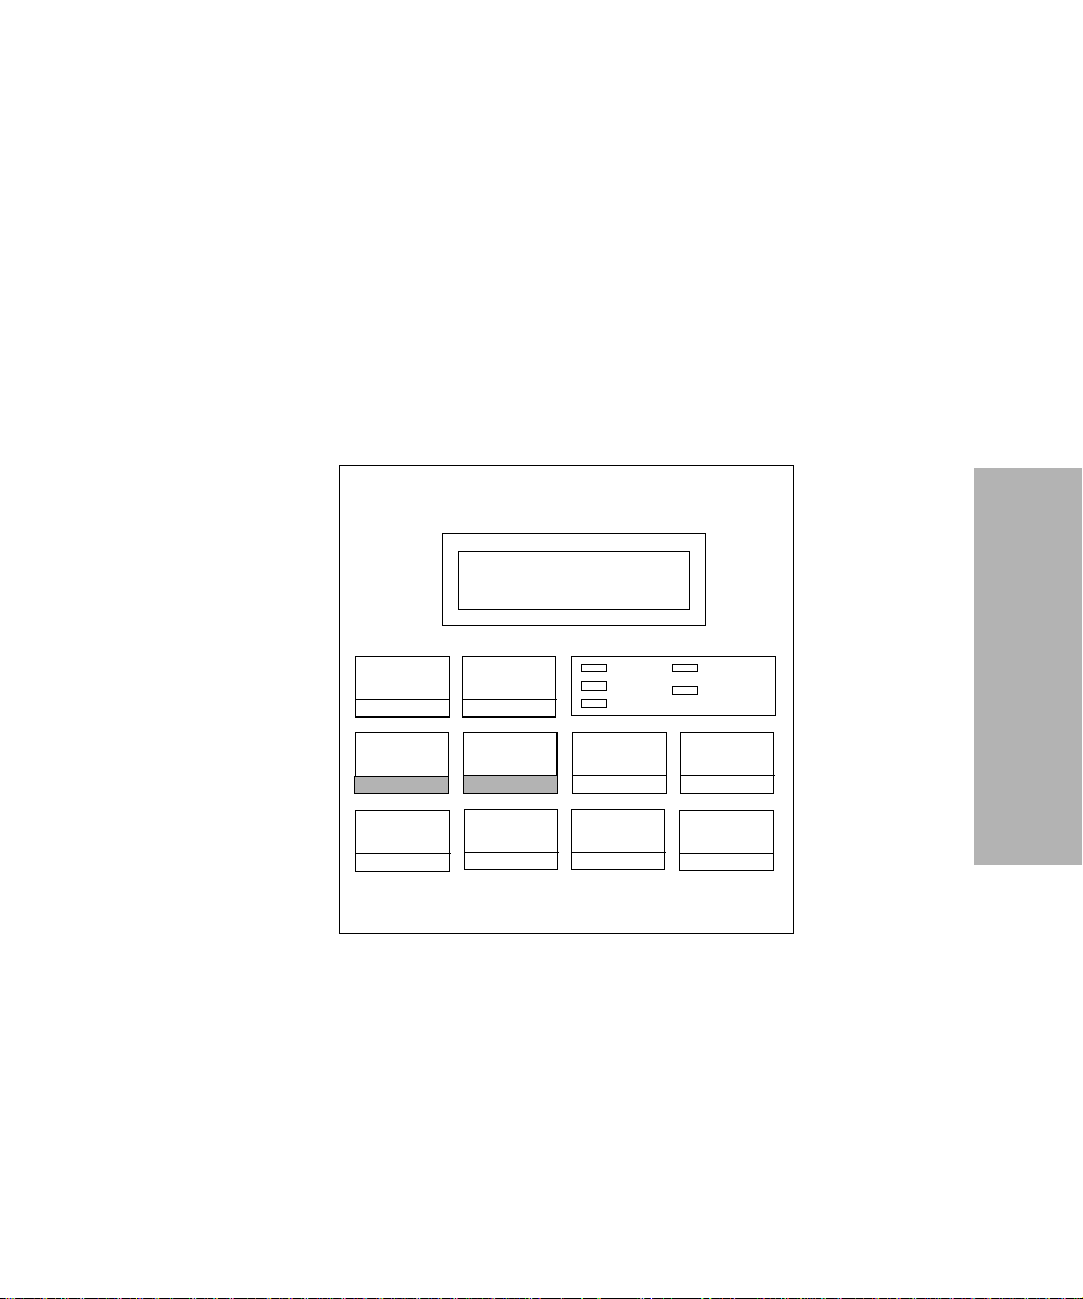
Using the Operator Panel
Chapter
This section describes the basic functions of the operator panel buttons,
lights, and the function menus.
Display
Menu/
Quit
Font
Item
Start/
Stop
Tear Off
Store
Pitch
Item
Load
Unload
Power
Ready
AutoGap
Micro
Next
LineFeed
Tractor2
Check
Micro
Prev.
FormFeed
3
Using the Operator Panel
Your application software may allow you to operate your printer from
your computer. You may not need to use the operator panel very often,
although, you will need to check the operator panel for messages if you
have printer problems.
Changes made to printer settings from your application software override
settings made from the operator panel, with the exception of the Font and
Pitch Lock features.
Chapter 3: Using the Operator Panel
31
Page 38

Buttons
When using the function menus, press Item ↓ or Item ↑ to scroll through
the menu items. Press Next
menu level.
Press this button: When you want to:
Enter the function menu. The printer goes offline.
Menu
Quit
Tear Off
Store
Font
•
Exit the function menus.
•
Run a Power-On Self Test (POST).
•
Advance the forms to the tear-off position.
•
Retract the forms to the Top-of-Form (TOF) position when the
•
forms are at the tear-off position.
Save the values you selected in the menus.
•
Select a font. See “Character Options” on page 40 for a list of
•
fonts available for your printer.
When you press
current pitch and font.
Font
→
or Prev. ← to move to the next previous
, the printer goes offline and displays the
Using the Operator Panel
Item
↓
Pitch
Item
↑
Chapter 3: Using the Operator Panel
32
Note:
When a pitch conflicts with a selected font, the
Pitch
message appears on the display.
Scroll down to display the selection you want.
•
Select a pitch. See “Character Options” on page 40 for the pitches
•
available for your printer.
When you press
current pitch and font.
Note:
When a font conflicts with a selected pitch, the
Pitch
Scroll up to display the selection you want.
•
Pitch
, the printer goes offline and displays the
message appears on the display.
Invalid
Invalid
Page 39

Press this button: When you want to:
Advance the forms down 0.35 mm (1/72 in.).
Micro
Next
Micro
Prev.
↓
↑
•
When you hold this button for more than one second, the forms
move continuously until you release it.
Scroll forward to display the value you want in the function menu.
•
Advance the forms up 0.35 mm (1/72 in.).
•
When you hold this button for more than one second, the forms
move continuously until you release it.
Return to the previous function menu selection.
•
Start/Stop
Load/Unload
LineFeed
FormFeed
Make sure the printer is online (ready state). The printer must be
•
online to accept data.
This is the only active button when the printer is printing. Press
this button to stop a print job. Printing continues until the current
line is completed. To resume printing, press Start/Stop until the
Ready light is on.
Load the forms to TOF position with the ready light on.
•
Load paper (cut or continuous forms) to the TOF position.
•
Retract the forms to the tractor position.
•
When the printer detects that it is at the end of a form, a message
appears on the operator panel. Press this button to eject the forms
from the printer.
Advance the paper to the next line.
•
To move the paper continuously (while the printer is offline) hold
LineFeed for more than one second.
Advance the paper to the TOF position on the next page.
•
Load the forms to the TOF position.
•
Using the Operator Panel
Chapter 3: Using the Operator Panel
33
Page 40

Lights
Light When you see this light...
Power (Green) The printer power is on.
Ready (Green) The printer is online and ready to print.
Check (Yellow) Any of the following conditions may have occurred:
Using the Operator Panel
The following conditions cause the Ready light to turn off:
Pressing Start/Stop
•
Detecting an end-of-form (EOF)
•
Detecting a paper jam
•
Detecting a cover open
•
Detecting a hardware error
•
Detecting a Power-On Self Test (POST) failure.
•
The printer is offline.
•
Detecting an end-of-form (EOF)
•
Detecting a paper jam
•
Detecting a cover open
•
Detecting a hardware error
•
Detecting a data transmission error
•
Detecting an interface mode error
•
Detecting a Power-On Self Test (POST) failure.
•
AutoGap (Green) AutoGap is on. AutoGap automatically adjusts the printer
Tractor2 (Green) The Tractor 2 Feeder is selected. (The Tractor 2 Feeder option must
Chapter 3: Using the Operator Panel
34
according to the thickness of the paper you are using.
be installed.)
Page 41

Using the Function Menus
This section describes the function menus and how to set them. To set
functions:
1 Press Start/Stop.
2 Press Menu to enter the function menu.
3 Press Item ↓ or Item↑ until the function menu you want appears on
the display.
Note: The selectable function menu is different depending on the
selected data stream mode (IBM PPDS or Epson emulation)
and the Interface mode (Parallel, RS-232 or RS-422).
4
Press Next
to enter that menu item.
5 Press Item ↓ or Item↑ until the value you want appears on the
display.
6 Press Store to save the selected value.
Note: The currently selected default value is displayed with an
asterisk (∗).
If you have to change the optional value in another function menu,
repeat steps 3 through 5. Otherwise, go to the next step.
7 To print the function setting, press Item ↓ or Item↑ until the Print
Settings message appears on the display.
8 Press Start/Stop to print the current setting values.
9 Press Quit to exit the function menus.
Note: If you have changed any settings, the printer performs a
Power-On Self Test. If you did not change any settings, the
printer enters the not-ready state.
Using the Operator Panel
Chapter 3: Using the Operator Panel
35
Page 42
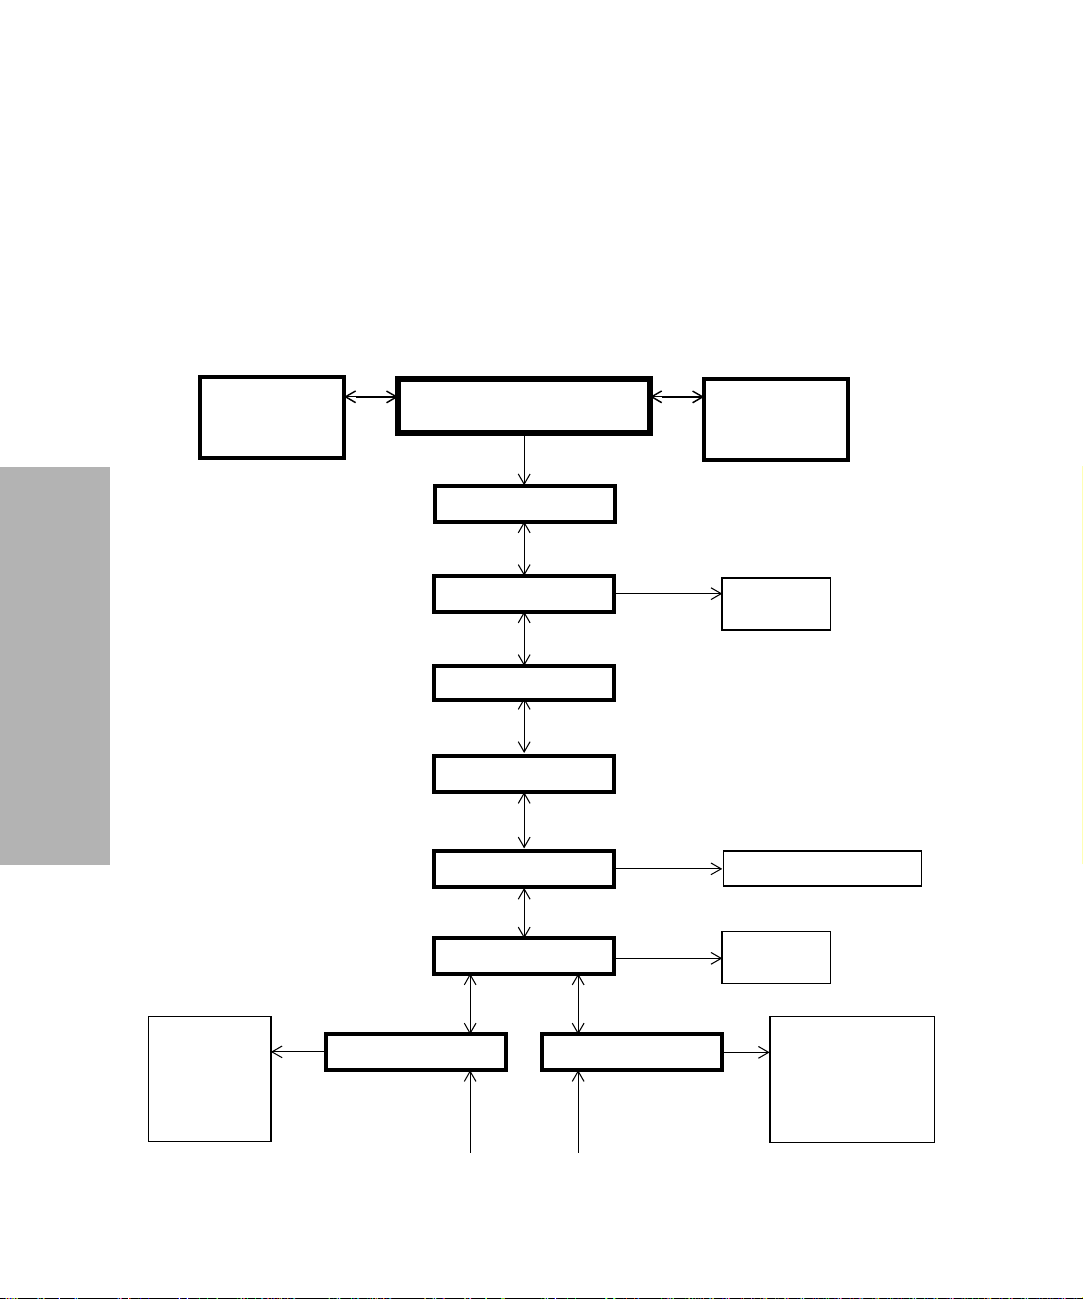
Overview of Function Menus
Use the Item ↑ and Item ↓ buttons to move through the menu and option
directories. Press Next
subordinate directories and choices. Press Prev.
back in a menu or return to the Main Menu.
→
to move away from the Main Menu to the
←
if you want to go
Primary
Options
Note: Menu items
marked with an
asterisk (
appear on the operator
panel, depending on
the printer settings or
what printer options
are installed. See
“Menu Options” on
page 38 for further
Using the Operator Panel
information.
Default
Font/Pitch
Code Page
Character Set
20-Pitch
) may not
*
Press
Next
Main Menu
Disabled
Character Opt.
Set Top of Form
Select Tractor
Print Demo
Print Settings
Load Macro
Default Macro
*
*
Macro x Options
Enabled
Press
Next
Press
Next
Press
Next
Primary
Options
Tractor 1
Tractor 2
Macro
Macro
Disable
Press
Next
(x = 1 to 4)
x
x
Character Opt. M
Paper H. Opt. M
AutoGap M
Single A.G. M
Copy Macro
x
x
x
x
x
Chapter 3: Using the Operator Panel
36
Page 43
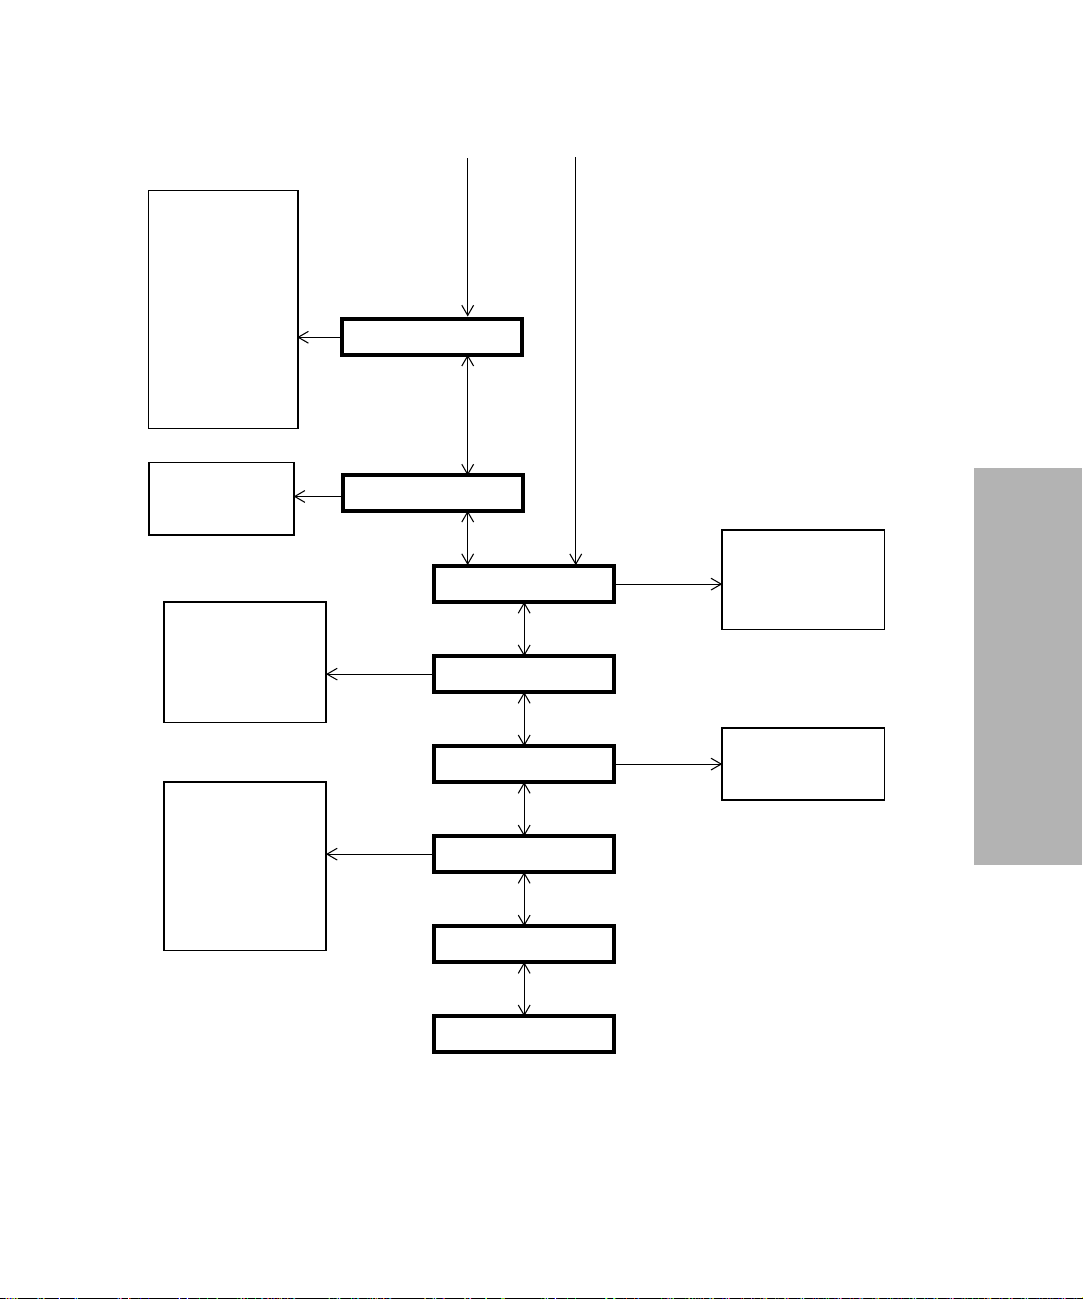
Auto Tear-Off
Auto Cut Sh. Ld.
Auto Sheet Feed
Tractor
*
Form Length
Left Margin
Right Margin
Bottom Margin
Lines Per Inch
Eject by FF
On
Off
Single
Uni-Dir Print
Auto Rdy Cut Sht
Paper Out Alarm
TOF Read
Menu Language
Interface
Data Speed
Data Bits
Parity
Stop Bits
Protocol
Honor DSR
*
*
*
*
*
*
*
Press
Next
Press
Next
Paper Hand. Opt.
AutoGap
Data Options
Press
Next
Control Options
Emulation Opt.
Press
Next
Interface Opt.
Print Adjust
Press
Next
Press
Next
Buffer Size
Automatic LF
Automatic CR
Slashed Zero
Emulation
Character Table
Int’l Character
Using the Operator Panel
*
*
Trace Mode
Chapter 3: Using the Operator Panel
37
Page 44

Menu Options
The following table provides information on where to find specific
functions on the operator panel of the printer. Those selections in italics
may or may not appear on the panel, depending on the printer settings or
what printer options are installed.
Navigating Through the Function Menus
Press: When you want to move:
Item
Item
Next
Prev.
Using the Operator Panel
↑
↓
→
←
Up through the Main, Primary, or Secondary levels.
For example, if the operator panel displays Control Options
and you want Data Options, press Item ↑.
Down through the Main, Primary, or Secondary levels.
For example, if the operator panel displays Print Demo and
you want Print Settings, press Item ↓.
To the Primary or Secondary level of options.
For example, if the operator panel displays Paper Hand Opt.
and you want to select Auto Tear-Off, press Next
Back to a Main or Primary level of options.
For example, if you are in the Secondary Options level and
you want to go back to the Primary level, press Prev.
→
.
←
.
Chapter 3: Using the Operator Panel
38
Page 45

Main Menu Primary Options Secondary Options
Set Top of Form ——
Tractor 1
Select Tractor
Allows you to specify which
tractor you would like to use.
Does not appear unless the
Tractor 2 Option is installed.
Print Demo ——
Print Settings ——
Load Macro
Sets up a macro, for which
you designate the settings.
For example, if you are going
to print many documents
using Gothic 12pt with a oneinch margin, you can use this
function to configure your
printer to use those settings
upon command.
Does not appear if “Disable”
is selected in “Default
Macro”.
•
Tractor 2
•
Macro
x (x
—
= 1 to 4)
Using the Operator Panel
—
Default Macro
Allows you to turn a macro
on or off.
Macro
•
Disable
•
x
—
Chapter 3: Using the Operator Panel
39
Page 46

Main Menu Primary Options Secondary Options
Macro x Options
x
= 1 to 4)
(
Does not appear if “Disable”
is selected in “Default
Macro”.
Character Options
If “Enable” is selected in
“Default Macro”, this item
appears in the macro menu.
Using the Operator Panel
Character Options
Paper Handling Options
AutoGap
Copy Macro
Allows you to copy the settings of
one macro to another.
Default Font
Changes the default font the printer
uses. (Used if no font is designated
in the application software).
Default Pitch
Changes the default pitch the printer
uses. (Used if no font is designated
in the application software).
Code Page
Changes the code page the printer
uses for your print job.
x
see below
a
x
Copy FM
Copy FM b TO
Copy FM c TO
FastDraft, Draft, Gothic,
Courier, Download
Asterisks (*) appear
next to the default
setting.
10, 12, 15, 17.1, 20, PS
– Asterisks (*) appear
next to the default
setting.
– Not all sizes available
for all fonts.
437, 437G, 813, 850, 851,
853T, 857, 860, 861, 863,
865, 869, 920, 1004, 1053
TO
x
x
Chapter 3: Using the Operator Panel
40
Character Set 1, 2
20-Pitch Enable, Disable
Page 47

Main Menu Primary Options Secondary Options
Paper Handling Options
If “Enable” is selected in
“Default Macro”, this item
appears in the macro menu.
Auto Tear-Off
If on, moves the top perforation of a
continuous form to the tear bar.
Auto Cut Sheet Load
If on, automatically loads cut sheets
into the printer.
Auto Sheet Feed
Automatically feeds cut sheets if
using Auto Sheet Feeder.
Does not appear when the Tractor 2
Option is installed.
Tractor
Select this option when you want to
set the default tractor.
Does not appear unless the Tractor
2 Option is installed.
Form Length
Allows you to specify the length of
the paper you are using.
On, Off, One Second
On, Off
On, Off
Using the Operator Panel
Tractor 1, Tractor 2,
Tractor 1 + 2
1LPP/0.17” to
132LPP/22.00”
Left Margin 0”, 1”, 2”, 3”
Right Margin 4”, 5”, 6”, 7”, 8”, 13.6”
Bottom Margin 0”, ½”, 1”, 2”, 3”
Lines Per Inch
Adjusts the number of lines that
print per inch.
Eject by FormFeed
Automatically ejects your print job
when it has finished printing.
3, 4, 6, 8
On, Off
Chapter 3: Using the Operator Panel
41
Page 48

Main Menu Primary Options Secondary Options
AutoGap
If “Enable” is selected in
“Default Macro”, this item
appears in the macro menu.
Using the Operator Panel
On
– Automatically adjusts the printer
to the thickness of the paper being
printed upon.
– Select this option when you want
the printer to check for paper
thickness every time paper is
loaded.
Off
– Allows you to manually specify
the thickness of the paper being
printed upon.
– Select this option when you want
to specify how thick the paper is.
Single
– Adjusts the printhead to the paper
thickness:
when you turn the printer on,
•
when you change the paper
•
select lever.
– Select this option when you want
to print several cut sheets with the
same paper thickness when using
the Auto Sheet Feeder.
—
Manual Position:
1, 2, 3, 4, 5, 6, 7
Open, Fixed
Chapter 3: Using the Operator Panel
42
Page 49

Main Menu Primary Options Secondary Options
Data Options Buffer Size
Controls the size of the buffer
between the computer and the
printer.
Automatic LF
Automatically performs a line feed
(LF) when a carriage return (CR) is
sent.
Automatic CR
Automatically performs a carriage
return (CR) when a line feed (LF) is
sent.
Slashed Zero
Prints all zeros with a slash through
the center.
Control Options Uni-Dir Print
Tells the printer to print unidirectionally or bidirectionally.
(Select On for high-quality, one-way
printing, or select Off for fast, twoway printing).
Maximum, Minimum
On, Off
On, Off
Using the Operator Panel
On, Off
On, Off
Auto Rdy Cut Sht
(Auto Ready Cut Sheet)
– When set to On, the printer
automatically loads a cut form.
– When set to Off, you must press
FormFeed or LineFeed to load a
cut form.
Paper Out Alarm
Sounds an alarm when the printer is
out of paper.
Chapter 3: Using the Operator Panel
On, Off
Enable, Disable
43
Page 50

Main Menu Primary Options Secondary Options
Control Options
(continued)
Emulation Options Emulation IBM, EPSON
Interface Options Interface
TOF Read
Tells the printer to check the TOF
after each new sheet is loaded.
Menu Language
Changes the language used on the
operator panel.
Character Table Italics, Graphics
International Character U.S.A., France, Germany ,
Allows you to switch from parallel
to serial protocols. If serial is
chosen, you must also set the
italicized options that follow to
match those of your computer.
Enable, Disable
English, French,
German, Italian, Spanish
U.K., Denmark I,
Sweden, Italy, Spain I
Parallel, Serial RS-232
Switch between RS-232
or RS-422 serial
interface using the
interface mode switch
(for help, see
“Connecting the Serial
Cable” on page 12).
Using the Operator Panel
Chapter 3: Using the Operator Panel
44
Data Speed
Does not appear if “Parallel” is
selected for “Interface”.
Data Bits
Does not appear if “Parallel” is
selected for “Interface”.
Parity
Does not appear if “Parallel” is
selected for “Interface”.
150, 300, 600, 1200,
2400, 4800, 9600, 19200
bps
8, 7
No, Ignore, Odd, Even
Page 51

Main Menu Primary Options Secondary Options
Interface Options
(continued)
Print Adjust
Adjusts the horizontal
alignment from line to line.
When you select this
function, a series of
alignment patterns prints.
Trace Mode
Prints the hexadecimal values
for all data sent to the printer.
Stop Bits
Does not appear if “Parallel” is
selected for “Interface”.
Protocol
Does not appear if “Parallel” is
selected for “Interface”.
Honor DSR
Does not appear if “Parallel” is
selected for “Interface”.
——
——
1, 2
XON/XOFF,
DTR Pacing,
Multi XON/XOFF
On, Off
Using the Operator Panel
Chapter 3: Using the Operator Panel
45
Page 52

Setting the Printer Online or Offline
The printer must be online to accept data.
To set the printer:
• Online, press Start/Stop; the Ready light comes on. If paper is not
loaded, the Check light blinks.
• Offline, press Start/Stop; the Ready light goes off.
Stopping the Printer
To temporarily stop printing, press Start/Stop until the Ready light is off.
The printer finishes printing the current line and then stops printing.
To resume printing, press Start/Stop until the Ready light is on.
Advancing the Paper
You can use the operator panel to advance the paper when the printer is
not printing.
Using the Operator Panel
Chapter 3: Using the Operator Panel
46
To advance the paper:
• Press FormFeed to advance the paper to the Top-Of-Form (TOF) on
the next page or to eject the cut form.
• Press LineFeed to advance the paper to the next line.
• Press Micro ↓ or Micro ↑ lightly once for fine alignment, or press and
hold to scroll the paper up or down.
Page 53

Using Tear-Off
The Tear-Off function advances the perforation of a continuous form to
the tear bar position. Tear-Off can be set to move a continuous form
automatically to the tear-off position when Auto
Tear-Off is set to On, or it can be set so you can move a continuous form
manually to the tear-off position when Auto Tear-Off is set to Off. To set
Auto Tear-Off, see page 41.
Auto Tear-Off Set to On
When Auto Tear-Off is set to On, continuous form paper automatically
advances to the tear-off position when:
• the paper has advanced to the Top-Of-Form (TOF)
• the paper has advanced to the load position on the next page
• no data, printer control codes, or escape codes have been sent to the
printer after advancing to the TOF position
The continuous form remains at the tear-off position until the printer
receives the next print request. At that time, the continuous form moves
from the tear-off position to the TOF (load position) to prepare for
printing.
Using the Operator Panel
Chapter 3: Using the Operator Panel
47
Page 54

One Second Tear-Off
When Auto Tear-Off is set to one second, continuous form paper
automatically advances to the tear-off position if a print job ends and no
data is received within one second of the last data transmission. For more
information, see “Auto Tear-Off (Set to One Second)” on page 80.
Manual Tear-Off (Auto Tear-Off Set to Off)
When Auto Tear-Off is set to Off, you can manually advance the
perforation of a continuous form to the tear-off position by pressing Tear
Off, assuming the print position is still on the same page. To set Auto
Tear-Off to Off, see “Auto Tear-Off (Set to Off)” on page 80.
Setting AutoGap
The AutoGap function determines the amount of space that the printer
places between the printhead and the paper. You can select On, Off, or
Single AutoGap from the function menu.
Using the Operator Panel
When AutoGap is set to On, the printer automatically sets itself to the
thickness of the paper you are using. To set AutoGap On, press:
1 Menu.
2 Item ↓ until AutoGap appears.
3 Next
4 Item ↓ or Item ↑ until On appears.
5 Store to save the setting.
6 Quit to exit the function menu.
Chapter 3: Using the Operator Panel
48
AutoGap Set to On
→
.
Page 55

Manual AutoGap (AutoGap Set to Off)
When AutoGap is Off, you can manually adjust the gap position between
the printhead and the paper. To manually set AutoGap, press:
1 Menu.
Item ↓ until AutoGap appears.
2
3 Next
→
.
4 Item ↓ or Item ↑ until Off appears.
5 Store.
6 Next →.
7 Item
↓
or Item ↑ to select the manual position you want.
8 Store to save the setting.
9 Quit to exit the function menu.
The following table gives the manual setting choices and the information
needed to make the appropriate choice for your paper type.
Using the Operator Panel
Chapter 3: Using the Operator Panel
49
Page 56

Manual AutoGap Settings
Paper
Type
Single Forms
(Single Sheets or
Continuous Forms)
Multiple-Part Forms
When the setting is
4 or higher,
printing speed
becomes slower.
Envelopes 4, 5, or 6
AutoGap Set to Single
When AutoGap is set to Single, the printer sets the gap between the
Using the Operator Panel
printhead and the paper only once. This should only be used when
printing on several cut sheets of the same thickness while using the Auto
Sheet Feeder. The printer adjusts the printhead to the paper’s thickness
when you turn the printer on or when the paper select lever is changed.
Paper
Thickness
Thin 45.1 g/m
Normal 67.5 g/m
Thick 90 g/m
__ 2 Part Form 2 or 3
Weight of Paper
2
(12 lb)
2
56.25 g/m
75 g/m
3 Part Form 3 or 4
4 Part Form 4 or 5
5 Part Form 5 or 6
6 Part Form 5, 6, or 7
(15 lb)
2
(18 lb)
2
(20 lb)
2
(24 lb) 2
Manual
Setting
1
1 or 2
There are two Single AutoGap options:
• Open (factory default) means that the printhead moves out of the way
as each sheet of paper is loaded. This setting reduces paper jams.
• Fixed means that once the gap is set, the printhead does not move.
Chapter 3: Using the Operator Panel
50
Page 57

Selecting or Locking a Font or Pitch
When you select a temporary font or pitch, the printer uses it unless the
document software specifies a different one. The printer reverts to the
default font/pitch when you turn the power off.
If a font or pitch is locked, the printer uses the selected font/pitch
regardless of the font/pitch selection in the document software. The
printer reverts to the default font/pitch when you turn the power off.
To select a font or pitch temporarily, press:
1 Start/Stop. The printer goes offline and the operator panel displays
the current font and pitch.
2 Font or Pitch until you reach the selection you want.
3 Start/Stop. The printer goes online.
To lock a font or pitch, press:
1 Start/Stop. The printer goes offline and the operator panel displays
the current font and pitch.
2 Font or Pitch until the lock symbol, , appears next to the font/
pitch you want.
3 Start/Stop. The printer goes online.
If you want to change the default font or pitch, you must go through the
function menus. The default font and pitch are indicated with asterisks
(*). For help, see “Menu Options” on page 38.
Note: Not all pitches are available for all fonts.
Using the Operator Panel
Chapter 3: Using the Operator Panel
51
Page 58

Setting and Using a Macro
You can use up to four macros to store your settings permanently. To set a
macro, follow these steps:
1 Press Menu.
2 Press Item ↓ until Default Macro appears.
3 Press Next
4 Press Store to save the setting.
5 Press Prev.
6 Set and store your settings (see “Macro x Options” on page 40 for a
7 Press Quit.
To use a macro:
1 Press Menu.
2 Press Item ↓ until Load Macro appears.
3
4 Press Store to save the setting.
Using the Operator Panel
5 Press Quit.
→
and then Item ↓ until Macro x (x = 1 to 4) appears.
←
and then Item ↓ until Macro x Options appears.
list of items you can set in your macro).
Press Next → until Macro x (x = 1 to 4) appears.
Chapter 3: Using the Operator Panel
52
Page 59

Disabling/Enabling the Operator Panel
All buttons except the Start/Stop, FormFeed, and Load/Unload buttons
on the operator panel can be disabled. To disable the operator panel:
1 Turn the printer Off.
2 Press and hold Micro ↓ and Micro ↑ and then turn the printer On.
Note: When any button except Start/Stop, FormFeed, or Load/
Unload is pressed while the printer is disabled, the Operator
Panel Disabled message appears on the display for
approximately 2 seconds.
To enable the operator panel, repeat the above procedure.
Using the Operator Panel
Chapter 3: Using the Operator Panel
53
Page 60

Using the Operator Panel
Chapter 3: Using the Operator Panel
54
Page 61

Selecting and Loading Paper
Paper Types and Sizes
Below is an illustration of the types of paper you can use with your
printer.
Single Sheets
Envelope
Chapter
Continuous Forms
Labels
4
Selecting and Loading Paper
Chapter 4: Selecting and Loading Paper
55
Page 62
Single Sheets
Page Width Page Length Weight
Maximum 420 mm
Minimum 76 mm
Multiple Part Single Sheets
Maximum 420 mm
Minimum 76 mm
Selecting and Loading Paper
558.8 mm
(16.5 in.)
(3.0 in.)
Page Width Page Length
(16.5 in.)
(3.0 in.)
(22.0 in.)
76 mm
(3.0 in.)
558.8 mm
(22.0 in.)
76 mm
(3.0 in.)
90 g/m
(24 lb.)
56 g/m
(15 lb.)
2
2
Chapter 4: Selecting and Loading Paper
56
Page 63
Single Continuous Forms
Page Width Page Length Weight
Maximum 406 mm
(16.0 in.)
Minimum 76 mm
(3.0 in.)
Maximum
Hole to Hole
Minimum
Hole to Hole
393 mm
(15.5 in.)
63 mm
(2.5 in.)
N/A 90 g/m
76 mm
(3.0 in.)
N/A N/A
N/A N/A
Multiple Part Continuous Forms
Page Width Page Length Weight
Maximum 406 mm
(16.0 in.)
Minimum 76 mm
(3.0 in.)
N/A 90 g/m
76 mm
(3.0 in.)
(24 lb.)
56 g/m
(15 lb.)
(24 lb.)
56 g/m
(15 lb.)
2
2
Selecting and Loading Paper
2
2
Maximum
Hole to Hole
Minimum
Hole to Hole
393 mm
(15.5 in.)
63 mm
(2.5 in.)
N/A N/A
N/A N/A
Chapter 4: Selecting and Loading Paper
57
Page 64

Envelopes
Width Length Weight
Maximum 420 mm
Minimum 76 mm
Multiple Part Forms
(45 g/m2 or 12 lb) - Thickness
Single Sheets 0.058-0.114 mm
Continuous Forms 0.058-0.114 mm
Envelopes 0.053 mm (0.021 in.)
Selecting and Loading Paper
558.8 mm
(16.5 in.)
(3.0 in.)
Single Multiple part
(0.0023-0.0045 in.)
(0.0023-0.0045 in.)
(22.0 in.)
76 mm
(3.0 in.)
90 g/m
(24 lb.)
56 g/m
(15 lb.)
0.512 mm (0.0202 in.)
0.512 mm (0.0202 in.)
2
2
Chapter 4: Selecting and Loading Paper
58
Page 65

Loading a Single Sheet or Envelope
Single sheets or multi-part forms can be loaded one at a time into
the manual feed.
Note: If you have installed the optional Auto Sheet Feeder or
Tractor 2 Feeder, see “Auto Sheet Feeder” on page 85 or
“Tractor 2 Feeder” on page 96 for paper loading
instructions.
Loading a Single Sheet or Envelope into the Manual
Feed
Turn the printer On.
1
2 Make sure the paper path is clear.
If continuous forms are currently loaded, park them by
pressing Load/Unload.
3 Make sure AutoGap is set to On or Single AutoGap. For help,
see “Setting AutoGap” on page 48.
Move the paper select lever up to the single sheets position.
4
Selecting and Loading Paper
Chapter 4: Selecting and Loading Paper
59
Page 66

5 Pull the paper supports up.
Paper Select Lever
Open the manual feed door.
6
Paper Supports
Selecting and Loading Paper
Chapter 4: Selecting and Loading Paper
60
Page 67

7 Set the left margin.
Before inserting paper, move the left paper guide so that the
print start position you want aligns with the symbol [A
printed on the margin guide.
Printing begins at the [A symbol
Margin Guide
Left Paper Guide
The distance from the left paper guide to the [A
symbol determines the width of the left margin.
Selecting and Loading Paper
Note: If you make a left margin setting in your application
software, it is added to the left margin setting on the
printer.
For example, if you set the left margin at 2.54 cm (1 in.)
on the printer, and also have the left margin set at 2.54
cm (1 in.) in your application software, the printer
begins printing 5.08 cm (2 in.) from the left edge of the
page.
Chapter 4: Selecting and Loading Paper
61
Page 68

8
To load a single sheet:
Place a single sheet against the left paper guide.
a
b Move the right paper guide so that it aligns with the right
edge of the paper.
When you load preprinted forms, put the top of the form in
first, printed side up.
Left Paper Guide
Right Paper Guide
The Paper Empty/Add Paper message disappears.
Selecting and Loading Paper
Chapter 4: Selecting and Loading Paper
62
• If Auto Cut Sheet Load is On (factory default), the paper
• If Auto Cut Sheet Load is Off, press FormFeed.
feeds automatically to the TOF. To turn Auto Cut Sheet
Load On, see “Setting Auto Cut Sheet Load” on page 64.
For more information about setting TOF, see “Setting TOF
for Single Sheets and Envelopes” on page 78.
Page 69

To load an envelope:
Place a single envelope against the left paper guide, with
a
the top edge first, print side up.
Move the right paper guide so that it aligns with the right
b
edge of the envelope.
Address added
to show correct
orientation.
Selecting and Loading Paper
The Paper Empty/Add Paper message disappears.
• If Auto Cut Sheet Load is On (factory default), the paper
feeds automatically to the TOF. To turn Auto Cut Sheet
Load On, see “Setting Auto Cut Sheet Load” on page 64.
For more information about setting TOF, see “Setting TOF
for Single Sheets and Envelopes” on page 78.
• If Auto Cut Sheet Load is Off, press FormFeed.
Make sure the printer is online (Ready light is on solid). If it is
9
not, press Start/Stop until the Ready light is on solid. You are
now ready to print.
Chapter 4: Selecting and Loading Paper
63
Page 70

Setting Auto Cut Sheet Load
When set to On, the printer automatically loads a cut form.
When set to Off, you must press FormFeed or LineFeed to load a
cut form.
To turn Auto Cut Sheet Load On, press:
1 Menu.
2 Item
3 Next →.
4 Item
5 Next →.
6 Item ↓ or Item ↑ until On appears.
7 Store to save the setting.
8
Quit to exit the function menu.
Selecting and Loading Paper
↓ until Paper Hand Opt. appears.
↓ or Item ↑ until Auto Cut Sheet Load appears.
Chapter 4: Selecting and Loading Paper
64
Page 71

Loading a Single Sheet or Envelope With
Continuous Forms Already Loaded
Move the paper select lever down to the continuous forms
1
position.
2 Turn the printer On.
A
Paper Select Lever
3 To clear the paper path, tear off the leading edge of the
continuous form, as shown.
Selecting and Loading Paper
Park the continuous forms by pressing Load/Unload.
4
5 Make sure AutoGap is set to On or Single AutoGap. For help,
see “Setting AutoGap” on page 48.
Chapter 4: Selecting and Loading Paper
65
Page 72

6 Open the manual feed door.
Move the paper select lever up to the single sheets
7
position.
Manual Feed Door
Paper Select Lever
Selecting and Loading Paper
Chapter 4: Selecting and Loading Paper
66
Page 73

8 Set the left margin.
Before inserting paper, move the left paper guide so that the
print start position you want aligns with the [A symbol
printed on the margin guide.
Printing begins at the [A symbol
Margin Guide
Left Paper Guide
The distance from the left paper guide to the [A
symbol determines the width of the left margin.
Selecting and Loading Paper
Note: If you make a left margin setting in your application
software, it is added to the left margin setting on the
printer.
For example, if you set the left margin at 1 inch (2.54
cm) on the printer, and also have the left margin set at
1 inch in your application software, the printer begins
printing 2 inches from the left edge of the page.
Chapter 4: Selecting and Loading Paper
67
Page 74
9
To load a single sheet:
a
b Move the right paper guide so that it aligns with the right
The Paper Empty/Add Paper message disappears.
• If Auto Cut Sheet Load is On (factory default), the paper
Selecting and Loading Paper
• If Auto Cut Sheet Load is Off, press FormFeed.
Place a single sheet against the left paper guide.
edge of the paper.
When you load preprinted forms, put the top of the form in
first, printed side up.
feeds automatically to the TOF position. For help, see
“Setting Auto Cut Sheet Load” on page 64.
Chapter 4: Selecting and Loading Paper
68
Page 75
To load an envelope:
Place a single envelope against the left paper guide, with
a
the top edge first, print side up.
Move the right paper guide so that it aligns with the right
b
edge of the envelope.
Address added
to show correct
orientation.
The Paper Empty/Add Paper message disappears.
• If Auto Cut Sheet Load is On (factory default), the paper
feeds automatically to the TOF position. For help, see
“Setting Auto Cut Sheet Load” on page 64.
• If Auto Cut Sheet Load is Off, press FormFeed.
Selecting and Loading Paper
Make sure the printer is online (Ready light is on solid). If it is
10
not, press Start/Stop until the Ready light is on solid. You are
now ready to print.
Chapter 4: Selecting and Loading Paper
69
Page 76

Loading Continuous Forms
The printer offers one paper path for continuous forms.
Note: If you have installed the optional Auto Sheet Feeder or
Tractor 2 Feeder, see “Printer Options” beginning on page
83 for paper loading instructions.
To load continuous forms:
1 Turn the printer On.
Make sure the paper path is clear. If a single sheet or envelope
2
is loaded in the printer, press FormFeed to remove it.
Make sure AutoGap is On. (This is the default setting.) For
3
help, see “AutoGap Set to On” on page 48.
4 Move the paper select lever down to the continuous forms
position.
Pull up the bottom front of the printer to open the front cover.
5
Selecting and Loading Paper
Chapter 4: Selecting and Loading Paper
70
Page 77
6 Pull up the left and right tractor locking levers to unlock the
tractors.
Locking Lever
Open the left and right tractor doors.
7
8 Place the paper pinfeed holes over the second or third pins of
the tractor unit.
If necessary, move the left or right tractor to adjust the tractor
to the paper width.
Selecting and Loading Paper
Left Tractor Door
Right Tractor Door
Close the left and right tractor doors.
9
Chapter 4: Selecting and Loading Paper
71
Page 78
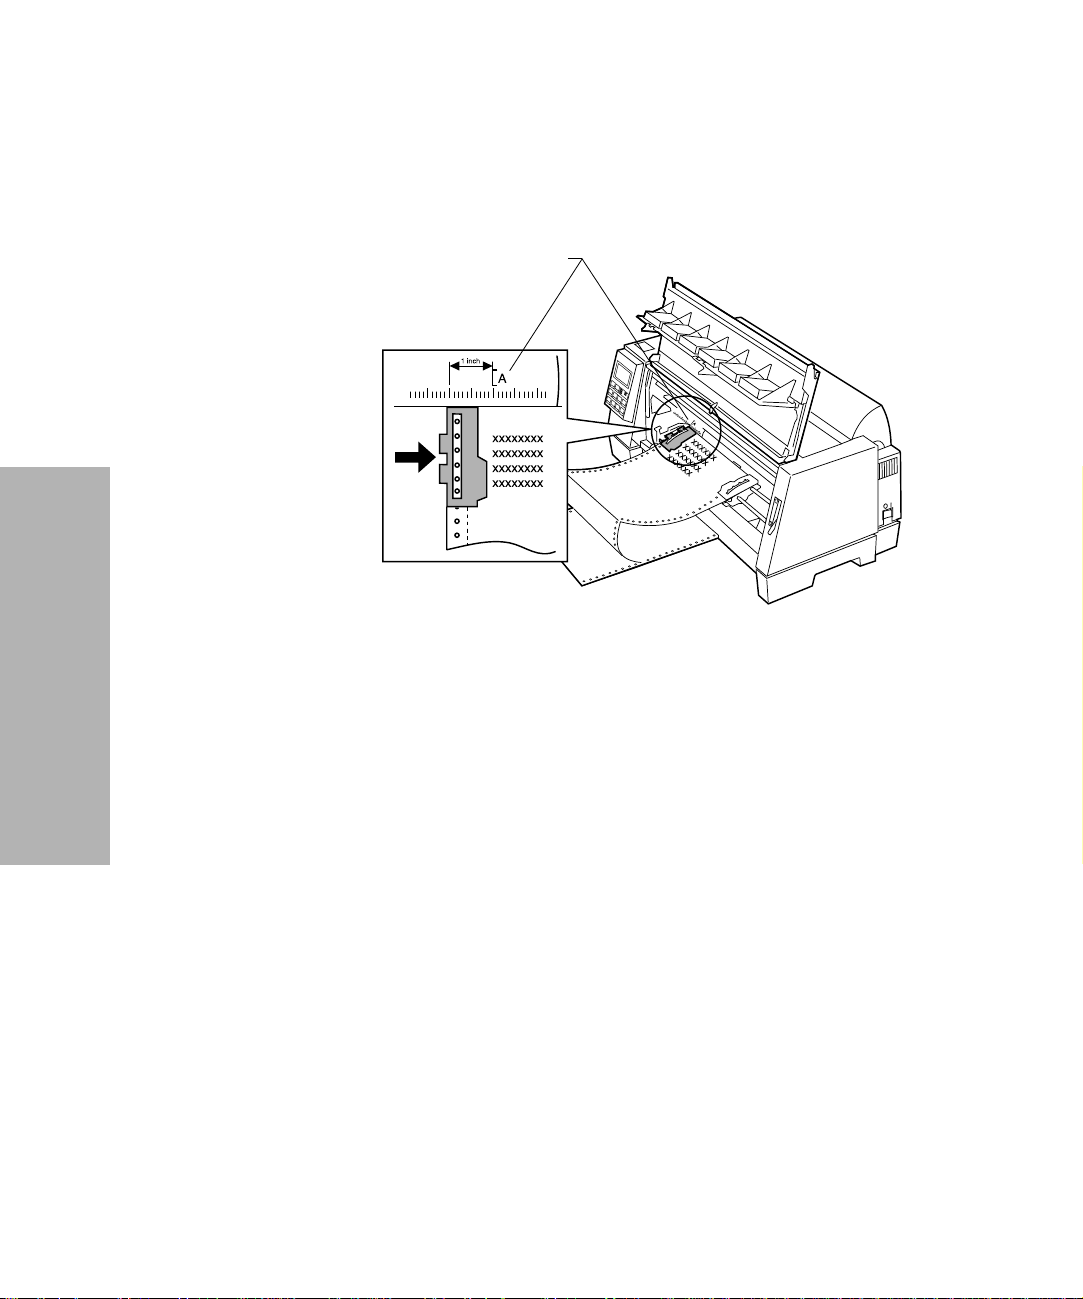
10 Set the left margin. Adjust the tractors so that the print start
position you want aligns with the symbol [A printed on the
rear plate.
Printing starts at the [A symbol
The distance from the [A symbol to the left edge of the
paper determines the width of the left margin.
Note: If you make a left margin setting in your application
Selecting and Loading Paper
11 Push down the left tractor locking lever to lock the tractor in
place. Remove slack from the paper and lock the right lever.
Chapter 4: Selecting and Loading Paper
72
software, it is added to the left margin setting on the
printer.
For example, if you set the left margin at 1 inch (2.54
cm) on the printer, and also have the left margin set at
1 inch (2.54 cm) in your application software, the
printer begins printing 2 inches from the left edge of
the page.
Page 79
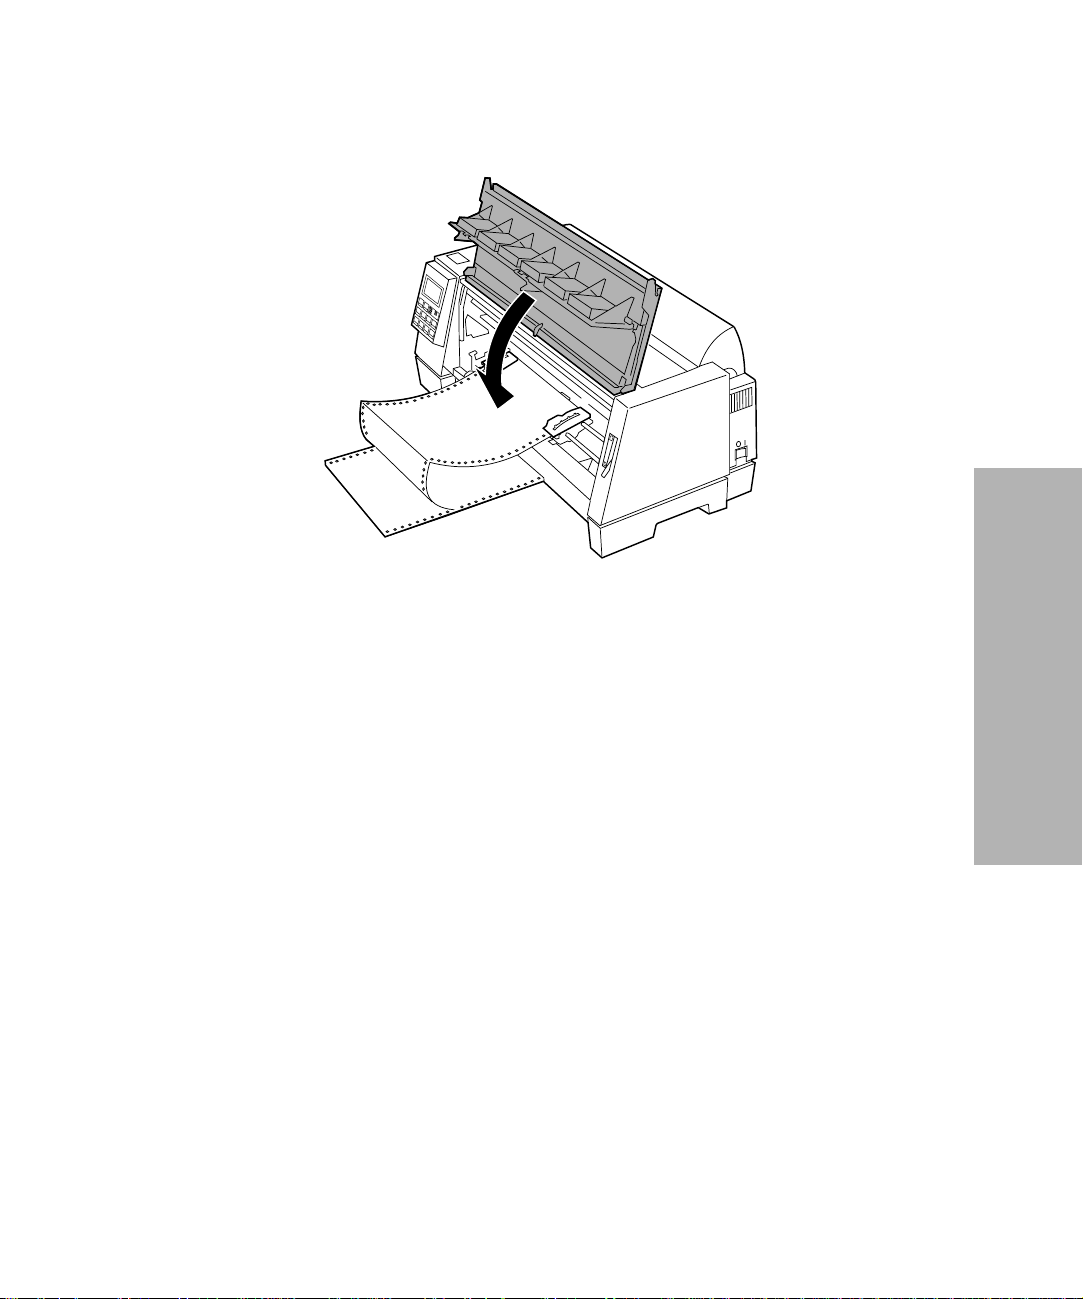
12 Close the front cover.
13 Press Start/Stop. The paper loads to the first print position, or
tear-off position if Auto Tear-Off is On.
14 Make sure the printer is online (Ready light is on solid). If not,
press Start/Stop until the Ready light is on solid. You are now
ready to print.
Selecting and Loading Paper
When printing on continuous forms, the first 1½ inches of the first
page may have unequal line spacing. This occurs because the top
of the paper is not yet being held by the upper feed rollers.
Chapter 4: Selecting and Loading Paper
73
Page 80
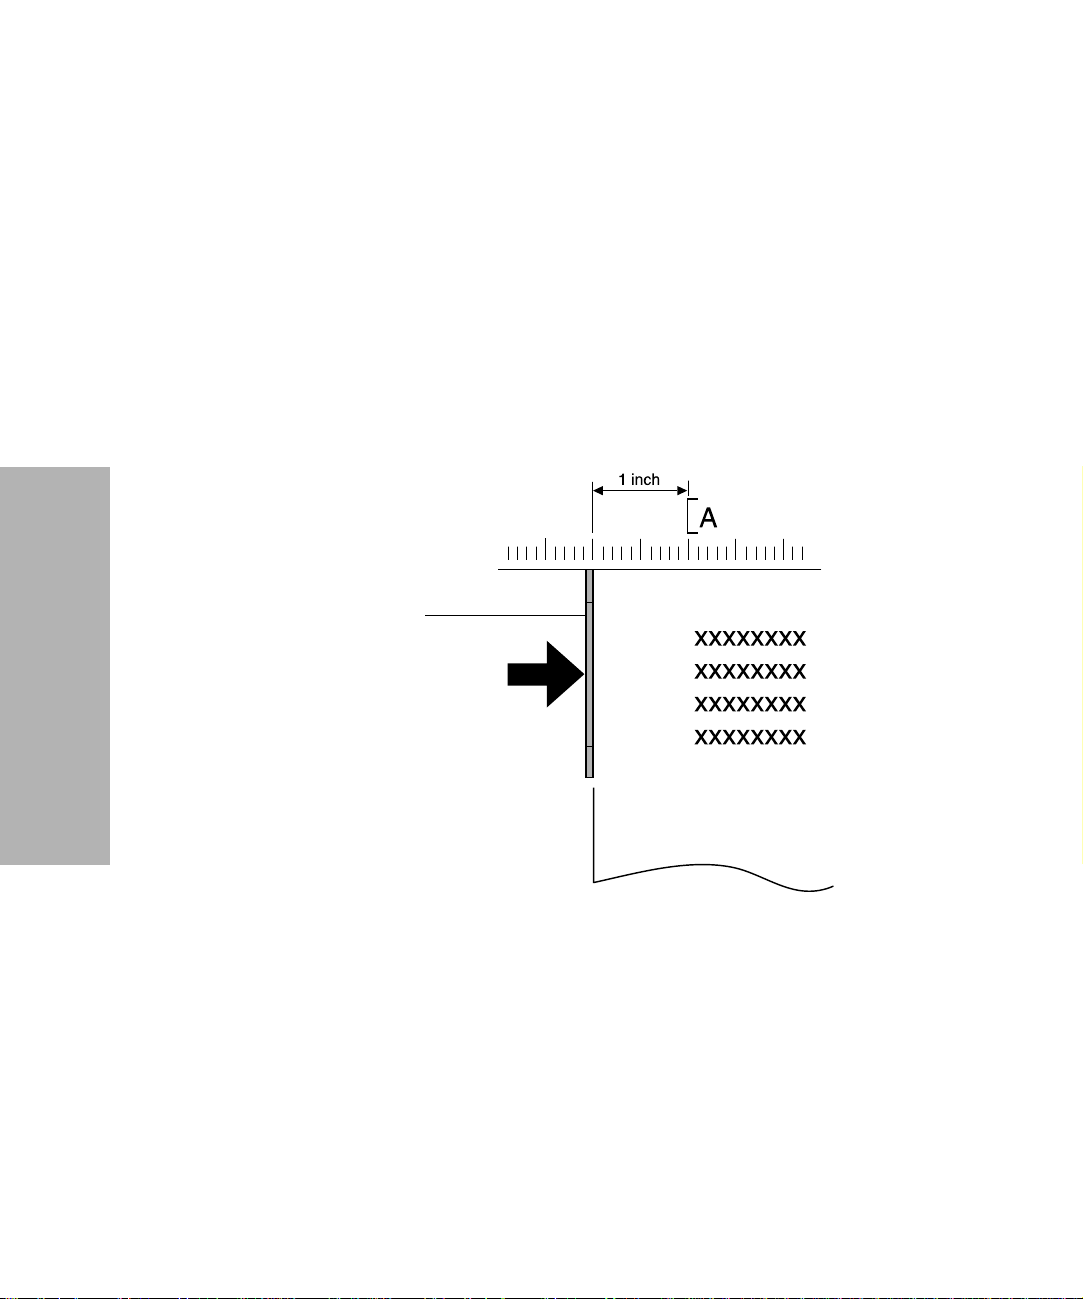
Aligning the Left Margin
You can manually change the first print position at the left margin.
The first print position is indicated by the [A symbol. You can also
set the left margin from your application software.
Manually-Loaded Single Sheets or Envelopes
To set the left margin for single sheets or envelopes, move the left
paper guide to the left of the [A symbol, located above the left
paper guide.
Left Paper Guide
B
Selecting and Loading Paper
After doing this, you may need to adjust the right paper guide to
fit flush against the right edge of the page.
If you make a left margin setting in your application software, it is
added to the left margin setting on the printer. For example, if you
set the left margin at 1 inch (2.54 cm) on the printer, and also have
the left margin set at 1 inch (2.54 cm) in your application software,
the printer begins printing 2 inches from the left edge of the page.
Chapter 4: Selecting and Loading Paper
74
Page 81

Continuous Forms
To set the left margin for continuous forms, first locate the [A
symbol on the printer (see figure below).
[A
Symbol
Pull up the left and right tractor locking levers to unlock the
tractors.
Selecting and Loading Paper
Locking Lever
Move the left tractor to the left or right of the [A symbol. Push
down the left tractor locking lever to lock it in place. Remove slack
from the paper and lock the right lever.
Chapter 4: Selecting and Loading Paper
75
Page 82

Top-Of-Form (TOF)
Top-Of-Form (TOF) sets the first line of print. You can set and save
TOF from the operator panel for single sheets, continuous forms,
and for each macro that is enabled.
Setting TOF for Continuous Forms
TOF can range from minus 2.54 cm (1 in.) to plus 35.56 cm (14 in.)
from the top of continuous form paper.
Note: Use this method to set TOF for continuous forms loaded in
the optional Tractor 2 Feeder.
To set and save TOF:
1 Turn the printer On.
Make sure the paper path is clear.
2
Move the paper select lever down to the continuous forms
3
position.
Load continuous form paper on the feed pins (or Tractor 2
4
feeder pins if you are using the Tractor 2 Feeder option).
5 Press Start.
Selecting and Loading Paper
Chapter 4: Selecting and Loading Paper
76
The paper moves to the current TOF.
Page 83

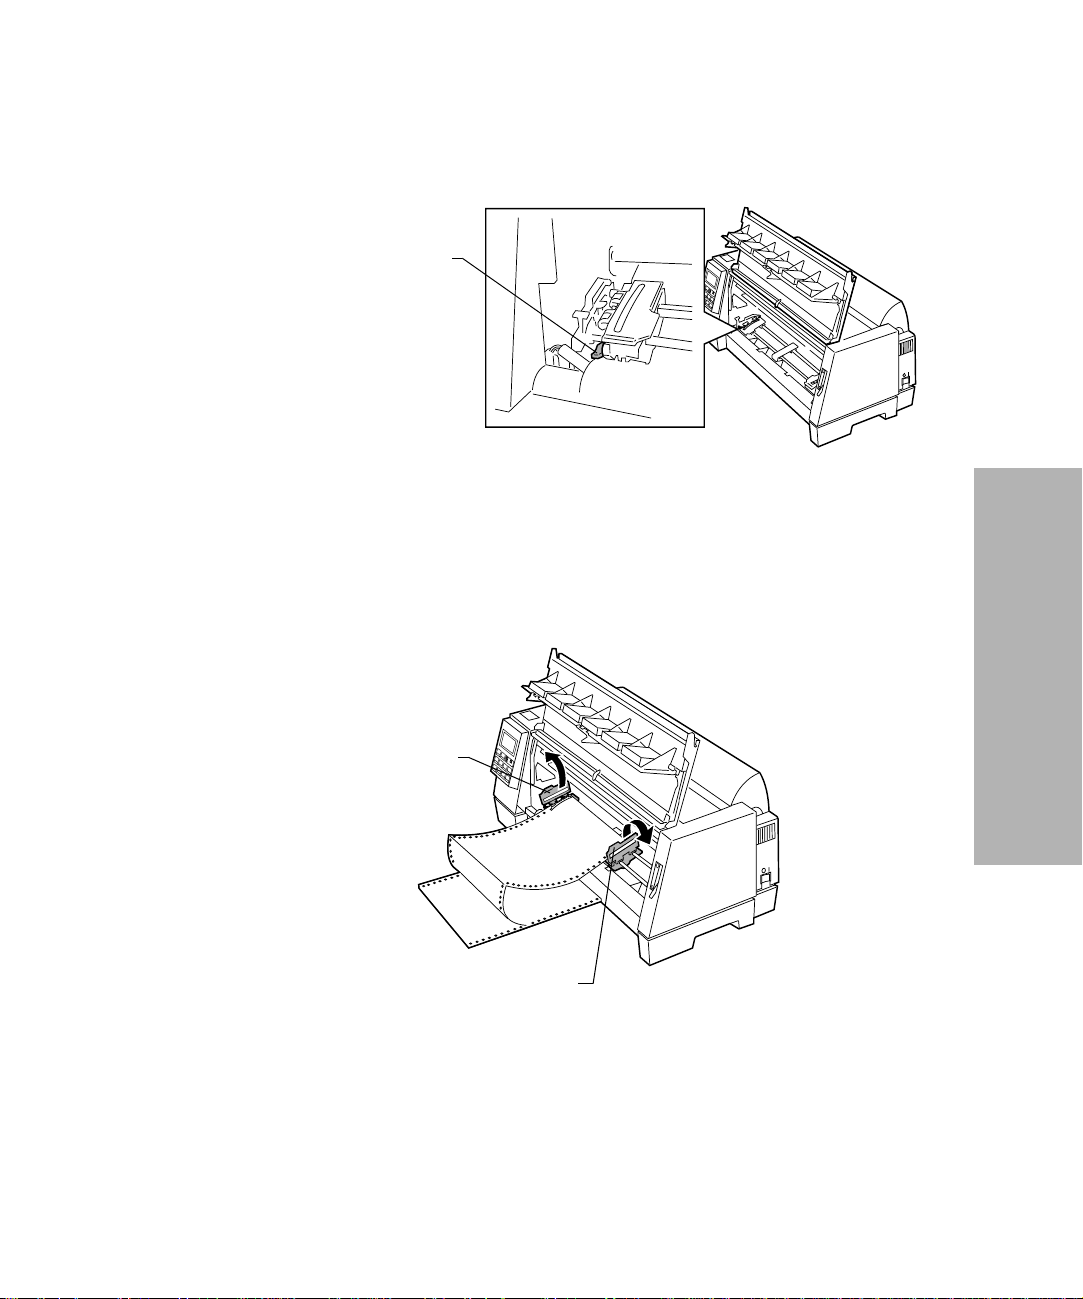
6 Press Menu. Set Top of Form appears on the display.
Press any paper movement key (Micro ↓, Micro ↑, or
7
LineFeed) to move the paper to the position you want.
The following illustration shows the printer without the
ribbon cartridge installed. When the cartridge is not installed,
you can easily see the position of the two horizontal white
lines on either end of the metal platen bar. Use these lines as
your reference point when lining up your TOF. The bottom of
a printed character will be even with the white lines.
White lines
Selecting and Loading Paper
Note: When the ribbon cartridge is installed and the top edge
of the paper is even with the top edge of the ribbon, the
TOF is set to one line, or 1/6 inch.
Press Store to save the position you want. The Ready light
8
comes on solid.
Whenever you change the TOF setting, tear off excess continuous
forms, then unload and reload the paper by pressing Load/
Unload. This ensures the printer goes to the current TOF setting.
Note: When Auto Tear-Off is set to On, the paper advances to the
current tear off position. If the tear off position is not correct,
see “Auto Tear-Off (Set to On)” on page 79.
Chapter 4: Selecting and Loading Paper
77
Page 84

Setting TOF for Single Sheets and Envelopes
TOF can range from minus 2.54 cm (1 in.) to plus 55.88 cm (22 in.)
from the top of cut sheet paper. To set and save TOF:
Turn the printer On.
1
Make sure continuous forms are parked (press Load/Unload.)
2
The operator panel displays a Paper Empty/Add Paper
message.
Move the paper select lever up to the single sheets position.
3
4 Load a cut sheet of paper or envelope through the manual
feed.
The printer moves the paper or envelope to the current TOF.
5 Press Menu. Set Top Of Form appears.
Press any paper movement key (Micro ↓, Micro ↑, or
6
LineFeed) to move the paper or envelope to the appropriate
position.
7 Press Store to save the position you want. The Ready light
comes on solid.
When you reload paper at a later time, press Start/Stop. The
paper moves to the TOF.
Selecting and Loading Paper
Setting TOF in a Macro
Each macro has a separate TOF setting. To set TOF in a macro:
Select the macro you want to use. For help selecting a macro,
1
see “Setting and Using a Macro” on page 52.
2 Set Top of Form. For help, see “Setting TOF for Continuous
Forms” on page 76 or “Setting TOF for Single Sheets and
Envelopes” on page 78.
3 Press Store to save the settings in the currently selected macr o.
Chapter 4: Selecting and Loading Paper
78
Page 85

Auto Tear-Off (Set to On)
When Auto Tear-Off is on, it moves the top perforation of a
continuous form to the tear bar (tear-off position) when:
• the printer has finished printing;
• the paper has advanced to the TOF on the next page;
• no data, printer control codes, or escape codes have been sent
to the printer after advancing to the TOF; and
• the print buffer has not received data for one second.
If you have already set your TOF and now want to change the
Auto Tear-Off setting, complete the following steps:
Press Start/Stop to take the printer offline.
1
2 Press Micro ↓ or Micro ↑ to move the paper to the appropriate
position on the tear bar. The printer beeps if you go out of
range.
Press Start/Stop to set and save the tear-off position. The
3
printer beeps twice. The paper rolls backward, then goes to
the new tear-off position. The Ready light goes on.
The paper remains at the current tear-off position until you send
another job to the printer. The paper then moves from the tear-off
position to the TOF and begins printing.
Selecting and Loading Paper
Tip: To print labels, set Auto Tear-Off to "Off". For help, see “Auto
Tear-Off (Set to Off)” on page 80.
Chapter 4: Selecting and Loading Paper
79
Page 86

Auto Tear-Off (Set to Off)
When Auto Tear-Off is off, press Tear Off/Store to manually move
the continuous form paper to the tear-off position.
When your print job has finished, press Tear Off.
1
The continuous form moves to the tear-off position.
2 Press Micro ↓ or Micro ↑ to move the paper to the position
you want on the tear bar.
Press Start/Stop to set the tear-off position.
3
The printer beeps twice. The paper rolls backward, then goes
to the new tear-off position.
Auto Tear-Off (Set to One Second)
When the print buffer has not received data for one second, Auto
Tear-Off automatically moves the continuous form paper to the
tear-off bar. The print line can be anywhere on the page for Auto
Tear-Off to function in this mode.
To change the Auto Tear-Off setting in One-Second mode:
Press Start/Stop to take the printer offline.
1
2 Press Micro ↓ or Micro ↑ to move the paper to the appropriate
Selecting and Loading Paper
Chapter 4: Selecting and Loading Paper
80
position on the tear bar. The printer beeps if the paper is out of
range.
Press Start/Stop to set and save the tear-off position.
3
The printer beeps twice. The paper rolls backward, then
advances to the new tear-off position. The Ready light comes
on.
If your application software has delays between data
transmissions while Auto Tear-Off is set to one second, partial
pages may print. To prevent this, set Auto Tear-Off to on.
Page 87

Adjusting Bidirectional Alignment
If your print job looks fuzzy or blurry, you may wish to adjust the
character alignment (also called bidirectional alignment) on your
printer. The following steps illustrate how to adjust the alignment
of the print wires.
1 Load continuous forms.
Press Menu.
2
3 Press Item ↓ until Print Adjust appears on the display.
Press Next
4
→
.
5 Press Item ↓ or Item ↑ to choose Draft or Courier.
Draft prints each alignment pattern once (uni-directional).
Courier prints each alignment pattern twice (bidirectional).
6 Press Start/Stop to print the alignment pattern.
The following example shows a printer that needs alignment.
The message Choose the Best Alignment appears on the
display.
Selecting and Loading Paper
Chapter 4: Selecting and Loading Paper
81
Page 88

7 Press Next
Lines 2 and 4 move to align with lines 1 and 3. The printer is
aligned correctly when lines 2 and 4 are vertically aligned
with lines 1 and 3.
Press Item
move lines 2 and 4 to the left. In the example below, press
Item
or Prev. to adjust the alignment.
↑ to move lines 2 and 4 to the right. Press Item ↓ to
↑ to correct the alignment.
8 Press Store to save the selected value.
Press Start/Stop to print the alignment pattern. The example
9
below shows proper alignment.
Selecting and Loading Paper
Press Quit to exit the menu.
10
Lines 1 and 3
do not move
Lines 2 and 4
move right to align
with lines 1 and 3
Chapter 4: Selecting and Loading Paper
82
Page 89

Printer Options
Chapter
The following options are available for your printer:
Available Options Part Number
Auto Sheet Feeder 79F4841
Extended Cut Sheet Paper Guides 1333163
Parallel Cable 1329605 (3.05 m [10 ft.]),
1427498 (6.1 m [20 ft.]),
or equivalent
Printer Stand 1368001
Serial Cable 1180786
Tractor 2 Feeder 11A6196
5
Printer Options
Chapter 5: Printer Options
83
Page 90
This section also describes how to install the Auto Sheet Feeder
and Tractor 2 Feeder. Paper loading instructions for the options are
also included.
For information about the: See page
Auto Sheet Feeder 85
Tractor 2 Feeder 96
Printer Options
Chapter 5: Printer Options
84
Page 91

Auto Sheet Feeder
Read this section to install the Auto Sheet Feeder, change the Auto
Sheet Feeder setting on the printer, and load paper in the Auto
Sheet Feeder.
The Auto Sheet Feeder attaches to the front of your printer and
automatically feeds single sheets of paper into the printer. With the
Auto Sheet Feeder installed, you can print from single sheets of
paper stacked in a tray instead of manually feeding each sheet.
You can also print on continuous forms loaded in the printer’s
tractor feeder while the Auto Sheet Feeder is installed. If you need
to manually feed a single sheet, a convenient manual feed tray is
located on top of the feeder.
Front Paper Supports
Printer Options
Front Cover
Wire Paper Supports
Chapter 5: Printer Options
85
Page 92

The paper you use in the Auto Sheet Feeder must meet the
following specifications.
Automatic Feed Mode (Single-part Form)
Printer Options
Length 139.7 mm (5.5 in.) minimum
355.6 mm (14.0 in.) maximum
558.8 mm (22 in.)
2
1
Width 105 mm (4.13 in.) minimum
364 mm (14.3 in.) maximum
1
Paper width greater than 215.9 mm (8.5 in.).
2
For 215.9 mm (8.5 in.) paper width or less.
.
Manual Insertion Mode (Single-/Multi-part Form)
Length 139.7 mm (5.5 in.) minimum
355.6 mm (14.0 in.) maximum
558.8 mm (22 in.)
2
1
Width 76.2 mm (3.0 in.) minimum
420 mm (16.5 in.) maximum
2
Paper Weight
1
Paper width greater than 215. 9 mm (8.5 in.).
2
For 215.9 mm (8.5 in.) paper width or less.
60 ~ 90 g/m
(16 ~ 24 lbs)
Chapter 5: Printer Options
86
Page 93
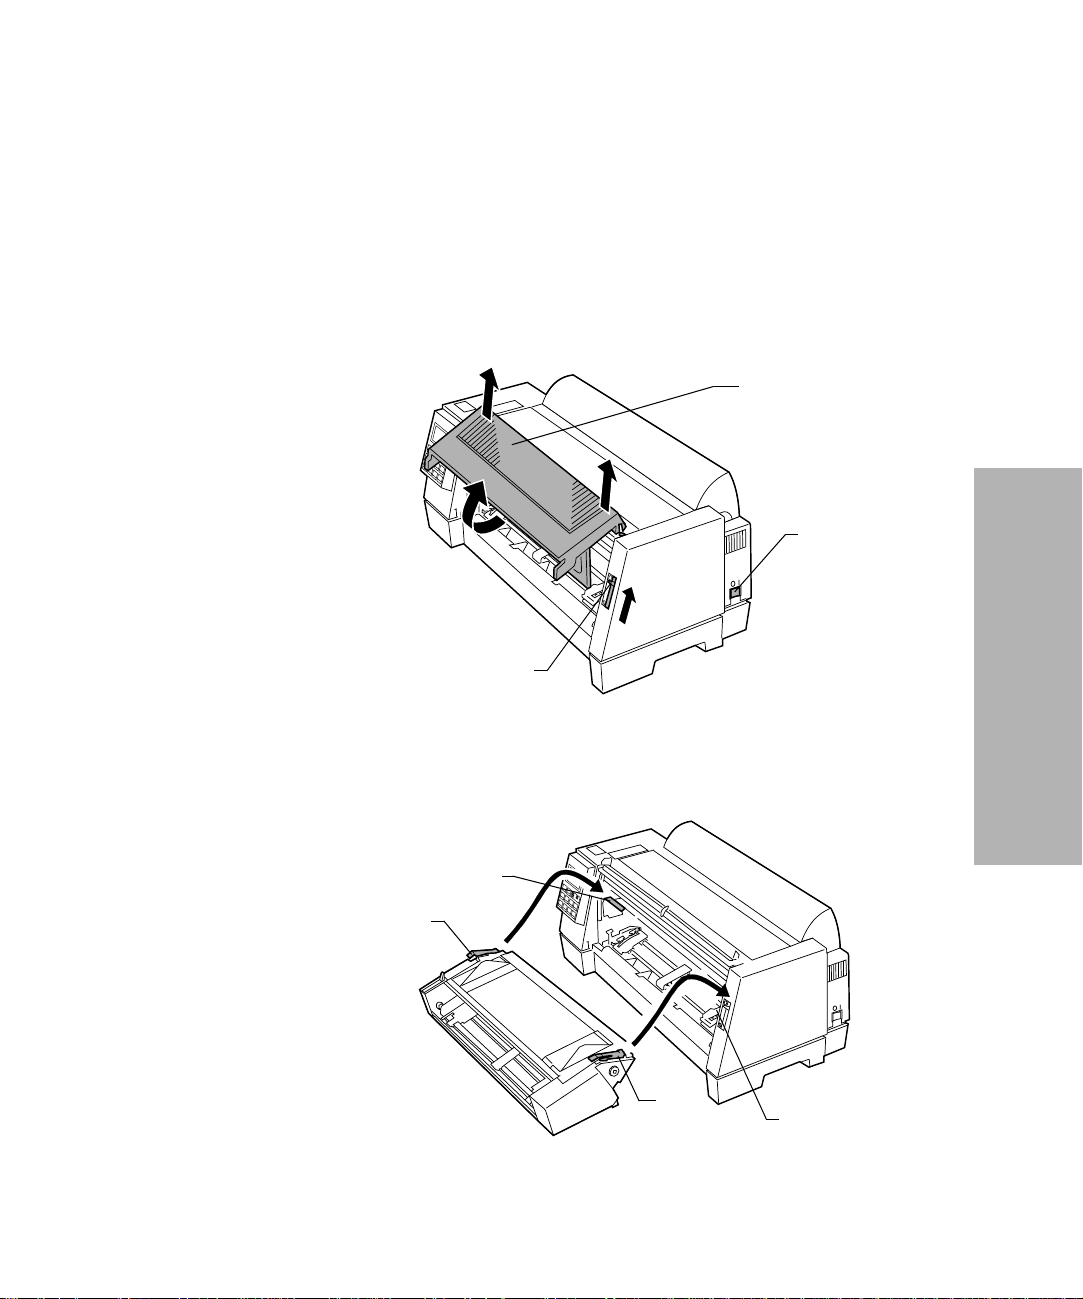
Installing the Auto Sheet Feeder
The Auto Sheet Feeder is easy to install and remove. You will not
need to make electrical connections or require special training or
tools.
1 Make sure the printer is Off.
Open, pull up, and remove the front cover.
2
Paper Select Lever
3 Push up the paper select lever.
Front Cover
Power Switch
Printer Options
4 Insert the tabs on both sides of the Auto Sheet Feeder into the
grooves on the printer.
Groove
Tab
Tab
Groove
Chapter 5: Printer Options
87
Page 94
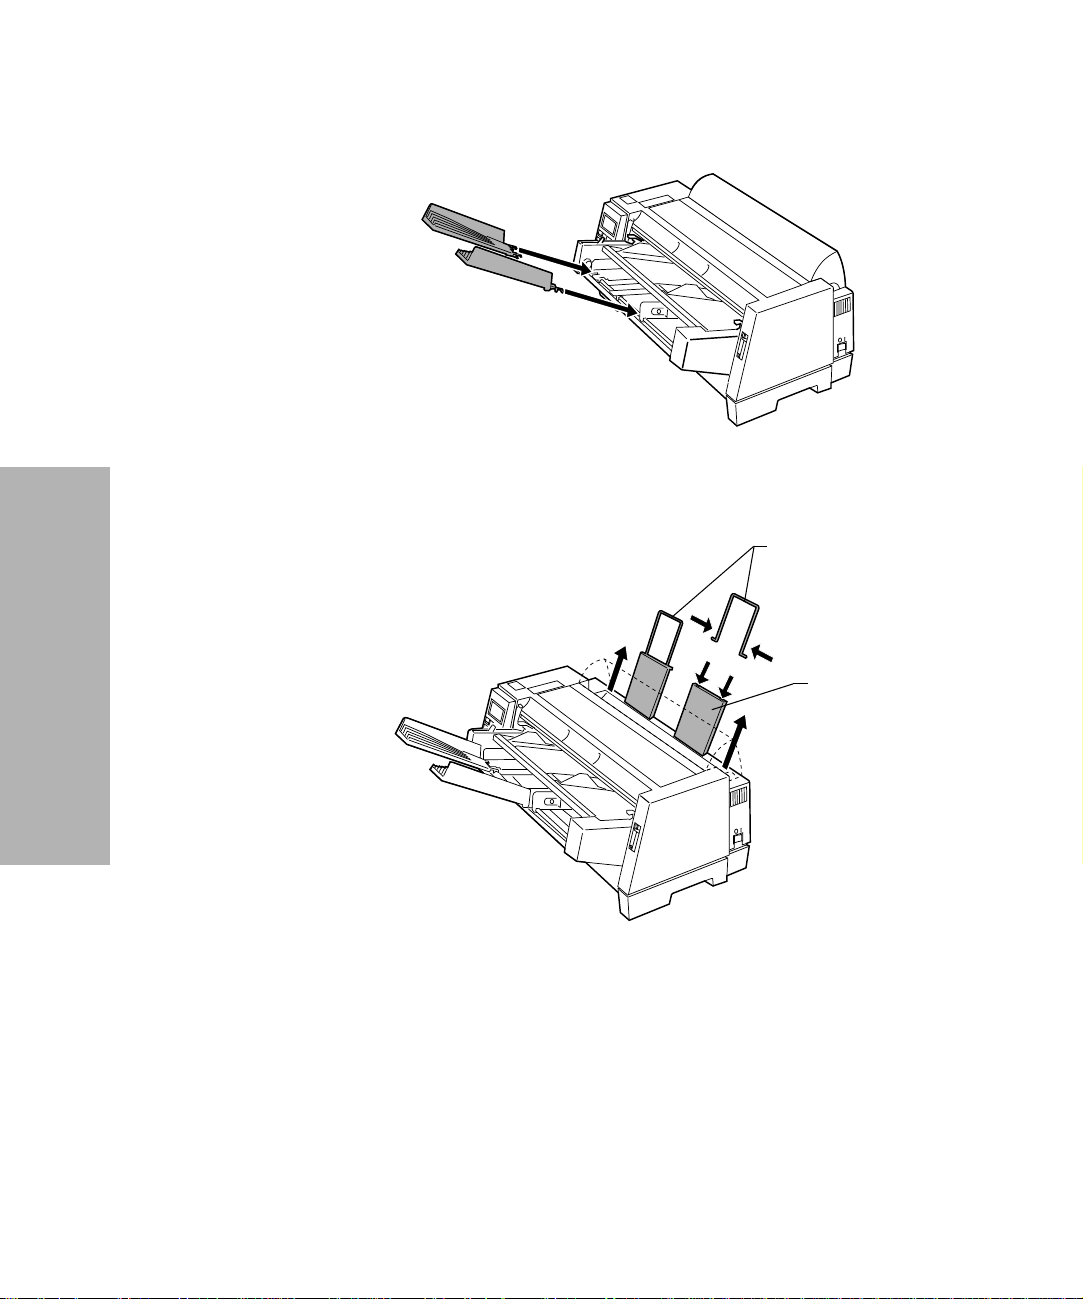
5 Attach the front paper supports to the Auto Sheet Feeder.
6 Pull the paper supports to the upright position and attach the
wire paper supports to them.
Wire Paper Supports
Paper Supports
Printer Options
Chapter 5: Printer Options
88
Page 95
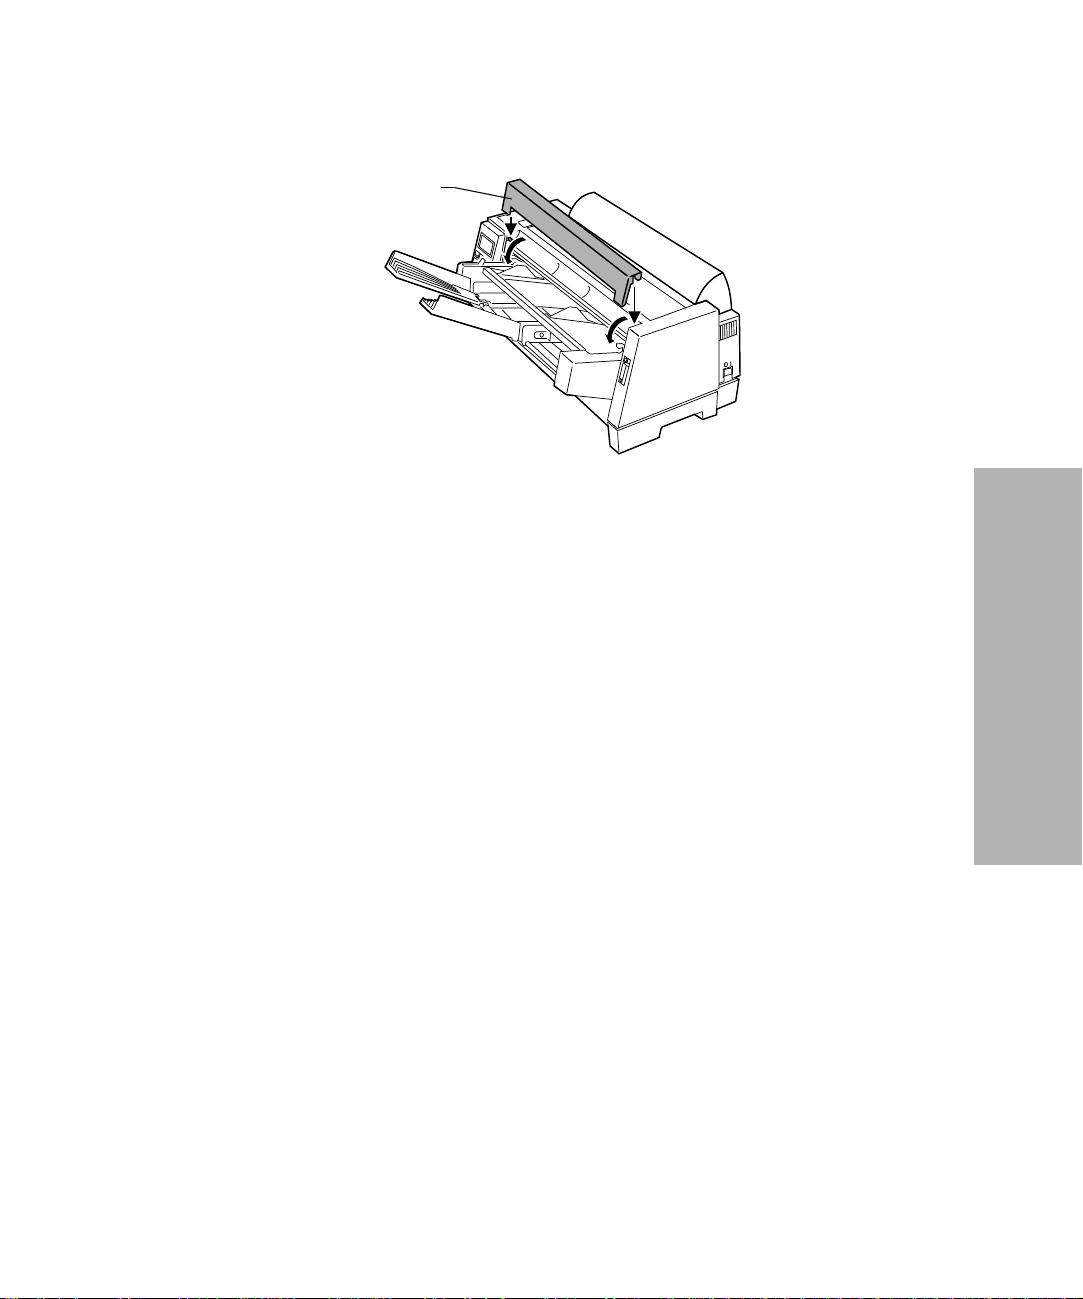
7 Attach the front cover that came with the Auto Sheet Feeder.
Front Cover
Turn the printer on.
8
9 Select Auto Sheet Feed On from the function menu. To turn
Auto Sheet Feed on, press:
a Menu.
b Item ↓ until Paper Hand Opt. appears.
Printer Options
c Next
→.
d Item ↓ until Auto Sheet Feed appears.
e Next → to see the printer’s setting.
f Item
↓ until On appears.
g Store to save the setting.
h Quit to exit the function menus.
Chapter 5: Printer Options
89
Page 96

Loading Paper in the Auto Sheet Feeder
The Auto Sheet Feeder lets you print from single sheets of paper
stacked in the feeder. The option also includes a manual feed tray
that lets you manually feed a single sheet of paper.
This section includes instructions for loading paper in the
automatic sheet feeder and the automatic sheet feeder’s manual
feed tray.
Loading Paper for Automatic Feed
If continuous forms are loaded, park them.
1
For help parking continuous forms, see step 1 of “Parking
Continuous Forms and Changing Tractor Feeders” on page
111.
2 Make sure AutoGap is set to On. For help, see “Setting Auto-
Gap” on page 48.
3 Move the paper select lever up to the single sheet position.
4 Pull the paper supports to the upright position.
Printer Options
Chapter 5: Printer Options
90
5 Pull the locking lever forward to allow paper to be loaded.
Locking Lever
Page 97

6 Place single sheets into the Auto Sheet Feeder.
Note:
• Place letterhead paper with the letterhead facing up
and toward the printer.
• The paper level should not exceed the markings on the
label located on the inside of the paper holder.
Printer Options
Chapter 5: Printer Options
91
Page 98

7 Move the paper guide so the print start position you want
aligns with the symbol [A printed on the margin guide of the
Auto Sheet Feeder.
Printing begins at
the [A symbol.
Margin Guide
Left Paper Guide
The distance from the [A symbol to the left
paper guide determines the left margin.
8 Move the right paper guide to match the paper width you are
using.
Printer Options
Chapter 5: Printer Options
92
Page 99

9 Push the locking lever in toward the printer.
Locking Lever
10 Press Start/Stop. The Ready light comes on and you are ready
to print.
Printer Options
Chapter 5: Printer Options
93
Page 100

Loading Paper for Auto Sheet Feeder Manual
Feed
If continuous forms are currently loaded on the printer, park the
continuous forms before performing these steps. For help parking
continuous forms, see steps 1 and 2 of “Parking Continuous Forms
and Changing Tractor Feeders” on page 111.
1 Push the paper select lever up to the single sheet position.
Pull the locking lever forward.
2
Note: After you finish printing on manual insertion paper,
move the locking lever back to let paper feed automatically.
Locking Lever
Printer Options
Chapter 5: Printer Options
94
Paper Select Lever
 Loading...