

Lexmark™ Forms Printer 2400 Series Setup / Quick Reference
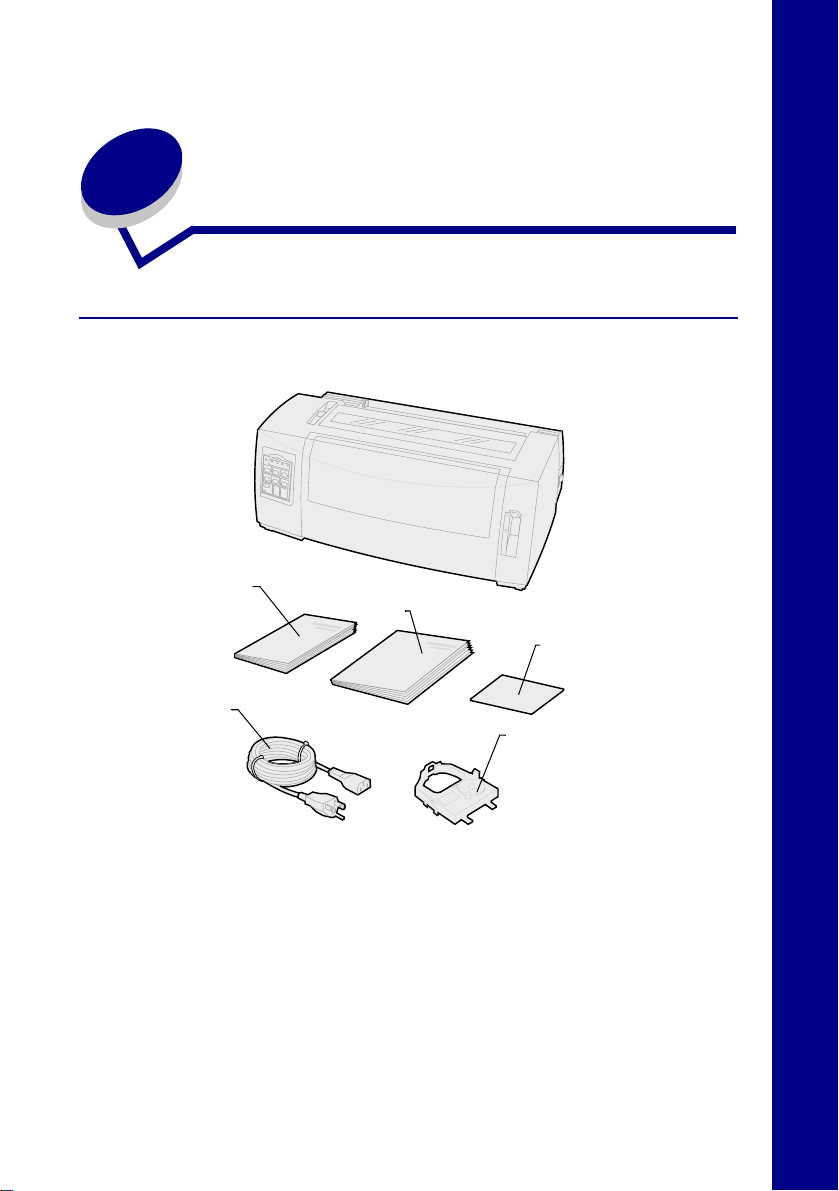
Printer ship group
Printer setup/
quick reference
Power
cord
User’s
guide
Registration
card
Ribbon
cartridge
English
1
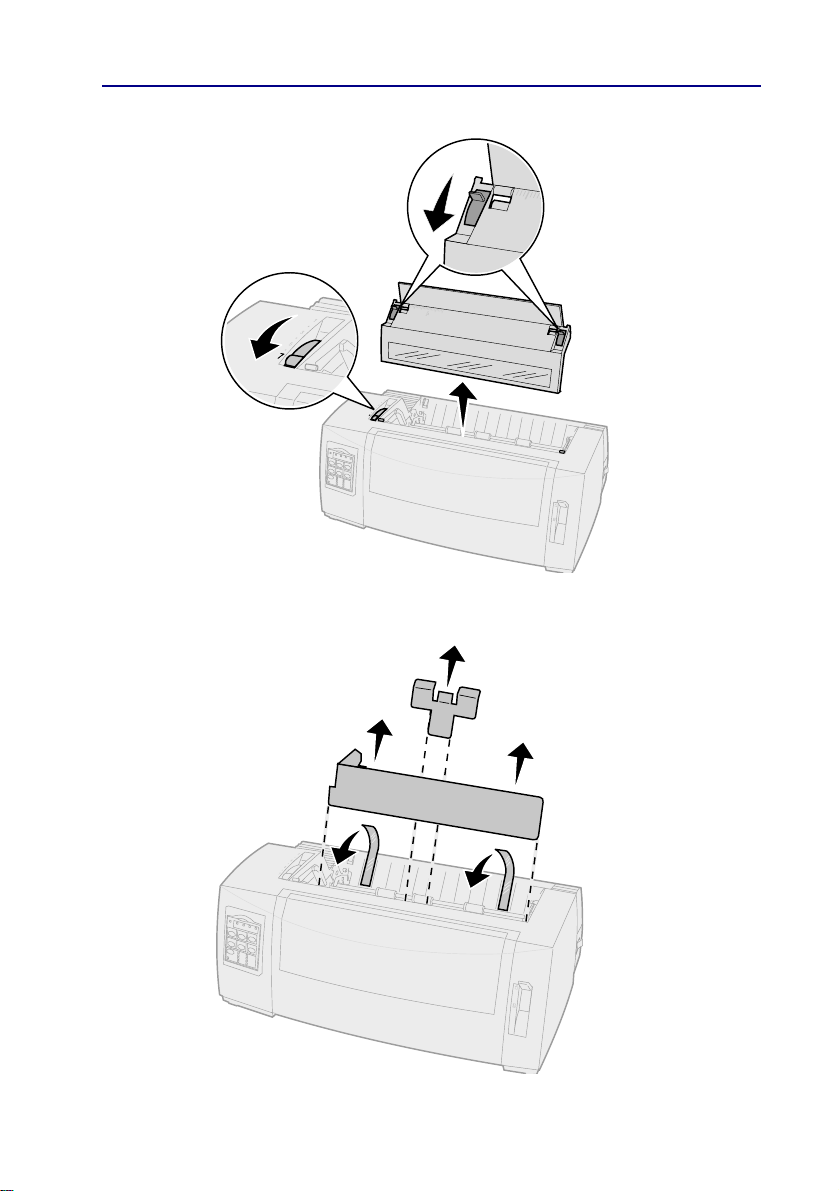
Printer setup
1
2
b
a
c
a
b
c
d
2
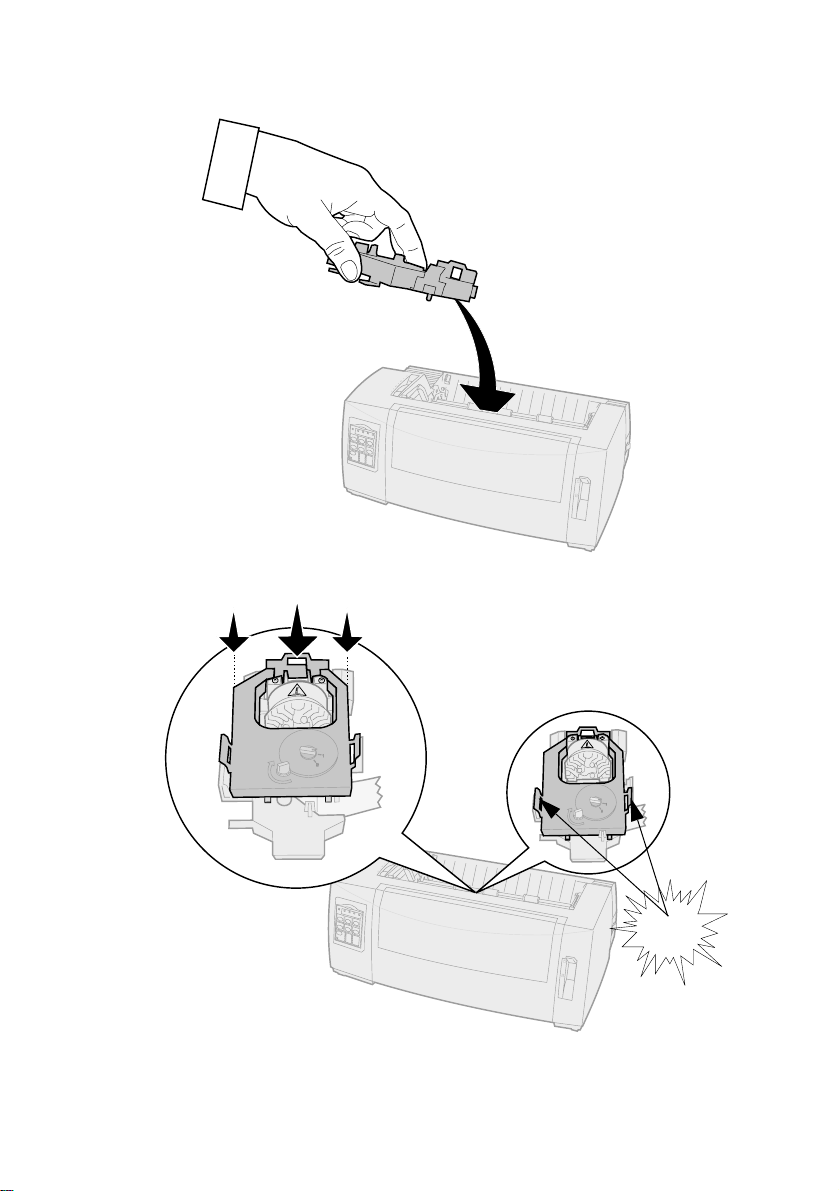
3
a
b
c
SNAP
3
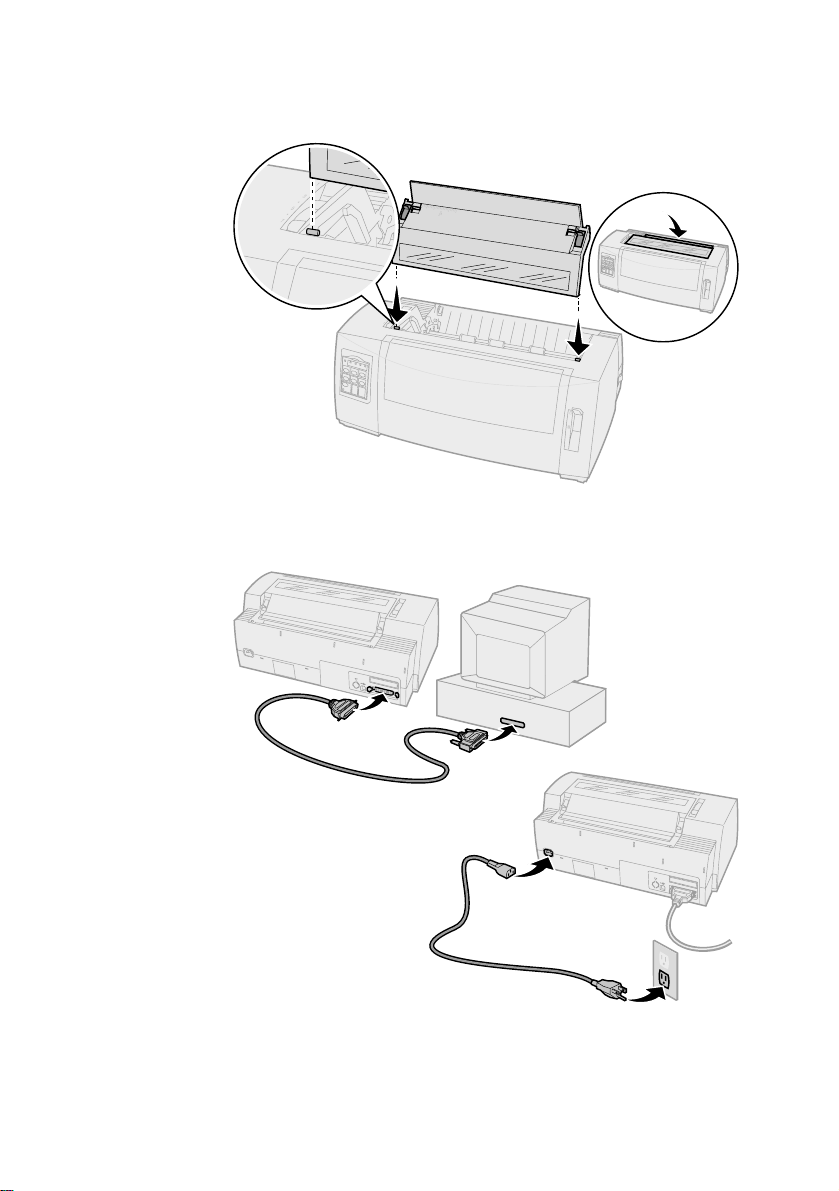
4
5
a
b
a
b
4
566
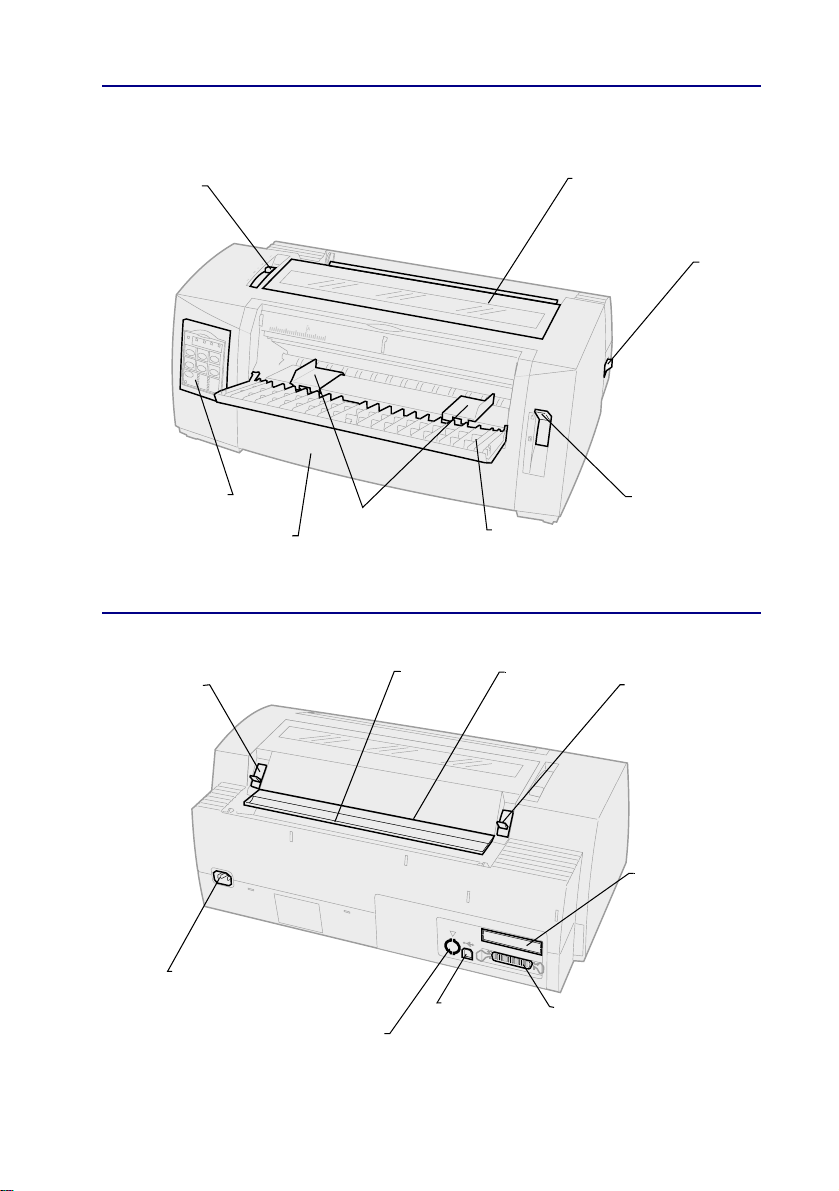
Front view of printer
Forms
thickness
lever
Ribbon
access
cover
Power
switch
Operator
panel
Front
cover
Paper
guides
Rear view of printer
Latch
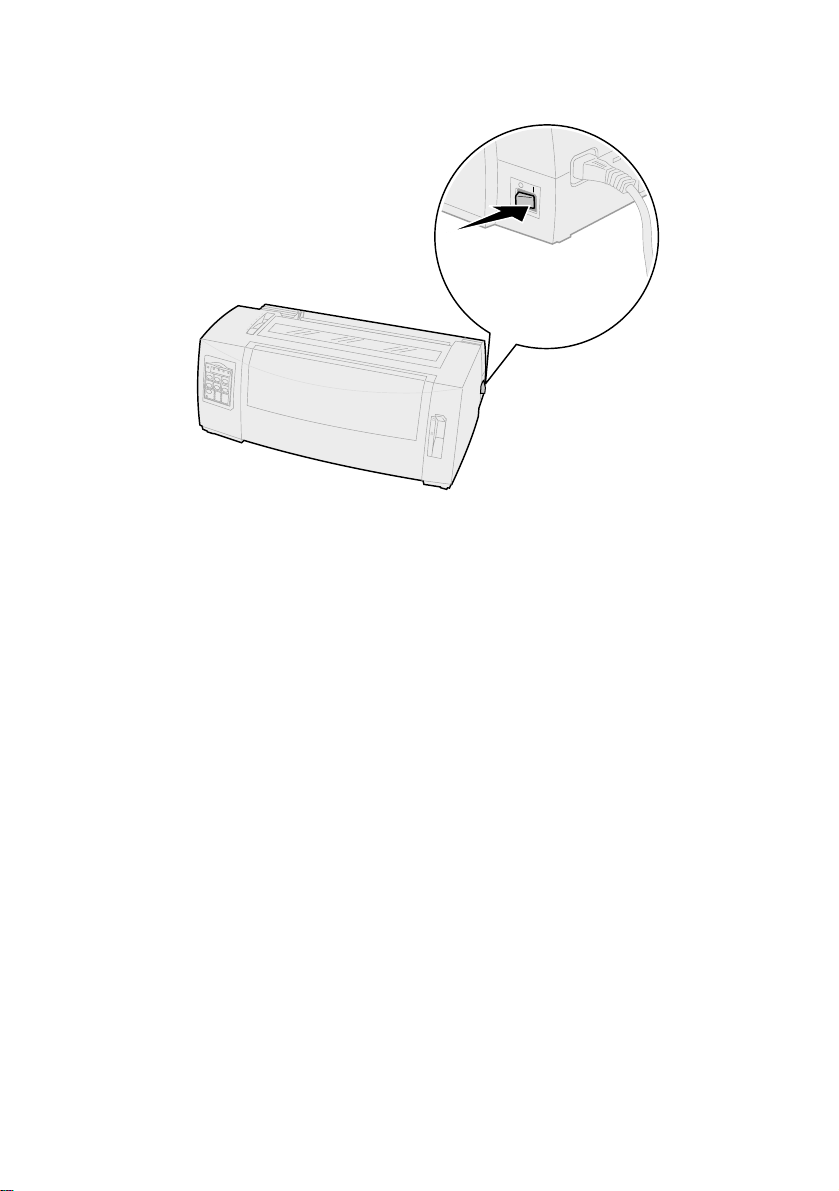
Power cord
connector
Tractor 2
connector
(behind plastic
knockout cover)
Acoustic
flap
USB
connector
Manual
feed
door
Tear Off
bar
Parallel
connector
Paper
select
lever
Latch
Optional Serial
interface
knockout

Setting the forms thickness lever
Forms thickness for 2480/2481
Paper
Paper type
Single forms Thin 56 g/m² (15 lb) continuous
Single forms Normal 68 g/m² (18 lb)
Multiple-part forms 2-part form 2 or 3
Envelopes 4, 5, or 6
Note:
• Print quality depends on the multiple-paper quality and the operating
environment. Printing at low temperature may cause poor print quality,
depending on the paper used.
• When the setting is 4 or higher, printing speed becomes slower.
thickness
Thick 90 g/m² (24 lb) 2
Paper weight
forms
65 g/m² (16 lb) cut form
75 g/m² (20 lb)
3-part form 3 or 4
4-part form 4 or 5
5-part form 5 or 6
6-part form 5, 6, or 7
Forms thickness
lever setting
1
1 or 2
7

Forms thickness for 2490/2491
Paper
Paper type
Single forms Thin 56 g/m² (15 lb) continuous
Single forms Normal 68 g/m² (18 lb)
Multiple-part forms 2-part form 2 or 3
Envelopes 4, 5, or 6
Note:
Print quality depends on the multiple-paper quality and the operating
environment. Printing at low temperature ma y cause poor print quality, depending
on the paper used.
thickness
Thick 90 g/m² (24 lb) 2
Paper weight
forms
65 g/m² (16 lb) cut form
75 g/m² (20 lb)
3-part form 3 or 4
4-part form 4, 5, 6 or 7
Forms thickness
lever setting
1
1 or 2
8

Loading paper
Loading continuous forms using the push tractor
1
2
3
4
FormFeed
Press
Set the forms thickness lever.
For help, see “Setting the forms thickness lever” on page 7.
Move the paper select lever down to continuous forms .
Pull out the front cover to release it and swing the cover up out of the way.
Front cover
to clear the paper path.
Paper select
lever
Front cover
Push
tractor
9

5
Pull up the left and right tractor locking levers to unlock the tractors.
Left
tractor
door
Locking
lever
6
Open the left and right tractor doors.
7
Place the paper pinfeed holes over the second or third pins of the tractor
unit.
If necessary, adjust the left or right tractor to fit the paper width.
8
Close the left and right tractor doors.
9
Set the left margin.
Move the tractor to align the left margin on your paper with the [A symbol
printed on the rear plate.
Keeping the left tractor positioned to the left of the rubber tractor stop
keeps your paper within the paper sensor area while in push tractor
position.
10
Push down the left tractor locking lever.
11
Adjust the right tractor to remove slack in the paper and lock the right
lever.
12
Close the front cover.
13
14
Press
Press
Load/Unload
Start/Stop
to load paper to the current Top-Of-Form.
to put the printer online.
Locking
lever
Left
tractor
door
10

Loading a cut form or envelope manually
1
Clear the paper path.
2
If continuous forms are currently loaded, tear off any used forms and
Load/Unload
press
The Paper Out light is blinking.
3
Set the forms thickness lever.
For help, see “Setting the forms thickness lever” on page 7.
4
Move the paper select lever up to cut forms .
5
Open the manual feed door.
6
Set the left margin.
Move the left paper guide so that the print start position you want aligns
with the [A symbol printed on the margin guide.
7
Place a cut form or envelope against the left paper guide.
8
Move the right paper guide against the right edge of the paper.
9
Insert paper into the printer until the Paper Out light stops blinking.
a
If Auto Cut Sheet Load is set to On, the paper feeds automatically to
the Top-Of-Form.
b
If Auto Cut Sheet Load is set to
10
Printer is online (Ready light On solid).
If it is not, press
to park the continuous forms.
Off
, press
Start/Stop
until the Ready light is On solid.
FormFeed
.
11

Using the operator panel
Layer 1
Press this button: When you want to …
Start/Stop
LineFeed
FormFeed
Tear Off
Load/Unload
Tractor
Font
Note:
• Repeatedly
pressing the
button rotates
through the printer
font selections. If
you continue
pressing
through a second
pass, the font
selections are
locked.
• This setting will be
lost when the
printer is powered
Off
and back On.
Note:
Some functions may not work when data is being processed and the
printer is online (Ready light is On).
Font
Font
Alternate the printer between online (Ready light is On)
and offline (Ready light is
Advance the paper one line.
If you press and hold
micro movements and then goes into continuous mode.
Advance the paper to the next Top-Of-Form.
Alternate paper between Tear Off and Top-Of-Form.
Load paper to the current Top-Of-Form or unload paper
to parked position.
Alternate between Tractor 1 and Tractor 2 if the optional
Tractor 2 is installed.
Select one of the resident font
styles:
Off
).
LineFeed
, the paper advances 5
2480/2481
• FastDft
•Draft
•Gothic
• Courier
2490/2491
• Courier
•Prestige
•Gothic
•Presentor
•Orator
•Script
•Draft
• FastDft
12

Layer 2
24
Power
Set TOF LineFeed Macro
Micro
↑
Pitch
Lock
311
Macro
Micro ↓Setup
10
20
12
PS
15
17
Press this button: When you want to…
Set TOF
Set Top-Of-Form. Top-Of-Form is the position of the
first print line on the page.
LineFeed
Advance the paper one line.
If you press and hold
5 micro movements and then goes into continuous
feed.
Macro
Select between four document formats. For more
information, refer to “Using Setup mode” in the
User’s Guide
.
LineFeed
Power
Set TOF
Micro
Pitch
Lock
12
↑
34
Macro
LineFeed Macro
Micro ↓Setup
10
20
12
24
15
PS
17
, the paper advances
Micro
↑
Feed the paper upward in:
• 1/72-inch increments (2480/2481 models)
• 1/90-inch increments (2490/2491 models)
If you press and hold
Micro
↑, the paper
advances in micro mov ements and then goes into
continuous feed.
Micro
Use
↑ to adjust the Top-Of-Form.
13

Press this button: When you want to…
Micro
↓
Setup
Pitch
Note:
• Repeatedly pressing
Pitch
rotates through
the printer pitch
selections. If you
continue pressing
Pitch
through a
second pass, the pitch
selections are locked.
• This setting will be lost
when the printer is
powered
On
Off
and back
.
Feed the paper downward in:
• 1/72-inch increments (2480/2481 models)
• 1/90-inch increments (2490/2491 models)
If you press and hold
advances in micro mov ements and then goes into
continuous feed.
Micro
Use
Enter Setup mode. You can change the default
values and modes for printer operation.
Set the character pitch to: 10 cpi, 12 cpi, 15 cpi,
17 cpi, 20 cpi, or Proportional Spacing.
Note:
• On 2490/2491 models you can also select 24 cpi.
• Fast Draft supports only 10, 12, and 15 pitch.
↓ to adjust the Top-Of-Form.
Micro
↓, the paper
Note:
Some functions may not work when data is being processed and the
printer is online (Ready light is On).
14

Top-Of-Form
Setting Top-Of-Form for continuous form paper
in push mode
Top-Of-Form can range from minus 1 inch to plus 14 inches from the top of
continuous form paper.
Note: Use this method to also set Top-Of-Form for continuous
forms loaded in the optional Tractor 2 Feeder.
1
Clear the paper path.
If the Paper Out light is
FormFeed
Press
2
Move the paper select lever to continuous forms .
3
Load continuous form paper on the push tractor feed pins (or Tractor 2
feed pins if you are using the optional Tractor 2 Feeder).
4
Remove the ribbon access cover.
5
Press
Load/Unload
Off
, tear off excess forms and press
to clear a cut sheet.
. The Paper Out light goes
Off
.
Load/Unload
.
15

6
Open the operator panel cover to layer 2.
7
Press any paper movement button (
the Top-Of-Form you want with the horizontal lines (located on the platen).
This illustration shows the position of the horizontal lines on either side of
the metal platen bar. Use these lines as your reference point when lining
up your Top-Of-Form. The bottom of a printed character will be even with
the horizontal lines.
LineFeed, Micro
↑,
Micro
↓) to align
Top view of printer
Horizontal
line
Align paper with the
horizontal lines on
metal platen bar
Paper
Operator
panel
8
9
10
11
12
Set TOF
Press
Close the operator panel cover.
To verify the new Top-Of-Form, press
continuous forms and press
The continuous forms load to the current Top-Of-Form setting.
Reinstall the ribbon access cover.
Start/Stop
Press
to set and save Top-Of-Form.
Ribbon
cartridge
Load/Unload
to set printer online.
Platen
Load/Unload to
again to reload the forms.
Front
cover
unload the
16

Setting Top-Of-Form for a cut form or envelope
Top-Of-Form can range from minus 1 to plus 22 inches from the top of cut
sheet paper.
1
2
3
4
5
6
7
8
9
FormFeed
Press
If the Paper Out light is
Move paper select lever to the cut forms.
Load a cut sheet of paper or envelope through the manual feed door.
The printer moves the paper or envelope to the current Top-Of-Form, if
Auto Cut Sheet is set to On.
If not, press
Open the operator panel to layer 2.
Press any paper movement button (
the Top-Of-Form you want with the horizontal lines (located on the platen).
Set TOF
Press
Close the operator panel cover.
Start/Stop
Press
to clear paper path.
Off
, tear off excess forms and press
FormFeed
to set and save Top-Of-Form.
when the
to put the printer online.
Paper Out
LineFeed, Micro
light goes
↑,
Load/Unload
Off
.
Micro
↓) to align
Changing from continuous forms to a cut sheet or envelope
Load/Unload parks (unloads) continuous forms so you can insert a cut
form or envelope into the manual feed door to print or load paper to the
current Top-Of-Form.
.
1
Make sure the tractor unit is in the push position.
2
Tear off the continuous form at the perforation.
3
Move the paper select lever down to continuous forms.
4
5
Load/Unload
Press
The continuous form paper moves out of the paper path. The Paper Out
light blinks and the paper out alarm sounds.
Move the paper select lever up to cut forms.
.
17

Printing a demonstration sample
1
Turn the printer On.
2
Load paper in the printer.
3
Adjust the left and right paper guides to fit the paper.
4
Turn the printer
5
Press and hold the
operator panel lights blink.
6
Release
The demonstration page prints.
© Copyright 1993, 2000 Lexmark International, Inc.
Lexmark is a trademark of Lexmark International, Inc., registered in the United
States and/or other countries.
P/N 12T0273
EC 4T0001
Printed in Singapore
6/00
Font
Off
.
Font
button while turning the printer
.
On
until the
18
 Loading...