

Page 1

PLACEHOLDER
COVER
PN: 22W0020
Page 2

Edition notice
July 2006
The following paragraph does not apply to any country where such provisions are inconsistent with
local law: LEXMARK INTERNATIONAL, INC., PROVIDES THIS PUBLICATION “AS IS” WITHOUT
WARRANTY OF ANY KIND, EITHER EXPRESS OR IMPLIED, INCLUDING, BUT NOT LIMITED TO, THE
IMPLIED WARRANTIES OF MERCHANTABILITY OR FITNESS FOR A PARTICULAR PURPOSE. Some
states do not allow disclaimer of express or implied warranties in certain transactions; therefore, this statement
may not apply to you.
This publication could include technical inaccuracies or typographical errors. Changes are periodically made
to the information herein; these changes will be incorporated in later editions. Improvements or changes in
the products or the programs described may be made at any time.
Comments about this publication may be addressed to Lexmark International, Inc., Department F95/032-2,
740 West New Circle Road, Lexington, Kentucky 40550, U.S.A. In the United Kingdom and Eire, send to
Lexmark International Ltd., Marketing and Services Department, Westhorpe House, Westhorpe, Marlow
Bucks SL7 3RQ. Lexmark may use or distribute any of the information you supply in any way it believes
appropriate without incurring any obligation to you. To obtain additional copies of publications related to this
product, visit the Lexmark Web site at www.lexmark.com.
References in this publication to products, programs, or services do not imply that the manufacturer intends
to make these available in all countries in which it operates. Any reference to a product, program, or service
is not intended to state or imply that only that product, program, or service may be used. Any functionally
equivalent product, program, or service that does not infringe any existing intellectual property right may be
used instead. Evaluation and verification of operation in conjunction with other products, programs, or
services, except those expressly designated by the manufacturer, are the user’s responsibility.
© 2006 Lexmark International, Inc.
All rights reserved.
UNITED STATES GOVERNMENT RIGHTS
This software and any accompanying documentation provided under this agreement are commercial
computer software and documentation developed exclusively at private expense.
Safety information
Use only the power supply and power supply cord provided with this product or the manufacturer's authorized
replacement power supply and power supply cord.
Connect the power supply cord to an electrical outlet that is near the product and easily accessible.
Refer service or repairs, other than those described in the user documentation, to a professional service
person.
This product is designed, tested, and approved to meet strict global safety standards with the use of specific
Lexmark components. The safety features of some parts may not always be obvious. Lexmark is not
responsible for the use of other replacement parts.
CAUTION: Do not set up this product or make any electrical or cabling connections, such as the power
supply cord or telephone, during a lightning storm.
Page 3

Contents
Finding information about the printer...............................................5
Setting up the printer..........................................................................9
Aligning the print cartridge for better print quality..............................................9
Checking the box contents...............................................................................10
Learning about the printer...............................................................11
Understanding the parts of the printer.............................................................11
Using the control panel buttons.......................................................................13
Using the control panel menus........................................................................14
Learning about the software............................................................19
Loading paper...................................................................................20
Loading paper..................................................................................................20
Using supported paper types...........................................................................20
Connecting photo storage devices.................................................21
Inserting a memory card..................................................................................21
Inserting a flash drive.......................................................................................23
Connecting a PictBridge-enabled digital camera.............................................24
Viewing photos.................................................................................25
Viewing a photo slideshow on the control panel display..................................25
Printing photos.................................................................................26
Printing photos using the control panel............................................................26
Editing photos...................................................................................33
Cropping photos...............................................................................................33
Adjusting the brightness of photos...................................................................34
Enhancing photos automatically......................................................................35
Adding frames to photos..................................................................................36
Using color effects on photos...........................................................................38
3
Page 4

Transferring photos..........................................................................40
Transferring photos from a memory device to a computer..............................40
Transferring photos from a memory card to a flash drive................................40
Using Bluetooth technology............................................................41
Setting the Bluetooth mode..............................................................................41
Printing using Bluetooth...................................................................................41
Troubleshooting................................................................................43
Setup troubleshooting......................................................................................43
Print troubleshooting........................................................................................45
Jams and misfeeds troubleshooting................................................................48
Device troubleshooting....................................................................................48
Error messages troubleshooting......................................................................49
Removing and reinstalling the software...........................................................51
Notices...............................................................................................53
4
Page 5

Finding information about the printer
Setup sheet
Description Where to find
The Setup sheet gives you instructions
for setting up hardware and software.
Getting Started or Setup Solutions booklet
Description Where to find
The Getting Started booklet gives you
instructions for setting up hardware and
software (on Windows operating systems)
and some basic instructions for using the
printer.
Note: If your printer supports Macintosh
operating systems, see the Mac Help:
1
From the Finder desktop, double-click
the Lexmark 350 Series folder.
2
Double-click the printer Help icon.
The Setup Solutions booklet tells you how
to solve printer setup problems.
Note: These documents do not ship with all
printers. If you did not receive a Getting
Started booklet or a Setup Solutions
booklet, see the User's Guide instead.
You can find this document in the printer box or
on the Lexmark Web site at
www.lexmark.com.
You can find this document in the printer box
or on the Lexmark Web site at
www.lexmark.com.
5
Page 6

User's Guide
Description Where to find
The User's Guide gives you instructions for
using the printer and other information such
as:
•
Using the software (on Windows
operating systems)
•
Loading paper
•
Printing
•
Working with photos
•
Scanning (if supported by your printer)
•
Making copies (if supported by your
printer)
•
Faxing (if supported by your printer)
•
Maintaining the printer
•
Connecting the printer to a network (if
supported by your printer)
•
Troubleshooting problems with printing,
copying, scanning, faxing, paper jams,
and misfeeds
Note: If your printer supports Macintosh
operating systems, see the Mac Help:
1
From the Finder desktop, double-click
the Lexmark 350 Series folder.
2
Double-click the printer Help icon.
When you install the printer software, the
User's Guide will be installed.
1
Click Start Programs or All
Programs Lexmark 350 Series.
2
Click User's Guide.
If the link to the User's Guide is not on your
desktop, follow these instructions:
1
Insert the CD.
The installation screen appears.
Note: If necessary, click Start Run,
and then type D:\setup, where D is the
letter of your CD-ROM drive.
2
Click View User's Guide (including
Setup Troubleshooting).
3
Click Yes.
An icon of the User's Guide appears on
your desktop, and the User's Guide
appears on the screen.
You can also find this document on the
Lexmark Web site at www.lexmark.com.
Help
Description Where to find
The Help gives you instructions for using the
software, if your printer connects to a
computer.
While in any Lexmark software program,
click Help, Tips Help, or Help Help
Topics.
Lexmark Solution Center
Description Where to find
The Lexmark Solution Center software is
included on your CD. It installs with the other
software, if your printer connects to a
computer.
To access the Lexmark Solution Center:
1
Click Start Programs or All
Programs Lexmark 350 Series.
2
Select Lexmark Solution Center.
6
Page 7

Customer support
Description Where to find (North America) Where to find (rest of world)
Telephone support
E-mail support
Call us at
•
US: 1-800-332-4120
Monday–Friday (8:00 AM–
11:00 PM EST)
Saturday (Noon–6:00 PM
EST)
•
Canada: 1-800-539-6275
Monday–Friday (9:00 AM–
9:00 PM EST)
Saturday (Noon–6:00 PM
EST)
•
Mexico: 001-888-377-0063
Monday–Friday (8:00 AM–
8:00 PM EST)
Note: Support numbers and times
may change without notice. For the
most recent phone numbers
available, see the printed warranty
statement that shipped with your
printer.
For e-mail support, visit our Web
site: www.lexmark.com.
1
Click CUSTOMER SUPPORT.
2
Click Technical Support.
3
Select your printer family.
4
Select your printer model.
5
From the Support Tools
section, click e-Mail Support.
6
Complete the form, and then
click Submit Request.
Telephone numbers and
support hours vary by country or
region.
Visit our Web site at
www.lexmark.com. Select a
country or region, and then
select the Customer Support
link.
Note: For additional information
about contacting Lexmark, see
the printed warranty that
shipped with your printer.
E-mail support varies by country
or region, and may not be
available in some instances.
Visit our Web site at
www.lexmark.com. Select a
country or region, and then
select the Customer Support
link.
Note: For additional information
about contacting Lexmark, see
the printed warranty that
shipped with your printer.
7
Page 8

Limited Warranty
Description Where to find (US) Where to find (rest of
Limited Warranty
Information
Lexmark International, Inc.
furnishes a limited warranty
that this printer will be free
of defects in materials and
workmanship for a period of
12 months after the original
date of purchase.
Record the following information (located on the store receipt and the back of the printer),
and have it ready when you contact us so that we may serve you faster:
•
Machine Type number
•
Serial number
•
Date purchased
•
Store where purchased
To view the limitations and
conditions of this limited warranty,
see the Statement of Limited
Warranty included with this
printer, or set forth at
www.lexmark.com.
1
Click CUSTOMER
SUPPORT.
2
Click Warranty Information.
3
From the Statement of Limited
Warranty section, click Inkjet
& All-In-One Printers.
4
Scroll through the Web page
to view the warranty.
world)
Warranty information
varies by country or
region. See the printed
warranty that shipped
with your printer.
8
Page 9

Setting up the printer
The printer can be used as a stand-alone product, or with a connection to a computer. To set
up the printer, see the Setup sheet that came with the product.
Aligning the print cartridge for better print quality
1
Load photo paper, with the glossy or printable side facing you. (If you are not sure which
side is the printable side, see the instructions that came with the paper.) For more
information, see “Loading paper” on page 20.
Note: For best results, use the photo paper you intend to use for printing.
2
Press or repeatedly until Tools appears on the display.
3
Press .
4
Press or repeatedly until Maintenance appears.
5
Press .
6
Press or repeatedly until Align Cartridge appears.
7
Press .
An alignment page prints.
After you align the cartridge, print your photo again. If print quality has not improved, clean
the print cartridge nozzles.
9
Page 10
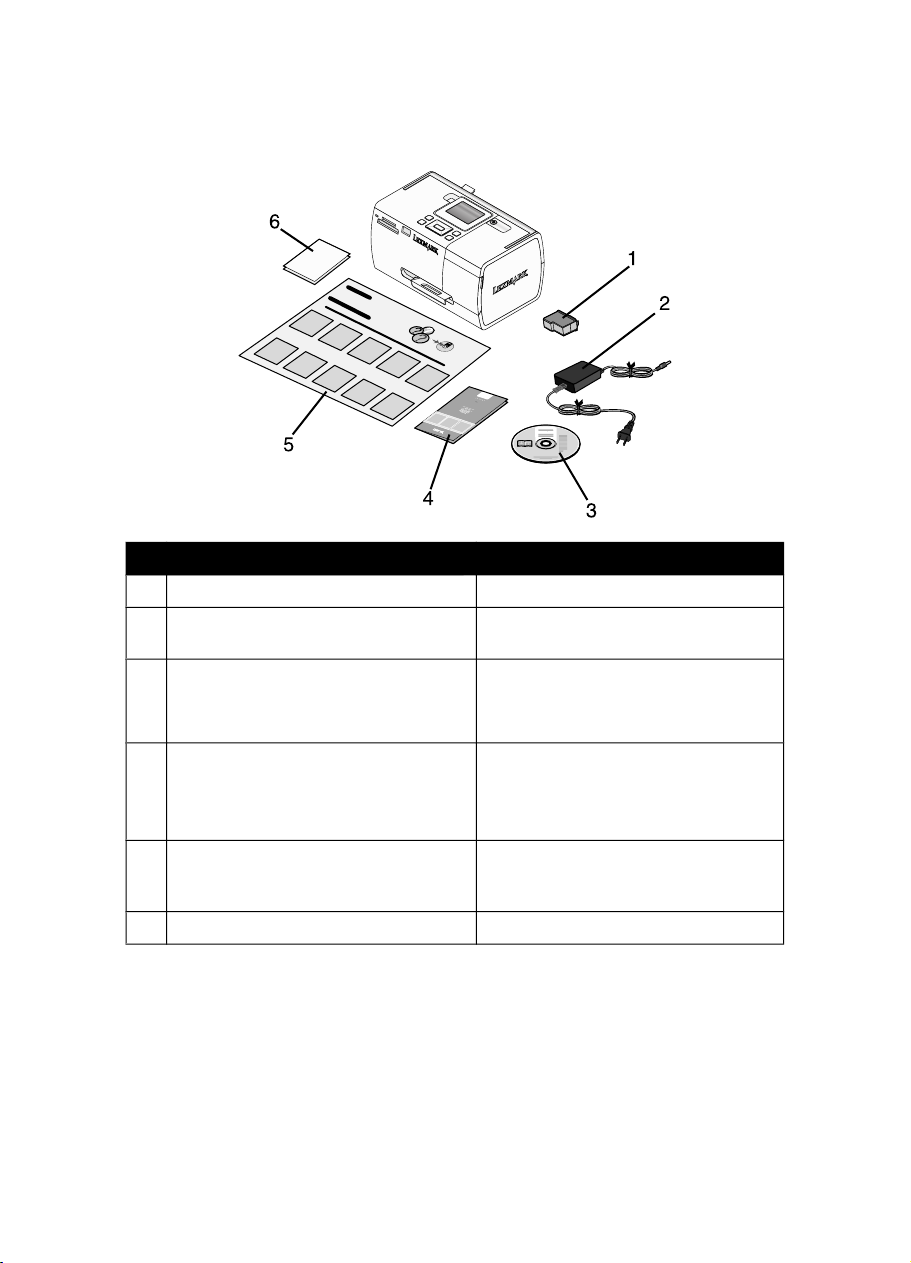
Checking the box contents
Name Description
Color print cartridge Cartridge to be installed in the printer
1
Power supply Attaches to the power supply port located
2
Installation software CD
3
Getting Started or Setup Solutions booklet Printed booklet that serves as a guide
4
Setup Instructions sheet Instructions on setting up printer
5
4 x 6 in. (10 x 15 cm) photo paper Paper for the printer
6
at the back of the printer
Installation software for the printer
•
Help
•
User's Guide in electronic format
•
Note: The complete User's Guide can be
found on the installation software CD that
shipped with the printer.
hardware and software, and information
on setup troubleshooting
Note: USB cable sold separately
10
Page 11
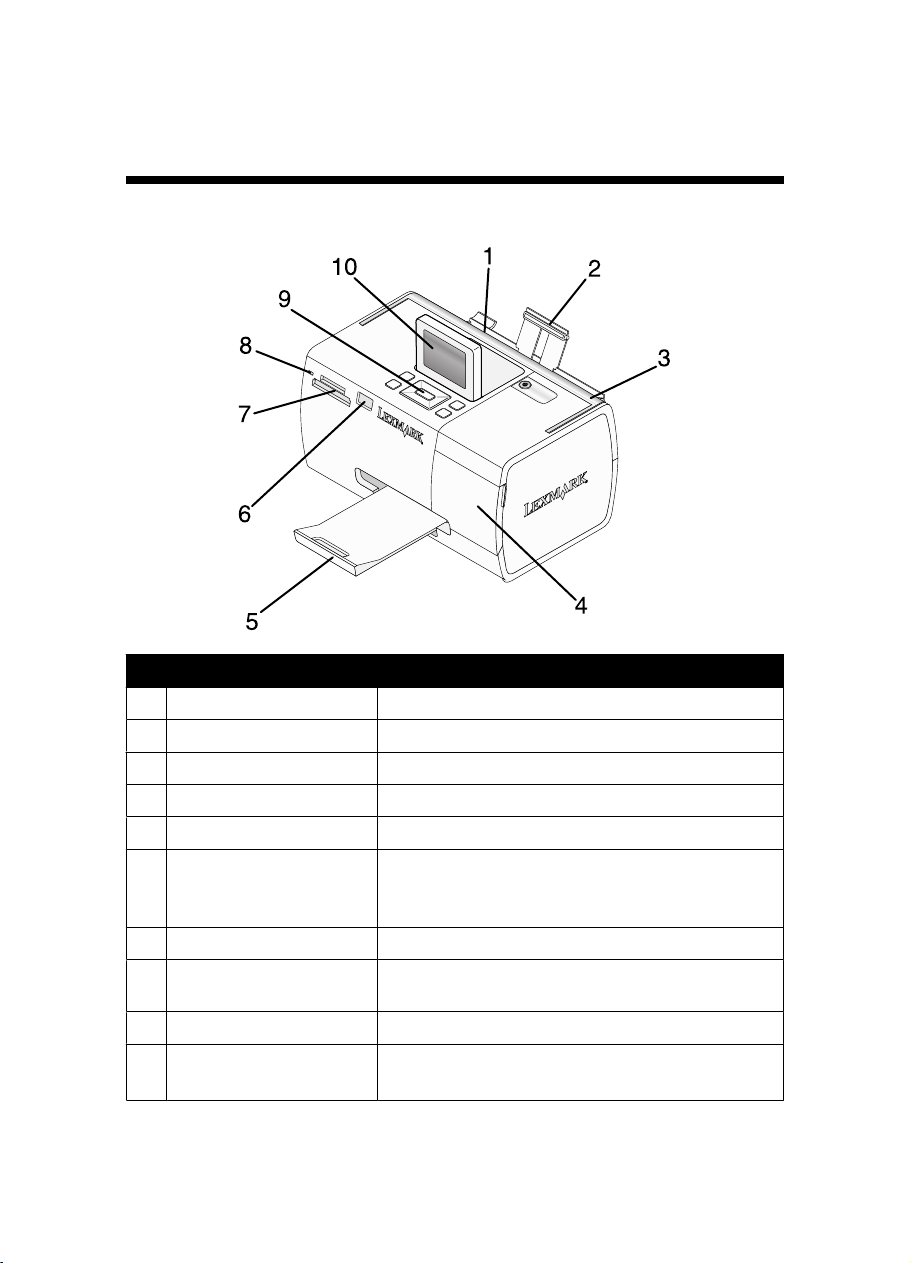
Learning about the printer
Understanding the parts of the printer
Use the To
Paper guide Keep paper straight when feeding.
1
Paper support Load paper.
2
Handle Carry the printer.
3
Access cover Access the print cartridge.
4
Paper exit tray Hold paper as it exits.
5
PictBridge port Connect a PictBridge-enabled digital camera, a flash
6
Memory card slots Insert memory cards.
7
Light Determine if the printer is reading a memory card. The
8
Control panel Operate the printer.
9
Display View photos or menus, or check the status of the printer.
10
drive, or a Bluetooth adapter to the printer.
Note: Bluetooth adapter sold separately.
light blinks while reading the device.
The display tilts for easy viewing.
11
Page 12
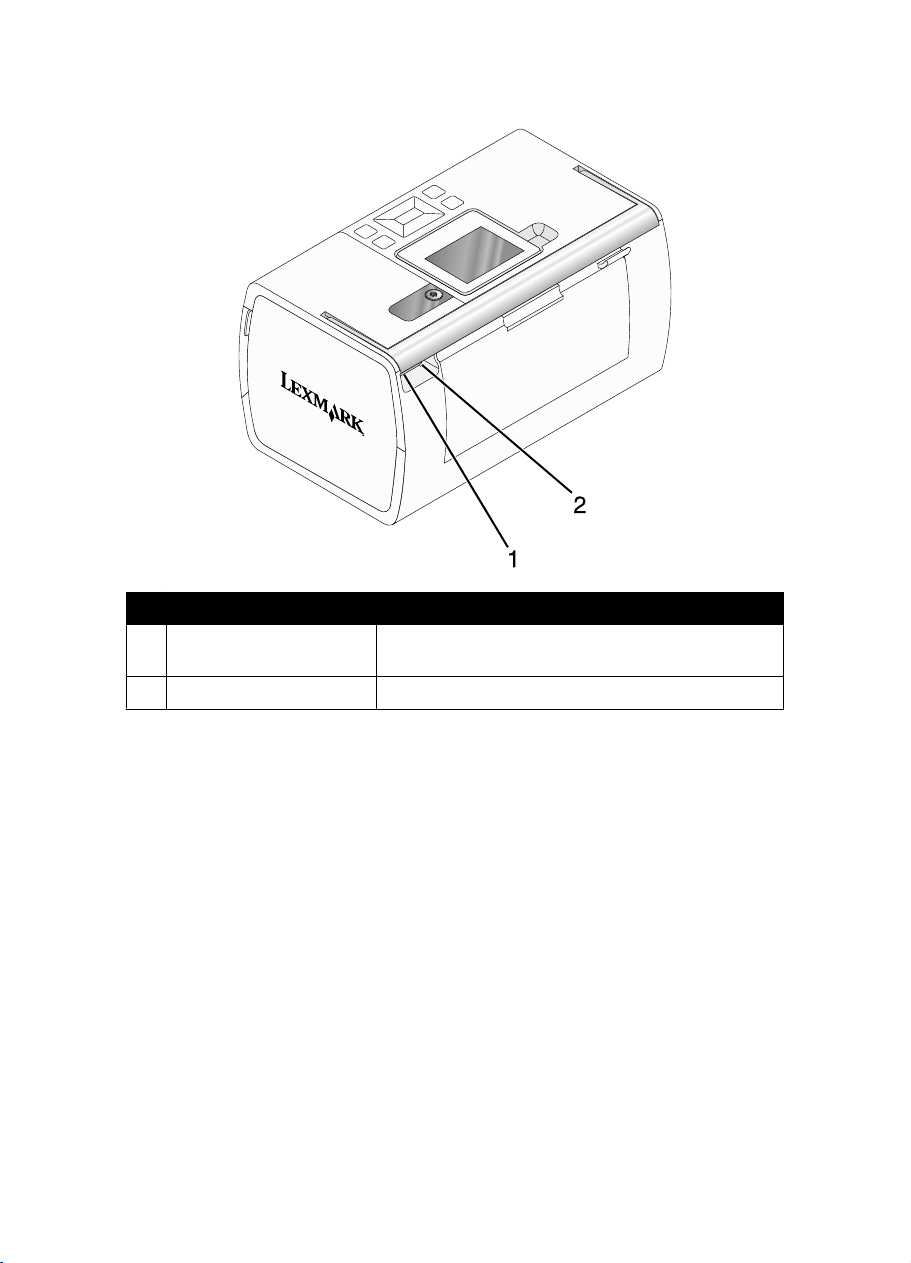
Use the To
Power supply port Connect the printer to a power source using the power
1
USB port Connect the printer to a computer using a USB cable.
2
supply.
12
Page 13
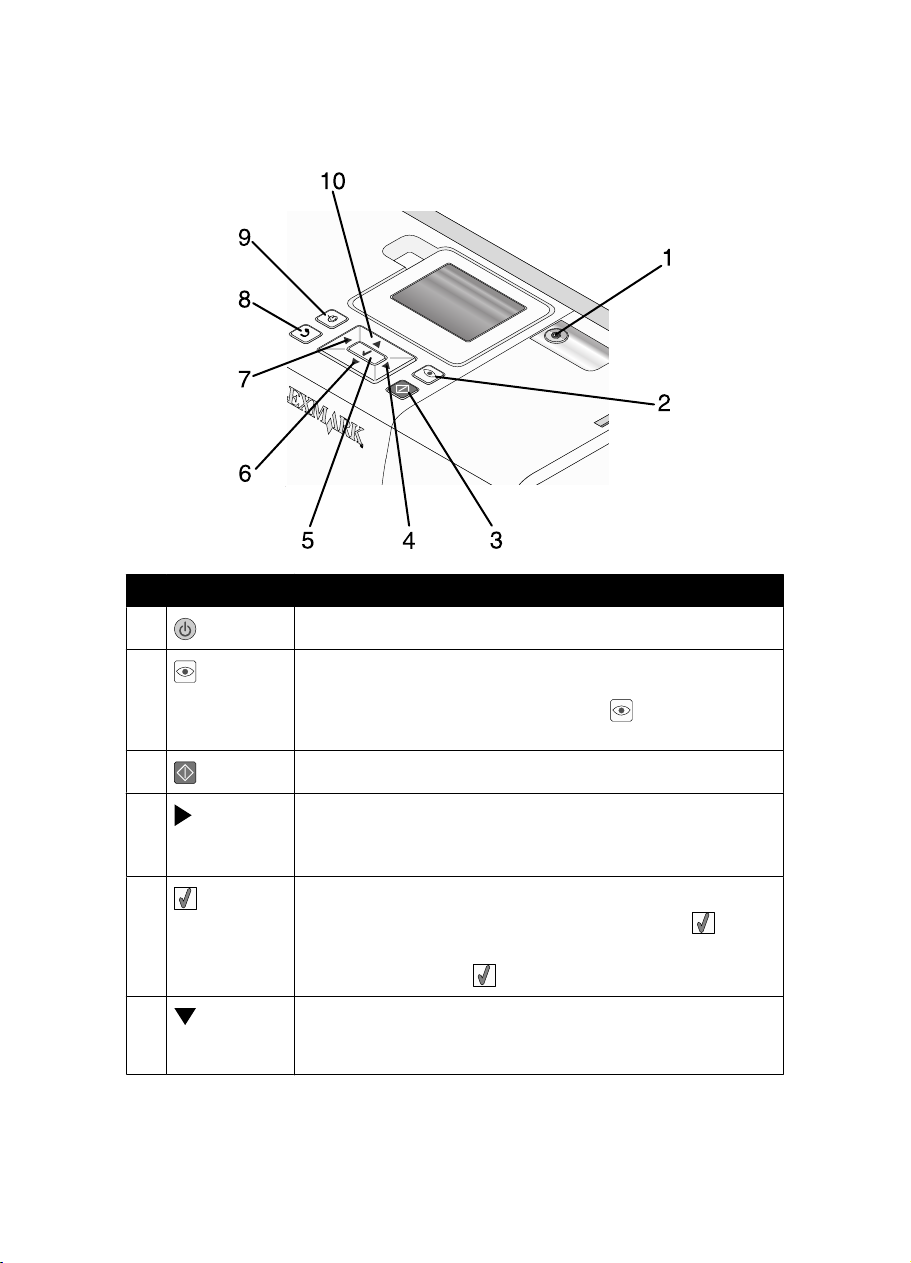
Using the control panel buttons
Press To
1
Turn the printer on and off.
2
3
4
5
6
Apply red-eye reduction to the photo on the display when it is
printed. An icon appears on the bottom of the display to indicate that
red-eye reduction will be performed. Press
correction.
Start a color print job using the current settings.
•
Navigate through menu selections of the main menu.
•
Navigate through selections of a submenu.
•
When viewing photos, navigate from one photo to another.
•
In a menu, enter submenus and perform actions.
•
Select a photo being viewed on the display. Press again to
deselect the photo.
•
Eject paper. (Press for three seconds.)
•
Navigate through submenus of a menu.
•
When previewing a photo, decrease the number of copies to be
printed.
again to cancel the
13
Page 14
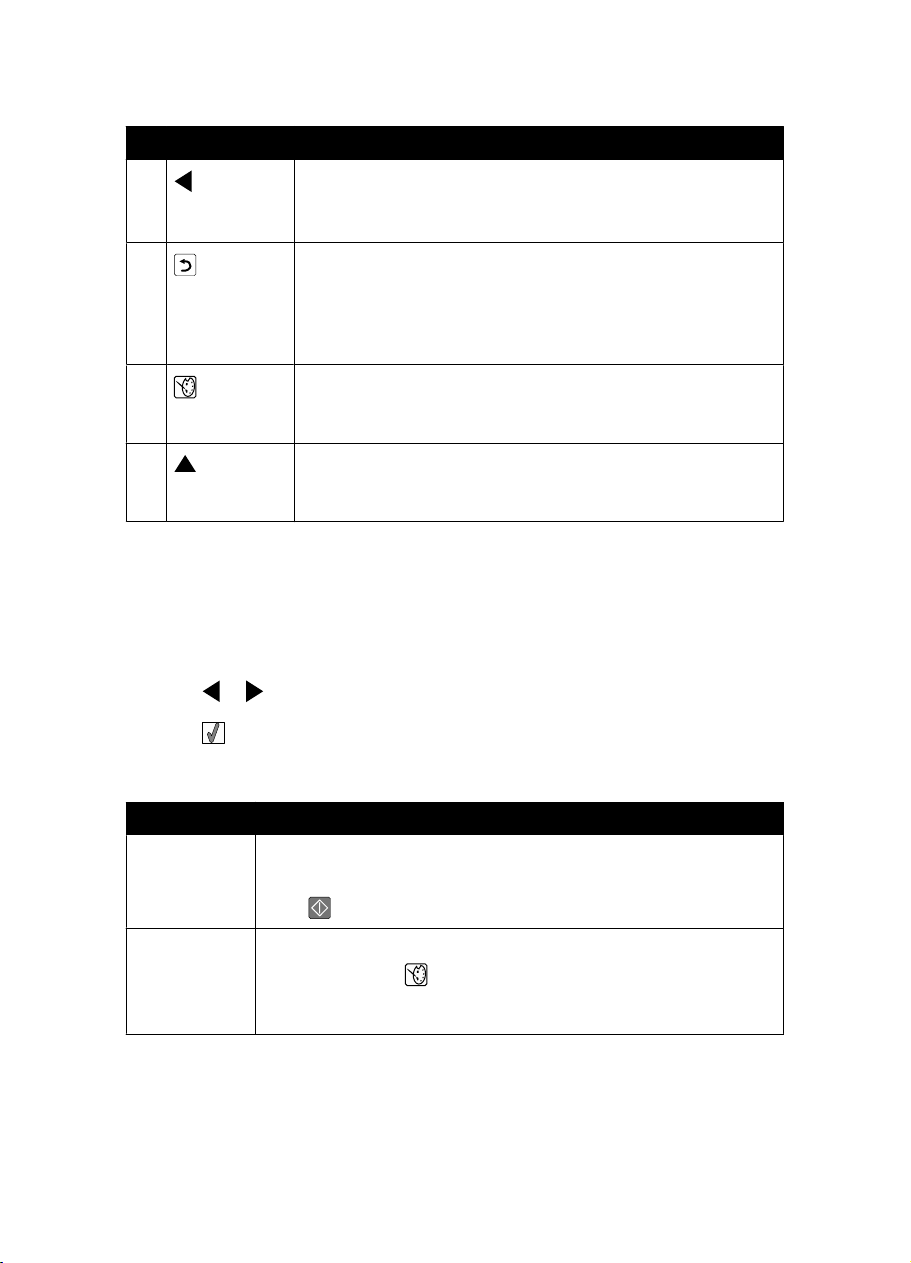
Press To
7
8
9
10
•
Navigate through menu selections of the main menu.
•
Navigate through selections of a submenu.
•
When viewing photos, navigate from one photo to another.
•
In a submenu, save the current selection, and return to the
previous display.
•
When viewing a photo slideshow, pause or stop the slideshow.
•
When printing a photo or an alignment page, stop and cancel
the job, and eject the paper.
•
In the photo selection screen, bring up the Photo Edit Mode
menu.
•
In the Print Preview screen, bring up the Print Settings menu.
•
Navigate through submenus of a menu.
•
When previewing a photo, increase the number of copies to be
printed.
Using the control panel menus
Using the View and Select menu
1
Insert a memory card or flash drive. For more information, see “Inserting a memory card”
on page 21 or “Inserting a flash drive” on page 23.
2
Press or repeatedly until View and Select appears on the display.
3
Press .
4
Follow the instructions on the display.
From here You can
View and Select
Print Preview See a preview of the photo/s to be printed.
•
Select one or more photos for viewing and/or printing
•
Select the number of copies to print.
Press
You can also press
photo size, layout, print quality, paper type, and passport photo print
settings.
to go to the Print Preview screen.
to adjust the print settings, including paper size,
14
Page 15

Using the Print Photos menu
This menu allows you to select a group of photos for printing.
1
Insert a memory card or flash drive. For more information, see “Inserting a memory card”
on page 21 or “Inserting a flash drive” on page 23.
2
Press or repeatedly until Print Photos appears on the display.
3
Press .
From here You can
Print Camera Selections Print Digital Print Order Format (DPOF) selections. This option
Print All N Photos Print all the photos on a memory device. N is the total number of
Print Photos by Date Print photos taken within certain dates. For more information, see
Print Photo Range Select the first and last photos in a range to be printed. For more
appears only when there is a valid DPOF file on your memory
card. For more information, see “Printing photos from a digital
camera using DPOF” on page 31.
images that will be printed. You can select:
•
Photo/s on Paper to view available paper sizes.
•
Index Print to print an index page of photos. For more
information, see “Printing an index page of photos” on
page 30.
•
Copies Per Photo to select the number of copies to print per
photo.
•
Other Print Settings to choose a paper size, photo size,
layout, print quality, and paper type.
“Printing photos by date” on page 28.
information, see “Printing photos by range” on page 29.
Using the Transfer menu
You can transfer photos from a memory card to a flash drive or a computer (if the printer is
attached to a computer). The photos on the memory card are retained.
1
Insert a memory card. For more information, see “Inserting a memory card” on
page 21.
2
Press or repeatedly until Transfer appears on the display.
3
Press .
4
If you wish to transfer photos to a USB flash drive, insert the drive.
5
Press or to select either USB Flash Drive or Computer (if the printer is
attached to a computer).
15
Page 16
6
Press .
7
Follow the instructions on the printer display.
Using the Slideshow menu
The Slideshow menu lets you view the images stored on a memory card or flash drive.
1
Insert a memory card or flash drive. For more information, see “Inserting a memory card”
on page 21 or “Inserting a flash drive” on page 23.
2
Press or repeatedly until Slideshow appears on the display.
3
Press .
4
Press to continue.
Each photo is displayed for a few seconds.
5
If you want to move to the previous or next photo manually, press or .
6
Use any of the following buttons:
•
Press to select a photo or photos to print after the slideshow.
•
Press to pause the slideshow. Press again to stop the slideshow.
•
Press to rotate the photo on the display.
When the slideshow is stopped, the photo or photos you selected for printing during the
slideshow are displayed by pressing
.
Using the Tools menu
1
Press or repeatedly until Tools appears on the display.
2
Press .
From here You can
Device Defaults Select:
•
Language to change the language setting.
•
Country to set the default blank paper size and date format being
used in your location.
•
Power Save to set the length of time before the printer, if left unused,
enters a low power state. During Power Save, the display and
backlight will be turned off. Press any button to restore power to the
printer.
Print Settings Select a paper size, photo size, layout, print quality, and paper type.
16
Page 17

From here You can
Maintenance Select:
•
View Ink Level to view a graphic representing the ink level in the print
cartridge. For more information, see “Viewing the ink level” in the
“Maintaining the printer” chapter of the User's Guide on the CD.
•
Clean Cartridge to clean the print cartridge nozzles. For more
information, see “Cleaning the print cartridge nozzles” in the
“Maintaining the printer” chapter of the User's Guide on the CD.
•
Align Cartridge to align the cartridge. For more information, see
“Aligning the print cartridge for better print quality” on page 9.
•
Print Test Page to print a test page. For more information, see
“Printing a test page” in the “Maintaining the printer” chapter of the
User's Guide on the CD.
•
Reset Defaults to reset default settings to factory settings.
Bluetooth Select:
•
Bluetooth Enable to enable or disable Bluetooth communication. For
more information, see “Using Bluetooth technology” on page 41.
•
Discovery Mode to turn the Discovery mode on or off. For more
information, see “Using Bluetooth technology” on page 41.
•
Device Name to view the Device Name and the Universally
Administered Address (UAA) number automatically assigned to your
Bluetooth-enabled device.
•
Device Address to view the 48-bit address of your Bluetooth-enabled
device.
Customize Select:
•
Screen Saver to turn the screen saver function on after 30 seconds,
on after one minute, or off.
•
Replace Screen Saver Photos to select up to four photos to use as
screen savers.
•
Hinting to turn hints on or off. Hints are messages on the control panel
display that give more information on the current selection.
Using the Photo Edit Mode menu
When you are viewing a photo, press to access the Photo Edit Mode menu.
From here You can
Brightness Adjust the brightness of a photo. For more information, see “Adjusting
Crop Crop a photo. For more information, see “Cropping photos” on
the brightness of photos” on page 34.
page 33.
17
Page 18
From here You can
Auto Enhance Enhance a photo automatically. For more information, see “Enhancing
Red Eye Reduction Reduce the red-eye effect caused by light reflection.
Colorized Effect Select whether to print a photo in Black & White, Sepia, Antique Brown,
Rotate Rotate a photo in 90-degree increments clockwise or
Frames Select a style and color to frame a photo. For more information, see
photos automatically” on page 35.
or Antique Gray. For more information, see “Using color effects on
photos” on page 38.
counter-clockwise.
“Adding frames to photos” on page 36.
Using the PictBridge menu
The PictBridge default settings menu allows the selection of printer settings if no selections
were specified on your digital camera beforehand. To make camera selections, see the
camera documentation.
1
Connect a PictBridge-enabled digital camera. For more information, see “Connecting a
PictBridge-enabled digital camera” on page 24.
2
Press to access the PictBridge menu.
3
Press or to navigate through the following options:
From here You can
Paper Size Select a paper size.
Photo Size Select a photo size.
Layout Select a photo layout.
Print Quality Select a print quality.
Paper Type Select a paper type. For more information, see “Using supported paper
types” on page 20.
4
Press or to make a selection.
5
Press to print.
18
Page 19
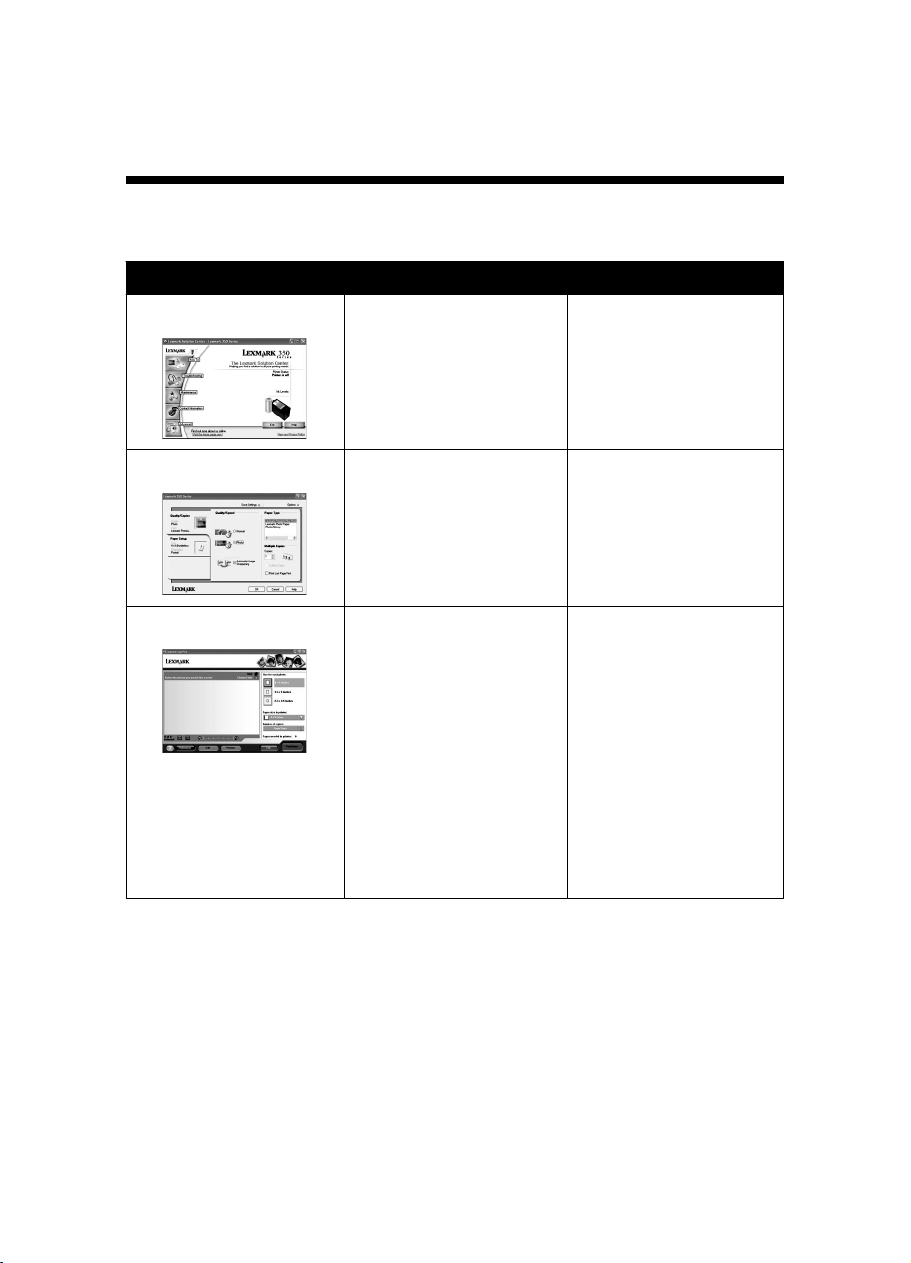
Learning about the software
The printer software can be accessed only from a computer. For more information on setting
up the printer with a computer, see the Setup sheet that came with the product.
Use this To Opening the software
The Solution Center Find troubleshooting,
maintenance, and cartridge
ordering information.
From the desktop:
1
Click Start
Programs or All
Programs Lexmark
350 Series.
2
Select Solution Center.
Print Properties Select the best print settings
Fast Pics
for the photo you are printing
using a computer.
•
Transfer photos from a
memory device to a
computer. For more
information, see
“Transferring photos from
a memory device to a
computer” on page 40.
•
Edit and print photos
stored on the computer.
For more information, see
“Printing photos using
Fast Pics” in the “Printing
photos” chapter of the
User's Guide on the CD.
1
With a photo open in a
program, click File
Print.
2
From the Print dialog,
click Properties,
Preferences, Options,
or Setup.
Insert a memory card or flash
drive. For more information,
see “Inserting a memory
card” on page 21 or
“Inserting a flash drive” on
page 23.
19
Page 20

Loading paper
Loading paper
Notes:
•
Load photo paper with the glossy or printable side facing you. (If you are not sure which
side is the printable side, see the instructions that came with the paper.)
•
Make sure the paper is not used or damaged.
•
Do not force paper into the printer.
1
Move the paper guide to the left edge of the paper support.
2
Load the paper vertically against the right side of the paper support, and gently release
the paper guide.
2
1
Using supported paper types
You can use the following paper types with your printer:
•
Lexmark Perfectfinish Photo Paper
•
Lexmark Photo Paper
•
Photo/glossy paper
Notes:
•
For best results, use Lexmark Perfectfinish Photo Paper or Lexmark Photo Paper.
•
Do not use Lexmark Premium Photo Paper. Your print cartridge is not compatible with
this type of paper.
Your printer supports the following paper sizes:
•
A6 card: 4.1 x 5.8 inches (105 x 148 mm)
•
Hagaki postcard: 3.9 x 5.8 inches (100 x 148 mm)
•
3.5 x 5 inches (8.89 x 12.7 cm)
•
4 x 6 inches
•
4 x 8 inches
•
10 x 15 cm
•
10 x 20 cm
•
L photo (89 x 127 mm)
Note: Do not load more than 25 sheets into the paper support.
20
Page 21
Connecting photo storage devices
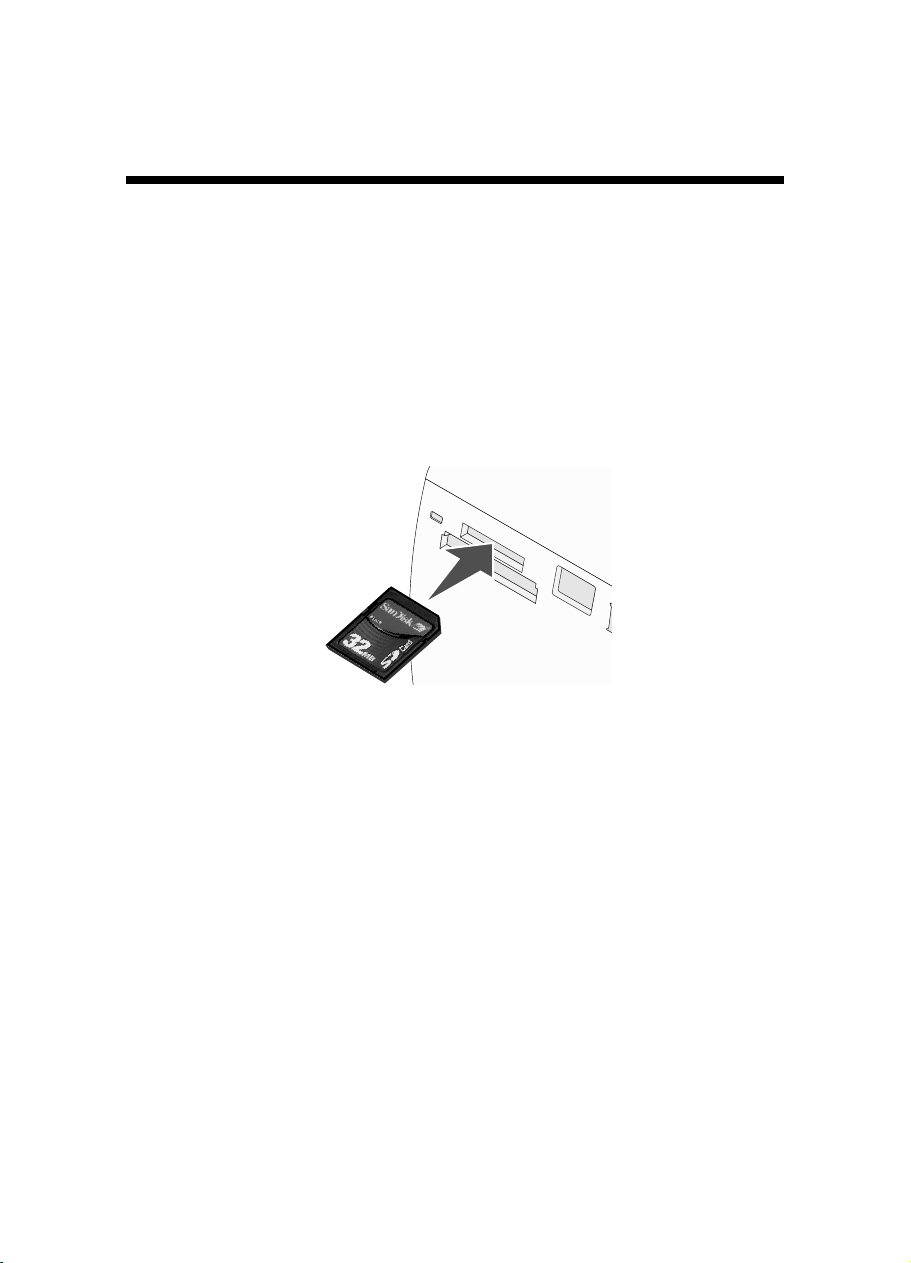
Inserting a memory card
A memory card can be used to store photos taken using a digital camera or camera phone.
The printer lets you view, edit, and print photos stored on a memory card. For more
information, see “Printing photos” on page 26 or “Editing photos” on page 33.
The printer also lets you transfer photos:
•
From a memory card to a computer. For more information, see “Transferring photos from
a memory device to a computer” on page 40.
•
From a memory card to a flash drive. For more information, see “Transferring photos from
a memory card to a flash drive” on page 40.
1
Insert a memory card.
•
Insert the card with the brand name label facing up.
•
If there is an arrow on the card, make sure it points toward the printer.
21
Page 22
Slot Memory card
Top slot
Bottom slot CompactFlash Type I and Type II
* Make sure you connect the memory card to the adapter that came with it before
inserting it in the slot.
2
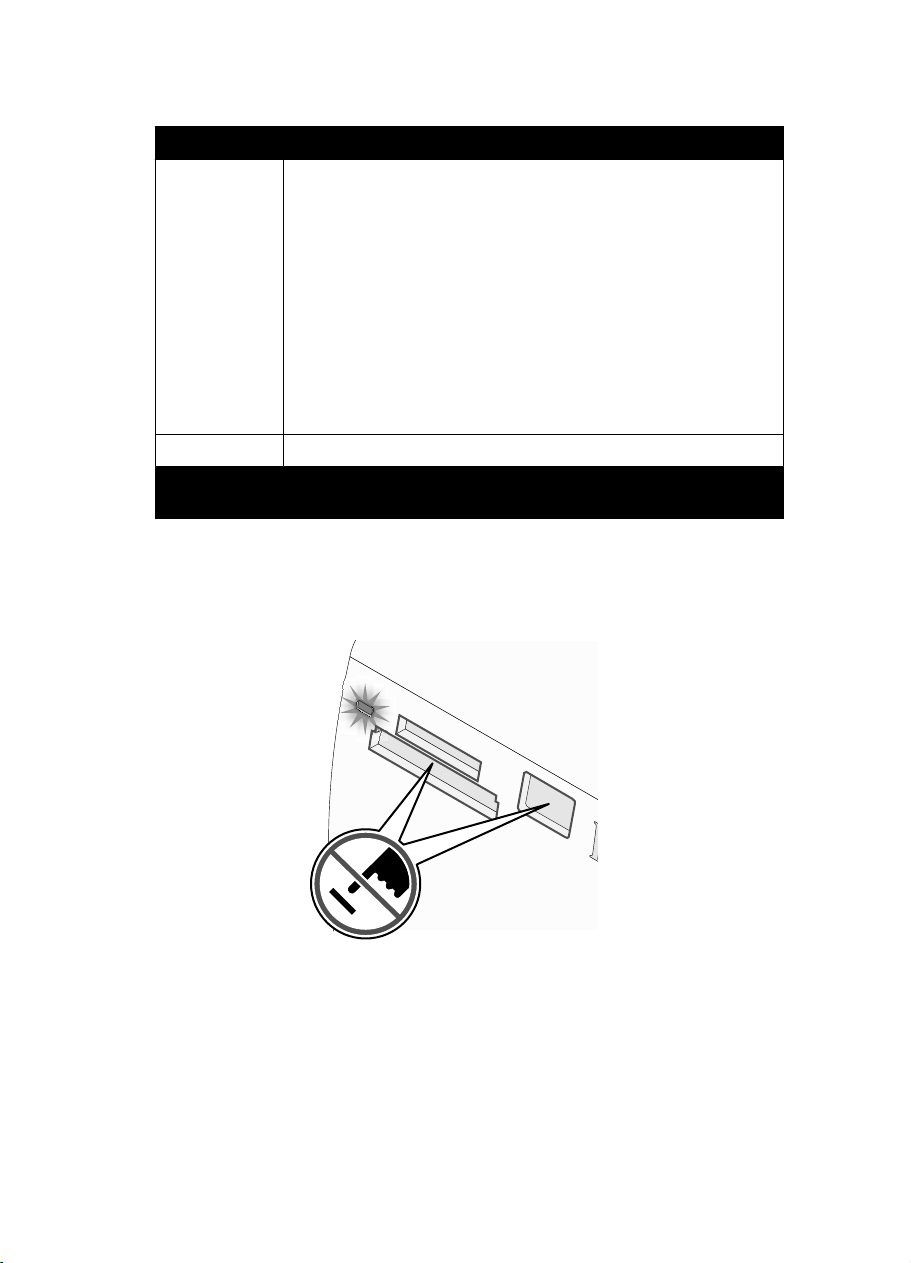
Wait for the light on the printer to come on. The light blinks to indicate the memory card
is being read or is transmitting data.
Warning: Do not remove the memory card or touch the printer in the area of the memory card
while the light is blinking.
•
xD Picture Card
•
SD (Secure Digital)
•
miniSD (with adapter) *
•
microSD (with adapter) *
•
RS-MMC (with adapter) *
•
MultiMedia Card
•
Memory Stick
•
Memory Stick PRO
•
Memory Stick Duo (with adapter) or Memory Stick PRO Duo (with
adapter) *
•
TransFlash (with adapter) *
If the printer does not read the memory card, remove and reinsert it.
Note: The printer reads only one media device at a time. If you insert more than one memory
card, you will be asked to select which one you wish to use and remove the other one.
22
Page 23
Inserting a flash drive
A flash drive can be used to store photos taken using a digital camera or camera phone. The
printer lets you view, edit, and print photos stored on a flash drive. For more information, see
“Printing photos” on page 26 or “Editing photos” on page 33.
The printer also lets you transfer photos:
•
From a flash drive to a computer. For more information, see “Transferring photos from a
memory device to a computer” on page 40.
•
From a memory card to a flash drive. For more information, see “Transferring photos from
a memory card to a flash drive” on page 40.
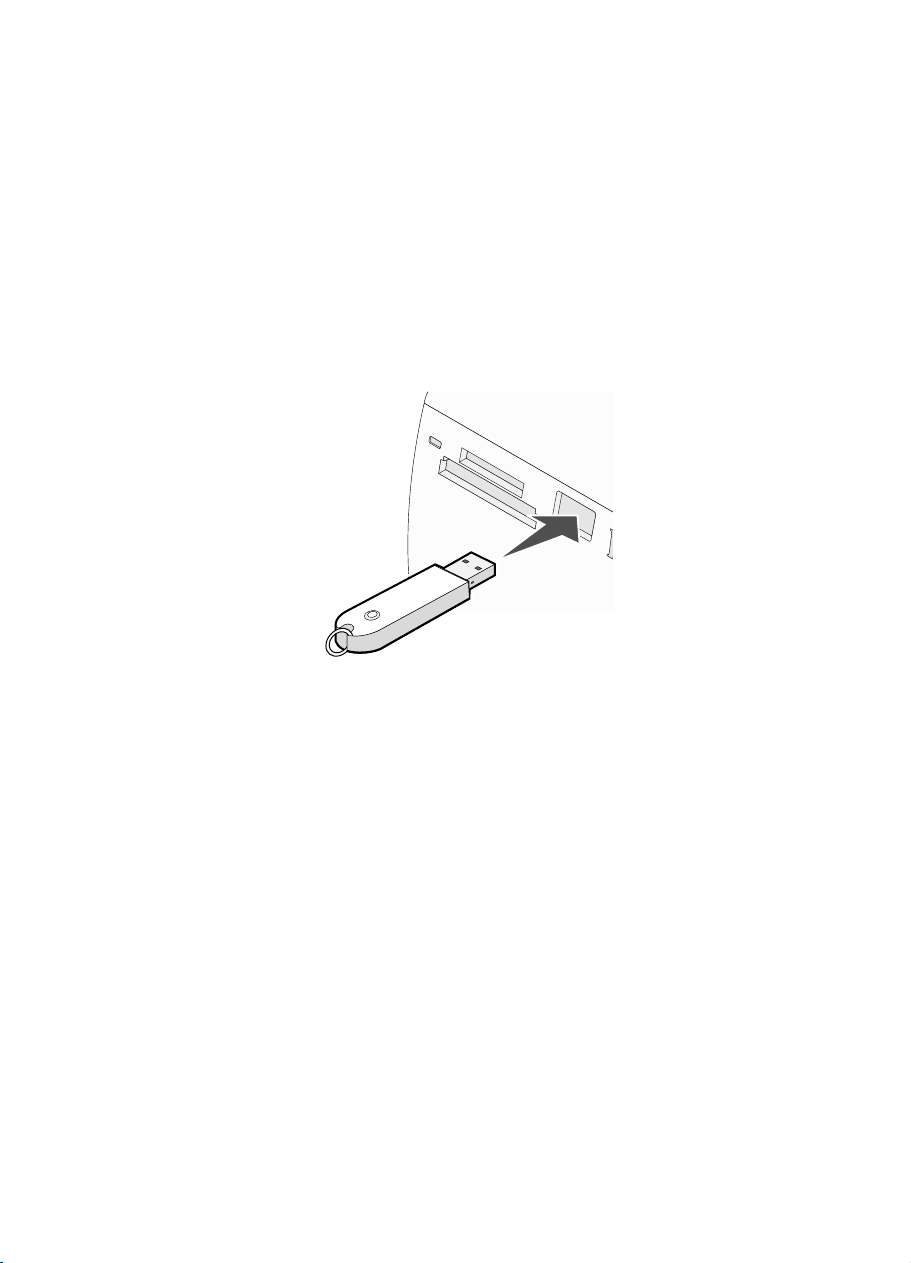
1
Insert a flash drive into the PictBridge port on the front of the printer.
Notes:
•
An adapter may be necessary if your flash drive does not fit directly into the port.
•
The printer reads only one media device at a time. If you insert more than one media
device, you will be asked to select which one you wish to use and remove the other
one.
2
Wait for the printer to read the flash drive.
23
Page 24
Connecting a PictBridge-enabled digital camera
PictBridge is a technology available in most digital cameras that lets you print directly from
your digital camera without using a computer. You can connect a PictBridge-enabled digital
camera to the printer, and use either the printer or the camera to control printing photos.
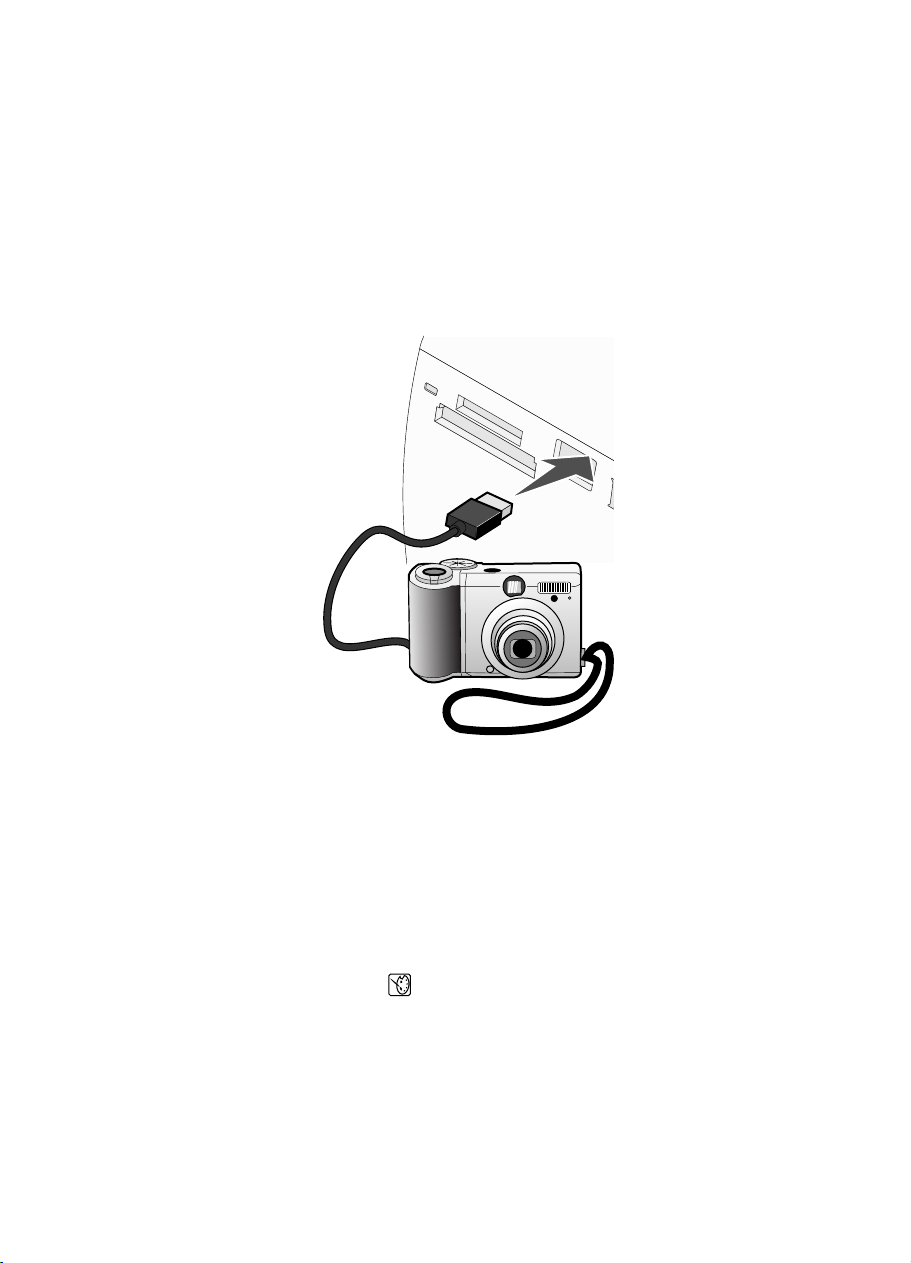
1
Insert one end of the USB cable into the camera.
Note: Use only the USB cable that came with the camera.
2
Insert the other end of the cable into the PictBridge port on the front of the printer.
Notes:
•
Make sure the PictBridge-enabled digital camera is set to the correct USB mode. For
more information, see the camera documentation.
•
The printer reads only one media device at a time.
3
If the PictBridge connection is successful, the following appears on the display: Camera
connected. Refer to Camera display or Camera User Manual for
further information. If you want to use the camera to control printing photos, refer
to the instructions in the camera documentation.
4
If no selections were specified on your digital camera beforehand, you can use the printer
to control printing photos. Press
panel display. For more information, see “Using the PictBridge menu” on page 18.
to make the PictBridge menu appear on the control
24
Page 25

Viewing photos
Viewing a photo slideshow on the control panel display
If you want to see a slideshow of the photos on a memory card or flash drive, see “Using the
Slideshow menu” on page 16.
25
Page 26

Printing photos
You can use the following paper types with your printer:
•
Lexmark Perfectfinish Photo Paper
•
Lexmark Photo Paper
•
Photo/glossy paper
Notes:
•
For best results, use Lexmark Perfectfinish Photo Paper or Lexmark Photo Paper.
•
Do not use Lexmark Premium Photo Paper. Your print cartridge is not compatible with
this type of paper.
Printing photos using the control panel
Printing a photo or selected photos
Use these instructions to view photos, and select one or more photos for editing and printing.
1
Load photo paper with the glossy or printable side facing you. (If you are not sure which
side is the printable side, see the instructions that came with the paper.) For more
information, see “Loading paper” on page 20.
2
Insert a memory card or flash drive. For more information, see “Inserting a memory card”
on page 21 or “Inserting a flash drive” on page 23.
3
Press or repeatedly until View and Select appears on the display.
4
Press .
5
Press to continue.
6
Press or to navigate through the photos.
7
Press to select a photo for printing.
8
If you want to edit the photo:
a
Press . For more information, see “Using the Photo Edit Mode menu” on
page 17.
b
Make your changes.
c
Press to save your changes, and then go back to the photo selection screen.
9
Press or to select the number of copies to print.
Note: Pressing
Pressing
when the number of copies is set to 1 will deselect the image.
when the image is not selected will select the image.
26
Page 27

10
You can select more photos for printing and editing by repeating step 6 through step 9.
11
Press to go to the Print Preview screen.
12
If you want to adjust the print settings:
a
Press .
b
Make your selections.
c
Press to save your selections, and then go back to the Print Preview screen.
13
Press to print.
Note: To prevent smudging or scratching, avoid touching the printed surface with your
fingers or sharp objects. For best results, remove each printed sheet individually from the
paper exit tray, and allow the prints to dry at least 24 hours before stacking, displaying,
or storing.
Printing all photos
Use these instructions to print all photos stored on your memory card or flash drive.
1
Load photo paper with the glossy or printable side facing you. (If you are not sure which
side is the printable side, see the instructions that came with the paper.) For more
information, see “Loading paper” on page 20.
2
Insert a memory card or flash drive. For more information, see “Inserting a memory card”
on page 21 or “Inserting a flash drive” on page 23.
3
Press or repeatedly until Print Photos appears on the display.
4
Press .
5
Press or repeatedly until Print All N Photos is selected. (N is the total
number of images that will be printed.)
6
Press .
7
Press or to select a photo size, paper size, and the number of copies to print per
photo.
8
Press .
27
Page 28

9
If you want to adjust the print settings:
a
Press .
b
Make your selections.
c
Press to save your selections, and then go back to the Print Preview screen.
10
Press to print.
Note: To prevent smudging or scratching, avoid touching the printed surface with your
fingers or sharp objects. For best results, remove each printed sheet individually from the
paper exit tray, and allow the prints to dry at least 24 hours before stacking, displaying,
or storing.
Printing photos by date
Use these instructions to print photos taken within certain dates.
1
Load photo paper with the glossy or printable side facing you. (If you are not sure which
side is the printable side, see the instructions that came with the paper.) For more
information, see “Loading paper” on page 20.
2
Insert a memory card or flash drive. For more information, see “Inserting a memory card”
on page 21 or “Inserting a flash drive” on page 23.
3
Press or repeatedly until Print Photos appears on the display.
4
Press .
5
Press or repeatedly until Print Photos by Date is selected.
6
Press .
7
Press or to select an earlier or later start date.
8
Press or to select an earlier or later end date.
9
Press to save the date range you selected.
10
Press or to select a photo size and paper size, and the number of copies to print
per photo.
11
Press .
28
Page 29

12
If you want to adjust the print settings:
a
Press .
b
Make your selections.
c
Press to save your selections, and then go back to the Print Preview screen.
13
Press to print.
Note: To prevent smudging or scratching, avoid touching the printed surface with your
fingers or sharp objects. For best results, remove each printed sheet individually from the
paper exit tray, and allow the prints to dry at least 24 hours before stacking, displaying,
or storing.
Printing photos by range
Use these instructions to select the first and last photos in a range to be printed.
1
Load photo paper with the glossy or printable side facing you. (If you are not sure which
side is the printable side, see the instructions that came with the paper.) For more
information, see “Loading paper” on page 20.
2
Insert a memory card or flash drive. For more information, see “Inserting a memory card”
on page 21 or “Inserting a flash drive” on page 23.
3
Press or repeatedly until Print Photos appears on the display.
4
Press .
5
Press or repeatedly until Print Photo Range is selected.
6
Press .
7
Press to continue.
8
Press or to navigate to the first photo in the range to be printed.
9
Press .
10
Press or to navigate to the last photo in the range to be printed.
11
Press .
12
Press or to select a photo size and paper size, and the number of copies to print
per photo.
13
Press .
29
Page 30
14
If you want to adjust the print settings:
a
Press .
b
Make your selections.
c
Press to save your selections, and then go back to the Print Preview screen.
15
Press to print.
Note: To prevent smudging or scratching, avoid touching the printed surface with your
fingers or sharp objects. For best results, remove each printed sheet individually from the
paper exit tray, and allow the prints to dry at least 24 hours before stacking, displaying,
or storing.
Printing an index page of photos
Use these instructions to print thumbnail images of all photos stored on your memory card or
flash drive.
1
Load photo paper with the glossy or printable side facing you. (If you are not sure which
side is the printable side, see the instructions that came with the paper.) For more
information, see “Loading paper” on page 20.
2
Insert a memory card or flash drive. For more information, see “Inserting a memory card”
on page 21 or “Inserting a flash drive” on page 23.
3
Press or repeatedly until Print Photos appears on the display.
4
Press .
5
Press or repeatedly until Print All N Photos is selected. (N is the total
number of images that will be printed.)
6
Press .
7
Press or repeatedly until Index Print is selected.
8
Press .
An index page of images appears on the display.
9
Press to print.
Note: To prevent smudging or scratching, avoid touching the printed surface with your
fingers or sharp objects. For best results, remove each printed sheet individually from the
paper exit tray, and allow the prints to dry at least 24 hours before stacking, displaying,
or storing.
30
Page 31

Printing photos from a digital camera using DPOF
Digital Print Order Format (DPOF) is a feature available on some digital cameras. If your
camera supports DPOF, you can specify which photos to print, and how many of each, while
the memory card is still in the camera. The printer recognizes these settings when you insert
the memory card into the printer.
Note: If you specified a photo size while the memory card is still in the camera, make sure
the size of the paper loaded in the printer is not smaller than the size you specified in the
DPOF selection.
1
Load photo paper, with the glossy or printable side facing you. (If you are not sure which
side is the printable side, see the instructions that came with the paper.) For more
information, see “Loading paper” on page 20.
2
Insert a memory card. For more information, see “Inserting a memory card” on page 21.
3
Press or repeatedly until Print Photos appears on the display.
4
Press .
5
Press or repeatedly until Print Camera Selections is selected. This option
appears only when there is a valid DPOF file on your memory card.
6
Press .
7
Press to print.
Note: To prevent smudging or scratching, avoid touching the printed surface with your
fingers or sharp objects. For best results, remove each printed sheet individually from the
paper exit tray, and allow the prints to dry at least 24 hours before stacking, displaying,
or storing.
Printing photos from a digital camera using the PictBridge menu
PictBridge is a technology available in most digital cameras that lets you print directly from
your digital camera without using a computer. You can connect a PictBridge-enabled digital
camera to the printer, and use the PictBridge menu on the printer to print photos.
1
Load photo paper, with the glossy or printable side facing you. (If you are not sure which
side is the printable side, see the instructions that came with the paper.) For more
information, see “Loading paper” on page 20.
2
Connect a PictBridge-enabled digital camera. For more information, see “Connecting a
PictBridge-enabled digital camera” on page 24.
31
Page 32

3
If no selections were specified on your digital camera beforehand, press to access
the PictBridge menu on the printer. For more information, see “Using the PictBridge menu”
on page 18.
4
After making your selections, press to print.
Note: To prevent smudging or scratching, avoid touching the printed surface with your
fingers or sharp objects. For best results, remove each printed sheet individually from the
paper exit tray, and allow the prints to dry at least 24 hours before stacking, displaying,
or storing.
32
Page 33

Editing photos
You can use the following paper types with your printer:
•
Lexmark Perfectfinish Photo Paper
•
Lexmark Photo Paper
•
Photo/glossy paper
Notes:
•
For best results, use Lexmark Perfectfinish Photo Paper or Lexmark Photo Paper.
•
Do not use Lexmark Premium Photo Paper. Your print cartridge is not compatible with
this type of paper.
Cropping photos
1
Load photo paper with the glossy or printable side facing you. (If you are not sure which
side is the printable side, see the instructions that came with the paper.) For more
information, see “Loading paper” on page 20.
2
Insert a memory card or flash drive. For more information, see “Inserting a memory card”
on page 21 or “Inserting a flash drive” on page 23.
3
Press or repeatedly until View and Select appears on the display.
4
Press .
5
Press to continue.
6
Press or to navigate through the photos.
7
Press to select a photo for printing.
8
Press .
The Photo Edit Mode menu appears.
9
Press or repeatedly until Crop appears at the bottom of the display, and the crop
icon is highlighted.
10
Press .
11
Use the cropping tools shown on the display. Press or to select the tool and
or to use the selected tool.
12
Press to save your changes and go back to the Photo Edit Mode menu.
13
Press to go back to the photo selection screen.
33
Page 34
14
Press or to select the number of copies to print.
Note: Pressing
Pressing
15
You can select more photos for printing and editing by repeating step 6 through step 14.
16
Press to go to the Print Preview screen.
17
If you want to adjust the print settings:
a
Press .
b
Make your selections.
c
Press to save your selections, and then go back to the Print Preview screen.
18
Press to print.
Note: To prevent smudging or scratching, avoid touching the printed surface with your
fingers or sharp objects. For best results, remove each printed sheet individually from the
paper exit tray, and allow the prints to dry at least 24 hours before stacking, displaying,
or storing.
when the number of copies is set to 1 will deselect the image.
when the image is not selected will select the image.
Adjusting the brightness of photos
1
Load photo paper with the glossy or printable side facing you. (If you are not sure which
side is the printable side, see the instructions that came with the paper.) For more
information, see “Loading paper” on page 20.
2
Insert a memory card or flash drive. For more information, see “Inserting a memory card”
on page 21 or “Inserting a flash drive” on page 23.
3
Press or repeatedly until View and Select appears on the display.
4
Press .
5
Press to continue.
6
Press or to navigate through the photos.
7
Press to select a photo for printing.
8
Press .
The Photo Edit Mode menu appears.
9
Press or repeatedly until Brightness appears on the display.
10
Press or to adjust the brightness of the photo.
Note: The image on the display does not accurately reflect the image when printed.
34
Page 35
11
Press to save your changes and go back to the photo selection screen.
12
Press or to select the number of copies to print.
Note: Pressing
Pressing
13
You can select more photos for printing and editing by repeating step 6 through step 12.
14
Press to go to the Print Preview screen.
15
If you want to adjust the print settings:
a
Press .
b
Make your selections.
c
Press to save your selections, and then go back to the Print Preview screen.
16
Press to print.
Note: To prevent smudging or scratching, avoid touching the printed surface with your
fingers or sharp objects. For best results, remove each printed sheet individually from the
paper exit tray, and allow the prints to dry at least 24 hours before stacking, displaying,
or storing.
when the number of copies is set to 1 will deselect the image.
when the image is not selected will select the image.
Enhancing photos automatically
1
Load photo paper with the glossy or printable side facing you. (If you are not sure which
side is the printable side, see the instructions that came with the paper.) For more
information, see “Loading paper” on page 20.
2
Insert a memory card or flash drive. For more information, see “Inserting a memory card”
on page 21 or “Inserting a flash drive” on page 23.
3
Press or repeatedly until View and Select appears on the display.
4
Press .
5
Press to continue.
6
Press or to navigate through the photos.
7
Press to select a photo for printing.
8
Press .
The Photo Edit Mode menu appears.
9
Press or repeatedly until Auto Enhance appears on the display.
35
Page 36
10
Press or to select On.
Note: The image on the display does not accurately reflect the image when printed.
11
Press to save your selection and go back to the photo selection screen.
An icon appears on the bottom of the display to indicate that the photo will be auto
enhanced when printed.
12
Press or to select the number of copies to print.
Note: Pressing
Pressing
13
You can select more photos for printing and editing by repeating step 6 through step 12.
14
Press to go to the Print Preview screen.
15
If you want to adjust the print settings:
a
Press .
b
Make your selections.
c
Press to save your selections, and then go back to the Print Preview screen.
16
Press to print.
Note: To prevent smudging or scratching, avoid touching the printed surface with your
fingers or sharp objects. For best results, remove each printed sheet individually from the
paper exit tray, and allow the prints to dry at least 24 hours before stacking, displaying,
or storing.
when the number of copies is set to 1 will deselect the image.
when the image is not selected will select the image.
Adding frames to photos
You can select a frame style and color as a border for your photo.
1
Load photo paper, with the glossy or printable side facing you. (If you are not sure which
side is the printable side, see the instructions that came with the paper.) For more
information, see “Loading paper” on page 20.
2
Insert a memory card or flash drive. For more information, see “Inserting a memory card”
on page 21 or “Inserting a flash drive” on page 23.
3
Press or repeatedly until View and Select appears on the display.
4
Press .
5
Press to continue.
6
Press or to navigate through the photos.
7
Press to select a photo for printing.
36
Page 37
8
Press .
The Photo Edit Mode menu appears.
9
Press or repeatedly until Frames appears on the display.
10
Press .
11
Press or to select a frame style.
12
Press .
13
Press or to select a frame color.
14
Press .
15
Press to save your selections and go back to the photo selection screen.
An icon appears on the bottom of the display to indicate that the photo will have a frame
when printed.
16
Press or to select the number of copies to print.
Note: Pressing
Pressing
17
You can select more photos for printing and editing by repeating step 6 through step 16.
18
Press to go to the Print Preview screen.
19
If you want to adjust the print settings:
a
Press .
b
Make your selections.
c
Press to save your selections, and then go back to the Print Preview screen.
20
Press to print.
Note: To prevent smudging or scratching, avoid touching the printed surface with your
fingers or sharp objects. For best results, remove each printed sheet individually from the
paper exit tray, and allow the prints to dry at least 24 hours before stacking, displaying,
or storing.
when the number of copies is set to 1 will deselect the image.
when the image is not selected will select the image.
37
Page 38
Using color effects on photos
The Colorized Effect feature lets you print a photo in Black & White, Sepia, Antique Brown,
or Antique Gray.
1
Load photo paper with the glossy or printable side facing you. (If you are not sure which
side is the printable side, see the instructions that came with the paper.) For more
information, see “Loading paper” on page 20.
2
Insert a memory card or flash drive. For more information, see “Inserting a memory card”
on page 21 or “Inserting a flash drive” on page 23.
3
Press or repeatedly until View and Select appears on the display.
4
Press .
5
Press to continue.
6
Press or to navigate through the photos.
7
Press to select a photo for printing.
8
Press .
The Photo Edit Mode menu appears.
9
Press or until Colorized Effect appears on the display.
10
Press or to select a color effect option.
11
Press to save your selection and go back to the photo selection screen.
12
Press or to select the number of copies to print.
Note: Pressing
Pressing
13
You can select more photos for printing and editing by repeating step 6 through step 12.
14
Press to go to the Print Preview screen.
when the number of copies is set to 1 will deselect the image.
when the image is not selected will select the image.
38
Page 39

15
If you want to adjust the print settings:
a
Press .
b
Make your selections.
c
Press to save your selections, and then go back to the Print Preview screen.
16
Press to print.
Note: To prevent smudging or scratching, avoid touching the printed surface with your
fingers or sharp objects. For best results, remove each printed sheet individually from the
paper exit tray, and allow the prints to dry at least 24 hours before stacking, displaying,
or storing.
39
Page 40

Transferring photos
Transferring photos from a memory device to a computer
You can transfer photos from a memory card or flash drive to a computer to save space on
the memory device.
1
Make sure the printer is connected to a computer, and both the printer and computer are
on.
2
Insert a memory card or flash drive. For more information, see “Inserting a memory card”
on page 21 or “Inserting a flash drive” on page 23.
The Fast Pics software automatically launches on your computer screen.
3
From the Fast Pics dialog, click Save Photos to PC.
The light on the printer blinks to indicate the memory card is transmitting data to the
computer.
4
Follow the instructions on the computer screen to specify where you want to save the
images.
Transferring photos from a memory card to a flash drive
You can transfer photos from a memory card to a flash drive. The photos on the memory card
are retained.
1
Insert a memory card. For more information, see “Inserting a memory card” on page 21.
2
Press or repeatedly until Transfer appears on the display.
3
Press .
4
Insert a flash drive. For more information, see “Inserting a flash drive” on page 23.
5
Press or to select USB Flash Drive.
6
Press .
7
Press or to navigate through the following options:
•
All Images to transfer all photos
•
Selected Photos to transfer selected photos
•
Image Range to transfer photos by range
•
Date Range to transfer photos taken within certain dates
8
Press to select an option.
9
Follow the instructions on the display.
40
Page 41

Using Bluetooth technology
Bluetooth is a wireless technology that lets compatible products send and receive
communication. The printer communicates with Bluetooth-enabled devices through a
Universal Serial Bus (USB) Bluetooth adapter, which is sold separately.
Setting the Bluetooth mode
1
Press or repeatedly until Tools appears on the display.
2
Press .
3
Press or repeatedly until Bluetooth appears.
4
Press .
5
Press or repeatedly until Bluetooth Enable is selected.
6
Press or to select either On or Off.
7
Press or repeatedly until Discovery Mode is selected.
8
Press or to select either On or Off.
9
Press to save your selection.
Printing using Bluetooth
You can print photos from a Bluetooth-enabled device such as a camera phone using a USB
Bluetooth adapter.
1
Load photo paper with the glossy or printable side facing you. (If you are not sure which
side is the printable side, see the instructions that came with the paper.) For more
information, see “Loading paper” on page 20.
2
Make sure that the Bluetooth Enable and Discovery Mode selections on your
printer are set to On. For more information, see “Setting the Bluetooth mode” on
page 41.
41
Page 42
3
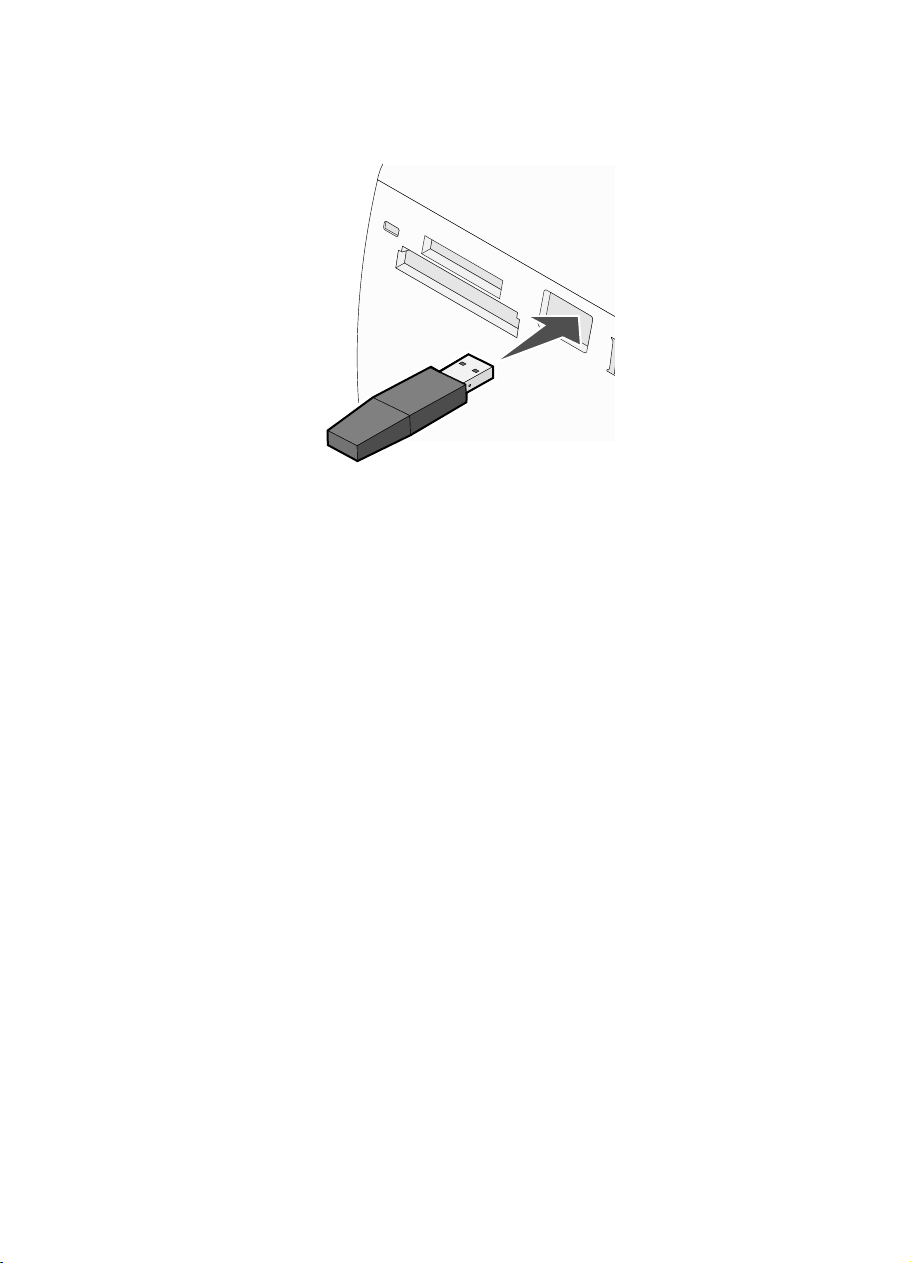
Insert a USB Bluetooth adapter into the PictBridge port on the front of the printer.
Note: Bluetooth adapter sold separately.
4
Once the printer detects the Bluetooth adapter, the following message appears on the
printer display for five seconds: Bluetooth Dongle Connected.
5
To print photos from your Bluetooth-enabled device, see the documentation that came
with the product.
Note: To prevent smudging or scratching, avoid touching the printed surface with your
fingers or sharp objects. For best results, remove each printed sheet individually from the
paper exit tray, and allow the prints to dry at least 24 hours before stacking, displaying,
or storing.
42
Page 43
Troubleshooting
•
“Setup troubleshooting” on page 43
•
“Print troubleshooting” on page 45
•
“Jams and misfeeds troubleshooting” on page 48
•
“Device troubleshooting” on page 48
•
“Error messages troubleshooting” on page 49
•
“Removing and reinstalling the software” on page 51
Setup troubleshooting
Incorrect language appears on the display
1
Press to turn the printer off.
2
Press to turn the printer back on.
3
Press .
4
Press .
5
Press to continue.
6
Press or repeatedly until the language you want appears on the display.
7
Press to save your selection.
Power button is not lit
Make sure you have disconnected the power supply cord from the printer and then from the
wall outlet.
1
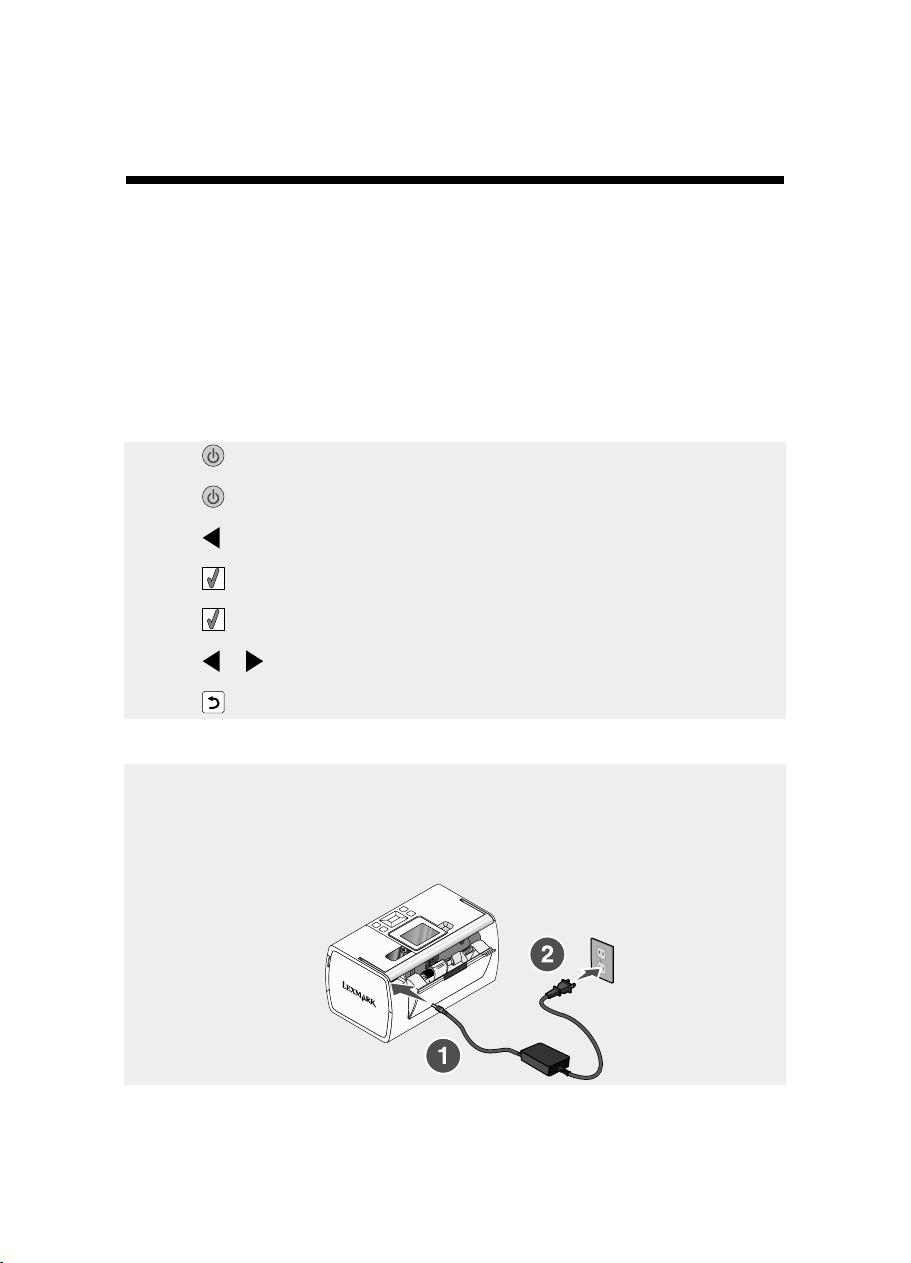
Plug the cord all the way into the power supply port on the printer.
2
Plug the cord into an electrical outlet that other electrical devices have been using.
43
Page 44

3
If the light is not on, press .
Software does not install
The following operating systems are supported:
•
Windows 2000
•
Windows XP
•
Windows Vista
•
Mac OS X version 10.3 or later
Solution 1
Close all open software applications.
1
2
Disable any anti-virus programs.
3
Remove the printer software CD from the CD-ROM drive.
4
Restart the computer.
5
When the desktop appears, reinsert the printer software CD. The CD icon is created on
the desktop.
6
Follow the instructions on the computer screen to install the software.
Solution 2
1
Remove the printer software CD.
2
Restart the computer.
3
When the desktop appears, cancel all Found New Hardware windows.
4
Reinsert the printer software CD.
5
Follow the instructions on the computer screen.
Solution 3
Check the USB cable for any obvious damage.
1
2
Firmly plug the square end of the USB cable into the back of the printer.
3
Firmly plug the rectangular end of the USB cable into the USB port of the computer.
The USB port is marked with the
USB symbol.
Solution 4
Disconnect the USB cable from any other device, such as a USB hub or switch box.
1
2
Directly connect the cable to the printer and the computer.
44
Page 45

Cannot print from a digital camera using PictBridge
Solution 1
Enable PictBridge printing on the camera by selecting the correct USB mode. For more
information, see the digital camera documentation.
Solution 2
Disconnect the camera.
1
2
Connect a PictBridge-enabled digital camera to the PictBridge port. See the digital camera
documentation to determine whether it is PictBridge-enabled.
Solution 3
Use only the USB cable that came with the camera.
Print troubleshooting
Improving print quality
If you are not satisfied with the print quality of a photo, make sure you:
•
Use the appropriate paper for the photo. For best results, use Lexmark Perfectfinish Photo
Paper or Lexmark Photo Paper.
Note: Do not use Lexmark Premium Photo Paper. Your print cartridge is not compatible
with this type of paper.
•
Load the paper with the glossy or printable side facing you. (If you are not sure which side
is the printable side, see the instructions that came with the paper.)
•
Select Photo as the print quality.
Note: To prevent smudging or scratching, avoid touching the printed surface with your fingers
or sharp objects. For best results, remove each printed sheet individually from the paper exit
tray, and allow the prints to dry at least 24 hours before stacking, displaying, or storing.
If the photo still does not have the print quality you want, follow these steps:
1
Align the print cartridge. For more information, see “Aligning the print cartridge for better
print quality” on page 9.
If print quality has not improved, continue to step 2.
2
Clean the print cartridge nozzles. For more information, see “Cleaning the print cartridge
nozzles” in the “Maintaining the printer” chapter of the User's Guide on the CD.
If print quality has not improved, continue to step 3.
45
Page 46

3
Remove and reinsert the print cartridge. For more information, see “Removing a used
print cartridge” and “Installing the print cartridge” in the “Maintaining the printer” chapter
of the User's Guide on the CD.
If print quality has not improved, continue to step 4.
4
Wipe the print nozzles and contacts. For more information, see “Wiping the print cartridge
nozzles and contacts” in the “Maintaining the printer” chapter of the User's Guide on the
CD.
If print quality is still not satisfactory, replace the print cartridge. For more information, see
“Ordering supplies” in the “Maintaining the printer” chapter of the User's Guide on the CD.
Photo does not print
Solution 1
If an error message is displayed, see “Error messages troubleshooting” on page 49.
Solution 2
If the light is not on, see “Power button is not lit” on page 43.
Solution 3
Remove and then load paper. For more information, see “Loading paper” on page 20.
Solution 4
Check the ink level, and install a new print cartridge if necessary. For more information, see
“Installing the print cartridge” in the “Maintaining the printer” chapter of the User's Guide on
the CD.
Solution 5
If the printer is connected to the computer through another device:
1
Disconnect the USB cable from any other device, such as a USB hub or switch box.
2
Directly connect the cable to the printer and the computer.
Solution 6
1
Press to turn the printer off.
2
Disconnect the power supply cord from the wall outlet.
3
Disconnect the other end of the power supply cord from the printer.
4
Reconnect the power supply cord to the printer.
5
Plug the power supply cord into the wall outlet.
6
Press to turn the printer back on.
46
Page 47

Print speed is slow
Solution 1
Close all programs on your computer that you are not using.
Solution 2
Try minimizing the number and size of graphics and images in the document.
Solution 3
Consider purchasing more Random Access Memory (RAM) for your computer.
Solution 4
Remove as many unused fonts as possible from your system.
Solution 5
From the software application, click File Print.
1
2
Click Properties, Preferences, Options, or Setup.
3
Click Quality/Copies.
4
From the Quality/Speed area, select Normal.
Solution 6
Uninstall the printer software, and then reinstall it. For more information, see “Removing
1
and reinstalling the software” on page 51.
2
If the software still does not install correctly, visit our Web site at www.lexmark.com to
check for the latest software.
a
In all countries or regions except the United States, select your country or region.
b
Click the links for drivers and downloads.
c
Select your printer family.
d
Select your printer model.
e
Select your operating system.
f
Select the file you want to download, and follow the directions on the computer screen.
Partial photo prints
The memory card, flash drive, or Pictbridge-enabled camera you inserted is empty or contains
files that cannot be read by the printer.
Solution 1
Use another memory card, flash drive, or Pictbridge-enabled camera.
Solution 2
Make sure the paper size being used matches the size you selected.
47
Page 48

Jams and misfeeds troubleshooting
Paper jam in the printer
1
Press to turn off the printer.
2
Firmly grasp the paper, and gently pull it out.
3
Press to turn the printer back on.
Paper jam in the paper support
1
Press to turn off the printer.
2
Firmly grasp the paper, and gently pull it out.
3
Press to turn the printer back on.
Device troubleshooting
Device cannot be inserted
Make sure that the type of memory card, flash drive, PictBridge camera, or Bluetooth adapter
you are using can be used in the printer. For more information, see “Connecting photo storage
devices” on page 21.
Nothing happens when a device is inserted
Solution 1
Remove and reinsert the memory card, flash drive, PictBridge-enabled camera, or Bluetooth
adapter quickly.
Solution 2
For more information, see “Connecting photo storage devices” on page 21.
Solution 3
Check that there is no obvious damage to the memory card, flash drive, PictBridge-enabled
camera, or Bluetooth adapter.
Solution 4
Insert only one device at a time.
Solution 5
Check the cable connections.
1
Check the USB cable for any obvious damage.
2
Firmly plug the square end of the USB cable into the back of the printer.
48
Page 49
3
Firmly plug the rectangular end of the USB cable into the USB port of the computer.
The USB port is marked with the
USB symbol.
Error messages troubleshooting
Alignment Error
Solution 1
1
Remove the print cartridge.
2
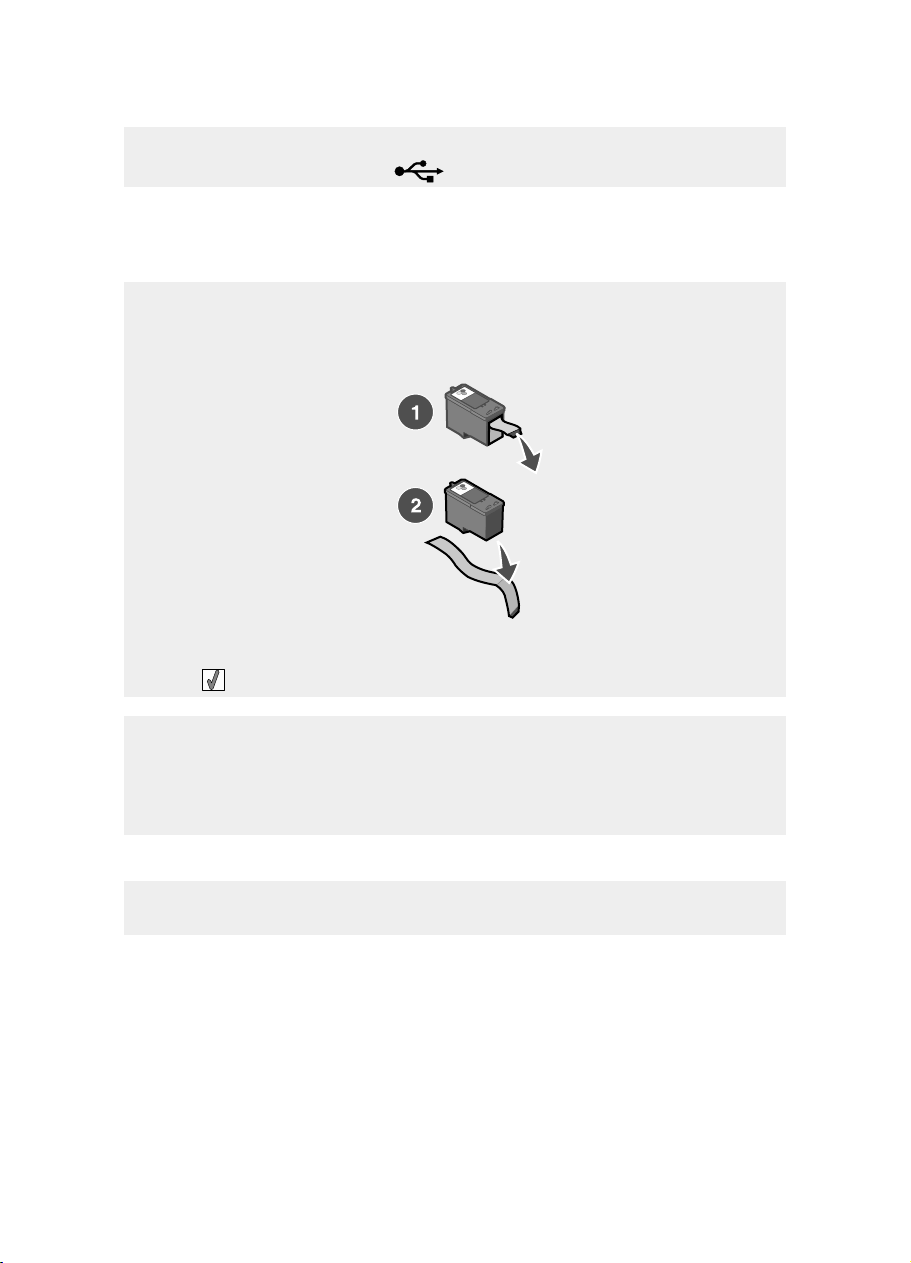
Make sure the sticker and tape have been completely removed.
3
Reinsert the print cartridge.
4
Press to align the cartridge.
Solution 2
Load photo paper, with the glossy or printable side facing you. (If you are not sure which side
is the printable side, see the instructions that came with the paper.)
Load new paper only. The printer will read any markings on used paper, which could cause
the alignment error message to appear.
Carrier Jam
1
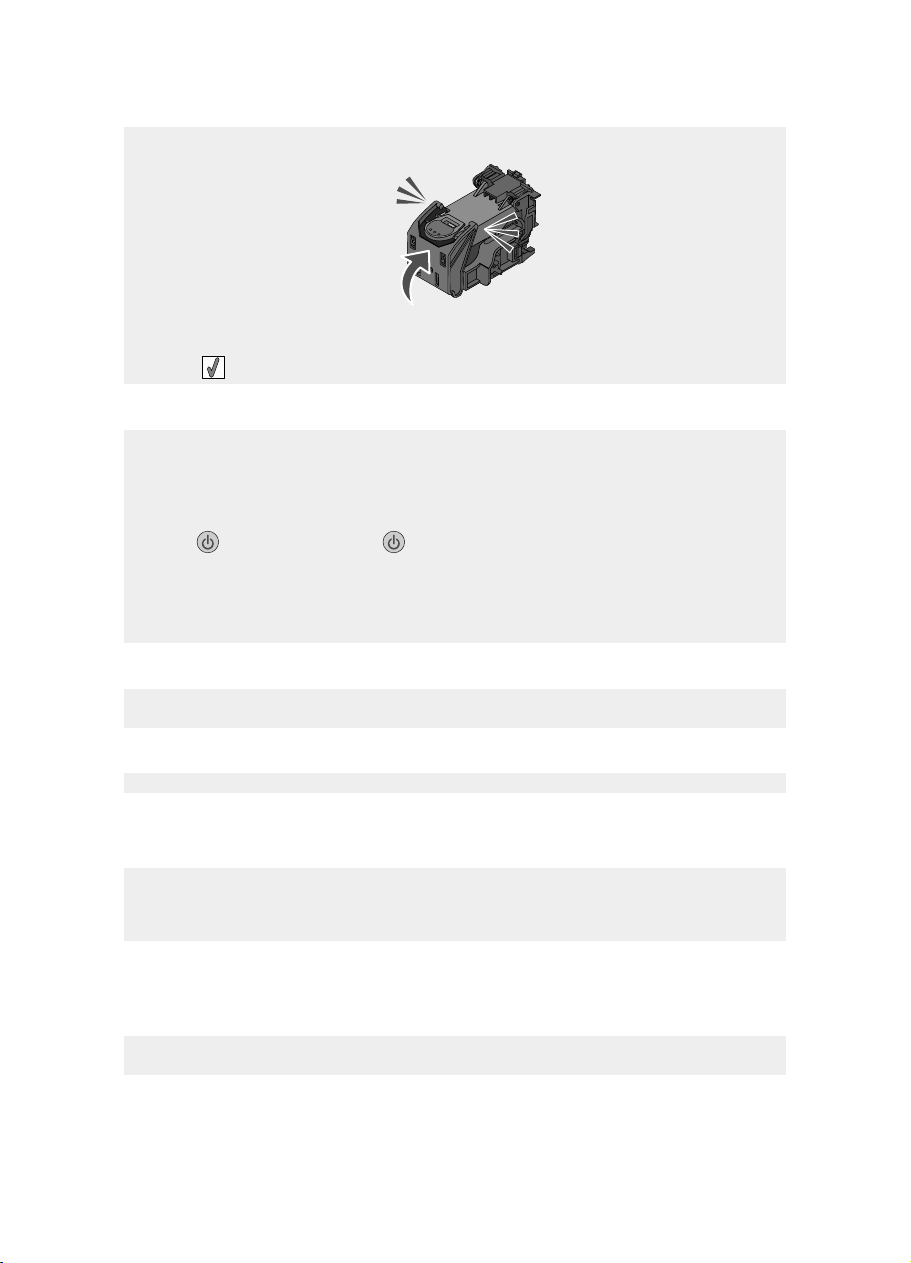
Open the access cover.
2
Remove any objects blocking the path of the print cartridge carrier.
49
Page 50
3
Make sure the cartridge carrier lid is closed.
4
Close the access cover.
5
Press .
Cartridge Error
1
Remove the print cartridge.
2
Disconnect the power supply cord from the electrical outlet.
3
Reconnect the power supply cord to the electrical outlet.
4
If the button is not lit, press .
5
Reinsert the cartridge.
6
If the cartridge error returns, install a new cartridge. For more information, see “Installing
the print cartridge” in the “Maintaining the printer” chapter of the User's Guide on the CD.
Cartridge missing
The print cartridge is missing or is not installed properly. For more information, see “Installing
the print cartridge” In the “Maintaining the printer” chapter of the User's Guide on the CD.
Cover open
Make sure that the access cover is closed.
Invalid Device
The camera you connected to the printer is not communicating using PictBridge.
1
Disconnect the camera from the printer.
2
Check to see if the camera is PictBridge-enabled. For more information, see the camera
documentation.
Invalid Image File
The memory card or flash drive you inserted is empty or contains files that cannot be read by
the printer.
Use another memory card or flash drive. For more information, see “Inserting a memory card”
on page 21 or “Inserting a flash drive” on page 23.
50
Page 51

Ink level
Message Ink level
Your Color Cartridge will need to be replaced soon.
Your Color Cartridge will need to be replaced soon.
Your Color Cartridge will need to be replaced very
soon.
Note: These messages and percentages may not apply to the starter cartridge that shipped
with your printer.
1
Install a new print cartridge if necessary.
To order supplies, see “Ordering supplies” in the “Maintaining the printer” chapter of the
User's Guide on the CD.
2
Press to continue.
25% full
15% full
5% full
Paper Jam
See “Jams and misfeeds troubleshooting” on page 48.
Paper Out
1
Load photo paper, with the glossy or printable side facing you. (If you are not sure which
side is the printable side, see the instructions that came with the paper.) For more
information, see “Loading paper” on page 20.
2
Press .
PictBridge Error
Solution 1
Make sure your PictBridge-enabled digital camera is properly connected to the printer. For
more information, see “Connecting a PictBridge-enabled digital camera” on page 24.
Solution 2
The camera you connected is not in PictBridge mode. For more information, see the camera
documentation.
Removing and reinstalling the software
If the printer is not functioning properly, or if a communications error message appears when
you try to use the printer, you may need to remove and reinstall the printer software.
1
Click Start Programs or All Programs Lexmark 350 Series.
2
Select Uninstall.
3
Follow the instructions on the computer screen to remove the printer software.
51
Page 52

4
Restart the computer before reinstalling the printer software.
5
Click Cancel on all New Hardware Found screens.
6
Insert the CD, and then follow the instructions on the computer screen to reinstall the
software.
52
Page 53

Notices
Federal Communications Commission (FCC) compliance
information statement
This product complies with the limits for a Class B digital device, pursuant to Part 15 of the FCC Rules.
Operation is subject to the following two conditions:
1
this device may not cause harmful interference, and
2
this device must accept any interference received, including interference that may cause undesired
operation.
Any questions on this statement should be directed to:
Director of Lexmark Technology & Services
Lexmark International, Inc.
740 West New Circle Road
Lexington, KY 40550
(859) 232-3000
For additional compliance information, see the online documentation.
Statement of Limited Warranty
Lexmark International, Inc., Lexington, KY
This limited warranty applies to the United States. For customers outside the U.S., see the country-specific
warranty information that came with your product.
This limited warranty applies to this product only if it was originally purchased for your use, and not for resale,
from Lexmark or a Lexmark remarketer, referred to in this statement as “Remarketer.”
Limited warranty
Lexmark warrants that this product:
—Is manufactured from new parts, or new and serviceable used parts, which perform like new parts
—Is, during normal use, free from defects in material and workmanship
If this product does not function as warranted during the warranty period, contact a Remarketer or Lexmark
for repair or replacement (at Lexmark's option).
If this product is a feature or option, this statement applies only when that feature or option is used with the
product for which it was designed. To obtain warranty service, you may be required to present the feature or
option with the product.
If you transfer this product to another user, warranty service under the terms of this statement is available to
that user for the remainder of the warranty period. You should transfer proof of original purchase and this
statement to that user.
Limited warranty service
The warranty period starts on the date of original purchase as shown on the purchase receipt. The warranty
period ends 12 months later.
To obtain warranty service you may be required to present proof of original purchase. You may be required
to deliver your product to the Remarketer or Lexmark, or ship it prepaid and suitably packaged to a Lexmark
designated location. You are responsible for loss of, or damage to, a product in transit to the Remarketer or
the designated location.
53
Page 54

When warranty service involves the exchange of a product or part, the item replaced becomes the property
of the Remarketer or Lexmark. The replacement may be a new or repaired item. The replacement item
assumes the remaining warranty period of the original product.
Replacement is not available to you if the product you present for exchange is defaced, altered, in need of a
repair not included in warranty service, damaged beyond repair, or if the product is not free of all legal
obligations, restrictions, liens, and encumbrances.
Before you present this product for warranty service, remove all print cartridges, programs, data, and
removable storage media (unless directed otherwise by Lexmark).
For further explanation of your warranty alternatives and the nearest Lexmark authorized servicer in your area,
contact Lexmark at (800) 332-4120, or on the World Wide Web at www.lexmark.com/support.
Remote technical support is provided for this product throughout its warranty period. For products no longer
covered by a Lexmark warranty, technical support may not be available or only be available for a fee.
Extent of limited warranty
We do not warrant uninterrupted or error-free operation of any product.
Warranty service does not include repair of failures caused by:
—Modification or attachments
—Accidents or misuse
—Unsuitable physical or operating environment
—Maintenance by anyone other than Lexmark or a Lexmark authorized servicer
—Operation of a product beyond the limit of its duty cycle
—Use of printing media outside of Lexmark specifications
—Supplies (such as ink) not furnished by Lexmark
—Products, components, parts, materials, software, or interfaces not furnished by Lexmark
TO THE EXTENT PERMITTED BY APPLICABLE LAW, NEITHER LEXMARK NOR ITS THIRD PARTY
SUPPLIERS OR REMARKETERS MAKE ANY OTHER WARRANTY OR CONDITION OF ANY KIND,
WHETHER EXPRESS OR IMPLIED, WITH RESPECT TO THIS PRODUCT, AND SPECIFICALLY
DISCLAIM THE IMPLIED WARRANTIES OR CONDITIONS OF MERCHANTABILITY, FITNESS FOR A
PARTICULAR PURPOSE, AND SATISFACTORY QUALITY. ANY WARRANTIES THAT MAY NOT BE
DISCLAIMED UNDER APPLICABLE LAW ARE LIMITED IN DURATION TO THE WARRANTY PERIOD.
NO WARRANTIES, EXPRESS OR IMPLIED, WILL APPLY AFTER THIS PERIOD. ALL INFORMATION,
SPECIFICATIONS, PRICES, AND SERVICES ARE SUBJECT TO CHANGE AT ANY TIME WITHOUT
NOTICE.
Limitation of liability
Your sole remedy under this limited warranty is set forth in this document. For any claim concerning
performance or nonperformance of Lexmark or a Remarketer for this product under this limited warranty, you
may recover actual damages up to the limit set forth in the following paragraph.
Lexmark's liability for actual damages from any cause whatsoever will be limited to the amount you paid for
the product that caused the damages. This limitation of liability will not apply to claims by you for bodily injury
or damage to real property or tangible personal property for which Lexmark is legally liable. IN NO EVENT
WILL LEXMARK BE LIABLE FOR ANY LOST PROFITS, LOST SAVINGS, INCIDENTAL DAMAGE, OR
OTHER ECONOMIC OR CONSEQUENTIAL DAMAGES. This is true even if you advise Lexmark or a
Remarketer of the possibility of such damages. Lexmark is not liable for any claim by you based on a third
party claim.
This limitation of remedies also applies to claims against any Suppliers and Remarketers of Lexmark.
Lexmark's and its Suppliers' and Remarketers' limitations of remedies are not cumulative. Such Suppliers and
Remarketers are intended beneficiaries of this limitation.
54
Page 55

Additional rights
Some states do not allow limitations on how long an implied warranty lasts, or do not allow the exclusion or
limitation of incidental or consequential damages, so the limitations or exclusions contained above may not
apply to you.
This limited warranty gives you specific legal rights. You may also have other rights that vary from state to
state.
Statement of Warranty
Lexmark Canada, Inc.
50 Leek Crescent
Richmond Hill, Ontario
L4B 4J3
This warranty applies to Canada. For customers outside Canada, refer to the country-specific warranty
information that came with your product.
This Statement of Warranty applies to this product if it was originally purchased for your use, and not for resale,
from Lexmark Canada, Inc. (“Lexmark”) or a Lexmark remarketer, referred to in this statement as “Remarketer.”
Warranty
Lexmark warrants that this product:
—Is manufactured from new parts, or new and serviceable used parts, which perform like new parts
—Is, during normal use, free from defects in material and workmanship
If this product does not function as warranted during the warranty period, contact a Remarketer or Lexmark
for repair or replacement (at Lexmark's option).
If this product is a feature or option (e.g., additional paper tray, envelope feeder, scanner, etc.), this statement
applies only when that feature or option is used with the product for which it was designed. To obtain warranty
service, you may be required to present the feature or option with the product.
If you transfer this product to another user, warranty service under the terms of this statement is available to
that user for the remainder of the warranty period. The transferee may be required to present proof of original
purchase and a copy of this statement to obtain warranty service.
Warranty service
The warranty period is 12 months and starts on the date of original purchase as shown on the purchase receipt.
To obtain warranty service you may be required to present proof of original purchase. You may be required
to deliver your product to the Remarketer or Lexmark, or ship it, suitably packaged, to a Lexmark designated
location. Unless otherwise provided for by provincial law, you are responsible for shipping charges and for
loss of, or damage to, a product in transit to the Remarketer or the designated location.
When warranty service involves the exchange of a product or part, the item replaced becomes the property
of the Remarketer or Lexmark. The replacement may be a new or repaired item. The replacement item
assumes the remaining warranty period of the original product.
Before you present this product for warranty service, remove any print cartridge(s), programs, data, and
removable storage media (unless otherwise directed by Lexmark).
For further explanation of your warranty alternatives and the nearest Lexmark authorized servicer in your area,
please contact Lexmark at 1-800-539-6275, or on the World Wide Web at www.lexmark.com/support.
Remote technical support is provided for this product throughout its warranty period. For products no longer
covered by a Lexmark warranty, technical support may not be available or only be available for a fee.
55
Page 56

Extent of warranty
We do not warrant uninterrupted or error-free operation of a product.
Replacement is not available to you if the product you present for exchange is defaced, altered, or damaged
or in need of a repair not included in warranty service (as listed below). Also, such product must be free of any
legal obligations and restrictions.
Warranty service does not include repair of failures caused by:
—Modification or attachments
—Accidents or misuse
—Unsuitable physical or operating environment
—Maintenance by anyone other than Lexmark or a Lexmark authorized servicer
—Operation of a product beyond the limit of its duty cycle (the maximum number of pages that the product is
designed to process monthly)
—Failure to have installed a maintenance kit as specified (if applicable)
—Use of printing media outside of Lexmark specifications
—Use of other than Lexmark supplies (such as toner cartridges, inkjet cartridges, and ribbons), except where
such mandatory use of Lexmark supplies is prohibited by provincial law.
ALL EXPRESS, IMPLIED AND STATUTORY WARRANTIES AND CONDITIONS, INCLUDING THE
IMPLIED WARRANTIES AND CONDITIONS OF MERCHANTABILITY AND FITNESS FOR A
PARTICULAR PURPOSE, ARE LIMITED IN DURATION TO THE WARRANTY PERIOD. NO WARRANTIES
AND CONDITIONS, EXPRESS OR IMPLIED, WILL APPLY AFTER THIS PERIOD.
Limitation of liability
Your sole remedy under this Statement of Warranty is set forth in this section. For any claim against Lexmark
or a Remarketer concerning performance or nonperformance of this product, you may only recover direct
damages up to the limit set forth as follows:
To the maximum extent permitted by applicable law, Lexmark's liability for direct damages from any cause
whatsoever will be limited to the lesser of 1) $5,000 or 2) the amount you paid for the product that caused the
damages, including claims by you for bodily injury or damage to real property or tangible personal property.
In no event will Lexmark be liable for any special or indirect damages, lost profits, lost savings, incidental or
other economic consequential damages, or other economic damages or losses. This is true even if you advise
Lexmark or the Remarketer of the possibility of such damages or losses. Lexmark is not liable for any claim
by you based on a third party claim.
This limitation of liability also applies to any claim by you against any developer, including Lexmark
International, Inc., of materials or products supplied to Lexmark. Lexmark's, the developer's and the
manufacturer’s limitations of liability are not cumulative. Such developers and manufacturers are intended
beneficiaries of this limitation.
Additional rights
You may have greater rights existing under legislation in your province or territory. Where any term of this
warranty is prohibited by such laws, it shall be null and void, but the remainder of the warranty shall remain in
effect.
Technical assistance
—Make sure you followed the setup instructions.
—See your User’s Guide.
—Visit our Web site at www.lexmark.com/support.
—Call Lexmark Customer Service at 1-800-539-6275.
56
Page 57

Index
A
access cover 11
aligning print cartridge 9
alignment error 49
Auto Enhance
Photo Edit Mode menu 18
B
Bluetooth
adapter, inserting 41
printing 41
setting mode 41
Tools menu 17
box contents 10
Brightness
Photo Edit Mode menu 17
brightness, adjusting 34
buttons, control panel
Back 14
down arrow 13
left arrow 14
Menu 14
Power 13
Red-eye 13
right arrow 13
Select 13
Start 13
up arrow 14
C
cannot print from digital camera using
PictBridge 45
cards
memory 21
carrier jam error 49
cartridge error 50
cartridge missing error 50
cartridge, print
aligning 9
Colorized Effect
Photo Edit Mode menu 18
contents, box 10
control panel 11
Photo Edit Mode menu 17
PictBridge menu 18
Print Photos menu 15
Tools menu 16
Transfer Photos menu 15
using 13
View and Select menu 14
View Slideshow menu 16
cover open 50
cropping photos 33
D
device cannot be inserted 48
Device Defaults
Tools menu 16
device troubleshooting
device cannot be inserted 48
nothing happens when device is
inserted 48
display 11
E
emission notices 53
enhancing photos automatically 35
error messages troubleshooting
alignment error 49
carrier jam 49
cartridge error 50
cartridge missing 50
cover open error 50
ink level 51
invalid device 50
invalid image file 50
paper jam 51
paper out 51
PictBridge error 51
F
Fast Pics
opening 19
FCC notices 53
finding
information 5
publications 5
Web site 5
flash drive
inserting 23
frames, adding to photos 36
57
Page 58

H
handle 11
I
improving print quality 45
incorrect language appears on display 43
information, finding 5
ink level 51
inserting
Bluetooth adapter 41
flash drives 23
memory cards 21
installing
printer software 51
invalid device 50
invalid image file 50
J
jams and misfeeds troubleshooting
paper jam in paper support 48
paper jam in printer 48
L
light 11
loading
paper 20
M
Maintenance
Tools menu 17
memory card
inserting 21
memory card slots 11
N
nothing happens when device is
inserted 48
notices 53
P
paper exit tray 11
paper guide 11
paper jam 51
paper jam in paper support 48
paper jam in printer 48
paper out 51
paper support 11
paper, loading 20
paper, using supported types 20, 26, 33
partial photo prints 47
parts
access cover 11
control panel 11
display 11
handle 11
light 11
memory card slots 11
paper exit tray 11
paper guide 11
paper support 11
PictBridge port 11
power supply port 12
USB port 12
passport photos, printing 14
photo does not print 46
Photo Edit Mode menu 17
photos
adding frames 36
adjusting brightness 34
applying color effects 38
cropping 33
enhancing automatically 35
passport photos, printing 14
Photo Edit Mode menu 17
printing a photo or selected photos 26
printing all 27
printing by date 28
printing by range 29
printing from digital camera using
DPOF 31
printing from digital camera using
PictBridge menu 31
printing index page 30
printing using Bluetooth 41
red-eye, removing 18
rotating 18
transferring from memory card to flash
drive 40
transferring from memory device to
computer 40
viewing and selecting 14
viewing slideshow on control panel 16, 25
PictBridge error 51
PictBridge menu 18
PictBridge port 11
PictBridge-enabled camera, connecting 24
power button is not lit 43
power supply port 12
print cartridge
aligning 9
58
Page 59

Print Photos menu 15
Print Properties
opening 19
print quality, improving 45
print speed is slow 47
print troubleshooting
improving print quality 45
partial photo prints 47
print speed is slow 47
printer software
reinstalling 51
removing 51
using 19
printing
a photo or selected photos 26
all photos 27
index page of photos 30
photos by date 28
photos by range 29
photos from digital camera using
DPOF 31
photos from digital camera using PictBridge
menu 31
photos using color effects 38
photos with automatic enhancement 35
photos with frames 36
publications, finding 5
R
red-eye, removing 18
rotating photos 18
S
safety information 2
setup troubleshooting
cannot print from digital camera using
PictBridge 45
incorrect language appears on display 43
photo does not print 46
power button is not lit 43
software does not install 44
slideshow, viewing 16
software
Fast Pics 19
Print Properties 19
removing and reinstalling 51
Solution Center 19
using 19
software does not install 44
Solution Center
opening 19
T
Tools menu 16
Transfer Photos menu 15
transferring photos
from memory card to flash drive. 40
from memory device to computer 40
troubleshooting, device
device cannot be inserted 48
nothing happens when device is
inserted 48
troubleshooting, error messages
alignment error 49
carrier jam 49
cartridge error 50
cartridge missing 50
cover open 50
ink level 51
invalid device 50
invalid image file 50
paper jam 51
paper out 51
PictBridge error 51
troubleshooting, jams and misfeeds
paper jam in paper support 48
paper jam in printer 48
troubleshooting, print
improving print quality 45
partial photo prints 47
print speed is slow 47
troubleshooting, setup
cannot print from digital camera using
PictBridge 45
incorrect language appears on display 43
photo does not print 46
power button is not lit 43
software does not install 44
U
USB port 12
using
supported paper types 20, 26, 33
V
View and Select menu 14
View Slideshow menu 16
viewing slideshow 25
59
Page 60

W
Web site
finding 5
60
Page 61

Puesta en marcha
Español
Page 62

Aviso de la edición
Julio de 2006
El párrafo siguiente no se aplica a los países en los que tales disposiciones son contrarias a la
legislación local: LEXMARK INTERNATIONAL, INC, PROPORCIONA ESTA PUBLICACIÓN "TAL CUAL"
SIN GARANTÍA DE NINGÚN TIPO, NI EXPLÍCITA NI IMPLÍCITA, LO QUE INCLUYE, PERO SIN LIMITARSE
A ELLO, LAS GARANTÍAS IMPLÍCITAS DE COMERCIABILIDAD O IDONEIDAD PARA UN PROPÓSITO
EN PARTICULAR. Algunos estados no permiten la renuncia a garantías explícitas ni implícitas en algunas
transacciones; por lo tanto, es posible que la presente declaración no se aplique en su caso.
Esta publicación puede incluir inexactitudes técnicas o errores tipográficos. Periódicamente se realizan
modificaciones en la presente información; dichas modificaciones se incluyen en ediciones posteriores. Las
mejoras o modificaciones en los productos o programas descritos pueden efectuarse en cualquier momento.
Los comentarios acerca de esta publicación pueden dirigirse a Lexmark International, Inc., Department
F95/032-2, 740 West New Circle Road, Lexington, Kentucky 40550, U.S.A. En el Reino Unido y la República
de Irlanda, envíelos a Lexmark International Ltd., Marketing and Services Department, Westhorpe House,
Westhorpe, Marlow Bucks SL7 3RQ. Lexmark puede utilizar o distribuir la información suministrada de la
forma que considere apropiada sin que ello implique obligación alguna por su parte. Para obtener copias
adicionales de publicaciones relacionadas con este producto, visite el sitio web de Lexmark en
www.lexmark.com..
Las referencias hechas en esta publicación a productos, programas o servicios no implican que el fabricante
tenga la intención de ponerlos a la venta en todos los países en los que opere. Cualquier referencia a un
producto, programa o servicio no indica o implica que sólo se pueda utilizar dicho producto, programa o
servicio. Se puede utilizar cualquier producto, programa o servicio de funcionalidad equivalente que no infrinja
los derechos de la propiedad intelectual. La evaluación y comprobación del funcionamiento mediante otros
productos, programas o servicios, excepto aquéllos designados expresamente por el fabricante, son
responsabilidad del usuario.
© 2006 Lexmark International, Inc.
Reservados todos los derechos.
UNITED STATES GOVERNMENT RIGHTS
This software and any accompanying documentation provided under this agreement are commercial
computer software and documentation developed exclusively at private expense.
Información de seguridad
Utilice únicamente la fuente y el cable de alimentación que se proporcionan con este producto o los de
repuesto autorizados por el fabricante.
Conecte el cable de alimentación a una toma eléctrica que se encuentre cerca del producto y a la que se
pueda acceder sin dificultad.
Las tareas de reparación o mantenimiento de la impresora que no se describan en las instrucciones de
funcionamiento deberá realizarlas un técnico autorizado.
Este producto se ha diseñado, probado y aprobado para que cumpla los estándares de seguridad más
estrictos con el uso de componentes específicos de Lexmark. Es posible que las características de seguridad
de algunos componentes no siempre sean evidentes. Lexmark no se responsabiliza del uso de consumibles
de sustitución.
PRECAUCIÓN: No instale este producto ni realice conexiones eléctricas o de cableado (cable de
alimentación, línea telefónica, etc.) durante tormentas eléctricas.
Page 63

Índice general
Búsqueda de información sobre la impresora................................5
Configuración de la impresora........................................................10
Alineación del cartucho de impresión para mejorar la calidad de
impresión.....................................................................................................10
Comprobación del contenido de la caja...........................................................11
Información acerca de la impresora...............................................12
Descripción de las partes de la impresora.......................................................12
Uso de los botones del panel de control..........................................................14
Uso de los menús del panel de control............................................................15
Información acerca del software.....................................................22
Carga del papel.................................................................................23
Carga del papel................................................................................................23
Uso de tipos de papel compatibles..................................................................23
Conexión de dispositivos de almacenamiento de
fotografías.........................................................................................25
Introducción de tarjetas de memoria................................................................25
Introducción de una unidad flash.....................................................................27
Conexión de una cámara digital compatible con PictBridge............................28
Visualización de fotografías............................................................30
Visualización de una presentación de diapositivas de las fotografías en
la pantalla del panel de control...................................................................30
Impresión de fotografías..................................................................31
Impresión de fotografías mediante el panel de control....................................31
Edición de fotografías......................................................................38
Recorte de fotografías.....................................................................................38
Ajuste del brillo de las fotografías....................................................................39
Mejora automática de fotografías....................................................................40
3
Page 64

Adición de marcos a fotografías......................................................................42
Uso de efectos de color en las fotografías.......................................................43
Transferencia de fotografías...........................................................45
Transferencia de fotos de un dispositivo de memoria a un equipo..................45
Transferencia de fotografías de una tarjeta de memoria a una unidad
flash.............................................................................................................45
Uso de la tecnología Bluetooth.......................................................47
Configuración del modo Bluetooth...................................................................47
Impresión por medio de Bluetooth...................................................................47
Solución de problemas....................................................................49
Solución de problemas de instalación.............................................................49
Solución de problemas de impresión...............................................................51
Solución de problemas de atascos y alimentación de papel...........................54
Solución de problemas de dispositivos............................................................54
Solución de problemas de mensajes de error.................................................55
Desinstalación y reinstalación del software.....................................................58
4
Page 65

Búsqueda de información sobre la impresora
Hoja de instalación
Descripción Ubicación
La hoja de instalación contiene las
instrucciones necesarias para configurar
el hardware y el software.
Catálogo Soluciones de configuración o Introducción
Descripción Ubicación
En el catálogo Introducción se ofrecen
instrucciones acerca de la configuración
del hardware y software, así como
procedimientos básicos para la utilización
de la impresora.
Nota: Si su impresora es compatible con
sistemas operativos Macintosh, consulte
la Ayuda Mac:
1
En el escritorio Finder haga doble clic
en la carpeta Lexmark 350 Series.
2
Haga doble clic en el icono de Ayuda
de la impresora.
En el catálogo Soluciones de
configuración se indica cómo resolver
problemas de configuración de la
impresora.
Nota: Estos documentos no se distribuyen
con todas las impresoras. Si con su
impresora no se ha incluido alguno de los
catálogos Introducción o Soluciones de
configuración, consulte en su lugar la Guía
del usuario.
Puede encontrar este documento en la caja de
la impresora o en el sitio web de Lexmark en
www.lexmark.com.
Puede encontrar este documento en la caja de
la impresora o en el sitio web de Lexmark en
www.lexmark.com.
5
Page 66

Guía del usuario
Descripción Ubicación
La Guía del usuario proporciona
instrucciones para la utilización de la
impresora y otra información, como por
ejemplo:
•
Uso del software (en sistemas operativos
Windows)
•
Carga del papel
•
Impresión
•
Trabajo con fotografías
•
Escaneo (si la impresora lo permite)
•
Realización de copias (si la impresora lo
permite)
•
Envío de faxes (si la impresora lo
permite)
•
Mantenimiento de la impresora
•
Conexión de la impresora a una red (si la
impresora lo permite)
•
Solución de problemas de impresión,
copia, escaneo, envío de faxes, atascos
y errores de alimentación de papel
Nota: Si su impresora es compatible con
sistemas operativos Macintosh, consulte la
Ayuda Mac:
1
En el escritorio Finder haga doble clic en
la carpeta Lexmark 350 Series.
2
Haga doble clic en el icono de Ayuda de
la impresora.
Cuando instale el software de la impresora,
se instalará automáticamente la Guía del
usuario.
1
Haga clic en Inicio Programas o
Todos los programas Lexmark 350
Series.
2
Haga clic en la Guía del usuario.
En caso de que no aparezca en su escritorio
el vínculo a la Guía del usuario, siga los
pasos que se indican a continuación:
1
Introduzca el CD.
Aparecerá la pantalla de instalación.
Nota: Si es necesario, haga clic en
Inicio Ejecutar y, a continuación,
escriba D:\setup, siendo D la letra de su
unidad de CD-ROM.
2
Haga clic en Ver Guía del usuario
(incluye la sección Solución de
problemas de configuración).
3
Haga clic en Sí.
Aparece un icono de la Guía del
usuario en su escritorio, y la Guía del
usuario aparece en pantalla.
También encontrará este documento en el
sitio web de Lexmark en
www.lexmark.com.
Ayuda
Descripción Ubicación
La Ayuda ofrece las instrucciones de uso del
software, en caso de que se conecte la
impresora a un equipo.
Cuando se encuentre en un programa de
software de Lexmark, haga clic en Ayuda,
Sugerencias Ayuda o Ayuda Temas
de ayuda.
6
Page 67

Centro de soluciones Lexmark
Descripción Ubicación
El software del Centro de soluciones
Lexmark se incluye en el CD. Se instala con
el resto del software, en caso de que la
impresora esté conectada a un equipo.
Para acceder al Centro de soluciones
Lexmark:
1
Haga clic en Inicio Programas o
Todos los programas Lexmark 350
Series.
2
Seleccione Centro de soluciones
Lexmark.
Atención al cliente
Descripción Ubicación (Norteamérica) Ubicación (resto del
Asistencia telefónica
Llámenos al
•
EE.UU.: 1-800-332-4120
De lunes a viernes (08:00 –
23:00, franja horaria del este
de EE.UU.)
Sábados (12:00–18:00, franja
horaria del este de los
EE.UU.)
•
Canadá: 1-800-539-6275
De lunes a viernes (09:00–
21:00, franja horaria del este
de EE.UU.)
Sábados (12:00–18:00, franja
horaria del este de los
EE.UU.)
•
México: 001-888-377-0063
De lunes a viernes (08:00–
20:00, franja horaria del este
de EE.UU.)
Nota: Los números de teléfono y
los horarios de atención al público
pueden cambiar sin previo aviso.
Para los números disponibles más
recientes, consulte la declaración
de garantía impresa que se incluye
con la impresora.
mundo)
Los números de teléfono y las
horas de atención al público
pueden variar en función del
país o región.
Visite nuestro sitio web en
www.lexmark.com.
Seleccione un país o región y,
a continuación, seleccione el
vínculo de atención al cliente.
Nota: Para obtener
información adicional acerca
de cómo ponerse en contacto
con Lexmark, consulte la
garantía impresa incluida con
la impresora.
7
Page 68

Descripción Ubicación (Norteamérica) Ubicación (resto del
Asistencia por
correo electrónico
Para obtener asistencia por correo
electrónico, visite nuestro sitio
web: www.lexmark.com.
1
Haga clic en el vínculo de
ATENCIÓN AL CLIENTE.
2
Haga clic en vínculo de
soporte técnico.
3
Seleccione la familia de
impresoras.
4
Seleccione el modelo de
impresora.
5
En la sección de herramientas
de asistencia, haga clic en el
vínculo de asistencia por
correo electrónico.
6
Rellene el formulario y haga
clic en el botón de envío de
solicitud.
mundo)
La asistencia por correo
electrónico varía en función
del país o la región, y puede
no estar disponible.
Visite nuestro sitio web en
www.lexmark.com.
Seleccione un país o región y,
a continuación, seleccione el
vínculo de atención al cliente.
Nota: Para obtener
información adicional acerca
de cómo ponerse en contacto
con Lexmark, consulte la
garantía impresa incluida con
la impresora.
Garantía limitada
Descripción Ubicación (EE.UU.) Ubicación (resto del
Información de garantía
limitada
Lexmark International, Inc.
ofrece una garantía
limitada de que esta
impresora no presentará
defectos en los materiales
ni de fabricación durante
los doce primeros meses a
partir de la fecha original de
adquisición.
Para ver las limitaciones y
condiciones de esta garantía
limitada, consulte la Declaración
de garantía limitada incluida en la
impresora o establecida en
www.lexmark.com.
1
Haga clic en el vínculo de
ATENCIÓN AL CLIENTE.
2
Haga clic en el vínculo de
información acerca de la
garantía.
3
En la sección de declaración
de garantía limitada, haga clic
en Impresoras de inyección
de tinta y Todo en Uno.
4
Desplácese por la página web
si desea leer la garantía.
mundo)
La información de
garantía varía en función
del país o región.
Consulte la garantía
impresa incluida con la
impresora.
8
Page 69

Anote la información que aparece a continuación (extraída del recibo de compra y la parte
trasera de la impresora) y téngala preparada cuando se ponga en contacto con nosotros, de
modo que podamos atenderle con mayor rapidez:
•
Número de tipo de máquina
•
Número de serie
•
Fecha de compra
•
Punto de venta
9
Page 70

Configuración de la impresora
Esta impresora puede utilizarse como un producto independiente o conectada a un equipo.
Para configurar la impresora, consulte la hoja de configuración que se facilita con el producto.
Alineación del cartucho de impresión para mejorar la calidad de impresión
1
Cargue el papel fotográfico con la cara brillante o imprimible mirando hacia arriba. (Si no
está seguro de cuál es la cara imprimible, consulte las instrucciones que se incluyen con
el papel.) Para obtener más información, consulte “Carga del papel” en la página 23.
Nota: Para obtener mejores resultados, utilice el papel fotográfico adecuado.
2
Pulse o varias veces hasta que aparezca Herramientas en la pantalla.
3
Pulse .
4
Pulse o varias veces hasta que aparezca Mantenimiento.
5
Pulse .
6
Pulse o varias veces hasta que aparezca Alinear cartucho.
7
Pulse .
Se imprimirá una página de alineación.
Después de alinear el cartucho, vuelva a imprimir la fotografía. Si no ha mejorado la calidad
de impresión, limpie los inyectores de los cartuchos.
10
Page 71
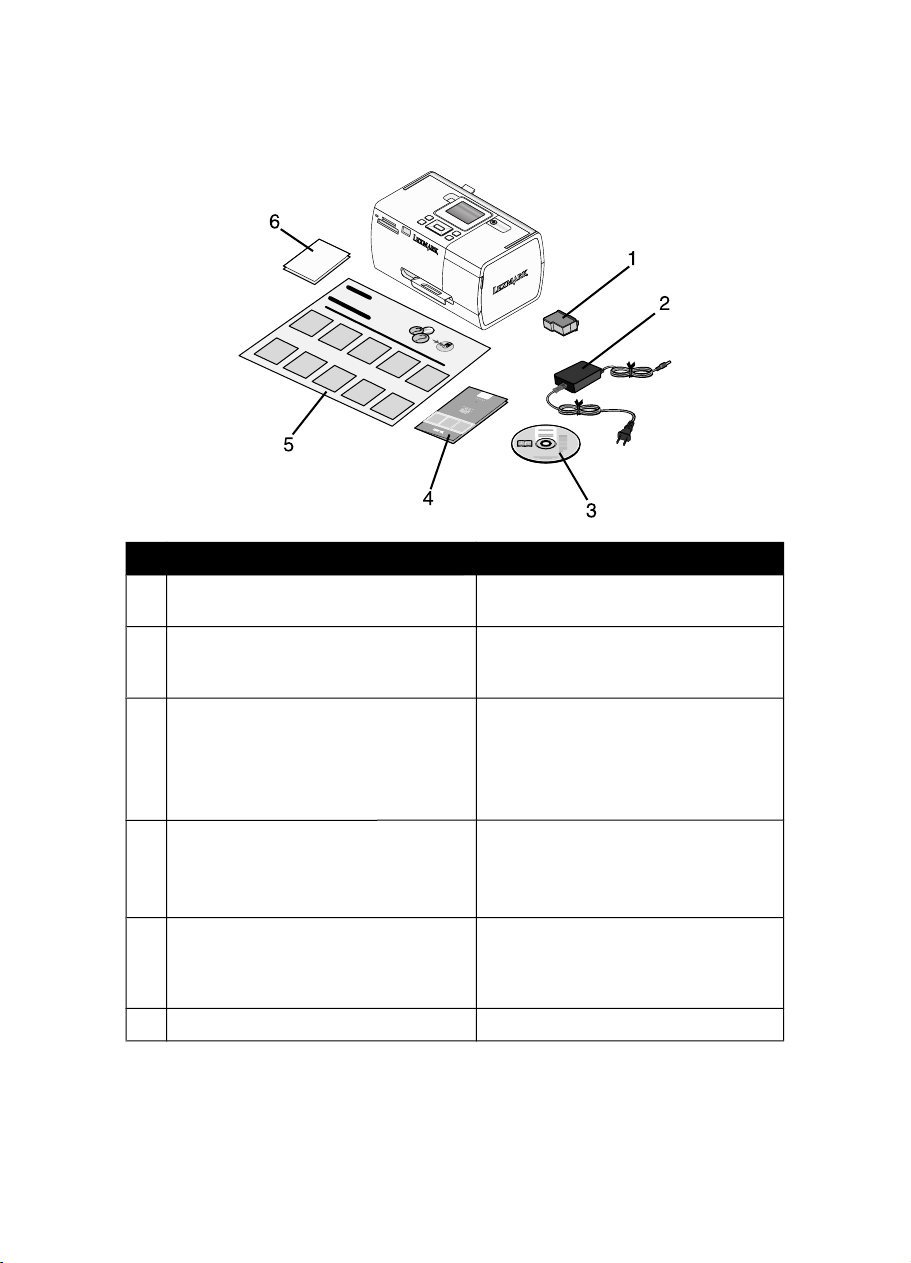
Comprobación del contenido de la caja
Nombre Descripción
Cartucho de impresión de color Cartucho que se va a instalar en la
1
Fuente de alimentación Se conecta al puerto de la fuente de
2
CD del software de instalación
3
Folleto Soluciones de configuración o
4
Introducción
Hoja de Instrucciones de configuración Instrucciones sobre la instalación del
5
Papel fotográfico 4 x 6 pulg. (10 x 15 cm) Papel para la impresora
6
impresora
alimentación situado en la parte posterior
de la impresora
Software de instalación de la
•
impresora
Ayuda
•
Guía del usuario en formato
•
electrónico
Folleto impreso que sirve de guía
Nota: La Guía del usuario completa está
disponible en el CD del software de
instalación que acompaña a la impresora.
hardware y el software de la impresora,
además de información sobre la solución
de problemas de instalación.
Nota: El cable USB se adquiere por separado
11
Page 72
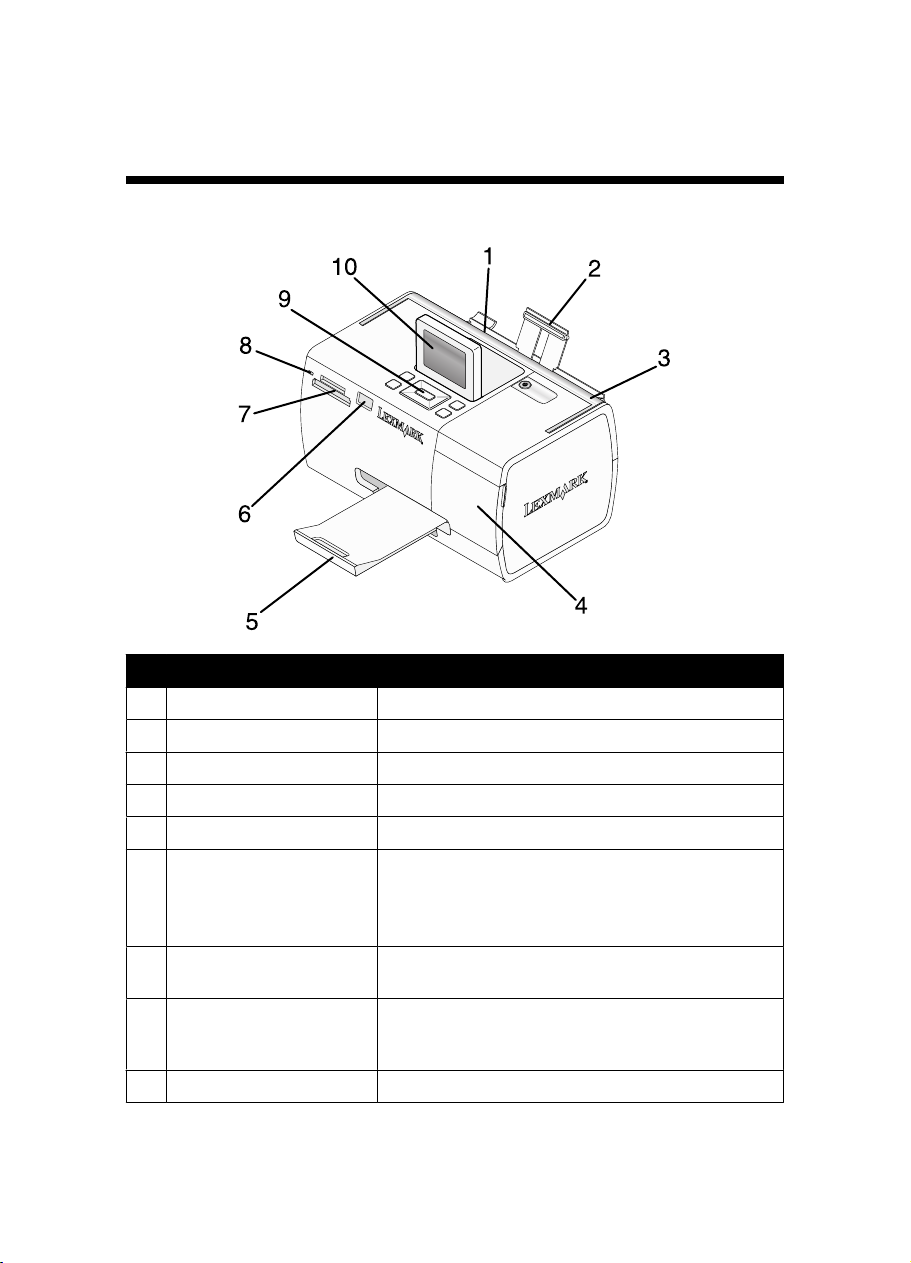
Información acerca de la impresora
Descripción de las partes de la impresora
Utilice Para
Guía del papel Mantener el papel recto cuando se introduce.
1
Bandeja de papel Cargar papel.
2
Asa Transportar la impresora.
3
Cubierta de acceso Acceder a los cartuchos de impresión.
4
Bandeja de salida de papel Sostener el papel a medida que sale del dispositivo.
5
Puerto PictBridge Conectar a la impresora una cámara digital compatible
6
Ranuras de la tarjeta de
7
memoria
Luz Determinar si la impresora está leyendo una tarjeta de
8
Panel de control Utilizar las funciones de la impresora.
9
con PictBridge, una unidad flash o un adaptador
Bluetooth.
Nota: El adaptador Bluetooth se vende por separado.
Introducir tarjetas de memoria.
memoria. La luz parpadea cuando esté leyendo el
dispositivo.
12
Page 73
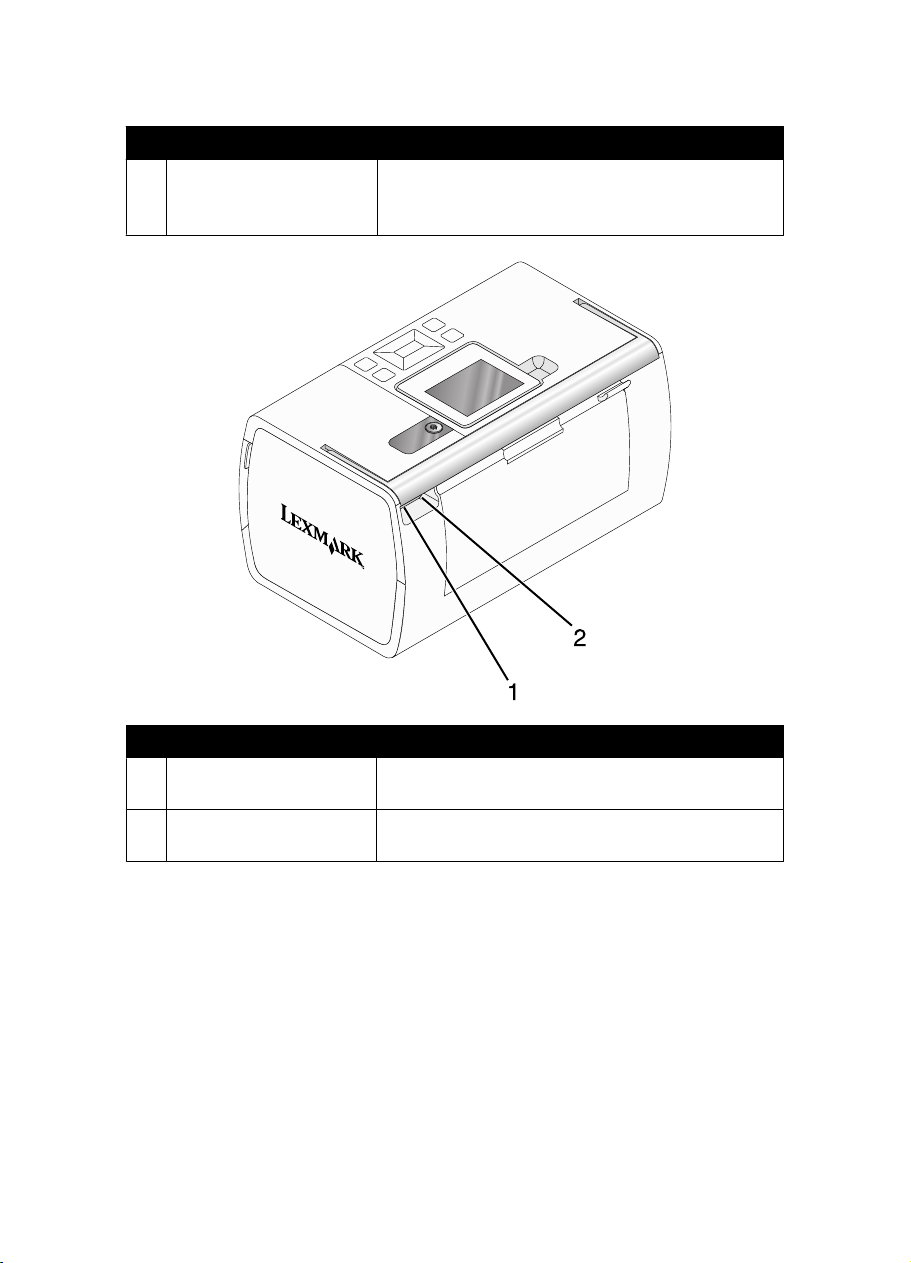
Utilice Para
Pantalla del panel Ver fotografías y menús o comprobar el estado de la
10
impresora.
La pantalla se inclina para poder ver mejor.
Utilice Para
Puerto de la fuente de
1
alimentación
Puerto USB Conectar la impresora a un equipo mediante el cable
2
Conectar la impresora al suministro eléctrico mediante
la fuente de alimentación.
USB.
13
Page 74
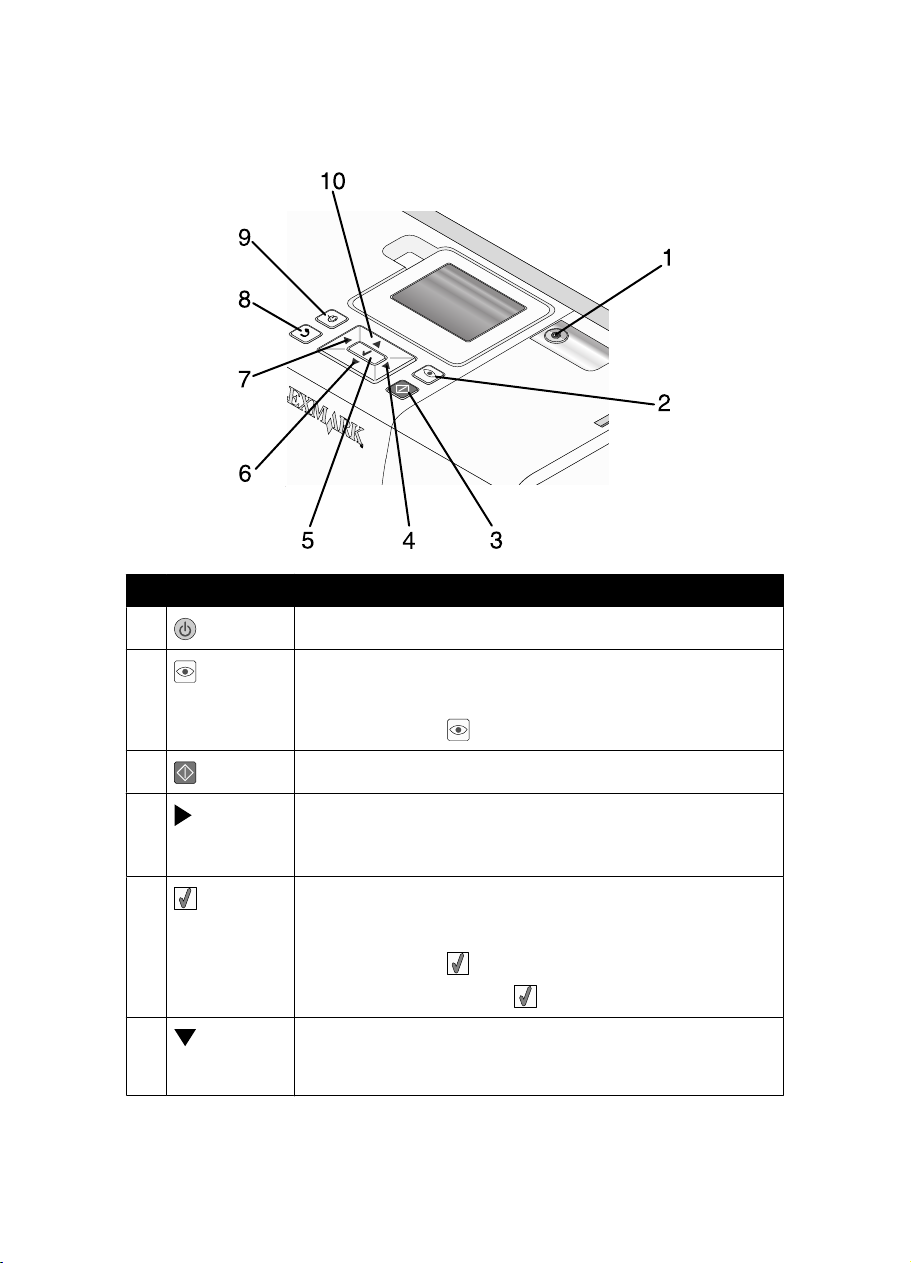
Uso de los botones del panel de control
Pulse Para
1
Encender y apagar la impresora.
2
3
4
5
6
Aplicar la reducción del efecto de ojos rojos a la fotografía de la
pantalla al imprimirla. Aparece un icono en la parte inferior de la
pantalla para indicar que se va a llevar a cabo la reducción del efecto
de ojos rojos. Pulse
Iniciar un trabajo de impresión en color con la configuración actual.
•
Desplazarse por las selecciones de menú del menú principal.
•
Desplazarse por las selecciones de un submenú.
•
Al visualizar fotografías, desplazarse de una a otra.
•
En un menú, entrar en un submenú y realizar determinadas
acciones.
•
Seleccionar una fotografía que se muestra en la pantalla.
Vuelva a pulsar
•
Expulsar el papel. (Pulse durante tres segundos.)
•
Desplazarse por los submenús de un menú.
•
Al ver una presentación preliminar de una fotografía, reducir el
número de copias que se van a imprimir.
otra vez para cancelar la corrección.
para cancelar la selección de fotografías.
14
Page 75
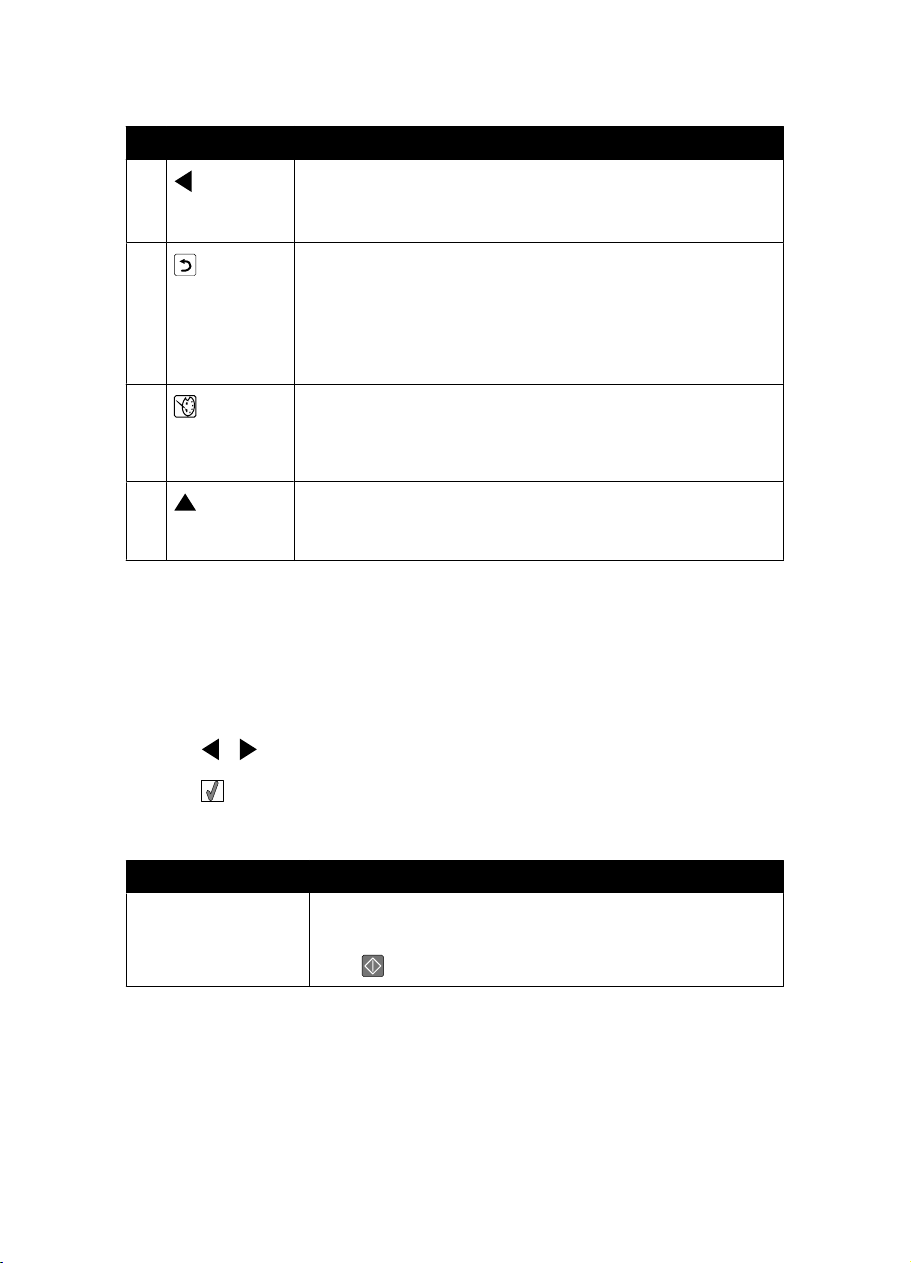
Pulse Para
7
8
9
10
•
Desplazarse por las selecciones de menú del menú principal.
•
Desplazarse por las selecciones de un submenú.
•
Al visualizar fotografías, desplazarse de una a otra.
•
En un submenú, guardar la selección actual y volver a la
pantalla anterior.
•
Al visualizar una presentación de diapositivas de las fotografías,
interrumpir o detener la presentación de diapositivas.
•
Al imprimir una fotografía o una página de alineación, detener
y cancelar un trabajo y expulsar papel.
•
En la pantalla de selección de fotografías, abrir el menú Modo
de edición de foto.
•
En la pantalla Presentación preliminar, abrir el menú Valores de
impresión.
•
Desplazarse por los submenús de un menú.
•
Al ver una presentación preliminar de una fotografía, aumentar
el número de copias que se van a imprimir.
Uso de los menús del panel de control
Uso del menú Ver y seleccionar
1
Introduzca una tarjeta de memoria o una unidad flash. Para obtener más información,
consulte “Introducción de tarjetas de memoria” en la página 25 o “Introducción de una
unidad flash” en la página 27.
2
Pulse o varias veces hasta que aparezca Ver y seleccionar en la pantalla.
3
Pulse .
4
Siga las instrucciones que aparecen en pantalla.
En Puede
Ver y seleccionar
•
Seleccionar las fotografías que desee ver o imprimir.
•
Seleccionar el número de copias para imprimir.
Pulse
para volver a la pantalla Presentación preliminar.
15
Page 76

En Puede
Presentación preliminar Ver una presentación preliminar de las fotografías que se van a
imprimir.
También puede pulsar
entre los que se encuentran el tamaño de papel, tamaño de
fotografía, presentación, calidad de impresión, tipo de papel y los
valores de impresión de fotografías de pasaporte.
para ajustar los valores de impresión,
Uso del menú Imprimir fotografías
Este menú permite seleccionar un grupo de fotografías para imprimirlas.
1
Introduzca una tarjeta de memoria o una unidad flash. Para obtener más información,
consulte “Introducción de tarjetas de memoria” en la página 25 o “Introducción de una
unidad flash” en la página 27.
2
Pulse o varias veces hasta que aparezca Imprimir fotografías en la pantalla.
3
Pulse .
En Puede
Imprimir selecciones de cámara Imprimir selecciones de formato de orden de impresión
Imprimir las N fotografías Imprimir todas las fotografías del dispositivo de memoria.
Imprimir fotos por fecha Imprimir fotografías realizadas en unas fechas en
digital (DPOF, Digital Print Order Format). Esta opción
sólo se muestra si hay un archivo DPOF válido en la
tarjeta de memoria. Para obtener más información,
consulte “Impresión de fotografías desde una cámara
digital mediante DPOF” en la página 36.
N es el número total de imágenes que se van a imprimir.
Puede seleccionar:
•
Fotos en papel para ver los tamaños de papel
disponibles.
•
Impresión de índice para imprimir una página de
índice de las fotografías. Para obtener más
información, consulte “Impresión de una página de
índice de fotografías” en la página 35.
•
Copias por foto para seleccionar el número de
copias para imprimir por fotografía.
•
Otros valores de impresión para seleccionar un
tamaño de papel, un tamaño de fotografía, diseño,
calidad de impresión y tipo de papel.
concreto. Para obtener más información, consulte
“Impresión de fotografías por fecha” en la página 33.
16
Page 77

En Puede
Imprimir intervalo de fotografías Seleccionar la primera y última fotografía de un intervalo
que desee imprimir. Para obtener más información,
consulte “Impresión de fotografías por intervalo” en la
página 34.
Uso del menú Transferir
Puede transferir fotografías de una tarjeta de memoria a una unidad flash o un equipo (si la
impresora está conectada a un equipo). Las fotografías de la tarjeta de memoria no se
perderán.
1
Introduzca una tarjeta de memoria. Para obtener más información, consulte “Introducción
de tarjetas de memoria” en la página 25.
2
Pulse o varias veces hasta que aparezca Transferir en la pantalla.
3
Pulse .
4
Si desea transferir fotografías a una unidad flash USB, introduzca la unidad.
5
Pulse o para seleccionar Unidad flash USB o Equipo (si la impresora está
conectada a un equipo).
6
Pulse .
7
Siga las instrucciones que aparecen en la pantalla de la impresora.
Uso del menú Presentación de diapositivas
El menú Presentación de diapositivas permite ver las imágenes guardadas en una tarjeta de
memoria o unidad flash.
1
Introduzca una tarjeta de memoria o una unidad flash. Para obtener más información,
consulte “Introducción de tarjetas de memoria” en la página 25 o“Introducción de una
unidad flash” en la página 27.
2
Pulse o varias veces hasta que aparezca Presentación de diapositivas
en la pantalla.
3
Pulse .
4
Pulse para continuar.
Cada fotografía se muestra durante unos segundos.
5
Si desea moverse a la fotografía anterior o la siguiente de forma manual, pulse
o .
17
Page 78
6
Utilice alguno de los botones siguientes:
•
Pulse para seleccionar las fotografías que desea imprimir tras la presentación de
diapositivas.
•
Pulse para interrumpir la presentación de diapositivas. Pulse otra vez para
detener la presentación de diapositivas.
•
Pulse para girar la fotografía en la pantalla.
Cuando se detiene la presentación de diapositivas, se muestran las fotografías que ha
seleccionado durante la presentación de diapositivas al pulsar
.
Uso del menú Herramientas
1
Pulse o varias veces hasta que aparezca Herramientas en la pantalla.
2
Pulse .
En Puede
Valores predeterminados del dispositivo Seleccionar:
•
Idioma para cambiar el ajuste de idioma.
•
País para establecer el tamaño de papel en
blanco predeterminado y el formato de fecha
que se utilizará en su ubicación.
•
Ahorro de energía para configurar el tiempo
que debe transcurrir antes de que la
impresora entre en modo de ahorro de
energía si está inactiva. Mientras se esté en
el modo de ahorro de energía, se
desactivará la pantalla y la iluminación.
Pulse cualquier botón para restaurar la
alimentación de la impresora.
Ajustes de impresión Seleccionar un tamaño de papel, un tamaño de
fotografía, diseño, calidad de impresión y tipo de
papel.
18
Page 79

En Puede
Mantenimiento Seleccionar:
•
Ver nivel de tinta para ver una
representación gráfica del nivel de tinta del
cartucho de impresión. Para obtener más
información, consulte la sección sobre la
comprobación del nivel de tinta en el capítulo
“Mantenimiento de la impresora” de la Guía
del usuario del CD.
•
Limpiar cartucho para limpiar los
inyectores del cartucho de impresión. Para
obtener más información, consulte la
sección sobre limpieza de los inyectores del
cartucho de impresión en el capítulo
“Mantenimiento de la impresora” de la Guía
del usuario del CD.
•
Alinear cartucho para alinear el cartucho.
Para obtener más información, consulte
“Alineación del cartucho de impresión para
mejorar la calidad de impresión” en la
página 10.
•
Imprimir página de prueba para imprimir
una página de prueba. Para obtener más
información, consulte la sección sobre
impresión de páginas de prueba en el
capítulo “Mantenimiento de la impresora” de
la Guía del usuario del CD.
•
Restablecer valores predeterminados
para restaurar los valores predeterminados
a los valores de fábrica.
19
Page 80
En Puede
Bluetooth Seleccionar:
•
Activación Bluetooth para activar o
desactivar la comunicación Bluetooth. Para
obtener más información, consulte “Uso de
la tecnología Bluetooth” en la página 47.
•
Modo de descubrimiento para activar o
desactivar el modo de descubrimiento. Para
obtener más información, consulte “Uso de
la tecnología Bluetooth” en la página 47.
•
Nombre de dispositivo para ver el nombre
del dispositivo y el número de dirección
administrada universalmente (UAA)
asignados al dispositivo compatible con
Bluetooth.
•
Dirección del dispositivo para ver la
dirección de 48 bits del dispositivo
compatible con Bluetooth.
Personalizar Seleccionar:
•
Salvapantallas para activar la función del
salvapantallas cuando transcurran 30
segundos o un minuto o desactivarla.
•
Cambiar fotos de salvapantallas para
seleccionar hasta cuatro fotos para utilizar
como salvapantallas.
•
Sugerencias para activar o desactivar las
sugerencias. Las sugerencias son mensajes
del panel de control que ofrecen información
acerca de la selección actual.
Uso del menú Modo de edición de foto
Cuando se esté mostrando una fotografía, pulse para acceder al menú Modo de edición
de foto.
En Puede
Brillo Ajustar el brillo de la fotografía. Para obtener más información,
Recortar Recortar una fotografía. Para obtener más información, consulte
Mejora automática Mejorar automáticamente una fotografía. Para obtener más
consulte “Ajuste del brillo de las fotografías” en la página 39.
“Recorte de fotografías” en la página 38.
información, consulte “Mejora automática de fotografías” en la
página 40.
20
Page 81
En Puede
Reducción de ojos rojos Reducir el efecto de ojos rojos provocado por el reflejo de la luz.
Efecto de coloración Seleccionar si desea imprimir una fotografía en blanco y negro,
Girar Girar una fotografía en incrementos de 90 grados en el sentido
Marcos Seleccionar un color y un estilo para el marco de la fotografía.
sepia, marrón envejecido o gris envejecido. Para obtener más
información, consulte “Uso de efectos de color en las fotografías”
en la página 43.
de las agujas del reloj o en el sentido inverso.
Para obtener más información, consulte “Adición de marcos a
fotografías” en la página 42.
Uso del menú PictBridge
El menú Valores predeterminados de PictBridge permite seleccionar los valores de impresión
si no se han especificado selecciones en la cámara digital con anterioridad. Para realizar
selecciones de cámara, consulte la documentación de la cámara.
1
Conecte una cámara digital compatible con PictBridge. Para obtener más información,
consulte “Conexión de una cámara digital compatible con PictBridge” en la página 28.
2
Pulse para acceder al menú PictBridge.
3
Pulse o para desplazarse por las opciones siguientes:
En Puede
Tamaño del papel Seleccionar un tamaño de papel.
Tamaño foto Seleccionar el tamaño de la fotografía.
Disposición Seleccionar una disposición de fotografías.
Calidad de impresión Seleccionar un valor de calidad de impresión.
Tipo de papel Seleccionar el tipo de papel. Para obtener más información,
consulte “Uso de tipos de papel compatibles” en la
página 23.
4
Pulse o para realizar una selección.
5
Pulse para imprimir.
21
Page 82
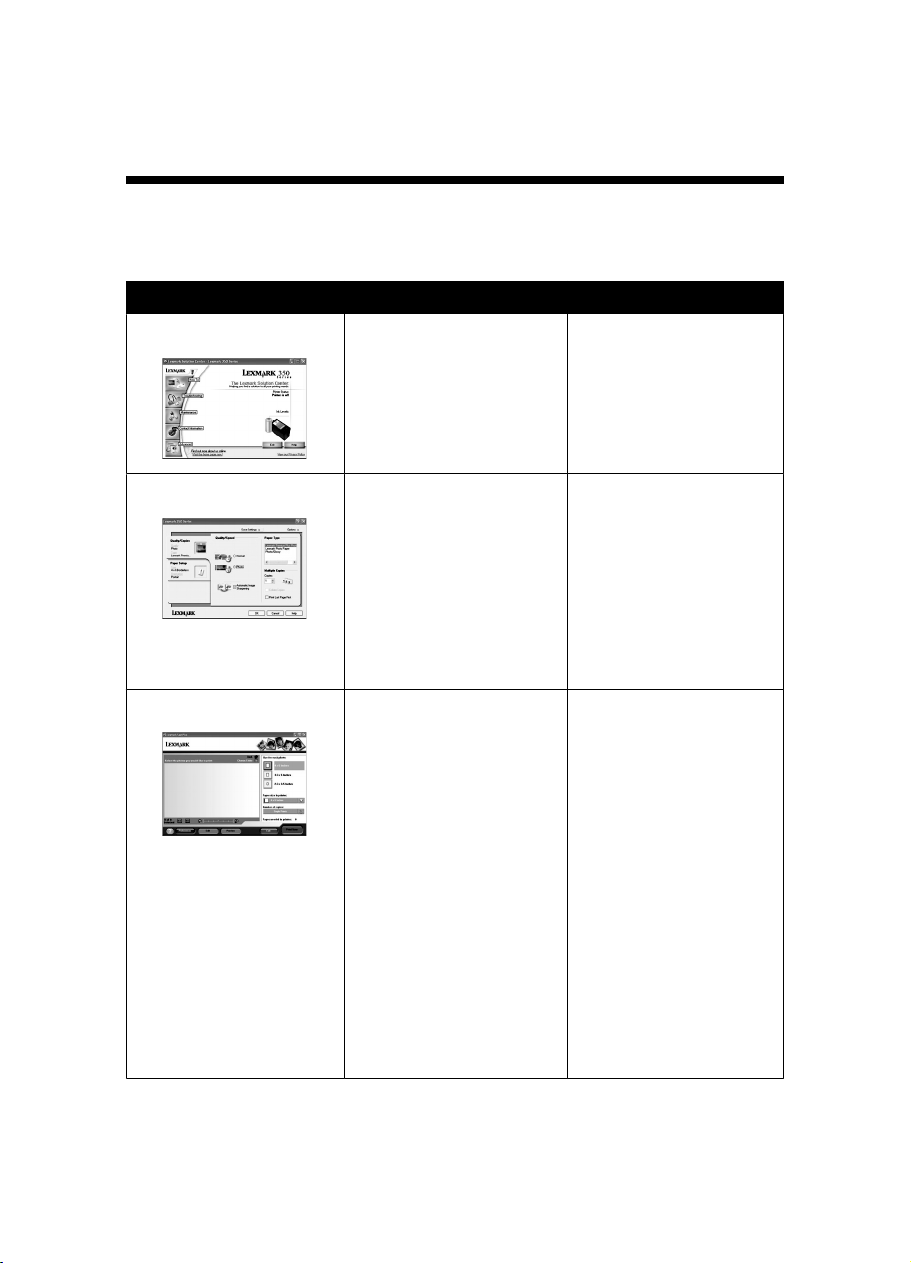
Información acerca del software
Sólo se puede acceder al software de la impresora por medio de un equipo. Para obtener
más información acerca de la configuración de la impresora con un equipo, consulte la hoja
Configurar que se incluía con el producto.
Utilice Para Apertura del software
Centro de soluciones Buscar información sobre
Propiedades de impresión Seleccionar los mejores
Fast Pics
solución de problemas,
mantenimiento y pedidos de
cartuchos.
valores de impresión para la
fotografía que va a imprimir
por medio del equipo.
•
Transferir fotografías de
un dispositivo de
memoria a un equipo.
Para obtener más
información, consulte
“Transferencia de fotos
de un dispositivo de
memoria a un equipo” en
la página 45.
•
Editar e imprimir
fotografías almacenadas
en el equipo. Para
obtener más información,
consulte "Impresión de
fotografías mediante Fast
Pics" en el capítulo
“Impresión de
fotografías” de la Guía
del usuario del CD.
Desde el escritorio:
1
Haga clic en Inicio
Programas o Todos
los programas
Lexmark 350 Series.
2
Seleccione Centro de
soluciones.
1
Con la fotografía abierta
en un programa, haga
clic en Archivo
Imprimir.
2
En el cuadro de diálogo
Imprimir, haga clic en
Propiedades,
Preferencias,
Opciones o
Configurar.
Introduzca una tarjeta de
memoria o una unidad flash.
Para obtener más
información, consulte
“Introducción de tarjetas de
memoria” en la página 25
o“Introducción de una
unidad flash” en la
página 27.
22
Page 83
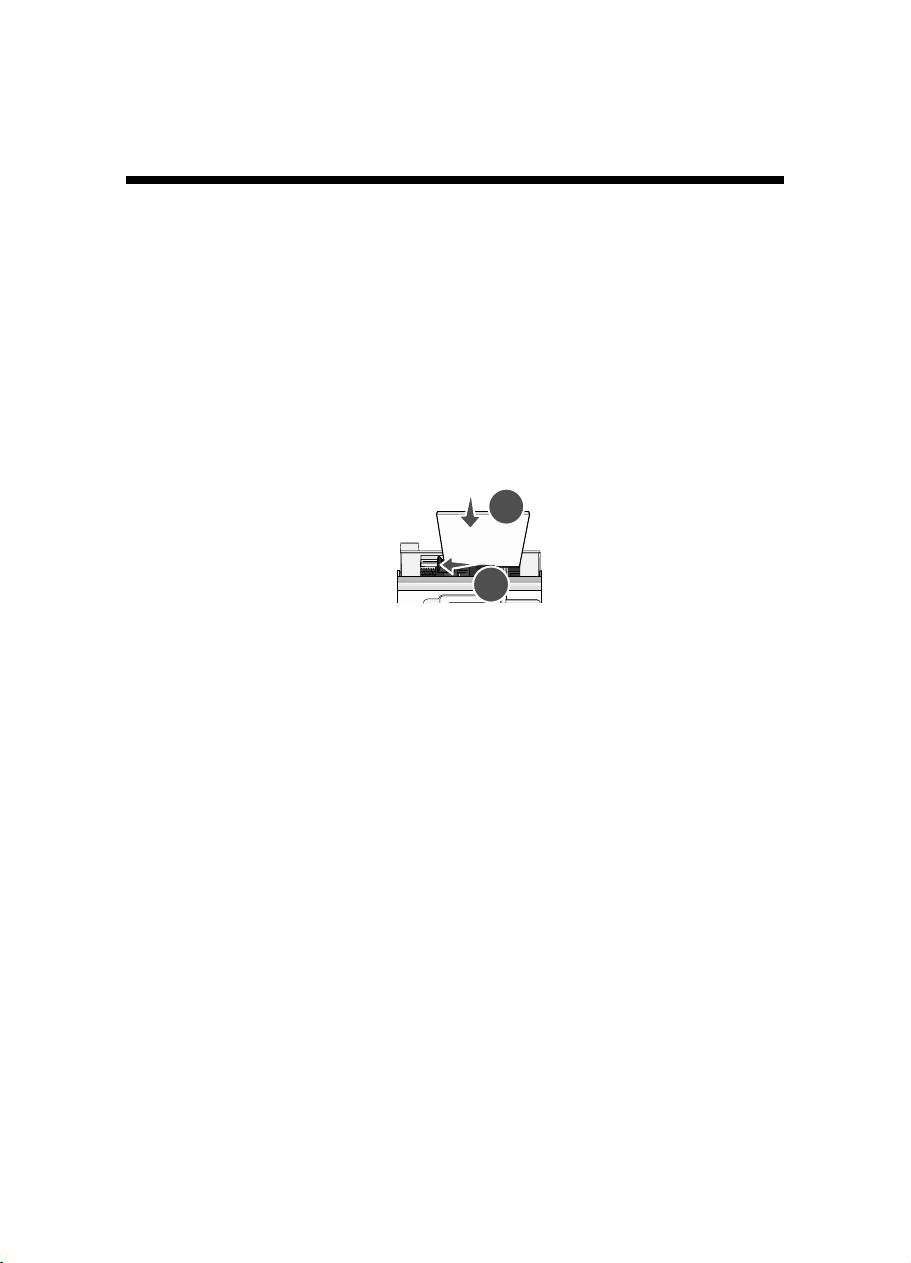
Carga del papel
Carga del papel
Notas:
•
Cargue papel fotográfico con la cara brillante o imprimible dirigida hacia usted. (Si no está
seguro de cuál es la cara imprimible, consulte las instrucciones que se incluyen con el
papel.)
•
Asegúrese de que el papel no está usado ni dañado.
•
No fuerce el papel al introducirlo en la impresora.
1
Mueva la guía del papel hacia el borde izquierdo de la bandeja de papel.
2
Cargue el papel en posición vertical contra el lado derecho de la bandeja de papel y suelte
la guía del papel con suavidad.
2
1
Uso de tipos de papel compatibles
Puede utilizar los tipos de papel siguientes para la impresora:
•
Papel fotográfico Perfectfinish de Lexmark
•
Papel fotográfico de Lexmark
•
Papel brillante o fotográfico
Notas:
•
Para obtener mejores resultados, utilice el Papel fotográfico Perfectfinish de Lexmark o
Papel fotográfico de Lexmark.
•
No utilice Papel fotográfico de primera calidad de Lexmark. El cartucho de impresión de
este dispositivo no es compatible con este tipo de papel.
Esta impresora permite los tamaños de papel siguientes:
•
Tarjeta A6: 4,1 x 5,8 pulgadas (105 x 148 mm)
•
Postal Hagaki: 3,9 x 5,8 pulgadas (100 x 148 mm)
•
3,5 x 5 pulgadas (8,89 x 12,7 cm)
•
4 x 6 pulgadas
•
4 x 8 pulgadas
•
10 x 15 cm
23
Page 84

•
10 x 20 cm
•
Foto L (89 x 127 mm)
Nota: No cargue más de 25 hojas en la bandeja de papel.
24
Page 85
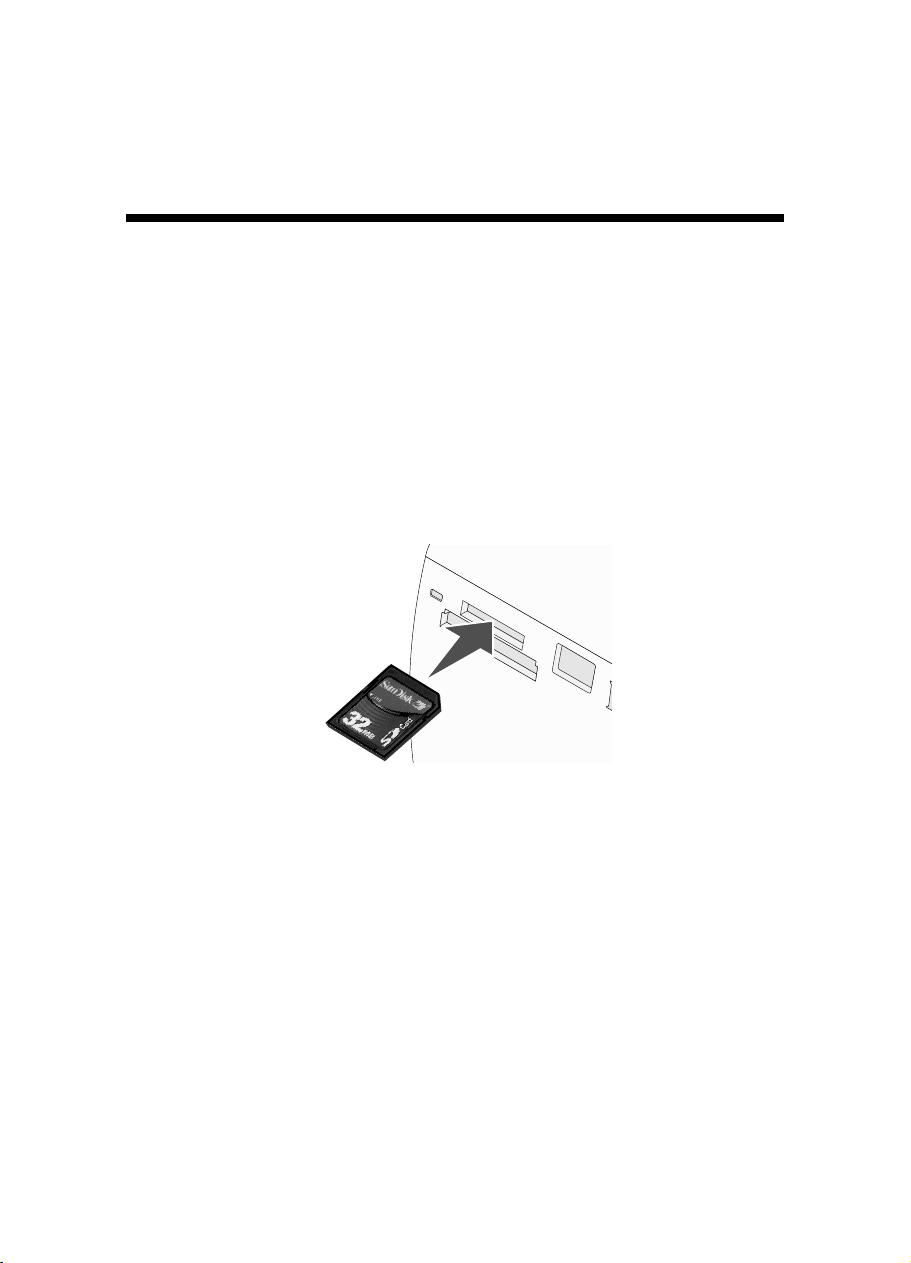
Conexión de dispositivos de almacenamiento de fotografías
Introducción de tarjetas de memoria
Se puede utilizar una tarjeta de memoria para guardar fotografías realizadas con una cámara
digital o un teléfono con cámara. La impresora permite ver, editar e imprimir fotografías
guardadas en una tarjeta de memoria. Para obtener más información, consulte “Impresión
de fotografías” en la página 31 o “Edición de fotografías” en la página 38.
Asimismo, la impresora permite transferir fotografías:
•
Desde una tarjeta de memoria a un equipo. Para obtener más información, consulte
“Transferencia de fotos de un dispositivo de memoria a un equipo” en la página 45.
•
Desde una tarjeta de memoria a una unidad flash. Para obtener más información,
consulte “Transferencia de fotografías de una tarjeta de memoria a una unidad flash” en
la página 45.
1
Introduzca una tarjeta de memoria.
•
Introduzca la tarjeta con la etiqueta en la que figura el nombre de la marca hacia
arriba.
•
Si aparece una flecha en la tarjeta, asegúrese de que apunta hacia la impresora.
25
Page 86
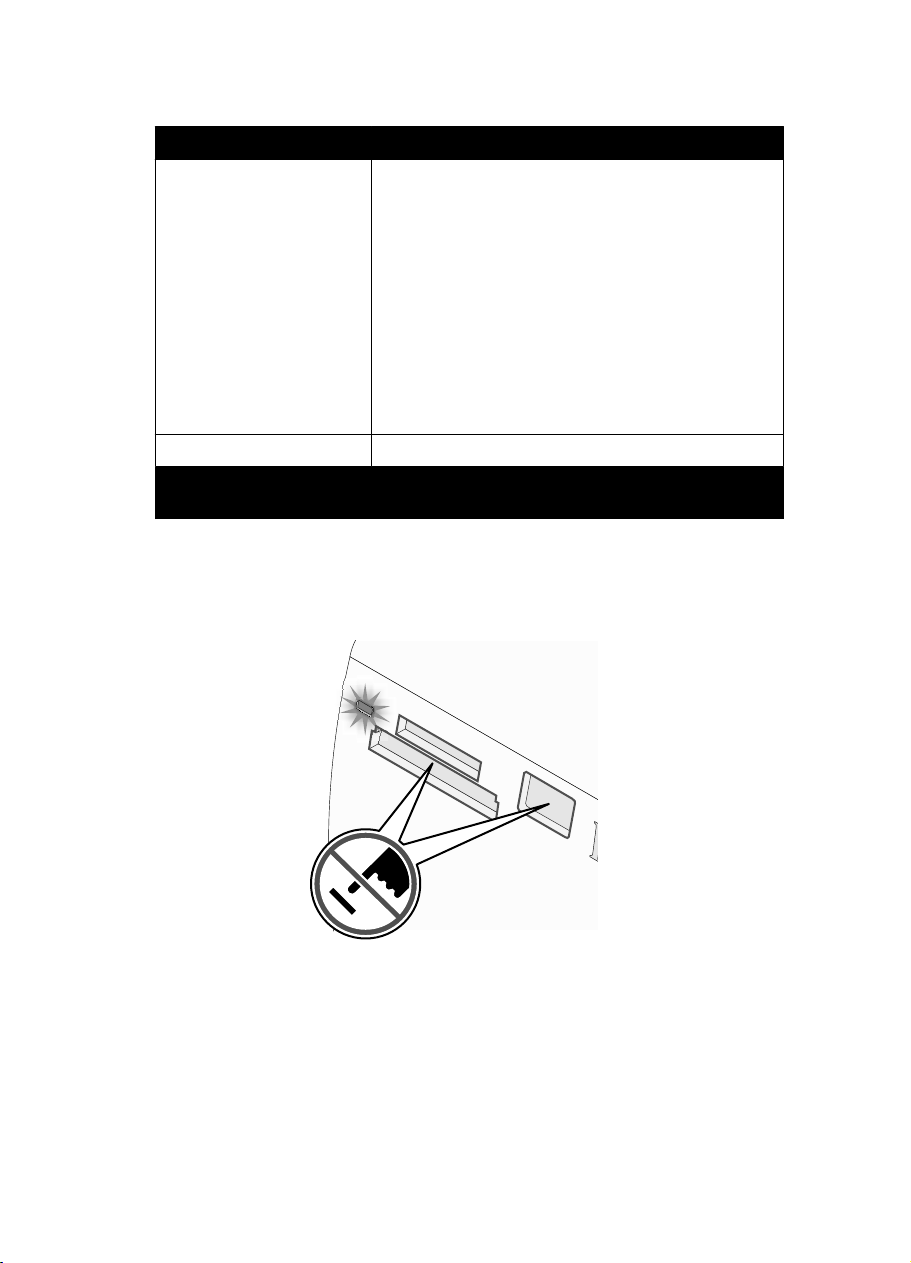
Ranura Tarjeta de memoria
Ranura superior
Ranura inferior CompactFlash I y II
* Antes de introducir la tarjeta de memoria en la ranura, asegúrese de que la conecta
al adaptador suministrado con la tarjeta.
2
Espere a que se encienda el indicador luminoso de la impresora. Éste parpadeará para
indicar que se está leyendo la tarjeta de memoria o se están transmitiendo datos.
Advertencia: No retire la tarjeta de memoria ni toque el área de la tarjeta de memoria de la
impresora mientras la luz esté parpadeando.
•
xD Picture Card
•
SD (Secure Digital)
•
miniSD (con adaptador) *
•
microSD (con adaptador) *
•
RS-MMC (con adaptador) *
•
Tarjeta MultiMedia
•
Memory Stick
•
Memory Stick PRO
•
Memory Stick Duo (con adaptador) o Memory Stick
PRO Duo (con adaptador) *
•
Transflash (con adaptador) *
Si la impresora no lee la tarjeta de memoria, extráigala y vuelva a introducirla.
Nota: La impresora no puede leer más de un dispositivo de almacenamiento a la vez. Si
introduce más de una tarjeta de memoria, se solicitará que seleccione cuál desea utilizar y
elimine la otra.
26
Page 87
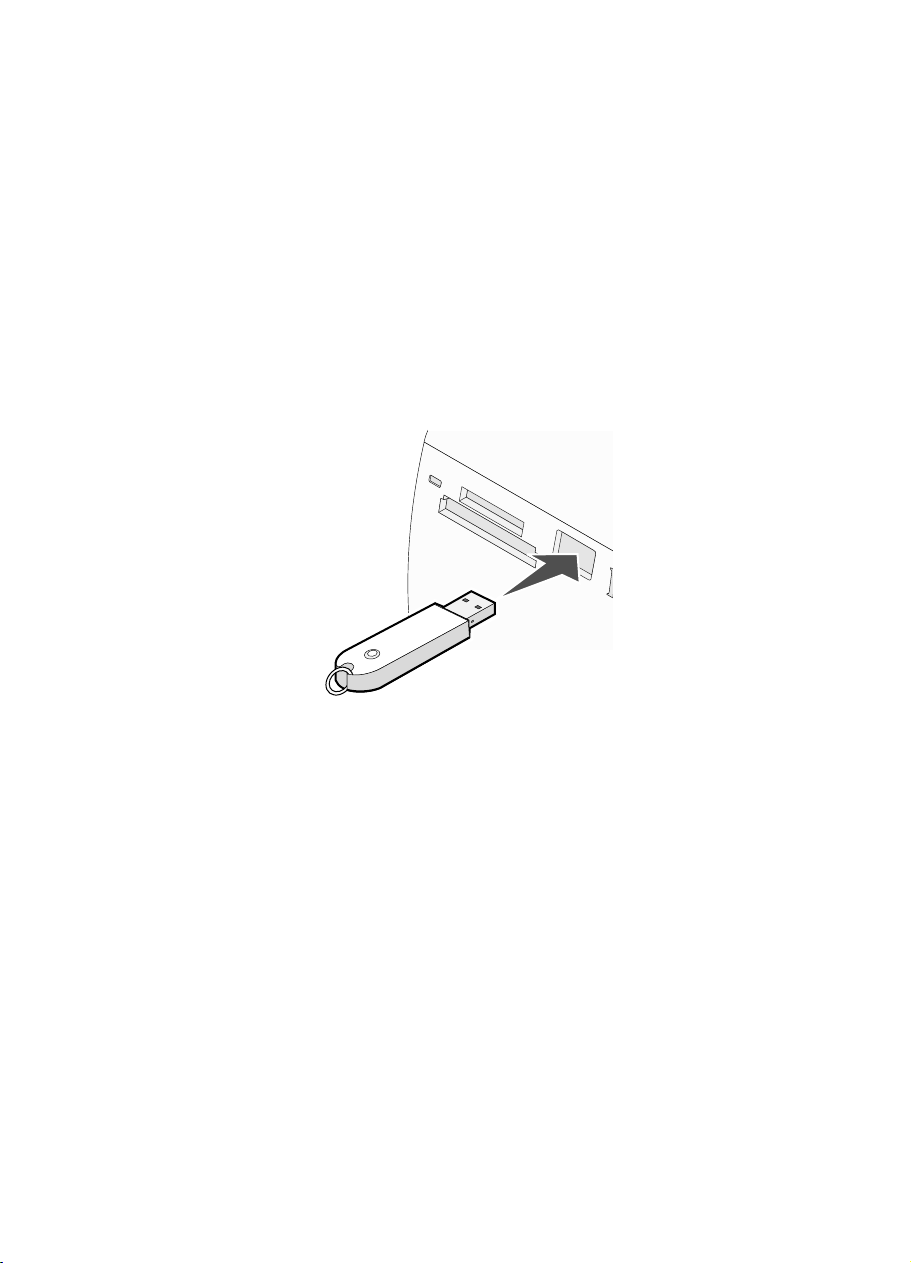
Introducción de una unidad flash
Puede utilizar una unidad flash para guardar fotografías realizadas con una cámara digital o
un teléfono con cámara. La impresora permite ver, editar e imprimir fotografías guardadas en
una unidad flash. Para obtener más información, consulte “Impresión de fotografías” en la
página 31 o “Edición de fotografías” en la página 38.
Asimismo, la impresora permite transferir fotografías:
•
Desde una unidad flash a un equipo. Para obtener más información, consulte
“Transferencia de fotos de un dispositivo de memoria a un equipo” en la página 45.
•
Desde una tarjeta de memoria a una unidad flash. Para obtener más información,
consulte “Transferencia de fotografías de una tarjeta de memoria a una unidad flash” en
la página 45.
1
Introduzca una unidad flash en el puerto PictBridge de la parte delantera de la impresora.
Notas:
•
Es posible que se necesite un adaptador si su unidad no encaja directamente en el
puerto.
•
La impresora sólo lee un dispositivo de manera simultánea. Si conecta más de un
dispositivo de almacenamiento, se le pedirá que seleccione cuál desea utilizar y
elimine el otro.
2
Espere a que la impresora lea la unidad flash.
27
Page 88
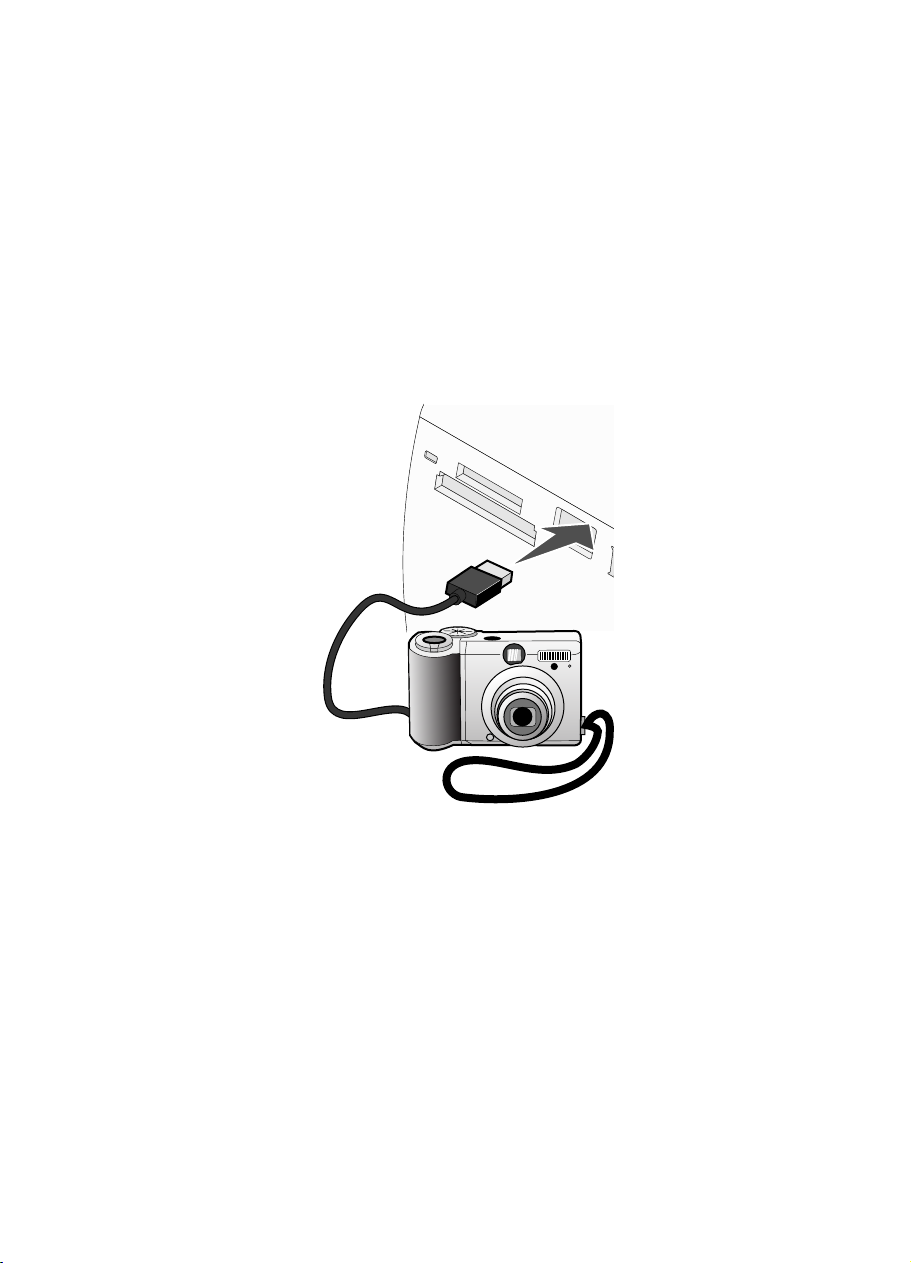
Conexión de una cámara digital compatible con PictBridge
La tecnología PictBridge, que está disponible en la mayor parte de las cámaras digitales,
permite imprimir directamente desde la cámara digital sin necesidad de utilizar un equipo.
Puede conectar una cámara digital compatible con PictBridge a la impresora y utilizar los
botones de ésta o de la cámara para controlar la impresión de fotografías.
1
Conecte un extremo del cable USB a la cámara digital.
Nota: Utilice sólo el cable USB que se suministra con la cámara.
2
Conecte el otro extremo del cable al puerto PictBridge situado en la parte delantera de
la impresora.
Notas:
•
Asegúrese de que la cámara digital compatible con PictBridge esté definida con el
modo USB correcto. Para obtener más información, consulte la documentación de la
cámara.
•
La impresora sólo lee un dispositivo de manera simultánea.
28
Page 89

3
Si la conexión PictBridge se ha realizado con éxito, el siguiente mensaje aparece en la
pantalla: Cámara conectada. Consulte la pantalla de la cámara o el
manual del usuario para obtener más información. Si desea utilizar la
cámara para controlar la impresión de fotografías, consulte las instrucciones que
encontrará en la documentación de la cámara.
4
Si no se especificó ninguna selección en la cámara digital con anterioridad, puede utilizar
la impresora para controlar la impresión de fotografías. Pulse
aparezca el menú PictBridge en la pantalla del panel de control. Para obtener más
información, consulte “Uso del menú PictBridge” en la página 21.
para hacer que
29
Page 90

Visualización de fotografías
Visualización de una presentación de diapositivas de las fotografías en la pantalla del panel de control
Si desea ver una presentación de diapositivas de las fotografías que se encuentran en una
tarjeta de memoria o unidad flash, consulte “Uso del menú Presentación de diapositivas” en
la página 17.
30
Page 91

Impresión de fotografías
Puede utilizar los tipos de papel siguientes para la impresora:
•
Papel fotográfico Perfectfinish de Lexmark
•
Papel fotográfico de Lexmark
•
Papel brillante o fotográfico
Notas:
•
Para obtener mejores resultados, utilice el Papel fotográfico Perfectfinish de Lexmark o
Papel fotográfico de Lexmark.
•
No utilice Papel fotográfico de primera calidad de Lexmark. El cartucho de impresión de
este dispositivo no es compatible con este tipo de papel.
Impresión de fotografías mediante el panel de control
Impresión de las fotografías seleccionadas
Siga las instrucciones siguientes para ver y seleccionar las fotografías que desee editar o
imprimir.
1
Cargue el papel fotográfico con la cara brillante o imprimible hacia arriba. (Si no está
seguro de cuál es la cara imprimible, consulte las instrucciones que se incluyen con el
papel). Para obtener más información, consulte “Carga del papel” en la página 23.
2
Introduzca una tarjeta de memoria o una unidad flash. Para obtener más información,
consulte “Introducción de tarjetas de memoria” en la página 25 o “Introducción de una
unidad flash” en la página 27.
3
Pulse o varias veces hasta que aparezca Ver y seleccionar en la pantalla.
4
Pulse .
5
Pulse para continuar.
6
Pulse o para desplazarse por las fotografías.
7
Pulse para seleccionar las fotografías que desee imprimir.
8
Si desea editar las fotografías:
a
Pulse . Para obtener más información, consulte “Uso del menú Modo de edición
de foto” en la página 20.
b
Realice los cambios.
c
Pulse para guardar los cambios y volver a la pantalla de selección de fotografías.
31
Page 92
9
Pulse o para seleccionar el número de copias que se van a imprimir.
Nota: Si se pulsa
selección de la imagen. Si se pulsa
seleccionará la imagen.
10
Puede seleccionar más fotografías para imprimir y editar repitiendo los pasos que van
del paso 6 al paso 9.
11
Pulse para volver a la pantalla Presentación preliminar.
12
Si desea configurar los valores de impresión:
a
Pulse .
b
Realice las selecciones que desee.
c
Pulse para guardar las selecciones y vuelva a la pantalla Presentación preliminar.
13
Pulse para imprimir.
Nota: Para evitar manchas o arañazos, evite tocar la superficie impresa con los dedos o
con objetos afilados. Para obtener resultados óptimos, retire las hojas impresas de una
en una de la bandeja de salida y deje que se sequen durante al menos 24 horas antes
de apilarlas, mostrarlas o almacenarlas.
cuando el número de copias está definido en 1, se cancelará la
cuando la imagen no está seleccionada, se
Impresión de todas las fotografías
Siga las instrucciones que se indican a continuación para imprimir todas las fotografías
guardadas en una tarjeta de memoria o unidad flash.
1
Cargue el papel fotográfico con la cara brillante o imprimible hacia arriba. (Si no está
seguro de cuál es la cara imprimible, consulte las instrucciones que se incluyen con el
papel). Para obtener más información, consulte “Carga del papel” en la página 23.
2
Introduzca una tarjeta de memoria o una unidad flash. Para obtener más información,
consulte “Introducción de tarjetas de memoria” en la página 25 o “Introducción de una
unidad flash” en la página 27.
3
Pulse o varias veces hasta que aparezca Imprimir fotografías en la pantalla.
4
Pulse .
5
Pulse o varias veces hasta que se seleccione Imprimir las N fotos. (N es
el número total de imágenes que se van a imprimir.)
6
Pulse .
7
Pulse o para seleccionar el tamaño de fotografía, tamaño de papel y el número
de copias para imprimir por fotografía.
8
Pulse .
32
Page 93
9
Si desea configurar los valores de impresión:
a
Pulse .
b
Realice las selecciones que desee.
c
Pulse para guardar las selecciones y vuelva a la pantalla Presentación preliminar.
10
Pulse para imprimir.
Nota: Para evitar manchas o arañazos, evite tocar la superficie impresa con los dedos o
con objetos afilados. Para obtener resultados óptimos, retire las hojas impresas de una
en una de la bandeja de salida y deje que se sequen durante al menos 24 horas antes
de apilarlas, mostrarlas o almacenarlas.
Impresión de fotografías por fecha
Siga las instrucciones siguientes para imprimir fotografías realizadas en unas fechas en
concreto.
1
Cargue el papel fotográfico con la cara brillante o imprimible hacia arriba. (Si no está
seguro de cuál es la cara imprimible, consulte las instrucciones que se incluyen con el
papel). Para obtener más información, consulte “Carga del papel” en la página 23.
2
Introduzca una tarjeta de memoria o una unidad flash. Para obtener más información,
consulte “Introducción de tarjetas de memoria” en la página 25 o “Introducción de una
unidad flash” en la página 27.
3
Pulse o varias veces hasta que aparezca Imprimir fotografías en la pantalla.
4
Pulse .
5
Pulse o varias veces hasta que se seleccione Imprimir fotos por fecha.
6
Pulse .
7
Pulse o para seleccionar una fecha de inicio anterior o posterior.
8
Pulse o para seleccionar una fecha de finalización anterior o posterior.
9
Pulse para guardar el intervalo seleccionado.
10
Pulse o para seleccionar el tamaño de fotografía, el tamaño de papel y el número
de copias que se van a imprimir por fotografía.
11
Pulse .
33
Page 94

12
Si desea configurar los valores de impresión:
a
Pulse .
b
Realice las selecciones que desee.
c
Pulse para guardar las selecciones y vuelva a la pantalla Presentación preliminar.
13
Pulse para imprimir.
Nota: Para evitar manchas o arañazos, evite tocar la superficie impresa con los dedos o
con objetos afilados. Para obtener resultados óptimos, retire las hojas impresas de una
en una de la bandeja de salida y deje que se sequen durante al menos 24 horas antes
de apilarlas, mostrarlas o almacenarlas.
Impresión de fotografías por intervalo
Siga las instrucciones siguientes para seleccionar la primera y última fotografía de un intervalo
que desee imprimir.
1
Cargue el papel fotográfico con la cara brillante o imprimible hacia arriba. (Si no está
seguro de cuál es la cara imprimible, consulte las instrucciones que se incluyen con el
papel). Para obtener más información, consulte “Carga del papel” en la página 23.
2
Introduzca una tarjeta de memoria o una unidad flash. Para obtener más información,
consulte “Introducción de tarjetas de memoria” en la página 25 o “Introducción de una
unidad flash” en la página 27.
3
Pulse o varias veces hasta que aparezca Imprimir fotografías en la pantalla.
4
Pulse .
5
Pulse o varias veces hasta que se seleccione Imprimir intervalo de
fotografías.
6
Pulse .
7
Pulse para continuar.
8
Pulse o para desplazarse hasta la primera fotografía del intervalo que desee
imprimir.
9
Pulse .
10
Pulse o para desplazarse hasta la última fotografía del intervalo que desee
imprimir.
11
Pulse .
12
Pulse o para seleccionar el tamaño de fotografía, el tamaño de papel y el número
de copias que se van a imprimir por fotografía.
34
Page 95

13
Pulse .
14
Si desea configurar los valores de impresión:
a
Pulse .
b
Realice las selecciones que desee.
c
Pulse para guardar las selecciones y, a continuación, vuelva a la pantalla
Presentación preliminar.
15
Pulse para imprimir.
Nota: Para evitar manchas o arañazos, evite tocar la superficie impresa con los dedos o
con objetos afilados. Para obtener resultados óptimos, retire las hojas impresas de una
en una de la bandeja de salida y deje que se sequen durante al menos 24 horas antes
de apilarlas, mostrarlas o almacenarlas.
Impresión de una página de índice de fotografías
Siga las instrucciones que se indican a continuación para imprimir imágenes en miniatura de
todas las fotografías guardadas en una tarjeta de memoria o unidad flash.
1
Cargue el papel fotográfico con la cara brillante o imprimible hacia arriba. (Si no está
seguro de cuál es la cara imprimible, consulte las instrucciones que se incluyen con el
papel). Para obtener más información, consulte “Carga del papel” en la página 23.
2
Introduzca una tarjeta de memoria o una unidad flash. Para obtener más información,
consulte “Introducción de tarjetas de memoria” en la página 25 o “Introducción de una
unidad flash” en la página 27.
3
Pulse o varias veces hasta que aparezca Imprimir fotografías en la pantalla.
4
Pulse .
5
Pulse o varias veces hasta que se seleccione Imprimir las N fotos. (N es
el número total de imágenes que se van a imprimir.)
6
Pulse .
7
Pulse o varias veces hasta que aparezca seleccionado Impresión de
índice.
8
Pulse .
Aparece en la pantalla una página de índice de imágenes.
9
Pulse para imprimir.
Nota: Para evitar manchas o arañazos, evite tocar la superficie impresa con los dedos o
con objetos afilados. Para obtener resultados óptimos, retire las hojas impresas de una
en una de la bandeja de salida y deje que se sequen durante al menos 24 horas antes
de apilarlas, mostrarlas o almacenarlas.
35
Page 96

Impresión de fotografías desde una cámara digital mediante DPOF
Formato de orden de impresión digital (Digital Print Order Format o DPOF) es una función
disponible en algunas cámaras digitales. Si su cámara admite el formato DPOF, podrá
especificar las fotografías que va a imprimir y la cantidad de copias de cada una mientras la
tarjeta de memoria se encuentra todavía en la cámara. La impresora reconocerá estos valores
cuando introduzca la tarjeta de memoria en ésta.
Nota: Si ha especificado un tamaño de fotografía mientras la tarjeta de memoria se
encontraba todavía en la cámara, asegúrese de que el tamaño de papel cargado en la
impresora no sea más pequeño que el tamaño especificado en la selección DPOF.
1
Cargue el papel fotográfico con la cara brillante o imprimible mirando hacia arriba. (Si no
está seguro de cuál es la cara imprimible, consulte las instrucciones que se incluyen con
el papel). Para obtener más información, consulte “Carga del papel” en la página 23.
2
Introduzca una tarjeta de memoria. Para obtener más información, consulte “Introducción
de tarjetas de memoria” en la página 25.
3
Pulse o varias veces hasta que aparezca Imprimir fotografías en la pantalla.
4
Pulse .
5
Pulse o varias veces hasta que aparezca seleccionado Imprimir
selecciones de cámara. Esta opción sólo se muestra si hay un archivo DPOF válido
en la tarjeta de memoria.
6
Pulse .
7
Pulse para imprimir.
Nota: Para evitar manchas o arañazos, evite tocar la superficie impresa con los dedos o
con objetos afilados. Para obtener resultados óptimos, retire las hojas impresas de una
en una de la bandeja de salida y deje que se sequen durante al menos 24 horas antes
de apilarlas, mostrarlas o almacenarlas.
Impresión de fotografías desde una cámara digital mediante el menú PictBridge
La tecnología PictBridge, que está disponible en la mayor parte de las cámaras digitales,
permite imprimir directamente desde la cámara digital sin necesidad de utilizar un equipo.
Puede conectar a la impresora una cámara digital compatible con PictBridge y utilizar el menú
PictBridge de la impresora para imprimir fotografías.
1
Cargue el papel fotográfico con la cara brillante o imprimible mirando hacia arriba. (Si no
está seguro de cuál es la cara imprimible, consulte las instrucciones que se incluyen con
el papel). Para obtener más información, consulte “Carga del papel” en la página 23.
2
Conecte una cámara digital compatible con PictBridge. Para obtener más información,
consulte “Conexión de una cámara digital compatible con PictBridge” en la página 28.
36
Page 97

3
Si no se especificó ninguna selección en la cámara digital con anterioridad, pulse
para acceder al menú PictBridge de la impresora. Para obtener más información, consulte
“Uso del menú PictBridge” en la página 21.
4
Una vez realizada la selección, pulse para imprimir.
Nota: Para evitar manchas o arañazos, evite tocar la superficie impresa con los dedos o
con objetos afilados. Para obtener resultados óptimos, retire las hojas impresas de una
en una de la bandeja de salida y deje que se sequen durante al menos 24 horas antes
de apilarlas, mostrarlas o almacenarlas.
37
Page 98

Edición de fotografías
Puede utilizar los tipos de papel siguientes para la impresora:
•
Papel fotográfico Perfectfinish de Lexmark
•
Papel fotográfico de Lexmark
•
Papel brillante o fotográfico
Notas:
•
Para obtener mejores resultados, utilice el Papel fotográfico Perfectfinish de Lexmark o
Papel fotográfico de Lexmark.
•
No utilice Papel fotográfico de primera calidad de Lexmark. El cartucho de impresión de
este dispositivo no es compatible con este tipo de papel.
Recorte de fotografías
1
Cargue el papel fotográfico con la cara brillante o imprimible hacia arriba. (Si no está
seguro de cuál es la cara imprimible, consulte las instrucciones que se incluyen con el
papel). Para obtener más información, consulte “Carga del papel” en la página 23.
2
Introduzca una tarjeta de memoria o una unidad flash. Para obtener más información,
consulte “Introducción de tarjetas de memoria” en la página 25 o “Introducción de una
unidad flash” en la página 27.
3
Pulse o varias veces hasta que aparezca Ver y seleccionar en la pantalla.
4
Pulse .
5
Pulse para continuar.
6
Pulse o para desplazarse por las fotografías.
7
Pulse para seleccionar las fotografías que desee imprimir.
8
Pulse .
Se muestra el menú Modo de edición de foto.
9
Pulse o varias veces hasta que aparezca Recortar en el fondo de la pantalla y
se resalte el icono Recortar.
10
Pulse .
11
Utilice las herramientas de recorte que se muestran en la pantalla. Pulse o para
seleccionar la herramienta y
12
Pulse para guardar los cambios y volver al menú Modo de edición de foto.
o para utilizar la herramienta seleccionada.
38
Page 99
13
Pulse para volver a la pantalla de selección de fotografías.
14
Pulse o para seleccionar el número de copias que se van a imprimir.
Nota: Si se pulsa
selección de la imagen. Si se pulsa
seleccionará la imagen.
15
Puede seleccionar más fotografías para imprimir y editar repitiendo los pasos que van
del paso 6 al paso 14.
16
Pulse para volver a la pantalla Presentación preliminar.
17
Si desea configurar los valores de impresión:
a
Pulse .
b
Realice las selecciones que desee.
c
Pulse para guardar las selecciones y, a continuación, vuelva a la pantalla
Presentación preliminar.
18
Pulse para imprimir.
Nota: Para evitar manchas o arañazos, evite tocar la superficie impresa con los dedos o
con objetos afilados. Para obtener resultados óptimos, retire las hojas impresas de una
en una de la bandeja de salida y deje que se sequen durante al menos 24 horas antes
de apilarlas, mostrarlas o almacenarlas.
cuando el número de copias está definido en 1, se cancelará la
cuando la imagen no está seleccionada, se
Ajuste del brillo de las fotografías
1
Cargue el papel fotográfico con la cara brillante o imprimible hacia arriba. (Si no está
seguro de cuál es la cara imprimible, consulte las instrucciones que se incluyen con el
papel). Para obtener más información, consulte “Carga del papel” en la página 23.
2
Introduzca una tarjeta de memoria o una unidad flash. Para obtener más información,
consulte “Introducción de tarjetas de memoria” en la página 25 o “Introducción de una
unidad flash” en la página 27.
3
Pulse o varias veces hasta que aparezca Ver y seleccionar en la pantalla.
4
Pulse .
5
Pulse para continuar.
6
Pulse o para desplazarse por las fotografías.
7
Pulse para seleccionar las fotografías que desee imprimir.
8
Pulse .
Se muestra el menú Modo de edición de foto.
39
Page 100
9
Pulse o varias veces hasta que aparezca Brillo en la pantalla.
10
Pulse o para ajustar el brillo de la fotografía.
Nota: La imagen de la pantalla no refleja la imagen con precisión cuando se imprime.
11
Pulse para guardar los cambios y volver a la pantalla de selección de fotografías.
12
Pulse o para seleccionar el número de copias que se van a imprimir.
Nota: Si se pulsa
selección de la imagen. Si se pulsa
seleccionará la imagen.
13
Puede seleccionar más fotografías para imprimir y editar repitiendo los pasos que van
del paso 6 al paso 12.
14
Pulse para volver a la pantalla Presentación Preliminar.
15
Si desea configurar los valores de impresión:
a
Pulse .
b
Realice las selecciones que desee.
c
Pulse para guardar las selecciones y, a continuación, vuelva a la pantalla
Presentación preliminar.
16
Pulse para imprimir.
Nota: Para evitar manchas o arañazos, evite tocar la superficie impresa con los dedos o
con objetos afilados. Para obtener resultados óptimos, retire las hojas impresas de una
en una de la bandeja de salida y deje que se sequen durante al menos 24 horas antes
de apilarlas, mostrarlas o almacenarlas.
cuando el número de copias está definido en 1, se cancelará la
cuando la imagen no está seleccionada, se
Mejora automática de fotografías
1
Cargue el papel fotográfico con la cara brillante o imprimible hacia arriba. (Si no está
seguro de cuál es la cara imprimible, consulte las instrucciones que se incluyen con el
papel). Para obtener más información, consulte “Carga del papel” en la página 23.
2
Introduzca una tarjeta de memoria o una unidad flash. Para obtener más información,
consulte “Introducción de tarjetas de memoria” en la página 25 o “Introducción de una
unidad flash” en la página 27.
3
Pulse o varias veces hasta que aparezca Ver y seleccionar en la pantalla.
4
Pulse .
5
Pulse para continuar.
6
Pulse o para desplazarse por las fotografías.
40
 Loading...