

Page 1
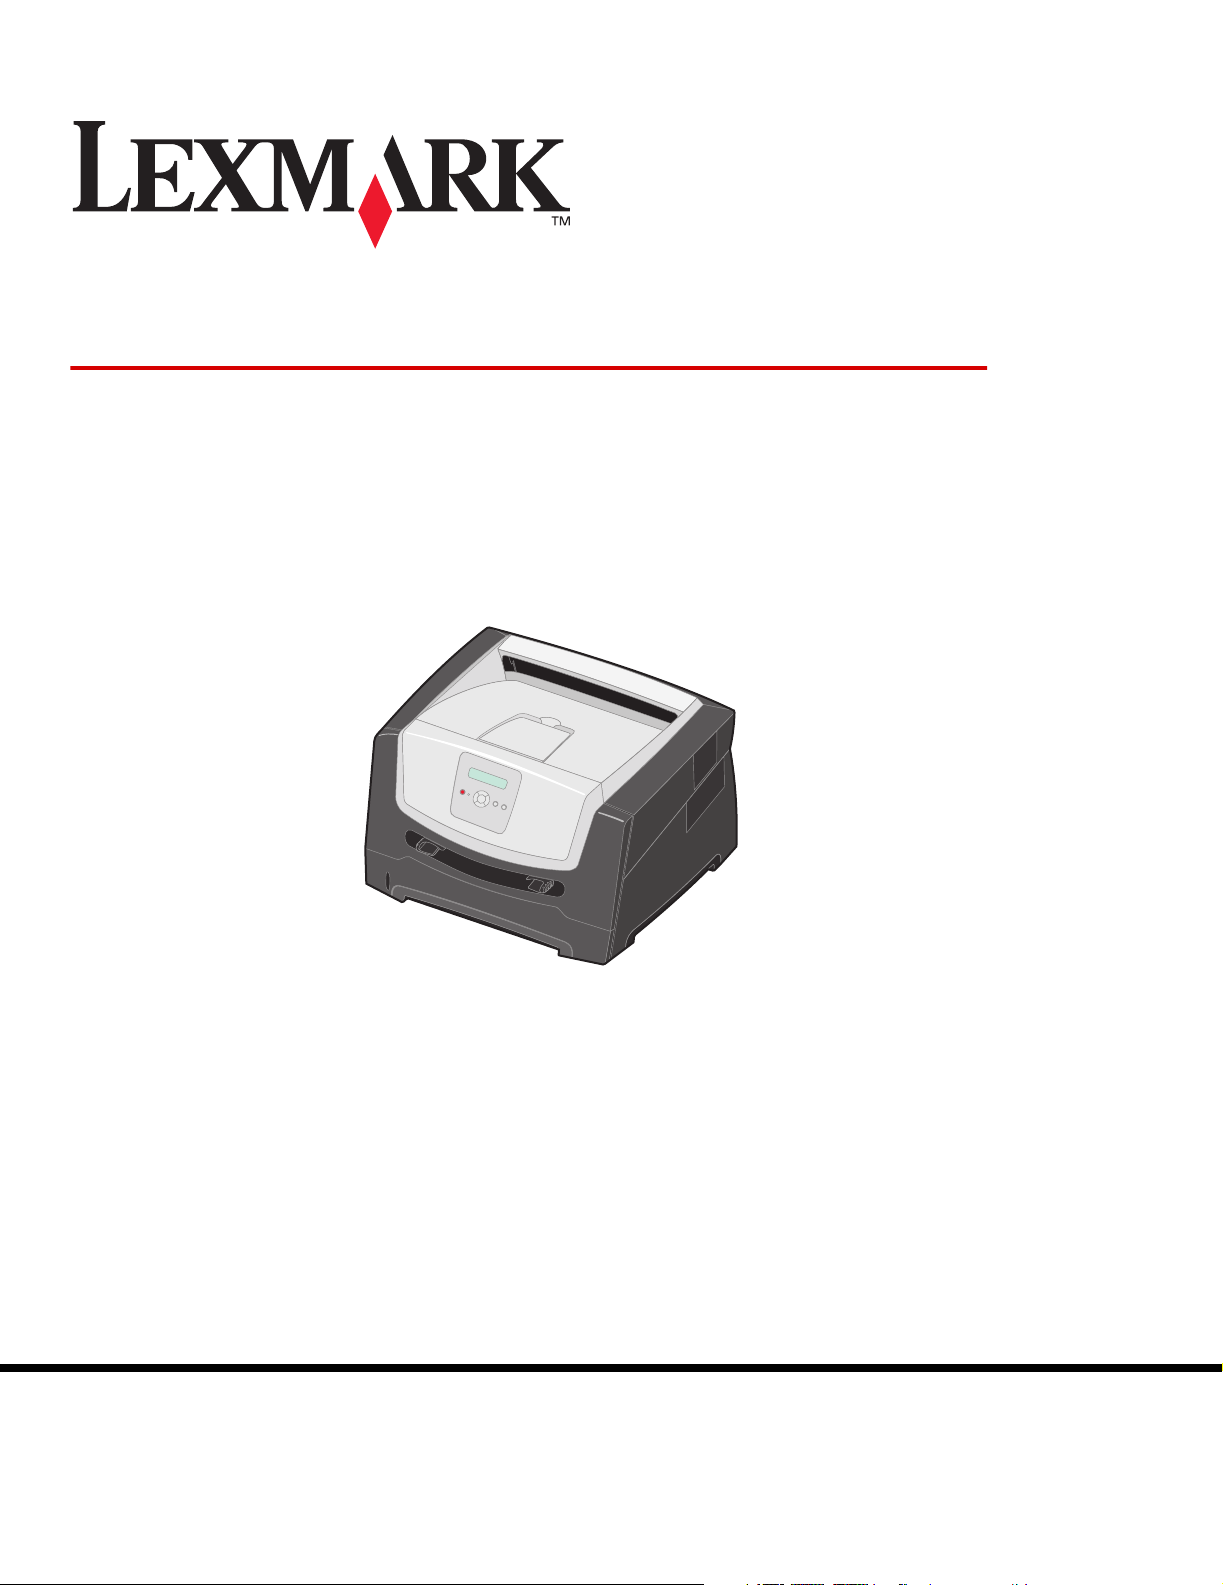
E352dn
Menus and Messages
June 2006
Lexmark and Lexmark with diamond design are trademarks of Lexmark International, Inc.,
registered in the United States and/or other countries.
© 2006 Lexmark International, Inc.
All rights reserved.
740 West New Circle Road
Lexington, Kentucky 40550
www.lexmark.com
Page 2

Edition: June 2006
The following paragraph does not apply to any country where such provisions are inconsistent with local law: LEXMARK
INTERNATIONAL, INC., PROVIDES THIS PUBLICATION “AS IS” WITHOUT WARRANTY OF ANY KIND, EITHER EXPRESS OR
IMPLIED, INCLUDING, BUT NOT LIMITED TO, THE IMPLIED WARRANTIES OF MERCHANTABILITY OR FITNESS FOR A
PARTICULAR PURPOSE. Some states do not allow disclaimer of express or implied warranties in certain transactions; therefore, this
statement may not apply to you.
This publication could include technical inaccuracies or typographical errors. Changes are periodically made to the information herein;
these changes will be incorporated in later editions. Improvements or changes in the products or the programs described may be made
at any time.
Comments about this publication may be addressed to Lexmark International, Inc., Department F95/032-2, 740 West New Circle Road,
Lexington, Kentucky 40550, U.S.A. In the United Kingdom and Eire, send to Lexmark International Ltd., Marketing and Services
Department, Westhorpe House, Westhorpe, Marlow Bucks SL7 3RQ. Lexmark may use or distribute any of the information you supply in
any way it believes appropriate without incurring any obligation to you. To obtain additional copies of publications related to this product,
visit the Lexmark Web site at www.lexmark.com.
References in this publication to products, programs, or services do not imply that the manufacturer intends to make these available in all
countries in which it operates. Any reference to a product, program, or service is not intended to state or imply that only that product,
program, or service may be used. Any functionally equivalent product, program, or service that does not infringe any existing intellectual
property right may be used instead. Evaluation and verification of operation in conjunction with other products, programs, or services,
except those expressly designated by the manufacturer, are the user’s responsibility.
© 2006 Lexmark International, Inc.
All rights reserved.
UNITED STATES GOVERNMENT RIGHTS
This software and any accompanying documentation provided under this agreement are commercial computer software and
documentation developed exclusively at private expense.
2
Page 3

Contents
Contents
Chapter 1: Using printer menus ........................................................................................ 4
Understanding the control panel ......................................................................................................................5
Menu Groups ...................................................................................................................................................7
Paper Menu .............................................................................................................................................. 7
Finishing Menu ....................................................................................................................................... 12
Utilities Menu ..........................................................................................................................................14
Job Menu ................................................................................................................................................ 16
Quality Menu .......................................................................................................................................... 16
Setup Menu ............................................................................................................................................ 16
PCL Emul Menu ..................................................................................................................................... 19
PostScript Menu ..................................................................................................................................... 21
PPDS Menu ............................................................................................................................................22
Parallel Menu ..........................................................................................................................................24
Network Menu ........................................................................................................................................ 26
USB Menu .............................................................................................................................................. 27
Chapter 2: Understanding printer messages ................................................................. 29
Index .................................................................................................................................... 34
3
Page 4
Using printer menus
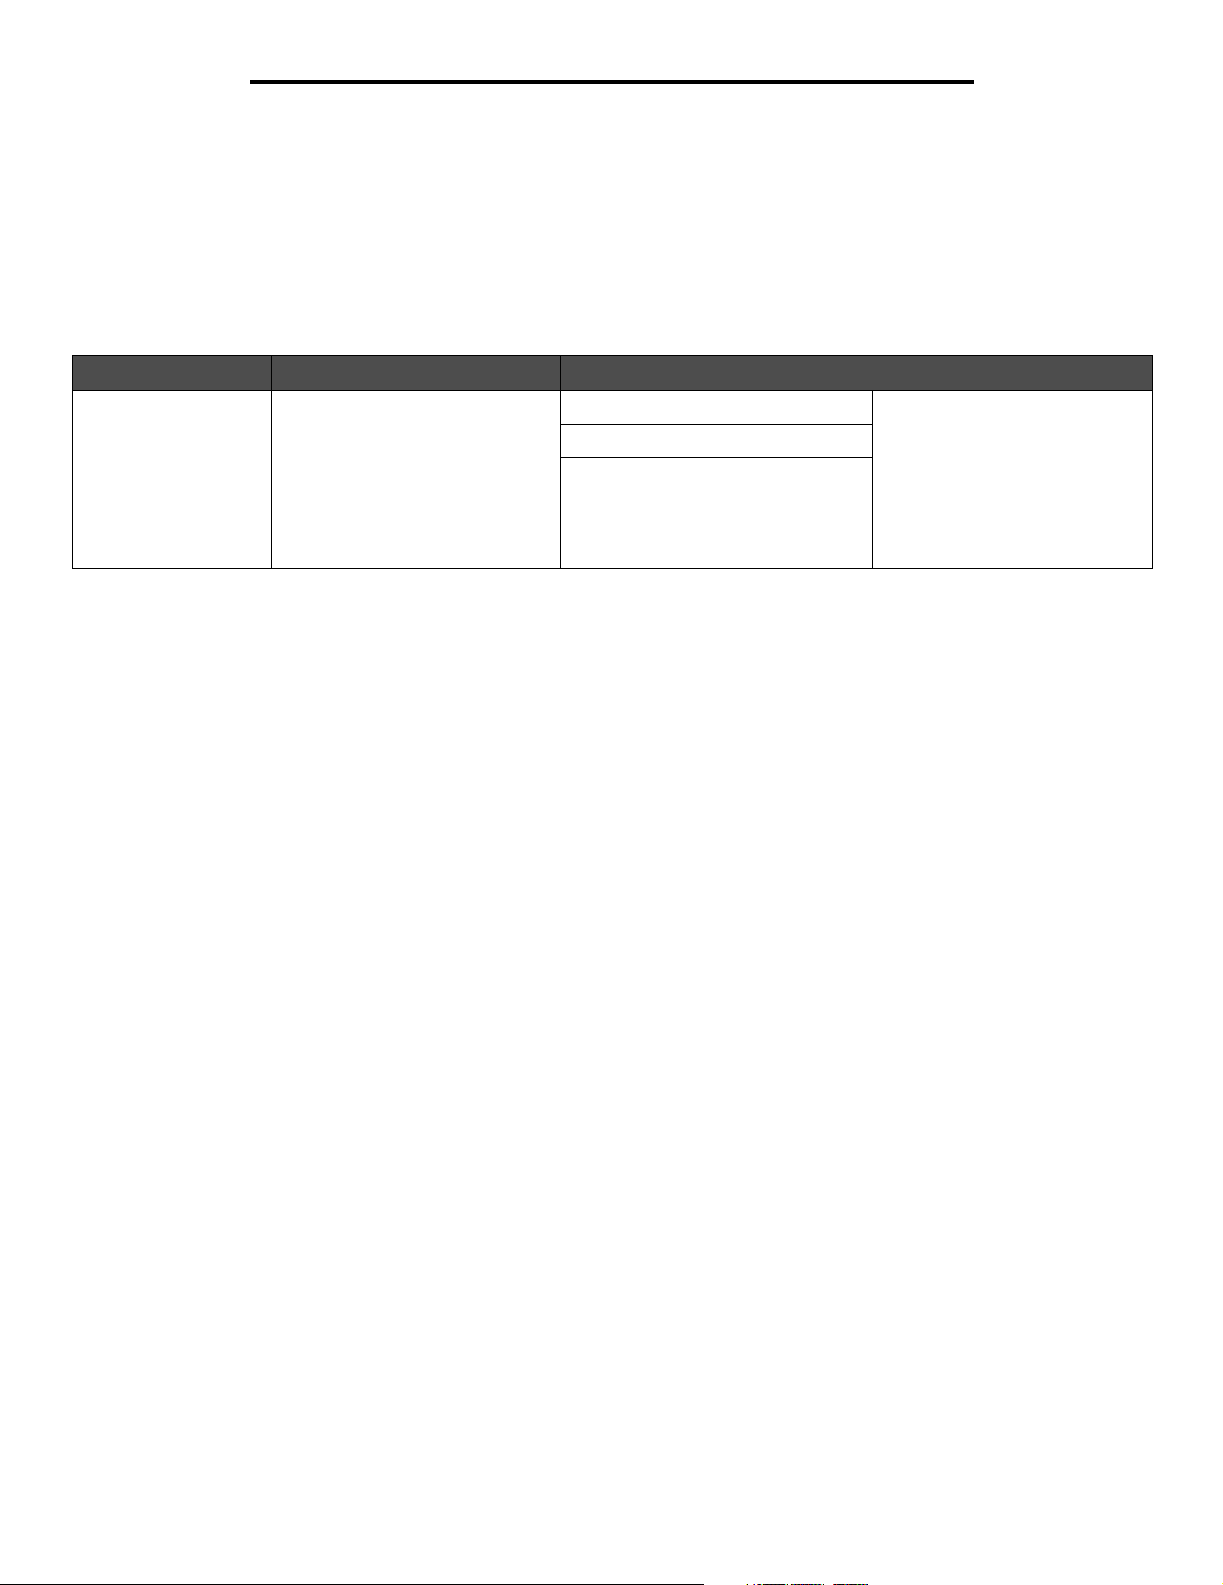
A number of menus are available to make it easy for you to change printer settings. The diagram shows the menu index on the control
panel, the menus, and items available under each menu. The items in each menu and the values you can select are described in more
detail later in this chapter.
Some menu items or values are displayed only if a specific option is installed on the printer. Other menu items may only be effective for a
particular printer language. You can select these values at any time, but they only affect printer function when you have the optional
equipment or the specified printer language.
Select a menu or menu item for more details.
Paper Menu
Paper Source
Paper Size
Paper Type
Custom Types
Universal Setup
Substitute Size
Paper Texture
Paper Weight
Paper Loading
PostScript Menu
Print PS Error
Font Priority
Finishing Menu
Duplex
Duplex Bind
Copies
Blank Pages
Collation
Separator Sheets
Separator Source
Multipage Print
Multipage Order
Multipage View
Multipage Border
PCL Emul Menu
Font Source
Font Name
Point Size
Pitch
Symbol Set
Orientation
Lines per Page
A4 Width
Tray Renumber
Auto CR after LF
Auto LF after CR
Utilities Menu
Print Menus
Print Stats
Print Net Setup
Print Fonts
Print Directory
Factory Defaults
Format Flash
Defragment Flash
Hex Trace
Setup Menu
Eco-Mode
Quiet Mode
Printer Language
Power Saver
Resource Save
Print Timeout
Wait Timeout
Auto Continue
Jam Recovery
Page Protect
Display Language
Toner Alarm
Job Menu
Reset Printer
Quality Menu
Print Resolution
Toner Darkness
Small Font Enh.
PPDS Menu
Orientation
Lines per Page
Lines per Inch
Page For mat
Character Set
Best Fit
Tray 1 Renumber
Auto CR after LF
Auto LF after CR
Parallel Menu
Std Parallel
Network Menu
Standard Network
4
USB Menu
Standard USB
Page 5
Using printer menus
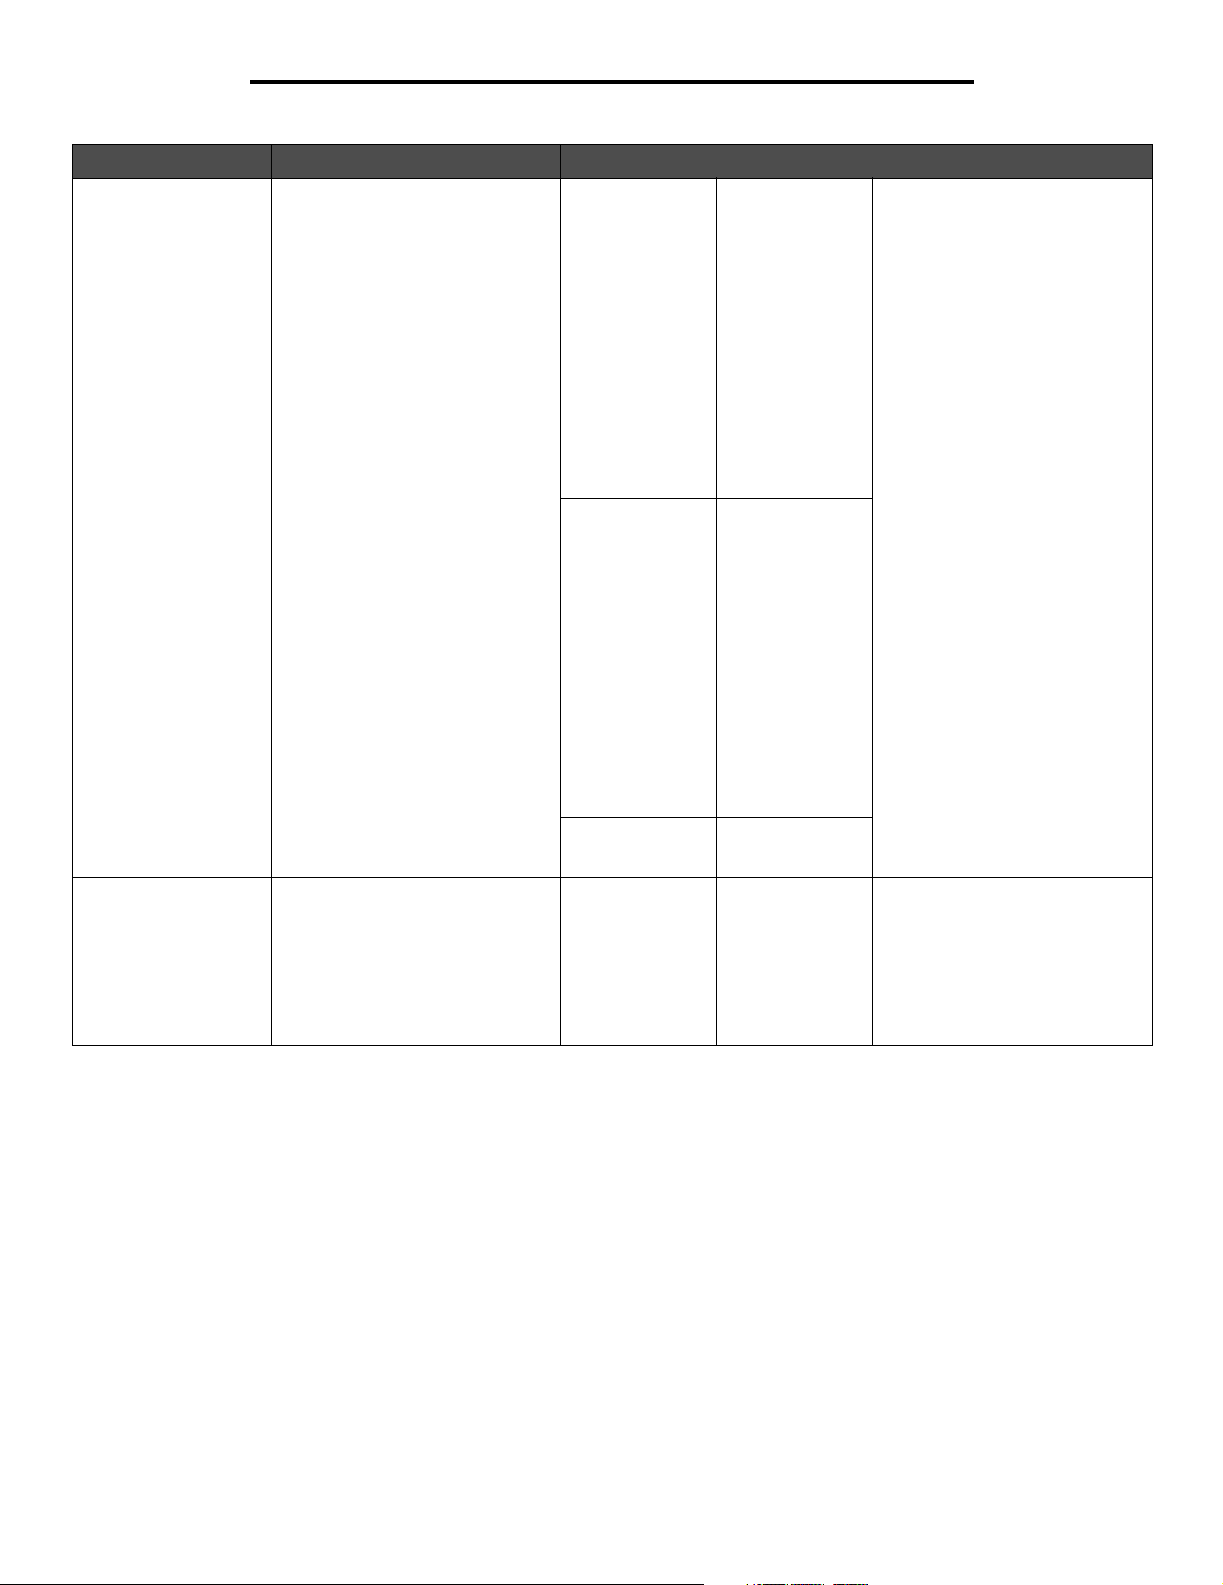
Understanding the control panel
The control panel consists of these items:
• A 2-line liquid crystal display (LCD) that can show text
• Six buttons: Stop , Navigation (with Left Menu ,Select , and Right Menu ), Back , and Go
• An indicator light
1
2
6
3
4
The use of the buttons and the layout of the display are described in the following table.
Button or control panel
item
1 Display The display shows messages describing the current state of the printer and indicating
2 Indicator light A green LED is used on the display, indicating the printer status.
Function
possible printer problems you must resolve.
Status Indicates
Off Power is off.
On Printer is on, but idle.
Flashing green Printer is on, and busy.
5
3 Stop Press and release the Stop button to stop the mechanical operation of the printer.
The Not Ready message will appear. Operation will resume when the Go button is
pressed.
5
Page 6
Using printer menus
Button or control panel
item
4 Navigation buttons The Left Menu and Right Menu buttons are used to enter a menu group.
5 Back Press and release the Back button to return to the previous menu group. If at the top of
Function
Once a menu group is active, press and release to go to the next selection,
or press and release to go to the previous selection.
You can also use these buttons to automatically increase ( ) or decrease ( )
the desired number of copies.
The printer must be in the Ready state to access the menu index. A message indicating the
menus are unavailable will appear if the printer is not ready.
Press and release the Select button to initiate action on a selection. Press
Select when the cursor appears next to the selection you want such as following
a link, submitting a configuration item, or when you want to start or cancel a job.
the menu group, the button functions as a Go button.
6 Go Press and release the Go button to place the printer in the Ready state when the
printer is offline.
6
Page 7
Using printer menus
Menu Groups
Note: An asterisk (*) next to a value indicates the default setting.
Paper Menu
Use the Paper Menu to define the default paper source, paper size, and paper type.
Menu selection Purpose Val ues
Paper Source Identifies the default paper source Tray <x> If you loaded the same size and
Manual Paper
Manual Env
type of paper in two paper
sources (and the Paper Size and
Paper Type menu items are
correctly set), the trays are
automatically linked. When one
paper source is empty, paper
automatically feeds from the next
linked source.
7
Page 8

Using printer menus
Menu selection Purpose Val ues
Paper Size Identifies the default paper size for
this paper source
Tray <x> Size A4* (non-US)
A5
A6
JIS B5
Letter* (US)
Legal
Executive
JIS B4
A3
11x17
Folio
Statement
Manual Pap Size A4* (non-US)
A5
A6
JIS B5
Letter* (US)
Legal
Executive
JIS B4
A3
11x17
Folio
Statement
Universal
If you loaded the same size and
type of paper in two paper
sources (and the Paper Size and
Paper Type menu items are
correctly set), the trays are
automatically linked. When one
paper source is empty, paper
automatically feeds from the next
linked source.
Manual Env Size 7 3/4 Envelope
10 Envelope*
(US)
DL Envelope*
(non-US)
C5 Envelope
Other Envelope
8
Page 9
Using printer menus
Menu selection Purpose Val ues
Paper Type Identifies the type of paper
installed in this paper source
Note: If a user-defined name is
available, it appears instead of
Custom Type <x>. If two or more
custom types share the same
name, the name only appears
once in the Paper Type list.
Custom Types Specifies the type of paper
associated with each Custom
Type available in the Paper Type
menu
Tray <x> Type Plain Paper*
Card Stock
Transparency
Labels
Bond
Letterhead
Preprinted
Colored Paper
Light Paper
Heavy Paper
Rough/Cotton
Custom Type <x>
Manual Pap type Plain Paper*
Card Stock
Transparency
Labels
Bond
Letterhead
Preprinted
Colored Paper
Light Paper
Heavy Paper
Rough/Cotton
Custom Type <x>
Manual Env Type Envelope*
Custom Type <x>
Custom Type <x> Paper*
Card Stock
Transparency
Labels
Envelope
Use this menu item to:
• Optimize print quality for the
specified paper.
• Select paper sources through
your software program by
selecting type and size.
• Automatically link paper
sources. Any sources
containing the same type and
size of paper are automatically
linked by the printer if you
have set the Paper Size and
the Paper Type to the correct
values.
The custom type media must be
supported in the input source
you designate in order to assign
a user-defined name.
Once the name is assigned, the
name (truncated to 16
characters) will be displayed
instead of Custom Type x.
9
Page 10
Using printer menus
Universal Setup
This menu selection is used to specify the height and width of the Universal Paper Size. By specifying the height and width for Universal
Paper Size, the printer will use the Universal setting exactly like other paper sizes, including support for duplex and n-up.
Menu selection Purpose Val ues
Units of Measure Determines the unit of measure used to
enter the Universal Height and Width
Portrait Width Sets the portrait width of the universal
media
Note: If the value set exceeds the
maximum width, the printer will use the
maximum value allowed in inches or
millimeters.
Portrait Height Sets the portrait height of the universal
media
Note: If the value set exceeds the
maximum height, the printer will use the
maximum value allowed in inches or
millimeters.
Feed Direction Specifies the feed direction Short Edge*
Inches
Millimeters
3 inches to 14.17 inches
in 0.01 inch increments
76 mm to 360 mm in
1 mm increments
3 inches to 14.17 inches
in 0.01 inch increments
76 mm to 360 in 1 mm
increments
Long Edge
Inches is the US default; Millimeters is the
international default.
Shows either inches or mm from Units of
Measure setting; 11.69 inches is the US
default, and 297 mm is the international
default.
Shows either inches or mm from Units of
Measure setting; 17 inches is the US
default, and 432 mm is the international
default.
Long Edge is only shown if the longest
edge is shorter than the Maximum Physical
Width of the printer.
Substitute Size
This menu selection is used to determine whether the printer can substitute another size paper if the requested paper size is not currently
installed in any of the printer input sources. If, for example, Substitute Size is set to Letter/A4, and only letter size paper is installed in the
printer. When a request is received to print on A4 paper, the printer will substitute letter for A4 and print the job instead of displaying a
change paper request.
Menu selection Purpose Values
Substitute Size Substitutes the specified paper size if
the requested size is not loaded
Off
Statement/A5
Letter/A4
All Listed*
The All Listed value indicates that all
available substitutions are allowed.
Paper Texture
This menu selection is used to set the media texture for each of the defined media types. This allows the printer to optimize the print
quality for the specified media.
Menu selection Purpose Values
Plain Texture Identifies the texture of the media loaded
in a specific input source
Card Stock Text Identifies the texture of the card stock
loaded in a specific input source
Smooth
Normal*
Rough
Smooth
Normal*
Rough
Shown if Card Stock is supported in the
specified input source
10
Page 11
Using printer menus
Menu selection Purpose Values
Transprncy Text Identifies the texture of the media loaded
Labels Texture
Bond Texture
Envelope Texture
Ltrhead Texture
Preprint Texture
Colored Texture
Light Texture
Heavy Texture
Rough Texture Identifies the texture of the media loaded
Custom <x>
Tex tu re
in a specific input source
in a specific input source
Identifies the texture of the custom
media loaded in a specific input source
Smooth
Normal*
Rough
Smooth
Normal
Rough*
Smooth
Normal*
Rough
Shown if the custom type is supported in
the specified input source
Paper Weight
This menu selection is used to set the paper weight for each of the defined media types. This allows the printer to optimize the print
quality for the media weight.
Menu selection Purpose Valu es
Plain Weight Identifies the weight of the media loaded
in a specific input source
CardStock Weight Identifies the weight of the card stock
loaded in a specific input source
Transprncy Weight Identifies the weight of the media loaded
in a specific input source
Labels Weight
Bond Weight
Envelope Weight
Ltrhead Weight
Preprint Weight
Colored Weight
Light Weight Identifies the weight of the media loaded
in a specific input source
Light
Normal*
Heavy
Light
Normal*
Heavy
Light
Normal*
Heavy
Light*
Normal
Heavy
Shown if Card Stock is supported in the
specified input source
11
Page 12

Using printer menus
Menu selection Purpose Valu es
Heavy Weight Identifies the weight of the media loaded
Rough Weight
Custom <x> Weight Identifies the weight of the custom
in a specific input source
media loaded in a specific input source
Light
Normal
Heavy*
Light
Normal*
Heavy
Shown if the custom type is supported in
the specified input source
Paper Loading
This menu selection is used to set the loading orientation for each paper type. This lets you load an input source with preprinted media,
and then notify the printer that the media is loaded for duplex printing. You can then use your program to indicate simplex printing. When
simplex printing is selected, the printer automatically inserts blank pages to print the simplex job correctly.
Note: Paper Loading is only available if a duplex unit is installed.
Menu selection Purpose Values
Card Stock Load Properly handles preprinted card stock
Labels Loading Properly handles preprinted paper
Bond Loading
Ltrhead Loading
Preprinted Loading
whether the job is a duplexed or singlesided job
whether the job is a duplexed or singlesided job
Duplex
Off*
Duplex
Off*
Shown if Card Stock is supported in the
specified input source
Colored Loading
Custom <x>
Loading
Properly handles preprinted custom
paper whether the job is a duplexed or
single-sided job
Duplex
Off*
Finishing Menu
Use this menu selection to define how the printer delivers the printed output.
Menu selection Purpose Val ues
Duplex Sets duplexing as the default for all print
jobs
Note: Select Duplex from the printer
driver to duplex only specific jobs.
Duplex Bind Defines the way duplexed pages would
be bound, and how the printing on the
back of the sheet (even-numbered
pages) is oriented in relation to the
printing on the front (odd-numbered
pages)
Off* Prints on one side of the paper
On Prints on both sides of the paper
Long Edge* Assumes binding along the long edge of
Short Edge Assumes binding along the short edge of
Shown if the custom type is supported in
the specified input source
the page (left edge for portrait orientation
and top edge for landscape orientation)
the page (top edge for portrait orientation
and left edge for landscape orientation)
12
Page 13

Using printer menus
Menu selection Purpose Val ues
Copies Sets the number of copies you want for
the printer default value
Note: Set the number of copies required
for a specific job from the printer driver.
Blank Pages Specifies whether to include program-
generated blank pages as part of your
printed output
Collation Keeps the pages of a print job stacked in
sequence when printing multiple copies
of the job
Separator Sheets Inserts blank separator sheets between
jobs, between multiple copies of a job, or
between each page of a job
1...999 (1*) Values selected from the printer driver
always override values selected from the
control panel.
Do Not Print* Does not print program-generated blank
pages as part of your job
Print Prints program-generated blank pages as
part of your job
Off* Prints each page of a job the number of
times specified by the Copies menu item.
For example, if you set Copies to 2, and
send three pages to print, the printer prints
page 1, page 1, page 2, page 2, page 3,
page 3.
On Prints entire job the number of times
specified by the Copies menu item. For
example, if you set Copies to 2, and send
three pages to print, the printer prints page
1, page 2, page 3, page 1, page 2, page 3.
None* Does not insert separator sheets
Between Copies Inserts a blank sheet between each copy of
a job. If Collation is Off, a blank page is
inserted between each set of printed pages
(all page 1’s, all page 2’s, and so on). If
Collation is On, a blank page is inserted
between each collated copy of the job.
Separator Source Specifies the paper source that holds
separator sheets
Multipage Print Prints multiple-page images on one side
of a sheet of paper, also called n-up or
Paper Saver
Between Jobs Inserts a blank sheet between jobs
Between Pages Inserts a blank sheet between each page
of a job. This is useful if you are printing
transparencies or want to insert blank
pages in a document for notes.
Tray <x> (Tray 1*) Selects separator sheets from the specified
tray
Off* Prints 1 page image per side
2 Up Prints 2 page images per side
3 Up Prints 3 page images per side
4 Up Prints 4 page images per side
6 Up Prints 6 page images per side
9 Up Prints 9 page images per side
12 Up Prints 12 page images per side
16 Up Prints 16 page images per side
13
Page 14

Using printer menus
Menu selection Purpose Val ues
Multipage Order Determines the positioning of multiple
Multipage View Determines the orientation of a multiple-
page images when using Multipage Print
The positioning depends on the number
of images and whether the images are
portrait or landscape in orientation.
For example, if you select 4-Up multipage printing and portrait orientation, the results differ depending on the
Multipage Order value you select:
Horizontal
Order
21
43
page sheet
Ver tical
Order
Horizontal*
Ver tic al
Rev Horizontal
Rev Vertical
Reverse
Horizontal Order
31
42
Auto* Lets the printer choose between portrait
Long Edge Sets the long edge of the paper as the top
Short Edge Sets the short edge of the paper as the top
12
34
Reverse
Vertical Order
13
24
and landscape orientation
of the page (landscape)
of the page (portrait)
Multipage Border Prints a border around each page image
when using Multipage Print
None* Does not print a border around each page
image
Solid Prints a solid line border around each page
image
Utilities Menu
Use this menu selection to change printer settings, remove jobs, set up printer hardware, and troubleshoot printer problems.
Menu selection Purpose Values
Print Menus Prints information relating to the default
printer settings and verifies that printer
options are installed correctly
Print Stats Prints information relating to the printer
statistics
Print Net Setup Prints information about the network
settings
No value for this. Pressing prints the specified page. After
selecting this item, the page will print and the printer will return to
Ready.
14
Page 15

Using printer menus
Menu selection Purpose Values
Print Fonts Prints a sample of all the fonts available
for the selected printer language
Print Directory Prints the contents of the flash memory
card
Note: This option is only available if a
flash memory card is installed.
Factory Defaults Returns printer settings to the factory
default values
Format Flash Formats the flash memory card
Note: This option is only available if a
flash memory card is installed, is not
write protected, and is not defective.
Defragment Flash Reclaims any fragmented space on the
flash memory card
Note: This option is only available if a
flash memory card is installed, is not
write protected, and is not defective.
Hex Trace Helps isolate the source of a print job
problem
PCL Fonts Prints a sample of all printer fonts available
for PCL emulation
PS Fonts Prints a sample of all printer fonts available
for PostScript emulation
PPDS Fonts Prints a sample of all printer fonts available
for PPDS emulation. This value is only
available if PPDS emulation is active.
No value for this. Pressing prints the specified page. After
selecting this item, the page will print and the printer will return to
Ready.
Do Not Restore* User-defined settings remain.
Restore All menu items are returned to the factory
default values except:
• Display Language
• All settings in the Parallel Menu,
Network Menu, and USB Menu
• Resources residing in flash memory
Note: All downloaded resources (fonts,
macros, and symbol sets) in printer
memory (RAM) are deleted.
No* No changes are made to the flash memory
card.
Yes Clears the contents of the flash memory
card
No* No changes are made to the flash memory
card.
Yes Defragments the flash memory card.
Restore All menu items are returned to the factory
default values except:
• Display Language
• All settings in the Parallel Menu,
Network Menu, and USB Menu
• Resources residing in flash memory
Note: All downloaded resources (fonts,
macros, and symbol sets) in printer
memory (RAM) are deleted.
15
Page 16

Using printer menus
Job Menu
Menu selection Purpose Val ues
Reset Printer Clears current print jobs No value for this. Pressing initiates the reset cycle. After selecting
this item, the printer will reset and return to Ready.
Quality Menu
Use this menu selection to change settings that affect print quality and save toner.
Menu selection Purpose Val ues
Print Resolution Specifies the printed output resolution 300 dpi
600 dpi
1200 Image Q
2400 Image Q*
Toner Darkness Lightens or darkens printed output and
conserves toner
Small Font Enh. Enhances the quality of small fonts Off*
1–10 8* is the default setting.
Select a lower number to lighten the printed
output or save toner.
Fonts Only
Fonts/Images
Setup Menu
Use this menu selection to configure a variety of printer features.
Menu selection Purpose Val ues
Eco-Mode The printer minimizes waste (toner,
paper, energy) while maintaining
acceptable print quality.
Quiet Mode The printer operates quietly by printing
output at a slower speed.
Off* No changes in operation are made.
Energy The following options are changed:
Energy/Paper Same options as Energy option, except
Off* No changes in operation are made.
On The following options are changed:
• Duplex is turned off.
• The control panel’s power indicator LED
and backlight remain off.
• Ready mode is disabled.
Duplex is turned on.
• The control panel’s power indicator LED
remains illuminated when in Ready state
and blinks when in Busy state
• All print jobs print at half speed.
• Fuser standby mode is enabled.
Note: The engine prints at half speed in
all resolutions.
16
Page 17

Using printer menus
Menu selection Purpose Val ues
Printer Language Specifies the default printer language
used to communicate data from the
computer to the printer
Note: Setting a printer language as the
default does not prevent a program from
sending print jobs that use the other
language.
Power Saver Specifies the amount of time (in
minutes) the printer waits after a job is
printed before it goes into a reduced
power state
Resource Save Specifies what the printer does with
downloaded resources, such as fonts
and macros stored in RAM, if the printer
receives a job that requires more
memory than is available.
PCL Emulation*
PS Emulation
PPDS Emulation
Disabled This value does not appear unless Energy
1...240 Specifies the amount of time after a print
Off* Printer retains downloaded resources only
On Printer retains all downloaded resources
PCL emulation—Uses a PCL emulation
interpreter for incoming host
communications.
PostScript emulation—Uses a PS
interpreter for incoming host
communications.
PPDS emulation—Uses a PPDS
interpreter for incoming host
communications.
Conserve is set to Off. For more
information, see the User’s Guide on the
Software and Documentation CD.
job before the printer goes into Power
Saver mode. (Your printer may not support
the entire range of values.)
The factory default Power Saver setting
depends on your printer model. Print the
menu settings page to determine the
current Power Saver setting. When the
printer is in Power Saver mode, it is still
ready to receive print jobs.
Select 1 to put the printer in Power Saver
mode one minute after it finishes a print
job. This uses much less energy, but
requires more warm-up time for the printer.
Select 1 if your printer shares an electrical
circuit with room lighting and you notice
lights flickering.
Select a high value if your printer is in
constant use. Under most circumstances,
this keeps the printer ready to print with
minimum warm-up time. Select a value
between 1 and 240 minutes if you want a
balance between energy consumption and
a shorter warm-up period.
until memory is needed. It then deletes
those resources associated with the
inactive printer language.
for all printer languages during language
changes and printer resets. If the printer
runs out of memory, 32 Memory Full
appears.
Download Target Specifies the storage location for
downloaded resources
Storing downloaded resources in flash
memory is permanent storage rather
than the temporary storage that RAM
provides. The resources remain in the
flash memory even when the printer is
turned off.
RAM* All downloaded resources are
automatically stored in printer memory
(RAM).
Flash All downloaded resources are
automatically stored in flash memory.
17
Page 18

Using printer menus
Menu selection Purpose Val ues
Print Timeout Specifies the amount of time (in
seconds) the printer waits before printing
the last page of a print job that does not
end with a command to print the page.
The print timeout counter does not start
until Waiting is displayed.
Wait Timeout To specify the amount of time (in
seconds) the printer waits to receive
additional bytes of data from the
computer. When this timeout expires,
the print job is canceled.
Wait Timeout is only available when you
use PostScript emulation. This menu
item has no effect on PCL emulation
print jobs.
Auto Continue Defines the amount of time (in seconds)
the printer waits after displaying an
operator intervention error message
before it resumes printing
Jam Recovery Specifies whether the printer reprints
jammed pages
Disabled The printer does not print the last page of a
print job until one of the following occurs:
• The printer receives enough information
to fill the page.
• The printer receives a Form Feed
command.
• You select Print Buffer from the Job
Menu.
1...255 (90*) The printer prints the last page after the
specified time. (Your printer may not
support the entire range of values.)
Disabled Disables Wait Timeout
15...65535 (40*) Specifies the amount of time the printer
waits for additional data before it cancels
the job
Disabled* Printer does not resume printing until
someone clears the error message.
5...255 Printer waits the specified amount of time,
and then automatically resumes printing.
This timeout value also applies if the
menus are displayed (and the printer is
offline) for the specified period of time.
On Printer reprints jammed pages.
Off Printer does not reprint jammed pages.
Page Protect Successfully prints a page that may
otherwise generate Complex Page
errors.
If, after selecting On, you still cannot
print the page, you may also have to
reduce the size and number of fonts on
the page, or increase the installed
printer memory.
For most print jobs, you do not need to
select On. When On is selected, printing
may be slower.
Auto* Printer reprints a jammed page unless the
memory required to hold the page is
needed for other printer tasks.
Off* Prints a partial page of data if memory is
insufficient to process the entire page
On Ensures that an entire page is processed
before it prints
18
Page 19

Using printer menus
Menu selection Purpose Val ues
Display Language Determines the language of the text
displayed on the control panel
Toner Alarm Specifies how the printer responds when
it is low on toner
English
Français
Deutsch
Italiano
Español
Dansk
Norsk
Nederlands
Svenska
Por tuguês
Suomi
Russian
Polski
Magyar
Tu r k i s h
Czech
Simplified Chinese
Traditional Chinese
Korean
Japanese
Off* Printer will display a warning and continue
Single Printer will display a warning and stop
Note: All values may not be available.
printing pages.
printing pages.
Continuous Printer will continuously display a warning
and stop printing pages.
PCL Emul Menu
Use this menu selection to change printer settings that affect jobs using the PCL emulation printer language.
Menu selection Purpose Val ues
Font Source Determines the set of fonts displayed in
the Font Name menu item
Font Name Identifies a specific font from the
specified font source
Resident* Displays all fonts resident in printer RAM
when the printer ships from the factory
Download Displays all fonts downloaded to printer
RAM
Flash Displays all fonts stored in flash memory
All Displays all fonts available to the printer
from all sources
R0 Courier* The font name and font ID for all fonts in
the selected font source are displayed.
The font source abbreviation is R for
resident, F for flash, K for disk, and D for
download.
19
Page 20

Using printer menus
Menu selection Purpose Val ues
Point Size Specifies the point size for scalable
typographic fonts
Pitch Specifies the font pitch for scalable
monospaced fonts
Symbol Set Determines the symbol set for a
specified font name
Orientation To determine how text and graphics are
oriented on the page
1...1008
in increments of 0.25
points)
12*
0.08...100
(in increments of 0.01 cpi)
10*
10U PC-8* (US)
(country/region-specific
factory default values)
12U PC-850* (non-US)
(country/region-specific
factory default values)
Portrait* Prints text and graphics parallel to the
Landscape Prints text and graphics parallel to the
Point size refers to the height of the
characters in the font. One point equals
approximately 1/72 of an inch. You can
select point sizes from 1 to 1008 in
increments of 0.25 points.
Point Size is only displayed for
typographic fonts.
Pitch refers to the number of fixed-space
characters in a horizontal inch of type.
You can select a pitch from 0.08 to 100
characters per inch (cpi) in increments of
0.01 cpi. For nonscalable monospaced
fonts, the pitch is displayed, but cannot
be changed.
Pitch is only displayed for fixed, or
monospaced, fonts.
A symbol set is a set of alphabetic and
numeric characters, punctuation, and
special symbols used when printing with
a selected font. Symbol sets support the
different requirements for languages or
specific applications, such as math
symbols for scientific text. Only the
symbol sets supported for the selected
font name are displayed.
short edge of the paper
long edge of the paper
Lines per Page Determines the number of lines that
print on each page
A4 Width Specifies the width of the logical page
for A4 size paper.
1...255 The printer sets the amount of space
60*
(country/region-specific
factory default values)
64*
(country/region-specific
factory default values)
198 mm* Makes the logical page compatible with
203 mm Makes the logical page wide enough to
between each line (vertical line spacing)
based on the Lines per Page, Paper Size,
and Orientation menu items. Select the
correct Paper Size and Orientation before
changing Lines per Page.
the Hewlett-Packard LaserJet 5 Printer
print eighty 10-pitch characters
20
Page 21

Using printer menus
Menu selection Purpose Val ues
Tray Renumber Configures your printer to work with printer drivers or programs that use different source assignments for the
Auto CR after LF Specifies whether the printer
Auto LF after CR Specifies whether the printer
paper trays
Specifies a paper source Assign Tray <x>
Assign Man Env
Assign Man Paper
Specifies a value Off* Printer uses factory default paper source
0...199 Select a numeric value to assign a
None Paper source ignores the Select Paper
Other Tray Renumber selections View Factory Def Press
Restore Defaults Select Yes to return all tray assignments
automatically performs a carriage return
after a line feed control command
automatically performs a line feed after a
carriage return control command
Off* Printer does not perform a carriage return
On Printer performs a carriage return after a
Off* Printer does not perform a line feed after
On Printer performs a line feed after a
assignments.
custom value to a paper source.
Feed command.
Menu to display the factory default
value assigned to each paper source.
to factory default values.
after a line feed control command.
line feed control command.
a carriage return control command.
carriage return control command.
PostScript Menu
Use this menu selection to change printer settings that affect jobs using the PostScript printer language.
Menu selection Purpose Val ues
Print PS Error Prints a page defining the PostScript
emulation error when an error occurs
Font Priority Establishes the font search order
Font Priority is only displayed when a
formatted flash is installed, is neither
defective nor Read/Write or Write
protected, and Job Buffer Size is not set
to 100%.
Off* Discards the print job without printing an
error message
On Prints an error message before it discards
the job
Resident* Printer searches printer memory for the
requested font before searching flash
memory.
Flash Printer searches the flash memory for the
requested font before searching printer
memory.
21
Page 22

Using printer menus
PPDS Menu
Use the PPDS Menu to change printer settings that only affect jobs using the PPDS emulation printer language.
Note: The PPDS MENU is only displayed after the PPDS emulator has been activated.
Menu selection Purpose Val ues
Orientation Determines how text and graphics are
oriented on the page
Lines per Page Determines the number of lines that
print on each page
Lines per Inch Determines the number of lines that
print per vertical inch
Page Format Affects how the printer interprets the
margins set from software applications
Portrait* Prints text and graphics parallel to the short
edge of the paper
Landscape Prints text and graphics parallel to the long
edge of the paper
1...255 (64*) The printer sets the amount of space
between each line (vertical line spacing)
based on the Lines per Inch, Lines per
Page, Paper Size, and Orientation menu
items. Select the correct Paper Size and
Orientation before changing Lines per
Page.
1...30 (6*) The printer sets the amount of space
between each line (vertical line spacing)
based on the Lines per Inch, Lines per
Page, Paper Size, and Orientation menu
items. Select the correct Paper Size and
Orientation before changing Lines per Inch.
Print* Printer measures the margin settings from
the inside edge of the left unprintable area
and the bottom of the top unprintable area.
The left and top margin areas on the print
job are equal to the software margins
setting plus the unprintable area.
Whole Printer measures margin settings form the
top left edge of the paper. The left and top
margins areas on the print job are equal to
the software margins settings.
Character Set Determines which code page to use to
print PPDS jobs
Best Fit Determines whether to perform a font
best fit search if the requested font
cannot be found
Tray 1 Renumber Configures your printer to work with
printer drivers or applications that use
different source assignments for the
paper trays.
This menu item is only displayed when
Tray 2 is installed.
1 The standard code pages are used.
2* The addresses from Value 1 change to
represent characters and symbols used in
non-US English languages.
Off Printer stops printing when a requested
font cannot be found. An error message is
posted indicating the font could not be
found.
On* Printer continues even though it was not
able to locate a requested font. Instead, the
printer tries to select another font that best
matches the characteristics of the
requested font.
Off* Print jobs are printed from the requested
source.
Tray 2 Print job requests for Tray 2 are converted
to requests for Tray 1.
Print job requests for Tray 1 are converted
to requests for Tray 2.
22
Page 23

Using printer menus
Menu selection Purpose Val ues
Auto CR after LF Specifies whether the printer
automatically performs a carriage return
after a line feed control command
Auto LF after CR Specifies whether the printer
automatically performs a line feed after a
carriage return control command
Off* Printer does not perform a carriage return
after a line feed control command.
On Printer performs a carriage return after a
line feed control command.
Off* Printer does not perform a line feed after a
carriage return control command.
On Printer performs a line feed after a carriage
return control command.
23
Page 24

Using printer menus
Parallel Menu
Use the Parallel Menu to change printer settings affecting jobs sent to the printer through a parallel port.
Std Parallel
Menu selection Purpose Val ues
PCL SmartSwitch Configures the printer so it automatically
switches to PCL emulation when a print
job received through the parallel port
requires it, regardless of the default
printer language
PS SmartSwitch Configures the printer so it automatically
switches to PostScript emulation when a
print job received through the parallel
port requires it, regardless of the default
printer language
NPA Mode Specifies whether the printer performs
the special processing required for
bidirectional communication, following
the conventions defined in the Network
Printing Alliance (NPA) Protocol
Changing this menu item automatically
resets the printer.
Parallel Buffer Configures the size of the parallel input
buffer
Changing this menu item automatically
resets the printer.
On* Printer examines data on the parallel
interface and selects PCL emulation if the
data indicates that is the required printer
language.
Off Printer does not examine the incoming
data. The printer uses PostScript emulation
to process the job if PS SmartSwitch is On,
or uses the default printer language
specified in the Setup Menu if PS
SmartSwitch is Off.
On* Printer examines data on the parallel
interface and selects PostScript emulation
if the data indicates that is the required
printer language.
Off Printer does not examine the incoming
data. The printer uses PCL emulation to
process the job if PCL SmartSwitch is On,
or uses the default printer language
specified in the Setup Menu if PCL
SmartSwitch is Off.
On Printer performs NPA processing. If data is
not in NPA format, it is rejected as bad
data.
Off Printer does not perform NPA processing.
Auto* Printer examines data to determine the
format and then processes it appropriately.
Disabled Disables job buffering. Any jobs already
buffered on the disk are printed before
normal processing of incoming jobs
resumes.
Auto* Printer automatically calculates the Parallel
Buffer size (recommended setting).
3K to maximum
size allowed
Advanced Status Enables bidirectional communication
through the parallel port
Protocol Specifies the parallel interface protocol Standard May resolve some parallel interface
Off Disables parallel port negotiation
On* Enables bidirectional communication
Fastbytes* Provides compatibility with most existing
User specifies the Parallel Buffer size. The
maximum size depends on the amount of
memory in your printer, the size of the other
link buffers, and whether Resource Save is
set to On or Off. To maximize the range for
the Parallel Buffer size, disable or reduce
the size of the USB buffer.
through the parallel interface
problems
parallel interface implementations
(recommended setting)
24
Page 25

Using printer menus
Menu selection Purpose Val ues
Honor Init Determines whether the printer honors
hardware initialization requests from the
computer. The computer requests
initialization by activating the INIT signal
on the parallel interface. Many personal
computers activate the INIT signal each
time the computer is turned on and off.
Parallel Mode 2 Determines whether the parallel port
data is sampled on the leading or trailing
edge of strobe
MAC Binary PS Configures the printer to process
Macintosh binary PostScript print jobs
Off* Printer does not honor hardware
initialization requests from the computer.
On Printer honors hardware initialization
requests from the computer.
On* Samples parallel port data on the leading
edge of strobe.
Off Samples parallel port data on the trailing
edge of strobe.
On Printer processes raw binary PostScript
print jobs from computers using the
Macintosh operating system.
This setting often causes Windows print
jobs to fail.
Off Printer filters PostScript print jobs using
standard protocol.
Auto* Printer processes print jobs from
computers using either Windows or
Macintosh operating systems.
25
Page 26

Using printer menus
Network Menu
Use the Network Menu to change printer settings affecting jobs sent to the printer through a network port.
Standard Network
Menu selection Purpose Val ues
PCL SmartSwitch Configures the printer so it automatically
switches to PCL emulation when a print
job received through the network port
requires it, regardless of the default
printer language
PS SmartSwitch Configures the printer so it automatically
switches to PostScript emulation when a
print job received through the network
port requires it, regardless of the default
printer language
NPA Mode Specifies whether the printer performs
the special processing required for
bidirectional communication, following
the conventions defined in the Network
Printing Alliance (NPA) Protocol
Changing this menu item automatically
resets the printer.
Network Buffer Configures the size of the network input
buffer
Changing the Network Buffer menu item
automatically resets the printer.
On* Printer examines data on the network
Off Printer does not examine the incoming
On* Printer examines data on the network
Off Printer does not examine the incoming
Off Printer does not perform NPA processing.
Auto* Printer examines the data to determine the
Auto* Printer automatically calculates the
3K to maximum size
allowed
interface and selects PCL emulation if the
data indicates that is the required printer
language.
data. The printer uses PostScript emulation
to process the job if PS SmartSwitch is On,
or uses the default printer language
specified in the Setup Menu if PS
SmartSwitch is Off.
interface connection and selects
PostScript emulation if the data indicates
that is the required printer language.
data. The printer uses PCL emulation to
process the job if PCL SmartSwitch is On,
or uses the default printer language
specified in the Setup Menu if PCL
SmartSwitch is Off.
format and then processes it appropriately.
Network Buffer size (recommended
setting).
User specifies the Network Buffer size. The
maximum size depends on the amount of
memory in your printer, the size of the other
link buffers, and whether Resource Save is
set to On or Off. To maximize the range for
the Network Buffer size, disable or reduce
the size of the parallel and USB buffers.
MAC Binary PS Configures the printer to process
Macintosh binary PostScript print jobs
Std Net Setup Configures an internal print server Values for this menu item are supplied by the specific print server.
On Printer processes raw binary PostScript
print jobs from computers using the
Macintosh operating system.
This setting often causes Windows print
jobs to fail.
Off Printer filters PostScript print jobs using
standard protocol.
Auto* Printer processes print jobs from
computers using either Windows or
Macintosh operating systems.
Select the menu item to see the available values.
26
Page 27

Using printer menus
USB Menu
Use this menu selection to change printer settings affecting a Universal Serial Bus (USB) port.
Standard USB
Menu selection Purpose Val ues
PCL SmartSwitch Configures the printer so it automatically
switches to PCL emulation when a print
job received through the USB port
requires it, regardless of the default
printer language
PS SmartSwitch Configures the printer so it automatically
switches to PostScript emulation when a
print job received through the USB port
requires it, regardless of the default
printer language
NPA Mode Specifies whether the printer performs
the special processing required for
bidirectional communication, following
the conventions defined in the Network
Printing Alliance (NPA) Protocol
Note: Changing this menu item
automatically resets the printer.
USB Buffer Configures the size of the USB input
buffer
Note: Changing the USB Buffer menu
item automatically resets the printer.
On* Printer examines the data on the USB port
and selects PCL emulation if the data
indicates that is the required printer
language.
Off Printer does not examine the incoming
data. The printer uses PostScript emulation
to process the job if PS SmartSwitch is On,
or uses the default printer language
specified in the Setup Menu if PS
SmartSwitch is Off.
On* Printer examines data on the USB interface
and selects PostScript emulation if the data
indicates that is the required printer
language.
Off Printer does not examine the incoming
data. The printer uses PCL emulation to
process the job if PCL SmartSwitch is On,
or uses the default printer language
specified in the Setup Menu if PCL
SmartSwitch is Off.
Off The printer will not perform any NPA
processing.
On All data received by the printer must be in
NPA packets. Any non-packet data
received will be rejected as bad.
Auto* Printer examines the incoming data to
determine the format. If the incoming data
is not NPA packets, the information is
passed to the printer as non-NPA.
Disabled Job buffering is disabled. Any jobs already
buffered on the disk are printed before
normal processing of incoming jobs
resumes.
Auto* Printer automatically calculates the USB
Buffer size (recommended setting).
3K to maximum size
allowed
27
User specifies the USB Buffer size. The
maximum size depends on the amount of
memory in the printer, the size of the other
link buffers, and whether Resource Save is
set to On or Off. To maximize the range for
the USB Buffer size, disable or reduce the
size of the parallel and network buffers.
Page 28

Using printer menus
Menu selection Purpose Val ues
Mac Binary PS Configures the printer to process
Macintosh binary PostScript print jobs
Off Printer processes raw binary PostScript
print jobs from computers using the
Macintosh operating system.
Note: This setting often causes Windows
print jobs to fail.
On Printer filters PostScript print jobs using
standard protocol.
Auto* Printer processes print jobs from
computers using either Windows or
Macintosh operating systems.
28
Page 29

Understanding printer messages
The printer control panel displays messages describing the current state of the printer and indicates possible printer problems you must
resolve. This topic provides a list of all printer messages, explains what they mean, and tells you how to clear the messages.
The following table lists the messages in alphanumerical order. You can also locate a message using the index.
Message Action
Activating Demo Mode Wait for the message to clear.
Activating Menu Changes Wait for the message to clear.
Activating/Deactivating PPDS Wait for the message to clear.
Busy Wait for the message to clear, or cancel the print job.
Cancelling Job Wait for the message to clear.
Change Cartridge Invalid Refill The printer has detected an unsupported refilled cartridge. Remove the indicated print
Close door Close the specified door to clear the message.
Deactivating Demo Mode Wait for the message to clear.
Defragmenting Flash DO NOT POWER OFF Warning: Do not turn the printer off while this message is displayed.
Disabling Menus Wait for the message to clear.
Enabling Menus Wait for the message to clear.
Flushing buffer Wait for the message to clear.
Formatting Flash DO NOT POWER OFF Warning: Do not turn the printer off while this message is displayed.
Invalid Engine Code Download valid engine code to the printer.
Invalid Standard Network Code The code in an internal print server is not valid. The printer cannot receive and
Load manual feeder with
<Custom Type>
Load manual feeder with
<Custom String>
Load manual feeder with <size>
Load manual feeder with <size> <type>
cartridge and install a new one.
Wait for the message to clear.
Note: While the menus are disabled, you cannot change the printer settings from the
control panel.
Wait for the message to clear.
Note: You can download engine code while this message is displayed.
process jobs until valid code is programmed into the internal print server. Download
valid code to the internal print server.
Note: You can download network code while this message is displayed.
• Load the specified paper in the manual feed tray or multipurpose feeder.
• To ignore the manual feed request and print on paper already installed in one of the
input sources, press .
If the printer finds a tray that has paper of the correct type and size, it feeds paper
from that tray. If the printer cannot find a tray with the correct paper type and size, it
prints on whatever paper is installed in the default input source.
• Cancel the current job.
29
Page 30

Understanding printer messages
Message Action
Load <src> with <Custom Type Name> • Load the input source with the correct type and size media.
Load <src> with <Custom String>
Load <src> <size>
Load <src> <type> <size>
Maintenance Replace the maintenance items and, if necessary, reset the printer maintenance
Menus Disabled The printer menus are disabled. You cannot change the printer settings from the
Network A network interface is the active communication link.
Network Card Busy An internal print server (also called an internal network adapter or INA) is being reset.
Not Ready The printer is not ready to receive or process data. Someone pressed to take the
Parallel A parallel interface is the active communication link.
Performing Self Test The printer is running the series of start-up tests it performs after it is turned on. Wait
Power Saver • Send a job to print.
• Cancel the current job.
counter.
control panel.
Note: You can still cancel a job.
Contact your system support person.
Wait for the message to clear.
printer offline. Press to make the printer ready to receive jobs.
for the message to clear.
• Press to warm the printer to normal operating temperature and display the
Ready message.
Printing Directory List The printer is processing or printing a directory of all files stored in flash memory. Wait
Printing Font List The printer is processing or printing a list of all available fonts for the specified printer
Printing Menu Settings The printer is processing or printing the menu settings page. Wait for the message to
Printing Device Statistics The printer is printing statistical information about the printer. Wait for the message to
Printing Quality Test Pages The printer is formatting and printing the Print Quality Test, which consists of 4 pages.
Prog Engine Code
DO NOT POWER OFF
Program Flash
DO NOT POWER OFF
Prog System Code
DO NOT POWER OFF
Ready Send a job to print.
Remove Paper
Standard bin
for the message to clear.
language. Wait for the message to clear.
clear.
clear.
Page 1 contains a mixture of graphics and text, pages 2 and 3 contain only graphics,
and page 4 is a blank page. If Duplex is turned on, then the pages are duplexed;
otherwise, they are simplexed. Wait for the message to clear.
The printer is programming new engine code. Wait for the message to clear and the
printer to reset.
Warning: Do not turn the printer off while this message is displayed.
The printer is storing resources, such as fonts or macros, in flash memory. Wait for the
message to clear.
Warning: Do not turn the printer off while this message is displayed.
The printer is programming new system code. Wait for the message to clear and the
printer to reset.
Warning: Do not turn the printer off while this message is displayed.
The standard output bin is full.
30
Page 31

Understanding printer messages
Message Action
Resetting
Maint Cnt Value
Resetting
PC Cnt Value
Resetting the Printer Wait for the message to clear.
Res Reduced The printer is reducing the resolution of a page in the current job from 600 dots per
Restoring Factory Defaults Wait for the message to clear.
Std Bin Full The standard bin is full.
Toner Low • Replace the toner cartridge.
Tray <x> Missing Insert the tray into the printer.
USB The printer is processing data through the specified USB port.
Waiting The printer has received a page of data to print, but is waiting for an End of Job
31 Missing or defective cart. Insert or replace the toner cartridge.
The printer is resetting the counter that tracks wear on the fuser.
The printer is resetting the counter that tracks wear on the photoconductor.
inch (dpi) to 300 dpi to prevent a 38 Memory Full error. Res Reduced remains on
the display while the job prints.
Note: When factory default settings are restored:
• All downloaded resources (fonts, macros, symbol sets) in the printer memory are
deleted.
• All menu settings return to the factory default setting except:
– The Display Language setting in the Setup Menu
– All settings in the Parallel Menu, Network Menu, and USB Menu
• Press to clear the message and continue printing.
command, a Form Feed command, or additional data.
• Press to print the contents of the buffer.
• Cancel the current job.
32 unsupported print cartridge Install a toner cartridge that is the correct type and capacity for this printer.
34 Short paper • Load the appropriate media in the selected source.
35 Res save off deficient memory • To disable Resource Save and continue printing, press .
37 Insufficient collation area • To print the portion of the job already stored and begin collating the rest of the job,
37 Insufficient Defrag memory • To stop the defragment operation and continue printing, press .
38 Memory Full • To clear the message and continue printing, press .
• To clear the message and print the job using a different paper source, press .
• To enable Resource Save after you get this message:
– Make sure the link buffers are set to Auto, then exit the menus to activate the link
buffer changes.
– When Ready is displayed, enable Resource Save.
• Install additional memory.
press .
• Cancel the current job.
• Delete fonts, macros, and other data in printer memory.
• Install additional printer memory.
The job may not print correctly.
• Cancel the current job.
• Install additional printer memory.
31
Page 32

Understanding printer messages
Message Action
39 Complex Page The page may not print correctly because the print information on the page is too
42 Cartridge Region Mismatch The geographic region of the printer does not match the geograhpic region of the
50 PPDS font error • To clear the message and continue printing, press .
51 Defective flash To clear the message and continue printing, press .
52 Flash full • To clear the message and continue printing, press .
53 Unformatted flash To clear the message and continue printing, press .
complex.
• Press to clear the message and continue printing the job. The job may not print
correctly.
• Press to open the Job Menu and cancel the current job.
• To avoid this error in the future:
– Reduce the complexity of the page by reducing the amount of text or graphics on
the page and deleting unnecessary downloaded fonts or macros.
– Set Page Protect to On in the Setup Menu.
– Install additional printer memory.
installed toner cartridge. Remove the toner cartridge and install a new cartridge that
matches the region of the printer.
The job may not print correctly.
• Cancel the current job.
You must install different flash memory before you can download any resources to
flash.
Downloaded fonts and macros not previously stored in flash memory are deleted.
• Delete fonts, macros, and other data stored on the flash memory.
• Install a larger capacity flash memory card.
You must format the flash memory before you can store any resources on it. If the
error message remains, the flash memory may be defective and require replacing.
54 Std network software error • To clear the message and continue printing, press .
The job may not print correctly.
• Program new firmware for the network interface.
• Reset the printer.
55 Unsupported flash in slot <x> 1 Turn the printer off.
2 Unplug the power cord from the wall outlet.
3 Remove the unsupported option.
4 Plug in the power cord.
5 Turn the printer on.
56 Std parallel port disabled • To clear the message, press .
56 Standard USB port disabled • To clear the message, press .
56 Standard USB port disabled • To clear the message, press .
58 Too many flash options 1 Turn off and unplug the printer.
• The printer discards any data received through the parallel port.
• Make sure the Parallel Buffer menu item is not set to Disabled.
The printer discards any data received through the USB port.
• Make sure the USB Buffer menu item is not set to Disabled.
The printer discards any data received through the USB port.
• Make sure the USB Buffer menu item is not set to Disabled.
2 Remove the excess flash memory.
3 Plug in the printer, and turn it on.
32
Page 33

Understanding printer messages
Message Action
58 Too many trays attached 1 Turn off and unplug the printer.
2 Remove the excess trays.
3 Plug in the printer, and turn it on.
80 Scheduled maintenance • To clear the message, and continue printing, press .
• Replace the maintenance items and if necessary, reset the printer maintenance
counter.
81 Engine Code CFC Failure The microcode to be programmed in the engine flash code module has failed a CRC
check. Press GO to clear the message. The microcode data will be discarded and
must be re-transmitted from the host.
84 Photoconduct life warning • To clear the message, and continue printing, press .
84 Replace Photoconductor • To clear the message, and continue printing, press .
84 PC unit abnormal • Replace the photoconductor unit.
88 Toner low • Replace the toner cartridge.
200 Paper jam
Remove Cartridge
201 Paper jam
Remove Cartridge
202 Paper jam
Open rear door
231 Paper jam
Open rear door
23x Paper jam
Open rear door
234 Paper jam
Check duplex
235 Paper jam
Unsupported size
24x Paper jam
Check tray <x>
• Replace the photoconductor unit.
• Replace the photoconductor unit.
• To clear the message, and continue printing, press .
1 Clear the paper path.
2 Press to resume printing.
1 Clear the paper path.
2 Press to resume printing.
1 Clear the paper path.
2 Press to resume printing.
1 Clear the paper path.
2 Press to resume printing.
1 Clear the paper path.
2 Press to resume printing.
1 Clear the paper path.
2 Press to resume printing.
1 Clear the paper path.
2 Press to resume printing.
3 Check the paper size to insure that it is supported by the printer.
1 Clear the paper path.
2 Press to resume printing.
251 Paper jam
Check man feeder
900–999 Service <message> 1 Turn the printer off.
1 Clear the paper path.
2 Press to resume printing.
2 Unplug the power cord from the wall.
3 Check all cable connections.
4 Plug in the power cord.
5 Turn the printer back on.
If the service message recurs, call for service, and report the message number and
description of the problem.
33
Page 34

Index
Numerics
200.yy Paper jam 33
201.yy Paper jam 33
202.yy Paper jam 33
231.yy Paper jam 33
242.yy Paper jam 33
243.yy Paper jam 33
244.yy Paper jam 33
250.yy Paper jam 33
31 Replace defective or missing toner cartridge 31
37 Insufficient memory for Flash Memory Defragment
operation 31
37 Insufficient memory to collate job 31
38 Memory Full 31
39 Complex Page 32
51 Defective flash 32
53 Unformatted flash detected 32
54 Standard network software error 32
55 Unsupported option in slot 32
56 Standard USB port disabled 32
56 USB port disabled 32
58 Too many flash options installed 32, 33
80 Scheduled maintenance 33
84 PC unit abnormal 33
84 Replace PC unit 33
88 Toner is low 33
900–999 Service 33
A
A4 Width (PCL Emul Menu) 20
Activating Menu Changes 29
Advanced Status (Parallel Menu) 24
alarms
error messages 18
toner 19
Auto Continue (Setup Menu) 18
Auto CR after LF (PCL Emul Menu) 21, 23
Auto LF after CR (PCL Emul Menu) 21, 23
C
Cancelling Job 29
Close door 29
Collation, enabling 13
complex page errors 18
control panel 5
Copies, specifying number 13
custom paper type 9
D
Defragmenting Flash 29
diagram, menu 4
Disabling Menus 29
Display Language 19
Download Target (Setup Menu) 17
downloaded resources
storing 17
duplex binding 12
duplex enabling 12
E
Enabling Menus 29
F
Factory Defaults 15
Feed Direction 10
Finishing Menu 12
flash memory
setting as download target 17
Flushing buffer 29
Font Name, PCL 19
font printing 15
Font Priority (PostScript Menu) 21
Font Source, PCL 19
fonts
priority 21
Formatting Flash 29
B
Blank Pages 13
buffer sizes, adjusting
network 26
parallel 24
Busy 29
H
hard disk
setting as download target 17
Hex Trace 15
Honor Init (Parallel Menu) 25
I
Insufficient memory to support Resource Save feature 31
34
Page 35

Index
interfaces
network 26
parallel 24
Invalid Engine Code 29
J
Jam Recovery (Setup Menu) 18
jams
See paper jams
L
language, display 19
language, printer 17
Lines per Page (PCL Emul Menu) 20, 22
Load Manual <Custom String> 29
Load Manual <Custom Type> 29
Load Manual <size> 29
Load Manual <size> <type> 29
Load, src with, Custom String 30
Load, src with, Custom Type Name 30
Load, src, size 30
Load, src, type, size 30
loading paper 12
M
MAC Binary PS (Network Menu) 26
MAC Binary PS (Parallel Menu) 25
Mac Binary PS, USB 28
Maintenance 30
Manual Envelope Type 8, 9
Manual Paper Size 8
Manual Paper Type 9
menu diagram 4
Menu Settings Page 14
Menus are Disabled 30
messages
Change <x> Invalid Refill 29
Network Card Busy 30
Not Ready 30
Performing Self Test 30
Printing Directory List 30
Printing Font List 30
Printing Menu Settings 30
Prog System Code 30
Program Flash 30
Remove Paper <specified bin> 30
Res Reduced 31
Resetting Maint Cnt Value 31
Std Bin Full 31
Multipage Border 14
Multipage Order 14
Multipage Print 13
Multipage View 14
N
Network Buffer (Network Menu) 26
Network interface 30
Network Menu 26
MAC Binary PS 26
Network Buffer 26
NPA Mode 26
PCL SmartSwitch 26
PS SmartSwitch 26
Std Net Setup 26
network port
configuring
buffer size 26
NPA mode 26
PCL SmartSwitch 26
PS SmartSwitch 26
NPA Mode (Network Menu) 26
NPA Mode (Parallel Menu) 24
NPA mode, setting
network port 26
parallel port 24
NPA Mode, USB 27
O
Orientation (PCL Emul Menu) 20, 22
P
Page Protect (Setup Menu) 18
panel, control 5
paper jams
reprinting jammed pages 18
Paper Loading 12
paper menu 7
Paper Texture 10
Parallel Buffer (Parallel Menu) 24
Parallel interface 30
Parallel Menu 24
Advanced Status 24
Honor Init 25
MAC Binary PS 25
NPA Mode 24
Parallel Buffer 24
Parallel Mode 2 25
PCL SmartSwitch 24
Protocol 24
PS SmartSwitch 24
Parallel Mode 2 (Parallel Menu) 25
parallel port
configuring
bidirectional communication 24
buffer size 24
data sampling 25
hardware initialization 25
NPA mode 24
PCL SmartSwitch 24
protocol 24
PS SmartSwitch 24
PCL Emul Menu
35
Page 36

Index
A4 Width 20
Auto CR after LF 21, 23
Auto LF after CR 21, 23
Lines per Page 20, 22
Orientation 20, 22
Pitch 20
Point Size 20
Tray Renumber 21, 22
PCL emulation
A4 width 20
automatic carriage return 21, 23
automatic line feed 21, 23
lines per page 20, 22
orientation 20, 22
pitch 20
point size 20
tray renumber 21, 22
PCL font name 19
PCL font source 19
PCL Menu 19
PCL SmartSwitch (Network Menu) 26
PCL SmartSwitch (Parallel Menu) 24
PCL SmartSwitch, setting
network port 26
parallel port 24
PCL SmartSwitch, USB 27
PCL symbol set 20
PDF Menu 16
Pitch (PCL Emul Menu) 20
Point Size (PCL Emul Menu) 20
Portrait Height 10
Portrait Width 10
ports
network 26
parallel 24
PostScript emulation
font priority 21
PostScript Menu 21, 22
Font Priority 21
Power Saver 17, 30
Print Fonts 15
Print PS Error 21
Print Resolution 16
print timeout
configuring 18
Print Timeout (Setup Menu) 18
Printer Language 17
Protocol (Parallel Menu) 24
PS emulation
See PostScript emulation
PS SmartSwitch (Network Menu) 26
PS SmartSwitch (Parallel Menu) 24
PS SmartSwitch, setting
network port 26
parallel port 24
PS SmartSwitch, USB 27
Q
Quality Menu 16
R
Ready 30
Resetting the Printer 31
Resource Save 17
Restoring Factory Defaults 31
S
saving power 17
Separator Sheets 13
Separator Source 13
Setup Menu 16
Auto Continue 18
Download Target 17
Jam Recovery 18
Page Protect 18
Print Timeout 18
Toner Alarm 19
Wait Timeout 18
Std Net Setup (Network Menu) 26
Substitute Size 10
Symbol Set, PCL 20
T
Textured Paper 10
timeout
print 18
wait 18
toner
alarm 19
Toner Alarm (Setup Menu) 19
Toner Darkness 16
Toner Low 31
Tray <x> Missing 31
Tray <x> Type 8, 9
Tray Renumber (PCL Emul Menu) 21, 22
U
Units of Measure 10
Universal Paper Size 10
USB 31
USB Buffer 27
Utilities Menu 14
W
Wait Timeout (Setup Menu) 18
wait timeout, configuring 18
Waiting 31
36
 Loading...