

Page 1
E340, E342n
User’s Reference
June 2005
Lexmark and Lexmark with diamond design are trademarks of Lexmark International, Inc.,
registered in the United States and/or other countries.
© 2005 Lexmark International, Inc. All rights reserved.
740 West New Circle Road
Lexington, Kentucky 40550
Page 2

Notices
Edition notice
Edition: June 2005
The following paragraph does not apply to any country where
such provisions are inconsistent with local law: LEXMARK
INTERNATIONAL, INC., PROVIDES THIS PUB L IC ATION “AS IS”
WITHOUT WARRANTY OF ANY KIND, EITHER EXPRESS OR
IMPLIED, INCLUDING, BUT NOT LIMITED TO, THE IMPLIED
WARRANTIES OF MERCHAN TABILITY OR FITNESS FOR A
PARTICULAR PURPOSE. Some states do not allow disclaimer of
express or implied warranties in certain transactions; therefore, this
statement may not apply to you.
This publication could include technical inaccuracies or
typographical errors. Changes are periodically made to the
information herein; these changes will be incorporated in later
editions. Improvements or changes in the products or the programs
described may be made at any time.
Comments about this publication may be addressed to Lexmark
International, Inc., Department F95/032-2, 740 West New Circle
Road, Lexington, Kentucky 40550, U.S.A. In the United Kingdom
and Eire, send to Lexmark International Ltd., Marketing and
Services Department , Westhorpe House, Westhorpe, Marlow
Bucks SL7 3RQ. Lexmark may use or distribute any of the
information you supply in any way it believes appropriate without
incurring any obligation to you. You can purchase additional copies
of publications related to this product by calling 1-800-553-9727. In
the United Kingdom and Eire, call +44 (0)8704 440 044. In other
countries, contact your point of purchase.
References in this publication to products, programs, or services do
not imply that the manufacturer intends to make these available in
all countries in which it operates. Any reference to a product,
program, or service is not intended to state or imply that only that
product, program, or service may be used. Any functionally
equivalent product, program, or service that does not infringe any
existing intellectual property right may be used instead. Evaluation
and verification of operation in conjunction with other products,
programs, or services, except those expressly designated by the
manufacturer , are the user’s responsibility.
© 2005 Lexmark International, Inc.
All rights reserved.
UNITED STATES GOVERNMENT RIGHTS
This software and any accompanying documentation provided
under this agreement are commercial computer software and
documentation developed exclusively at private expense.
Trademarks
Lexmark and Lexmark with diamond design, and MarkVision are
trademarks of Lexmark International, Inc., registered in the United
States and/or other countries.
PictureGrade is a trademark of Lexmark International, Inc.
®
PCL
is a registered trademark of the Hewlett-Packard Company.
PCL is Hewlett-Packard Company’s designation of a set of printer
commands (language) and functions included in its printer
products. This printer is intended to be compatible with the PCL
language. This means the printer recognizes PCL commands used
in various application programs, and that the printer emulates the
functions corresponding to the commands.
PostScript
Incorporated. PostScript 3 is Adobe Systems’ designation of a set
of printer commands (language) and functions included in its
software products. This printer is intended to be compatible with the
PostScript 3 language. This means the printer recognizes
PostScript 3 commands used in various application programs, and
that the printer emulates the functions corresponding to the
commands.
Details relating to compatibility are included in the Technical
Reference.
Other trademarks are the property of their respective owners.
®
is a registered trademark of Adobe Systems
Licensing notice
The printer resident software contains software developed and
copyrighted by Lexmark.
In addition, the printer resident software may contain:
• Lexmark modified software licensed under the provisions of
the GNU General Public License version 2 and/or the GNU
Lesser General Public License version 2.1
• Software licensed under the BSD license
• Software licensed under other licenses
Click the title of the document you want to review:
BSD License and Warranty statements
GNU General Public License
Other licenses
Notices
2
Page 3

Notices
The Lexmark modified third-party software covered by these thirdparty licenses is free software; you can redistribute it and/or modify
it under the terms of the licenses referenced abov e. These licenses
do not provide you any rights to the Lexmark copyrighted software
in this printer.
Since the third-party licensed software the Lexmark modifications
are based on is supplied explicitly without warranty, use of the
Lexmark modified version is similarly provided without warranty.
See the warranty disclaimers in the referenced licenses for
additional details.
To obtain source code files for the Le xmark modified GNU licensed
software, launch the drivers CD that shipped with your printer and
click Contact Lexmark.
Safety information
• Connect the power cord to a properly grounded electrical
outlet that is near the product and easily accessible.
CAUTION: Do not set up this product or make any electrical
or cabling connections, such as the power cord or tel ephone,
during a lightning storm.
• Refer service or repairs, other than those described in the
operating instructions, to a professional service person.
• This product is designed, tested, and approved to meet strict
global safety standards with the use of specific Lexmark
components. The safety features of some parts may not
always be obvious. Le xmark is not responsible f or the use of
other replacement parts.
• Your product uses a laser.
CAUTION: Use of controls or adjustments or performance of
procedures other than those specified herein may result in
hazardous radiation exposure.
• Your product uses a printing process that heats the print
media, and the heat may cause the media to release
emissions. You must understand the section in your
operating instructions that discusses the guidelines for
selecting print media to avoid the possibility of harmful
emissions.
Laser notice
The printer is certified in the U.S. to conform to the requirements of
DHHS 21 CFR Subchapter J for Class I (1) laser products, and
elsewhere is certified as a Class I laser product conforming to the
requirements of IEC 60825-1.
Class I laser products are not considered to be hazardous. The
printer contains internally a Class IIIb (3b) laser that is nominally a
5 milliwatt gallium arsenide laser operating in the w avelength region
of 770-795 nanometers. The laser system and printer are designed
so there is never any human access to laser radiation above a
Class I level during normal operation, user maintenance, or
prescribed service condition.
The United Kingdom Telecommunications Act 1984
This apparatus is approved under the approval number
NS/G/1234/J/100003 for the indirect connections to the public
telecommunications systems in the United Kingdom.
Conventions
Note: A note identifies something that could help you.
CAUTION: A caution identifies something that could cause you
harm.
Warning: A warning identifies something that could damage your
product hardware or software.
Electronic emission notices
Federal Communications Commission (FCC)
compliance information statement
The Lexmark E340, Machine Type 4511-600, and Lexmark E342n,
Machine Type 4511-610, have been tested and found to comply
with the limits for a Class B digital device , pursuant to Part 15 of the
FCC Rules. Operation is subject to the following two conditions: (1)
this device may not cause harmful interference, and (2) this device
must accept any interference received, including interference that
may cause undesired operation.
The FCC Class B limits are designed to provide reasonable
protection against harmful interference in a residential installation.
This equipment generates, uses, and can radiate radio frequency
energy and, if not installed and used in accordance with the
instructions, may cause harmful interference to radio
communications. However, there is no guarantee that interference
will not occur in a particular installation. If this equipment does
cause harmful interference to radio or television reception, which
can be determined by turning the equipment off and on, the user is
encouraged to try to correct the interference by one or more of the
following measures:
• Reorient or relocate the receiving antenna.
• Increase the separation between the equipment and
receiver.
• Connect the equipment into an outlet on a circuit different
from that to which the receiver is connected.
• Consult your point of purchase or service representative for
additional suggestions.
The manufacturer is not responsible for any radio or television
interference caused by using other than recommended cables or by
unauthorized changes or modifications to this equipment.
Unauthorized changes or modifications could void the user's
authority to operate this equipment.
Note: To assure compliance with FCC regulations on
electromagnetic interference for a Class B computing device, use a
properly shielded and grounded cable such as Lexmark part
number 1329605 for parallel attach or 12A2405 for USB attach.
Safety information
3
Page 4
Notices
Use of a substitute cable not properly shielded and grounded may
result in a violation of FCC regulations.
Any questions regarding this compliance information statement
should be directed to:
Director of Lexmark Technology & Services
Lexmark International, Inc.
740 West New Circle Road
Lexington, KY 40550
(859) 232-3000
Industry Canada compliance statement
This Class B digital apparatus meets all requirements of the
Canadian Interference-Causing Equipment Regulations.
Avis de conformité aux normes de l’industrie du
Canada
Cet appareil numérique de la classe B respecte toutes les
exigences du Règlement sur le matériel brouilleur du Canada.
European Community (EC) directives conformity
This product is in conformity with the protection requirements of EC
Council directives 89/336/EEC and 73/23/EEC on the
approximation and harmonization of the laws of the Member States
relating to electromagnetic compatibility and safety of electrical
equipment designed for use within certain voltage limits.
A declaration of conformity with the requirements of the directives
is available from the Director of Manufacturing and Technical
Support, Lexmark International, S. A., Boigny, France.
This product satisfies the limits of EN 55022; safety requirements
of EN 60950; radio spectrum requirements of ETSI EN 300 330-1
and ETSI EN 300 330-2; and the EMC requirements of EN 55024,
ETSI EN 301 489-1 and ETSI EN 301 489-3.
The following measurements were made in accordance with
ISO 7779 and repor ted in conformance with ISO 9296.
1-meter average sound pressure, dBA
Printing 53—Machine types 4511-600, 4511-610
Idling 30
ENERGY STAR
The EPA ENERGY STAR Office
Equipment program is a partnership effort
with office equipment manufacturers to
promote the introduction of energyefficient products and to reduce air
pollution caused by power generation.
Companies participating in this program
introduce products that power down when
they are not being used. This f eature will cut the energ y used b y up
to 50 percent. Lexmark is proud to be a participant in this program.
As an ENERGY STAR Partner, Lexmark International, Inc. has
determined that this product meets the ENERGY STAR guidelines
for energy efficiency.
WEEE
The WEEE logo signifies specific recycling
programs and procedures for electronic products
in countries of the European Union. We
encourage the recycling of our products. If you
have further questions about recycling options,
visit the Lexmark Web site at www.lexmark.com
for your local sales office phone number.
Japanese VCCI notice
If this symbol appears on your product, the
accompanying statement is applicable.
Korean MIC statement
This equipment has If this symbol appears
on your product, the accompanying
statement is applicable.
This equipment has undergone EMC registration as a household
product. It can be used in any area, including a residential area.
Noise emission levels
Printer energy consumption
Printer energy consumption
The following table documents the power consumption
characteristics of the printer.
Mode Description Power consumption
Printer is generating
Printing
Ready
Power
Saver
Off
The power consumption levels listed in the previous table represent
time-averaged measurements. Instantaneous power draws may be
substantially higher than the average.
4
hard copy output 475 W
Printer is waiting for
a print job 85 W
Printer is in energy
saving mode 8 W
Printer is plugged
into a wall outlet, b ut
switch is turned off 0 W
Page 5

Notices
Power Saver
This printer is designed with an energy-saving mode called Power
Saver. The Power Saver Mode is equivalent to the EPA Sleep
Mode. The Power Saver Mode sav es energy by lowering power
consumption during extended periods of inactivity. The Po wer
Saver Mode is automatically engaged after this printer is not used
for a specified period of time, called the Pow er Sav er Timeout. The
factory default Power Saver Timeout is 30 minutes for the
Lexmark E320, and Lexmark E342n.
By using the printer configuration menus, the P ower Sa ver Timeout
can be modified between 1 minute and 240 minutes. Setting the
Power Saver Timeout to a low value reduces energy consumption,
but may increase the response time of the printer. Setting t he Power
Saver Timeout to a high value maintains a fast response, but uses
more energy.
If the Power Sa ver Mode is aff ecting the effectiv e use of this printer ,
this mode can be disabled from the Local Printer Settings Utility
(see page 14) or, if you have a network model, from the printer’s
resident Web page (see page 91).
Total energy usage
It is sometimes helpful to calculate the total printer energy usage.
Since power consumption claims are provided in power units of
Watts, the pow er consumption should be multipl ied by the ti me the
printer spends in each mode in order to calculate energy usage.
The total printer energy usage is the sum of each mode's energy
usage.
Statement of Limited Warranty
Lexmark International, Inc. Lexington, KY
This limited warranty applies to the United States and Canada. For
customers outside the U.S., refer to the country-specific warranty
information that came with your product.
Lexmark E340, E342n
This limited warranty applies to this product only if it was originally
purchased for your use, and not for resale, from Lexmark or a
Lexmark Remarketer, referred to in this statement as “Remarketer .”
Limited warranty
Lexmark warrants that this product:
• Is manufactured from new parts, or new and serviceable
used parts, which perform like new parts
• Is, during normal use, free from defects in material and
workmanship
If this product does not function as warranted during the warranty
period, contact a Remarketer or Lexmark for repair or replacement
(at Lexmark's option).
If this product is a feature or option, this statement applies only
when that feature or option is used with the product for which it was
intended. To obtain warranty service, you may be required to
present the feature or option with the product.
If you transfer this product to another user, warranty service under
the terms of this statement is available to that user for the
remainder of the warranty period. You should transfer proof of
original purchase and this statement to that user.
Limited warranty service
The warranty period starts on the date of original purchase as
shown on the purchase receipt and ends 12 months later provided
that the warranty period for any supplies and for any maintenance
items included with the printer shall end earlier if it, or its original
contents, are substantially used up, depleted, or consumed.
###List product-specific maintenance items such as fuser units,
transfer belts, and paper feed items)###, if any, and any other items
for which a Maintenance Kit is availabl e are substantially consumed
when the printer displays a “Life Warning” or “Scheduled
Maintenance” message for such item.
To obtain warranty service you may be required to present proof of
original purchase. You may be required to deliver your product to
the Remarketer or Lexmark, or ship it prepaid and suitably
packaged to a Lexmark designated location. You are responsible
for loss of, or damage to, a product in transit to the Remarketer or
the Lexmark designated location.
When warranty service involves the e xchange of a product or part,
the item replaced becomes the property of the Remarketer or
Lexmark. The replacement may be a new or repaired item.
The replacement item assumes the remaining warranty period of
the original product.
Replacement is not available to you if the product you present for
exchange is defaced, altered, in need of a repair not included in
warranty service, damaged beyond repair, or if the product is not
free of all legal obligations, restrictions, liens, and encumbrances.
Before you present this product for warranty service, remove all
print cartridges, programs, data, and removable storage media
(unless directed otherwise by Lexmark).
For further explanation of your warranty alternatives and the
nearest Lexmark authorized servicer in your area contact Lexmark
on the World Wide Web at http://support.lexmark.com.
Remote technical support is provided for this product throughout its
warranty period. For products no longer covered by a Lexmark
warranty, technical support may not be available or only be
available for a fee.
Extent of limited warranty
Lexmark does not warrant uninterrupted or error-free operation of
any product or the durability or longevity of prints produced by any
product.
Warranty service does not include repair of failures caused by:
• Modification or unauthorized attachments
• Accidents, misuse, abuse or use inconsistent with Lexmark
user’s guides, manuals, instructions or guidance
• Unsuitable physical or operating environment
• Maintenance by anyone other than Lexmark or a Lexmark
authorized servicer
• Operation of a product beyond the limit of its duty cycle
• Use of printing media outside of Lexmark specifications
• Refurbishment, repair, refilling or remanufacture by a third
party of products, supplies or parts
• Products, supplies, parts, materials (such as toners and
inks), software, or interfaces not furnished by Lexmark
Statement of Limited Warranty
5
Page 6

Notices
TO THE EXTENT PERMITTED BY APPLICABLE LA W , NEITHER
LEXMARK NOR ITS THIRD PARTY SUPPLIERS OR
REMARKETERS MAKE ANY OTHER WARRANTY OR
CONDITION OF ANY KIND, WHETHER EXPRESS OR IMPLIED ,
WITH RESPECT TO THIS PRODUCT, AND SPECIFICALLY
DISCLAIM THE IMPLIED WARRANTIES OR CONDITIONS OF
MERCHANTABILITY, FITNESS FOR A PARTICULAR
PURPOSE, AND SA TISF A CTOR Y QUALI TY . ANY W ARRANTIES
THAT MAY NOT BE DISCLAIMED UNDER APPLICABLE LAW
ARE LIMITED IN DURATION TO THE WARRANTY PERIOD. NO
WARRANTIES, EXPRESS OR IMPLIED, WILL APPLY AFTER
THIS PERIOD. ALL INFORMA TION, SPECI FICA TIONS, PRICES,
AND SERVICES ARE SUBJECT TO CHANGE AT ANY TIME
WITHOUT NOTICE.
Limitation of liability
Your sole remedy under this limited warranty is set forth in this
document. For any claim concerning performance or
nonperformance of Lexmark or a Remarketer for this product under
this limited warranty, you may recover actual damages up to the
limit set forth in the following paragraph.
Lexmark's liability for actual damages from any cause whatsoever
will be limited to the amount you paid for the product that caused
the damages. This limitation of liability will not apply to claims by
you for bodily injury or damage to real property or tangible personal
property for which Lexmark is legally liable. IN NO EVENT WILL
LEXMARK BE LIABLE FOR ANY LOST PROFITS, LOST
SAVINGS, INCIDENTAL DAMAGE, OR OTHER ECONOMIC OR
CONSEQUENTIAL DAMAGES. This is true even if you advise
Lexmark or a Remarketer of the possibility of such damages.
Lexmark is not liable for any claim by you based on a third party
claim.
This limitation of remedies also applies to claims against any
Suppliers and Remarketers of Lexmark. Lexmark's and its
Suppliers' and Remarketers' limitations of remedies are not
cumulative. Such Suppliers and Remarketers are intended
beneficiaries of this limitation.
Additional rights
Some states do not allow limitations on how long an implied
warranty lasts, or do not allow the exclusion or limitation of
incidental or consequential damages, so the limitations or
exclusions contained above may not apply to you.
This limited warranty gives you specific legal rights. You may also
have other rights that vary from state to state.
Statement of Limited Warranty
6
Page 7

Contents
Notices ............................................................................................................2
Edition notice ................................................................................................................... 2
Trademarks ...................................................................................................................... 2
Licensing notice ...............................................................................................................2
Safety inform a t io n ... ................ ............................ ............................. ................ ................ 3
Laser notice ..................................................................................................................... 3
The United Kingdom Telecommunications Act 1984 ............. ............................. .. ........... 3
Conventions ..................................................................................................................... 3
Electronic emission notices .............................................................................................. 3
Printer energy consumption ............................................................................................. 4
Statement of Li m it e d Wa rranty ................................... ............... ............................. .......... 5
Chapter 1: Printer overview .......................................................................11
Chapter 2: Installing software for local printing ......................................13
Before installing printer software .................................................................................... 13
Windows ........................................................................................................................13
Installing pr in t e r so f tw a re using the drive rs CD .... ............................. ....................... 13
Installing pr in t e r so f tw a re through the A d d Printer Wizard ............................... ........ 13
Installing optional printer software ............................................................................14
Macintosh . ............. ........... ............. .............. ............. ........... ............. ............. ........... ...... 14
Creating a queue in Print Center / Printer Setup Util ity (Mac OS X) ........................ 14
UNIX/Linux ..................... ...................... .................... ...................... ...................... ..........15
Chapter 3: Installing software for network printing .................................16
Windows ........................................................................................................................16
Installing software for direct printing ......................................................................... 16
Setting up shared printing ............ ............... ............................. ............... ................. 17
Installing optional printer software ............................................................................18
Macintosh . ............. ........... ............. .............. ............. ........... ............. ............. ........... ...... 19
Mac OS X ................................................................................................................. 20
Mac OS 9.x .............................................................................................................. 21
7
Page 8

Contents
UNIX/Linux ..................... ...................... .................... ...................... ...................... ..........22
NetWare ... ........................ ...................... ........................ ......................... ....................... 22
Chapter 4: Print media tasks and tips .......................................................23
What types of print media can be loaded? ................................................................. .... 23
Where can print media be loaded in the printer? ................................. ..........................24
Tips on choosing the right print media ............................... ............................................25
Paper ........................................................................................................................25
Preprinted forms and letterhead ...............................................................................25
Transparencies ........................................................................................................ 25
Envelopes ................................................................................................................ 25
Labels ....................................................................................................................... 26
Card stock .................................... ............................ ............................. ................... 27
Tips on storing print media and supplies ........ ................................................................ 27
Storing paper ............................................................. ..................... ...................... .... 27
Storing supplies ........................................................................................................ 27
Tips on preventing jams ................................................................................................. 28
How to load the 250-sheet and 550-sheet trays ............................................................ 29
Extending the tray for legal or folio size paper ................................... ......................32
How to load the manual feeder ........................................................... ......................... ..33
How to use the rear exit ................................................................................................. 33
How to clear paper jams .................................... ............................. ............................. ..35
Chapter 5: Printing tasks ...........................................................................38
How to manually feed a print job .................................................................................... 38
How to print on both sides of the paper (manual duplex) ...............................................40
How to print multiple page images on one page (N-up printing) .................................... 42
How to print a booklet .................................. .. ............................. .. ................................. 43
How to print a poster ...................................................................................................... 44
How to print on letterhead .................................................... .. ........................... .. ........... 45
How to print using an overlay or a watermark ................................................................ 45
Using an overlay ...................................................................................................... 45
Using a watermark ................................................................................................... 46
How to cancel a print job ................................................................................................ 47
From the printer operator panel ...............................................................................47
From a Windows computer ......................................................................... ............. 47
Canceling a job from a Macintosh computer ............................................................ 47
Contents
8
Page 9

Contents
Chapter 6: How to install options ..............................................................48
How to access the system board ............... .............................. ........................... .. ......... 48
How to add a memory card ............................................................. .. ........................... ..50
How to add a flash card .................................................. ....................... ........................51
How to install a 550-sheet drawer ..................................................... .. ...........................52
Recognizing installed options ......................................................................................... 53
Chapter 7: Understanding the operator panel ..........................................54
Using the operator panel ................................................................................................ 54
Indicator light ............................................................................................................ 54
Buttons ..................................................................................................................... 55
Using the operator panel to change printer settings ...................................................... 56
Menus Disabled ........................................... .. .. .. .................................. .. .. ...................... 56
Using the printer menus .................. .............................................. ........................ ......... 58
Paper Menu .............................................................................................................. 59
Finishing Menu .........................................................................................................63
Utilities Menu ............................................................................................................ 65
Job Menu ................................................................................................................. 65
Quality Menu ........ ............................................. ........................ ............................... 67
Setup Menu ................................................................................................... ...........68
PCL Emul Menu ....................................................................................................... 71
PostScript Menu ........................................................ ............................................... 73
PPDS Menu .............................................................................................................73
Parallel Menu ................................................................. .. ................................... ..... 75
Network Menu ...... ............................................. ........................ ............................... 76
USB Menu ..................................... .. .. .. .......................................... ...........................78
Chapter 8: Understanding the printer messages .....................................80
Chapter 9: Understanding the printer configuration menus ...................86
Network menu ...... ............................................. ........................ ............................... 86
Parallel menu ................................................................. .. ................................... ..... 87
Setup menu ................................................................................................... ...........87
USB menu ..................................... .. .. .. .......................................... ...........................88
Utilities menu ............................................................................................................ 88
Chapter 10: Software and network tasks ..................................................89
Printing the menu settings and network setup pages .................................................... 89
Printing the Print Quality Test Pages ............................................................................. 90
Contents
9
Page 10

Contents
How to configure for TCP/IP .......................................................................................... 90
Assigning a printer IP address ........................................... ....................... ............... 90
Verifying the IP settings ........................................................................................... 90
Using the printer resident Web page .......... ........................................................... ......... 91
Chapter 11: Supplies information .............................................................92
What supplies do I need and how do I order them? ........... ........................ ....................92
Storing supplies ........................................................................................................ 93
How to conserve supplies .............................................................................................. 93
How to know when you need new supplies .............. .. .. ................................. ................ 94
Checking the toner and photoconductor levels ........................................................ 94
How to change a toner cartridge .................... .......................... ...................................... 95
Recycling Lexmark products .......................................................................... ................98
How to change a photoconductor kit ............................. .. ........................... .. ..................99
Chapter 12: Administration ......................................................................102
Disabling the operator panel menus ............................................................................ 102
Enabling the menus ..................................... ................................................. ......... 102
Restoring factory default settings ................................................................................. 103
Chapter 13: Troubleshooting ...................................................................104
General problems ........................................................................................................104
Print quality problems ................................................................................................... 106
How to clean the printhead lens .............................. ............................................. ..109
Index ............................................................ ................................................ 112
Contents
10
Page 11
1
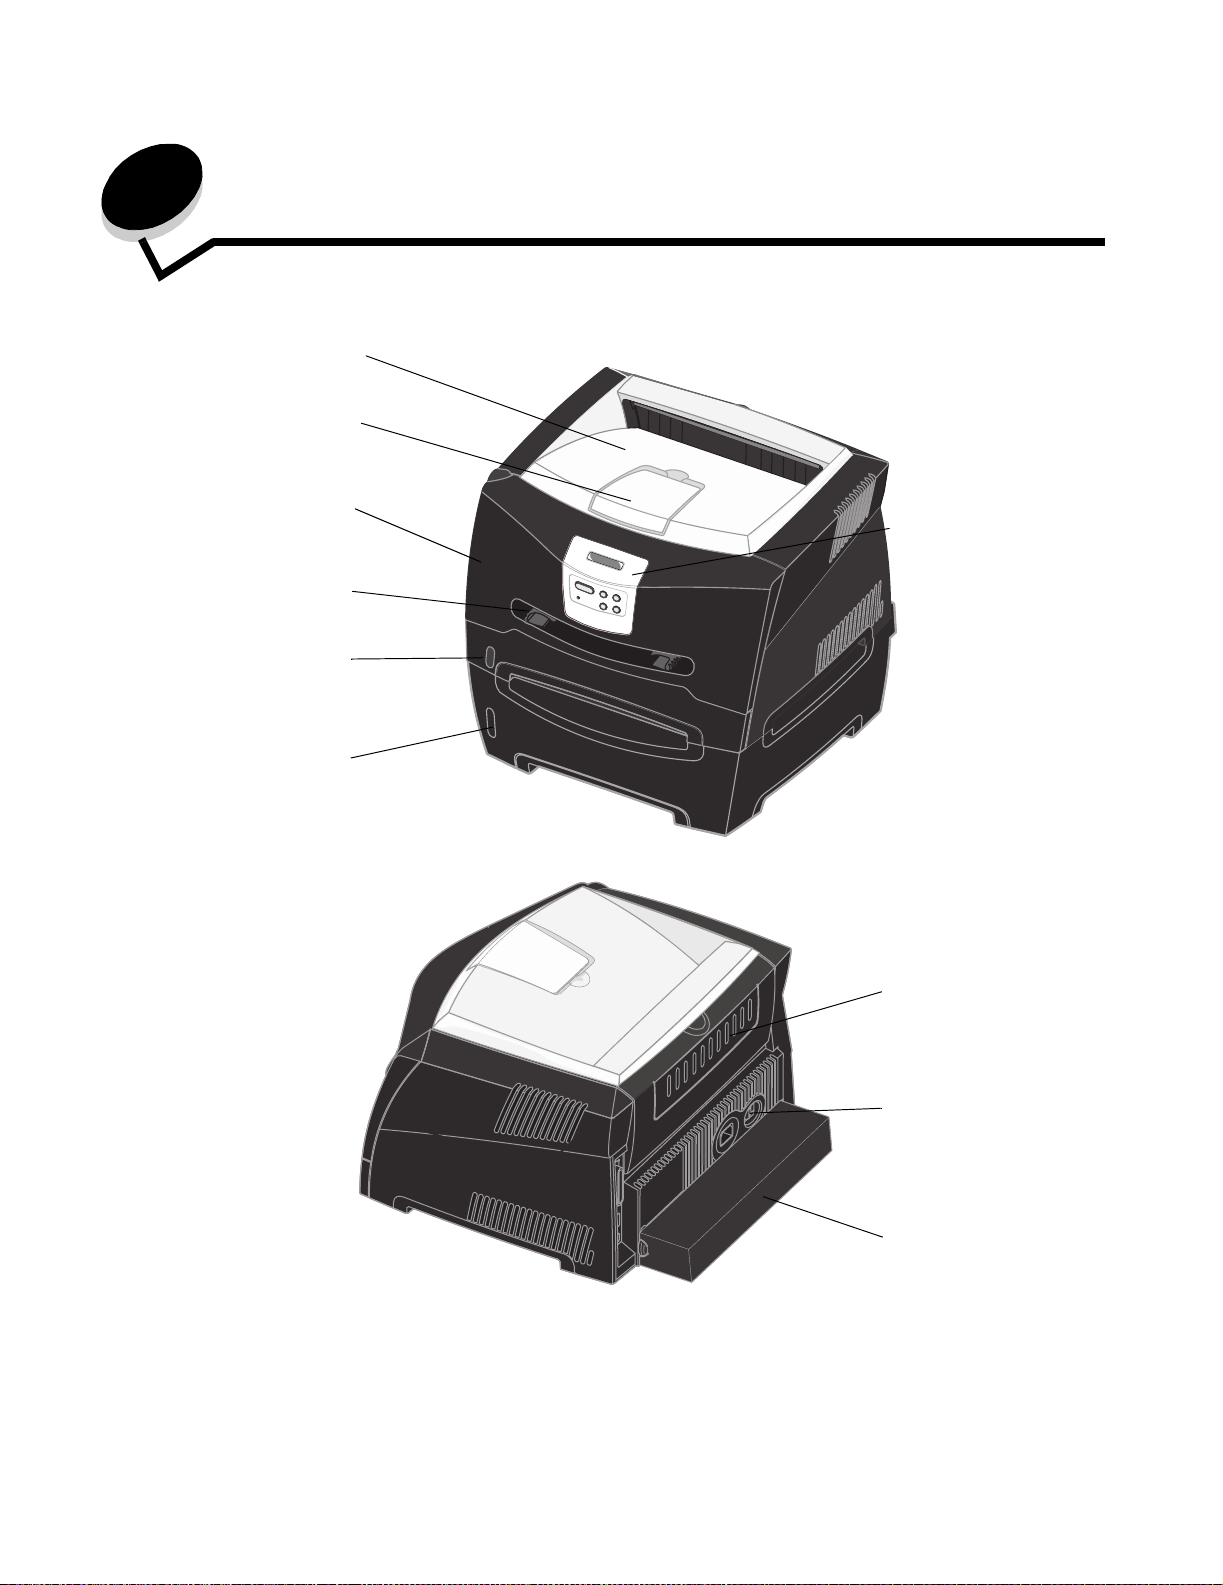
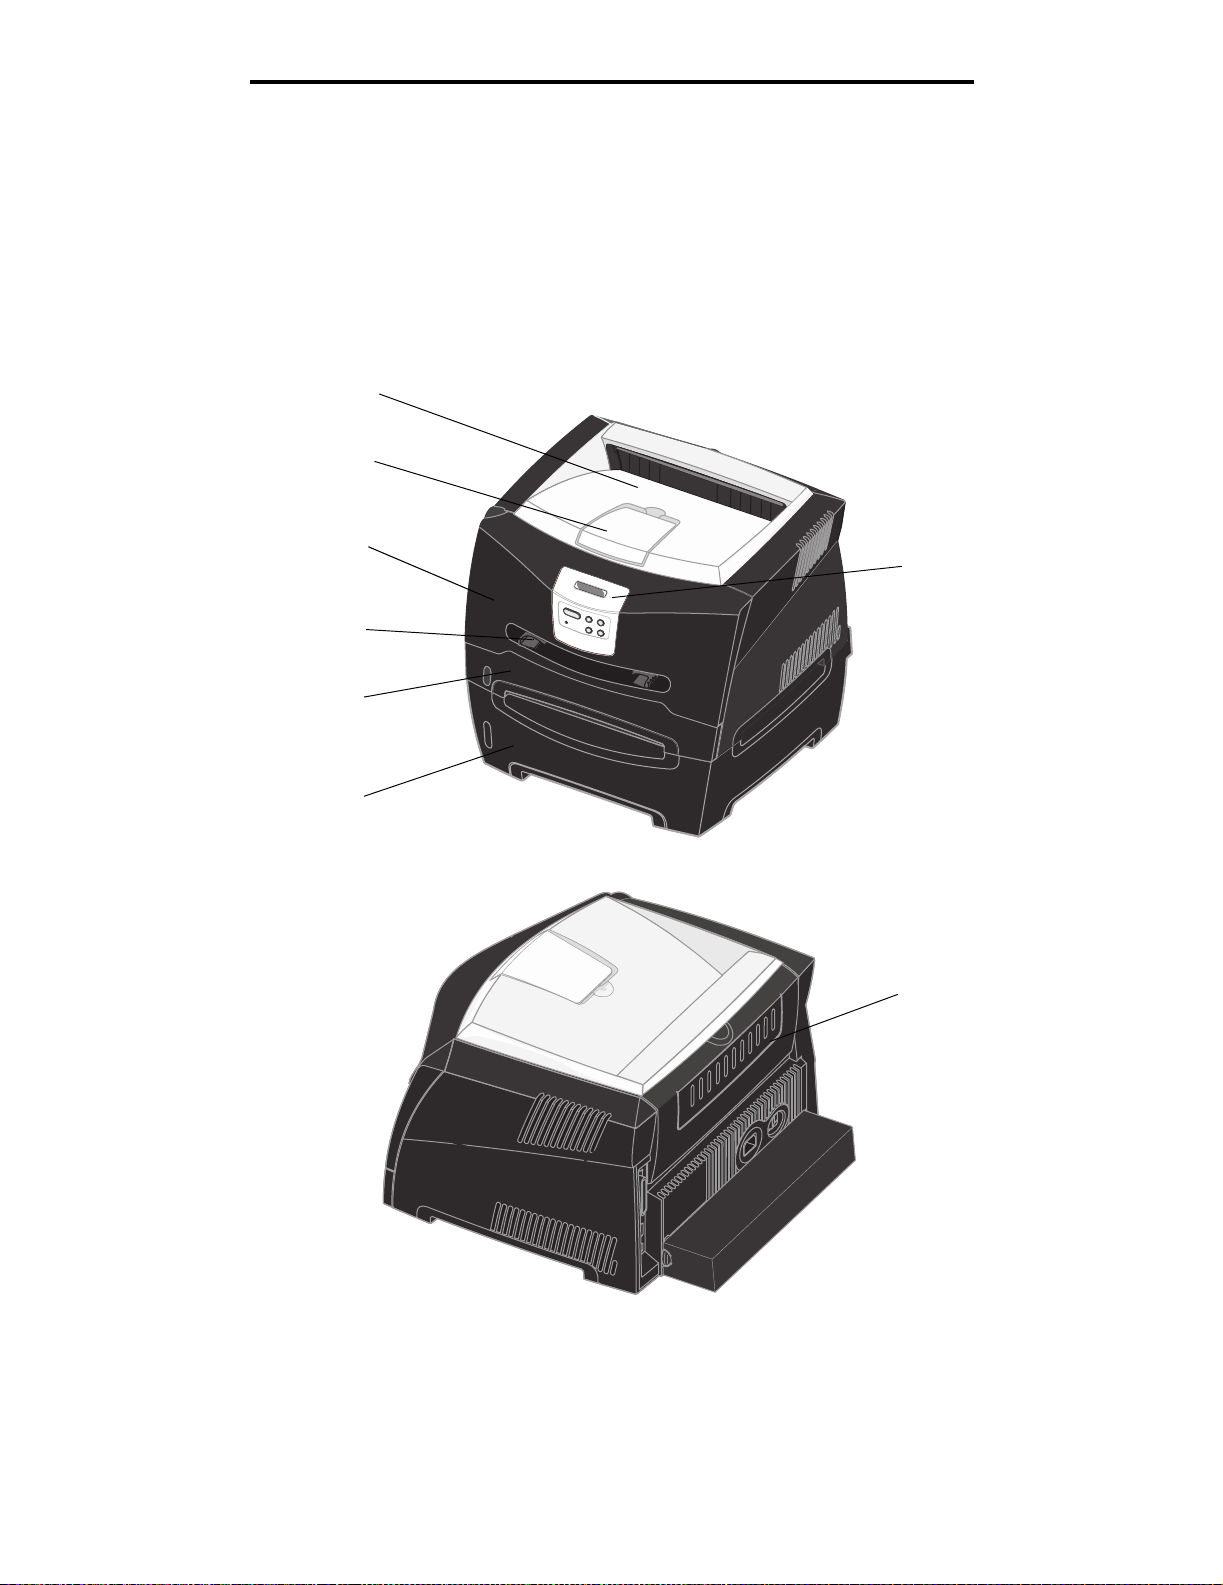
Printer overview
150-sheet output bin
Paper support
Front cover
Manual feeder
250-sheet tray
Optional 550-sheet drawer
Operator panel
Printer overview
11
Rear paper exit
Power button
Dust cover
Page 12
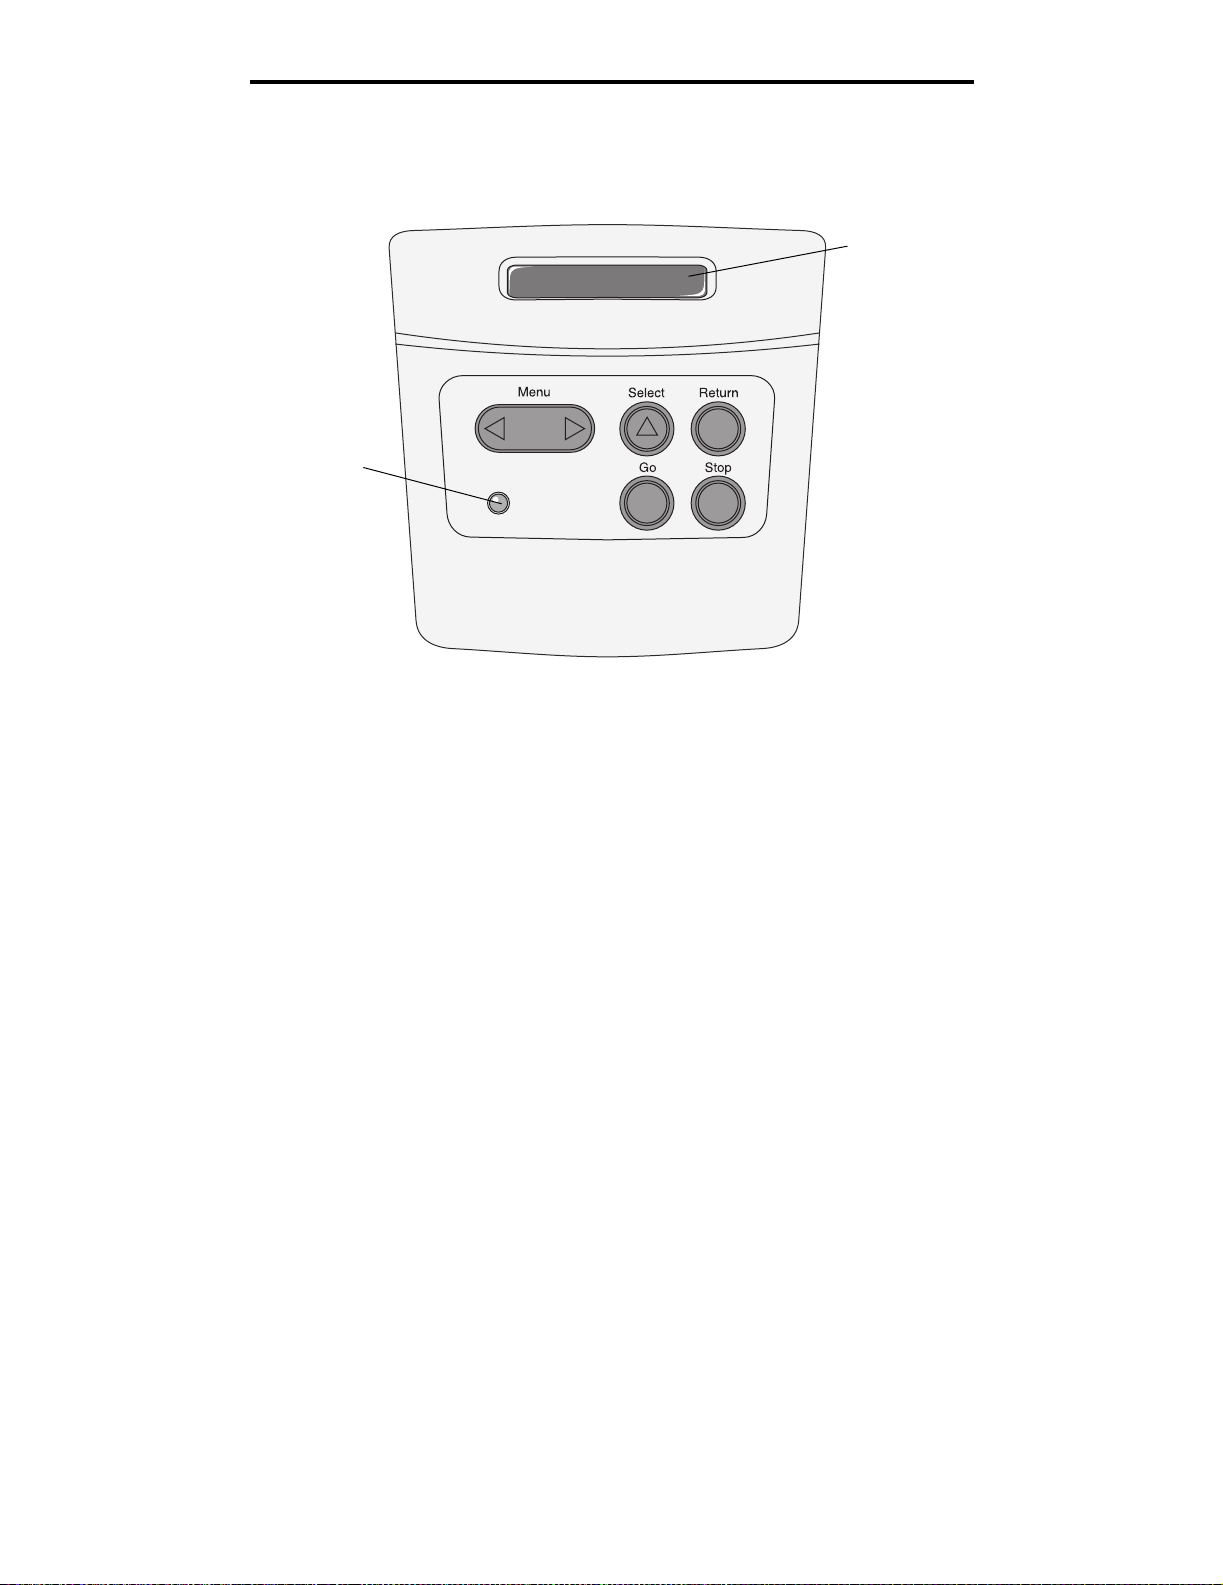
Printer overview
The printer opera t or pa nel h as a 2-li ne by 16-character l iqu id c rystal d isplay (LCD), five buttons, and o ne indicator light that
flashes when the printer is processing a job indicated by the Busy message .
LCD
Light
Printer overview
12
Page 13

2
Installing software for local printing
Before installing printer software
A local printer is a printer attached to a computer using a USB or parallel cable. You must install some necessary printer
software on the computer before connecting the USB cable.
Windows
The drivers CD can be used to install software on most Windows operating systems. If the operating system is not
supported by the CD, the Add Printer Wizard must be used. Updates for the printer software may be available on the
Lexmark Web site at www.lexmark.com.
Installing printer software using the drivers CD
You can install printer drivers and software for the following operating systems using the drivers CD:
• Windows Server 2003
• Windows Server 2003 x64
• Windows XP
• Windows XP x64 bit Edition
• Windows 2000
• Windows 98 Second Edition
• Windows Me
• Windows NT 4.x (USB not supported)
1 Insert the drivers CD. If the CD does not launch automatically, click Start Æ Run, and type D:\Setup.exe in the
Run dialog (where D is the letter of the CD-ROM drive).
2 Select the Local install path and follow the instructions on the screen.
3 Connect the USB ca bl e, and turn on the printer. The Plug and Play screen appears , and a printer obje ct is cre ated
in the printers folder of the computer.
Installing printer software through the Add Printer Wizard
The following operating systems must use the Add Printer Wizard to install printer software:
• Windows 95 (USB not supported)
• Windows 98 First Edition (USB not supported)
1 Insert the drivers CD. If the CD launches automatically, click Exit.
2 Launch the Add Printer Wizard .
3 When prompted, select to install a Local printer, then click Have Disk.
4 Specify the location of the printer software on the drivers CD. The path should be similar to the following:
D:\Drivers\Print\Win_9xMe\<language> where D is the letter of the CD-ROM drive.
5 Click OK.
Installing software for local printing
13
Page 14

Installing software for local printing
Installing optional printer software
If you want to use any of the other software applications available on the drivers CD, now is a good time to set them up.
Local Printer Settings Utility
The Local Printer Settin gs U til ity, a printer configuration utility, gives yo u th e a bil ity to c han ge and save printer s ett ing s on a
locally (USB and parallel) connected printer. User default settings remain in effect until you make other selections, or until
you restore the original printer settings (called preset factory default settings). The configurable settings are organized
according to menu . You can change settings such as Toner Darkness, P ower Saver, Default Paper Size, and Default Paper
Type.
Installing the Local Printer Settings Utility
1 Launch the drivers CD.
2 Click Install Printer Software.
3 Select the Custom install path.
4 Under Tools, select Local Printer Settings Utility.
5 Click Finish to complete the installation.
Use the printer driver to make changes to settings for individual print jobs, which will override the default settings on the
printer. To access the Local Printer Setup Utility from y our desktop , cl ick Start Æ Programs Æ Lexmark Æ Local Printer
Settings Utility.
Macintosh
Mac OS 9.x or later is required for USB printing. To print locally to a USB-attached printer, create a desktop printer icon
(Mac OS 9), or create a queue in Print Center / Printer Setup Utility (Mac OS X).
Note: A PPD for the printer is also available in a downlo ada b le softw are pa c kage on the Le x mark W eb si te
at www.lexmark.com.
Creating a queue in Print Center / Printer Setup Utility (Mac OS X)
1 Install a PostScript Printer Description (PPD) file on the computer. A PPD file provides detailed information about
the capabilities of a printer to the Macintosh computer.
a Insert the drivers CD.
b Double-click the installer package for the printer.
c Click Continue on the Welcome screen and again after viewing the Readme file.
d Click Continue after viewing the license agreement, and click Agree to accept the terms of the agreement.
e Select a Destination, and click Continue.
f On the Easy Install screen, click Install.
g Enter the user password, and click OK. All the necessary software is installed on the computer.
h Click Close when installation is complete.
2 Open Finder, click Applications, and click Utilities.
3 Double-click Print Center or Printer Setup Utility.
Macintosh
14
Page 15

Installing software for local printing
4 Do one of the follow ing :
• If the USB-attached printer appears in the Printer List, quit Print Center or Printer Setup Utility. A queue has
been created for the printer.
• If the USB-attached printer does not appear in the Printer List, make sure the USB cable is properly
connected and the printer is turned on. After the printe r appears in the Printer Lis t, quit Print Cente r or Printer
Setup Utility.
`
Creating a desktop printer icon (Mac OS 9.x)
1 Install a PostScript Printer Description (PPD) file on the computer. A PPD file provides detailed information about
the capabilities of a printer to the Macintosh computer.
a Insert the drivers CD.
b Double-click Classic, and double-click the installer package for the printer.
c Choose the language needed for use, and click Continue.
d Click Continue after viewing the Readme file.
e Click Continue after viewing the license agreement, and click Agree to accept the terms of the agreement.
f On the Easy Install screen, click Install. All the necessary files are installed on the computer.
g Click Close when installation is complete.
2 Do one of the follow ing :
• For Mac OS 9.0: Open Apple LaserWriter.
• For Mac OS 9.1–9.x: Open Applications, and click Utilities.
3 Double-click Desktop Printer Utility.
4 Select Printer (USB), and click OK.
5 In the USB Printer Selection section, clic k Change. If the p rinter does no t appear in the USB Printer Selec tion lis t,
make sure the USB cable is properly connected, and the printer is turned on.
6 Select the name of the printer, and click OK. The printer appears in the original Printer (USB) window.
7 In the PostScript Printer Description (PPD) File section, click Auto Setup. Make sure the printer PPD now
matches the printer in use.
8 Click Create, and click Save.
9 Specify a printer name, and click Save. The printer is now saved as a desktop printer.
UNIX/Linux
Local printing is supported on many UNIX and Linux platforms, such as Sun Solaris and Red Hat.
The Sun Solaris and Linux packages are available on the drivers CD and on the Lexmark Web site at www.lexmark.com.
The UNIX/Linux User’s Guide in each package give s de tai led ins tructio ns for installing and using Lexmark printers in UNIX
and Linux environments.
All the printer driver packages support local printing using a parallel connection. The driver package for Sun Solaris
supports USB connections to Sun Ray appliances and Sun workstations.
Visit the Lexmark Web site at www.lexmark.com for a complete list of s upported UNIX and Linux platforms.
UNIX/Linux
15
Page 16
3
Installing sof tware for network printi ng
Windows
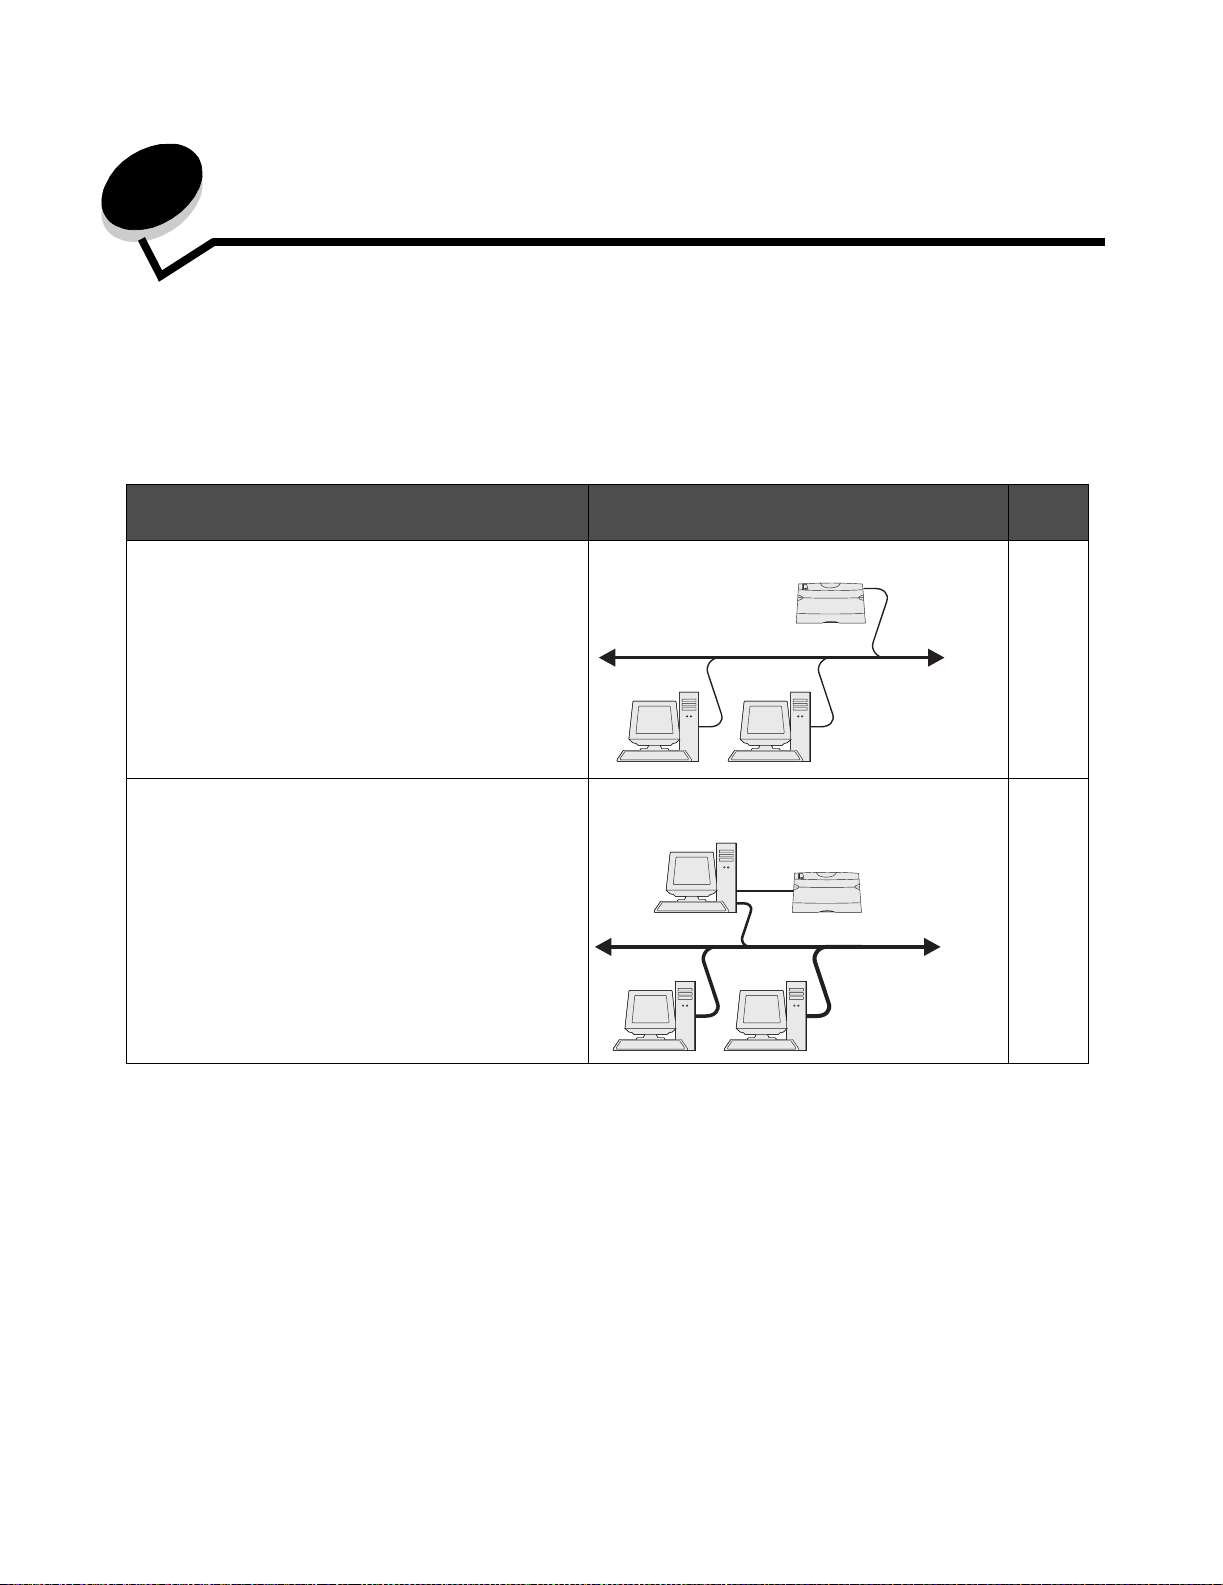
In Windows environments, network printers can be configured for direct printing or shared printing. Both network printing
methods require the installation of printer software and the creation of a network printer port.
Follow the steps for the printing configuration and operating system in use to configure the network printer:
Go to
Printing configuration
page
Direct IP printing
• Printer is connected directly to the network using a
network cable, such as Ethernet.
• Printer drivers are typically installed on each network
computer.
Shared printing
• Printer is connected to one of the computers on the
network using a local cable, such as USB.
• Printer drivers are instal led on the computer attached
to the printer.
• During driver installation, the printer is set up to be
“shared” so that o the r ne twork computers can print to
it.
Installing software for direct printing
16
Printer
Clients
17
Server
Printer
Clients
1 Launch the drivers CD.
2 Follow t he inst ructions on t he screen . Select th e Suggested path to accept the defaults. Select Custom to choose
the software that is installed. The printer is automatically discovered on the network, an IP address is assigned,
and a network printer object is created in the printers folder.
3 Print a test page to verify printer installation.
4 Repeat steps 1–4 on every computer you want to enable to print directly to the network printer.
Installing software for network printing
16
Page 17

Installing software for network printing
Setting up shared printing
Setting up shared printing requires several steps and should be done in the following order:
1 Install the software on the computer attached to the printer.
2 Share the printer on the network.
3 Connect other network computers to the printer.
Installing software on the computer attached to the printer
1 Launch the drivers CD.
2 Follow the instructions on the screen.
3 Connect the USB cab le to the printer . Once Plug an d Pla y is finished, a p rinter object wi ll be created in the printers
folder.
4 Print a test page to verify local printer installation.
Sharing the printer on the network
1 Open the Printers folder of the operating system.
2 Select the printer object.
3 Open the Properties of t he printer,and click the option to sha re th e prin ter. This requires assigning a shared name
to the printer.
4 Click OK. If files are missing, prompts may appear to request the operating system CD.
5 Check the following to make sure the printer was successfully shared.
• The printer object in the Printers folder now has a shared indicator. For example, in WindowsNT 4.0, a hand
appears under the printer object.
• Browse Network Neighborhood. Find the host name of the attached computer, and look for the shared name
assigned to the printer.
Connecting other network computers to the printer
The printer driver or a su bset of the driv er inf o rmation mu st be ins tal led on every network computer that y o u w ant to ena b le
to print to a shared printer.
Using the peer-to-peer method
With this method, the printer driver is fully installed on each network computer. Each network computer retains control of
driver modifications. Each network computer handles the print job processing.
1 Launch the Add Printer Wizard .
2 Select the option to add a network printer.
3 Enter the printer name or URL (if on t he In ternet or an intr a net ), and then cli ck Next. If the printer name or URL is
unknown, leave the text box blank, and then click Next.
4 Select the network printer from the Shared printers list. If the printer is not listed, ent er the path of the printer in the
text box. The path looks similar to the following: \\<server host name>\<shared printer name>.
The server host name is the na me of the serve r computer tha t identi fies it to the net work. The shared printer name
is the name assigned during the server installation process.
5 Click OK. When prompted, select whether this printer will be the default printer for the client.
6 When installation is complete, print a test page to verify.
Windows
17
Page 18

Installing software for network printing
7 Repeat steps 1–6 on every network computer you want to enable to print to the shared printer.
Using the point-and-print method
Note: Point and print ma y no t be sup ported in some 64 bi t en viron ments . Refer to the Lexma rk W eb site at
www.lexmark.com for the latest informat ion. Lo ok f or a Kno wled gebas e article about 64 bit su pport
for the printer.
This method is usu ally t he best use of s ystem res our ces . The c omput er attach ed to the printer h andles driv er mod ificat ions
and print job processing for all print jobs including those routed from other network computers. This lets the other network
computers return to applications much faster. With this method, a subset of driver information is copied from the computer
attached to the printer across the network to the other computers. This is just enough information to send a print job to the
printer.
1 On the next network computer you want to enable to print to the printer, double-click Network Neighborhood or
My Network Places on the desktop.
2 Locate the host name of the computer attached to the printer, and double-click the host name.
3 Right-click the shared printer name, and select the option to install the printer on your computer.
Wait a few minutes f or the printe r soft ware to be copied from the computer atta ch ed to the printe r to the com pu ter
you are working on, and for a new printer object to be added to the Printers folder. The time this takes varies
based on network traffic and other factors.
4 Close Network Neighborhood or My Network Places.
5 Print a test page to verify printer installation.
6 Repeat steps 1–5 on every network computer you want to enable to print to the shared printer.
Installing optional printer software
If you want to use any of the other software applications available on the drivers CD, now is a good time to set them up.
They can be installed by following the Custom install path.
Helpful tips for network printing
Assigning a printer IP address
If your network is using DHCP, an IP address is automatically assigned after you connect the network cable to the printer.
1 Look for the address under the “TCP/IP” heading on the network setup page. See Printing a network
setup page.
2 Go to Verifying the IP settings on page 19.
If your network is not using DHCP, then you must manually assign an IP address to the printer.
An easy way to do this is to use the printer operator panel:
Standard Network appears if you purchased a printer with a network port on the printer system board. If you have a
MarkNet print server installed in option card slot 1 or 2, you see Network Option 1 or Network Option 2.
1 Press Menu until you see NETWORK MENU, and then press Select.
2 Press Menu until you see Standard Network, and then press Sele ct.
3 Press Menu until you see Std Net Setup (or Network 1 Setup or Network 2 Setup), and then press Select.
4 Press Menu until you see TCP/IP, and then press Select.
Windows
18
Page 19

Installing software for network printing
5 Press Menu until you see Set IP Address, and then press Se l e ct.
6 Change the address by pressing Menu to increase or decrease each number. Press Select to move to the next
segment. Press Select when you are finished. The message Saved appears briefly.
7 Press Menu until you see Set IP Netmask, and then press Select.
8 Repeat step 6 to set the IP Netmask.
9 Press Menu until you see Set IP Gateway , and then press Select.
10 Repeat step 6 to set the IP Gateway.
11 When you are finished, press Go to return the printer to the Ready state.
12 Go on to Verifying the IP settings on page 19.
Printing a network setup page
If the printer is attached to a network, print a network setup page to verify th e network connection. This page als o p ro v ide s
important information that helps you configure for network printing.
Note: If an optional MarkNet print server is installed, you may see Print Net1 Setup (or Print Net2
Setup).
1 Make sure the printer is on.
2 Press Menu until you see UTILITIES MENU, and then press Select.
3 Press Menu until you see Print Net Setup, and then press Select to print the page.
Note: Save the network setup page after it prints. You will use it in the other steps.
4 Check the first section on the network setup page and confirm that Status is “Connected.”
If Status is “Not Connected,” your LAN drop may not be active or your network cable may be malfunctioning.
Consult your net work support person f or a soluti on. Afterwa rds, print an other netw ork setup pag e to verify tha t you
are connected to your network.
Printing setup pages
Verifying the IP settings
Print another network setu p page . L ook u nder the “TCP/I P” headi ng, an d mak e su re t he IP ad dress , netm ask, and ga te way
are what you e xp ected . See Printing the menu settings a nd netw ork se tup pa ges on page 89 for additiona l inf ormatio n.
Note: To display a command prompt on a Windows computer, click Start
prompt (or Accessories
Ping the printer , and v e rify that it re spond s. For example , at a comm and pro mpt on a netwo rk compu ter, type ping followed
by the new printer IP address (f or e xam ple, ping 192.168.0. 11). If the printer is active on the netw ork, you s hould rec eive
a reply.
Æ Command prompt if using Windows 2000).
Æ Programs Æ Command
Macintosh
To print to a network printer, e ach Mac intos h user must instal l a c ustom PostScript Printer Description (PPD ) file , an d eithe r
create a desktop printer on the computer (Mac OS 9.x), or create a print queue in Print Center (Mac OS X).
Note: A PostScript Printer Description (PPD) file provides detailed information about the capabilities of a
printer to UNIX or Macintosh computers.
Macintosh
19
Page 20

Installing software for network printing
Mac OS X
Step 1: Install a custom PPD file
1 Install a PostScript Printer Description (PPD) file on the computer.
a Insert the drivers CD.
b Double-click the installer package for the printer.
c Click Continue on the Welcome screen and again after viewing the Readme file.
d Click Continue after viewing the license agreement, and click Agree to accept the terms of the agreement.
e Select a Destination, and click Continue.
f On the Easy Install screen, click Install.
g Enter the user password, and click OK. All the necessary software is installed on the computer.
h Click Close when installation is complete.
Step 2: Create a print queue in Print Center or Printer Setup Utility
Using AppleTalk Printing
Follow these steps to create a print queue using AppleTalk Printing.
1 Open Finder, click Applications, and click Utilities.
2 Double-click Print Center or Printer Setup Utility.
3 Choose Add Printer from the “Printers” menu.
4 Choose AppleTalk from the pop-up menu. Look on the network setup page under the “AppleTalk” heading to
know which zone or printer to select.
5 Select the AppleTalk zone from the list.
6 Select the new printer from the list, and click Add.
7 Verify printer installation:
a Open Finder, click Applications, and click TextEdit.
b Choose Print from the “File” menu.
c Choose Summary from the “Copies & Pages” pop-up menu. Look on the Network Setup page under the
“AppleTalk” heading to find the default name of the printer to know which printer to select.
• If the PPD file displayed in the Summary window is correct for the printer, then printer setup is complete.
• If the PPD file displayed in the Summary window is not correct f or the prin ter, delete the printer from the
printer list in Print Center or Printer Setup Utility, and repeat Step 1: Install a custom PPD file.
Using IP Printing
Follow these steps to create a print queue using IP Printing.
1 Open Finder, click Applications, and click Utilities.
2 Double-click Print Center or Printer Setup Utility.
3 Choose Add Printer from the “Printers” menu.
4 Choose IP Printing from the pop-up menu.
5 Enter the IP address or the printer DNS name in the Printer Address box.
6 Choose Lexmark from the “Printer Model” pop-up menu.
Macintosh
20
Page 21

Installing software for network printing
7 Select the new printer from the list, and click Add.
8 Verify printer installation:
a Open Finder, click Applications, and click TextEdit.
b Choose Print from the “File” menu.
c Choose Summary from the “Copies & Pages” pop-up menu.
d Do one of the following:
• If the PPD file displayed in the Summary window is correct for the printer, then printer setup is complete.
• If the PPD file displayed in the Summary window is not correct f or the printer, delete the printer from the
printer list in Print Center or Printer Setup Utility, and repeat the step for installing a custom PPD file.
Mac OS 9.x
Step 1: Install a custom PPD file
1 Insert the drivers CD.
a Double-click Classic, and double-click the installer package for the printer.
b Choose the language needed for use, and click Continue.
c Click Continue after viewing the Readme file.
d Click Continue after viewing the license agreement, and click Agree to accept the terms of the agreement.
e On the Easy Install screen, click Install. All the necessary files are installed on the computer.
f Click Close when installation is complete.
Note: A PPD for the printer is also available in a downlo ada b le softw are pa c kage on the Le x mark W eb si te
at www.lexmark.com.
Step 2: Create a desktop pr inter
1 In the Chooser, select the LaserWriter 8 driver.
2 For a routed net w o rk, selec t the de fault zone from the li st. For the zone to selec t, l ook on the N etw ork Set up p ag e
under AppleTalk for Zone.
3 Select the new printer from the list.
4 To determine which printer to select, look on the Network Setup page under the “AppleTalk” heading to find the
default name of the printer.
5 Click Create.
6 Make sure there is an icon next to the printer name in the Chooser.
7 Close the Chooser window.
8 Verify printer installation.
a Click the desktop printer icon just added.
b Choose Printing
– If the PPD file displayed in the PostScript Printer Description (PPD) file portion of the menu is correct for the
printer, printer setup is complete.
– If the PPD file displayed in the PostScript Printer Description (PPD) file portion of the menu is not correct for
the printer, repeat the step for installing a custom PPD file.
Æ Change Setup.
Macintosh
21
Page 22

Installing software for network printing
UNIX/Linux
The printer supports many UNIX and Linux platforms, such as Sun Solaris and Red Hat. Visit the Lexmark Web site at
www.lexmark.com for a complete list of supported UNIX and Linux platforms.
Note: The Sun Solaris and Linux pack ages are av aila ble on the driv ers CD and on the Le xmark We b site a t
www.lexmark.com.
Lexmark pro vide s a printer driv er p ac kage f or eac h suppo rted UNIX and Linu x plat f orm. The User’ s Guide in each package
gives detailed instructions for installing and using Lexmark printers in UNIX and Linux environments.
These packages are available for download from the Lexmark Web site. The driver package needed is also on the drivers
CD.
NetWare
The printer supports Novell Distributed Print Services (NDPS/iPrint). For the latest information about installing a network
printer in a NetWare environment, launch the drivers CD, and click View Documentation.
UNIX/Linux
22
Page 23

4
Print media tasks and tips
What types of print media can be lo aded?
Get the most out of your printer by properly loading the trays. Never mix media types within a tray.
Source Sizes Types Weight Capacity* (sheets)
2
(24 lb)
2
2
2
2
2
• 250 paper
• 50 labels
• 50 transparencies
• 550 paper
• 50 labels
• 50 transparencies
1
Tray 1
(250-sheet tray)
Tray 2
(550-sheet tray)
Manual feeder A4, A5, JIS B5, letter,
* Capacity for 20 lb print media, unless otherwise noted.
†
Grain short is recommended. Use rear exit for best results.
‡
Universal size ranges:
– Tray 1: 89–216 x 210–356 mm (3.5–8.5 x 8.27–14.0 in.)
– Tray 2: 148–216 x 210–356 mm (5.83–8.5 x 8.27–14.0 in.)
– Manual feeder: 76–216 x 127–356 mm (3.0–8.5 x 5.0–14.0 in.) (includes 3 x 5 in. cards)
A4, A5, JIS B5, letter,
legal, executive, folio,
statement, Universal
A4, A5, JIS B5, letter,
legal, executive, folio,
statement, Universal
legal, executive, folio,
statement, Universal
7¾, 9, 10, DL, C5, B5,
other (custom size)
‡
‡
‡
Plain paper ,
transparencies,
labels
Plain paper ,
transparencies,
labels
Plain paper ,
transparencies,
labels
Card stock
Envelopes 90 g/m
†
60–90 g/m
(16–24 lb)
60–90 g/m
(16–24 lb)
60–163 g/m
(16–43 lb)
• 120–163 g/m
(16–90 lb) Index
Bristol
• 75–163 g/m
(50–100 lb) Tag
Print media tasks and tips
23
Page 24
Print media tasks and tips
Where can print media be loaded in the printer?
Your printer has two standard paper sources: an automatic 250-sheet paper feeder (Tray 1) and a single-sheet manual
feeder. Use Tray 1 for most print jobs. Use the manual feeder for a single piece of paper, transparency, envelope, paper
label, card stock, or index card. You can increase paper capacity by purchasing an optional 550-sheet drawer.
An output bin on top of the printer holds up to 150 sheets. The si ngl e-s hee t re ar exit provides a s traight-through paper path
to help reduce curling and potential jams. This is especially useful for specialty media, such as transparencies, envelopes,
paper labels, card stock, or index cards.
150-sheet output bin
Front paper support
Front cover
Operator panel
Manual feeder
250-sheet tray
Optional 550-sheet drawer
Rear paper exit
Where can print media be loaded in the printer?
24
Page 25

Print media tasks and tips
Tips on choosing the right print media
Selecting the right pa per or other media reduce s printing problems. For best print quality, try a sample of the pa pe r o r other
media you are considering before buying large quantities.
See the Card Stock & Label Guide available on our Lexmark Web sit e at www.lexmark.com for more information about
which paper provides optimum results for your printing environment.
Paper
• For the best print quality, use 20 lb (75 g/m2) xerographic, grain long paper.
2
The printer can automatically feed paper weights from 60 to 90 g/m
than 60 g/m
should be fed through the optional 550-sheet tray or the manual feeder.
• The laser printing process heats paper to high temperatures of 170°C (338°F) for non-MICR applications. Use
only paper able to with st and thes e tem peratures without discoloring, bleeding, or releasing hazardous emis s ion s .
Check with the manufacturer or vendor to determine whether the paper you have chosen is acceptable for laser
printers.
2
(16 lb) might not be stiff enough to feed properly, causing jams. Paper heavier than 90 g/m2 (24 lb)
Preprinted forms and letterhead
(16 to 24 lb bond) grain long. Paper lighter
• Use only forms and letterhead printed using an offset lithographic or engraved printing process.
• Choose papers that absorb ink, but do not bleed.
• Avoid papers with rough or heavily textured surfaces.
Use papers printed with heat-resistant inks designed for use in xerographic copiers. The ink must withstand temperatures
of 170°C (338°F) without m elting or rel easing ha zardous emis sions . Use inks that are not aff ec ted by the resin in toner. Inks
that are oxidation-set or oil-based should meet these requirements; latex inks might not. If you are in doubt, contact your
paper supplier.
Preprinted papers such as letterhead must be able to withstand temperatures up to 170°C (338°F) without melting or
releasing hazardous emis si on s .
Transparencies
• Use transparencies designed specifically for laser printers. Transparencies must be able to withstand
temperatures of 170°C (338°F) without melting, discoloring, offsetting, or releasing hazardous emissions.
We recommend Lexmark laser printer transparencies: part number 70X7240 for letter size transparencies; part
number 12A5010 for A4 size transparencies.
• To prevent print quality problems, avoid getting fingerprints on the transparencies.
Envelopes
• Use envelopes made from 24 lb (90 g/m2) bond paper.
• Do not use envelopes that:
– Have excessive curl
– Are stuck together
– Are damaged in any way
– Contain windows, holes, perforations, cutouts, or embossments
– Use metal clasps, string ties, or metal folding bars
– Have postage stam ps attached
Tips on choo sing the right print media
25
Page 26

Print media tasks and tips
– Have any exposed adhesive when the flap is in the sealed position
• Use envelopes that can withstand temperatures of 170°C (338°F) without:
– sealing
– excessive curling
– wrinkling
– releasing hazardous emis si on s
If you have any doubts about the envelopes you are considering using, check with the envelope supplier.
• A combination of high humidity (over 60%) and the high printing temperatures may seal the envelopes.
Labels
• Do not use labels that have exposed adhesive on the sheets.
• Do not print a large number of labels continuously.
• Do not use vinyl labels.
• Use labels that can withstand temperatures of 170°C (338°F) without sealing, excessive curling, wrinkling, or
releasing hazardous emissions. Label adhesives, face sheet (printable stock), and topcoats must also be able to
withstand 25 pounds per square inch (psi) (172kilopascals) pressure.
Tips on choo sing the right print media
26
Page 27

Print media tasks and tips
Card stock
• Preprinting, perforation, and creasing can significantly affect the print quality and cause media handling or
jamming problems.
• Avoid using card stock that may release hazardous emissions when heated.
• Do not use preprinted card stock manufactured with chemicals that may contaminate the printer. Preprinting
introduces semi-liquid and volatile components into the printer.
• Use card stock with a maximum weight of 163 g/m
2
and a minimum size of 76 x 127 mm (3 x 5 in.).
Tips on storing print media and supplies
Storing paper
Use the following guidelines to avoid paper feeding problems and uneven print quality.
• Store paper in an environment where the temperature is approximately 21°C (70°F) and the relative humidity is
40%.
• Store cartons of paper on a pallet or shelf rather than directly on the floor.
• If you store individual packages of paper out of the original carton, make sure they rest on a flat surface so the
edges do not buckle, curl, or become damaged.
• Do not place anything on top of paper packages.
Storing supplies
Choose a cool, c le an sto r age area for your prin ter su ppl ies. Store supplies righ t side up in their original pac k ag ing until you
are ready to use them.
Do not expose supplies to:
• Direct sunlight
• Temperatures above 35°C (95°F)
• High humi dity (above 80%)
• Salty air
• Corrosive gases
• Heavy dust
Tips on storing print media and supplies
27
Page 28

Print media tasks and tips
Tips on preventing jams
You can avoid most paper jams by correctly loading paper and specialty media in the printer.
The following hints can help you av oi d paper jams:
• Do not load wrinkled, creased, or damp paper.
• Never mix media ty pes within a tray.
• Flex, fan, and straighten paper before you load it.
• Do not exceed the maximum stack height.
• Push all trays firmly into the printer after loading them.
• Make sure the guides in the trays are positioned snug against the paper or specialty media.
• Do not remove paper trays while a job is printing.
• Before loading transparencies, fan the stack to prevent sheets from sticking together.
• Do not use envelopes that:
– Have excessive curl
– Are stuck together
– Are damaged in any way
– Contain windows, holes, perforations, cutouts, or embossments
– Have metal clasps, string ties, or metal folding bars
– Have postage stam ps attached
– Have any exposed adhesive when the flap is in the sealed position
• Use only recommended paper. See the Card Stock & Label Guide available on our Lexmark Web site at
www.lexmark.com for more information about which paper provides optimum results for your printing
environment.
• If you need detailed information before purchasing large quantities of customized paper, see the Card Stock &
Label Guide.
Tips on preventing jams
28
Page 29
Print media tasks and tips
How to load the 250-sheet and 550-sheet trays
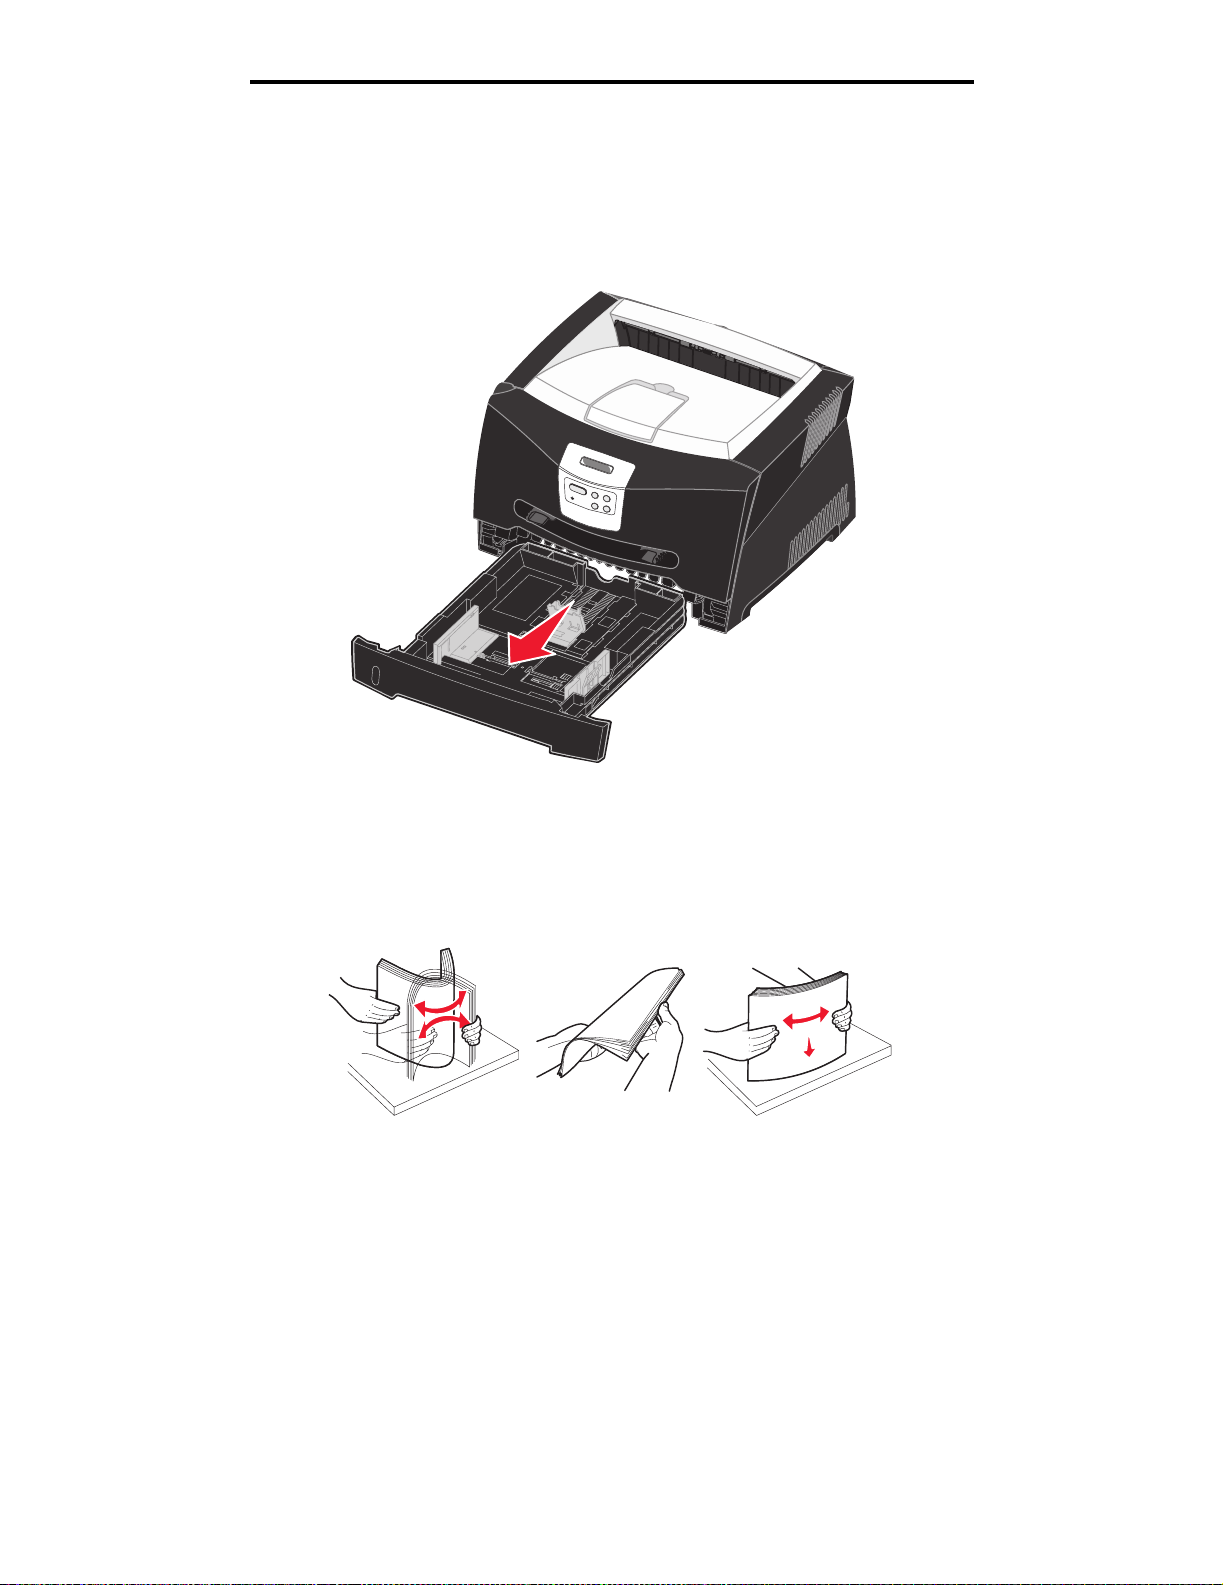
Follow these instructions to load paper in the 250-sheet tray and 550-sheet tray.
1 Remove the tr ay.
Note: If you are going to load legal or folio size paper, you have to extend the leng th of th e pap er tray. See
Extending the tray for legal or folio size paper on page 32 for instructions.
2 Prepare a stack of paper for loading by flexing and fanning it back and forth. Straighten the edges on a level
surface.
How to load the 250-sheet and 550-sheet trays
29
Page 30
Print media tasks and tips
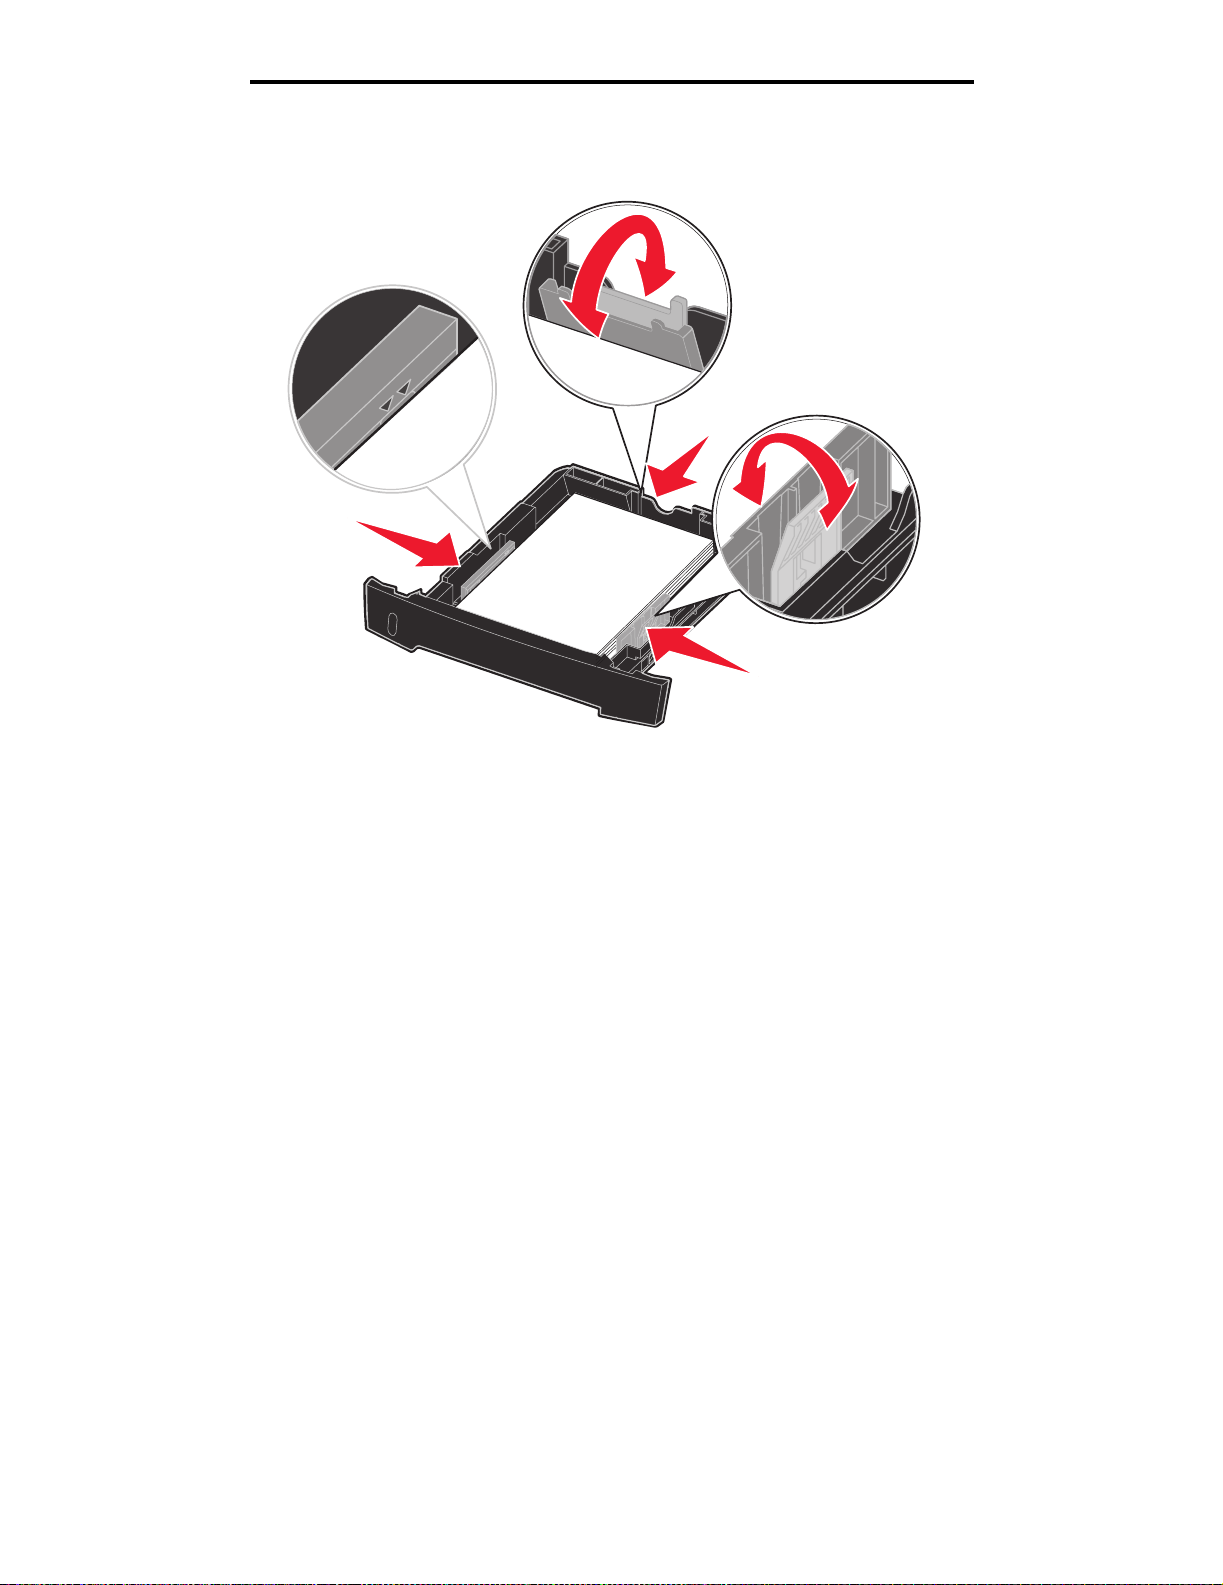
3 Load the paper in the tray with the print side facing down.
Note: Load letterhead paper with the design side facing down. The top edge of the sheet with the logo
should be placed at the front of the tray.
Make sure the paper is below the max fill line on the side guides. Overloading may cause jams.
4 Slide the two side guides and the back guide until they fit snugly against the stack of paper.
How to load the 250-sheet and 550-sheet trays
30
Page 31

5 Insert the tray.
Print media tasks and tips
6 Extend the paper support on the output bin.
How to load the 250-sheet and 550-sheet trays
31
Page 32

Print media tasks and tips
Extending the tray for legal or folio size paper
To load legal or folio size paper, you need to ex tend the pa per tr a y. You should also attach the dust cover on the ba c k of the
printer to protect the tray while it is extended.
1 Press down on the latch at the back of the tray.
2 Expand the tray until the extender locks into place.
Attaching the dust cover
The dust cover helps protect the paper tray from
the environment as well as keep the tray from
being knocked out of position while it is extended.
Attach the dust cover to the back of the printer by
aligning the tabs on the cover to the holes on the
printer, and snap the cover into place.
How to load the 250-sheet and 550-sheet trays
32
Page 33

Print media tasks and tips
How to load the manual feeder
The manual feeder is located at the front of your printer and can only feed one sheet of print media at a time. You can use
the manual feeder to make quick runs of paper types or sizes that are not currently loaded in the paper tray.
For inf ormation on accepta ble print med ia to use in the man ual f eeder, see What types of print me dia can be loa ded? on
page 23. Using only the specified print media helps prevent paper jams and print quality problems.
Note: We recommend that you send your print jo b to the printer prior t o loading the manual f eeder . See How
to manually feed a print job on page 38 for more information.
To load the manual feeder:
1 Place a sheet of the selected print media,
print side facing up, at the center of the
manual feeder, but only to the point where its
leading edge can contact the paper guides.
Otherwise, the printer will engage the print
media too soon and likely skew the print job.
2 Adjust the paper guides to the print media
width.
3 Hold both sides of the print media close to
the manual feeder, and push it into the
printer until it automatically engages.
There is a brief pause between the time the
printer engages the print media and when it
feeds into the printer.
Warning: Do not force the print media into
the feeder. Forcing the media
causes jams.
• Insert envelopes wit h th e flap side down and
with the stamp area as shown.
• Hold transparencies by the edges , an d a v oid
touching the print side. Oil from your fingers can affect print quality.
• Load letterhead face-up, with the top of the sheet entering first.
• If you experience problems with paper feed, turn the paper over.
How to use the rear exit
The single-sheet rear exit provides a straight-through paper path to help reduce curling and potential jams. This is
especially useful for specialty media, such as transparencies, envelopes, labels, card stock, or index cards.
How to load the manual feeder
33
Page 34

Print media tasks and tips
To use the rear exit, open the rear exit door. When the rear exit door is open, all print media comes out the rear exit. When
closed, all media is sent to the output bin on top of the printer.
How to use the rear exit
34
Page 35

Print media tasks and tips
How to clear paper jams
By carefully selecting print media and loading it properly, you should be able to avoid most jams.
Note: T o clear the Paper Jam e rror message, y ou must remov e all jammed print medi a from the entire paper
path, and then press Go.
To clear a paper jam:
1 If you are feeding paper from a tray, remove the tray, and then remove any jams.
How to clear paper jams
35
Page 36

Print media tasks and tips
2 Open the front cover, and remove the print cartridge assembly.
Warning: Do not leave the print cartridge assembly exposed to direct light for an extended period of time.
Extended light exposure can cause print quality problems.
3 Remove any jams in the area behind the print cartridge assembly.
Warning: Fuser or area may be hot.
How to clear paper jams
36
Page 37

Print media tasks and tips
4 Lift the flap at the front of the printer, and remove any jams beneath the flap.
5 Open the rear exit, and remove any jams.
Warning: Fuser or area may be hot.
6 After you have cleared the jams, reinstall the print cartridge assembly, make sure all printer covers and trays are
closed, and then then press Go to resume printing.
Note: The printer reprints the pages that caused the paper jam.
How to clear paper jams
37
Page 38

5
Printing tasks
How to manually feed a print job
The manual f eede r is located at the f ront of the printer and can only feed one sheet of print media at a ti me . F or information
on acceptable print media to use in the manual feeder, see What types of print media can be loaded? on page 23.
When using the manual feeder, send the print job to the printer before loading the print media. When the printer is ready, it
will prompt you to load the manual feeder, at which point you should load the media.
To manually feed a print job:
1 From the computer software application, select File Æ Print.
2 Click Properties (or Options, Printer, or Setup , depending on the application) to view the printer driver settings.
3 Click the Paper tab.
4 Select Manual paper from the Paper tray drop-down list.
5 Select the appropriate Paper size and type.
6 Click OK.
7 Click OK on the Print window to send the job to print.
8 Place a sheet of the selected print media, print side facing up, at the center of the manual feeder, but only to the
point where its leading edge can contact the paper guides.
• Hold transparencies by the edges, and avoid touching the print side. Oil from your fingers can affect print
quality.
• Load envelopes flap side down with the stamp area and flap on the left. The end of the envelope with the
stamp area enters the multipurpose feeder first.
• Load letterhead face-up, with the top of the sheet first.
• If you experience problems with paper feed, turn the paper over.
9 Adjust the paper guides to the print media width.
Printing tasks
38
Page 39

Printing tasks
10 Hold both sides of the print media close to the manual feeder, and push it into the printer until it automatically
engages.
There is a brief pause between the time the printer engages the print media and when it feeds into the printer.
Warning: Do not force the print media into the feeder. Forcing the media causes jams.
How to manually feed a print job
39
Page 40

Printing tasks
How to print on both sides of the paper (manual duplex)
Printing on both sides of the paper reduces printing costs.
Although yo u ca n us e Tray 1 o r the 550-sheet tray to print the first s ide o f the duplex job, only use Tray 1 to print the seco nd
side.
You can choose how you want your job duplexed: Long Edge or Short Edge.
• Long Edge means pages are bound along the long edge of the page (left edge for portrait, top edge for
landscape).
Landscape
Portrait
Back of sheet
Back of
sheet
• Short Edge means pages are bound along the short edge of the page.
Front of
next sheet
Front of
next sheet
Portrait
Back of sheet
Landscape
Back of sheet
Front of sheet
Front of sheet
To manually duplex a print job:
1 From the computer software application, select File Æ Print.
2 Click Properties (or Options, Printer, or Setup , depending on the application) to view the printer driver settings.
3 From the Page Layout tab, select 2-sided printing.
4 Select either Long Edge or Short Edge.
5 Select Manual 2-sided printing.
6 Click the Paper tab.
7 Select the appropriate Input options for your print job.
How to print on both sides of the paper (manual duplex)
40
Page 41

Printing tasks
8 Click OK.
9 Click OK on the Print w indow.
The printer prints every other page of the document first. Once the first side of your job prints, the Load Paper
message appears.
10 Load the paper back into the printer with the already-printed side up and the top of the pag e towa rd the front of the
tray, and press Go to resume printing.
Note: Manual duplex is not available on a Macintosh computer.
How to print on both sides of the paper (manual duplex)
41
Page 42

Printing tasks
How to print multiple page images on one page (N-up printing)
The Multipage Printing (N-up) settin g is used to print mul tiple p age im ages on a si ngle p age . F or example, 2-Up mea ns tw o
page images are printed on one page, 4-up means four page images are printed on one page, and so on.
The printer uses the Multipa ge Order, Multipage View , and Multip age Border se ttings to determine th e order and orient ation
of the page images, and whether a border is printed around each page image.
1 From the computer software application, select File Æ Print.
2 Click Properties (or Options, Printer, or Setup , depending on the application) to view the printer driver settings.
3 From the Page Layout tab, select the number of images per sheet (from the Multipage printing section) and the
orientation you would like the paper to have.
The positioning depends on the number of images and whether the images are portrait or landscape in
orientation.
For example, if you select 4-Up multipage printing and portrait orientation, the results differ depending on the
Multipage Order value you select:
Across Down
21
43
31
42
4 To print a visible border around each page image, select Prin t page borde rs.
5 Click OK.
6 Click OK on the Print window to send the job to print.
How to print multiple page images on one page (N-up printing)
42
Page 43

Printing tasks
How to print a booklet
The Booklet setting lets you print multiple pages in booklet form without having to re-format your document so the pages
print in the proper order. The pages print so that the finished collated document may be folded along the center of each
page to form a booklet.
4
2
If the document contains many pages, a booklet may have too many pages to fold easily. If you are printing a fairly large
booklet, you might want to use the Sheets per Bundle option to specify how many physical pages are put into one bundle.
The printer will print the necessary number of bu nd les, which you can then bind into one boo kl et. Printing in bundles helps
the outside edge of the pages line up more evenly.
You must specify whether or not you want to print using any Duplex printing options before you select to print using the
booklet function. Once you choose Print Using Booklet, the controls for the Duplex options are unavailable and remain at
the last setting used.
5
7
1 From the computer software application, select File Æ Print.
2 Click Properties (or Options, Printer, or Setup , depending on the application) to view the printer driver settings.
3 From the Page Layout tab, click More Page Layout Options.
4 Click Booklet.
If your print job is large, you may want to use the Sheets per Bundle option.
5 Select the appropriate binding edge for your print job.
6 To print a visible fold mark on the pages, select Print fold mark.
7 Click OK twice.
8 Click OK on the Print window to send the job to print.
Note: Booklet printing is not available on a Macintosh computer.
How to print a booklet
43
Page 44

Printing tasks
How to print a poster
The Poster setting lets you print a single image across several pages. Once printed, you can combine the pages to create
one large image.
1 From the computer software application, select File Æ Print.
2 Click Properties (or Options, Printer, or Setup , depending on the application) to view the printer driver settings.
3 From the Page Layout tab, click More Page Layout Options.
4 Click Poster.
5 Select the poster size you want by choosing the number of pages to use in the poster.
6 To print crop marks on the pages, select Print crop marks.
7 Select the amount of overlap you want each page to have.
8 Click OK twice.
9 Click OK on the Print window to send the job to print.
Note: Poster printing is not available on a Macintosh computer.
How to print a poster
44
Page 45

Printing tasks
How to print on letterhead
To print on letterhead, make sure the paper is loaded with the proper orientation.
1 Make sure the letterhead is properly loaded according to the paper source you are using:
•Tray 1 or 2—Load the letterhead paper with the design side facing down. The top edge of the sheet with the
logo should be placed at the front of the tray.
• Manual feeder—Load the letterhead paper face-up, with the top of the sheet entering first.
Note: If you are using the ma nual f eeder , first s end the job to print, then load th e letterhead wh en the printer
displays the Load Manual Feeder message (see How to manually feed a print job on page 38).
2 From the computer software application, select File Æ Print.
3 Click Properties (or Options, Printer, or Setup , depending on the application) to view the printer driver settings.
4 Click the Paper tab.
5 Select Letterhead from the Paper type drop-down lists.
6 Select the appropriate paper size and tray.
7 Click OK.
8 Click OK on the Print window to send the job to print.
How to print using an overlay or a watermark
Overlays and watermarks are templates that can be defined and then printed as a background on a form before the data
from the current job is printe d. Typical e xa mp les of overlays include company log os or le tte rheads, decorativ e b orde r s, and
simulated “preprinted” forms. Overlays can include text, graphics, or images. Watermarks are simple text. You can create
overlays and watermarks and then download them directly to the printer, or you can create an overlay or watermark file on
your system and then download it to the printer.
Note: To create and download overlays, you must have flash memory installed.
For information about how to create, save, or download an overlay or watermark, see the printer driver Help.
Using an overlay
1 From the computer software application, select File Æ Print.
2 Click Properties (or Options, Printer, or Setup , depending on the application) to view the printer driver settings.
3 Click the Other Options tab.
4 Click Overlay.
5 Select which pages rece ive the overlay.
6 Select the overlay to use.
7 Select whether to place the overlay on top of or underneath the page image in the Overlay placement area.
8 Click OK.
How to print on letterhead
45
Page 46

Printing tasks
Using a watermark
1 From the computer software application, select File Æ Print.
2 Click Properties (or Options, Printer, or Setup , depending on the application) to view the printer driver settings.
3 Click the Other Options tab.
4 Click Watermark.
5 Select which pages receive the watermark.
6 Select the watermark to use.
7 Select whether to pl ace the watermark on top of or underneath the page ima ge i n the Watermark placement area.
8 Click OK.
How to print using an overlay or a watermark
46
Page 47

Printing tasks
How to cancel a print job
A print job can be canceled from the operator panel or from your computer.
From the printer operator panel
If the job you want to cancel is printing, and Busy appears on the display:
1 Press Menu until you see Job Menu, and then press Select.
2 Press Menu until you see Cancel Job , and then press Select.
From a Windows computer
1 Click Start Æ Settings Æ Printers.
2 Double-click the printer you are using to print the job.
A list of print jobs appears.
3 Right-click the document you want to stop printing, and then click Cancel.
Canceling a job from a Macintosh computer
Canceling a print job from a computer running Mac OS 9
When you send a job to print, the printer icon for your selected printer appears on the desktop.
1 Double-click the printer icon on your desktop.
A list of print jobs appears in the printer window.
2 Select the print job you wa nt to cancel.
3 Click the trash can button.
Canceling a job from a computer running Mac OS X
When you send a job to print, the printer icon for your selected printer appears in the dock.
1 Open Applications Æ Utilities, and then double-c lick Print Center or Printer Setup.
2 Double-click the printer you are printing to.
3 In the printer window, select the print job you want to cancel.
4 Press Delete.
How to cancel a print job
47
Page 48

6
How to install options
How to access the system board
To install a memory or flash card, you must access the printer system board.
CAUTION: Turn the printer off, and unplug the power cord before continuing.
1 Open the front cover by pressing the button on the left side of the printer and lowering the cover.
How to install options
48
Page 49

2 Open the rear exit.
How to install options
3 Open the side cover by pressing the two detents on the front right side of the machine and swinging the cover
back.
How to access the system board
49
Page 50

How to install options
How to add a memory card
The system board has one connector for an optional memory card. The Lexmark E340 and the Lexmark E342n can
support up to 128MB of additional memory (for a total of 160MB).
CAUTION: If you are installing a memory card after setting up the printer, turn the printer off, and unplug the
power cord before continuing.
Note: Memory options designed for other Lex ma rk printers may not work with your printer.
1 Access the system board (see How to access the system board).
2 Push open the latches on both ends of the memory connector.
3 Unpack the memory card.
Warning: Memory and flash memory cards are easily damaged
by static electricity. T ouch some thing metal, s uch as the
printer frame, before you touch a memory card.
Avoid touching the connection points along the edge of the card.
4 Align the notches o n the b ottom of the ca rd with the not ch es
on the connector.
5 Push the memory card firmly into the connector until the
latches on either end of the connector snap into place.
It may require some force to fully seat the card.
6 Make sure each latch fits over the notch on each end of the
card.
7 Close the side cover.
8 Close the rear exit.
9 Close the front cover.
10 See Recognizing installed options.
How to add a memory card
50
Page 51

How to install options
How to add a flash card
The system board has one connector for an optional flash card. The printer can support 16MB and
32MB flash c ards.
CAUTION: If you are install ing a fl as h c ard a fter set t in g up the printer, turn the printer off , an d un plu g th e power
cord before continuing.
Note: Flash cards designed for other Lexmark printers may not work with your printer.
1 Access the system board (see How to access the system board).
2 Unpack the flash card.
Warning: Flash cards are easily damaged by static electricity. Touch something metal, such as the printer
frame, before you touch a card.
Avoid touching the metal pins on the bottom of the card.
Metal pins
3 Holding the card by its sides, align the pins on the card with the holes on the system board.
4 Push the flash card firmly into place.
The entire length of the connector on the flash card must touch and be flush against the system board.
Be careful not to damage the connectors.
5 Close the side cover.
6 Close the rear exit.
How to add a flash card
51
Page 52

How to install options
7 Close the front cover.
8 See Recognizing installed options.
How to install a 550-sheet drawer
Your printer supports one optional drawer that lets you load up to 550 sheets of paper.
CAUTION: If you are installing a 55 0-sheet dr aw er after sett ing up the printer, turn the printer off, and unp lug the
power cord before continuing.
1 Unpack the 550-sheet drawer, and remove any packing material.
2 Place the drawer in the location you have chosen for your printer.
3 Align the holes in the printer with the positioning posts on the 550-sheet drawer, and lower the printer into place.
4 See Recognizing installed options.
How to install a 550-sheet drawer
52
Page 53

How to install options
Recognizing installed options
After the printer is turned on, the printer driver should au tomatically recogniz e an option y ou insta lled. If it does not , you can
add it manually.
Note: If you have not in stalled your printer driv er yet, f ollow the appropriate instructions under Software and
network tasks. After you have installed a printer driver, return here to complete these instructions.
1 Click Start Æ Settings Æ Printers.
2 Select the printers icon.
3 Click File Æ Properties.
4 Click the Install Options tab.
5 Add the appropriate options to your configuration:
• 550-Sheet Tray or Flash Card—Select the option you installed from the Available options list, and click Add.
• Memory Card—Increase the printer memory to the appropriate number.
6 Click OK.
Recognizing installed options
53
Page 54

7
Understanding the operator panel
You can change most printer settings from your software application or printer driver. Settings you change from the
application or printer driver apply only to the job you are preparing to send to the printer.
Changes made to printer settings from a software application override changes made from the printer operator panel.
If you cannot change a setting from your application, use the printer operator panel or the remote operator panel available
from MarkVision™. Changing a printer setting from the printer operator panel or from MarkVision makes that setting the
user default.
Using the operator panel
The printer opera t or pa nel h as a 2-li ne by 16-character l iqu id c rystal d isplay (LCD), five buttons, and o ne indicator light that
flashes when the printer is processing a job indicated by the Busy message .
LCD
Light
See the menu map for a brief overview of the printer menus available from the operator panel.
Indicator light
The indicator light gives information about the status of your printer.
If the light is The print er is
Off Off
Understanding the operator panel
54
Page 55

Understanding the operator panel
If the light is The print er is
On On, but idle
Blinking On and busy
Buttons
Use the five operator panel buttons to open a menu, scroll through a list of values, change printer settings, and respond to
printer messages.
Note: Buttons act on the information displayed on the second line of the operator panel.
The following information describes the functions of each button.
Button Function
Go Press Go to:
• Return to the Ready state if the printer is offline (the Ready message does not appear on the dis pl ay).
• Exit printer menus and return to the Ready state.
• Clear some operator panel messages.
• Resume printing after loading print media and clearing paper jams.
•Exit Power Saver.
If you have changed printer settings from the operator panel menus, press Go before sending a job to
print. The printer must display Ready for jobs to print.
Menu Each end of the button has a function. Press Menu>:
• When Ready is displayed, to take the printer offline (out of the Ready state) and enter t he menus.
• When Busy is displayed, to take the printer to the Job Menu.
• When the printer is offline, to scroll through the menus.
Press <Menu to go to the previous item in the menus.
For menu items with numeric values, such as Copies, press and hold Menu to scroll through the values.
Release the button when the number you want appears.
Select Press Sele ct to:
• Open the menu shown on the second line of the operator panel. Depending on the type of menu, this
action:
– Opens the menu and displays the first item in the menu.
– Opens the menu item and displays the default setting.
• Save the displayed menu item as the new user default setting. The printer displays the
message and returns to the menu item.
• Clear certain messages from the operator panel.
Return Press Return to return to the previous menu level or menu item.
Stop Press Stop at the Ready, Busy , or Waiting me ssage to tem porarily tak e the p rinter offline . The mes sage
changes to Not Ready. No data is lost.
Press Go to return the printer to the Ready, Busy , or Waiting state.
If your printer is confi gured a s a n etw ork printer a v ai lab le to a n umber of use rs, it is poss ib le tha t Menus Disabled appears
on the display when you press Menu from the Ready state. Disabling the menus prevents other users from using the
operator panel to inadvertently change a printer user default that has been set by the administrator. You can still clear
messages and selec t it em s fro m th e Jo b M en u w h en p rinting a job, but y ou cannot change other printer settings. However,
you can use your printer driver to override printer user defaults and select settings for individual print jobs.
Saved
Using the operator panel
55
Page 56

Understanding the operator panel
Using the operator panel to change printer settings
From the op erat or panel, y ou can se lect men u items and associat ed v alues to print y our jobs successful ly. Y ou ca n also use
the panel to alter the se tup and oper ating en vi ronment o f th e printer. See Using printer men us f or an ex planation of all the
menu items.
You can modify printer settings by:
• Selecting a setting from a list of values
• Changing an On/Off setting
• Changing a numerical setting
To select a new value as a setting:
1 From a Ready status message, press Menu. The menu names appear.
2 Continue to press and release Menu until you see the menu you need.
3 Press Select to select the menu or menu item on the second line of the display.
• If the selection is a menu, the menu is opened, and the first printer setting in the menu appears.
• If the selection is a menu item, the default setting for the menu item appears.
(The current user default setting has an asterisk [*] beside it.)
Each menu item has a list of values for the menu item. A value can be:
• A phrase or word to describe a setting
• A numerical value that can be changed
• An On or Off setting
4 Press Menu to move to the value you need.
5 Press Select to select the value on the second line of the operator panel . An aste risk ap pea rs be si de the value to
indicate that it is now the user default setting. The new setting appears for one second, clears, displays the word
Saved, and then displays the previous list of menu items.
6 Press Return to go back to previous menus. Make additional menu selections to set new default settings. Press
Go if this is the last printer setting you want to change.
User default settings remain in effect until you save new settings or restore the factory defaults. Settings you choose from
your software application can also change or override the user default settings you select from the operator panel.
The diagram in Using the printer menus shows the menu items in each menu.
An asterisk (*) next to a value indicates the factory default setting. Factory defaults may differ for different countries or
regions.
Factory defaults are the function settings in effect the first time you turn your printer on. These remain in effect until you
change them. Factory defaults are re sto red if y ou s elect the Restore v alue for the F actory Def au lts m enu item in t he Util ities
Menu. See Utilities Menu for more information.
When you select a new setting from the operator panel, the asterisk moves next to the selected setting to identify it as the
current user default.
User defaults are the settings you select for different printer functions and store in printer memory. Once stored, these
settings remain active until new ones are stored or the factory defaults are restored.
Note: Settings you choose from your software application may override the settings you select from the
operator panel.
Menus Disabled
If your printer is configured as a network printer available to a number of users, Menus Disabled may appear when you
press Menu from the Ready state. Disabling the menus prevents users from using the operator panel to inadvertently
Using the operator panel to change printer settings
56
Page 57

Understanding the operator panel
change a printer default that has been set by the person managing the printer. You can still use Print and Hold features,
clear messages, and sel ect item s from th e Job Me nu w hen printin g a job, but you ca nnot cha nge oth er printer setti ngs . You
can, however, use your printer driver to override printer defaults and select settings for individual print jobs.
Menus Disabled
57
Page 58

Understanding the operator panel
Using the printer menus
Select a menu or menu item for more details.
Paper Menu
Paper Source
Paper Size
Paper Type
Custom Types
Universal Setup
Substitute Size
Paper Texture
Paper Weight
PostScript Menu
Print PS Error
Font Priority
Finishing Menu
Copies
Blank Pages
Collation
Separator Sheets
Separator Source
Multipage Print
Multipage Order
Multipage View
Multipage Border
PCL Emul Menu
Font Source
Font Name
Point Size
Pitch
Symbol Set
Orientation
Lines per Page
A4 Width
Tray Renumber
Auto CR after LF
Auto LF after CR
Utilities Menu
Quick Demo
Print Menus
Print Net Setup
Print Fonts
Print Directory
Print Demo
Factory Defaults
Hex Trace
Setup Menu
Printer Language
Power Saver
Resource Save
Download Target
Print Timeout
Wait Timeout
Auto Continue
Jam Recovery
Page Protect
Print Area
Display Language
Toner Alarm
Job Menu
Cancel Job
Reset Printer
Print Buffer
Quality Menu
Print Resolution
Toner Darkness
PictureGrade™
PPDS Menu
Orientation
Lines per Page
Lines per Inch
Pag e Format
Character Set
Best Fit
Tray 1 Renumber
Auto CR after LF
Auto LF after CR
Parallel Menu
PCL SmartSwitch
PS SmartSwitch
NPA Mode
Parallel Buffer
Advanced Status
Protocol
Honor Init
Parallel Mode 2
MAC Binary PS
Using the printer menus
58
Network Menu
PCL SmartSwitch
PS SmartSwitch
NPA Mode
Network Buffer
Mac Binary PS
Std Net Setup
USB Menu
PCL SmartSwitch
PS SmartSwitch
NPA Mode
USB Buffer
Mac Binary PS
Page 59

Understanding the operator panel
Paper Menu
Use the Paper Menu to define the print media loaded in each tray and the default source and output bin.
Note: Values marked by an asterisk (*) are the factory default settings.
Menu item Purpose Values
Custom Types
Paper Size
T o speci fy the kind of paper associated
with each of the Custom Types
available in the Paper Type menu item.
To identify the default paper size for each paper source. For trays with automatic size sensing, only
the value detected by the hardware is displayed.
1 Select a paper source. Tr ay <x> Size
2 Select a value.
(* Denotes country/region-specific
factory default values)
Values for Custom T ype <x>, where <x> represents 1, 2, 3,
4, 5, or 6:
Paper* Note: If a user-defined name is
Card Stock
Transparency
Labels
Envelope
Manual Pap Size
Manual Env Size
Letter*
Legal
Executive
Statement (not available for 500-sheet drawer)
A4*
A5 (not available for 500-sheet drawer)
B5
available, it is displayed instead of
Custom Type <x>. The user-defined
name is truncated to 14 characters. If
two or more custom types share the
same name, the name only appears
once in the Custom Types value list.
Folio
10 Envelope* (US)
9 Envelope
B5 Envelope
Other Envelope
7 3/4 Envelope
DL Envelope* (non US)
C5 Envelope
Universal Select Universal when you load paper
Using the printer menus
59
that does not match any of the other
available sizes. The printer
automatically formats the page for the
maximum possible size. You can then
set the actual page size from your
application software.
Page 60

Understanding the operator panel
Menu item Purpose Values
Paper Source
Paper Texture
To identify the default paper source. Tray <x>
(Tray 1*)
Manual Paper
Manual Env
To identify the texture of the paper loaded in a specific source and to ensure that characters print
clearly.
Use Paper Texture in connection with the Paper Type and Paper Weight menu items. You may need
to change those menu items to optimize print quality for your specific paper.
1 Select a paper type. Plain Texture
Card Stock Text
Trnsprncy Text
Preprint Texture
Colored Texture
Custom <x> Texture
Labels Texture
Bond Te xture
Envelope Texture
Ltrhead Texture
2 Select a value. Smooth Note: The default for Bond Texture is
Normal*
Rough
If you loaded the same size and type
of paper in two paper sources (and the
Paper Size and Paper Type menu
items are correctly set) , the trays are
automatically linked. When one paper
source is empty, paper automatically
feeds from the next linked source.
Rough instead of Normal. If a userdefined name is av ai lab le f or a cus tom
Type, then the name is displ ayed
instead of Custom <x> Texture. The
name is truncated to 14 characters.
Using the printer menus
60
Page 61

Understanding the operator panel
Menu item Purpose Values
Paper Type
To identify the type of paper installed in each paper source.
Use this menu item to:
• Optimize print quality for the specified paper.
• Select paper sources through your software application by selecting type and size.
• Automatically link paper sources. Any sources containing the same type and size of paper are
automatically linked by the printer, if you have set the Paper Size and the Paper Type to the
correct values.
1 Select a paper source. Tr ay <x> Type
Manual Pap Type
Manual Env Type
2 Select a value. Plain Paper
Card Stock
Transparency
Labels
Bond
Letterhead
Preprinted
Custom Type <x>
Envelope
Colored Paper
The Paper Type default for each
envelope source is Envelope. The
Paper Type default for each paper tray
is as follows:
Note: If a user-defined name is
available, it is displayed instead of
Custom Type <x>. The user-defined
name is truncated to 14 characters. If
two or more custom types share the
same name, the name only appears
once in the Paper Type value list.
Tray 1—Plain Paper
Tray 2—Custom Type 2
Manual Pap Type—Plain Paper
Using the printer menus
61
Page 62

Understanding the operator panel
Menu item Purpose Values
Paper Weight
Substitute Size
To identify the relative weight of the paper loaded in a specific source and ensure that the toner
adheres properly to the printed page.
1 Select a paper type.
Note: If a user-defined name is
available, it is displayed instead of
Custom <x> Weight. The name is
truncated to 14 characters.
2 Select a value. Light
To have the printer substitute the
specified paper size if the requested
size is not loaded.
Plain Weight
CardStock Weight
Trnsprncy Weight
Preprint Weight
Colored Weight
Custom <x> Weight
Bond Weight
Envelope Weight
Labels Weight
Ltrhead Weight
Normal*
Heavy
Off Printer prompts the user to load the
requested paper size.
Statement/A5 Prints A5 size jobs on statement size
paper if only statement size paper is
loaded, and prints statement size jobs
on A5 paper if only A5 p ap er is lo ad ed.
Letter/A4 Prints A4 size jobs on letter size paper
if only letter size paper is loaded, and
prints letter size jobs on A4 size paper
if only A4 size paper is loaded.
Universal
Setup
All Listed* Substitutes Letter/A4 and
To determine the default size when the Paper Size setting for a tray or feeder is Universal.
1 Select a unit of measure.
(* Denotes a country/region-s pecific
factory default value)
2 Select the values. Portrait Width =3. 00– 14. 17 in. (8.5 in.*)
Inches*
Millimeters*
Portrait Height =3.00–14.17 in. (14 in.*)
Feed Direction =Short Edge*
Statement/A5.
=76–360 mm (216 mm*)
=76–360 mm (356 mm*)
=Long Edge
Using the printer menus
62
Page 63

Understanding the operator panel
Finishing Menu
Use the Finishing Menu to define how the printer delivers the printed output.
Note: Values marked by an asterisk (*) are the factory default settings.
Menu item Purpose Values
Blank Pages
Collation
Copies
Multipage
Border
Multipage
Order
To specify whether to include
application-generated blank pages as
part of your printed output.
To keep the pages of a print job
stacked in sequence when printing
multiple copies of the job.
To set the number of copies you wan t
for the printer default value. (Set the
number of copies required for a
specific job from the printer driver.
Values selected from the printer driver
always o verride values selected from
the operator panel.)
To print a border around each page
image when using Multipage Print.
To determine the positioning of
multiple page images when using
Multipage Print. The positioning
depends on the numbe r of images and
whether the images are portrait or
landscape in orientation.
Do Not Print* Does not print application-generated
blank pages as part of your job.
Print Prints application-generated blank
pages as part of your job.
Off* Prints each page of a job the number
of times specified by the Co pi es me n u
item. For exam ple , if yo u set Copies to
2 and send three pages to print, the
printer prints page 1, page 1, page 2,
page 2, page 3, page 3.
On Prints entire job the number of times
specified by the C opies menu item. F or
example, if you set Copies to 2 and
send three pages to print, the printer
prints page 1, page 2, page 3, page 1,
page 2, page 3.
1...999 (1*)
None* Does not print a border around each
page image.
Solid Prints a solid line border around each
page image.
Horizontal*
Vertical
Rev Horizontal
Rev Vertical
For example, if you select 4-Up multipage printing and portrait orientation, the results differ
depending on the Multipage Order value you select:
Horizontal Order Vertical Order
21
43
31
42
Reverse
Horizontal Order
12
34
Reverse
Vertical Order
13
24
Using the printer menus
63
Page 64

Understanding the operator panel
Menu item Purpose Values
Multipage Print
Multipage View
Separator
Sheets
To print multiple page images on one
side of a sheet of paper. Also called
n-up or Paper Saver.
To determine the orientation of a
multipage sheet.
To insert blank separator sheets
between jobs , betw een m ultiple copies
of a job, or between each page of a
job.
Off* Prints 1 page image per side.
2 Up Prints 2 page images per side.
3 Up Prints 3 page images per side.
4 Up Prints 4 page images per side.
6 Up Prints 6 page images per side.
9 Up Prints 9 page images per side.
12 Up Prints 12 page images per side.
16 Up Prints 16 page images per side.
Auto* Lets the printer choose between
portrait and landscape orientation.
Long Edge Sets the long edge of the pa per as the
top of the page (landscape).
Short Edge Sets the short edge of the paper a s the
top of the page (portrait).
None* Does not insert separator sheets.
Between Copies Inserts a blank sheet between each
copy of a job. If Collation is Off, a blank
page is inserted between each set of
printed pages (all page 1’s, all page
2’s, and so on). If Collation is On, a
blank page is inserted between each
collated copy of the job.
Between Jobs Inserts a blank sheet between jobs.
Separator
Source
To specify the paper source that holds
separator sheets.
Between Pages Inserts a blank sheet between each
page of a job. This is useful if you are
printing transparencies or want to
insert blank pages in a document for
notes.
Tray <x> (Tray 1*)
Selects separator sheets from the specified tray.
Using the printer menus
64
Page 65

Understanding the operator panel
Utilities Menu
Use the Utilities Menu to print a variety of listings relating to available printer resources, printer settings, and print jobs.
Other menu items let you set up printer hardware and troubleshoot printer problems.
Menu item Purpose Values
Quick Demo
Factory
Defaults
Hex Trace
Print Directory
Print Demo
Print Fonts
To print a demo page.
To return printer settings to the fa cto ry
default values.
To help isolate the source of a print job problem. With He x Trace selected, all data sent to the printer
is printed in hexadecimal and character representation. Control codes are not executed.
To exit Hex Trace, turn the printer off, or reset the printer from the Job Menu.
To print a list of all the resources stored in flash me mory or on the hard disk.
Note: Print Directory is available only when either a nondefective flash or disk is installed and
formatted, and Job Buffer Size is not set to 100%.
To print pages describing the printer and demonstrating its capabilities.
To print a sample of all the fonts
available for the selected printer
language.
Restore • All menu items are returned to the
factory de fault values except:
– Display Language.
– All settings in the Parallel Menu,
Serial Menu, Network Menu, and
USB Menu.
• All downloaded resources (fonts,
macros, and symbol sets) in printer
memory (RAM) are deleted.
(Resources residing in flash
memory or on the hard disk are
unaffected.)
Do Not Restore User-defined settings remain.
PCL Fonts Prints a sample of all printer fonts
available for PCL emulation.
PS Fonts Prints a sample of all printer fonts
available for PostScript emulation.
PPDS Fonts Prints a sample of all printer fonts
available for PPDS emulation.
Print Menus
Print Net Setup
To print a listing of the current user default values, the installed options, the amount of installed
printer memory, and the status of printer supplies.
To print information relating to the internal print server and the network settings defined by the
Network Setup menu item in the Network Menu.
Job Menu
The Job Menu is only available when the printer is busy processing or printing a job, when a printer message is displayed,
or when the printer is in Hex Trace mode. Press Menu to open the Job Menu.
Menu item Purpose Values
Cancel Job
To cancel the current print job.
Note: Cancel Job is only displayed if the printer is processing a job or has a job in printer memory.
Using the printer menus
65
Page 66

Understanding the operator panel
Menu item Purpose Values
Print Buffer
Reset Printer
To print any data stored in the print buffer.
Note: Print Buffer is only available when you enter the Job Menu while Waiting is displayed. The
Waiting st ate occu rs if an inc ompl ete job is sent to the printer or an ASCII jo b , su ch as a print sc reen
command, is printing.
To reset the printer to the user default value for each menu item, delete all downloaded resources
(fonts, macros, and symbol sets) stored in printer memory (RAM), and delete all data in the interface
link buffer.
Note: Before selecting Reset Printer, exit the software application you are using.
Using the printer menus
66
Page 67

Understanding the operator panel
Quality Menu
Use the Quality Menu to change printer settings affecting the quality of printed characters and images.
Note: Values marked by an asterisk (*) are the factory default settings.
Menu item Purpose Values
PictureGrade
Print Resolution
Toner Darkness
To improve the quality of grayscale
printing.
To select printed output resolution. 600 dpi
To lighten or darken text images, or
conserve toner.
On Uses modified screening parameters
Off* Uses standard screening parameters.
1200 Image Q
2400 Image Q
1200 dpi
1–10 (8*) Select a lower value for finer line wid th
to improve print quality of graphics.
and lighter grayscale images. Select a
higher value for bolder line widths or
darker grayscale images. Sele ct 10 for
very bold text. Selec t a v alue le ss than
7 to conserve toner.
On the operator panel display, a
vertical bar ( | ) indicates the factory
default value. An arrow symbol ( V )
indicates a user default value.
Using the printer menus
67
Page 68

Understanding the operator panel
Setup Menu
Use the Setup Menu to configure a variety of printer features.
Menu item Purpose Values
Auto Continue
To define the amount of time (in
seconds) the printer waits after
displaying an operator intervention
error message before it resumes
printing.
Disabled* Printer does not resume printing until
5...255 Printer waits the specified amount of
someone clears the error message.
time, and then automatically resumes
printing. This timeout value also
applies if the menus are displayed
(and the printer is offline) for the
specified period of time.
Display
Language
Download
Target
To determine the language of the text
on the operator panel display.
To specify the storage location for
downloaded resources.
Storing downloaded resou rce s in flas h
memory or on a hard disk is
permanent storage rather than the
temporary storage that RAM provides.
The resources remain in the flash
memory or on the hard disk e v en when
the printer is turned off.
English Note: All values may not be available.
Français
Deutsch
Italiano
Español
Dansk
Norsk
Nederlands
Svenska
Português
Suomi
Japanese
Russian
Polski
Hungarian
Turkish
Czech
RAM* All downloaded resources are
automatically stored in pri nter me mory
(RAM).
Flash All downloaded resources are
automatically stored in flash memory.
Jam Recovery
To establish whether the printer
reprints jammed pages.
Using the printer menus
On Printer reprints jammed pages.
Off Printer does not reprint jammed
pages.
Auto* Printer reprints a jammed page un les s
the memory required to hold the page
is needed for other printer tasks.
68
Page 69

Understanding the operator panel
Menu item Purpose Values
Page Protect
Print Area
Power Saver
To successfully print a page that may
otherwise generate Complex Page
errors.
If, after selecting On, you still cannot
print the page, you may also have to
reduce the size a nd number of f onts on
the page, or increase the installed
printer memory.
For most print job s, y o u do not nee d to
select On. When On is selected,
printing may be slower.
To modify the logical and physical
printable area.
To specify the amount of time (in
minutes) the printer waits after a job is
printed before it goes into a reduced
power state.
Off* Prints a partial page of data if me mo ry
On Ensures that an entire page is
Normal* Note: The Whole Page setting only
Fit to Page
Whole Page
Disabled This value does not appear unless
1...240 Specifies the amount of time after a
is insufficient to process the entire
page.
processed before it prints.
affects pages printed using PCL 5
interpreter. This setting has no effect
on pages printed using the PCL XL or
PostScript interpreters. If you try to
print any data i n the no n-printabl e area
defined by Normal Print Area, the
printer will clip the image at the
boundary defined by the Normal
defined printable area.
Energy Conserve is set to Off.
print job before the printer goes into
Power Saver mode. (Your printer may
not support the entire range of values.)
The factory default Power Saver
setting depends on y our printer model .
Print the menu settings page to
determine the current Power Saver
setting. When the printer is in Power
Saver mode, it is still ready to receive
print jobs.
Select 1 to put the printer in Power
Saver mode one minute after it fini shes
a print job. This uses much less
energy, but requires more warm-up
time for the printer. Select 1 if your
printer shares an electrical circuit with
room lighting and you notice lights
flickering.
Select a high value if your printer is in
constant use. Under most
circumstances, this keeps the printer
ready to print with minimum warm-up
time. Select a value between 1 and
240 minutes if you want a balance
between energy cons um pti on and a
shorter warm-up period.
Using the printer menus
69
Page 70

Understanding the operator panel
Menu item Purpose Values
Print Timeout
Printer
Language
Resource Save
Toner Alarm
To specify the amount of time (in
seconds) the printer waits before
printing the last page of a print job tha t
does not end with a command to print
the page. The print timeout counter
does not start until Waiting appears
on the display.
To establish the default printer
language used to communicate data
from the computer to the printer.
Note: Setting a printer language as
the default doe s not pre vent a so ftware
application from sen ding print jobs that
use the other language.
To determine what the printer does
with downloaded resources, such as
fonts and mac ros s tore d i n R AM , i f th e
printer receives a job that requires
more memory than is available.
To specify how the printer responds
when it is low on toner.
Disabled The printer does not print the last pag e
of a print job until one of the following
occurs:
• The printer receives enough
information to fill the page.
• The printer receives a Form Feed
command.
• You select Print Buffer from the Job
Menu.
1...255 (90*) The printer prints the last page after
the specified time. (Your printer may
not support the entire range of values.)
PCL Emulation PCL emulation, compatible with
Hewlett-Packard printers.
PS Emulation* PostScript emulation, compatible with
Adobe PostScript language.
PPDS Emulation PPDS emulation.
Off* Printer retains downloaded resources
only until memory is needed. It then
deletes those resources associated
with the inactive printer language.
On Printer retains all downloaded
resources for all printer languages
during language changes and printer
resets. If the printer runs out of
memory, 38 Memory Full a ppears on
the display.
Off* An error message is displayed until
someone replaces the toner cartridge.
If an Auto Continue value is selected
from the Setup Menu, the printer
resumes printing after the specified
timeout value.
Wait Timeout
To specify the amount of time (in
seconds) the printer waits to receive
additional bytes of data from the
computer. When this time out expires,
the print job is canceled.
Note: Wait Timeout is only available
when you use PostScript emulation.
This menu item has no effect on PCL
emulation print jobs.
Using the printer menus
Single Printer stops printing, displ ay s an er ror
message, and sounds three quick
beeps.
Continuous Printer stops printin g, displ ays an error
message, and repeats three beeps
every 10 seconds until the toner
cartridge is replaced.
Disabled Disables Wait Timeout.
15...65535 (40*) Specifies the amount of time the
printer waits for additional data before
it cancels the job.
70
Page 71

Understanding the operator panel
PCL Emul Menu
Use the PCL Emul Menu to change printer settings that only affect jobs using the PCL emulation printer language.
Note: Values marked by an asterisk (*) are the factory default settings.
Menu item Purpose Values
A4 Width
Auto CR after
LF
Auto LF after
CR
Font Name
Font Source
To select the width of the logical page
for A4 size paper.
To specify whether the printer
automatically performs a carriage
return after a line feed control
command.
To specify whether the printer
automatically perf orms a line feed after
a carriage return control command.
To choose a specific font from the
specified font source.
To determine the set of fonts di spla ye d
in the Font Name menu item.
198 mm* Makes the logical page compatible
with the Hewlett-Packard LaserJet 5
Printer.
203 mm Mak es the logical pa ge wide enough to
print 80 10-pitch characters.
Off* Printer does not perform a carriage
return after a line feed control
command.
On Printer performs a carriage return after
a line feed control command.
Off* Printer does not perform a line feed
after a carriage return control
command.
On Printer performs a line feed after a
carriage return control command.
R0 Courier 10* The font name and font ID for all fonts
in the selected font source are
display e d. The font source
abbreviation is R for resident, F for
flash, K for disk, and D for download.
Resident* Displays all fonts resident in printer
RAM when the printer ships from the
factory.
Download Displays all fonts downloaded to
printer RAM.
Lines per Page
Orientation
To determine the number of lines that
print on each page.
To determine how text and graphics
are oriented on the page.
Using the printer menus
Flash Displa y s all fonts stored in flash
All Displays all fonts available to the
1...255 The printer sets the amount of space
60*
(country/regionspecific factory
default values)
64*
(country/regionspecific factory
default values)
Portrait* Prints text and graphics parallel to the
Landscape Prints text and graphics parallel to the
memory.
printer from all sources.
between each line (vertical line
spacing) based on the Lines per Page,
Paper Size, and Orientation menu
items. Select the correct Paper Size
and Orientation before changing Lines
per Page.
short edge of the paper.
long edge of the paper.
71
Page 72

Understanding the operator panel
Menu item Purpose Values
Pitch
Point Size
Symbol Set
Tray Renumber
To specify the font pitch for scalable
monospaced fonts.
To change the point size for scalable
typographic fonts.
To choose a symbol set for a specified
font name.
To configure your printer to work with printer drivers or applications that use different source
assignments for the paper trays.
Note: See the Technical Reference for more information about assigning source numbers.
1 Select a paper source. Assign Tray <x>
0.08...100
(in increments of
0.01 cpi)
10*
1...1008
in increments of
0.25 points)
12*
10U PC-8*
(country/regionspecific factory
default values)
12U PC-850*
(country/regionspecific factory
default values)
Pitch refers to the number of fixedspace characters in a horizontal inch
of type. You can select a pitch from
0.08 to 100 characters per inc h (cpi ) in
increments of 0.01 cpi. For
nonscalable monospaced fonts, the
pitch is displayed, but cannot be
changed.
Note: Pitch is onl y displayed for fixed,
or monospaced, fonts.
Point size refers to the height of the
characters in the font. One point
equals approximately 1/72 of an inch.
You can select point sizes from 1 to
1008 in increments of 0.25 points.
Note: Point Size is only displayed for
typographic fonts.
A symbol set i s a s et of alphabetic and
numeric characters, punctuation, and
special s y mbols used when printing
with a selected font. Symbol sets
support the different requirements for
languages or specific applications,
such as math symbols for scientific
text. Only the symbol sets supported
for the selected font name are
displayed.
Assign Man Env
Assign Man Paper
2 Select a value. Off* Printer uses factory default paper
0...199 Select a numeric value to assign a
None Paper source ignores the Select Paper
Other Tray Renumber selections View Factory Def Press
Restore Defaults Select Yes to return all tray
source assignments.
custom value to a paper sou rce.
Feed command .
Menu to display the factory
default value assigned to each paper
source.
assignments to factory default values.
Using the printer menus
72
Page 73

Understanding the operator panel
PostScript Menu
Use the PostScript Menu to change printer settings that only affect jobs using the PostScript emulation printer language.
Note: Values marked by an asterisk (*) are the factory default settings.
Menu item Purpose Values
Font Priority
PDF Menu
Print PS Error
To establish the font search order.
Note: Font Priority is only displayed
when a formatted flash or hard disk is
installed, is neithe r defective nor Read/
Write or Write protected, and Job
Buffer Size is not set to 100%.
Use the PDF Menu within the
PostScript Menu to change printer
settings that only affect jobs using
Portable Document Format (PDF) files.
To print a page defining the PostScript
emulation error when an error occurs.
Resident* Printer searches printer memory for
the reque sted font before searching
flash memory or har d disk.
Flash/Disk Printer searches the hard disk and
flash memory for the requested font
before searching printer memory.
See PPDS Menu for more information.
Off* Discards the print job without printing
an error message.
On Prints an error message before it
discards the job.
PPDS Menu
Use the PPDS Menu to change printer settings that only affect jobs using the PPDS emulation printer language.
Note: Values marked by an asterisk (*) are the factory default settings.
Menu item Purpose Values
Auto CR after
LF
Auto LF after
CR
To specify whether the printer
automatically performs a carriage
return after a line feed control
command.
To specify whether the printer
automatically perf orms a line feed after
a carriage return control command.
Off* Printer does not perform a carriage
return after a line feed control
command.
On Printer performs a carriage return after
a line feed control command.
Off* Printer does not perform a line feed
after a carriage return control
command.
Best Fit
T o d etermine whether to perf orm a font
best fit search if the requested font
cannot be found.
Using the printer menus
On Printer performs a line feed after a
carriage return control command.
Off Printer stops printing when a
requested font cannot be found. An
error message is posted indic atin g the
font could not be found.
On* Pr inter continues even though it was
not able to locate a requested font.
Instead, the printer tries to select
another font that best matches the
characteristics of the requested font.
73
Page 74

Understanding the operator panel
Menu item Purpose Values
Character Set
Lines per Inch
Lines per Page
Orientation
Page Format
To determine which code page to use
to print PPDS jobs.
To determine the number of lines that
print per vertica l inch.
To determine the number of lines that
print on each page.
To determine how text and graphics
are oriented on the page.
Affects how the printer interprets the
margins set from software
applications.
1 The standard code pages are used.
2* The addresses from V alue 1 ch ange to
represent characters and symbols
used in non-US English languages.
1...30 (6*) The printer sets the amount of space
between each line (vertical line
spacing) based on the Lines per Inch,
Lines per Page, Paper Size, and
Orientation menu items . Sele ct the
correct Paper Size and Orientation
before changing Lines per Inch.
1...255 (64*) The printer sets the amount of space
between each line (vertical line
spacing) based on the Lines per Inch,
Lines per Page, Paper Size, and
Orientation menu items . Sele ct the
correct Paper Size and Orientation
before changing Lines per Page.
Portrait* Prints text and graphics parallel to the
short edge of the paper.
Landscape Prints text and graphics parallel to the
long edge of the paper.
Print* Printer measures the margin settings
from the inside edge of the left
unprintable area an d the bottom of the
top unprintable area. The left and top
margin areas on th e print jo b are equa l
to the software margins setting plus
the unprintable area.
Whole Printer measures margin se ttings from
the top left edge of the paper. The left
and top margin areas on the print job
are equal to the software margin
settings.
Tray 1
Renumber
To configure your printer to work with
printer drivers or applications that use
different source assignments for the
paper trays.
Note: This menu item is only display ed
when Tray 2 is inst alled.
Using the printer menus
Off* Print jobs are printed from the
requested source.
Tr ay 2 • Print job requests for Tray 2 are
converted to requests for Tray 1.
• Print job requests for Tray 1 are
converted to requests for Tray 2.
74
Page 75

Understanding the operator panel
Parallel Menu
Use the Parallel Menu to change printer setti ng s affecting jobs sent to t he p rinter thro ugh a parallel port (either Std Pa ra lle l
or Parallel Opt <x>).
Note: Values marked by an asterisk (*) are the factory default settings.
Menu item Purpose Values
Advanced
Status
To enable bidirectional communication
through the parallel port.
Off Disables parallel port negotiation.
On* Enables bidirectional communication
through the parallel interface.
Honor Init
MAC Binary PS
NPA Mode
To determine whether the printer
honors hardware init ialization reques ts
from the computer. The computer
requests initialization by activating the
INIT signal on the parallel interface.
Many personal computers activate the
INIT signal each time the computer is
turned on and off.
To configure the printer to process
Macintosh binary PostScript print jobs.
To specify whether the printer
performs the special processing
required for bi directional
communication, following the
conventions defined in the Network
Printing Alliance (NPA) Protocol.
Note: Changing this menu item
automatically resets the printer.
Off* Printer does not honor hardware
initialization requests from the
computer.
On Printer honors hardware initialization
requests from the computer.
On Printer processes raw binary
PostScript print jobs from computers
using the Macintosh operating system.
Note: This setting often causes
Windows pr int jobs to fail.
Off Printer filters PostScript print jobs
using standard protocol.
Auto* Printer processes print jobs from
computers using either Windows or
Macintosh operatin g sys te ms.
On Printer performs NPA processing. If
data is not in NPA format, it is rejected
as bad data.
Off Printer does not perform NPA
processing.
Auto* Printer examines data, determines the
format, and then processes it
appropriately.
Parallel Buffer
To configure the size of the parallel
input buffe r.
Note: Changing this menu item
automatically resets the printer.
Using the printer menus
Disabled Disables job buffering. Any jobs
Auto* Printer automatically calculates the
3K to maximum
size allowed
already buffered on the disk are
printed before normal processing of
incoming jobs resumes.
Parallel Buffer size (recommended
setting).
User specifies the Parallel Buffer size.
The maximum size depends on the
amount of memory in your printer, the
size of the other link buffers, and
whether Resource Sa v e is set to O n o r
Off. To maximize the range for the
Parallel Buffer size, disable or reduce
the size of the serial and USB buffers.
75
Page 76

Understanding the operator panel
Menu item Purpose Values
Parallel Mode 2
PCL
SmartSwitch
PS
SmartSwitch
Protocol
To determine whether the parallel port
data is sampled on the leading or
trailing edge of strobe.
To configure the printer so it
automatically switches to
PCL emulation when a print job
received through the parallel port
requires it, regardless of the default
printer language.
To configure the printer so it
automatically switches to PostScript
emulation when a print job received
through the parallel port requires it,
regardless of the default printer
language.
To specify the parallel interface
protocol.
On* Samples parallel port data on the
leading edge of strobe.
Off Samples parallel port data on the
trailing edge of strobe.
On* Printer examines data on the par al le l
interface and selects PCL emulation if
the data indicates that is the required
printer language.
Off Printer does not examine th e incoming
data. The printer uses PostScript
emulation to process the job if PS
SmartSwitch is On, or uses the def a ult
printer language specif ied in the Se tup
Menu if PS SmartSwitch is Off.
On* Printer examines data on the par al le l
interface and selects PostScript
emulation if the data indicates that is
the required printer language.
Off Printer does not examine th e incoming
data. The printer uses PCL emulation
to process the job if PCL SmartSwitch
is On, or uses the default printer
language specified in the Setup Menu
if PCL SmartSwitch is Off.
Standard May resolve some parallel interface
problems.
Fastbytes* Provides compatibility with most
existing parallel interface
implementations (recommended
setting).
Network Menu
Use the Network Menu to change printer settings affecting jobs sent to the printer through a network port (either Standard
Network or Network Opt <x>).
Note: Values marked by an asterisk (*) are the factory default settings.
Menu item Purpose Values
Mac Binary PS
To configure the printer to process
Macintosh binary PostScript print jobs.
On Printer processes raw binary
PostScript print jobs from computers
using the Macintosh operating system.
Note: This setting often causes
Windows pr int jobs to fail.
Off Printer filters PostScript print jobs
using standard protocol.
Auto* Printer processes print jobs from
computers using either Windows or
Macintosh operatin g sys te ms.
Using the printer menus
76
Page 77

Understanding the operator panel
Menu item Purpose Values
Network Buffer
NPA Mode
PCL
SmartSwitch
PS
SmartSwitch
To configure the size of the network
input buffe r.
Note: Changing the Network Buffer
menu item automatically resets the
printer.
To specify whether the printer
performs the special processing
required for bi directional
communication, following the
conventions defined in the Network
Printing Alliance (NPA) Protocol.
Note: Changing this menu item
automatically resets the printer.
To configure the printer so it
automatically switches to
PCL emulation when a print job
received through the network port
requires it, regardless of the default
printer language.
To configure the printer so it
automatically switches to
PostScriptemulation when a print job
received through the network port
requires it, regardless of the default
printer language.
Auto* Printer automatically calculates the
3K to maximum
size allowed
Off Printer does not perform NPA
Auto* Printer examines the data to determine
On* Printer examines data on the network
Off Printer does not examine th e incoming
On* Printer examines data on the network
Off Printer does not examine th e incoming
Network Buffer size (rec om me nde d
setting).
User specifies the N etwork Buff er siz e.
The maximum size depends on the
amount of memory in your printer, the
size of the other link buffers, and
whether Resource Sa v e is set to O n o r
Off. To maximize the range for the
Network Buffer size, disable or reduce
the size of the paral lel, serial, a nd USB
buffers.
processing.
the format and then processes it
appropriately.
interface and selects PCL emulation if
the data indicates that is the required
printer language.
data. The printer uses PostScript
emulation to process the job if PS
SmartSwitch is On, or uses the def a ult
printer language specif ied in the Se tup
Menu if PS SmartSwitch is Off.
interface connection and selects
PostScriptemulation if the data
indicates that is the required printer
language.
data. The printer uses PCLemulation
to process the job if PCL SmartSwitch
is On, or uses the default printer
language specified in the Setup Menu
if PCL SmartSwitch is Off.
Std Net Setup
To configure an internal print server. Values for this menu item are supplied by the specific print
server. Select the menu item to see the available values.
Note: See the documentation on the drivers CD for more
information.
Using the printer menus
77
Page 78

Understanding the operator panel
USB Menu
Use the USB Menu to change printer settings affecting a Universal Serial Bus (USB) port (USB Option <x>).
Note: Values marked by an asterisk (*) are the factory default settings.
Menu item Purpose Values
Mac Binary PS
NPA Mode
PCL
SmartSwitch
PS
SmartSwitch
To configure the printer to process
Macintosh binary PostScript print jobs.
To specify whether the printer
performs the special processing
required for bi directional
communication, following the
conventions defined in the Network
Printing Alliance (NPA) Protocol.
Note: Changing this menu item
automatically resets the printer.
To configure the printer so it
automatically switches to
PCL emulation when a print job
received through the USB port
requires it, regardless of the default
printer language.
To configure the printer so it
automatically switches to
PostScriptemulation when a print job
received through the USB port
requires it, regardless of the default
printer language.
Off Printer processes raw binary
PostScript print jobs from computers
using the Macintosh operating system.
Note: This setting often causes
Windows pr int jobs to fail.
On Printer filters PostScript print jobs
using standard protocol.
Auto* Printer processes print jobs from
computers using either Windows or
Macintosh operatin g sys te ms.
Off Printer performs NPA processing. If
data is not in NPA format, it is rejected
as bad data.
On Printer does not perform NPA
processing.
Auto* Printer examines the data to determine
the format and then processes it
appropriately.
On* Printer examines the data on the USB
interface and selects PCL emulation if
the data indicates that is the required
printer language.
Off Printer does not examine th e incoming
data. The printer uses
PostScript emulation to process the
job if PS SmartSwitch is On, or uses
the default printer language specified
in the Setup Menu if PS SmartSwitch
is Off.
On* Printer examines data on the USB
interface and selects
PostScriptemulation if the data
indicates that is the required printer
language.
Off Printer does not examine th e incoming
data. The printer uses PCLemulation
to process the job if PCL SmartSwitch
is On, or uses the default printer
language specified in the Setup Menu
if PCL SmartSwitch is Off.
Using the printer menus
78
Page 79

Understanding the operator panel
Menu item Purpose Values
USB Buffer
To configure the size of the USB input
buffer.
Note: Changing the USB Buffer menu
item automatically resets the printer.
Disabled Job buffering is disabled. Any jobs
Auto* Printer automatically calculates the
3K to maximum
size allowed
already buffered on the disk are
printed before normal processing of
incoming jobs resumes.
USB Buffer size (recommended
setting).
User specifies the USB Buffer size.
The maximum size depends on the
amount of memory in your printer, the
size of the other link buffers, and
whether Resource Sa v e is set to O n o r
Off. T o maximize the range for the USB
Buffer size, disable or reduce the size
of the parallel, serial, and network
buffers.
Using the printer menus
79
Page 80

8
Understanding the printer messages
The printer operator panel displays messages describing the current state of the printer and indicates possible printer
problems y ou m ust resolv e . Th is to pic pro vi des a list o f all printer mess ages , e x plain s what they mean, and tells you h o w to
clear the messages.
Message What this message means What you can do
Activating Menu Changes The printer is activating changes made to
Activating PPDS The printer is activating PPDS emulation. Wait for the message to clear.
Busy The printer is busy receiv ing, processing,
Canceling Job The printer is processing a request to
Change Cartridge Invalid
Refill
Close Door The upper front door is open. • Close the upper front door.
Deactivating PPDS The printer is deactivating PPDS
the printer settings.
or printing data.
cancel the current print job .
The printer has detected an unsupported
refilled cartridge.
emulation.
Wait for the message to clear.
See also: Disabling the operator panel
menus
• Wait for the message to clear.
•Press Menu to open the Job Menu, and
cancel the current job.
Wait for the message to clear.
See also: How to cancel a print job
Remove the indicated print cartridge, and
install a new one.
See also: How to change a toner
cartridge
• Ins tall the print cartridge.
Wait for the message to clear.
Understanding the printer messages
80
Page 81

Understanding the printer messages
Message What this message means What you can do
Defragmenting
DO NOT POWER OFF
Disabling Menus The printer is responding to a request to
Enabling Menus The printer is responding to a request to
Flushing Buffer The printer is flushing corrupted print data
Formatting Flash
DO NOT POWER OFF
Invalid Engine Code The printer engine code is not valid. The
Invalid Standard Network
Code
Load <x> The printer is trying to feed paper from a
The printer is defragmenting the flash
memory to reclaim storag e space o ccupied
by deleted resources.
disable the menus.
make the menus available to all users.
and discarding the current print job.
The printer is formatting the flash memory. Wait for the message to clear.
printer cannot receive and process jobs
until valid code is programmed into the
engine.
The code in an internal print server is not
valid. The printer cannot receive and
process jobs until valid code is
programmed into the internal print server.
source it detects is empty.
x is one of the following sources:
•Tray 1–Tray 3
Wait for the message to clear.
Warning: Do not turn the printer off while
this message is displayed.
Wait for the message to clear.
Note: While the menus are disabled, you
cannot change the printe r sett ings f rom the
operator panel.
See also: Disabling the operator panel
menus
Wait for the message to clear, then press
Menu to view the menus from the operator
panel.
See also: Enabling the menus
Wait for the message to clear.
Warning: Do not turn the printer off while
this message is displayed.
Download valid code to the printer engine.
Note: You can download eng ine code w hile
this message is displayed.
Download valid code to the printer internal
print server.
Note: You can download network code
while this message is displayed.
• Load paper of the size and type
requested in the second line of the
display in th e spec ifi ed tray. Press Go to
clear the message.
•Press Menu to open the Job Menu, and
cancel the current job.
See also: How to load the 250-sheet and
550-sheet trays
Load Manual <x> The printer is trying to feed paper from the
multipurpose feeder, which it detects is
empty.
Menus Disabled The printer men us are disab led. You cannot
change the printer settings from the
operator panel.
Network Card Busy An internal print server (also called an
internal network adapter or INA) is being
reset.
Understanding the printer messages
81
• Load paper of the size and type
requested in the second line of the
display in the specified tray. The printer
automatically clears the message and
continues printing the job.
•Press Menu to open the Job Menu and
cancel the current job.
You can still open the Job Menu to canc el a
job that is printing or to se lect a con fidential
job or a held job that you want to print. If
you need access to the printer menus,
contact your system support person.
See also: Disabling the operator panel
menus
Wait for the message to clear.
Page 82

Understanding the printer messages
Message What this message means What you can do
Not Ready The printer is not ready to receive or
process data. Someone pressed Stop to
take the printer offline.
Performing Self Test The printer is running the series of start-up
tests it performs after it is turned on.
Power Saver The printer is ready to receive and process
data. It is reducing its electricity
consumption while idle. If the printer
remains inactive for the period of time
specified in the Power Saver menu i tem (30
minutes is the factory default), the Power
Saver message replaces the Ready
message on the display.
Printing Directory List The printer is processing or printing a
directory of all files stored in flash memory
or on a hard disk.
Printing Font List The printer is processing or printing a list of
all available fonts for the specified printer
language.
Printing Menu Settings The printer is processing or printing the
menu settings page.
Printing Quality Test Pages The printer is formatting and printing the
Print Quality Test, which consists of 4
pages. Page 1 contains a mixture of
graphics and text, pages 2 and 3 contain
only graphics, and page 4 is a blank page.
If Duplex is turned on, then the pages will
be duplexed; otherwise, they are
simplexed.
Press Go to make the printer ready to
receive jobs.
Wait for the message to clear.
• Send a job to print.
•Press Go to quickly wa rm the printer to
normal operating temperature and
display the Ready message.
Wait for the message to clear.
Wait for the message to clear.
Wait for the message to clear.
Wait for the message to clear.
Prog Engine Code
DO NOT POWER OFF
Prog System Code
DO NOT POWER OFF
Program Flash
DO NOT POWER OFF
Ready The printer is ready to receive and process
Ready Hex The printer is in Hex Trace mode and is
Res Reduced The printer is reducing the resolution of a
The printer is programming new engine
code.
The printer is programming new system
code.
The printer is storing resources, such as
fonts or macros, in flash memory.
print jobs.
ready to receive and process print jobs.
page in the current job from 600 dots per
inch (dpi) to 300 dpi to prevent a
38 Memory Full error. Res Reduced
remains on the display while the job prints .
Wait for the message to clear and the
printer to reset.
Warning: Do not turn the printer off while
this message is displayed.
Wait for the message to clear and the
printer to reset.
Warning: Do not turn the printer off while
this message is displayed.
Wait for the message to clear.
Warning: Do not turn the printer off while
this message is displayed.
Send a job to print.
• Send a job to print. All data sent to the
printer is printed in hexadecimal and
character represent ation. Control strings
are printed, not executed.
• Turn the printer off and then on to exit
Hex Trace mode and return to Ready
status.
Press Menu to open the Job Menu, and
cancel the current job.
Understanding the printer messages
82
Page 83

Understanding the printer messages
Message What this message means What you can do
Resetting the Printer The printer is resetting to the current
default settings. Any active print jobs are
canceled.
Restoring Factory Defaults The printer is restoring the factory default
printer settings. When f ac tory def au lt
settings are restored:
• All downloaded resources (fonts,
macros, symbol sets) in the prin ter
memory are deleted.
• All menu settings return to the factory
default setti ng except:
– The Display Language setting in the
Setup Menu.
– All settings in the Parallel Menu,
Serial Menu, Network Menu, USB
Menu, and Fax Menu.
Toner Low The print cartridge is low on toner. • Shake the print cartridge to utilize the
Waiting The printer has received a page of data to
print but is waiting for an End of Job
command, a Form Feed command, or
additional data.
Wait for the message to clear.
See also: Using the operator panel to
change printer settings
Wait for the message to clear.
See also: Restoring factory default
settings
remaining toner.
• Replace the cartridge.
•Press Go to clear the message and
continue printing.
Note: If you do not replace the cartri dge,
you may experience print quality problems.
•Press Go to print the contents of the
buffer.
•Press Menu to open the Job Menu, and
cancel the current job.
See also: How to cancel a print job
2<xx> Paper Jam The printer detects a jam. Clear the paper path.
See also: How to clear paper jams
31 Missing or Defective
Cart.
32 Unsupported
Print Cartridge
34 Shor t Paper The printer has determined that the length
The print cartridge is missing or is
defective.
An unsupported print cartridge is installed. Remove the print cartridge, and install a
of the paper in the source specified on the
second line of the display is too short to
print the formatted data.
Install a print cartridge, or replace the
defective cartridge.
new one.
See also: How to change a toner
cartridge
•Press Go to clear the message and
continue printing. The printer does not
automatically reprint the page that
prompted the message .
• Make sure the Paper Size setting in the
Paper Menu is correct for the size paper
you are using. If MP Feeder Size is set
to Universal, make sure your paper is
large enough for the formatted data.
•Press Menu to open the Job Menu and
cancel the current job.
See also: What types of print media can
be loaded?
Understanding the printer messages
83
Page 84

Understanding the printer messages
Message What this message means What you can do
35 Res Save Off Deficient
Memory
37 Insufficient Collation
Area
37 Insufficient Defrag
Memory
38 Memory Full The printer is processing data, but the
The printer lacks the memory needed to
enable Resource Save. This message
usually indicates too much memory is
allocated for one or more of the printer link
buffers.
The printer memory (or hard disk, if
installed) does not have the free space
necessary to collate the print job.
The printer cannot defragment flash
memory because the printer memory used
to store undeleted flash resources is full.
memory used to store pages is full.
•Press Go to disable Res ou rce Save and
continue printing.
• To enable Resource Save after you get
this messag e:
– Make sure the link buffers are set to
Auto , and exit the menus to activa te
the link buffer changes.
– When Ready is displayed, enable
Resource Save from the Setup Menu.
• Install additional memory.
•Press Go to print the portion of the job
already stored and begin collating the
rest of the job.
•Press Menu to open the Job Menu, and
cancel the current job.
See also: How to cancel a print job
• Delete fonts, macros, and other data in
printer memory.
• Install additional printer memory.
•Press Go to clear the message and
continue printing the job. The job may
not print correctly.
•Press Menu to open the Job Menu and
cancel the current job.
• To avoid this error in the future:
– Simplify the print job by reducing the
amount of text or graphics on a page
and deleting unnecessary
downloaded fonts or macros.
– Install additional printer memory.
See also: How to clear paper jams
39 Complex Page The page may not print correctly because
42 Cartridge Region
Mismatch
50 PPDS Font Error The PPDS interpreter has encountered a
51 Defective Flash The printer detects defective flash memory. Press Go to clear the message and
the print information on the page is too
complex.
The cartridge you are using is not desi gned
to match the region of your printer.
font error , or the printer has receiv ed in vali d
PPDS download font data.
•Press Go to clear the message and
continue printing the job. The job may
not print correctly.
•Press Menu to open the Job Menu and
cancel the current job.
• To avoid this error in the future:
– Reduce the comple xi ty of the page b y
reducing the amount of text or
graphics on the page and deleting
unnecessary downloaded fonts or
macros.
– Set Page Protect to On in the Setup
Menu.
– Install additional printer memory.
See also: Setup menu
• Install a toner cartridge made for your
printer region.
•Press Go to clear the message and
continue printing.
•Press Menu to open the Job Menu, and
cancel the job or reset the printer.
continue printing. You must install different
flash memory before y ou can do wnload any
resources to flash.
Understanding the printer messages
84
Page 85

Understanding the printer messages
Message What this message means What you can do
52 Flash Full There is not enough free spac e in the fla sh
53 Unformatted Flash The printer detects unformatted flash
54 Std Network Software
Error
55 Unsupported Flash
in Slot X
56 Std Parallel Port
Disabled
memory to store the data you are trying to
download.
memory.
The printer cannot establish
communications with an installed network
port.
The printer detects an unsupported flash
memory card in one of the connectors.
Data has been sent to t he printer th rough a
parallel port, but the parallel port is
disabled.
•Press Go to clear the message and
continue printing. Do wnloaded f onts and
macros not previously stored in flash
memory are deleted.
• Delete fonts, macros, and other data
stored on the flash memory.
• Install flash memory with more storage
capacity.
•Press Go to clear the message and
continue printing. You must format the
flash memory before you can store any
resources on it.
• If the error message remains, the flash
memory may be defective and require
replacing.
•Press Go to clear the message and
continue printing. The job may not print
correctly.
• Program new firmware for the network
interface by way of the parallel port.
•Press Menu to open the Job Menu, and
reset the printer.
Turn the printer off. Remove the
unsupported option card.
•Press Go to clear the message. The
printer discards any data received
through the parallel port.
• Make sure the Parallel Buffer menu item
in the Parallel Menu is not set to
Disabled.
See also: Parallel menu
56 Standard USB Port
Disabled
58 Too Many
Flash Options
58 Too Many
Trays Attached
88 Toner Low The printer has detected that the toner
900–999 Service
<message>
Data has been sent to t he printer th rough a
USB port, but the USB port is disabled.
Too many flash memory options are
installed on the printer.
Too many drawers with matching trays are
installed on the printer.
supply in the print cartridge is low . If y ou do
not have a print cartridge on hand, order
one now.
Messages labeled 90 0–999 relate to printer
problems that may require printer service.
•Press Go to clear the message. The
printer discards any data received
through the USB port.
• Make sure the USB Bu ffer menu item in
the USB Menu is not set to Disabled.
T urn off and unp lug the printer . Remo ve the
excess flash memory. Plug in the printer,
and turn it on.
T urn off and unp lug the printer . Remo ve the
additional drawers. Plug in the printer, and
turn it on.
See also: Setup Sheet
• Shake the print cartridge to utilize the
remaining toner.
• Replace the cartridge.
•The Toner Low message is displayed
until you replace the cartridge.
See also: How to change a toner
cartridge
Turn the printer off, and check all cable
connections. Turn the printer back on. If t he
service message recurs, call for service,
and report the message number and
description of the problem.
Understanding the printer messages
85
Page 86

Understanding the printer configuration menus
9
Network menu
Use the Network menu to change print er settin gs on job s sent throug h a net work port (either Standard N etwork or Network
Opt <x>).
Setting Purpose Values
NPA Mode Send print jobs to the printer and query
printer status information simultaneously.
Mac Binary PS Configure the printer to process Macintosh
binary PostScript print jobs.
Set Card Speed Automatically detect the connection speed
of your network. You can disable this
setting to set the speed manually.
* Factory default
† Megabits per second
•Off
• Auto*
• Off—The printer filters Po stS cript p rint jo bs us in g
standard protocol.
• On—The printer processes raw binary PostScript
print jobs from computers using the Macintosh
operating system. This setting often causes
Windows print jobs to fail.
• Auto*—The printer processes print jobs from
computers using either Windows or Macintosh
operating systems.
• Auto*—The printer detects current network
speed.
• 10Mbps†, Half Duplex—Forces the printer to try
to connect to the network only at 10Mbps, Half
Duplex.
• 10Mbps, Full Duplex—Forces the printer to try to
connect to the network only at 10Mbps, Full
Duplex.
• 100Mbps, Half Duplex—Forc es the printer to try
to connect to the network only at 100Mbps, Half
Duplex.
• 100Mbps, Full Duplex—Forces the printer to try
to connect to the network only at 100Mbps, Full
Duplex.
Understanding the printer configuration menus
86
Page 87

Understanding the printer configuration menus
Parallel menu
Use the Parallel menu to change printer settings on jobs sent through a parallel port.
Setting Purpose Values
NPA Mode Send print jobs to the printer and
query printer status information
simultaneously.
•Off
•On
• Auto*
Protocol Receive information at a much higher
transmission rate if your printer is set
to Fastbytes (if your computer
supports Fastbytes) or receive
information at a normal transmission
rate if your printer is set to Standard.
Parallel Mode 2 Determine whether the par al lel port
data is sampled on the leadin g (On) or
trailing (Off) edge of strobe.
MAC Binary PS Configure the printer to process
Macintosh binary PostScript print jobs.
* Factory default
•Standard
• Fastbytes*
•Off
• On*
• Off—The printer filters PostScript print jobs using
standard protocol.
• On—The printer processes raw binary P ostScript print
jobs from computers using the Macintosh operating
system. This setting often causes Windows print jobs
to fail.
• Auto*—The printer processes print jobs from
computers using either Windows or Macintosh
operating systems.
Setup menu
Use the Setup menu to configure how the printer formats the end of a line, depending on the computer system being used.
Setting Purpose Values
Auto CR after LF Specify wh ethe r the printer automatically perf orms a ca rriage re turn aft er a
line feed control command.
Auto LF after CR Specify whether the print er automatically performs a line feed after a
carriage return control command.
* Factory default
Understanding the printer configuration menus
87
• Off*
•On
• Off*
•On
Page 88

Understanding the printer configuration menus
USB menu
Use the USB menu to change printer settings on jobs sent through a Universal Serial Bus (USB) port.
Setting Purpose Values
NPA Mode Send print jobs to the printer and query
printer status information simultaneously.
•Off
•On
• Auto*
Mac Binary PS Configure the printer to process Macintosh
binary PostScript print jobs.
* Factory default
• Off—The printer filters PostScript print jobs using
standard protocol.
• On—The printer processes raw binary P ostScript print
jobs from computers using the Macintosh operating
system. This setting often causes Windows print jobs
to fail.
• Auto*—The printer processes print jobs from
computers using either Windows or Macintosh
operating systems.
Utilities menu
Use the Utilities menu to troubleshoot printer problems.
Setting Purpose Values
Reset Factory
Defaults
Reset
Photoconductor
Counter
Return your printer settings to the factory default values. Sometimes resetting the printer to the
original settings solves formatting problems. All menu items are reset to the factory default values
except:
• Display Language.
• All settings in the Parallel menu, Network menu, LocalTalk menu, and USB menu.
All downloaded resources (fonts, macros, and symbo l set s) in printer me mory (RAM) are deleted.
Resources in flash memory are unaffected.
Return the photoconductor counter to zero.
The replace photoconductor message should be cleared only when the photoconductor kit has
been replaced.
Hex Trace Help isolate printing problems when unexpected characters print or characters
Print Quality Test
Pages
* Factory default
are missing. Hex Trace helps you determine if there is a problem with the
language interpreter or the cable by telling you what information your printer is
receiving. To exit Hex Trace, turn off the printer.
Help isolate print quality problems, such as streaking. When you select this setting, three pages
print to help you evaluate print quality:
• A text page with printer information, cartridge information, current margin settings, and a
graphic.
• Two pages with graphics.
Understanding the printer configuration menus
88
• Off*
•On
Page 89

10
Software and network tasks
Printing the menu settings and network setup pages
The menu settings page shows current settings (user default settings) for the menus, a list of installed options, and
available printer memory. You can use this page to verify that all printer options are properly installed and the printer
settings are correct.
See Using the operator panel to identify the display and operator panel buttons if you need help.
1 Make sure the printer is on and the Ready message appears.
2 Press and release Menu until you see Utilities Menu, and then press Select.
3 Press and release Menu until you see Print Menus, and then press Select.
The message Printing Menu Settings appears while the page prints. The printer returns to the Ready message after
the menu settings page prints.
If any other message appears when you print this page, see Understanding the printer messages for more information.
If your printer has a netw ork port, an additional page prints to indicate more about netw ork settings . The Netw ork Menu and
network settings are only shown if you are using the network printer model.
Settings for menu items can be set through the operator panel. Settings fr menu items can also be made using Print Job
Language (PJL) commands. See the Technical Reference on the Lexmark’s Web site for information about PJL.
You can use the menu settings page to verify that all printer options are properly installed and that printer settings are set
correctly.
Software and network tasks
89
Page 90

Software and network tasks
Printing the Print Quality Test Pages
To help isolate print quality problems, print the Print Quality Test Pages:
Note: The test pages must be printed on letter, legal, or A4 paper.
1 Turn off the printer.
2 Press and hold Select and Retur n as you turn on the printer.
Release the buttons once Performing Self Test displays.
3 Select Prt Quality Pgs.
The printer posts the Pr inting Quality Test Pages messa ge as the pag es print. The pages inc lu de:
• An information page containing printer information, cartridge information, current margin settings, and a
graphic to use to evaluate the print quality
• Two pages with graphics to use to evaluate how well the printer is capable of printing various types of
graphics
4 Examine the pages to determine the quality of printing. If there are problems, see Print quality problems.
To exit these menus, turn the printer off and then back on.
How to configure for TCP/IP
If you have TCP/IP available on your network, we recommend that you assign an IP address to the printer.
Assigning a printer IP address
If your network is using DHCP, an IP address is automatically assigned after you connect the network cable to the printer.
1 Look for the address under the “TCP/IP” heading on the network setup page you printed in Printing the menu
settings and network setup pages on page 89.
2 Go to Verifying the IP settings on page 90, and begin with step 2.
If your network is not using DHCP, then you must manually assign an IP address to the printer.
An easy way to do this is to use the Print Server TCP/IP Setup Utility.
Detailed instructions about installing and using this utility are located on the drivers CD that shipped with your printer.
Launch the CD, click View Documentation, and then click Network Printer Install. Look for information about using the
Print Server TCP/IP Setup Utility.
To use this utility, you will need to know the 12-digit physical address or Universally Administered Address (UAA) of the
printer. Look f or the UAA entry on the network setup page you printed earlier . You can use either the MSB or canonical form
of the UAA.
Verifying the IP settings
1 Print another network setup page . Look und er the “TCP/IP” hea ding, and ma ke sure the IP address , netmask, and
gateway are what you expected.
See Printing the menu settings and network setup pages on page 89 if you need help.
Note: To display a command prompt on a Windows computer, click Start
prompt (or Accessories
Æ Command prompt if using Windows 2000).
Printing the Print Quality Test Pages
90
Æ Programs Æ Command
Page 91

Software and network tasks
2 Ping the printer, and verify th at it respo nds . F or e xa mple , at a c omman d prom pt on a n etwork c omput er, type ping
followed by the new printer IP address (for example, 192.168.0.11):
If the printer is active on the network, you will receive a confirmation.
Using the printer resident Web page
If you hav e a netw ork model, y our printer has a resident W eb pa ge, which y ou can acce ss from y our bro wser. To access the
resident Web page, type the printer IP address in the URL address field of your browser (for example,
http://192.168.236. 24). If y ou do not k no w the IP addres s of y our printer, you can find it on the n etwork s etup p age (for help,
see Printing the menu settings and network setup pages on page 89).
Some of the resident Web page features include a real-time status window of the printer and details of the printer
configuration, such as current memory and engine code levels. If you have administrative rights, you can also change
printer settings.
Using the printer resident Web page
91
Page 92

11
Supplies information
What supplies do I need and how do I order them?
There are only two suppl y item s that ha v e to be re placed on a re gular b asis: the ton er cartridge and the ph otocon ducto r kit,
which together comprise the print cartridge assembly. The photoconductor kit typically lasts up to 30,000 pages (at
approxima tely 5% co v erag e), whereas th e toner ca rtridge has to be replaced more frequ ently. How often the toner cartridge
needs replacing depends on which cartridge you purchase and the average amount of toner coverage you have on your
print jobs.
Within the United States or Canada, you can order Lexmark supplies from any authorized Lexmark supplies dealer. To
locate the dealer nearest you, call 1-800-539-6275. In other countries or regions, visit the Lexmark online store at
www.lexmark.com, or contact the place where you bought your printer.
The recommended supplies specifically designed for the printer are:
Part number Description Average cartridge yield
World Wide
12A8302 Photoconductor kit 30,000 standard pages
For the USA and Canada
24035SA Print Cartridge 2,500 standard pages
34035HA High Yield Print Cartridge 6,000 standard pages
24015SA Return Program Print Cartridge 2,500 standard pages
34015HA High Yield Return Program Print Cartridge 6,000 standard pages
For Europe, the Middle East, and Africa
24036SE Print Cartridge 2,500 standard pages
34036HE High Yield Print Cartridge 6,000 standard pages
24016SE Return Program Print Cartridge 2,500 standard pages
34016HE High Yield Return Program Print Cartridge 6,000 standard pages
For the Asia Pacific Region
34237HR Print Cartridge 2,500 standard pages
34237XR High Yield Print Cartridge 6,000 standard pages
34217HR Return Program Print Cartridge 2,500 standard pages
34217XR High Yield Return Program Print Cartridge 6,000 standard pages
1
Approximately 5% coverage.
2
Declared yield value in accord an ce w ith ISO/IEC 1975 2.
3
Designed for use only in the USA and Canada.
4
Designed for use only in Europe, Middle East, and Africa.
5
Designed for use only in Asia Pacific Region, Australia, and New Zealand.
6
Designed for use only in Latin America.
3
4
5
1
2
2
2
2
2
2
2
2
2
2
2
2
Supplies information
92
Page 93

Supplies information
Part number Description Average cartridge yield
For Latin America
24038SL Print Cartr i dge 2,500 standard pages
34038HL High Yield Print Cartridge 6,000 standard pages
24018SL Return Program Print Cartridge 2,500 standard pages
34018HL High Yield Return Program Print Cartridge 6,000 standard pages
1
Approximately 5% coverage.
2
Declared yield value in accord an ce w ith ISO/IEC 1975 2.
3
Designed for use only in the USA and Canada.
4
Designed for use only in Europe, Middle East, and Africa.
5
Designed for use only in Asia Pacific Region, Australia, and New Zealand.
6
Designed for use only in Latin America.
6
2
2
2
2
Storing supplies
Choose a cool, c le an sto r age area for your prin ter su ppl ies. Store supplies righ t side up in their original pac k ag ing until you
are ready to use them.
Do not expose supplies to:
• Direct sunlight
• Temperatures above 35°C (95°F)
• High humi dity (above 80%)
• Salty air
• Corrosive gases
• Heavy dust
How to conserve supplies
Conserving supplies lowers printing costs.
• When printing drafts, conserve toner by changing the Toner Darkness setting in your printer driver. The settings
range from 1 (very light) to 10 (very dark), with 8 being t he default. Setting the Toner Darkness to 1 conse rves th e
most toner.
• Reduce paper consumption by printing on both sides of the paper.
How to conserve supplies
93
Page 94

Supplies information
How to know when you need new supplies
The following sections describe ways to determine when new supplies are needed.
Checking the toner and photoconductor levels
You can determine approximately how much toner is left in your cartridge and how full the photoconductor kit is by printing
a menu settings pa ge. Thi s help s y ou de cide wh en y ou m ight ne ed to ord er repla ceme nt supp lies . F or hel p printing a men u
settings page, see Printing the menu settings and network setup pages on page 89.
The Toner Low message (see page 83) is displayed when the toner cartridge is nearly empty. You can still print for a short
time while this message is displayed, but print quality begins to decrease as the toner level decreases.
Note: The Toner Low message does not appear if the 1500-page starter print cartridge is installed.
When the toner lo w mes sage appear s, or when y o u e x perience faded print, remov e t he toner cartridge. Fi rmly shak e it side
to side and front to back several times to redistribute the toner, and reinsert it. Repeat this procedure multiple times. If the
print remains faded, replace the toner cartridge.
To ensure print quality and to av oid da mage to the prin ter, the printer stops oper ati ng afte r the photocond uctor h as reache d
a maximum of 40,000 pages. The printer automatically notifies you before the photoconductor reaches this point.
When you first recei v e the “Repl ace pho tocon ductor k it” messag e, y o u shoul d imme diatel y order a ne w photocon ductor k it.
While the printer may continue to function properly after the photoconductor kit has reached its official end-of-life
(approximately 30,000 pages), print quality begins to significantly decrease until the photoconductor stops operating at the
maximum of 40,000 pages. Print a menu settings page (See Printing the menu settings and network setup pages on
page 89) to determine when it reaches this point.
How to know when you need new supplies
94
Page 95

Supplies information
How to change a toner cartridge
1 Open the front cover by pressing the button on the left side of the printer and lowering the cover.
How to change a toner cartridge
95
Page 96

Supplies information
2 Remove the toner cartridge:
a Press the button on the base of the print cartridge assembly.
b Pull the toner cartridge up and out using the handle.
a
b
3 Unpack the new toner cartridge.
Note: You can use the packing ma terial from t he ne w cartridge to shi p the ol d cartridge back to Le xma rk f or
recycling. See Recycling Lexmark products on page 98 for more information.
4 Firmly shake the cartridge in all directions to distribute the toner.
How to change a toner cartridge
96
Page 97

Supplies information
5 Install the new toner cartridge by aligning the white rollers on the toner cartridge with the white arrows on the
tracks of the photoconductor kit and pushing the toner cartridge in as far as it will go. The cartridge clicks into
place when correctly installed.
6 Close the front cover.
How to change a toner cartridge
97
Page 98

Supplies information
Recycling Lexmark products
To return Lexmark products to Lexmark for recycling:
1 Visit our Web site:
www.lexmark.com/recycle
2 Follow the instructions on the computer screen.
Recycling Lexmark products
98
Page 99

Supplies information
How to change a photoconductor kit
Warning: When replacing a ph otoc on duc tor ki t, d o n ot l eave the toner ca rtridge or the n ew photoconductor kit
exposed to d irect light f or an e xtend ed period of time . Extended light e xposure c an cause print qual ity
problems.
1 Open the front cover by pressing the button on the left side of the printer and lowering the cover.
How to change a photoconductor kit
99
Page 100

Supplies information
2 Pull the print cartridge assembly out of the printer by pulling on the toner cartridge handle.
Note: Do not press the button on the print cartridge assembly.
Place the print cartridge assembly on a flat, clean surface.
3 Remove the toner cartridge:
a Press the button on the base of the print cartridge assembly.
b Pull the toner cartridge up and out using the handle.
a
b
4 Unpack the new photoconductor kit.
How to change a photoconductor kit
100
 Loading...