

Page 1

E320/E322
Setup Guide
April 2001
www.lexmark.com
Page 2

Edition: April 2001
The following paragraph does not apply to any country where such provisions are inconsistent with local law: LEXMARK INTERNATIONAL,
INC., PROVIDES THIS PUBLICATION “AS IS” WITHOUT WARRANTY OF ANY KIND, EITHER EXPRESS OR IMPLIED, INCLUDING, BU T NOT
LIMITED TO, THE IMPLIED WARRANTIES OF MERCHANTABILITY OR FITNESS FOR A PARTICULAR PURPOSE. Some states do not allow
disclaimer of express or implied warranties in certain transactions; therefore, this statement may not apply to you.
This publication could include technical inaccuracies or typographical errors. Changes are periodically made to the information herein; these changes will
be incorporated in later editions. Improvements or changes in the products or the programs described may be made at any time.
Comments about this publication may be addressed to Lexmark International, Inc., Department F95/032-2, 740 West New Circle Road, Lexington,
Kentucky 40550, U.S.A. In the United Kingdom and Eire, send to Lexmark International Ltd., Marketing and Services Department, Westhorpe House,
Westhorpe, Marlow Bucks SL7 3RQ. Lexmark may use or distribute any of the information you supply in any way it believes appropriate without incurring
any obligation to you. You can purchase additional copies of publications related to this product by calling 1-800-553-9727. In the United Kingdom and
Eire, call 0628-481500. In other countries, contact your point of purchase.
References in this publication to products, programs, or services do not imply that the manufacturer intends to make these available in all countries in
which it operates. Any reference to a product, program, or service is not intended to state or imply that only that product, program, or service may be
used. Any functionally equivalent product, program, or service that does not infringe any existing intellectual property right may be used instead.
Evaluation and verification of operation in conjunction with other products, programs, or services, except those expressly designated by the
manufacturer, are the user’s responsibility.
Lexmark and Lexmark with diamond design, MarkVision, and MarkNet are trademarks of Lexmark International, Inc., registered in the United States a nd/
or other countries.
Macintosh is a trademark of Apple Computer, Inc., registered in the U.S. and other countries.
© Copyright 2001 Lexmark International, Inc.
All rights reserved.
UNITED STATES GOVERNMENT RESTRICTED RIGHTS
This software and documentation are provided with RESTRICTED RIGHTS. Use, duplication or disclosure by the Government is subject to restrictions
as set forth in subparagraph (c)(1)(ii) of the Rights in Technical Data and Computer Software clause at DFARS 252.227-7013 and in applicable FAR
provisions: Lexmark International, Inc., Lexington, KY 40550.
FCC emissions information
This device complies with Part 15 of the FCC Rules. Operation is subject to the following two conditions:
(1) This device may not cause harmful interference, and (2) this device must accept any interference received, including interference that may cause
undesired operation.
Any questions on this statement should be directed to:
Director of Lab Operations
Lexmark International, Inc.
740 West New Circle Road
Lexington, KY 40550
(859) 232-3000
Refer to the Lexmark Publications CD for details.
Safety information
• If your product is NOT marked with this symbol , it MUST be connected to an electrical outlet that is properly grounded.
• The power cord must be connected to an electrical outlet that is near the product and easily accessible.
• Refer service or repairs, other than those described in the operating instructions, to a professional service person.
• This product is designed, tested, and approved to meet strict global safety standards with the use of specific Lexmark components. The safety
features of some parts may not always be obvious. Lexmark is not responsible for the use of other replacement parts.
• Your product uses a laser, exercise CAUTION: Use of controls or adjustments or performance of procedures other than those specified
herein may result in hazardous radiation exposure.
• Your product uses a printing process that heats the print media, and the heat may cause the media to release emissions. You must understand
the section in your operating instructions that discusses the guidelines for selecting print media to avoid the possibility of harmful emissions.
Conventions
Warning! A warning identifies something that might damage your printer hardware or software.
CAUTION! A caution identifies something that might cause you harm.
Page 3

Table of
contents
Preface . . . . . . . . . . . . . . . . . . . . . . . . . . . . . . . . . . . . . . . . . . .v
About your printer . . . . . . . . . . . . . . . . . . . . . . . . . . . . . . . . . . .v
About this book . . . . . . . . . . . . . . . . . . . . . . . . . . . . . . . . . . . viii
Other sources of information . . . . . . . . . . . . . . . . . . . . . . . . viii
Viewing the Lexmark Publications CD . . . . . . . . . . . . . . . . . . ix
Step 1: Unpack the printer . . . . . . . . . . . . . . . . . . . . . . . . . .1
Attaching an operator panel overlay . . . . . . . . . . . . . . . . . . . . .2
Removing print cartridge packaging . . . . . . . . . . . . . . . . . . . . .2
Step 2: Install the print cartr idge . . . . . . . . . . . . . . . . . . . . .4
Step 3: Install memory cards . . . . . . . . . . . . . . . . . . . . . . . .6
Removing the printer side cover . . . . . . . . . . . . . . . . . . . . . . . .6
Removing the system board shield . . . . . . . . . . . . . . . . . . . . . .8
Installing a printer memory card . . . . . . . . . . . . . . . . . . . . . . . .9
Installing a flash memory card . . . . . . . . . . . . . . . . . . . . . . . .11
Reattaching the metal shield . . . . . . . . . . . . . . . . . . . . . . . . .13
Reattaching the side cover . . . . . . . . . . . . . . . . . . . . . . . . . . .14
Table of contents
iii
Page 4

Step 4: Install the tray 2 option . . . . . . . . . . . . . . . . . . . . .15
Step 5: Attach cables . . . . . . . . . . . . . . . . . . . . . . . . . . . . .17
Local printing . . . . . . . . . . . . . . . . . . . . . . . . . . . . . . . . . . . . .17
Network printing . . . . . . . . . . . . . . . . . . . . . . . . . . . . . . . . . . . 19
Attaching a power cord . . . . . . . . . . . . . . . . . . . . . . . . . . . . . .20
Step 6: Load paper . . . . . . . . . . . . . . . . . . . . . . . . . . . . . . .21
Loading tray 1 . . . . . . . . . . . . . . . . . . . . . . . . . . . . . . . . . . . . .21
Loading the manual feed . . . . . . . . . . . . . . . . . . . . . . . . . . . .24
Loading the optional tray 2 . . . . . . . . . . . . . . . . . . . . . . . . . . .27
Step 7: Verify printer setup . . . . . . . . . . . . . . . . . . . . . . . .30
Step 8: Understanding the operator panel lights . . . . . . .31
Step 9: Install printer drivers . . . . . . . . . . . . . . . . . . . . . . .38
iv
Local printing . . . . . . . . . . . . . . . . . . . . . . . . . . . . . . . . . . . . .38
Network printing . . . . . . . . . . . . . . . . . . . . . . . . . . . . . . . . . . . 39
Statement of limited warranty . . . . . . . . . . . . . . . . . . . . . . .44
Index . . . . . . . . . . . . . . . . . . . . . . . . . . . . . . . . . . . . . . . . . . . 47
Table of contents
Page 5

Preface
About your printer Three printer models are available: the
Lexmark E320, Lexmark E322, and
Lexmark E322n. The differences
between these three models are listed in
the following table.
Item Lexmark E320 Lexmark E322 Lexmark E322n
Base memory 4MB 8MB 16MB
Maximum memory 68MB 72MB 80MB
Emulations PCL 5e and
Connectivity Parallel and USB Parallel and USB 10/100 Base-TX
Ships with print
cartridge yield (at
approximately 5%
coverage)
Macintosh
compatibility
1,500 pages
(standard)
PostSc ript Level 2 and
PCL 6
3,000 pages
(standard)
PostScript Level 2 and
PCL 6
Ethernet and USB
3,000 pages (standard)
Preface
v
Page 6
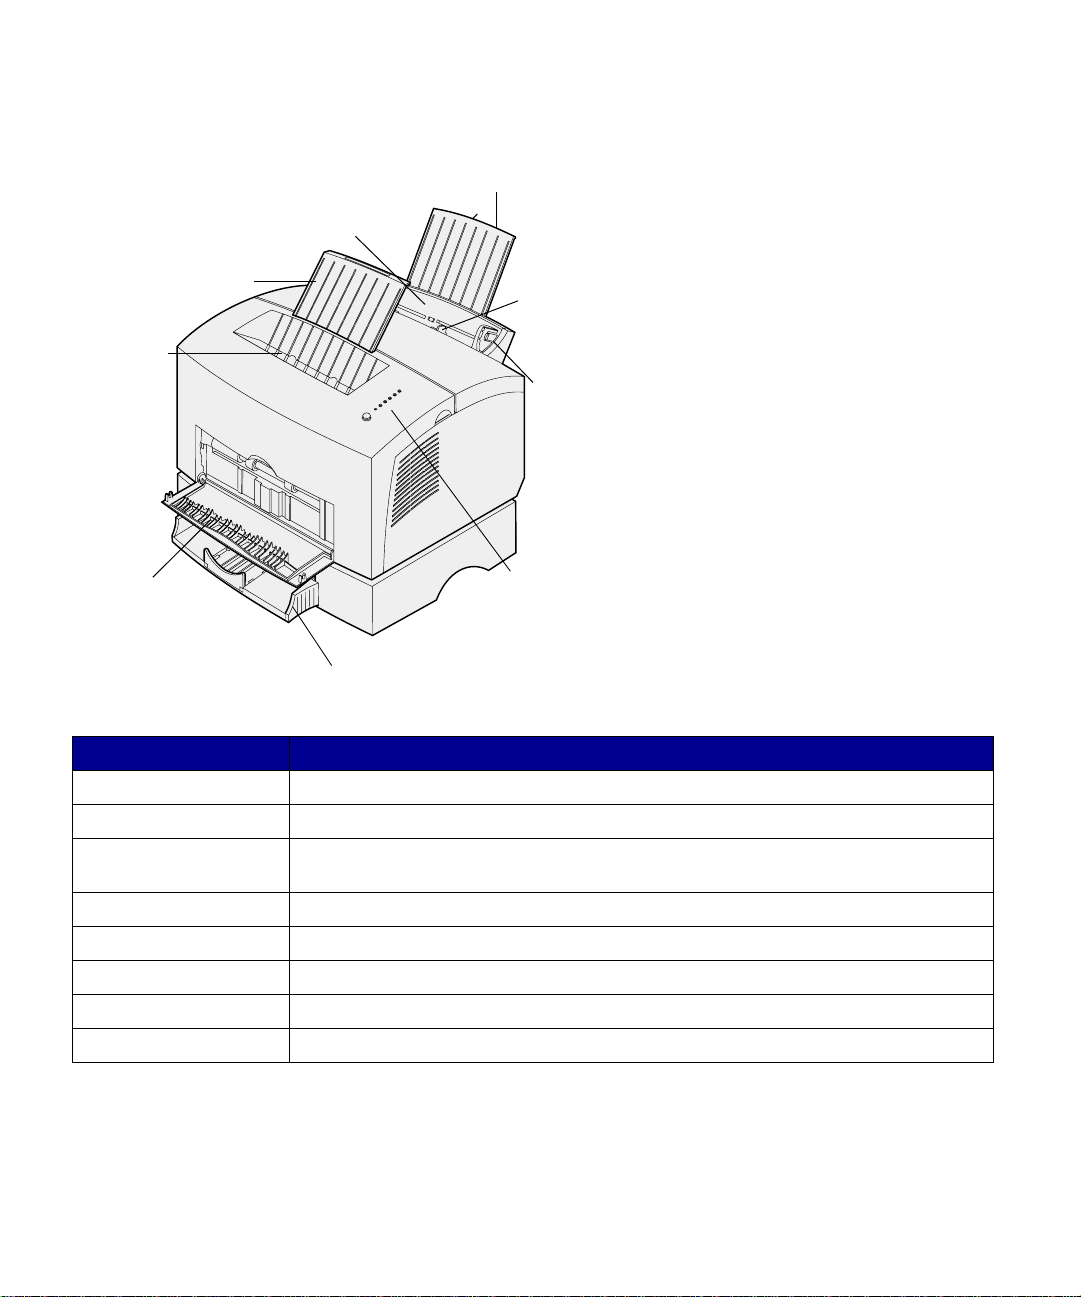
Tray 1
Paper
support
Paper support
Top
output
bin
Front output door
Optional tray 2
Manual
feed
Paper
guide
Operator
panel
lights
Use this feature: When you want to:
Tray 1 Load up to 150 sheets of paper or 10 sheets of other media.
Paper support Support media in tray 1 or the top output bin.
Manual feed Load a single sheet of paper/other media. Use for transparencies, labels, envelopes,
and card stock.
Paper guides Adjust the width of the media in tray 1 and the manual feed.
Operator panel lights Check the status of your printer.
Top output bin Stack printed documents face down.
Front output door Print on special media, for example, labels or card stock.
Optional tray 2 Increase your paper capacity.
vi
Preface
Page 7
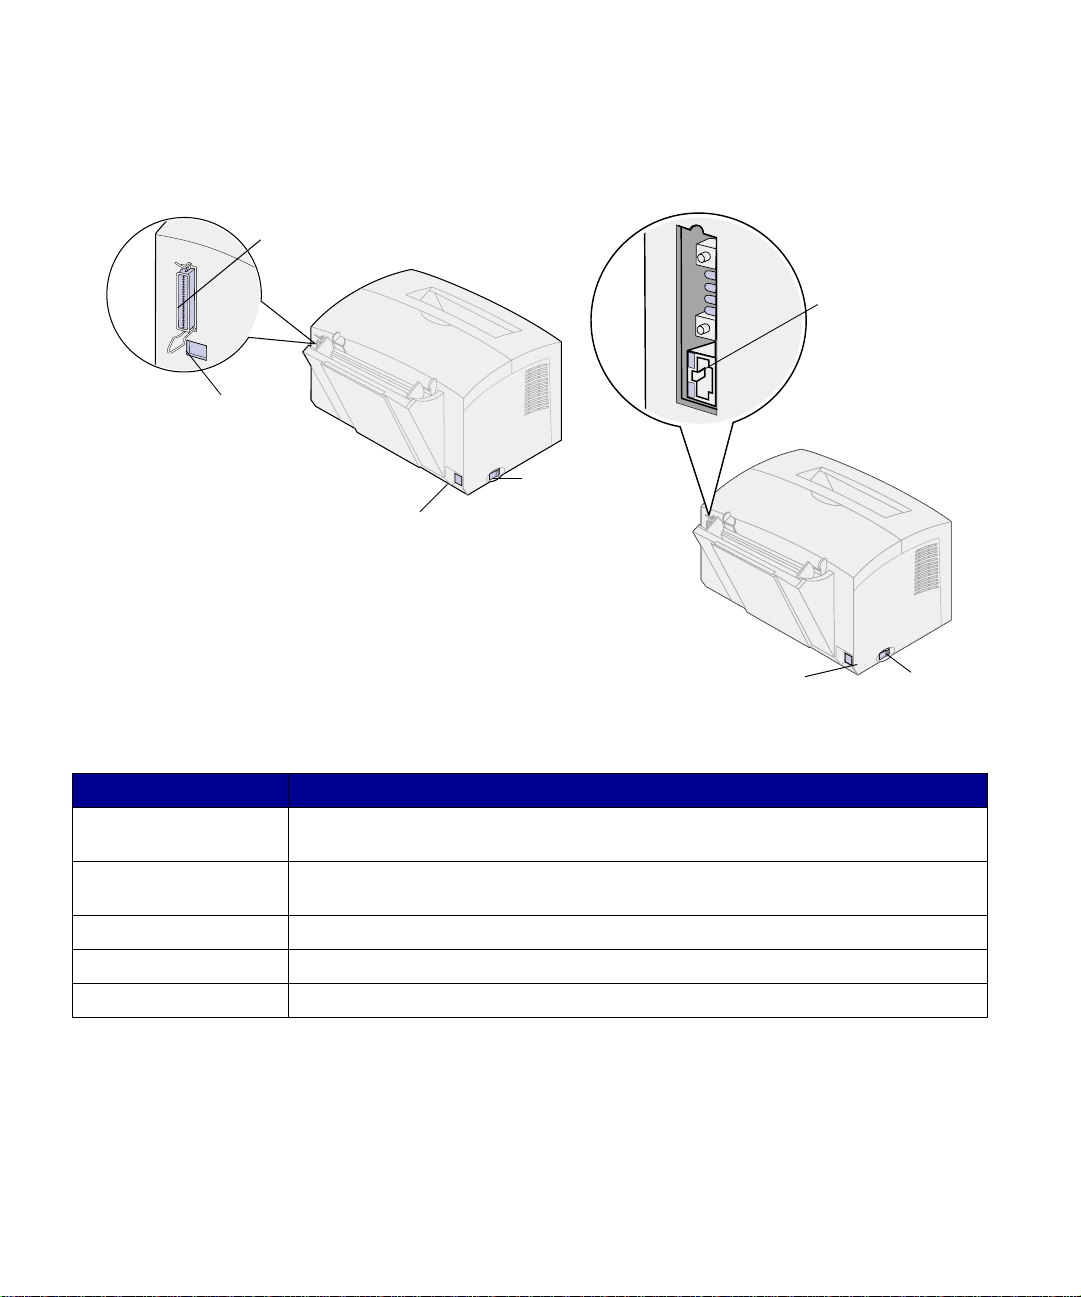
Lexmark E320 and E322
Parallel cable
connector
USB cable
connector
Lexmark E322n
Ethernet
connector
Power
switch
Power cord connector
Power cord
connector
Power
switch
Use this feature: When you want to:
Parallel cable connector Connect your computer to the Lexmark E320 or E322 parallel port with a parallel
cable.
USB connector Connect your computer to your printer’s USB port with a Universal Serial Bus (USB)
cable.
Ethernet cable connector Connect your computer to the Lexmark E322n network port with an Ethernet cable.
Power cord connector Connect your printer to a properly grounded wall outlet with a power cord.
Power switch Turn your printer on or off.
Preface
vii
Page 8

Operator panel The operator panel has 6 lights and 1
About this book
button. Different light sequences provide
status, attendance and service
information.
Depending on the light sequence, briefly
(approximately 1 second) push the
operator panel button to restart the
printer, display an error code, or activate
other printer functions.
Use your printer driver or, if your printer
is connected to a network, MarkNet Web
Pages, to change the paper source,
paper size and other printer settings.
Note: See the safety information on the
inside of the front cover before setting up
your printer.
This Setup Guide pr ovides detaile d
instructions for unpacking and setting up
the printer, installing supplies and
options, loading media, launching the
drivers CD to install printer drivers and
utilities, and printing information from the
Lexmark Publications CD.
Other sources of
information
Lexmark Publications CD The Lexmark Publications CD, which is
packaged with the Setup Guide,
provides information about choosing
media, understanding the operator panel
lights, clearing paper jams, and solving
printing problems.
viii
Preface
Page 9

Viewing the Lexmark
Publications CD
Quick Reference card The Quick Reference card provid es easy
Insert the Lexmark Publications CD into
your CD-ROM drive. If the CD does not
automatically launch:
1 Select your CD-ROM drive.
2 Double-click START.PDF (or
double-click the CD icon on your
desktop and then click
START .PDF if you are using a
Macintosh computer ).
You must have a copy of Adobe
Acrobat Reader, Version 4.05c
with Search or later installed on
your computer to view the
Lexmark Publications CD.
If Acrobat Reader is not installed
on your operating system, visit the
Adobe Web site at
www.adobe.com to download the
Acrobat Reader version you need.
access to information about loading
paper, clearing jams, and understanding
common operator panel light messages.
Drivers CD The drivers CD contains all the
necessary printer drivers to get your
printer up and running.
Depending on which version of the
drivers CD shipped with your printer, it
may also contain MarkVision
Professional, other printer utilities, worldwide customer support phone numbers,
screen fonts, and additional
documentation.
These items and updates to the printer
drivers are also located on the Lexmark
Web site at www.lexmark.com.
Preface
ix
Page 10

Lexmark Web site Access our site on the World Wide Web
for updated printer drivers and utilities,
and other Lexmark E320/E322 printer
documentation: www.lexmark.com.
x
Preface
Page 11

Step 1: Unpack the printer
1 Remove the printer and all
accessories from the packaging
carton.
Save the carton and packing
materials in case you need to
repack the printer for service or
storage.
2 Remove all tape from outside and
inside the printer.
3 Make sure you have the following
Power cord
Setup Guide and
Publications CD
Overlay
Drivers CD
Quick Reference card
items:
— Printer with print cartridge
installed
— Setup Guide
— Lexmark Publications CD
— Quick Reference card
— Power cord
— Drivers CD
— Operator panel overlay
If you need help during setup, or if
any items are missing or
damaged, refer to the publications
CD for the designated Lexmark
phone number for your country.
Unpack the printer
1
Page 12
4 Place the printer on a flat, stable
surface in a well-ventilated area
near your computer.
Do not place the printer:
— In direct sunlight
— Nea r heat sour ce s or air
conditioners
— In dusty or dirty environments
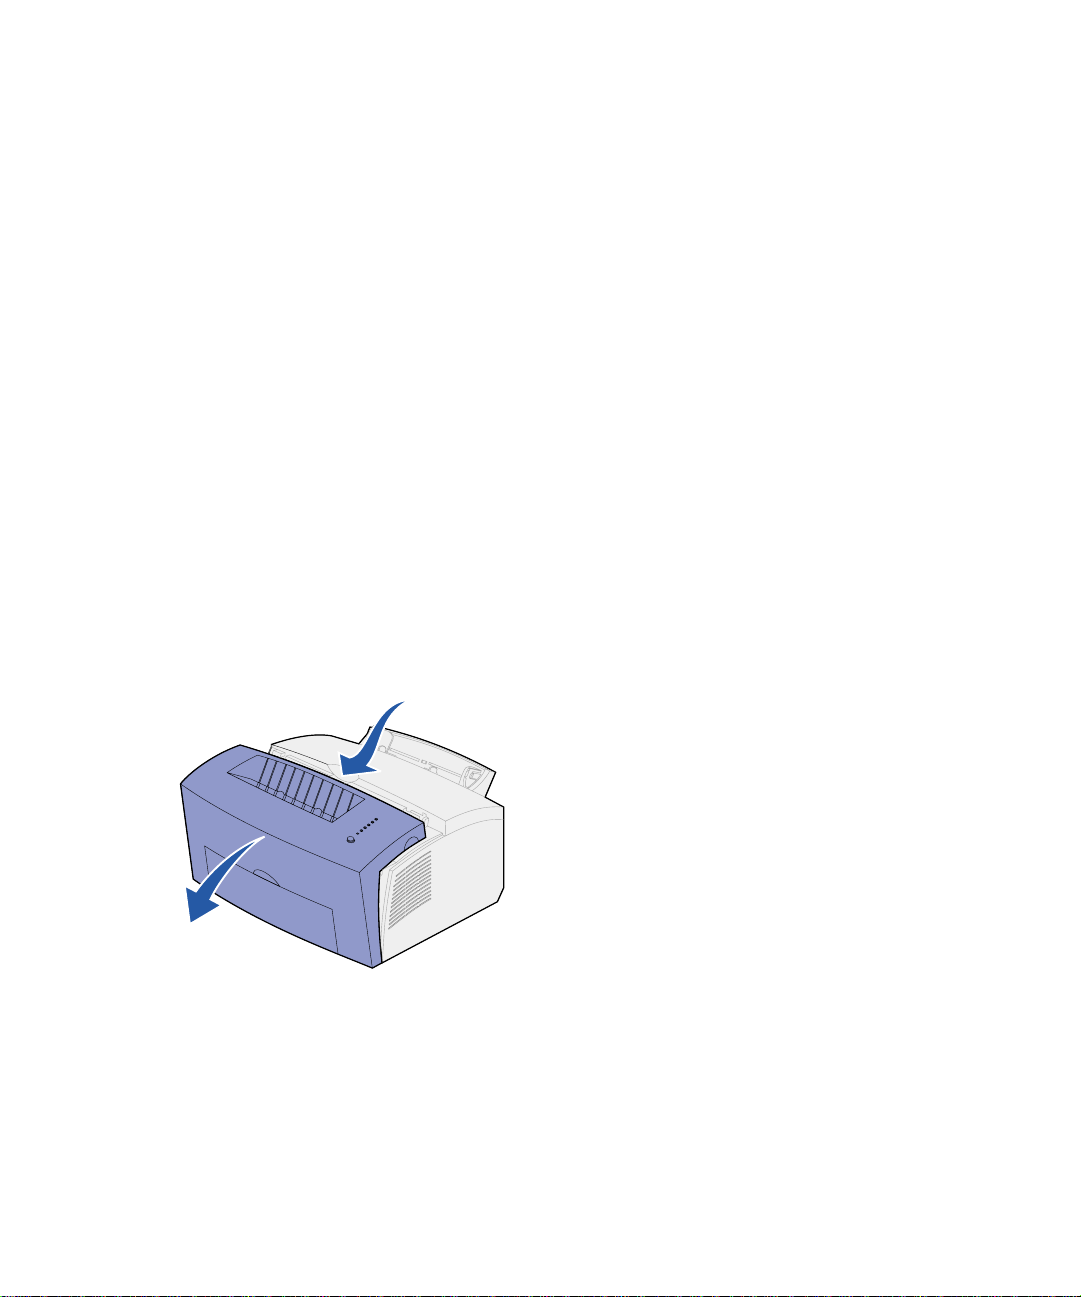
Attaching an operator
panel overlay
Removing print
cartridge packaging
If you have a non-English operator panel
overlay in your printer box and wish to
use it, peel it off, align it on the operator
panel, and press it into place.
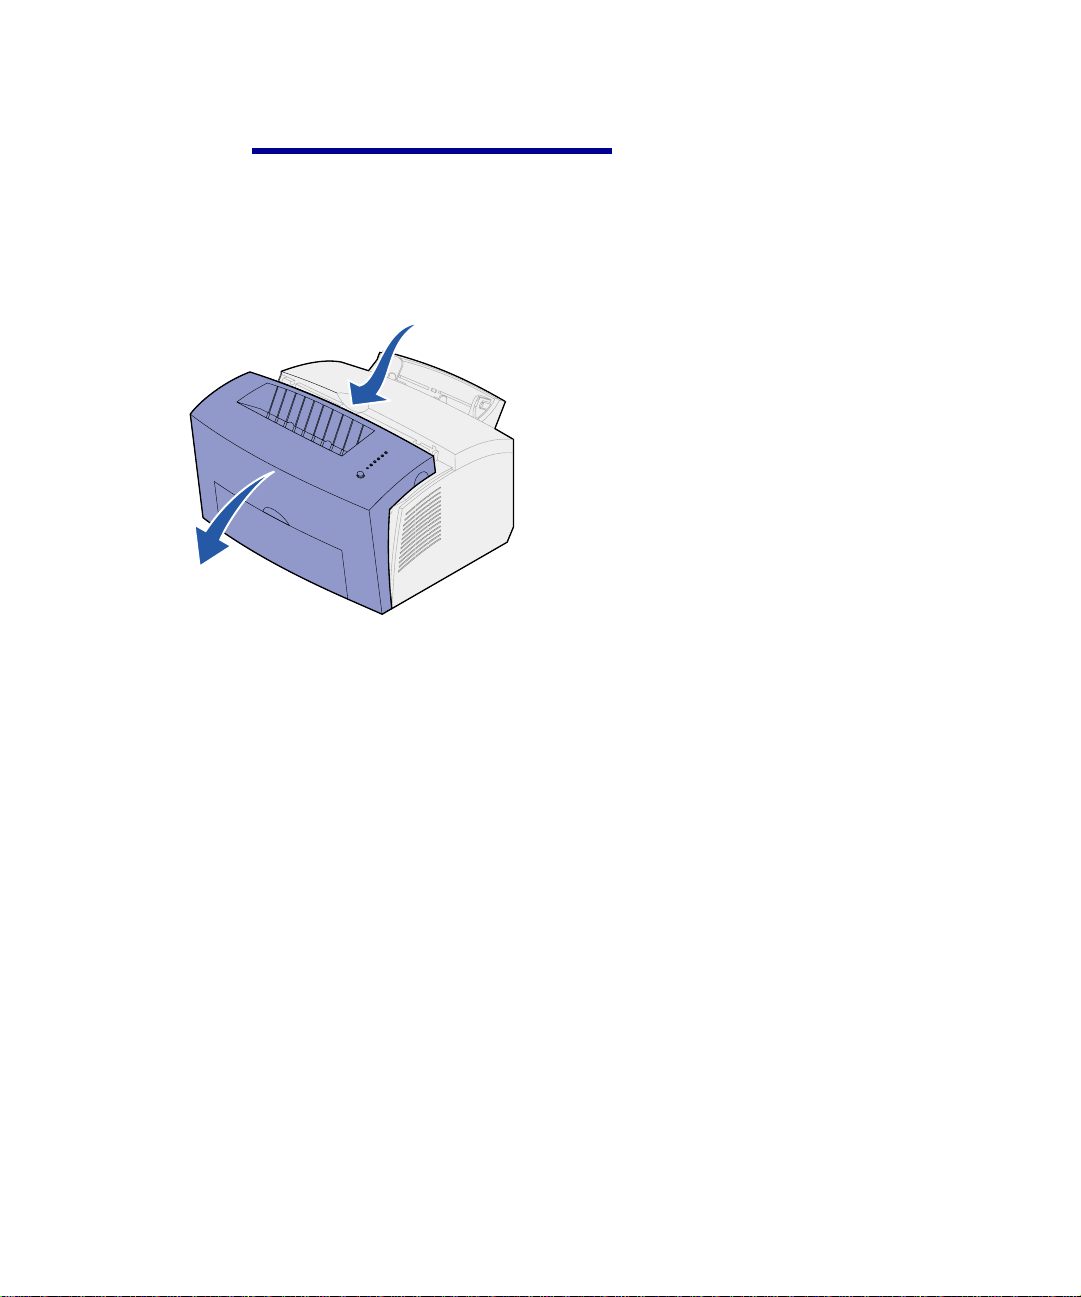
1 Use the finger tab to pull down the
printer cover.
2
Unpack the printer
Page 13
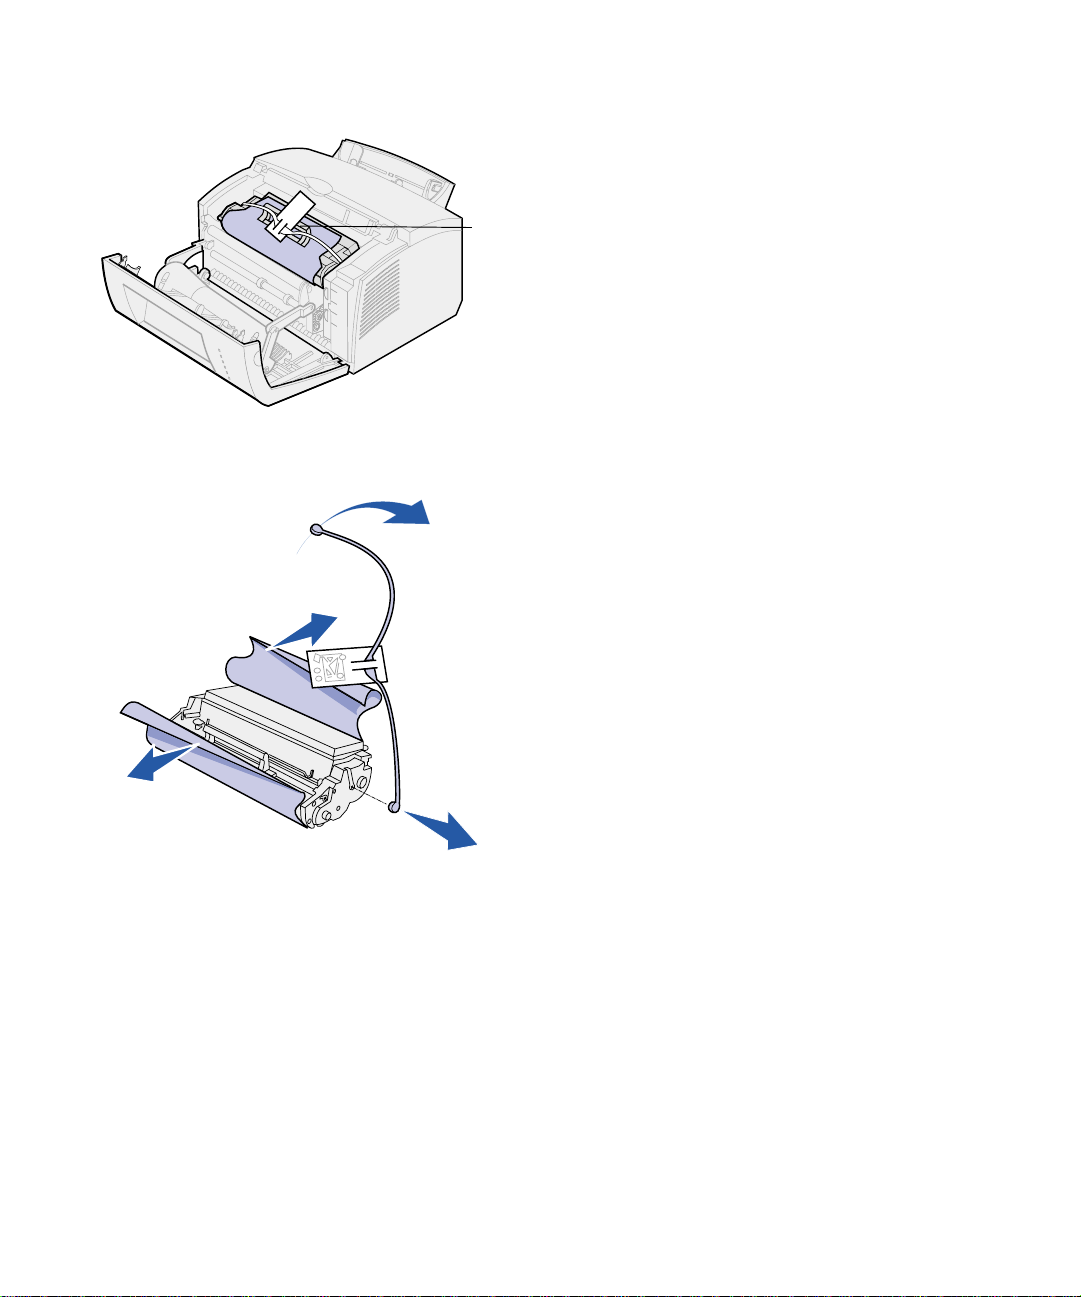
Cartridge
handle
2 Grasp the cartridge handle and
pull the print cartridge straight up.
3 Remove the protective foam
packaging from the print cartridge.
4 Pull off the plastic piece attached
to the ends of the print cartridge.
Discard the plastic piece, foam
and paper.
5 Continue with “Install the print
cartridge” on page 4.
Unpack the printer
3
Page 14
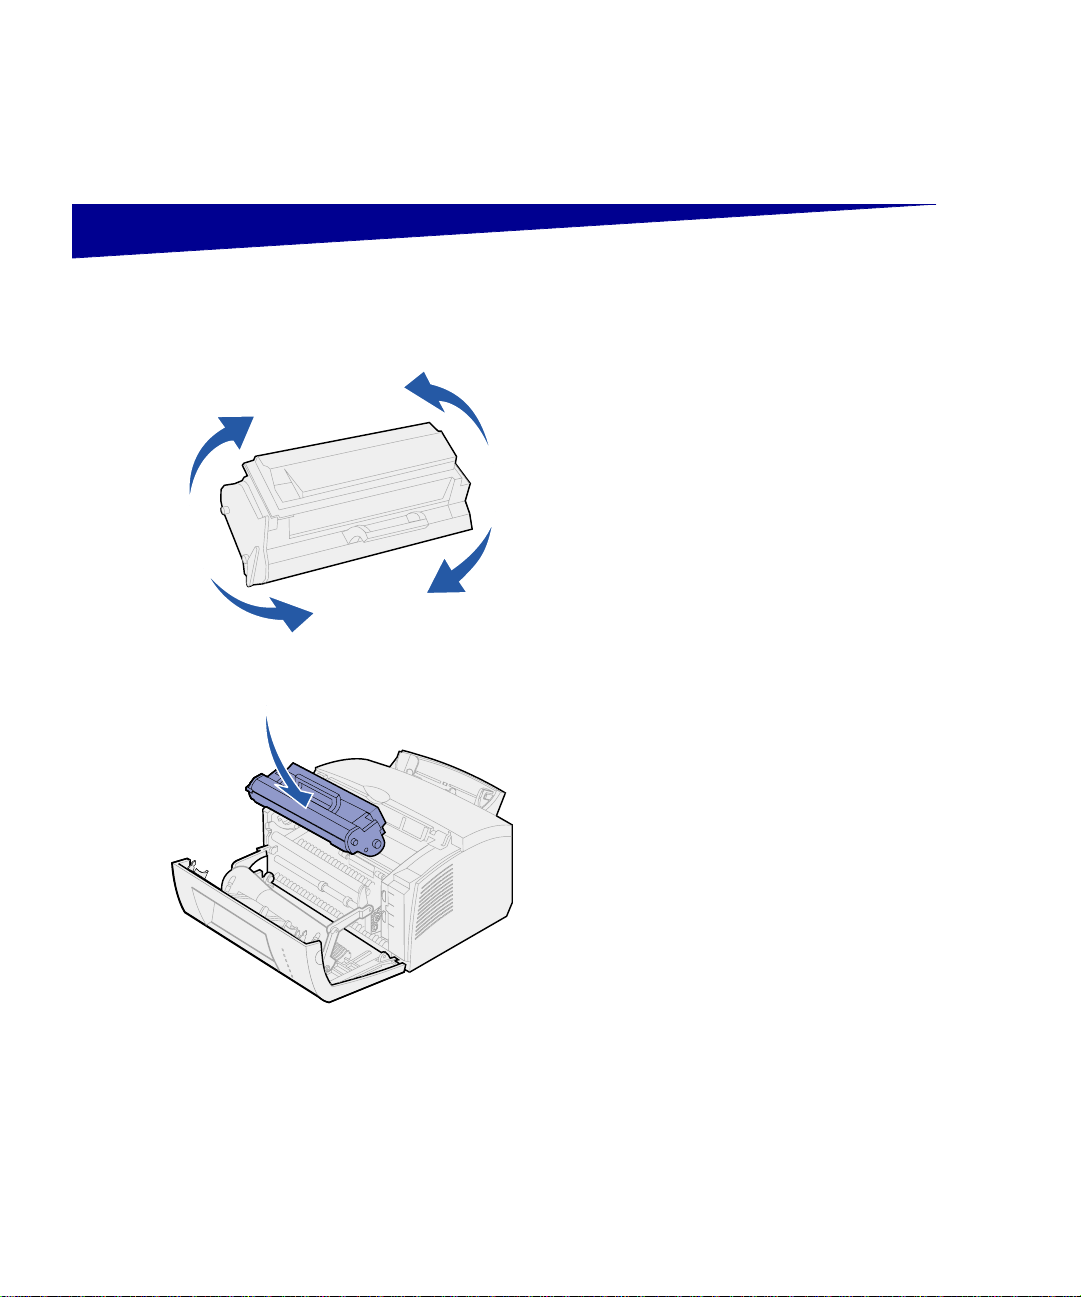
Step 2: Install the print cartridge
1 Shake the cartridge to distribute
the toner evenly.
2 Insert the print cartridge:
a Align the colored labels on
either side of the print
cartr idge with the
corresponding labels in the
printer.
b Holding the handle, tilt the print
cartr idge down and guide it
between the print cartridge
grooves.
c Push down on the cartridge
until it is firmly in place.
4
Install the print cartridge
Page 15
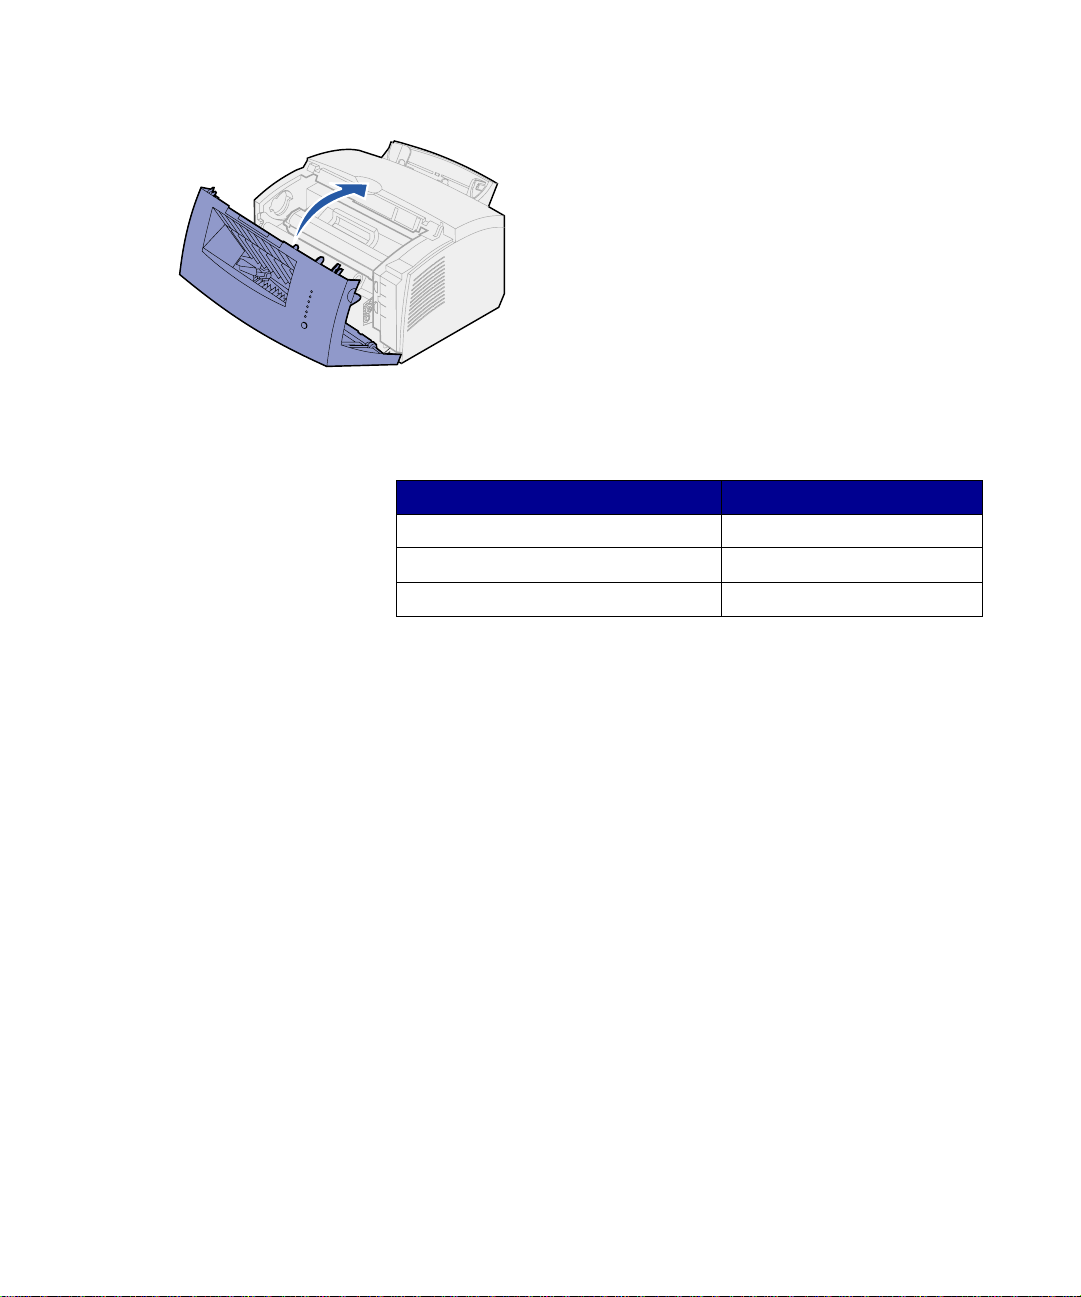
3 Close the p rinter cover.
What do I do next?
Task Go to page ...
Install optional memory 6
Install tray 2 15
Attach cables 17
Install the print cartridge
5
Page 16

Step 3: Install memory cards
Depending on your printer model, you
can increase printer memory for a total
of up to 68MB (Lexmark E320), 72MB
(Lexmark E322), and 80MB (Lexmark
E322n).
If you have a Lexmark E322 or E322n,
you can also install a 1MB, 2MB, or 4MB
optional flash memory card for storing
downloaded fonts or macros.
Removing the printer
side cover
Before installing any memory options,
you must remove the printer side cover.
6
Install memory cards
Page 17
CAUTION! If you are installing memory
cards sometime after setting up the
printer, turn the printer off and unplug
any attached peripherals before
continuing.
1 Open the printer front cover.
Install memory cards
7
Page 18
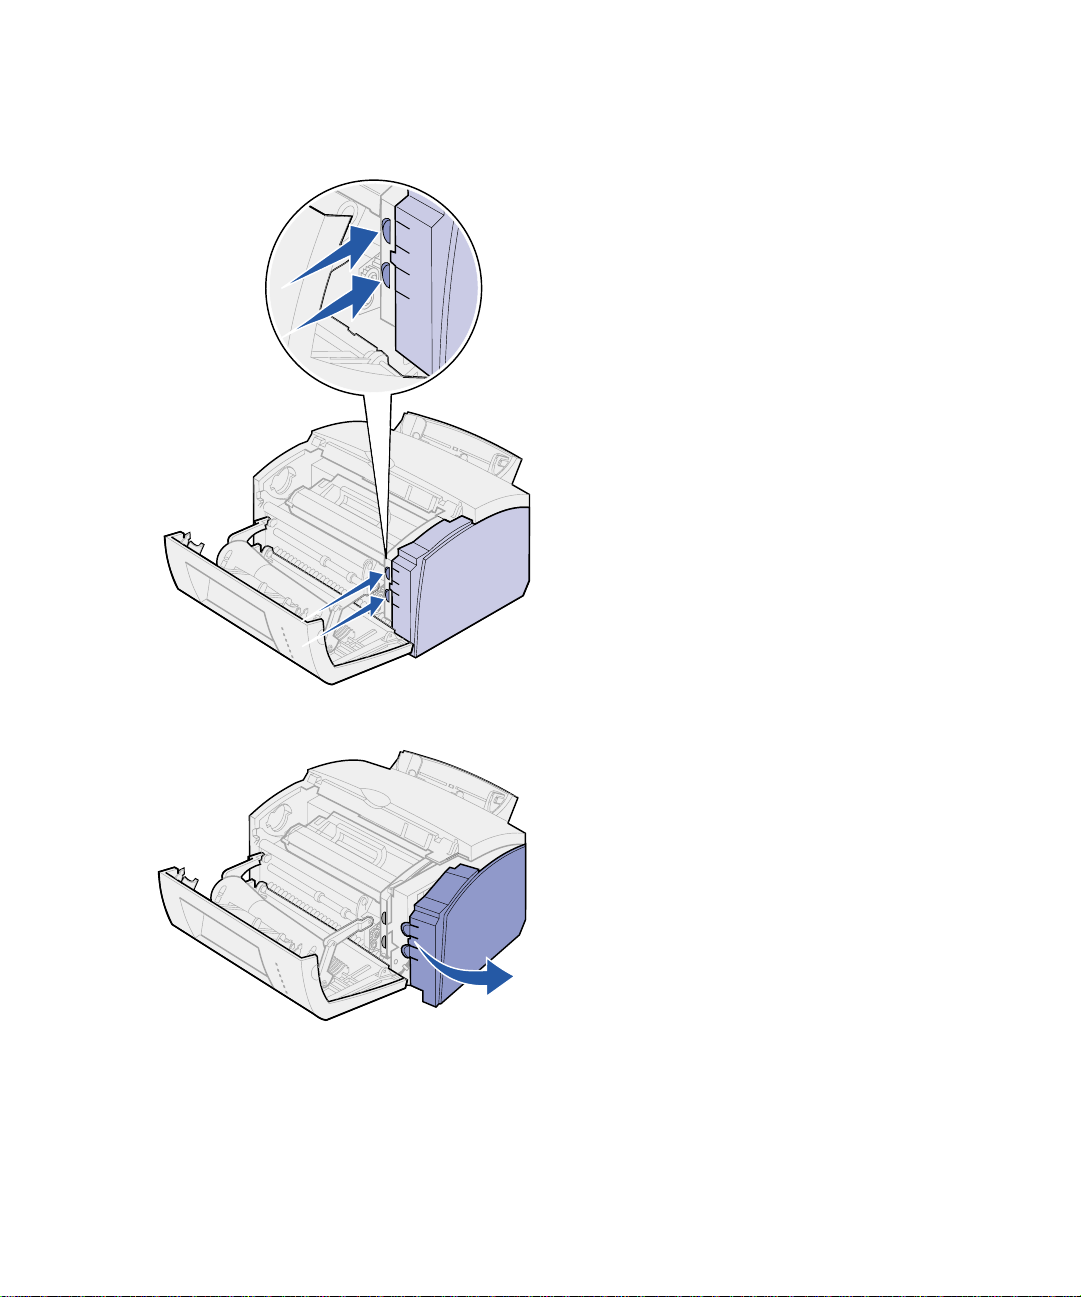
2 Firmly push in the two oval tabs as
you pull open the side cover.
3 Remove the cover and set it
aside.
Removing the system
board shield
8
Install memory cards
You will need a small Phillips screwdriver
to remove the metal shield covering the
printer system board.
Page 19

1 Remove the single screw and set
it aside.
2 Remove the metal shield by
sliding it along the top and bottom
grooves and set it aside.
Installing a printer
memory card
Warning! Printer memory cards are
easily damaged by static electricity.
Touch something metal on the printer
before you touch a memory card.
To install an optional printer memory
card:
1 Unpack the printer memory card.
Install memory cards
9
Page 20

Connection points
System board
2 Avoid touching the connection
points along the edge of the card.
Save the packaging.
3 Locate the top connector on the
system board.
4 Hold the memory card with the
connection points pointing toward
the top connector on the system
board.
5 Insert the card into the connector.
10
Install memory cards
Page 21

6 Push the memory card firmly into
the connector until the latches on
either side of the connector snap
into place.
7 If you are installing flash memory
in a Lexmark E322 or E322n,
continue. Otherwise, reattach the
metal shield and side cover. See
page 13 for instructions.
Installing a flash
memory card
Note: Flash memory cards are easily
damaged by static electricity. Touch
something metal on the printer before
you touch a memory card.
1 Unpack the flash memory card.
Install memory cards
11
Page 22

Connection points
2 Avoid touching the connection
points along the edge of the card.
Save the packaging.
3 Locate the bottom connector on
the system board.
4 Hold the option card with the
connection points pointing toward
the bottom connector on the
system board.
5 Insert the card into the connector
at a 45 degree angle.
12
Install memory cards
Page 23

6 Push the card firmly into the
connector with your thumbs until
the latches snap into place.
7 Reattach the metal shield and
side cover.
Reattaching the metal
shield
When you have finished installing the
memory card(s):
1 Align the metal shield between the
top and bottom grooves and slide
it all the way back.
2 Reattach the screw to keep the
shield in place.
Install memory cards
13
Page 24

Reattaching the side
cover
Tab
Tab
What do I do next?
Task Go to page...
Install the tray 2 15
Attach cables 17
1 Align the top and bottom tabs with
the corresponding slots.
2 As you close the door, push the
oval tabs firmly into the slots.
3 Close the front cover.
14
Install memory cards
Page 25

Step 4: Install the tray 2 option
You can increase paper capacity with the
optional 250-sheet drawer, which
Support unit
Paper tray
attaches underneath the printer.
A drawer consists of a paper tray and a
support unit.
1 Remove the tray from the support
unit.
2 Remove all packing material and
tape from the tray and the support
unit.
3 Place the support unit in the
location you have chosen for your
printer.
Install the tray 2 option
15
Page 26

Note: If you install the 250-sheet drawer
at a later time, be sure to turn off the
printer before installing the drawer.
4 Align the printer with the front of
the support unit and place it on
top of the support unit.
Make sure the support unit is
firmly in place.
When you complete setting up the
printer, print a menu settings page
to verify the 250-sheet drawer is
listed under Installed Features
(see page 30).
16
5 Insert the tray.
Install the tray 2 option
Page 27

Step 5: Attach cables
Local printing To attach a Lexmark E320 or E322
printer to a computer using an IEEE1284 compliant parallel cable, we
recommend using Lexmark part number
1329605 (10 ft) or 1427498 (20 ft).
1 Make sure the printer, computer,
and any attached peripherals are
turned off and unplugged.
2 Plug one end of the cable into the
parallel connector on the pr inte r.
3 Snap down the clips at each end
of the connector.
4 Plug the other end of the parallel
cable into the connector on the
computer.
Attach cables
17
Page 28

To attach a Lexmark E320, E322, or
E322n printer to a computer using a
USB cable, we recommend Lexmark
part number 12A2405 (2 m).
1 Plug one end of the USB cable
into the USB port on the printer.
Match the USB symbol on the
cable to the USB symbol on the
printer.
2 Plug the other end of the cable
into the USB port on the
computer.
18
Attach cables
Page 29

Network printing You can attach a Lexmark E322n printer
to a network using an Ethernet cable
(UTP cable with RJ.45 connector).
To attach the printer to a network with an
Ethernet cable:
1 Plug one end of the Ethernet
cable into the Ethernet network
port on the Mark Net™ print
server.
2 Plug the other end of the cable
into a network LAN connection.
Attach cables
19
Page 30

Attaching a power cord 1 Make sure the printer is turned off.
2 Plug one end of the power cord
into the power cord connector.
3 Plug the other end into a properly
grounded outlet.
4 Turn on the printer.
Each indicator light turns on and
off, starting with Press Button and
ending with the Ready light.
20
Attach cables
Page 31

Step 6: Load paper
Paper support
Top
output
bin
Front output door
Tray 1
Tray 2
Paper support
Manual
feed
Your printer has two standard paper
sources: tray 1, which holds up to 150
sheets of plain paper, and a single-sheet
manual feed. Use tray 1 for most print
jobs. Use the manual feed to feed a
single page, transparency, envelope,
label, or card stock.
You can increase your printer paper
capacity with the optional 250-sheet
drawer.
An output bin on top of the printer holds
up to 100 sheets. The single-sheet front
output door provides a straight-through
paper path for special media, reducing
curling and potential paper jams.
Loading tray 1 Use tray 1, which is behind the manual
feed, to feed paper
Tray 1 holds up to 150 sheets of paper,
10 sheets of transparencies or labels, 10
envelopes, 10 sheets of card stock.
and special media.
Load paper
21
Page 32

1 Extend the rear paper support
until you hear a click.
2 Flex the sheets back and forth to
loosen them, then fan them.
22
Load paper
Page 33

3 If loading:
• letterhead paper, insert letterhead
with the top of the page pointing
down, facing you
• envelopes, insert them vertically,
flap side down with the stamp
area in the top left corner
To reduce paper jams, do not use
envelopes that:
— Have excessive curl
— Ar e stu ck together
— Are damaged in any way
— Contain windows, holes,
perforations, cutouts, or
embossing
— Use metal clasps, string ties,
or metal folding bars
— Have postage stamps attached
— Have any exposed adhesive
when the flap is in the sealed
position
Load paper
23
Page 34

4 Extend the front paper support on
the paper output bin until you hear
a click.
5 If you are printing on legal size
paper, completely extend the front
paper support.
6 Open the front output door for a
straight-through paper path if
you’re printing on special media.
7 Slide the paper guides against the
edges of the paper or envelopes.
8 Select the paper size and type
from your software application.
9 Select the number of copies from
your software application or
printer driver if you are printing
multiple copies.
24
Load paper
Loading the manual
feed
10 Start your print job.
Use the manual feed to feed media, one
sheet at a time, into your printer.
Page 35

If you experience problems feeding
envelopes or card stock in tray 1, try
printing them one at a time from the
manual feed.
1 Extend the front paper support on
the paper output bin until you hear
a click.
2 If you are loading legal paper,
extend the front paper support all
the way up.
3 Open the front output door if
you’re printing on special media.
4 If loading:
• letterhead paper, insert one sheet
of letterhead with the top of the
page pointing down, facing you
• card stock, insert one card or
sheet vertically
• envelopes, insert one envelope
vertically, flap side down with the
stamp area in the top left corner
To reduce paper jams, do not use
envelopes that:
— Have excessive curl
— Ar e stu ck together
— Are damaged in any way
— Contain windows, holes,
perforations, cutouts, or
embossing
— Use metal clasps, string ties,
or metal folding bars
Load paper
25
Page 36

— Have postage stamps attached
— Have any exposed adhesive
when the flap is in the sealed
position
5 Slide the paper guides flush
against the edges of the paper or
envelope.
6 Select the paper size and type
from your software application.
7 Start your print job.
8 Briefly (approximately one
second) push the operator panel
button to start printing.
9 When the Load Paper light and
the Press Button light come on,
place another piece of media in
the manual feed.
10 Press the operator panel button to
print another page.
26
What do I do next?
Task Go to page ...
Install optional tray 2 15
Attach cables 17
Load paper
Page 37

Loading the optional
tray 2
1 Grasp the tabs on either side of
the tray and pull it completely out
of the printer.
2 Make sure the metal plate is
pressed down before inserting it
into the printer.
After the tray is inserted, the metal
plate springs back up so the paper
can feed into the printer.
Load paper
27
Page 38

3 If loading A4 or legal size paper,
extend the paper support on the
front of the tray.
4 Flex the sheets back and forth to
loosen them, then fan them.
5 If loading letterhead paper, insert
letterhead face down with the top
of the page entering the printer
first.
6 Do not exceed the stack height
indicator; overfilling the tray may
cause paper jams.
28
7 Make sure the paper is under both
corner bucklers and lying flat in
the tray.
Corner bucklers
Load paper
Page 39

8 Slide the paper guides flush
against the edges of the paper.
9 Reinstall the tray, making sure the
tray is pushed all the way in.
10 Select the paper size and type
from your software application.
11 Start your print job.
Load paper
29
Page 40

Step 7: Verify printer setup
Print a menu settings page for a list of the current printer settings. If
you have a Lexmark E322n, your printer prints both a menu settings
page and a setup page listing the IP address and other network
settings.
1 Make sure the printer is on and briefly press the operator panel
button to print the page.
2 If you installed the optional tray 2 or additional memory, make
sure it is listed under Installed Features.
If the option is not listed, turn off the printer, unplug the power
cord, and reinstall the option.
30
Verify printer setup
Page 41

Step 8: Understanding the 8: Understanding the
operator panel lights
The operator panel lights mean different
things, depending on their sequence.
They indicate that the printer is ready to
print, the printer needs intervention, or
the printer needs servicing.
Some of the more common light
sequences are shown in the next
section. For a complete explanation of all
of the light sequences, refer to the
Understanding the operator panel lights
section of the Lexmark Publications CD.
Understanding the operator panel lights
31
Page 42

Operator panel terms
Light is on
Light is off
Light is blinking
Light is blinking slowly
Press Button
Press Button
• A brief button press (push the
button once for no more than 3
seconds) restarts the printer.
• A long button press (hold until all
the lights come on) resets the
printer or selects a setting in the
special function menu (see the
Publications CD for more
information).
32
• A double button press (push and
release the button twice quickly)
displays additional error codes or
cycles through the special
function menu settings.
Understanding the operator panel lights
Page 43

The printer is ready to receive and
process data.
The printer is busy
processing data.
receiving or
Understanding the operator panel lights
33
Page 44

The printer is w aiting
is received.
The printer top cover is open or the print
cartridge is not installed.
If both the Error light and Press Button
lights are on, a secondary error has
occurred:
until additional data
1 Press the operator panel button
with a double-button press to
display the secondary error code.
34
2 Refer to Understanding the
Operator Panel Lights section in
the Lexmark Publications CD for
information on what it means and
what you can do.
Understanding the operator panel lights
Page 45

Tray 1 or tray 2 is out of media or the
media did not feed properly.
The printer prompts you to load another
sheet of media in the manual feed.
Understanding the operator panel lights
35
Page 46

The printer detects a jam.
The printer alerts you the toner is getting
low. Remove the print cartridge and
shake it to print more pages before
replacing it.
(On the Lexmark E320, the Toner Low
light does not come on if the standard
1,500-page print cartridge is installed.)
36
Understanding the operator panel lights
Page 47

The printer has a service error. Turn the
printer off and back on. If the lights are
still blinking, contact your point of
purchase.
Understanding the operator panel lights
37
Page 48

Step 9: Install printer drivers
A printer driver is software that lets your computer communicate with
your printer.
Local printing The following instructions explain how to install a printer driver on a
printer attached to a computer using a parallel or USB connection.
Windows Supported connections
The following printer connections are supported:
• Parallel (Windows 95/98/Me, Windows NT 4.0, and Windows
2000)
• USB (Windows 98/Me and Windows 2000)
38
Printer drivers
The following printer drivers are supported:
• Windows system printer driver
• Lexmark E322 custom printer driver
System drivers are built into Windows operating systems. Custom
drivers are available on the drivers CD.
Updated system and custom drivers are available at
www.lexmark.com.
Installation instructions
Read the detailed online instructions on the drivers CD. Click View
Documentation and look for information about local printer
Install printer drivers
Page 49

installation. Detailed instructions are provided for parallel and USB
connections.
Macintosh If you are setting up the printer for local printing, you need to install
the Lexmark E320 PPD and use it with the LaserWriter 8 printer
driver or the Adobe PostScript driver.
The Lexmark E320 PPD and specific information about local printer
installation on Macintosh computers can be found on the drivers CD
that shipped with your printer.
After the printer is installed, print a test page to verify your printer is
correctly se t up.
Network printing If you have a Lexmark E322n, the following instructions explain how
to install printer drivers on printers attached to a network.
Windows Ports
The following network printer ports are supported:
Note: Using the Lexmark E322
custom printer driver and a
Lexmark network port provides
enhanced functionality, such as
printer status alerts.
• Microsoft IP port (Windows NT 4.0 and Windows 2000)
• Lexmark network port (Windows 95/98/Me, Windows NT 4.0,
and Windows 2000)
Printer drivers
The following printer drivers are supported:
• Windows system printer driver
• Lexmark E322 custom printer driver
System drivers are built into Windows operating systems. Custom
drivers are available on the drivers CD.
Updated system and custom drivers are available on the Lexmark
Web site at www.lexmark.com.
Install printer drivers
39
Page 50

Printing methods
The following network printing methods are supported:
• Direct IP printing
• Shared printing (point and print, peer-to-peer)
Creating ports and installing drivers
Read the detailed instructions on the drivers CD. Click View
Documentation and look for network printer installation.
If you choose to install without using the instructions on the drivers
CD, you need a basic understanding of network printing on TCP/IP
networks, printer driver installation, and the process involved in
adding new network ports.
Macintosh Your printer connects automatically to AppleTalk networks and
becomes readily visible to other network clients.
Note: A PostScript (PPD) file
provides detailed information
about the capabilities of a printer
to UNIX or Macintosh drivers or
applications.
NetWare The Le xmark E322n works with both Novell Distributed Print Services
You must create a printer object (icon) on the desktop of each
network client using the LaserWriter 8 printer driver and the
Lexmark E322 PostScript Printer Description (PPD) file.
Specific information about installing the printer on your AppleTalk
network can be found in the online documentation on the drivers CD
that shipped with your printer.
A Lexmark PPD Installer is provided in the downloadable Web
package available on the Lexmark Web site at www.lexmark.com.
Depending upon which version of the drivers CD shipped with your
printer, you may also find this software on the drivers CD. Launch this
utility and follow the instructions to install the PPDs. Send a test print
job when you have finished.
(NDPS) and regular queue-based NetWare environments.
40
Install printer drivers
Page 51

Novell Distributed Print Services (NDPS)
If you have an NDPS environment, we recommend you install the
Lexmark NDPS IP Gateway. The gateway tightly integrates your
printers with NDPS so you can easily monitor, control, and print to
them.
You can get the gateway, the snap-ins, the support files and a white
paper with installation instructions on the Web at
www.lexmark.com/networking/ndps.html.
Additional information about network printer installation can be found
in the online documentation on the drivers CD that shipped with your
printer.
Non-NDPS (queue-based)
For the latest information about Lexmark support for non-NDPS
(queue-based) environments, click View Documentation on the
drivers CD and look for network printer installation.
Install printer drivers
41
Page 52

Step 10: Troubleshooting tips
Problem: What to do:
Installing a print cartridge
Characters appear light or b lu rred. • The print cartridge may be low on toner. Replace the cartridge.
The printer seems to be printing, but pages
are blank.
The printer is on, but nothing prints.
Jobs are not printing and the Error light is
on solid.
Attaching cables
Unexpected characters print or characters
are missing.
The operator panel lights do not come on
when the printer is turned on.
Loading paper
Toner smudges appear on the front or back
of the page.
The paper sticks together/printer feeds
multiple sheets of paper.
The paper skews or buckles. • Don’t overfill tray 1 or optional tray 2.
• The print cartridge has an error. Replace the cartridge.
• Make sure the print cartridge is installed.
• Make sure the parallel cable, USB cable or Ethernet cable is firmly
plugged in at the back of the printer.
• Make sure the power cord is firmly plugged in at the back of the
printer and at the wall outlet.
• Make sure the paper is straight and unwrinkled.
• Remove the paper fr om tr ay 1 or optional tr ay 2 and fa n th e paper.
• Don’t overfill tray 1 or optional tray 2.
• Mak e sure th e paper is und er both c orner buc klers and lying fla t in
the optional tray 2.
• Make sure the paper guides are properly positioned against the
edges of the paper.
42
Troubleshooting tips
Page 53

Problem: What to do:
The paper fails to feed from tray 1. • Make sure tray 1 is selected from the printer driver.
The paper fa ils to f eed from t he optional tray 2.• Make sure tray 2 is selected from the printer driver.
• Remove the paper from tray 1 and fan the paper.
• Make sure the tray is pushed all the way in.
• Make sure the metal plate is pressed down.
• Make sure the paper is under both corner bucklers.
• Make sure the paper does not exceed the stack height indicator.
• Remove the paper from the optional tray 2 and fan the paper.
Troubleshooting tips
43
Page 54

Statement of
limited warranty
Lexmark International, Inc., Lexington, KY
This warranty applies to the United States and Canada. For
customers outside the U.S. and Canada, refer to the country-specific
warranty information that came with your printer.
Lexmark E320/E322
printer
Warranty Lexmark warrants that this product:
This Statement of Limited Warranty applies to this product if it was
originally purchased for your use, and not for resale, from Lexmark or
a Lexmark remarketer, referred to in this statement as “Remarketer.”
• Is manufactured from new parts, or new and serviceable used
parts, which perform like new parts
• Is free from defects in material and workmanship
• Conforms to Lexmark’s official published sp eci f i ca tio ns
• Is in good working order
If this product does not function as warranted during the warranty
period, contact a Remarketer or Lexmark for repair without charge.
If this product is a feature or option, this statement applies only when
that feature or option is used with the product for which it was
designed. T o obtain warranty service, you may be required to present
the feature or option with the product.
If you transfer this product to another user, warranty service under the
terms of this statement is available to that user for the remainder of
the warranty period. You should transfer proof of original purchase
and this statement to that user.
44
Statement of limite d warranty
Page 55

Warranty service The warranty period is 12 months and starts on the date of original
purchase as shown on the purchase receipt.
To obtain warranty service you may be required to present proof of
original purchase. Warranty service will be provided at your location.
When warranty service involves the exchange of a product or part,
the item replaced becomes the property of the Remarketer or
Lexmark. The replacement may be a new or repaired item. The
replacement item assumes the remaining warranty period of the
original product.
Replacement is not available to you if the product you present for
exchange is defaced, altered, in need of a repair not included in
warranty service, or damaged beyond repair. Also, such product must
be free of any legal obligation or restrictions that prevent its
exchange.
Before you present this product for warranty service, remove all
programs, data, and removable storage media.
For further explanation of your warranty alternatives and the nearest
Lexmark authorized servicer in your area, please contact Lexmark at
1-800-LEXMARK (1-800-539-6275), or on the World Wide Web at
http://www.lexmark.com.
Free remote technical support is provided for this product throughout
its warranty period. Lexmark offers a variety of extended warranty
programs that include an extension of technical support. For products
no longer covered by a Lexmark warranty, technical support may only
be available for a fee.
Extent of warranty We do not warrant uninterrupted or error-free operation of a product.
Warranty service does not include repair of failures caused by:
• Modification or attachments
• Accidents or misuse
• Unsuitable physical or operating environment
• Maintenance by anyone other than Lexmark or a Lexmark
authorized servicer
• Operation of a product beyond the limit of its duty cycle
Statement of limited warranty
45
Page 56

• Failure to have installed a maintenance kit as specified (if
applicable)
• Use of printing media outside of Lexmark specifications
• Use of other than Lexmark supplies (such as toner cartridges,
inkjet cartridges, and ribbons)
• Use of other than Lexmark product or component
ALL EXPRESS AND IMPLIED WARRANTIES, INCLUDING THE
IMPLIED WARRANTIES OF MERCHANTABILITY AND FITNESS
FOR A PARTICULAR PURPOSE, ARE LIMITED IN DURATION TO
THE WARRANTY PERIOD. NO WARRANTIES, EXPRESS OR
IMPLIED, WILL APPLY AFTER THIS PERIOD.
Limitation of liability Your sole remedy under this Statement of Limited Warranty is set
forth in this section. For any claim concerning performance or
nonperformance of Lexmark or a Remarketer for this product under
this Statement of Limited Warranty, you may recover actual damages
up to the limit set forth in the following paragraph.
Lexmark's liability for actual damages from any cause whatsoever will
be limited to the greater of 1) $5,000 or 2) the amount you paid for the
product that caused the damages. This limitation of liability will not
apply to claims by you for bodily injury or damage to real property or
tangible personal property for which Lexmark is legally liable. In no
event will Lexmark be liable for any lost profits, lost savings, incidental
damage, or other economic consequential damages. This is true even
if you advise Lexmark or a Remarketer of the possibility of such
damages. Lexmark is not liable for any claim by you based on a third
party claim.
46
This limitation of remedies also applies to any developer of materials
supplied to Lexmark. Lexmark’s and the developer’s limitations of
remedies are not cumulative. Such developer is an intended
beneficiary of this limitation.
Additional rights Some states do not allow limitations on how long an implied warranty
lasts, or do not allow the exclusion or limitation of incidental or
consequential damages. If such laws apply, the limitations or
exclusions contained in this statement may not apply to you.
This warranty gives you specific legal rights. You may also have other
rights which vary from state to state.
Statement of limited warranty
Page 57

Index
Symbols
23
Numerics
250-sheet drawer 15
A
A4, loading 23, 25, 28
A5, loading 23, 25, 28
B
B5, loading 23, 25, 28
C
cable, connecting
Ethernet 19
parallel 17
USB 18
card stock, loading 23
cautions iii
CD
drivers ix
changing a print cartridge
see Publications CD Reference
connecting the printer
using a parallel cable 17
using a USB cable 18
using an Ethernet cable 19
D
drivers CD ix
drivers, installing
local printing 38
network printing 39
E
envelopes, loading 23, 25
Ethernet cable 19
executive, loading 23, 25, 28
F
features vi
I
installing
250-sheet drawer 15
memory 6
print cartridge 4
L
legal, loading 24, 25, 28
Index
47
Page 58

letter, loading 23, 25, 28
letterhead, loading 23, 25, 28
Lexmark Publications CD viii
Lexmark Web site x
loading
card stock 23, 25
envelopes 23, 25
manual feed 24
paper
A4 23, 25, 28
A5 23, 25, 28
B5 23, 25, 28
executive 23, 25, 28
legal 24, 25, 28
letter 23, 25, 28
letterhead 23, 25, 28
transparencies 23, 25
tray 1 21
tray 2 27
local printing, drivers 38
M
Macintosh printer drivers 40
manual feed, loading 24
MarkNet internal print server 19
memory cards, installing 6
menu settings page, printing 30
P
paper jams
see the Publications CD or Quick Reference
Card
parallel cable 17
power cord, connecting 20
print cartridge
installi ng 4
removing 2
replacing
see Publications CD
printer
features vi
lights 31
reset 32
unpacking 1
printer drivers
Macintosh 40
Windows 39
printing
from the correct tray 43
menu settings page 30
multiple copies 24
setup page 30
Publications CD viii
Q
N
NetWare 40
network printing, drivers 39
O
operator panel
lights viii
operator panel button viii
options
250-sheet drawer, installing 15
memory cards 6
tray 2, loading 27
48
Index
Quick Reference card ix
R
removing a print cartridge 2
replacing a print cartridge
see the Publications CD
resetting the printer 32
restoring factory defaults
see the Publications CD
S
safety information iii, viii
setup page, printing 30
special function menu
Page 59

see the Publications CD
T
toner cartridge
see print cartridge
transparencies, loading 23, 25
tray 1, loading 21
tray 2, loading 27
troubleshooting
attaching cables 42
installing a print cartridge 42
loading paper 42
paper jams
see Publications CD or Quick Reference
printing from the correct tray 43
restoring factory defaults
see the Publications CD
U
unpacking the printer 1
USB cable 18
W
warnings iii
warranty 44
Web site, Lexmark x
Windows printer drivers 39
Index
49
Page 60

Lexmark and Lexmark with diamond design are trademarks of Lexmark International, Inc.,
registered in the United States and/or other countries.
© 2001 Lexmark International, Inc.
740 West New Circle Road
Lexington, Kentucky 40550
www.lexmark.com
 Loading...