

Page 1
Quick Reference
•
For Windows users, click File Print, and then click
Properties, Preferences, Options, or Setup.
•
For Macintosh users, choose File > Print, and then adjust the
settings from the print dialog and pop-up menus.
Do not remove trays while a job prints or when the Busy light
sequence appears on the printer control panel. Doing so may
cause a jam.
Loading paper and specialty media
This section explains how to load the 250- and 550-sheet trays, and
the manual feeder. It also includes information about setting the
Paper Size and Paper Type.
Setting the paper size and paper type
Make sure the settings for the trays reflect the size and type of
paper loaded in the trays. The factory default paper type setting
is plain paper, so the paper type setting must be set manually for
all trays that do not contain plain paper. Access the Paper menu
through the Embedded Web Server if your printer is networked:
1
Type the printer IP address in the address field of your Web
browser.
Note: If you do not know the IP address of the printer, then
print a network setup page and locate the IP address in the
TCP/IP section.
2
Click Settings.
3
From the Paper menu, find the Size and Type for each input
source.
4
Select the paper size and paper type used most frequently from
each input source.
5
Click Submit.
If the printer is connected to a computer by a USB or parallel cable,
use one of the following utilities to access the Paper menu,
depending on your operating system:
•
On a Windows computer, access the Paper menu through the
Local Printer Settings Utility.
•
On a Macintosh computer, access the Paper menu through the
Printer Settings.
Note: The Paper Size and Type settings will be saved until you reset
factory default settings. If you would like to override the Paper Size
and Type settings for a special print job, do one of the following:
Loading the standard 250-sheet tray
The printer has two trays to select from: the standard tray (Tray 1),
also known as the 250-sheet tray, and either the optional
250-sheet tray or the optional 550-sheet tray (Tray 2). Only one
optional drawer (which includes an optional tray) may be attached
to the printer at one time.
Proper paper loading prevents jams and facilitates trouble-free
printing.
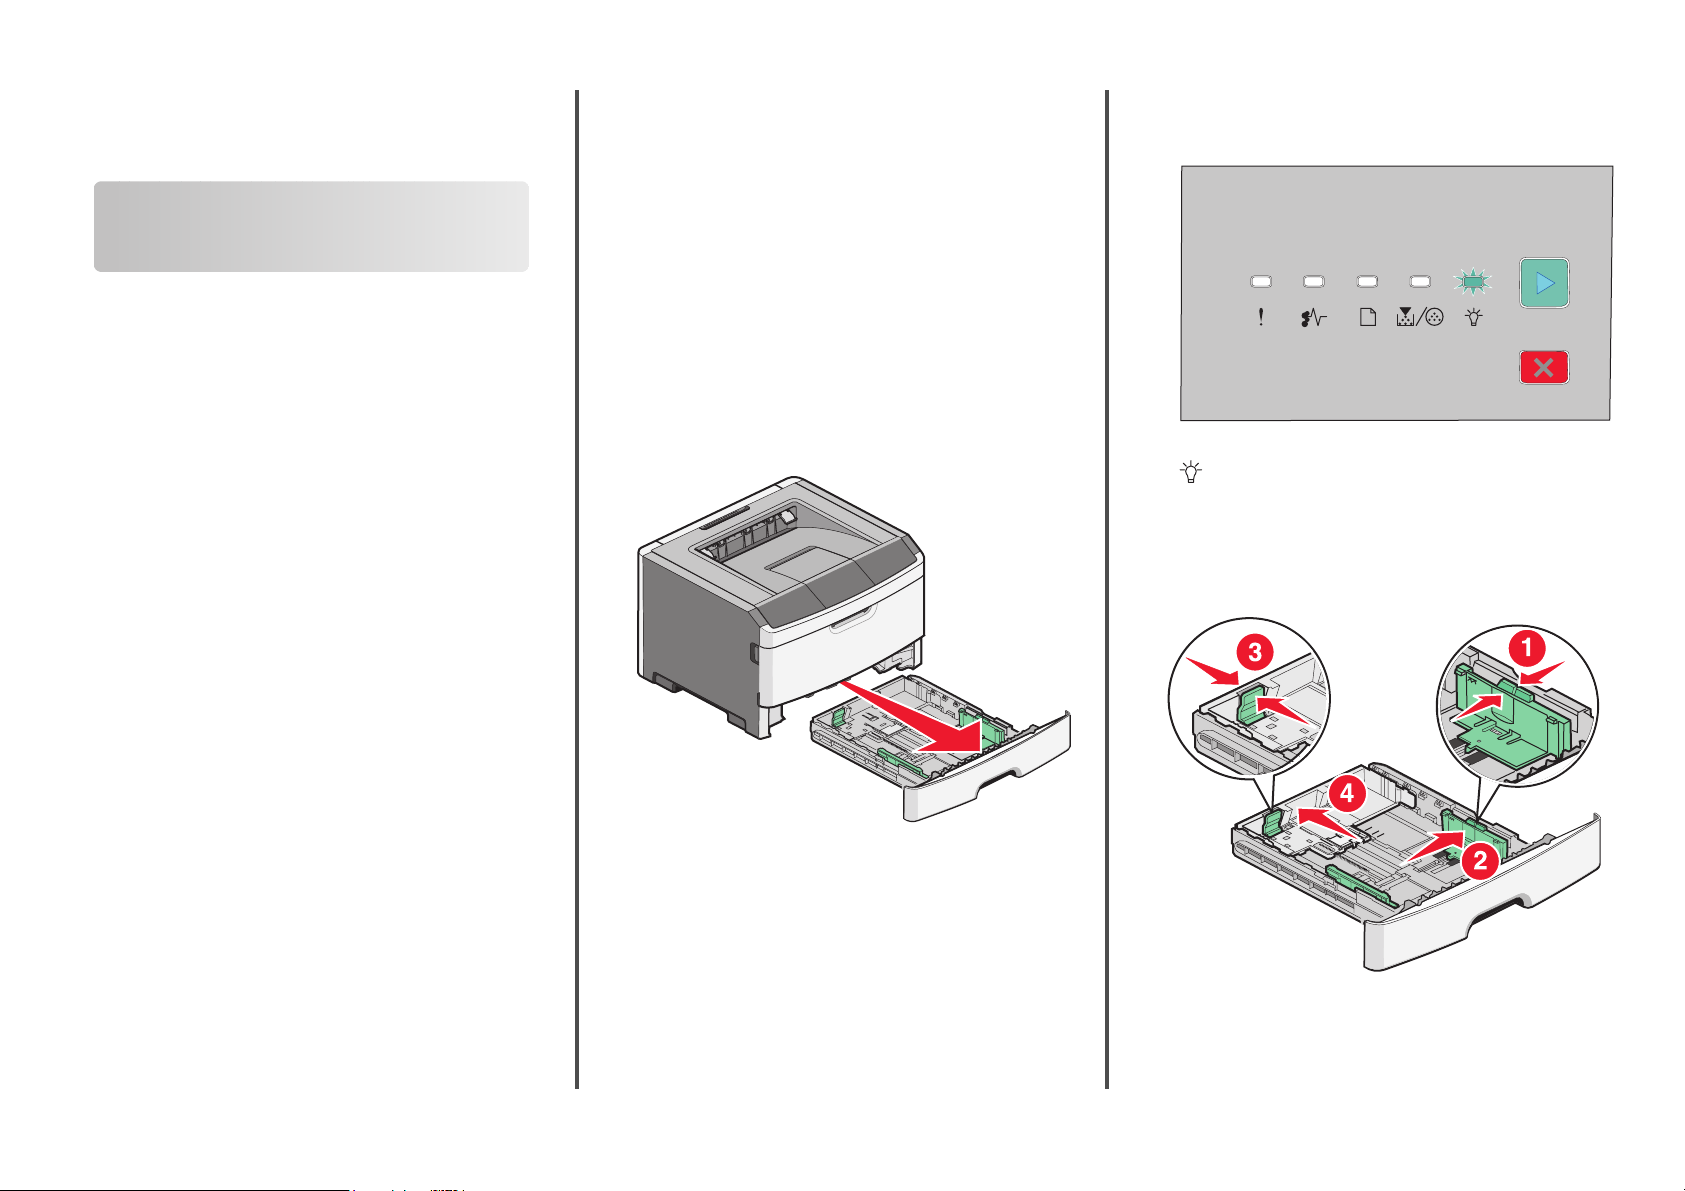
1
Pull the tray completely out.
Busy
- On
2
Squeeze the width guide tabs, and then slide them to the sides
of the tray. The width guides move in unison.
3
Squeeze the length guide tabs together, and then slide the
length guide to the correct position for the paper size being
loaded.
If you are loading a longer size of paper like A4 or lega l, squeeze
the length guide tabs and slide the length guide backwards to
Loading paper and specialty media
1
Page 2
the position for the length of paper you are loading. The tray
extends backwards.
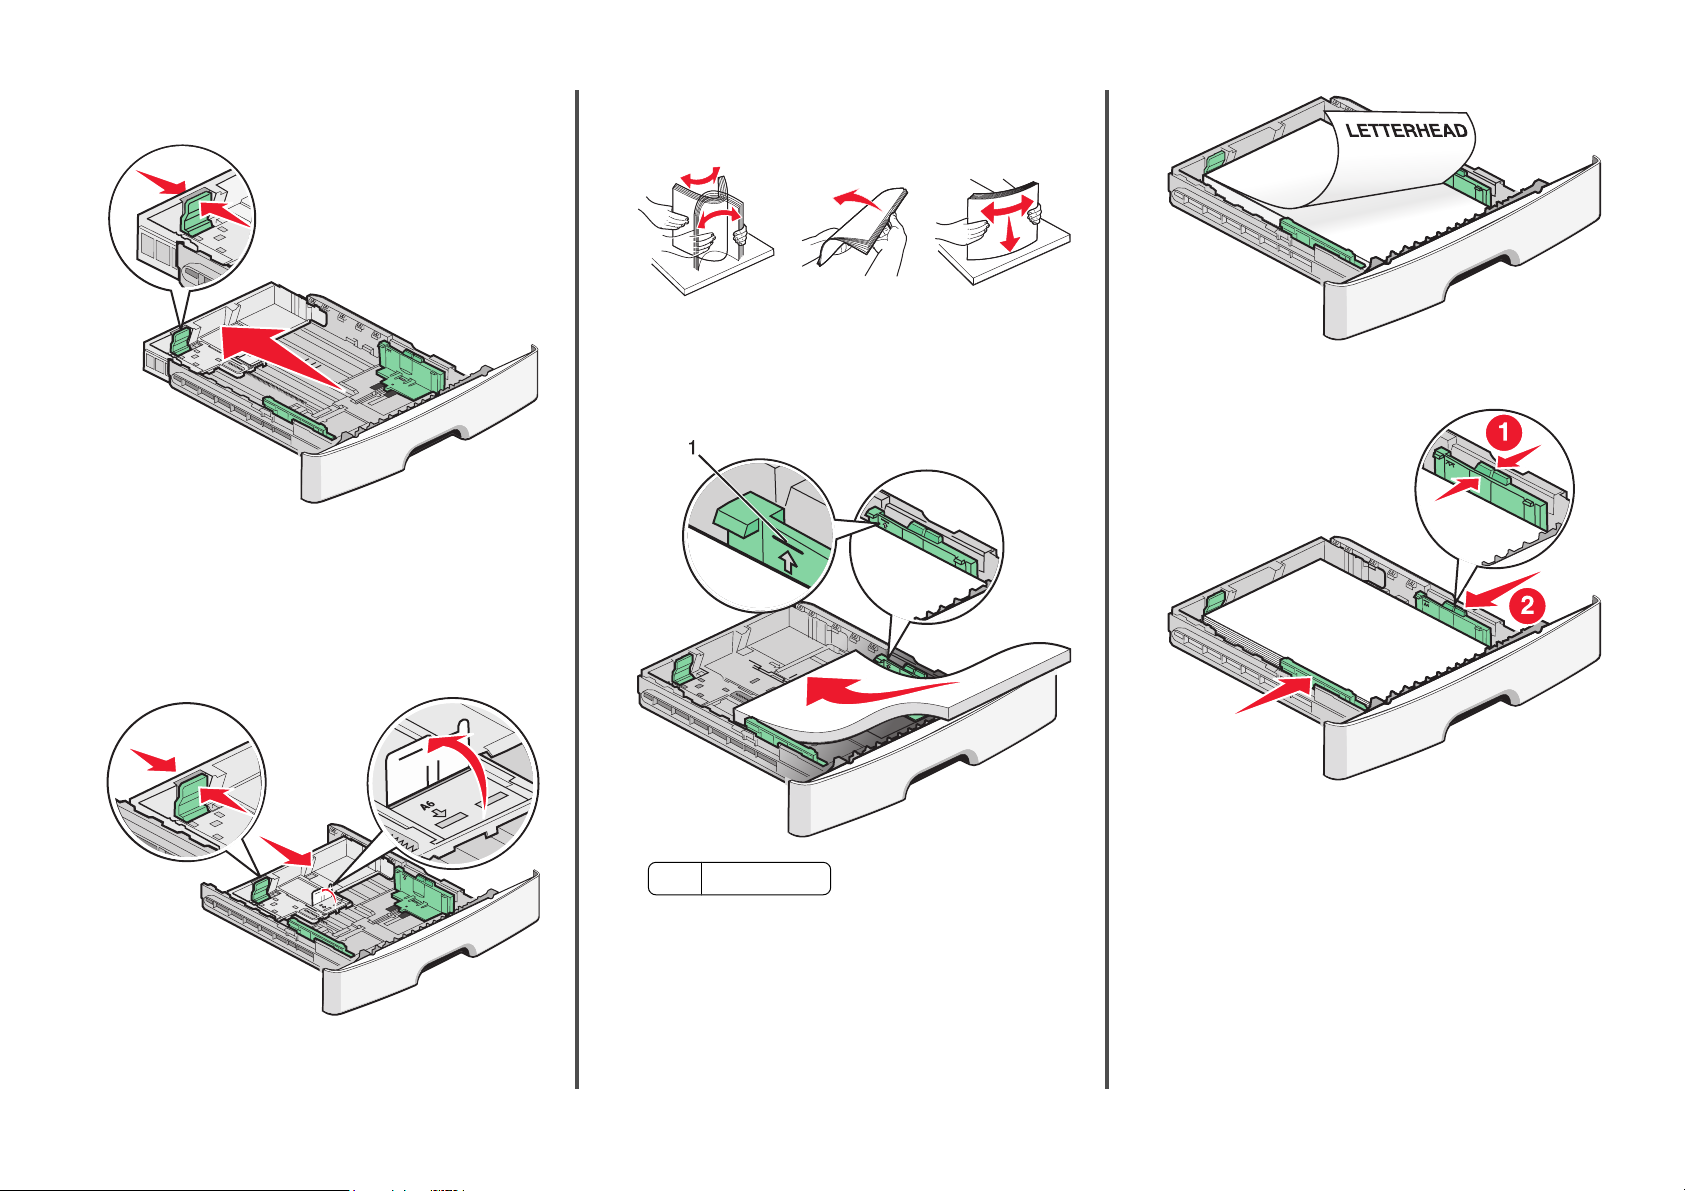
If you are loading A6-size paper:
a
Squeeze the length guide tabs together as shown, and
slide the length guide toward the center of the tray to the
A6 size position.
b
Raise the A6 length guide.
Note: The standard tray accommodates only 150 sheets of A6-size
paper.
4
Flex the sheets back and forth to loosen them, and then fan
them. Do not fold or crease the paper. Straighten the edges on
a level surface.
5
Load the paper stack toward the back of the tray as shown with
the recommended print side facedown.
Note: Notice the maximum fill line. Do not try to overload the
tray. Do not load A6-size paper to the maximum fill line; the
tray holds only 150 sheets of A6-size paper.
6
Squeeze the width guide t abs on the right guide, and slide the
width guides to lightly touch the side of the stack.
Maximum fill line
1
Note: When loading letterhead, place the top edge of the
sheet toward the front of the tray. Load the letterhead with
the design placed facedown.
Loading paper and specialty media
2
Page 3
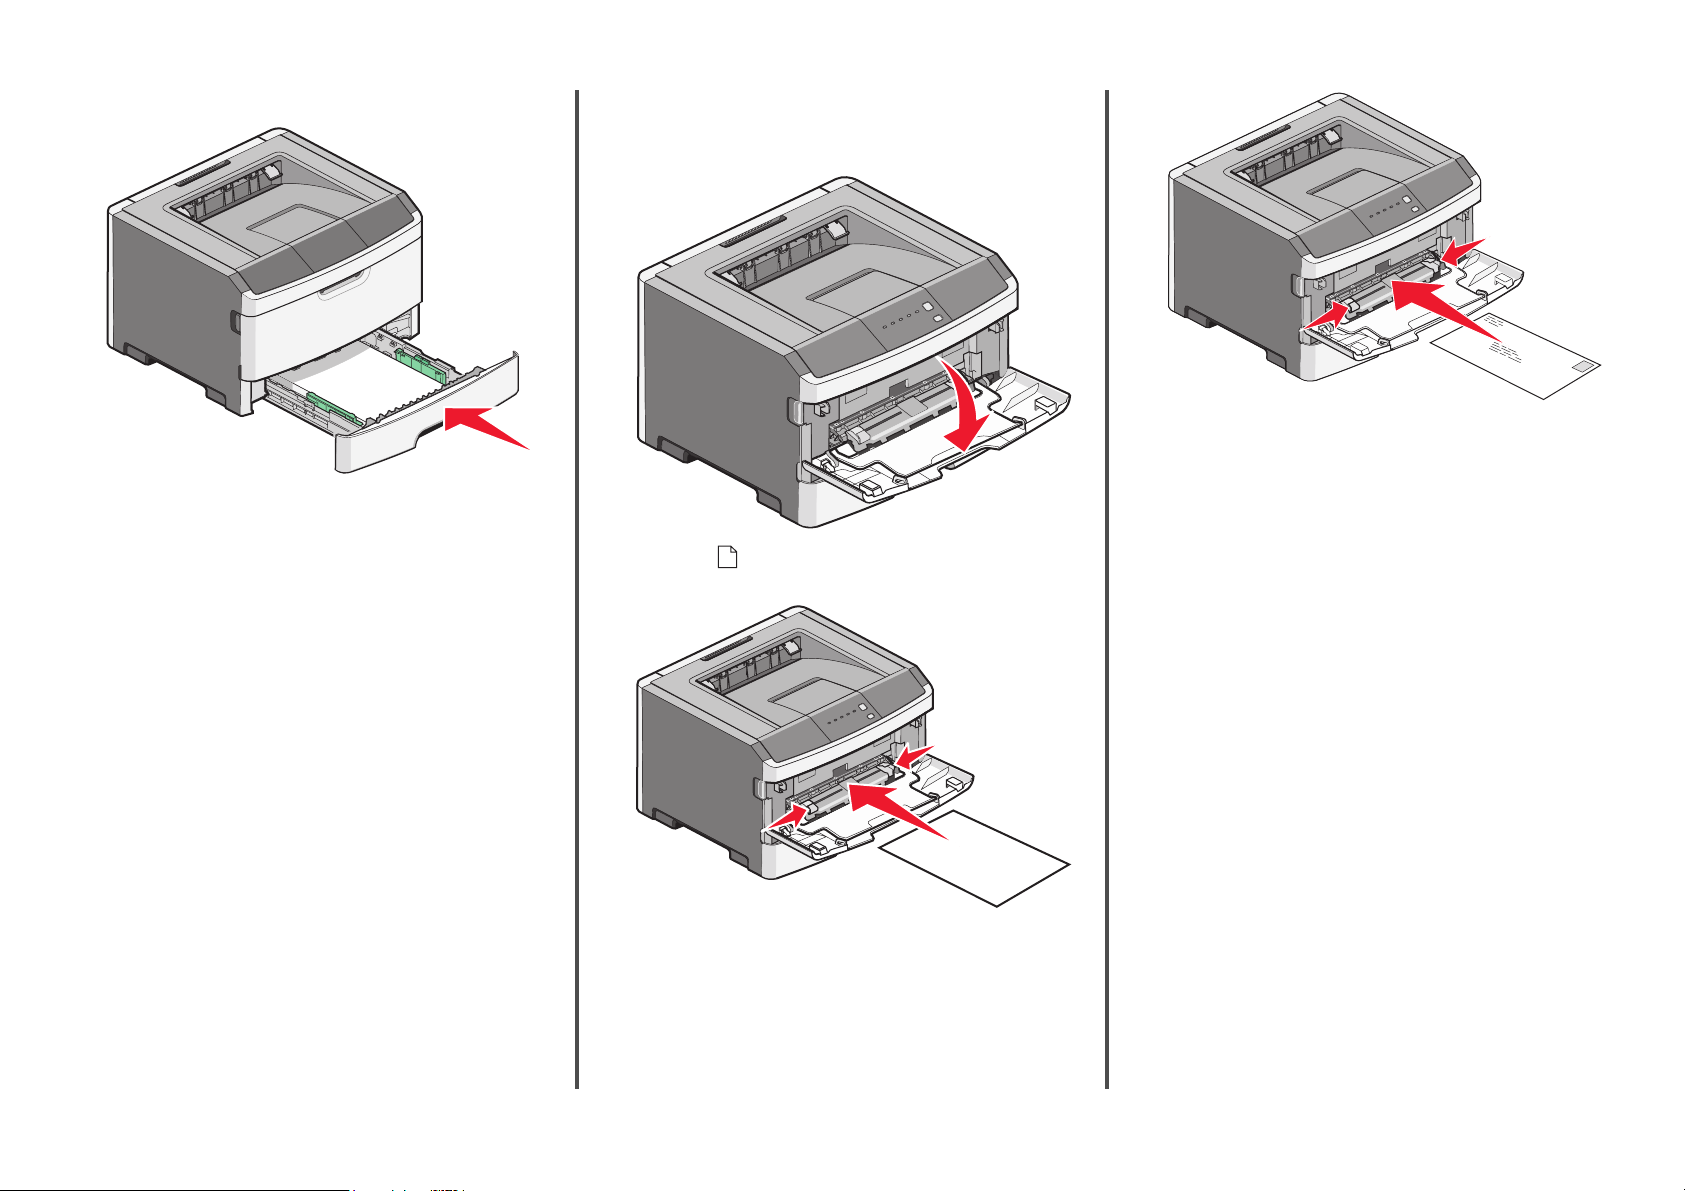
7
Insert the tray.
8
If a different type of paper was loaded than the type previously
loaded in the tray, change the Paper Type setting.
Note: The difference between the standard 250-sheet tray and the
optional 250- and 550-sheet trays is that the standard tray
accommodates up to 150 sheets of A6-size paper, so the width
guides slide farther to the center of the tray.
Using the manual feeder
The manual feeder is located inside the manual feeder door of the
printer and can feed only one sheet of paper at a time. You can use
the manual feeder to quickly print on paper types or sizes that are
not currently loaded in the tray.
1
Open the manual feeder door.
2
When the light is lit, load the paper faceup into the center
of the manual feeder.
3
Feed paper into the manual feeder only to the point where its
leading edge can contact the paper guides.
4
Adjust the paper guides to the paper width.
Warning—Potential Damage: Do not force the paper into the
feeder. Forcing the paper causes jams.
Using the standard exit bin and paper stop
The standard exit bin holds up to 150 sheets of 20 lb paper. It
collects print jobs facedown. The standard exit bin includes a
paper stop that keeps paper from sliding out the front of the bin
as it stacks. The paper stop also aids in neater stacking of the paper.
Notes:
•
Load letterhead faceup, with the top of the sheet entering
first.
•
Load envelopes with the flap side down and with the
stamp area as shown.
Loading paper and specialty media
3
Page 4

To open the paper stop, pull it so it flips forward.
Notes:
•
Do not leave the paper stop in the open position if you are
printing on transparencies. Doing so may cause creases in the
transparencies.
•
When moving the printer to another location, make sure the
paper stop is closed.
Load up to Notes
Tray 2
250 or 550 sheets of
paper
Manual feeder
1 sheet of paper
1 sheet of A6-size paper
1 transparency
1 sheet of card stock
1 envelope
Note: Only one optional drawer
may be installed on the printer at
a time. The maximum amount of
paper that can be loaded depends
on whether you have an optional
250- or 550-sheet tray.
Note: Feed paper into the manual
feeder only to the point where its
leading edge can contact the
paper guides. Do not force the
paper into the feeder.
Paper capacities
The capacities of the trays and the manual feeder are based on 75
2
(20 lb) paper.
g/m
Load up to Notes
Tray 1
250 sheets of paper
150 sheets of A6-size
paper
50 transparencies
Note: The A6 paper size is
supported only in Tray 1.
Loading paper and specialty media
4
Page 5

Clearing jams
Avoiding jams
The following hints can help you avoid jams:
•
Use only recommended paper or specialty media.
•
Do not load too much paper. Make sure the stack height does
not exceed the indicated maximum height.
•
Do not load wrinkled, creased, damp, or curled paper.
•
Flex, fan, and straighten paper before loading it.
•
Do not use paper that has been cut or trimmed by hand.
•
Do not mix paper sizes, weights, or types in the same stack.
•
Store the paper in an appropriate environment.
•
Do not remove trays while the printer is printing. Wait for
the
light to come on before removing a tray. The light
sequence for loading paper also signals that the tray may be
removed:
•
Make sure the guides in the trays are properly positioned, and
are not pressing too tightly against the paper.
•
Make sure all paper sizes and paper types are set correctly.
•
Make sure all printer cables are attached correctly. For more
information, see the setup documentation.
Accessing jam areas
Open doors and remove trays to access jam areas. The following
illustration shows possible jam areas:
1
2
3
4
7
Access point Description
1
2
3
4
5
6
7
Push the button to open the front door. Inside
this door is the unit housing the toner cartridge
and photoconductor kit.
Standard exit bin
Front door
Manual feeder door
Standard 250-sheet tray (Tray 1)
Optional tray (Tray 2)
Rear door
5
6
200.yy Paper jam
- On
- On
- On
Try one of the following:
•
Remove Tray 1.
•
Open the front door, and then remove the photoconductor kit
and toner cartridge unit.
Load paper
- On
•
Do not load the manual feeder while the printer is printing.
Wait for the
•
Push all trays in firmly after loading paper.
light to come on.
Understanding jam lights and access locations
The following table lists the jam lights and messages and provides
brief instructions for how to access each jam. More detailed
instructions follow.
Note: The jam messages listed appear on the virtual display of the
Embedded Web Server.
200.yy Paper jam
Clearing jams
5
201.yy Paper jam
- On
- On
- On
Open the front door, and then remove the photoconductor kit and
toner cartridge unit.
Page 6

Try one of the following:
•
Open the front door, and then open the rear door.
•
Remove Tray 1, and then depress the lever.
202.yy Paper jam
- On
- On
- On
Open the front door, and then open the rear door.
231.yy Paper jam
- On
- Blinking
- On
Open the front door, and then open the rear door.
233.yy Paper jam
- On
- Blinking
- Blinking
- On
Try one of the following:
•
Remove Tray 1, and then depress the lever.
•
Open the front door, and then open the rear door.
234.yy Paper jam
- On
- Blinking
- On
235.yy Paper jam
- On
- Blinking
- Blinking
- On
Remove the jam from the standard exit bin.
24x.yy Paper jam
- On
- On
- On
Clearing jams
6
- On
Page 7

Try one of the following:
•
Remove Tray 1.
•
Open the front door, and then remove the photoconductor kit
and toner cartridge unit.
•
Remove Tray 2.
251.yy Paper jam
- On
- On
- On
- On
Remove the jam from the manual feeder.
Clearing jams behind the photoconductor kit and toner cartridge
1
Push the release button, and then lower the front door.
2
Lift and pull the unit containing the photoconductor kit and
the toner cartridge out of the printer. Set the unit aside on a
flat, clean surface.
CAUTION—HOT SURFACE: The inside of the printer
might be hot. To reduce the risk of injury from a hot
component, allow the surface to cool before touching.
3
Remove the jammed paper.
Note: If the paper is not easy to remove, then open the rear
door to remove the paper.
4
Align and reinstall the unit.
Warning—Potential Damage: Do not touch the
photoconductor on the underside of the photoconductor kit.
Use the cartridge handle whenever you are holding the
cartridge.
Clearing jams
7
5
Close the front door.
6
Press to continue printing.
Clearing jams from the standard exit bin
A duplex print job was sent to the printer using a paper size not
supported for duplex printing. A sheet is jammed in the standard
exit bin.
Page 8

To remove the jam, gently pull the sheet straight out of the
standard exit bin.
Clearing jams from Tray 1
To see whether paper is jammed in or behind Tray 1, the standard
tray:
1
Remove Tray 1.
2
Remove the jammed paper.
3
If necessary, depress the lever to free the paper and remove
the jam.
4
Insert the tray.
5
Press to continue printing.
Clearing jams in the manual feeder
Clearing jams
8
Page 9

Paper jammed in the manual feeder can usually be grasped and
pulled straight out. If the jam cannot be removed this way, check
for jammed paper behind the photoconductor kit and toner
cartridge unit. For more information, see “Clearing jams behind
the photoconductor kit and toner cartridge” on page 7.
Clearing jams behind the rear door
If the paper is exiting the printer, pull the paper out. If the paper
is not exiting the printer:
1
Push the release button, and then lower the front
door
.
2
Pull open the rear door.
CAUTION—HOT SURFACE: The inside of the printer
might be hot. To reduce the risk of injury from a hot
component, allow the surface to cool before touching.
3
Remove the jammed paper.
The paper may be jammed with one end caught in the
standard exit bin.
4
Close both the front and rear doors.
5
Press to continue printing.
Clearing jams
9
 Loading...