

Page 1
Lexmark C920
User’s Guide
March 2005
Lexmark and Lexmark with diamond design are trademarks of Lexmark International, Inc.,
registered in the United States and/or other countries.
© 2005 Lexmark International, Inc.
All rights reserved.
740 West New Circle Road
Lexington, Kentucky 40550
www.lexmark.com
Page 2

Edition: March 2005
The following paragraph does not apply to any country where such provisions are inconsistent with local law: LEXMARK
INTERNATIONAL, INC., PROVIDES THIS PUBLICATION “AS IS” WITHOUT WARRANTY OF ANY KIND, EITHER EXPRESS OR
IMPLIED, INCLUDING, BUT NOT LIMITED TO, THE IMPLIED WARRANTIES OF MERCHANTABILITY OR FITNESS FOR A
PARTICULAR PURPOSE. Some states do not allow disclaimer of express or implied warranties in certain transactions; therefore, this
statement may not apply to you.
This publication could include technical inaccuracies or typographical errors. Changes are periodically made to the information herein;
these changes will be incorporated in later editions. Improvements or changes in the products or the programs described may be made
at any time.
Comments about this publication may be addressed to Lexmark International, Inc., Department F95/032-2, 740 West New Circle Road,
Lexington, Kentucky 40550, U.S.A. In the United Kingdom and Eire, send to Lexmark International Ltd., Marketing and Services
Department, Westhorpe House, Westhorpe, Marlow Bucks SL7 3RQ. Lexmark may use or distribute any of the information you supply in
any way it believes appropriate without incurring any obligation to you. You can purchase additional copies of publications related to this
product by calling 1-800-553-9727. In the United Kingdom and Eire, call +44 (0)8704 440 044. In other countries, contact your point of
purchase.
References in this publication to products, programs, or services do not imply that the manufacturer intends to make these available in all
countries in which it operates. Any reference to a product, program, or service is not intended to state or imply that only that product,
program, or service may be used. Any functionally equivalent product, program, or service that does not infringe any existing intellectual
property right may be used instead. Evaluation and verification of operation in conjunction with other products, programs, or services,
except those expressly designated by the manufacturer, are the user’s responsibility.
© 2005 Lexmark International, Inc.
All rights reserved.
UNITED STATES GOVERNMENT RIGHTS
This software and any accompanying documentation provided under this agreement are commercial computer software and
documentation developed exclusively at private expense.
Trademarks
Lexmark, Lexmark with diamond design, MarkNet, and MarkVision are trademarks of Lexmark International, Inc., registered in the United
States and/or other countries.
Drag’N’Print , ImageQuick, and PrintCryption, are trademarks of Lexmark International, Inc.
®
PCL
is a registered trademark of the Hewlett-Packard Company. PCL is Hewlett-P ac kard Company’s designation of a set of printer
commands (language) and functions included in its printer products. This printer is intended to be compatible with the PCL language. This
means the printer recognizes PCL commands used in various application programs, and the printer emulates the functions corresponding
to the commands.
PostScript
commands (language) and functions included in its software products. This printer is intended to be compatible with the PostScript 3
language. This means the printer recognizes PostScript 3 commands used in various application programs, and the printer emulates the
functions corresponding to the commands.
Details relating to compatibility are included in the Technical Reference.
Other trademarks are the property of their respective owners.
®
is a registered trademark of Adobe Systems Incorporated. PostScript 3 is Adobe Systems’ designation of a set of printer
Safety information
• Connect the power cord to a properly grounded electrical outlet that is near the product and easily accessible.
CAUTION: Do not set up this product or make any electrical or cabling connections, such as the power cord or telephone, during
a lightning storm.
• Refer service or repairs, other than those described in the operating instructions, to a professional service person.
• This product is designed, tested, and approved to meet strict global safety standards with the use of specific Lexmark components.
The safety features of some parts may not always be obvious. Lexmark is not responsible for the use of other replacement parts.
• Your product uses a printing process that heats the print media, and the heat may cause the media to release emissions. Y ou must
understand the section in your operating instructions that discusses the guidelines for selecting print media to avoid the possibility
of harmful emissions.
2
Page 3

Contents
Chapter 1: Learning about the printer .........................................................6
Understanding the printer operator panel ................. ........................... ............................8
Chapter 2: Installing drivers for local printing .........................................11
Windows ........................................................................................................................11
Macintosh . ............. ........... ............. .............. ............. ........... ............. ............. ........... ...... 14
UNIX/Linux ..................... ...................... .................... ...................... ...................... ..........15
Chapter 3: Installing drivers for network printing ....................................17
Printing a network setup page .............. .. ............................. .. ........................................ 17
Assigning a printer IP address .............................. .......................... ............................... 17
Verifying the IP settings ................................................................................................. 18
Windows ........................................................................................................................18
Macintosh . ............. ........... ............. .............. ............. ........... ............. ............. ........... ...... 22
UNIX/Linux ..................... ...................... .................... ...................... ...................... ..........24
NetWare ... ........................ ...................... ........................ ......................... ....................... 24
Chapter 4: Installing and removing options .............................................25
Removing the system board access cover ....................................................................26
Installing a me m o r y card .... .. ................ ............... ... ............... .. ................ .. ............... ... ... 29
Installing a fl a sh memory or firmwa r e card .................. .. ................ ............... ... .............. 29
Installing a ha rd disk . ... ............... .. ................ ............... .. ................ ............... ... .............. 30
Installing an o p tio n card ........................... ................ .. ............... ... ............... .. ................ . 32
Reinstalling the system board access cover .................................................................. 34
Aligning the optional high capacity feeder ......................................................................34
Aligning the optional finisher .......................................................................................... 36
Adjusting the finisher wheels ..........................................................................................43
Removing the duplex unit ........................................................................ ......................44
Removing the high capacity feeder ................................. ............................... ................ 46
Removing an optional drawer ........................................................................................ 49
3
Page 4

Contents
Chapter 5: Printing ......................................................................................51
Sending a job to print .......... .. ......................................................................................... 51
Printing from a USB flash memory device ..................................................................... 52
Canceling a print job ...................................................................................................... 53
Printing the m e nu s et tings page ...... ............... ............... ... ............... ................ .. ............ 54
Printing a network setup page .............. .. ............................. .. ........................................ 54
Printing a font sample list ............................................................................................... 55
Printing a directory list .................................................................................................... 55
Printing confidential and held jobs ........................................................................ ......... 55
Printing folio and statement sizes .................... ........................... ............................ .. ..... 58
Loading standard trays and optional trays .....................................................................60
Loading the multipurpose feeder ................................................................................... 61
Loading the high capacity feeder .................................... ........................... ....................65
Linking trays ................................................................................................................... 68
Tips for successful printing ............................................................................................. 69
Chapter 6: Media specifications ................................................................70
Media guidelines .......... ............... ................ .. ............... .. ................ ............... ... .............. 70
Storing paper ........................................ ........................... .............................................. 72
Storing media ................................................................................................................. 77
Identifying media sources and specifications ................................................. ................ 78
Tray linking ..................................................................................................................... 82
Using the duplex function (two-sided printing) ................. ..............................................82
Avoiding jams ................................................................................................................. 84
Lexmark Confidential until announced - Revision: 03/21/05
Chapter 7: Maintaining the printer .............................................................85
Determining the status of supplies ................................................................................. 86
Conserving supplies ....................................................................................................... 86
Ordering supplies .................. ................................................................... ......................87
Cleaning the LEDs .........................................................................................................88
Closing the top cover ..................................................................................................... 93
Chapter 8: Clearing jams ............................................................................95
Identifying jams .............................................................................................................. 95
Identifying jam areas ...................................................................................................... 96
4
Page 5

Contents
Understanding jam messages ........................................................................................ 97
200 Paper Jam <x> Pages Jammed (Check Areas A-F, T1-5, MPF) ............................97
250 Paper Jam Check MP Feeder ...............................................................................125
24<x> Paper Jam Check Tray <x> .............................................................................. 126
Chapter 9: Administrative support ..........................................................130
Adjusting operator panel brightness and contrast ........................................................ 130
Disabling operator panel menus ..................................................................................130
Enabling operator panel menus .......... .. ............................... ............................... .. ....... 131
Restoring factory default settings ................................................................................. 131
Adjusting Po we r S a ve r . .. ............... ... ............... ............... ... ............... .. ................ .. ........ 132
Encrypting th e di sk .... ... ............... .. ................ .. ............... ... ............... .. ................ .. ........ 132
Setting security using the Embedded Web Server (EWS) ......................... .................. 133
Quick start mode ...................................................................... ....................... ............. 136
Black only mode ...................................... ............................... .. ............................... .. ... 137
Chapter 10: Troubleshooting ...................................................................138
Calling for service ......................................................................................................... 138
Checking an unresponsive printer ... .............................................................................138
Printing multiple-language PDFs .................................................................................. 138
Solving printing problems ............................................................................................. 139
Solving option problems ............................................................................................... 141
Solving paper feed problems ............................................................... ........................142
Solving print quality problems ...................................................................................... 144
Color quality information .............................................................................................. 148
Lexmark Confidential until announced - Revision: 03/21/05
Quality Menu ..................................... .. .. .. .....................................................................148
Solving color quality problems ................... ............................ ...................................... 151
Notices ........................................................................................................155
Index ............................................................ ................................................ 160
5
Page 6
1
Learning about the printer
CAUTION: Do not set up this product or make any electrical or cabling connections, such as the power cord or
telephone, during a lightning storm.
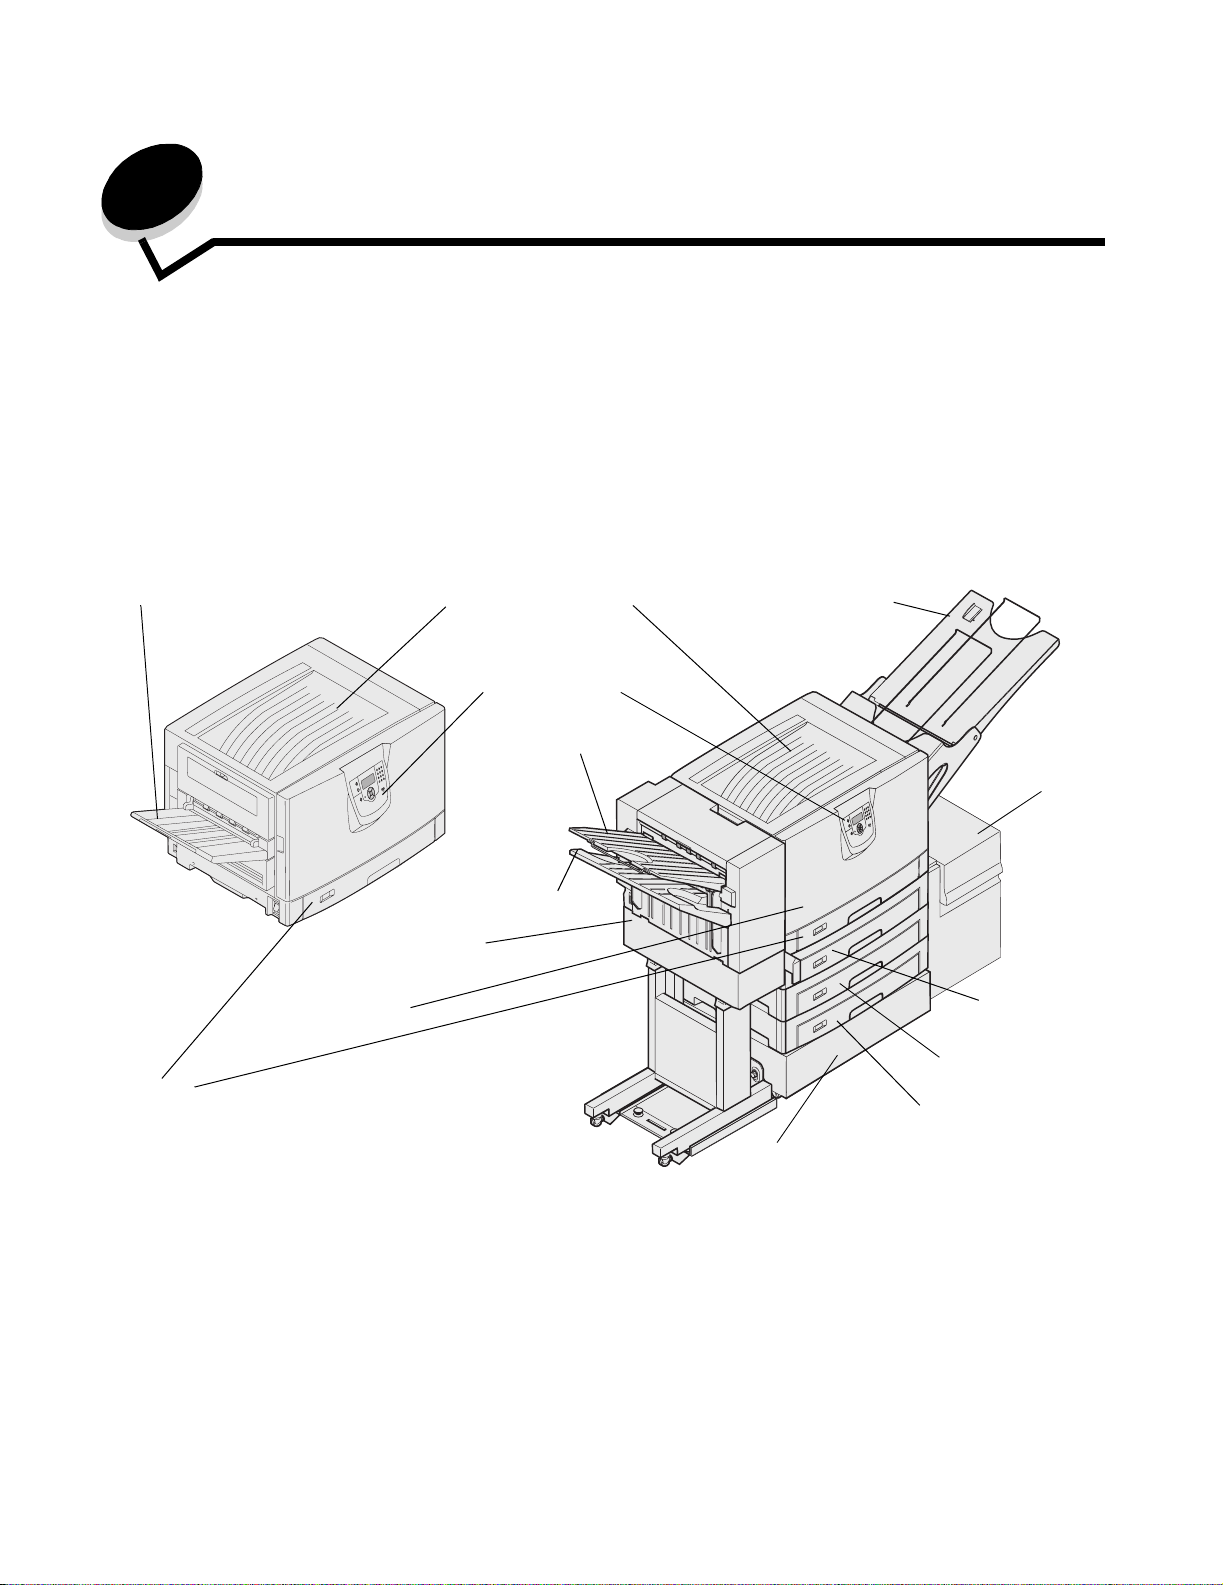
Configured models
The follo wing illust ratio ns show a standard netw ork and fully co nfigured printer. If you attach prin t media hand ling option s to
the printer, it may look more like the fully configured model. Items denoted with an asterisk (*) are options.
Standard network
Bin 1
Duplex* (internal)
Tray 1
(integrated tray or standard
tray—550 she ets)
Standard output bin
Finisher Bin 1
Finisher Bin 2
Finisher*
Fully configured
Banner media tray*
Operator panel
High
capacity
feeder*
(3,000
sheets)
Tray 2*
(550 sheets)
Tray 3*
(550 sheets)
Tray 4*
(550 sheets)
Printer base*
Learning about the printer
6
Page 7
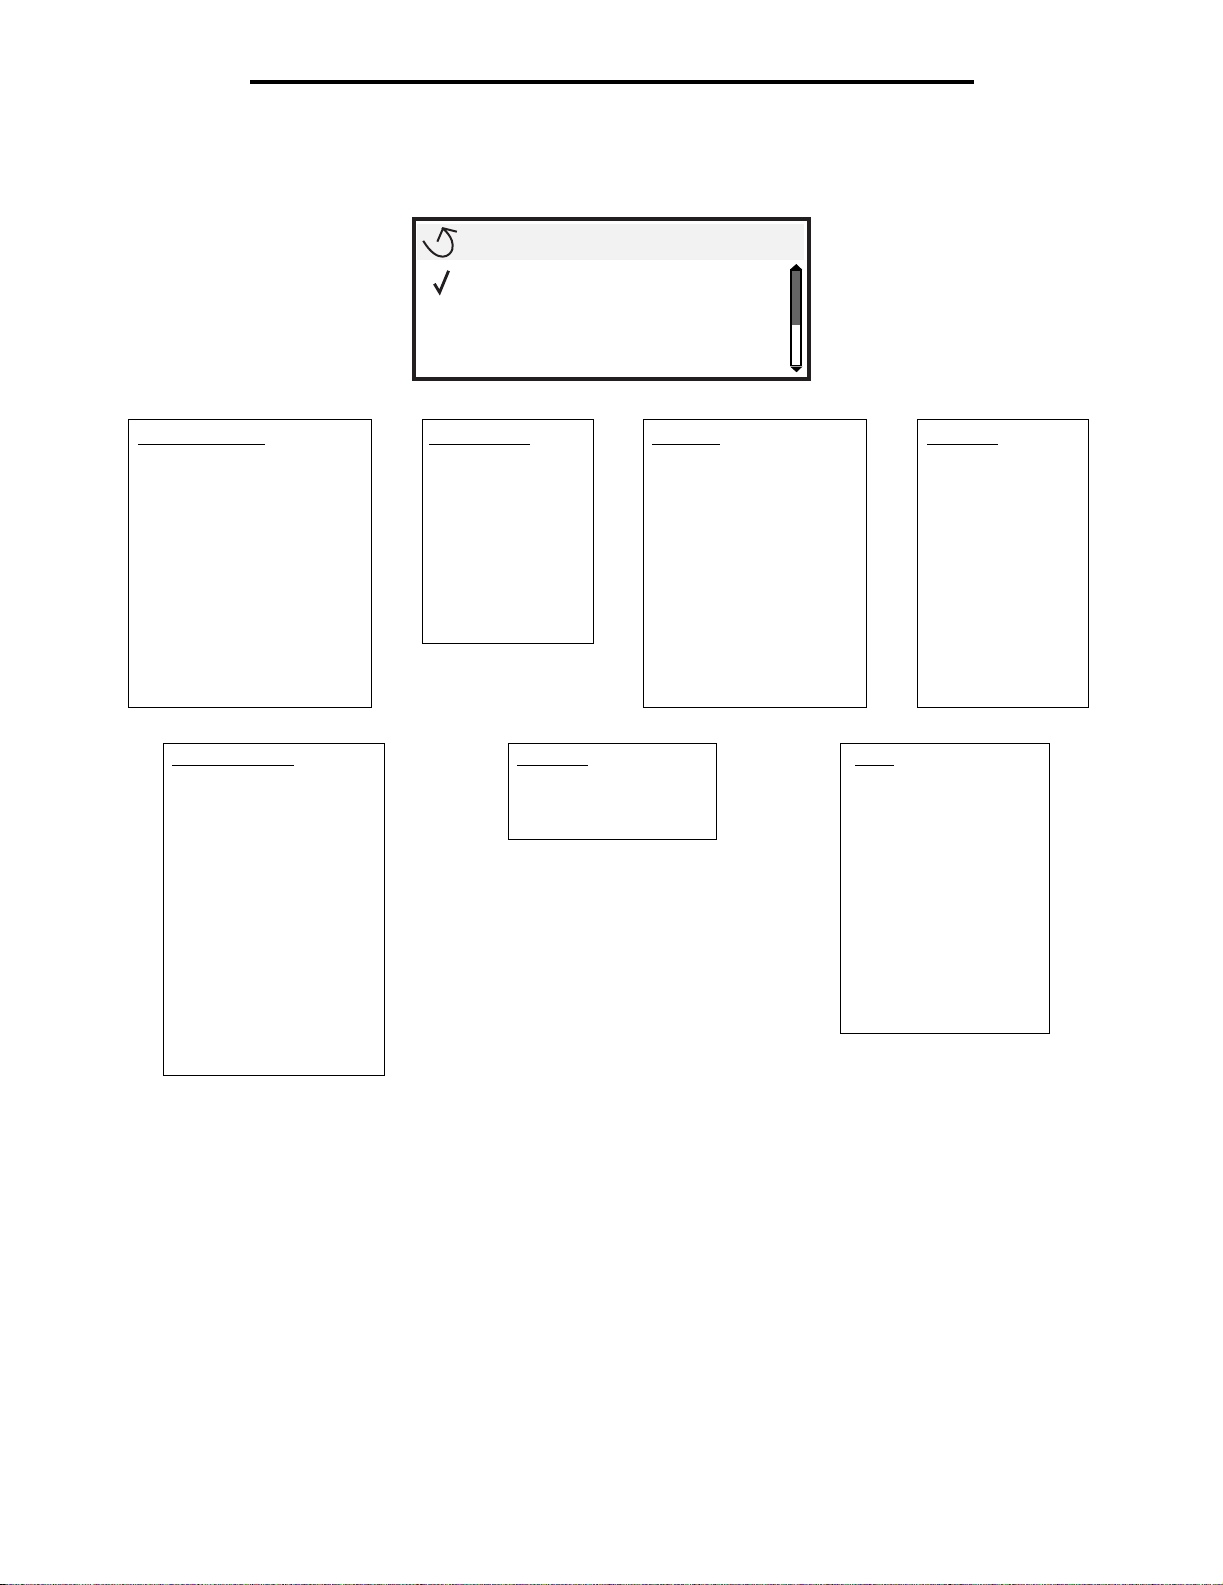
Learning about the printer
A number of men us are available to make it easy fo r you to change printer setting s . T he dia gram shows the menu index on
the operator panel and the menus and items available under each menu. For more information about menus and menu
items, see the Menus and Messages book on your publications CD.
Menu
Supplies Menu
Paper Menu
Reports
Supplies Menu
Cyan Toner
Yel low Toner
Magenta Toner
Black T oner
Oil Coating Roll
Color Photodevs
Black Photodev
Fuser
Transfer Belt
Staples
Punch
Network/Ports
TCP/IP
IPv6
Standard Network
Network [x]
Standard USB
USB [x]
Parallel
Parallel [x]
Serial
Serial [x]
NetWare
AppleTalk
LexLink
Paper Menu
Default Source
Paper Size/Type
Configure MP
Substitute Size
Paper Loading
Custom Types
Universal Setup
Bin Setup
Security
Max Invalid PIN
Job Expiration
Reports
Menu Settings Page
Device Statistics
Network Setup Page
Network [x] Setup Page
Profiles List
Print Quick Ref
NetWare Setup Page
Print Fonts
Print Directory
Print Demo
Defaults
Setup Menu
Finishing Menu
Quality Menu
Utilities Menu
PDF Menu
PostScript Menu
PCL Emul Menu
PPDS Menu
HTML Menu
Image Menu
Help
Print All
Color Quality
Print Quality
Printing Guide
Media Guide
Print Defects
Menu Map
Information Guide
Connection Guide
Moving Guide
Learning about the printer
7
Page 8
Learning about the printer
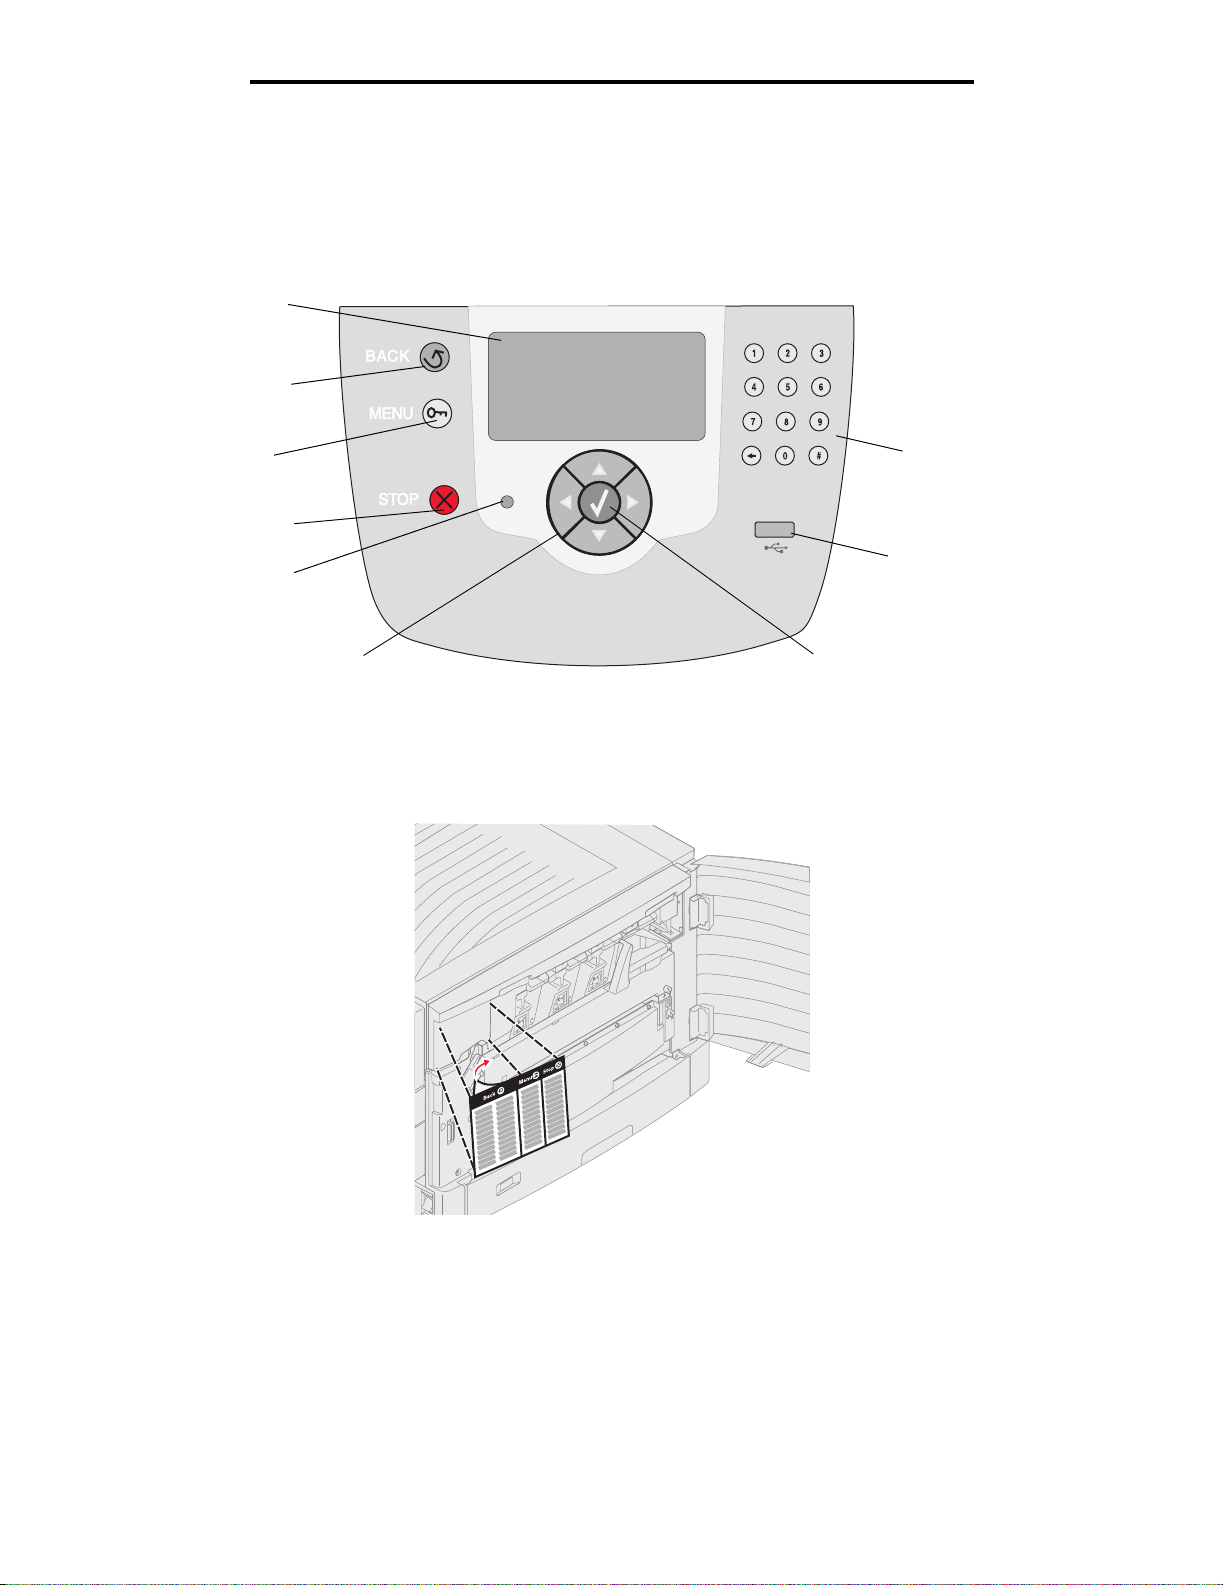
Understanding the printer operator panel
The operator panel on your printer is a 4-line backlit gray scale display that can show both graphics and text. The Back,
Menu, and Stop buttons are located to the left of the display, the navigation buttons are located below the display, and the
numeric pad is located to the right of the display.
Display panel
Back
Menu
Stop
Indicator light
Navigation buttons
Select button
Numeric pad
USB Direct interface
Translations label
If English is not your native language, peel the backing off the translations label that shipped with your printer and affix it
inside the front door as shown. The label serves as a guide for interpreting the operator panel buttons.
Understanding the printer operator panel
8
Page 9
Learning about the printer
The use of the buttons and the layout of the display panel are described in the following table.
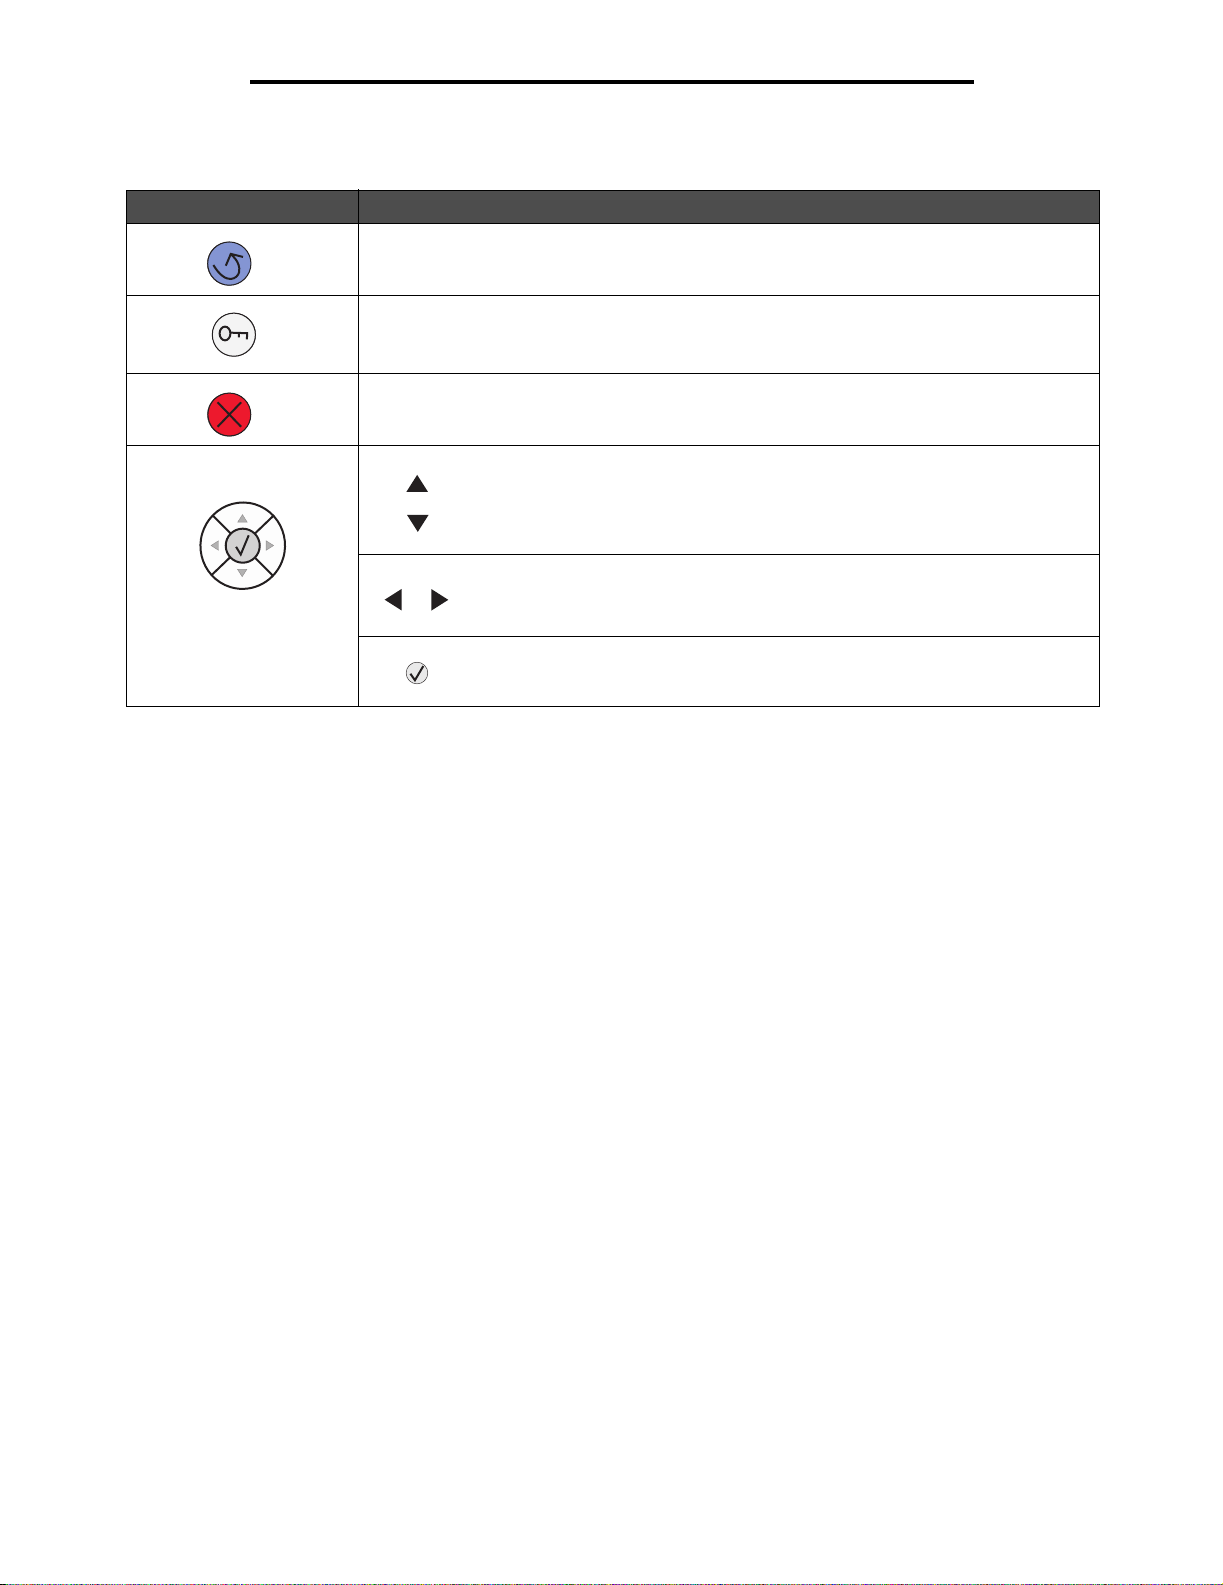
Button Function
Back
Press the Back button to return to the last screen you viewed.
Note: Changes made on a screen will not be applie d if you press the Back button.
Menu
Stop
Navigation buttons
Press the Menu button to open the me nu index.
Note: The printer must be in the Ready state to access the menu index. A message
indicating the menus are unavailable will appear if the printer is not ready.
Press the Stop button to stop the mechanical operation of the printer. After pressing Stop,
the message Stopping is displayed. When the printer has stopped, the status line in the
operator panel will show Stopped, and a list of options will appear.
The Up and Down buttons are used to move up and down lists.
When navigating through a list using the Up or Down button, the cursor
moves one line at a time. Pressing the Down button at the bottom of the
screen changes the screen to the next whole page.
The Left and Right bu tton s are use d to m o ve within a screen such as mov in g
from one menu index item to another. They are also used to scroll through
text that will not fit on the screen.
The Select button is used to initiate action on a selection. Press Select when
the cursor appears next to the selection you want such as following a link,
submitting a configuration item, or when you want to start or cancel a job.
Understanding the printer operator panel
9
Page 10
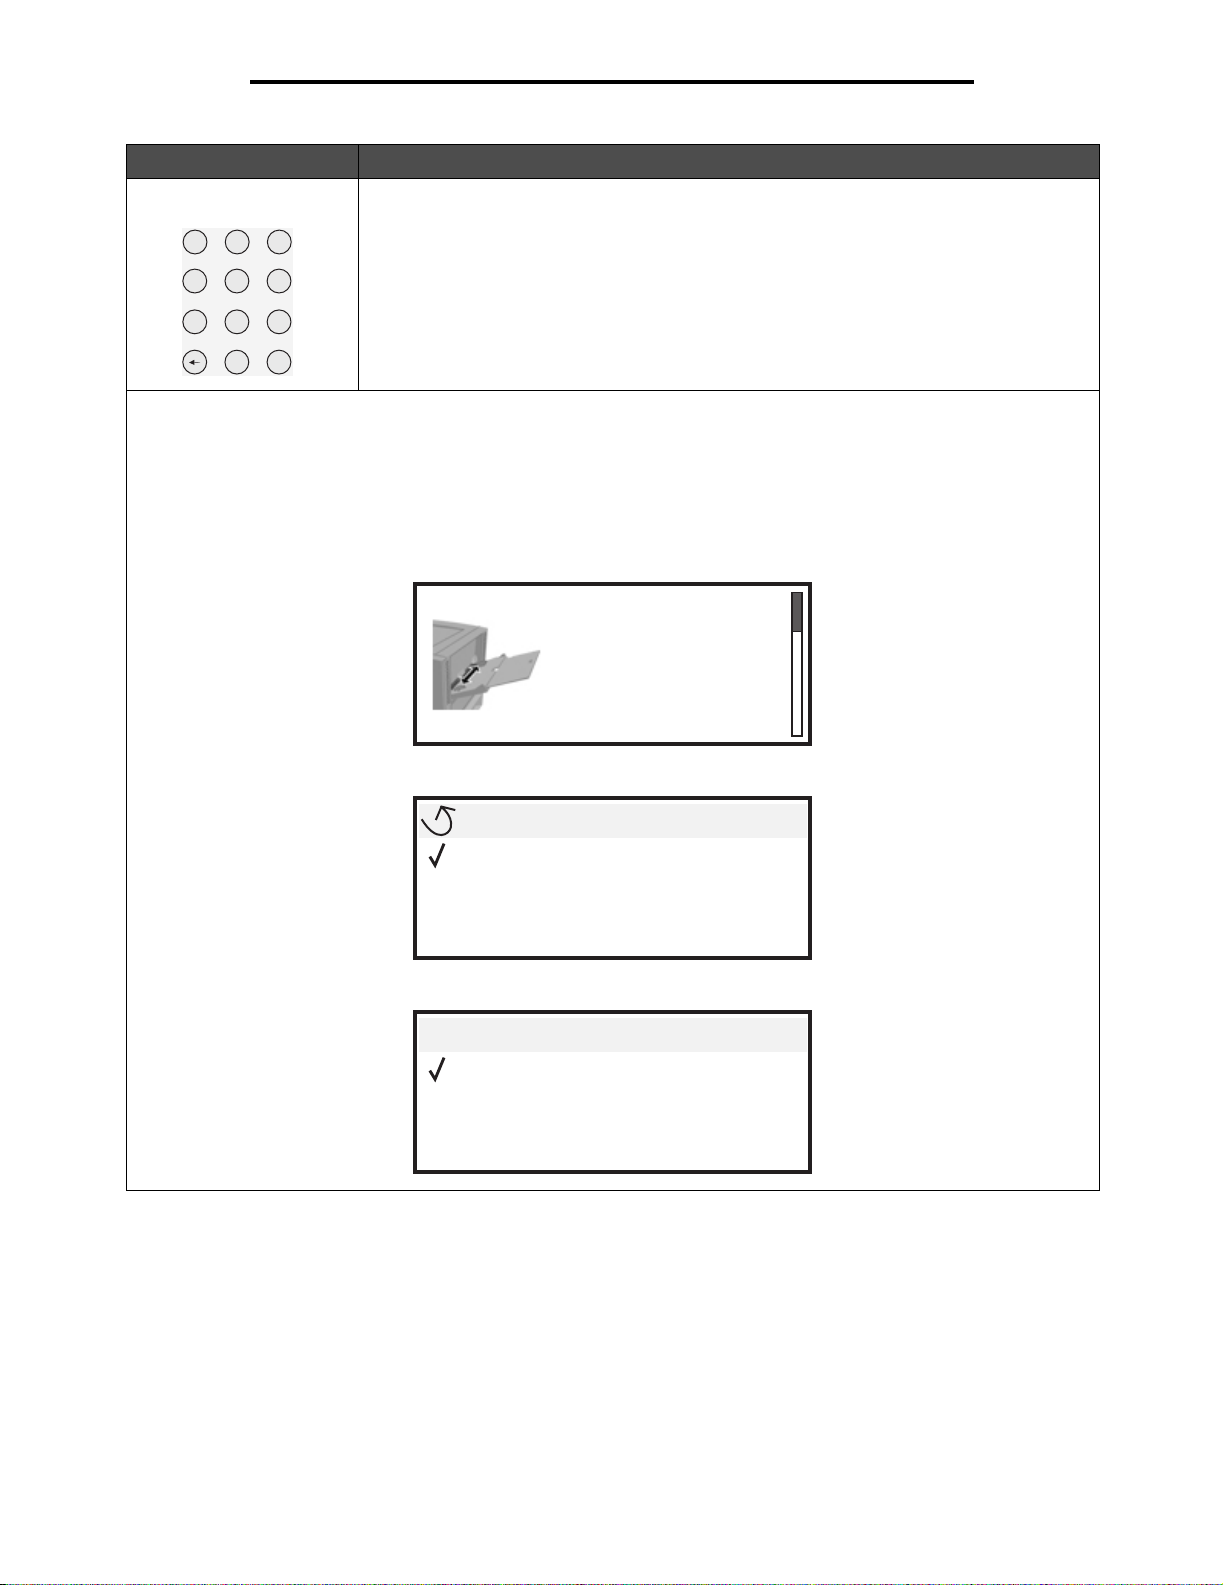
Button Function
Learning about the printer
Numeric pad
2
1
4
7
Display panel
The display pan el show s message s and grap hics describi ng the current state of the prin ter and indicating possib le printer
problems you m us t resol ve.
The top line of the display is the header line. If applicable, it will contain the graphic indicating the Back button can be
used. It will also display the current status, and the Supplies (Warnings) status. If multiple warnings are present, each
warning will be separated by a comma.
The other three lines of the dis pl ay are the body of the screen. This is where you view printer status , supplies messages,
show-me screens, and make selections.
3
5
6
8
9
#
0
The numeric pad consists of numbers, a pound '#' sign, and a backspace button. The 5
button has a raised bump for non-visual orientation.
The numbers are used to enter numeric values for items like quantities or PINs. The
backspace is used to delete the number to the left of the cursor. Pressing the backspace
multiple times will delete additional entries.
Note: The pound '#' sign is not used.
1. Remove print
media; adjust
width guides.
Status / Supplies
View supplies
Ready
Tray 1Low
Printing pg. 1
Cancel a Job
Status / Supplies
Held jobs
Understanding the printer operator panel
10
Page 11
2
Installing drivers fo r local printing
A local printer is a printer attach ed to the compute r using a U SB or paralle l cab le. T he local printe r is intended to be used b y
the computer to which it is attached. If attaching a local printer, install the printer driver on the computer before setting up
the printer.
The printer driver is software that lets the computer communicate with the printer.
The procedure to install drivers depends on the operating system used. Use the following table to find driver installation
instructions for the particular operating system. For additional help, see the documentation that shipped with the computer
and the software.
Operating system Go to page
Windows 11
Windows Server 2003, Windows 2000, Windows XP, Windows 98 SE, Windows Me,
Windows NT 4.x
Windows 95 and Windows 98 (first edition) 12
Serial printing 12
Macintosh 14
UNIX/Linux 15
11
Windows
Some Windows operating syste ms may already include a printer driver that is compatible with the printer.
Note: Installing a custom driver will not replace the system driv er. A separate printer obje ct w il l be crea ted
and appear in the Printers folder.
Use the drivers CD that shipp ed with the printe r to install the custom printer driv er and obtai n enhance d printer f eature s and
functionality.
Drivers are a lso available in downloa dable software packages on the Lexmark Web site at www.lexmark.com.
Using Windows Server 2003, Windows 2000, Windows XP, Windows 98 SE,
Windows Me, or Windows NT
Note: Install the printer software before connecting the USB cable.
1 Insert the drivers CD.
If the CD does not launch automatically, click Start
is the letter of the CD-ROM drive).
Note: USB support is not available for Windows NT operating systems.
Æ Run, and type D:\Setup.exe in the Run dialog (where D
Installing drivers for local printing
11
Page 12

Installing drivers for local printing
2 Click Install Printer and Software.
Note: Some Windows operating systems require that the user has administrative access to install printer
drivers on the computer.
3 Click Agree to accept the license agreement.
4 Select Suggested, and click Next.
The Suggested option is the default installation for local and network-attached setup. To install utilities, change
settings, or customize device drivers, select Custom, and follow the instructions on the screen.
5 Select Local Attach, and click Finish.
Follow the instructions on the screen. It may take some time for the drivers to load.
6 Close the drivers CD installer application.
7 Connect th e USB cable, and turn on the printer.
The Plug and Play screen appears, and a printer object is created in the printers folder of the computer.
Using Windows 95 and Windows 98 (first edition)
1 Turn on the computer.
2 Insert the drivers CD. If the CD launches automatically, click Exit to return to the Add Printer Wizard.
3 Click Start Æ Settings Æ Printers, and double-click Add Printer.
Note: USB support is not available for Windows 95 and Windows 98 (first edition) operating systems.
4 When prompted, select Local printer.
5 Click Have Disk.
Note: Some Windows operating systems require that the user has administrative access to install printer
drivers on the computer.
6 Specify the location of the custom printer driver on the drivers CD.
The path should be similar to the following:
D:\Drivers\Print\Win_9xMe\<language>
Where D is the letter of the CD-ROM drive.
7 Click OK.
It may take some time for the drivers to load.
8 Close the drivers CD.
Serial printing
With serial printing, data is transferred one bit at a time. Although serial printing is usually slower than parallel printing, it is
the preferred o ption whe n there is a gr eat de al of dis tance betwe en the pri nter and com puter, or when a parall el inte rf ace i s
not available.
Note: A serial interface card is required and can be purchased separately.
Windows
12
Page 13
Installing drivers for local printing
Before printing, establishing communication between the printer and computer is required. To do this:
1 Set serial parameters in the printer.
2 Install a printer driver on the attached computer.
3 Match the serial settings in the COM port.
Setting parameters in the printer
1 Press on the operator panel.
2 Press until Reports appears, and then press .
Note: For information about serial menus and messages, see the publications CD that shipped with the
printer.
3 Press until Menu Settings Page appears, and then press .
4 Press until Serial Standard (or Serial Option X if a serial interface card is installed) appears,
and then press .
5 Press until <Parameter> appear s , and then pres s (where <Parameter> is the parameter required for
a change).
6 Press until <Setting> appears, and then press (where <Setting> is the setting required for a
change).
Note the following restrictions:
• Maximum baud rate supported is 115,200.
• Data Bits must be set to 7 or 8.
• Parity must be set to Even, Odd, or None.
• Stop Bits must be set to 2.
• Flow Control recommended protocol setting is Xon/Xoff.
7 Press to return the printer to the Ready state.
8 Print a Menu Settings page, and verify that the serial parameters are correct.
Note: Keep this page for later use.
a Press on the operator panel.
b Press until Reports appears, and then press .
c Press until Menu Settings Page appears, and then press .
d Look under the Standard Serial (or Serial Option X if a serial interface card is installed) heading to find the
serial pa rameters.
Installing a printer driver
A printer driver must be installed on the computer that is connected to the printer.
Note: Windows 95 and Windows 98 (first editi on) use rs shoul d fo llow the insta llation d irections in Using Windows 95 and
Windows 98 (first edition).
1 Insert the drivers CD. It should launch automatically. If the CD does not launch automatically, click Start Æ Run,
and type the following in the Run dialog:
D:/Setup.exe
Where D is the letter of the CD-ROM drive.
2 Click Install Printer and Software.
Windows
13
Page 14

Installing drivers for local printing
3 Click Agree to accept the Printer Software License Agreement.
4 Select Custom, and click Next.
5 Select Components, and click Next.
6 Select Local, and click Next.
7 Select the printer from the list, and click Add Printer.
8 Expand the printer item listed below Selected Components.
9 Click PORT: <LPT1>, and select the communications port (COM1 or COM2) needed for use.
10 Click Finish to complete the printer software installation.
Setting parameters in the communications (COM) port
After the printer driver is installed, the serial parameters must be set for the communications port assigned to the printer
driver.
The serial parameters in the communications port must match exactly to the serial parameters set in the printer.
1 Click Start Æ Settings Æ Control Panel, and double-click System.
2 On the Device Manager tab, click + to expand the list of available ports.
3 Select the communications port assigned to the printer (COM1 or COM2).
4 Click Properties.
5 On the Port Settings tab, set the serial parameters to the exact same serial parameters in the printer.
Look for the printer settings under the Serial Standard (or Serial Option X) heading on the Menu Settings page
printed previously.
6 Click OK, and close all the windo w s.
7 Print a test page to verify printer installation.
a Click Start
b Select the printer just added.
c Click File Æ Properties.
d Click Print Test Page. When a test page prints successfully, printer setup is complete.
Æ Settings Æ Printers.
Macintosh
Mac OS 9.x or later is required for USB printing. To print locally to a USB-attached printer, create a desktop printer icon
(Mac OS 9) or create a queue in Print Center / Printer Setup Utility (Mac OS X).
Creating a queue in Print Center / Printer Setup Utility (Mac OS X)
1 Install a PostScript Printer Description (PPD) file on the computer.
a Insert the drivers CD.
b Double-click the installer package for the printer.
Note: A PPD file provides det ailed information about the capa bilities of a p rinter to the Ma cintosh c omputer.
c Click Continue on the Welcome screen and again after viewing the Readme file.
d Click Continue after viewing the license agreement, and click Agree to accept the terms of the agreement.
Macintosh
14
Page 15

Installing drivers for local printing
e Select a Destination, and click Continue.
f On the Easy Install screen, click Install.
g Enter the user password, and click OK. All the necessary software is installed on the computer.
h Click Close when installation is complete.
2 Open Finder, click Applications, and click Utilities.
3 Double-click Print Center or Printer Setup Utility.
Note: A PPD for the printer is also available in a dow nloada b le softw ar e pac kage on the Le x mark W e b site
at www.lexmark.com.
4 Do one of the follow ing :
• If the USB-attached printer appears in the Printer List, quit Print Center or Printer Setup Utility. A queue has
been created for the printer.
• If the USB-attached printer does not appear in the Printer List, make sure the USB cable is properly
connected and the printer is turned on. After the printe r appears in the Printer Lis t, quit Print Cente r or Printer
Setup Utility.
`
Creating a desktop printer icon (Mac OS 9.x)
1 Install a PostScript Printer Description (PPD) file on the computer.
a Insert the drivers CD.
b Double-click Classic, and double-click the installer package for the printer.
Note: A PPD file provides det ailed information about the capa bilities of a p rinter to the Ma cintosh c omputer.
c Choose the language needed for use, and click Continue.
d Click Continue after viewing the Readme file.
e Click Continue after viewing the license agreement, and click Agree to accept the terms of the agreement.
f On the Easy Install screen, click Install. All the necessary files are installed on the computer.
g Click Close when installation is complete.
Note: A PPD for the printer is also available in a dow nloada b le softw ar e pac kage on the Le x mark W e b site
at www.lexmark.com.
2 Do one of the follow ing :
• For Mac OS 9.0: Open Apple LaserWriter.
• For Mac OS 9.1–9.x: Open Applications, and click Utilities.
3 Double-click Desktop Printer Utility.
4 Select Printer (USB), and click OK.
5 In the USB Printer Selection section, click Change.
If the printer does not appear in the USB Printer Selection list, make sure the USB cable is properly connected,
and the printer is turned on.
6 Select the name of the printer, and click OK. The printer appears in the original Printer (USB) window.
7 In the PostScript Printer Description (PPD) File section, click Auto Setup. Make sure the printer PPD now
matches the printer in use.
8 Click Create, and click Save.
9 Specify a printer name, and click Save. The printer is now saved as a desktop printer.
Macintosh
15
Page 16

Installing drivers for local printing
UNIX/Linux
Local printing is supported on many UNIX and Linux platforms, such as Sun Solaris and Red Hat.
The Sun Solaris and Linux packages are available on the drivers CD and on the Lexmark Web site at www.lexmark.com.
The UNIX/Linux User’s Guide in each package giv e s de tai led ins truct io ns for installing and using Lexmark printers in UNIX
and Linux environments.
All the printer driver packages support local printing using a parallel connection. The driver package for Sun Solaris
supports USB connections to Sun Ray appliances and Sun workstations.
Visit the Lexmark Web site at www.lexmark.com for a complete list of supported UNIX and Linux platforms.
UNIX/Linux
16
Page 17

3
Installing drivers fo r network printing
Printing a network setup page
If the printer is attached to a ne twork, print a network setup page on the prin ter to verify the network connection. This pag e
also provides important information that helps in configuring for network printing.
1 Make sure the printer is on.
2 Press on the operator panel.
3 Press until Reports appears, and then press .
4 Press until Network Setup Page appears, and then press .
Note: If an optional MarkNet™ N8 000 series in ternal print server i s ins talled , Print Net1 Setup app ears
on the display.
5 Check the first section on the network setup page, and confirm that Status is “Connected.”
If Status is “Not Connected” is on the page, the LAN drop may not be active, or the network cable may be
malfunctioning. C onsult a sys tem support person f or a solution , and print ano ther network s etup page t o ve rify that
the printer is connected to the network.
Assigning a printer IP address
If the network is using DHCP, an IP address is automatically assigned after connecting the network cable to the printer.
1 Look for the add res s un der the “TCP/IP” heading on the network setup page printed in Printing a netw o r k se tup
page.
2 Go to Verifying the IP settings, and begin with step2.
If the network is not using DHCP, then manually assign an IP address to the printer. One of the easiest ways is to use the
operator panel:
1 Press on the operator panel.
2 Press until Network/Ports appears, and then press .
3 Press until TCP/IP appears, and then press .
Standard Network appears if the printer has a netw ork port on the printer system board. If an optional Ma rkNet
N8000 series internal print server is installed in the option card, Network Option 1 appears.
4 Press until Address appears, and then press .
5 Using the numeric pad, enter the IP address. Once it is entered, press .
Submitting Selection appears briefly.
6 Press until Netmask appears, and then press .
7 Using the numeric pad, enter the IP netmask. Once it is entered, pre s s .
Submitting Selection appears briefly.
8 Press until Gateway appears, and then press .
Installing drivers for network printing
17
Page 18

Installing drivers for network printing
9 Using the numeric pad, enter the IP gateway. Once it is entered, press .
Submitting Selection appears briefly.
10 Press until the printer returns to Ready.
Verifying the IP settings
1 Print another network setup page . Look und er the “TCP/IP” hea ding, and ma ke sure the IP address , netmask, and
gateway are correct . See Printi ng a network setup page if help is needed.
2 Ping the printer , a nd verify that it responds . At a comm and prom pt o n a ne tw o rk com put er, type ping followed by
the new printer IP address (for example, 192.168.0.11).
Note: On Windows computers, click Start
Command prompt if using Windows 2000).
If the printer is active on the network, a reply is sent.
After the TCP/IP settings are assigned and verified, install the printer on each network computer.
Æ Programs Æ Command prompt (or Accessories Æ
Windows
In Windows environments, network printers can be configured for direct printing or shared printing. Both network printing
methods require the installation of a printer driver and the creation of a network printer port.
Supported printer drivers
• Windows system printer driver
• Lexmark custom printer driver
System drivers are built into Windows operating systems. Custom drivers are available on the drivers CD.
Updated system and custom drivers are available on the Lexmark Web site at www.lexmark.com.
Supported network printer ports
• Microsoft Standard TCP/IP port—Windows 2000, Windows XP, and Windows Server 2003
• LPR—Windows NT 4.0
• Lexmark Enhanced TCP/IP port—Windows 98 SE/Me, WindowsNT 4.0, Windows 2000, Windows XP, and
Windows Server 2003
For basic printer functionality, install a system printer driver and use a system network printer port, such as an LPR or a
Standard TCP/IP port. The system printe r driv er and port allow f or a consi stent user i nterf ac e f or use wit h all the prin ters on
the network. However, using a custom printer driver and network port provides enhanced functionality, such as printer
status alerts.
Verifying the IP settings
18
Page 19
Installing drivers for network printing
Follow the steps for the printing configuration and operating system in use to configure the network printer:
Printing configuration Operating system Go to page
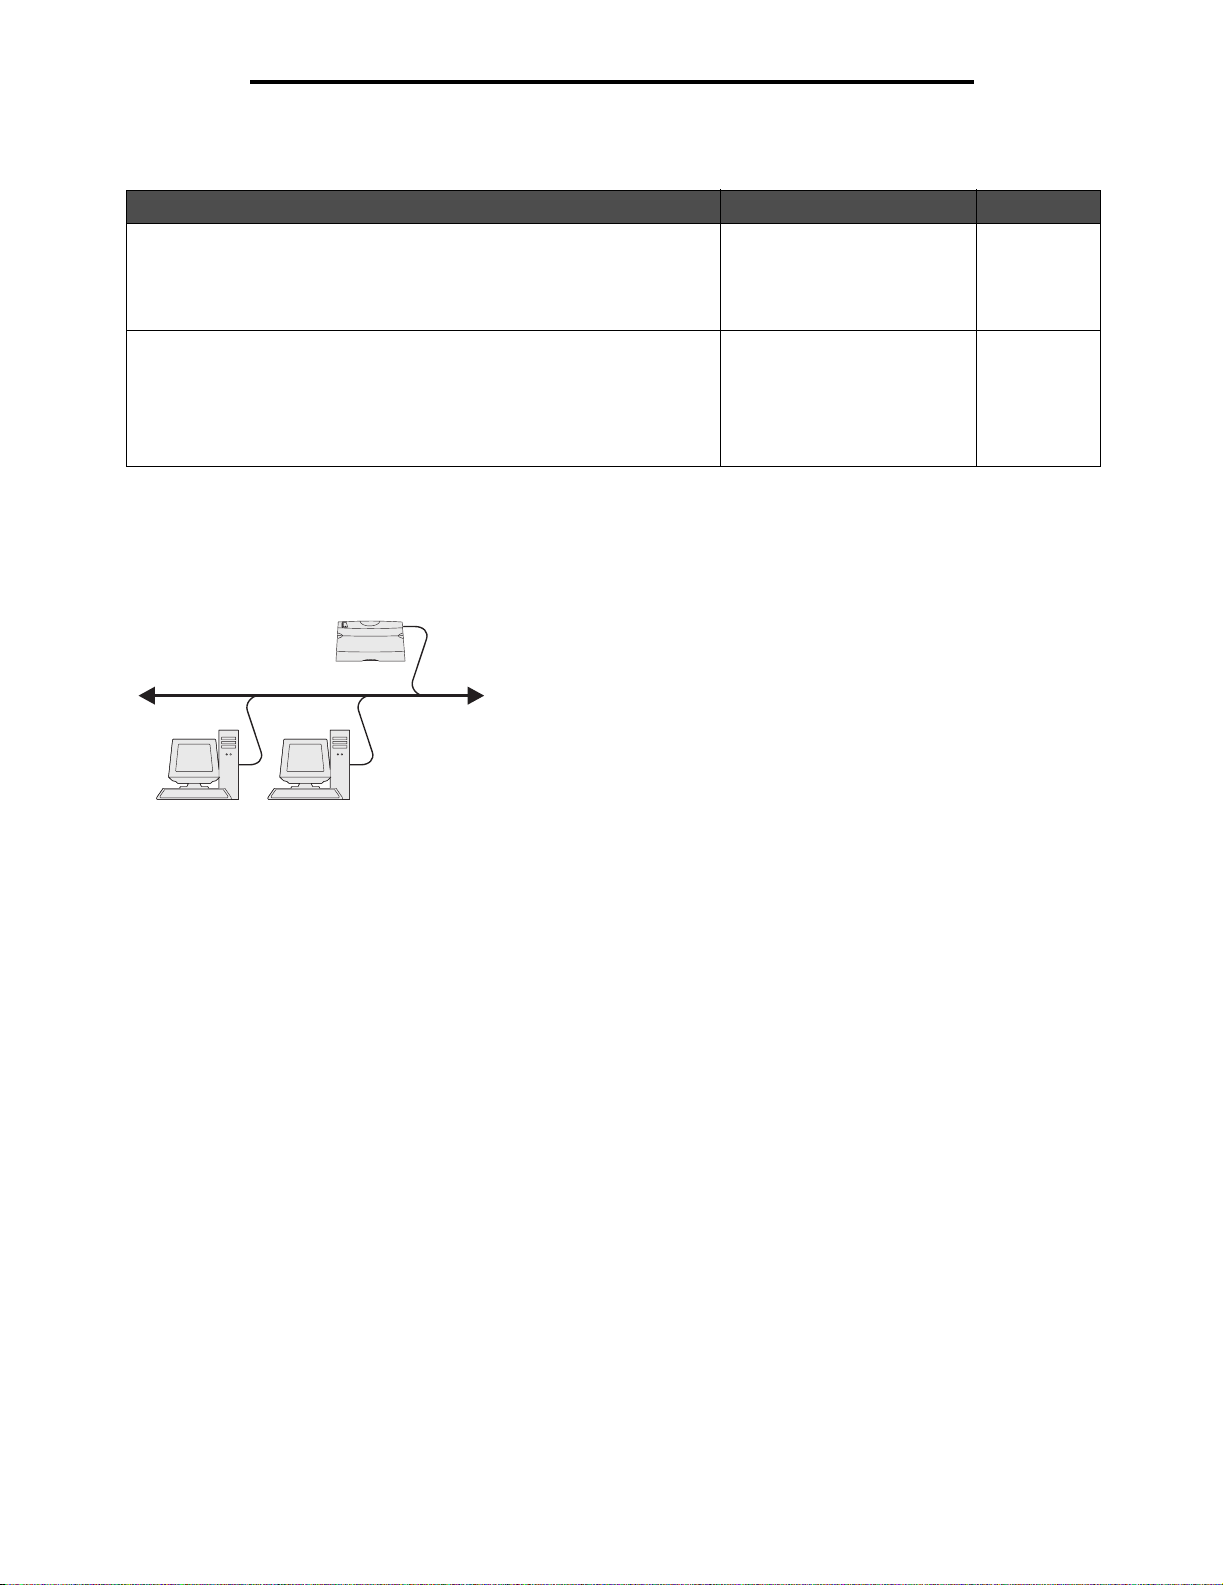
Direct
• Printer is connected directly to the network using a network cable,
such as Ethernet.
• Printer drivers are typically installed on each network computer.
Windows 98 SE,
Windows NT 4.0,
Windows Me, Windows 2000,
Windows XP, or
Windows Server 2003
19
Shared
• Printer is connected to one of the computers on the network using a
local cable, such as USB.
• Printer drivers are installed on the computer attached to the printer.
• During driver installation, the printer is set up to be “shared” so that
other netwo rk computers can print to it.
Windows NT 4.0,
Windows 2000, Windows XP,
or Windows Server 2003
20
Direct printing using Windows 98 SE, Me, Windows NT 4.0, Windows 2000,
Windows XP, or Windows Server 2003
To install a custom printer driver and network port:
Printer
Clients
1 Launch the drivers CD.
2 Click Install Printer and Software.
3 Click Agree to accept the license agreement.
4 Select Suggested, and click Next.
5 Select Network Attach, and click Next.
6 Select the printer model from the list, and click Next.
7 Select the printer port from the list, and click Finish to complete the installation.
If the printer port is not listed:
a Click Add Port.
b Select Lexmark Enhanced TCP/IP Port, and enter the information to create the port.
c Enter a port name.
This can be an y name to associa te with the p rinter , su ch as Color1-lab4. After the port is created , this name
appears in the list of available ports.
d Enter the IP address in the text box.
Note: If the IP address is unknown, print a network setup page, and look under the TCP/IP heading. For
help, see Printing a network setup page and Verifying the IP settings.
8 Print a test page to verify printer installation.
Windows
19
Page 20

Installing drivers for network printing
Shared printing using Windows NT 4.0, Windows 2000, Windows XP, or
Windows Server 2003
Note: Install the printer software before connnecting the USB cable.
After connecting the printer to a Windows NT 4.0, Windows 2000, Windows XP, or Windows Server 2003 computer (which
will act as a server), follow these steps to configure the network printer for shared printing:
Server
Printer
Clients
1 Install a custom printer driver.
a Launch the drivers CD.
b Click Install Printer and Software.
c Click Agree to accept the license agreement.
d Select Suggested, and click Next.
The Suggested option is the default installation for local and network-attached setup. To install utilities,
change settings, or customize device drivers, select Custom, and follow the instructions on the screen.
e Select Local Attach, and click Finish.
Follow the instructions on the screen. It may take some time for the drivers to load.
f Close the drivers CD installer application.
g Connect the USB cable, a nd turn on the printer.
The Plug and Play screen appears, and a printer object is created in the Printers folder of the computer. The
printer is shared in step2: “Share the printer on the network.”
h Print a test page to verify printer installation.
2 Share the printer on the network.
a Click Start
b Select the printer just added.
c Click File
d Select the Shared as check box, and enter a name in the text box.
e In the Alternate Drivers section, select the operating systems of all the network clients that will print to the
printer.
f Click OK.
Æ Settings Æ Printers.
Æ Sharing.
Note: If files are missing, prompts may appear to request the server operating system CD.
Windows
20
Page 21

Installing drivers for network printing
g Check the following to make sure the printer was successfully shared.
• The printer object in the Printers folder now has a shared indicator. For example, in Windows NT 4.0, a
hand appears under the printer object.
• Browse Network Neighborhood. Find the host name of the server, and look for the shared name
assigned to the printer.
Install the printer driver (or subset) on network clients
Using the point and print method
Note: This method is usuall y the best use of sy stem resources . The server han dles driver mod ifications and
the print job processing. This lets network clients return to applications much faster.
With this method, a subset of driver information is copied from the server to the client computer. This is just enough
information to send a print job to the printer.
1 Double-click Network Neighborhood on the Windows desktop of the client computer.
2 Locate the host name of the server compu ter, and double-click the host name.
3 Right-click the shared printer name, and click Install.
Wait a few minutes for the driver information to be copied from the server computer to the client computer and for
a new printer object to be added to the Printers folder. The time this takes varies based on network traffic and
other factors.
4 Close Network Neighborhood.
5 Print a test page to verify printer installation.
Using the peer-to-peer method
With this method, the printer driver is fully installed on each client computer. Network clients retain control of driver
modifications. The client computer handles the print job processing.
1 Click Start Æ Settings Æ Printers.
2 Click Add Printer to launch the Add Printer wizard.
3 Click Next.
4 Click Network Printer, and click Next.
5 Enter the printer name or URL (if on the Internet or an intranet), and click Next.
If the printer name or URL is unknown, leave the text box blank, and click Next.
6 Select the network printer from the Shared printers list. If the printer is not listed, ent er the path of the printer in the
text box.
The path looks similar to the following:
\\<server host name>\<shared printer name>
Note: If this is a new printer, prompts may occur to install a printer driver. If no system driver is available,
provide a path to available drivers.
The server host name is the na me of the serve r computer tha t identi fies it to the net work. The shared printer name
is the name assigned during the server installation process.
7 Click OK.
8 Select whether this printer will be the default printer for the client, and click Finish.
9 Print a test page to verify printer installation.
Windows
21
Page 22

Installing drivers for network printing
Configuring Drag‘N’Print
Note: Drag’N’Print™ support is not available for all printers.
For detaile d c on figu ration instructions, laun ch the drivers CD, click View Documentation, and click Software and utilities.
Macintosh
Note: A PostScript Printer Description (PPD) file provides detailed information about the capabilities of a
printer to UNIX or Macintosh computers.
To print to a network printer, e ach M acint osh use r mu st ins tall a cust om PostScript Printer Description (PPD) file, and ei ther
create a desktop printer on the computer (Mac OS 9.x) or create a print queue in Print Center (Mac OS X).
Mac OS X
Step 1: Install a custom PPD file
1 Install a PostScript Printer Description (PPD) file on the computer.
a Insert the drivers CD.
b Double-click the installer package for the printer.
Note: A PPD file provides det ailed information about the capa bilities of a p rinter to the Ma cintosh c omputer.
c Click Continue on the Welcome screen and again after viewing the Readme file.
d Click Continue after viewing the license agreement, and click Agree to accept the terms of the agreement.
e Select a Destination, and click Continue.
f On the Easy Install screen, click Install.
g Enter the user password, and click OK. All the necessary software is installed on the computer.
h Click Close when installation is complete.
Step 2: Create a print queue in Print Center or Printer Setup Utility
Using AppleTalk Printing
Follow these steps to create a print queue using AppleTalk Printing.
1 Open Finder, click Applications, and click Utilities.
2 Double-click Print Center or Printer Setup Utility.
3 Choose Add Printer from the “Printers” menu.
4 Choose AppleTalk from the pop-up menu.
Note: Look on the network setup page under the “AppleTalk” heading to know which zone or printer to
select.
5 Select the AppleTalk zone from the list.
6 Select the new printer from the list, and click Add.
Macintosh
22
Page 23

Installing drivers for network printing
7 Verify printer installation:
a Open Finder, click Applications, and click TextEdit.
b Choose Print from the “File” menu.
c Choose Summary from the “Copies & Pages” pop-up menu.
Note: Look on the Netw ork Setup page u nder the “Apple Talk” heading to find the d efault name of the printer
to know which printer to select.
• If the PPD file displayed in the Summary window is correct for the printer, then printer setup is complete.
• If the PPD file displayed in the Summary window is not correct f or the printer, delete the printer from the
printer list in Print Center or Printer Setup Utility, and repeat Step 1: Install a custom PPD file.
Using IP Printing
Follow the se steps to c reate a print queu e using IP Printing. To create an AppleTalk print queue, see Step 2 : Crea te a print
queue in Print Center or Printer Setup Utility.
1 Open Finder, click Applications, and click Utilities.
2 Double-click Print Center or Printer Setup Utility.
3 Choose Add Printer from the “Printers” menu.
4 Choose IP Printing from the pop-up menu.
5 Enter the IP address or the printer DNS name in the Printer Address box.
6 Choose Lexmark from the “Printer Model” pop-up menu.
7 Select the new printer from the list, and click Add.
8 Verify printer installation:
a Open Finder, click Applications, and click TextEdit.
b Choose Print from the “File” menu.
c Choose Summary from the “Copies & Pages” pop-up menu.
d Do one of the following:
• If the PPD file displayed in the Summary window is correct for the printer, then printer setup is complete.
• If the PPD file displayed in the Summary window is not correct for the printer, delete the printer from the
printer list in Print Center or Printer Setup Utility, and repeat Step 1: Install a custom PPD file.
Mac OS 9.x
Step 1: Install a custom PPD file
1 Insert the drivers CD.
a Double-click Classic, and double-click the installer package for the printer.
Note: A PPD file provides det ailed information about the capa bilities of a p rinter to the Ma cintosh c omputer.
b Choose the language needed for use, and click Continue.
c Click Continue after viewing the Readme file.
d Click Continue after viewing the license agreement, and click Agree to accept the terms of the agreement.
e On the Easy Install screen, click Install. All the necessary files are installed on the computer.
Macintosh
23
Page 24

Installing drivers for network printing
f Click Close when installation is c omplete.
Note: A PPD for the printer is also available in a dow nloada b le softw ar e pac kage on the Le x mark W e b site
at www.lexmark.com.
Step 2: Create a desktop pr inter
1 In the Chooser, select the LaserWriter 8 driver.
2 For a routed net w o rk, selec t the de fault zone from the li st. For the zone to selec t, l ook on the N etw ork Set up p ag e
under AppleTalk for Zone.
3 Select the new printer from the list.
4 For printer to select , look on the Netw ork Setup page un der the “AppleTalk” heading to find the de fa ult name of the
printer.
5 Click Create.
6 Make sure there is an icon next to the printer name in the Chooser.
7 Close the Chooser window.
8 Verify printer installation.
a Click the desktop printer icon just added.
b Choose Printing Æ Change Setup.
– If the PPD file displayed in the PostScript Printer Description (PPD) file portion of the menu is correct for the
printer, printer setup is complete.
– If the PPD file displayed in the PostScript Printer Description (PPD) file portion of the menu is not correct for
the printer, repeat Step 1: Install a custom PPD file.
UNIX/Linux
The printer supports many UNIX and Linux platforms, such as Sun Solaris and Red Hat. Visit the Lexmark Web site at
www.lexmark.com for a complete list of supported UNIX and Linux platforms.
Note: The Sun Solaris and L inux pac kag es are a v ailab le on the driv ers CD and on the Le xma rk We b site a t
www.lexmark.com.
We provi de a printer driver package for each supported UNIX and Linux platform. The User’s Guide in eac h pa ckage gives
detailed instructions for installing and using Lexmark printers in UNIX and Linux environments.
These packages are available for download from the Lexmark Web site. The driver package needed is also on the drivers
CD.
NetWare
The printer supports Novell Distributed Print Services (NDPS/iPrint). For the latest information about installing a network
printer in a NetWare environment, launch the drivers CD, and click View Documentation.
UNIX/Linux
24
Page 25

4
Installing and r emo vi ng opti ons
CAUTION: If you are installing memory or option cards sometime after setti ng up the prin ter, turn the printer off
and unplug the po wer c ord before continuing. If you hav e a ny other d e vices conne cted to the printer,
turn them off as well and unplug any cables going to the printer.
You can customize your printer memory capacity and connectivity by adding optional cards. You can also use these
instructions to help you locate an option for removal. The instructions in this section cover the following options:
Internal options:
• Memory cards
– Printer memory
– Flash memory
– Fonts
• Firmware cards
– Bar Code
– ImageQuick™
– IPDS and SCS/TNe
– PrintCryption™
Note: Use a Phillips screwdriver to remove the system board access cover.
• Other internal options
– Printer hard disk
– RS-232 serial interface card
– Parallel 1284-B interface card
– MarkNet N8000 Series internal print servers (also called internal network adapters or INAs)
Other options:
• Duplex unit (removal instructions only)
• Finisher
• High capacity feeder
• Optional drawer (removal instructions only)
Installing and removing options
25
Page 26
Installing and removing options
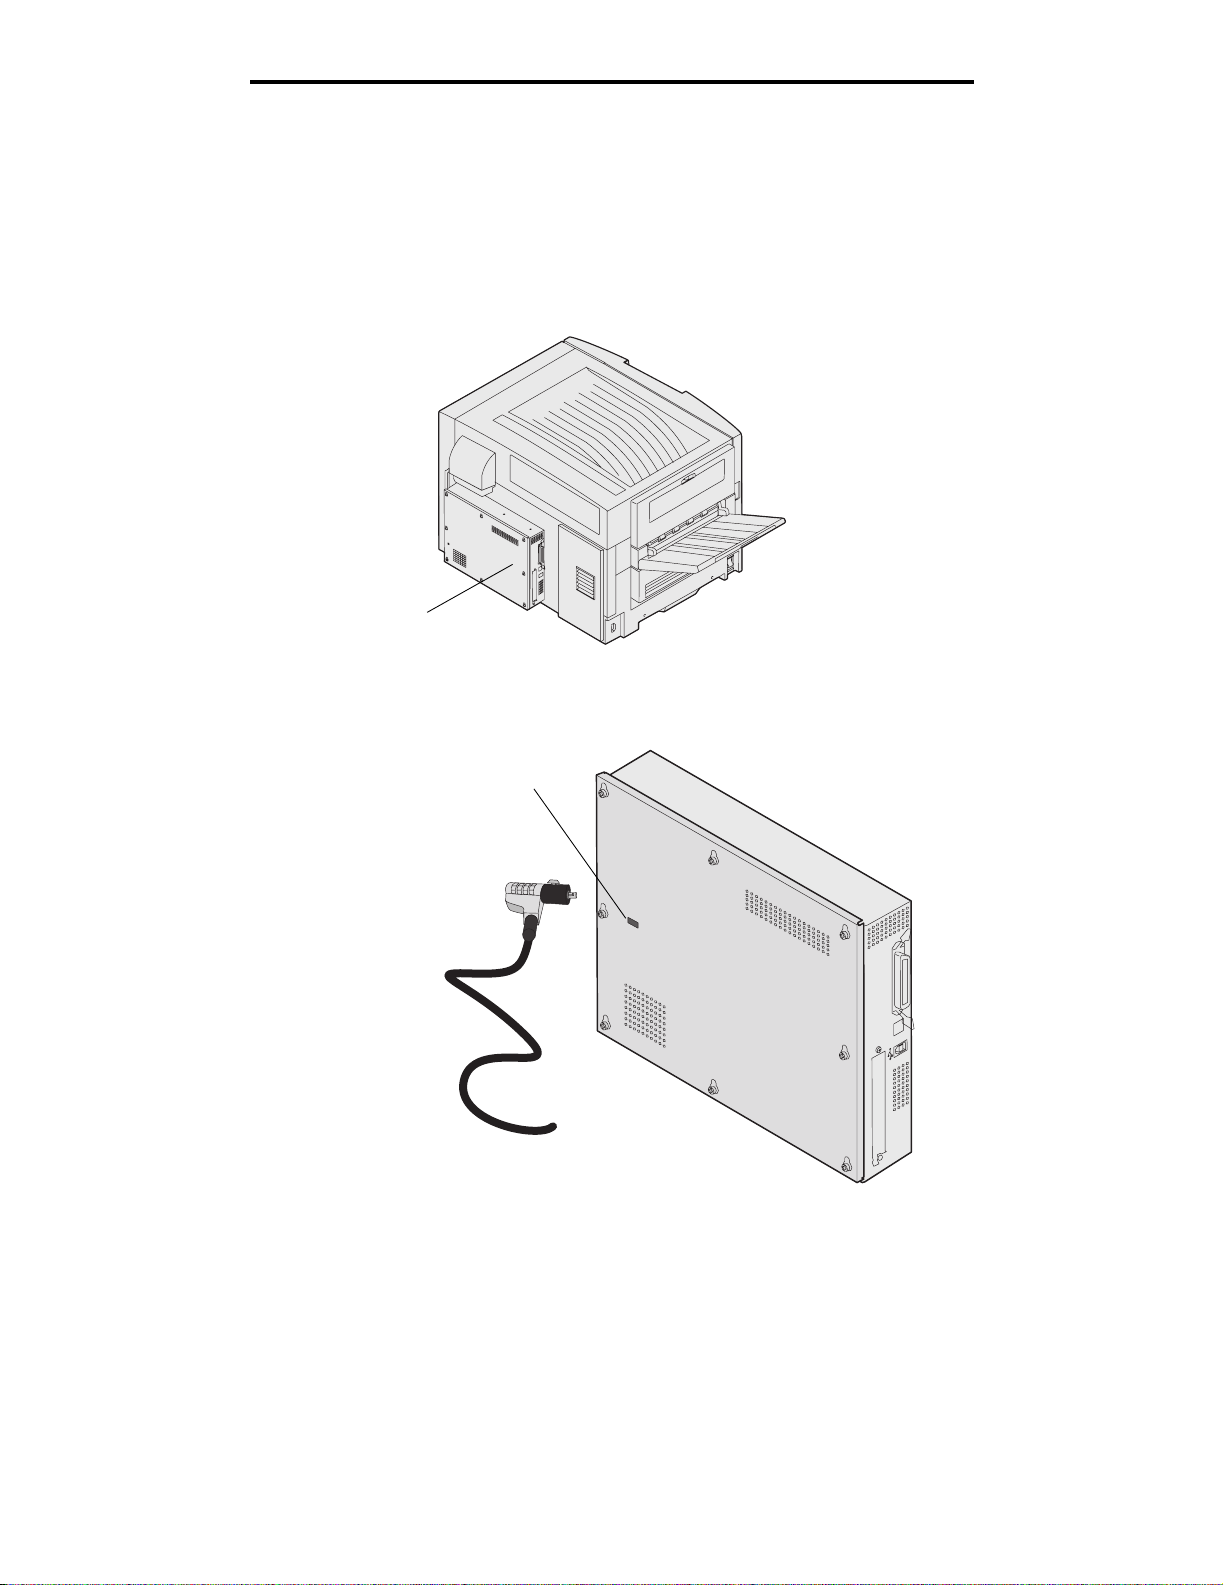
Removing the system board access cover
You must remove the system board access cover to install memory cards, a firmware card, a hard disk, or an option card.
CAUTION: This printer weighs 77–107 kg (170–235 Ib) and requ ires four people to lift. Anyti me you move or lift
the printer , mak e sure y ou ha v e enoug h people to help . U se the han dholds l ocated on the sides to lift
the printer.
Rear cover
This printer has a Kensington Security Slot, which can work with a Kensington lock to secure the system board access
cover. This may need to be unlocked before the system board access cover can be removed.
Kensington security slot
Removing the system board access co ver
26
Page 27
Installing and removing options
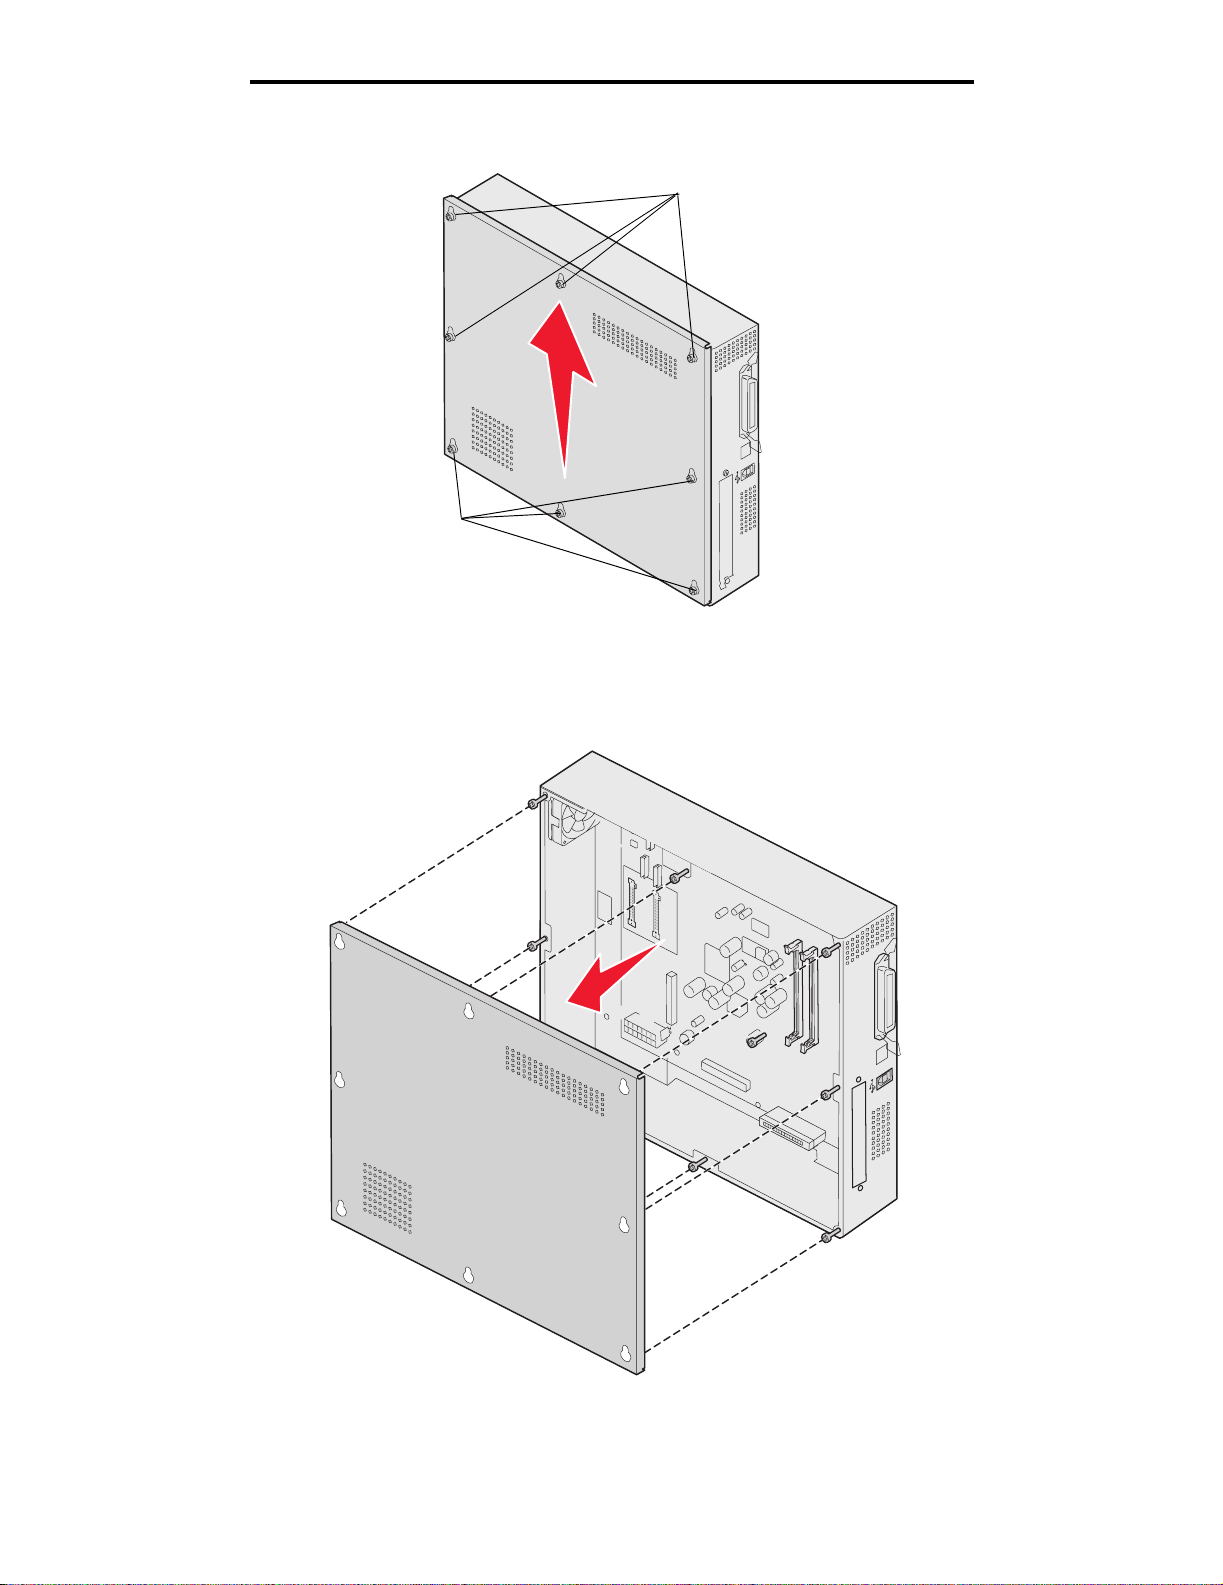
You need a number 2 Phillips screwdriver to remove the system board access cover.
Screws
Screws
1 Loosen the eight screws on the system board access cover. Do not remove the screws completely.
Warning: The system board access cover must be replaced before operating the printer.
2 Slide the cover up and away from the printer.
Removing the system board access co ver
27
Page 28
Installing and removing options
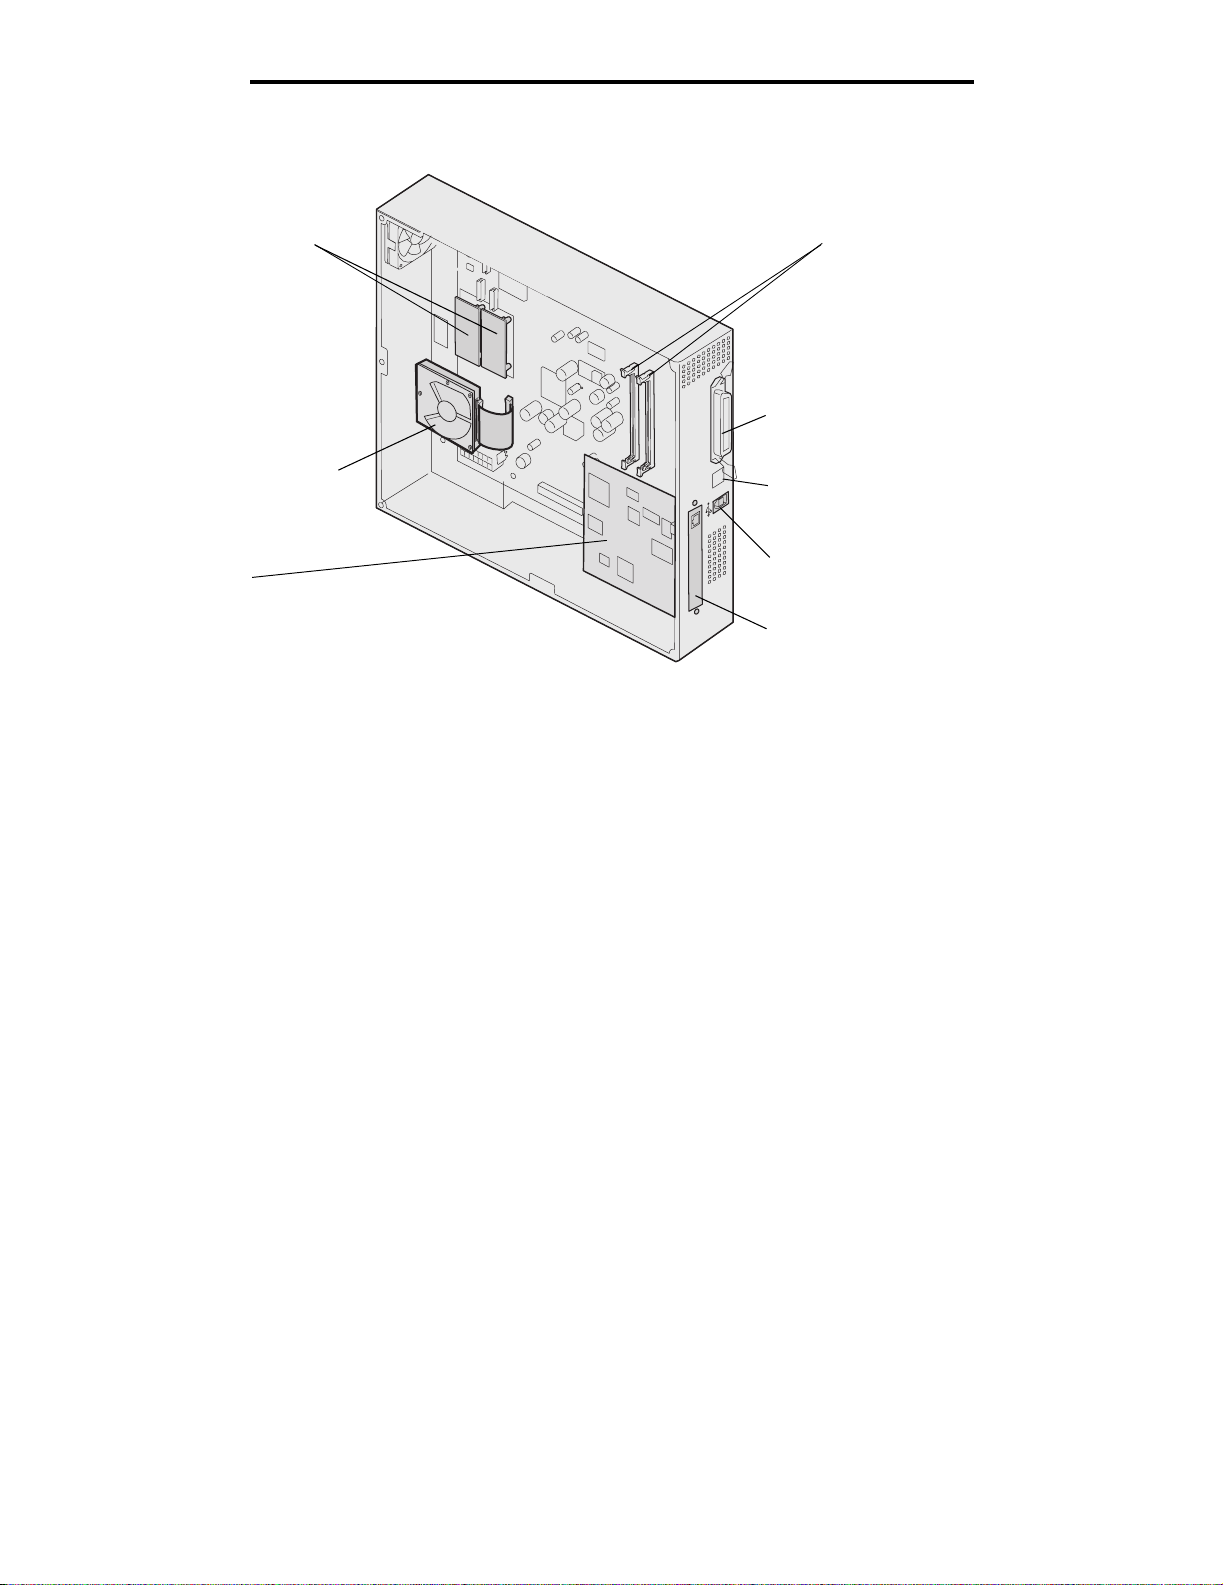
3 Use the illustration to locate the connector for the card you want to install or remove.
Flash mem ory or
firmware card
connectors
Memory c onnectors
Parallel connector
Optional hard disk
Option card
Ethernet connector
USB connector
Option card cov er
Removing the system board access co ver
28
Page 29
Installing and removing options
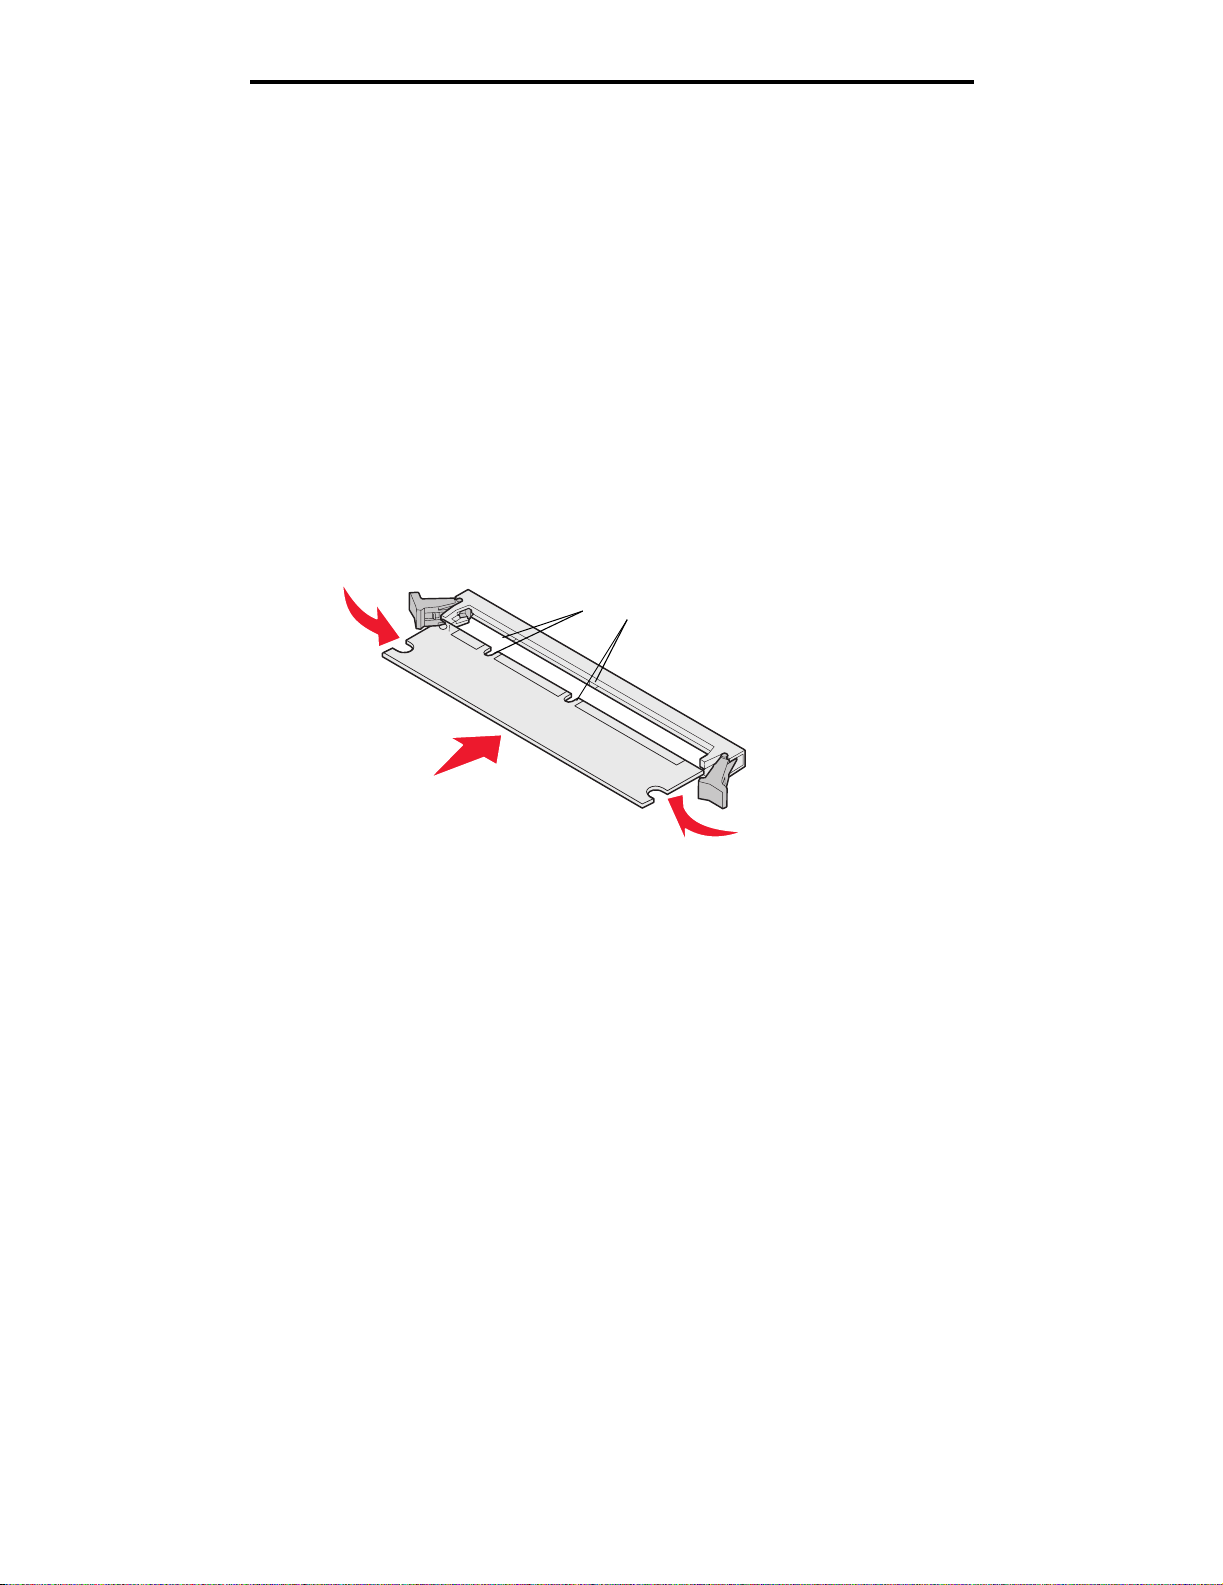
Installing a memory card
Complete the following instr uctions to install a printer memory card.
Note: Memory cards designed for other Lexmark printers may not work with your printer.
1 Remove the syste m boa rd acc es s cover. (See Removing the system board access cover.)
2 Push open the latches on both ends of the memory card connector.
3 Unpack the memory card.
Warning: Printer memory cards are easily damaged by static electricity. Touch something metal such as the
printer frame before you touch a memory card.
Avoid touching the connection points along the edge of the card. Save the packaging.
4 Align the notches on the bottom of the card with the notches on the connector.
5 Push the memory card firmly into the connector until the latches on either end of the connector snap into place.
It may require some force to fully seat the card.
Notches
6 Make sure each latch fits over the notch on the end of the card.
Installing a flash memory or firmware card
Note: Flash memory and firmware cards desig ned for other Lexm ark printers may no t work with your printer.
1 Remove the syste m boa rd acc ess co ver (see Removing the system board access cover).
Warning: Flash memory and firmware cards are easily damaged by static electricity. Touch something metal,
such as the printer frame, before you touch a card.
2 Unpack the flash memory or firmware card.
Avoid touching the metal pins on the bottom of the card. Save the packaging.
Installing a memory card
29
Page 30
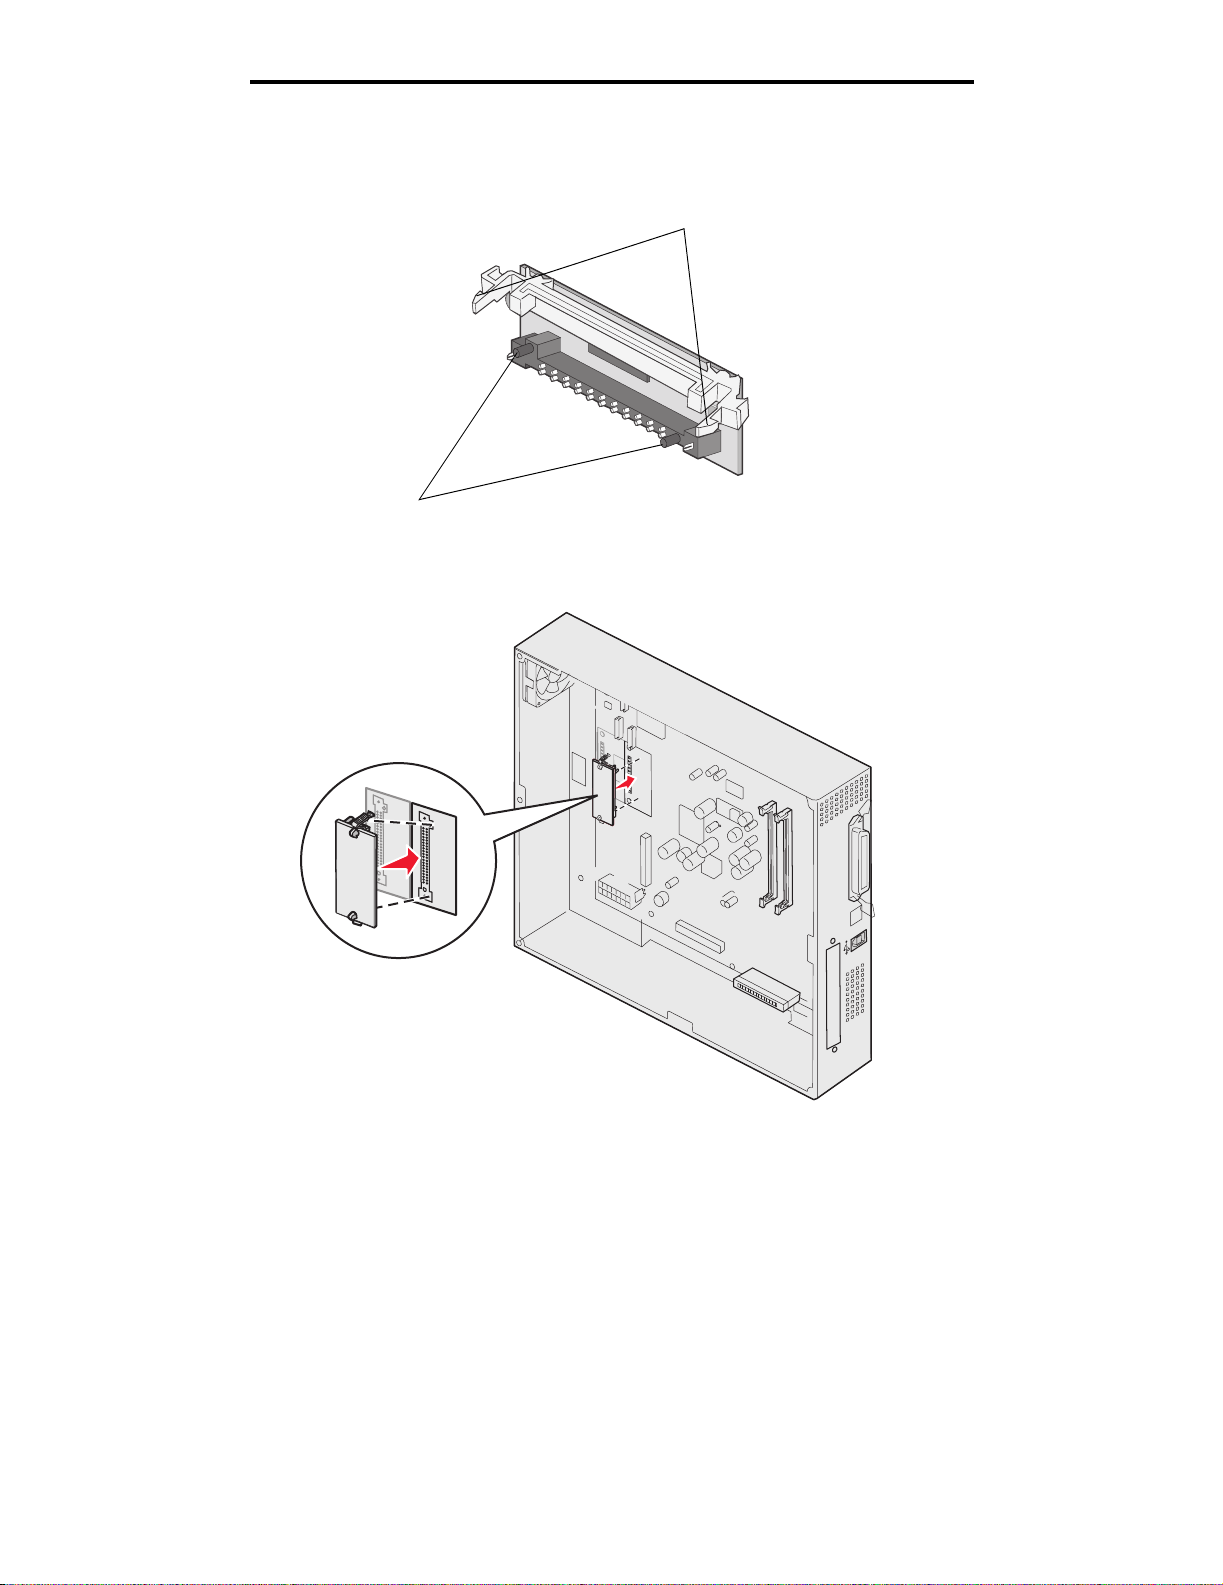
Installing and removing options
3 Holding the flash memory or firmware card by the locking clips , ali gn the plastic pins on the card with the holes on
the system board.
Locking clips
Pins
4 Push the flash memory or firmware card firmly into place, and release the locking clips.
The entire length of the connector on the flash memory or firmware card must touch the system board and be
locked into the connector.
Be careful not to damage the connectors.
Installing a hard disk
Warning: Hard disks are easily damaged by static electricity and physical shock (such as dropping). Touch
something metal, such as the printer frame, before you touch the hard disk.
Installing a hard disk
30
Page 31

Installing and removing options
If an option card has been installed, you may have to remove the option card before installing the hard disk.
1 Remove the syste m boa rd acc ess co ver (see Removing the system board access cover).
2 Align and press the ribbon cable connector into the connector on the system board.
3 Flip the hard disk over, and then press the three posts on the mounting plate into the holes on the system board.
The hard disk snaps into place.
Installing a hard disk
31
Page 32

Installing and removing options
Installing an option card
Your printer has one expansion card slot that supports a number of option cards. The following table describes their
function.
Card Function
MarkNet N8000 series internal print
server
Serial/Parallel 1284-C Interface Card Adds an RS-232C serial and 1284-C parallel interface port.
Coax/Twinax Adapter Card for SCS Adds a coaxial/twinaxial network port.
802.11g Wireless Print Adapter Connects to an optional MarkNet N8000 series internal print server to add
Note: The network models ship with an Ethernet print server already installed.
You need a small Phillips screwdriver to install these options.
Adds an Ethernet, Token-Ring, or Fiber port to connect your printer to a
network.
US or international 802.11g wireless printing capability.
1 Remove the syste m boa rd acc ess co ver (see Removing the system board access cover).
2 Remove the screw from the metal plate that covers the connector slot, and then lift the plate off.
Save the screw.
Warning: Option cards are easily damaged by static electricity. Touch something metal, such as the printer
frame, before you touch an option card.
3 Unpack the option card.
Save the packing materials.
Installing an option card
32
Page 33

Installing and removing options
4 Align the connector on the option card with the connector on the system board.
The cable connectors on the side of the option card must fit through the connector slot.
5 Push the option card firmly into the option card connector.
6 Secure the card to the system board with the screws.
Installing an option card
33
Page 34

Installing and removing options
Reinstalling the system board access cover
After you finish installing cards on the printer system board, reinstall the system board access cover.
1 Align the holes on the access cover with the screws on the printer.
Hole
2 Place the cover against the printer and slide it down.
3 Tighten the eight screws.
Aligning the optional high capacity feeder
Note: Failure to properly align the high capacity feeder may cause paper jams.
Reinstalling the system board access cover
34
Page 35

Installing and removing options
Installing height adjustment spacers
If the pins on the high capacity feeder do not align with the holes in the docking frame, adjust the height of the feeder.
You can either remove the factory installed spacer or add two spacers between each caster and the bottom of the high
capacity feeder.
Use the following steps to add or remove spacers.
1 Determine the height difference between high capacity feeder alignment pins and the docking frame.
2 Place the high capacity feeder on the floor or adequate work surface.
3 Remove the four screws securing one of the casters to the high capacity feeder.
4 Add or remove spacers.
To add spacers:
a Insert the four screws through the caster.
b Place the spacers on the screws.
Aligning the optional high capacity feeder
35
Page 36

Installing and removing options
c Align and insert the screws into the screw holes on the high capacity feeder.
To remove the factory installed spacer:
a Remove the spacer from the top of the caster.
b Insert the four screws through the caster.
c Align and insert the screws into the screw holes on the high capacity feeder.
5 Tighten the four screws to secure the caster.
6 Repeat steps 3 through 5 to add or remove spacers on the remaining three casters.
Note: If installing or removing height adj ustment spa cers does not bring the hig h capacity feed er to the right
height, you may need to raise or lower to height of the feet on your printer cabinet or printer base.
Aligning the optional finisher
Note: Failure to properly align the finisher may cause paper jams.
Aligning the optional finisher
36
Page 37

Installing and removing options
Aligning the finisher with the printer
The following three areas must align properly to prevent paper jams.
Alignment marks
Docking plate pin
Spacing
Hole in
finisher
1 The docking plate pins must enter the holes in the finisher.
2 The space between the printer and finisher must be the same at the top and bottom of the finisher.
3 The alignment marks on top of the finisher must align with the edges of the cover on the side of the printer.
4 Roll the finisher toward the printer until the finisher locks to the docking plate pins.
You hear a click when the finisher locks into position.
If the pins did not go into the holes in the finisher, see Lowering or raising the finisher. Otherwise, go to
Aligning the sides of the finisher.
Aligning the optional finisher
37
Page 38

Installing and removing options
Lowering or raising the finisher
Follow these instructions if the holes on the finisher are above or below the pins on the docking plate.
Pin
Hole in finisher
1 Determine if the pins are above or below the holes in the finisher.
Aligning the optional finisher
38
Page 39

Installing and removing options
2 Loosen the guide rail thumbscrews.
3 Rotate the adjustment knobs as needed to align the holes in the finisher with the pins.
To raise the finisher, rotate the adjustment knobs clockwise.
To lower the finisher, rotate the adjustment knobs counterclockwise.
4 Roll the finisher toward the printer until the finisher locks to the docking plate pins.
You hear a click when the finisher locks into position.
If the pins go into the holes but the finisher did not lock to the pins, see Aligning the sides of the finisher.
Otherwise, go to Aligning the top of the finisher.
Aligning the optional finisher
39
Page 40

Installing and removing options
Aligning the sides of the finisher
Follow these instructions if the distance between the finisher and printer is not the same at the top and bottom.
1 Loosen the guide rail thumbscrews.
Aligning the optional finisher
40
Page 41

Installing and removing options
If you previously lowered or raised the guide rail plate, the thumbscrews will already be loose.
2 Rotate the rear adjustment knobs to equally align the top and bottom of the finisher with the printer.
To move the top of the finisher closer to the printer, rotate the adjustment knobs clockwise.
To move the top of the finisher away from the printer, rotate the adjustment knobs counterclockwise.
3 Roll the finisher toward the printer until the finisher locks to the docking plate pins.
You hear a click when the finisher locks into position.
Aligning the optional finisher
41
Page 42

Installing and removing options
Aligning the top of the finisher
Follow these instructions if the alignment marks on top of the finisher are not aligned with the edges of the cover on the side
of the printer.
Note: Any time you move the printer or finisher, recheck printer and finisher top alignment.
1 Loosen the guide rail thumbscrews.
If you made previous adjustments, the thumbscrews will already be loose.
2 Rotate the adjustment knobs as needed to raise or lower the side of the finisher.
To raise the finisher, rotate the adjustment knobs clockwise.
To lower the finisher, rotate the adjustment knobs counterclockwise.
3 Tighten the guide rail thumbsc rews.
Aligning the optional finisher
42
Page 43

Installing and removing options
4 Roll the finisher toward the printer until the finisher locks to the docking pins.
You hear a click when the finisher locks into position.
Adjusting the finisher wheels
Adjust the wheels on the end of the finisher so the stand will remain aligned when moved.
To adjust and lock the wheels:
1 Rotate the left and right upper adjustment knobs on the rear wheels until the wheels touch the floor.
To lower the wheels, rotate the adjustment knobs clockwise.
2 Turn the wheels until the locking knobs are aligned with the finisher base.
3 Rotate the locking knobs counterclockwise until they contact the finisher base.
Adjusting the finisher wheels
43
Page 44

Installing and removing options
Removing the duplex unit
1 Turn the printer off.
2 Open the duplex unit door.
3 Loosen the thumbscrews securing the duplex unit.
Removing the duplex unit
44
Page 45

4 Slide the duplex unit out.
Installing and removing options
5 Close the duplex unit door.
Removing the duplex unit
45
Page 46

Installing and removing options
Removing the high capacity feeder
1 Turn the printer off.
2 Unplug the high capacity feeder power cord from the electrical outlet.
3 Disconnect the interface cable from the side of the high capacity feeder.
4 Roll the high capacity feeder away from the printer.
5 Remove the high capacity feeder from the guide rail.
Removing the high capacity feeder
46
Page 47

Installing and removing options
6 Raise the g uide rail and pull it away from the docking frame.
7 Remove the wrench from the holder in the high capacity feeder.
Removing the high capacity feeder
47
Page 48

Installing and removing options
8 Remove the four screws securing the doc kin g fra me.
9 Insert the two side covers into the screw holes on the optional drawer until they snap into place.
Removing the high capacity feeder
48
Page 49

Installing and removing options
Removing an optional drawer
1 Turn the printer off.
2 Unplug the powe r cord.
Note: To prevent an electrical overload, plug your printer into a well-grounded outlet on a non-ground fault
interrupter (GFI) circuit.
3 Disconnect the USB or Ethernet cable from the printer.
If you have any other devices connected to the printer, turn them off and unplug any cables going to the printer.
CAUTION: This printer weighs 77–107 kg (170–235 Ib) and requires four people to lift. An yti me you move or lift
the printer , mak e sure you ha ve en ough p eople to help . Use t he han dholds l ocated on th e sides to lift.
4 Lift the printer and move it away from the optional drawer.
CAUTION: An optional drawer weighs 18.5 kg (40.8 Ib). Have someone help when lifting.
Removing an optional drawer
49
Page 50

5 Lift the optional drawer.
Installing and removing options
Removing an optional drawer
50
Page 51

5
Printing
This chapter covers information about sending a job to print, printing confidential jobs, cancelling a print job, printing a
menu settings page, a font list, and a directory list. This chapter also provides information on printing folio and statement
size media. For tips on paper jam prevention and print media storage, see Avoiding jams or Storing print media.
Sending a job to print
A printer driver is software that lets your computer communicate with your printer. When you choose Print from a software
application, a windo w represe nting the printer drive r open s. You can then select the appropriate se ttings f or the spec ific job
you are sending to the printer. Print settings selected from the driver override the default settings selected from the printer
operator panel.
You may need to click Properties or Setup from the initial Print box to see all of the available printer settings you can
change. If you are not familiar with a feature in the printer driver window, open the online Help for more information.
To support all the printer features, use the Lexmark custom printer drivers supplied with your printer. Updated drivers, as
well as a complete description of the driver packages and Lexmark driver support, are available from the Lexmark Web
site.You can also use the system drivers built into your operating system.
To print a job from a typical Windows application:
1 Open the file you want to print.
2 From the File menu, select Print.
3 Select the correc t p rinter i n t he dialog box. Modify th e p rint er s ett ing s as ap prop riate (s uc h as the p age s you want
to print or the number of copies).
4 Click Properties or Setup to adjust printer settings that were not available on the first screen, and then click OK.
5 Click OK or Print to send the job to the selected printer.
Printing
51
Page 52

Printing
Printing from a USB flash memory device
A USB Direct interface is located on the operator panel so you can insert a USB flash memory device and print PDF
documents. Printing a document from a USB flash memory device is similar to printing a held job.
For information regarding tested and approved USB flash memory devices, see our Lexmark Web site at
www.lexmark.com.
Note the following when using a USB flash memory device with the printer USB Direct Interface:
• USB devices must be compatible with the USB 2.0 standard.
• Hi-Speed USB devices must support the Full-Speed standard as well. Devices only supporting USB low speed
capabilities are not supported.
• USB devices must support the FAT file system. Devices formatted with NTFS or any other file system are not
supported.
• You cannot print encrypted files or files without printing permissions.
To print from a USB flash memory device:
1 Make sure the printer is on and Ready or Busy appears.
2 Insert a USB flash memory device into the USB Direct interface.
Note:
• If you insert the memory device when the printer requires attention such as when a paper jam
has occurred, the printer ignores the memory device.
• If you insert the memory device when the printer is busy printing other jobs, the message
Printer Busy appears. Select Continue, and your job prints after the other jobs finish.
Printing from a USB flash memory device
52
Page 53

Printing
3 Press until the appears next to the document you want to print, and then press .
A screen asking the number of copies to be printed will appear.
USB drive
Copies
My_document_01
My_document_02
4 To print only one copy, press , or manually input the number of copies with the number pad, then press .
Note: Do not remove the USB flash memory device from the USB Direct interface until the document has
finished printing.
The document prints.
If you leave the drive in the printer after leaving the initial USB menu screen, you can still print PDFs on the drive as held
jobs. See “Printing confidential and held jobs”.
1
Canceling a print job
There are several methods for canceling a print job.
• Canceling a job from the printer operator panel
• Canceling a job from a computer running Windows
– Canceling a job from the taskbar
– Canceling a job from the desktop
• Canceling a job from a Macintosh computer
– Canceling a job from a Macintosh computer running Mac OS 9.x
– Canceling a job from a Macintosh computer running Mac OS X
Canceling a job from the printer operator panel
Note: For more information about the operator panel, see Understanding the printer operator panel.
If the job you want to cancel is printing, and Busy appears on the display, press until Cancel a job appears, and
then press . The message Cancel Pending appears until the job is canceled.
Canceling a job from a computer running Windows
Canceling a job from the taskbar
When you send a job to print, a small printer icon appears in the right corner of the taskbar.
1 Double-click the printer icon.
A list of print jobs appears in the printer window.
2 Select the job you want to cance l.
3 Press the Delete key on the keyboard.
Canceling a print job
53
Page 54

Printing
Canceling a job from the desktop
1 Minimize all programs to reveal the desktop.
2 Double-click the My Computer icon.
3 Double-click the Printers icon.
A list of available printers appears.
4 Double-click the printer you selected when you sent the job.
A list of print jobs appears in the printer window.
5 Select the job you want to cance l.
6 Press the Delete key on the keyboard.
Canceling a job from a Macintosh computer
Canceling a job from a Macintosh computer running Mac OS 9.x
When you send a job to print, the printer icon for your selected printer appears on the desktop.
1 Double-click the printer icon on your desktop.
A list of print jobs appears in the printer window.
2 Select the print job you want to cancel.
3 Click the trash can icon.
Canceling a job from a Macintosh computer running Mac OS X
1 Open Applications Æ Utilities, and then double-click Print Center or Printer Setup.
2 Double-click the printer you are printing to.
3 In the printer window, select the print job you want to cancel.
4 Press Delete.
Printing the menu settings page
You can print a menu settings page to review the default printer settings and to verify printer options are installed correctly.
1 Make sure the printer is on and Ready.
2 Press on the operator panel.
3 Press until Reports appears, and then press .
4 Press until Menu Settings Page appears, and then press .
Printing Menus Settings appears on the display.
The printer returns to the Ready state after the menu settings page prints.
Printing the menu settings page
54
Page 55

Printing
Printing a network setup page
If the printer is attached to a ne twork, print a network setup page on the prin ter to verify the network connection. This pag e
also provides important information that helps in configuring for network printing.
1 Make sure the printer is on.
2 Press on the operator panel.
3 Press until Reports appears, and then press .
4 Press until Network Setup Page appears, and then press .
Note: If an optional MarkNet N8000 series internal print server is instal led, Print Net1 Setup appea rs on
the display.
5 Check the first section on the network setup page, and confirm that Status is “Connected.”
If Status is “Not Connected” is on the page, the LAN drop may not be active, or the network cable may be
malfunctioning. C onsult a sys tem support person f or a solution , and print ano ther network s etup page t o ve rify that
the printer is connected to the network.
Printing a font sample list
To print samples of the fonts currently available for your printer:
1 Make sure the printer is on and the Ready message appears.
2 Press on the operator panel.
3 Press until Reports appears, and then press .
4 Press until Print Fonts appears, and then press .
5 Press until the appears next to PCL Emul Fonts, PostScript Fonts, or PPDS Fonts , and then press
.
Printing a directory list
A directory listing shows the resources stored in flash memory or on the hard disk. To print a listing:
1 Make sure the printer is on and the Ready message appears.
2 Press on the operator panel.
3 Press until Reports appears.
4 Press .
5 Press until Print Directory appears.
6 Press .
The message Printing Directory List appears on the display.
The printer returns to the Ready state after the directory list prints.
Printing a network setup page
55
Page 56

Printing
Printing confidential and held jobs
The term held job refers to any type of print job that can be initiated by the user at the printer. This includes a confidential
job, a verify print job, a reserve print job, a repeat print job, a bookmark, a profile, or a file on a USB flash memory device.
When sending a job to the printer, you can specify in the driver that you want the printer to hold the job in memory. Once
your job is s tore d in printer memory, go to the printer and use the printer o per ator panel to specify w ha t you want to do w ith
your print job.
All confidential and held jobs have a user name associated with them. To access confidential or held jobs, you must first
select the type of job (confidential or held), and then select your user name from the user name list. Once you select your
user name, you can print all your confidential jobs or select an individual print job. You can then choose the number of
copies for the print job or you can delete the print job.
Printing a confidential job
When you send a confidential job to the printer, you must enter a personal identification number (PIN) from the driver. The
PIN must be four digits using the numbers 0–9. The job is held in printer memory until you enter the same four-digit PIN
from the operator panel and choose to print or delete the job. This ensures the job does not print until you are there to
retrieve it. No one else using the printer can print the job without the PIN.
Windows
1 From a word processor, spreadsheet, browser, or other application, select File Æ Print.
2 Click Properties. (If there is no Properties button, click Setup, and then click Properties.)
3 Depending on the oper at ing sys tem , you may have to click the Other Options tab, and then cl ick Print and Hold.
Note: If you have difficulty finding Print and Hold Æ Confidential Print, click Help and see the topic
Confidential Print or Print and Hold, and then follow the driver instructions.
4 Enter a User Name and PIN.
5 Send your job to the printer.
Go to the printer when you are ready to retrieve your confidential print job, and follow the “At the printer” steps on
page 56.
Macintosh
1 From a word processor, spreadsheet, browser, or other application, select File Æ Print.
2 In the “Copies & Pages” or “General” pop-up menu, select Job Routing.
a When using Mac OS 9, if Job Routing is not a choice on the pop-up menu, select Plug-in Preferences
Print Time Filters.
b Turn down the disclosure triangle to the left of Print Time Filters, and select Job Routing.
c In the pop-up menu, select Job Routing.
3 In the radio group, select Confiden tial Pr int.
4 Enter a User Name and PIN.
5 Send your job to the printer.
Go to the printer when you are ready to retrieve your confidential print job, and follow the “At the printer” steps on
page 56.
Æ
Printing confidential and held jobs
56
Page 57

Printing
At the printer
1 Press until Held jobs appears, and then press .
2 Press until Confidential jobs appears, and then press .
3 Press until the appears next to your user name, and then press .
4 Enter your PIN.
For more information, see Entering a personal identification number (PIN).
5 Press until the appears next to the job you want to print, and then press .
Note: After your job prints, it is deleted from printer memory.
Entering a personal identification number (PIN)
When you sel ect Confidential Job from the Held job menu, the f ollo wing pr ompt appears on the dis pla y after y ou se lect
your user name:
Enter PIN
*
1 Use the numeric pad to enter the four-digit PIN associated with your confidential job.
Note: As you enter the PIN, asterisks appear on the display to ensure confidentiality.
If you enter an invalid PIN, the Invalid PIN screen appears.
• To reenter the PIN, make sure Try again appears, and then press .
• To cancel, press until Cancel appears, and then press .
2 Press until the appears next to the job you want to print, and then press .
Note: After your job prints, it is deleted from printer memory.
Printing and deleting held jobs
Held jobs such as Verify Print, Reserve Print, Repeat Print, Bookmarks, and USB flash memory files differ in function and
do not require a PIN to print the job. These jobs are printed or deleted from the printer operator panel.
Verify Print
If you send a Verify Print job, the printer prints one copy and holds the remaining copies you requested in printer memory.
Use Verify Print to examine th e fi rst copy to see if it is satisfactory before printing the remaining co pi es. Once all copies are
printed, the Verify Print job is automatically deleted from printer memory.
Reserve Print
If you send a Reserve Print job, the printer does not print the job immediately. It stores the job in memory so you can print
the job later. The job is held in memory until you delete it from the “Held Jobs” menu. Reserve Print jobs may be deleted if
the printer requires extra memory to process additional held jobs.
Printing confidential and held jobs
57
Page 58

Printing
Repeat Print
If you send a Repeat Print job, the printer prints all requested copies of the job and stores the job in memory so you can
print additional copies later. You can print additional copies as long as the job remains stored in memory.
Note: Repeat Print jobs are automatically deleted from printer memory when the printer requires extra
memory to process additional held jobs.
Windows
1 From a word processor, spreadsheet, browser, or other application, select File Æ Print.
2 Click Properties. (If there is no Properties button, click Setup, and then click Properties.)
3 Depending on the operating system, you may have to click the Other Options tab, and then click Print and Hold.
Note: If you hav e di ffic ul ty fin di ng Print and HoldÆ Held Jobs, clic k Help, and see the topic Held Jobs or
Print and Hold, then follow the driver instructions.
4 Select the type of held job you want, and then send your job to the printer.
Go to the printer when you are ready to retrieve your confidential print job, and follow the “At the printer” steps on
page 58.
Macintosh
1 From a word processor, spreadsheet, browser, or other application, select File Æ Print.
2 In the Copies & Pages or General pop-up menu, select Job Routing.
a When using Mac OS 9, if Job Routing is not a choice on the pop-up menu, select Plug-in Preferences
Print Time Filters.
b Turn down the disclosure triangle to the left of Print Time Filters, and select Job Routing.
c In the pop-up menu, select Job Routing.
3 In the radio group, select the type of held job you want, enter a user name, and then send your job to the printer.
Go to the printer when you are ready to retrieve your confidential print job, and follow the “At the printer” steps on
page 58.
At the printer
1 Press until Held jobs appears, and then press .
2 Press until the appears next to your user name, and then press .
3 Press until the appears next to the type of action you want to perform:
Print All Jobs Delete All Jobs
Print A Job Delete A Job
Print Copies
Æ
4 Press .
5 Press until the appears next to the job you want, and then press .
The job will print or be deleted according to the type of print job and action you selected.
Printing confidential and held jobs
58
Page 59

Printing
Printing folio and statement sizes
Folio and st atemen t siz es ar e not a v ail ab le in th e Paper Size menu unti l Siz e Sensi ng is turned off . To turn off Size Sensing:
1 Make sure the printer is off.
2 Press and hold the and buttons while you turn the printer on.
3 Release both buttons when Performing Self Test appears on the display.
The printer performs its power-on sequence, and then Config Menu appears on the first line of the display.
4 Press until Size Sensing appears.
5 Press .
Tray 1 Sensing appears on the second line of the display.
6 Press and release or to select the input option for the folio or statement size paper.
7 Press .
The first line of the display shows the selected input option, and the second line shows the current setting.
8 Press or to change the setting to Off.
9 Press .
SAVED appears briefly on the d isplay, and then is rep laced by Config Menu on the first lin e and Si ze Sensing on
the second line.
10 Press and release or until appears next to Exit Config Me nu appears.
11 Press .
Activating Menu Changes appears briefly, followed by Performing Self Test. The printer returns to Ready.
Printing folio and statement sizes
59
Page 60

Printing
Loading standard trays and optional trays
Your printer has a 550-sheet standard tray. Y o u m ay have also p urch as ed o ne o r mo re 55 0-s he et op tio nal trays. Th e s tep s
for loading a standard or optional tray are the same.
Note: The steps for loading an optional high capacity feeder are different than the steps for loading a 550-
sheet tray.
To load print media:
Note: Do not remov e a tra y when a job is printing or when the operato r panel indicat or light is bl inking. Doing
so may cause a jam.
1 Open the tray.
2 Squeeze the side guide tab, and position the guide for the size media you are using.
3 Flex the sh eets bac k a nd f orth to loosen the m, then f an the m. Do not f ol d or crea se the p rint me dia. Str aight en th e
edges on a level surface.
4 Place the print media face down in the tray. For duplex (two-sided) printing on letterhead, place the print media
face up in the tray.
Note: Do not fill paper above the load line. Overfilling the tray may cause jams.
5 Squeeze the front guide tab, and slide the guide toward the inside of the tray until it lightly rests against the edge
of the media.
Loading standard trays and optional trays
60
Page 61

Printing
6 Adjust the knob to show the size of the print media currently loaded.
Note: This setting serves as a visual reminder only; it has no effect on the operation of the printer.
7 Insert the tray into the printer.
Loading the multipurpose feeder
The multipurpose feeder can hold several sizes and types of print media, such as transparencies, postcards, note cards,
and envelopes. It can be used for single-page or manual printing or as an additional tray.
The multipurpose feeder can hold approximately:
• 100 sheets of 75 g/m
• 80 sheets of 24 lb 12x18 paper
• 55 sheets of labels
• 55 sheets of card stock
• 50 transparencies
• 10 envelopes
• 1 sheet of glossy paper (manual feed)
• 1 sheet of banner paper (297.2 x 1219.2 mm. [11.7 x 48 in.]), manual feed
The multipurpose feeder accepts print media within the following dimensions:
• Width—69.85 mm (2.75 in.) to 304.8 mm (12 in.)
• Length—127 mm (5 in.) to 1219.2 mm (48 in.)
2
(20 lb) paper
Loading the multipurpose feeder
61
Page 62

Printing
The icons on the m ultipurpose f eeder sho w y ou how to load the mu ltipurpose f eeder wi th paper of various si zes , and ho w to
turn an envelope for printing. Load letterhead face up for simplex printing, face down for duplex printing.
12 x 18
123
To load print media:
123
123
Note: Do not add or remove print media when the printer is printing from the multipurpose feeder or when
A3
A4
the operator panel indicator light is blinking. Doing so may cause a jam.
LTR
123
123
B5
123
123
1 Open the multipurpose feeder, and then extend the recessed tray to accommodate the paper you want to use.
2 Slide the paper width guides to the correct position.
A5
123
Loading the multipurpose feeder
62
Page 63

Printing
3 Push down the bottom plate until it locks into place.
Note: Do not place objects on the multipurpose feeder. Also, avoid pressing down on it or applying
excessive force to it.
4 Flex the sheets or envelopes back and forth to loosen them, then fan them. Do not fold or crease the print media.
Straighten the edges on a level surface.
Note: Hold transparencies by the edges and a void touching the print side. Fan the stack of transparencies
to prevent jams. Be careful not to scratch or leave fingerprints on the transparencies.
Paper
Envelopes
Transparencies
Loading the multipurpose feeder
63
Page 64

Printing
5 Load the media in the tray and push the set button to raise the media for feeding.
Use the stack height label as a guide for stack height when loading print media.
Loading paper, transparencies, or envelopes
Note: Letterhead or other preprinted paper must be loaded differently depending on the options you have
installed.
Load envelopes flap side down. Orient them as indicated by the icons on the multipurpose feeder.
– Neve r use en v e lopes with stam ps , clas ps , snaps , win do ws , coat ed lini ngs , or sel f-stic k adhesi v es . Thes e
envelopes may severely damage the printer.
Note: Load only one size and type of prin t media at a tim e in the mu ltipurpose f eeder. Do not mix sizes and
types in the same tray.
Loading letterhead or preprinted paper
• Print side face up for simplex (single-sided) printing
• Print side face down for duplex printing
• Do not fill paper above the load line. Overfilling the tray may cause jams.
6 Set the Paper Size and Paper Type for the multipurpose feeder (MP Feeder Size and MP Feeder Type) to the
correct value f or the prin t media y o u load ed.
a Press on the operator panel.
b Press until you see Paper Menu.
c Press .
d Press until you see Paper Size/Type.
e Press .
f Press until you see MP Feeder Size/Type.
g Press .
h Press until the appears next to the media size you loaded.
i Press .
j Press until you see MP Feeder Size/Type.
k Press .
l Press until the appears next to the media type you loaded.
m Press .
The printer returns to the Ready state.
Loading the multipurpose feeder
64
Page 65

Printing
Closing the multipurpose feeder
1 Remove print medi a from the mul t ip urpose f ee der.
2 Push the extension tray in.
3 Push down on the multipurpose feeder near the printer entry rollers to secure it for closing.
4 Close the multipurpose feeder cover.
Loading the high capacity feeder
The optional high capacity feeder provides an additional input of 3,000 sheets of paper.
Note: Do not load any print media other than paper in the high capacity feeder.
To load the high capacity feeder:
1 Open the top cover.
The paper guides are set at the factory and may already be configured for your paper size.
2 Inspect the position of the paper guides.
If the paper guides are correc tly s et f or th e siz e o f paper y ou are l oadin g, go to step 6 on page 66. If not, continue
with step 3.
Note: The high capacity feeder must be properly adjusted for A4 or Letter size paper. If the paper guides
are in the wrong position, you may experience paper feeding problems.
Loading the high capacity feeder
65
Page 66

Printing
3 Loosen the left and right paper guide thumbscrews.
4 Slide the guides left or right to the correct position for the paper size you are loading (A4 or Letter).
5 Tighten the left and right paper guide thumbscrews.
6 Flex the sheets back and forth to loosen them, and then fan them.
Do not fold or crease the paper. Straighten the edges of the stack on a level surface.
Loading the high capacity feeder
66
Page 67

Printing
7 Place the paper against the paper guides with the print side up.
Note: Do not exceed the maximum stack height. Overfilling the tray may cause paper jams.
8 Press the paper tray button.
The paper tray lowers so you can load another 500 sheets of paper.
Note: If there is only a partial stack of paper in the tray, the paper low sensor will not allow the tray to go
down. Add more paper to lower the tray.
9 Place the paper against the paper guides, with the print side up.
10 Repeat step 8 and step 9 until you have filled the tray or loaded the desired quantity.
Loading the high capacity feeder
67
Page 68

11 Close th e top cover.
Make sure the high capacity feeder is pushed completely against the printer.
Linking trays
Printing
Tray linking enables the automatic linking feature for trays when you load the same size and type of print media in multiple
sources. The printer automatically links the trays; when one tray is empty, print media feeds from the next linked tray.
For example, if you have the same size and type of print media loaded in tray 2 and tray 4, the printer selects print media
from tray 2 until it becomes empty, and then the printer automatically feeds print media from the next linked tray—tray 4.
By linking all five trays, you effectively create a single source with a capacity of 4,000 sheets.
If you load the same size print media in each tray, make sure the print media is all the same type in order to link the trays.
To set the paper type or size:
1 Press on the operator panel.
2 Press until you see Paper Menu.
3 Press .
4 Press until you see Paper Size/Type.
5 Press .
6 Press until you see Tray <x> Size/Type.
7 Press .
8 Press until the appears next to the envelope size you loaded.
9 Press .
10 Press until you see Tray <x> Size/Type.
11 Press .
12 Press until the appears next to the envelope type you loaded.
13 Press .
The printer returns to the Ready state.
Once the trays you selected are loaded with the same size and type of print media, select the same Paper Ty pe setting in
the Paper Menu for these sources.
Linking trays
68
Page 69

Printing
To disable tray linking, set the Paper Type to a unique value in each one of the trays. If all the trays do not have the same
type of print media when they are linked, you could mistakenly print a job on the wrong paper type.
Tips for successful printing
Storing print media
Properly storing the media helps ensure trouble-free printing. Use the following guidelines:
• For best results, store media in an environment where the temperature is approximately 21
relative humidity is 40%.
• Store cartons of paper on a pallet or shelf, rather than directly on the floor.
• If you store individual packages of paper out of the original carton, make sure they rest on a flat surface so the
edges do not buckle or curl.
• Do not place anything on top of the paper packages.
Avoiding paper jams
By carefully selecting print media and loa ding them pro perly, you should be able to av oid most paper ja ms. If jams do occur ,
follow the steps outlined in Clearing paper jams. If jams occur frequently, make sure you follow these tips to avoid jams:
• See Loading standard trays and optional trays to load paper properly. Make sure the adjustable guides are
positioned correctly before closing the tray.
• Do not overload the paper trays. Make sure the paper is under the paper capacity mark on the inside of the tray
relative to the size and weight of the paper you are using.
• Do not remove trays while print jobs are in process.
• Do not mix reams of paper.
• Remove the top and bottom sheets of a ream before loading paper.
• Do not force paper into the multipurpose feeder when you load it; otherwise, it may skew or buckle.
• Make sure the paper width and length guides on the paper sources are adjusted correctly.
• Flex, fan, and straighten the paper before loading it.
• Fan stacks of labels or transparencies before loading them into the multipurpose feeder. If jams occur using the
multipurpose feeder, try feeding one sheet at a time.
• Do not load wrinkled, creased, damp, or curled paper.
• Do not mix paper types or paper sizes in one tray.
• Use only recommended print media. See Media guidelines.
• Make sure the recommended print side is face up when placed in the multipurpose feeder or high capacity feeder.
• Make sure the recommended print side is face down when loading trays 1 through 4.
• Keep print media stored in an acceptable environment. See Media guidelines.
• If paper consistently jams in the tray, reduce the paper stack height to level A in the tray.
°
C (70°F) and the
Tips for successful printing
69
Page 70

6
Media specifications
Media is paper, card stock, transparencies, labels, and envelopes. The last four are sometimes referred to as specialty
media. The printer provides high quality printing on a variety of media. A number of things must be considered concerning
media before printing. Thi s chapter provides information to help make media selections and how to care for media.
Media guidelines
Selecting the appropriate media for the printer helps avoid printing problems.
The following sections contain guidelines for choosing the correct media for the printer.
For detaile d in formation about media characteristics, see the Card Stock & Label Guide availab le on the Lexmark W eb si te
at www.lexmark.com/publications.
Paper
To ensure the best print quality and feed reliability, use 90 g/m2 (24 lb) xerographic, grain long paper. Business papers
designed for general business use may also provide acceptable print quality.
We recommend Lexmark part number 12A5950 letter size glossy paper and Lexmark part number 12A5951 for A4 size
glossy paper.
Always print several samples before buying large quantities of any type of media. When choosing any media, consider the
weight, fiber content, and color.
The LED printing process heats paper to high temperatures of 230°C (446°F) for non-MICR applications. Use only paper
able to withs tand these temperatures without discoloring, bleeding, or releasing hazardous emissions. Check with the
manufacturer or vendor to determine whether the paper chosen is acceptable for laser printers.
When loading paper, note the recommended print side on the paper package, and load paper accordingly. See Loading
standard trays and optional trays for detailed loading instructions.
Paper characteristics
The following paper characteristics affect print quality and reliability. It is recommended that these guidelines are followed
when evaluating new paper stock.
For detailed information, see the Card Stock & Label Guide available on the Lexmark Web site at www.lexmark.com/
publications.
Media specifications
70
Page 71

Media specifications
Weight
The printer can automatically feed paper weights from 60 to 176 g/m
2
60 g/m
(16 lb) might not be stiff enough to feed properly, causing jams. For best performance, use 90 g/m2 (24 lb bond)
grain long paper. To use paper narrower than 182 x 257 mm (7.2 x 10.1 in.), it is recommended that the weight be greater
than or equal to 90g/m2 (24 lb bond).
Curl
Curl is the tendency of medi a to c urve at its edg es. Excessive curl can cause pa per feeding problem s . Curl can occ ur a fter
the paper passes through the printer, where it is exposed to high temperatures. Storing paper unwrapped in hot, humid,
cold and dry conditions, even in the trays, can contribute to paper curling prior to printing and can cause feeding problems.
Smoothness
The degree of smoothness of paper directly affects print quality. If the paper is too rough, the toner does not fuse to the
paper properly, resulting in poor print quality. If the paper is too smooth, it can cause paper feeding or print quality issues.
Smoothness needs to be between 100 and 300 Sheffield points; however, smoothness between 150 and 250 Sheffield
points produces the best print quality.
Moisture content
The amount of mo is ture in th e p ape r affects both print qual ity an d the ability of the printer t o feed the paper prope rly. Leave
the paper in its original wrapper until it is time to use it. This limits the exposure of the paper to moisture changes that can
degrade its performance.
Condition paper while it is still in the original wrapper. To condition it, store it in the same environment as the printer for 24
to 48 hours before printing to let the paper stabilize in the new conditions. Extend the time several days if the storage or
transportation environment is very different from the printer environment. Thick paper may also require a longer
conditioning period because of the mass of material.
Grain direction
Grain refers to the alignment of the paper fibers in a sheet of paper. Grain is either grain long, running the length of the
paper, or grain short, running the width of the paper.
2
For 60 to 90 g/m
(16 to 24 lb bond) paper, grain long fibers are recommended.
Fiber content
Most high-quality xerographic paper is made from 100% chemically pulped wood. This content provides the paper with a
high degree of stability resulting in fewer paper feeding problems and better print quality. Paper containing fibers such as
cotton possess characteristics that can result in degraded paper handling.
2
(16 to 47 lb bond) grain long. Paper lighter than
Media guidelines
71
Page 72

Media specifications
Unacceptable paper
The following papers are not recommended for use with the printer:
• Chemically treated papers used to make copies without carbon paper, also known as carbonless papers,
carbonless copy paper (CCP), or no carbon required (NCR) paper
• Preprinted papers with chemicals that may contaminate the printer
• Preprinted papers that can be affected by the temperature in the printer fuser
• Preprinted papers that require a registration (the precise print loca tion on the page) gre ater than ±0. 09 in., suc h as
optical character recognition (OCR) forms
In some cases, registration can be adjusted with the software application to successfully print on these forms.
• Coated papers (erasable bond), synthetic papers, thermal papers
• Rough-edged, rough or heavily textured surface papers or curled papers
• Recycled papers containing more than 25% post-consumer waste that do not meet
DIN 19 309
• Recycled paper having a weight less than 60 g/m
• Multiple-part forms or documents
2
(16 lb)
Selecting paper
Proper paper loading helps prevent jams and ensures trouble-free printing.
To help avoid jams or poor print quality:
• Always use new, undamaged paper.
• Before loading paper, know the recommended print side of the paper. This information is usually indicated on the
paper package.
• Do not use paper that has been cut or trimmed by hand.
• Do not mix media sizes, weights, or types in the same source; mixing results in jams.
• Do not use coated papers unless they are specifically designed for electrophotographic printing.
• Do not forget to change the Paper Size setting when using a source that does not support auto size sensing.
• Do not remove trays while a job is printing or Busy appears on the operator panel.
• Make sure the P a per Type and Paper Weight se ttings are c orrect . (See “P ape r Men u” i n the Me nus and Me ssag es
Guide on the publications CD for detailed information about these settings.)
• Make sure the paper is properly loaded in the source.
• Flex paper back and forth. Do not fold or crease the paper. Straighten the edges on a level surface.
Storing paper
Use the following guidelines to avoid paper feeding problems and uneven print quality.
• Store paper in an environment where the temperature is approximately 21°C (70°F) and the relative humidity is
40%.
• Store cartons of paper on a pallet or shelf rather than directly on the floor.
Storing paper
72
Page 73

Media specifications
• If you store individual packages of paper out of the original carton, make sure they rest on a flat surface so the
edges do not buckle or curl.
• Do not place anything on top of paper packages.
• Store paper in its original wrapper until you load it into the printer.
Selecting preprinted forms and letterhead
Use the following guidelines when selecting preprinted forms and letterhead paper for the printer:
• Use grain long papers for best results for 60 to 90 g/m
• Use only forms and letterhead printed using an offset lithographic or engraved printing process.
• Avoid papers with rough or heavily textured surfaces.
Use papers printed with heat-resistant inks designed for use in xerographic copiers. The ink must withstand temperatures
of 230°C (446°F) without m elting or rel easing ha zardous emis sions . Use inks that are not aff ec ted by the resin in toner. Inks
that are oxidation-set or oil-based should meet these requirements; latex inks might not. When in doubt, contact the paper
supplier.
Preprinted papers such as letterhead must be able to withstand temperatures up to 230°C (446°F) without melting or
releasing hazardous emis si on s .
2
weigh ts.
Storing paper
73
Page 74

Media specifications
Printing on letterhead
Check with the manufacturer or vendor to determine whether the chosen preprinted letterhead is acceptable for laser
printers.
Page orientation is important when printing on letterhead. Use the following table for help when loading letterhead in the
media sources.
Media source or process Print side Top of page
Trays Printed letterhead face down Letterhead goes toward the rear of the tray.
Duplex (two-side d) printing from
trays
Printed letterhead face up Letterhead goes toward the front of the tray.
Multipurpose feeder Printed letterhead face up Icons on the multipurpose feeder show the
Duplex (two-side d) printing from
multipurpose feeder
Printed letterhead face down Icons on the multipurpose feeder show the
correct orientation for each paper size.
correct orientation for each paper size.
Transparencies
Feed transparencies from the standard tray or the multipurpose feeder. Try a sample of any transparencies being
considered for use with the printer before buying large quantities.
When printing on transparencies:
• Be sure to set the Paper Type to Transparency from the printer driver or from MarkVision™ Professional to avoid
damaging the printer.
• Use transparencies designed specifically for laser printers. Transparencies must be able to withstand
temperatures of 230°C (446°F) without melting, discoloring, offsetting or releasing hazardous emissions.
• To prevent print quality problems, avoid getting fingerprints on the transparencies.
• Before loading transparencies, fan the stack to prevent sheets from sticking together.
Selecting transparencies
The printer can print direc tly on transparencies designe d for use in laser printers . Pri nt q ual ity an d d ur ab ili ty depend on the
transparency used. Always print samples on the transparencies being considered for use before buying large quantities.
Lexmark recommends Lexmark Part Number 12A8240 letter size transparency and Lexmark Part Number 12A8241 for A4
size transparency.
The Pape r Type setting should be s et to Transparency to he lp prevent jams . (See “P ape r Type” in the Men us a nd M essag es
Guide on the publicationsCD for detailed information about this setting.) Check with the manufacturer or vendor to
determine whether the transparencies are compatible with laser printers that heat transparencies to 230°C (446°F). Use
only transparencies that are able to withstand these temperatures without melting, discoloring, offsetting, or releasing
hazardous emissions. For detailed information, see the Card Stock & Label Guide, which is available on the Lexmark Web
site at www.lexmark.com/publication s .
Envelopes
Try a sample of any envelopes in consideration for use with the printer before buying large quantities. See Loading the
multipurpose feeder for instructions on loading en velopes.
When printing on envelopes:
• To achieve the best possible print quality, use only high-quality envelopes that are designed for use in laser
printers.
Storing paper
74
Page 75

Media specifications
• Set the Paper Source in the Paper Menu based on the source in use, set the Paper Type to Envelope, and select
the correct envelope size from the operator panel, the printer driver, or from MarkVision Professional.
• For best performance, use envelopes made from 90 g/m2 (24 lb bond) paper. Use up to 105 g/m2 (28 lb bond)
weight for t he 250-s heet s tandard tra y or 105 g /m
is 25% or less. Envelopes with 100% cotton content must not exceed 90 g/m
• Use only new, undamaged envelopes.
• For best performance and to minimize jams, do not use envelopes that:
– Have excessive curl or twist
– Are stuck together or damaged in any way
– Contain windows, holes, perforations, cutouts, or embossing
– Use metal clasps, string ties, or metal folding bars
– Have an interlocking design
– Have postage stam ps attached
– Have any exposed adhesive when the flap is in the sealed or closed position
– Have nicked edges or bent corners
– Have rough, cockle, or laid finishes
• Use envelopes that can withstand temperatures of 230°C (446°F) without sealing, excessive curling, wrinkling, or
releasing hazardous emissions. If any doubts exist about the envelopes considered for use, check with the
envelope supplier.
• A combination of high humidity (over 60%) and the high printing temperatures may seal the envelopes.
2
(28 lb bond) weight f or en v elop es as l ong as the co tton co ntent
2
(24 lb bond) weight.
Storing paper
75
Page 76

Media specifications
Labels
The printer can print on many labels designed for use with laser printers. These labels are supplied in letter size, A4 size,
and legal size sheets. Label adhesives, face sheet (printable stock), and topcoats must be able to withstand temperatures
of 230°C (446°F) and pressure of 25 pounds per square inch (psi).
Try a sample of any labels considered for use with the printer before purchasing a large quantity.
For detailed information on label printing, characteristics and design, see the Card Stock & Label Guide available on the
Lexmark Web site at www.lexmark.com/publications.
When printing on labels:
• Set the Paper Type menu item to Labels in the Paper Menu. Set the Paper Type from the printer operator panel,
the printer driver, or from MarkVision Professional.
• Do not load labels together with paper or transparencies in the same source; mixing media can cause feeding
problems.
• Do not use label sheets with a slick backing material.
• Do not print within 1 mm (0.04 in.) of the die cut.
• Use full label sheets. Partial sheets may cause labels to peel off during printing, resulting in a jam. Partial sheets
also contaminate the printer and the cartridge with adhesive, and could void the printer and cartridge warranties.
• Use labels that can withstand temperatures of 230°C (446°F) without sealing, excessive curling, wrinkling, or
releasing hazardous emis si on s .
• Do not print within 1 mm (0.04 in.) of the edge of the label, of the perforations, or between die-cuts of the label.
• Do not use label sheets that have adhesive to the edge of the sheet. Zone coating of the adhesive at least 1 mm
(0.04 in.) away from edges is recommended. Adhesive material contaminates the printer and could void the
warranty.
• If zone coating of the adhesiv e is not pos sibl e, remo v e a 3 mm (0.125 in.) strip on the lea ding and driv er edge , and
use a non-oozing adhesive.
• Remove a 3 mm (0.125 in.) strip from the leading edge to prevent labels from peeling inside the printer.
• Portrait orientation is preferred, especially when printing bar codes.
• Do not use labels that have exposed adhesive.
For detailed information on label printing, characteristics, and design, see the Card Stock & Label Guide, available on the
Lexmark Web site at www.lexmark.com/publications.
Storing paper
76
Page 77

Media specifications
Card stock
Card stock is single ply, and has a large array of properties, such as the moisture content, thickness, and texture, that can
significantly affect print quality. See Identifying med ia sour ces and s pecifica tions f or i nf ormation o n the pref erre d wei ght
for the grain direction of media.
Try a sample of any card stock considered for use with the printer before purchasing a large quantity.
See Media types and weights for information on the preferred weight of media.
When pri nting on card s tock:
• Set the Paper Type menu item in the Paper Menu to Card Stoc k from th e oper ator pan el, from th e printer driv er, or
from MarkVision Professional. Set the Paper Weight to CardStock Weight, and select the CardStock Weight as
Normal or Heavy f or the v alue . Set this from the o perator p anel, the printer drive r , or from MarkVision Profe ssional.
Use Heavy for card stock weighing more than or heavier than 163 g/m
• Be aware that preprinting, perforation, and creasing can significantly affect the print quality and cause media
handling or jamming problems.
• Avoid using card stock that may release hazardous emissions when heated.
• Do not use preprinted card stock manufactured with chemicals that may contaminate the printer. Preprinting
introduces semi-liquid and volatile components into the printer.
• The use of grain long card stock is recommended.
2
(90 lb).
Storing media
Use the following guidelines for proper media storage. These help avoid media feeding problems and uneven print quality:
• For best results, store media in an environment where the temperature is approximately 21°C (70°F) and the
relative humidity is 40%. Most label manufacturers recommend printing in a temperature range of 18 to 24°C (65
to 75°F) with a relative humidity of 40 to 60%.
• Store cartons of media on a pallet or shelf, rather than directly on the floor.
• When storing individual packages of media out of the original carton, make sure they rest on a flat surface so the
edges do not buckle or curl.
• Do not place anything on top of the media packages.
Storing media
77
Page 78

Media specifications
Identifying media sources and specifications
The following tables provide information on standard and optional sources, including the media sizes available from the
Paper Size menu, and supported weights.
Note: If a media size not listed needs to be used, select the next larger size.
For information on card stock and labels, see the Card Stock & Label Guide.
Media sizes and support
Legend
✓ — supported
✘— unsupported
Media size
Dimensions
A3 297 x 420 mm
(11.7 x 16.5 in.)
A4 210 x 297 mm
(8.27 x 11.7 in.)
A5 148 x 210 mm
(5.83 x 8.27 in.)
JIS B4 257 x 364 mm
(10.1 x 14.3 in.)
JIS B5 182 x 257 mm
(7.17 x 10.1 in.)
Letter 215.9 x 279.4 mm
(8.5 x 11 in.)
Legal 215.9 x 355.6 mm
(8.5 x 14 in.)
Executive 184.2 x 266.7 mm
(7.25 x 10.5 in.)
Folio 216 x 330 mm
(8.5 x 13 in.)
Statement 139.7 x 215.9 mm
(5.5 x 8.5 in.)
Optional high
550-sheet
trays
✓✓ ✘ ✓✓
✓✓✓✓✓
✘✓ ✘ ✓✓
✓✓ ✘ ✓✓
✘✓ ✘ ✓✓
✓✓✓✓✓
✓✓ ✘ ✓✓
✘✓ ✘ ✓✓
✘✓ ✘ ✓✓
✘✓ ✘ ✘✘
Multipurpose
feeder
capacity
feeder
Optional
duplex
unit
Optional
finisher****
Tabloid 279 x 432 mm
*
This size setting formats the page or envelope for 297.0 x 1219.2 mm
(11.7 x 48 in.) unless the size is specified by the software application.
**
Measurements apply to simplex (single-sided) printing only. For
duplex (tw o-side d) printing , the m inim um size is 1 39.7 x 210 m m (5.5 0
x 8.27 in.).
***
This size setting formats the page or envelope for 216.0 x 355.6 mm
(8.5 x 14 in.) unless the size is specified by the software application.
****
Finisher bin 1. Only A4 and Letter sizes may be fed to finisher bin 2.
(11 x 17 in.)
✓✓ ✘ ✓✓
Identifying media sources and specifications
78
Page 79

Media sizes and support (continued)
Legend
✓ — supported
✘— unsupported
Media specifications
Media size
Dimensions
Universal
*
69.85 x 127 mm to
297 x 1219.2 mm
(2.75 x 3.5 in. to
11.69 x 48 in.)***
Banner 297 x 914 mm
(11.69 x 36 in.)
Banner 297 x 1219.2 mm
(11.69 x 48 in.)
7 3/4 Envelope
(Monarch)
98.4 x 190.5 mm
(3.875 x 7.5 in.)
9 Envelope 98.4 x 225.4 mm
(3.875 x 8.9 in.)
Com 10
Envelope
104.8 x 241.3 mm
(4.12 x 9.5 in.)
DL Envelope 110 x 220 mm
(4.33 x 8.66 in.)
C5 Envelope 162 x 229 mm
(6.38 x 9.01 in.)
B5 Envelope 176 x 250 mm
(6.93 x 9.84 in.)
550-sheet
trays
Multipurpose
feeder
Optional high
capacity
feeder
Optional
duplex
unit
Optional
finisher****
✘✓ ✘ ✘✘
✘✓ ✘ ✘✘
✘✓ ✘ ✘✘
✘✓ ✘ ✘✘
✘✓ ✘ ✘✘
✘✓ ✘ ✘✘
✘✓ ✘ ✘✘
✘✓ ✘ ✘✘
✘✓ ✘ ✘✘
Other
Envelope
***
104.8 mm x 210 mm
to 215.9 mm x 355.6
✘✓ ✘ ✘✘
mm
4.125 in. x 8.27 in.
to 8.5 in. x 14 in.)
*
This size setting formats the page or envelope for 297.0 x 1219.2 mm
(11.7 x 48 in.) unless the size is specified by the software application.
**
Measurements apply to simplex (single-sided) printing only. For
duplex (tw o-side d) printing , the m inim um size is 1 39.7 x 210 m m (5.5 0
x 8.27 in.).
***
This size setting formats the page or envelope for 216.0 x 355.6 mm
(8.5 x 14 in.) unless the size is specified by the software application.
****
Finisher bin 1. Only A4 and Letter sizes may be fed to finisher bin 2.
Identifying media sources and specifications
79
Page 80

Media specifications
Media support by type for optional features
Legend
✓ — supported
✘— unsupported
Media
550-sheet
trays
Multipurpose
feeder
Paper ✓✓✓✓✓
Card stock ✓✓✘✘✓
Transparencies ✓✓✘✘✓
Banner ✘✓✘✘✓
Paper labels ✓✓✘✘✓
Envelopes ✘✓✘✘✓
Glossy paper ✓✓ ✘ ✓ ✓
1
Output Banner size paper to Finisher Bin 1 only.
Optional high
capacity
feeder
Optional
duplex
Optional
finisher
1
Media types and weights
Legend
✓ — supported
✘— unsupported
Media
Type
Paper Xerographic or business
paper
(Used for simplex
printing)
1
Xerographic or business
paper
(Used for duple x printing)
Glossy papers Book 88 to 176 g/m2
Cover 162 to 176 g/m2
1
Paper weighing less than 75 g/m2 (20 lb bond) is limited to simplex printing only at less than 60% relative
humidity.
2
This paper weight in any source is not supported for duplex (two-sided) printing.
3
For 60 to 176 g/m2(16 to 47 lb bond) paper, grain long fibers are recommended. For papers heavier than 176 g/
m2 (47 lb bond), grain short is recommended.
4
Pressure sensitive area must enter the printer first.
5
100% cotton content maximum weight is 90.2g/m2 (24 lb) bond.
6
105 g/m2 (28 lb bond) envelopes are limited to 25% cotton content.
Media weight
550-sheet trays Multipurpose feeder
60 to 74.9 g/m2 grain long
(16 to 19.9 lb bond)2
75 to 176 g/m2
grain long
(20 to 47 lb bond)
60 to 74.9 g/m2 grain long
(16 to 19.9 lb bond)2
75 to 176 g/m2
grain long
(20 to 47 lb bond)
88 to 176 g/m2
grain long
(60 to 120 lb book)
grain long
(60 to 120 lb book)
162 to 176 g/m2
grain long
(60 to 65 lb cover)
grain long
(60 to 65 lb cover)
Identifying media sources and specifications
80
Page 81

Media types and weights (continued)
Media specifications
Legend
Media weight
✓ — supported
✘— unsupported
Media
Card stock—maximum
(grain long)
2,3
Type
Index Bristol 163 g/m2 (90 lb) 163 g/m2 (90 lb)
Tag 163 g/m2 (100 lb) 163 g/m2 (100 lb)
550-sheet trays Multipurpose feeder
Cover 176 g/m2 (65 lb) 176 g/m2 (65 lb)
Card stock—maximum
(grain short)
2,3
Index Bristol 199 g/m2 (110 lb) 199 g/m2 (110 lb)
Tag 203 g/m2 (125 lb) 203 g/m2 (125 lb)
Cover 216 g/m2 (80 lb) 216 g/m2 (80 lb)
Transparencies
Labels—maximum
Envelopes
1
Paper weighing less than 75 g/m2 (20 lb bond) is limited to simplex printing only at less than 60% relative
2
2
Laser printer 161 to 192 g/m2
2,4
Paper 180 g/m2
Sulfite, wood-free or up
to 100% cotton bonds
(43 to 51 lb bond)
(43 to 51 lb bond)
199 g/m2
161 to 192 g/m2
(48 lb bond)
(53 lb bond)
Inapplicable 60 to 105 g/m
(16 to 28 lb
5, 6
bond)
2
humidity.
2
This paper weight in any source is not supported for duplex (two-sided) printing.
3
For 60 to 176 g/m2(16 to 47 lb bond) paper, grain long fibers are recommended. For papers heavier than 176 g/
m2 (47 lb bond), grain short is recommended.
4
Pressure sensitive area must enter the printer first.
5
100% cotton content maximum weight is 90.2g/m2 (24 lb) bond.
6
105 g/m2 (28 lb bond) envelopes are limited to 25% cotton content.
Identifying media sources and specifications
81
Page 82

Media specifications
Media capacities
Legend
✓ — supported
✘— unsupported
Multipurpose
Media type
Paper 550 sheets* 100 sheets* 3000 100 1000
Card stock 40 sheets** 11 ✘ 100 ✘
Paper labels 40 11 ✘ 30 ✘
Vinyl labels ✘ 11 ✘ 30 ✘
Transparencies 20 7 ✘ 50 ✘
Envelopes ✘ 10 of Com 10 ✘ 10 ✘
* Based on 20 lb paper.
** 30 sheets of 90 lb card stock or 25 sheets of 110 lb card
stock.
550-sheet tray
feeder
Optional high
capacity
feeder
Optional
finisher bin 1
Optional
finisher bin 2
Tray linking
Tray linking enables the automatic linking feature for trays when the same size and type of media is loaded in multiple
sources. The printer automatically links the trays; when one tray is empty, media feeds from the next linked tray.
For example, if the same size and type of media is loaded in tray 1 and tray 2, the printer selects media from tray 1 until it
becomes empty, and then the printer automatically feeds media from the next linked tray—tray 2.
By linking both trays, a single source with a capacity of 1100 sheets is created.
If the same size media in each tray is loaded, make sure the media is all the same type in order to link the trays.
Once the selected trays are loaded with the same size an d typ e of med ia, sele ct the sam e Paper Type setting in the Paper
Menu for these sour ces.
To disable tray linking, set the Paper Type to a unique value in each one of the trays. If all the trays do not have the same
type of media when they are linked, a job could mistakenly print on the wrong paper type.
Using the duplex function (two-sided printing)
Duplex printing (or two-sided printing) allows printing on both sides of a sheet of paper. Printing on both sides of paper
reduces printing costs.
Tray linking
82
Page 83

Media specifications
For sizes that are acceptable for duplex printing, see Media sizes and support.
Select Duplex from the printer driver to print individual duplex jobs.
Duplex printing on letterhead
When duplex (two-sided) printing on letterhead from the trays, load it with the logo face-up and entering the printer first.
Using Duplex Bind
When Duplex Bind printing is selected in the printer driver or Duplex Bind in the Finishing Menu, either long edge or short
edge binding must be selected, which are the values for this setting. The purpose of Duplex Bind is to define the way
duplexed pages are bound, and how the printing on the back of the sheet (even-numbered pages) is oriented in relation to
the printing on the front (odd-numbered pages).
The two values for Duplex Bind are:
Long Edge*
The asterisk (*)
indicates this is
the factory default
setting.
Short Edge Assumes binding along the short edge of the page (top edge for portrait
Assumes binding along the long end of the page (left edge for portrait orientation
and top edge f or l andscap e orientati on). The f ollo wing ill ustratio n sho ws lo ng-edge
binding for portrait and landscape pages:
Binding
Back of
sheet
Portrait
orientation and left edge for landscape orientation). The following illustration
shows short-edge binding for portrait and landscape pages:
Back of
sheet
Front of
next sheet
Binding
Binding
Back of
sheet
Back of sheet
Front of next
sheet
Binding
Front of
next sheet
Front of
next sheet
Landscape
Portrait
Using the duplex function (two-sided printing)
83
Page 84

Media specifications
Avoiding jams
Use appropriate print media (paper, transparencies, labels, and card stock) to help ensure trouble-free printing. See
Identifying media sources and specifications f or mo re information.
Note: Try a limited sample of any print media you are considering using with the printer before purchasing
large quantities.
By selecting the appropriate print media and loading it properly, you can avoid most jams. See Loading standard trays
and optional trays, Loading the multipurpose feeder, or Loading the high capacity feeder for detailed tray loading
instructions.
The follow i ng hin ts can help you avoid jams :
• Use only recommended print media.
• Do not overload the print media sources. Make sure the stack height does not exceed the maximum height
indicated by the stack line on the labels in the sources.
• Do not load wrinkled, creased, damp, or curled print media.
• Flex, fan, and straighten print media before you load it. If jams do occur with print media, try feeding one sheet at
a time through the multipurpose feeder.
• Do not use print media that you have cut or trimmed yourself.
• Do not mix print media sizes, weights, or types in the same print media source.
• Make sure the recommended print side is loaded in the source according to your simplex or duplex needs.
• Keep print media stored in an acceptable environment. See Storing media.
• Do not remove trays during a print job.
• Push all trays in firmly after loading them.
Make sure the guide s in the tr a ys a re properly pos ition ed f o r the siz e of print me dia y ou ha v e loaded . Make sure the gu ides
are not placed too tightly against the stack of print media.
Avoiding jams
84
Page 85

7
Maintaining the printer
Periodically, you need to complete certain tasks to maintain optimum print quality. These tasks are covered in this chapter.
If several people are using the printer, you may want to designate a key operator to do the setup and maintenance of your
printer. Refer printing problems and maintenance tasks to this key operator.
In the U .S ., c ontact Lexmark at 1-800-539-6275 f or i nformation about Lexm ark A uth oriz ed Sup plies D eale rs in y our area. In
other countries or regions, visit the Lexmark Web site at www.lexmark.com or contact the place where you bought your
printer.
Storing supplies
Choose a cool, c le an sto r age area for your prin ter su ppl ies. Store supplies right s ide up in th eir original packaging un til you
are ready to use them.
Do not expose supplies to:
• Direct sunlight
• Temperatures above 35°C (95°F)
• High humidity (above 80%)
• Salty air
• Corrosive gases
• Heavy dust
Maintaining the printer
85
Page 86

Maintaining the printer
Determining the status of supplies
The printer operator panel alerts you once a supply item or maintenance is required. You can also view the status of
supplies in your printe r on the oper ator pan el unle ss the pri nter is printing or in a busy state. The header or gr a y area at the
top of the displa y w ill in dicat e the printer is Ready and le ts y ou kn ow if an y tr a ys ar e lo w. Selecting Status / Supplies on
the display will open the Status / Supplies screen where you ca n view the status of the various trays and open the
supplies screen to view the current status of your toner cartridge.
Ready. Tray 1 Low, Tray 2 Low…
Status / Supplies
Held jobs
Status / Supplies
View supplies
Ready
Tray 1Low
View supplies
CMYK
Cyan Toner: OK
Magenta Toner : OK
Conserving supplies
Several settings in your application software or on the display let you conserve toner and paper. For more information on
changing these settings, see the Menus and Messages Guide.
Supply Menu selection item What the setting does
Toner Toner Darkness in the
Color toner
and color
photodevelopers
Defaults
Black Only Print Mode in the
Defaults Æ Quality Menu
Æ Quality Menu
Lets you adjust th e l e v el of toner releas ed on a sheet of p rint media . The
values range from 1 (lightest setting) to 5 (darkestsetting).
Prints black only to conserve your color print supplies.
Color toner Color Saver in the Defaults
Print media Multipage Print in the
Quality Menu
Defaults
Duplex in the Defaults Æ
Finishing Menu
Use your software application
or printer driver to send a
V erify Print job.
Æ Finishing Menu
Æ
Prints colors less vividly to conse rve your color toner.
Causes the printer to print the two or more page images on one si de of a
sheet. Values for Multipage Print are 2 Up, 3 Up, 4 Up, 6 Up, 9 Up, 12
Up, and 16 Up. Combined with the duplex setting, Multipage Print lets
you print up to 32 pages on one sheet of paper (16 images on the front
and 16 on the back).
Duplex printing is available when you attach the optional duplex unit. It
lets you print on both sides of a sheet of paper.
Lets you examine the first copy of a multiple-copy job to be sure it is
satisfactory before you print the other copies. If the job is unsatisfactory,
you can cancel the job.
See Printing and deleting held jobs for more information about a
Verify Print job.
Determining the status of supplies
86
Page 87

Maintaining the printer
Ordering supplies
To order supplies in the U.S., contact Lexmark at 1-800-539-6275 for information about Lexmark Authorized Supplies
Dealers in your area. In other countries or regions, visit the Lexmark Web site at www.lexmark.com or contact the place
where you bought your printer.
Ordering a toner cartridge
When the [color] Low message appears, y ou shoul d orde r a ne w print c artridge. You can print a f e w hundred page s afte r
the [color] Low message comes on. You need to have a new cartridge available when the current one no longer prints
satisfactorily.
Note: Be sure to shake your new print cartridge before installing it into the printer to maximize its yield.
The recommended print cartridges specifically designed for your printer are:
Part number Description Average yield
C9202CH Cyan toner cartridge 14,000 pages
C9202MH Magenta toner cartr idge 14,000 pages
C9202YH Yellow toner cartridge 14,000 pages
C9202KH Black toner cartridge 15,000 pages
1
At approximately 5% coverage.
When the message Rep lace Bla c k Toner and Oil C oating Roll ap pears, th e b lac k cartridge is empty. Replace both th e b lac k
toner cartridge and the oil coating roll. Order Lexmark part number C92035X to replace the oil coating roll.
1
Fuser and transfer belt
Order a fuser or a transfer belt when Fuser Life Warning or Transfer Belt Life Warning appears on the display.
Replace the item s w hen Re place Fuser or Replace Transfer Belt appear . E ach k it c ontain s all the items nece ssary to
replace either the transfer belt or the fuser. See the following table for the maintenance kit part number for your specific
printer.
Maintenance items Part numbers
Transfer belt 0040X1251
Fuser 56P2650 (1 10 V)
56P2651 (220 V)
Ordering a black photodeveloper or color photodevelopers
We recommend ordering new photodevelopers when Black Photo Dev Life Warning or Color Photo Dev Life
Warning appears on the display.
Note: When replacing color photodevelopers, it is important to replace all four color photodevelopers at
once.
Order Lexmark part number C92030X for black or C92034X for color photodevelopers.
Ordering supplies
87
Page 88

Maintaining the printer
Finisher
For inf ormation on finisher maintenance and ordering fi nis he r sup pli es, see the Finisher Setup and Users Gu ide that came
with your finisher.
Cleaning the LEDs
If you are experiencing print quality problems such as voids, light streaks, or light print, you may need to clean the LEDs
inside the top cover.
1 Open the top cover.
a Open the front door.
b Rotate the top cover locking lever to the left.
Cleaning the LEDs
88
Page 89

Maintaining the printer
c Push up on the right top cover locking button and at the lift points shown below.
d Lift the top cover until it stops.
Cleaning the LEDs
89
Page 90

Maintaining the printer
2 Remove and re-insert each photodeveloper.
Warning: Exposing the photodev elopers to light f or prolonged periods of time can damage it. Do not expo se the
photodevelopers to light for more than ten minutes. Fingerprints can affect the performance of the
photodevelopers. Avoid touching the photodevelopers anywhere except the handles.
a Open the waste toner arm.
b Remove the photodeveloper completely, and then re-insert it.
Cleaning the LEDs
90
Page 91

c Close the waste toner arm.
Maintaining the printer
d Repeat steps a through c for each pho todeveloper.
Removing and re-inserting the photodevelopers sufficiently cleans the LEDs in most cases. If the problem
persists, continue with step 3.
Cleaning the LEDs
91
Page 92

Maintaining the printer
3 Remove all photodevelopers and toner cartridges.
Warning: Exposing the photodev elopers to light f or prolonged periods of time can damage it. Do not expo se the
photodevelopers to light for more than ten minutes. Fingerprints can affect the performance of the
photodevelopers. Avoid touching the photodevelopers anywhere except the handles.
Warning: The toner inside the toner cartridges can soil clothing. Do not clean clothing soiled with toner in hot
water; this permanently adheres the toner to the clothing. Use cold water to remove toner that has
soiled clothing.
4 Wipe the glass lenses of all four LED heads with a clean, dry cloth or tissue paper.
Cleaning the LEDs
92
Page 93

Maintaining the printer
5 Reinstall all toner cartridges.
CAUTION: Before closing the top cover, make sure everyone is away from the printer and the area under the
cover is free of hands, clothing, and other items.
6 Close the top cover and the front door.
Closing the top cover
CAUTION: Before closing the top cover make, sure everyone is away from the printer and the area under the
cover is free of hands, clothing, and other items.
1 Place both hands on the top cover as shown.
2 Press down firmly until the top cover clicks into place.
Closing the top cover
93
Page 94

Maintaining the printer
3 Rotate the top cover locking lever to the right.
Note: If you cannot rotate the lock ing le ver , the c ov er is not fully close d. Open the top co ver a nd press do wn
firmly until the top cover clicks into place.
4 Close the front door.
CAUTION: An optional drawer weighs 18.5 kg (40.8 Ib.). Have someone help when lifting.
Closing the top cover
94
Page 95

8
Clearing jams
By carefully selecting print media and loading it properly, you should be able to avoid most paper jams. For more
information on avoiding paper jams, see Avoiding jams. If jams do occur, follow the steps outlined in this section.
To resolve the paper jam messages, you must clear the entire paper path and then press to clear the message and
resume printing. The printer prints a new copy of the page that jammed if Jam Recovery is set to On or Auto; however, the
Auto setting does not guarantee the page will print.
Identifying jams
When the printer jams, the appropriate jam message will be displayed on the printer operator panel. If you select Show
Areas on the operator panel, you can view one or more images to help you clear the jam.
200 Paper Jam,
3 pages jammed
Continue
Show areas A, C, MPF
Show A
Show C
Show MPF
Show areas
1. Remove print
media; adjust
width guides.
See the diagram on page 96 for an overview of the paper path and areas where jams may occur. The path varies
depending on the paper source and outpu t bins.
Clearing jams
95
Page 96

Clearing jams
Identifying jam areas
The follo wing il lustr at ion sho w s the p ath that p rint media t ra v els through the prin ter. The path varies depending on the input
sources you are using.
200 Paper Jam
Check Area I
200 Paper Jam
Check Area G
200 Paper Jam
Check Area D
200 Paper Jam
Check Areas A,B
250 Paper Jam
200 Paper Jam
Check Areas C
200 Paper Jam
Check Area F
249 Paper Jam
T 1
200 Paper Jam
Check Area H
T 2
T 3
T 4
241 Paper Jam
242 Paper Jam
243 Paper Jam
244 Paper Jam
T 3/T 5
(depending on
configuration)
200 Paper Jam
Check Area E
Identifying jam areas
96
Page 97

Clearing jams
Understanding jam messages
The following table lists the jam messages that can occur and the action necessary to clear the message. The jam
message indicates the area where the jam occurred. However, it is best to clear the entire paper path to ensure you have
cleared all possible jams.
200 Paper Jam <x> Pages Jammed (Check Areas A-F, T1-5,
MPF)
This message identifies the areas (A–F, MPF, or T1–T5) you need to check to remove the paper or to clear the message.
The display alternates between 200 Paper Jam <x> Pages Jammed and Check Areas A-F ., T1-5, MPF:
Jam message Jam message
Check Area A Check Area G
Check Area B Check Area H
Check Area C Check Area I
Check Area D Check MP Feeder
Check Area E Check tray [x]
(with
241-244 Paper J am message )
Check Area F Check tray [x]
(with 249 Paper Jam message)
Note: If there is a paper j am when y ou turn the prin ter on, t he secon d line of the 200 Paper Jam me ssag e
is blank. To resolve the message, you must clear all paper from the paper path.
Understanding jam messages
97
Page 98

Clearing jams
Check Area A
This message indicates a paper jam in the transfer belt area. To clear area A:
1 Complete the steps to open the top cover.
Note: If you need instructions on how to open the top cover, see Open the top cover.
Photodeveloper
Warning: Never touch the photodeveloper drum on the underside of the toner cartridge.
Note: The paper may be covered with unfused toner, which can stain garments.
200 Paper Jam <x> Pages Jammed (Check Areas A-F, T1-5, MPF)
98
Page 99

Clearing jams
2 Remove any paper on the transfer belt.
If the paper source w as the mult ipurpose f ee der, check the area between the mul tipurpose feeder and the tran sf er
belt.
Transfer belt
Warning: Do not use any pointed objects to remove the paper. This could cause permanent damage to the
transfer belt.
Note: If banner paper is jammed in the fuser area, continue with step 2 of the topic “Check Area B”. If
banner paper is jammed in the transfer belt area but has not entered the fuser, remove the jam by
rolling up the paper from inside the printer until the entire banner sheet is free.
3 Check the fuser area and top cover for additional jams.
If there is no jam in the fuser area or top co ver, close the top c o ver and front door, and then press . If a jam is
present, continue with step 2 of the topic “Check Area B”.
Note: If you need instructions on how to close the top cover, see Closing the top cover.
200 Paper Jam <x> Pages Jammed (Check Areas A-F, T1-5, MPF)
99
Page 100

Clearing jams
Check Area B
This message indicates a paper jam in the fuser or output roller area. To clear area B:
1 Complete the steps to open the top cover.
Note: If you need instructions on how to open the top cover, see Open the top cover.
Photodeveloper
Warning: Never touch the photodeveloper drum on the underside of the toner cartridge.
The paper may be covered with unfused toner, which can stain garments.
200 Paper Jam <x> Pages Jammed (Check Areas A-F, T1-5, MPF)
100
 Loading...