

Page 1
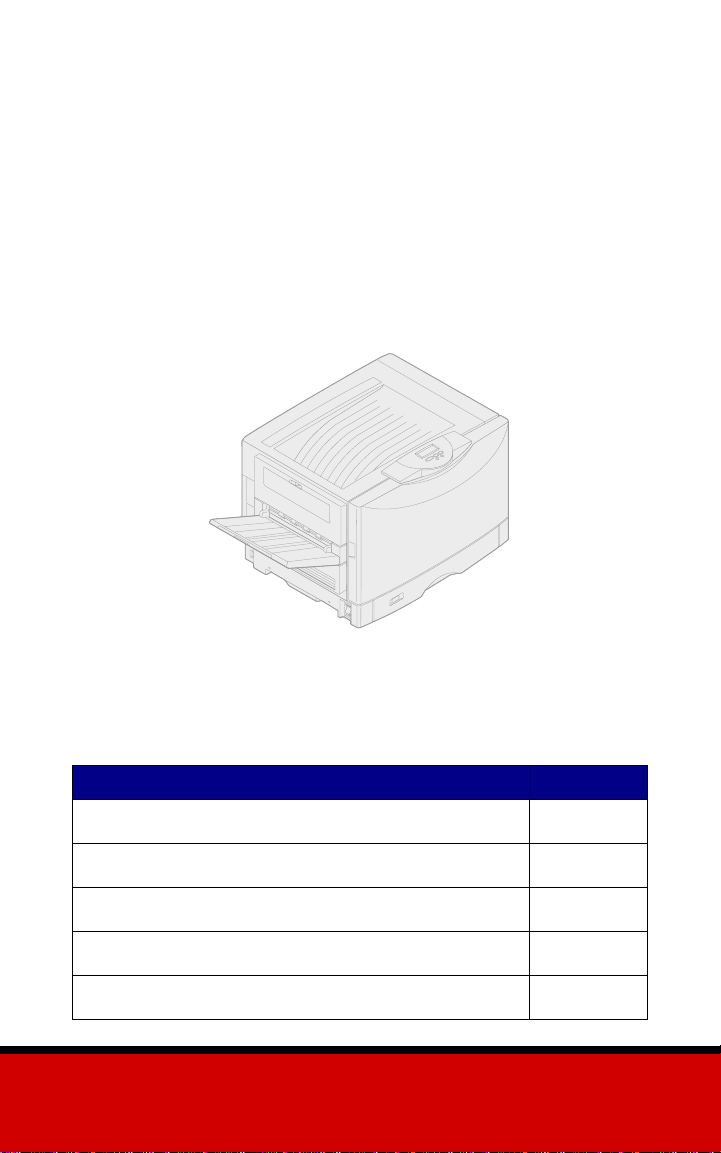
Lexmark™ C910
Quick Reference
Topic Page
Printer menu o verview 1
Using the operator panel 2
Understanding printer messages 6
Loading paper 8
Locating and clearing paper jams 17
www.lexmark.com
Page 2

Edition: October 2001
The following paragraph does not apply to any country where such provisions are
inconsistent with local law: LEXMARK INTERNATIONAL, INC., PROVIDES THIS
PUBLICATION “AS IS” WITHOUT WARRANTY OF ANY KIND, EITHER EXPRESS OR
IMPLIED, INCLUDING, BUT NOT LIMITED TO, THE IMPLIED WARRANTIES OF
MERCHANTABILITY OR FITNESS FOR A PARTICULAR PURPOSE. Some states do not
allow disclaimer of express or implied warranties in certain transactions; therefore, this
statement may not apply to you.
This publication could include technical inaccuracies or typographical errors. Changes are
periodically made to the information herein; these changes will be incorporated in later
editions. Improvements or changes in the products or the programs described may be made
at any time.
Comments about this publication may be addressed to Lexmark International, Inc.,
Department F95/032-2, 740 West New Circle Road, Lexington, Kentucky 40550, U.S.A. In the
United Kingdom and Eire, send to Lexmark International Ltd., Marketing and Services
Department, Westhorpe House, Westhorpe, Marlow Bucks SL7 3RQ. Lexmark may use or
distribute any of the information you supply in any way it believ es appropriate without incurring
any obligation to you. You can purchase additional copies of publications related to this
product by calling 1-800-553-9727. In the United Kingdom and Eire, call 0628-481500. In
other countries, contact your point of purchase.
References in this publication to products, programs, or services do not imply that the
manufacturer intends to make these available in all countries in which it operates. Any
reference to a product, program, or service is not intended to state or imply that only that
product, program, or service may be used. Any functionally equivalent product, program, or
service that does not infringe any existing intellectual property right may be used instead.
Evaluation and verification of operation in conjunction with other products, programs, or
services, except those expressly designated by the manufacturer, are the user’s responsibility.
Lexmark and Lexmark with diamond design, MarkNet, and MarkVision are trademarks of
Lexmark International, Inc., registered in the United States and/or other countries.
ImageQuick is a trademark of Lexmark International, Inc.
PostScript® is a registered trademark of Adobe Systems Incorporated. PostScript 3 is Adobe
Systems’ designation of a set of printer commands (language) and functions included in its
software products. This printer is intended to be compatible with the PostScript 3 language.
This means the printer recognizes PostScript 3 commands used in various application
programs, and that the printer emulates the functions corresponding to the commands.
© Copyright 2001 Lexmark International, Inc.
All rights reserved.
UNITED STATES GOVERNMENT RESTRICTED RIGHTS
This software and documentation are provided with RESTRICTED RIGHTS. Use, duplication
or disclosure by the Government is subject to restrictions as set forth in subparagraph (c)(1)(ii)
of the Rights in Technical Data and Computer Software clause at DFARS 252.227-7013 and
in applicable FAR provisions: Lexmark International, Inc., Lexington, KY 40550.
ii
Page 3
Printer menu overview
Finishing Menu
Duplex
Duplex Bind
Copies
Blank Pages
Collation
Separator Sheets
Separator Source
Multipage Print
Multipage Order
Multipage View
Multipage Border
Netwo rk Menu
PCL SmartSwitch
PS SmartSwitch
MAC Binary PS
NPA Mode
Network Buffer
Job Buffering
Network <x> Setup
Std Net Setup
PCL Emul Menu
Font Source
Font Name
Poi nt S ize
Pitch
Symbol Set
Orientation
Lines per Page
A4 Width
Auto CR after LF
Auto LF after CR
Tray Renumber
Serial Menu
PCL SmartSwitch
PS SmartSwitch
NPA Mode
Serial Buffer
Job Buffering
RS-232/RS-422
RS-422 Polarity
Serial Protocol
Robust XON
Baud
Data Bits
Parity
Honor DSR
PostScript Menu
Print PS Error
Font Priority
Image Smoothing
Job Menu
Reset Printer
Cancel Fax
Confidential Job
Held Jobs
LocalTalk Menu
LocalT alk Port
PCL SmartSwitch
PS SmartSwitch
NPA Mode
LocalTalk Buffer
Job Buffering
NPA Hosts
LocalT alk Name
LocalT alk Addr
LocalT alk Zone
Parallel Menu
PCL SmartSwitch
PS SmartSwitch
MAC Binary PS
NPA Mode
Parallel Buffer
Job Buffering
Advanced Status
Protocol
Honor Init
Parallel Mode 1
Parallel Mode 2
Setup Menu
Printer Language
Printer Usage
Power Saver
Resource Save
Download Target
Print Timeout
Auto Continue
Wait Timeout
Jam Recovery
Page Protect
Display Language
Alarm Control
Job Accounting
Job Acct Limit
Color Menu
Color Correction
Manual Color
Print Mode
Toner Darkness
Paper Menu
Paper Source
Paper Size
Paper Type
Custom Types
Output Bin
Configure Bins
Overflow Bin
Assign Type/Bin
Substitute Size
Configure MP
Paper Weight
Paper Loading
Universal Setup
Infrared Menu
Infrared Port
PCL SmartSwitch
PS SmartSwitch
NPA Mode
Infrared Buffer
Job Buffering
Window Size
Transmit Delay
Max Baud Rate
USB Menu
PCL SmartSwitch
PS SmartSwitch
MAC Binary PS
NPA Mode
USB Buffer
Job Buffering
Utilities Menu
Color Samples
Print Demo
Print Menus
Print Net <x> Setup
Print Fonts
Print Directory
Factory Defaults
Format Flash
Defragment Flash
Format Disk
Job Acct Stat
Hex Trace
Supplies Menu
Black Photo Dev
Color Photo Dev
<color> Toner
Supplies Life
1
Page 4

Using the operator panel
Press Menu to:
• Enter the menus from the
Ready state.
• Scroll through menus or
1
Menu
2
Select
Go
3
5
Return
Stop
4
6
values.
• Increase or decrease a
numerical value.
• Display the Jo b Menu or
the Supplies Menu while
the printer is busy.
Press Select to:
• Select the item on the
second line of the
display.
• Save the selection as a
new default setting.
Press Return to back up to the
previous menu level.
Press Stop to temporarily stop
all print activity without losing
data.
Press Go to:
• Exit the menus and
return to the Ready
state.
• Clear messages.
2
Page 5

Canceling a print job
To cancel a p rint job aft e r it ha s
started printing:
1 Press Menu until you see
2 Press Menu unti l y o u see
Printing a menu settings page
To verify Paper Size and Paper
Type settings, and check
installed options and memory,
print a menu settings page:
1 Press Menu until you see
2 Press Menu until you see
Job Menu, and then
Select.
press
Cancel Job, and then
Select.
press
Utilities Menu, and then
Select.
press
Print Menus, and then
Select. The menu
press
settings page prints.
Printing confidential jobs
If you want to print a job that is
personal or confidential, and
you do not want anyone else to
see it, the printer can hold your
job in memory until you arrive at
the printer.
3
Page 6

To a print confidential job:
Note: Confidential printing
only works with Lexmark
C910 custom printe r dr ivers.
These driv ers ar e lo ca t e d on
the drivers CD that shipped
with your printer and on the
Web at www.lexmark.com.
Note: If you send a large file
to a shared network printer, it
remains in the printer
memory until you print it.
This could prevent others
from printing. Retrieve your
print jobs as soon as
possible. To check the
amount of memory in your
printer, see “Printing a menu
settings page” on page 3.
1 In your word processor,
spreadsheet, browser, or
other application, select
Print.
File
2 Click Properties (or
Options, Printer, or
Setup, depending on the
application) to view the
printer driver settings.
3 Click Help and refer to
the topic confidential
print or print and hold.
Follow the instructions.
4 Go to the printer and use
the operator panel to
retrieve your confidential
print job:
a Press Menu until you
see Confidential Job,
and then press
Select.
b Press Menu until you
see your user name,
and then press
Select.
c Enter your four-digit
personal identification
number (PIN) using
the numb ered butt ons
on the operator panel.
As you enter your
PIN, asterisks appear
on the display.
d Press Menu until you
see Print A Job, and
then press
Select.
4
Page 7

(Print All Jobs sends
all jobs with the same
user name and PIN
immediately to the
printer.)
e Press Menu until you
see the job you want
to print, and then
Select.
press
f Press Go to send the
job to the printer.
After the job prints, it is deleted
from printer memory and the
printer returns to the Ready
state.
5
Page 8

Understanding printer messages
The following table lists some typical operator panel messages
you may encounter and the action you can take to clear them. For
more information on these or other printer messages, refer to the
Lexmark C910 Publications CD.
Message Action
37 Insufficient Memory
The printer memory isn’t
sufficient and cannot
continue processing print
jobs.
38 Memory Full
The printer is processing
data, but the memo ry used to
store pages is full.
39 Complex Page
The page may not print
correctly because the print
information on the page is
too complex.
80 Fuser Exhausted
It is time for you to replace
the fuser.
• Press Go to clear the message. The
printer deletes held jobs until there
is enough printer memory to
process the current job.
• Press Stop to clear the message
without deleting any held jobs. The
current job may not print correctly.
• Press Menu to open the Job Menu,
and then press Select to cancel the
current job.
Note: The messages 37
Insufficient Memory and Held
Jobs may be lost alternate on the
display.
• Press Go to clear the message and
continue printing the job. The job
may not print c orrectly.
• Press Menu to open the Job Menu,
and then press Select to cancel the
current job.
• Press Go to clear the message and
continue printing the job. The job
may not print c orrectly.
• Press Menu to open the Job Menu,
and then press Select to cancel the
current job.
• Press Go to clear the message.
• Install a new fuser.
Note: If the front door is opened and
closed, the message Did you
replace fuser? appears. If a new
fuser has not been installed, press
Stop. If a ne w fuse r has be en insta lled,
press Go.
6
Page 9

Message Action
81 Transfer Belt
Exhausted
It is time to replace the
transfer belt.
84 <color> PC Life
Warning
It is time to replace one or
more specified
photodevelopers.
85 Coating Roll Life
Warning
It is time to replace the oil
coating roll.
88 <color> Toner Low
It is time to replace one or
more toner cartridges.
• Press Go to clear the message.
• Install a new transfer belt.
Note: If the front door is opened and
closed, the message Did you
replace transfer belt? appears. If
a new transfer belt h as not been
installed, press Stop. If a new transfer
belt has been installed, press Go.
• Press Go to clear the message.
• Install a new <color>
photodeveloper.
• Press Go to clear the message.
• Install a new oil coating roll
Note: When the life of the coating roll
has expired, 85 Coating Roll
Exhausted appears. You must re place
the coating roll to continue printing.
• Press Go to clear the message.
• Install a ne w < color> toner ca rtridge.
Note: When the life of the toner
cartridge has expired, the display
alternates between the 88 <color>
Toner Empty and Open Cover
Replace <color> messages. You
must replace the toner cartridge to
continue printing.
900-999 Service Message
Messages 900–999 relate to
printer problems that may
require service.
Turn the printer off and check all cable
connections. Turn the printer back on.
If the service message recurs, call for
service and report the message
number and descript ion of the prob lem .
7
Page 10
Loading paper
Paper source Page
Loading a 550-sheet tray 9
Loading the multipurpose feeder 11
Loading the high capacity feeder 13
Your printer supports a wide
variety of paper types, sizes,
and weights. The standard tray
(tray 1) and optional trays 2, 3,
and 4 are marked with stack
height letters A, B, C. The
optional heavy media tray is
marked with stack height letters
D, E, and F.
The following table lists
recommended media, weights,
and the stack height guide to
use when loading the paper
trays..
Stack
height
letter Recommended media
A Lexmark Glossy Paper
Letter (P/N 12A5950), A4 (P/N 12A5951)
B 11x17, Legal, B4, A3 (90–105 g/m2, 24–28 lb bond)
C • Letter, A4 (60–105 g/m2, 16–28 lb bond)
• 11x17, Legal, B4, A3 (60 - 90 g/m2, 16 - 24 lb bond)
D Lexmark Transparency
Letter (P/N 12A5940), A4 (P/N 12A5941)
*
Lexmark Glossy Paper is 120 g/m2, 80 lb. book, 32 lb bond.
**
Lexmark Transparency weight is 120 g/m2.
*
:
**
:
8
Page 11
Stack
height
letter Recommended media
E • Lexmark Glossy Paper
F Letter, A4 (105 - 128 g/m
*
Lexmark Glossy Paper is 120 g/m2, 80 lb. book, 32 lb bond.
**
Lexmark Transparency weight is 120 g/m2.
Letter (P/N 12A5950), A4 (P/N 12A5951)
• Cardstock: Letter, A4 (128–163 g/m2, 90 lb. index)
• Paper Labels: Letter, A4 (up to 180 g/m
A
2
, 28–34 lb. bond)
2
, 48 lb. bond)
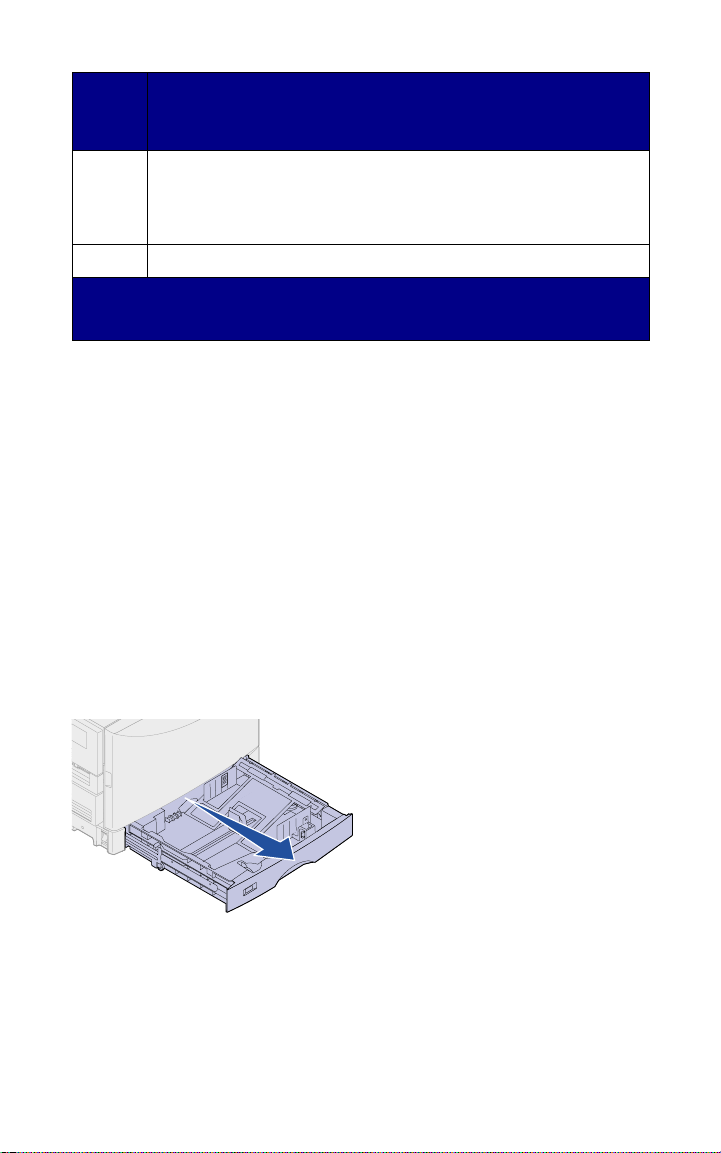
Loading a 550-sheet tray
Note: If you are loading an
optional heavy media paper
tray, make sure the paper
size and type are set for print
media you are loading. Refer
to your Setup Guide or the
Lexmark C910
Publications CD for
instructions on setting the
paper size or paper type.
1 Pull the paper tray out
until it stops.
9
Page 12
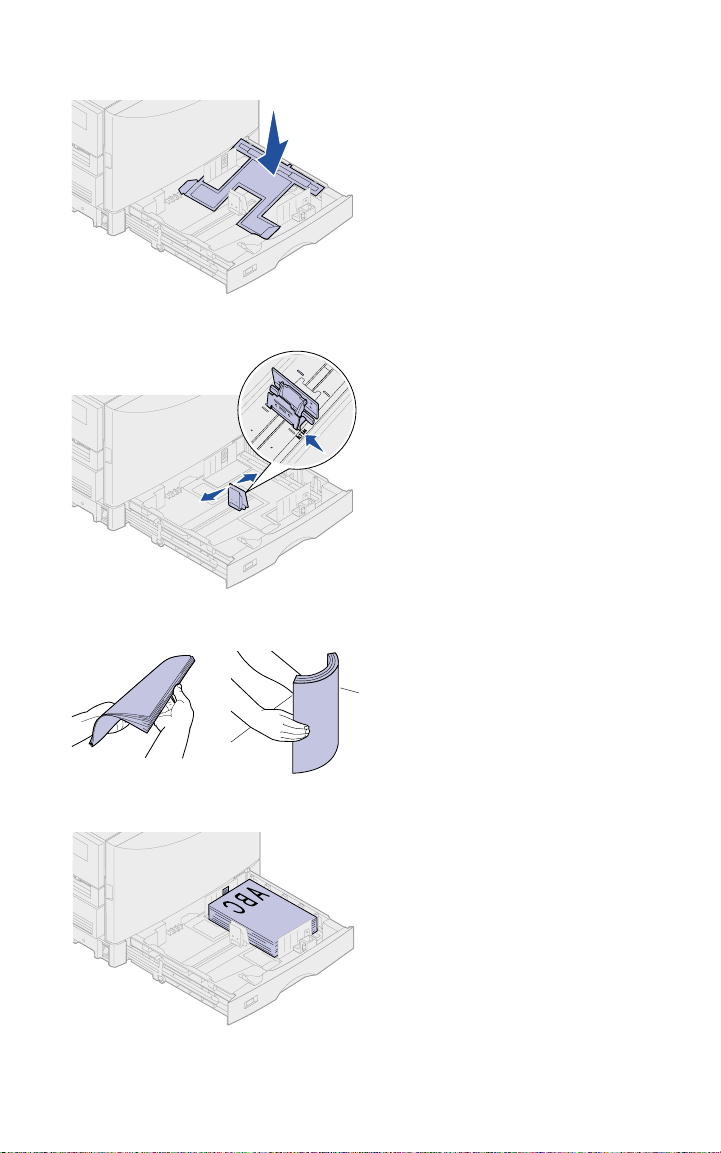
2 Press the metal plate
down until it locks.
3 Squeeze the left guide
and slide it to the position
for the size paper you are
loading.
The position of the left
paper guide tells the
printer the size of the
paper in the tray.
4 Release the paper guide.
5 Flex the sheets back and
forth to loosen them, and
then fan them.
10
6 Place the paper in the
tray, print side down.
Page 13

7 Squeeze the front paper
guide lever and slide the
guide until it lightly
touches the stack of
paper.
8 Rotate the paper size
dial until you see the
correct size of paper
indicated in the window.
9 Push in the tray
completely.
Loading the multipurpose feeder
Warning! Feeding more than
a single sheet of glossy
paper may damage the fuser.
You can load up to 100 sheets
of plain paper in the
multipurpose feeder.
11
Page 14

1 Open and extend the
multipurpose feeder.
2 Slide the paper guides to
the correct position for
the size paper you are
loading.
3 Press the paper feed
plate down until it locks
into place.
12
4 Flex the sheets back and
forth to loosen them, and
then fan them.
Page 15

5 Place the paper print
side up between the
paper guides.
6 Move the SET button to
the left to unlock the tray.
Loading the high capacity feeder
Note: Load only plain paper
in the high capacity feeder.
You can load up to 3,000 sheets
of plain paper in the optional
high capacity feeder.
13
Page 16

1 Open the high capacity
feeder top cover.
2 Check the position of the
paper guides.
If the paper guide arrows
are correctly aligned to
the size paper you are
loading, go to step 6 on
page 15. If not, continue
with step 3 on page 14.
3 Loosen the left and right
paper guide
thumbscrews.
14
4 Slide the guides left or
right to the correct
position for the size
paper you are loading
(A4 or Letter).
5 Tighten the left and right
paper guide
thumbscrews.
Page 17

If there is only a
Note:
partial stack of paper in
the tray, the paper low
sensor will not allow the
tray to go down. Add more
paper to lower the tray.
6 Flex the sheets back and
forth to loosen them, and
then fan them.
7 Place the paper against
the paper guides, with
the print side up.
8 Press the Paper Tray
button.
The paper tray lowers so
you can load another 500
sheets of paper.
9 Repeat steps 7 and 8
until you have loaded the
desired quantity.
15
Page 18

10 Close the top cover.
16
Page 19

Locating and clearing paper jams
200 Paper Jam
Check Areas A,B
T 1
240 Paper Jam
200 Paper Jam
Check Area C
200 Paper Jam
Check Area F
249 Paper Jam
T 2
T 3
T 4
200 Paper Jam
Check Area D
241 Paper Jam
242 Paper Jam
243 Paper Jam
244 Paper Jam
Paper source Page
200 Paper Jam <x>Pages Jammed
(Check Areas A–F, T 1–5, MPF)
240 Paper Jam Check MP Feeder 30
T 5
200 Paper Jam
Check Area E
18
241–244 Paper Jam Check Tray 1–433
249 Paper Jam Check Tray 5 35
17
Page 20

200 Paper Jam <x> Pages Jammed (Check Areas A–F, T1–5, MPF)
This message identifies the
areas (
you need to check to remove
the paper or to clear the
message. To clear these areas:
Jam message Page
Check Areas A, B 18
Check Area C 24
Check Area D 24
Check Area E 27
Check Area F 29
Check MPF 30
Check T1
Check T5 35
–T4 33
Check Areas A, B
A–F, MPF, or T1–T5)
18
This message indicates a paper
jam in the transfer belt, fuser, or
output roller area. To clear
areas A–B:
1 Open the front door.
Page 21

Lifting points
Right top cover latch
and lifting point
2 Rotate the top cover
locking lever to the left.
3 Place both hands on the
lifting points and
squeeze the right top
cover latch.
4 Lift the cover.
19
Page 22

Warning! Do not use pointed
objects to remove the paper.
They may damage the
transfer belt.
Note: The paper may be
covered with unfused toner,
which can stain garments.
Transfer belt
5 Remove any paper on
the transfer belt.
If the paper source was
the multipurpose feeder,
check the area between
the multipurpose feeder
and the transfer belt.
6 Check the fuser area and
top cover for additional
jams.
If there is no jammed
paper in the fuser area or
top cover, go to step 12
on page 22. If jammed
paper is present,
continue with step 7 on
page 20.
20
Transfer belt
Release lever
7 Lift the fuser pressure
release lever.
Page 23

Note: The top cover will not
close until the lever is in the
down position.
8 Slowly pull the paper out
of the fuser toward the
inside of the printer.
9 Rotate the fuser
pressure release lever
down.
10 Check the top cover for
additional jams.
If there is no jammed
paper in the top cover, go
to step 12 on page 22.
11 Remov e the jam from the
top cover.
21
Page 24

12 Place both your hands
on the top cover as
shown.
13 Press down firmly until
the top cover clicks into
place.
14 Rotate the top cover
locking lever to the right.
If you cannot rotate the
locking lever , the cover is
not fully closed.
15 Open the jam access
door on the left side of
the printer.
22
16 Remo ve any paper
inside the printer.
Page 25

17 Close the jam access
door.
To prevent additional
paper jams, make sure
both sides of the door
are closed.
18 Close the front door.
19 Press Go.
If the paper jam
message continues,
check and clear all paper
from the paper path.
23
Page 26

Check Area C
This message indicates a paper
jam in the duplex unit area by
the access door. To clear
area C:
1 Open the duplex jam
access door on the right
side of the printer.
2 Remove the jam.
3 Press Go.
If the paper jam
message continues,
check and clear all paper
from the paper path.
Check Area D
24
This message indicates a paper
jam in the duplex unit area. To
clear area D:
1 Open the duplex jam
access door on the right
side of the printer.
Page 27

2 Gently pull out the duplex
unit.
3 Turn the paper
forwarding dial
counterclockwise.
If the paper advances out
of the duplex unit,
remove the jam and go to
step 7 on page 26. If the
paper does not advance,
go to step 4 on page 25.
4 Open the duplex unit
covers.
5 Remove the jam.
25
Page 28

6 Close the duplex unit
covers.
7 Push the duplex unit in
until it stops.
8 Close the duplex jam
access door.
9 Press Go.
If the paper jam
message continues,
check and clear all paper
from the paper path.
26
Page 29

Check Area E
Note: If you have a high
capacity feeder, pull the
feeder away from the printer.
This message indicates a paper
jam in the top, middle, or
bottom optional drawer paper
path area. To clear area E:
1 Open the jam access
door on the top optional
drawer.
2 Remove the jam.
3 Close the jam access
door.
4 Open the jam access
door on the middle
optional drawer.
27
Page 30

5 Remove the jam.
6 Close the jam access
door.
7 Open the jam access
door on the bottom
optional drawer.
8 Remove the jam.
9 Close the jam access
door.
10 Press Go.
28
If the paper jam
message continues,
check and clear all paper
from the paper path.
Page 31

Check Area F
1 Pull the high capacity
feeder away from the
printer.
2 Open the jam access
door on the top optional
drawer.
3 Remove any jam.
4 Close the jam access
door.
29
Page 32

5 Slide the high capacity
feeder until the feeder
locks to the docking
frame.
When the feeder is in the
correct position, you hear
a click.
6 Press Go.
If the paper jam
message continues,
check and clear all paper
from the paper path.
240 Paper Jam Check MP Feeder
1 Slowly pull the jam
straight out of the
multipurpose feeder.
If the paper will not come
out, proceed with step 2.
30
2 Open the front door.
Page 33

Lifting points
Right top cover latch
and lifting point
3 Rotate the top cover
locking lever to the left.
4 Place both hands on the
lifting points and
squeeze the right top
cover latch.
5 Lift the cover.
31
Page 34

Warning! Do not use pointed
objects to remove the paper.
They may damage the
transfer belt.
Transfer belt
6 Remove the paper on the
transfer belt.
7 Place both your hands
on the top cover as
shown.
8 Press down firmly until
the top cover clicks into
place.
32
9 Rotate the top cover
locking lever to the right.
If you cannot rotate the
locking lever , the cover is
not fully closed.
Page 35

10 Close the front door.
11 Press Go.
241–244 Paper Jam Check Tray 1–4
Note: Although tray 1 is
shown, you can use the
same procedure to clear any
241–244 or Check
of the
Tray 1–4
messages.
Paper jam messages
Check Tray 1–4 indicate a
and
jam in one of the paper trays.
(See the illustration on page 17
for tray numbering.) To remove
the jam:
241–244
1 If you have a high
capacity feeder, pull the
feeder away from the
printer.
2 Open the jam access
door for the paper tray
indicated on the display.
3 Remove the jam.
4 Close the jam access
door.
33
Page 36

5 Pull out the paper tray
indicated on the display.
6 Remove any wrinkled or
creased paper.
7 Push down on the
remaining paper in the
tray until the bottom plate
clicks into place.
34
8 Close the paper tray.
9 Press Go.
If the paper jam
message continues,
check and clear all paper
from the paper path.
Page 37

249 Paper Jam Check Tray 5
Note: If you have an optional
printer cabinet, the hig h
capacity feeder will be
identified as tray 3.
249 Paper Jam Check Tray 5
A
message indicates a jam in the
high capacity feeder. T o remove
the jam:
1 Open the high capacity
feeder top cover.
2 Remove the jam.
3 Close the cover.
4 Press Go.
35
Page 38

P/N 12N0423
E.C. 2N0016
October 2001
Lexmark and Lexmark with diamond design are trademarks of Lexmark
International, Inc., registered in the United States and/or other countries.
© 2001 Lexmark International, Inc.
740 West New Circle Road
Lexington, Kentucky 40550
www.lexmark.com
 Loading...