


www.lexmark.com
Menus and Messages
March 2005
Lexmark and Lexmark with diamond design are trademarks of Lexmark International, Inc.,
registered in the United States and/or other countries.
© 2005 Lexmark International, Inc.
All rights reserved.
740 West New Circle Road
Lexington, Kentucky 40550

2
Edition: March 2005
The following paragraph does not apply to any country where such provisions are inconsistent with local law: LEXMARK
INTERNATIONAL, INC ., PROVIDES THIS PUBLICATION “AS IS” WITHOUT WARRANTY OF ANY KIND, EITHER EXPRESS OR
IMPLIED, INCLUDING, BUT NOT LIMITED TO, THE IMPLIED WARRANTIES OF MERCHANTABILITY OR FITNESS FOR A
PARTICULAR PURPOSE. Some states do not allow disclaimer of express or implied warranties in certain transactions; therefore, this
statement may not apply to you.
This publication could include technical inaccuracies or typographical errors. Changes are periodically made to the information herein;
these changes will be incorporated in later editions. Improvements or changes in the products or the programs described may be made
at any time.
Comments about this publication may be addressed to Lexmark International, Inc., Department F95/032-2, 740 West New Circle Road,
Lexington, Kentucky 40550, U.S.A. In the United Kingdom and Eire, send to Lexmark International Ltd., Marketing and Services
Department, Westhorpe House, Westhorpe, Marlow Bucks SL7 3RQ. Lexmark may use or distribute any of the information you supply in
any way it believes appropriate without incurring any obligation to you. You can purchase additional copies of publications related to this
product by calling 1-800-553-9727. In the United Kingdom and Eire, call +44 (0)8704 440 044. In other countries, contact your point of
purchase.
References in this publication to products, programs, or services do not imply that the manufacturer intends to make these available in all
countries in which it operates. Any reference to a product, program, or service is not intended to state or imply that only that product,
program, or service may be used. Any functionally equivalent product, program, or service that does not infringe any existing intellectual
property right may be used instead. Evaluation and verification of operation in conjunction with other products, programs, or services,
except those expressly designated by the manufacturer, are the user’s responsibility .
Lexmark and Lexmark with diamond design are trademarks of Lexmark International, Inc., registered in the United States and/or other
countries.
Mac and the Mac logo are trademarks of Apple Computer, Inc., registered in the U.S. and other countries.
PCL
®
is a registered trademark of the Hewlett-Packard Company.
PostScript
®
is a registered trademark of Adobe Systems Incorporated.
Other trademarks are the property of their respective owners.
© 2005 Lexmark International, Inc.
All rights reserved.
UNITED STATES GOVERNMENT RIGHTS
This software and any accompanying documentation provided under this agreement are commercial computer software and
documentation developed exclusively at private expense.

3
Contents
Contents
Chapter 1: Using printer menus ................. ....................................................................... 4
Understanding the printer operator panel ........................................................................................................5
Menu Groups ...................................................................................................................................................7
Paper Menu ......................................................... ........................................ ..... ...... ..................................7
Reports ...................................................................................................................................................13
Settings ...................................................................................................................................................15
Security ...................................................................................................................................................28
Network/Ports .........................................................................................................................................29
Help ........................................................................................................................................................38
Chapter 2: Understanding printer messages .................................. ............................... 39
Index .................................................................................................................................... 49
4
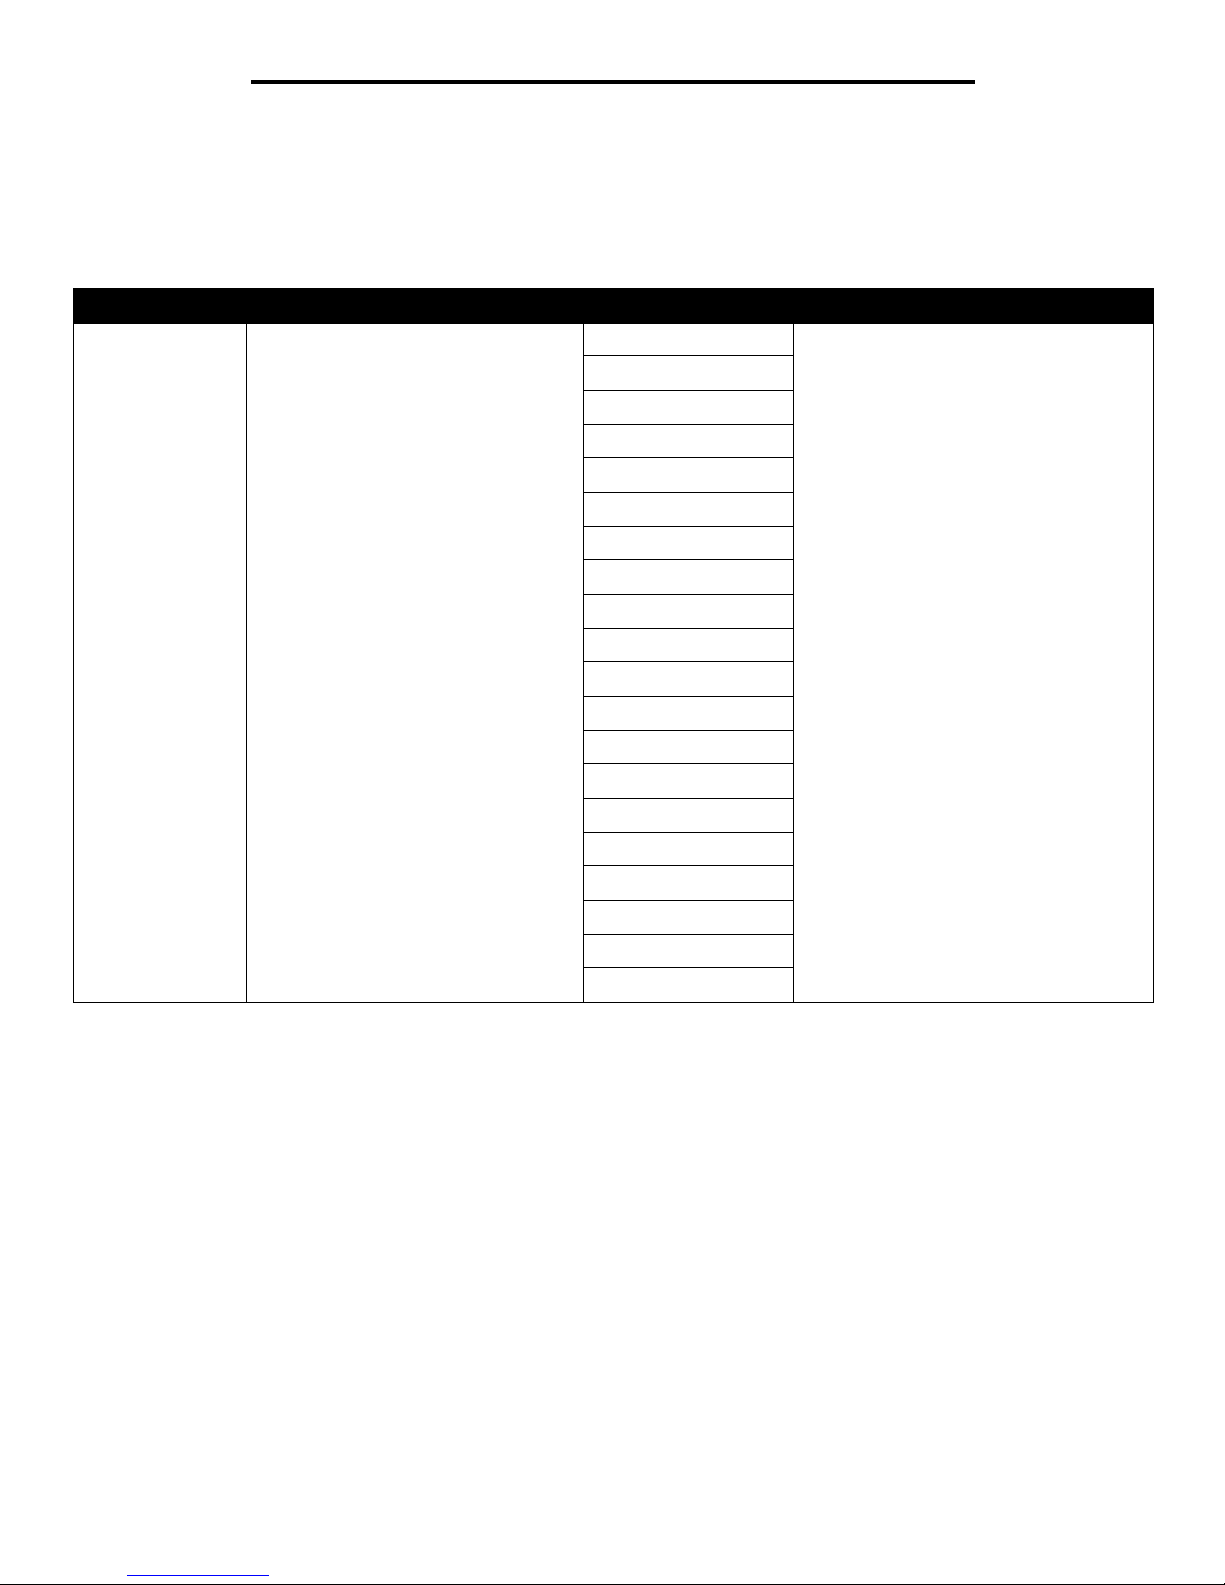
Using printer menus
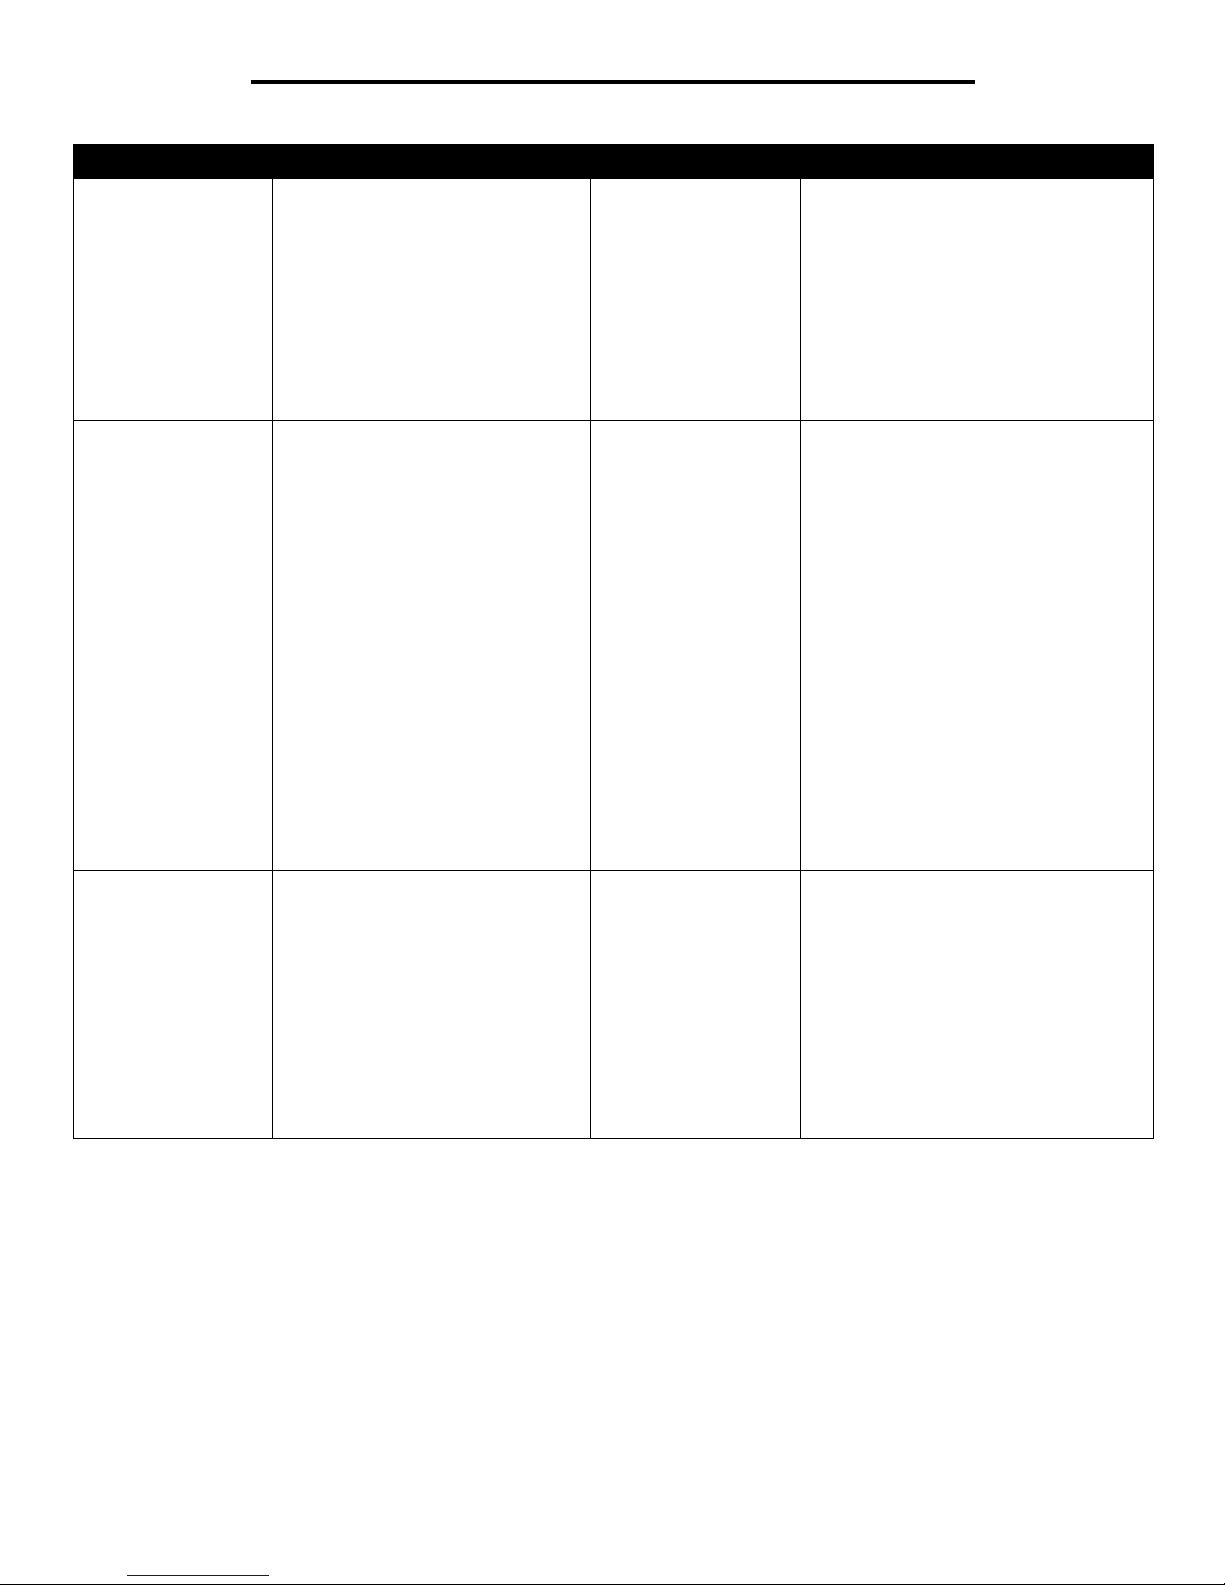
A number of menus are available to make it easy for you to change printer settings. The diagram shows the menu index on the operator
panel, the menus, and items available under each menu. The items in each menu and the values you can select are described in more
detail later in this chapter.
Some menu items or v al ues are di splayed only if a spec ific op tion is in stalle d on the printer. Other menu items may only be ef f ective for a
particular printer language. You can select these values at any time, but they only affect printer function when you have the optional
equipment or the specified printer language.
Paper Menu
Default Source
Paper Siz e/Type
Configure MP
Substitute Size
Paper Texture
Paper Loadin g
Custom Types
Universal Setup
Bin Setup
Reports
Menu Settings Page
Device Statistics
Network Setup Page
Network <x> Setup Page
Profiles List
NetWare Setup Page
Print Fonts
Print Directory
Settings
Setup Menu
Finishing Menu
Quality Menu
Utilities Menu
PDF Menu
PostScript Menu
PCL Emul Menu
HTML Menu
Image Menu
Security
Max Invalid PIN
Job Expiration
Network/Ports
TCP/IP
IPv6
Standard Network
Network Option <x>
Standard USB
USB Option <x>
Parallel and Parallel <x>
Serial Option <x>
NetWare
AppleTalk
LexLink
Help
Print All
Print Quality
Printing Guide
Supplies Guide
Media Gui de
Print Defects
Menu Map
Information Guide
Connection Guide
Moving Guide
Menu
Paper Menu
Reports
Settings
5
Using printer menus
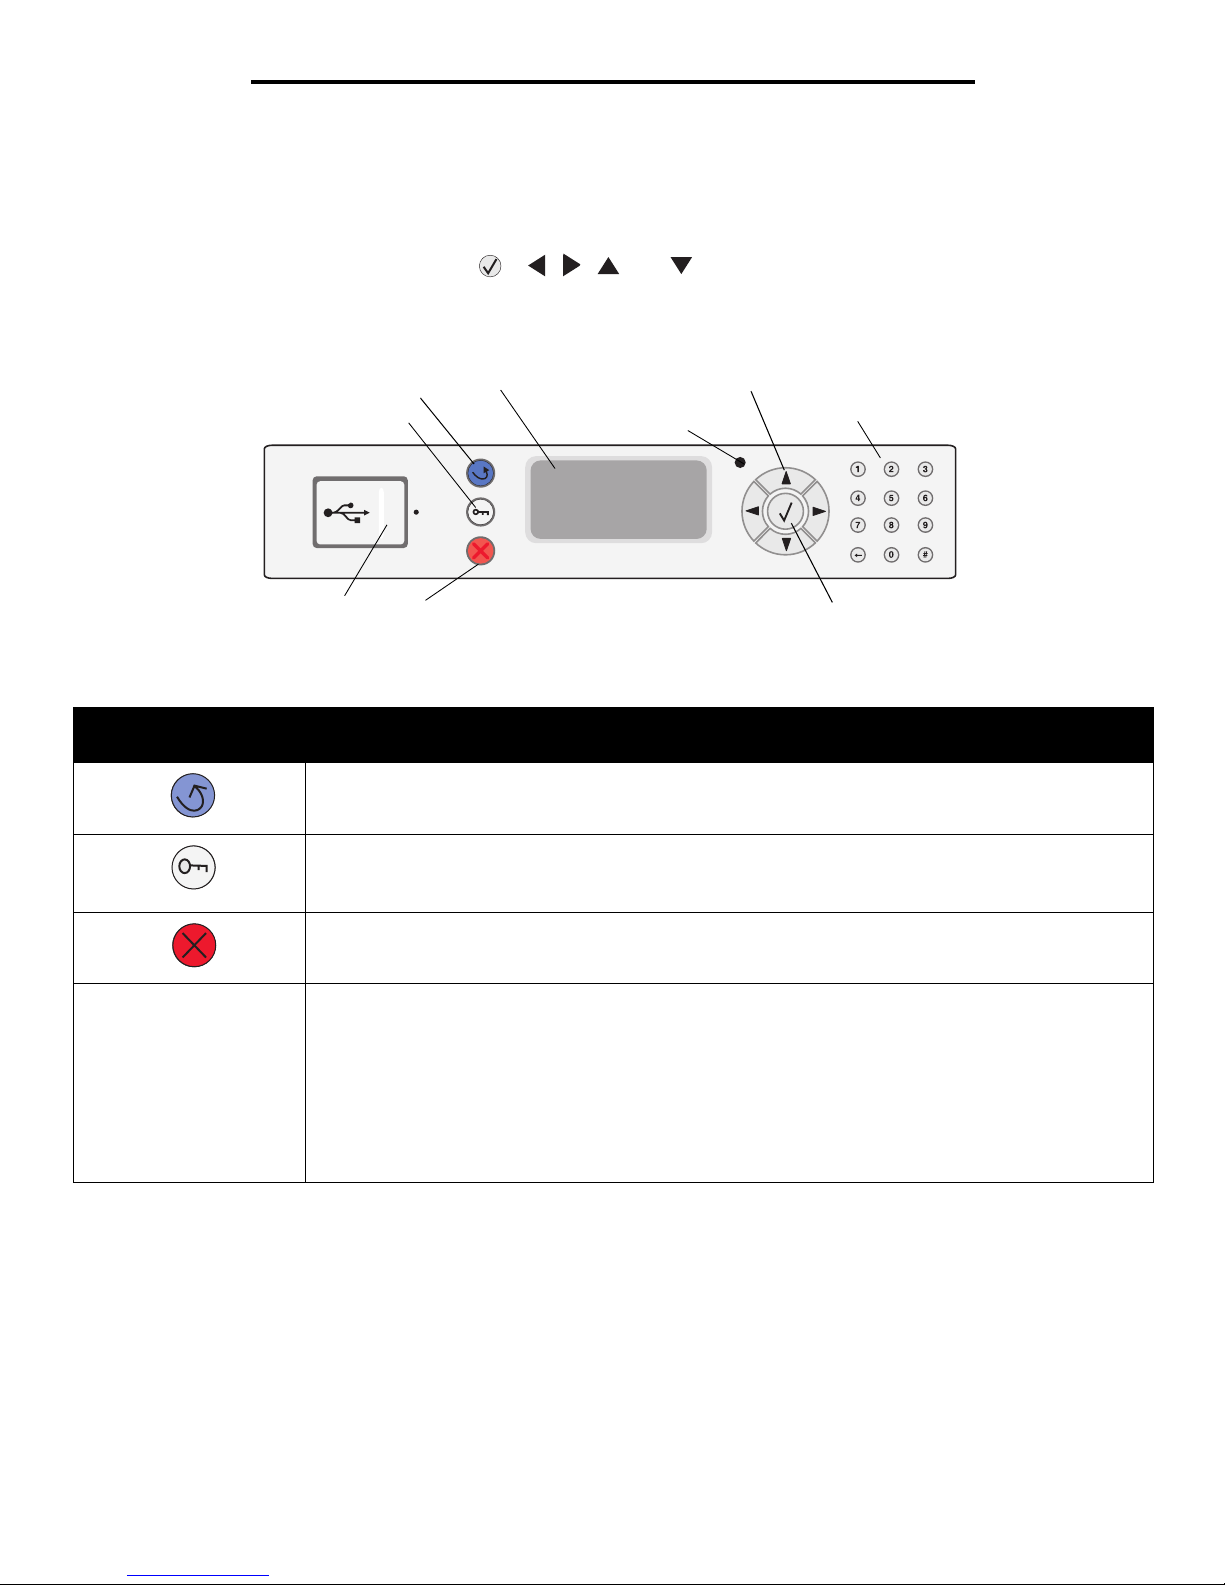
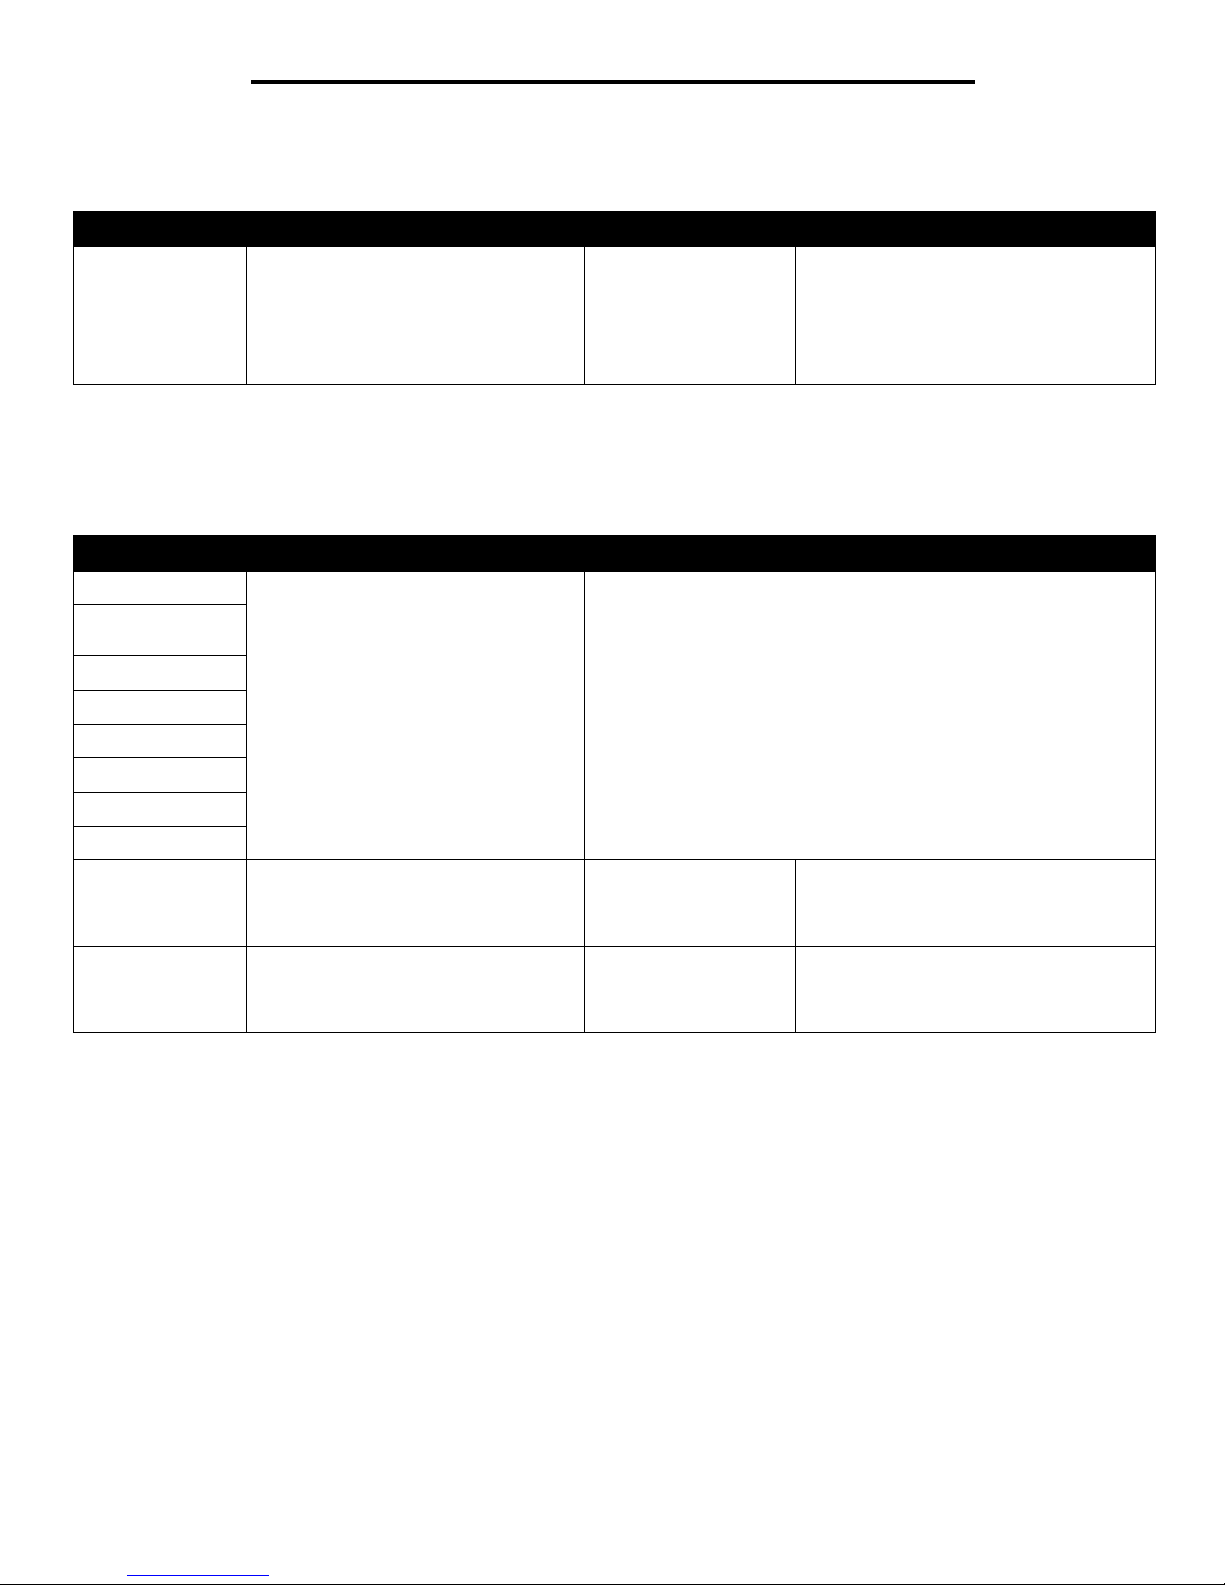
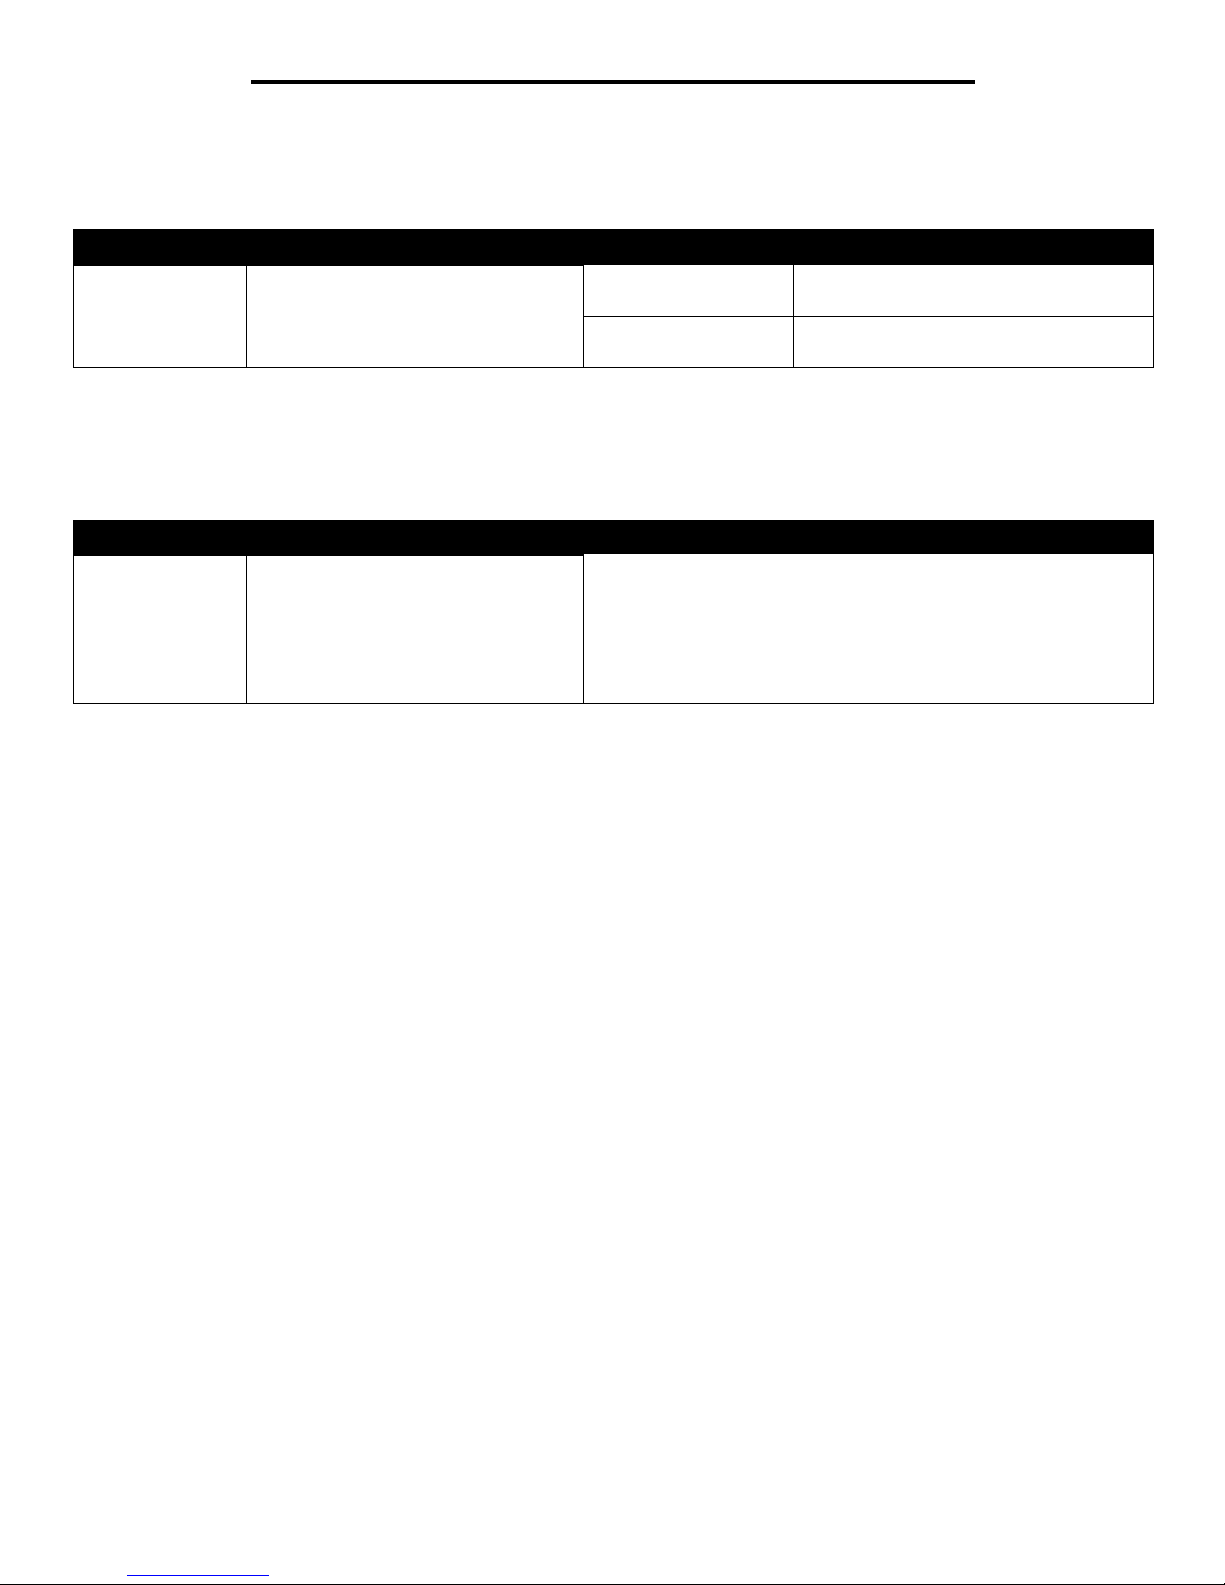
Understanding the printer operator panel
The operator panel consists of these items:
• A 4-line, back-lit, gray-scale display that can show both graphics and text
• Eight buttons: Back, Menu, Stop, Select ( ), , , , and
• Indicator light
• Numeric pad
• USB Direct Interface
The use of the buttons and the layout of the display panel is described in the following table.
Button or operator panel
item
Function
Back To return to the last screen viewed.
Note: Changes made on a screen will not be applied if you press the Back button.
Menu To open the menu index.
Note: The printer must be in the Ready state to access the menu index. A message indicating the menus
are unavailable will appear if the printer is not ready.
Stop To stop the mechanical operation of the printer. After pressing Stop , the message Stopping appears.
When the printer has stopped, the status line in the operator panel will show Stopped, and a list of
options will appear.
Indicator light A two-toned LED is used o n the o perat or pane l, one c olor b eing g reen a nd the other be ing red. Th e ligh ts
indicate whether the printer power is on, the printer is busy, idle, processing a job, or requires operator
intervention.
Status Indicates
Off Power is off
Solid green Printer is on, but idle
Flashing green Printer is warming up, processing data, or printing a job.
Solid red Operator intervention is required.
Display
Back
Menu
Stop
USB Direct interface
Navigation buttons
Indicator light
Numeric pad
Select
6
Using printer menus
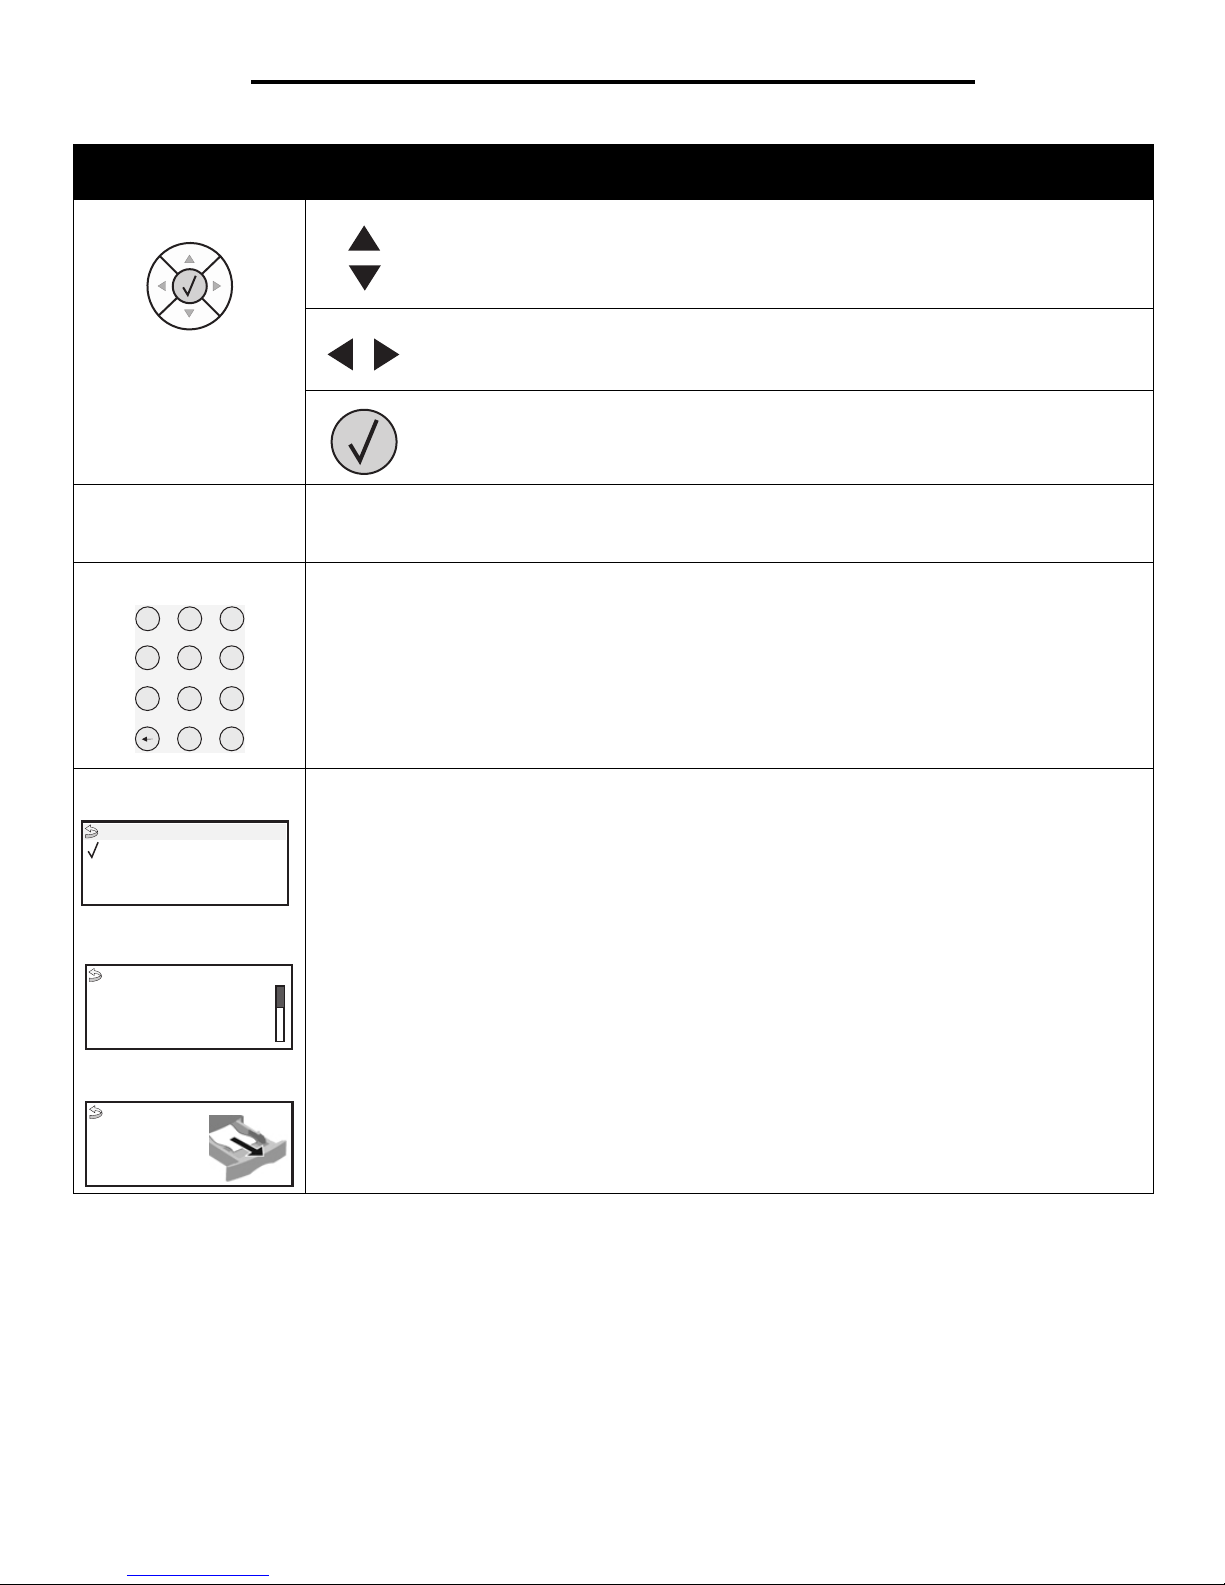
Navigation buttons The Up and Down buttons are used to move up and down lists.
When navi gating t hrough a l ist using the Up or Down bu tton, the cu rsor mo ves one line at a
time. Pressing the Down button at the botto m of the scre en chan ges the sc reen to the ne xt
whole page.
The Left and Right buttons are used to move within a screen, such as moving from one
menu index item to another. They are also used to scroll through text that will not fit on the
screen.
The Select button is used to initiate action on a selec tio n. Pres s Select when the cursor is
next to the selection you want, such as following a link, submitting a configuration item, or
to start or cancel a job.
USB Direct interface The host USB Direct interface on the operator panel is used to plug in a USB flash memory device and
print PDF files.
Note: A USB port is located on the back of the printer to connect a PC or other peripheral.
Numeric pad The numeric pad consists of numbers, a pound (#) sign, and a backspace button. The 5 button has a
raised bump for non-visual orientation.
The numbers are used to enter n umeric v alues f or items lik e quant ities or PINs . The bac kspace is used to
delete the number to the left of the cursor. Pressing the backspace multiple times will delete additional
entries.
Note: The pound (#) sign is not used.
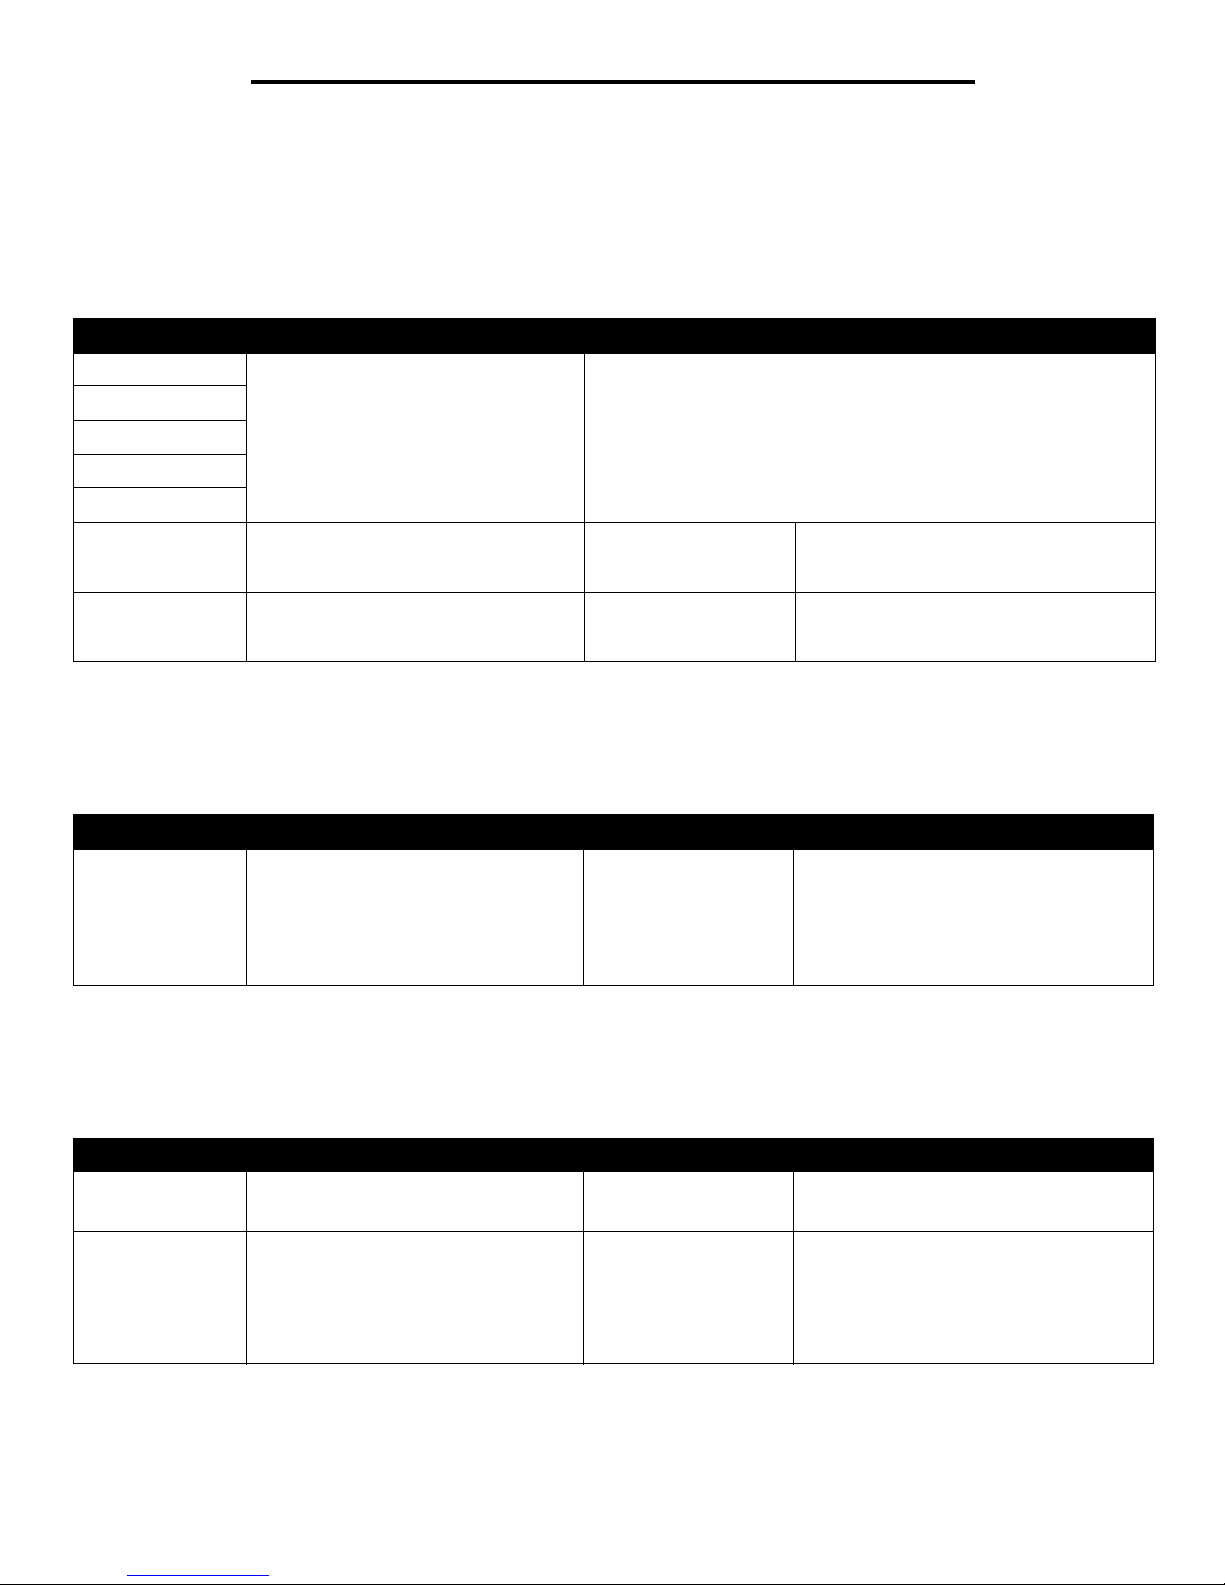
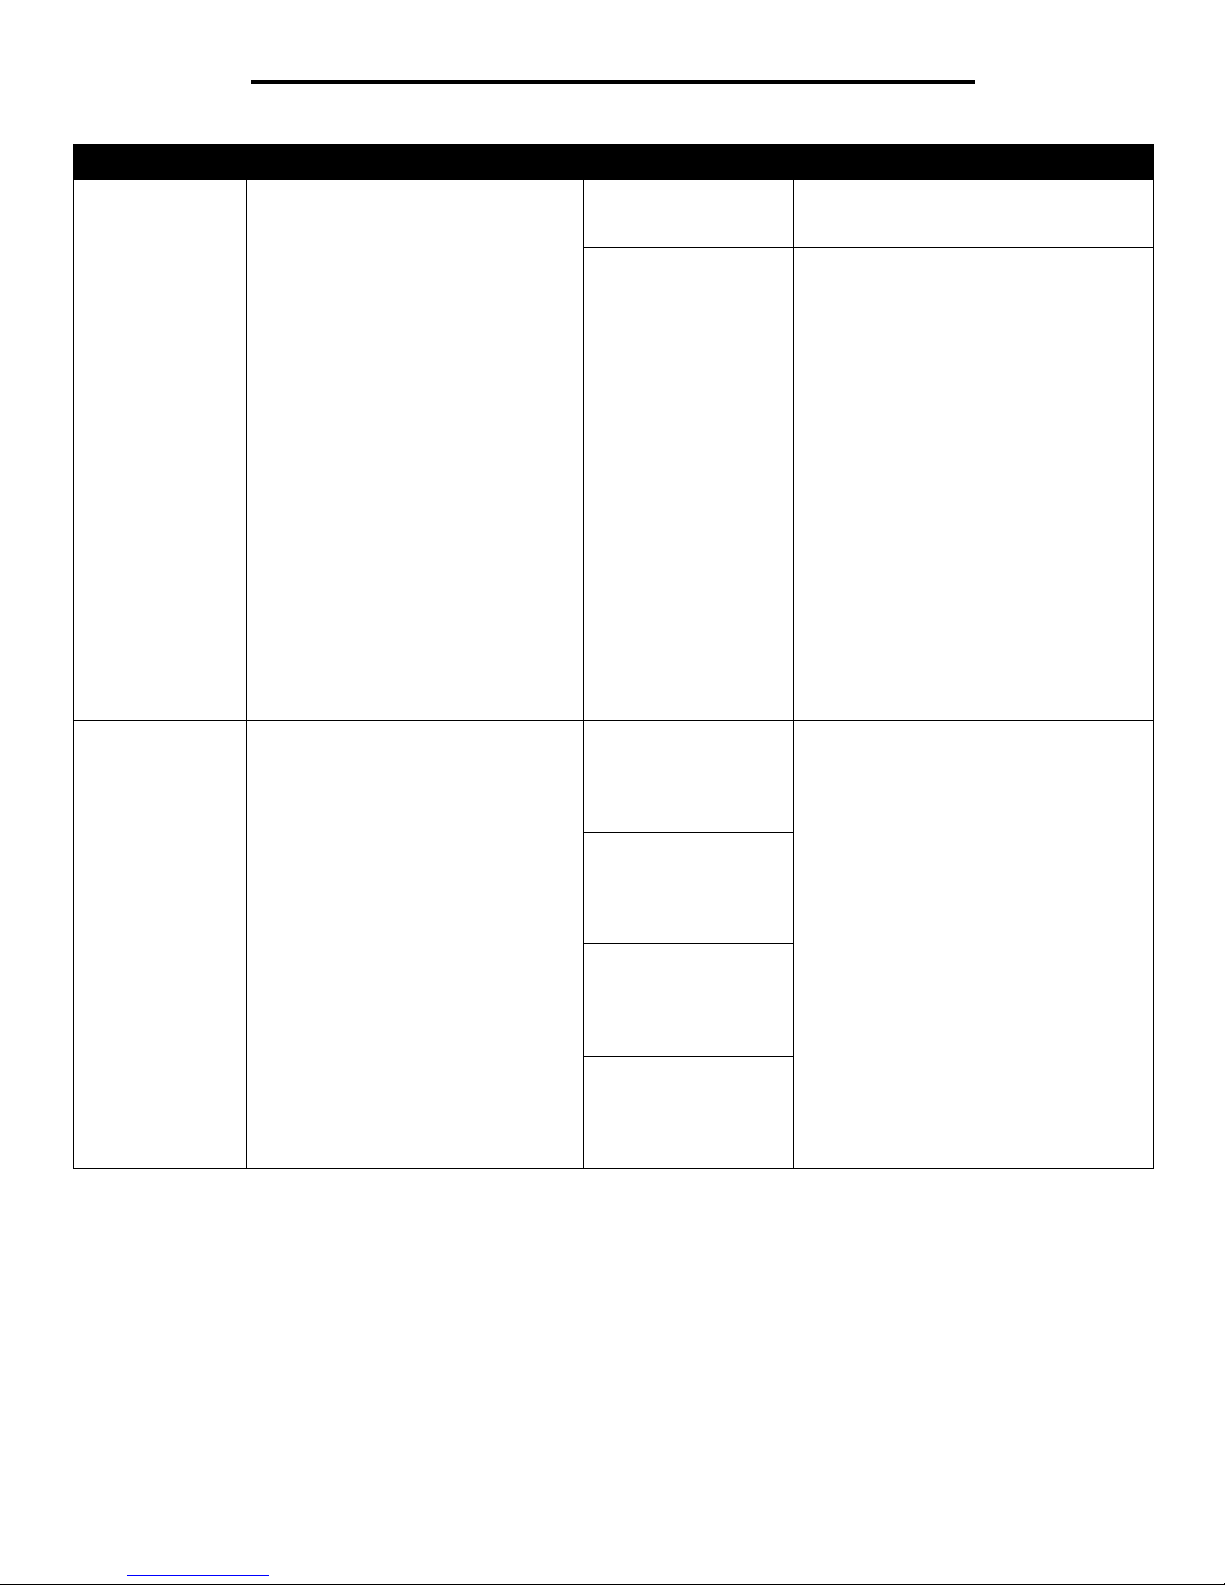
Display
Tell Me More screen
Show me screen
The display shows messages and graphics describing the current state of the printer and indicating
possible printer problems you must resolve.
The top line of the display is the header line. If applicable, it will contain the graphic indicating the Back
button can be used. It will also display the current status and the Supplies (Warnings) status. If multiple
warnings are present, each warning will be separated by a comma.
The other three lines of the display are the body of the screen. This is where you view printer status,
supplies messages, Show me screens, and make selections.
Button or operator panel
item
Function
1
2
3
4
5
6
7
8
9
0
#
Ready
Tray 1 low
View Supplies
Status / Supplies
Some held jobs were not
restored.
Remove tray;
remove print media
7
Using printer menus
Menu Groups
Note: An asterisk (*) next to a value indicates the default setting.
Paper Menu
Use the Paper Menu to define the paper loaded in each paper tray, the default paper source, and the output bin.
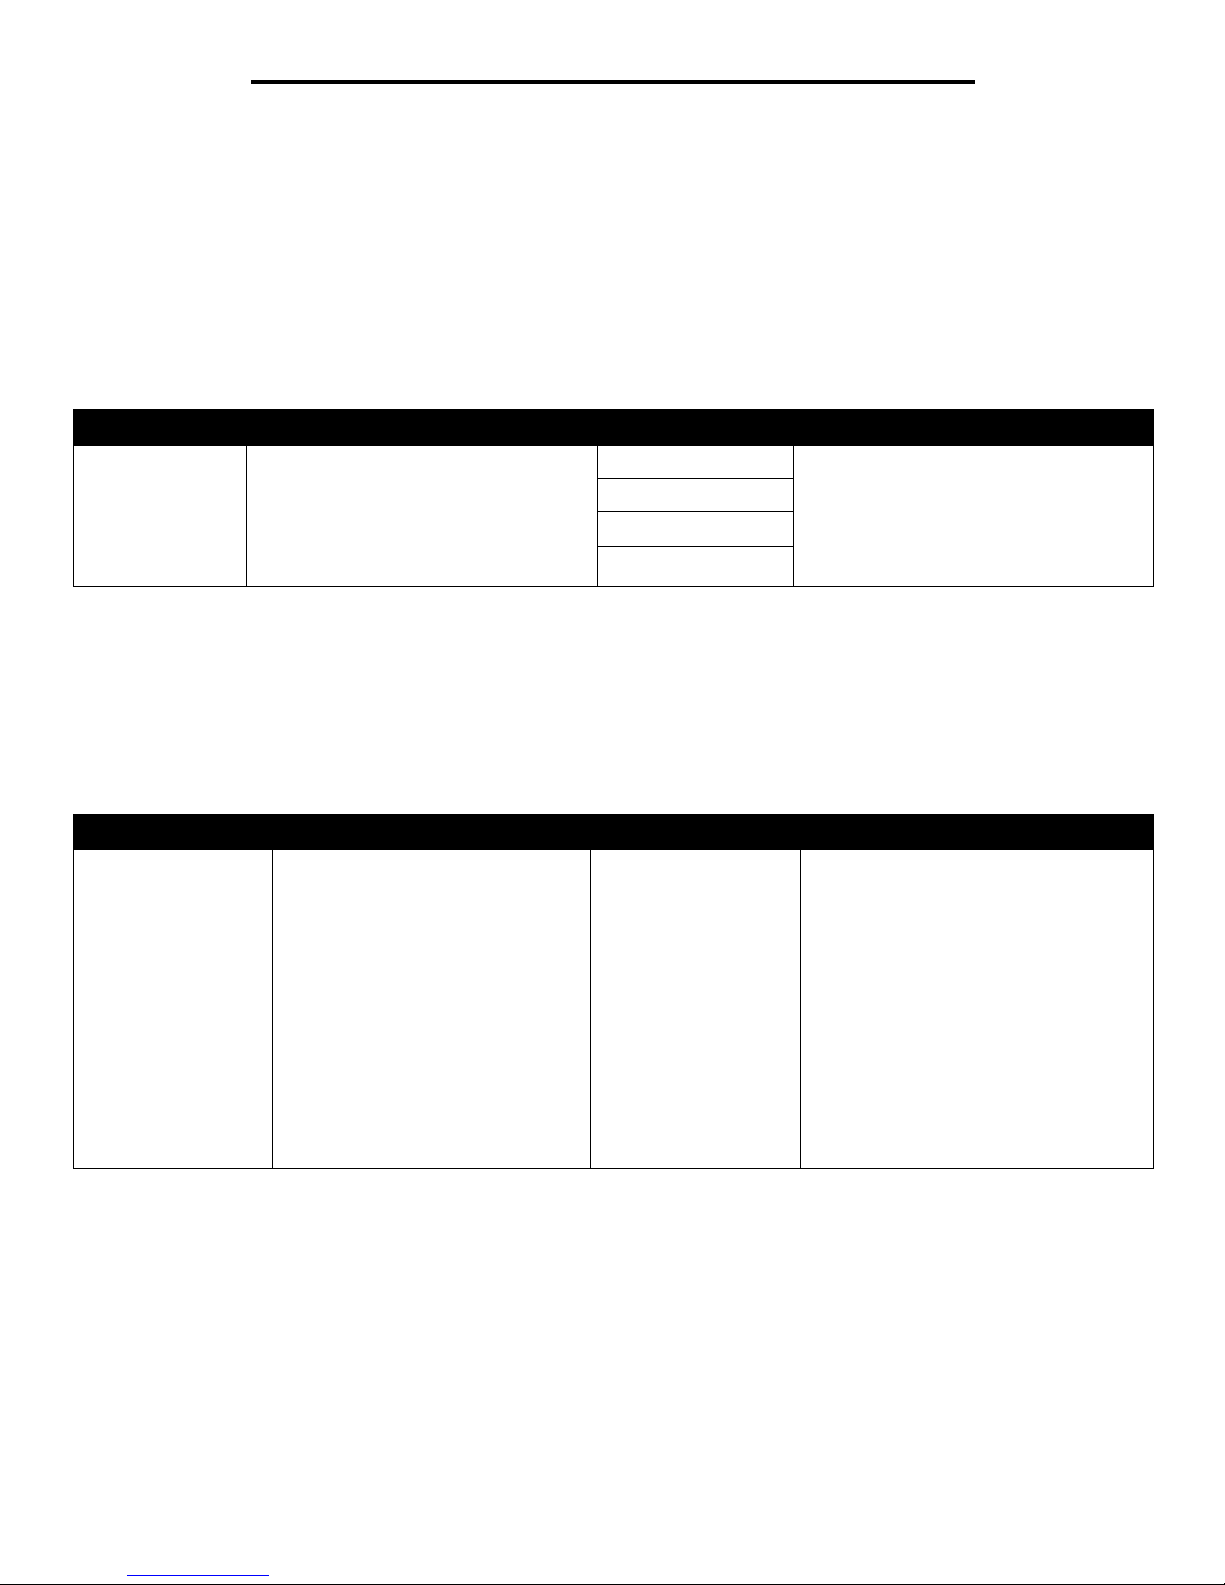
Default Source
Paper Size/Type
Note: Only installed paper sources are displayed.
This menu selection is used to set the size and type of media loaded into an input tray. Setting the paper size and type is a two-step
process. In the first menu selection, Size appears in bold letters. After you select the media size, the screen will change, and Type
appears in bold letters. You can then select the media type.
Menu selection Purpose Values
Default Source Identifies the default paper source. Tray <x> If you loaded the same size and type of
paper in two paper sou rces (and the Pap er
Size and Paper Type menu items are
correctly set), the trays are automatically
linked. When one paper source is empty,
paper automatically feeds from the next
linked source.
MP Feeder
Manual Paper
Manual Env
Menu selection Purpose Values
Tray <x>
Size/Type
Identifies the default paper size for
each paper source.
Note: For trays with automatic size
sensing, only the val ue detec ted b y
the hardware appears.
A4* (non-US)
A5
JIS B5
Letter* (US)
Legal
Executive
JIS B4
A3
11x17
Folio
Statement
Universal
If you loaded the same size and type of
paper in two paper sources (an d the P aper
Size and Paper Type menu items are
correctly set), the trays are automatically
linked. When one paper source is empty,
paper automatically feeds from the next
linked source.
8
Using printer menus
Tray <x>
Size/type
Identifies the type o f paper ins talled in
each paper source.
Note: If a user-defined name is
available, it appears instead of
Custom Type <x>. If two or more
custom types share the same name,
the name only appears once in the
Paper Type list.
Plain Paper*
Card Stock
Transparency
Labels
Bond
Letterhead
Preprinted
Colored Pape r
Custom Type <x>
Use this me nu item to:
• Optimize print quality for the specified
paper.
• Select paper sources through your
software application by selecting type
and size.
Automatically link paper sourc es. Any
sources containing the same type and size
of paper are automatically linked by the
printer if you have set the Paper Size and
the Paper Type to the correct values.
MP Feeder
Size/Type
Identifies the size of pa per in stall ed in
the multipurpose feeder.
A4* (non-US)
A5
JIS B5
Letter* (US)
Legal
Executive
JIS B4
A3
11x17
Folio
Statement
Universal
7 3/4 Envelope
10 Envelope
DL Envelope
C5 Envelope
Other Envel ope
The multipurpose feeder is only displayed
on the operator panel when Configur e MP
is set to Cassette.
MP Feeder
Size/Type
Identifies the type o f paper ins talled in
the multipurpose feeder.
Note: If a user-defined name is
available, it appears instead of
Custom Type <x>. If two or more
custom types share the same name,
the name only appears once in the
Paper Type value list.
Plain Paper*
Card Stock
Transparency
Labels
Bond
Envelope
Letterhead
Preprinted
Colored Pape r
Custom Type <x>
The multipurpose feeder is only displayed
on the operator panel when Configur e MP
is set to Cassette.
Menu selection Purpose Values

9
Using printer menus
Configure MP
This menu selection is used to configure the multipurpose feeder as another paper tray or manual feeder. If you link the multipurpose
feeder with another tray, you can have the printer pull paper from the multipurpose feeder before taking paper from another tray.
Substitute Size
This menu selecti on is used to determine whethe r the printer ca n substit ute another s ize pape r if the reques ted paper si ze is not currently
installed in any o f the printer input sources. If, fo r example, Subs titute Size is set to L ett er/A4 , an d only letter size pa per i s ins tal led in the
Manual Paper
Size/Type
Identifies the paper size being
manually loaded.
A4* (non-US)
A5
JIS B5
Letter* (US)
Legal
Executive
JIS B4
A3
11x17
Folio
Statement
Universal
Manual Paper
Size/Type
Identifies the paper type being
manually loaded.
Plain Paper*
Card Stock
Transparency
Labels
Bond
Letterhead
Preprinted
Colored Pape r
Custom Type <x>
Manual Envelope
Size/Type
Identifies the envelope size being
manually loaded.
7 3/4 Envelope
10 Envelope* (US)
DL Envelope* (non-US)
C5 Envelope
Other Envel ope
Manual Envelope
Size/Type
Identifies the envelope type being
manually loaded.
Envelope*
Custom Type <x>
Menu selection Purpose Values
Configure MP Determines when the printer selects
paper loaded in the multipurpose feeder.
Cassette*
Manual
First
Menu selection Purpose Values
10
Using printer menus
printer. When a request is received to print on A4 paper, the printer will substitute letter for A4 and print the job instead of displaying a
change paper request.
Paper Texture
This menu selection is used to set the media texture for each of the defined media types. This allows the printer to optimize the print
quality for the specified media.
Menu selection Purpose Values
Substitute Size Substitutes the specified paper size if
the requested size is not loaded.
Off
Statement/A5
Letter/A4
11x17/A3
All Listed*
• The Off value indicates no size
substitutions are allowed.
• The All Listed value indica tes that all
avail able substitutions are allo wed.
Menu selection Purpose Values
Plain T ex ture Identifies the te xture o f the media lo aded
in a specific input source.
Smooth
Normal*
Rough
Transparency
Texture
Labels Texture
Bond Texture
Envelope Texture
Letterhead Texture
Preprinted Texture
Colored Texture
Card Stock Texture Identifies the texture of the card stock
loaded in a specific input source.
Smooth
Normal*
Rough
Shown if Card Stock is supported in the
specified input source.
Custom <x>
Texture
Identifies the texture of the custom
media loade d in a specific input source.
Smooth
Normal*
Rough
Shown if the custom type is supported in
the specified input source.
11
Using printer menus
Paper Loading
This menu selection is used to set the loading orientation for each paper type. This lets you load an input source with preprinted media,
and then notify the printer that the media is loaded for duplex printing. You can then use your application software to indicate simplex
printing. When simplex printing is selected, the printer automatically inserts blank pages to print the simplex job correctly.
Note: Paper Loading is only available if a duplex unit is installed.
Custom Types
This menu selection is used to define a name for each custom paper type. You can assign n ames using a utility such as MarkVision or
from the operator panel.
Universal Setup
This menu selection is used to specify the height and width of the Universal Paper Size. By specifying the height and width for Universal
Paper Size, the printer will use the Universal setting exactly like other paper sizes, including support for duplex and n-up.
Menu selection Purpose Values
Labels Loading Properly handles preprinted paper
whether the job is a duplexed or singlesided job.
Duplex
Off*
Bond Loading
Letterhead Loading
Preprinted Loading
Colored Loading
Card Stock Loading Properly handles preprinted card stock
whether the job is a duplexed or singlesided job.
Duplex
Off*
Shown if Card Stock is supported in the
specified input source.
Custom <x>
Loading
Properly handles preprinted custom
paper whether the job is a duplexed or
single-sided job.
Duplex
Off*
Shown if the custom type is supported in
the specified input source.
Menu selection Purpose Values
Custom Type N Specifies the type of paper associated
with each Custom Type available in the
Paper Type menu.
Paper*
Card Stock
Transparency
Labels
Envelope
The custom type me dia m ust be supp orted
in the input source you designate in order
to assign a user-defined name.
Once the name is assigned, the nam e
(truncated to 16 characters) will be
displayed instead of Custom Type x.
Menu selection Purpose Values
Units of Measure Determines the unit of measure used to
enter the Universal Height and Width.
Inches
Millimeters
Inches is US default; Millimeters is
international default.
Portrait Width Sets the portrait width of the universal
media.
Note: If the value set exceeds the
maximum width, the printer will use the
maximum value allowed in inches or
millimeters.
3 inches to 17 inches in
0.01 inch increments
76 mm to 432 mm in 1
mm increments
Shows either i nches or mm from Units of
Measure setting, 11.69 inches is the US
default and 297 mm is the international
default.

12
Using printer menus
Bin Setup
This menu selection is used to specify the output bin where you want your printed material to go to.
Note: Bin Setup is only displayed when at least one optional output bin is installed.
Portrait Height Sets the portrait height of the universal
media.
Note: If the value set exceeds the
maximum height, the pri nter will use the
maximum value allowed in inches or
millimeters.
3 inches to 17 inches in
0.01 inch increments
76 mm to 432 in 1 mm
increments
Shows either i nches or mm from Units of
Measure setting; 17 inches US default,
432 international default.
Feed Direction Specifies the feed direction. Short Edge*
Long Edge
Long Edge is only shown if the longest
edge is shorter than the Ma ximum Physical
Width of the printer.
Menu selection Purpose Values
Output Bin Specifies the default bin for printed
material.
Standard Bin* • If a user- defined name is available, it
appears instead of Bin <x>.
• The name is truncated to 14 characters.
• If two or more bins share the same
name, the name only appears once in
the Output Bin value list.
Bin <x>
Configure Bins Determines which output bin(s) the
printer uses for a particular job.
Mailbox* Sends print jobs to the output bin
designated for that user.
Link Links two or more bins together as though
they were one large bin. When one linked
bin is full, the printer starts filling the next
linked bin, and continues with each
additional linked bin.
Link Optional Links all optional output bins as thou gh
they were one large bin, while leaving the
standard bin individually addressable.
Type Assignment Sends each job to the output bin specified
for that paper type.
Assign Type/Bin Sends print jobs to a specific output bin
based on the requested paper type.
Note: If a user-defined name is
available, it appears instead of
Custom <x> Bin. The name is
truncated to 14 characters. If two or
more bins share the same name, the
name only appears once in the Assign
Type/Bin value list.
Plain Paper Bin Disabled*
Standard Bin
Bin 1
Bin 2
Note: Only installed output bins will be
displayed. If Configure Bins is set to Type
Assignment then the default is the
Standard Bin.
Card Stock Bin
Transparency Bin
Labels Bin
Bond Bin
Envelope Bin
Letterhead Bin
Preprinted Bin
Colored Bin
Custom <x> Bin (<x>
represents 1 through 6)
Menu selection Purpose Values
13
Using printer menus
Reports
Menu Settings Page
This menu selection prints a menu settings page.
Device Statistics
This menu selection displays the printer statistics.
Network Setup Page
This menu selection prints a network setup page.
Profiles List
This menu selection prints a list of profiles stored on this printer.
NetWare Setup Page
This menu selection prints information relating to the internal print server.
Menu selection Purpose Values
Menu Settings
Page
Prints information relating to the default
printer settings and verifies that printer
options are installed correctly.
After selecting this item, the page will print and the printer will return to
Ready .
Menu selection Purpose Values
Device Statistics Prints information relating to the printer
statistics.
After selecting this item, the page will print and the printer will return to
Ready .
Menu selection Purpose Values
Network Setup
Page
Network <x>
Setup Page will
appear if additional
network options are
installed.
Prints information relating to network
settings and verifies the net w o rk
connection.
Note: This page also provides
information that helps you configure for
network printing.
After selecting this item, the page will print, and the printer will return
to Ready .
Menu Selection Purpose Values
Profiles List Prints a list of profiles stored on the
printer.
After selecting this item, the page will print, and the printer will return
to Ready .
Menu selection Purpose Values
NetWare Setup
Page
Prints information relating to t he i nte rnal
print server and the network settings
defined by the N etwork <x > Setup m en u
item in the Network Menu.
After selecting this item, the page will print, and the printer will return
to Ready .
14
Using printer menus
Print Fonts
This menu selection prints a list of the fonts stored in the printer.
Print Directory
This menu selection prints the directory listing. The directory listing is a list of the resources that are stored on a formatted optional flash
memory card or hard disk.
Menu selection Purpose Values
Print Fonts Prints a sample of all the fonts available
for the selected printer langua ge.
PCL Fonts Prints a sample of all printer fonts av aila bl e
for PCL emulation.
PS Fonts Prints a sample of all printer fonts av aila bl e
for PostScript emulation.
Menu selection Purpose Values
Print Directory Prints a list of the resources that are
stored on the optional flash memory
card or hard disk.
Note: Print Directory is available only
when either a nondefective flash or disk
is installed and formatted, and Job
Buffer Size is not set to 100%.
After selecting this item, the page will print, and the printer will return
to Ready .
15
Using printer menus
Settings
Setup Menu
Use this menu selection to configure a variety of printer features.
Menu selection Purpose Values
Display Language Determines the language of the text
displayed on the operator panel.
English Note: All values may not be available.
Français
Deutsch
Italiano
Español
Dansk
Norsk
Nederlands
Svenska
Português
Suomi
Russian
Polski
Magyar
Turkish
Czech
Simplified Chinese
Traditional Chinese
Korean
Japanese
16
Using printer menus
Power Saver Specifies the amount of time (in
minutes) the printer waits after a job is
printed before it goes into a reduced
power state.
Disabled This value does not appear unless Energy
Conserve is set to Off. See the User’s
Guide for more information.
1...240 Specifies the amount of time after a print
job before the printer goes into Power
Saver mode. (Your printer may not support
the entire range of values.)
The factory default Power Saver setting
depends on your printer model. Print the
menu settings page to determine the
current Power Saver setting. When the
printer is in Power Saver mode, it is still
ready to receive print jobs.
Select 1 to put the printer in Power Saver
mode one minute after it finishes a print
job. This uses much less energy, but
requires more warm-up t ime for the printer.
Select 1 if your printer shares an electrical
circuit with room lighting and you notice
lights flickering.
Select a high value if your printer is in
constant use. Under most circumstances,
this keeps the printer ready to print with
minimum warm-up time. Select a value
between 1 and 240 minutes if you want a
balance between energy consumption and
a shor ter warm-up period.
Alarms Controls whether the printer sounds an
alarm when the printer requires operat or
intervention.
Alarm Control:
Off
Single*
Continuous
Off—Printer does not sound an alarm.
Single*—Printer sounds three quick
beeps.
Continuous—Printer repeats three beeps
every 10 seconds.
Note: Staple and hole punch alarms
appear only when an optional finisher is
installed.
Toner Alarm:
Off*
Single
Continuous
Staple Alarm:
Off*
Single
Continuous
Hole Punch Alarm:
Off*
Single
Continuous
Menu selection Purpose Values
 Loading...