

Page 1
4
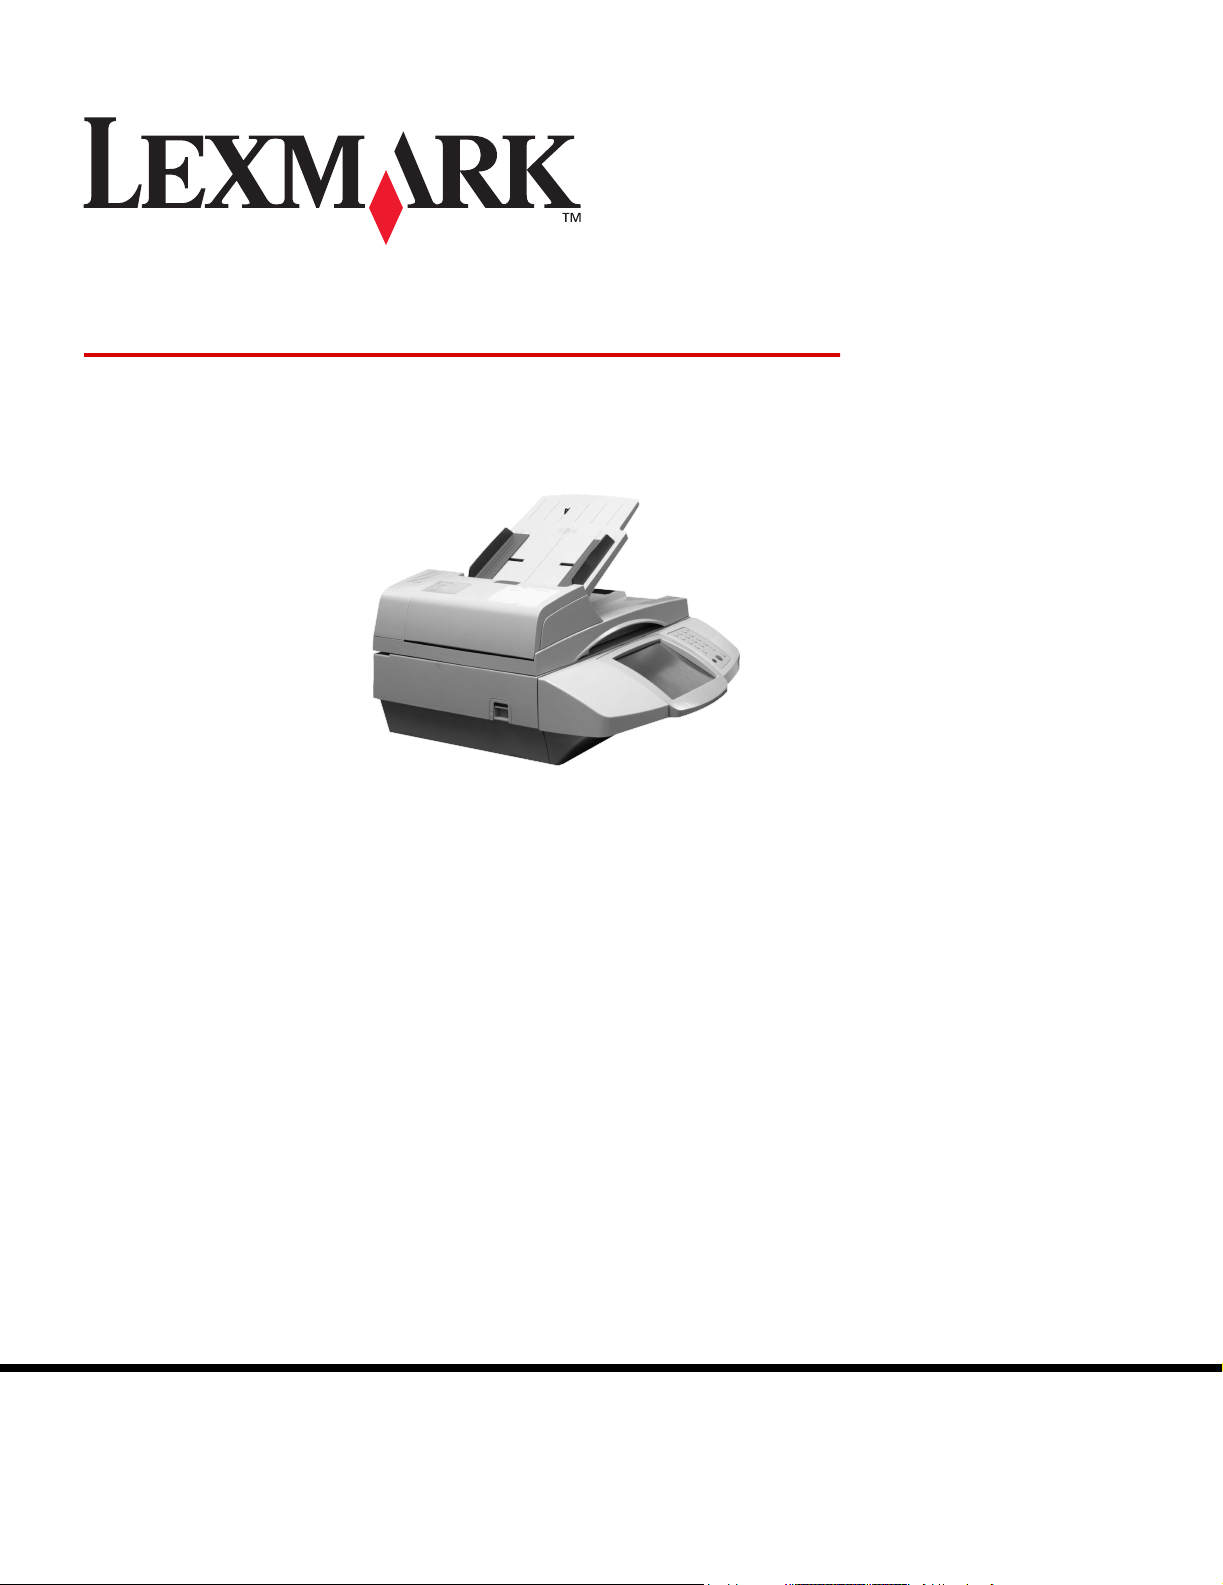
600 MFP
Menus and Messages Guide
August 2006
Lexmark and Lexmark with diamond design are trademarks of Lexmark International, Inc.,
registered in the United States and/or other countries.
© 2006 Lexmark International, Inc.
All rights reserved.
740 West New Circle Road
Lexington, Kentucky 40550
www.lexmark.com
Page 2
Edition: August 2006
The following paragraph does not apply to any country where such provisions are inconsistent with local law: LEXMARK
INTERNATIONAL, INC., PROVIDES THIS PUBLICATION “AS IS” WITHOUT WARRANTY OF ANY KIND, EITHER EXPRESS OR
IMPLIED, INCLUDING, BUT NOT LIMITED TO, THE IMPLIED WARRANTIES OF MERCHANTABILITY OR FITNESS FOR A
PARTICULAR PURPOSE. Some states do not allow disclaimer of express or implied warranties in certain transactions; therefore, this
statement may not apply to you.
This publication could include technical inaccuracies or typographical errors. Changes are periodically made to the information herein; these
changes will be incorporated in later editions. Improvements or changes in the products or the programs described may be made at any
time.
Comments about this publication may be addressed to Lexmark International, Inc., Department F95/032-2, 740 West New Circle Road,
Lexington, Kentucky 40550, U.S.A. In the United Kingdom and Eire, send to Lexmark International Ltd., Marketing and Services
Department, Westhorpe House, Westhorpe, Marlow Bucks SL7 3RQ. Lexmark may use or distribute any of the information you supply in
any way it believes appropriate without incurring any obligation to you. To obtain additional copies of publications related to this product,
visit the Lexmark Web site at www.lexmark.com.
References in this publication to products, programs, or services do not imply that the manufacturer intends to make these available in all
countries in which it operates. Any reference to a product, program, or service is not intended to state or imply that only that product,
program, or service may be used. Any functionally equivalent product, program, or service that does not infringe any existing intellectual
property right may be used instead. Evaluation and verification of operation in conjunction with other products, programs, or services, except
those expressly designated by the manufacturer, are the user’s responsibility.
Lexmark and Lexmark with diamond design, MarkNet, MarkTrack, and MarkVision are trademarks of Lexmark International, Inc., registered
in the United States and/or other countries.
®
PCL
is a registered trademark of the Hewlett-Packard Company.
The following terms are trademarks or registered trademarks of these companies:
Albertus The Monotype Corporation plc ITC Lubalin Graph International Typeface Corporation
Antique Olive Monsieur Marcel OLIVE ITC Mona Lisa International Typeface Corporation
Apple-Chancery Apple Computer, Inc. ITC Zapf Chancery International Typeface Corporation
Arial The Monotype Corporation plc Joanna The Monotype Corporation plc
Based on Times New Roman under license from The
CG Times
Chicago Apple Computer, Inc. Monaco Apple Computer, Inc.
Clarendon Linotype-Hell AG and/or its subsidiaries New York Apple Computer, Inc.
Eurostile Nebiolo Oxford Arthur Baker
Geneva Apple Computer, Inc. Palatino Linotype-Hell AG and/or its subsidiaries
GillSans The Monotype Corporation plc Stempel Garamond Linotype-Hell AG and/or its subsidiaries
Helvetica Linotype-Hell AG and/or its subsidiaries Taffy Agfa Corporation
Hoefler Jonathan Hoefler Type Foundry Times New Roman The Monotype Corporation plc
ITC Avant Garde
Gothic International Typeface Corporation Univers Linotype-Hell AG and/or its subsidiaries
ITC Bookman International Typeface Corporation
Monotype Corporation plc, is a product of Agfa
Corporation Marigold Arthur Baker
All other trademarks are the property of their respective owners.
© 2006 Lexmark International, Inc.
All rights reserved.
UNITED STATES GOVERNMENT RIGHTS
This software and any accompanying documentation provided under this agreement are commercial computer software and
documentation developed exclusively at private expense.
2
Page 3

Contents
Contents 3
Chapter 1: Using the MFP menus ...................................................................................... 5
Understanding the multifunction printer (MFP) control panel ........................................................................... 5
Home screen ............................................................................................................................................ 8
Using the LCD touch-screen buttons ............................................................................................................. 11
Sample screen one ................................................................................................................................. 11
Information on LCD touch-screen buttons .............................................................................................. 13
Sample screen two .................................................................................................................................15
Information on LCD touch-screen buttons .............................................................................................. 15
Other LCD touch-screen buttons ............................................................................................................17
Features ................................................................................................................................................. 18
Menus ............................................................................................................................................................ 19
Menu map ............................................................................................................................................... 19
Paper Menu ................................................................................................................................................... 20
Default Source ........................................................................................................................................20
Paper Size/Type ..................................................................................................................................... 20
Configure MP ..........................................................................................................................................23
Substitute Size ........................................................................................................................................23
Paper Weight ..........................................................................................................................................24
Paper Loading ........................................................................................................................................25
Custom Types ........................................................................................................................................ 25
Custom Names .......................................................................................................................................26
Custom Bin Names ................................................................................................................................. 26
Universal Setup ......................................................................................................................................26
Bin Setup ................................................................................................................................................ 27
Reports .......................................................................................................................................................... 28
Network/Ports ................................................................................................................................................ 30
TCP/IP .................................................................................................................................................... 30
IPv6 ........................................................................................................................................................ 32
E-mail Server Setup ...............................................................................................................................33
Wireless .................................................................................................................................................. 34
Standard Network or Network <x> ......................................................................................................... 35
Standard USB or USB <x> ..................................................................................................................... 36
Standard Parallel or Parallel <x> ............................................................................................................ 38
Serial <x> ............................................................................................................................................... 40
NetWare ................................................................................................................................................. 42
AppleTalk ................................................................................................................................................ 43
LexLink ................................................................................................................................................... 43
Settings .......................................................................................................................................................... 44
General Settings .....................................................................................................................................44
Copy Settings .........................................................................................................................................51
Fax Settings ............................................................................................................................................56
E-mail Settings ...................................................................................................................................... 65
FTP Settings ...........................................................................................................................................69
Scan to USB Settings ............................................................................................................................. 73
3
Page 4

Contents
Print Settings .......................................................................................................................................... 75
Security ................................................................................................................................................... 88
Set Date and Time .................................................................................................................................. 94
Help Pages .................................................................................................................................................... 95
Manage Shortcuts .......................................................................................................................................... 96
Chapter 2: Understanding MFP messages ..................................................................... 98
Status messages ...........................................................................................................................................98
Fax status messages ...................................................................................................................................101
Cancel jobs messages ................................................................................................................................. 101
Password and PIN messages ...................................................................................................................... 102
Copy, e-mail, fax, FTP, and scan button messages ....................................................................................102
Attendance messages ................................................................................................................................. 102
Functions disabled transitional messages ................................................................................................... 118
Index .................................................................................................................................. 119
4
Page 5
1
Using the MFP menus
Understanding the multifunction printer (MFP) control panel
Most print settings can be changed from the application in use or the print driver. Settings changed from the application or
print driver apply only to the job being sent to the MFP.
Changes made to print settings from an application override changes made from the control panel.
If a setting cannot be changed from the application, use the control panel, MarkVision™ Professional, or the Embedded
Web Server (EWS) pages. Changing a setting from any of these makes that setting the user default.
Whenever a touch screen MFP is attached to a printer, the printer operator panel and any printer operator panel buttons
are disabled. The only panel and buttons that are functional are those on the MFP control panel.
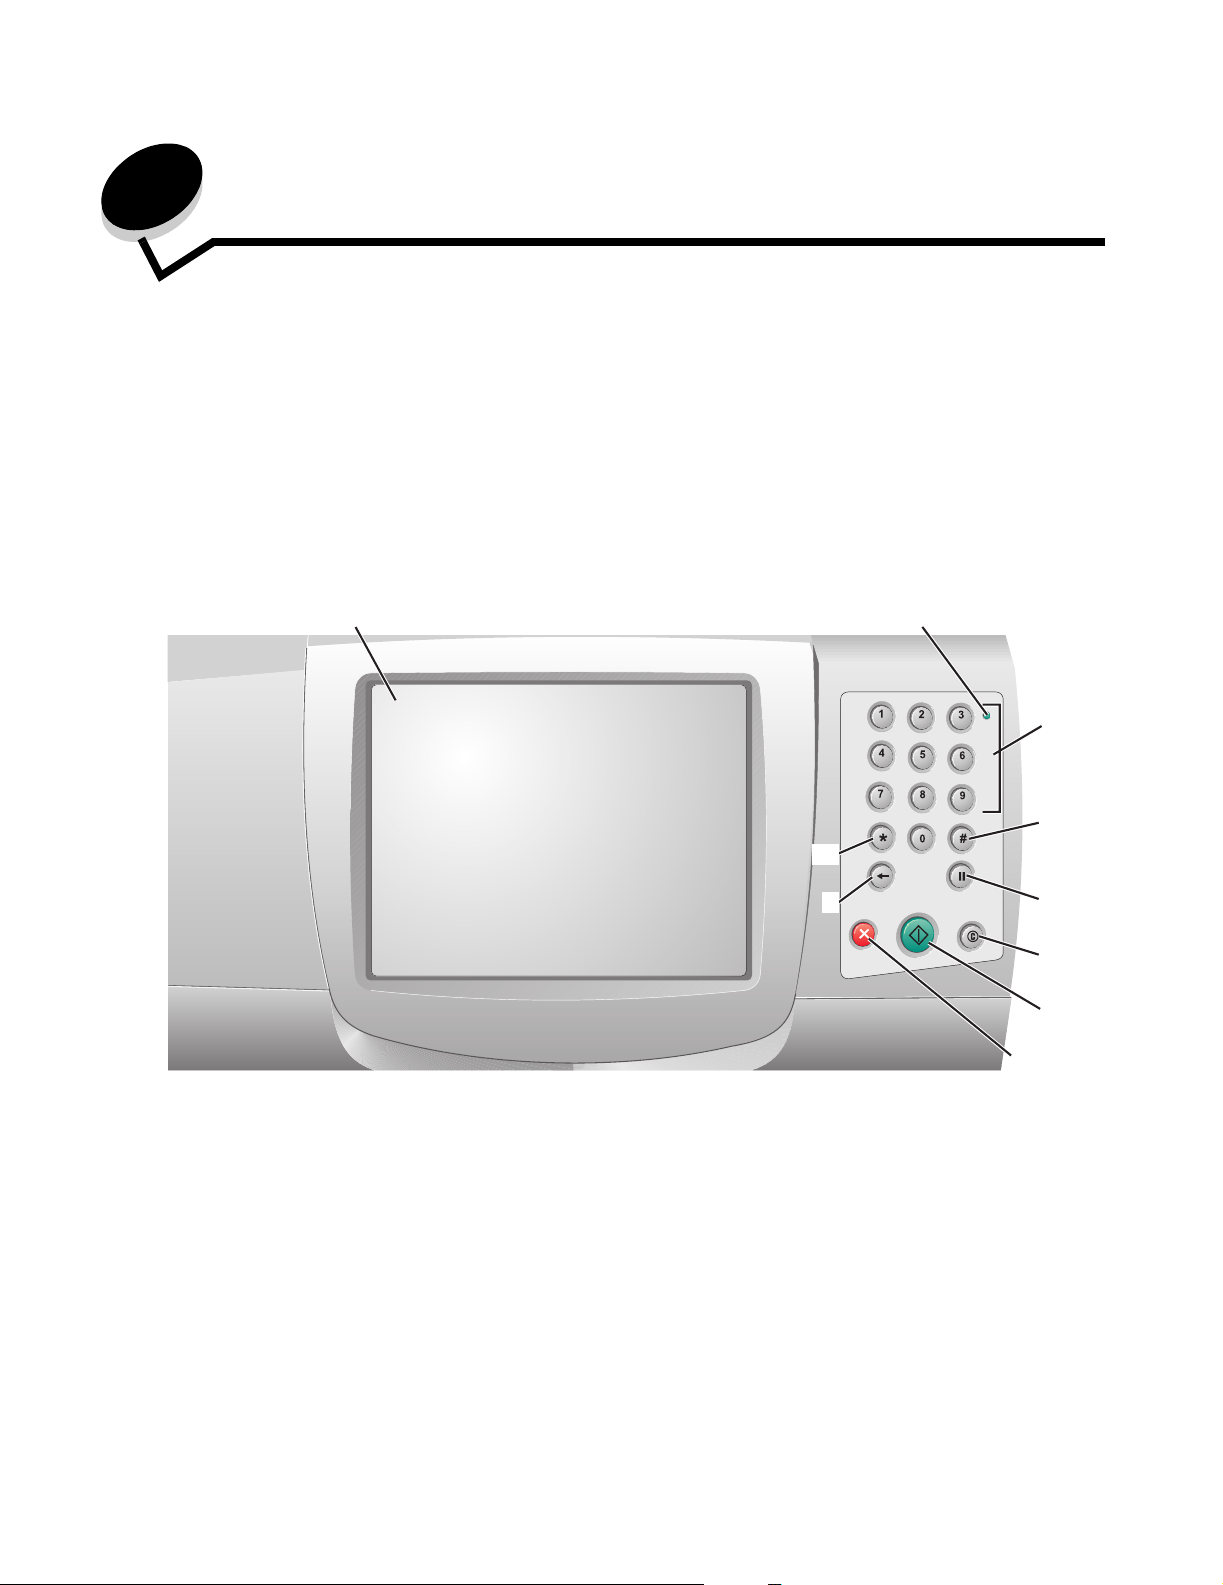
The MFP control panel consists of:
1
2
ABC
DEF
GHI
JKL
MNO
3
10
PQRS
TUV
WXYZ
4
9
5
6
7
8
Using the MFP menus
5
Page 6
Using the MFP menus
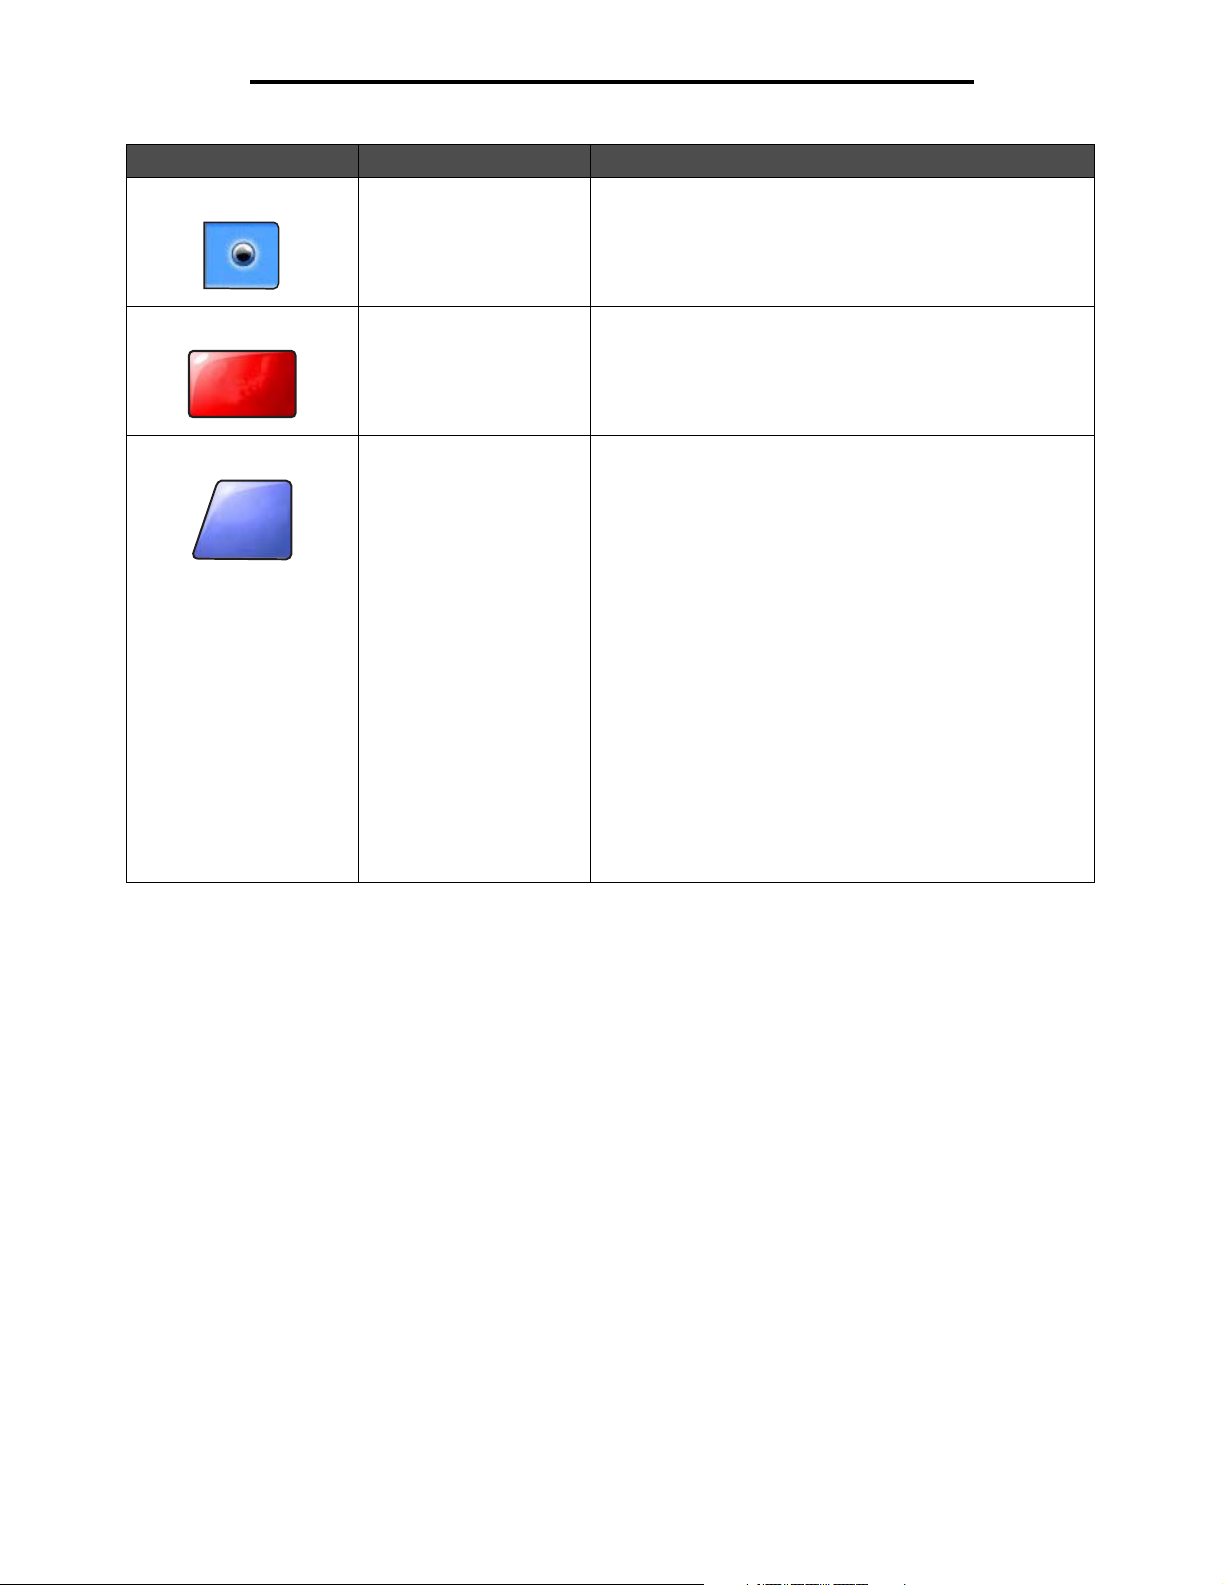
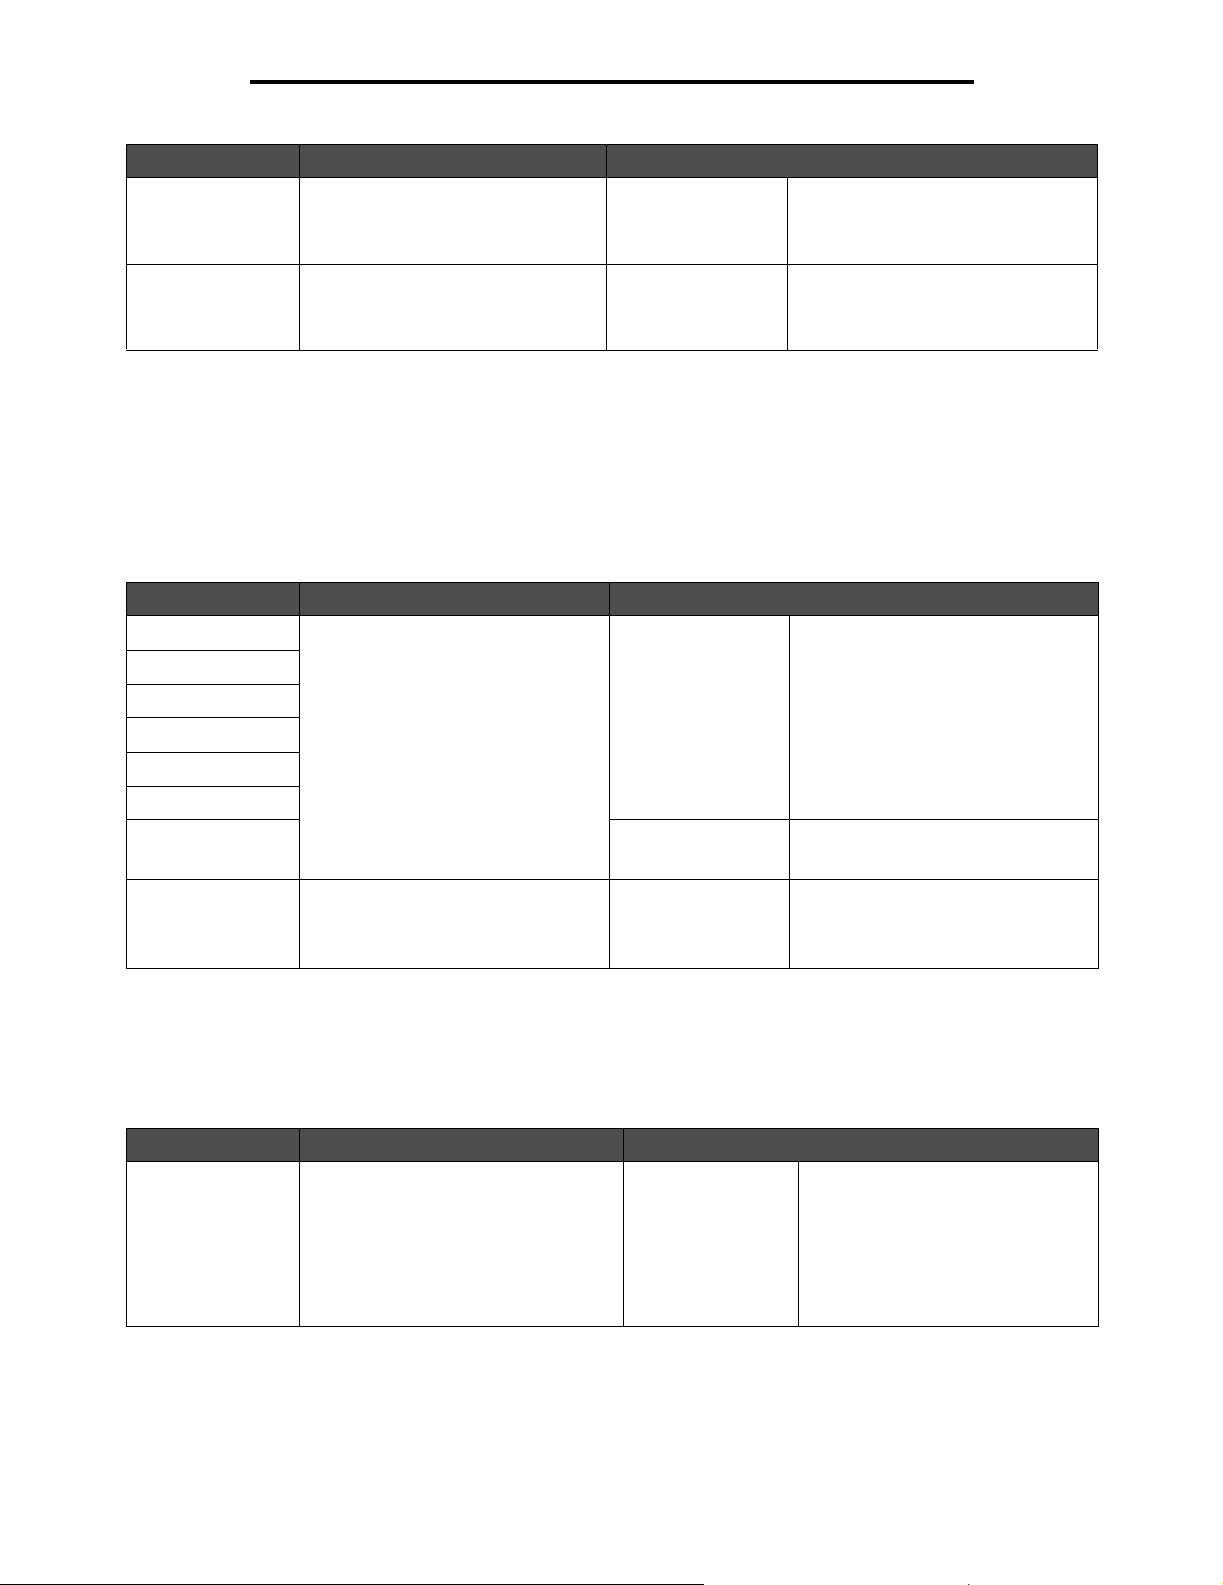
Callout Control panel item Function
1 LCD The liquid crystal display (LCD) shows home screen
buttons, menus, menu items, and values. It allows for
making selections within Copy, Fax, and so on.
2 Indicator light Gives information about the status of the MFP using the
3 0—9
Note: Referred to as the numeric
keypad.
4 # (Pound or number character) Press this button:
5 Dial Pause Cause a two- or three-second dial pause in a fax number.
colors red and green:
Status Indicates
Off MFP power is off.
Blinking green MFP is warming up, processing data,
or printing a job.
Solid green MFP is on, but idle.
Solid red Operator intervention is required.
Enter numbers when the LCD screen has a field that
accepts the entry of numbers. Also, use these buttons to
dial phone numbers for faxes.
Note: If a number is pressed while on the home screen
without pressing the # button first, the Copy menu opens
and changes the Copy Quantity.
• For a shortcut identifier.
• Within phone numbers. For a Fax number with a #,
enter it twice – ##.
• From the home screen, the Fax Destination List menu
item, E-mail Destination List menu item, or Profile List
menu item to access shortcuts.
The button only functions within the Fax menu or with fax
functions.
Redial a fax number from the home screen.
When outside of the Fax menu, fax function, or home
screen, an error beep sounds if Dial Pause is pressed.
When sending a fax, in the Fax To: field, a Dial Pause
press is represented by a comma (,).
6 Clear All When in the function menus, such as Copy, Fax, E-mail,
7 Start Initiate the current job indicated on the control panel.
and FTP, it returns all settings to their default values, and
then returns the MFP to the home screen.
When in any other menu while the MFP is Ready, it
cancels all changes that have not been submitted and
returns the MFP to the home screen.
From the home screen, press it to start a copy job with
the default settings.
The button has no effect if it is pressed while a job runs
through the scanner.
Understanding the multifunction printer (MFP) control panel
6
Page 7
Using the MFP menus
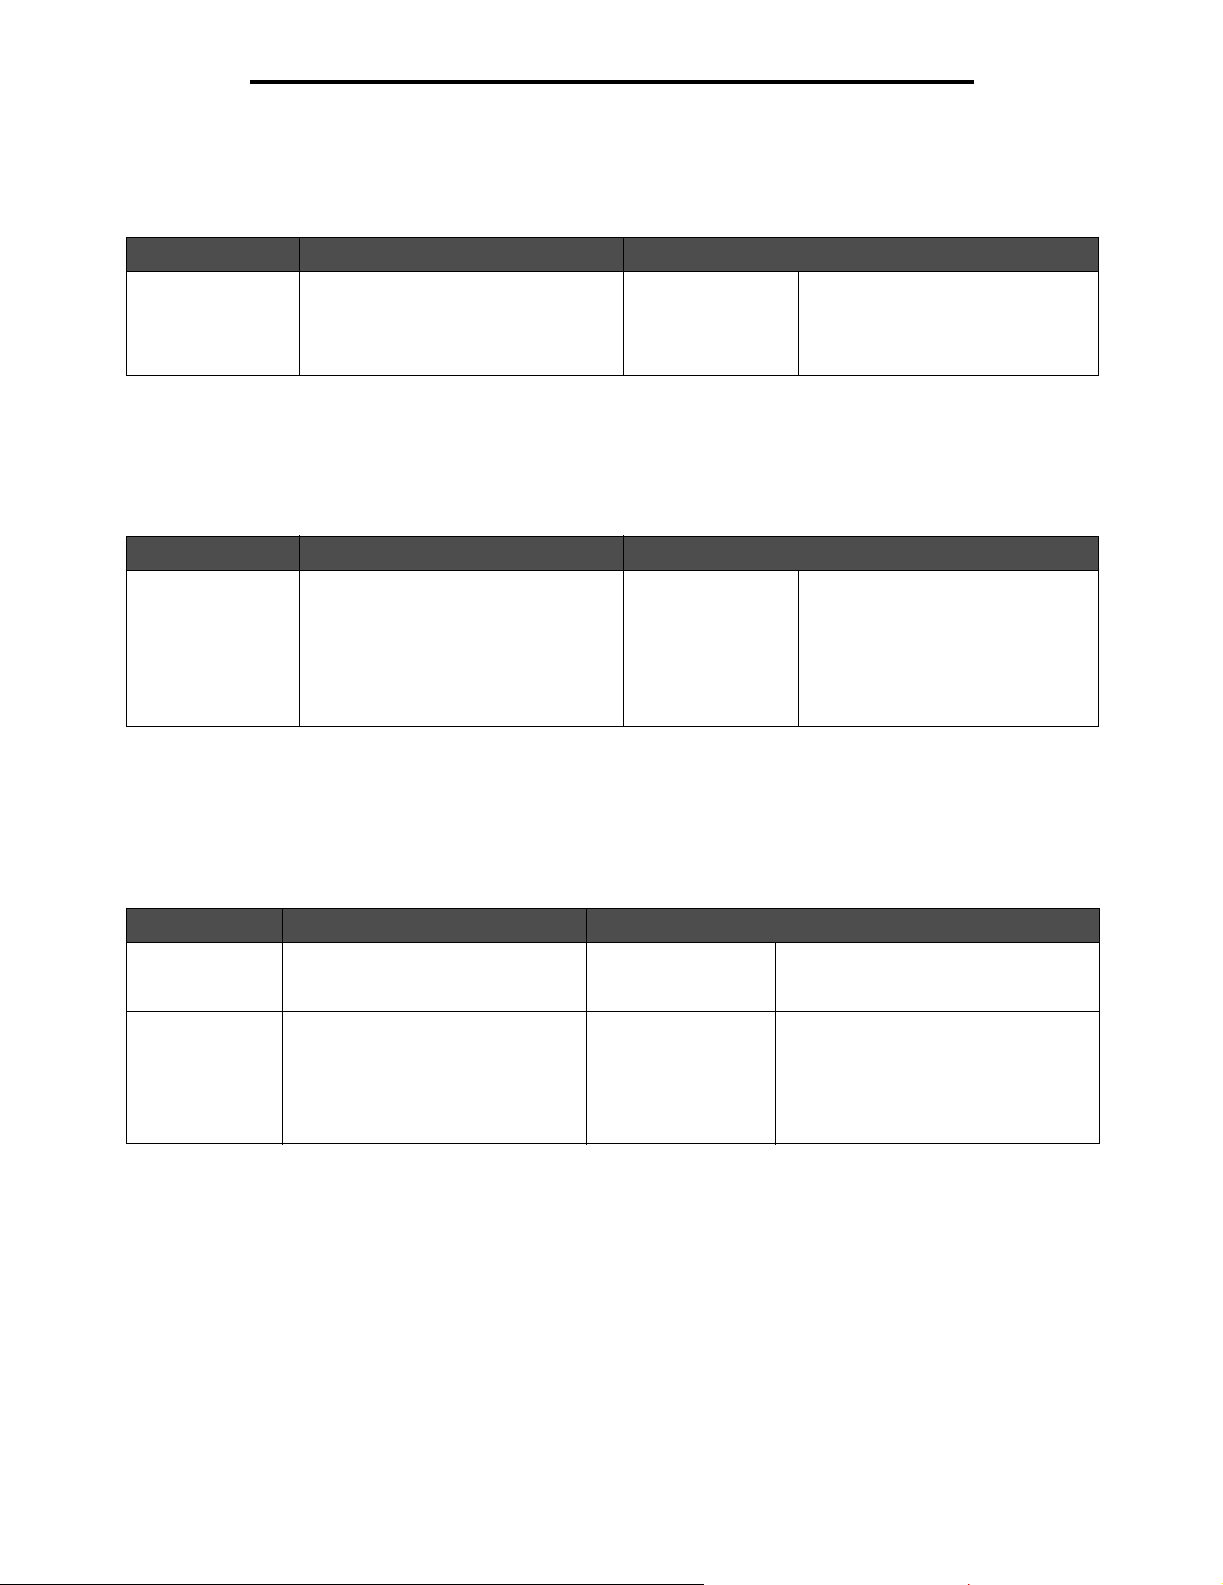
Callout Control panel item Function
8 Stop Cause the printing or scanning to stop.
During a scan job, the scanner finishes scanning the
current page and then stops, which means paper may
remain in the automatic document feeder (ADF).
During a print job, the print media path is cleared before
the printing stops.
Stopping appears on the control panel during this
process.
9 Backspace Within the Copy menu, which is accessed by touching
10 Asterisk (*) * is used as part of a fax number or as an alphanumeric
the Copy button, press Backspace to delete the rightmost digit of the value in the Copy Count. The default
value of 1 appears if the entire number is deleted by
pressing Backspace numerous times.
Within the Fax Destination List, press Backspace to
delete the right-most digit of a number entered manually.
It also deletes an entire shortcut entry. Once an entire
line is deleted, another press of Backspace causes the
cursor to move up one line.
Within the E-mail Destination List, press Backspace to
delete the character to the left of the cursor. If the entry is
in a shortcut, the entire entry is deleted.
character.
Understanding the multifunction printer (MFP) control panel
7
Page 8
Using the MFP menus
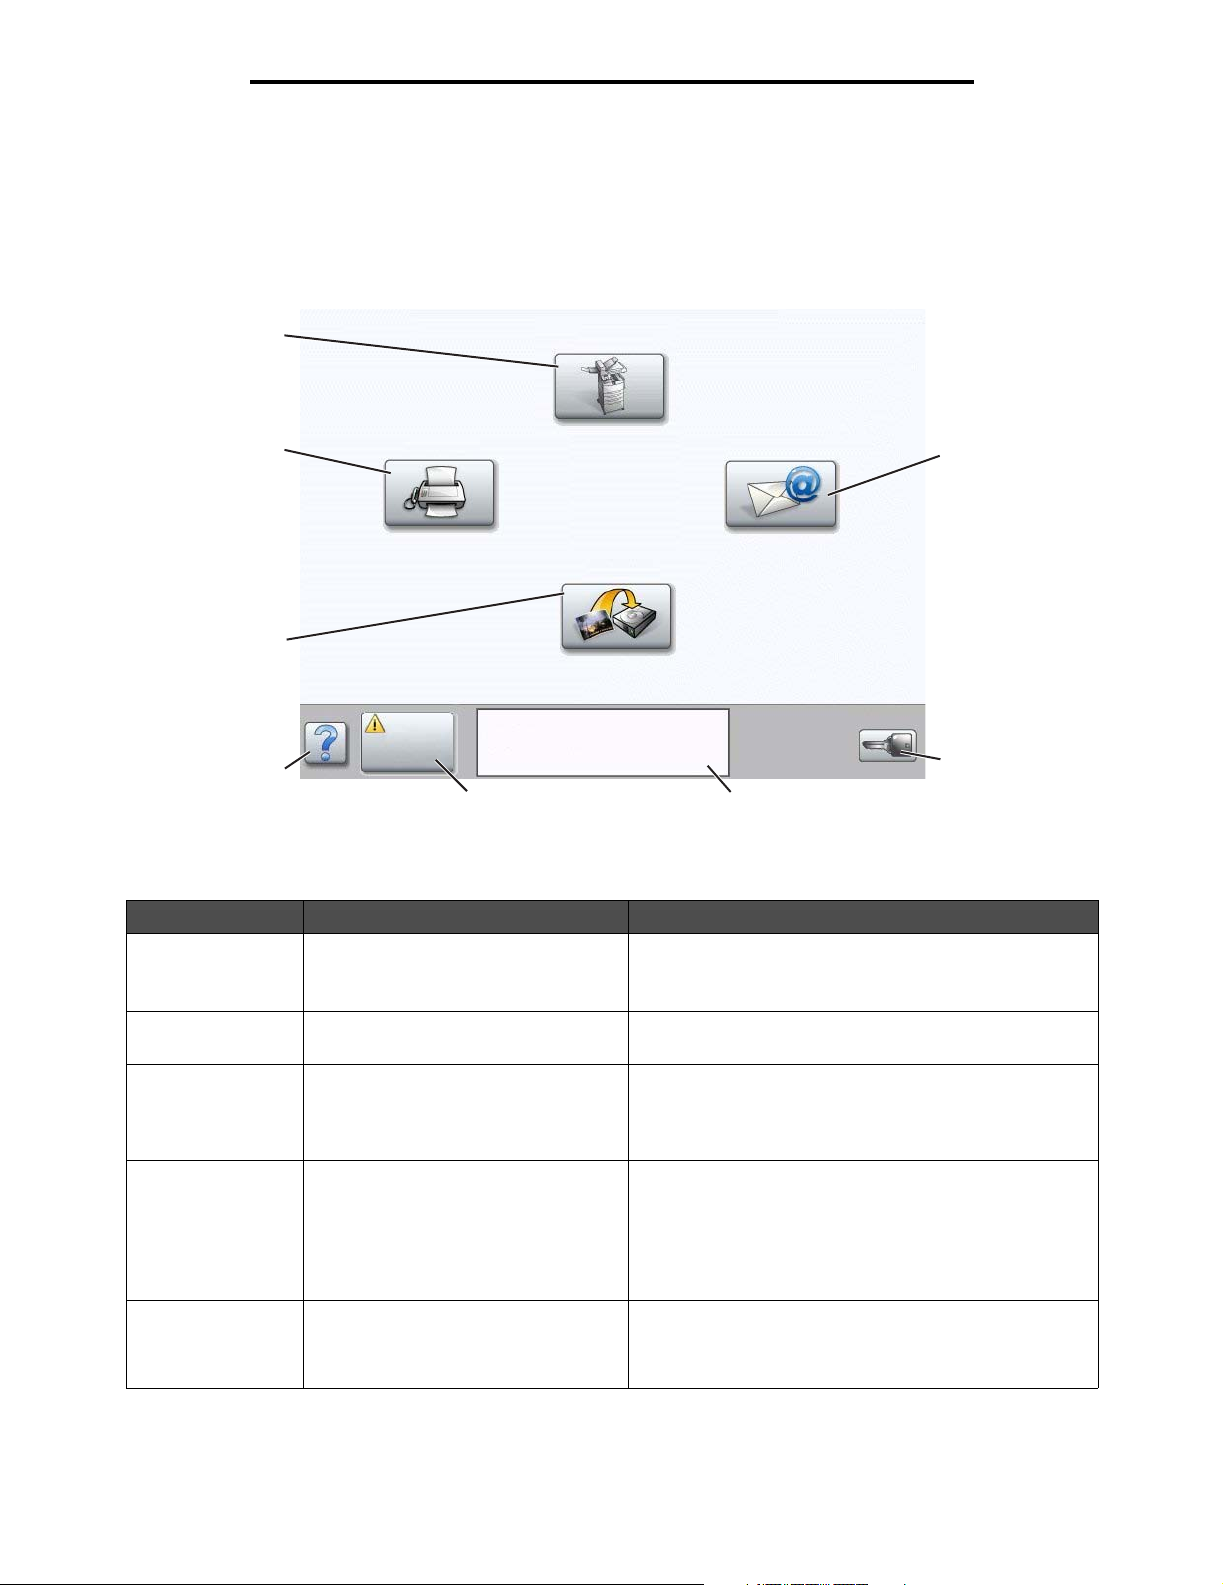
Home screen
After the MFP is turned on and a short warm-up period occurs, the LCD shows the following basic screen, which is referred
to as the home screen. Use the LCD touch-screen home screen buttons to open a menu. Once in a menu, use other
buttons to scroll through a list of menu items or values, select a value to change the user default setting, and respond to
messages.
1
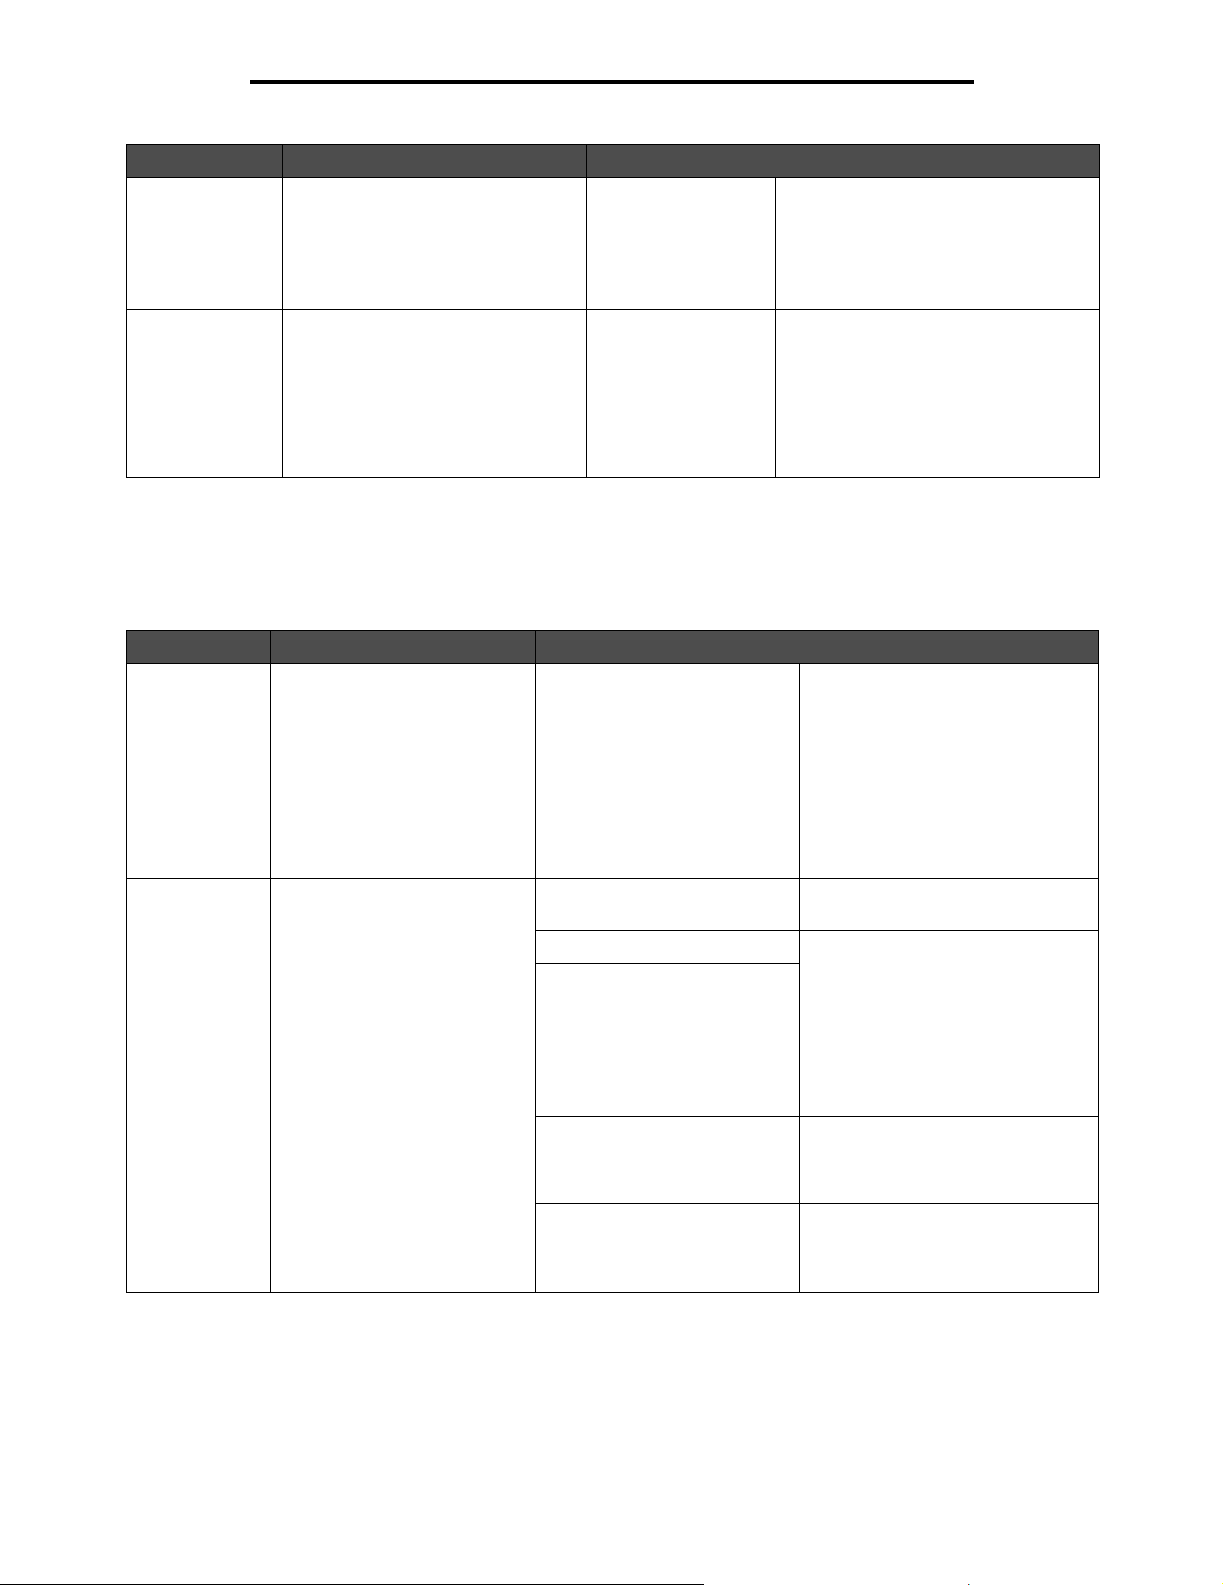
8
Fax
Copy
FTP
E-mail
2
7
Status/
Supplies
6
Ready. Toner low.
Touch any button to begin.
5
4
Menus
3
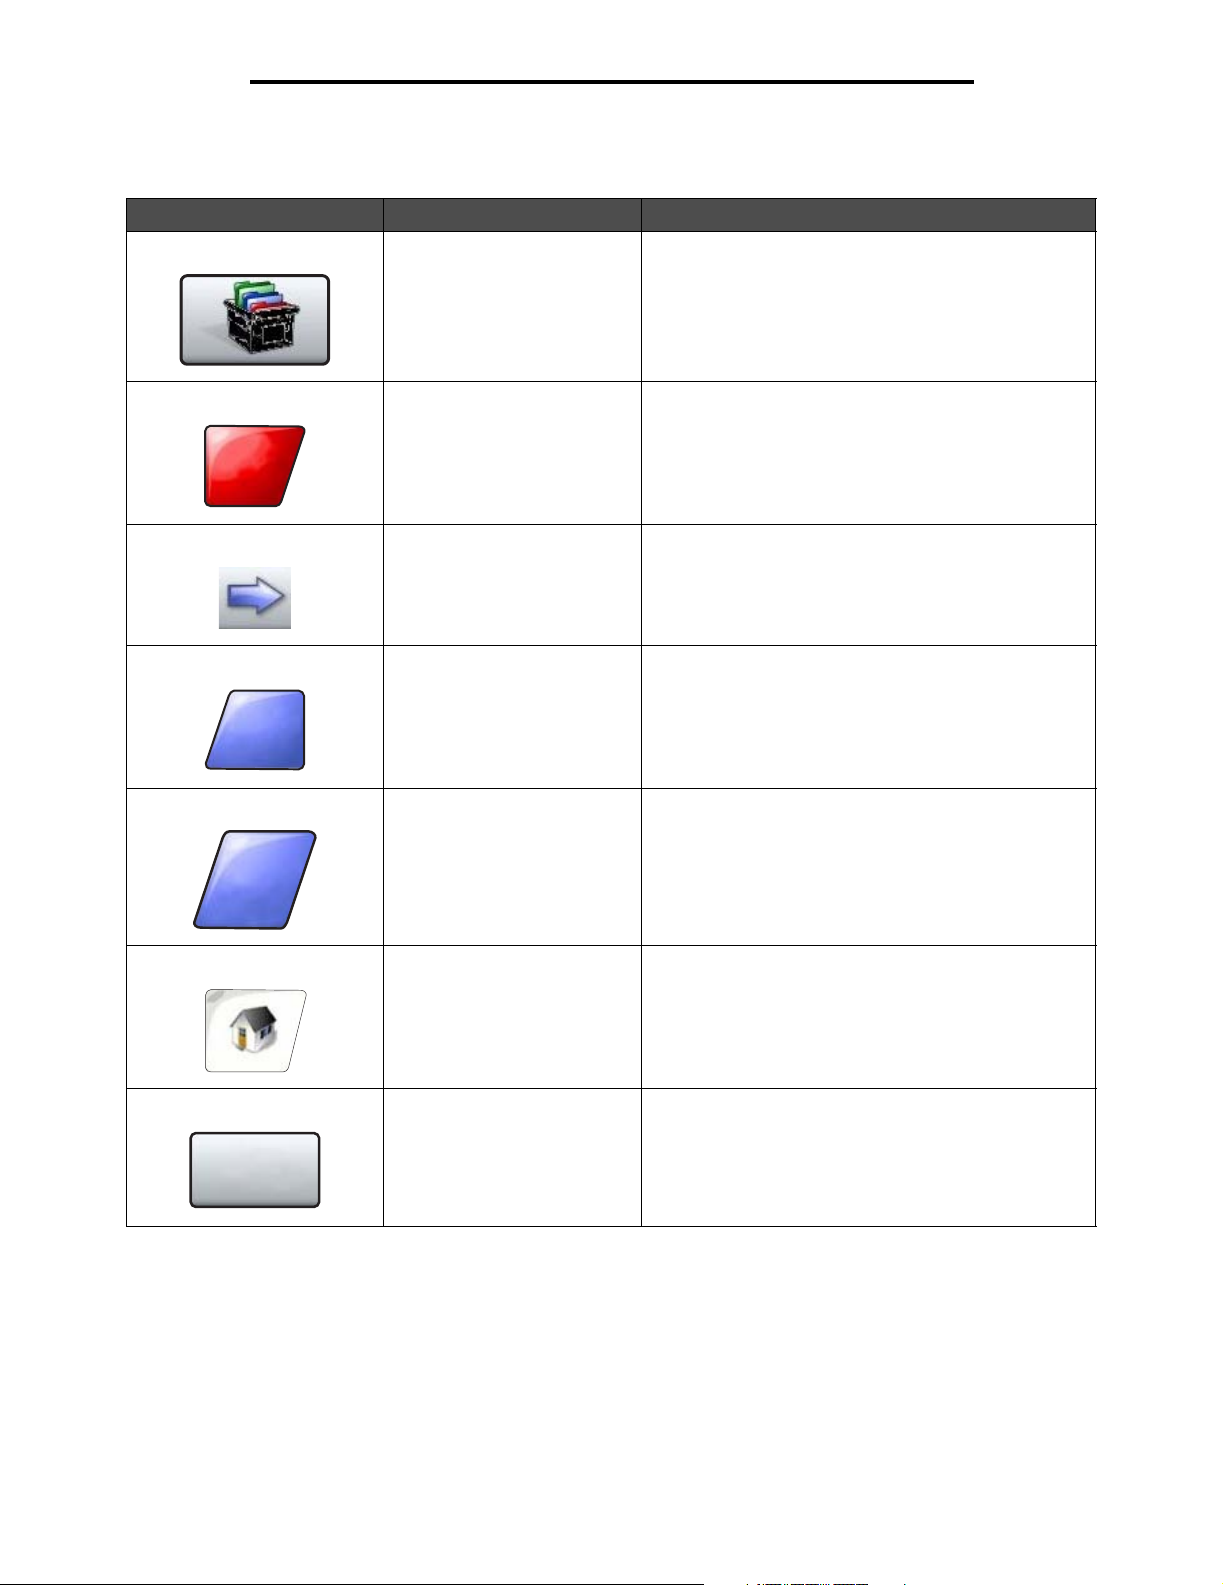
Callout number Button or screen item Function
1 Copy Access the Copy menus.
If the home screen is shown, press a number to access
the Copy menus, too.
2 E-mail Access the E-mail menus. It is possible to scan a
3 Menus (A key is shown on the button.) Access the menus. These menus are only available
4 Status message bar Shows the current MFP status, such as Ready or Busy.
5 Status/Supplies Appears on the LCD whenever the MFP status includes a
document directly to an e-mail address.
when the MFP is in the Ready state.
The Menus button is on a gray bar called the navigation
bar. The bar contains other buttons described as follows.
Shows MFP conditions, such as Toner Low.
Shows intervention messages to give instructions on
what the user should do so the MFP can continue
processing, such as Close door or insert print
cartridge.
message requiring intervention. Touch it to access the
messages screen for more information on the message,
including how to clear it.
Understanding the multifunction printer (MFP) control panel
8
Page 9
Using the MFP menus
Callout number Button or screen item Function
6 ? (Tips) All menus have a Tips button. Tips is the
7 FTP Access the File Transfer Protocol (FTP) menus. A
8 Fax Access the Fax menus.
Other LCD touch-screen buttons may appear on the home screen. They are:
Button Button name Function
Release Held Faxes
(or Held Faxes if in
Manual Mode)
Search Held Jobs Search on any of the following items and return any matches:
There are held faxes with a scheduled hold time previously set. To
access the list of held faxes, touch this button.
• User names for held or confidential print jobs
• Job names for held jobs, excluding confidential print jobs
• Profile names
• Bookmark container or job names
• USB container or job names for supported extensions only
context-sensitive Help feature within the LCD touch
screens.
document can be scanned directly to an FTP site.
Held Jobs Open a screen containing all the held jobs containers.
Lock Device This button appears on the screen when the MFP is unlocked and the
Device Lockout Personal Identification Number (PIN) is not null or
empty.
To lock the MFP:
1 Touch Lock Device to open a PIN entry screen.
2 Enter the correct PIN to lock the control panel which locks both the
control panel buttons and the touch-screen buttons.
Once the control panel is locked, the PIN entry screen clears, and
the Lock Device button is replaced with the Unlock Device button.
Note: If an invalid PIN is entered, Invalid PIN. appears. A pop-up
screen appears with the Continue button shown. Touch Continue. The
home screen returns with the Lock Device button shown.
Understanding the multifunction printer (MFP) control panel
9
Page 10
Using the MFP menus
Button Button name Function
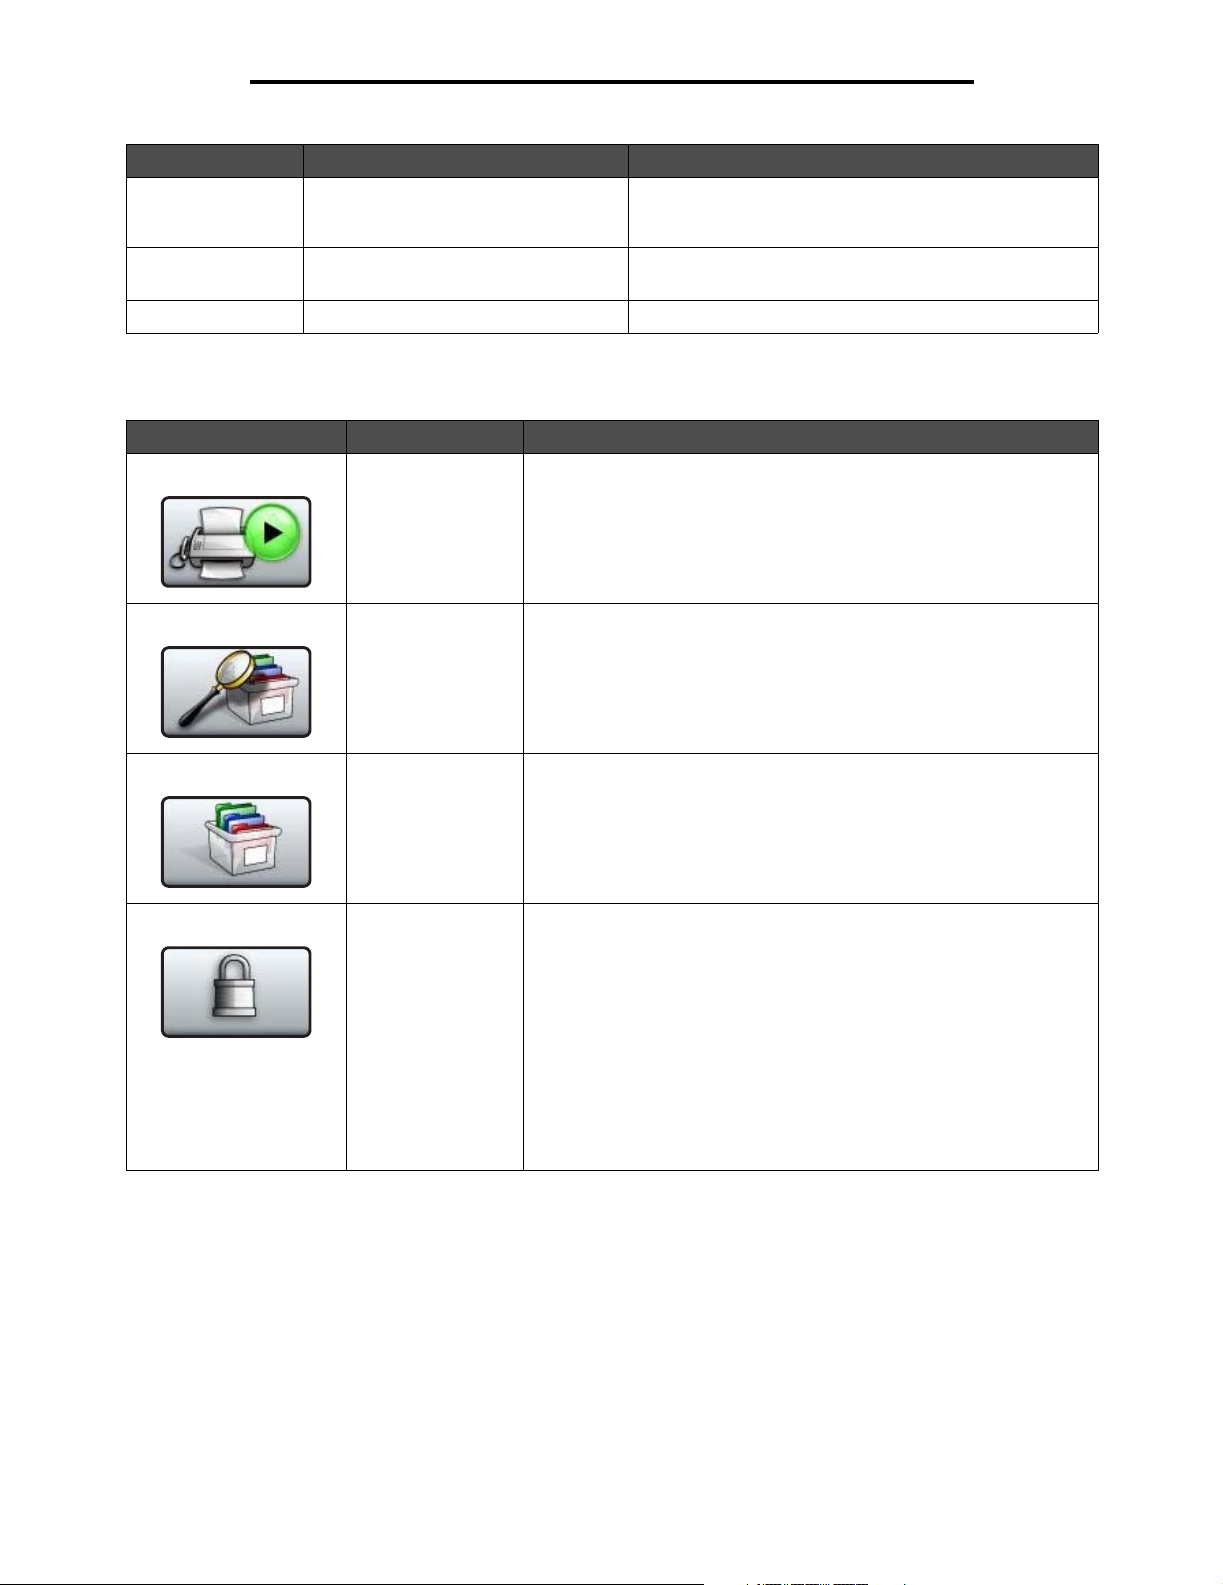
Unlock Device This button appears on the screen when the MFP is locked. The
Cancel Jobs Open the Cancel Jobs screen. The Cancel Jobs screen shows any of
Cancel
Jobs
control panel buttons and shortcuts cannot be used while it appears
and no default copy starts may occur.
To unlock the MFP:
1 Touch Unlock Device to open a PIN entry screen.
2 Enter the correct PIN to unlock the numeric keypad (0—9) and the
Backspace button on the control panel.
Note: If an invalid PIN is entered, Invalid PIN. appears. A pop-up
screen appears with the Continue button shown. Touch Continue. The
home screen returns with the Unlock Device button shown.
the following items under three headings on the screen, which are
Print, Fax, and Network:
•print job
• copy job
•fax
• profile
•FTP
• e-mail send
Each heading has its own list of jobs shown in a column under it. Each
column can only show three jobs per screen. Each job appears as a
button. If more than three jobs exist in a column, then the down arrow
appears at the bottom of the column. Each touch of the down arrow
accesses one job in the list. When more than three jobs exist, once the
fourth job in the list is reached, then an up arrow appears at the top of
the column. For illustrations of the up and down arrow buttons, see
Information on LCD touch-screen buttons on page 15.
To cancel a job, see the User’s Guide for instructions.
Understanding the multifunction printer (MFP) control panel
10
Page 11
Using the MFP menus
Using the LCD touch-screen buttons
The following section provides information on navigating through several screens. Only a few are chosen to demonstrate
the use of the touch-screen buttons.
Sample screen one
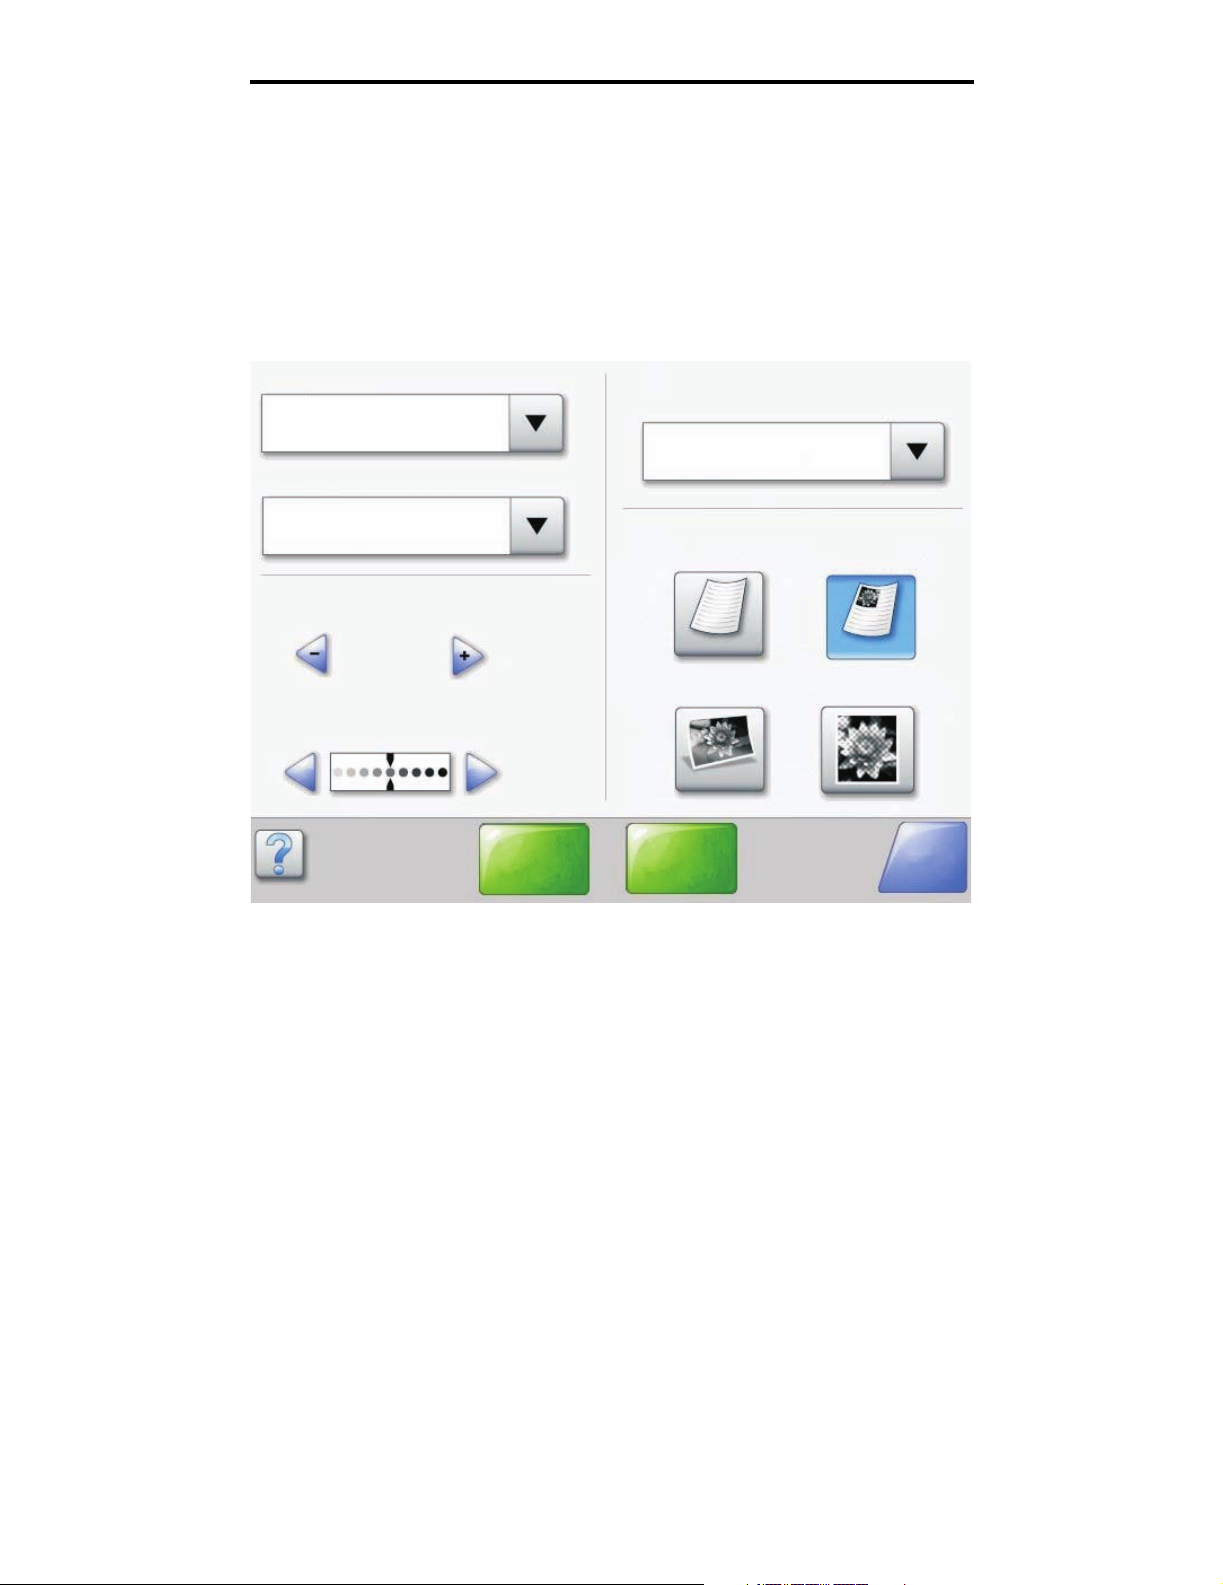
The touch screen appears as follows when the touch screen MFP is a mono printer.
Copy from
Letter (8.5 x 11 in.)
Copy to
Letter (8.5 x 11 in.)
Plain Paper
Scale
Auto
(100%)
Darkness
Scan the
ADF
Sides (Duplex)
Portrait
1-sided to 1-sided
Content
Text Text/Photo
Photograph Printed Image
Scan the
flatbed
Back
Using the LCD touch-screen buttons
11
Page 12
Using the MFP menus
The touch screen appears as follows when the touch screen MFP is a color printer.
Copy from
Letter (8.5 x 11 in.)
Copy to
Letter (8.5 x 11 in.)
Plain Paper
Scale
Auto
(100%)
Darkness
Copy It
Copies:
Sides (Duplex)
1 sided to 1 sided 1 sided to 2 sided
2 sided to 1 sided 2 sided to 2 sided
Collate
On
1
Off
Back
Options
Using the LCD touch-screen buttons
12
Page 13
Using the MFP menus
Information on LCD touch-screen buttons
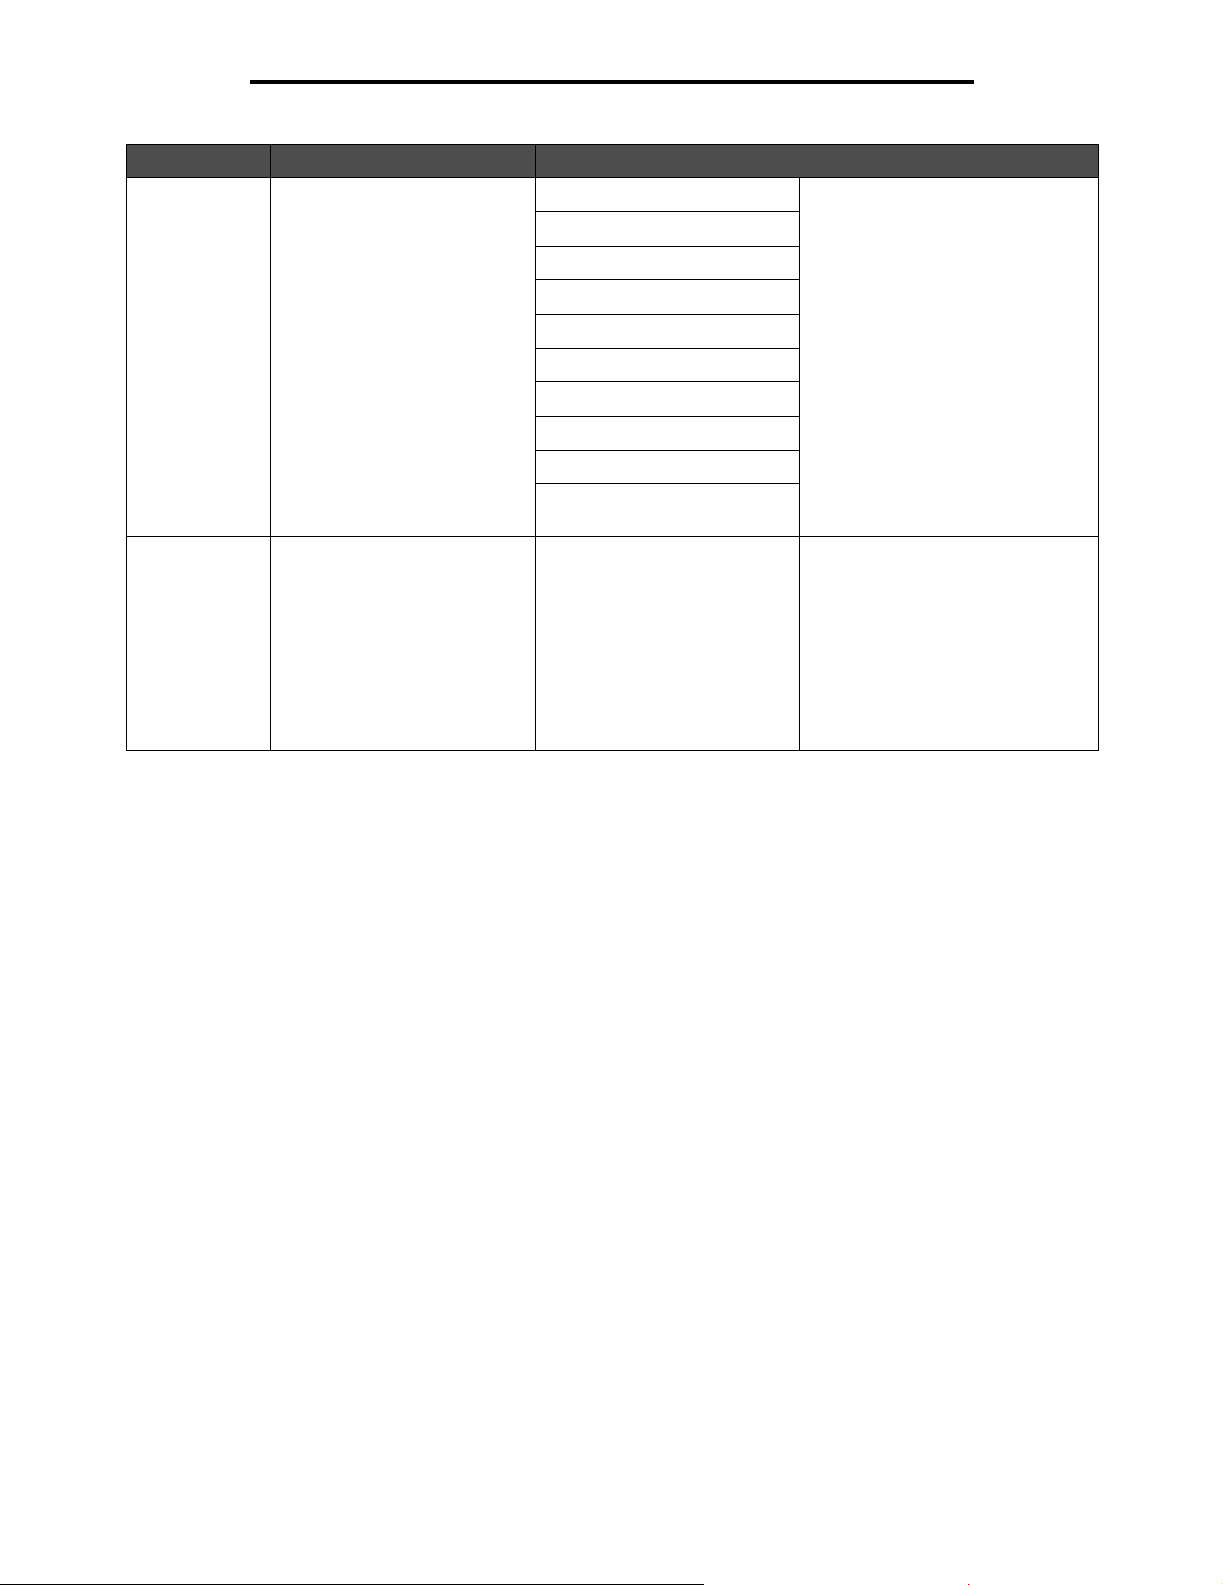
Button Button name Function or description
Select Touch the select button to have another screen appear with additional
items. On the first screen, the user default setting is shown. Once the
select button is touched, and the next screen appears, touching
another item shown on the screen changes the user default setting.
Scan the
ADF
Left scroll decrease Touch the left scroll decrease button to scroll to another value in
Right scroll increase Touch the right scroll increase button to scroll to another value in
Left arrow Touch the left arrow button to scroll left to:
Right arrow Touch the right arrow button to scroll right to:
Scan the ADF
Scan the flatbed
Submit A green button indicates a choice. If a different value within a menu
decreasing order.
increasing order.
• Reach a decreased value shown by an illustration.
• See a full text field on the left.
• Reach an increased value shown by an illustration.
• See a full text field on the right.
On the gray navigation bar, these two choices indicate that two types
of scanning are possible. One may choose to scan from the ADF or
the flatbed.
item is touched, it needs to be saved to become the current user
default setting. To save the value as the new user default setting,
touch Submit.
Scan the
flatbed
Submit
For information on user default settings, see page 19.
Using the LCD touch-screen buttons
13
Page 14

Using the MFP menus
Button Button name Function or description
Back When the Back button is shaped like this, no other navigation is
Back
Back When the Back button is shaped like this, both forward and backward
Back
possible from this screen except to go back. If any other choice is
made on the navigation bar, the screen closes.
For example, in Sample screen one all the selections for scanning
have been made. One of the preceding green buttons should be
touched. The only other button available is Back. Touch Back to return
to the previous screen, and all the settings for the scan job made on
Sample screen one are lost.
navigation is possible from this screen, so there are other options
available on the screen besides selecting Back.
Using the LCD touch-screen buttons
14
Page 15
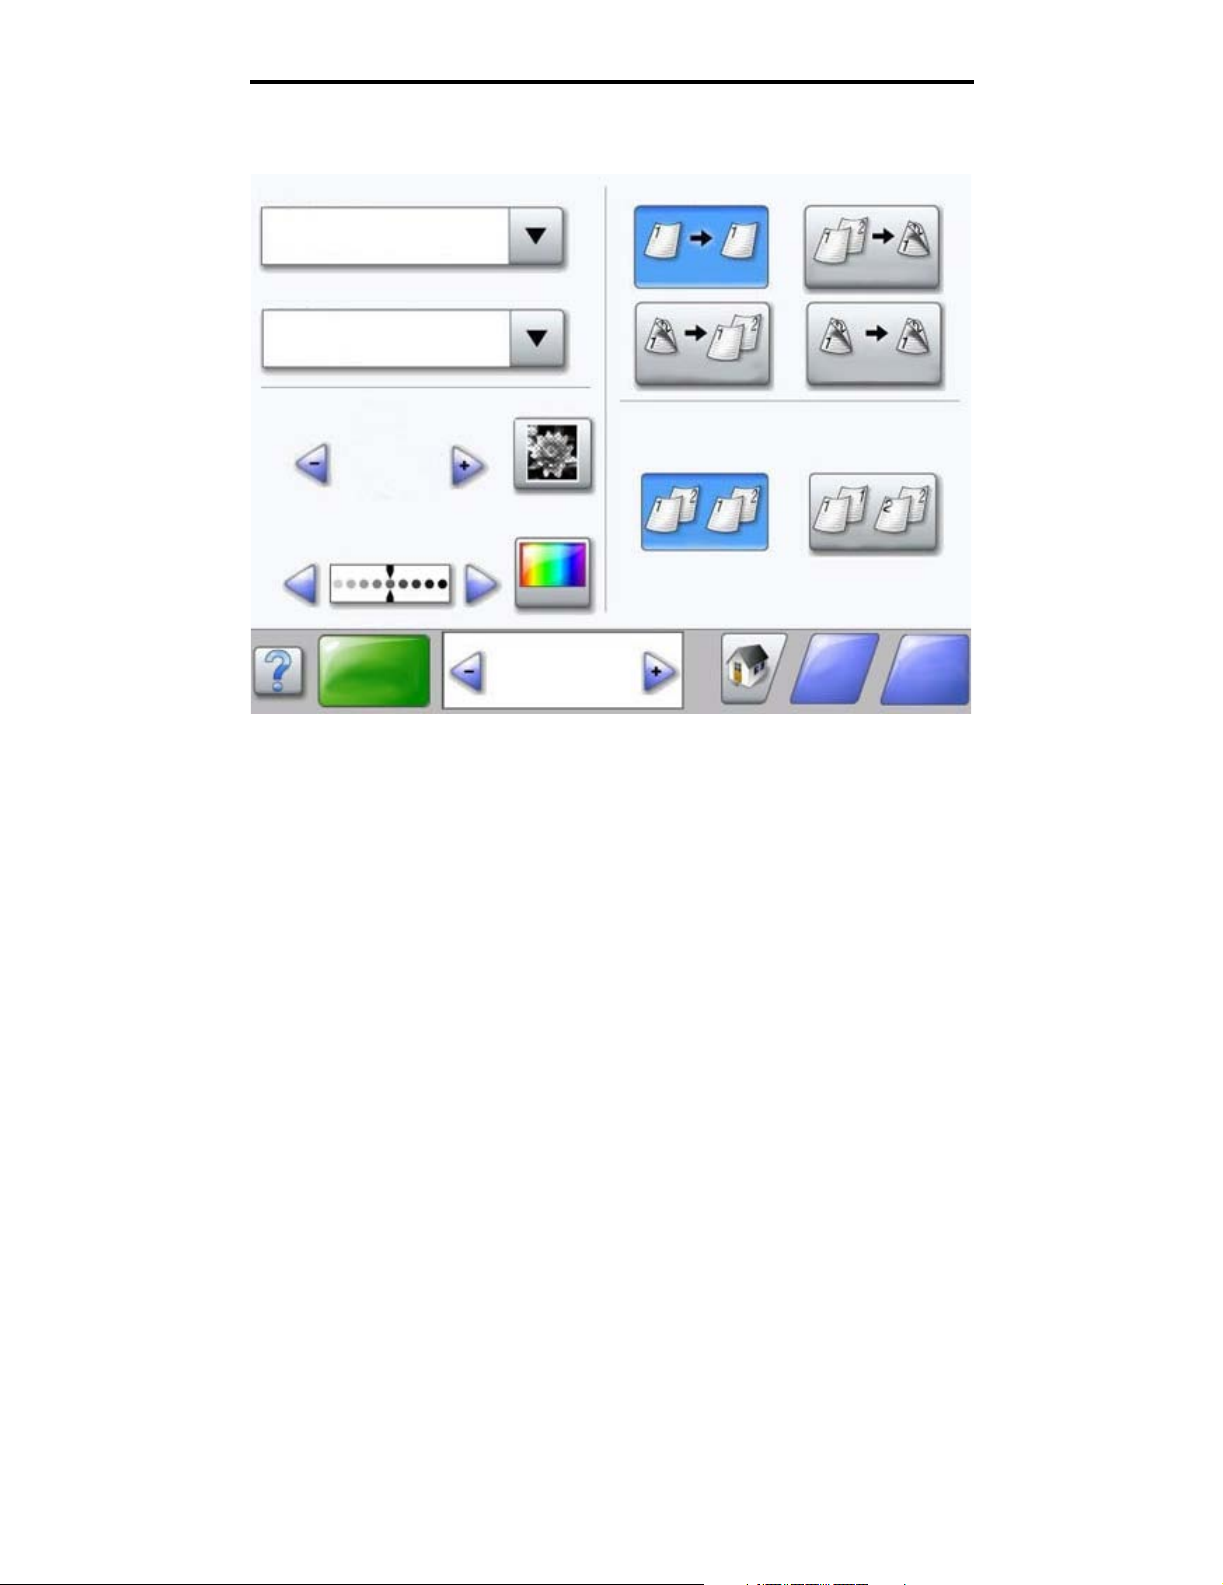
Sample screen two
Unknown paper size. Copy from:
Letter (8.5 x 11 in.)
Legal (8.5 x 14 in.)
Executive (7.25 x 10.5 in.)
Folio (8. 5 x 13 in.)
Statement (5.5 x 8.5 in.)
A4 (210 x 297 mm)
Using the MFP menus
Information on LCD touch-screen buttons
Button Button name Function or description
Down arrow Touch the down arrow to move down to the next item in a list,
such as a list of menu items or values. The down arrow does
not appear on a screen with a short listing. It only appears if
the entire listing cannot be seen on one screen. On the last
screen of the listing, the down arrow is gray to indicate that it
is not active since the end of the list appears on this screen.
Up arrow Touch the up arrow to move up to the next item in a list, such
as a list of menu items or values. When on the first screen
presented with a long list, the up arrow is gray to indicate that
it is not active. On the second screen, which is needed to
show the rest of the listed items, the up arrow is blue to show
that it is active.
Unselected radio button This is an unselected radio button.
Cancel
Job
Continue
Using the LCD touch-screen buttons
15
Page 16
Using the MFP menus
Button Button name Function or description
Selected radio button This is a selected radio button. Touch a radio button to select
Cancel Job See Cancel Jobs on page 10.
Cancel
Job
it. The radio button changes color to show that it is selected.
In Sample screen two, the only paper size selected is Letter.
Continue
Continue Touch Continue after a menu item or value on a screen is
selected and more changes need to be made for a job from
the original screen. Once Continue is touched, the original
screen appears.
For example, if one touched Copy on the home screen, the
Copy screen appears like Sample screen one on page 11.
The following example shows how the Continue button
reacts.
1 Touch the select button by the Copy to box, and a new
screen appears.
2 Touch MP Feeder, and a new screen appears.
3 Touch Legal, and a new screen appears.
4 Touch Next, and a new screen appears.
5 Touch Plain Paper for the type of print media needed.
6 Touch Continue. The Copy screen returns to allow other
selections besides Copy to. The other settings on the Copy
screen available are Duplex, Scale, Darkness, Collate, and
Copies.
Touch Continue to return to the original screen and make
other setting changes for a copy job before the Copy it
button is touched to start the job.
Using the LCD touch-screen buttons
16
Page 17
Using the MFP menus
Other LCD touch-screen buttons
Button Button name Function or description
Custom Allows for creating a custom button based on the
user’s needs.
Cancel
Done
Back
Cancel Cancel an action or a selection, or cancel out of a
screen and return to the previous screen.
Select Select a menu. The next screen appears showing
menu items.
Select a menu item. The next screen appears showing
values.
Done Specify that a job is finished. For example, when
scanning an original document, one can indicate that
the last page is scanned, and then the print job begins.
Back Return to the previous screen without saving any
settings from the screen.
Note: The Back button appears on each menu screen
except for the home screen.
Home Return to the home screen.
Note: The Home button appears on every screen
except the home screen.
For more information, see the Home screen on
page 8.
Reset
active bin
Reset active bin Define the active bin as the start bin (the first bin to
receive printed output) in a set of linked bins.
Note: This button only appears when the MFP is in a
stopped state.
Using the LCD touch-screen buttons
17
Page 18

Using the MFP menus
Button Button name Function or description
Grayed out button When this button appears, it looks faded with a faded
Gray button Touch this button to select the action appearing on the
word on it. It means the button is not active or is
unavailable on this screen. It was probably active on
the previous screen, but the selections made on the
previous screen caused it to be unavailable on the
current screen.
For an example, see page 96.
button.
For an example, see page 97.
Features
Feature Feature name Description
Æ Settings
Menus
Æ Copy Settings
Æ Number of
Copies
Menu trail line A line is located at the top of each menu screen. This
feature acts as a trail. It gives the exact location within
the menus. Touch any of the underlined words to return
to that menu or menu item. The Number of Copies is not
underlined since this is the current screen.
If this feature is used on the Number of Copies screen
before the Number of Copies is set and saved, then the
selection is not saved, and it does not become the user
default setting.
Attendance message alert If an attendance message occurs which closes a
function, such as copy or fax, then a blinking red
exclamation point appears over the function button on the
home screen. This feature indicates an attendance
message exists.
Using the LCD touch-screen buttons
18
Page 19
Using the MFP menus
Menus
Factory defaults are the function settings in effect the first time the MFP is turned on. These remain in effect until they are
changed. To restore factory defaults, select the Restore value from the Factory Defaults menu item.
When a value or setting is selected and saved, it is stored in MFP memory. Once stored, these settings remain active until
new ones are stored or the factory defaults are restored. These settings are called user default settings since the user
selects and saves them.
Note: Settings chosen for faxing, scanning, e-mailing, and copying, and settings for printing from the
application may override the user default settings.
Menu map
The following menu map provides an overview of the menus and menu items available from the control panel. Select a
menu or menu item for more details. For values or settings for each menu item, see the individual descriptions of menu
items following the menu map. There can be an extra level in the menu hierarchy so that it is structured: menu, menu item,
menu item (there can be several more menu items under a menu item), and values.
Click any of the following menus or menu items listed for more information:
Paper Menu
Default Source
Paper Size/Type
Configure MP
Substitute Size
Paper Texture
Paper Weight
Paper Loading
Custom Types
Custom Names
Custom Bin Names
Universal Setup
Bin Setup
Reports
Note: The factory default is indicated by an asterisk (*) by the value in the following tables.
Reports
Menu Settings Page
Device Statistics
Network Setup Page
Wireless Setup Page
Shortcut List
Fax Job Log
Fax Call Log
E-mail Shortcuts
Fax Shortcuts
FTP Shortcuts
Profiles List
NetWare Setup Page
Print Fonts
Print Directory
Manage Shortcuts
Manage Fax Shortcuts
Manage E-mail Shortcuts
Manage FTP Shortcuts
Manage Profile Shortcuts
Network/Ports
TCP/IP
IPv6
E-mail Server Setup
Wireless
Standard Network
Network <x>
Standard USB
USB <x>
Standard Parallel
Parallel <x>
Serial <x>
NetWare
AppleTalk
LexLink
Settings
General Settings
Copy Settings
Fax Settings
E-mail Settings
FTP Settings
Print Settings
Security
Set Date and Time
Help Pages
Print All
Information Guide
Copying
E-mail
Faxing
FTP
Menus
19
Page 20
Using the MFP menus
Paper Menu
Use the Paper Menu to define settings relating to print media.
Default Source
Use this menu item to define the default print media source.
Menu item Purpose Values and descriptions
Default Source Identifies the default print media
source.
Tray <x> If the same size and type of print media
MP Feeder
Envelope Feeder
Manual Paper
Manual Env
are in two sources (and the Paper Size
and Paper Type menu items are
correctly set), the sources are
automatically linked. When one source
is empty, print media automatically
feeds from the next linked source.
Tray 1 is the factory default setting.
x represents the tray number, such as
Tray 1 for the standard tray and Tray 2
for an optional tray.
Note: The MP Feeder value, which
stands for the multipurpose feeder, is
shown only when Configure MP is set
to Cassette. See Configure MP for
more information.
Paper Size/Type
Note: Only installed print media sources appear for this menu item.
These menu items are used to set the size and type of print media loaded into a source, such as a tray, the multipurpose
feeder, or the manual feed slot. Setting the size and type is a two-step process. In the first menu item, Size appears in bold
letters. After selecting the print media size, the screen changes, and Type appears in bold letters. Select the print media
type.
Menu item Purpose Values and descriptions
Tray <x>
Size
Identifies the default size for each
source.
Only installed sources appear.
Note: For trays with automatic size
sensing, only the value detected by
the hardware appears.
A4* (non-US)
A5
JIS B5
Letter* (US)
Legal
Executive
Folio
Statement
Universal
If the same size and type of print
media is in two sources (and the
Paper Size and Paper Type menu
items are correctly set), the sources
are automatically linked. When one
source is empty, print media
automatically feeds from the next
linked source.
See Tray <x> Type for more
information.
Paper Menu
20
Page 21
Using the MFP menus
Menu item Purpose Values and descriptions
Tray <x>
Type
Identifies the type of print media
loaded in each source.
Note: If a user-defined name is
available, it appears instead of
Custom Type <x>. If two or more
custom types share the same name,
the name only appears once in the
Paper Type list.
Plain Paper
Card Stock
Transparency
Labels
Vinyl Labels
Bond
Letterhead
Preprinted
Colored Paper
Custom Type <x>
(where x
represents 1—6)
Use this menu item to:
• Optimize print quality for the
specified print media.
• Select sources through the
software application by selecting
type.
• Automatically link sources.
Any sources containing the same
type and size of print media are
automatically linked by the MFP if the
Paper Size and the Paper Type are
set to the correct values.
MP Feeder
Size
MP Feeder
Type
Identifies the size of print media
inserted in the multipurpose feeder.
Identifies the type of print media
inserted in the multipurpose feeder.
Note: If a user-defined name is
available, it appears instead of
Custom Type <x>. If two or more
custom types share the same name,
the name only appears once in the
Paper Type value list.
A4 (non-US)*
A5
JIS B5
Letter (US)*
Legal
Executive
Folio
Statement
Universal
7 3/4 Envelope
9 Envelope
10 Envelope
DL Envelope
B5 Envelope
C5 Envelope
Other Envelope
Plain Paper*
Card Stock
Transparency
Labels
Vinyl Labels
Bond
Envelope
Letterhead
Preprinted
Colored Paper
Custom Type <x>
(where x
represents 1—6)
The multipurpose feeder only
appears on the control panel when
Configure MP is set to Cassette.
Note: See Configure MP for more
information.
The multipurpose feeder only
appears on the control panel when
Configure MP is set to Cassette.
Custom Type 6 is the factory default
for Custom Types.
Note: See Configure MP for more
information.
Paper Menu
21
Page 22
Using the MFP menus
Menu item Purpose Values and descriptions
Envelope Feeder
Size
Identifies the size of envelope
inserted in the envelope feeder.
This menu item appears only if the
optional envelope feeder is installed.
7 3/4 Envelope
9 Envelope
10 Envelope* (US)
DL Envelope* (non-US)
C5 Envelope
B5 Envelope
Other Envelope
Envelope Feeder
Type
Manual Paper
Size
Manual Paper
Type
Manual Envelope
Size
Manual Envelope
Type
Identifies the type of envelope
inserted in the envelope feeder.
This menu item appears only if the
optional envelope feeder is installed.
Identifies the print media size being
manually loaded.
Identifies the print media type being
manually loaded.
Identifies the envelope size being
manually loaded.
Identifies the envelope type being
manually loaded.
Envelope
Custom Type <x>
(where x
represents 1—6)
A4* (non-US)
A5
JIS B5
Letter* (US)
Legal
Executive
Folio
Statement
Universal
Plain Paper*
Card Stock
Transparency
Labels
Vinyl Labels
Bond
Letterhead
Preprinted
Colored Paper
Custom Type <x> (where x represents 1—6)
7 3/4 Envelope
9 Envelope
10 Envelope (US)*
DL Envelope (non-US)*
B5 Envelope
C5 Envelope
Other Envelope
Envelope*
Custom Type <x> (where x represents 1—6)
Note: If a user-defined name is
available, it appears instead of
Custom Type <x>. If two or more
custom types share the same name,
the name only appears once in the
Envelope Feeder Type value list.
Paper Menu
22
Page 23
Using the MFP menus
Configure MP
This menu item is used to configure the multipurpose feeder as another source or manual feeder. If the multipurpose feeder
is linked with another tray, the MFP can select print media from the multipurpose feeder before selecting print media from
another tray.
Menu item Purpose Values and descriptions
Configure MP Determines when the MFP selects
print media loaded in the multipurpose
feeder.
Cassette* MFP treats the multipurpose feeder
like any other tray. If a print job
requests a size or type that is only
loaded in the multipurpose feeder,
the MFP pulls print media from the
multipurpose feeder for the job.
Manual MFP treats the multipurpose feeder
First MFP pulls print media from the
like a manual feed tray, and Load
Manual appears when a single
sheet of print media needs to be
inserted in the feeder.
multipurpose feeder until it is
empty, regardless of the source or
size requested for the job.
Substitute Size
This menu item is used to determine whether the MFP can substitute another print media size if the requested size is not
currently installed in any of the MFP sources. If, for example, Substitute Size is set to Letter/A4, and only letter size paper
is installed in the MFP when a request is received to print on A4 paper, the MFP substitutes letter for A4 and prints the job
instead of showing a change paper request.
Menu item Purpose Values and descriptions
Substitute Size The MFP substitutes the specified
print media size if the requested size
is not loaded.
Off MFP prompts the user to load the
requested paper size. No size
substitutions are allowed.
Statement/A5 Prints A5 size jobs on statement
size paper if only statement size
paper is loaded, and prints
statement size jobs on A5 paper if
only A5 paper is loaded.
Letter/A4 Prints A4 size jobs on letter size
paper if only letter size paper is
loaded, and prints letter size jobs on
A4 size paper if only A4 size paper
is loaded.
All listed* Substitutes both Letter/A4 and
Paper Menu
23
Statement/A5 which means all
available substitutions are allowed.
Page 24
Using the MFP menus
Paper Texture
These menu items are used to set the print media texture for each of the defined print media types. This allows the MFP to
optimize the print quality for the specified print media.
Menu item Purpose Values and descriptions
Plain Texture Identifies the texture of the print
Transparency
Texture
Glossy Texture
Labels Texture
Bond Texture
Envelope Texture
Letterhead Texture
Preprinted Texture
Colored Texture
Vinyl Labels
Texture
Card Stock Texture Identifies the texture of the card stock
Custom <x>
Texture
media loaded in a specific source.
Identifies the texture of the vinyl
labels loaded in a specific source.
loaded in a specific source.
Identifies the texture of the custom
print media loaded in a specific
source. (x represents 1—6.)
Smooth
Normal*
Rough
Smooth
Normal*
Rough
Smooth
Normal*
Rough
Smooth
Normal*
Rough
Note: The default for Bond Texture
is Rough.
Shown if vinyl labels are supported
in the specified source.
Shown if Card Stock is supported in
the specified source.
Shown if the custom type is
supported in the specified source.
Paper Weight
These menu items are used to set the paper weight for each of the defined print media types. This allows the MFP to
optimize the print quality for the print media weight.
Menu item Purpose Values and descriptions
Plain Weight Identifies the relative weight of the
Card Stock Weight
Transparency
Weight
Labels Weight
Bond Weight
Envelope Weight
Letterhead Weight
Preprinted Weight
Colored Weight
print media loaded in a specific
source, and ensures the toner
adheres properly to the printed
page.
Light
Normal*
Heavy
Paper Menu
24
Note: Card Stock is shown on the
control panel only if it is supported in
a specified source.
Page 25
Using the MFP menus
Menu item Purpose Values and descriptions
Vinyl Labels Weight Identifies the relative weight of the
vinyl labels loaded in a specific
source.
Light
Normal*
Heavy
Shown if vinyl labels are a supported
type.
Custom <x> Weight Identifies the relative weight of the
custom paper loaded in a specific
source. (x represents 1—6.)
Light
Normal*
Heavy
Shown if the custom type is
supported in the specified source.
Paper Loading
These menu items are used to set the loading orientation for each print media type. A source is loaded with preprinted print
media, and then the MFP can be notified that the print media is loaded for duplex (two-sided) printing. Use the application
software to indicate simplex (one-sided) printing. When simplex printing is selected, the MFP automatically inserts blank
pages to print the simplex job correctly.
Paper Loading is only shown on the control panel if a duplex unit is installed.
Menu item Purpose Values and descriptions
Card Stock Loading Properly handles the specific
Labels Loading
Bond Loading
Letterhead Loading
Preprinted Loading
Colored Loading
Vinyl Labels
Loading
Custom <x>
Loading
preprinted print media whether the
job is a duplex job (two-sided) or a
simplex job (single-sided).
Properly handles preprinted custom
paper whether the job is a duplex job
(two-sided) or a simplex job
(single-sided). (x represents 1—6.)
Duplex
Off*
Duplex
Off*
Duplex
Off*
Duplex is for two-sided printing on
the print media, and off indicates that
duplex printing is turned off.
Shown if vinyl labels are supported
in the specified source.
Shown if the custom type is
supported in the specified source.
Custom Types
This menu item is used to define a name for each custom paper type. Assign names using a utility such as MarkVision or
from the control panel.
Menu item Purpose Values and descriptions
Custom Type <x> Specifies the type of print media
associated with each Custom Type
available in the Paper Type menu.
Paper Menu
Paper*
Card Stock
Transparency
Labels
Vinyl Labels
Envelope
25
The custom type print media must
be supported in the designated
source in order to assign a userdefined name.
Once the name is assigned, the
name appears instead of Custom
Type <x>.
Page 26
Using the MFP menus
Custom Names
This menu item is used to define a custom name for each print media.
Menu item Purpose Values and descriptions
<user-defined
Custom Name>
Specifies the name of print media
associated with each Custom Name
<x> available in the Paper Type menu,
where x is 1—6.
[user-defined
name], such as:
Stephen’s labels
Mary’s card stock
The custom print media loaded in
the designated source must be a
supported media type in order for a
user-defined name to be assigned.
Custom Bin Names
This menu item is used to define a custom name for each output bin based on a person or the type of print media assigned
to exit to a specific output bin.
Menu item Purpose Values and descriptions
<user-defined
Custom Bin Name>
Specifies the custom name of output
bin <x>, where x is 1—10 based on the
MFP model or the optional finisher, if
one is attached.
[user-defined
name], such as:
Company’s bin
Lawyer’s bin
Mary’s bin
Stephen’s bin
The custom output bin must be able
to accept the type of print media
assigned to exit to the defined bin in
order for a user-defined name to be
assigned.
Universal Setup
These menu items are used to specify the height and width of the Universal Paper Size. When the height and width for
Universal Paper Size are specified, the MFP uses the Universal setting like other paper sizes, including support for duplex
and n-up. For more information on n-up, see Multipage Print.
Menu item Purpose Values and descriptions
Units of Measure Determines the unit of measure
used to enter the Universal Height
and Width.
Portrait Width Sets the portrait width of the
universal media.
Note: If the value set exceeds the
maximum width, the MFP uses the
maximum value allowed in inches or
millimeters.
Inches
Millimeters
3—14.17 inches in
0.01 inch increments
76—360 mm in 1 mm
increments
Inches is the US default, and
Millimeters is the international default.
Shows either inches or millimeters
from the Units of Measure setting;
8.5 inches is the US default, and
216 mm is the international default.
Paper Menu
26
Page 27
Using the MFP menus
Menu item Purpose Values and descriptions
Portrait Height Sets the portrait height of the
universal media.
Note: If the value set exceeds the
maximum height, the MFP uses the
maximum value allowed in inches or
millimeters.
Feed Direction Specifies the feed direction of the
Universal Paper Size.
3—14.17 inches in
0.01 inch increments
76—360 mm in 1 mm
increments
Short Edge*
Long Edge
Shows either inches or millimeters
from the Units of Measure setting;
14 inches is the US default, and
356 mm is the international default.
Feed Direction is only shown if the
Long Edge value is available. Long
Edge exists if the longest edge is
shorter than the maximum physical
width that the tray can accommodate.
See Duplex Bind on page 76 for
more information about short and long
edges.
Bin Setup
This menu item is used to specify the output bin where the printed print media goes. This menu item only appears if at least
one optional output bin is installed, and only installed output bins appear as values.
Menu item Purpose Values and descriptions
Output Bin Specifies the default bin for
printed print media.
The number of bins listed are
based on the number of bins
installed.
Configure Bins Determines which output bin(s)
the MFP uses for a particular
job.
Standard Bin*
Bin 1
Bin 2
Bin 3
Bin 4
Bin 5
Bin 6
Bin 7
Bin 8
Bin 9
Bin 10
Mailbox* Sends print jobs to the output bin
Link Links two or more output bins
Link Optional
Mail Overflow Sends print jobs to the output bin
Type Assignment Links all optional output bins as
If a user-defined name is available
for an output bin, then the name
appears instead.
Note: If multiple output bins are
assigned the same name, the
name only appears once in the
Output Bin value list.
designated for that user.
together as though they were one
large bin. When one linked output
bin is full, the MFP starts filling the
next linked bin and continues with
each additional linked bin.
Note: The Link Optional value only
appears when at least two optional
output bins are installed.
designated for the specific user
until it is full, and then sends jobs to
the designated overflow bin.
though they were one large bin,
while leaving the standard output
bin individually addressable.
Paper Menu
27
Page 28
Using the MFP menus
Menu item Purpose Values and descriptions
Assign Type/
Bin
Sends print jobs to a specific
output bin based on the
requested paper type.
Note: This menu item only
appears when Configure Bins
appears and is set to Mailbox
or Type Assignment.
If a user-defined name is
available, it appears instead of
Custom <x> Bin. If two or
more output bins share the
same name, the name only
appears once in the Assign
Type/Bin value list.
Plain Paper Bin Disabled*
Card Stock Bin
Transparency Bin
Labels Bin
Bond Bin
Envelope Bin
Letterhead Bin
Preprinted Bin
Colored Bin
Custom <x> Bin (<x>
represents 1—10)
Standard Bin
Bin 1
Bin 2
Bin 3
Bin 4
Bin 5
Bin 6
Bin 7
Bin 8
Bin 9
Bin 10
Note: Only installed output bins
appear. If Configure Bins is set to
Type Assignment, then the default
is the Standard Bin.
Overflow Bin Sends print jobs to a specific
output bin based on the
requested paper type.
Standard Bin*
Bin 1
Bin 2
Bin 3
Bin 4
Bin 5
Bin 6
Bin 7
Bin 8
Bin 9
Bin 10
Reports
Note: After a report prints, the MFP returns to the home screen.
Each report prints using some standard print values, such as:
• one copy
• portrait orientation
• 600 dots per inch (dpi) print resolution
• normal print area
• no separator sheets
• duplex printing is set off
• multiple page printing is set off
• toner darkness is set to four
• media source is the user default
Note: Only installed output bins will
be displayed. If multiple output bins
are assigned the same name, the
name only appears once in the
Output Bin value list.
Reports
28
Page 29
Using the MFP menus
Menu item Purpose Values and descriptions
Menu Settings Page Prints information relating to:
• Current settings for each of the menu
items for all menus
• Cartridge information
• A list of installed options and features
• Available MFP memory
After selecting this item, the page prints
and the MFP returns to Ready.
Device Statistics Prints information relating to the MFP
Network Setup Page
Network <x> Setup Page
appears if additional network
options are installed.
Wireless Setup Page Prints information relating to wireless
Shortcut List Prints a list of previously defined shortcuts.
Fax Job Log Prints a list of pending fax jobs along with the
Fax Call Log Prints a list of the of the last 100 fax calls
E-mail Shortcuts Prints a list of the e-mail shortcuts.
Fax Shortcuts Prints a list of the fax shortcuts.
FTP Shortcuts Prints a list of the FTP shortcuts.
Profiles List Prints a list of profiles stored in the MFP.
statistics.
Prints information relating to network settings
and verifies the network connection.
Note: This page also provides information
that aids in configuring for network printing.
settings.
Note: This menu item appears when an
optional wireless internal print server is
installed.
most recent 200 fax tasks completed.
Note: The menu item only appears when
Enable Job Log is on.
made or answered by the MFP.
Note: The menu item only appears when
Enable Call Log is on.
NetWare Setup Page Prints a page listing the NetWare protocol
settings.
Print Fonts Prints a sample of all the fonts available for
the selected emulation.
Print Directory Prints a list of the resources that are stored
on the optional flash memory card or the
internal hard disk.
Note: Print Directory is available on the
control panel if either an optional
nondefective flash memory or standard hard
disk is installed and formatted.
Reports
29
PCL Fonts Prints a sample of
all MFP fonts
available for
PCL emulation.
PostScript Fonts Prints a sample of
all MFP fonts
available for
PostScript
emulation.
After selecting this
item, the page
prints and the MFP
returns to Ready.
Page 30
Using the MFP menus
Network/Ports
TCP/IP
This menu item is used to view and change the Transmission Control Protocol/Internet Protocol settings. Internet Protocol
(IP) specifies the format of packets, also called datagrams, and the addressing scheme. Most networks combine IP with a
higher-level protocol called Transmission Control Protocol (TCP). TCP enables two hosts to establish a connection and
exchange streams of data. TCP guarantees delivery of data and also guarantees that packets are delivered in the same
order in which they were sent.
Menu item Purpose Values and descriptions
Set Hostname
Address Defines a specific address on the
network which defines the device.
Netmask Defines information that the network
uses to decide how to search for the
specific IP address.
Gateway Provides the address of the
machine that controls the
communication for the sub-network.
IP address 4 field IP address
Display only
netmask 4 field mask
Display only
gateway 4 field IP address
Display only
Set static IP address link Link to the page to set a static IP
Enable DHCP DHCP is Dynamic Host
Configuration Protocol. The network
automatically assigns a number for
the network information.
Enable RARP RARP is Reverse Address
Resolution Protocol.
Enable BOOTP BOOTP is Bootstrap Protocol. On*
AutoIP Provides an automatic IP. On*
Enable FTP/TFTP Allows files to be transferred to the
device.
File Transfer Protocol (FTP) is the
protocol used on the Internet for
exchanging files. FTP uses the
Internet TCP/IP protocols to enable
data transfer.
TFTP is Trivial File Transfer
Protocol, which is a simple form of
FTP.
HTTP Server Enabled Specifies if Web pages can be seen.
HyperText Transfer Protocol (HTTP)
is the underlying protocol used by
the World Wide Web (WWW). HTTP
defines how messages are
formatted and transmitted, and what
actions Web servers and browsers
should take in response to various
commands.
On*
Off
On*
Off
Off
Off
On*
Off
On* The function is enabled. Web pages
Off The function is disabled.
address. Changing the IP address
sets DHCP, BOOTP, and RARP to Off.
can be seen.
Network/Ports
30
Page 31

Using the MFP menus
Menu item Purpose Values and descriptions
WINS Server Address A server handles host names by
DNS Server Address Registers the host name with the
Backup DNS Server
Address
assigning host names to IP
addresses. Devices have a host
name registered with the WINS
server.
Windows Internet Naming Service
(WINS) is a system that determines
the IP address associated with a
particular network computer. This is
called name resolution. WINS
supports network client and server
computers running Windows and
can provide name resolution for
other computers set with special
arrangements.
DNS server. Enables name
resolution for the e-mail server, FTP,
and other host name entries.
Domain Name System (or Domain
Name Service) [DNS] is an Internet
service that translates domain
names into IP addresses. Domain
names are alphabetic; therefore,
they are easier to remember. The
Internet is really based on IP
addresses. Each time a domain
name is used, a DNS service must
translate the name into the
corresponding IP address.
This is used if the DNS Server
Address is not available.
4 field IP
address
4 field IP
address
4 field IP
address
Domain Search Order Defines the search order of the
domains.
Restricted Server List Defines a limited number of IP
addresses.
MTU Defines the range of the
communication type.
Default TTL* numeric entry Gives the range in seconds, such as
DDNS On*
mDNS On*
Zero Configuration Name text entry Example: John’s office printer.
SLP Broadcast On*
LPD Timeout numeric entry The range is 0—65535 seconds.
text entry
field
text entry This is a comma delimited list of up to
numeric entry This is a range, such as 256—1500
Off
Off
Off
The search order is given in a comma
delimited list, such as:
myserver.com, myprinter.com
10 IP addresses allowed to make TCP
connections. A zero (0) can be used
as a wildcard in the list.
Ethernet, 256—4096 Token-Ring.
Range: 5—254 seconds.
Network/Ports
31
Page 32

Using the MFP menus
Menu item Purpose Values and descriptions
LPD Banner Page On
Off*
LPD Trailer Page On
Off*
LPD Carriage Return
Conversion
On
Off*
IPv6
Use this menu item to view or change Internet Protocol Version 6 (IPv6) settings.
Note: This menu item does not appear for non-network models.
Menu item Purpose Values and descriptions
IPv6 Sets the network to IPv6 (Internet
Protocol Version 6).
Enable IPv6 Yes*
Auto Configuration On*
Hostname text entry field
Address text entry field
Router Address text entry field
Enable DHCPv6 Yes*
No
Off
No
Network/Ports
32
Page 33

Using the MFP menus
E-mail Server Setup
Menu item Purpose Values and descriptions
Primary SMTP Gateway IP address field
Primary SMTP Gateway Port numeric entry
(25*)
Secondary SMTP Gateway IP address field
Secondary SMTP Gateway
Port
SMTP Timeout numeric entry
Authentication header
numeric entry
(25*)
5—30 (30*)
The timeout numeric entry is a range
of 5 to 30 seconds with 30 seconds
as the default.
Server Requires
Authentication
Userid text entry
Password text entry, plain
Reply Address text entry This is a required item.
Subject text entry
Message text entry The text entry field has a limitation of
Send me a copy Sends a copy of the e-mail
back to the creator of the
e-mail.
Max e-mail size Specifies the maximum
e-mail size in kilobytes.
E-mail above the specified
size is not sent.
Size error message Sends a message when an
e-mail is greater than the
configured size limit.
Limit destinations Sends an e-mail only when
the address contains the
domain name, such as a
company domain name.
E-mail can only be sent to
the specified domain.
Web Link Setup header
Server Specifies the name of the
server.
Login text entry
Password password text
Yes
No*
text? if not need
confirm
512 characters.
Never appears*
On by default
Off by default
Always on
numeric entry Specify 0 (zero) for no limit.
text entry
@text entry The limit is one domain. The @ is
text entry For example:
entry
The user must be authenticated.
permanent before the text field.
Example: @companydomain.com
For the example, e-mails are only
sent when the address ends with
@companydomain.com.
server.mine.com
Network/Ports
33
Page 34

Using the MFP menus
Menu item Purpose Values and descriptions
Path Defines the path name. text entry For example:
Base file name Specifies the base file name.
A timestamp is added to the
end of the base file name.
Web Link text entry Example:
text entry
image*
/directory/path
The following characters or symbols
are invalid entries for a path name:
* — asterisk
: — colon
? — question mark
< — less than symbol
> — greater than symbol
| — vertical bar
The default value is the following
word:
image
Note: There is a 53-character limit for
the base file name. The following
characters or symbols are invalid:
* — asterisk
: — colon
? — question mark
< — less than symbol
> — greater than symbol
| — vertical bar
A time stamp is added to the end of
the base file name.
http://my.business.com/directory/path
Wireless
The menu does not appear unless a wireless card is installed.
Menu item Values
Mode Infrastructure
Ad hoc
Network Name list of available network names
print server*
Network/Ports
34
Page 35

Using the MFP menus
Standard Network or Network <x>
Use these menu items to change printer settings affecting jobs sent to the MFP through a network port, either Standard
Network or Network <x>, where x represents 1 or 2.
Menu item Purpose Values and descriptions
PCL
SmartSwitch
PS SmartSwitch Configures the MFP so it
NPA Mode Specifies whether the MFP
Network Buffer Configures the size of the network
Job Buffering Temporarily stores jobs on the MFP
Configures the MFP so it
automatically switches to
PCL emulation when a print job
received through the network port
requires it, regardless of the default
printer language.
automatically switches to
PostScript emulation when a print
job received through the network
port requires it, regardless of the
default printer language.
performs the special processing
required for bidirectional
communication, following the
conventions defined in the Network
Printing Alliance (NPA) Protocol.
Note: Changing this menu item
automatically resets the MFP.
input buffer.
Note: Changing the Network Buffer
menu item automatically resets the
MFP. Any permanent resources,
such as fonts or macros, are lost.
hard disk before printing. This menu
item only appears when a
nondefective formatted hard disk is
installed.
Note: Changing this menu item
automatically resets the MFP.
On* The MFP examines data on the
Off The MFP does not examine the
On* The MFP examines data on the
Off The MFP does not examine the
Off The MFP does not perform NPA
Auto* The MFP examines the data to
Auto* The MFP automatically calculates the
3K to maximum
size allowed
(1K increments)
Off* Does not buffer jobs to the hard disk.
On Buffers print jobs to the hard disk.
Auto Buffers print jobs only if the MFP is
network interface and selects
PCL emulation if the data indicates
that is the required printer language.
incoming data. The printer uses
PostScript emulation to process the
job if PS SmartSwitch is On, or uses
the default printer language specified
in the Setup Menu if PS SmartSwitch
is Off.
network interface connection and
selects PostScript emulation if the
data indicates that is the required
printer language.
incoming data. The printer uses
PCL emulation to process the job if
PCL SmartSwitch is On, or uses the
default printer language specified in
the Setup Menu if PCL SmartSwitch is
Off.
processing.
determine the format and then
processes it appropriately.
Network Buffer size (recommended
setting).
User specifies the Network Buffer size.
The maximum size depends on the
amount of memory in the MFP, the
size of the other link buffers, and
whether Resource Save is set to On or
Off. To maximize the range for the
Network Buffer size, disable or reduce
the size of the parallel, serial, and USB
buffers.
busy processing data from another
input port.
Network/Ports
35
Page 36

Using the MFP menus
Menu item Purpose Values and descriptions
Mac Binary PS Configures the MFP to process
Macintosh binary PostScript print
jobs.
On The MFP processes raw binary
PostScript print jobs from computers
using the Macintosh operating system.
Note: This setting often causes
Windows print jobs to fail.
Off The MFP filters PostScript print jobs
using standard protocol.
Auto* The MFP processes print jobs from
computers using either Windows or
Macintosh operating systems.
Standard USB or USB <x>
These menus are only shown if a USB port is available. Use these menu items to change printer settings affecting a
Universal Serial Bus (USB) port (USB <x>). x represents 1 or 2.
Menu item Purpose Values and descriptions
PCL
SmartSwitch
PS SmartSwitch Configures the MFP so it
Configures the MFP so it
automatically switches to
PCL emulation when a print job
received through the USB port
requires it, regardless of the default
printer language.
automatically switches to
PostScript emulation when a print
job received through the USB port
requires it, regardless of the default
printer language.
On* The MFP examines the data on the
USB port and selects PCL emulation if
the data indicates that is the required
printer language.
Off The MFP does not examine the
incoming data. The MFP uses
PostScript emulation to process the
job if PS SmartSwitch is On, or uses
the default printer language specified
in the Setup Menu if PS SmartSwitch
is Off.
On* The MFP examines data on the USB
interface and selects
PostScript emulation if the data
indicates that is the required printer
language.
Off The MFP does not examine the
incoming data. The MFP uses
PCL emulation to process the job if
PCL SmartSwitch is On, or uses the
default printer language specified in
the Setup Menu if PCL SmartSwitch is
Off.
NPA Mode Specifies whether the MFP
performs the special processing
required for bidirectional
communication, following the
conventions defined in the Network
Printing Alliance (NPA) Protocol.
Note: Changing this menu item
automatically resets the MFP once
the menus are exited. It is reset to
configure memory, and any
permanent resources, such as fonts
or macros, are lost.
On The MFP performs NPA processing. If
data is not in NPA format, it is rejected
as bad data.
Off The MFP does not perform NPA
processing.
Auto* The MFP examines the data to
determine the format and then
processes it appropriately.
Network/Ports
36
Page 37

Using the MFP menus
Menu item Purpose Values and descriptions
USB Buffer Configures the size of the USB input
buffer.
Note: Changing the USB Buffer
menu item automatically resets the
MFP. Any permanent resources,
such as fonts or macros, are lost.
Job Buffering This menu item is shown only when
a formatted hard disk is installed.
Temporarily stores jobs on the MFP
hard disk before printing.
Note: Changing the Job Buffering
menu item automatically resets the
MFP. It is reset to configure memory,
and any permanent resources, such
as fonts or macros, are lost.
Mac Binary PS Configures the MFP to process
Macintosh binary PostScript print
jobs.
Disabled Job buffering is disabled. Any jobs
Auto* The MFP automatically calculates the
3K to maximum size
allowed
(1K increments)
Off* Does not buffer print jobs to the hard
On Buffers print jobs to the hard disk.
Auto Buffers print jobs only if the MFP is
On The MFP filters PostScript print jobs
Off The MFP processes raw binary
Auto* The MFP processes print jobs from
already buffered on the hard disk are
printed before normal processing of
incoming jobs resumes.
USB Buffer size (recommended
setting).
The user specifies the USB Buffer
size. The maximum size depends on
the amount of memory in the MFP, the
size of the other link buffers, and
whether Resource Save is set to On or
Off. To maximize the range for the
USB Buffer size, disable or reduce the
size of the parallel, serial, and network
buffers.
disk.
busy processing data from another
input port.
using standard protocol.
PostScript print jobs from computers
using the Macintosh operating system.
Note: This setting often causes
Windows print jobs to fail.
computers using either Windows or
Macintosh operating systems.
ENA Address Sets the USB port ENA Address. 4 field IP address
ENA Netmask Sets the USB port ENA Netmask.
ENA Gateway Sets the USB port ENA Gateway.
(0.0.0.0*)
Network/Ports
37
Shown only if an ENA is attached
through the USB port.
Page 38

Using the MFP menus
Standard Parallel or Parallel <x>
Use these menu items to change printer settings affecting jobs sent to the MFP through a parallel port, either Std Parallel or
Parallel <x>, where x represents 1 or 2.
Menu item Purpose Values and descriptions
PCL
SmartSwitch
PS SmartSwitch Configures the MFP so it
NPA Mode Specifies whether the MFP
Parallel Buffer Configures the size of the parallel
Configures the MFP so it
automatically switches to
PCL emulation when a print job
received through the parallel port
requires it, regardless of the default
printer language.
automatically switches to PostScript
emulation when a print job received
through the parallel port requires it,
regardless of the default printer
language.
performs the special processing
required for bidirectional
communication, following the
conventions defined in the Network
Printing Alliance (NPA) Protocol.
Note: Changing this menu item
automatically resets the MFP. It is
reset to configure memory, and any
permanent resources, such as fonts
or macros, are lost.
input buffer.
Note: Changing this menu item
automatically resets the MFP. It is
reset to configure memory, and any
permanent resources, such as fonts
or macros, are lost.
On* The MFP examines data on the
Off The MFP does not examine the
On* The MFP examines data on the
Off The MFP does not examine the
On The MFP performs NPA processing. If
Off The MFP does not perform NPA
Auto* The MFP examines data, determines
Disabled Disables job buffering. Any jobs
Auto* The MFP automatically calculates the
3K to maximum
size allowed
(1K increments)
parallel interface and selects
PCL emulation if the data indicates
that is the required printer language.
incoming data. The MFP uses
PostScript emulation to process the
job if PS SmartSwitch is On, or uses
the default printer language specified
in the Setup Menu if PS SmartSwitch
is Off.
parallel interface and selects
PostScript emulation if the data
indicates that is the required printer
language.
incoming data. The MFP uses PCL
emulation to process the job if PCL
SmartSwitch is On, or uses the default
printer language specified in the
Setup Menu if PCL SmartSwitch is
Off.
data is not in NPA format, it is rejected
as bad data.
processing.
the format, and then processes it
appropriately.
already buffered on the hard disk are
printed before normal processing of
incoming jobs resumes.
Parallel Buffer size (recommended
setting).
The user specifies the Parallel Buffer
size. The maximum size depends on
the amount of memory in the MFP, the
size of the other link buffers, and
whether Resource Save is set to On or
Off. To maximize the range for the
Parallel Buffer size, disable or reduce
the size of the serial and USB buffers.
Network/Ports
38
Page 39

Using the MFP menus
Menu item Purpose Values and descriptions
Job Buffering This menu item only appears when
a formatted hard disk is installed.
Temporarily stores jobs on the MFP
hard disk before printing.
Note: Changing this menu item
automatically resets the MFP. It is
reset to configure memory, and any
permanent resources, such as fonts
or macros, are lost.
Advanced Status Enables bidirectional
communication through the parallel
port.
Off* Does not buffer print jobs to the hard
disk.
On Buffers print jobs to the hard disk.
Auto Buffers print jobs only if the MFP is
busy processing data from another
input port.
Off Disables parallel port negotiation.
On* Enables bidirectional communication
through the parallel interface.
Protocol Specifies the parallel interface
protocol.
Honor Init Determines whether the MFP
honors hardware initialization
requests from the computer. The
computer requests initialization by
activating the INIT signal on the
parallel interface. Many personal
computers activate the INIT signal
each time the computer is turned on
and off.
Parallel Mode 2 Determines whether the parallel port
data is sampled on the leading or
trailing edge of strobe.
This menu item only appears when
the associated parallel port supports
this feature.
Mac Binary PS Configures the MFP to process
Macintosh binary PostScript print
jobs.
ENA Address Sets the parallel port ENA Address. 4 field IP address
ENA Netmask Sets the parallel port ENA Netmask.
ENA Gateway Sets the parallel port ENA Gateway.
Standard May resolve some parallel interface
Fastbytes* Provides compatibility with most
Off* The MFP does not honor hardware
On The MFP honors hardware
On* Samples parallel port data on the
Off Samples parallel port data on the
On The MFP processes raw binary
Off The MFP filters PostScript print jobs
Auto* The MFP processes print jobs from
(0.0.0.0*)
problems.
existing parallel interface
implementations (recommended
setting).
initialization requests from the
computer.
initialization requests from the
computer.
leading edge of strobe.
trailing edge of strobe.
PostScript print jobs from computers
using the Macintosh operating system.
Note: This setting often causes
Windows print jobs to fail.
using standard protocol.
computers using either Windows or
Macintosh operating systems.
Shown only if an ENA is attached
through a parallel port.
Network/Ports
39
Page 40

Using the MFP menus
Serial <x>
Use these menu items to change printer settings affecting jobs sent to the MFP through an optional serial port.
Menu item Purpose Values and descriptions
PCL
SmartSwitch
Configures the MFP so it
automatically switches to PCL
emulation when a print job received
through the serial port requires it,
regardless of the default printer
language.
On*
Off
On–The MFP examines the data at
the serial interface and selects PCL
emulation if the data indicates that is
the required printer language.
Off–The MFP does not examine the
incoming data. The MFP uses
PostScript emulation to process the
job if PS SmartSwitch is On, or uses
the default printer language specified
in the Setup Menu if PS SmartSwitch
is Off.
PS SmartSwitch Configures the MFP so it
automatically switches to PostScript
emulation when a print job received
through the serial port requires it,
regardless of the default printer
language.
NPA Mode Specifies whether the MFP
performs the special processing
required for bidirectional
communication, following the
conventions defined in the Network
Printing Alliance (NPA) Protocol.
Note: Changing this menu item
automatically resets the MFP. It is
reset to configure memory, and any
permanent resources, such as fonts
or macros, are lost.
Serial Buffer Configures the size of the serial
input buffer.
Note: Changing the Serial Buffer
menu item automatically resets the
MFP. Any permanent resources,
such as fonts or macros, are lost.
On*
Off
On The MFP performs NPA processing. If
Off The MFP does not perform NPA
Auto* The MFP examines the data to
Disabled The MFP disables job buffering. Any
Auto* The MFP automatically calculates the
3K to maximum
size allowed
(1K increments)
On–The MFP examines the data at
the serial interface and selects
PostScript emulation if the data
indicates that is the required printer
language.
Off–The MFP does not examine the
incoming data. The MFP uses PCL
emulation to process the job if PCL
SmartSwitch is On, or uses the default
printer language specified in the
Setup Menu if PCL SmartSwitch is Off.
data is not in NPA format, it is rejected
as bad data.
processing.
determine the format and then
processes it appropriately.
jobs already buffered on the hard disk
are printed before normal processing
of incoming jobs resumes.
Serial Buffer size (recommended
setting).
The user specifies the Serial Buffer
size. The maximum size depends on
the amount of memory in the MFP, the
size of the other link buffers, and
whether Resource Save is set to On or
Off. To maximize the range for the
Serial Buffer size, disable or reduce
the size of the parallel and USB
buffers.
Network/Ports
40
Page 41

Using the MFP menus
Menu item Purpose Values and descriptions
Job Buffering This menu item only appears when
a formatted hard disk is installed.
Temporarily stores jobs on the MFP
hard disk before printing.
Note: Changing the Job Buffering
menu item automatically resets the
MFP. It is reset to configure
memory, and any permanent
resources, such as fonts or macros,
are lost.
Serial Protocol Selects the hardware and software
handshaking values for the serial
interface.
Off* Does not buffer print jobs to the hard
disk.
On Buffers print jobs to the hard disk.
Auto Buffers print jobs only if the MFP is
busy processing data from another
input port.
DTR* Hardware handshaking.
DTR/DSR Hardware handshaking.
XON/XOFF Software handshaking.
XON/XOFF/DTR Combined hardware and software
handshaking.
XONXOFF/DTRDSR Combined hardware and software
handshaking.
Robust XON Determines whether the MFP
communicates availability to the
computer.
This menu item only applies to the
serial port if Serial Protocol is set to
XON/XOFF.
Baud Specifies the rate at which data can
be received through the serial port.
Note: 138200, 172800, 230400,
and 345600 baud rates appear in
the Standard Serial menu. These
values do not appear in the Serial
Option 1, Serial Option 2, or Serial
Option 3 menus.
Data Bits Specifies the number of data bits
that are sent in each transmission
frame.
Off* The MFP waits to receive data from
the computer.
On The MFP sends a continuous stream
of XONs to the host computer to
indicate that the serial port is ready to
receive more data.
1200
2400
4800
9600*
19200
38400
57600
115200
138200
172800
230400
345600
7
8*
Parity Sets the parity for serial input and
output data frames.
Even
Odd
None*
Ignore
Network/Ports
41
Page 42

Using the MFP menus
Menu item Purpose Values and descriptions
Honor DSR Determines whether the MFP uses
the Data Set Ready (DSR) signal.
DSR is one of the handshaking
signals for most serial interface
cables.
The serial interface uses DSR to
distinguish data sent by the
computer from data created by
electrical noise in the serial cable.
This electrical noise can cause stray
characters to print. Select On to
prevent stray characters from
printing.
Off* All data received by the serial port is
On Only data received while the DSR
NetWare
Use these menu items to view or change the printer NetWare settings.
Menu item Purpose Values and descriptions
View Login
Name
View Print Mode Assigns the NetWare print mode. Pserver*
View Network
Number
Activate Activates or deactivates the
Ethernet 802.2 Sets the Ethernet 802.2 value On or
Ethernet 802.3 Sets the Ethernet 802.3 value On or
Ethernet Type II Sets the Ethernet Type II value On
Ethernet SNAP Sets the Ethernet SNAP value On
Packet Burst Sets the Packet Burst value On or
NSQ/GSQ Mode Sets the NSQ/GSQ Mode value On
Shows the field used to assign the
NetWare login name.
Shows the field used to assign the
NetWare number.
NetWare feature.
Off.
Off.
or Off.
or Off.
Off.
or Off.
text entry
Enter the Login Name. Thereafter, select Login Name to show
the NetWare name on the control panel.
Rprinter
text entry
Enter the Netware number. Thereafter, select View Network
Number to show the NetWare network number on the control
panel.
Off
On*
On*
Off
On*
Off
On*
Off
On*
Off
On
Off*
On
Off*
treated as valid data.
signal is high is treated as valid.
Off–Deactivates the NetWare feature.
On–Activates the NetWare feature.
IPX Frame Types, which allow the
adapter to initiate conversations, are
used.
This is the broadcast search method
on the Web pages.
Network/Ports
42
Page 43

Using the MFP menus
AppleTalk
Use these menu items to view or change the printer AppleTalk settings.
Menu item Purpose Values and descriptions
View Name Shows the assigned AppleTalk
name.
View Address Shows the assigned AppleTalk
address.
Activate Activates or deactivates the
AppleTalk feature.
Set Zone Provides a list of zones from the
network.
Select Name to show the AppleTalk name on the control panel.
Select Address to show the AppleTalk address on the control
panel.
Off
On*
*
list of zones from the
network
LexLink
Use these menu items to view the LexLink name or change the LexLink activation.
Off–Deactivates the AppleTalk
feature.
On–Activates the AppleTalk feature.
The default is the default zone for the
network. If no default zone exists on
the network, the * is the default.
Menu item Purpose Values and descriptions
View Nickname Shows the field used to assign the
LexLink nickname.
Activate Activates or deactivates the LexLink
feature.
text entry
Enter the nickname. Thereafter, select Nickname to show the
LexLink nickname on the control panel.
On*
Off
On–Activates the LexLink feature.
Off–Deactivates the LexLink feature.
Network/Ports
43
Page 44

Using the MFP menus
Settings
General Settings
Use these menu items to set various MFP settings.
Menu item Purpose Values and descriptions
Display Language To determine the language of
the text on the control panel
LCD.
English* (English)
Français (French)
Deutsch (German)
Italiano (Italian)
Español (Spanish)
Dansk (Danish)
Norsk (Norwegian)
Nederlands (Dutch)
Svenska (Swedish)
Português (Brazilian-Portuguese)
Keyboard Type Specifies the type of virtual
alphanumeric keyboard that
appears on the control panel.
Custom Key 1 Allows for .co.uk type
addresses.
Suomi (Finnish)
Русский (Russian)
Polski (Polish)
English* (English)
Français (French)
Français Canadien (French-Canadian)
Deutsch (German)
Italiano (Italian)
Español (Spanish)
Dansk (Danish)
Norsk (Norwegian)
Nederlands (Dutch)
Svenska (Swedish)
Suomi (Finnish)
Português (Brazilian-Portuguese)
Русский (Russian)
Polski (Polish)
text field
null
.com is the default text in the field.
The text entry field is limited to six characters.
and periods are considered characters, too.
If the text field is null or empty, the associated
Custom Key does not appear on the
keyboard.
Settings
44
Page 45

Using the MFP menus
Menu item Purpose Values and descriptions
Custom Key 2 Allows for .co.uk type
General Defaults Specifies the defaults based
Show initial
prompts
Date Format Specifies the format based on
Time Format Specifies if the format is for a
Screen Brightness Adjusts the brightness of the
Show Bookmarks On*
Allow Custom Job
scans
Scanner jam
recovery
addresses.
on geographical location.
Sets the MFP to show initial
prompts after the device is
powered on so the user can
complete the setup.
the geographical location.
12-hour clock or for a 24-hour
clock.
LCD on the control panel.
Controls the show and hide
function for the Custom Job
setting and the Custom Job
scanning settings for each
function. The Custom Job
scanning settings set the
default values for Custom Job
for each function. They are
not shown if custom jobs are
not allowed.
This function is also known
as Job Build.
Custom Job is not supported
on all models.
Determines if the MFP
recovers an entire print job or
just the page of the print job
when a scanner jam occurs.
text field
null
U.S. Setting the menu item to one of the values
International
Yes*
No
MM-DD-YYYY*
DD-MM-YYYY*
YYYY-MM-DD
12 hour A.M./P.M.
24 hour clock
20—100
(100*)
Off
Yes*
No
Job level* Custom jobs may not recover at the job level.
Page level Custom jobs always recover at the page level.
.org is the default text in the field.
The text entry field is limited to six characters.
(Periods are considered characters, too.)
If the text field is null or empty, the associated
Custom Key does not appear on the
keyboard.
affects these settings:
• Tray <x> (where x is the number of the
• Manual Env (10 Envelope, DL Envelope)
• MP Feeder Paper Size
• Copy Original Size
• Fax Send Original Size
• E-mail Original Size
• FTP Original Size
• Universal Units of Measure (mm/inches)
• Date Time Format
When the MFP is powered on the first time,
the default is Yes. After the user completes
the setup wizard and selects Done at the
Country select screen, the default is No.
Month, Day, and Year (U.S.)
Day, Month, Year (International)
(* Denotes a country/region-specific factory
default value)
12 A.M.—12 P.M., 12:01 P.M.—11:59 P.M.
00:00—24:00
When set to No, the Bookmarks container is
not shown in Held Jobs.
This menu item controls hide or show for the
user interface Custom Job setting as well as
the Custom Job scanning settings for each
function. The Custom Job scanning settings
set the default values for Custom Job for each
function.
tray), MP Feeder, and Manual Pap (Letter/
A4)
— MM_DD_YYYY for U.S.
— DD_MM_YYYY for International
Settings
45
Page 46

Using the MFP menus
Menu item Purpose Values and descriptions
Web Page Refresh
Rate
Contact Name text field
Location text field
Alarms
Controls whether the MFP sounds an alarm when
the device requires operator intervention.
30—300
(120*)
NULL*
NULL*
Alarm Control
Off
Single*
Continuous
Toner Alarm
Off*
Single
Continuous
Staple Alarm
Off*
Single
Continuous
The range is in seconds.
Alarm Control sets the function of each alarm.
Toner Alarm activates when the print cartridge
or a toner cartridge is low on toner.
Note: Staple alarm appears only when an
optional finisher is installed.
Off—MFP does not sound an alarm.
Single—MFP sounds three quick beeps.
Continuous—MFP repeats three beeps
every 10 seconds.
Settings
46
Page 47

Using the MFP menus
Menu item Purpose Values and descriptions
Timeouts Specifies the amount of time
the MFP waits to return to the
home screen, receive an endof-job message, or receive
additional bytes of data from
the computer.
Note: Wait Timeout is only
available when using
PostScript emulation. This
menu value has no effect on
PCL emulation print jobs.
Standby Mode
Disabled
1—240 (15*)
Power Saver Mode
Disabled
2—240 (60*)
Screen Timeout
15—300 (30*)
Touch the LCD screen or press any of the
hard buttons to exit (wake up) from this mode.
Disabled–Disables Standby Mode.
1—240–Specifies the amount of time in
minutes that the MFP waits before returning
to the home screen.
It sets the number of minutes that pass after
exiting Standby Mode before the MFP goes
into a reduced power state called Power
Saver Mode.
If Standby Mode is disabled, which is
considered a setting of 0, then Power Saver
Mode is the number of minutes of inactivity
that occurs before entering Power Saver
Mode.
Print the menu settings page to determine the
current Power Saver setting. When the MFP
is in Power Saver Mode, it is still ready to
receive print jobs.
Disabled–Disables Power Saver Mode.
Disabled is not available if Energy Conserve
is set to On.
2—240 (60*)–Specifies the amount of time
after exiting Standby Mode or after finishing a
print job before the MFP goes into Power
Saver mode.
For example, select 15 to put the MFP in
Power Saver mode 15 minutes after it finishes
a print job. This uses much less energy, but
requires more warm-up time for the MFP.
Select 15 if your MFP shares an electrical
circuit with room lighting and you notice lights
flickering. Select a high value if the MFP is in
constant use. Under most circumstances, this
keeps the MFP ready to print with minimum
warm-up time. Select a value between 1 and
240 minutes for a balance between energy
consumption and a shorter warm-up period.
Note: When the MFP enters Power Saver
Mode, for the entire duration in this mode,
Screen Brightness is set to 15. Touch the LCD
screen or press any of the hard buttons to exit
(wake up) from this mode.
Disabled–Disables Screen Timeout.
15—300–Specifies the amount of time in
seconds before the control panel returns to
the home screen due to inactivity.
Settings
47
Page 48

Using the MFP menus
Menu item Purpose Values and descriptions
Timeouts
(continued)
Print Recovery Specifies whether the MFP
continues from certain offline
situations, reprints jammed
pages, or waits until the
entire page is processed and
ready to be printed.
Print Timeout
Disabled
1—255 (90*)
Wait Timeout
Disabled
15...65535 (40*)
Network Job
Timeout
Disabled
1-255 (90*)
Auto Continue
Disabled*
5—255
Disabled–Disables Print Timeout.
1—255–Specifies the amount of time in
seconds the MFP waits for an end-of-job
message before canceling the remainder of
the print job.
Note: When the timer expires, any partially
formatted page still in the MFP is printed, and
other input ports are examined to see if data
exists.
Disabled–Disables Wait Timeout.
15...65535–Specifies the amount of time in
seconds the MFP waits for additional data
before it cancels the job.
Disabled–Disables Network Job Timeout.
1—255–Specifies the amount of time in
seconds the MFP waits before canceling a
network job. If a value between 1 to 9 is
selected, the setting is saved as 10.
Lets the MFP automatically continue from
certain offline situations when not resolved
within the specified time period.
Disabled–Disables Auto Continue.
5—255–Specifies the amount of time in
seconds that the MFP waits.
Jam Recovery
On
Off
Auto*
Page Protect
Off*
On
Specifies whether the MFP reprints jammed
pages.
On–The printer reprints jammed pages.
Off–The printer does not reprint jammed
pages.
Auto–The printer reprints a jammed page
unless the memory required to hold the page
is needed for other MFP tasks.
Successfully prints a page that may otherwise
generate Complex Page errors.
Off–Prints a partial page of data if memory is
insufficient to process the entire page.
On–Ensures that an entire page is
processed before it prints.
Note: If, after selecting On, the page still
cannot print, reduce the size and number of
fonts on the page, or increase the installed
printer memory.
Note: For most print jobs, On is not needed.
When On is selected, printing may be slower.
Settings
48
Page 49

Using the MFP menus
Menu item Purpose Values and descriptions
Printer Language Specifies the default printer
language used to
communicate data from the
computer to the MFP.
Note: This menu item is not
available from the control
panel. It is only available on
the MFP Embedded Web
Server. Setting a printer
language as the default does
not prevent a software
application from sending print
jobs that use the other
language.
Print Area Modifies the logical and
physical printable area.
Note: This menu item is not
available from the control
panel. It is only available on
the MFP Embedded Web
Server.
PCL Emulation
PS Emulation*
Normal*
Whole Page
PCL emulation–Uses a PCL interpreter for
incoming host communications.
PostScript emulation–Uses a PS interpreter
for incoming host communications.
Note: The Whole Page setting only affects
pages printed using PCL 5 interpreter. This
setting has no effect on pages printed using
the PCL XL or PostScript interpreters. If
attempting to print any data in the nonprintable area defined by Normal Print Area,
the MFP clips the image at the boundary
defined by the Normal defined printable area.
Download Target Specifies the storage location
for downloaded resources.
Storing downloaded
resources in flash memory or
on a hard disk is permanent
storage rather than the
temporary storage that RAM
provides. The resources
remain in the flash memory or
on the hard disk even when
the MFP is turned off.
Note: This menu item is not
available from the control
panel. It is only available on
the MFP Embedded Web
Server.
Job Accounting Specifies to store or not store
statistical information about
the most recent print jobs on
the hard disk. The statistics
include whether the job
printed with or without errors,
the print time, the job size (in
bytes), the requested print
media size and type, the total
number of printed pages, and
the number of copies
requested.
Note: This menu item is not
available from the control
panel. It is only available on
the MFP Embedded Web
Server.
RAM* All downloaded resources are automatically
stored in printer memory (RAM).
Flash All downloaded resources are automatically
stored in flash memory.
Note: Flash appears as a menu item if a
formatted, nondefective optional flash
memory card which is not Write or Read/Write
password protected is installed.
Disk All downloaded resources are automatically
stored on the hard disk.
Note: Disk appears as a menu item if a
formatted, nondefective hard disk that is not
Write or Read/Write password protected is
installed.
Off* The MFP does not store job statistics on the
hard disk.
On The MFP stores job statistics for the most
recent print jobs.
Settings
49
Page 50

Using the MFP menus
Menu item Purpose Values and descriptions
Resource Save Specifies what the MFP does
with downloaded resources,
such as fonts and macros
stored in RAM, if the MFP
receives a job that requires
more memory than is
available.
Note: This menu item is not
available from the control
panel. It is only available on
the MFP Embedded Web
Server.
Banner Page Specifies if the print job
should be printed as a
Banner Page.
Note: This menu item is not
available from the control
panel. It is only available on
the MFP Embedded Web
Server.
Factory Defaults Returns MFP settings to the
factory default values.
Off* The MFP retains downloaded resources only
On The MFP retains all downloaded resources
Off*
On
Restore Now • All menu items are returned to the factory
Do Not Restore* User-defined settings remain.
until memory is needed. It then deletes those
resources associated with the inactive printer
language.
for all printer languages during language
changes and MFP resets. If the MFP runs out
of memory, 38 Memory Full appears.
To set to Off, clear the check box.
To set to On, select the check box.
• All downloaded resources (fonts, macros,
default values except:
— Display Language
— All settings in the Fax, E-mail, and FTP
Settings menu items, the Standard
Parallel and Parallel <x> menu items,
the Standard Serial and Serial <x>
menu items, the Standard Network and
Network <x> menu items, and the
Standard USB and USB <x> menu
items
and symbol sets) in printer memory (RAM)
are deleted. (Resources residing in flash
memory or on the hard disk are
unaffected.)
Settings
50
Page 51

Using the MFP menus
Copy Settings
Use these menu items to set the MFP for settings related to copying.
Menu item Purpose Values and descriptions
Content Specifies the type of content
contained in the copy job.
This menu item appears for
mono and color printers. See
the difference in the touch
screens with the examples as
follows.
Content screen
Text The copy job contains mostly text or line art.
Text/Photo* The copy job contains a mixture of text and graphics.
Photograph The copy job is a high quality photograph or high
quality inkjet print that is primarily composed of
images.
Printed image The copy job is halftoned, such as documents printed
on a laser printer or pages from a magazine that are
primarily composed of images. A halftone is a
collection of black and white dots arranged to simulate
the brightness values of grayscale images.
For the difference between the Content touch screen
and the Content/Color screen, see page 51 for the
Content screen and page 52 for the Content/Color
screen.
Content
Te xt
Text/Photo
Photograph
Printed Image
Cancel
Done
Settings
51
Page 52

Using the MFP menus
Menu item Purpose Values and descriptions
Color This menu item only appears
for color printers.
Content/Color screen
Content
Color
Gray
Touch Color for a copy job that is printed in color.
Touch Gray for a Black/White copy job that is printed
in shading from white to black with all the shades of
gray in between.
For the difference between the Content touch screen
and the Content/Color screen, see page 51 for the
Content screen and page 52 for the Content/Color
screen.
Te xt
Color
Text/Photo
Color
Photograph
Gray
Printed Image
Content color printer
Cancel
Done
Settings
52
Page 53

Using the MFP menus
Menu item Purpose Values and descriptions
Duplex To specify if an original
document is duplex (twosided) or simplex (one-sided)
when making a copy based on
whether the sheets in the
original document are simplex
or duplex.
If an optional duplex unit is not
installed, then two-sided
output cannot be selected.
Only one-sided to one-sided or
two-sided to one-sided is
available for scanning.
The orientation of each sheet
defaults to portrait. The
binding defaults to long edge.
See Duplex Bind on page 76
for information on long edge
binding.
1 sided to 1
sided*
1 sided to 2
sided
The original draft placed in the ADF has printing on
one side of a sheet of paper. The requested copy is
one-sided, so each copied sheet only has an image
on one side of the sheet. The copy mimics the original
exactly.
The original draft has printing on one side of a sheet
of paper. The requested copy is two-sided, so an
image of an original page is placed on each side of a
copied sheet. For example, if the original is six sheets,
the copy is three sheets with printing on both sides.
Paper Saver Specifies how many images of
pages from a print job to place
on one printed page of print
media.
2 sided to 1
sided
2 sided to 2
sided
Off* Places the image of one page from the print job onto
2 on 1 Portrait Places the images of two pages from the print job
The original draft has printing on both sides of a sheet
of paper. The requested copy is one-sided, so each
copied sheet only has an image on one side of the
sheet. For example, if the original draft is three sheets
of paper with an image on each side of each sheet,
then the copy is six sheets with only one image on
one side of each sheet.
The original draft placed in the ADF has printing on
both sides of a sheet. The requested copy of the
original is two-sided, also. The copy mimics the
original exactly.
one printed page.
onto one printed page with portrait orientation.
2 on 1
Landscape
4 on 1 Portrait Places the images of four pages from the print job
4 on 1
Landscape
Places the images of two pages from the print job
onto one printed page with landscape orientation.
onto one printed page with portrait orientation.
Places the images of four pages from the print job
onto one printed page with landscape orientation.
Settings
53
Page 54

Using the MFP menus
Menu item Purpose Values and descriptions
Print Page
Borders
Specifies if a border is printed
around the edge of the page at
the margins.
On* A page border prints when Paper Saver is set to 2 on
1 Portrait, 2 on 1 Landscape, 4 on 1 Portrait, or 4 on 1
Landscape.
Off A page border does not print.
Collate To keep the pages of a print
Staple Specifies if the stapler is
Original Size Provides a list of possible
Copy To
Source
Transparency
Separators
Separator
Sheets
job stacked in sequence when
making multiple copies of the
job.
turned on or off.
scanner sizes to select from to
specify the size of the original
copy document.
Provides a list of possible print
media sources to send the
copy job to for printing.
Places a sheet of paper
between transparencies.
Places a sheet of paper
between pages, copies, or
jobs based on the value
selected.
On* Copies the entire job the number of times specified.
Off Copies each page of a job the number of times
Off*
1 staple
Letter (8.5 x 11
in.)*
Legal (8.5 x 14
in.)
Executive
(7.25 x 10.5
in.)
Folio (8.5 x 13
in.)
Statement
(5.5x 8.5 in.)
A4 (210 x 297
mm)*
A5 (148 x 210
mm)
JIS-B5 (182 x
257 mm)
Auto Size
Sense
Mixed Sizes
Tray 1*
MP Feeder
Tray 2
On*
Off
None*
Between
Copies
Between Jobs
Between
Pages
For example, if you set Copies to 2 and have three
pages to copy, the MFP output is page 1, page 2,
page 3, page 1, page 2, page 3.
specified. For example, if you set Copies to 2 and
have three pages to copy, the MFP output is page 1,
page 1, page 2, page 2, page 3, page 3.
The menu item displays when a finisher with a stapler
is installed.
(* Denotes a country/region-specific factory default
value.)
Auto Size Sense determines a single size for a job.
When the MFP is unable to determine a size, the user
is prompted to determine the size of the scan window.
A default size needs to be pre-selected on the LCD.
Tray 2 is not listed as a selection in the values list
unless an optional drawer is installed.
An envelope feeder cannot be a value even if one is
installed.
Select On to have sheets placed between
transparencies.
Select Off to not have sheets placed between
transparencies.
Separator
Source
Provides a list of possible print
media sources where the
separator sheets could be
accessed.
Tray 1*
MP Feeder
Tray 2
Settings
Tray 2 is not listed as a selection in the values list
unless an optional drawer is installed.
An envelope feeder cannot be a value even if one is
installed.
54
Page 55

Using the MFP menus
Menu item Purpose Values and descriptions
Darkness Specifies the level of darkness
for the copy job.
1—9 (5*) A graphic representation depicts the values. As the
right or left scroll button is touched, the asterisk
moves back and forth on the line. 1 is next to the - and
9 is next to the +. As shown, 5 is the current value.
-+
Output Bin Specifies the bin which
Number of
Copies
Overlay Specifies the selection for
Custom
Overlay
Allow priority
copies
Custom Job
scanning
receives the copy once it is
printed.
Specifies the number of copies
for the copy job.
overlay text to print on each
page of the copy job.
The overlay looks similar to
the following on a page:
l
a
i
t
n
e
d
i
f
n
o
C
Specifies a custom overlay. text entry field Use the text entry field to specify a custom overlay.
Allows interruption to a
network print job, so the MFP
may be used as a copier to
copy a page or document.
Specifies if Custom Job
scanning is On or Off.
This is also known as Job
Build.
Custom Job is not supported
on all models.
*Standard Bin
[list of
available bins]
1—999 (1*)
Confidential
Copy
Draft
Urgent
Custom
Off*
On* Interrupts the print job at the next page.
Off Interrupts the print job at the next job boundary which
On
Off*
This menu item displays when at least one optional
output bin is installed.
The Custom value is not shown unless text is entered
into the Custom Overlay text field from the EWS page.
The text used for the overlay is what the user entered
on the EWS page, but Custom must be selected in the
menu for the text to be printed as an overlay on each
page.
The field has a 64-character limit.
means between incoming individual print jobs.
To set to On, select the check box.
To set to Off, clear the check box.
Background
Removal
Contrast Specifies the contrast used for
Adjusts the amount of
background visible on a copy.
the copy job. The default is
dependent on the Content
menu item. If the Content
menu item is reset from the
default setting, then the default
for Contrast is reset, also.
-4 to +4 (0*) -4 sets Background Removal to off.
+4 sets Background Removal to the maximum
allowed.
0—5 Text default is 5.
The default is 0 for items other than text.
Settings
55
Page 56

Using the MFP menus
Menu item Purpose Values and descriptions
Shadow Detail Adjusts the amount of shadow
Scan edge to
edge
detail visible on a copy.
Specifies if the original
document is scanned edge-toedge prior to making copies.
-4 to +4 (0*) -4 preserves the least amount of shadow detail.
+4 preserves the most shadow detail.
Off*
On
Fax Settings
Use these menu items to set the MFP for settings related to faxing.
Menu item Purpose Values and descriptions
Fax Mode Sets which fax
Analog Fax
Setup
Fax Server
Setup
method or mode is
used.
Specifies the link
to analog fax
setup. With analog
fax, the fax
method is by a
telephone line.
Specifies the link
for fax server
setup. The fax job
is sent to a fax
server for
transmission.
Analog Fax Server If the MFP does not have a modem, this menu item
does not appear.
link If the MFP does not have a modem, Fax Setup link
does not appear.
link
Analog Fax Setup
With analog fax, the fax method is by a telephone line. Use the following menu items to set up analog fax.
Settings
56
Page 57

Using the MFP menus
General Fax Settings
Menu item Purpose Values and descriptions
Station Name Specifies the name of the fax
within the MFP. The name could be
a person’s name or the name of a
company.
text entry field The text entry field is limited to eight
characters.
Enter the name in the provided field
using the virtual alphanumeric
keyboard screen. See Virtual
alphanumeric keyboard on
page 58.
Station Number Specifies the fax phone number. limited text entry
Station ID Station Name
Enable Manual Fax Sets the MFP to manual fax only,
which requires a line splitter and a
telephone hand set. Use a regular
telephone to answer an incoming
fax job and to dial a fax number.
Note: Touch # 0 on the numeric
keypad to go directly to the Manual
Fax function.
Memory Use Defines the amount of
non-volatile memory used in
relation to fax for a fax job. The
default setting splits an equal
amount of memory between
sending and receiving fax jobs.
However, when one of the values
is set, then the memory is not set
equally.
Cancel Faxes Sets the MFP to have the option of
canceling fax jobs. If this is not
allowed, the Cancel Faxes menu
item is hidden and does not appear
on the control panel.
field
Station Number
On
Off*
All receive All the memory is set to receive fax
Mostly receive Most of the memory is set to receive
Equal* Splits the memory for sending and
Mostly sent Most of the memory is set to send
All send All the memory is set to send fax
Allow* Allows fax job cancelation. Causes
Don’t Allow Canceling fax jobs is not allowed
Text entry characters are limited to:
0—9, (, ), ., +, -, and a space.
jobs.
fax jobs.
receiving fax jobs into equal
amounts.
fax jobs.
jobs.
the Fax column to appear on the
Cancel Jobs screen.
since the Cancel Faxes menu item
does not appear.
Settings
57
Page 58

Virtual alphanumeric keyboard
Using the MFP menus
abc
q
w
s
a
Shift lock
fdhg
xz
vcnb
Space
kj
Clear
l
m
Fax Send Settings
Menu item Purpose Values and descriptions
Resolution To define quality in dots per inch (dpi).
A higher resolution gives greater print
quality, but it increases the fax
transmission time for outgoing faxes.
Original Size Provides a list of possible scanner
sizes to select from to specify the size
of the original copy document.
Standard*
Fine
Super Fine
Ultra Fine
Letter (8.5 x 11 in.)*
Legal (8.5 x 14 in.)
Executive
(7.25 x 10.5 in.)
Folio (8.5 x 13 in.)
Statement
(5.5x 8.5 in.)
A4 (210 x 297 mm)*
A5 (148 x 210 mm)
JIS-B5
(182 x 257 mm)
Auto Size Sense
Mixed Sizes
oytui
(* Denotes a country/region-specific
factory default value)
8.5 in. supports Mixed Sizes.
per
Backspace
Search
Back Cancel
Settings
58
Page 59

Using the MFP menus
Menu item Purpose Values and descriptions
Duplex Sets duplex scanning (two-sided
scanning) either on or off for outgoing
fax jobs.
Content Specifies the type of content contained
in the fax job.
Off* The fax job is not set for duplex
Long edge The long end of the page (left edge is
Short edge The short edge of the page (top edge
Text* The fax job contains mostly text or line
printing.
for portrait orientation and top edge for
landscape orientation). See Duplex
Bind on page 76 for more
information.
for portrait orientation and left edge for
landscape orientation). See Duplex
Bind on page 76 for more
information.
art.
Darkness Specifies the level of darkness for the
Dial Prefix A numeric entry field is provided to
Automatic
Redial
Redial
Frequency
Behind a
PABX
Enable ECM Enables Error Correction Mode for fax
fax job.
enter numbers. The previously entered
numbers are shown.
The dial prefix could be a country code
or a code businesses use to dial an
outside line.
Specifies the number of times the MFP
automatically tries to send the fax job
again by resubmitting the Fax To
number.
Select a range in minutes for the
number of redials to occur in that time
span.
Enables or disables switchboard blind
dialing without a dial tone.
jobs, which makes faxing more
reliable.
Text/Photo The fax job contains a mixture of text
and images.
Photo The fax job contains only images.
1—9 (5*) A graphic representation depicts the
values. As the right or left scroll
button is touched, the asterisk moves
back and forth on the line. 1 is next to
the - and 9 is next to the +. As shown,
5 is the current value.
-+
Number string The entry field is limited to 16
characters. Text entry characters are
limited to:
0—9, (, ), ., +, -, and a space.
0—9 (5*)
1—200 (3*)
Yes Do not wait for a dial tone.
No* Wait for a dial tone.
Yes* ECM is enabled.
No ECM is disabled.
Enable Fax
Scans
Driver to Fax Allows driver to fax jobs to be sent by
Allows sending faxes by scanning at
the MFP.
the MFP.
On* Fax scans are enabled.
Off Fax scans are disabled.
On* Driver to fax jobs can be sent.
Off Driver to fax jobs cannot be sent.
Driver to fax jobs are treated like
PostScript jobs.
Settings
59
Page 60

Using the MFP menus
Menu item Purpose Values and descriptions
Allow Save as
Shortcut
Allows for saving fax numbers as
shortcuts in the MFP.
Yes* A Save as Shortcut button appears on
No A Save as Shortcut button does not
the screen.
appear on the Fax Destination screen.
Dial Mode Specifies the dialing sound, either as a
Custom Job
scanning
Background
Removal
Contrast Specifies the contrast used for the
Shadow detail Adjusts the amount of shadow detail
Scan edge to
edge
tone or a pulse.
Note: This menu item may not be
available in all countries or regions.
Allows for scanning of custom fax jobs.
This is also known as Job Build.
Custom Job is not supported on all
models.
Adjusts the amount of background
visible on a copy.
scan job. The default is dependent on
the Content menu item. If the Content
menu item is reset from the default
setting, then the default for Contrast is
reset also.
visible on a copy.
Specifies if the original document is
scanned edge-to-edge prior to sending
the fax job.
Tone* A tone sounds for each number dialed.
Pulse A pulsating noise sounds for each
On
Off*
-4 to +4 (0*) -4 sets Background Removal to off.
0—5 Text default is 5.
-4 to +4 (0*) -4 preserves the least amount of
Off*
On
number dialed.
To set to On, select the check box.
To set to Off, clear the check box.
+4 sets Background Removal to the
maximum allowed.
The default is 0 for items other than
text.
shadow detail.
+4 preserves the most shadow detail.
Settings
60
Page 61

Using the MFP menus
Fax Receive Settings
Menu item Purpose Values and descriptions
Enable Fax Receive Allows fax jobs to be received by the
MFP.
Rings to Answer The MFP rings a set number of times
to indicate an incoming fax job.
Yes* Fax jobs can be received.
No Fax jobs cannot be received.
1—25 (1*)
Auto Reduction Scales an incoming fax job so it fits the
size of the print media loaded in the
designated fax source. See Paper
Source as follows for more
information.
Paper Source Specifies the print media source
selected to supply print media for the
MFP to print an incoming fax.
Output Bin Specifies the bin that receives the
printed fax once it is printed.
Duplex Sets duplex printing (two-sided
printing) either on or off for incoming
fax jobs.
This menu item appears if an optional
duplex unit is installed or if the MFP
model has an internal duplex unit.
Fax Footer Prints the transmission information at
the bottom of each page from a
received fax.
On* Scales the incoming fax.
Off Does not scale the incoming fax.
Auto* The print media source is
Tray <x> Tray <x> or the standard tray is the
MP Feeder The multipurpose feeder is the
Tray <x>
(if an optional
drawer is
installed)
*Standard Bin
[list of available
bins]
On The incoming fax is a duplex job.
Off* The incoming fax is not a duplex job.
On*
Off
automatically selected by the MFP.
specified print media source, where
<x> is the number of the tray.
specified print media source.
Tray <x>, which can be any optional
drawer, is the specified print media
source, where <x> is the number of
the tray in the drawer.
This menu item displays when at least
one optional output bin is installed.
Select On to print the footer.
Select Off to prevent the footer from
printing.
Settings
61
Page 62

Using the MFP menus
Fax Log Settings
Menu item Purpose Values and descriptions
Transmission Log Selects whether the MFP prints a log
with details about the fax job sent. If
the fax job failed to send, the header
on the page reads “Fax Failed” instead
of “Transmission Log.”
Print Always* The MFP prints a page indicating
information about the fax job sent
that includes the fax number and the
time the fax job was sent.
Print Never The MFP never prints the log.
Print on Error The MFP prints a page with
information if the fax job failed to be
sent.
Receive Error Log Sets the MFP to print a log of received
fax jobs for each one that had an error
when it was received.
Auto Print Logs Specifies that a log prints after 45 fax
jobs have been sent or received.
Log Paper Source Specifies the print media source
selected to supply print media for the
MFP to print a log of all sent and
received faxes. Envelopes do not
apply.
Note: This menu item applies to all
scan functions.
Logs Display Specifies if a send log shows a dialed
phone number or a remote station
name.
Enable Job Log Sets the MFP to track the most recent
fax jobs.
Enable Call Log Sets the MFP to track the most recent
fax calls.
Print Never* The MFP never prints a log.
Print on Error The MFP prints a log.
On* The MFP prints a log of sent or
Off The MFP does not print a log of sent
Tray 1* Tray 1 or the standard tray is the
MP Feeder The multipurpose feeder is the
Tray 2 (if an
optional drawer is
installed)
Remote Station
Name*
Dialed Phone
Number
Yes* The MFP does track fax jobs.
No The MFP does not track fax jobs.
Yes* The MFP does track fax calls.
No The MFP does not track fax calls.
received fax jobs.
or received fax jobs.
specified print media source.
specified print media source.
Tray 2, which is an optional drawer,
is the specified print media source.
Shows the remote station name of a
fax job in the log.
Shows the phone number of a fax job
in the log.
Log Output Bin Specifies the output bin that accepts
the printed fax log.
The menu item only appears when one
optional output bin is installed.
Settings
A list of available
output bins is
shown as values,
such as Bin 1, Bin
2, and so on
based on the
number of bins
installed.
62
Page 63

Using the MFP menus
Speaker Settings
Menu item Purpose Values and descriptions
Speaker Mode Specifies how long the speaker
remains on.
Speaker Volume Specifies the volume setting. High* The speaker volume is high.
Ringer Volume Sets the MFP fax speaker
ringer volume.
Distinctive Ring Settings
Menu item Purpose Values and descriptions
Single Ring Answers calls with a one ring pattern. On* The one ring pattern is set on.
Always Off The speaker is set off.
On until Connected* The speaker is on until the fax
connection is made.
Always On The speaker is set on.
Low The speaker volume is low.
Off The speaker volume is off.
On* The speaker volume is on.
Off The one ring pattern is set off.
Double Ring Answers calls with a double ring
pattern.
Triple Ring Answers calls with a triple ring pattern. On* The triple ring pattern is set on.
On* The double ring pattern is set on.
Off The double ring pattern is set off.
Off The triple ring pattern is set off.
Fax Server Setup
Menu item Purpose Values and descriptions
To format text entry field Use [#] for the fax number. For example:
[x]@fax.thecompany.com
Reply Address text entry field This field is required.
Subject text entry field
Message text entry field The text entry field is limited to 512
Primary SMTP
Gateway
Secondary SMTP
Gateway
Image Format Specifies the format of the
file to be faxed.
value in text Links to a Primary SMTP Gateway in E-mail
value in text Links to a Secondary SMTP Gateway in
PDF*
TIFF
characters.
Server Setup in Network/Ports.
E-mail Server Setup in Network/Ports.
Portable Document Format
Tagged Image File Format
Settings
63
Page 64

Using the MFP menus
Menu item Purpose Values and descriptions
Content Specifies the type of
content contained in the
fax job.
Fax Resolution Defines quality in dots per
inch (dpi). A higher
resolution gives greater
print quality, but it
increases the fax
transmission time for
outgoing faxes.
Darkness Specifies the level of
darkness for the fax job.
Text* The fax job contains mostly text or line art.
Text/Photo The fax job contains a mixture of text and
Photo The fax job contains only images.
Standard
Fine
Super Fine
Ultra Fine
1—9 (5*) A graphic representation depicts the values.
images.
Standard is suitable for most documents.
Use Fine for documents with small print.
Use Super fine for documents with fine
detail.
Use Ultra fine for documents with graphics
or photographs.
As the right or left scroll button is touched,
the asterisk moves back and forth on the
line. 1 is next to the - and 9 is next to the +.
As shown, 5 is the current value.
-+
Orientation Determines how text and
graphics are oriented on
the page for the fax job.
Original Size Provides a list of possible
scanner sizes to select
from to specify the size of
the original scanned
document for faxing.
Use Multi-page TIFF Indicates that the jobs are
multiple-page Tagged
Image File Format jobs.
This menu item applies to
all scan functions.
Portrait* Text and graphics are parallel to the short
Landscape Text and graphics are parallel to the long
Letter (8.5 x 11 in.)*
Legal (8.5 x 14 in.)
Executive
(7.25 x 10.5 in.)
Folio (8.5 x 13 in.)
Statement
(5.5x 8.5 in.)
A4 (210 x 297 mm)*
A5 (148 x 210 mm)
JIS-B5
(182 x 257 mm)
Auto Size Sense
Mixed Sizes
Yes* Multiple-page TIFF files are created.
No One single TIFF file is created for each
edge. See Duplex Bind on page 76 for
more information about short edge.
edge. See Duplex Bind on page 76 for
more information about long edge.
(* Denotes a country/region-specific factory
default value.)
8.5 in. supports Mixed Sizes.
Select the check box to turn it on.
page.
Clear the check box to turn it off.
Settings
64
Page 65

Using the MFP menus
E-mail Settings
Menu item Purpose Values and descriptions
E-mail Server Setup See E-mail Server Setup on page 33.
Format Specifies the format of the file to be
scanned.
PDF* Portable Document Format
JPEG Joint Photographic Experts Group
TIFF Tagged Image File Format
PDF version Sets the version of an Adobe Acrobat
PDF file that is sent.
This menu item applies to all scan
functions.
Content Specifies the type of content
contained in the e-mail.
Color Specifies if the MFP recognizes a
color image in the e-mail or sees the
color image in gray shades.
Resolution Specifies the resolution of the e-mail
in dots per inch (dpi).
Resolution is limited by the value set
for the Color menu item. If this value
is set to Color and Resolution is set to
400 or 600 dpi, the configuration is
allowed, but it is not seen in the
normal workflow, so the combinations
are invalid. The resolution is reduced
to 300 dpi.
Darkness Specifies the level of darkness for the
e-mail as a graphic representation of
a page that uses a fill pattern to
indicate various levels from light (1)
to dark (9).
1.2
1.3
1.4
1.5
1.6
Text The e-mail job contains mostly text or
Text/Photo* The e-mail job contains a mixture of
Photo The e-mail job contains only images.
Gray* Does not send a color image in the
Color Sends the e-mail job with a color
75 dpi
150 dpi
200 dpi
300 dpi
400 dpi
600 dpi
1—9 (5*) Specifies the level of darkness for the
line art.
text and images.
e-mail job.
image enclosed.
75—600 dpi are available for Gray.
75—300 are available for Color. See
Color listed previously.
e-mail.
A graphic representation depicts the
values. As the right or left scroll
button is touched, the asterisk moves
back and forth on the line. 1 is next to
the - and 9 is next to the +. As shown,
5 is the current value.
Settings
65
-+
Page 66

Using the MFP menus
Menu item Purpose Values and descriptions
Orientation Specifies the default orientation of
the document to be sent in the scan
job.
Portrait* Sends the original document as
portrait for the scan job, which means
text and graphics are parallel to the
short edge. See Duplex Bind on
page 76 for more information about
short edge.
Original Size Provides a list of possible scanner
sizes to select from to specify the
size of the original document to be
scanned.
Landscape Sends the original document as
Letter
(8.5 x 11 in.)*
Legal
(8.5 x 14 in.)
Executive
(7.25 x 10.5 in.)
Folio
(8.5 x 13 in.)
Statement
(5.5x 8.5 in.)
A4
(210 x 297 mm)*
A5
(148 x 210 mm)
JIS-B5
(182 x 257 mm)
Auto Size Sense
Mixed Sizes
landscape for the scan job, which
means text and graphics are parallel
to the long edge. See Duplex Bind
on page 76 for more information
about long edge.
(* Denotes a country/region-specific
factory default value.)
Settings
66
Page 67

Using the MFP menus
Menu item Purpose Values and descriptions
Duplex Sets duplex scanning (two-sided
scanning) either on or off for e-mails.
Photo JPEG Quality Sets the quality of a JPEG photo
image in relation to file size and the
quality of the image.
This menu item applies to all scan
functions.
JPEG Quality Sets the quality of a JPEG text or
text/photo image in relation to file size
and the quality of the image.
This menu item applies to Text and
Text/Photo, and all scan functions.
E-mail images sent
as
Use multi-page TIFF Provides a choice between single-
page TIFF files and multiple-page
TIFF files. For a multiple-page scan
to e-mail job, either one TIFF file is
created containing all the pages, or
multiple TIFF files are created with
one file for each page of the job.
This menu item applies to all scan
functions.
Transmission Log Specifies when the transmission log
prints.
The log page is a confirmation that
the e-mails transferred successfully.
Log Paper Source To select the print media source to
supply print media for the MFP to
print a log of all sent and received emails. Envelopes do not apply.
Note: This menu item applies to all
scan functions.
Off* The e-mail job is not set for duplex
Long edge The binding is along the long edge of
Short edge The binding is along the short edge of
5—90 (50%*) A 5 setting gives a smaller file size,
5—90 (75%*) A 5 setting gives a smaller file size,
Attachment*
Web Link
Yes* Multiple-page TIFF files are created.
No One single TIFF file is created for
Print Always* The e-mail transmission log always
Print Never The e-mail transmission log never
Print on Error The e-mail transmission log only
Tray 1* Tray 1, or the standard tray, is the
MP Feeder The multipurpose feeder is the
Tray 2 (if an
optional drawer
is installed)
printing.
the page (left edge is for portrait
orientation and top edge for
landscape orientation). See Duplex
Bind on page 76 for more
information.
the page (top edge for portrait
orientation and left edge for
landscape orientation). See Duplex
Bind on page 76 for more
information.
but the quality of the image is
lessened.
A 90 setting gives the best quality of
the image, but the file size is very
large.
but the quality of the image is
lessened.
A 90 setting gives the best quality of
the image, but the file size is very
large.
Select the check box to turn this item
on.
each page.
Clear the check box to turn this item
off.
prints.
prints.
prints when an error occurs.
specified print media source.
specified print media source.
Tray 2, which is an optional drawer, is
the specified print media source.
Settings
67
Page 68

Using the MFP menus
Menu item Purpose Values and descriptions
Log Output Bin Specifies the output bin that accepts
the printed e-mail log.
The menu item only appears when
one optional output bin is installed.
A list of available
output bins is
shown as values,
such as Bin 1,
Bin 2, and so on
based on the
number of bins
installed.
E-mail Bit Depth Enables the Mixed mode to have
Custom Job scanning Allows for scanning of custom e-
Allow Save as
shortcut
Background Removal Adjusts the amount of background
Contrast Specifies the contrast used for the
Shadow Detail Adjusts the amount of shadow detail
Scan edge to edge Specifies if the original document is
smaller file sizes by using 1 bit
images when Color is set to Off.
mails.
This is also known as Job Build.
Custom Job is not supported on all
models.
Allows saving of e-mail addresses as
shortcuts.
visible on a copy.
e-mail. The default is dependent on
the Content menu item. If the Content
menu item is reset from the default
setting, then the default for Contrast
is reset also.
visible on a copy.
scanned edge-to-edge prior to
sending the e-mail.
1 bit*
8 bit
On
Off*
Yes*
No
-4 to +4 (0*) -4 sets Background Removal to off.
0—5 Text default is 5.
-4 to +4 (0*) -4 preserves the least amount of
Off*
On
To set to On, select the check box.
To set to Off, clear the check box.
When it is set to No, the Save as
Shortcut button does not appear on
the E-mail Destination screen.
+4 sets Background Removal to the
maximum allowed.
The default is 0 for items other than
text.
shadow detail.
+4 preserves the most shadow detail.
Settings
68
Page 69

Using the MFP menus
FTP Settings
Menu item Purpose Values and descriptions
Format PDF*
JPEG
TIFF
PDF version Sets the version of an Adobe
Acrobat PDF file that is sent.
This menu item applies to all scan
functions.
Content Specifies the type of content
contained in the FTP job.
Color Specifies if the MFP recognizes a
color image in the FTP job or sees
the color image in gray shades.
1.2
1.3
1.4
1.5*
1.6
Text The FTP job contains mostly text or line
Text/Photo* The FTP job contains a mixture of text and
Photo The FTP job contains only images.
Gray* Does not send a color image in the FTP
Color Sends the FTP job with a color image
Portable Document Format
Joint Photographic Experts Group
Tagged Image File Format
art.
images.
job.
enclosed.
Resolution Specifies the resolution of the FTP
job in dots per inch (dpi).
Resolution is limited by the value set
for the Color menu item. If this value
is set to Color and Resolution is set
to 400 or 600 dpi, the configuration
is allowed, but it is not seen in the
normal workflow, so the
combinations are invalid. The
resolution is reduced to 300 dpi.
Darkness Specifies the level of darkness for
the FTP as a graphic representation
of a page that uses a fill pattern to
indicate various levels from light (1)
to dark (9).
Orientation To specify the default orientation of
the document to be sent in the FTP
job.
75 dpi
150 dpi
200 dpi
300 dpi
400 dpi
600 dpi
1—9 (5*) Specifies the level of darkness for the
75—600 dpi are available for Gray. 75—300
are available for Color. See Color listed
previously.
FTP.
A graphic representation depicts the
values. As the right or left scroll button is
touched, the asterisk moves back and
forth on the line. 1 is next to the - and 9 is
next to the +. As shown, 5 is the current
value.
-+
Portrait* Sends the original document as portrait
Landscape Sends the original document as
for the FTP job, which means text and
graphics are parallel to the short edge.
See Duplex Bind on page 76 for more
information about short edge.
landscape for the FTP job, which means
text and graphics are parallel to the long
edge. See Duplex Bind on page 76 for
more information about long edge.
Settings
69
Page 70

Using the MFP menus
Menu item Purpose Values and descriptions
Original Size Provides a list of possible scanner
sizes to select from to specify the
size of the original document to be
scanned.
Letter
(8.5 x 11 in.)*
Legal
(8.5 x 14 in.)
Executive
(7.25 x 10.5 in.)
Folio (8.5 x 13 in.)
Statement
(5.5x 8.5 in.)
A4
(210 x 297 mm)*
A5
(148 x 210 mm)
JIS-B5
(182 x 257 mm)
Auto Size Sense
Mixed Sizes
(* Denotes a country/region-specific
factory default value.)
Duplex Sets duplex printing (two-sided
Photo JPEG
Quality
JPEG Quality Sets the quality of a JPEG text or
Use multi-page
TIFF
printing) either on or off for FTP jobs.
This menu item appears if an
optional duplex unit is installed or if
the MFP model has an internal
duplex unit.
Sets the quality of a JPEG photo
image in relation to file size and the
quality of the image.
This menu item applies to all scan
functions.
text/photo image in relation to file
size and the quality of the image.
This menu item applies to Text,
Text/Photo, and all scan functions.
Provides a choice between
single-page TIFF files and multiplepage TIFF files. For a multiple-page
scan to FTP job, either one TIFF file
is created containing all the pages,
or multiple TIFF files are created
with one file for each page of the
job.
This menu item applies to all scan
functions.
Off* The FTP job is not set for duplex printing.
Long edge The binding is along the long edge of the
page (left edge for portrait orientation and
top edge for landscape orientation). See
Duplex Bind on page 76 for more
information.
Short edge The binding is along the short edge of the
page (top edge for portrait orientation and
left edge for landscape orientation). See
Duplex Bind on page 76 for more
information.
5—90 (50%*) A 5 setting gives a smaller file size, but
the quality of the image is lessened.
A 90 setting gives the best quality of the
image, but the file size is very large.
5—90 (75%*) A 5 setting gives a smaller file size, but
the quality of the image is lessened.
A 90 setting gives the best quality of the
image, but the file size is very large.
Yes* Multiple-page TIFF files are created.
Select the check box to turn it on.
No One single TIFF file is created for each
page.
Clear the check box to turn it off.
Transmission
Log
Specifies when the transmission log
prints.
The log page is a confirmation that
files transferred successfully.
Print Always* The FTP transmission log always prints.
Print Never The FTP transmission log never prints.
Print on Error The FTP transmission log only prints
when an error occurs.
Settings
70
Page 71

Using the MFP menus
Menu item Purpose Values and descriptions
Log Paper
Source
Log Output Bin Specifies the output bin that accepts
To select the print media source to
supply print media for the MFP to
print a log of all sent and received
FTPs. Envelopes do not apply.
Note: This menu item applies to all
scan functions.
the printed FTP log.
The menu item only appears when
one optional output bin is installed.
Tray 1* Tray 1 or the standard tray is the specified
MP Feeder The multipurpose feeder is the specified
Tray 2 (if an
optional drawer is
installed)
A list of available
output bins is
shown as values,
such as Bin 1, Bin
2, and so on
based on the
number of bins
installed.
print media source.
print media source.
Tray 2, which is an optional drawer, is the
specified print media source.
FTP Bit Depth Enables the Text/Photo mode to
Base file name text entry The default value is the following word:
Custom Job
scanning
Allow Save as
shortcut
Background
Removal
Contrast Specifies the contrast used for the
have smaller file sizes by using 1 bit
images when Color is set to Off.
Allows for scanning of custom FTP
jobs.
This is also known as Job Build.
Custom Job is not supported on all
models.
Allows saving of FTP addresses as
shortcuts.
Adjusts the amount of background
visible on a copy.
FTP job. The default is dependent
on the Content menu item. If the
Content menu item is reset from the
default setting, then the default for
Contrast is reset, also.
1 bit*
8 bit
image
Note: There is a 53-character limit for the
base file name. The following characters
or symbols are invalid:
* — asterisk
: — colon
? — question mark
< — less than symbol
> — greater than symbol
| — vertical bar
A time stamp is added to the end of the
base file name.
On
Off*
Yes*
No
-4 to +4 (0*) -4 sets Background Removal to off.
0—5 Text default is 5.
To set to On, select the check box.
To set to Off, clear the check box.
When it is set to No, the Save as Shortcut
button does not appear on the FTP
Destination screen.
+4 sets Background Removal to the
maximum allowed.
The default is 0 for items other than text.
Settings
71
Page 72

Using the MFP menus
Menu item Purpose Values and descriptions
Shadow Detail Adjusts the amount of shadow detail
Scan edge to
edge
visible on a copy.
Specifies if the original document is
scanned edge-to-edge prior to
sending the FTP job.
-4 to +4 (0*) -4 preserves the least amount of shadow
detail.
+4 preserves the most shadow detail.
Off*
On
Settings
72
Page 73

Using the MFP menus
Scan to USB Settings
Menu item Purpose Values and descriptions
Format PDF*
JPEG
TIFF
PDF version Sets the version of an Adobe
Acrobat PDF file that is sent.
This menu item applies to all scan
functions.
Content Specifies the type of content
contained in the scan to USB job.
1.2
1.3
1.4
1.5*
1.6
Text The scan to USB job contains mostly text
Text/Photo* The scan to USB job contains a mixture of
Portable Document Format
Joint Photographic Experts Group
Tagged Image File Format
or line art.
text and images.
Color Specifies if the MFP recognizes a
color image in the scan job or sees
the color image in gray shades.
Resolution Specifies the resolution of the scan
job in dots per inch (dpi).
Resolution is limited by the value
set for the Color menu item. If this
value is set to Color and Resolution
is set to 400 or 600 dpi, the
configuration is allowed, but it is not
seen in the normal workflow, so the
combinations are invalid. The
resolution is reduced to 300 dpi.
Darkness Specifies the level of darkness for
the scan job as a graphic
representation of a page that uses a
fill pattern to indicate various levels
from light (1) to dark (9).
Photo The scan to USB job contains only
Gray* Does not send a color image in the scan to
Color Sends the scan to USB job with a color
75 dpi
150 dpi
200 dpi
300 dpi
400 dpi
600 dpi
1—9 (5*) Specifies the level of darkness for the
images.
USB job.
image enclosed.
75—600 dpi are available for Gray. 75—300
are available for Color. See Color listed
previously.
scan to USB jobs.
A graphic representation depicts the
values. As the right or left scroll button is
touched, the asterisk moves back and
forth on the line. 1 is next to the - and 9 is
next to the +. As shown, 5 is the current
value.
-+
Orientation To specify the default orientation of
the document to be sent in the scan
job.
Portrait* Sends the original document as portrait for
the scan to USB job, which means text
and graphics are parallel to the short
edge. See Duplex Bind on page 76 for
more information about short edge.
Landscape Sends the original document as landscape
for the scan to USB job, which means text
and graphics are parallel to the long edge.
See Duplex Bind on page 76 for more
information about long edge.
Settings
73
Page 74

Using the MFP menus
Menu item Purpose Values and descriptions
Original Size Provides a list of possible scanner
sizes to select from to specify the
size of the original document to be
scanned.
Letter
(8.5 x 11 in.)*
Legal
(8.5 x 14 in.)
Executive
(7.25 x 10.5 in.)
Folio
(8.5 x 13 in.)
Statement
(5.5x 8.5 in.)
A4
(210 x 297 mm)*
A5
(148 x 210 mm)
JIS-B5
(182 x 257 mm)
Auto Size Sense
Mixed Sizes
(* Denotes a country/region-specific
factory default value.)
Duplex Sets duplex printing (two-sided
Photo JPEG
Quality
JPEG Quality Sets the quality of a JPEG text or
Use multi-page
TIFF
printing) either on or off for scan to
USB jobs.
This menu item appears if an
optional duplex unit is installed or if
the MFP model has an internal
duplex unit.
Sets the quality of a JPEG photo
image in relation to file size and the
quality of the image.
This menu item applies to all scan
functions.
text/photo image in relation to file
size and the quality of the image.
This menu item applies to Text,
Text/Photo, and all scan functions.
Provides a choice between
single-page TIFF files and multiplepage TIFF files. For a multiple-page
scan job, either one TIFF file is
created containing all the pages, or
multiple TIFF files are created with
one file for each page of the job.
This menu item applies to all scan
functions.
Off* The scan to USB job is not set for duplex
printing.
Long edge The binding is along the long edge of the
page (left edge for portrait orientation and
top edge for landscape orientation). See
Duplex Bind on page 76 for more
information.
Short edge The binding is along the short edge of the
page (top edge for portrait orientation and
left edge for landscape orientation). See
Duplex Bind on page 76 for more
information.
5—90 (50%*) A 5 setting gives a smaller file size, but the
quality of the image is lessened.
A 90 setting gives the best quality of the
image, but the file size is very large.
5—90 (75%*) A 5 setting gives a smaller file size, but the
quality of the image is lessened.
A 90 setting gives the best quality of the
image, but the file size is very large.
Yes* Multiple-page TIFF files are created.
Select the check box to turn it on.
No One single TIFF file is created for each
page.
Clear the check box to turn it off.
Scan Bit Depth Enables the Text/Photo mode to
have smaller file sizes by using 1 bit
images when Color is set to Off.
1 bit*
8 bit
Settings
74
Page 75

Using the MFP menus
Menu item Purpose Values and descriptions
Base file name text entry The default value is the following word:
image
Note: There is a 53-character limit for the
base file name. The following characters
or symbols are invalid:
* — asterisk
: — colon
? — question mark
< — less than symbol
> — greater than symbol
| — vertical bar
A time stamp is added to the end of the
base file name.
Custom Job
scanning
Background
Removal
Contrast Specifies the contrast used for the
Shadow Detail Adjusts the amount of shadow
Scan edge to
edge
Allows for scanning of custom scan
to USB jobs.
This is also known as Job Build.
Custom Job is not supported on all
models.
Adjusts the amount of background
visible on a copy.
scan to USB job. The default is
dependent on the Content menu
item. If the Content menu item is
reset from the default setting, then
the default for Contrast is reset,
also.
detail visible on a copy.
Specifies if the original document is
scanned edge-to-edge prior to
sending the scan to USB job.
On
Off*
-4 to +4 (0*) -4 sets Background Removal to off.
0—5 Text default is 5.
-4 to +4 (0*) -4 preserves the least amount of shadow
Off*
On
To set to On, select the check box.
To set to Off, clear the check box.
+4 sets Background Removal to the
maximum allowed.
The default is 0 for items other than text.
detail.
+4 preserves the most shadow detail.
Print Settings
Print settings consist of the following menus. Click any of the menus for more information
Finishing Menu PCL Emulation Menu
Quality Menu PDF Menu
Utilities Menu HTML Menu
Setup Menu Image Menu
PostScript Menu
Settings
75
Page 76

Using the MFP menus
Finishing Menu
Use these menu items to set the user default settings for all jobs. Printing from an application may override user default
settings.
Menu item Purpose Values and descriptions
Duplex Sets duplex (two-sided) printing as
the default for all print jobs.
Note: This menu item appears if an
optional duplex unit is installed.
Duplex Bind Defines the way duplex pages are
bound, and how the printing on the
back of the sheet (even-numbered
pages) is oriented in relation to the
printing on the front (odd-numbered
pages).
Note: This menu item appears if an
optional duplex unit is installed.
Off* Prints on one side of the print media.
On Prints on both sides of the print media.
Long Edge*
Assumes binding along the long edge of the page (left edge for
portrait orientation and top edge for landscape orientation).
The following illustration shows long-edge binding for portrait
and landscape pages.
Binding
Back of sheet
Back of
sheet
Portrait
Short Edge
Assumes binding along the short edge of the page (top edge
for portrait orientation and left edge for landscape orientation).
The following illustration shows short-edge binding for portrait
and landscape pages.
Back of
sheet
Front of
next sheet
Front of
next sheet
Binding
Back of
sheet
Binding
Front of next
sheet
Landscape
Binding
Front of
next sheet
Copies Sets the number of copies needed
as the MFP user default value.
Landscape
Portrait
1—999 (1*) Values selected from the application or
printer driver always override values
selected from the control panel.
Settings
76
Page 77

Using the MFP menus
Menu item Purpose Values and descriptions
Blank Pages Specifies whether to include
application-generated blank pages
as part of the printed output.
Do Not Print* Does not print application-generated
blank pages as part of the job.
Print Prints application-generated blank
pages as part of the job.
Collation Keeps the pages of a print job
Separator Sheets Inserts blank separator sheets
Separator
Source
stacked in sequence when printing
multiple copies of the job.
between jobs, between multiple
copies of a job, or between each
page of a job.
Specifies the source that holds
separator sheets.
Only installed sources are shown in
the list of values.
Off* Prints each page of a job the number
of times specified by the Copies menu
item. For example, if Copies is set to 2,
and three pages are sent to print, the
printer prints page 1, page 1, page 2,
page 2, page 3, page 3.
On Prints entire job the number of times
specified by the Copies menu item.
For example, if Copies is set to 2, and
three pages are sent to print, the
printer prints page 1, page 2, page 3,
page 1, page 2, page 3.
None* Does not insert separator sheets.
Between Copies Inserts a blank sheet between each
copy of a job. If Collation is Off, a blank
page is inserted between each set of
printed pages (all page 1’s, all page
2’s, and so on). If Collation is On, a
blank page is inserted between each
collated copy of the job.
Between Jobs Inserts a blank sheet between jobs.
Between Pages Inserts a blank sheet between each
page of a job. This is useful when
printing transparencies or wanting to
insert blank pages in a document for
notes.
Tray <x> (Tray 1*) Selects separator sheets from the
specified tray.
MP Feeder Selects separator sheets from the
multipurpose feeder.
Note: Configure MP must be set to
Cassette.
Envelope Feeder Selects an envelope as a separator
sheet.
Multipage Print Prints multiple-page images on one
side of a sheet of paper. This is also
called n-up or Paper Saver.
Off* Prints 1 page image per side.
2 Up Prints 2 page images per side.
3 Up Prints 3 page images per side.
4 Up Prints 4 page images per side.
6 Up Prints 6 page images per side.
9 Up Prints 9 page images per side.
12 Up Prints 12 page images per side.
16 Up Prints 16 page images per side.
Settings
77
Page 78

Using the MFP menus
Menu item Purpose Values and descriptions
Multipage Order Determines the positioning of
multiple page images when using
Multipage Print. See Multipage
Print on page 77.
The positioning depends on the
number of images and whether the
images are portrait or landscape in
orientation.
For example, if selecting 4-Up multiple page printing and portrait orientation, the results differ
depending on the Multipage Order value selected.
Horizontal
Order
Horizontal*
Ver tica l
Reverse Horizontal
Reverse Vertical
Ver tical
Order
Reverse
Horizontal Order
Reverse
Vertical Order
21
43
Multipage View Determines the orientation of a
multiple-page sheet.
Multipage Border Prints a border around each page
image when using Multipage Print.
Staple Job Sets stapling as the default for all
print jobs.
This menu item is only displayed
when an optional finisher is
installed.
Note: Select stapling from the
printer driver to staple only specific
jobs.
Offset Pages Offsets the output of each print job
or each copy of a print job, making it
easier to separate the documents
stacked in the finisher output bin.
Note: This menu item only appears
when an optional finisher is
installed.
31
42
Auto* Lets the MFP choose between portrait
Long Edge Sets the long edge of the print media
Short Edge Sets the short edge of the print media
None* Does not print a border around each
Solid Prints a solid line border around each
Off* Does not staple print jobs.
On Staples each print job.
None* Stacks all sheets directly on top of
Between Copies Offsets each copy of a print job.
Between Jobs Offsets each print job.
12
34
and landscape orientation.
as the top of the page (landscape).
See Duplex Bind on page 76 for
more information.
as the top of the page (portrait). See
Duplex Bind on page 76 for more
information.
page image.
page image.
each other.
13
24
Settings
78
Page 79

Using the MFP menus
Quality Menu
Use these menu items to change settings that affect print quality and save toner. Printing from an application may override
user default settings.
Menu item Purpose Values and descriptions
Print Resolution To select printed output resolution. 600 dpi* Produces high quality output for print
jobs that are mostly text.
Toner Darkness Lightens or darkens printed output
Brightness Adjusts the gray value of printed
Contrast Adjusts the contrast of printed
Enhance Fine
Lines
Gray Correction Automatically adjusts the contrast
and conserves toner.
A scale appears on the control
panel LCD shown as follows. A
vertical bar ( | ) indicates the factory
default value. An arrow symbol ( V )
indicates a user default value and
the V moves left or right on the scale
while touching the left arrow or right
arrow buttons. When the default of
8 is selected, the V covers the
vertical bar as shown:
images.
images.
Enables a print mode preferable for
certain files containing fine line
detail, such as architectural
drawings, maps, electronic circuit
diagrams, and flow charts.
Note: Enhance Fine Lines is not a
menu item available from the control
panel. This setting is only available
on the PCL emulation driver or
PostScript driver or on the MFP
Embedded Web Server.
enhancement applied to images.
-.......v..+
1200 dpi Produces highest quality output for
jobs where print speed is not important
and memory is abundant.
1200 Image Q Uses line screening for print jobs that
contain bitmapped images, such as
scanned photos.
2400 Image Q Uses line screening for print jobs that
contain bitmapped images, such as
scanned photos.
1—5 (4*) • Select a lower value for finer line
width, lighter grayscale images, and
to lighten printed output.
• Select a higher value for bolder line
widths or darker grayscale images.
• Select 5 for very bold text.
• Select a value less than 4 to
conserve toner.
-6 to +6 (0*) -6 is maximum decrease.
+6 is maximum increase.
0—5 (0*) 0 is maximum decrease.
5 is maximum increase.
On In the driver, select the check box.
Off* In the driver, clear the check box.
Auto In the driver, select the check box.
Off* In the driver, clear the check box.
Settings
79
Page 80

Using the MFP menus
Utilities Menu
Use the Utilities Menu to print a variety of listings relating to available MFP resources, settings, and print jobs. Other menu
items let you set up MFP hardware and troubleshoot problems.
Menu item Purpose Values and descriptions
Factory Defaults Returns the MFP settings to the factory
Remove Held
Jobs
Format Flash Formats the flash memory.
Job Acct Stat Prints a listing of all job statistics
Activate Hex
Trace
Coverage
Estimator
default values.
This menu item is also available in the
Setup Menu.
Removes confidential and held jobs
from the MFP hard disk.
The menu item appears if a hard disk
is installed containing held or
confidential jobs.
Do not turn off the MFP while the flash
is formatting.
Note: This menu item only appears if a
nondefective optional flash memory
card, which is not write or read/write
protected, is installed.
stored on the hard disk or clears all
statistics on the hard disk.
Warning: Clear appears as a value
only if Job Accounting is not set to
MarkTrack™.
Note: This menu item only appears if
the hard disk is not write or read/write
password protected.
Helps isolate the source of a print job
problem. With Hex Trace selected, all
data sent to the MFP is printed in
hexadecimal and character
representation. Control codes are not
executed.
Provides an estimate of the
percentage of coverage of cyan,
magenta, yellow, and black on a page.
The estimate is printed on a separator
page.
Restore Now • All menu items are returned to
Do Not Restore* User-defined settings remain.
Confidential
Held
Not Restored
All
Yes Deletes any data stored in flash
No* Cancels the request to format the
Print Prints all statistics available for the
Clear Deletes all accumulated job
Off* Percent coverage is not printed.
On Prints the estimated percentage of
the factory default values except:
— Display Language
— All settings in the Fax, E-mail,
and FTP Settings menu items,
the Standard Parallel and
Parallel <x> menu items, the
Standard Serial and Serial
<x> menu items, the Standard
Network and Network <x>
menu items, and the Standard
USB and USB <x> menu
items
• All downloaded resources (fonts,
macros, and symbol sets) in
MFP memory (RAM) are
deleted. (Resources residing in
flash memory are unaffected.)
Selecting a value only affects jobs
that are resident in the MFP.
Bookmarks, jobs on USB flash
memory devices, and other types of
held jobs are not affected.
memory and prepares the flash
memory to receive new resources.
flash memory and leaves current
resources stored in flash memory.
most recent print jobs.
statistics from the hard disk. As the
MFP deletes all stored job
statistics, the message Clearing
job accounting statistics
appears as the jobs are deleted.
Touch Activate Hex Trace to enter
Hex Trace mode.
To exit Hex Trace mode, turn the
MFP off, wait 15 seconds, and then
turn the MFP on.
coverage for each color on the
page.
Settings
80
Page 81

Using the MFP menus
Setup Menu
Use the Setup Menu to configure a variety of MFP features.
Menu item Purpose Values and descriptions
Printer Language Specifies the default printer language
used to communicate data from the
computer to the MFP.
Note: Setting a printer language as the
default does not prevent a software
application from sending print jobs that
use the other language.
Resource Save Specifies what the MFP does with
downloaded resources, such as fonts
and macros stored in RAM, if the MFP
receives a job that requires more
memory than is available.
Setting Resource Save to On causes
the MFP to reset and returns the LCD
to the home screen.
Download Target Specifies the storage location for
downloaded resources.
Storing downloaded resources in flash
memory or on a hard disk is
permanent storage rather than the
temporary storage that RAM provides.
The resources remain in the flash
memory or on the hard disk even when
the MFP is turned off.
Job Accounting Specifies to store or not store
statistical information about the most
recent print jobs on the hard disk. The
statistics include whether the job
printed with or without errors, the print
time, the job size (in bytes), the
requested media size and type, the
total number of printed pages, and the
number of copies requested.
Note: Job Accounting only appears
when a nondefective hard disk is
installed.
PCL Emulation*
PS Emulation
Off* The MFP retains
On The MFP retains all
RAM* All downloaded resources
Flash All downloaded resources
Disk All downloaded resources
Off* The MFP does not store job
On The MFP stores job
PCL emulation–Uses a
PCL interpreter for
incoming host
communications.
PostScript emulation–
Uses a PS interpreter for
incoming host
communications.
downloaded resources only
until memory is needed. It
then deletes those
resources associated with
the inactive printer
language.
downloaded resources for
all printer languages during
language changes and
MFP resets. If the MFP
runs out of memory, 38
Memory Full appears.
are automatically stored in
printer memory (RAM).
are automatically stored in
flash memory.
Note: Flash appears as a
menu item if a formatted,
nondefective optional flash
memory card that is not
Write or Read/Write
password protected is
installed.
are automatically stored on
the hard disk.
Note: Disk appears as a
menu item if the hard disk
is not Write or Read/Write
password protected.
statistics on the hard disk.
statistics for the most
recent print jobs.
Settings
81
Page 82

Using the MFP menus
Menu item Purpose Values and descriptions
Print Area Modifies the logical and physical
printable area.
Normal*
Fit to Page
Whole Page
Note: The Whole Page
setting only affects pages
printed using PCL 5
interpreter. This setting has
no effect on pages printed
using the PCL XL or
PostScript interpreters. If
attempting to print any data
in the non-printable area
defined by Normal Print
Area, the MFP clips the
image at the boundary
defined by the Normal
defined printable area.
Factory Defaults Returns printer settings to the factory
default values.
Restore Now • All menu items are
returned to the factory
default values except:
— Display Language
— All settings in the
Standard Parallel and
Parallel <x> menu
items, the Standard
Serial and Serial <x>
menu items, the
Standard Network
and Network <x>
menu items, and the
Standard USB and
USB <x> menu items
• All downloaded
resources (fonts,
macros, and symbol
sets) in printer memory
(RAM) are deleted.
(Resources residing in
flash memory or on the
hard disk are
unaffected.)
Do Not Restore* User-defined settings
remain.
PostScript Menu
Use these menu items to change printer settings that affect jobs using the PostScript printer language. Printing from an
application may override user default settings.
Menu item Purpose Values and descriptions
Print PS Error Prints a page defining the
PostScript emulation error when an
error occurs.
Off* Discards the print job without
On Prints an error message
Settings
82
printing an error message.
before it discards the job.
Page 83

Using the MFP menus
Menu item Purpose Values and descriptions
Font Priority Establishes the font search order.
Note: Font Priority only appears
when a formatted flash or hard disk
is installed, is neither defective nor
Read/Write or Write protected, and
Job Buffer Size is not set to 100%.
Resident* The MFP searches printer
memory for the requested font
before searching the flash
memory or the hard disk.
Flash/Disk The MFP searches the hard
disk and flash memory for the
requested font before
searching the printer memory.
PCL Emulation Menu
Use these menu items to change printer settings that affect jobs using the PCL emulation printer language. Printing from an
application may override user default settings.
Menu item Purpose Values and descriptions
Font Source Determines the set of fonts shown in
the Font Name menu item.
Font Name Identifies a specific font from the
specified font source.
Symbol Set Determines the symbol set for a
specified font name.
Resident* Shows all fonts resident in printer
Disk Note: Shows all fonts stored on the
Flash Shows all fonts stored in flash
Download Shows all fonts downloaded to
All Shows all fonts available to the MFP
R0 Courier* The font name and font ID for all
10U PC-8 (US)*
(country/region-specific
factory default values)
12U PC-850 (non-US)*
(country/region-specific
factory default values)
RAM when the MFP ships from the
factory.
MFP hard disk.
memory.
printer RAM.
from all sources.
fonts in the selected font source are
shown. The font source abbreviation
is R for resident, F for flash, K for
hard disk, and D for download.
A symbol set is a set of alphabetic
and numeric characters, punctuation,
and special symbols used when
printing with a selected font. Only the
symbol sets supported for the
selected font name are shown.
Settings
83
Page 84

Using the MFP menus
Menu item Purpose Values and descriptions
PCL Emulation
Settings
Changes the point size for scalable
typographic fonts.
Specifies the font pitch for scalable
monospaced fonts.
Determines how text and graphics
are oriented on the page.
Determines the number of lines that
print on each page.
Sets the width of the logical page for
A4 size paper.
Specifies whether the MFP
automatically performs a carriage
return (CR) after a line feed (LF)
control command.
Specifies whether the printer
automatically performs a line feed
after a carriage return control
command.
Point Size
1.00—1008.00 (12*)
Pitch
0.08—100.00 (10*)
Orientation
Portrait*
Landscape
Lines per Page
1—255
60* (US)
64* (non-US)
A4 Width
198 mm*
203 mm
Auto CR after LF
Off*
On
Auto LF after CR
Off*
On
Point size refers to the height of the
characters in the font. One point
equals approximately 1/72 of an
inch. Point sizes from 1 to 1008 in
increments of 0.25 points can be
selected.
Note: Point Size only appears for
typographic fonts.
Pitch refers to the number of fixedspace characters in a horizontal inch
of type. A pitch from 0.08 to 100
characters per inch (cpi) in
increments of 0.01 cpi can be
selected. For nonscalable
monospaced fonts, the pitch appears
but cannot be changed.
Note: Pitch only appears for fixed, or
monospaced, fonts.
Portrait prints text and graphics
parallel to the short edge of the
paper.
Landscape prints text and graphics
parallel to the long edge of the paper.
See Duplex Bind on page 76 for
more information about short and
long edges.
The MFP sets the amount of space
between each line (vertical line
spacing) based on the Lines per
Page, Paper Size, and Orientation
menu items. Select the correct Paper
Size and Orientation before
changing Lines per Page.
Note: The 203 mm setting makes
the logical page wide enough to print
eighty 10-pitch characters.
Off–The MFP does not perform a
carriage return after a line feed
control command.
On–The MFP performs a carriage
return after a line feed control
command.
Off–The MFP does not perform a
line feed after a carriage return
control command.
On–The MFP performs a line feed
after a carriage return control
command.
Settings
84
Page 85

Using the MFP menus
Menu item Purpose Values and descriptions
Tray Renumber Configures the MFP to work with
printer drivers or applications that
use different source assignments for
the sources: trays, the multipurpose
feeder, and the manual feed slot.
Note: See the Technical Reference
for more information about
assigning source numbers.
Assign MP Feeder
Off*
None
0—199
Assign Tray [x]
Off*
None
0—199
Off–The MFP uses factory default
source assignments.
None–Source ignores the Select
Paper Feed command. None
appears only if it is the current
default. None must be selected by
the PCL interpreter.
0—199–Select a numeric value to
assign a custom value to a source.
Off–The MFP uses factory default
source assignments.
None–Source ignores the Select
Paper Feed command. None
appears only if it is the current
default. None must be selected by
the PCL interpreter.
0—199–Select a numeric value to
assign a custom value to a source.
Assign Env Feeder
Off*
None
0—199
Assign Manual Paper
Off*
None
0—199
Assign Man Env
Off*
None
0—199
Off–The MFP uses factory default
source assignments.
None–Source ignores the Select
Paper Feed command. None
appears only if it is the current
default. None must be selected by
the PCL interpreter.
0—199–Select a numeric value to
assign a custom value to a source.
Off–The MFP uses factory default
source assignments.
None–Source ignores the Select
Paper Feed command. None
appears only if it is the current
default. None must be selected by
the PCL interpreter.
0—199–Select a numeric value to
assign a custom value to a source.
Off–The MFP uses factory default
source assignments.
None–Source ignores the Select
Paper Feed command. None
appears only if it is the current
default. None must be selected by
the PCL interpreter.
0—199–Select a numeric value to
assign a custom value to a source.
Settings
85
Page 86

Using the MFP menus
Menu item Purpose Values and descriptions
Tray Renumber
(continued)
View Factory Default Shows the factory default value
Restore Defaults
Yes
No
assigned to each source. For
example:
MPF Default = 8
T1 Default = 1
T2 Default = 4
T3 Default = 5
T4 Default = 20
T5 Default = 21
Env Default = 6
MPaper Default = 2
MEnv Default = 3
The menu item is for viewing
information only. No item in the value
list can be selected.
All possible options appear even if
they are not installed.
Select Yes to return all source
assignments to factory default
values.
PDF Menu
Use these menu items to change printer settings that affect PDF jobs.
Menu item Purpose Values and descriptions
Scale to Fit Scales page content to fit the
selected print media size.
Annotations Specifies whether to print
annotations in the PDF.
Yes
No*
Do Not Print*
Print
Yes–Scales the page to fit the
selected print media.
No–Does not scale the page; printed
text or graphics are cropped if they are
larger than the selected print media.
Do Not Print–Does not print PDF
annotations.
Print–Prints PDF annotations.
Settings
86
Page 87

Using the MFP menus
HTML Menu
These menu items are used to change the printer HTML settings.
Menu item Purpose Values and descriptions
Font Name Sets the default font for HTML
documents.
Note: Times will be used in HTML
documents that do not specify a
font.
Font Size Sets the default font size for HTML
documents.
Scale Scales the default font for HTML
documents.
Orientation Sets the page orientation for HTML
documents.
Albertus MT
Antique Olive
Apple Chancery
Arial MT
Avant Garde
Bodoni
Bookman
Chicago
Clarendon
Cooper Black
Copperplate
Coronet
Courier
Eurostile
Garamond
Geneva
Gill Sans
Goudy
Helvetica
Hoefler Text
1 pt—255 pt (12 pt*) Select point sizes from 1 to 255 points
1%—400% (100%*) Select scale sizes from 1 to 400% in
Portrait*
Landscape
Intl CG Times
Intl Courier
Intl Univers
Joanna MT
Letter Gothic
Lubalin Graph
Marigold
MonaLisa Recut
Monaco
New CenturySbk
New York
Optima
Oxford
Palatino
StempelGaramnd
Ta ff y
Times
TimesNewRoman
Univers
Zapf Chancery
in 1 point increments.
1% increments.
Portrait–Prints text and graphics
parallel to the short edge of the paper.
Landscape–Prints text and graphics
parallel to the long edge of the paper.
See Duplex Bind on page 76 for
more information about short and long
edges.
Margin Size Sets the page margin for HTML
documents.
Backgrounds Specifies whether to print
backgrounds in HTML documents.
8 mm—255 mm
(19 mm*)
Print*
Do Not Print
Sets the margin from 8 to 255 mm in
1 mm increments.
Print–Prints HTML backgrounds.
Do Not Print–Does not print HTML
backgrounds.
Image Menu
These menu items are used to change the size or orientation of a printed image or to invert a printed image.
Menu item Purpose Values and descriptions
Auto Fit Selects optimal print media size,
scaling, and orientation.
Invert Inverts bi-tonal monochrome
images.
On*
Off
On
Off*
Settings
87
Note: When set to On, this setting
overrides the scaling setting and can
override the orientation setting for
some images.
Note: Does not apply to GIF or JPEG.
Page 88

Using the MFP menus
Menu item Purpose Values and descriptions
Scaling Scales the image to fit the print
media size.
Orientation Sets the image orientation. Portrait*
Anchor Top Left
Best Fit*
Anchor Center
Fit Height / Width
Fit Height
Fit Width
Landscape
Note: When the Auto Fit setting is set
to On, Scaling is automatically set to
Best Fit.
Portrait–Prints text and graphics
parallel to the short edge of the paper.
Landscape–Prints text and graphics
parallel to the long edge of the paper.
See Duplex Bind on page 76 for
more information about short and long
edges.
Security
These menu items are used to set security levels on individual print jobs requiring a PIN and securing setup.
Menu item Purpose Values and descriptions
Authentication
Method
Auto 'Log out' delay Sets a delay in seconds at
Scan to PC Port
Range
the home screen before
an authenticated user is
automatically logged off.
This menu item is used by
the system support person
who has a port-blocking
firewall between the MFP
and their users.
Authentication disabled*
Internal
NTLM
Kerberos 5
LDAP
LDAP + GSSAPI
1—60 (3*)
text entry Valid text entries are two sets of
If Authentication disabled is selected,
Function Access settings requiring
user IDs or passwords are ignored.
See Function Access for more
information.
Note: For LDAP and LDAP +
GSSAPI, use the MFP Embedded
Web Server (EWS) interface.
numerical values separated by a
colon.
The default is an empty text entry
field.
Settings
88
Page 89

Using the MFP menus
Menu item Purpose Values and descriptions
Function Access Menus
Enabled*
Disabled
Copy Access
No authentication
required*
Require User ID only
Require User ID and
Password
Function disabled
If Disabled is selected and set as the
user default, then access to
everything from the Menu button is
disabled.
If Function Disabled is selected, the
menu item does not appear on the
LCD.
See Functions disabled transitional
messages for more information.
Fax Access
No authentication
required*
Require User ID only
Require User ID and
Password
Function disabled
E-mail Access
No authentication
required*
Require User ID only
Require User ID and
Password
Function disabled
FTP Access
No authentication
required*
Require User ID only
Require User ID and
Password
Function disabled
Held Jobs Access
No authentication
required*
Require User ID only
Require User ID and
Password
Function disabled
If Function Disabled is selected, the
menu item does not appear on the
LCD.
See Functions disabled transitional
messages for more information.
If Function Disabled is selected, the
menu item does not appear on the
LCD.
See Functions disabled transitional
messages for more information.
This menu item and its values control
access to the Scan to FTP function.
If Function Disabled is selected, the
menu item does not appear on the
LCD.
See Functions disabled transitional
messages for more information.
If Function Disabled is selected, the
menu item does not appear on the
LCD.
See Functions disabled transitional
messages for more information.
Settings
89
Page 90

Using the MFP menus
Menu item Purpose Values and descriptions
Function Access
(continued)
Flash Drive Scan
No authentication
required*
Require User ID only
Require User ID and
Password
Function disabled
Selecting Function Disabled prevents
the Scan button from appearing.
Selecting No authentication required
lets any user perform the scan.
If either Require User ID only or
Require User ID and Password is
selected, when the Scan to USB Drive
button is touched, a prompt for
authentication appears. The same
prompt occurs if a function button, like
Scan or E-mail, is touched on the
home screen.
If Function Disabled is selected, the
menu item does not appear on the
LCD.
See Functions disabled transitional
messages for more information.
Confidential Print This menu item appears
on the Web page only; it
does not appear on the
control panel LCD.
Flash Drive Print
No authentication
required*
Require User ID only
Require User ID and
Password
Function disabled
Lexmark Embedded
Solutions (LES) Access
No authentication
required*
Require User ID only
Require User ID and
Password
Function disabled
Max Invalid PIN
Off*
2—10
Job Expiration
Off*
1 hour
4 hours
24 hours
1 week
Selecting Function Disabled causes
any file on the Flash Drive to be
unprintable. When the file is selected
for printing, an unrecognized file
screen appears. The only choice is to
delete the file.
Selecting Require User ID only or
Require User ID and Password
causes the authentication screen to
appear when the Print button is
touched. The user must log on before
printing takes place.
If Function Disabled is selected, the
menu item does not appear on the
LCD.
See Functions disabled transitional
messages for more information.
If Function Disabled is selected, the
menu item does not appear on the
LCD.
See Functions disabled transitional
messages for more information.
This menu item only appears when a
hard disk is installed. It counts the
number of times an invalid PIN for a
user name is entered before all the
jobs are deleted.
Specifies the amount of time a
confidential job is held in memory
before it is deleted.
Settings
90
Page 91

Using the MFP menus
Menu item Purpose Values and descriptions
Protect Menus These security menu
items are always
password protected when
either an Advanced
Password or a User
Password is set. If both
passwords are set, only
the Advanced Password is
valid.
Paper Menu
Not protected
Accept Advanced
Password only*
Accept Advanced or User
Passwords
Reports
Not protected
Accept Advanced
Password only*
Accept Advanced or User
Passwords
Settings
Not protected
Accept Advanced
Password only*
Accept Advanced or User
Passwords
Network/Ports
Not protected
Accept Advanced
Password only*
Accept Advanced or User
Passwords
Shortcuts
Not protected
Accept Advanced
Password only*
Accept Advanced or User
Passwords
Supplies Menu
Not protected
Accept Advanced
Password only*
Accept Advanced and
User Passwords
Create Scan Profile
Not protected
Accept Advanced
Password only*
Accept Advanced and
User Passwords
Protection is not applied unless the
password is set, meaning that the
password field cannot be a null field.
Protection is not applied unless the
password is set, meaning that the
password field cannot be a null field.
Protection is not applied unless a valid
password is set, meaning that the
password field cannot be a null field.
The password protects General
Settings, Copy Settings, Fax Settings,
E-mail Settings, FTP Settings, Print
Settings, and Set Date and Time.
Security is protected when a
password is set.
If both the Advanced and User
Passwords are set, only the Advanced
Password is valid for security.
Protection is not applied unless the
password is set, meaning that the
password field cannot be a null field.
Protection is not applied unless the
password is set, meaning that the
password field cannot be a null field.
Protection is not applied unless the
password is set, meaning that the
password field cannot be a null field.
Protection is not applied unless the
password is set, meaning that the
password field cannot be a null field.
Protects the button on the Web pages
that is used to start the Scan to PC
applet.
Settings
91
Page 92

Using the MFP menus
Menu item Purpose Values and descriptions
Protect Menus
(continued)
Create/Change
Passwords
See Create, Change, or Remove Passwords on page 93.
LES configuration
Not protected
Accept Advanced
Password only*
Accept Advanced or User
Passwords
Protection is not applied for Lexmark
Embedded Solutions (LES)
configuration unless the password is
set, meaning that the password field
cannot be a null field.
NTLM
Authentication
Setup
Allows registration or
removing registration of
the MFP with an NT
domain by a user with
administrator privileges on
the domain.
Note: Either Registered
or Not Registered
appears on the status
message bar. Continue is
the pop-up message for
removing registration.
Domain Name
Domain PDC Name
Domain Name–Enter the text entry
for the domain name. The factory
default for the variable domain name
is <domain>. Use the virtual
alphanumeric keyboard to enter the
text.
Domain PDC Name–Enter the text
entry for the domain PDC name. The
factory default for the Domain PDC
Name variable is an asterisk (*). Use
the virtual alphanumeric keyboard to
enter the text.
Note: Other pop-up messages
include:
• Unregistering this device will
prevent any use of NTLM
authentication until the device is
registered again.
• Keep registration
• Unregister now
Settings
92
Page 93

Using the MFP menus
Create, Change, or Remove Passwords
Create, Change, or Remove Advanced Password
Menu item Values and descriptions Pop-up message
Password text entry The range for a password is 8—127 characters.
If a password less than eight characters is
entered, a pop-up message appears to instruct
the user to enter a password of a minimum of
eight characters.
Reenter Password text entry This entry must match the Password field or an
error pop-up message appears.
Create, Change, or Remove User Password
Menu item Values and descriptions Pop-up message
Password text entry The range for a password is 8—127 characters.
If a password less than eight characters is
entered, a pop-up message appears to instruct
the user to enter a password of a minimum of
eight characters.
Reenter Password text entry This entry must match the Password field or an
error pop-up message appears.
Password must be a
minimum of 8
characters.
Password and Reenter
Password did not
match.
Password must be a
minimum of 8
characters.
Password and Reenter
Password did not
match.
Create, Change, or Remove Device Lockout PIN
Menu item Values and descriptions Pop-up message
PIN 4-digit numeric
entry
Reenter PIN 4-digit numeric
entry
This must be a 4-digit entry. Valid entries are
numerals 0—9. The PIN lets anyone lock the
MFP for all activity at the MFP.
If a password of less than four digits or any
numerals other than 0—9 are entered, a pop-up
message appears, and the field is cleared.
This menu item appears only if a nondefective
hard disk is installed.
This entry must match the PIN field or an error
pop-up message appears, and the field is
cleared.
PIN must be 4 digits.
PIN and Reentered PIN
did not match.
Settings
93
Page 94

Using the MFP menus
Set Date and Time
Menu item Purpose Values and descriptions
Time Zone Sets the time zone for
the fax.
Not Set*
US Hawaii
US Alaska
US/Can Pacific
Tijuana
US/Can Mountain
US/Can Central
US/Can Eastern
US/Can Atl
Newfoundland
Brasilia, Braz.
Mid-Atlantic
Azores
Cape Verde Is.
GMT
Ireland
London
Central Europe
Amsterdam
Berlin
Bern
Brussels
Lisbon
Madrid
Paris
Prague
Rome
Stockholm
Vienna
Warsaw
Eastern Europe
Cairo
Helsinki
Athens
Istanbul
Israel
South Africa
Moscow
Tehran, Iran
Beijing, China
Urumqi
Aus Western
Aus Central
Aus Eastern
Queensland
Ta sm a ni a
Northern Ter.
New Zealand
Korea
Japan
Current Date and
Time
Year Allows a manual
Month Allows a manual
Day Allows a manual
Hour Allows a manual
Minute Allows a manual
This is a display item
only.
change to the year.
change to the month.
change to the date.
change to the hour.
change to the minute.
YYYY-MM-DD HH:MM The current year, month, date, hour, and
minute appear.
2003—2028 Year is expressed in one-year increments.
January
February
March
April
May
June
July
August
September
October
November
December
1—31 Day is expressed in one-day increments. If
Day is set to a date that is not in the month,
the month changes, and the new date moves
into that month. For example, if June 31 is set,
it becomes July 1. If June 32 is set, it
becomes July 2.
0—23 The hour is expressed in one-hour
increments.
0—59 The minute is expressed in one-minute
increments.
Settings
94
Page 95

Using the MFP menus
Menu item Purpose Values and descriptions
DST Mode Allows methods of
changing Daylight
Savings Time (DST)
Mode.
Daylight Savings Yes
Time Server IP
Time Server Name text field
Allow NTP
Broadcast
Automatic* The time is set by the time server.
Manual The time is hand set.
The default value depends on the date and
No
None
Yes
No*
time.
Note: Once this value is changed, change
DST mode to Manual.
Select the check box for Yes.
Clear the check box for No.
Help Pages
These menu items are used to print some or all of the resident Help Pages. These pages contain information about MFP
settings for copy, fax, e-mail, and FTP.
If the control panel is set to a language other than English, Brazilian Portuguese, French, German, Spanish, or Italian the
document prints in English.
The Help menu pages can be printed in the following languages from the Software and Documentation CD.
English Spanish Dutch Polish
Brazilian Portuguese Italian Finnish Russian
French Danish Norwegian Swedish
German
Menu item Purpose Values and descriptions
Print All Prints all Help Pages menu
Information
Guide
Copying Prints the Copy guide on making
E-mail Prints the E-mail guide on
Faxing Prints the Fax guide on typing
FTP Prints the FTP guide on
topics.
Prints the Information guide.
copies and changing settings.
sending jobs to addresses, using
shortcut numbers, and using
address books.
fax numbers, using shortcut
numbers, and faxing to one or
more recipients.
scanning items to send to an
FTP site.
After selecting this menu item, the Help Pages print, and the
MFP returns to Ready.
After selecting this menu item, the Help Pages print, and the
MFP returns to Ready.
Help Pages
95
Page 96

Using the MFP menus
Manage Shortcuts
To manage Fax, E-mail, FTP, and Profile shortcuts, only deletions of an entry or a complete list are possible. Use the up
and down arrows to scroll through the listing of shortcut items if there are enough entries on the screen for the up and down
arrows to appear. The following example shows a Profile shortcuts screen with no items in the list selected. It does not
show arrows since there are only three shortcuts listed which all appear on one screen. As the status message bar
indicates, it shows 1 to 3 entries of a total of 3 entries. If there were more entries, scrolling up and down with arrows would
be possible. Since none of the entries are selected, Delete Entry is an unavailable button, meaning it is not active. Only the
Delete List button is available.
Menus->Manage Shortcuts->Manage Profiles Shortcuts
legal1/my_twain_net_scan
finance_report_scan
Delete
customfolder/personnel/roles_profiles
Entry
Delete
List
Displaying 1 - 3 / 3
Manage Shortcuts
96
Page 97

Using the MFP menus
Touch the radio button beside the one listing needed, and it changes to a selected radio button as shown by the blue color.
Delete Entry is now active. Touch Delete Entry to delete the selected entry.
Menus->Manage Shortcuts->Manage Profiles Shortcuts
legal1/my_twain_net_scan
finance_report_scan
Delete
customfolder/personnel/roles_profiles
Entry
Delete
List
Displaying 1 - 3 / 3
The Fax, E-mail, and FTP manage shortcut screens work in the same manner.
Manage Shortcuts
97
Page 98

2
Understanding MFP messages
Messages appear on the MFP control panel describing the current state of the MFP and indicating possible MFP problems
requiring intervention.
Status messages
Status messages provide information on the status of the MFP.
Message Meaning Action
Bin [x] Full x represents the number of the
output bin that is full when the MFP
bins are linked.
Busy The MFP is busy receiving,
processing, or printing data.
Remove print media from the bins. The message
clears once the output level of the linked bins is no
longer full.
Note: The message appears on the Menu Settings
Page also. See Menu Settings Page for more
information.
Press Stop to access the job queue.
Flushing Buffer The MFP flushes corrupted data and
Hex Trace The MFP is in Hex Trace mode.
[linked set bin
name] Full
Maintenance The MFP maintenance counter has
Network
Network [x]
Network [x], [y]
Parallel
Parallel [x]
Serial [x] A serial interface is the active
USB
USB [x]
[PJL RDYMSG] This is the Printer Job Language
discards the current print job.
Hex Trace isolates the source of a
print job problem. When Hex Trace
is active, all data sent to the MFP
prints in hexadecimal and character
representation.
The linked set of bins with a
previously defined name is full.
exceeded its limit, so the MFP
requires maintenance.
A network interface is the active
communication link.
A parallel interface is the active
communication link.
communication link.
The MFP is processing data through
the specified USB port.
(PJL) Ready message.
Exit Hex Trace to print jobs normally. To exit Hex
Trace, unplug the MFP.
Remove print media from the bins. The message
clears once the output level of the linked bins is no
longer full.
Note: The message appears on the Menu Settings
Page also. See Menu Settings Page for more
information.
Replace the maintenance items. If necessary, reset
the MFP maintenance counter.
Wait for the message to clear.
Notes:
• The current interface appears on the Menu Settings
Page. Interfaces shown without an x or y means
the active host interface is a standard interface.
• x indicates the active interface is connected to the
MFP through PCI connector x.
• x, y indicates the active interface is connected to
the MFP through channel y on PCI connector x, or
that x equals 0 on the standard network interface.
Understanding MFP messages
98
Page 99

Understanding MFP messages
Message Meaning Action
Power Saver The MFP is ready to receive and
Printing The MFP is printing a job.
Printing page [x] A sheet of print media moves
Printing page [x],
copy [a]/[b]
process data. It is reducing its
electricity consumption while idle. If
the MFP remains inactive for the
period of time specified in the Power
Saver menu item (60 minutes is the
factory default), the Power Saver
message replaces the Ready
message.
through the MFP to be printed.
x represents the number of the sheet
being printed. Even though a duplex
(two-sided) sheet has two sides,
called pages, it only counts as one
sheet.
A sheet of print media moves
through the MFP to be printed.
x represents the number of the sheet
being printed. Even though a duplex
sheet has two sides, called pages, it
only counts as one sheet, so pages
are not counted, only sheets passing
through the MFP.
The total number of sheets in a set is
not known, but the number of sets is
known. For example, a user may
have requested that three copies
print, so there are three sets of
sheets, but the number of sheets is
unknown.
Send a job to print.
Press any control panel button.
Printing page [x]/
[y], copy [a]/[b]
Ready The MFP is ready to receive and
Scanner automatic
document feeder
cover open
A sheet of print media moves
through the MFP to be printed.
x represents the number of the sheet
being printed. A sheet is considered
a front and back page of one piece
of print media. A group of sheets is
called a set. y represents the total
number of sheets in a set.
a is the number of the current set
printing. b is the total number of sets
to be printed. For example, a user
may send a 6-page duplex print job
and select three copies to print, so
there are three sheets to print for
each job. This makes one set. Three
sets must print before the user has
the complete job.
process jobs.
The automatic document feeder
(ADF) cover is open.
Print, fax, scan, e-mail, copy, or use FTP.
Close the cover.
Status messages
99
Page 100

Understanding MFP messages
Message Meaning Action
Standard Bin Full
Bin [x] Full
[bin name] Full
Toner Low The toner cartridge is low on toner.
Tray [x] Empty x represents the number of the tray.
Tray [x] Low x specifies the number of the tray
The standard bin is full.
x represents the number of the bin
that is full.
[bin name] specifies a previously
defined name for the bin, such as
Mary’s bin, and it is full.
The Menu Settings Page shows the
level. It takes an unspecified amount
of time for the MFP to read the level
of toner. Until the level is read, the
MFP does not show the message.
The tray has no print media installed.
that is low.
Remove the stack of print media from the standard
output bin or from the specified bin to clear the
message.
Note: These messages appear on the Menu Settings
Page also. See Menu Settings Page for more
information.
• The message clears automatically when the cover
or door over the toner cartridge is opened or if the
MFP power is turned off and then on.
• Replace the toner cartridge. If it is not replaced, the
MFP issues the message again when the door or
cover is closed.
1 Remove the tray. The message clears.
2 Install print media in the tray according to the
User’s Guide.
3 Insert the tray.
Load print media into the specified tray to clear the
message.
Tray [x] Missing x represents the number of the tray
missing from the MFP.
The message is on the Menu
Settings Page also.
Waiting The MFP receives a page of data to
print but waits for an End of Job
command, a Form Feed command,
or additional data.
Insert the tray to clear the message.
Press Stop. Touch Continue to print the contents of
the buffer.
Cancel the current job.
Wait for the message to clear.
Status messages
100
 Loading...