

Page 1
®
UUsseerrss IInnssttrruuccttiioonn MMaannuuaall
Contents and Index page:
TTAABB 110000 SSeerriieess
Page 2
Chapter 1 General Information
Congratulations on the purchase of your TAB100 series PDA.
The TAB100 series is a range of PDA’s which contain many useful features designed to help organise
your everyday life. Data can be synchronised with a Personal Computer and with a secure web site,
ensuring your data is safe and protected at all times.
This instruction manual is designed to ensure that you get the most out of the unit and enjoy the best use
of all the features and functions it will provide you with. Please read it carefully and keep it in a safe
place for future reference.
This particular chapter gives you some general information about your new handheld and this user’s
guide. It briefly introduces the keys, power supply, input methods, screen displays, virtual keyboard and
so on, so that you can use your handheld more efficiently and more easily.
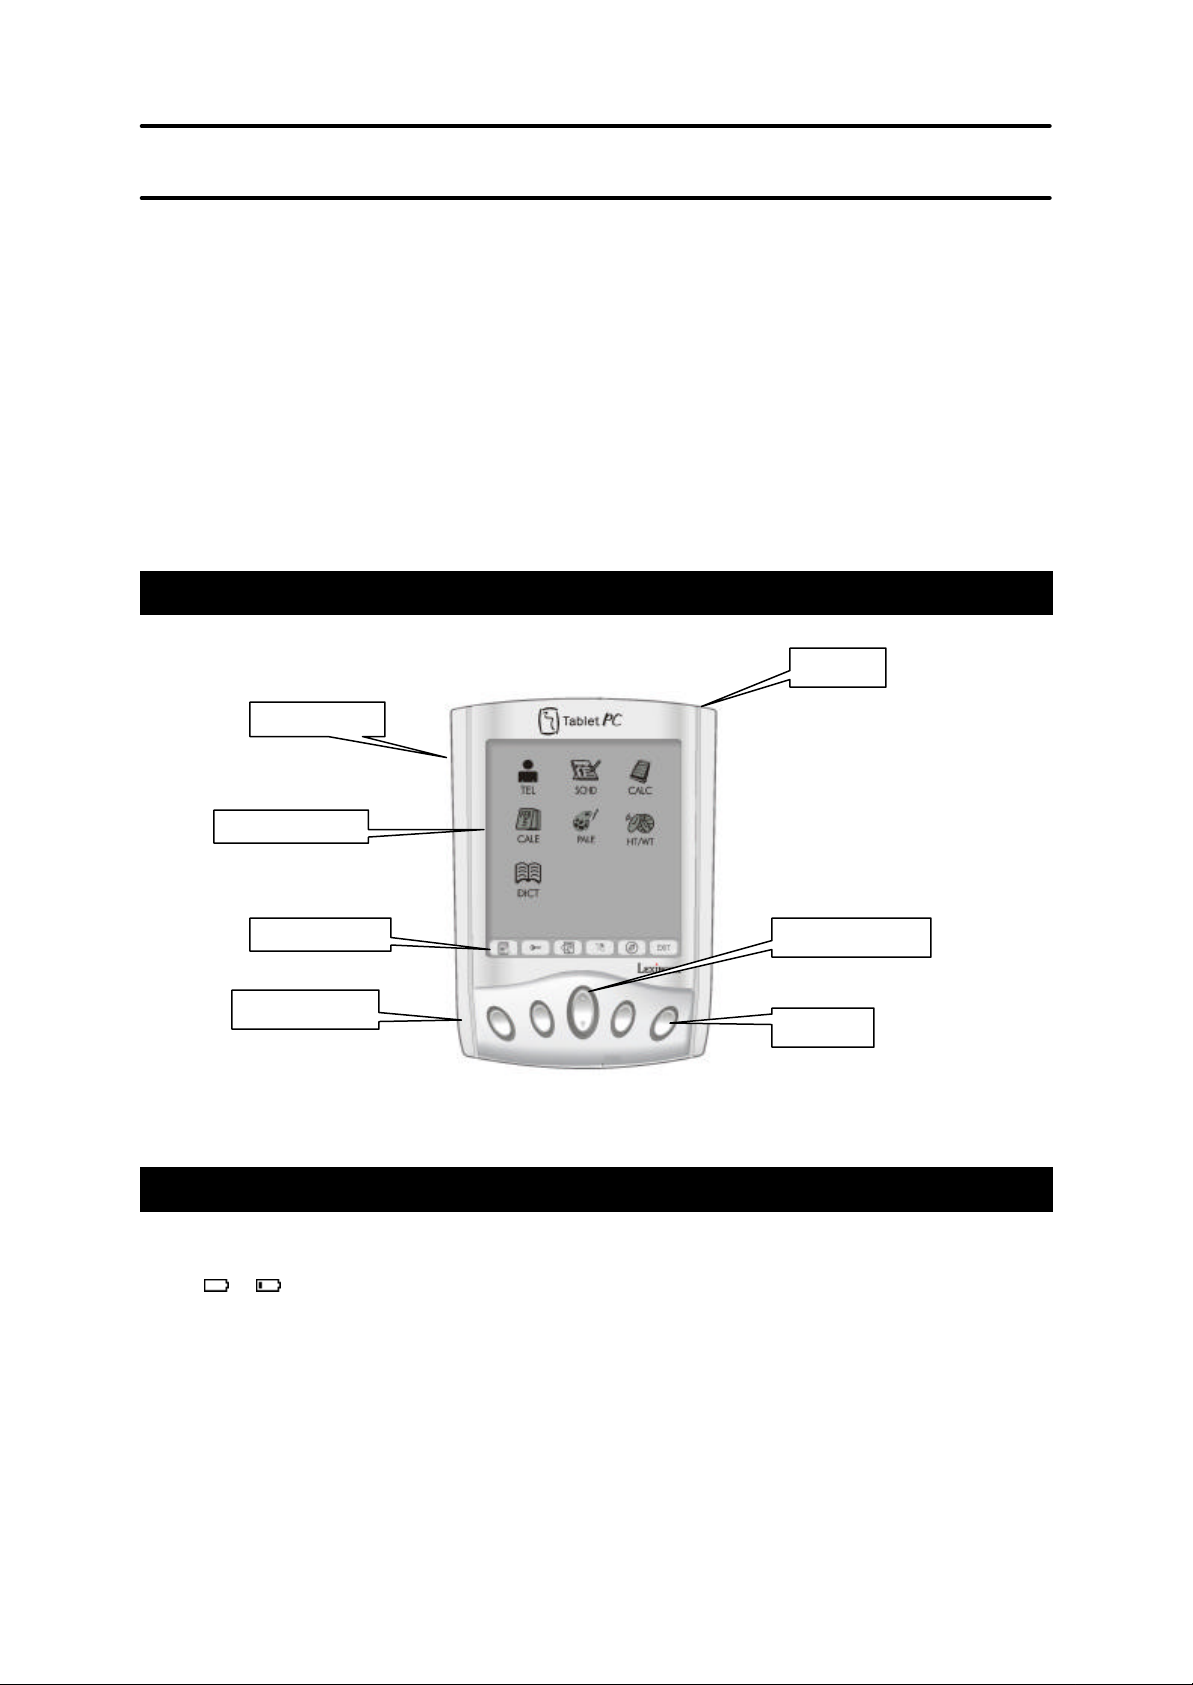
Layout of the unit
Stylus
ON/Off key
Desktop area
Shortcut bar
PC Link port
Above are the essential areas and keys of the TAB100 series. Familiarise yourself with them to ensure
you understand the features and functions of this unit. More information on key usage is outlined below.
Up/Down key
Hotkeys
Power supply
The TAB100 series is powered by a single AAA alkaline battery. If the battery indicator on the main menu
shows or , it indicates a low battery. Please replace the battery immediately.
To save power, your device has an auto power-off function which switches the unit off after 3 minutes of
none use.
You may change the auto-off period in “System” setting mode.
For bat tery care and rule of battery usage please see the section at the end of this instruction manual
Page 3
Shortcut Bar
The shortcut bar allows you access to several functions at the tap of one button.
There are 6 shortcut icons at the bottom of screen as follows:-
(Main) Return to main menu
(Lock) To enable or disable Record Password.
(Find) Keyword Search entry
(Back-light) Switch on or off the back-light
(Sycronisation) Syncronise with a PC using SyncMan® Software
(Exit) Exit without save or Return to previous screen
To use one of the functions tap on the iconised button.
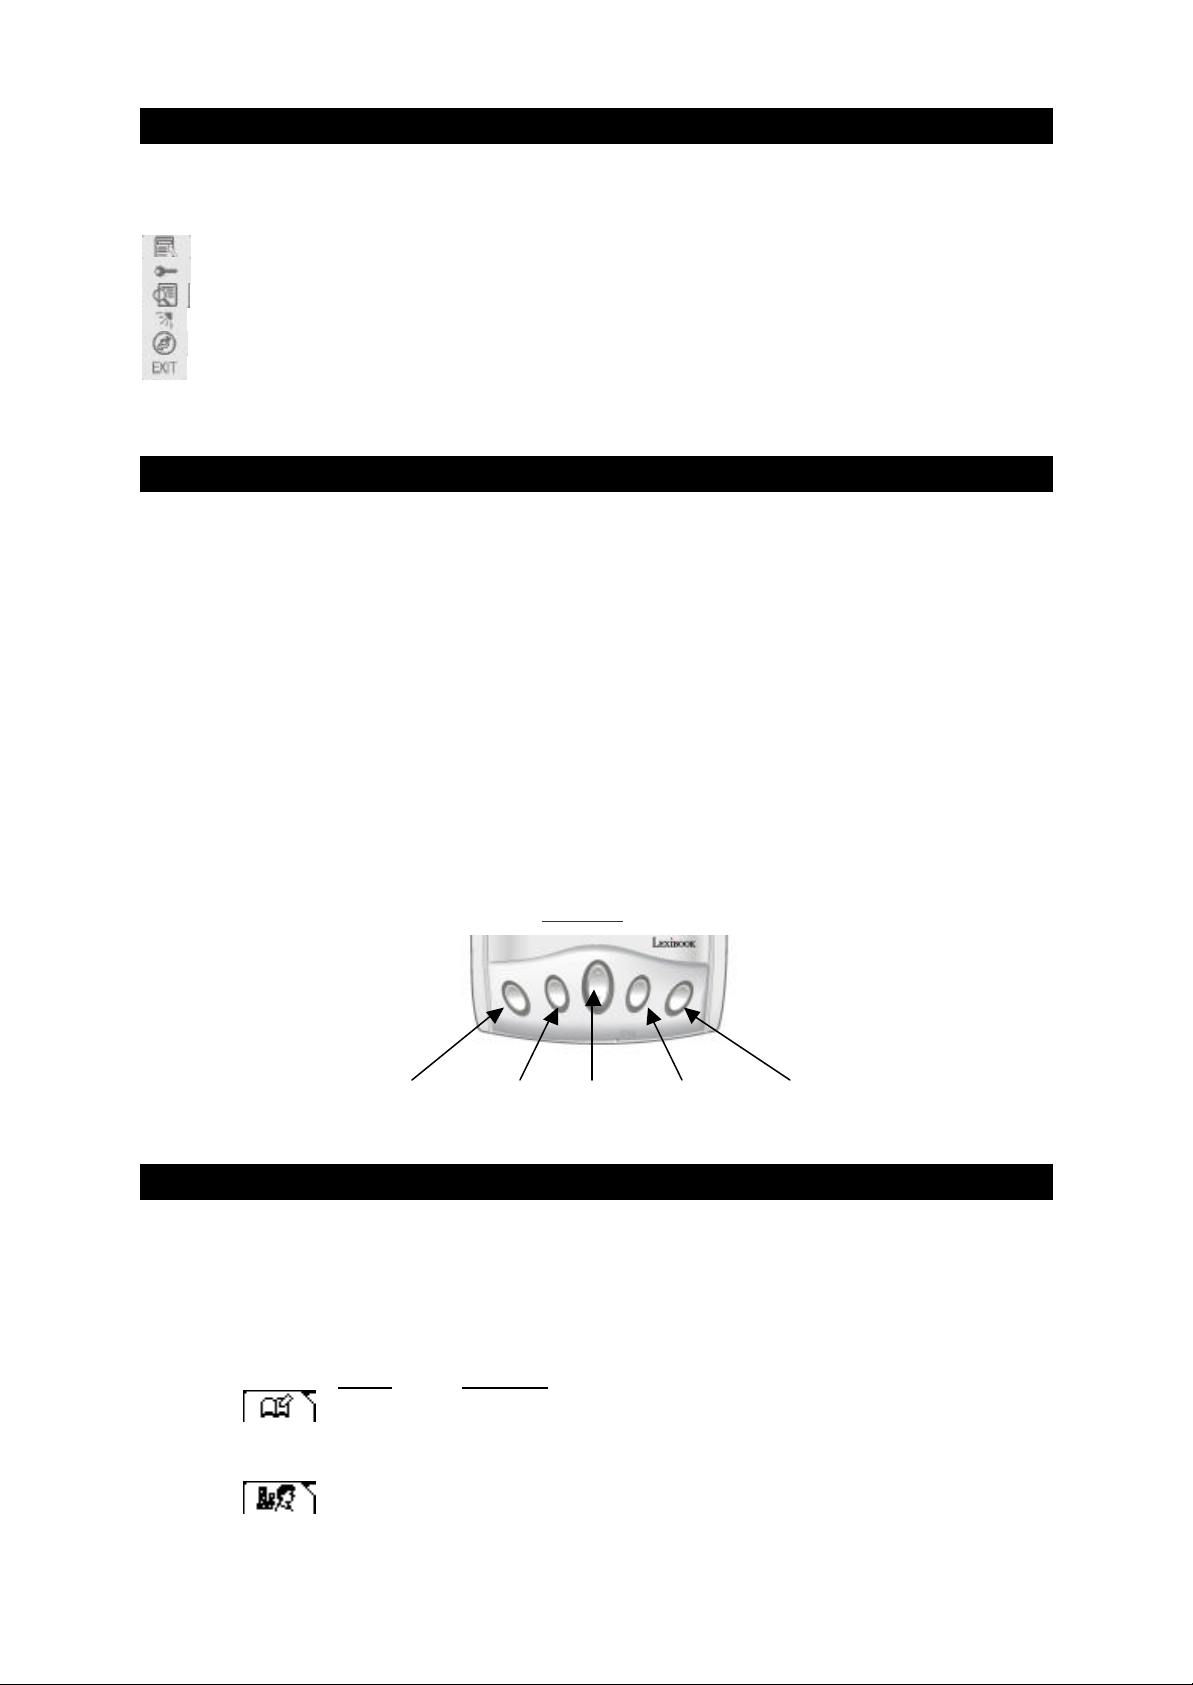
Hotkeys
There are 4 Hot Keys on the front of the unit, just below the Shortcut Bar. These are called the Hot Keys.
Hot Keys can be configured to perform one touch actions. Such as run the calculator feature without
having to use the desktop area. They can also be configured to turn the PDA on when touched and go
straight to an application.
When shipped the Hot Keys are configured as follows:-
•Hotkey 1 – Phonebook
•Hotkey 2 – To do
•Hotkey 3 – Calculator
•Hotkey 4 – Schedule
There is also an Up/Down arrow key which allows you to scroll through records on the screen when you
are in applications.
Please see the instructions on how to set the Hot Keys later on in this manual.
Hotkey 1 Hotkey 2 Up/Down Hotkey 3 Hotkey 4
Button
Desktop Area
The Desktop Area is where you gain access to the main features of the PDA and start programs just by
tapping on one of the icons. There are also 5 Tabs at the top of the display which indicate separate
folders which further contain programs and applications.
These are:
Folder Functions
Organizer Phonebook, Schedule, Notes , Shorthand,
Drawpad, To Do, Calendar, Owner Info, Time and
Today
Office E-Mail, E-Book and Mini Text
Page 4
Tools Trans, Calc and Unit conversion
System System, SIM Card, Memory, Date & Time,
Password, SyncMan®, Hotkey and My Text
Download Downloaded functions and files
1. From the desktop, tap the tab of the folder at the top of the screen to toggle between the 5 menus (see
below).
2. Tap on the desired Application Software icon to enter an application.
3. You can move an Application into another folder. Tap and hold the Application icon and drag it to
destination folder or another location in same folder.
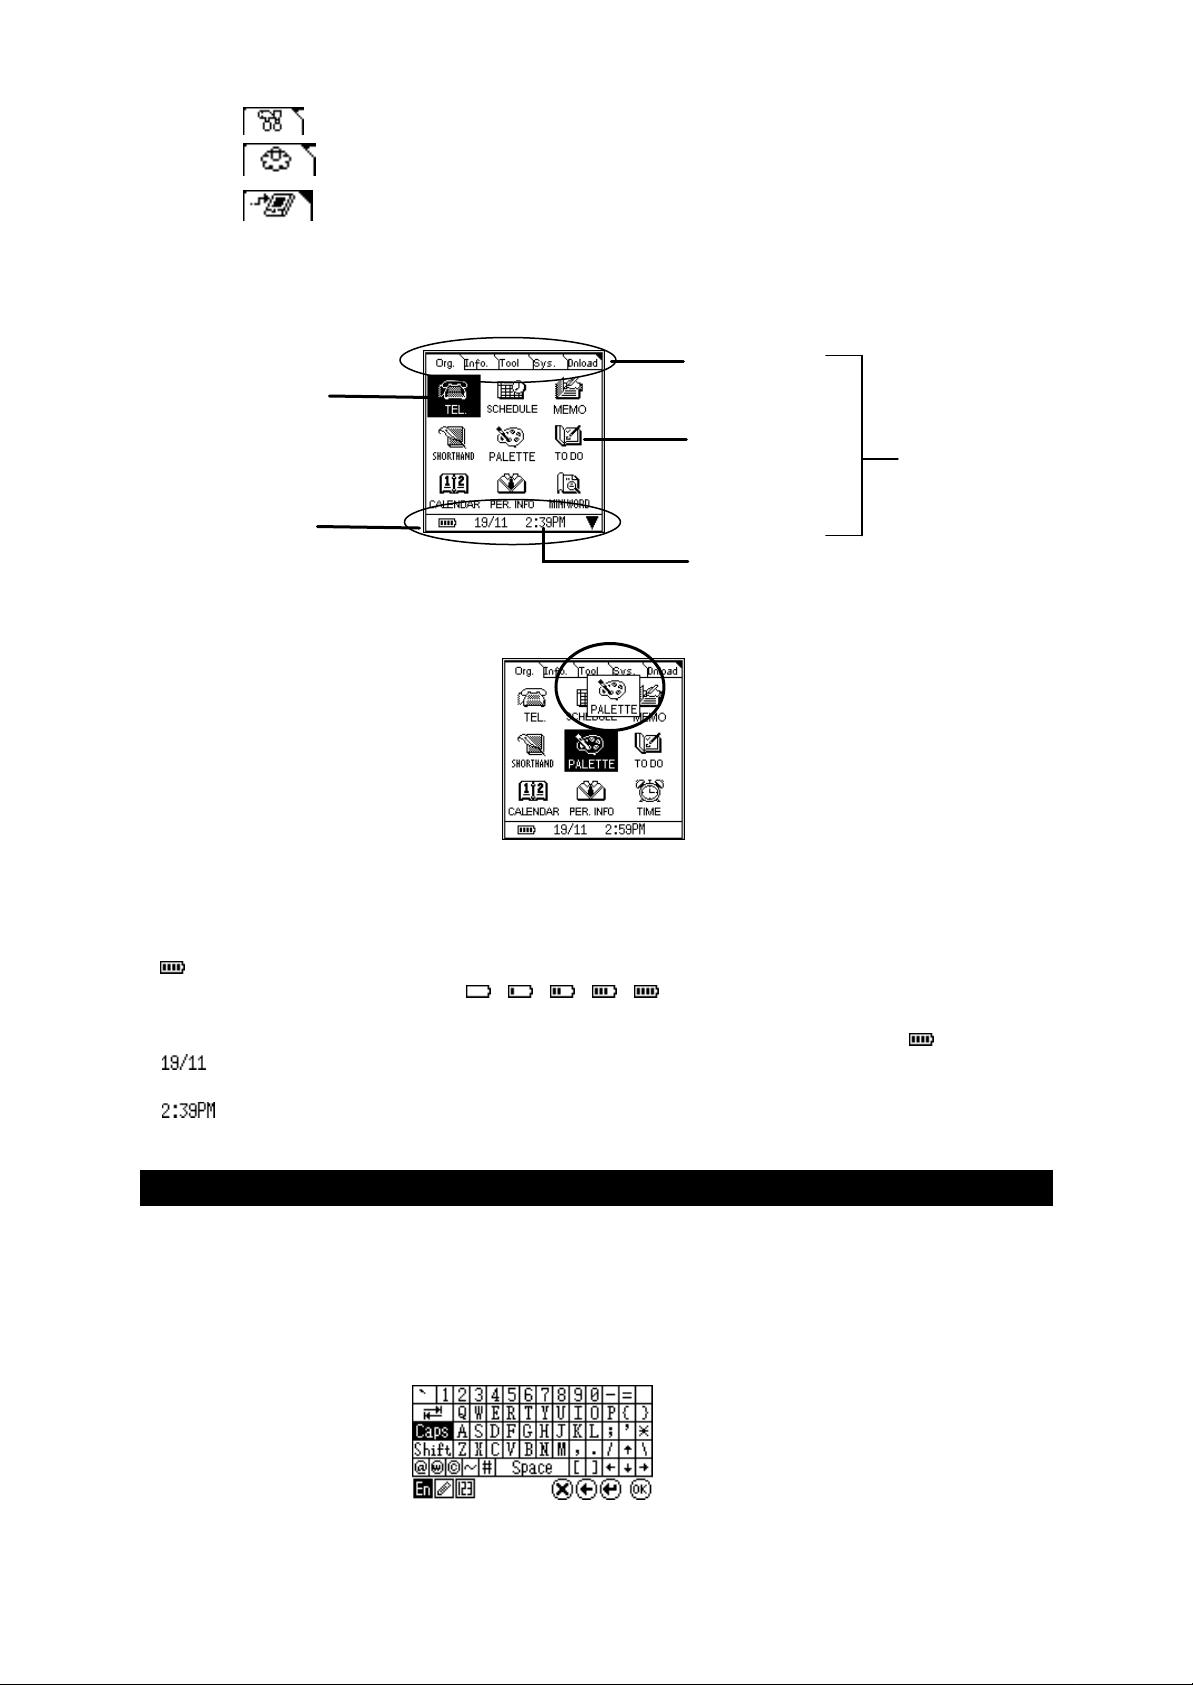
4. The indicators on the status bar show the battery level, date and time
Battery indicator
Tapping on the date will show the weekday. Tap on the day to change back to the date.
Highlighted
Status bar
There are five levels: , , , , . representing from low power to full power
You can also tap on the battery indicator and it will show the remaining power in
percentage, tap on the percentage number to change back to the icon: .
Indicates the current date
Shows the current time. NOTE: display will vary depending if your unit is set to the 12hr
clock or the 24hr clock.
Folder icons
Application
icon
Desktop area
Indicator
Virtual Keyboard
In Edit mode, there are three kinds of keyboards available.
These are: Alpha numeric, Stylus -entry and Numeric Keyboard.
The status of Keyboard is shown in the lower left corner of virtual keyboard with the icon of the current
keyboard highlighted. As shown:-
Page 5
Tap the icon to activate the pop up menu to select an one of the alpha numeric keyboards. You
can select from 5 languages including English, German, French, Italian and Spanish.
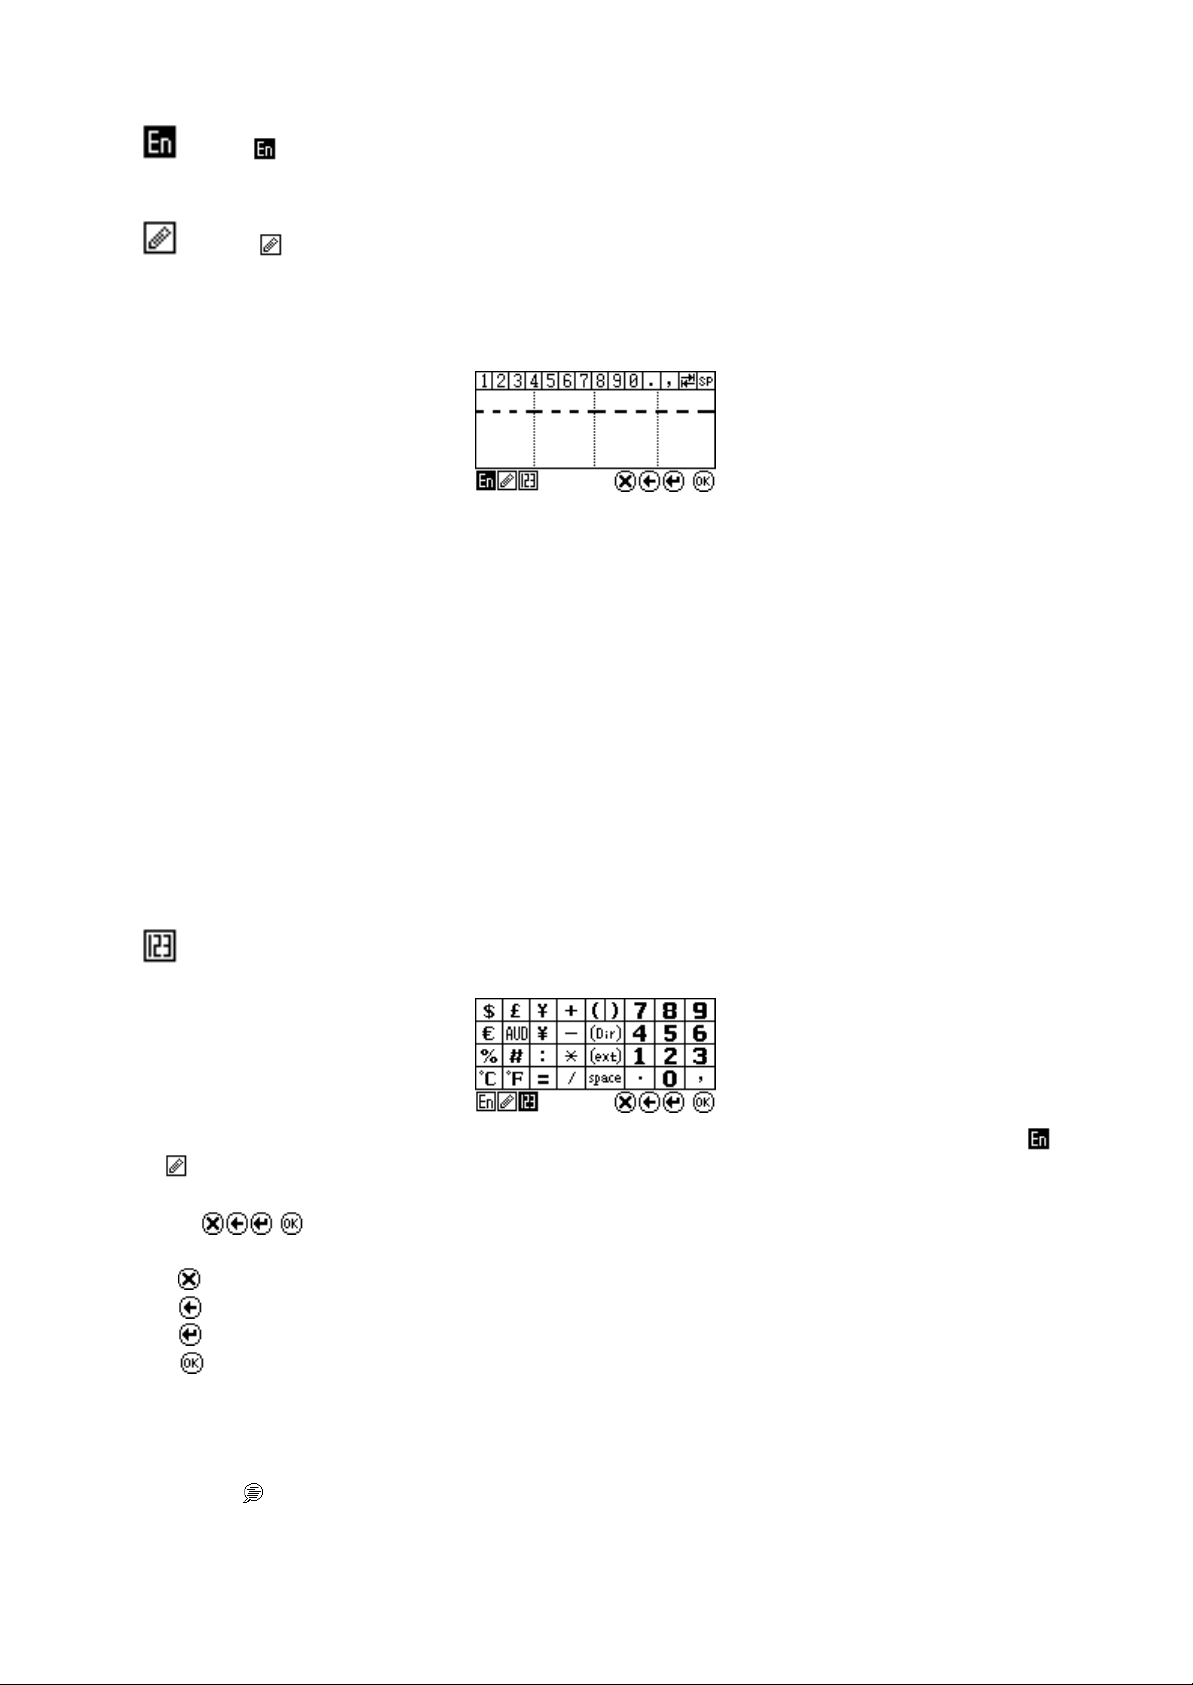
Tap the icon to activate Pen-entry Keyboard.
In this keyboard mode you can write directly onto the Screen, in a natural manner, to input data .
There are 4 areas to write in the Pen-entry keyboard: -
You can write alpha characters in the first 3 boxes and symbols in the last box.
There is a dotted line in the alpha character drawing box area, approximately 2/3rds of the way
from the bottom of the box. This dotted line helps the unit differentiate between upper and lower
case letters when these are the same shape. For instance: Cc, Kk, Mm, Oo, Pp, Ss, Uu, Vv, Ww,
Xx, etc. The unit can recognize these characters easily by drawing the lower case character below
the dotted line and the upper case character across the dotted line.
Above the writing area, just above the number line is an empty line. This is called the “candidate
row”. After writing a character on the screen, possible or close match characters are shown in the
candidate row. Tap the correct candidate character to input it. If a candidate character isn’t tapped,
the unit will select the first candidate and use it.
After entering a character you can edit it easily. In the top row of the display make sure the cursor
is flashing just after the character you have just entered. In the candidate row selec t the correct
character, if it is there. This will change the last character, or the character the cursor is behind, to
the character you have just chosen from the candidate bar.
Tap this icon to Activate Numeric Keyboard: -
You can switch to this keyboard at any time to enter numbers or special characters. To return to the
or keyboards tap the relevant icon.
Using icons allows you to carry out certain functions whilst editing a file or document:-
- deletes characters both before and after the cursor
- deletes character before the cursor and moves cursor backwards
- insert a line feed or new line
- confirms an action or saves a record/file
To make numeric and symbol input easier and faster you can use the My Text feature to create and save
favourite sentences or phrases. You can also store lists of words for later use as well.
Tap on the icon in the Settings folder, to start the application. See later in this manual for how to use
the My Text functions.
Page 6

System Reset
If the TAB100 PDA locks up or seems to have ceased to function you can normally re -start it by invoking
a system reset.
This is an easy process and there are 2 types of reset:-
Hard Reset – this will delete all data files in the unit and reset the system clock and screen
calibration
System Reset – will allow the unit to restart but only reset the system clock and screen calibration.
Hard Reset:
Find a thin blunt instrument, such as a paper clip and:
1. Hold the ON/OFF button at the same time as inserting the blunt instrument into the reset hole on the
back of the unit, just below the product identification label. Press gently and then release. The
calibration screen will then appear.
2. Tap the centre of calibration targets on the screen sequentially.
3. After the screen calibration the login screen will display if login password is activated.
4. Enter correct login password to go to Main Menu.
System Reset:
Find a thin blunt instrument, such as a paper clip and:
1. Insert the blunt instrument into the reset hole on the back of the unit, just below the product
identification label. Press gently and then release. The calibration screen will then appear.
2. Tap the centre of calibration targets on the screen sequentially.
3. After the screen calibration the login screen will display if login password is activated.
4. Enter correct login password to go to Main Menu.
Note: The unit will take up to 1 minute to re-boot as it has to process data in the memory of the unit.
Please wait whilst this process takes place and do not be tempted to keep pressing the ON/OFF button
otherwise this will interrupt the process.
Page 7
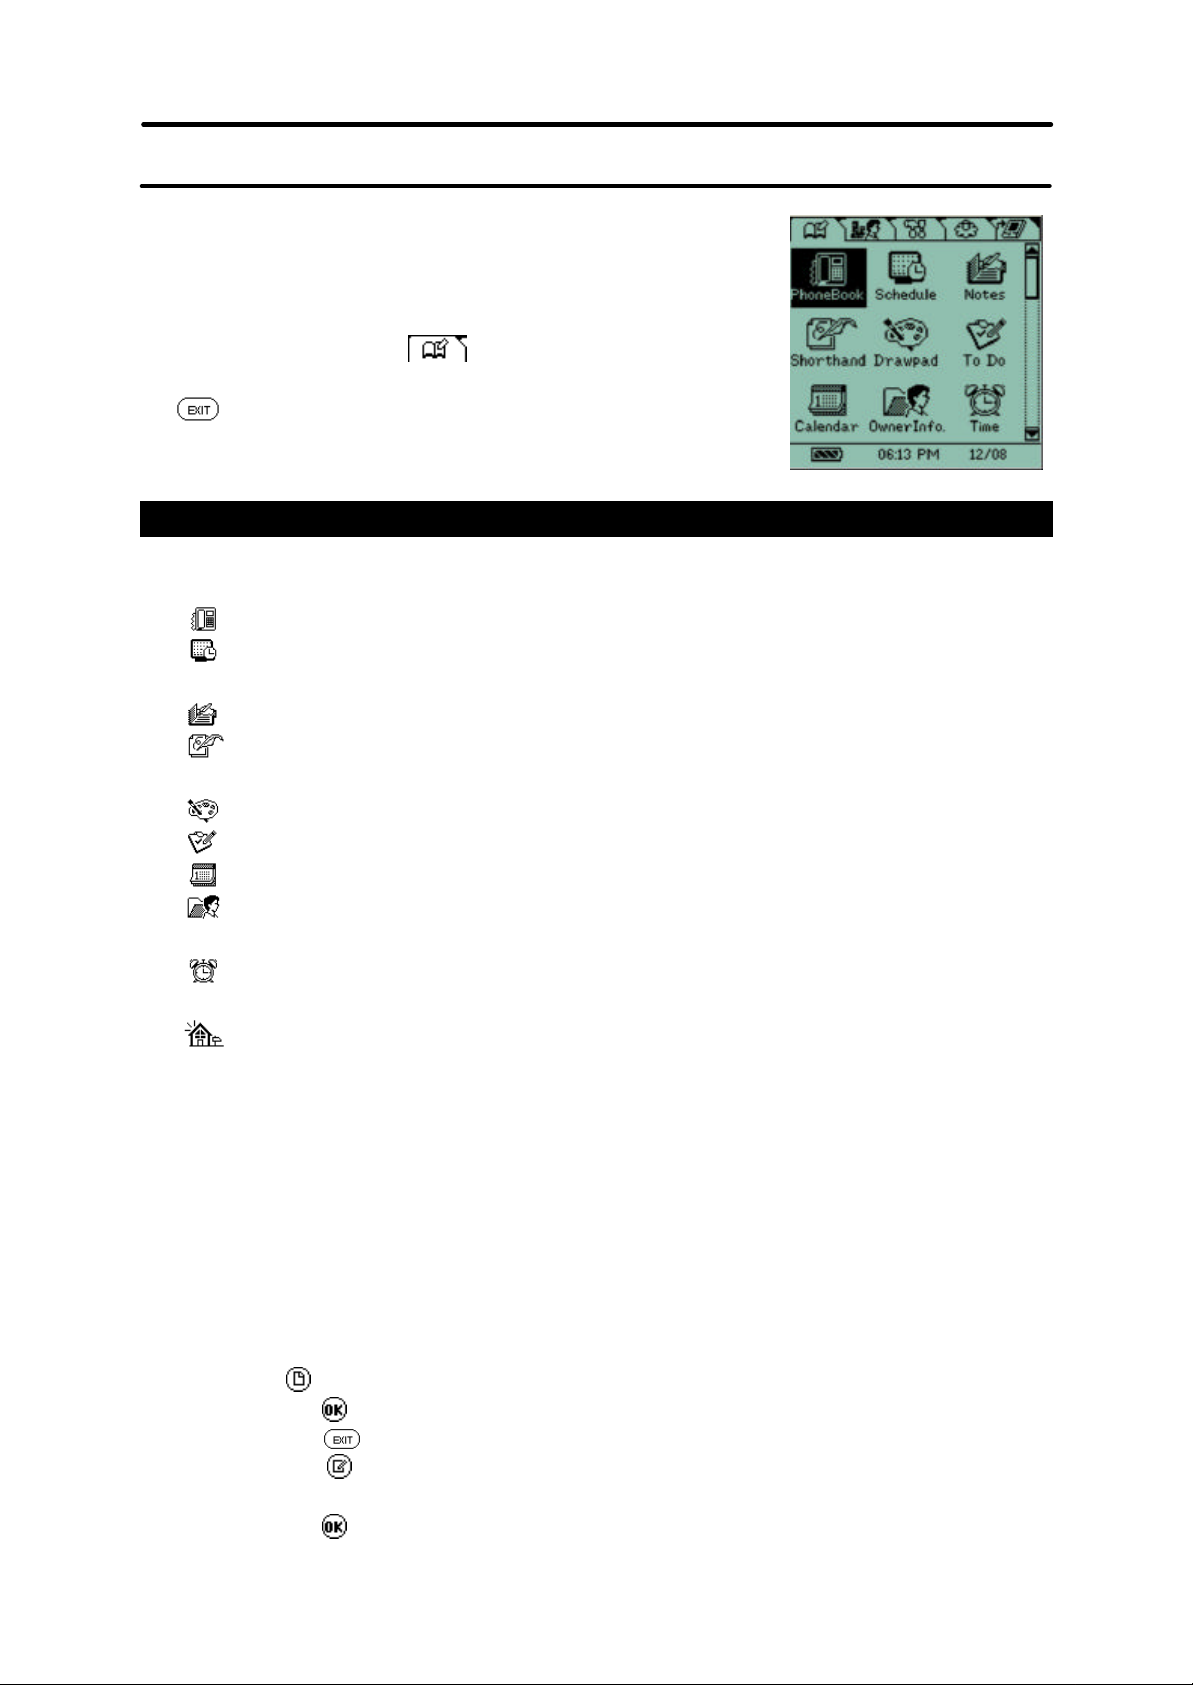
Chapter 2 Organizer Folder
The Organizer folder contains several applications for managing
information and data. In this folder are applications such as the phone
book, scheduler, notes, shorthand, drawpad, to do, calendar, owner
information, time and today.
Tap the Organizer folder icon to view the Organizer functions. To
start a function, tap it’s icon. To exit a function and return to the Desktop,
tap
General
The Organizer folder contains the following applications:-
Phone Book – stores names , telephone numbers and addresses of contacts.
Schedule – stores appointments and meeting information, which can also have alarms linked
to them.
Notes – stores short memorandums or notes.
Shorthand – stores hand written notes. You can draw notes dire ctly onto the screen instead of
typing them into the unit.
Drawpad – allows you to draw pictures and save them.
To do – stores a list of “To Do’s”, which can be prioritized and have alarms linked to them.
Calendar – will display a month to a view calendar and show and schedules at a glance.
Owner information – stores personal information of the owner. This can be displayed when
the unit is turned on.
Time – Displays the home and world time. You can set home time, alarms and world cities in
this application.
Today – shows the tasks and schedule for today and displays the owner information.
This section summarises how to create, view, edit, delete, mark, search records and how to enable or
disable record password. You may follow this guide for general operations, unless otherwise specified.
1. Mode of Display
Most Application software in the Organizer folder has 3 modes of display:
a. Index Mode
This lists out the record to quick record review. Different Application Software provides
different sorting method, for easy access.
b. View Mode
Tap particular record in Index Mode to view the detail information in this record.
c. Edit Mode
Tap the following icon to enter edit mode:
: to create a new record and enter Edit mode
Tap to save input and exit.
Tap to abort input and exit
Edit : to edit a highlighted record in index mode or a record already open in view
mode.
Tap to save input and exit.
Page 8
Tap to abort edit and exit
Tapping here will reveal a drop
2. Delete : to delete a highlighted record in index mode or a record already open in view mode. Tap
on this icon and a message box will pop up to ask for delete confirmation. Tap to confirm delete
and exit. Tap to abort delete and return to previous screen.
3. Keyword searching
Tap the search icon in the shortcut bar to activate a keyword search.
This function is only va lid when an application is open.
Input the keyword and tap to start searching within this application.
This function is not available when a folder is open but no application is running.
4. Lock
In some applications you can set a password to allow you to lock the record from being viewed by
non-authorized person, as long as the record password mode is activated. (refer to Password in
Settings folder for further details)
The Lock icon in the shortcut bar provides a quick access to enable or disable the Lock
function.
Scroll Bar
If the display screen is more than one page a scroll bar will appear on the right hand side of the
screen. You may scroll up or down by tapping the up/down arrow or by dragging the scroll box.
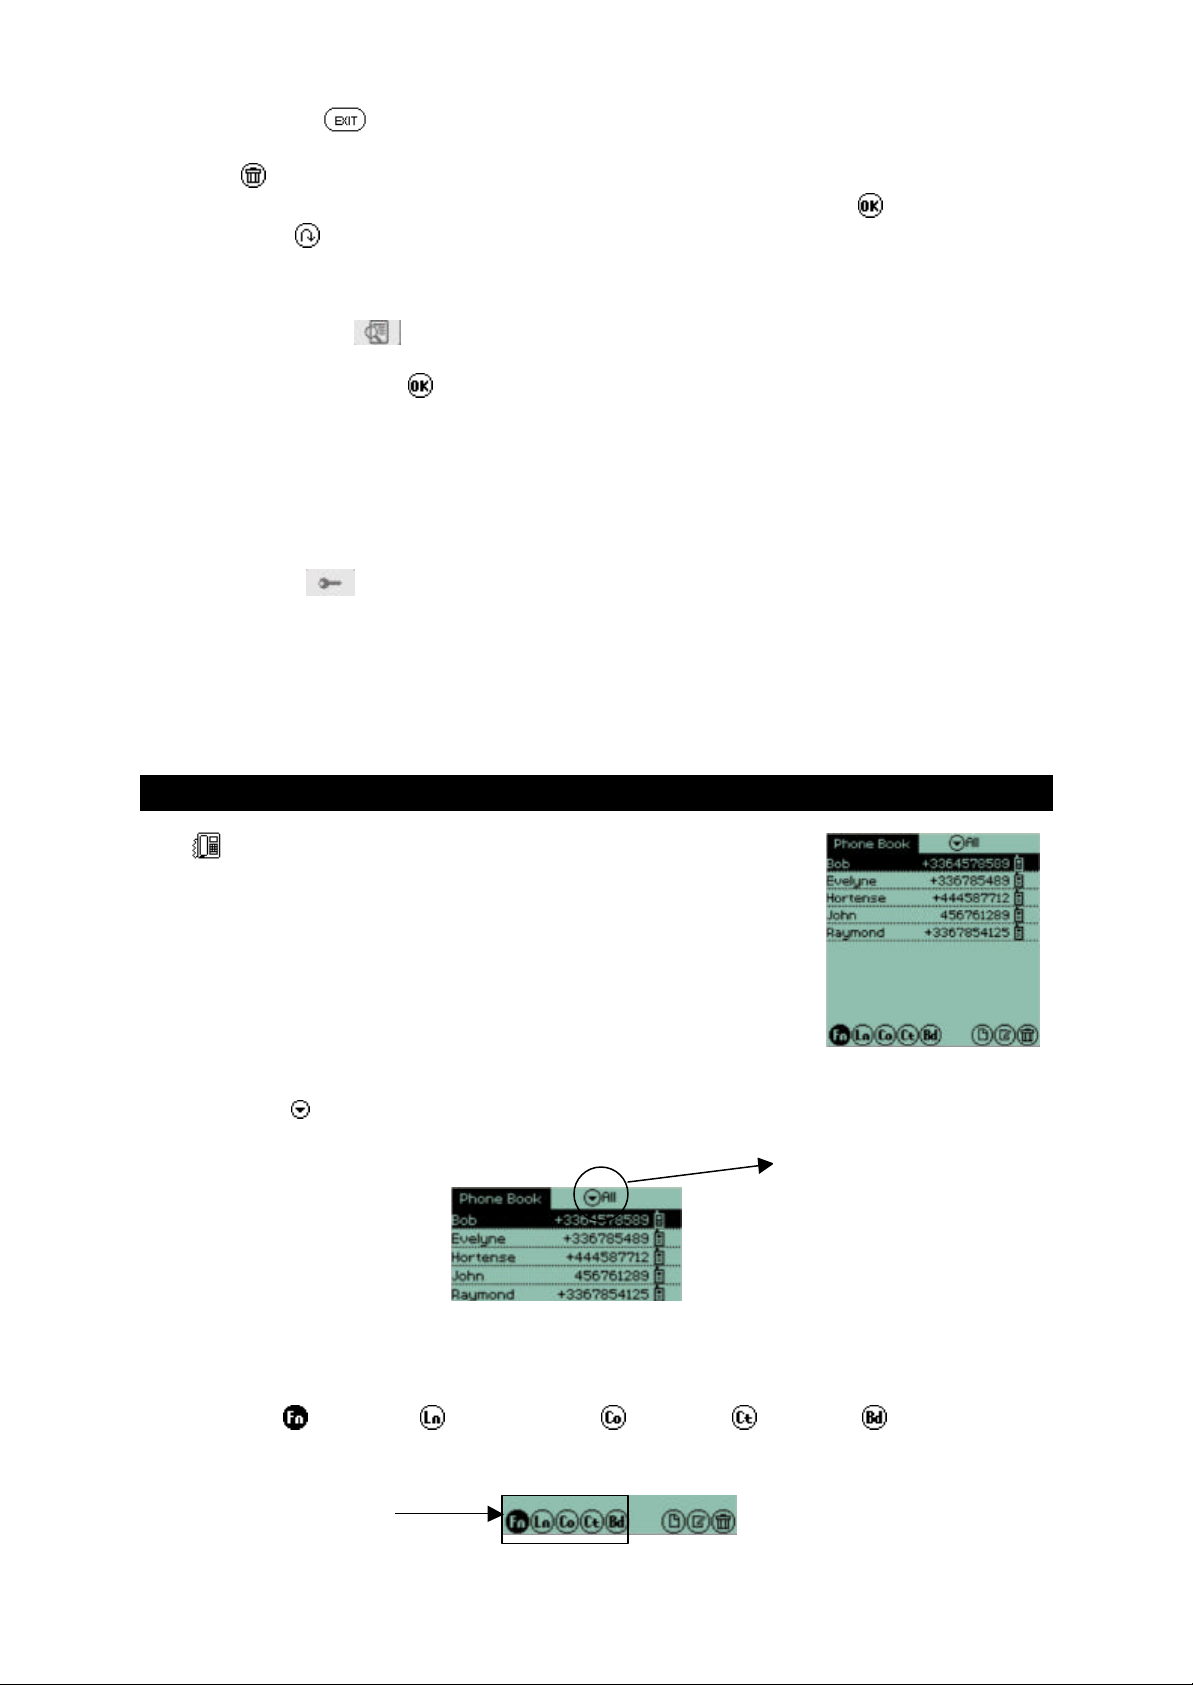
Phone Book
Tap to open Phonebook application.
The Phone Book application allows you to store contact names, addresses,
phone numbers, email addresses and so on and manage them efficiently.
1. Category
You can group records into one of several different categories. When creating or editing a record tap
the upper right button to pull down the category menu and select the category to store records in.
You can also view groups of records already stored into categories.
2. Sorting
In index mode, there are five sorting buttons at the lower left corner. You can sort records in the order
of First Name , Last Name , Company Name , City name or Birthday to allow you to
search for record easier.
Order icons
down menu
Page 9
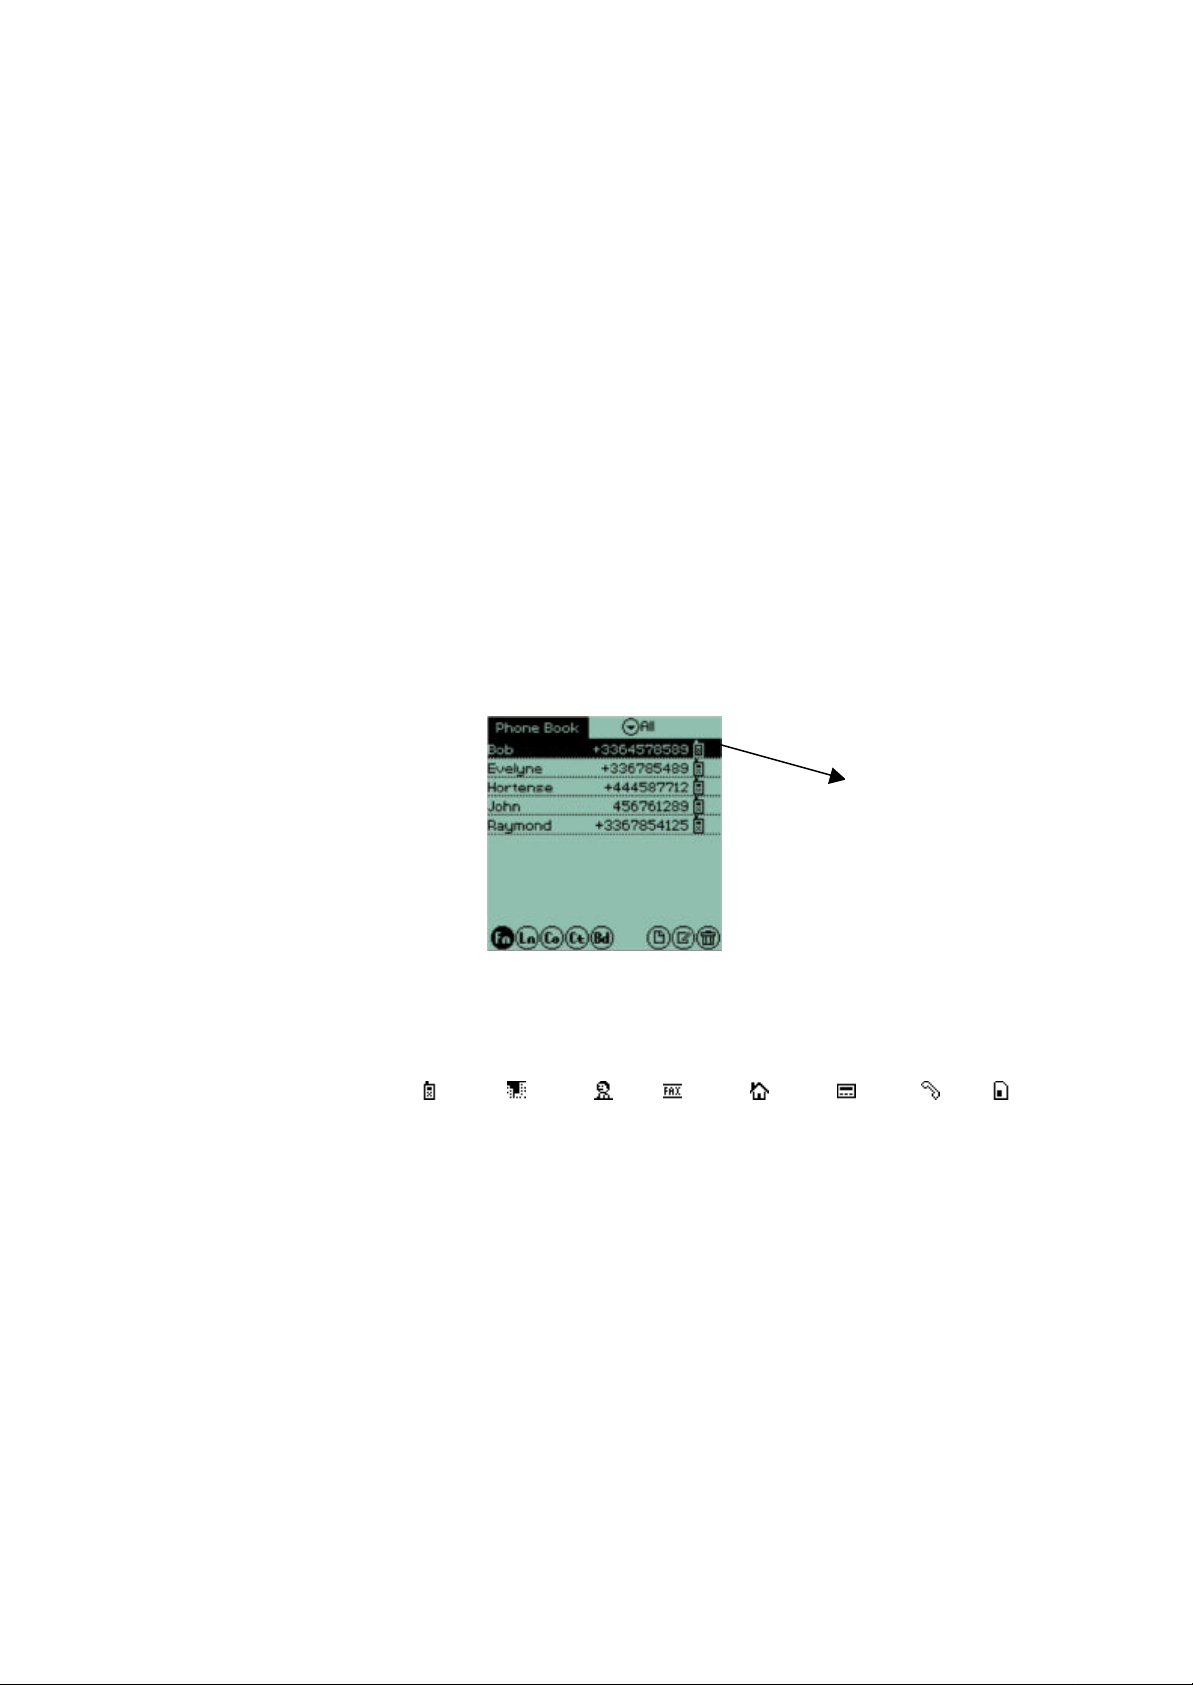
Tap on a record to review
a) Sort by Person name
You can sort by using the First Name or Last Name of a person, in alphabetical order. You can
scroll up and down easily to locate the name you want. A phone number which is designated as
the first phone number input in this record (refer to detailed instruc tions in Edit mode input) will be
displayed on the right hand side of each record.
b) Sort by Company and Depart ment
If you cannot remember a persons name clearly but CAN remember the Company name and
department name, you can search the records using a company and department name.
Tap Company Name button to generate a list of Company names. Tapping a particular Company
name will list out the Department names in this Company. Tapping a particular Department name
will list out the people’s names and phone numbers in this Department.
c) Sort by City
This allows you to search all the people who are in a particular city. Tap the City name to display a
list of cities. Then, select the city to list the names of people who are in this city.
d) Sort by Birthday
This lists people according to their Birthday date in calendar order.
3. Viewing a record in detail
Tap a particular record to view the detail information of this record.
it’s contents.
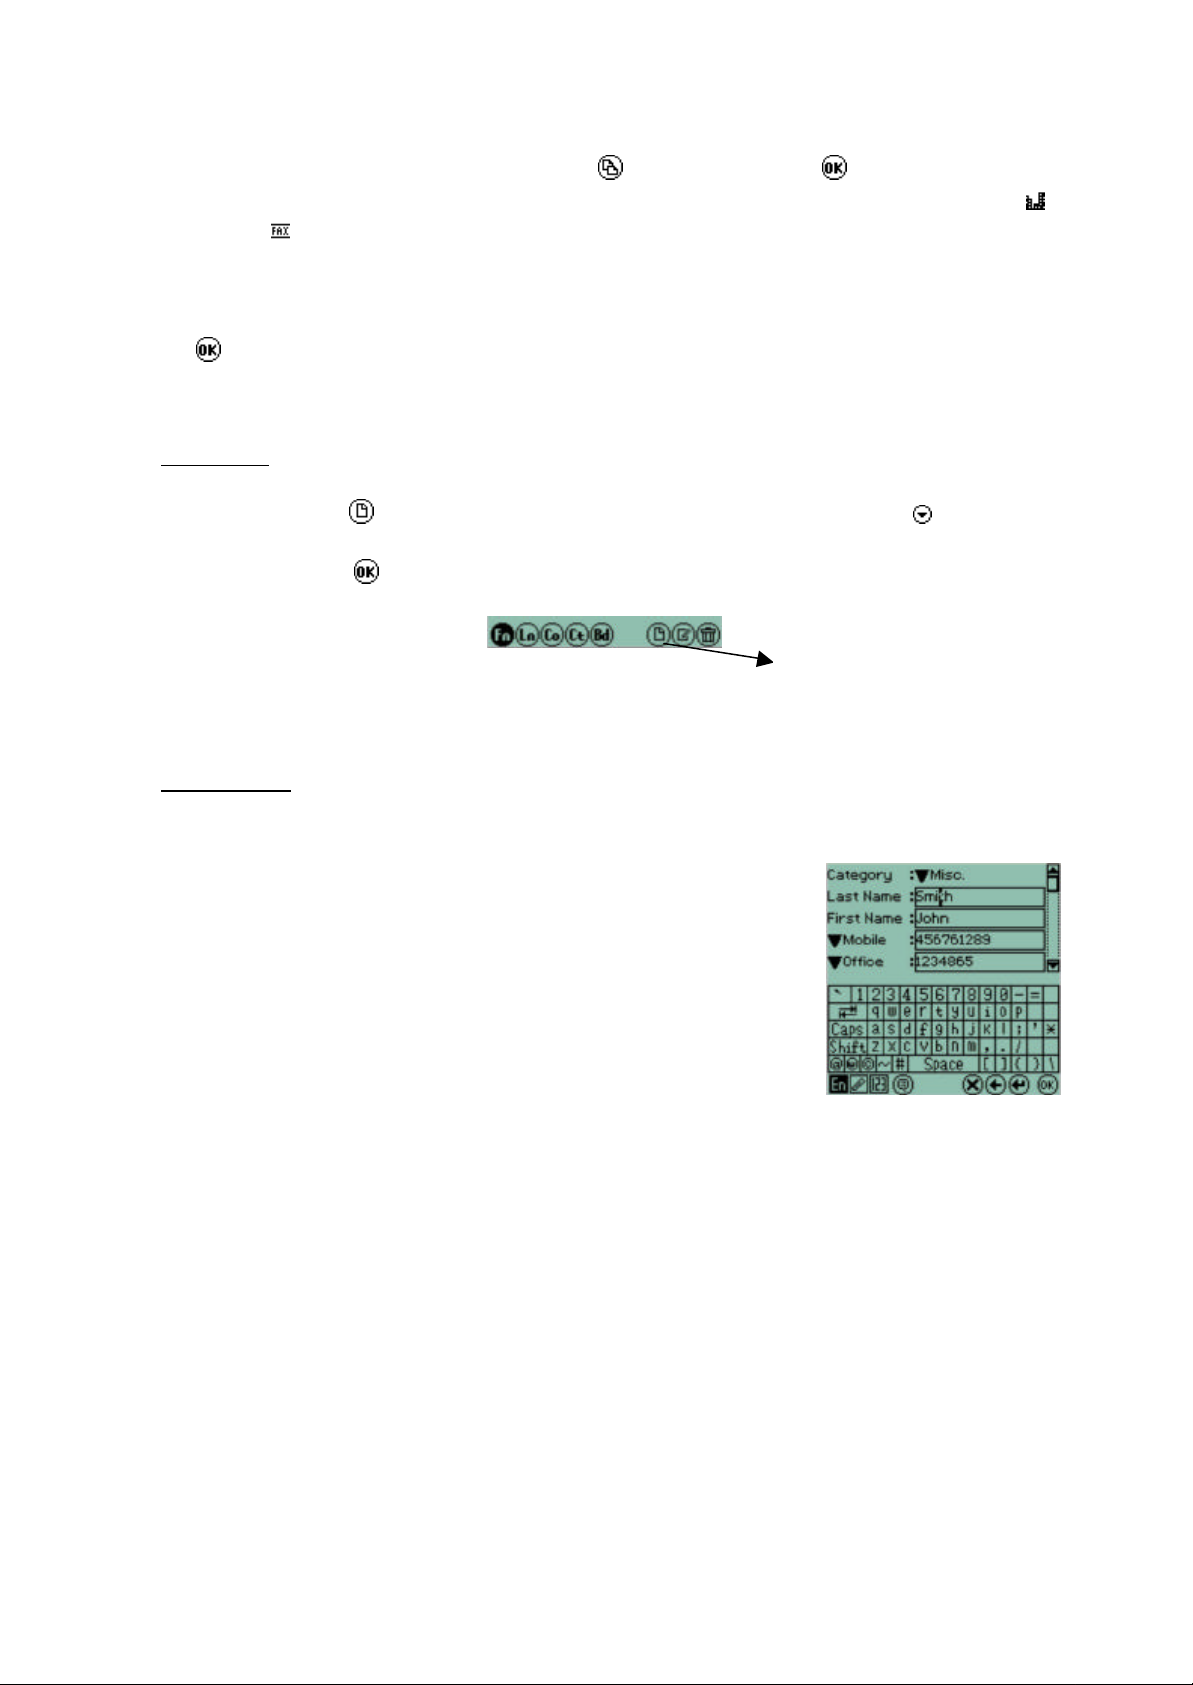
Record details show:
Category name,
Last Name,
First Name,
8 phone numbers (Mobile , Office , Direct , Fax , Home , Pager , Other , SIM ),
e-mail address,
web site address,
Company name,
Department,
Title,
Address,
City,
State,
Zip Code (Postcode),
Country,
Birthday,
Notes and
Lock.
In this order
You can also copy information from one record to a new record. This is useful if you have several
people working for the same company and you want to copy general information such as the company
Page 10
name, category, office and fax number, web site address, department and address details.
Whilst viewing a record tap on the bottom left icon to copy an entry. Tap on the confirmation
screen and then at the next editing screen carry out the entries for the new record. Office number ,
Fax number , web site address, Company name, Department, Address, City, State, Zip and Country
will be copied into the new record. This reduces the time to input the same data from a group of
persons who are from same company or department.
Tap to save and exit the entry.
4. Creating and editing records:
New records
Tap on the NEW icon button to create a new record. Tap on the drop down list icon to pick which
category name the entry should belong to. Then enter data into the relevant fields using the keypads
and when finished tap to save and exit entry.
Tap here to create a new record
Editing functions are as described in Chapter 1.
Editing records
a. Category
Tap the category arrow to select the category you want to put this
record in.
Or tap custom to create a new category name or rename a current
category. Maximum 12 category name can be created. You can also
delete a current category name but it will delete all the records in this
category too.
b. Birthday
Tap the Birthday field to generate a Calendar Keyboard to input the Month and Date of a birthday.
You may also set a pre-reminder alarm of the birthday by tapping the alarm icon.
A message box of Birthday alarm reminder with beep tone will pop up to remind you at the time
you set.
c. Lock
If the Lock box is tapped, this record will be hidden when record password is activated to protect
this record from being viewed by others. (refer to Password in Settings folder for detail)
Page 11

Daily View
Schedule
The Scheduler allows you to record appointments and meetings.
Tap on the icon to start the Schedule Function.
You can view your schedule appointments in different ways:
a. : to view all the appointment records as a list
b. : to view all the appointment in a designated date. Tap the
day of the week button in the header bar to change the date.
Tap the left/right arrow in the header bar to change the week.
c. : to view all the appointments in a week. Tap the left/right
arrow in the header bar to change the week.
d. : to view all the appointments in a month. A date which is
underlined means there is/are appointment(s) on that date.
Tapping a particular date will switch the screen to the daily view of this particular date.
e. : tap today button, in the monthly view, to go back to the current date.
Detailed view of a record
Tap on a particular record to view the detail of this record: Date of appointment, Time of appointment
(Start to end), Alarm setting and Repeat status.
Edit and Creating records
Tap to create a new record or to change/edit a record
a. Tap on the date field and enter/change the date of an appointment
from Calendar Keyboard
b. Tap in the All day box to automatically set the start and end time as
8:00am to 6:00pm or
c. Tap Start or End time box to enter the time entry mode. Use the time
bars on the right hand side of the display.
d. Tap Subject box to enter the appointment details
e. Tap Alarm box to activate Alarm reminder. Then input the time when
you want the alarm go on before the appointment time.
f. Repeat: if it is a repeating event, tap the repeat box to set the repeat format. There are 5 repeat
types: None, day, week, month or year.
g. Lock : If the Lock box is tapped a tick will appear. This record will be then be hidden when
record password is activated. This will stop this record from being viewed by others. (refer to
Password in Settings folder for detail)
Note: the status of Alarm , Repeat and Lock will be displayed in the index and view mode
accordingly.
Notes
Tap on the icon to start the Notes application.
The Notes application offers you a simple and quick tool for writing
memorandum. You may view, edit and delete records at any time.
Each record contains 3 fields: Subject, Content and Lock.
If you have any notes they will be listed in Alphabetical order: -
Page 12

Keyword Search:
This allows you to search the keyword across the Notes records.
Tap the Search icon in the shortcut bar and then input the keyword you want to search.
Tap to start searching.
If the record matches with they keyword, the matched wording will be highlighted and displayed.
Tap to exit search mode.
Edit and Creating records
Tap to create a new record or to change/edit a record.
Enter the details and tap on to save end exit the entry.
Tap to exit the application and return the Organizer folder.
Shorthand
This function allows you to write directly onto the screen to create notes,
signatures and similar small graphical files.
Tap on the icon to start the application.
1. Tap to create a new record from the index screen or tap to edit an
already saved record, after highlighting the record.
2. Whilst creating or editing a record write on the screen directly at the lower
part of the of the LCD, within the three line space. As you write on the
screen the characters will be automatically entered on the cursor line.
3. In new/edit mode the 5 buttons on the bottom of the display can be used to
carry out certain functions:-
= enter a space
= delete a character or entry
= enter a new line
= backspace
= confirm an entry
After inputting data, tap to save and go to Subject Screen. Input the subject title, then tap to save
the data.
Page 13

Drawpad
This application allows you to make drawings and small picture files by writing or drawing on the screen
with the stylus.
Tap on the icon to start this application.
1. Tap to create a new record from the index screen or tap to edit an already saved record, after
highlighting the record.
Note. Editing and record saving is the same as the Shorthand function.
2. Tap to select the desired tool at the bottom of the screen to write or draw; tap the u icon at the top
right of the screen to turn or change pages.
Tools:
Free draw (there are 3 sizes available for selection)
Straight line (there are 3 sizes available for selection)
Eraser (there are 3 sizes available for selection)
Square
Circle
3. After inputting or drawing the picture, tap to enter into Subject
Screen.
Input title, then tap to save the record.
Tap to exit the application and return the Organizer folder.
To do
Click on to start the To Do function
You may input due date, status and content of your tasks for easy
checking.
1. In the index view, you can tap the buttons at the lower left of the screen
to view all records, today’s records, a weeks records and a
month’s records. The records will be listed in the order of Due Date.
2. Tap in the box in upper right of screen to show only the completed
records.
3. Tap and highlight the box in upper right of screen to show the
uncompleted records.
4. The check box ahead of each record shows the status of the record, complete and uncompleted.
5. Tap on the box to show all records. Both completed and uncompleted.
You can also lock a record to hide it when the password function is enabled.
Editing and Creating new records is done in the same manner as the Phonebook or Scheduler.
Tap to exit the application and return the Organizer folder.
Page 14

Calendar
The Calendar function shows a monthly view with a year table.
The Calendar function is designed to allow you to just review months and
years. It has no other function.
Tap on the icon to start the Calendar function
To return to Today tap the icon at the upper right of screen at any time.
Tap to exit the application and return the Organizer folder.
Owner information
This function allows you to store your own personal information as a reminder or to identify the device as
yours. You can also have the device show your name/owner details at start up or device switch on.
1. Business card
Here you can store Business card information such as first Name, last Name, title, department,
company, address, city, county, Postcode, Country, Direct telephone number, Office tel, Mobile
tel, Pager tel, Fax number, e-mail address, web-site address.
2. Private
Here you can store private information such as Sex, Birthday, Age, Blood type, Home Address,
city, county, postcode, country, home tel, other tel, ID number, passport number, expire date,
driving license number, ex piry date, credit card number, expiry date, saving account number,
current account number, social security number, commemorate date, notes
Enter data in the same manner as the other applications.
Tap to exit the application and return the Organizer folder.
Time
The Time function includes Home Time and World Time.
Tap on to run the Time function. You can chose Home time or World Time by tapping on the
relevant tab: .
In Home Time folder, you can select any city in the city database as the local city
and set the local time, activate DST function, and set the date, date format and
time format.
To change a city tap on the icon to bring down the city list. Scroll up/down the
list until you find the city you want and tap on it. To change the Home time tap on
the icon. In the set time mode you can change the city, date, date format,
time format (from 12 hour to 24 hour) and set the time. Use the drop down ’s
and the arrows to make the changes. Then tap on to confirm the changes.
In World Time folder, you can select and display the time of two cities in the
world at the same time.
Use the drop down arrows to change the 2 world cities from the lists provided.
City time will automatically change according to the time set in the Home city.
You can also place a “tick” in the DST box by tapping in it which will switch on
Daylight Saving and put the time forward by one hour.
Page 15

Tapping in this box again will switch this off.
Tap to exit the application and return the Organizer folder.
Today
This function allows you to view quickly owner information, your current
tasks/to-do’s, appointments and birthday alerts for the current day.
It is also possible to turn on the Today function so it automatically appears
after you switch on your device. (refer to the set up for this in the Settings
folder)
Information which can be displayed includes:
A) Personal information
1) Owner’s name
2) Company name
3) Phone number (the first phone number input in owner information)
B) To Do
1) all the today tasks/to-do’s
2) all the overdue undone tasks/to-do’s
C) Schedule
All the today’s appointments
D) Birthday alert
Those names with birthday set for Today in Phone Book.
Tap to exit the application and return the Organizer folder.
Page 16

Chapter 3 Office
The Office folder contains several software applications designed to handle
your business documents.
Text, Emails and the E-Book applications reside in this folder.
Tap on the icon to enter the Office folder.
Mini - Text
Tap on the icon to use this function.
Using the SyncMan® program, you can transfer text (*.txt) files from a PC.
During the process of downloading a text (*.txt) file to your handheld the text file will be automatically
converted and saved as a Text application file in the TAB100 series.
The process of transfer from SyncMan® is quite easy and detailed instructions of how to Syncronise
your device with the SyncMan ® program are supplied within the help function of the SyncMan® progam.
To read a text file highlight the file you want to read and then tap on it. A list of files, presuming there are
more than one, will be shown. Tap on the file you want to read.
If you want to delete a file, you can highlight it on the list, then tap .
NOTE: Every time you syncronise using SyncMan® a Log file is automatically created by the TAB100
series device. This log file can then be read using the Text application.
Tap to exit the application and return the Officer folder.
Email
You can create Emails on the TAB100 device or you can create emails in the SyncMan® program and
then syncronise them later with the hand held device. You can also use the SyncMan® program to send
Emails through a PC.
For the set-up of Email and the details of sending Email through SyncMan ®. program, please refer to the
user’s guide of SyncMan® program itself.
Tap on the icon to start the email application. This will take you to the
Index screen where a list of emails, presuming there are some, will be shown.
Index screen
There are several items you should know about in the index screen of the
Email application:
Indicator boxes:
a.The first box at the beginning of the line indicates if the mail is read or not.
A tick in this box indicates the mail is read; otherwise, the mail is
unread if not ticked.
b.The second box indicates the priority level: 1 is Low, 2 is Normal, and 3 is High priority.
Email categories:
Tap on the symbol at the furthest top right of the display, next and to the right of the words Move To.
Page 17
By default this shows Inbox but may have been changed. Tapping on the symbol will reveal a drop
down menu with 5 category choices. You can save emails or move them into any one of the categories.
Categories are: -
Inbox – where, by default, emails arrive when received [only applicable if you have used the "Import
Emails" function of the SyncMan® program.]
Outbox – where, by default, emails are saved after being sent and are ready to transmit
Draft – part finished or emails needing to be sent at a later time can be saved into this category.
Sent – where, by default, emails that have been transmitted are saved. Normally emails that were in
the Outbox would move to here after a syncronisation has taken place between the unit and a PC.
Trash – where, by default, emails that have been deleted are saved, pending a hard deletion.
At the bottom of the display, to the left, is shown how many emails are unread and to the right how many
total emails exist.
To view or read an email: Tap on any mail. This will take you to the view screen. Here you can review
the content of the email.
To delete an email: Highlight the email or view it. Tap to delete the highlighted mail. You can also
delete an email if you are reviewing it.
You can Reply , Reply All or forward a mail through the icons provided on the screen. Within the
viewing screen tap on any one of these icons to start the function. When replying the recipient(s) email
address will automatically appear. If forwarding an email the To: box will be empty and an email address
will have to be entered.
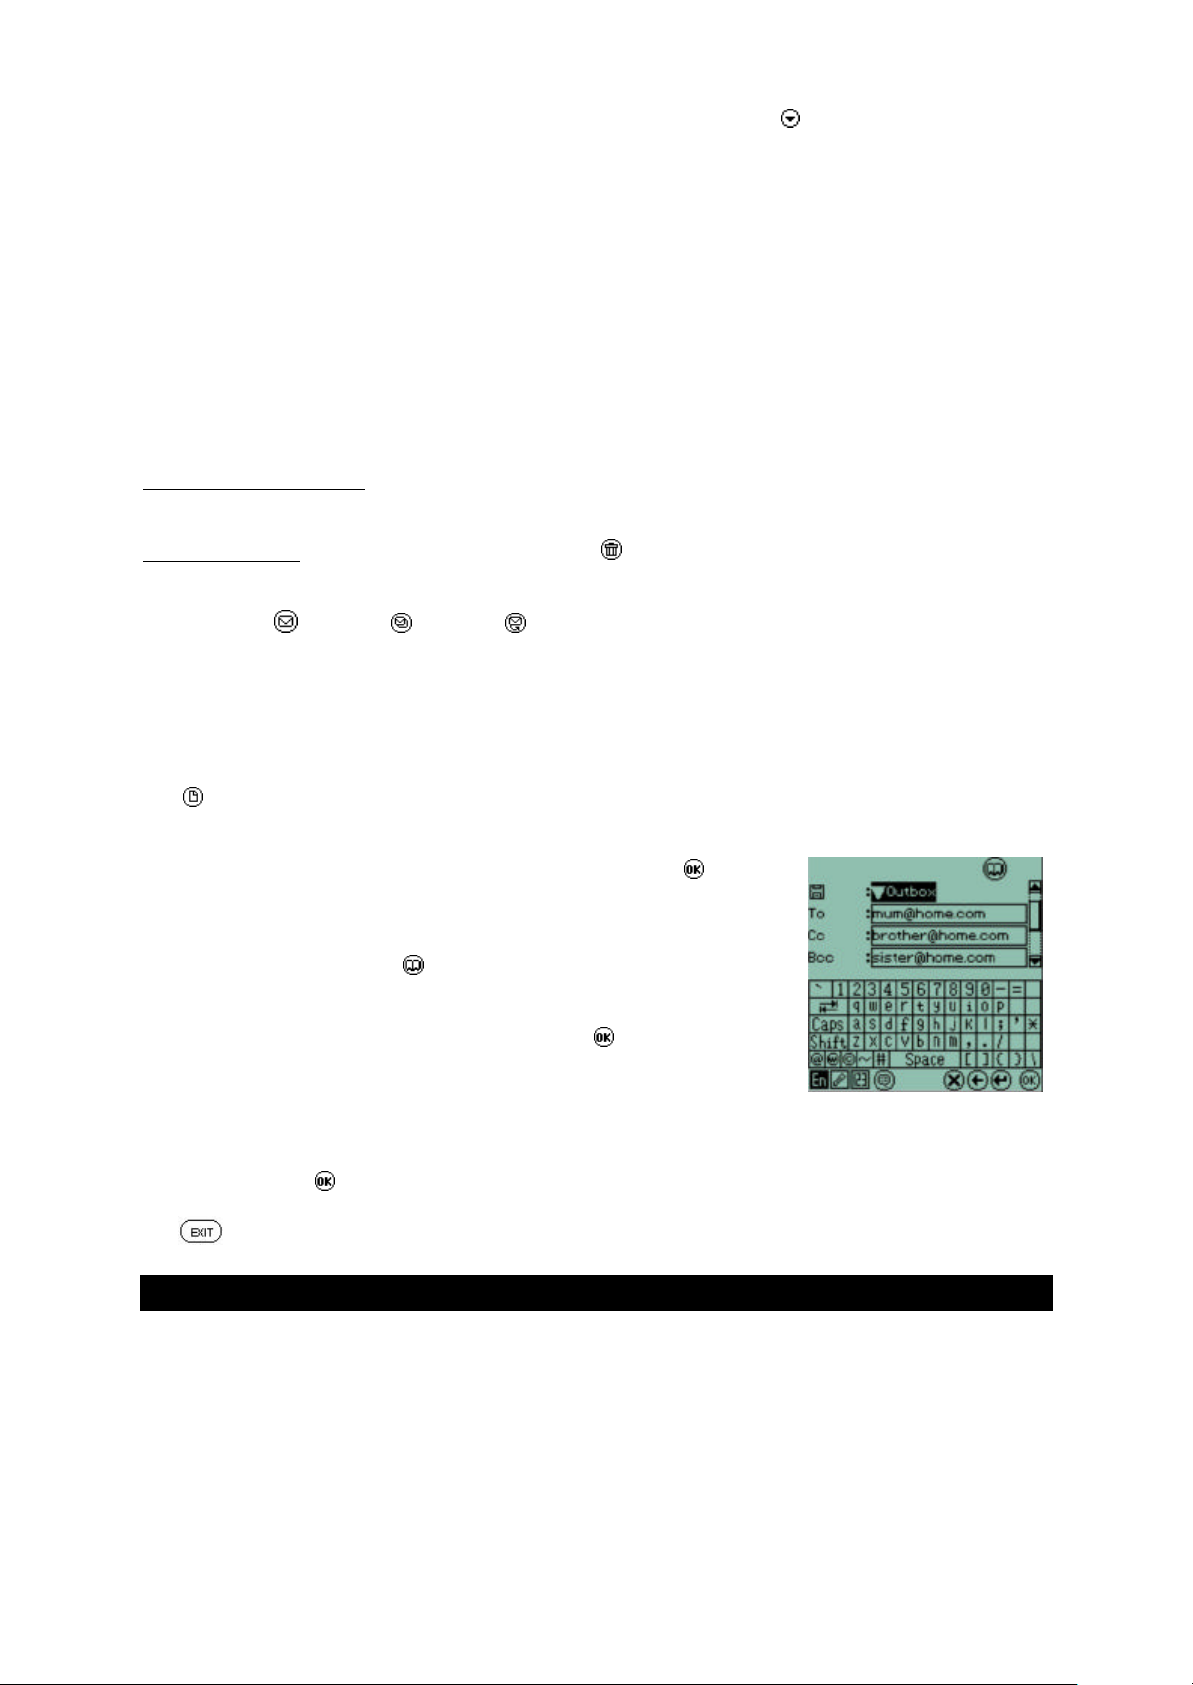
New Email creation:-
Tap . From the email edit screen use the drop down arrows to select a priority. Then choose where to
save to by using the drop down arrows. You can save to either the Outbox or Draft category.
Input the receiver address, subject, content and lock, then tap to save
the mail to either the Outbox or Draft category.
You may input the e-mail address directly or from the email address book
by tapping address book icon at upper right corner of the screen to
retrieve e-mail address data which you have input earlier. NOTE: when
looking up an email address use either the keyboard or the handwriting
recognition option to search for addresses, then tap .
In the Email function email addresses from the main phonebook are not
available.
Entering data in this function is similar to the other function already discussed. Once you have finished
an email tap on the to complete the email and store it.
Tap to exit the application and return the Officer folder.
E- Book
The E-Book function is a program that allows you to read electronic-books (E -Books).
You can download e-books (*.prc or *.pdb) using the SyncMan® program from our CD or other places,
such as the Internet or the My Lexibook secure web site and read these in the E-Book application.
Using the SyncMan® program download any E-Book with the file extension of .prd or .prc. Details on
how to do this are explained in the help function in the SyncMan® program.
Page 18

Tap the icon in to enter E-Book file listing screen.
E-Book File Listing
In the file listing screen, the amount of available files is displayed in the upper
left corner and the files are listed by title in alphabetical order on the display.
The size of the file is also listed in the right hand column.
Tap the desired file to read its contents. You can also use the Up/Down key to
highlight the file to read, then tap icon to enter view screen.
To delete a file highlight it then tap .
Hint: If you want to view or read a Word document on the TAB100 series. Create the Word document
and then save it as a TEXT file (.txt). Then you can download this file onto the Mini-Text
application. DO NOT try to save a text file as a .pdb as it will crash your device.
Viewing Data
In the view screen, you can read a file and activate the following functions:
1.Tap the icon at the lower left corner of the screen to return to the index
screen.
2.Tap to show bookmark screen.
a.If there are previously placed bookmarks, there will be two icons, and
, at the the end of the existing bookmarks. Tap to delete the
bookmark; tap to view the content of the bookmark itself.
b.If there is no bookmark stored, there will be an icon at the end of the
empty item. Tap to set bookmark at the point of the currently viewed
content.
c.To go to a book mark in the text tap on [NO ICON] and from the list of book
marks shown tap on the icon.
3.If you want to read a certain part of the file, from a certain point, you can tap
at the lower right corner to pull down a percentage menu. Tap on a percentage and the file will jump to
the relevant point in the E-Book.
4. Use the Up/Down key to view the content of the E-Book.
Tap to exit the application and return the Officer folder.
Page 19
Chapter 4 Tools Folder
The tool folder contains three main applications: Translator, calculator and
metric conversion function.
Tap on the tab to enter the Tools folder.
5 Language Translator
This Translator can translate 5 languages: English, German, French, Spanish, Dutch, Portuguese and
Italian.
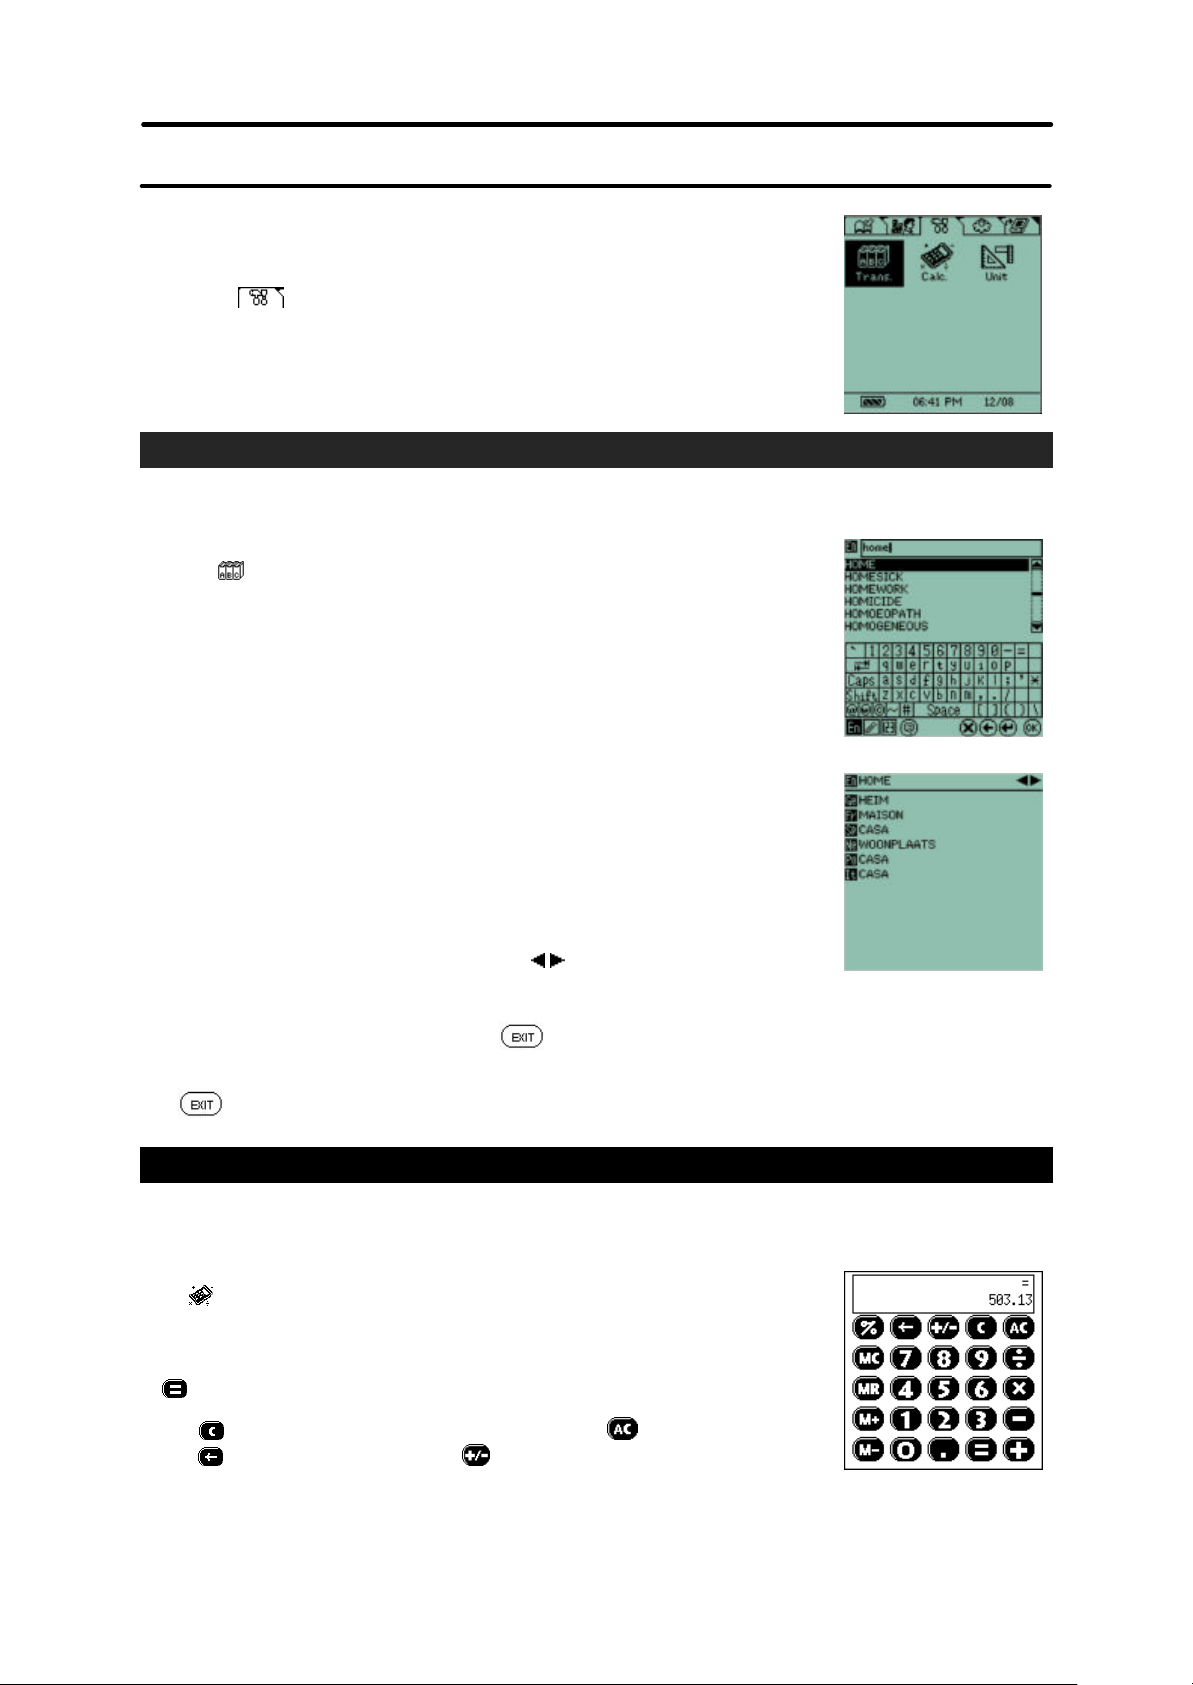
Tap on icon to start the translator function. You will see a screen similar to
the one shown to the right.
To select the language to be input, tap the language selection button in the
upper left corner of screen. You will be offered a list of languages. Tap on the
language you wish to translate FROM.
Then, input the word you want to translate. For instance if you are translating
from EN (English) to FR (French) type in a word such as “home”. As you type
the database will search for the closest match to your entry and the word you
require will appear, presuming it is in the database. Then tap on the word in
the list and you will be shown the translation. Next to each translated word is
the language symbol.
At the top right of the display are two arrows . Tapping on these you can
cursor either up or down the word list from the home language. The left arrow = up and the right arrow =
down.
To return to the word entry screen tap on .
In the word entry screen the editing functions are the same as the other main applications.
Tap to exit the application and return the Tools folder.
Calculator
You can make arithmetic calculations (e.g. addition, subtraction, multiplication and division) in
Calculator.
Tap to start the calculator function.
1. Enter numbers and operating functions by tapping on the display, then tap
to get the result.
2. Tap to clear the data last entry or the result; tap to restart calculation.
Tap to delete the numbers; tap to switch between positive and
negative.
Page 20
3. Tap to add the displayed value to the memory.
Tap to deduct the displayed value from the memory.
Tap to recall the value stored in the memory.
Tap to clear the value in the memory.
Other calculator functions and systems are the same as a standard calculator. You can calculate
percentages, retrieve amounts form the memory and add them to results already on the display and so
on.
Tap to leave the application.
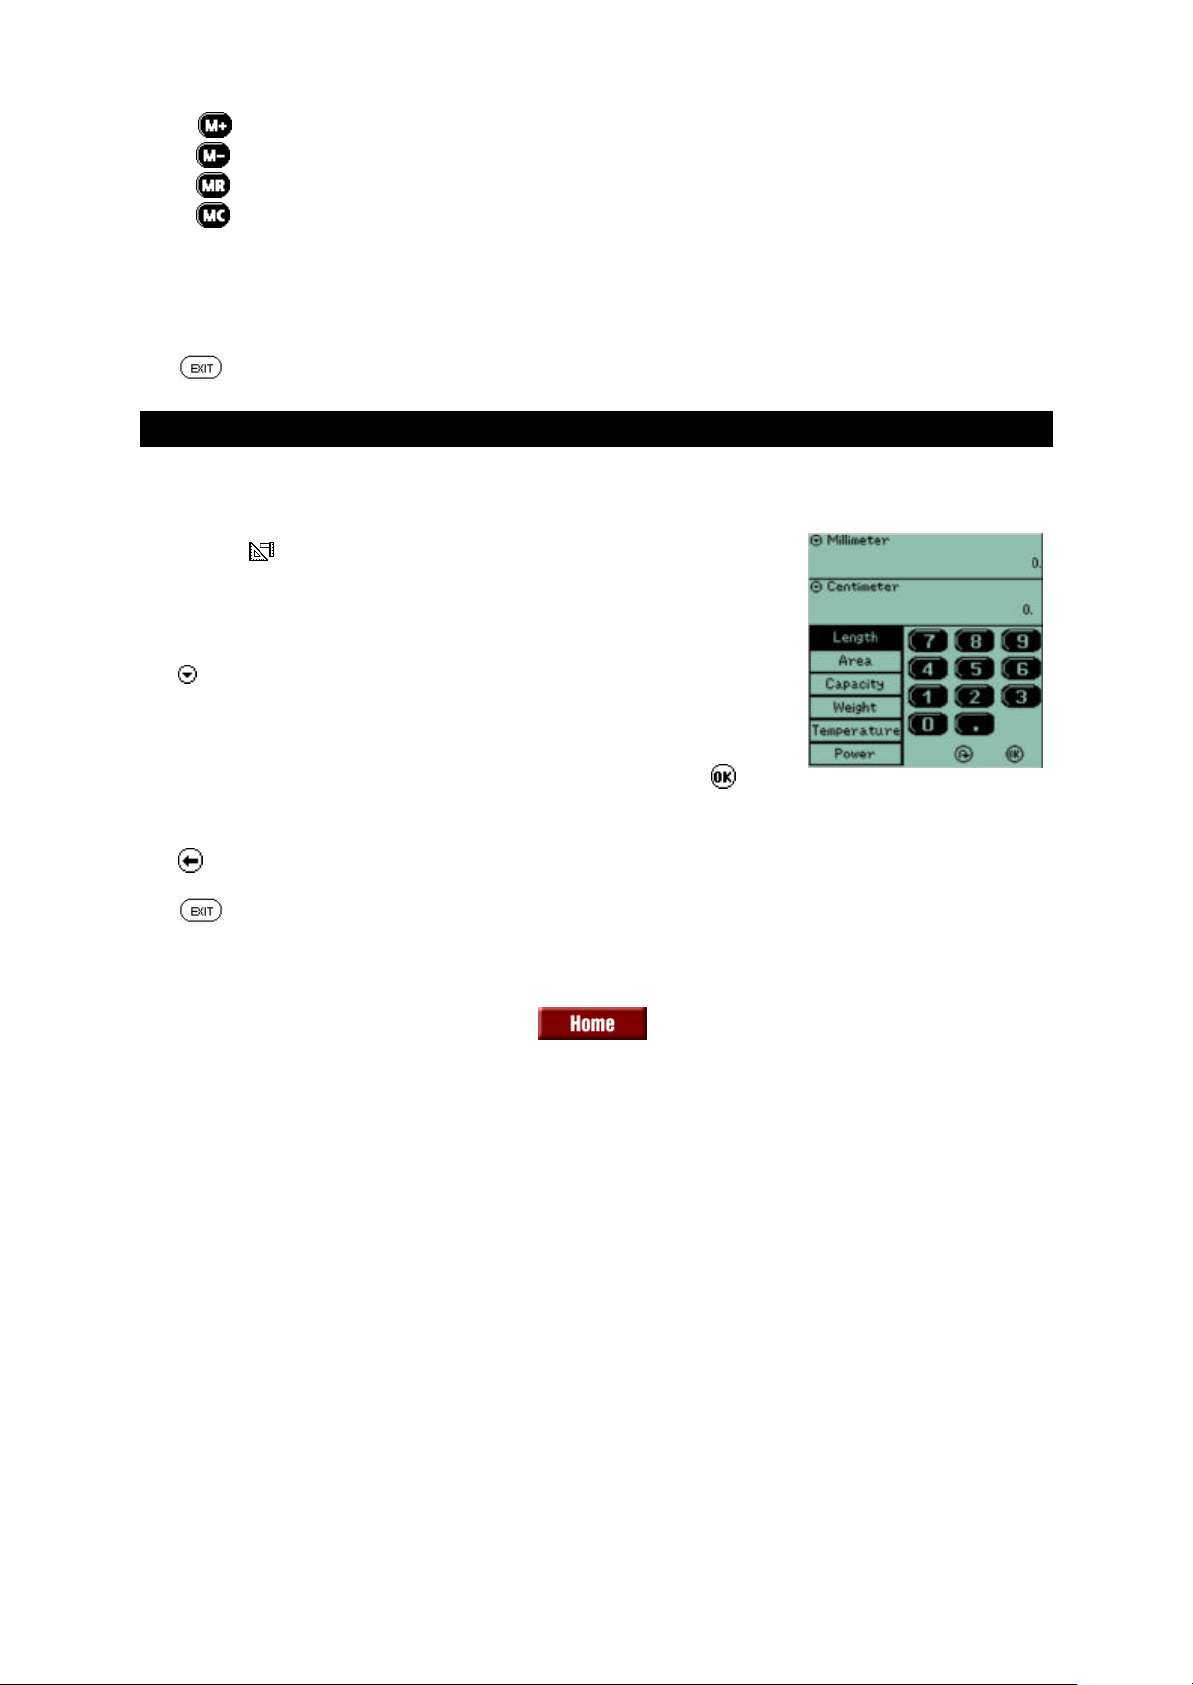
Unit conversion
The unit (metric) conversion function provides a two-way conversion tool between common units of
measurement. e.g. length, area, weight, et c.
Tap on the icon the start the conversion application.
From the list of categories on the lower left side of the screen tap on your
choice to select one for your conversions.
Tap before the unit name to pull down a menu of conversion choices
within the category you have chosen, then tap to select the unit to convert
from (top line) and the unit to convert to (second line).
Enter the value to convert by using the number keypad, then tap to get
the result.
Tap to clear the values.
Tap to leave the application.
Page 21
Chapter 5 Settings Folder
The setting folder contains several applications to allow you to maintain your
TAB100 device and also contains applications for downloading and syncronising
with a PC and/or a mobile telephone SIM card. Memory usage and password
setting is also carried out in this folder.
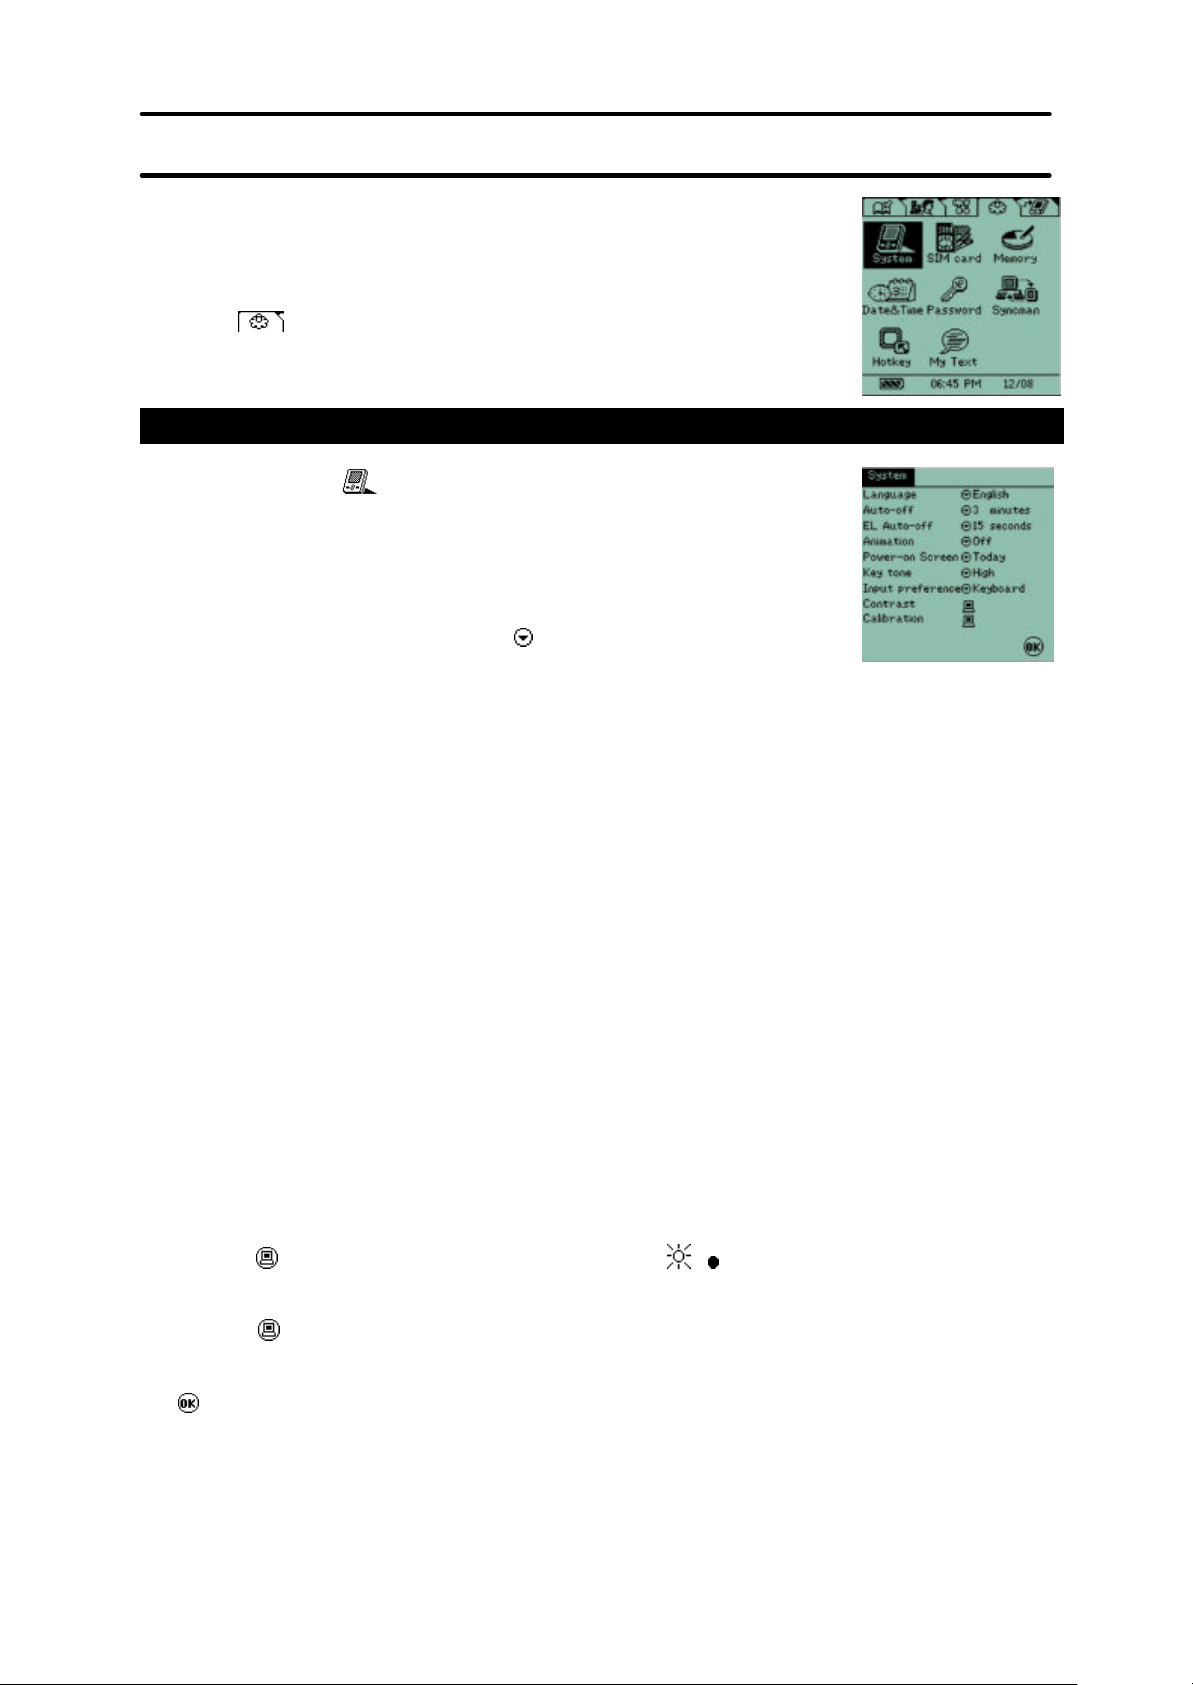
Tap on the icon to open the Settings folder.
System
In Settings folder, tap icon to customize your device. The
settings that can be changed are listed below.
1. Language interface
5 languages are available, including English, French, German, Italian and
Spanish. One of these can be set as default screen display and keyboard
language. Tap on the drop down list icon
list.
2. Auto-off period
To save power, your handheld will switch off automatically if there is no activity after a certain period.
The auto-off period is set to a default of 3 minutes. Use the drop down list to change this.
3. EL Auto-off period
To save power, EL backlight will be switched off automatically, if there is no activity after a certain period.
The auto-off period is set to a default of 10 seconds. Use the drop down list to change this.
4. Animation
Selection the animation source or switch it off. Use the drop down list to change this.
5. Power-on Screen
Select the first display screen, like Today, Phone, Organizer, Main Menu or Las t screen. Use the drop
down list to change this.
6. Key tone
To set High, Low or Off for the key tone. Use the drop down list to change this.
7. Input preference
This sets the default preference in using either Handwriting keyboard or Alpha Keyboard. Use the drop
down list to change this.
8. Contrast
Tap on the to show the adjustment screen. Tapping on / will adjust the screen contrast.
9. Calibration
Tap on the to show the adjustment screen. Calibrate the touch screen position by tapping the centre
of each target sequentially.
Tap to leave the system settings.
and pick your language from the
Page 22
SIM Card
To use this application you have to ensure that your unit has a SIM card inserted into the SIM card slot
inside the battery compartment.
To do this, turn off the unit (this is important), remove the battery lid by sliding it off in the direction
indicated on the lid of the compartment. Remove the battery (if any) and slide out the SIM card holder.
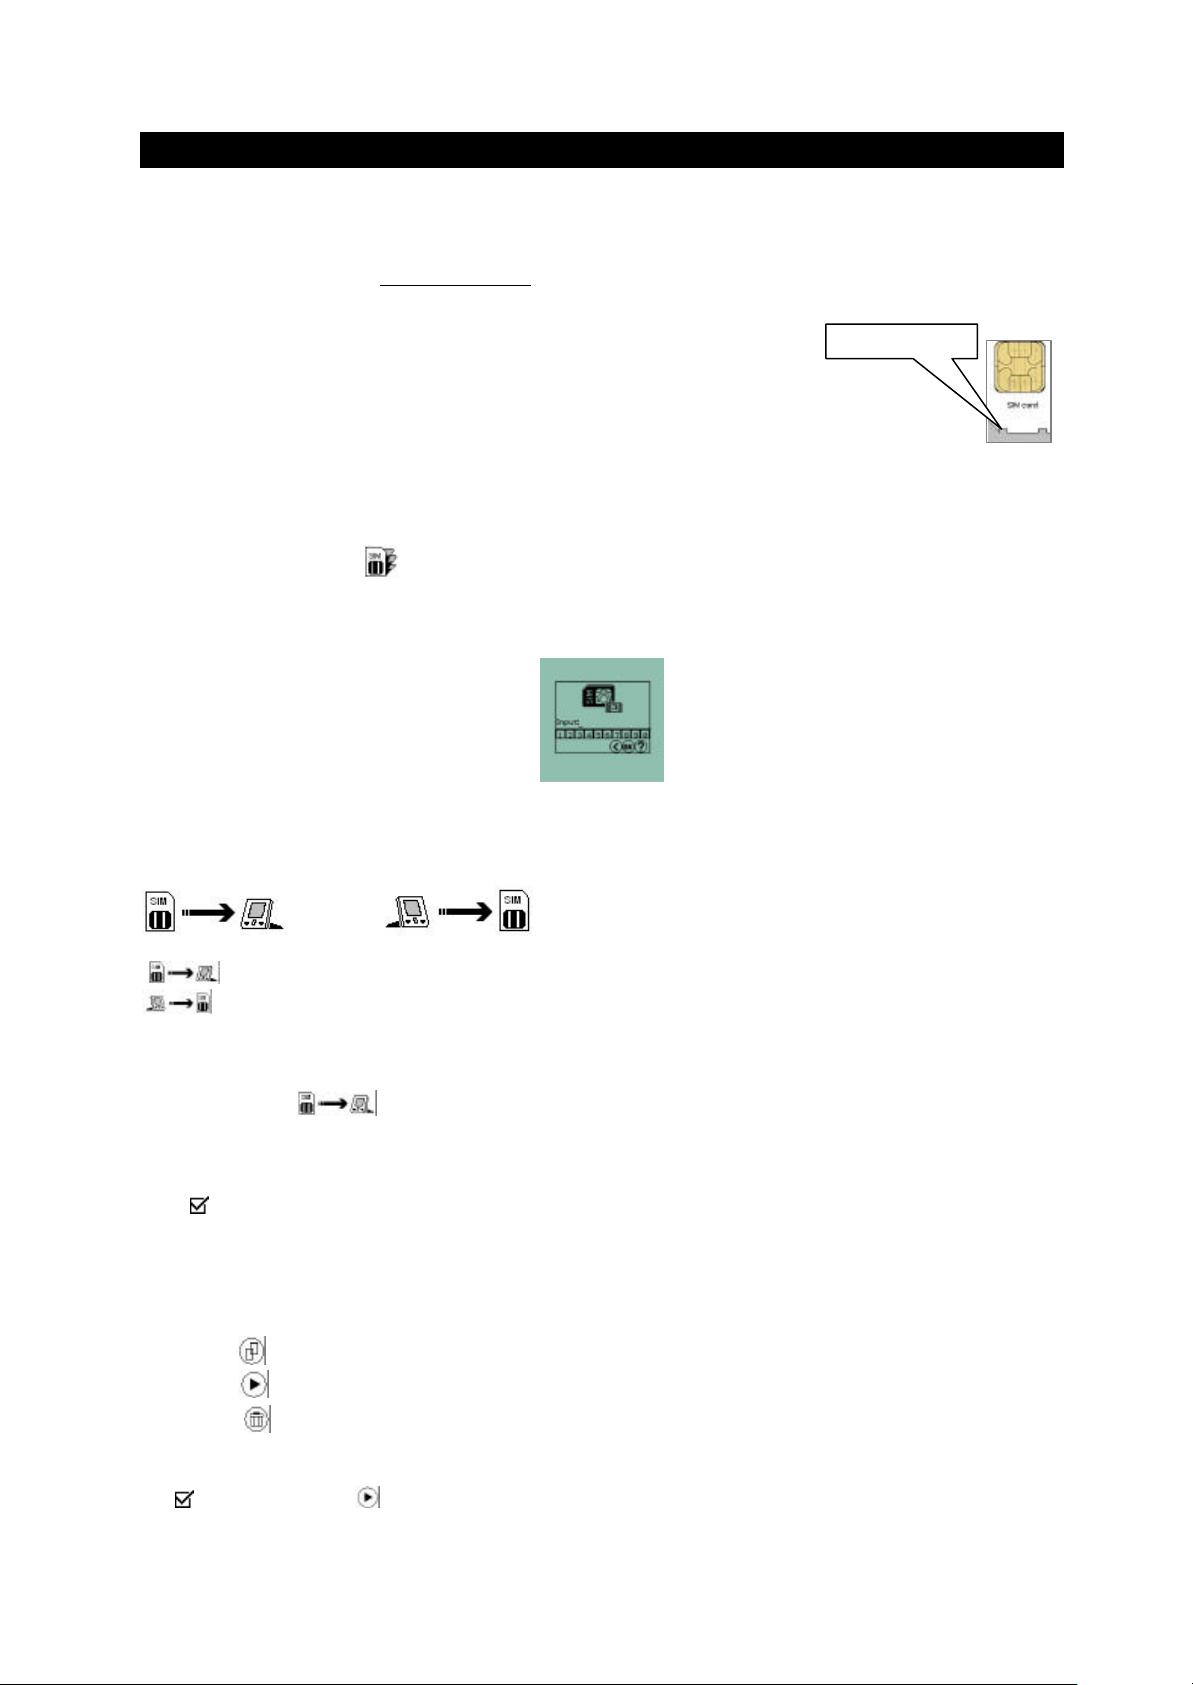
Place the SIM card into the holder, ensuring that the cut corner of the SIM
matches the cut corner in the holder and that the SIM is underneath the two
plastic feet in the holder (see illustration). Slide the SIM holder back into the
unit with the SIM card in place.
Replace the battery and slide the battery compartment lid back on. Press the ON/OFF button and wait for
approx. 1 minute whilst the unit re-initialises and turns on.
Tap on the SIM card icon .
If your sim is protected with a pin number you will first have to enter this. From the following display tap in
the pin number: -
SIM location feet
There will be a pause whilst the unit reads the data on the SIM card. Once the data has been read two
icons will appear: -
and
= Transfer of ‘phone records from the SIM card to the TabletPC®
= Transfer of records from the TabletPC® to the SIM card.
Tap on the relevant icon.
When you tap on the unit will load the data from the SIM card and then list the ‘phone records
on the display. There will be 4 columns of information: -
Record number: starting from 000
= a selected record. Tap in this box to select or deselect a record
Contact Name
Contact mobile telephone number
There will also be three icons at the bottom of the display:-
= selects or deselects all records
= enters transfer screen
= record deletion. If you select this option you will be asked to confirm your choice
To transfer records from the SIM to the unit first of all select which records you want to transfer by using
the icon. Then tap on . You will be given 2 choices:-
Page 23
1.Add all data – this transfers ALL records from the SIM to the unit. Use this option once only,
to transfer all files. If you use this option more than once you will place duplicate records into
your phone book.
2.Paste additional data – transfer ONLY the records that do not match an entry already in the
phonebook. Use this option when you have added extra entries on your mobile handset and
want to update the records on the TAB100 device.
When you tap on records in your phonebook in the TAB100 device can be transferred to the SIM
card.
You will be shown a list of available telephone numbers and names. You can us the and icons to
select/deselect records. You can also tap on the icon to select which number from a record is to be
transferred to the SIM card. Once records have been selected you can use the icon to move to the
transfer screen
In the transfer screen you will be given 3 options:-
1.Add all data – transfers ALL records from the unit to the SIM. Use this option once only,
to transfer all files. If you use this option more than once you will place duplicate
records into your SIM card.
2.Paste additional data – transfer ONLY the records that do not match an entry already in
the SIM.
3. Overwrite current data – overwrites data on the SIM with data from the TabletPC®.
When you have completed entries or updating your SIM or the TAB100 device tap on to leave the
application.
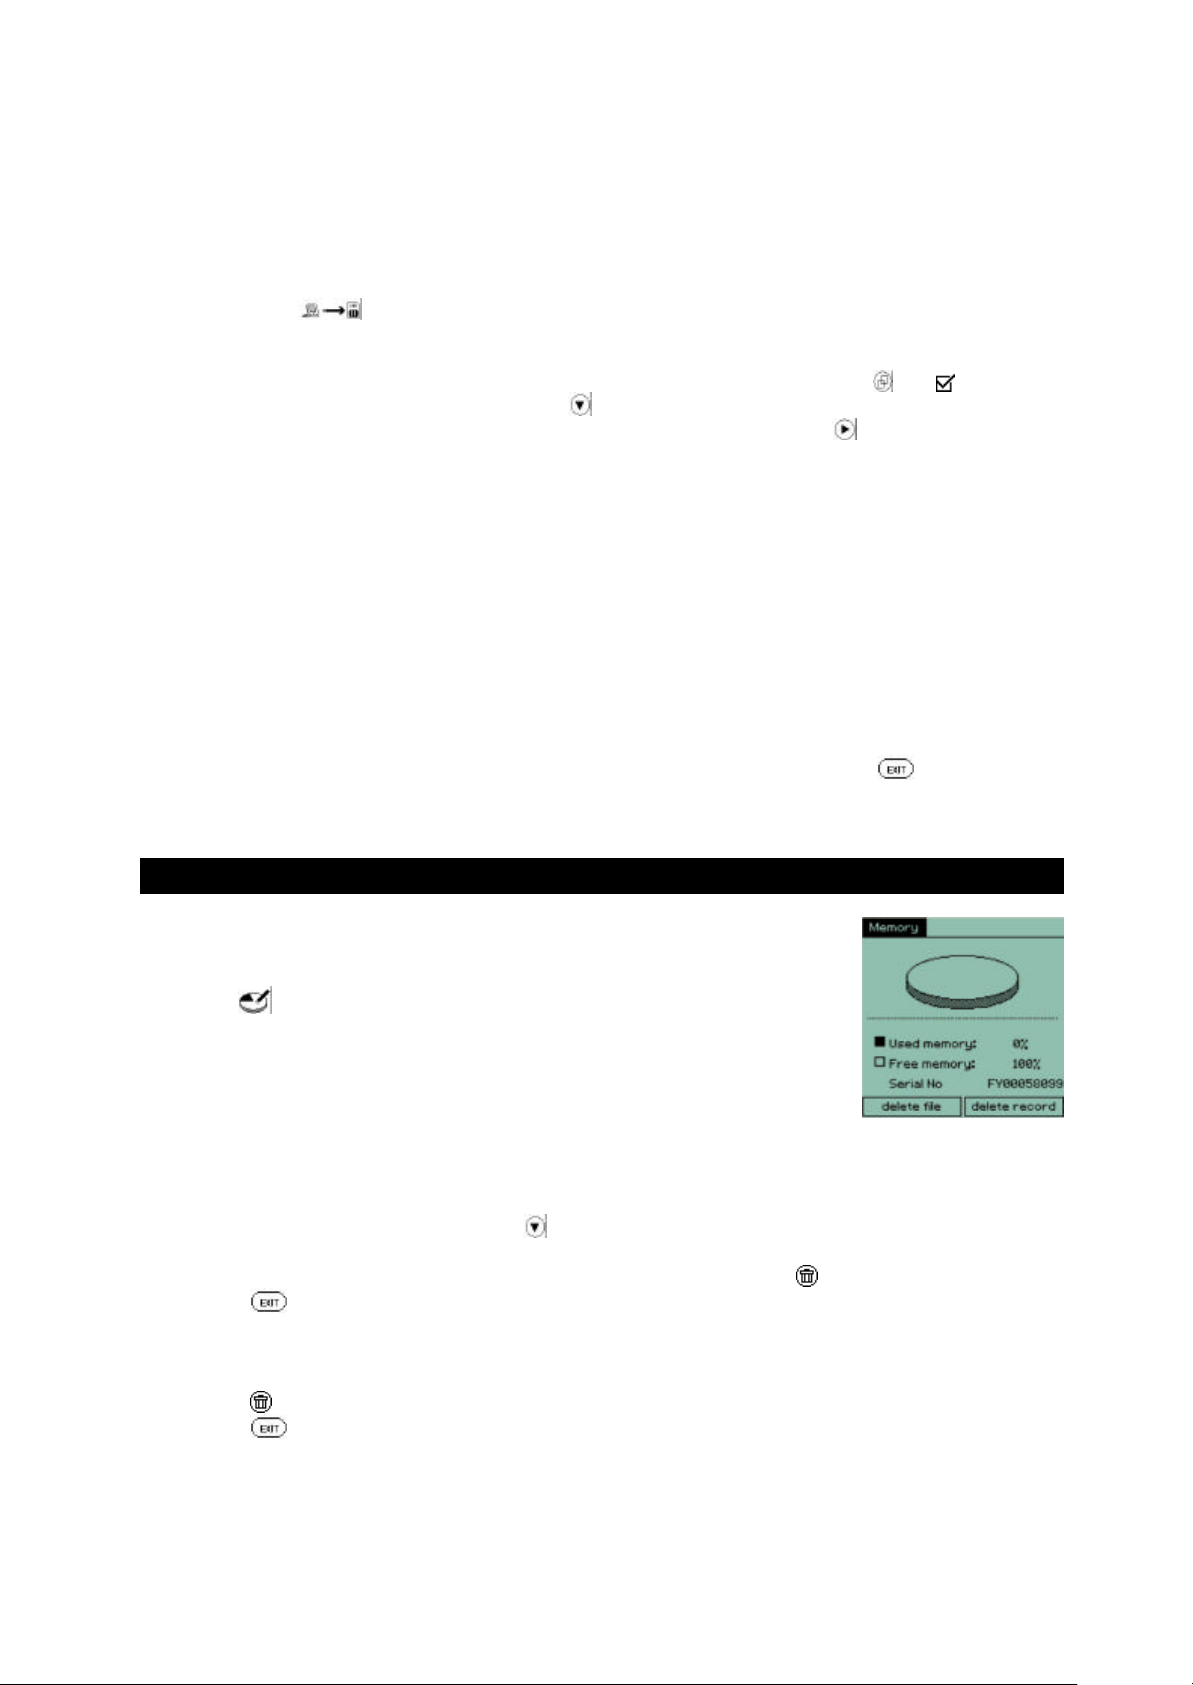
Memory
This application shows the percentage of used memory and free memory in the
unit and also allows you to delete files and data.
Tap on the icon to start the application.
The display will show graphically and in text the percentage of memory used and
the percentage free.
In this application you can also delete files and data.
File deletion:
Tap on the “delete file” button. This will take you to the file list screen. At the top right of this
screen is a category selection icon .
Tap the category box to select the type of file you wish to delete
Highlight the file you want to delete and tap the “Delete file” button to delete the relevant file(s)
Tap button to exit file deletion mode
Record deletion:
Tap the “delete record” button and highlight particular application data you want to delete
Tap button to delete the record
Tap button to exit record deletion mode
Page 24
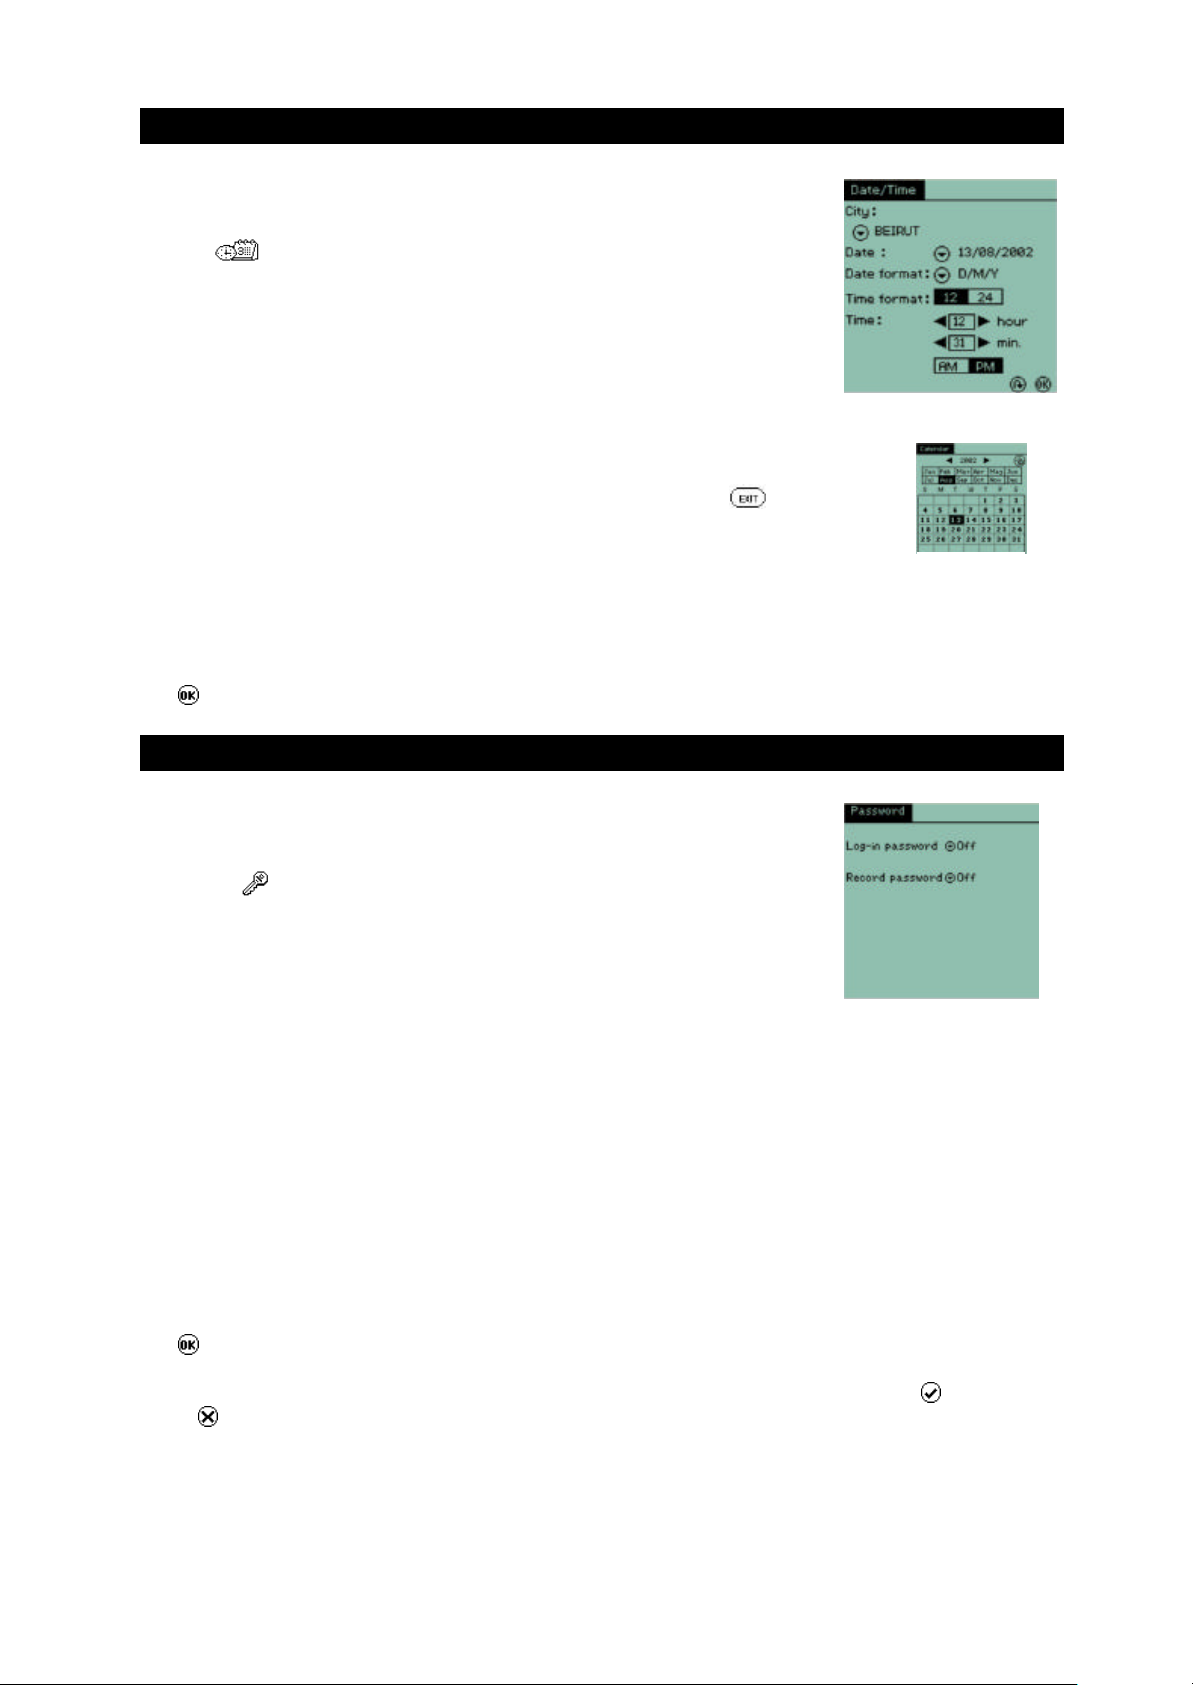
Time/Date
This application allows you to set or change the home date, time, city and time
format.
Tap the icon to start this application.
The display will list the current home city and all the time, date and format
settings currently set on the unit.
To make changes:-
City : Tap the drop down list icon and select a city by tapping on it.
Date : Set current date by tapping on the drop down list icon. This will
take you to the calendar view where you can select the year, month
and date by tapping on the relevant items. Tap to return to the
setting screen.
Date format : Set date format as D/M/Y or M/D/Y by using the drop down menu.
Time : Set current time by tapping on the t or u arrows.
Time format : Set 12 or 24 hours format by tapping on the t or u arrows. If you
select 12 hour format you will have to tap on the AP/PM button to ensure that the
unit knows if it is AM or PM.
Tap to save the settings and exit.
Password
The Password application allows you to set a private password to protect your
data.
Calendar view
Tap on the icon to start this application.
There are two password setting available in this device to protect your records
(as illustrated):
1. Login password
This activates the login password. Every time you start the unit or turn it on you will need to input
your password.
2. Record password
This activates the record password. This hides up all the Locked records from being viewed.
When shipped the TAB100 series has the Password switched off. This is the default setting.
To activate login in or record password, tap the arrow button and tap SET in the pull down menu.
Input your login password (minimum 3 characters, maximum 13 characters)
Re-input the password in the confirmation box.
Tap to save the settings.
A message box will ask you if you want to set hints to avoid forgetting the password. Tap to input Hints
or tap to ignore the hint setting.
To turn off the password setting, tap OFF in pull down menu, then input the password to confirm
authorization.
Page 25
To change the password, tap NEW in the pull down menu, then input the old password to confirm
authorization. Then input the new password.
To clear the password setting, tap DELETE in the pull down menu, then input the password to confirm
authorization. The password function will then automatically set itself to OFF
If a password is wrongly input, an error message box will pop up to ask you to try again. Tap button to
display the hints.
Tap button to exit from the application and return to the Settings folder.
Tap the password icon on the shortcut bar to enable or disable the record password.
SyncMan®
This application allows you to transfer records in the TAB100 device to PC and syncronise them. This
serves as a backup and also allows you to download files for reading or reviewing later. It is also the
function that allows you to send Emails from the HHD and to download E-Books.
Tap on the SyncMan® icon to start this application. HOWEVER do not do this unless you wish to
transfers files or syncronise as tapping this icon actually starts the transfer process.
FIRST you should install the SyncMan® software suite onto your PC. The SyncMan® CD is provided with
your TAB100 device and should it be missing or faulty pleas e contact the customer service number at the
end of this manual for a replacement. Alternatively you can download the latest version of SyncMan®
from the secure web site:
https://www.my.lexibook.com.
Please refer to the SyncMan® manual on the CD ROM for detailed instructions on how to install and run
the SyncMan® software application.
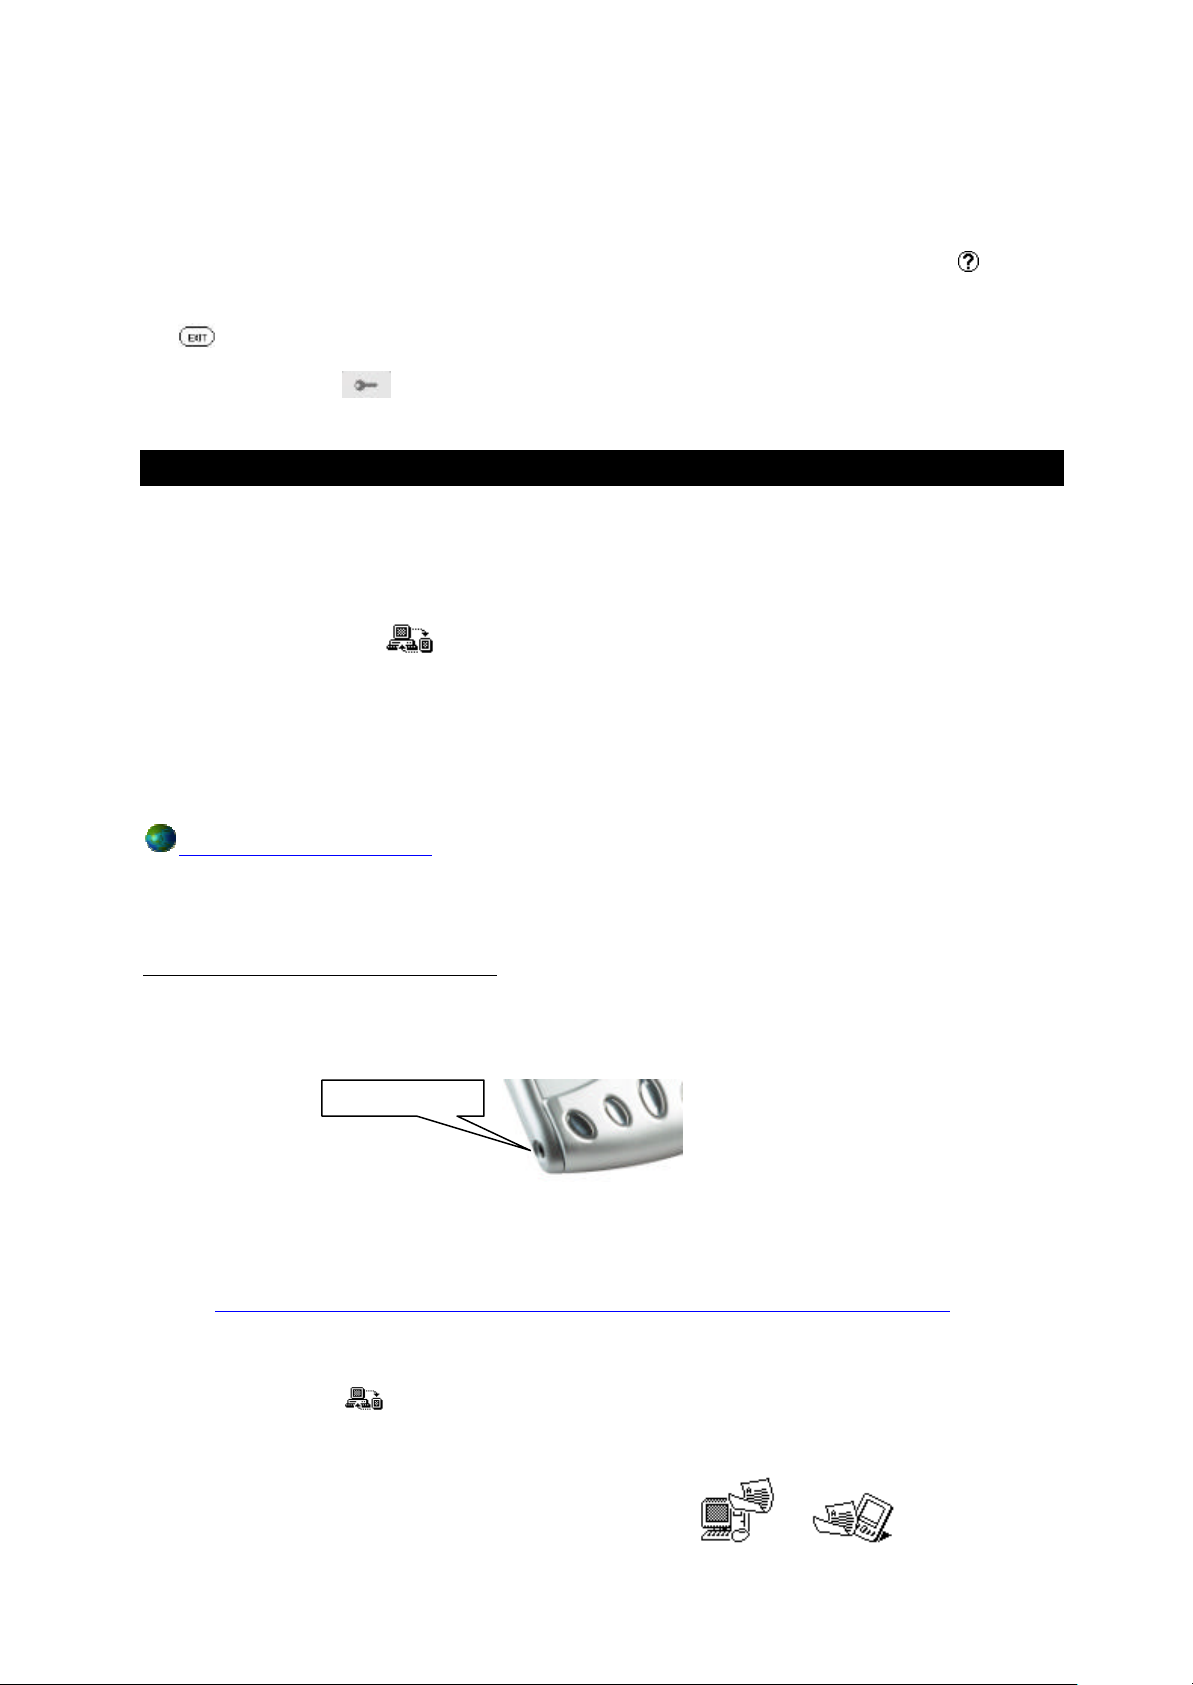
Synchronising and Transferring Files.
Connect the PC to your device with the PC Link cable provided. Plug the small round jack into the port on
the TAB100 series and the “D” shaped 9 pin plug into a free and available COM port on the PC.
NOTE: If you have the older style 25 pin COM port on your PC you can purchase adapters from your
local PC accessories store. If you only have USB ports on your computer (as it may be a laptop
machine) you can purchase a USB to COM adapter from several PC accessory vendors or you
can visit our web site at:
http://www.lexibook.co.uk/LexUK_Site_2002/Servce_Help/syncmanhelp/En/USB.htm
for further information.
After you have installed the software on the PC and attached the cable to the PC and the TAB100
device you can tap the icon to activate PC synchronization process. If the settings are correct in
the SyncMan® program your TAB100 series should automatically start transferring files and/or
syncronising.
After you press the icon you will see a display similar to: -
TAB100 series port
Page 26

The icon is animated and shows that a transfer is taking place. If the icon locks up or the animation stops
this could indicate a lack of communication between the device and the PC. You can press the cancel
button on the display to stop the transfer and then start again.
When a syncronisation has taken place and been completed the de vice will confirm this with a message.
NOTE: Large databases contain many records can take some time to transfer if it is a first time
syncronisation. Sometimes the data transfer can take as much as 30 - 40 minutes if the data file
is large. Please be patient.
Tap button to exit from the application and return to the Settings folder.
Hot Key
The Hot Key function allows you to designate any of the 4 hot keys
individually to be able to start applications immediately, instead of using the
tabs and folders. They can also be defined to turn on the device at the same
time as a hot key is pressed.
Tap the icon to start this application.
You will be shown a list of the four keys and next to each key is an icon.
Tap on this icon to reveal a list of the available applications that can be assigned to the key. Then
select the appropriate application and tap to confirm.
The last option in this display is Key start. This has an icon next to it. Tap on this icon to switch on or
off the Key start. Switching Key start on will allow you to start the TabletPC® and go straight to the chosen
application every time you press a Hotkey.
Tap to save the setting and exit
Tap button to exit from the application and return to the Settings folder.
My Text
This application allows you to store text files, which can contain notes.
These can then be used to paste into other applications.
Tap the icon to start this application.
The display will show a list of files, if previous text files have been created,
and three icons:
= Create a new record
= Edit a record
= Delete a record. You will be asked to confirm this action.
If you tap on the create a record icon you will see a display similar to the one on
the right. You can enter a string of text which can be saved and used in other
applications.
Page 27

Enter the text and when ready click on to save the record and exit.
You will be taken back to the file listing screen.
The editing functions are the same as the other applications discussed earlier.
Tap to leave the Hot Key application and return to the Settings folder.
Page 28

Chapter 6 Download Folder
This folder contains built-in games and the downloaded applications.
Applications that can be downloaded are available at the secure website https://www.my.lexibook.com.
Note: these will be available after October 2002.
Your unit has been provided with 3 games: Bubble
Submarine
and
Mines
These games are placed in this folder.
Any downloaded application software will also be placed in this folder. Applications can only be
downloaded via SyncMan® software.
You may re-position the downloaded applications into different folders according to your needs. This is
done by tapping on an icon in the folder and holding the stylus on the icon. Then drag the icon onto the
tab of the folder you wish to place the application in.
Care and Safety
Keep the unit away from direct sunlight, high or low temperatures, humidity and dust.
Do not drop the unit.
Do not use detergent, liquid cleaners or solvents to clean the unit. Wipe the unit with a clean, soft, dry
cloth.
Do not twist or bend the unit.
Batteries
The TabletPC® uses 1 x AAA Alkaline battery. If the display becomes too dim to read properly, use the
display contrast control to increase the contrast. If the display is still too dim, this is an indicat ion that the
battery life is low and they should be replaced as soon as possible.
To replace the battery, open the battery compartment on the bottom of the unit, take out the old battery
and dispose of it carefully. Note the polarity of the battery compartment and replace the old battery with a
NEW alkaline AAA battery. Replace the battery compartment lid and turn the unit on.
After battery replacement the unit will require you to re-calibrate. After calibration the unit will take
approximately 1 minute to re-boot and re-initialise data and programs. Please be patient and do not
repeatedly press the ON/OFF button.
DO NOT dispose of old batteries by throwing them into a fire. They may explode and cause serious
injury. ALWAYS dispose of batteries carefully.
DO NOT leave the battery in the unit for extended periods of non-use as it may leak and cause
irrevocable damage to your unit. This will invalidate your warranty.
Page 29

If in doubt consult your local stockist or ring the help line for further information.
General Specifications
v Batteries 1 x AAA
v Dimensions 100 x 70 x 13 mm
v Weight 94g (with battery)
v Warranty 2 years
v Memory TAB 102 : 2Mb, TAB 108 : 8Mb
Made in China
Specifications are subject to change without notice.
Warning: If the unit receives an electrostatic shock and ceases to function, it can be reset by pressing
on/off key or by removing the battery then reinserting it.
Warranty
This product is covered by our standard 2-year manufacturer warranty. In the case of any fault, please
return the unit to the address below for replacement or repair. A copy of your sales receipt must be
provided, or other proof of purchase. This warranty does not cover damage or faults occurring through
misuse, damage or abuse. This does not affect your statutory rights.
If you wish to register your product for our extended 3 year warranty program please enclose a cheque,
made payable to Lexibook UK Limited, for £15.00, along with your full name and address details. You will
be registered and a warranty certificate will be forwarded to you *
Return/Warranty addresses:
United Kingdom France
Lexibook UK Limited
PO Box 66
Bordon
Hants
GU35 0ZN
England
Freephone Help Line: 0808 100 3015.
FAX: +44 1420 477929
Email: infouk@lexibook.com
*Damage to LCD display not included.
Lexibook SA
2 avenue de Scandinavie.
91953 COURTABOEUF
Cedex
FRANCE.
TEL: 33 (0)1 73 23 23 23
FAX: 33 (0)1 73 23 23 00
Web: http://www.lexibook.com, http://www.lexibook.co.uk and https://my.lexibook.com
TabletPC is a registered trademark of Lexibook Group SA and will be protected at all times from unauthorised usage. Lexibook
is a registered brand name of Lexibook Group SA. SyncMan is a registered trade mark of Lexibook Group SA.
Page 30

Index
File listing............................................... 18
A
Alpha Numeric Keyboard..............................5
B
Battery Indicator ...........................................4
C
Calculator
Memory functions ...................................20
Chapter 1 ....................................................2
Chapter 2 ....................................................7
Chapter 3 ..................................................16
Chapter 4 ..................................................19
Chapter 5 ..................................................21
Chapter 6 ..................................................28
Conversion
Entering amounts ................................... 20
Select category ...................................... 20
Navigation.............................................. 18
Reading Word files ................................. 18
SyncMan program .................................. 18
Viewing files ........................................... 18
Email
Categories ............................................. 17
Creating................................................. 17
Creating and Syncronising emails ............ 16
Index screen .......................................... 16
Indicator boxes....................................... 16
Inserting email addresses ....................... 17
Replying ................................................ 17
Viewing and reading ...............................17
G
General
Batteries ................................................ 28
Battery care ..................................... 28, 29
Care and safety of the TAB100................ 28
Country of manufacture ...........................29
D
Date Indicator ..............................................4
Desktop Area...............................................3
Download Folder........................................ 28
Dowloaded Applications ......................... 28
Games .................................................. 28
Moving applications................................ 28
Drawpad
Tools..................................................... 13
E
E-Book
Bookmarks ............................................ 18
Downloading E-Books............................ 17
File deletion ........................................... 18
Electrostatic shocks................................ 29
LCD damage.......................................... 29
Specifications ......................................... 29
Warranty................................................ 29
Warranty Addresses ............................... 29
Web sites ...............................................29
General Folder
Deleteing .................................................8
Display Modes ..........................................7
Keyword Searching ..................................8
Locking the device ....................................8
Phone Book .............................................8
Phone book categories .............................8
Phonebook Sorting ...................................8
Scroll Bar.................................................8
General Information ......................................2
Page 31

H
Hot Key
Application list........................................ 26
Designating keys ................................... 26
Key Start ............................................... 26
Hotkey Picture .............................................3
Hotkeys ..................................................... 26
M
Memory Application
File Deletion .......................................... 23
General....................................................7
Notes.....................................................11
Owner Information ..................................14
Scheduler ..............................................11
Shorthand ..............................................12
To Do..................................................... 13
Today .................................................... 15
Owner Information
Business Card........................................ 14
Private Information ................................. 14
P
Record Deletion ..................................... 23
Mini Text
Deleting a text file .................................. 16
Log file .................................................. 16
Reading a text file .................................. 16
Transferring text files from the PC........... 16
My Text
Creating and editing files ........................ 26
Deleting files.......................................... 27
Using text in other applications ............... 27
N
Notes
Creating and Editting records.................. 12
Keyword Search .................................... 12
Numeric Keyboard .......................................5
Page1..........................................................1
Password
Default password.................................... 24
Login password ...................................... 24
Password activation................................ 24
Password deletion .................................. 25
Password hints .......................................25
Password types...................................... 24
Record Password ................................... 24
Pen Entry Keyboard ......................................5
Pen Keyboard Picture...................................5
Phone book
Editing records ....................................... 10
Locking records ...................................... 10
New records........................................... 10
Sort by Birthday........................................9
Sort by City..............................................9
O
Office Folder.............................................. 16
E-Book.................................................. 17
Email Application ................................... 16
Mini Text ................................................ 16
Organiser Folder..........................................7
Calendar ............................................... 14
Drawpad................................................ 13
Sort by Company and Depart ....................9
Sort by person name ................................9
Viewing records in detail ...........................9
Power supply ...............................................2
R
Resetting the Device.....................................6
Hard Reset ...............................................6
Page 32

S
Scheduler
Edit and creating records.........................11
Record View - detailed ............................11
Settings Folder .......................................... 21
Hot Key function .................................... 26
Memory Application................................ 23
My Text ................................................. 26
Password Application............................. 24
SIM Card reader.................................... 22
SyncMan............................................... 25
System application................................. 21
TAB100 data port ....................................25
System
Animation............................................... 21
Auto Off period ....................................... 21
Backlight................................................ 21
Display calibration .................................. 21
Display Contrast..................................... 21
Input interface ........................................21
Key tone ................................................ 21
Language Interface................................. 21
power on screen..................................... 21
Time/Date Application............................. 24
Shortcut Bar ................................................3
Shorthand
Creating a record ................................... 12
Functions .............................................. 12
SIM Card
Add all data ........................................... 23
Add all data (to SIM card) ....................... 23
Additional data transfer (SIM card) .......... 23
Data transfer.......................................... 22
File transfer ........................................... 23
Overwrite current data (SIM card) ........... 23
Pin number............................................ 22
Removing/replacing battery .................... 22
Selecting files to transfer ........................ 22
SIM card access .................................... 22
Transfer additional data only................... 23
T
TAB100 Series Picture..................................2
Time
Change a city .........................................14
Daylight saving....................................... 14
Displayable information........................... 15
Select a city........................................... 14
World and Home Time ............................ 14
Time Indicator ..............................................4
Time/Date
Making changes ..................................... 24
Tools Folder............................................... 19
Calculator .............................................. 19
Language Translator application ..............19
Unit Conversion application..................... 20
Translator
Transferring data form the TAB100 to a SIM
card .......................................................... 23
Soft Reset ...................................................6
SyncMan
COM port types ...................................... 25
Installing SyncMan software ................... 25
Large database transfer .......................... 26
Secure web site..................................... 25
Synchronising and file transfer ................ 25
SyncMan instructions ............................. 25
Input language ....................................... 19
Input words ............................................ 19
Languages ............................................. 19
Navigation.............................................. 19
U
Unit Layout ...................................................2
Page 33

V Virtual Keyboard.........................................4
Virtual Keyboard Picture ...............................4
 Loading...