

Page 1

Table of contents
Collins Le Robert
Bilingual Dictionary
Dictionnaire électronique
bilingue Le Robert & Collins
English/French User Manual
Mode d'emploi Français/Anglais
1. Introduction
2. Key Guide and Display Symbols
2.1. Key Guide
2.2. Display Symbols
3. Getting Started
3.1. Removing the battery
protection tab
3.2. Switching the unit on
3.3. Contrast control
3.4. Display language
3.5. On-Screen help
3.6. Function modes
3.7. Auto Power Off.
3.8. Demo
4. Translator
4.1. General search
4.1.1. Correcting the typed word
4.1.2. Typing capital letters or
accented characters
4.1.3. Parts of Speech
4.1.4. Choose between multiple
word forms
4.2 Other Translator Functions
4.2.1 Spell Checker
4.2.2 Highlighting a word
4.2.3 Grammar function
4.2.4 Synonym function
5. Phrases (Theme)
6. Games
6.1. Hangman
6.2. Jumble word
6.3. Missing letter
6.4 Guess what?
6.5 Letter blaster
6.6 Pairs
6.7 Number puzzle
6.8 Secret code
6.9 Snake
2
7. Converter
7.1 Currency conversion
2
2
7.1.1. Selection of currencies for
conversion
3
7.1.2. Conversion between two
4
4
Euroland currencies
4
7.1.3. Conversion between one
4
Euroland and one non Euroland
4
currency
4
7.1.4. Conversion between two
5
non-Euroland currencies .
5
8. Calculator
6
9. Clock
6
9.1. Viewing the time and date
6
9.2. Setting the time and date
6
9.3. Setting the date format
6
9.4. Setting the time format
9.5. Setting the user city
6
9.6. Setting the GMT
7
9.7. World time
10. Power Supply.
7
11. Reset
7
12. Maintenance
7
13. Warranty
7
Appendix 1 - Parts of Speech
7
Appendix 2 - Euro fixed rates
8
8
9
9
9
10
10
11
11
11
11
12
12
12
12
12
12
12
14
14
14
14
14
15
15
15
15
15
16
16
16
16
18
18
T200
Copyright © Lexibook 2006 1
149mm (W) x 210mm (H)
Page 2
1. Introduction
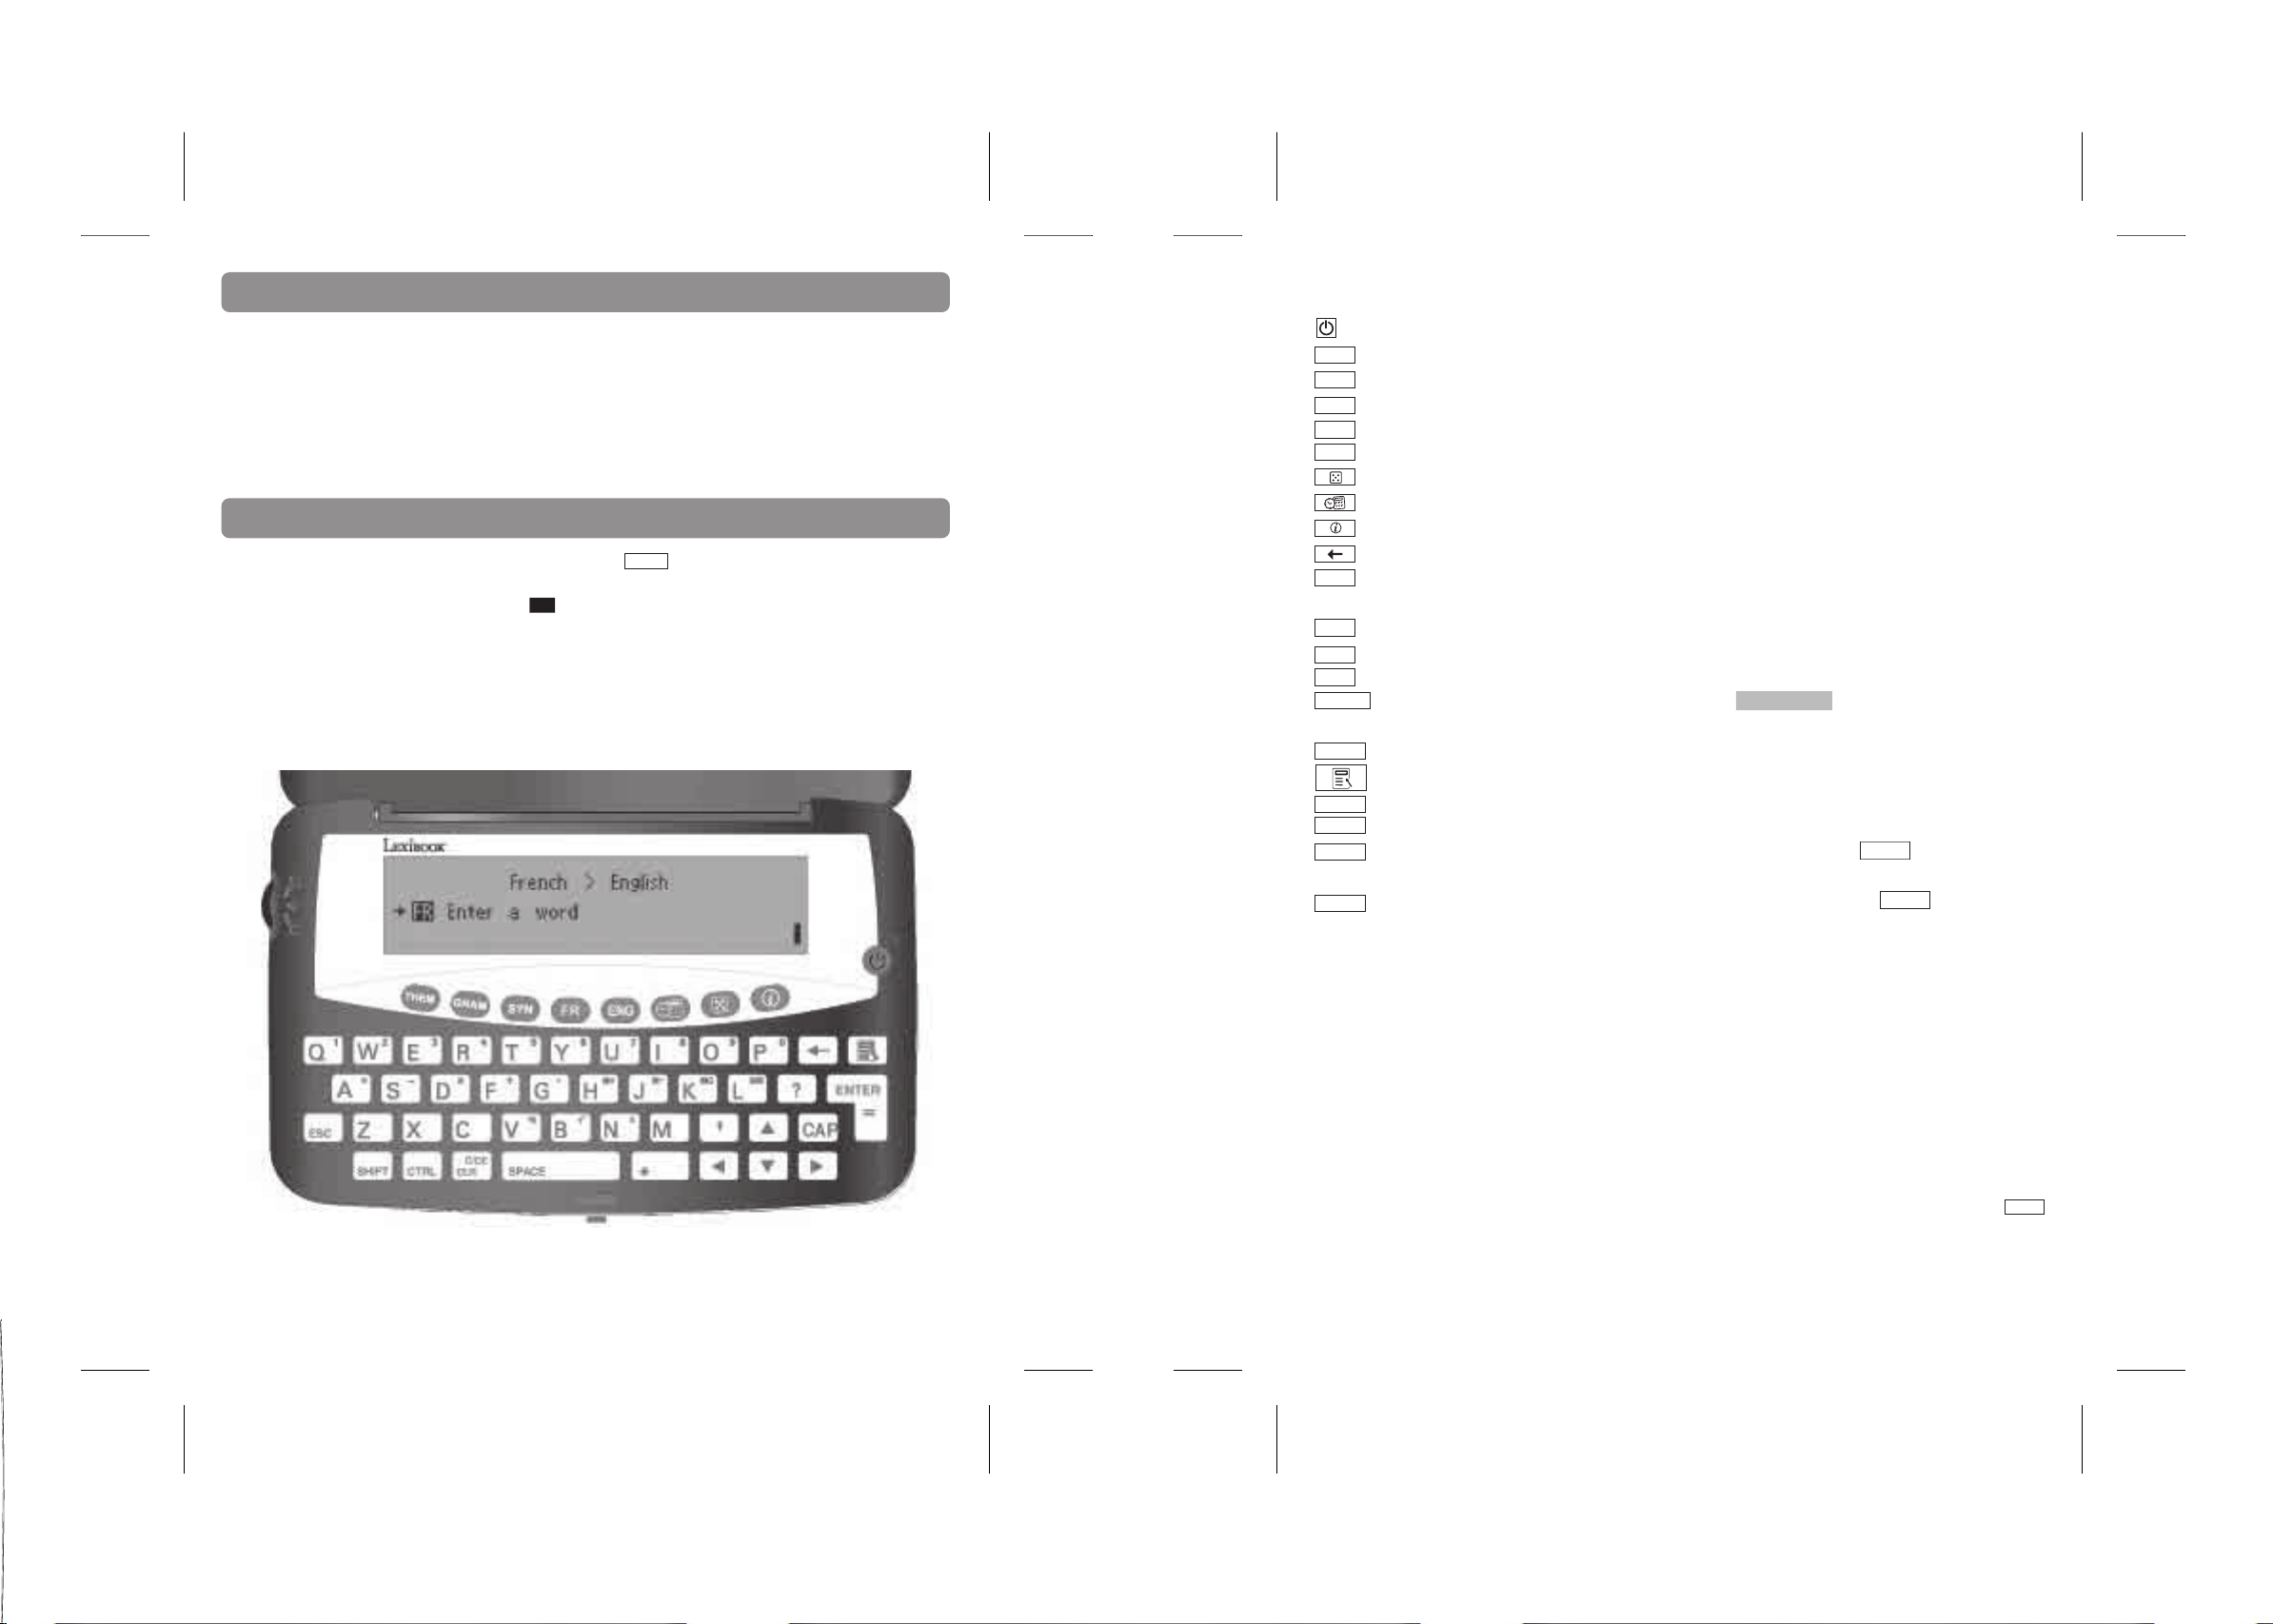
The following diagram shows the keyboard layout. The functions of the keys are described overleaf:
Table of contents
Thank you for purchasing this T200 bilingual dictionary based on the Collins-Robert French English
desktop Dictionary. This product has been designed to help you to translate from French to English and
vice versa.
The database includes 65,000 words for each language, as well as 150 conversational phrases, which
have been grouped into 10 different categories for easy access and use. Under normal use the T200 is
designed to give many years of service. Please follow these instructions carefully to ensure your
product operates correctly.
2. Key Guide and Display symbols
In this instruction manual, keys are represented like this:
and screen illustrations are shown like this:
EN Enter a word
Opening and closing the unit:
To open the unit, press the front centre button to release the catch. To close it, gently push the lid
down.
2.1 Key Guide
ENTER
ON / OFF: to turn the unit on and off.
THEM
THEM Theme: to access the theme mode (Phrases).
GRAM
GRAM Grammar: to access the grammar mode.
SYN
Synonyms: to access the synonym mode.
ENG
English: to access the English to French translator function.
FR
French: to access the French to English translator function.
Games: to enter in game mode.
Menu: to access the menu.
Help: to display a list of help topics.
Backspace: to delete the last character typed.
ENTER
Enter: to perform a translation, to confirm a selection. It also stands for the sign ‘=’ to
calculate and answer in calculator mode.
SHIFT
Shift: to type a capital letter and accented characters. To access 2nd functions.
Escape: to go back to the previous screen.
ESC
CTRL
Control: in game mode, press to reveal the solution.
CLR.C/CE
Clear: to clear the display and return to the screen Enter a word ; to return to the previous
menu option, and the clear the data in calculator and currency converter mode.
SPACE
Space: to type a space.
User Settings: to display the menu of user settings. .
Arrow up: to scrolls the display up or search for preceding words.
▲
▼
Arrow down: to scroll the display down or search for following words.
To move the cursor to the left and scroll long words to the left. Note: SHIFT and
▲
moves
▲
display to the beginning of a word / phrase.
▲
To move the cursor to the right and scroll long words to the right. Note: SHIFT and ▲moves
the display to end of a word / phrase
149mm (W) x 210mm (H)
Letters Q to P Types numbers in Calculator and currency modes
Letter G Types a decimal point
Letters ASDF Add, subtract, multiply, divide
Letters HJKL Memory: M+, M-, M Clear and M Recall
Letters VBN Percentage, Square root, Plus/ Minus sign
2.2 Display symbols
• There are 4 arrow symbols on the right of the display. These symbols will flash to indicate when you
can use the arrow keys to scroll up, down, left and right.
• There is one arrow symbol on the left side of the display. This symbol appears in the menus and
enables you to see where you are in the menu. When the arrow is in front of a topic you can press
ENTER
to select it.
Copyright © Lexibook 2006 3Copyright © Lexibook 2006 2
Page 3

3. Getting Started
3.1 Removing the battery protection tab
Before you start using the unit, carefully remove the battery tab located at the rear of the unit. The unit
should switch on when you remove this tab. You can also press to switch the unit on, after the tab
has been removed.
Note: In the unlikely event that your unit does not switch on, you may need to reset it using the following
procedure.
1. Turn the unit over and locate the small RESET hole on the back of the product.
2. Insert a small, thin, blunt instrument, such as a paperclip, into the hole, press
gently and then release.
Your unit should now have reset and the display will show the prompt Select your language.
3.5 On-Screen Help
Table of contents
If you require help at any time, press HELP . The unit will display a list of the following help
topics:
• Default language
• Useful Keys
• FR to ENG translator
• ENG to FR translator
• Spell check
• Grammar
• Synonyms
• Clock
• Calculator
• Currency
• Unit
• Hangman
• Jumble word
• Missing letter
• Guess what? FR > ENG
• Guess what? ENG > FR
• Letter blaster
• Pairs
• Number puzzle
• Secret code
• Snake
• DEMO
3.2 Switching the unit on
Before switching the unit on, make sure you remove the clear film label from the LCD screen by pulling
the tab.
Press to switch the unit on. Press again to switch the unit off.
The LEXIBOOK screen will be displayed briefly, then the ‘language combination & direction’ screen
English > French is displayed followed by the word-entry screen Enter a word .
3.3 Contrast Control
The LCD contrast can be adjusted by entering the User settings key and selecting
>Screen contrast
• Press ▲ to decrease contrast or ▲to increase contrast.
• Each time ▲ is pressed the contrast scale moves to the right and the contrast gets
darker. Each time ▲ is pressed, the contrast scale moves back to the left, and the contrast
gets brighter.
3.4 Display language
The Display language is the language in which the screen messages are displayed. When you first
use the unit, you may need to change this:
• Press User settings Key to view the Language option.
Press to confirm.
ENTER
• The current display language is shown, e.g. English .
• Press ▲or ▲ to change to French. Press to confirm. The unit will then revert to the
ENTER
MENU list.
1. Press and ▼ to ▲ scroll through the list of topics until you see the desired topic.
2. Press to confirm.
ENTER
3. Press and ▼ to ▲ scroll through the information.
4. To return to the list of help topics, press ESC.
3.6 Function modes
The T200 has several modes. To reach the desired mode:
• Press TRANSLATOR keys: FR or ENG for translation of words from
French English or from English French.
• Press GRAM to view inflections and other grammatical information.
• Press SYN to view the synonyms of a given word.
• Press THEM for translation of phrases.
• Press for games.
• Press for help topics.
• Press to view the user settings menu:
- Language
- Screen Contrast
- Date Time setting
- Date Format
- Time Format
- User city
- GMT setting
- Daylight Saving Time
- Home currency
- Auto power-off
- Demo
Copyright © Lexibook 2006 5Copyright © Lexibook 2006 4
Page 4

3.7 Auto Power Off
If you forget to switch off the unit, it will switch off automatically after 3 minutes to save the battery life.
Press to switch the unit back on. You can change the Auto Power Off to 1, 2 or 3 minutes in the User
settings menu ( Key).
key repeatedly until the desired accented character is displayed, then release the
SHIFT key.
Table of contents
(e.g. SHIFT + A + A types an ‘à’).
4.1.3 Parts of Speech
3.8 Demo
• Press User settings Key to view the Demo option.
Press to confirm.
ENTER
• The demo starts to scroll down the screen.
• Press ▼ or ▲ to scroll back up or scroll down faster.
• At the end of the demo text, the unit will then revert to the menu list.
4. Translator
4.1 General Search
1. Press Translator keys FR or ENG
2. The ‘language combination & direction’ screen English > French or
French > English is displayed.
3. Type a word you want to translate, and press .
Note: This translator has a special feature, designed to provide you with alternative translations of
words which may have different meanings in the target language. For example the word “full” in English
can have the corresponding translations of “plein” or “rassasié” in French. Both these translations are
correct but have subtly different uses. To fully utilise this feature always use the
translations of the word you have entered (if any available).
4. Press ESC to return to the word entered.
5. If the word is not contained in the database, the display will advise you. It will
show the nearest alphabetical entry in the database, and then the translation.
6. If this is not the desired word, you can press ▼and ▲ to search for the previous/
next alphabetical word in the source language. Press Enter to display its translation.
7. To look up another word, you can either start typing a new word directly or you
can clear the display first by pressing CLR.C/CE.
4.1.1 Correcting the word typed
1. Press ESC to return to the word which you entered.
2. You can then edit the word using the ▼ and ▲ keys to move the cursor to the
desired position where you wish to insert or delete letters, (use to delete
the character to the left of the cursor).
4.1.2 Typing capital letters or accented characters
1. To type a capital letter, press and hold SHIFT and press the desired letter key
once. For example, SHIFT + A types an ‘A’.
2. To type an accented character, press and hold SHIFT and press the desired letter
ENTER
▲
key to look for other
The Part of Speech is shown to the right. In this example, N = noun.
Please refer to appendix 1 for the complete list of Parts of Speech.
4.1.4. Choose between multiple word forms
Some words in this dictionary might have more than one form (for example
“résumer” and “résumé” in French).
When you are searching for a word with several forms, the dictionary will display the
various forms. Use the arrow keys to highlight the required form, and press .
ENTER
If you want to check another form of this word press ESC .
4.2 Other Translator Functions
4.2.1 Spell Checker
- To look for a word with a missing a letter, replace the missing letter
by a «?». Then, press and the translator will display a list of words
ENTER
corresponding to your entry (ex : maga?ine)
- To look for a word with a missing part, you can replace it with a
«*». Then, press and the translator will display a list of words corresponding to
ENTER
your entry (ex : maga* )
- Note: it is possible to put «* » and« ? » anywhere in a word.
4.2.2 Highlighting a word
-To obtain the translation of any displayed word, Press to start
ENTER
the highlight. Use the arrow key to select the word you want to highlight.
-To confirm the highlighted word, and get the translation press .
ENTER
-To turn the highlight off press ESC .
Note: the target language may change when you obtain the translation of a highlighted word.
4.2.3 Grammar function
1. Select the dictionary to use by pressing FR or ENG .
2. 2. The ‘language combination & direction’ screen English > French or
French >English is displayed.
3. Type a word and press the GRAM key to get the corresponding inflexion.
4. Use the arrow keys to see the different proposals. Press to confirm your
ENTER
choice and see the conjugations or inflections. The T200 database includes 9 000
verbs.
Copyright © Lexibook 2006 7Copyright © Lexibook 2006 6
Page 5

Note: the prompts/menu are displayed in the default language
5. Press the ESC key to go back to the previous screen and enter another word.
6. Press the ESC key twice to go back to the main screen (translator mode).
4.2.4 Synonym function
1. Select the dictionary to use by pressing the FR or ENG key.
2. The ‘language combination & direction’ screen English > French or
French >English is displayed.
3. Type a word, and press SYN key to view the corresponding synonyms. The T200
database includes 250 000 synonyms.
4. Use the arrow keys to see the different proposals. Press to confirm your
ENTER
choice, and display the definition of the chosen word.
5. Press the ESC key to go back to the previous screen, and enter another word.
6. Press the ESC key twice to go back to the general screen and translator mode.
5. Phrases (Theme)
The T200 includes conversational phrases grouped into the following categories:
BUSINESS
RESTAURANT
HOTELS
IN TOWN
TRAVELLING AROUND
HOSPITAL/DENTIST/DOCTOR/POLICE
ENTERTAINMENT
BANK/POST OFFICE/TELEPHONE
AIRPORT
GENERAL PHRASES
Using the THEM key:
1. Press the THEM key to access the PHRASE mode.
2. The first category, BUSINESS
3. Press ▼ to view the next category. When the desired category is displayed,
press to confirm. The first phrase of the category will be shown.
ENTER
4. Press ▼ to see the next phrase in the list. Press ▲ to see the previous phrase in
the list.
5. When the desired phrase is displayed, press to view the translation.
6. To return to the category listing, press ESC.
To exit PHRASE mode, press the FR or ENG keys to return to translator mode.
▼ , is displayed.
ENTER
6. Games
The T200 includes 10 fun and educational word games: Hangman, Jumble word, Missing letter, Guess
what? FR > ENG, Guess what? ENG > FR, Letter blaster, Pairs, Number puzzle, Secret code and
Snake. All word games can be played in either English or French.
Press to select game mode. Use ▼ to highlight the game of your choice and press to confirm.
At the end of a game, press ”Y” to start a new game or press “N” or ESC or to view the game menu.
You may also press CLR.C/CE to return to the translator mode.
6.1 Hangman
1. Select the language in which you wish to play using ▼. Press to confirm a
language.
2. The display prompts you to select a word length.
3. Press ▼ repeatedly to increase the word length (max. 13) and to decrease the
word length (min. 3). Press to confirm.
ENTER
4. The display shows question marks representing the letters of the word you must
guess ???????? 9
5. The number at the right indicates the number of attempts allowed to guess the
word.
6. For assistance, you can press to reveal a letter. However, this will use one
ENTER
of your attempts.
7. Press a letter key to make your guess. When you type in a correct letter, it will
replace the question mark in the appropriate position.
8. If you type a letter that is not in the word, the screen will tell you There is no X,
and it will reduce your number of attempts by one.
9. If you type a letter that you have already tried, the screen will also tell
you X already used. Your number of attempts will not be reduced.
10. If you guess all the letters, you win.
11. If your number of attempts reaches zero, you have lost the game. The correct
word will then be revealed.
12. If you want to give up, and reveal the word, press CTRL.
13. Press to see the translation of the word. Press ESC to go back to the
ENTER
game.
6.2 Jumble Word
1. Select the language in which you wish to play using ▼ . Press to confirm
a language.
2. The display prompts you to select a word length.
3. Press ▼ repeatedly to increase the word length (max. 13) and ▼ to decrease
the word length (min. 3). Press to confirm.
ENTER
4. The display shows the jumbled letters of the word you must find bedlumj 9
5. The number at the right indicates the number of attempts allowed to guess the
word.
6. Type the word that you think the jumbled letters come from. Press to see if
you are correct.
7. If you are wrong, your number of attempts is reduced by one. Try again.
ENTER
ENTER
ENTER
ENTER
Copyright © Lexibook 2006 9Copyright © Lexibook 2006 8
Page 6

8. You can re-jumble by pressing (for words of 4 letters and up only).
SPACE
9. If you guess the word before losing all your attempts, you have won. If your
number of attempts reaches reaches zero, you have lost the game. The correct
word will be revealed.
10. If you want to give up the game and reveal the word, press CTRL.
11. At the end of the game when the correct answer is displayed, you may also
press to see the translation of the word. Press ESC to go back to the game.
ENTER
6.3. Missing letter
1. Select the language in which you wish to play using
▼. Press to confirm a
ENTER
language.
2. The display prompts you to select a word length.
3. Press ▼ repeatedly to increase the word length (max. 13) and ▲ to decrease the
word length (min. 3). Press to confirm.
ENTER
4. The display shows a word with a missing letter. Lan?uage 3
5. The number at the right indicates the number of attempts allowed to guess the
missing letter.
6. Type the letter that you think is missing.
7. If you are wrong, your number of attempts is reduced by one. Try again.
8. If you guess the word before losing all your attempts, you have won. If your
number of attempts reaches reaches zero, you have lost the game. The correct
word will be revealed.
9. If you want to give-up the game and reveal the word, press CTRL.
10. At the end of the game when the correct answer is displayed, you may also
press to view the translation of the word.
ENTER
6.4 Guess what? FR > ENG and Guess what? ENG > FR
1. This game is a translation quiz. You can either translate words from French to
English (Guess what? FR > ENG) or from English to French (Guess what? ENG >
FR)
2. The display prompts you to select a word length.
3. Press ▼ repeatedly to increase the word length (max. 13) and
word length (min. 3). Press to confirm.
ENTER
▲ to decrease the
4. The display shows a word in the source language for which you need to find the
translation ????????.
5. The number at the right indicates the number of attempts allowed to find the
correct answer.
6. Type your answer and press to confirm.
ENTER
7. If you are wrong, your number of attempts is reduced by one. Try again.
8. If you guess the word before losing all your attempts, you have won. If your
number of attempts reaches reaches zero, you have lost the game. The correct
word will be revealed.
9. If you want to give up and reveal the word, press CTRL.
10. At the end of the game when the correct answer is displayed, you may also
press to view the translation of the word.
ENTER
6.5 Letter blaster
1. Select the language in which you wish to play using ▼. Press to confirm a
language.
2. The display prompts you to select a word length.
3. Press
word length (min. 3). Press to confirm.
▼ repeatedly to increase the word length (max. 13) and ▲ to decrease the
ENTER
4. The display shows a word which contains an extra letter. Langouage 3
5. The number at the right indicates the number of attempts allowed to guess the
extra letter.
6 Select the extra letter the letter using the ▼ and ▼ keys. Press to confirm.
ENTER
7. If you are wrong, your number of attempts is reduced by one. Try again.
8. If you guess the word before losing all your attempts, you have won. If your
number of attempts reaches reaches zero, you have lost the game. The correct
word will be revealed.
9. If you want to give up and reveal the word, press CTRL.
10. At the end of the game when the correct answer is displayed, you may also
press to view the translation of the word.
ENTER
6.6 Pairs
1. Select a difficulty level:
Easy: grid 4x3 = 12 cards
Medium: grid 8x3 = 24 cards
Difficult: grid 10x4 = 40 cards
2. Letter and number cards are displayed for a few seconds. The cards are then
flipped over and you need to match all the pairs! Use the arrow keys and
to display the cards two by two. To get a high score you need to uncover as
ENTER
many matching pairs as you can while turning over as few non-matching pairs as
possible
3. If you uncover all the cards, you have won.
4. To give up and flip all the cards over, press CTRL.
6.7 Number puzzle
1. Select a difficulty level:
Easy : grid 3x3 = 9
Medium: grid 4x3 = 12
Difficult : grid 5x3 = 15
2. The aim of the game is to rearrange the jumbled numbers to form a grid showing
the numbers in order.
3. Use the arrows to move the number on the grid.
4. You win as soon as all the numbers are in the right order.
6.8 Secret code
1. Find the 4-digit code by trying out various combinations. To make a try, enter a
4-digit number and press to confirm.
ENTER
2. When you confirm, the cursor moves to the next line and up to 4 dots appear on
the previous line on the right of the last code entered (the position of the dots does
not correspond to the position of the last digits entered).
Copyright © Lexibook 2006 11Copyright © Lexibook 2006 10
Page 7

3. A black dot indicates that a number is correct and at the right position.
A clear dot indicates that a number is correct but at the wrong position.
If there are less than 4 dots, then some numbers are not part of the code.
4. You have 12 opportunities to find the right number (from 0 to 9).
5. If you find the correct number within the 12 opportunities you have won.
Otherwise, the correct number will be revealed.
6. To give up and uncover the correct number, press CTRL.
6.9 Snake
1. Select the difficulty level:
Easy: Slow speed, no obstacles
Medium: Medium speed, one obstacle
Difficult: Fast speed, two obstacles.
2. Use the arrow keys to guide the snake around the screen, and collect as many
flags as possible. Each flag increases the size and the speed of the snake.
3. You lose if the snake touches the edges of the screen, the obstacles or its tail.
7. Currency converter
7.1 Currency conversion
The T200 includes a useful currency converter which complies with the strict EEC regulations for the
Euro. To see the Euro fixed rates press the user settings key , select Home currency and press .
Then you can scroll through the 12 Euro fixed rates.
7.1.1. Selection of currencies for conversion
1. Press the MENU key.
2. Press
3. To change the top currency, press and press ▼ repeatedly.
▼ to select Currency Conversion and press to confirm.
ENTER
ENTER
To change the bottom line currency, press ▲ once and then ▼ and ▲ repeatedly.
Press to confirm.
ENTER
4. You can reverse the direction of the conversion by pressing ▼ and ▲ .
7.1.2. Conversion between two Euroland currencies
1. Select the two desired Euroland currencies using the keys as shown above, for
example:
=FFR
>ITL.
2. Press ▲ to view the rate for the currency combination: >1 ITL=0.0034 FRF
Please note that rates between the EURO and the 11 ‘Euroland’ currencies are fixed
and have been pre-stored. You cannot change these rates.
Please refer to appendix 2 for list of rates.
3. Press ▼ to return to the currency combination. Type the amount to be converted
using the number keys and the decimal point (G key). For example >FFR 234
4. The result will be displayed automatically: =ITL 69072.56
ENTER
5. You can toggle between the two currencies by pressing ▼ and ▲ .
6. To make another conversion, press CLR.C/CE to clear the previous entry and
type in a new amount.
7.1.3. Conversion between a Euroland currency and a non-Euroland currency
1. Select the two desired currencies as explained in step 7.1.1.
for example
>FFR
=USD
2. Press ENTER. The screen shows the prompt:
Please enter Euro rate
EURO
USD
3. To set the rate, type a figure:
1Euro=USD 1.07 and press to save the rate.
ENTER
The rate is saved and the currency combination / direction is displayed again.
4. To make a conversion, proceed as shown in the section above.
7.1.4. Conversion between two non-Euroland currencies
1. Select the two desired currencies using the keys as shown above, for example
>ENGP
=USD
2. Press ENTER. The screen shows the prompt:
Please enter Euro rate
EURO
USD
3. To set the rate for two non-Euroland currencies you have to first set the rate for
the two currencies with respect to the Euro. Type in the exchange rate:
1 ENGP=EURO 0.74, and press to save the rate. Proceed the same way to enter
the rate of the second currency. Once the rates are saved, the currency combination
/ direction is displayed again.
To return to Translator mode, press CLR.C/CE.
7.2 Metric Conversion
There are 4 possible conversions:
- Length: inch to centimeter, inch to meter, foot to centimeter, foot to meter, mile to
kilometer, yard to meter.
- Volume: UK gallon to litre and US gallon to liter.
- Mass: pound to kilogram and ounce to gram.
- Temperature: Celsius to Fahrenheit.
To make a conversion in any category:
1. Press MENU.
2. Press ▼ to select Metric Conversion and press to confirm.
ENTER
Copyright © Lexibook 2006 13Copyright © Lexibook 2006 12
Page 8

3. The Metric Conversion menu is displayed:
Length
Volume
Mass
Temperature
4. Select a conversion and press .
4. To change the conversion units, press , and then ▼ and ▲ repeatedly.
Press to confirm.
ENTER
ENTER
ENTER
5. You can reverse the direction of the conversion by pressing ▼ and ▲ .
6. Key in an amount. The conversion will be made automatically.
8. Calculator
The T200 includes a 12-digit calculator with memory and percentage functions.
1. Press the MENU key.
2. Press ▼ once to select Calculator and press to confirm.
3. Choose between simple or paperless mode.
The Simple mode is the usual calculator mode and your calculations are not saved
on the screen.
The Paperless mode saves all your calculations which you can refer to using the up
and down arrow keys.
4. Use the calculator keys (please refer to the Key Guide) to key in numbers and
operators.
ENTER
9.3 Setting the date format
1. Press the user settings key. Select Date format and press .
ENTER
2. The display will prompt you to select the date format between:
MM-DD-YYYY
DD-MM-YYYY
YYYY-MM-DD
Select a date format using the up and down arrow keys and press to confirm.
9.4 Setting the time format
1. Press the user settings key . Select Time format and press .
ENTER
2. The display will prompt you to select the time format between:
24 hour
12 hour
3. Press ▼ to select a time format option and press to confirm.
ENTER
9.5 Setting the User city
1. Press the user settings key . Select User city and press .
2. You can select your home city in the list using the ▼ and ▲ arrows. Press to
ENTER
ENTER
confirm.
3. Or you can press on the empty field on the top of the list -------------- to enter your
ENTER
own city name.
3. Your home city will now appear under ‘home time’ when viewing the time and date (see
9.1)
9. Clock
The T200 includes a clock with date display.
9.1 Viewing the time and date
1. Press MENU, followed by to select Clock.
The Home time is displayed 05:58 AM .
The date is displayed SAT JAN- 01- 2006.
The GMT is displayed (time zone) GMT 0:00
3. Press to turn the daylight saving time on (sun icon is displayed) and off. It
ENTER
can also be activated/deactivated in the user settings menu under “Daylight Saving
time”.
9.2 Setting the time and date
1. The first time you use the T200 you will need to set the time and date.
2. Press the user settings key . Select Date Time setting and press .
3. DD:MM:YYYY is displayed with the first number flashing, you can enter the date
using the number keys.
4. Then to enter the time. HH:MM is displayed with the first number flashing.
5. Press to confirm.
ENTER
ENTER
ENTER
9.6 Setting the GMT (Greenwich Mean Time)
1. Press the user settings key . Select GMT setting and press .
ENTER
2. Enter the time difference in your home city ( EX: +09:00).
3. Press ▼ arrow to change from “+” to “-“.
4. Press to confirm.
ENTER
5. The time difference in your home city will be displayed when viewing the time and date (
see 9.1).
Note: All the cities in the list have pre-selected GMT.
9.7 World Time
1. Press MENU. Select Clock and press to confirm. The home time is displayed.
ENTER
2. Press ▼ repeatedly to display the time in different time zones.
The time in each zone is automatically adjusted to the home time set.
10. Power Supply
The T200 uses 1 CR2032 batteries (included). If the display becomes too dim to read properly, it is an
indication that the batteries are nearing the end of their life, and that they should be replaced as soon
as possible.
Copyright © Lexibook 2006 15Copyright © Lexibook 2006 14
Page 9

To replace the batteries:
1- Undo the screw on the back of the unit's battery door and then remove it.
2- Take out the battery, noting the polarity, and then replace a new one making sure the polarity is
correct.
3. Replace the battery door and its screw.
Replace batteries as per the instructions above; failure to do so may lead to the loss of information
stored in the unit’s memory. Non-rechargeable batteries should not to be recharged. Do not use
rechargeable batteries. Batteries should be inserted with the correct polarity. Exhausted batteries
should be removed from the unit. The supply terminals should not be short-circuited. Do not mix old and
new batteries. Do not mix alkaline, standard (carbon-zinc) or rechargeable (nickel-cadmium) batteries.
Do not bury or burn used batteries. Use alkaline batteries for best performance and longer life. Only use
batteries of the same or equivalent types as recommended.
Caution: If the unit receives an electrostatic shock and stops working, reset the product by removing the
batteries, waiting 30 seconds and then replacing the batteries.
11. Reset
In the unlikely event that your unit should cease to function or stop operating you can reset it by a
simple procedure.
1. Turn the unit over and locate the small RESET hole on the back of the product.
2. Insert a small, thin, blunt instrument, such as a paperclip, into the hole, press gently and
then release.
Your unit should now have reset and the display will show the prompt Enter a word , as the
unit automatically defaults to translator mode. You are now ready to re-use your unit. If the
unit is still not working, the battery may need to be replaced.
12. Maintenance
\
Only use a soft, dry cloth to clean the unit.
Do not use detergent or harmful abrasives/solvents.
Do not expose the unit to direct sunlight or any other heat source.
Avoid exposure to extreme heat or cold temperatures.
Do not immerse the unit in water.
Do not dismantle or drop the unit.
Do not try to bend or twist the unit.
Do not place the unit close to any powerful magnetic source (e.g. loudspeakers), or source of static
electricity.
Note: Warranty does not cover broken LCD displays.
It is the nature of products utilising electronic memory that on rare occasions the information stored in
the memory of the unit may be lost. Lexibook cannot accept any responsibility for the loss of data
caused by misuse, attempts to repair the unit, an error, replacement of batteries, use of batteries after
their use-by-date has expired, or any other circumstance. Similarly we cannot accept any direct or
indirect responsibility for financial losses or complaints of third parties, which could result from the use
of this product. Our warranty covers material or installation-related defects attributable to the manufac
turer; with the exception of wear caused by failure to respect the instructions for use or any unauthorised work on the equipment (such as dismantling, exposure to heat or damp etc).
Note: It is recommended that all packaging be kept for future reference. Keep this instruction manual
in a safe place as it contains important information.
Disclaimer
In our constant concern for improvement, the colours and details of the product may differ slightly from
those shown on the packaging.
Reference: T200
2-year warranty
©2006 LEXIBOOK®
Designed and developed in Europe – Made in China
Customer Service
LEXIBOOK UK ltd
Unit 10 Petersfield Industrial Estate
Bedford Road, Petersfield
Hampshire, GU32 3QA,
United Kingdom
Freephone helpline: 0808 100 3015
http://www.lexibook.com
Environmental Protection
Unwanted electrical appliances can be recycled and should not be discarded along with regular
household waste! Please actively support the conservation of resources and help protect the
environment by returning this appliance to a collection centre (if available)
Instruction Manual Reference: T200IM0026
-
13. Warranty
This product is covered by our 2-year warranty.
To make use of the warranty or after-sales service, please contact your retailer and supply proof of
purchase, or return the unit the address given below complete with proof of purchase.
Copyright © Lexibook 2006 17Copyright © Lexibook 2006 16
Page 10

Appendix 1 - Parts of Speech
Abbreviation French English
Sommaire
ADJ adjectif adjective
ADV adverbe adverb
ONO onomatopée onomatopoeia
ALP lettre alphabétique alphabetic letter
ART article article
CNJ conjonction conjunction
INT interjection interjection
PRO pronom pronoun
N nom noun
V infinitif infinitive
NA nom adjectif adjective noun
PRP préposition preposition
NBR nombre number
PAR participe passé present past or present participle
PLU pluriel plural
ADJ adjectif possessif possessive adjective
ADJ adjectif interrogatif interrogative adjective
PRO pronom personnel personal pronoun
M masculin masculine
F féminin feminine
PN phrase nominale nominal phrase
PV phrase verbale verbal phrase
Appendix 2 - Euro fixed rates
Currency Code Currency Description Country Euro rate
FRF French Franc France 1 Euro = 6.55957 FRF
DEM Mark Germany 1 Euro = 1.95583 DEM
IEP Punt Ireland 1 Euro = 0.787564 IEP
ESP Peseta Spain 1 Euro = 166.386 ESP
ITL Lira Italy 1 Euro = 1936.27 ITL
ATS Shilling Austria 1 Euro = 13.7603 ATS
BEF Belgium Franc Belgium 1 Euro = 40.3399 BEF
FIM Finish Mark Finland 1 Euro = 5.94573 FIM
LUF Luxembourg Franc Luxembourg 1 Euro = 40.3399 LUF
NLG Gilder Holland 1 Euro = 2.20371 NLG
PTE Eschudos Portugal 1 Euro = 200.482 PTE
1. Introduction
2. Guide des touches et symboles écran
2.1. Guide des touches
2.2. Symboles écran
3. Bien démarrer
3.1. Retirer la languette de protection
de la pile
3.2. Mise en marche
3.3. Contraste écran
3.4. Langue d’affichage
3.5. Aide à l’écran
3.6. Les fonctions
3.7. Arrêt automatique
3.8. Démo
4. Traducteur
4.1. Traduction mot à mot
4.1.1 Corriger le mot tapé
4.1.2 Taper des lettres capitales
ou accentuées
4.1.3 Catégorie grammaticale
4.1.4 Choisir entre des
formes multiples
4.2 Autres fonctions du traducteur
4.2.1 Correcteur d’orthographe
4.2.2 Sélectionner un mot
4.2.3 Fonction grammaticale
4.2.4 Fonction synonyme
5. Phrases
5.1 Recherche par thème
6. Jeux
6.1. Jeu du pendu
6.2. Jeu du méli-mélo
6.3. Jeu de la lettre manquante
6.4. Le mot à deviner FR>ENG & le
mot à deviner ENG>FR
6.5. Le jeu de la lettre en trop
6.6. Le jeu des paires
6.7. Le jeu du puzzle
6.8. Le jeu du code secret
6.9. Le jeu du serpent.
7. Convertisseur
7.1 Conversion devises
7.1.2 Conversion entre deux
monnaies de l’Euroland
20
7.1.3 Conversion entre une monnaie
Euroland et une monnaie hors
20
20
Euroland
7.1.4 Conversion entre deux
21
monnaies hors Euroland
22
7.2 Conversion mesures
22
8. Calculatrice
22
9. Horloge
22
9.1 Afficher l’heure et la date
22
9.2 Mise à l’heure et mise à jour de
23
l’horloge
23
9.3 Régler le format de la date
24
9.4 Régler le format de l’heure
24
9.5 Régler la ville de l’utilisateur
24
9.6 Réglage GMT (fuseau horaire)
24
9.7 Horloge Internationale
24
10. Reset
11. Piles
24
12. Précautions d’emploi
25
13. Garantie
Annexe 1 - Catégories grammaticales
25
Annexe 2 - Taux fixes Euro
25
25
25
26
25
26
26
26
27
27
28
28
29
29
29
30
30
30
30
31
31
32
32
33
33
33
33
33
34
34
34
34
35
35
35
36
37
37
Fra nçais
Copyright © Lexibook 2006 18
Copyright © Lexibook 2006 19
Page 11
1. Introduction
Nous sommes heureux de vous compter aujourd’hui parmi les très nombreux utilisateurs des produits
LEXIBOOK.
Voici le nouveau dictionnaire bilingue Français Anglais T200 issu du dictionnaire Le Robert & Collins
Compact Plus. Il vous garantit les meilleures traductions du langage courant, parlé ou écrit.
Il contient plus de 65,000 mots ou expressions par langue en plus de 150 phrases par langue réparties
en 10 thèmes pour vous permettre de traduire les principales situations vécues lors d’un voyage à
l’étranger.
Nous vous invitons à lire attentivement ce mode d’emploi pour profiter au maximum de toutes les
fonctions offertes par le traducteur T200.
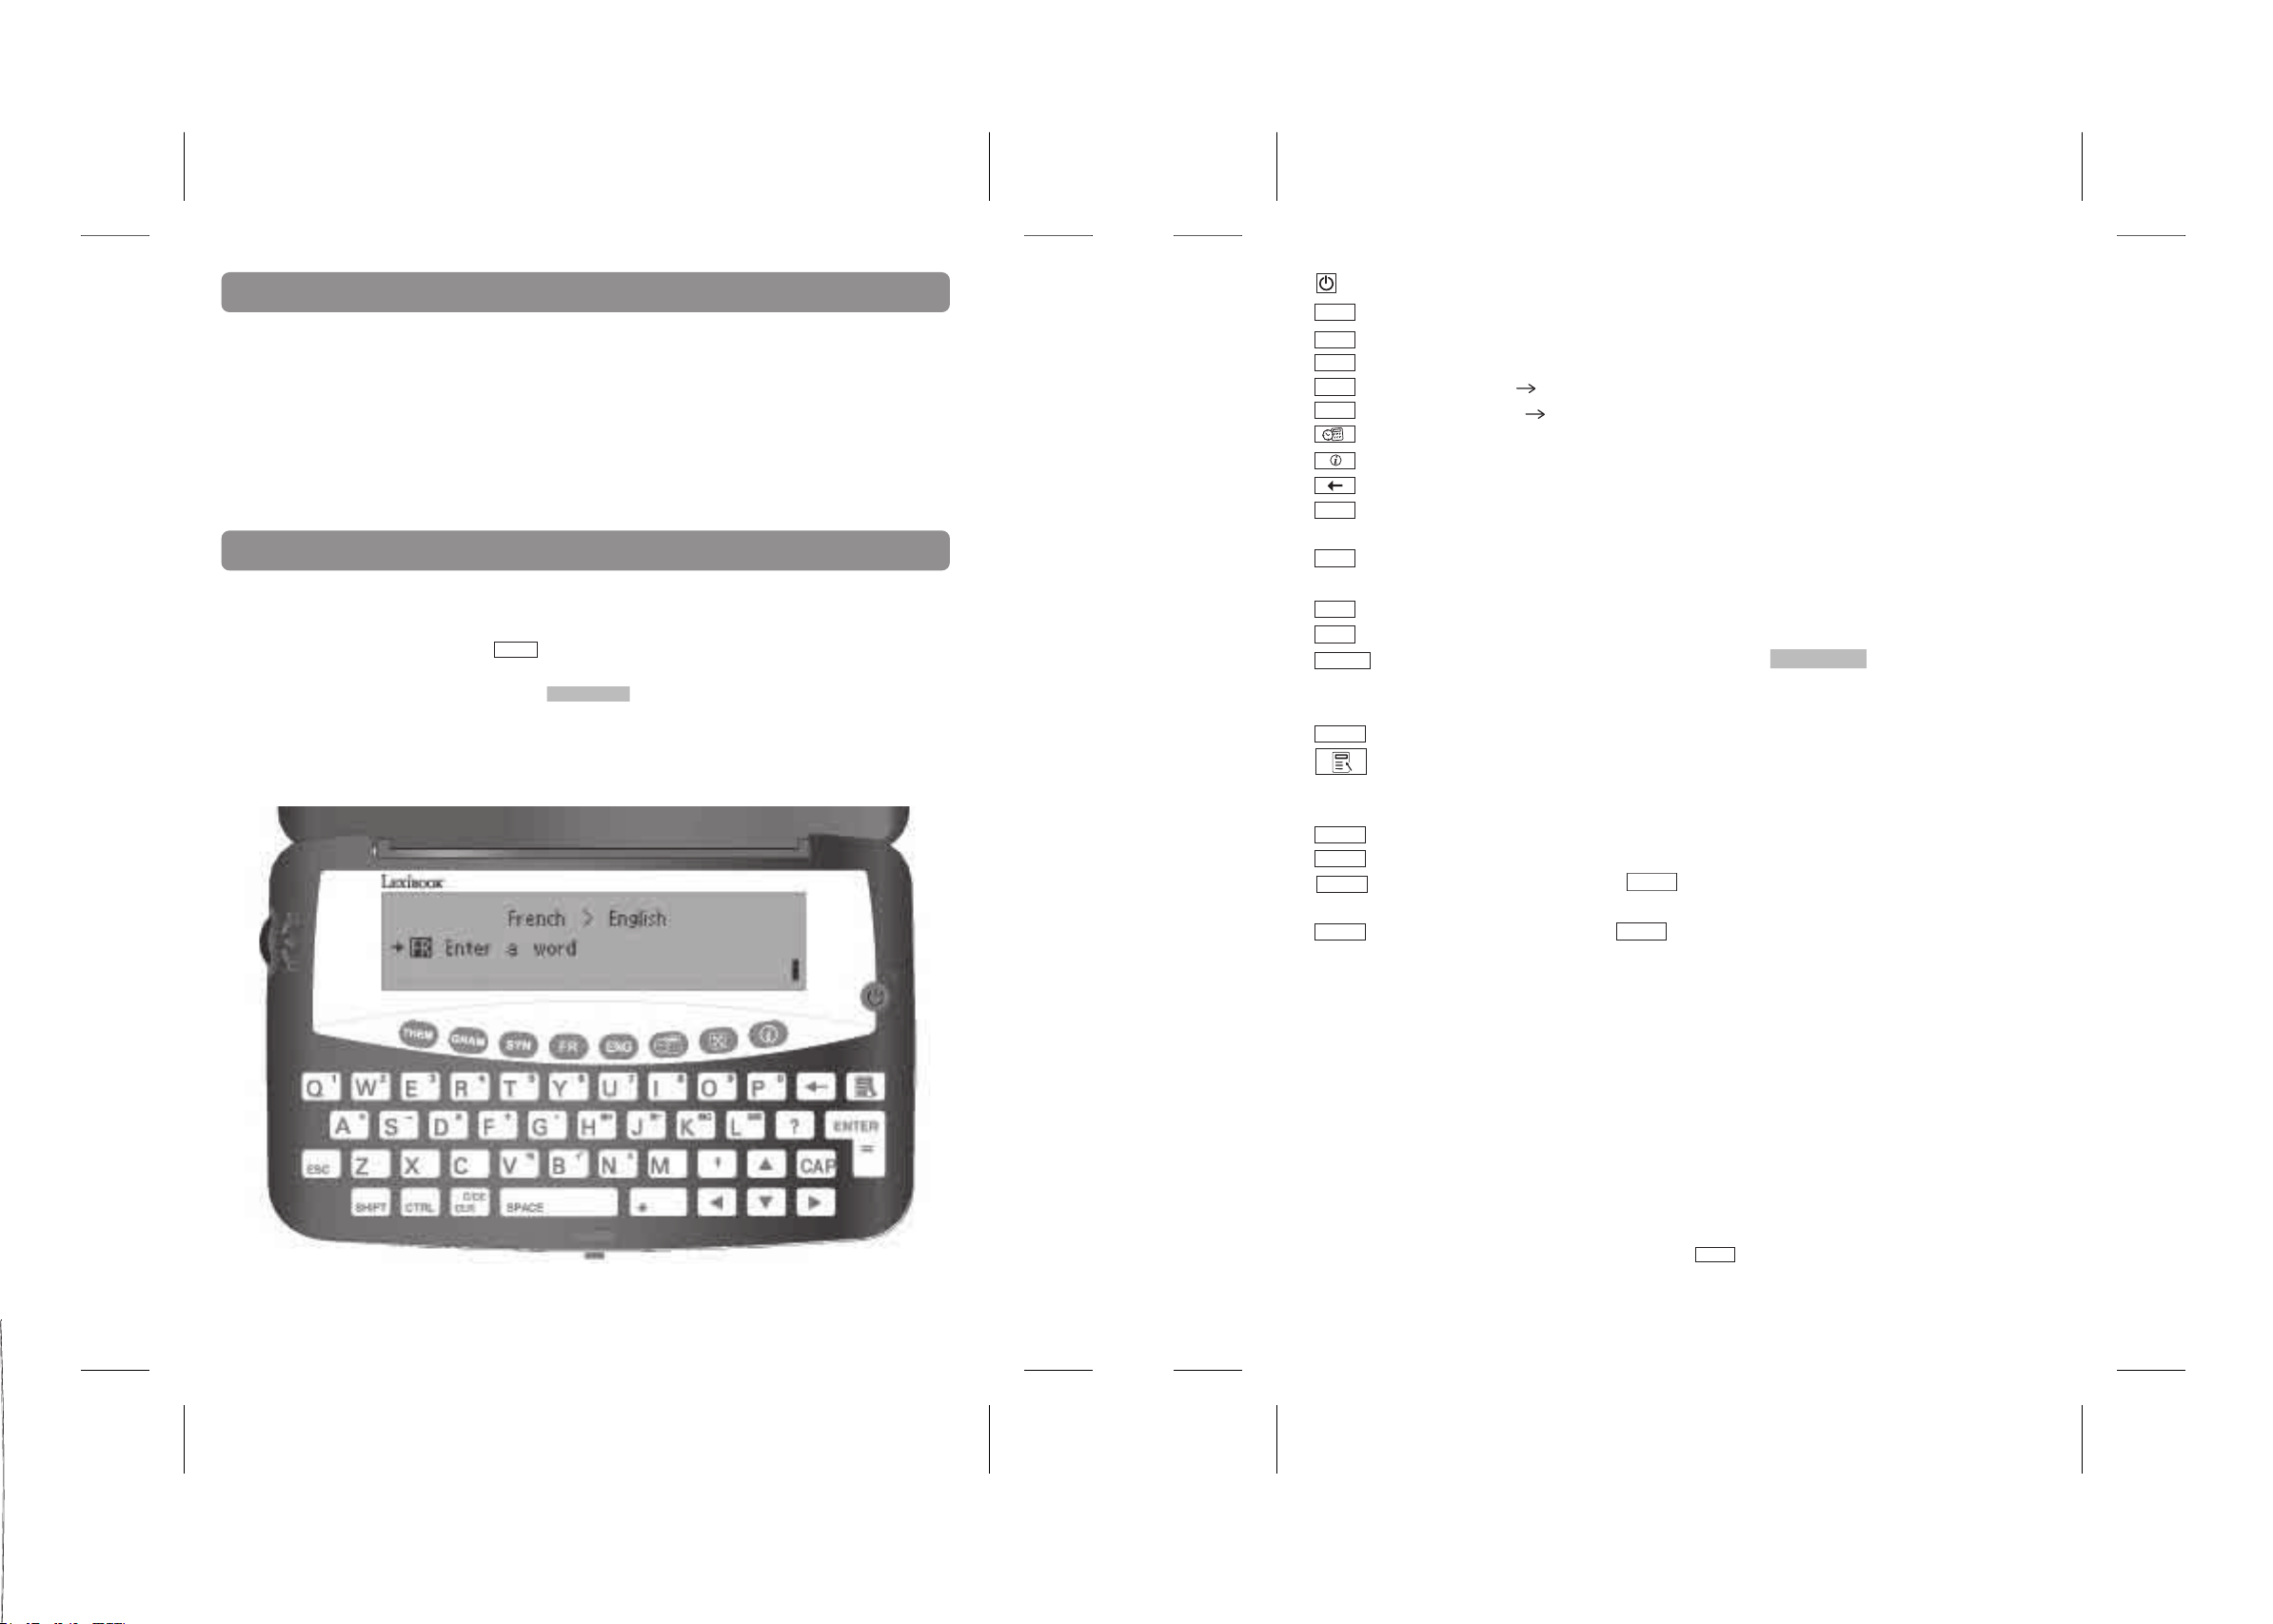
2. Guide des touches et symboles écran
2.1 Guide des touches
N.B :
Les touches sont représentées ainsi :
Les captures écrans sont représentées ainsi :
Ouvrir et refermer le T200 :
Pour allumer l’appareil, appuyez sur le bouton rouge sur le devant du boîtier.
Pour le refermer, rabaissez le couvercle et appuyez jusqu’à entendre le clic de fermeture.
ENTER
Tapez un mot
ON / OFF. Mise en marche et arrêt de l’appareil.
THEM
THEME. Accès au mode thème (phrases).
Accès au mode conjugaison inflexion/ et correction d’orthographe.
GRAM
SYN
Accès au mode synonymes.
ENG
Traducteur Anglais Français.
FR
Traducteur Français Anglais.
Menu principal (horloge, calculatrice, conversions devises et mesures).
INFO/AIDE. Affiche la liste des rubriques d’aide.
ARRIERE. Efface le dernier caractère tapé.
ENTER
ENTRER. Lance la traduction. Confirme le choix de l’option affichée.
Touche = pour afficher le résultat de la calculatrice.
SHIFT
SHIFT. Pour taper les lettres capitales ou accentuées. Pour accéder aux fonctions
secondaires.
ESC
RETOUR. Pour revenir à l’écran précédent.
CTRL
CTRL. Pour donner la réponse aux jeux.
CLR.C/CE
EFFACER. Efface l’écran et revient à l’écran de départ Tapez un mot.
Revient au menu précédent.
Egalement touche C/CE de mise à zéro pour la calculatrice et la conversion monétaire.
SPACE
ESPACE : Tape un espace.
Menu de réglages. (langue, contraste écran, réglage date et heure, format date, format
heure, réglage fuseau horaire, réglage GMT, heure d’été, monnaie locale, arrêt
automatique, démo).
Fait défiler l’écran vers le haut ou affiche le mot précédent ou la phrase précédente de la liste.
▲
▼
Fait défiler l’écran vers le bas ou affiche le mot suivant ou la phrase suivante de la liste.
Déplace le curseur vers la gauche. SHIFT et
▲
gauche et revient directement au début du mot ou de la phrase.
▲
Déplace le curseur vers la droite. SHIFT et ▼ fait défiler les longs affichages vers la droite et
▼ fait défiler les longs affichages vers la
va directement à la fin du mot ou de la phrase.
Lettres Q à P Tapent les chiffres utilisés avec la calculatrice et la conversion monétaire.
Lettre G Tape un point en mode calculatrice.
Lettres ASDF Addition, soustraction, multiplication et division en mode calculatrice.
Lettres HJKL M+, M-, MC et MR en mode calculatrice.
Lettres VBN Pourcentages, racine carrée et signe +/- en mode calculatrice.
2.2 Symboles écran
• Il y a 4 symboles de flèches à la droite de l’écran. Ces symboles indiquent quelle flèche peut être
utilisée pour faire défiler l’écran.
• Il y a un symbole de flèche à la gauche de l’écran qui apparaît dans certains menus ( jeux par
exemple), on peut faire bouger la flèche le long du menu grâce aux flèches de direction, la flèche
montre le sous-menu prêt a sélectionner (appuyer sur pour confirmer).
Copyright © Lexibook 2006 21Copyright © Lexibook 2006 20
ENTER
Page 12

3. Bien démarrer
3.1 Retirer la languette de protection de la pile
Avant toute manipulation, veillez à retirer la languette plastique qui protège les piles. Pour cela,
dévissez la vis du compartiment pile au dos de l’appareil et retirez la trappe.
Soulevez la pile pour dégager la languette plastique puis repositionner la pile. Refermez la trappe du
compartiment pile et revissez.
Si après cette manipulation le traducteur ne se met pas en route, procédez à un reset de
l’appareil.
1. Localisez le trou du RESET au dos de l’appareil.
2. Insérez une pointe fine et appuyez doucement.
L’écran du Traducteur doit maintenant afficher Select your language. (affichage en Anglais par défaut
pour passer à l’affichage en Français voir paragraphe 3.4).
3.5 Aide à l’écran
Table of contents
A tout moment vous pouvez obtenir de l’aide en appuyant sur la touche INFO . Le Traducteur
affichera alors la liste des rubriques d’aide disponibles:
• Langue par défaut
• Touches utiles
• Traducteur FR>ENG
• Traducteur ENG>FR
¡
• Correcteur d’orthographe
• Grammaire
• Synonymes
• Horloge
• Calculatrice
• Monnaies
• Mesures
• Pendu
• Méli-mélo
• Lettre manquante
• Le mot à deviner FR > ENG
• Le mot à deviner ENG > FR
• La lettre en trop
• Paires
• Puzzle
• Code secret
• Serpent
• DEMO
3.2 Mise en marche
Retirer la pellicule statique protectrice de l’écran LCD.
Appuyez sur pour mettre l’appareil en marche.
Appuyez à nouveau sur pour l’arrêter.
L’écran LEXIBOOK s’affiche brièvement, puis l’écran indiquant le sens de traduction et les langues
utilisées Anglais > Français s’afficheront également ainsi que l’affichage Tapez un mot.
N.B. La langue d’affichage par défaut est l’Anglais. Dans ce cas les messages d’accueil seront les
suivants : LEXIBOOK, English > French et enfin Enter a Word. Reportez-vous au paragraphe 3.4
ci-dessous pour la modifier.
3.3 Contraste écran
Le contraste de l’écran peut être ajusté en pressant la touche et en sélectionnant
>Contraste écran .
• Appuyez sur
pour éclaircir l’écran ou sur ▲ pour foncer l’écran.
▲
• Chaque fois que vous appuyez sur la touche ▲, le repère se déplace vers la droite sur
l’échelle et l’affichage de l’écran est de plus en plus foncé. Chaque fois que vous appuyez
sur la touche
le repère se déplace vers la gauche sur l’échelle et l’affichage de
▲
l’écran est de plus en plus clair.
3.4 Modifier la langue d’affichage
La langue d’affichage est la langue dans laquelle les messages sont affichés à l’écran.
1. Appuyez sur MENU pour afficher l’option Langue affichage.
2. Appuyez sur pour confirmer. La langue utilisée est d’abord affichée.
ENTER
Exemple : English.
3. Appuyez sur
4. Appuyez sur pour confirmer.
▼ ou ▲ pour afficher Français.
ENTER
1. Appuyez sur ▼ ou sur
▲ pour passer d’une rubrique à l’autre jusqu’à trouver celle que vous
cherchez.
2. Appuyez sur pour confirmer. Appuyez sur ▼ et ▲ pour faire défiler le message
ENTER
d’aide à l’écran.
3. Pour revenir à la liste des rubriques, appuyez sur ESC.
4. Pour revenir à l’utilisation du traducteur, appuyez sur CLR.C/CE .
3.6 Fonctions
Le Traducteur T200 a plusieurs fonctions. Pour les atteindre :
• Appuyez sur les touches FR ou ENG pour la traduction des mots du
Français à l’Anglais ou de l’Anglais au Français.
• Appuyez sur la touche GRAM pour accéder au mode conjugaison, inflexion et
correction d’orthographe.
• Appuyez sur la touche SYN pour accéder au mode synonymes.
• Appuyez sur la touche THEM pour la traduction des phrases.
• Appuyez sur la touche JEUX pour les jeux.
• Appuyez sur la touche INFO pour l’aide.
• Appuyez sur la touche de réglages pour accéder au menu des autres fonctions :
- Langue
- Contraste écran
- Réglage date et heure
- Format date
- Format heure
- Réglage fuseau horaire
- Réglage du fuseau horaire (GMT)
- Heure d’été
- Monnaie locale
- Arrêt auto.
- Démo
Copyright © Lexibook 2006 23Copyright © Lexibook 2006 22
Page 13

3.7 Arrêt automatique
Le traducteur s’arrêtera automatiquement après 3 minutes de non utilisation pour économiser la durée
de vie des piles. Pour le remettre en marche, appuyez sur . Vous pouvez changer l’arrêt automa
-
tique à 1, 2 ou 3 minutes grâce a la touche réglages .
3.8 Démo
• Appuyez sur la touche réglages et utilisez les flèches pour faire apparaître l’option
Démo. Appuyez sur pour confirmer.
ENTER
• La démo défile à l’écran.
• Utilisez les flèches ▼ et ▲ pour faire défiler plus vite ou pour revenir en arrière.
• A la fin de la démo, le système retournera automatiquement au menu des réglages.
4.1.3 Catégorie grammaticale
Table of contents
Les catégories grammaticales des mots sont indiquées à droite de l’écran par une
abréviation en majuscules (voir annexe 1).
4.1.4 Choisir entre des formes multiples
Certains mots dans ce dictionnaire peuvent avoir plus d’une forme (par exemple :
résume et résumé).
Quand vous cherchez un mot qui a plusieurs formes, le dictionnaire affichera les
différentes possibilités. Utilisez les flèches pour choisir le mot voulu et appuyer sur
pour confirmer. Pour choisir un autre mot dans la liste, taper ESC pour
ENTER
retourner a la liste.
4. Traducteur
4.1 Traduction mot à mot
1. Appuyez sur l’une des touches traducteur FR ou ENG.
2. L’écran affiche la paire de langues utilisée et le sens de la traduction:
FRANÇAIS > ANGLAIS ou ANGLAIS> FRANÇAIS.
3. Tapez le mot à traduire et appuyez sur pour voir sa traduction.
4. Pour revenir à l’écran précédent appuyez sur la touche ESC et pour revenir au
mot tapé appuyez sur la touche CLR.C/CE.
5. Si le mot tapé n’est pas dans la liste du Traducteur, le mot avoisinant vous sera
proposé automatiquement. Utilisez alors les touches
mots par ordre alphabétique et retrouver le mot voulu ou un dérivé du mot.
IMPORTANT
Il se peut que le même mot ait plusieurs traductions. Pour éviter les contresens nous vous
conseillons vivement de vérifier s’il y a d’autres traductions pour le même mot.
4.1.1 Corriger le mot tapé
1. Appuyez sur ESC pour retourner au mot entré.
2. En cours de frappe, appuyez sur pour effacer le dernier caractère tapé ou
utilisez les flèches ▼ ou ▲ pour vous placer à l’endroit où vous souhaitez insérer
une lettre.
4.1.2 Taper des lettres capitales ou accentuées
Appuyez et maintenez enfoncée la touche SHIFT puis appuyez sur la lettre voulue une
fois pour obtenir sa majuscule ou plusieurs fois pour afficher successivement ses différentes
formes accentuées.
Ex : Appuyez simultanément sur SHIFT et une première fois sur A pour taper un A
majuscule, puis une deuxième fois sur A pour taper un à et une troisième fois pour taper un
â.
ENTER
▼ et ▲ pour faire défiler les
4.2 Autres fonctions du traducteur
4.2.1 Correcteur d’orthographe
- Quand vous cherchez un mot et qu’il vous manque une lettre, vous pouvez
remplacer la lettre manquante par « ? », appuyez sur pour valider et le
ENTER
traducteur vous proposera une liste de mots correspondants. (Ex : Maga?ine
- Quand vous cherchez un mot et qu’il vous manque une partie du mot, vous pouvez
la remplacer par «* », puis appuyez sur pour valider et le traducteur vous
ENTER
proposera une liste de mots correspondants. (Ex : Maga*)
- Il est possible de positionner «* » et « ? » n’importe où dans le mot.
4.2.2 Sélectionner un mot
- Pour avoir la traduction de n’importe quel mot affiché à l’écran, appuyez sur
ENTER
et utilisez les flèches de direction pour ‘’surligner’’ le mot désiré.
- Ensuite pressez à nouveau pour avoir la traduction du mot.
ENTER
- Pour ‘’désélectionner’’ un mot et retourner à l’écran précédent, appuyez sur ESC .
4.2.3 Fonction grammaticale
1. Appuyez sur l’une des touches traducteur FR ou ENG.
2. L’écran affiche la paire de langues utilisée et le sens de la traduction:
FRANÇAIS > ANGLAIS ou ANGLAIS> FRANÇAIS.
3. Tapez un mot et appuyez sur SYN pour voir les synonymes correspondants.
Utilisez les flèches de direction pour parcourir les propositions, et tapez pour
ENTER
confirmer votre choix et voir la définition du mot sélectionné.
4. Pour revenir à l’écran précédent appuyez sur la touche ESC et pour revenir au
mot tapé appuyez sur la touche CLR.C/CE .
5. Si le mot tapé n’est pas dans la liste du Traducteur, il vous sera proposé
automatiquement le mot le plus approchant. Utilisez alors les touches ▼ et ▲ pour
faire défiler les mots par ordre alphabétique et retrouver le mot voulu ou un dérivé
du mot. Le traducteur électronique T200 compte 9000 verbes.
Copyright © Lexibook 2006 25Copyright © Lexibook 2006 24
Page 14

4.2.4 Fonction synonyme
1. Appuyez sur l’une des touches traducteur FR ou ENG.
2. L’écran affiche la paire de langues utilisée et le sens de la traduction :
FRANÇAIS > ANGLAIS ou ANGLAIS> FRANÇAIS.
3. Tapez un mot et appuyez sur SYN pour voir les synonymes correspondants.
Utilisez les flèches de direction pour parcourir les propositions, et tapez pour
ENTER
confirmer votre choix et voir la définition du mot sélectionné.
4. Pour revenir à l’écran précédent appuyez sur la touche ESC et pour revenir au
mot tapé appuyez sur la touche CLR.C/CE.
5. Si le mot tapé n’est pas dans la liste du Traducteur, il vous sera proposé
automatiquement le mot le plus approchant. Utilisez alors les flèches pour faire
défiler les mots par ordre alphabétique et retrouver le mot voulu ou un dérivé du
mot. Le traducteur électronique T200 compte 250 000 synonymes.
5. Phrases
Le traducteur T200 Lexibook dispose d’une liste de phrases pour dialoguer et communiquer plus
facilement. Elles sont réparties en plusieurs catégories :
AFFAIRES RESTAURANT HOTELS EN VILLE VOYAGER URGENCES LOISIRS BANQUE/POSTE/TELEPHONE
AEROPORT GENERALITES
5.1 Recherche par thème
1. Appuyez sur la touche THEM pour accéder au mode traduction des phrases.
2. L’écran affiche la première catégorie du mode PHRASES : AFFAIRES ▼ .
3. Appuyez sur
4. Quand la catégorie voulue est affichée appuyez sur pour accéder à la liste
▼ pour afficher la catégorie suivante.
ENTER
des phrases.
5. Appuyez sur ▼ ou sur ▲ pour afficher les autres phrases de la liste.
6. Quand la phrase voulue est affichée appuyez sur pour voir sa
ENTER
traduction dans l’autre langue.
7. Pour revenir à la liste des catégories, appuyez sur ESC.
Appuyez sur une des touches TRADUCTEUR FR ou ENG pour revenir au mode de traduction
des mots ou sur une autre touche de fonction pour accéder à l’un des autres modes du
traducteur.
6. JEUX
Le T200 propose 10 jeux de lettres éducatifs à pratiquer dans chacune des langues, le pendu, le
méli-mélo, la lettre manquante, le mot à deviner FR>ENG, le mot à deviner ENG>FR, la lettre en trop,
le jeu des paires, le jeu du puzzle, le jeu du code secret, et le jeu du serpent.
Pour tous les jeux :
- Pour commencer une partie, appuyez sur la touche pour accéder au menu des jeux, sélectionnez le
jeu désiré et appuyez sur pour confirmer.
- A la fin d’une partie, appuyez sur ‘’O’’ pour commencer une nouvelle partie du même jeu ou appuyez
sur ‘’N’’, ou ESC ou pour retourner au menu des jeux.
- Une fois terminé avec le mode jeux. Appuyez sur CLR.C/CE pour revenir au mode de traduction des
mots ou sur une autre touche de fonction pour accéder à l’un des autres modes du traducteur.
ENTER
6.1 Pendu
1. L’écran affiche la langue source utilisée ANGLAIS ?
2. Appuyez sur pour confirmer ce choix ou sur la touche ▼ puis pour
ENTER
ENTER
jouer en Français.
3. L’écran affiche LONGUEUR DU MOT? Puis <03> lettres ? ▼ .
4. Appuyez sur les touches ▼ ou ▲ pour augmenter ou réduire la longueur du mot
(min.3 et max. 13 lettres).
5. Appuyez sur pour confirmer votre choix et lancer le jeu.
ENTER
6. L’écran affiche une série de points d’interrogation représentant les lettres du mot
à deviner ???????? 9.
Le chiffre 9 indique le nombre de chances pour jouer.
7. Proposez des lettres en appuyant sur leur touche respective. Si la lettre est
correcte elle sera insérée à sa place dans le mot. Si la lettre n’est pas dans le mot,
l’écran affichera Pas de X et le nombre de chances restant à jouer diminuera
d’autant. Si vous tapez une lettre déjà donnée, l’écran affichera X déjà utilisée sans
diminuer le nombre de chances.
8. Vous pouvez obtenir de l’aide pour votre jeu en appuyant sur pour révéler
ENTER
une lettre. Dans ce cas le nombre de chances restantes sera diminué.
9. Si vous devinez le mot avant d’épuiser toutes vos chances vous avez gagné.
Sinon vous avez perdu et le Traducteur affichera le mot correct que vous n’avez pas
trouvé.
10. Appuyez sur la touche CTRL pour abandonner le jeu en cours et obtenir la
bonne réponse.
11. Appuyez sur pour voir la définition du mot. Appuyez sur ESC pour revenir
ENTER
au jeu.
6.2 Jeu du méli-mélo
1. L’écran affiche la langue source utilisée ANGLAIS ? Appuyez sur pour
confirmer ce choix ou sur la touche ▼ puis pour jouer en Français.
ENTER
2. L’écran affiche LONGUEUR DU MOT? Puis <03> lettres ?
ENTER
. Appuyez sur les
▼
touches ▼ ou ▲ pour augmenter ou réduire la longueur du mot (min.3 et max. 13
lettres).
3. Appuyez sur pour confirmer votre choix et lancer le jeu.
ENTER
4. L’écran affiche les lettres du mot à deviner dans le désordre BEDLUMJ 9. Le
chiffre 9 indique le nombre de chances pour jouer.
5. Tapez le mot que vous pensez correspondre aux lettres et appuyez sur
ENTER
pour savoir si c’est correct. Pendant que vous tapez le mot, vous pouvez revoir les
lettres en désordre en appuyant sur la touche ▲ . Appuyez sur ▼ pour reprendre la
frappe.
6. Si le mot proposé n’est pas le bon, vous perdrez une chance et vous êtes invité
à essayer à nouveau.
7. Une fois que le mot a été découvert, vous pouvez appuyer sur la touche
ENTER
pour afficher la traduction du mot à deviner dans la langue cible.
8. A tout moment du jeu, vous pouvez modifier le ‘désordre’ des lettres en pressant
la touche .
SPACE
Copyright © Lexibook 2006 27Copyright © Lexibook 2006 26
Page 15

9. Si vous devinez le mot avant d’épuiser toutes vos chances vous avez gagné.
Sinon vous avez perdu et le traducteur affichera le mot correct que vous n’avez pas
trouvé.
10. Appuyez sur la touche CTRL pour abandonner le jeu en cours et obtenir la
bonne réponse.
11. Appuyez sur pour avoir la traduction du mot. Appuyez sur ESC pour
ENTER
revenir au jeu.
6.3 Jeu de la lettre manquante
1. L’écran affiche la langue source utilisée ANGLAIS ? Appuyez sur pour
confirmer ce choix ou sur la touche ▼ puis pour jouer en Français.
ENTER
ENTER
2. L’écran affiche LONGUEUR DU MOT? Puis <03> lettres ? ▼ . Appuyez sur les
touches ▼ ou ▲ pour augmenter ou réduire la longueur du mot (minimum 3 et
maximum 13 lettres).
3. Appuyez sur pour confirmer votre choix et lancer le jeu.
ENTER
4. Un mot avec une lettre manquante s'affiche.
5. Vous avez 3 chances pour trouver la lettre manquante, il suffit pour cela de taper
une lettre, l’affichage vous dira si la lettre est correcte, si elle ne l’est pas, une de
vos chances sera déduite.
6. Si vous devinez le mot avant d’épuiser toutes vos chances vous avez gagné.
Sinon vous avez perdu et le traducteur affichera le mot correct que vous n’avez pas
trouvé.
7. Appuyez sur la touche CTRL pour abandonner le jeu en cours et obtenir la bonne
réponse.
8. Appuyez sur pour avoir la traduction du mot. Appuyez sur ESC pour revenir
ENTER
au jeu.
6.4 Mot à deviner FR>ENG & mot à deviner ENG>FR
1. L’écran affiche LONGUEUR DU MOT? puis <03> lettres ?
. Appuyez sur les
▼
touches ▼ ou ▲ pour augmenter ou réduire la longueur du mot (min.3 et
max. 13 lettres).
2. Appuyez sur pour confirmer votre choix et lancer le jeu.
ENTER
3. Un mot en Français (FR>ENG) ou en Anglais (ENG>FR) est affiché et vous avez
3 chances pour trouver sa bonne traduction dans l’autre langue.
4. I l suffit pour cela de taper un mot et de presser pour valider.
ENTER
5. Si la réponse est correcte vous avez gagné, sinon une de vos chances sera
déduite et vous pourrez proposer une autre réponse.
6. Si vous devinez le mot avant d’épuiser toutes vos chances vous avez gagné.
Sinon vous avez perdu et le Traducteur affichera le mot correct que vous n’avez pas
trouvé.
7. Appuyez sur la touche CTRL pour abandonner le jeu en cours et obtenir la
réponse correcte.
8. Appuyez sur pour avoir la traduction du mot. Appuyez sur ESC pour revenir
ENTER
au jeu.
6.5 La Lettre en trop
1. L’écran affiche la langue source utilisée ANGLAIS ? . Appuyez sur pour
confirmer ce choix ou sur la touche ▼ puis pour jouer en Français.
ENTER
ENTER
2. L’écran affiche LONGUEUR DU MOT? Puis <03> lettres ? ▼. Appuyez sur les
touches ▼ ou ▲ pour augmenter ou réduire la longueur du mot (min.3 et max. 13
lettres).
3. Appuyez sur pour confirmer votre choix et lancer le jeu.
ENTER
4. Un mot avec une lettre en trop s'affiche.
5. Vous avez 3 chances pour trouver la lettre en trop, il suffit pour cela de sélectionner
la lettre que vous pensez « en trop »avec ▼ ou ▲ et de presser pour
ENTER
valider.
6. Si la réponse est correcte vous avez gagné, sinon une de vos chances sera
déduite et vous pourrez proposer une autre réponse.
7. Si vous devinez le mot avant d’épuiser toutes vos chances vous avez gagné.
Sinon vous avez perdu et le Traducteur affichera le mot correct que vous n’avez pas
trouvé.
8. Appuyez sur la touche CTRL pour abandonner le jeu en cours et obtenir la bonne
réponse.
9. Appuyez sur pour avoir la traduction du mot. Appuyez sur ESC pour revenir
ENTER
au jeu.
6.6 Le jeu des paires
1. Sélectionnez un niveau de difficulté:
Facile: grille 4x3 = 12
Moyen: grille 8x3 = 24
Difficile: grille 10x4 = 40
2. Des cartes sont exposées à découvert pendant un court instant puis retournées.
Vous devez alors retrouver toutes les paires. Utilisez les flèches et pour
ENTER
découvrir les cartes deux par deux. Plus vous retrouvez rapidement les paires, plus
vous marquez de points!
3. Vous avez gagné quand toutes les cartes sont retournées.
4. Pour abandonner et voir le jeu découvert, appuyez sur CTRL
6.7 Le jeu du puzzle
1. Sélectionnez un niveau de difficulté:
Facile: grille 3x3 = 9
Moyen: grille 4x3 = 12
Difficile: grille 5x3 = 15
2. Le but du jeu est de remettre en ordre les pièces du puzzle sur la grille.
3. Utilisez les flèches pour déplacer les pièces.
4. Quand toutes les pièces sont dans l’ordre, vous avez gagné.
Copyright © Lexibook 2006 29Copyright © Lexibook 2006 28
Page 16

6.8 Le jeu du code secret
1. Retrouvez le code à 4 chiffres en essayant diverses combinaisons.
2. Pour faire un essai tapez 4 chiffres et appuyez sur pour valider.
ENTER
3. Une fois validé, le curseur passera à la ligne suivante et des cercles apparaîtront
sur la ligne précédemment entrée (si un ou plusieurs des chiffres entrés est correct).
5. Un cercle plein indique que le chiffre est bon et bien positionné; un cercle vide
indique que le chiffre est bon mais mal placé. (La position des cercles ne
correspond pas forcement à la position des chiffres dans le code secret)
6. Vous avez 12 essais pour retrouver le code !
7. Vous avez gagné quand vous avez découvert tous les chiffres du code secret
dans le bon ordre (4 cercles pleins)
8. Pour quitter le jeu et voir la réponse, appuyez sur CTRL
6.9 Le jeu du serpent.
1. Sélectionnez un niveau de difficulté:
Facile: Peu rapide, pas d’obstacles.
Moyen: Moyennement rapide, un obstacle.
Difficile : Rapide, deux obstacles.
2. Guidez le serpent sur l'écran à l'aide des flèches de direction pour collecter le
plus de drapeaux possible. Le plus de drapeaux vous collectez, plus le serpent est
long et plus il est rapide.
3. La partie est perdue si le serpent touche un obstacle ou les extrémités de
l'enclos. Pour quitter le jeu, appuyez sur CTRL.
7. Conversion Euro
7.1 Conversion devises
La fonction conversion Euro du Traducteur T200 de Lexibook est conforme aux règles de conversion
européennes.
Pour consulter les taux fixes Euro, appuyez sur la touche réglages , choisissez ‘’Monnaie Locale’’ et
appuyez sur , ensuite vous pouvez consulter les 12 taux fixes Euro et vous avez la possibilité
d’en sélectionner un en appuyant sur .
7.1.1 Sélectionner les monnaies pour la conversion
1. Appuyez sur la touche MENU pour afficher liste des autres fonctions du
traducteur. L’écran affiche la première option Horloge
2. Appuyez sur la touche ▼ pour afficher l’option Conversion devise et appuyez sur
pour confirmer.
3. La conversion par défaut est affichée
>Euro
=FFR
ENTER
ENTER
ENTER
4. Pour modifier la monnaie du haut (Euro), appuyez sur puis sur ▼ et sur ▲
ENTER
plusieurs fois pour choisir la monnaie voulue.
Pour modifier la monnaie du bas (FFR), appuyez sur ▼ une fois puis appuyez
sur ▼ et sur ▲ jusqu'à afficher la monnaie désirée. Appuyez sur
ENTER
pour confirmer.
5. Pour modifier le sens de la conversion, appuyez sur les touches ▲ et ▼ .
7.1.2 Conversion entre deux monnaies de la zone de l'Euro.
1. Sélectionnez deux monnaies de la zone Euro pour la conversion en utilisant les
flèches comme vu précédemment.
Ex :
=FRF
>ITL
2. Pour voir le taux de conversion utilisé, appuyez sur ▲ : 1 Euro=FFR 6.55957
Tous les taux fixes de l’Euro pour les 11 monnaies de la zone Euro sont déjà
enregistrés dans le Traducteur T200. Ils ne peuvent pas être modifiés.
(Voir en annexe 2 la liste des monnaies de la zone Euro et leur taux fixe).
3. Appuyez sur ▼ pour revenir à la conversion et tapez le montant à convertir en
utilisant les touches sur lesquelles sont inscrits les chiffres et le point décimal
(touche G). Ex : FFR234.
4 Le résultat s’affiche directement : ITL 69072.56
5. Vous pouvez passer d’un montant à l’autre en utilisant les flèches ▲ et ▼ .
5. Pour recommencer appuyez sur CLR.C/CE pour effacer l’écran et tapez un
nouveau montant.
7.1.3 Conversion entre une monnaie de la zone Euro et une monnaie hors Euro.
1. Sélectionnez la combinaison souhaitée en utilisant les flèches (comme vu
précédemment), par exemple :
>FRF
=USD.
2. Appuyez sur , l’écran affiche :
ENTER
Entrez un taux Euro
EURO
USD
3. Tapez le taux en Dollar pour 1 Euro en utilisant les touches sur lesquelles sont
inscrits les chiffres et le point décimal (touche G). Ex : 1 Euro>USD 1.07.
4. Appuyez sur pour enregistrer le taux. L’écran revient à la combinaison de
ENTER
départ
>FRF
=USD.
5. Procédez comme indiqué dans le paragraphe précédent pour effectuer une
conversion.
Copyright © Lexibook 2006 31Copyright © Lexibook 2006 30
Page 17

7.1.4 Conversion entre deux monnaies hors zone de l'Euro
1. Sélectionnez la combinaison souhaitée en utilisant les flèches (comme vu
précédemment), par exemple :
>USD
= GBP
2. Appuyez sur , l’écran affiche :
ENTER
Entrez un taux Euro
EURO
USD
3. Pour régler le taux entre deux monnaies hors de la zone Euro, il faut déjà régler
les deux monnaies séparément par rapport à l’Euro. Tapez le taux voulu :
1 GBP=EURO 0.74
et appuyez sur pour enregistrer le taux, puis entrez le taux
ENTER
1 EURO=USD 1.1. Le taux est sauvegardé et la conversion et sa direction sont
affichées de nouveau.
5. Procédez comme indiqué dans le paragraphe précédent pour effectuer une
conversion.
Appuyez sur une autre touche de fonction pour accéder à l’un des autres modes du
Traducteur, ou sur CLR.C/CE pour retourner au mode de départ.
7.2 Conversions métriques
Il y a 4 sous-menus de conversions métriques avec les conversions possibles suivantes:
- Longueur
- Volume
- Masse
- Température
8. Calculatrice
La calculatrice du Traducteur T200 Lexibook est une calculatrice 12-chiffres avec mémoires.
1. Appuyez sur la touche MENU.
2. Appuyez deux fois sur la touche ▼ pour afficher l’option Calculatrice.
3. Appuyez sur pour accéder au mode calculatrice.
ENTER
4. La calculatrice vous propose de choisir entre :
Version simple
Version détaillée
La version détaillée permettra de mémoriser les informations entrées de haut en bas
de la page, avec la possibilité de se déplacer dans la page avec les flêches.
5. Utilisez les touches sur lesquelles sont inscrits les chiffres et les symboles de
calcul pour effectuer vos opérations.
9. Horloge
L’horloge du Traducteur Lexibook vous donne l’heure et la date.
9.1 Afficher l’heure et la date
1. Appuyez sur la touche
2. Appuyez sur pour confirmer.
ENTER
L’heure locale est affichée : 05:58 AM.
La date est affichée : SAM 01 JAN 2006.
Le fuseau horaire est affiché : GMT0 :00
3. Appuyez sur pour ajouter ou enlever l’heure d’été (une icône soleil
ENTER
apparaîtra ou disparaîtra)
(Il est également possible de changer l’heure d’été dans le menu des réglages et
dans le sous-menu ‘Heure d’été’).
MENU .
Pour faire une conversion dans n’importe quelle catégorie :
1. Appuyez sur MENU, l’option Horloge est affichée.
2. Appuyez sur ▼ pour trouver l’option Conversions Métriques.
Appuyez sur pour confirmer.
ENTER
3. Le menu des conversions métriques est affiché :
Longueur
Volume
Masse
Température
4. Sélectionnez la catégorie voulue et appuyez sur .
5. Pour changer les unités métriques pour faire la conversion, appuyez sur
puis appuyez sur ▲ et
▼ plusieurs fois. Les deux lignes vont changer pour
ENTER
ENTER
proposer les différentes possibilités.
Appuyez sur pour confirmer.
ENTER
6. Il est possible de changer la direction de la conversion en utilisant les touches
▲ et ▼ .
7. Ensuite vous pouvez entrer un nombre à convertir d’une unité à l’autre et le
résultat sera donné automatiquement.
9.2 Mise à l’heure et mise à jour de l’horloge
1. À la première utilisation du T200, il faudra régler l’heure et la date.
2. Appuyez sur la touche et sélectionnez Réglage date et heure .
Appuyez sur .
ENTER
3. 01-01-2005 est affiché et le premier chiffre clignote, il est donc possible d’entrer
la date en utilisant les touches des chiffres.
4. Appuyez sur ▼ pour entrer l’heure. 03 :14 l’heure à changer est affichée avec les
premiers chiffres qui clignotent.
5. Appuyez sur pour confirmer.
ENTER
9.3 Régler le format de la date
1. Appuyez sur la touche et sélectionnez Format Date .
Appuyez sur .
ENTER
Copyright © Lexibook 2006 33Copyright © Lexibook 2006 32
Page 18

2. L’écran vous proposera une liste de choix :
MM-JJ-AAAA
JJ-MM-AAAA
AAAA-MM-JJ
Choisissez un format de date à l’aide des flèches de direction et appuyez sur
ENTER
pour confirmer.
9.4 Régler le format de l’heure
1. Appuyez sur la touche et sélectionnez Format Heure .
Appuyez sur .
ENTER
2. L’écran affiche l’option du format 12-heures pour l’heure Format 12H ?
3. Appuyez sur pour confirmer ce choix ou sur ▼ pour afficher l’option du
format 24-heures Format 24H ? .Appuyez sur pour confirmer votre choix.
ENTER
ENTER
3. Appuyez sur ▼ plusieurs fois pour faire apparaître l’heure mondiale et la liste des
villes et des fuseaux horaires.
L’heure dans chaque pays et chaque fuseau est automatiquement calculée et
affichée par rapport à l’heure locale précédemment entrée.
10. Reset
Dans le cas très improbable où votre Traducteur cesserait de fonctionner, appliquez la procédure
suivante :
1. Localisez le trou du RESET au dos de l’appareil.
2. Insérez une pointe fine et appuyez doucement puis relâchez.
Votre Traducteur devrait redémarrer et afficher l’écran Tapez un mot.
Si votre appareil ne redémarre pas, changez la pile.
9.5 Réglage du fuseau horaire
1. Appuyez sur la touche et sélectionnez Réglage fuseau horaire .
Appuyez sur .
ENTER
2. Vous pouvez choisir votre ville locale parmi la liste proposée en utilisant les
touches ▲ et ▼ , appuyez sur pour confirmer.
ENTER
3. Ou alors vous pouvez sélectionner l’entrée ‘ -------------- ‘du haut de la liste de
façon à pouvoir entrer votre propre nom de ville.
4. La ville entrée apparaîtra dans l’écran de l’heure locale quand vous consultez
l’heure et la date (voir 9.1).
9.6 Réglage du fuseau horaire (GMT)
1. Appuyez sur la touche et sélectionnez Réglage GMT .
Appuyez sur .
ENTER
2. Vous pouvez entrer votre fuseau horaire (heures de différence avec l’heure de
Greenwich) appuyant sur les touches de chiffres.
3. Appuyez sur ▼ pour changer de ‘’+’’ a ‘’–‘’ devant l’heure entrée.
Appuyez sur pour confirmer.
ENTER
4. L’heure GMT entrée apparaîtra dans l’écran de l’heure locale quand vous
consultez l’heure et la date (voir 9.1)
Note : L’heure de GMT entrée manuellement sera uniquement sélectionnée et affichée si la ville locale
entrée n’était pas dans la liste des villes présélectionnées.
9.7 Heure mondiale
1. Appuyez sur la touche MENU. L’option Horloge s’affiche.
2. Appuyez sur pour confirmer.
ENTER
L’heure locale est affichée.
11. Pile
La référence de la pile utilisée dans votre Traducteur Lexibook est CR2032.
Si le contraste écran faiblit fortement même après l’avoir réglé au plus fort, nous vous conseillons de
changer la pile sans tarder.
1. Dévissez la vis au dos de l’appareil qui maintient la trappe du compartiment de la
pile.
2. Retirez la trappe puis la pile usagée.
3. Insérez la pile neuve en respectant la polarité (côté + au dessus).
4. Appuyez sur la touche ON/OFF pour mettre en marche l’appareil.
Ne pas utiliser de piles rechargeables. Les piles ne doivent pas être rechargées. Retirer les
accumulateurs du jeu avant de les recharger. Ne charger les accumulateurs que sous la surveillance
d'un adulte. Ne pas mélanger différents types de piles ou accumulateurs, ou des piles et accumulateurs
neufs et usagés. Les piles et accumulateurs doivent être mis en place en respectant la polarité. Les
piles et accumulateurs usagés doivent être enlevés du jouet. Les bornes d'une pile ou d'un accumulateur ne doivent pas être mis en court-circuit. Ne pas jeter les piles au feu.
Si l’appareil ne démarre pas, procédez à un Reset comme indiqué dans le paragraphe précédent.
12. Précautions d’emploi
‘
• Ne pas exposer l’appareil au soleil direct, à des températures extrêmes, à l’humidité et à la poussière.
• Ne pas laisser tomber l’appareil.
• Ne pas utiliser de détergent, de produit nettoyant ou de solvant pour nettoyer l’appareil. Essuyez
simplement l’appareil avec un chiffon doux, sec et propre.
• Ne pas tordre l’appareil.
• Ne pas tenter d’ouvrir le boîtier.
AVERTISSEMENT: Si cet appareil subit des décharges électrostatiques, vous pouvez le réinitialiser à
l'aide de la touche reset ou en enlevant puis en réinstallant les piles.
Copyright © Lexibook 2006 35Copyright © Lexibook 2006 34
Page 19

13. Garantie
Ce produit est couvert par notre garantie de deux ans. Pour toute mise en oeuvre de la garantie ou de
service après vente, vous devez vous adresser à votre revendeur muni de votre preuve d'achat. Notre
garantie couvre les vices de matériel ou de montage imputables au constructeur à l'exclusion de toute
détérioration provenant du non respect de la notice d'utilisation ou de toute intervention intempestive
sur l'article (telle que démontage, exposition à la chaleur ou à l'humidité…).
Note : la garantie ne couvre pas le bris de l’écran LCD.
NOTE : veuillez garder ce mode d’emploi, il contient d’importantes informations.
Dans un souci constant d’amélioration, nous pouvons être amenés à modifier les couleurs et les détails
du produit présenté sur l’emballage.
Référence : T200
Garantie 2 ans
©2006 LEXIBOOK®
Conçu en Europe – Fabriqué en Chine
LEXIBOOK S.A
2, avenue de Scandinavie
91953 Courtaboeuf Cedex France
Assistante technique : 0892 23 27 26 (0,34 € TTC/Min)
Site Internet : www.lexibook.com
Annexe 1 - Catégories grammaticales
Abréviation Français Anglais
ADJ adjectif adjective
ADV adverbe adverb
ONO onomatopée onomatopoeia
ALP lettre alphabétique alphabetic letter
ART article article
CNJ conjonction conjunction
INT interjection interjection
PRO pronom pronoun
N nom noun
V infinitif infinitive
NA nom adjectif adjective noun
PRP préposition preposition
NBR nombre number
PAR participe passé present past or present participle
PLU pluriel plural
ADJ adjectif possessif possessive adjective
ADJ adjectif interrogatif interrogative adjective
PRO pronom personnel personal pronoun
M masculin masculine
F féminin feminine
PN phrase nominale nominal phrase
PV phrase verbale verbal phrase
Annexe 2 - Taux fixes Euro
Informations sur la protection de l'environnement
Tout appareil électrique usé est une matière recyclable et ne devrait pas faire partie des ordures
ménagères! Nous vous demandons de bien vouloir nous soutenir en contribuant activement au
ménagement des ressources et à la protection de l'environnement en déposant cet appareil dans
des sites de collecte (si existants).
Code Monnaie Pays Taux Euro
FRF Franc Français France 1 Euro = 6.55957 FRF
DEM Mark allemand Allemagne 1 Euro = 1.95583 DEM
IEP Livre Irlandaise Irlande 1 Euro = 0.787564 IEP
ESP Peseta Espagnole Espagne 1 Euro = 166.386 ESP
ITL Lire Italienne Italie 1 Euro = 1936.27 ITL
ATS Shilling Autrichien Autriche 1 Euro = 13.7603 ATS
BEF Franc Belge Belgique 1 Euro = 40.3399 BEF
FIM Mark Finlandais Finlande 1 Euro = 5.94573 FIM
LUF Franc Luxembourgeois Luxembourg 1 Euro = 40.3399 LUF
NLG Florin Hollande 1 Euro = 2.20371 NLG
PTE Escudos portugais Portugal 1 Euro = 200.482 PTE
Copyright Lexibook Limited ©2006. Tous droits réservés.
Copyright © Lexibook 2006 37Copyright © Lexibook 2006 36
 Loading...