

Page 1
H
I
E
J
by
ST600
D
G
N
M
P
Q
A
F
C
B
K
L
O
R
ST600IM ST600IM
100mm (W) x 150mm (h) 100mm (W) x 150mm (h)
Page 2

Introduction
Avec votre nouvelle télécommande universelle, vous pouvez contrôler jusqu’à 6
appareils audio-visuels: téléviseur (TV), magnétoscope (VCR), lecteur de DVD
(DVD), satellite (SAT), câble (CAB) et appareil audio (AUD).
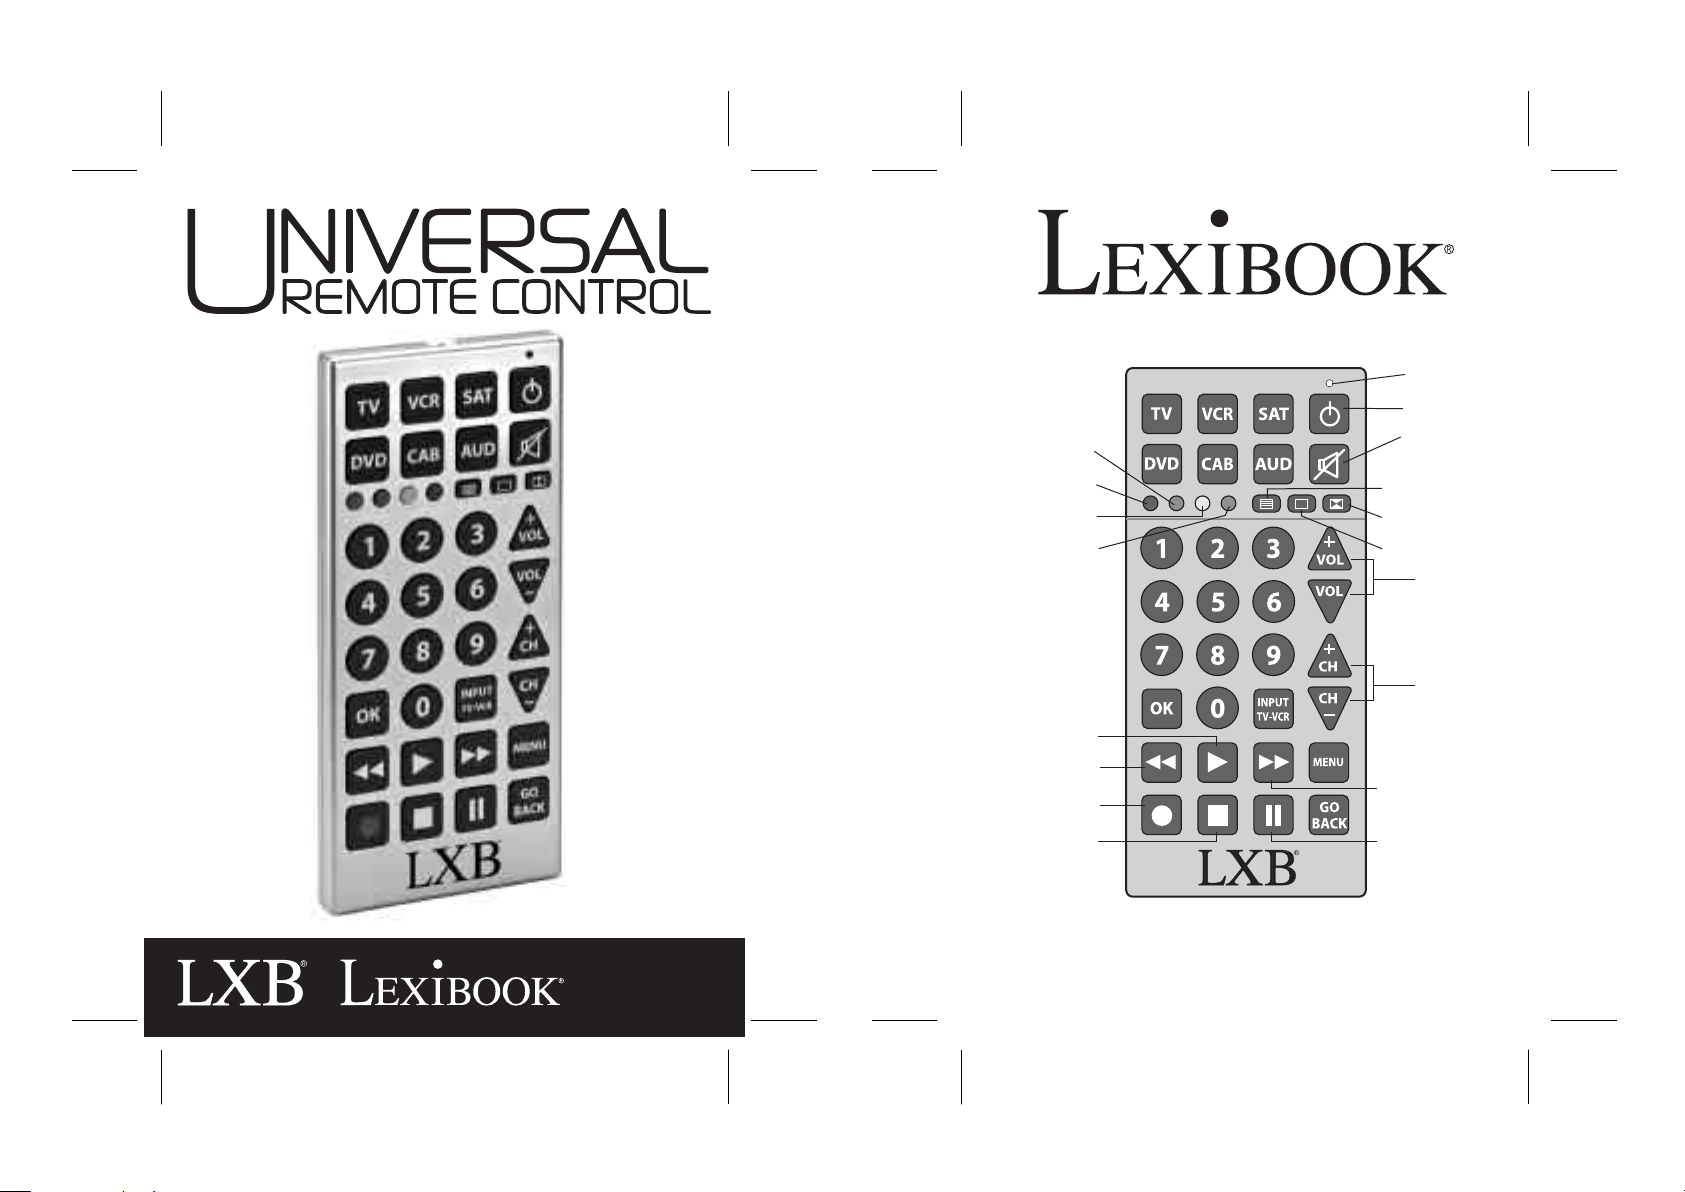
Reportez-vous à l’illustration située au dos de la page couverture pour vous
familiariser avec l’agencement des différentes fonctions de votre télécommande
universelle. Il est bon de garder les manuels d’utilisation de vos télécommandes
originales sous la main afin de pouvoir vous y référer en cas de besoin.
A. Télétexte Touche Marche
B. Télétexte Touche Arrêt
C. Télétexte Touche Verrouillage
D. Télétexte Touche Rouge
E. Télétexte Touche Verte
F. Télétexte Touche Jaune
G. Télétexte Touche Bleue
H. Voyant Lumineux Rouge
I. Marche/Arrêt
J. Sourdine
K. Volume
L. Chaîne
M. Retour Rapide
N. Lecture
O. Avance Rapide
P. Enregistrement
Q. Arrêt
R. Pause
Installation des Piles
1. Enlevez la trappe du compartiment à piles située au dos de la télécommande.
2. Insérez 2 x piles alcalines AA en veillant à respecter les indications de polarité
( +/-) à l’intérieur du compartiment à piles. Remettez la trappe du compartiment
à piles en place.
3. Appuyez sur la touche Marche/Arrêt. Le voyant lumineux s’illumine pour
indiquer que la télécommande est sous tension. S’il ne s’allume pas, essayez
avec d’autres piles.
Note: tous les réglages sont perdus lorsque vous changez les piles.
Correspondance des Touches
Important: Lorsque vous utilisez votre télécommande universelle, sélectionnez
d’abord le type d’appareil que vous souhaitez contrôler en appuyant sur la touche
correspondante sur la télécommande (TV, VCR, SAT, DVD, CAB, AUD).
Fonction de
Nom
la touche pour
de la
TV, VCR, SAT, CAB
touche
1
CHIFFRE 1
2
CHIFFRE 2
3
CHIFFRE 3
4
CHIFFRE 4
5
CHIFFRE 5
6
CHIFFRE 6
CHIFFRE 7
7
CHIFFRE 8
8
CHIFFRE 9
9
CHIFFRE 0
0
Note: les fonctions avancées mentionnées dans ce tableau (lecteur DVD et appareil audio)
ne sont pas disponibles pour toutes les marques de lecteurs DVD et d’appareils audio.
Fonction de la touche pour DVD
(la touche de fonction
spéciale a la priorité)
CONFIG. > MENU > CHIFFRE 1
MENU PRINCIPAL > CHIFFRE 2
TITRE > CHIFFRE 3
RELECTURE > CHIFFRE 4
ALEATOIRE > CHIFFRE 5
REPETITION > CHIFFRE 6
ANGLE > CHIFFRE 7
SOUS-TITRES > DIGIT 8
ZOOM > CHIFFRE 9
OUVRIR > FERMER > EJECTER > CHIFFRE 0
Fonction de la touche pour AUDIO
(les touches numériques
CHIFFRE 1 > SELECT. CASSETTE OU VCR
CHIFFRE 2 > SELECT. CD, DVD OU LD
CHIFFRE 3 > SELECT. TV
CHIFFRE 4 > SELECT. VIDEO1
CHIFFRE 5 > SELECT. VIDEO2
CHIFFRE 6 > SELECT. SAT
CHIFFRE 7 > SELECT. VIDEO
CHIFFRE 8 > SELECT. PHONO
CHIFFRE 9 > SELECT. CD, DVD, OU DISQUE
CHIFFRE 0 > SELECT. SYNTO.
ont la priorité)
3 4
FRANÇAIS
Programmation
Note: tous les réglages sont perdus lorsque vous changez les piles. Conservez ce guide
d’utilisation afin de pouvoir reprogrammer votre télécommande universelle lorsque vous
remplacez les piles.
Entrer un code manuellement:
FRANÇAIS
1. Allumez manuellement l’appareil que vous souhaitez programmer
(TV, VCR, SAT, DVD, CAB, AUD).
2. Reportez-vous à la liste des codes située à la fin de ce guide d’utilisation pour
identifier les codes de la marque de l’appareil que vous souhaitez programmer.
3. Sur la télécommande, appuyez sur le bouton correspondant à l’appareil que
vous souhaitez programmer (TV, VCR, SAT, DVD, CAB, AUD) et
maintenez-le enfoncé pendant plus de trois secondes. Le voyant lumineux rouge
s’illumine pour indiquer que la télécommande est en mode de programmation.
4. Vous avez 30 secondes pour entrer le code à trois chiffres correspondant à la marque
de votre appareil. Le voyant lumineux rouge s’éteint pour indiquer que la
télécommande est programmée.
5. Appuyez sur la touche MARCHE/ARRÊT pour vérifier que vous avez entré le bon
code. Si l’appareil s’éteint, la programmation est terminée.
6. Si l’appareil ne répond pas, répétez les étapes 2-5 en utilisant un autre code listé pour
la marque de votre appareil.
Note: écrivez sur un morceau de papier le code à trois chiffres qui vous a permis de
programmer votre télécommande. Ceci vous permettra de reprogrammer rapidement
votre télécommande lorsque vous remplacez les piles.
Programmer la télécommande avec Power Scan:
En mode de programmation Power Scan, la télécommande teste tous les codes
disponibles dans la liste de codes et assigne le bon code pour l’appareil sélectionné.
Cette méthode est certes fastidieuse mais cela vous évite de vérifier les codes dans la
liste et de les entrer manuellement.
1. Mettez en veille manuellement l’appareil que vous souhaitez programmer
(TV, VCR, SAT, DVD, CAB, AUD).
2. Sur la télécommande, appuyez sur le bouton correspondant à l’appareil que vous
souhaitez programmer (TV, VCR, SAT, DVD, CAB, AUD) et maintenez-le enfoncé
pendant plus de trois secondes. Le voyant lumineux rouge s’illumine pour indiquer que
la télécommande est en mode de programmation.
3. Appuyez brièvement sur la touche MARCHE/ARRÊT. Le voyant lumineux rouge
clignote une fois puis reste allumé pour indiquer que la télécommande est en mode de
balayage Power Scan.
4. Appuyez répétitivement sur la touche CH+ ou CH- jusqu’à ce que l’appareil que vous
souhaitez programmer se mette en marche. La touche CH+ permet de naviguer vers le
haut dans la liste de codes tandis que la touche CH- permet de naviguer vers le bas.
5. Lorsque l’appareil que vous souhaitez programmer se met en marche, appuyez
brièvement sur la touche OK pour sauvegarder le nouveau code et sortir du mode de
balayage. Pour sortir sans sauvegarder le code, appuyez sur la touche RETOUR.
NOTE: Si vous appuyez de nouveau sur la touche CH+ or CH- après la mise en marche
de l’appareil, la programmation de l’appareil est interrompue. Il vous faut répéter les
étapes 1-5.
6. Appuyez sur n’importe quelle touche fonctionnelle (VOL+/VOL-) de la télécommande.
Si l’appareil répond, la programmation est terminée. Si l’appareil ne répond pas,
répétez les étapes 1-5.
ST600IM ST600IM
100mm (W) x 150mm (h) 100mm (W) x 150mm (h)
Page 3

Réinitialisation
ATTENTION: Si la télécommande vient à mal fonctionner ou à recevoir une
décharge électrostatique, enlevez les piles puis réinsérez-les au bout de
quelques minutes.
Garantie
NOTE: Conservez ce guide d’utilisation car il contient des informations
importantes. Ce produit est couvert par une garantie de deux ans. Pour faire
usage de cette garantie et bénéficier de notre service après-vente, contactez
votre revendeur et présentez votre preuve d’achat. Notre garantie couvre les
défauts de fabrication et dans les matériaux imputables au fabricant, à
l’exception des défauts et dommages causés par une utilisation non conforme
aux instructions ou résultant de modifications apportées au produit (telles que
l’exposition à des températures extrêmes ou à l’humidité, etc).
LEXIBOOK S.A,
2, avenue de Scandinavie,
91953 Courtaboeuf Cedex France
Assistance technique : 0892 23 27 26 (0,34 € TTC/Min)
http://www.lexibook.com
Protection de l’Environnement
Les appareils électriques et électroniques ne doivent pas être mis au rebut avec
le reste de vos ordures ménagères! Aidez activement à la protection de
l’environnement et à la conservation des ressources en faisant usage des points
de collecte agréés (si disponibles) pour un recyclage approprié de cet appareil.
FRANÇAIS
5
Introduction
This Universal Remote Control can operate up to 6 types of devices: televisions
(TV), video cassette recorders (VCR), and digital video disc players (DVD),
Satellite (SAT), Cable view (CAB), audio devices (AUD).
ENGLISH
Take a look at the product image located at the back of the cover page to
familiarize yourself with the features of this remote control. You may also need to
review the operating manuals of your original remotes to refresh yourself on the
functions of those units.
A. Teletext On key
B. Teletext Off key
C. Teletext Hold key
D. Teletext Red key
E. Teletext Green key
F. Teletext Yellow key
G. Teletext Blue key
H. LED
I. On/Off
J. Mute
K. Volume
L. Channel
M. Backward
N. Play
O. Fast Forward
P. Record
Q. Stop
R. Pause
Battery Installation
1. Remove the battery compartment cover located on the bottom of the unit.
2. Insert 2 x AA-size alkaline batteries according to the polarities (+/- signs)
located inside the battery compartment. Replace the battery compartment
cover.
3. Press the ON/OFF button; the LED should illuminate. If it does not, insert other
batteries and try again.
Note: all settings will be lost when replacing the batteries.
Key correspondence
Important: when you use the remote, first select the type of device you wish to
use by pressing the corresponding device key (TV, VCR, SAT, DVD, CAB, AUD).
Key function
Key
for TV, VCR,
name
SAT, CAB
1
DIGIT 1
2
DIGIT 2
3
DIGIT 3
4
DIGIT 4
5
DIGIT 5
6
DIGIT 6
DIGIT 7
7
DIGIT 8
8
DIGIT 9
9
DIGIT 0
0
Note: the advanced functions mentioned in this table (DVD player and AUDIO
6
device) are not applicable to all brands of DVD players or audio devices.
Key function for DVD
(special function key has
higher precedence)
SETUP > MENU > DIGIT 1
TOP MENU > DIGIT 2
TITLE > DIGIT 3
REPLAY > DIGIT 4
RANDOM > DIGIT 5
REPEAT > DIGIT 6
ANGLE > DIGIT 7
SUBTITLE > DIGIT 8
ZOOM > DIGIT 9
OPEN > CLOSE > EJECT > DIGIT 0
Key function for AUDIO
(digit keys has higher
precedence)
DIGIT 1 > SELECT TAPE OR VCR
DIGIT 2 > SELECT CD, DVD OR LD
DIGIT 3 > SELECT TV
DIGIT 4 > SELECT VIDEO1
DIGIT 5 > SELECT VIDEO2
DIGIT 6 > SELECT SAT
DIGIT 7 > SELECT VIDEO
DIGIT 8 > SELECT PHONO
DIGIT 9> SELECT CD, DVD, OR DISC
DIGIT 0 > SELECT TUNER
ST600IM ST600IM
100mm (W) x 150mm (h) 100mm (W) x 150mm (h)
Page 4

To Program
Note: all settings will be lost when replacing the batteries. Please keep this user
guide so that you can program the remote again after changing the batteries.
Entering a code manually:
1. Turn on manually the device you wish to program (TV, VCR, SAT, DVD, CAB,
AUD).
2. Using the code list located at the end of this user guide, locate the codes for
the brand name of the device you wish to program.
3. Press and hold the button of the device you wish to program (TV, VCR, SAT,
DVD, CAB, AUD) for more than three seconds; the red LED will illuminate,
indicating that the remote control is ready to accept a 3-digit code.
4. Enter a 3-digit code listed for the brand of your device within 30 seconds; the
LED will shut off, indicating that the remote control is programmed.
5. Press the ON/OFF button to verify if the correct code was entered. If the
device shuts down, no further programming is required.
6. If the device does not respond, repeat Steps 2-5, using a different 3-digit code
listed for that device brand.
Note: please note down the 3-digit code that programmed that remote control
successfully. You will need to program the remote control again after changing
the batteries.
Programming the remote using Power Scan:
With Power Scan programming, the remote control tests all the codes available
in the code list and assigns the correct code for the selected device. Although
this method can be more time consuming, it eliminates the need to look up
codes and enter them manually.
1. Manually put the device you wish to program
(TV, VCR, SAT, DVD, CAB, AUD) in sleep mode.
2. Press and hold the appropriate device key (TV, VCR, SAT, DVD, CAB, AUD)
until the red LED illuminates. This indicates that the remote is in programming
mode.
3. Press and release the ON/OFF key. The LED flashes once and stays ON,
indicating that the remote is in Power Scan mode.
4. Press either the CH+ or CH- button repeatedly until the device switches ON.
The CH+ button searches upward in the code list, while the CH- key searches
downward.
5. When the device turns on, press and release the OK button to store the new
code and exit. To exit without setting the code, press the GO BACK button.
NOTE: If you press CH+ or CH- again after the device turns on, the device will
not be programmed; you will need to repeat Steps 1-5 again.
6. Press any other operable key (VOL+/VOL-). If the device responds, no further
programming is required. If the device does not respond, repeat steps 1-5.
ENGLISH
7
Reset
WARNING: If the unit malfunctions or receives an electrostatic shock, remove
the batteries and insert them again.
ENGLISH
NOTE: Please keep this instruction manual, it contains important information.
This product is covered by our two-year warranty. To make use of the warranty or
the after-sales service, please contact your retailer and supply proof of purchase.
Our warranty covers material or installation-related defects attributable to the
manufacturer, with the exception of wear caused by failure to respect the
instructions for use or any unauthorised work on the equipment (such as
dismantling, exposure to heat or damp, etc.).
LEXIBOOK UK ltd,
Unit 10 Petersfield Industrial Estate,
Bedford Road, Petersfield,
Hampshire, GU32 3QA,
United Kingdom,
Freephone helpline: 0808 100 3015,
http://www.lexibook.com
Environmental Protection
Unwanted electrical appliances can be recycled and should not be
discarded along with regular household waste! Please actively support the
conservation of resources and help protect the environment by returning
8
this appliance to a collection centre (if available).
Warranty
ST600IM ST600IM
100mm (W) x 150mm (h) 100mm (W) x 150mm (h)
Page 5

Introducción
Este mando a distancia universal puede manejar hasta 6 tipos de equipos:
televisiones (TV), grabadores de cinta de vídeo (VCR), reproductores de vídeo
digital (DVD), receptores de televisión por satélite (SAT), receptores de vídeo por
cable (CAB) y equipos de audio (AUD).
Estudie la imagen del producto que se muestra en la contraportada, para
familiarizarse con las características de este mando a distancia. También deberá
revisar los manuales de uso de sus mandos a distancia originales para recordar
de nuevo las funciones de esas unidades.
A. Tecla Activar teletexto
B. Tecla Desactivar teletexto
C. Tecla Mantener teletexto
D. Tecla Roja para teletexto
E. Tecla Verde para teletexto
F. Tecla Amarilla para teletexto
G. Tecla Azul para teletexto
H. Indicador luminoso de tipo LED
I. On/Off
J. Anular sonido (Mute)
K. Volumen
L. Canal
M. Retroceder
N. Reproducir
O. Avance rápido
P. Grabar
Q. Paro
R. Pausa
ESPAÑOL
Instalación de las pilas
1. Retire la cubierta del compartimento de las pilas situado en la parte inferior de
la unidad.
2. Coloque 2 pilas alcalinas de tamaño AA con los símbolos de polaridad (+/-) en
la posición que se indica en el compartimento de las pilas. Vuelva a colocar la
cubierta del compartimento.
3. Pulse el botón ON/OFF; el indicador LED deberá iluminarse. Si no lo hace,
coloque otras pilas y pruebe de nuevo.
Nota: al sustituir las pilas se perderán todos los ajustes.
Correspondencia de teclas
Importante: cuando utilice el mando, seleccione primero el tipo de equipo que
quiere usar, pulsando para ello la tecla correspondiente (TV, VCR, SAT, DVD,
CAB o AUD).
Nombre
Función de la
de tecla
tecla para TV,
VCR, SAT, CAB
1
DÍGITO 1
2
DÍGITO 2
3
DÍGITO 3
4
DÍGITO 4
5
DÍGITO 5
6
DÍGITO 6
DÍGITO 7
7
DÍGITO 8
8
DÍGITO 9
9
DÍGITO 0
10
Nota: las funciones avanzadas mencionadas en esta tabla (reproductor de DVD y equipo de
AUDIO) no se aplican a todas las marcas de reproductores de DVD o de equipos de audio.
Función de la tecla para DVD
(las teclas de función especial
tienen mayor prioridad)
CONFIGURACIÓN > MENÚ > DÍGITO 1
MENÚ PRINCIPAL > DÍGITO 2
TÍTULO > DÍGITO 3
VOLVER A REPRODUCIR > DÍGITO 4
ALEATORIO > DÍGITO 5
REPETIR > DÍGITO 6
ÁNGULO > DÍGITO 7
SUBTÍTULO > DÍGITO 8
ZOOM > DÍGITO 9
ABRIR > CERRAR > EXPULSAR > DÍGITO 0
Función de la tecla para AUDIO
(las teclas numéricas tienen
DÍGITO 1 > SELECCIONAR CINTA O VCR
DÍGITO 2 > SELECCIONAR CD, DVD O LD
DÍGITO 3 > SELECCIONAR TV
DÍGITO 4 > SELECCIONAR VIDEO1
DÍGITO 5 > SELECCIONAR VIDEO2
DÍGITO 6 > SELECCIONAR SAT
DÍGITO 7 > SELECCIONAR VIDEO
DÍGITO 8 > SELECCIONAR PHONO
DÍGITO 9> SELECCIONAR CD, DVD, O DISC
DÍGITO 0 > SELECCIONAR SINTONIZADOR
mayor prioridad)
9 10
Para programar el mando
Nota: al sustituir las pilas se perderán todos los ajustes. Conserve esta guía de
manera que pueda programar de nuevo el mando a distancia después de
cambiar las pilas.
Para introducir manualmente un código:
ESPAÑOL
1. Encienda manualmente el equipo que quiera programar
(TV, VCR, SAT, DVD, CAB, AUD).
2. Utilice la lista de códigos que se proporciona al final de este manual de uso
para localizar los códigos correspondientes a la marca del equipo que desea
programar.
3. Mantenga pulsado durante más de 3 segundos el botón correspondiente al
tipo de equipo (TV, VCR, SAT, DVD, CAB, AUD); el indicador LED rojo se
iluminará, indicando que el mando a distancia está preparado para aceptar el
código de 3 dígitos.
4. Antes de que transcurran 30 segundos, introduzca el código de 3 dígitos
correspondiente a la marca de su equipo; el indicador LED se apagará
indicando que el mando a distancia está programado.
5. Pulse el botón ON/OFF para verificar que el código introducido es el correcto.
Si el equipo se apaga, no es necesaria ninguna otra tarea de programación.
6. Si el equipo no responde, repita los pasos 2-5 utilizando un código de 3
dígitos diferentes entre los correspondientes a la marca de su equipo.
Nota: tome nota del código de 3 dígitos con el cual ha programado correctamente el mando a distancia para su equipo. Necesitará programar de nuevo el
mando a distancia después de cambiar las pilas.
Para programar el mando utilizando la función Power Scan:
Con la programación utilizando la función Power Scan, el mando a distancia
comprueba todos los códigos disponibles en la lista y asigna el código correcto
para el equipo seleccionado. Aunque este método puede llevar más tiempo,
elimina la necesidad de buscar los códigos en la lista e introducirlos luego
manualmente.
1. Coloque manualmente el equipo que desea programar
(TV, VCR, SAT, DVD, CAB, AUD), en modo “standby“.
2. Mantenga pulsada la tecla correspondiente al equipo que desea programar
(TV, VCR, SAT, DVD, CAB, AUD), hasta que se encienda el indicador LED
rojo. Esto indica que el mando a distancia está en modo de programación.
3. Pulse y suelte la tecla ON/OFF. El indicador LED parpadea una vez y se
mantiene encendido, indicando que está realizándose la función Power Scan.
4. Pulse repetidamente el botón CH+ o CH- hasta que el equipo se encienda. El
botón CH+ busca hacia arriba en la lista de códigos, mientras que el botón
CH- busca hacia abajo.
5. Cuando el equipo se encienda, pulse y suelte el botón OK para almacenar el
nuevo código y salir del modo de programación. Si quiere salir sin ajustar el
código, pulse el botón Retroceder.
NOTA: Si pulsa CH+ o CH- de nuevo después de que el equipo se encienda y
antes de pulsar OK, la unidad no quedará programada; necesitará volver a
repetir los pasos 1-5.
6. Pulse cualquier otra tecla que tenga función en ese equipo (VOL+/VOL-). Si
el equipo responde, no es necesaria ninguna otra tarea de programación. Si el
equipo no responde, repita los pasos 1-5.
ST600IM ST600IM
100mm (W) x 150mm (h) 100mm (W) x 150mm (h)
Page 6
Reinicialización (Reset)
ADVERTENCIA: En caso de que la unidad funcionase mal o recibiese una
descarga electrostática, retire la pila y vuelva a colocarla.
Garantía
NOTA: Conserve este manual de instrucciones ya que contiene información
importante. Este producto tiene una garantía de dos años. Para utilizar la
garantía o el servicio postventa, contacte con su vendedor presentándole el
comprobante de compra. Nuestra garantía cubre defectos relativos al material o
al montaje atribuibles al fabricante; con excepción del desgaste causado por no
seguir las instrucciones de uso o cualquier manipulación no autorizada del
equipo (como desensamblado, exposición al calor o a la humedad, etc.).
Lexibook Ibérica S.L,
C/ de las Hileras 4, 4° dpcho 14,
28013 Madrid, España
Servicio consumidores: 91 548 89 32.
http://www.lexibook.com
Protección ambiental
¡Los aparatos eléctricos, al finalizar su vida útil, pueden ser reciclados y no deben
ser desechados juntamente con la basura doméstica habitual! Contribuya
activamente a la conservación de los recursos naturales y ayude a proteger el
medio ambiente entregando este producto para su desecho en un centro de
recogida selectiva de residuos (en caso de estar disponible).
ESPAÑOL
11 12
Introdução
Este Telecomando Universal pode operar até 6 tipos de aparelhos diferentes:
televisões (TV), vídeos (VCR) e leitores de discos digitais (DVD), satélite (SAT),
cabo (CAB) e aparelhos de áudio (AUD).
Veja a imagem do produto que se encontra na parte traseira da capa para se
familiarizar com as características deste telecomando. Também precisa de rever
os manuais de funcionamento dos telecomandos originais para se lembrar das
PORTUGUÊS
funções desses aparelhos.
A. Botão do teletexto
B. Botão de desligar o teletexto
C. Botão “Hold” do teletexto
D. Botão vermelho do teletexto
E. Botão verde do teletexto
F. Botão amarelo do teletexto
G. Botão azul do teletexto
H. LED
I. Ligar/desligar
J. Desligar o som
K. Volume
L. Canal
M. Retroceder
N. Reproduzir
O. Avanço rápido
P. Gravar
Q. Parar
R. Pausa
Colocação das pilhas
1. Retire a tampa do compartimento das pilhas, que se encontra na parte inferior
da unidade.
2. Coloque 2 pilhas alcalinas AA, de acordo com a polaridade (sinais +/-), que se
encontra dentro do compartimento das pilhas. Volte a colocar a tampa do
compartimento das pilhas.
3. Prima o botão de ligar/desligar (ON/OFF). O LED deverá acender. Se não for
o caso, insira outras pilhas e tente novamente.
Nota: perderá todas as configurações quando substituir as pilhas.
Correspondência dos botões
Importante: Quando usar o telecomando, primeiro escolha o tipo de aparelho
que deseja, premindo o botão correspondente ao aparelho (TV, VCR, SAT, DVD,
CAB, AUD).
Nome
Função do
do
botão para
botão
TV, VCR, SAT, CAB
1
DÍGITO 1
2
DÍGITO 2
3
DÍGITO 3
4
DÍGITO 4
5
DÍGITO 5
6
DÍGITO 6
DÍGITO 7
7
DÍGITO 8
8
DÍGITO 9
9
DÍGITO 0
0
Nota: As funções avançadas mencionadas nesta tabela (leitor de DVD e sistema de
ÁUDIO) não se aplicam a todas as marcas de leitores de DVD ou de sistemas de áudio.
Função do botão para DVD
(botão de função especial que
tem uma precedência superior)
CONFIGURAÇÃO > MENU > DÍGITO 1
MENU SUPERIOR > DÍGITO 2
TÍTULO > DÍGITO 3
REPETIÇÃO > DÍGITO 4
ALEATÓRIO > DÍGITO 5
REPETIR > DÍGITO 6
ÂNGULO > DÍGITO 7
LEGENDAS > DÍGITO 8
ZOOM > DÍGITO 9
ABRIR > FECHAR > EJECTAR > DÍGITO 0
Função do botão para ÁUDIO
têm uma precedência superior)
DÍGITO 1 > ESCOLHER CASSETE OU VÍDEO
DÍGITO 2 > ESCOLHER CD, DVD OU LD
DÍGITO 3 > ESCOLHER TV
DÍGITO 4 > ESCOLHER VÍDEO1
DÍGITO 5 > ESCOLHER VÍDEO2
DÍGITO 6 > ESCOLHER SAT
DÍGITO 7 > ESCOLHER VÍDEO
DÍGITO 8 > ESCOLHER PHONO
DÍGITO 9> ESCOLHER CD, DVD OU DISCO
DÍGITO 0 > ESCOLHER SINTONIZAÇÃO
(os botões dos dígitos
ST600IM ST600IM
100mm (W) x 150mm (h) 100mm (W) x 150mm (h)
Page 7

Para Programar
Nota: Perderá todas as configurações quando substituir as pilhas. Por favor,
guarde este manual do utilizador, de modo a que possa programar novamente o
telecomando após mudar as pilhas.
Inserir um código manualmente:
1. Ligue manualmente o aparelho que deseja programar
(TV, VCR, SAT, DVD, CAB, AUD).
2. Com a lista de códigos que se encontra no final deste manual, encontre os
códigos da marca do aparelho que deseja programar.
3. Prima e mantenha premido o botão do aparelho que deseja programar
(TV, VCR, SAT, DVD, CAB, AUD) durante mais de três segundos. O LED
vermelho acende, indicando que o telecomando está pronto para aceitar um
código de três dígitos.
4. Insira um código de 3 dígitos listado para a marca do seu aparelho no espaço
de 30 segundos. O LED desliga-se, indicando que o telecomando está
programado.
5. Prima o botão de ligar/desligar (ON/OFF) para verificar se introduziu o código
correcto. Se o aparelho se desligar, não precisa de fazer mais nenhuma
programação.
6. Se o aparelho não responder, repita os passos 2 a 5, usando um código de 3
dígitos diferente listado para essa marca.
Nota: Por favor, anote o código de 3 dígitos que programou com sucesso o
telecomando. Precisará de programar novamente o telecomando quando mudar
as pilhas.
Programar o telecomando com a busca automática (Power Scan)
Com a busca automática, o telecomando testa todos os códigos disponíveis na
lista de códigos e escolhe o código correcto para o aparelho seleccionado.
Apesar deste método demorar mais tempo, elimina a necessidade de procurar
códigos e de os inserir manualmente.
1. Coloque manualmente o aparelho que deseja programar
(TV, VCR, SAT, DVD, CAB, AUD) no modo de hibernamento.
2. Prima e mantenha premido o botão apropriado do aparelho
(TV, VCR, SAT, DVD, CAB, AUD), até que o LED vermelho se acenda.
Este indica que o telecomando está no modo de programação.
3. Prima e deixe de premir o botão de ligar/desligar (ON/OFF). O LED pisca
uma vez e permanece ligado, indicando que o telecomando está no modo de
busca automática.
4. Prima o botão CH+ ou CH- repetidamente até que o aparelho se ligue.
O botão CH+ procura para cima na lista de códigos, enquanto o botão
CH- procura para baixo.
5. Quando o aparelho se liga, prima e deixe de premir o botão OK para
memorizar o novo código e sair. Para sair sem memorizar o código, prima o
botão de retroceder.
NOTA: Se premir novamente o botão CH+ ou CH- após o aparelho se ligar, o
aparelho não é programado e terá de repetir os passos 1 a 5.
6. Prima qualquer botão operável (VOL+/VOL-). Se o aparelho responder, não
precisa de continuar a programação. Se o aparelho não responder, repita os
passos 1 a 5.
PORTUGUÊS
13 14
Reiniciar
AVISO: Se a unidade funcionar mal ou receber um choque electrostático, retire
as pilhas e volte a colocá-las.
Garantia
PORTUGUÊS
NOTA: Por favor, guarde este manual de instruções, pois contém informações
importantes. Este produto é abrangido pela nossa garantia de dois anos. Para
utilizar a garantia ou o nosso serviço pós-venda, queira contactar o seu
revendedor e apresente-lhe a prova de compra. A nossa garantia abrange
defeitos relacionados com o material ou com a instalação, que possam ser
atribuídos ao fabricante, com a excepção do desgaste causado pelo não respeito
das instruções de utilização ou por qualquer alteração no equipamento que não
tenha sido autorizada (como desmontar, expor ao calor ou à humidade, etc.).
LEXIBOOK Electronica Lda,
Quinta dos Loios,
Praceta José Domingos dos Santos,
6B-8ª, 2835-343 Lavradio-Barreiro,
Portugal Apoio Técnico: 212 06 1 348
http://www.lexibook.com
Protecção Ambiental
Os aparelhos eléctricos indesejados podem ser reciclados e não deverão ser
deitados ao lixo juntamente com o lixo doméstico vulgar! Por favor, suporte
activamente a conservação de recursos e ajude a proteger o ambiente,
devolvendo esta unidade a um centro de recolha (se disponível).
ST600IM ST600IM
100mm (W) x 150mm (h) 100mm (W) x 150mm (h)
Page 8

Introduzione
Questo Telecomando Universale può funzionare con max. 6 tipi di dispositivi:
televisori (TV), videoregistratori (VCR) e lettori DVD (DVD), Satellite (SAT), TV
via cavo (CAB), dispositivi audio (AUD).
Osservare l’immagine del prodotto sul retro di copertina per familiarizzarsi con le
caratteristiche del telecomando. Potrebbe essere necessario anche controllare i
manuali d’uso dei telecomandi originali per rivedere le funzioni di quelle unità.
A. Tasto Televideo On
B. Tasto Televideo Off
C. Tasto Televideo Hold (fermo)
D. Tasto Televideo Rosso
E. Tasto Televideo Verde
F. Tasto Televideo Giallo
G. Tasto Televideo Blu
H. LED
I. On/Off
J. Mute (Silenziato)
K. Volume
L. Channel (Canale)
M. Backward (Indietro)
N. Play
O. Fast Forward (Avanti veloce)
P. Record (Registra)
Q. Stop
R. Pause (Pausa)
Inserimento Batterie
1. Togliere il coperchio del vano batterie collocato sul fondo dell’unità.
2. Inserire 2 batterie alcaline tipo AA secondo la polarità indicata (segni +/-)
all’interno del vano batterie. Riposizionare il coperchio del vano batterie.
3. Premere il tasto ON/OFF; il LED si accende. Se ciò non avviene, inserire altre
batterie e provare di nuovo.
Nota: Durante la sostituzione delle batterie si perdono tutte le impostazioni.
Corrispondenza tasti
Importante: quando si utilizza il telecomando, selezionare innanzitutto il tipo di
dispositivo che si desidera utilizzare premendo il tasto corrispondente (TV, VCR,
SAT, DVD, CAB, AUD).
Funzione
Nome
chiave per
tasto
TV, VCR,
SAT, CAB
1
CIFRA 1
2
CIFRA 2
3
CIFRA 3
4
CIFRA 4
5
CIFRA 5
6
CIFRA 6
CIFRA 7
7
CIFRA 8
8
CIFRA 9
9
CIFRA 0
0
Nota: Le funzioni avanzate citate in tabella (lettore DVD e dispositivo AUDIO)
non sono applicabili a tutte le marche di lettori DVD o dispositivi audio.
Funzione chiave per DVD
(il tasto funzione speciale
ha la precedenza)
IMPOSTAZIONE > MENU > CIFRA 1
MENU PRINCIPALE > CIFRA 2
TITOLO > CIFRA 3
REPLAY > CIFRA 4
CASUALE > CIFRA 5
RIPETERE > CIFRA 6
ANGOLO > CIFRA 7
SOTTOTITOLI > CIFRA 8
ZOOM > CIFRA 9
APRI > CHIUSI > ESPELLI > CIFRA 0
Funzione chiave per AUDIO
(i tasti numerici hanno
la precedenza)
CIFRA 1 > SELEZIONA NASTRO O VCR
CIFRA 2 > SELEZIONA CD, DVD O LD
CIFRA 3 > SELEZIONA TV
CIFRA 4 > SELEZIONA VIDEO1
CIFRA 5 > SELEZIONA VIDEO2
CIFRA 6 > SELEZIONA SAT
CIFRA 7 > SELEZIONA VIDEO
CIFRA 8 > SELEZIONA FONO
CIFRA 9> SELEZIONA CD, DVD, O DISCO
CIFRA 0 > SELEZIONA SINTONIZZATORE
ITALIANO
15 16
Per Programmare
Nota: Durante la sostituzione delle batterie si perdono tutte le impostazioni. Si
prega di conservare questa guida utente per riprogrammare il telecomando
dopo la sostituzione delle batterie.
ITALIANO
Inserire manualmente un codice:
1. Accendere manualmente il dispositivo che si desidera programmare
(TV, VCR, SAT, DVD, CAB, AUD).
2. Utilizzando l’elenco codici collocato alla fine di questa guida utente,
localizzare i codici della marca del dispositivo che si desidera programmare.
3. Tenere premuto il pulsante del dispositivo che si desidera programmare
(TV, VCR, SAT, DVD, CAB, AUD) per più di tre secondi; il LED rosso si
accende, indicando che il telecomando è pronto per accettare un codice a 3
cifre.
4. Inserire un codice a 3 cifre elencato per la marca del dispositivo entro 30
secondi; il LED si spegne, indicando che il telecomando è programmato.
5. Premere il tasto ON/OFF per verificare se è stato inserito il codice corretto.
Se il dispositivo si spegne, non si richiede ulteriore programmazione.
6. Se il dispositivo non risponde, ripetere i Passaggi 2-5, utilizzando un codice a
3 cifre diverso tra quelli elencati per la marca del dispositivo.
Nota: Annotare il codice a 3 cifre che ha programmato il telecomando con
successo. Ne avrete bisogno per riprogrammare il telecomando dopo la
sostituzione delle batterie.
Programmare il telecomando utilizzando la funzione Power Scan:
Con la programmazione Power Scan, il telecomando testa tutti i codici
disponibili nell’elenco codici e assegna il codice corretto al dispositivo
selezionato. Benché questo metodo possa essere più lungo, elimina la
necessità di cercare i codici e di inserirli manualmente.
1. Mettere manualmente il dispositivo che si desidera programmare
(TV, VCR, SAT, DVD, CAB, AUD) in modalità sleep (non attivo).
2. Tenere premuto il tasto del dispositivo corretto
(TV, VCR, SAT, DVD, CAB, AUD) fino a che si accende il LED rosso.
Ciò indica che il telecomando è in modalità programmazione.
3. Tenere premuto il tasto ON/OFF. Il LED lampeggia una volta e rimane
acceso, indicando che il telecomando è in modalità Power Scan.
4. Premere ripetutamente il pulsante CH+ o CH- fino a che il dispositivo si
accende. Il pulsante CH+ cerca nell’elenco codici in avanti, mentre il tasto
CH- cerca all’indietro.
5. Quando il dispositivo si accende, premere e rilasciare il pulsante OK per
memorizzare il nuovo codice e uscire. Per uscire senza impostare il codice,
premere il tasto GO BACK (indietro).
NOTA: Se si preme di nuovo CH+ o CH- dopo che il dispositivo si accende, il
dispositivo non sarà programmato; dovranno essere ripetuti i passaggi 1-5.
6. Premere qualsiasi altro tasto funzionale (VOL+/VOL-). Se il dispositivo
risponde, non si richiede ulteriore programmazione. Se il dispositivo non
rispondere, ripetere i passaggi 1-5.
ST600IM ST600IM
100mm (W) x 150mm (h) 100mm (W ) x 150mm (h)
Page 9

Reset
AVVERTENZA: Se l’unità non funziona correttamente o se subisce uno shock
elettrostatico, togliere le batterie e reinserirle.
Garanzia
NOTA: Conservare il manuale di istruzioni, contiene informazioni importanti.
Questo prodotto è coperto da una garanzia di due anni. Per far valere la garanzia
o il servizio post-vendita, contattare il rivenditori e presentare lo scontrino. La
nostra garanzia copre difetti legati a materiali o installazione attribuibili al
costruttore, ad eccezione di usura causata dal mancato rispetto delle istruzioni
d’uso oppure da operazioni non autorizzate all’apparecchiatura (ad es.
smontaggio, esposizione a calore o umidità, ecc.).
Lexibook Italia S.r.l,
Via Eustachi, 45,
20129 Milano, Italia
Servizio consumatori : 022040 4959
(Prezzo di una chiamata locale).
http://www.lexibook.com
Protezione Ambientale
Gli elettrodomestici da buttare possono essere riciclati e non devono essere
smaltiti con i rifiuti domestici! Sostenete attivamente la conservazione delle
risorse e aiutateci a proteggere l’ambiente portando l’apparecchiatura presso un
centro di raccolta (se disponibile).
ITALIANO
17 18
Einleitung
Mit dieser Universal-Fernbedieung können bis zu 6 Geräte bedient werden:
Fernsehgeräte (TV), Videokassettenrekorder (VCR), digitale Video-Disk-Player
(DVD), Satellit (SAT), Kabelfernsehen (CAB) und Audiogeräte (AUD).
Sehen Sie sich die Produktabbildung auf der Rückseite des Deckblatt, bevor Sie
DEUTSCH
sich mit den Funktionen dieser Fernbedienung vertraut machen. Eventuell
müssen Sie auch in den Bedienungsanleitungen Ihrer Originalfernbedienungen
nachschlagen, um sich deren Funktionen ins Gedächtnis zu rufen.
A. Teletext einschalten
B. Teletext abschalten
C. Teletext halten
D. Teletext rote Taste
E. Teletext grüne Taste
F. Teletext gelbe Taste
G. Teletext blaue Taste
H. LED
I. Ein/Aus
J. Stumm schalten
K. Lautstärke
L. Kanal
M. Zurück
N. Wiedergabe
O. Schnellvorlauf
P. Aufnahme
Q. Stopp
R. Pause
Batterie einsetzen
1. Öffnen Sie das Batteriefach unten am Gerät.
2. Setzen Sie die 2 x AAA-Alkaliatterien bitte entsprechend der Polaritätsmarkier
ungen (+/-) in das Batteriefach ein. Schließen Sie die Abdeckung.
3. Drücken Sie die Taste EIN/AUS. Die LED-Anzeige leuchtet. Sonst setzen Sie
die Batterien erneut ein und versuchen es noch einmal.
Hinweis: Wenn die Batterien ausgetauscht werden, werden alle Einstellungen
gelöscht.
Tastenbelegung
Wichtig: Wenn Sie die Fernbedienung das erste Mal benutzen, müssen Sie
zuerst den entsprechenden Geräteschlüssel eingeben (TV, VCR, SAT, DVD,
CAB, AUD).
Tasten
Tastenfunktion für
bezeic
TV, VCR,
hnung
SAT, CAB
1
ZAHL 1
2
ZAHL 2
3
ZAHL 3
4
ZAHL 4
5
ZAHL 5
6
ZAHL 6
ZAHL 7
7
ZAHL 8
8
ZAHL 9
9
ZAHL 0
0
Hinweis: Die in dieser Tabelle aufgeführten erweiterten Funktionen (DVD-Player und
AUDIO-Gerät) stehen nicht für alle DVD-Player oder Audio-Geräte zur Verfügung.
Tastenfunktion für DVD
(Sondertasten haben Priorität)
EINRICHTUNG > MENÜ > ZAHL 1
TOP-MENÜ > ZAHL 2
TITEL > ZAHL 3
WIEDERHOLUNG > ZAHL 4
ZUFALL > ZAHL 5
WIEDERHOLUNG > ZAHL 6
WINKEL > ZAHL 7
UNTERTITEL > ZAHL 8
ZOOM > ZAHL 9
ÖFFNEN > SCHLIESSEN > AUSWERFEN > ZAHL 0
Tastenfunktion für AUDIO
(Zahlentasten haben Priorität)
ZAHL 1 > BAND- ODER VCR-AUSWAHL
ZAHL 2 > >CD-, DVD- ODER LCD-AUSWAHL
ZAHL 3 > TV-AUSWAHL
ZAHL 4 > AUSWAHL VIDEO 1
ZAHL 5 > AUSWAHL VIDEO 2
ZAHL 6 > SAT-AUSWAHL
ZAHL 7 > VIDEO-AUSWAHL
ZAHL 8 > PHONO -AUSWAHL
ZAHL 9 > CD-, DVD- ODER DISC-AUSWAHL
ZAHL 0 > TUNER-AUSWAHL
ST600IM ST600IM
100mm (W) x 150mm (h) 100mm (W) x 150mm (h)
Page 10

Programmierung
Hinweis: Wenn die Batterien ausgetauscht werden, werden alle Einstellungen
gelöscht. Bitte bewahren Sie diese Bedienungsanleitung auf, damit Sie die
Fernbedienung erneut programmieren können, nachdem Sie die Batterien
ausgewechselt haben.
So geben Sie den Code manuell ein:
1. Schalten Sie das Gerät, das Sie programmieren möchten, von Hand ein
(TV, VCR, SAT, DVD, CAB, AUD).
2. Suchen Sie auf der Code-Übersicht am Ende dieser Bedienungsanleitung
den Code für die Marke heraus, die Sie programmieren möchten.
3. Halten Sie die Gerätetaste des Geräts, dass Sie programmieren möchten
mindestens drei Sekunden gedrückt (TV, VCR, SAT, DVD, CAB, AUD); die
rote LED leuchtet. Nun kann der 3-stellige Code an der Fernbedienung
eingegeben werden.
4. Geben Sie innerhalb von 3 Sekunden den 3-stelligen-Markencode ein;
die LED erlischt. Nun haben Sie die Fernbedienung programmiert.
5. Überprüfen Sie die korrekte Codeeingabe mit der EIN/AUS-Taste. Wenn sich
das Gerät abschaltet, ist die Programmierung abgeschlossen.
6. Sofern das Gerät nicht reagieren sollte, wiederholen Sie die Schritte 2-5.
Geben Sie einen anderen für die Marke aufgeführten 3-stelligen Code ein.
Hinweis: Bitte notieren Sie den richtig programmierten 3-stelligen Code. Sie
müssen die Fernbedienung nach jedem Batteriewechsel erneut programmieren.
Programmierung der Fernbedienung mit Power Scan:
Mit der Power Scan-Programmierung überprüft die Fernbedienung alle
aufgeführten Codes und weist dem ausgewählten Gerät den richtigen Code zu.
Zwar kann diese Vorgehensweise mehr Zeit beanspruchen, allerdings müssen
Sie die Codes nicht mehr suchen und manuell eingeben.
1. Schalten Sie das Gerät, das Sie programmieren möchten, von Hand
(TV, VCR, SAT, DVD, CAB, AUD) in den Schlummermodus.
2. Halten Sie die entsprechende Gerätetaste (TV, VCR, SAT, DVD, CAB, AUD)
gedrückt, bis die rote LED leuchtet. Nun befindet sich das Gerät in der
Betriebsart Programmieren.
3. Drücken und lösen Sie die EIN/AUS-Taste. Die LED blinkt einmal und
leuchtet PERMANENT; das Gerät befindet sich in der Betriebsart Power
Scan.
4. Drücken Sie die Taste CH+ oder CH-, bis das Gerät sich EINSCHALTET.
Mit der Taste CH+ wird die Code-Übersicht vorwärts, mit der Taste CH rückwärts durchsucht.
5. Wenn das Gerät sich einschaltet, drücken Sie kurz die Taste OK, um den
neuen Code zu speichern und die Betriebsart zu verlassen. Wenn Sie die
Programmierung ohne Speicherung des Codes beenden möchten, drücken
Sie die Taste ZURÜCK.
HINWEIS: Sofern Sie die Taste CH+ oder CH- erneut drücken, nachdem das
Gerät sich eingeschaltet hat, wird es nicht programmiert; Sie müssen die
Schritte 1-5 wiederholen.
6. Drücken Sie eine weitere Betriebstaste (VOL+/VOL-). Wenn das Gerät
reagiert, ist die Programmierung abgeschlossen. Sollte das Gerät nicht
reagieren, wiederholen Sie die Schritte 1-5.
DEUTSCH
19 20
Zurücksetzen
WARNUNG: Bei Fehlfunktion oder statischer Aufladung bitte die Batterien
herausnehmen und erneut einlegen.
DEUTSCH
HINWEIS: Bitte bewahren Sie diese Bedienungsanleitung auf; sie enthält
wichtige Informationen. Die Garantiezeit für dieses Gerät beläuft sich auf 2 Jahre.
Wenn Sie eine Garantieleistung in Anspruch nehmen oder sich mit dem
Kundendienst in Verbindung setzen müssen, wenden Sie sich bitte an Ihren
Händler und halten Sie Ihren Kaufbeleg bereit. Unsere Gewährleistung bezieht
sich auf Material- und Verarbeitungsfehler des Herstellers, jedoch nicht auf
Verschleiß, Nichteinhaltung der Anleitungen, unautorisierte Arbeiten am Gerät
und dessen Bestandteilen (Demontage, Hitze, Dampf usw.).
http://www.lexibook.com
Umweltschutz
Elektronische Geräte können aufbereitet werden und dürfen nicht im
Haushaltsmüll entsorgt werden. Bitte unterstützen Sie die Wiederaufbereitung
und schützen Sie die Umwelt, indem Sie Altgeräte entsprechend der
Umweltschutzbestimmungen entsorgen bzw. abgeben.
Garantie
ST600IM ST600IM
100mm (W) x 150mm (h) 100mm (W) x 150mm (h)
Page 11

Inleiding
Deze universele afstandsbediening kan tot 6 verschillende apparaten bedienen:
televisies (TV), videocassetterecorders (VCR) en digitale videodiskrecorders
(DVD), Satelliet (SAT), Kabel (CAB), audioapparaten (AUD).
Bekijk de onderstaande afbeelding van dit product afbeelding op de keerzijde van
de voorpagina. Je zal misschien ook de handleidingen van jouw oorspronkelijke
afstandsbedieningen moeten doornemen om je geheugen op te frissen omtrent
de functies van deze apparaten.
A. Teletekst Aan-toets
B. Teletekst Uit-toets
C. Teletekst Aanhoud-toets
D. Teletekst Rode toets
E. Teletekst Groene toets
F. Teletekst Gele toets
G. Teletekst Blauwe toets
H. LED
I. Aan/Uit
J. Stil
K. Volume
L. Kanaal
M. Terugspoelen
N. Spelen
O. Snel vooruitspoelen
P. Opnemen
Q. Stop
R. Pauze
Batterij insteken
1. Verwijder het deksel van het batterijvak aan de onderkant van het apparaat.
2. Steek 2 x AA alkaline batterijen in, rekening houdend met de polariteiten
(+/- symbolen) binnenin het batterijvak. Plaats het deksel van het batterijvak
terug.
3. Druk op de AAN/UIT-toets; de LED zou nu moeten branden. Indien dit niet het
geval is, moet je andere batterijen insteken en opnieuw proberen.
Opmerking: alle instellingen zullen uitgewist worden bij het vervangen van de
batterijen.
Toetsfuncties
Belangrijk: wanneer je de afstandsbediening gebruikt, moet je eerst het type
apparaat kiezen dat je wil gebruiken, door op de overeenkomstige apparaattoets
te drukken ( TV, VCR, SAT, DVD, CAB, AUD).
Toetsfunctie
Toetsnaam
voor
TV, VCR,
SAT, CAB
1
CIJFER 1
2
CIJFER 2
3
CIJFER 3
4
CIJFER 4
5
CIJFER 5
6
CIJFER 6
CIJFER 7
7
CIJFER 8
8
CIJFER 9
9
CIJFER 0
0
Opmerking: de gevorderde toetsen die in deze tabel zijn vermeld (DVD-speler en
AUDIOapparaat) zijn niet van toepassing op alle merken DVD-spelers of audioapparaten.
Toetsfunctie voor DVD
(speciale functietoets heeft
een hogere prioriteit)
IMPOSTAZIONE > MENU > CIFRA 1
MENU PRINCIPALE > CIFRA 2
TITOLO > CIFRA 3
REPLAY > CIFRA 4
CASUALE > CIFRA 5
RIPETERE > CIFRA 6
ANGOLO > CIFRA 7
SOTTOTITOLI > CIFRA 8
ZOOM > CIFRA 9
APRI > CHIUSI > ESPELLI > CIFRA 0
Toetsfunctie voor
(cijfertoetsen hebben
een hogere prioriteit)
CIFRA 1 > SELEZIONA NASTRO O VCR
CIFRA 2 > SELEZIONA CD, DVD O LD
CIFRA 3 > SELEZIONA TV
CIFRA 4 > SELEZIONA VIDEO1
CIFRA 5 > SELEZIONA VIDEO2
CIFRA 6 > SELEZIONA SAT
CIFRA 7 > SELEZIONA VIDEO
CIFRA 8 > SELEZIONA FONO
CIFRA 9> SELEZIONA CD, DVD, O DISCO
CIFRA 0 > SELEZIONA SINTONIZZATORE
21 22
NEDERLANDS
Om te programmeren
Opmerking: alle instellingen zullen uitgewist worden bij het vervangen van de
batterijen. Gelieve deze gebruikershandleiding te bewaren zodat je de
afstandsbediening opnieuw kan programmeren na het vervangen van de
batterijen.
Een code manueel invoeren:
1. Zet het apparaat dat je wil programmeren manueel aan
(TV, VCR, SAT, DVD, CAB, AUD).
NEDERLANDS
2. Met behulp van de codelijst achteraan in deze gebruikershandleiding, moet je
de codes voor het merk van het apparaat dat je wil programmeren, opzoeken.
3. Hou de toets voor het apparaat dat je wil programmeren
(TV, VCR, SAT, DVD, CAB, AUD) iets langer dan 3 seconden ingedrukt; de
rode LED zal branden, hetgeen aantoont dat de afstandsbediening klaar is
om een 3-cijferige code te ontvangen.
4. Voer binnen de 30 seconden een 3-cijferige code in die voor het merk van
jouw apparaat is aangeduid; de LED zal doven, hetgeen aantoont dat de
afstandsbediening nu is geprogrammeerd.
5. Druk op de AAN-/UIT-toets om te controleren of de juiste code werd
ingevoerd. Indien het apparaat uitgaat, is er geen verdere programmering
meer nodig.
6. Indien het apparaat niet reageert, moet je stappen 2-5 herhalen en een
andere 3-cijferige code voor dat merk gebruiken.
Opmerking: gelieve de 3-cijferige code die deze afstandsbediening programmeerde, te noteren. Je zal de afstandsbediening opnieuw moeten programmeren na het vervangen van de batterijen.
De afstandsbediening programmeren via Power Scan:
Met de Power Scan programmering, zal de afstandsbediening alle codes in de
codelijst testen en de juiste code voor het geselecteerde apparaat toewijzen.
Alhoewel deze methode meer tijd in beslag neemt, elimineert het het opzoeken
van codes en het manueel invoeren ervan.
1. Zet het apparaat dat je wil programmeren
(TV, VCR, SAT, DVD, CAB, AUD), manueel UIT.
2. Hou de juiste apparaattoets (TV, VCR, SAT, DVD, CAB, AUD) ingedrukt tot
de rode LED brandt. Dit toont aan dat de afstandsbediening zich in de
programmeermodus bevindt.
3. Druk op de AAN-/UIT-toets en laat los. De LED zal eenmaal flikkeren en dan
BLIJVEN BRANDEN, hetgeen aanduidt dat de afstandsbediening zich in de
Power Scan modus bevindt.
4. Druk herhaaldelijk op de CH+ of CH- toets tot het apparaat wordt AANgezet.
De CH+toets zal naar boven in de lijst zoeken, terwijl de CH-toets naar
onderen zal zoeken.
5. Wanneer het apparaat aan springt, druk op de OK-toets en laat deze los om
de nieuwe code te bewaren en deze modus te verlaten. Om de modus te
verlaten zonder de code in te stellen, druk je op de GA TERUG-toets
(GO BACK).
OPMERKING: Indien je opnieuw op de CH+ of CH- toets drukt, nadat het
apparaat aanstaat, zal het apparaat niet geprogrammeerd worden; je zal de
stappen 1-5 opnieuw moeten herhalen.
6. Druk op eender werlke werkingstoets (VOL+/VOL-). Indien het appraat
reageert, is er geen verdere programmering meer nodig. Indien het apparaat
niet reageert, moet je stappen 1-5 herhalen.
ST600IM ST600IM
100mm (W) x 150mm (h) 100mm (W) x 150mm (h)
Page 12

Reset
WAARSCHUWING: Indien het apparaat niet meer werkt of een electrostatische
schok ondergaat, moet je de batterijen eruit nemen en opnieuw insteken.
Garantie
OPMERKING: Gelieve deze instructiehandleiding te bewaren daar het
belangrijke informatie bevat. Dit product is gedekt door een garantie van 2 jaar.
Om gebruik te maken van deze garantie of van de naverkoopdienst, gelieve jouw
verkoper te contacteren en een aankoopbewijs voor te leggen. Onze garantie
dekt defecten in materialen of installaties toegediend door de fabrikant, met
uitzondering van slijtage veroorzaakt door het niet naleven van de gebruiksinstructies of niet-geautoriseerde reparaties aan dit apparaat (zoals uit elkaar
halen, blootstellen aan hitte of vocht, enz.).
http://www.lexibook.com
Milieubescherming
Ongewenste electrische apparaten moeten gerecycleerd worden en mogen niet
worden weggegooid met het dagelijkse huisvuil! Gelieve de conservatie van
bronmaterialen te ondersteunen en de bescherming van het milieu te helpen door
dit apparaat terug te brengen naar een inzamelingscentrum (indien beschikbaar).
NEDERLANDS
23 24
Brand TV Code Brand TV Code
Digital TV
So ny 041
HT Projector
Epson 036 040 046
Hitachi 052
CODE LIST
Mitsubishi 060
Philips 058
Sanyo 033
Sharp 034 037 044 048 049
So ny 032 039 045
Toshiba 038 047 057 059 061
LCD Projection TV
Sharp 024
So ny 007
Toshiba 023
LCD TV
Bush 009
LG 012 013 016 018
Panasonic 014 017
Philips 004 279
Samsung 002 003 011 015 021
Sharp 010 019 020 022
So ny 005
Toshiba 008
LCD TV/RadioTuner Combo
Philips 279
Plasma Display
Hitachi 026 029
Panasonic 031
PLASMA TV
Philips 027
Samsung 025
Plasma TV Monitor
Philips 028
Thomson 030
Projection TV
Hitachi 042
Panasonic 043
TV
Acm e 074
Acura 066
A D C 064
Admiral 062 063 072 073 121
A G B 129
Aiko 064 066
Akai 064 066 067 137 141
050 053 054 055 056
150
Aki ba 067
Akito 076
Akura 067 099
Alb a 066 067 078 079 096
Alkos 148
Allorgan 077
Amstrad 066 067 081 099 121
Anam 066 098
Anglo 066
Anitech 066
Ansonic 066 069
Arc en Ciel 089 132 140
Aristona 150
A S A 062 070 071 073
Astra 066
Asuka 067
Atlantic 150
Atori 066
Audiosonic 066 067 140 150
Autovox 062 116 131
Baird 122 140
Bang & Olufsen 062
Basic Line 066 067
Baur 101 126 136 141 150
Beko 084 106 233 237 249
Beon 150
Bestar 124
Blaupunkt 138
Blue Sky 067
Blue Star 127
Boots 076
BPL 127
Brandt 086 089 090 132 133
140 252
Brionvega 062 150
Bruns 062
SR 077 135
B T C 067
Bush 066 067 072 075 076
078 079 096 124 127
135 136 140 150 151
Carrefour 078
Cascade 066
Cathay 150
106 150 262
129
224 244 253 259 268
270 273
ST600IM ST600IM
100mm (W) x 150mm (h) 100mm (W) x 150mm (h)
Page 13

Brand TV Code Brand TV Code
Centurion 150
Century 062
C G E 135
Cimline 066 079
Ci t y 066
Clarivox 150
Clatronic 066 067 081 106
Concorde 066
Condor 106
Contec 066 078 080 081
Continental Edison086 089 090 122 132
Cosmel 066
Crosle y 062 135
Crown 066 106 150
CS Electronics 067
CTC Clatronic 069
Cybertron 067
Daewoo 066 094 113 124 162
Dainichi 067
Dansai 150
Dantax 084 109 150 151
Daytron 066
De Graaf 072 083
Decca 064 076 081 129 150
Desmet 150
Dixi 066 150
DTS 066
Dual 110 131 132 135 140
Dual-Tec 066 135
Dumont 062 069 070 071
Dux 150
Dynatron 150
Elbe 121
Elcit 062
Electa 127
EL EC TRO TEC H 066
Elin 071 150
Elite 067
Elman 069 135
Elta 066
Emerson 062 133 141
Erres 150
Etron 066
Euroline 109 143 150
Europhon 069 076 129 135
Fenner 066 124
140
177 189
Ferguson 085 086 092 093 104
122 133 147 150
Fidelity 072
Finlandia 072
Finlux 062 064 069 070 071
129 135 150
FIRST LINE 066 077 096
Fisher 062 071 078 080 087
Formenti 062 063 131 135 137
Fortress 062 063
Frontech 066 072 073 126
Fujitsu 064
Funai 077
Galaxy 106
G B C 066 078 135
G E C 064 073 088 129 136
141 150
Geloso 066 072 135
General Technic 066
Genexxa 067 073
GoldStar 066 068 072 107 135
Goodmans 064 066 078 079 122
Gorenje 106
G P M 067
Graetz 073 141 142
Granada 064 072 078 082 087
Grandin 066 067 127 150
Grundig 070 112 116 123 125
Hanseatic 066 077 078 126 135
141 150
Hantarex 066 129
H C M 066 127
Hifivox 140
Hinari 066 067 078 150
Hisawa 067 127
Hitachi 064 072 073 074 078
083 088 089 090 091
Hoshai 067
Huan yu 124
106 135
150
150 151
124 133 150 245
097 129 133 137 150
138 139 172 186 210
108 126 129 135 137
140 141 142 205 218
219 220 243
CODE LIST
25 26
Brand TV Code Brand TV Code
Hyp er 066 135
Hyps on 127 150
I C E 066 067
Imperial 073 106 135
Indesit 075 116
CODE LIST
Indiana 150
Ingelen 073
Ingersol 066
Inno Hit 064 066 067 129 150
Innovation 066 122 124 151 153
Interbuy 066
Interfunk 062 073 140 141 150
Intervision 069
Irradio 066 067 150
Isukai 067
I T C 135
ITS 067 127
IT T 066 073 082 136 137
141 142
I T V 066 109 150 151
JE C 148
J V C 078 104 265
Kaisui 066 067 127
Kapsch 073
Karcher 066 150 277
Kendo 069 072 079 121
Kennedy 135
Konka 067
Korpel 150
Korting 062
Koyoda 066
Lenco 066
Lenoir 066
Leyco 064 077 150
LG 066 068 072 107 109
135 143 150 151 215
236 240
Liesenk 150
Life 066 122 124 151 153
Lifetec 066 122 124 151 153
Loewe 114 115 174 202 271
Loewe Opta 062 150
Logik 081
Luma 072 141 150
Lumatron 072 141 150
Luxor 072 091 116 136 141
M Electronic 066 071 073 086 124
140 150
Magnadyne 062 069 129 135 150
Magnafon 069 129
Magnum 066 122 124 151 153
Manesth 079 150
Marantz 150
Marelli 062
Mark 150
Matsui 064 066 072 076 077
Matsushita 098
McMichael 088
Mediator 150
Medion 066 124 151 153
Memorex 066
Memphis 064 066
Metz
Micromaxx 066 122 124 151 153
Microstar 066 122 124 151 153
Minerva
Mitsubishi 062 078 081 115 116
Miv ar 129
M T C 136
Multi System 150
Multitech 066 069 072 078 089
135 150
Murphy 071 137
N A D 141
Naonis 072 121
National 097 116
N E C 078 156
Neckermann 062 072 106 126 136
NEI 150
New Tech 066
New World 067
Nikkai 064 067 148 150
Nobliko 069 070
Nogamatic 140
Nokia 073 082 136 137 141
Nordmende 062 073 075 086 089
090 122 132 133 140
Nordvision 150
Oceanic 073 141 142
Oka no 106
078 079 081 096 112
129 148 150
062 100 138 144 145
070 116 138
138 221 230 267
150
142
ST600IM
100mm (W) x 150mm (h)
ST600IM
100mm (W) x 150mm (h)
Page 14

Brand TV Code Brand TV Code
Orion 066 077 079 081 096
100 129 142 150 151
206 257 258 276
Ormond 151
Osa ki 064 067 149
Oso 067
Osume 064 080
Otto Versand 063 078 101 122 126
Palladium 068 106
Panama 066 149
Panasonic 073 097 098 116 130
Pathe Cinema 135
Pathe Marconi 089 090 132 140
Pausa 066
Perdio 064
Philco 062 135
Philharmonic 149
Philips
Phoenix 062 150
Phonola 062 150
Pioneer 073 086 140 150
Pop py 066
Prandoni-Prince 072 129 141
Precision 149
Prima 066 073
Prinz 091
Profex 066 141
Profilo 151
Proline 064 096
Prosonic 150 151
Protech 066 069 135 136 149
150
Provision 150 151
Py e 150 216
Py m i 066
Quelle 070 071 077 081 101
135 138 141 150 151
Questa 078
127 135 136 140 141
150
141 142 144 145 157
168 173 178 184 203
231 275
001 062 088 109 110
122 124 135 141 146
150 164 165 167 169
171 176 179 180 181
188 190 191 193 194
196 199 209 211 212
Radiola 150
RB M 070
R C A 082
Rediffusion 141
Revox 150
Rex 072 073 121
RFT 062
R-Line 150
Roadstar 066 067
Robotron 062
RTF 062
Saba 062 073 086 089 090
Saisho 066 079 081 129
Salora 072 073 082 091 121
Sambers 069 129
Samsung 064 066 081 106 111
Sanyo 064 071 078 080 081
SB R 088 150
SCHAUB LORENTZ 073 141 142
Schneider 067 099 131 135 140
150 153 217 226 232
247 248 250
S E G 069 078 109 135 150
SEI-Sinudyne 062 069 073 077 100
Seleco 072 073 078 121 135
Sencora 066
Sentra 148
Sharp 063 065 078 080 095
Shorai 077
Siarem 062 069 129 135
Siemens 080 138
Silver 078
Singer 062 069 135
Sinudyne 062 069 077 079 100
Skantic 073
Solavox 073
094 122 129 132 133
140 141 142 235
126 135 136 141
118 119 149 150 152
163 192 195 204 254
266 269 272
082 087 133 135 198
228 229 260
129
158 159 185 213 223
227
135 150
CODE LIST
27 28
Brand TV Code Brand TV Code
Sonitron 082
Sonoko 066 150
Sonolor 073
Sontec 150
So ny 035 064 066 078 080
CODE LIST
Sound & Vision 067 069
Soundw ave 150
Standard 066 067 149
Starlight 150
Stenwa y 127
Stern 072 073
Sunkai 066 077 096
Sunwood 066
SuperTech 126
Supra 066
Susumu 067
Sutron 066
Sy dne y 149
Sysline 150
Tandberg 077
Tandy 063 064 067 073 137
149
Tashiko 072 078 088 149
Tatung 064 076 129 149 150
T C M 066 122 124 151 153
Tec 066 135 137 149
Technics 098
Teleavia 086 089 122 132 140
Telefunken 085 086 092 093 102
Teletech 066 109 150
Teleton 126 136 149
Tensai 066 067 071 077
Tevion 066 122 124 151 153
Texet 149
Thomson
Thorn 064 071 085 104 122
133 141 148 150
Tokai 064
Tomashi 127
081 101 120 133 134
149 154 155 166 175
182 201 207 222
103 116 121 122 132
133 140 147 161
000 051 086 089 090
092 093 094 116 117
122 132 133 140 147
156 170 187 264
Toshiba
Towada 073 135
Trident 149
Triumph 105 129
Uher 073
Ultravox 062 069 135 137
United 109 150
Universum 071 106 117 128 135
Vestel 072 073 106 135 150
Vexa 066 150
Victor 078 098
Videologique 067
Vistar 137
Vortec 150
Voxson 062 072 073 121
Waltham 137 149
Watson 150
Watt Radio 069 135
Wega 062 078
Weltblick 150
Weston 135
White Westinghouse069 150
Yoko 066 067 149 150
Yorx 067
Zanussi 072 121
TV/DVD Combo
Bush 268
Goodmans 245
Panasonic 275
Thomson 264
Grundig 186
LG 240
Orion 276
Philips 234 241
Samsung 204
So ny 207
Toshiba 238 274
006 070 078 105 123
148 160 183 197 200
208 214 225 238 239
251 256 263 274
150
151
ST600IM
100mm (W) x 150mm (h)
ST600IM
100mm (W) x 150mm (h)
Page 15

Brand VCR Code Brand VCR Code
DVD/VCR Combo
J V C 075 083
LG 068
Philips 074
Samsung 052 063
Sharp 080
TV/VCR Combo
Grundig 064
Samsung 081
VCR
Aki ba 020
Akura 020
Alb a 005 007 020
Allorgan 033
Ambassador 007
Anitech 020
A S A 011 012
Asuka 011 012 020
Baird 005
Basic Line 005 007 020
Baur 012 015
Bestar 005 007
Black Panther Line 005
Blaupunkt 012 013 014 015 018
Bondstec 007
Bush 005 020 022
Catron 007
Cimline 020
Clatronic 007
Condor 005 007
Crown 005 007 020
Cybermaxx 039
Daewoo 005 007 016 019 039
Dansai 020
Daytron 005
De Graaf 012
Decca 012
Dual 012
Dumont 012
Elin 009
Elta 020
E S C 005
Etzuko 020
Ferguson 018 025
Finlandia 012
Finlux 012 029
FIRST LINE 011 016 020 029
Formenti/Phoenix 012
Frontech 007
G B C 007 020
G E C 012
Geloso 020
General 007
General Technic 014 033
GoldHand 020
GoldStar 011
Goodmans 005 007 009 011 020
Granada 003 012 018
Grandin 005 007 011 020
Grundig 012 013 015 018 020
Hanseatic 011 012
H C M 020 022
Hinari 020 022
Hitachi 012 058
Hyps on 020
Impego 007
Inno Hit 005 007 009 012 020
Innovation 014 033 034
Interbuy 011
Interfunk 012
Irradio 011 020
IT T 024
I T V 005 011
J V C 024 025 026 027 028
051 075 083
Kaisui 020
Karcher 012
Kendo 005 007 016
Korpel 020
Lenco 005
Leyco 020
LG 011 054 068
Lifetec 014 033 034 039
Loewe 014 017
Loewe Opta 011 012 018
Logik 009 020
Lumatron 005 019
Luxor
Magnum 034
Manesth 016 020
Marantz 012
Matsui 011
Mediator 012
Medion 014 033 034 039
Memorex 003 011
Memphis 020
021
022 023 040 064
021 029
018 021
CODE LIST
29 30
Brand VCR Code Brand VCR Code
Metz 014 015 017 018
Micromaxx 014 033 034 039
Microstar 014 033 034 039
Minerva 015 018
Mitsubishi 012 025 029
CODE LIST
Multitech 007 012 020
National 013 014
N E C 025
Neckermann 012
NEI 012
Nesco 020
Nikkai 007
Nokia 003 009
Nordmende 024 025
Oceanic 003
On k yo 033
Osa ki 011 020
Otto Versand 012
Palladium 011 018 020
Panasonic 013 014 017 036 044
047 062 070 076 079
082
Philips
Phonola 012
Pioneer 012 025
Portland 005 007
Profex 020
Proline 022
Py e 012
Quelle 012 015 018
Radiola 012
Rex 024
RFT 007 012
Roadstar 005 009 011 020
Saba 024
Saisho 020
Salora 029
Samsung
Samurai 007
Sansui 025
SB R 012
Schneider 005 007 011 012 016
020
S E G 009 020
SEI-Sinudyne 012
002 012 018 023 024
037 041 043 049 050
055 059 065 066 069
071 073 074
009 033 034 052 063
081
Sentra 007
Sentron 020
Sharp 003 004 021 057 080
Shintom 020
Shivak i 011
Siemens 011 015 018
Silva 011
Sinudyne 012
Solavox 007
Sonoko 005
Sonolor 003
Sontec 011
So ny 006 008 010 031 032
Standard 005
Sunwood 020
Tandberg 015
Tashiko 003
Tatung 012
T C M 014 033 034 039
Tec 007
Technics 013 014
Telefunken 024 025 026 030
Tenosal 020
Tensai 011 020
Tevion 014 033 034 039
Thomson 000 001 024 025 026
053
Tivo Hdd 038
Tokai 011 020
Tonsai 020
Toshiba 012 016 024 029 042
056 060 061 078 084
085
Towada 020
Towika 020
T V A 007
Uher 011
Unitech 009
United Quick Star 005
Universum 011 012 015 018 023
Victor
Videon 014 033
Weltblick 011
Yamishi 020
Yokan 020
Yoko 007 009 011 020
035 038 045 046 048
067 072 077
025 026
ST600IM
100mm (W) x 150mm (h)
ST600IM
100mm (W) x 150mm (h)
Page 16

Brand DVD Code Brand DVD Code
CD
Innovation 031
Lifetec 031
Magnum 031
Medion 031
Micromaxx 031
Microstar 031
T C M 031
Tevion 031
DVD
Ai w a 022 108
Akai 016
Alb a 068
Apex 034
Brandt 054
Bush 069 076 115
Classic 028
Cyb erHom e 047 073
Daewoo 003 004 005
Daytek 048 070
Denon 033
Denver 026
DK Digital 074
Dmtech 001
Elta 013 027
Emerson 020
Fisher 023
Go Video 015
Goodmans 100
Grundig 017 025
Harmon/Kardon 039
Hitachi 015 031 082 090 104
109 116
Innovation 018
J V C 010 058 062 075 079
Kenwood 037
LG 020 053 056 091
Life 018
Lifetec 018
Loewe 017 114
Marantz 024 101
M B O 040
Medion 002 018
Micromaxx 018
Microstar 018
Mitsubishi 014
Mustek 028 045 113
N A D 038
Nakamichi 042
On kyo 019
Oritron 018
Panasonic 067
Philips 011 017 024 044 049
071 083 086 089 097
101
Philips Magnavox 011
R C A 029
Saba 054
Sampo 030
Samsung 015 052 060 064 088
Sanyo 084
Schneider 001 002 018 117
Scott 065
S E G 036 055 080 117
Sharp 038 078
Sherwood 035
Shinco 029
Skymaste r 027 028
So ny
T C M 018
Tevion 018
Thomson
Toshiba 011 046 094 096
Wharfedale 021
Yamaha 032
Yamakawa 041
Zenith 020
DVD Recorder
J V C 077
Philips 061 063 092 099
DVD/VCR Combo
Bush 076
Hitachi 082
Philips 089
Samsung 064 088 095
HTIB
DK Digital 074
Mustek 113
Thomson 103
Portable DVD
Bush 087
Yukai 110
TV
Thomson 006 007 043
TV/DVD Combo
Bush 115
Goodmans 100
Thomson 107
093 095 111
012 050 051 057 066
072 081 085 102 105
000 008 009 054 059
098 103 106 107 112
CODE LIST
31 32
Brand SAT Code SAT CodeBrand
SAT
Akai 027
Alb a 081
Allsat 027
Amstrad 022
CODE LIST
Asa t 027
Astra 082
Astro 005 006
Blaupunkt 005
Brain Wave 007
Brandt 030
BT Satellite 030
Bush 008 081
Chaparral 017
Chess 024 031
Ci tyC o m 081
Clatronic 007
Connexions 004 009
Daeryung 004
Diskxpress 009
DNT 004 027
Echostar 004 031
Elta 027
Emme Esse 008
Ep Sat 081
Eurodec 041
Ferguson 008 010 041 081
Finlandia 081
Finlux 081 082
Finnsat 041
F T E 013
Fuba 004 005 027
Goodmans 081
Granada 082
Grundig 003 005 008 012 026
Hanseatic 016
Hantor 007
Hirschmann 005 024
Hisawa 007
Hitachi 008 081
Huth 007
Innovation 016 031 032
ITT Nokia 008 081 082
ITT/Nokia 009
Johansson 007
Kathrein 005 006 013 014 015
017 025 027 043 044
Kosmos 013
Kreiselmeyer 005
Leng 007
Lenson 011
Lifesat
Lifetec
Luxor 082
Lyonnaise 041
040 081
016 031 032
016 031 032
Macab 041
Manhattan 008 081
Marantz 027
Maspro 008 017 081
Matsui 030
M B 016
Medion 016 031 032
Mega 027
Metronic 049
Metz 005
Micromaxx 016 031 032
Microstar 016 031 032
Minerva 005
Mitsubishi 005 030 081
Morgan’s 027
Multichoice 040
Multistar 013
Multitec 031 032
Nav ex 007
Neuhaus 011
Nokia 008 009 081 082
Nordmende 010 025 041 081
Nov is 007
Oka no 013
Otto Versand 005
Pace 005 008 018 081
Palcom 011
Panasonic 008 081
Panda 081
Philips 003 008 012 018 019
026 027 029 038 039
042 081
Phonotrend 081
Polsat 041
Predki 007
Promax 081
Quelle 005
Quiero 041
Radiola 027
Radix 004 047
RFT 027
Saba 008 010
Sabre 081
Sagem 041
Salora 082
Satcom 016
Satec 008
SatPartner 007
Schneider 031 032
Schwaiger 014 016 032
Seemann 004
S E G 007 016 022 050
Siemens 005
Skymaster 016 023 024 031 032
033 034 035 036 037
045
ST600IM
100mm (W) x 150mm (h)
ST600IM
100mm (W) x 150mm (h)
Page 17

Brand SAT Code Brand SAT Code
Sky ma x 027
SR 010
Starland 031
Starring 007
Strong 009
Tandberg 041
Tantec 008 011 081
T C M 016 031 032
TechniSat 004 011 020 021 046
Telasat 016
Telefunken 008 028 030
Teleka 004
Telesat 016
Telestar 011
Televes 081
Tevion 016 031 032
Thomson 000 001 002 010 028
030 041 081
Thorn 008 081
Tonna 081
Triax 005 011
Unitor 007
Universum 005
Variostat 005
Ventana 027
Visiosat 007 031
VTech 019
Wevasat 081
Wewa 081
Winersat 007
Wisi 004 005 081
Zehnder 013 014 022 048 049
SAT-DVR
BS k y B 062
Medion 060
Pace 055
Alb a 063
Amstrad 057
Anttron 063
Astro 063
AudioTon 063
Boca 064 066 071 080
BS k y B 057
Cambridge 064
Exator 063
F T E 064
Grundig 057
Hirschmann 061
Humax 054 056
JOK 065
Kathrein 053 063
KR 063
Kyostar 063
Lasat 064
Metronic 063
Morgan’s 064
Nokia 074 075
Octagon 063
Pace 057
Panasonic 057
Philips 063
Preisner 064
Radix 058 068 077
Rainbow 063
Saba 065
Schacke 063
S E G 067 072 076 079
Siemens 064
So ny 052
Strong 069
TechniSat 051 070 078
Teleciel 063
Teleka 063
Visiosat 065
V-Tech 065
Wisi 065 073
Zodiac 063
Hauppauge 059
CODE LIST
33 34
Brand CBL Code Brand
Cable Box
Alcatel 024 025
Amstrad 000
Arcon 000
Axis 000
CODE LIST
Cabletime 001 002 003 018 019
Clyde Cablevision 004
Cryptovision 005
Fidelity 000
Filmnet Cablecrypt 006 020
Filmnet Comcrypt 006
Finlux 008
France Telecom 022 023
G E C 004
Gooding 007
Grundig 000 007
Hirschmann 008
ITT Nokia 008
Jerrold 014 016
J V C 007
Macab 023
Maspro 007
Matsui 007
Minerva 007
M-Ne t 020
Movie Time 013
Nokia 008
Palladium 007
Philips 007 015 022 023
Pioneer 000 009 010
PVP Stereo Visual Matrix
Sagem 023
SAT 000
Scientific Atlanta 011 012
Tele +1 006
Tele+1 020
Telepiu 020
United Cable 016
Universum 007 008
Vide ow ay 017
Visiopass 008 022 023
Wittenberg 000
021
016
AUDIO Devices
Amplifier
Denon 003
J V C 006
Marantz 021 022
Pioneer 008 019 020
So ny 002 004 018 023 024
Teac 017 025
Yamaha 007 011 026 027 028
CD
Adcom 120
Ai w a 121 122 123 194 195
Akai 124 125 126
Alb a 127
Arcam 179
Bestar 128
BS R 129
Bush 130
Carrera 131
Condor 129
Denon 132 133 197
Dual 120 203
Elta 152 153 185
Emerson 120 128
Fisher 134
Genexxa 128 135 136 137 138
GoldStar 131
Goodmans 141 142
Grundig 177 179
Harmon/Kardon 143 144
Hitachi 120 145 146
Innovation 178 182 183 184 185
J V C 147
Kenwood 134 148 149 150
LG 131
Lifetec 178 182 183 184 185
Linn 179
Luxman 151
Magnavox 177
Magnum 178 182 183 184 185
Marantz 154 177 179
Matsui 155 179
Medion 178 182 183 184 185
Memorex 120 128 140
Meridian 179
Micromaxx 178 182 183 184 185
Micromega 179
029 030
201
139 140
186 187
186 187
186 187
186 187
186 187
ST600IM
100mm (W) x 150mm (h)
ST600IM
100mm (W) x 150mm (h)
Page 18

Brand Brand
Microstar 178 182 183 184 185
Mission 179
N A D 135 180
Naim 179
Nakamichi 156 157
On k yo 118 158 159 160 199
Panasonic 130
Philips 119 161 177 179
Philips CD-V 118
Pioneer 137 140 191
Proton 179
Quad 179
Realistic 120 128 138
Roadstar 161 162
Rotel 179
Saba 120
S A E 179
Sansui 119 163 164 165 177
Schneider 129 179
Scott 128
Sharp 136 166 167 168 200
Sherwood 198
Skymaster 196
So ny 135 169 170 171 181
Tandberg 179
T C M 178 182 183 184 185
186 187
Teac 202
Technics 173
Telefunken 120
Tevion 178 182 183 184 185
Thomson 120
Toshiba 174 175
Universum 179
Victor 147
Victor Research 131
Yamaha 166 172 176
Yorx 162
HTIB
Ai w a 033
DK Digital 032
LG 034
Sanyo 035
Receiver
Pioneer 031
Receiver/Amplifier
Yamaha 029 030
AUDIO Devices AUDIO Devices
186 187
179
188 189 190 191 192
193
186 187
Receiver/Tuner
Ai w a 033 047
Denon 005 014 039 046 048
DK Digital 032
J V C 010
Kenwood 000
LG 034
Marantz 001
Pioneer 031
Sanyo 035
So ny 015 036 040 041 042
Teac 013
Technics 037 049
Thomson 009
Yamaha 012 016 038 045 050
CODE LIST
043 044
051
ST600IM
100mm (W) x 150mm (h)
Copyright © LEXIBOOK 2007
ST600IM0017
35
 Loading...