

Page 1

MP3 THERMOCLOCK®
RLR920
Manuel d’instruction – Instruction manual
RLR920IM0328.indb 1 18/8/08 16:30:18
Page 2

2
RLR920IM0328.indb 2 18/8/08 16:30:18
Page 3
3
OPEN
A
B
C
1
2
3
4
5
6
7
RLR920IM0328.indb 3 18/8/08 16:30:18
Page 4

4
FRANÇAIS
Introduction
Félicitations ! Nous sommes heureux de vous compter aujourd’hui parmi les très nombreux
utilisateurs des produits LEXIBOOK®. Vous venez d’acheter l’horloge de voyage MP3 RLR920 de
LEXIBOOK®. Nous vous invitons à lire attentivement ce mode d’emploi pour proter pleinement de
toutes les fonctions offertes par votre appareil.
Déballage de l’appareil
Lors du déballage, assurez-vous que les pièces suivantes soient incluses :
Une horloge de voyage MP3 Thermoclock® RLR920
Une coque de protection/support de table
Un CD-ROM
Un câble USB
Un manuel d’instruction
Conservez les matériaux d’emballage en lieu sûr, vous pourriez en avoir besoin pour
transporter l’unité. Conservez le ticket de caisse, qui sert également de garantie.
Bien démarrer
1. Enlevez la pellicule statique de l’écran LCD en tirant sur la languette.
2. Déverrouillez le compartiment des piles situé à l’arrière de l’unité en
poussant le bouton vers le haut, dans le sens de la èche (voir
gure C, p.3).
3. Retirez le couvercle du compartiment et insérez 2 piles de type
LR03/AAA de 1,5V (non fournies) en respectant la polarité
(signes +/-) indiquée au fond du compartiment et selon le schéma
ci-contre.
4. Replacez le couvercle des piles et poussez le bouton vers le bas pour verrouiller le compartiment
(voir gure C, p.3). L’heure, la date et la température s’afcheront sur l’écran LCD.
Note: Le compartiment des piles doit être fermé à l’aide du bouton de verrouillage pour que l’unité
puisse fonctionner.
Ne pas recharger les piles non rechargeables. Retirer les accumulateurs du produit avant
de les recharger. Ne charger les accumulateurs que sous la surveillance d’un adulte. Ne pas
mélanger différents types de piles ou accumulateurs, ou des piles et accumulateurs neufs et
usagés. Les piles et accumulateurs doivent être mis en place en respectant la polarité. Les
piles et accumulateurs usagés doivent être enlevés du produit. Les bornes d’une pile ou d’un
accumulateur ne doivent pas être mises en court-circuit. Ne pas jeter les piles au feu. Retirer
les piles en cas de non utilisation prolongée.
AVERTISSEMENT : Si le produit présente un mauvais fonctionnement ou subit des décharges
électrostatiques, localisez le trou du RESET au dos de l’appareil. Insérez une pointe ne et appuyez
doucement puis relâchez. Si le produit ne fonctionne toujours pas correctement, enlevez puis
remettez les piles.
Description de l’appareil
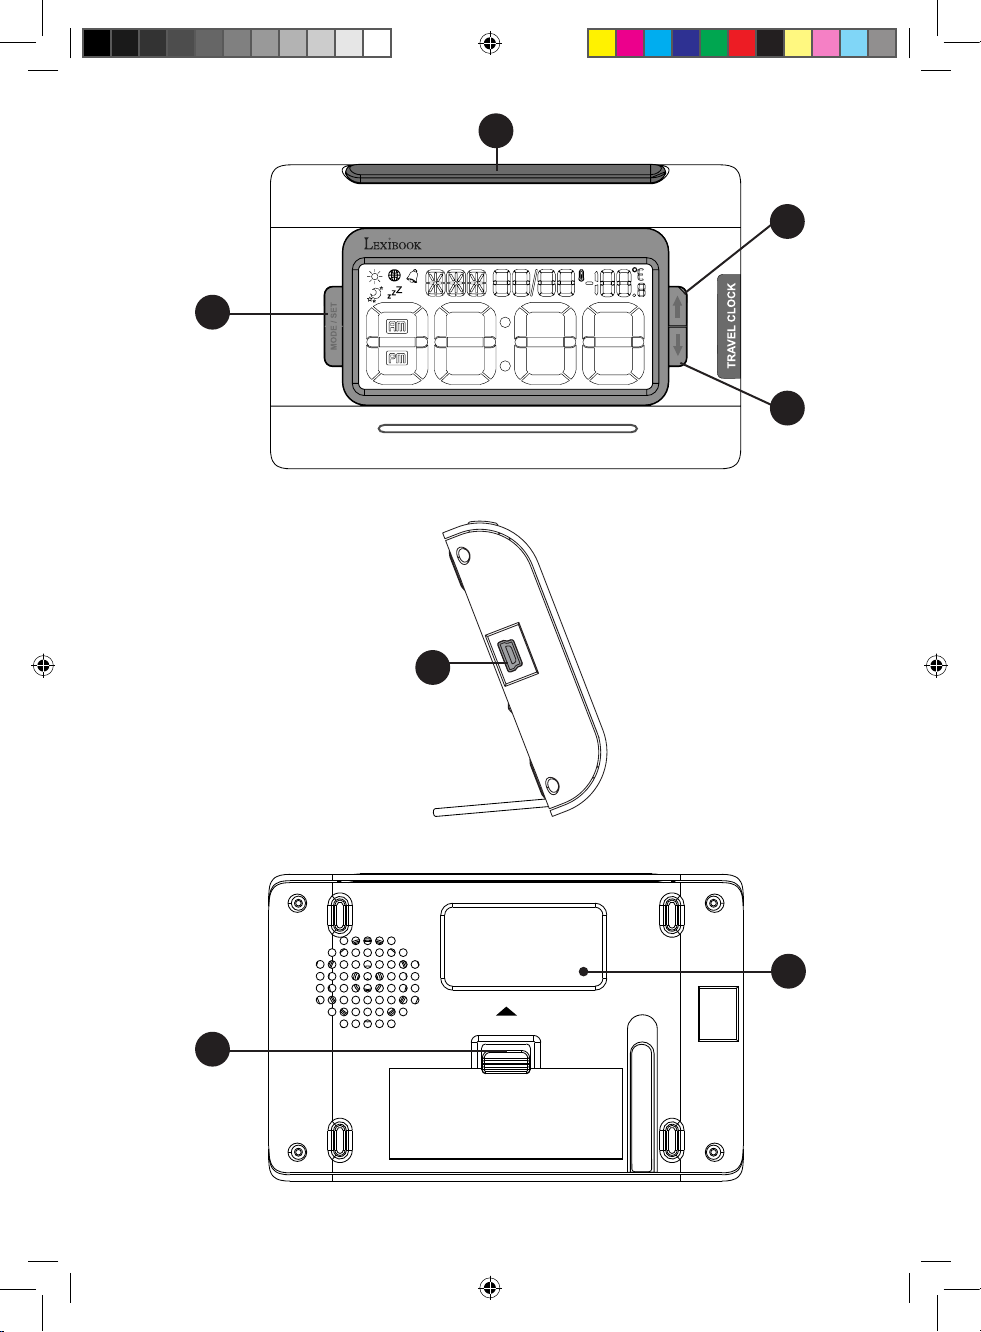
Référez-vous aux images au dos de la page de couverture.
Figure A
1. Touche MODE/SET
2. Touche BACKLIGHT/SNOOZE
(Rétro-éclairage / répétition de l’alarme)
3. Touche de sélection
4. Touche de sélection
Figure B
5. Prise USB
Figure C
6. Bouton RESET
7. Bouton de verrouillage/déverrouillage
du compartiment à piles
RLR920IM0328.indb 4 18/8/08 16:30:19
Page 5

5
FRANÇAIS
Installer le logiciel ThermoClock MP3 Voyage
Suivez les instructions suivantes pour installer le logiciel ThermoClock MP3 Voyage. Ce logiciel
vous permet de télécharger un chier audio au format MP3 ou WAV pour l’utiliser comme sonnerie
d’alarme ou vous aider à vous endormir (mode « Sommeil », voir p.7).
1. Insérez le CD du logiciel (inclus) dans votre lecteur de CD-ROM.
2. Cliquez sur « Démarrer », sélectionnez « Poste de travail » puis double-cliquez sur votre lecteur CD-ROM.
3. Double-cliquez sur le chier « Setup.exe »pour lancer l’installation.
4. Sélectionnez la langue d’installation puis cliquez sur « OK ».
5. Suivez les instructions à l’écran pour installer le logiciel ThermoClock MP3 Voyage.
6. A la n de l’installation, si l’horloge est connectée à l’ordinateur, le programme ThermoClock se
lancera automatiquement.
Note : Pour lancer directement l’installation, allez dans la barre des tâches, cliquez sur
« Démarrer », « Exécuter », écrivez « D:\setup.exe » dans la boîte de dialogue d’exécution (où D:\
est votre lecteur CD-ROM) et appuyez sur Entrée.
Télécharger des mélodies MP3 ou WAV
1. Connectez l’horloge de voyage MP3 RLR920 au port USB de votre ordinateur à l’aide du câble
USB fourni. L’heure reste afchée, mais la date et la température disparaissent et « CON »
(conversion) s’afche sur l’écran de l’horloge.
Note : Les touches de l’horloge sont désactivées quand l’appareil est connecté à l’ordinateur.
2. L’interface de téléchargement apparaît dès que l’unité est connectée au PC. Dans le cas
contraire, double-cliquez sur l’icône « ThermoClock » sur le bureau pour ouvrir le logiciel.
3. Cliquez sur le bouton « Parcourir » pour parcourir vos dossiers et sélectionner un chier audio
MP3 ou WAV. Vous pouvez aussi choisir une des mélodies ou un des effets sonores enregistrés
sur le CD d’installation.
4. Lorsque vous avez sélectionné le chier désiré, cliquez sur le bouton « Télécharger » pour lancer
la conversion du chier et le téléchargement. « DWL » clignote sur l’écran LCD de l’horloge
pendant le transfert du chier.
5. Une fois le téléchargement terminé, le logiciel afche le message « Terminé !» et « END »
apparaît sur l’écran LCD de l’horloge.
Note :
• Pour annuler la conversion et le téléchargement d’un chier, cliquez à tout moment sur le bouton
« Annuler ».
• L’horloge doit être connectée à l’ordinateur pour que vous puissiez utiliser le logiciel Thermo
clock MP3 Voyage.
ATTENTION :
• Vous ne pouvez télécharger qu’un seul chier audio à la fois dans la mémoire ash de l’appareil.
Quand vous téléchargez une nouvelle mélodie, elle remplace automatiquement l’ancien chier.
• L’horloge MP3 peut enregistrer jusqu’à environ 30 secondes de son au format MP3 ou WAV
(si la durée totale du chier téléchargé est plus longue, l’unité ne sauvegardera que les 30
premières secondes).
• Les chiers MP3 mono ou d’une qualité inférieure à 80 kbps (kilobit par seconde) peuvent
provoquer un mauvais fonctionnement du logiciel ThermoClock MP3 Voyage.
Réglage de l’heure et de la date
1. En mode d’afchage de l’heure, appuyez et maintenez la touche MODE/SET jusqu’à ce que les
chiffres des heures clignotent.
2. Pour régler l’heure, utilisez les touches
et puis appuyez sur la touche MODE/SET pour
conrmer votre réglage et accéder au réglage des minutes.
3. Pour régler les minutes, utilisez les touches
et puis appuyez sur la touche MODE/SET pour
conrmer votre réglage et accéder au réglage de l’année.
RLR920IM0328.indb 5 18/8/08 16:30:19
Page 6

6
FRANÇAIS
4. Pour régler l’année, utilisez les touches et puis appuyez sur la touche MODE/SET pour
conrmer votre réglage et accéder au réglage du mois.
5. Pour régler le mois, utilisez les touches et puis appuyez sur la touche MODE/SET pour
conrmer votre réglage et accéder au réglage du jour.
6. Pour régler le jour, utilisez les touches et puis appuyez sur la touche MODE/SET pour
conrmer votre réglage et accéder au réglage du mode d’afchage 12H ou 24H.
7. Pour alterner entre le mode 12 H et le mode 24 H, utilisez les touches
et puis appuyez sur
la touche MODE/SET pour conrmer votre réglage et accéder au réglage de la langue d’afchage.
8. Pour sélectionner une langue d’afchage, utilisez les touches et . Vous avez le choix entre
l’Anglais (ENG), le Français (FRA), l’Italien (ITA), l’Espagnol (ESP), l’Allemand (DEU) et le
Portugais (POR). Appuyez sur la touche MODE/SET pour conrmer votre réglage et revenir à
l’afchage de l’heure.
Note : Durant les réglages, si aucune touche n’est activée pendant environ 1 minute, l’unité
retournera au mode d’afchage de l’heure.
Réglage de l’alarme
Régler l’heure d’alarme
1. En mode d’afchage de l’heure, appuyez une fois sur la touche MODE/SET pour accéder au
mode d’alarme (« ALM » est afché à l’écran).
2. Appuyez sur les touches
et pour activer/désactiver l’alarme. L’icône d’alarme s’afche
lorsque l’alarme est activée.
3. Appuyez et maintenez la touche MODE/SET durant environ 2 secondes pour régler l’alarme. Les
chiffres des heures clignotent.
4. Utilisez les touches
et pour régler l’heure d’alarme, puis appuyez sur la touche MODE/SET
pour conrmer votre réglage et accéder au réglage des minutes.
5. Utilisez les touches et pour régler les minutes, puis appuyez sur la touche MODE/SET pour
conrmer votre réglage et accéder au réglage de la sonnerie d’alarme.
6. Utilisez les touches et pour sélectionner la sonnerie d’alarme. Vous pouvez choisir l’une des
5 sonneries préprogrammées ou une mélodie au format MP3 ou WAV téléchargée depuis votre
PC (pour plus d’informations concernant le téléchargement des sonneries, consultez la section
« Télécharger des mélodies MP3 ou WAV » p.5). Appuyez sur la touche MODE/SET pour
conrmer votre réglage et retourner à l’afchage de l’heure d’alarme.
Note :
• Lorsque l’alarme est activée, l’icône reste afchée à l’écran dans tous les modes.
• L’alarme sonnera à l’heure choisie tous les jours sauf si elle est désactivée.
• Durant le réglage de l’alarme, si aucune touche n’est activée pendant 1 minute, l’horloge
retournera au mode d’afchage de l’heure.
Fonction répétition d’alarme
1. Lorsque l’alarme sonne, l’icône clignote. Appuyez sur la touche BACKLIGHT/SNOOZE pour
l’arrêter temporairement et activer la fonction « Répétition d’alarme ».
2. Lorsque la fonction de répétition d’alarme est activée, l’icône
ne clignote plus mais reste à
l’écran et l’icône de répétition clignote.
3. L’alarme sonnera toutes les 7 minutes jusqu’à ce que vous l’arrêtiez complètement.
Arrêter l’alarme
Lorsque l’alarme sonne, appuyez sur n’importe quelle touche autre que la touche BACKLIGHT/
SNOOZE pour l’arrêter complètement. L’alarme sonnera à nouveau le lendemain à l’heure
programmée. Quand la fonction SNOOZE est activée, appuyez et maintenez n’importe quelle autre
touche que la touche BACKLIGHT/SNOOZE pour l’arrêter complètement. L’alarme sonnera à
nouveau le lendemain à l’heure programmée.
RLR920IM0328.indb 6 18/8/08 16:30:20
Page 7
7
FRANÇAIS
Mode « Sommeil »
L’horloge de voyage MP3 RLR920 propose un mode « Sommeil » pour vous aider à vous endormir
paisiblement. Lorsque ce mode est activé, la mélodie ou le son téléchargé dans l’appareil sera joué
en boucle pendant une durée sélectionnée (de 1minute à 60 minutes). Pour activer le mode
« Sommeil » :
1. En mode d’afchage de l’heure, appuyez deux fois sur la touche MODE/SET pour accéder au
mode « Sommeil » (« SLE » s’afche à l’écran).
2. Pour sélectionner une durée de lecture pour le son ou la mélodie, appuyez et maintenez la
touche MODE/SET jusqu’à ce que les chiffres commencent à clignoter.
3. Utilisez les touches
et pour régler la durée (entre 1 minute et 60 minutes), puis appuyez sur
la touche MODE/SET pour conrmer votre choix.
4. Appuyez sur la touche
pour activer le mode « Sommeil » et lancer la lecture. Le son s’arrêtera
automatiquement à la n du délai programmé.
5. Pour désactiver la fonction et interrompre la lecture :
• en mode « Sommeil », appuyez sur la touche
ou maintenez enfoncée la touche BACKLIGHT/
SNOOZE pendant au moins deux secondes.
• dans tous les autres modes, maintenez enfoncée la touche BACKLIGHT/SNOOZE pendant au
moins deux secondes.
Note : Si aucune touche n’est activée pendant 1 minute, l’horloge retournera au mode d’afchage
de l’heure.
Réglage du fuseau horaire
1. En mode d’afchage de l’heure, appuyez trois fois sur la touche MODE/SET pour accéder au
mode de réglage du fuseau horaire (l’icône est afchée sur l’écran).
2. Appuyez sur la touche
pour faire déler l’heure dans 37 villes du monde.
3. Appuyez sur la touche
pour afcher l’heure d’été (le symbole apparaît à l’écran). Appuyez
encore une fois sur la même touche pour revenir à l’heure d’hiver (le symbole
disparaît).
4. Une fois la ville désirée sélectionnée, appuyez et maintenez la touche MODE/SET pendant au
moins 2 secondes pour conrmer votre choix et revenir au mode d’afchage de l’heure. L’heure
afchée sera l’heure de la ville sélectionnée.
Note :
• En mode d’afchage de l’heure, appuyez une fois sur la touche pour afcher le nom de la ville
sélectionnée dans le mode de réglage du fuseau horaire. Appuyez une nouvelle fois sur pour
revenir à l’afchage du jour.
• En mode de réglage du fuseau horaire, l’icône clignote lorsque la ville afchée est la même que
celle sélectionnée pour le mode d’afchage de l’heure.
• Si vous activez l’heure d’été lors du réglage du fuseau horaire, le symbole sera également
afché en mode d’afchage de l’heure.
NOM DE LA VILLE ABRÉVIATION HEURE DE DIFFÉRENCE
1 Londres LON 0
2 Paris PAR + 1
3 Berlin BER + 1
4 Milan MIL + 1
5 Rome ROM + 1
6 Le Caire CAI + 2
7 Istanbul IST + 2
8 Jérusalem JRS + 2
9 Moscou MOW + 3
10 Doubaï DXB + 4
11 Karachi KHI + 5
RLR920IM0328.indb 7 18/8/08 16:30:21
Page 8

8
FRANÇAIS
NOM DE LA VILLE ABRÉVIATION HEURE DE DIFFÉRENCE
NOM DE LA VILLE ABRÉVIATION HEURE DE DIFFÉRENCE
1 Londres LON 0
2 Paris PAR + 1
3 Berlin BER + 1
4 Milan MIL + 1
5 Rome ROM + 1
6 Le Caire CAI + 2
7 Istanbul IST + 2
8 Jérusalem JRS + 2
9 Moscou MOW + 3
10 Doubaï DXB + 4
11 Karachi KHI + 5
12 Dacca DAC + 6
13 Bangkok BKK + 7
14 Hong Kong HKG + 8
15 Singapour SIN + 8
16 Tokyo TYO + 9
17 Séoul SEL + 9
18 Sydney SYD + 10
19 Nouméa NOU + 11
20 Wellington WLG + 12
21 Majuro MAJ - 12
22 Apia APW - 11
23 Honolulu HNL - 10
24 Anchorage ANC - 9
25 San Francisco SFO - 8
26 Los Angeles LAX - 8
27 Vancouver VAR - 8
28 Denver DEN - 7
29 Chicago CHI - 6
30 Mexico MEX - 6
31 New York NYC - 5
32 Miami MIA - 5
33 Saint Domingue SDO - 4
34 Rio de Janeiro RIO - 3
35 Buenos Aires BAI - 3
36 Fernando de Noronha FEN - 2
37 Tasiilaq AGM - 1
Rétro éclairage
Appuyez une fois sur la touche BACKLIGHT/SNOOZE pour activer le rétro éclairage pendant
5 secondes.
Température
En mode d’afchage de l’heure, utilisez la touche pour faire permuter l’afchage de la
température entre Celsius (°C) et Fahrenheit (°F).
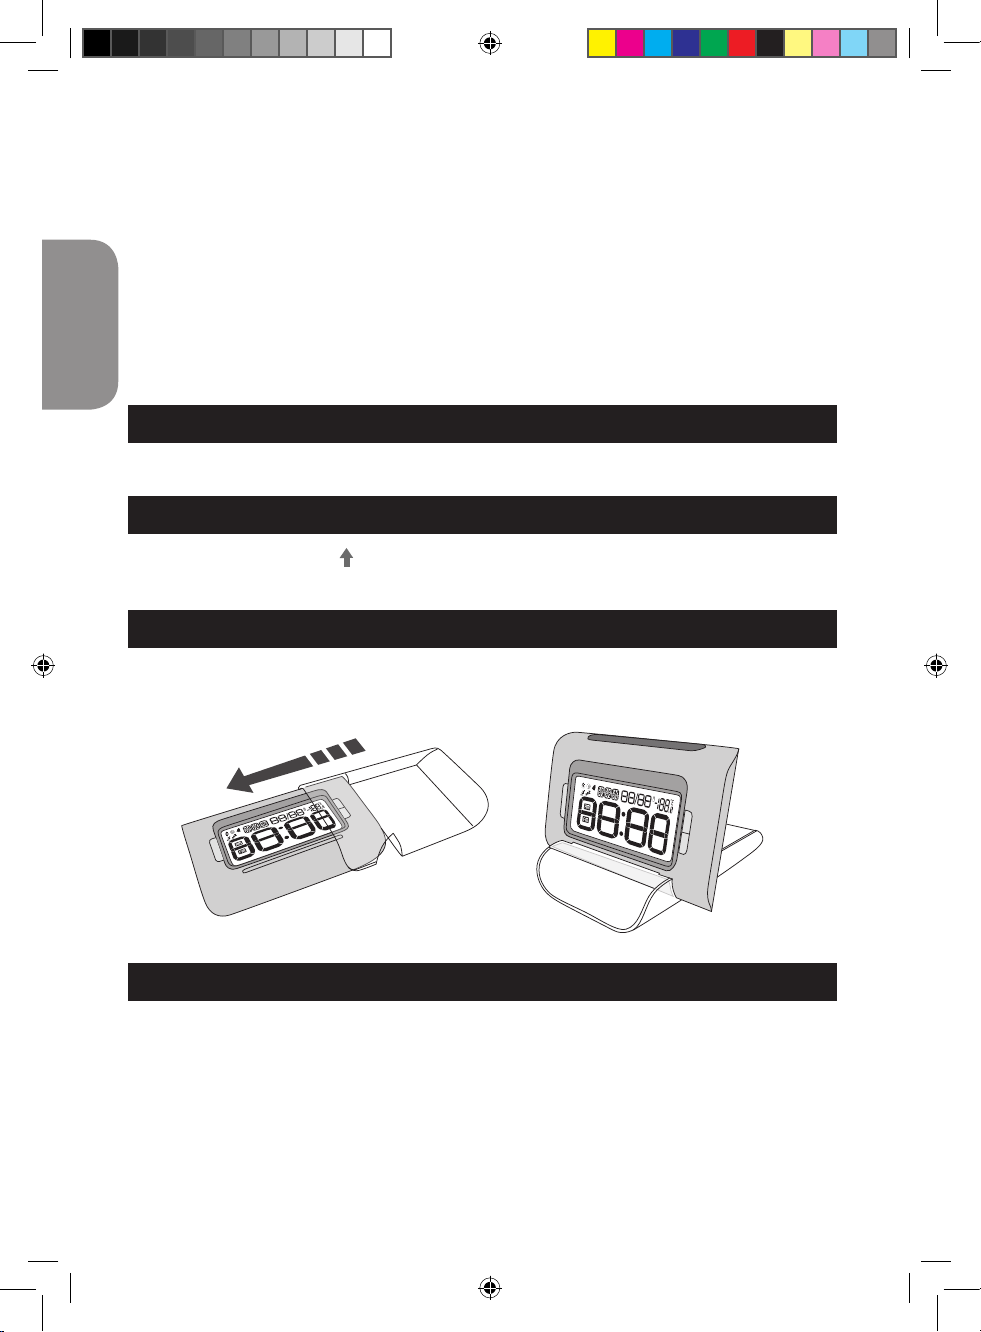
Support de table
Vous pouvez utilisez la coque de protection fournie avec votre RLR920 comme support de table.
Installez simplement l’horloge dans l’encoche prévue à cet effet .
RLR920IM0328.indb 8 18/8/08 16:30:22
Page 9

9
FRANÇAIS
Nettoyage et entretien
Ne nettoyez aucune partie de votre horloge de voyage MP3 RLR920 avec du benzène, du diluant
ou d’autres solvants chimiques. Cela peut entraîner un dommage permanent qui n’est pas couvert
par la garantie. Si nécessaire, nettoyer avec un chiffon humide. Evitez de soumettre votre horloge
RLR920 aux températures extrêmes, aux chocs sévères, et évitez de la mouiller. Quand l’intensité
de l’écran LCD diminue, remplacez les piles. Evitez toute utilisation en présence de champs magné-
tiques comme dans les aéroports. Tout a été fait pour assurer une grande abilité de votre RLR920.
Toutefois, en cas de problème, ne tentez pas de la réparer vous-même, consultez votre fournisseur
ou la ligne d’aide LEXIBOOK®.
Garantie
Ce produit est couvert par notre garantie de deux ans. Pour toute mise en œuvre de la garantie ou
de service après vente, vous devez vous adresser à votre revendeur muni de votre preuve d’achat.
Notre garantie couvre les vices de matériel ou de montage imputables au constructeur à l’exclusion
de toute détérioration provenant du non respect de la notice d’utilisation ou de toute intervention
intempestive sur l’article (telle que démontage, exposition à la chaleur ou à l’humidité…).
Note : la garantie ne couvre pas le bris de l’écran LCD.
NOTE : Veuillez garder ce mode d’emploi, il contient d’importantes informations. Dans un souci
constant d’amélioration, nous pouvons être amenés à modier les couleurs et les détails du produit
présenté sur l’emballage.
Référence: RLR920
©2008 LEXIBOOK®
Conçu en Europe – Fabriqué en Chine
LEXIBOOK S.A
2, avenue de Scandinavie
91953 Courtaboeuf Cedex France
Assistance technique : 0892 23 27 26 (0,34 € TTC/Min), www.lexibook.com
Informations sur la protection de l’environnement
Tout appareil électrique usé est une matière recyclable et ne devrait pas faire partie
des ordures ménagères! Nous vous demandons de bien vouloir nous soutenir
en contribuant activement au ménagement des ressources et à la protection de
l’environnement en déposant cet appareil dans des sites de collecte (si existants).
RLR920IM0328.indb 9 18/8/08 16:30:23
Page 10

10
ENGLISH
Introduction
Congratulations for the purchase of your MP3 Thermoclock® RLR920 from LEXIBOOK®! We invite
you to read this manual attentively as it will help and guide you with the usage of your new product.
Unpacking the device
When unpacking, ensure that the following elements are included:
1 x MP3 Thermoclock® RLR920
1 x protective cover/stand
1 x CD-ROM
1 x USB cable
1 x instruction manual
Please keep all packaging in a safe place for future reference. Please keep your sales (till)
receipt – this is your guarantee.
Getting started
1. Remove the clear lm label from the LCD screen by pulling the tab.
2. Push the lock button up, in the direction of the arrow, to unlock the
battery compartment located on the back side of the unit
(see image C, p.3).
3. Remove the battery door and install 2 x 1,5V LR03/AAA type
batteries (not included) according to the polarity (+/- signs) indicated
at the bottom of the battery compartment, and as per the diagram shown opposite.
4. Replace the battery door and push the lock button down to lock the battery compartment
(see image C, p.3). The time, date, and temperature will be displayed on the LCD screen.
Note: The battery door must be locked with the lock button in order for the unit to operate.
Non-rechargeable batteries are not to be recharged. Remove the storage batteries before
recharging. Recharge storage batteries under adult supervision. Do not mix different types of
battery and storage battery, or new and old batteries or storage batteries. Insert batteries and
storage batteries according to the polarity. Remove used storage batteries from product. Do
not short-circuit the battery or storage battery terminals. Keep batteries away from re. If the
product remains unused for an extended period, remove batteries.
WARNING: If the unit malfunctions or receives an electrostatic shock, locate the small RESET hole
on the back of the product. Insert a small, thin, blunt instrument, such as a paperclip, into the hole,
press gently and then release. If this proves to be ineffective, remove the batteries and insert them
again.
Product description
Please refer to the images at the back of the cover page.
Image A
1. MODE/SET key
2. BACKLIGHT/SNOOZE key
3. Up arrow key
3. Down arrow key
Image B
5. USB port
Image C
6. RESET key
7. Battery compartment lock/unlock button
RLR920IM0328.indb 10 18/8/08 16:30:23
Page 11

11
ENGLISH
Installing the ThermoClock MP3 Voyage software
Follow these instructions to install the Thermoclock MP3 Voyage software on your PC system. This
software allows you to download an audio le in MP3 and WAV format. You can use the le as an
alarm ringtone or to help you go to sleep (refer to the “Sleep” mode section, p.12).
1. Insert the CD Software (included) in your CD-ROM drive.
2. Click “Start”, then “My Computer” and double-click your CD-ROM drive.
3. Double-click the “Setup.exe” le to launch the installation.
4. Select the installation program language and click the “Ok” key.
5. Follow the instructions to install the ThermoClock MP3 Voyage software.
6. If your ThermoClock is connected to your PC system, the program will launch automatically once
the installation process is completed.
Note: To launch the installation directly, click “Start”, “Run”, type in “D:\setup.exe” in the Run dialog
text box (where D:\ is your CD-ROM drive) and press Enter.
Downloading MP3 and WAV melodies
1. Connect the MP3 Thermoclock® RLR920 to your computer’s USB port via the USB cable
provided. The date and weather information disappeared; the time and “CON” (conversion) are
displayed on the LCD screen.
Note: The unit’s keys are disabled when the clock is connected to the computer.
2. The download screen will be displayed automatically when the unit is connected to the computer.
If the download screen does not appear, double-click on the “ThermoClock” icon on the desktop to
launch the software.
3. Click on the “Browse” key to browse through your folders. Select an audio le in MP3 or WAV
format. You can also select one of the melodies or sound effects that are included on the
installation CD.
4. When you have selected the desired sound or melody, click on the “Download” key to start the le
conversion and the download process. During the transfer, “DWL” blinks on the LCD screen of the
clock.
5. When the downloading process ends, the software displays the message “Finished!” and “END”
appears on the clock’s LCD screen.
Note:
• To cancel the le conversion and the download, you can click at any moment on the “Cancel” key.
• To use the ThermoClock MP3 Voyage software, the clock must be connected to the computer.
WARNING:
• Only one audio le can be saved in the unit’s ash memory. When you download a new melody,
it will automatically replace the previous le.
• The MP3 clock can store up to around 30 seconds of sound in MP3 or WAV format (if the length of
the downloaded le exceeds the maximum length, the unit will only download and save the rst 30
seconds).
• MP3 les in mono or below 80 kbps (kilobit per second) might cause the Thermoclock MP3 Voyage
software to malfunction.
Setting the time and date
1. In time display mode, press and hold the MODE/SET key until the hour’s digits start ashing.
2. To adjust the hour, press the
and keys and then press MODE/SET to conrm. The minute’s
digits ash.
3. To adjust the minutes, press the
and keys and then press MODE/SET to conrm. The year’s
digits ash.
4. To adjust the year, press the
and keys and then press MODE/SET to conrm. The month’s
digits ash.
5. To adjust the month, press the and keys and then press MODE/SET to conrm. The date’s
digits ash.
RLR920IM0328.indb 11 18/8/08 16:30:23
Page 12
12
ENGLISH
6. To adjust the date, press the and keys and then press MODE/SET to conrm and enter the
12 or 24 hour mode selection.
7. To toggle between the 12 or 24 hour mode, press the and keys and then press MODE/SET
to conrm and select the language.
8. To select the language, press the and keys. You can choose between English (ENG), French
(FRA), Italian (ITA), Spanish (ESP), German (DEU) and Portuguese (POR). Press the MODE/SET
key to conrm and go back to the time display.
Note: During the setting process, if there is no input within 1 minute, the display will automatically go
back to the normal time display mode.
Alarm mode
Setting the alarm time
1. In normal time display mode, press the MODE/SET key once to enter the alarm mode (“ALM” is
displayed on screen).
2. Press the
and keys to turn the alarm on/off. A clock icon is displayed when the alarm is
turned on.
3. Press and hold MODE/SET for about 2 seconds to set the alarm. The hour’s digits are ashing.
4. To adjust the hour, press the
and keys and then press MODE/SET to conrm and set the
minutes.
5. Press the and keys to adjust the minutes. Press the MODE/SET key to conrm the alarm
time and select the alarm ring tone.
6. Use the and keys to choose a ring tone. You can select one of the 5 pre-loaded ringtones or
a MP3 or WAV melody downloaded from your computer (for more information regarding the
download of ringtones, consult the “Downloading MP3 or WAV melodies” section p.11). Press
MODE/SET to conrm your settings and go back to the alarm time display mode.
Note:
• When the alarm is clock on, the icon is displayed in all modes.
• The alarm will ring at the time set every day unless it is turned off.
• During the setting process, if there is no input within 1 minute, the display will automatically go
back to the normal time display mode.
Snooze function
1. When the alarm is ringing, the clock icon ashes on the display.
Press the BACKLIGHT/SNOOZE key to temporarily turn off the alarm and use the snooze function.
2. When the snooze function is on, the icon stays constant on the display and the snooze icon
ashes.
3. The alarm will be repeated every 7 minutes until you turn it off.
Turning off the alarm
When the alarm is ringing, press any key other than the BACKLIGHT/SNOOZE key to turn it off. It
will ring again the next day at the set time.
When Snooze is activated, press and hold any key other than the BACKLIGHT/SNOOZE key to turn
it off. It will ring again the next day at the set time.
“Sleep” mode
The MP3 Thermoclock® RLR920 includes a “Sleep” mode feature to help you go to sleep
peacefully. When this mode is enabled, the downloaded sound or melody will be played in a loop for
a specied time period (from 1 minute to 60 minutes). To turn on the “Sleep” mode:
1. In time display mode, press the MODE/SET key two times to enter the “Sleep” mode (“SLE” is
displayed on screen).
2. To set the sound duration, press and hold the MODE/SET key until the digits start ashing.
RLR920IM0328.indb 12 18/8/08 16:30:24
Page 13
13
ENGLISH
Time-zone setting
1. In time display mode, press the MODE/SET key three times to enter the time-zone setting mode
(the icon is displayed on screen).
2. Press the
key to browse the time in 37 world cities.
3. Press the
key to turn the daylight saving time (DST) function on or off (the is displayed on
screen when the DST function is enabled).
4. When you have selected the desired city, press and hold MODE/SET for about 2 seconds to
conrm your settings and go back to the normal time display mode. The displayed time will be the
time of the selected city.
Note:
• In normal time display mode, press the key once to display the name of the city selected in the
time-zone setting mode. Press again to go back to the date display.
• In time-zone setting mode, the icon ashes when the displayed word city is the same as the
currently selected city in time display mode.
• If the DST function has been turned on, the icon will also be displayed in time display mode.
CITY NAME ABBREVIATION TIME DIFFERENCE
1 London LON 0
2 Paris PAR + 1
3 Berlin BER + 1
4 Milan MIL + 1
5 Rome ROM + 1
6 Cairo CAI + 2
7 Istanbul IST + 2
8 Jerusalem JRS + 2
9 Moscow MOW + 3
10 Dubai DXB + 4
11 Karachi KHI + 5
12 Dhaka DAC + 6
13 Bangkok BKK + 7
14 Hong Kong HKG + 8
15 Singapore SIN + 8
16 Tokyo TYO + 9
17 Seoul SEL + 9
18 Sydney SYD + 10
19 Noumea NOU + 11
20 Wellington WLG + 12
21 Majuro MAJ - 12
22 Apia APW - 11
23 Honolulu HNL - 10
24 Anchorage ANC - 9
25 San Francisco SFO - 8
3. Use the and keys to select a time (between 1 minute and 60 minutes), then press MODE/SET
to conrm.
4. Press the
key to turn on the “Sleep” mode and start the playback. The sound will automatically
turn off when the selected time expires.
5. To turn off the function:
• in “Sleep” mode, press the
key or press and hold the BACKLIGHT/SNOOZE key for about
2 seconds.
• in all the other modes, press and hold the BACKLIGHT/SNOOZE key for about 2 seconds.
Note: If no key is pressed within 1 minute, the display will automatically go back to the normal time
display mode.
RLR920IM0328.indb 13 18/8/08 16:30:25
Page 14
14
ENGLISH
CITY NAME ABBREVIATION TIME DIFFERENCE
CITY NAME ABBREVIATION TIME DIFFERENCE
1 London LON 0
2 Paris PAR + 1
3 Berlin BER + 1
4 Milan MIL + 1
5 Rome ROM + 1
6 Cairo CAI + 2
7 Istanbul IST + 2
8 Jerusalem JRS + 2
9 Moscow MOW + 3
10 Dubai DXB + 4
11 Karachi KHI + 5
12 Dhaka DAC + 6
13 Bangkok BKK + 7
14 Hong Kong HKG + 8
15 Singapore SIN + 8
16 Tokyo TYO + 9
17 Seoul SEL + 9
18 Sydney SYD + 10
19 Noumea NOU + 11
20 Wellington WLG + 12
21 Majuro MAJ - 12
22 Apia APW - 11
23 Honolulu HNL - 10
24 Anchorage ANC - 9
25 San Francisco SFO - 8
26 Los Angeles LAX - 8
27 Vancouver VAR - 8
28 Denver DEN - 7
29 Chicago CHI - 6
30 Mexico MEX - 6
31 New York NYC - 5
32 Miami MIA - 5
33 Santo Domingo SDO - 4
34 Rio de Janeiro RIO - 3
35 Buenos Aires BAI - 3
36 Fernando de Noronha FEN - 2
37 Tasiilaq AGM - 1
Backlight
Press the BACKLIGHT/SNOOZE key once to turn on the backlight for 5 seconds.
Temperature
In time display mode, use the key to toggle between temperature display in Celsius (°C) and
Fahrenheit (°F).
Clock stand
You can use the protective cover provided with your RLR920 as a stand. Simply place the clock in
the cover’s notch and install it on a table.
Maintenance
Don’t clean any part of your RLR920 with benzene, thinners or other solvent chemicals—this may
cause permanent damage which is not covered by the guarantee. When necessary, clean it with a
damp cloth. Keep your RLR920 away from extreme temperature, water or severe shock. When the
LCD screen turns unclear, replace the batteries. Avoid using in the presence of magnetic elds such
as in airports. Every effort has been made to ensure high standards of reliability for your RLR920.
However, if something does go wrong, please do not try to repair it yourself – consult your supplier
or the LEXIBOOK® help line.
RLR920IM0328.indb 14 18/8/08 16:30:26
Page 15

15
ENGLISH
Warranty
This product is covered by our two-year guarantee*. For all matters relating to the guarantee or our
after-sales service, please contact your retailer and have your receipt on hand. Our guarantee cov-
ers manufacturing or assembly defects with the exception of all damage resulting from a failure to
respect the instructions, or any inappropriate handling of the article (such as taking it apart, exposing
it to heat or humidity, etc).
* excluding the deterioration of the LCD screen.
NOTE: It is recommended that all packaging be kept for future reference.
Keep this instruction manual in a safe place as it contains important information. In our constant
concern for improvement, the colours and details of the product may differ slightly from those shown
on the packaging.
Reference: RLR920
©2008 LEXIBOOK®
Designed and developed in Europe – Made in China
Lexibook UK Ltd,
Unit 10 Peterseld Industrial Estate,
Bedford Road, Peterseld,
Hampshire, GU32 3QA, United Kingdom.
Helpline: 0808 1003015, www.lexibook.com
Environmental Protection:
Unwanted electrical appliances can be recycled and should not be discarded
along with regular household waste! Please actively support the conservation
of resources and help protect the environment by returning this appliance to a
collection centre (if available).
RLR920IM0328.indb 15 18/8/08 16:30:26
Page 16

16
ESPAÑOL
Introducción
¡Enhorabuena por su compra del MP3 Thermoclock® RLR920 de LEXIBOOK®! Le pedimos que lea
este manual con atención porque esto le servirá de ayuda y guía para usar el producto.
Desembalaje del aparato
Al desembalar el aparato compruebe que los siguientes elementos se encuentran dentro:
1 MP3 Thermoclock® RLR920
1 soporte/cubierta protectora
1 CD-ROM
1 cable USB
1 manual de instrucciones
Guarde el embalaje para futuras consultas. Por favor, guarde el recibo porque éste es la garantía
del producto.
Inicio
1. Retire la lámina transparente de la pantalla LCD tirando de la lengüeta.
2. Presione hacia arriba el botón de cierre en la dirección que marca la
echa para abrir el compartimiento de las pilas que se encuentra
situado en la parte posterior del aparato (ver imagen C, pág. 3).
3. Retire la tapa de las pilas e instale 2 pilas de 1,5V
de tipo LR03/AAA
(no incluidas) de acuerdo a las indicaciones sobre polaridad (+/-) que
se encuentran en la parte inferior del compartimiento de las pilas. Siga
las indicaciones de los diagramas ilustrados.
4. Coloque de nuevo la tapa de las pilas y presione el cierre hacia abajo para cerrarla
(ver imagen C, pág. 3). La hora, la fecha y la temperatura aparecerán en la pantalla LCD.
Nota: Para que la unidad funcione debe jarse la puerta del compartimento de las pilas con el
botón de bloqueo.
Las pilas no recargables no deben ser recargadas. Retirar las pilas recargables del aparato
antes de proceder a su recarga. Las pilas recargables deben ser recargadas solamente bajo
supervisión adulta. No mezclar tipos de pilas diferentes o pilas nuevas con pilas usadas. Usar
solamente pilas del tipo recomendado o equivalentes. Insertar las pilas con las polaridades en
posición correcta. Retirar las pilas gastadas de dentro del aparato. No provocar cortocircuitos
en los terminales. No echar las pilas al fuego. Retirar las pilas de dentro del aparato si éste no
va a ser utilizado por un periodo de tiempo prolongado.
ADVERTENCIA: Si el aparato funcionara de forma defectuosa o recibe una descarga electrostática
busque el pequeño oricio de REINICIO situado en la parte posterior del aparato e inserte un
instrumento pequeño, no y de punta roma, como por ejemplo un clip, en el mismo. Presione con
cuidado y a continuación sáquelo. Si esta operación no soluciona el problema, retire las pilas y
colóquelas de nuevo.
Descripción del producto
Imagen A
1. Tecla MODO/PROGRAMACIÓN
2. Tecla LUZ DE FONDO/REPETICIÓN ALARMA
3. Tecla de echa ascendente
4. Tecla de echa descendente
Imagen B
5. Puerto USB
Imagen C
6. Tecla REINICIO
7. Botón de cierre/abertura del compartimiento
de pilas
RLR920IM0328.indb 16 18/8/08 16:30:27
Page 17

17
ESPAÑOL
Instalación del software del Thermoclock MP3 Voyage
Siga estas instrucciones para instalar el software del Thermoclock MP3 Voyage en su PC. Este
software le permite descargar archivos de audio en formatos MP3 y WAV. Puede usar el archivo
como tono de timbre de alarma o como ayuda para dormir (ver la sección modo “Dormir”, pág. 18).
1. Introduzca el CD con el software (incluido) en la unidad de CD-ROM de su PC.
2. Pulse en “Inicio”, luego en “Mi PC”, y pulse dos veces sobre el icono de la unidad CD-ROM.
3. Pulse dos veces sobre el icono del archivo “Setup.exe” para que se ejecute la instalación.
4. Seleccione el idioma del programa de instalación y pulse el botón “Aceptar”.
5. Siga las instrucciones que se mostrarán en la pantalla para instalar el programa ThermoClock
MP3 Voyage.
6. Si el ThermoClock está conectado al PC, el programa se ejecutará automáticamente una vez que
termine el proceso de instalación.
Nota: Para ejecutar directamente la instalación, seleccione “Inicio” => “Ejecutar” e introduzca
“D:\setup.exe” en el campo de texto del diálogo (sustituya “D” por la unidad de CD-ROM de su
ordenador), y pulse luego Aceptar.
Descarga de melodías MP3 y WAV
1. Conecte el MP3 Thermoclock® RLR920 al puerto USB con el cable USB incluido. La fecha y la
información sobre el tiempo desaparecerán; la hora y “CON” (conversión) aparecerán en la
pantalla LCD.
Nota: Las teclas del aparato quedan inutilizadas cuando el reloj está conectado al ordenador.
2. La pantalla de descarga aparecerá automáticamente cuando el aparato esté conectado al
ordenador. Si no apareciera la pantalla de descarga haga un clic doble en el icono del
“ThermoClock” del escritorio para lanzar el software.
3. Haga clic en “Browser” (Hojear) para ver los archivos. Seleccione un archivo de audio en formato
MP3 o WAV. También puede seleccionar una melodía o efectos de sonido que vienen incluidos
en el CD de instalación.
4. Cuando haya seleccionado el sonido o melodía deseados haga clic en “Download” (Descargar)
para iniciar el proceso de conversión y de descarga. Durante la transferencia “DWL” parpadeará
en la pantalla LCD del reloj.
5. Cuando el proceso de descarga termine aparecerá en pantalla el mensaje “Finished” (Finalizado)
y “END” (FIN) aparecerá en la pantalla LCD del reloj.
Nota:
• Para cancelar la conversión del archivo haga clic en cualquier momento en “Cancel” (Cancelar).
• Para usar el software del ThermoClock MP3 Voyage el reloj debe estar conectado al ordenador.
ADVERTENCIA:
• Solamente se puede guardar un archivo de audio en la memoria ash del aparato. Cuando
descargue una nueva melodía ésta reemplazará automáticamente el archivo anterior.
• El reloj MP3 puede guardar hasta 30 segundos de sonido en formato MP3 o WAV (si la longitud
del archivo excede el máximo el aparato descargará solamente los primeros 30 segundos).
• Los archivos MP3 monoaurales o por debajo de 80 kbps (kilobits por segundo) pueden hacer que
el software Thermoclock MP3 Voyage funcione mal.
Programación de la hora y la fecha
1. En el modo de hora pulse y mantenga pulsada la tecla MODO/PROGRAMACIÓN hasta que los
dígitos de las horas comiencen a parpadear.
2. Para programar la hora pulse las teclas
y y a continuación pulse MODO/PROGRAMACIÓN
para conrmar. Los dígitos de los minutos parpadearán.
3. Para programar los minutos pulse las teclas
y y a continuación pulse MODO/PROGRAMACIÓN
para conrmar. Los dígitos del año parpadearán.
4. Para programar el año pulse las teclas
y y a continuación pulse MODO/PROGRAMACIÓN
para conrmar. Los dígitos del mes parpadearán.
5. Para programar el mes pulse las teclas y y a continuación pulse MODO/PROGRAMACIÓN
para conrmar. Los dígitos de la fecha parpadearán.
6. Para programar la fecha pulse las teclas y y a continuación pulse MODO/PROGRAMACIÓN
para conrmar e introducir el formato de 12 o 24 horas.
RLR920IM0328.indb 17 18/8/08 16:30:27
Page 18

18
ESPAÑOL
7. Para alternar entre los formatos de 12 y 24 horas pulse las teclas y a continuación pulse
MODO/PROGRAMACIÓN para conrmar y seleccionar el idioma.
8. Para seleccionar el idioma pulse las teclas
y . Puede elegir entre inglés (ENG),
francés (FRA), italiano (ITA), español (ESP), alemán (DEU) y portugués (POR). Pulse la tecla
MODO/PROGRAMACIÓN para conrmar y volver a la pantalla de la hora.
Nota: Durante el proceso de programación si no se pulsa ninguna tecla durante 1 minuto la pantalla
volverá automáticamente al modo normal de hora.
Modo alarma
Programación de la hora de alarma
1. En el modo de pantalla de hora normal pulse la tecla MODO/PROGRAMACIÓN una vez para ir al
modo de alarma (“ALM” aparecerá en pantalla).
2. Pulse las teclas
y para activar y desactivar la alarma. El icono del reloj aparecerá en
pantalla cuando la alarma está activada.
3. Pulse y mantenga pulsada la tecla MODO/PROGRAMACIÓN durante unos 2 segundos para
programar la alarma. Los dígitos de la hora parpadearán.
4. Para programar la hora pulse las teclas
y y a continuación pulse la tecla
MODO/PROGRAMACIÓN para conrmar y programar los minutos.
5. Pulse las teclas
y para programar los minutos. Pulse la tecla MODO/PROGRAMACIÓN para
conrmar la hora de alarma y seleccione el tono de timbre.
6. Utilice las teclas
y para elegir el tono de timbre. Puede seleccionar uno de los 5 tonos
previamente descargados o una melodía MP3 o WAV descargada de su ordenador (para más
información sobre como descargar tonos de timbre consulte la sección “Descarga de melodías
MP3 y WAV”’ pág. 17). Pulse MODO/PROGRAMACIÓN para conrmar y volver al modo de hora
de alarma en pantalla.
Nota:
• Cuando la alarma está activada el icono aparece en todos los modos.
• La alarma sonará a la hora programada al menos que se haya desactivado previamente.
• Durante el proceso de programación si no se pulsa ninguna tecla por un minuto la pantalla volverá
automáticamente al modo de hora normal.
Función de repetición de alarma
1. Cuando la alarma está tocando el icono
parpadeará en pantalla.
Pulse la tecla LUZ DE FONDO/REPETICIÓN DE ALARMA para detener la alarma temporalmente
y utilizar la función de repetición de alarma.
2. Cuando la función de repetición de alarma está activada el icono
permanece jo en pantalla y
el icono parpadea.
3. La alarma tocará cada 7 minutos si no se desactiva.
Cómo desactivar la alarma
Cuando la alarma está tocando pulse cualquier tecla excepto LUZ DE FONDO/REPETICIÓN DE
ALARMA para desactivarla. La alarma tocará al día siguiente a la misma hora.
Cuando la repetición de alarma está activada pulse y mantenga pulsada cualquier tecla excepto
LUZ DE FONDO/REPETICIÓN DE ALARMA para desactivarla. La alarma tocará al día siguiente a
la misma hora.
Modo “Dormir”
El MP3 Thermoclock® RLR920 posee un modo “Dormir” para ayudarle a quedarse dormido plácidamente. Cuando este modo está activado el sonido o melodía descargados se escucharán sin
descanso por un periodo especico de tiempo (de 1 minuto a 60 minutos). Para activar el modo
“Dormir”:
1. En el modo de hora en pantalla pulse la tecla MODO/PROGRAMACIÓN dos veces para entrar
en el modo “Dormir” (“SLE” aparecerá en pantalla).
RLR920IM0328.indb 18 18/8/08 16:30:28
Page 19

19
ESPAÑOL
Programación del huso horario
1. En el modo de hora pulse la tecla MODO/PROGRAMACIÓN tres veces para entrar en el modo
de programación de huso horario (el icono aparecerá en pantalla).
2. Pulse la tecla
para ver el horario de 37 ciudades del mundo.
3. Pulse la tecla
para activar o desactivar la función de horario de verano, (el icono aparecerá
en pantalla cuando dicha función esté activada).
4.Cuando haya seleccionado la ciudad deseada pulse y mantenga pulsada la tecla
MODO/PROGRAMACIÓN durante 2 segundos para conrmar la programación y volver a la
pantalla de hora normal. La hora en pantalla será la hora de la ciudad seleccionada.
Nota:
• En el modo de hora normal pulse la tecla una vez para ver el nombre de la ciudad seleccionada
en el huso horario, pulse de nuevo la tecla para ir a la pantalla de la fecha.
• En el modo de huso horario el icono parpadeará cuando la ciudad que aparece en pantalla es
la misma que la ciudad seleccionada en el modo de hora.
• Si la función “Horario de verano” está activada el icono aparecerá también en la pantalla de la
hora normal.
NOMBRE DE LA CIUDAD ABREVIATURA DIFERENCIA HORARIA
1 Londres LON 0
2 París PAR + 1
3 Berlín BER + 1
4 Milán MIL + 1
5 Roma ROM + 1
6 El Cairo CAI + 2
7 Estanbul IST + 2
8 Jerusalén JRS + 2
9 Moscú MOW + 3
10 Dubái DXB + 4
11 Karachi KHI + 5
12 Dhaka DAC + 6
13 Bangkok BKK + 7
14 Hong Kong HKG + 8
15 Singapur SIN + 8
16 Tokio TYO + 9
17 Seúl SEL + 9
18 Sídney SYD + 10
19 Numea NOU + 11
20 Wellington WLG + 12
21 Majuro MAJ - 12
22 Apia APW - 11
2. Para programar la duración de la melodía pulse y mantenga pulsada la tecla
MODO/PROGRAMACIÓN hasta que los dígitos comiencen a parpadear.
3. Utilice las teclas
y para seleccionar la hora (entre 1 minuto y 60 minutos) y a continuación
pulse MODO/PROGRAMACIÓN para conrmar.
4. Pulse la tecla
para activar el modo “Dormir” y comenzar la reproducción de la música.
La música se apagará automáticamente cuando el tiempo programado nalice.
5. Para desactivar esta función:
• En el modo “Dormir” pulse la tecla
o pulse y mantenga pulsada la tecla
LUZ DE FONDO/REPETICIÓN DE ALARMA durante 2 segundos.
• En los demás modos pulse y mantenga pulsada la tecla LUZ DE FONDO/REPETICIÓN DE
ALARMA durante 2 segundos.
Nota: Si no se pulsa ninguna tecla durante 1 minuto la pantalla volverá automáticamente al modo
de hora normal.
RLR920IM0328.indb 19 18/8/08 16:30:28
Page 20

20
ESPAÑOL
NOMBRE DE LA CIUDAD ABREVIATURA DIFERENCIA HORARIA
NOMBRE DE LA CIUDAD ABREVIATURA DIFERENCIA HORARIA
1 Londres LON 0
2 París PAR + 1
3 Berlín BER + 1
4 Milán MIL + 1
5 Roma ROM + 1
6 El Cairo CAI + 2
7 Estanbul IST + 2
8 Jerusalén JRS + 2
9 Moscú MOW + 3
10 Dubái DXB + 4
11 Karachi KHI + 5
12 Dhaka DAC + 6
13 Bangkok BKK + 7
14 Hong Kong HKG + 8
15 Singapur SIN + 8
16 Tokio TYO + 9
17 Seúl SEL + 9
18 Sídney SYD + 10
19 Numea NOU + 11
20 Wellington WLG + 12
21 Majuro MAJ - 12
22 Apia APW - 11
23 Honolulu HNL - 10
24 Anchorage ANC - 9
25 San Francisco SFO - 8
26 Los Ángeles LAX - 8
27 Vancouver VAR - 8
28 Denver DEN - 7
29 Chicago CHI - 6
30 México MEX - 6
31 Nueva York NYC - 5
32 Miami MIA - 5
33 Santo Domingo SDO - 4
34 Rio de Janeiro RIO - 3
35 Buenos Aires BAI - 3
36 Fernando de Noronha FEN - 2
37 Tasiilaq AGM - 1
Luz de fondo
Pulse la LUZ DE FONDO/REPETICIÓN DE ALARMA una vez para encender la luz de fondo
durante 5 segundos.
Temperatura
En el modo de hora normal utilice la tecla para elegir entre la temperatura en grados Celsius (°C)
y Fahrenheit (°F).
Soporte del reloj
Puede usar la cubierta protectora incluida con el RLR920 como soporte. Simplemente introduzca el
reloj en la muesca de la cubierta y colóquelo sobre una mesa.
Mantenimiento
No limpie ninguna parte del RLR920 con bencina, disolventes o cualquier otro solvente
químico—esto puede causar daños permanentes que no están cubiertos por la garantía. Cuando
sea necesario, limpie el aparato con un paño limpio y húmedo. Mantenga el RLR920 alejado de
lugares con temperaturas extremas o agua y evite darle golpes severos. Cuando la pantalla LCD
no se vea clara deberá reemplazar las pilas. Evite usar el aparato en lugares donde haya campos
magnéticos tales como aeropuertos. Se han realizado los máximos esfuerzos para asegurar que
el RLR920 posee un alto estándar de abilidad. Sin embargo, si no funcionará correctamente no
deberá intentar repararlo por sí mismo – consulte con una línea de atención al consumidor de un
distribuidor de LEXIBOOK®.
RLR920IM0328.indb 20 18/8/08 16:30:30
Page 21

21
ESPAÑOL
Garantía
Este producto posee una garantía* de dos años. Para asuntos relacionados con la garantía o con
el servicio postventa, entre en contacto con el vendedor y presente el recibo de compra. Nuestra
garantía cubre defectos de fabricación o montaje con excepción de problemas resultantes del no
seguimiento de las instrucciones o de un manejo incorrecto del producto (como el desmontarlo,
exponerlo al calor o a la humedad, etc.).
* La garantía no cubre el deterioro de la pantalla LCD.
NOTA: Recomendamos que guarde el embalaje para futuras consultas.
Guarde el manual de instrucciones en lugar apropiado porque contiene información importante. En
nuestro esfuerzo constante por mejorar, los colores y detalles del producto pueden ser diferentes de
los ilustrados en el embalaje.
Referencia: RLR920
©2008 LEXIBOOK®
Diseñado y desarrollado en Europa – Fabricado en China
Lexibook Ibérica S.L,
C/ de las Hileras 4, 4° dpcho 14,
28013 Madrid, España.
Servicio consumidores: 902 102 191
www.lexibook.com
Advertencia para la protección del medio ambiente
¡Los aparatos eléctricos desechados son reciclables y no deben ser
eliminados en la basura doméstica! Por ello pedimos que nos ayude a
contribuir activamente en el ahorro de recursos y en la protección del medio
ambiente entregando este aparato en los centros de colección (si existen).
RLR920IM0328.indb 21 18/8/08 16:30:30
Page 22

22
PORTUGUÊS
Introdução
Parabéns pela aquisição do seu MP3 Thermoclock® RLR920 da LEXIBOOK®! Convidamo-lo a ler
com atenção este manual, pois vai ajudá-lo e orientá-lo na utilização do seu novo produto.
Retirar o aparelho da caixa
Quando retirar o aparelho da caixa, certique-se de que os seguintes elementos se encontram
incluídos:
1 x MP3 Thermoclock® RLR920
1 x cobertura de protecção/suporte
1 x CD-ROM
1 x cabo USB
1 x manual de instruções
Por favor, guarde todos os materiais de empacotamento num local seguro, para futuras
referências. Por favor, guarde o seu talão (recibo) – Este é a sua garantia.
Iniciar
1. Retire a película protectora transparente do ecrã LCD, puxando a aba.
2. Prima o botão de bloqueio para cima, na direcção da seta, para
desbloquear o compartimento das pilhas, que se encontra na parte
traseira da unidade (consulte a imagem C, p.3).
3. Retire o compartimento das pilhas e coloque 2 pilhas
LR03/AAA de
1,5V (não incluídas), de acordo com os sinais da polaridade +/- indica
dos no fundo do compartimento das pilhas, e de acordo com a imagem
apresentada ao lado.
4. Volte a colocar a tampa do compartimento das pilhas e prima o botão de bloqueio para baixo
para bloquear o compartimento das pilhas (consulte a imagem C, p.3). As horas, data e a
temperatura serão apresentados no ecrã LCD.\
Nota: A tampa do compartimento das pilhas tem de ser fechada com o botão de bloqueio, de modo
a que a unidade funcione.
Não recarregue pilhas não recarregáveis. As pilhas recarregáveis devem ser retiradas do
brinquedo antes de serem recarregadas. As pilhas recarregáveis só devem ser recarregadas
sob a supervisão por parte de um adulto. Não misture diferentes tipos de pilhas nem pilhas
novas com pilhas usadas. Use apenas pilhas do mesmo tipo ou equivalentes às
recomendadas. As pilhas devem ser inseridas com a polaridade correcta. Retire as pilhas
gastas do brinquedo. Não coloque os terminais em curto-circuito. Não atire as pilhas para o
fogo. Retire as pilhas se não usar o brinquedo durante um longo período de tempo.
AVISO: Se a unidade funcionar mal ou receber um choque electrostático, procure o pequeno
orifício do RESET (reiniciar) na parte traseira do produto. Insira um pequeno instrumento no e
pequeno, como um clipe para papéis, dentro do orifício e prima suavemente e depois deixe de
premir. Se isto não funcionar, retire as pilhas e volte a colocá-las.
Descrição do produto
Imagem A
1. Botão MODE/SET (modo/congurar)
2. Botão BACKLIGHT/SNOOZE
(luz de fundo/snooze)
3. Botão da seta para cima
4. Botão da seta para baixo
Imagem B
5. Porta USB
Imagem C
6. Botão RESET (reiniciar)
7. Botão de bloquear/desbloquear o
compartimento das pilhas
RLR920IM0328.indb 22 18/8/08 16:30:31
Page 23

23
PORTUGUÊS
Instalar o software do ThermoClock MP3 Voyage
Siga estas instruções para instalar o software do Thermoclock MP3 Voyage no seu PC. Este
software permite-lhe descarregar um cheiro de áudio no formato MP3 e WAV. Pode usar o cheiro
como um toque de despertador ou para o ajudar a adormecer (consulte a secção do modo “Sleep”
(adormecer), p.24).
1. Insira o CD do Software (incluído) na sua unidade de CD-ROM.
2. Clique em “Iniciar” e depois em “Meu Computador” e clique duas vezes na unidade de CD-ROM.
3. Clique duas vezes no cheiro “Setup.exe” para iniciar a instalação.
4. Escolha a língua do programa de instalação e clique em “Ok”.
5. Siga as instruções para instalar o software ThermoClock MP3 Voyage.
6. Se o seu ThermoClock estiver ligado ao sistema do seu PC, o programa inicia automaticamente
quando o processo de instalação estiver completo.
Nota: Para iniciar directamente a instalação, clique em “Executar”, escreva “D:\setup.exe” na caixa
de diálogo de “Executar” (em que D:\ é a sua unidade de CD-ROM) e prima Enter.
Descarregar melodias em MP3 e WAV
1. Ligue o MP3 Thermoclock® RLR920 à porta USB do seu computador através do cabo USB
fornecido. A informação da data e do tempo desaparecem e as horas e “CON” (conversão) são
apresentadas no ecrã LCD.
Nota: Os botões da unidade cam desactivados quando a unidade estiver ligada ao computador.
2. O ecrã de descarregar aparece automaticamente quando a unidade estiver ligada ao computador.
Se o ecrã de descarregar não aparecer, clique duas vezes no ícone “ThermoClock” no ambiente
de trabalho para iniciar o software.
3. Clique em “Browse” para correr as suas pastas. Seleccione um cheiro de áudio no formato MP3
ou WAV. Também pode escolher uma das melodias ou efeitos sonoros que estejam incluídos no
CD de instalação.
4. Quando tiver seleccionado o som ou melodia desejada, clique em “Download” (descarregar) para
iniciar a conversão do cheiro e o processo de descarregar. Durante a transferência, “DWL” pisca
no ecrã LCD da unidade.
5. Quando o processo de descarregar terminar, o software apresenta a mensagem “Finished!”
(Terminado!) e “END” (FIM) aparece no ecrã LCD da unidade.
Nota:
• Para cancelar a conversão do cheiro e o descarregar, pode clicar a qualquer momento em
“Cancel” (cancelar).
• Para usar o software do ThermoClock MP3 Voyage, a unidade tem de estar ligada ao computador.
AVISO:
• Só pode guardar um cheiro de áudio na memória ash da unidade. Quando descarregar uma
nova melodia, esta substitui automaticamente o cheiro anterior.
• O relógio MP3 pode guardar até cerca de 30 segundos de som no formato MP3 ou WAV (se o
tamanho do cheiro descarregado exceder o tamanho máximo, a unidade só descarrega e guarda
os primeiros 30 segundos.
• Ficheiros MP3 em mono ou abaixo dos 80 kbps (kilobit por segundo) podem fazer com que o
software do Thermoclock MP3 Voyage funcione mal.
Acertar as horas e a data
1. No modo de apresentação das horas, prima e mantenha premido o botão MODE/SET até que os
dígitos das horas comecem a piscar.
2. Para acertar a hora, prima os botões e e depois prima MODE/SET para conrmar. Os
dígitos dos minutos começam a piscar.
3. Para acertar os minutos, prima os botões e e depois prima MODE/SET para conrmar. Os
dígitos do ano começam a piscar.
4. Para acertar o ano, prima os botões e y e depois prima MODE/SET para conrmar. Os
dígitos do mês começam a piscar.
5. Para acertar o mês, prima os botões e e depois prima MODE/SET para conrmar. Os
dígitos da data começam a piscar.
RLR920IM0328.indb 23 18/8/08 16:30:31
Page 24

24
PORTUGUÊS
6. Para acertar a data, prima os botões e e depois prima MODE/SET para conrmar e entrar
na escolha do modo do formato de apresentação das horas, em 12 ou 24 horas.
7. Para alternar entre o modo das 12 ou 24 horas, prima os botões
e e depois prima
MODE/SET para conrmar e escolher a língua.
8. Para escolher a língua, prima os botões
y Pode escolher entre inglês (ENG), francês (FRA),
italiano (ITA), espanhol (ESP), alemão (DEU) e português (POR). Prima o botão MODE/SET para
conrmar e voltar à apresentação das horas.
Nota: Durante o processo de acerto/conguração, se não inserir quaisquer dados durante 1 minuto,
o ecrã volta automaticamente ao modo de apresentação normal das horas.
Modo de despertador
Acertar as horas do despertador
1. No modo de apresentação normal das horas, prima o botão MODE/SET para entrar no modo de
despertador (“ALM” é apresentado no ecrã).
2. Prima os botões e para ligar/desligar o despertador. Aparece um ícone de um sino
quando o despertador é ligado.
3. Prima e mantenha premido MODE/SET durante cerca de 2 segundos para acertar o despertador.
Os dígitos das horas começam a piscar.
4. Para acertar a hora, prima os botões y e depois prima MODE/SET para conrmar e acertar
os minutos.
5. Prima os botões y para acertar os minutos. Prima o botão MODE/SET para conrmar as
horas do despertador e escolher o toque do despertador.
6. Use os botões y para escolher um toque. Pode escolher um dos 5 toques predenidos ou
uma melodia em MP3 ou WAV descarregada a partir do seu computador (para mais informações
em relação ao descarregar de toques, consulte a secção “Descarregar melodias em MP3 ou
WAV” na p.23). Prima MODE/SET para conrmar as suas congurações e voltar ao modo de
apresen tação normal das horas.
Nota:
• Quando o despertador é ligado, o ícone é apresentado em todos os modos.
• O despertador toca à hora que deniu, todos os dias, a não ser que o desligue.
• Durante o processo de acerto, se não inserir quaisquer dados durante 1 minuto, o ecrã volta auto
maticamente ao modo de apresentação normal das horas.
Função “snooze”
1. Quando o despertador estiver a tocar, o ícone do sino pisca no ecrã.
Prima o botão BACKLIGHT/SNOOZE para desligar temporariamente o despertador e para usar a
função “snooze”.
2. Quando a função “snooze” estiver ligada, o ícone permanece ligado no ecrã e o ícone do
“snooze” pisca.
3. O despertador volta a tocar a cada 7 minutos, até que o desligue.
Desligar o despertador
Quando o despertador estiver a tocar, prima qualquer botão sem ser o BACKLIGHT/SNOOZE para
desligar o despertador. Este volta a tocar no dia seguinte à hora denida.
Quando o “snooze” é activado, prima e mantenha premido qualquer botão sem ser o BACKLIGHT/
SNOOZE, para desligar o despertador. Este volta a tocar no dia seguinte à hora denida.
Modo “Sleep” (adormecer)
O MP3 Thermoclock® RLR920 inclui um modo “Sleep” para o ajudar a adormecer calmamente.
Quando este modo está ligado, o som descarregado ou melodia será tocado continuamente durante
um período especíco de tempo (de 1 minuto a 60 minutos). Para ligar o modo “Sleep”:
1. No modo de apresentação das horas, prima o botão MODE/SET duas vezes para entrar no modo
“Sleep” (“SLE” aparece no ecrã).
2. Para denir a duração do som, prima e mantenha premido o botão MODE/SET até que os dígitos
comecem a piscar.
RLR920IM0328.indb 24 18/8/08 16:30:32
Page 25

25
PORTUGUÊS
Conguração do fuso horário
1. No modo de apresentação das horas, prima o botão MODE/SET três vezes para entrar no modo
de conguração do fuso horário (o ícone é apresentado no ecrã).
2. Prima o botão para correr as horas em 37 cidades do mundo.
3. Prima o botão para ligar ou desligar a função de poupança de energia durante o dia (DST)
(o ícone
é apresentado no ecrã quando a função DST estiver ligada).
4. Quando seleccionar a cidade desejada, prima e mantenha premido o botão MODE/SET durante
cerca de 2 segundos para conrmar as suas denições e voltar ao modo de apresentação normal
das horas. As horas apresentadas serão as horas na cidade seleccionada.
Nota:
• No modo de apresentação normal das horas, prima o botão
para ver o nome da cidade
seleccionada no modo de conguração do fuso horário. Prima o botão
novamente para voltar
à apresentação da data.
• No modo de conguração do fuso horário, o ícone
pisca quando a cidade do mundo
apresentada for a mesma que a cidade actualmente seleccionada no modo de apresentação
das horas.
• Se a função DST tiver sido ligada, o ícone
também é apresentado no modo de apresentação
das horas.
NOME DA CIDADE ABREVIATURA DIFERENÇA HORÁRIA
1 Londres LON 0
2 Paris PAR + 1
3 Berlim BER + 1
4 Milão MIL + 1
5 Roma ROM + 1
6 Cairo CAI + 2
7 Istambul IST + 2
8 Jerusalém JRS + 2
9 Moscovo MOW + 3
10 Dubai DXB + 4
11 Carachi KHI + 5
12 Dhaka DAC + 6
13 Banguecoque BKK + 7
14 Hong-Kong HKG + 8
15 Singapura SIN + 8
16 Tóquio TYO + 9
17 Seoul SEL + 9
18 Sydney SYD + 10
19 Noumea NOU + 11
20 Wellington WLG + 12
21 Majuro MAJ - 12
22 Apia APW - 11
3. Prima os botões e para escolher uma duração de tempo (entre 1 minuto e 60 minutos) e prima
MODE/SET para conrmar.
4. Prima o botão
para ligar o modo “Sleep” e iniciar a reprodução. O som desliga-se
automaticamente quando o tempo escolhido terminar.
5. Para desligar a função:
• No modo “Sleep”, prima o botão
ou prima e mantenha premido o botão BACKLIGHT/SNOOZE
durante cerca de 2 segundos.
• Em todos os outros modos, prima e mantenha premido o botão BACKLIGHT/SNOOZE durante
cerca de 2 segundos.
Nota: Se não premir qualquer botão no espaço de 1 minuto, o ecrã volta automaticamente para o
modo de apresentação normal das horas.
RLR920IM0328.indb 25 18/8/08 16:30:33
Page 26

26
PORTUGUÊS
NOME DA CIDADE ABREVIATURA DIFERENÇA HORÁRIA
NOME DA CIDADE ABREVIATURA DIFERENÇA HORÁRIA
1 Londres LON 0
2 Paris PAR + 1
3 Berlim BER + 1
4 Milão MIL + 1
5 Roma ROM + 1
6 Cairo CAI + 2
7 Istambul IST + 2
8 Jerusalém JRS + 2
9 Moscovo MOW + 3
10 Dubai DXB + 4
11 Carachi KHI + 5
12 Dhaka DAC + 6
13 Banguecoque BKK + 7
14 Hong-Kong HKG + 8
15 Singapura SIN + 8
16 Tóquio TYO + 9
17 Seoul SEL + 9
18 Sydney SYD + 10
19 Noumea NOU + 11
20 Wellington WLG + 12
21 Majuro MAJ - 12
22 Apia APW - 11
23 Honolulu HNL - 10
24 Anchorage ANC - 9
25 São Francisco SFO - 8
26 Los Angeles LAX - 8
27 Vancouver VAR - 8
28 Denver DEN - 7
29 Chicago CHI - 6
30 Cidade do México MEX - 6
31 Nova Iorque NYC - 5
32 Miami MIA - 5
33 Santo Domingo SDO - 4
34 Rio de Janeiro RIO - 3
35 Buenos Aires BAI - 3
36 Fernando de Noronha FEN - 2
37 Tasiilaq AGM - 1
Luz de fundo
Prima o botão BACKLIGHT/SNOOZE para ligar a luz de fundo durante 5 segundos.
Temperatura
No modo de apresentação das horas, use o botão para alternar entre a apresentação da
temperatura em Celsius (°C) e Fahrenheit (°F).
Suporte do relógio
Pode usar a cobertura protectora fornecida com o seu RLR920 como suporte. Basta colocar o
entalhe da cobertura do relógio e colocá-lo numa mesa.
Manutenção
Não limpe nenhuma parte do seu RLR920 com benzeno, diluentes ou outros solventes químicos,
pois isso pode dar origem a danos permanentes que não são abrangidos pela garantia. Quando
for necessário, limpe-o com um pano ligeiramente embebido em água. Mantenha o seu RLR920
afastado de temperaturas extremas, água ou choques severos. Quando o ecrã LCD apresentar
informação incompreensível, substitua as pilhas. Evite usar a unidade na presença de campos
magnéticos, como em aeroportos. Foram feitos todos os esforços para assegurar elevados padrões
de conança para o seu RLR920. No entanto, se algo correr mal, não o tente reparar sozinho.
Consulte o seu fornecedor ou a linha de ajuda da LEXIBOOK®.
RLR920IM0328.indb 26 18/8/08 16:30:34
Page 27

27
PORTUGUÊS
Garantia
Este produto é abrangido pela nossa garantia* de dois anos. Para todas as questões relacionadas
com a garantia ou com o nosso serviço pós-venda, por favor, contacte o seu revendedor e
apresente-lhe o talão ou recibo da compra. A nossa garantia abrange defeitos de fabrico ou de
montagem, excepto todos os danos resultantes do não respeito pelas instruções, ou qualquer
manuseamento inadequado do artigo (como desmontagem, exposição ao calor ou humidade, etc.).
* Excluindo a deterioração do ecrã LCD.
NOTA: Recomendamos que guarde todo o material de empacotamento para futuras referências.
Guarde este manual de instruções num local seguro, pois contém informação importante. Na nossa
busca constante por melhorias, as cores e pormenores do produto podem ser ligeiramente diferentes dos apresentados na caixa.
Referência: RLR920
Criado e desenvolvido na Europa – Fabricado na China
Lexibook Electrónica Lda,
Quinta dos loios,
Praceta José Domingos dos Santos, 6B-8A,
2835-343 Lavradio-Barreiro, Portugal.
Apoio técnico: 21 206 13 48
www.lexibook.com
Indicações para a protecção do meio ambiente
Aparelhos eléctricos antigos são materiais que não pertencem ao lixo doméstico!
Por isso pedimos para que nos apoie, contribuindo activamente na poupança de
recursos e na protecção do ambiente ao entregar este aparelho nos pontos de
recolha, caso existam.
RLR920IM0328.indb 27 18/8/08 16:30:34
Page 28

28
ITALIANO
Introduzione
Grazie per aver acquistato l’MP3 Thermoclock® RLR920 di LEXIBOOK®! Vi invitiamo a leggere il
manuale con attenzione in quanto vi aiuterà e vi guiderà nell’utilizzo del nuovo prodotto.
Apertura della confezione
Nell’aprire la confezione, controllare che contenga i seguenti elementi:
1 x MP3 Thermoclock® RLR920
1 x coperchio protettivo/supporto
1 x CD-ROM
1 x cavo USB
1 x manuale di istruzioni
Conservare l’imballo in un luogo sicuro per eventuali riferimenti futuri. Conservare lo scontrino/
ricevuta – rappresenta la garanzia.
Per iniziare
1. Togliere la pellicola trasparente dallo schermo LCD tirando la linguetta.
2. Spingere il pulsante di chiusura, in direzione della freccia, per aprire il
vano batterie posizionato sulla parte posteriore dell’unità (vedere gura
C, p.3).
3. Togliere lo sportello e inserire 2 batterie da 1,5V LR03/AAA (non in
dotazione) secondo la polarità (segni +/-) indicata sul fondo del vano
batterie, come da schema a lato.
4. Riposizionare lo sportello e spingere il pulsante di chiusura per chiudere il vano batterie (vedere
gura C, p.3). Ora, data e temperatura compariranno sullo schermo LCD.
Nota: Lo sportello batterie deve essere chiuso con il pulsante perché l’unità funzioni.
Le batterie non ricaricabili non vanno ricaricate. Rimuovere le batterie ricaricabili dal giocattolo
prima di ricaricarle. Le batterie ricaricabili vanno ricaricate unicamente con la supervisione di
un adulto. Non mischiare diversi tipi di batterie o batterie vecchie e nuove. Servirsi unicamente
di batterie del tipo indicato o equivalenti. Le batterie vanno inserite badando a rispettare le
polarità. Le batterie esaurite vanno rimosse dal giocattolo. I terminali di alimentazione non
devono essere messi in corto circuito. Non gettare le batterie nel fuoco. Rimuovere le batterie
nel caso in cui non si intenda utilizzare il giocattolo per lunghi periodi di tempo.
AVVERTENZA: Se l’unità non funziona correttamente o riceve uno shock elettrostatico, trovare
il forellino di RESET sulla parte posteriore. Inserire nel foro uno strumento piccolo e sottile, non
appuntito, ad es. una graffetta, premere delicatamente e togliere. Se ciò non ha effetto, togliere le
batterie e reinserirle.
Descrizione del prodotto
Figura A
1. Tasto MODE/SET (modalità/impostazione)
2. Tasto BACKLIGHT/SNOOZE (retroilluminazione/snooze)
3. Freccia su
4. Freccia giù
Figura B
5. Porta USB
Figura C
6. Tasto RESET
7. Pulsante di chiusura vano batterie
RLR920IM0328.indb 28 18/8/08 16:30:35
Page 29

29
ITALIANO
Installare il software ThermoClock MP3 Voyage
Seguire queste istruzioni per installare il software Thermoclock MP3 Voyage sul PC. Tale software
consente di scaricare un le audio in formato MP3 e WAV. Si può usare il le come suoneria per la
sveglia o per addormentarsi (vedere la sezione modalità “Sleep” (sonno), p.30).
1. Inserire il CD contenente il Software (in dotazione) nel drive CD-ROM.
2. Cliccare su “Start”, poi “Risorse del computer” e fare doppio clic sul drive CD-ROM.
3. Fare doppio clic sul le “Setup.exe” per lanciare l’installazione.
4. Selezionare la lingua del programma di installazione e cliccare su “Ok”.
5. Seguire le istruzioni per installare il software ThermoClock MP3 Voyage.
6. Se ThermoClock è collegato al PC, il programma parte automaticamente una volta completata la
procedura di installazione.
Nota: Per lanciare direttamente l’installazione, cliccare su “Start”, “Esegui”, inserire “D:\setup.exe”
nella nestra di dialogo di Esegui (dove D:\ è il drive CD-ROM) e premere Invio.
Scaricare musiche MP3 e WAV
1. Collegare l’MP3 Thermoclock® RLR920 alla porta USB del computer con il cavo USB in dotazione.
La data e le informazioni sul tempo scompaiono; ora e “CON” (conversione) compaiono sullo
schermo LCD.
Nota: I tasti dell’unità sono disabilitati quando l’orologio è collegato al computer.
2. La schermata di download compare automaticamente quando l’unità è connessa al computer. Se
la schermata di download non compare, fare doppio click sull’icona “ThermoClock” sul desktop
per lanciare il software.
3. Cliccare sul tasto “Browse” (sfoglia) per sfogliare le cartelle. Selezionare un le audio in formato
MP3 o WAV. Si può anche selezionare una delle musiche o degli effetti sonori che sono inclusi sul
CD di installazione.
4. Dopo aver selezionato il suono o melodia desiderato, cliccare sul tasto “Download” per iniziare
la conversione del le e la procedura di download. Durante il trasferimento, sullo schermo LCD
dell’orologio lampeggia “DWL”.
5. Quando termina la procedura di download, il software visualizza il messaggio “Finished!” (nito) e
compare “END” (ne) sullo schermo LCD dell’orologio.
Note:
• Per annullare la conversione del le e il download, cliccare in qualsiasi momento sul tasto “Cancel”.
• Per utilizzare il software ThermoClock MP3 Voyage, l’orologio deve essere collegato al computer.
AVVERTENZA:
• Nella memoria ash dell’unità può essere salvato un solo le audio. Quando si scarica una nuova
musica, sostituisce automaticamente il le precedente.
• L’orologio MP3 può memorizzare circa 30 secondi di suoni in formato MP3 o WAV (se la lunghezza
del le scaricato supera la lunghezza massima, l’unità scarica e salva solo i primi 30 secondi).
• MP3 le in mono o inferiori a 80 kbp (kilobit per secondo) potrebbero causare malfunzionamenti al
software di Thermoclock MP3 Voyage.
Impostare ora e data
1. In modalità visualizzazione ora, tenere premuto il tasto MODE/SET no a quando le cifre dell’ora
iniziano a lampeggiare.
2. Per regolare l’ora, premere i tasti
e quindi premere MODE/SET per confermare. Le cifre dei
minuti lampeggiano.
3. Per regolare i minuti, premere i tasti
e quindi premere MODE/SET per confermare. Le cifre
dell’anno lampeggiano.
4. Per regolare l’anno, premere i tasti
e quindi premere MODE/SET per confermare. Le cifre del
mese lampeggiano.
5. Per regolare il mese, premere i tasti e quindi premere MODE/SET per confermare. Le cifre
della data lampeggiano.
6. Per regolare la data, premere i tasti e quindi premere MODE/SET per confermare e inserire
la selezione della modalità a 12 o 24 ore.
7. Per passare dalla modalità 12 a 24 ore e viceversa, premere i tasti
e quindi premere
MODE/SET per confermare e selezionare la lingua.
RLR920IM0328.indb 29 18/8/08 16:30:35
Page 30

30
ITALIANO
8. Per selezionare la lingua, premere i tasti e . Si può scegliere tra inglese (ENG), francese
(FRA), italiano (ITA), spagnolo (ESP), tedesco (DEU) e portoghese (POR). Premere il tasto
MODE/SET per confermare e tornare alla visualizzazione ora.
Nota: Durante la procedura di impostazione, se non ci sono inserimenti per 1 minuto, il display torna
automaticamente alla visualizzazione ora normale.
Modalità sveglia
Impostazione della sveglia
1. In modalità visualizzazione ora normale, premere una volta il tasto MODE/SET per accedere alla
modalità sveglia (sullo schermo compare “ALM”).
2. Premere i tasti e per attivare/ disattivare la sveglie. Quando la sveglia è attiva compare
l’icona della campanella .
3. Tenere premuto MODE/SET per circa 2 secondi per impostare la sveglia. Le cifre dell’ora lampeggiano.
4. Per regolare l’ora, premere i tasti e e tenere premuto MODE/SET per confermare e
impostare i minuti.
5. Premere i tasti e per regolare i minuti. Premere il tasto MODE/SET per confermare l’ora della
sveglia e selezionare la suoneria.
6. Usare i tasti e per scegliere una suoneria. Si può selezionare una delle 5 suonerie precaricate
o una musica MP3 o WAV scaricata dal computer (per ulteriori informazioni riguardanti
il download delle suonerie, consultare la sezione “Scaricare musiche MP3 o WAV” p.29). Premere
MODE/SET per confermare le impostazioni e tornare alla modalità visualizzazione ora sveglia.
Note:
• Quando la sveglia è attiva, l’icona è visualizzata in tutte le modalità.
• La sveglia suonerà all’ora impostata ogni giorno a meno che non sia disattivata.
• Durante la procedura di impostazione, se non ci sono inserimenti per 1 minuto, il display torna
automaticamente alla visualizzazione ora normale.
Funzione Snooze
1. Quando la sveglia suona, l’icona della campanella lampeggia sul display.
Premere il tasto BACKLIGHT/SNOOZE per disattivare temporaneamente la sveglia e utilizzare la
funzione snooze.
2. Quando la funzione snooze è attiva, l’icona rimane ssa sul display e lampeggia l’icona
snooze
Spegnimento della sveglia
Quando la sveglia suona, premere un tasto qualsiasi tranne il tasto BACKLIGHT/SNOOZE per
spegnerla. Suonerà di nuovo il giorno successivo all’ora impostata.
Quando è attivo lo Snooze, tenere premuto un tasto qualsiasi tranne il tasto BACKLIGHT/SNOOZE
per disattivarlo. Suonerà nuovamente il giorno successivo alla stessa ora.
Modalità “Sleep” (sonno)
L’MP3 Thermoclock® RLR920 è dotato di funzionalità “Sleep” (sonno) per aiutarvi ad addormentarvi
dolcemente. Quando questa modalità è abilitata, la musica o i suoni scaricati saranno suonati continu-
amente per un tempo specicato (da 1 minuto a 60 minuti). Per attivare la modalità “Sleep”:
1. In modalità visualizzazione ora, premere il tasto MODE/SET due volte per accedere alla modalità
“Sleep” (sullo schermo compare “SLE”).
2. Per impostare la durata del suono, tenere premuto il tasto MODE/SET no a quando le cifre iniziano
a lampeggiare.
3. Usare i tasti
e per selezionare un’ora (tra 1 minuto e 60 minuti), quindi premere MODE/SET
per confermare.
4. Premere il tasto
per attivare la modalità “Sleep” e iniziare l’ascolto. Il suono si spegne
automaticamente quando nisce il tempo selezionato.
RLR920IM0328.indb 30 18/8/08 16:30:36
Page 31

31
ITALIANO
Impostazione fuso orario
1. In modalità visualizzazione ora, premere il tasto MODE/SET tre volte per accedere alla modalità
impostazione fuso orario (sullo schermo compare l’icona ).
2. Premere il tasto
per scorrere l’ora in 37 città del mondo.
3. Premere il tasto per attivare/disattivare la funzione (DST) (quando la funzione DST è abilitata,
sullo schermo compare l’icona
).
4. Dopo aver selezionato la città desiderata, tenere premuto MODE/SET per circa 2 secondi per
confermare le impostazioni e tornare alla modalità di visualizzazione ora normale. L’ora
visualizzata sarà l’ora della città selezionata.
Note:
• In visualizzazione ora normale, premere una volta il tasto
per visualizzare il nome della città
selezionata in impostazione fuso orario. Premere di nuovo
per tornare alla visualizzazione
data.
• In modalità impostazione fuso orario, l’icona
lampeggia quando la città visualizzata è la
stessa città selezionata in modalità visualizzazione ora.
• Se è stata attivata la funzione DST, in modalità visualizzazione ora comparirà anche l’icona
.
NOME CITTÀ ABBREVIAZIONE DIFFERENZA ORA
1 Londra LON 0
2 Parigi PAR + 1
3 Berlino BER + 1
4 Milano MIL + 1
5 Roma ROM + 1
6 Cairo CAI + 2
7 Istanbul IST + 2
8 Gerusalemme JRS + 2
9 Mosca MOW + 3
10 Dubai DXB + 4
11 Karachi KHI + 5
12 Dhaka DAC + 6
13 Bangkok BKK + 7
14 Hong Kong HKG + 8
15 Singapore SIN + 8
16 Tokyo TYO + 9
17 Seoul SEL + 9
18 Sydney SYD + 10
19 Nouméa NOU + 11
20 Wellington WLG + 12
21 Majuro MAJ - 12
22 Apia APW - 11
23 Honolulu HNL - 10
24 Anchorage ANC - 9
25 San Francisco SFO - 8
26 Los Angeles LAX - 8
27 Vancouver VAR - 8
28 Denver DEN - 7
29 Chicago CHI - 6
5. Per disattivare la funzione:
• in modalità “Sleep”, premere il tasto
o tenere premuto il tasto BACKLIGHT/SNOOZE per circa
2 secondi.
• in tutte le altre modalità, tenere premuto il tasto BACKLIGHT/SNOOZE per circa 2 secondi.
Nota: Se non vengono premuti tasti per 1 minuto, il display torna automaticamente alla
visualizzazione ora normale.
RLR920IM0328.indb 31 18/8/08 16:30:36
Page 32

32
ITALIANO
NOME CITTÀ ABBREVIAZIONE DIFFERENZA ORA
NOME CITTÀ ABBREVIAZIONE DIFFERENZA ORA
1 Londra LON 0
2 Parigi PAR + 1
3 Berlino BER + 1
4 Milano MIL + 1
5 Roma ROM + 1
6 Cairo CAI + 2
7 Istanbul IST + 2
8 Gerusalemme JRS + 2
9 Mosca MOW + 3
10 Dubai DXB + 4
11 Karachi KHI + 5
12 Dhaka DAC + 6
13 Bangkok BKK + 7
14 Hong Kong HKG + 8
15 Singapore SIN + 8
16 Tokyo TYO + 9
17 Seoul SEL + 9
18 Sydney SYD + 10
19 Nouméa NOU + 11
20 Wellington WLG + 12
21 Majuro MAJ - 12
22 Apia APW - 11
23 Honolulu HNL - 10
24 Anchorage ANC - 9
25 San Francisco SFO - 8
26 Los Angeles LAX - 8
27 Vancouver VAR - 8
28 Denver DEN - 7
29 Chicago CHI - 6
30 Messico MEX - 6
31 New York NYC - 5
32 Miami MIA - 5
33 Santo Domingo SDO - 4
34 Rio de Janeiro RIO - 3
35 Buenos Aires BAI - 3
36 Fernando de Noronha FEN - 2
37 Tasiilaq AGM - 1
Retroilluminazione
Premere una volta il tasto BACKLIGHT/SNOOZE per attivare la retroilluminazione per 5 secondi.
Temperatura
In modalità visualizzazione ora, utilizzare il tasto per passare dalla temperatura in Celsius (°C) a
Fahrenheit (°F) e viceversa.
Supporto orologio
Si può utilizzare il coperchio protettivo fornito con l’RLR920 come supporto. Posizionare
semplicemente l’orologio nella tacca del coperchio e metterlo su un piano.
Manutenzione
Non pulire parti dell’RLR920 con benzene, diluenti o altri solventi chimici — Ciò potrebbe causare
danni permanenti non coperti da garanzia. Quando è necessario, pulirlo con un panno umido.
Tenere l’RLR920 al riparo da temperature estreme, acqua o colpi. Quando lo schermo LCD
comincia ad offuscarsi, sostituire le batterie. Evitare di utilizzare in presenza di campi magnetici,
ad es. in aeroporti. È stato compiuto ogni sforzo per garantire alti standard di afdabilità all’RLR920.
Tuttavia, se qualcosa non funziona, non tentare di riparare l’unità da soli– consultare il fornitore o la
help line LEXIBOOK®.
RLR920IM0328.indb 32 18/8/08 16:30:38
Page 33

33
ITALIANO
Garanzia
Questo prodotto è coperto da una garanzia di due anni *. Per tutte le questioni relative alla garanzia
o al servizio post-vendita, contattare il rivenditore con la ricevuta a portata di mano. La garanzia
copre difetti di produzione o di montaggio, tranne tutti i danni risultati dalla mancata osservanza
delle istruzioni o dall’utilizzo improprio dell’articolo (quali ad es. smontaggio, esposizione a calore o
umidità, ecc).
* tranne il deterioramento dello schermo LCD.
NOTA: Si consiglia di conservare l’imballo per eventuali riferimenti futuri.
Conservare il manuale di istruzioni in un luogo sicuro in quanto contiene informazioni importanti. Nel
nostro costante sforzo per migliorare, colori e dettagli del prodotto potrebbero differire leggermente
rispetto a quanto illustrato sulla confezione.
Riferimento: RLR920
Progettato e sviluppato in Europa – Fabbricato in China
Lexibook Italia S.r.l,
Via Eustachi, 45,
20129 Milano, Italia.
Servizio consumatori : 022040 4959 (Prezzo di una chiamata locale).
www.lexibook.com
Avvertenze per la tutela dell’ambiente
Gli apparecchi elettrici vecchi sono materiali pregiati, non rientrano nei normali
riuti domestici! Preghiamo quindi i gentili clienti di contribuire alla salvaguardia
dell’ambiente e delle risorse e di consegnare il presente apparecchio ai centri di
raccolta competenti, qualora siano presenti sul territorio.
RLR920IM0328.indb 33 18/8/08 16:30:38
Page 34

34
DEUTSCH
Einleitung
Herzlichen Glückwunsch zum Kauf Ihrer MP3 Thermoclock® RLR920 von LEXIBOOK®! Wir bitten
Sie, diese Bedienungsanleitung aufmerksam durchzulesen, da Ihnen bei der Benutzung Ihres neuen
Produktes helfen und anleiten wird.
Auspacken des Gerätes
Bitte stellen Sie beim Auspacken sicher, dass die folgenden Bestandteile mitgeliefert wurden:
1 x MP3 Thermoclock® RLR920
1 x Schutzabdeckung/Ständer
1 x CD-ROM
1 x USB-Kabel
1 x Bedienungsanleitung
Bitte bewahren Sie das gesamte Verpackungsmaterial für zukünftige Benutzung an einem
sicheren Platz auf. Bitte behalten Sie Ihren Kaufbeleg, da dieser Ihre Garantie ist.
Inbetriebnahme
1. Entfernen Sie die Klarsichtfolie vom LC-Display, indem Sie am Streifen
ziehen.
2. Schieben Sie die Verriegelungstaste in die Richtung des Pfeils nach
oben, um das Batteriefach auf der Rückseite des Geräts zu entriegeln
(sehen Sie Bild C, S.3).
3. Entfernen Sie die Batteriefachabdeckung und legen Sie 2 x 1,5V
LR03/AAA Batterien (nicht im Lieferumfang enthalten) gemäß der am Boden des Batteriefachs
markierten Polarität (+/- Zeichen) und wie im nachfolgenden Schaubild abgebildet ein.
4. Setzen Sie die Batteriefachabdeckung wieder ein und schieben Sie die Verriegelungstaste nach
unten, um das Batteriefach zu verriegeln (siehe Bild C, S.3). Uhrzeit, Datum und Temperatur
werden auf dem LC-Display angezeigt.
Hinweis: Die Batteriefachabdeckung muss mit dem Verschlussknopf verriegelt werden, damit das
Gerät funktioniert.
Nichtauadbare Batterien dürfen nicht wiederaufgeladen werden. Wiederauadbare
Batterien müssen vor dem Auaden entfernt werden. Wiederauadbare Batterien dürfen nur
unter Aufsicht von Erwachsenen entfernt werden. Keine unterschiedlichen Batterietypen oder
neue und gebrauchte Batterien gleichzeitig verwenden. Nur Batterien desselben oder
equivalenten empfohlenen Typs verwenden. Batterien nur mit richtiger Polarität einsetzen.
Leere Batterien aus dem Gerät entfernen. Anschlussklemmen nicht kurzschliessen. Keine
Batterien in eine offene Flamme werfen. Entfernen Sie die Batterien, wenn Sie das Gerät für
längere Zeit nicht verwenden.
WARNUNG: Falls das Gerät nicht korrekt funktioniert oder einen elektrostatischen Schock erhält,
suchen Sie das kleine Loch zum ZURÜCKSETZEN auf der Rückseite des Produktes. Schieben Sie
einen kleinen, dünnen, stumpfen Gegenstand, wie z.B. eine Büroklammer, in die Öffnung, drücken
Sie vorsichtig und lassen Sie dann los. Sollte dies ergebnislos bleiben, entfernen Sie die Batterien
und legen Sie sie wieder ein.
Produktbeschreibung
Bild A
1. MODE/SET-Taste (Modus/Einstellen)
2. BACKLIGHT/SNOOZE-Taste
(Hintergrundbeleuchtung/Snooze)
3. Aufwärts Pfeil-Taste
4. Abwärts Pfeil-Taste
Bild B
5. USB-Port
Bild C
6. RESET- Loch (Zurücksetzen)
7. Batteriefach Verriegelungs-/ Entriegelungs-Taste
RLR920IM0328.indb 34 18/8/08 16:30:39
Page 35

35
DEUTSCH
ThermoClock MP3 Voyage Software installieren
Folgen Sie diesen Anleitungen, um die Thermoclock MP3 Voyage Software auf Ihrem PC zu
installieren. Diese Software ermöglicht Ihnen Audiodateien in MP3 und WAV-Format
herunterzuladen. Sie können die Dateien als Weckalarmton oder Einschlafhilfe benutzen (siehe
„Schlaf”-Modus Abschnitt, S. 37).
1. Legen Sie die Software-CD (mitgeliefert) in Ihr CD-ROM-Laufwerk.
2. Klicken Sie „Start”, dann „Arbeitsplatz” und doppelklicken Sie auf Ihr CD-ROM-Laufwerk.
3. Doppelklicken Sie die „Setup.exe” Datei, um die Installation zu starten.
4. Wählen Sie die Installationsprogrammsprache und klicken Sie auf die „OK” Schaltäche.
5. Folgen Sie den Anleitungen, um die ThermoClock MP3 Voyage Software zu installieren.
6. Wenn Ihre ThermoClock mit Ihrem PC-System verbunden ist, startet das Programm automatisch,
sobald der Installationsprozess abgeschlossen ist.
Hinweis: Um die Installation zu starten, klicken Sie „Start”, dann „Ausführen”, tippen Sie „D:\setup.
exe” in das Ausführen-Dialogfenster (D:\ Ihr CD-ROM-Laufwerk ist) und drücken Sie Eingabe.
MP3- und WAV-Melodien herunterladen
1. Verbinden Sie die MP3 Thermoclock® RLR920 mit dem USB-Port Ihres Computers mit Hilfe des
mitgelieferten USB-Kabels. Das Datum und die Wetter-Informationen verschwinden; die Uhrzeit
und „CON” (Konvertierung) werden auf dem LC-Display angezeigt.
Hinweis: Die Tasten des Gerätes sind deaktiviert, wenn es mit dem Computer verbunden ist.
2. Die Benutzeroberäche zum Herunterladen wird automatisch angezeigt, wenn das Gerät mit dem
Computer verbunden ist. Wenn die Benutzeroberäche zum Herunterladen nicht erscheint, dop
pelklicken Sie auf das „ThermoClock” Symbol auf dem Desktop, um die Software zu starten.
3. Klicken Sie auf die „Durchsuchen” Schaltäche, um Ihre Ordner zu durchsuchen. Wählen Sie eine
Audiodatei in MP3 oder WAV-Format. Sie können auch eine der Melodien oder Geräuscheffekte
wählen, die auf der Installations-CD enthalten sind.
4. Wenn Sie die gewünschte Melodie oder das gewünschte Geräusch gewählt haben, klicken Sie
auf die „Herunterladen” Schaltäche, um die Dateikonvertierung und den Herunterladen-Prozess
zu starten. Während des Übertragens blinkt auf dem LC-Display der Uhr „DWL”.
5. Wenn das Herunterladen beendet ist, zeigt die Software die Nachricht „Abgeschlossen!” an und
auf dem LC-Display der Uhr erscheint „ENDE”.
Hinweis:
• Um die Dateikonvertierung und das Herunterladen abzubrechen, können Sie jederzeit auf die
„Abbrechen” Schaltäche klicken.
• Um die ThermoClock MP3 Voyage Software zu benutzen, muss die Uhr mit dem Computer
verbunden sein.
WARNUNG:
• Es kann nur eine Audiodatei im Flashspeicher des Gerätes gespeichert werden. Wenn Sie eine
neue Melodie herunterladen, ersetzt diese automatisch die vorangegangene Datei.
• Die MP3 Uhr kann bis 30 Sekunden lange Geräusche im MP3- oder WAV-Format speichern (wenn
die Länge der heruntergeladenen Datei diese Höchstlänge überschreitet, lädt das Gerät nur die
ersten 30 Sekunden herunter und speichert sie).
• Bei MP3 Dateien, die in mono aufgenommen oder kleiner als 80 kbps (Kilobit pro Sekunde) sind,
funktioniert die Thermoclock MP3 Voyage Software möglicherweise nicht richtig.
Uhrzeit und Datum einstellen
1. Halten Sie die MODE/SET-Taste im Uhrzeitanzeige-Modus gedrückt, bis die Stellen für die
Stundenanzeige zu blinken beginnen.
2. Drücken Sie die
und Tasten, um die Stunde einzustellen und drücken Sie dann MODE/SET
zur Bestätigung. Die Stellen für die Minutenanzeige blinken jetzt.
3. Drücken Sie die
und Tasten, um die Minuten einzustellen und drücken Sie dann zur
Bestätigung MODE/SET. Die Stellen für die Jahresanzeige blinken.
4. Drücken Sie die
und Tasten, um das Jahr einzustellen und drücken Sie MODE/SET zur
Bestätigung. Die Stellen für die Monatsanzeige blinken.
RLR920IM0328.indb 35 18/8/08 16:30:39
Page 36

36
DEUTSCH
5. Drücken Sie die und Tasten, um den Monat einzustellen und drücken Sie dann MODE/SET
zur Bestätigung. Die Stellen für die Tagesanzeige blinken.
6. Drücken Sie die und Tasten, um den Tag einzustellen und drücken Sie dann MODE/SET
zur Bestätigung. Sie gelangen zur Auswahl des 12- oder 24-Stunden-Modus.
7. Um zwischen dem 12- oder 24-Stunden-Modus umzuschalten, drücken Sie di
und Tasten
und drücken Sie dann die MODE/SET-Taste zur Bestätigung. Wählen Sie anschließend die
Sprache aus.
8. Drücken Sie die
und Tasten, um die Sprache auszuwählen. Sie können zwischen Englisch
(ENG), Französisch (FRA), Italienisch (ITA), Spanisch (ESP), Deutsch (DEU) und Portugiesisch
(POR) wählen. Drücken Sie die MODE/SET-Taste zur Bestätigung und zur Uhrzeitanzeige zurück
zukehren.
Hinweis: Wenn während des Einstellungsprozesses für 1 Minute keine Eingabe erfolgt, kehrt das
Display automatisch in den normalen Uhrzeitanzeige-Modus zurück.
Weckalarm-Modus
Weckzeit einstellen
1. Drücken Sie im normalen Uhrzeitanzeige-Modus die MODE/SET-Taste einmal, um in den
Weckalarm-Modus zu gelangen (auf dem Display erscheint „ALM”).
2. Schalten Sie mit Hilfe der und Tasten den Weckalarm ein/aus. Wenn der Weckalarm aktiviert
ist, erscheint ein Glocken-Symbol .
3. Halten Sie die MODE/SET-Taste für 2 Sekunden gedrückt, um die Weckalarmzeit einzustellen.
Die Stunde blinkt.
4. Stellen Sie mit Hilfe de und Tasten die Stunde ein und drücken Sie dann die
MODE/SET-Taste, um zu bestätigen und die Minuten einzustellen.
5. Stellen Sie mit Hilfe de und Tasten die Minuten ein. Drücken Sie die MODE/SET-Taste,
um die Weckzeit zu bestätigen und einen Weckalarm-Klingelton auszuwählen.
6. Wählen Sie mit Hilfe de und Tasten einen Klingelton. Sie können einen der bereits
heruntergeladenen Klingeltöne wählen oder eine MP3- oder WAV-Melodie von Ihrem Computer
herunterladen (bitte lesen Sie Abschnitt „MP3- oder WAV-Melodien herunterladen” auf S. 35 für
weitere Informationen bezüglich des Herunterladens von Klingeltönen). Drücken Sie die MODE/
SET-Taste, um Ihre Einstellungen zu bestätigen und zum Weckzeitanzeige-Modus zurückzukehren.
Hinweis:
• Wenn der Weckalarm aktiviert ist, wird in allen Modi das Symbol angezeigt.
• Der Weckalarm wird zur eingestellten Zeit jeden Tag ertönen, es sei denn, er wird deaktiviert.
• Wenn während des Einstellungsprozesses für länger als 1 Minute keine Eingabe erfolgt, kehrt das
Display automatisch in den normalen Zeitanzeige-Modus zurück.
Snooze-Funktion
1. Wenn der Weckalarm ertönt, blinkt das Glocken-Symbol auf dem Display auf. Drücken Sie die
BACKLIGHT/SNOOZE-Taste, um den Weckalarm zeitweilig auszuschalten und die
Snooze-Funktion zu nutzen.
2. Wenn die Snooze-Funktion aktiviert ist, bleibt das Symbol konstant auf dem Display und das
Snooze-Symbol blinkt.
3. Der Weckalarm wird alle 7 Minuten wiederholt, bis Sie ihn ausschalten.
Weckalarm ausschalten
Wenn der Weckalarm ertönt, drücken Sie eine beliebige Taste, ausgenommen die BACKLIGHT/
SNOOZE-Taste, um den Weckalarm auszuschalten. Er wird am nächsten Tag wieder zur
eingestellten Zeit ertönen.
Wenn die Snooze-Funktion aktiviert ist, halten Sie eine beliebige Taste, ausgenommen die
BACKLIGHT/SNOOZE-Taste, gedrückt, um den Weckalarm auszuschalten. Er wird am nächsten
Tag wieder zur eingestellten Zeit ertönen.
RLR920IM0328.indb 36 18/8/08 16:30:40
Page 37

37
DEUTSCH
„Schlaf”-Modus
Die MP3 Thermoclock® RLR920 besitzt eine „Schlaf”-Modus-Funktion, die Ihnen hilft, friedlich einzuschlafen. Wenn dieser Modus aktiviert ist, wird das heruntergeladene Geräusch oder die Melodie
in einer Wiederholschleife für eine festgelegte Zeitspanne gespielt (von 1 Minute bis 60 Minuten). Um
den „Schlaf”-Modus einzuschalten:
1. Drücken Sie im Zeitanzeige-Modus die MODE/SET-Taste zweimal, um in den „Schlaf”-Modus zu
gehen („SLE” wird auf dem Display angezeigt).
2. Um die Dauer der Melodie-Wiedergabe einzustellen, halten Sie die MODE/SET-Taste gedrückt, bis
die Stellen zu blinken beginnen.
3. Wählen Sie mit Hilfe der und Tasten eine Zeit (zwischen 1 Minute und 60 Minuten) und
drücken Sie dann die MODE/SET-Taste zur Bestätigung.
4. Drücken Sie die
Taste, um den „Schlaf”-Modus zu aktivieren und die Wiedergabe zu starten.
Die Wiedergabe schaltet sich automatisch ab, wenn die ausgewählte Zeitdauer abgelaufen ist.
5. Um die Funktion zu deaktivieren:
• im „Schlaf”-Modus, drücken Sie die
Taste oder halten Sie die BACKLIGHT/SNOOZE-Taste für
etwa 2 Sekunden gedrückt.
• in allen anderen Modi halten Sie die BACKLIGHT/SNOOZE-Taste für etwa 2 Sekunden gedrückt.
Hinweis: Wenn für länger als 1 Minute keine Taste betätigt wird, kehrt das Display automatisch in
den normalen Zeitanzeige-Modus zurück.
Zeitzone einstellen
1. Drücken Sie die MODE/SET-Taste dreimal im Zeitanzeige-Modus, um in den Modus zum
Einstellen der Zeitzonen zu gelangen (das Symbol wird auf dem Display angezeigt).
2. Durchsuchen Sie mit Hilfe der
Taste die Zeitzonen von 37 Weltstädten.
3. Drücken Sie die
Taste, um die Sommerzeit-Funktion (DST) ein oder auszuschalten (das
Symbol wird auf dem Display angezeigt, wenn die DST-Funktion aktiviert ist).
4. Wenn Sie die gewünschte Stadt ausgewählt haben, halten Sie die MODE/SET-Taste für etwa
2 Sekunden gedrückt, um Ihre Einstellung zu bestätigen und in den normalen Zeitanzeige-Modus
zurückzukehren. Die angezeigte Zeit ist die Zeit der gewählten Stadt.
Hinweis:
• Drücken Sie im normalen Zeitanzeige-Modus die
Taste einmal, um den Namen der Stadt, die
im Zeitzonen-Modus eingestellt wurde, anzuzeigen. Drücken Sie die
Taste erneut, um zur
Datumsanzeige zurückzukehren.
• Im Modus zum Einstellen der Zeitzone blinkt da
Symbol, wenn die angezeigte Weltstadt
dieselbe ist wie die aktuell gewählte Weltstadt im Zeitanzeige-Modus.
• Wenn die Sommerzeit-Funktion aktiviert ist, wird da
Symbol auch im Zeitanzeige-Modus
angezeigt.
STADTNAME ABKÜRZUNG ZEITUNTERSCHIED
1 London LON 0
2 Paris PAR + 1
3 Berlin BER + 1
4 Mailand MIL + 1
5 Rom ROM + 1
6 Kairo CAI + 2
7 Istanbul IST + 2
8 Jerusalem JRS + 2
9 Moskau MOW + 3
10 Dubai DXB + 4
11 Karachi KHI + 5
12 Dhaka DAC + 6
RLR920IM0328.indb 37 18/8/08 16:30:40
Page 38

38
DEUTSCH
STADTNAME ABKÜRZUNG ZEITUNTERSCHIED
STADTNAME ABKÜRZUNG ZEITUNTERSCHIED
1 London LON 0
2 Paris PAR + 1
3 Berlin BER + 1
4 Mailand MIL + 1
5 Rom ROM + 1
6 Kairo CAI + 2
7 Istanbul IST + 2
8 Jerusalem JRS + 2
9 Moskau MOW + 3
10 Dubai DXB + 4
11 Karachi KHI + 5
12 Dhaka DAC + 6
13 Bangkok BKK + 7
14 Hong Kong HKG + 8
15 Singapur SIN + 8
16 Tokio TYO + 9
17 Seoul SEL + 9
18 Sydney SYD + 10
19 Noumea NOU + 11
20 Wellington WLG + 12
21 Majuro MAJ - 12
22 Apia APW - 11
23 Honolulu HNL - 10
24 Anchorage ANC - 9
25 San Francisco SFO - 8
26 Los Angeles LAX - 8
27 Vancouver VAR - 8
28 Denver DEN - 7
29 Chicago CHI - 6
30 Mexiko MEX - 6
31 New York NYC - 5
32 Miami MIA - 5
33 Santo Domingo SDO - 4
34 Rio de Janeiro RIO - 3
35 Buenos Aires BAI - 3
36 Fernando de Noronha FEN - 2
37 Tasiilaq AGM - 1
Hintergrundbeleuchtung
Drücken Sie die BACKLIGHT/SNOOZE-Taste einmal, um die Hintergrundbeleuchtung für 5
Sekunden einzuschalten.
Temperatur
Schalten Sie im Zeitanzeige-Modus mit der Taste zwischen der Temperaturanzeige in Celsius
(°C) und Fahrenheit (°F) um.
Uhrenständer
Sie können die mit Ihrer RLR920 mitgelieferte Schutzabdeckung als Ständer benutzen. Platzieren
Sie die Uhr einfach in der Kerbe der Abdeckung und stellen Sie sie auf dem Tisch auf.
RLR920IM0328.indb 38 18/8/08 16:30:42
Page 39

39
DEUTSCH
Garantie
Dieses Produkt ist mit unserer 2-Jahres-Garantie versehen*. Bitte wenden Sie sich in allen Angelegenheiten, die diese Garantie oder unseren Kundenservice betreffen, an Ihren Händler und haben
Sie Ihren Kaufbeleg dabei. Unsere Garantie deckt Herstellungs- oder Montagemängel ab, mit
Ausnahme aller Schäden, die aus der Nichtbeachtung der Anleitungen oder unsachgemäßer Handhabung des Gerätes resultieren (wie z.B. das Gerät auseinander nehmen, es Hitze oder Feuchtigkeit aussetzen, usw.).
* ausschließlich der Abnutzung des LC-Displays.
HINWEIS: Es wird empfohlen, das Verpackungsmaterial für zukünftigen Gebrauch aufzubewahren.
Bewahren Sie diese Bedienungsanleitung an einem sicheren Ort auf, da sie wichtige Informationen
enthält. Da wir stets bemüht sind, unsere Produkte zu verbessern, können die Produktfarben und
–ausführungen sich leicht von den auf der Verpackung abgebildeten unterscheiden.
Referenznummer: RLR920
Design und Entwicklung in Europa - Made in China
Lexibook Deutschland - Service-Hotline/Kundendienst
Tel. 01805 010931(0,14 Euro/Minute)
E-Mail: savcomfr@lexibook.com
www.lexibook.com
Hinweise zum Umweltschutz
Alt-Elektrogeräte sind Wertstoffe, sie gehören daher nicht in den Hausmüll! Wir
möchten Sie daher bitten, uns mit Ihrem aktiven Beitrag bei der Ressourcenschonung und beim Umweltschutz zu unterstützen und dieses Gerät bei den (falls
vorhanden) eingerichteten Rücknahmestellen abzugeben.
Pege
Reinigen Sie Ihre RLR920 nicht mit Benzol, Verdünnungsmittel oder üssigen Chemikalien —
dadurch könnten dauerhafte Schäden entstehen, die nicht von der Garantie abgedeckt sind. Falls
nötig, reinigen Sie das Gerät mit einem feuchten Tuch. Halten Sie Ihre RLR920 von extremen
Temperaturen, Wasser oder starken Erschütterungen fern. Wenn das LC-Display nicht mehr klar
anzeigt, wechseln Sie die Batterien aus. Vermeiden Sie es, das Produkt in der Gegenwart von
Magnetfeldern, wie z.B auf Flughäfen, zu benutzen. Es wurde jede Anstrengung unternommen,
den hohen Standard an Verlässlichkeit Ihrer RLR920 zu gewährleisten. Sollten trotzdem Probleme
auftreten, versuchen Sie bitte nicht die Uhr selbst zu reparieren – wenden Sie sich an Ihren Händler
oder die LEXIBOOK® Hotline.
RLR920IM0328.indb 39 18/8/08 16:30:42
Page 40

40
NEDERLANDS
Inleiding
Gefeliciteerd met de aankoop van uw MP3 Thermoclock® RLR920 van LEXIBOOK®! Lees deze
gebruikershandleiding aandachtig zodat u alles te weten komt over uw nieuw product.
Uitpakken van het product
Controleer bij het uitpakken of volgende onderdelen aanwezig zijn:
1 x MP3 Thermoclock® RLR920
1 x beschermdeksel/statief
1 x CD-ROM
1 x USB kabel
1 x gebruikershandleiding
Bewaar alle verpakking op een veilige plaats voor later gebruik. Bewaar ook de aankoopbon
– want dit geldt als uw garantie.
Aan de slag
1. Verwijder het transparant etiket van het LCD scherm door aan het
uitsteeksel te trekken.
2. Duw de vergrendelingsknop naar omhoog, in de richting van de pijl,
om het batterijvakje, dat zich aan de achterkant van het toestel bevindt,
te openen (zie afbeelding C, p. 3).
3. Verwijder het batterijdeksel en installeer 2 x 1,5V
LR03/AAA batterijen
(niet inbegrepen) volgens de polariteit (+/- markeringen) aangegeven op de bodem van het
batterijvakje en volgens het diagram hiernaast afgebeeld.
4. Plaats het batterijdeksel terug en duw de vergrendelingsknop naar beneden om het batterijvakje
te sluiten (zie afbeelding C, p. 3). De tijd, datum en temperatuur zullen op het LCD scherm
weergegeven worden.
Opmerking: Het apparaat functioneert enkel wanneer het batterijdeksel vergrendeld is met de
vergrendelingsknop.
Probeer niet-oplaadbare batterijen niet op te laden. Oplaadbare batterijen moeten uit het
apparaat gehaald worden voordat deze opgeladen worden. Oplaadbare batterijen dienen
alleen onder toezicht van een volwassene opgeladen te worden. Gebruik niet tegelijkertijd
batterijen van verschillende types of oude en nieuwe batterijen. Gebruik alleen batterijen van
hetzelfde of gelijkwaardige types als aanbevolen. Batterijen dienen geplaatst te worden met
de juiste polariteit. Lege batterijen dienen uit het apparaat gehaald te worden. De polen van
de batterijen dienen niet kortgesloten te worden. Gooi batterijen niet in open vuur. Verwijder
batterijen als u het apparaat langere tijd niet gebruikt.
WAARSCHUWING: Zoek naar de smalle RESET opening op de achterkant van het product, indien
het toestel defect is of een elektrostatische schok krijgt. Voeg een smal, dun en stomp voorwerp,
zoals een paperclip, in de opening, druk zachtjes en haal het daarna terug uit. Indien dit niet helpt,
verwijder de batterijen en voeg ze opnieuw in.
Productbeschrijving
Afbeelding A
1. MODE/SET toets
2. BACKLIGHT/SNOOZE toets
3. Pijl omhoog toets
4. Pijl omlaag toets
Afbeelding B
5. USB poort
Afbeelding C
6. RESET toets
7. Batterijvakje ver-/ontgrendelingsknop
RLR920IM0328.indb 40 18/8/08 16:30:43
Page 41

41
NEDERLANDS
Installatie van de ThermoClock MP3 Voyage software
Volg deze instructies om de Thermoclock MP3 Voyage software op uw PC te installeren. Via deze
software kan u een audiobestand in MP3 en WAV-formaat downloaden. U kan het bestand
gebruiken als een weksignaal of om mee in slaap te vallen (zie het hoofdstuk “Slaap” modus, p. 42).
1. Voeg de CD software (inbegrepen) in uw CD-ROM drive.
2. Klik op “Start”, daarna op “My computer” en dubbelklik op uw CD-ROM drive.
3. Dubbelklik op het ”Setup.exe” bestand om de installatie te starten.
4. Selecteer de taal van het installatieprogramma en klik op de “Ok” toets.
5. Volg de instructies om de ThermoClock MP3 Voyage software te installeren.
6. Indien uw Thermoclock verbonden is aan uw PC-systeem zal het programma automatisch
opstarten eenmaal het installatieproces is voltooid.
Opmerking: Om de installatie direct te starten, klik op “Start“, “Run”, type “D:\setup.exe” in het Run
dialoogvenster (waarbij D:\ uw CD-ROM drive is) en druk op Enter.
Downloaden van MP3 of WAV melodieën
1. Verbind de MP3 Thermoclock® RLR920 aan de USB-poort van uw computer via de bijgevoegde
USB-kabel. De datum en weerinformatie verdwijnen van het scherm; de tijd en “CON” (conversie)
worden op het LCD scherm weergegeven.
Opmerking: De toetsen van het toestel zijn onbruikbaar wanneer de klok aan de computer is verbonden.
2. Het downloadscherm wordt automatisch weergegeven wanneer het toestel aan de computer is
verbonden. Klik tweemaal op het “Thermoclock” icoon op uw desktop om de software op te
starten indien het downloadscherm niet wordt weergegeven.
3. Klik op de “Browse” toets om uw mappen te doorlopen. Selecteer een audiobestand in MP3 of
WAV-formaat. U kunt ook een van de melodieën of geluidseffecten selecteren die zich op de
installatie-CD bevinden.
4. Klik op de “Download” toets om de bestandsconversie en het downloadproces te starten eens u
een gewenst geluid of melodie hebt geselecteerd. Tijdens de overdracht zal ”DWL” ikkeren op
het scherm van de klok.
5. Op het einde van het downloadproces heeft de software de boodschap “Finished!” weer en “END”
verschijnt op het scherm van de klok.
Opmerking:
• Klik op gelijk welk moment op de “Cancel” toets om de bestandsconversie en de overdracht te
annuleren.
• De klok moet verbonden zijn aan de computer om gebruik te kunnen maken van de ThermoClock
MP3 Voyage software.
WAARSCHUWING:
• Slechts één audiobestand kan bewaard worden in het ashgeheugen van het toestel. Wanneer u
een nieuwe melodie downloadt zal het automatisch het oude bestand overschrijven.
• De MP3 klok kan ongeveer 30 seconden aan geluid in MP3 of WAV formaat bewaren (het toestel
zal enkel de eerste 30 seconden downloaden en bewaren, indien de lengte van het gedownloade
bestand de maximum lengte overschrijdt).
• MP3 bestanden in mono of onder de 80 kbps (kilobit per seconde) kunnen een storing bij de
Thermoclock MP3 Voyage software veroorzaken.
Instellen van tijd en datum
1. Druk en houd de MODE/SET toets vast in de tijdweergavemodus totdat de cijfers van de
uuraanduiding beginnen ikkeren.
2. Druk op de
en toetsen om het uur aan te passen en druk daarna op MODE/SET om te
bevestigen. De cijfers van de minuutaanduiding ikkeren.
3. Druk op de
en toetsen om de minuten aan te passen en druk daarna op MODE/SET om te
bevestigen. De cijfers van de jaaraanduiding ikkeren.
4. Druk op de
en toetsen om het jaar aan te passen en druk daarna op MODE/SET om te
bevestigen. De cijfers van de maandaanduiding ikkeren.
RLR920IM0328.indb 41 18/8/08 16:30:43
Page 42

42
NEDERLANDS
5. Druk op de en toetsen om de maand aan te passen en druk daarna op MODE/SET om te
bevestigen. De cijfers van de datum ikkeren.
6. Druk op de en toetsen om de datum aan te passen en druk op MODE/SET om te
bevestigen. Open daarna de 12 of 24 uur moduskeuze.
7. Druk op de
en toetsen om te kiezen tussen de 12 en 24 uur modus en druk daarna op de
MODE/SET om te bevestigen en de taal te selecteren.
8. Druk op de
en toetsen om de taal te selecteren. U kunt kiezen tussen Engels (ENG),
Frans (FRA), Italiaans (ITA), Spaans (ESP), Duits (DEU) en Portugees (POR). Druk daarna op de
MODE/SET toets om te bevestigen en naar de tijdsweergave terug te keren.
Opmerking: Indien er tijdens het instellingsproces binnen de 1 minuut geen invoer is zal de
weergave automatisch terugkeren naar de normale tijdweergavemodus.
Alarmmodus
Instellen van de alarmtijd
1. Druk in de normale tijdweergavemodus eenmaal op de MODE/SET toets om de alarmmodus te
openen (“ALM” wordt op het scherm weergegeven).
2. Druk op de en toetsen om het alarm aan/uit te zetten. Een klok icoon wordt weergegeven
wanneer het alarm is aangezet.
3. Druk en houdt MODE/SET vast gedurende 2 seconden om het alarm in te stellen. De cijfers van
de uuraanduiding ikkeren.
4. Druk op de en toetsen om het uur aan te passen en druk daarna op MODE/SET om te
bevestigen en de minuten in te stellen.
5. Druk op de en toetsen om de minuten aan te passen. Druk op de MODE/SET toets om de
alarmtijd te bevestigen en het alarmsignaal te selecteren.
6. Gebruik de en toetsen om een alarmsignaal uit te kiezen. U kunt één van de 5 vooraf
ingestelde alarmsignalen of een MP3 of WAV melodie gedownload van uw computer selecteren
(voor meer informatie omtrent het downloaden van alarmsignalen, raadpleeg het hoofdstuk
“Downloaden van MP3 of WAV- melodieën op p. 41). Druk op MODE/SET om uw instellingen te
bevestigen en naar de alarmtijdweergavemodus terug te gaan.
Opmerking:
• Het icoon wordt weergegeven in alle modi wanneer het alarm is aangezet
• Het alarm zal elke dag op de ingestelde tijd afgaan tenzij het wordt uitgezet.
• Indien er tijdens het instellingsproces binnen de 1 minuut geen invoer is zal de weergave
automatisch terugkeren naar de normale tijdweergavemodus.
Snooze-FunktionSnooze-functie
1. Het belicoon ikkert op het scherm wanneer het alarm afgaat. Druk op de BACKLIGHT/SNOOZE
toets om het alarm tijdelijk uit te zetten en de snooze-functie te gebruiken.
2. Het icoon blijft permanent op het scherm en het snooze-icoon ikkert wanneer de
snooze-functie aan is.
3. Het alarm wordt elke 7 minuten herhaald totdat u het uitzet.
Uitzetten van het alarm
Druk op gelijk welke toets uitgezonderd de BACKLIGHT/SNOOZE toets om het alarm uit te zetten
wanneer het afgaat. Het zal de volgende dag op dezelfde tijd afgaan.
Druk en houd gelijk welke toets vast uitgezonderd de BACKLIGHT/SNOOZE toets om de snooze uit
te zetten wanneer het is geactiveerd. Het zal de volgende dag op dezelfde tijd afgaan.
“Slaap” modus
De MP3 Thermoclock® RLR920 bevat een “Slaap” modus zodat u rustig in slaap kan vallen. Wanneer
deze modus geactiveerd is zal de gedownloade melodie of geluid steeds opnieuw worden afgespeeld
gedurende een vooraf ingestelde tijd (van 1 minuut tot 60 minuten). Aanzetten van de “Slaap” modus:
1. Druk in de tijdweergavemodus tweemaal op de MODE/SET toets om de “Slaap” modus te openen
(“SLE” wordt op het scherm weergegeven).
RLR920IM0328.indb 42 18/8/08 16:30:44
Page 43

43
NEDERLANDS
Instellen van de tijdzone
1. Druk in de tijdweergavemodus driemaal op de MODE/SET toets om de tijdzone instelmodus te
openen (het icoon wordt op het scherm weergegeven).
2. Druk op de
toets om de tijd van 37 wereldsteden te doorlopen.
3. Druk op de
toets om de zomertijdfunctie in of uit te zetten ( het icoon wordt weergegeven op
het scherm wanneer de zomertijdfunctie is geactiveerd).
4. Wanneer u de gewenste stad heeft geselecteerd, druk en houd de MODE/SET vast voor
ongeveer 2 seconden om uw instelling te bevestigen en ga terug naar de normale
tijdweergavemodus. De weergegeven tijd is de tijd van de geselecteerde stad.
Opmerking:
• druk eenmaal op de
toets in de normale tijdweergavemodus om de naam van de
geselecteerde stad in de tijdzone instelmodus weer te geven. Druk nogmaals op
om terug te
keren naar de datumweergave.
• In de tijdzone instelmodus ikkert het
icoon wanneer de weergegeven wereldstad dezelfde is
als de huidig geselecteerde stad in de tijdweergavemodus.
• Het
icoon zal ook weergegeven worden in de tijdweergavemodus indien de zomertijdfunctie
aangezet is.
NAAM VAN DE STAD AFKORTING TIJDSVERSCHIL
1 Londen LON 0
2 Parijs PAR + 1
3 Berlijn BER + 1
4 Milaan MIL + 1
5 Rome ROM + 1
6 Cairo CAI + 2
7 Istanbul IST + 2
8 Jeruzalem JRS + 2
9 Moskou MOW + 3
10 Dubai DXB + 4
11 Karachi KHI + 5
12 Dhaka DAC + 6
13 Bangkok BKK + 7
14 Hong Kong HKG + 8
15 Singapore SIN + 8
16 Tokyo TYO + 9
17 Seoel SEL + 9
18 Sydney SYD + 10
19 Nouméa NOU + 11
20 Wellington WLG + 12
21 Majuro MAJ - 12
2. Druk en houd de MODE/SET toets vast totdat de cijfers beginnen ikkeren om de tijdsduur in te
stellen.
3. Gebruik de
en toetsen om een tijd te selecteren (tussen de 1 en 60 minuten) druk daarna op
MODE/SET om te bevestigen.
4. Druk op de
toets om de “Slaap” modus aan te zetten en de playback te starten. Het geluid zal
automatisch uitgeschakeld worden wanneer de geselecteerde tijd is verstreken.
5. Uitzetten van de “Slaap” modus:
• In de “Slaap” modus, druk op de
toets of druk en houd de BACKLIGHT/SNOOZE toets vast
voor ongeveer 2 seconden.
• In alle andere modi, druk en houd de BACKLIGHT/SNOOZE toets vast voor ongeveer
2 seconden.
Opmerking: Het scherm zal automatisch terug naar de normale tijdweergavemodus keren wanneer
er geen toets wordt ingedrukt binnen de 1 minuut.
RLR920IM0328.indb 43 18/8/08 16:30:44
Page 44

44
NEDERLANDS
NAAM VAN DE STAD AFKORTING TIJDSVERSCHIL
NAAM VAN DE STAD AFKORTING TIJDSVERSCHIL
1 Londen LON 0
2 Parijs PAR + 1
3 Berlijn BER + 1
4 Milaan MIL + 1
5 Rome ROM + 1
6 Cairo CAI + 2
7 Istanbul IST + 2
8 Jeruzalem JRS + 2
9 Moskou MOW + 3
10 Dubai DXB + 4
11 Karachi KHI + 5
12 Dhaka DAC + 6
13 Bangkok BKK + 7
14 Hong Kong HKG + 8
15 Singapore SIN + 8
16 Tokyo TYO + 9
17 Seoel SEL + 9
18 Sydney SYD + 10
19 Nouméa NOU + 11
20 Wellington WLG + 12
21 Majuro MAJ - 12
22 Apia APW - 11
23 Honolulu HNL - 10
24 Anchorage ANC - 9
25 San Francisco SFO - 8
26 Los Angeles LAX - 8
27 Vancouver VAR - 8
28 Denver DEN - 7
29 Chicago CHI - 6
30 Mexico MEX - 6
31 New York NYC - 5
32 Miami MIA - 5
33 Santo Domingo SDO - 4
34 Rio de Janeiro RIO - 3
35 Buenos Aires BAI - 3
36 Fernando de Noronha FEN - 2
37 Tasiilaq AGM - 1
Achtergrondverlichting
Druk eenmaal op de BACKLIGHT/SNOOZE om de achtergrondverlichting voor 5 seconden aan te
zetten.
Temperatuur
Gebruik de toets in de tijdweergavemodus om te kiezen tussen een temperatuurweergave in
Celsius (°C) of Fahrenheit (°F).
Klokstatief
U kunt het beschermdeksel dat met uw RLR920 wordt meegeleverd gebruiken als een statief.
Plaats de klok in de inkeping van het deksel en plaats het op een tafel.
Onderhoud
Maak geen enkel onderdeel schoon met benzeen, verdunningsmiddelen of andere chemische
schoonmaakmiddelen – dit kan permanente schade veroorzaken dat niet door de garantie wordt
gedekt. Reinig het met een vochtige doek indien nodig. Houd uw RLR920 uit de buurt van extreme
temperaturen, water of zware schokken. Vervang de batterijen indien het LCD scherm onduidelijk
wordt. Gebruik het niet in de aanwezigheid van magnetische velden zoals in luchthavens. Elke
inspanning werd geleverd om ervoor te zorgen dat uw RLR920 de hoogste betrouwbaarheid heeft.
Hoewel, probeer het niet zelf te repareren indien er iets mis gaat – raadpleeg in dit geval uw
handelaar of de LEXIBOOK® hulplijn.
RLR920IM0328.indb 44 18/8/08 16:30:46
Page 45

45
NEDERLANDS
Garantie
Dit product is gedekt met een garantie van twee jaar*. Raadpleeg uw handelaar voor alle kwesties
in verband met de garantie of onze klantendienst na verkoop en houd uw aankoopbon binnen hand-
bereik. Onze garantie dekt alle vervaardigings- of montagefouten uitgezonderd schade veroorzaakt
door een gebrek aan kennis van de instructies, of gelijk welke incorrecte behandeling van het artikel
(zoals het demonteren, blootstellen aan warmte of vochtigheid, enz.).
* Uitgezonderd de achteruitgang van het LCD scherm.
OPMERKING: Het wordt aanbevolen om alle verpakkingen te bewaren voor later gebruik.
Bewaar deze gebruikershandleiding op een veilige plaats aangezien het belangrijke informatie
bevat. Omwille van onze constante drang naar verbetering kunnen de kleuren en de details van ons
product lichtjes verschillen dan hetgeen op de verpakking wordt weergegeven.
Referentie : RLR920
Ontworpen en ontwikkeld in Europa - Gemaakt in China
www.lexibook.com
Richtlijnen voor milieubescherming
Gebruikte elektronische apparaten horen niet thuis in het huisafval ! Wij vragen
u daarom een bijdrage aan de bescherming van ons milieu te leveren en dit
apparaat op de voorziene verzamelplaatsen af te geven.
Ref: RLR920IM0328
RLR920IM0328.indb 45 18/8/08 16:30:46
Page 46

RLR920IM0328.indb 46 18/8/08 16:30:46
Page 47

YOUR OPINION MATTERS / VOTRE AVIS COMPTE
Help us make products better than ever! Please fill out the following form in English or in French, and return it to / Aidez-nous à rendre nos
produits encore meilleurs! Merci de bien vouloir remplir ce coupon en français ou en anglais et de nous le retourner à l’adresse suivante :
Name and reference of product purchased / Nom et référence du produit acheté :
Date of purchase / Date de l’achat : ____/_____/_____
Store / Enseigne :
Birth Date of the user / Date de naissance de l’utilisateur de ce produit : ____/_____/_____
What is your overall impression of the product? / Vous trouvez le produit globalement :
Very satisfactory/Très satisfaisant
Satisfactory/Satisfaisant
Please feel free to leave your comments here / Vous pouvez à présent utiliser l’espace suivant pour nous donner vos remarques :
Find all our new products / Retrouvez toute notre actualité: http://www.lexibook.com
First name/Prénom :
Last name/Nom de famille :
Address/Adresse :
Zip code/Code Postal :
Country/Pays :
Phone/Téléphone :
Email :
Average/Moyen
Disappointing/Décevant Very disappointing/Très décevant
LEXIBOOK S.A,
Mon avis compte
2, avenue de Scandinavie,
91953 Courtaboeuf Cedex
FRANCE
City/Ville :
Conformément aux articles 34 et suivants de la loi « Informatique et Libertés » du 6 janvier 1978, vous disposez d'un droit d'accès, de modification,
de rectification et de suppression des données qui vous concernent. Vous pouvez l'exercer sur simple demande à notre adresse. Si vous ne souhaitez
pas que ces données soient utilisées à des fins de prospection commerciale, veuillez cocher ici :
RLR920IM0328.indb 47 18/8/08 16:30:47
Page 48

LEXIBOOK S.A,
Mon avis compte,
2, avenue de Scandinavie,
91953 Courtaboeuf Cedex
FRANCE
Affranch ir
ici
RLR920IM0328.indb 48 18/8/08 16:30:47
 Loading...