

Page 1

1
LevelOne
WAP-6110
300Mbps Wireless PoE Access Point
User’s Manual
Page 2

2
Table of Contents
1 Introduction ....................................................................................................... 5
Features ................................................................................................................................................... 5
Device Requirements .............................................................................................................................. 5
Using this Document ............................................................................................................................... 6
Notational conventions................................................................................................................. 6
Typographical conventions .......................................................................................................... 6
Special messages ........................................................................................................................ 6
2 Getting to know the device .............................................................................. 7
Computer / System requirements .......................................................................................................... 7
Package Contents ................................................................................................................................... 7
LED meanings & activations ................................................................................................................... 8
Front Panel ................................................................................................................................... 8
Rear and Right Panel and bottom Side ...................................................................................... 9
3 Computer configurations under different OS, to obtain IP address
automatically .................................................................................................. 11
For Windows 98SE / ME / 2000 / XP ................................................................................................... 11
For Windows Vista-32/64 ...................................................................................................................... 14
For Windows 7-32/64 ............................................................................................................................ 18
For Windows 8-32/64 ............................................................................................................................ 22
4 Connecting your device ................................................................................. 27
Connecting the Hardware ..................................................................................................................... 27
Using WISP (Wireless ISP) .................................................................................................................. 28
Using PoE (Power over Ethernet) ........................................................................................................ 29
Using AP (Access Point) ....................................................................................................................... 30
Wireless Connection ............................................................................................................................. 31
5 What the Internet/WAN access of your own Network now is ....................... 33
Internet/WAN access is the DHCP client ............................................................................................. 35
Internet/WAN access is the Static IP ................................................................................................... 36
Internet/WAN access is the PPPoE client ........................................................................................... 38
6 Getting Started with the Web pages.............................................................. 39
Accessing the Web pages .................................................................................................................... 39
Testing your Setup ................................................................................................................................ 41
Default device settings .......................................................................................................................... 41
7 Wireless Network ........................................................................................... 43
Basic Settings ........................................................................................................................................ 43
Advanced Settings ................................................................................................................................ 45
Security................................................................................................................................................... 46
Page 3

3
WEP + Encryption Key .............................................................................................................. 49
WEP + Use 802.1x Authentication............................................................................................ 51
WPA/WPA2/WPA2 Mixed + Personal (Pre-Shared Key) ....................................................... 53
WPA/WPA2/WPA2 Mixed + Enterprise (RADIUS) ................................................................. 54
Access Control ....................................................................................................................................... 56
Allow Listed ................................................................................................................................. 56
Deny Listed ................................................................................................................................. 58
WDS settings ......................................................................................................................................... 59
Configure WDS (Wireless Distribution System) only ............................................................... 60
Configure AP (Access Point) + WDS (Wireless Distribution System) .................................... 65
Site Survey ............................................................................................................................................. 70
Configure Wireless client + Site Survey ................................................................................... 71
Configure Wireless ISP + Site Survey ...................................................................................... 75
WPS ....................................................................................................................................................... 79
Introduction of WPS ................................................................................................................... 80
Supported WPS features ........................................................................................................... 81
AP mode ..................................................................................................................................... 81
AP as Enrollee ............................................................................................................................ 81
AP as Registrar .......................................................................................................................... 81
AP as Proxy ................................................................................................................................ 81
Infrastructure-Client mode ......................................................................................................... 82
Instructions of AP’s and Client’s operations ............................................................................. 82
Wireless Basic Settings page .................................................................................................... 83
Operations of AP - AP being an enrollee ............................................................................................. 84
Operations of AP - AP being a registrar............................................................................................... 98
AP mode ..................................................................................................................................... 98
Push Button method ................................................................................................................ 102
8 LAN Interface ............................................................................................... 106
LAN Interface Setup ............................................................................................................................ 106
Changing the LAN IP address and subnet mask .............................................................................. 108
Show Client .......................................................................................................................................... 110
9 Status............................................................................................................ 111
10 Statistics ....................................................................................................... 112
11 Log ................................................................................................................ 113
System Log .......................................................................................................................................... 113
12 Firmware Update.......................................................................................... 115
About firmware versions ..................................................................................................................... 115
Manually updating firmware ................................................................................................................ 115
13 Save/Reload Settings .................................................................................. 117
Page 4

4
Save Settings to File............................................................................................................................ 117
Load Settings from File ....................................................................................................................... 119
Resetting to Defaults ........................................................................................................................... 121
14 Password ...................................................................................................... 124
Setting your username and password ............................................................................................... 124
15 Logout ........................................................................................................... 126
Logout ................................................................................................................................................... 126
A Configuring your Computers ........................................................................ 127
Configuring Ethernet PCs ................................................................................................................... 127
Before you begin ...................................................................................................................... 127
Windows® XP PCs .................................................................................................................. 127
Windows 2000 PCs .................................................................................................................. 127
Windows Me PCs ..................................................................................................................... 129
Windows 95, 98 PCs................................................................................................................ 129
Windows NT 4.0 workstations ................................................................................................. 130
Assigning static Internet information to your PCs .................................................................. 131
B IP Addresses, Network Masks, and Subnets .............................................. 133
IP Addresses ........................................................................................................................................ 133
Structure of an IP address ....................................................................................................... 133
Network classes ....................................................................................................................... 133
Subnet masks ...................................................................................................................................... 134
C UPnP Control Point Software on Windows ME/XP .................................... 136
UPnP Control Point Software on Windows ME................................................................................. 136
UPnP Control Point Software on Windows XP with Firewall ........................................................... 137
SSDP requirements ................................................................................................................. 137
D Troubleshooting ........................................................................................... 140
Troubleshooting Suggestions ............................................................................................................. 140
Diagnosing Problem using IP Utilities ................................................................................................ 142
ping ............................................................................................................................................ 142
nslookup .................................................................................................................................... 142
E Glossary ....................................................................................................... 144
Page 5

5
1 Introduction
Congratulations on becoming the owner of the Wireless
Gateway. You will now be able to access the Internet using your
high-speed xDSL/Cable modem connection.
This User Guide will show you how to connect your Wireless
Gateway, and how to customize its configuration to get the most
out of your new product.
Features
The list below contains the main features of the device and may
be useful to users with knowledge of networking protocols. If
you are not an experienced user, the chapters throughout this
guide will provide you with enough information to get the most
out of your device.
Features include:
10/100Base-T Ethernet Wireless APto provide Internet
connectivity to all computers on your LAN
Network address translation (NAT) functions to provide
security for your LAN
Network configuration through DHCP Server and DHCP
Client
Services including IP route and DNS configuration, RIP,
and IP
Supports remote software upgrades
User-friendly configuration program accessed via a web
browser
User-friendly configuration program accessed via
EasySetup program
The Wireless Gateway has the internal Ethernet switch
allows for a direct connection to a 10/100BASE-T Ethernet
network via an RJ-45 interface, with LAN connectivity for
both the Wireless Gateway and a co-located PC or other
Ethernet-based device.
Device Requirements
In order to use the Wireless Gateway, you must have the
following:
One RJ-45 Broadband Internet connection via cable
modem or xDSL modem
Instructions from your ISP on what type of Internet access
you will be using, and the addresses needed to set up access
One or more computers each containing an Ethernet card
(10Base-T/100Base-T network interface card (NIC))
TCP/IP protocol for each PC
Page 6
6
Note
You do not need to use a hub or switch in order to connect more
than one Ethernet PC to your device. Instead, you can connect
up to four Ethernet PCs directly to your device using the ports
labeled Ethernet on the rear panel.
Note
Provides clarifying or non-essential information on the current
topic.
Definition
Explains terms or acronyms that may be unfamiliar to many
readers. These terms are also included in the Glossary.
WARNING
Provides messages of high importance, including messages
relating to personal safety or system integrity.
For system configuration using the supplied
a. web-based program: a web browser such as Internet
Explorer v4 or later, or Netscape v4 or later. Note that
version 4 of each browser is the minimum version
requirement – for optimum display quality, use Internet
Explorer v5, or Netscape v6.1
b. EasySetup program: Graphical User Interface
Using this Document
Notational conventions
Acronyms are defined the first time they appear in the text
and also in the glossary.
For brevity, the Wireless Gateway is referred to as “the device”.
The term LAN refers to a group of Ethernet-connected
computers at one site.
Typographical conventions
Italic text is used for items you select from menus and drop-
down lists and the names of displayed web pages.
Bold text is used for text strings that you type when prompted
by the program, and to emphasize important points.
Special messages
This document uses the following icons to draw your attention to
specific instructions or explanations.
Page 7

7
2 Getting to know the device
Computer / System requirements
1. Pentium 200MHZ processor or above
2. Windows 98SE, Windows Me, Windows 2000, Windows
XP, Windows Vista, Windows 7 and Windows 8
3. 64MB of RAM or above
4. 25MB free disk space
Package Contents
1. WAP-6110
2. CD-ROM With User Manual
3. Quick Installation Guide
4. Ethernet Cable (RJ-45)
5. Power Adapter
6. Detachable Antenna
Page 8

8
Label
Color
Function
POWER
green
On: device is powered on
Off: device is powered off
WLAN
green
On: WLAN link established and active
Blink: Valid Wireless packet being transferred
WPS
green
Off: WPS link isn’t established and active
Blink: Valid WPS packet being transferred
LAN
green
On: LAN link established and active
Off: No LAN link
Blink: Valid Ethernet packet being transferred
LED meanings & activations
Front Panel
The front panel contains lights called Light Emitting Diodes
(LEDs) that indicate the status of the unit.
* Actual Front Panel and ANTENNA may vary depending on model.
Figure 1: Front Panel and LEDs
Page 9
9
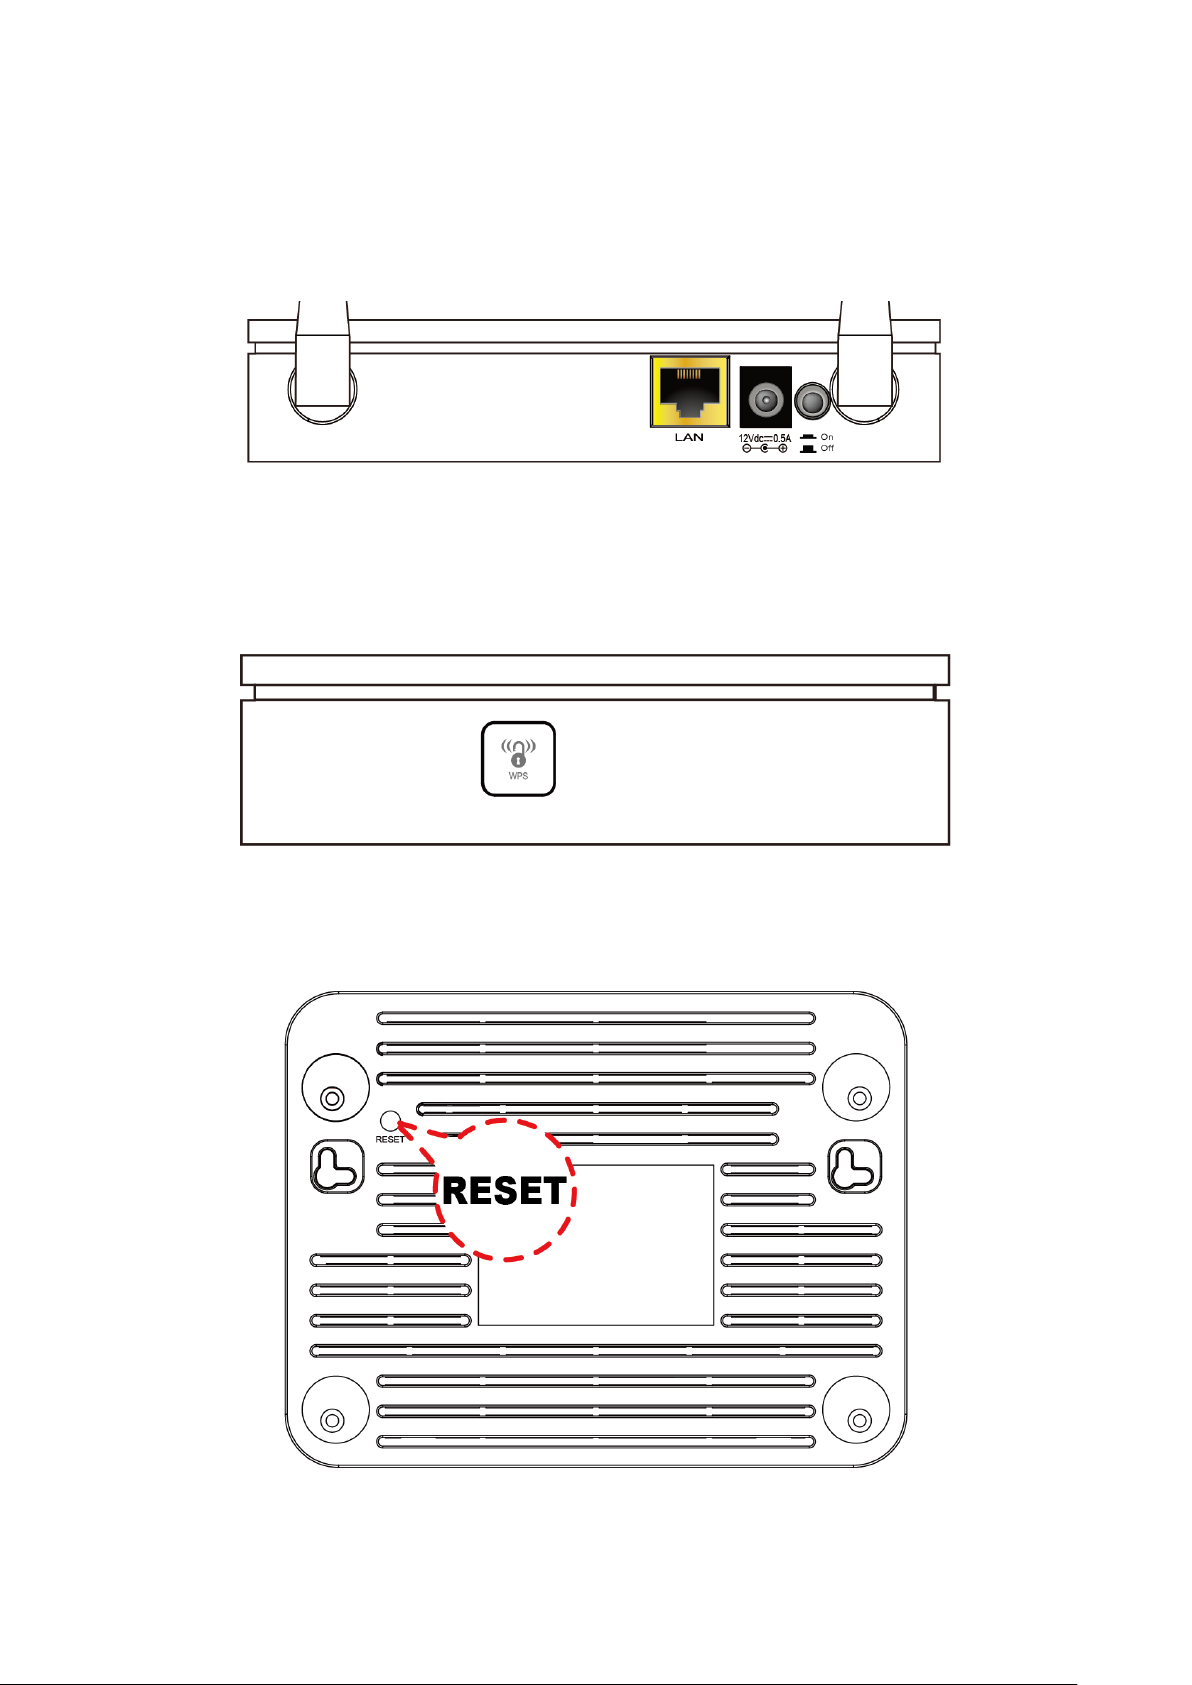
Rear and Right Panel and bottom Side
The rear and right panel and bottom side contains a Restore
Defaults button, the ports for the unit's data and power
connections.
* Actual Rear Panel and ANTENNA may vary depending on model.
Figure 2: Rear Panel Connections
* Actual button may vary depending on model.
Figure 3: Right Panel Connections
* Actual button may vary depending on model.
Page 10

10
Label
Function
ANTENNA
2 detachable ANTENNA
ON/OFF
SWITCH
Power on/off the device
POWER
Connects to the supplied power adaptor
LAN
Connects the device via LAN Ethernet
WPS
Press this button for at least 3 full seconds and
the WPS LED will flash to start WPS.
Now go to the wireless adapter or device and
press its WPS button. Make sure to press the
button within 120 seconds (2 minutes) after
pressing the AP's WPS button.
RESET
Reset button. RESET the 802.11n WLAN AP to its
default settings.
Press this button for at least 6 full seconds to RESET
device to its default settings.
Page 11
11
3 Computer configurations under different OS,
to obtain IP address automatically
Before starting the 802.11n WLAN AP configuration, please
kindly configure the PC computer as below, to have automatic
IP address / DNS Server.
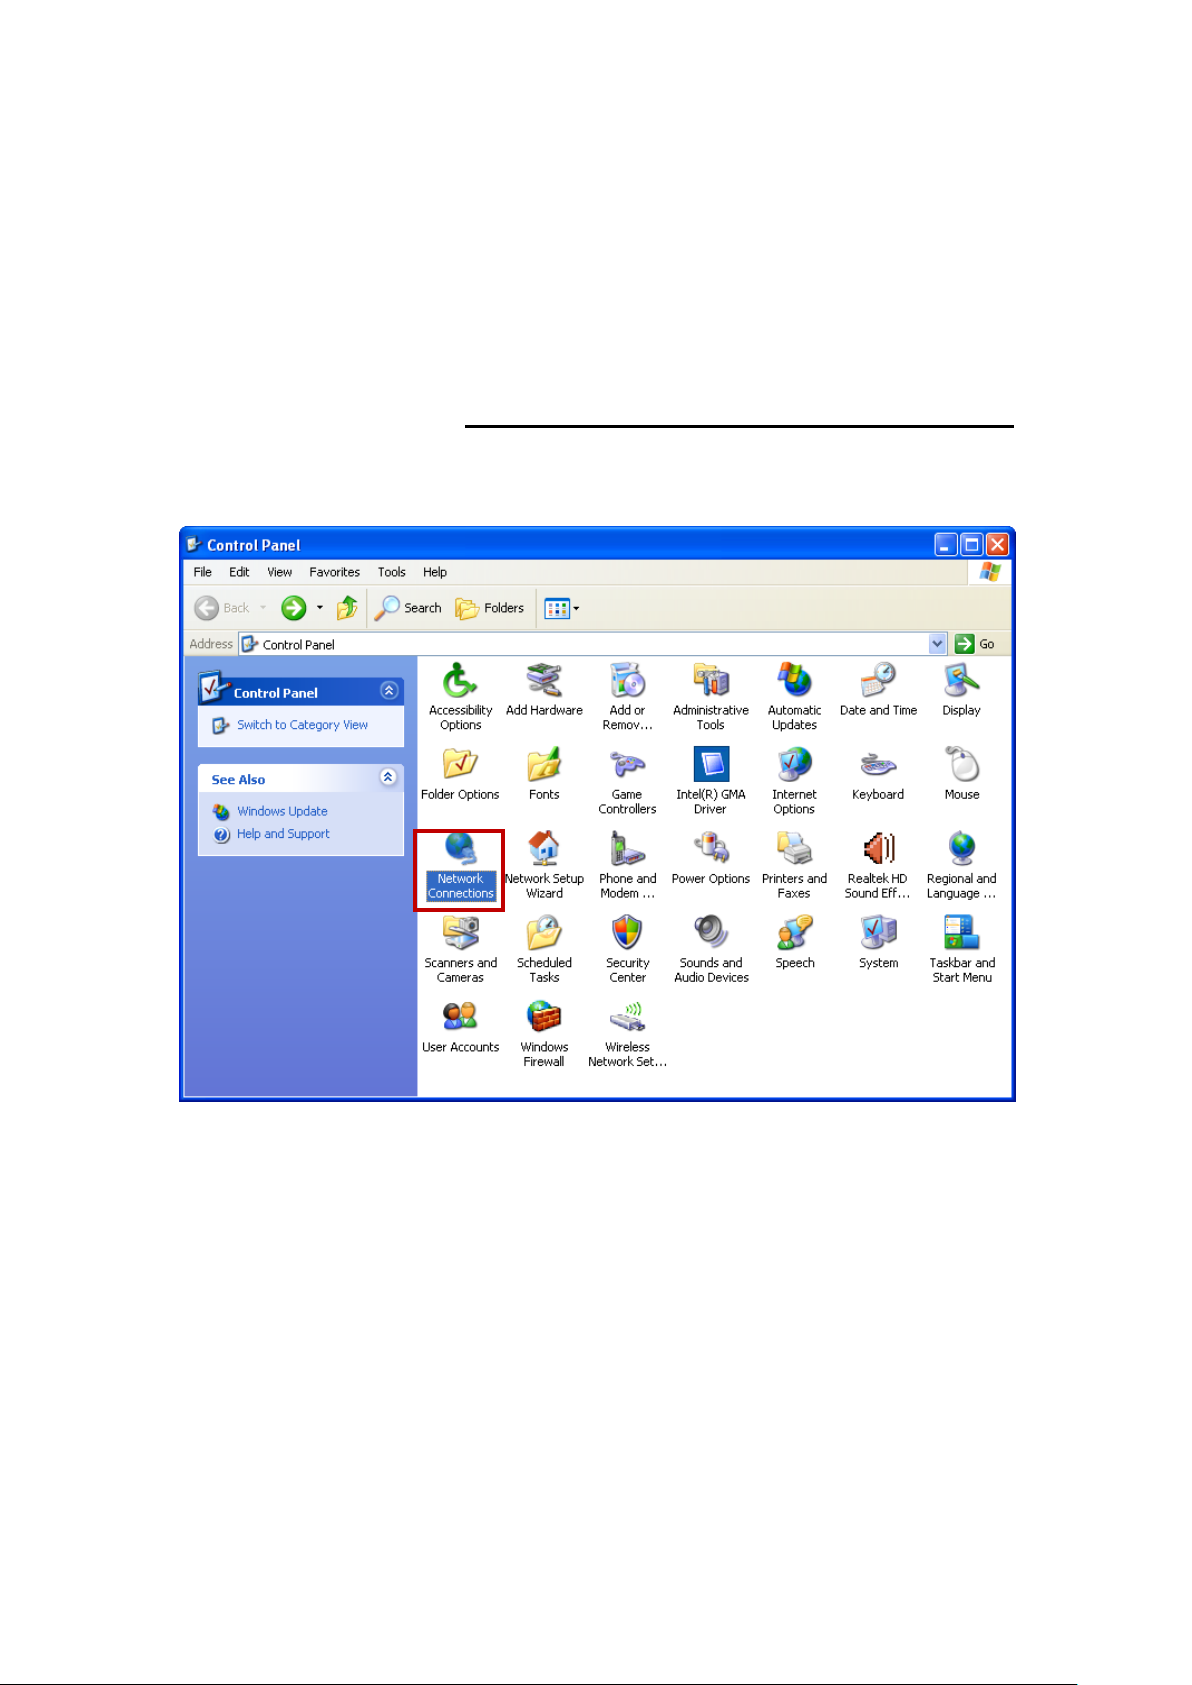
For Windows 98SE / ME / 2000 / XP
1. Click on "Start" -> "Control Panel" (in Classic View). In
the Control Panel, double click on "Network Connections"
to continue.
Page 12
12
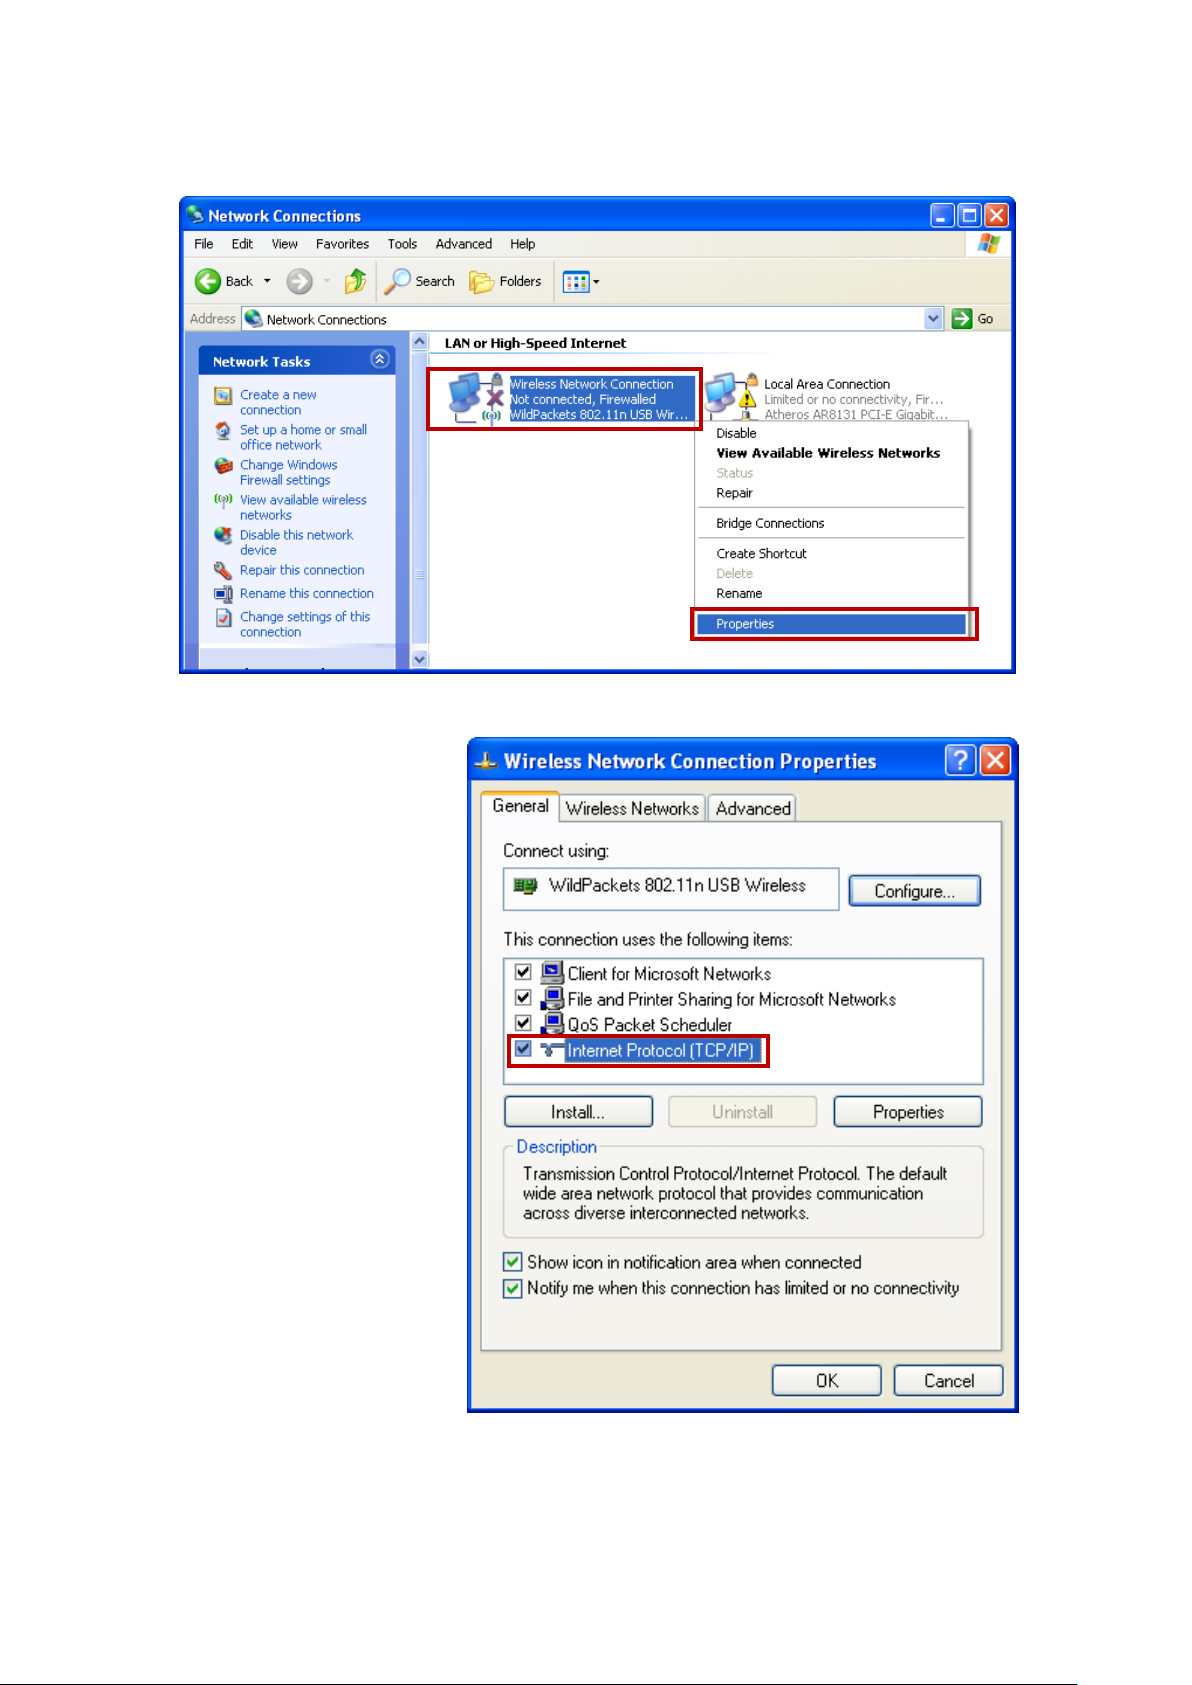
2. Single RIGHT click on "Local Area connection", then click
"Properties".
3. Double click on "Internet Protocol (TCP/IP)".
Page 13
13
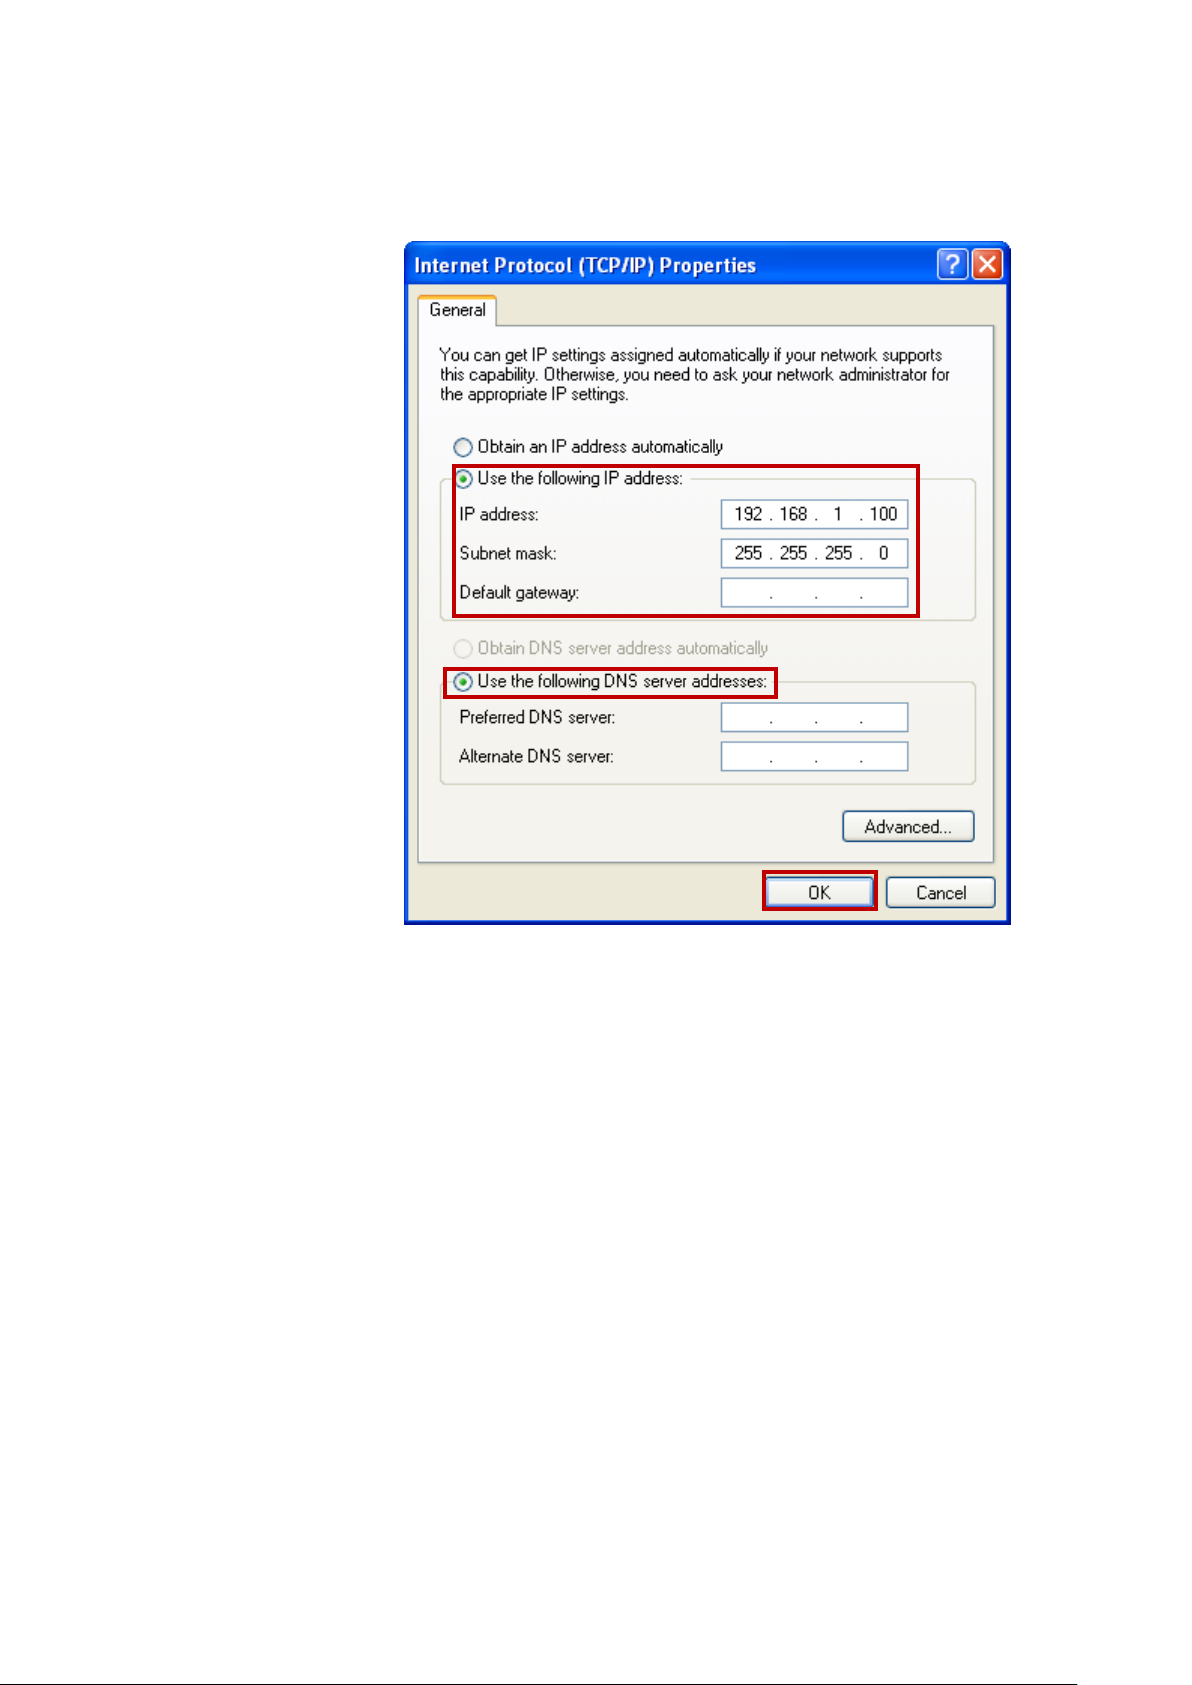
4. Check "Use the following IP address", configure IP
address to "192.168.1.100", Subnet mask to
"255.255.255.0" and check “Use the following DNS
server addresses” then click on "OK" to continue.
5. Click "Show icon in notification area when connected"
(see screen image in 3. above) then Click on "OK" to
complete the setup procedures.
Page 14

14
For Windows Vista-32/64
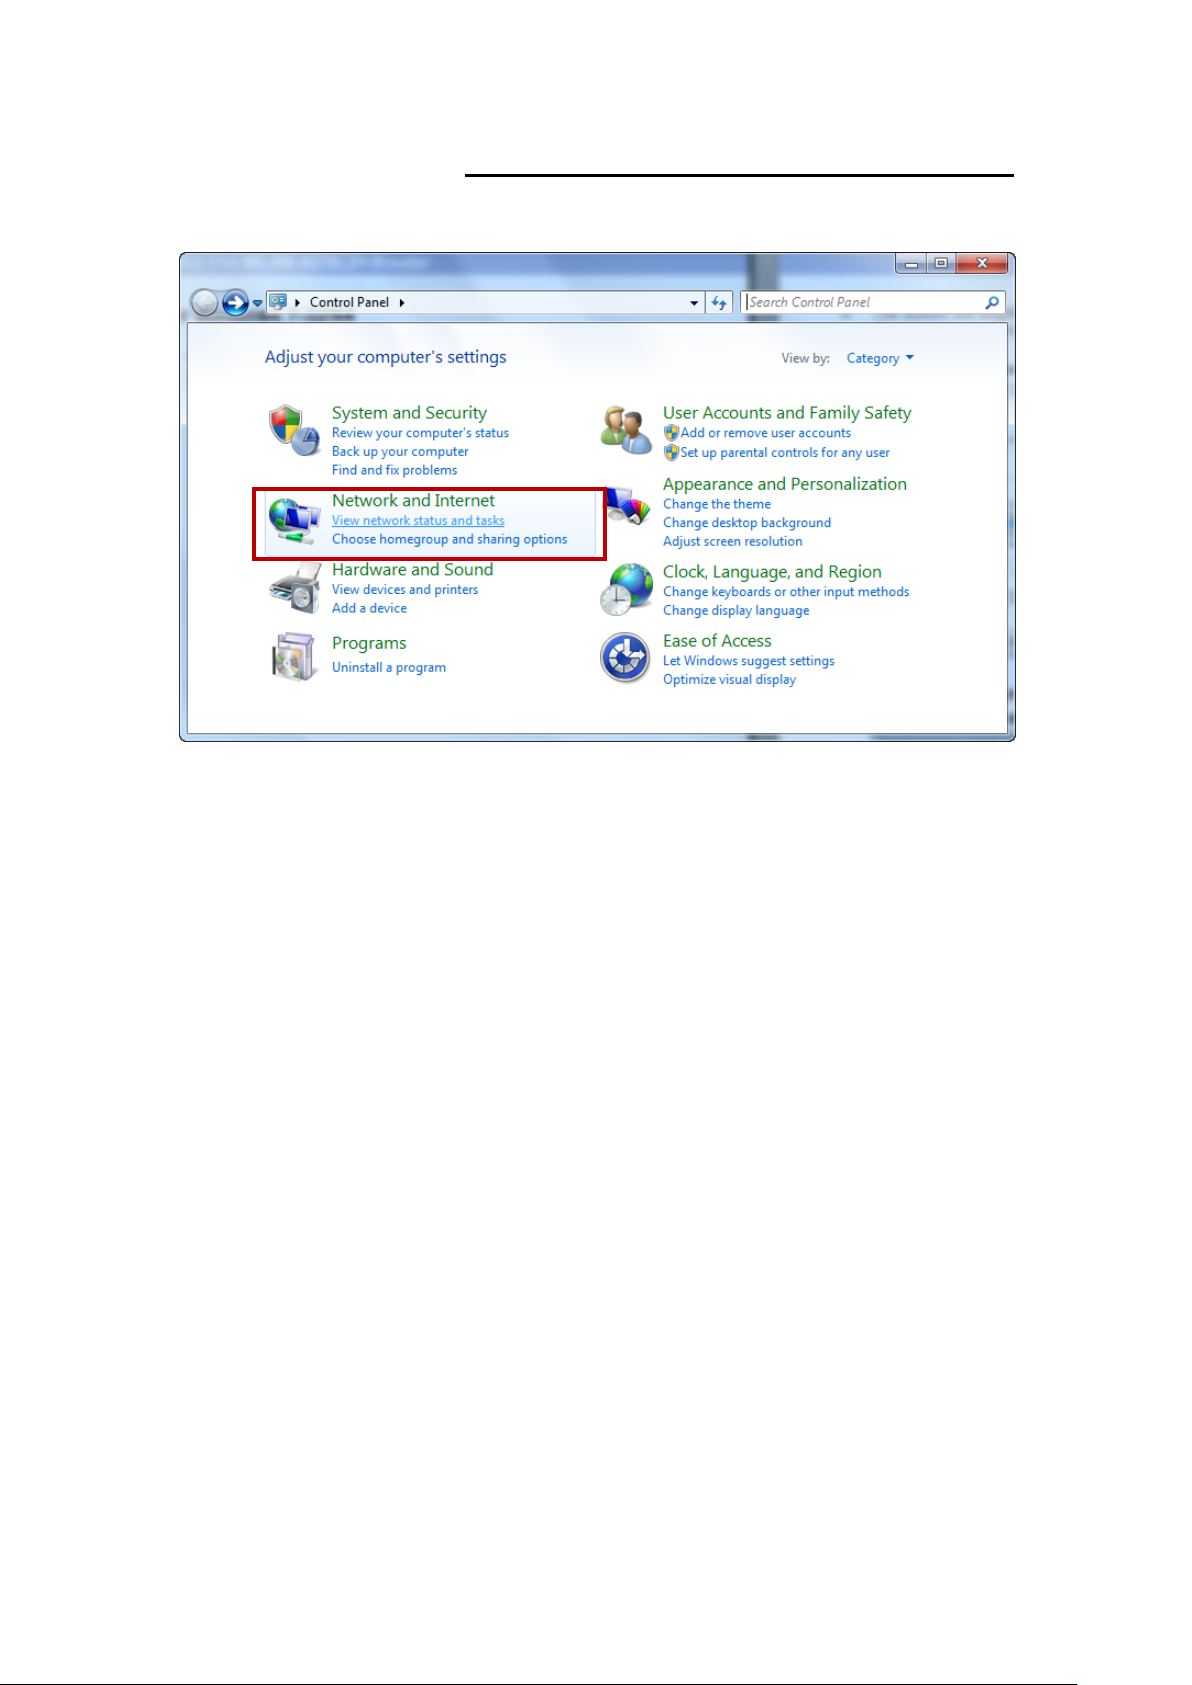
1. Click on “Start” -> “Control Panel” -> “View network
status and tasks”.
Page 15
15
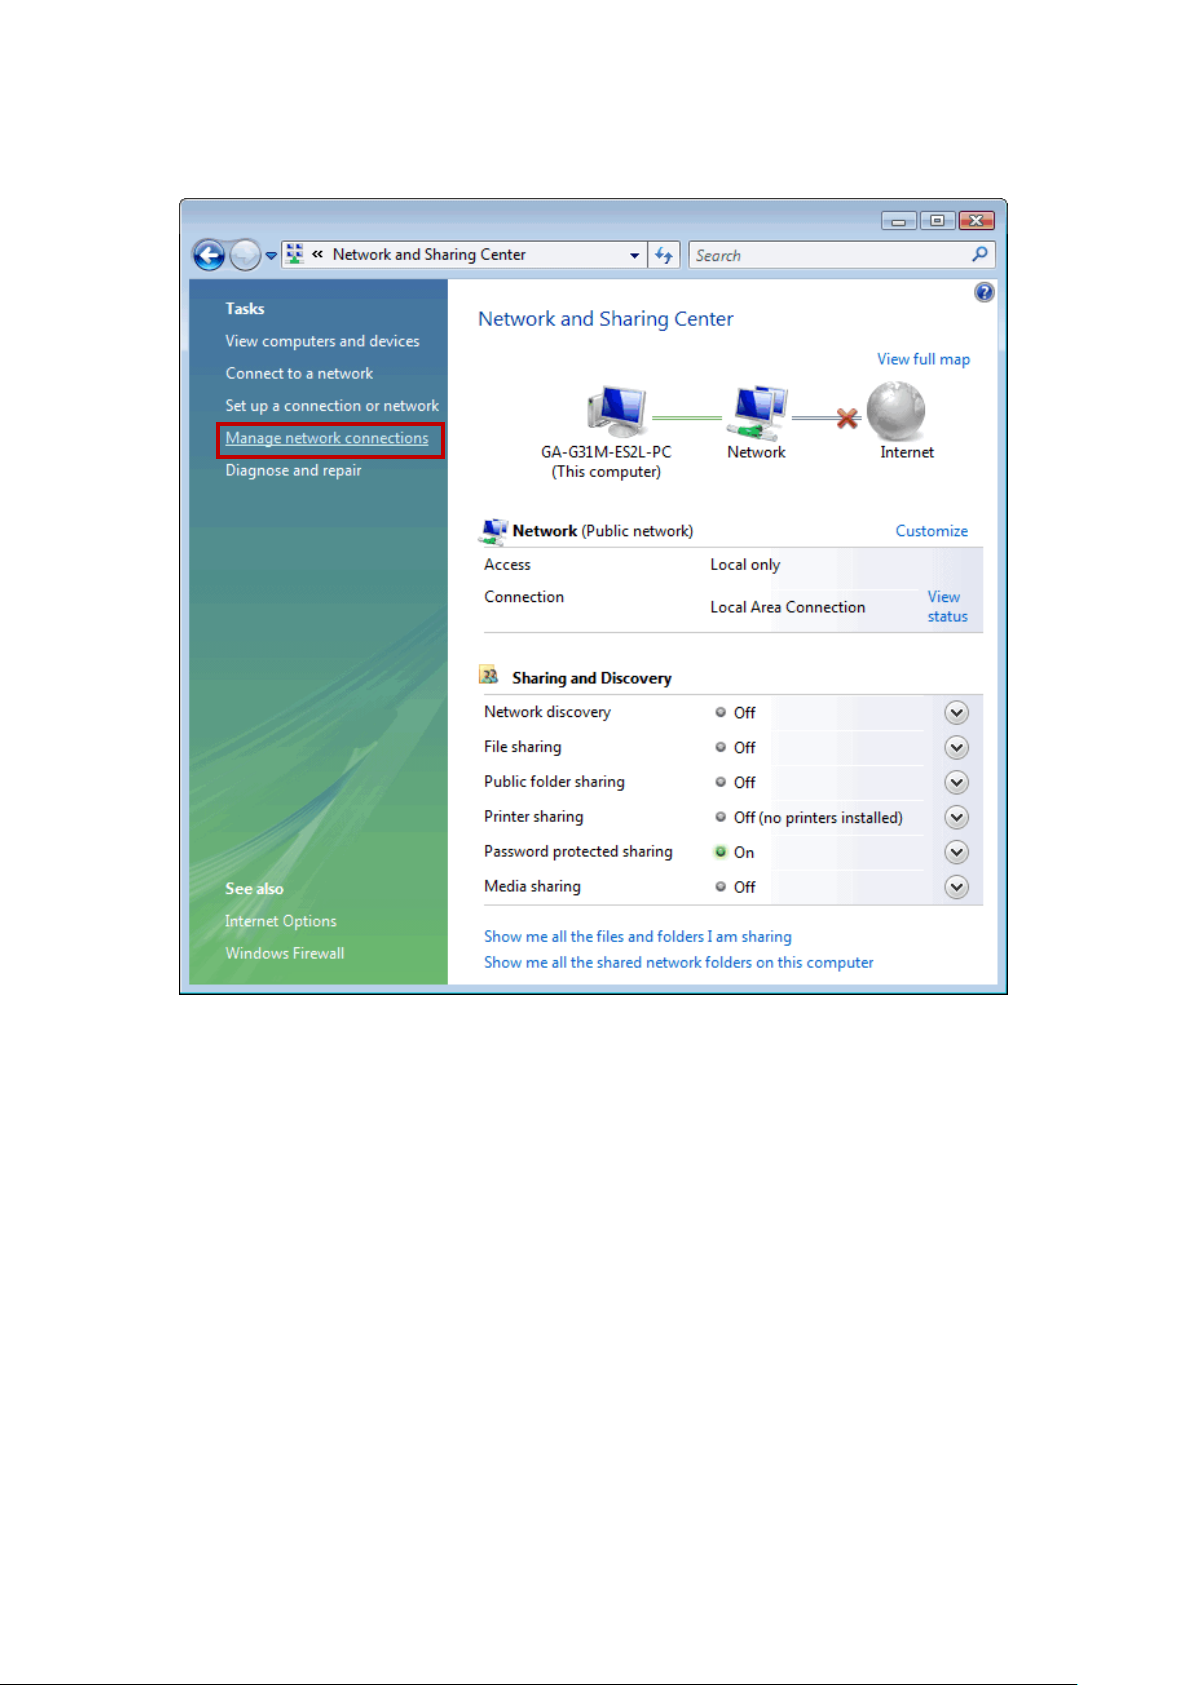
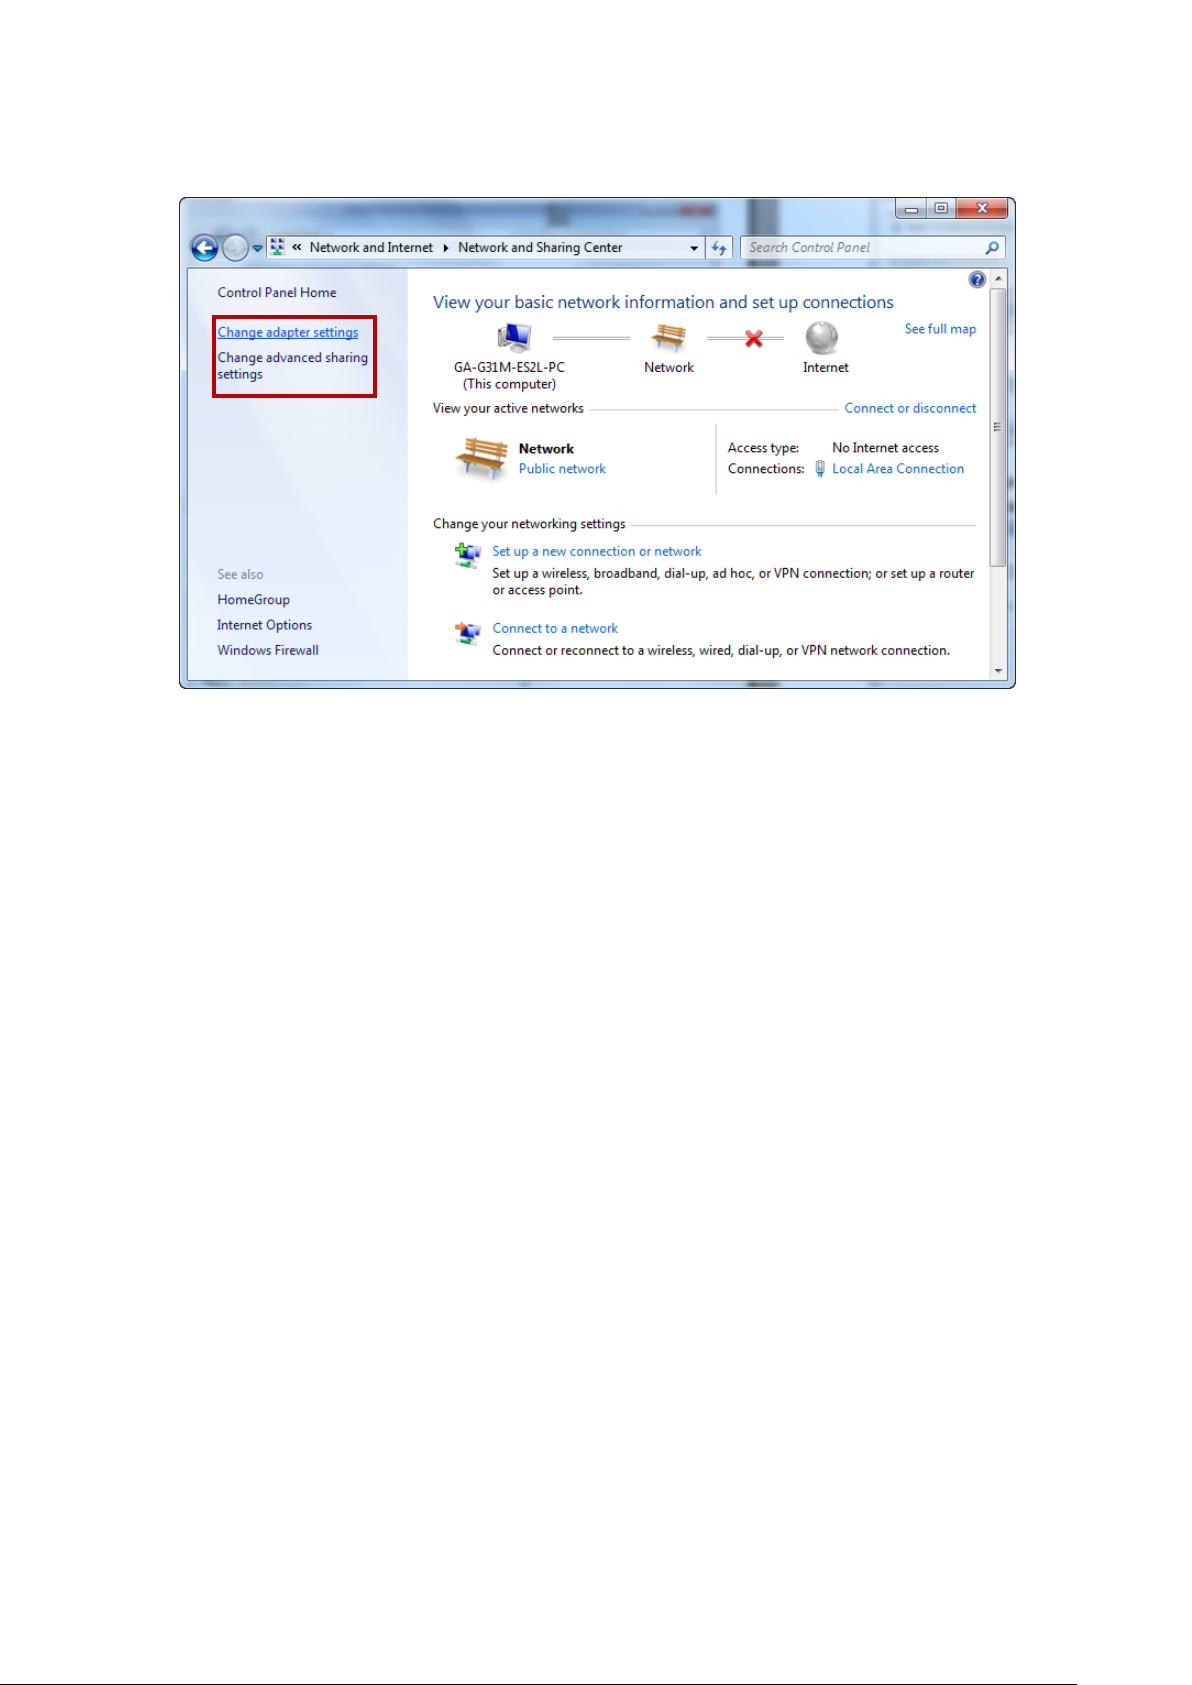
2. In the Manage network connections, click on “Manage
network connections” to continue.
Page 16
16
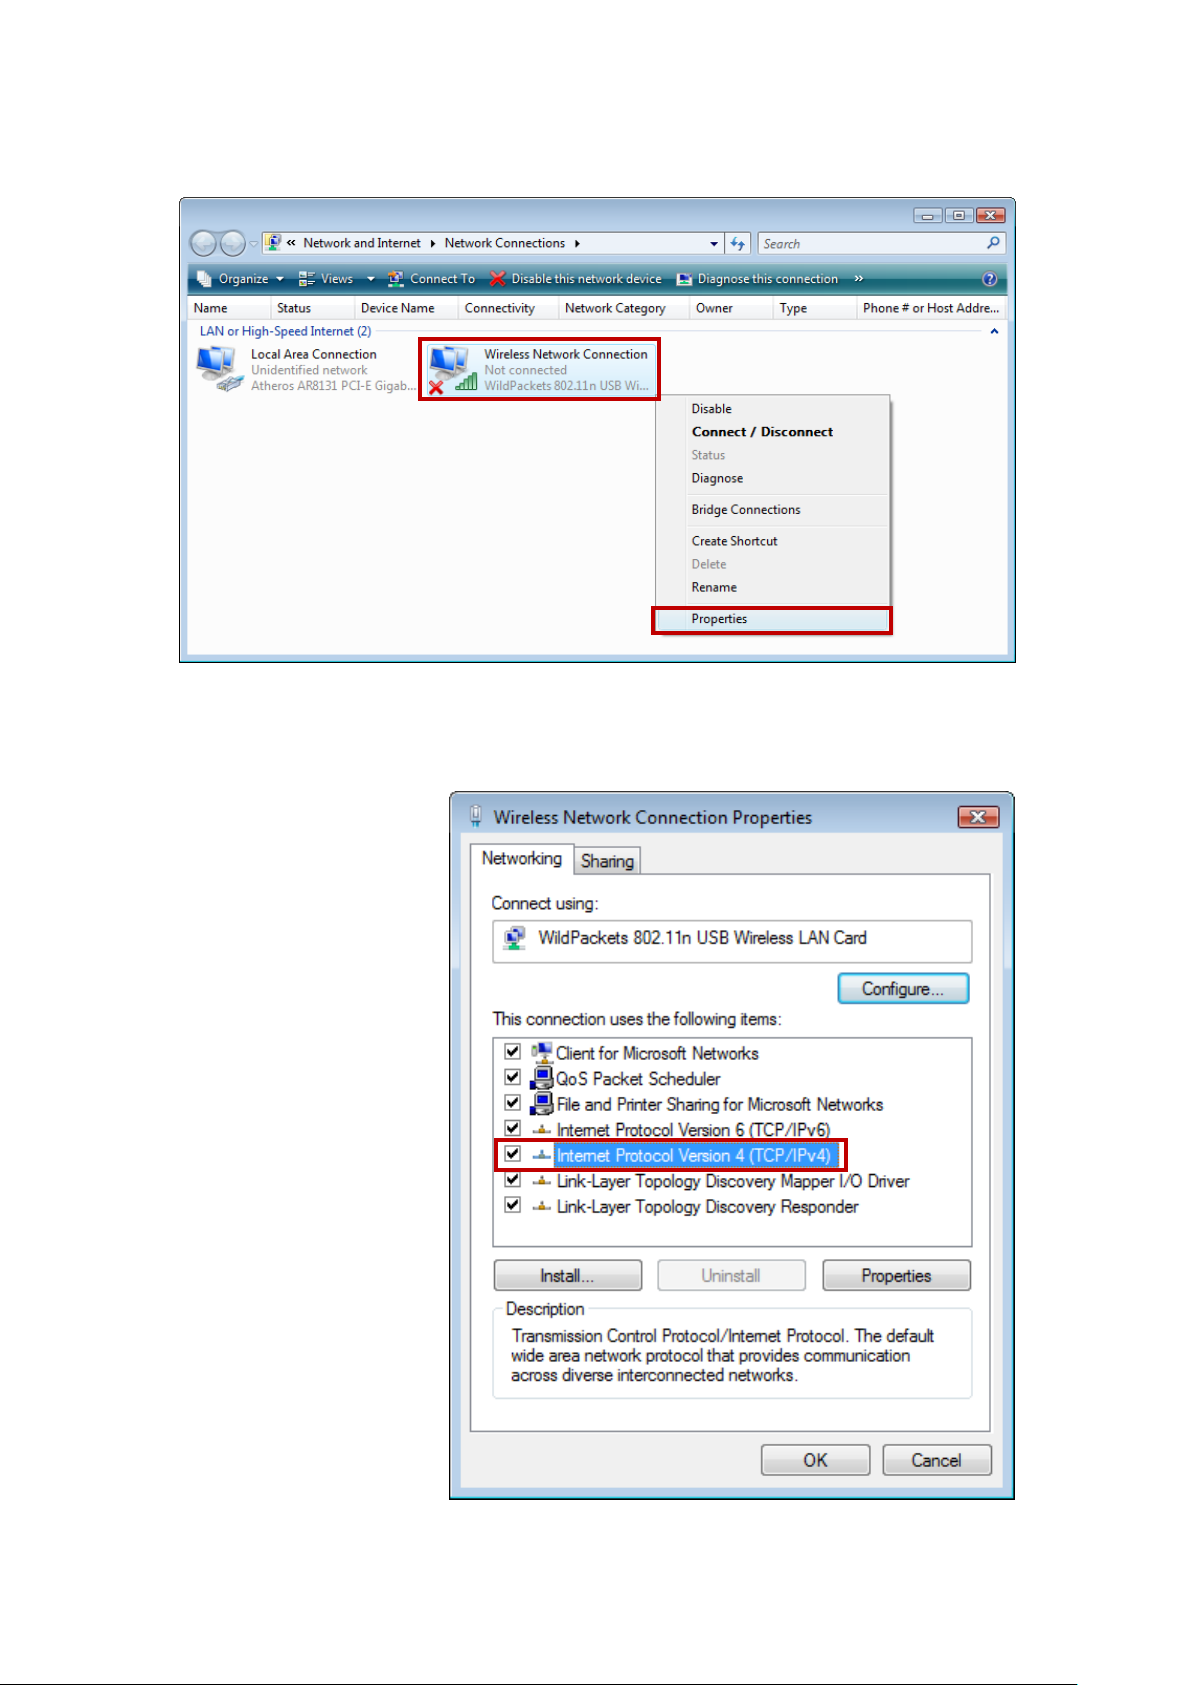
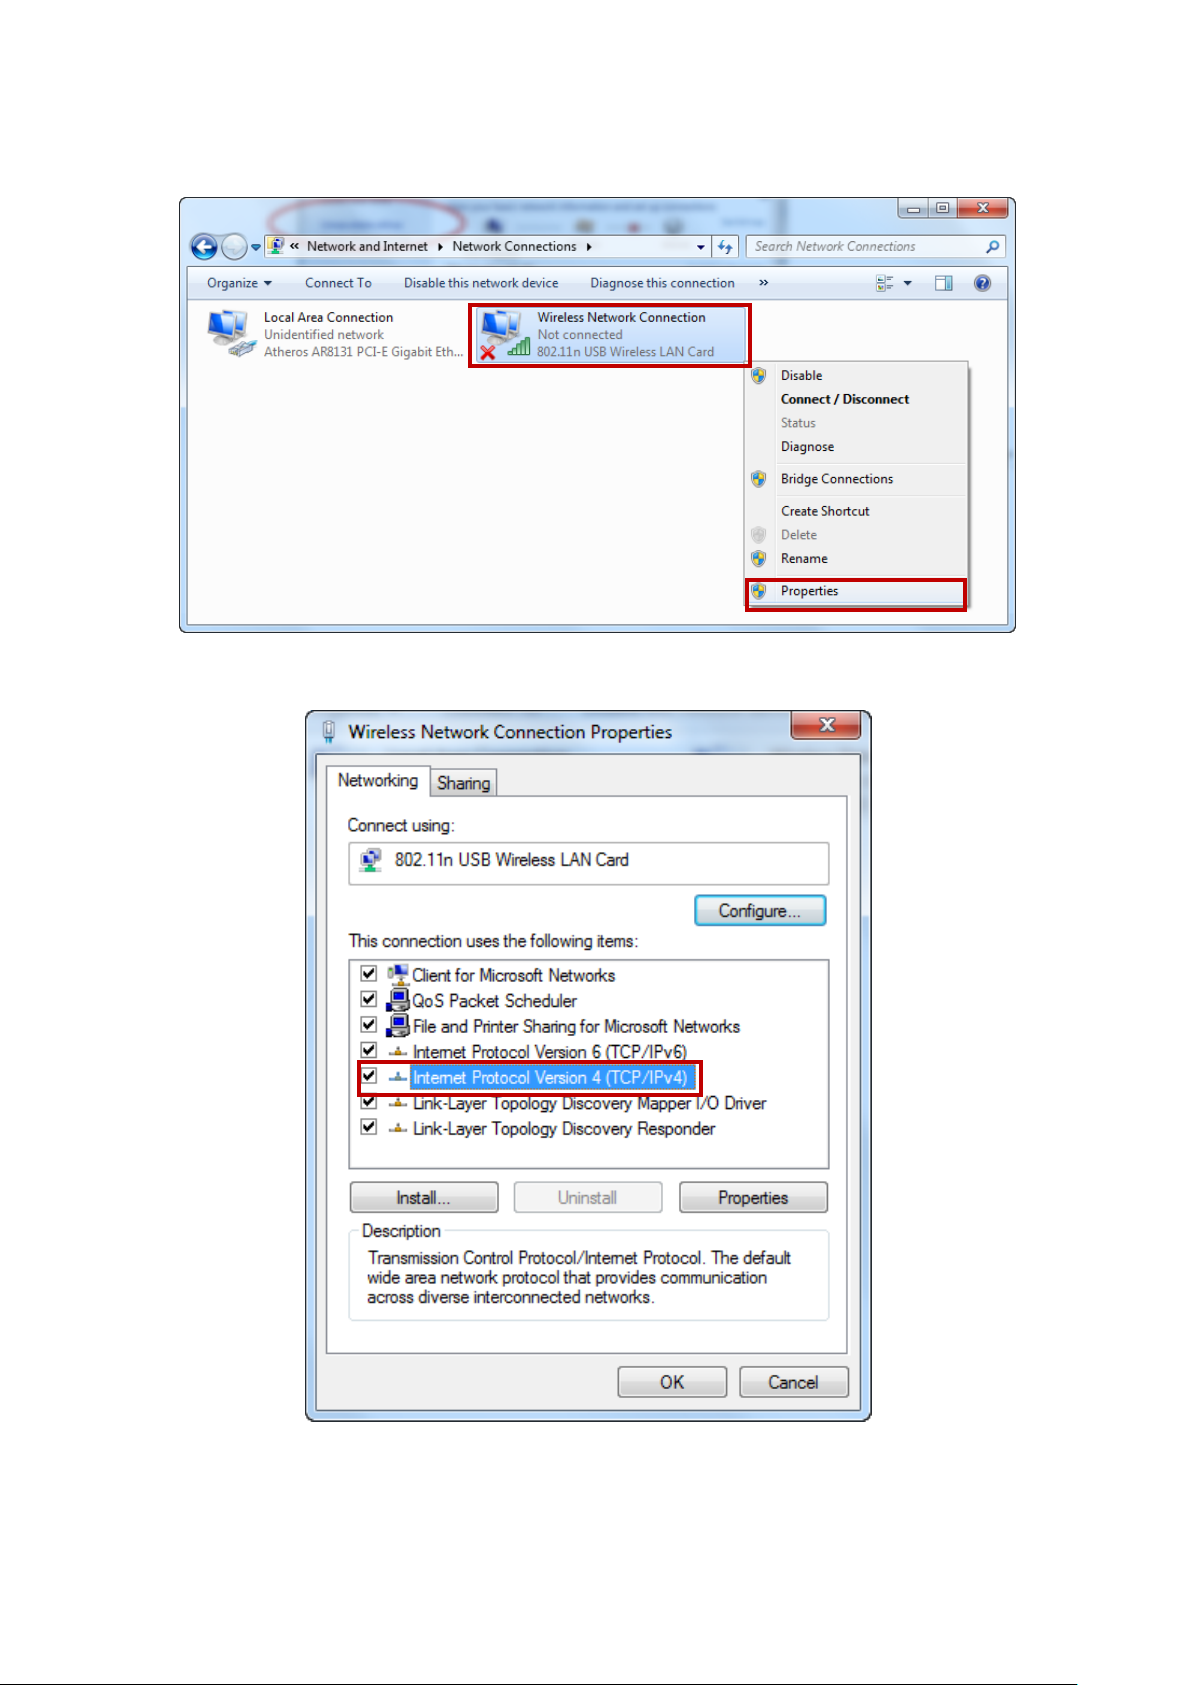
3. Single RIGHT click on "Wireless Network Connection",
then click "Properties".
4. The screen will display the information "User Account
Control" and click "Continue" to continue.
5. Double click on "Internet Protocol Version 4 (TCP/IPv4)".
Page 17
17
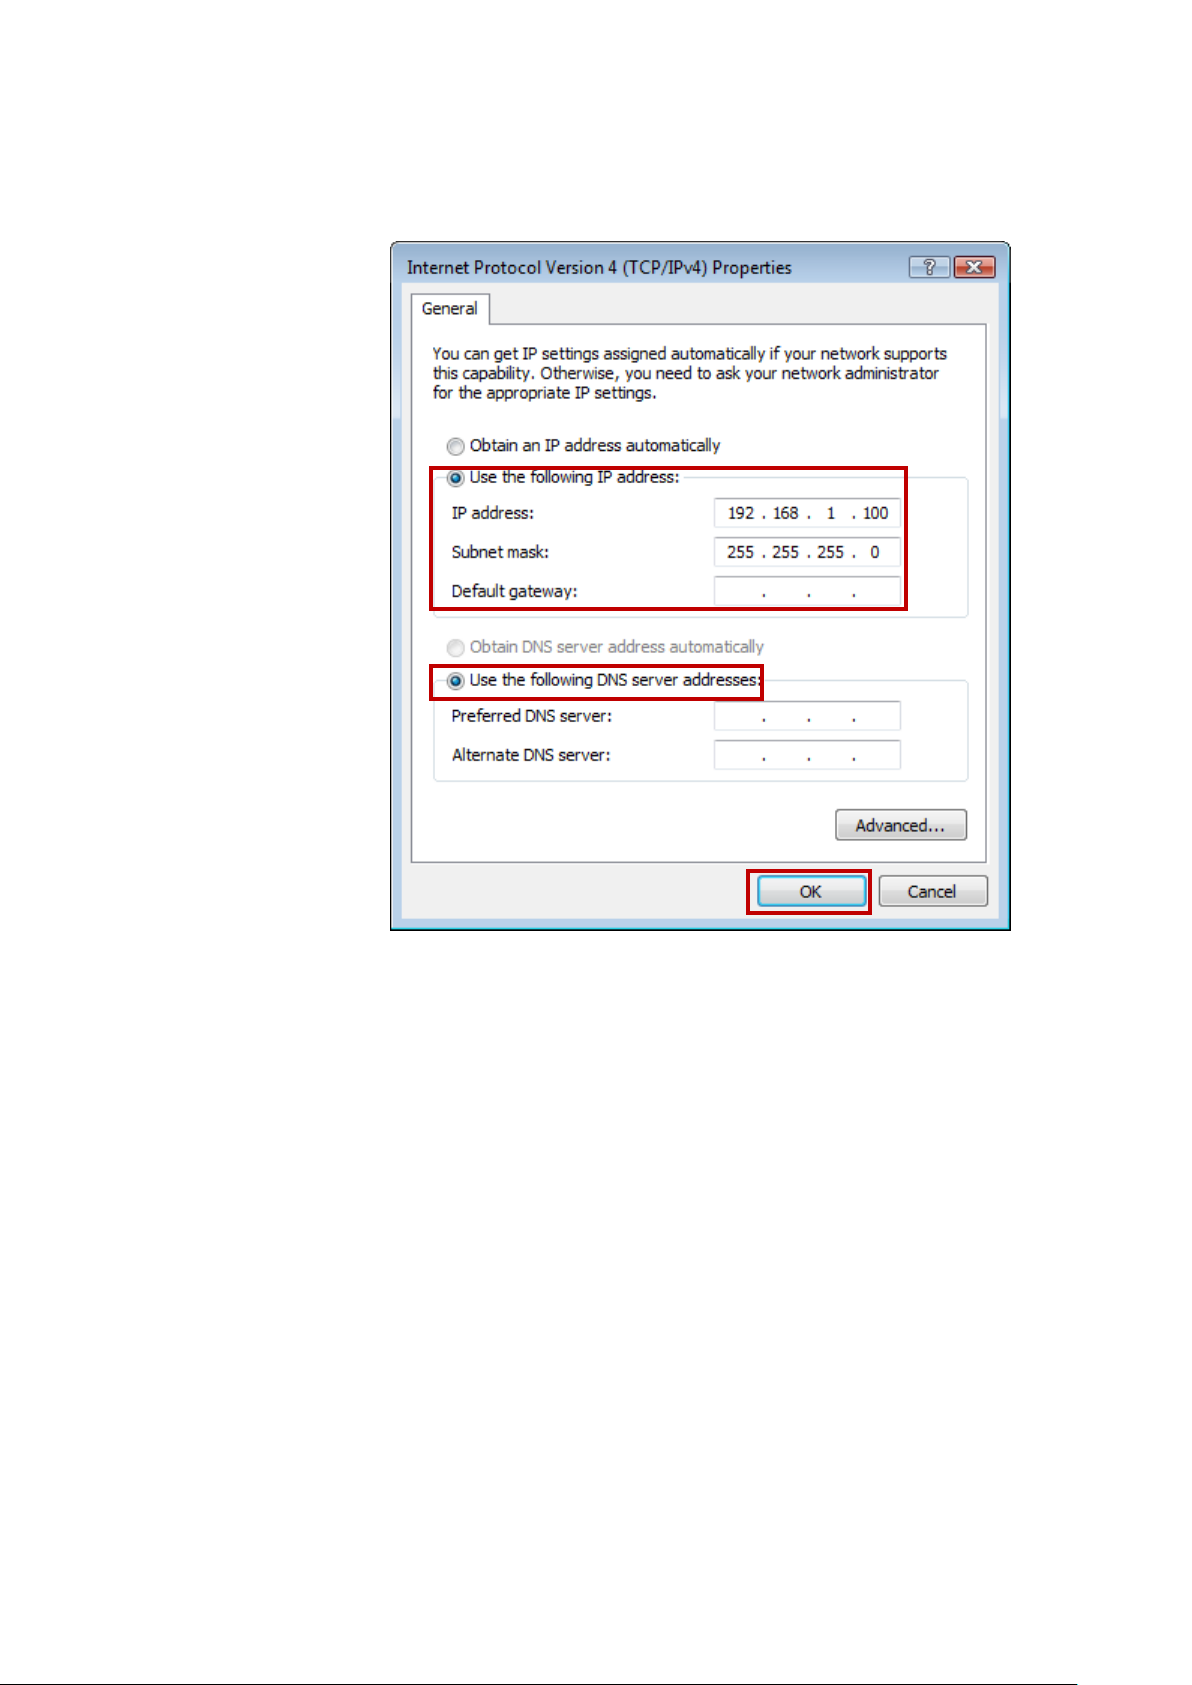
6. Check "Use the following IP address", configure IP
address to "192.168.1.100", Subnet mask to
"255.255.255.0" and check “Use the following DNS
server addresses” then click on "OK" to continue.
Page 18
18
For Windows 7-32/64
1. Click on “Start” -> “Control Panel” (in Category View) ->
“View network status and tasks”.
Page 19
19
2. In the Control Panel Home, click on “Change adapter
settings” to continue.
Page 20
20
3. Single RIGHT click on “Local Area Connection”, then click
“Properties”.
4. Double click on "Internet Protocol Version 4 (TCP/IPv4)".
Page 21

21
5. Check "Use the following IP address", configure IP
address to "192.168.1.100", Subnet mask to
"255.255.255.0" and check “Use the following DNS
server addresses” then click on "OK" to continue.
Page 22
22
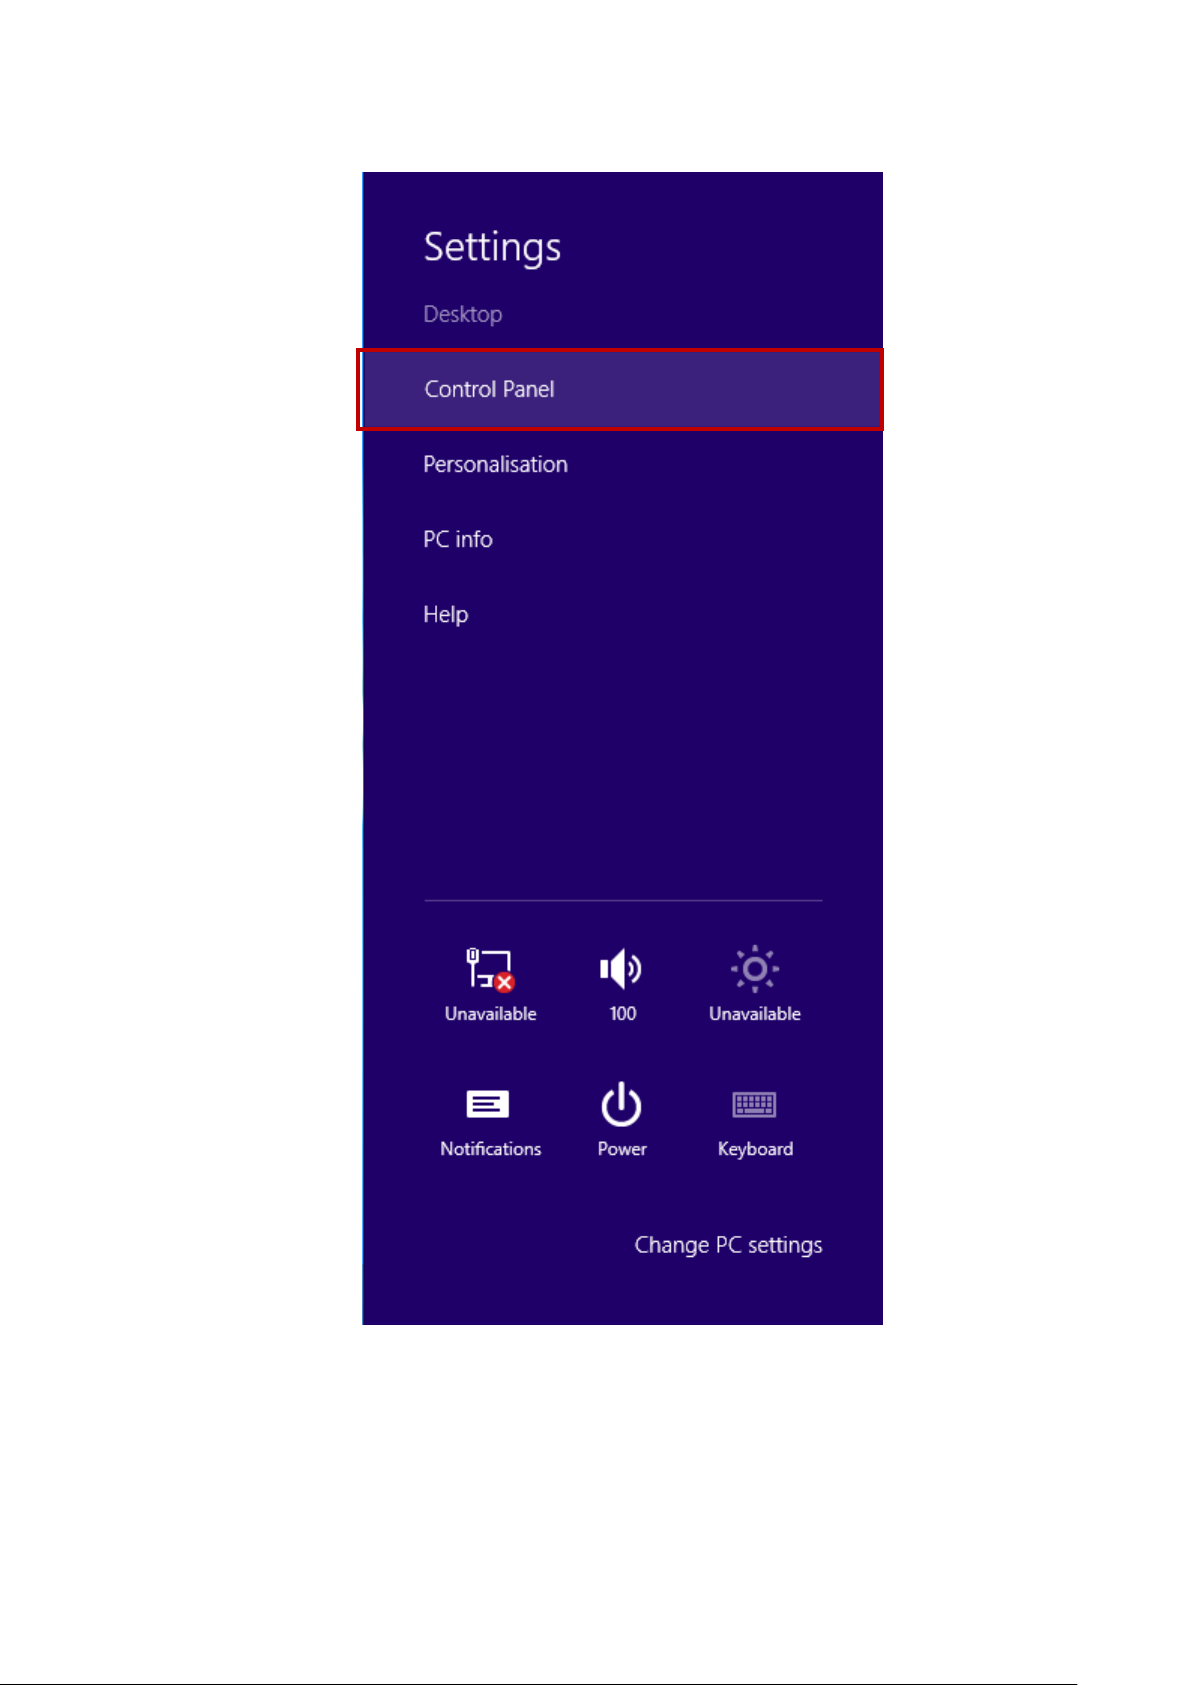
For Windows 8-32/64
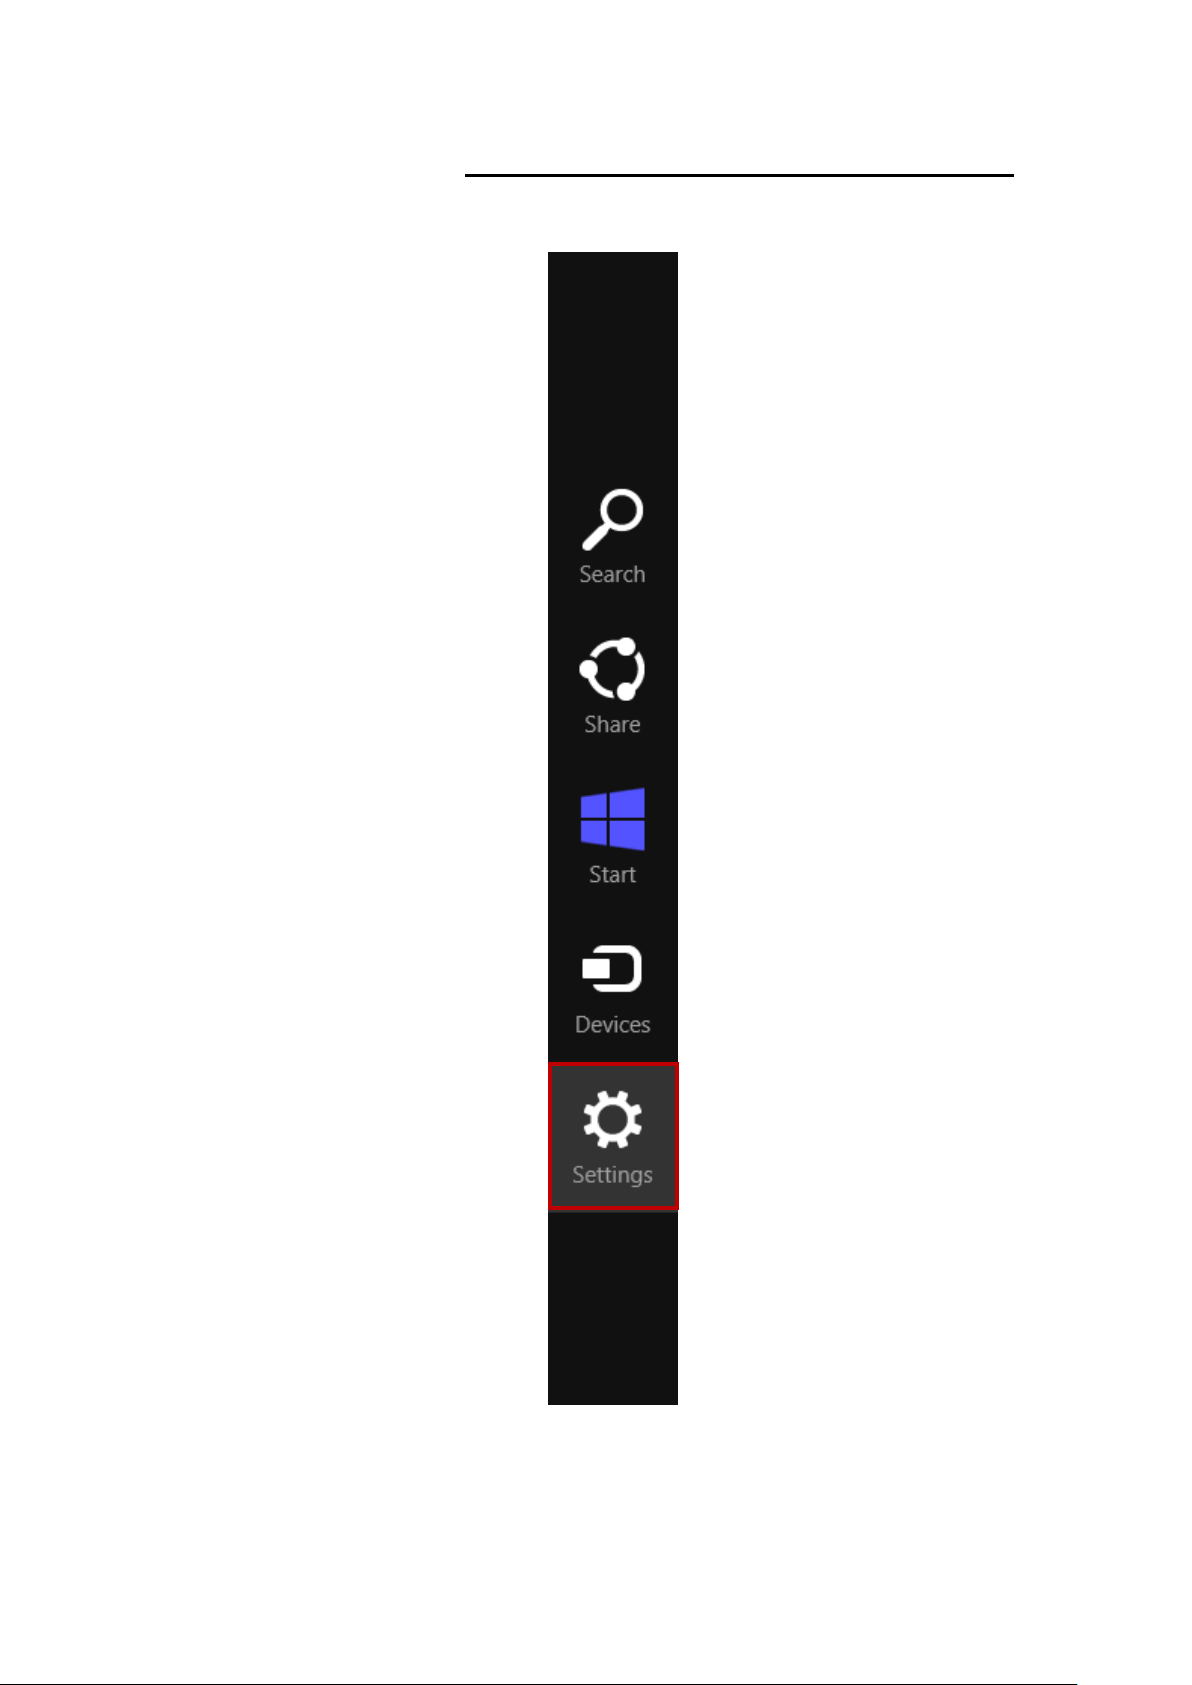
1. Move the mouse or tap to the upper right corner and click
on “Settings”.
Page 23
23
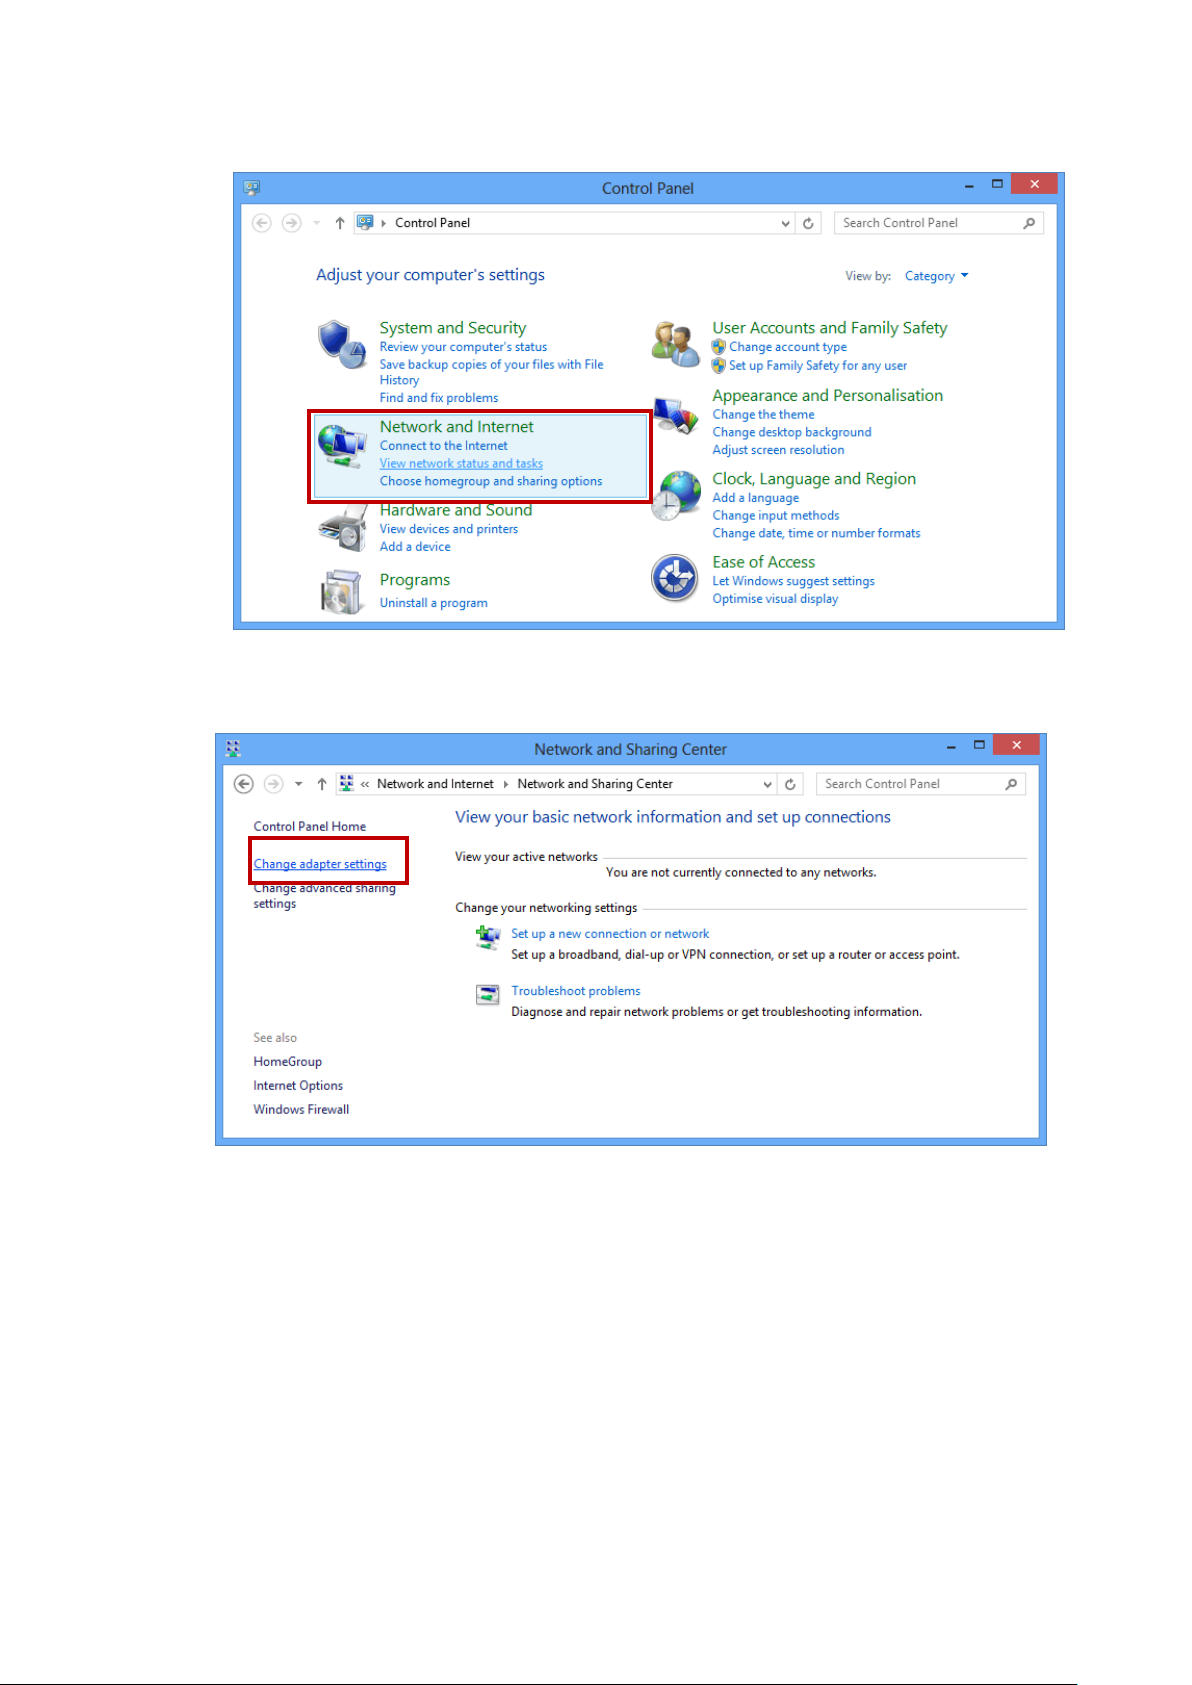
2. Click on “Control Panel”.
Page 24
24
3. Click on “View network status and tasks”.
4. In the Control Panel Home, click on “Change adapter
settings” to continue.
Page 25
25
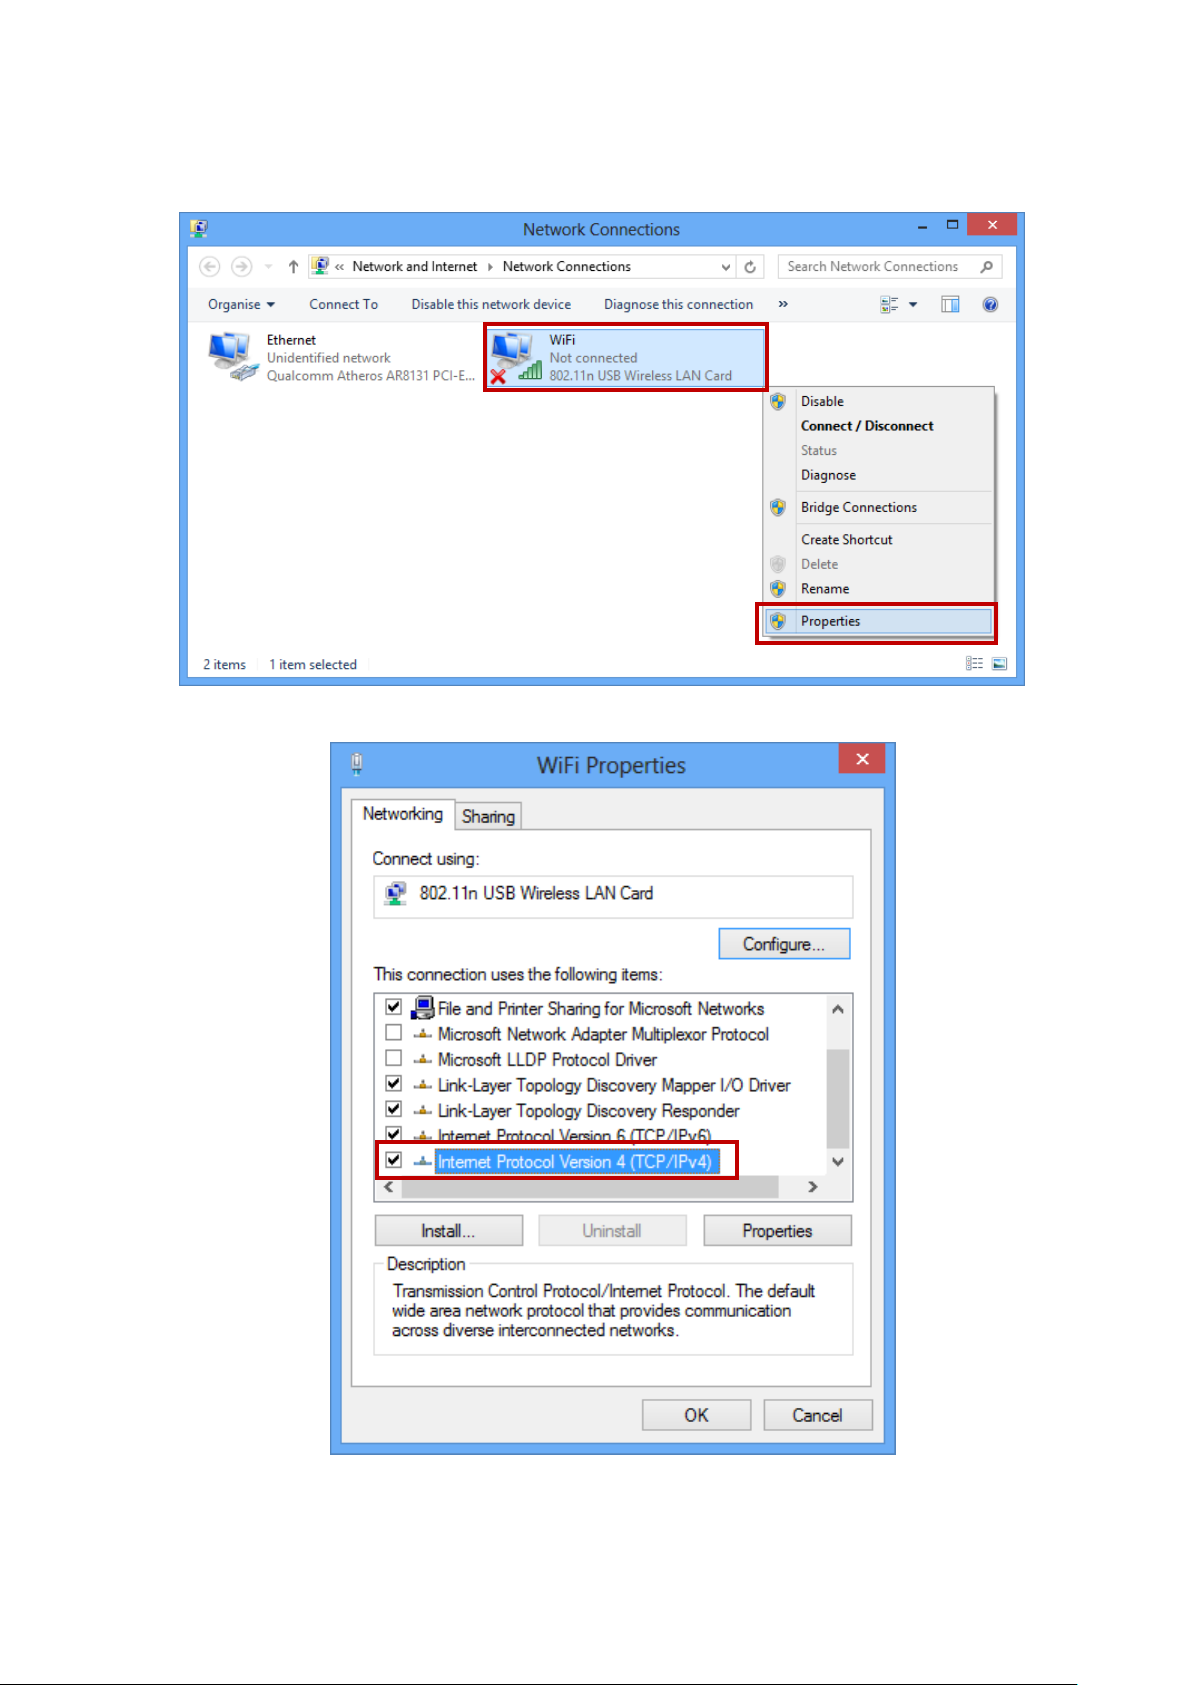
5. Single RIGHT click on “Ethernet", then click "Properties".
6. Double click on "Internet Protocol Version 4 (TCP/IPv4)".
Page 26
26
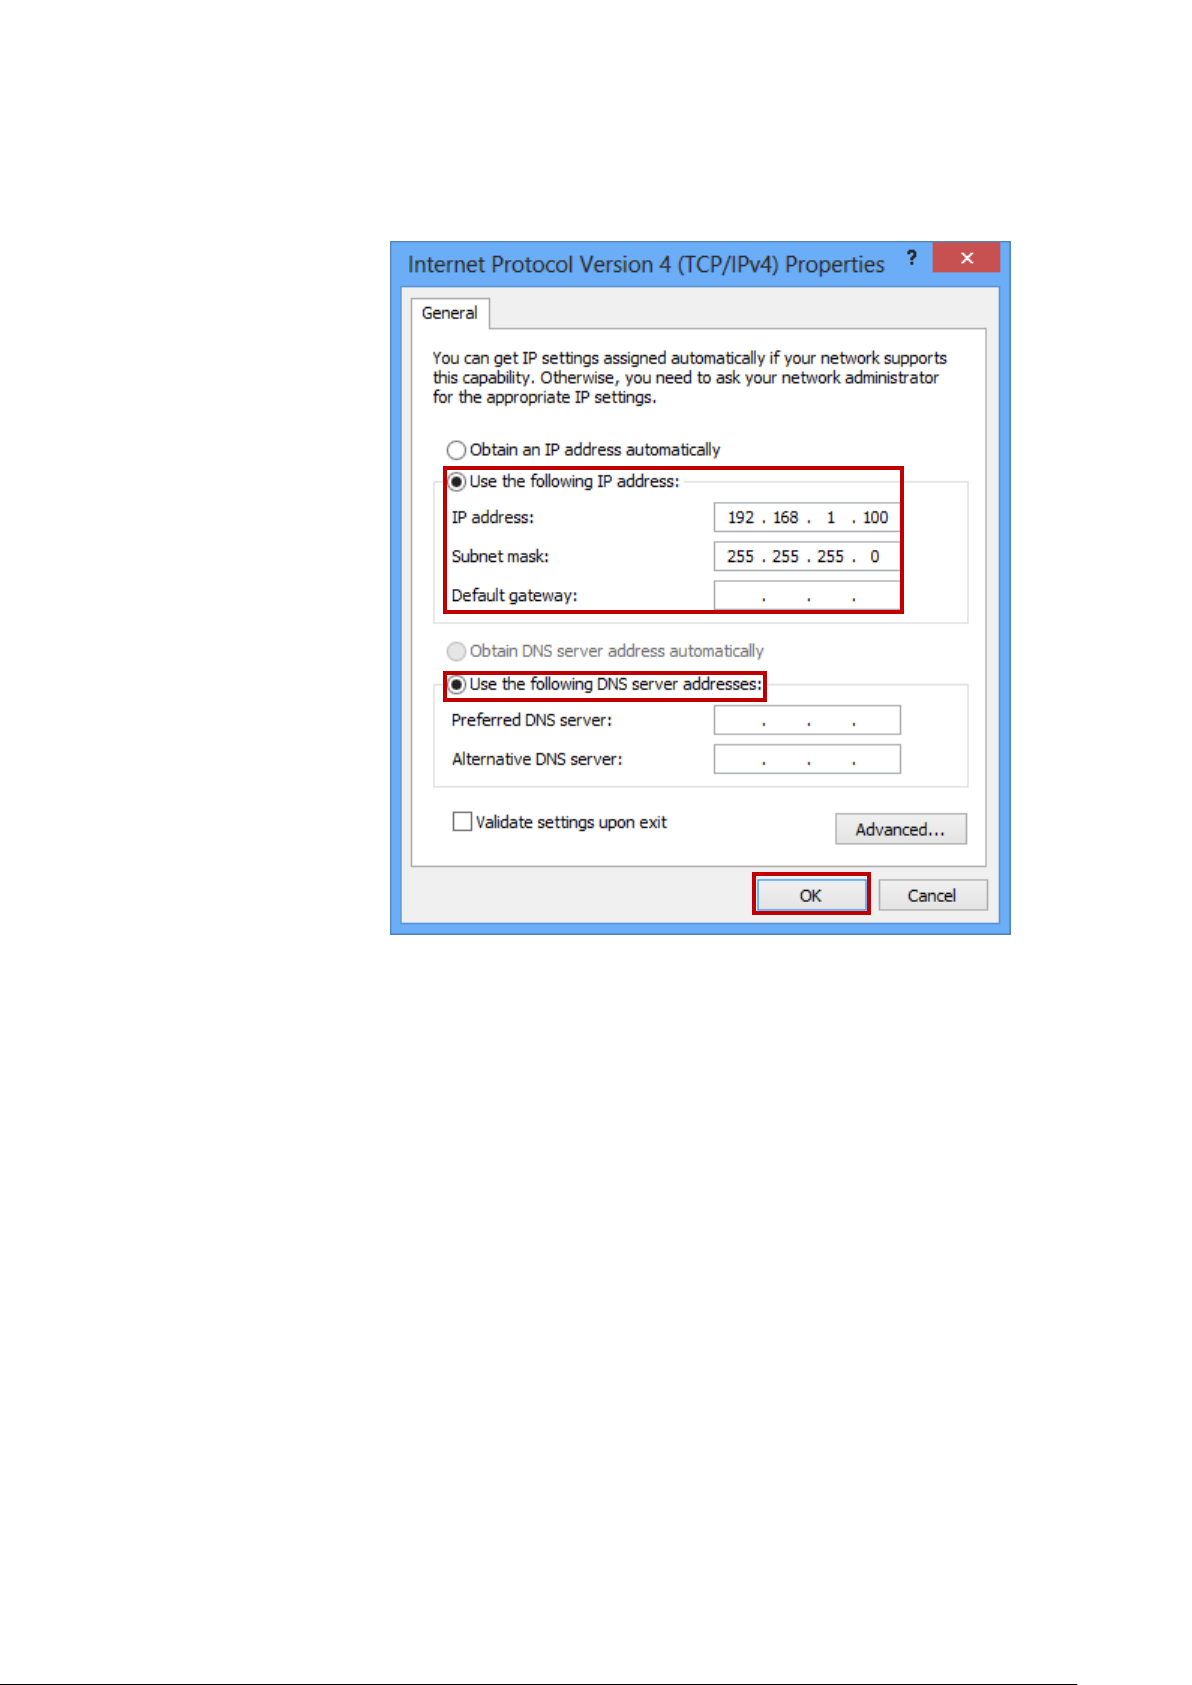
7. Check "Use the following IP address", configure IP
address to "192.168.1.100", Subnet mask to
"255.255.255.0" and check “Use the following DNS
server addresses” then click on "OK" to continue.
Page 27

27
WARNING
Before you begin, turn the power off for all devices. These
include your computer(s), your LAN hub/switch (if applicable),
and the Wireless Gateway.
4 Connecting your device
This chapter provides basic instructions for connecting the
Wireless Gateway to a computer or LAN and to the Internet.
In addition to configuring the device, you need to configure the
Internet properties of your computer(s). For more details, see
the following sections:
Configuring Ethernet PCs
This chapter assumes that you have already established a
DSL/Cable service with your Internet service provider (ISP).
These instructions provide a basic configuration that should be
compatible with your home or small office network setup. Refer
to the subsequent chapters for additional configuration
instructions.
Connecting the Hardware
This section describes how to connect the device to the wall
phone port, the power outlet and your computer(s) or network.
The diagram below illustrates the hardware connections. The
layout of the ports on your device may vary from the layout
shown. Refer to the steps that follow for specific instructions.
Page 28
28
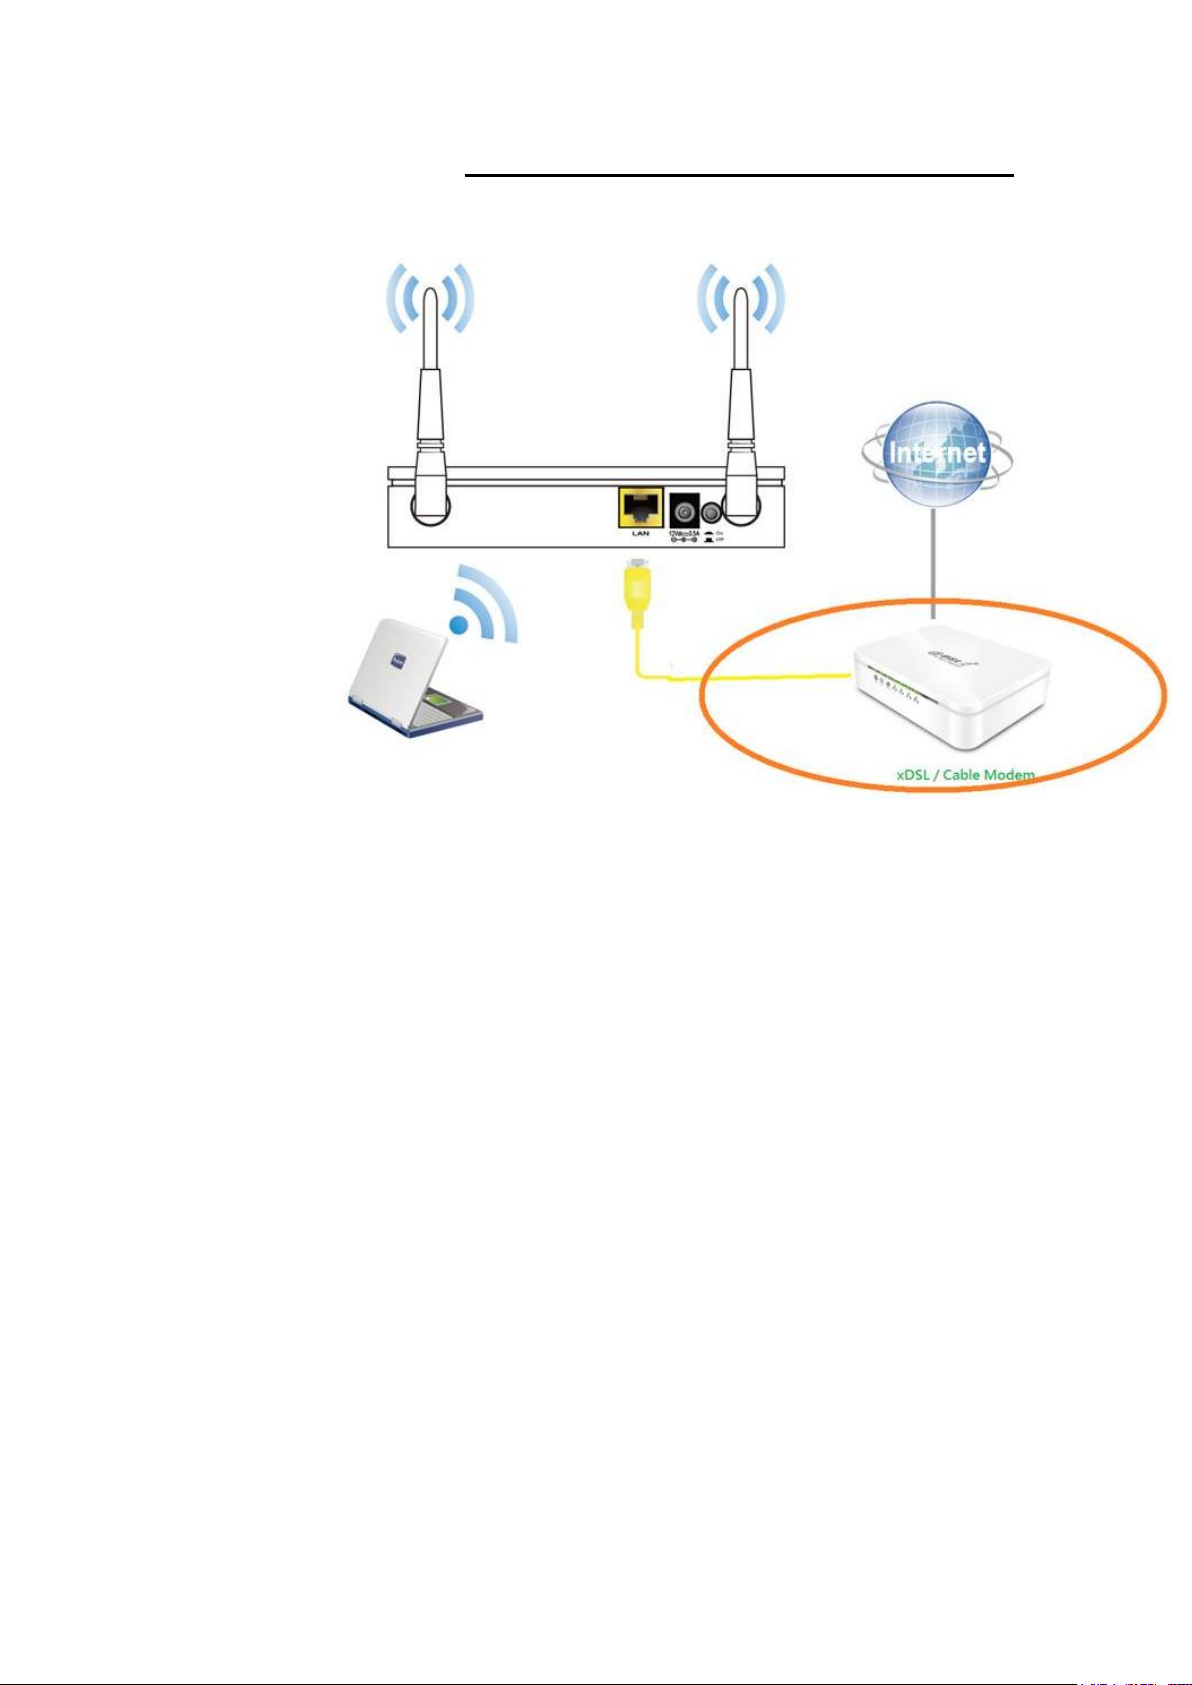
Using WISP (Wireless ISP)
The Wireless Access Point supports WISP (Wireless ISP). To
use WISP:
Figure 4: Overview of Hardware Connections
Step 1. Connect the Ethernet cable to LAN Port
Connect the supplied RJ45 Ethernet cable from your PC's
Ethernet port to the 802.11n WLAN AP's LAN Port.
Step 2. Attach the power connector
Connect the power adapter to the power inlet “POWER” of
the 802.11n WLAN AP and turn the power switch “ON/OFF
SWITCH” of your 802.11n WLAN AP on.
* Actual ANTENNA may vary depending on model
Page 29

29
Using PoE (Power over Ethernet)
The Wireless Access Point supports PoE (Power over Ethernet).
To use PoE:
Step 1. Do not connect the supplied power adapter to the
Wireless Access Point.
Step 2. Connect one end of a standard (category 5) LAN
cable to the Ethernet port on the Wireless Access Point.
Step 3. Connect the other end of the LAN cable to the
powered Ethernet port on a suitable PoE Adapter.
Step 4. Connect the unpowered Ethernet port on the PoE
adapter to your Hub or switch.
Step 5. Connect the power supply to the PoE adapter and
power up.
Step 6. Check the LEDs on the Wireless Access Point to
see it is drawing power via the Ethernet connection.
Page 30
30
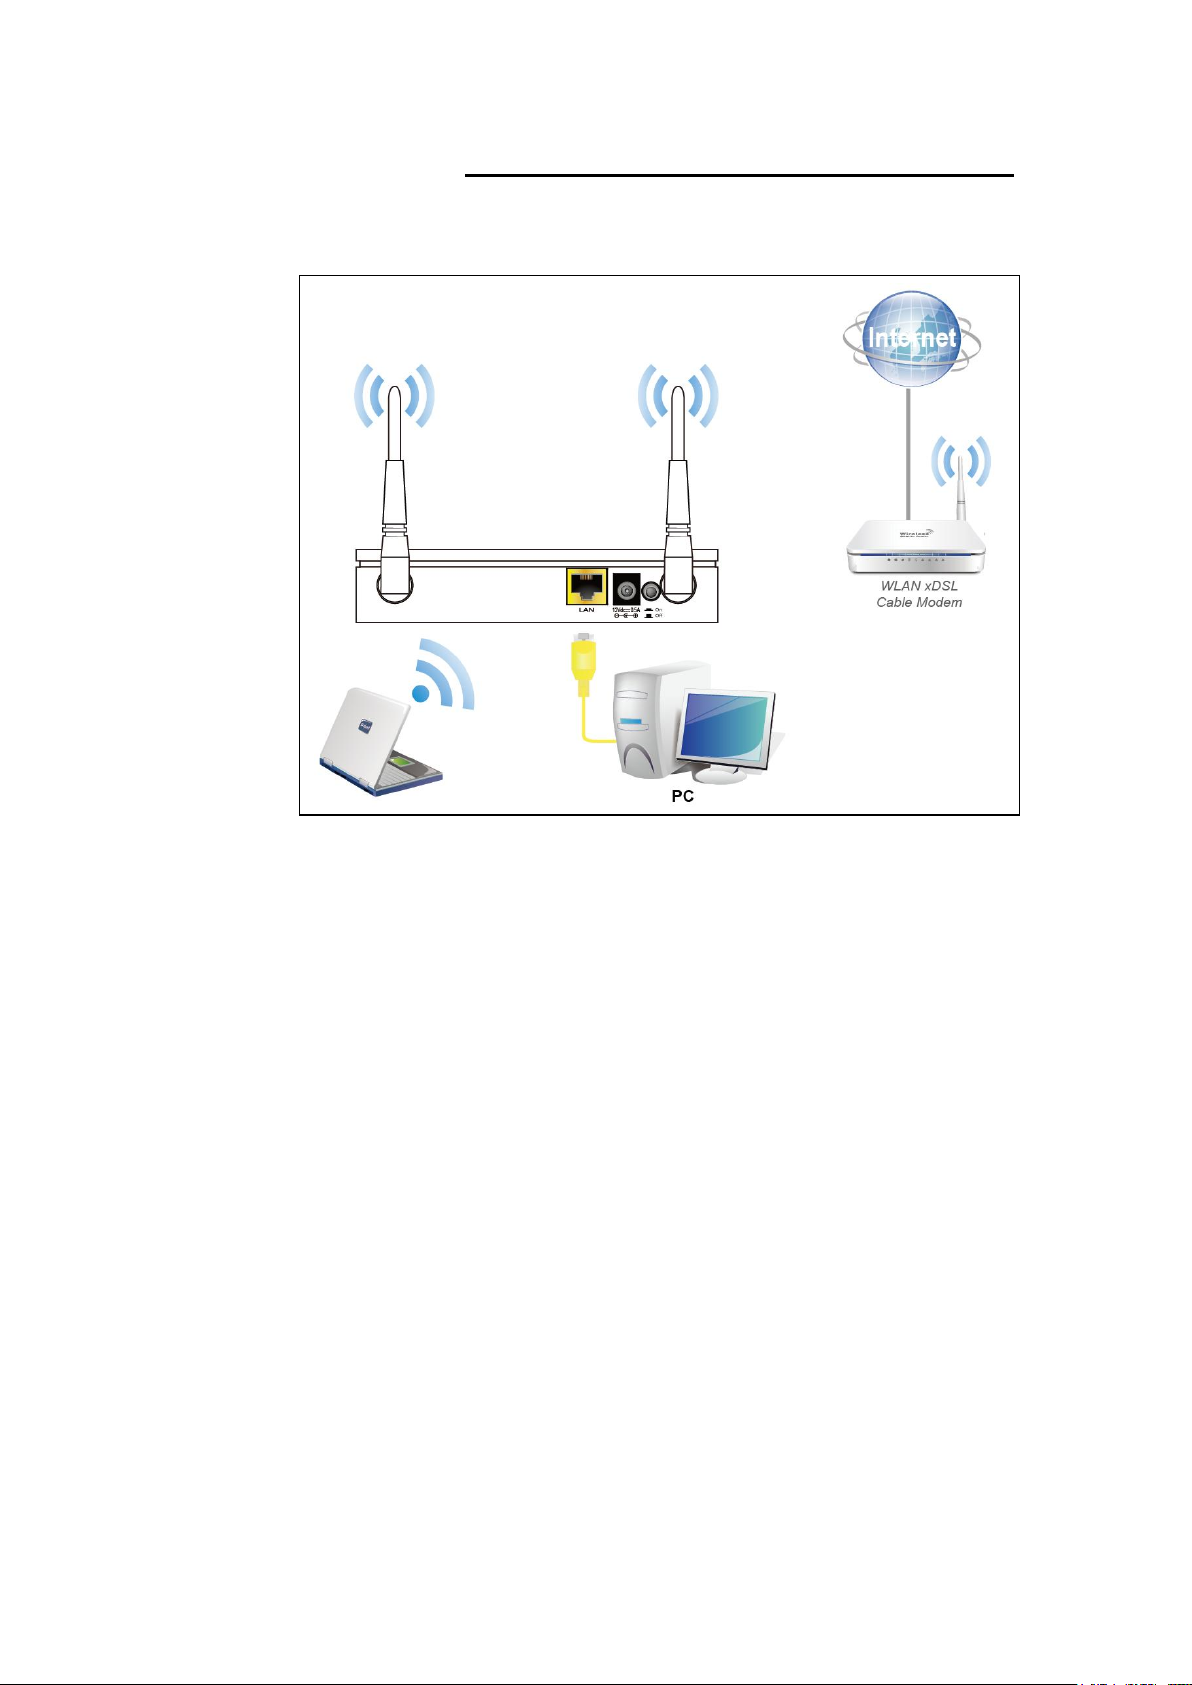
Using AP (Access Point)
The Wireless Access Point supports AP (Access Point). To use
AP:
Step 1. Connect the Ethernet cable to LAN Port
Connect the supplied RJ45 Ethernet cable from
xDSL/Cable Modem’s LAN port to the 802.11n WLAN AP's
LAN Port.
Step 2. Attach the power connector
Connect the power adapter to the power inlet “POWER” of
the 802.11n WLAN AP and turn the power switch “ON/OFF
SWITCH” of your 802.11n WLAN AP on.
* Actual ANTENNA may vary depending on model
Page 31

31
Wireless Connection
For easy installation it is saved to keep the settings. You can
later change the wireless settings via the wireless configuration
menu. (see user manual on the CD – Chapter 8).
1. Double click on the wireless icon on your computer and
search for the wireless network that you enter SSID name.
2. Click on the wireless network that you enter SSID name
(the default setting SSID = LevelOne) to connect.
Page 32

32
3. If the wireless network isn’t encrypted, click on "Connect
Anyway" to connect.
4. If the wireless network is encrypted, enter the network key
that belongs to your authentication type and key. You can
later change this network key via the wireless configuration
menu. (see user manual on the CD – Chapter 8).
5. Click on "Connect" or "Apply".
6. Now, the 802.11n WLAN AP has been connected, and able
to be configured.
Page 33

33
5 What the Internet/WAN access of your own
Network now is
Now you could check what the Internet/WAN access of your
network is to know how to configure the WAN port of Wireless
Gateway.
Please follow steps below to check what the Internet/WAN
access if your own Network is DHCP Client, Static IP or PPPoE
Client.
1. Click Start -> Control Panel
Page 34

34
2. Double click Network Connections
Page 35

35
Internet/WAN access is the DHCP client
If you cannot see any Broadband Adapter in the Network
Connections, your Internet/WAN access is DHCP Client or
Static IP.
3. Click Local Area Connection in LAN or High-Speed
Internet and you could see string Assigned by DHCP in
Details.
Page 36

36
Internet/WAN access is the Static IP
If you cannot see any Broadband Adapter in the Network
Connections, your Internet/WAN access is DHCP Client or
Static IP.
4. Click Local Area Connection in LAN or High-Speed
Internet and you could see string Manually Configured in
Details.
Page 37

37
5. Right click Local Area Connection and click Properties
and then you could get the IP settings in detail and write
down the IP settings as follow:
IP Address: 192.168.10.110
Subnet mask: 255.255.255.0
Default gateway: 192.168.10.100
Preferred DNS server: 192.168.10.100
Alternate DNS Server: If you have it, please also write it
down.
Page 38

38
Internet/WAN access is the PPPoE client
If you can see any Broadband Adapter in the Network
Connections, your Internet/WAN access is PPPoE Client.
1. Click Broadband Adapter in Broadband and you could
see string Assigned by Service Provider in Details.
For PPPoE configuration on Wireless Gateway, you’ll need
following information that you could get from your Telecom, or
by your Internet Service Provider.
Username of PPPoE: 1234 for example
Password of PPPoE: 1234 for example
Page 39

39
6 Getting Started with the Web pages
The Wireless Gateway includes a series of Web pages that
provide an interface to the software installed on the device. It
enables you to configure the device settings to meet the needs
of your network. You can access it through your web browser
from any PC connected to the device via the LAN ports.
Accessing the Web pages
To access the Web pages, you need the following:
A PC or laptop connected to the LAN port on the device.
A web browser installed on the PC. The minimum browser
version requirement is Internet Explorer v4 or Netscape v4.
For the best display quality, use latest version of Internet
Explorer, Netscape or Mozilla Fire fox. From any of the LAN
computers, launch your web browser, type the following
URL in the web address (or location) box, and press [Enter]
on your keyboard:
http://192.168.1.1
The Status homepage for the web pages is displayed:
Figure 5: Homepage
Page 40

40
User Name:
admin
Password:
admin
Note
You can change the password at any time or you can configure your
device so that you do not need to enter a password. See Password.
Note
If you receive an error message or the Welcome page is not
displayed, see Troubleshooting Suggestions.
The first time that you click on an entry from the lefthand menu, a login box is displayed. You must enter
your username and password to access the pages.
A login screen is displayed:
Figure 6: Login screen
1. Enter your user name and password. The first time you log
into the program, use these defaults:
2. Click on OK. You are now ready to configure your device.
This is the first page displayed each time you log in to the Web
pages.
Page 41

41
Label
Color
Function
POWER
green
On: device is powered on
Off: device is powered off
WLAN
green
On: WLAN link established and active
Blink: Valid Wireless packet being transferred
WPS
green
Off: WPS link isn’t established and active
Blink: Valid WPS packet being transferred
WAN
green
On: WAN link established and active
Off: No LAN link
Blink: Valid Ethernet packet being transferred
LAN
1/2/3/4
green
On: LAN link established and active
Off: No LAN link
Blink: Valid Ethernet packet being transferred
WARNING
We strongly recommend that you contact your ISP prior to
changing the default configuration.
Testing your Setup
Once you have connected your hardware and configured your
PCs, any computer on your LAN should be able to use the DSL
/Cable connection to access the Internet.
To test the connection, turn on the device, wait for 30 seconds
and then verify that the LEDs are illuminated as follows:
Table 1. LED Indicators
If the LEDs illuminate as expected, test your Internet connection
from a LAN computer. To do this, open your web browser, and
type the URL of any external website (such as
http://www.yahoo.com). The LED labeled WAN should blink
rapidly and then appear solid as the device connects to the site.
If the LEDs do not illuminate as expected, you may need to
configure your Internet access settings using the information
provided by your ISP. For details, see Internet Access. If the
LEDs still do not illuminate as expected or the web page is not
displayed, see Troubleshooting Suggestions or contact your
ISP for assistance.
Default device settings
In addition to handling the xDSL / Cable modem connection to
your ISP, the Wireless Gateway can provide a variety of
services to your network. The device is preconfigured with
default settings for use with a typical home or small office
network.
The table below lists some of the most important default settings;
these and other features are described fully in the subsequent
chapters. If you are familiar with network configuration, review
these settings to verify that they meet the needs of your network.
Follow the instructions to change them if necessary. If you are
unfamiliar with these settings, try using the device without
modification, or contact your ISP for assistance.
Page 42

42
Option
Default Setting
Explanation/Instructions
WAN Port IP
Address
DHCP Client
This is the temporary public IP address of the WAN
port on the device. It is an unnumbered interface that
is replaced as soon as your ISP assigns a ‘real’ IP
address. See Network Settings -> WAN Interface.
LAN Port
IP Address
Assigned static IP address:
192.168.1.1
Subnet mask:
255.255.255.0
This is the IP address of the LAN port on the device.
The LAN port connects the device to your Ethernet
network. Typically, you will not need to change this
address. See Network Settings -> LAN Interface.
DHCP (Dynamic
Host Configuration
Protocol)
DHCP server disabled
The Wireless Gateway maintains a pool of private IP
addresses for dynamic assignment to your LAN
computers. To use this service, you must have set up
your computers to accept IP information dynamically,
as described in Configuring Ethernet PCs.
Page 43

43
7 Wireless Network
This chapter assumes that you have already set up your
Wireless PCs and installed a compatible Wireless card on your
device. See Configuring Wireless PCs.
Basic Settings
The Wireless Network page allows you to configure the
Wireless features of your device. To access the Wireless
Network Basic Settings page:
From the left-hand Wireless menu, click on Basic Settings. The
following page is displayed:
Figure 7: Wireless Network page
Page 44

44
Field
Description
Disable
Wireless LAN
Interface
Enable/Disable the Wireless LAN Interface.
Default: Disable
Band
Specify the WLAN Mode to 802.11b/g Mixed mode, 802.11b mode or
802.11g mode
Mode
Configure the Wireless LAN Interface to AP, Client, WDS, AP + WDS or
WISP mode
Network Type
Configure the Network Type to Infrastructure or Ad hoc.
SSID
Specify the network name.
Each Wireless LAN network uses a unique Network Name to identify the
network. This name is called the Service Set Identifier (SSID). When you
set up your wireless adapter, you specify the SSID. If you want to
connect to an existing network, you must use the name for that
network. If you are setting up your own network you can make up your
own name and use it on each computer. The name can be up to 20
characters long and contain letters and numbers.
Channel Width
Choose a Channel Width from the pull-down menu.
Control
Sideband
Choose a Control Sideband from the pull-down menu.
Channel
Number
Choose a Channel Number from the pull-down menu.
Broadcast SSID
Broadcast or Hide SSID to your Network.
Default: Enabled
WMM
Enable/disable the Wi-Fi Multimedia (WMM) support.
Data Rate
Select the Data Rate from the drop-down list
TX restrict / RX
restrict
Configure the TX restrict / RX restrict
Associated
Clients
Show Active Wireless Client Table
This table shows the MAC address, transmission, receiption packet
counters and encrypted status for each associated wireless client.
Enable Mac
Clone (Single
Ethernet Client)
Enable Mac Clone (Single Ethernet Client)
Enable
Universal
Repeater Mode
Acting as AP and client simultaneously
SSID of
Extended
Interface
When mode is set to “AP” and URM (Universal Repeater Mode ) is
enabled, user should input SSID of another AP in the field of “SSID of
Extended Interface”. Please note, the channel number should be set to
the one, used by another AP because 8186 will share the same channel
between AP and URM interface (called as extended interface hereafter).
Page 45

45
Field
Description
Fragment
Threshold
When transmitting a packet over a network medium, sometimes the
packet is broken into several segments, if the size of packet exceeds
that allowed by the network medium.
The Fragmentation Threshold defines the number of bytes used for the
fragmentation boundary for directed messages.
RTS Threshold
RTS stands for “Request to Send”. This parameter controls what size
data packet the low level RF protocol issues to an RTS packet. The
default is 2347.
Beacon Interval
Choosing beacon period for improved response time for wireless http
clients.
Preamble Type
Specify the Preamble type is short preamble or long preamble
Advanced Settings
These settings are only for more technically advanced users
who have a sufficient knowledge about wireless LAN. These
settings should not be changed unless you know what effect the
changes will have on your Access Point. To access the
Wireless Network Advanced Settings page:
From the left-hand Wireless menu, click on Advanced Settings.
The following page is displayed:
Page 46

46
IAPP
Disable or Enable IAPP
Protection
A protection mechanism prevents collisions among 802.11g nodes.
Aggregation
Disable or Enable Aggregation
Short GI
Disable or Enable Short GI
WLAN Partition
Disable or Enable WLAN Partition
STBC
Disable or Enable STBC
20/40MHz
Coexist
Disable or Enable 20/40MHz Coexist
RF Output
Power
TX Power measurement.
Security
This page allows you setup the wireless security. Turn on WEP
or WPA by using Encryption Keys could prevent any
unauthorized access to your wireless network. To access the
Wireless Network Security page:
From the left-hand Wireless menu, click on Security. The
following page is displayed:
Page 47

47
Field
Description
Select SSID
Select the SSID
Encryption
Configure the Encryption to Disable, WEP, WPA , WPA2 or WPA-Mixed
Use 802.1x
Authentication
Use 802.1x Authentication by WEP 64bits or WEP 128bits
Authentication
Configure the Authentication Mode to Open System, Shared Key or
Auto
Key Length
Select the Key Length 64-bit or 128-bit
Key Format
Select the Key Format ASCII (5 characters), Hex (10 characters), ASCII
(13 characters) or Hex (26 characters)
Encryption Key
Enter the Encryption Key
WPA
Authentication
Mode
Configure the WPA Authentication Mode to Enterprise (RADIUS) or
Personal (Pre-Shared Key)
WPA Cipher
Suite
Configure the WPA Cipher Suite to AES
Field
Description
WPA2 Cipher
Suite
Configure the WPA2 Cipher Suite to AES
Pre-Shared Key
Format
Configure the Pre-Shared Key Format to Passphrase or HEX (64
characters)
Pre-Shared Key
Type the Pre-Shared Key
Enable PreAuthentication
According to some of the preferred embodiments, a method for
proactively establishing a security association between a mobile node
in a visiting network and an authentication agent in another network to
which the mobile node can move includes: negotiating pre-
Page 48

48
authentication using a flag in a message header that indicates whether
the communication is for establishing a pre-authentication security
association; and one of the mobile node and the authentication agent
initiating pre-authentication by transmitting a message with the flag set
in its message header, and the other of the mobile node and the
authentication agent responding with the flag set in its message header
only if it supports the pre-authentication. Enable/disable preauthentication support. Default: disable.
Authentication
RADIUS Server
Port: Type the port number of RADIUS Server
IP address: Type the IP address of RADIUS Server
Password: Type the Password of RADIUS Server
Page 49

49
WEP + Encryption Key
WEP aims to provide security by encrypting data over radio
waves so that it is protected as it is transmitted from one end
point to another. However, it has been found that WEP is not as
secure as once believed.
1. From the Encryption drop-down list, select WEP setting.
2. From the Key Length drop-down list, select 64-bit or 128-bit
setting.
3. From the Key Format drop-down list, select ASCII (5
characters), Hex (10 characters), ASCII (13 characters) or
Hex (26 characters) setting.
4. Enter the Encryption Key value depending on selected
ASCII or Hexadecimal.
5. Click Apply Changes button.
6. Click OK button.
Page 50

50
7. Change setting successfully! Click on Reboot Now button to
confirm.
Page 51

51
WEP + Use 802.1x Authentication
WEP aims to provide security by encrypting data over radio
waves so that it is protected as it is transmitted from one end
point to another. However, it has been found that WEP is not as
secure as once believed.
1. From the Encryption drop-down list, select WEP setting.
2. Check the option of Use 802.1x Authentication.
3. Click on the ratio of WEP 64bits or WEP 128bits.
4. Enter the Port, IP Address and Password of RADIUS
Server:
5. Click Apply Changes button.
6. Click OK button.
Page 52

52
7. Change setting successfully! Click on Reboot Now button to
confirm.
Page 53

53
WPA/WPA2/WPA2 Mixed + Personal (Pre-Shared Key)
Wi-Fi Protected Access (WPA and WPA2) is a class of systems
to secure wireless (Wi-Fi)
computer networks. WPA is designed to work with all wireless
network interface cards, but not necessarily with first generation
wireless access points. WPA2 implements the full standard, but
will not work with some older network cards. Both provide good
security, with two significant issues:
Either WPA or WPA2 must be enabled and chosen in
preference to WEP. WEP is usually presented as the first
security choice in most installation instructions.
In the "Personal" mode, the most likely choice for homes
and small offices, a pass phrase is required that, for full
security, must be longer than the typical 6 to 8 character
passwords users are taught to employ.
1. From the Encryption drop-down list, select WPA, WPA2 or
WPA2 Mixed setting.
2. Click on the ratio of Personal (Pre-Shared Key).
3. Check the option of TKIP and/or AES in WPA Cipher Suite
if your Encryption is WPA:
4. Check the option of TKIP and/or AES in WPA2 Cipher Suite
if your Encryption is WPA2:
5. Check the option of TKIP and/or AES in WPA/WPA2
Cipher Suite if your Encryption is WPA2 Mixed:
6. From the Pre-Shared Key Format drop-down list, select
Passphrase or Hex (64 characters) setting.
7. Enter the Pre-Shared Key depending on selected
Passphrase or Hex (64 characters).
Page 54

54
8. Click on Apply Changes button to confirm and return.
9. Change setting successfully! Click on Reboot Now button to
confirm.
WPA/WPA2/WPA2 Mixed + Enterprise (RADIUS)
Wi-Fi Protected Access (WPA and WPA2) is a class of systems
to secure wireless (Wi-Fi) computer networks. WPA is designed
to work with all wireless network interface cards, but not
necessarily with first generation wireless access points. WPA2
implements the full standard, but will not work with some older
network cards. Both provide good security, with two significant
issues:
Either WPA or WPA2 must be enabled and chosen in
preference to WEP. WEP is usually presented as the first
security choice in most installation instructions.
In the "Personal" mode, the most likely choice for homes
and small offices, a pass phrase is required that, for full
security, must be longer than the typical 6 to 8 character
passwords users are taught to employ.
1. From the Encryption drop-down list, select WPA, WPA2 or
WPA2 Mixed setting.
2. Click on the ratio of Enterprise (RADIUS).
3. Check the option of TKIP and/or AES in WPA Cipher Suite
if your Encryption is WPA:
Page 55

55
4. Check the option of TKIP and/or AES in WPA2 Cipher Suite
if your Encryption is WPA2:
5. Check the option of TKIP and/or AES in WPA/WPA2
Cipher Suite if your Encryption is WPA2 Mixed:
6. Enter the Port, IP Address and Password of RADIUS
Server:
7. Change setting successfully! Click on Reboot Now button to
confirm.
Page 56

56
Access Control
For security reason, using MAC ACL's (MAC Address Access
List) creates another level of difficulty to hacking a network. A
MAC ACL is created and distributed to AP so that only
authorized NIC's can connect to the network. While MAC
address spoofing is a proven means to hacking a network this
can be used in conjunction with additional security measures to
increase the level of complexity of the network security
decreasing the chance of a breach.
MAC addresses can be add/delete/edit from the ACL list
depending on the MAC Access Policy.
If you choose 'Allowed Listed', only those clients whose wireless
MAC addresses are in the access control list will be able to
connect to your Access Point. When 'Deny Listed' is selected,
these wireless clients on the list will not be able to connect the
Access Point. To access the Wireless Network Access Control
page:
From the left-hand Wireless menu, click on Access Control. The
following page is displayed:
Allow Listed
If you choose 'Allowed Listed', only those clients whose wireless
MAC addresses are in the access control list will be able to
connect to your Access Point.
1. From the Wireless Access Control Mode drop-down list,
select Allowed Listed setting.
2. Enter the MAC Address.
3. Enter the Comment.
4. Click Apply Changes button.
Page 57

57
5. Change setting successfully! Click on Reboot Now button to
confirm.
6. The MAC Address that you created has been added in the
Current Access Control List.
Page 58

58
Deny Listed
When 'Deny Listed' is selected, these wireless clients on the list
will not be able to connect the Access Point.
1. From the Wireless Access Control Mode drop-down list,
select Deny Listed setting.
2. Enter the MAC Address.
3. Enter the Comment.
4. Click Apply Changes button.
5. Change setting successfully! Click on Reboot Now button to
confirm.
6. The MAC Address that you created has been added in the
Current Access Control List.
Page 59

59
WDS settings
Wireless Distribution System uses wireless media to
communicate with other APs, like the Ethernet does. To do this,
you must set these APs in the same channel and set MAC
address of other APs which you want to communicate with in
the table and then enable the WDS. To access the Wireless
Network WDS settings page:
From the left-hand Wireless menu, click on WDS settings. The
following page is displayed:
Page 60

60
Configure WDS (Wireless Distribution System) only
1. From the left-hand Wireless menu, click on Basic Settings.
2. From the Mode drop-down list, select WDS.
3. From the Channel Number drop-down list, select a Channel.
4. Click Apply Changes button.
5. Change setting successfully! Click on Reboot Now button to
confirm.
Page 61

61
6. From the left-hand Wireless menu, click on WDS settings.
7. Check on the option Enable WDS.
8. Enter the MAC Address.
9. Enter the Comment.
10. Click the Set Security.
Page 62

62
11. This page allows you setup the wireless security for WDS.
When enabled, you must make sure each WDS device has
adopted the same encryption algorithm and Key.
12. Configure each field with the Encryption that you selected.
13. Click Apply Changes button.
14. Change setting successfully! Click on Reboot Now button to
confirm.
Page 63

63
15. Click Close button to close and exit the WDS Security
Setup.
16. Change setting successfully! Click on Reboot Now button to
confirm.
Page 64

64
17. Click Apply Changes button.
18. Change setting successfully! Click on Reboot Now button to
confirm.
19. The MAC Address that you created has been added in the
Current Access Control List.
Page 65

65
Configure AP (Access Point) + WDS (Wireless Distribution
System)
1. From the left-hand Wireless menu, click on Basic Settings.
2. From the Mode drop-down list, select AP+WDS.
3. Enter SSID for example LevelOne.
4. From the Channel Number drop-down list, select a Channel.
5. Click Apply Changes button.
Page 66

66
6. Change setting successfully! Click on Reboot Now button to
confirm.
7. From the left-hand Wireless menu, click on WDS settings.
8. Check on the option Enable WDS.
9. Enter the MAC Address.
10. Enter the Comment.
11. Click the Set Security.
Page 67

67
12. This page allows you setup the wireless security for WDS.
When enabled, you must make sure each WDS device has
adopted the same encryption algorithm and Key.
13. Configure each field with the Encryption that you selected.
14. Click Apply Changes button.
15. Change setting successfully! Click on Reboot Now button to
confirm.
Page 68

68
16. Click Close button to close and exit the WDS Security
Setup.
17. Click Apply Changes button.
Page 69

69
18. Change setting successfully! Click on Reboot Now button to
confirm.
19. The MAC Address that you created has been added in the
Current Access Control List.
Page 70

70
Site Survey
This page provides tool to scan the wireless network. If any
Access Point or IBSS is found, you could choose to connect it
manually when client mode is enabled. To access the Wireless
Network WDS settings page:
From the left-hand Wireless menu, click on Site Survey. The
following page is displayed:
Page 71

71
Configure Wireless client + Site Survey
1. From the left-hand Wireless menu, click on Basic Settings.
2. From the Mode drop-down list, select Client.
3. Enter SSID of the AP that you want to connect to for
example LevelOne. If you don’t know what the SSID of the
AP that you want to connect to, please skip this step.
4. Click Apply Changes button.
Page 72

72
5. Change setting successfully! Click on Reboot Now button to
confirm.
6. Please wait 20 seconds ...
7. From the left-hand Wireless menu, click on Site Survey.
8. Click Site Survey button.
Page 73

73
9. Now you could see the APs that scanned by the Wireless
Gateway were listed below.
10. Click on the ratio of AP’s SSID under the item Select that
you want the Wireless Gateway to connect to.
11. Click Next button.
12. Click Next button.
13. Please wait...
Page 74

74
14. Check on Add to Wireless Profile.
15. Click Reboot Now button.
16. Change setting successfully! Please wait 20 seconds….
Page 75

75
Configure Wireless ISP + Site Survey
1. From the left-hand Wireless menu, click on Basic Settings.
2. From the Mode drop-down list, select WISP.
3. Enter SSID for example LevelOne.
4. Click Apply Changes button.
Page 76

76
5. Change setting successfully! Please wait 20 seconds….
6. From the left-hand Wireless menu, click on Site Survey.
7. Click Site Survey button.
Page 77

77
8. Now you could see the APs that scanned by the Wireless
Gateway were listed below.
9. Click on the ratio of AP’s SSID under the item Select that
you want the Wireless Gateway to connect to.
10. Click Next button.
11. Click Next button.
12. Please wait...
Page 78

78
13. Check on Add to Wireless Profile.
14. Click Reboot Now button.
15. Change setting successfully! Please wait 20 seconds….
Page 79

79
Field
Description
Disable WPS
Checking this box and clicking “Apply Changes” will disable Wi-Fi
Protected Setup. WPS is turned on by default.
WPS Status
When AP’s settings are factory default (out of box), it is set to open
security and un-configured state. It will be displayed by “WPS
Status”. If it already shows “Configured”, some registrars such as
Vista WCN will not configure AP. Users will need to go to the
“Save/Reload Settings” page and click “Reset” to reload factory
default settings.
Self-PIN Number
“Self-PIN Number” is AP’s PIN. Whenever users want to change
AP’s PIN, they could click “Regenerate PIN” and then click “ Apply
Changes”. Moreover, if users want to make their own PIN, they
could enter four digit PIN without checksum and then click “ Apply
Changes”. However, this would not be recommended since the
registrar side needs to be supported with four digit PIN.
WPS
This page allows you to change the setting for WPS (Wi-Fi
Protected Setup). Using this feature could let your wireless
client automatically syncronize its setting and connect to the
Access Point in a minute without any hassle. To access the
Wireless Network WPS page:
From the left-hand Wireless menu, click on WPS. The following
page is displayed:
Page 80

80
Field
Description
Push Button
Configuration
Clicking this button will invoke the PBC method of WPS. It is only
used when AP acts as a registrar.
Apply Changes
Whenever users want to enable/disable WPS or change AP’s PIN,
they need to apply this button to commit changes.
Reset
It restores the original values of “Self-PIN Number” and “Client PIN
Number”.
Client PIN Number
It is only used when users want their station to join AP’s network.
The length of PIN is limited to four or eight numeric digits. If users
enter eight digit PIN with checksum error, there will be a warning
message popping up.
If users insist on this PIN, AP will take it.
Introduction of WPS
Although home Wi-Fi networks have become more and more
popular, users still have trouble with the initial set up of network.
This obstacle forces users to use the open security and
increases the risk of eavesdropping. Therefore, WPS is
designed to ease set up of security-enabled Wi-Fi networks and
subsequently network management (Wi-Fi Protected Setup
Specification 1.0h.pdf, p. 8).
The largest difference between WPS-enabled devices and
legacy devices is that users do not need the knowledge about
SSID, channel and security settings, but they could still surf in a
security-enabled Wi-Fi network. For examples, in the initial
network set up, if users want to use the PIN configuration, the
only thing they need to do is entering the device PIN into
registrar, starting the PIN method on that device and simply wait
until the device joins the network. After the PIN method is
started on both sides, a registration protocol will be initiated
between the registrar and the enrollee. Typically, a registrar
could be an access point or other device that is capable of
managing the network. An enrollee could be an access point or
a station that will join the network. After the registration protocol
has been done, the enrollee will receive SSID and security
settings from the registrar and then join the network. In other
words; if a station attempts to join a network managed by an
access point with built-in internal registrar, users will need to
enter station’s PIN into the web page of that access point. If the
device PIN is correct and valid and users start PIN on station,
the access point and the station will automatically exchange the
encrypted information of the network settings under the
management of AP’s internal registrar. The station then uses
this information to perform authentication algorithm, join the
secure network, and transmit data with the encryption algorithm.
More details will be demonstrated in the following sections.
Page 81

81
Supported WPS features
Currently, Wireless Gateway supports WPS features for AP
mode, AP+WDS mode, Infrastructure-Client mode, and the
wireless root interface of Universal Repeater mode.
Other modes such as WDS mode, Infrastructure-Adhoc
mode, and the wireless virtual interface of Universal
Repeater mode are not implemented with WPS features.
If those unsupported modes are enforced by users, WPS
will be disabled. Under the configuration of every WPS-
supported mode, Wireless Gateway has Push Button method
and PIN method. For each method, Wireless Gateway offers
different security levels included in network credential, such as
open security, WEP 64 bits, WEP 128 bits, WPA-Personal TKIP,
WPA-Personal AES, WPA2-Personal TKIP, and WPA2Personal AES. Users could choose either one of the methods at
their convenience.
AP mode
For AP mode, Wireless Gateway supports three roles, registrar,
proxy, and enrollee in registration protocol. At different
scenarios, Wireless Gateway will automatically switch to an
appropriate role depending on the other device’s role or a
specific configuration.
AP as Enrollee
If users know AP’s PIN and enter it into external registrar, the
external registrar will configure AP with a new wireless profile
such as new SSID and new security settings. The external
registrar does this job either utilizing the in-band EAP (wireless)
or out-of-band UPnP (Ethernet). During the WPS handshake, a
wireless profile is encrypted and transmitted to AP. If the
handshake is successfully done, AP will be re-initialized with the
new wireless profile and wait for legacy stations or WPS
stations to join its network.
AP as Registrar
Wireless Gateway also has a built-in internal registrar.
Whenever users enter station’s PIN into AP’s webpage, click
“Start PBC”, or push the physical button, AP will switch to
registrar automatically. If users apply the same method on
station side and the WPS handshake is successfully done,
SSID and security settings will be transmitted to that station
without the risk of eavesdropping. And then the station will
associate with AP in a security-enabled network.
AP as Proxy
At this state, AP is transparent to users. If users want to
configure a station or any device that is capable of being an
enrollee, they have to enter device’s PIN into an external
registrar and choose an appropriate wireless profile. After the
PIN is entered, the external registrar will inform AP this event.
AP then conveys the encrypted wireless profile between the
Page 82

82
device and the external registrar. Finally, the device will use the
wireless profile and associate with AP. However, the device
may connect to other APs if the wireless profile does not belong
to the proxy AP. Users must carefully choose the wireless
profile or create a wireless profile on an external registrar.
Infrastructure-Client mode
In Infrastructure-Client mode, Wireless Gateway only supports
enrollee’s role. If users click “Start PIN”, click “Start PBC”, or
press the physical button on Wireless Gateway, it will start to
seek WPS AP. Once users apply the same method on registrar
side, Wireless Gateway will receive the wireless profile upon
successfully doing the registration protocol. Then Wireless
Gateway will associate with an AP.
Instructions of AP’s and Client’s operations
At this state, AP is transparent to users. If users want to
configure a station or any device that is capable of being an
enrollee, they have to enter device’s PIN into an external
registrar and choose an appropriate wireless profile. After the
PIN is entered, the external registrar will inform AP this event.
AP then conveys the encrypted wireless profile between the
device and the external registrar. Finally, the device will use the
wireless profile and associate with AP. However, the device
may connect to other APs if the wireless profile does not belong
to the proxy AP. Users must carefully choose the wireless
profile or create a wireless profile on an external registrar.
Page 83

83
Wireless Basic Settings page
Users need to make sure the “Broadcast SSID” file is set to
“Enabled”. Otherwise, it might prevent WPS from working
properly.
Page 84

84
Operations of AP - AP being an enrollee
In this case, AP will be configured by any registrar either
through in-band EAP or UPnP. Here, users do not need to do
any action on AP side. They just need AP’s device PIN and
enter it into registrar. An example from Vista WCN will be given.
1. From the left-hand Wireless -> WPS menu. The following
page is displayed:
2. Make sure AP is in un-configured state.
Page 85

85
3. Plug the Ethernet cable into AP’s LAN port and make sure
the IP connection is valid with Vista.
4. Make sure WCN is enabled. Users may need to enable it at
the first time. They could open the “Control Panel”, click
“Classic View“, open “Administrative Tools”, double click
“Services”, ”, a User Account Control pop up and click
“Continue“, edit properties of “Windows Connect Now”,
choose the “Startup type” with “Automatic” and click “Start”.
Page 86

86
5. If the previous steps are done, open Windows Explorer. Go
to the Network section.
6. Click on “Network discovery and file sharing are turned off.
Network computers and devices are not visible. Click to
Change…“
Page 87

87
7. Click on “Turn on network discovery and file sharing“
Page 88

88
8. Click on “No, make the network that I am connected to a
private network“
Page 89

89
9. AP’s icon will show up. Double click on it.
Page 90

90
10. Users could also Click “Add a wireless device” if the icon is
not there. Click “next”.
Page 91

91
11. Enter AP’s Self-PIN Number and click “next”.
Page 92

92
12. Choose a name that people who connect to your network
will recognize.
Page 93

93
13. Enter the Passphrase and then click Next.
Page 94

94
14. A User Account Control screen pops up, click Continue.
15. AP is successfully configured by WCN.
Page 95

95
16. Finally, AP will become configured (see WPS Status). The
authentication algorithm, encryption algorithm, and key
assigned by WCN will be displayed below “Current Key
Info”.
Page 96

96
17. The SSID field of Wireless Basic Settings page will also be
modified with the value assigned by WCN.
Page 97

97
18. The security settings on the Wireless Security Page will be
modified by WCN, too. The warning message will show up
if users try to modify the security settings. The reason is the
same as we explained in the previous section.
Page 98

98
Operations of AP - AP being a registrar
AP mode
Whenever users enter station’s PIN into AP’s Wi-Fi Protected
Setup page and click “Start PIN”, AP will become a registrar.
Users must start the PIN method on the station side within two
minutes.
1. From the left-hand Wireless -> WPS menu. The following
page is displayed:
2. Make sure AP is in un-configured state.
3. Enter the Client PIN Number.
4. Click Start PIN.
Page 99

99
5. Users must start the PIN method on the station side within
two minutes.
6. Users must start the PIN method on the station side within
two minutes.
Page 100

100
7. If the device PIN is correct and the WPS handshake is
successfully done on the station side, User’s Wi-Fi
Protected status will be shown as below.
 Loading...