

Page 1

LevelOne
WBR-3402TX
1W,4L 11g Wireless ADSL Router
w/VPN/Printer Server(USB)
User`s Manual
1
Page 2

Table of Contents
Chapter 1 Introduction .....................................................................................................4
Functions and Features.............................................................................................. 4
Packing List...............................................................................................................6
Chapter 2 Hardware Installation....................................................................................... 7
2.1 Panel Layout........................................................................................................7
2.2 Procedure for Hardware Installation.................................................................... 8
Chapter 3 Network Settings and Software Installation .................................................. 10
3.1 Make Correct Network Settings of Y our Computer...........................................10
3.2 Install the Software into Your Computers.......................................................... 11
Chapter 4 Configuring ADSL Wireless Broadband Router...........................................13
4.1 Start-up and Log in............................................................................................14
4.2 Status ................................................................................................................. 15
4.3 Wizard................................................................................................................16
4.4 Basic Setting......................................................................................................17
4.5 Forwarding Rules .............................................................................................. 33
4.6 Security Settings................................................................................................37
4.6.1 Packet Filter.................................................................................................... 38
4.6.2 Domain Filter.................................................................................................. 42
4.6.3 URL Blocking................................................................................................. 44
4.6.4 MAC Address Control.................................................................................... 46
4.6.5 VPN setting..................................................................................................... 48
4.6.6 Miscellaneous Items....................................................................................... 54
4.7 Advanced Setting............................................................................................... 55
4.7.1 ADSL Modem Performance Setting............................................................... 56
4.7.2 System Time ................................................................................................... 58
4.7.3 System Log..................................................................................................... 59
4.7.4 Dynamic DNS................................................................................................. 61
4.7.5 SNMP Setting................................................................................................. 63
4.7.6 Routing Table.................................................................................................. 65
4.7.7 Schedule Rule................................................................................................. 67
4.8 Toolbox.............................................................................................................. 71
4.8.1 V iew Log ........................................................................................................ 72
4.8.2 Firmware Upgrade.......................................................................................... 73
4.8.3 Backup Setting................................................................................................ 74
4.8.4 Reset to default............................................................................................... 74
4.8.5 Reboot............................................................................................................. 74
2
Page 3

4.8.6 Miscellaneous Items....................................................................................... 75
Chapter 5 Print Server.................................................................................................... 76
5.1 Configuring on Windows 95/98 Platforms ........................................................ 76
5.2 Configuring on Windows NT Platforms............................................................ 79
5.3 Configuring on Windows 2000 and XP Platforms............................................. 80
5.4 Configuring on Unix-like based Platforms........................................................ 85
5.5 Configuring on Apple PC .................................................................................. 90
Appendix A TCP/IP Configuration for Windows 95/98................................................ 91
Appendix B Win 2000/XP IPSEC Setting guide ........................................................... 97
Appendix C PPTP and L2TP Configurations............................................................... 133
Appendix D 802.1x Setting.......................................................................................... 139
Appendix E FAQ and Troubleshooting........................................................................ 145
Reset to factory Default......................................................................................... 145
TFTP Mode............................................................................................................145
3
Page 4

C
h
a
p
t
e
r
1
I
n
t
r
o
d
u
c
t
i
o
n
C
h
a
p
t
e
r
1
I
n
t
r
o
d
C
h
a
p
t
e
r
1
I
n
Congratulations on your purchase of LevelOne WBR-3402 ADSL Wireless Broadband Router. This
product is specifically designed for Small Office and Home Office needs. It provides a complete
SOHO solution for Internet surfing, and is easy to configure and operate even for non-technical users.
Instructions for installing and configuring this product can be found in this manual. Before you install
and use this product, please read this manual carefully for fully exploiting the functions of this product.
Functions and Features
Router Basic functions
Auto-sensing Ethernet Switch
Equipped with a 4-port auto-sensing Ethernet switch.
Printer sharing
Embedded a print server to allow all of the networked computers to share one printer.
Built-in USB host to connect to USB printer for printer sharing
u
t
r
o
d
u
c
t
i
o
n
c
t
i
o
n
Wan type supported
The router supports some wan types, Ethernet Over ATM(RFC 1483 Bridged) without
NAT, Ethernet Over ATM(RFC 1483 Bridged) with NAT, IP over ATM(RFC 1483 Routed),
Classical Ip over ATM(RFC 1577), PPP over ATM (RFC 2364), PPP over Ethernet(RFC
2516).
Firewall
All unwanted packets from outside intruders are blocked to protect your Intranet.
DHCP server supported
All of the networked computers can retrieve TCP/IP settings automatically from this product.
Web-based configuring
Configurable through any networked computer’s web browser using Netscape or Internet
Explorer.
Virtual Server supported
Enables you to expose WWW, FTP and other services on your LAN to be accessible to
Internet users.
User-Definable Application Sensing Tunnel
User can define the attributes to support the special applications requiring multiple
connections, like Internet gaming, video conferencing, Intern et telephony and so on, then this
product can sense the application type and open multi-port tunnel for it.
DMZ Host supported
Lets a networked computer be fully exposed to the Internet; this function is used when
special application sensing tunnel feature is insufficient to allow an applicatio n to function
4
Page 5

correctly.
Statistics of WAN Supported
Enables you to monitor inbound and outbound packets
Wireless functions
High speed for wireless LAN connection
Up to 54Mbps data rate by incorporating Orthogonal Frequency Division Multiplexing
(OFDM).
Roaming
Provides seamless roaming within the IEEE 802.11b(11M) and IEEE 802.11g(54M) WLAN
infrastructure.
IEEE 802.11b compatible (11M)
Allowing inter-operation among multiple vendors.
IEEE 802.11g compatible (54M)
Allowing inter-operation among multiple vendors.
Auto fallback
54M, 48M,36M, 24M, 18M,12M, 6M data rate with auto fallback in 802.11g mode.
11M, 5.5M, 2M, 1M data rate with auto fallback in 802.11b mode.
Security functions
Packet filter supported
Packet Filter allows you to control access to a network by analyzing the incoming and
outgoing packets and letting them pass or halting them based on the IP address of the source
and destination.
Domain Filter Supported
let you prevent users under this device from accessing specific URLs.
URL Blocking Supported
URL Blocking can block hundreds of websites connection by simply a keyword.
VPN Servers
The router has three vpn server, IPSEC (Dynamic vpn ),PPTP,L2TP.
VPN Pass-through
The router also supports vpn pass-through.
802.1X supported
When the 802.1X function is enabled, the Wireless user must authenticate to this router first
to use the Network service.
SPI Mode Supported
5
Page 6

When SPI Mode is enabled, the router will check every incoming packet to detect if this
packet is valid.
DoS Attack Detection Supported
When this feature is enabled, the router will detect and log the DoS attack comes from the
Internet.
Advanced functions
System time Supported
Allow you to synchronize system time with network time server.
E-mail Alert Supported
The router can send its info by mail.
Dynamic dns Supported
At present,the router has 3 ddns.dyndns,TZO.com and dhs.org.
SNMP Supported
Because SNMP this function has many versions, anyway, the router supports V1 and V2c.
Routing Table Supported
Now, the router supports static routing and two kinds of dynamic routing RIP1 and RIP2.
Schedule Rule supported
Customers can control some functions, like virtual server and packet filters when to access or
when to block.
Other functions
UPNP (Universal Plug and Play)Supported
The router also supports this function. The applications: X-box, Msn Messenger.
Packing List
WBR-3402, Wireless ADSL Router unit
Installation CD-ROM
Power adapter
CAT-5 UTP Fast Ethernet cable
6
Page 7

C
h
a
p
t
e
r
2
H
a
r
d
w
a
r
e
I
n
s
t
a
l
l
a
t
i
o
C
h
a
p
t
e
r
2
H
a
r
d
w
a
r
e
I
n
s
t
C
h
a
p
t
e
r
2
H
a
r
d
w
a
r
e
2.1 Panel Layout
2.1.1. Front Panel
Figure 2-1 Front Panel
LED:
LED Function Color Status Description
a
I
n
s
t
a
n
l
l
a
t
i
o
n
l
l
a
t
i
o
n
POWER Power indication Green On
STATUS System status Green Blinking
On The ADSL is linked.
Show-tme ADSL status1 Green
Blinking
ADSL-Act ADSL status2 Green Blinking
WLAN Wireless activity Green Blinking
On
L1~L4 Link status Green
Blinking
Power is being applied to this
product.
This product is functioning
properly.
This router is trying to connect to
your ISP
The ADSL is sending or
receiving data.
Sending or receiving data via
wireless
An active station is connected to
the corresponding LAN port.
The corresponding LAN port is
sending or receiving data.
7
Page 8

2.1.2. Rear Panel
Figure 2-2 Rear Panel
Ports:
Port Description
5VDC
ADSL
Port 1-4
USB
Power inlet: DC 5V, 2A
the port where you will connect your phone jack..
the ports where you will connect networked computers and other
devices.
USB Ports for USB printer.
2.2 Procedure for Hardware Installation
1. Decide where to place your WBR-3402, Wireless ADSL Router
You can place your ADSL Wireless Broadband Router on a desk or other flat surface, or you can
mount it on a wall. For optimal performance, place your ADSL Wireless Broadband Router in the
center of your office (or your home) in a location that is away from any potential source of
interference, such as a metal wall or microwave oven. This location must be close to power and
network connection.
2. Setup LAN connection
a. Wired LAN connection: connects an Ethernet cable from your computer ’s Ethernet port to one
of the LAN ports of this product.
b. Wireless LAN connection: locate this product at a proper position to gain the best transmit
performance.
8
Page 9
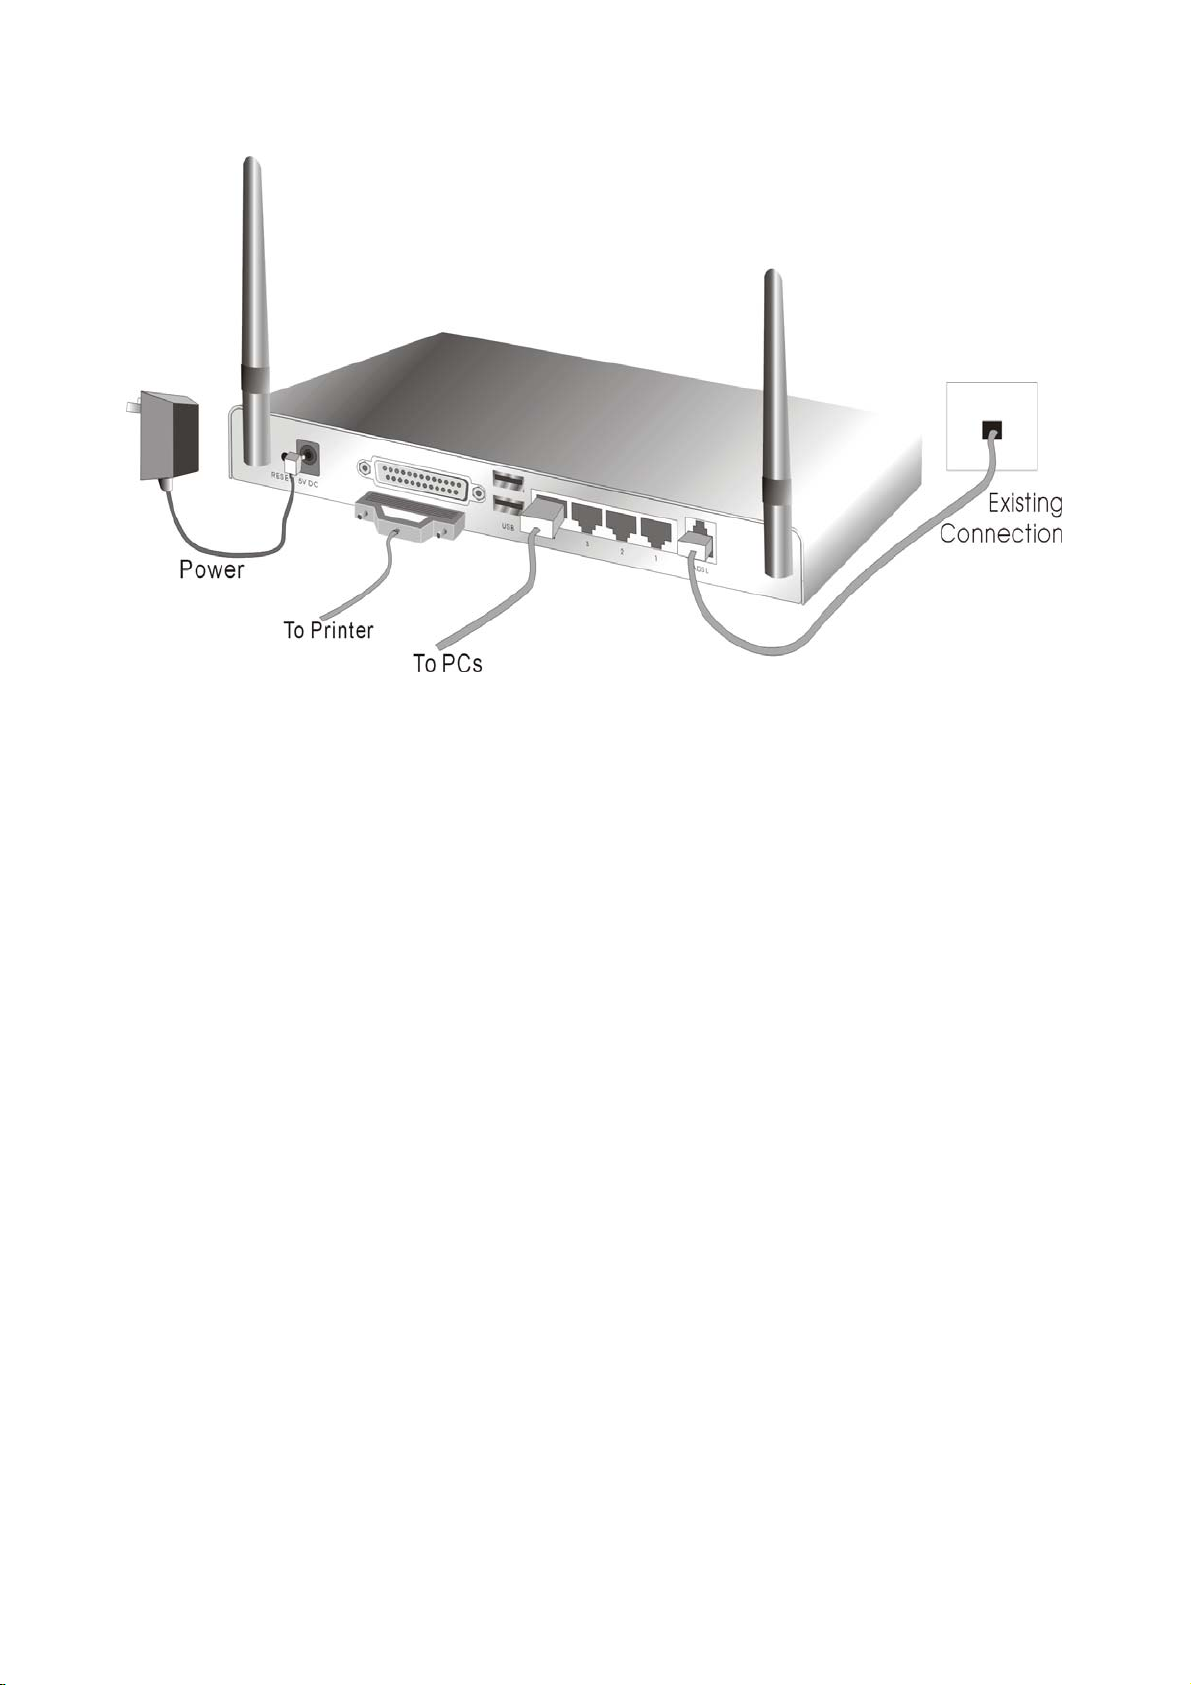
Figure 2-3 Setup of LAN and WAN connections for this product.
3. Setup ADSL connection
Prepare a telephone cable for connecting this product to your ISP. Figure 2-3 illustrates the ADSL
connection.
4. Connecting this product with your printer
Use the printer cable to connect your printer to the USB printer port of this product.
5. Power on
Connecting the power cord to power inlet and turning the power switch on, this product will
automatically enter the self-test phase. When it is in the self-test phase, the indicators STATUS
will be lighted ON for about 10 seconds, and then STATUS will be flashed 3 times to indicate that
the self-test operation has finished. Finally, the STATUS will be continuously flashed once per
second to indicate that this product is in normal operation.
9
Page 10

C
h
a
p
t
e
r
3
N
e
t
w
o
r
k
S
e
t
t
i
n
g
s
a
C
h
a
p
t
e
r
3
N
e
t
w
o
r
k
S
e
t
t
C
h
a
p
t
e
r
3
N
e
t
w
o
r
k
To use W BR-3402 correctly, you h ave to properly configure the network settings of your computers
and install the attached setup program into your MS Windows platform (Windows 95/98/NT/2000).
3.1 Make Correct Network Settings of Your Computer
The default IP address of this product is 192.168.123.254, and the default subnet mask is
255.255.255.0. These addresses can be changed on your need, but the d efault values are used in this
manual. If the TCP/IP environment of your computer has not yet been configured, you can refer to
Appendix A to configure it. For example,
1. configure IP as 192.168.123.1, subnet mask as 255.255.255.0 and gateway as
192.168.123.254, or more easier,
2. configure your computers to load TCP/IP setting automatically, that is, via DHCP server of
this product.
i
S
e
t
t
i
n
n
g
s
a
n
n
g
s
a
n
f
t
w
a
r
e
I
n
s
t
a
l
l
a
t
i
o
n
d
S
o
o
f
t
w
a
r
e
I
n
s
t
a
l
d
S
f
t
w
a
r
e
d
S
o
I
l
n
s
t
a
l
l
a
t
i
o
n
a
t
i
o
n
After installing the TCP/IP communication protocol, you can use the ping command to check if your
computer has successfully connected to this product. The following example shows the ping procedure
for Windows 95 platforms. First, execute the ping command
ping 192.168.123.254
If the following messages appear:
Pinging 192.168.123.254 with 32 bytes of data:
Reply from 192.168.123.254: bytes=32 time=2ms TTL=64
a communication link between your computer and this product has been successfully established.
Otherwise, if you get the following messages,
Pinging 192.168.123.254 with 32 bytes of data:
Request timed out.
There must be something wrong in your installation procedure. You have to check the following items
in sequence:
1. Is the Ethernet cable correctly connected between this product and your computer?
Tip: The LAN LED of this product and the link LED of network card on your computer must be
lighted.
2. Is the TCP/IP environment of your computers properly configured?
Tip: If the IP address of this product is 192.168.123.254, the IP address of your computer must
be 192.168.123.X and default gateway must be 192.168.123.254.
10
Page 11
3.2 Install the Software into Your Computers
Skip this section if you do not want to use the print server function of this product.
Notice: If you are using Windows 2000/XP, please refer to Chapter 5 Printer - 5.3 Configuring on
Windows 2000 and XP Platforms. It is not necessary to setup any program and the print-server can
work.
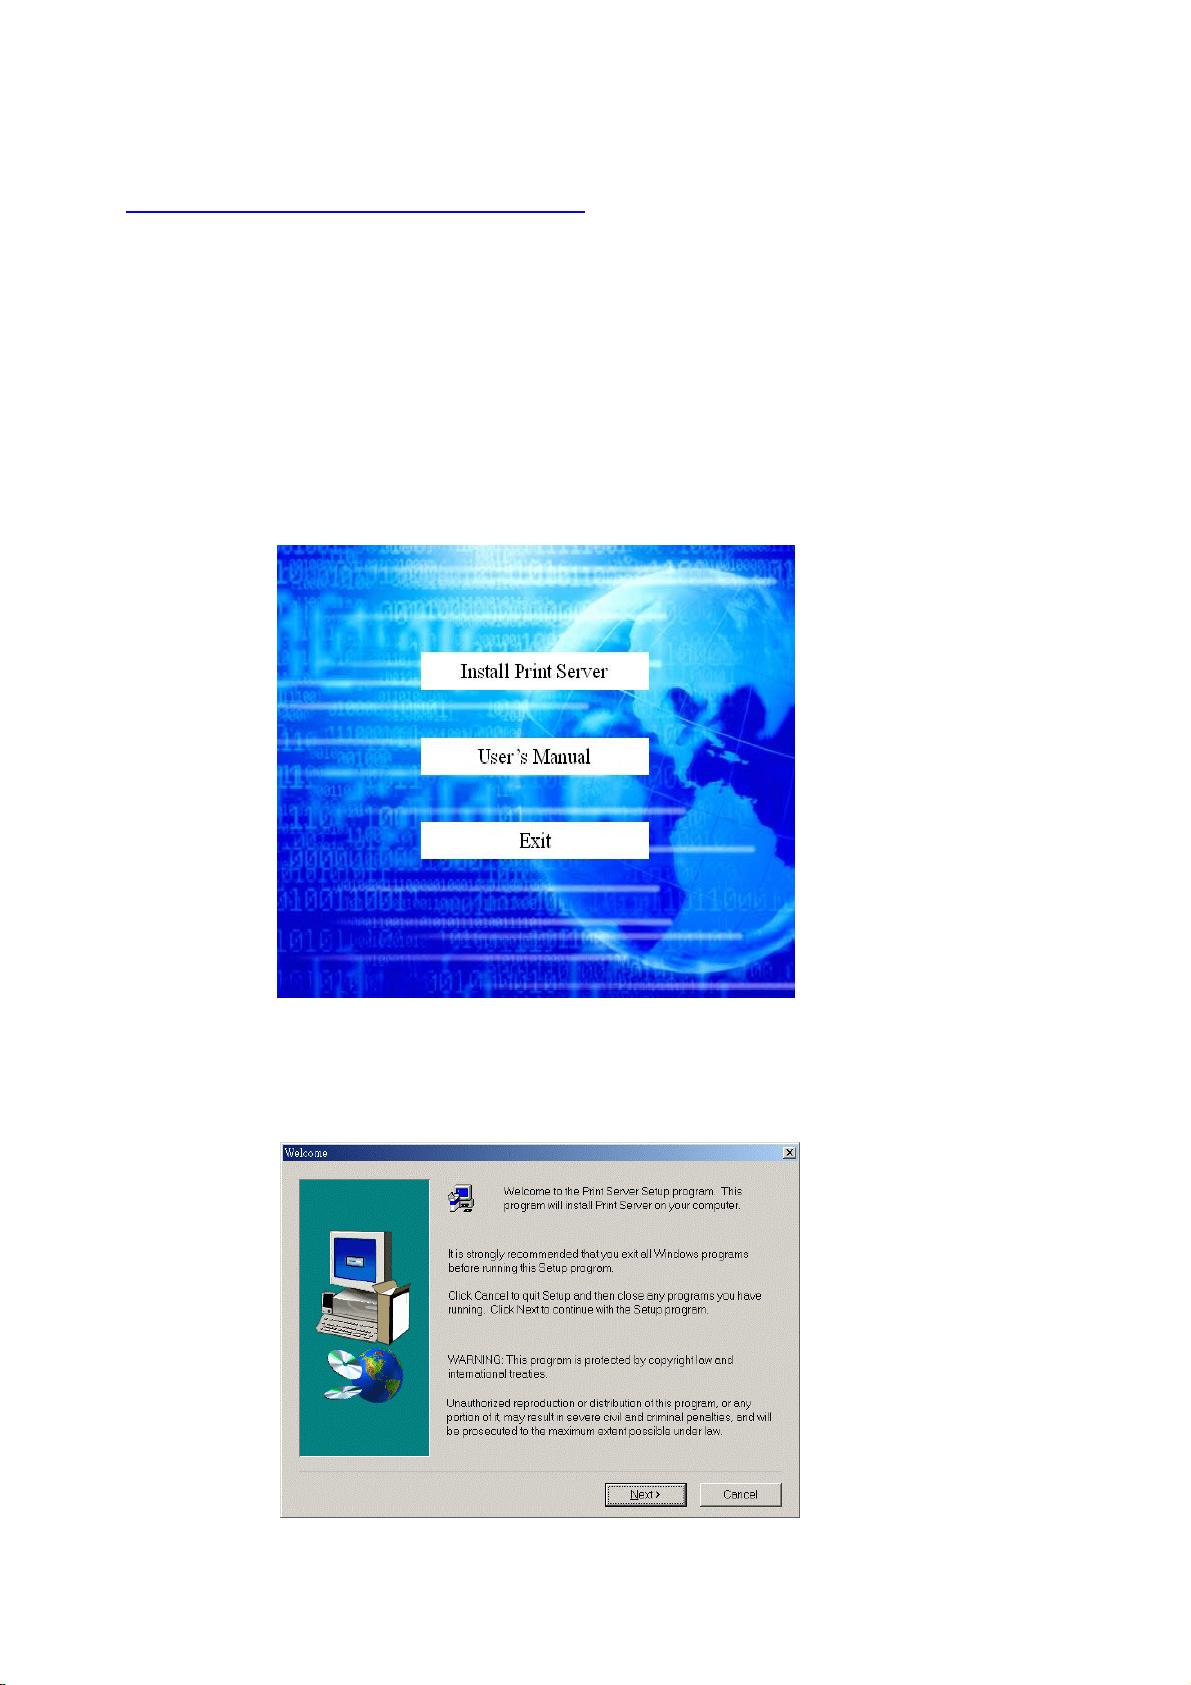
Step 1: Insert the installation CD-ROM into the CD-ROM drive. The following window will be shown
automatically. If it isn’t, please run “install.exe” on the CD-ROM.
Step 2: Click on the INSTALL button. Wait until the following Welcome dialog to appear, and click
on the Next button.
11
Page 12
Step 3: Select the destination folder and click on the Next button. Then, the setup program will begin
to install the programs into the destination folder .Step 4: When the following window is
displayed, click on the Finish button.
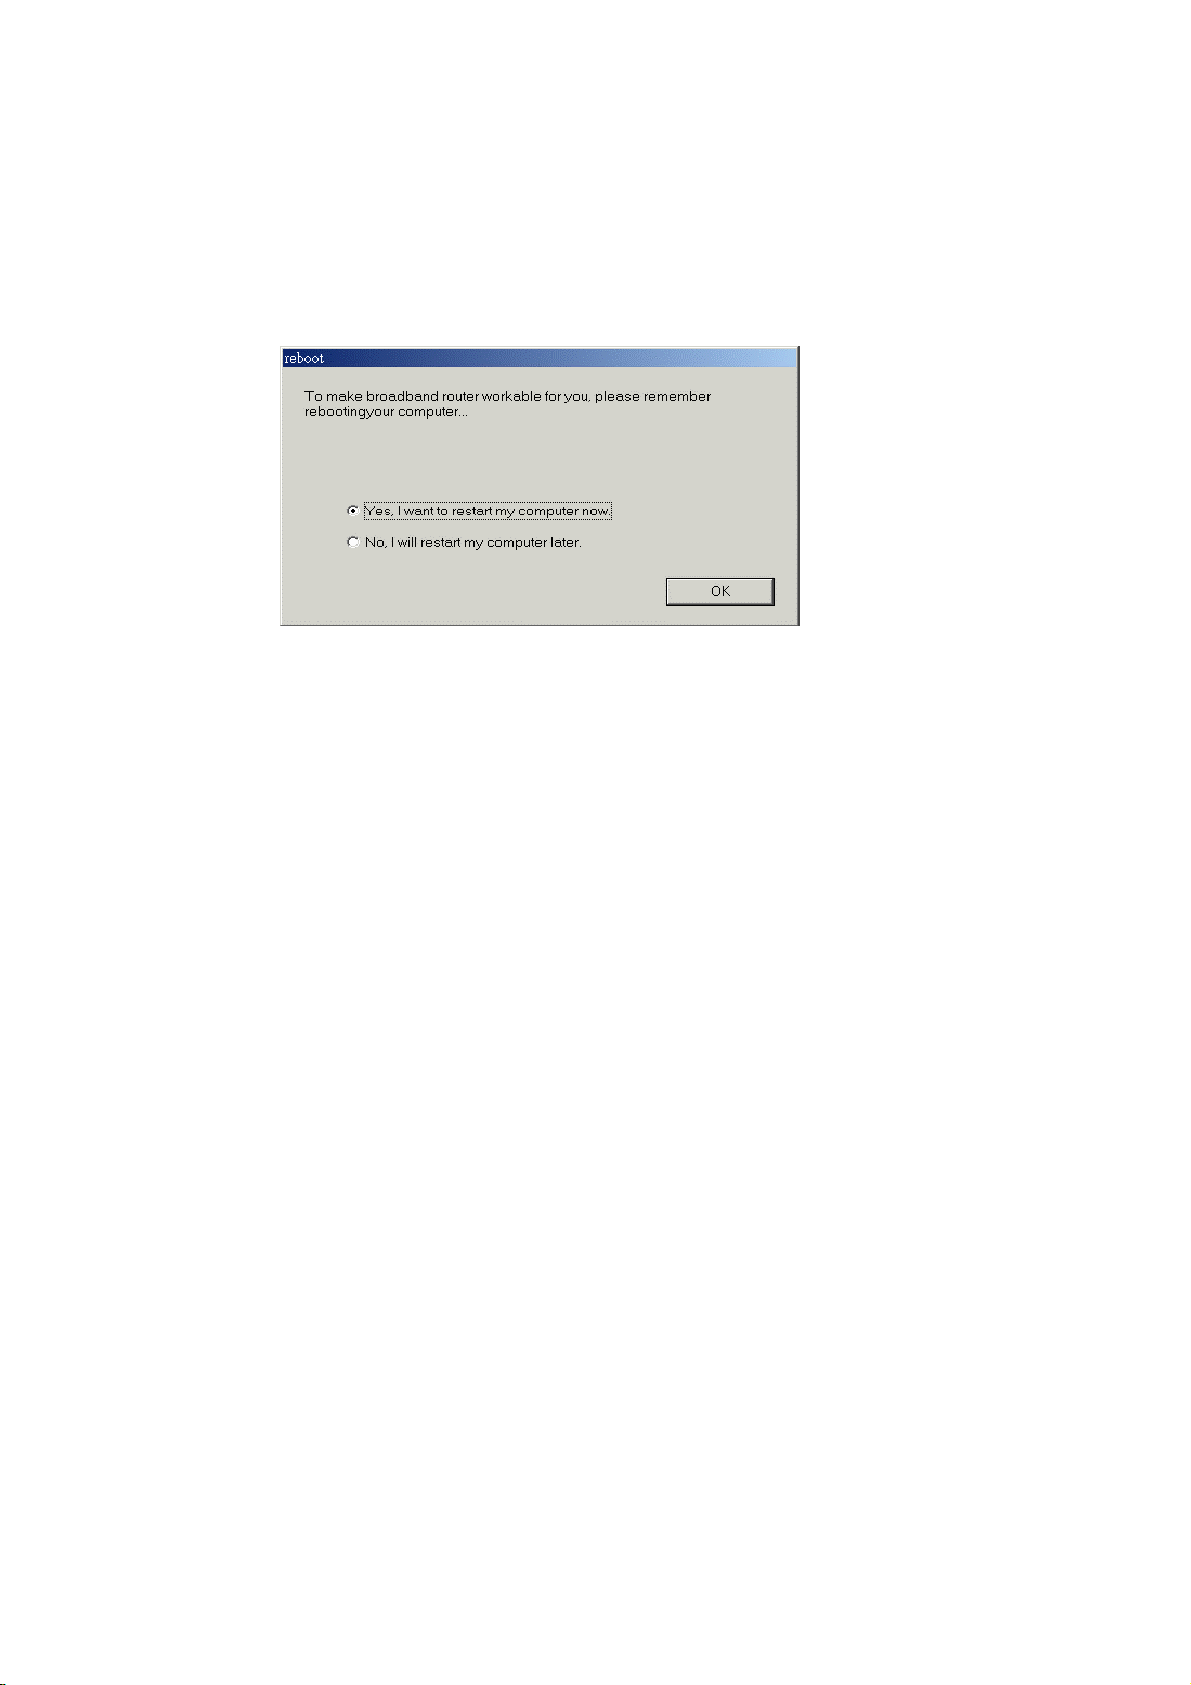
Select the item to restart the computer and then click the OK button to reboot your computer.
Step 4: After rebooting your computer, the software installation procedure is finished.
Now, you can configure the NAT Router (refer to Chapter 4) and setup the Print Server (refer to
Chapter 5).
12
Page 13
C
h
a
p
t
e
r
4
C
o
n
f
i
g
u
r
i
n
g
A
D
S
L
C
h
a
p
t
e
r
4
C
o
n
f
i
g
u
r
i
n
g
C
h
a
p
t
e
r
4
C
o
n
f
i
g
u
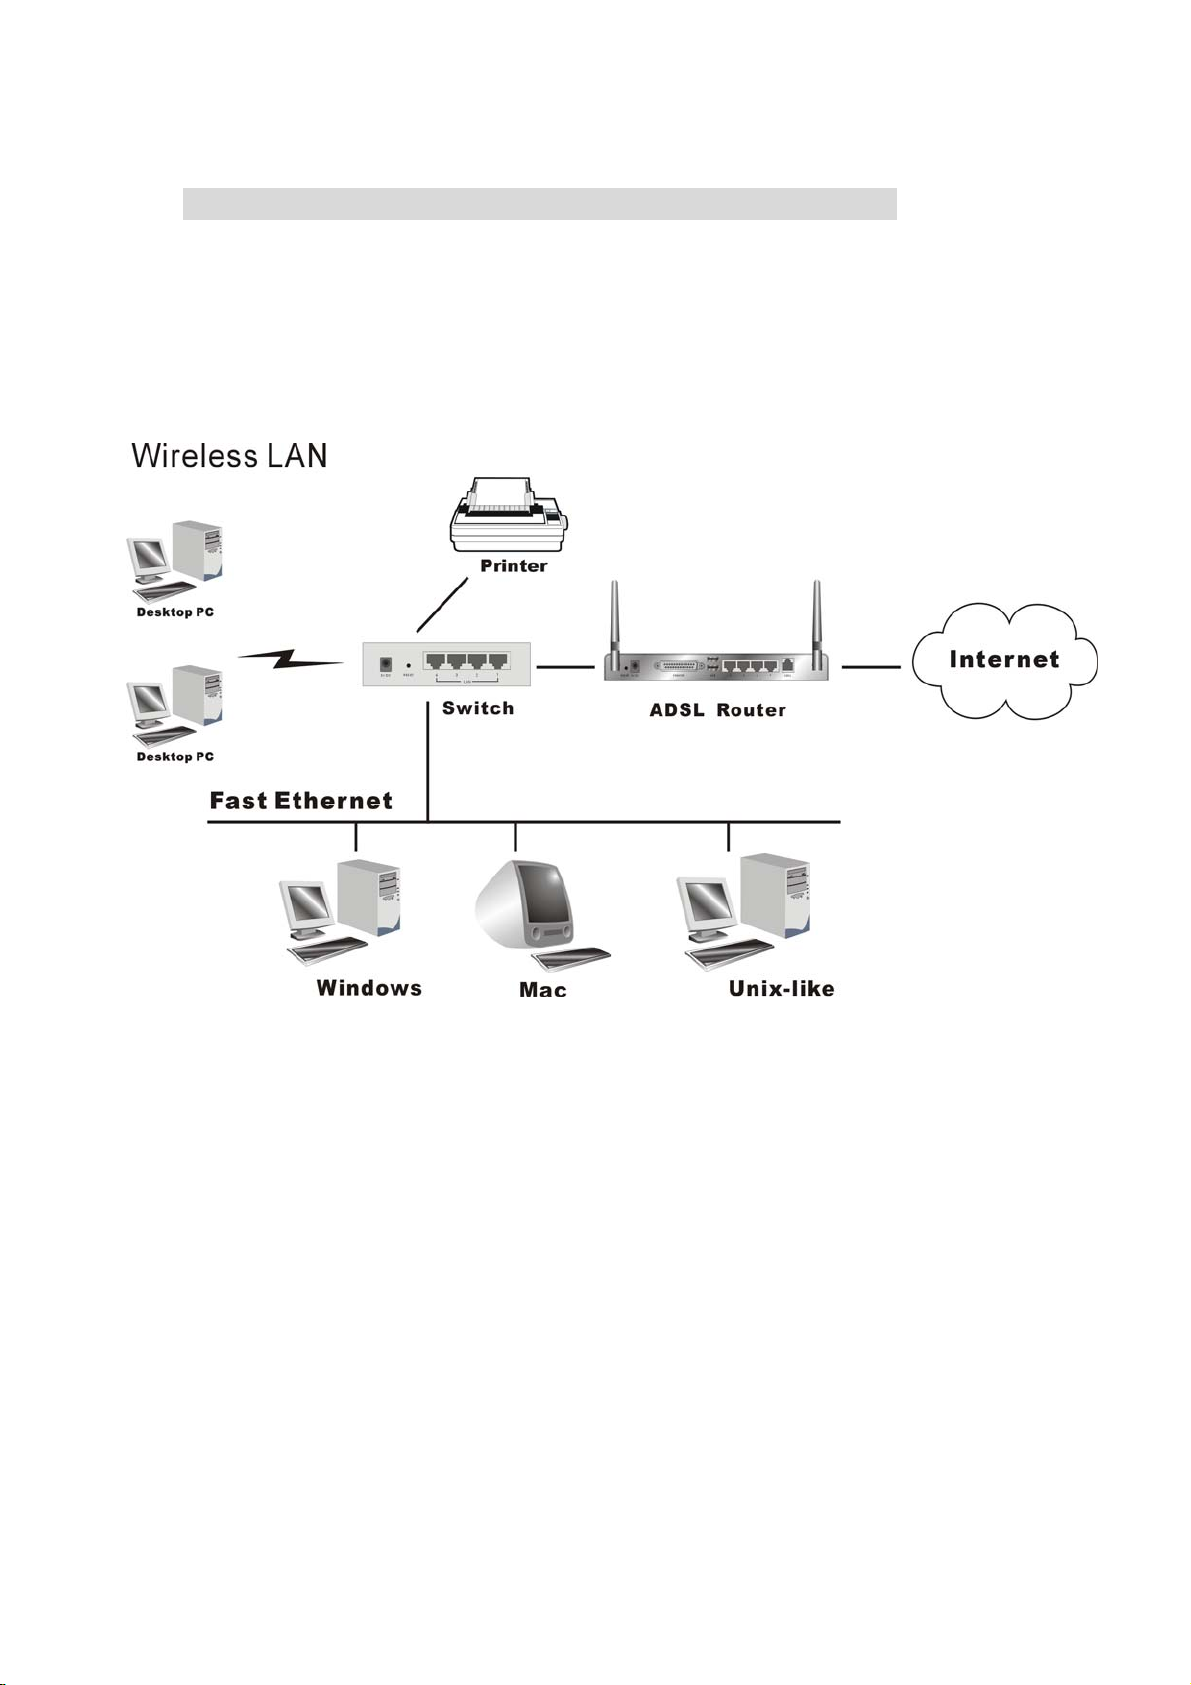
This product provides Web based configuration scheme, that is, configuring by your Web browser,
such as Netscape Communicator or Internet Explorer. This approach can be adopted in any MS
Windows, Macintosh or UNIX based platforms.
A
r
i
n
g
A
D
D
W
S
L
W
S
L
W
s
s
B
r
o
a
d
b
a
n
d
R
o
u
t
e
r
i
r
e
l
e
e
s
s
B
r
o
a
d
b
a
n
d
R
i
r
e
l
s
s
B
r
o
a
d
b
i
r
e
l
e
a
o
n
d
R
o
u
t
e
r
u
t
e
r
13
Page 14
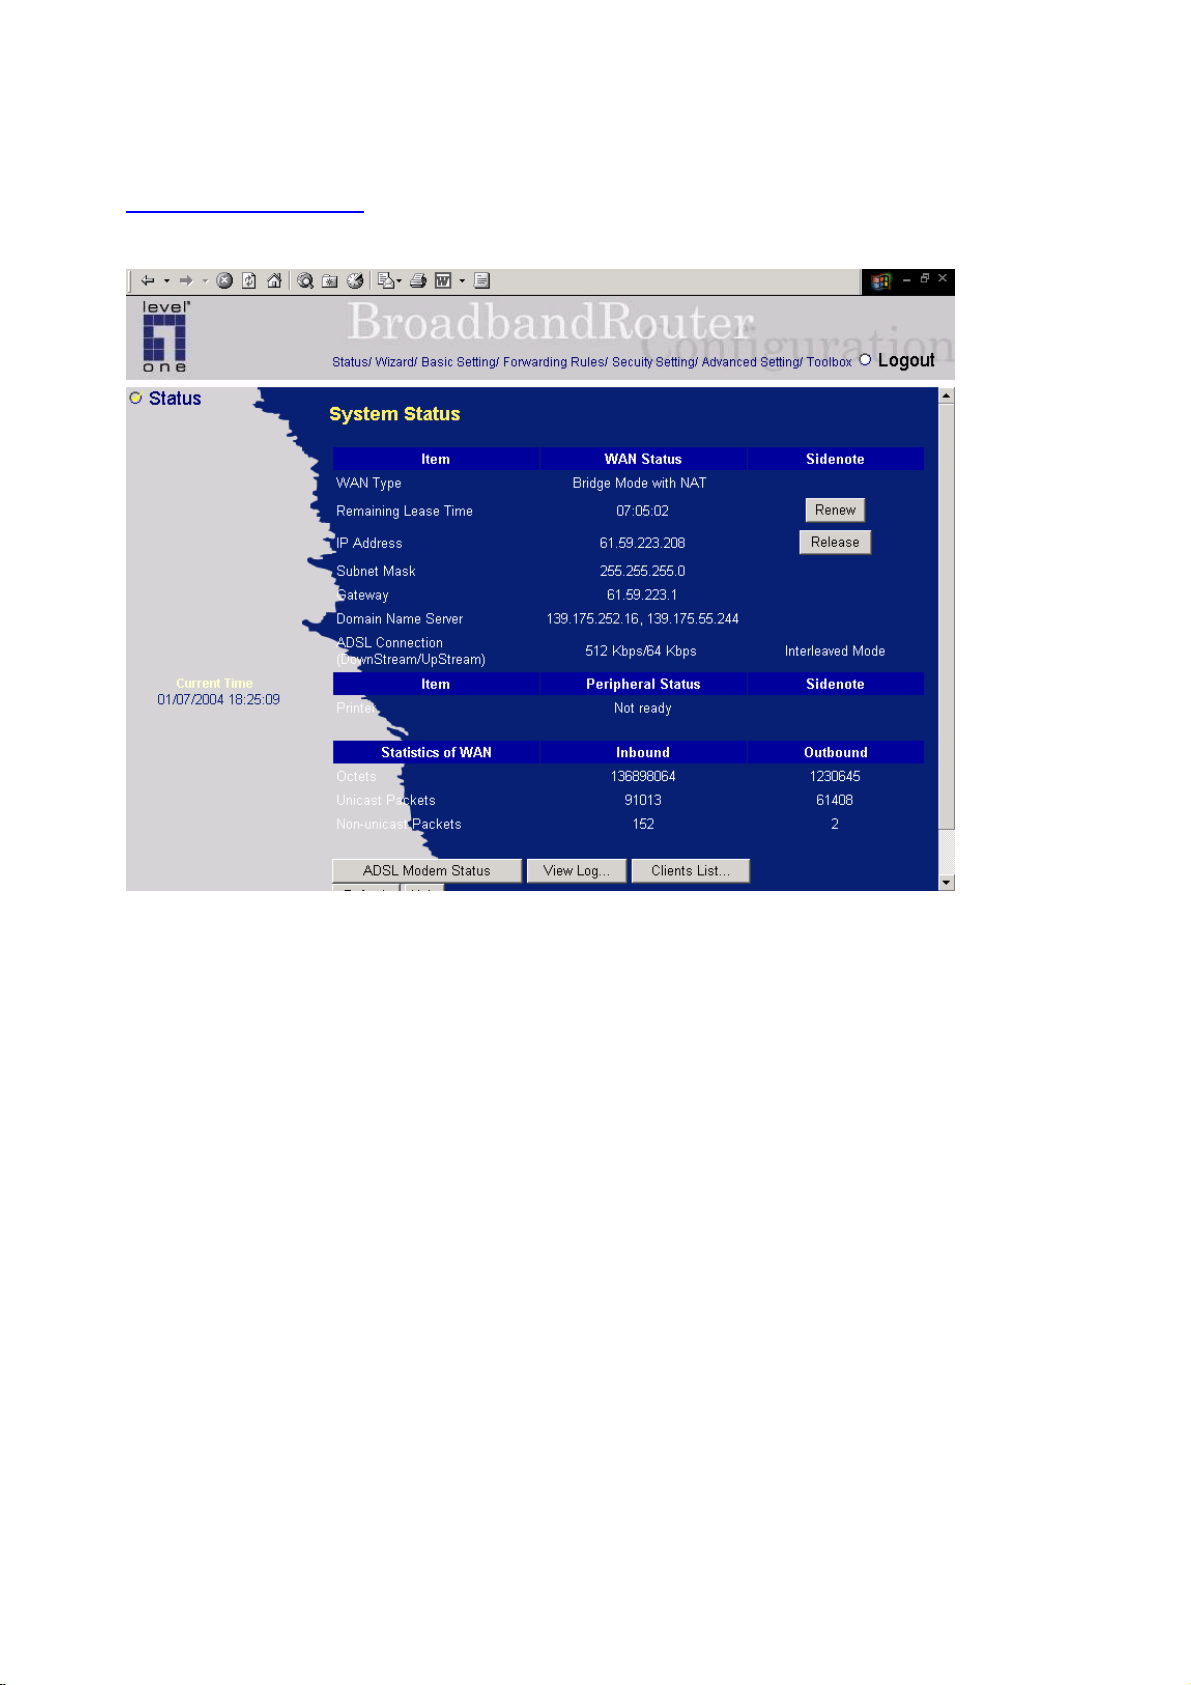
4.1 Start-up and Log in
Activate your browser, and disable the proxy or add the IP address of this product into the
exceptions. Then, type this product’s IP address in the Location (for Netscape) or Address (for IE)
field and press ENTER. For example: http://192.168.123.254.
After the connection is established, you will see the web user interface of this product. There are two
appearances of web user interface: for general users and for system administrator.
To log in as an administrator, enter the system password (the factory setting is ”admin”) in the System
Password field and click on the Log in button. If the password is correct, the web appearance will be
changed into administrator configure mode. As listed in its main menu, there are several options for
system administration.
14
Page 15
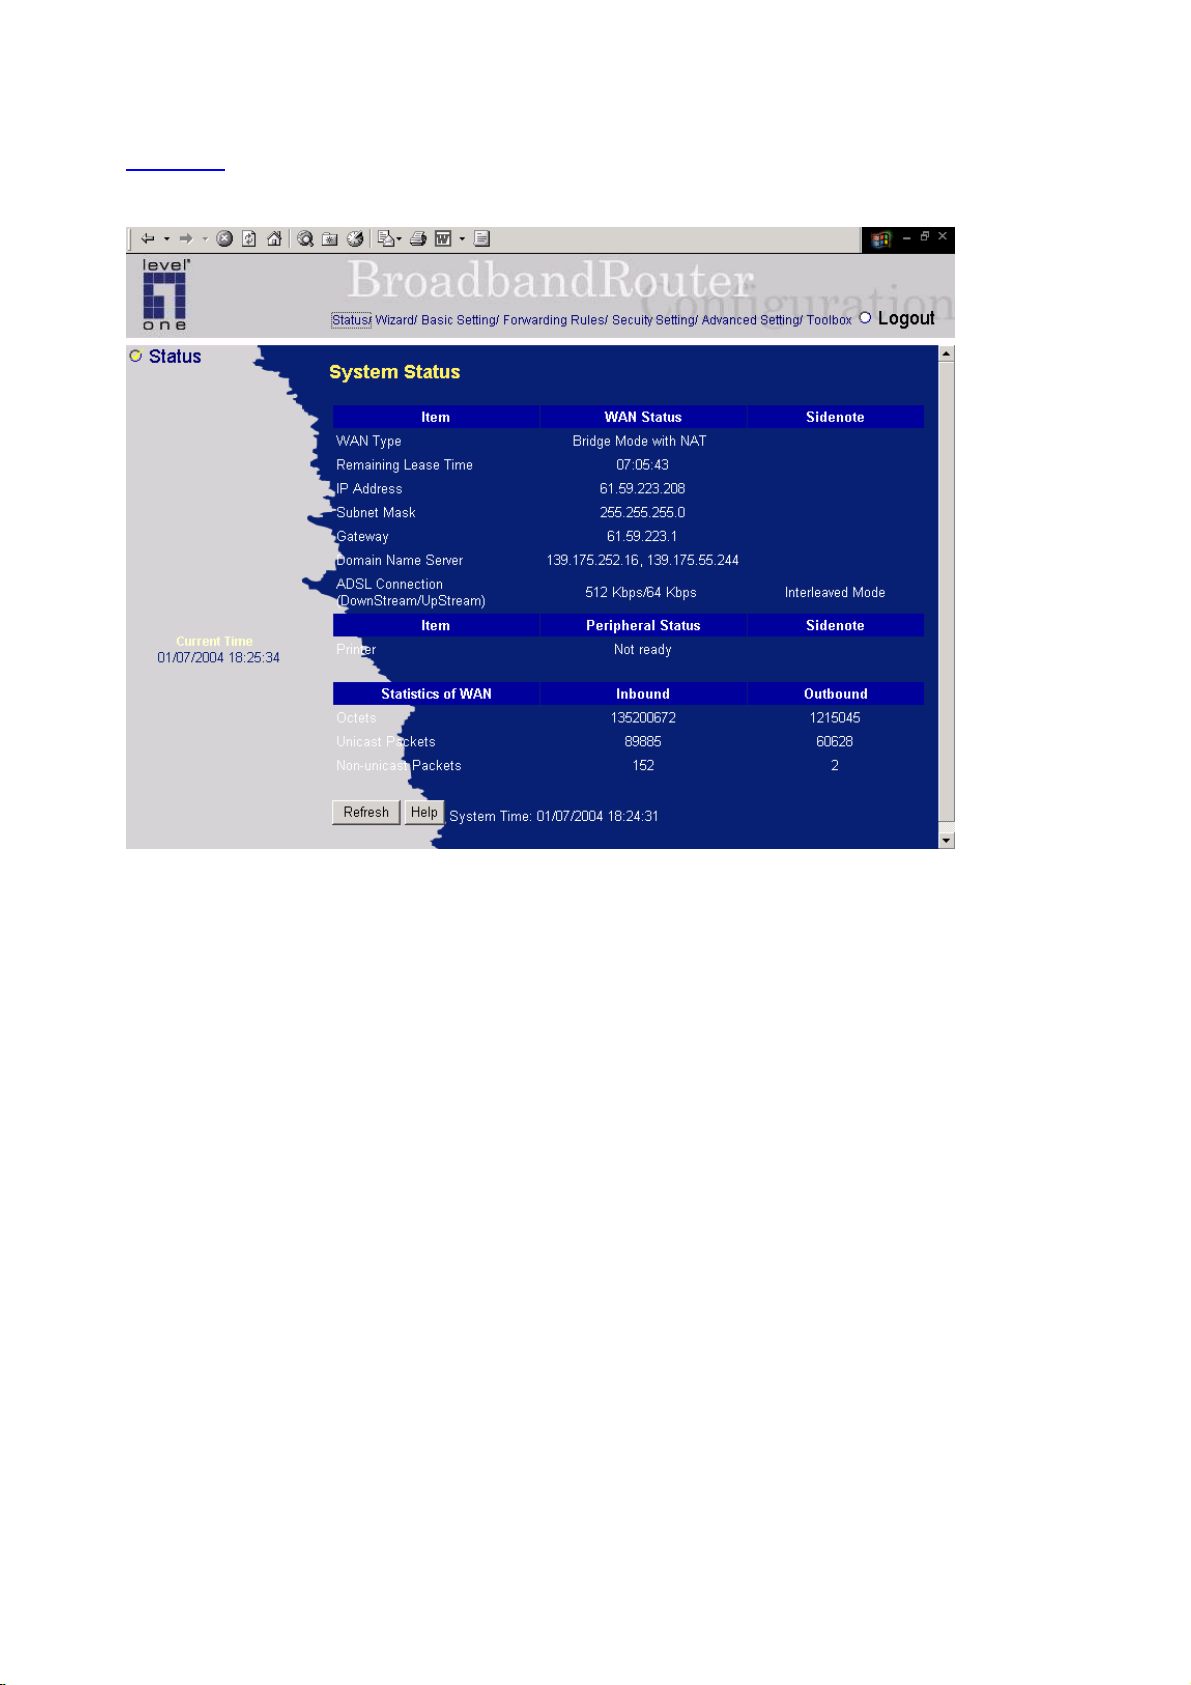
4.2 Status
This option provides the function for observing this product’s working status:
A. WAN Port Status.
If the WAN port is assigned a dynamic IP, there may appear a “Renew” or “Release” button
on the Sidenote column. You can click this button to renew or release IP manually.
B. Printer Status. The possible kinds of printer status include “Ready”, “Not ready”,
“Printing…”, and “Device error”.
When a job is printing, there may appear a “Kill Job” button on the Sidenote column. You can
click this button to kill current printing job manually.
C. Statistics of WAN: enables you to monitor inbound and outbound packets
Notice: For the WBR-3402B, it can support both Annex B and U-R2 ADSL line coding schemes.
The default setting is Annex B. If your ISP used U-R2 scheme, you have to change the line oding
scheme to U-R2, and then reboot this product to successfully establish the connection with ISP
15
Page 16
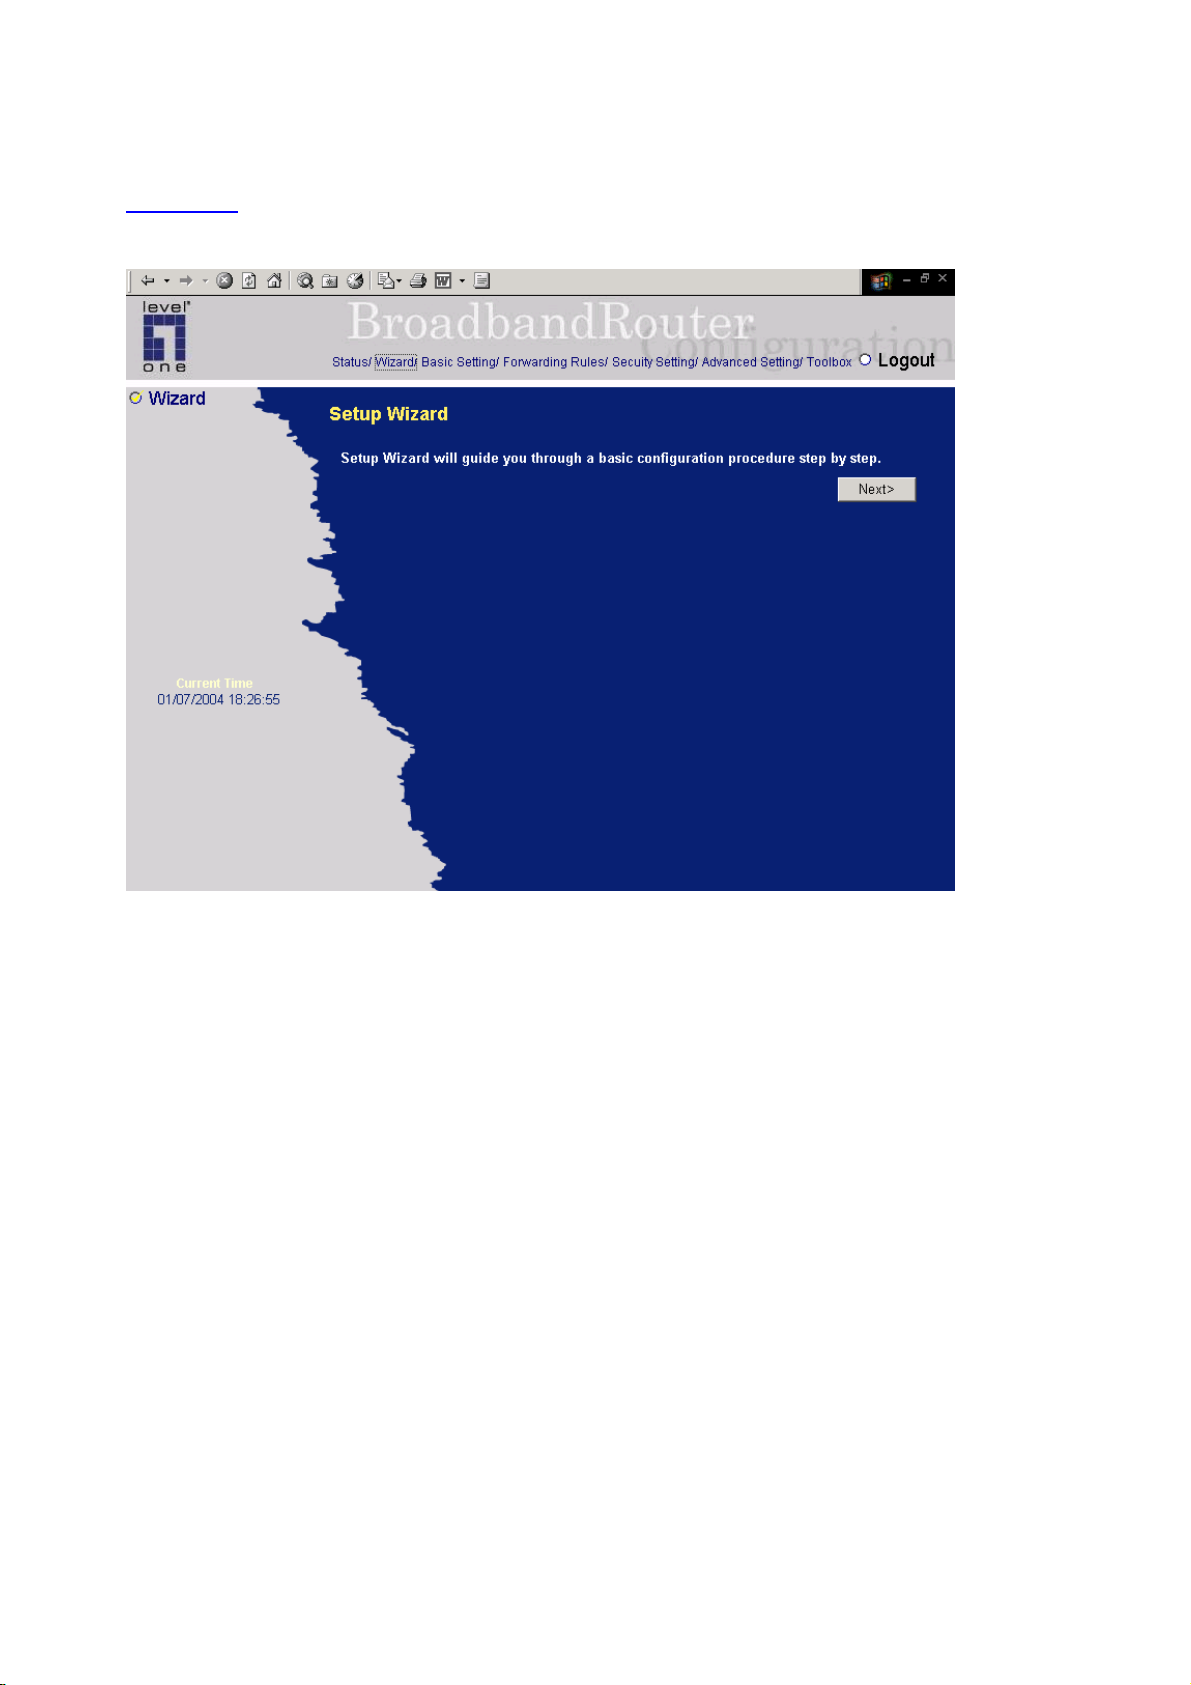
4.3 Wizard
Setup Wizard will guide you through a basic configuration procedure step by step. Press ”Next >”
16
Page 17
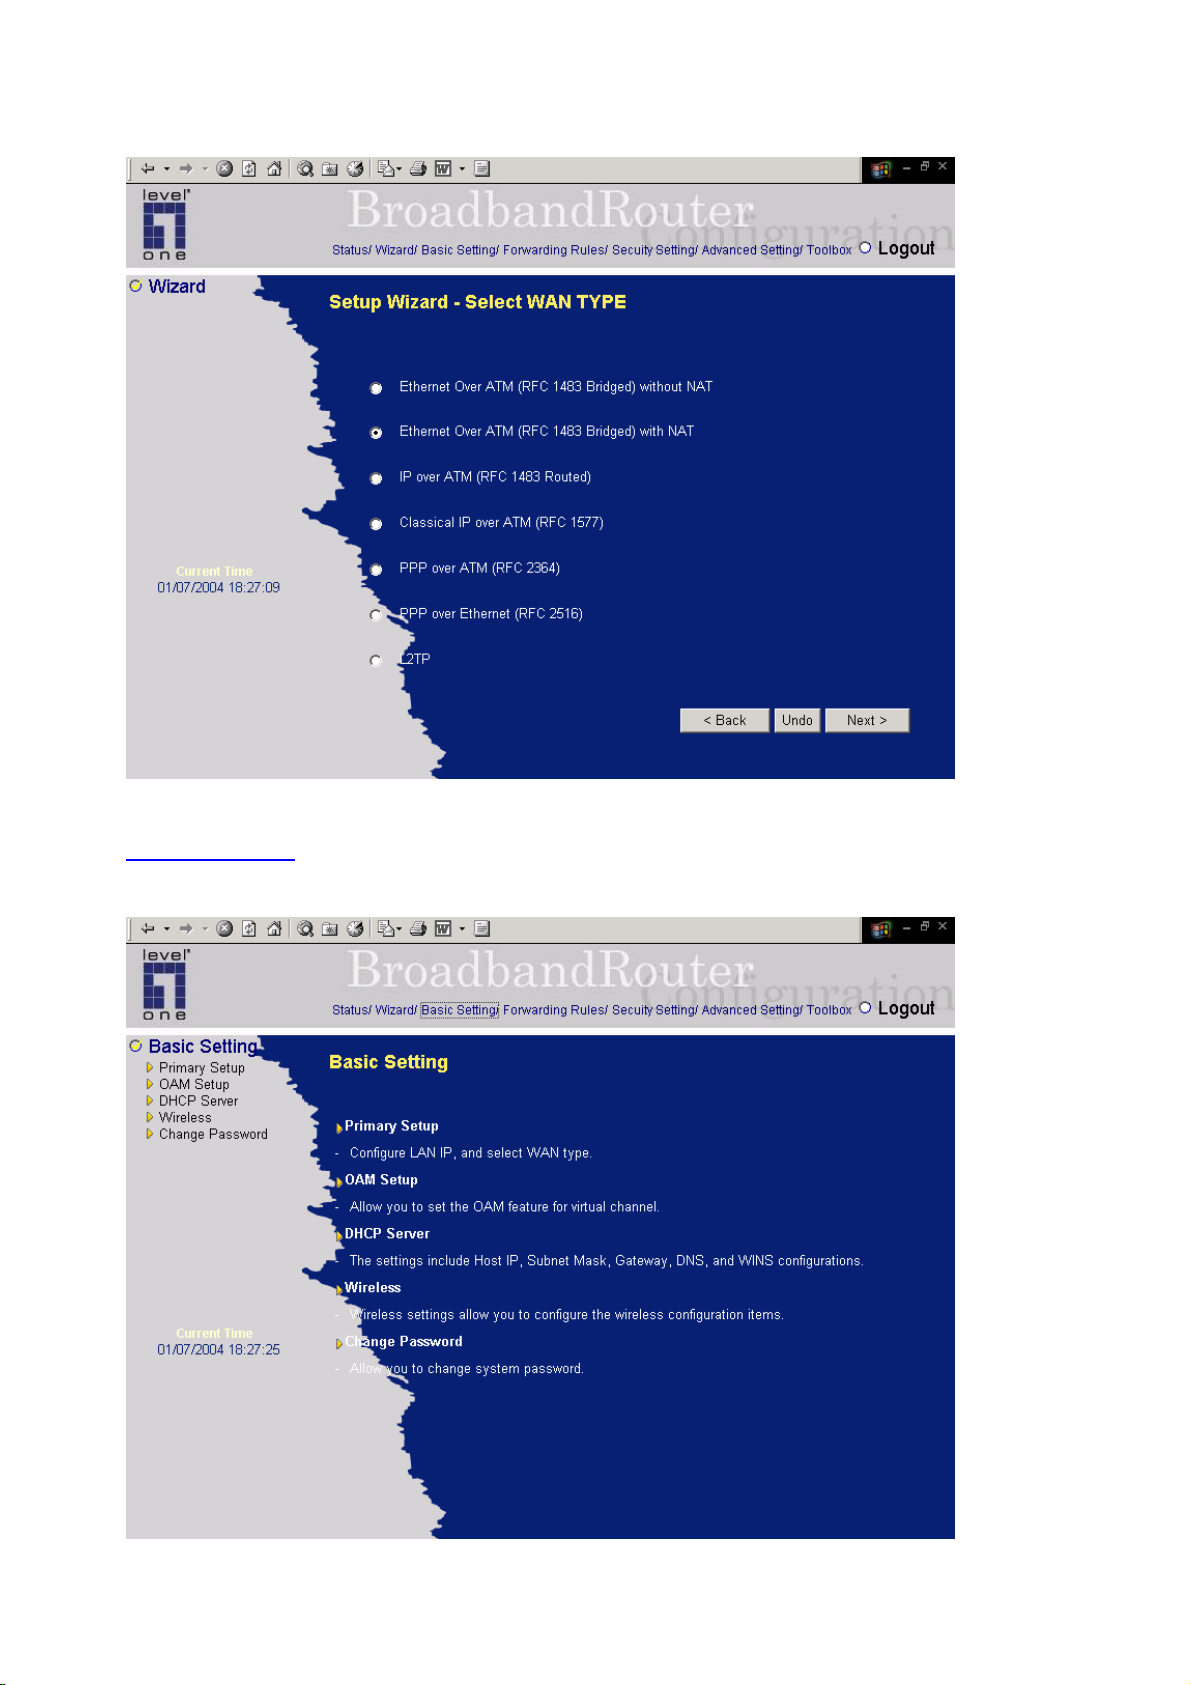
Setup Wizard - Select WAN Type: For detail settings, please refer to 4.4.1 primary setup.
4.4 Basic Setting
17
Page 18

4.4.1 Primary Setup – WAN Type
Press “Change”
18
Page 19
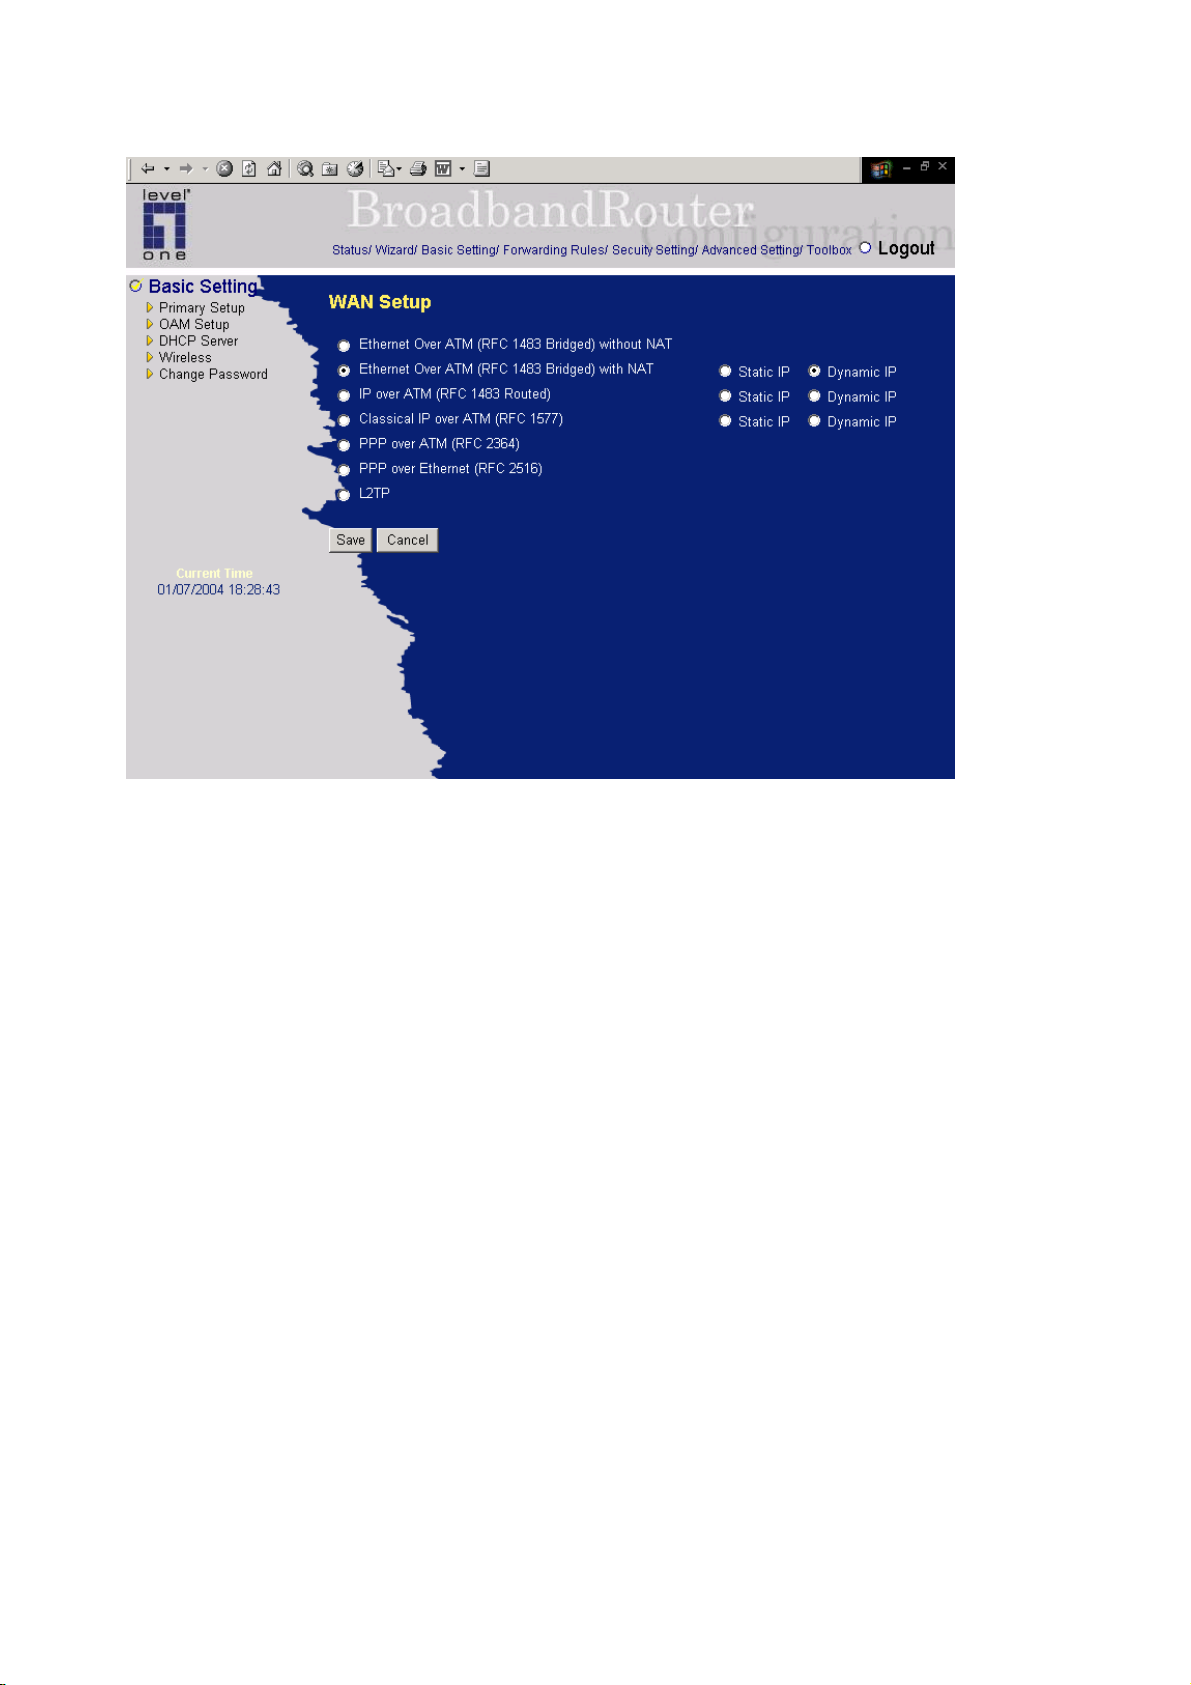
This page is primary to enable this product to work properly. The setting items and the web appearance
depend on the WAN type. Choose correct WAN type before you start.
1. LAN IP Address: the local IP address of this device. The computers on your network must use the
LAN IP address of your product as their Default Gateway. You can change it if necessary.
2. WA N Type: WAN connection type of your ISP. You can click Change button to choose a correct
one from the following five options:
A. Ethernet Over ATM (RFC 1483 Bridged) without NAT
B. Ethernet Over ATM (RFC 1483 Bridged) with NAT
C. IP over ATM (RFC 1483 Routed).
D. Classical IP over ATM (RFC 1577).
E. PPP over ATM (RFC 2364).
F. PPP over Ethernet (RFC 2516).
3. Data Encapsulation: Two data encapsulation type are supported: LLC and vc-MUX. It is
specified by your ISP. Once you finished above settings, click on the "Advanced Setting" button to
another page for further configurations.
19
Page 20
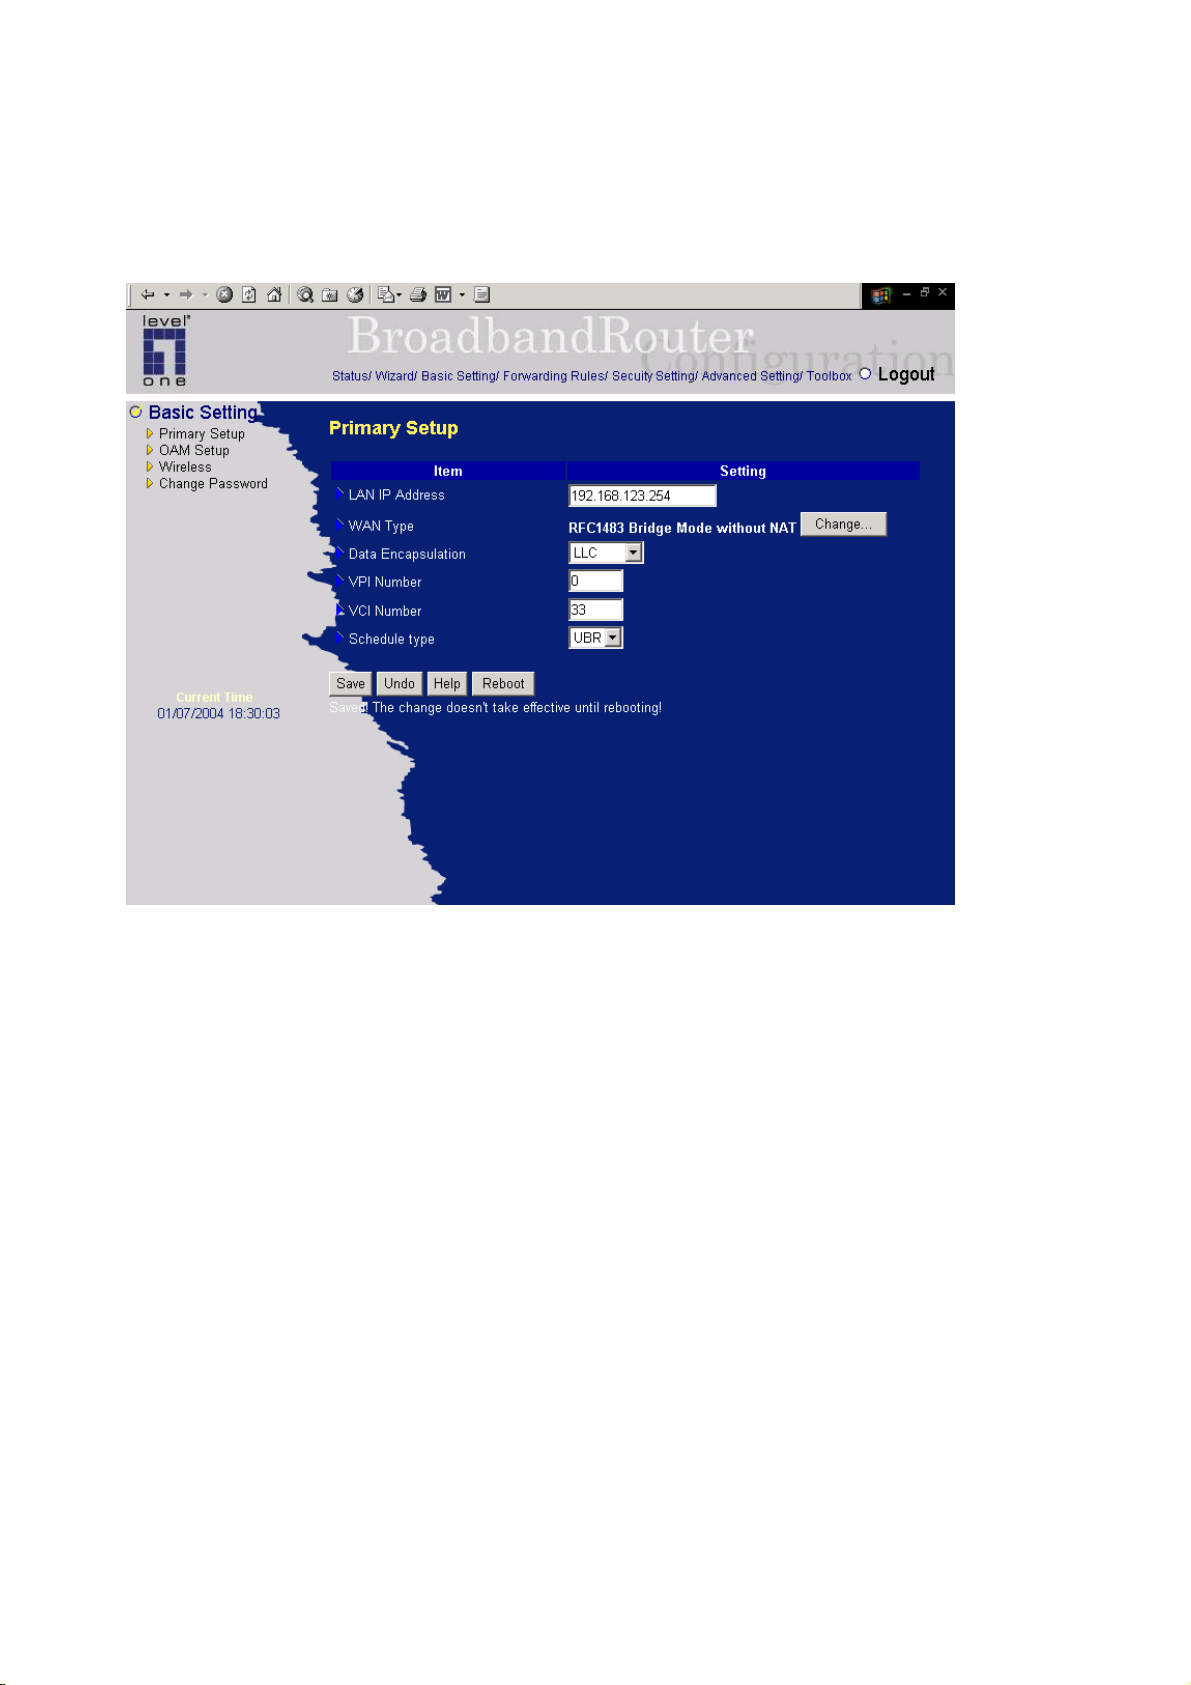
4.4.1.1 Ethernet Over ATM (RFC 1483 Bridged) without NAT
This WAN type disable the NAT, this device becomes a pure bridge between your LAN and WAN, all
the clients in your LAN must have legal IPs. If you enable the NAT feature, you have to set the
following WAN IP settings.
WAN IP Address, WAN Subnet Mask, WAN Gateway, and Primary/Secondary DNS
These settings are also specified by your ISP.
VPI/VCI Numbers:
The channel settings provided by your ISP.
Schedule T ype:
The setting of the ADSL traffic schedule type. This device supports UBR (Un-specified bit rate) and
CBR (Constant bit rate). Once you finished the required configuration , you must click on the "Save"
button to save the configuration into Flash memory, and the reboot this device.
20
Page 21
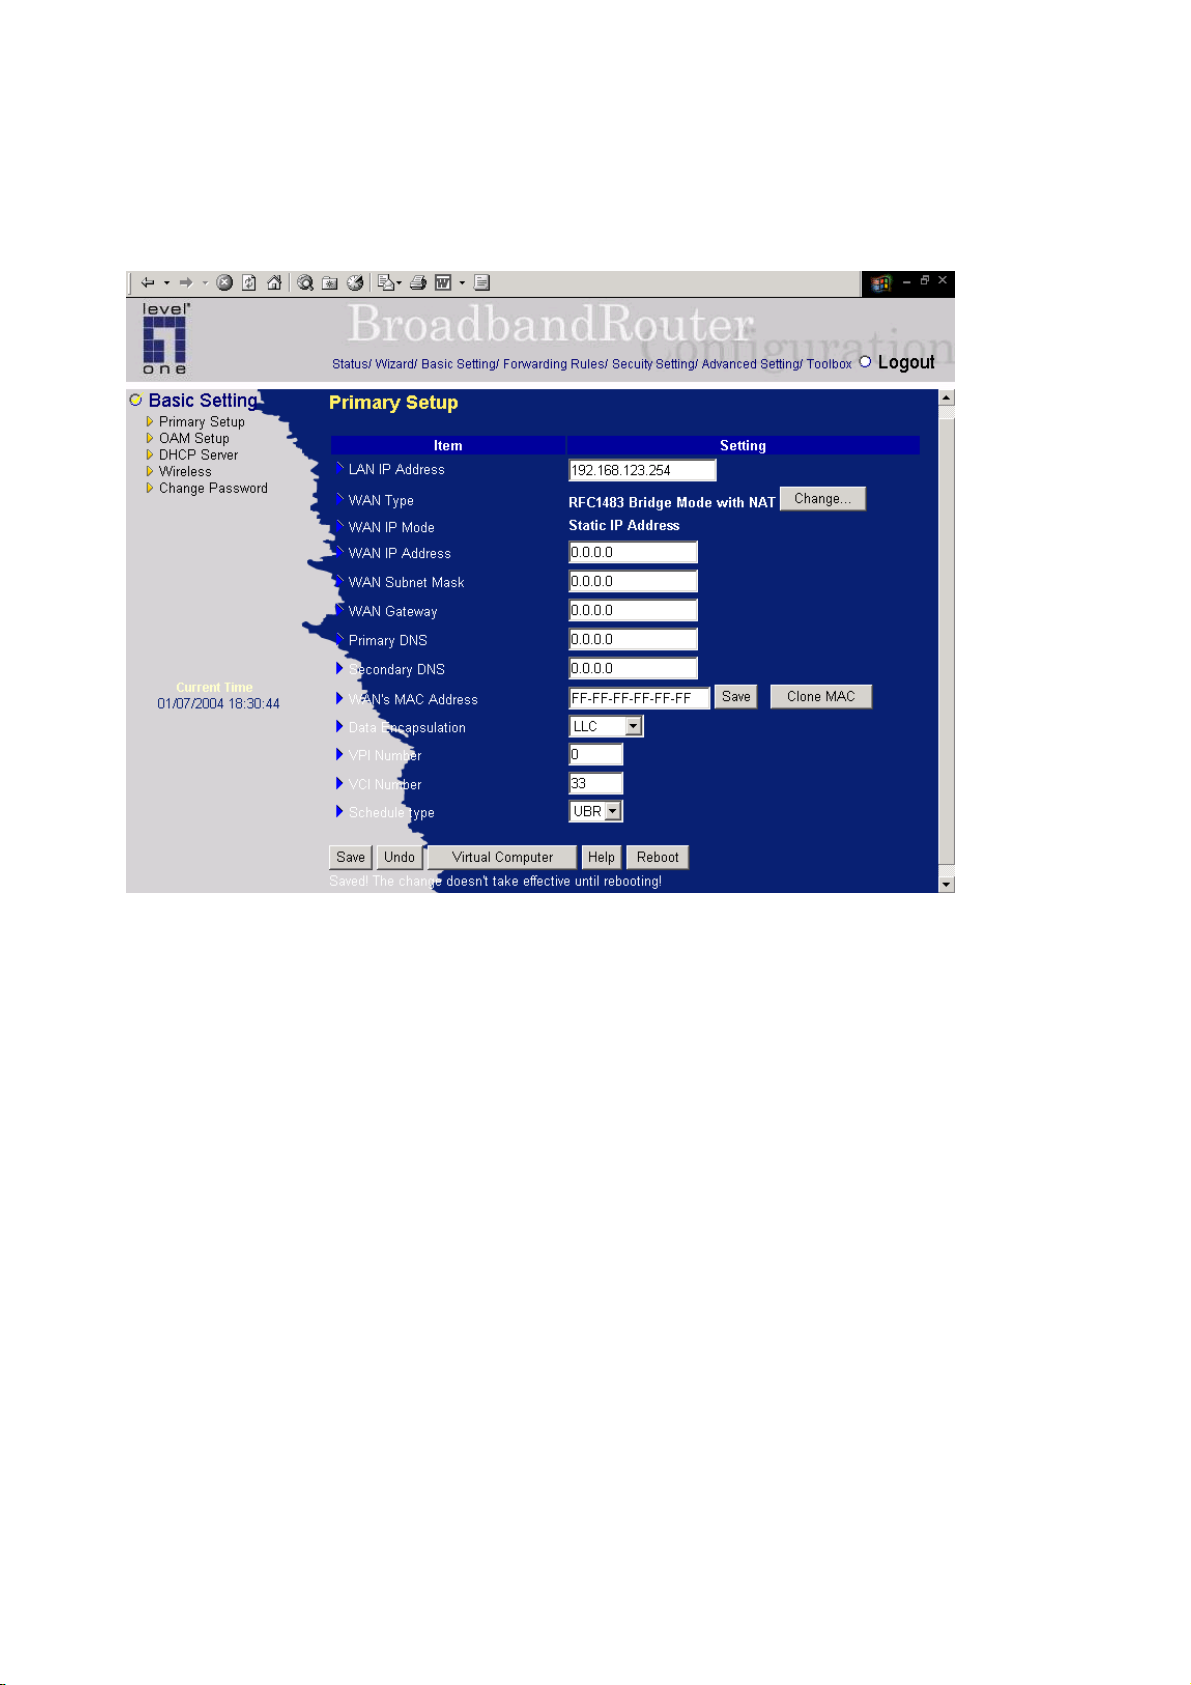
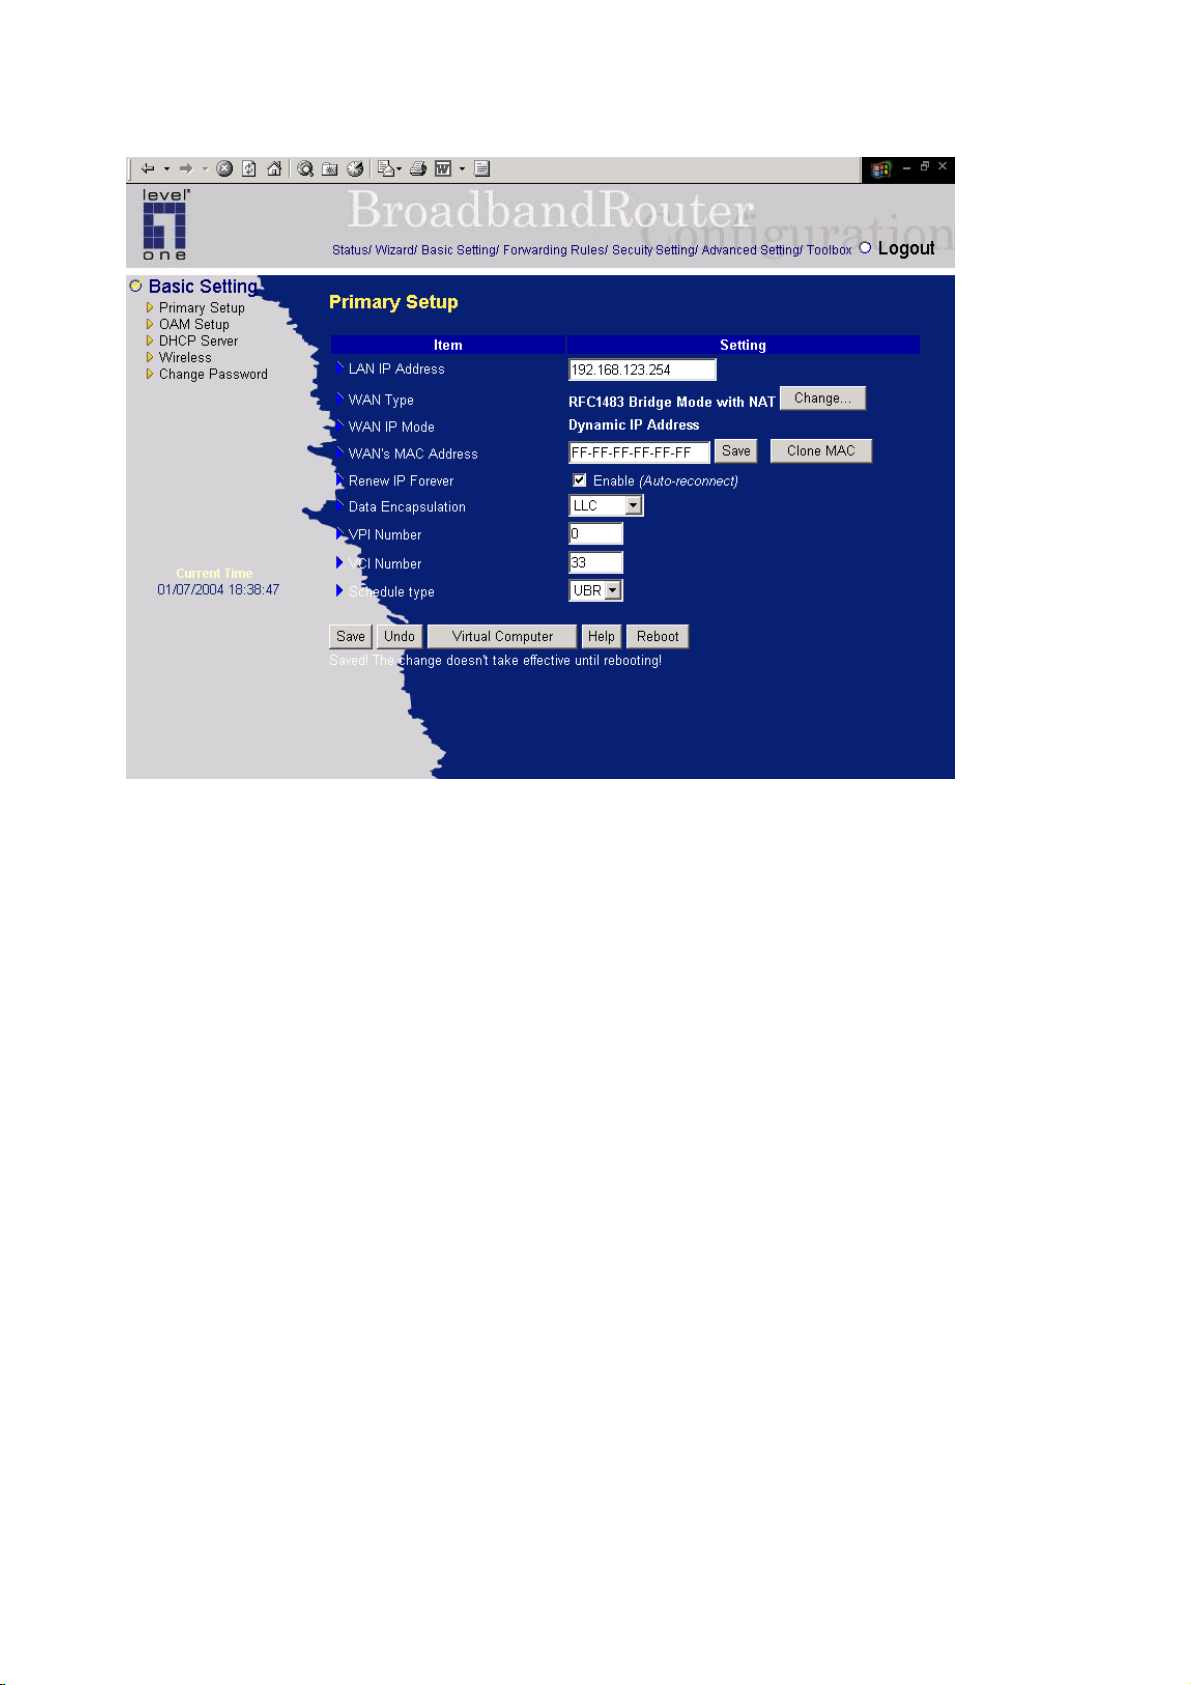
4.4.1.2 Ethernet Over ATM (RFC 1483 Bridged) with NAT
Dynamic IP Address: Obtain an IP address from ISP automatically.
Host Name: optional. Required by some ISPs, for example, @Home.
1. Renew IP Forever: this feature enables this product to renew your IP address automatically when
the lease time is expiring-- even when the system is idle.
21
Page 22
22
Page 23
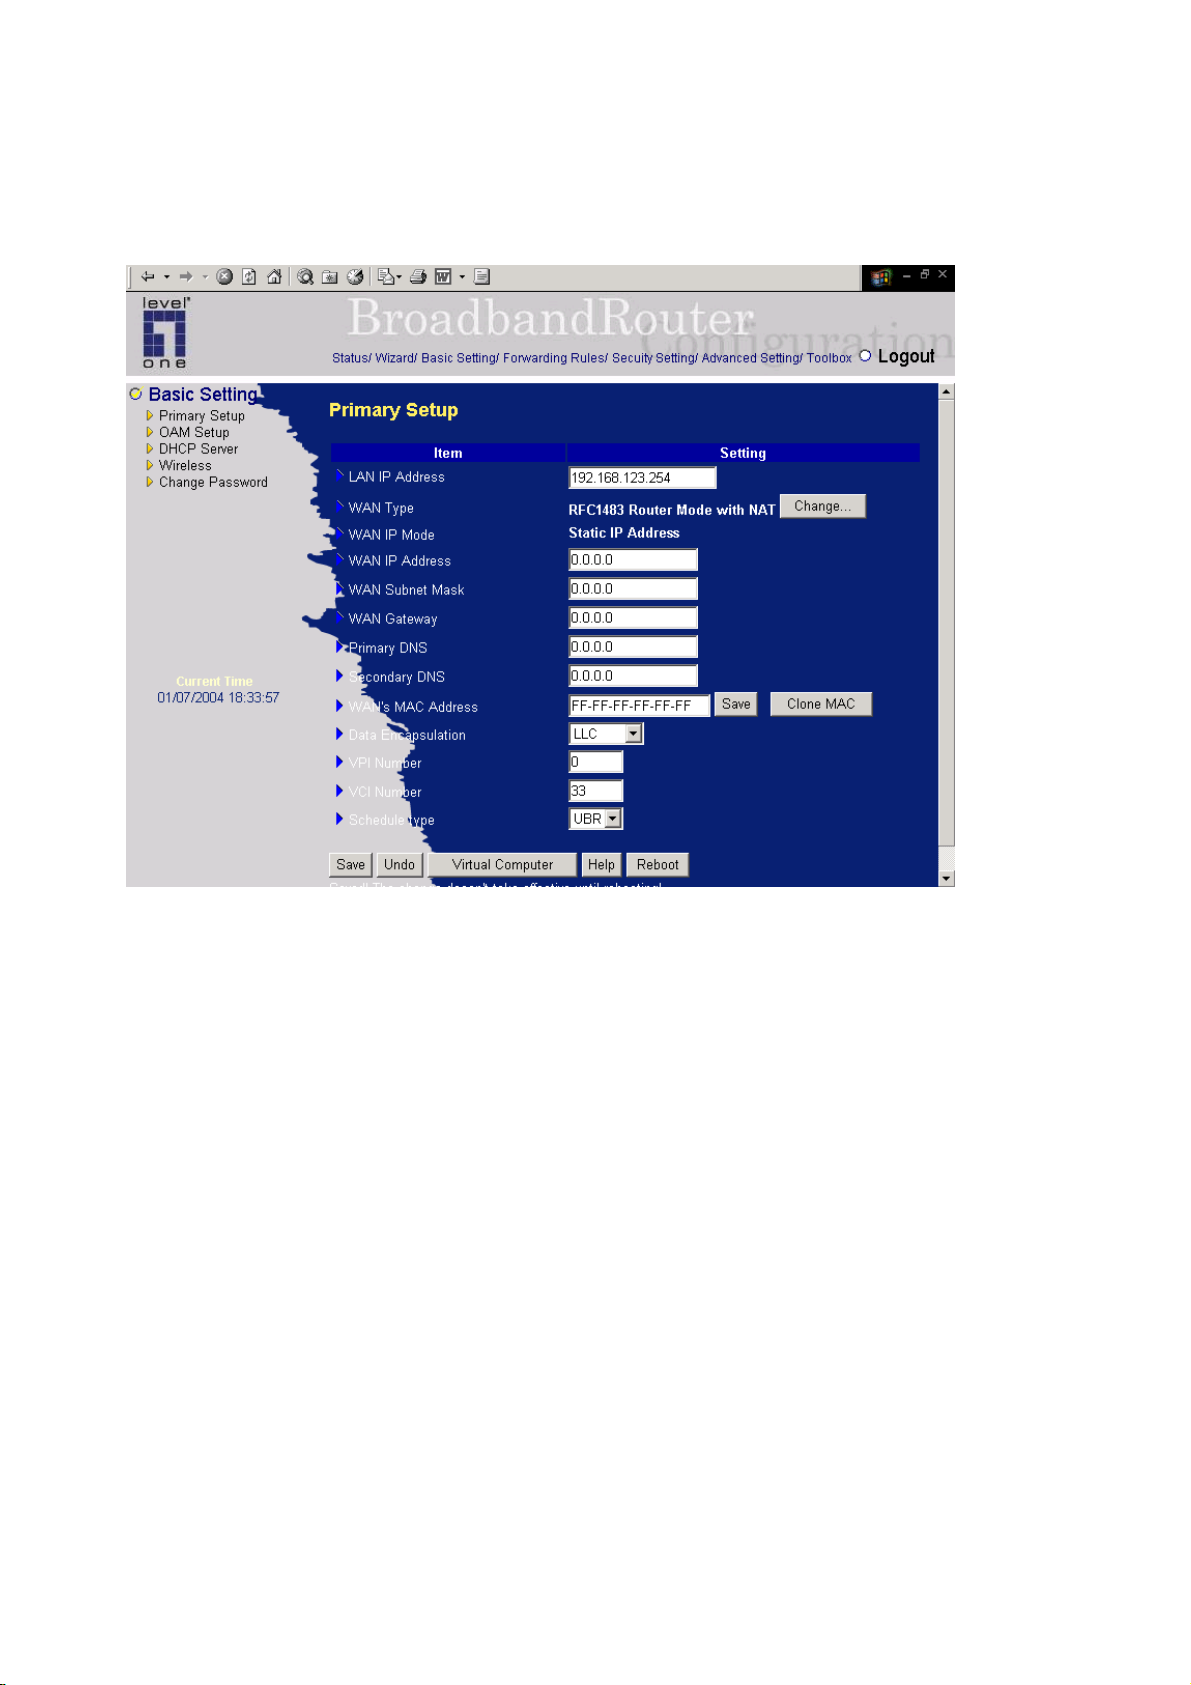
4.4.1.3 IP over ATM (RFC 1483 Routed)
In the Router Mode, NAT is always enabled. You have to set the following WAN IP settings:
WAN IP Mode:
This product supports two WAN IP modes: static and dynamic. If you select dynamic mode, it will try
to get a legal IP and WAN settings from ISP’s DHCP server. If you select static mode, you have to set
the following WAN setting manually.
WAN IP Address, WAN Subnet Mask, WAN Gateway, and Primary/Secondary DNS
These settings are assigned by your ISP.
VPI/VCI Numbers:
The channel settings provided by your ISP.
Schedule T ype:
The setting of the ADSL traffic schedule type. This device supports UBR (Un-specified bit rate) and
CBR (Constant bit rate). Once you finished the required configuration, you must click on the
"Save" button to save the configuration into Flash memory, and the reboot this device.
23
Page 24
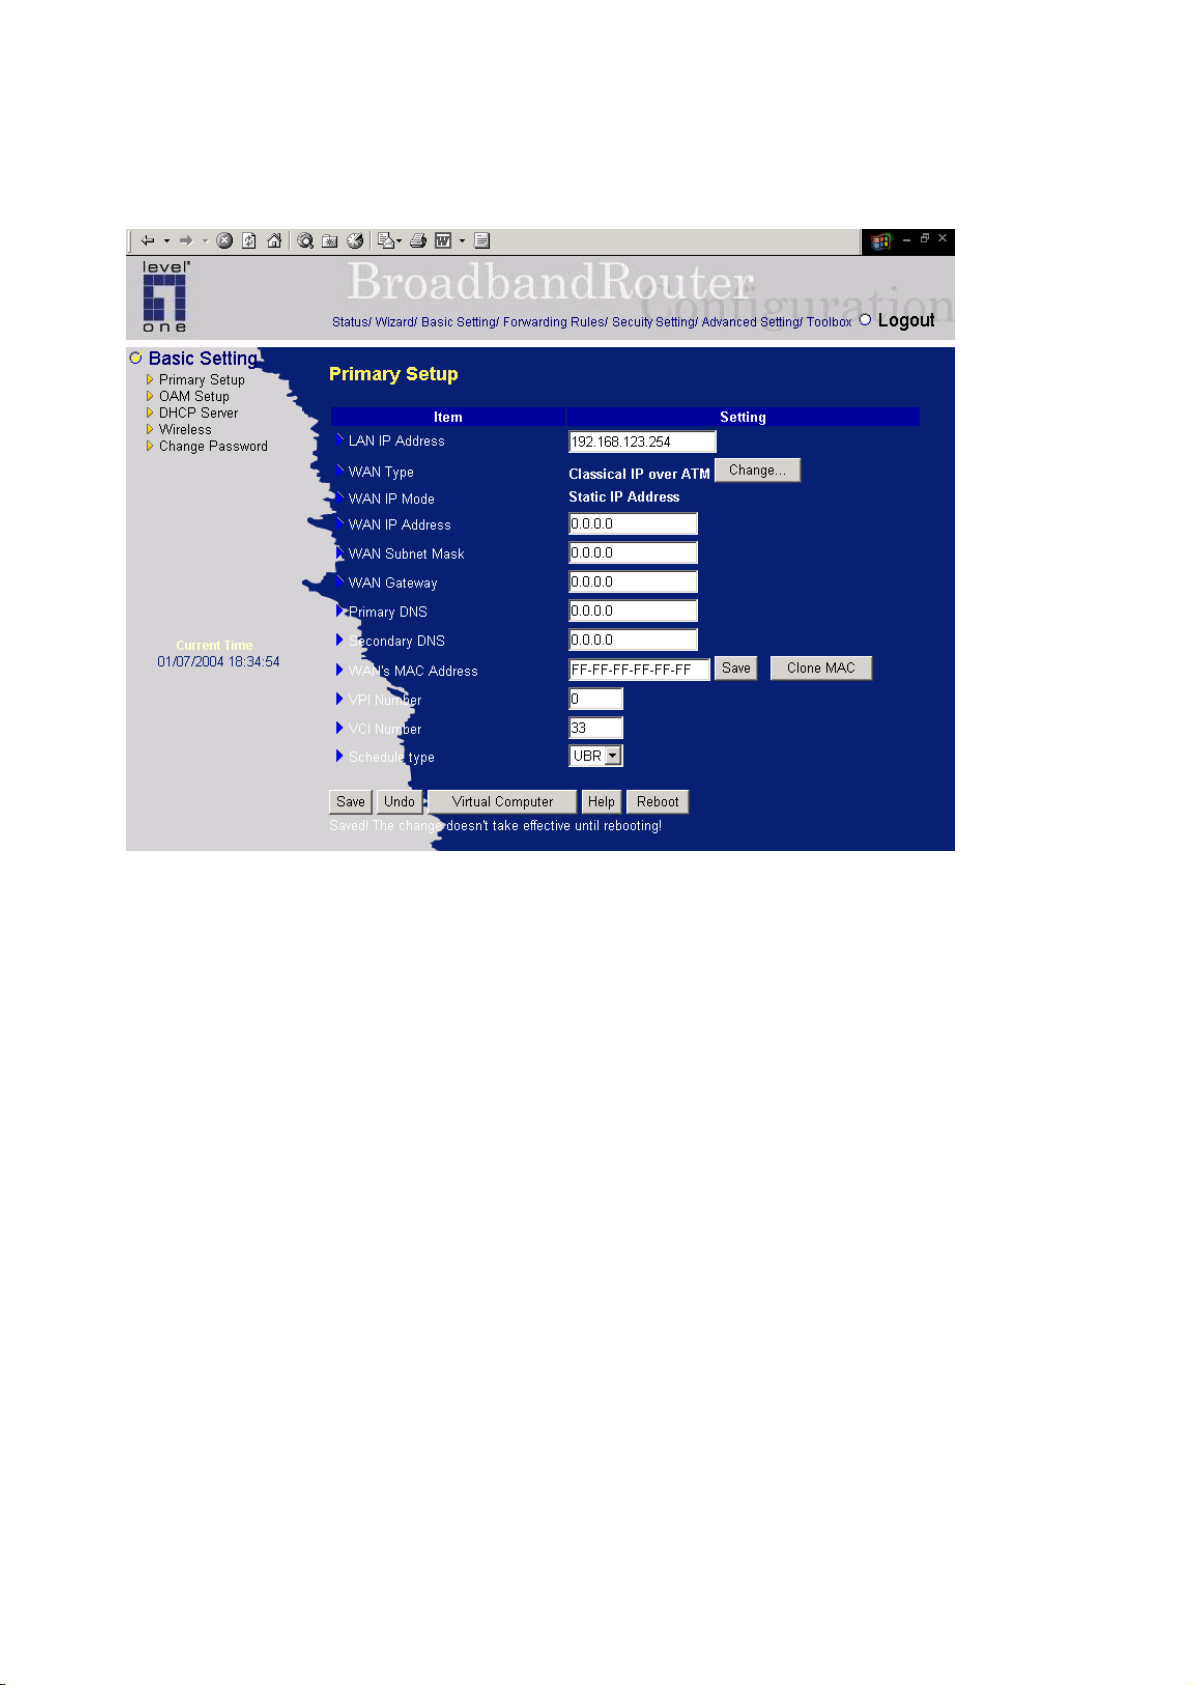
4.4.1.4 Classical IP over ATM (RFC 1577)
In the Classical IP over ATM Mode, NAT is always enabled. You have to set the following WAN IP
settings:
WAN IP Mode:
This product supports two WAN IP modes: static and dynamic. If you select dynamic mode, it will try
to get a legal IP and WAN settings from ISP’s DHCP server. If you select static mode, you have to set
the following WAN setting manually.
WAN IP Address, WAN Subnet Mask, WAN Gateway, and Primary/Secondary DNS
These settings are assigned by your ISP.
VPI/VCI Numbers:
The channel settings provided by your ISP.
Schedule T ype:
The setting of the ADSL traffic schedule type. This device supports UBR (Un-specified bit rate) and
CBR (Constant bit rate). Once you finished the required configuration , you must click on the "Save"
24
Page 25
button to save the configuration into Flash memory, and the reboot this device.
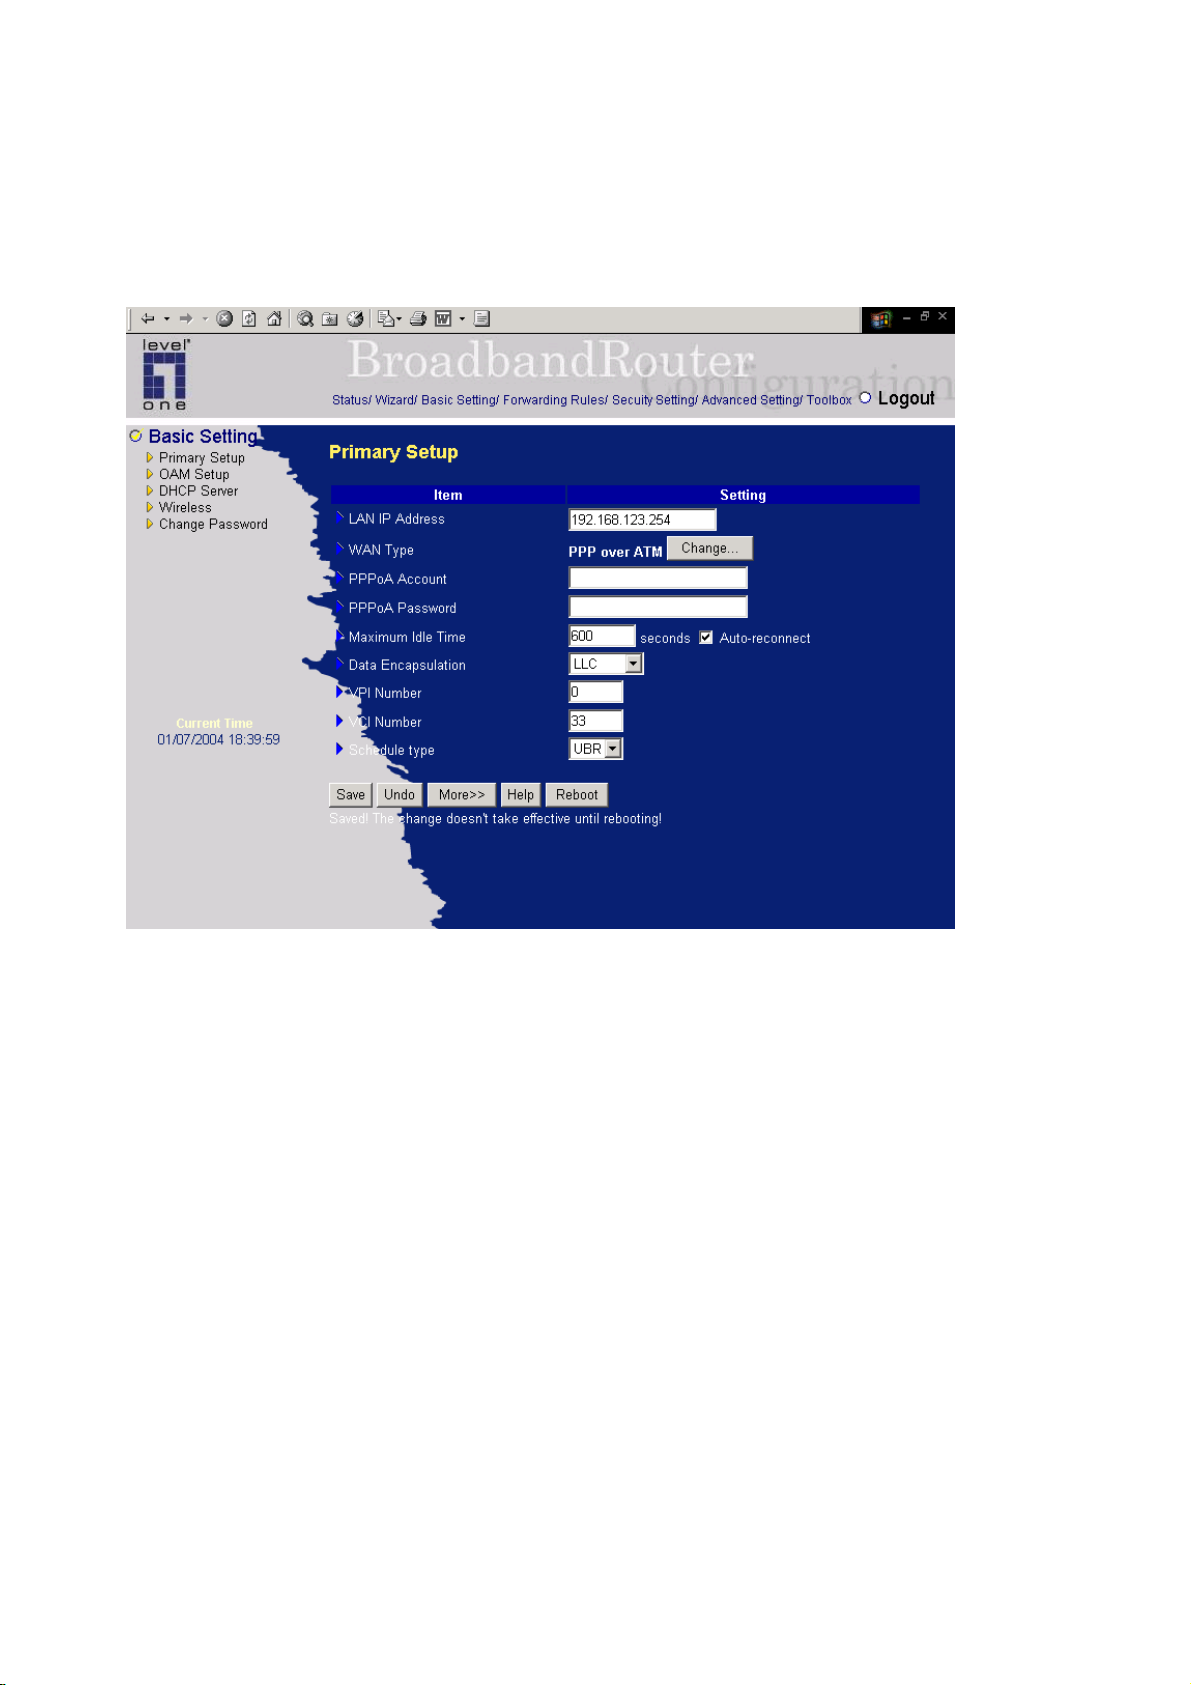
4.4.1.5 PPP over ATM (RFC 2364)
Press “More >>”
25
Page 26
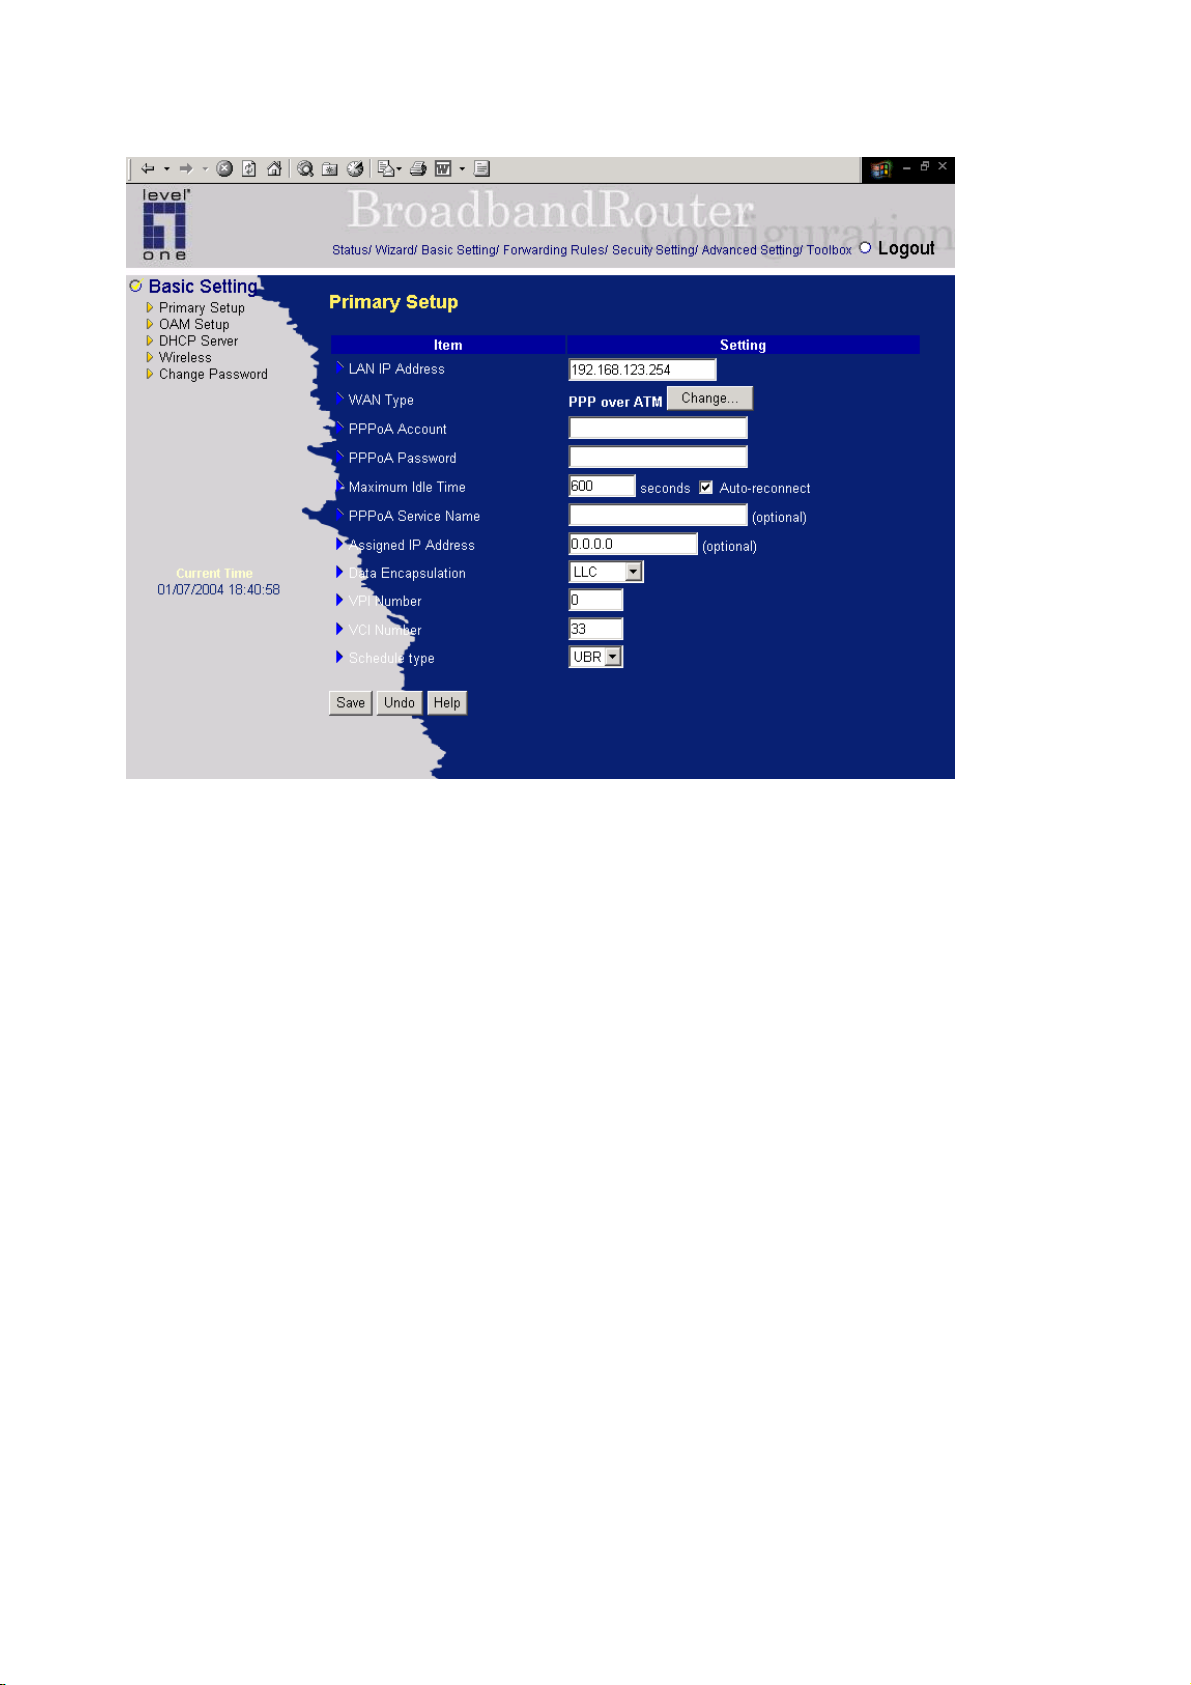
PPPoA Account/Password:
The account ID & password provided by your ISP.
Maximum Idle Time:
The time of no activity disconnect to your PPPoA session. You can also set it to zero or enable
Auto-reconnect to disable this feature. If Auto-reconnect is enabled, this product will automatically
connect to ISP after system is restarted or connection is dropped.
VPI/VCI Numbers:
The channel settings provided by your ISP.
Schedule T ype:
The setting of the ADSL traffic schedule type. This device supports UBR (Un-specified bit rate) and
CBR (Constant bit rate).
PPPoA Service Name:
Optional. Input the service name if your ISP requires it.
Assigned IP Address:
Optional. Required by some ISPs. Once you finished the required configuration, you must click on the
26
Page 27
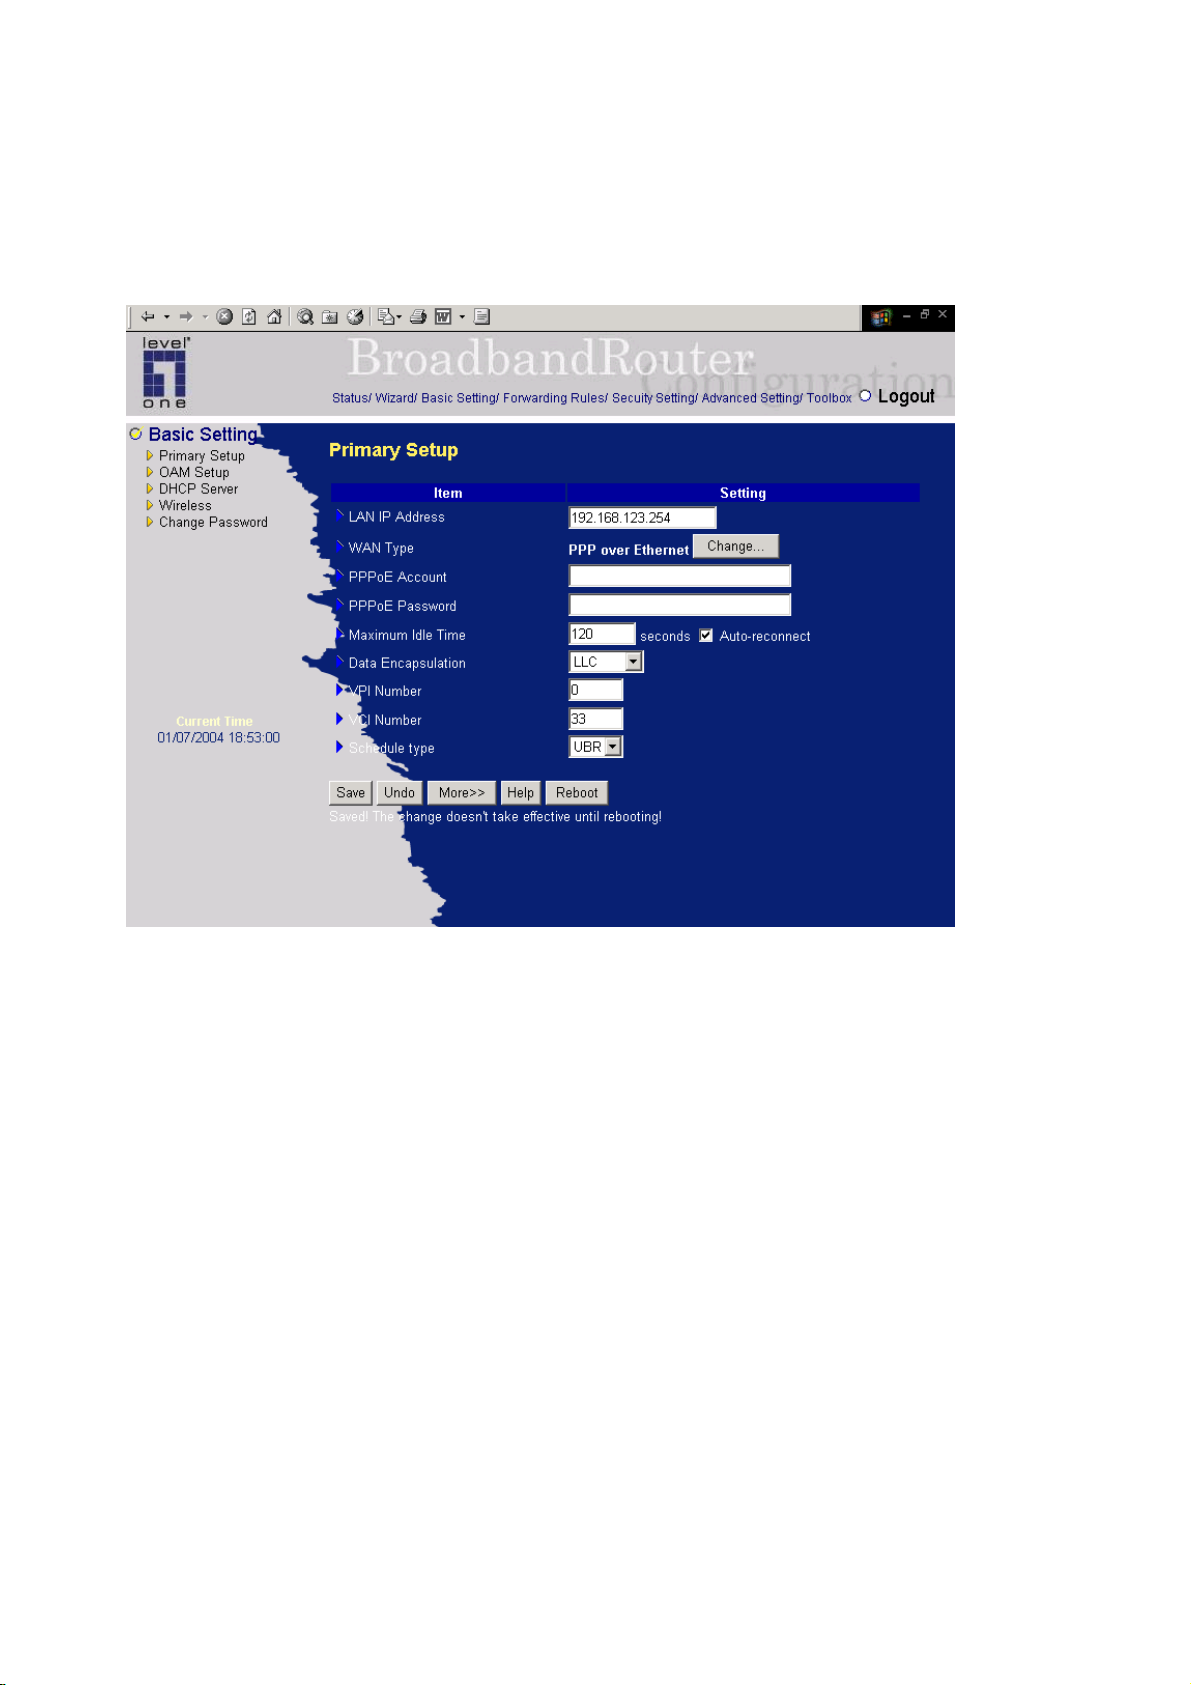
"Save" button to save the configuration into Flash memory, and the reboot this device.
4.4.1.6 PPP over Ethernet (RFC 2516)
PPPoE Account/Password:
The account ID & password provided by your ISP.
Maximum Idle Time:
The time of no activity disconnect to your PPPoE session. You can also set it to zero or enable
Auto-reconnect to disable this feature. If Auto-reconnect is enabled, this product will automatically
connect to ISP after system is restarted or connection is dropped.
VPI/VCI Numbers:
The channel settings provided by your ISP.
Schedule T ype:
The setting of the ADSL traffic schedule type. This device supports UBR (Un-specified bit rate) and
CBR (Constant bit rate).
27
Page 28
PPPoE Service Name:
Optional. Input the service name if your ISP requires it.
Assigned IP Address:
Optional. Required by some ISPs. Once you finished the required configuration, you must click on the
"Save" button to save the configuration into Flash memory, and the reboot this device.
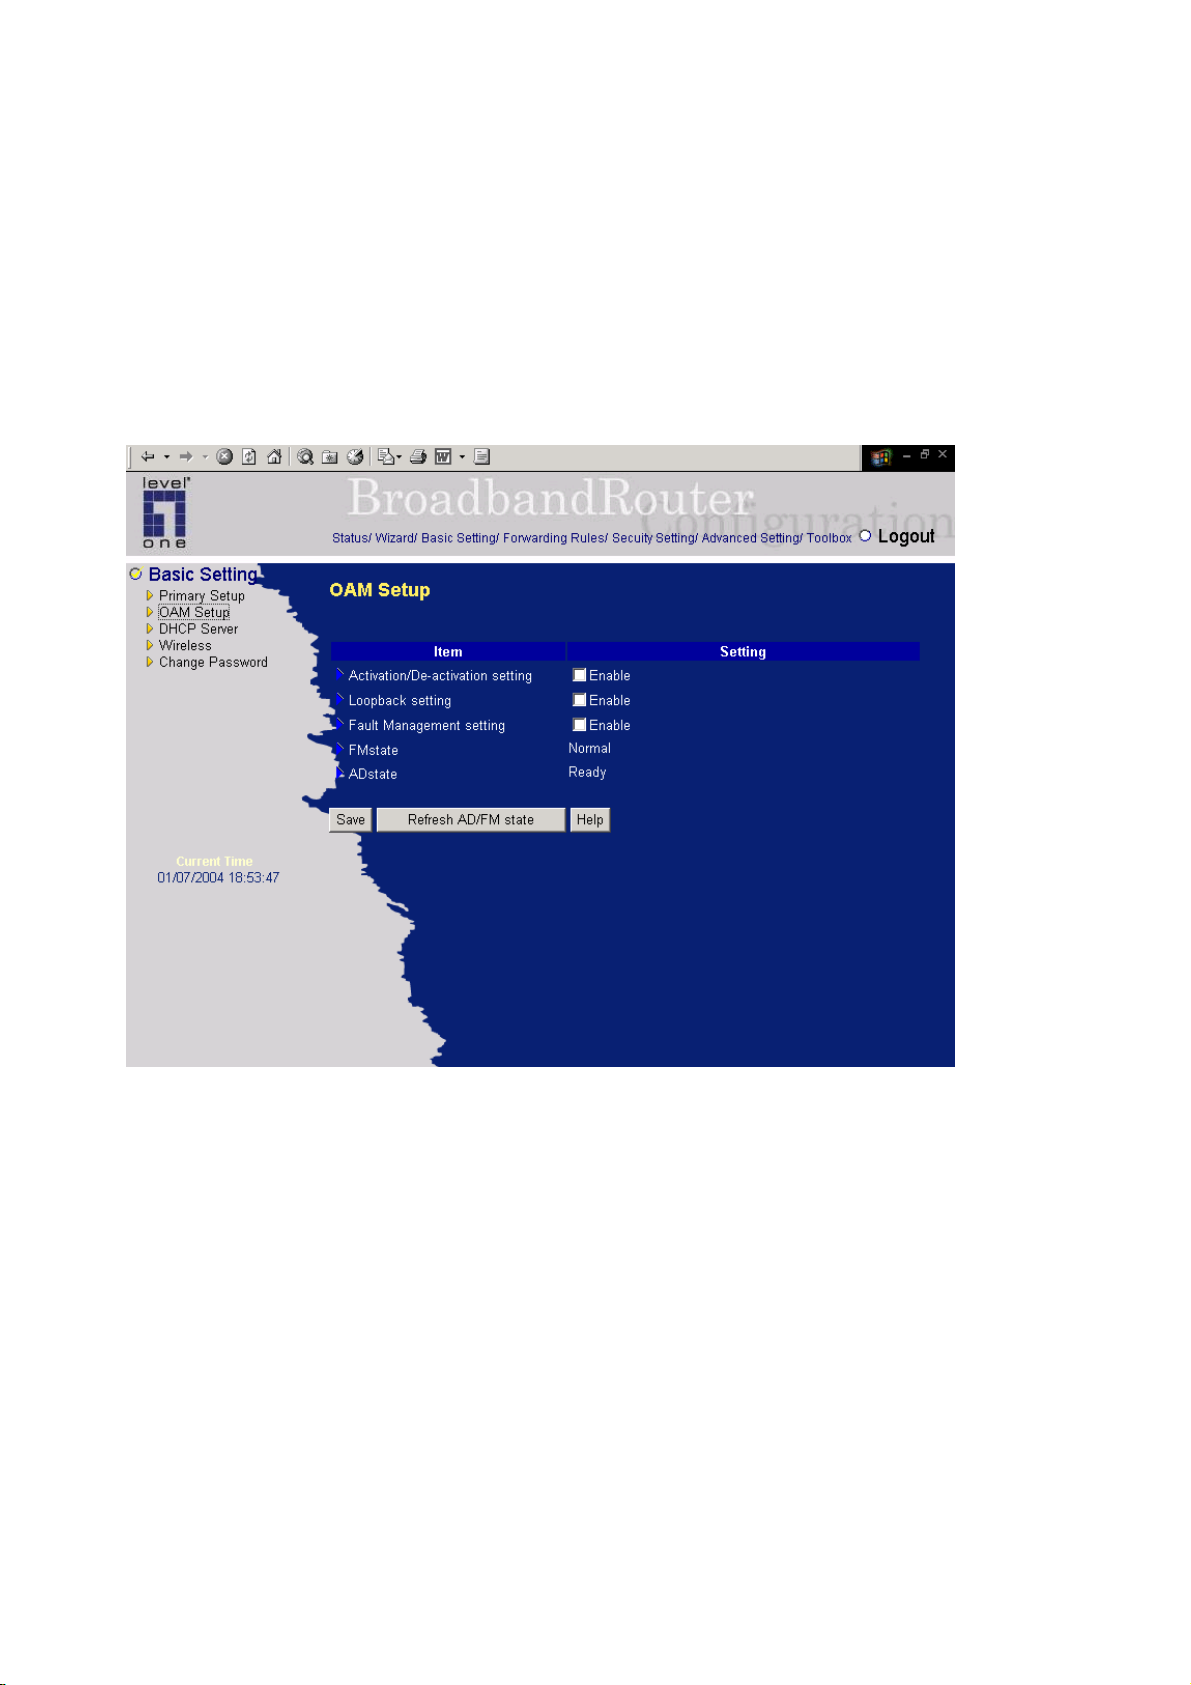
4.4.2 OAM Server
In this page, you can set the OAM feature for virtual channel.
First click on the Enable or Disable circle for the settings of OAM Function, Activation/De-activation,
Loopback, and Fault Management individually.
Then, click on the "Save" button to finish the configuration of the selected session.
Once you set the appropriate OAM settings on virtual channel, you can see the corresponding
up-to-date maintenance status by clicking the "Refresh AD/FM State" button in this page.
28
Page 29
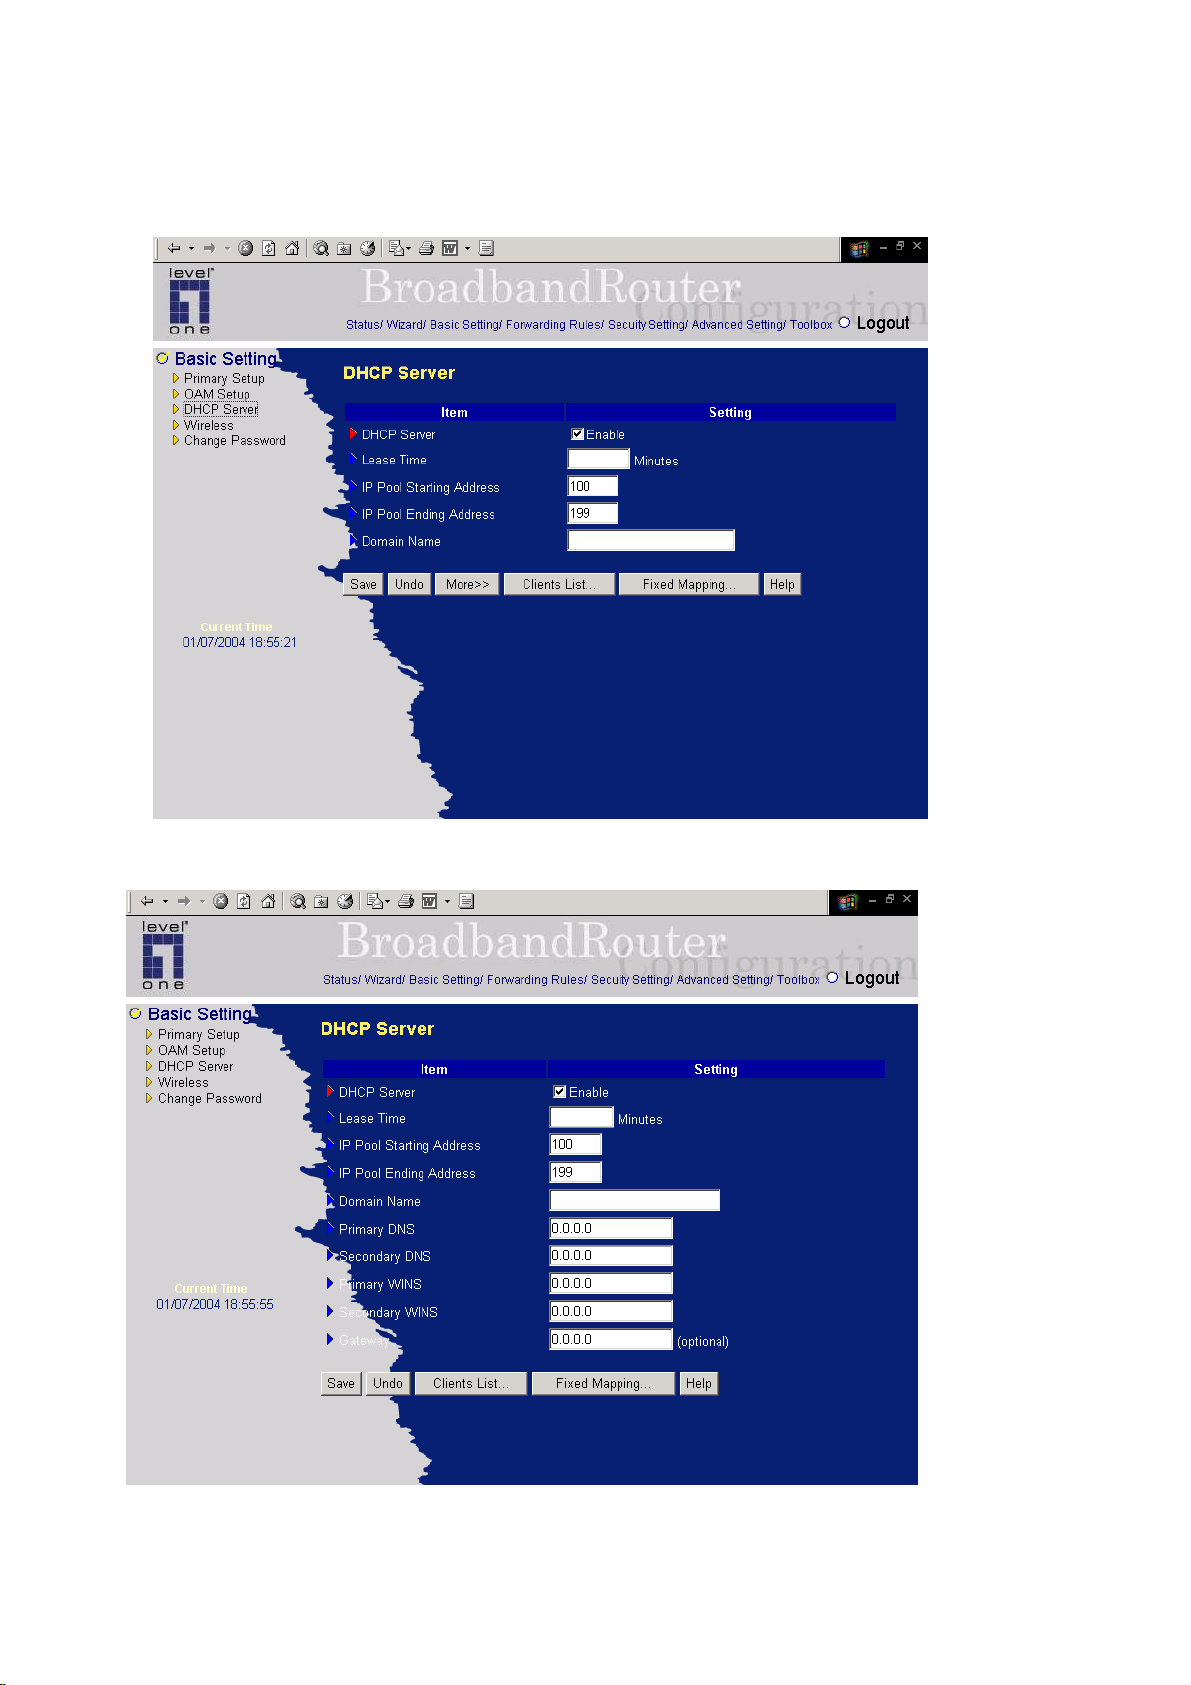
4.4.3 DHCP Server
Press “More”
The settings of a TCP/IP environment include host IP, Subnet Mask, Gateway, and DNS configurations.
29
Page 30
It is not easy to manually configure all the computers and devices in your network. Fortunately, DHCP
Server provides a rather simple approach to handle all these settings. This product supports the
function of DHCP server. If you enable this product’s DHCP server and configure your computers as
“automatic IP allocation” mode, then when your computer is powered on, it will automatically load the
proper TCP/IP settings from this product. The settings of DHCP server include the following items:
1. DHCP Server: Choose “Disable” or “Enable.”
2. Lease Time: this feature allows you to configure IP’s lease time (DHCP client).
3. IP pool starting Address/ IP pool starting Address: Whenever there is a request, the DHCP
server will automatically allocate an unused IP address from the IP address pool to the
requesting computer. You must specify the starting and ending address of the IP address pool .
4. Domain Name: Optional, this information will be passed to the client.
5. Primary DNS/Secondary DNS: This feature allows you to assign DNS Servers
6. Primary WINS/Secondary WINS: This feature allows you to assign WINS Servers
7. Gateway: The Gateway Address would be the IP address of an alternate Gateway.
This function enables you to assign another gateway to your PC, when DHCP
server offers an IP to your PC.
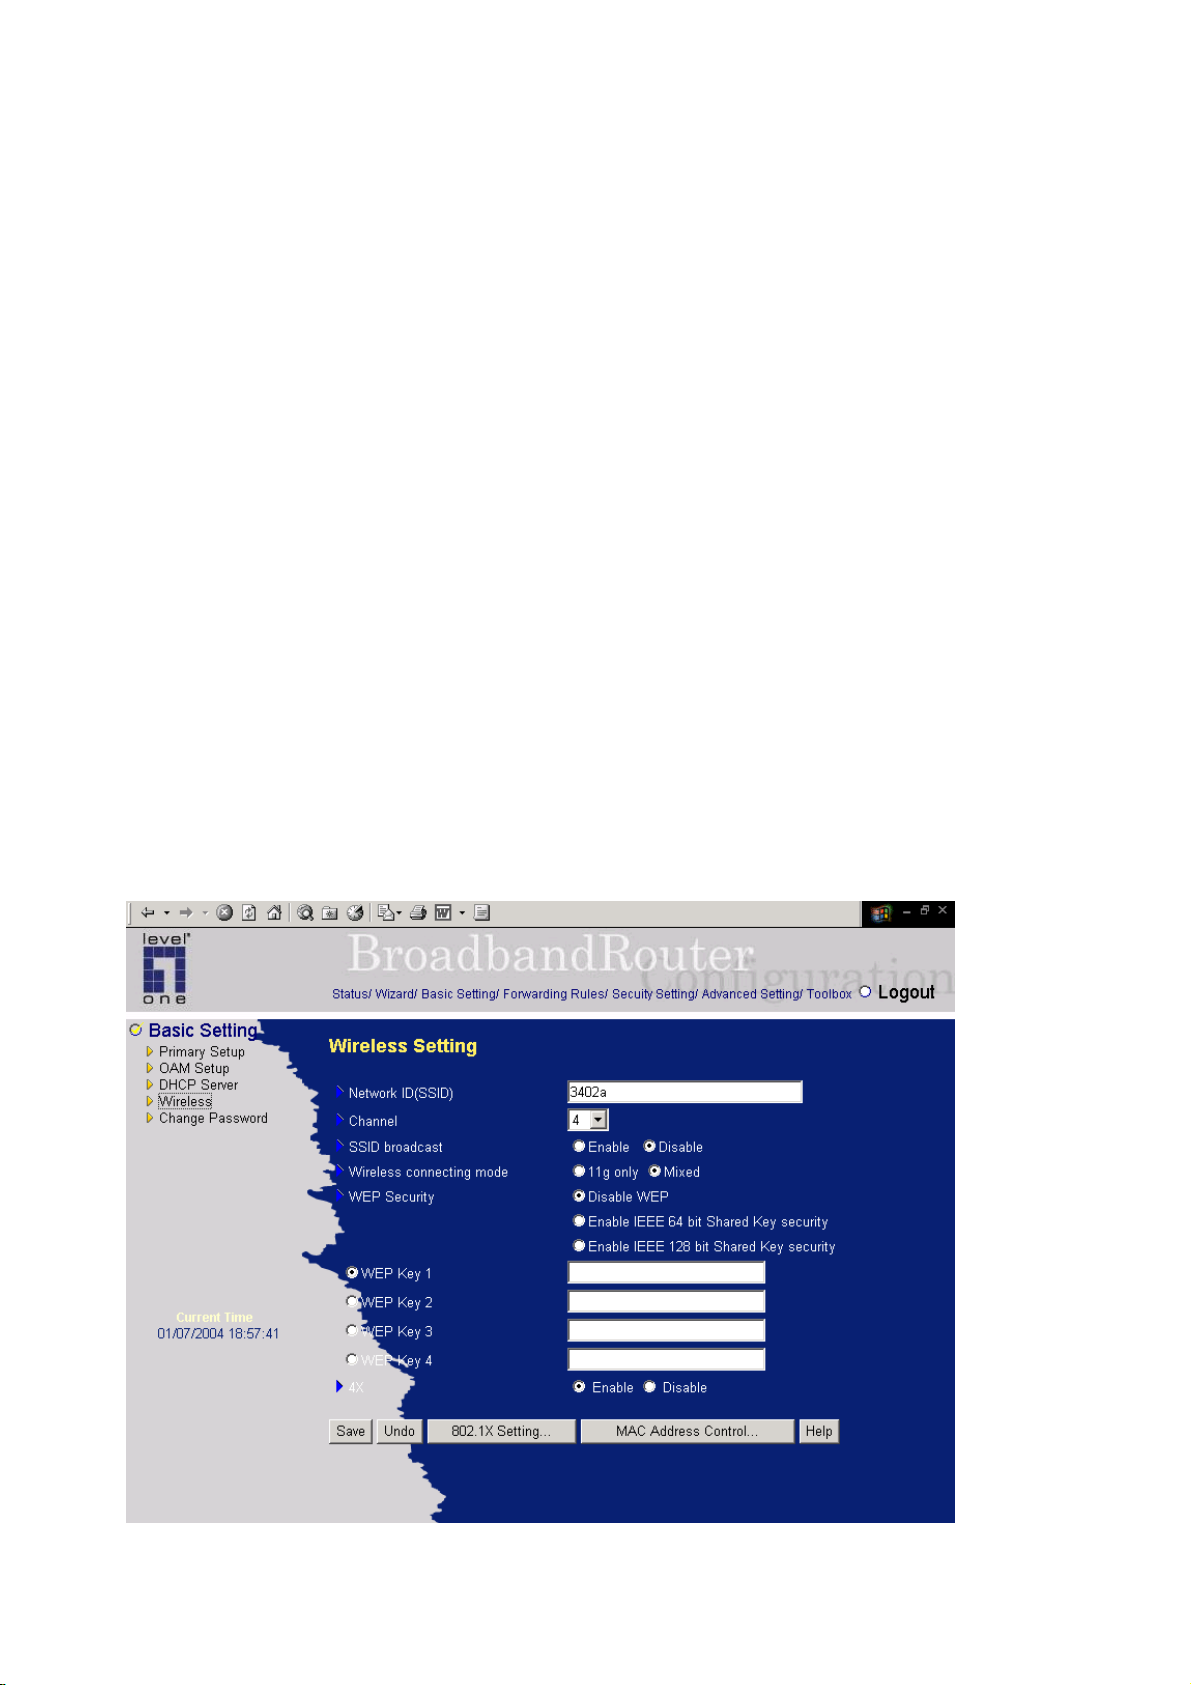
4.4.4 Wireless Setting, and 802.1X setting
30
Page 31

Wireless settings allow you to set the wireless configuration items.
1. Network ID(SSID): Network ID is used for identifying the Wireless LAN (WLAN). Client
stations can roam freely over this product and other Access Points that have the same Network ID.
(The factory setting is “default”)
2. Channel: The radio channel number . The permissible channels depend on the Regulatory Domain.
The factory setting is as follow: channel 6 for North America; channel 7 for European (ETSI);
channel 7 for Japan.
3. SSID Broadcast: Enable or disable SSID via this option.
4. Wireless Connecting Mode: Choose your Connecting Mode. Mixed Mode allows 11Mbps or
54Mbps wireless adapter connection. 11g only mode only allows the connection from 54Mbps
wireless adapter and will refuse the connection from 11 Mbps wireless adapter.
5. WEP Security: Select the data privacy algorithm you want. Enabling the security can protect your
data while it is transferred from one station to another. The standardized IEEE 802.11 WEP (128
or 64-bit) is used here.
6. WEP Key 1, 2, 3 & 4: When you enable the 128 or 64 bit WEP key security, please select one
WEP key to be used and input 26 or 10 hexdecimal (0, 1, 2…8, 9, A, B…F) digits.
7. Pass-phrase Generator: Since hexadecimal characters are not easily
remembered, this device offers a conversion utility to convert a simple
word or phrase into hex.
6. 802.1X Setting
802.1X
CheckBox was used to switch the function of the 802.1X. When the 802.1X function is enable, the
Wireless user must authenticate to this router first to use the Network service.
RADIUS Server
IP address or the 802.1X server’s domain-name.
RADIUS Shared Key
Key value shared by the RADIUS server and this router. This key value is consistent with the key
value in the RADIUS server.
31
Page 32
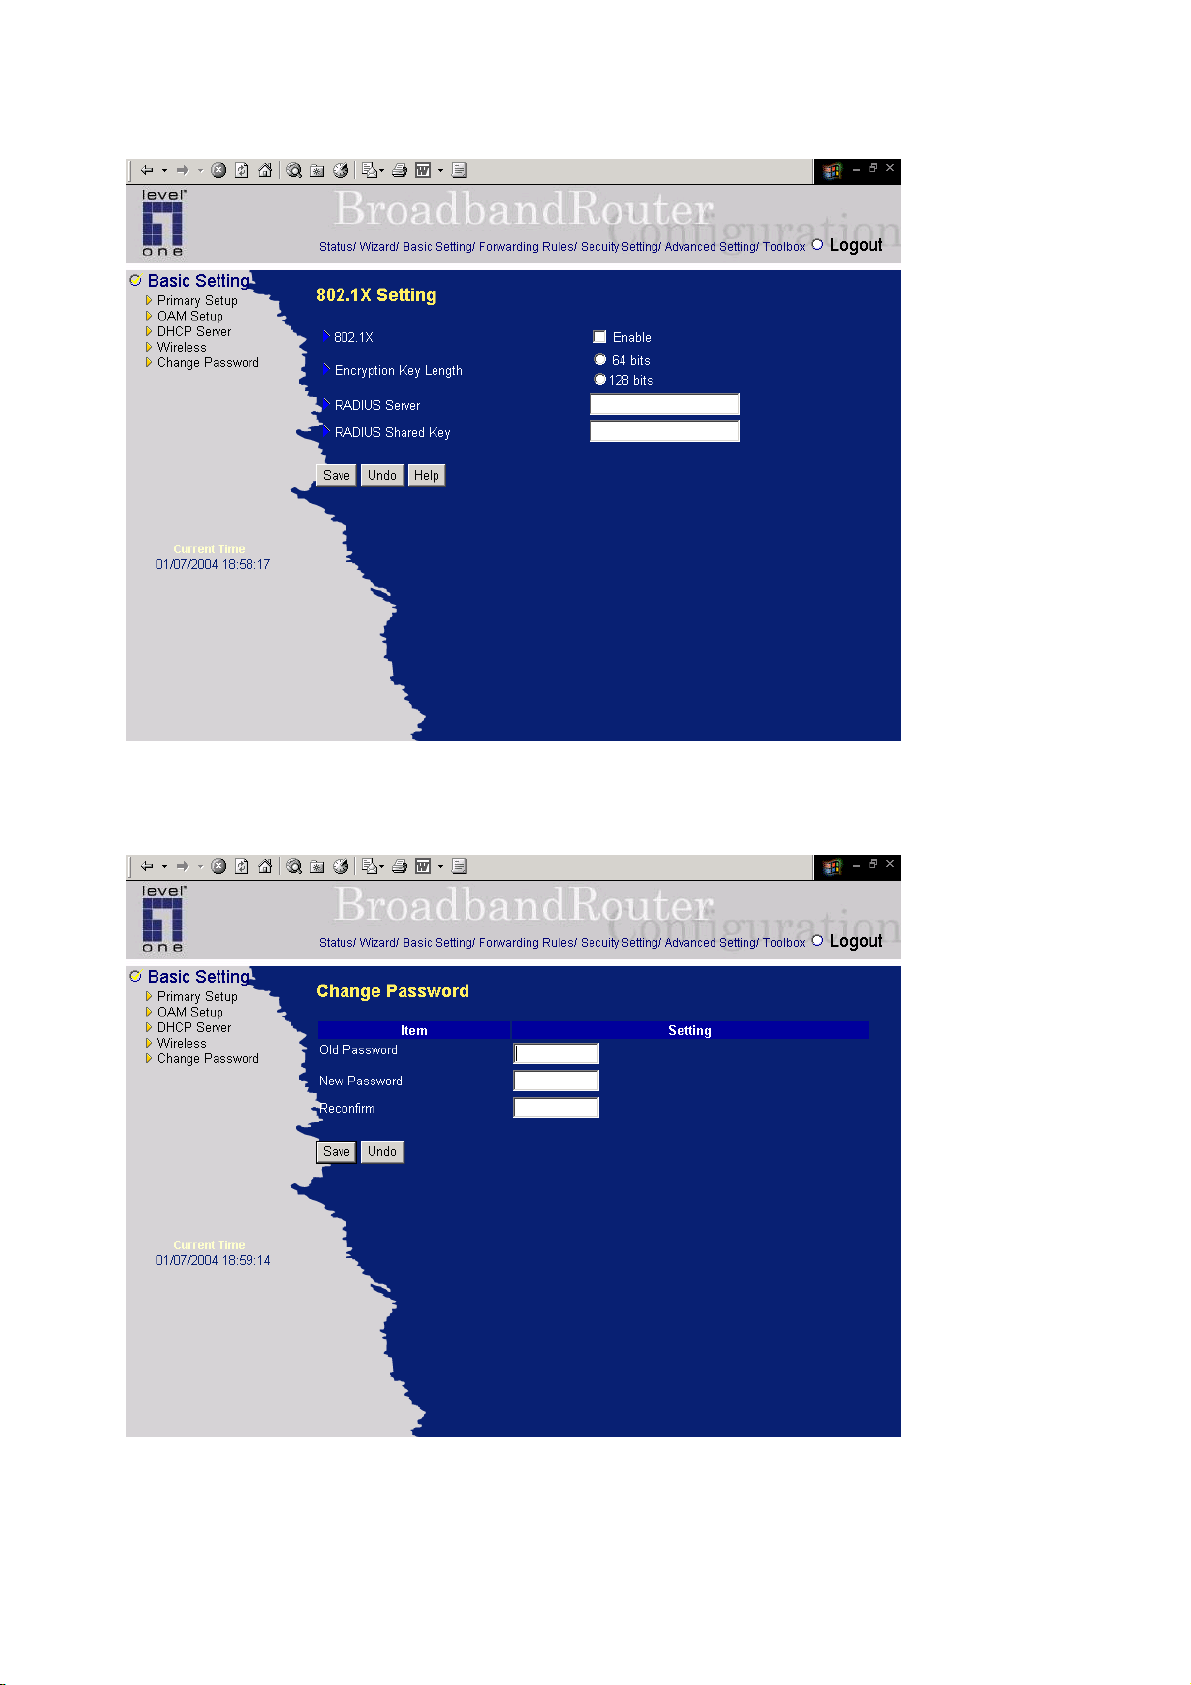
4.4.5 Change Password
You can change Password here. We strongly recommend you to change the system password for
security reason.
32
Page 33
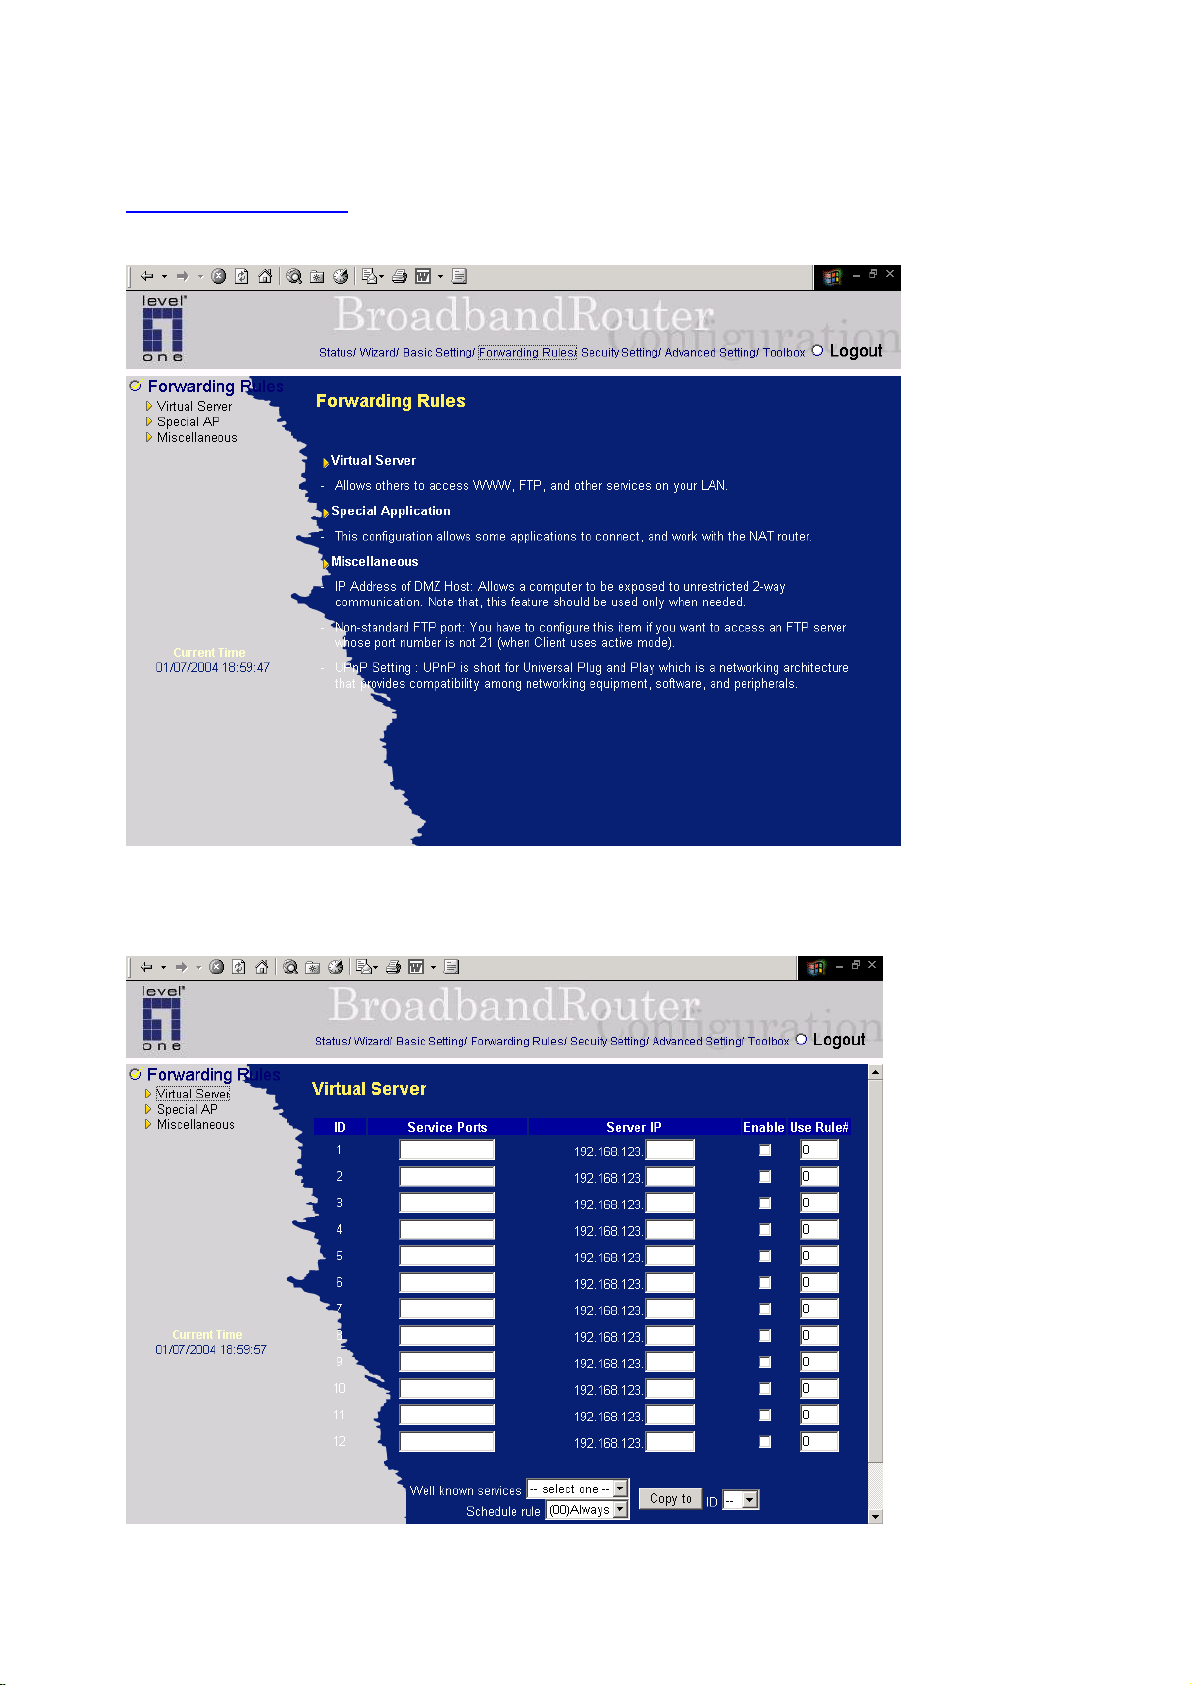
4.5 Forwarding Rules
4.5.1 Virtual Server
33
Page 34

This product’s NAT firewall filters out unrecognized packets to protect your Intranet, so all hosts
behind this product are invisible to the outside world. If you wish, you can make some of them
accessible by enabling the Virtual Server Mapping.
A virtual server is defined as a Service Port, and all requests to this port will be redirected to the
computer specified by the Server IP. Virtual Server can work with Scheduling Rules, and give
user more flexibility on Access control. For Detail, please refer to Scheduling Rule.
For example, if you have an FTP server (port 21) at 192.168.123.1, a Web server (port 80) at
192.168.123.2, and a VPN server at 192.168.123.6, then you need to specify the following virtual
server mapping table:
Service Port Server IP Enable
21 192.168.123.1 V
80 192.168.123.2 V
1723 192.168.123.6 V
34
Page 35
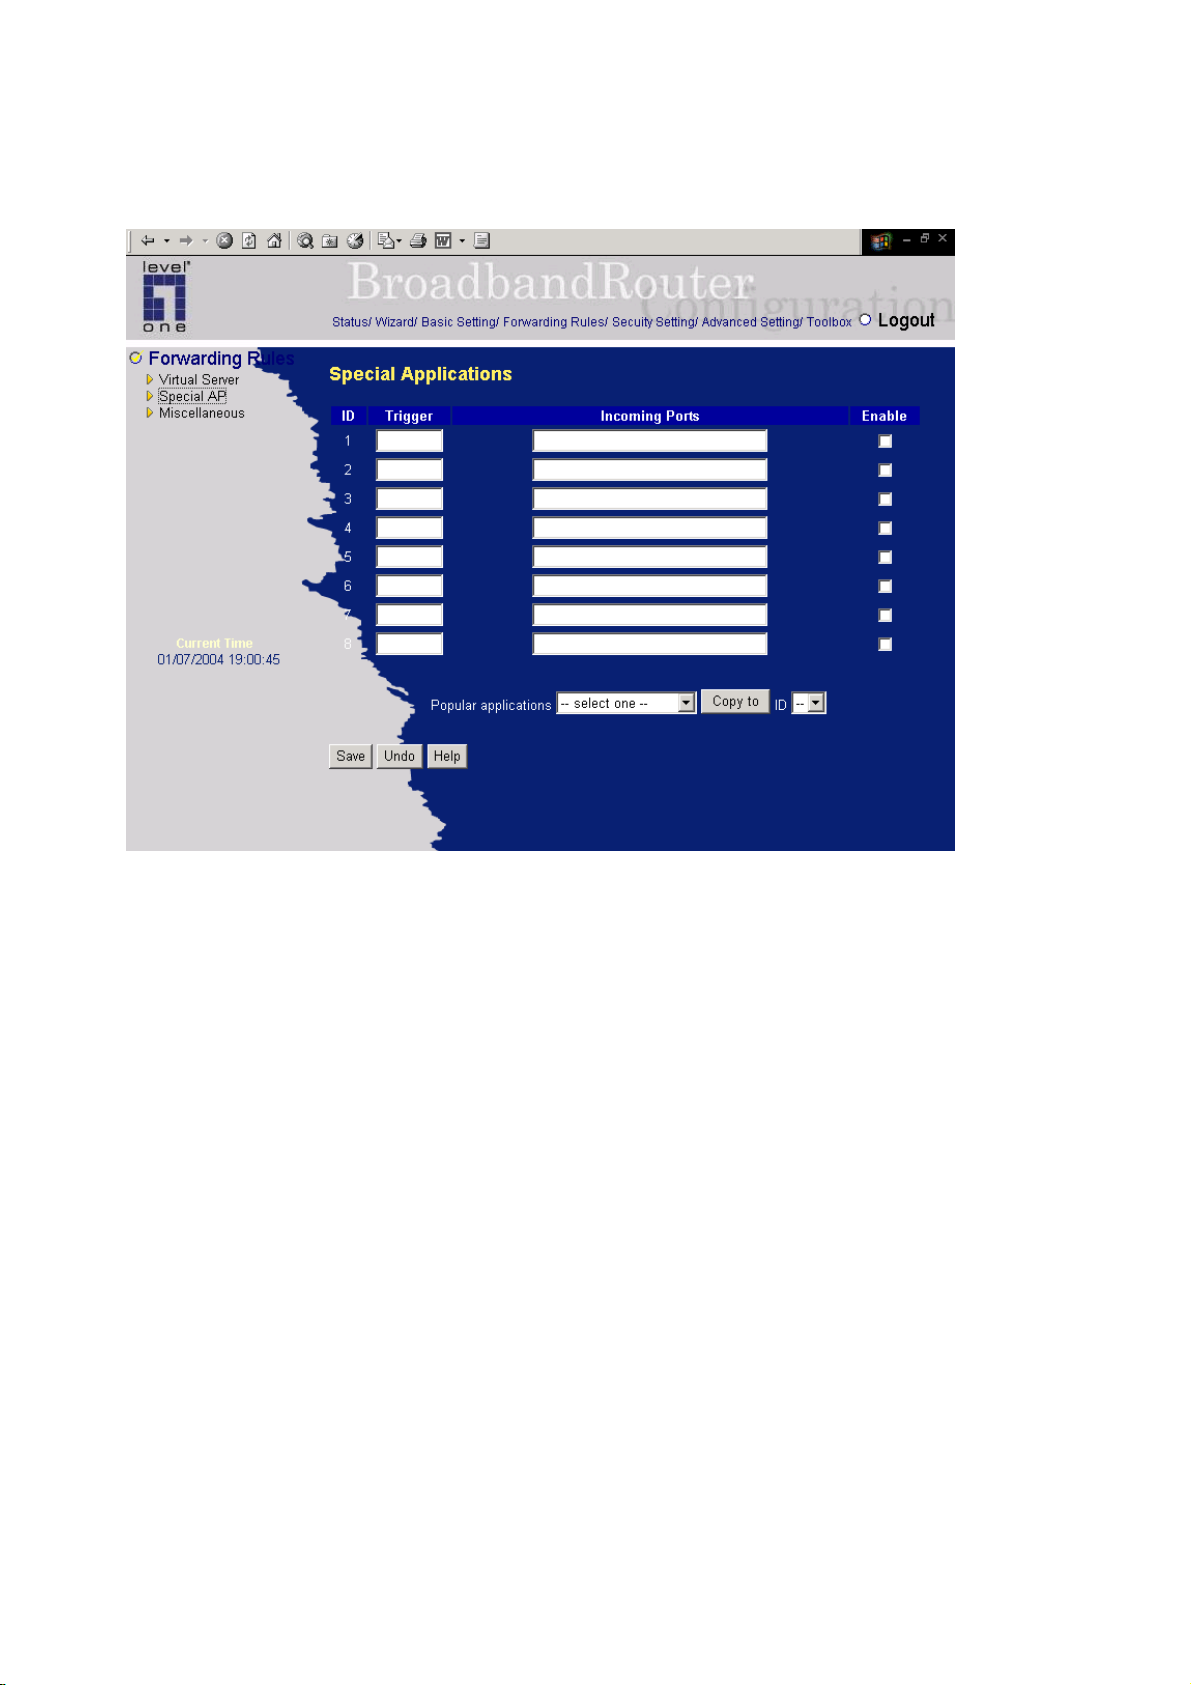
4.5.2 Special AP
Some applications require multiple connections, like Internet games, Video conferencing, Internet
telephony, etc. Because of the firewall function, these applications cannot work with a pure NAT router.
The Special Applications feature allows some of these applications to work with this product. If the
mechanism of Special Applications fails to make an application work, try setting your computer as the
DMZ host instead.
1. Trigger: the outbound port number issued by the application..
2. Incoming Ports: when the trigger packet is detected, the inbound packets sent to the specified
port numbers are allowed to pass through the firewall.
This product provides some predefined settings Select your application and click Copy to to ad d the
predefined setting to your list.
Note! At any given time, only one PC can use each Special Application tunnel.
35
Page 36
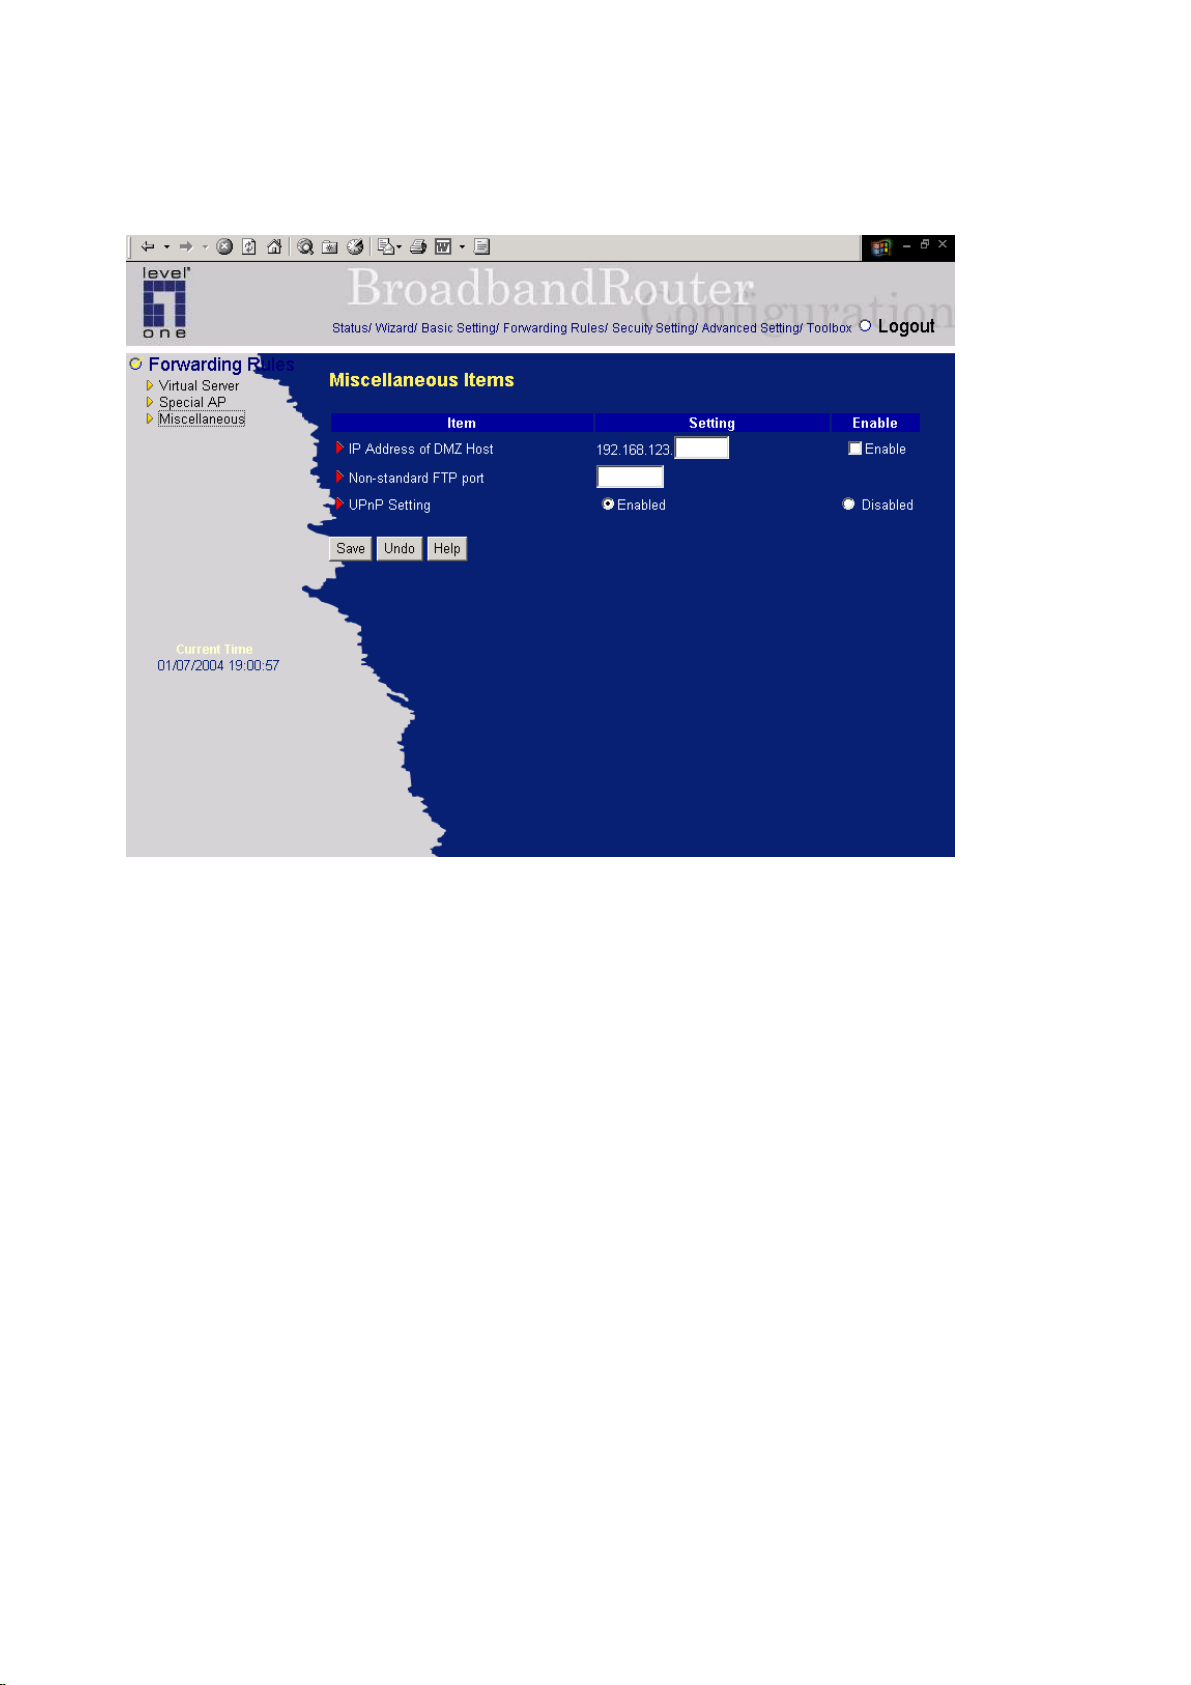
4.5.3 Miscellaneous Items
IP Address of DMZ Host
DMZ (DeMilitarized Zone) Host is a host without the protection of firewall. It allows a computer to be
exposed to unrestricted 2-way communication for Internet games, Video conferencing, Internet
telephony and other special applications.
NOTE: This feature should be used only when needed.
Non-standard FTP port
You have to configure this item if you want to access an FTP server whose port number is not 21. This
setting will be lost after rebooting.
36
Page 37
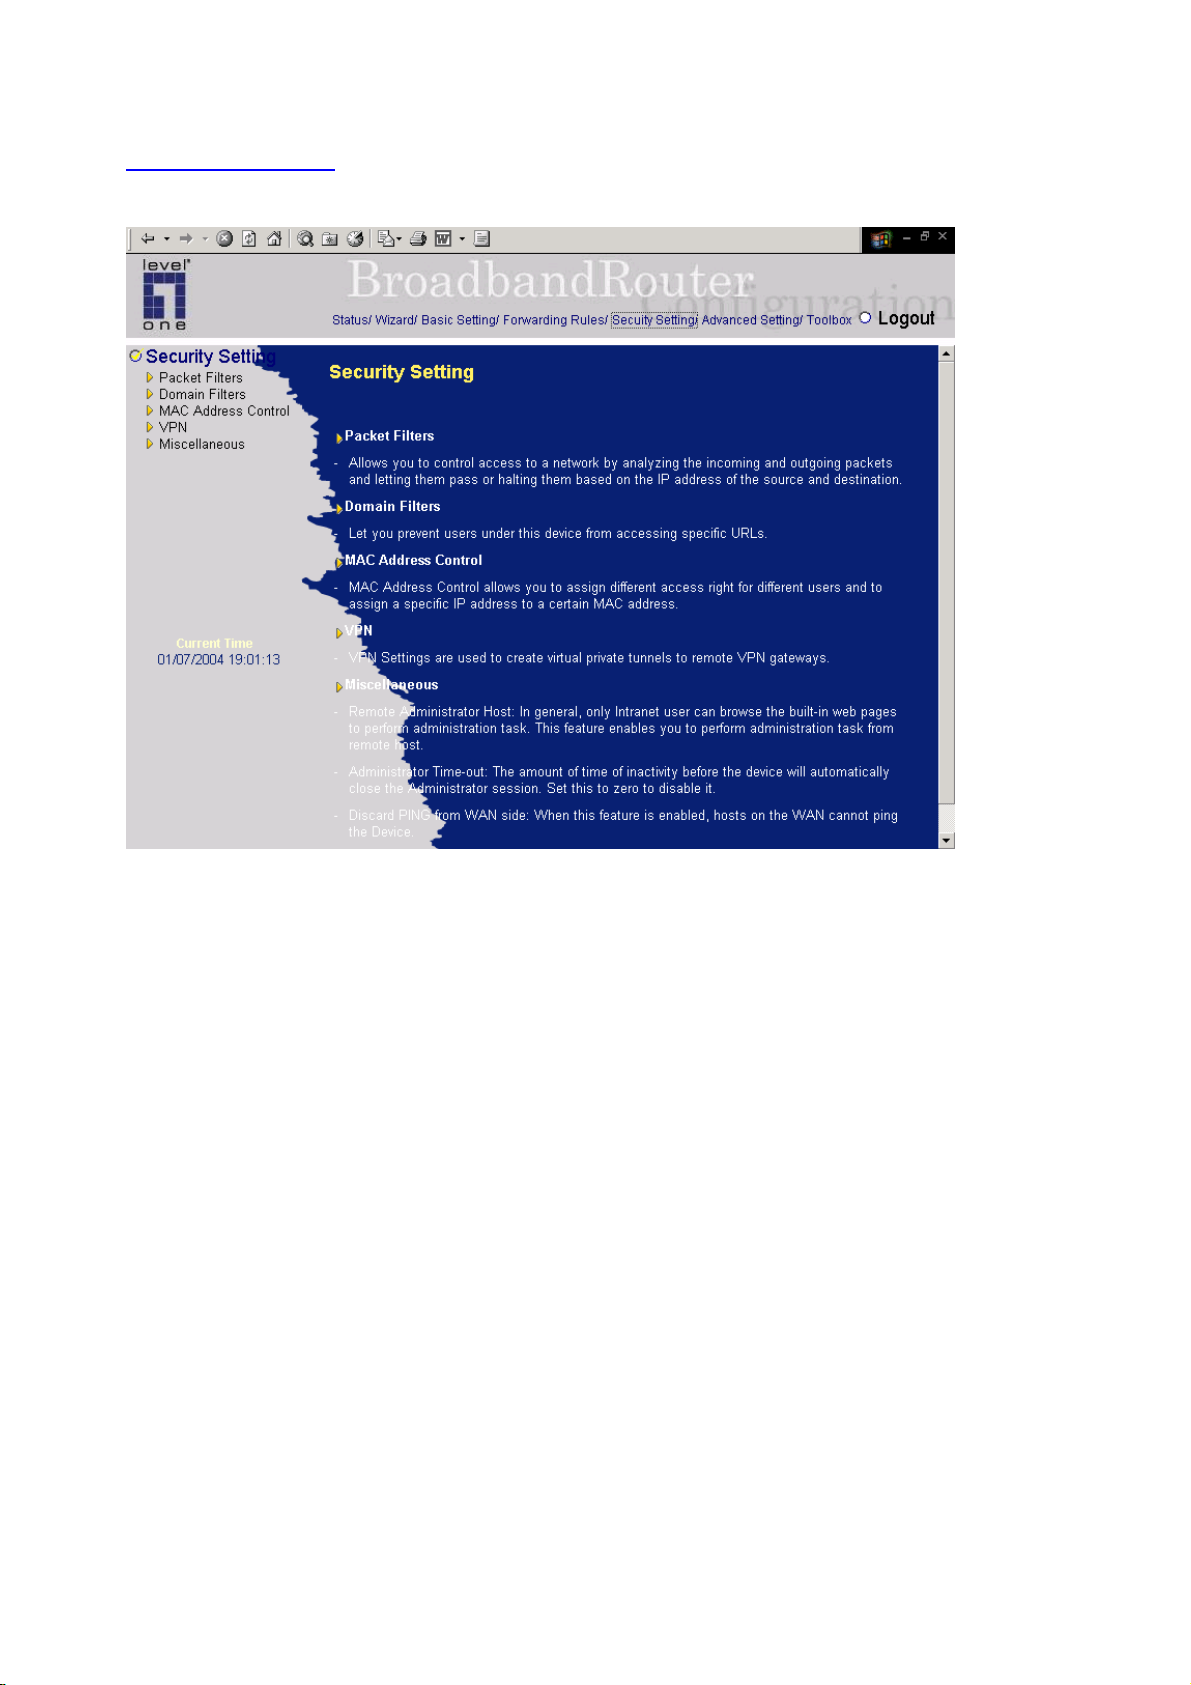
4.6 Security Settings
37
Page 38
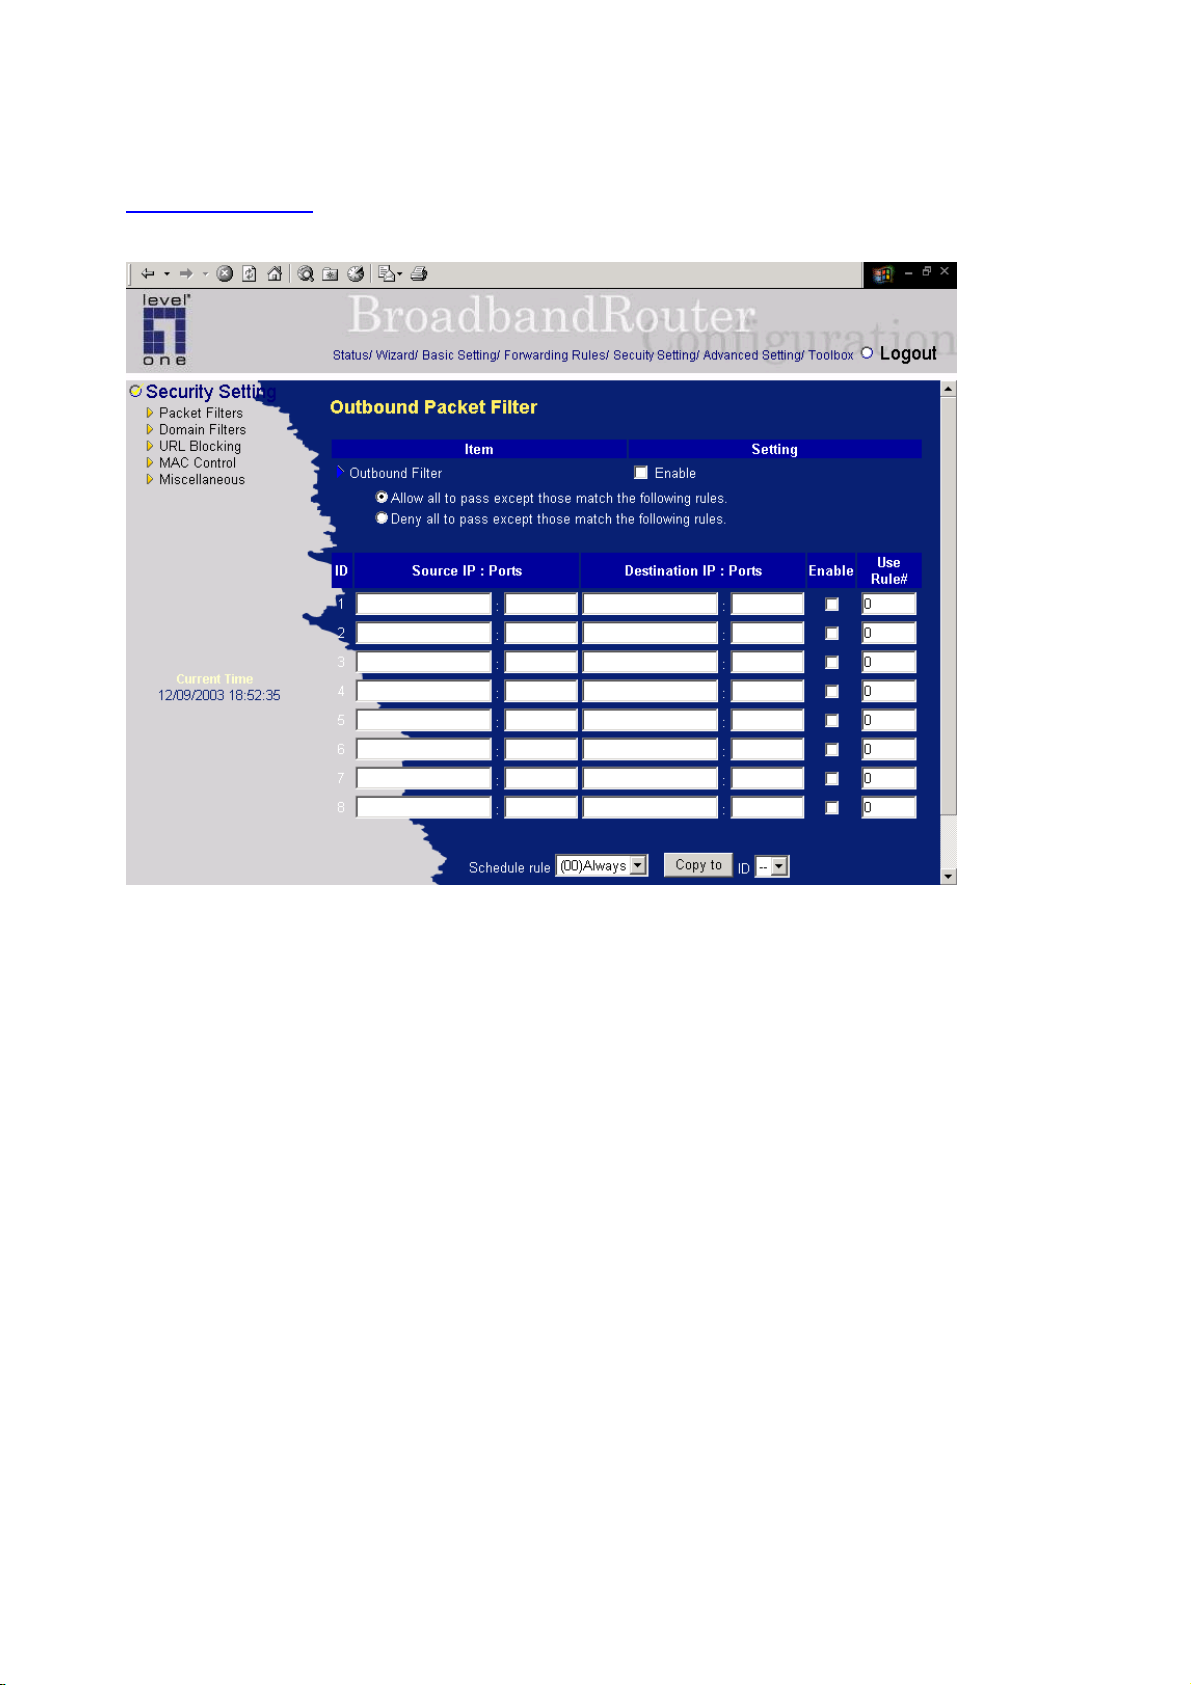
4.6.1 Packet Filter
Packet Filter enables you to control what packets are allowed to pass the router. Outbound filter applies
on all outbound packets. However, Inbound filter applies on packets that destined to Virtual Servers or
DMZ host only. You can select one of the two filtering policies:
1. Allow all to pass except those match the specified rules
2. Deny all to pass except those match the specified rules
You can specify 8 rules for each direction: inbound or outbound. For each rule, you can define the
following:
• Source IP address
• Source port address
• Destination IP address
• Destination port address
• Protocol: TCP or UDP or both.
• Use Rule#
38
Page 39
For source or destination IP address, you can define a single IP address (4.3.2.1) or a range of IP
addresses (4.3.2.1-4.3.2.254). An empty implies all IP addresses.
For source or destination port, you can define a single port (80) or a range of ports (1000-1999). Add
prefix "T" or "U" to specify TCP or UDP protocol. For example, T80, U53, U2000-2999. No prefix
indicates both TCP and UDP are defined. An empty implies all port addresses. Packet Filter can work
with Scheduling Rules, and give user more flexibility on Access control. For Detail, please refer to
Scheduling Rule.
Each rule can be enabled or disabled individually.
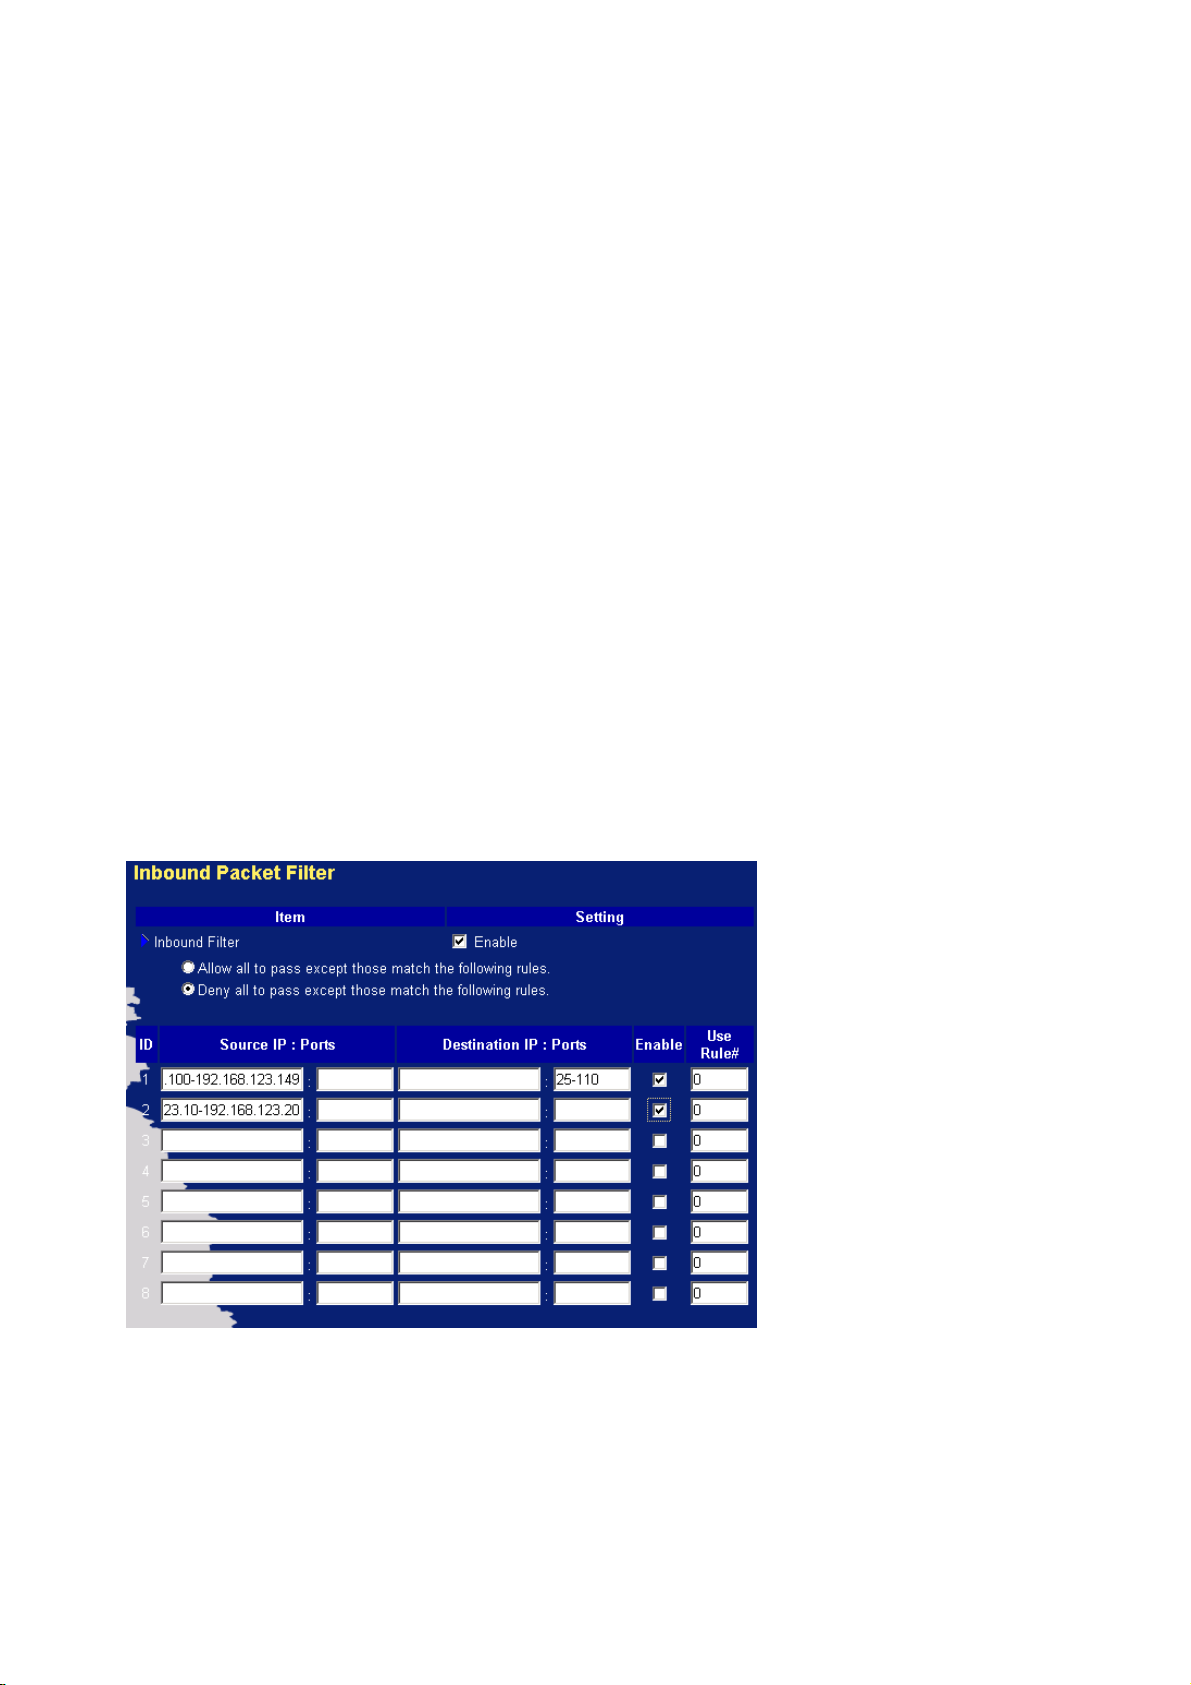
Inbound Filter:
To enable Inbound Packet Filter click the check box next to Enable in the Inbound Packet Filter field.
Suppose you have SMTP Server (25), POP Server (110), Web Server (80), FTP Server (21), and News
Server (119) defined in Virtual Server or DMZ Host.
Example 1:
(192.168.123.100-192.168.123.149) They are allow to send mail (port 25), receive mail (port 110), and
browse the Internet (port 80)
(192.168.123.10-192.168.123.20) They can do everything (block nothing)
Others are all blocked.
39
Page 40
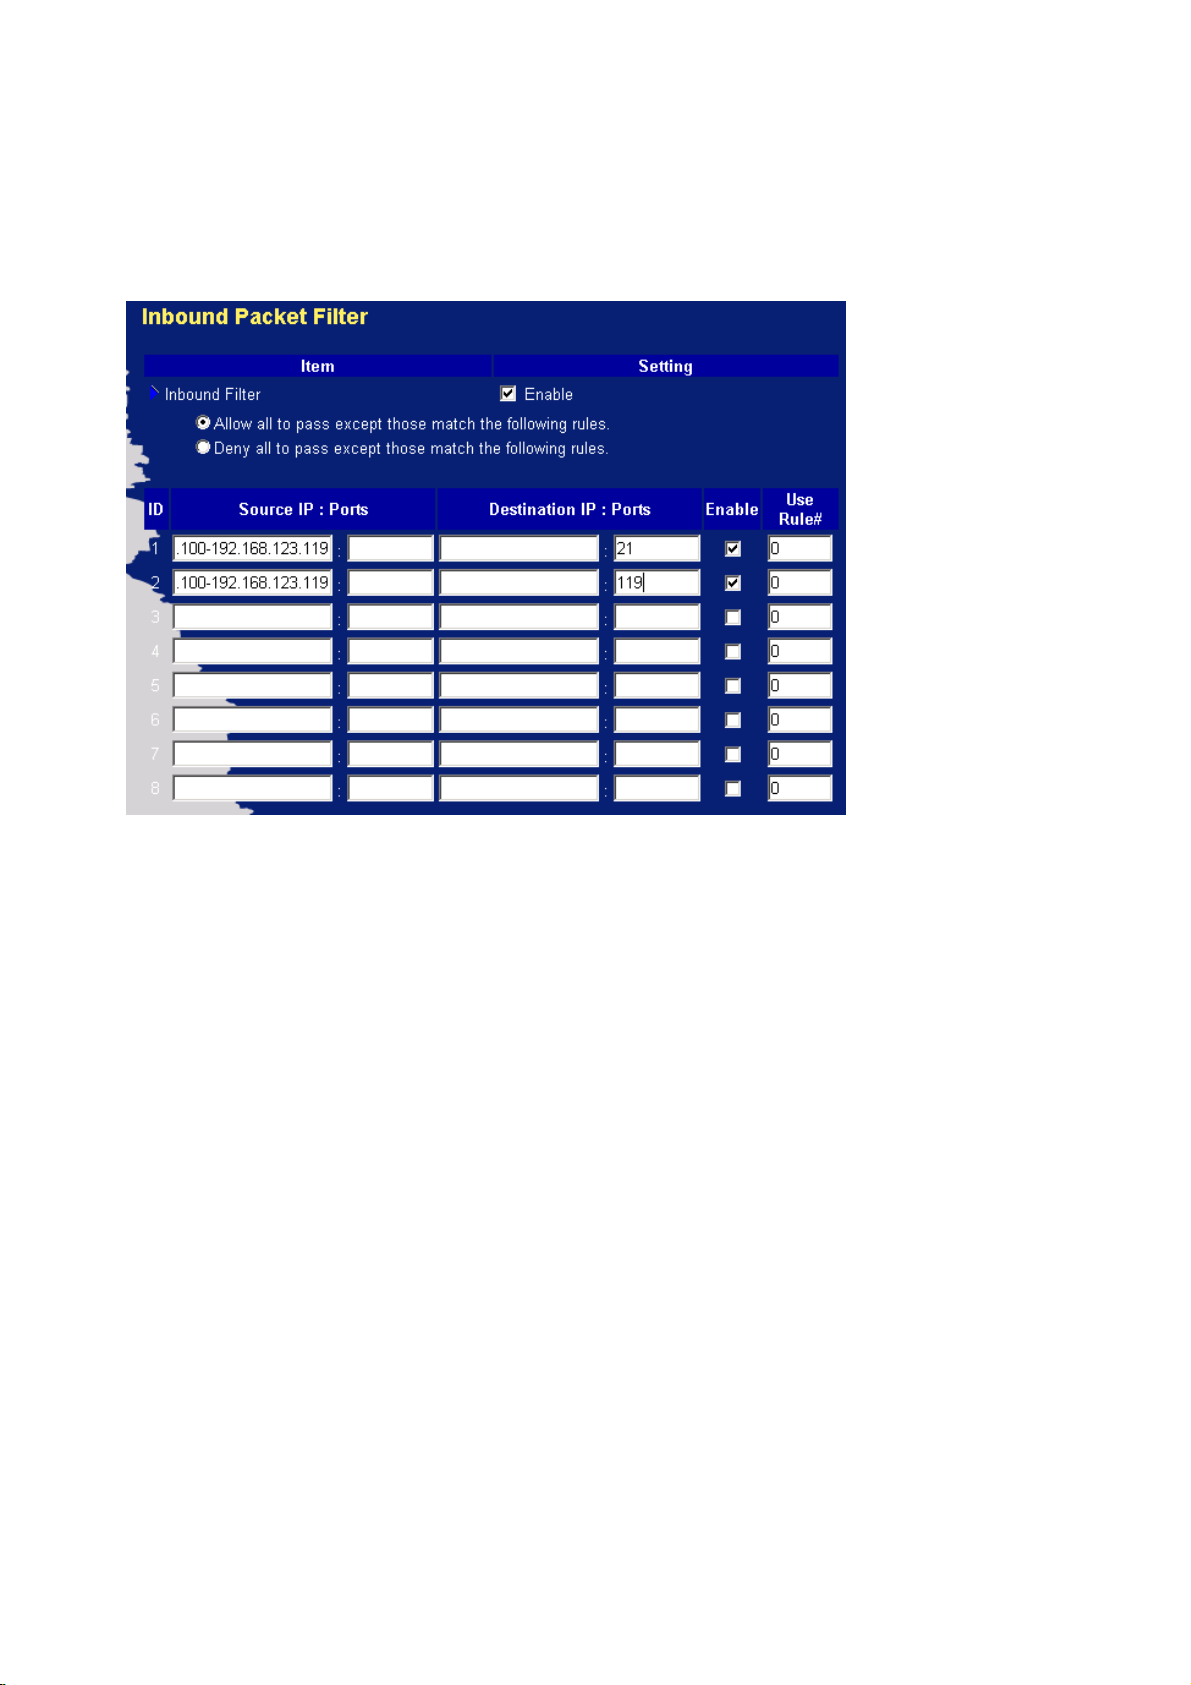
Example 2:
(192.168.123.100-192.168.123.119) They can do everything except read net news (port 119) and
transfer files via FTP (port 21)
Others are all allowed.
After Inbound Packet Filter setting is configured, click the save button.
Outbound Filter:
To enable Outbound Packet Filter click the check box next to Enable in the Outbound Packet Filter field.
Example 1:
40
Page 41
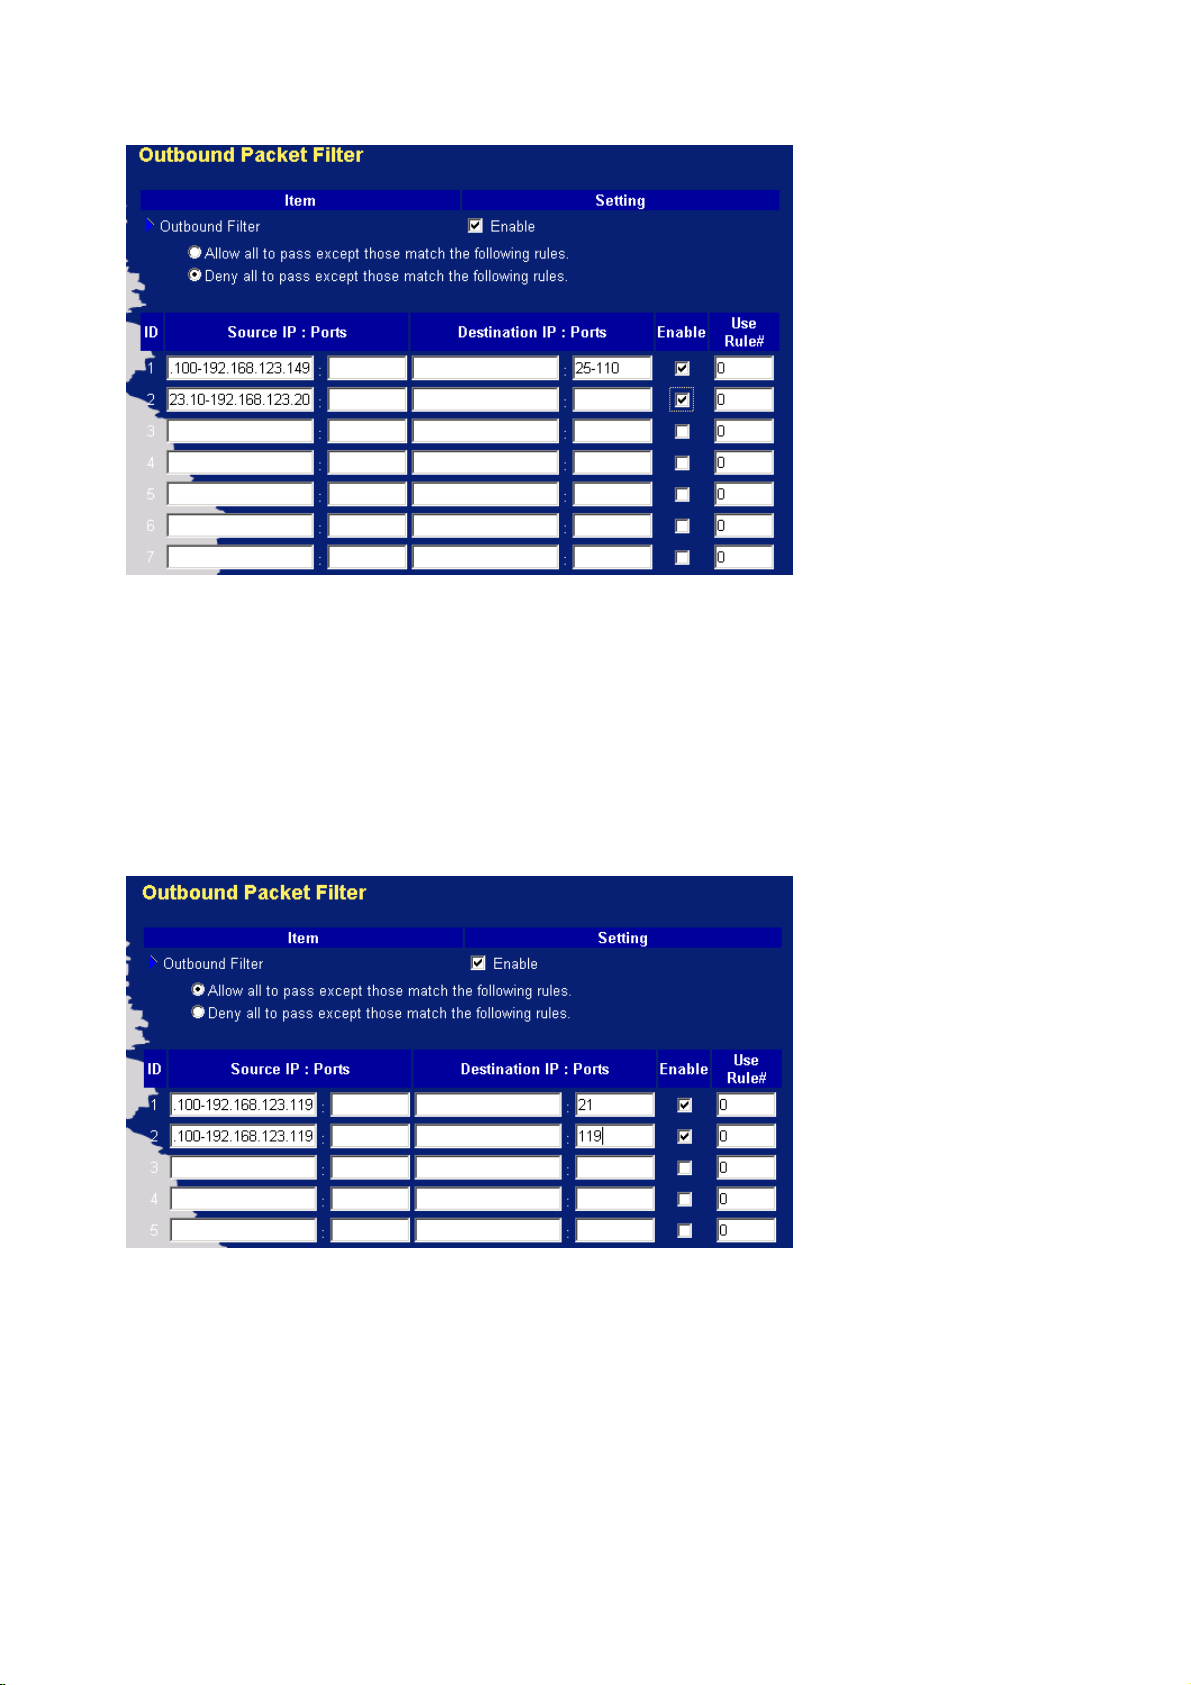
(192.168.123.100-192.168.123.149) They are allowed to send mail (port 25), receive mail (port 110),
and browse Internet (port 80); port 53 (DNS) is necessary to resolve the domain name.
(192.168.123.10-192.168.123.20) They can do everything (block nothing)
Others are all blocked.
Example 2:
(192.168.123.100-192.168.123.119) They can do everything except read net news (port 119) and
transfer files via FTP (port 21)
Others are allowed
After Outbound Packet Filter setting is configured, click the save button.
41
Page 42
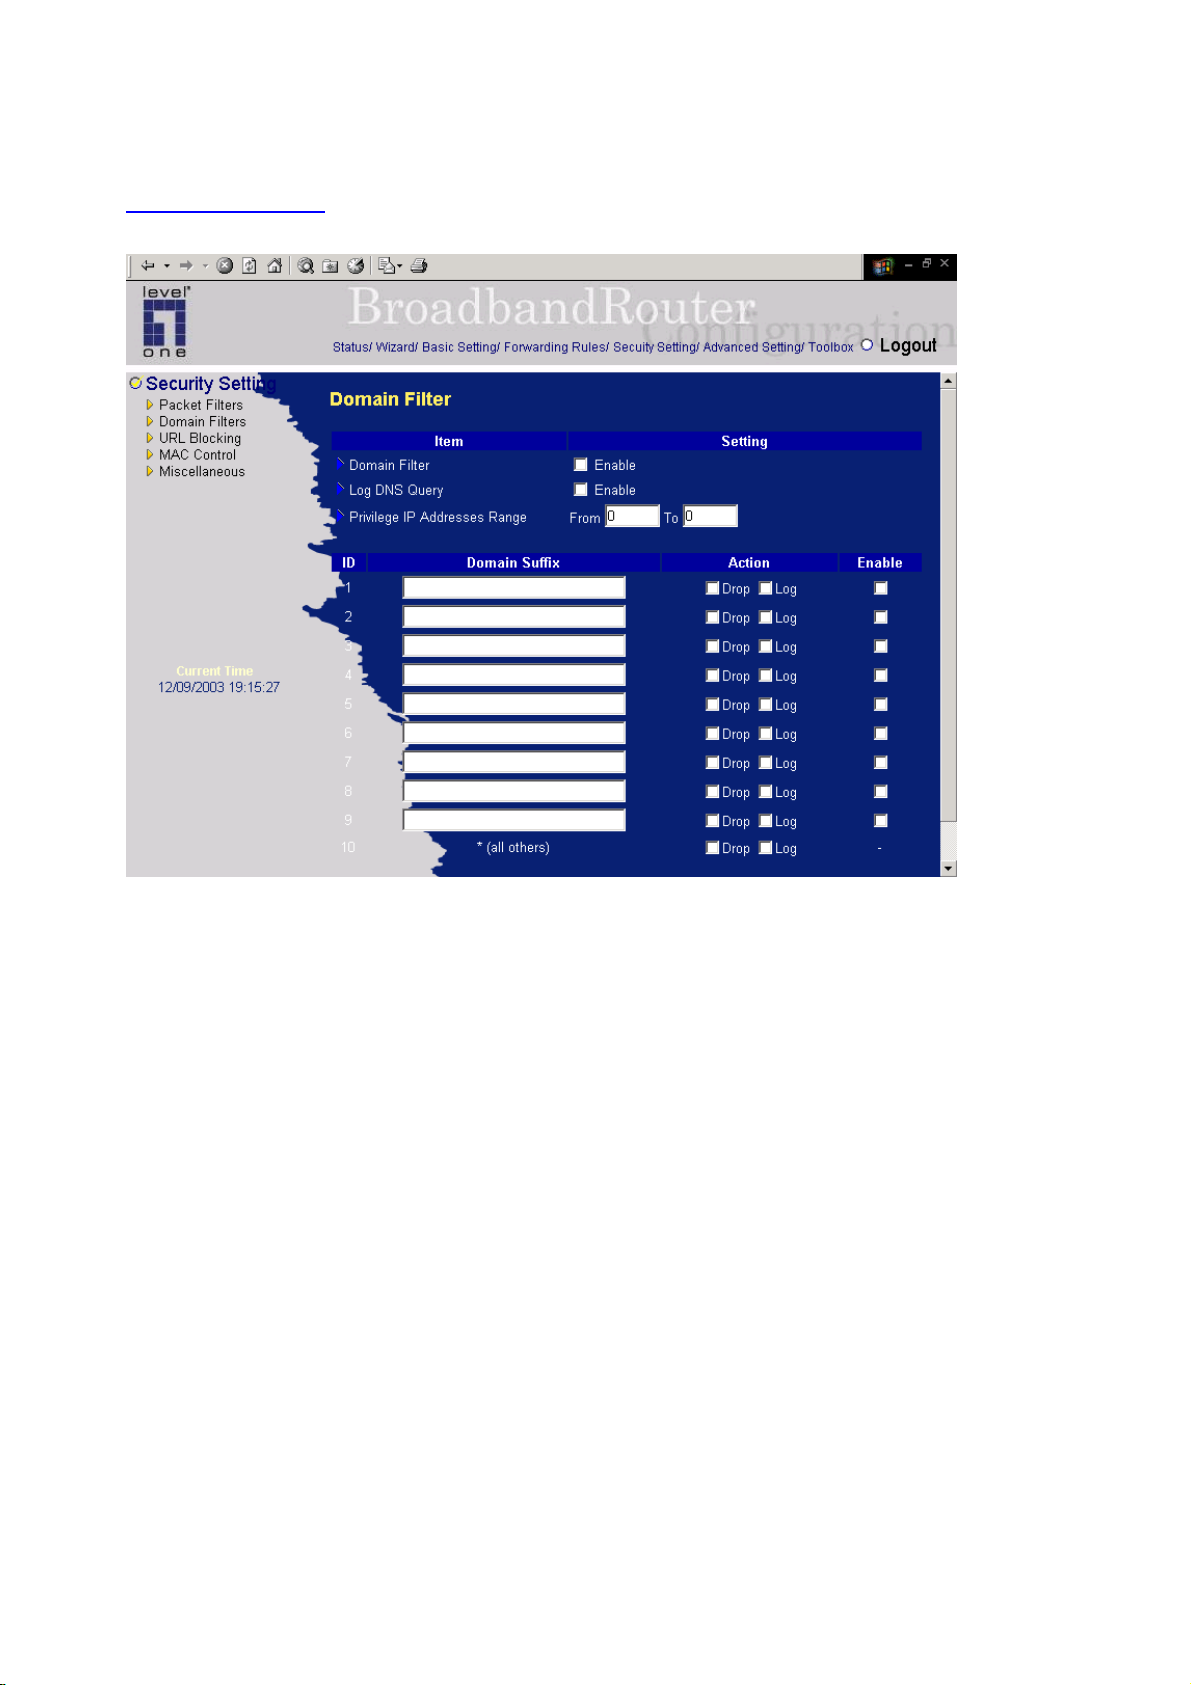
4.6.2 Domain Filter
Domain Filter
let you prevent users under this device from accessing specific URLs.
Domain Filter Enable
Check if you want to enable Domain Filter.
Log DNS Query
Check if you want to log the action when someone accesses the specific URLs.
Privilege IP Addresses Range
Setting a group of hosts and privilege these hosts to access network without restriction.
Domain Suffix
A suffix of URL to be restricted. For example, ".com", "xxx.com".
Action
When someone is accessing the URL met the domain-suffix, what kind of action you want.
Check drop to block the access. Check log to log these access.
Enable
Check to enable each rule.
42
Page 43
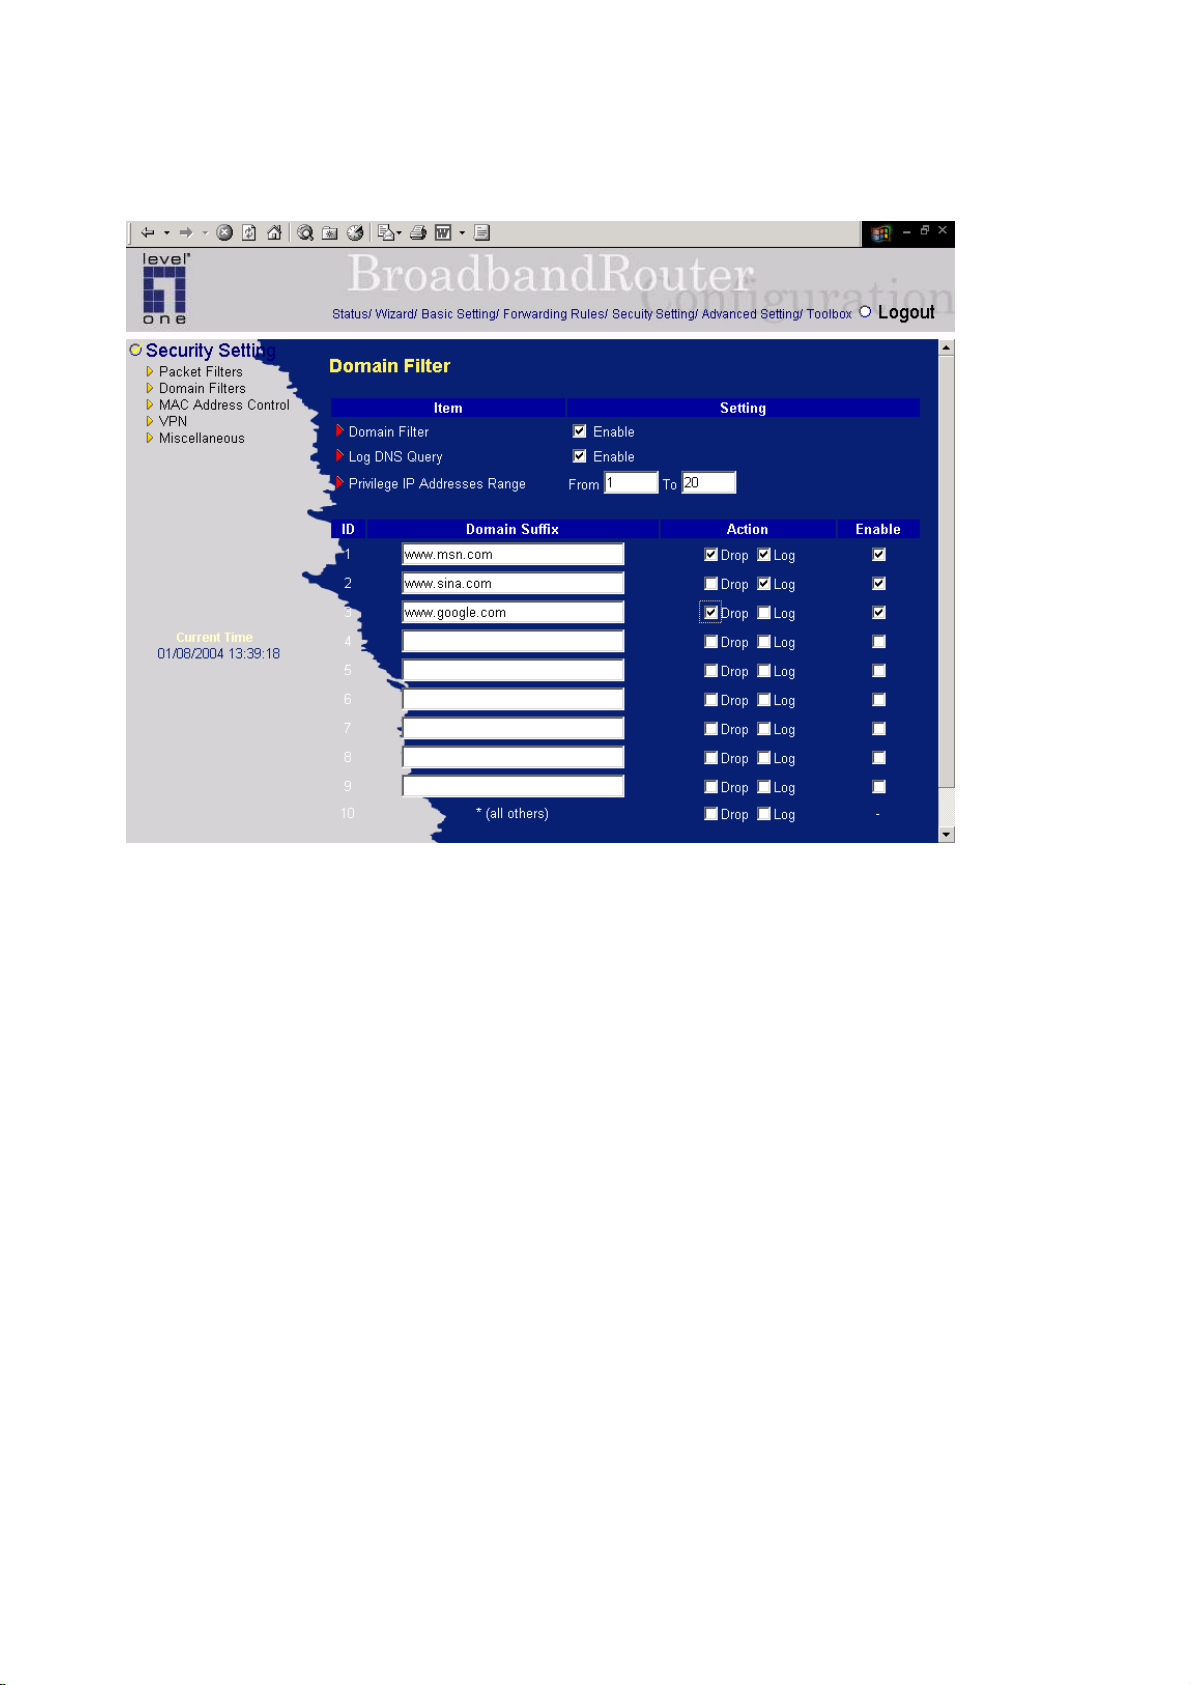
Example:
In this example:
1. URL include “www.msn.com” will be blocked, and the action will be record in log-file.
2. URL include “www.sina.com” will not be blocked, but the action will be record in log-file.
3. URL include “www.google.com” will be blocked, but the action will not be record in log-file.
4. IP address X.X.X.1~ X.X.X.20 can access network without restriction.
43
Page 44
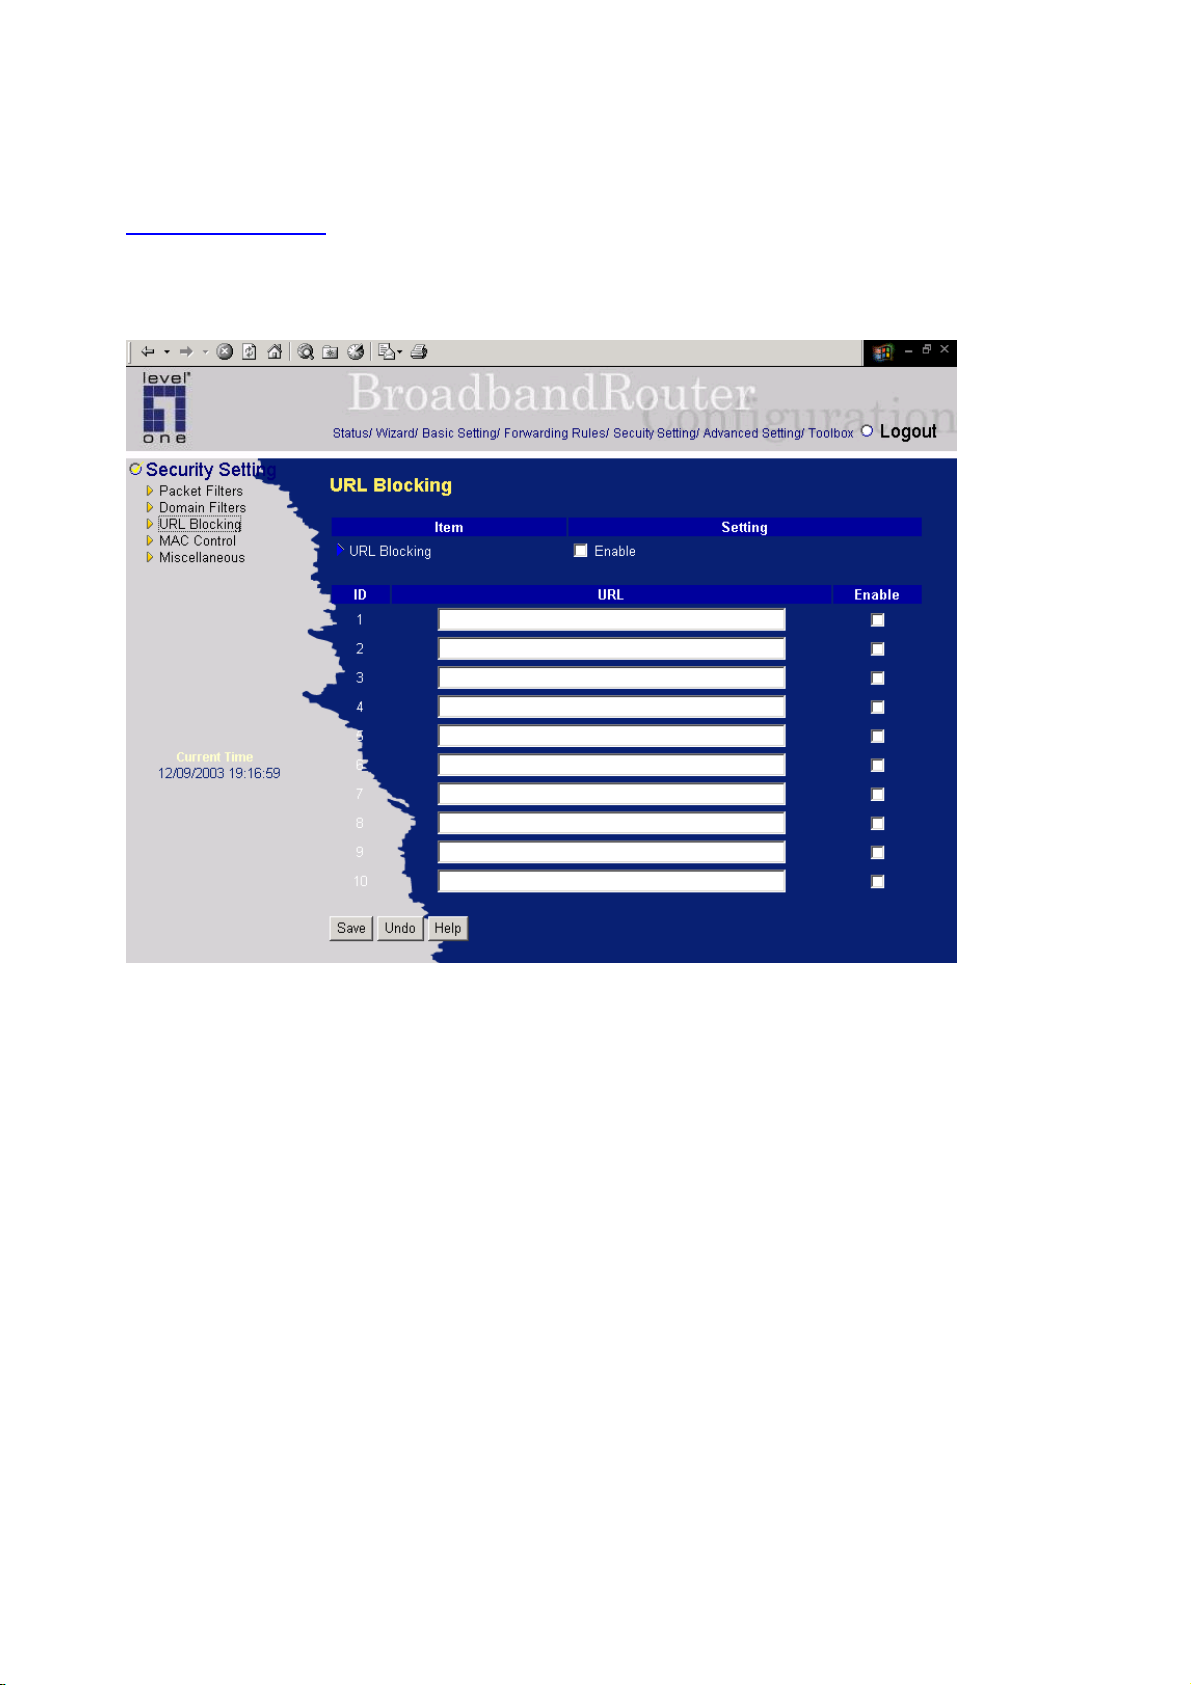
4.6.3 URL Blocking
URL Blocking will block LAN computers to connect to pre-defined Websites.
The major difference between “Domain filter” and “URL Blocking” is Domain filter require user to
input suffix (like .com or .org, etc), while URL Blocking require user to input a keyword only. In other
words, Domain filter can block specific website, while URL Blocking can block hundreds of websites
by simply a keyword.
URL Blocking Enable
Checked if you want to enable URL Blocking.
URL
If any part of the Website's URL matches the pre-defined word, the connection will be blocked.
For example, you can use pre-defined word "sex" to block all websites if their URLs contain
pre-defined word "sex".
Enable
Checked to enable each rule.
44
Page 45
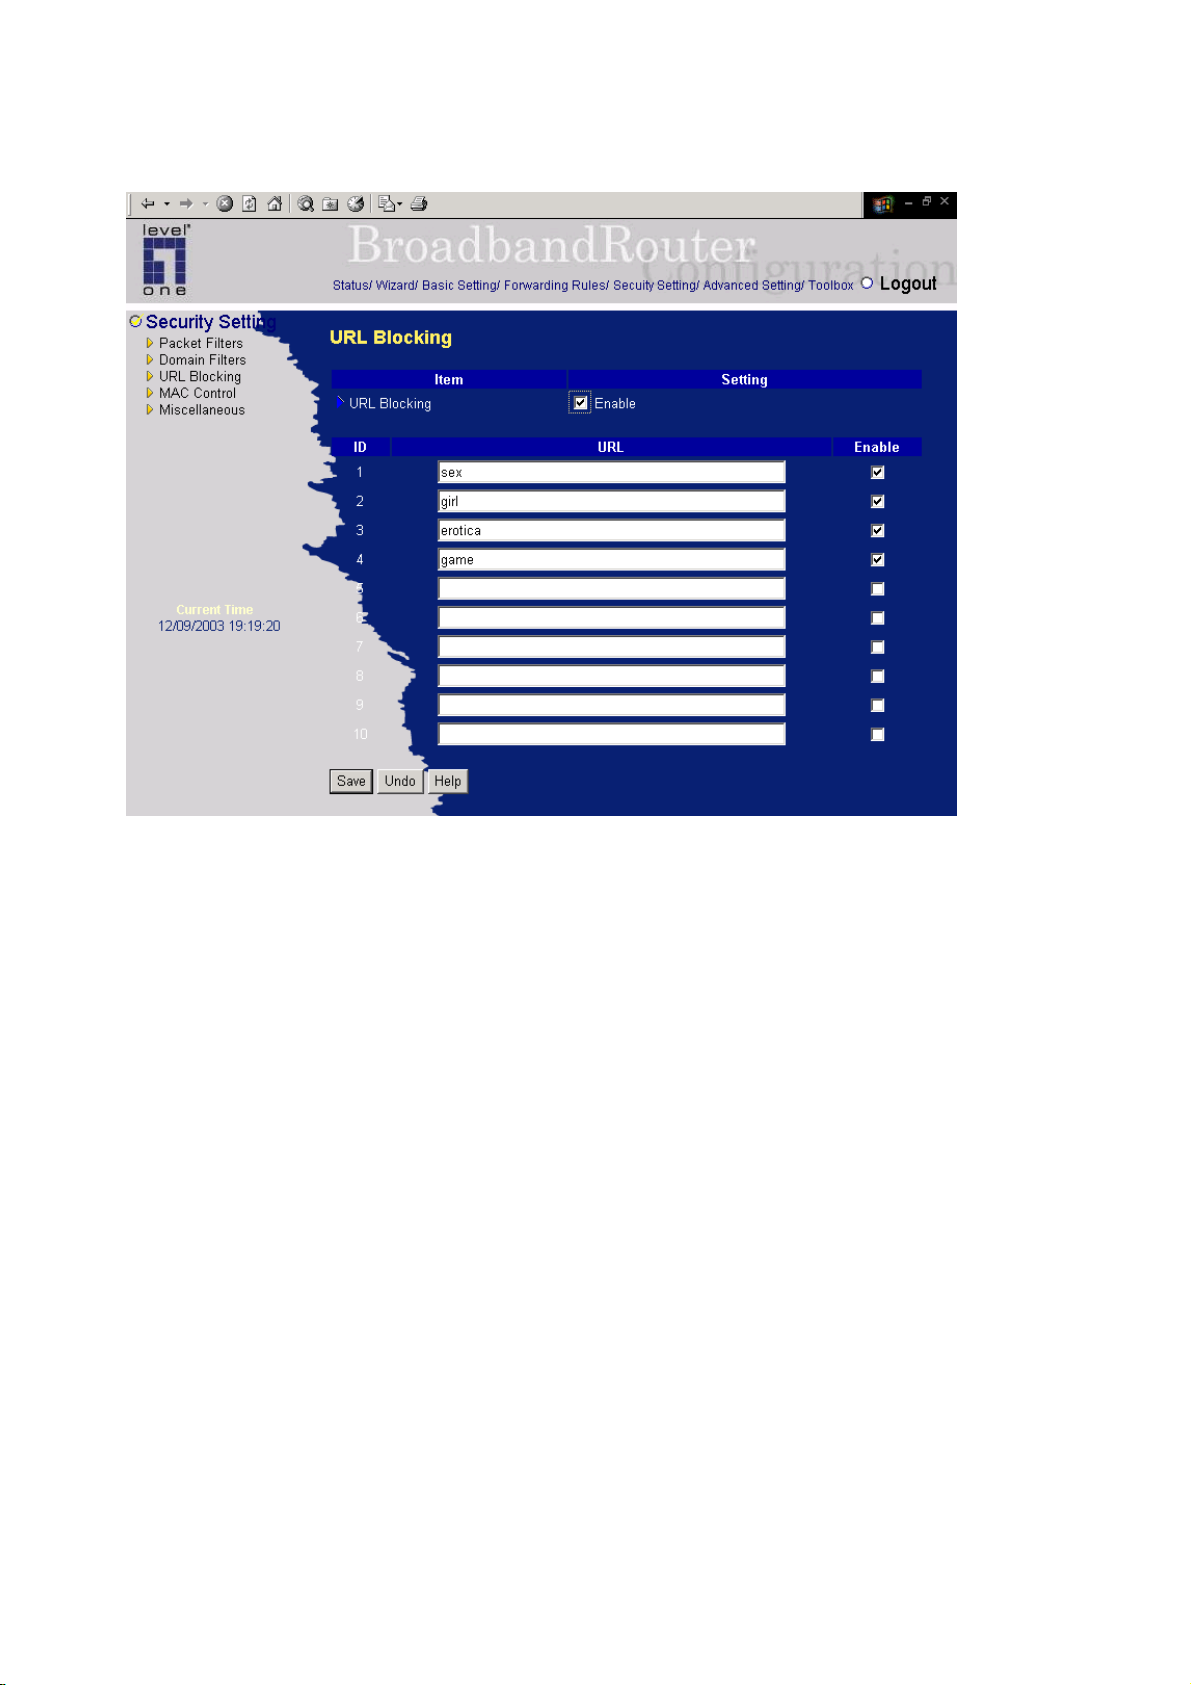
In this example:
1.URL include “sex” will be blocked, and the action will be record in log-file.
2.URL include “erotica” will be blocked, but the action will be record in log-file
3.URL include “girl” will not be blocked, but the action will be record in log-file.
4. URL include “game” will be blocked, but the action will be record in log-file
45
Page 46
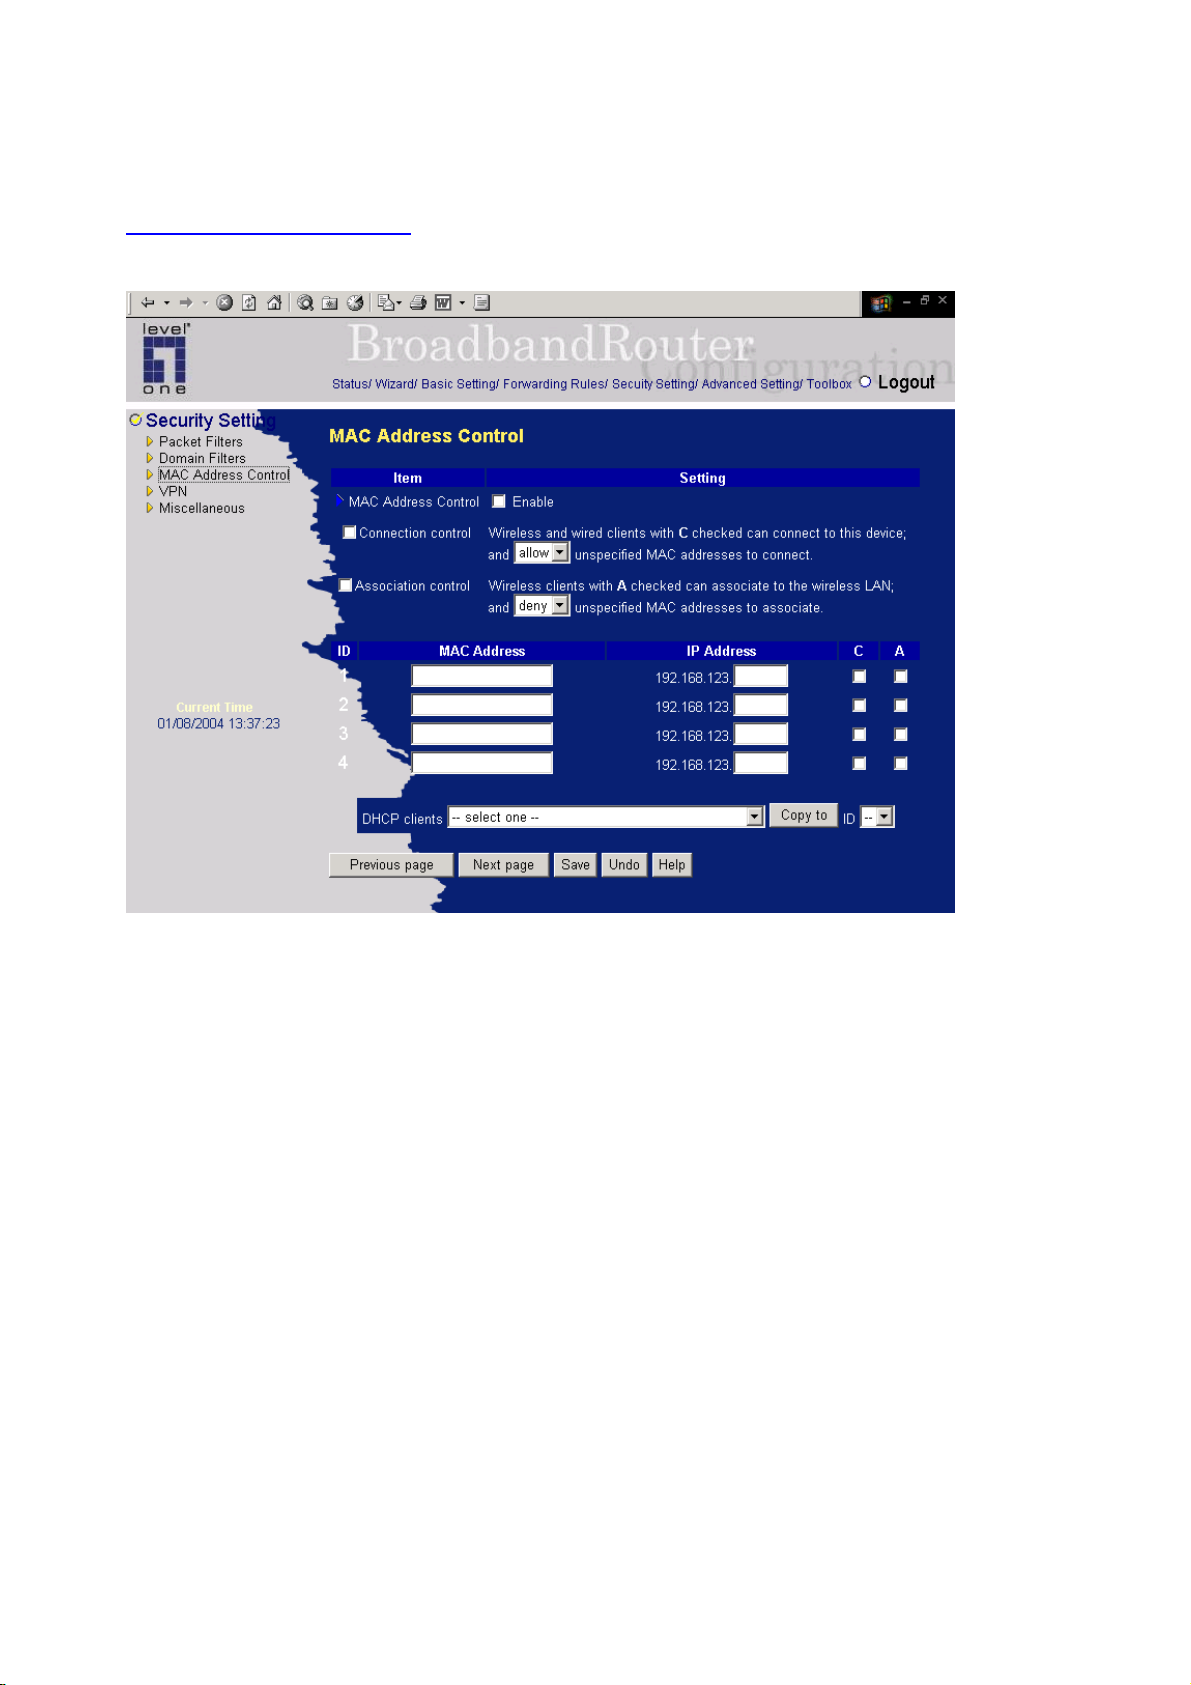
4.6.4 MAC Address Control
MAC Address Control allows you to assign different access right for different users and to assign a
specific IP address to a certain MAC address.
MAC Address Control Check “Enable” to enable the “MAC Address Control”. All of the
settings in this page will take effect only when “Enable” is checked.
Connection control Check "Connection control" to enable the controlling of which wired and
wireless clients can connect to this device. If a client is denied to connect
to this device, it means the client can't access to the Internet either.
Choose "allow" or "deny" to allow or deny the clients, whose MAC
addresses are not in the "Control table" (please see below), to connect to
this device.
Assosiation control Check "Association control" to enable the controling of which wireless
client can associate to the wireless LAN. If a client is denied to associate
to the wireless LAN, it means the client can't send or receive any data via
this device. Choose "allow" or "deny" to allow or deny the clients, whose
MAC addresses are not in th e "Control tab le", to associate to the wireless
LAN.
46
Page 47
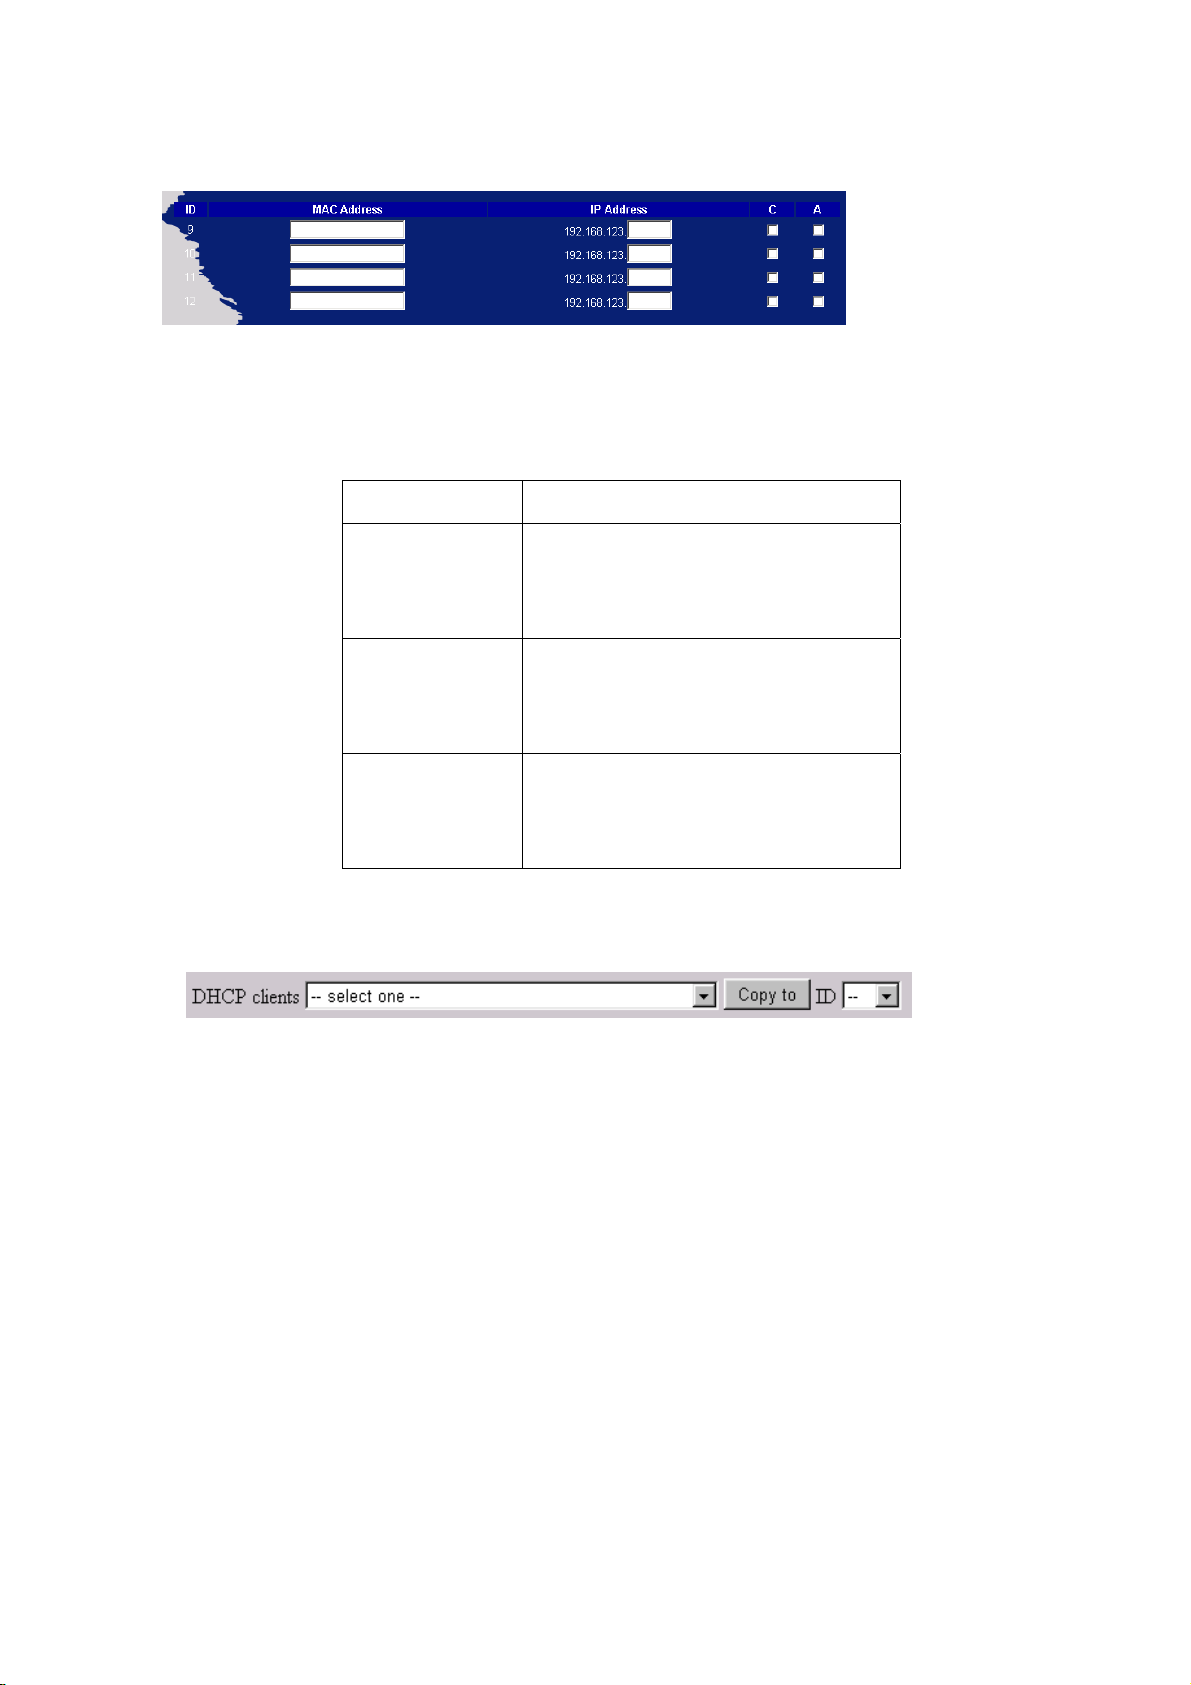
Control table
"Control table" is the table at the bottom of the "MAC Address Control"
page. Each row of this table indicates the MAC address and the expected
IP address mapping of a client. There are four columns in this table:
MAC Address
IP Addr ess
MAC address indicates a specific client.
Expected IP address of the corresponding
client. Keep it empty if you don't care its IP
address.
C
When "Connection control" is checked,
check "C" will allow the corresponding client
to connect to this device.
A
When "Association control" is checked,
check "A" will allow the corresponding client
to associate to the wireless LAN.
In this page, we provide the following Combobox and button to help you to input the MAC address.
You can select a specific client in the “DHCP clients” Combobox, and then click on the “Copy to”
button to copy the MAC address of the client you select to the ID selected in the “ID” Combobox.
Previous page and Next Page To make this setup page simple and clear, we have divided the
“Control table” into several pages. You can use these buttons to
navigate to different pages.
47
Page 48
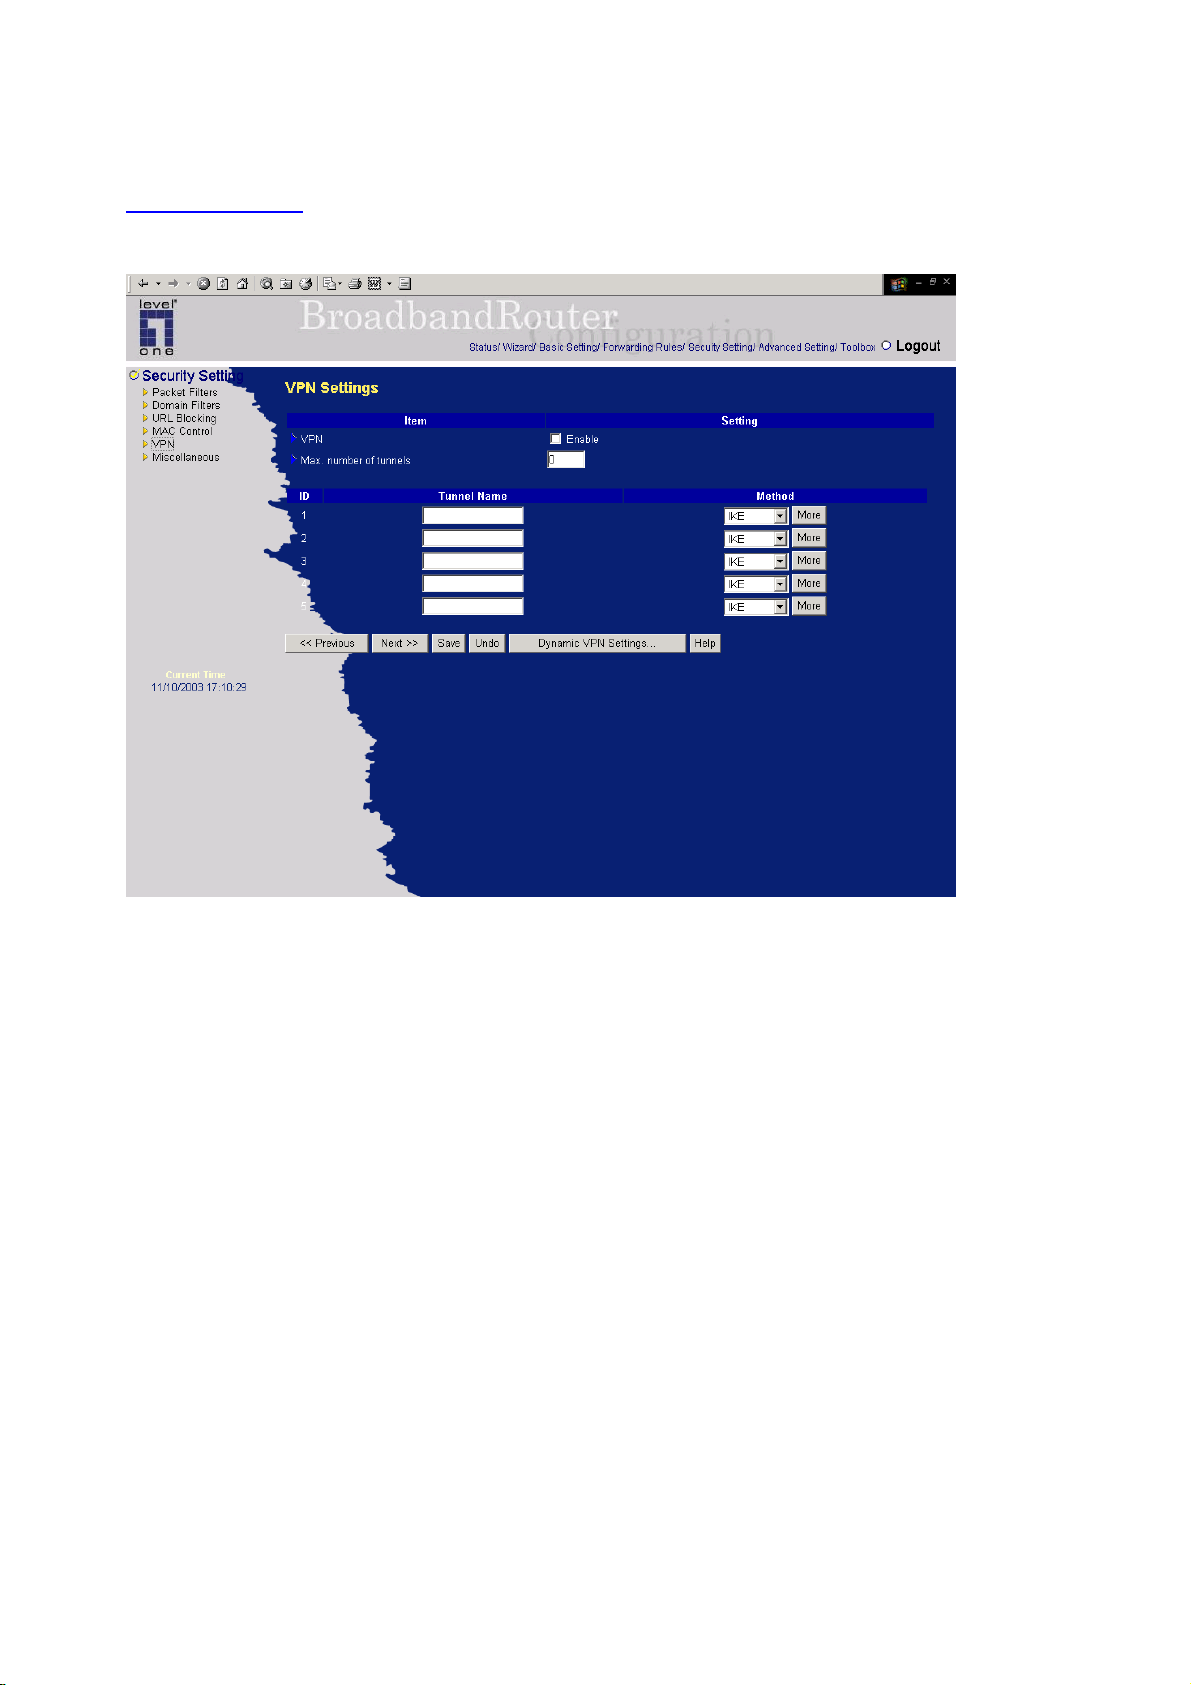
4.6.5 VPN setting
VPN Settings are settings that are used to create virtual private tunnels to remote VPN gateways. The
tunnel technology supports data confidentiality , data origin authentication and data integrity of network
information by utilizing encapsulation protocols, encryption algorithms, and hashing algorithms.
• VPN enable item
VPN protects network information from ill network inspectors. But it greatly degrades network throughput.
Enable it when you really need a security tunnel. It is disabled for default.
• Max. number of tunnels item
Since VPN greatly degrades network throughput, the allowable maximum number of
Be careful to set the value for allowing the number of tunnels can be created simultaneously. Its value
ranges from 1 to 5.
• Tunnel name
Indicate which tunnel that is focused now.
• Method
IPSec VPN supports two kinds of key-obtained methods: manual key and automatic key exchange.
tunnels is limited.
Manual key approach indicates that two end VPN gateways setup authenticator and encryption key by
system managers manually. However, IKE approach will perform automatic Internet key exchange.
48
Page 49
System managers of both end gateways only need set the same pre-shared key.
Function of Buttons
More: To setup detailer configuration for manual key or IKE approaches by clicking the "More"
button.
•
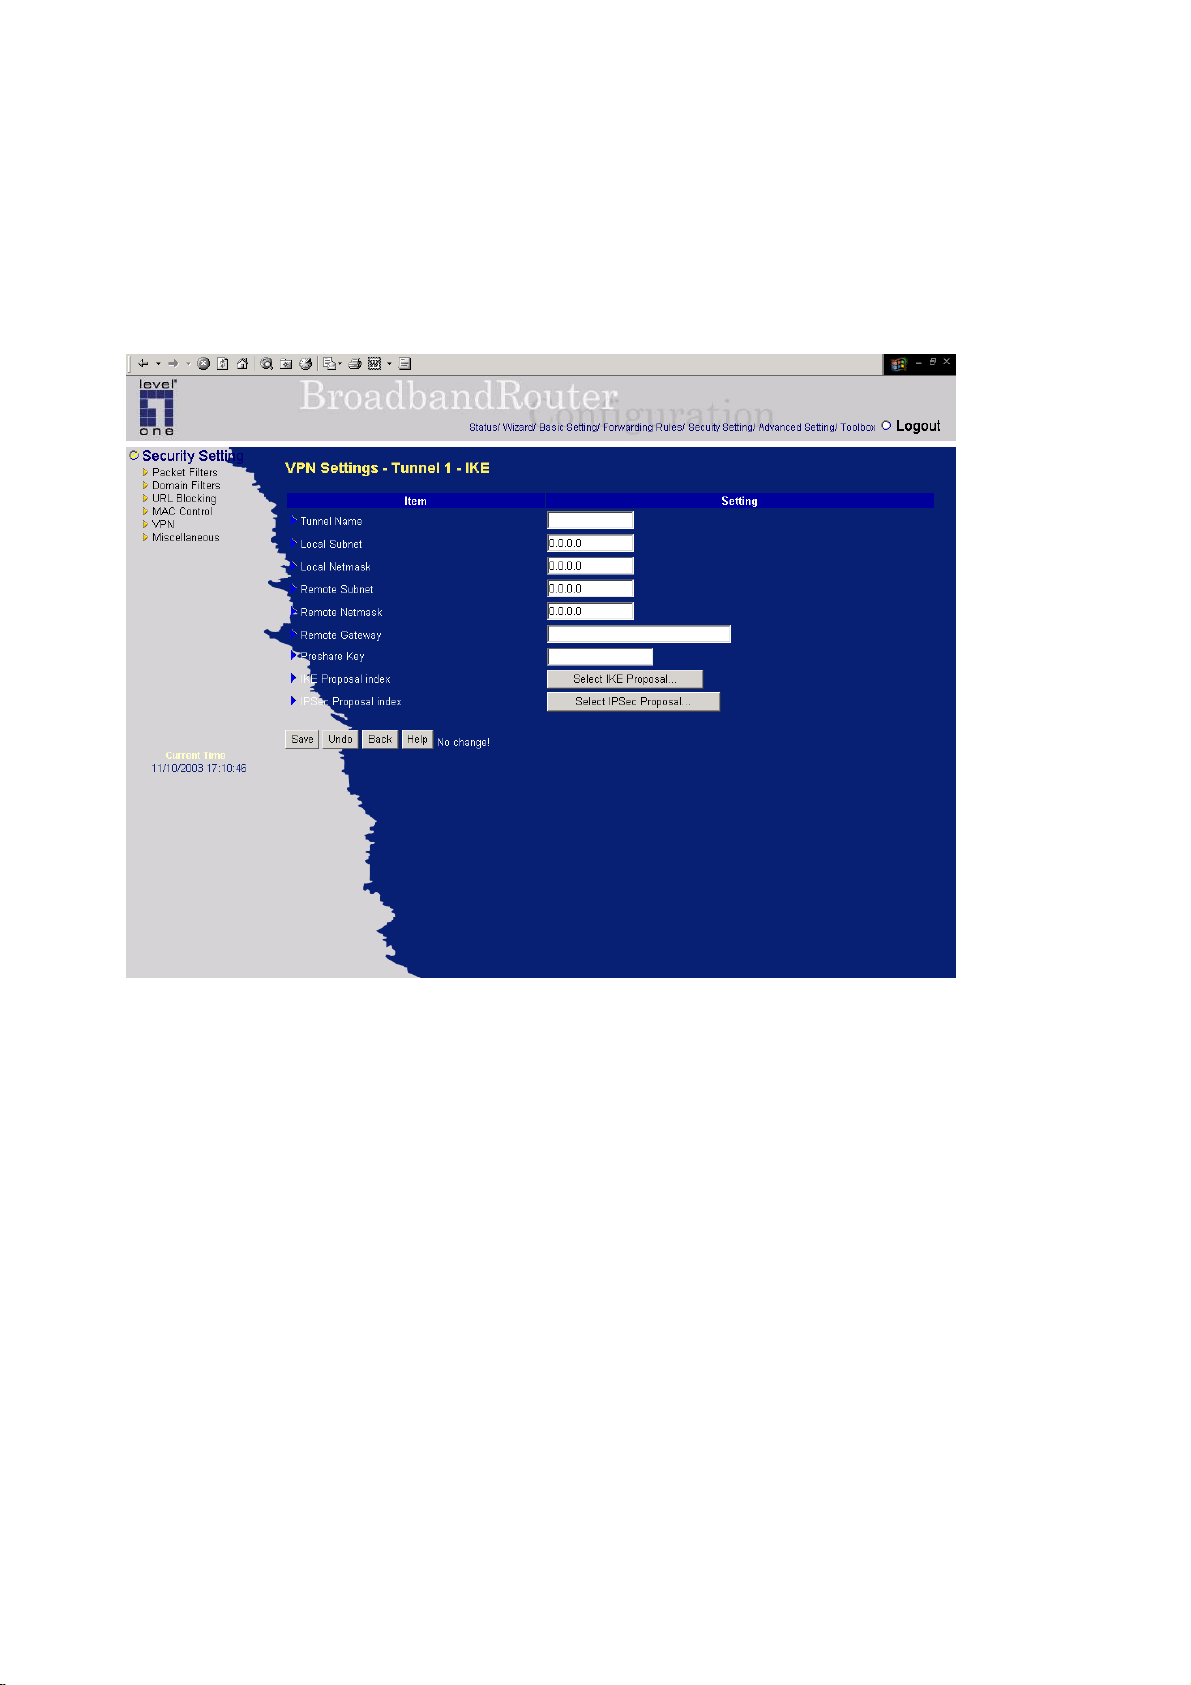
VPN Settings - IKE
There are three parts that are necessary to setup the configuration of IKE for the dedicat ed tunnel: basic
setup, IKE proposal setup, and IPSec proposal setup.
Basic setup includes the setting of following items: local subnet, local netmask, remote subnet, remote
netmask, remote gateway, and pre-shared key. The tunnel name is derived from previous page of VPN
setting. IKE proposal setup includes the setting of a set of frequent-used IKE proposals and the
selecting from the set of IKE proposals. Similarly, IPSec proposal setup includes the setting of a set of
frequent-used IPSec proposals and the selecting from the set of IPSec proposals.
- Basic setup:
Local subnet
The subnet of LAN site of local VPN gateway. It can be a host, a partial subnet, and the whole subnet
of LAN site of local gateway.
49
Page 50
Local netmask
Local netmask combined with local subnet to form a subnet domain.
Remote subnet
The subnet of LAN site of remote VPN gateway, it can be a host, a partial subnet, and the whole subnet
of LAN site of remote gateway.
Remote netmask
Remote netmask combined with remote subnet to form a subnet domain of remote end.
Remote gateway
The IP address of remote VPN gateway.
Pre-shared key
The first key that supports IKE mechanism of both VPN gateways for negotiating further security keys.
The pre-shared key must be same for both end gateways.
Function of Buttons
Select IKE proposal: Click the button to setup a set of frequent-used IKE proposals and select
from the set of IKE proposals for the dedicated tunnel. proposals for the
dedicated tunnel.
Select IPSec proposal: Click the button to setup a set of frequent-used IPSec proposalsand select
from the set of IKE proposals for the dedicated tunnel.
50
Page 51

•VPN Settings - Set IKE Proposal
IKE Proposal index
A list of selected proposal indexes from the IKE proposal pool listed below. The selecting activity is
performed by selecting a proposal ID and clicking "add to" button in the bottom of the page. There are
only four indexes can be chosen from the proposal pool for the dedicated tunnel. Remove button
beside the index list can remove selected proposal index before.
Proposal name
It indicates which IKE proposal to be focused. First char of the name with 0x00 value stands for the
IKE proposal is not available.
• DH group
There are three groups can be selected: group 1 (MODP768), group 2 (MODP1024), group 5
(MODP1536).
Encryption algorithm
There are two algorithms can be selected: 3DES and DES.
Authentication algorithm
There are two algorithms can be selected: SHA1 and MD5.
Life time
The unit of life time is based on the value of Life Time Unit. If the value of unit is second, the value of
life time represents the life time of dedicated VPN tunnel between both end gateways. Its value ranges
from 300 seconds to 172,800 seconds. If the value of unit is KB, the value of life time represents the
maximum allowable amount of transmitted packets through the dedicated VPN tunnel between both
end gateways. Its value ranges from 20,480 KBs to 2,147,483,647 KBs.
Life time unit
There are two units can be selected: second and KB.
Proposal ID
The identifier of IKE proposal can be chosen for adding corresponding proposal to the dedicated
tunnel. There are total ten proposals can be set in the proposal pool. At most only four proposals from
the pool can be applied to the dedicated tunnel as shown in the proposal index list.
Function of Buttons
Add to button: Click it to add the chosen proposal indicated by proposal ID to IKE Proposal index list.
The proposals in the index list will be used in phase 1 of IKE negotiation for getting the IKSAMP SA
of dedicated tunnel.
51
Page 52
•
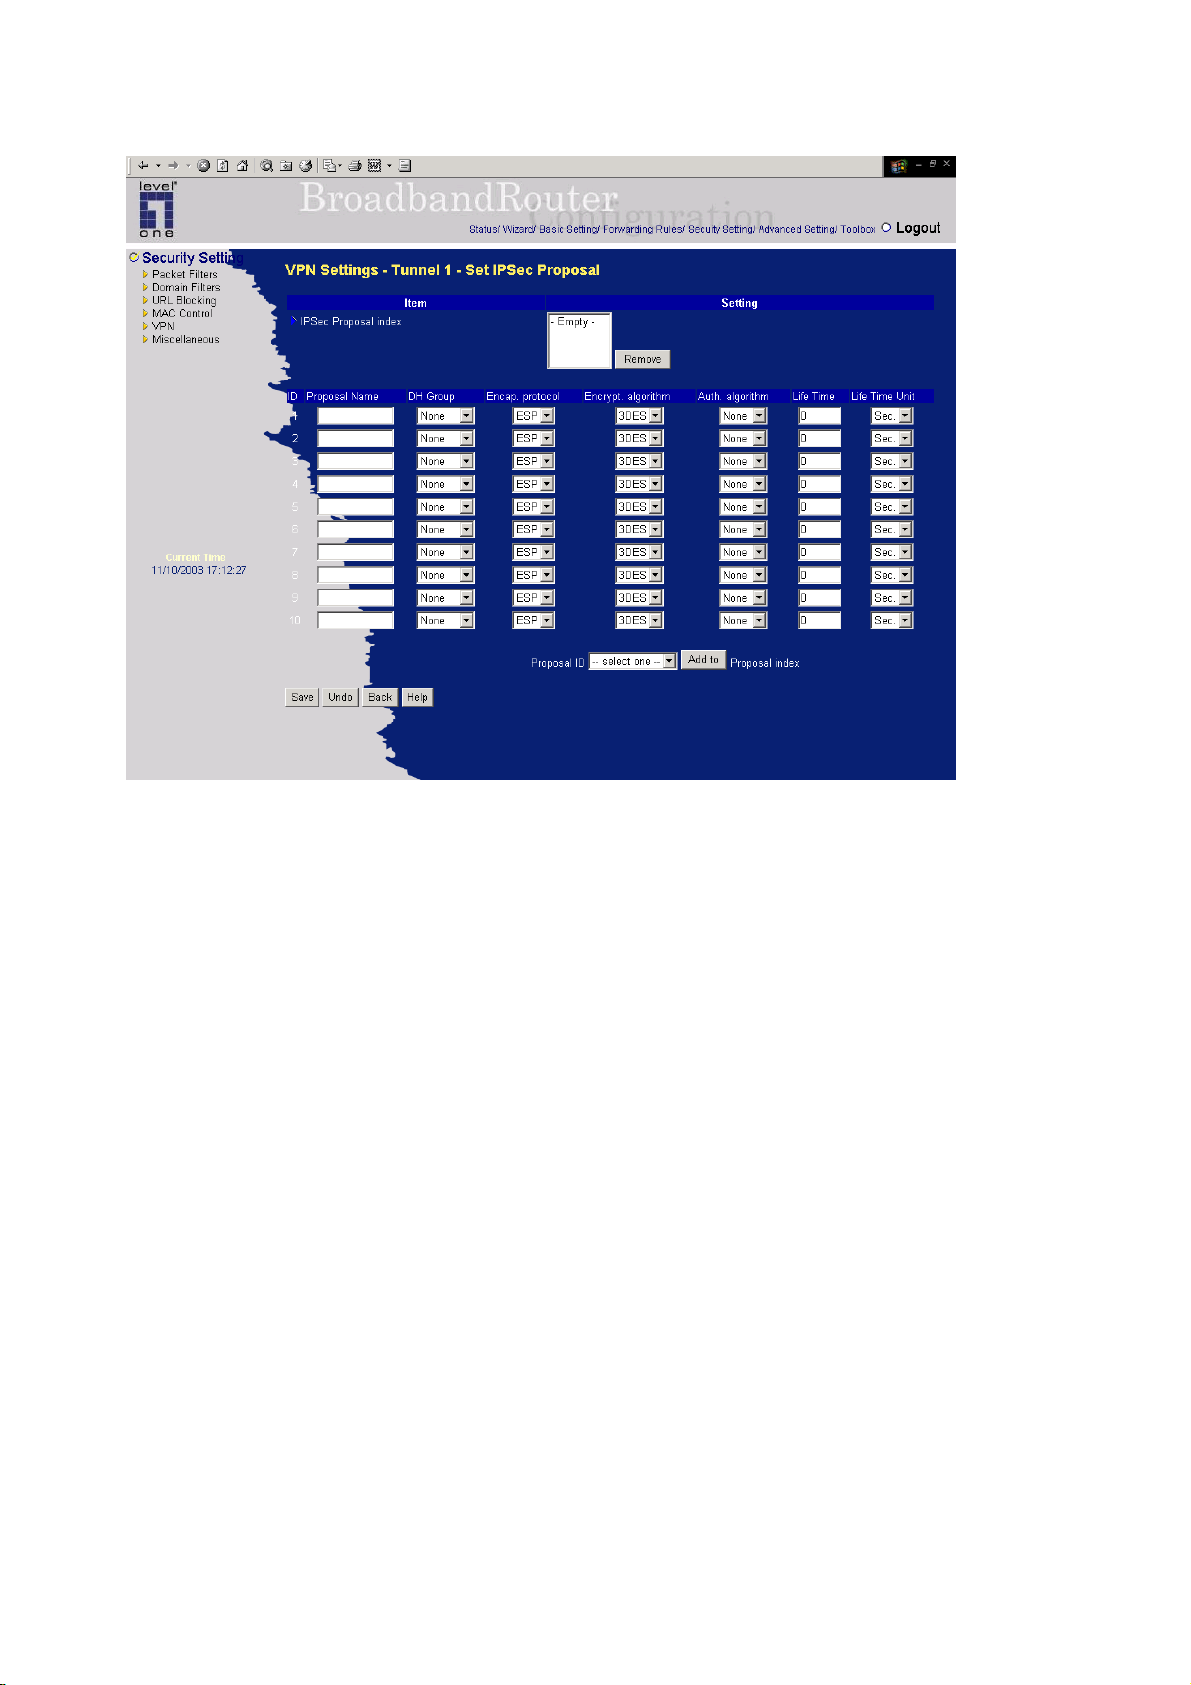
VPN Settings -Set IPSec Proposal
IPSec Proposal index
A list of selected proposal indexes from the IPSec proposal pool listed below. The selecting activity is
performed by selecting a proposal ID and clicking "add to" button in the bottom of the page. There are
only four indexes can be chosen for the dedicated tunnel. Remove button beside the index list can
remove selected proposal index before.
Proposal name
It indicates which IPSec proposal to be focused. First char of the name
the proposal is not available.
with 0x00 value stands for
• DH group
There are three groups can be selected: group 1 (MODP768), group 2 (MODP1024), group 5
(MODP1536). But none also can be selected here for IPSec proposal.
Encapsulation protocol
There are two protocols can be selected: ESP and AH.
Encryption algorithm
There are two algorithms can be selected: 3DES and DES. But when the encapsulation protocol is AH,
encryption algorithm is unnecessarily set.
Authentication algorithm
There are two algorithms can be selected: SHA1 and MD5. But none also can be selected here for
52
Page 53

IPSec proposal.
Life time
The unit of life time is based on the value of Life Time Unit. If the value of unit is second, the value of
life time represents the life time of dedicated VPN tunnel between both end gateways. Its value ranges
from 300 seconds to 172,800 seconds. If the value of unit is KB, the value of life time represents the
maximum allowable amount of transmitted packets through the dedicated VPN tunnel between both
end gateways for. Its value ranges from 20,480 KBs to 2,147,483,647 KBs.
Life time unit
There are two units can be selected: second and KB.
Proposal ID
The identifier of IPSec proposal can be chosen for adding the proposal to the dedicated tunnel. There
are total ten proposals can be set in the proposal pool. At most only four proposals from the pool can
be applied to the dedicated tunnel as shown in the proposal index list.
Function of Buttons
Add to button: Click it to add the chosen proposal indicated by proposal ID to IPSec Proposal index
list. The proposals in the index list will be used in phase 2 of IKE negotiatio n for g etting the IPSec SA
of dedicated tunnel.
53
Page 54
4.6.6 Miscellaneous Items
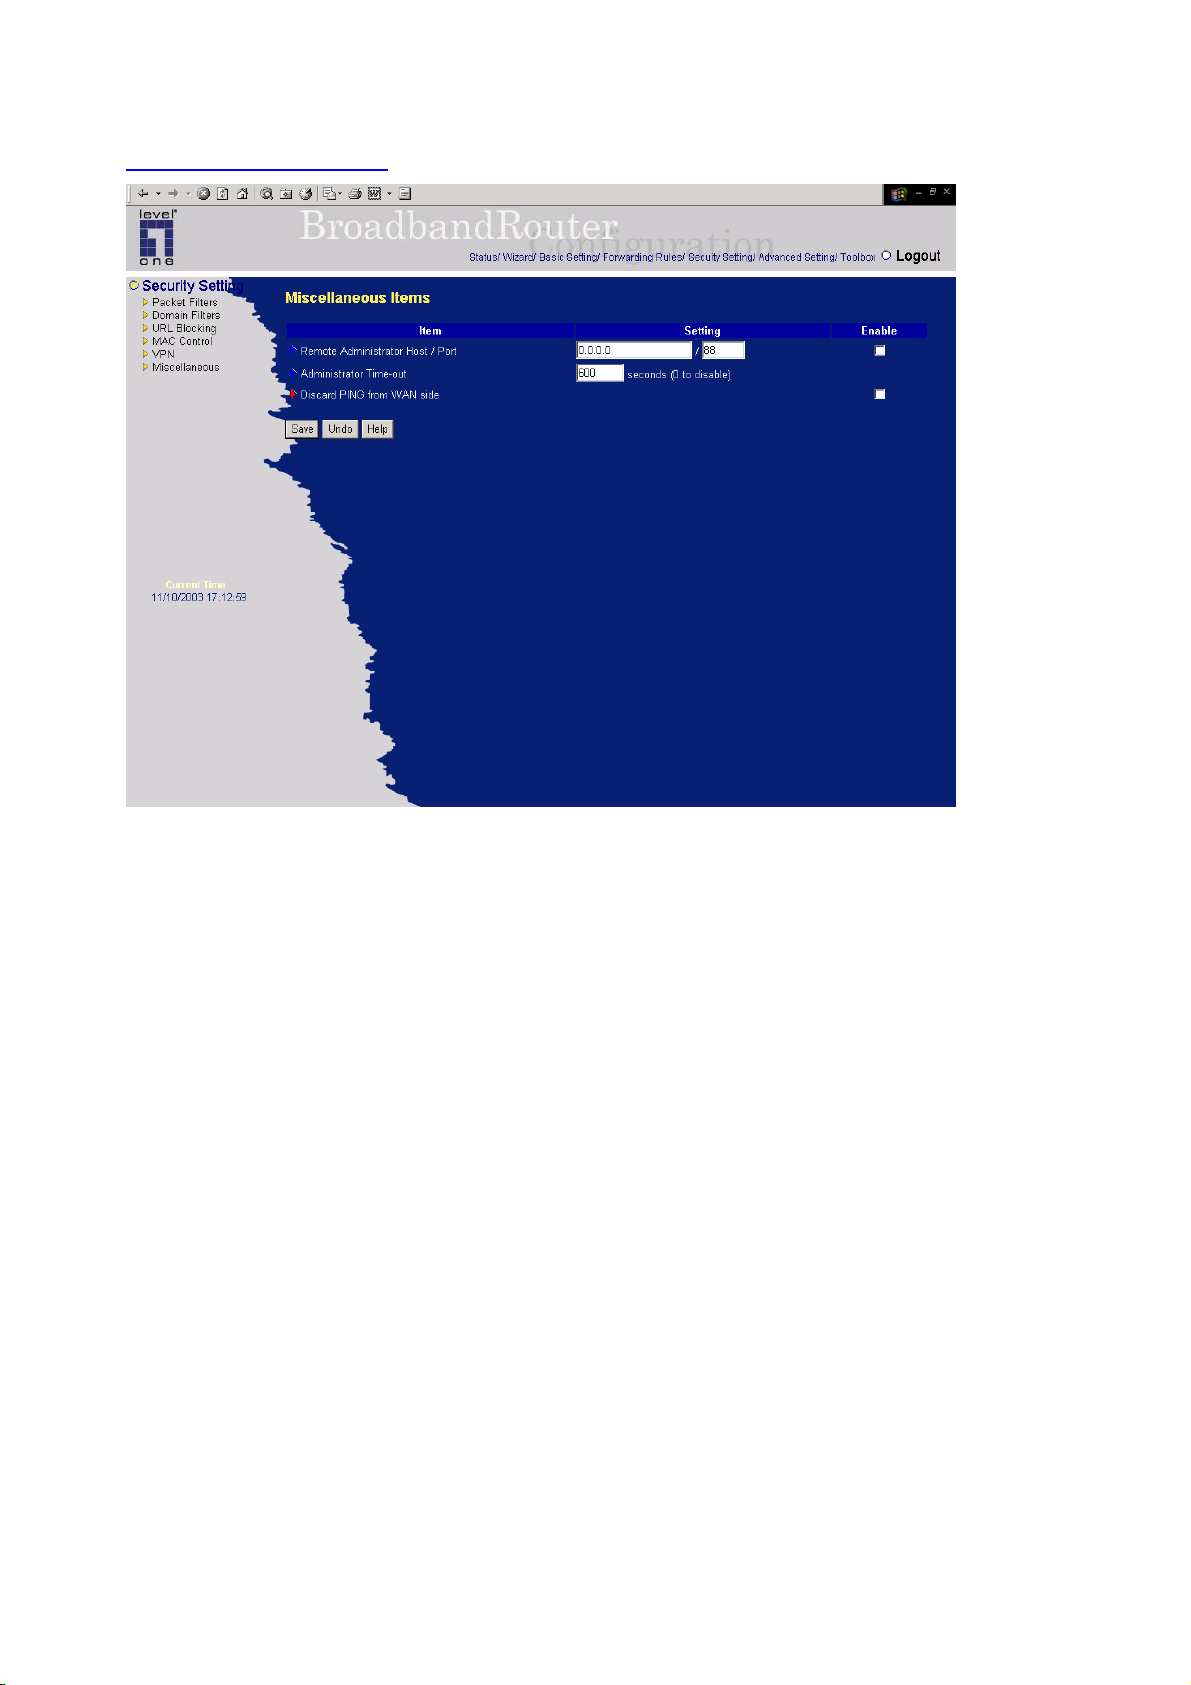
Remote Administrator Host/Port
In general, only Intranet user can browse the built-in web pages to perform administration task. This
feature enables you to perform administration task from remote host. If this feature is enabled, only the
specified IP address can perform remote administration. If the specified IP address is 0.0.0.0, any host
can connect to this product to perform administration task. You can use subnet mask bits "/nn" notation
to specified a group of trusted IP addresses. For example, "10.1.2.0/24".
NOTE: When Remote Administration is enabled, the web server port will be shifted to 88. You can
change web server port to other port, too.
Administrator Time-out
The time of no activity to logout automatically. Set it to zero to disable this feature.
Discard PING from WAN side
When this feature is enabled, any host on the WAN cannot ping this product.
54
Page 55
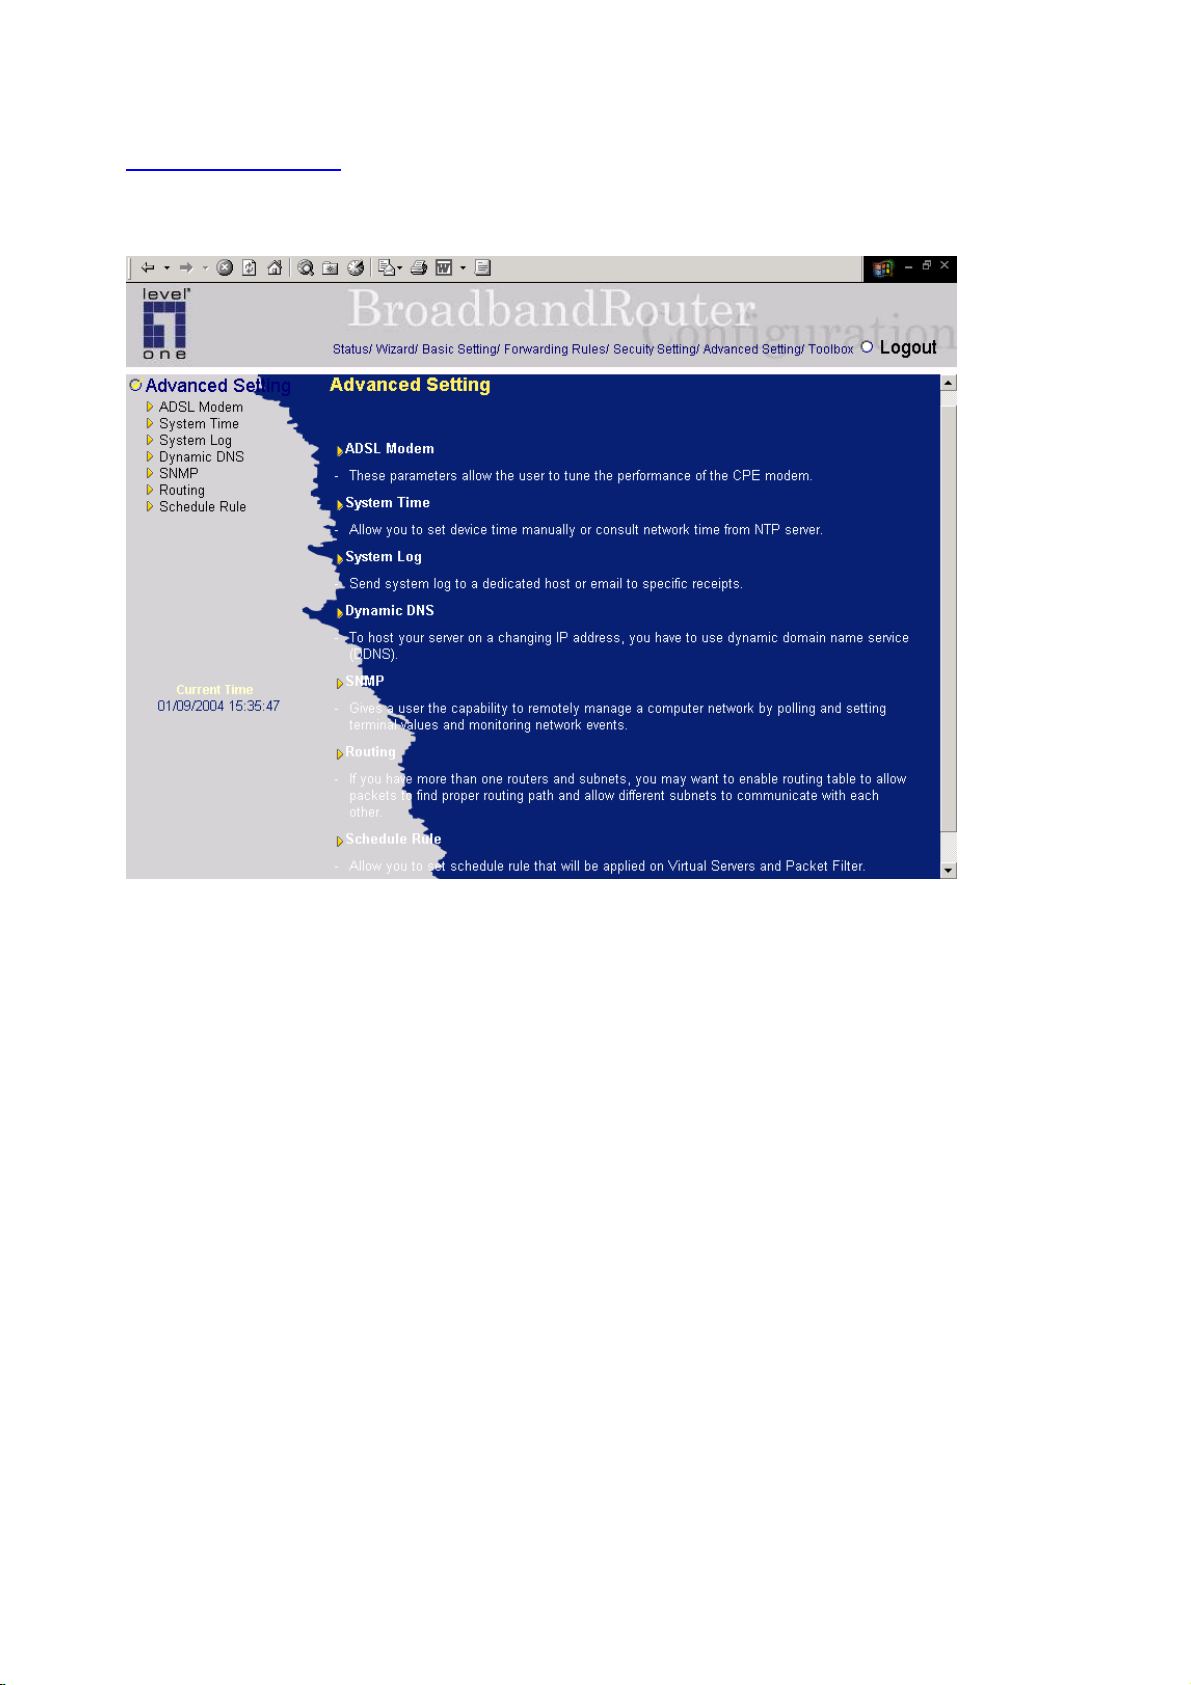
4.7 Advanced Setting
55
Page 56
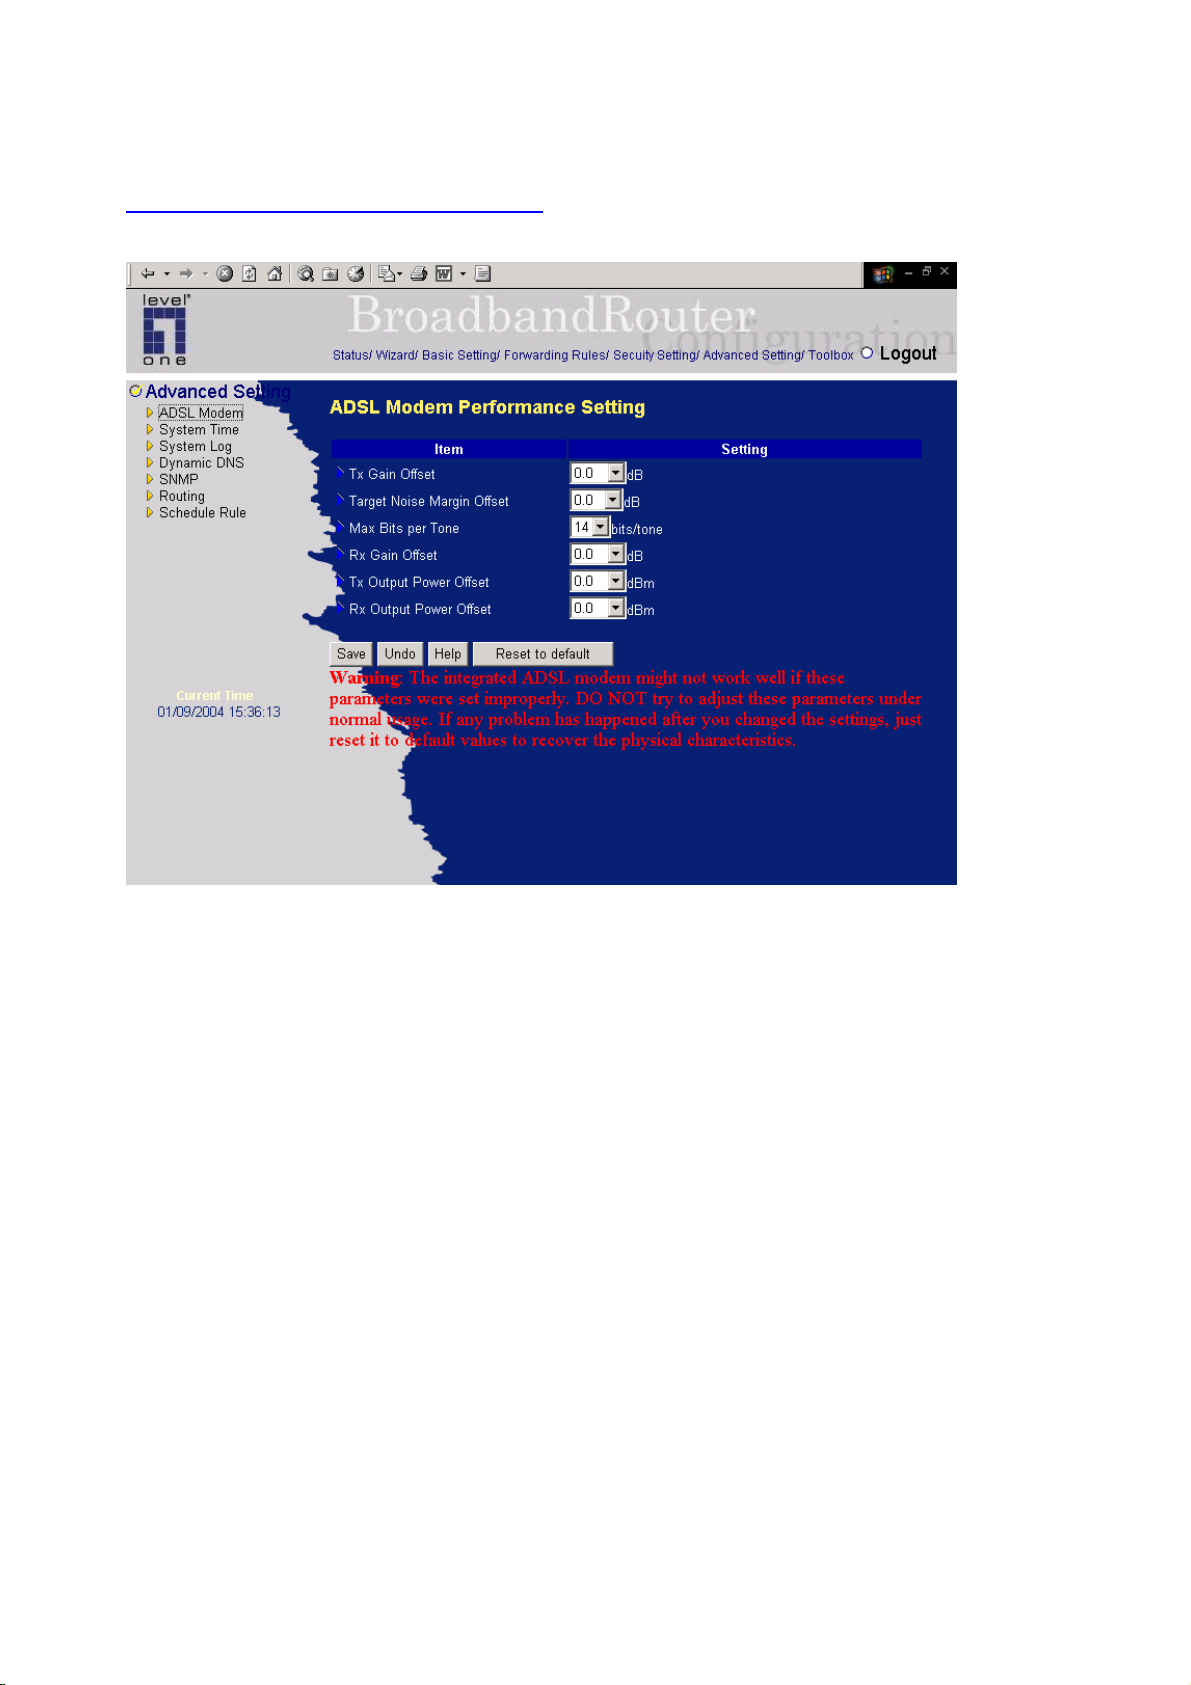
4.7.1 ADSL Modem Performance Setting
Tx Gain Offset
This parameter allows the user to add an offset on the Tx gain of the CPE Modem. The offset range is
limited between -10 dB and +3 dB with a granularity of 0.5 dB. The default value is set to 0 dB, no
offset.
Target Noise Margin Offset
This parameter allows the user to add an offset on the Target Noise Margin of the CPE Modem. The
offset is directly added to the calculated Target Noise margin. It should be ranged between -3dB and
+3dB, with a granularity of 0.5 dB. The default value is set to 0 dB, no offset.
Max Bits per Tone
The value of this parameter will limit the number of bits loaded in each upstream tone. It should be
ranged between 2 and 14 bits/tone. The default value is set to the ADSL maximum standard: 14
bits/tone.
Rx Gain Offset
This parameter allows the user to add an offset on the Rx gain of the CPE Modem.
is limited between -10 dB and +3dB with a granularity of 0.5 dB. The default value is set to 0 dB, no
56
The offset range
Page 57

offset.
Tx Output Power Offset
This parameter allows user to reduce the Tx output power (in the upst ream direction). The value should
be ranged between 0 and 10 dBm.
Rx Output Power Offset
This parameter allows user to reduce the Rx output power. The value should be ranged between 0 and
10 dBm.
57
Page 58
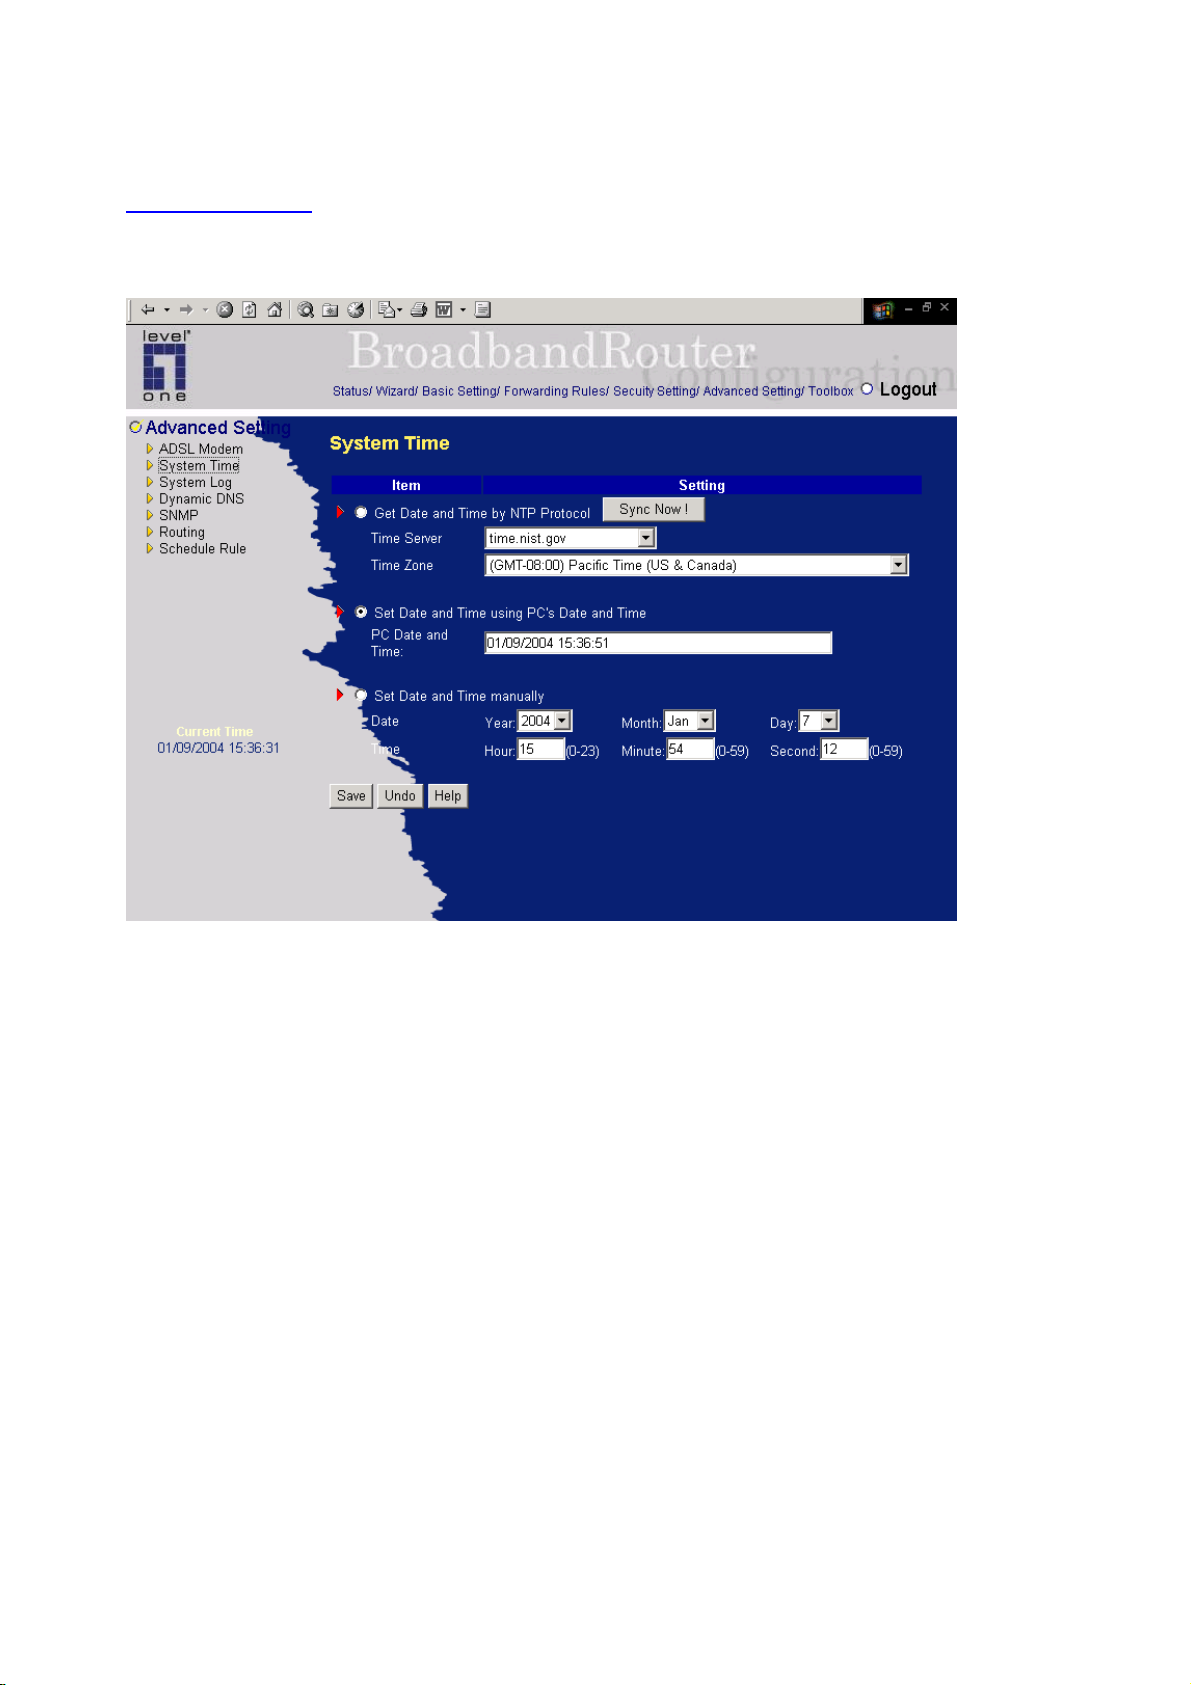
4.7.2 System Time
Get Date and Time by NTP Protocol
Selected if you want to Get Date and Time by NTP Protocol.
Time Server
Select a NTP time server to consult UTC time
Time Zone
Select a time zone where this device locates.
Set Date and Time manually
Selected if you want to Set Date and Time manually.
Function of Buttons
Sync Now: Synchronize system time with network time server
58
Page 59
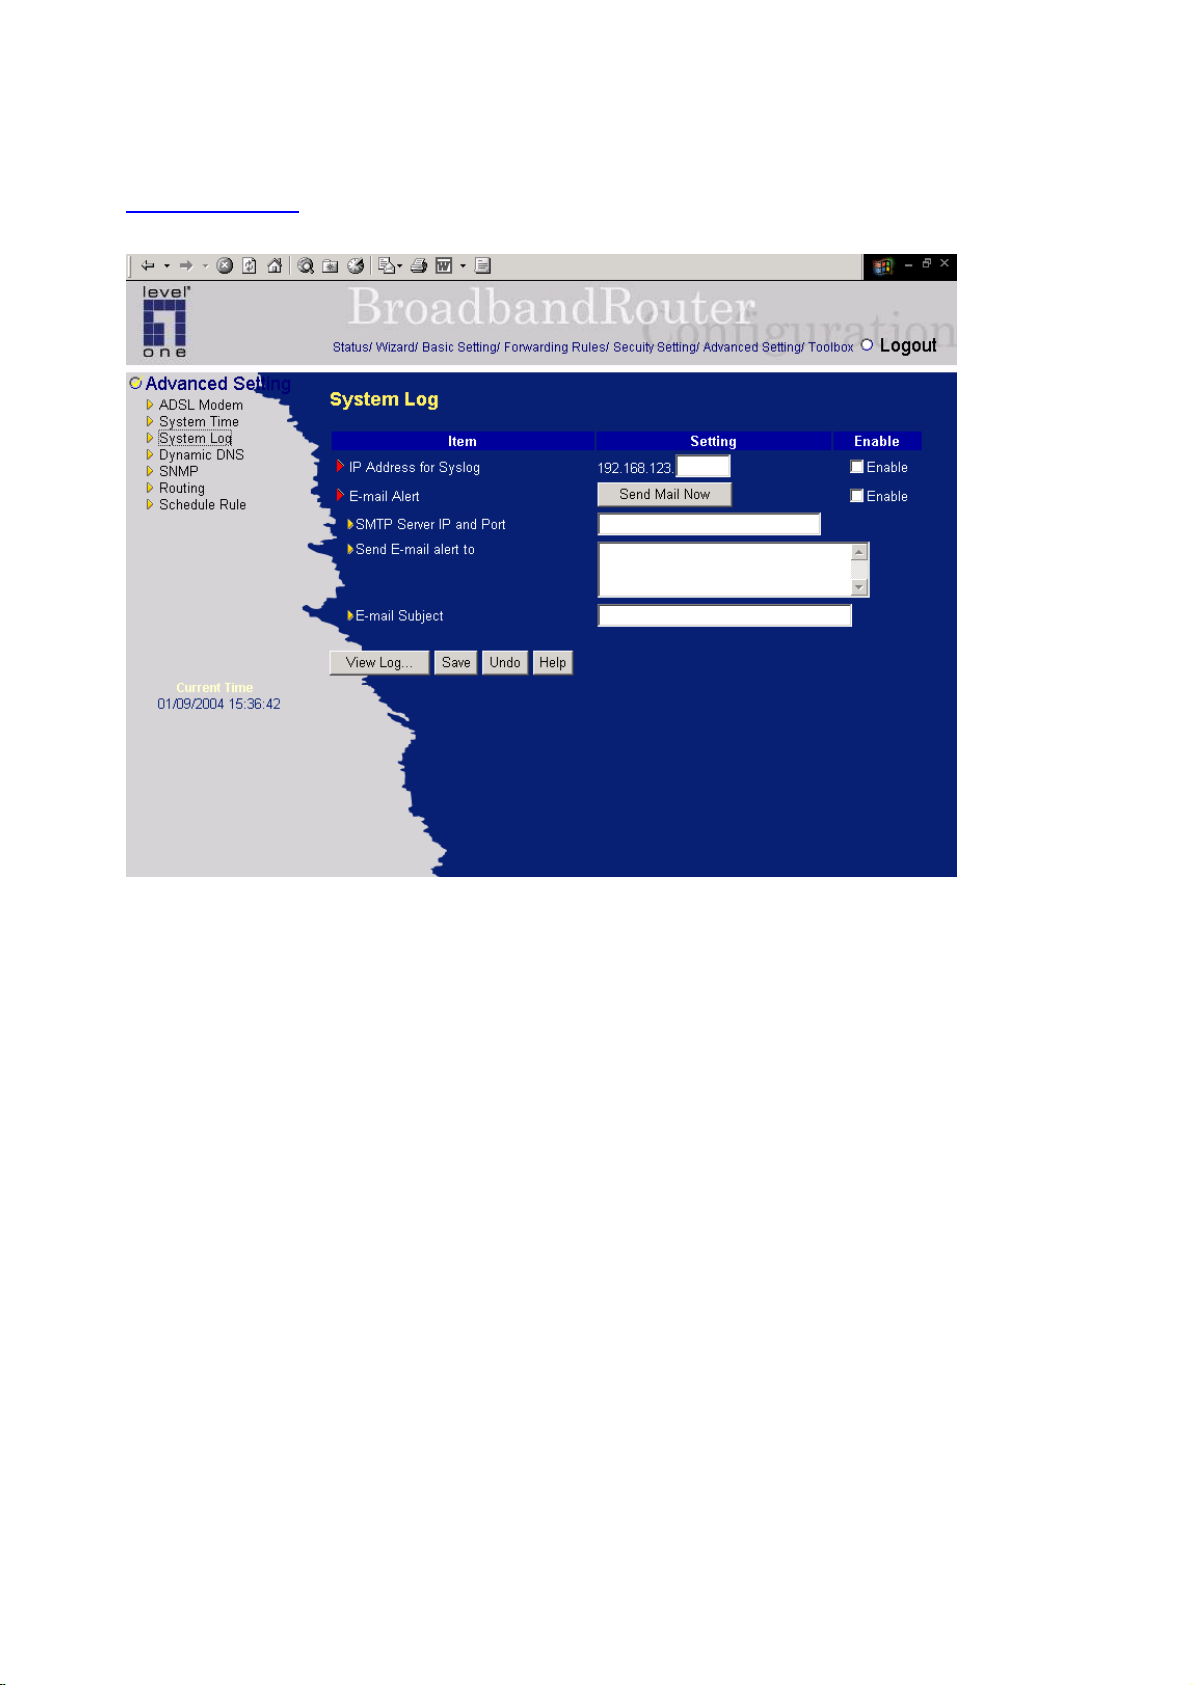
4.7.3 System Log
This page support two methods to export system logs to specific destination by means of syslog(UDP)
and SMTP(TCP). The items you have to setup including:
IP Address for Syslog
Host IP of destination where syslogs will be sent to.
Check Enable to enable this function.
E-mail Alert Enable
Check if you want to enable Email alert(send syslog via email).
SMTP Server IP and Port
Input the SMTP server IP and port, which are contacted with ':'. If you do not specify port number, the
default value is 25.
For example, "mail.your_url.com" or "192.168.1.100:26".
Send E-mail alert to
The recipients who will receive these logs. You can assign more than 1 recipient,
using ';' or ',' to separate these email addresses.
59
Page 60

E-mail Subject
The subject of email alert. This setting is optional.
60
Page 61
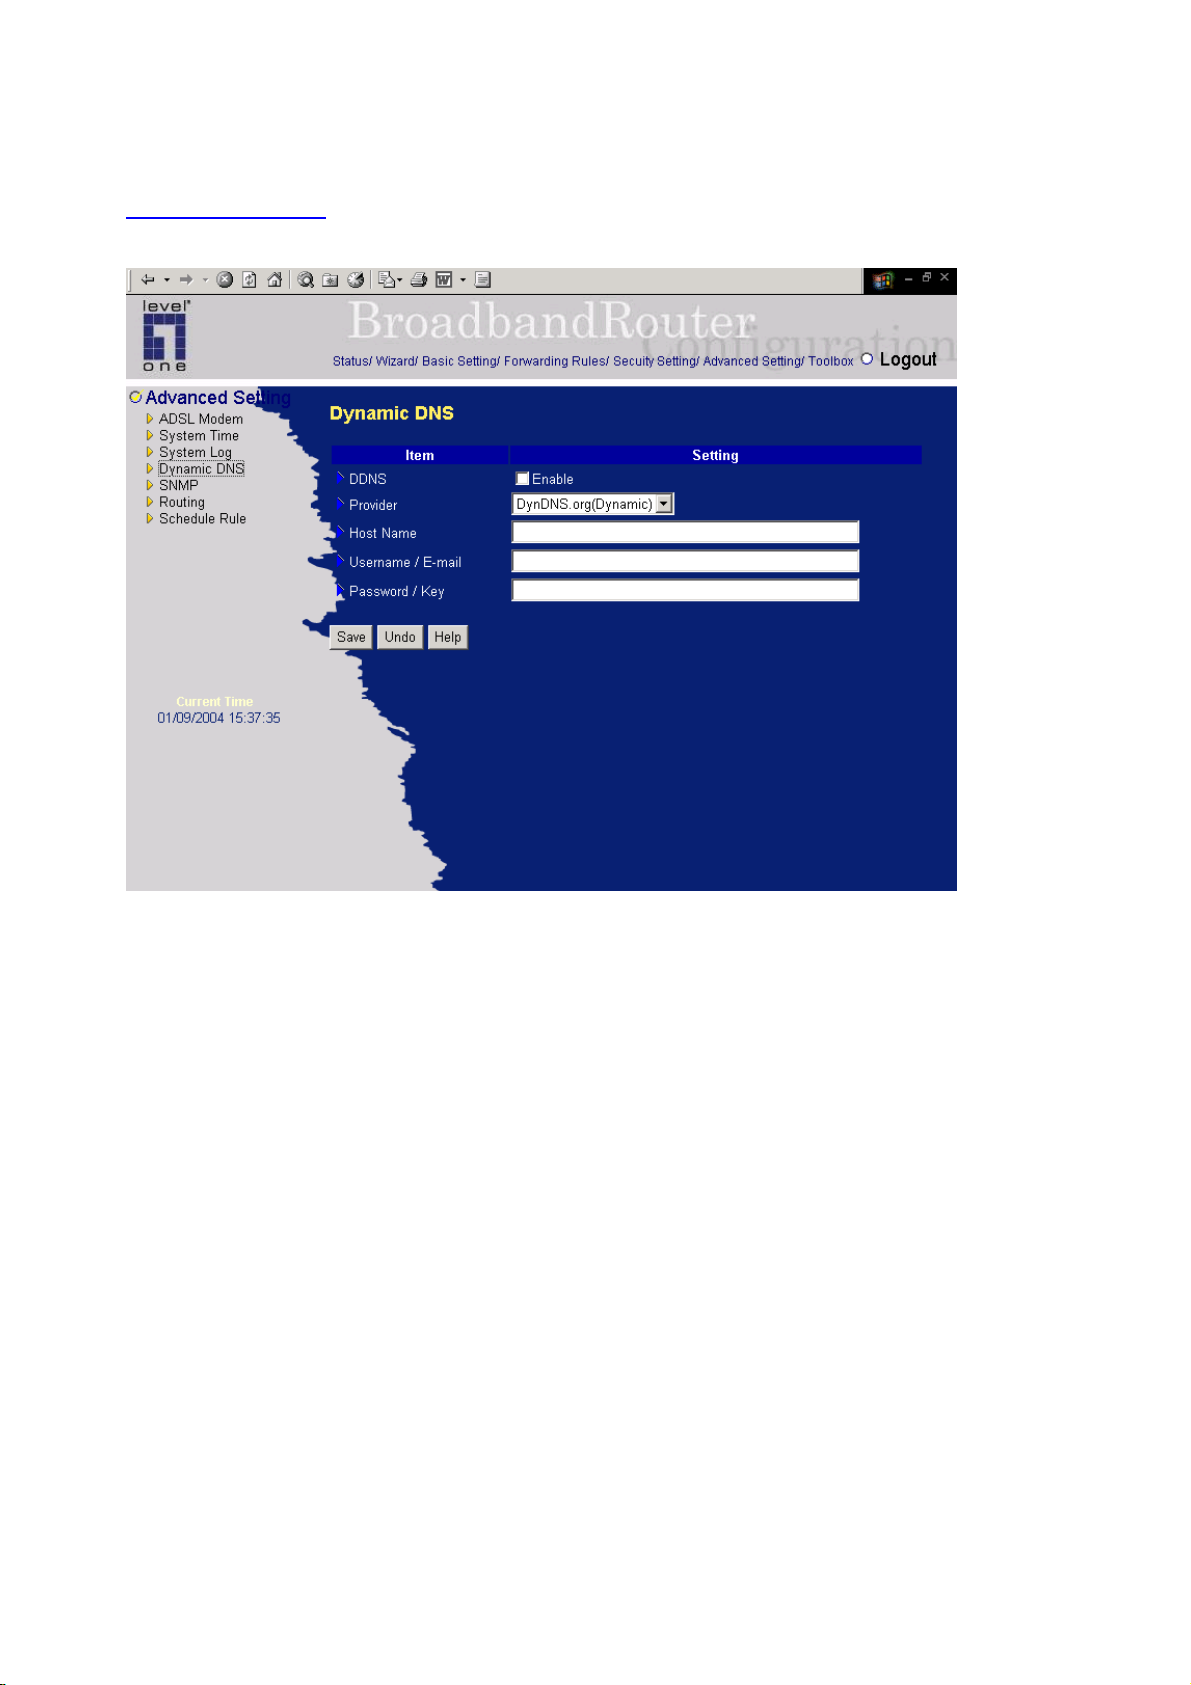
4.7.4 Dynamic DNS
To host your server on a changing IP address, you have to use dynamic domain name service (DDNS).
So that anyone wishing to reach your host only needs to know the name of it. Dynamic DNS will map
the name of your host to your current IP address, which changes each time you connect your Internet
service provider.
Before you enable Dynamic DNS, you need to register an account on one of these Dynamic DNS
servers that we list in provider field.
To enable Dynamic DNS click the check box next to Enable in the DDNS field.
Next you can enter the appropriate information about your Dynamic DNS Server.
You have to define:
Provider
Host Name
61
Page 62
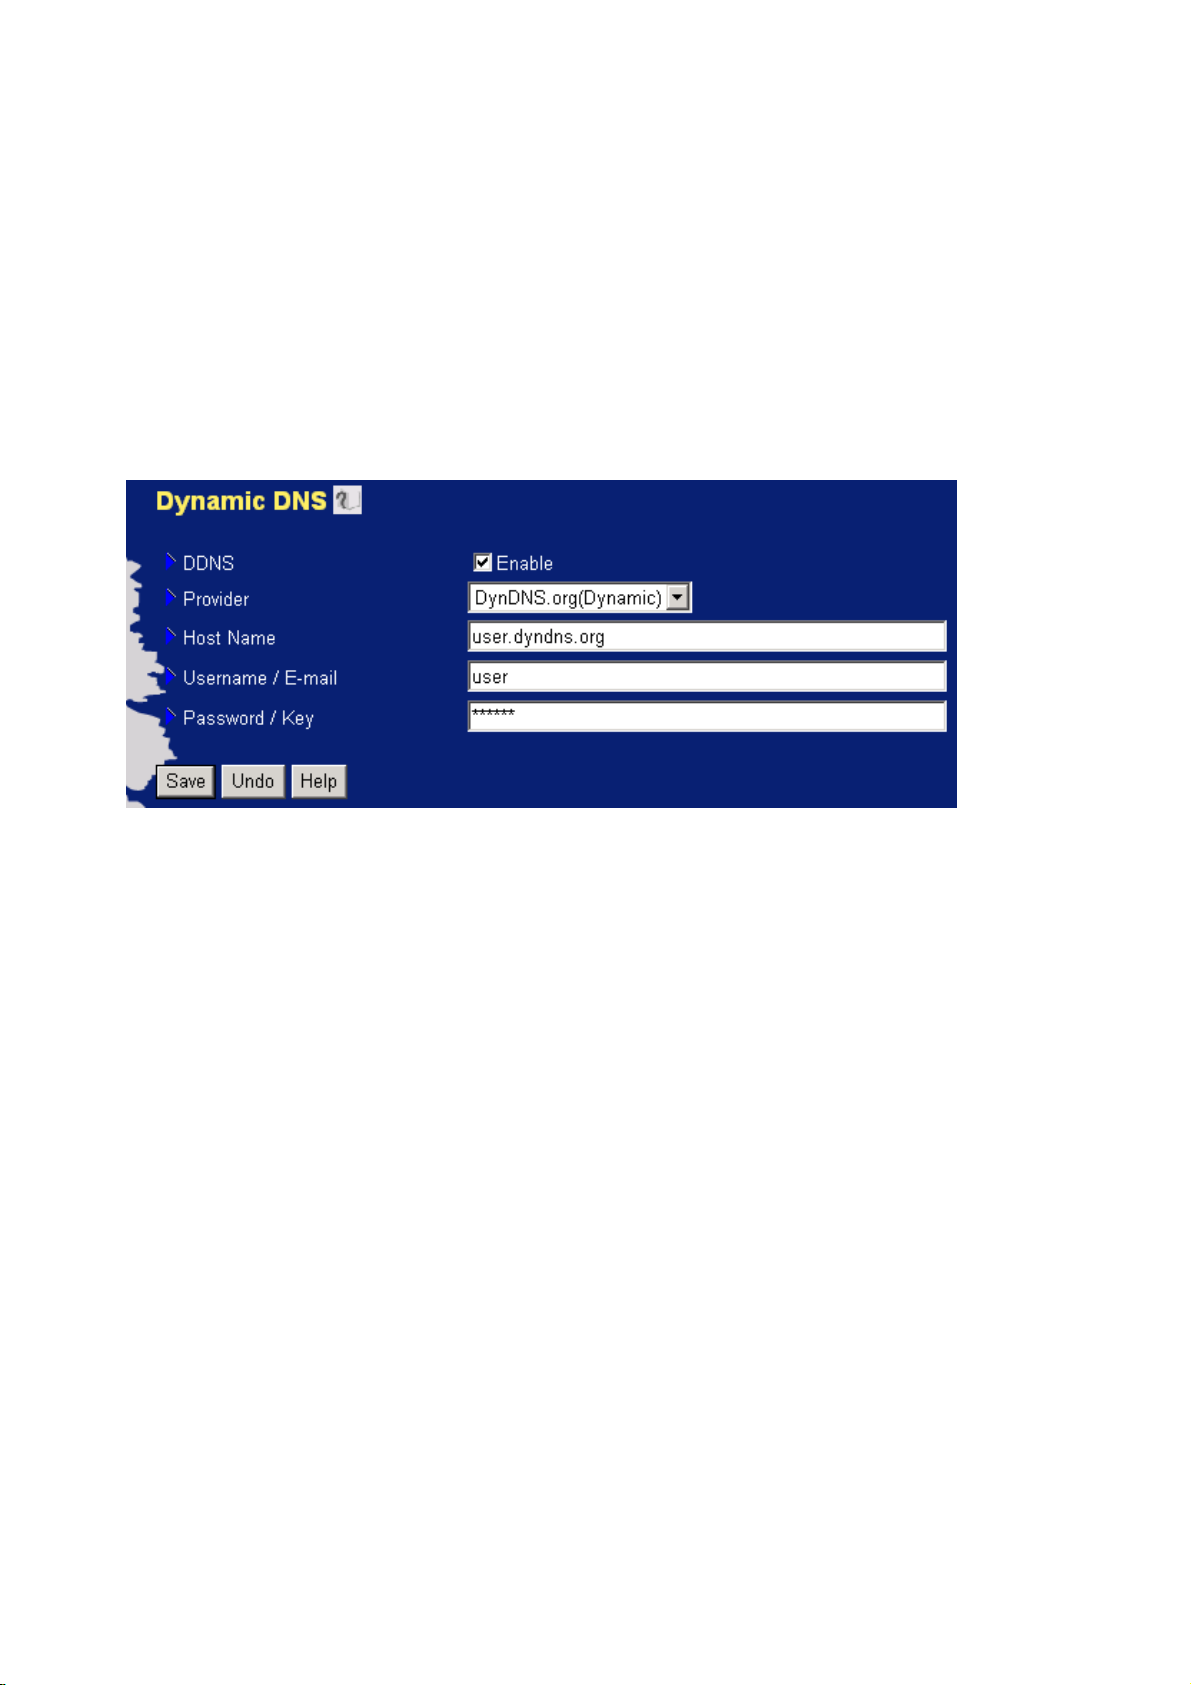
Username/E-mail
Password/Key
You will get this information when you register an account on a Dynamic DNS server.
Example:
After Dynamic DNS setting is configured, click the save button.
62
Page 63
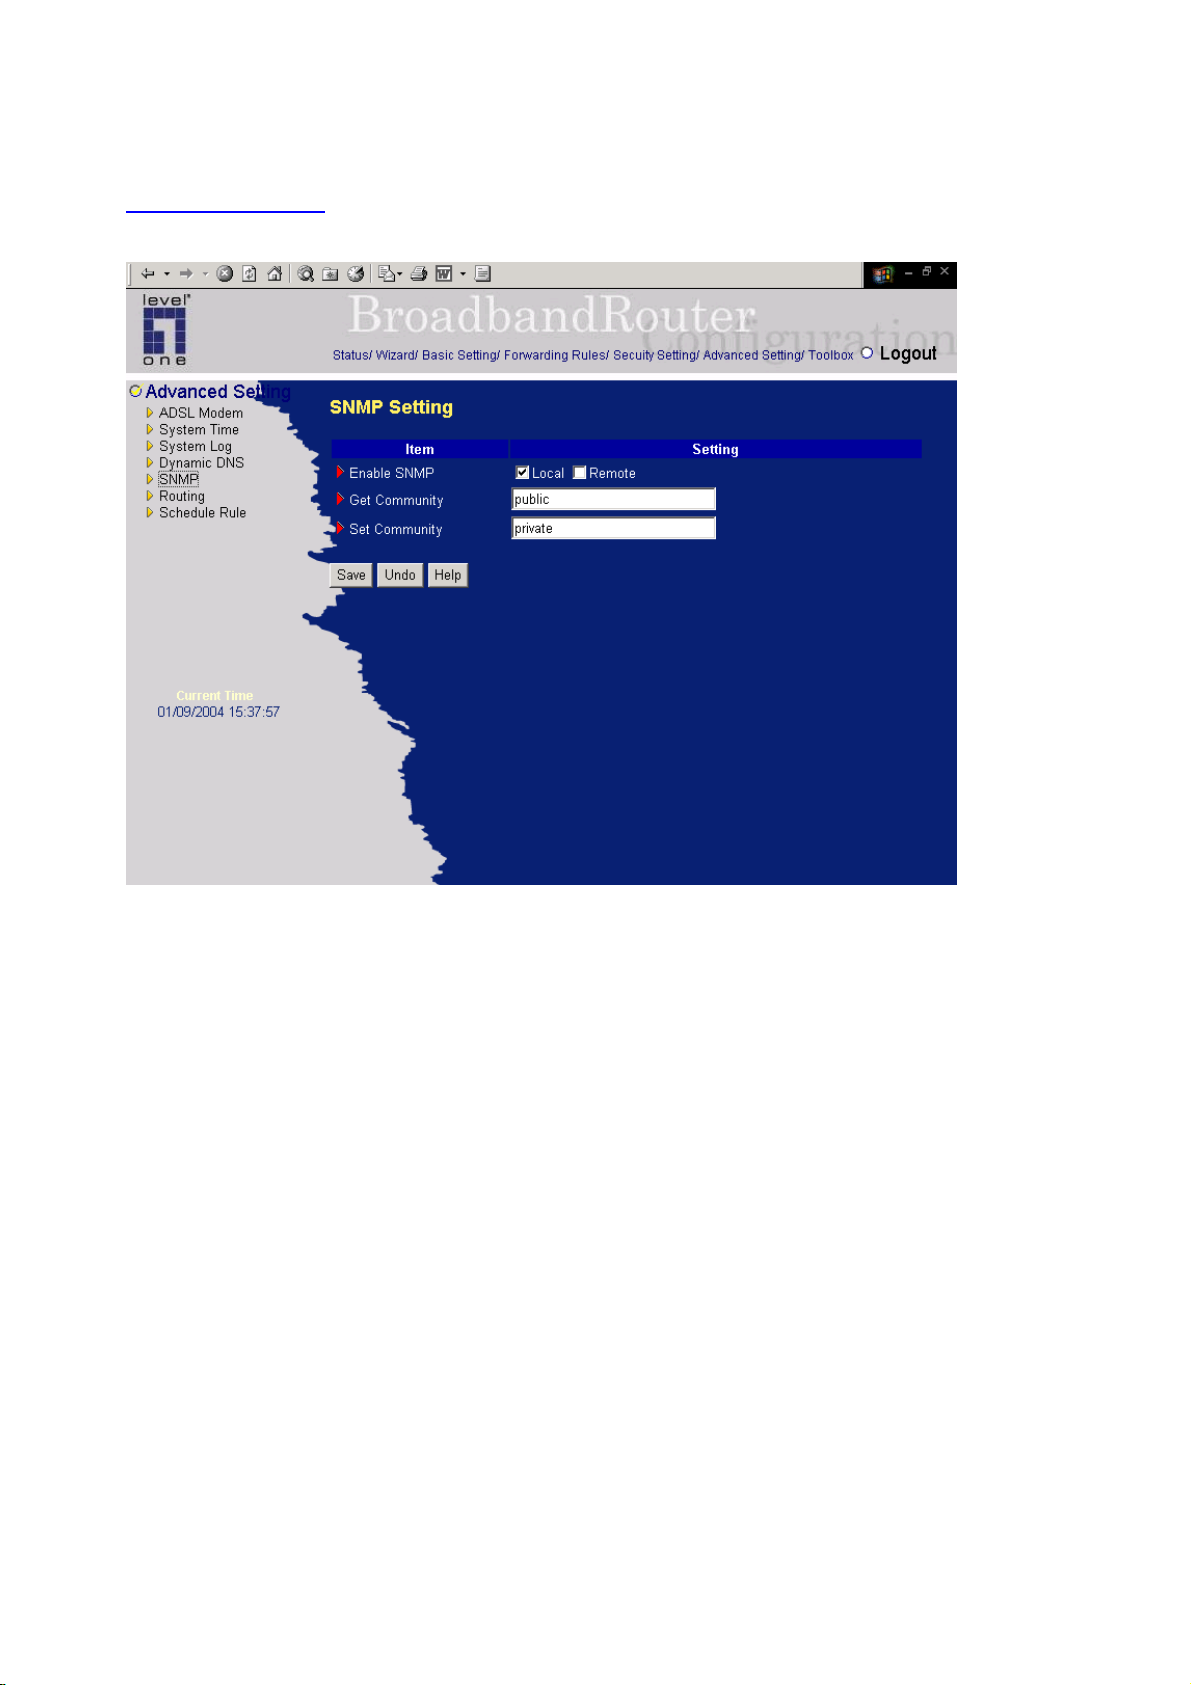
4.7.5 SNMP Setting
In brief, SNMP, the Simple Network Management Protocol, is a protocol designed to give a user the
capability to remotely manage a computer network by polling and setting terminal values and
monitoring network events.
Enable SNMP
You must check either Local or Remote or both to enable SNMP function. If Local is checked, this
device will response request from LAN. If Remote
from WAN.
is checked, this device will response request
Get Community
Setting the community of GetRequest your device will response.
Set Community
Setting the community of SetRequest your device will accept.
Example:
63
Page 64
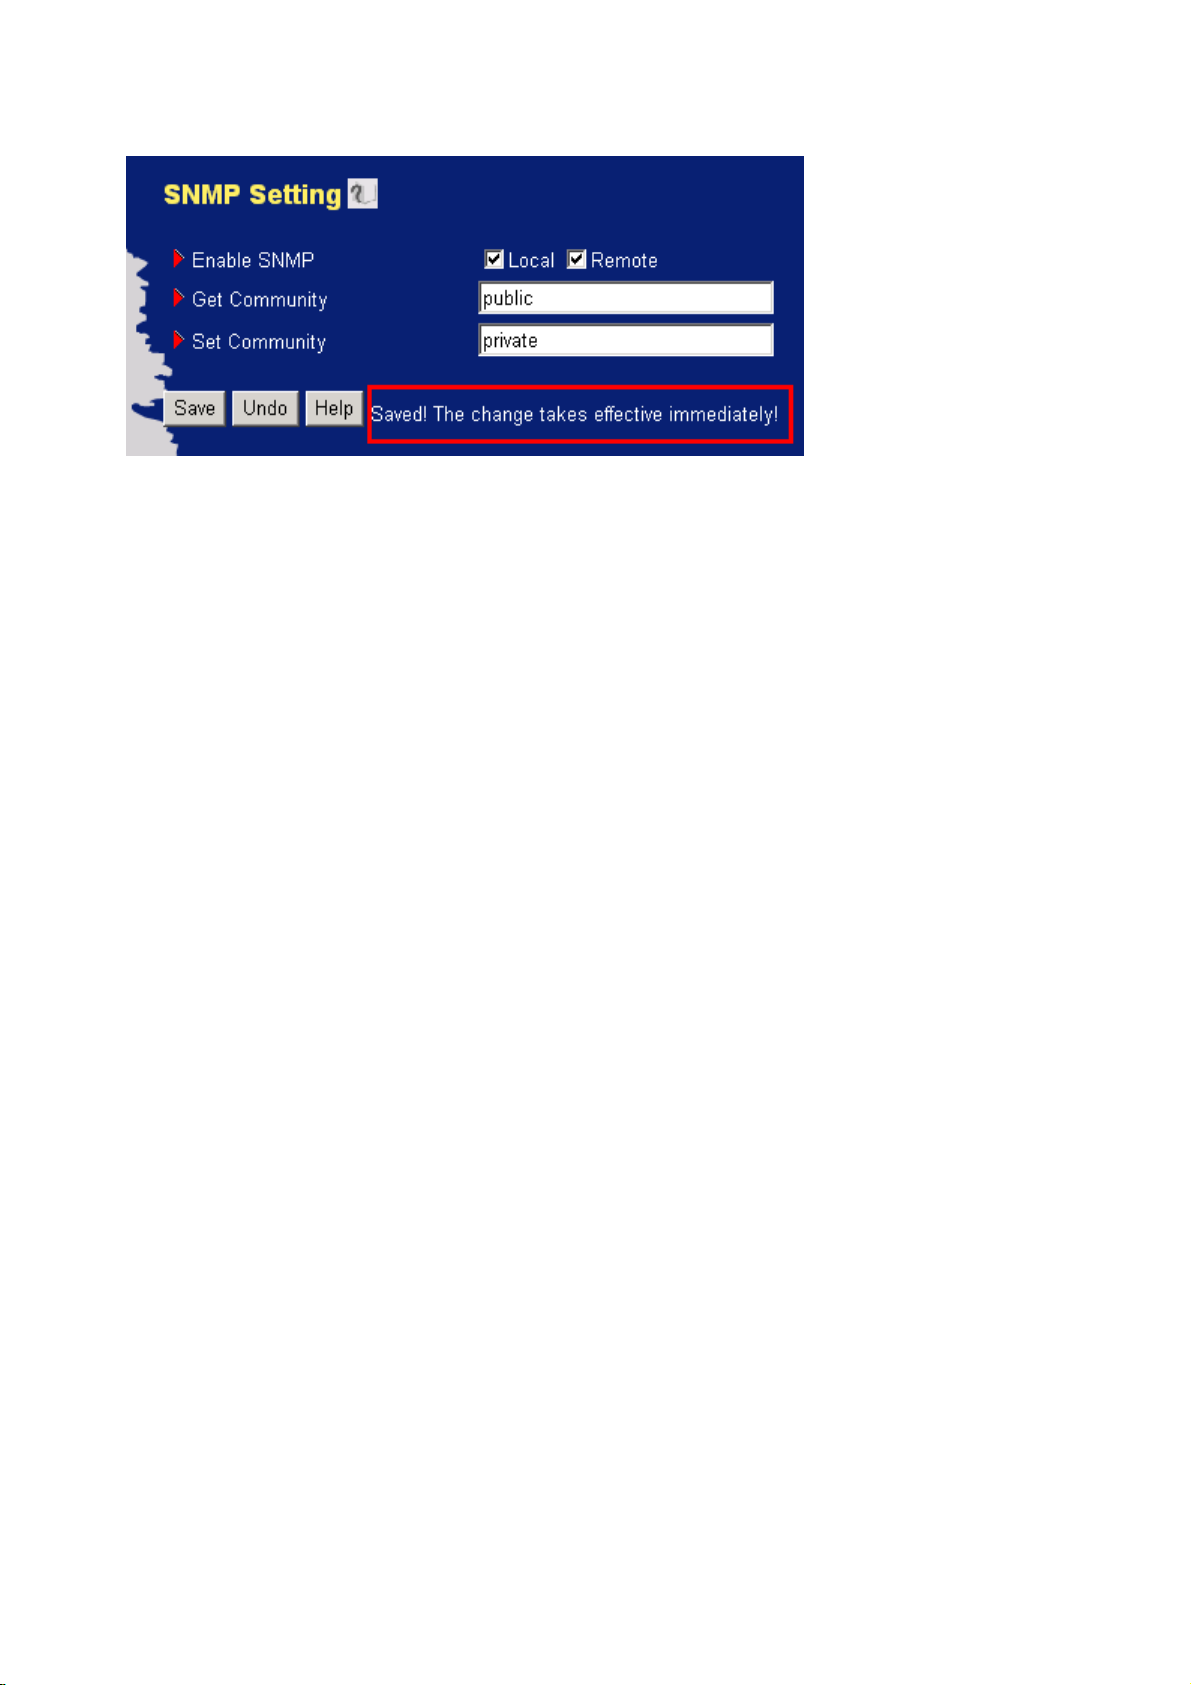
1. This device will response to SNMP client which’s get community is set as “public”
2. This device will response to SNMP client which’s set community is set as “private”
3. This device will response request from both LAN and WAN
64
Page 65
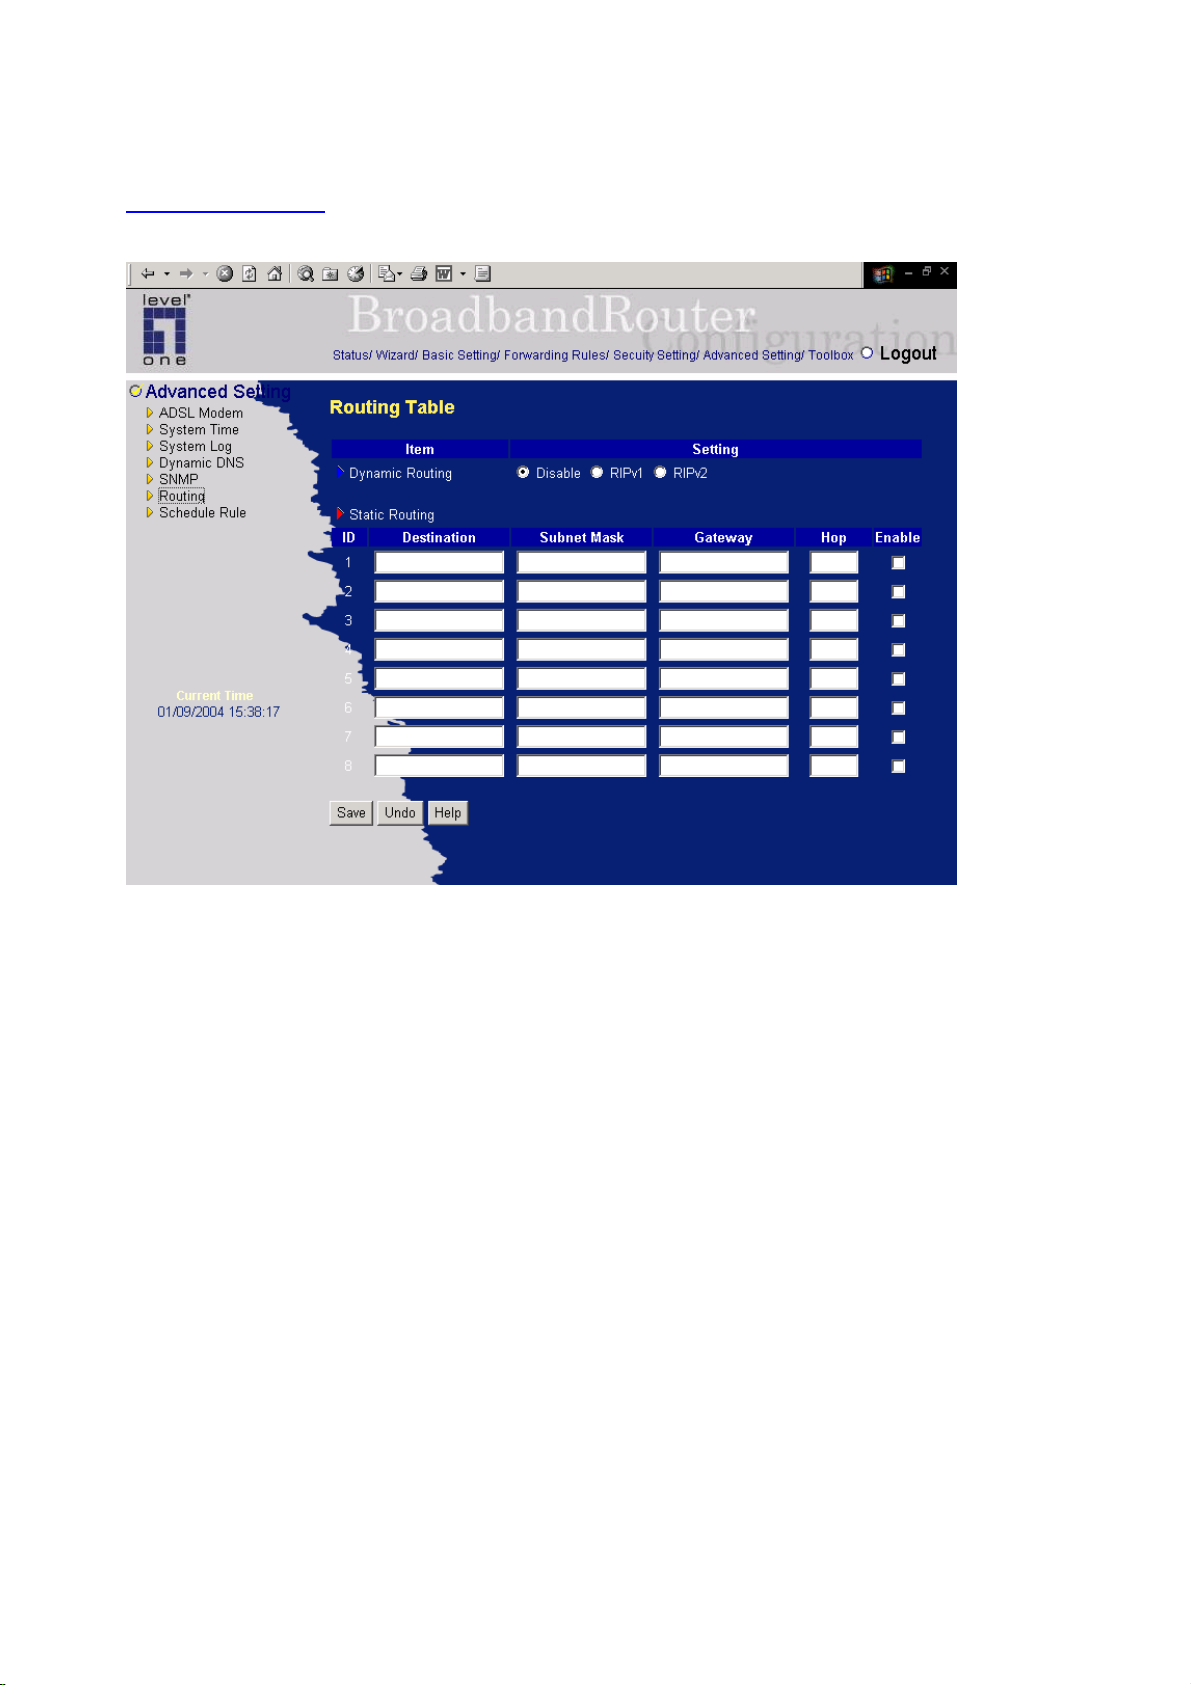
4.7.6 Routing Table
Routing Tables allow you to determine which physical interface address to use for outgoing IP data
grams. If you have more than one routers and subnets, you will need to enable routing table to allow
packets to find proper routing path and allow different subnets to communicate with each other.
Routing Table settings are settings used to setup the functions of static and dynamic routing.
RIP Enable: Check to enable RIP function.
Static Routing: For static routing, you can specify up to 8 routing rules. You can enter the destination
IP address, subnet mask, gateway, hop for each routing rule, and then enable or disable the rule by
checking or unchecking the Enable checkbox.
65
Page 66
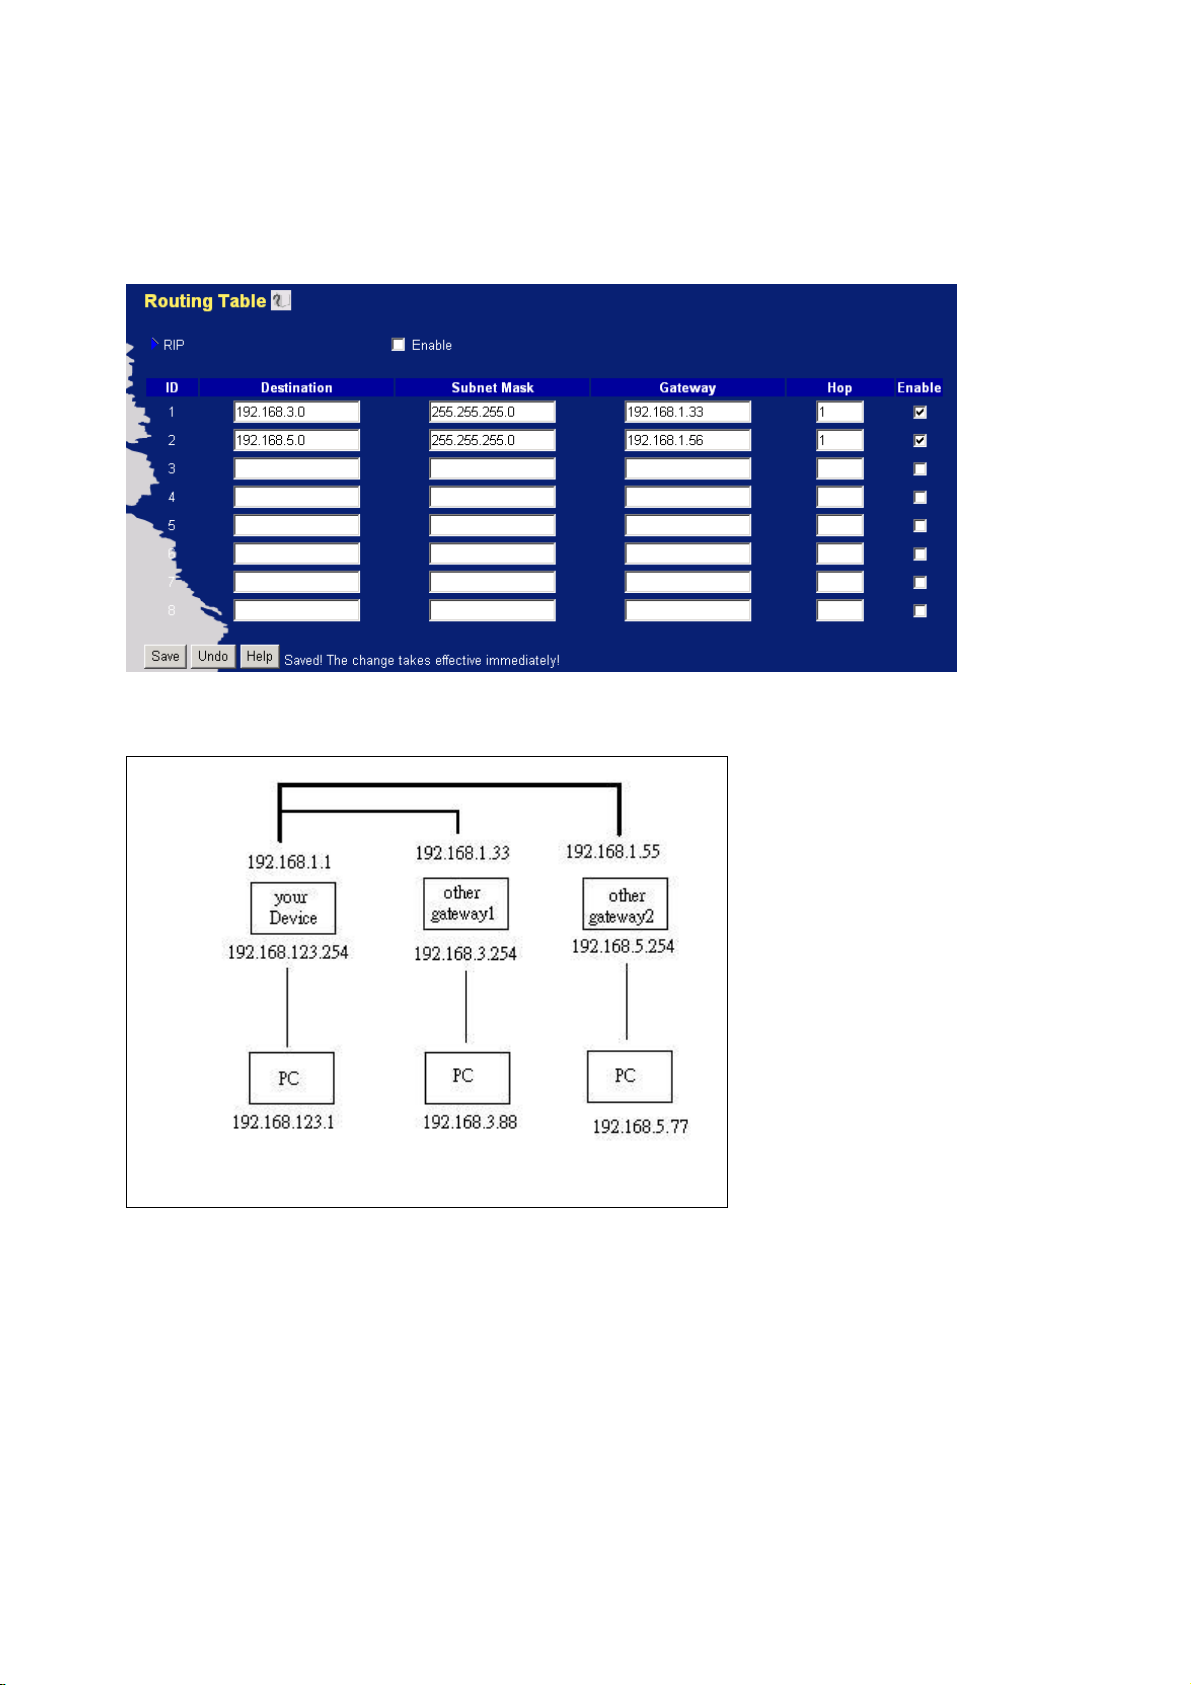
Example:
So if, for example, the host wanted to send an IP data gram to 192.168.3.88, it would use the above
table to determine that it had to go via 192.168.1.33 (a gateway),
And if it sends Packets to 192.168.5.77 will go via 192.168.1.55
Each rule can be enabled or disabled individually.
After routing table setting is configured, click the save button.
66
Page 67
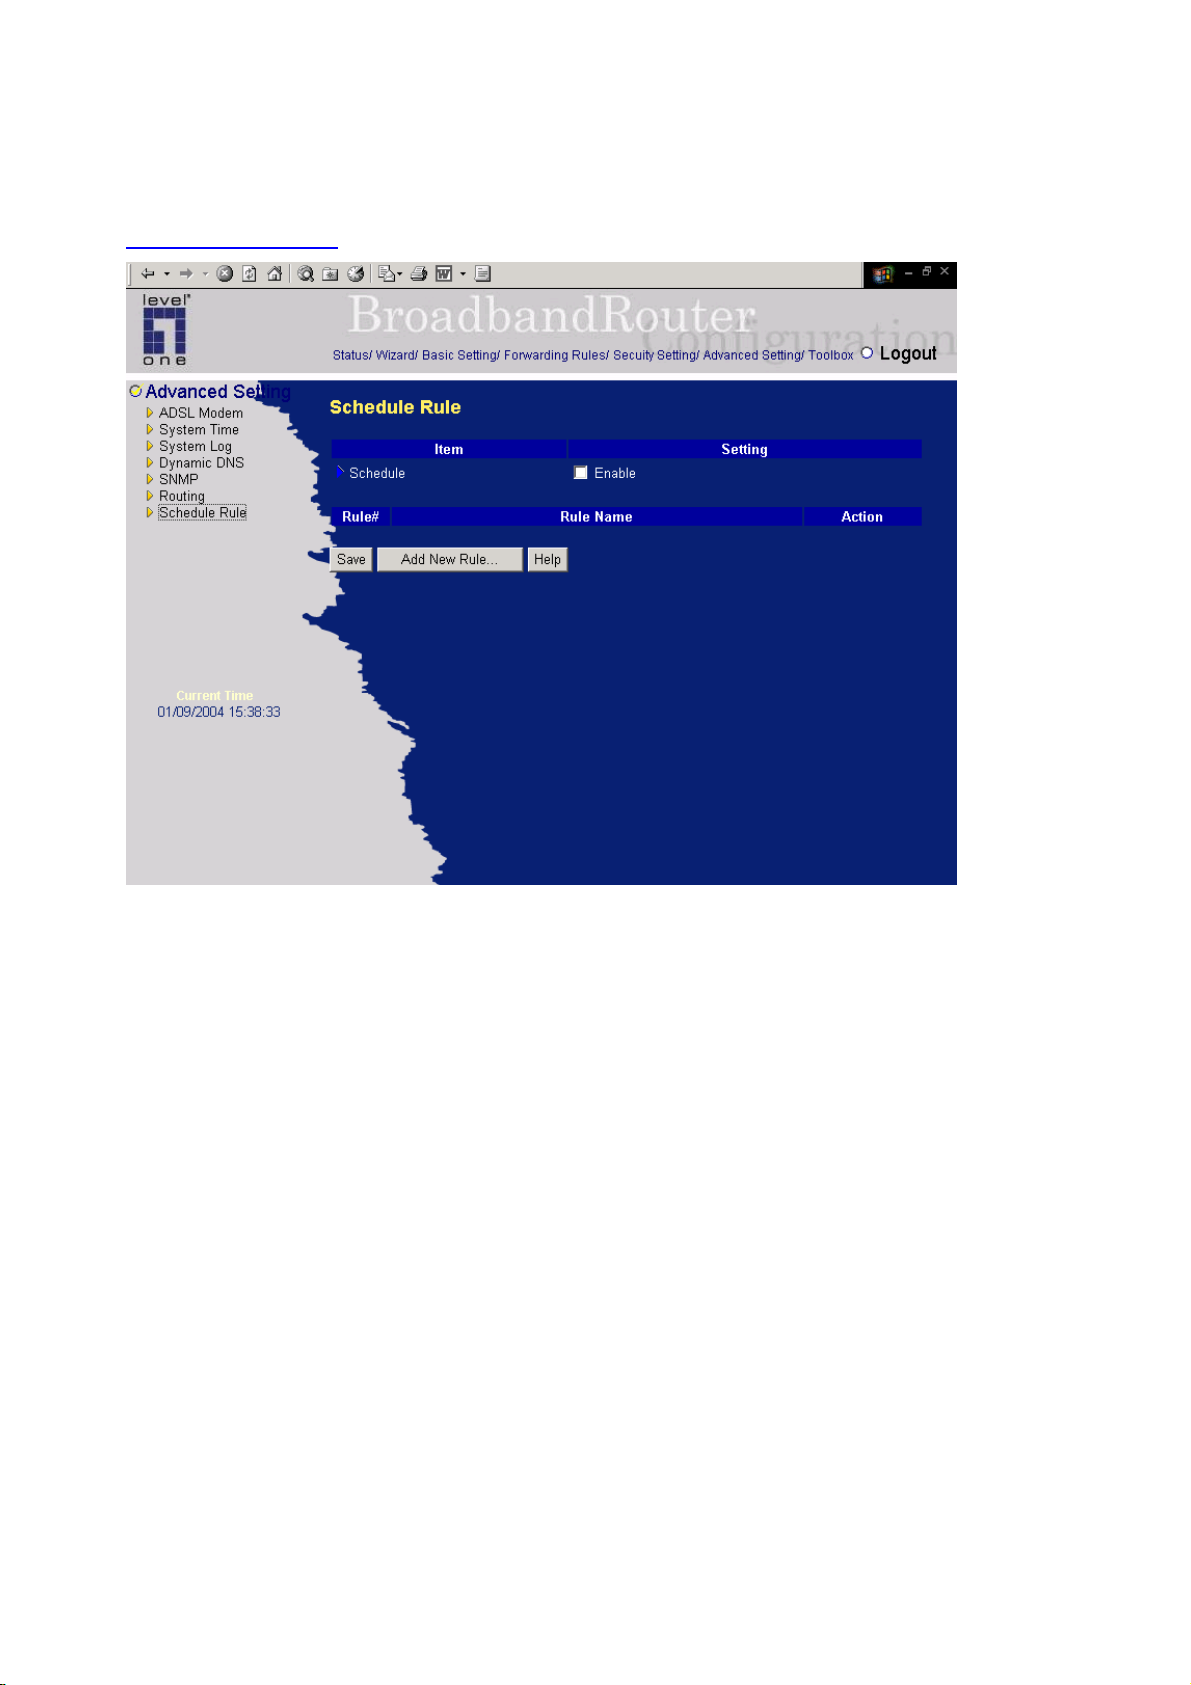
4.7.7 Schedule Rule
You can set the schedule time to decide which service at what time will be turned on or off. Select the
“enable” item.
Press “Add New Rule”
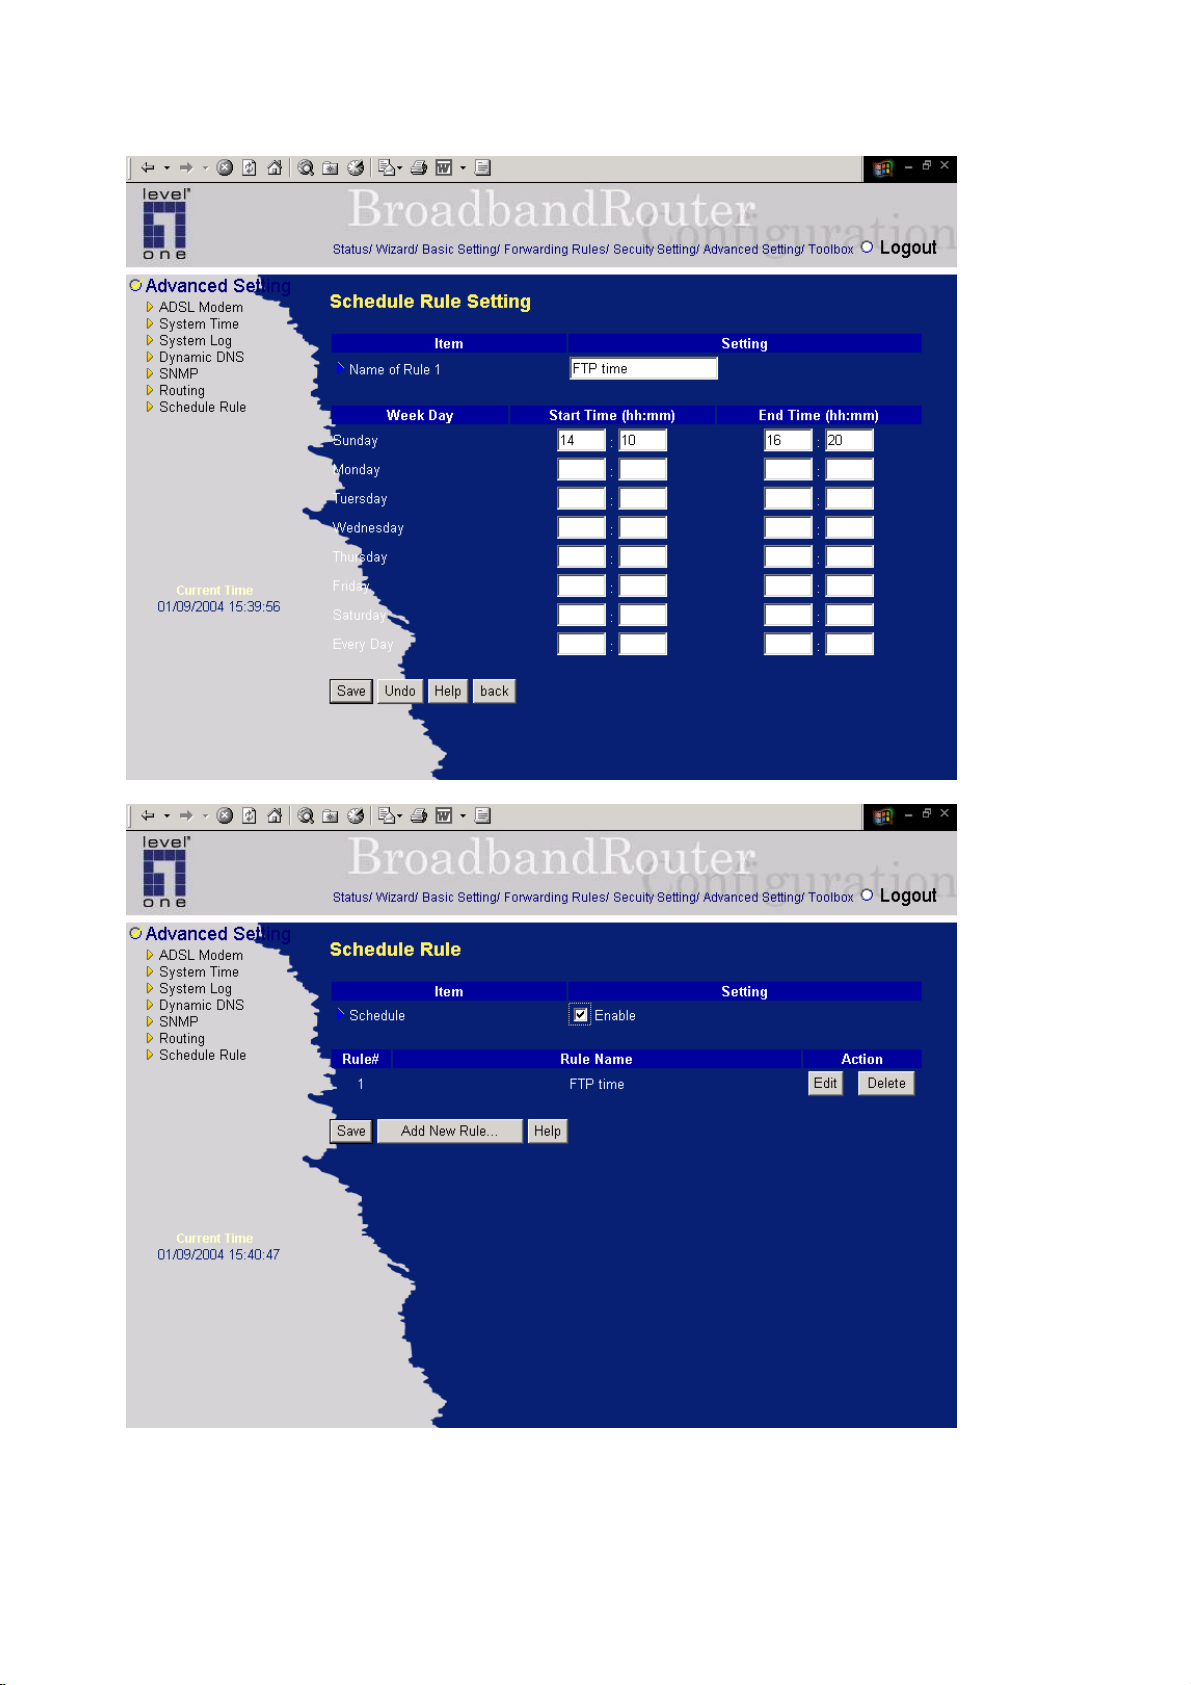
You can write a rule name and set which day and what time to schedule from “Start Time” to “End
Time”. The following example configure “FTP time” as everyday 14:10 to 16:20
67
Page 68
68
Page 69
Schedule Enable
Selected if you want to Enable the Scheduler.
Edit
To edit the schedule rule.
Delete
To delete the schedule rule, and the rule# of the rules behind the deleted one will decrease one
automatically.
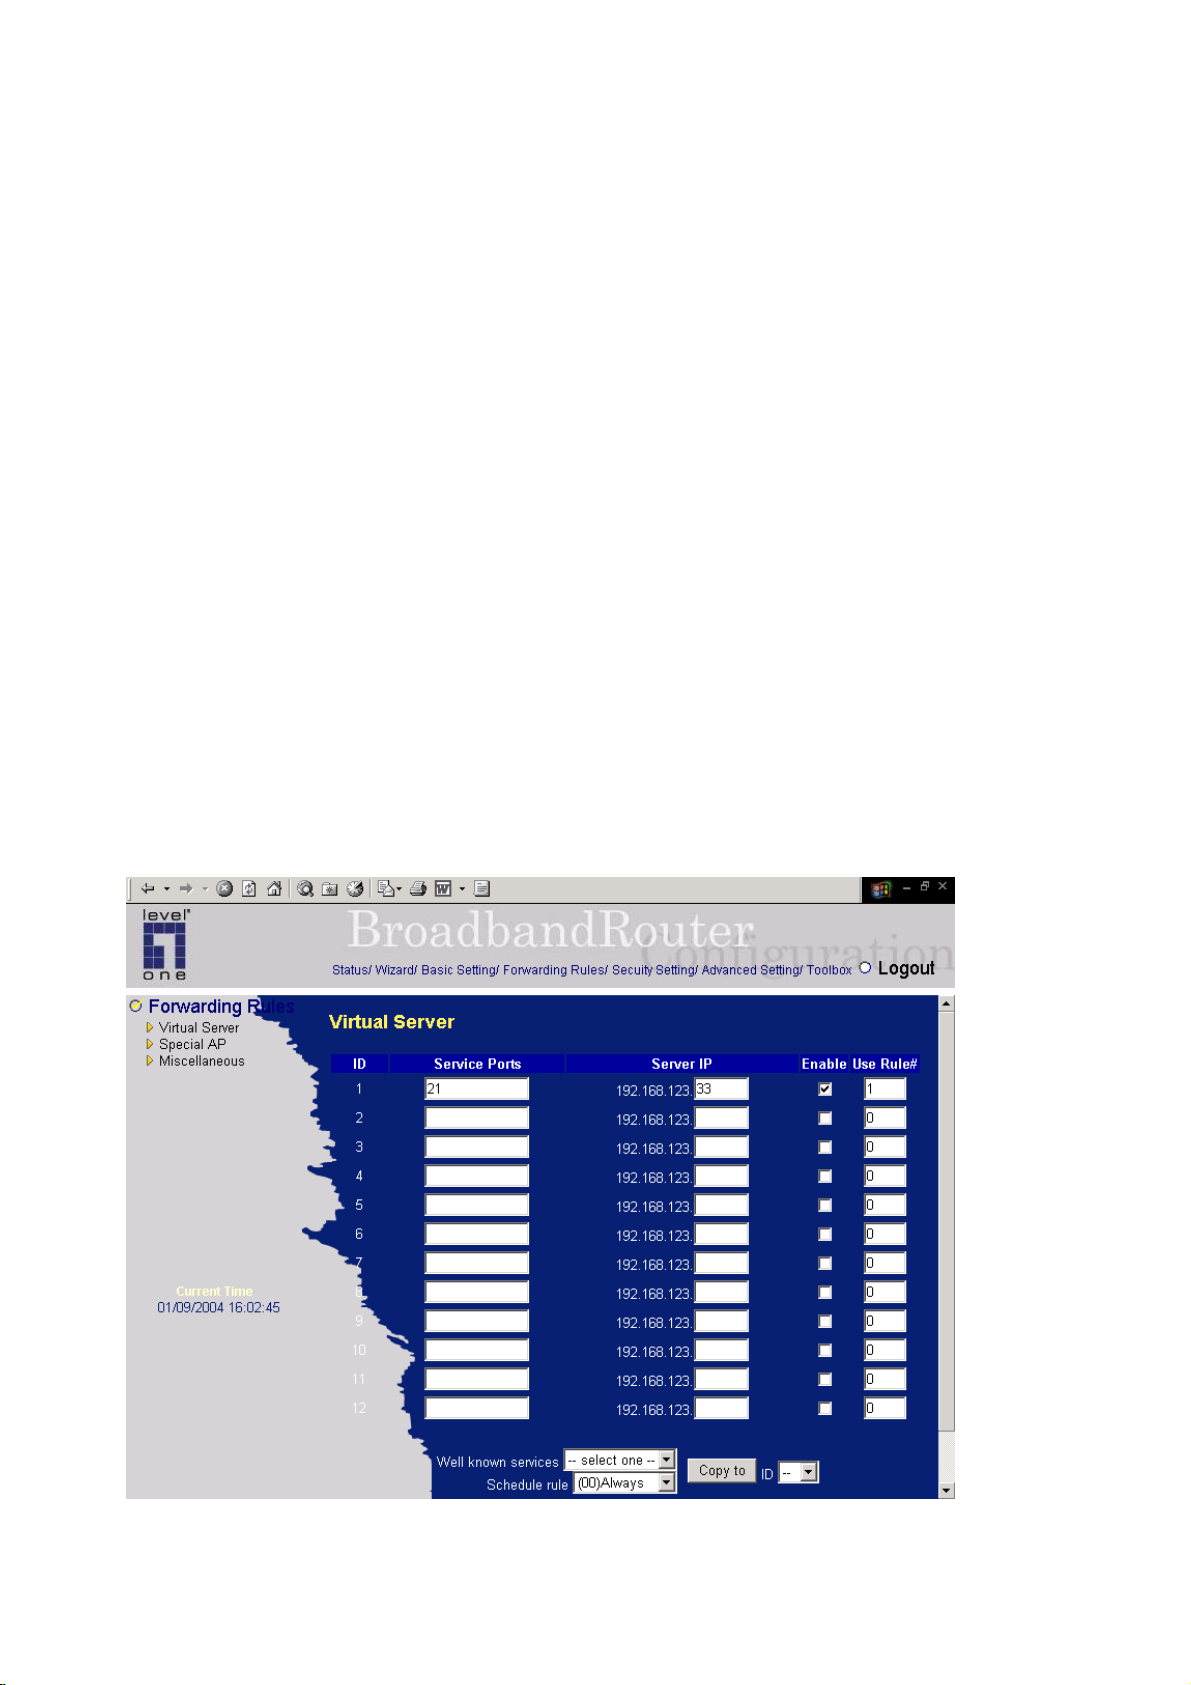
Schedule Rule can be apply to Virtual server and Packet Filter, for example:
Exanple1: Virtual Server – Apply Rule#1 (ftp time: everyday 14:10 to 16:20)
69
Page 70
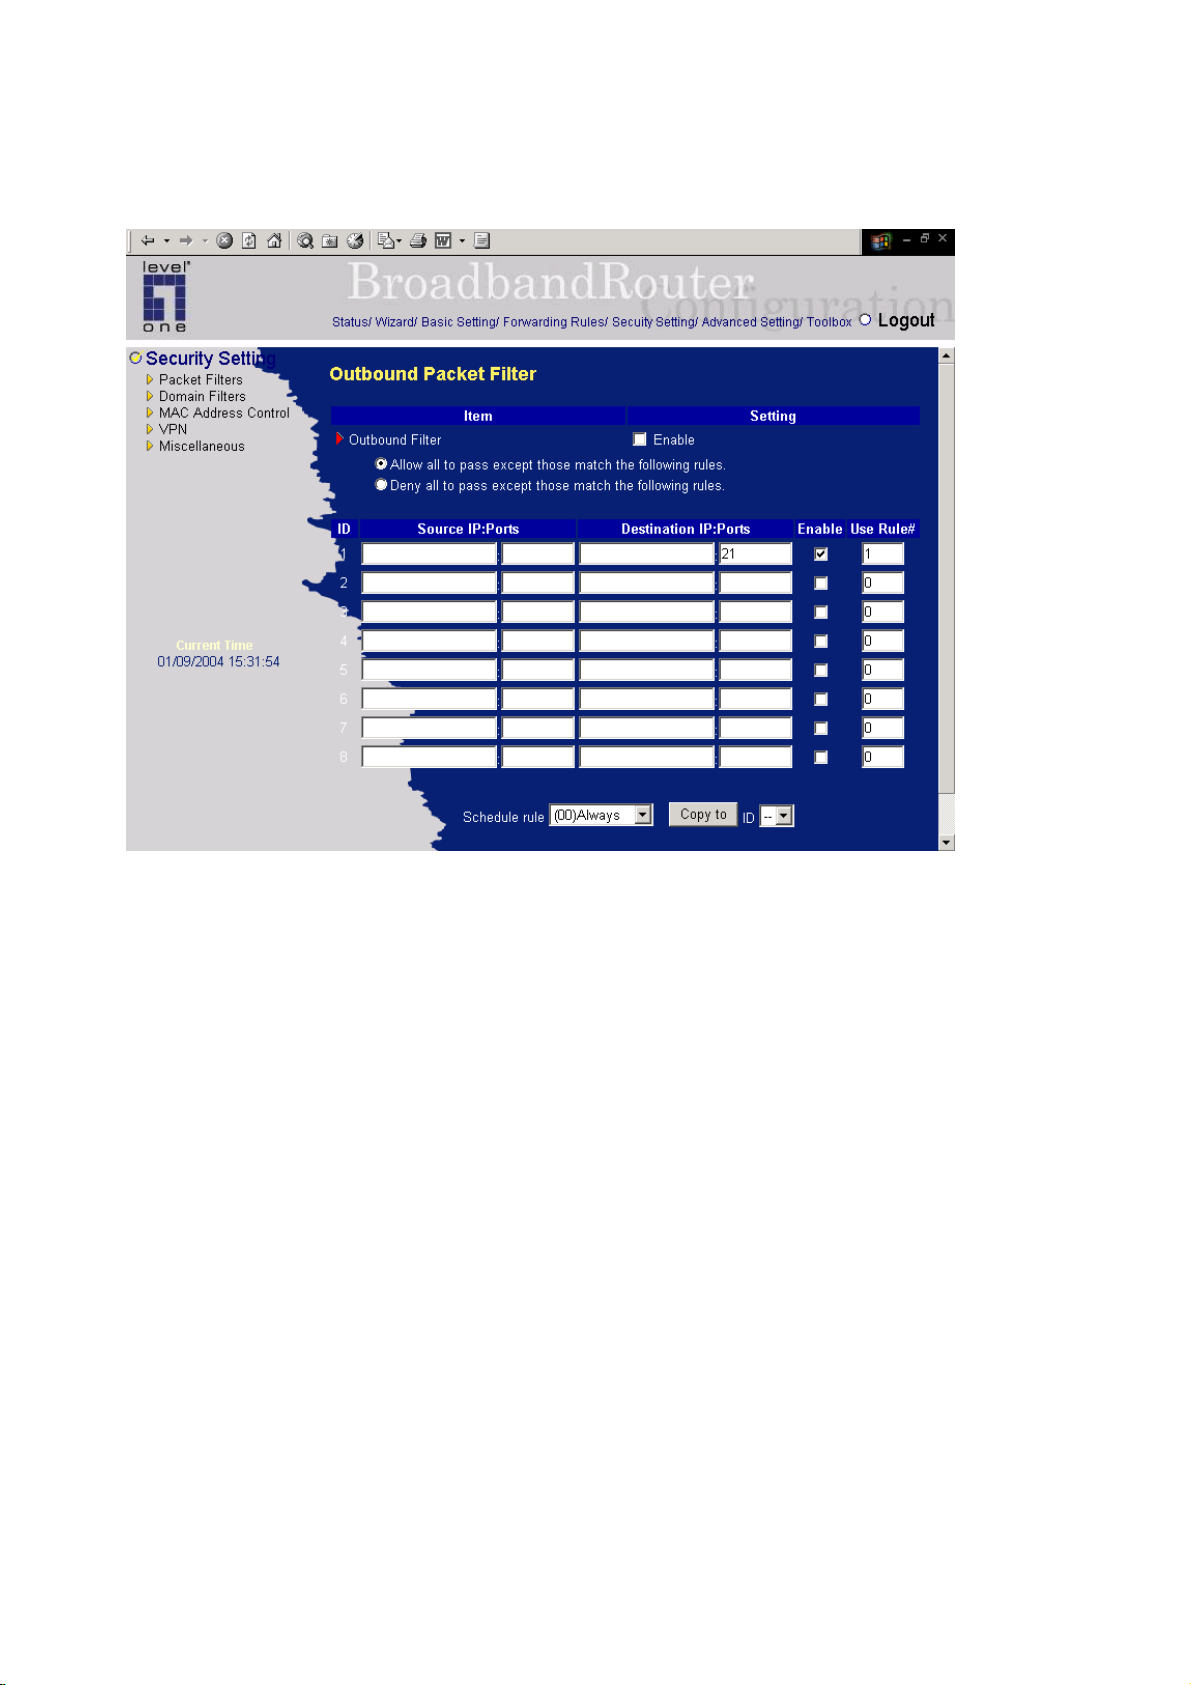
Exanple2: Packet Filter – Apply Rule#1 (ftp time: everyday 14:10 to 16:20).
70
Page 71
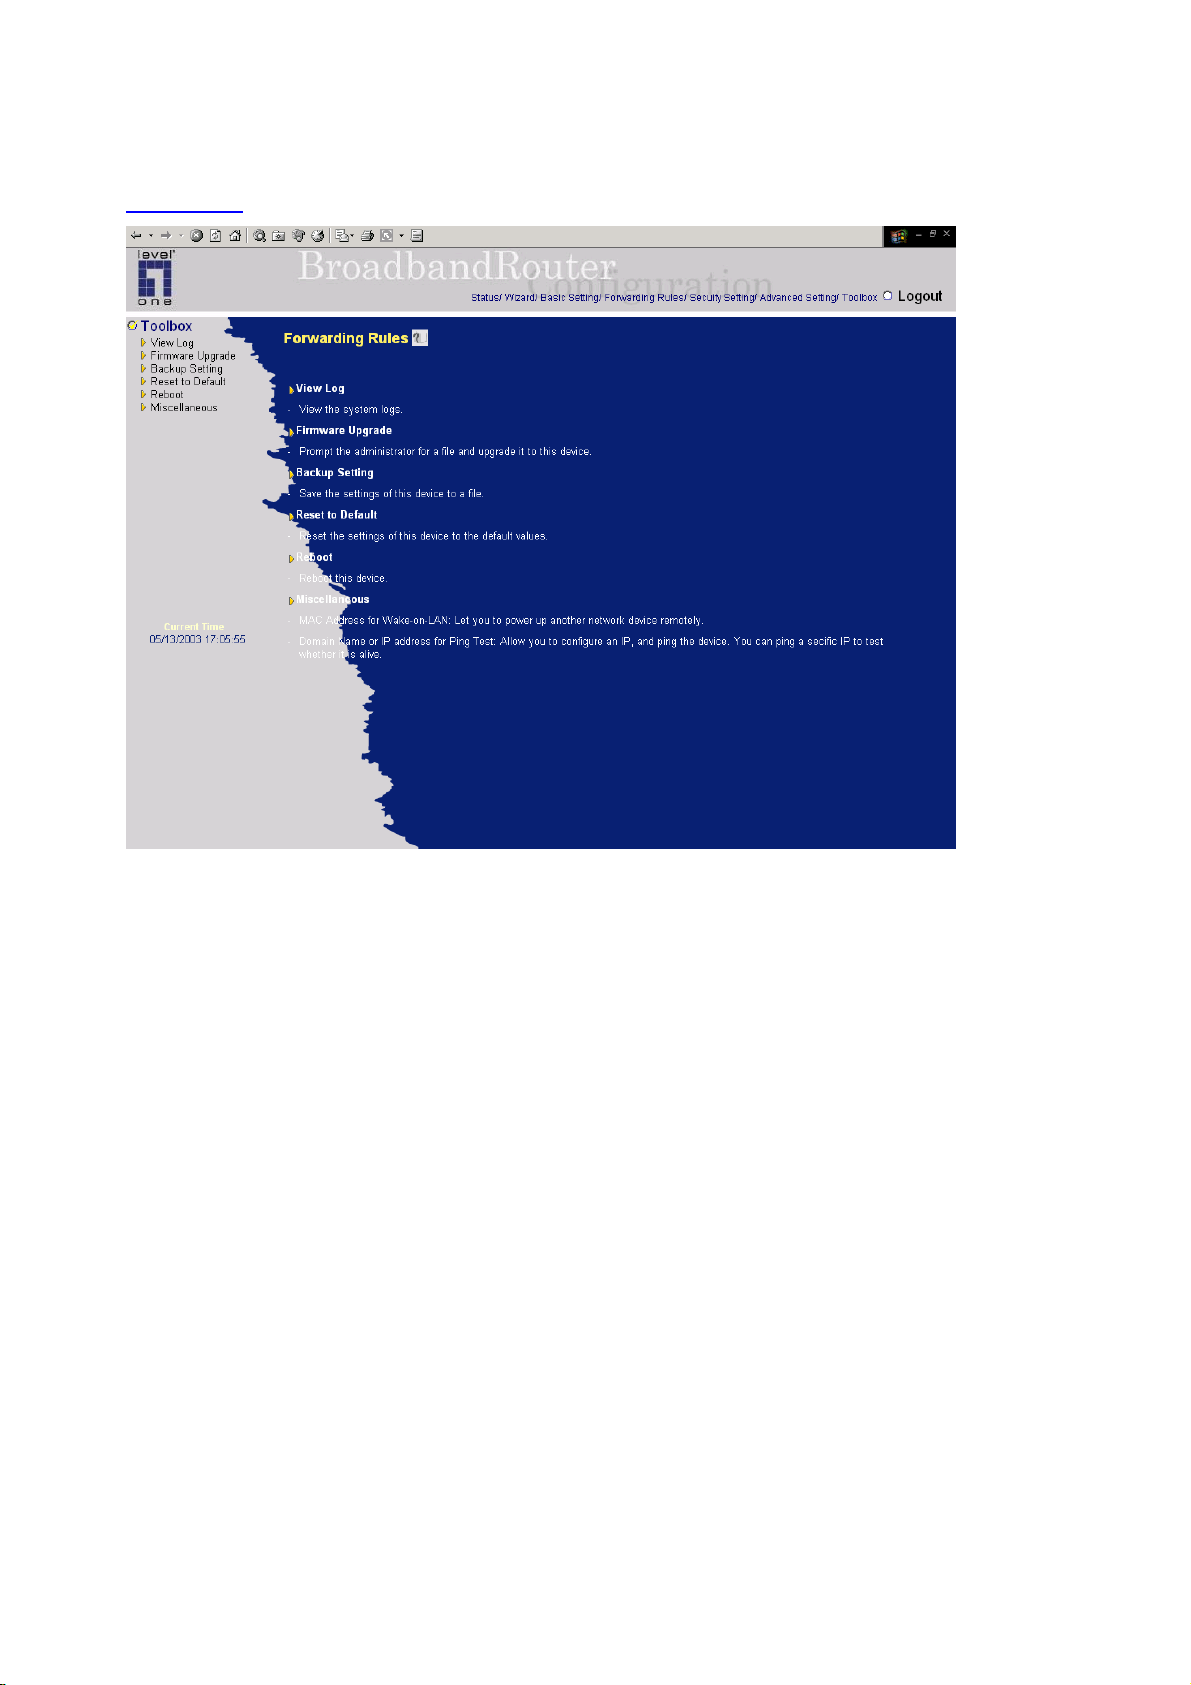
4.8 Toolbox
71
Page 72
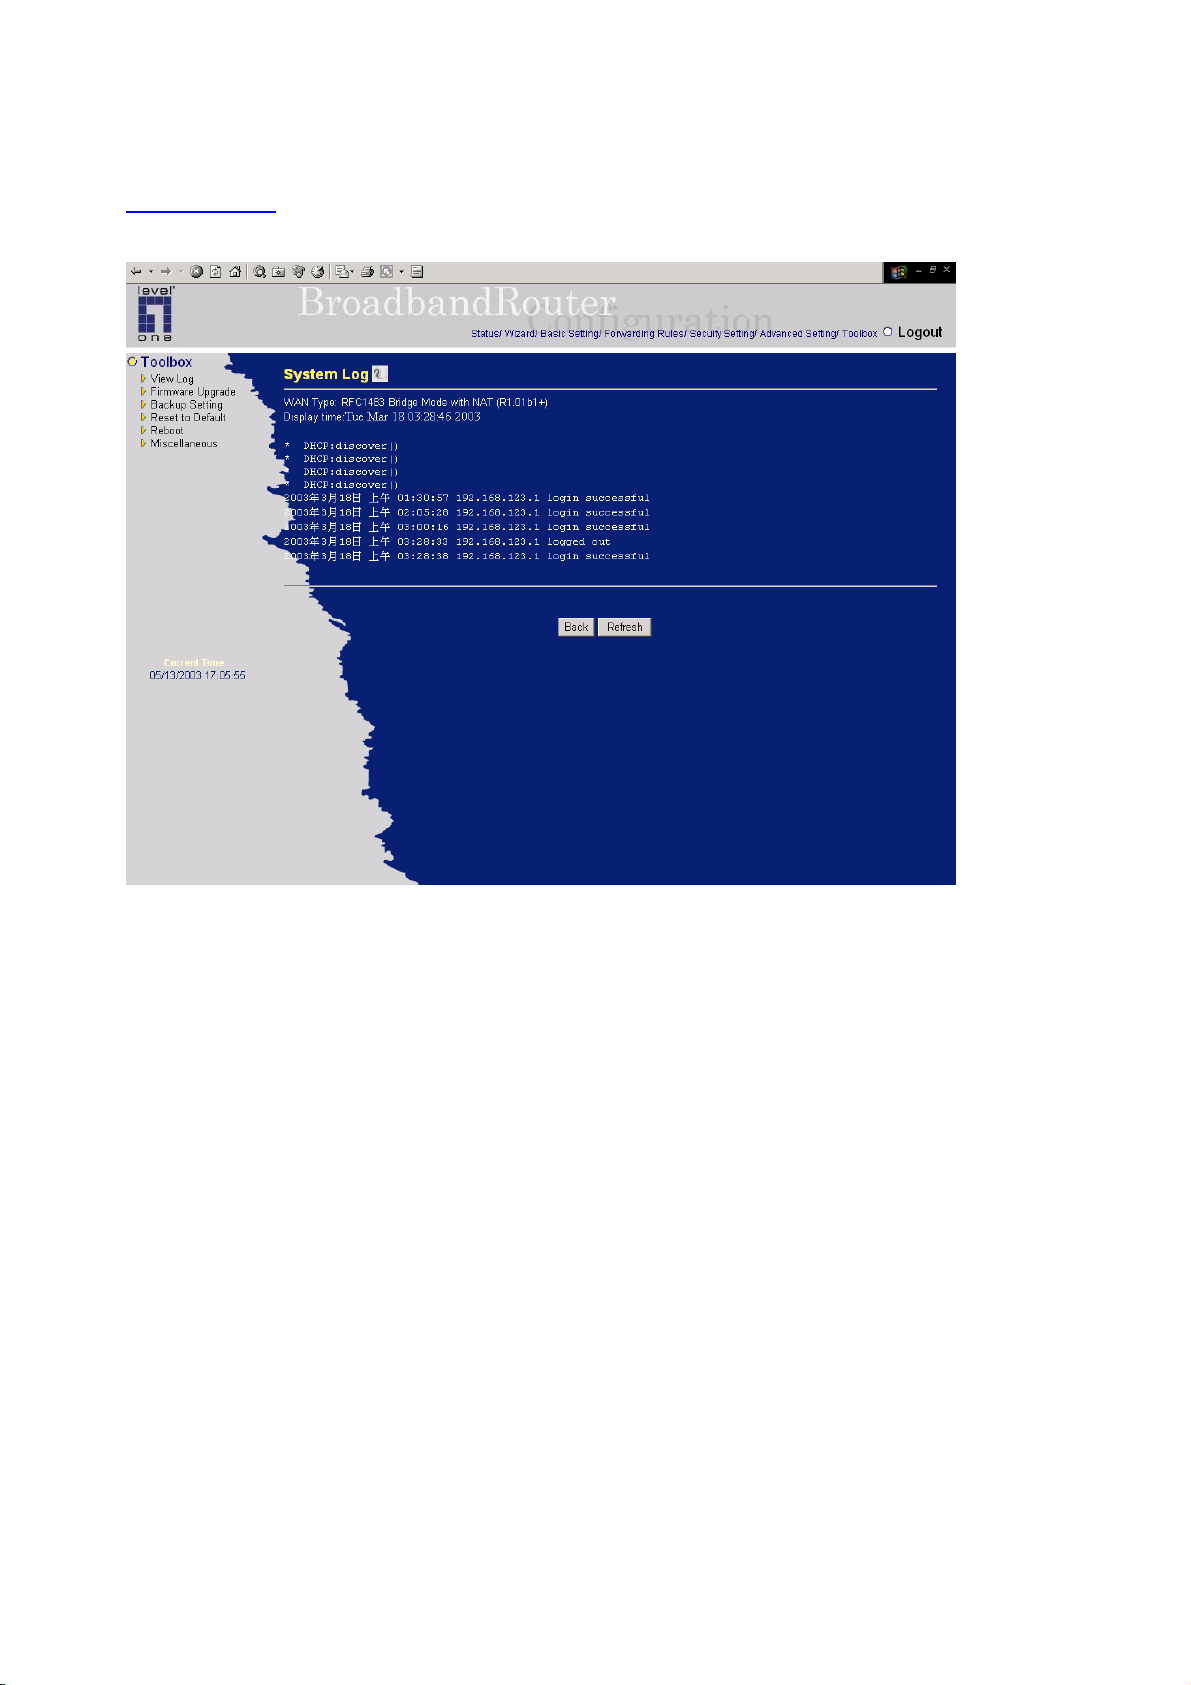
4.8.1 View Log
You can View system log by clicking the View Log button
72
Page 73
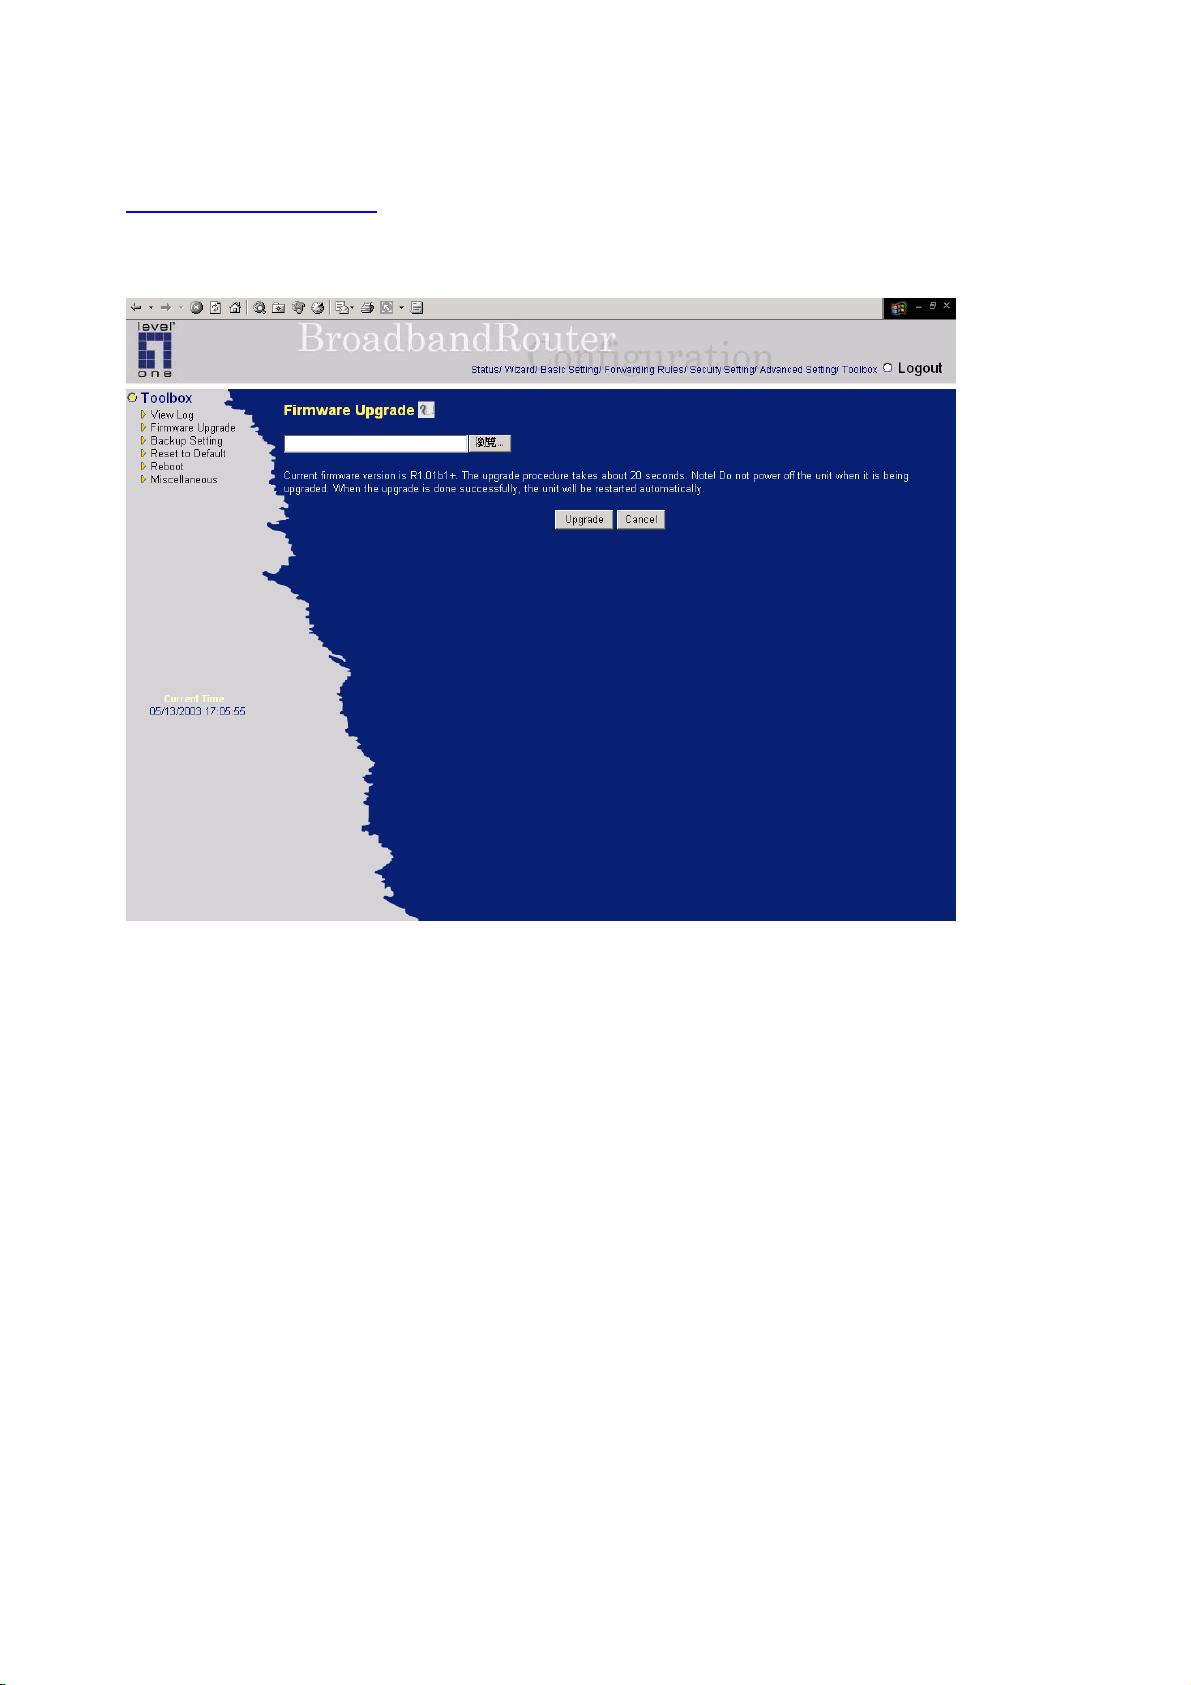
4.8.2 Firmware Upgrade
You can upgrade firmware by clicking Firmware Upgrade button.
73
Page 74
4.8.3 Backup Setting
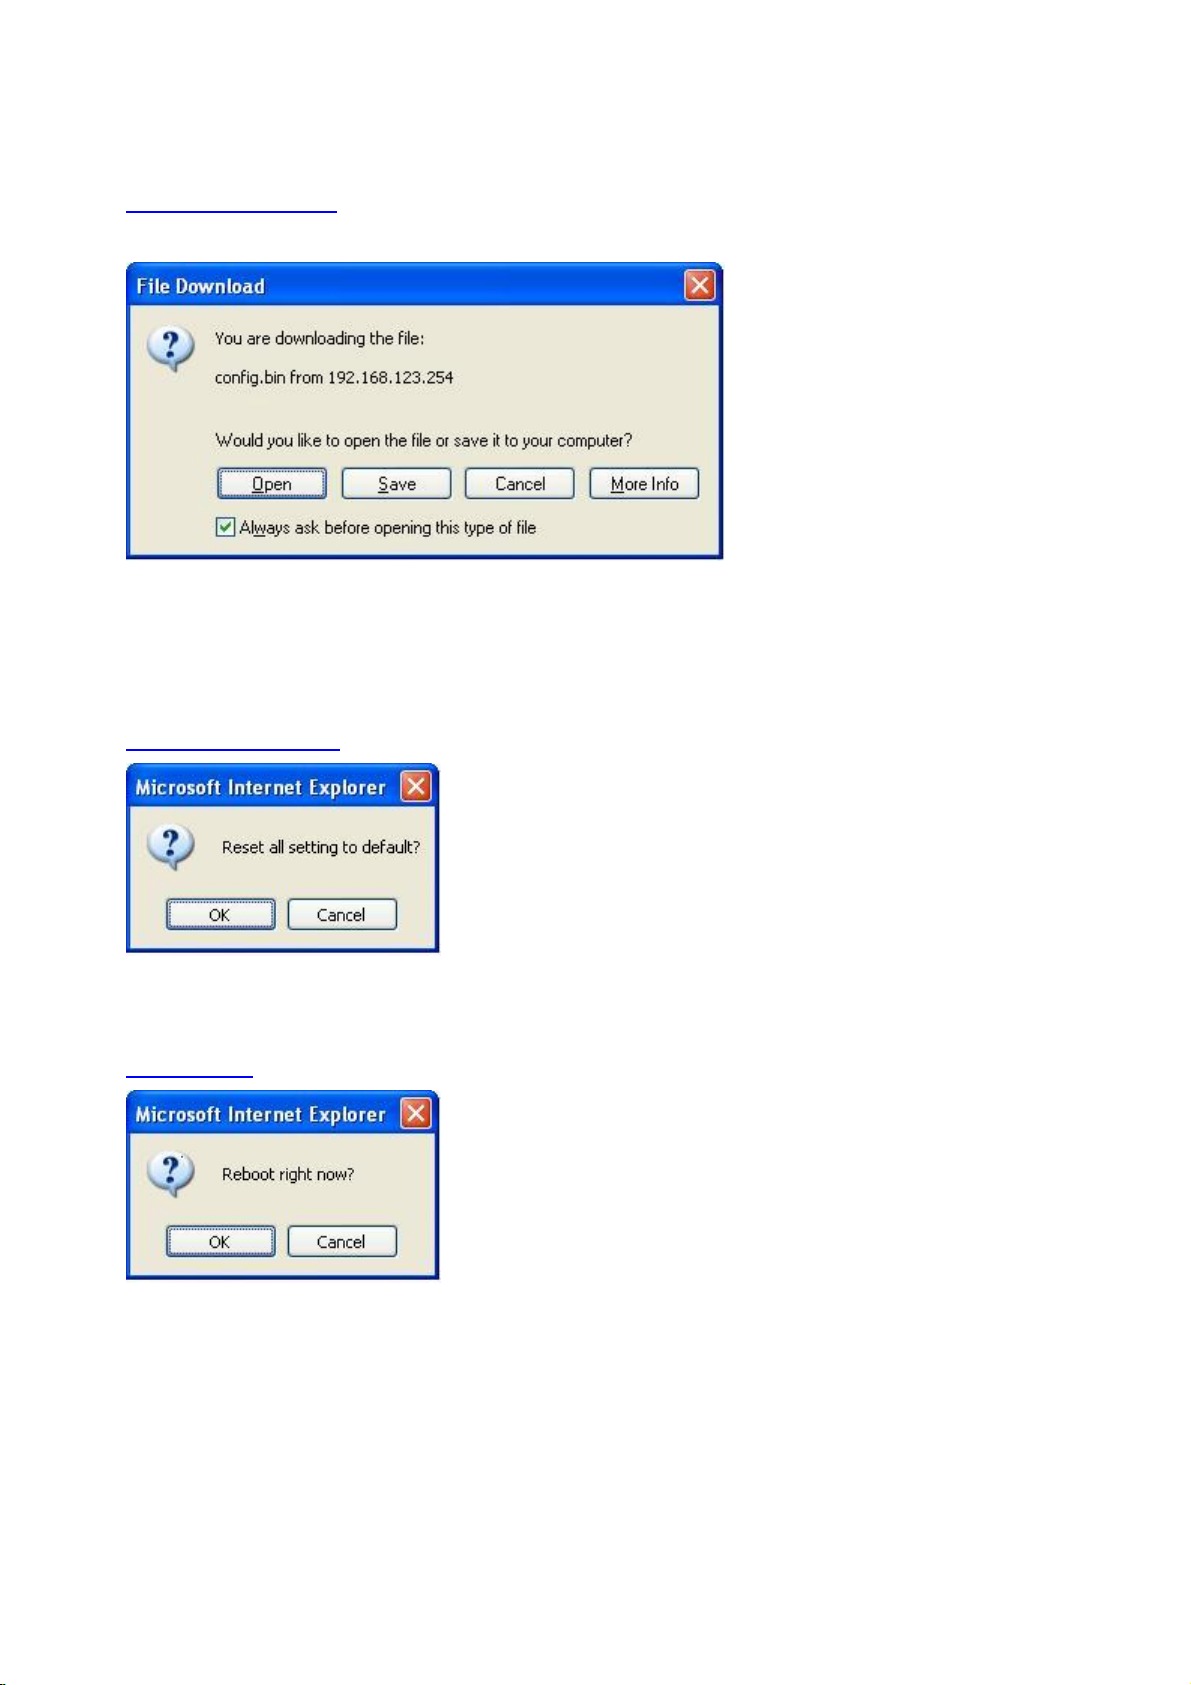
You can backup your settings by clicking the Backup Setting button and save it as a
bin file. Once you want to restore these settings, please click Firmware Upgrade
button and use the bin file you saved.
4.8.4 Reset to default
You can also reset this product to factory default by clicking the Reset to default button.
4.8.5 Reboot
You can also reboot this product by clicking the Reboot button.
74
Page 75
4.8.6 Miscellaneous Items
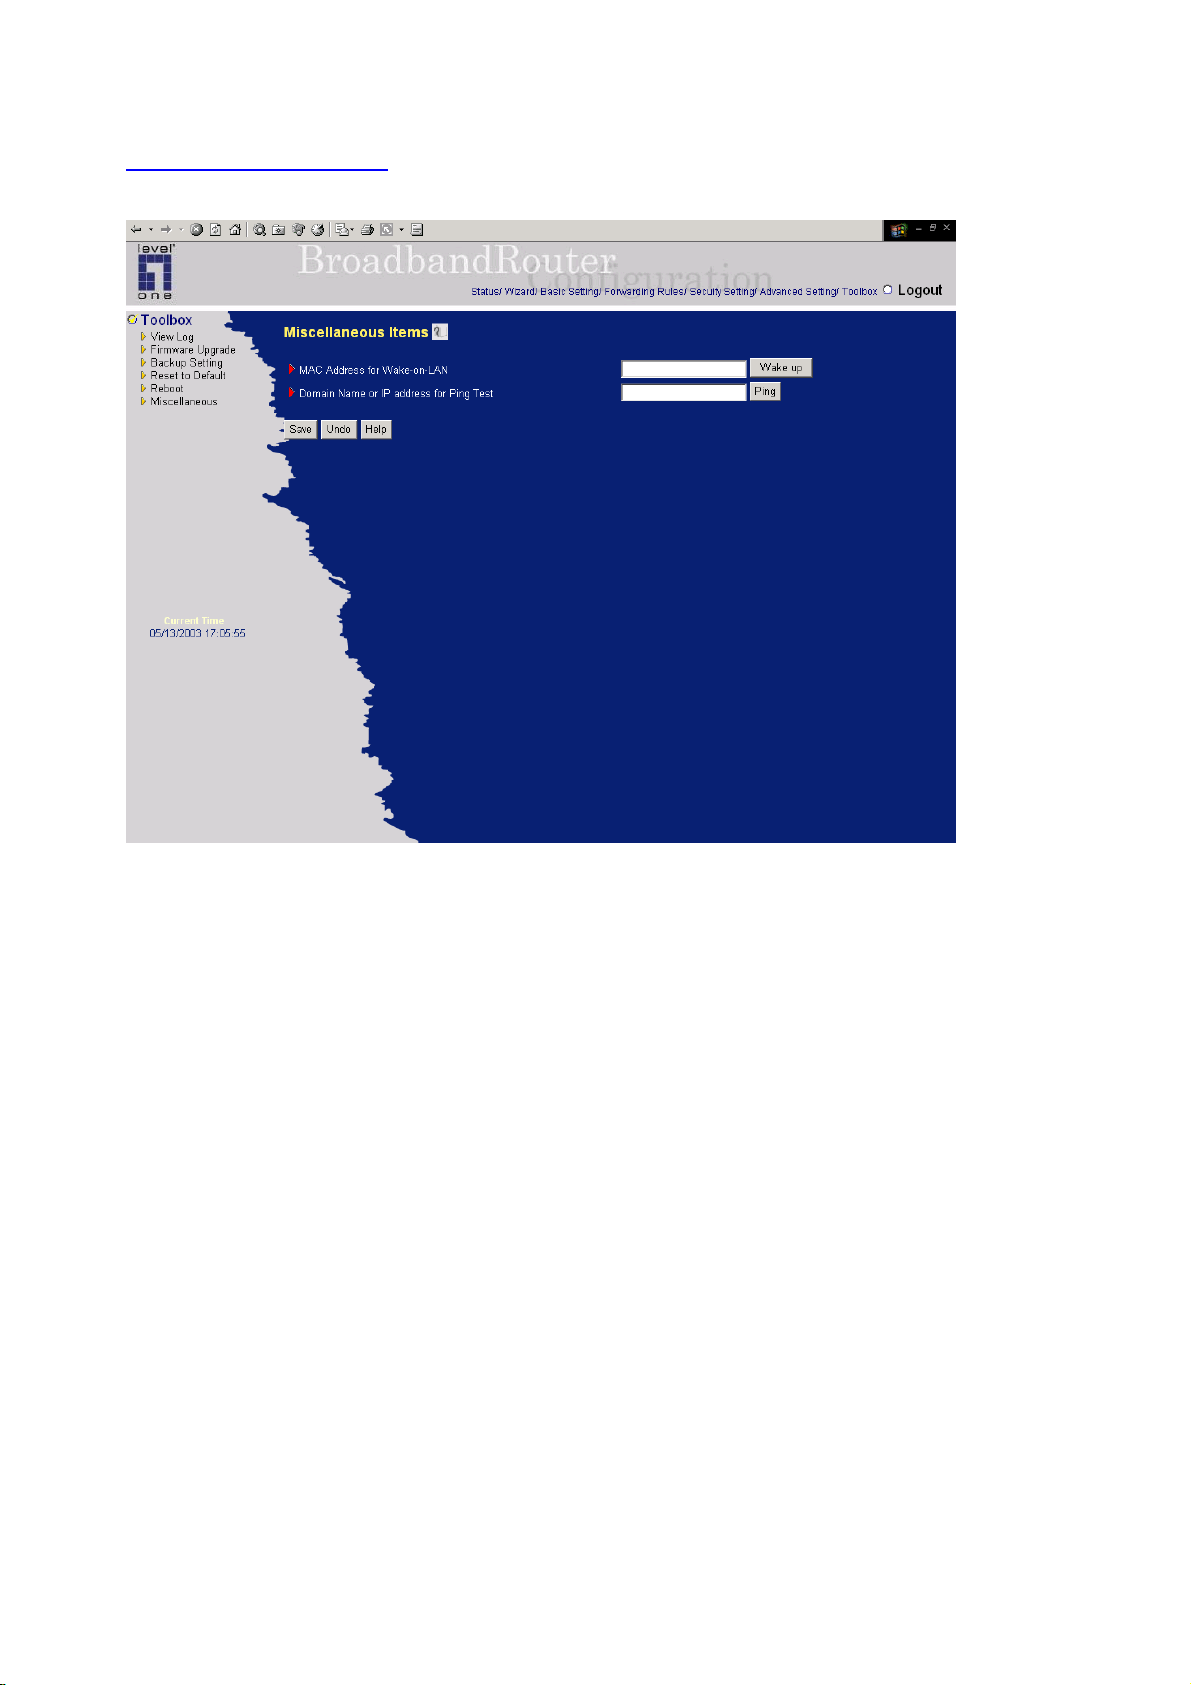
MAC Address for Wake-on-LAN
Wake-on-LAN is a technology that enables you to power up a networked device remotely. In order to
enjoy this feature, the target device must be Wake-on-LAN enabled and you have to know the MAC
address of this device, say 00-11-22-33-44-55. Clicking "Wake up" button will make the router to send
the wake-up frame to the target device immediately.
Domain Name or IP address for Ping Test
Allow you to configure an IP, and ping the device. You can ping a specific IP to test whether it is alive.
75
Page 76
C
h
a
p
t
e
r
5
P
r
i
n
t
S
e
r
v
e
r
C
h
a
p
t
e
r
5
P
r
i
n
t
S
e
C
h
a
p
t
e
r
5
P
r
i
WBR-3402 provides the function of network print server for MS Windows 95/98/NT/2000 and Unix
based platforms. (If the product you purchased doesn’t have printer port, please skip this chapter.)
5.1 Configuring on Windows 95/98 Platforms
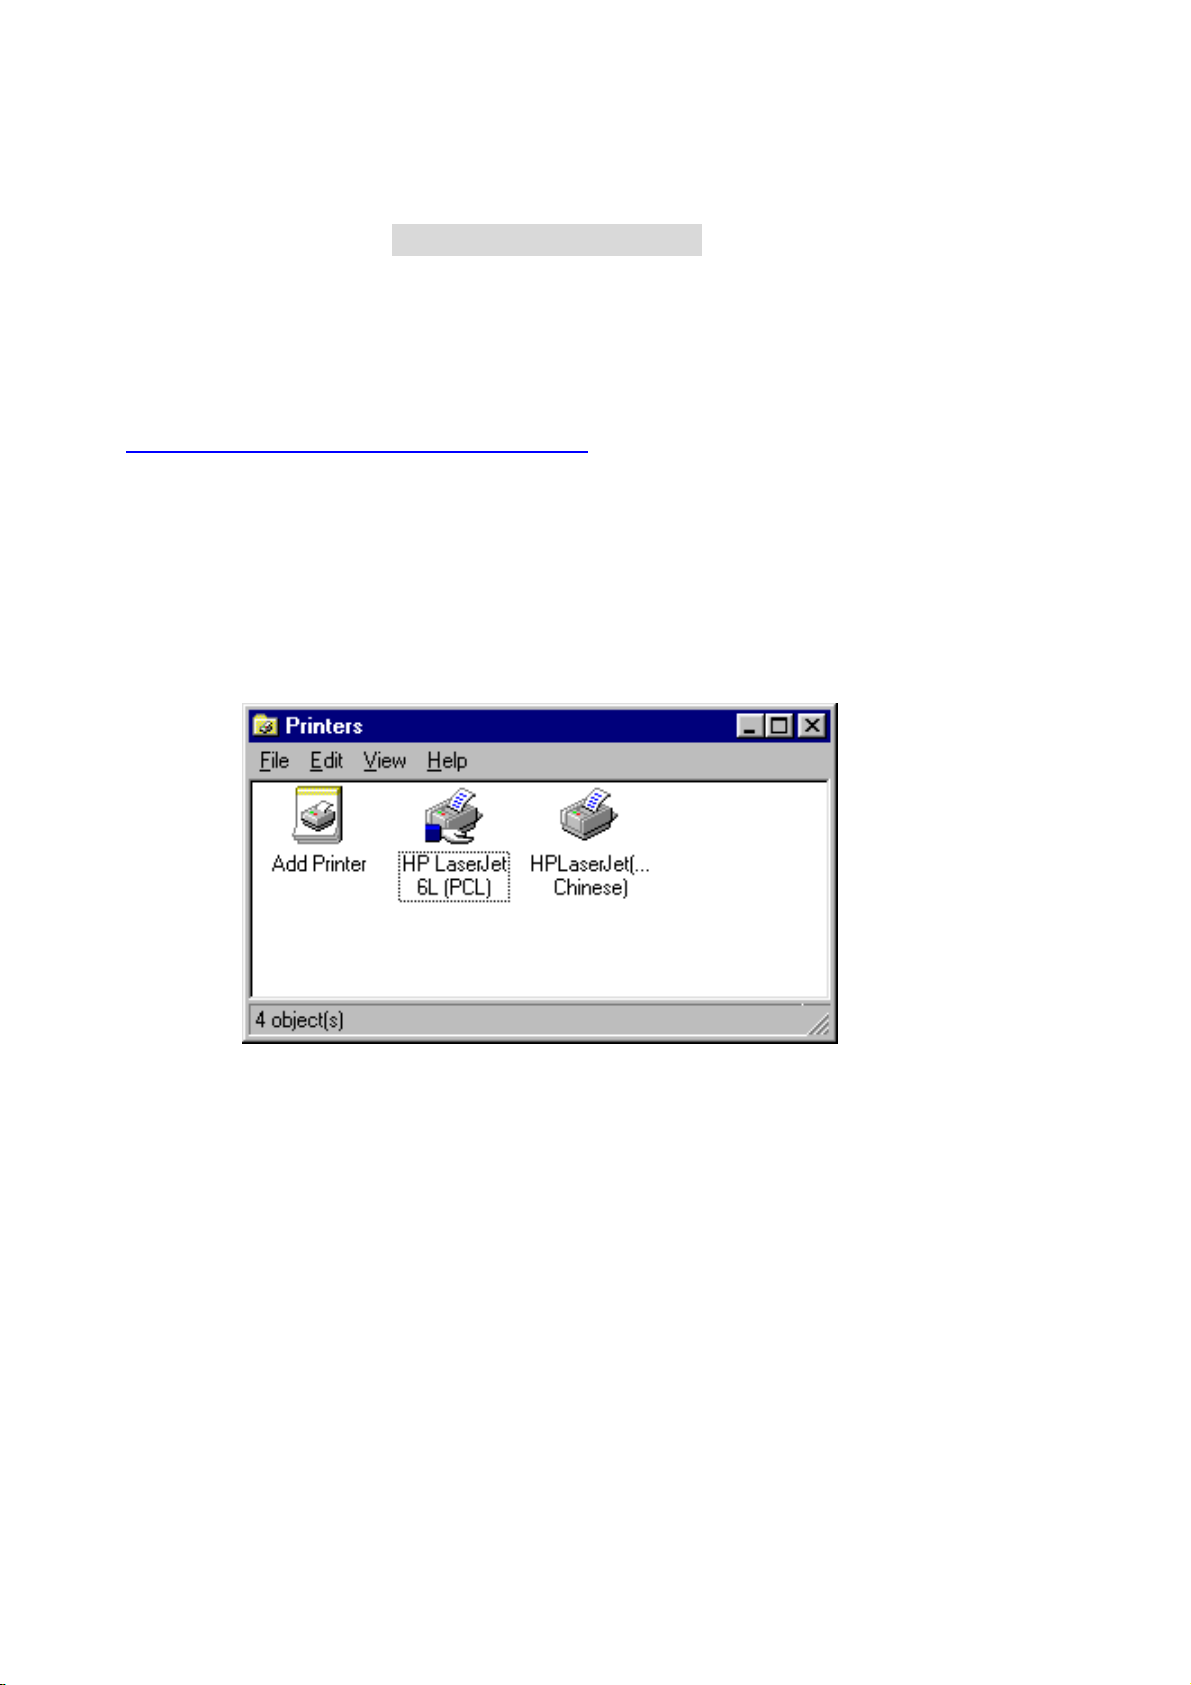
After you finished the software installation procedure described in Chapter 3, your computer has
possessed the network printing facility provided by this product. For conv enience, we call the printer
connected to the printer port of this product as server printer. On a Windows 95/98 platform, open the
Printers window in the My Computer menu:
r
n
t
S
e
r
v
e
r
v
e
r
Now, yon can configure the print server of this product:
76
Page 77
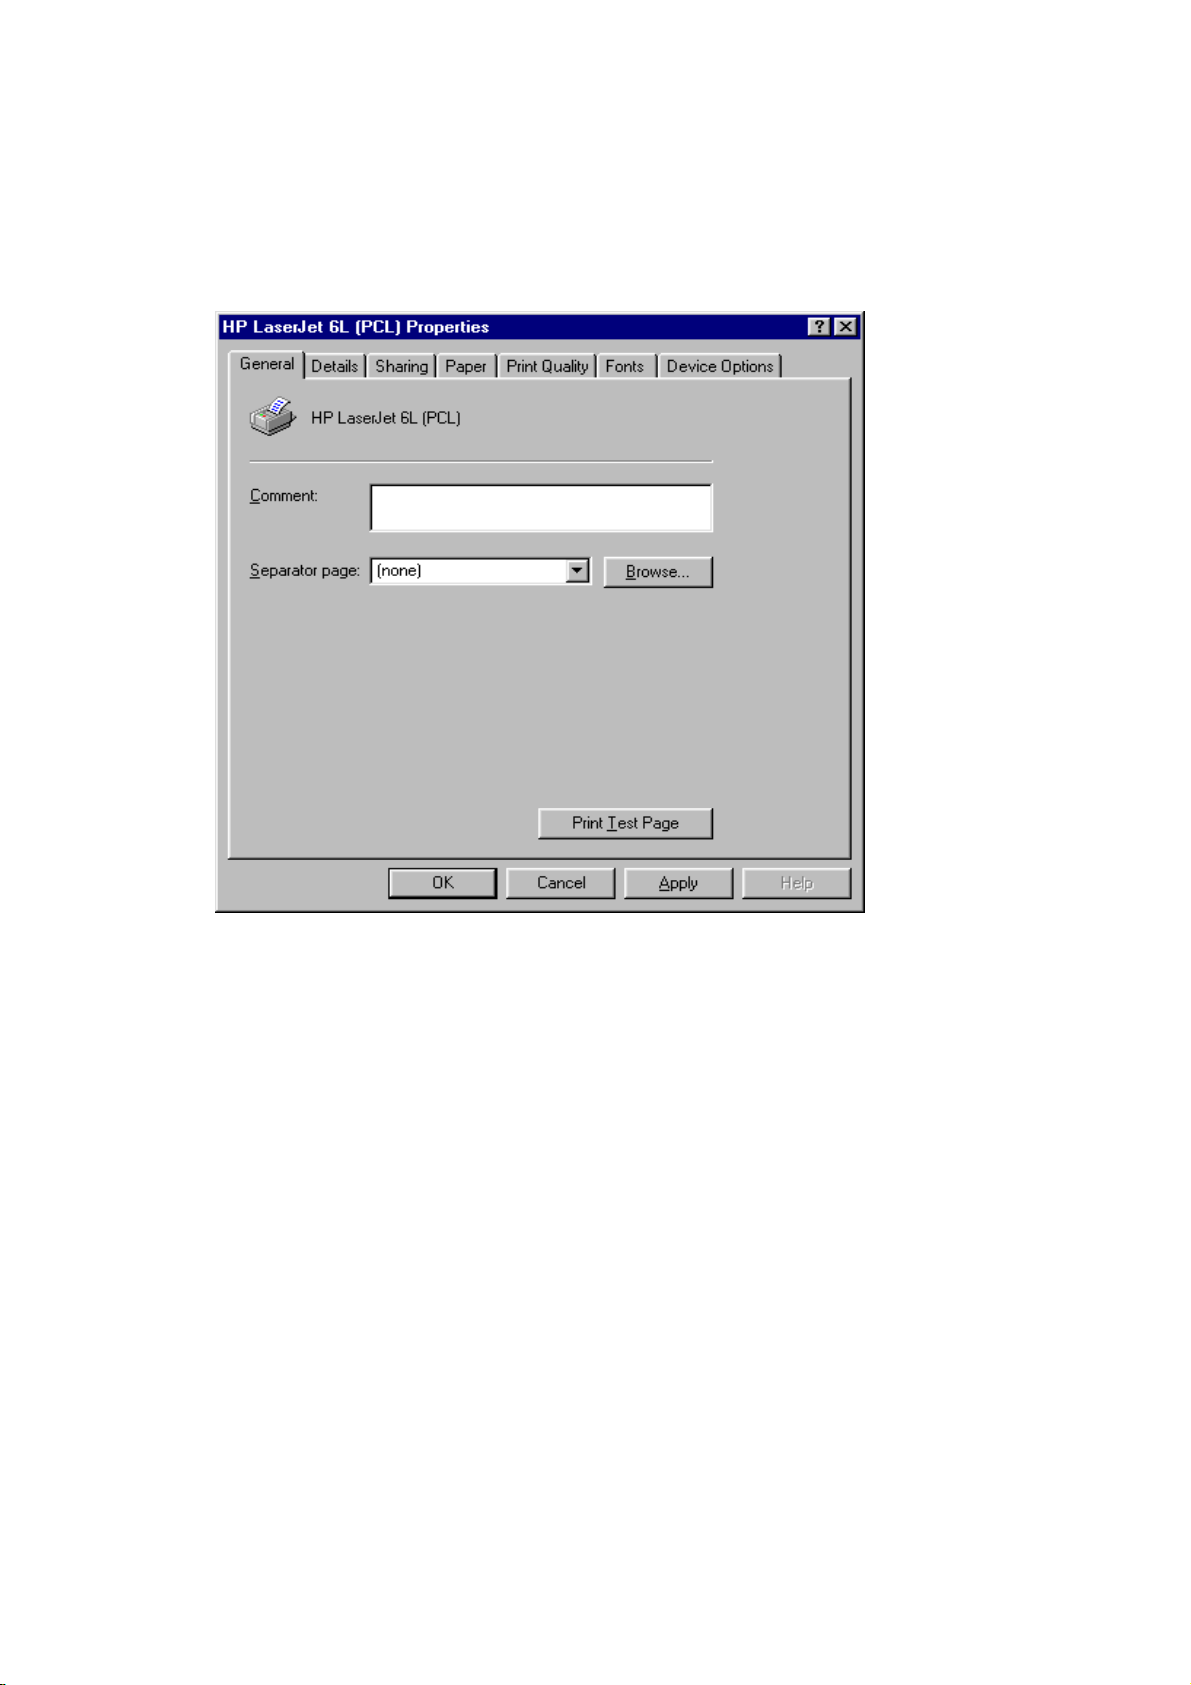
1. Find out the corresponding icon of your server printer, for example, the HP
LaserJet 6L. Click the mouse’s right button on that icon, and then select the Properties
item:
77
Page 78
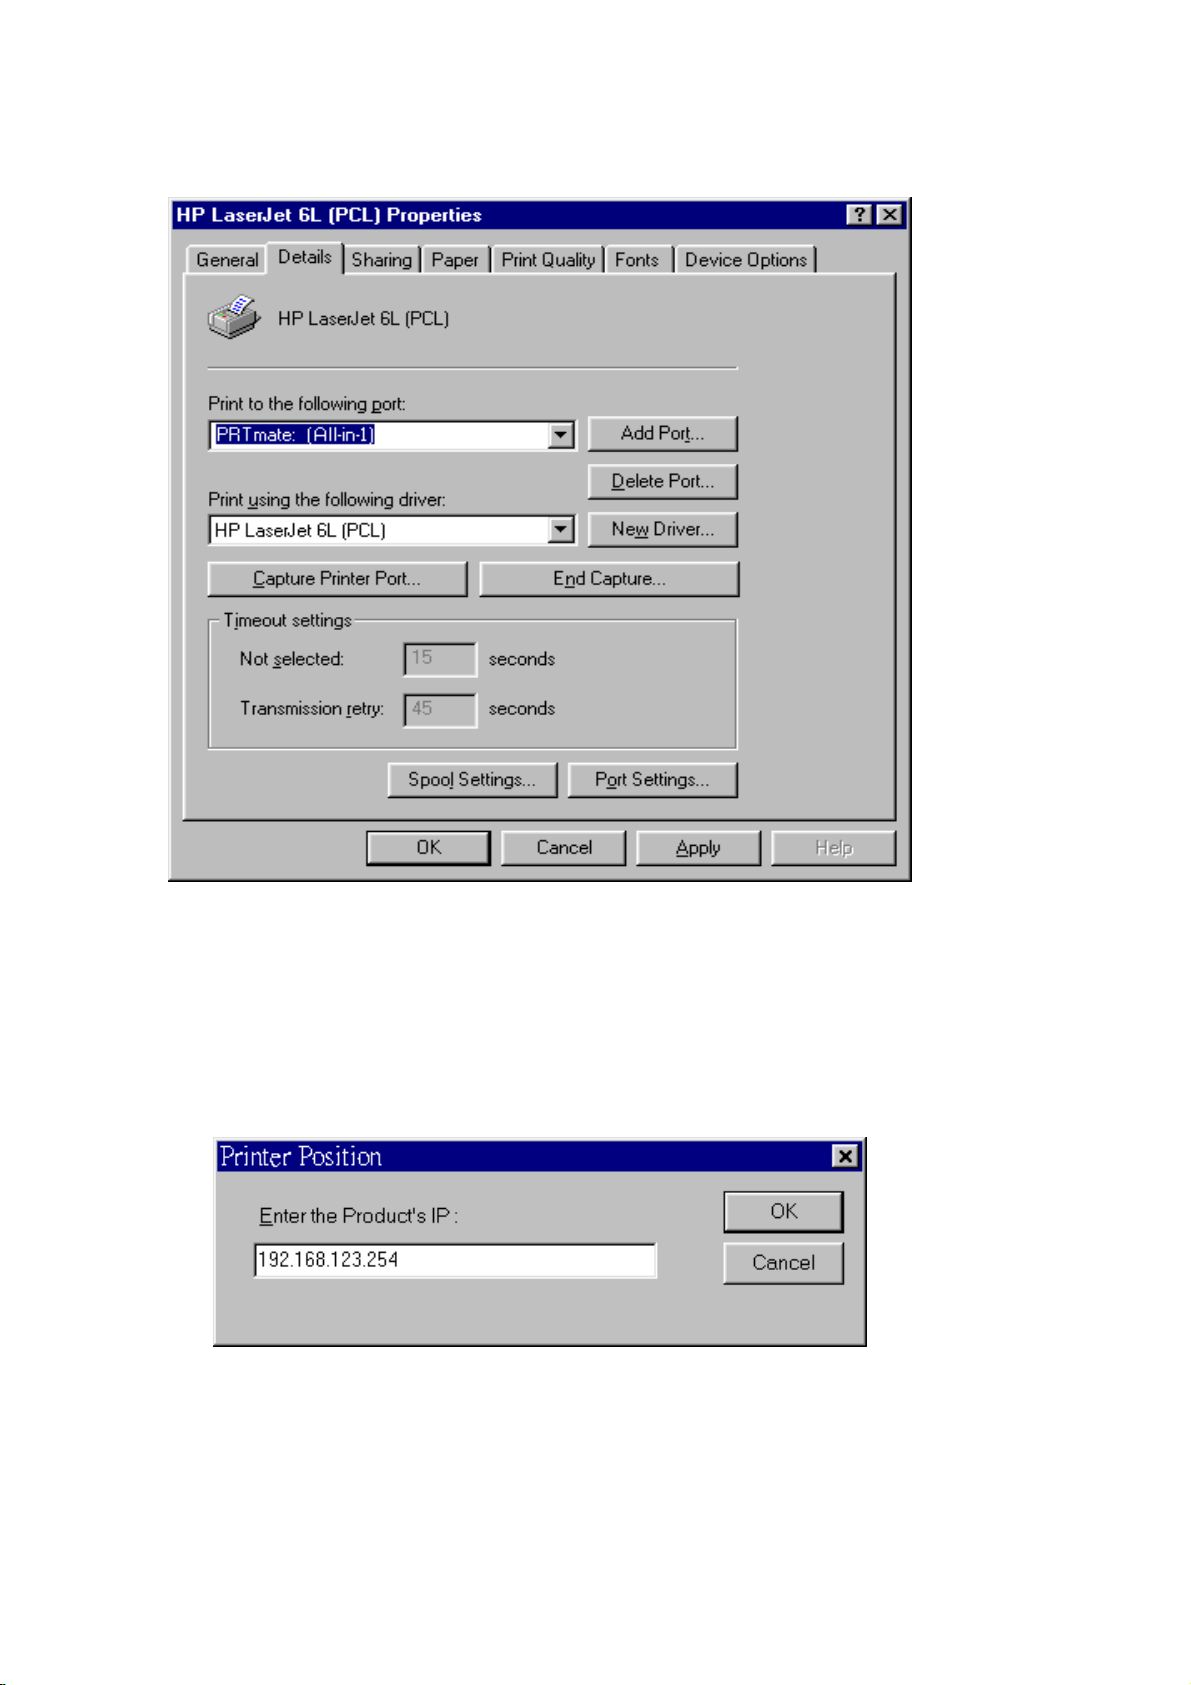
2. Click the Details item:
3. Choose the “PRTmate: (All-in-1)” from the list attached at the Print To item. Be sure that the
Printer Driver item is configured to the correct driver of your server printer.
4. Click on the button of Port Settings:
Type in the IP address of this product and then click the OK button.
8. Make sure that all settings mentioned above are correct and then click the OK button.
78
Page 79
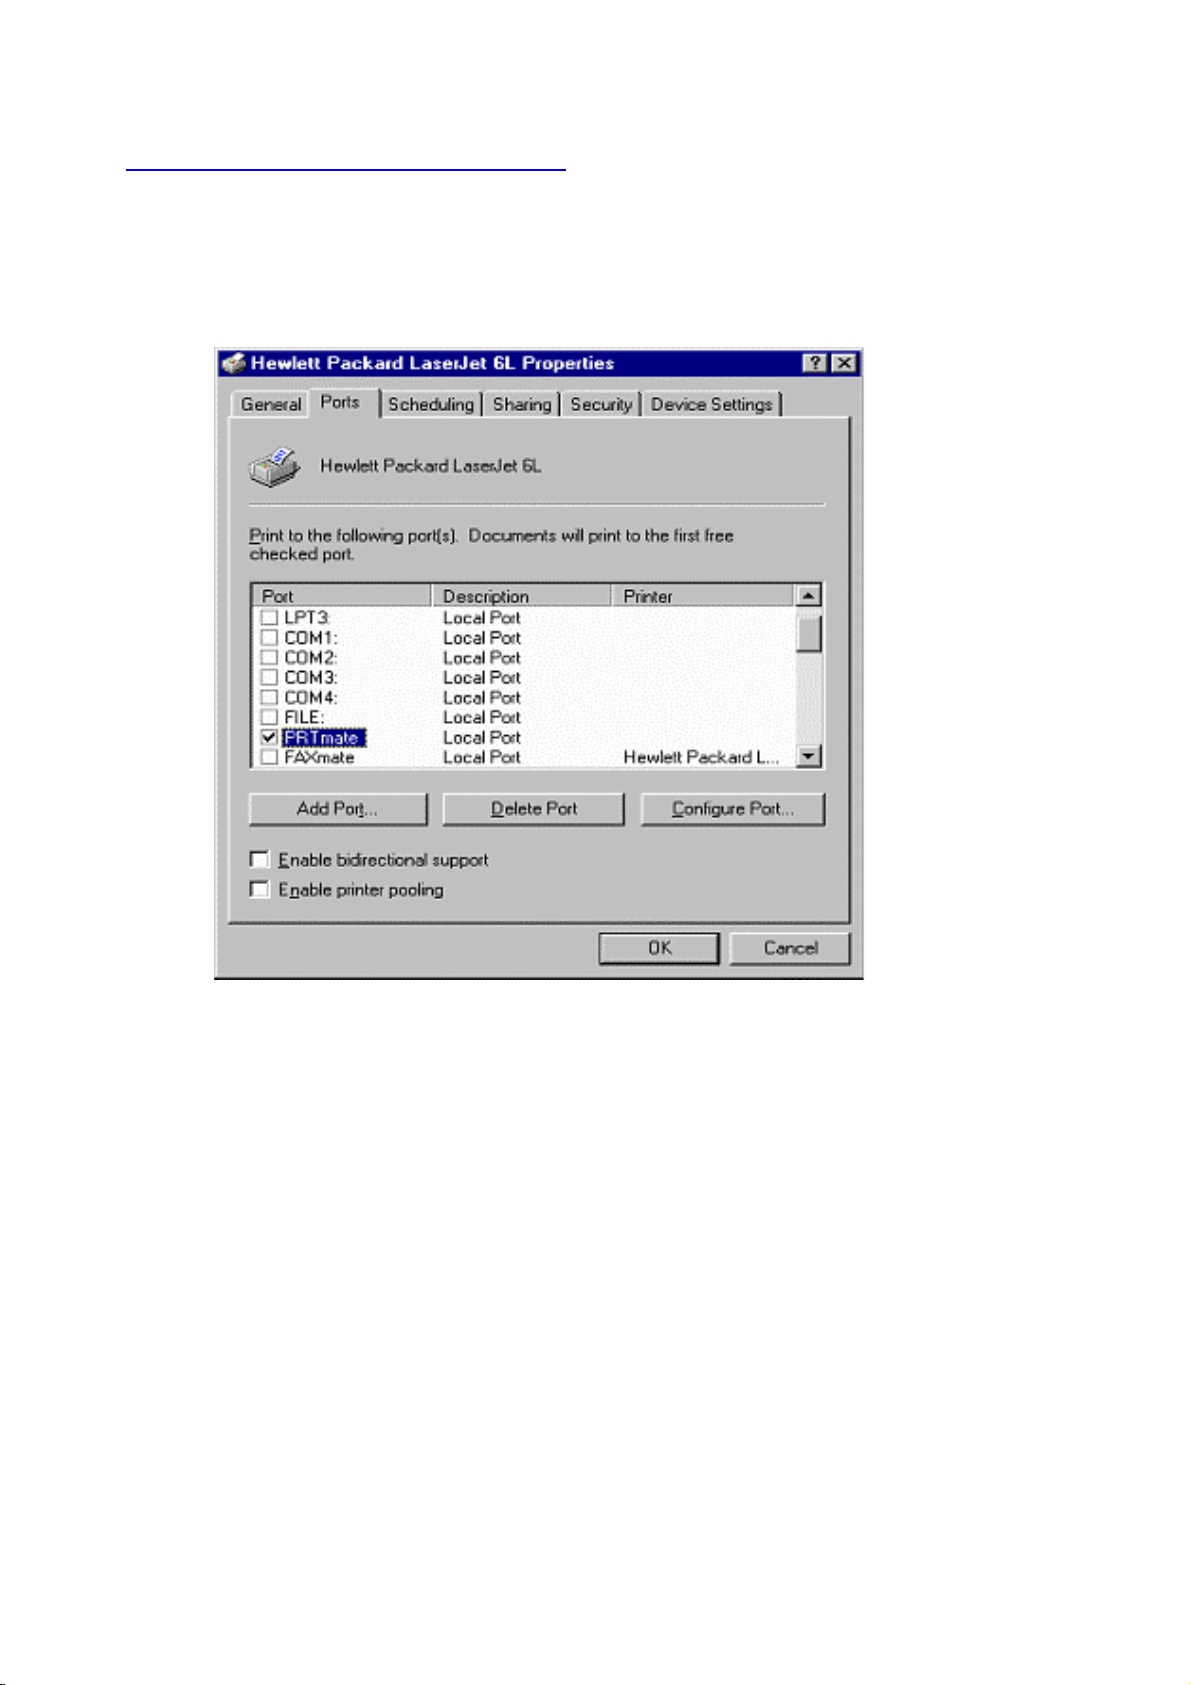
5.2 Configuring on Windows NT Platforms
The configuration procedure for a Windows NT platform is similar to that of Windows 95/98 except
the screen of printer Properties:
Compared to the procedure in last section, the selection of Details is equivalent to the selection of
Ports, and Port Settings is equivalent to Configure Port.
79
Page 80
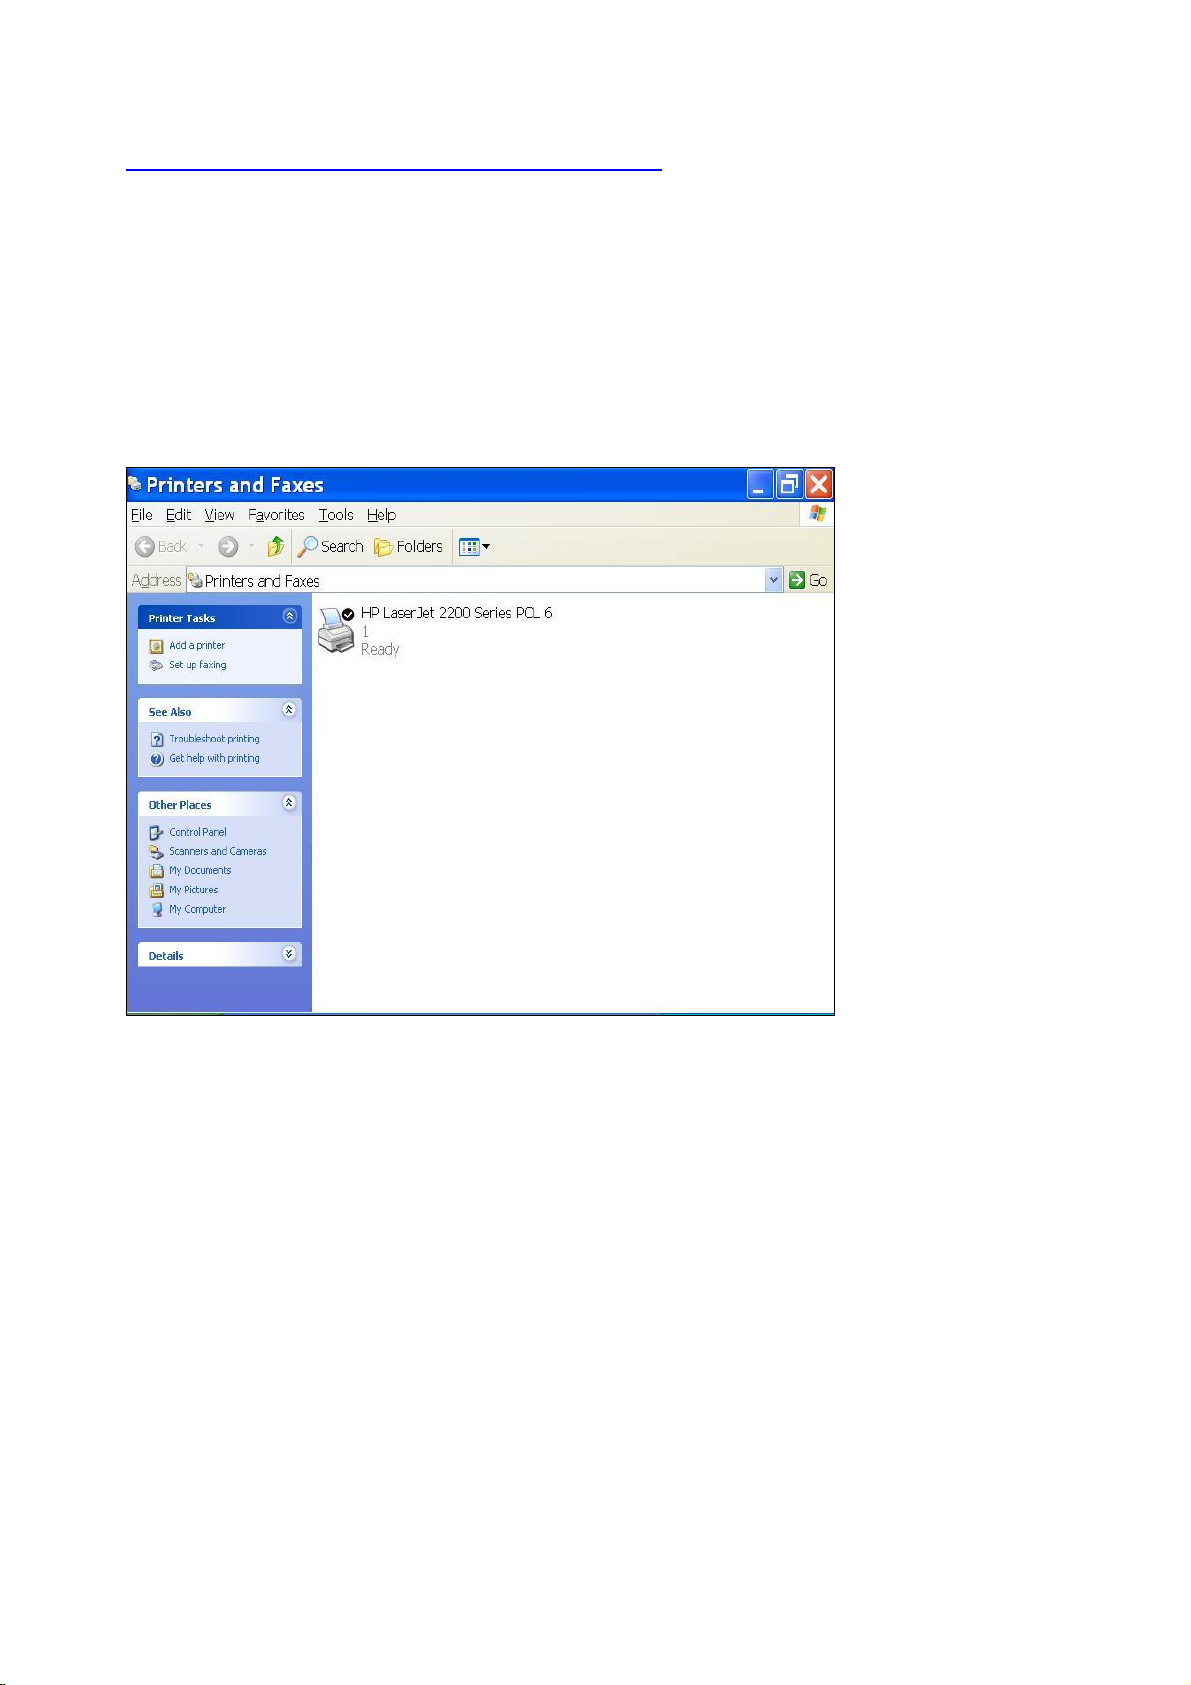
5.3 Configuring on Windows 2000 and XP Platforms
Windows 2000 and XP have built-in LPR client, users could utilize this feature to Print.
You have to install your Printer Driver on LPT1 or other ports before you preceed the following
sequence.
1.Open Printers and Faxs
.
80
Page 81
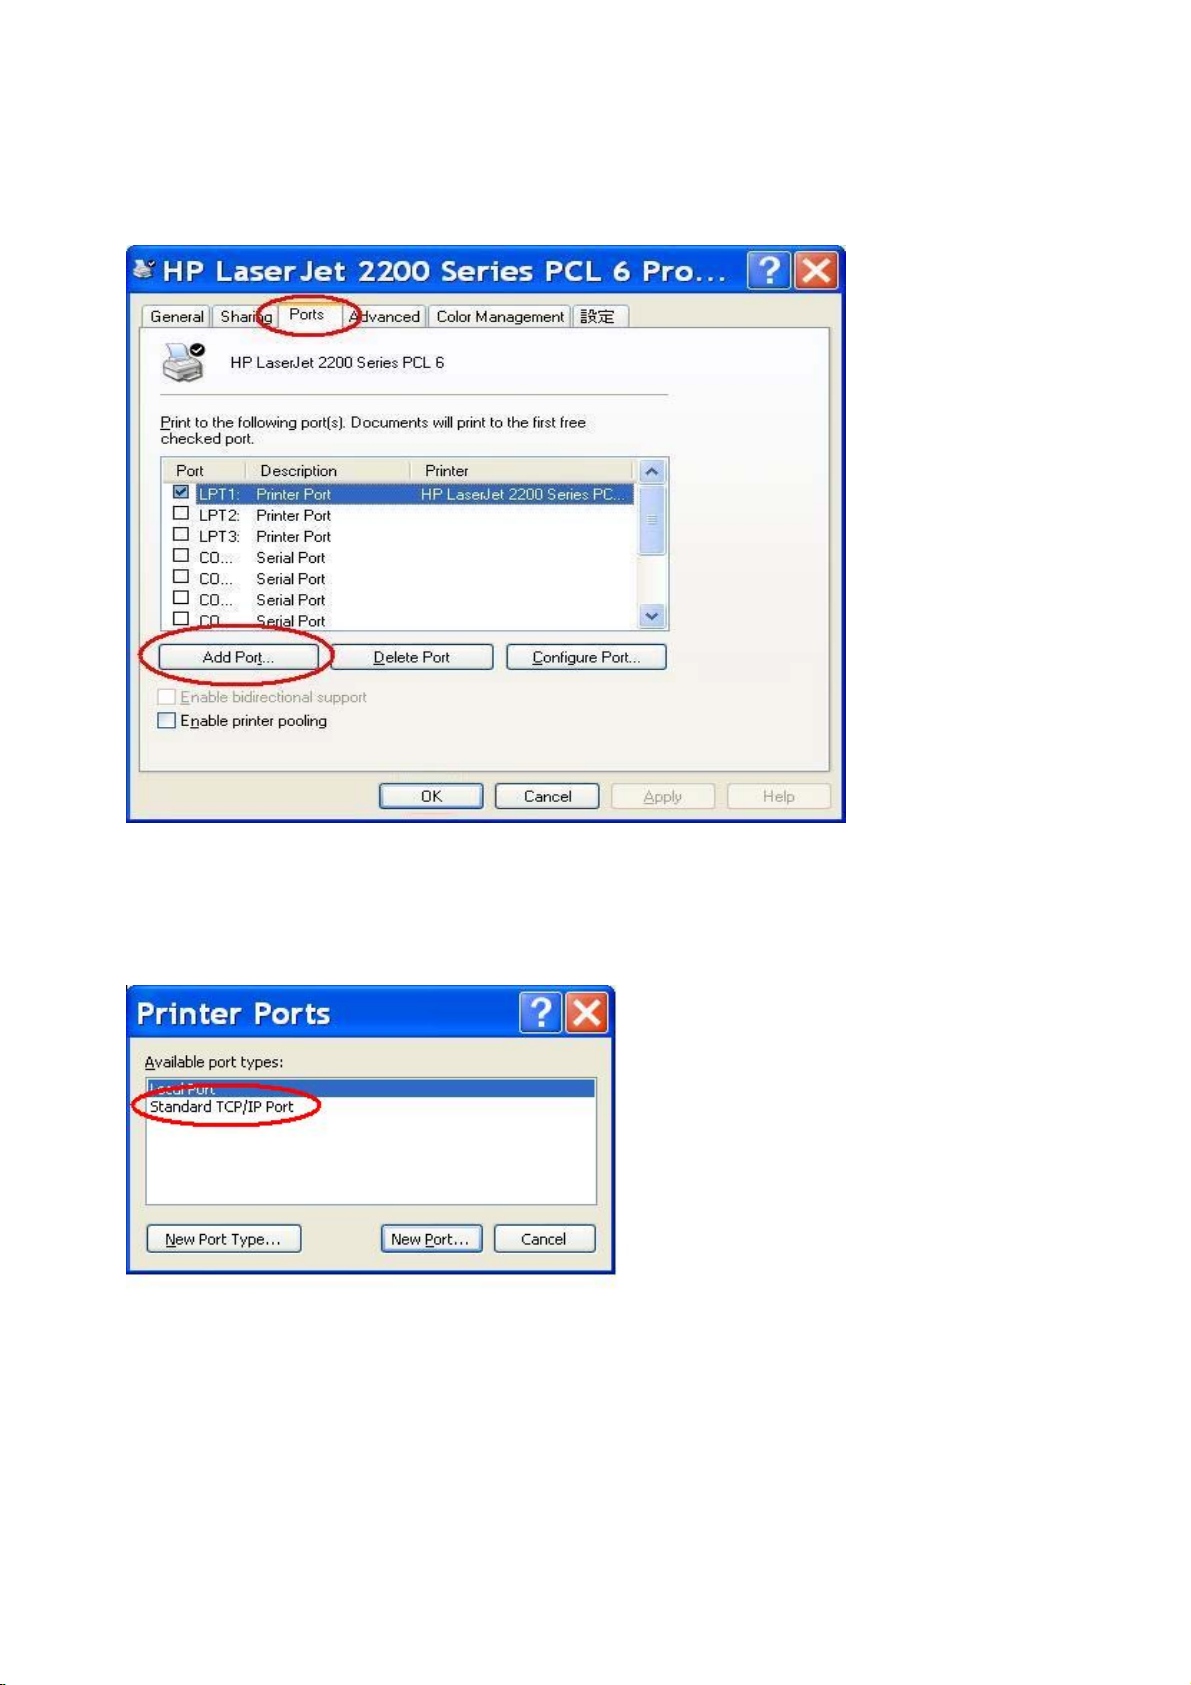
2.Select “Ports” page, Click “Add Port…”
3. Select “Standard TCP/IP Port”, and then click “New Port…”
81
Page 82
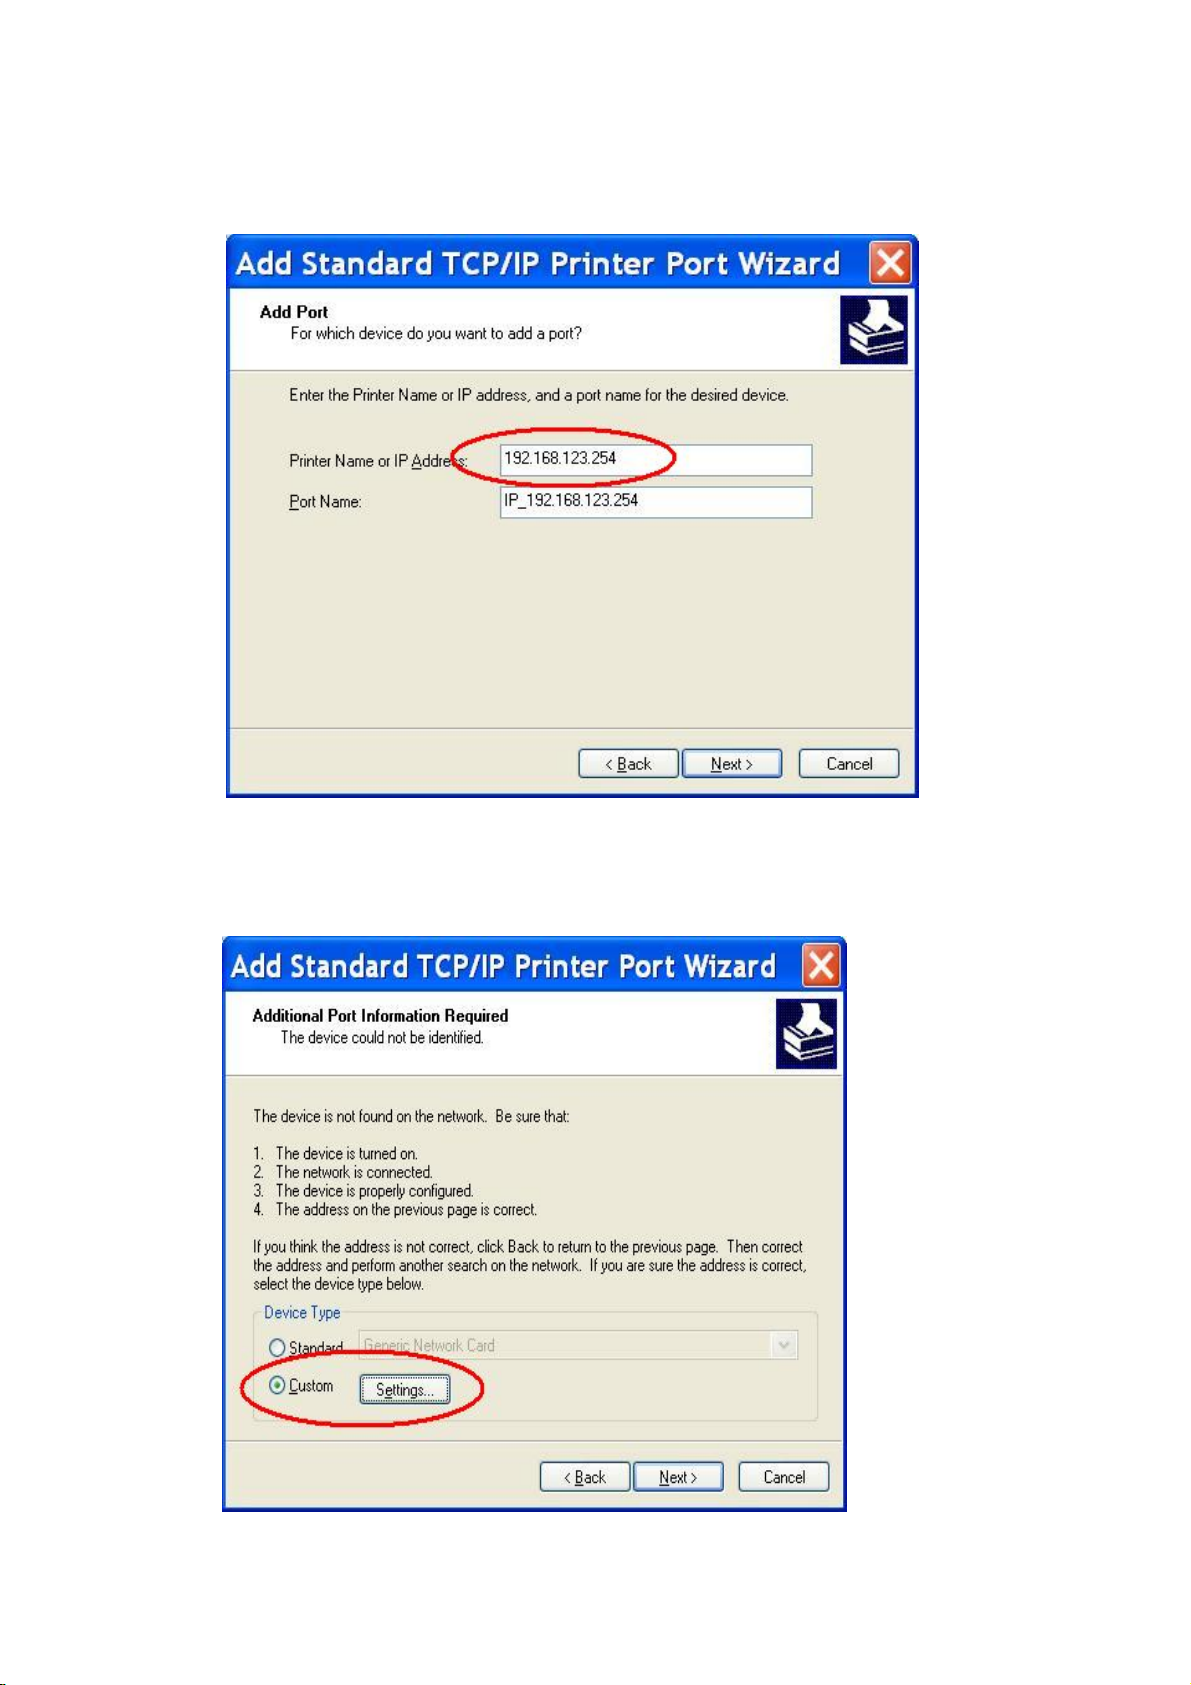
4.Click Next and then provide the following information:
Type address of server providing LPD that is our NAT device:192.168.123.254
4. Select Custom, then click “Settings…”
82
Page 83
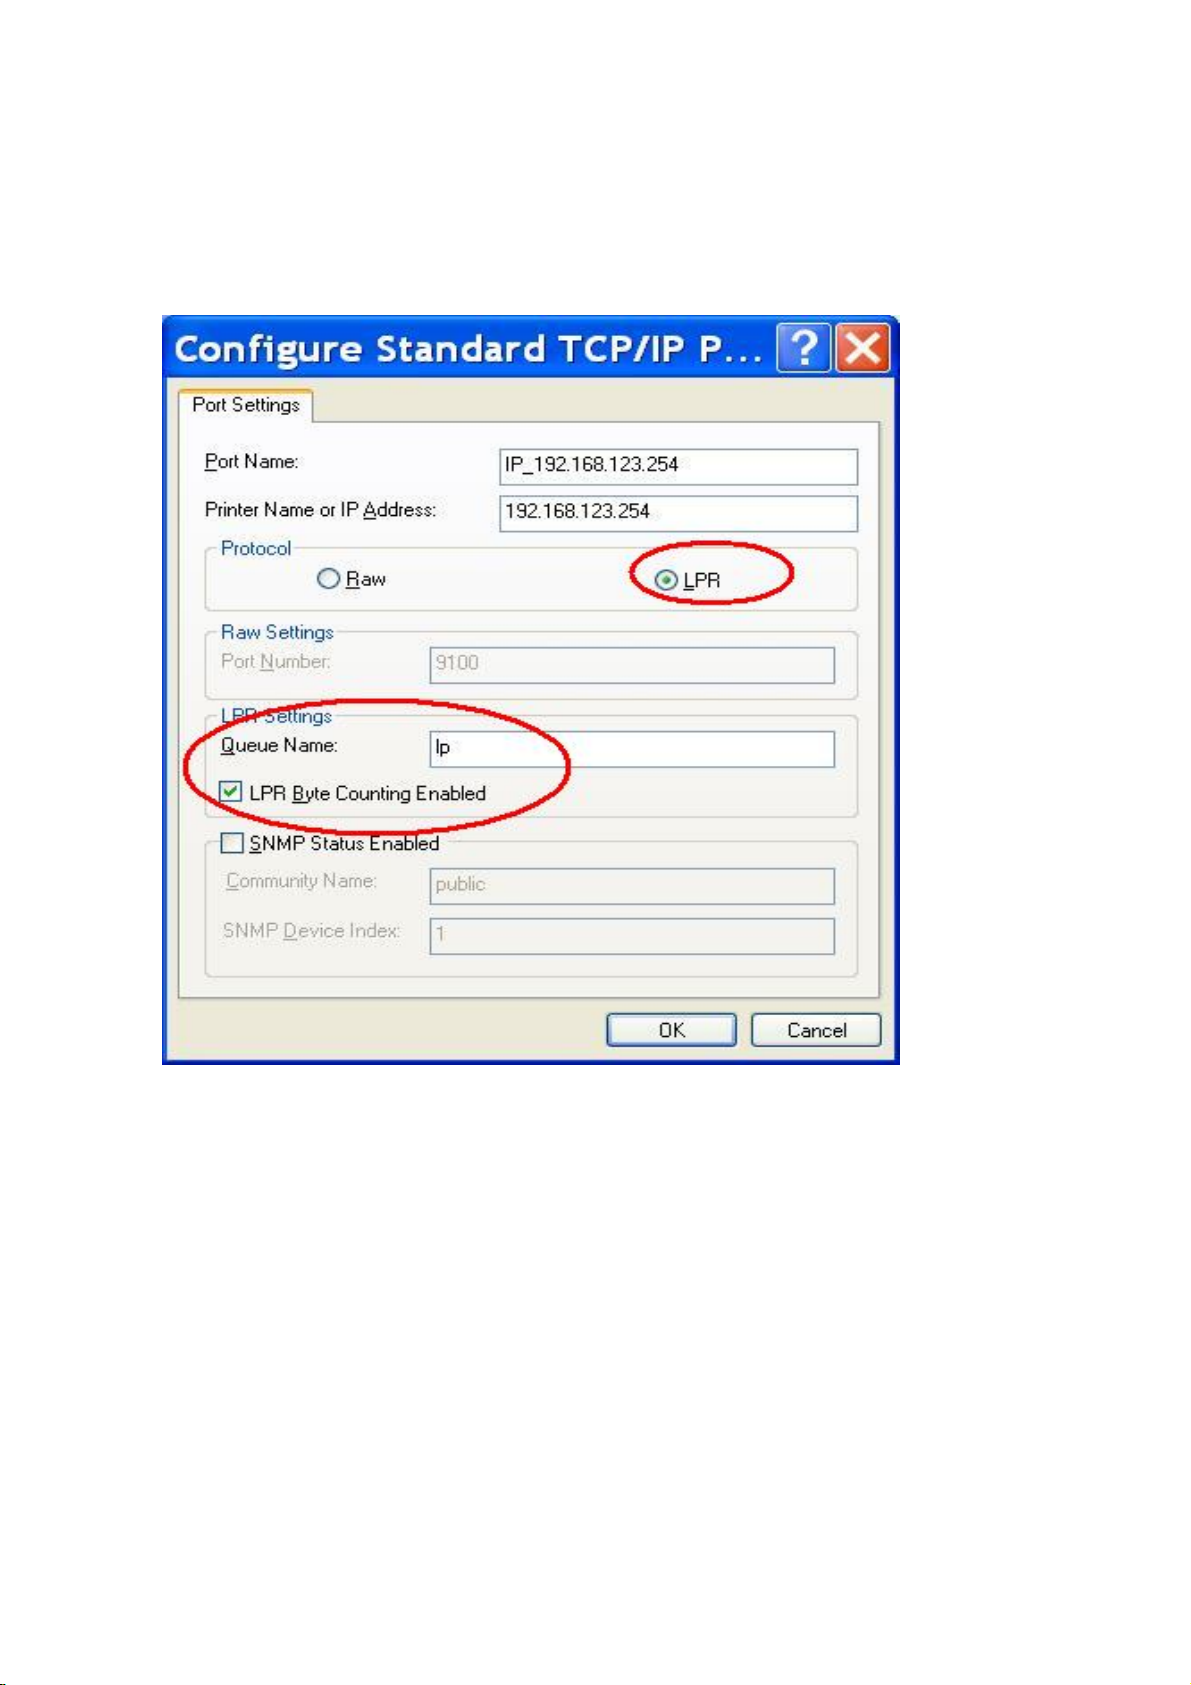
6.Select “LPR”, type ” lp“ lowercase letter in “Queue Name:”
And enable “LPR Byte Counting Enabled”.
83
Page 84
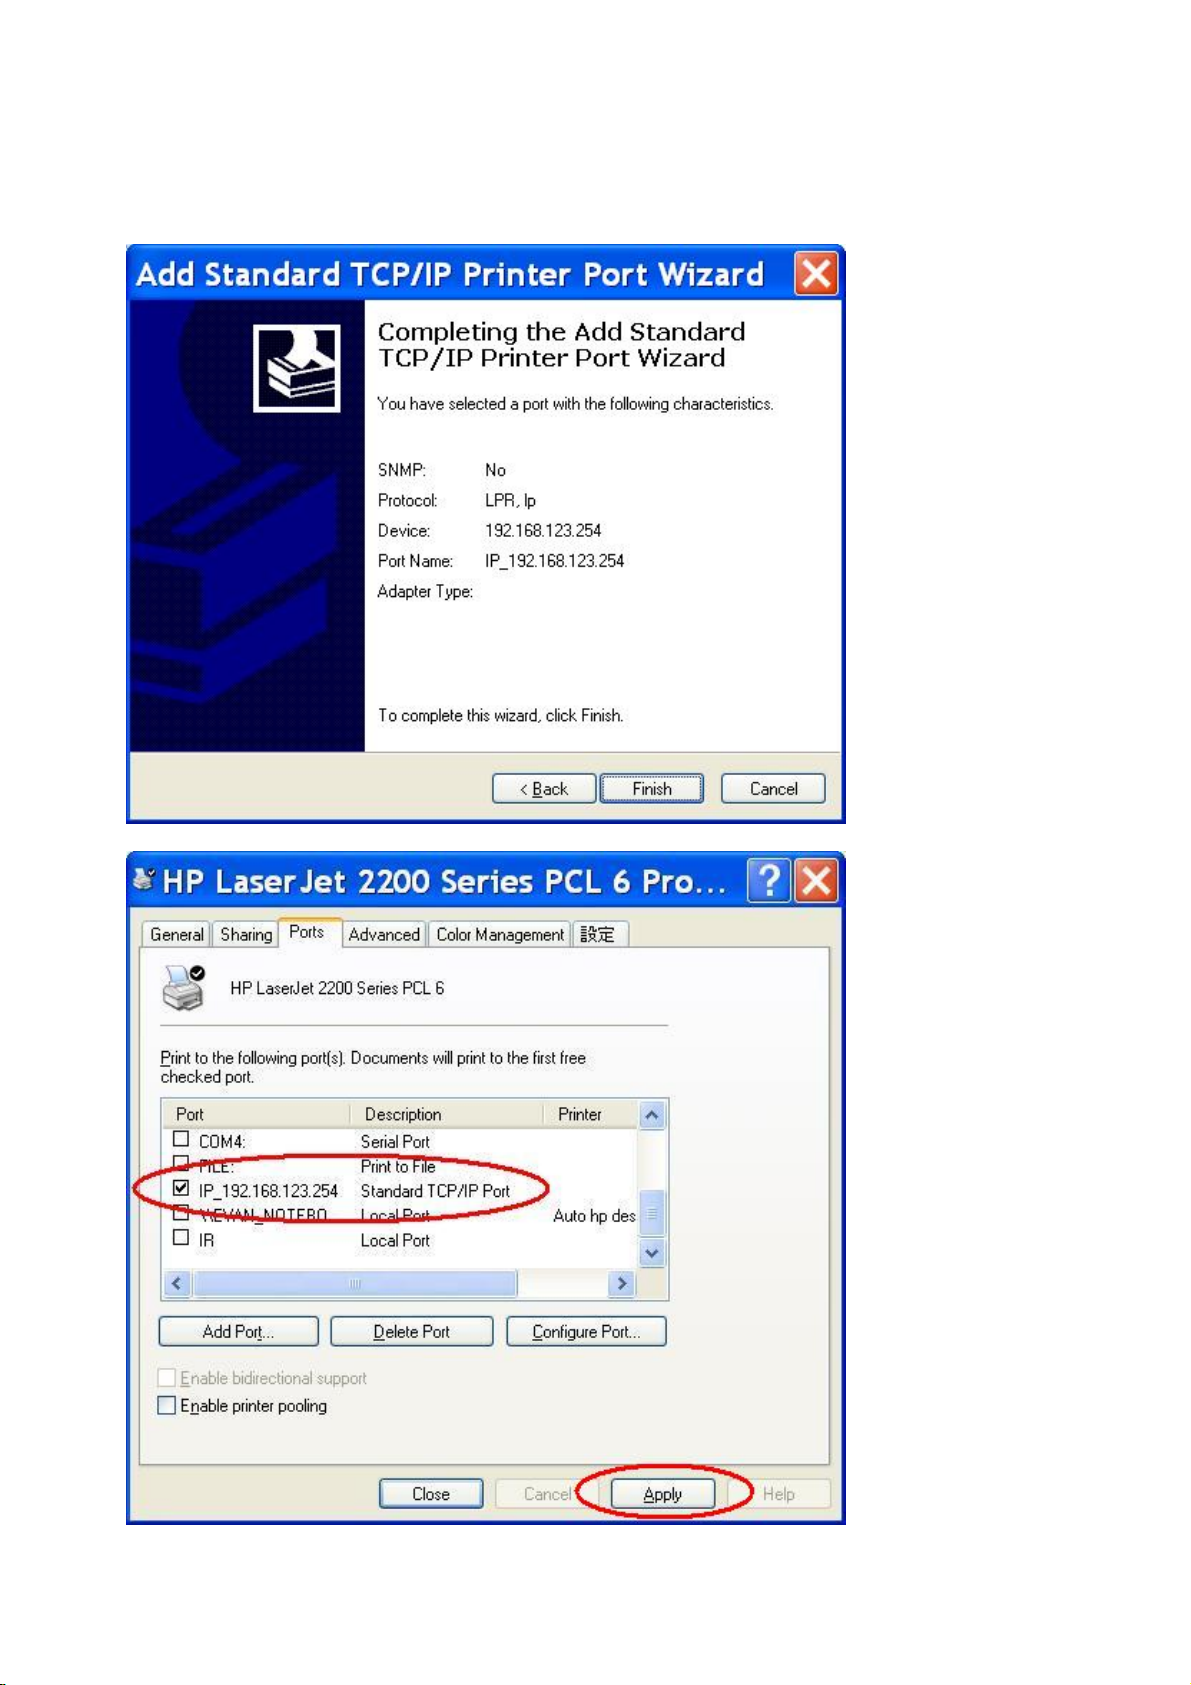
7.Apply your settings
84
Page 85
5.4 Configuring on Unix-like based Platforms
Please follow the traditional configuration procedure on Unix platforms to setup the print server of this
product. The printer name is “lp.”
In X-Windows, for example, In Redhat Platforms,
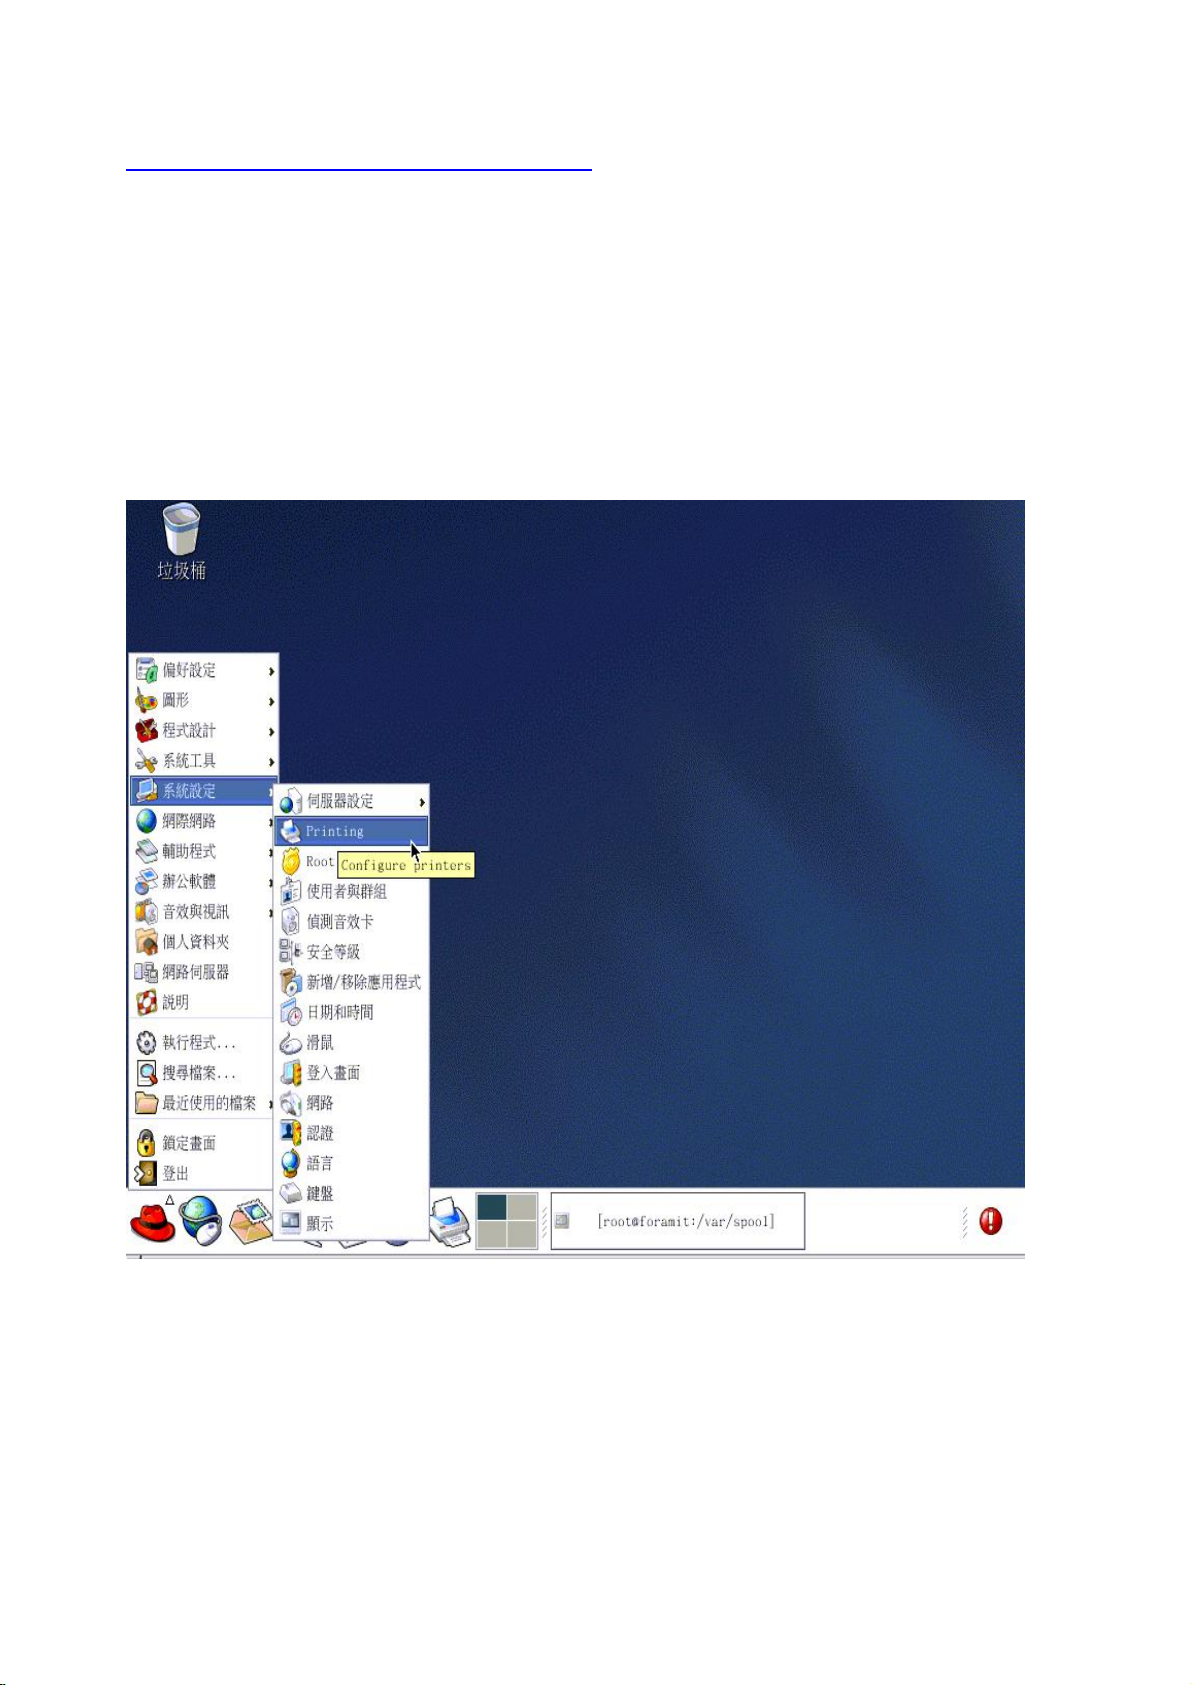
Please follow the below steps to configure your printer on Red Hat 9.0.
1. Start from the Red Hat---> System Setting---> Printing.
85
Page 86
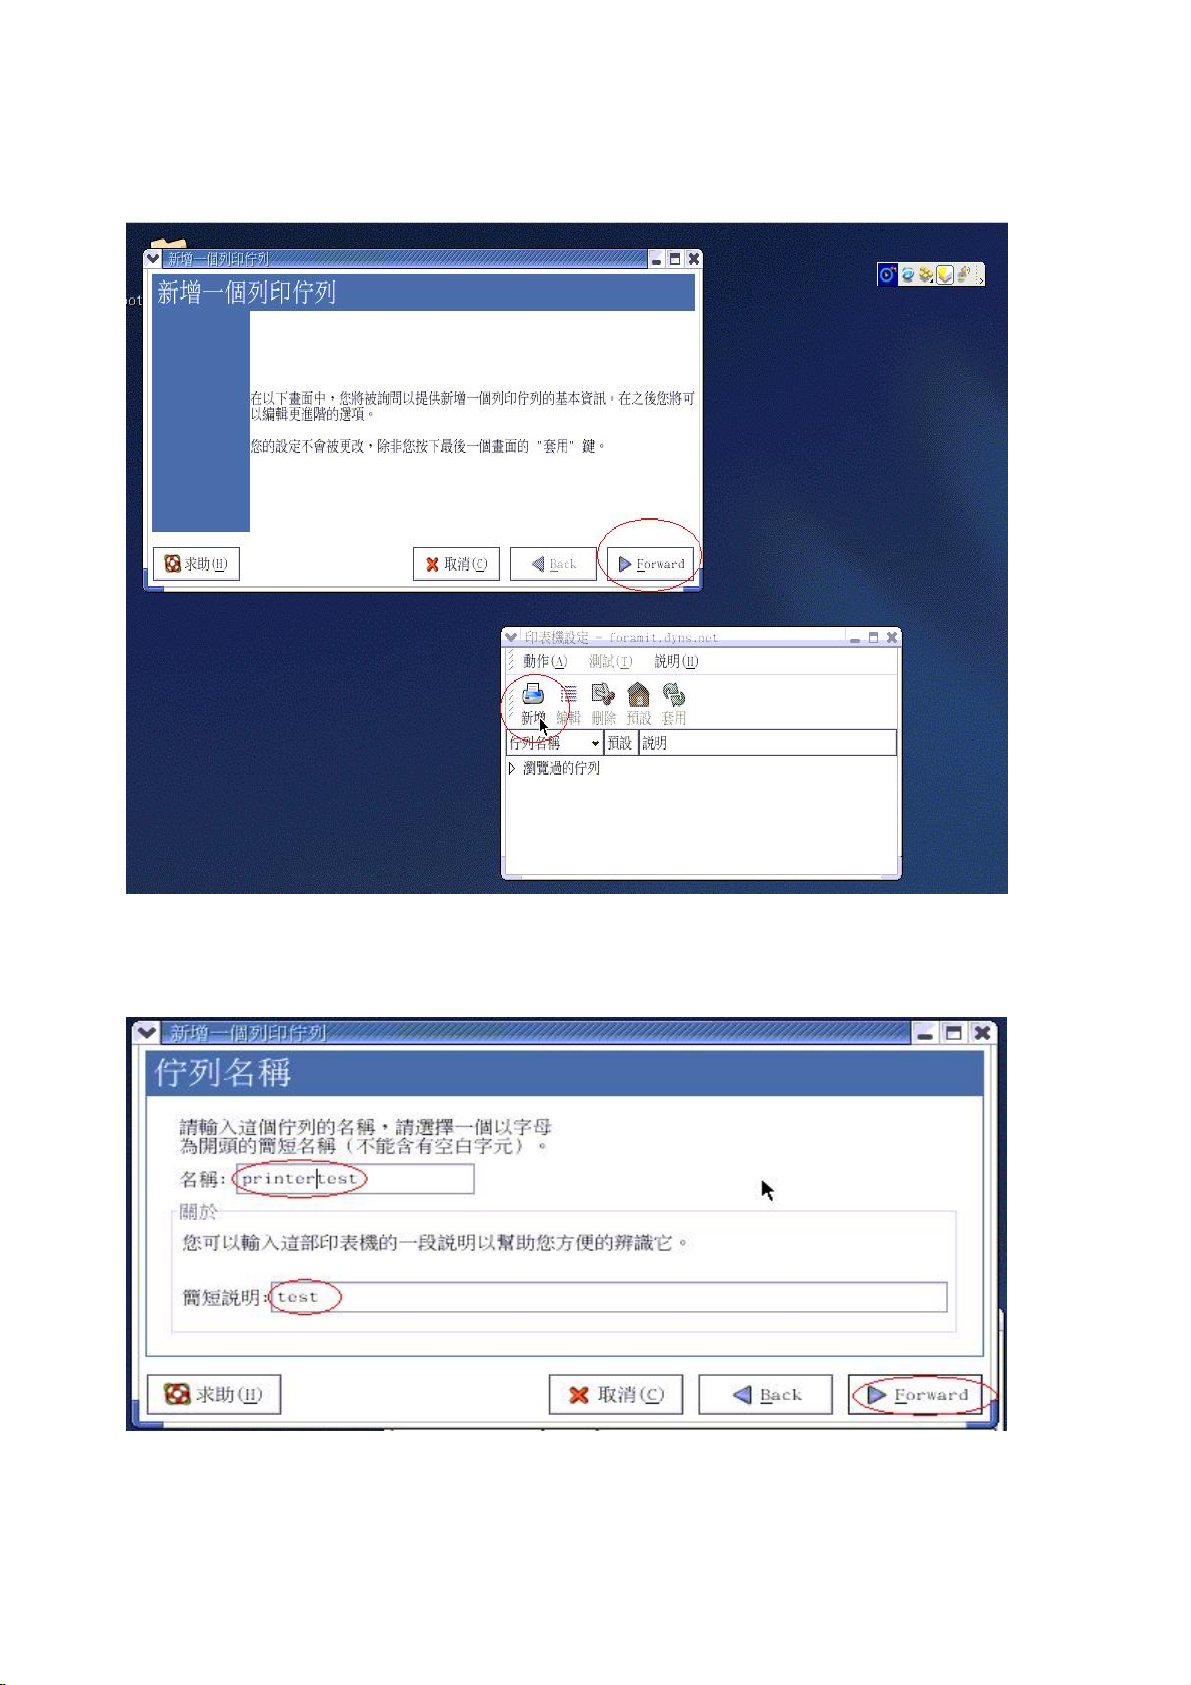
2. Click Add---> Forward.
3. Enter the Pinter Name, Comments then forward.
86
Page 87
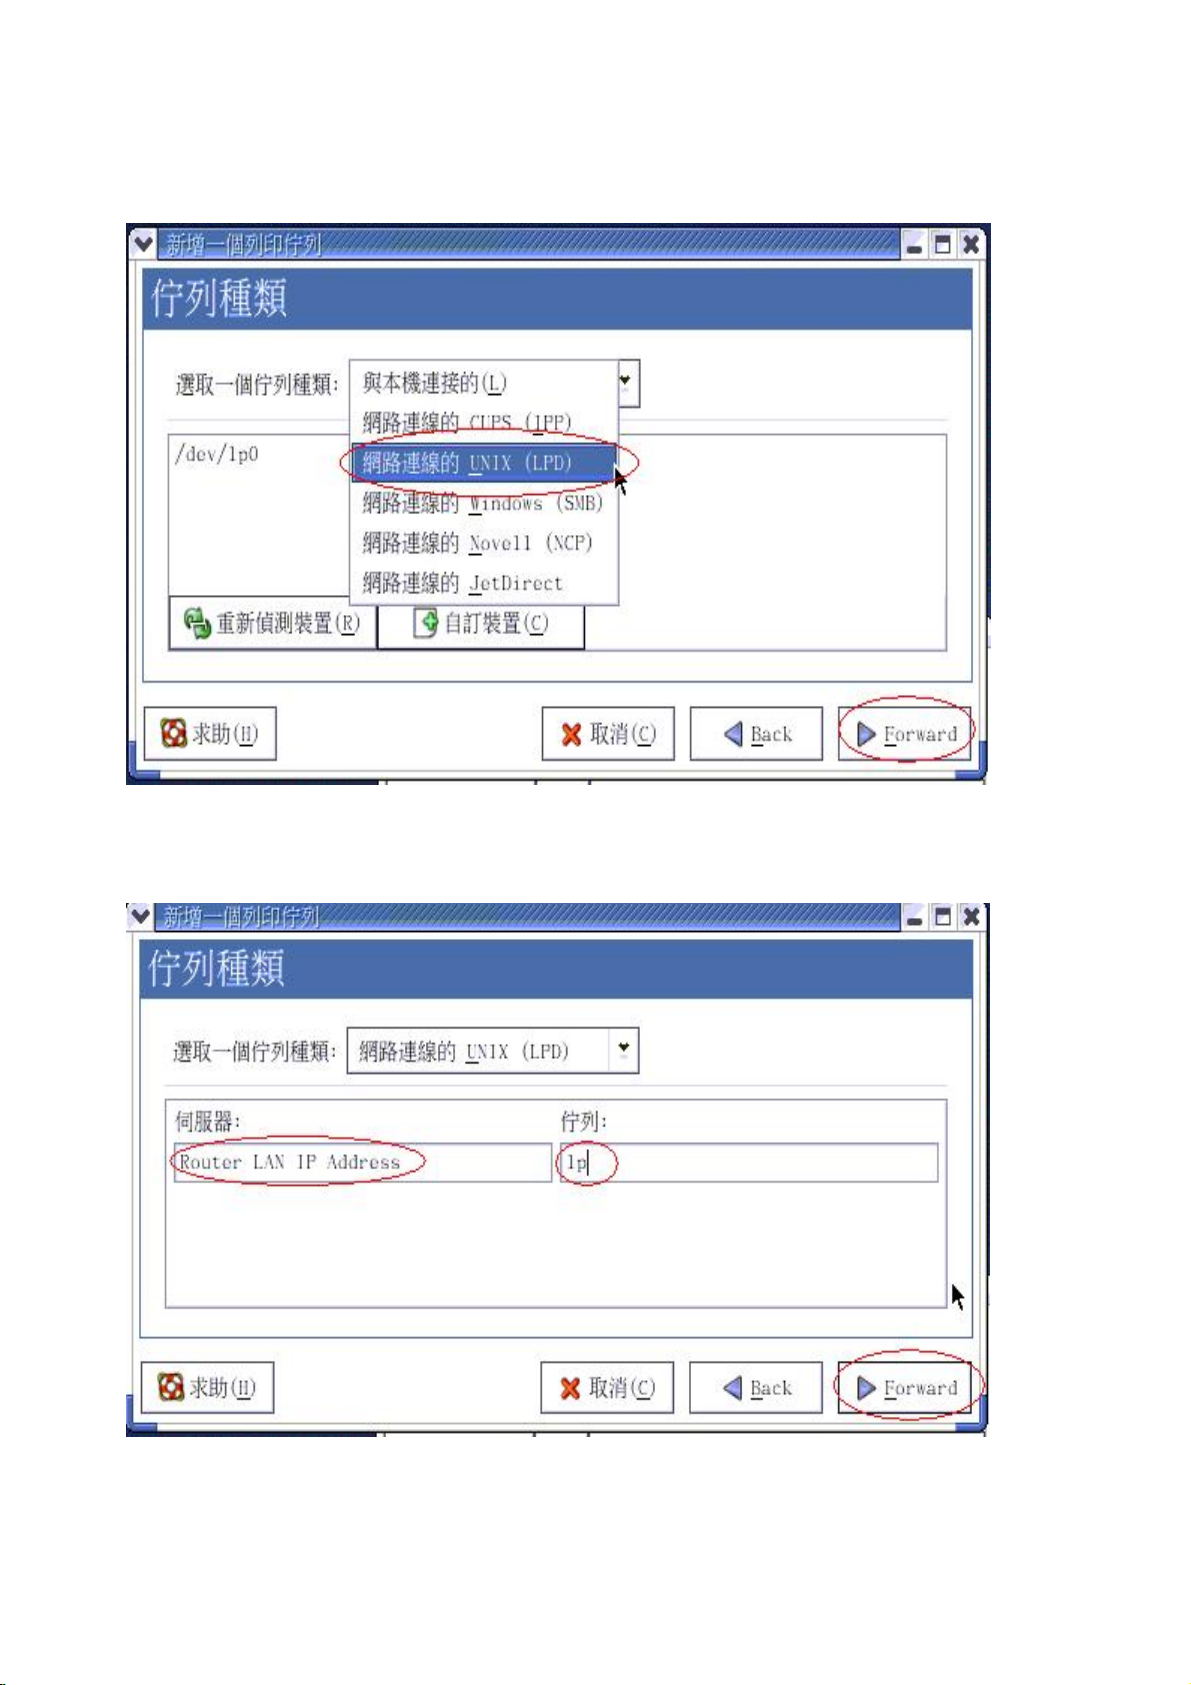
4. Select LPD protocol and then forward.
5. Enter the router LAN IP Address and the queue name "lp". Then forward.
87
Page 88
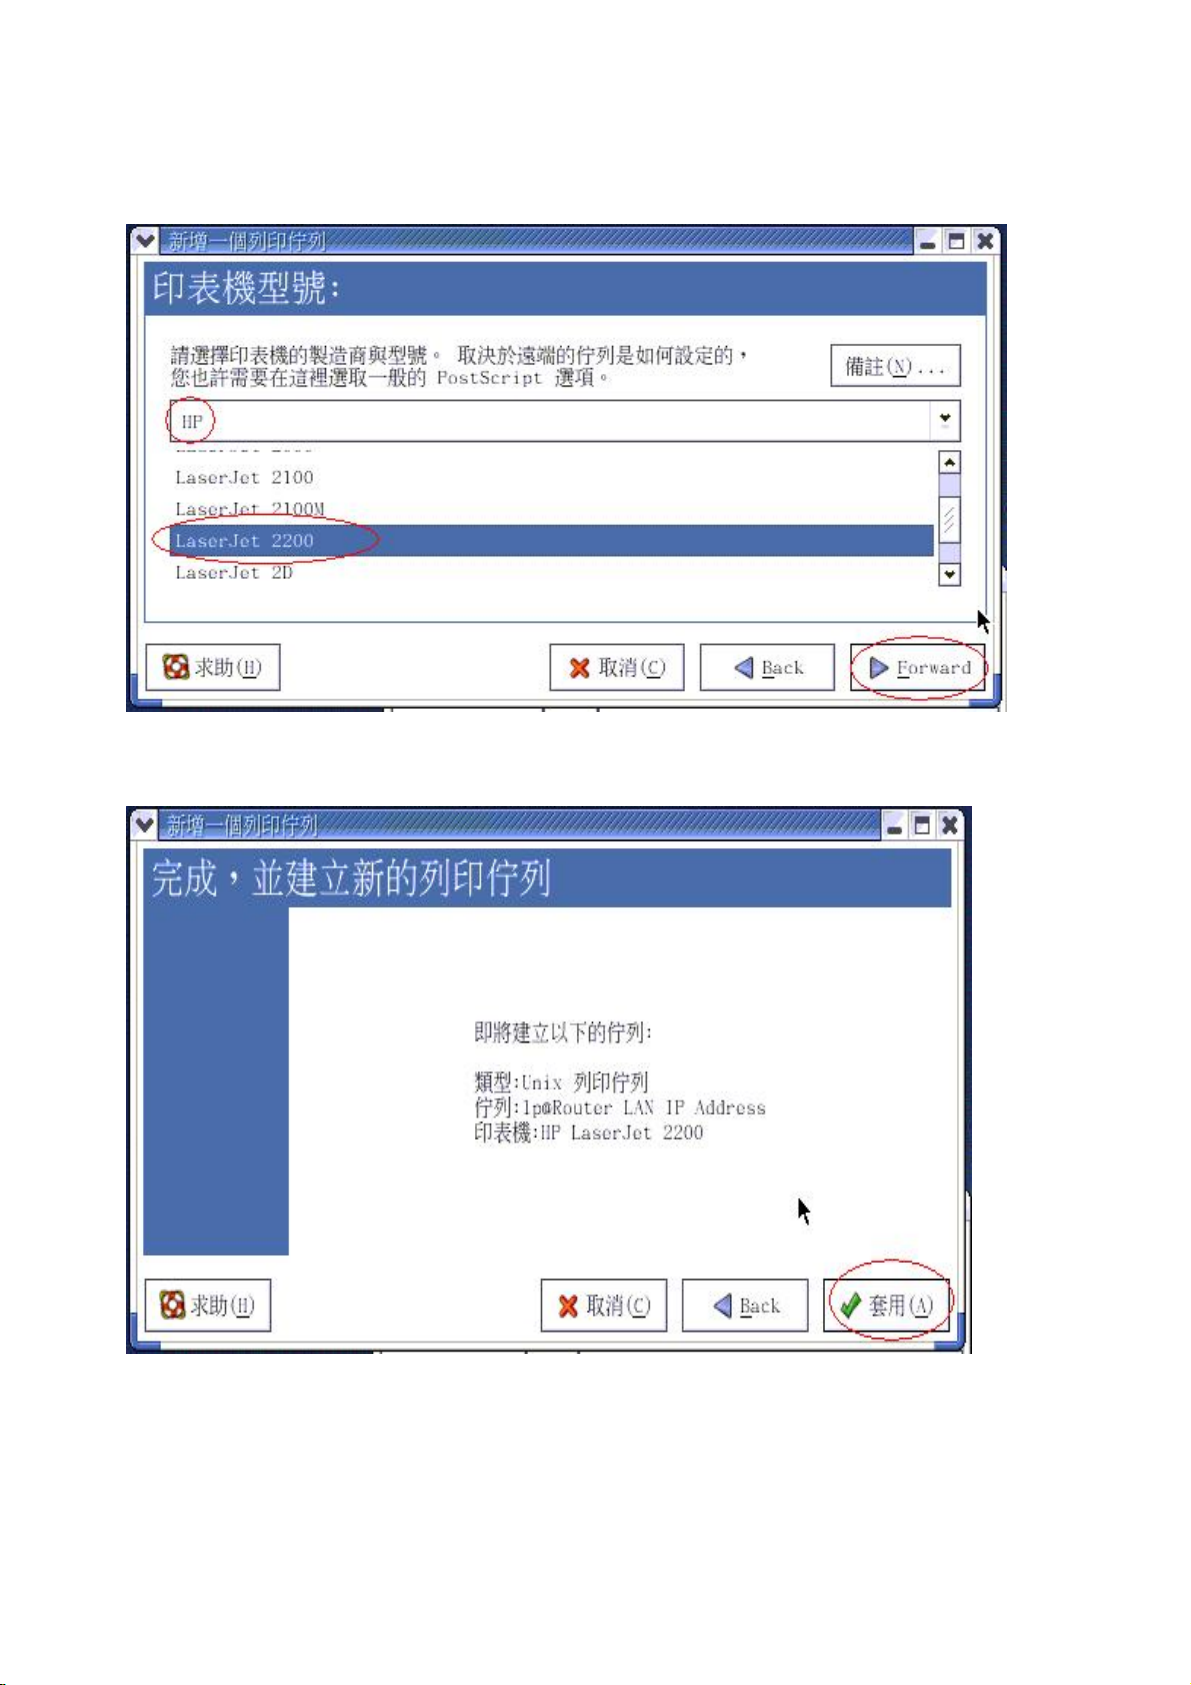
6. Select the Printer Brand and Model Name. Then Forward.
7. Click Apply to finish setup.
88
Page 89
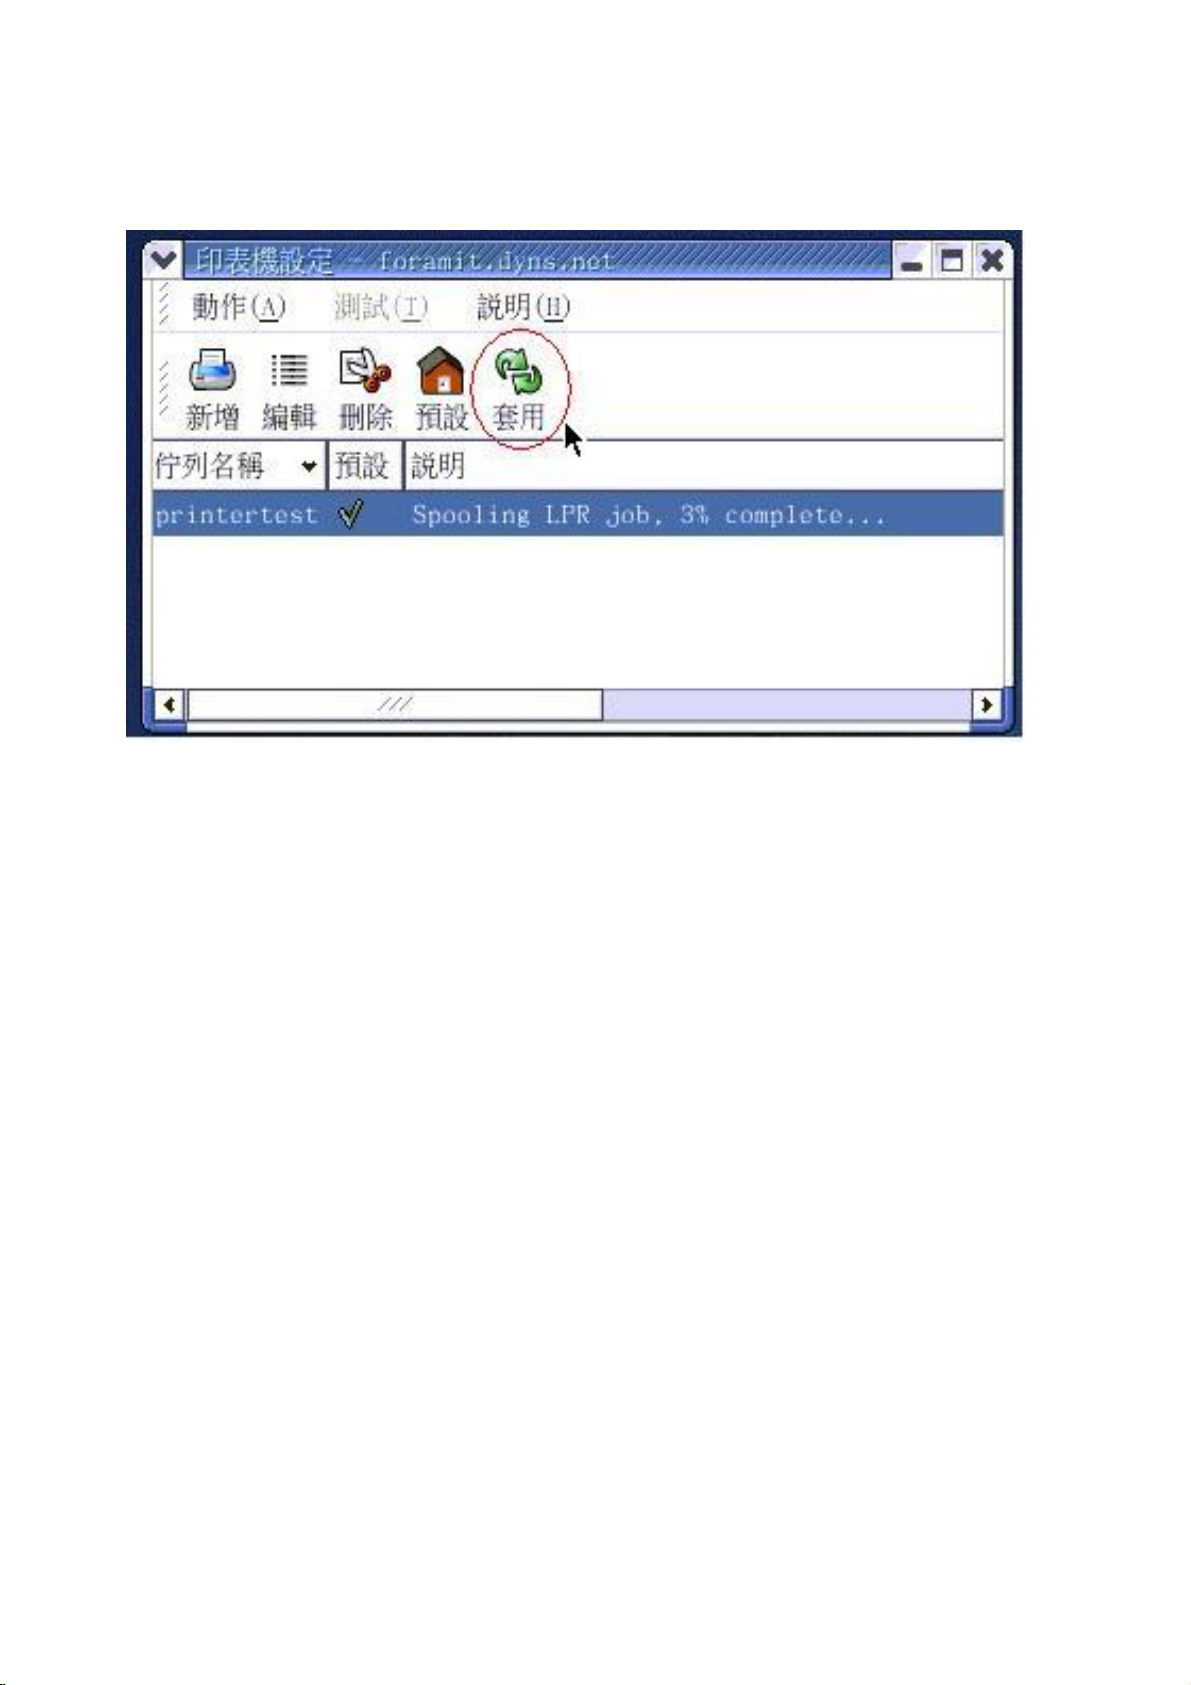
8. At last you must click Apply on the toolbox to make the change take effective.
In Command Mode:
Linux has built-in LPR client ,You can utilize it for printing.
You can manual set it or via the tool "printtool" in X-windows.
PS: The spool name is "lp"------all lowercase letter.
Below is my setting.
/etc/printcap
------------------------------------------------------------------------------
lp:\
:sd=/var/spool/lpd/lp:\
:mx#0:\
:sh:\
:rm=192.168.123.254:\
:rp=lp:\ -------------->key point
:if=/var/spool/lpd/lp/filter:
------------------------------------------------------------------------------
Then add the corresponding directory
#mkdir /var/spool/lpd/lp
Too see the detail ,please refer to the online manual in linux.
#man printcap
89
Page 90
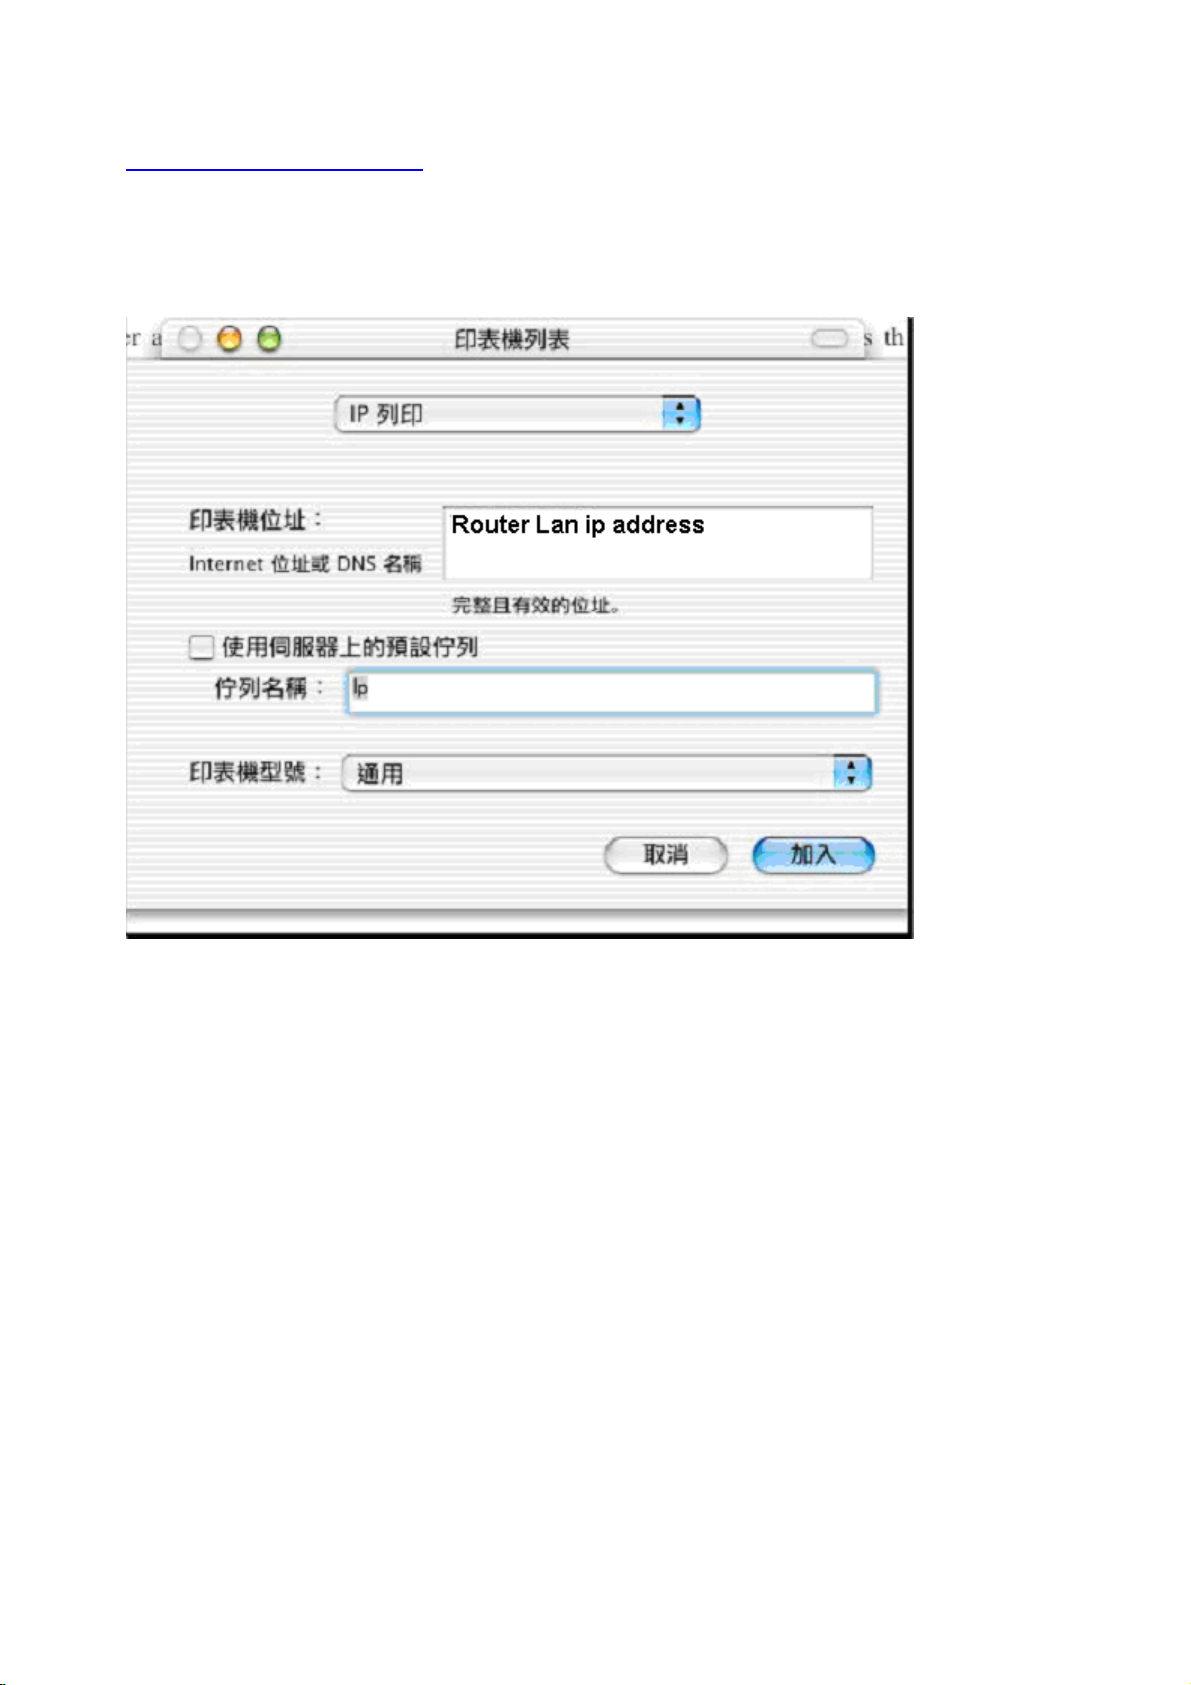
5.5 Configuring on Apple PC
1.First, go to Printer center (Printer list) and add printer
2.Choose IP print and setup printer ip address (router Lan ip address).
3.Disable “Default Queue of Server.” And fill in ‘ lp ‘ in Queue name item.
4.Printer type: Choose “General”.
90
Page 91
A
p
p
e
n
d
i
x
A
T
C
P
/
I
P
C
o
n
f
i
g
u
r
a
A
p
p
e
n
d
i
x
A
T
C
P
/
I
P
C
o
n
f
A
p
p
e
n
d
i
x
A
T
C
P
/
I
P
This section introduces you how to install TCP/IP protocol into your personal computer. And suppose
you have been successfully installed one network card on your personal computer. If not, please refer
to your network card manual. Moreover, the Section B.2 tells you how to set TCP/IP values for
working with this NAT Router correctly.
A.1 Install TCP/IP Protocol into Your PC
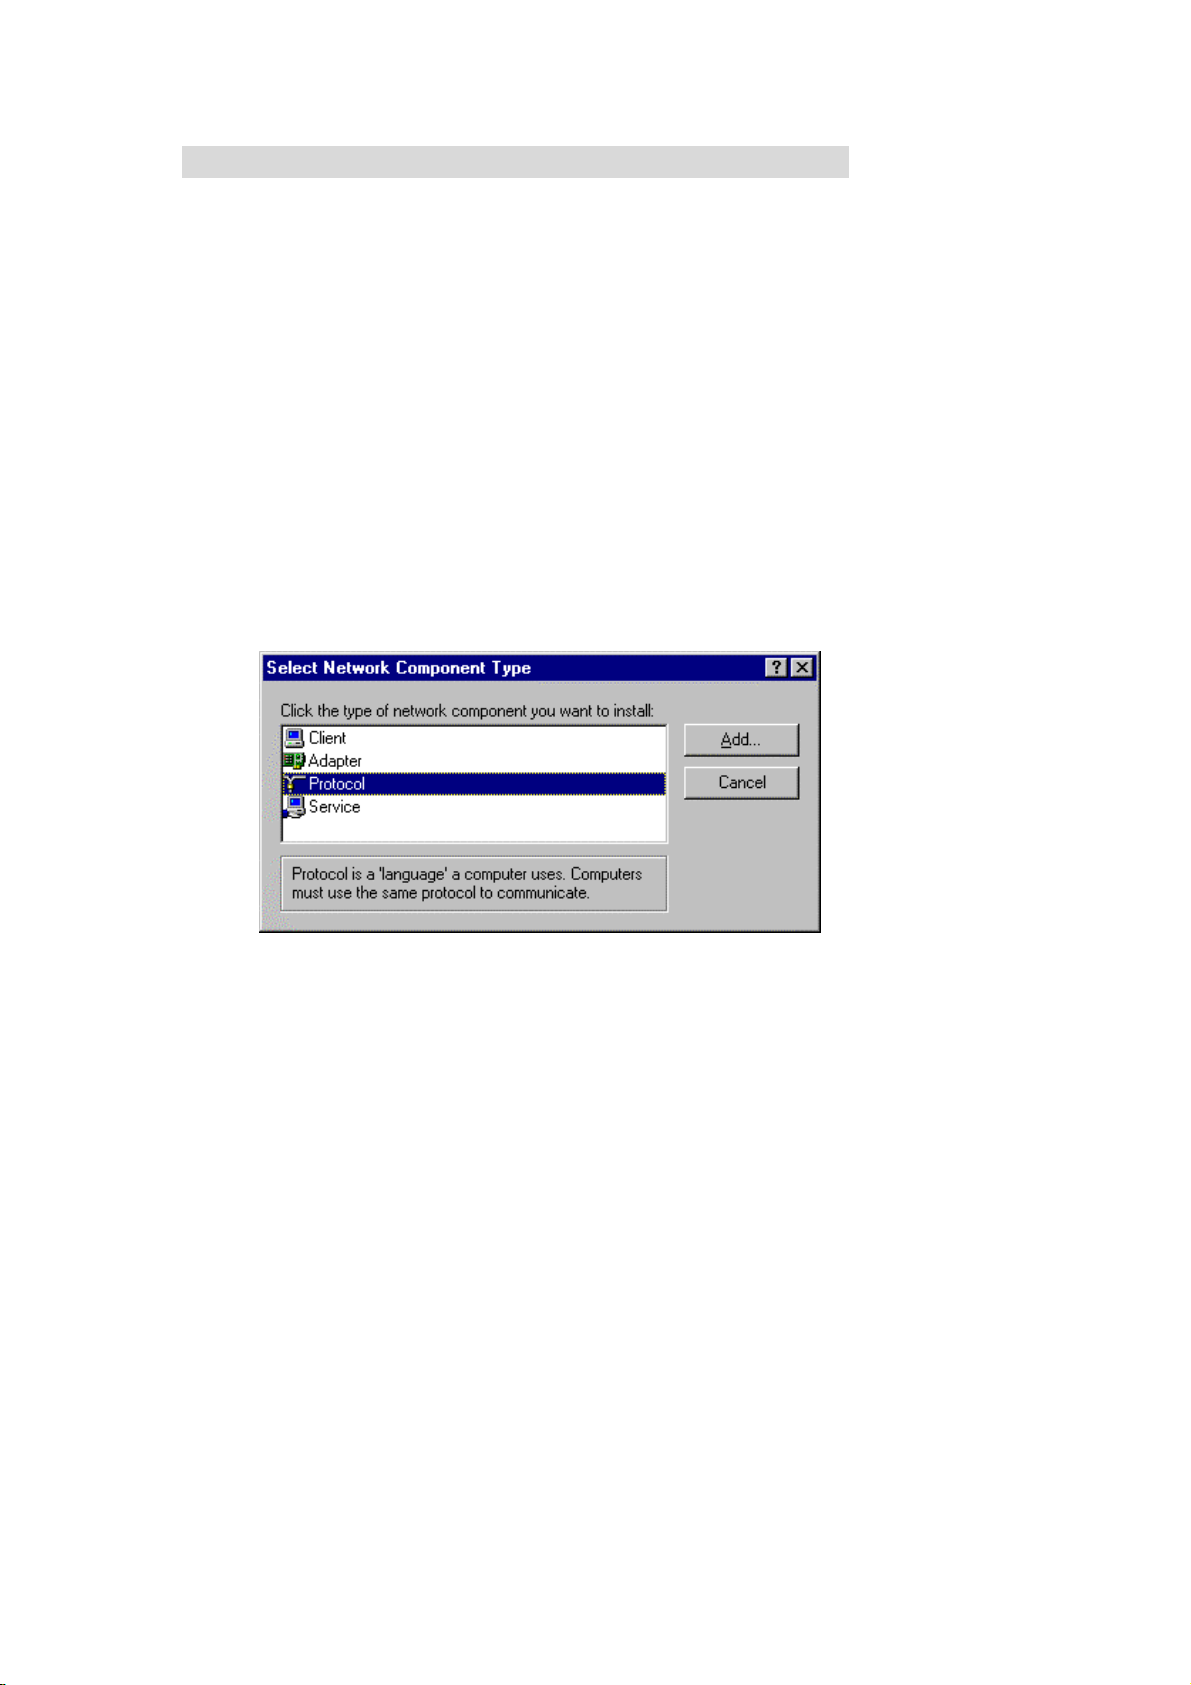
1. Click Start button and choose Settings, then click Control Panel.
2. Double click Network icon and select Configuration tab in the Network window.
3. Click Add button to add network component into your PC.
4. Double click Protocol to add TCP/IP protocol.
C
i
o
n
f
i
t
g
u
r
a
g
u
r
a
o
r
W
i
n
d
o
w
s
9
5
/
9
8
i
o
n
f
f
o
r
W
i
n
d
o
w
s
t
i
o
n
o
r
W
i
n
t
i
o
n
f
d
9
o
w
s
9
5
/
9
8
5
/
9
8
91
Page 92
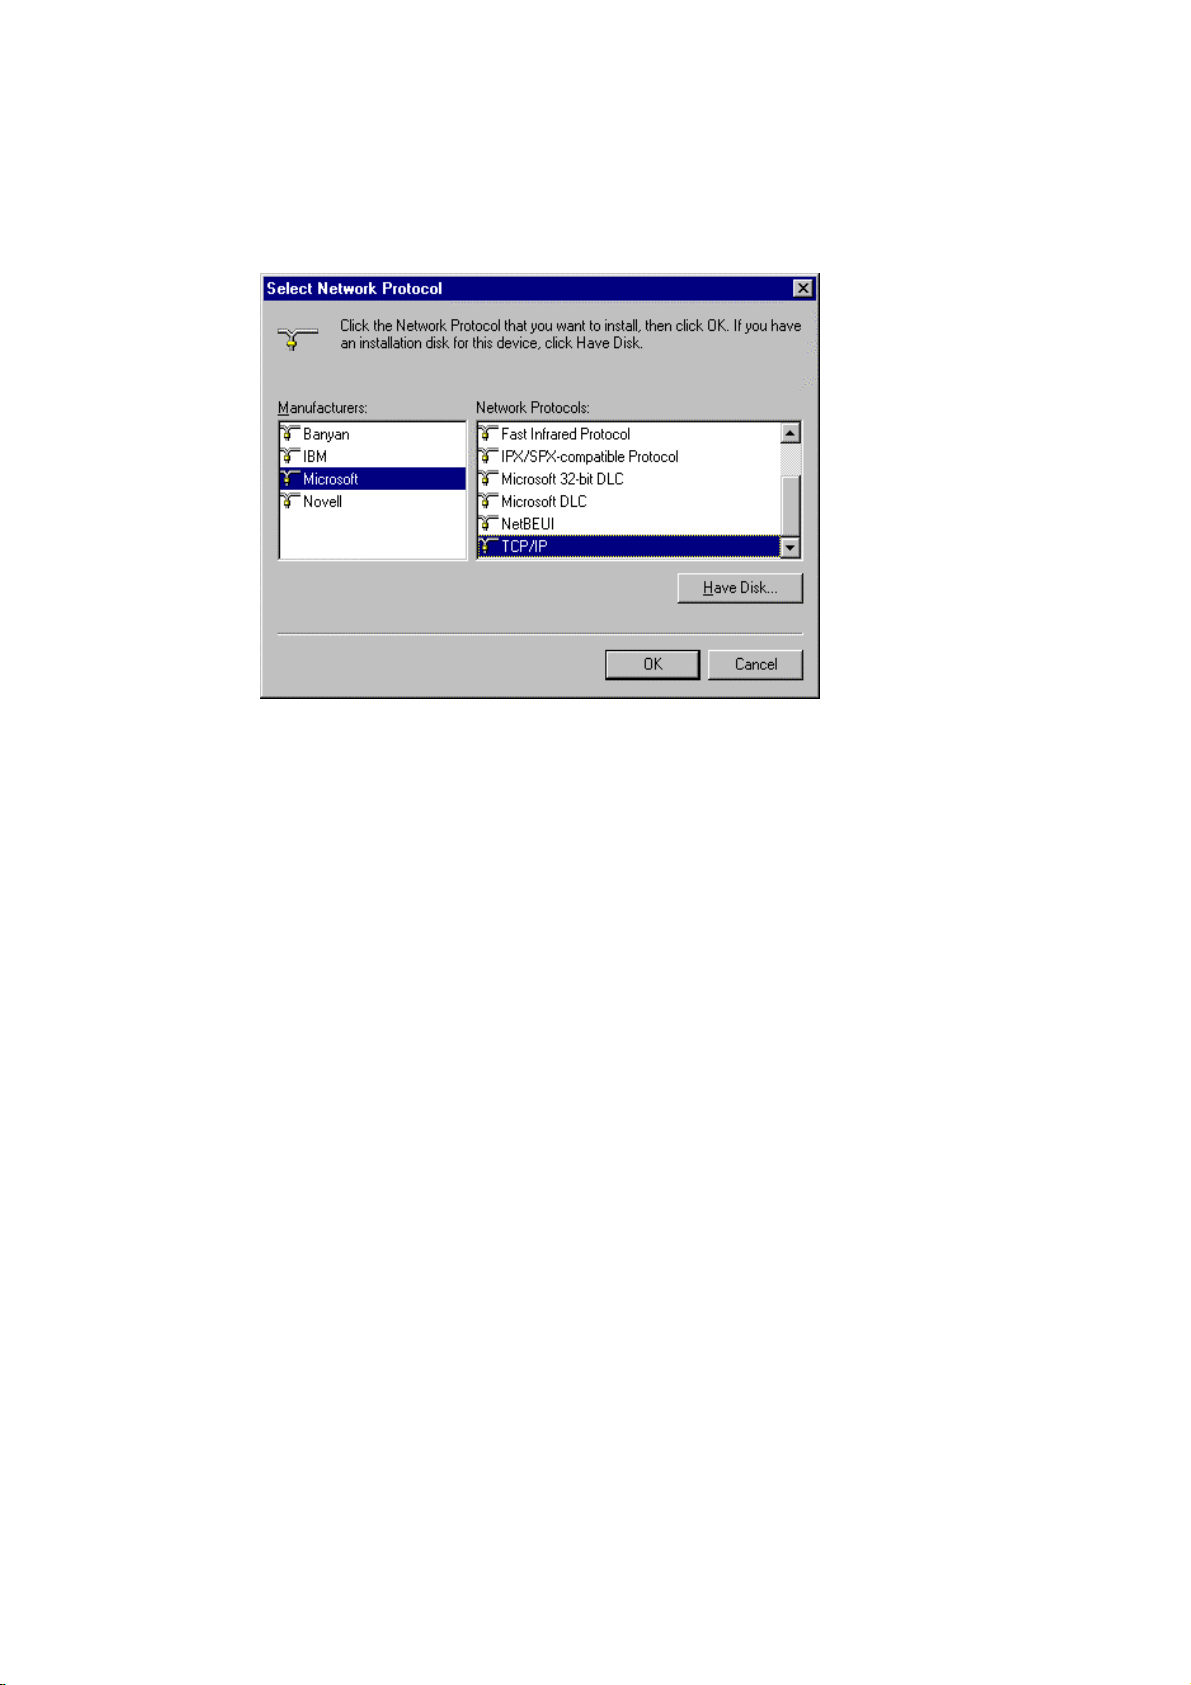
5. Select Microsoft item in the manufactures list. And choose TCP/IP in the Network Protocols.
Click OK button to return to Network window.
6. The TCP/IP protocol shall be listed in the Network window. Click OK to complete the install
procedure and restart your PC to enable the TCP/IP protocol.
92
Page 93
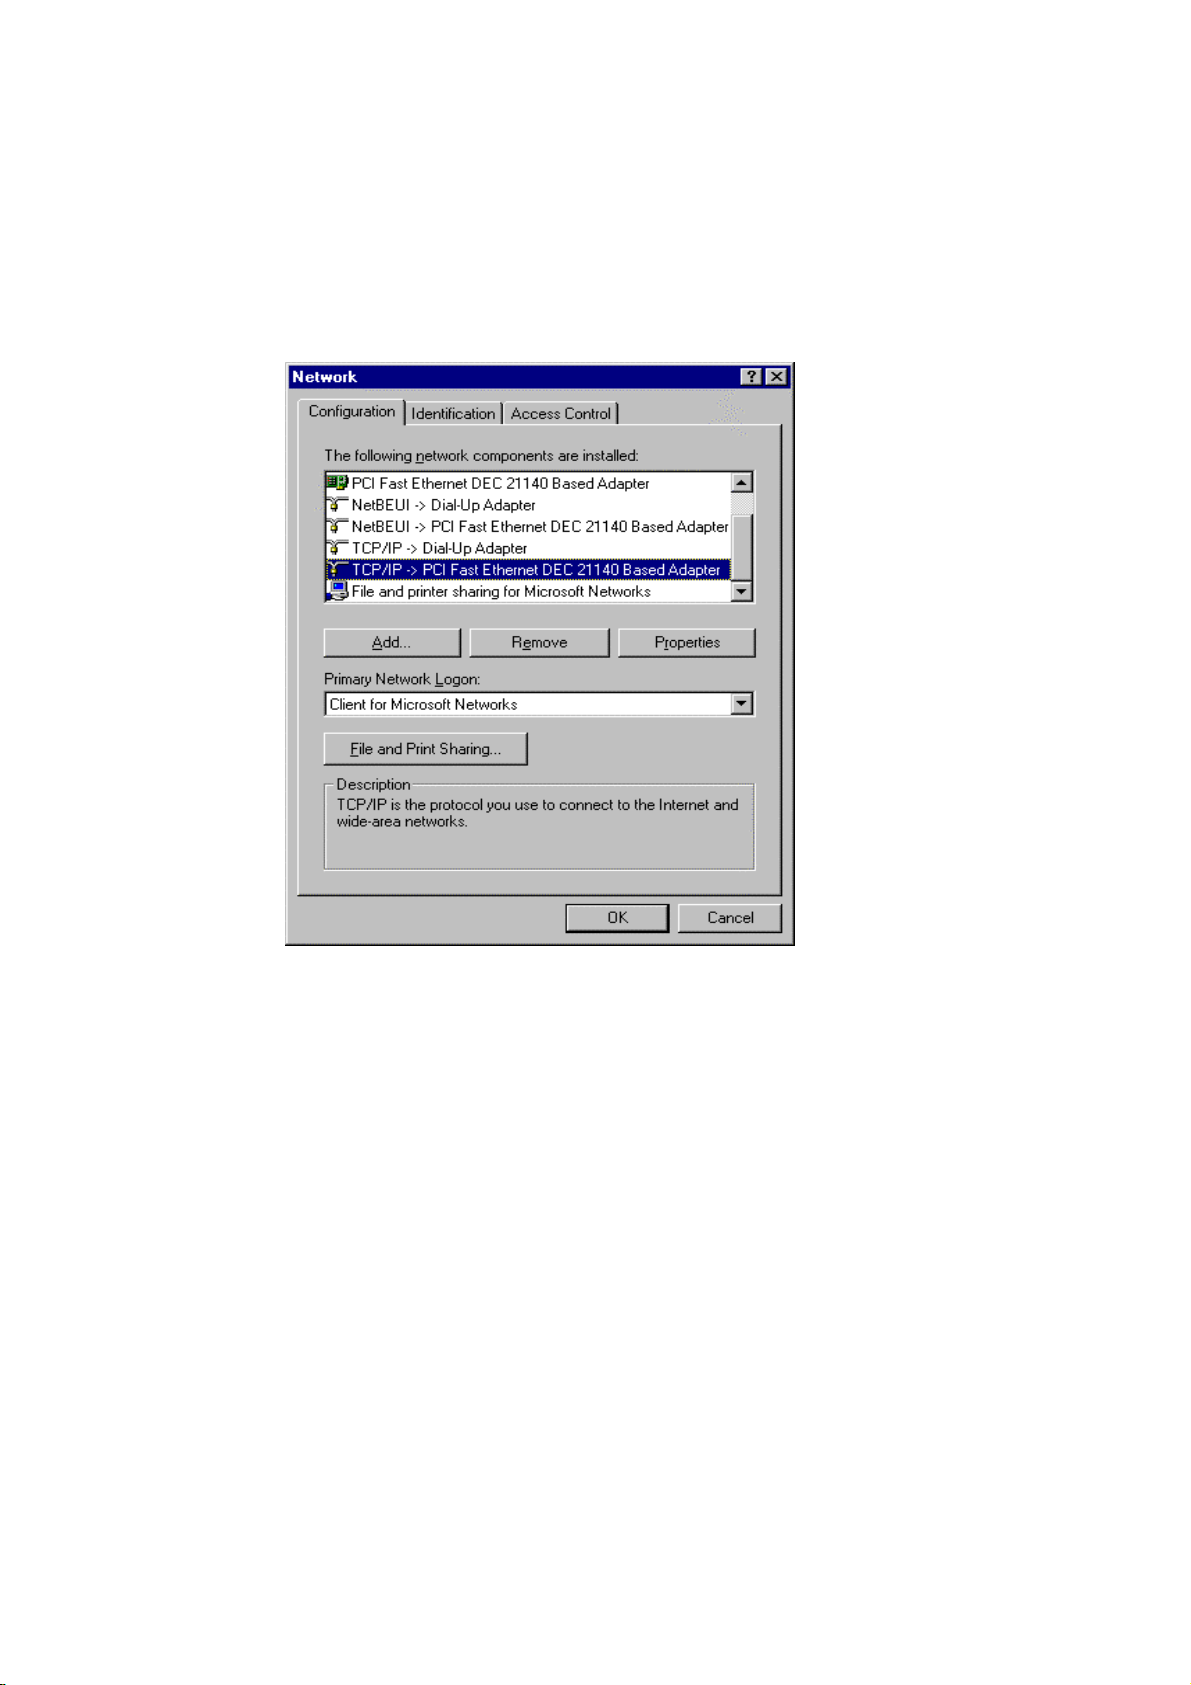
A.2 Set TCP/IP Protocol for Working with NAT Router
1. Click Start button and choose Settings, then click Control Panel.
2. Double click Network icon. Select the TCP/IP line that has been associated to your network card
in the Configuration tab of the Network window.
3. Click Properties button to set the TCP/IP protocol for this NAT Router.
4. Now, you have two setting methods:
93
Page 94
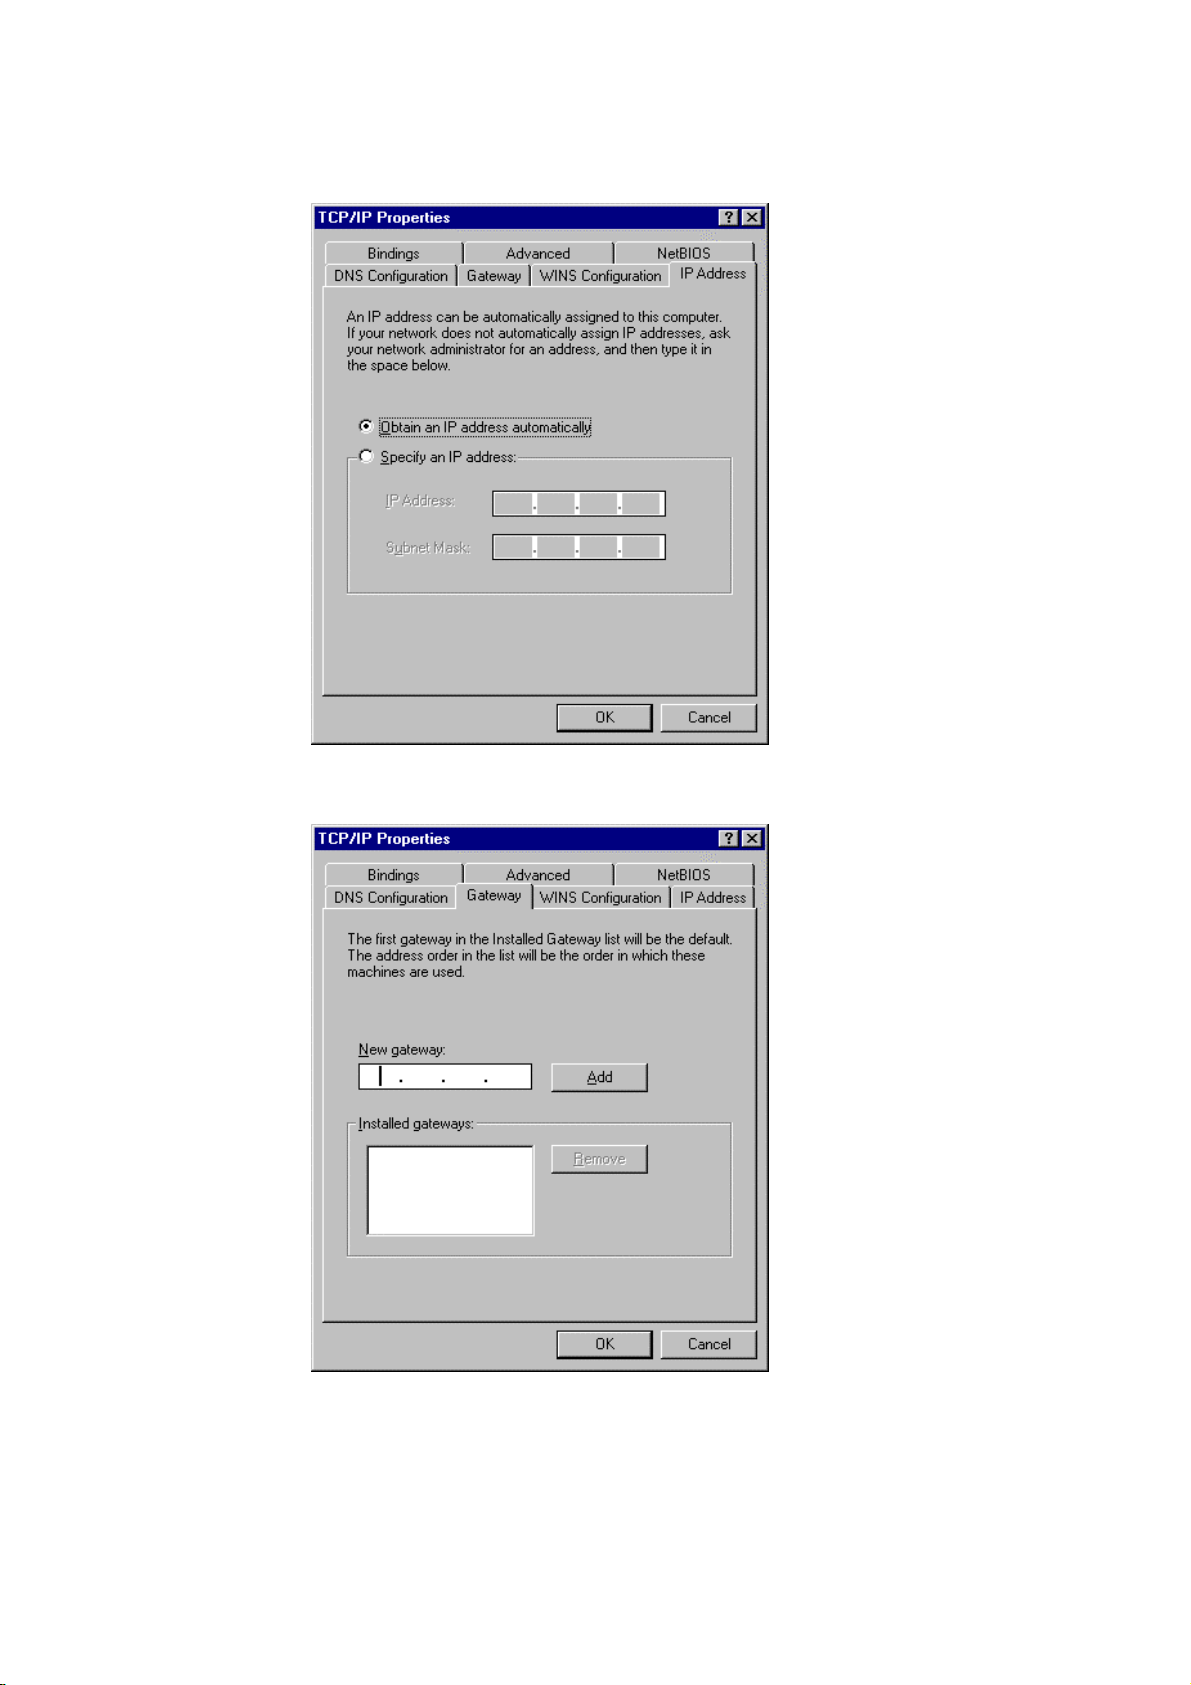
a. Select Obtain an IP address automatically in the IP Address tab.
b. Don’t input any value in the Gateway tab.
94
Page 95
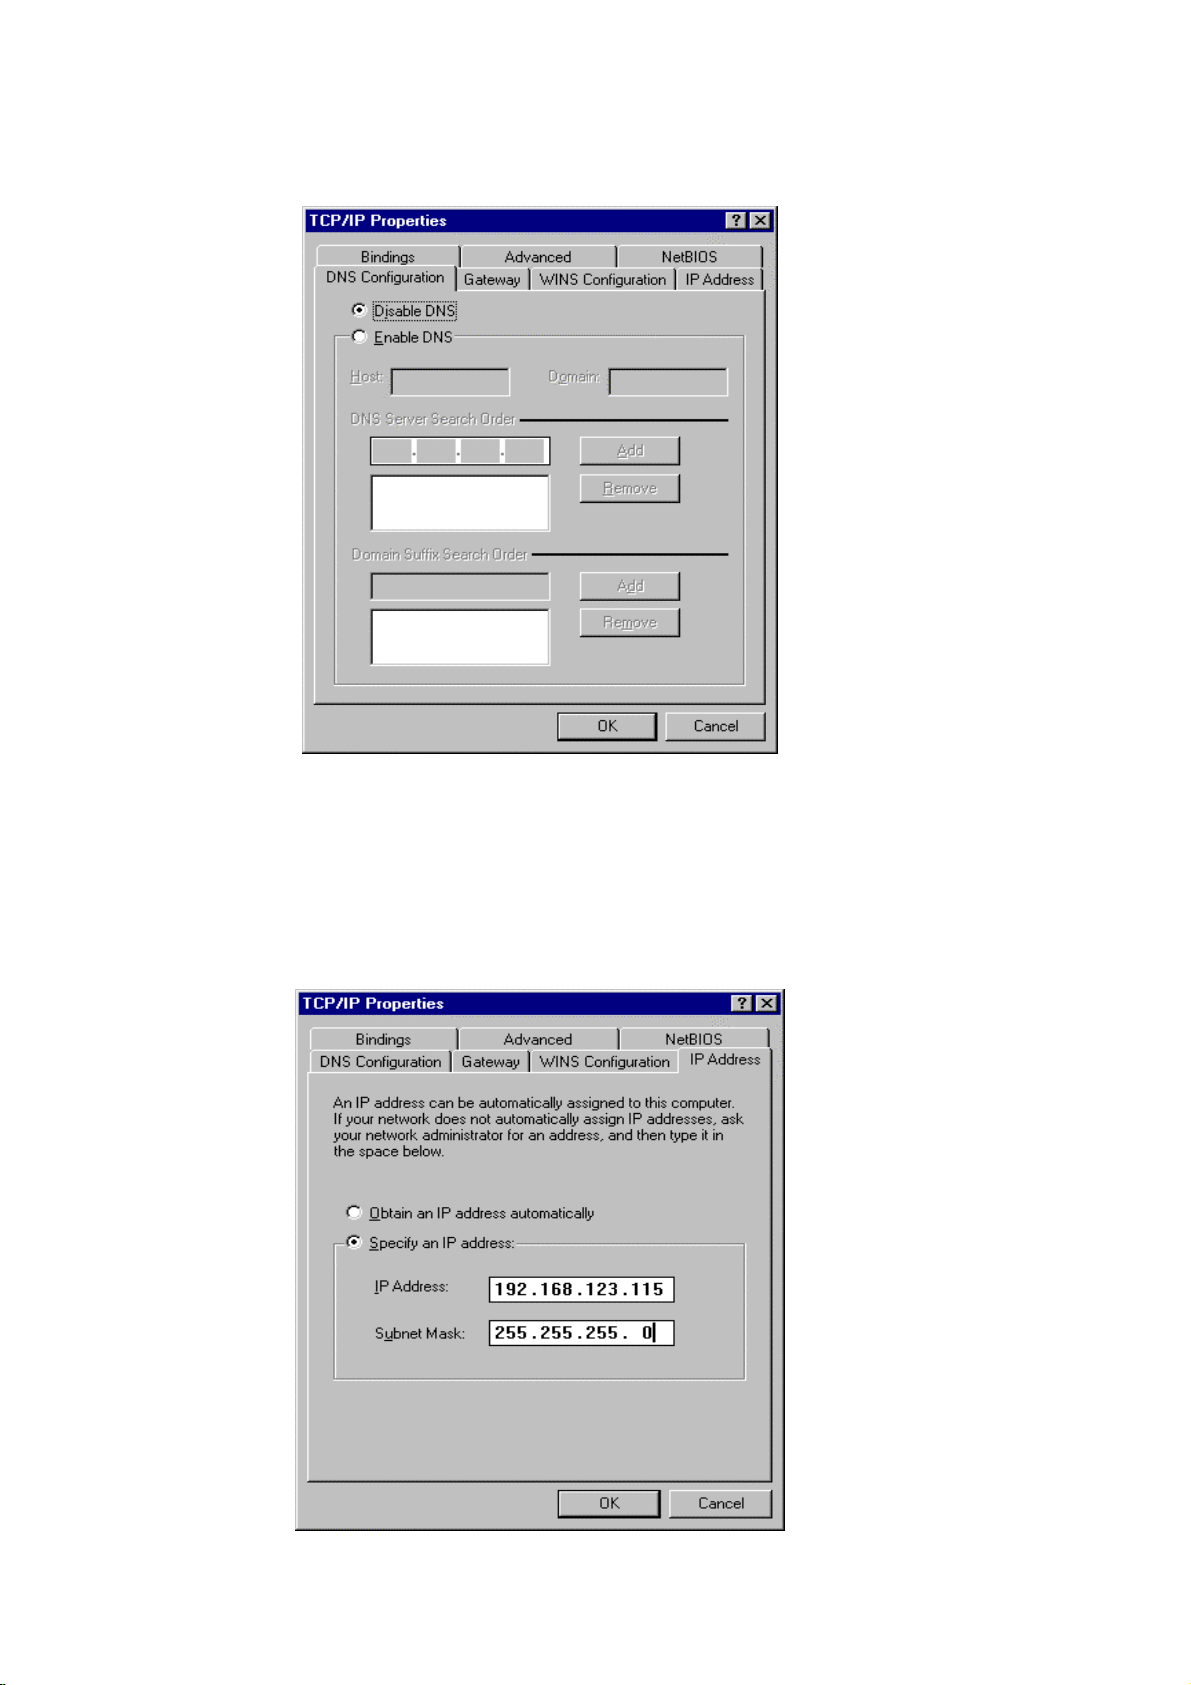
c. Choose Disable DNS in the DNS Configuration tab.
B. Configure IP manually
a. Select Specify an IP address in the IP Address tab. The default IP address of this
product is 192.168.123.254. So please use 192.168 .123.xxx (xxx is be tween 1 and 253 )
for IP Address field and 255.255.255.0 for Subnet Mask field.
95
Page 96
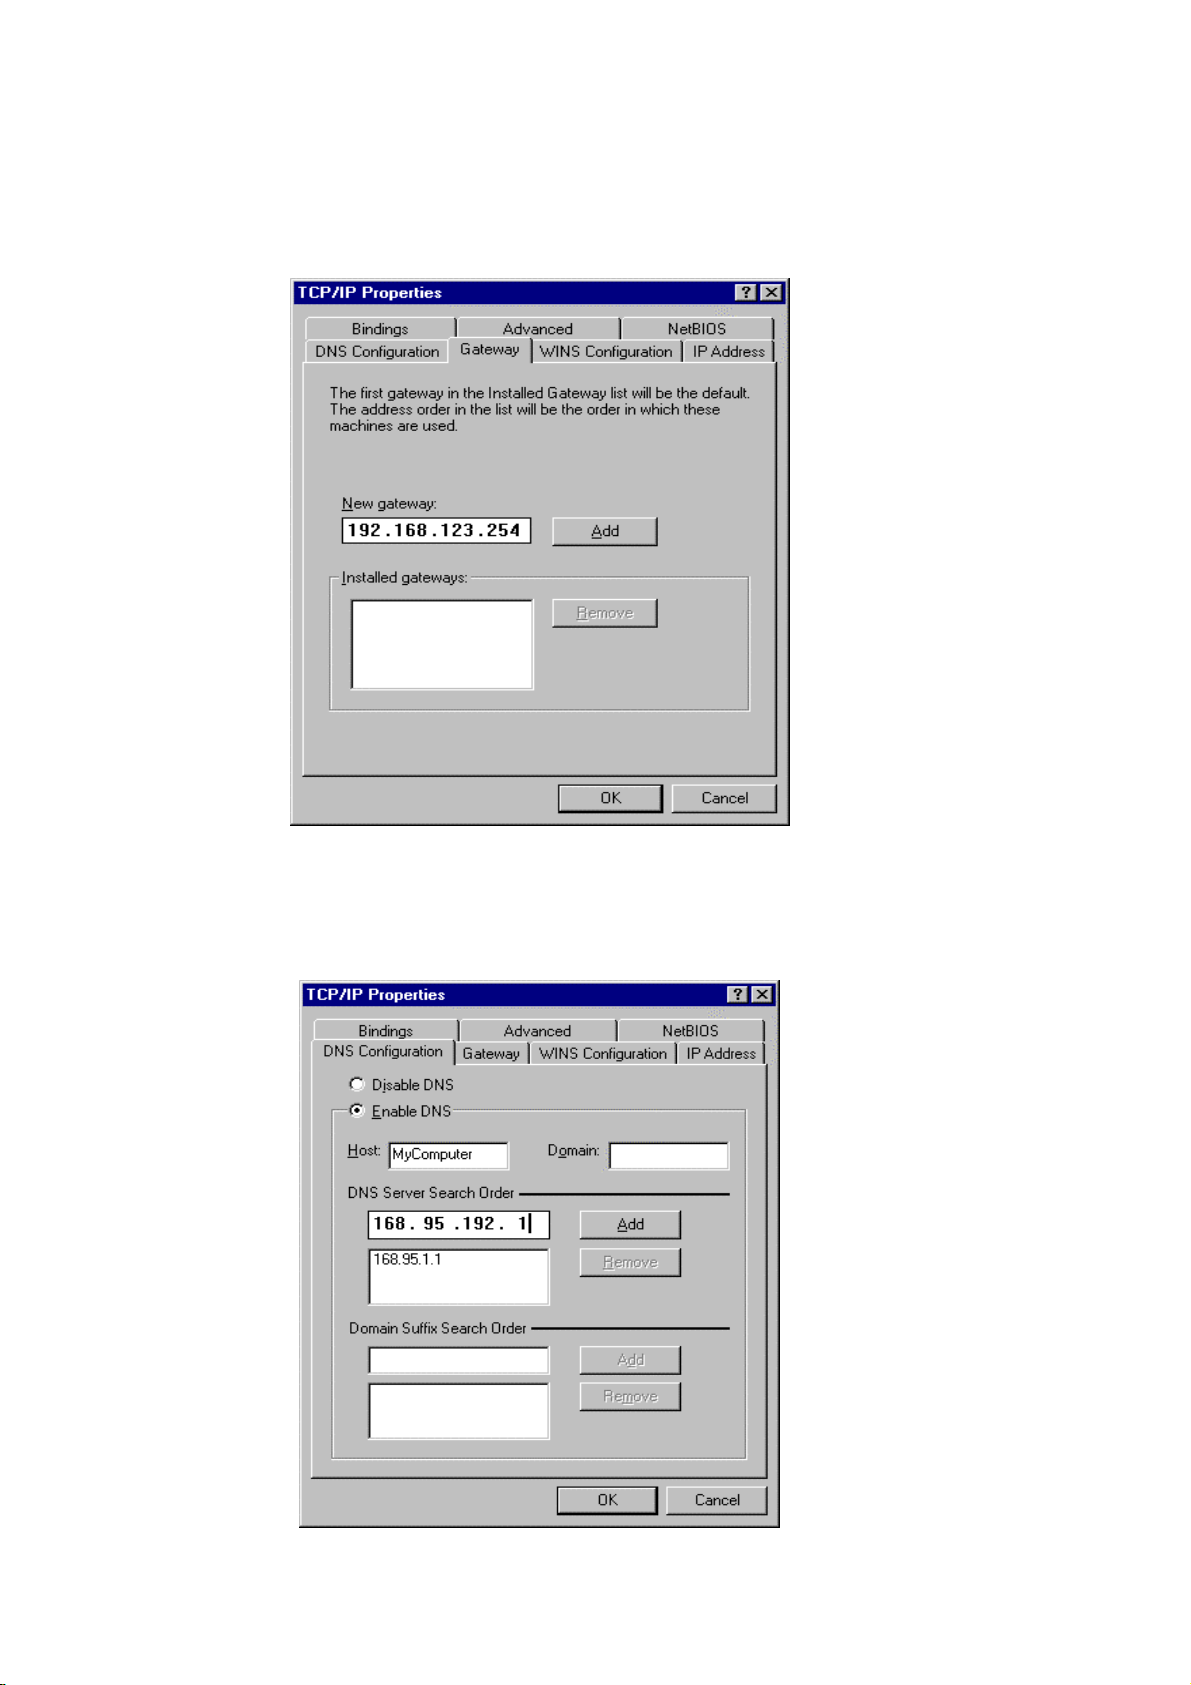
b. In the Gateway tab, add the IP address of this product (default IP is 192.168.123.254)
in the New gateway field and click Add button.
c. In the DNS Configuration tab, add the DNS values which are provided by the ISP into
DNS Server Search Order field and click Add button.
96
Page 97
A
p
p
e
n
d
i
x
B
W
i
n
2
0
0
0
/
X
P
I
P
S
E
A
p
p
e
n
d
i
x
B
W
i
n
2
0
0
0
/
X
P
A
p
p
e
n
d
i
x
B
W
i
n
2
0
0
0
Example: Win XP/2000 VPN Router
(Configuration on WIN 2000 is similar to XP)
1. On Win 2000/XP, click [Start] button, select [Run], type secpol.msc in the field, then click
[Run] Goto **Local Security Policy Settings** page
I
/
X
P
C
P
S
E
P
C
S
E
C
I
i
n
g
g
u
S
e
t
t
t
i
n
S
e
t
i
n
S
e
t
t
i
g
g
u
i
g
g
u
d
e
d
e
i
d
e
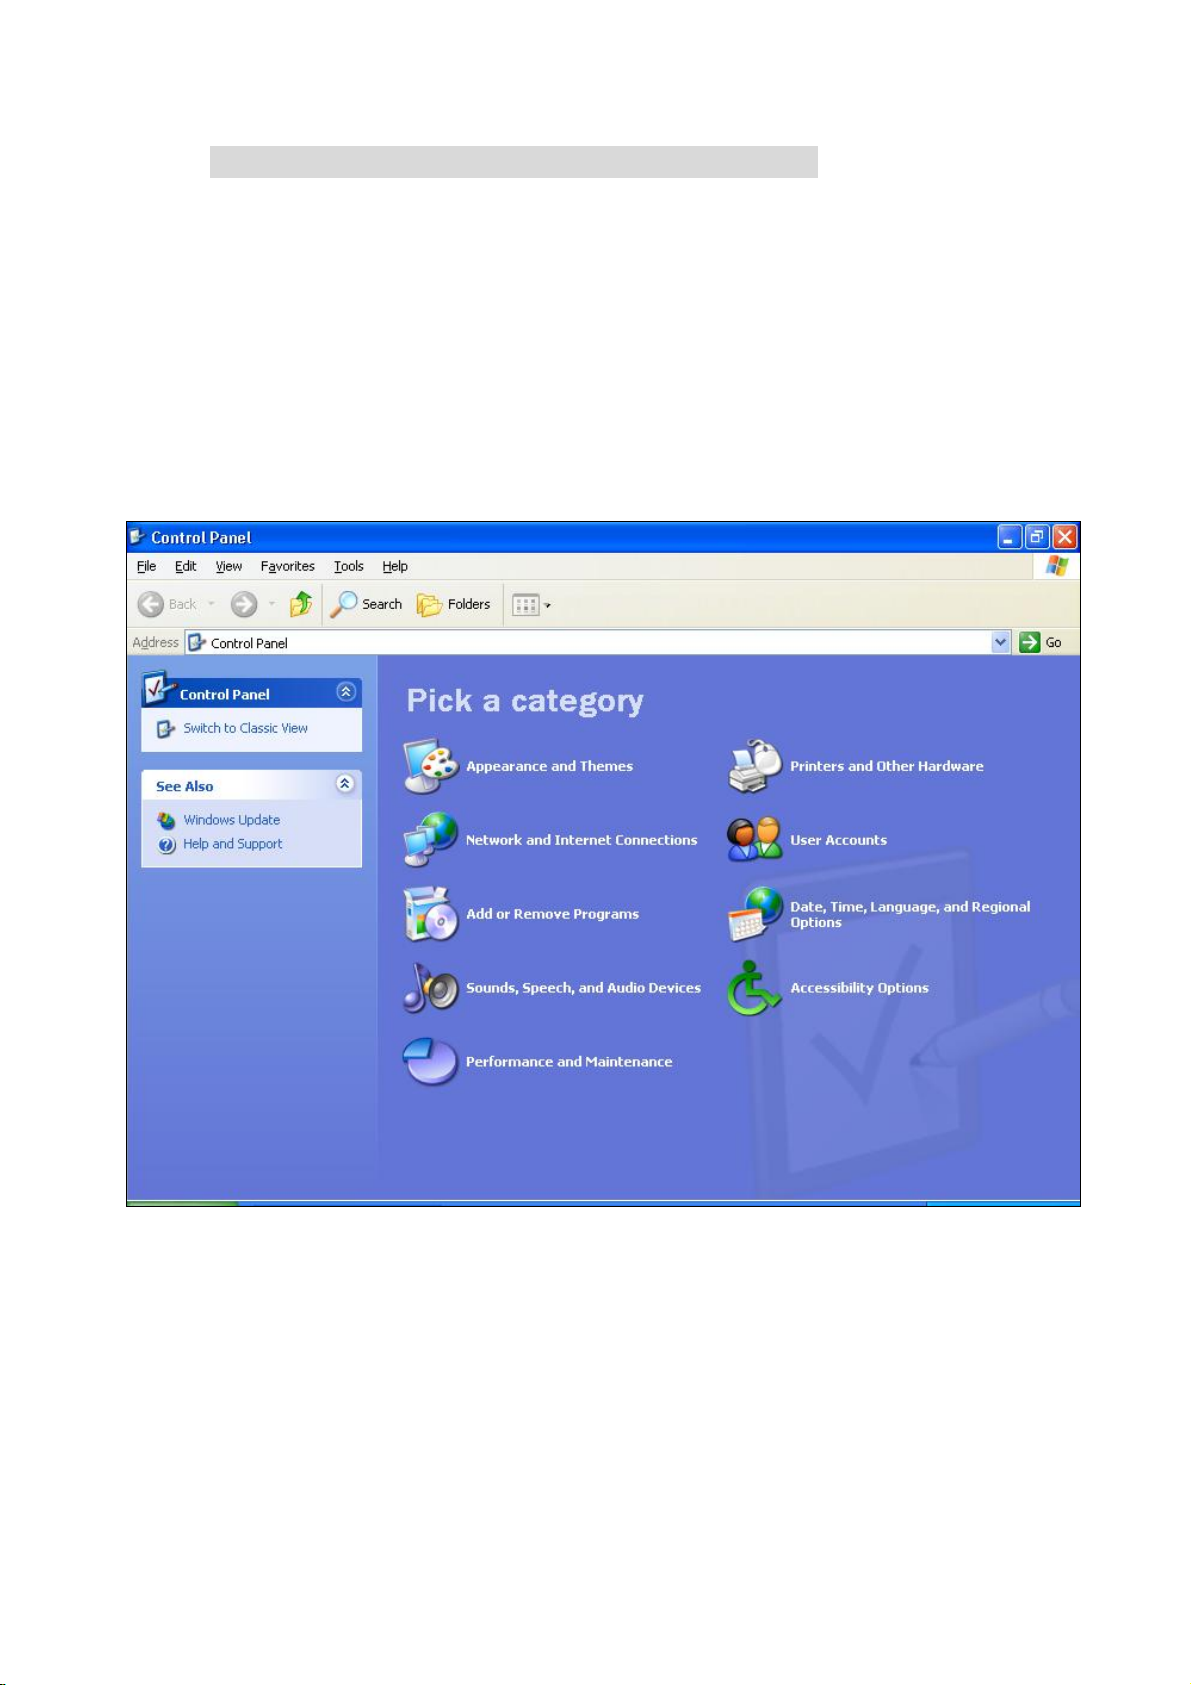
2. Or in Win XP, Click [Control Pannel]
Double-click [Performance and Maintenance]
97
Page 98
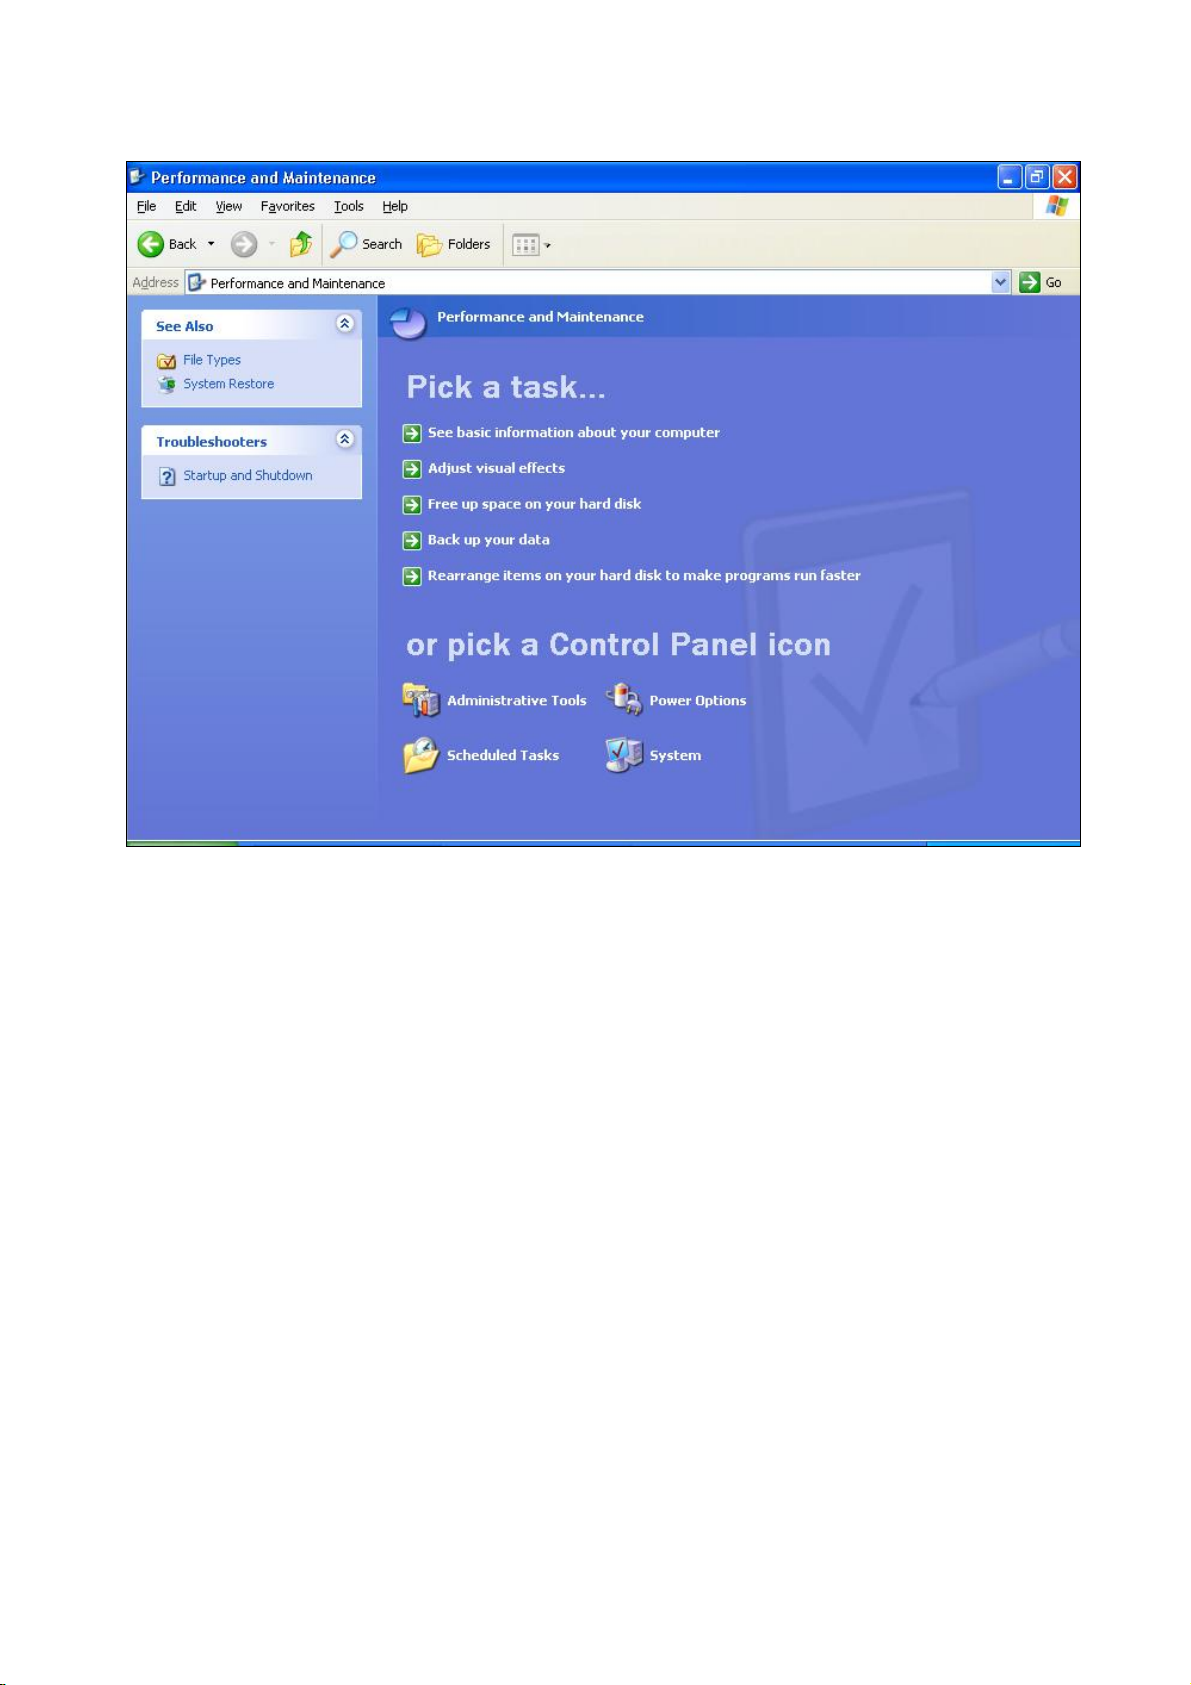
Double-click [Administrative Tools]
98
Page 99
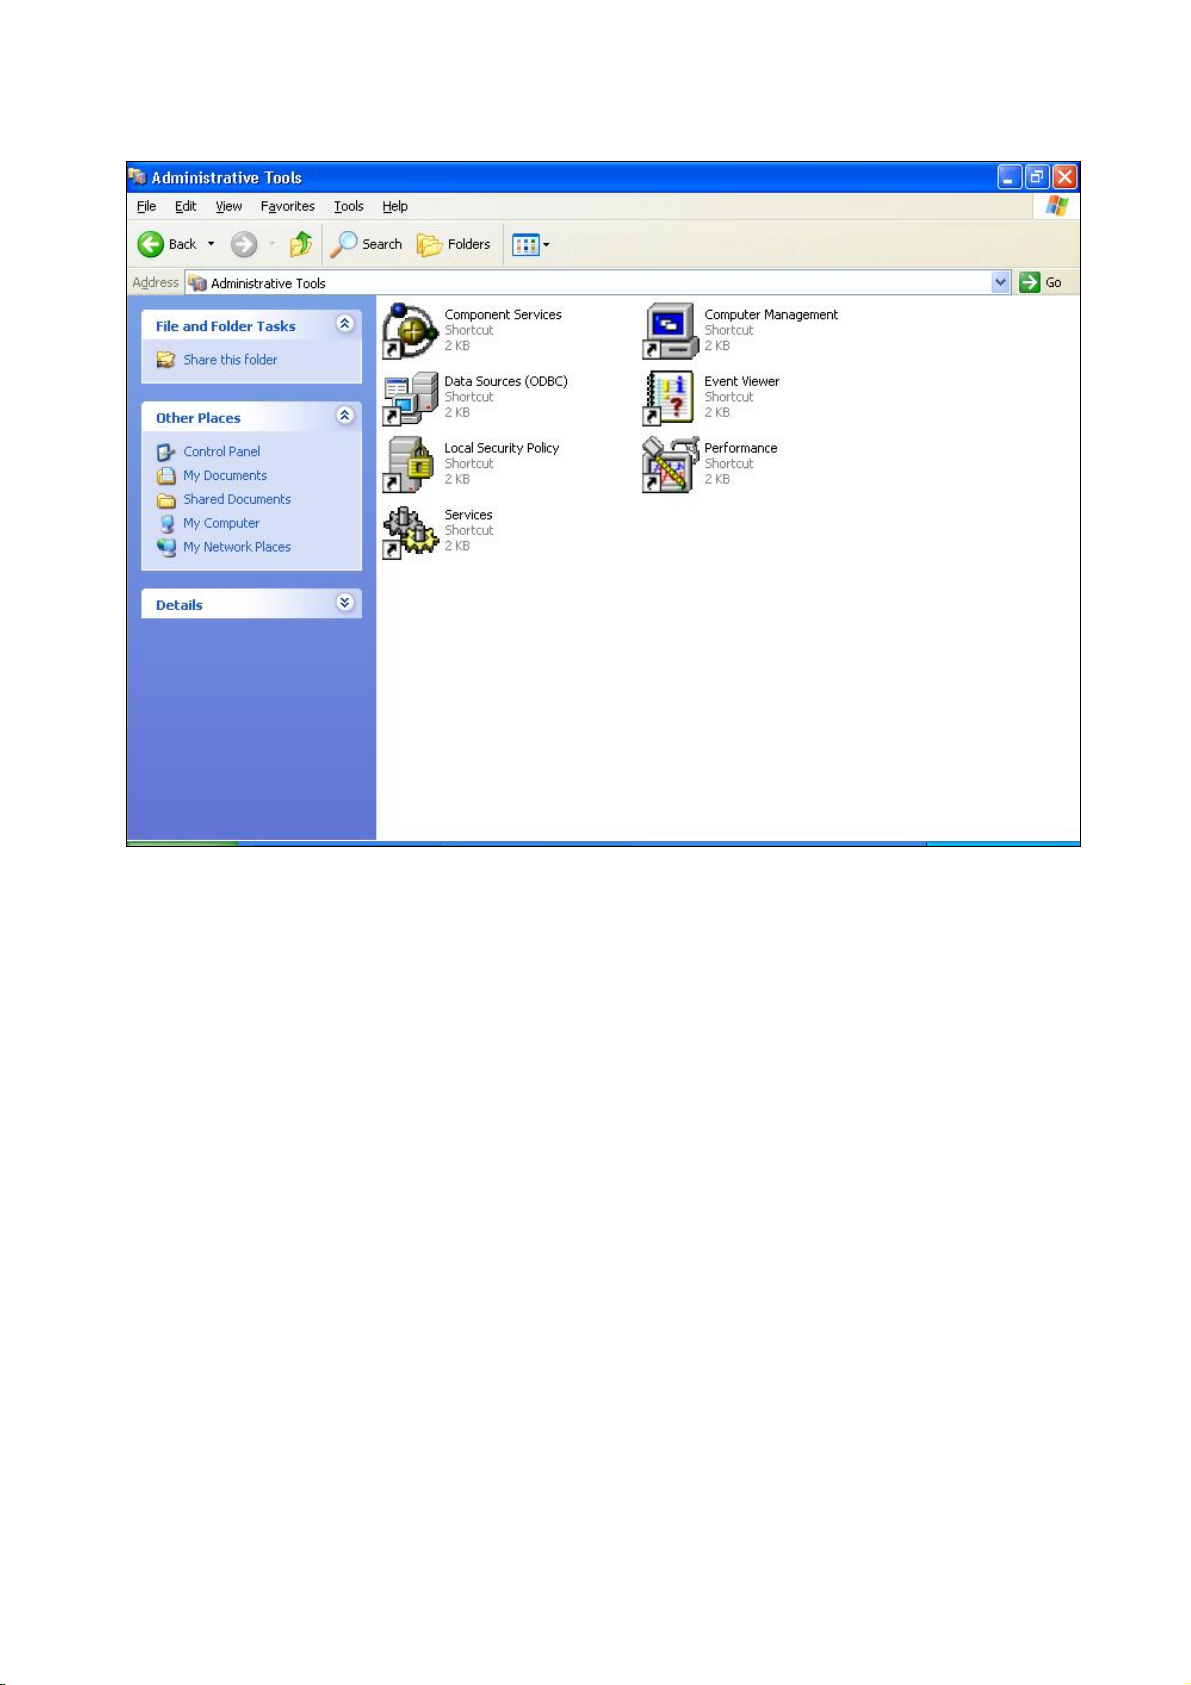
Local Security Policy Settings
Double-click [Local Security Policy]
99
Page 100
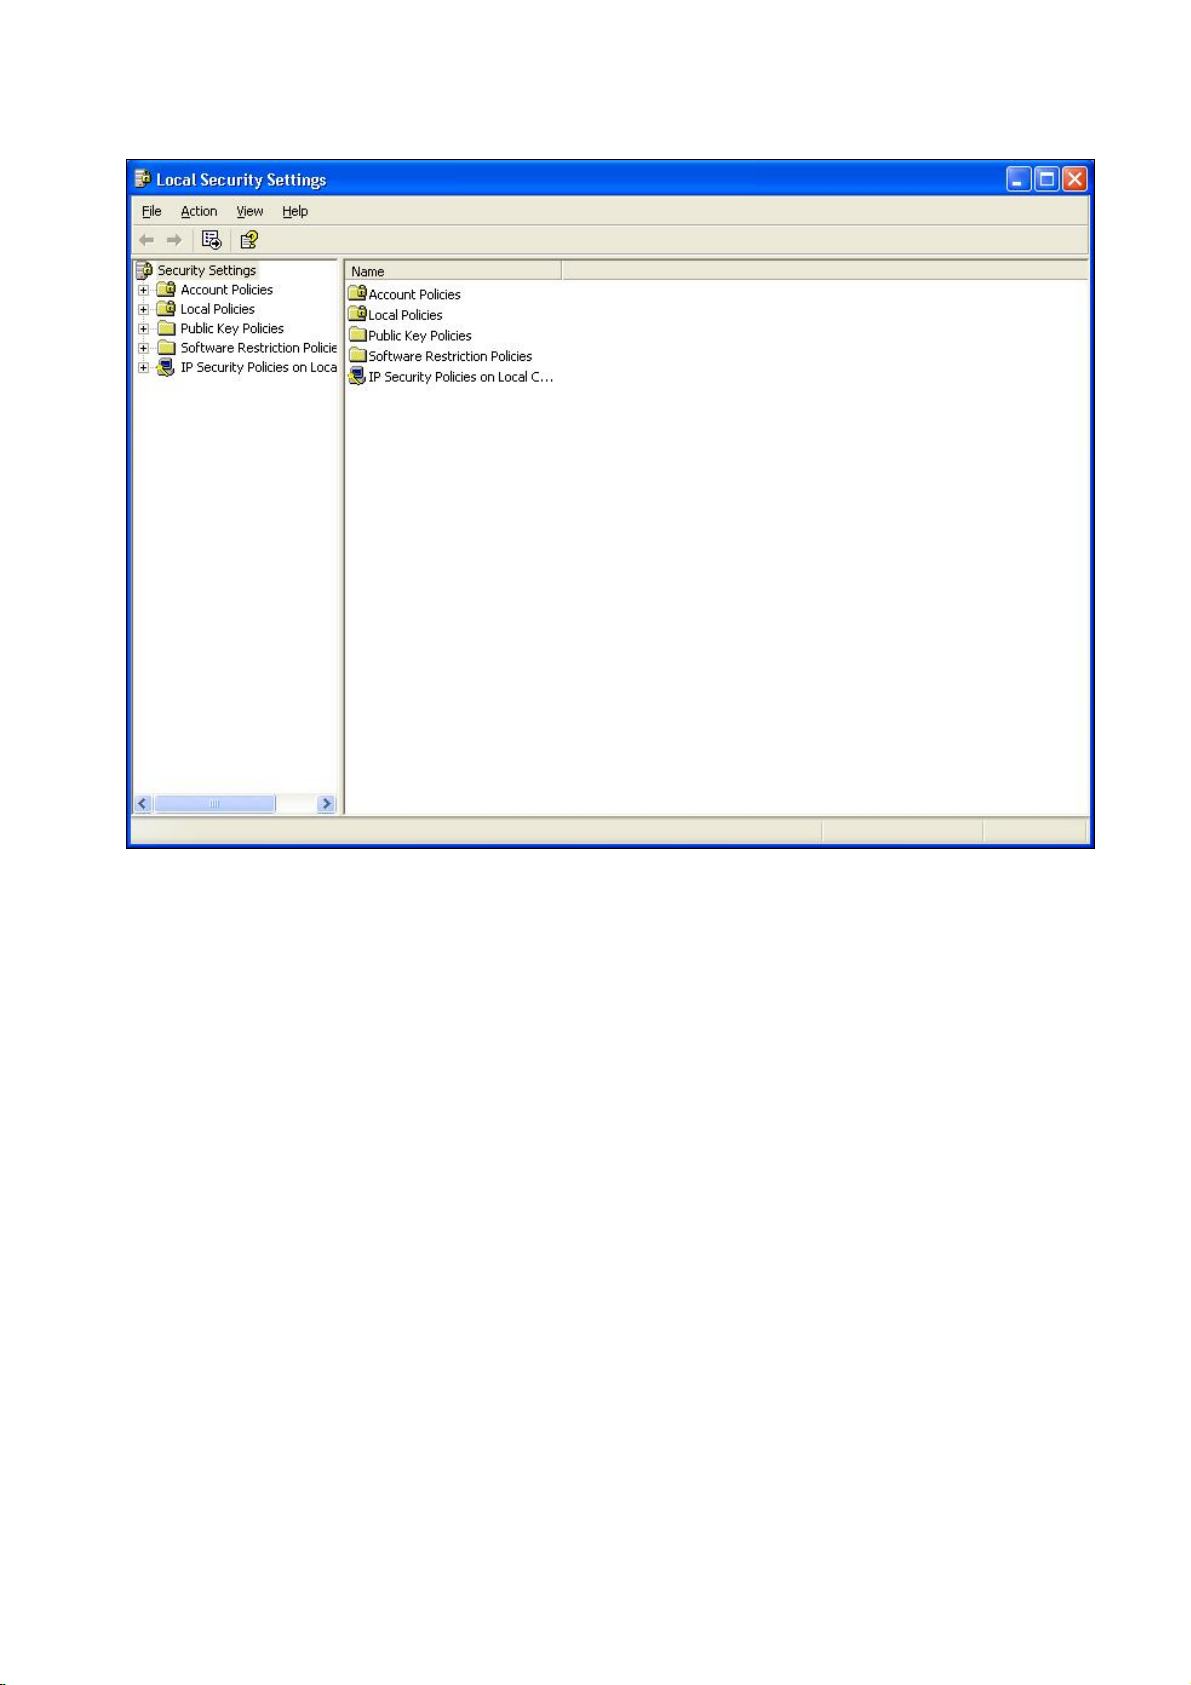
Right-click [IP Security Policies on Local Computer], and click [Create IP
Security Policy].
Click the [Next] button, enter your policy’s name (Here it is
to_vpn_router). Then, click [Next].
Introduction
Dis-select the [Activate the default response rule] check box, and click
[Next] button.
Click [Finish] button, make sure [Edit] check box is checked.
100
 Loading...