

Page 1

LevelOne
WAP-0008
11g Wireless AP Storage w/ STAT/IDE
Interface
User Manual
V1.0
Page 2

2
Table of Contents
CHAPTER 1: INTRODUCTION .......................................................................... 5
1.1 OVERVIEW ............................................................................................ 5
1.2 FEATURES ............................................................................................ 7
1.3 SYSTEM REQUIREMENTS ....................................................................... 9
1.4 PACKAGE LIST .................................................................................... 10
1.5 HARDWARE CONFIGURATION ............................................................... 11
CHAPTER 2: GETTING STARTED.................................................................. 14
2.1 HARD DISK INSTALLATION .................................................................... 14
2.2 MAKING CONNECTIONS ....................................................................... 17
2.2.1 Install Necessary Communication Protocols ................................ 17
2.2.2 Wired Ethernet Connection ............................................................. 19
2.2.3 Wireless Connection ........................................................................ 24
2.3 FILE SHARING ..................................................................................... 26
2.3.1 Accessing the Network Hard Drive via My Network Places ....... 26
2.3.2 Searching the Computers ............................................................... 26
2.3.3 Search the “Entire Network” Manually .......................................... 27
2.3.4 Accessing Files via FTP .................................................................. 28
CHAPTER 3: MAKING CONFIGURATION .................................................... 29
3.1 CONFIGURATION WIZARD .................................................................... 31
3.2 NETWORK SETTINGS ........................................................................... 46
3.2.1 DHCP Setting .................................................................................... 46
3.2.2 Wireless Setting................................................................................ 48
Page 3

3
CHAPTER 4: STORAGE CONFIGURATION ................................................. 80
4.1 DISK UTILITY ...................................................................................... 80
4.2 FILE SHARING ..................................................................................... 83
4.3 ACCESS CONTROL .............................................................................. 85
4.4 FILE BROWSER ................................................................................... 90
CHAPTER 5: ADVANCED TOOLS .................................................................. 92
5.1 BACKUP CONFIGURATION .................................................................... 93
5.2 RESET CONFIGURATION TO DEFAULT ................................................... 93
5.3 REBOOT ............................................................................................. 93
5.4 FIRMWARE UPGRADE .......................................................................... 94
CHAPTER 6: DOWNLOAD ASSISTANT ........................................................ 95
6.1 FTP ................................................................................................... 95
6.2 HTTP ................................................................................................ 98
6.3 EMAIL ALERT CONFIGURATION ........................................................... 100
6.4 DOWNLOAD STATUS .......................................................................... 101
CHAPTER 7: MISC ........................................................................................... 102
7.1 TIME SETTING ................................................................................... 102
7.2 LOGIN SETTING ................................................................................. 103
7.3 SYSTEM LOG .................................................................................... 104
CHAPTER 8: FAQ & TROUBLE SHOOTING .............................................. 105
8.1 WHAT CAN I DO WHEN I HAVE SOME TROUBLE? ................................... 105
8.2 HOW TO SETUP WIRELESS FUNCTION? ................................................ 108
8.3 HOW TO MAP NETWORK DRIVE IN WINDOWS? ..................................... 119
Page 4

4
8.4 HOW TO BACKUP DATA BY USING MICROSOFT BACKUP UTILITY? ........... 121
APPENDIX A: LICENSING INFORMATION ................................................. 128
REGULATORY APPROVALS ....................................................................... 138
NOTE: THE CONTENT OF THIS MANUAL WILL BE REVISED WITHOUT PRIOR
NOTICE.
Page 5

5
C
h
a
p
t
e
r
1
:
I
n
t
r
o
d
u
c
t
i
o
n
C
h
a
p
t
e
r
1
:
I
n
t
r
o
d
u
c
C
h
a
p
t
e
r
1
:
I
n
t
r
o
d
Congratulations on your purchase of this outstanding Network Storage
device. This product is specifically designed for Small Office and Home
Office needs. It provides a complete SOHO solution for Internet surfing, and
is easy to configure and operate even for non-technical users. Instructions
for installing and configuring this product can be found in this manual.
Before you install and use this product, please read this manual carefully for
fully exploiting the functions of this product.
1.1 Overview
The product is designed for 3.5” IDE and serial-ATA (SATA) hard disk drive
use. It is an ideal device for small-medium companies and home users who
need to backup and share files more efficiently and easily anytime and
u
c
t
t
i
o
n
i
o
n
anywhere. Additionally, with its WLAN* feature which is fully compliant with
IEEE 802.11b/g will also let you share files easily.
The Network Storage offers WLAN mobility for home user and business
people to maintain continuous network connectivity. Home users can stay
connected to the network anywhere through a building without being limited
by LAN cables via its AP functionality. This device also has the additional
advantage of providing network storage with its 3.5” hard disk which allows
you to share information and storage capacity via wireless or wired network.
Page 6

6
The Network Storage supports the UPnP content directories and users can
share the music and video files easily. Besides, the click-and-copying of files
from a flash drive to the Network Storage hard disk make the user backup
files efficiently. Please refer to the following application diagram.
Page 7

7
1.2 Features
Basic Functions
Adapt for one 3.5” IDE or Serial-ATA(SATA) hard disk drive.
Network File Storage and File Sharing via My Network Places
in Windows or Samba in Linux and Mac OS.
Backup files easily: compliant with Windows backup utility.
Support FAT, FAT32, and Ext2 files system and can read from
NTFS file system.
Support security level as Guest or Authorization user for file
sharing.
Real time clock to synchronize the computer time setting.
Easy to upgrade: using web browser or windows application to
upgrade new version of firmware.
Browser-based interface configuration and management: OS
independent, easy-to-use for consumer installation.
Support HDD sleeping mode to save power consumption.
Built-in FTP server.
UPnP (Universal Plug and Play) AV content directory support.
Scheduling download assistant.
Aluminum housing provides better effect for heat-release. (It’s
normal that aluminum housing getting warm when Network
Storage is working.)
Page 8

8
USB Device
Built-in USB2.0 host to connect to USB mass storage device,
like USB flash drive, USB hard drive, etc.
Easy copy button: Offer the button to copy folders and files
from USB device to internal HDD.
Wireless Functions
Up to 54Mbps data rate by incorporating Orthogonal
Frequency Division Multiplexing (OFDM).
IEEE 802.11b compatible (11Mbps): Allowing inter-operation
among multiple vendors.
IEEE 802.11g compatible (54Mbps): Allowing inter-operation
among multiple vendors.
Wireless data rate supported: 6/12/18/24/36/48/54 Mbps in
802.11g mode; 1/2/5.5/11Mbps in 802.11b mode.
Support 64/128-bit WEP encryption.
Support 802.1X authentication.
Support WPA, WPA-PSK with TKIP and AES encryption.
Support WPA2, WPA2-PSK with TKIP and AES encryption.
Support Client, AP, WDS, and WDS Hybrid wireless modes.
(NOTE. Only AP mode and Hybrid mode can support WPA and
WPA2.)
Scheduling Download Assistant
Scheduling download assistant allows users to download files
via FTP, HTTP without turning on computer.
Page 9

9
1.3 System Requirements
To start to use the Network Storage, your system must have the following
minimum requirements:
Windows 98SE / ME / 2000 / XP, or any other operating system
can support Samba.
An Ethernet (10BaseT or 10/100BaseT) adapter for wired
client.
At least one WLAN client adapter of 802.11g (54Mbps) or
802.11b (11Mbps) for wireless connection.
TCP/IP and NetBIOS network protocol installed.
Web browser installed.
The Network Storage requires an external 12V, 4A power supply which is
included in the package. For safe operation, please only use the power
adapter which is provided by this product.
Page 10

10
1.4 Package List
The Network Storage package contains the following items:
WAP-0008
Power Adapter
Stand
Dipole Antenna
CD Manual/Utility
Quick Installation Guide
Page 11
11
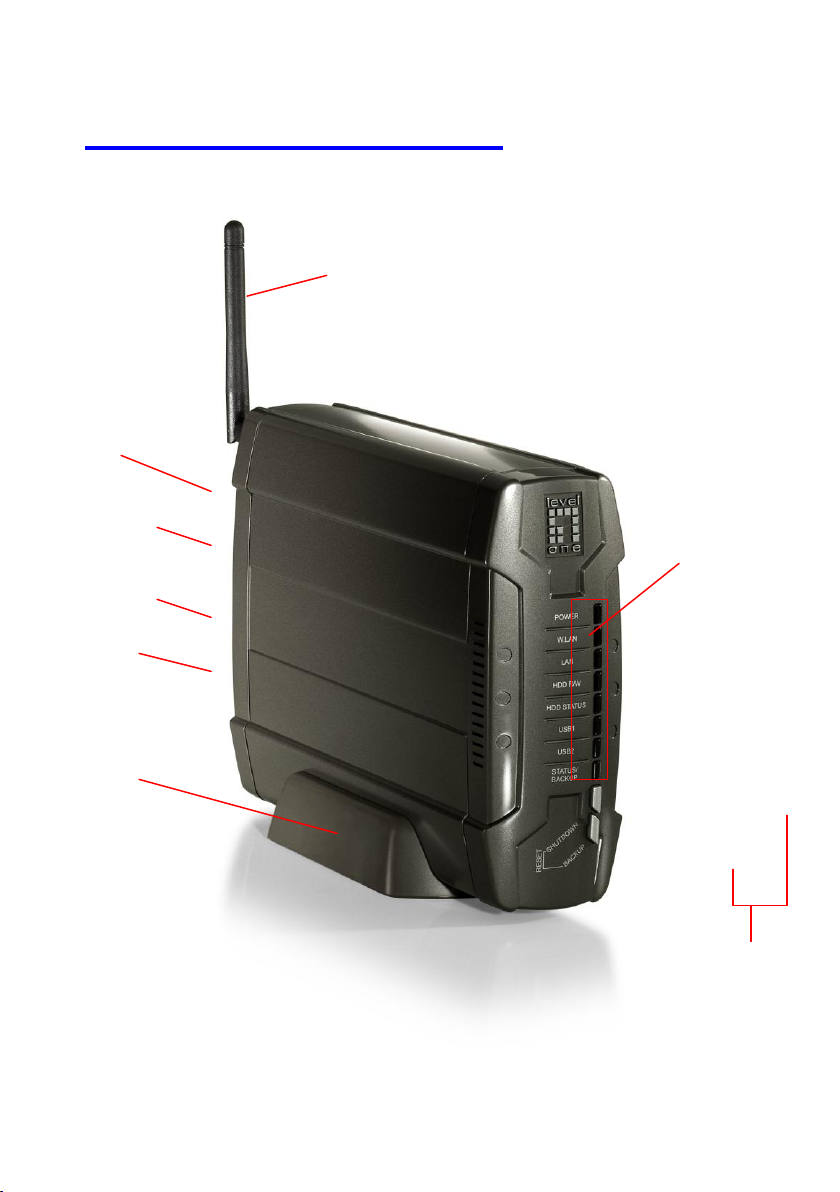
1.5 Hardware Configuration
LED
Indicators
Shutdown Button
Reset Button
Stand
Backup Button
Antenna
LAN Port
USB 2.0 Port
Power Switch
Power Jack
Page 12

12
LED Indicators:
LED
Light Off
Solid Light
Blinking
Power
Power off
Power on
W.LAN
No packet
On transmitting
LAN
No device
Linked
On transmitting.
HDD R/W
Not in use
HDD read/write
HDD Status
No HDD
HDD full or error
More blinking quickly,
fewer available HDD
capacity.
USB 1
No device
USB drive ready
USB 2
No device
USB drive ready
Status (Backup)
1. Blinking once per
second when
device works
normally.
2. Blinking quickly
when “Backup”
button is pressed.
Buttons
Description
Shutdown
Press the button for 4 seconds to shut down the
whole system before power-off.
Backup
Press the button for 4 seconds to copy data from
attached USB device to HDD.
Front Buttons:
Page 13

13
Reset
Press the buttons of “Shutdown” and “Backup”
simultaneously for 6 seconds to reset the system
setting to factory default.
Ports
Description
Antenna
Connect 2.4GHz dipole antenna.
LAN
Automatically MDI / MDIX LAN port can sense the
cable type when connecting to Ethernet-enabled
computer, network of hub, switch, or router.
USB1 / USB2
The ports where you can connect to USB disk, digital
camera, or card reader.
Card reader:
* Memory card must insert to card reader first before
connect to the storage device.
* Storage device supports one memory card at a
time. Please do not insert multiple memory cards into
the card reader.
Power Switch
Switch on/off the device.
Power Jack
12V / 4A power inlet.
Rear Ports:
Page 14
14
C
WARNING:
The Network Storage is not hot-swappable. Please make sure that it is
turned off and not connected to the power outlet when performing the
following assembly procedure.
h
a
p
t
e
r
2
:
G
e
t
t
i
n
g
S
t
a
r
t
e
d
C
h
a
p
t
e
r
2
:
G
e
t
t
i
n
g
S
t
a
C
h
a
p
t
e
r
2
:
G
e
t
t
i
n
g
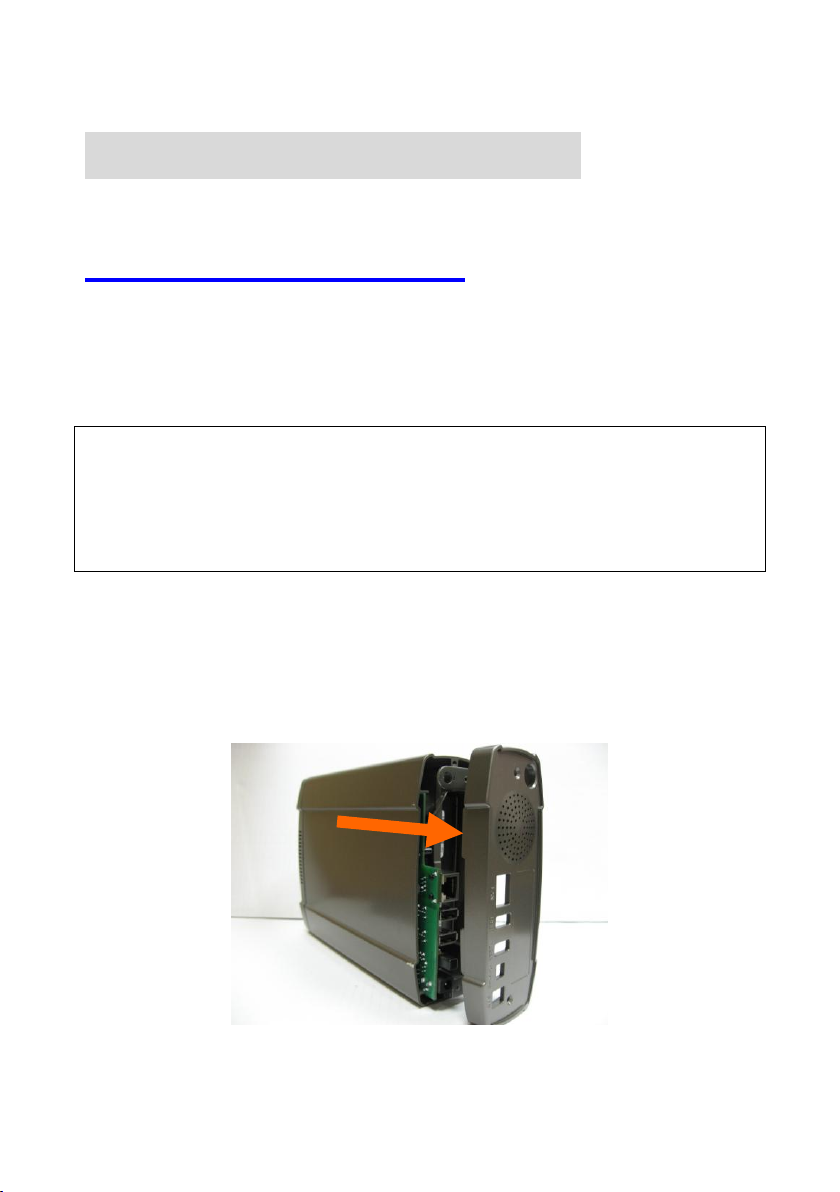
2.1 Hard Disk Installation
Follow the steps below to insert the 3.5” hard disk and assemble the device
before using the Network Storage.
Step 1: Unfasten two screws at the rear side of device, and pull out the back
cover.
S
r
t
a
r
t
e
d
t
e
d
Page 15
15
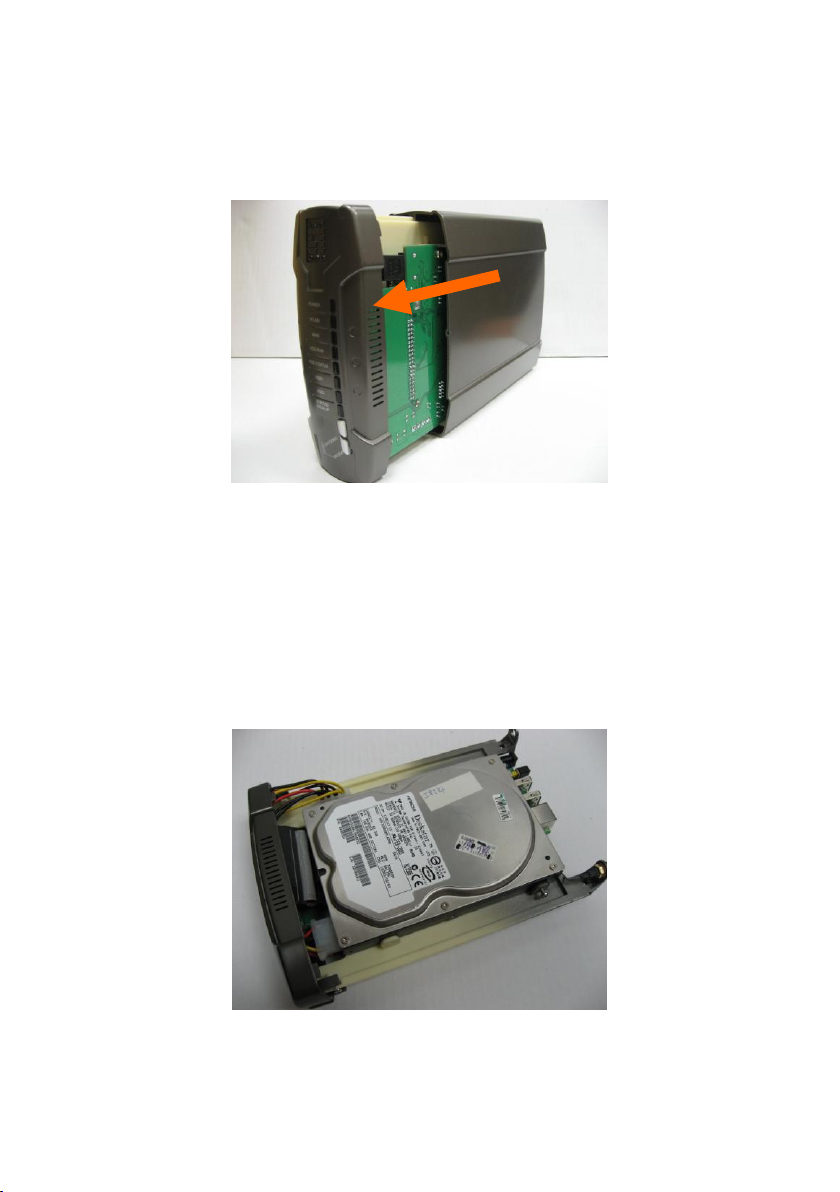
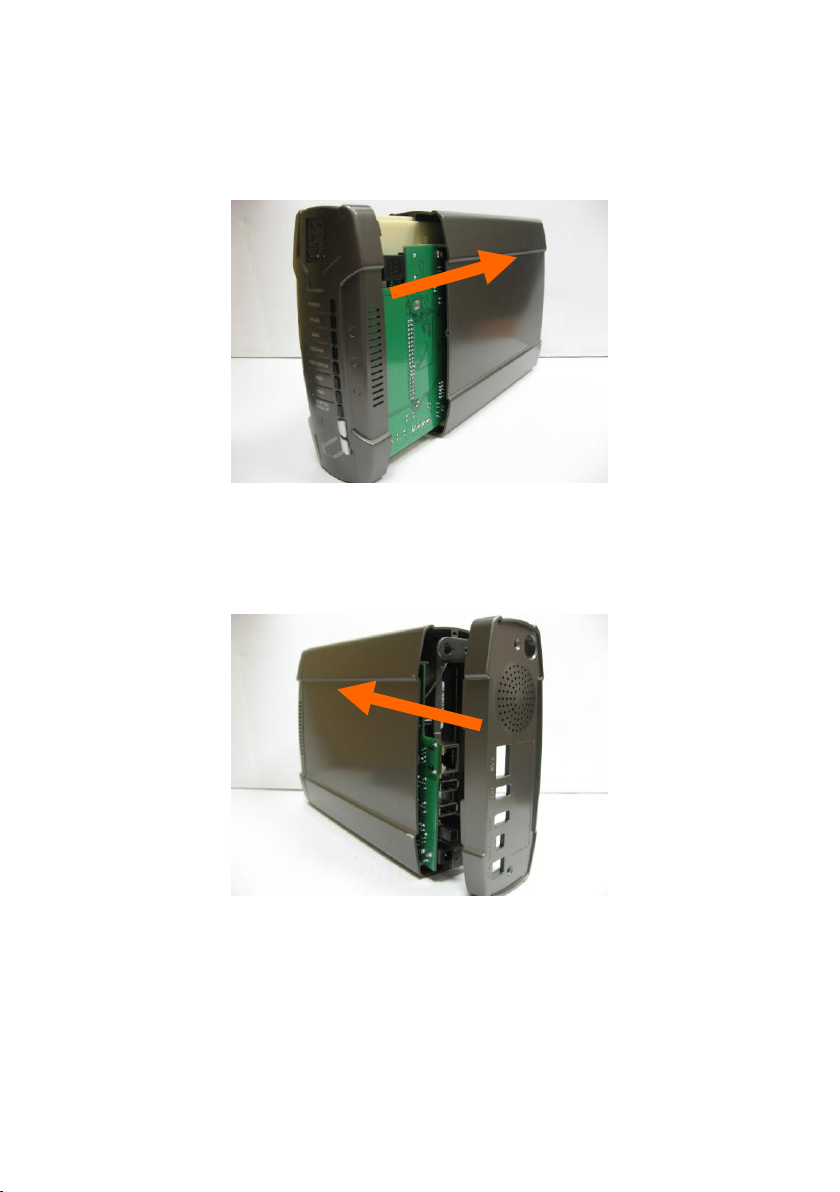
Step 2: Pull out the front panel.
Step 3: Put the 3.5” IDE or SATA hard disk into the slot, and connect proper
data (the red cable is used for SATA hard disk and the gray one is for IDE
hard disk) and power cable to the hard disk. Then fasten the screws that are
included in the package to fix hard disk.
Page 16
16
Step 4: Put the front panel back.
Step 5: Put the back cover back, and assemble tightly. Finally, fasten two
screws.
Page 17
17
2.2 Making Connections
In order to access the Network Storage as the network storage drive or as a
wireless AP, you need to configure the TCP/IP settings correctly in advance.
Either the “Wired Ethernet Connection” or “Wireless Connection” can be
used to connect to Network Storage.
2.2.1 Install Necessary Communication Protocols
Follow the steps below to install “Client for Microsoft Networks”, “File
and Printer Sharing for Microsoft Networks”, and “Internet Protocol
(TCP/IP)” on your computer.
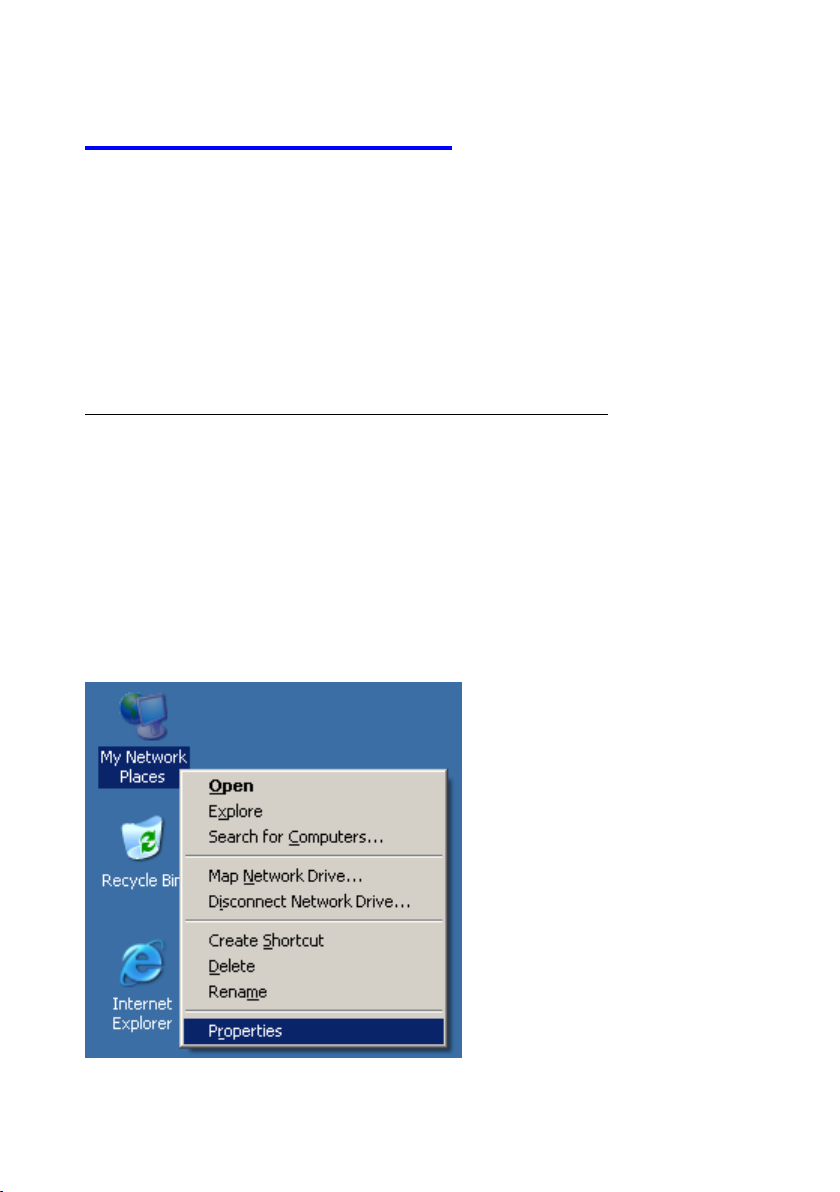
Step 1: Select the “My Network Places” on the desktop menu, and right
click on the icon to choose “Properties”.
Page 18
18
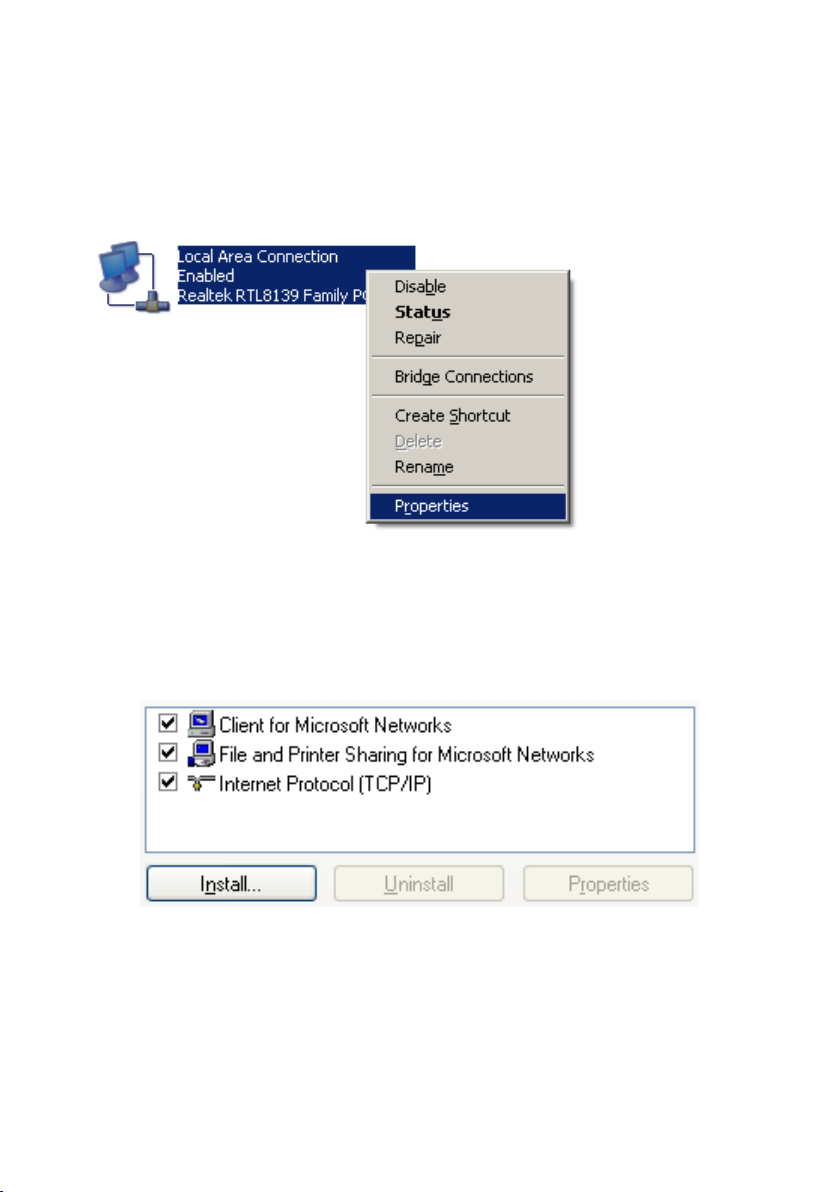
Step 2: You may see there are many connections in your computer. Just
select one which you will use it to connect to Network Storage. Then choose
the “Properties” of that connection.
Step 3: Check the “Client for Microsoft Networks”, “File and Printer
Sharing for Microsoft Networks”, and “Internet Protocol (TCP/IP)” are
installed or not. If not, please install those communication protocols.
If you use other operating system, such as Linux, X-window or Mac OS,
please refer to original manual of your OS to finish the configurations of
TCP/IP and other required communication protocols.
Page 19
19
2.2.2 Wired Ethernet Connection
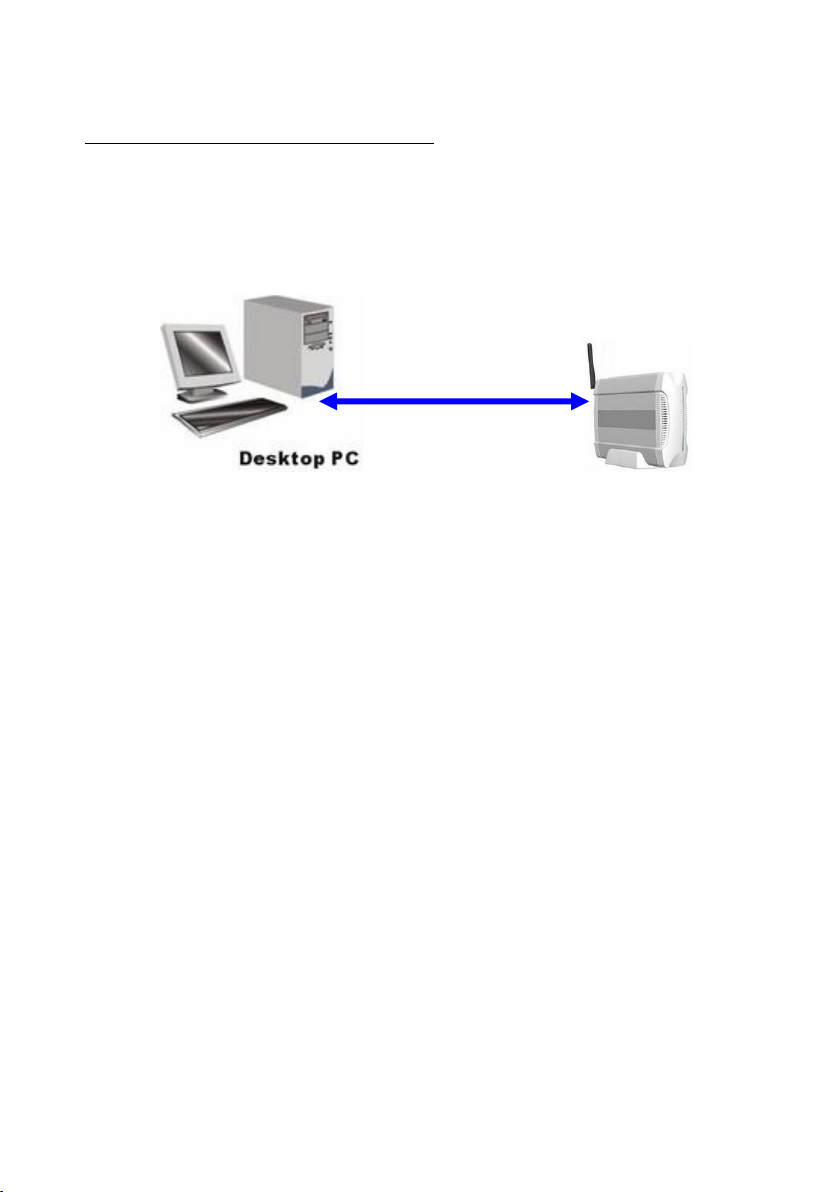
Ethernet cable
Use one Ethernet cable to connect the Network Storage and your computer
directly. Then power on the Network Storage.
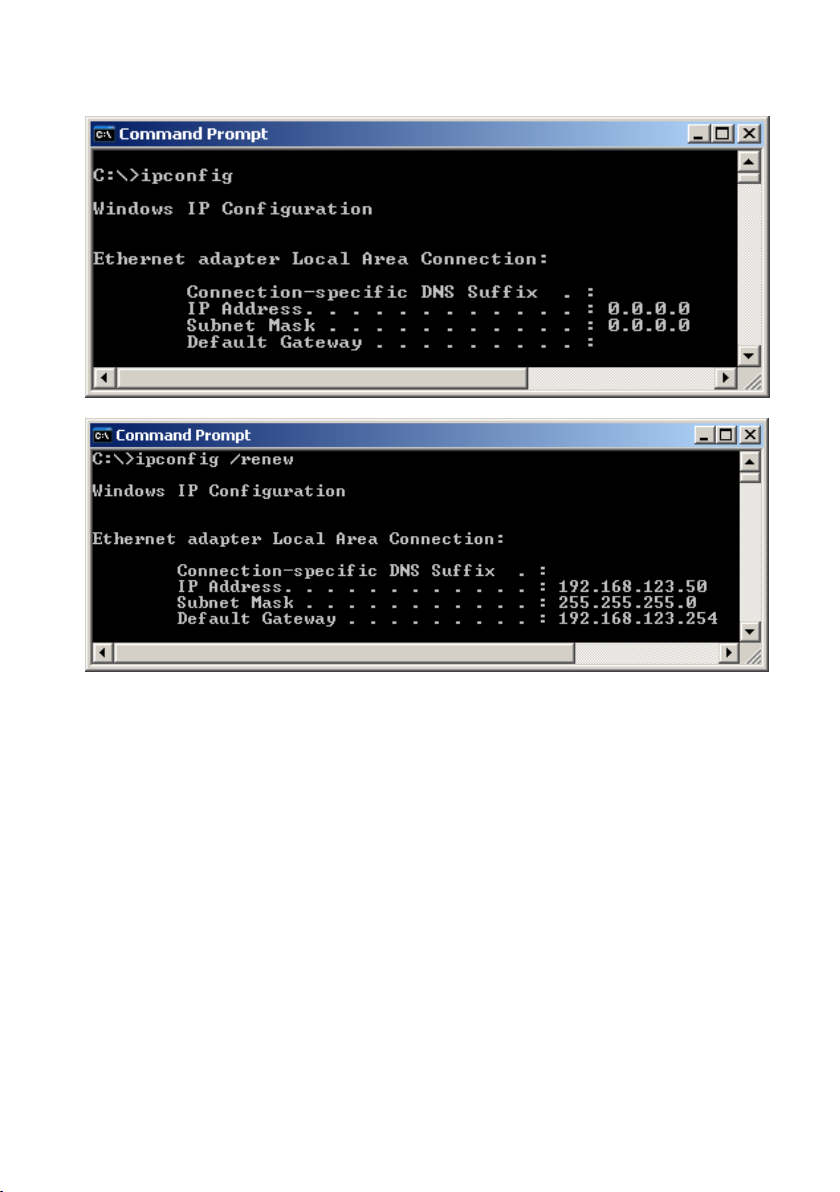
The Network Storage will detect automatically if there is any DHCP server
nearby. If yes, it will get an IP address from DHCP server. But if there is no
DHCP server in your environment, the Network Storage will become a
DHCP server, and assign IP address to your computer. You can get some
information as below shown.
Then go to command prompt mode from Start Menu->Programs->
Accessories, and type “ipconfig”. If the IP address and subnet mask are
shown 0.0.0.0, please type “ipconfig /renew” to retrieve an IP address.
Page 20
20
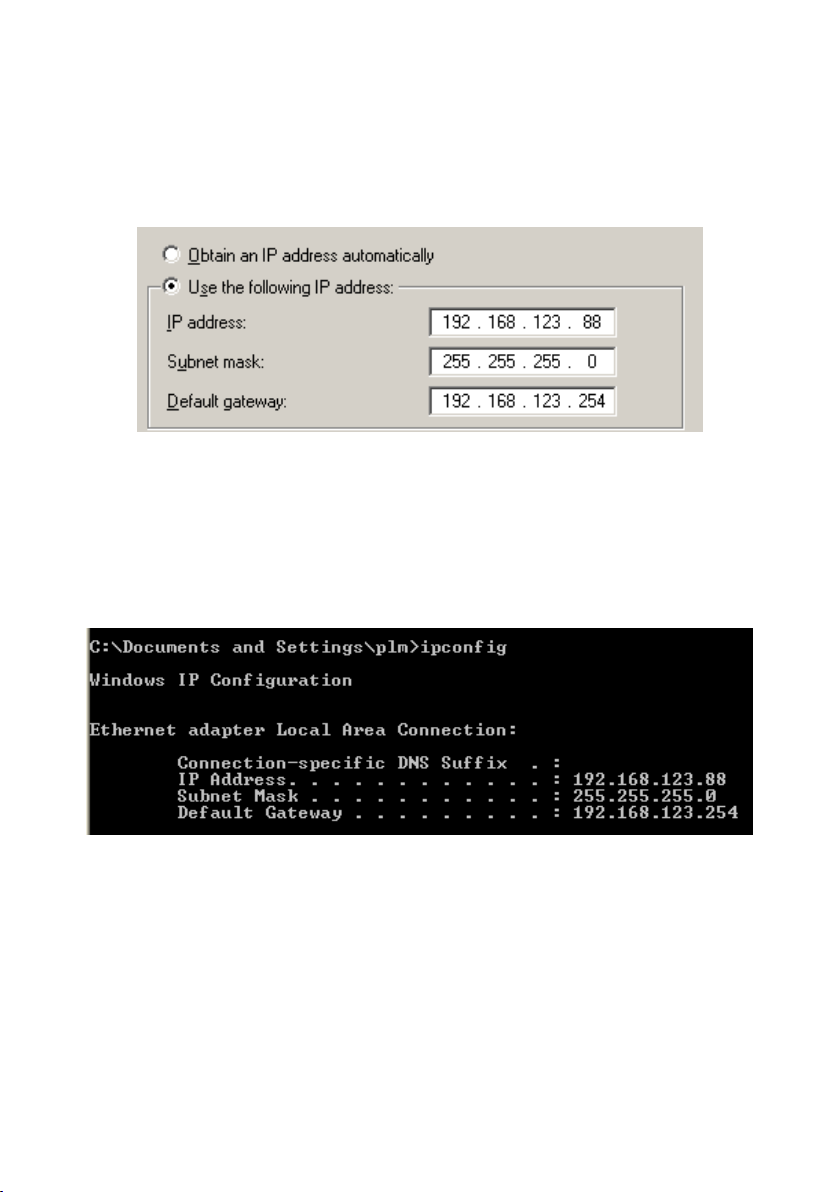
In addition, you can also allocate a static IP address on your computer as
below:
Step 1: Find the Internet Protocol (TCP/IP) Properties from My Network
Places and check the Properties of Local Area Network Connection.
Choose “Use the following IP address”, and assign one IP address which
can be from 192.168.123.1 to 192.168.123.253. Here we use the
192.168.123.88 as the IP address. The Subnet mask must be
255.255.255.0, and the Default gateway must be 192.168.123.254. Then
Page 21
21
click “OK” button to complete TCP/IP setup.
NOTE. The IP address of default gateway must be same as IP address of
Network Storage.
Step 2: Then go to command prompt mode from Start Menu->Programs->
Accessories. Type “ipconfig” and press the “Enter”. Then the following
message should be found. Check the IP address, Subnet Mask, and Default
Gateway addresses are same as previous settings. If same, you are
successful to setup the network configuration.
There are three methods to configure Network Storage. Please refer to the
following instructions, and choose one which is most convenient to you.
Page 22
22
Method 1: Use Configuration Tool to Setup
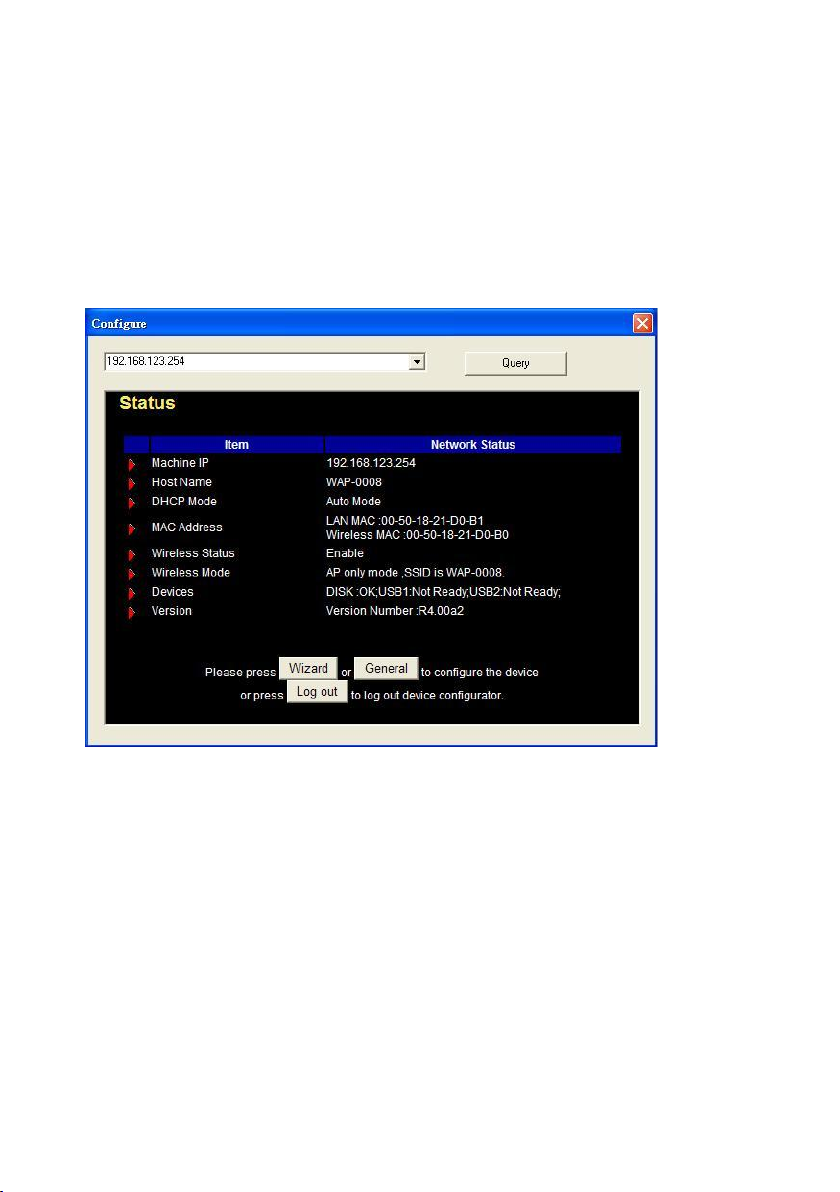
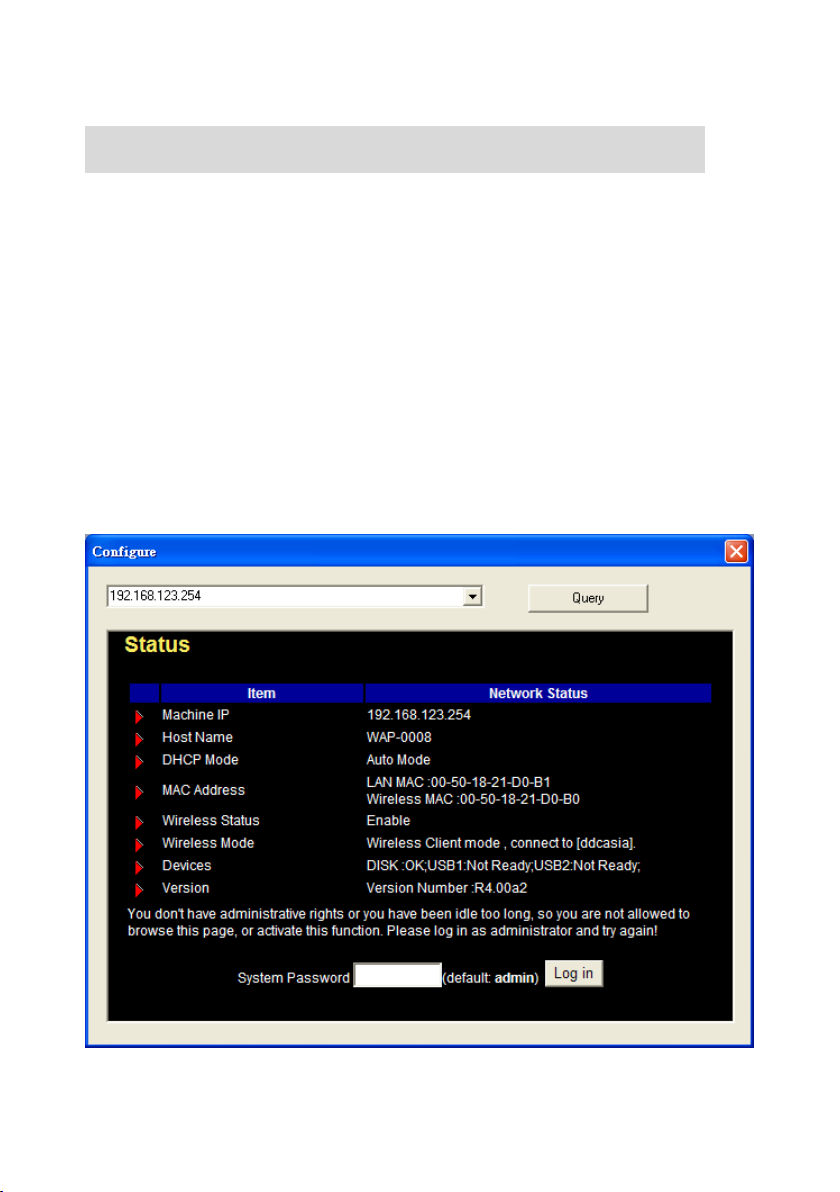
Before you can do this, you need to install the configuration tool from
installation CD first. After that, please use the configuration tool to “Query”
and you will see the status page and input “admin” to login.
NOTE. The default login password is “admin”.
If there is any DHCP server in the network, Network Storage will be as the
client and get one IP address from existed DHCP server. You can also use
configuration utility to Query to find the IP address that Network Storage
gets.
About other operating systems, such as Linux X-window or Mac OS, please
use web browser to configure.
Page 23

23
Method 2: Use Web Browser to Setup
Launch any web browser, such as Internet Explorer or Netscape on your
computer, and then input IP address of Network Storage in the address field.
For an example, type “http://192.168.123.254” and press “Enter”, then you
can see the configuration page of Network Storage.
NOTE. You have to know the IP address of Network Storage when you use
this method. The default IP address is “192.168.123.254”.
Method 3: Use “My Network Places” to Search and Setup
First, go to My Network Places and search “WAP-0008”.
NOTE. The default host name of Network Storage is “WAP-0008”.
Page 24
24
Double click on “samba server (wap-0008)”, and you will see two folders.
Then double click the folder “Configure”.
You can find there is a “Configure.html” in the folder, just double click on
“Configure.html” directly to see configuration page.
2.2.3 Wireless Connection
Follow the steps below to connect to the Network Storage in a wireless
environment. We assume that there is at least one WLAN card installed on
your computer, and Network Storage is powered on.
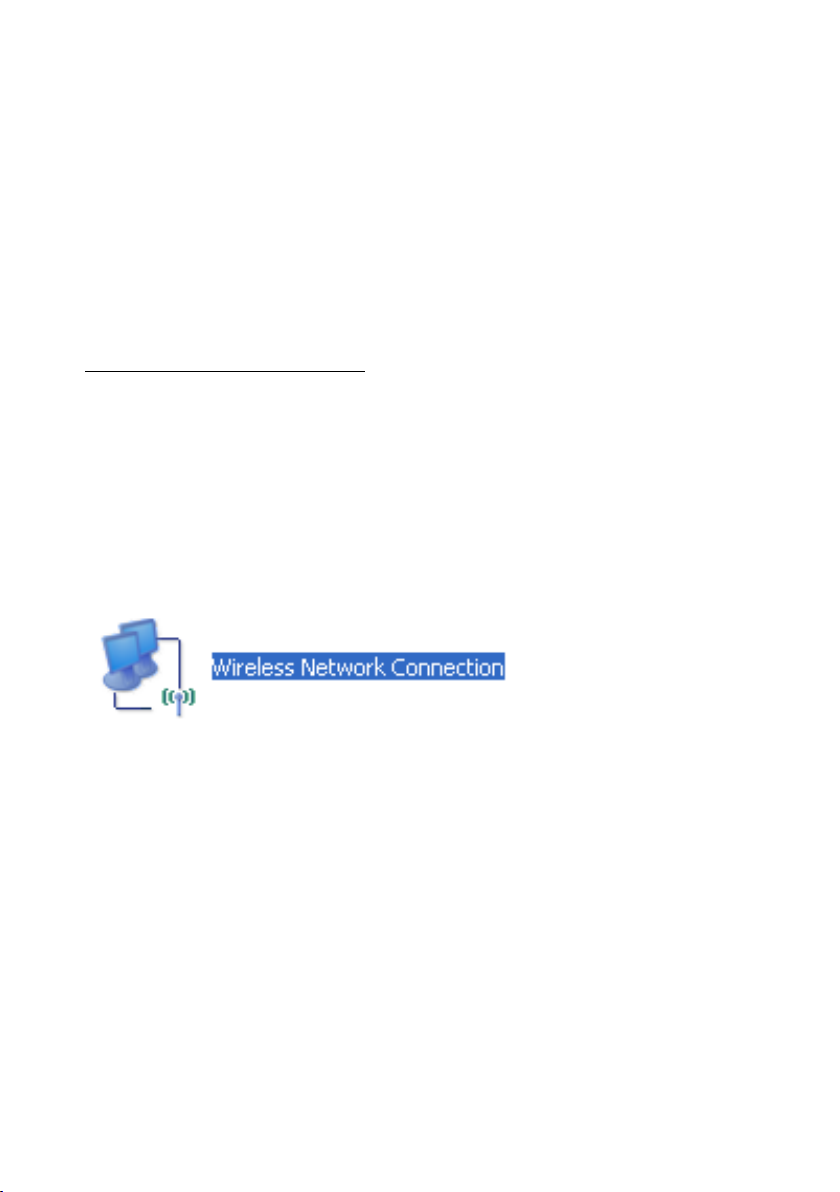
Step 1: Enabling the WLAN card first, and check the Wireless Network
Connection properties from My Network Places.
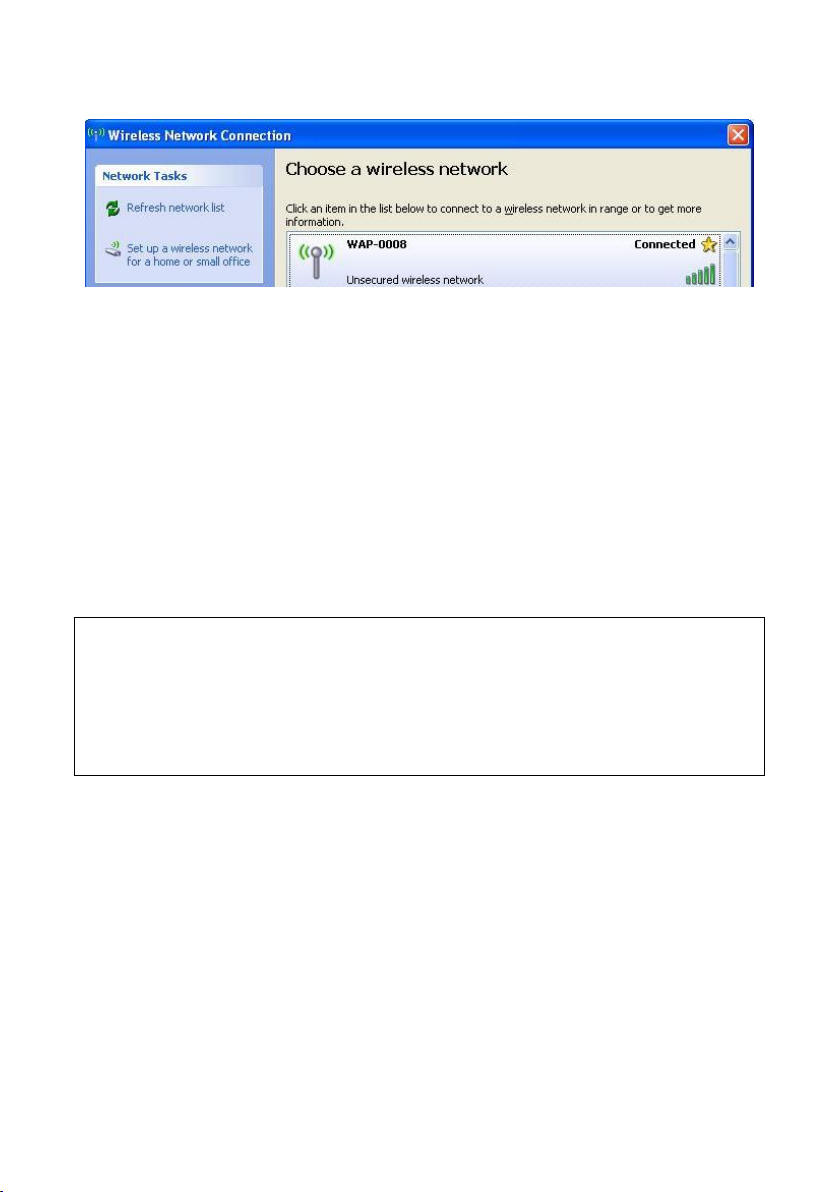
Step 2: Select the Wireless Networks icon after entering the “Wireless
Network Connection Properties”. You will find the WAP-0008 in the
available network list, then select the WAP-0008, and click Connect button
to connect. Otherwise, if you can’t find WAP-0008, please refresh network
list again.
NOTE. The default network name (SSID) of Network Storage is
“WAP-0008”.
Page 25
25
Step 2: Then go to command prompt mode from Start
WARNING:
We strongly recommended that you enable wireless encryption feature, or
add User Access rules on Network Storage. Otherwise, everyone can
connect to it wirelessly and access data which is stored in your hard drive.
Menu->Programs-> Accessories. Type “ipconfig” in the command prompt
window and press the “Enter”. Then the messages of IP address, Subnet
Mask, and Default Gateway should be found.
Step 4: After you connect to Network Storage successfully, you can use
method 1~3 that have been described in section 2.2.2 to configure Network
Storage.
Page 26
26
2.3 File Sharing
The Network Storage can be a shared network hard drive in an existing
wireless or wired network environment. The users in the same network area
can read or write data from the device as required. The following various
steps are for users to start using the network hard drive.
2.3.1 Accessing the Network Hard Drive via My Network Places
Select the “My Network Places” and type the address of “\\WAP-0008” and
press “Enter”. Then you will find the Storage icon.
Click the “Storage” icon, and you will find the “C” folder as below. The folder
“C” is the root directory of attached hard disk drive.
NOTE. The other folder “USB” is the root directory of attached USB drive.
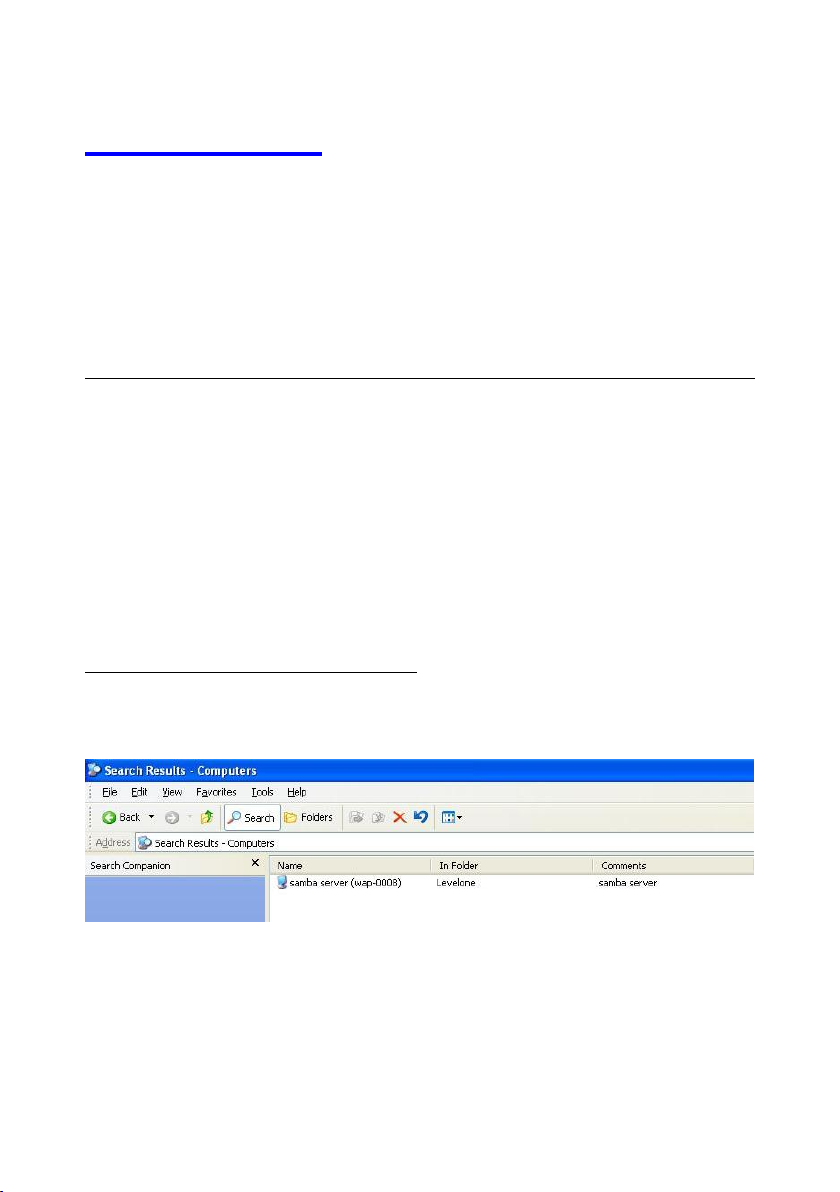
2.3.2 Searching the Computers
Open “My Computer” on the desktop menu, and use the “Search” function
to search the computer of “WAP-0008” as below.
Page 27
27
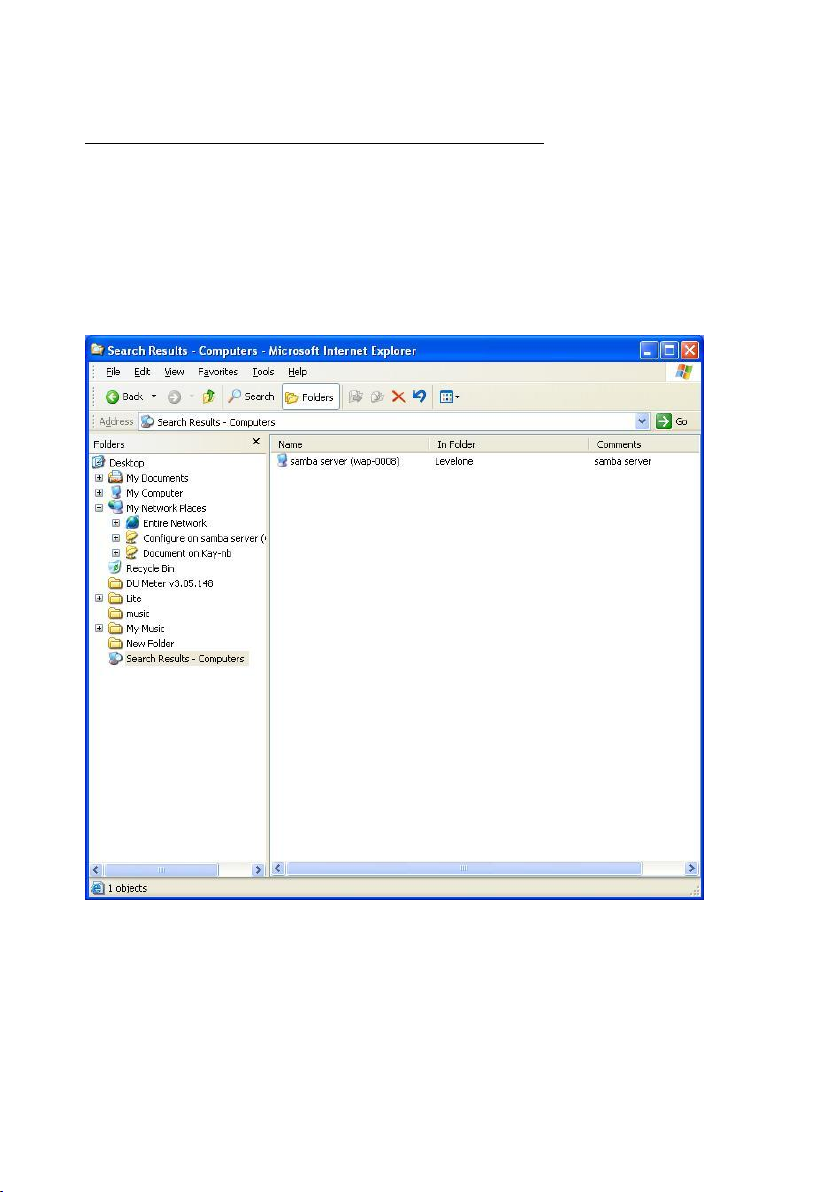
2.3.3 Search the “Entire Network” Manually
Open Windows Explorer, and then click the My Network Places icon.
Double click the Entire Network to view the components of the network.
Select and click the Microsoft Windows Network icon, then the various
network components showed in the list. The default workgroup of Network
Storage is LevelOne.
Page 28
28
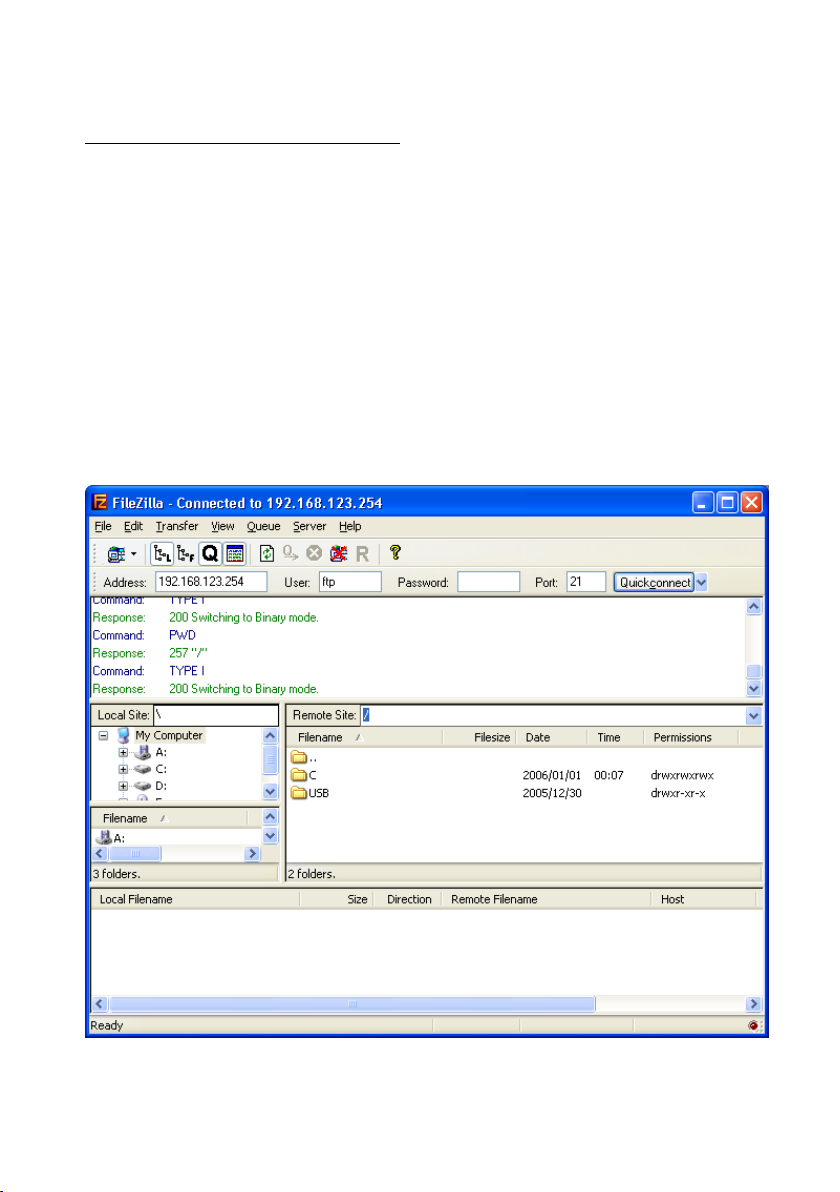
2.3.4 Accessing Files via FTP
The Network Storage offers FTP service for the clients which don’t support
Microsoft Windows File sharing. You can use any FTP client utility to
connect to Network Storage with anonymous username and password
(username: ftp, and without password) when the Security Level is set to
“Guest mode”. But if you change to “Authorization mode”, the accessing
permission is limited, and then users have to input specified username and
password to access any permitted folders. The rule of access control would
be explained in much detail in chapter 4.
NOTE. The FTP service of Network Storage can be switched off.
Page 29
29
C
h
a
p
t
e
r
3
:
M
a
k
i
n
g
C
o
n
f
i
g
u
r
a
t
i
o
n
C
h
a
p
t
e
r
3
:
M
a
k
i
n
g
C
o
n
f
i
g
u
r
a
C
h
a
p
t
e
r
3
:
M
a
k
i
n
g
C
o
n
f
i
g
u
The Network Storage can be configured various settings through the
proprietary Configuration Tool or general web browser. Even you don’t know
which IP is being used by Network Storage; the Configuration Tool will help
you to find it. All you have to do is click the “Query” button of the
Configuration Tool.
NOTE. You need to know the IP address of Network Storage if you want to
configure it by web browser. The default IP address of Network Storage is
192.168.123.254.
t
r
a
t
i
o
n
i
o
n
Page 30
30
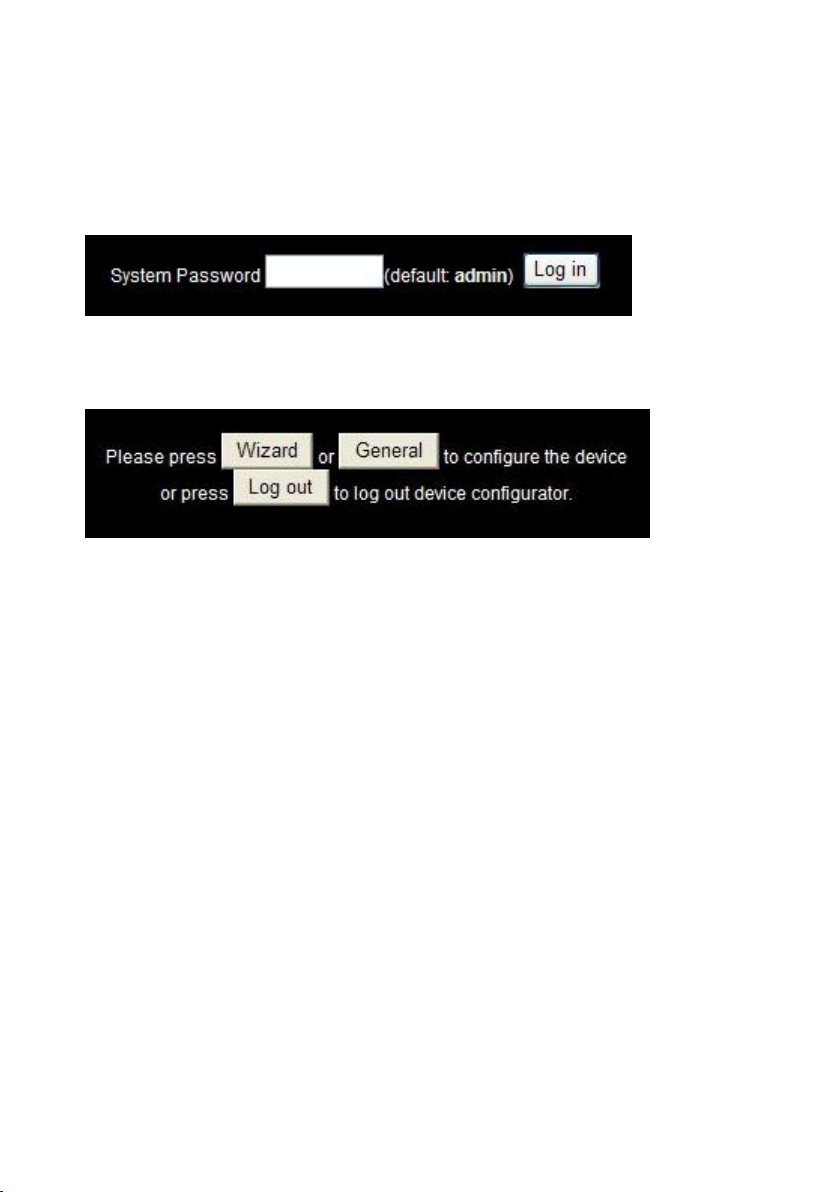
When you enter the configuration mode, you are requested to provide the
“System Password” to activate the configurations. The default login
password is “admin”.
After login, you could see these buttons:
Press “Wizard” button if you want to do basic settings with simpler way.
(Please check section 3.1)
Press “General” button if you want to make some advanced settings.
(Please check each item from section 3.2)
Press “Logout” button if you don’t want to do anything.
Page 31

31
3.1 Configuration Wizard
With wizard setting steps, you could configure Network Storage in a very
simple way. This configuration wizard includes settings of Language, IP &
DHCP, Wireless, Time, and Disk. Press “Next” button to start
configuration.
Page 32

32
Step 1: Select which language will be used for folder/file name in the hard
disk. Incorrect language setting may cause folder/file name unreadable.
Page 33

33
Step 2: If you don’t know how to set DHCP option, just keep it as Auto.
Page 34

34
If you choose Server/Auto/Static mode, you need to set some TCP/IP
settings for Network Storage. If you are not sure about these values, please
ask your network administrator or ISP.
Page 35

35
Step 3: Choose which wireless mode that you want to use. You can also
disable wireless feature of Network Storage.
Page 36

36
If you choose AP Only Mode, in next page, you could specify the SSID and
the wireless channel number for Network Storage.
Page 37

37
If you select the Wireless Client Mode, in next page, you would have to
specify the AP that you want Network Storage to connect to.
Page 38

38
You have two ways to do this job. One is searching the available AP that
Network Storage could get.
Page 39

39
After finish searching, you could select the AP that you want Network
Storage to connect to.
Page 40

40
The other way to add an AP is setting the SSID manually.
Page 41

41
Step 4: Next, you have three ways to set time for Network Storage. You
could sync time with NTP server or your PC, or set time manually.
Step 5: Here you will see three options of security level. The “Guest Mode”
means everyone can access any data in your hard disk drive. The
“Authorization Mode” means only authorized user can access data which
is stored in their home directory. Or you can decide the security level later if
you don’t have any idea yet.
Page 42

42
If you choose Decide it later, the Network Storage won’t do any change to
your hard disk. So you can keep all your data which has been stored in the
hard disk.
If you choose Guest Mode, it’s not necessary to initial your hard disk drive.
As a result, if you use a whole new hard disk, please select “Yes”. If you
already have data in this hard disk, you might want to select “No”. This
option would format your hard disk to one partition if you select “Yes”.
NOTE. You can get better performance after disk initialization.
Page 43

43
WARNING:
The format process will erase all your data which has been stored in your
hard disk drive.
WARNING:
Even there is only one partition in your hard disk, the Network Storage will
format your hard disk again if you press OK.
If you select “Yes”, the Network Storage would ask you one more time to
confirm your decision.
If you choose Authorization Mode, it’s necessary to initial your hard disk
drive. The public directory will store data which can be accessed by any
user. But only authorized user can access data which is stored in their home
directory in the private directory. Please indicate capacities for public
directory and private directory separately. After you indicate capacity for one
directory, the rest of capacity can be assign to the other directory
automatically.
NOTE. The easy copy button in the front panel is going to copy folders/files
from USB drive to public directory while you activate authorization mode.
Page 44

44
WARNING:
The initialization will erase all your data which has been stored in the hard
disk.
Step 6: This page will show the configurations that you choose, please
check your settings again before saving. Click “Discard Settings”, then you
would return to the first page and without saving any changes. If you want to
change any setting, please click “Previous” button to go back to previous
page. Finally, if everything is okay, click “Save Settings” to save your new
settings.
Page 45

45
If you choose to initialize or format hard disk, please wait the progressing
WARNING:
Do Not press any button or power off the Network Storage when the format
is in progress.
bar become 100%.
After everything is done, system would reboot automatically. Please wait 30
seconds at least for system restarting.
Page 46

46
3.2 Network Settings
3.2.1 DHCP Setting
Following sections describe the various DHCP settings.
General Settings: default machine IP is 192.168.123.254. This IP
address must be unique on your network. You can change it if
necessary. This setting is only used for DHCP server mode, and
Static IP mode. Host name is the identification of Network
Storage when you browse it in Microsoft My Network Places.
DCHP Mode: The default mode is “Auto”
Client: If you have a DHCP server on the network, set this
Page 47

47
option to receive an automatic IP address and subnet mask
assignment.
Server: The Network Storage will become a DHCP server
on the network.
Auto: Select this option to let Network Storage send out a
DCHP request during boot up. If you have another DHCP
server on the network, the Network Storage will receive an
automatic IP address and subnet mask assignment. If there
is no DHCP server on the network, the Network Storage will
become a DHCP server on the network.
Static: You can manually configure the IP address and
subnet mask of Network Storage.
Server Settings: (This information would be used when you
choose Server mode or Static mode.)
Subnet Mask: subnet mask of your network.
IP Pool: decide the IP address range that DHCP server will
offer.
Primary DNS / Secondary DNS: This feature allows you to
assign DNS Servers. You could get this information from
your ISP.
Gateway: The gateway IP address would be the IP address
of an alternate gateway. If you do not know how to setup
the gateway, please contact your network administrator or
ISP.
Client List: When Network Storage is as a DHCP server,
here will show some information of DHCP client.
Page 48

48
Fixed Mapping: DHCP server can assign the same IP
address to a certain “MAC address”.
3.2.2 Wireless Setting
Select the Wireless option in the Network Settings page.
Following information will let you know the current wireless operation status.
Basic Settings: allow you to enable or disable wireless function.
Advanced Settings: the Network Storage provides four wireless
modes to select. Please refer to the following section to check
details of each wireless mode separately.
Page 49

49
Choose the wireless mode you need, and click “Next” button to setup detail
items.
3.2.2.1 AP Only Mode
When you are in the AP Only mode, you can setup the basic wireless
functions as below.
Page 50

50
Wireless AP Setting:
Channel: choose the radio channel number. The default channel of
Network Storage is “1”. Please DO NOT set the same channel
with your existed wireless network.
SSID: the SSID identifies a specific wireless LAN. Before
associating with a particular wireless LAN, a station must have the
same SSID as the access point. The default SSID setting is
“WAP-0008”.
Authentication: authentication ensures that digital data
transmissions are delivered to the intended receiver. This option
enables you to set the authentication method for various encryption
schemes.
WEP Encryption: select “64” or “128” bits for encryption method to
protect your data by encrypting it. The WEP key can be 5(or 13)
ASCII characters or 10(or 26) hexadecimal characters based on
whether you select 64 bit or 128 bit WEP encryption.
Page 51

51
802.1X: IEEE 802.1x authentication can be done by using an
external RADIUS server. You need to input the IP address of
RADIUS server and Shared Secret. Please refer to FAQ in chapter
8 to get more detailed information.
Page 52

52
WPA-PSK, WPA2-PSK: AP and Client need to use identical
Pre-shared key (PSK). Please choose TKIP or AES for encryption
type, and then input 64 Hex key (0~F) or 8~63 ASCII characters.
Page 53

53
WPA, WPA2: WPA applies IEEE802.1x and Extensible
Authentication Protocol (EAP) to authenticate wireless clients using
an external RADIUS server. Please input the IP address of RADIUS
server and Shared Secret. Please refer to FAQ in chapter 8 to get
more detailed information.
NOTE. This device can support WPA version 1 and version 2.
Page 54

54
Page 55

55
Advanced Setting:
Wireless mode: 11b/g mixed can let 11g or 11b computers both
exist on the network, but the speed will be reduced. Select 11g only
for maximum speed, but no 11b users will be allowed on the
network.
Beacon interval: This represents the amount of time between
beacon transmissions. The interval tells receiving devices on the
network how long they can wait in low-power mode before waking
up to handle the beacon. Beacons are packets sent by an Access
Point to synchronize a wireless network. Specify a Beacon interval
value between 1 and 1000. The default value is set to 100
milliseconds.
Page 56

56
RTS Threshold: The RTS threshold specifies the packet size of an
RTS transmission. This helps control traffic flow through an access
point, especially one with many clients. The setting value range is
from 1 to 2347, and default value is set to 2347.
Fragmentation: In a network, the maximum size or length of a
fragment is determined by the protocol used to transport the data.
This value should remain at its default setting of 2346. If you
experience a high packet error rate, you may slightly decrease your
"Fragmentation" value within the value range of 256 to 2346, even
number only. Setting the Fragmentation value too low may result in
poor performance.
DTIM interval: A Delivery Traffic Indication Message (DTIM) is a
countdown informing clients of the next window for listening to
broadcast and multicast messages. When the Access Point has
buffered broadcast or multicast messages for associated clients, it
sends the next DTIM with a DTIM Interval value. AP clients hear the
beacons and awaken to receive the broadcast and multicast
messages. Enter a value from 1 to 255 for DTIM. The default value
for DTIM interval is set to 3.
Preamble Type: The Preamble Type defines the length of the CRC
(Cyclic Redundancy Check) block for communication between the
Access Point and roaming wireless adapters.
SSID Broadcast: Enable or Disable a SSID broadcast. When
enabled, the SSID of Network Storage is sent to wireless enabled
devices on the LAN. This feature is enabled by default.
Then press “Next” button, you could see the Wireless MAC Filtering setting.
Page 57

57
The default setting is “Disable MAC filtering”, every wireless client could
connect to this Network Storage. When you select “ALL accept”, the
wireless clients with the MAC addresses you enter below will be accepted to
connect to this Network Storage, the others will be rejected. When you
select “ALL Reject”, the wireless clients with the MAC addresses you enter
below will be rejected to connect to this Network Storage, the others will be
accepted.
After finish configuration, press “Next” button to review all wireless settings.
If everything is correct, then press “Confirm” button to save and take effect
new settings.
Page 58

58
3.2.2.2 Wireless Client Mode
Select the “Wireless Client mode” and click “Next” button to setup under
the Wireless client mode.
After entering the Wireless client mode setting, click the “Scan AP” to scan
the existing AP in your environment. Then click the AP that you want to
connect to.
NOTE. If Network Storage can’t find any AP in your environment, please
check whether the antenna is well connected or not.
Page 59

59
Input encryption keys if needed. Then press “Connect” button to connect.
NOTE. The encryption method is decided by remote AP.
Page 60

60
Then Network Storage will save configurations and reboot automatically.
After that, you can check the wireless status in the status page.
Page 61

61
Besides selecting AP from available list, you can also add AP manually.
Press “Advanced Setting” in the wireless configuration page.
Page 62

62
Press “Add” button to add a remote AP.
Page 63

63
Input the SSID information of remote AP. You may also need to input
correct encryption keys when remote AP activates encryption mechanism.
Then press “Save” to save the configuration.
Page 64

64
You can also modify attributes of existed AP. Go to wireless “Advanced
Setting” page, choose the AP that you want to modify, then press “Edit”
button.
Page 65

65
When you finish all the modification, press “Save” button to save changes.
Page 66

66
3.2.2.3 WDS Hybrid Mode
Select the “WDS Hybrid mode” and click “Next” to set up.
Page 67

67
After entering the WDS Hybrid mode setting, click “Add” to set up.
Page 68

68
You can select the remote AP from AP list, or you can also input the MAC
address of remote AP manually.
NOTE. The channel of Network Storage and remote AP must be the same.
Page 69

69
After indicating MAC address of remote AP, press “Next” to continue.
Page 70

70
Input information of wireless channel, SSID, and encryption method of
Network Storage. Press “Next” to continue.
NOTE. The wireless channel must be same as remote AP.
Page 71

71
You can keep the original setting of this page, and then press “Next”.
NOTE. Please refer to 3.2.2.1 to review the meanings of this page.
Page 72

72
Edit wireless MAC Filtering setting, and then press “Next”.
NOTE. Please refer to 3.2.2.1 to review the meanings of this page.
Page 73

73
Finally, you could see the confirm page. If every setting is correct, just press
“Confirm” to save all configurations.
Page 74

74
3.2.2.4 WDS Only Mode
Select the “WDS only mode”, and click “Next” to set up.
Page 75

75
After entering the WDS Only mode setting, click “Add” to set up.
Page 76

76
You can select the remote AP from AP list, or you can also input the MAC
address of remote AP manually.
NOTE. The channel of Network Storage and remote AP must be the same.
Page 77

77
After indicating MAC address of remote AP, press “Next” to continue.
Page 78

78
Input information of wireless channel and encryption method of Network
Storage. Then press “Next” to continue.
NOTE. The wireless channel must be same as remote AP.
Page 79

79
Finally, you could see the confirm page. If every setting is correct, just press
“Confirm” to save all configurations.
Page 80

80
C
h
a
p
t
e
r
4
:
S
t
o
r
a
g
e
C
o
n
f
i
g
u
r
a
t
i
o
n
C
h
a
p
t
e
r
4
:
S
t
o
r
a
g
e
C
o
n
f
i
g
u
r
a
C
h
a
p
t
e
r
4
:
S
t
o
r
a
g
e
C
o
n
f
i
g
u
In this section, you will know how to use the “Disk Utility” to configure the
hard disk setting. Besides, this chapter will also show you how to finish
configuration of File Sharing, and assign user access rules.
4.1 Disk Utility
Before using the hard disk, users need to format the hard disk first. Click
“Format” button, and the Network Storage will start to format the hard disk
automatically. Once finishing the format, the Network Storage will reboot
automatically, and please reconnect the network in 30 seconds.
NOTE. The hard disk will be formatted as “Ext2” file system.
t
r
a
t
i
o
n
i
o
n
Page 81

81
The other option is used for file checking. If you power off Network Storage
before normally shut down the system, you are recommended to do this by
pressing “Check” button. Click “Disk fdisk” for entering FDisk Utility to
create new partition.
NOTE: Partition can only be created under Authorization mode.
Page 82

82
Create a new partition
WARNING:
All data in the hard disk will be ERASED after pressing format button. The
hard disk is formatted to Ext2 file system. It can not be connected directly
to a Microsoft Windows system without reformatting to other file system
that Windows system can recognize.
You could also format your hard disk by using FDISK Utility.
Page 83

83
4.2 File Sharing
In the configuration of File Sharing, you can see the following items:
Computer Name: Host name is the identification of Network Storage when
you browse it in Microsoft My Network Places.
WorkGroup: Indicate a workgroup name of Microsoft Network Places.
Server Comment: The comment will be showed when you browse it in
Microsoft My Network Places.
Language: Select which language will be used for folder/file name in the
hard disk. Incorrect language setting may cause folder/file name
unreadable.
FTP Configuration: The FTP server is enabled by default, so you can also
access Network Storage by any FTP client utility. Besides, you can also set
the maximum concurrent connections of FTP service. The maximum
concurrent connections of FTP are limited to 20.
Page 84

84
Page 85

85
4.3 Access Control
The Network Storage can provide two security levels of access control. One
is Guest mode; it means anyone can access any data which has been
stored in the hard disk. With Guest mode, you don’t need to edit any user
configuration and start to enjoy file sharing.
Note. The security level here is applied to file sharing of Microsoft Network
Places and FTP service.
Page 86

86
The other is Authorization mode, it means only authorized people can
WARNING:
The initialization of hard disk will ERASE all data which have been stored
in the hard disk.
access certain folders in the hard disk. With Authorization mode, you need
to edit user configuration to assign access right to privileged users. Besides,
you can also assign quota limit for every user in the authorization mode.
Note. The hard disk needs to be initialized when you activate authorization
mode by first time.
Page 87

87
User Configuration
With user configuration, you can add or delete user account for privileged
user. After you input user name, password, and quota information, just press
“Add” button to add user account.
Note. The user information here is applied to file sharing of Microsoft
Network Places and FTP service.
Besides, you can also check the status of used capacity for every user by
entering new quota then pressing “Modify” button.
Page 88

88
How to access folders in Authorization mode
If you have added a user account (named user1), then you will find the
following folders when you browse Network Storage by My Network Places
in authorization mode.
With this scenario, everyone can access data which is stored in folder
Public and usb_disk. But only user1 can access data which is stored in
folder user1. If you try to access folder user1, an authentication window will
pop-up.
Page 89

89
Page 90

90
4.4 File Browser
The Network Storage provides a file browser to let users rename and delete
folders/files easily. Especially when users can not rename or delete
folder/file via FTP or Microsoft My Network Places successfully. For an
example, users may download an “unrecognized” file, such as $#@*2$.avi
from Internet, and they can’t change the file name via My Network Places or
FTP. In this case, users can correct the file name with this file browser.
Step 1: Select a folder/file that you want to change name or delete.
Step 2: Press the “Delete” button if you want to delete that file.
Page 91

91
Step 3: Or press the “Rename” button if you want to rename the file name.
The field of “Current File” will become editable when pressing “Rename”
button. After inputting a new file name, just press “Confirm” button to finish
changing.
Page 92

92
C
h
a
p
t
e
r
5
:
A
d
v
a
n
c
e
d
T
o
o
l
s
C
h
a
p
t
e
r
5
:
A
d
v
a
n
c
e
d
T
C
h
a
p
t
e
r
5
:
A
d
v
a
n
c
e
Click the Advanced Tools option on the left panel to display its submenus.
The Advanced Tools menus enable you to configure the various system
settings. Refer to the following sections for more details.
d
o
T
o
o
o
l
s
l
s
Page 93

93
5.1 Backup Configuration
This option enables you to backup current settings of Network Storage.
5.2 Reset Configuration to Default
This option enables you to reset the Network Storage to its default factory
settings.
5.3 Reboot
This option enables you to reboot the device.
Page 94

94
5.4 Firmware Upgrade
This option enables you to upgrade new firmware, or restore backup
configuration to this product.
Page 95

95
C
h
a
p
t
e
r
6
:
D
o
w
n
l
o
a
d
A
s
s
i
s
t
a
n
t
C
h
a
p
t
e
r
6
:
D
o
w
n
l
o
a
d
A
s
s
i
s
C
h
a
p
t
e
r
6
:
D
o
w
n
l
o
a
d
A
s
With Download Assistant, you can download files from remote server
without using any computer. The one thing you need to do is adding a
download task in the configuration page. Besides, you can also set a
schedule rule to indicate which time the download task will start. As a result,
the download task won’t disturb your daily work, and can start automatically
when you are sleeping. Additionally, the download assistant will send a mail
to inform the receiver automatically when the file is downloaded completely.
6.1 FTP
This page allows you to download files from remote FTP server. Please
refer to the following description.
s
t
i
s
t
a
a
n
n
t
t
Page 96

96
Job Name: Name of download task.
FTP Address: IP address and file path of remote FTP server.
(e.g. ftp://ftp.yahoo.com/file1.avi)
Port: Port number that remote FTP server uses.
Save To: Indicate which folder you will save the file in the hard disk. You can
type the file path manually or press Browse button to select the destination
folder. Press OK button when you finish the selection.
Page 97

97
Login method: The login method is decided by remote FTP server. You can
choose anonymous login or input authorized user name and password.
Inform Receiver: This option is used for mail alert. This device will send a
mail to inform the receiver when the file is downloaded completely. You
need to indicate the SMTP server, and mail address of receiver. Use “;” to
separate different mail addresses.
Start Time: The download task can be started immediately, or assign a
schedule rule. You can set the start time to midnight or other time when the
network bandwidth is more available.
Page 98

98
6.2 HTTP
This page allows you to download files from remote HTTP server. Please
refer to the following description.
Name: Name of download task.
URL: IP address and file path of remote HTTP server.
(e.g. http://software.yahoo.com/file1.avi)
Save To: Indicate which folder you will save the file in the hard disk. You can
type the file path manually or press Browse button to select the destination
folder. Press OK button when you finish the selection.
Page 99

99
Inform Receiver: This option is used for mail alert. This device will send a
mail to inform the receiver when the file is downloaded completely. You
need to indicate the SMTP server, and mail address of receiver. Use “;” to
separate different mail addresses.
Start Time: The download task can be started immediately, or assign a
schedule rule. You can set the start time to midnight or other time when the
network bandwidth is more available.
Page 100

100
6.3 Email Alert Configuration
E-mail Alert Configuration: You need to finish the configuration of E-mail
server before mail alert function can be working properly.
Admin’s E-mail Address: Please enter an E-mail address that will be used
as the sender of e-mail alert feature.
Note. Some mail servers would refuse the mail relay service if the sender
isn’t on the same mail server.
SMTP Server Address: Please enter the IP address or domain name of
mail server that you want to use.
Account Name: Please enter your login name of mail server if needed.
Password: Please enter your login password of mail server if needed.
 Loading...