

Page 1

LevelOne
GNS-4000
4-Bay SATA NAS w/ Gigabit LAN
User Manual
v1.0 - 0706
Page 2

ii
Ver. 1.0-0706
Page 3
iii
Notice
Although LevelOne has attempted to ensure the accuracy of the content of this
manual, it is possible that this document may contain technical inaccuracies,
typographical, or other errors. LevelOne assumes no liability for any error in this
publication, and for damages, whether direct, indirect, incidental, consequential or
otherwise, that may result from such error, including, but not limited to loss of data
or profits. LevelOne provides this publication “as is” without warranty of any kind,
either express or implied, including, but not limited to implied warranties of
merchantability or fitness for a particular purpose. The published information in the
manual is subject to change without notice. LevelOne reserves the right to make
changes in the product design, layout, and driver revisions without notification to its
users. This version of the Product Manual supersedes all previous versions.
Limited Warranty
In no event shall the liability of Digital Data Communication Co., Ltd. (LevelOne)
exceed the price paid for the product from direct, indirect, special, incidental, or
consequential software, or its documentation. LevelOne offers no refunds for its
products. LevelOne makes no warranty or representation, expressed, implied, or
statutory, with respect to its products or the contents or use of this documentation
and all accompanying software, and specifically disclaims its quality, performance,
merchantability, or fitness for any particular purpose. LevelOne reserves the right
to revise or update its products, software, or documentation without obligation to
notify any individual or entity.
Page 4
iv
About This Manual
This User Manual describes how to setup, use, and maintain the Network Storage
GNS-4000. It also describes how to use the NAS Setup Wizard, SmartSYNC utility,
and Advanced Storage Management. This manual includes a full table of contents,
chapter task lists, and numerous cross-references to help you find the specific
information you are looking for.
Also included are four levels of notices:
Note
A Note provides helpful information such as hints or alternative
ways of doing a task.
Important
An Important calls attention to an essential step or point required
to complete a task. Important items include things often missed.
Caution
A Caution informs you of possible equipment damage or loss of
data and how to avoid them.
Warning
A Warning notifies you of probable equipment damage or loss of
data, or the possibility of physical injury, and how to avoid them.
Page 5

v
Table of Contents
1. INTRODUCTION ................................................................................. 1
1.1. KEY FEATURE ............................................................................................. 1
Specifications ........................................................................................ 2
Compatible Backup Software .............................................................. 3
Client OS Support ................................................................................. 3
Browser Support ................................................................................... 3
1.2. PACKAGE CONTENT ................................................................................... 4
1.3. FRONT PANEL ............................................................................................. 4
1.4. REAR PANEL ............................................................................................... 5
2. CHAPTER 2: INSTALLATION AND SETUP ...................................... 7
2.1. INSTALLING DISK DRIVES ........................................................................... 7
2.2. CONNECTING TO THE NETWORK ................................................................ 8
2.3. CONNECTING THE POWER ......................................................................... 8
2.4. INSTALLING THE SOFTWARE ....................................................................... 9
2.5. SELECTING YOUR NETWORK ................................................................... 13
2.6. SETTING UP THE NETWORK STORAGE .................................................... 14
2.7. CONNECTING TO ASM ............................................................................. 18
Browser Support ................................................................................. 18
Finding the Network Storage’s IP Address ...................................... 18
ASM in your Browser ......................................................................... 19
ASM in SmartSYNC ........................................................................... 20
3. CONNECTING TO THE NETWORK STORAGE ............................. 21
3.1. SETTING UP A NETWORK DRIVE ON A WINDOWS PC .............................. 21
3.2. SETTING UP A NETWORK DRIVE ON A UNIX OR LINUX PC ..................... 25
On the Windows PC ........................................................................... 25
On the UNIX/Linux PC with Command Line Interface .................. 27
On the Linux PC with Graphic Desktop ........................................... 27
3.3. SETTING UP A NETWORK DRIVE ON A MACINTOSH PC ........................... 29
3.4. CONNECTING A USB PRINTER ................................................................. 33
3.5. SETTING UP THE PRINT SERVER ON NETWORK STORAGE ..................... 34
3.6. SETTING UP WINDOWS PRINTING ............................................................ 35
3.7. SETTING UP LINUX PRINTING ................................................................... 38
3.8. SETTING UP MACINTOSH PRINTING ......................................................... 41
3.9. CONNECTING A USB DRIVE ..................................................................... 44
Windows PC ........................................................................................ 45
Linux PC ............................................................................................... 46
Macintosh PC ...................................................................................... 47
3.10. DISCONNECTING A USB DRIVE ............................................................... 47
Page 6

vi
4. ONE TOUCH BACKUP .................................................................... 49
4.1. ENABLING ONE TOUCH BACKUP .............................................................. 49
4.2. CREATING A BACKUP SCHEDULE ............................................................. 50
4.3. PERFORMING A ONE TOUCH BACKUP ..................................................... 52
4.4. VIEWING YOUR BACKUP FILES ................................................................ 53
4.5. RESTORING YOUR BACKUP FILES ........................................................... 54
5. SMARTSYNC ................................................................................... 57
Opening the SmartSYNC Window ................................................... 57
Selecting a Language ........................................................................ 57
Closing the SmartSYNC Window ..................................................... 57
Quitting SmartSYNC .......................................................................... 57
Displaying the Network Storages on your Netwo rk ....................... 58
Starting ASM ........................................................................................ 58
5.1. CHANGING THE NETWORK SETTINGS ...................................................... 59
5.2. CONNECTING A NETWORK DRIVE ............................................................ 60
5.3. DELETING DEVICE (NETWORK DRIVE) RECORDS ................................... 61
5.4. PERFORMING A BACKUP .......................................................................... 62
5.5. VIEWING YOUR BACKUP FOLDERS .......................................................... 63
5.6. PERFORMING A RESTORE ........................................................................ 64
5.7. SCHEDULING A BACKUP ........................................................................... 65
Modifying a Backup Schedule .......................................................... 66
Deleting a Backup Schedule ............................................................. 66
5.8. SETTING THE DEFAULT BROWSER FOR ASM .......................................... 67
5.9. VIEWING THE EVENT LOG ........................................................................ 67
Clearing the Event Log ...................................................................... 67
6. ADV ANCED STORAGE MANAGER ............................................... 69
6.1. CONNECTING TO ASM ............................................................................. 69
ASM in your Browser ......................................................................... 69
ASM in SmartSYNC ........................................................................... 70
6.2. SELECTING A LANGUAGE ......................................................................... 71
6.3. NAVIGATING IN ASM................................................................................. 71
6.4. SETTING UP NETWORK STORAGE WITH THE SETUP WIZARD ................. 72
6.5. MANAGING USERS AND GROUPS ............................................................. 74
Viewing a List of Users ...................................................................... 74
Creating a User ................................................................................... 74
Changing the Administrator’s Password ......................................... 74
Changing a User's Password ............................................................ 74
Deleting a User ................................................................................... 75
Viewing a List of Groups .................................................................... 75
Creating a Group ................................................................................ 75
Adding Members to a Group ............................................................. 76
Page 7

vii
Removing Members from a Group ................................................... 76
Deleting a Group ................................................................................. 76
Viewing Quotas ................................................................................... 77
Setting Quotas ..................................................................................... 77
6.6. MANAGING FILE & PRINT SERVICES ........................................................ 78
Setting up Windows Access .............................................................. 78
Setting up UNIX/Linux Access .......................................................... 79
Setting up for Macintosh Access ...................................................... 80
Setting up for FTP Access ................................................................. 80
Setting up your Print Server .............................................................. 81
Setting up your DLNA Server ............................................................ 81
Viewing a List of Folders .................................................................... 82
Modifying Folder Services ................................................................. 82
Adding a Folder ................................................................................... 82
Deleting a Folder ................................................................................. 83
Setting up Windows Sharing for a Folder........................................ 83
Setting up UNIX and Linux Sharing for a Folder ............................ 84
Setting up FTP Sharing for a Folder ................................................ 84
6.7. MANAGING RAID VOLUMES .................................................................... 85
Viewing RAID Volume Status ............................................................ 85
Viewing Disk Drive Information ......................................................... 85
Creating a RAID Volume .................................................................... 86
Designating a Spare Drive ................................................................. 86
Migrating a RAID Volume .................................................................. 87
Deleting a RAID Volume .................................................................... 88
Viewing an External USB Drive or Memory Stick ........................... 89
Formatting an External USB Drive or Memory S t ick ..................... 89
6.8. MANAGING BACKUPS ............................................................................... 90
Viewing a List of Snapshot Backups ................................................ 90
Setting up a Snapshot Backup ......................................................... 90
Viewing the NAS Replication Schedule ........................................... 91
Setting up NAS Replication ............................................................... 92
Enabling One Touch Backup ............................................................. 93
6.9. MANAGING THE NETWORK CONNECTION ................................................ 94
Viewing Network Setup Information ................................................. 94
Making Network Settings ................................................................... 94
Working with Jumbo Frames ............................................................. 95
6.10. MAKING MANAGEMENT SETTINGS ........................................................... 96
Viewing Service Status....................................................................... 96
Viewing the Event Log ....................................................................... 96
Setting up SMTP Authentication ....................................................... 97
Viewing the Email Alert List ............................................................... 97
Adding an Email Alert Recipient ....................................................... 98
Page 8

viii
Deleting an Email Alert Recipient ..................................................... 98
Upgrading the System Firmware ...................................................... 98
Installing an Application Plug-in ........................................................ 98
Enabling and Disabling the Buzzer .................................................. 98
Viewing UPS Status ............................................................................ 99
Setting up a UPS ................................................................................ 99
6.11. MANAGING SERVICES ............................................................................ 100
Setting System Date and Time ....................................................... 100
Running the Network Time Protocol .............................................. 100
Viewing the Results of NTP Synchronization ............................... 101
Rebooting the Network Storage ...................................................... 101
Shutting Down the Network Storage .............................................. 102
Restarting the Network Storage ...................................................... 102
Viewing System Information ............................................................ 103
Viewing Enclosure Information ....................................................... 103
7. RAID TECHNOLOGY ..................................................................... 105
7.1. INTRODUCTION TO RAID ....................................................................... 105
RAID 0 – Stripe ................................................................................. 106
RAID 1 – Mirror ................................................................................. 107
RAID 5 – Block Striping with Distributed Parity ............................ 108
RAID 10 – Mirror / Stripe.................................................................. 109
7.2. CHOOSING A RAID LEVEL ..................................................................... 110
RAID 0 ................................................................................................ 110
RAID 1 ................................................................................................ 110
RAID 5 ................................................................................................. 1 1 1
RAID 10 ............................................................................................... 111
7.3. 2 TB LIMITATION ..................................................................................... 112
7.4. SPARE DRIVE ......................................................................................... 112
7.5. AUTOMATIC REBUILDING ........................................................................ 112
7.6. PARTITION AND FORMAT ........................................................................ 113
7.7. RAID VOLUME MIGRATION .................................................................... 113
RAID 0 ................................................................................................ 114
RAID 1 ................................................................................................ 114
RAID 5 ................................................................................................ 114
RAID 10 .............................................................................................. 114
8. TROUBLESHOOTING ................................................................... 115
8.1. RESPONDING TO AN AUDIBLE ALARM .................................................... 1 15
8.2. CHECKING THE SYSTEM STATUS LED ................................................... 115
8.3. CHECKING DISK STATUS LEDS ............................................................. 116
8.4. CHECKING RAID VOLUME STATUS IN ASM .......................................... 117
Responds to a Critical RAID Volume ............................................. 117
Page 9

ix
Responding to an Invalid RAID Volume ........................................ 118
8.5. CHECKING FILE SYSTEM STATUS IN ASM ............................................. 119
Rebuilding the File System .............................................................. 119
8.6. CHECKING THE EVENT LOG IN ASM ...................................................... 120
Responding to Events ...................................................................... 120
8.7. CHECKING ENCLOSURE STATUS IN ASM .............................................. 125
8.8. RESOLVING CONNECTIONS WITH SMARTSYNC ................................... 126
Multiple Network Connections ........................................................ 127
8.9. SOLVING NETWORK CONNECTION PROBLEMS ...................................... 128
8.10. CHECKING YOUR EMAIL INBOX .............................................................. 129
8.11. RESTORING THE DEFAULT PASSWORD .................................................. 130
8.12. RESOLVING A WINDOWS FIREWALL ISSUE ............................................. 131
9. SETUP WIZARD ADVANCED MODE ............................................ 133
10. MAINTENANCE .............................................................................. 143
10.1. UPGRADING THE FIRMWARE .................................................................. 143
10.2. INSTALLING APPLICATION PLUG-INS ...................................................... 144
10.3. REPLACING THE FAN .............................................................................. 145
10.4. REPLACING THE POWER SUPPLY .......................................................... 147
10.5. CONNECTION PROBLEMS AFTER RESTART ........................................... 149
11. SUPPORT ....................................................................................... 151
11.1. FREQUENTLY ASKED QUESTIONS .......................................................... 151
11.2. GNU GENERAL PUBLIC LICENSE .................................................. 154
Page 10

x
Page 11

1
1. Introduction
LevelOne Network Storage GNS-4000 is a network attached storage (NAS) solution
for external storage targeted for small and medium business (SMB) users and small
office/home office (SOHO) users. With a NAS product, users can save their work
and have access to files over the network without having to carry around a disk
drive or memory stick. The Administrator can manage access privileges for greater
security. Multiple backup and synchronization functions protect your data.
The Network Storage GNS-4000’s architecture is based on the powerful Freescale
microprocessor and the hardware based Serial ATA RAID Controller. The Gigabit
Ethernet port is used for the data transfer and management. The USB ports are
used for a printer, expansion drives, and Uninterrupted Power Supply (UPS).
1.1. Key Feature
Easy-to-use browser-based management interface
Data sharing over the network
One-touch backup of designated file folders on client PC
Snapshot backup for real-time image of the file system
Remote NAS-to-NAS synchronization and backup
Network print server with USB printer
User, Group, and Quota management
UPS support with automated shutdown
Heterogeneous environment: Windows, UNIX, Linux, and Macintosh
SmartSYNC Backup Utility
Setup Wizard Utility
Windows 2000, XP Professional, 2003 Server, and Vista clients through SMB
and CIFS protocols
UNIX and Linux clients through the NFS protocol
Macintosh clients through the AFP protocol
FTP clients through the FTP protocol
DLNA clients through UPnP protocol with an optional plug-in
Page 12

2
Specifications
Disk drive support:
à Four 1.5 Gb/s or 3 Gb/s SATA 3.5-inch disk drives
à Conforms to Serial ATA 1.0 specification and Serial ATA II: Extensions to
Serial ATA 1.0 specification (SATA II, phase I specification)
à SATA specification of 3 Gb/s transfers with CRC error-checking
à Hot-swapping of disk drives
à Tagged command queuing
à Native command queuing
à Drive roaming among chan nels
à S.M.A.R.T status polled every 15 minutes
à Online capacity expansion
à RAID Level Migration
à Hot spare drives
à RAID Volume rebuilding
à Gigabyte rounding
à Background rebuilding
RAID level support: RAID 0, 1, 5, and 10
Large file support up to 2 TB
Unicode file name support
Hardware SATA RAID Controller
Networking: 10/100/1000 Mb/s Ethernet Port on motherboard
USB ports: USB 2.0, up to 480 Mb/s, two Type-A connectors
File protocols: SMB, CIFS, FTP, AFP, NFS
Flash Memory: 16 MB, 16-bit
Memory: 128 MB DDR SDRAM
Power Supply: 200-watt ATX with PFC
Network Time Protocol (NTP) client
Error logging
Phone home capability (email notification) to contact IT staff
Hardware monitoring of:
à Fan
à Temperature
à Power
à Disk status
à One-Touch button
à Enclosure status
Page 13

3
Compatible Backup Software
Network Storage GNS-4000 is compatible with the following backup software
products:
VERITAS® NetBackup/Backup Exec™
CA BrightStor™ARCserve/Enterprise
LEGATO® NetWorker™
Syncsort Backup Express
Microsoft Backup Software for Windows 95/98/NT/2000/ME/XP
Dantz Retrospect for Macintosh
Client OS Support
Microsoft Windows:
à Vista, Server 2003, XP Professional, 2000
à Supports Intel IA32, AMD64 and Intel EM64T platforms
UNIX/Linux:
à Red Hat Enterprise Linux 3.0 (AS/WS/ES)
à Red Hat Enterprise Linux 4.0 (AS/WS/ES)
à SuSe Linux Enterprise 10 (Server/Desktop)
Apple Macintosh:
à Mac OS X
Browser Support
Use the latest version of the following browsers to manage the Network Storage
GNS-4000:
Internet Explorer
Netscape Navigator
Mozilla
Firefox
Safari (Mac OS X)
Caution
1. Back up your system periodically to avoid any potential data loss.
LevelOne disclaims any responsibility of all sorts of data loss or
recovery.
2. Should you return any components of Network Storage package for
refund or maintenance, make sure they are carefully packed for
shipping. Any form of damages due to improper packaging will
not be compensated.
Page 14
4
1.2. Package Content
The Network Storage GNS-4000 box contains the following items:
– GNS-4000
– Power Cord
– Ethernet cable
– Screws for disk drives (16, including 4 spares)
– CD with User Manual / NAS Utilities
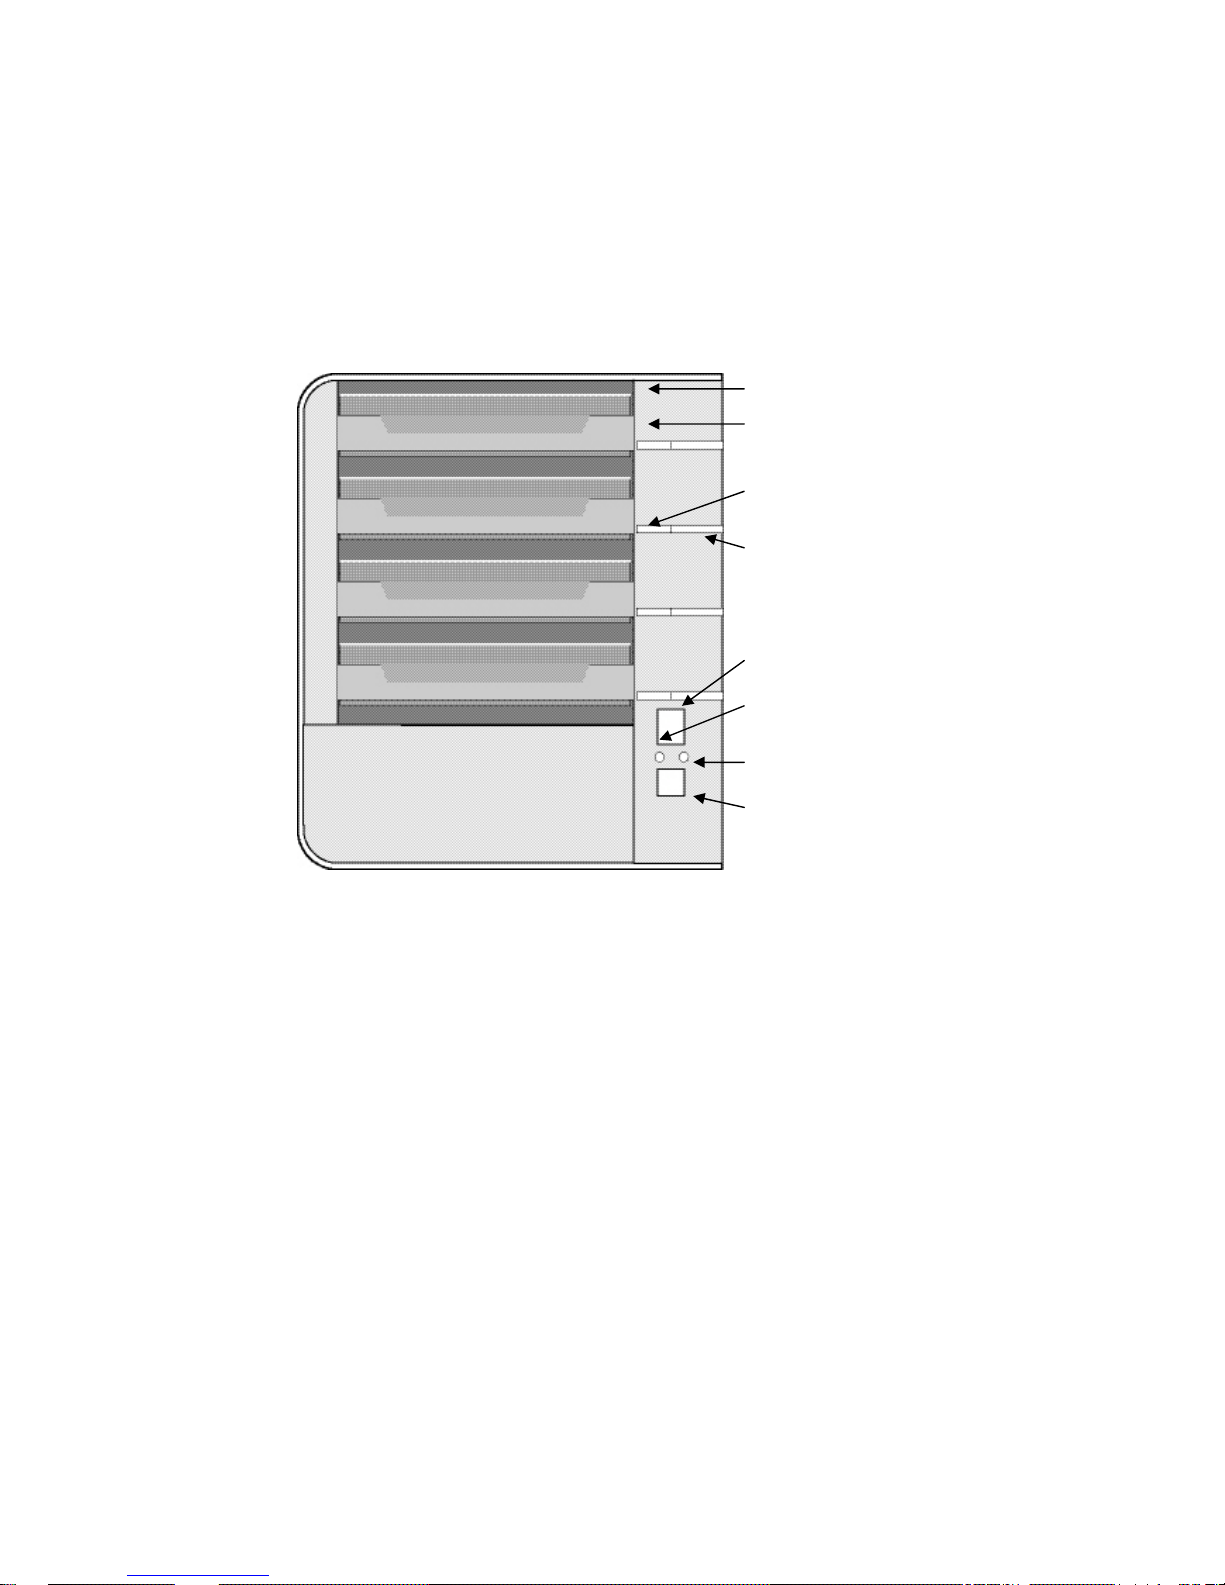
1.3. Front Panel
Disk Drive
Driver Carrier
Disk Status LED
Disk ACT LED
Power Button
System Status LED
Ethernet ACT LED
One Touch Button
Page 15
5
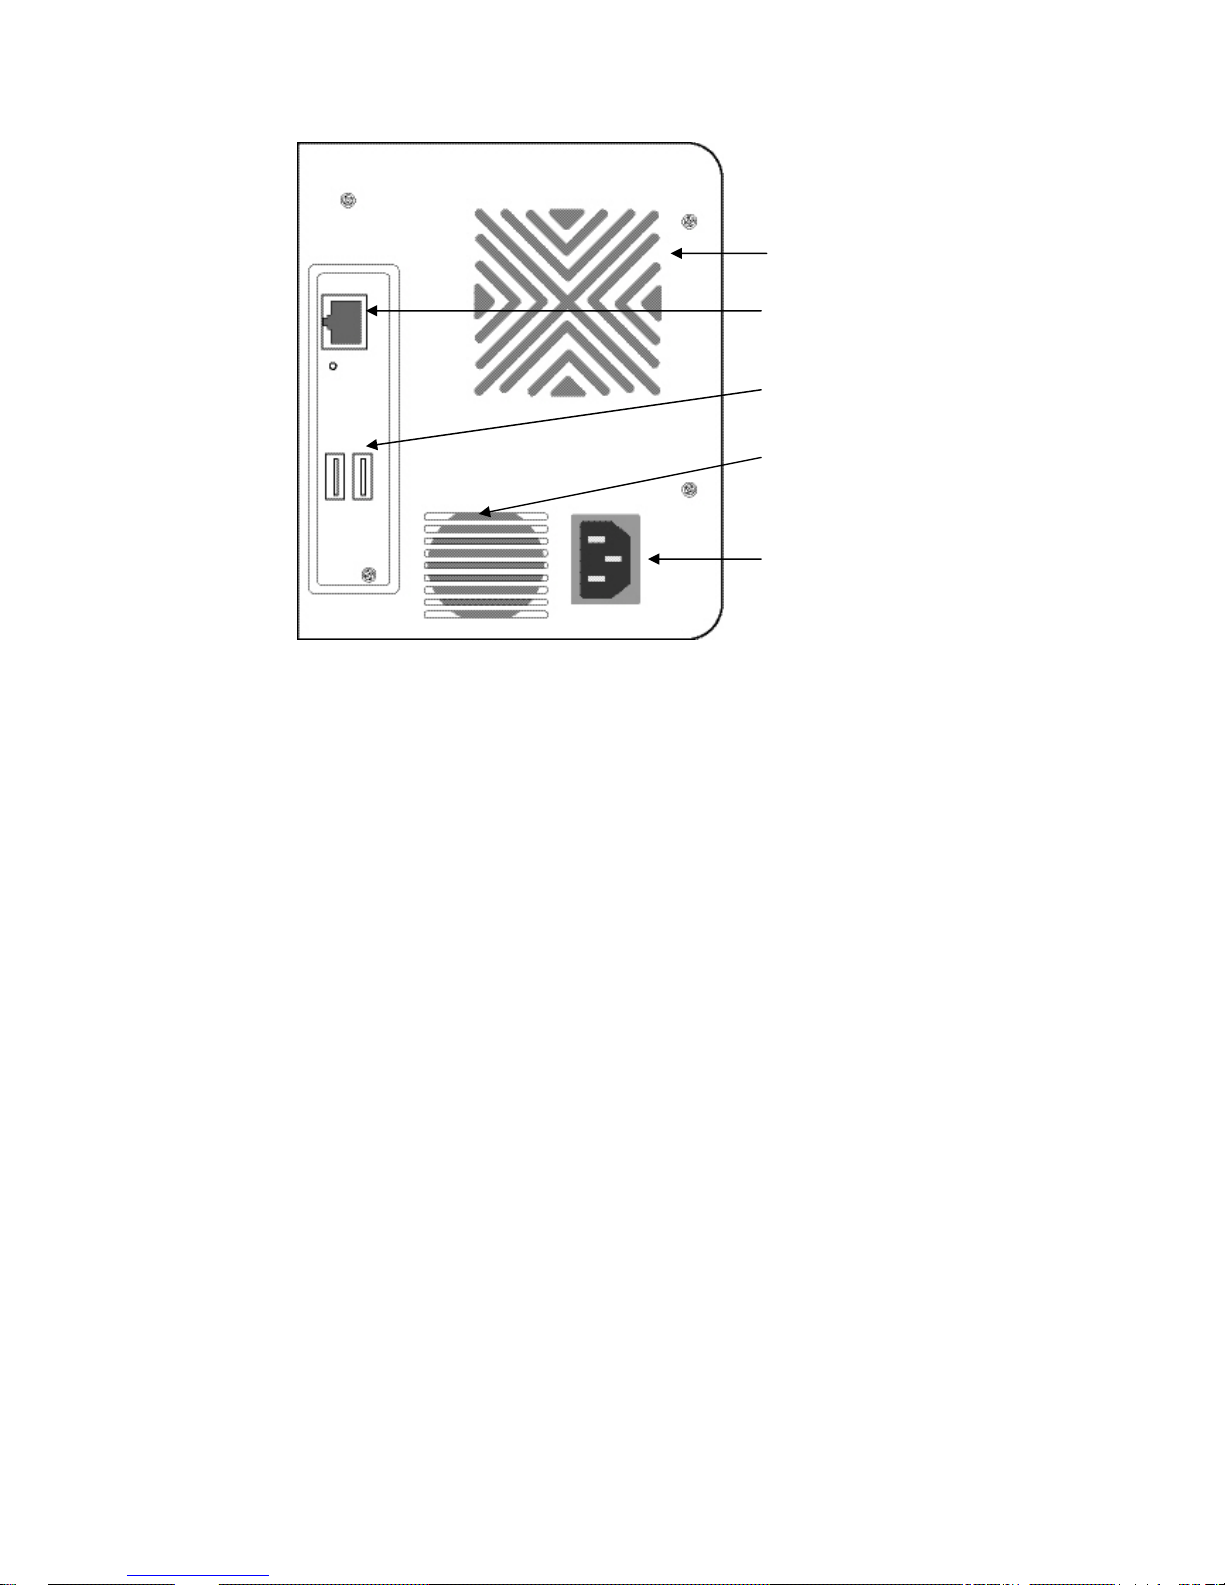
1.4. Rear Panel
Disk Drive
Cooling Fan
RJ45 Network
Connection
USB
Connection
Power Supply
Fan
Power
Connection
Page 16

6
Page 17
7
2. Chapter 2: Installation and Setup
Warning
The electronic components within the Network Storage are
sensitive to damage from Electro-Static Discharge (ESD).
Observe appropriate precautions at all times when handling the
Network Storage or its subassemblies.
Important
To configure the Network Storage, you must install the software
onto a PC running Windows Vista, 2003 Server, XP Professional,
or 2000.
2.1. Installing Disk Drives
You can populate the Network Storage GNS-4000 with SATA 1.5 Gb/s or 3.0 Gb/s
disk drives. For optimal performance, install disk drives of the same model and
capacity. Your disk drives will become a RAID Volume on the Network Storage.
To install disk drives:
1. Open the door on the front of the Network Storage enclosure.
2. Pull a disk drive carrier from the enclosure.
3. Carefully lay the disk drive into the drive carrier, so that the screw holes on the
sides of the carrier align with the screw holes in the drive.
4. Insert the screws through the holes in the drive carrier and into the sides of
the disk drive.
Install only the counter-sink screws supplied with the Network Storage.
Install four screws per drive.
Snug each scr ew. Be careful not to over-tighten.
5. Reinstall the drive carrier into the Network Storage enclosure.
Repeat steps 2 through 5 until all of your disk drives are installed.
6. Close the door on the front of the Network Storage.
Page 18

8
2.2. Connecting to the Network
To connect the Network Storage to your network:
1. Attach one end of the network cable to the RJ45 network connection.
2. Attach the other end of the network cable to your Ethernet hub or switch
Important
If there are multiple networks at your facility, note the network to
which you connect the Network Storage. You will need this
information during the setup process.
2.3. Connecting the Power
To power the Network Storage:
1. Attach the power cord on the back of the Network Storage enclosure and plug
the other end into the power source
2. On the front of the Network Storage, press the power button
It takes about a minute to boot the Network Storage. When fully booted:
T he System Status LED turns green
T he buzzer beeps one time.
Page 19
9
2.4. Installing the Software
When you install the software onto your Windows PC, three new items are added to
the Windows Start menu:
1. NAS Setup Wizard – Sets up the Network Storage
2. SmartSYNC – Connects your PC to the Network Storage, sets up network
drives on your PC, and performs backups
3. Configuration Tool – Ensures that the Network Storage, NAS Setup Wizard,
and SmartSYNC are all on the same network
To install the software:
1. Insert the CD into your CDROM.
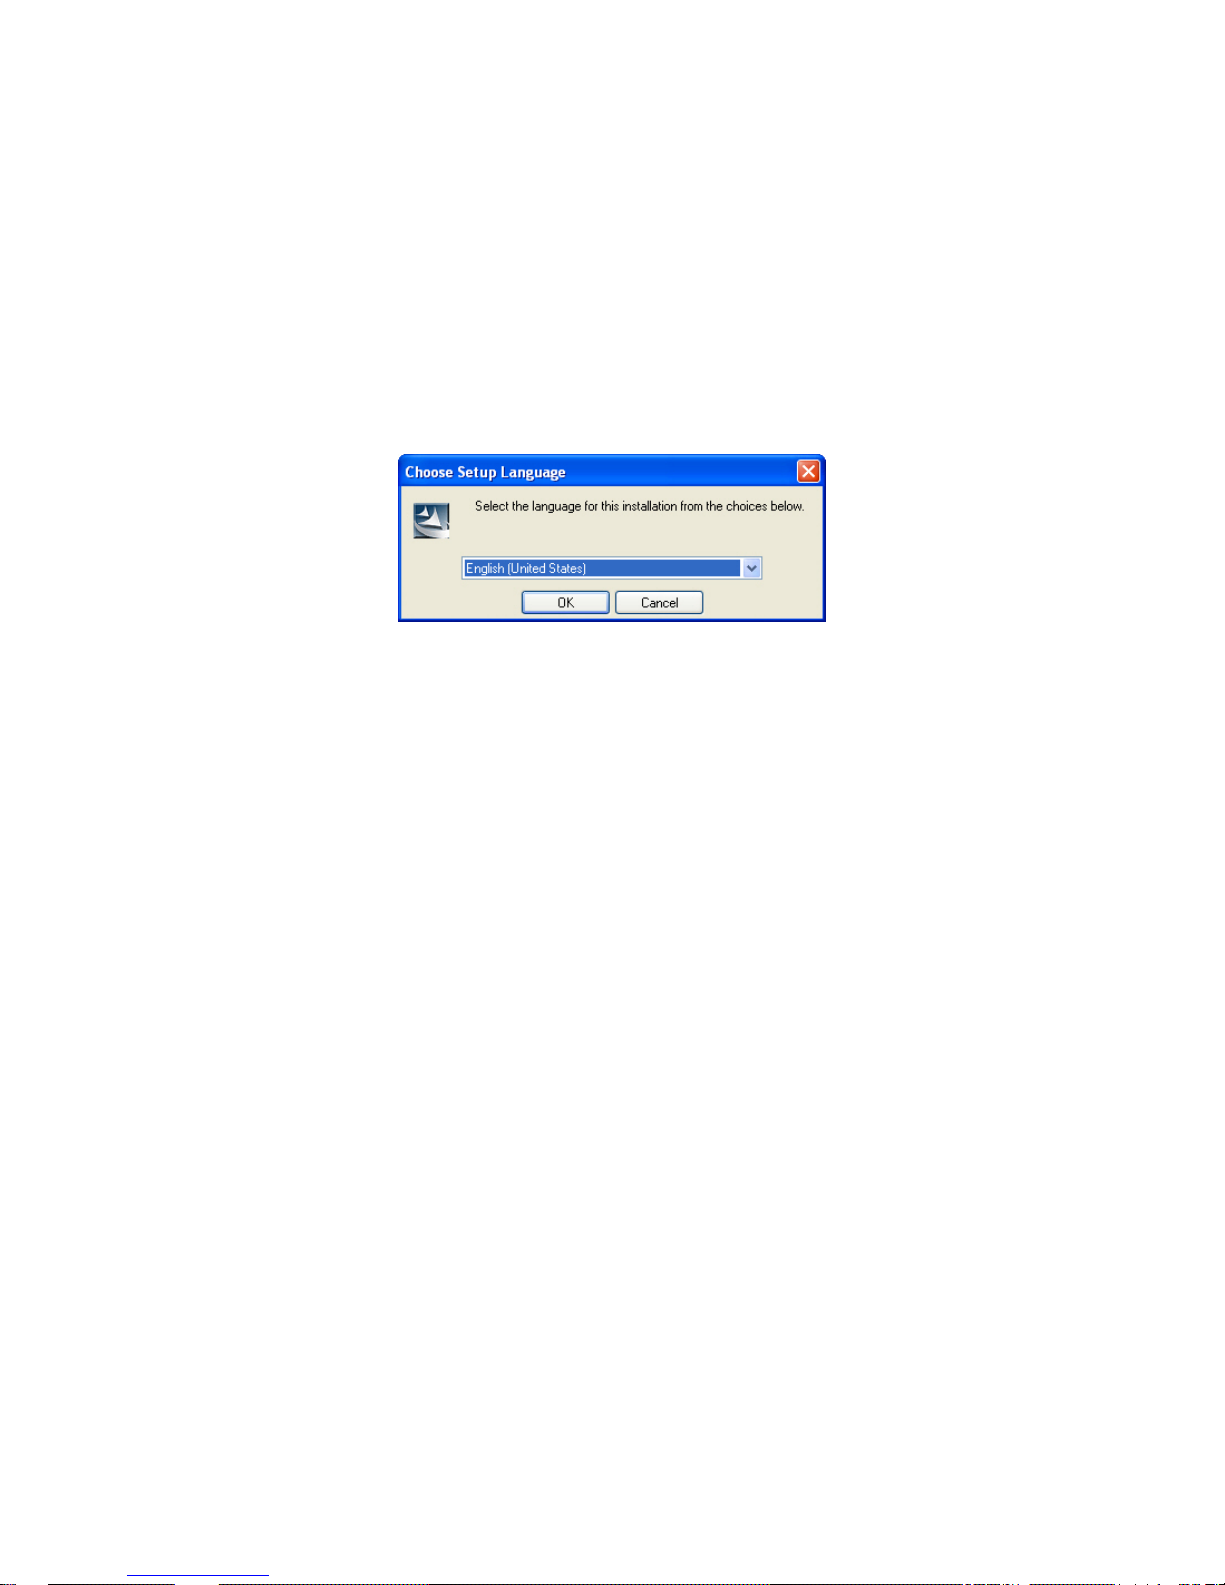
2. Double-click on NAS Utility Installer icon.
Select appropriate language
Page 20
10
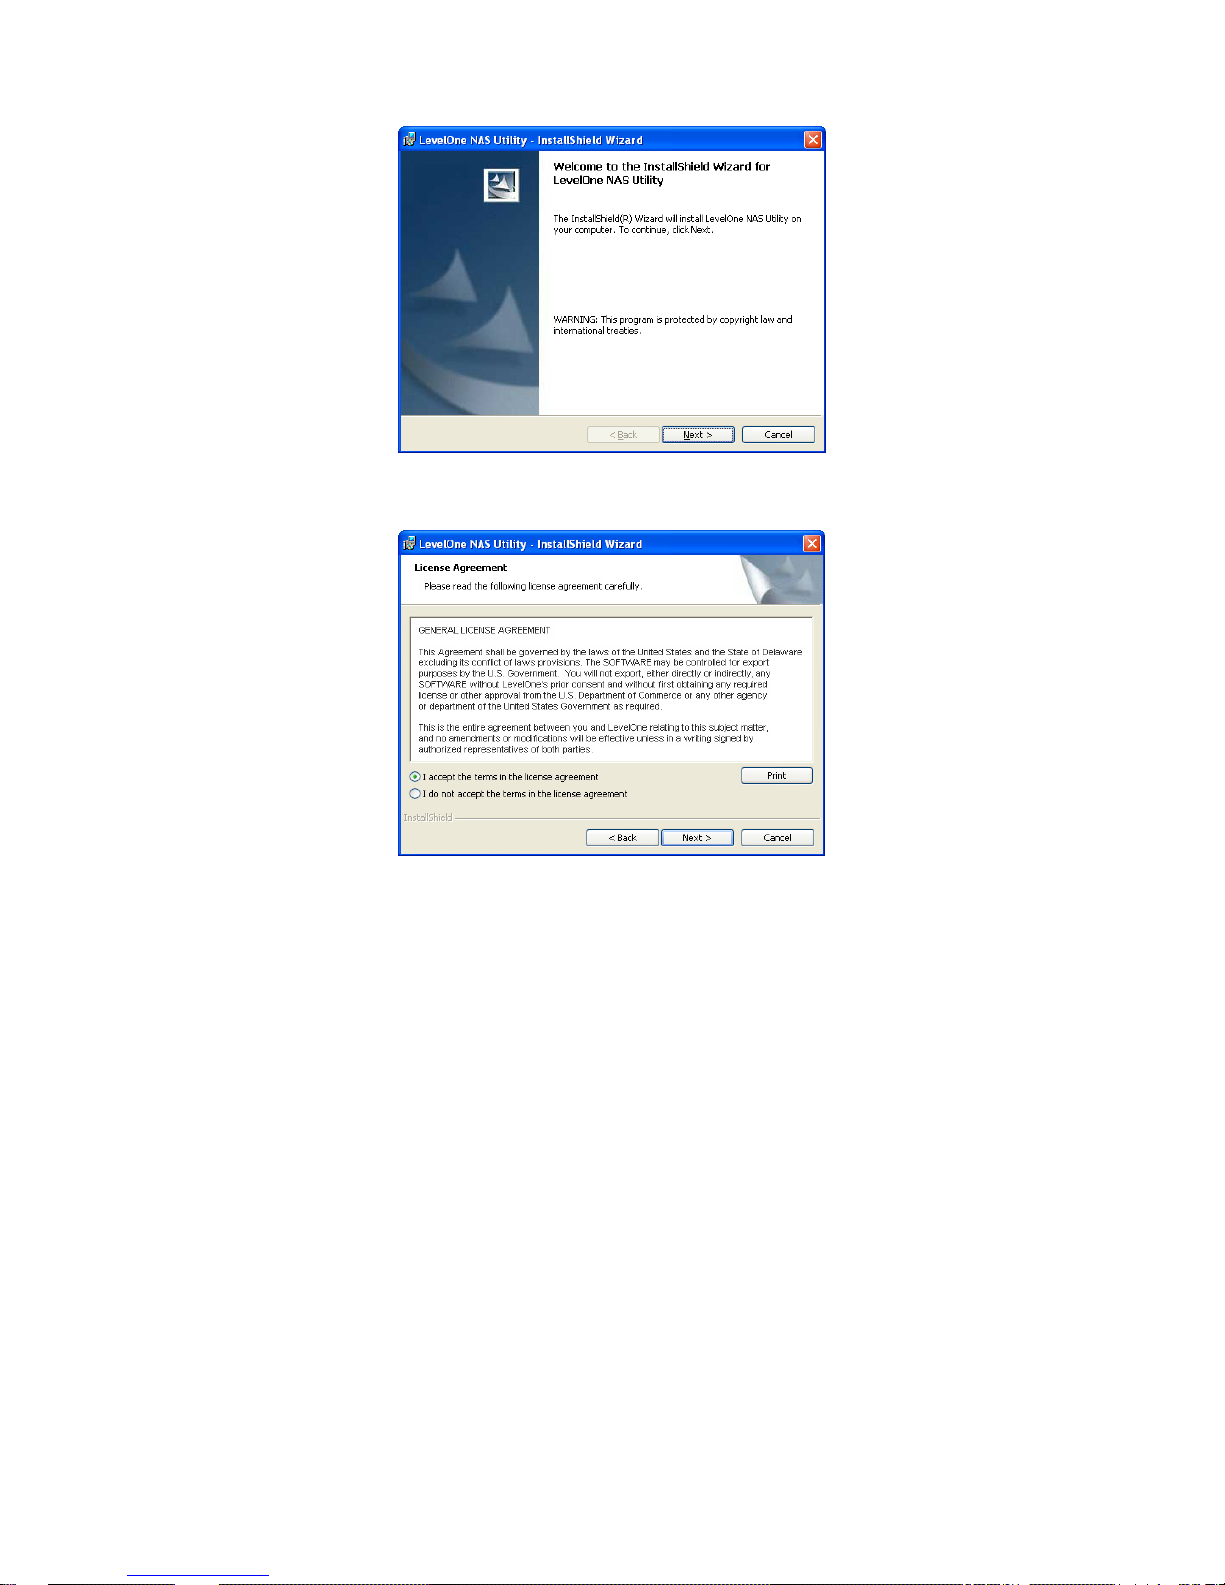
The installer screen appears.
3. Click the Next button to begin installation.
The License Agreement screen appears.
4. Click the “I accept the terms...” option, then click the Next button.
The Customer Information screen appears.
Page 21
11
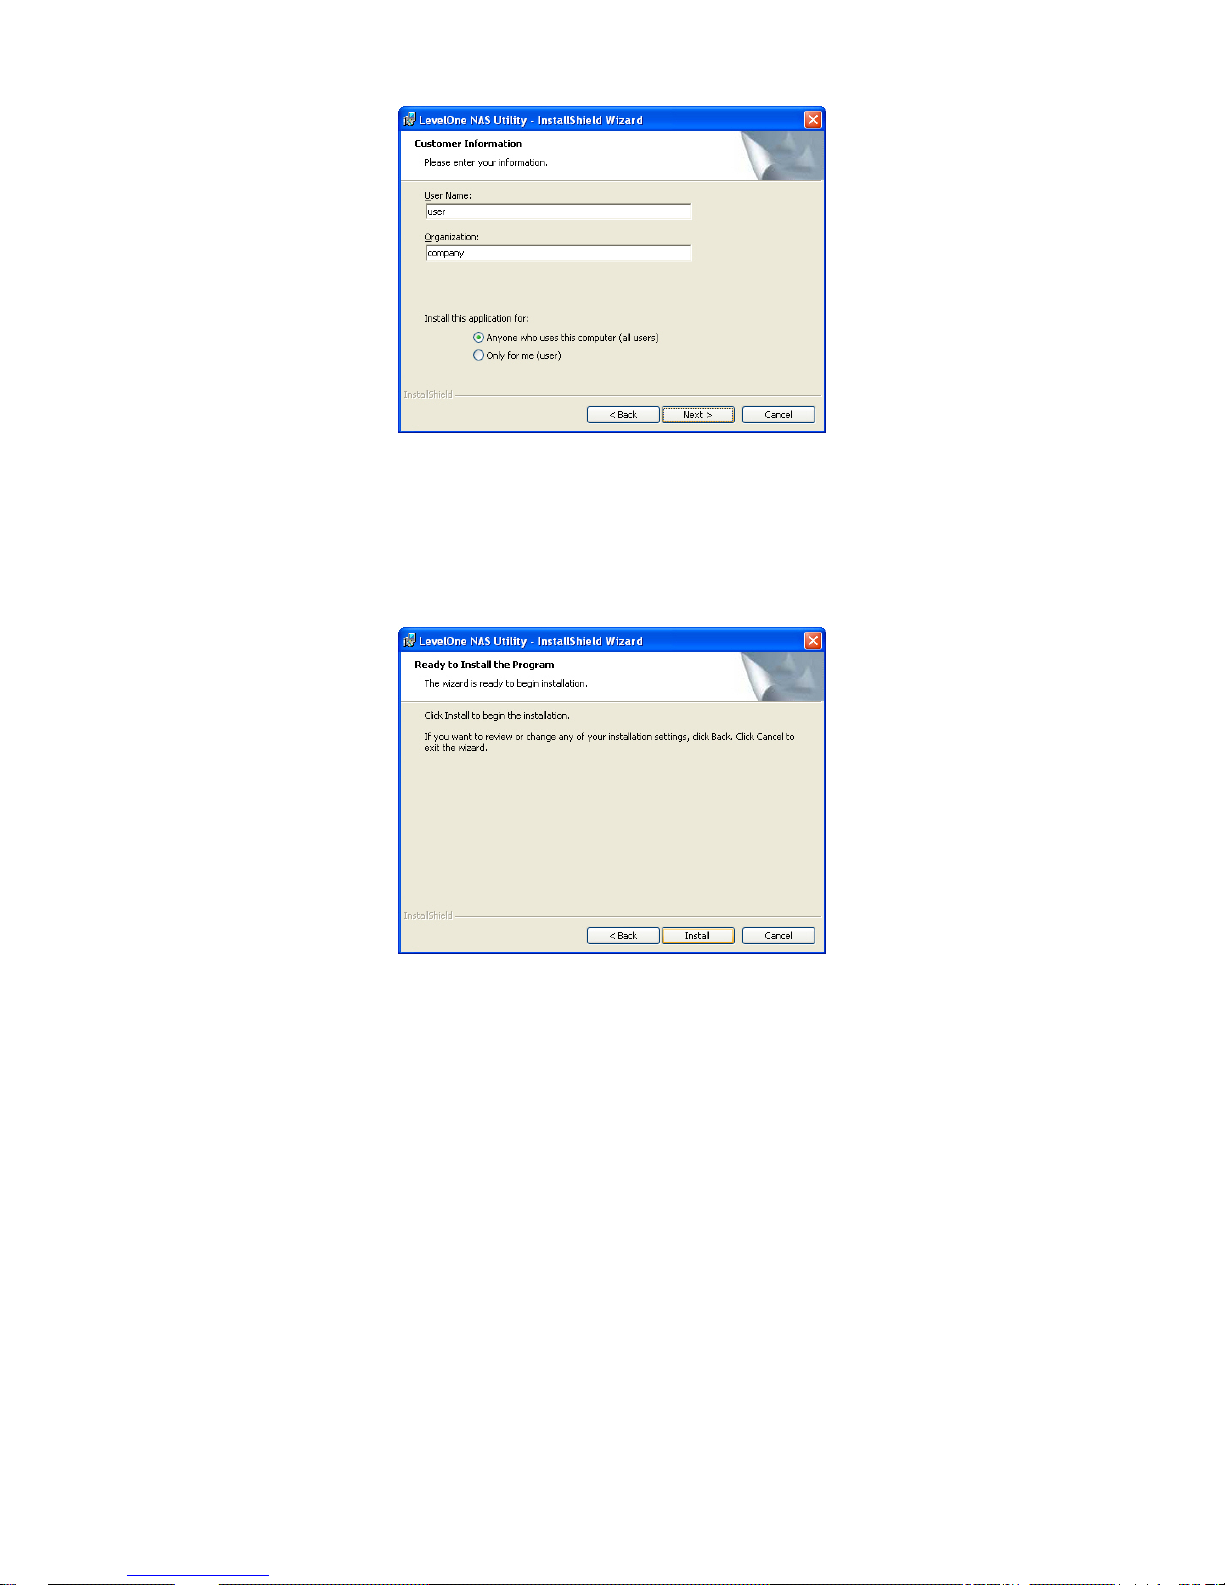
5. Type a user name and organization name into the respective fields or leave
them unchanged to accept the default entries.
Click the Install option for:
Anyone who uses this computer (all users)
Only for me (the current user)
Click the Next button.
The Ready to Install screen appears.
6. Click the Install button to proceed with installation.
Page 22
12
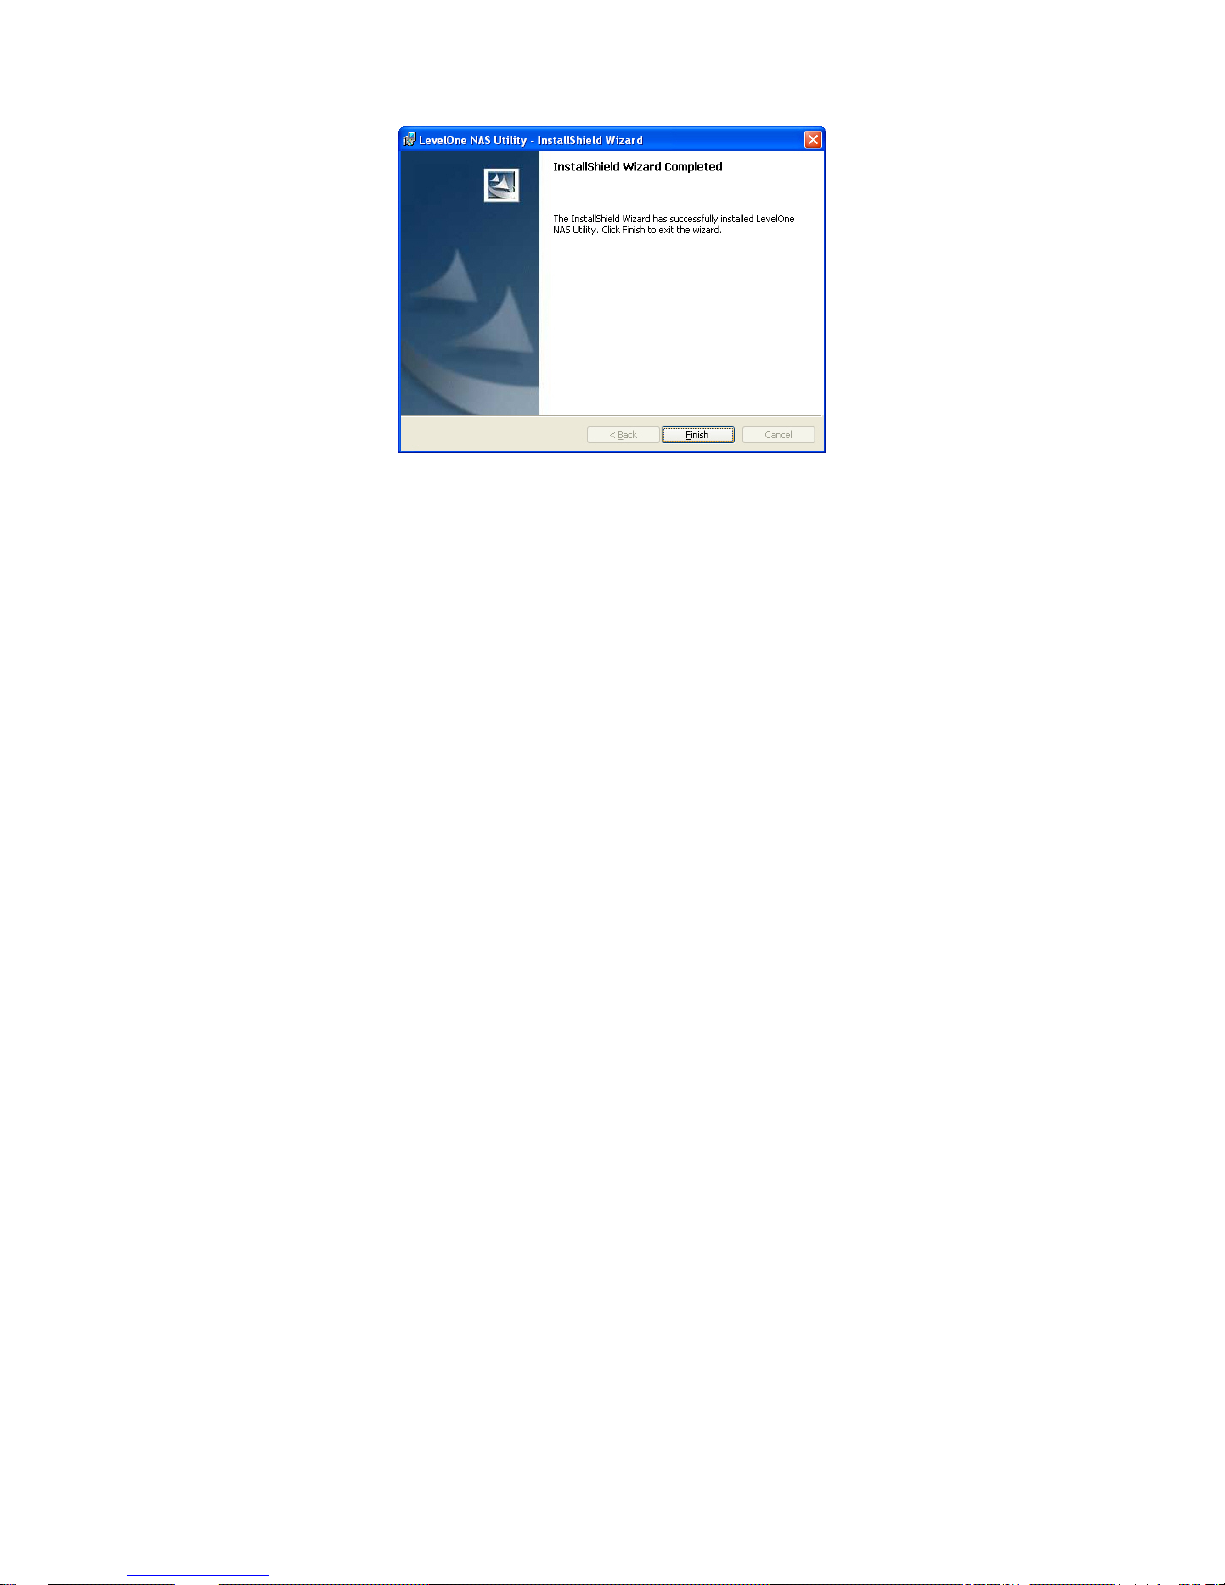
When the installation is finished, the final installation screen appears.
7. Click to Finish button to close the installer.
Page 23
13
2.5. Selecting Your Network
If your PC has only one network connection, skip to “Setting up the Network
Storage”. If your PC has multiple network connections, you must ensure that the
Network Storage, NAS Setup Wizard, and SmartSYNC utility are all connected to
the same network. The Configuration Tool performs that function.
To make your network selection:
1. From the Windows Start menu, choose Programs, then LevelOne NAS Utility,
and then Configuration Tool.
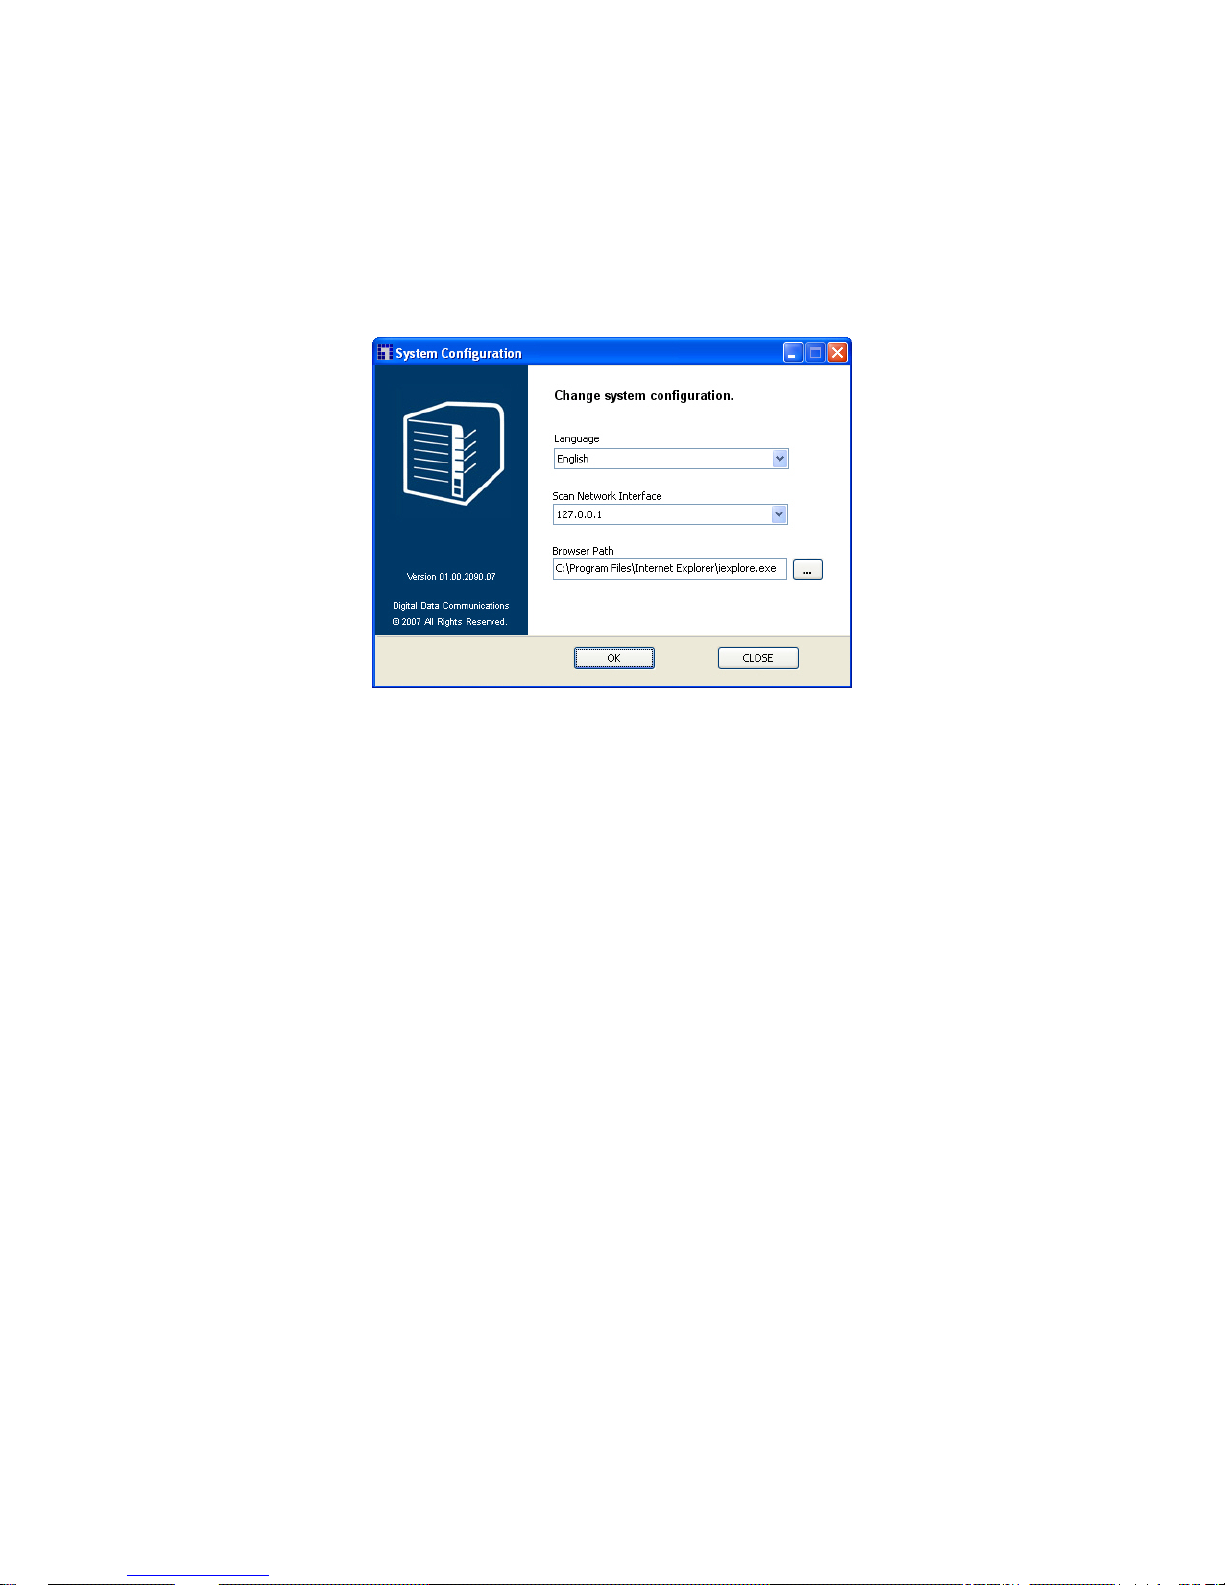
The Change system configuration screen appears.
2. From the language dropdown menu, choose the language you prefer.
3. From the Scan Network Interface dropdown menu, choose the IP address for
the network where you installed the Network Storage.
The IP addresses in this menu belong to the network interface cards (NICs) in
your PC. You must select the NIC that is connected to the network where you
installed the Network Storage.
4. Optional. Click the ... button to navigate to the browser you want to use as
with the Network Storage.
The default browser appears in the Browser Path field. Change this setting
only if you want use a different browser.
5. Click the OK button.
6. In the System Message, click OK to finish your network selection.
Page 24
14
2.6. Setting up the Network Storage
Caution
The NAS Setup Wizard will overwrite all existing settings on the
Network Storage. In most cases, you should only run the NAS
Setup Wizard one time - when you first set up your Network
Storage.
The NAS Setup Wizard performs the setup procedures on your Network Storage.
To set up your Network Storage:
1. From the Windows Start menu, choose Programs, then LevelOne NAS Utility,
then NAS Setup Wizard.
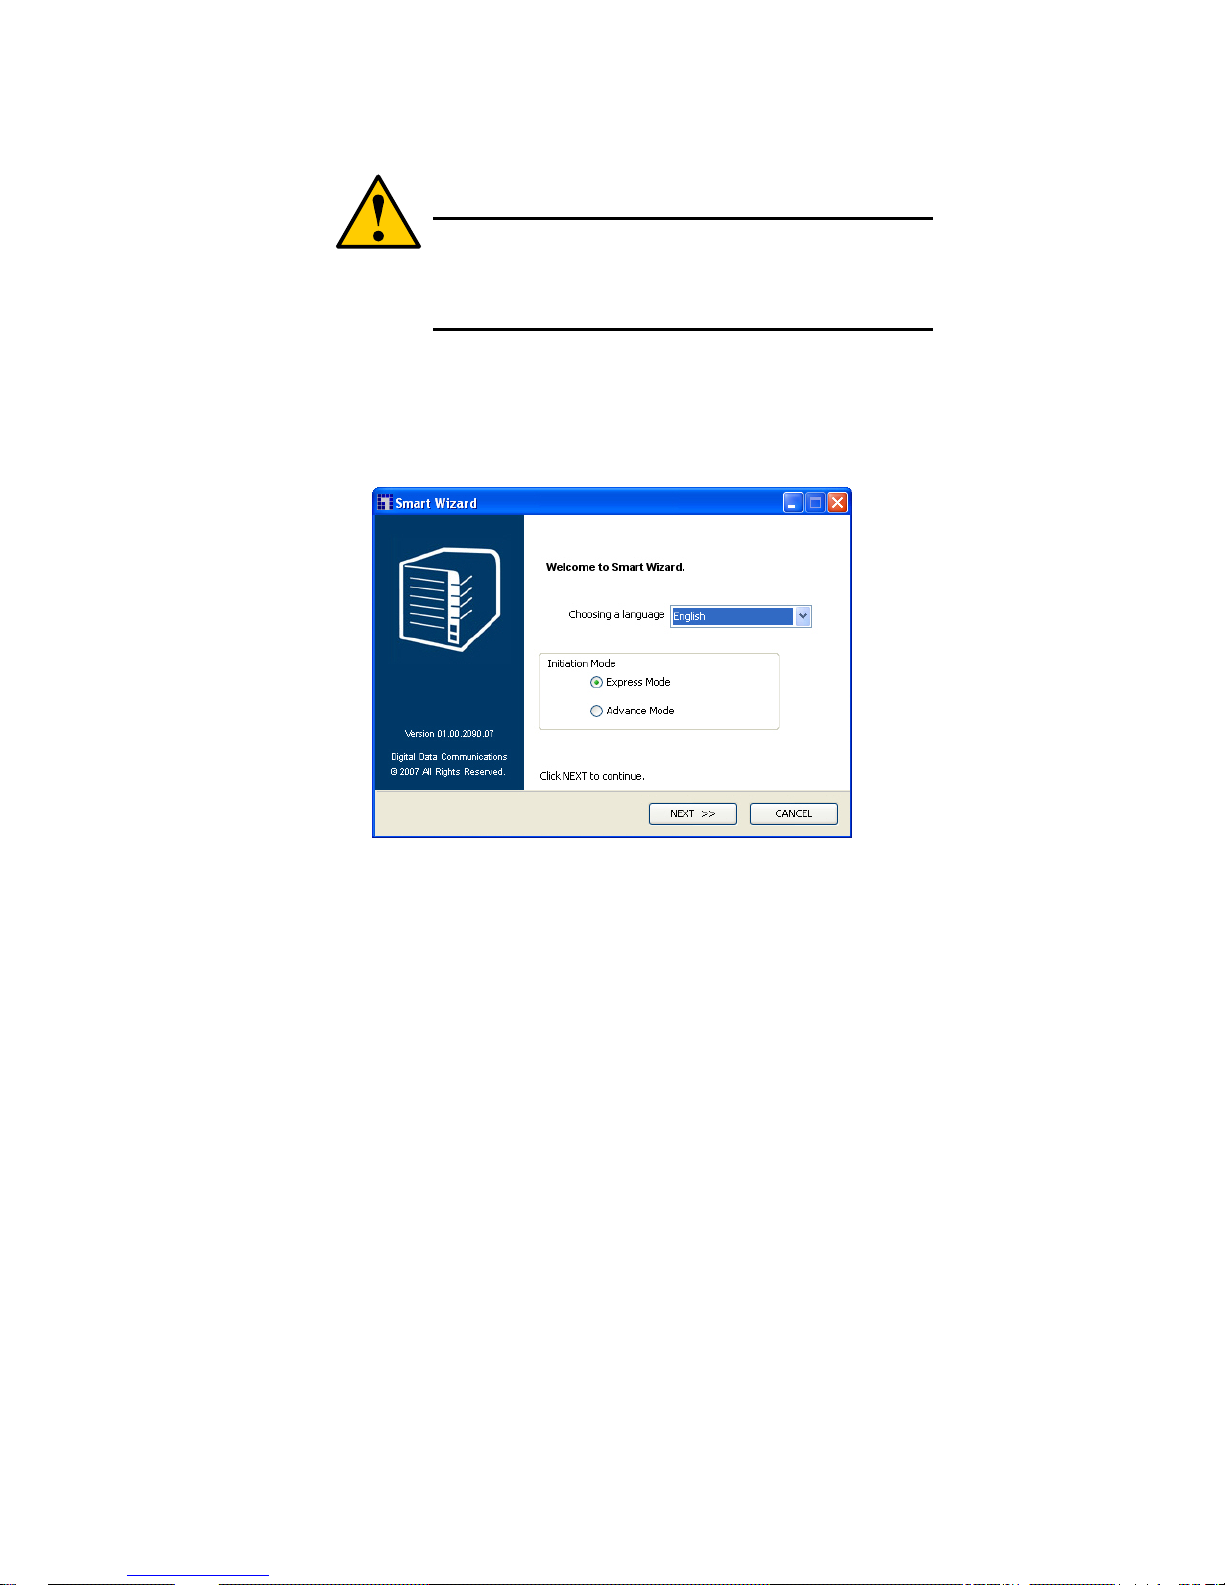
The NAS Setup Wizard welcome screen appears.
2. From the Choosing a language dropdown menu, choose the language you
prefer.
3. Choose an Initiation Mode.
Click the Express Mode option if ALL of these conditions apply:
You have a DHCP server on your network with addresses available.
You want data protection for your RAID Volume.
You want to use date and time settings from your PC.
Page 25
15
Click the Advanced Mode option if one or more of these conditions apply:
You do not have a DHCP server on your network.
You have a DHCP server but no addresses are available.
You want to set the IP address manually.
You want maximum capacity RAID 0 Volume.
You want to set date and time manually.
The rest of the setup instructions describe Express mode. For setup
instructions using Advanced mode, see “Appendix A: Setup Wizard Advanced
Mode”
4. Click Next >> to continue.
The Discovering LevelOne NAS screen appears. The Network Storage is
listed as a GNS-4000.
5. Highlight the Network Storage you are initiating, then click Next >> to continue.
Page 26
16
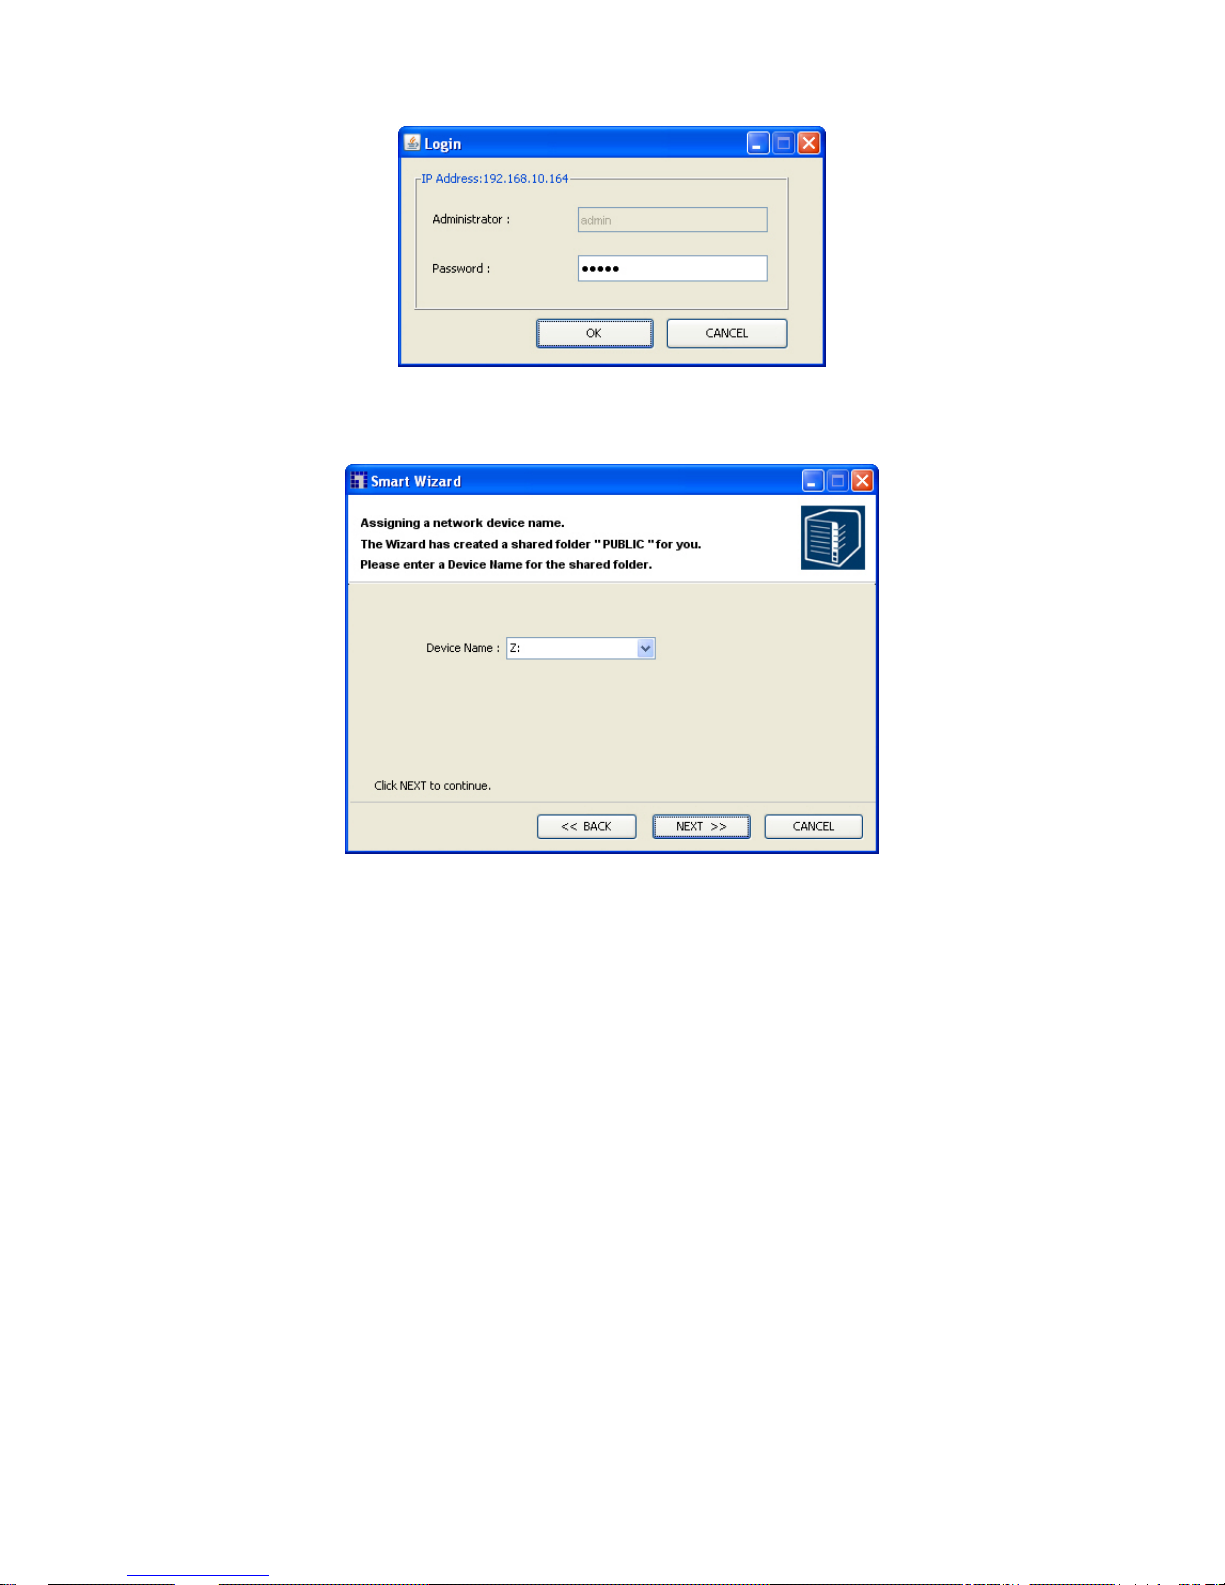
The Login dialog box appears.
6. Type admin into the Password field, then click OK
The password is case sensitive.
The Select a Device Name screen appears.
7. Select a Device Name (drive letter) to represent the default folder on the
Network Storage as a network drive on your PC. The list begins with Z and
goes in reverse alphabetical order.
Click Next >> to continue.
Page 27
17
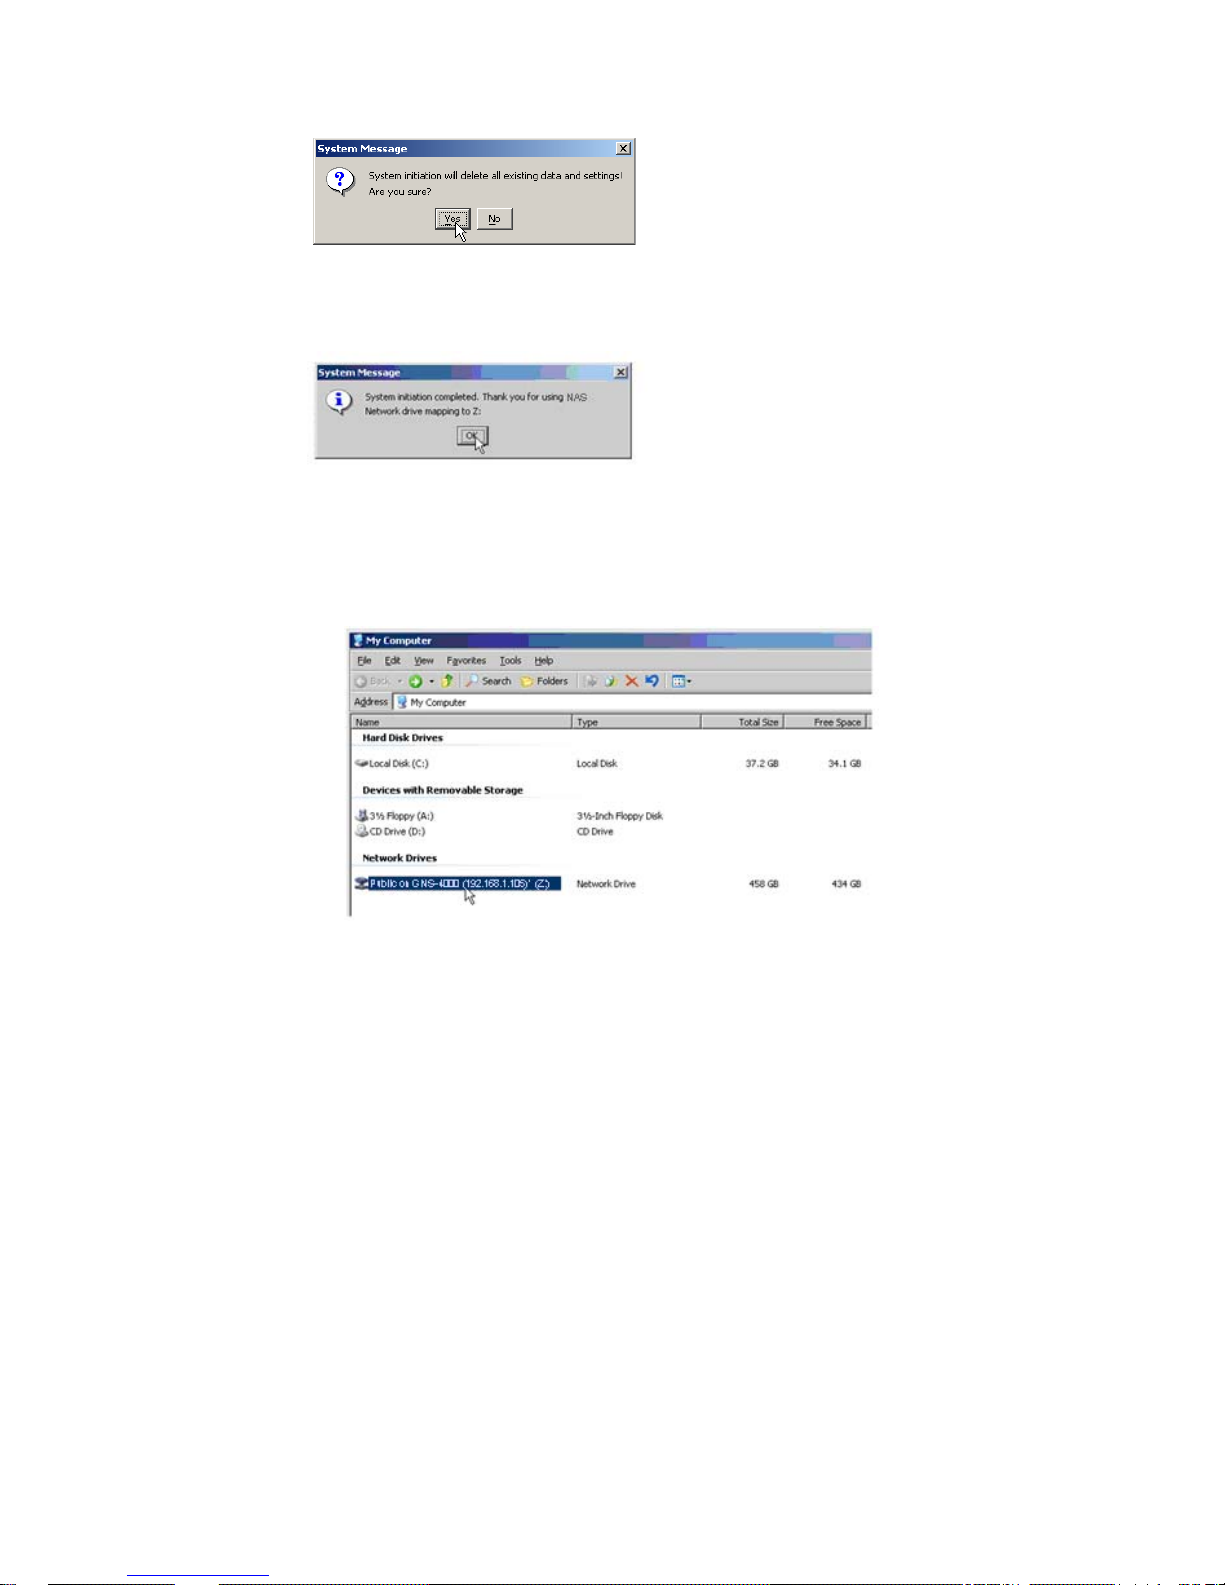
The System Message appears.
8. Click the Yes button to begin the system initiation.
The Wizard requires several minutes to configure your Network Storage,
depending on the size of your disk drives. When the Wizard is done another
System Message appears.
9. Click OK to finish the system initiation.
The Wizard creates a RAID Volume and a default folder called Public.
If two disk drives are installed in your Network Storage, the Wizard creates a RAID1
Volume. If three or four disk drives are installed, the Wizard creates a RAID5
Volume. The Public folder on the Network Storage appears under My Computer as
a network drive.
You can now copy files to and from the folder on the Network Storage.
Page 28
18
2.7. Connecting to ASM
The LevelOne Advanced Storage Management (ASM) software is factory-installed
on the Network Storage system. ASM runs in the browser on your PC. You can
access ASM:
Directly in your browser.
Through SmartSYNC.
Browser Support
Choose one of the following browsers to use with ASM:
Internet Explorer
Mozilla
Firefox
Netscape Navigator
Safari (Mac OS X)
Finding the Network Storage’s IP Address
To access the Network Storage in your browser, you must know the Network
Storage’s IP address. Use SmartSYNC for this purpose.
1. From the Windows Start menu, choose Programs, then LevelOne NAS Utility,
and then SmartSYNC.
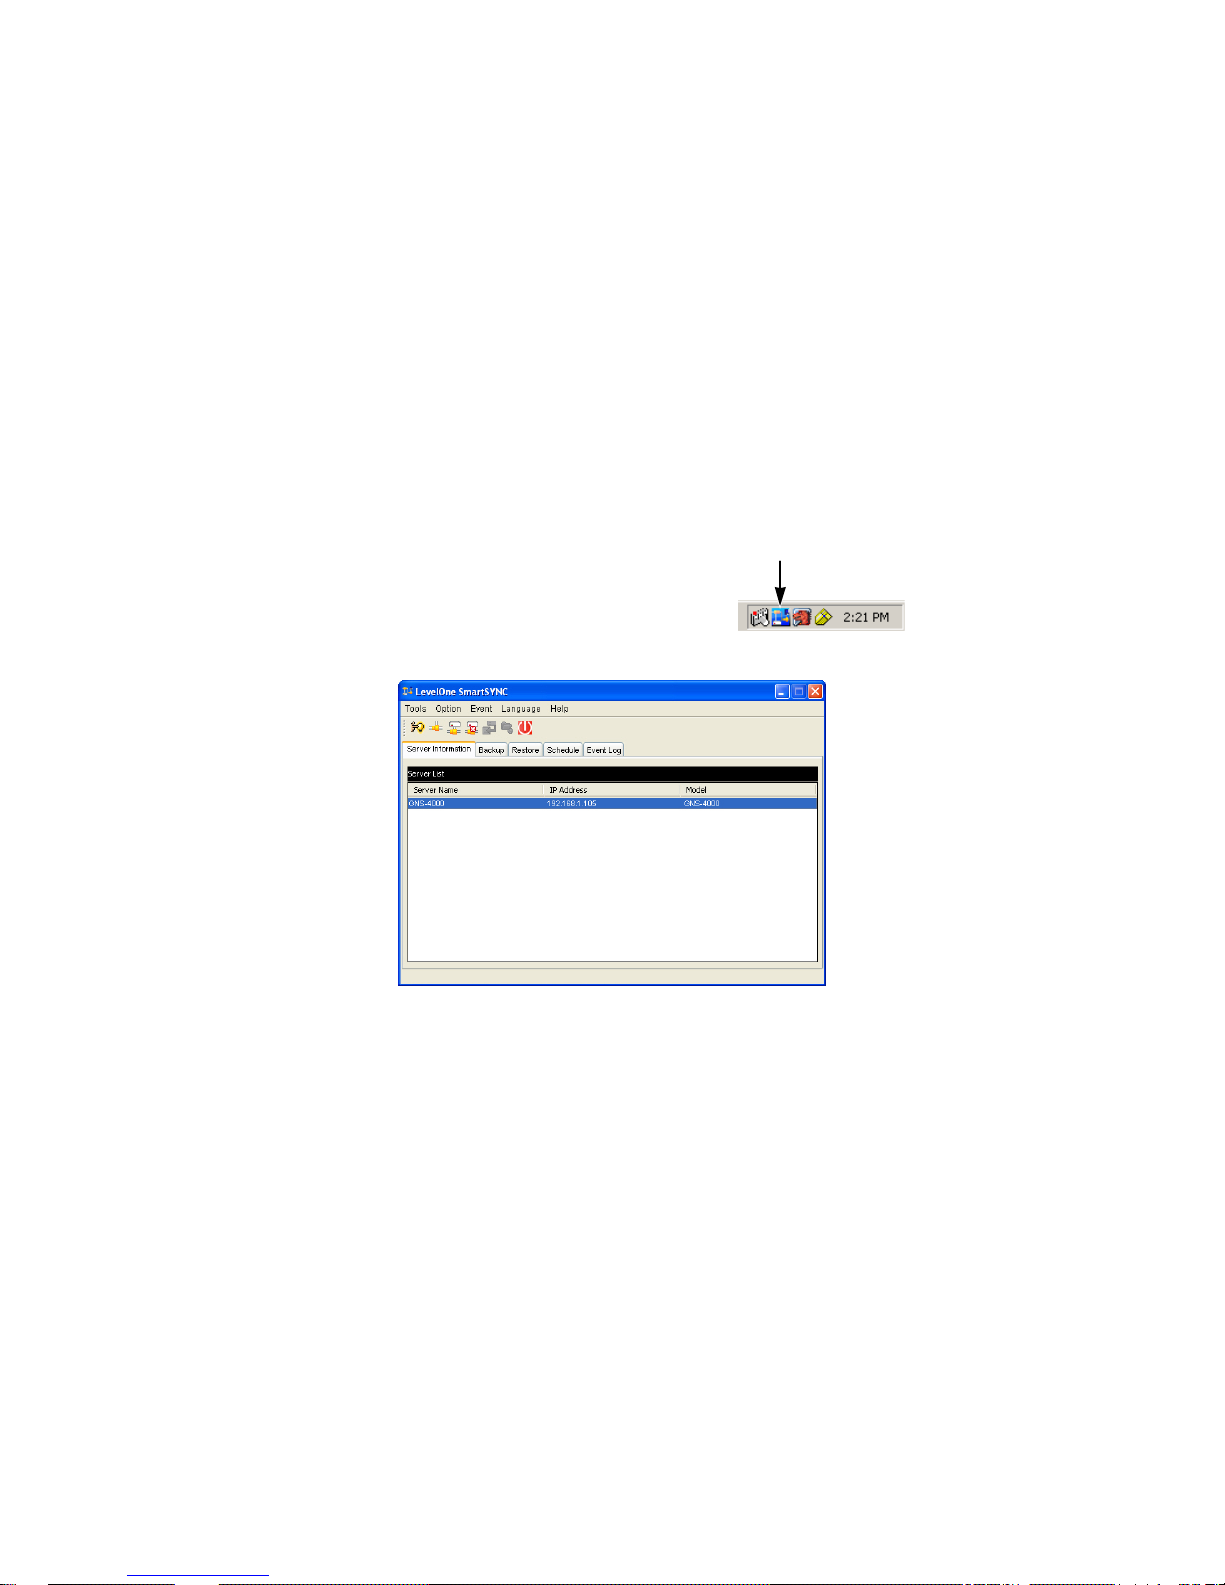
2. To open the SmartSYNC window, in the Windows
application tray (lower right corner of the screen),
double-click on the SmartSYNC icon.
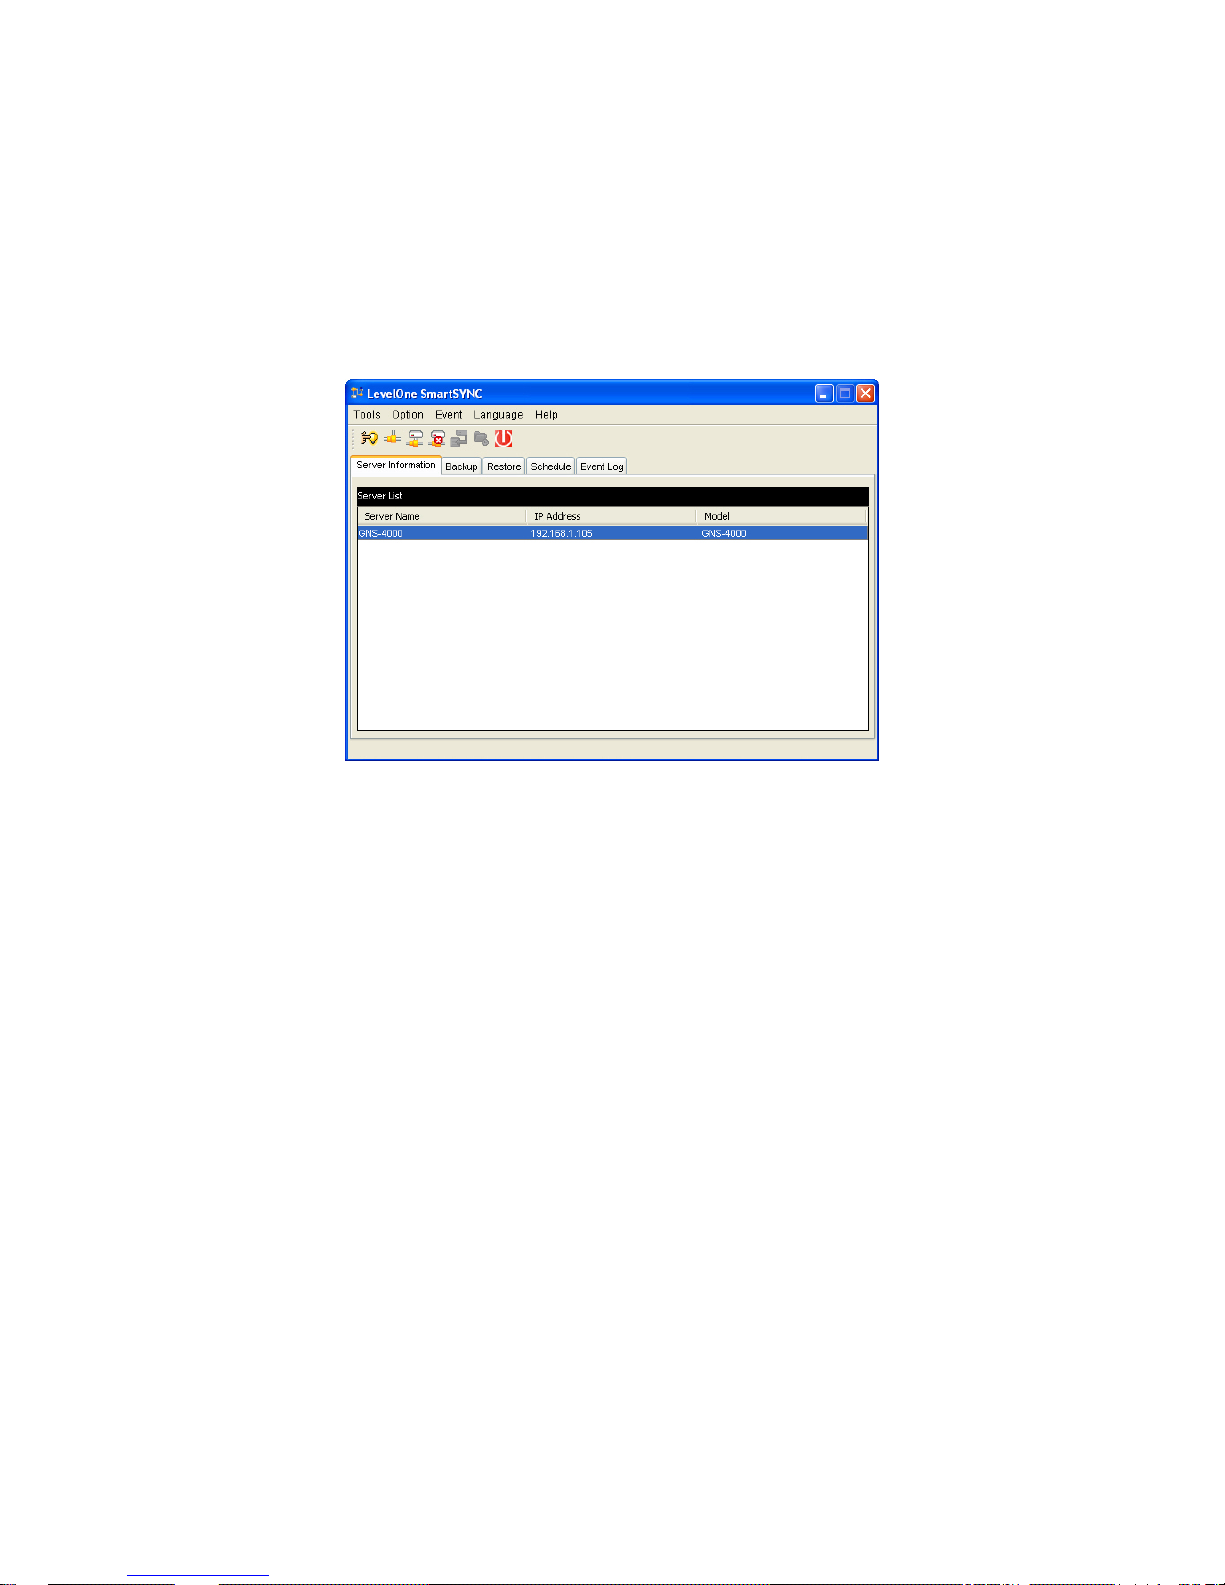
The SmartSYNC screen appears with the Server
Information tab displayed. The IP address of the
Network Storage shown in the Server List.
S
mar
tSYNC i
con
Page 29
19
ASM in your Browser
To log into ASM in your browser:
1. Start your Browser.
2. In the Browser address field, type in the IP address of the Network Storage.
Note that the IP address shown below is only an example. The IP address you type
into your browser will be different.
ASM uses an HTTP connection http://
Enter the Network Storage’s IP address 192.168.1.105
Together, your entry looks like this: http://192.168.1.105
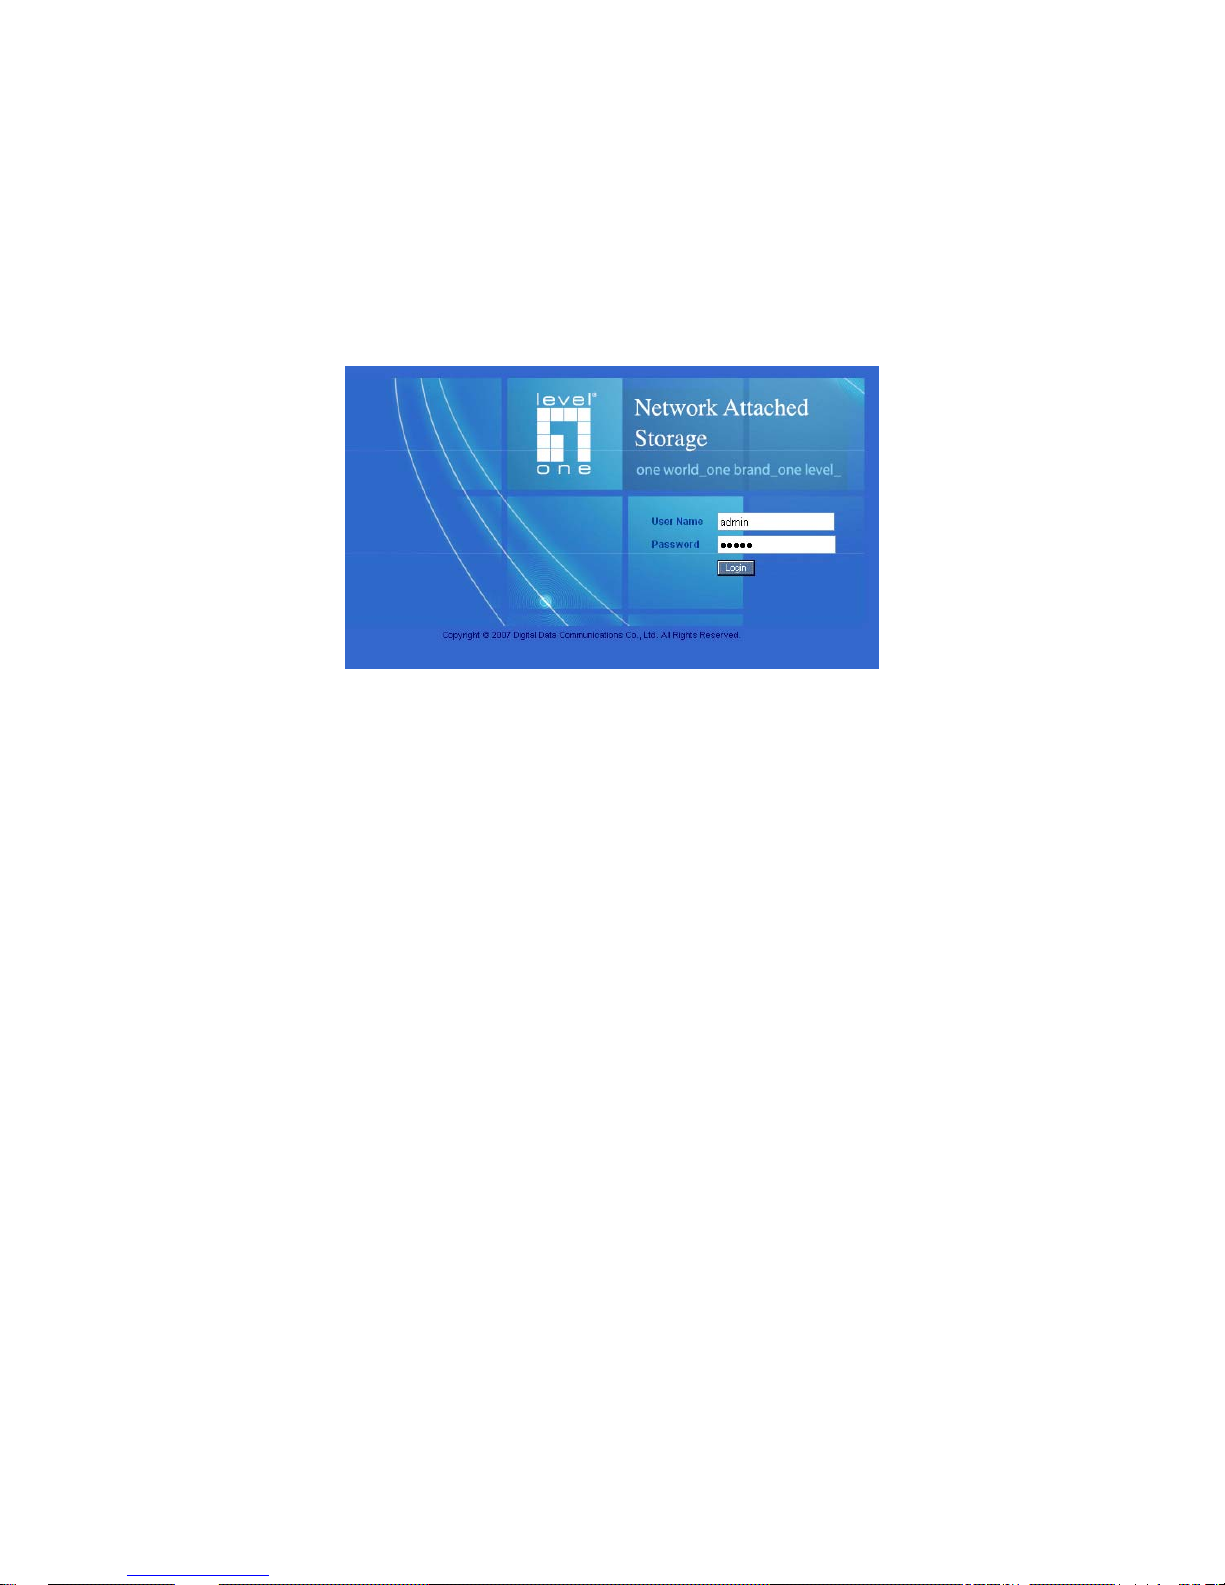
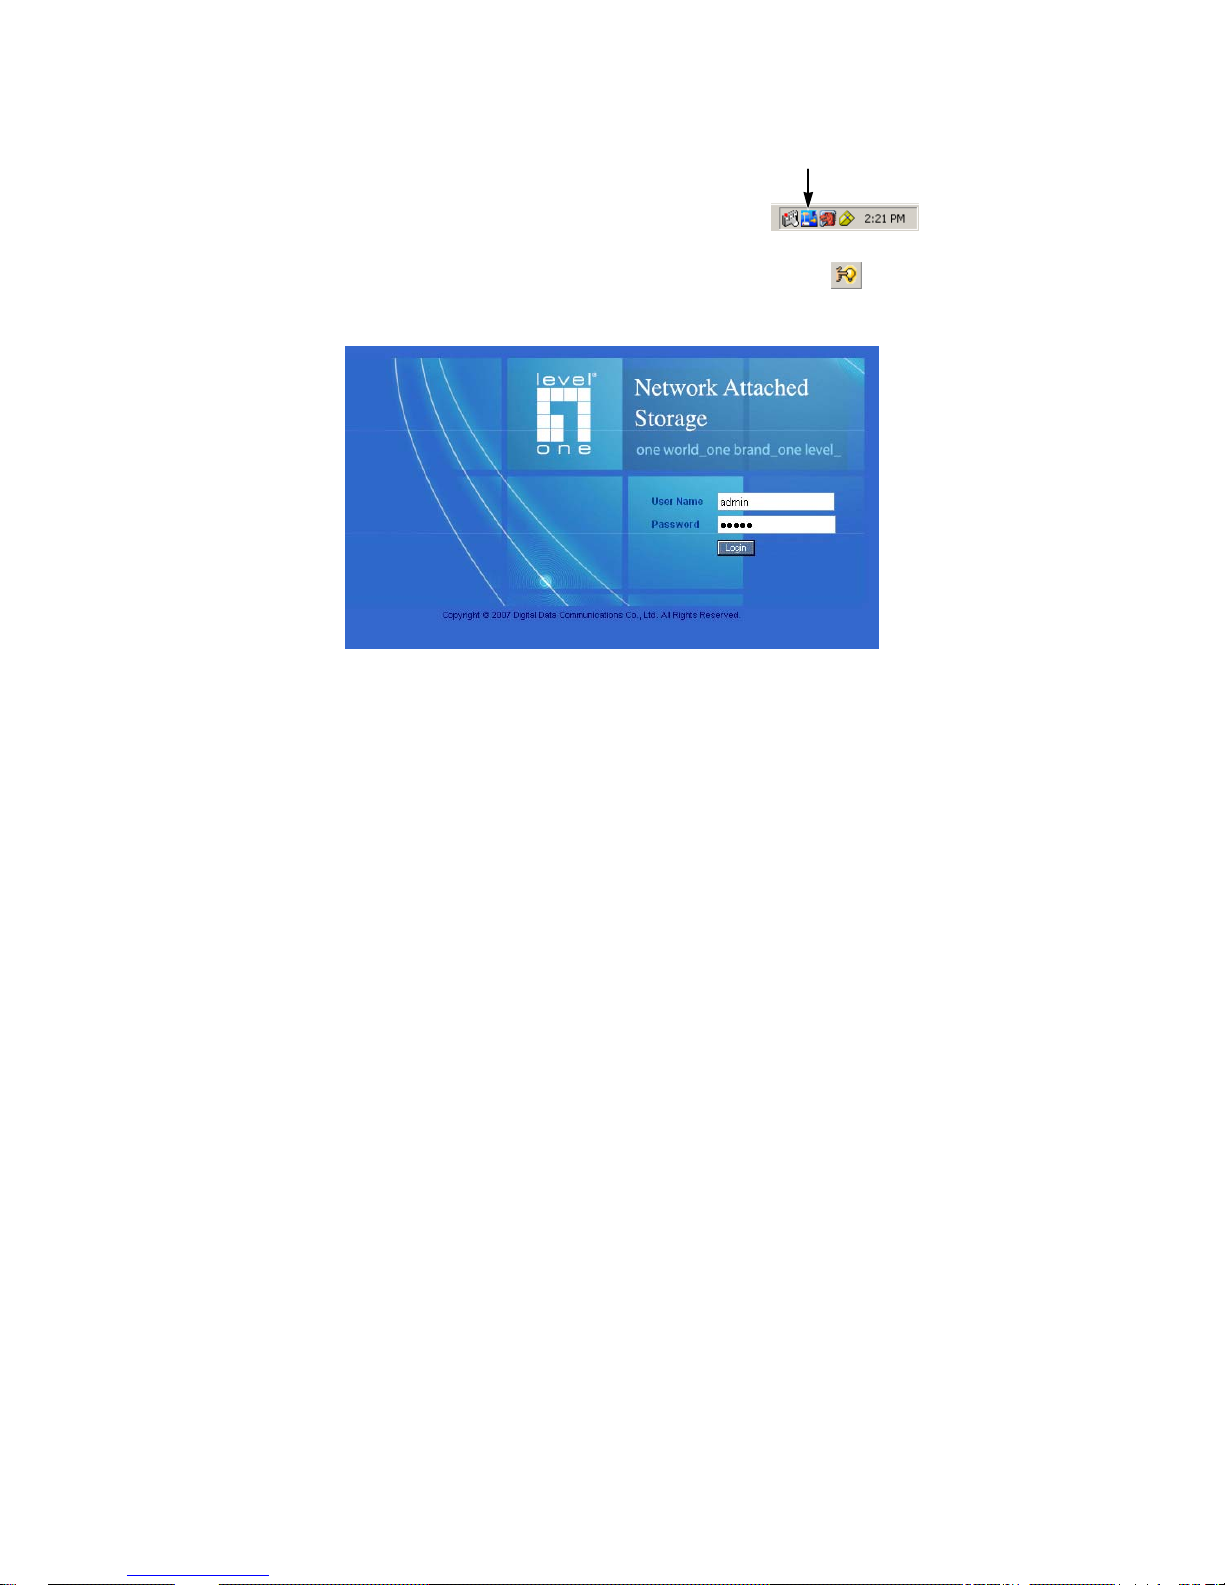
The ASM login screen displays
3. Type the user name and password in the respective fields, then click the
Login button.
The default user name is admin. The default password is admin.
The user name and password are case sensitive.
Page 30
20
ASM in SmartSYNC
To log into ASM in SmartSYNC:
1. In the Windows application tray (lower right corner of
the screen), double-click on the SmartSYNC icon
(right). SmartSYNC opens with the Server Information
tab displayed.
2. Click on the Open GUI button (right).
Your default browser starts and the ASM login screen
displays.
3. Type the user name and password in the respective fields, then click the Login
button.
The default user name is admin. The default password is admin.
The user name and password are case sensitive.
S
mar
tSYNC i
con
Open GUI button
Page 31
21
3. Connecting to the Network Storage
To copy files to and from a folder on the Network Storage, you must make the folder
a network drive on your PC. To use the Network Storage as a print server, you must
connect the USB printer, enable Network Storage’s print server, and set up printing
on your PC.
3.1. Setting up a Network Drive on a Windows PC
You can also use SmartSYNC for this purpose, see “Connecting a Network Drive”. If
your PC does not have SmartSYNC, use the following procedure to setup a
Network Drive with My Network Places.
To setup a network drive:
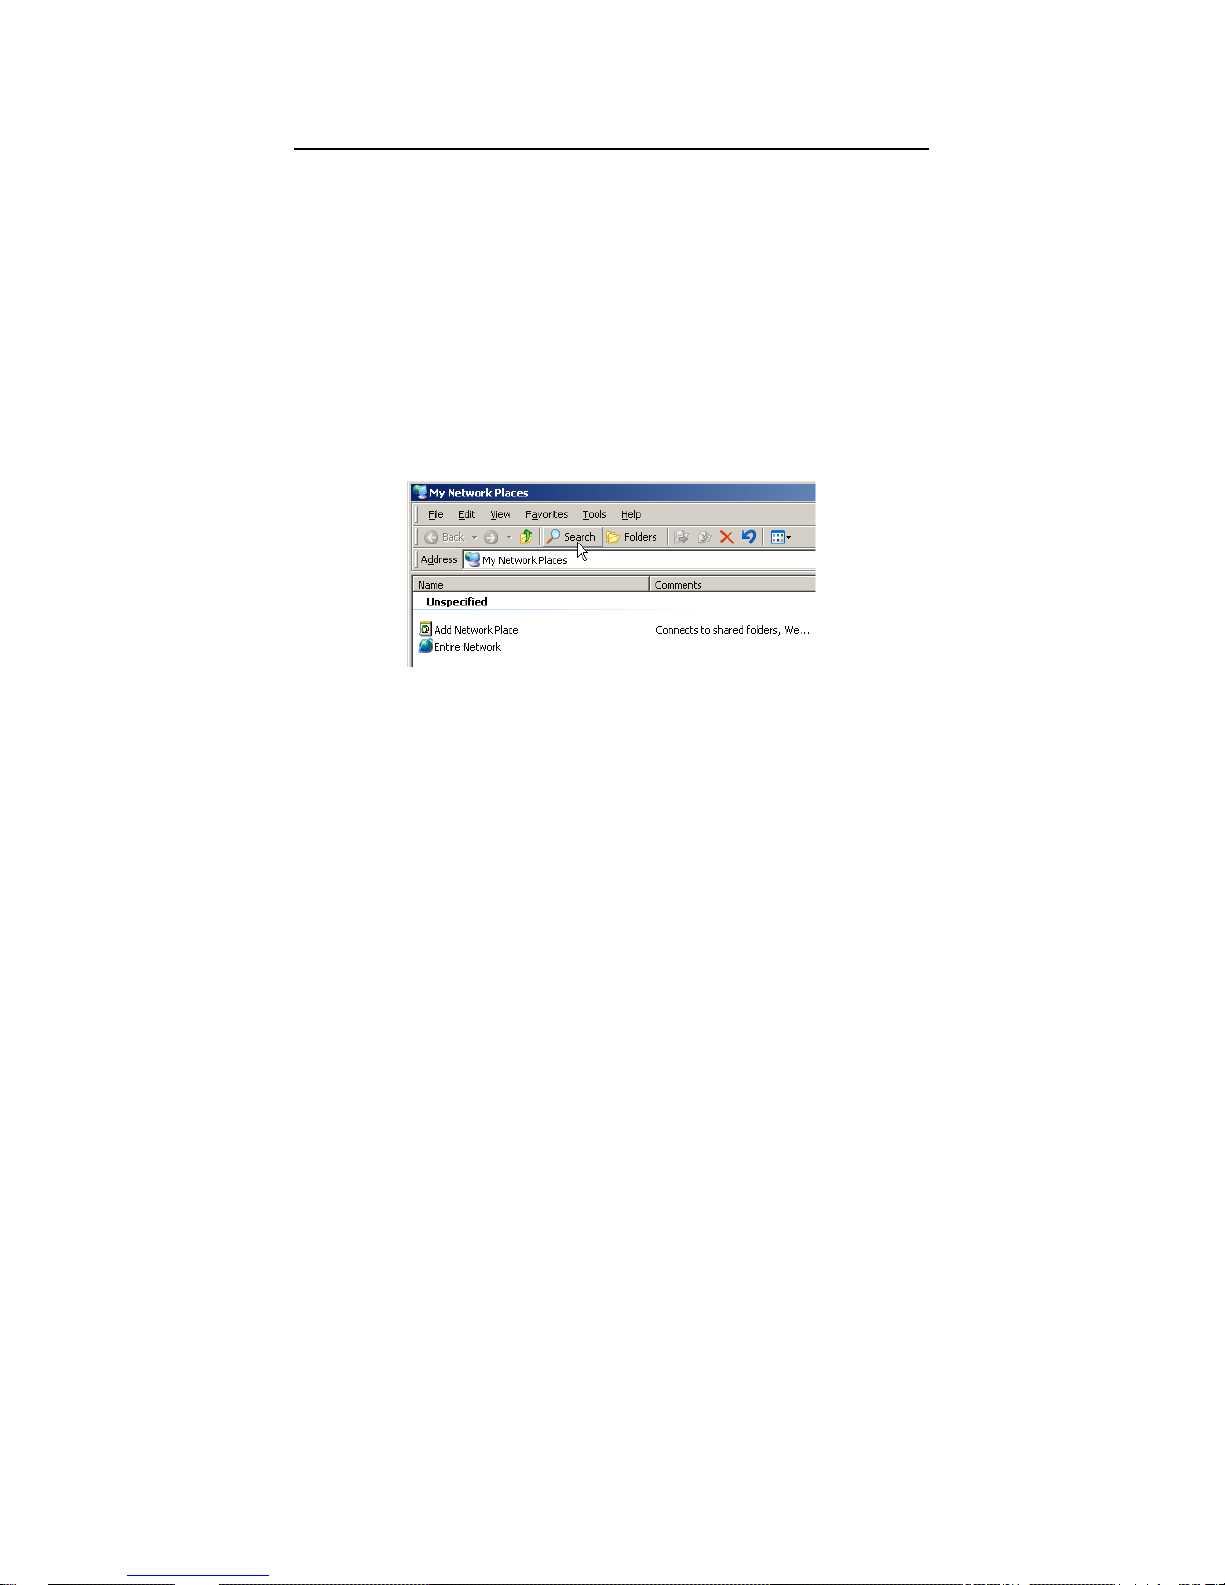
1. On the Windows desktop, double-click on the My Network Places icon.
2. Click the Search button in the toolbar.
If the Search button is not shown, from the View menu, choose Toolbars, then
Standard Buttons.
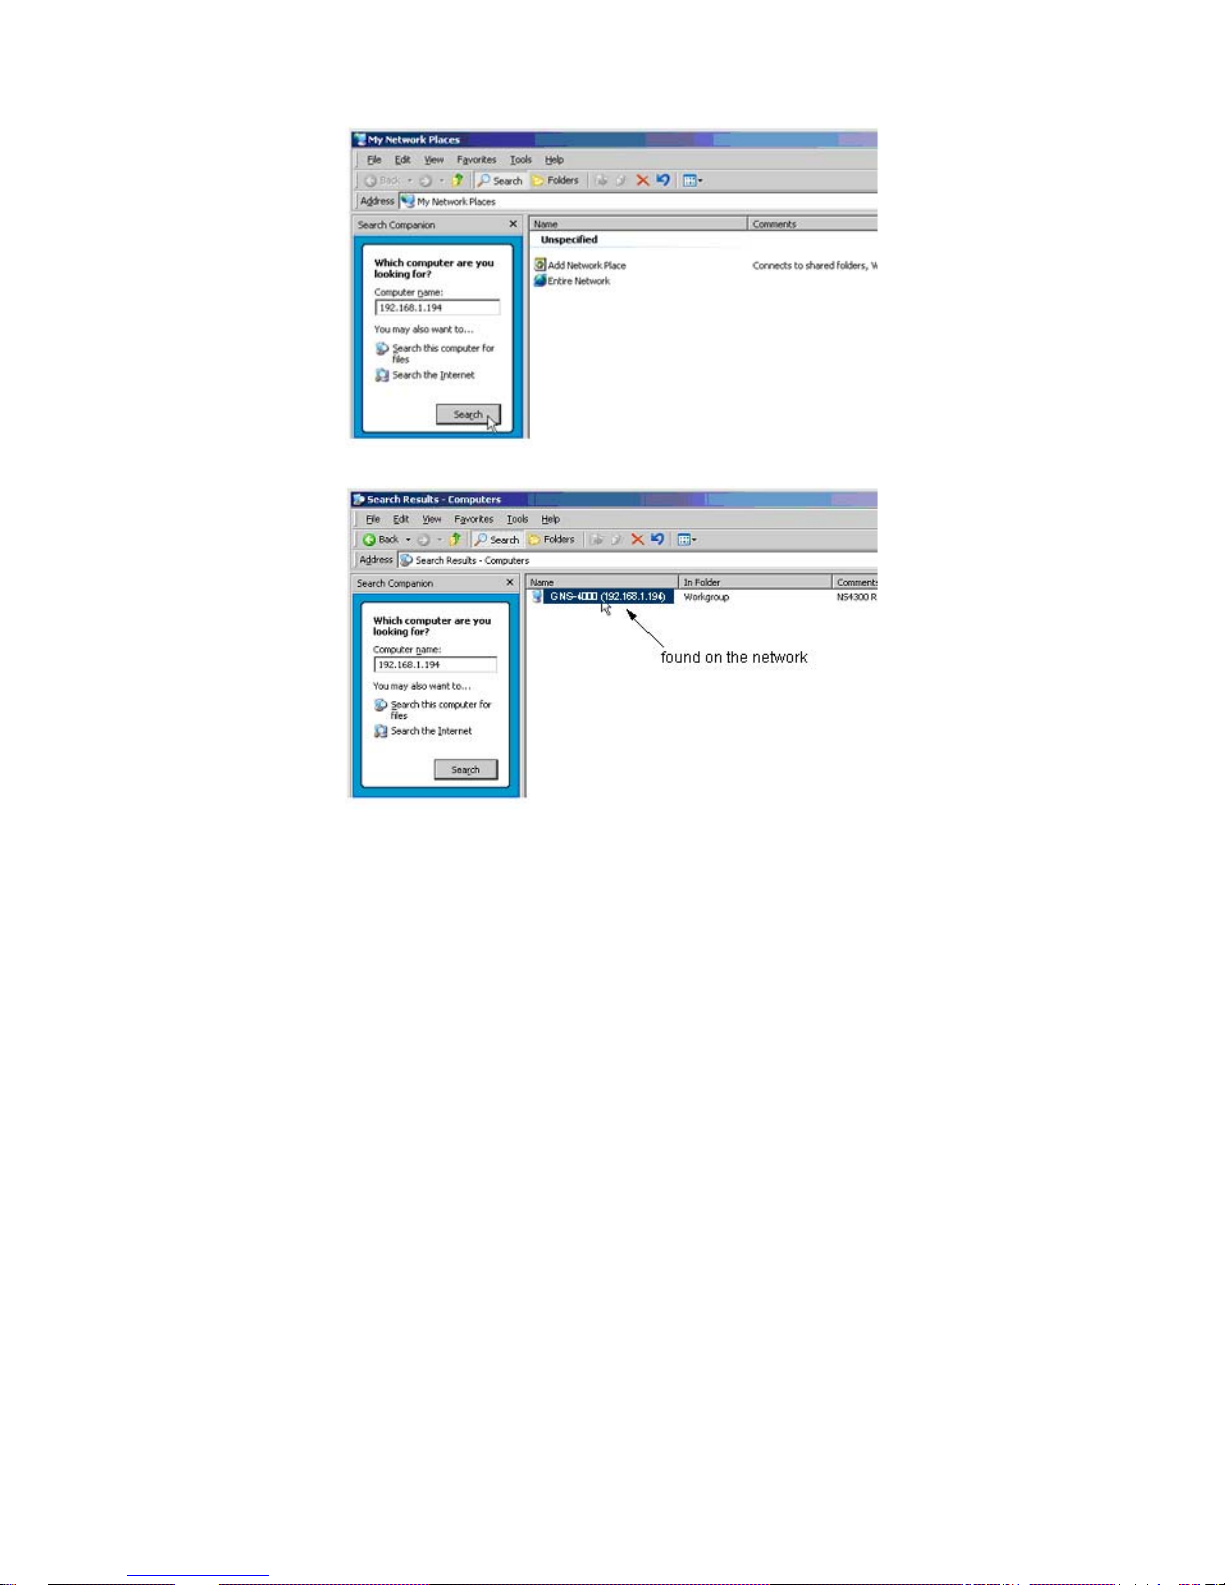
3. In the Computer name field, type the IP address of the Network Storage and
click the Search button.
Page 32
22
The Network Storage appears in the search results list.
4. Double-click on the Network Storage to show the Public folder and any other
folders you have created.
Page 33
23
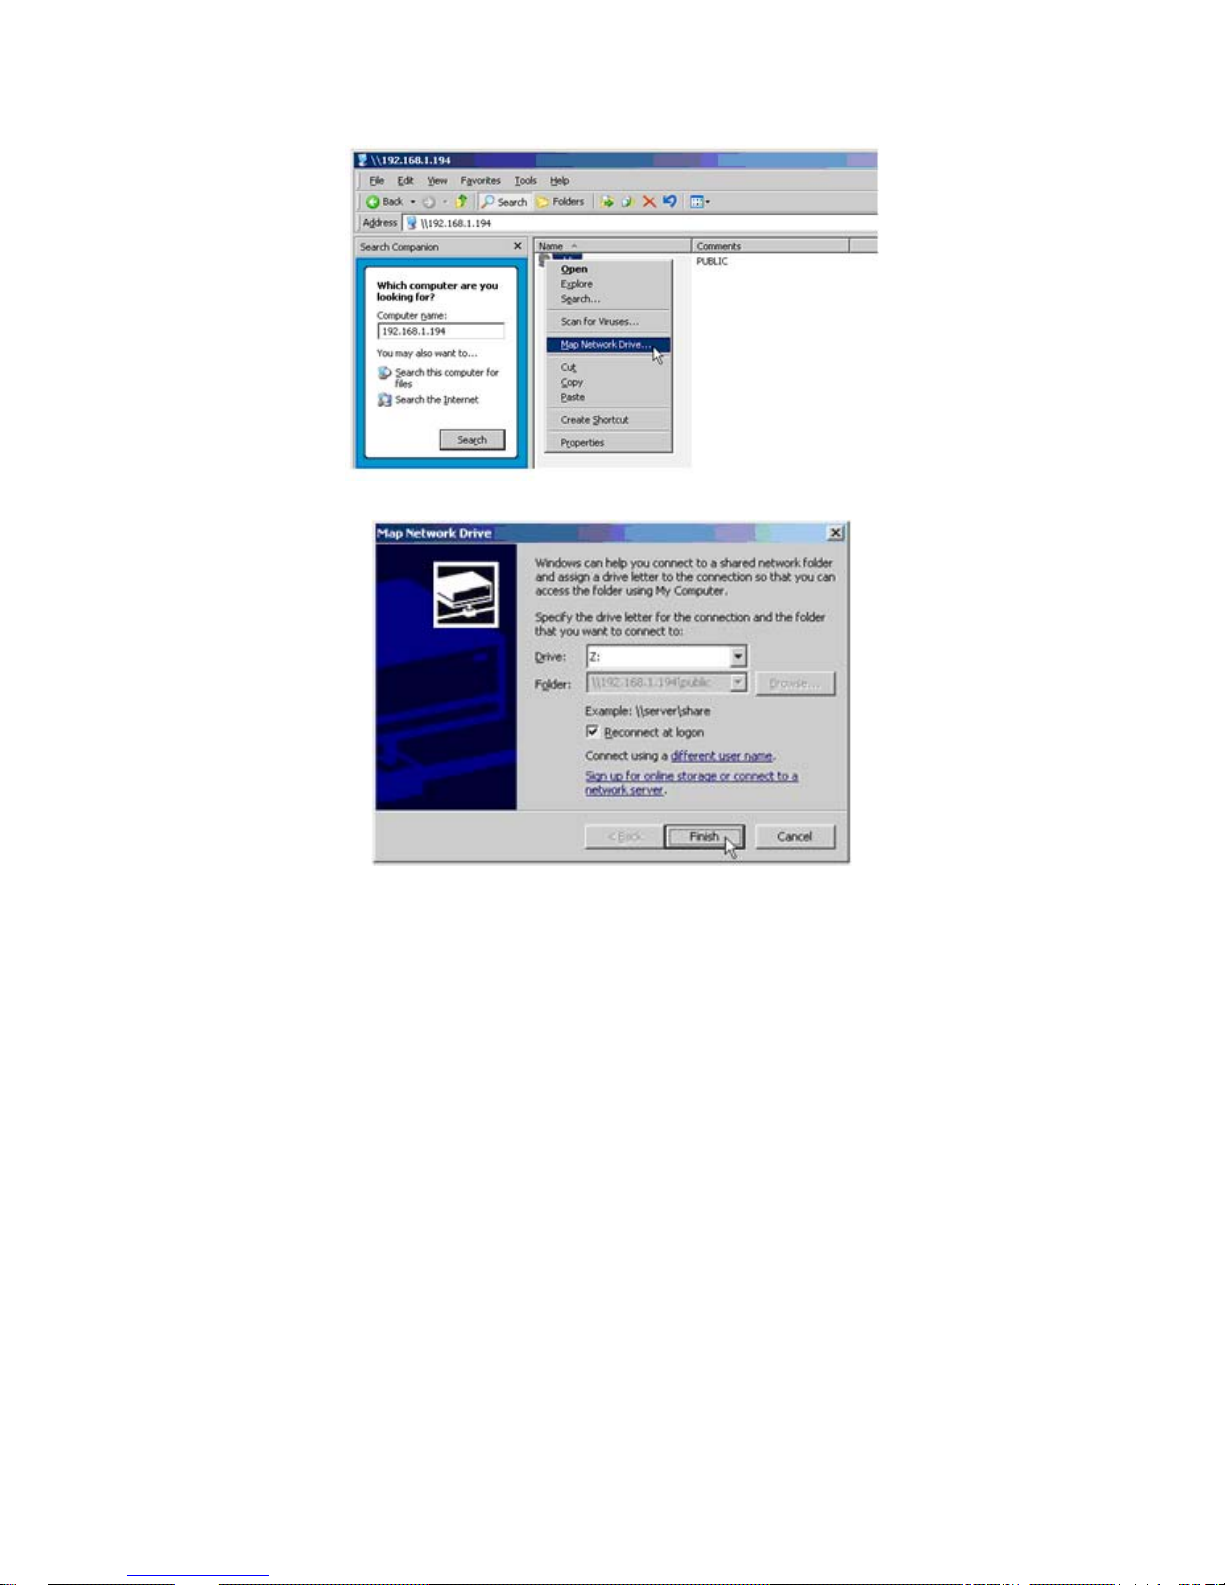
5. Right-click on the folder you want and choose Map Network Drive from the
dropdown menu.
The Map Network Drive dialog box appears.
6. In the Map Network Drive dialog box, choose a drive letter and click the
Finish button.
7. Double-click on the My Computer icon on your Windows desktop.
Page 34
24
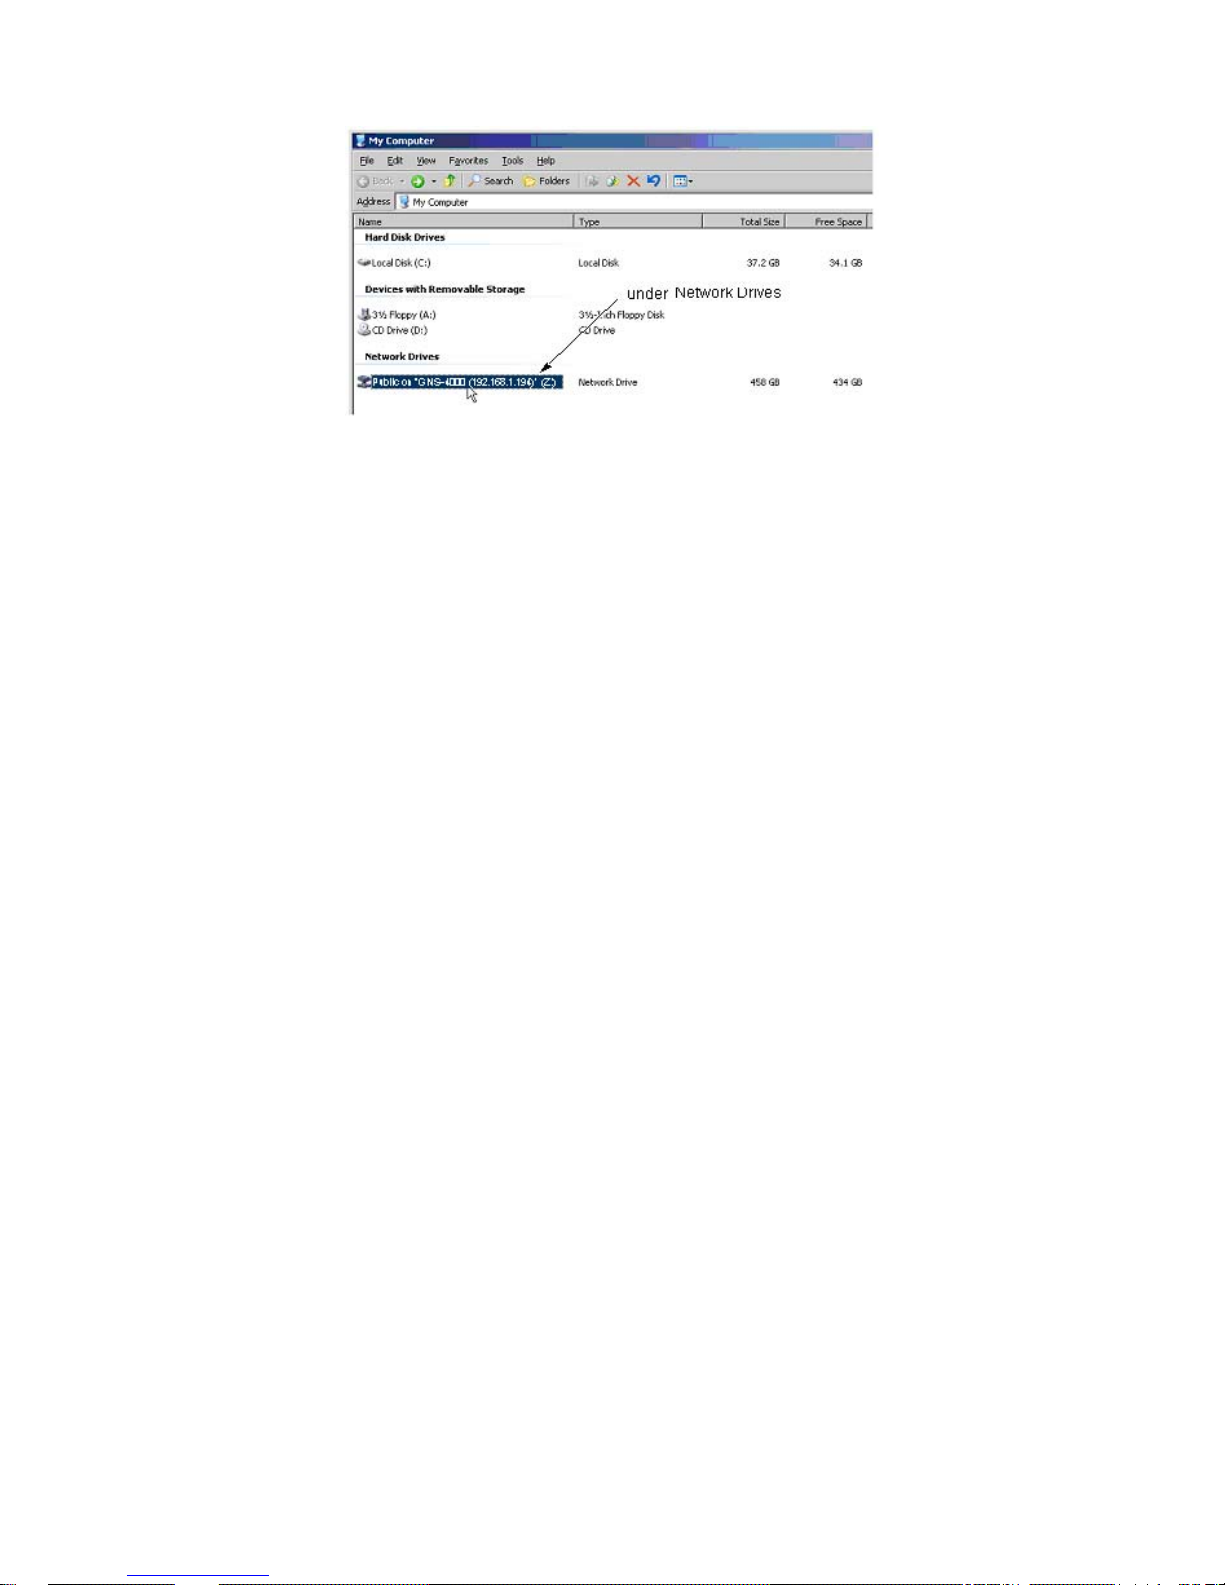
The folder on the Network Storage appears under My Computer as a network drive.
You can now copy files to and from the folder on the Network Storage.
Page 35
25
3.2. Setting up a Network Drive on a UNIX or
Linux PC
Before you can access the Network Storage from a UNIX or Linux PC, you must
configure the Network Storage to communicate with UNIX and Linux.
On the Windows PC
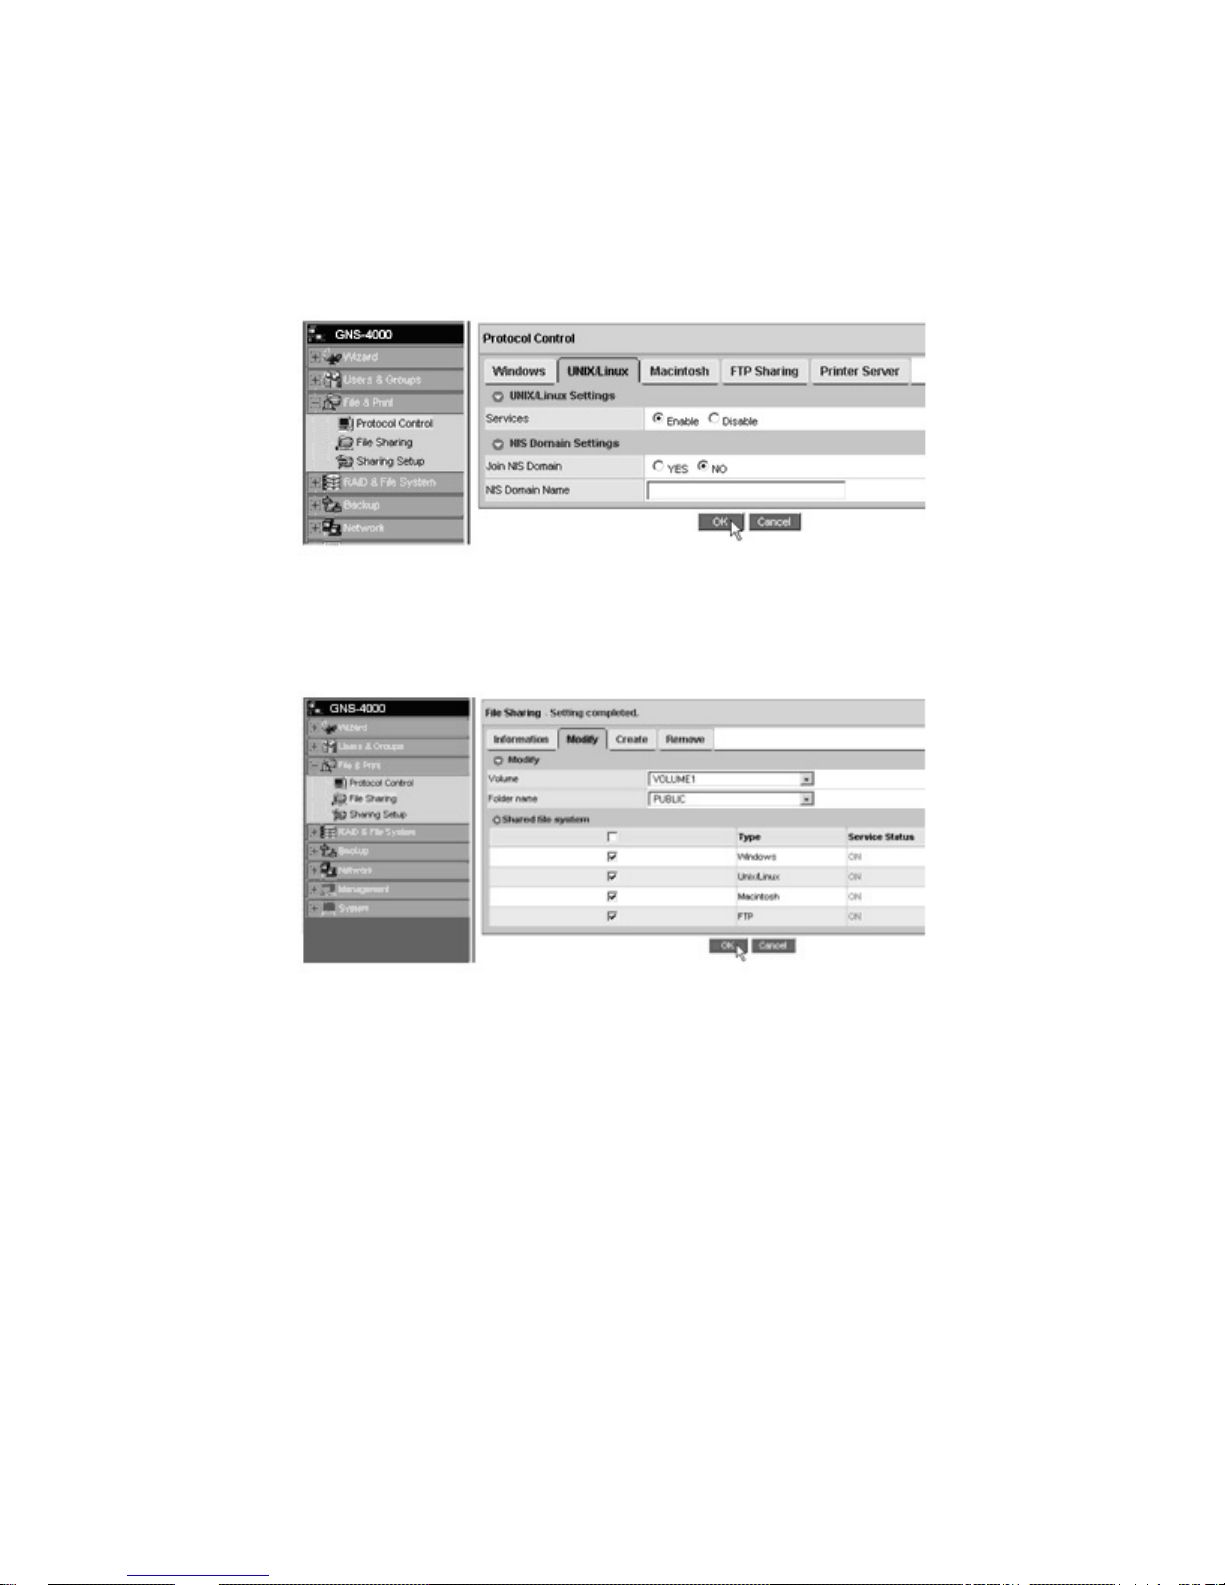
1. Start ASM.
2. In the Tree, click on the + beside the File & Print icon to expand the Tree.
3. Click on the Protocol Control icon, then click on the UNIX/Linux tab.
4. Next to Service, click the Enable option, then click the OK button. The
UNIX/Linux protocol enables UNIX and Linux PCs to connect to Network
Storage.
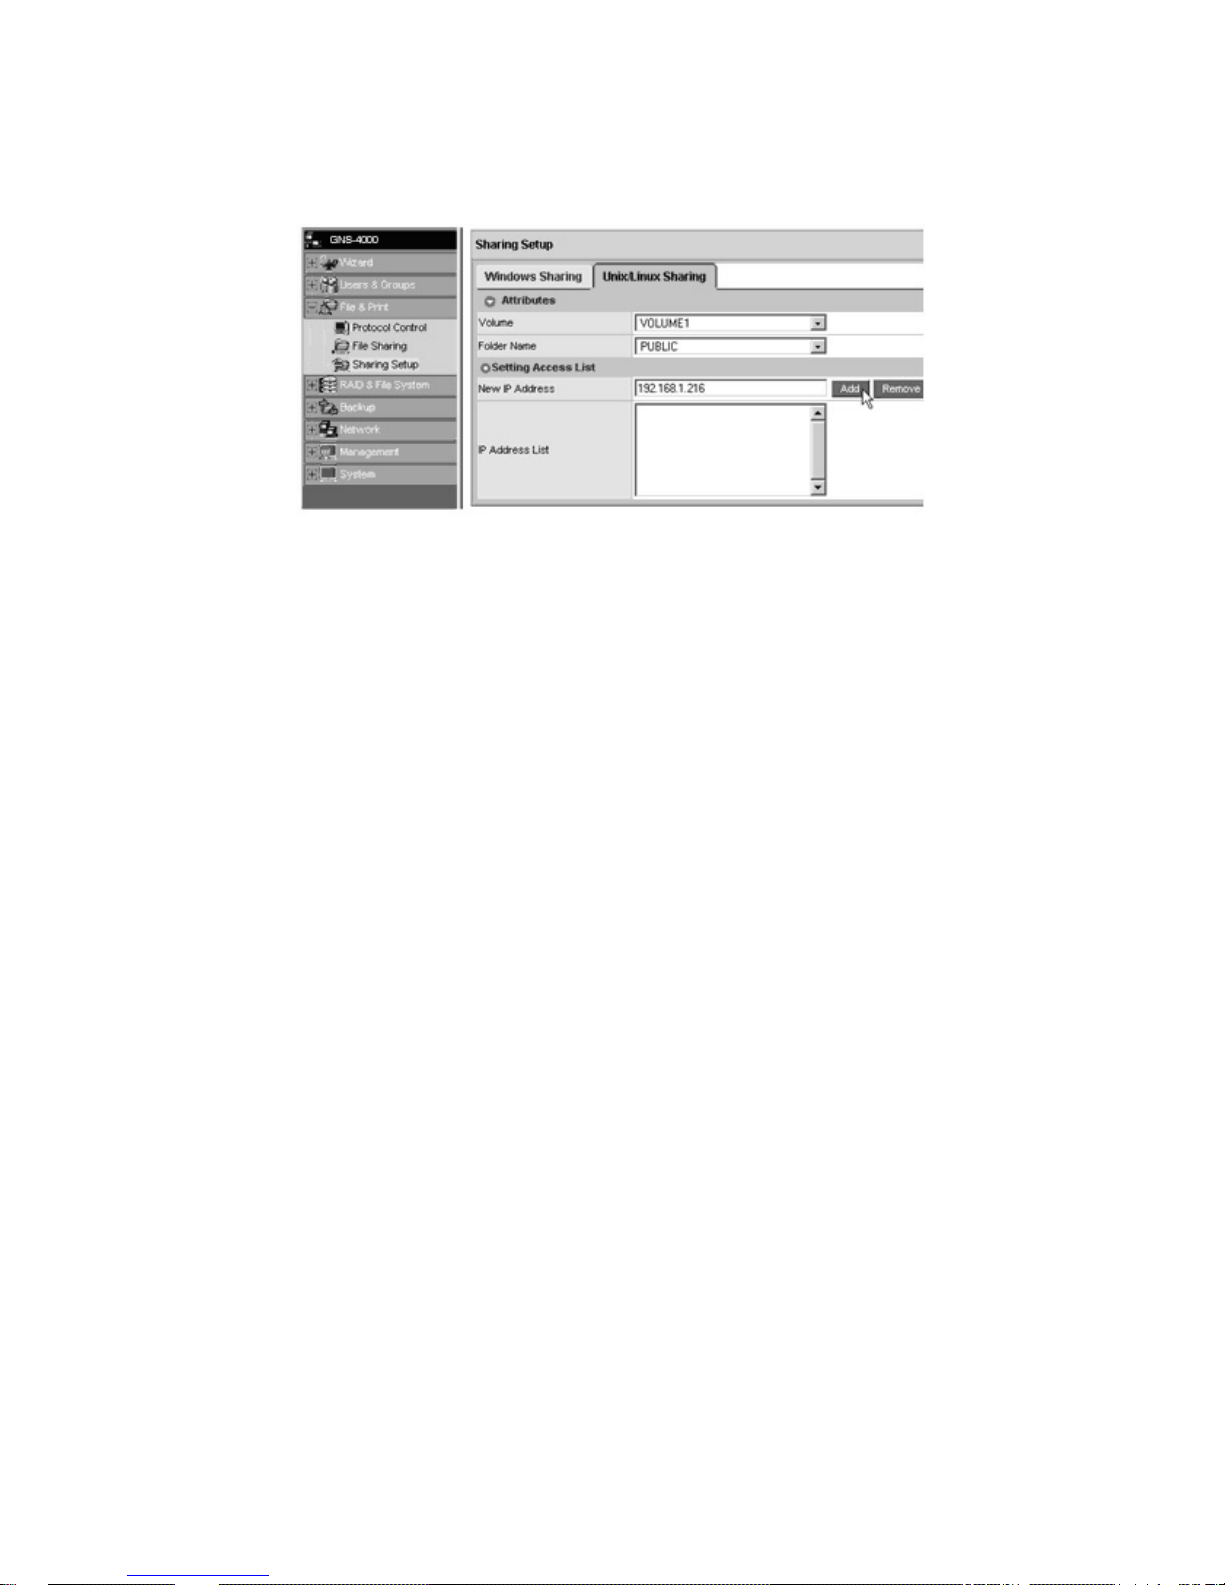
5. Click on the File Sharing icon in the tree.
6. Click on the Modify tab.
Page 36
26
7. Check the Unix/Linux box, then click the OK button. The UNIX/Linux file
sharing enables UNIX and Linux PCs to access folders on the Network
Storage. In this case, access is given for the PUBLIC folder.
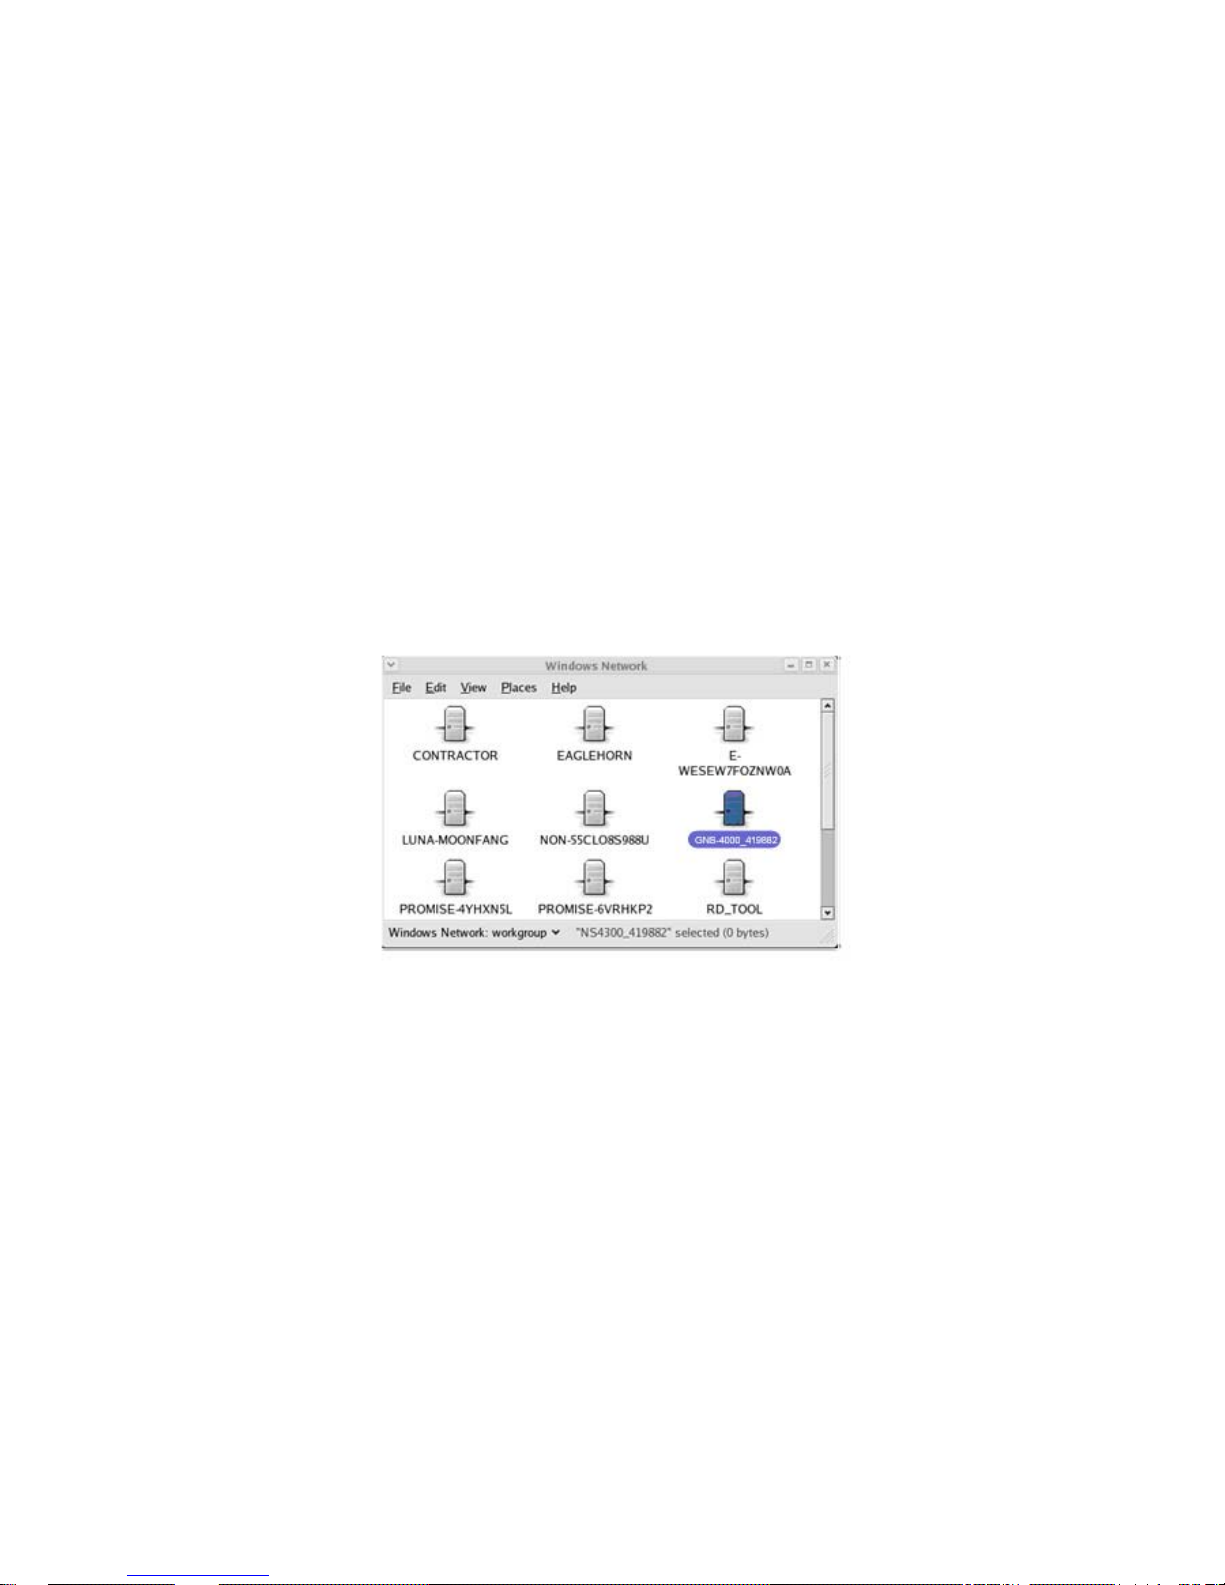
8. Click on the Sharing Setup icon in the tree.
9. Click on the UNIX/Linux Sharing tab.
10. In the New IP Address field, type the IP address of the UNIX/Linux PC from
which you want to access the Network Storage.
11. Click the Add button.
Page 37
27
On the UNIX/Linux PC with Command Line Interface
1. Open a terminal window.
2. Create a new folder for the Network Storage. Type mkdir Network Storage and
press Enter.
3. Mount the Network Storage. Type mount 192.168.1.194:/Volume1/Public
/Network Storage and press Enter
Note that the IP address shown above is only an example. The IP address you
type in your terminal window will be different.
Volume1 and Public refer to the default Volume and folder created during
setup. If you created another volume or folder, use their names.
4. Change to the Network Storage directory. Type cd /Network Storage and
press Enter.
5. You can now copy files to and from the folder on the Network Storage.
6. When you are done with the Network Storage, type cd; umount /Network
Storage and press Enter
On the Linux PC with Graphic Desktop
This procedure is for a RedHat Enterprise Linux 4 configuration. If you run a
different version of Linux, you might have to adapt the procedure. See your OS
documentation.
1. From the Applications menu, choose Network Servers.
2. In the Network window, double-click on Windows Network.
3. Double-click on the Network Storage (GNS-4000) on the network.
4. Double-click on the folder you want
Page 38
28
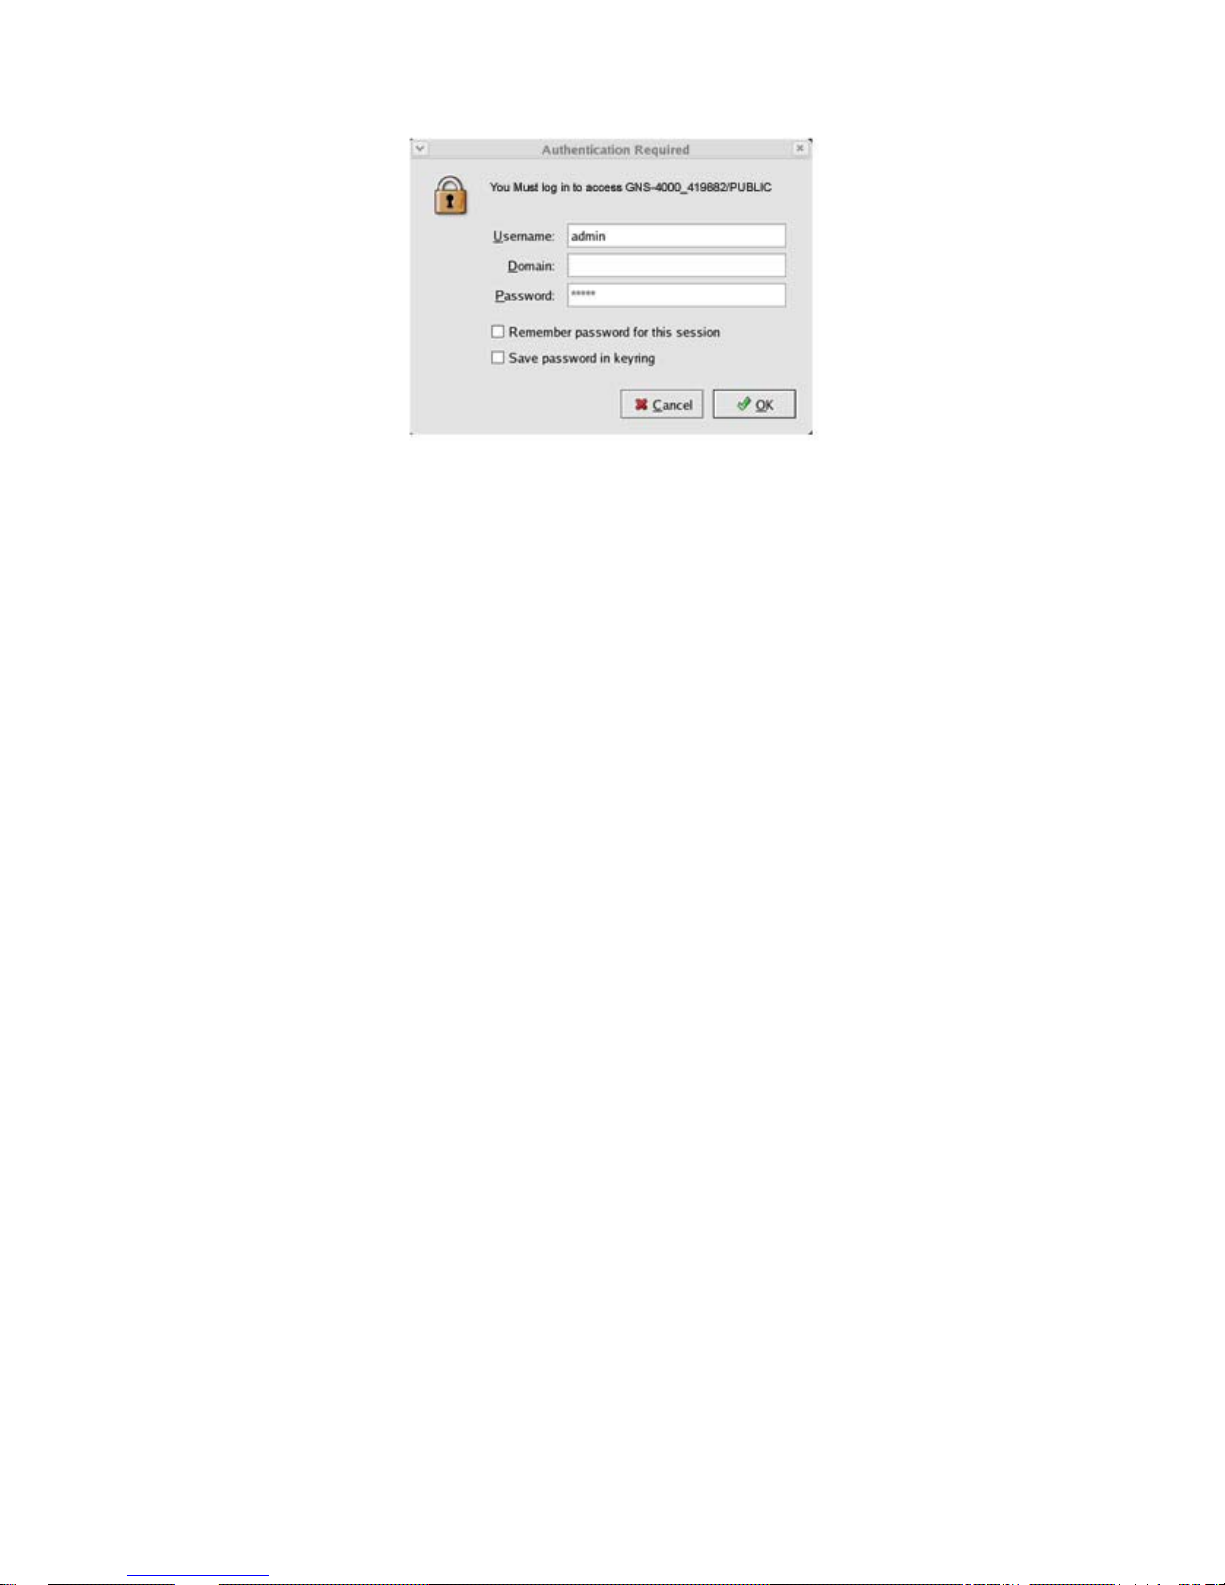
If this is the first time you accessed this folder, an Authentication dialog box opens.
5. Type the user name and password in the respective fields, then click the OK
button.
The default user name is admin. The default password is admin
The user name and password are case sensitive.
Leave the Domain field blank.
The folder opens. You can now copy files to and from the folder on the
Network Storage.
Page 39
29
3.3. Setting up a Network Drive on a Macintosh
PC
Before you can access the Network Storage from a Macintosh (Mac OS X) PC,
you must configure the Network Storage to communicate with the Mac OS.
On the Windows PC
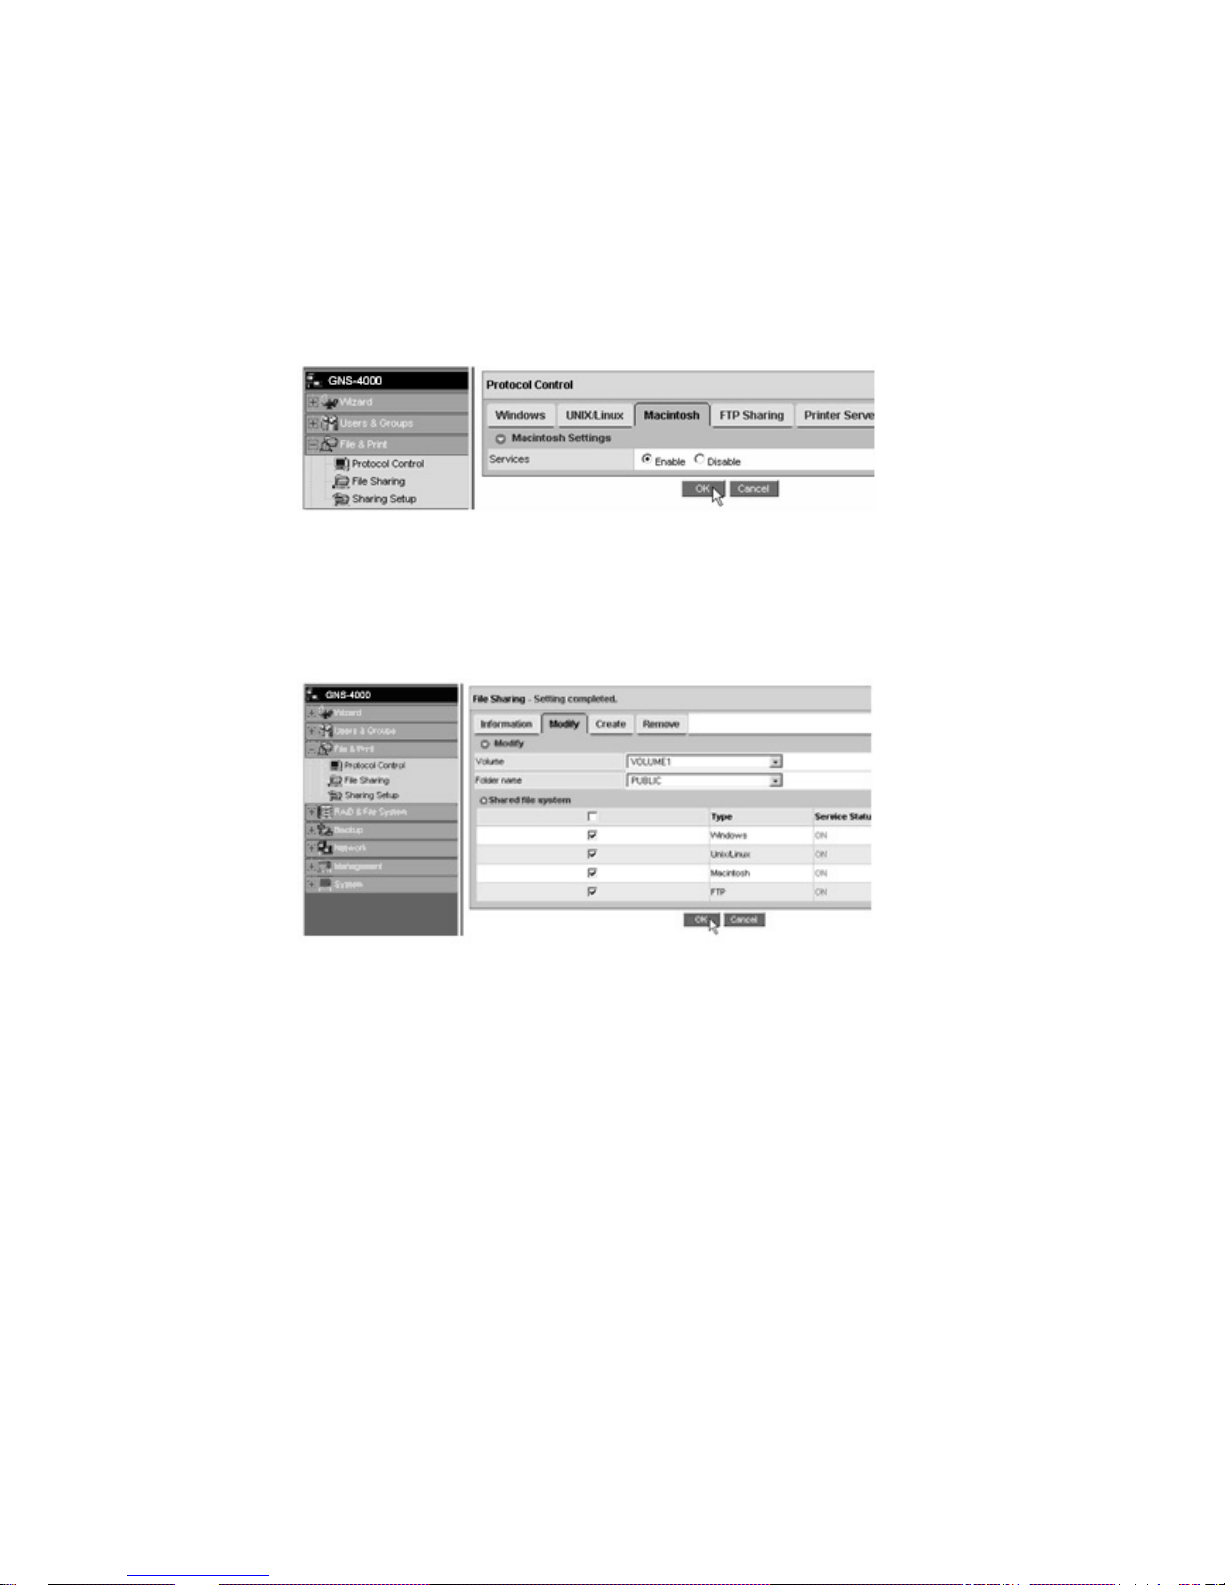
1. Start ASM.
2. In the Tree, click on the + beside the File & Print icon to expand the Tree.
3. Click on the Protocol Control icon, then click on the Macintosh tab.
4. Next to Service, click the Enable option, then click the OK button.
The Macintosh protocol enables Macintosh PCs to connect to Network
Storage.
5. Click on the File Sharing icon in the Tree.
Click on the Modify tab.
7. Check the Macintosh box, then click the OK button.
The Macintosh file sharing enables Macintosh PCs to access folders on
the Network Storage. In this case, access is given for the PUBLIC folder.
Page 40
30
On the Macintosh PC
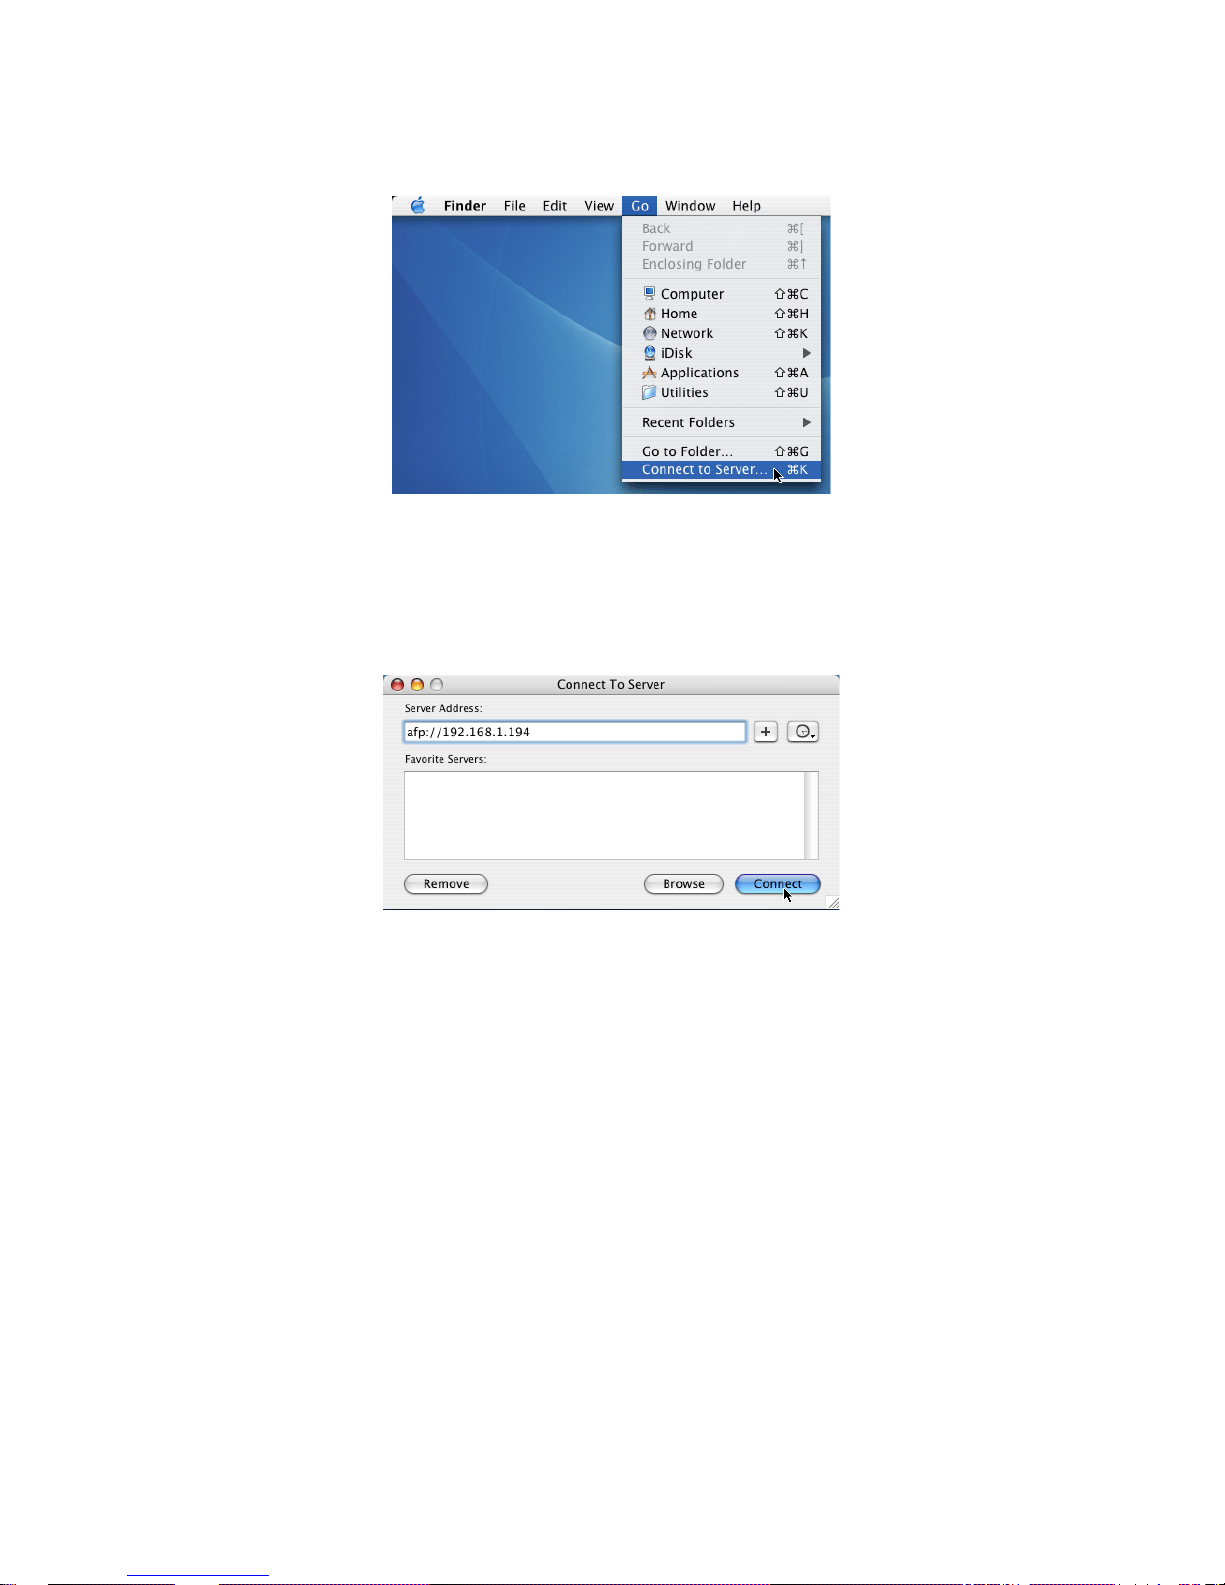
1. From the Go menu, choose Connect to Server.
2. In the Connect to Server dialog box, type afp://192.168.1.194 and click the
Connect button.
Note that the IP address shown below is only an example. The IP address
you type in the dialog box on your Macintosh will be different.
Click the + button to add this IP address to the Favorite Servers list.
Page 41
31
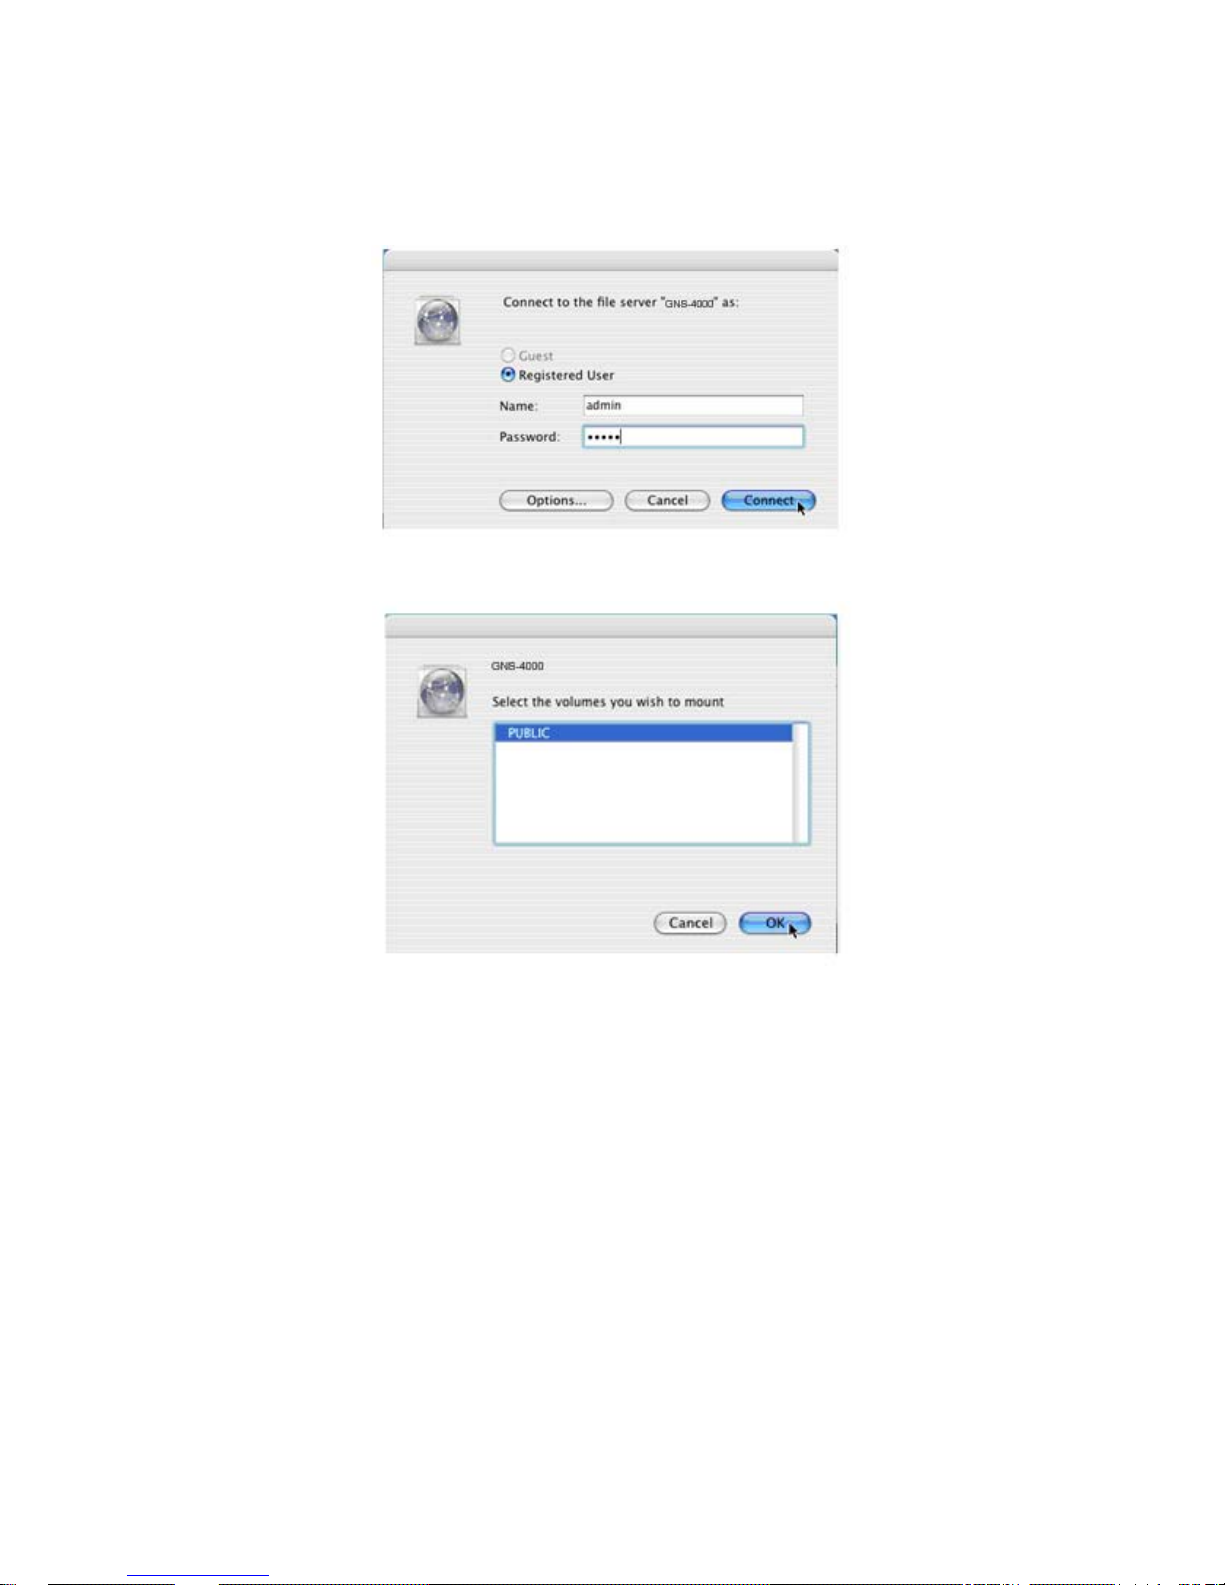
3. Type the user name and password in the respective fields, then click the
Connect button.
The default user name is admin. The default password is admin.
The user name and password are case sensitive.
4. In the GNS-4000 dialog box, click on the folder you want, then click the
OK button.
Page 42
32
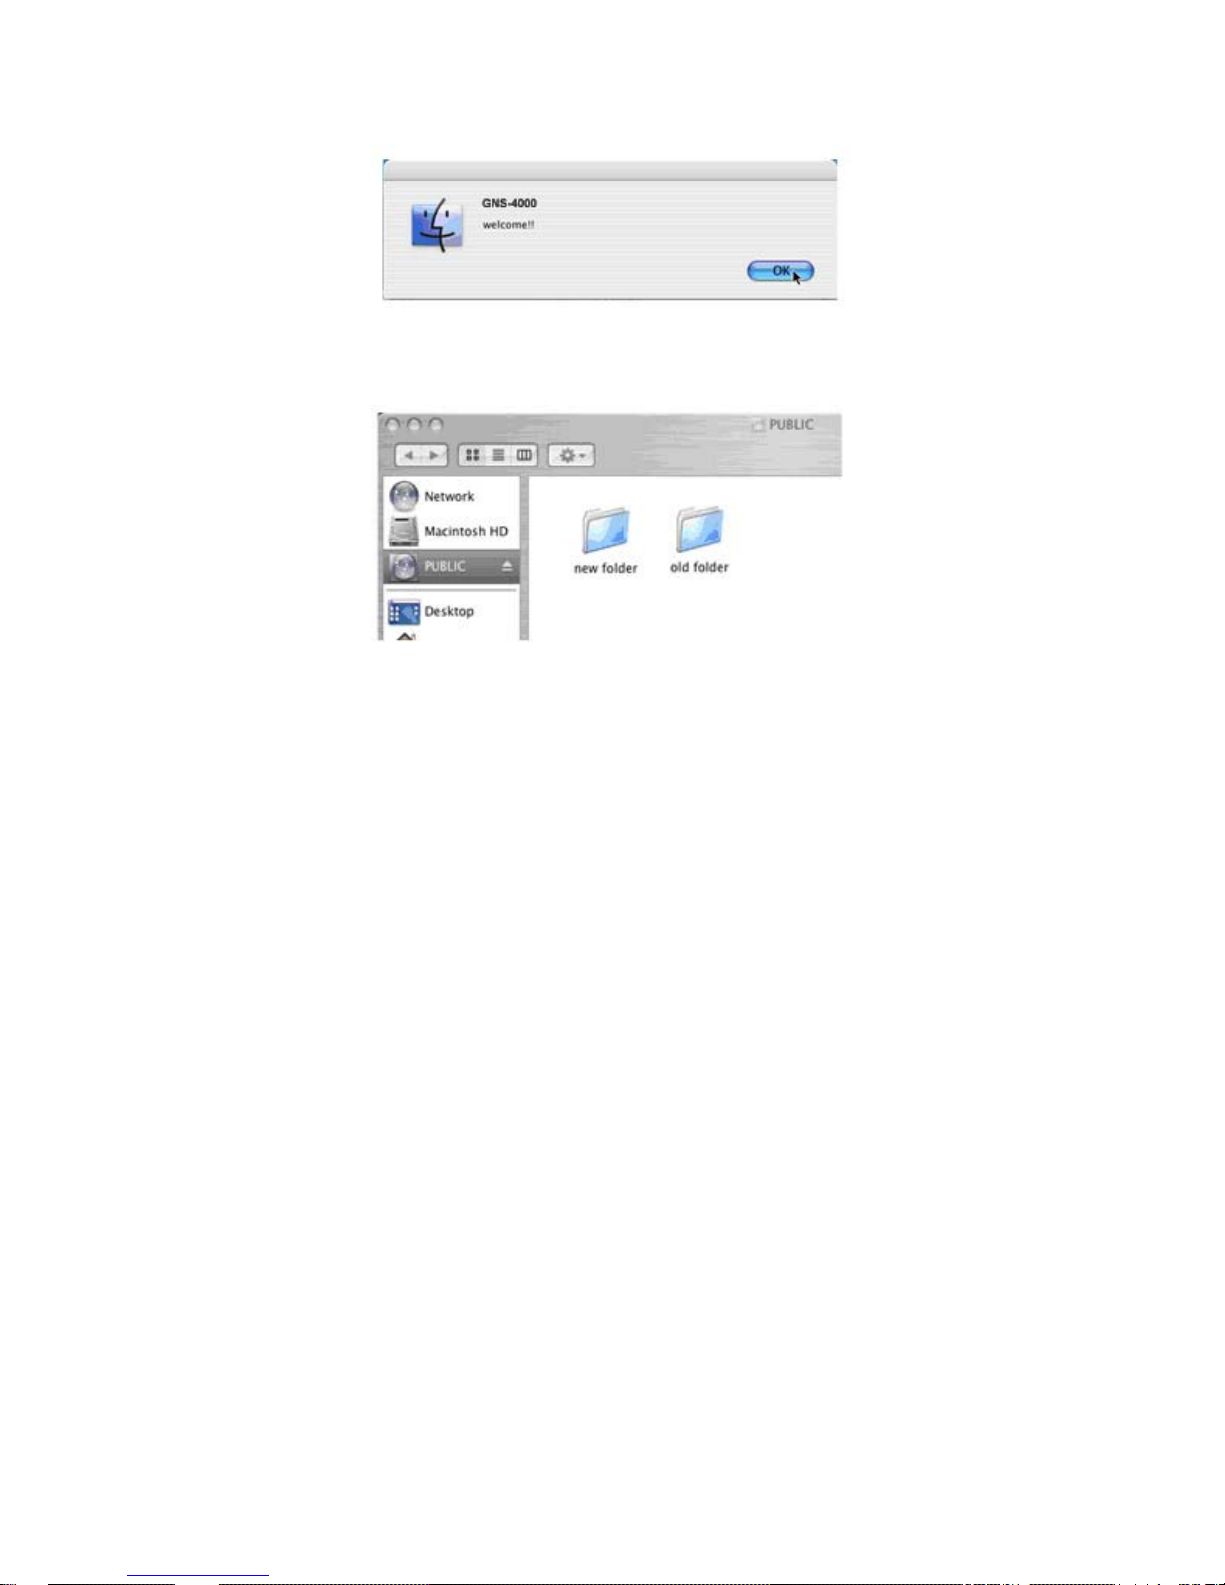
5. In the GNS-4000 Welcome screen, click the OK button.
A window opens on the Macintosh desktop to access the folder on the
Network Storage.
You can now copy files to and from the folder on the Network Storage.
Page 43
33
3.4. Connecting a USB Printer
To connect a USB printer to the Network Storage:
1. Set up your printer according to the printer’s Setup Guide or User Manual.
2. Install the printer drivers onto your PC as described in the printer’s Setup
Guide or User Manual.
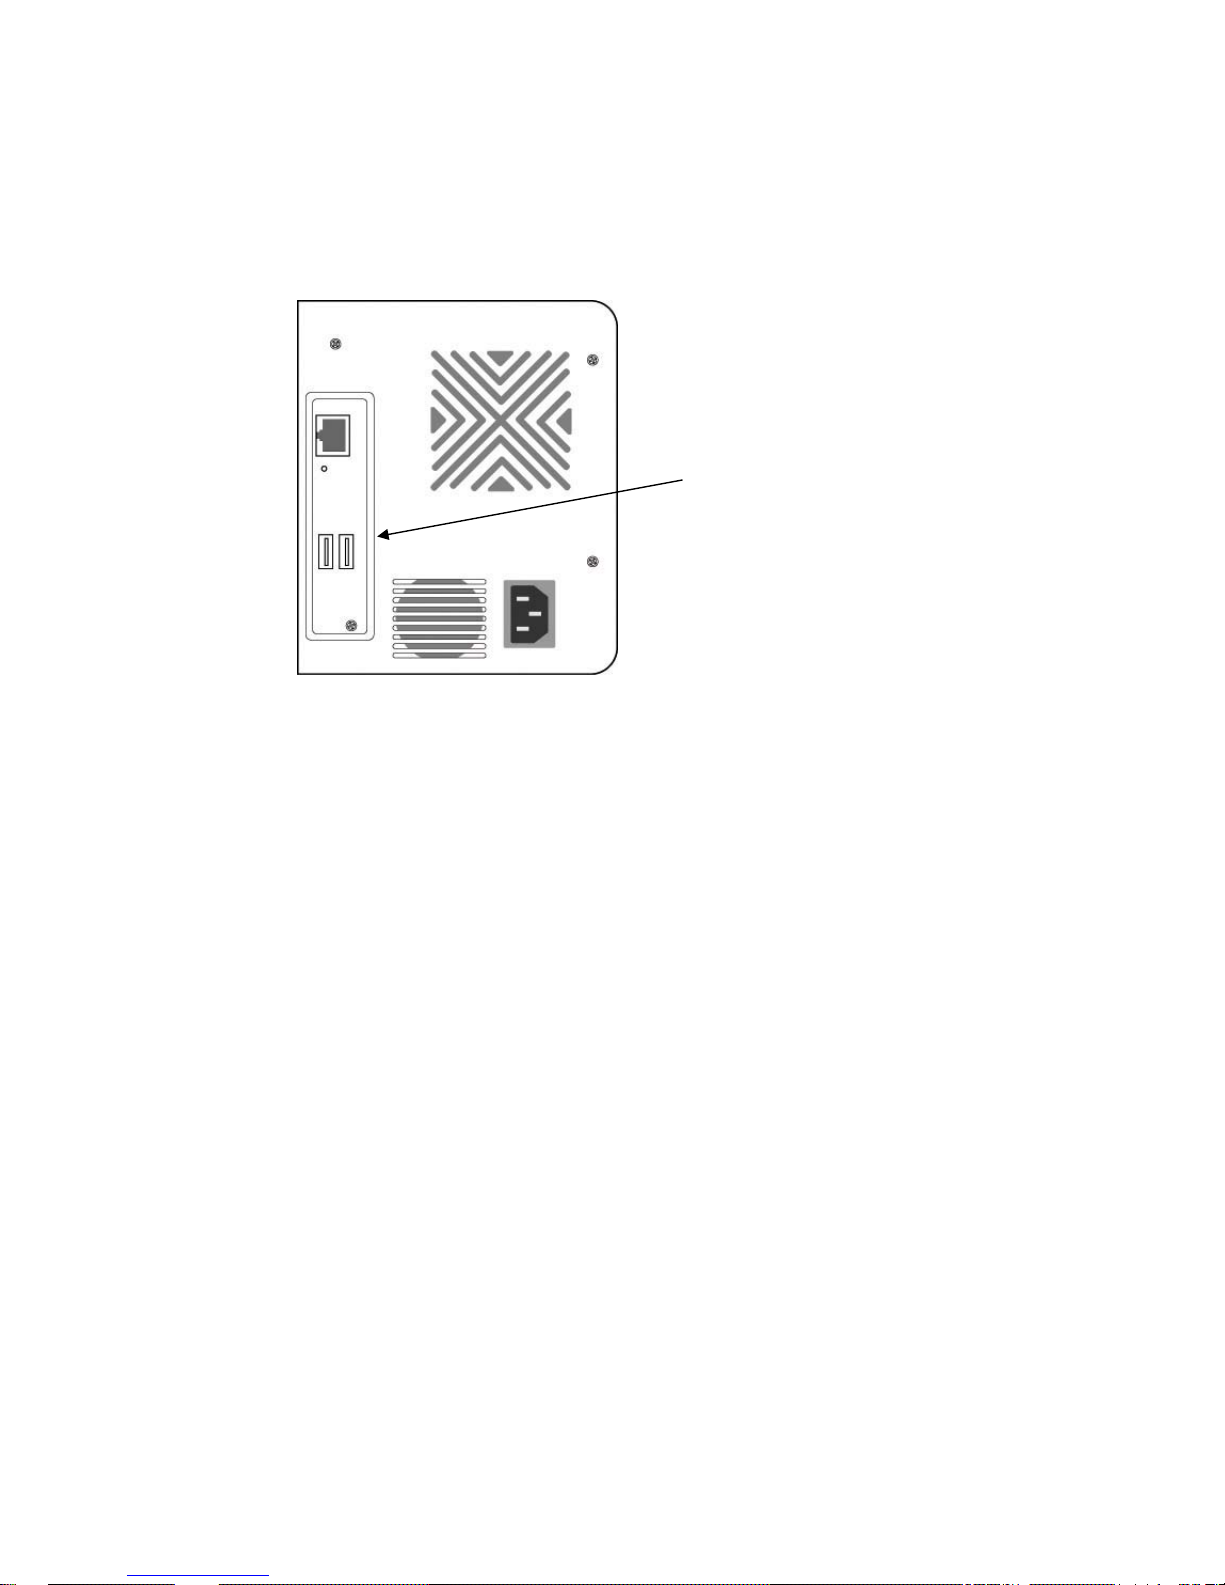
Attach the USB cable from your printer to one of the USB connections on the back
of the Network Storage.
USB
Connections
Page 44
34
3.5. Setting up the Print Server on Network
Storage
To set up the Network Storage’s print server:
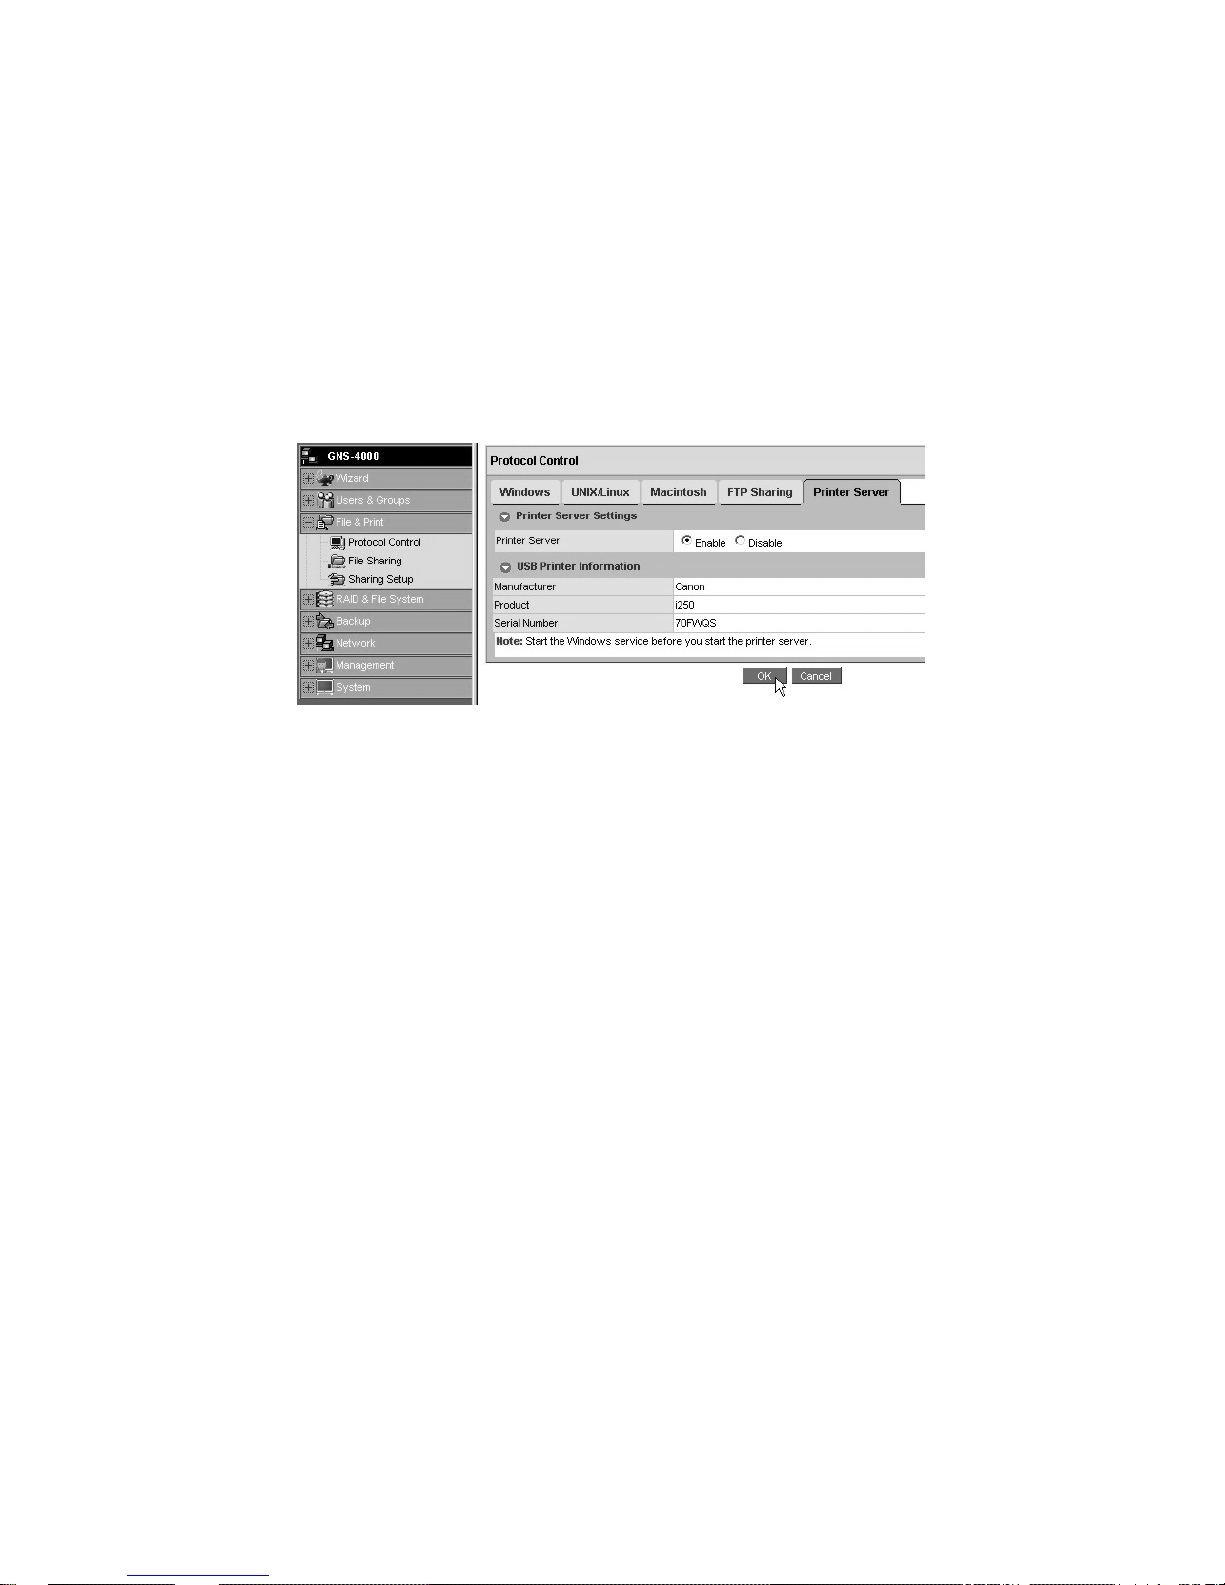
1. Start ASM.
2. In the Tree, on the left side of the ASM screen, click on the + beside the
File & Print icon to expand the Tree.
3. Click on the Protocol Control icon, then click on the Windows tab.
4. Click the Enable option button beside Services.
5. Click the OK button to save your settings.
6. Click on the Printer Server tab.
7. Click the Enable option button beside Printer Server.
Click the OK button to save your settings.
Page 45
35
3.6. Setting up Windows Printing
To set up printing on a Windows PC:
1. On the Windows desktop, double-click on the My Network Places icon.
2. Click the Search button in the toolbar.
If the Search button is not shown, from the View menu, choose Toolbars, then
Standard Buttons.
3. In the Computer name field, type the IP address of the Network Storage and
click the Search button in the side bar.
The Network Storage appears in the search results list.
4. In the computer list, double-click on the Network Storage to open it.
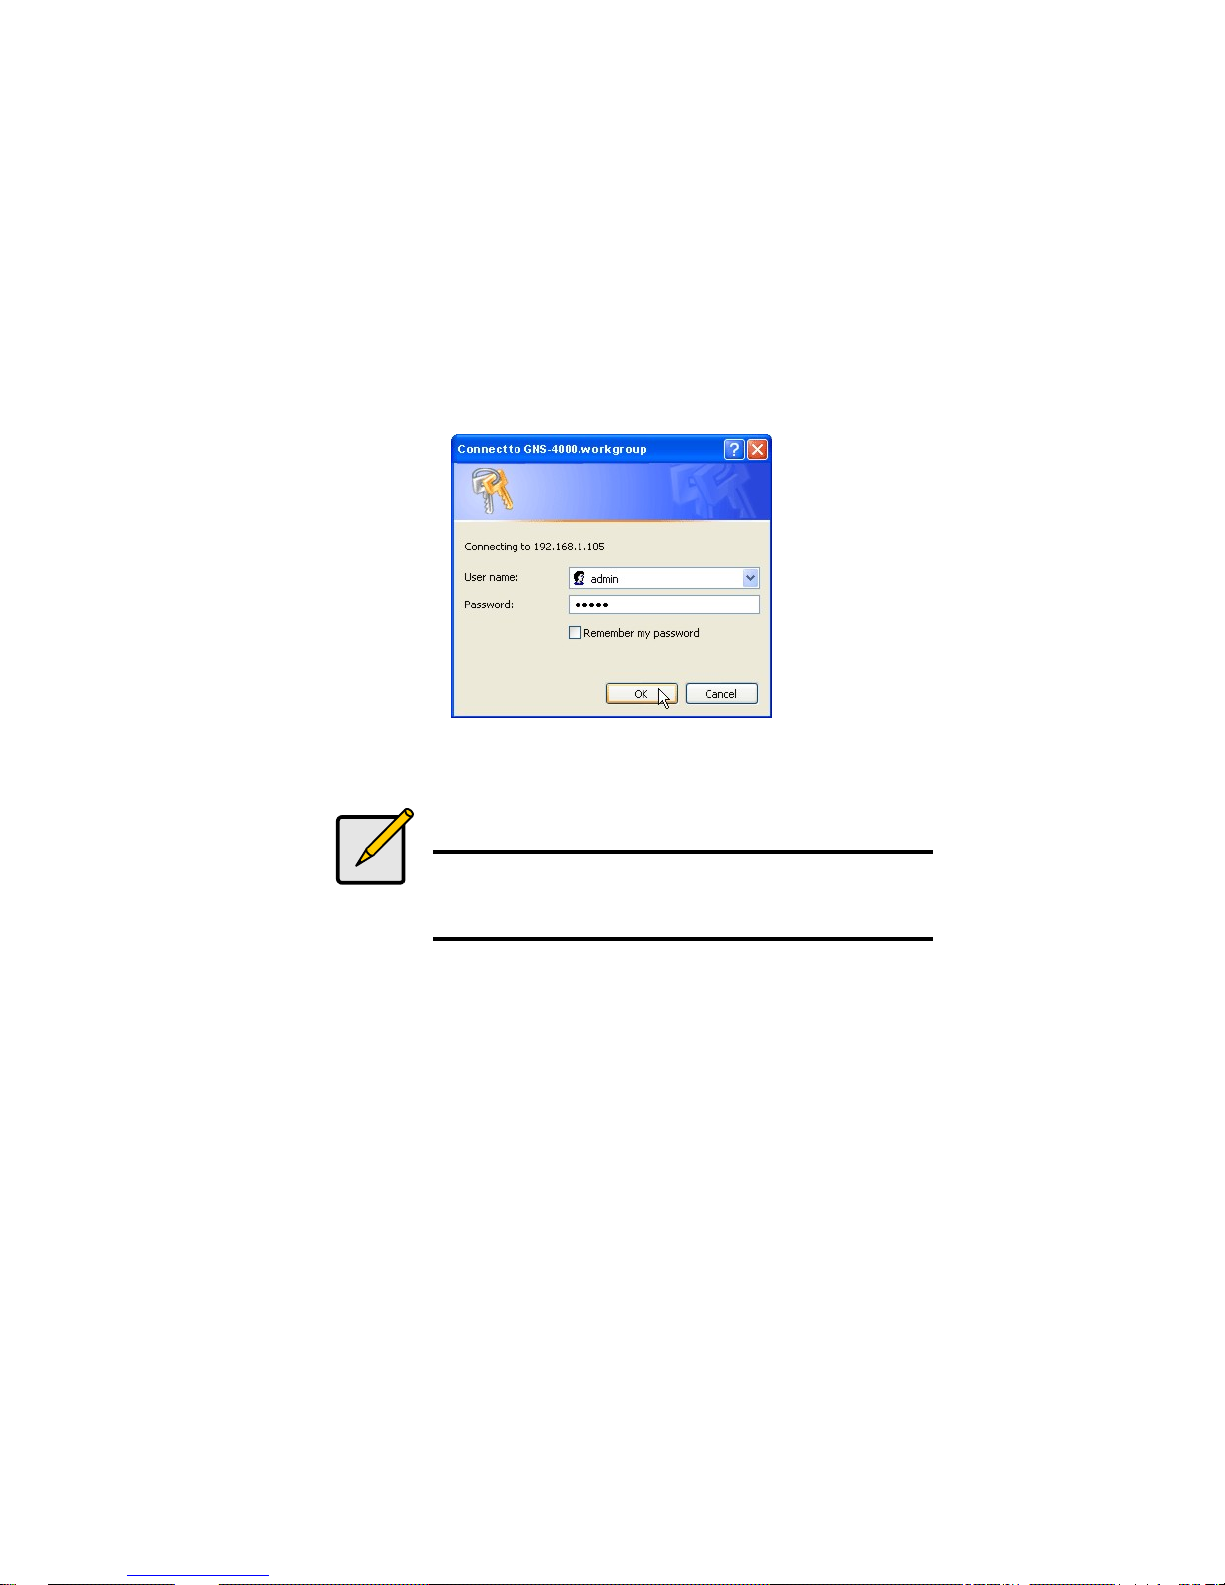
If the Connect to dialog box appears, type the user name and password in the
respective fields, then click the OK button.
The default user name is admin. The default password is admin.
The user name and password are case sensitive.
Note
For sharing printer under Microsoft ® Windows Vista OS, the
User name and Password must same as Network Storage’s
account.
Page 46
36
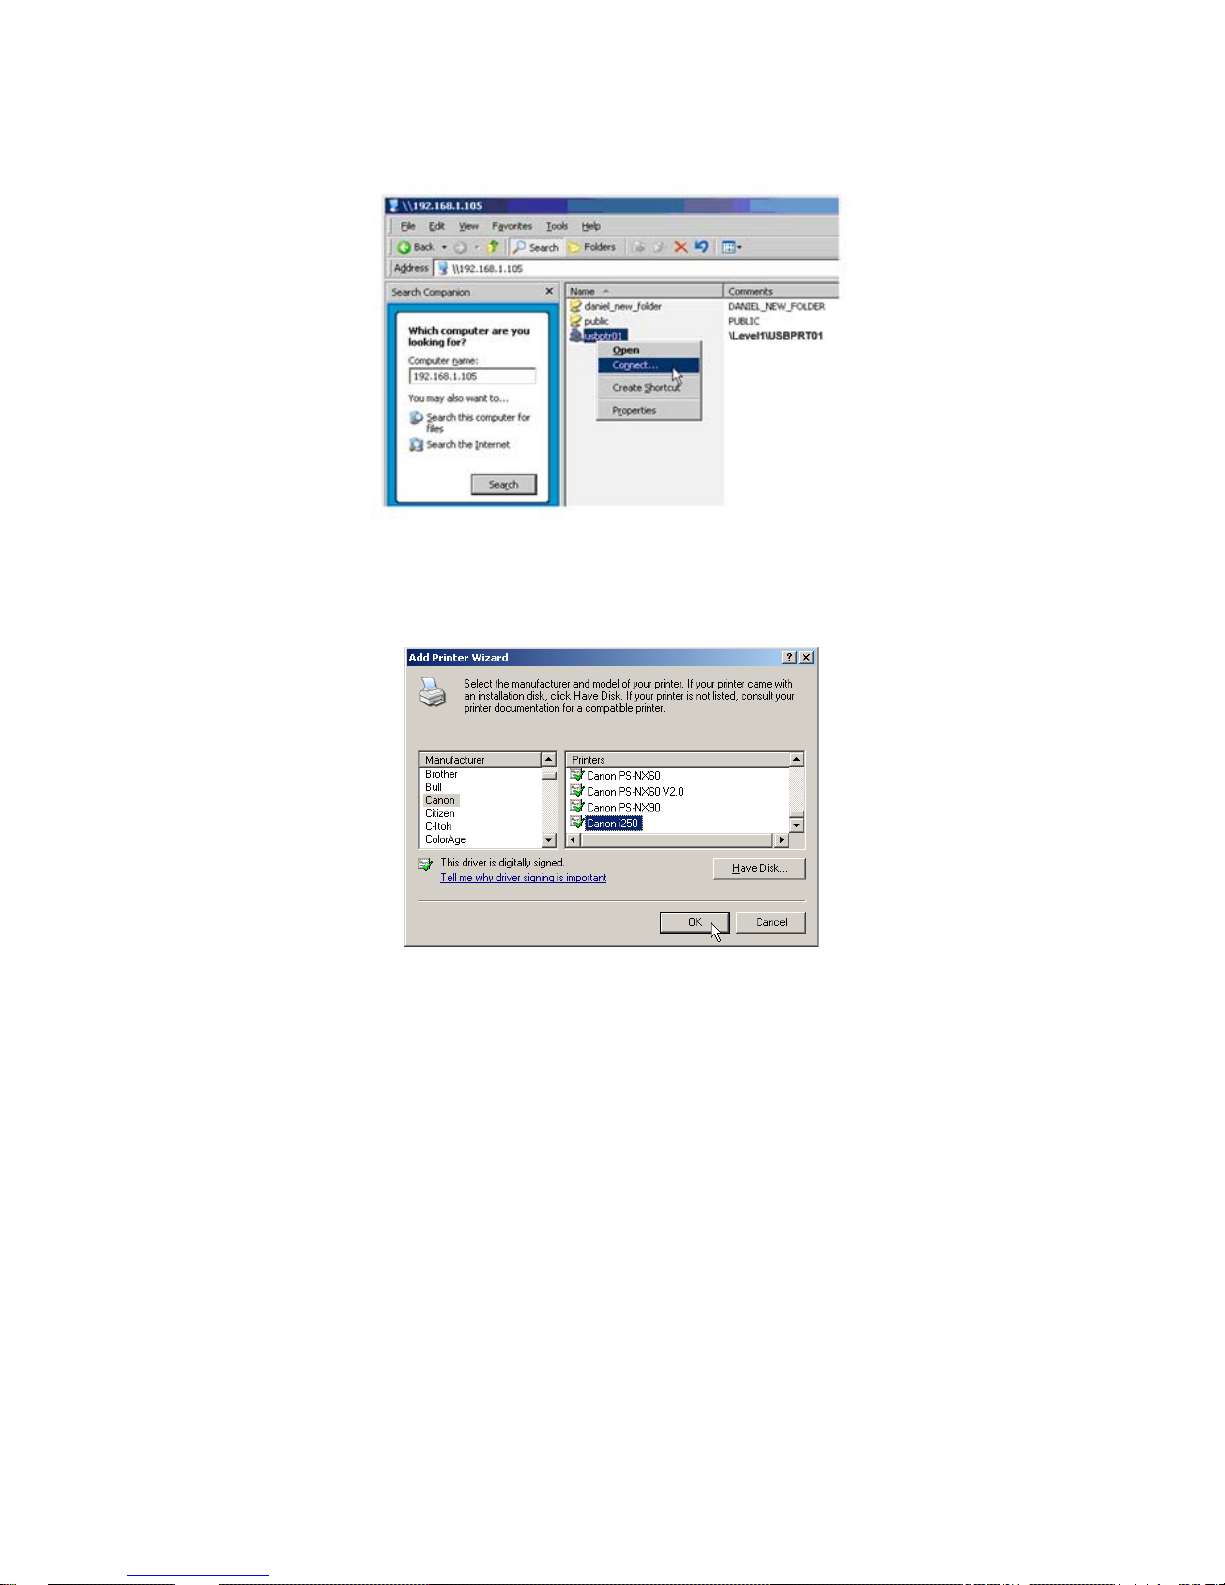
5. Right-click on the usbptr1 icon folder and choose Connect... from the
dropdown menu.
6. When the warning message about printer drivers appears, click the OK button
to continue.
7. In the Add Printer Wizard, click on the Manufacturer and model name of your
USB printer, then click the OK button.
Page 47
37
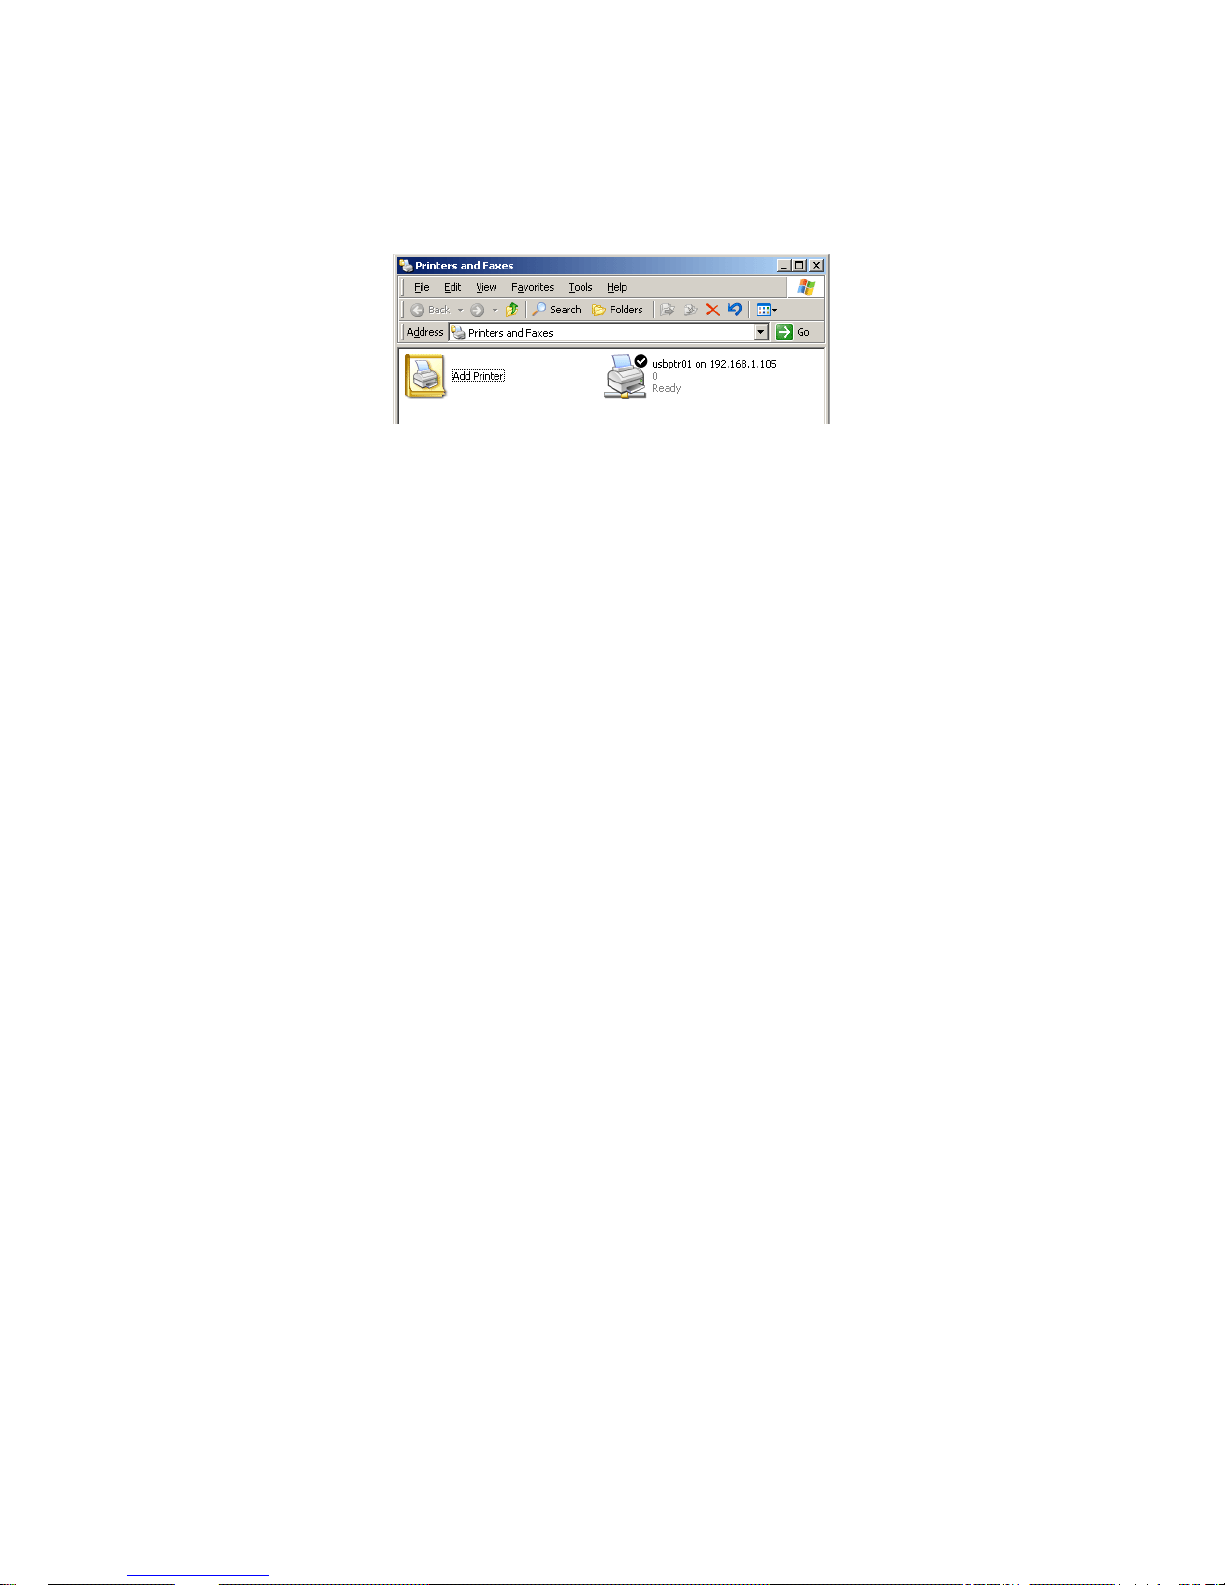
8. In the Add Printer Wizard, click the OK button.
9. To verify printer installation, in the Windows Start menu, choose Settings, then
Printers and Faxes.
The Printers and Faxes screen appears. The usbptr1 is the USB printer on the
Network Storage.
Page 48
38
3.7. Setting up Linux Printing
This procedure is for a RedHat Enterprise Linux 4 configuration. If you run a
different version of Linux, you might have to adapt the procedure. See your OS
documentation.
1. From the Applications menu, choose System Settings, then Printing.
Printer configuration window opens.
2. Click the New button.
Add a new print queue dialog box opens.
3. Click the Forward button.
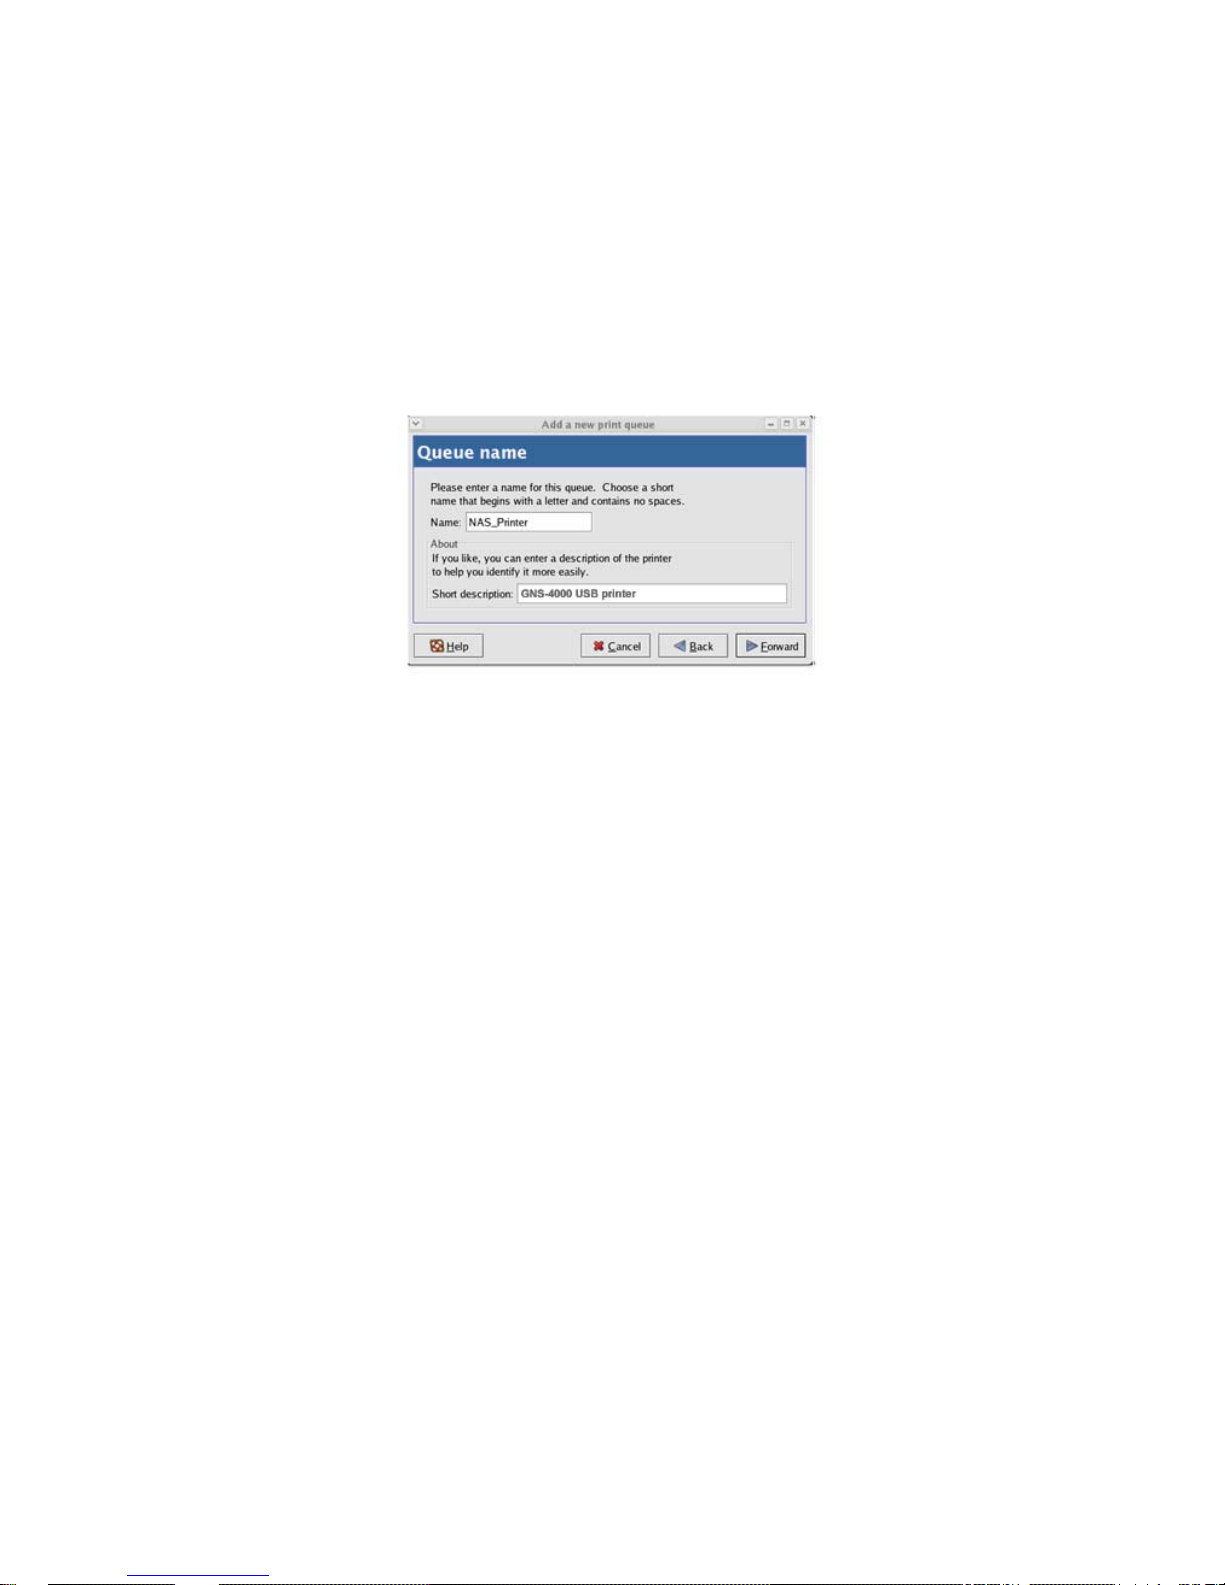
4. In the Name field, type a name for the printer, such as NAS_printer, a
description, and click the Forward button.
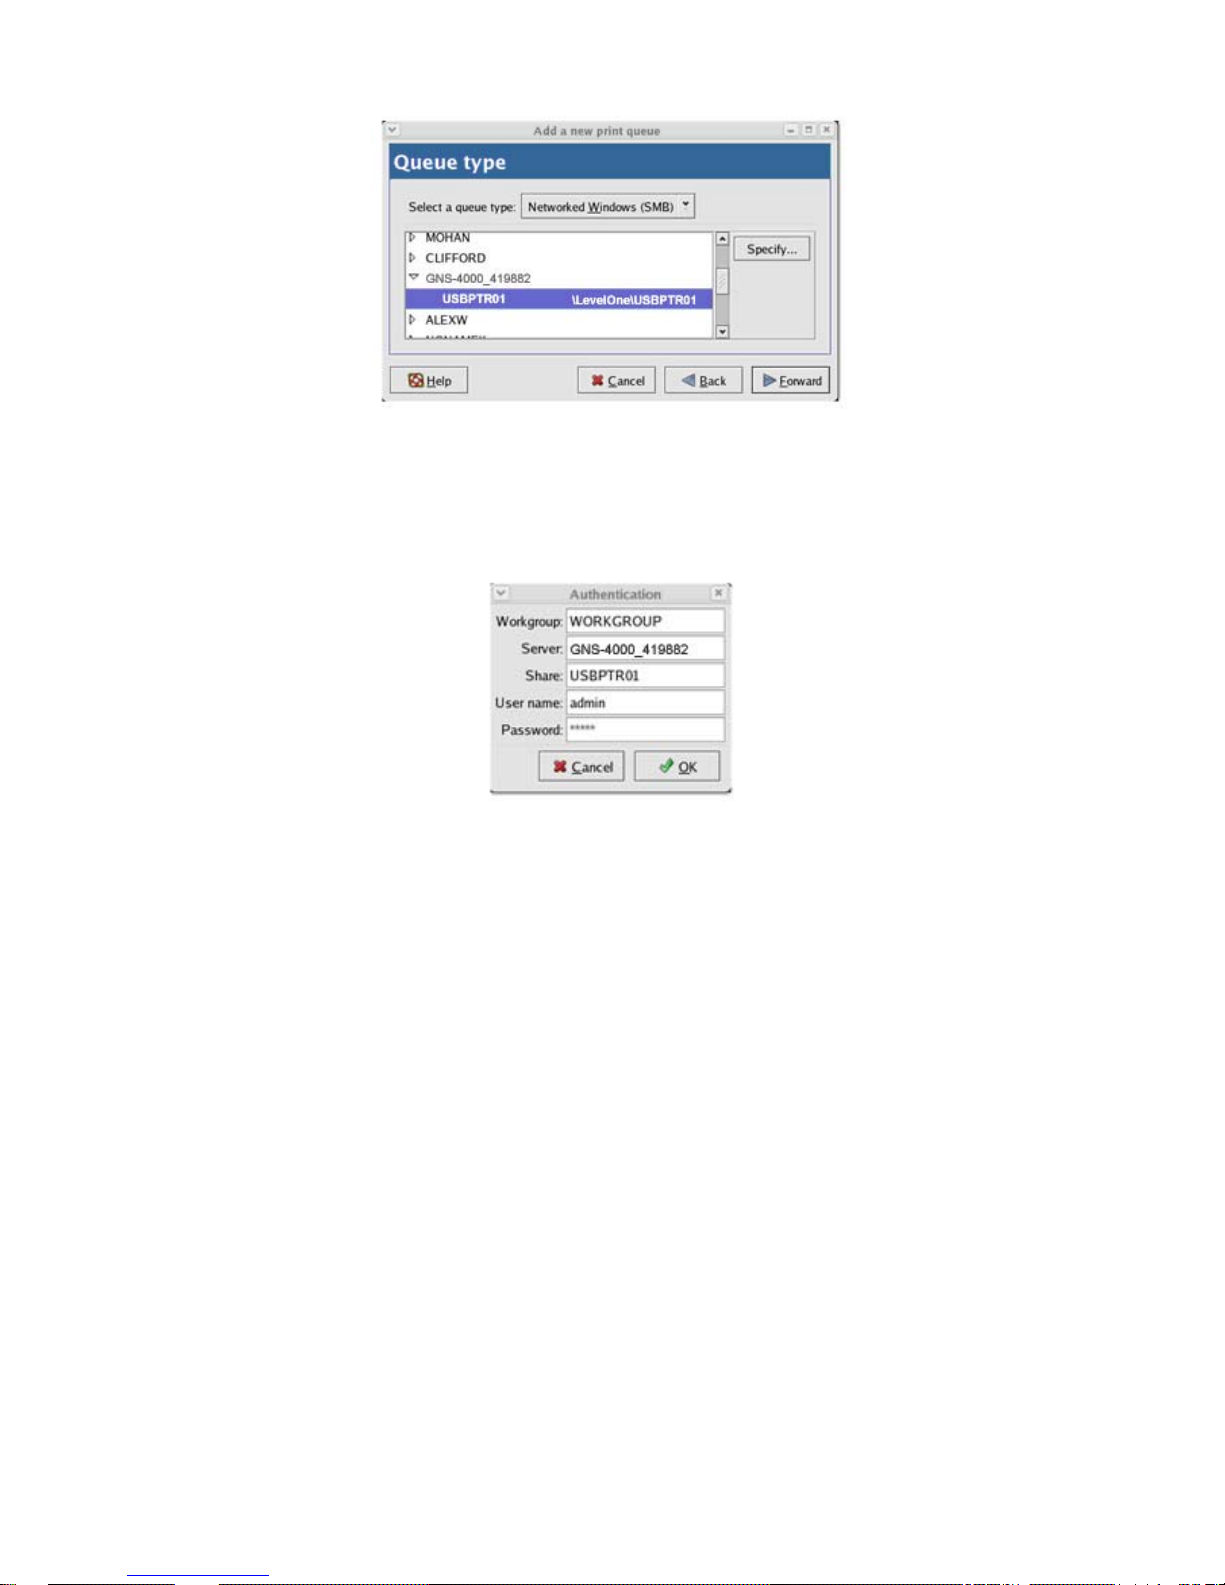
5. From the Select a queue type dropdown menu, choose Network Window s
(SMB).
6. Scroll the list and click on the triangle icon beside GNS-4000.
USBPTR01 appears below GNS-4000. USBPTR01 represents the USB printer
connected to the Network Storage.
Page 49
39
7. Highlight USBPTR01 and click the Forward button.
The Authentication dialog box opens.
In the User name and Password fields, type admin, then click the OK
button.
The user name and password are case sensitive.
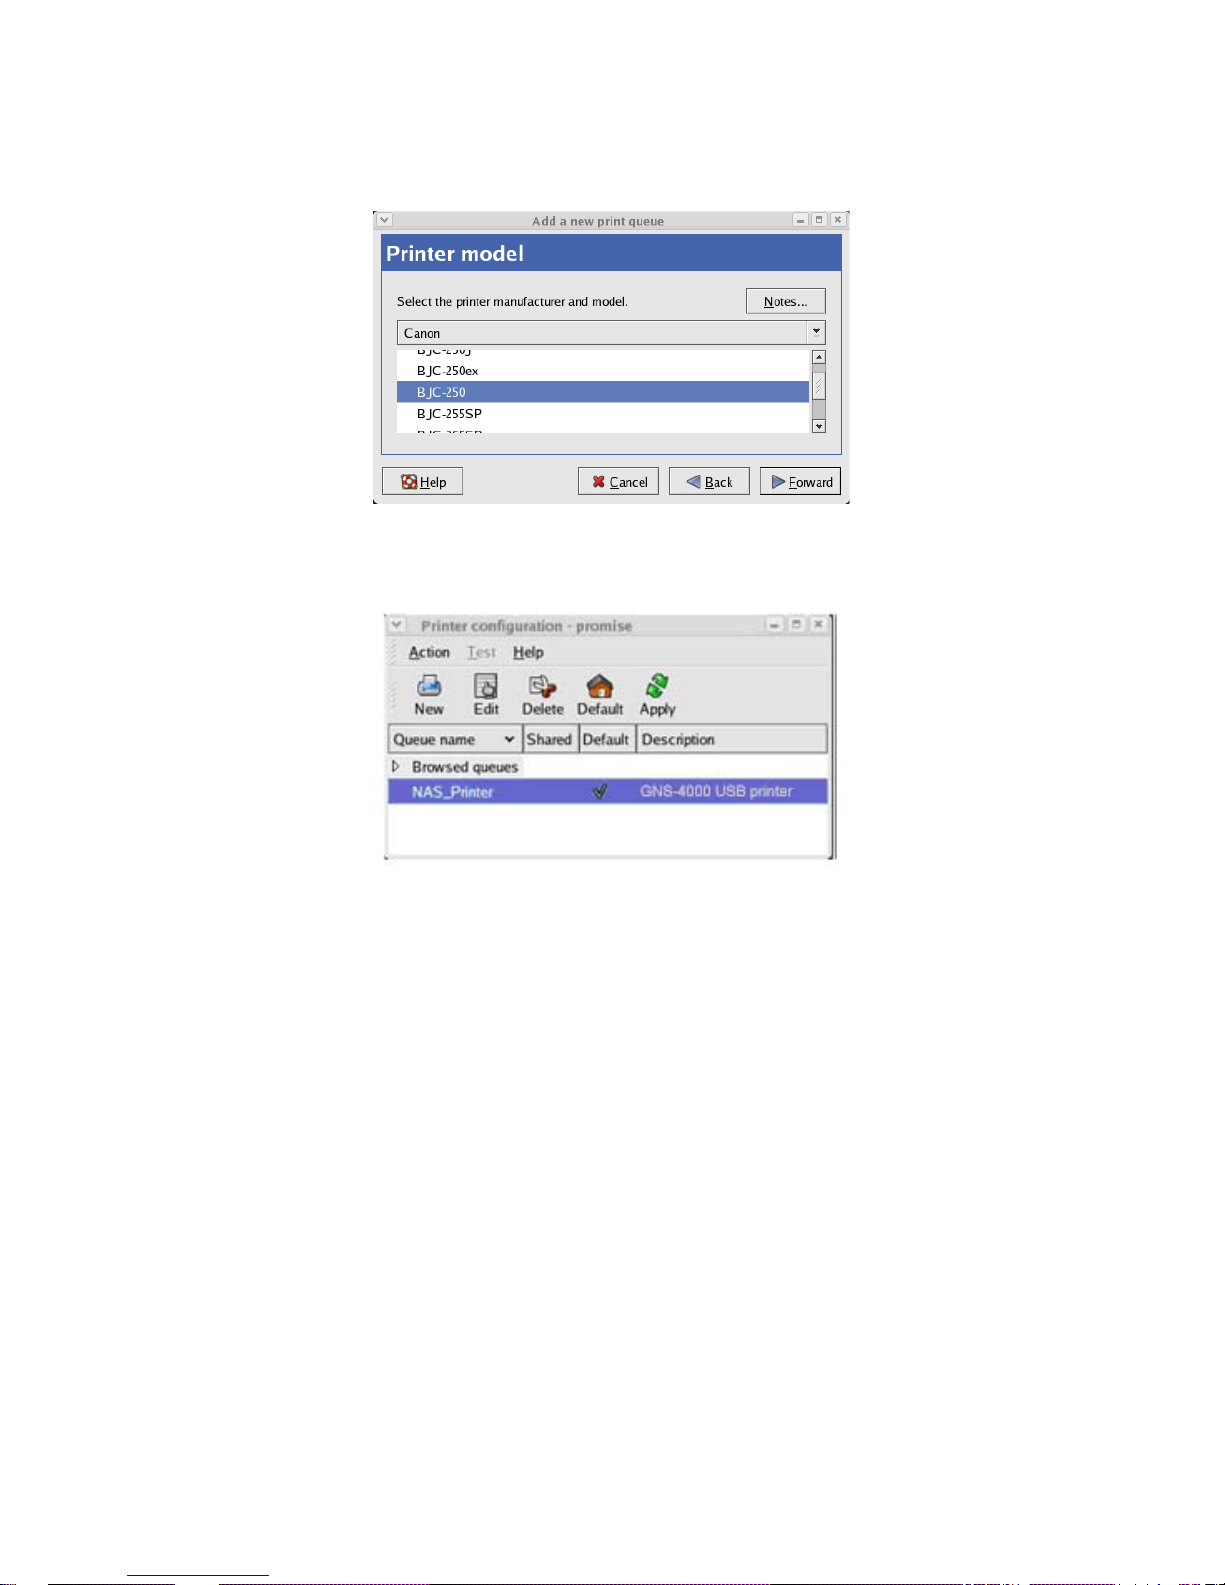
The Printer Model dialog box opens.
Page 50
40
8. From the dropdown menu, choose the manufacturer of your printer.
From the model list, highlight the model of your computer.
Then click the Forward button.
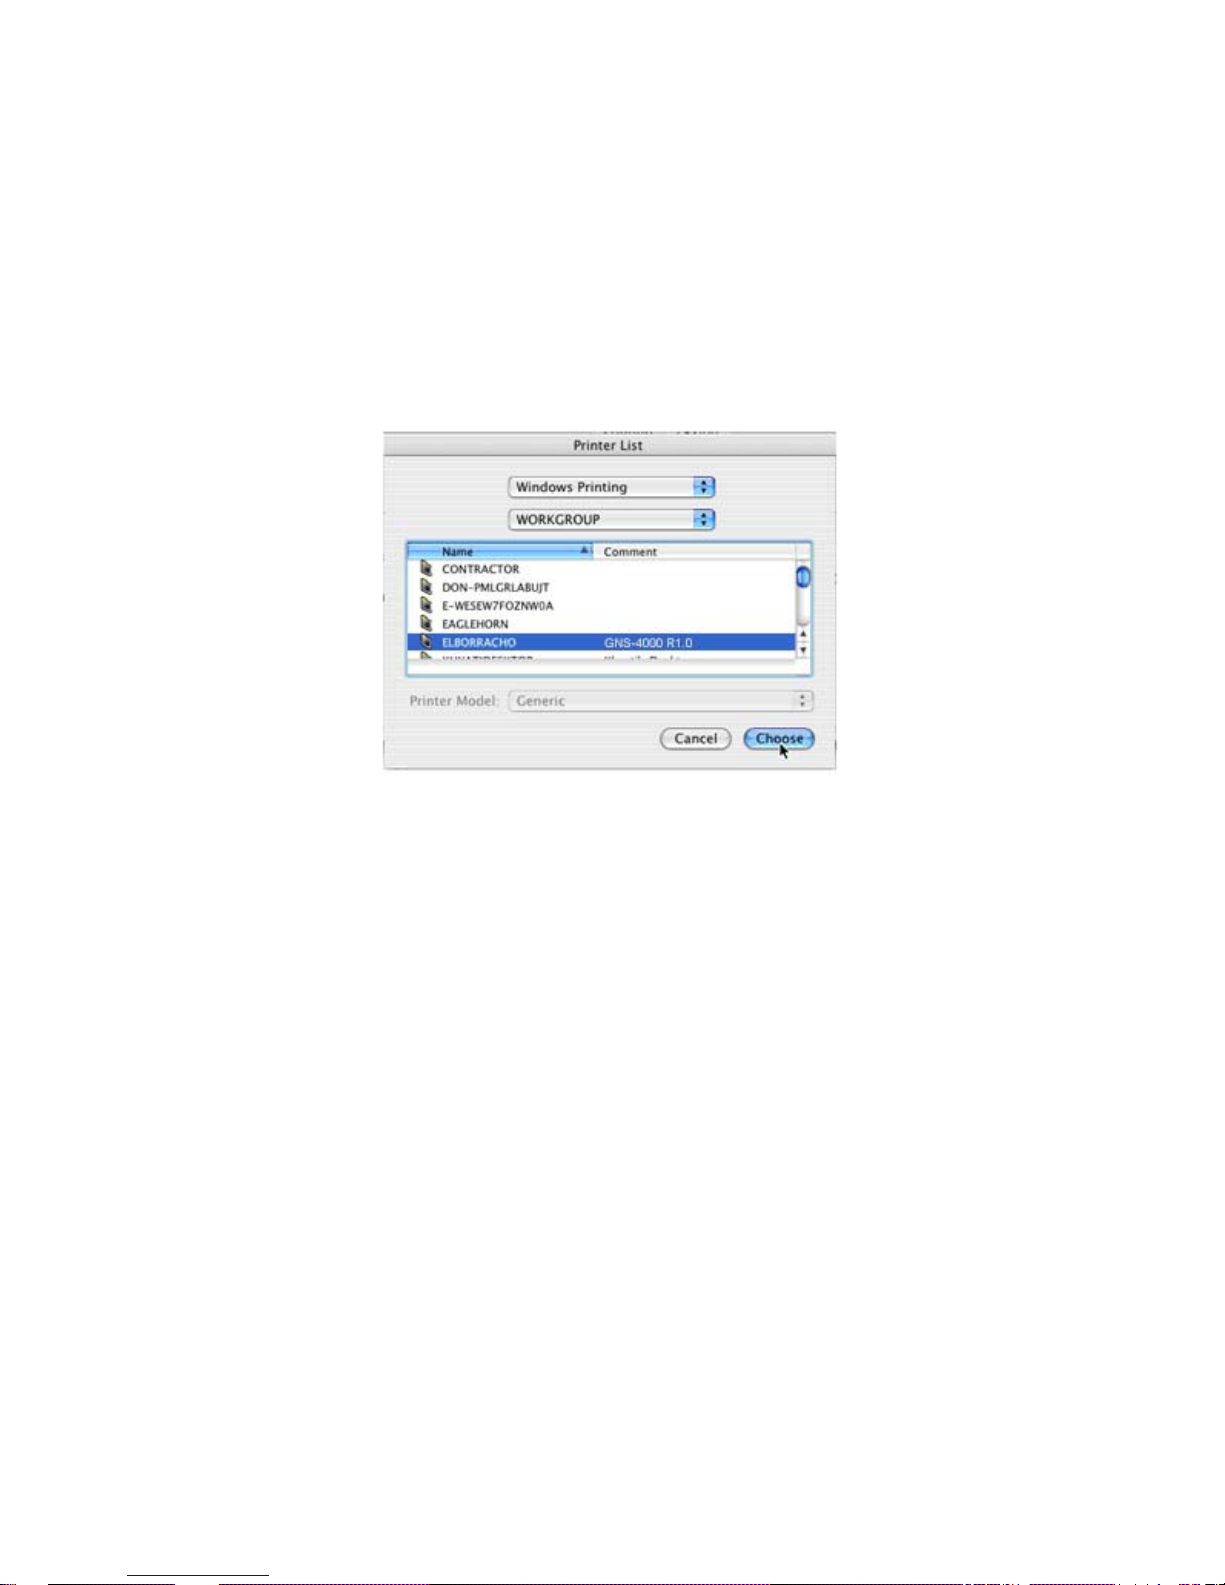
9. Click the Finish button.
USBPTR01 is added to your printer list.
Page 51
41
3.8. Setting up Macintosh Printing
To set up printing on a Macintosh PC:
1. From the Apple Menu, choose System Preferences.
2. Double-click on the Print & Fax icon.
3. Click on the Setup Printers button.
4. In the Printer List, click on the Add icon.
The Printer List displays a new panel.
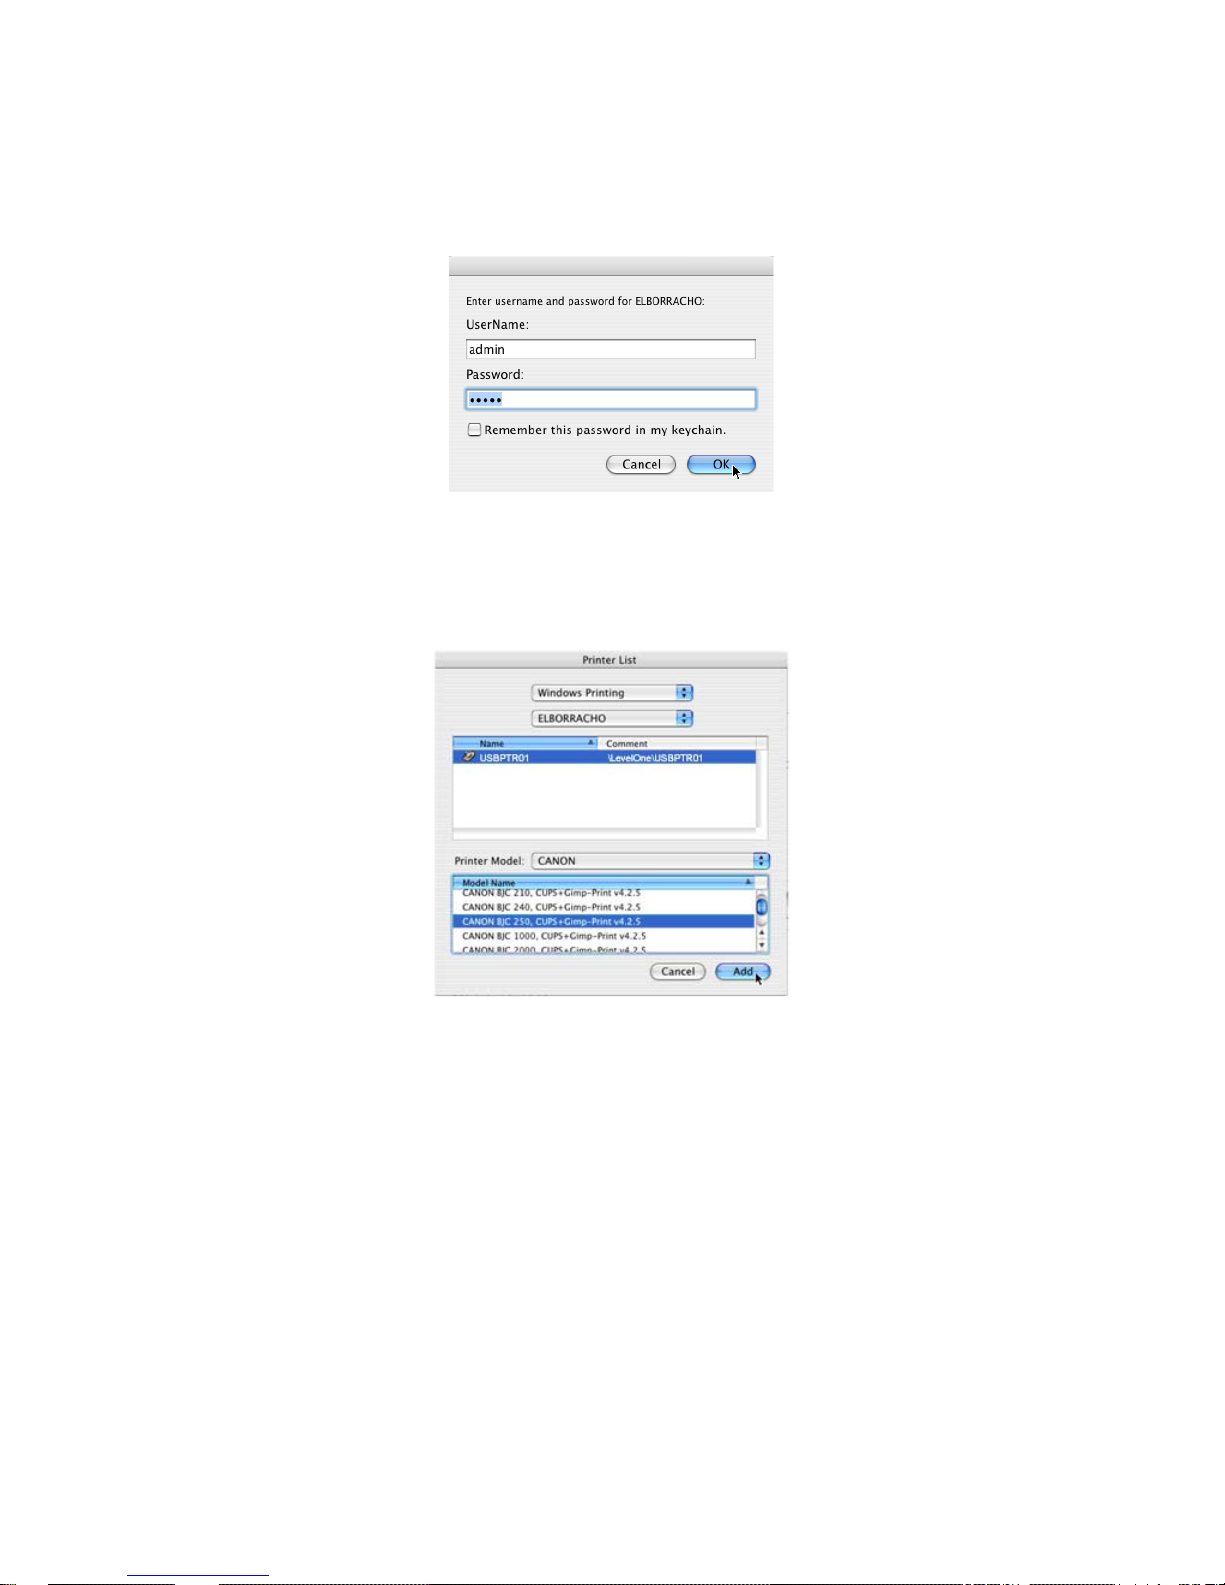
5. In the new panel, from the popup menus, choose:
• Windows Printing
• Workgroup
6. From the list, highlight the N etwork Storage, then click the Choose button.
Page 52
42
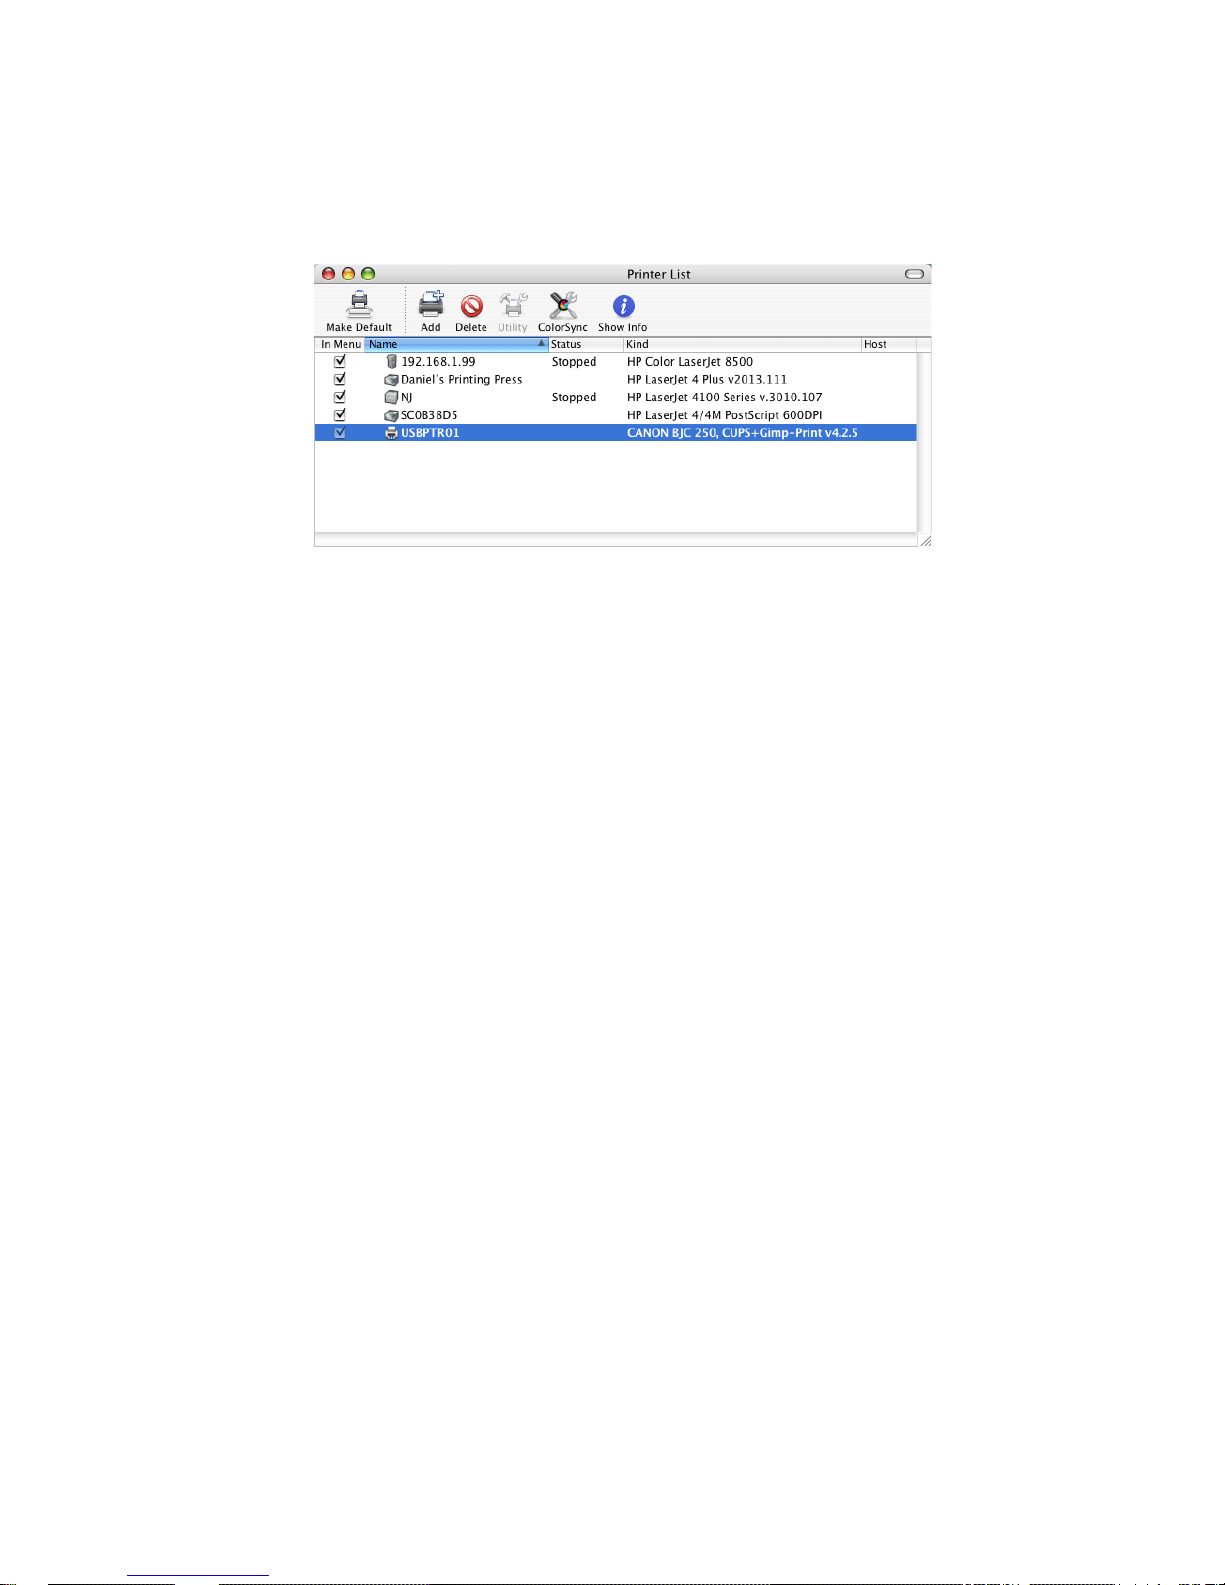
A user name and password dialog box appears.
7. Type the user name and password in the respective fields, then click the
OK button.
The default user name is admin. The default password is admin.
The user name and password are case sensitive.
The printer list displays a new panel.
8. Highlight the USBPTR01 in the list.
USBPRT01 represents the USB printer connected to the Network Storage.
Page 53
43
9. In the Printer Model popup menu, choose the make of your printer.
10. In the Model Name list, choose the model of your printer.
11. Click the Add button.
USBPTR01 is added to your printer list.
Page 54
44
3.9. Connecting a USB Drive
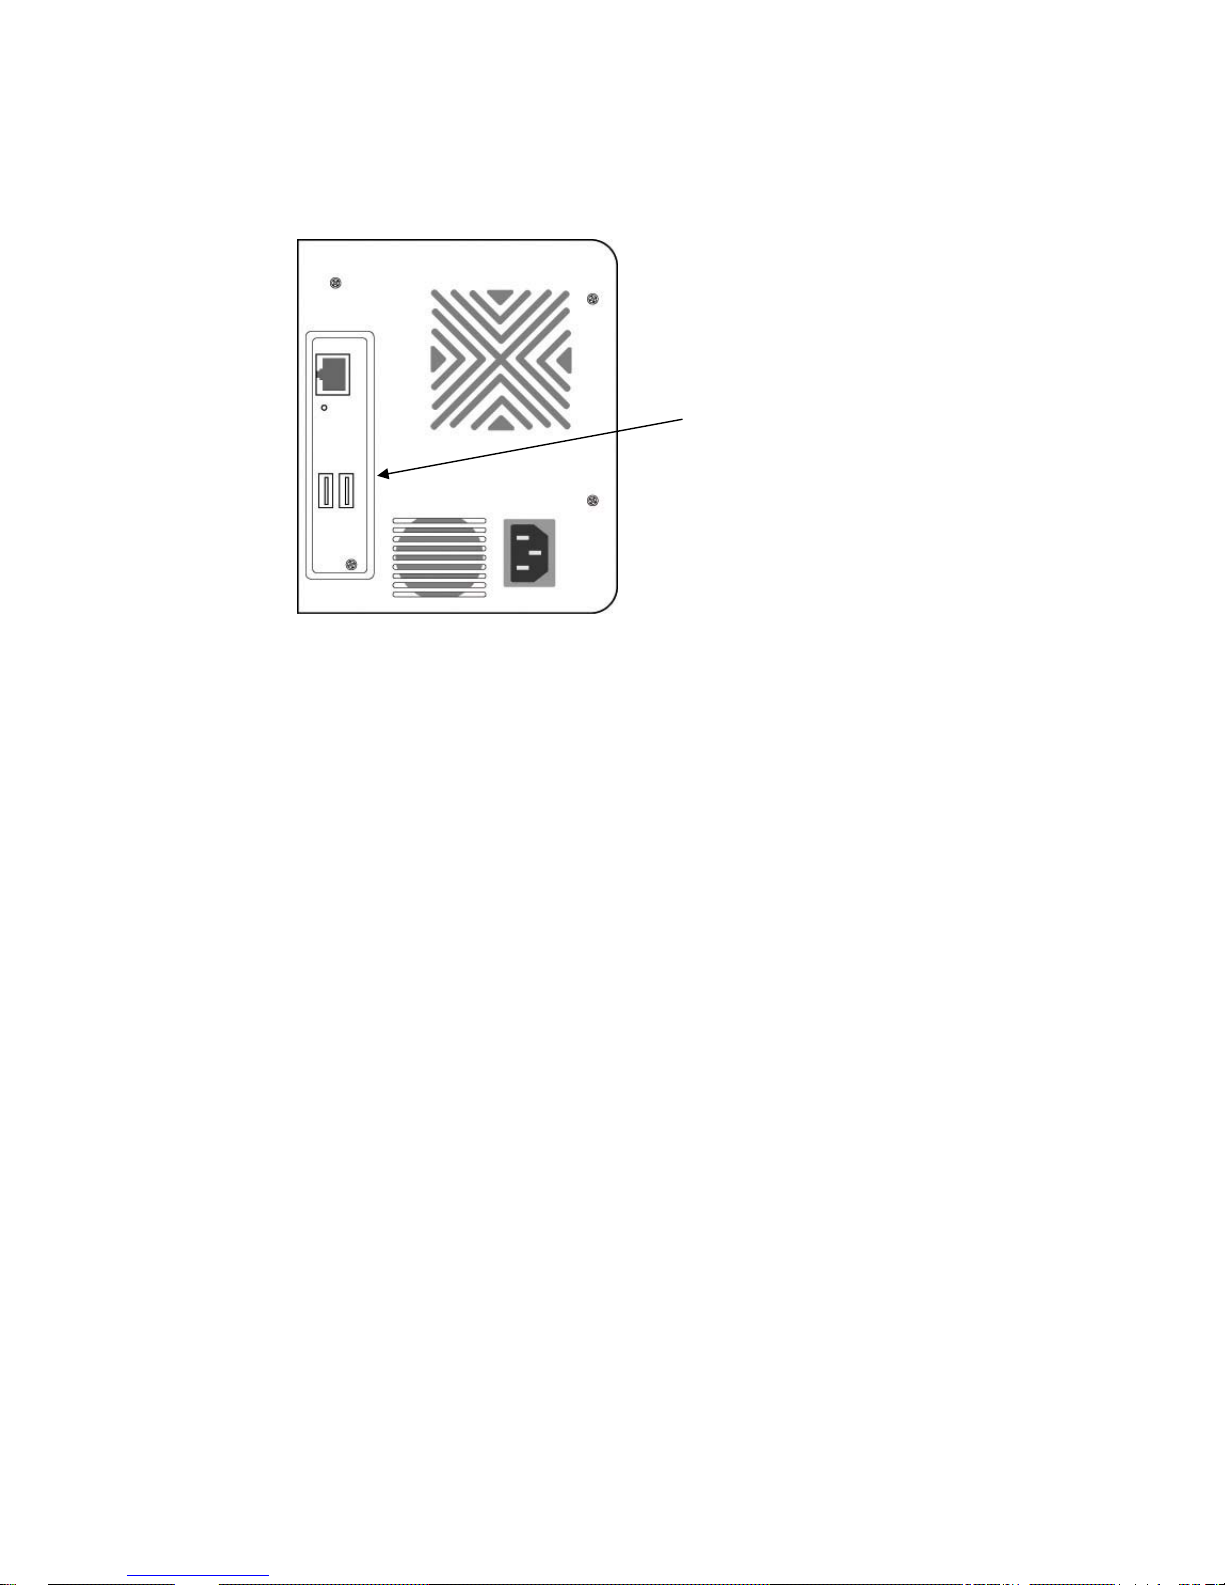
To connect a USB drive to the Network Storage, attach the USB cable from your
external drive to one of the USB connections on the back of the Network Storage.
If you have a USB memory stick, attach it directly to one of the USB connections or
use a USB cable, whichever is more convenient.
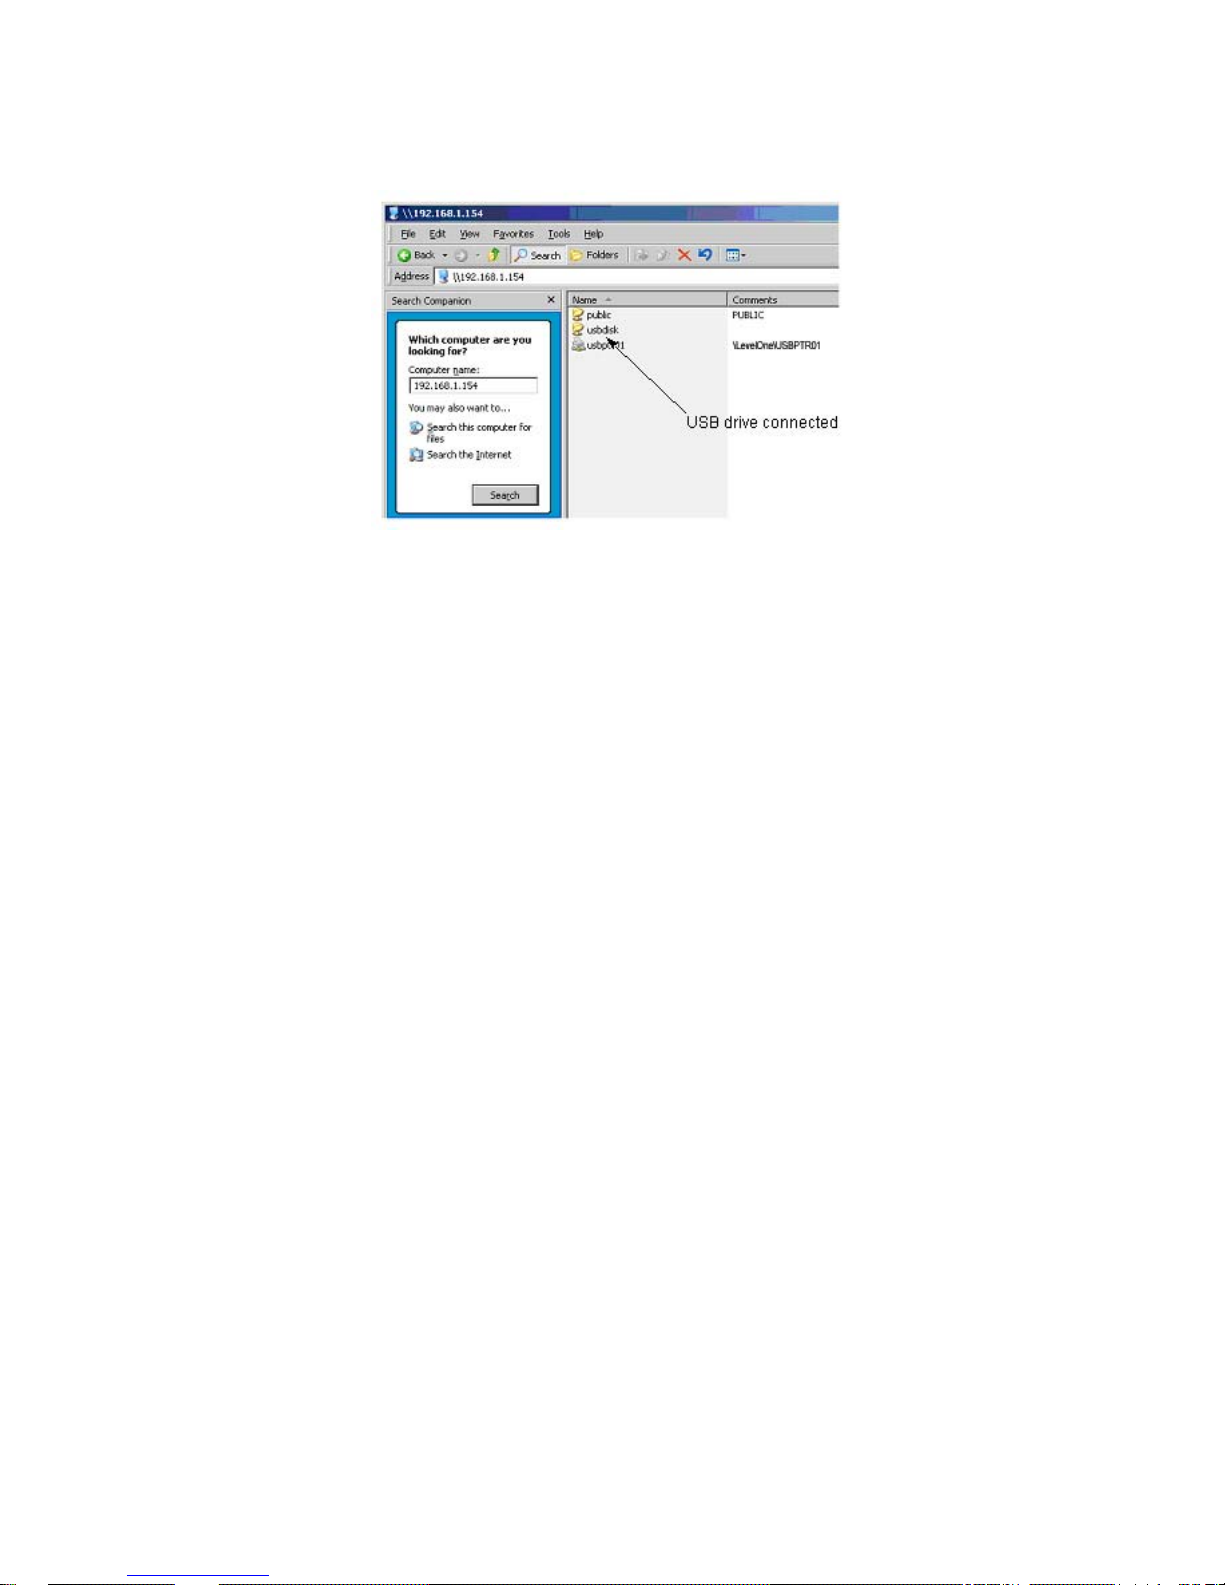
The USB drive or memory stick appears as a folder called usbdisk when you create
your network drive. See the instructions on the following page.
Network Storage supports USB drives and memory sticks formatted to FAT32 or
Ext3 file formats. If the Network Storage does recognize the USB drive or memory
stick, the usbdisk folder does not appear.
USB
Connections
Page 55
45
Windows PC
The USB drive appears as a folder on the Network Storage when you create a
network drive on a Windows PC.
Follow the procedure “Setting up a Network Drive”, but select the usbdisk folder
instead of the public folder.
Page 56
46
Linux PC
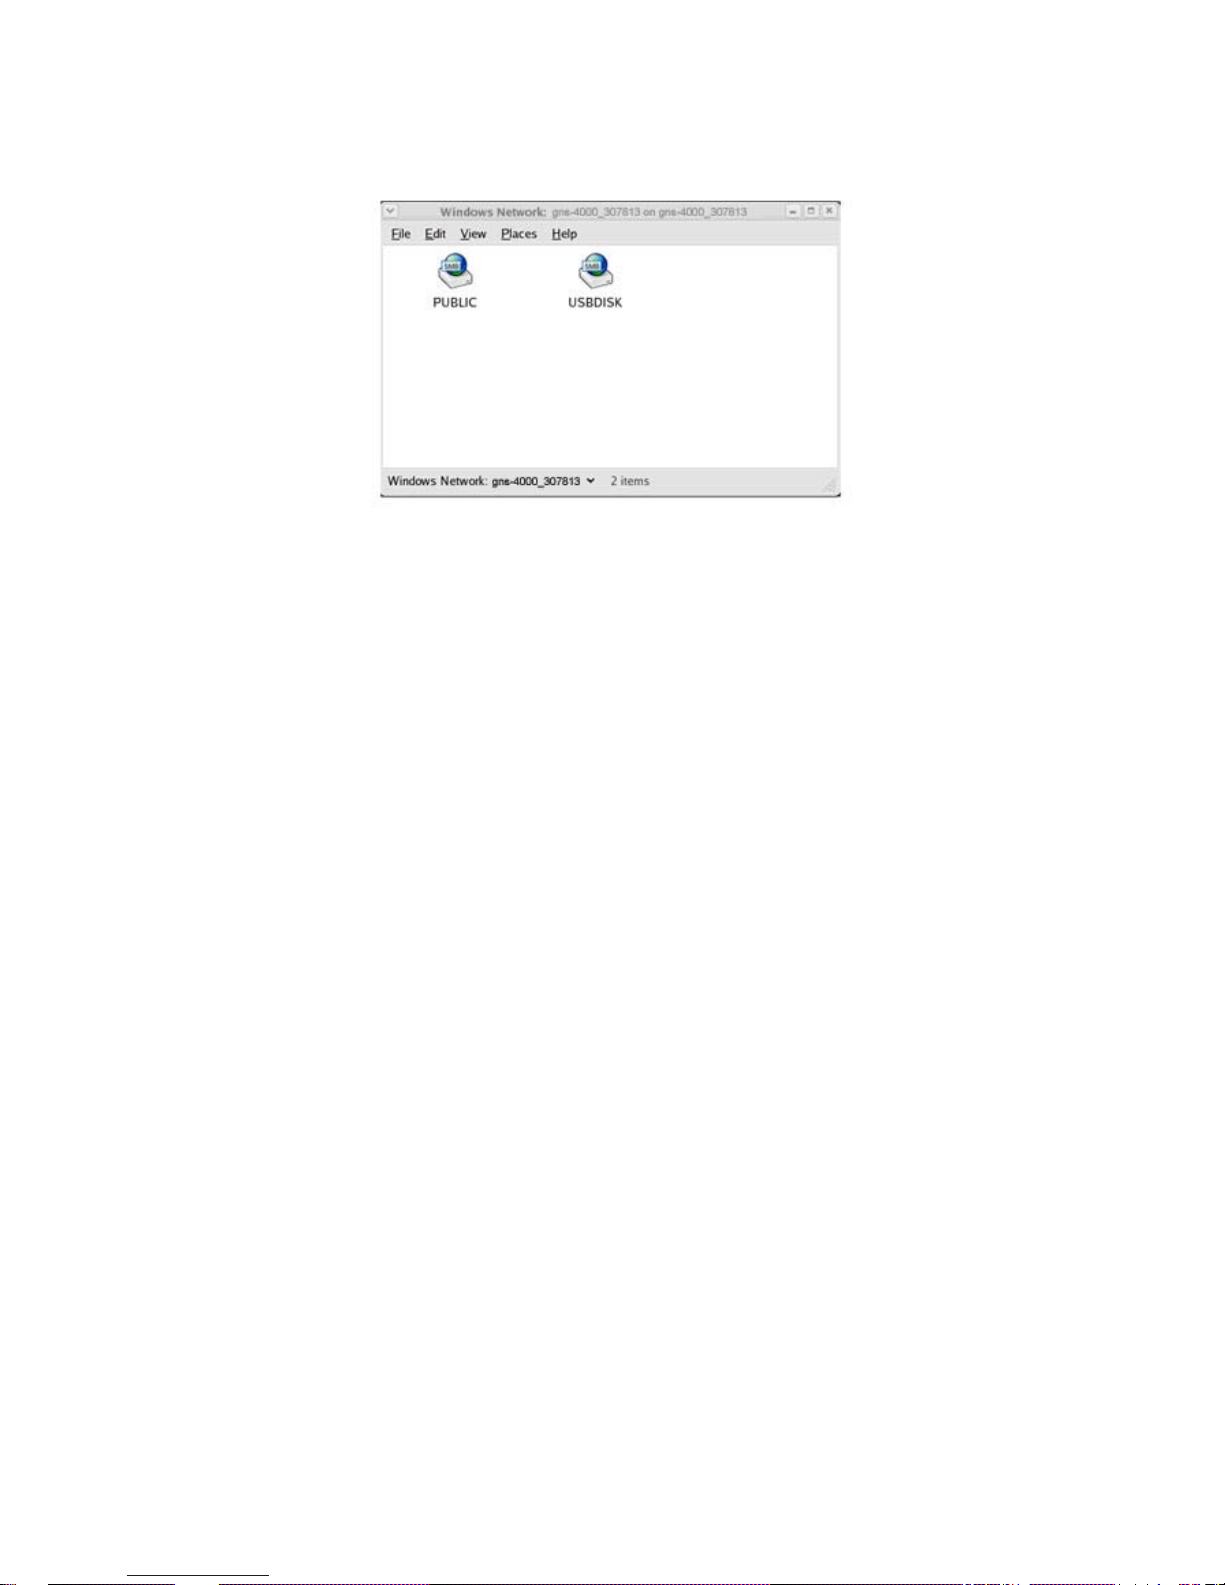
The USB drive appears as a folder on the Network Storage when you create a
network drive on a Linux PC.
Follow the procedure “Setting up a Network Drive on a UNIX or Linux PC”, but
select the USBDISK folder instead of the PUBLIC folder.
Page 57
47
Macintosh PC
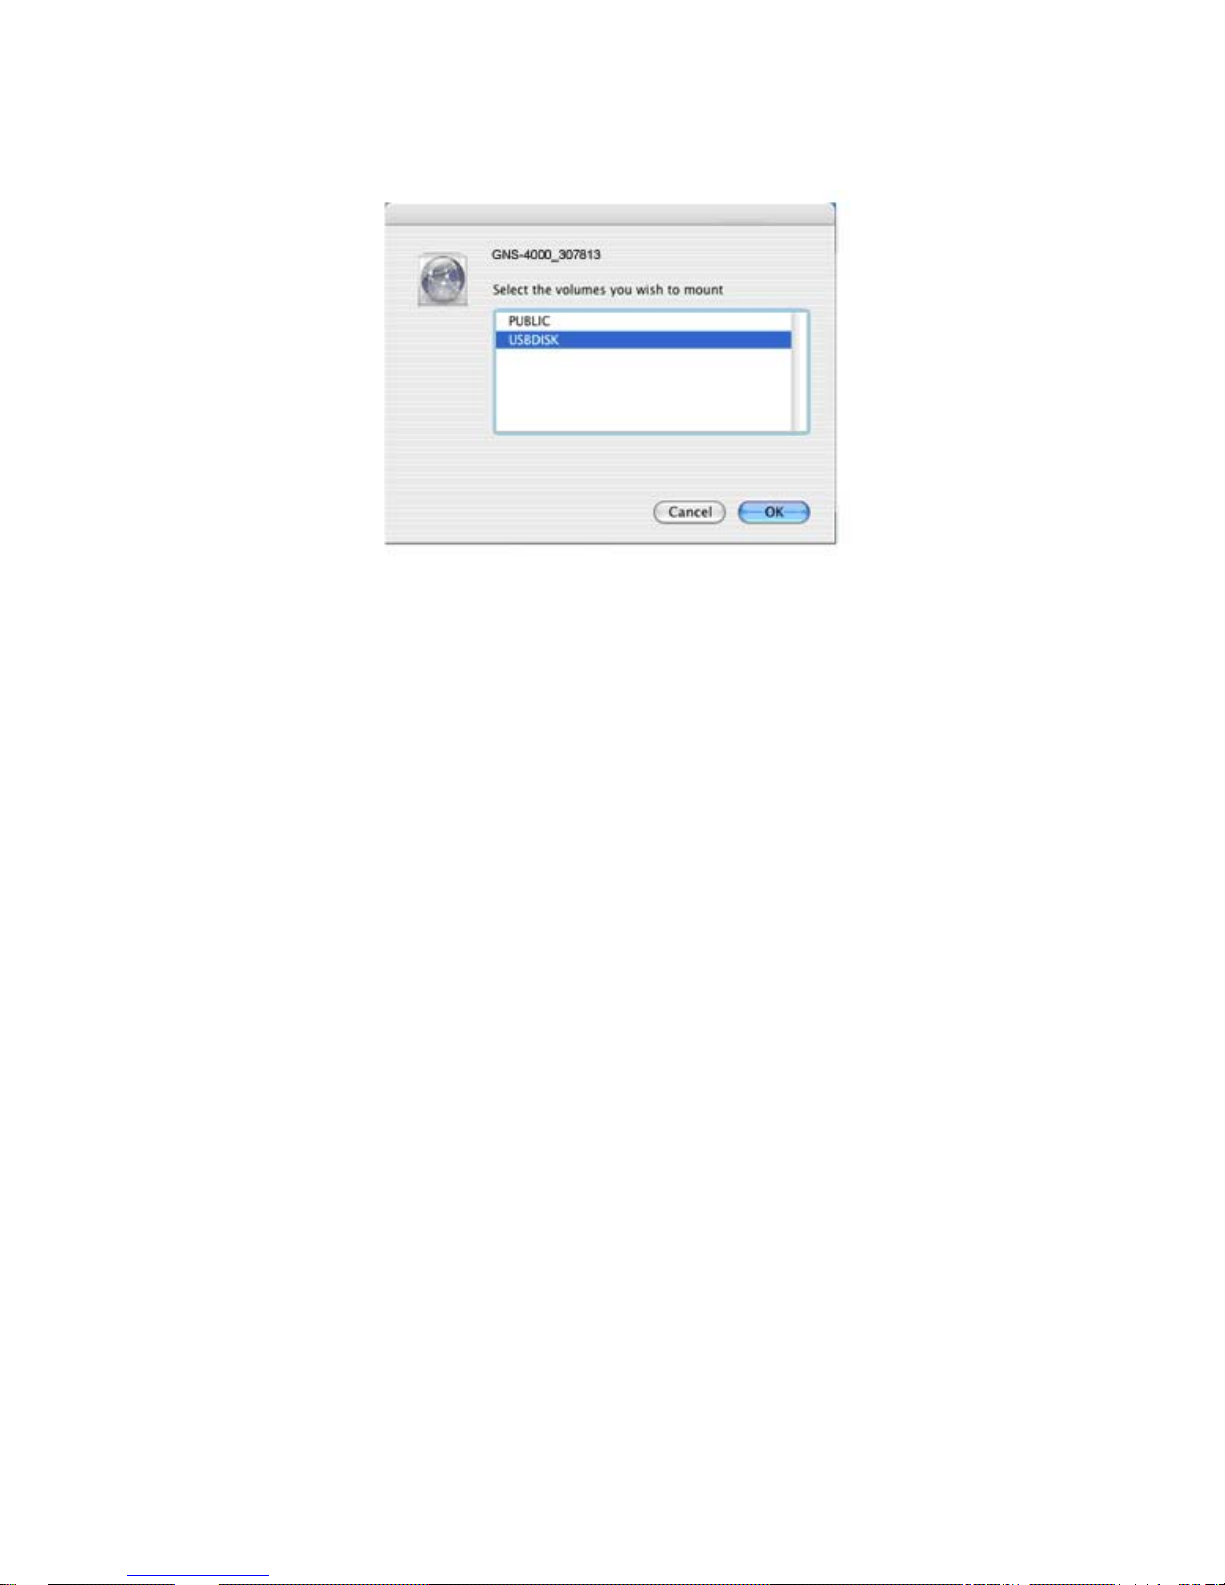
The USB drive appears as a folder on the Network Storage when you create a
network drive on a Macintosh PC.
Follow the procedure “Setting up a Network Drive on a Macintosh PC”, but select
the USBDISK folder instead of the PUBLIC folder.
3.10. Disconnecting a USB Drive
To disconnect a USB drive or memory stick from the Network Storage:
1. Be sure that no files on the USB drive or memory stick are still open.
2. Unplug the USB drive or memory stick from the Network Storage.
The Network Storage automatically unmounts the USB drive or memory stick.
Page 58

48
Page 59
49
4. One Touch Backup
One Touch Backup enables you to make a quick, automated backup of a
selected folder on your PC, at the touch of a button. You can backup the files in
a single folder, multiple folders, or your complete hard disk drive. This feature
works on the Windows PC where you installed the Network Storage software.
Caution
The Network Storage and One Touch Backup cannot restore a
failed boot drive in your PC. However, you can use the Network
Storage to save your system backup file. See your Windows
documentation for information about system backups.
For One Touch Backup to work, you must:
• Enable One Touch Backup on the Network Storage
• Create a Backup Schedule in SmartSYNC
Notes
• Windows does not allow SmartSYNC to access protected
folders and files. If you want to perform a backup, you must
first disable protection on your folders and files.
• If you want to run the Windows Backup or Restore Wizard,
access the Network Storage as a network drive. See “Setting
up a Network Drive on a Windows PC”
4.1. Enabling One Touch Backup
To enable One Touch Backup on the Network Storage:
1. On the Windows PC, start ASM.
2. In the Tree, click on the + beside the Backup icon, then click on the Client
Backup icon.
3. On the One Touch Backup tab, click the Enable button for One Touch
Backup Services, then click the OK button.
Page 60
50
4.2. Creating a Backup Schedule
For each folder you want to backup, you must create a backup schedule.
To create a Backup Schedule in SmartSYNC:
1. On the Windows desktop, double-click on the
SmartSYNC icon (right).
2. In SmartSYNC, click on the Schedule tab.
3. Click the Create button.
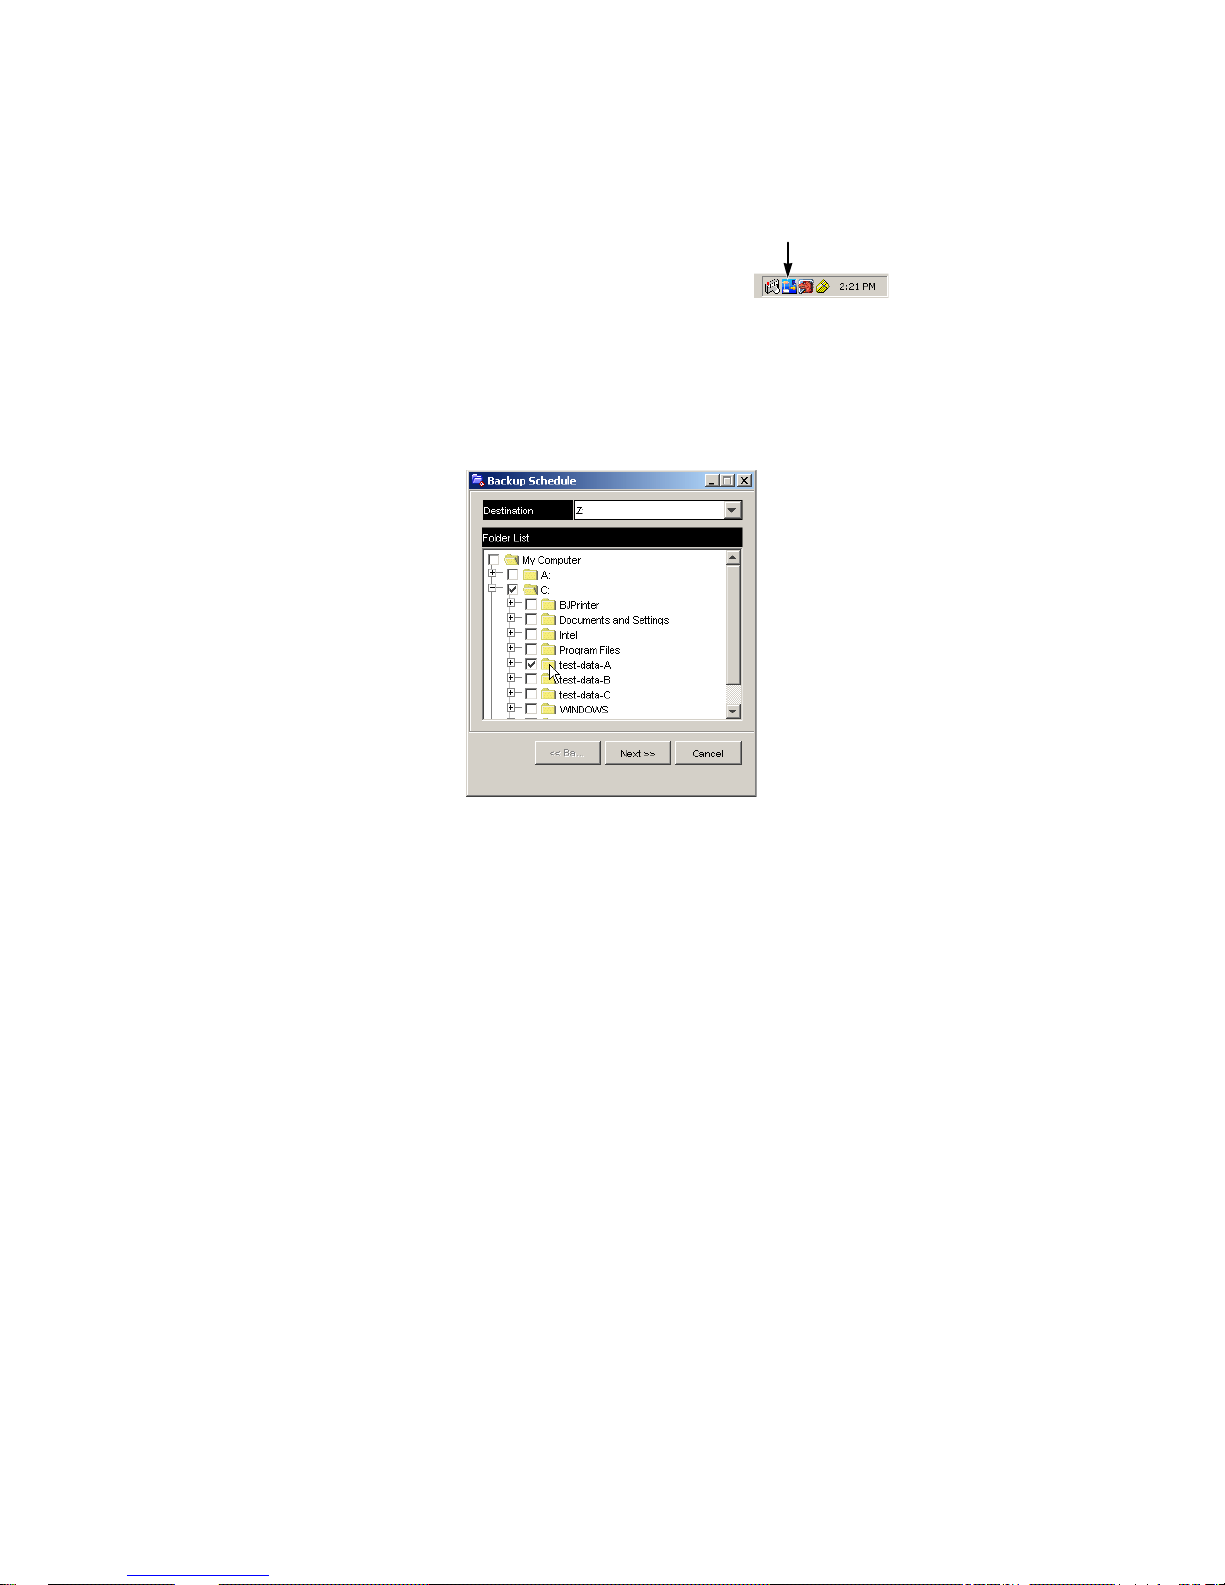
4. In the Backup Schedule window, verify the Destination.
The destination is a letter, typically Z, Y, or X, which represents a network
drive on your PC and a specific folder on the Network Storage.
5. In the folder list, click on the + icons to expand the tree.
The Folder List is a representation of the file structure on your PC.
6. Click on the folder you want to backup.
A checkmark appears beside the selected folder. The backup will include
the folder you select and all subfolders.
7. Click the Next >> button.
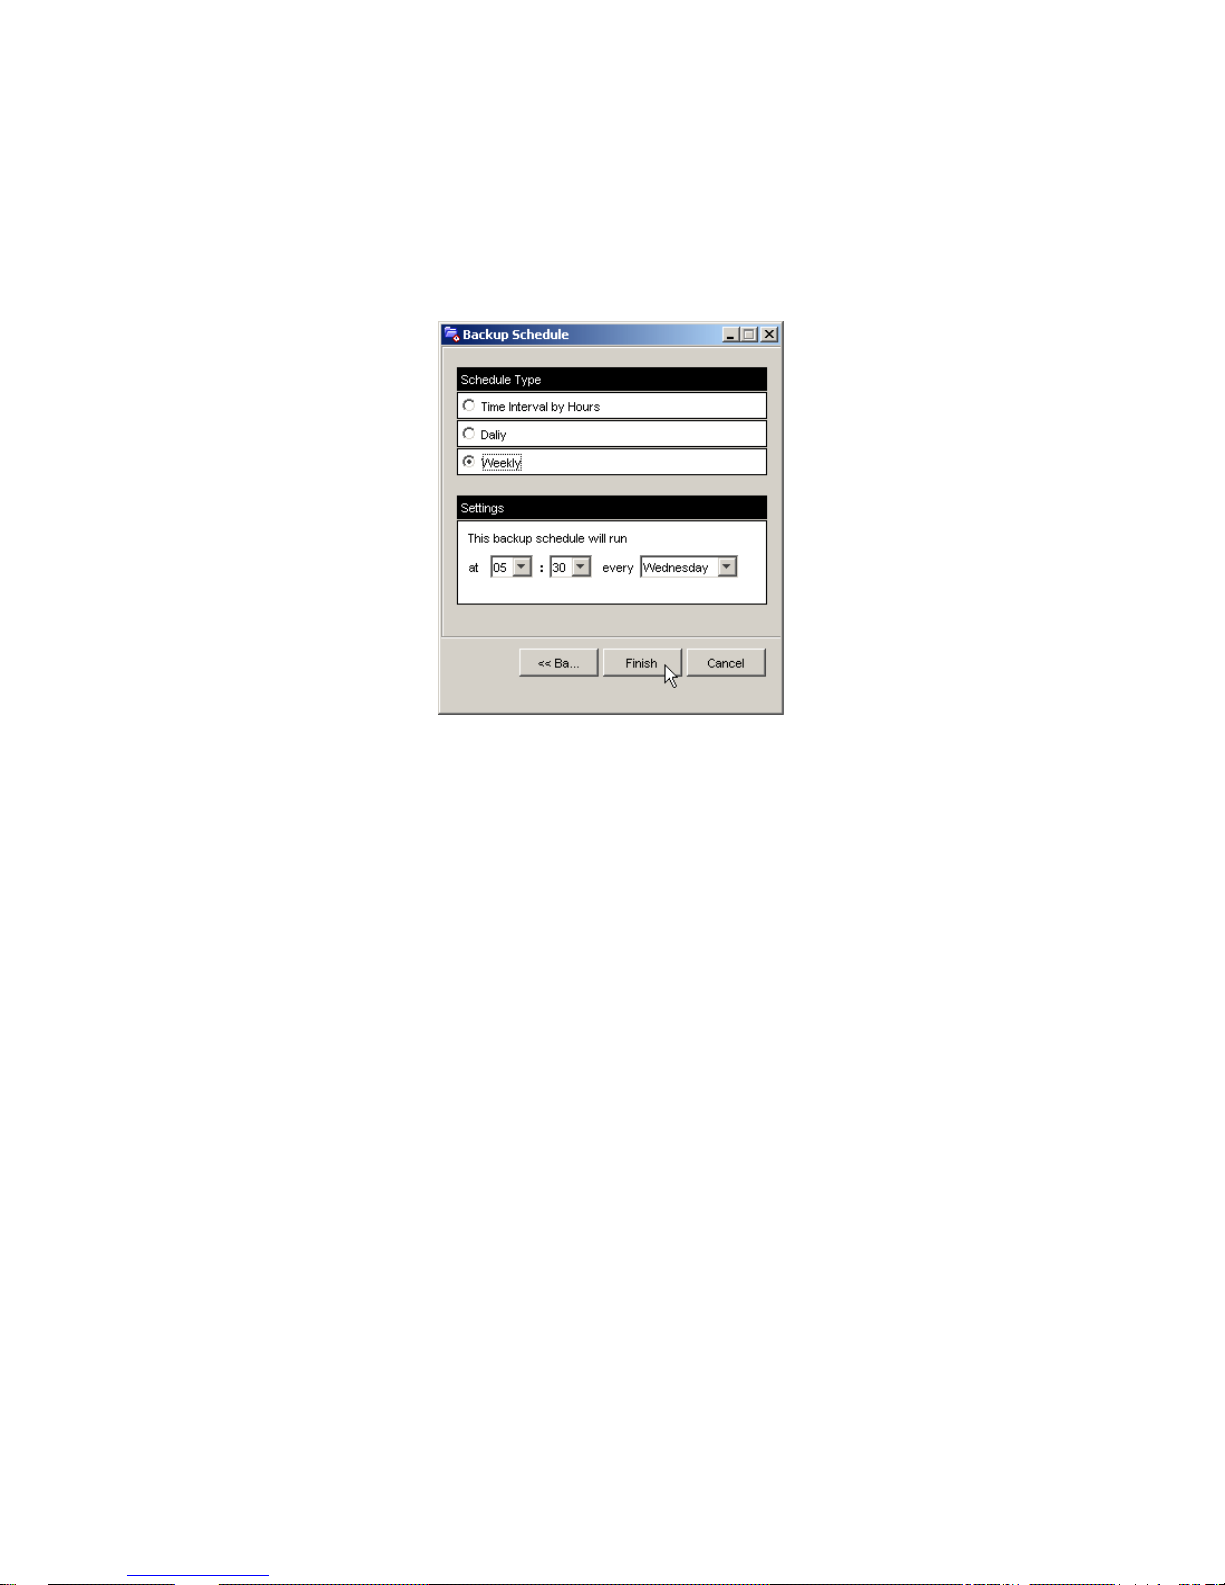
8. Choose a Schedule interval by number of hours, dail y, or weekly.
S
mar
tSYNC i
con
Page 61
51
9. Choose a setting:
• If you chose hours, choose the number of hours from the dropdown
menu.
• If you chose daily, choose the time of day in the hour (24-hour clock)
and minutes dropdown menu.
If you chose weekly, choose the time of day and day of the week in the hour (24hour clock), minutes, and day dropdown menus.
10. Click the Finish button.
Your Backup Schedule appears in the Schedule tab.
Page 62
52
4.3. Performing a One Touch Backup
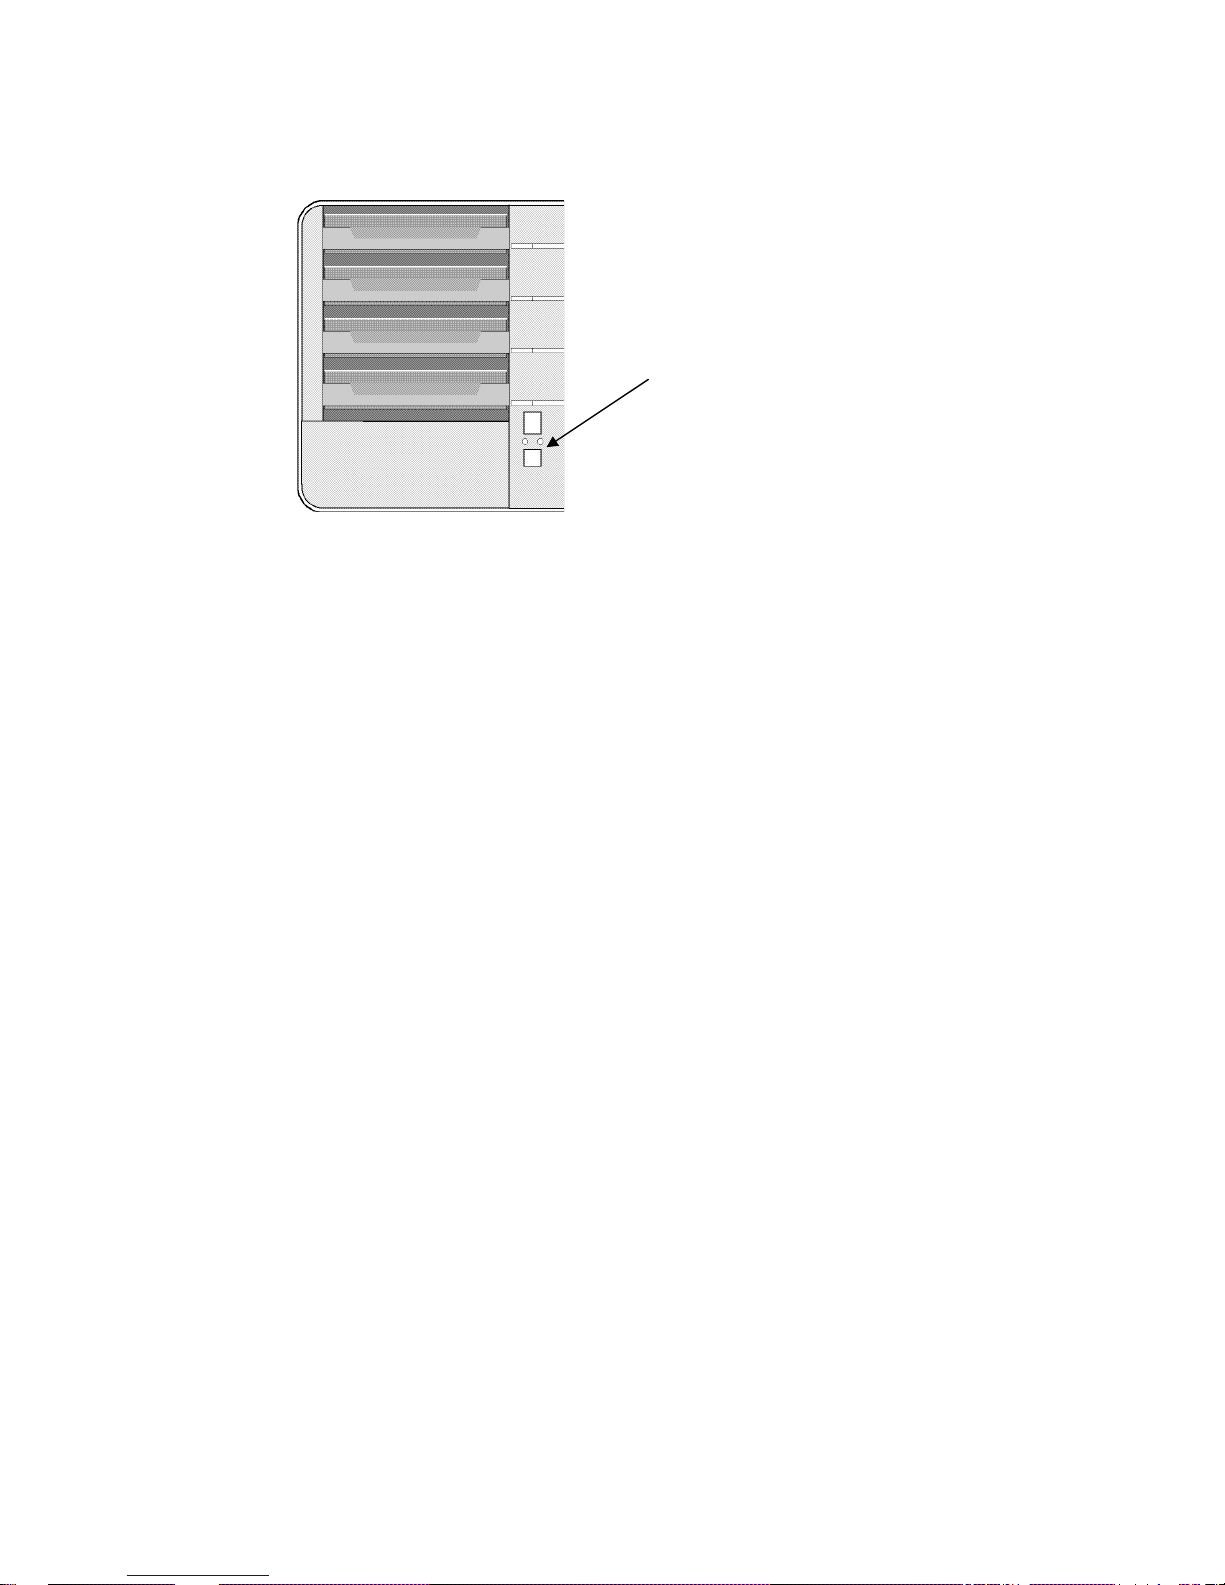
To perform a One Touch Backup, press the One Touch Backup button on the front
of the Network Storage.
Within moments, the folders you specified are backed up onto the Network Storage.
The One Touch Backup function backs up all of the folders on your PC for which
you created a backup schedule.
One Touch Button
Page 63
53
4.4. Viewing Your Backup Files
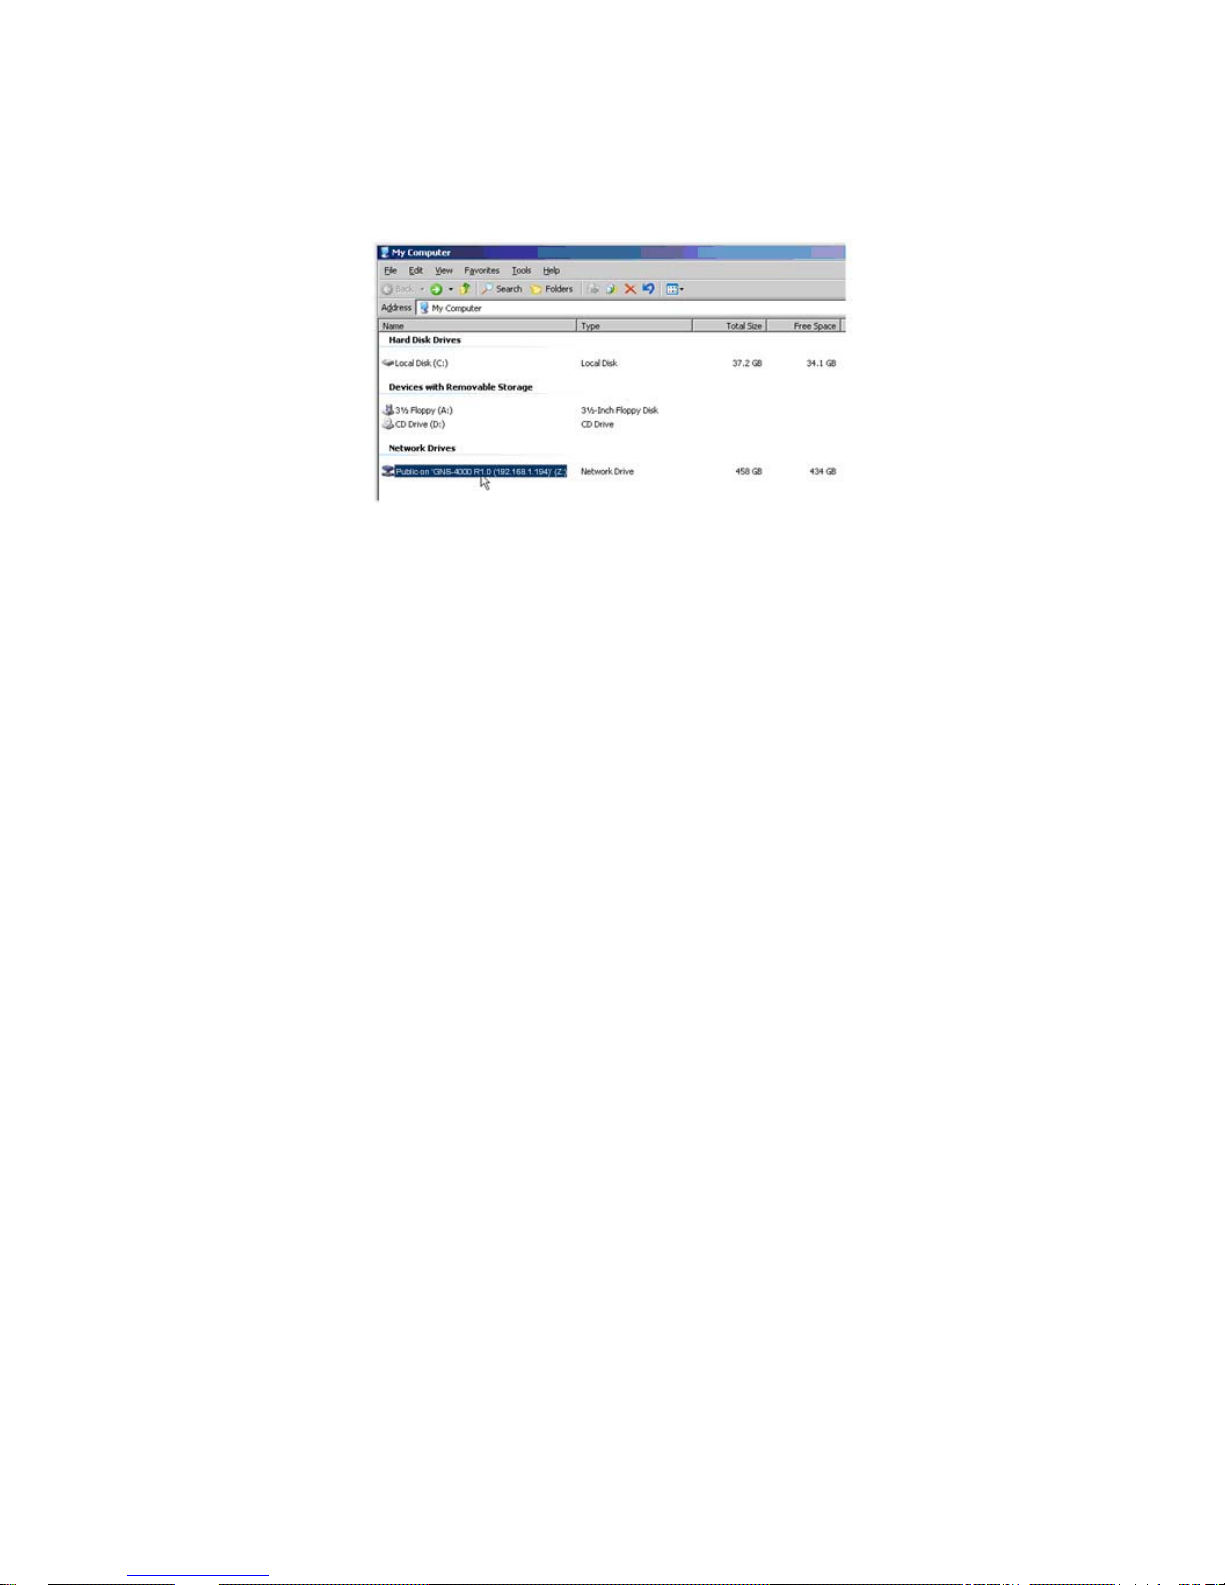
To view your backup files on the Network Storage:
1. On the Windows PC desktop, double-click on the My Computer icon.
2. Under Network Drives, double-click on the Network Storage.
3. On the Network Storage, find the folder called BACKUPDATA.
The BACKUPDATA folder contains the results of the One Touch Backup from your
PC. The subfolders inside the BACKUPDATA folder match the file structure on your
PC’s hard disk drive.
Page 64
54
4.5. Restoring Your Backup Files
Caution
The Restore function will overwrite files in the destination folder
on your PC.
If the backup files on the Network Storage match the names of
the files in the restore location folder on your PC, the Restore
function will overwrite those files on your PC.
If you do not want to overwrite the files on your PC, take one of
the following actions:
• Move the current files to a different folder on your PC.
• Choose a different restore location folder.
To restore backup files from the Network Storage to your PC:
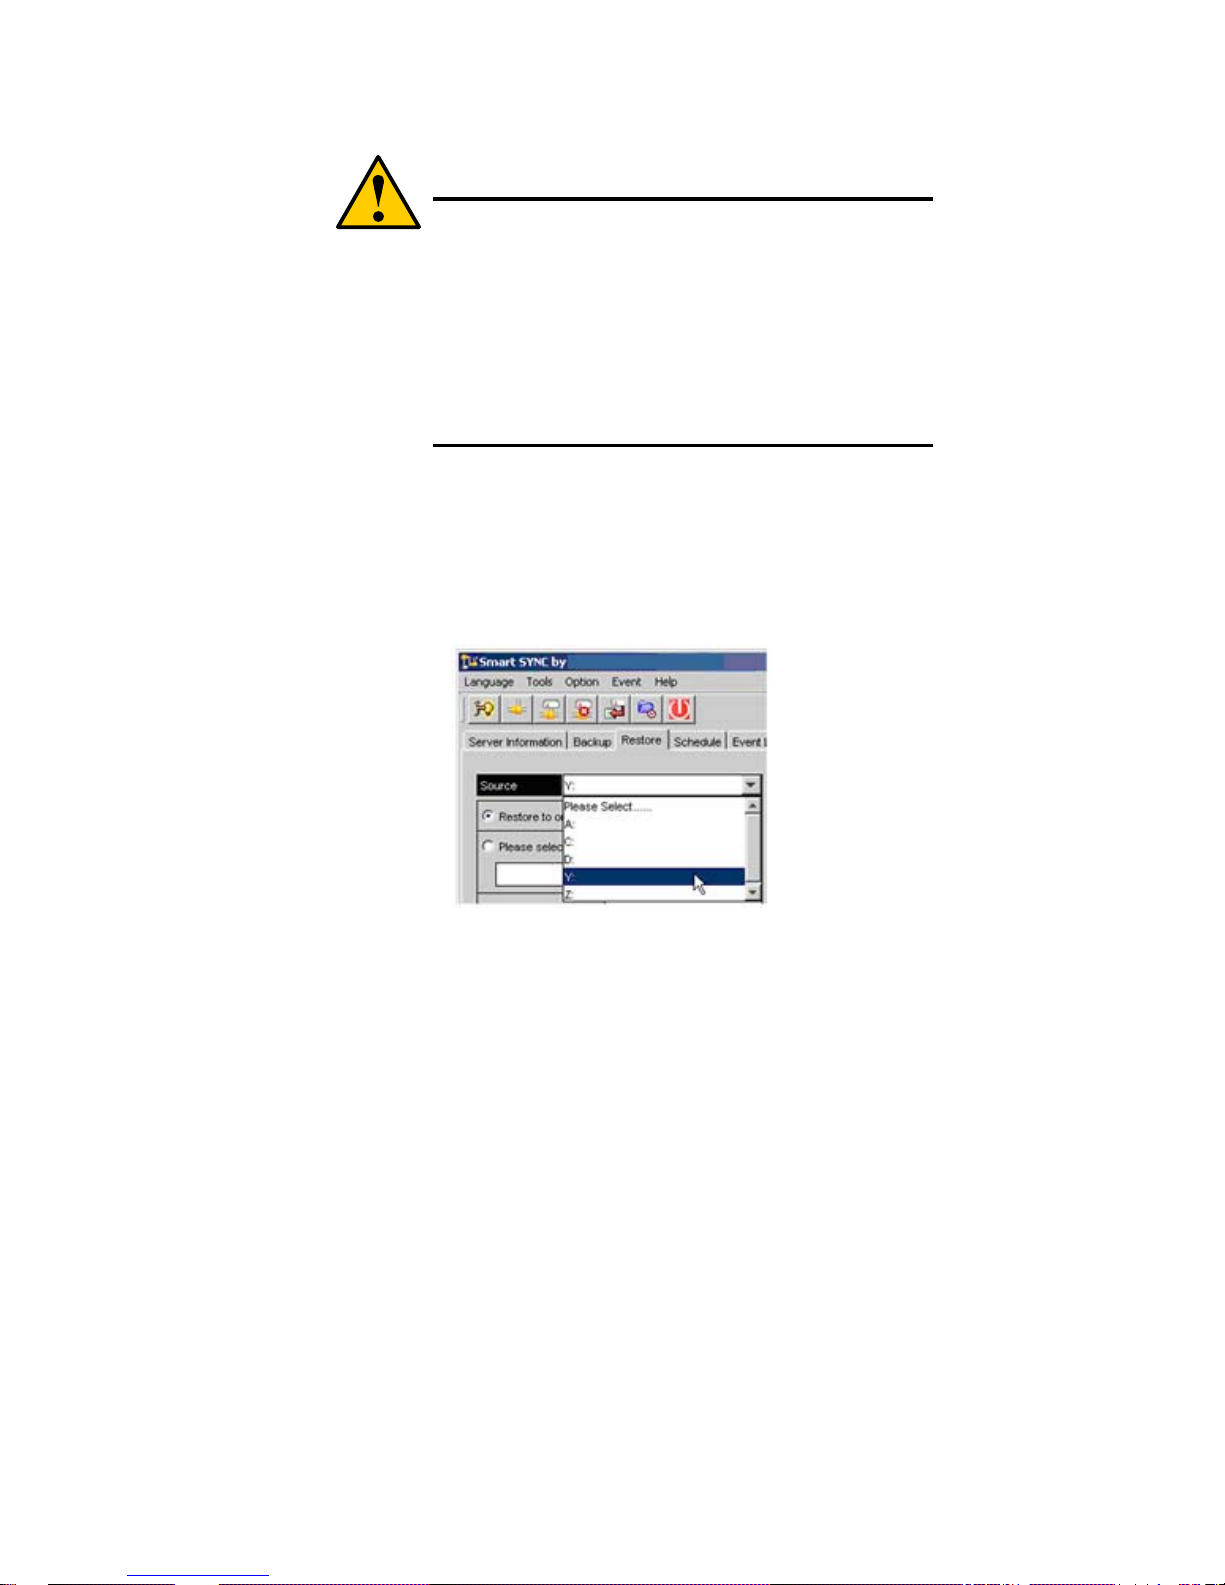
1. On the Windows PC, open SmartSYNC and click on the Restore tab.
2. In the Source field, select the folder that contains the backup files that you
want to restore.
In the Source field, folders are identified by their network drive names, such as
Z, Y, or X.
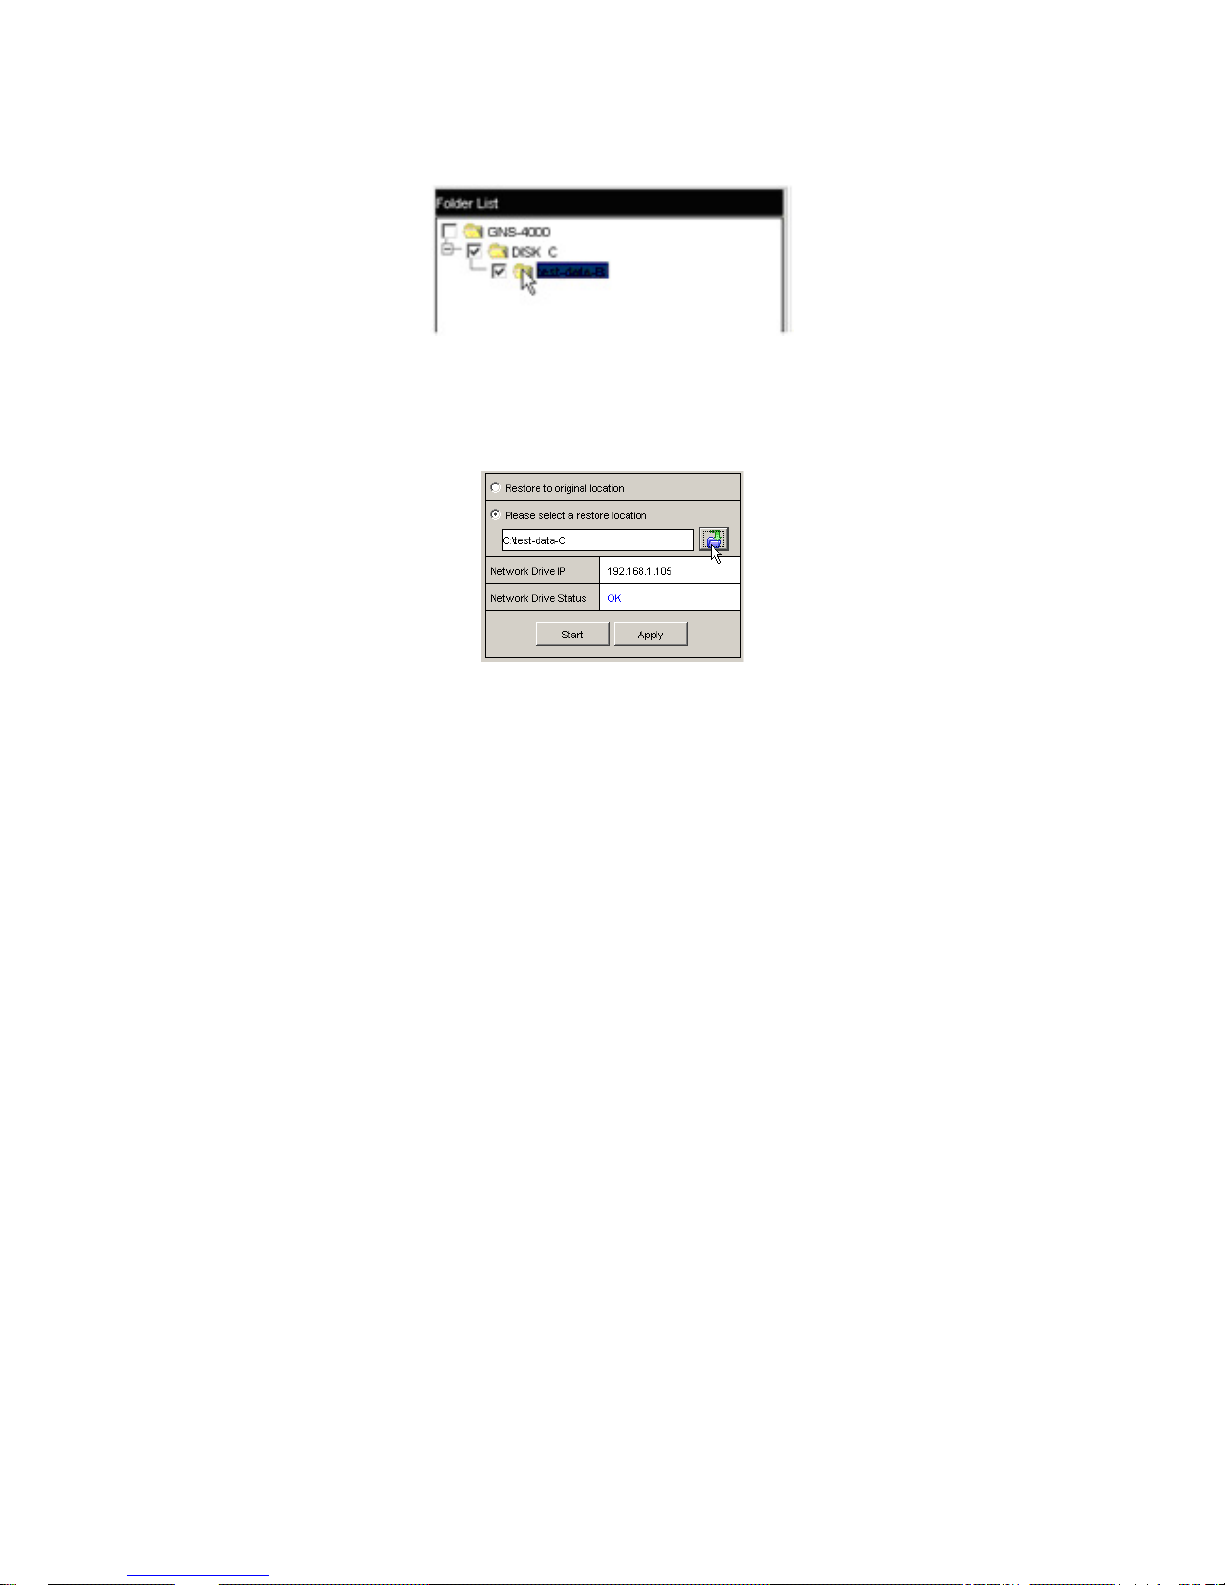
3. In the Folder List, click on the folders that contain the backup files you
want to restore.
Page 65
55
In the Folder List, folders are identified by their file structure as it was copied
from your PC. The lowest folder in the structure is the one that actually contains
the files.
4. Choose a restore location:
Original location -- The same folder on your PC from which the files
were copied for the backup.
Select a restore location -- A folder on your PC that you specify.
5. Click the Start button.
The files are copied from the Network Storage to your PC.
If you selected a restore location on your PC other than the original, the
Restore function includes subfolders that match the files structure on your
PC’s hard disk drive.
Page 66

56
Page 67

57
5. SmartSYNC
After installation, the SmartSYNC utility starts automatically in the background on
your Windows PC. SmartSYNC does not run on UNIX, Linux, or Macintosh PCs.
Opening the SmartSYNC Window
To open the SmartSYNC window, in the Windows
application tray (lower right corner of the screen),
double-click on the SmartSYNC icon.
The SmartSYNC window opens.
If the SmartSYNC icon does not appear in the Windows application tray, from the
Windows Start menu, choose Programs, then LevelOne NAS Utility, and then
SmartSYNC.
Selecting a Language
To select a language, click on Language menu and choose the language you prefer.
Closing the SmartSYNC Window
To close the SmartSYNC window, click the X (close) icon at the top right corner of
the window.
The SmartSYNC window closes but the utility continues to run.
To open the SmartSYNC window again, double-click on the SmartSYNC icon in the
application tray.
Quitting SmartSYNC
To quit SmartSYNC, click the Exit button (right).
The SmartSYNC utility quits.
To restart SmartSYNC, do one of the following actions:
Log out of Windows, then log in again.
From the Windows Start menu, choose Programs, then LevelOne NAS Utility,
and then SmartSYNC.
S
mar
tSYNC i
con
Exit button
Page 68
58
Displaying the Network Storages on your Network
To display a list of servers (Network Storages on your network), open the
SmartSYNC window.
The SmartSYNC window opens with the Server Information tab selected. A list of
servers appears in the Server List on the Server Information tab.
Starting ASM
LevelOne Advanced Storage Management (ASM) displays in the default browser.
To start the default browser and display ASM:
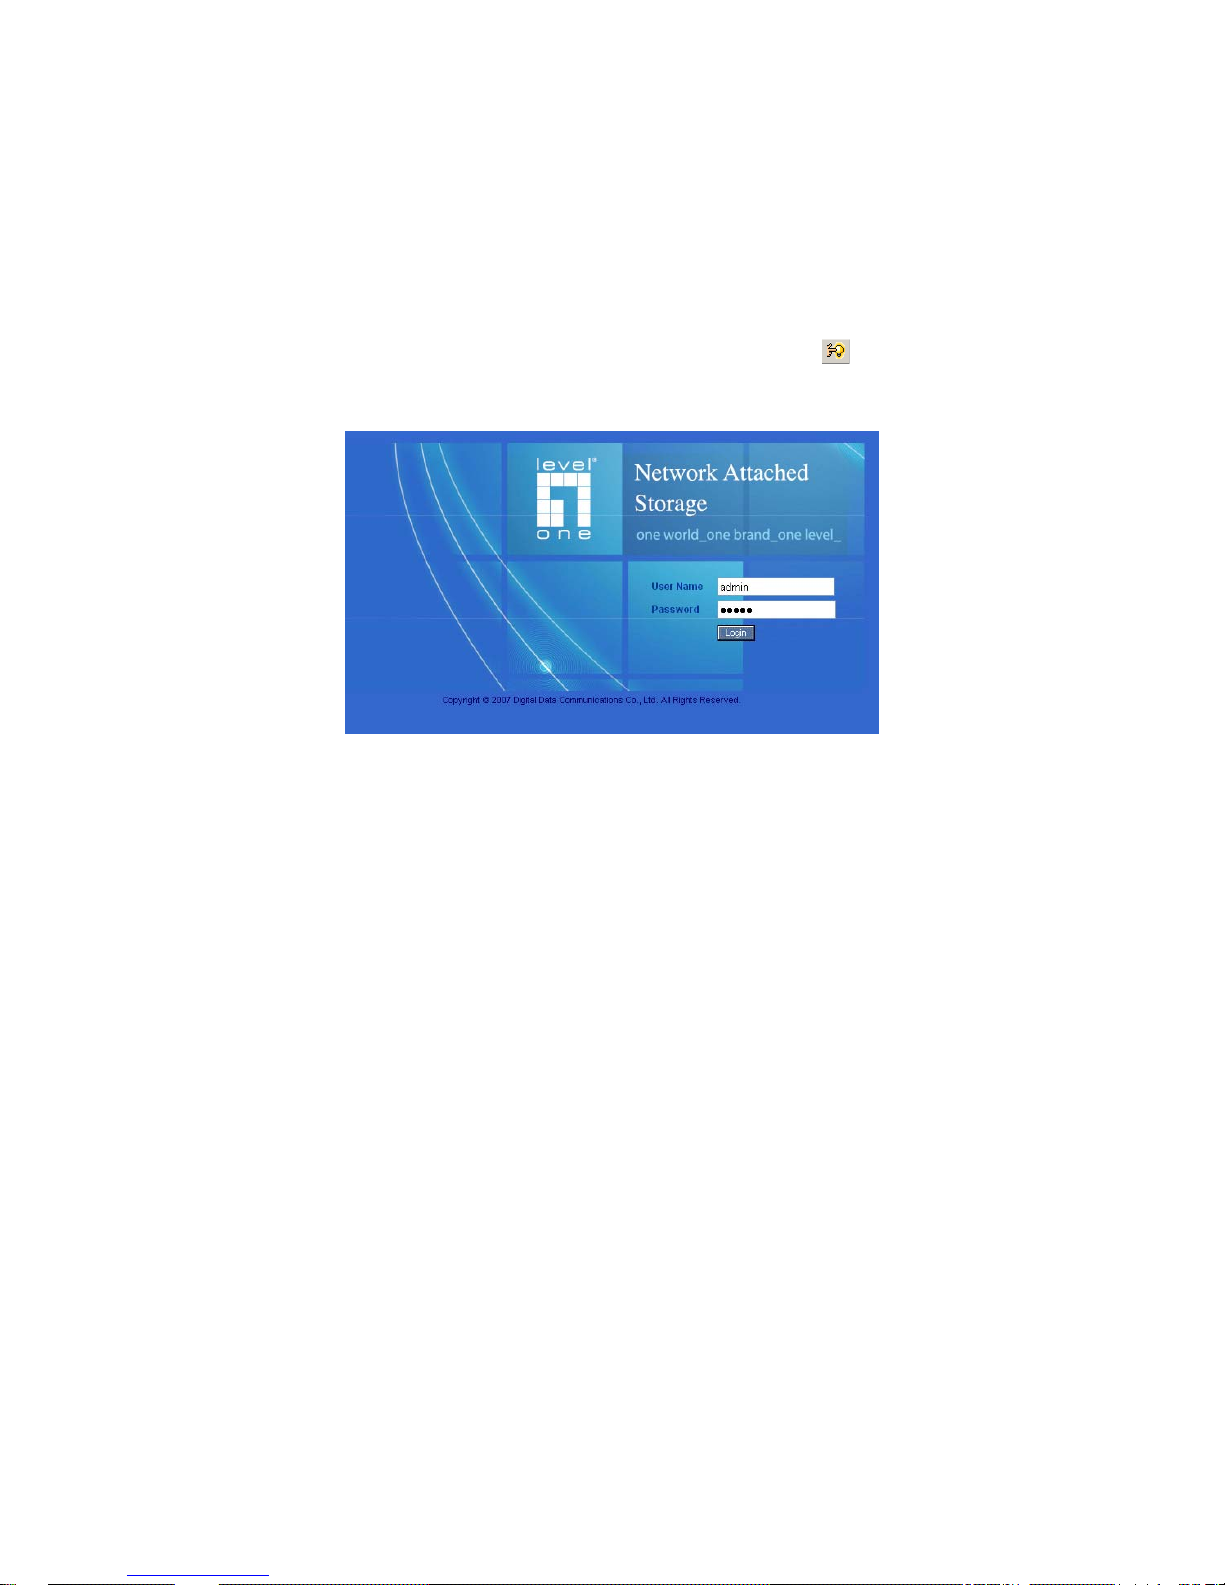
1. Open the SmartSYNC window.
2. Click on the Open GUI button (right).
Your default browser starts and the ASM login screen displays.
3. Type the user name and password in the respective fields, then click the Login
button.
Note:
The default user name is admin. The default password is admin.
The user name and password are case sensitive.
Open GUI
button
Page 69

59
5.1. Changing the Network Settings
To change the Network Storage’s network settings:
1. Open the SmartSYNC window.
2. Click on the Server Information tab.
3. Click on the Assign IP button (right).
The Assign IP login dialog box appears.
4. Type the user name and password in the respective fields, then click OK.
The default user name is admin. The default password is admin.
The user name and password are case sensitive.
The New IP Address dialog box appears.
5. Type the following into the fields provided:
• Computer Name – The Network Storage’s Server Name in
SmartSYNC
• IP address
• Subnet Mask
• Default Gateway
• Primary DNS
• Secondary DNS.
Note
See your Network Administrator for help in making these settings.
6. Click OK to save your settings.
The changes appear in the Server List on the Server Information tab.
The change of IP address will disconnect the Network Storage as a
network drive under My Computer on your Windows PC
To access your data on the Network Storage, you must create a new
network drive in Windows.
Assign IP
button
Page 70
60
5.2. Connecting a Network Drive
To access the folders you create on the Network Storage, you must make them
network drives on your PC.
To connect a folder on the Network Storage as a network drive:
1. Open the SmartSYNC window.
2. Highlight the Network Storage in the server list, then click
the Connect Network Drive button (right).
The Connect Network Drive dialog box appears.
3. Choose the Device Name and Share Folder from the dropdown menus.
The Device Name list begins with Z and goes in reverse alphabetical order.
The Share Folder list represents the folders you have created on the Network
Storage.
4. Click the OK button.
5. On the Windows desktop, double-click on the My Computer icon.
The Public folder on the Network Storage (GNS-4000) appears under My
Computer as a network drive.
Connect Network
Drive button
Page 71

61
5.3. Deleting Device (Network Drive) Records
To delete a drive record only affects SmartSYNC. Deleting a drive record does NOT
delete your network drive under My Computer and it does NOT affect the data
stored in your Network Storage’s folders.
To delete a device record:
1. Open the SmartSYNC window.
2. Highlight a server in the Server List.
3. Click on the Remove Device Record button (right).
A Device List window appears.
4. Click on the Device Name that you want to delete, then click the Remove
button.
The Device name is removed from the list.
5. Click X or the Cancel button to close the window.
Remove Device
Record button
Page 72
62
5.4. Performing a Backup
A Backup copies folders from your PC to the Network Storage.
Caution
The Network Storage and SmartSYNC cannot restore a failed
boot drive in your PC. However, you can use the Network
Storage to save your system backup file. See your Windows
documentation for information about system backups.
Note
• Windows does not allow SmartSYNC to access protected
folders and files. If you want to perform a backup, you must
first disable protection on your folders and files.
• If you want to run the Windows Backup or Restore Wizard,
access the Network Storage as a network drive.
To perform a backup of a selected folder:
1. Open the SmartSYNC window.
2. Highlight a server in the Server List.
3. Click on the Backup tab.
4. Select a Destination.
Destinations are identified by drive letters and correspond to a specific folder
on the Network Storage.
5. Click on the folder you want to backup in the Folder List.
Click the + icon to expand the file tree.
A checkmark appears beside the selected folder. The backup will include the
folder you select and all subfolders.
6. Do one of the following actions:
To perform the backup now, click Start button.
To perform the backup later, click the Apply button to save your
settings.
When you are ready perform the backup, click the Backup button (right).
Backup
button
Page 73

63
5.5. Viewing Your Backup Folders
To view your backup folders on the Network Storage:
1. On the Windows desktop, double-click on the My Computer icon.
2. Under Network Drives, double-click on the Network Storage.
3. On the Network Storage, find the folder called BACKUPDATA.
The BACKUPDATA folder contains the results of the One Touch Backup from
your PC. The subfolders inside the BACKUPDATA folder match the file
structure on your PC’s hard disk drive.
Page 74
64
5.6. Performing a Restore
Caution
The Restore function will overwrite files in the destination folder
on your PC.
Note
If you want to run the Windows Backup or Restore Wizard,
access the Network Storage as a network drive.
A Restore copies folders from the Network Storage to your PC.
To perform a Restore of a selected folder:
1. Open the SmartSYNC window.
2. Highlight a server in the Server List.
3. Click on the Restore tab.
4. Select a Source.
Sources are identified by drive letters and correspond to a specific folder on
the Network Storage.
5. Choose a restoration location.
Restore to original location – The files from the Network Storage will
overwrite the files on our PC
Select a restore location – The files from the Network Storage are saved
in a set of folders that match the original file structure from where they
were copied
6. Optional. If you chose a new Restore location, click the Browse button (right),
navigate to the destination you want, highlight the destination folder, then click
the Open button to select the folder.
7. In the Folder List, click on the folder you want to restore.
Click the + icon to expand the file tree.
A checkmark appears beside the selected folder. The restore will include the
folder you select and all subfolders.
8. Do one of the following actions:
To perform the Restore now, click Start button.
To perform the Restore later, click the Apply button to save your settings.
When you are ready perform the backup, click the Tools menu and choose
Restore > Start.
Page 75
65
5.7. Scheduling a Backup
A Backup copies folders from your PC to the Network Storage.
Caution
The Network Storage and SmartSYNC cannot restore a failed
boot drive in your PC. However, you can use the Network
Storage to save your system backup file. See your Windows
documentation for information about system backups.
Note
• Windows does not allow SmartSYNC to access protected
folders and files. If you want to perform a backup, you must
first disable protection on your folders and files.
• If you want to run the Windows Backup or Restore Wizard,
access the Network Storage as a network drive.
To schedule the backup of a selected folder:
1. Open the SmartSYNC window.
2. Click on the Schedule tab.
3. Click the Create button.
4. In the Backup Schedule window, verify the Destination.
Destinations are identified by drive letters and correspond to a specific folder
on the Network Storage.
5. In the folder list, click on the + icons to expand the tree.
The Folder List is a representation of the file structure on your PC.
6. Click on the folder you want to backup.
A checkmark appears beside the selected folder. The backup will include the
folder you select and all subfolders.
7. Click the Next >> button.
8. Choose a Schedule interval by number of hours, daily, or weekly.
Page 76

66
9. Choose a setting:
If you chose hours, choose the number of hours from the dropdown
menu.
If you chose daily, choose the time of day in the hour (24-hour clock)
and minutes dropdown menu.
If you chose weekly, choose the time of day and day of the week in the
hour (24-hour clock), minutes, and day dropdown menus.
10. Click the Finish button.
Your Backup Schedule appears in the Schedule tab.
Modifying a Backup Schedule
You can change source folders, time, and day settings for a scheduled Backup.
To modify a Backup Schedule:
1. Open the SmartSYNC window.
2. Click on the Schedule tab.
3. In the Schedule list, highlight the schedule you want to modify.
4. Click the Modify button.
5. Select the folders you want to backup from the tree, then click Next >>.
6. Select the Schedule Type (hour, daily, weekly).
7. Select the time and day settings.
8. Click Finish to save your Backup settings.
Deleting a Backup Schedule
To delete a Backup Schedule:
1. Open the SmartSYNC window.
2. Click on the Schedule tab.
3. In the Schedule list, highlight the schedule you want to delete.
4. Click the Delete button.
5. In the confirmation box, click Yes.
Page 77

67
5.8. Setting the Default Browser for ASM
To set the default browser for ASM:
1. Open the SmartSYNC window.
2. Click on the Option menu and choose Browser Path...
3. The Setup Browser Path dialog box displays.
4. Click on the ... button, then navigate to the browser’s .exe file.
5. Highlight the browser’s .exe file, then click the Open button.
6. Click the OK button to save your setting.
5.9. Viewing the Event Log
To view the Event Log:
1. Open the SmartSYNC window.
2. Click on the Event Log tab.
3. From the Type menu, select the type of events you want to display:
All – All events
Info – Information events only
Error – Error events only
Clearing the Event Log
To clear the Event Log:
1. Open the SmartSYNC window.
2. Click on the Event Log tab.
3. Click on Clear All.
Or, click on the Event menu and choose Clear All.
Page 78

68
Page 79
69
6. Advanced Storage Manager
6.1. Connecting to ASM
The LevelOne Advanced Storage Management (ASM) software is factoryinstalled on the Network Storage system. ASM runs in the browser on your PC.
You can access ASM:
• Directly in your browser.
• Through SmartSYNC
ASM in your Browser
To log into ASM in your browser:
1. Start your Browser.
2. In the Browser address field, type in the IP address of the Network Storage.
Note that the IP address shown below is only an example. The IP address
you type into your browser will be different.
• ASM uses an HTTP connection .............................................. .http://
• Enter the Network Storage’s IP address .................... 192.168.1.194
Together, your entry looks like this: http://192.168.1.194
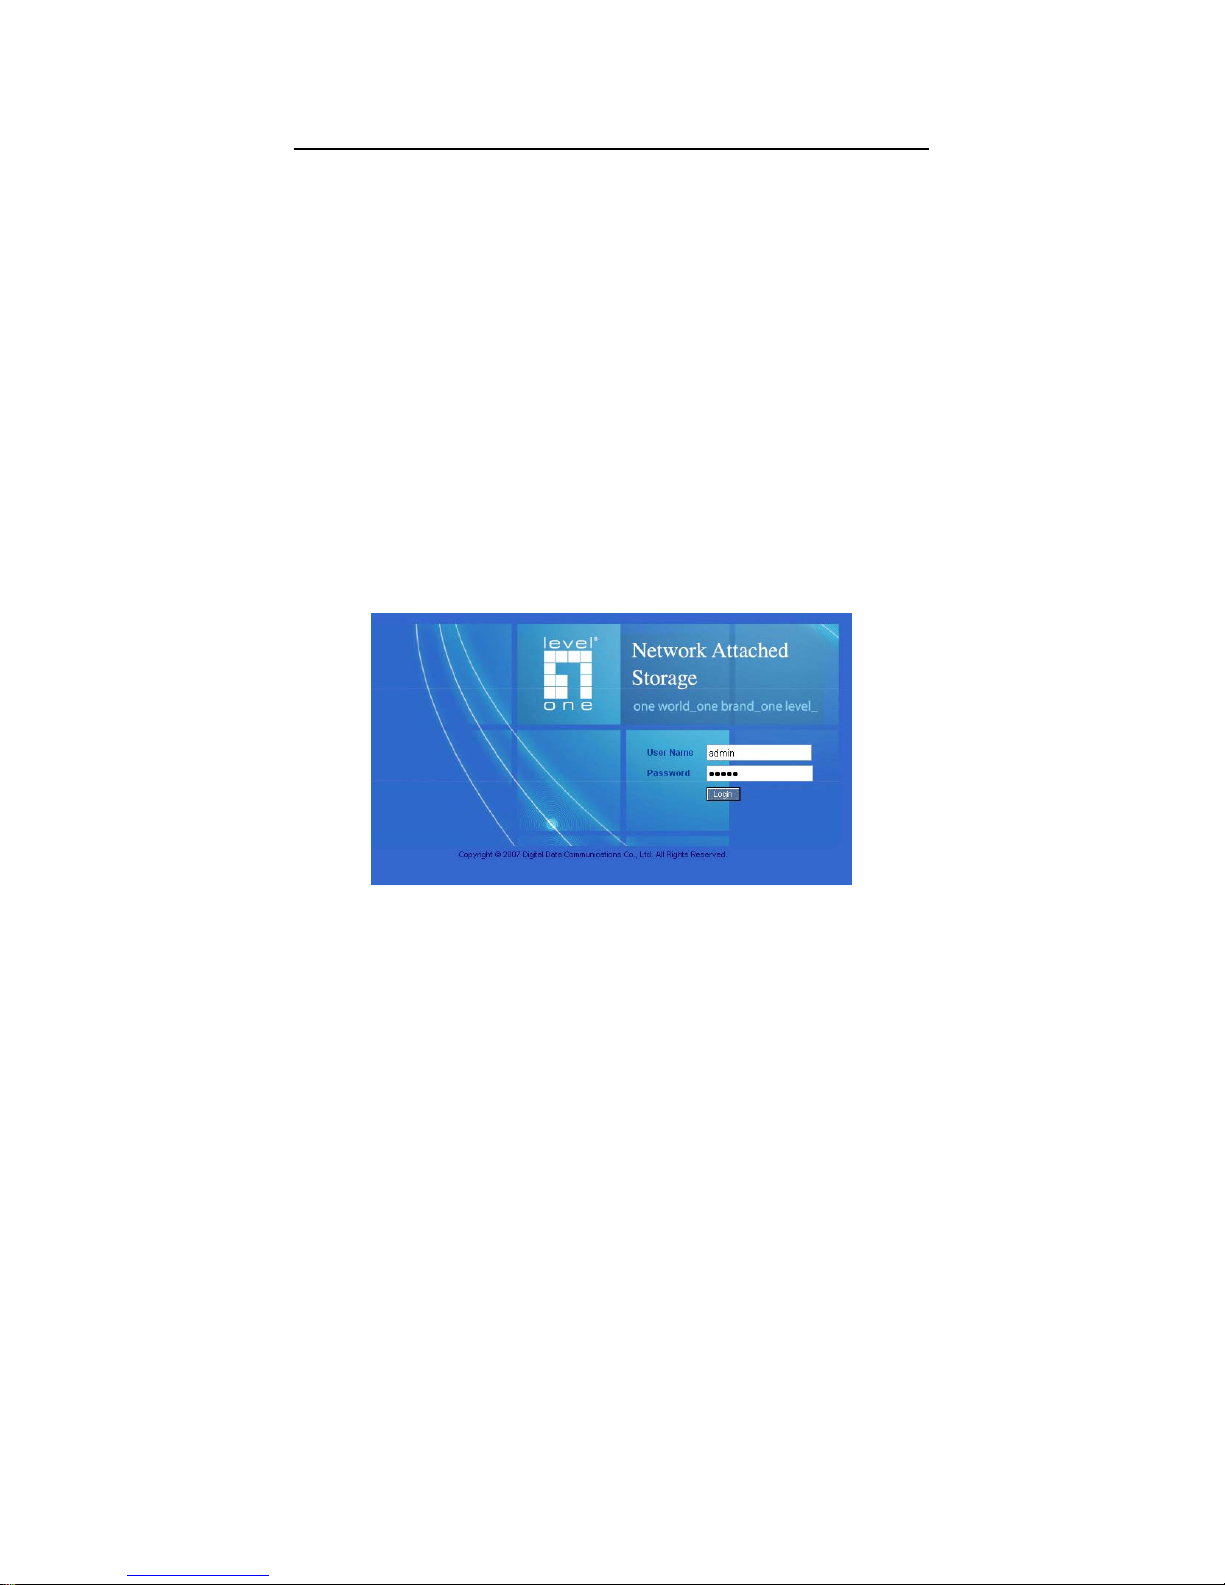
The ASM login screen displays
3. Type the user name and password in the respective fields, then click the
Login button.
The default user name is admin. The default password is admin.
The user name and password are case sensitive.
Page 80
70
ASM in SmartSYNC
To log into ASM through SmartSYNC:
1. In the Windows application tray (lower right
corner of the screen), double-click on the
SmartSYNC icon (right).
SmartSYNC opens with the Server Information
tab displayed.
2. Click on the Open GUI button (right).
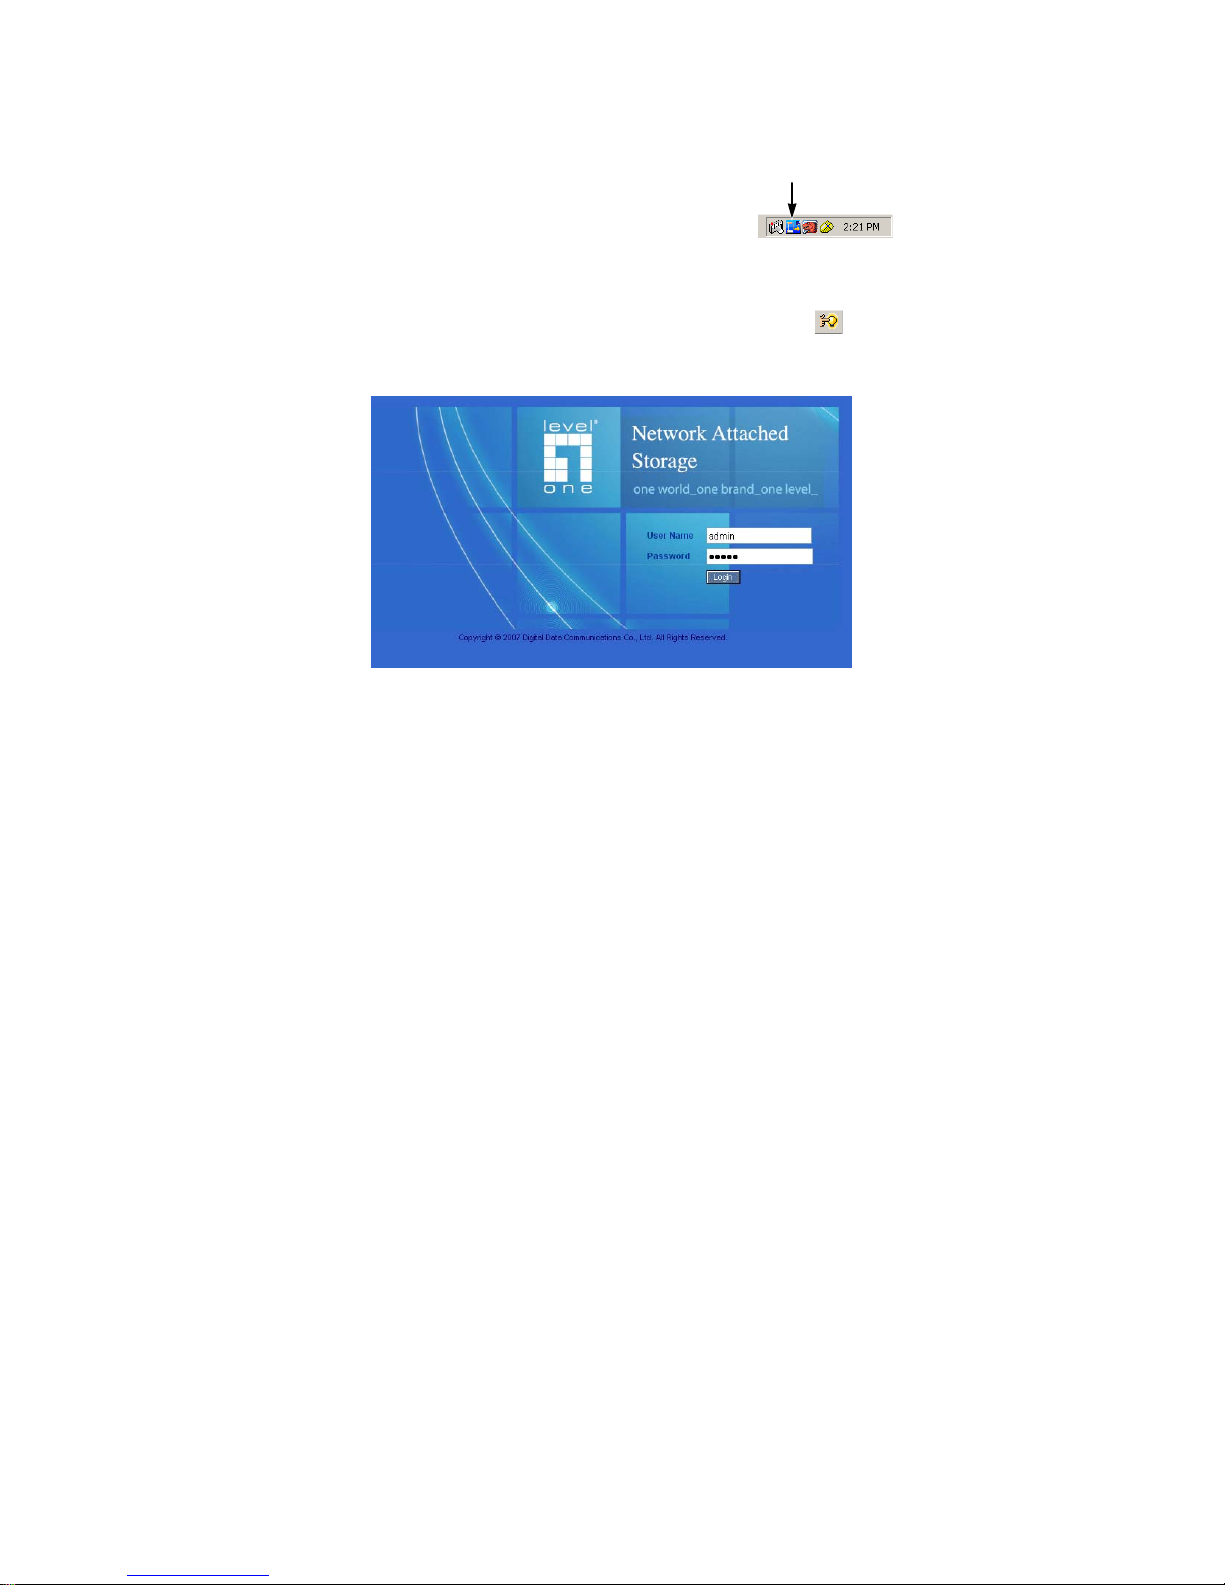
Your default browser starts and the ASM login screen
displays.
3. Type the user name and password in the respective fields, then click the
Login button.
The default user name is admin. The default password is admin.
The user name and password are case sensitive.
S
mart
SYNC i
con
Open GUI button
Page 81
71
6.2. Selecting a Language
To select a language, click on Language menu in the ASM Header and choose
the language you prefer.
6.3. Navigating in ASM
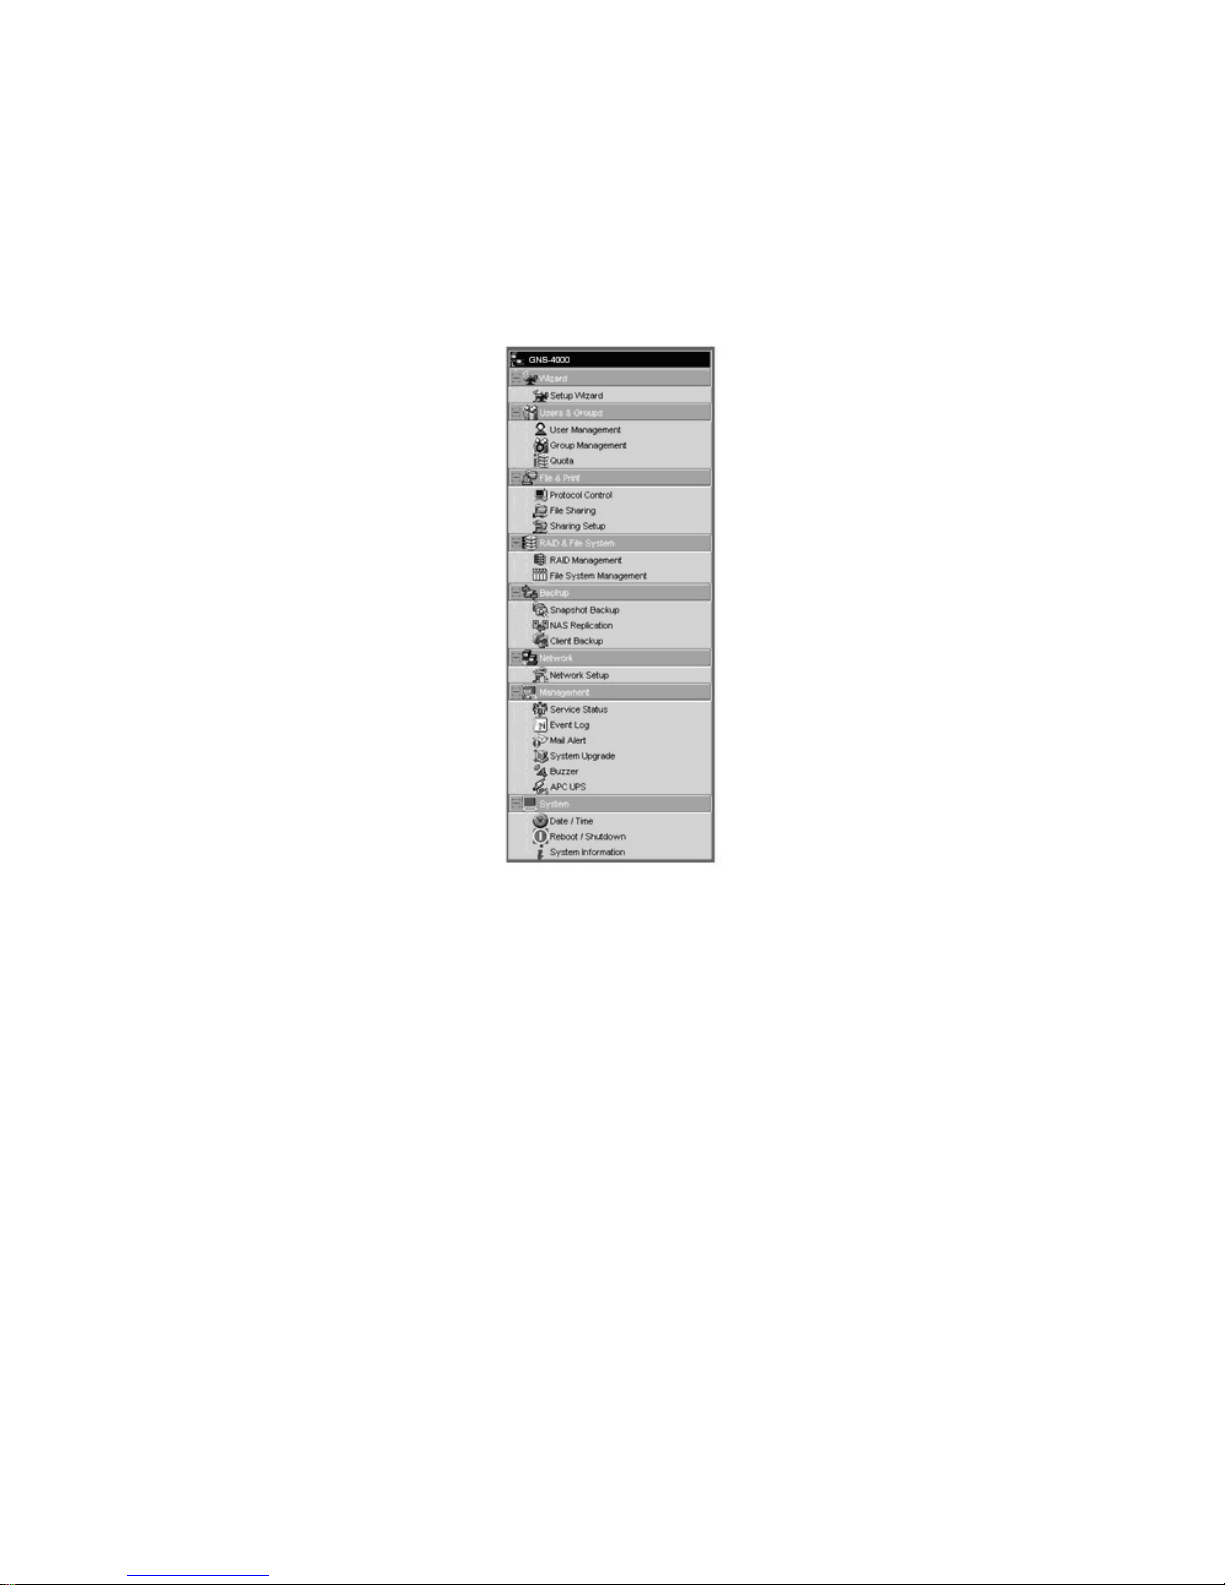
The Tree is the primary navigation tool in ASM. Categories of functions listed
with a + sign before the icon.
Icons for specific functions are listed under the categories. Click the + sign to show
the functions.
Click on the function icons to display their information on the screen. Each
function has one or more tabs in its screen.
Page 82

72
6.4. Setting up Network Storage with the Setup
Wizard
If you used the NAS Setup Wizard utility to set up your Network Storage, you
do not need to run the Setup Wizard in ASM.
If you have not yet set up your Network Storage:
1. In the Tree, click on the + beside the Wizard icon, then on the Setup
Wizard icon to display the Setup Wizard screen.
2. Click the Next button to start the Setup Wizard.
The Step 1 screen appears.
3. Optional. In the Computer Name field, enter a name for the Network
Storage.
Use only letters, numbers, and the underscore character for the name.
4. Under network configuration, choose one of the following options:
• Configure using DHCP – Choose this option if your network has a
DCHP server with addresses available
• Configure using Specify an IP address – Choose this option if you
want to set the IP address and other network setting manually
5. If you chose the Configure using Specify an IP address option, t ype the
following information in the fields provided:
• IP Address
• Subnet Mask
• Default Gateway IP Address
• Primary DNS
• Secondary DNS
See your Network Administrator for help with these settings.
6. Click the Next button to continue.
The Step 2 screen appears.
7. Optional. Type a new administrator password into the New Password field.
Retype the new password into the Retype Password field.
8. Optional. To add a user, click the Add new user option button.
9. If you clicked the Add new user option button, type a user name and
password into the fields provided, then click the Add button.
10. Click the Next button to continue.
The Step 3 screen appears.
11. Check the Enable box to the right of the services you plan to use.
Page 83

73
• Windows – Enables file access from Windows PCs. Also required to
use the Network Storage as a print server.
• Unix/Linux – Enables file access from Unix and Linux PCs
• Macintosh – Enables file access from Macintosh PCs
• FTP – Enables file access from PCs using FTP
12. Optional. Type new names into the Workgroup Name and Computer
Description fields.
13. Click the Next button to continue.
The Step 4 screen appears.
You must add at least one folder, which you will access from your PC as a
networked drive.
14. To add a folder, click the Add new folder option button.
15. Type a folder name into the field provided, check the boxes of the services
you expect to use with this folder, then click the Add button.
Add more folders as required.
16. Click the Next button to continue.
The Step 5 screen appears.
If a RAID Volume already exists on the Network Storage, information
about the RAID Volume is shown. To change the RAID, you must delete it
first, then run the Setup Wizard again.
17. From the RAID Level dropdown menu, select the RAID level you prefer for
your disk array.
See for more information.
18. Highlight disk drives in the Free Disks column and click the >> button to
move them to the Disks in RAID column.
19. Click the Next button to continue.
The Finish screen appears.
20. Click the Finish button to set up your Network Storage.
The setup process takes several minutes, depending on the size of your
disk drives.
Page 84

74
6.5. Managing Users and Groups
Viewing a List of Users
To view the list of Users:
1. In the Tree, click on the + beside the Users & Groups icon.
2. Click on the User Management icon.
A list of users appears on the Information tab.
Creating a User
You can create up to 512 Users.
To create or add a new user:
1. In the Tree, click on the + beside the Users & Groups icon.
2. Click on the User Management icon.
3. Click on the Create User tab.
4. Type a user name in the field provided.
5. Type a password into the fields provided.
6. Click the OK button.
Changing the Administrator’s Password
To change the Administrator’s password:
1. In the Tree, click on the + beside the Users & Groups icon.
2. Click on the User Management icon.
3. Click on the Change Password tab.
4. Type a new password into the fields provided .
5. Click the OK button.
If you forget your new password, you reset the Network Storage to the default
Administrator’s password.
Changing a User's Password
To change a user’s password:
1. In the Tree, click on the + beside the Users & Groups icon.
2. Click on the User Management icon.
3. Click on the Change Password tab.
4. From the User Name dropdown menu, select the name of the user whose
password you want to change.
5. Type a new password into the fields provided .
6. Click the OK button.
Page 85

75
Deleting a User
You cannot delete the Administrator or the Guest. To delete any other user:
1. In the Tree, click on the + beside the Users & Groups icon.
2. Click on the User Management icon.
3. Click on the Delete User tab.
4. Click on the option button to the left of the user you want to delete.
5. Click the OK button.
6. In the confirmation box, click the OK button.
Viewing a List of Groups
Groups are composed of users. You can assign permissions to a group, the
same as you would do with individual users.
To view a list of groups:
1. In the Tree, click on the + beside the Users & Groups icon.
2. Click on the Group Management icon.
A list of groups appears on the Information tab.
Creating a Group
Groups are composed of users. You can assign permissions to a group, the
same as you would do with individual users. You can create up to 256 groups.
To create a group:
1. In the Tree, click on the + beside the Users & Groups icon.
2. Click on the Group Management icon.
3. Click on the Create tab.
4. Type a group name in the field provided.
5. Click the OK button.
Page 86

76
Adding Members to a Group
You must create a group before you can assign members to it.
To add members to a group:
1. In the Tree, click on the + beside the Users & Groups icon.
2. Click on the Group Management icon.
3. Click on the Group Members tab.
4. From the dropdown menu, choose a group to which you want to add
members.
5. Highlight users in the Users column and click the >> button to move them
to the Members column.
6. Click the OK button.
Removing Members from a Group
1. In the Tree, click on the + beside the Users & Groups icon.
2. Click on the Group Management icon.
3. Click on the Group Members tab.
4. From the dropdown menu, choose a group from which you want to remove
members
5. Highlight users in the Members column and click the << button to move
them to the Users column.
6. Click the OK button.
Deleting a Group
You must remove all members from the group before you can delete the group.
To delete a group:
1. In the Tree, click on the + beside the Users & Groups icon.
2. Click on the Group Management icon.
3. Click on the Delete tab.
4. Click the option button next to the group you want to delete.
5. Click the OK button.
Page 87

77
Viewing Quotas
Quotas are portions of storage space that you assign to each user or group.
To view a quota:
1. In the Tree, click on the + beside the Users & Groups icon.
2. Click on the Quota icon.
A list of users and groups, and the following data appear on the screen:
• Currently assigned quotas
• Free space
• Used space
Setting Quotas
Quotas are portions of storage space that you assign to each user or group.
Assigning quotas enables you to control how much storage space each user or
group can access. By default, each user and group is assigned an unlimited
quota, meaning that any one user or group can access the entire storage
space. In the Quota screen, the names of groups are preceded with a @
symbol.
To set a quota:
1. In the Tree, click on the + beside the Users & Groups icon.
2. Click on the Quota icon.
3. Click on the Settings tab.
4. Highlight the user or group whose quota you want to assign.
5. Click on one of the following options:
• Unlimited
• Limited Quota
6. If you chose Limited Quota, type a number into the field provided.
This number represents how many MB of data the user or group can
access.
7. Click the OK button.
Page 88

78
6.6. Managing File & Print Services
Setting up Windows Access
Follow this procedure to set up access from a Windows PC:
1. In the Tree, click on the + beside the File & Print icon.
2. Click on the Protocol Control icon.
3. Click on the Windows tab.
4. Click the Enable option button beside Services.
5. Optional. Type a new Computer Description into the field provided.
6. Choose the option button to make the Network Storage a member of:
• An Active Directory (AD) Domain
• A Workgroup
Note: If you join an AD Domain, you automatically disable your NIS
Domain settings.
7. Optional. If you chose an AD Domain, enter the following in the fields
provided:
• Domain Name
• Kerberos Key Distribution Center
• Administrator Name
• Administrator Password
See your Network Administrator for help with this information.
8. Optional. If you chose an Workgroup, enter the Workgroup name into the
field provided:
See your Network Administrator for help with this information.
9. Click the OK button to save your settings.
10. In the Tree, click on the + beside the Sharing Setup icon.
11. Click on the Windows Sharing tab.
12. Select a folder from the Folder Name dropdown menu.
13. In the User/Group list, highlight the name of a user or group.
Group names are preceded by the @ character.
14. Under Permissions, choose a permission level for this user or group:
• Deny Access
• Read Only
• Read and Write
15. Click the OK button to save your settings.
You can now access the folder you selected from a Windows PC.
Page 89

79
Setting up UNIX/Linux Access
Follow this procedure to set up access from a UNIX or Linux PC:
1. In the Tree, click on the + beside the File & Print icon.
2. Click on the Protocol Control icon.
3. Click on the UNIX/Linux tab.
4. Click the Enable option button beside Services.
5. Optional. If you want to join a NIS Domain, click the NIS Domain option
button.
Note: If you join an NIS Domain, you automatically disable your AD
Domain settings.
6. Optional. If you chose to join a NIS Domain, enter the Domain name into
the field provided:
See your Network Administrator for help with this information.
7. Click the OK button to save your settings.
8. In the Tree, click on the + beside the File Sharing icon.
9. Click on the Modify tab.
10. From the Folder name dropdown menu, choose the folder you want to
access.
11. Check the UNIX/Linux box.
12. Click the OK button to save your settings.
13. In the Tree, click on the + beside the Sharing Setup icon.
14. Click on the UNIX/Linux Sharing tab.
15. Select a folder from the Folder Name dropdown menu.
16. In the New IP Address field, type the IP address of the UNIX or Linux PC
from which you will access this folder, then click the Add button.
You must designate the IP addresses for each folder individually. You can
have up to 256 IP addresses for all of your folders.
17. Click the OK button to save your settings.
You can now access the folder you selected from a UNIX or Linux PC.
Page 90

80
Setting up for Macintosh Access
Follow this procedure to set up access from a Macintosh PC:
1. In the Tree, click on the + beside the File & Print icon.
2. Click on the Protocol Control icon.
3. Click on the Macintosh tab.
4. Click the Enable option button beside Services.
5. Click the OK button to save your settings.
6. In the Tree, click on the + beside the File Sharing icon.
7. Click on the Modify tab.
8. From the Folder name dropdown menu, choose the folder you want to
access.
9. Check the Macintosh box.
10. Click the OK button to save your settings.
You can now access the specified folder from a Macintosh PC.
Setting up for FTP Access
Follow this procedure to set up FTP access for your folders:
1. In the Tree, click on the + beside the File & Print icon.
2. Click on the Protocol Control icon.
3. Click on the FTP Sharing tab.
4. Click the Enable option button beside Services.
5. Click the OK button to save your settings.
6. In the Tree, click on the + beside the File Sharing icon.
7. Click on the Modify tab.
8. From the Folder name dropdown menu, choose the folder you want to
access.
9. Check the FTP box.
10. Click the OK button to save your settings.
You can now access the specified folder from your PC using FTP.
If your FTP client does not support Unicode, only use ASCII characters to
name your shared folders on Network Storage.
Page 91

81
Setting up your Print Server
Follow this procedure to set up the Network Storage as a printer server:
1. In the Tree, click on the + beside the File & Print icon.
2. Click on the Protocol Control icon.
3. Click on the Windows tab.
4. Click the Enable option button beside Services.
5. Click the OK button to save your settings.
6. Click on the Printer Server tab.
7. Click the Enable option button beside Printer Server.
8. Click the OK button to save your settings.
Notes
• The Printer Server tab also verifies that your USB printer is
connected and online. If you do not see your printer on the
Printer Server tab, take the necessary action to connect and
power the printer. See “Connecting a USB Printer to Network
Storage”
• The software driver for your printer must be installed on your
PC before you can print from the PC. See this User Manual.
Setting up your DLNA Server
The Digital Living Network Alliance (DLNA) service enables the Universal Plugand-Play (UPnP) protocol, so your Network Storage can function as a Digital
Media Server (DMS). When your DLNA service is enabled, you can connect
your DLNA control unit or UPnP client on the network where the Network
Storage is connected, and use the Network Storage to play image, audio, and
AV media.
You must install the optional DLNA plug-in before you can make this setting
and use the UPnP protocol.
Follow this procedure to set up the Network Storage as a DLNA server:
1. In the Tree, click on the + beside the File & Print icon.
2. Click on the Protocol Control icon.
3. Click on the DLNA Server tab.
4. Click the Enable option button beside Services.
5. Click the OK button to save your settings.
Page 92

82
Viewing a List of Folders
A folder is the entity that appears as a Network Drive on your PC.
To view the list of folders:
1. In the Tree, click on the + beside the File & Print icon.
2. Click on the File Sharing icon.
A list of current folders appears in the Information tab.
Modifying Folder Services
Services enable different types of PCs to access your folders. Use this function
to add or remove a service for a specific folder.
To modify the services on a folder:
1. In the Tree, click on the + beside the File & Print icon.
2. Click on the File Sharing icon.
3. Click on the Modify tab
4. From the Volume dropdown menu, select the RAID Volume containing the
folder you want to modify.
5. From the Folder Name dropdown menu, select the folder you want to
modify.
6. Check the boxes beside the services you want to use.
7. Click the OK button.
Adding a Folder
A folder is the entity that appears as a Network Drive on your PC.
To add a folder:
1. In the Tree, click on the + beside the File & Print icon.
2. Click on the File Sharing icon.
3. Click on the Create tab.
4. From the Volume dropdown menu, select the RAID Volume in which you
want to create a new folder.
5. In the Folder Name field, type a name for your new folder.
6. Check the boxes beside the services you want to use.
7. Click the OK button.
.
Page 93

83
Deleting a Folder
Caution
When you delete a folder, you delete all the data saved in the
folder. Back up any important data before you delete a folder.
To delete a folder:
1. In the Tree, click on the + beside the File & Print icon.
2. Click on the File Sharing icon.
3. Click on the Remove tab
4. Click on the option button beside the folder you want to delete.
5. Click the OK button.
6. In the confirmation box, click the OK button to confirm.
Setting up Windows Sharing for a Folder
Windows sharing assigns user access the folders on your Network Storage. By
default all users and groups have read-only access.
To set up Windows sharing for a folder:
1. In the Tree, click on the + beside the File & Print icon.
2. Click on the Sharing Setup icon.
3. Click on the Windows Sharing tab.
4. From the Volume dropdown menu, select the RAID Volume containing the
folder you want to modify.
5. From the Folder Name dropdown menu, select the folder you want to
modify.
6. In the User/Group list, highlight the user or group to which you want to
assign permissions.
7. In the Permission list, click on the option button for one of the follo wing
permissions:
• Deny Access
• Read Only
• Read and Write
8. Click the OK button.
Be sure the Windows service is running for this folder.
Page 94

84
Setting up UNIX and Linux Sharing for a Folder
UNIX and Linux sharing designates which UNIX and Linux PCs can access the
folders on your Network Storage. You specify a UNIX or Linux PC by its IP address.
You can add up to 256 IP addresses for all of your folders.
You must designate the IP addresses for each folder individually.
To set up UNIX and Linux sharing for a folder:
1. In the Tree, click on the + beside the File & Print icon.
2. Click on the Sharing Setup icon in the tree.
3. Click on the UNIX/Linux Sharing tab.
4. From the Volume dropdown menu, select the RAID Volume containing the
folder you want to modify.
5. From the Folder Name dropdown menu, select the folder you want to
modify.
6. In the New IP Address field, type the IP address of the UNIX or Linux PC
from which you will access this folder.
7. Click the Add button.
Be sure the UNIX/Linux service is running for this folder.
Setting up FTP Sharing for a Folder
FTP sharing assigns user access the folders on your Network Storage. By default
all users and groups have read-only access.
To set up FTP sharing for a folder:
1. In the Tree, click on the + beside the File & Print icon.
2. Click on the Sharing Setup icon.
3. Click on the FTP Sharing tab.
4. From the Volume dropdown menu, select the RAID Volume containing the
folder you want to modify.
5. From the Folder Name dropdown menu, select the folder you want to
modify.
6. In the User/Group list, highlight the user or group to which you want to
assign permissions.
7. In the Permission list, click on the option button for one of the follo wing
permissions:
• Deny Access
• Read Only
• Read and Write
8. Click the OK button.
Be sure the FTP service is running for this folder.
Page 95

85
6.7. Managing RAID Volumes
Viewing RAID Volume Status
RAID status refers to the disk drives on your Network Storage and how they
are arranged into a RAID Volume.
To view the status of your RAID Volume:
1. In the Tree, click on the + beside the RAID & File System icon.
2. Click on the RAID Management icon.
The RAID Status tab displays the current RAID system and its status:
• RAID Name – The name of your RAID, automatically assigned when it
was created
• RAID Level – RAID 0, 1, 5, or 10, specified when it was created
• Capacity – Data capacity of the RAID Volume in GB
• RAID Status – Functional is normal. Critical means a disk drive has
failed. Offline means you cannot access your data.
Critical and offline RAIDs require you to take corrective action.
• Action Status – Idle is normal. Rebuilding means the RAID Volume is
being rebuilt after a disk drive failure. Migrating means the RAID
Volume is adding a disk drive or changing RAID levels.
• Background Activity – None is normal. Running means a background
activity is in progress.
Viewing Disk Drive Information
To view information about a disk drive:
1. In the Tree, click on the + beside the RAID & File System icon.
2. Click on the RAID Management icon.
The RAID Status tab displays the current RAID system and its status.
3. In the Disk List, double-click on a disk drive icon.
The disk drive information displays under Disk Status.
Page 96

86
Creating a RAID Volume
On Network Storage, the term RAID Volume refers to one or more disk drives
working together as a RAID logical drive.
You can also use a USB disk to create a RAID Volume.
You must have unassigned disk drives in your Network Storage to create a
new RAID.
To create a new RAID Volume:
1. In the Tree, click on the + beside the RAID & File System icon.
2. Click on the RAID Management icon.
3. Click on the Create tab.
4. From the RAID Level dropdown menu, select the RAID level you prefer for
your disk array.
See “Choosing a RAID Level” on page 102 for more information.
5. Highlight disk drives in the Free Disks column and click the >> button to
move them to the Disks in RAID column.
6. Click the OK button.
The RAID Volume is created and formatting begins. Formatting requires
several minutes, depending on the size of your disk drives.
After formatting is done, you must create folders on your RAID Volume.
Designating a Spare Drive
If you have an unassigned disk drive, you can assign it as a spare drive.
For more information, see “Spare Drive” on page 103 and “Automatic
Rebuilding” on page 104.
To assign a spare drive:
1. In the Tree, click on the + beside the RAID & File System icon.
2. Click on the RAID Management icon.
3. Click on the Create tab.
4. From the RAID Level dropdown menu, select Spare Disk.
5. Highlight disk drive in the Free Disks column and click the >> button to
move it to the Disks in RAID column.
6. Click the OK button.
Page 97

87
Migrating a RAID Volume
To migrate a RAID Volume means to change its RAID level or to add disk
drives. See “RAID Volume Migration” on page 105 for more information.
To migrate a RAID Volume:
1. In the Tree, click on the + beside the RAID & File System icon.
2. Click on the RAID Management icon.
3. Click on the Modify tab.
4. From the Current Volume dropdown menu, select the RAID Volume which
you want to modify.
5. In the Migrate to RAID Level dropdown menu, select the target RAID Level.
6. To add disk drives, highlight disk drives in the Free Disks column and click
the >> button to move them to the Disks in RAID column.
7. Click the OK button.
The RAID Volume is modified as you directed. Migration requires several
minutes, depending on the type of modification taking place and the size of
your disk drives.
During the modification, your RAID Volume and all of the folders on it are
fully accessible.
After the Migration is completed, you must extend the file system in order
to use the storage space you have added. You can extend the file system
immediately or wait until later.
8. Click on the File System Management icon.
9. In the File System Status tab, click on the Extend File System button.
Page 98
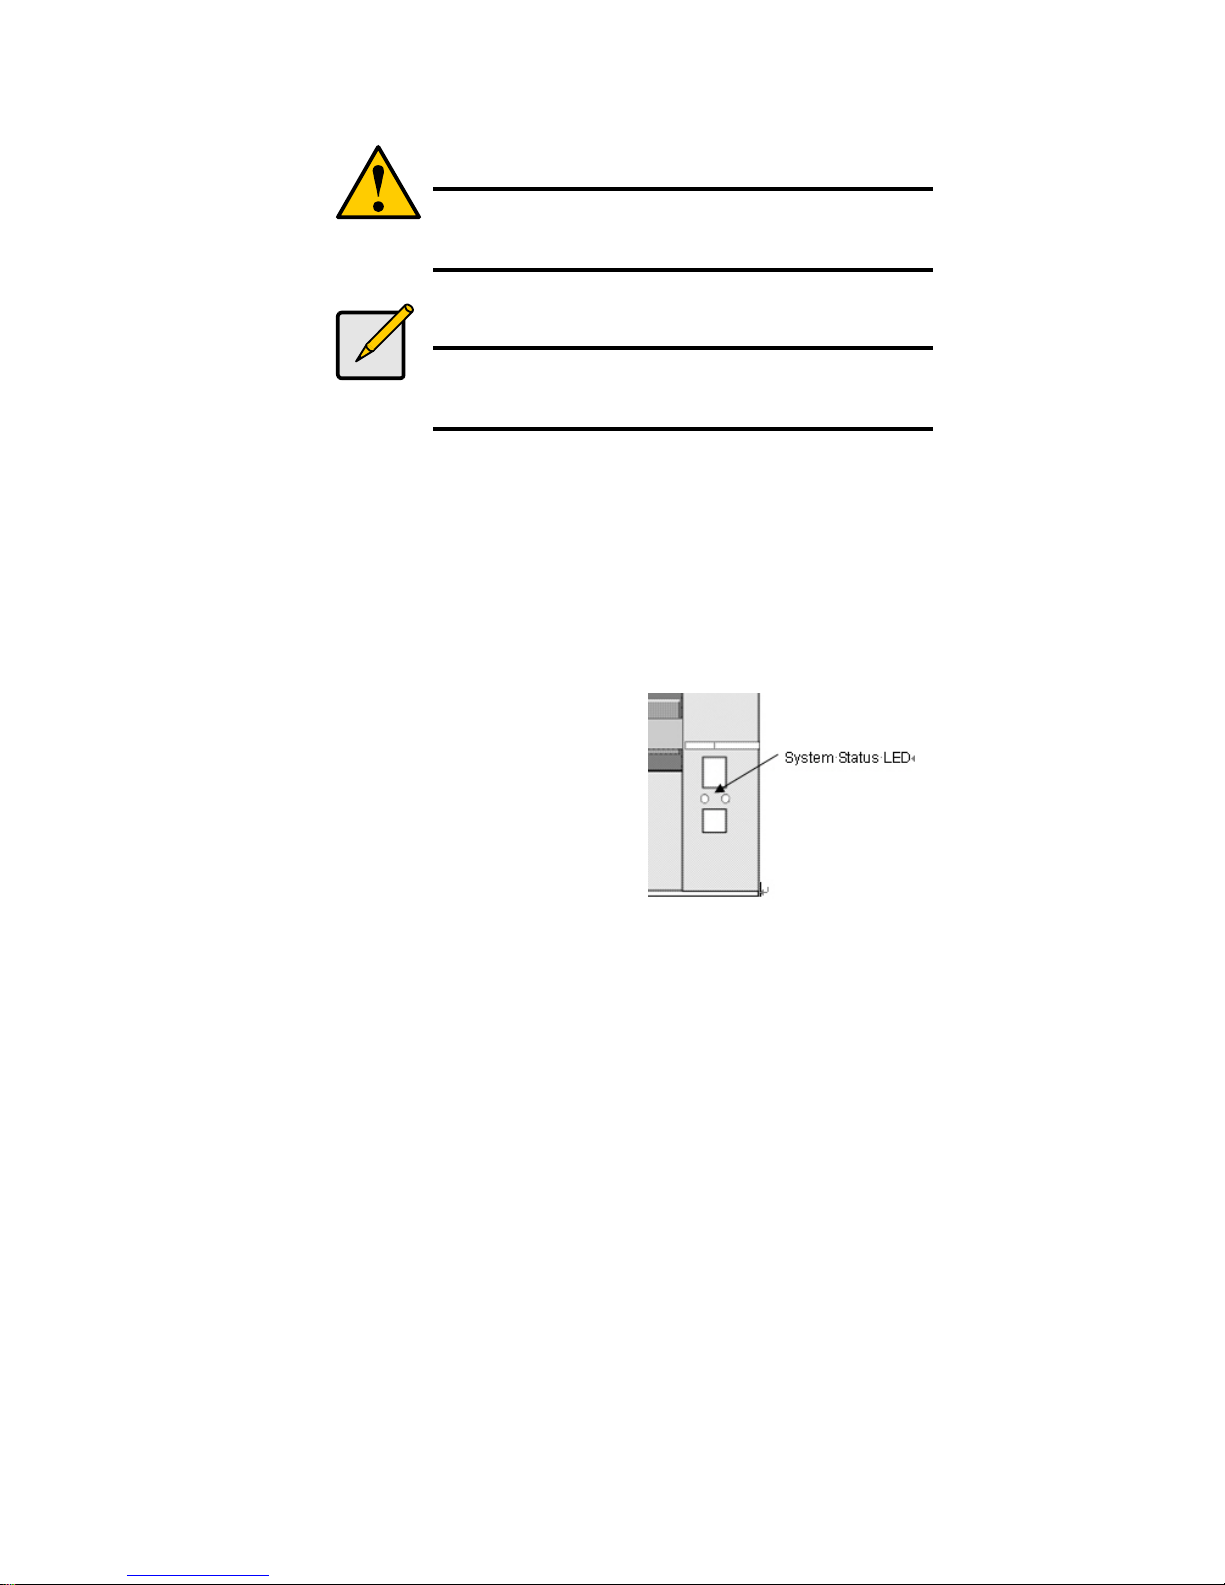
88
Deleting a RAID Volume
Caution
When you delete a RAID Volume, you delete all the folders in the
RAID volume and all the data saved in the folders. Back up any
important data before you delete a RAID Volume.
Note
You cannot delete a RAID Volume while a background activity is
running, such as Migration or Rebuild. Wait until these activities
are completed.
To delete a RAID Volume:
1. In the Tree, click on the + beside the RAID & File System icon.
2. Click on the RAID Management icon.
3. Click on the Delete tab.
4. Click the option button beside the RAID Volume you want to delete.
5. Click the OK button.
6. In the confirmation box, type yes into the field provided, then click the OK
button.
After a RAID Volume is deleted, the Network Storage reboots automatically.
When the Network Storage is fully booted:
• The System Status LED turns
green (right)
• The buzzer beeps one time (if
the buzzer is enabled)
7. Close your browser then restart the
browser to access ASM.
Page 99

89
Viewing an External USB Drive or Memory Stick
To view a USB drive or memory stick attached to the Network Storage:
1. In the Tree, click on the + beside the RAID & File System icon.
2. Click on the RAID Management icon.
The USB drive or memory stick appears as a USB External Disk
3. Click on the File System Management icon.
The USB drive or memory stick appears as a Volume called USBDISK.
You do NOT create a RAID Volume or folders with the USB drive or memory
stick as you would with the disk drives installed in the Network Storage
enclosure.
With the USB drive or memory stick connected to the Network Storage, create
a network drive on your PC and choose the USB disk as the folder. Then you
can access the USB drive or memory stick from your PC.
Formatting an External USB Drive or Memory Stick
This option only appears when Network Storage does not recognize the file system
on the USB drive or memory stick.
Caution
When you format a USB drive or memory stick, you delete all the
data saved on it. Back up any important data before you format.
To format a USB drive or memory stick:
1. Attach the USB drive or memory stick to one of the USB ports on the back
of the Network Storage.
2. In the Tree, click on the + beside the RAID & File System icon.
3. Click on the File System Management icon.
4. On the File System Status tab, highlight the USB drive.
5. From the Format File System Type dropdown menu, choose a file system:
• FAT 32 – Use for Windows, Linux, and Macintosh PCs, and NAS
• Ext3 – Use for UNIX and Linux PCs, and NAS
6. Click on the Format USB Disk button.
7. In the confirmation box, type yes, then click the OK button.
Formatting requires several minutes, depending on the size of your USB drive
or memory stick.
Page 100

90
6.8. Managing Backups
Viewing a List of Snapshot Backups
To view the list of Snapshot backups:
1. In the Tree, click on the + beside the Backup icon.
2. Click on the Snapshot Backup icon.
The current list of Snapshots displays on the Information tab.
Setting up a Snapshot Backup
Caution
Setting up a Snapshot will delete all existing snapshots.
To setup a Snapshot Backup:
1. In the Tree, click on the + beside the Backup icon.
2. Click on the Snapshot Backup icon.
3. Click on the Setup tab.
4. From the Volume dropdown menu, select the RAID Volume you want to
backup.
5. Next to Snapshot Status, click the Enable option.
6. In the Reserve Capacity dropdown menu, select a portion in GB of the
RAID Volume you want to reserve for snapshots.
7. Click the OK button.
8. In the confirmation box, type yes into the filed provided than click the OK
button.
 Loading...