

Page 1

ThinkStationP910
UserGuide
MachineTypes:30B8and30B9
Page 2

Note:Beforeusingthisinformationandtheproductitsupports,besuretoreadandunderstandthe“Read
thisfirst:Importantsafetyinformation”onpagev
andAppendixG“Notices”onpage155.
ThirdEdition(December2016)
©CopyrightLenovo2016.
LIMITEDANDRESTRICTEDRIGHTSNOTICE:IfdataorsoftwareisdeliveredpursuanttoaGeneralServices
Administration“GSA”contract,use,reproduction,ordisclosureissubjecttorestrictionssetforthinContractNo.
GS-35F-05925.
Page 3

Contents
Readthisfirst:Importantsafety
information...............v
Beforeusingthismanual............v
Serviceandupgrades.............v
Staticelectricityprevention...........vi
Powercordsandpoweradapters........vi
Extensioncordsandrelateddevices.......vi
Plugsandoutlets..............vii
Externaldevices..............vii
Heatandproductventilation.........vii
Operatingenvironment...........viii
Lasercompliancestatement.........viii
Powersupplystatement............ix
Cleaningandmaintenance...........ix
Chapter1.Productoverview......1
Hardwarelocations..............1
Frontview................1
Rearview................3
Computercomponents..........6
Partsonthesystemboard.........7
Internaldrives..............9
Machinetypeandmodellabel.......10
Computerfeatures.............10
Computerspecifications...........14
Programs.................14
Accessingaprogramonyourcomputer...14
Installingaprogramthatisreadytobe
installed(Windows7only)........15
AnintroductiontoLenovoprograms....15
Chapter2.Usingyourcomputer...17
Registeringyourcomputer..........17
Settingthecomputervolume.........17
Usingadisc................17
Guidelinesaboutusingtheopticaldrive...17
Handlingandstoringadisc........18
Playingandremovingadisc.......18
Recordingadisc............18
Connectingtoanetwork...........19
ConnectingtoanEthernetLAN......19
ConnectingtoawirelessLAN.......19
ConnectingtoaBluetooth-enableddevice..20
Chapter3.Y ouandyourcomputer..21
Arrangingyourworkspace..........21
Glareandlighting............21
Aircirculation.............21
Electricaloutletlocationsandcablelengths.21
Comfort...............21
Accessibilityinformation...........22
Cleaningyourcomputer...........25
Maintenance...............25
Basicmaintenancetips.........25
Goodmaintenancepractices.......25
Keepingyourcomputercurrent......26
Movingyourcomputer...........27
Chapter4.Security..........29
Lockingyourcomputer...........29
Lockingthecomputercover.......29
AttachingaKensington-stylecablelock...31
Viewingandchangingsecuritysettingsinthe
SetupUtilityprogram............31
UsingpasswordsandWindowsaccounts....32
Usingfingerprintauthentication........32
Usingthecoverpresenceswitch.......32
Usingfirewalls..............33
Protectingdataagainstviruses........33
ComputraceAgentsoftwareembeddedin
firmware.................33
BIOSguard................33
TrustedPlatformModule(TPM)........34
Chapter5.Advancedconfiguration..35
UsingtheSetupUtilityprogram........35
StartingtheSetupUtilityprogram.....35
ChangingthedisplaymodeoftheSetupUtility
program...............35
ChangingthedisplaylanguageoftheSetup
Utilityprogram.............35
Enablingordisablingadevice.......36
Enablingordisablingtheautomaticpower-on
ofyourcomputer............36
EnablingordisablingtheErPLPScompliance
mode................36
Enablingordisablingtheconfigurationchange
detection...............37
ChangingtheBIOSsettingsbeforeinstallinga
newoperatingsystem..........37
UsingBIOSpasswords.........38
Selectingastartupdevice........39
ExitingtheSetupUtilityprogram......40
UpdatingandrecoveringtheBIOS.......40
UpdatingtheBIOS...........40
©CopyrightLenovo2016
i
Page 4

RecoveringfromaBIOSupdatefailure...41
ConfiguringRAID..............41
ConfiguringRAIDwithIntelRSTe......41
QuickRAIDsetupusingtheLSIMegaRAID
BIOSconfigurationutility........44
Chapter6.T roubleshooting,
diagnostics,andrecovery......47
Basicprocedureforresolvingcomputer
problems.................47
Troubleshooting..............47
Startupproblems............47
Audioproblems............48
CDorDVDproblems..........49
Intermittentproblems..........50
Storagedriveproblems.........50
EthernetLANproblems.........50
WirelessLANproblem..........51
Bluetoothproblems...........52
Performanceproblems..........53
Serialconnectorproblem.........54
USBdeviceproblem..........54
Softwareanddriverproblems.......54
Diagnostics................55
LenovoSolutionCenter.........55
Hardwarediagnostics..........55
Recoveryinformation............56
RecoveryinformationforWindows7....56
RecoveryinformationforWindows10....57
Full-lengthPCIExpresscard.......112
Supercapacitormodule.........117
Memorymodule............120
Heatsinkandfanassemblies.......122
Rearfanassembly...........124
Wi-Fiunits..............125
Completingthepartsreplacement.......132
Chapter8.Gettinginformation,help,
andservice.............135
Informationresources............135
Accessingtheuserguideinvarious
languages...............135
Windowshelpsystem..........135
Safetyandwarranty...........135
LenovoWebsite............135
LenovoSupportWebsite.........136
Frequentlyaskedquestions........136
Helpandservice..............136
Callingforservice............136
Usingotherservices..........137
Purchasingadditionalservices......137
AppendixA.Systemmemory
speed................139
AppendixB.Supplemental
informationabouttheUbuntu
operatingsystem..........141
Chapter7.Installingorreplacing
hardware...............59
Handlingstatic-sensitivedevices.......59
Preparingyourcomputerandremovingthe
computercover..............59
Installingorreplacinghardware........60
Externaloptions............60
Coverpresenceswitch(intrusionswitch)..61
Directcoolingairbaffle.........63
Deviceinanoptical-drivebay.......65
Harddiskdriveinthefront-accessstorage
enclosure...............67
Storagedriveintheflexbaystorage
enclosure...............69
Deviceinthe5.25-inchflexmodule.....75
Internalstoragedrive..........83
Frontfanassembly...........95
Multi-functionbrackets.........96
Powersupplyassembly.........98
Battery................100
Flexadapter..............101
PCIcard...............104
AppendixC.Regulatory
information.............143
Exportclassificationnotice..........143
Electronicemissionsnotices.........143
FederalCommunicationsCommission
DeclarationofConformity........143
Eurasiancompliancemark..........145
Brazilaudionotice.............145
Mexicowireless-radiocomplianceinformation..145
Additionalregulatoryinformation.......146
AppendixD.WEEEandrecycling
information.............147
ImportantWEEEinformation.........147
RecyclinginformationforJapan........147
RecyclinginformationforBrazil........148
BatteryrecyclinginformationforTaiwan.....148
BatteryrecyclinginformationfortheEuropean
Union..................149
AppendixE.RestrictionofHazardous
SubstancesDirective(RoHS)....151
iiThinkStationP910UserGuide
Page 5

EuropeanUnionRoHS...........151
ChinaRoHS................151
TurkishRoHS...............151
UkraineRoHS...............152
IndiaRoHS................152
TaiwanRoHS...............152
AppendixF .ENERGYSTARmodel
information.............153
AppendixG.Notices.........155
Trademarks................156
©CopyrightLenovo2016
iii
Page 6

ivThinkStationP910UserGuide
Page 7
Readthisfirst:Importantsafetyinformation
Thischaptercontainsthesafetyinformationthatyoumustbefamiliarwith.
Beforeusingthismanual
CAUTION:
Beforeusingthismanual,besuretoreadandunderstandalltherelatedsafetyinformationforthis
product.RefertotheinformationinthissectionandthesafetyinformationintheSafety,Warranty,and
SetupGuidethatyoureceivedwiththisproduct.Readingandunderstandingthissafetyinformation
reducestheriskofpersonalinjuryanddamagetoyourproduct.
IfyounolongerhaveacopyoftheSafety,Warranty,andSetupGuide,youcanobtainaPortableDocument
Format(PDF)versionfromtheLenovo
SupportWebsitealsoprovidestheSafety,Warranty,andSetupGuideandthisUserGuideinadditional
languages.
®
SupportWebsiteathttp://www.lenovo.com/support.TheLenovo
Serviceandupgrades
DonotattempttoserviceaproductyourselfunlessinstructedtodosobytheCustomerSupportCenteror
yourdocumentation.OnlyuseaServiceProviderwhoisapprovedtorepairyourparticularproduct.
Note:Somecomputerpartscanbeupgradedorreplacedbythecustomer.Upgradestypicallyare
referredtoasoptions.ReplacementpartsapprovedforcustomerinstallationarereferredtoasCustomer
ReplaceableUnits,orCRUs.Lenovoprovidesdocumentationwithinstructionswhenitisappropriatefor
customerstoinstalloptionsorreplaceCRUs.Youmustcloselyfollowallinstructionswheninstallingor
replacingparts.TheOffstateofapowerindicatordoesnotnecessarilymeanthatvoltagelevelsinsidea
productarezero.Beforeyouremovethecoversfromaproductequippedwithapowercord,alwaysensure
thatthepoweristurnedoffandthattheproductisunpluggedfromanypowersource.Formoreinformation
aboutCRUs,refertoChapter7“Installingorreplacinghardware”onpage59
concerns,contacttheCustomerSupportCenter.
Althoughtherearenomovingpartsinyourcomputerafterthepowercordhasbeendisconnected,the
followingwarningsarerequiredforyoursafety.
CAUTION:
.Ifyouhaveanyquestionsor
Hazardousmovingparts.Keepfingersandotherbodypartsaway.
CAUTION:
Beforeyouopenthecomputercover,turnoffthecomputerandwaitseveralminutesuntilthe
computeriscool.
©CopyrightLenovo2016
v
Page 8

Staticelectricityprevention
Staticelectricity,althoughharmlesstoyou,canseriouslydamagecomputercomponentsandoptions.
Improperhandlingofstatic-sensitivepartscandamagethepart.WhenyouunpackanoptionorCRU,do
notopenthestatic-protectivepackagecontainingthepartuntiltheinstructionsdirectyoutoinstallit.
WhenyouhandleoptionsorCRUs,orperformanyworkinsidethecomputer,takethefollowingprecautions
toavoidstatic-electricitydamage:
•Limityourmovement.Movementcancausestaticelectricitytobuilduparoundyou.
•Alwayshandlecomponentscarefully.Handleadapters,memorymodules,andothercircuitboardsbythe
edges.Nevertouchexposedcircuitry.
•Preventothersfromtouchingcomponents.
•Whenyouinstallastatic-sensitiveoptionorCRU,touchthestatic-protectivepackagecontainingthe
parttoametalexpansion-slotcoverorotherunpaintedmetalsurfaceonthecomputerforatleasttwo
seconds.Thisreducesstaticelectricityinthepackageandyourbody.
•Whenpossible,removethestatic-sensitivepartfromthestatic-protectivepackagingandinstallthepart
withoutsettingitdown.Whenthisisnotpossible,placethestatic-protectivepackagingonasmooth,
levelsurfaceandplacethepartonit.
•Donotplacethepartonthecomputercoverorothermetalsurface.
Powercordsandpoweradapters
Useonlythepowercordsandpoweradapterssuppliedbytheproductmanufacturer.Donotusetheac
powercordforotherdevices.
Thepowercordsshallbesafetyapproved.ForGermany,itshallbeH05VV-F,3G,0.75mm
othercountries,thesuitabletypesshallbeusedaccordingly.
Neverwrapapowercordaroundapoweradapterorotherobject.Doingsocanstressthecordinwaysthat
cancausethecordtofray,crack,orcrimp.Thiscanpresentasafetyhazard.
Alwaysroutepowercordssothattheywillnotbewalkedon,trippedover,orpinchedbyobjects.
Protectpowercordandpoweradaptersfromliquids.Forinstance,donotleaveyourpowercordorpower
adapternearsinks,tubs,toilets,oronfloorsthatarecleanedwithliquidcleansers.Liquidscancausea
shortcircuit,particularlyifthepowercordorpoweradapterhasbeenstressedbymisuse.Liquidsalsocan
causegradualcorrosionofpowercordterminalsand/ortheconnectorterminalsonapoweradapter,
whichcaneventuallyresultinoverheating.
Ensurethatallpowercordconnectorsaresecurelyandcompletelypluggedintoreceptacles.
Donotuseanypoweradapterthatshowscorrosionattheacinputpinsorshowssignsofoverheating(such
asdeformedplastic)attheacinputoranywhereonthepoweradapter.
Donotuseanypowercordswheretheelectricalcontactsoneitherendshowsignsofcorrosionor
overheatingorwherethepowercordappearstohavebeendamagedinanyway.
2
,orbetter.For
Extensioncordsandrelateddevices
Ensurethatextensioncords,surgeprotectors,uninterruptiblepowersupplies,andpowerstripsthatyouuse
areratedtohandletheelectricalrequirementsoftheproduct.Neveroverloadthesedevices.Ifpowerstrips
viThinkStationP910UserGuide
Page 9

areused,theloadshouldnotexceedthepowerstripinputrating.Consultanelectricianformoreinformation
ifyouhavequestionsaboutpowerloads,powerrequirements,andinputratings.
Plugsandoutlets
Ifareceptacle(poweroutlet)thatyouintendtousewithyourcomputerequipmentappearstobedamaged
orcorroded,donotusetheoutletuntilitisreplacedbyaqualifiedelectrician.
Donotbendormodifytheplug.Iftheplugisdamaged,contactthemanufacturertoobtainareplacement.
Donotshareanelectricaloutletwithotherhomeorcommercialappliancesthatdrawlargeamountsof
electricity.Otherwise,unstablevoltagemightdamageyourcomputer,data,orconnecteddevices.
Someproductsareequippedwithathree-prongedplug.Thisplugfitsonlyintoagroundedelectricaloutlet.
Thisisasafetyfeature.Donotdefeatthissafetyfeaturebytryingtoinsertitintoanon-groundedoutlet.If
youcannotinserttheplugintotheoutlet,contactanelectricianforanapprovedoutletadapterortoreplace
theoutletwithonethatenablesthissafetyfeature.Neveroverloadanelectricaloutlet.Theoverallsystem
loadshouldnotexceed80percentofthebranchcircuitrating.Consultanelectricianformoreinformation
ifyouhavequestionsaboutpowerloadsandbranchcircuitratings.
Besurethatthepoweroutletyouareusingisproperlywired,easilyaccessible,andlocatedclosetothe
equipment.Donotfullyextendpowercordsinawaythatwillstressthecords.
Besurethatthepoweroutletprovidesthecorrectvoltageandcurrentfortheproductyouareinstalling.
Carefullyconnectanddisconnecttheequipmentfromtheelectricaloutlet.
Externaldevices
DonotconnectordisconnectanyexternaldevicecablesotherthanUniversalSerialBus(USB)cableswhile
thecomputerpowerison;otherwise,youmightdamageyourcomputer.T oavoidpossibledamageto
connecteddevices,waitatleastfivesecondsafterthecomputerisshutdowntodisconnectexternaldevices.
Heatandproductventilation
Computers,poweradapters,andmanyaccessoriescangenerateheatwhenturnedonandwhenbatteries
arecharging.Alwaysfollowthesebasicprecautions:
•Donotleaveyourcomputer,poweradapter,oraccessoriesincontactwithyourlaporanypartofyour
bodyforanextendedperiodwhentheproductsarefunctioningorwhenthebatteryischarging.Y our
computer,poweradapter,andmanyaccessoriesproducesomeheatduringnormaloperation.Extended
contactwiththebodycouldcausediscomfortor,potentially,askinburn.
•Donotchargethebatteryoroperateyourcomputer,poweradapter,oraccessoriesnearflammable
materialsorinexplosiveenvironments.
•Ventilationslots,fans,andheatsinksareprovidedwiththeproductforsafety,comfort,andreliable
operation.Thesefeaturesmightinadvertentlybecomeblockedbyplacingtheproductonabed,sofa,
carpet,orotherflexiblesurface.Neverblock,cover,ordisablethesefeatures.
Inspectyourdesktopcomputerfordustaccumulationatleastonceeverythreemonths.Beforeinspecting
yourcomputer,turnoffthepowerandunplugthecomputer'spowercordfromtheelectricaloutlet;then
removeanydustfromventsandperforationsinthebezel.Ifyounoticeexternaldustaccumulation,then
examineandremovedustfromtheinsideofthecomputerincludingheatsinkinletfins,powersupplyvents,
andfans.Alwaysturnoffandunplugthecomputerbeforeopeningthecover.Ifpossible,avoidoperating
©CopyrightLenovo2016
vii
Page 10

yourcomputerwithintwofeetofhigh-trafficareas.Ifyoumustoperateyourcomputerinornearahigh-traffic
area,inspectand,ifnecessary,cleanyourcomputermorefrequently.
Foryoursafetyandtomaintainoptimumcomputerperformance,alwaysfollowthesebasicprecautions
withyourdesktopcomputer:
•Keepthecoverclosedwheneverthecomputerispluggedin.
•Regularlyinspecttheoutsideofthecomputerfordustaccumulation.
•Removedustfromventsandanyperforationsinthebezel.Morefrequentcleaningsmightberequiredfor
computersindustyorhigh-trafficareas.
•Donotrestrictorblockanyventilationopenings.
•Donotstoreoroperateyourcomputerinsidefurniture,asthismightincreasetheriskofoverheating.
•Airflowtemperaturesintothecomputershouldnotexceed35°C(95°F).
•Donotinstallairfiltrationdevices.Theymayinterferewithpropercooling.
Operatingenvironment
Theoptimalenvironmentinwhichtouseyourcomputeris10°C–35°C(50°F–95°F)withhumidityranging
between35%and80%.Ifyourcomputerisstoredortransportedintemperatureslessthan10°C(50°F),
allowthecoldcomputertoriseslowlytoanoptimaloperatingtemperatureof10°C–35°C(50°F–95°F)before
use.Thisprocesscouldtaketwohoursinextremeconditions.Failuretoallowyourcomputertorisetoan
optimaloperatingtemperaturebeforeusecouldresultinirreparabledamagetoyourcomputer.
Ifpossible,placeyourcomputerinawell-ventilatedanddryareawithoutdirectexposuretosunshine.
Keepelectricalappliancessuchasanelectricfan,radio,high-poweredspeakers,airconditioner,and
microwaveovenawayfromyourcomputerbecausethestrongmagneticfieldsgeneratedbythese
appliancescandamagethemonitoranddataonthestoragedrive.
Donotplaceanybeveragesontopoforbesidethecomputerorotherconnecteddevices.Ifliquidisspilled
onorinthecomputeroraconnecteddevice,ashortcircuitorotherdamagemightoccur.
Donoteatorsmokeoveryourkeyboard.Particlesthatfallintoyourkeyboardcancausedamage.
Lasercompliancestatement
CAUTION:
Whenlaserproducts(suchasCD-ROMs,DVDdrives,fiberopticdevices,ortransmitters)are
installed,notethefollowing:
•Donotremovethecovers.Removingthecoversofthelaserproductcouldresultinexposureto
hazardouslaserradiation.Therearenoserviceablepartsinsidethedevice.
•Useofcontrolsoradjustmentsorperformanceofproceduresotherthanthosespecifiedherein
mightresultinhazardousradiationexposure.
viiiThinkStationP910UserGuide
Page 11
DANGER
SomelaserproductscontainanembeddedClass3AorClass3Blaserdiode.Notethefollowing:
Laserradiationwhenopen.Donotstareintothebeam,donotviewdirectlywithoptical
instruments,andavoiddirectexposuretothebeam.
Powersupplystatement
Neverremovethecoveronapowersupplyoranypartthathasthefollowinglabelattached.
Hazardousvoltage,current,andenergylevelsarepresentinsideanycomponentthathasthislabelattached.
Therearenoserviceablepartsinsidethesecomponents.Ifyoususpectaproblemwithoneoftheseparts,
contactaservicetechnician.
Cleaningandmaintenance
Keepyourcomputerandworkspaceclean.Shutdownthecomputerandthendisconnectthepower
cordbeforecleaningthecomputer.Donotsprayanyliquiddetergentdirectlyonthecomputeroruse
anydetergentcontainingflammablematerialtocleanthecomputer.Spraythedetergentonasoftcloth
andthenwipethecomputersurfaces.
©CopyrightLenovo2016
ix
Page 12

xThinkStationP910UserGuide
Page 13
Chapter1.Productoverview
7
6
8
9
10
Thischapterprovidesinformationaboutthefollowingtopics:
•“Hardwarelocations”onpage1
•“Computerfeatures”onpage10
•“Computerspecifications”onpage14
•“Programs”onpage14
Hardwarelocations
Thissectionprovidesinformationaboutthelocationsofyourcomputerhardware.
Note:Thecomputerhardwaremightlookslightlydifferentfromtheillustrations.
Frontview
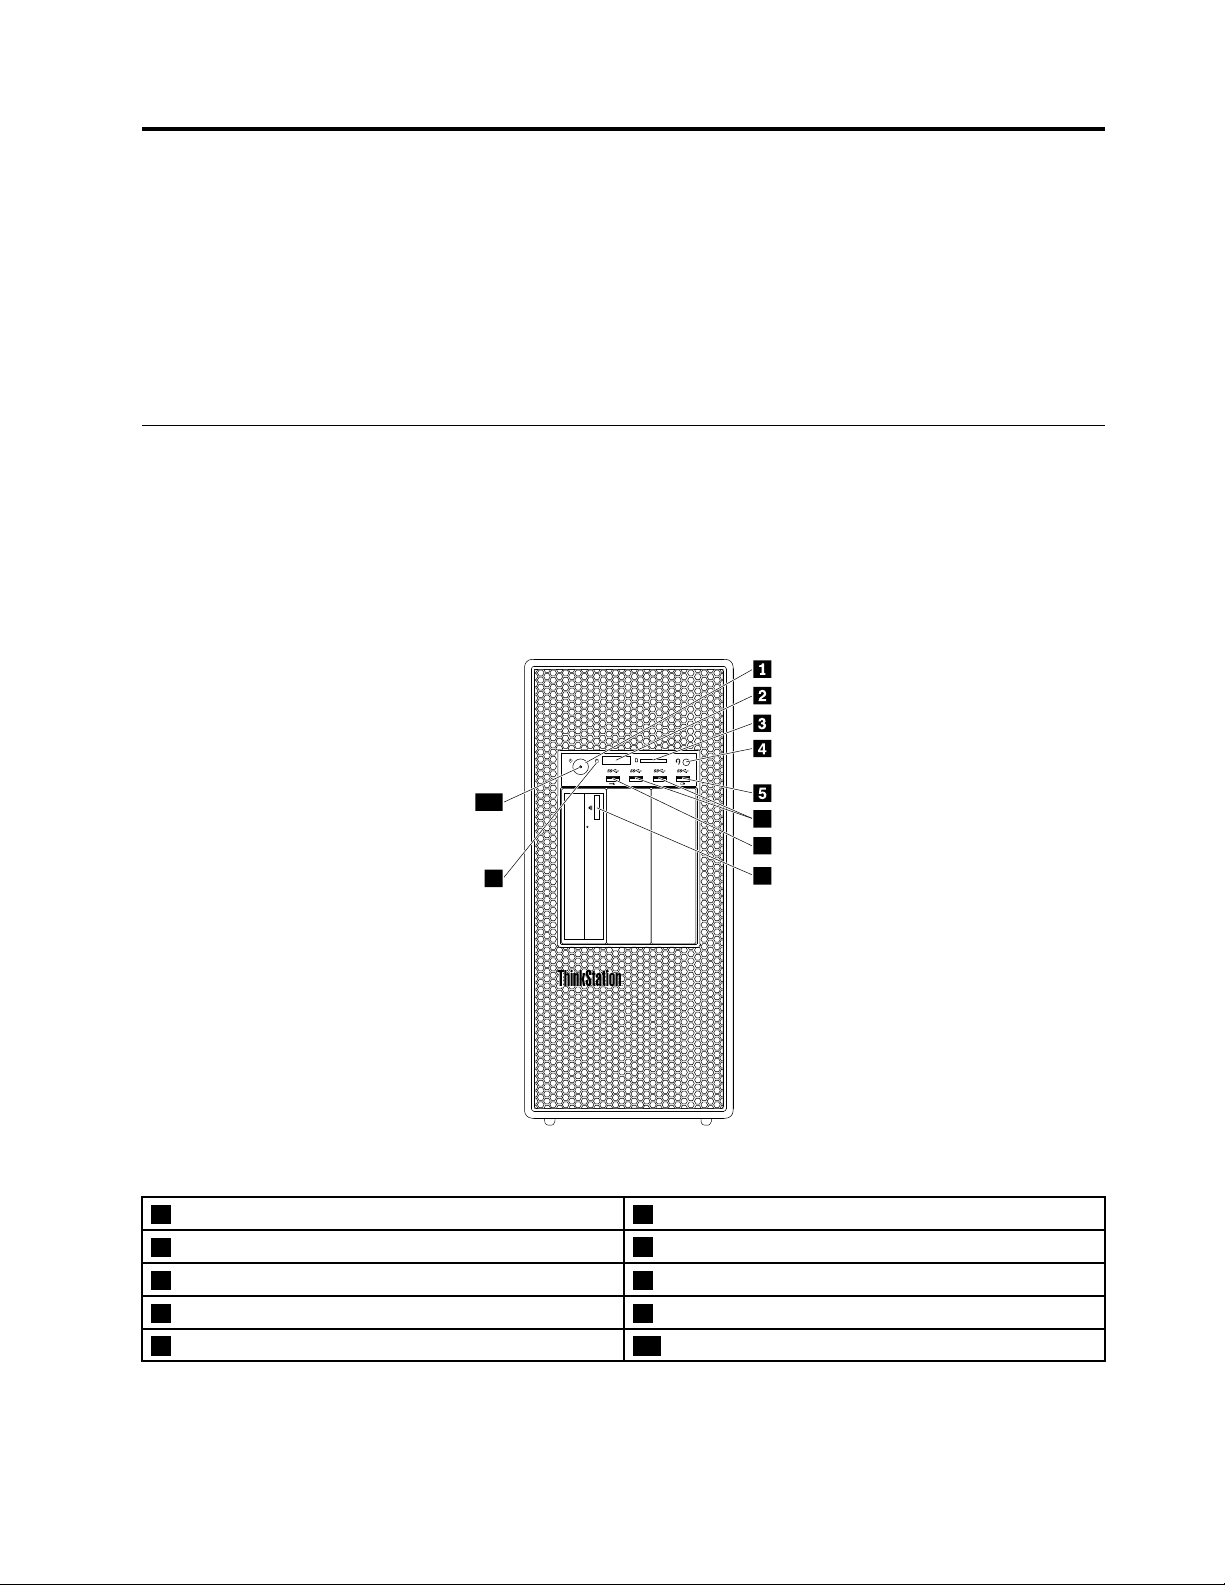
Figure1.Frontconnectors,controls,andindicators
1Powerbutton2Four-digitdiagnosticdisplay
3SDcardslot
5AlwaysOnUSB3.0connector6USB3.0connectors(2)
7DiagnosticUSB3.0connector8Optical-driveeject/closebutton(somemodels)
9Hard-disk-driveactivityindicator10Powerindicator
Note:TheorientationoftheThinkStation
®
logoplateonthefrontofyourcomputerisadjustable.Whenyou
4Headsetconnector
laythecomputeronitsside,youcanslightlypulloutthelogoplate,turnit90-degreecounterclockwise,
andthenpushitbackin.
©CopyrightLenovo2016
1
Page 14

1Powerbutton
Pressthepowerbuttontoturnonyourcomputer.Ifyourcomputerisunresponsive,youcanturnoffthe
computerbypressingandholdingthepowerbuttonforfourormoreseconds.
2Four-digitdiagnosticdisplay
Thefour-digitdiagnosticdisplayonthefrontofthecomputerdisplaystextandanumericalerrorcodewhen
thecomputerdetectsanissueorerror.
3SDcardslot
Insertasecuredigital(SD)cardintotheslotsothatthedataonthecardcanbeaccessedandread.
4Headsetconnector
Connecttheheadsettoyourcomputerthroughtheheadsetconnector.
5AlwaysOnUSB3.0connector
ConnectaUSB-compatibledevice,suchasaUSBkeyboard,mouse,storagedrive,orprinter,tothis
connector.Withthepowercordconnected,youcanchargetheconnectedUSBdeviceevenwhenthe
computerisinhibernationmodeorturnedoff.IftheAlwaysOnUSBconnectorfunctionisnotenabled,
openthePowerManagerprogramandenablethefunction.ToopenthePowerManagerprogram,see
“Accessingaprogramonyourcomputer”onpage14
.ToenabletheAlwaysOnUSBconnector,referto
thehelpsystemofthePowerManagerprogram.
6USB3.0connector
ConnectaUSB-compatibledevice,suchasaUSBkeyboard,mouse,storagedrive,orprinter,tothis
connector.
7DiagnosticUSB3.0connector
Whenasystemerrorisdetected,thediagnosticindicatorblinks.Inthiscase,ifyouconnectanFAT32
formatUSBflashdrivetotheconnector,theerror-relatedlogcanbeautomaticallydownloadedfromthe
diagnosticUSB3.0connectortotheUSBflashdrive.
8Optical-driveeject/closebutton
Pressthebuttontoejectorclosethetrayoftheopticaldrive.
9Hard-disk-driveactivityindicator
Indicatethestatusoftheinternalstoragedrives(suchasharddiskdrivesorsolid-statedrives).
On:Thestoragedrivesarereadyforuse.
Offwhencomputerpoweredon:Thestoragedrivesdonotworkproperlyorotherproblemsoccur.
10Powerindicator
Whenthepowerindicatorison,thecomputeristurnedon.
2ThinkStationP910UserGuide
Page 15
Rearview
1
2
3
4
5
8
6
7
9
12
13
14
11
10
Someconnectorsontherearofyourcomputerarecolor-codedtohelpyoudeterminewheretoconnect
thecablesonyourcomputer.
Figure2.Rearconnectors
1Powercordconnector2Audioline-outconnector
3Microphoneconnector
5Serialconnector6USB2.0connectors(4)
7USB3.0connectors(4)8PCIcardarea(PCIcardsavailablevarybycomputer
4PS/2keyboardconnector
model)
9Security-lockslot
11Ethernetconnectors(2)12PS/2mouseconnector
13Audioline-inconnector
10Key-nestslots
14PCIcardarea(PCIcardsavailablevarybycomputer
model)
Notes:
•AdiscretegraphicscardoranetworkinterfacecardcanbeinstalledintheappropriatePeripheral
ComponentInterconnect(PCI)orPCIExpresscardslot.Ifsuchacardisinstalled,ensurethatyouuse
theconnectorsonthecardinsteadofthecorrespondingconnectorsonthecomputer.
•Dependingonyourcomputermodel,oneormoregraphicscardsmightbeinstalledtoprovidethe
followingconnectors:
–DisplayPort®connector
–DigitalVisualInterface(DVI)connector
–MiniDisplayPort®connector
Chapter1.Productoverview3
Page 16

DisplayPortconnector
Attachahigh-performancemonitor,adirect-drivemonitor,orothercompatibledevicestotheDisplayPort
connector.
DVImonitorconnector
AttachaDVImonitororothercompatibledevicestotheDVImonitorconnector.
MiniDisplayPortconnector
Attachahigh-performancemonitor,adirect-drivemonitor,orothercompatibledevicestotheMini
DisplayPortconnector.TheMiniDisplayPortconnectorisaminiaturizedversionofaDisplayPortconnector.
1Powercordconnector
Connectthepowercordtoyourcomputerforpowersupply.
2Audioline-outconnector
Theaudioline-outconnectorisusedtosendaudiosignalsfromthecomputertoexternaldevices,such
asheadphones.
3Microphoneconnector
Attachamicrophonetoyourcomputerthroughthemicrophoneconnectorwhenyouwanttorecordsound
orifyouusespeech-recognitionsoftware.
4PS/2keyboardconnector
AttachaPersonalSystem/2(PS/2)keyboardtothePS/2keyboardconnector.
5Serialconnector
Connectanexternalmodem,aserialprinter,orotherdevicesthatusea9-pinserialconnectortothe
serialconnector.
6USB2.0connectors(4)
ConnectaUSB-compatibledevice,suchasaUSBkeyboard,mouse,storagedrive,orprinter,tothis
connector.
7USB3.0connectors(4)
ConnectaUSB-compatibledevice,suchasaUSBkeyboard,mouse,storagedrive,orprinter,tothis
connector.
814PCIcardarea(PCIcardsavailablevarybymodel)
Toimprovetheoperatingperformanceofyourcomputer,youcaninstallPCI/PCI-Expresscardsintothis
area.Dependingonyourcomputermodel,thecardsalreadyinstalledinthisareamightvary.
4ThinkStationP910UserGuide
Page 17

9Security-lockslot
AttachaKensington-stylecablelocktothesecurity-lockslottosecureyourcomputer.Formoreinformation,
see“AttachingaKensington-stylecablelock”onpage31.
10Key-nestslots
Installthekeyholderthatcomeswiththecomputercoverlockkeytothekey-nestslots.
11Ethernetconnectors(2)
AttachanEthernetcableforalocalareanetwork(LAN).
Note:TooperatethecomputerwithinFederalCommunicationsCommission(FCC)ClassBlimits,use
aCategory5Ethernetcable.
12PS/2mouseconnector
AttachaPS/2mouse,atrackball,orotherpointingdevicesthatuseaPS/2mouseconnector.
13Audioline-inconnector
Theaudioline-inconnectorisusedtoreceiveaudiosignalsfromanexternalaudiodevice,suchasastereo
system.Whenyouattachanexternalaudiodevice,acableconnectionisestablishedbetweentheaudio
line-outconnectorofthedeviceandtheaudioline-inconnectorofthecomputer.
Chapter1.Productoverview5
Page 18
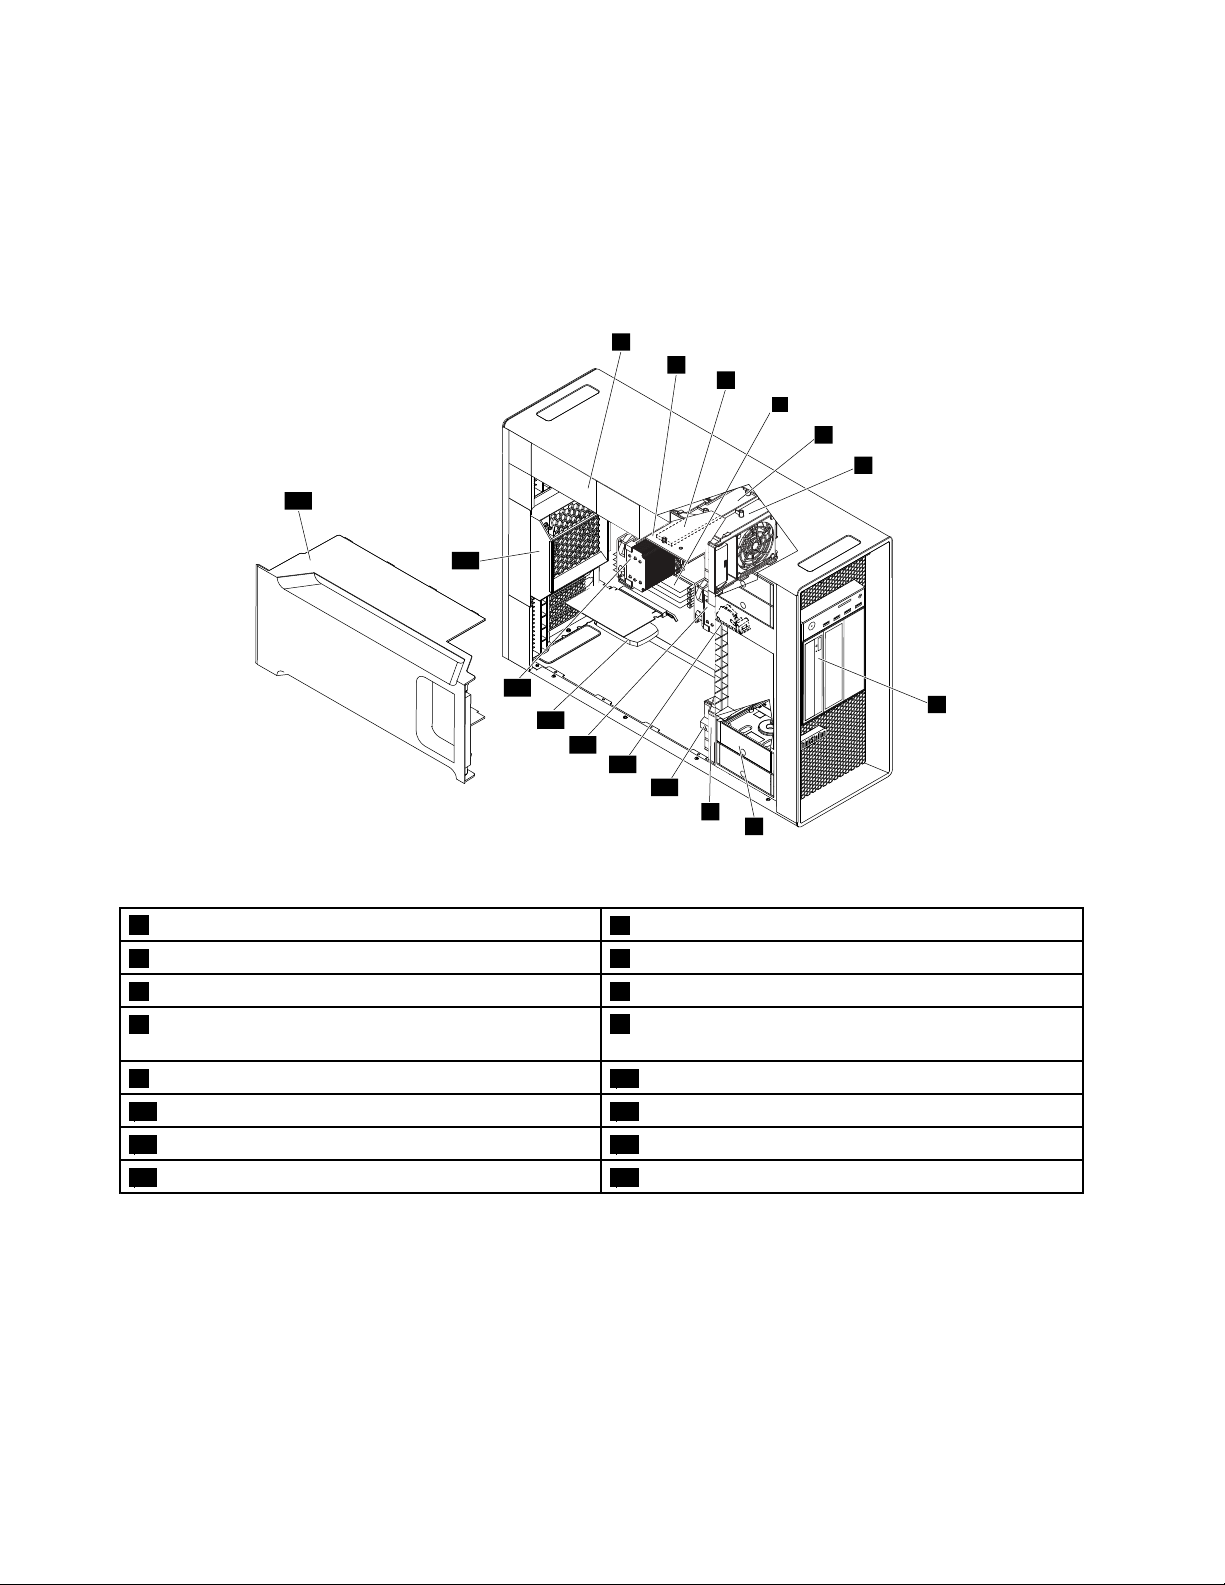
Computercomponents
1
7
8
4
13
14
15
3
5
2
6
16
12
11
10
9
Notes:
•Dependingonthemodel,yourcomputermightlookslightlydifferentfromtheillustration.
•Toremovethecomputercover,see“Preparingyourcomputerandremovingthecomputercover”on
page59
.
Figure3.Componentlocations
1Powersupplyassembly
3M.2solid-statedrive(somemodels)4Memorymodules(amountvariesbymodel)
5Multi-functionbracket6Frontfanassembly
7Opticaldrive,flexmoduleorflexbaystorageenclosure
(amountandcombinationvarybymodel)
9Frontfanassembly10Multi-functionbracket
11Coverpresenceswitch(intrusionswitch)
13PCIcard(varybycomputermodel)14Heatsinkandfanassembly2(somemodels)
15Rearfanassembly16Directcoolingairbaffle
6ThinkStationP910UserGuide
2Flexadapter(somemodels)
8Harddiskdrive,hybriddrive,orsolid-statedrive
(amountandcombinationvarybymodel)
12Heatsinkandfanassembly1
Page 19
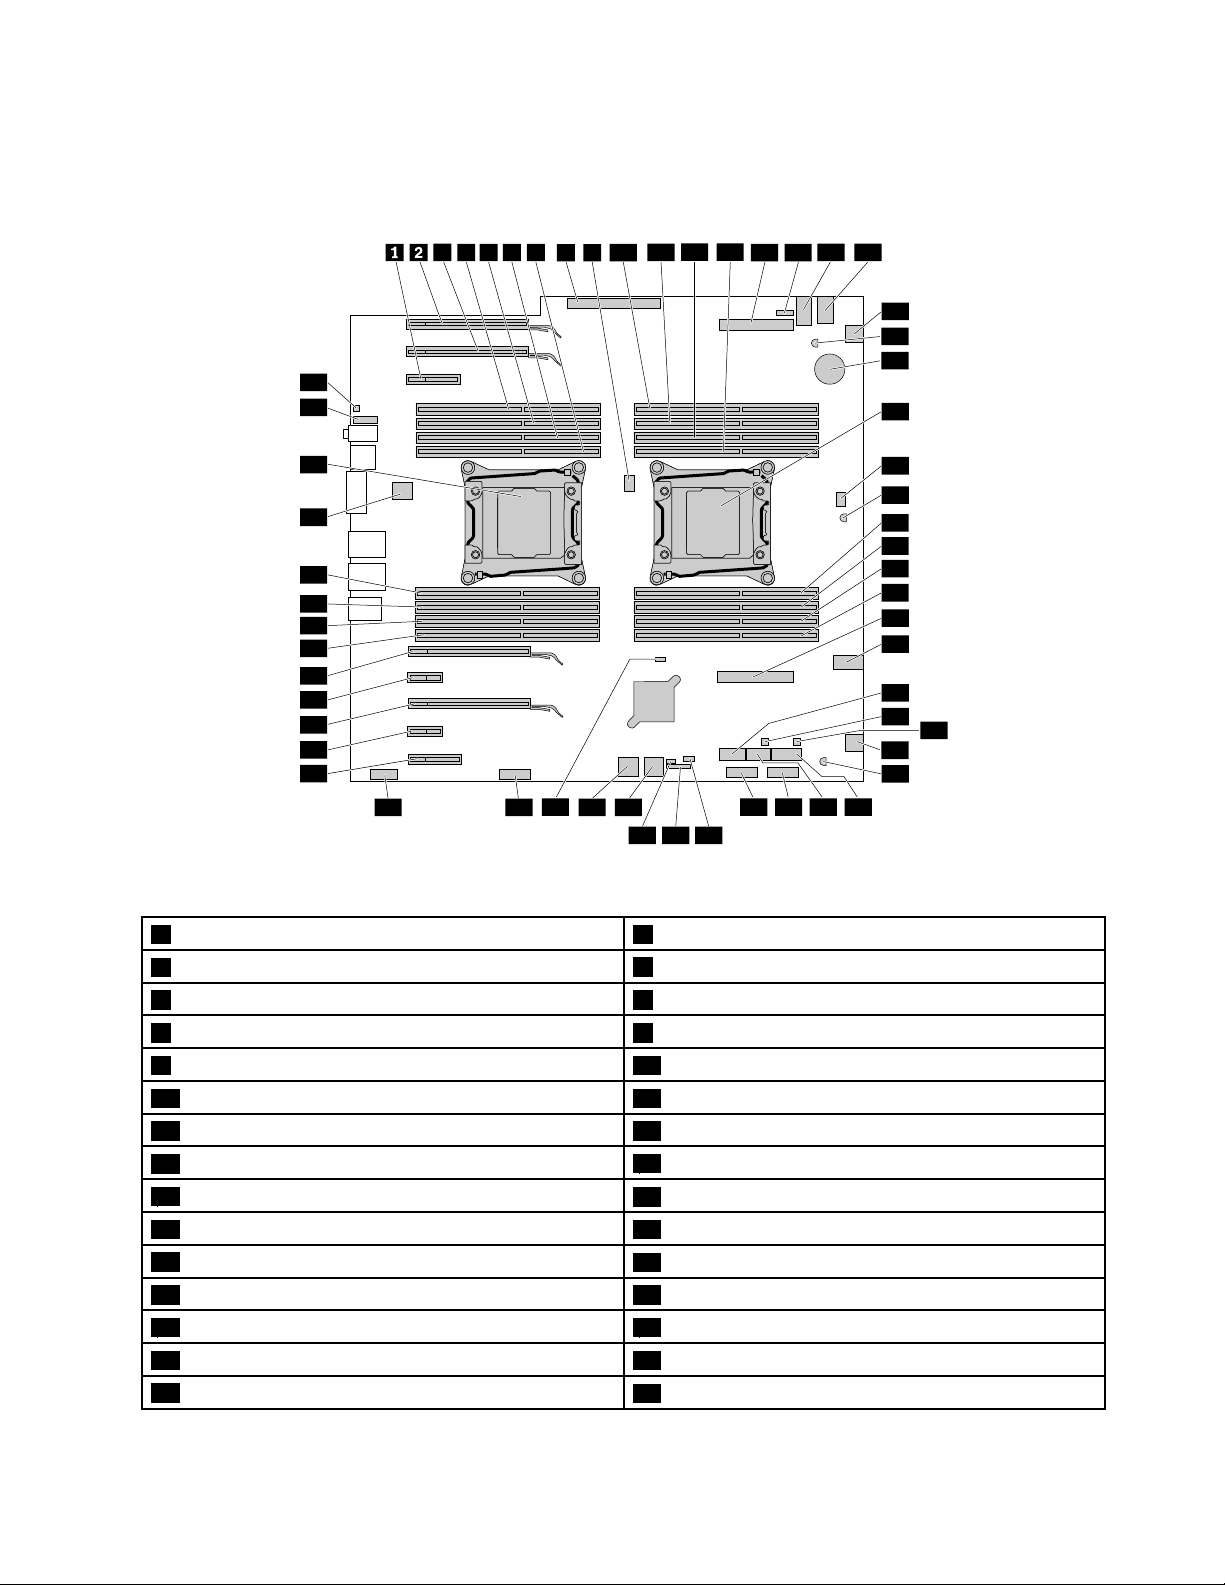
Partsonthesystemboard
3
8 9
14 15
18
19
20
22
21
23
29
31
33
34
37 36 3538
3941 40
43 42
44
4546
47
49
50
51
52
53
54
55
58
59
56
57
30
28
27
26
25
24
16 17
7654
10
11
12 13
48
32
Thefollowingillustrationshowsthelocationsofthepartsonthesystemboard.
Figure4.Partsonthesystemboard
1PCIExpress2.0x4cardslot2PCIExpress3.0x16graphicscardslot
3PCIExpress3.0x16graphicscardslot
5Memoryslot6Memoryslot
7Memoryslot8Powersupplyconnector
9Microprocessorfanconnector2
11Memoryslot12Memoryslot
13Memoryslot14Flexadapterslot2
15Optical-drivefanconnector
174-pinpowerconnector
19Thermalsensor20Battery
21Microprocessor1
23Thermalsensor24Memoryslot
25Memoryslot26Memoryslot
27Memoryslot28Flexadapterslot1
294-pinpowerconnector
4Memoryslot
10Memoryslot
164-pinpowerconnector
18Frontfanassemblyconnector
22Microprocessorfanconnector1
30eSATAconnector
Chapter1.Productoverview7
Page 20

31Front-accessstorageenclosurecontrolconnector(for
SATA5connector)
33Frontfanassemblyconnector
35SATA6connector36SATA5connector
3729-in-1cardreaderconnector
39Coverpresenceswitchconnector(intrusionswitch
32Front-accessstorageenclosurecontrolconnector(for
SATA6connector)
34Thermalsensor
38FrontUSB3.0connector
40Thunderbolt™adaptercontrolconnector
connector)
41Internal-storage-driveactivityindicatorconnector
42SA TA1/SATA2connector
(usedonlywitha9364RAIDcard)
43SA TA3/SATA4connector44ClearCMOS/Recoveryjumper
45Frontpanelconnector
47PCIExpress2.0x4cardslot48PCIExpress2.0x1cardslot
49PCIExpress3.0x16graphicscardslot50PCIExpress2.0x1cardslot
51PCIExpress3.0x16graphicscardslot
53Memoryslot54Memoryslot
55Memoryslot
57Microprocessor2(somemodels)
59Internalspeakerconnector
46Seven-segmentindicator
52Memoryslot
56Rearfanassemblyconnector
58Frontaudioconnector
8ThinkStationP910UserGuide
Page 21
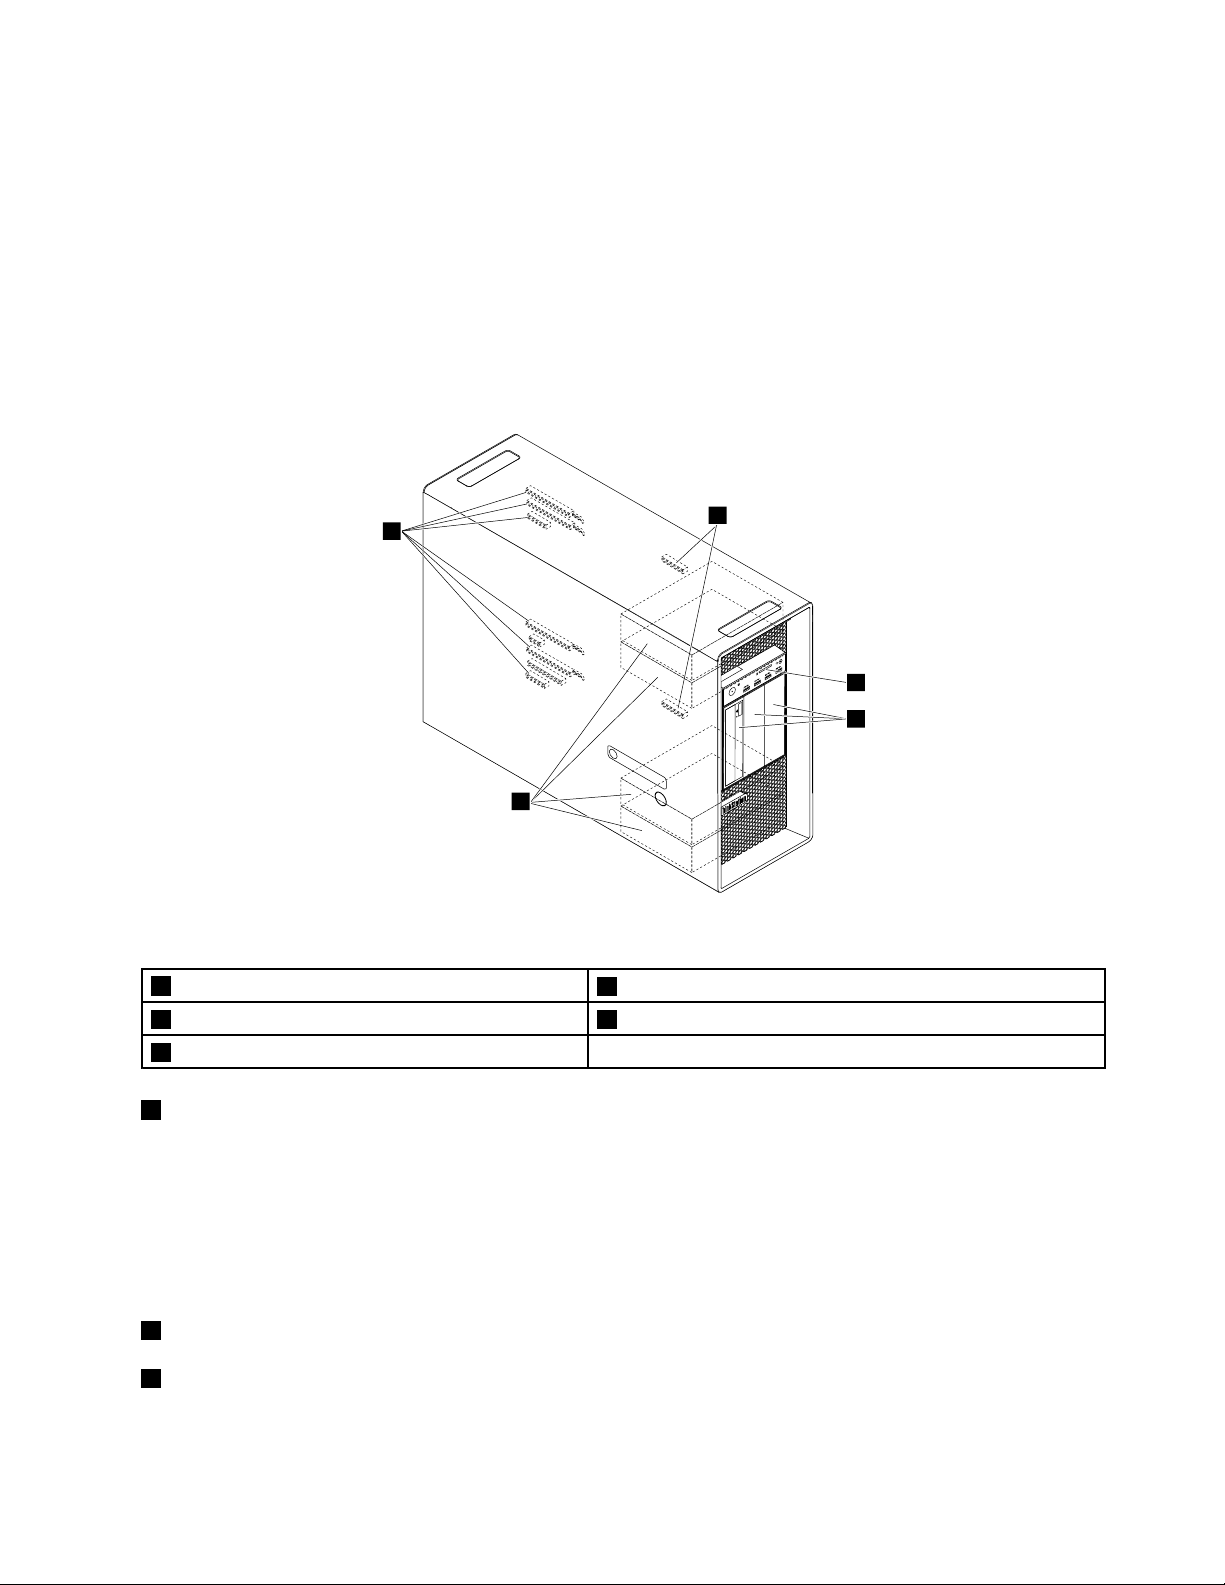
Internaldrives
2
3
4
1
5
Internaldrivesaredevicesthatyourcomputerusestoreadandstoredata.Youcanadddrivestoyour
computertoincreasestoragecapacityandenableyourcomputertoreadothertypesofmedia.Internal
drivesareinstalledinbays.
Whenyouinstallorreplaceaninternaldrive,notethetypeandsizeofthedrivethateachbaysupportsand
correctlyconnecttherequiredcables.RefertotheappropriatesectioninChapter7“Installingorreplacing
hardware”onpage59
Thefollowingillustrationshowsthelocationsofthedrivebays.
forinstructionsonhowtoinstallorreplaceinternaldrivesforyourcomputer.
Figure5.Drivebaylocations
1Flexadapterslots
3Optical-drivebays4Storagedrivebays
5PCIExpresscardslots
1Flexadapterslots
2SDcardslot
Dependingonyourcomputermodel,thefollowingflexadaptersmightbeinstalledintheflexadapterslots:
•FlexadapterwithtwominiSerialAttachedSCSI(SAS)high-density(HD)connectors
•FlexadapterwithoneSerialAdvancedTechnologyAttachment(SATA)3.0connector,oneUSB2.0
connector,andtwomini-SASHDconnectors
•FlexadapterwithtwoM.2slots(withtheM.2solid-statedriveinstalledinsomemodels)
2SDcardslot(withanSDcardinstalledinsomemodels)
3Optical-drivebays
Dependingonyourcomputermodel,thefollowingdevicesmightbeinstalledintheoptical-drivebays:
Chapter1.Productoverview9
Page 22
•Opticaldrive
•Flexmodule
Note:Theflexmodulemightbeinstalledwiththefollowing:
–IEEE1394connector
–eSATAconnector
–29-in-1cardreader
–Slimopticaldrive
•Flexbaystorageenclosure
4Storagedrivebays(withharddiskdrives,solid-statedrivesorhybriddrivesinstalledinsomebays)
5PCIExpressx16graphicscardslotsandPCIExpressx4cardslots(withPCIExpresssolid-statedrivesor
otherPCIcardsinstalledinsomemodels)
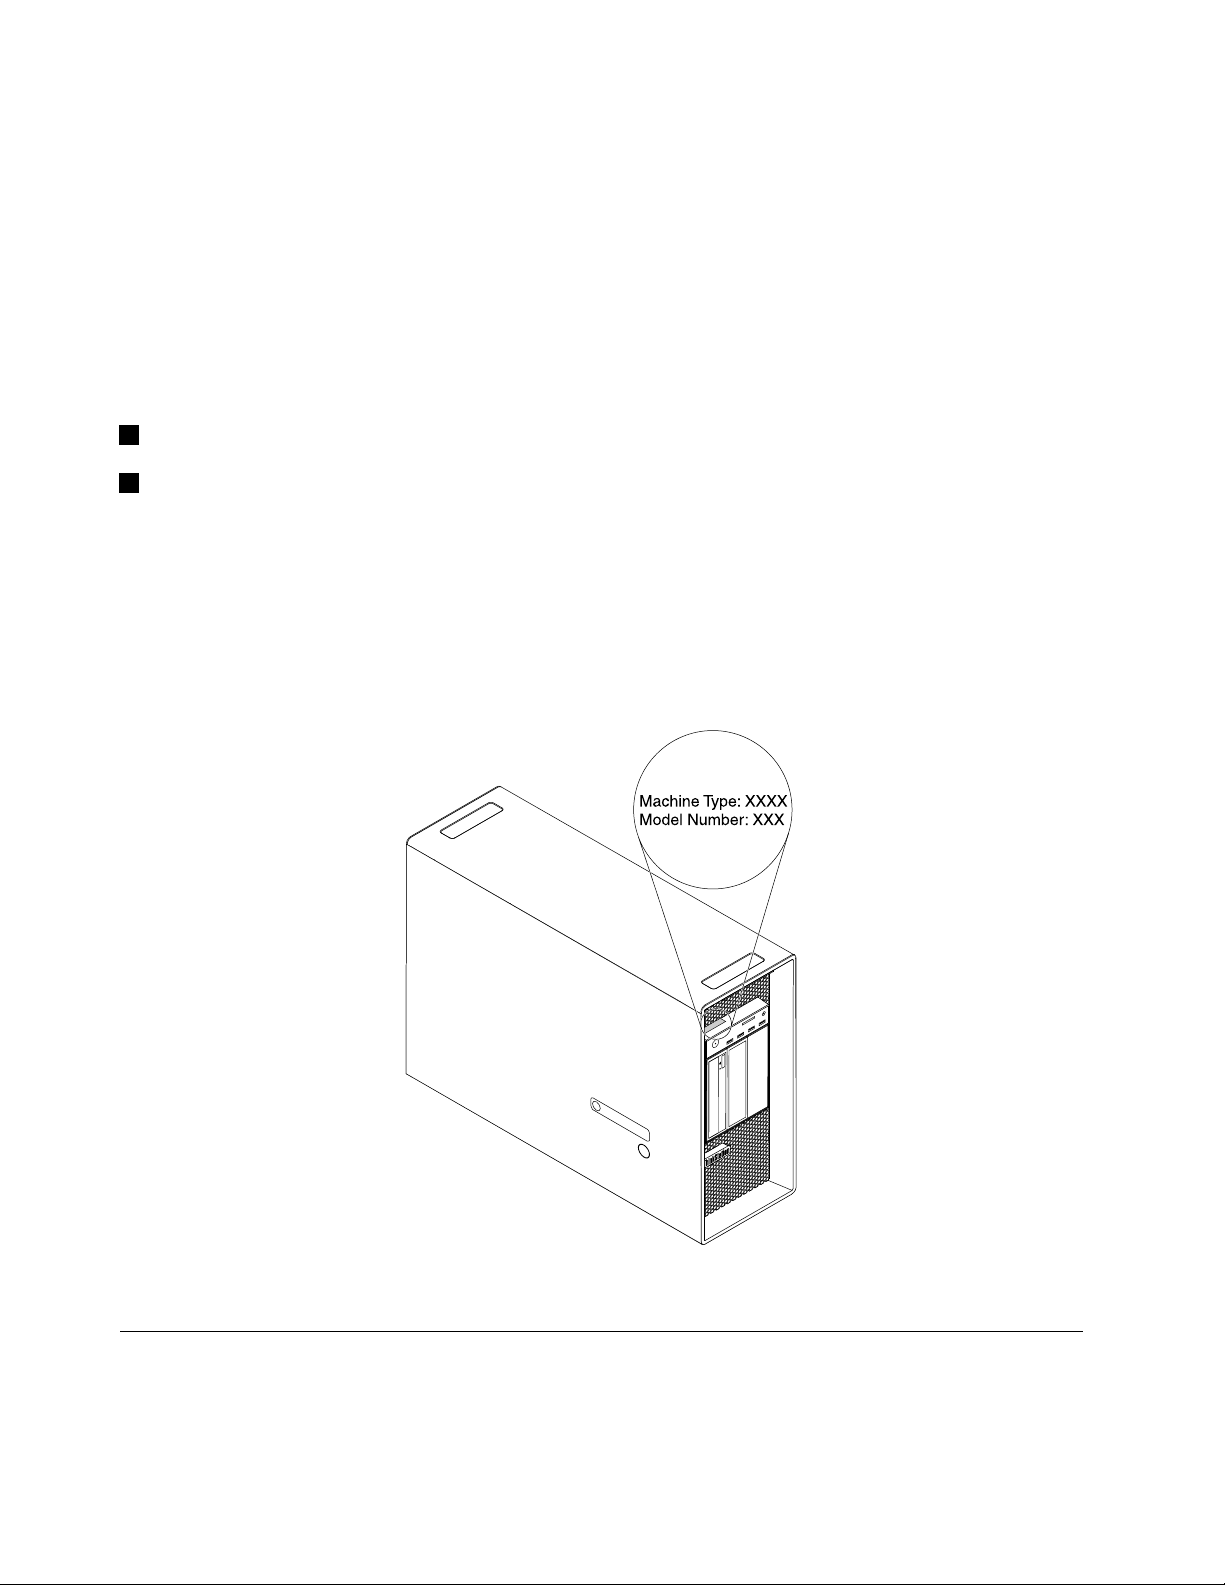
Machinetypeandmodellabel
Themachinetypeandmodellabelidentifiesyourcomputer.WhenyoucontactLenovoforhelp,themachine
typeandmodelinformationhelpssupporttechnicianstoidentifyyourcomputerandprovidefasterservice.
Themachinetypeandmodellabelisattachedonthefrontofyourcomputerasshown.
Figure6.Machinetypeandmodellabel
Computerfeatures
Foryourspecificcomputermodel,somefeaturesmightvaryornotapply.
10ThinkStationP910UserGuide
Page 23

Informationaboutyourcomputer
•Toviewbasicinformation(suchasmicroprocessorandmemoryinformation)aboutyourcomputer,
dothefollowing:
1.ClicktheStartbuttontoopentheStartmenu.
2.DependingonyourMicrosoft
®
Windows
®
operatingsystemversion,dooneofthefollowing:
–ForWindows7:Right-clickComputer,andthenclickProperties.
–ForWindows10:ClickSettings➙System➙About.
•Toviewdetailedinformationaboutthedevices(suchastheopticaldriveandnetworkadapters)onyour
computer,dothefollowing:
1.DependingonyourWindowsversion,dooneofthefollowing:
–ForWindows7:ClicktheStartbuttontoopentheStartmenu.Right-clickComputer,andthen
clickProperties.
–ForWindows10:Right-clicktheStartbuttontoopentheStartcontextmenu.
2.Locateanddouble-clickyourdeviceinDeviceManagertoviewdeviceproperties.T ypethe
administratorpasswordorprovideconfirmationifprompted.
Memory
Yourcomputersupportsupto16doubledatarate4(DDR4)errorcorrectioncode(ECC)registeredDIMMs
(RDIMMs)orDDR4ECCloadreducedDIMMs(LRDIMMs).
Formoreinformation,see“Memorymodule”onpage120.
Internaldrives
Yourcomputersupportsthefollowingstoragedrives:
•SDcard
•Harddiskdrive
•Hybriddrive(availableonsomemodels)
•Opticaldrive(availableonsomemodels)
•Solid-statedrive(availableonsomemodels)
Toviewtheamountofstoragedrivespace,dothefollowing:
1.DependingonyourWindowsversion,dooneofthefollowing:
•ForWindows7:ClicktheStartbuttontoopentheStartmenu.Right-clickComputer,andthenclick
Manage.
•ForWindows10:Right-clicktheStartbuttontoopentheStartcontextmenu.
2.ClickDiskManagementandfollowtheinstructionsonthescreen.
Videofeatures
DiscretegraphicscardinstalledinoneofthePCIExpressx16graphicscardslots(availableonsomemodels)
(theconnectorsvarybygraphicscard)
Note:Yourcomputerisinstalledwithoneormoregraphicscardsthatvarybycomputermodel.Depending
onyourcomputermodel,thegraphicscardsmightprovidethefollowingconnectors:
•DisplayPortconnector
•DVIconnector
•MiniDisplayPortconnector
Chapter1.Productoverview11
Page 24

Audiofeatures
Integratedaudiocontrollersupportsthefollowingconnectorsanddevicesonyourcomputer:
•Audioline-inconnector
•Audioline-outconnector
•Headsetconnector
•Internalspeaker
•Microphoneconnectors
Input/Output(I/O)features
•100/1000MbpsEthernetconnector
•9-pinserialconnectors
•Audioconnectors(audioline-inconnector,audioline-outconnector,headsetconnector,andmicrophone
connector)
•Displayconnectors(DisplayPortconnector,DVIconnector,andMiniDisplayPortconnector)(varyby
graphicscard)
•PS/2keyboardconnector
•PS/2mouseconnector
•USBconnectors
Formoreinformation,see“Frontview”onpage1
and“Rearview”onpage3.
Expansion
•Hard-disk-drivebays
•Flexadapterslots
•Optical-drivebays
•PCIExpressx1cardslots
•PCIExpressx4cardslots
•PCIExpressx16graphicscardslots
•SDcardslot
Formoreinformation,see“Internaldrives”onpage9
and“Partsonthesystemboard”onpage7.
Powersupply
1300-wattautomaticvoltage-sensingpowersupply
Wirelessfeatures
Dependingonyourcomputermodel,thefollowingwirelessfeaturesaresupported:
•WirelessLAN
•Bluetooth
Systemmanagementfeatures
•Abilitytostorepower-onself-test(POST)hardwaretestresults
•DesktopManagementInterface(DMI)
DesktopManagementInterfaceprovidesacommonpathforuserstoaccessinformationaboutall
aspectsofacomputer,includingprocessortype,installationdate,attachedprintersandotherperipherals,
powersources,andmaintenancehistory.
12ThinkStationP910UserGuide
Page 25

•ErPLPScompliancemode
Theenergy-relatedproductsdirective(ErP)lowestpowerstate(LPS)compliancemodereducesthe
consumptionofelectricitywhenyourcomputerisinsleeporoffmode.Formoreinformation,see
“EnablingordisablingtheErPLPScompliancemode”onpage36
.
•IntelStandardManageability(ISM)
IntelStandardManageabilityishardwareandfirmwaretechnologythatbuildscertainfunctionality
intocomputersinordertomakethemeasierandlessexpensiveforbusinessestomonitor,maintain,
update,upgrade,andrepair.
•IntelActiveManagementTechnology(AMT)
IntelActiveManagementTechnologyishardware-andfirmware-basedtechnologythatmakescomputers
easierandlessexpensiveforbusinessestomonitor,maintain,update,upgrade,andrepair.
•IntelRapidStorageT echnologyenterprise(RSTe)
IntelRSTeisadevicedriverthatprovidessupportforSATAorSASRedundantArrayofIndependent
Disks(RAID)0,1,5,and10arraysonspecificIntelchipsetsystemboardstoenhanceharddiskdrive
performance.
•PrebootExecutionEnvironment(PXE)
ThePrebootExecutionEnvironmentisanenvironmenttostartcomputersusinganetworkinterface
independentofdatastoragedrives(suchastheharddiskdrive)orinstalledoperatingsystems.
•SystemManagement(SM)BasicInput/OutputSystem(BIOS)andSMsoftware
TheSMBIOSspecificationdefinesdatastructuresandaccessmethodsinaBIOSthatallowsauseror
applicationtostoreandretrieveinformationspecificaboutthecomputerinquestion.
•WakeonLAN(WOL)
WakeonLANisanEthernetcomputernetworkingstandardthatallowsacomputertobeturnedon
orwokenupbyanetworkmessage.Themessageisusuallysentbyaprogramrunningonanother
computeronthesamelocalareanetwork.
•WindowsManagementInstrumentation(WMI)
WindowsManagementInstrumentationisasetofextensionstotheWindowsDriverModel.Itprovidesan
operatingsysteminterfacethroughwhichinstrumentedcomponentsprovideinformationandnotification.
Securityfeatures
•Abilitytoenableanddisableadevice
•AbilitytoenableanddisableUSBconnectorsindividually
•Antivirsusprogram
•BIOSguard
•BIOSpasswordsandWindowsaccountstodeterunauthorizeduseofyourcomputer
•ComputraceAgentsoftwareembeddedinfirmware
•Coverpresenceswitch(alsocalledintrusionswitch)
•Fingerauthentication(availableonsomemodels)
•Firewalls
•Startupsequencecontrol
•Startupwithoutkeyboardormouse
•SupportforaKensington-stylecablelock
•Supportforakeylock
•TrustedPlatformModule(TPM)
Chapter1.Productoverview13
Page 26

Formoreinformation,seeChapter4“Security”onpage29.
Preinstalledoperatingsystem
YourcomputerispreinstalledwithWindows7orWindows10operatingsystem.Additionaloperating
systemsmightbeidentifiedbyLenovoascompatiblewithyourcomputer.Todetermineifanoperating
systemhasbeencertifiedortestedforcompatibility,checktheWebsiteoftheoperatingsystemprovider.
Computerspecifications
Thissectionliststhephysicalspecificationsforyourcomputer.
Dimensions
Width:200mm(7.87inches)
Height:446mm(17.56inches)
Depth:620mm(24.41inches)
Weight
Maximumconfigurationasshipped:32.3kg(71.3lb)
Environment
•Airtemperature:
Operating:From10°C(50°F)to35°C(95°F)
Storageinoriginalshippingpackage:From-40°C(-40°F)to60°C(140°F)
Storagewithoutpackage:From-10°C(14°F)to60°C(140°F)
•Humidity:
Operating:10%–80%(non-condensing)
Storage:10%–90%(non-condensing)
•Altitude:
Operating:From-15.2m(-50ft)to3048m(10000ft)
Storage:From-15.2m(-50ft)to10668m(35000ft)
Electricalinput
Inputvoltage:From100Vacto240Vac
Inputfrequency:50/60Hz
Programs
Thissectionprovidesinformationabouttheprogramsonyourcomputer.
Accessingaprogramonyourcomputer
Note:ForWindows7,dependingonyourcomputermodel,someoftheLenovoprogramsmightbereadyto
beinstalled,soyoumustinstallthemmanually.Then,youcanaccessandusetheseprograms.
Toaccessaprogramonyourcomputer,dooneofthefollowing:
•FromWindowsSearch:
1.DependingonyourWindowsversion,dooneofthefollowing:
–ForWindows7:ClicktheStartbuttontoopentheStartmenu,andthentypetheprogramname
intothesearchbox.
14ThinkStationP910UserGuide
Page 27

–ForWindows10:TypetheprogramnameintothesearchboxnexttotheStartbutton.
2.Inthesearchresults,clickthenameofthedesiredprogramtolaunchtheprogram.
•FromtheStartmenuorControlPanel:
1.DependingonyourWindowsversion,dooneofthefollowing:
–ForWindows7:ClicktheStartbuttontoopentheStartmenu.Iftheprogramnameisnot
displayed,clickAllProgramstodisplaytheprogramlist.Then,clickthenameofthedesired
programtolaunchtheprogram.
–ForWindows10:ClicktheStartbuttontoopentheStartmenu.Then,clickthenameofthe
desiredprogramtolaunchtheprogram.
2.IftheprogramnameisnotdisplayedontheStartmenu,accesstheprogramfromControlPanel.
a.DependingonyourWindowsversion,dooneofthefollowing:
–ForWindows7:ClickControlPanelontheStartmenu.
–ForWindows10:Right-clicktheStartbuttontoopentheStartcontextmenu,andthenclick
ControlPanel.
b.ViewControlPanelbyLargeiconsorSmallicons,andthenclickthenameofthedesiredprogram
tolaunchtheprogram.
Installingaprogramthatisreadytobeinstalled(Windows7only)
OntheWindows7operatingsystem,toinstallaprogramthatisreadytobeinstalled,dothefollowing:
1.OpentheLenovoThinkVantage
page14.
2.ClickView➙Tilestoviewtheprogramicons.
3.Followtheinstructionsundergrayed-outiconstolocatetheiconforthedesiredprogram.Then,
double-clicktheicontoinstalltheprogram.
®
Toolsprogram.See“Accessingaprogramonyourcomputer”on
AnintroductiontoLenovoprograms
ThissectionprovidesinformationaboutthemajorLenovoprogramsavailableonyouroperatingsystem.
Note:Dependingonyourcomputermodel,someofthefollowingprogramsmightnotbeavailable.
FingerprintManagerProor
ThinkVantageFingerprintSoftware
(Windows7)
LenovoCompanion
(Windows10)
TheFingerprintManagerProorThinkVantageFingerprintSoftwareprogram
enablesyoutouseafingerprintreader.Theintegratedfingerprintreader
providedonsomekeyboardsenablesyoutoenrollyourfingerprintand
associateitwithyourpower-onpassword,harddiskpassword,andWindows
password.Asaresult,fingerprintauthenticationcanreplacepasswordsand
enablesimpleandsecureuseraccess.
Yourcomputer’sbestfeaturesandcapabilitiesshouldbeeasytoaccessand
understand.WithLenovoCompanion,theyare.UseLenovoCompanionto
dothefollowing:
•Optimizeyourcomputer’sperformance,monitoryourcomputer’shealth,
andmanageupdates.
•Accessyouruserguide,checkwarrantystatus,andviewaccessories
customizedforyourcomputer.
•Readhow-toarticles,exploreLenovoforums,andstayup-to-dateon
technologynewswitharticlesandblogsfromtrustedsources.
LenovoCompanionisfilledwithexclusiveLenovocontenttohelpyoulearn
moreaboutwhatyoucandowithyourcomputer.
Chapter1.Productoverview15
Page 28

LenovoDeviceExperienceor
LenovoPCExperience
(Windows7andWindows10)
LenovoID
(Windows10)
LenovoPowerENGAGE
(Windows7)
LenovoSolutionCenter
(Windows7andWindows10)
LenovoThinkVantageT ools
(Windows7)
RecoveryMedia
(Windows7)
RescueandRecovery
®
(Windows7)
SystemUpdate
(Windows7)
TheLenovoDeviceExperienceorLenovoPCExperienceprogramhelpsyou
workmoreeasilyandsecurely.TheprogramprovideseasyaccesstoLenovo
ThinkVantageToolsorLenovoTools,importantsettingsandinformation
aboutyourcomputer,theLenovoSupportWebsite,andsoon.
TheLenovoIDprogramenablesyoutocreateandmanageyourLenovoID.
WithaLenovoID,youcanconnecttoeverythingLenovothroughasingle
account.UseyourLenovoIDforquickandsimpleauthenticationandthen
enjoythevariousservicesprovidedbyLenovo.Suchservicesincludeonline
shopping,appdownload,personalizeddevicesupport,specialpromotional
offers,Lenovoforums,andsoon.
TheLenovoPowerENGAGEprogramprovidespowermanagementfunction.
TheLenovoSolutionCenterprogramenablesyoutotroubleshootand
resolvecomputerproblems.Itcombinesdiagnostictests,systeminformation
collection,securitystatus,andsupportinformation,alongwithhintsandtips
formaximumsystemperformance.
TheLenovoThinkVantageT oolsprogramprovideseasyaccesstovarious
toolstohelpyourworkmoreeasilyandsecurely.
TheRecoveryMediaprogramenablesyoutorestorethecontentsofthehard
diskdrivetothefactory-defaultsettings.
TheRescueandRecoveryprogramisaone-buttonrecoveryandrestore
solution.Itincludesasetofself-recoverytoolstohelpyoudiagnose
computerproblems,gethelp,andrecoverfromsystemcrashes,evenifyou
cannotstarttheWindowsoperatingsystem.
TheSystemUpdateprogramprovidesregularaccesstothesystemupdates
foryourcomputer,suchasdevicedriverupdates,softwareupdates,and
BIOSupdates.TheprogramgathersinformationfromtheLenovoHelp
Centeraboutnewupdatesforyourcomputer,andthensortsanddisplays
theupdatesfordownloadandinstallation.Y ouhavecompletecontrolof
whichupdatestodownloadandinstall.
16ThinkStationP910UserGuide
Page 29

Chapter2.Usingyourcomputer
Thischaptercontainsthefollowingtopics:
•“Registeringyourcomputer”onpage17
•“Settingthecomputervolume”onpage17
•“Usingadisc”onpage17
•“Connectingtoanetwork”onpage19
Registeringyourcomputer
WhenyouregisteryourcomputerwithLenovo,youenterrequiredinformationintoaLenovodatabase.The
informationenablesLenovotocontactyouwhenthereisarecallorothersevereproblemandprovide
quickerservicewhenyoucallLenovoforhelp.Inaddition,somelocationsofferextendedprivilegesand
servicestoregisteredusers.
ToregisteryourcomputerwithLenovo,gotohttp://www.lenovo.com/registerandfollowtheinstructionson
thescreen.
Settingthecomputervolume
Tosetthecomputervolume,dothefollowing:
1.ClickthevolumeiconintheWindowsnotificationareaonthetaskbar.
Note:IfthevolumeiconisnotdisplayedintheWindowsnotificationarea,addtheicontothe
notificationarea.SeetheWindowshelpsystem.
2.Followtheinstructionsonthescreenandthehovertexttoadjustthevolume,mutethespeaker,or
unmutethespeaker.
Usingadisc
Thissectionprovidesinformationaboutusingadiscandtheopticaldrive.
Guidelinesaboutusingtheopticaldrive
Whenusingtheopticaldrive,followtheseguidelines:
•Donotplacethecomputerinalocationwherethedriveisexposedtoanyofthefollowingconditions:
–Hightemperature
–Highhumidity
–Excessivedust
–Excessivevibrationorsuddenshock
–Aninclinedsurface
–Directsunlight
•Donotinsertanyobjectotherthanadiscintothedrive.
•Donotinsertdamageddiscsintothedrive.Warped,scratched,ordirtydiscscandamagethedrive.
•Beforemovingthecomputer,removethediscfromthedrive.
©CopyrightLenovo2016
17
Page 30

Handlingandstoringadisc
Whenhandlingandstoringadisc,followtheseguidelines:
•Holdthediscbyitsedges.Donottouchthesurfaceofthesidethatisnotlabeled.
•Toremovedustorfingerprints,wipethediscwithaclean,softclothfromthecentertotheoutside.Wiping
thediscinacirculardirectionmightcauselossofdata.
•Donotwriteorstickpaperonthedisc.
•Donotscratchormarkthedisc.
•Donotplaceorstorethediscindirectsunlight.
•Donotusebenzene,thinners,orothercleanerstocleanthedisc.
•Donotdroporbendthedisc.
Playingandremovingadisc
Toplayadisc,dothefollowing:
1.Withthecomputeron,presstheeject/closebuttononthefrontoftheopticaldrive.Thetrayslides
outofthedrive.
2.Insertadiscintothetray.Someopticaldrivehasasnaphubinthecenterofthetray.Ifyourdrivehasa
snaphub,supportthetraywithonehandandthenpushthecenterofthediscuntilitsnapsintoplace.
3.Presstheeject/closebuttonagainorgentlypushthetrayforwardtoclosethetray.Thediscplayer
programstartsautomatically.Formoreinformation,refertothehelpsystemofthediscplayerprogram.
Toremoveadiscfromtheopticaldrive,dothefollowing:
1.Withthecomputeron,presstheeject/closebuttononthefrontoftheopticaldrive.Thetrayslides
outofthedrive.
2.Carefullyremovethediscfromthetray.
3.Presstheeject/closebuttonagainorgentlypushthetrayforwardtoclosethetray.
Note:Ifthetraydoesnotslideoutofthedrivewhenyoupresstheeject/closebutton,turnoffyourcomputer.
Then,insertastraightenedpaperclipintotheemergency-ejectholeadjacenttotheeject/closebutton.
Usetheemergencyejectonlyinanemergency.
Recordingadisc
Ifyouropticaldrivesupportsrecording,youcanrecordadisc.
RecordingadiscusingWindowstools
TorecordadiscusingWindowstools,dooneofthefollowing:
•BurnadiscusingtheAutoPlaywindow.
1.Ensurethatthediscisplayedautomatically.
a.ClicktheStartbuttontoopentheStartmenu.
b.DependingonyourWindowsversion,dooneofthefollowing:
–ForWindows7:ClickControlPanel.ViewControlPanelbyLargeiconsorSmallicons,and
thenclickAutoPlay.
–ForWindows10:ClickSettings➙Devices➙AutoPlay.
c.SelectorturnonUseAutoPlayforallmediaanddevices.
2.Insertarecordablediscintotheopticaldrivethatsupportsrecording.TheAutoPlaywindowopens.
3.Followtheinstructionsonthescreen.
18ThinkStationP910UserGuide
Page 31

•BurnadiscusingWindowsMedia
1.Insertarecordablediscintotheopticaldrivethatsupportsrecording.
2.OpenWindowsMediaPlayer.See“Accessingaprogramonyourcomputer”onpage14.
3.Followtheinstructionsonthescreen.
•BurnadiscfromanISOfile.
1.Insertarecordablediscintotheopticaldrivethatsupportsrecording.
2.Double-clicktheISOfile.
3.Followtheinstructionsonthescreen.
®
Player.
Recordingadiscusingpreinstalledprograms
Torecordadiscusingpreinstalledprograms,dothefollowing:
1.Insertarecordablediscintotheopticaldrivethatsupportsrecording.
2.OpenthePowerDVDCreate,PowerProducer,orPower2Goprogram.See“Accessingaprogramon
yourcomputer”onpage14.
3.Followtheinstructionsonthescreen.
Connectingtoanetwork
Thissectionprovidesinformationaboutconnectingtoanetwork.Ifyoucannotconnectyourcomputertoa
network,see“EthernetLANproblems”onpage50.
ConnectingtoanEthernetLAN
YoucanconnectyourcomputertoanEthernetLANbyconnectinganEthernetcabletotheEthernet
connector.
DANGER
Toavoidtheriskofelectricalshock,donotconnectthetelephonecabletotheEthernetconnector.
ConnectingtoawirelessLAN
YoucanconnectyourcomputertoawirelessLANwithouttheuseofanEthernetcablebutbymeansof
radiowavesonly.
Note:ThewirelessLANfeatureisavailableonlyonsomemodels.
Toestablishawireless-LANconnection,dothefollowing:
1.EnsurethatawirelessLANisavailableandthewirelessLANfeatureonyourcomputerisworking.
2.Clickthewireless-network-connection-statusiconintheWindowsnotificationareatodisplayavailable
wirelessnetworks.
Note:Ifthewireless-network-connection-statusiconisnotdisplayedintheWindowsnotificationarea,
addtheicontothenotificationarea.SeetheWindowshelpsystem.
3.ClickawirelessLAN,andthenclickConnecttoconnectyourcomputertoit.Providerequired
informationifneeded.
Chapter2.Usingyourcomputer19
Page 32

ConnectingtoaBluetooth-enableddevice
Bluetoothisashort-rangewirelesscommunicationstechnology.UseBluetoothtoestablishawireless
connectionbetweenyourcomputerandanotherBluetooth-enableddevicewithinadistanceofabout10
m(32.8ft).
Note:TheBluetoothfeatureisavailableonlyonsomemodels.
ToconnecttoaBluetooth-enableddevice,dothefollowing:
1.EnsurethattheBluetoothfeatureonyourcomputerisworkingandtheBluetooth-enableddeviceis
locatedwithinadistanceofabout10m(32.8ft)fromyourcomputer.
2.ClicktheBluetoothiconintheWindowsnotificationareaonthetaskbar.Then,clickAddaDeviceand
followtheinstructionsonthescreen.
Note:IftheBluetoothiconisnotdisplayedintheWindowsnotificationarea,addtheicontothe
notificationarea.SeetheWindowshelpsystem.
20ThinkStationP910UserGuide
Page 33

Chapter3.Y ouandyourcomputer
Thischaptercontainsthefollowingtopics:
•“Arrangingyourworkspace”onpage21
•“Accessibilityinformation”onpage22
•“Cleaningyourcomputer”onpage25
•“Maintenance”onpage25
•“Movingyourcomputer”onpage27
Arrangingyourworkspace
Arrangeyourworkspacetosuityourneedsandthekindofworkyoudo.Thissectionprovidesinformation
aboutthefactorsthataffectthewayyouarrangeyourworkspace.
Glareandlighting
Positionthemonitortominimizeglareandreflectionsfromoverheadlights,windows,andotherlightsources.
Reflectedlightfromshinysurfacescancauseannoyingreflectionsonyourscreen.Whenpossible,place
themonitoratrightanglestowindowsandotherlightsources.Ifnecessary,reduceoverheadlighting
byturningofflightsorusinglowerwattagebulbs.Ifyouinstallthemonitornearawindow,usecurtains
orblindstoblockthesunlight.Y oucanadjustthebrightnessandcontrastcontrolsonthemonitorasthe
roomlightingchangesthroughouttheday.
Whereitisimpossibletoavoidreflectionsortoadjustthelighting,anantiglarefilterplacedoverthescreen
mightbehelpful.However,thesefiltersmightaffecttheclarityoftheimageonthescreen;trythemonlyafter
youhaveexhaustedothermethodsofreducingglare.
Aircirculation
Yourcomputerproducesheat.Thecomputerhasafanthatpullsinfreshairandforcesouthotairthrough
theairvents.Blockingtheairventscancauseoverheating,whichmightresultinamalfunctionordamage.
Positionthecomputersothatnothingblockstheairvents;usually,51mm(2inches)ofairspaceissufficient.
Ensurethattheventedairisnotblowingonpeople.
Electricaloutletlocationsandcablelengths
Thefollowingfactorsmightdeterminethefinalplacementofyourcomputer:
•Locationsofelectricaloutlets
•Lengthofpowercordsorpoweradapters
•Lengthofthecablesthatareconnectedtootherdevices
Formoreinformationaboutpowercordsorpoweradapters,see“Powercordsandpoweradapters”on
pagevi
.
Comfort
Althoughnosingleworkingpositionisidealforeveryone,hereareafewguidelinestohelpyoufindaposition
thatsuitsyoubest.Thefollowingfiguresetsanexampleforyourreference.
©CopyrightLenovo2016
21
Page 34

•Screenposition:Keepthescreenatacomfortableviewingdistance,usually51–61cm(20–24inches).
Then,adjustthescreensothatthetopofthescreenisatorslightlybeloweyelevelandyoucanviewit
withouttwistingyourbody.
•Chairposition:Useachairthatgivesyougoodbacksupportandseatheightadjustment.Usechair
adjustmentstobestsuityourdesiredposture.
•Headposition:Keepyourheadandneckinacomfortableandneutral(verticalorupright)position.
•Armandhandpositions:Keepyourforearms,wrists,andhandsinarelaxedandneutral(horizontal)
position.T ypewithasofttouchwithoutpoundingthekeys.
•Legposition:Keepyourthighsparalleltothefloorandyourfeetflatonthefloororonafootrest.
Makeminormodificationsinyourworkingposturetodetertheonsetofdiscomfortcausedbylongperiods
ofworkinginthesameposition.Frequentshortbreaksfromyourworkalsohelptopreventminordiscomfort
associatedwithyourworkingposture.
Accessibilityinformation
Lenovoiscommittedtoprovidinguserswhohavehearing,vision,andmobilitylimitationswithgreater
accesstoinformationandtechnology.Thissectionprovidesinformationaboutthewaystheseuserscanget
themostoutoftheircomputerexperience.Youalsocangetthemostup-to-dateaccessibilityinformation
fromthefollowingWebsite:
http://www.lenovo.com/accessibility
Keyboardshortcuts
Thefollowingtablecontainskeyboardshortcutsthatcanhelpmakeyourcomputereasiertouse.
Note:Dependingonyourkeyboard,someofthefollowingkeyboardshortcutsmightnotbeavailable.
KeyboardshortcutFunction
Windowslogokey+U
RightShiftforeightseconds
ShiftfivetimesTurnonorturnoffStickyKeys
NumLockforfivesecondsTurnonorturnoffToggleKeys
LeftAlt+LeftShift+NumLock
LeftAlt+LeftShift+PrtScn(orPrtSc)TurnonorturnoffHighContrast
OpenEaseofAccessCenter
TurnonorturnoffFilterKeys
TurnonorturnoffMouseKeys
Formoreinformation,gotohttp://windows.microsoft.com/,andthenperformasearchusinganyofthe
followingkeywords:keyboardshortcuts,keycombinations,shortcutkeys.
22ThinkStationP910UserGuide
Page 35

EaseofAccessCenter
EaseofAccessCenterontheWindowsoperatingsystemenablesuserstoconfiguretheircomputersto
suittheirphysicalandcognitiveneeds.
TouseEaseofAccessCenter,dothefollowing:
1.ClicktheStartbuttontoopentheStartmenu.
2.DependingonyourWindowsversion,dooneofthefollowing:
•ForWindows7:ClickControlPanel.ViewControlPanelbyLargeiconsorSmallicons,andthen
clickEaseofAccessCenter.
•ForWindows10:ClickSettings➙EaseofAccess.
3.Choosetheappropriatetoolbyfollowingtheinstructionsonthescreen.
EaseofAccessCentermainlyincludesthefollowingtools:
•Magnifier
Magnifierisausefulutilitythatenlargestheentirescreenorpartofthescreensothatyoucansee
theitemsbetter.
•Narrator
Narratorisascreenreaderthatreadsaloudwhatisdisplayedonthescreenanddescribeseventssuchas
errormessages.
•On-ScreenKeyboard
Ifyouprefertotypeorenterdataintoyourcomputerusingamouse,joystick,orotherpointingdevice
insteadofaphysicalkeyboard,youcanuseOn-ScreenKeyboard.On-ScreenKeyboarddisplaysavisual
keyboardwithallthestandardkeys.
•HighContrast
HighContrastisafeaturethatheightensthecolorcontrastofsometextandimagesonyourscreen.Asa
result,thoseitemsaremoredistinctandeasiertoidentify.
•Personalizedkeyboard
Adjustkeyboardsettingstomakeyourkeyboardeasiertouse.Forexample,youcanuseyourkeyboard
tocontrolthepointerandtypecertainkeycombinationseasier.
•Personalizedmouse
Adjustmousesettingstomakeyourmouseeasiertouse.Forexample,youcanchangethepointer
appearanceandmakeiteasiertomanagewindowswiththemouse.
SpeechRecognition
SpeechRecognitionenablesyoutocontrolyourcomputerbyvoice.
Usingonlyyourvoice,youcanstartprograms,openmenus,clickobjectsonthescreen,dictatetextinto
documents,andwriteandsende-mails.Everythingyoudowiththekeyboardandmousecanbedonewith
onlyyourvoice.
TouseSpeechRecognition,dothefollowing:
1.DependingonyourWindowsversion,dooneofthefollowing:
•ForWindows7:ClicktheStartbuttontoopentheStartmenu.
•ForWindows10:Right-clicktheStartbuttontoopentheStartcontextmenu.
2.ClickControlPanel.ViewControlPanelbyLargeiconsorSmallicons,andthenclickSpeech
Recognition.
Chapter3.Youandyourcomputer23
Page 36

3.Followtheinstructionsonthescreen.
Screen-readertechnologies
Screen-readertechnologiesareprimarilyfocusedonsoftwareprograminterfaces,helpinformationsystems,
andvariousonlinedocuments.Foradditionalinformationaboutscreenreaders,seethefollowing:
•UsingPDFswithscreenreaders:
http://www.adobe.com/accessibility.html?promoid=DJGVE
•UsingtheJAWSscreenreader:
http://www.freedomscientific.com/jaws-hq.asp
•UsingtheNVDAscreenreader:
http://www.nvaccess.org/
Screenresolution
Youcanmakethetextandimagesonyourscreeneasiertoreadbyadjustingthescreenresolutionofyour
computer.
Toadjustthescreenresolution,dothefollowing:
1.Right-clickablankareaonthedesktop.
2.DependingonyourWindowsversion,dooneofthefollowing:
•ForWindows7:ClickScreenresolution.
•ForWindows10:ClickDisplaysettings.OntheDisplaytab,clickAdvanceddisplaysettings.
3.Followtheinstructionsonthescreen.
Note:Settingtheresolutiontoolowmightpreventsomeitemsfromfittingonthescreen.
Customizableitemsize
Youcanmaketheitemsonyourscreeneasiertoreadbychangingtheitemsize.
•Tochangetheitemsizetemporarily,usetheMagnifiertoolinEaseofAccessCenter.See“Easeof
AccessCenter”onpage23.
•Tochangetheitemsizepermanently,dothefollowing:
–Changethesizeofalltheitemsonyourscreen.
1.Right-clickablankareaonthedesktop.
2.DependingonyourWindowsversion,dooneofthefollowing:
–ForWindows7:ClickScreenresolution➙Maketextandotheritemslargerorsmaller.
–ForWindows10:ClickDisplaysettings.
3.Changetheitemsizebyfollowingtheinstructionsonthescreen.
4.ClickApply.Thischangewilltakeeffectthenexttimeyoulogintotheoperatingsystem.
–ChangethesizeoftheitemsonaWebpage.
PressandholdCtrl,andthenpresstheplus-signkey(+)toenlargeortheminus-signkey(-)to
reducethetextsize.
–Changethesizeoftheitemsonthedesktoporawindow.
Note:Thisfunctionmightnotworkonsomewindows.
Ifyourmousehasawheel,pressandholdCtrl,andthenscrollthewheeltochangetheitemsize.
24ThinkStationP910UserGuide
Page 37

Industry-standardconnectors
Yourcomputerprovidesindustry-standardconnectorsthatenableyoutoconnectassistivedevices.
Formoreinformationaboutthelocationandfunctionofeachconnector,see“Hardwarelocations”onpage1.
TTY/TDDconversionmodem
Yourcomputersupportstheuseofatexttelephone(TTY)orthetelecommunicationsdeviceforthedeaf
(TDD)conversionmodem.ThemodemmustbeconnectedbetweenyourcomputerandaTTY/TDD
telephone.Then,youcantypeamessageonyourcomputerandsendittothetelephone.
Documentationinaccessibleformats
Lenovoprovideselectronicdocumentationinaccessibleformats,suchasproperlytaggedPDFfilesor
HyperTextMarkupLanguage(HTML)files.Lenovoelectronicdocumentationisdevelopedtoensure
thatvisuallyimpaireduserscanreadthedocumentationthroughascreenreader.Eachimageinthe
documentationalsoincludesadequatealternativetextsothatvisuallyimpaireduserscanunderstandthe
imagewhentheyuseascreenreader.
Cleaningyourcomputer
CAUTION:
Removeanymediafromthedrivesandturnoffallconnecteddevicesandthecomputer.Then,
disconnectallpowercordsfromelectricaloutletsanddisconnectallcablesthatareconnected
tothecomputer.
Itisagoodpracticetocleanyourcomputerperiodicallytoprotectthesurfacesandensuretrouble-free
operation.Useonlymildcleaningsolutionsandadampclothtocleanthepaintedsurfacesofthecomputer.
Dustbuildupcompoundsproblemsassociatedwithglare,soremembertocleanthescreenperiodically.
Wipethescreensurfacegentlywithasoft,drycloth,orblowonthescreentoremovegritandotherloose
particles.Dependingonthetypeofthescreen,moistenasoft,lint-freeclothwithanLCDcleanerorliquid
glasscleanerandthenwipethescreensurface.
Maintenance
Withappropriatecareandmaintenance,yourcomputerwillserveyoureliably.Thissectionprovides
informationaboutmaintainingyourcomputersothatitcankeepworkinginbettercondition.
Basicmaintenancetips
Herearesomebasicpointsaboutkeepingyourcomputerfunctioningproperly:
•Keepyourcomputerinaclean,dryenvironment.Ensurethatthecomputerrestsonaflat,steadysurface.
•Donotcoveranyofairvents.Theseairventsprovideairflowtokeepyourcomputerfromoverheating.
•Keepfoodanddrinksawayfromallpartsofyourcomputer.Foodparticlesandspillsmightmakethe
keyboardandmousestickandunusable.
•Donotgetthepowerswitchesorothercontrolswet.Moisturecandamagethesepartsandcausean
electricalhazard.
•Alwaysdisconnectapowercordbygraspingthepluginsteadofthecord.
Goodmaintenancepractices
Byperformingafewgoodmaintenancepractices,youcanmaintaingoodcomputerperformance,protect
yourdata,andbepreparedincaseofacomputerfailure.
Chapter3.Youandyourcomputer25
Page 38

•Emptyyourrecyclebinonaregularbasis.
•Usethediskdefragmentationordiskoptimizationfeatureofyouroperatingsystemoccasionallyto
preventperformanceproblemscausedbyanexcessivenumberoffragmentedfiles.
•CleanoutyourInbox,SentItems,andDeletedItemsfoldersinyoure-mailapplicationonaregularbasis.
•Backupcriticaldataregularlyonremovablemediamemory,suchasdiscsandUSBstoragedevices,
andstoretheremovablemediainasafelocation.Thefrequencyofmakingbackupcopiesdependson
howcriticalthedataistoyouoryourbusiness.
•Backupyourdataonthestoragedriveregularly.See“Recoveryinformation”onpage56
•Keepyourcomputersoftware,devicedrivers,andoperatingsystemup-to-date.See“Keepingyour
computercurrent”onpage26.
•Keepalogbook.Entriesmightincludemajorsoftwareorhardwarechanges,device-driverupdates,
intermittentproblemsandwhatyoudidtoresolvethem,andotherissuesyoumighthaveexperienced.
Thecauseofaproblemmightbechangeinhardware,changeinsoftware,oranyotheractionsthatmight
havetakenplace.AlogbookcanhelpyouoraLenovotechniciandeterminesthecauseofaproblem.
•CreateProductRecoverydiscs.See“Recoveryinformation”onpage56formoreinformationaboutusing
ProductRecoverydiscstorestoretheharddiskdrivetothefactory-defaultsettings.
•CreaterescuemediausingdiscsorUSBstoragedevicesasearlyaspossible.Youcanusearescue
mediumtorecoverfromfailuresthatpreventyoufromgainingaccesstotheWindowsenvironmentorthe
RescueandRecoveryworkspaceonyourharddiskdrive.
.
Keepingyourcomputercurrent
Inmostcases,itisagoodpracticetohavethemostup-to-dateoperatingsystemupdatepatches,software
programs,anddevicedrivers.Thissectionprovidesinformationabouthowtogetthelatestupdatesforyour
computer.
Gettingthelatestsystemupdates
Togetthelatestsystemupdatesforyourcomputer,ensurethatyourcomputerisconnectedtotheInternet
anddooneofthefollowing:
•UsethecorrespondingLenovoprogramtogetthesystemupdates,suchasdevicedriverupdates,
softwareupdates,andBIOSupdates:
–ForWindows7:UsetheSystemUpdateprogram.
–ForWindows10:UsetheLenovoCompanionprogram.
ToopentheSystemUpdateorLenovoCompanionprogram,see“Accessingaprogramonyourcomputer”
onpage14
•UseWindowsUpdatetogetthesystemupdates,suchassecurityfixes,newversionsofWindows
components,anddevicedriverupdates.
1.ClicktheStartbuttontoopentheStartmenu.
2.DependingonyourWindowsversion,dooneofthefollowing:
–ForWindows7:ClickControlPanel.ViewControlPanelbyLargeiconsorSmallicons,and
–ForWindows10:ClickSettings➙Update&security➙WindowsUpdate.
3.Followtheinstructionsonthescreen.
.Formoreinformationaboutusingtheprogram,refertothehelpsystemoftheprogram.
thenclickWindowsUpdate.
Note:ThedevicedriversprovidedbyWindowsUpdatemightnotbetestedbyLenovo.Itis
recommendedthatyougetdevicedriversbyusingLenovoprogramsorfromtheLenovoWebsiteat
http://www.lenovo.com/support.
26ThinkStationP910UserGuide
Page 39

Movingyourcomputer
Beforemovingyourcomputer,takethefollowingprecautions:
1.Backupyourdataonthestoragedrive.See“Goodmaintenancepractices”onpage25.
2.Removeanymediafromthedrivesandturnoffallconnecteddevicesandthecomputer.Then,
disconnectallpowercordsfromelectricaloutletsanddisconnectallcablesthatareconnectedtothe
computer.
3.Ifyousavedtheoriginalshippingcartonsandpackingmaterials,usethemtopacktheunits.Ifyouare
usingdifferentcartons,cushiontheunitstoavoiddamage.
Movingyourcomputertoanothercountryorregion
Whenyoumoveyourcomputertoanothercountryorregion,youmusttakelocalelectricalstandardsinto
consideration.Ifthelocalelectricaloutletstyleisdifferentfromthetypeyouarecurrentlyusing,contactthe
LenovoCustomerSupportCentertopurchaseeitheranelectricalplugadapteroranewpowercord.Fora
listofLenovoSupportphonenumbers,gotohttp://www.lenovo.com/support/phone.Ifyoucannotfindthe
supporttelephonenumberforyourcountryorregion,contactyourLenovoreseller.
Chapter3.Youandyourcomputer27
Page 40

28ThinkStationP910UserGuide
Page 41

Chapter4.Security
Thischaptercontainsthefollowingtopics:
•“Lockingyourcomputer”onpage29
•“ViewingandchangingsecuritysettingsintheSetupUtilityprogram”onpage31
•“UsingpasswordsandWindowsaccounts”onpage32
•“Usingfingerprintauthentication”onpage32
•“Usingthecoverpresenceswitch”onpage32
•“Usingfirewalls”onpage33
•“Protectingdataagainstviruses”onpage33
•“ComputraceAgentsoftwareembeddedinfirmware”onpage33
•“BIOSguard”onpage33
•“TrustedPlatformModule(TPM)”onpage34
Lockingyourcomputer
Thissectionprovidesinformationaboutlockingyourcomputerwiththelockingdevicestokeepyour
computersafe.
Lockingthecomputercover
Lockingthecomputercoverhelpspreventunauthorizedpeoplefromgainingaccesstotheinsideofyour
computer.Yourcomputermightcomewithakeylock1thatisbuiltintothecomputercover.Thekeys
forthekeylockareattachedtotherearofthemachine.Forsecurity,storethekeysinasecureplace
whenyouarenotusingthem.
©CopyrightLenovo2016
29
Page 42

Note:Thekeylockandkeysareavailableonlyonsomemodels.
Figure7.Lockingthecomputercover
30ThinkStationP910UserGuide
Page 43

AttachingaKensington-stylecablelock
YoucanuseaKensington-stylecablelocktosecureyourcomputertoadesk,table,orothernon-permanent
fixture.Thecablelockattachestothesecurity-lockslotattherearofyourcomputer.Dependingonthetype
selected,thecablelockcanbeoperatedwithakeyorcombination.Thecablelockalsolocksthebuttons
usedtoopenthecomputercover.Thisisthesametypeoflockusedwithmanynotebookcomputers.You
canordersuchacablelockdirectlyfromLenovobysearchingforKensingtonat:
http://www.lenovo.com/support
Figure8.Kensington-stylecablelock
ViewingandchangingsecuritysettingsintheSetupUtilityprogram
ToviewandchangesecuritysettingsintheSetupUtilityprogram,dothefollowing:
1.StarttheSetupUtilityprogram.See“StartingtheSetupUtilityprogram”onpage35.
2.SelectSecurity.
3.Followtheinstructionsontherightsideofthescreentoviewandchangesecuritysettings.Y oucan
referto“UsingtheSetupUtilityprogram”onpage35togetbasicinformationaboutsomemajor
securitysettings.
Chapter4.Security31
Page 44

4.TosavesettingsandexittheSetupUtilityprogram,pressF10,selectY esinthewindowdisplayed,
andpressEnter.
Note:Forsomekeyboards,youmightneedtopressFn+F10toexittheSetupUtilityprogram.
UsingpasswordsandWindowsaccounts
YoucanuseBIOSpasswordsandWindowsaccountstopreventunauthorizedaccesstoyourcomputerand
data.
•TouseBIOSpasswords,see“UsingBIOSpasswords”onpage38
•TouseWindowsaccounts,dothefollowing:
1.ClicktheStartbuttontoopentheStartmenu.
2.DependingonyourWindowsversion,dooneofthefollowing:
–ForWindows7:ClickControlPanel➙UserAccounts.
–ForWindows10:ClickSettings➙Accounts.
3.Followtheinstructionsonthescreen.
.
Usingfingerprintauthentication
Ifyourkeyboardhasafingerprintreader,youcanusefingerprintauthenticationtoreplacepasswordsfor
simpleandsecureuseraccess.T ousefingerprintauthentication,firstenrollyourfingerprintsandassociate
themwithyourpasswords(suchasthepower-onpassword,harddiskpassword,andWindowspassword).
Usethefingerprintreaderandthefingerprintprogramtocompletethisprocedure.
Tousefingerprintauthentication,dooneofthefollowing:
•ForWindows7:UsetheFingerprintManagerProorThinkVantageFingerprintSoftwareprogramprovided
byLenovo.Toopentheprogram,see“Accessingaprogramonyourcomputer”onpage14.Formore
informationaboutusingtheprogram,refertothehelpsystemoftheprogram.
•ForWindows10:UsethefingerprinttoolprovidedbytheWindowsoperatingsystem.ClicktheStart
buttontoopentheStartmenu,andthenclickSettings➙Accounts➙Sign-inoptions.Followthe
instructionsonthescreen.
Tousethefingerprintreader,refertothedocumentationshippedwiththefingerprintkeyboardorlocatedon
theLenovoSupportWebsiteathttp://www.lenovo.com/support/keyboards.
Usingthecoverpresenceswitch
Thecoverpresenceswitchpreventsyourcomputerfromloggingintotheoperatingsystemwhenthe
computercoverisnotproperlyinstalledorclosed.
Tousethecoverpresenceswitch,enablethecover-presence-switchconnectoronthesystemboard
first.Toachievethis,dothefollowing:
1.StarttheSetupUtilityprogram.See“StartingtheSetupUtilityprogram”onpage35.
2.SelectSecurity➙ChassisIntrusionDetectionandpressEnter.
3.SelectEnabledandpressEnter.
4.TosavesettingsandexittheSetupUtilityprogram,pressF10,selectYesinthewindowdisplayed,and
pressEnter.Thecover-presence-switchconnectoronthesystemboardisenabled.
Note:Forsomekeyboards,youmightneedtopressFn+F10toexittheSetupUtilityprogram.
32ThinkStationP910UserGuide
Page 45

Thecoverpresenceswitchstartsfunctioning.Iftheswitchdetectsthatthecomputercoverisnotcorrectly
installedorclosed,anerrormessagewillbedisplayedwhenyouturnonthecomputer.Tofixtheerrorand
logintotheoperatingsystem,dothefollowing:
1.Properlyinstallorcloseyourcomputercover.SeeChapter7“Installingorreplacinghardware”on
page59.
2.StartandthenexittheSetupUtilityprogram.See“StartingtheSetupUtilityprogram”onpage35and
“ExitingtheSetupUtilityprogram”onpage40.
Usingfirewalls
Afirewallcanbehardware,software,oracombinationofbothdependingonthelevelofsecurityrequired.
Firewallsworkonasetofrulestodeterminewhichinboundandoutboundconnectionsareauthorized.If
yourcomputerispreinstalledwithafirewallprogram,ithelpsprotectagainstcomputerInternetsecurity
threats,unauthorizedaccess,intrusions,andInternetattacks.Italsoprotectsyourprivacy.Formore
informationabouthowtousethefirewallprogram,refertothehelpsystemofyourfirewallprogram.
TouseWindowsFirewall,dothefollowing
1.DependingonyourWindowsversion,dooneofthefollowing:
•ForWindows7:ClicktheStartbuttontoopentheStartmenu.
•ForWindows10:Right-clicktheStartbuttontoopentheStartcontextmenu.
2.ClickControlPanel.ViewControlPanelbyLargeiconsorSmallicons,andthenclickWindows
Firewall.
3.Followtheinstructionsonthescreen.
Protectingdataagainstviruses
Yourcomputerispreinstalledwithanantivirusprogramtohelpyouguardagainst,detect,andeliminate
viruses.
Lenovoprovidesafullversionofantivirussoftwareonyourcomputerwithafree30-daysubscription.After
30days,youmustrenewthelicensetocontinuereceivingtheantivirussoftwareupdates.
Note:Virusdefinitionfilesmustbekeptup-to-datetoguardagainstnewviruses.
Formoreinformationabouthowtouseyourantivirussoftware,refertothehelpsystemofyourantivirus
software.
ComputraceAgentsoftwareembeddedinfirmware
TheComputraceAgentsoftwareisanITassetmanagementandcomputertheftrecoverysolution.The
softwaredetectsifchangeshavebeenmadeonthecomputer,suchashardware,software,orthecomputer
call-inlocation.YoumighthavetopurchaseasubscriptiontoactivatetheComputraceAgentsoftware.
BIOSguard
TheBIOSguardmodulecryptographicallyverifiesalltheBIOSupdatestothesystemBIOSflash.Therefore,
themalwareisblockedfromattackingtheBIOS.
Chapter4.Security33
Page 46

TrustedPlatformModule(TPM)
TPMisasecurecryptoprocessorthatstorescryptographickeys,whichinturnprotectsinformationstored
inyourcomputer.
34ThinkStationP910UserGuide
Page 47

Chapter5.Advancedconfiguration
Thischaptercontainsthefollowingtopics:
•“UsingtheSetupUtilityprogram”onpage35
•“ConfiguringRAID”onpage41
•“UpdatingandrecoveringtheBIOS”onpage40
UsingtheSetupUtilityprogram
TheSetupUtilityprogramisusedtoviewandchangetheconfigurationsettingsofyourcomputer.This
sectionprovidesinformationaboutonlythemajorconfigurationsettingsavailableintheprogram.
Note:TheoperatingsystemsettingsmightoverrideanysimilarsettingsintheSetupUtilityprogram.
StartingtheSetupUtilityprogram
TostarttheSetupUtilityprogram,dothefollowing:
1.Turnonorrestartyourcomputer.
2.Beforetheoperatingsystemstartsup,repeatedlypressandreleaseF1orFn+F1(dependingonthe
keyboard).BasedontheSetupUtilitydisplaymodesetting,oneofthefollowingsituationsoccurs:
•Textmode:TheSetupUtilityprogramopens.
•Graphicmode:Thestartscreenisdisplayed.Then,selectSetuptoopentheSetupUtilityprogram.
Note:IfaBIOSpasswordhasbeenset,theSetupUtilityprogramwillnotopenuntilyouenterthe
correctpassword.Formoreinformation,see“UsingBIOSpasswords”onpage38.
Toviewandchangetheconfigurationsettings,followtheinstructionsonthescreen.
ChangingthedisplaymodeoftheSetupUtilityprogram
YoucanusetheSetupUtilityprograminthegraphicmodeorthetextmodeaccordingtoyourneeds.
•Textmode:Youcanuseonlythekeyboardtomakeselections.Thekeysusedtoperformvarioustasks
aredisplayedatthebottomofthescreen.
•Graphicmode:Inadditiontothekeyboard,youalsocanusethemousetomakeselections.
Note:TheSerialPortConsoleRedirectionitemisavailableonlyinthetextmode.
TochangethedisplaymodeoftheSetupUtilityprogram,dothefollowing:
1.StarttheSetupUtilityprogram.See“StartingtheSetupUtilityprogram”onpage35.
2.Fromthemaininterface,locateSetupmodeselect,andselectGraphicorT ext.
3.TosavesettingsandexittheSetupUtilityprogram,pressF10orFn+F10(dependingonthekeyboard),
selectYesinthewindowdisplayed,andpressEnter.
ChangingthedisplaylanguageoftheSetupUtilityprogram
TheSetupUtilityprogramsupportsthreedisplaylanguages:English,French,andsimplifiedChinese.
TochangethedisplaylanguageoftheSetupUtilityprogram,dothefollowing:
©CopyrightLenovo2016
35
Page 48

1.StarttheSetupUtilityprogram.See“StartingtheSetupUtilityprogram”onpage35.
2.Fromthemaininterface,locateSystemLanguage,andselectthedisplaylanguageaccordingto
yourneeds.
Enablingordisablingadevice
Thissectionprovidesinformationabouthowtoenableordisableuseraccesstohardwaredevices(such
asUSBconnectorsorstoragedrives).
Toenableordisableadevice,dothefollowing:
1.StarttheSetupUtilityprogram.See“StartingtheSetupUtilityprogram”onpage35.
2.SelectDevices.
3.SelectthedeviceyouwanttoenableordisableandpressEnter.
4.SelectthedesiredsettingandpressEnter.
5.TosavesettingsandexittheSetupUtilityprogram,pressF10,selectY esinthewindowdisplayed,
andpressEnter.
Note:Forsomekeyboards,youmightneedtopressFn+F10toexittheSetupUtilityprogram.
Enablingordisablingtheautomaticpower-onofyourcomputer
TheAutomaticPowerOnitemintheSetupUtilityprogramprovidesvariousoptionsforyoutomakeyour
computerstartupautomatically.
ToenableordisabletheAutomaticPowerOnfeatures,dothefollowing:
1.StarttheSetupUtilityprogram.See“StartingtheSetupUtilityprogram”onpage35.
2.SelectPower➙AutomaticPowerOnandpressEnter.
3.SelectthefeatureyouwanttoenableordisableandpressEnter.
4.SelectthedesiredsettingandpressEnter.
5.TosavesettingsandexittheSetupUtilityprogram,pressF10,selectY esinthewindowdisplayed,
andpressEnter.
Note:Forsomekeyboards,youmightneedtopressFn+F10toexittheSetupUtilityprogram.
EnablingordisablingtheErPLPScompliancemode
Lenovocomputersmeettheeco-designrequirementsoftheErPLot3regulation.Formoreinformation,go
to:
http://www.lenovo.com/ecodeclaration
YoucanenabletheErPLPScompliancemodeintheSetupUtilityprogramtoreducetheconsumptionof
electricitywhenyourcomputerisofforinsleepmode.
ToenableordisabletheErPLPScompliancemode,dothefollowing:
1.StarttheSetupUtilityprogram.See“StartingtheSetupUtilityprogram”onpage35.
2.SelectPower➙EnhancedPowerSavingModeandpressEnter.
3.SelectEnabledorDisableddependingonyourneeds,andthenpressEnter.IfyouselectEnabled,you
alsoneedtodisabletheWakeonLANfeature.See“Enablingordisablingtheautomaticpower-onof
yourcomputer”onpage36.
4.TosavesettingsandexittheSetupUtilityprogram,pressF10,selectY esinthewindowdisplayed,
andpressEnter.
36ThinkStationP910UserGuide
Page 49

Note:Forsomekeyboards,youmightneedtopressFn+F10toexittheSetupUtilityprogram.
WhentheErPLPScompliancemodeisenabled,youcanwakeupyourcomputerbydoingoneofthe
following:
•Pressthepowerbutton.
•EnabletheWakeUponAlarmfeaturetomakeyourcomputerwakeupatasettime.See“Enablingor
disablingtheautomaticpower-onofyourcomputer”onpage36
•EnabletheAfterPowerLossfeaturetomakeyourcomputerwakeupwhenthepowersupplyresumes
afterasuddenlossofelectricity.
ToenabletheAfterPowerLossfeature,dothefollowing:
1.StarttheSetupUtilityprogram.See“StartingtheSetupUtilityprogram”onpage35.
2.SelectPower➙AfterPowerLossandpressEnter.
3.SelectPowerOnandpressEnter.
4.TosavesettingsandexittheSetupUtilityprogram,pressF10,selectYesinthewindowdisplayed,
andpressEnter.
Note:Forsomekeyboards,youmightneedtopressFn+F10toexittheSetupUtilityprogram.
.
Enablingordisablingtheconfigurationchangedetection
Whentheconfigurationchangedetectionisenabled,ifthePOSTdetectsconfigurationchangesofsome
hardwaredevices(suchasstoragedrivesormemorymodules),anerrormessageisdisplayed.
Toenableordisabletheconfigurationchangedetection,dothefollowing:
1.StarttheSetupUtilityprogram.See“StartingtheSetupUtilityprogram”onpage35.
2.SelectSecurity➙ConfigurationChangeDetectionandpressEnter.
3.SelectthedesiredsettingandpressEnter.
4.TosavesettingsandexittheSetupUtilityprogram,pressF10,selectY esinthewindowdisplayed,
andpressEnter.
Note:Forsomekeyboards,youmightneedtopressFn+F10toexittheSetupUtilityprogram.
Tobypasstheerrormessageandlogintotheoperatingsystem,dooneofthefollowing:
•PresstheF2key.
Note:Forsomekeyboards,youmightneedtopressFn+F2tobypasstheerrormessage.
•StartandthenexittheSetupUtilityprogram.See“StartingtheSetupUtilityprogram”onpage35and
“ExitingtheSetupUtilityprogram”onpage40.
ChangingtheBIOSsettingsbeforeinstallinganewoperatingsystem
BIOSsettingsvarybyoperatingsystem.ChangetheBIOSsettingsbeforeinstallinganewoperatingsystem.
TochangetheBIOSsettings,dothefollowing:
1.StarttheSetupUtilityprogram.See“StartingtheSetupUtilityprogram”onpage35.
2.FromtheSetupUtilityprogrammainmenu,selectExit➙OSOptimizedDefault.
3.Dependingontheoperatingsystemtobeinstalled,dooneofthefollowing:
•ToinstalltheWindows10(64-bit)operatingsystem,selectEnabled.
•ToinstallanoperatingsystemotherthanWindows10(64-bit),selectDisabled.
Chapter5.Advancedconfiguration37
Page 50

4.SelectYesinthewindowdisplayedandpressEntertoconfirmyourselection.
5.TosavesettingandexittheSetupUtilityprogram,pressF10,selectYesinthewindowdisplayed,
andpressEnter.
Note:Forsomekeyboards,youmightneedtopressFn+F10toexittheSetupUtilityprogram.
UsingBIOSpasswords
ByusingtheSetupUtilityprogram,youcansetpasswordstopreventunauthorizedaccesstoyourcomputer
anddata.
Youdonothavetosetanypasswordstouseyourcomputer.However,usingpasswordsimprovescomputer
security.Ifyoudecidetosetanypasswords,readthefollowingtopics.
Passwordtypes
ThefollowingtypesofpasswordsareavailableintheSetupUtilityprogram:
•Power-onpassword
Whenapower-onpasswordisset,youarepromptedtoenteravalidpasswordeachtimethecomputeris
turnedon.Thecomputercannotbeuseduntilthevalidpasswordisentered.
•Administratorpassword
Settinganadministratorpassworddetersunauthorizedusersfromchangingconfigurationsettings.Ifyou
areresponsibleformaintainingtheconfigurationsettingsofseveralcomputers,youmightwanttoset
anadministratorpassword.
Whenanadministratorpasswordisset,youarepromptedtoenteravalidpasswordeachtimeyou
trytoaccesstheSetupUtilityprogram.TheSetupUtilityprogramcannotbeaccesseduntilavalid
passwordisentered.
Ifboththepower-onpasswordandadministratorpasswordareset,youcanentereitherpassword.
However,youmustuseyouradministratorpasswordtochangeanyconfigurationsettings.
•Harddiskpassword
Settingaharddiskpasswordpreventsunauthorizedaccesstothedataontheinternalstoragedrive(such
asaharddiskdrive).Whenaharddiskpasswordisset,youarepromptedtoenteravalidpasswordeach
timeyoutrytoaccessthestoragedrive.
Notes:
–Afteryousetaharddiskpassword,yourdataonthestoragedriveisprotectedevenifthestoragedrive
isremovedfromonecomputerandinstalledinanother.
–Iftheharddiskpasswordisforgotten,thereisnowaytoresetthepasswordorrecoverdatafrom
thestoragedrive.
Passwordconsiderations
Apasswordcanbeanycombinationofupto64alphabeticandnumericcharacters.Forsecurityreasons,it
isrecommendedtouseastrongpasswordthatcannotbeeasilycompromised.
Note:TheSetupUtilityprogrampasswordsarenotcasesensitive.
Tosetastrongpassword,considerthefollowingguidelines:
•Haveatleasteightcharactersinlength
•Containatleastonealphabeticcharacterandonenumericcharacter
•Notbeyournameoryourusername
•Notbeacommonwordoracommonname
38ThinkStationP910UserGuide
Page 51

•Besignificantlydifferentfromyourpreviouspasswords
Setting,changing,anddeletingapassword
Toset,change,ordeleteapassword,dothefollowing:
1.StarttheSetupUtilityprogram.See“StartingtheSetupUtilityprogram”onpage35.
2.SelectSecurity.
3.Dependingonthepasswordtype,selectSetPower-OnPassword,SetAdministratorPassword,or
HardDiskPasswordandpressEnter.
4.Followtheinstructionsontherightsideofthescreentoset,change,ordeleteapassword.
Note:Apasswordcanbeanycombinationofupto64alphabeticandnumericcharacters.Formore
information,see“Passwordconsiderations”onpage38
5.TosavesettingsandexittheSetupUtilityprogram,pressF10,selectY esinthewindowdisplayed,
andpressEnter.
Note:Forsomekeyboards,youmightneedtopressFn+F10toexittheSetupUtilityprogram.
.
Erasinglostorforgottenpasswords(clearingCMOS)
Thissectionprovidesinstructionsonhowtoeraselostorforgottenpasswords,suchasauserpassword.
Toerasealostorforgottenpassword,dothefollowing:
1.Removeanymediafromthedrivesandturnoffallconnecteddevicesandthecomputer.Then,
disconnectallpowercordsfromelectricaloutletsanddisconnectallcablesthatareconnectedtothe
computer.
2.Removethecomputercover.SeeChapter7“Installingorreplacinghardware”onpage59.
3.LocatetheClearComplementaryMetalOxideSemiconductor(CMOS)/Recoveryjumperonthesystem
board.See“Partsonthesystemboard”onpage7.
4.Movethejumperfromthestandardposition(pin1andpin2)tothemaintenanceposition(pin2and
pin3).
5.Reinstallthecomputercoverandconnectthepowercord.SeeChapter7“Installingorreplacing
hardware”onpage59.
6.Turnonthecomputerandleaveitonforapproximately10seconds.Then,turnoffthecomputerby
holdingthepowerbuttonforapproximatelyfiveseconds.
7.Repeatstep1andstep2.
8.MovetheClearCMOS/Recoveryjumperbacktothestandardposition(pin1andpin2).
9.Reinstallthecomputercoverandconnectthepowercord.
Selectingastartupdevice
Ifyourcomputerdoesnotstartupfromadeviceasexpected,youcanchoosetochangethestartupdevice
sequencepermanentlyorselectatemporarystartupdevice.
Changingthestartupdevicesequencepermanently
Tochangethestartupdevicesequencepermanently,dothefollowing:
1.Dependingonthetypeofthestoragedevice,dooneofthefollowing:
•Ifthestoragedeviceisinternal,gotostep2.
•Ifthestoragedeviceisadisc,ensurethatyourcomputeristurnedon.Then,insertthediscinto
theopticaldrive.
Chapter5.Advancedconfiguration39
Page 52

•Ifthestoragedeviceisanexternaldeviceotherthanadisc,connectthestoragedevicetothe
computer.
2.StarttheSetupUtilityprogram.See“StartingtheSetupUtilityprogram”onpage35.
3.SelectStartup.
4.Followtheinstructionsontherightsideofthescreentochangethestartupdevicesequence.
5.TosavesettingsandexittheSetupUtilityprogram,pressF10,selectY esinthewindowdisplayed,
andpressEnter.
Note:Forsomekeyboards,youmightneedtopressFn+F10toexittheSetupUtilityprogram.
Selectingatemporarystartupdevice
Note:Notalldiscsandstoragedrivesarebootable.
Toselectatemporarystartupdevice,dothefollowing:
1.Dependingonthetypeofthestoragedevice,dooneofthefollowing:
•Ifthestoragedeviceisinternal,gotostep2.
•Ifthestoragedeviceisadisc,ensurethatyourcomputeristurnedon.Then,insertthediscinto
theopticaldrive.
•Ifthestoragedeviceisanexternaldeviceotherthanadisc,connectthestoragedevicetothe
computer.
2.Turnonorrestartthecomputer.BeforeWindowsstartsup,repeatedlypressandreleasetheF12key
untilBootMenuisdisplayed.
Note:Forsomekeyboards,youmightneedtopressFn+F12todisplayBootMenu.
3.SelectthedesiredstoragedeviceandpressEnter.Thecomputerthenstartsupfromthedeviceyou
select.
Ifyouwanttoselectapermanentstartupdevice,selectEnterSetuponBootMenuandpressEntertostart
theSetupUtilityprogram.Formoreinformationabouthowtoselectapermanentstartupdevice,see
“Changingthestartupdevicesequencepermanently”onpage39
.
ExitingtheSetupUtilityprogram
ToexittheSetupUtilityprogram,dooneofthefollowing:
•Ifyouwanttosavethenewsettings,presstheF10key.Then,selectYesinthewindowdisplayed
andpressEnter.
Note:Forsomekeyboards,youmightneedtopressFn+F10toexittheSetupUtilityprogram.
•Ifyoudonotwanttosavethenewsettings,selectExit➙DiscardChangesandExitandpressEnter.
Then,selectY esinthewindowdisplayedandpressEnter.
UpdatingandrecoveringtheBIOS
TheBIOSisthefirstprogramthatthecomputerrunswhenyouturnonthecomputer.TheBIOSinitializesthe
hardwarecomponentsandloadstheoperatingsystemandotherprograms.
UpdatingtheBIOS
Whenyouinstallanewprogram,hardwaredevice,ordevicedriver,youmightbeinformedtoupdate
theBIOS.YoucanupdatetheBIOSfromyouroperatingsystemoraflashupdatedisc(availableonly
onsomemodels).
40ThinkStationP910UserGuide
Page 53

ToupdatetheBIOS,dothefollowing:
1.Gotohttp://www.lenovo.com/support.
2.ToupdatetheBIOSfromyouroperatingsystem,downloadtheflashBIOSupdatedriveraccordingto
youroperatingsystemversion.ToupdatetheBIOSfromaflashupdatedisc,downloadtheISOimage
version(usedtocreateaflashupdatedisc).Then,downloadtheinstallationinstructionsfortheflash
BIOSupdatedriver.
3.PrinttheinstallationinstructionsyoudownloadandfollowtheinstructionstoupdatetheBIOS.
Note:IfyouwanttoupdatetheBIOSfromaflashupdatedisc,theinstallationinstructionsmightnotprovide
theinformationabouthowtorecordtheupdatedisc.See“Recordingadisc”onpage18.
RecoveringfromaBIOSupdatefailure
TorecoverfromaBIOSupdatefailure,dothefollowing:
1.Removeanymediafromthedrivesandturnoffallconnecteddevicesandthecomputer.Then,
disconnectallpowercordsfromelectricaloutletsanddisconnectallcablesthatareconnectedtothe
computer.
2.Removethecomputercover.SeeChapter7“Installingorreplacinghardware”onpage59.
3.LocatetheClearCMOS/Recoveryjumperonthesystemboard.See“Hardwarelocations”onpage1.
4.RemoveanypartsandcablesthatimpedeyouraccesstotheClearCMOS/Recoveryjumper.
5.Movethejumperfromthestandardposition(pin1andpin2)tothemaintenanceposition(pin2and
pin3).
6.Reinstallthepartsandcablesthatwereremoved.
7.Reinstallthecomputercoverandreconnectanycablesthatweredisconnected.SeeChapter7
“Installingorreplacinghardware”onpage59
8.TurnonthecomputerandinserttheBIOSupdatediscintotheopticaldrive.Waitafewminutes.The
recoveryprocessbegins.Aftertherecoveryprocessiscompleted,yourcomputerwillshutdown
automatically.
.
Note:Ifthecomputerdoesnotstartupfromthedisc,selectthediscasthestartupdevice.See
“Selectingatemporarystartupdevice”onpage40.
9.Repeatsteps1–4.
10.MovetheClearCMOS/Recoveryjumperbacktothestandardposition(pin1andpin2).
11.Repeatstep6andstep7.Then,turnonyourcomputer.
ConfiguringRAID
ThischapterprovidesinstructionsonhowtoinstallharddiskdrivesandconfigureRedundantArrayof
IndependentDisks(RAID)foryourcomputer.Dependingonyourcomputermodel,RAIDcanbeenabledby
IntelRapidStorageTechnologyenterprise(RSTe)ortheLSIMegaRAIDBIOS.
Note:TheRAIDconfigurationinformationdescribedinthischapterisonlyapplicableintheWindows
environment.ForinformationaboutconfiguringRAIDintheLinux
provider.
Thischapterprovidesinformationaboutthefollowingtopics:
•“ConfiguringRAIDwithIntelRST e”onpage41
•“QuickRAIDsetupusingtheLSIMegaRAIDBIOSconfigurationutility”onpage44
®
environment,contactyourLinuxsoftware
ConfiguringRAIDwithIntelRST e
IfyourcomputercomeswithIntelRST e,youcanfollowthesectionsbelowtoconfigureRAIDwithIntelRSTe.
Chapter5.Advancedconfiguration41
Page 54

Thissectionprovidesinformationaboutthefollowingtopics:
•“InstallingSATAorSASharddiskdrives”onpage42
•“ConfiguringSATAorSASRAIDfunctionalitywiththeIntelRST econfigurationutility”onpage42
InstallingSATAorSASharddiskdrives
EnsurethatyourcomputerhastheminimumnumberofSATAorSASharddiskdrivesinstalledforthe
followingsupportedlevelsofRAID:
•RAIDLevel0-Stripeddiskarray
–ARAIDLevel0harddiskdrivegroupconsistingofatleasttwoharddiskdrives
–Supportedstripsize:4KB,8KB,16KB,32KB,64KB,or128KB
–Betterperformancewithoutfaulttolerance
•RAIDLevel1-Mirroreddiskarray
–ARAIDLevel1harddiskdrivegroupconsistingoftwoharddiskdrives
–Improvedreadingperformanceand100%redundancy
•RAIDLevel10-Stripedandmirroreddiskarray(acombinationofRAIDLevel0andRAIDLevel1)
–ARAIDLevel10harddiskdrivegroupconsistingoffourharddiskdrives
–Supportedstripsize:4KB,8KB,16KB,32KB,or64KB
•RAIDLevel5-Block-levelstripeddiskarraywithdistributedparity
–ARAIDLevel5harddiskdrivegroupconsistingofatleastthreeharddiskdrives
–Supportedstripsize:4KB,8KB,16KB,32KB,or64KB
–Betterperformanceandfaulttolerance
ConfiguringSA TAorSASRAIDfunctionalitywiththeIntelRSTeconfigurationutility
ThissectiondescribestheinformationaboutconfiguringSATAorSASRAIDfunctionalitywiththeIntel
RSTeconfigurationutility.
Note:TheIntelRSTeconfigurationutilityassumesthatyourcomputerisinstalledwithmorethanonehard
diskdrive.Therefore,ifonlyoneharddiskdriveisinstalledinyourcomputer,thefollowinginformation
doesnotapply.
Thissectionprovidesinformationaboutthefollowingtopics:
•“EnteringtheIntelRSTeconfigurationutility”onpage42
•“CreatingRAIDvolumesusingtheIntelRSTeconfigurationutility”onpage43
•“DeletingRAIDvolumesusingtheIntelRSTeconfigurationutility”onpage43
•“Resettingharddiskdrivestonon-RAID”onpage43
EnteringtheIntelRSTeconfigurationutility
ThissectionprovidesinstructionsonhowtoentertheIntelRST econfigurationutility.
Duringthecomputerstartup,followtheinstructionsonthescreen.PressCtrl+ItoentertheIntelRSTe
configurationutility.
ThefollowingfouroptionsaredisplayedafteryouentertheIntelRST econfigurationutility:
1.CreateRAIDVolume
2.DeleteRAIDVolume
3.ResetDiskstoNon‐RAID
42ThinkStationP910UserGuide
Page 55

4.Exit
Presstheupanddownarrowkeystoselectanoption.PressEntertoenterthemenufortheselected
option.PressEsctoexittheIntelRST econfigurationutility,orselectExit,andthenpressEntertoexitthe
IntelRSTeconfigurationutility.
CreatingRAIDvolumesusingtheIntelRST econfigurationutility
ThissectionprovidesinstructionsonhowtousetheIntelRSTeconfigurationutilitytocreateRAIDvolumes.
TocreateaRAIDvolume,dothefollowing:
1.EntertheIntelRSTeconfigurationutility.See“EnteringtheIntelRSTeconfigurationutility”onpage42.
2.PresstheupanddownarrowkeystoselectCreateRAIDVolume,andthenpressEntertoviewthe
CREATEVOLUMEMENUwindow.
3.Thefollowingfiveoptionsaredisplayed.Presstheupanddownarrowkeystoselectanoption.After
youconfigureanoption,pressTaborEntertogotothenextoption.
a.Name:Volumename.Y oucanusethedefaultnameortypeapreferredname.
b.RAIDLevel:YoucanchangetheRAIDLeveltooneofthefollowing:
•RAIDLevel0
•RAIDLevel1
•RAIDLevel10
•RAIDLevel5
c.Disks:PressEntertoentertheSELECTDISKSMENUwindow.Followtheinstructionsatthebottom
ofthemenutoselectharddiskdrives,andthenpressEntertocompletetheconfiguration.
d.StripSize:Presstheupanddownarrowkeystoselectastripsize.
e.Capacity:CustomizethecapacityoftheRAIDvolume.ThedefaultRAIDvolumeisthelargestvalue.
4.PressEntertofinishconfiguringallthefiveoptions.Whenprompted,pressYtoconfirmthecreationof
thenewRAIDvolume.
5.AfterthenewRAIDvolumeiscreated,theinformationabouttheRAIDvolumewillbedisplayedunder
DISK/VOLUMEINFORMATION,suchasIDnumber,name,RAIDlevel,stripsize,volumesize,status,
andwhetheritisabootablevolume.
DeletingRAIDvolumesusingtheIntelRST econfigurationutility
ThissectionprovidesinstructionsonhowtousetheIntelRSTeconfigurationutilitytodeleteRAIDvolumes.
TodeleteaRAIDvolume,dothefollowing:
1.EntertheIntelRSTeconfigurationutility.See“EnteringtheIntelRSTeconfigurationutility”onpage42.
2.PresstheupanddownarrowkeystoselectDeleteRAIDVolume.PressEntertoentertheDELETE
VOLUMEMENUwindow.
3.PresstheupanddownarrowkeystoselecttheRAIDvolumethatisnotneeded.PressDeltodeleteit
fromtheRAIDVolumeslist.
4.Whenprompted,pressYtoconfirmthedeletionoftheselectedRAIDvolume.
Resettingharddiskdrivestonon-RAID
Thissectionprovidesinstructionsonhowtoresetharddiskdrivestonon-RAID.
Toresetharddiskdrivestonon-RAID,dothefollowing:
1.EntertheIntelRSTeconfigurationutility.See“EnteringtheIntelRSTeconfigurationutility”onpage42.
2.PresstheupanddownarrowkeystoselectResetDiskstoNon-RAID.PressEntertoenterthe
RESETRAIDDATAwindow.
Chapter5.Advancedconfiguration43
Page 56

3.Usetheupanddownarrowkeysandthespacekeytomarkindividualharddiskdrivetobereset,
andthenpressEntertocompletetheselection.
4.Whenprompted,pressYtoconfirmtheresetaction.
5.IftheharddiskdriveyouresetispartofaRAIDvolume,thecomputermightdetectthattheRAIDvolume
isdegraded.Inthiscase,youarepromptedtoselectaharddiskdrivetoinitiatearebuildprocess.
6.Selectanavailableharddiskdrive,andthenpressEntertoinitiatetherebuildprocess.
Note:PressEsctocancelarebuildprocessandkeeptheRAIDvolumeinthedegradedstatus.Inthe
MainMenuwindowunderDISK/VOLUMEINFORMA TION,youwillseethestatusoftheRAIDvolume
ischangedtoDegraded.
QuickRAIDsetupusingtheLSIMegaRAIDBIOSconfigurationutility
Notes:
•TheLSIMegaRAIDSASadapterandtheLSIMegaRAIDBIOSconfigurationutilityareonlyavailable
onsomemodels.
•Thefollowingstepsinthissectionareintendedtoguideyouthroughaquicksetupofbasic
RAIDfunctionswiththeLSIMegaRAIDSASadapter.Foradvancedsetupandconfiguration
usingthisadapter,refertothecompleteMegaRAIDSASSoftwareUserGuidethatisavailableat
http://support.lenovo.com/en_US/guides-and-manuals/detail.page?DocID=UM007543.
Thissectionprovidesinformationaboutthefollowingtopics:
•“InstallingSATAorSASharddiskdrives”onpage44
•“EnteringtheLSIMegaRAIDBIOSconfigurationutility”onpage45
•“CreatingRAIDvolumesusingtheLSIMegaRAIDBIOSconfigurationutility”onpage45
•“DeletingRAIDvolumesusingtheLSIMegaRAIDBIOSconfigurationutility”onpage46
•“Settingthehotspareharddiskdrive”onpage46
InstallingSATAorSASharddiskdrives
EnsurethatyourcomputerhastheminimumnumberofSATAorSASharddiskdrivesinstalledforthe
followingsupportedlevelsofRAID:
•RAIDLevel0-Stripeddiskarray
–ARAIDLevel0harddiskdrivegroupconsistingofatleastoneharddiskdrive
–Supportedstripsize:8KBto1MB
–Betterperformancewithoutfaulttolerance
•RAIDLevel00-SpannedharddiskdrivegroupwithaseriesofRAID0harddiskdrivegroups
–ARAIDLevel00harddiskdrivegroupconsistingoftwoorfourharddiskdrives
–Supportedstripsize:8KBto1MB
–Betterperformancewithoutfaulttolerance
•RAIDLevel1-Mirroreddiskarray
–ARAIDLevel1harddiskdrivegroupconsistingoftwoorfourharddiskdrives
–Improvedreadperformanceand100%redundancy
•RAIDLevel10-AcombinationofRAIDLevel0andRAIDLevel1
–ARAIDLevel10harddiskdrivegroupconsistingoffourharddiskdrives
–Databeingstripedacrossharddiskdrivegroups
–Providesbothhighdatatransferratesandcompletedataredundancy
44ThinkStationP910UserGuide
Page 57

•RAIDLevel5-Block-levelstripeddiskarraywithdistributedparity
–ARAIDLevel5harddiskdrivegroupconsistingofatleastthreeharddiskdrives
–Supportedstripsize:8KBto1MB
–Betterperformanceandfaulttolerance
–RAIDLevel5mightnotbeavailableonallmodelsofLSIMegaRAIDadapter
•RAIDLevel6-Block-levelstripeddiskarraywithdualdistributedparity
–ARAIDLevel6harddiskdrivegroupconsistingofatleastfourharddiskdrives
–Supportedstripsize:8KBto1MB
–Betterperformanceandfaulttolerancethatcanstanduptolossoftwoharddiskdrives
–RAIDLevel6mightnotbeavailableonallmodelsofLSIMegaRAIDadapter
EnsurethattheLSIMegaRAIDSASadaptercardisinstalledinyourcomputer,andthattheharddiskdrives
areconnectedtothisadaptercardandnottotheconnectorsonthesystemboard.
EnteringtheLSIMegaRAIDBIOSconfigurationutility
ThissectionprovidesinstructionsonhowtoentertheLSIMegeRAIDBIOSconfigurationutility.
ToentertheLSIMegaRAIDBIOSconfigurationutility,dothefollowing:
1.Duringthecomputerstartup,followtheinstructionsonthescreen.
2.PressCtrl+HtoentertheCONTROLLERSELECTIONwindow.
3.Selectthecontrolleryouwanttoconfigure,andthenclickStarttoentertheLSIMegaRAIDBIOS
configurationutility.
CreatingRAIDvolumesusingtheLSIMegaRAIDBIOSconfigurationutility
ThissectionprovidesinstructionsonhowtocreateRAIDvolumesusingtheLSIMegaRAIDBIOS
configurationutility.
TocreateRAIDvolumesusingtheLSIMegaRAIDBIOSconfigurationutility,dothefollowing:
1.ClickConfigurationWizardontheWebBIOSmainscreentoentertheChoosingtheConfiguration
Typewindow.
2.Presstheupanddownarrowkeystoselectoneofthethreeconfigurationtypes:
•ClearConfiguration:Cleartheexistingconfiguration.
•NewConfiguration:Cleartheexistingconfigurationandcreatenewconfiguration.
•AddConfiguration:Retaintheexistingstorageconfigurationandaddnewharddiskdrives.The
newconfigurationwillnotcauseanydataloss.
3.SelectAddConfiguration,andthenclickNext.Thefollowingtwooptionsaredisplayedinthe
ConfigurationMethodwindow.
•ManualConfiguration:Manuallycreateharddiskdrivegroupsandvirtualharddiskdrives,and
setparameters.
•AutomaticConfiguration:AutomaticallycreateanoptimalRAIDconfiguration.
4.SelectManualConfiguration,andthenclickNext.TheDriveGroupDefinitionwindowisdisplayed.To
createharddiskdrivegroups,dothefollowing:
a.Selectoneormoreharddiskdrivesforthegroup(keeppressingCtrlwhileselectingmorethan
oneharddiskdrive).
b.ClickAddToArraytomovetheselectedharddiskdrivestoDriveGroups.
Chapter5.Advancedconfiguration45
Page 58

c.ClickAcceptDGtocreatetheharddiskdrivegroup.
d.Repeattheabovestepsifyouwanttocreatemorethanoneharddiskdrivegroup.
5.ClickNext.TheSpanDefinitionwindowisdisplayed.Selecttheharddiskdrivegroupthatyouwant
toaddtoaspan,andthenclickAddtoSPAN.Repeatthisstepuntilyouhaveselectedallthehard
diskdrivegroupsyouwant.
6.ClickNext.TheVirtualDriveDefinitionwindowisdisplayed.Changethevirtualharddiskdriveoptions
fromthedefaultsettingslistedonthescreentothesettingsyouwant.ClickAccept,andthenfollow
theinstructionsonthescreentocustomizeyoursettings.
7.ClickNext,andthePreviewwindowisdisplayed.
8.Verifyyoursettings,andthenclickAccept.
9.ClickY estosavetheconfiguration.
DeletingRAIDvolumesusingtheLSIMegaRAIDBIOSconfigurationutility
ThissectionprovidesinstructionsonhowtodeleteRAIDvolumesusingtheLSIMegaRAIDBIOS
configurationutility.
TodeleteRAIDvolumesusingtheLSIMegaRAIDBIOSconfigurationutility,dothefollowing:
1.EntertheLSIMegaRAIDBIOSconfigurationutility.Referto“EnteringtheLSIMegaRAIDBIOS
configurationutility”onpage45.
2.Clickthevirtualharddiskdrivesyouwanttodelete,andthentheVirtualDrivewindowisdisplayed.
3.ClickDelete,andthenclickGo.
4.ClickY estosaveyourchanges.
Settingthehotspareharddiskdrive
Thissectionprovidesinstructionsonhowtosetthehotspareharddiskdrive.
Tosetthehotspaceharddiskdrive,dothefollowing:
1.EntertheLSIMegaRAIDBIOSconfigurationutility.Referto“EnteringtheLSIMegaRAIDBIOS
configurationutility”onpage45.
2.Clicktheharddiskdriveyouwanttosetasthehotspareharddiskdrive.TheDrivewindowisdisplayed.
3.SelectMakeGlobalHSPorMakeDedicatedHSP,andthenclickGo.
4.ThemainscreenoftheLSIMegaRAIDBIOSconfigurationutilityisdisplayed,andtheharddiskdrive
youselectedislistedasahotspareharddiskdriveintherightpane.
46ThinkStationP910UserGuide
Page 59

Chapter6.Troubleshooting,diagnostics,andrecovery
Thischapterprovidessolutionstoresolveyourcomputerproblems.Followthestepsinthebasicprocedure
forresolvingcomputerproblems,whichhelpsyoumakegooduseofthetroubleshooting,diagnostics,
andrecoveryinformation.
•“Basicprocedureforresolvingcomputerproblems”onpage47
•“Troubleshooting”onpage47
•“Diagnostics”onpage55
•“Recoveryinformation”onpage56
Basicprocedureforresolvingcomputerproblems
Itisrecommendedthatyouusethefollowingproceduretoresolvecomputerproblemsyouareexperiencing:
1.Ensurethat:
a.Thecablesforallconnecteddevicesareconnectedcorrectlyandsecurely.
b.Allconnecteddevicesthatrequireacpowerareconnectedtoproperlygrounded,functioning
electricaloutlets.
c.AllconnecteddevicesareenabledintheBIOSsettingsofyourcomputer.Referto“Enabling
ordisablingadevice”onpage36
Iftheseactionsdonotresolveyourproblem,continuewiththenextstep.
2.Useanantivirusprogramtoseeifyourcomputerhasbeeninfectedbyavirus.Iftheprogramdetects
avirus,removethevirus.Iftheantivirusprogramdoesnotresolveyourproblem,continuewiththe
nextstep.
3.Goto“Troubleshooting”onpage47andfollowtheinstructionsforthetypeofproblemyouare
experiencing.Ifthesetroubleshootinginstructionsdonotresolveyourproblem,continuewiththe
nextstep.
4.Runthediagnosticprogram.Referto“Diagnostics”onpage55.Ifthediagnosticprogramdoesnot
resolveyourproblem,continuewiththenextstep.
5.Recoveryouroperatingsystem.Referto“Recoveryinformation”onpage56.
6.Ifnoneoftheseactionssolveyourproblem,contacttheLenovoCustomerSupportCenter.Foralistof
LenovoSupportphonenumbers,gotohttp://www.lenovo.com/support/phone.Formoreinformation
abouthelp,service,andtechnicalassistance,refertoChapter8“Gettinginformation,help,and
service”onpage135.
.
Troubleshooting
Attention:Donotopenyourcomputerorattemptanyrepairbeforereadingandunderstandingthe“Read
thisfirst:Importantsafetyinformation”onpagev.
Usethetroubleshootinginformationtofindsolutionstoproblemsthathavedefinitesymptoms.
Startupproblems
Thecomputerdoesnotstartupwhenyoupressthepowerbutton.
Solutions:
Ensurethat:
©CopyrightLenovo2016
47
Page 60

•Thepowercordiscorrectlyconnectedtotherearofthecomputerandtoaworkingelectricaloutlet.
•Ifyourcomputerhasasecondarypowerswitchontherearofthecomputer,ensurethatitisswitchedon.
•Thepowerindicatoronthefrontofthecomputerison.
•Thecomputervoltagematchesthevoltageavailableattheelectricaloutletforyourcountryorregion.
Theoperatingsystemfailstostartup.
Solution:
EnsurethatthestartupdevicesequencesetintheSetupUtilityprogramincludesthedevicewhere
theoperatingsystemresides.Usually,theoperatingsystemisontheinternalstoragedrive.Formore
information,referto“Changingthestartupdevicesequencepermanently”onpage39.
Thecomputerbeepsmultipletimesbeforetheoperatingsystemstartsup.
Solution:
Ensurethatnokeysarestuck.
Audioproblems
TheaudiocannotbeheardontheWindowsoperatingsystem.
Solutions:
•IfyouareusingpoweredexternalspeakersthathaveanOn/Offcontrol,ensurethat:
–TheOn/OffcontrolissettotheOnposition.
–Thespeakerpowercableisconnectedtoaproperlygrounded,functionalacelectricaloutlet.
•Ifyourexternalspeakershaveavolumecontrol,ensurethatthevolumeisnotsettoolow.
•ClickthevolumeiconintheWindowsnotificationareaonthetaskbar.Ensurethatthemutespeakers
settingsarenotselectedandnoneofthevolumesettingsissettoolow.
Note:IfthevolumeiconisnotdisplayedintheWindowsnotificationarea,addtheicontothenotification
area.RefertotheWindowshelpsystem.
•Forsomecomputersthathaveafrontaudiopanel,ensurethatthevolumeisnotsettoolow.
•Ensurethatyourexternalspeakers(andheadphones,ifused)areconnectedtothecorrectaudio
connectorsonthecomputer.Mostspeakercablesarecolor-codedtomatchtheconnectors.
Note:Whenexternal-speakerorheadphonecablesareconnectedtotheaudioconnectors,theinternal
speaker,ifpresent,isdisabled.Inmostcases,ifanaudioadapterisinstalledinoneoftheexpansion
slots,theaudiofunctionbuiltintothesystemboardisdisabled.Therefore,youmustusetheaudio
connectorsontheaudioadapter.
•EnsurethattheprogramyouarerunningisdesignedforuseontheWindowsoperatingsystem.Ifthe
programisdesignedtoruninDOS,theprogramdoesnotusetheWindowssoundfeature.Theprogram
mustbeconfiguredtouseSoundBlasterProorSoundBlasteremulation.
•Ensurethattheaudiodevicedriversarecorrectlyinstalled.
Thesoundcomesfromoneoftheexternalspeakers.
Solutions:
•Ensurethatthespeakercableisinsertedcompletelyintotheconnectoronthecomputer.
•ClickthevolumeiconintheWindowsnotificationareaonthetaskbar.Then,clickthespeakericonontop
ofthevolumecontrol.ClicktheLevelstabandensurethattheBalancesettingsaresetcorrectly.
48ThinkStationP910UserGuide
Page 61

Note:IfthevolumeiconisnotdisplayedintheWindowsnotificationarea,addtheicontothenotification
area.RefertotheWindowshelpsystem.
CDorDVDproblems
ACDorDVDdoesnotwork.
Solutions:
•Ensurethatthepowercableandsignalcablearesecurelyconnectedtothedrive.
•Ensurethatthediscisinsertedcorrectly,withitslabelup.
•Ensurethatthediscyouareusingisclean.Toremovedustorfingerprints,wipethedisccleanwithasoft
clothfromthecentertotheoutside.Wipingadiscinacircularmotionmightcauselossofdata.
•Ensurethatthediscyouareusingisnotscratchedordamaged.Tryinsertinganotherdiscthatyou
knowisgood.Ifyoucannotreadfromaknown-gooddisc,youmighthaveaproblemwithyouroptical
driveorthecablingtoyouropticaldrive.
•IfyouhavemultipleCDorDVDdrivesinstalled(oracombinationofCDandDVDdrives),tryinsertingthe
discintotheotherdrive.Insomecases,onlyoneofthedrivesisconnectedtotheaudiosubsystem.
Abootablerecoverymedium,suchastheProductRecoveryCD,cannotbeusedtostartyour
computer.
Solution:
EnsurethattheCDorDVDdriveissetasthetoppriorityoftheBootPriorityOrderintheSetupUtility
program.Referto“Selectingatemporarystartupdevice”onpage40forinformationaboutviewingand
changingthestartupsequence.
Note:Onsomecomputermodels,thestartupsequenceispermanentlysetandcannotbechanged.
AblackscreenisdisplayedinsteadoftheDVDvideo.
Solutions:
•RestarttheDVDplayerprogram.
•Tryalowerscreenresolutionorcolordepth.
•Closeanyopenfiles,andthenrestartthecomputer.
ADVDmoviedoesnotplay.
Solutions:
•Ensurethatthediscsurfaceiscleanandnotscratched.
•Checkthediscorpackageforregionalcoding.Youmightneedtopurchaseadiscwithcodingfor
theregionwhereyouareusingyourcomputer.
NoaudiooronlyanintermittentaudiocomesoutwhileaDVDmovieisplaying.
Solutions:
•Checkthevolumecontrolsettingsonyourcomputerandonyourspeakers.
•Ensurethatthediscsurfaceiscleanandnotscratched.
•Checkallcableconnectionstoandfromthespeakers.
•UsetheDVDmenuforthevideotoselectadifferentaudiotrack.
Chapter6.Troubleshooting,diagnostics,andrecovery49
Page 62

Theplaybackissloworchoppy.
Solutions:
•Disableanybackgroundprograms,suchasAntiVirusorDesktopThemes.
•Ensurethatvideoresolutionislowerthan1152x864pixels.
Amessageindicatinginvaliddiscornodiscfoundisdisplayed.
Solutions:
•Ensurethatthediscisinthedrivewiththeshinysideofthediscfacingdown.
•Ensurethatvideoresolutionislowerthan1152x864pixels.
•EnsurethattheDVDorCDisinsertedintoanappropriateopticaldrive.Forexample,donotinsert
aDVDintoaCD-onlydrive.
Intermittentproblems
Intermittentproblemsrefertotheproblemsoccuronlyoccasionallyandaredifficulttorepeat.
Solutions:
•Ensurethatallcablesandcordsaresecurelyconnectedtothecomputerandattacheddevices.
•Ensurethatwhenthecomputerison,thefangrillisnotblocked(thereisairflowaroundthegrill),andthe
fansareworking.Ifairflowisblockedorthefansarenotworking,thecomputermightoverheat.
•IfSmallComputerSystemInterface(SCSI)devicesareinstalled,ensurethatthelastexternaldevicein
eachSCSIchainisterminatedcorrectly.Formoreinformation,refertoyourSCSIdocumentation.
Storagedriveproblems
SomeorallstoragedrivesaremissingfromtheSetupUtilityprogram.
Solutions:
•Ensurethatthesignalcablesandpowercablesforallthestoragedrivesareconnectedcorrectly.
•IfthecomputerisinstalledwithSASstoragedrives,ensurethattheLSIMegaRAIDSASadapteris
correctlyconnected.
Thecomputercannotstartupfromthecorrectstoragedriveorthemessage“NoOperatingSystem
Found”isdisplayed.
Solutions:
•Ensurethatthesignalcablesandpowercablesforallthestoragedrivesareconnectedcorrectly.
•Ensurethatthecomputerstartsupfromthecorrectstoragedrive.Setthestoragedrive,onwhichthe
operatingsystemresides,asthefirststartupdeviceintheSetupUtilityprogram.Referto“Changingthe
startupdevicesequencepermanently”onpage39
Note:Inrarecases,thestoragedrivewiththeoperatingsystemmightgetcorruptedordamaged.Ifthis
problemoccurs,replacethestoragedrive.RefertoChapter7“Installingorreplacinghardware”onpage59
.
EthernetLANproblems
.
ThecomputercannotconnecttoanEthernetLAN.
Solutions:
50ThinkStationP910UserGuide
Page 63

•ConnectthecablefromtheEthernetconnectortotheRJ45connectorofthehub.
•EnabletheEthernetLANfeatureintheSetupUtilityprogram.Referto“UsingtheSetupUtilityprogram”
onpage35.
•EnabletheEthernetLANadapter.
1.DependingonyourWindowsversion,dooneofthefollowing:
–ForWindows7:ClicktheStartbuttontoopentheStartmenu.
–ForWindows10:Right-clicktheStartbuttontoopentheStartcontextmenu.
2.ClickControlPanel.ViewControlPanelbyLargeiconsorSmallicons,andthenclickNetworkand
SharingCenter➙Changeadaptersettings.
3.Right-clicktheEthernetLANadaptericonandclickEnable.
•UpdateorreinstalltheEthernetLANdriver.Referto“Keepingyourcomputercurrent”onpage26.
•Installallnetworkingsoftwarethatisnecessaryforyournetworkenvironment.CheckwithyourLAN
administratorforthenecessarynetworkingsoftware.
•Setthesameduplexfortheswitchportandtheadapter.Ifyouconfiguredtheadapterforfullduplex,
ensurethattheswitchportisalsoconfiguredforfullduplex.Settingthewrongduplexmodemight
degradeperformance,causedataloss,orresultinlostconnections.
WhenaGigabitEthernetmodelcomputerisusedataspeedof1000Mbps,theEthernetLAN
connectionfailsorerrorsoccur.
Solution:
ConnectthenetworkcabletotheEthernetconnectorusingCategory5wiringanda100BASE-Thub/switch
(not100BASE-X).
AGigabitEthernetmodelcomputershouldconnecttothenetworkataspeedof1000Mbpsbutat
onlyaspeedof100Mbps.
Solutions:
•Tryanothercable.
•Setthelinkpartnertoauto-negotiate.
•Settheswitchtobe802.3ab-compliant(gigabitovercopper).
TheWakeOnLANfeaturedoesnotwork.
Solution:
EnabletheWakeOnLANfeatureintheSetupUtilityprogram.Referto“UsingtheSetupUtilityprogram”
onpage35.
WirelessLANproblem
Note:ThewirelessLANfeatureisavailableonlyonsomemodels.
ThewirelessLANfeaturedoesnotwork.
Solutions:
•EnablethewirelessLANfeatureintheSetupUtilityprogram.Referto“UsingtheSetupUtilityprogram”
onpage35
•ForWindows10,enablethewirelessLANfeatureinWindowsSettings.ClicktheStartbuttontoopenthe
Startmenu,andthenclickSettings➙Network&Internet➙Wi-Fi.TurnontheWi-Fifeature.
•EnablethewirelessLANadapter.
.
Chapter6.Troubleshooting,diagnostics,andrecovery51
Page 64

1.DependingonyourWindowsversion,dooneofthefollowing:
–ForWindows7:ClicktheStartbuttontoopentheStartmenu.
–ForWindows10:Right-clicktheStartbuttontoopentheStartcontextmenu.
2.ClickControlPanel.ViewControlPanelbyLargeiconsorSmallicons,andthenclickNetworkand
SharingCenter➙Changeadaptersettings.
3.Right-clickthewirelessLANadaptericonandclickEnable.
•UpdateorreinstallthewirelessLANdriver.Referto“Keepingyourcomputercurrent”onpage26.
Bluetoothproblems
Note:TheBluetoothfeatureisavailableonlyonsomemodels.
TheBluetoothfeaturedoesnotwork.
Solutions:
•EnabletheBluetoothfeatureintheSetupUtilityprogram.Referto“UsingtheSetupUtilityprogram”
onpage35
•TurnontheBluetoothradios.
1.DependingonyourWindowsversion,dooneofthefollowing:
–ForWindows7:ClicktheStartbuttontoopentheStartmenu.Right-clickComputer,andthen
–ForWindows10:Right-clicktheStartbuttontoopentheStartcontextmenu.
2.ClickDeviceManager.Typetheadministratorpasswordorprovideconfirmationifprompted.
3.Right-clicktheBluetoothradiosunderBluetoothRadiosandclickEnable.
•EnabletheBluetoothadapter.
1.DependingonyourWindowsversion,dooneofthefollowing:
.
clickProperties.
–ForWindows7:ClicktheStartbuttontoopentheStartmenu.
–ForWindows10:Right-clicktheStartbuttontoopentheStartcontextmenu.
2.ClickControlPanel.ViewControlPanelbyLargeiconsorSmallicons,andthenclickNetworkand
SharingCenter➙Changeadaptersettings.
3.Right-clicktheBluetoothadaptericonandclickEnable.
•UpdateorreinstalltheBluetoothdriver.See“Keepingyourcomputercurrent”onpage26.
NosoundcomesfromtheBluetoothheadsetorheadphones.
Solution:
SettheBluetoothheadsetorheadphonesasthedefaultdevice.
1.Exittheapplicationthatusesthesounddevice(forexample,WindowsMediaPlayer).
2.Right-clickthevolumeiconintheWindowsnotificationareaonthetaskbar.
Note:IfthevolumeiconisnotdisplayedintheWindowsnotificationarea,addtheicontothe
notificationarea.RefertoWindowhelpsystem.
3.ClickPlaybackdevices.
4.IfyouareusingtheHeadsetprofile,selectBluetoothHands-freeAudio,andthenclickSetDefault.If
youareusingtheAVprofile,selectStereoAudio,andthenclickSetDefault.
5.ClickOK.
52ThinkStationP910UserGuide
Page 65

Performanceproblems
Excessivefragmentedfilesexistonthestoragedrives.
Solution:
UsetheWindowsdiskdefragmentationordiskoptimizationfeaturetocleanupthefiles.
Note:Dependingonthevolumeofthestoragedrivesandamountofdatastoredonthestoragedrives,the
disk-defragmentationprocessmighttakeuptoseveralhours.
1.Closeanyopenprogramsandwindows.
2.ClicktheStartbuttontoopentheStartmenu.
3.DependingonyourWindowsversion,dooneofthefollowing:
•ForWindows7:ClickComputer.
•ForWindows10:ClickFileExplorer➙ThisPC.
4.Right-clickyourCdriveandthenclickProperties.
5.ClicktheToolstab.
6.DependingonyourWindowsversion,dooneofthefollowing:
•ForWindows7:ClickDefragmentnow.
•ForWindows10:ClickOptimize.SelectthedesireddriveandthenclickOptimize.
7.Followtheinstructionsonthescreen.
Thefreestoragedrivespaceisinsufficient.
Solutions:
Freeupthestoragedrivespace.
•CleanoutyourInbox,SentItems,andDeletedItemsfoldersfromyoure-mailapplication.
•CleanupyourCdrive.
1.ClicktheStartbuttontoopentheStartmenu.
2.DependingonyourWindowsversion,dooneofthefollowing:
–ForWindows7:ClickComputer.
–ForWindows10:ClickFileExplorer➙ThisPC.
3.Right-clickyourCdriveandthenclickProperties.
4.Checktheamountoffreespace,andthenclickDiskCleanup.
5.Alistofunnecessaryfilecategoriesisdisplayed.Selecteachfilecategoryyouwanttodelete,
andthenclickOK.
•TurnsomeWindowsfeaturesofforremovesomeunnecessaryprograms.
1.DependingonyourWindowsversion,dooneofthefollowing:
–ForWindows7:ClicktheStartbuttontoopentheStartmenu.
–ForWindows10:Right-clicktheStartbuttontoopentheStartcontextmenu.
2.ClickControlPanel.ViewControlPanelbyLargeiconsorSmallicons,andthenclickPrograms
andFeatures.
3.Dooneofthefollowing:
Chapter6.Troubleshooting,diagnostics,andrecovery53
Page 66

–ToturnsomeWindowsfeaturesoff,clickTurnWindowsfeaturesonoroff.Followthe
instructionsonthescreen.
–Toremovesomeunnecessaryprograms,selecttheprogramyouwanttoremove,andthenclick
Uninstall/ChangeorUninstall.
Thefreememoryspaceisinsufficient.
Solutions:
•Right-clickablankareaonthetaskbarandopenTaskManager.Then,endsometasksyouarenot
performing.
•Installadditionalmemorymodules.RefertoChapter7“Installingorreplacinghardware”onpage59.To
purchasememorymodules,goto:
http://www.lenovo.com
Serialconnectorproblem
Theserialconnectorcannotbeaccessed.
Solutions:
•Connecttheserialcablefromtheserialconnectoronthecomputertotheserialdevice.Iftheserialdevice
hasitsownpowercord,connectthepowercordtoagroundedelectricaloutlet.
•Turnontheserialdeviceandkeepthedeviceonline.
•Installanyapplicationprogramssuppliedwiththeserialdevice.Refertothedocumentationthatcomes
withtheserialdeviceformoreinformation.
•Ifyouaddedoneserial-connectoradapter,ensurethattheadapterisinstalledcorrectly.
USBdeviceproblem
AUSBdevicecannotbeaccessed.
Solutions:
•ConnecttheUSBcablefromtheUSBconnectortotheUSBdevice.IftheUSBdevicehasitsownpower
cord,connectthepowercordtoagroundedelectricaloutlet.
•TurnontheUSBdeviceandkeepthedeviceonline.
•InstallanydevicedriversorapplicationprogramssuppliedwiththeUSBdevice.Refertothe
documentationthatcomeswiththeUSBdeviceformoreinformation.
•DisconnectandreconnecttheUSBconnectortoresettheUSBdevice.
Softwareanddriverproblems
Forsomeprograms,datescannotbesortedincorrectorder.
Solution:
Someprogramsdevelopedbeforetheyear2000useonlythelasttwodigitsofayeartosortdates,assuming
thefirsttwodigitsare19.Consequently,datescannotbesortedincorrectordernowadays.Checkwith
yoursoftwaremanufacturertorefertoifanyupdatesareavailable.Manysoftwaremanufacturersmake
updatesavailablefromtheWorldWideWeb.
54ThinkStationP910UserGuide
Page 67

Someapplicationprogramsdonotworkasexpected.
Solutions:
1.Checkwhethertheproblemiscausedbyanapplicationprogram.
a.Ensurethatthesoftwareiscompatiblewithyourcomputer.Refertotheinformationsuppliedwith
thesoftwareformoreinformation.
b.Verifythatothersoftwareworksproperlyonyourcomputer.
c.Verifythatthesoftwareyouareusingworksonanothercomputer.
2.Iftheproblemiscausedbyanapplicationprogram:
•Refertotheprinteddocumentationthatcomeswiththeprogramorthehelpsystemoftheprogram
fortroubleshootinginformation.
•Updatetheprogram.Referto“Keepingyourcomputercurrent”onpage26
•Uninstalltheprogramandthenreinstallit.Todownloadaprogramthatispreinstalledonyour
computer,gotohttp://www.lenovo.com/supportandfollowtheinstructionsonthescreen.
Adevicedoesnotworkproperlyduetodevicedriverproblems.
Solution:
Updatethedevicedriver.Referto“Keepingyourcomputercurrent”onpage26.
.
Diagnostics
Note:IfyouareusingaWindowsoperatingsystemotherthanWindows7orWindows10,goto
http://www.lenovo.com/diagsforthediagnosticsinformationforyourcomputer.
Thediagnosticprogramisusedtotesthardwarecomponentsofyourcomputer.Thediagnosticprogramalso
canreportoperating-system-controlledsettingsthatinterferewiththecorrectoperationofyourcomputer.
LenovoSolutionCenter
TheLenovoSolutionCenterprogramisthediagnosticprogrampreinstalledonyourcomputer.Theprogram
enablesyoutotroubleshootandresolvecomputerproblems.Itcombinesdiagnostictests,system
informationcollection,securitystatus,andsupportinformation,alongwithhintsandtipsformaximum
systemperformance.
ToopentheLenovoSolutionCenterprogram,referto“Accessingaprogramonyourcomputer”onpage14.
Formoreinformationaboutusingtheprogram,refertothehelpsystemoftheprogram.
IfyouareunabletoisolateandrepairtheproblemyourselfafterrunningLenovoSolutionCenter,save
andprintthelogfilescreatedbytheprogram.YoumightneedthelogfileswhenyouspeaktoaLenovo
technicalsupportrepresentative.
Hardwarediagnostics
Yourcomputersupportsthehardwarediagnosticsfunction.Thisfunctionenablesyourcomputertomonitor
somehardwarecomponentsinrealtimeforpotentialissuesthatmightnotbeeasilydetectableduring
normaluse.Whenthecomputerdetectsanissueorerror,thefour-digitdiagnosticdisplayonthefrontofthe
computerdisplaystextandanumericalerrorcode.Referto“Frontview”onpage1
.
Forinformationabouttheissueorerror,dothefollowing:
1.ConnecteitherofthefollowingdevicestothediagnosticUSBconnectoronthefrontofthecomputer:
•AUSBkey
Chapter6.Troubleshooting,diagnostics,andrecovery55
Page 68

•AnAndroid
TM
devicewiththeLenovoWorkstationDiagnosticsappinstalled
Referto“Frontview”onpage1
2.Waitabout10to15secondsforthediagnosticdatatotransferfromthecomputertotheUSBdevice.
Duringthedatatransfer,thefour-digitdiagnosticdisplaydisplays“FileCopy”.Whenthedatatransfer
finishes,thefour-digitdiagnosticdisplaydisplays“FileCopyDone”.
Note:DiagnosticdataisavailablefortransferthroughthediagnosticUSBconnectoronlywhentext
andanumericalerrorcodeisdisplayedonthefour-digitdiagnosticdisplay.Innormalconditions,the
diagnosticUSBconnectorfunctionsasastandardUSB3.0connector.
3.DependingonwhetheryouareusingaUSBkeyoranAndroiddevice(suchasasmartphone),do
oneofthefollowing:
•IfyouareusingaUSBkey,gotohttp://support.lenovo.com/workstation_diagnosticsforinformation
abouthowtoreadtheerrordataontheUSBkey.
•IfyouareusinganAndroiddevicewiththeLenovoWorkstationDiagnosticsappinstalled,open
theapplicationfordetailsabouttheerror.FormoreinformationabouttheLenovoWorkstation
Diagnosticsapp,goto:
http://www.thinkworkstationsoftware.com/diags
FormoreinformationabouthowtousethediagnosticUSBconnectoronyourcomputer,deciphertheerror
codes,orusetheLenovoWorkstationDiagnosticsapp,goto:
http://www.thinkworkstationsoftware.com/diags
Thehardwarediagnosticfunctionisenabledonyourcomputerbydefault.Todisablethefunction,do
thefollowing:
1.StarttheSetupUtilityprogram.Referto“StartingtheSetupUtilityprogram”onpage35.
2.FromtheSetupUtilityprogrammainmenu,selectAdvanced➙Diagnostics,andthenpressEnter.
3.SelectReal-timeDiagnosticsMonitoringandpressEnter.ThenselectDisabledandpressEnter.
4.PressF10tosavechangesandexittheSetupUtilityprogram.
.
Recoveryinformation
Thissectionprovidesinstructionsonhowtorecoveryouroperatingsystem.
Note:Ifadevicedoesnotworknormallyafterrecoveringtheoperatingsystem,updatethedevicedriver.
Referto“Keepingyourcomputercurrent”onpage26.
RecoveryinformationforWindows7
TorecoveryourWindows7operatingsystem,usethefollowingsolutions:
•UseWindowsrecoverysolutions.
–UseSystemRestoretorestoresystemfilesandsettingstoanearlierpoint.
1.ClicktheStartbuttontoopentheStartmenu.
2.ClickControlPanel.ViewControlPanelbyLargeiconsorSmallicons,andthenclickRecovery
➙OpenSystemRestore.
3.Followtheinstructionsonthescreen.
–UsetheWindowsrecoveryenvironmentbydoingoneofthefollowing:
–Afterseveralconsecutivefailedbootattempts,theWindowsrecoveryenvironmentmightstart
automatically.Followtheinstructionsonthescreentochoosetheappropriaterecoverysolution.
56ThinkStationP910UserGuide
Page 69

–Turnonorrestartyourcomputer.Then,repeatedlypressandreleasetheF8keyuntiltheAdvanced
BootOptionswindowopens.SelectRepairYourComputer,pressEnter,andfollowtheinstructions
onthescreentochoosetheappropriaterecoverysolution.
Note:Forsomekeyboards,youmightneedtopressFn+F8toopentheAdvancedBootOptions
window.
•UsetheRescueandRecoveryprogramtorestorethestoragedrivefromabackup,orrestoretheC
drivetothefactory-defaultsettings.
Notes:
–Dependingonyourcomputermodel,theRescueandRecoveryprogrammightnotbeavailableunless
youinstalleditmanuallyearlier.
–IfyouusetheRescueandRecoveryprogramtorestorethestoragedrivefromabackup,ensurethat
youbackedupyourdataearlierwiththeprogram.
TousetheRescueandRecoveryprogram,dooneofthefollowing:
–OpentheRescueandRecoveryprogram.Referto“Accessingaprogramonyourcomputer”onpage
.Formoreinformationaboutusingtheprogram,refertothehelpsystemoftheprogram.
14
–OpentheRescueandRecoveryworkspace.
1.Turnoffyourcomputer.PressandholdtheEnterkeyandthenturnonthecomputer.Release
theEnterkeywhenStartupInterruptMenuisdisplayed.Then,pressF11toopentheRescue
andRecoveryworkspace.
2.IftheRescueandRecoveryworkspacefailstoopen,usetherescuemediumyoucreatedearlier
toresolvetheproblem.Selecttherescuemediumasthestartupdevice.Referto“Selectinga
temporarystartupdevice”onpage40.Whentherescuemediumstarts,theRescueandRecovery
workspaceopens.Followtheinstructionsonthescreen.
•UsetherecoverymediumyoucreatedearlierwiththeCreateRecoveryMediaprogramtorestoreonly
theCdriveortheentirestoragedrivetothefactory-defaultsettings.
Note:Tocreatearecoverymedium,referto“Goodmaintenancepractices”onpage25
1.Selecttherecoverymediumasthestartupdevice.Referto“Selectingatemporarystartupdevice”
onpage40.
2.Followtheinstructionsonthescreentochoosetheappropriaterecoverysolution.
•UsetherecoverydiscsetprovidedbyLenovotorestoretheentirestoragedrivetothefactory-default
settings.
–Ifyourcomputercomeswiththerecoverydiscset,followtheinstructionsshippedwiththediscset.
–Ifyourcomputerdoesnotcomewiththerecoverydiscset,contacttheLenovoCustomerSupport
Centertoorderarecoverydiscset.Referto“Callingforservice”onpage136
.
.
RecoveryinformationforWindows10
TorecoveryourWindows10operatingsystem,usethefollowingsolutions:
•UseWindowsrecoverysolutions.
–UserecoverysolutionsinWindowsSettings.
1.ClicktheStartbuttontoopentheStartmenu.
2.ClickSettings➙Update&security➙Recovery.
3.Choosetheappropriaterecoverysolutionbyfollowingtheinstructionsonthescreen.
–UseSystemRestoretorestoresystemfilesandsettingstoanearlierpoint.
Chapter6.Troubleshooting,diagnostics,andrecovery57
Page 70

1.Right-clicktheStartbuttontoopentheStartcontextmenu.
2.ClickControlPanel.ViewControlPanelbyLargeiconsorSmallicons,andthenclickRecovery
➙OpenSystemRestore.
3.Followtheinstructionsonthescreen.
–UsetheFileHistorytooltorestoreyourfilesfromabackup.
Note:IfyouusetheFileHistorytooltorestoreyourfilesfromabackup,ensurethatyoubackedup
yourdataearlierwiththetool.
1.Right-clicktheStartbuttontoopentheStartcontextmenu.
2.ClickControlPanel.ViewControlPanelbyLargeiconsorSmallicons,andthenclickFileHistory
➙Restorepersonalfiles.
3.Followtheinstructionsonthescreen.
–UsetheWindowsrecoveryenvironmentbydoingoneofthefollowing:
–Afterseveralconsecutivefailedbootattempts,theWindowsrecoveryenvironmentmightstart
automatically.Followtheinstructionsonthescreentochoosetheappropriaterecoverysolution.
–SelecttherecoverymediumyoucreatedearlierwiththeWindowstoolasthestartupdevice.Refer
to“Selectingatemporarystartupdevice”onpage40
.Then,followtheinstructionsonthescreen
tochoosetheappropriaterecoverysolution.
Note:Tocreatearecoverymedium,referto“Goodmaintenancepractices”onpage25.
•UsetherecoveryUSBkeyprovidedbyLenovotorestoretheentirestoragedrivetothefactory-default
settings.
–IfyourcomputercomeswiththerecoveryUSBkey,followtheinstructionsshippedwiththeUSBkey.
–IfyourcomputerdoesnotcomewiththerecoveryUSBkey,contacttheLenovoCustomerSupport
CentertoorderarecoveryUSBkey.Referto“Callingforservice”onpage136.
58ThinkStationP910UserGuide
Page 71

Chapter7.Installingorreplacinghardware
Thischaptercontainsthefollowingtopics:
•“Handlingstatic-sensitivedevices”onpage59
•“Preparingyourcomputerandremovingthecomputercover”onpage59
•“Installingorreplacinghardware”onpage60
•“Completingthepartsreplacement”onpage132
Handlingstatic-sensitivedevices
Donotopenthestatic-protectivepackagecontainingthenewpartuntilthedefectiveparthasbeenremoved
andyouarereadytoinstallthenewpart.Staticelectricity,althoughharmlesstoyou,canseriouslydamage
computercomponentsandoptions.
Whenyouhandleoptionsandothercomputercomponents,taketheseprecautionstoavoidstatic-electricity
damage:
•Limityourmovement.Movementcancausestaticelectricitytobuilduparoundyou.
•Alwayshandleoptionsandothercomputercomponentscarefully.HandlePCI/PCI-Expresscards,
memorymodules,systemboards,andmicroprocessorsbytheedges.Nevertouchanyexposedcircuitry.
•Preventothersfromtouchingtheoptionsandothercomputercomponents.
•Touchthestatic-protectivepackagecontainingtheparttoametalexpansion-slotcoverorother
unpaintedmetalsurfaceonthecomputerforatleasttwoseconds.Thisreducesstaticelectricityfrom
thepackageandyourbodybeforeyouinstallorreplaceanewpart.
•Whenpossible,removethenewpartfromthestatic-protectivepackage,andinstallitdirectlyinthe
computerwithoutsettingthepartdown.Whenthisisnotpossible,placethestatic-protectivepackageon
asmooth,levelsurfaceandplacethepartonthepackage.
•Donotplacethepartonthecomputercoverorothermetalsurface.
Preparingyourcomputerandremovingthecomputercover
Attention:Donotopenyourcomputerorattemptanyrepairbeforereadingandunderstandingthe“Read
thisfirst:Importantsafetyinformation”onpagev.
CAUTION:
Beforeyouopenthecomputercover,turnoffthecomputerandwaitseveralminutesuntilthe
computeriscool.
Beforeinstallingorremovinganyhardwarecomponentinyourcomputer,dothefollowingtoprepareyour
computerandremovethecomputercover:
1.Removeanymediafromthedrivesandturnoffallconnecteddevicesandthecomputer.Then,
disconnectallpowercordsfromelectricaloutletsanddisconnectallcablesthatareconnectedtothe
computer.
2.Unlockanylockingdevicethatsecuresthecomputercover.See“Lockingyourcomputer”onpage29.
©CopyrightLenovo2016
59
Page 72

3.Pressthepit1sothatthehandle2islifted.Then,pivotthehandletotheleftasshownandpull
1
2
thehandletoremovethecoverfromthechassis.
Figure9.Removingthecomputercover
Installingorreplacinghardware
Thissectionprovidesinstructionsonhowtoinstallorreplacehardwareforyourcomputer.Y oucanexpand
thecapabilitiesofyourcomputerandmaintainyourcomputerbyinstallingorreplacinghardware.
Attention:Donotopenyourcomputerorattemptanyrepairbeforereadingandunderstandingthe“Read
thisfirst:Importantsafetyinformation”onpagev.
Notes:
•Dependingonyourcomputermodel,someofthehardwarepartsinthissectionmightnotbeavailable.
•UsecomputerpartsprovidedonlybyLenovo.
•Wheninstallingorreplacinganoption,usetheappropriateinstructionsinthissectionalongwiththe
instructionsthatcomewiththeoption.
•Inmostareasoftheworld,LenovorequiresthereturnofthedefectiveCRU.Informationaboutthiswill
comewiththeCRUorwillcomeafewdaysaftertheCRUarrives.
Externaloptions
Youcanconnectexternaloptionstoyourcomputer,suchasexternalspeakers,aprinter,orascanner.For
someexternaloptions,youmustinstalladditionalsoftwareinadditiontomakingthephysicalconnection.
Wheninstallinganexternaloption,see“Frontview”onpage1and“Rearview”onpage3toidentifythe
60ThinkStationP910UserGuide
Page 73

requiredconnector.Then,usetheinstructionsthatcomewiththeoptiontohelpyoumaketheconnection
1
andinstallanyrequiredsoftwareordevicedrivers.
Coverpresenceswitch(intrusionswitch)
Attention:Donotopenyourcomputerorattemptanyrepairbeforereadingandunderstandingthe“Read
thisfirst:Importantsafetyinformation”onpagev.
Toreplacethecoverpresenceswitch(alsoknownasintrusionswitch),dothefollowing:
1.Prepareyourcomputer.See“Preparingyourcomputerandremovingthecomputercover”onpage59.
2.Laythecomputeronitssideforeasieraccesstothecoverpresenceswitchbracket.
3.Locatethecoverpresenceswitchbracket.See“Computercomponents”onpage6.
4.Notetheroutingofthecoverpresenceswitchcable,andthendisconnectthecoverpresenceswitch
cablefromthesystemboard.See“Partsonthesystemboard”onpage7.
5.Pivotthetab1onthecoverpresenceswitchbrackettotheleftasshown.Then,removethebracket
togetherwiththecoverpresenceswitchfromthechassis.
Figure10.Removingthecoverpresenceswitchbracket
Chapter7.Installingorreplacinghardware61
Page 74

6.Pivottheclip1onthebracketoutward,andthendisengagethefailingcoverpresenceswitchfrom
2
1
2
1
thecircleclip2toremoveitfromthebracket.
Figure11.Removingthecoverpresenceswitchfromthebracket
7.Inserttheendofthenewcoverpresenceswitchwiththepostintothecircleclip2.Ensurethattheclip
1isplacedbetweenthetwobranchedcablesofthenewcoverpresenceswitch.Then,pressthecover
presenceswitchdownwarduntilitsnapsintoposition.
Figure12.Installingthecoverpresenceswitchintothebracket
62ThinkStationP910UserGuide
Page 75

8.Routethecableofthenewcoverpresenceswitch,andalignthenotch2onthecoverpresenceswitch
1
2
withthetab1inthechassis.Thenpivotthecoverpresenceswitchbrackettotherightasshownuntil
itsnapsintoposition.
Figure13.Installingthecoverpresenceswitchbracket
9.Connectthecableofthenewcoverpresenceswitchtothesystemboard.See“Partsonthesystem
board”onpage7.
Whattodonext:
•Toworkwithanotherpieceofhardware,gototheappropriatesection.
•Tocompletetheinstallationorreplacement,goto“Completingthepartsreplacement”onpage132.
Directcoolingairbaffle
Attention:Donotopenyourcomputerorattemptanyrepairbeforereadingandunderstandingthe“Read
thisfirst:Importantsafetyinformation”onpagev.
Toremovethedirectcoolingairbaffle,dothefollowing:
1.Prepareyourcomputer.See“Preparingyourcomputerandremovingthecomputercover”onpage59.
Chapter7.Installingorreplacinghardware63
Page 76

2.Pullthedirectcoolingairbaffleoutwardbyitshandle1toremoveitfromthechassis.
1
Figure14.Removingthedirectcoolingairbaffle
64ThinkStationP910UserGuide
Page 77

Toreinstallthedirectcoolingairbaffle,dothefollowing:
1
1.Aligntheplasticboardsonthetopandbottomsidesofthedirectcoolingairbafflewiththesmallgaps
1inthechassis.Ensurethatthehandleofthedirectcoolingairbafflefacestowardsthefrontof
thechassis.
Figure15.Aligningtheplasticboardswiththesmallgaps
2.Slidethedirectcoolingairbaffleintothechassisuntilitissecuredfirmly.
Note:Ifnecessary,adjustthepositionofthedirectcoolingairbaffleslightlytoavoidanyinterference
withothercomponentsinthechassis.
Whattodonext:
•Toworkwithanotherpieceofhardware,gototheappropriatesection.
•Tocompletetheinstallationorreplacement,goto“Completingthepartsreplacement”onpage132.
Deviceinanoptical-drivebay
Attention:Donotopenyourcomputerorattemptanyrepairbeforereadingandunderstandingthe“Read
thisfirst:Importantsafetyinformation”onpagev.
Dependingonyourcomputermodel,thefollowingdevicesmightbeinstalledintheoptical-drivebays:
Chapter7.Installingorreplacinghardware65
Page 78

•Opticaldrive
1
•Flexmodule
Note:Theflexmodulemightbeinstalledwiththefollowing:
–IEEE1394connector
–eSATAconnector
–29-in-1cardreader
–Slimopticaldrive
•Fexbaystorageenclosure
Toremoveandinstallaflexmoduleoraflexbaystorageenclosure,followthestepsofremovingand
installinganopticaldrive.
Toremoveanopticaldrive,dothefollowing:
1.Prepareyourcomputer.See“Preparingyourcomputerandremovingthecomputercover”onpage59.
2.Removethedirectcoolingairbaffle.See“Directcoolingairbaffle”onpage63.
3.Locatetheoptical-drivebayfromwhichyouwanttoremoveanopticaldrive.See“Internaldrives”
onpage9.
4.Disconnectthecablesfromtheopticaldrive.
Note:Ifyouremoveaflexmoduleoraflexbaystorageenclosure,youmightneedtodisconnectthe
cablesfromthedevice,aPCIcard,orthesystemboard.See“Partsonthesystemboard”onpage7
5.Pressthetab1downwardandpushtheopticaldrivetothefrontofthechassis.Then,removethe
opticaldrivefromthefrontofthechassis.
.
Figure16.Removingtheopticaldrive
Toinstallanopticaldrive,dothefollowing:
1.Prepareyourcomputer.See“Preparingyourcomputerandremovingthecomputercover”onpage59.
2.Removethedirectcoolingairbaffle.See“Directcoolingairbaffle”onpage63.
3.Locatetheoptical-drivebayintowhichyouwanttoinstallanopticaldrive.See“Internaldrives”on
page9
.
4.Presstheclipunderneaththeplasticcoveroftheoptical-drivebaysothatthecoverisejectedoutofthe
bay.Then,removethemetalshieldinthebay.
66ThinkStationP910UserGuide
Page 79

5.Notetheorientationofthenewopticaldrive.Then,slidetheopticaldriveintotheoptical-drivebayfrom
thefrontofthechassisuntilitsnapsintoposition.
Figure17.Installingtheopticaldrive
6.Connectthecablestotheopticaldrive.
Note:Ifyouinstallaflexmoduleoraflexbaystorageenclosure,youmightneedtoconnectthecables
tothedevice,aPCIcard,orthesystemboard.See“Partsonthesystemboard”onpage7
7.Reinstallthedirectcoolingairbaffle.See“Directcoolingairbaffle”onpage63.
.
Whattodonext:
•Toworkwithanotherpieceofhardware,gototheappropriatesection.
•Tocompletetheinstallationorreplacement,goto“Completingthepartsreplacement”onpage132.
Harddiskdriveinthefront-accessstorageenclosure
Attention:Donotopenyourcomputerorattemptanyrepairbeforereadingandunderstandingthe“Read
thisfirst:Importantsafetyinformation”onpagev.
Youcaninstallorreplaceaharddiskdriveinthefront-accessstorageenclosure.Theharddiskdrivealso
canbehot-swappable,whichmeansthatyoucaninstallorreplacethedrivewithouteventurningoffyour
computer.
Theharddiskdriveinthefront-accessstorageenclosureishot-swappableonlywhenthefollowing
requirementsaremet:
•TheSATAcableofthefront-accessstorageenclosureisconnectedtotheeSATAconnectoronthesystem
board.Toverifythecableconnection,see“Preparingyourcomputerandremovingthecomputercover”
onpage59
•Theoperatingsystemofyourcomputerdoesnotresideontheharddiskdriveinstalledinthefront-access
storageenclosure.
Attention:Ifanyoftheaboverequirementsarenotmet,donotinstallorreplacetheharddiskdrivewhen
thecomputeristurnedon.Otherwise,dataontheharddiskdrivemightgetdamaged.
and“Partsonthesystemboard”onpage7formoreinformation.
Toinstallorreplaceaharddiskdriveinthefront-accessstorageenclosure,dothefollowing:
1.Beforereplacinganoldharddiskdrive,safelyejecttheoldharddiskdrivefromtheoperatingsystem
first.Formoreinformation,seetheWindowshelpsystem.
Chapter7.Installingorreplacinghardware67
Page 80

2.Unlocktheenclosurecoverwiththeprovidedkeyasshown.Pressthenotchatoopentheenclosure
a
cover.
Figure18.Openingthefront-accessstorageenclosurecover
3.Pressthepitonthebracketcover,andthengraspthetiltedcovertopullthebracketoutofthe
front-accessstorageenclosure.
Figure19.Removingtheharddiskdrivefromthefront-accessstorageenclosure
4.Flexbothsidesofthebrackettoremovetheharddiskdrivefromthebracket.
Figure20.Removingtheharddiskdrivefromthebracket
68ThinkStationP910UserGuide
Page 81

5.Flexbothsidesofthebracketandalignpins1onthebracketwiththecorrespondingholesinthenew
harddiskdrive.Donottouchthecircuitboardontheharddiskdrive.
Note:Ensurethatthecircuitboardfacesdownwardandtheconnectorsfacetowardtherearofthe
bracket.
Figure21.Installingtheharddiskdriveintothebracket
6.Slidethebracketwiththenewharddiskdriveintothefront-accessstorageenclosureuntilitsnapsinto
position.Pressthenotchtosecuretheenclosurecoverandlocktheenclosurecoverwiththekey.
Figure22.Installingthehard-disk-drivebracket
Whattodonext:
•Toworkwithanotherpieceofhardware,gototheappropriatesection.
•Tocompletetheinstallationorreplacement,goto“Completingthepartsreplacement”onpage132.
Storagedriveintheflexbaystorageenclosure
Attention:Donotopenyourcomputerorattemptanyrepairbeforereadingandunderstanding“Read
thisfirst:Importantsafetyinformation”onpagev.
Youcaninstalla3.5-inchharddiskdrive,a2.5-inchharddiskdrive,ora2.5-inchsolid-statedriveinto
theflexbaystorageenclosure.
Toinstallorreplaceastoragedriveintheflexbaystorageenclosure,refertothefollowing:
Chapter7.Installingorreplacinghardware69
Page 82

•“3.5-inchstoragedrive”onpage70
•“2.5-inchstoragedrive”onpage71
3.5-inchstoragedrive
Toinstallorreplacea3.5-inchstoragedrive,dothefollowing:
1.Prepareyourcomputer.See“Preparingyourcomputerandremovingthecomputercover”onpage59.
2.Iftheflexbaystorageenclosureisinstalledinthecomputer,disconnectthesignalcableandthepower
cablefromthe3.5-inchstoragedrivefirst.Then,removetheflexbaystorageenclosurefromthefrontof
thecomputer.See“Deviceinanoptical-drivebay”onpage65.
3.Ifyouarereplacinga3.5-inchstoragedrive,removethefourscrewsthatsecurethedrive.Thentakethe
olddriveoutoftheflexbaystorageenclosure.
Note:Wheninstallingorremovingthestoragedrive,donottouchthecircuitboardonthestoragedrive
andmakesurethatthecircuitboardfacesdownward.
Figure23.Removingthe3.5-inchstoragedrivefromtheflexbaystorageenclosure
70ThinkStationP910UserGuide
Page 83

4.Installthe3.5-inchstoragedriveintotheflexbaystorageenclosure.Then,installthefourscrewsto
securethedrivetotheflexbaystorageenclosure.
Figure24.Installingthe3.5-inchstoragedrivetotheflexbaystorageenclosure
5.Slidetheflexbaystorageenclosureintotheopticaldrivebay.See“Deviceinanoptical-drivebay”
onpage65
.
6.Connectthesignalcableandthepowercabletothenewstoragedrive.
Figure25.Connectingthecablestothestoragedrive
Whattodonext:
•Toworkwithanotherpieceofhardware,gototheappropriatesection.
•Tocompletetheinstallationorreplacement,goto“Completingthepartsreplacement”onpage132
.
2.5-inchstoragedrive
Toinstallorreplacea2.5-inchstoragedrive,dothefollowing:
Chapter7.Installingorreplacinghardware71
Page 84

1.Prepareyourcomputer.See“Preparingyourcomputerandremovingthecomputercover”onpage59.
2.Iftheflexbaystorageenclosureisinstalledinthecomputer,disconnectthesignalcableandthepower
cablefromthe2.5-inchstoragedrivefirst.Then,removetheflexbaystorageenclosurefromthefrontof
thecomputer.See“Deviceinanoptical-drivebay”onpage65.
3.Ifyouarereplacinga2.5-inchstoragedrive,dothefollowing:
a.Removethefourscrewsthatsecurethestorageconverter.Takethestorageconvertertogetherwith
thedriveoutoftheflexbaystorageenclosure.
Figure26.Removingthe2.5-inchstoragedriveandthestorageconverterfromtheflexbaystorageenclosure
72ThinkStationP910UserGuide
Page 85

b.Removethefivescrewsthatsecurethe2.5-inchstoragedrivetothestorageconverter.Takethe
driveoutofthestorageconverter.
Note:Wheninstallingorremovingthestoragedrive,donottouchthecircuitboardonthestorage
driveandmakesurethatthecircuitboardfacesdownward.
Figure27.Removingthe2.5-inchstoragedrivefromthestorageconverter
Chapter7.Installingorreplacinghardware73
Page 86

4.Installthe2.5-inchstoragedriveintothestorageconverter.Then,installthefivescrewstosecurethe
drivetothestorageconverter.
Figure28.Installingthe2.5-inchstoragedriveintothestorageconverter
5.Installthe2.5-inchstoragedriveandthestorageconverterintotheflexbaystorageenclosure.Then,
installthefourscrewstosecurethestorageconvertertotheflexbaystorageenclosure.
Figure29.Installingthe2.5-inchstoragedriveandthestorageconverterintotheflexbaystorageenclosure
74ThinkStationP910UserGuide
Page 87

6.Slidetheflexbaystorageenclosureintotheopticaldrivebay.See“Deviceinanoptical-drivebay”
onpage65.
7.Connectthesignalcableandthepowercabletothenewstoragedrive.
Figure30.Connectingthecablestothestoragedrive
Whattodonext:
•Toworkwithanotherpieceofhardware,gototheappropriatesection.
•Tocompletetheinstallationorreplacement,goto“Completingthepartsreplacement”onpage132.
Deviceinthe5.25-inchflexmodule
Attention:Donotopenyourcomputerorattemptanyrepairbeforereadingandunderstandingthe“Read
thisfirst:Importantsafetyinformation”onpagev.
Thissectionprovidesinstructionsonhowtoinstallorreplaceadeviceinthe5.25-inchflexmodule.Installing
andreplacingadeviceinthe5.25-inchflexmoduleinvolvesthefollowingoperations:
•“Slimopticaldrive”onpage75
•“Cardreader”onpage78
•“eSATAconnectororIEEE1394connector”onpage81
Slimopticaldrive
Toinstallorreplaceaslimopticaldriveintheflexmodule,dothefollowing:
1.Prepareyourcomputer.See“Preparingyourcomputerandremovingthecomputercover”onpage59.
2.Removetheflexmodulefromthefrontofthecomputer.See“Deviceinanoptical-drivebay”onpage65.
Chapter7.Installingorreplacinghardware75
Page 88

3.Lifttheclipontherearoftheflexmodule.Then,slidetheflexmodulecovertotherearoftheflex
moduletoremovethecover.
Figure31.Removingtheflexmodulecover
4.Dependingonwhetheryouareinstallingorreplacingaslimopticaldrive,dooneofthefollowing:
•Ifyouareinstallinganewslimopticaldrive,pressthetwometalclips
1toremovetheplasticclip
withthetwoscrewsasshown.RemovethetwoscrewsandthengotoStep5onpage77
Figure32.Removingtheplasticclipwiththetwoscrews
•Ifyouarereplacinganoldslimopticaldrive,dothefollowing:
.
76ThinkStationP910UserGuide
Page 89

a.Pressthebuttonasshowntoremovetheslimopticaldrivefromtheflexmodule.
Figure33.Removingtheslimopticaldrivefromtheflexmodule
b.Removethetwoscrewsthatsecurethecliptoremovetheplasticclipfromtherearoftheslim
opticaldrive.
Figure34.Removingtheplasticclipfromtheslimopticaldrive
5.Installthetwoscrewstosecuretheplasticclipontherearofthenewslimopticaldrive.
Figure35.Installingtheplasticcliptotheslimopticaldrive
Chapter7.Installingorreplacinghardware77
Page 90

6.Slidethenewslimopticaldrivewiththeplasticclipintotheflexmoduleuntiltheslimopticaldrive
snapsintoposition.
Figure36.Installingtheslimopticaldriveintheflexmodule
7.Positiontheflexmodulecoverontheflexmodule.Ensurethattherailguidesonthebottomoftheflex
modulecoverengagetherailsontheflexmodule.Then,pushthecovertothefrontoftheflexmodule
untilitsnapsintoposition.
Figure37.Reinstallingtheflexmodulecover
Whattodonext:
•Toworkwithanotherpieceofhardware,gototheappropriatesection.
•Tocompletetheinstallationorreplacement,goto“Completingthepartsreplacement”onpage132.
Cardreader
Toinstallorreplaceacardreaderintheflexmodule,dothefollowing:
1.Prepareyourcomputer.See“Preparingyourcomputerandremovingthecomputercover”onpage59.
2.Removetheflexmodulefromthefrontofthecomputer.See“Deviceinanoptical-drivebay”onpage65.
78ThinkStationP910UserGuide
Page 91

3.Liftthecliponthesideoftheflexmoduleupward.Then,slidetheflexmodulecovertotherearof
theflexmoduletoremovethecover.
Figure38.Removingtheflexmodulecover
4.Ifyouarereplacingacardreader,dothefollowing:
a.Disconnectthecardreadercablefromthesystemboard.See“Partsonthesystemboard”onpage7.
b.Pulltheclipasshowntoremovethecardreaderwiththecardreaderretainingbracketoutofthe
flexmodule.
Figure39.Removingthecardreaderintheflexmodule
c.Flexthefourclipsonthesidesofthecardreaderretainingbrackettoremovethecardreaderfrom
thebracket.
Figure40.Removingthecardreaderfromthecardreaderretainingbracket
Chapter7.Installingorreplacinghardware79
Page 92

5.Toinstallanewcardreaderintothecardreaderretainingbracket,alignthefourholesinthecard
readerwiththecorrespondingstudsonthebracket.Then,pressthenewcardreaderdownwarduntil
itsnapsintoposition.
Figure41.Installingthecardreaderintothecardreaderretainingbracket
6.Notetheorientationofthenewcardreaderandroutethecardreadercableintothecableclip.Hold
thecliponthecardreaderretainingbracket.Then,insertthenewcardreaderintothecardreader
slotinflexmoduleuntilitsnapsintoposition.
Figure42.Installingthecardreaderintheflexmodule
80ThinkStationP910UserGuide
Page 93

7.Positiontheflexmodulecoverontheflexmodule.Ensurethattherailguidesonthebottomoftheflex
modulecoverengagetherailsontheflexmodule.Then,pushthecovertothefrontoftheflexmodule
untilitsnapsintoposition.
Figure43.Reinstallingtheflexmodulecover
8.ConnectthecardreadercabletotheUSB2.0connectororcardreaderconnectoronthesystem
board.See“Partsonthesystemboard”onpage7.
Whattodonext:
•Toworkwithanotherpieceofhardware,gototheappropriatesection.
•Tocompletetheinstallationorreplacement,goto“Completingthepartsreplacement”onpage132.
eSATAconnectororIEEE1394connector
ToinstallorreplaceaneSATAconnectororIEEE1394connectorintheflexmodule,dothefollowing:
1.Prepareyourcomputer.See“Preparingyourcomputerandremovingthecomputercover”onpage59.
2.Slidetheflexmoduleoutofthefrontofthecomputer.See“Deviceinanoptical-drivebay”onpage65.
3.Liftthecliponthesideoftheflexmoduleupward.Then,slidetheflexmodulecovertotherearof
theflexmoduletoremovethecover.
Figure44.Removingtheflexmodulecover
4.IfyouarereplacinganeSATAconnectororIEEE1394connector,dothefollowing:
Chapter7.Installingorreplacinghardware81
Page 94

a.DisconnecttheeSATAconnectororIEEE1394connectorcablefromthesystemboard.See“Parts
onthesystemboard”onpage7.
b.PressthetwoclipstowardeachotherasshowntopulltheeSATAconnectororIEEE1394connector
outoftheflexmodule.
Figure45.RemovingtheeSA TAconnectororIEEE1394connectorintheflexmodule
5.NotetheorientationoftheeSATAconnectororIEEE1394connectorandroutetheeSATAconnectoror
IEEE1394connectorcableintothecableclip.
6.PlacetheeSATAconnectororIEEE1394connectorintothemetalretainer.Then,inserttheeSAT A
connectororIEEE1394connectorintothecorrespondingslotintheflexmoduleasshown.
Figure46.InstallingtheeSA TAconnectororIEEE1394connectorintheflexmodule
82ThinkStationP910UserGuide
Page 95

7.Positiontheflexmodulecoverontheflexmodule.Ensurethattherailguidesonthebottomoftheflex
modulecoverengagetherailsontheflexmodule.Then,pushthecovertothefrontoftheflexmodule
untilitsnapsintoposition.
Figure47.Reinstallingtheflexmodulecover
8.ConnecttheeSATAconnectororIEEE1394connectorcabletothecorrespondingconnectoronthe
systemboard.See“Partsonthesystemboard”onpage7.
Whattodonext:
•Toworkwithanotherpieceofhardware,gototheappropriatesection.
•Tocompletetheinstallationorreplacement,goto“Completingthepartsreplacement”onpage132.
Internalstoragedrive
Dependingonyourcomputermodel,yourcomputermightcomewithoneormoreofthefollowinginternal
storagedrives:
•3.5-inchharddiskdrive
•3.5-inchhybriddrive
•2.5-inchharddiskdrive
•2.5-inchsolid-statedrive
•M.2solid-statedrive
•PCIExpresssolid-statedrive
Toinstallorreplaceaninternalstoragedrive,refertooneofthefollowingtopics:
•“3.5-inchstoragedrive”onpage83
•“2.5-inchstoragedrive”onpage86
•“M.2solid-statedrive”onpage91
•“PCIcard”onpage104(appliestoaPCIExpresssolid-statedrive)
3.5-inchstoragedrive
Note:Dependingonyourcomputermodel,a3.5-inchharddiskdriveora3.5-inchhybriddrivemight
comewithyourcomputer.
Toinstallorreplacea3.5-inchstoragedriveinahard-disk-drivebay,dothefollowing:
Chapter7.Installingorreplacinghardware83
Page 96

1.Prepareyourcomputer.See“Preparingyourcomputerandremovingthecomputercover”onpage59.
1
2.Locatethehard-disk-drivebayinwhichyouwanttoinstallorreplaceastoragedrive.See“Internal
drives”onpage9.
3.Pressthepitonthecoveroftheharddiskdrivebaysothatthecoverisopened.Then,pullthecover
edgeasshowntoremovethehard-disk-drivebracketfromthehard-disk-drivebay.
Figure48.Removingthehard-disk-drivebracket
4.Dependingonwhetheryouareinstallingorreplacingastoragedrive,dooneofthefollowing:
•Ifyouareinstallingastoragedrive,gotostep6.
•Ifyouarereplacingastoragedrive,flexthesidesofthebrackettoreleasethefourpins1fromthe
storagedrive.Then,removethestoragedrivefromthebracket.
Figure49.Removingthestoragedrivefromthebracket
84ThinkStationP910UserGuide
Page 97

5.Holdthestoragedrivesothattheconnectorsfacetowardstherearofthebracketandthecircuit
1
2
board2facesupward.Then,flexthesidesofthebracketandalignthefourpins1onthebracket
withthecorrespondingholesinthestoragedrive.
Note:Donottouchthecircuitboard2ofthestoragedrive.
Figure50.Installingthestoragedriveintothebracket
Chapter7.Installingorreplacinghardware85
Page 98

6.Slidethebrackettogetherwiththeinstalledstoragedriveintothehard-disk-drivebayuntilthebracket
snapsintoposition.
Figure51.Installingthehard-disk-drivebracket
Whattodonext:
•Toworkwithanotherpieceofhardware,gototheappropriatesection.
•Tocompletetheinstallationorreplacement,goto“Completingthepartsreplacement”onpage132.
2.5-inchstoragedrive
Note:Dependingonyourcomputermodel,a2.5-inchharddiskdriveora2.5-inchsolid-statedrivemight
comewithyourcomputer.
Toinstallorreplacea2.5-inchstoragedrive,refertooneofthefollowingtopics:
•“Installingorreplacinga2.5-inchstoragedriveinahard-disk-drivebay”onpage86
•“Installingorreplacinga2.5-inchstoragedrivewithaconverterinahard-disk-drivebay”onpage88
Installingorreplacinga2.5-inchstoragedriveinahard-disk-drivebay
Attention:Donotopenyourcomputerorattemptanyrepairbeforereadingandunderstandingthe“Read
thisfirst:Importantsafetyinformation”onpagev.
Toinstallorreplacea2.5-inchstoragedriveinahard-disk-drivebay,dothefollowing:
1.Prepareyourcomputer.See“Preparingyourcomputerandremovingthecomputercover”onpage59.
2.Locatetheharddiskdrivebayinwhichyouwanttoinstallorreplaceastoragedrive.See“Internal
drives”onpage9.
3.Removethestoragedrivebracketfromthehard-disk-drivebay.Seestep3onpage84.
4.Dependingonwhetheryouareinstallingorreplacingastoragedrive,dooneofthefollowing:
•Ifyouareinstallingastoragedrive,gotostep6.
86ThinkStationP910UserGuide
Page 99

•Ifyouarereplacingastoragedrive,flexthesidesofthebrackettoreleasethefourpins1fromthe
1
1
storagedrive.Then,removethestoragedrivefromthebracket.
Figure52.Removingthestoragedrivefromthebracket
5.Keeptheconnectoronthestoragedriveontherightasshown.Then,flexthesidesofthebracketand
alignthefourpins1onthebottomofthebracketwiththecorrespondingholesinthestoragedrive.
Note:Donottouchthecircuitboard(ifaccessible)ofthe2.5-inchstoragedrive.
Figure53.Installingthestoragedriveintothebracket
Chapter7.Installingorreplacinghardware87
Page 100

6.Installthebracketwiththenewstoragedriveintothehard-disk-drivebay.Seestep6onpage86.
1
2
Whattodonext:
•Toworkwithanotherpieceofhardware,gototheappropriatesection.
•Tocompletetheinstallationorreplacement,goto“Completingthepartsreplacement”onpage132.
Installingorreplacinga2.5-inchstoragedrivewithaconverterinahard-disk-drivebay
Attention:Donotopenyourcomputerorattemptanyrepairbeforereadingandunderstandingthe“Read
thisfirst:Importantsafetyinformation”onpagev.
Toinstallorreplacea2.5-inchstoragedrivewitha2.5-inchto3.5-inchconverterinahard-disk-drive
bay,dothefollowing:
1.Prepareyourcomputer.See“Preparingyourcomputerandremovingthecomputercover”onpage59.
2.Locatethehard-disk-drivebayinwhichyouwanttoinstallorreplaceastoragedrive.See“Internal
drives”onpage9.
3.Removethestoragedrivebracketfromthehard-disk-drivebay.Seestep3onpage84.
4.Dependingonwhetheryouareinstallingorreplacingastoragedrive,dooneofthefollowing:
•Ifyouareinstallingastoragedrive,pivottab
1onthemetaladapterupward.Then,pushtheadapter
asshownuntilthefourtabsontheadapterareslideintothefournotches2.Pivottheadapteras
showntoremoveitfromtheconverter.
Figure54.Removingtheadapterfromtheconverter
•Ifyouarereplacingastoragedrive,dothefollowing:
a.Removetheconverterfromthebracket.Seestep4onpage84.
88ThinkStationP910UserGuide
 Loading...