

Lenovo ThinkPad 11e Chromebook 4th Gen, ThinkPad Yoga 11e Chromebook 4th Gen User Guide [uk]

ThinkPad 11e Chromebook 4th Gen and ThinkPad
Yoga 11e Chromebook 4th Gen User Guide


Примітка. Перш ніж використовувати надану в цьому документі інформацію та продукт, якого вона
стосується, уважно прочитайте такі документи.
• Посібник із техніки безпеки, гарантії та налаштування
• "Важлива інформація про техніку безпеки" на сторінці iii
Останні версії Посібника з техніки безпеки, гарантії та налаштування та документа Regulatory Notice
доступні на веб-сайті служби підтримки Lenovo:
http://www.lenovo.com/support
Second Edition (September 2017)
© Copyright Lenovo 2017.
LIMITED AND RESTRICTED RIGHTS NOTICE: If data or software is delivered pursuant to a General Services
Administration “GSA” contract, use, reproduction, or disclosure is subject to restrictions set forth in Contract No. GS35F-05925.

Вміст
Важлива інформація про техніку
безпеки . . . . . . . . . . . . . . . . . iii
Перед початком роботи . . . . . . . . . . . . iii
Important information about using your computer . . iii
Умови, що потребують негайних дій . . . . . . . v
Обслуговування та оновлення . . . . . . . . . vi
Шнури та адаптери живлення . . . . . . . . . vii
Подовжувачі та пов'язані пристрої . . . . . . . vii
Штекери та розетки . . . . . . . . . . . . viii
Заява про блок живлення . . . . . . . . . . viii
Зовнішні пристрої . . . . . . . . . . . . . . ix
Загальні зауваження щодо елементів
живлення . . . . . . . . . . . . . . . . . . ix
Зауваження щодо вбудованого
перезаряджуваного акумулятора . . . . . . . . x
Виділення тепла та вентиляція продукту . . . . . xi
Техніка безпеки під час роботи з електричним
струмом . . . . . . . . . . . . . . . . . . xii
Зауваження щодо РК-дисплея . . . . . . . . xiii
Використання навушників . . . . . . . . . . xiii
Зауваження щодо дрібних деталей . . . . . . xiii
Зауваження щодо пластикових пакетів. . . . . xiv
Зауваження щодо скляних деталей . . . . . . xiv
Глава 1. Огляд продукту . . . . . . . . 1
Елементи керування, роз'єми та індикатори
комп'ютера . . . . . . . . . . . . . . . . . 1
Front view . . . . . . . . . . . . . . . . 1
Left-side view. . . . . . . . . . . . . . . 3
Right-side view . . . . . . . . . . . . . . 4
Status indicators . . . . . . . . . . . . . 5
Important product information labels . . . . . . . 7
Machine type and model label . . . . . . . . 7
FCC ID and IC Certification number . . . . . . 7
Computer features. . . . . . . . . . . . . . . 8
Computer specifications . . . . . . . . . . . . 9
Умови експлуатації . . . . . . . . . . . . . 10
Глава 2. Використання
комп'ютера . . . . . . . . . . . . . . 11
Реєстрація комп'ютера . . . . . . . . . . . 11
Frequently asked questions . . . . . . . . . . 11
Operating modes . . . . . . . . . . . . . . 12
Rotating the computer display . . . . . . . 12
Notebook mode . . . . . . . . . . . . . 13
Stand mode . . . . . . . . . . . . . . 13
Tablet mode . . . . . . . . . . . . . . 14
Tent mode . . . . . . . . . . . . . . . 15
Keyboard frame travel function . . . . . . . . . 16
Using the multi-touch screen . . . . . . . . . 18
Using the special buttons . . . . . . . . . . . 19
Using the special keys . . . . . . . . . . . . 20
Using the ThinkPad pointing device . . . . . . . 21
Using the touch pad . . . . . . . . . . . 21
Керування живленням. . . . . . . . . . . . 22
Використання адаптера змінного струму . . 22
Using the battery . . . . . . . . . . . . 22
Managing the battery power . . . . . . . . 23
Power-saving modes . . . . . . . . . . . 23
Безпровідні з'єднання. . . . . . . . . . . . 24
Using the wireless-LAN connection . . . . . 24
Using the Bluetooth connection. . . . . . . 25
Using the NFC devices . . . . . . . . . . 25
Using the Airplane mode . . . . . . . . . 27
Using the NVIDIA Optimus Graphics feature. . . . 27
Using audio features . . . . . . . . . . . . . 27
Using the camera . . . . . . . . . . . . . . 27
Using an external display . . . . . . . . . . . 28
Traveling with your computer . . . . . . . . . 29
Глава 3. Enhancing your
computer. . . . . . . . . . . . . . . . 31
Finding ThinkPad options . . . . . . . . . . . 31
ThinkPad Pen Pro . . . . . . . . . . . . . . 31
ThinkPad Pen Pro . . . . . . . . . . . . . . 33
Tablet Digitizer Pen . . . . . . . . . . . . . 35
Глава 4. Інформація про спеціальні
можливості, ергономіку та
обслуговування . . . . . . . . . . . . 39
Accessibility information . . . . . . . . . . . 39
Інформація про ергономіку. . . . . . . . . . 41
Очищення й обслуговування . . . . . . . . . 42
Глава 5. Advanced configuration . . . 45
Installing device drivers. . . . . . . . . . . . 45
Using system management . . . . . . . . . . 46
Глава 6. Виправлення неполадок
комп'ютера . . . . . . . . . . . . . . 49
Виправлення неполадок . . . . . . . . . . . 49
Computer stops responding . . . . . . . . 49
Пролиття рідини на клавіатуру . . . . . . 49
Ethernet problems . . . . . . . . . . . . 50
Wireless-LAN problem . . . . . . . . . . 51
Bluetooth problem . . . . . . . . . . . . 51
Keyboard problems . . . . . . . . . . . 51
© Copyright Lenovo 2017 i

Computer screen problems . . . . . . . . 52
External monitor problems. . . . . . . . . 54
Audio problems . . . . . . . . . . . . . 55
Battery problems . . . . . . . . . . . . 56
ac power adapter problem. . . . . . . . . 57
Power problems. . . . . . . . . . . . . 57
Power button problem . . . . . . . . . . 58
Boot problems . . . . . . . . . . . . . 58
Sleep and hibernation problems . . . . . . 58
ThinkPad Pen Pro problem . . . . . . . . 59
Software problem . . . . . . . . . . . . 59
USB problem . . . . . . . . . . . . . . 60
Глава 7. Заміна обладнання . . . . . 61
Запобігання утворенню статичної електрики . . 61
Disabling the built-in battery . . . . . . . . . . 61
Replacing the bottom cover . . . . . . . . . . 62
Replacing the base cover assembly . . . . . . . 63
Глава 8. Отримання підтримки . . . 67
Before you contact Lenovo . . . . . . . . . . 67
Getting help and service . . . . . . . . . . . 67
Lenovo Support Web site . . . . . . . . . 68
Calling Lenovo . . . . . . . . . . . . . 68
Придбання додаткових послуг . . . . . . . . 69
Додаток A. Відомості про
нормативи . . . . . . . . . . . . . . . 71
Certification-related information . . . . . . . . 71
Відомості про безпровідний зв'язок . . . . . . 71
Wireless interoperability. . . . . . . . . . 71
Середовище використання та ваше
здоров'я . . . . . . . . . . . . . . . 71
Locating the UltraConnect wireless
antennas. . . . . . . . . . . . . . . . 72
Інформація про виконання вимог до
безпровідних пристроїв . . . . . . . . . 72
Розташування відомостей про нормативи
використання безпровідних пристроїв . . . 73
Зауваження щодо експортної класифікації . . . 73
Зауваження щодо електронного
випромінювання . . . . . . . . . . . . . . 73
Federal Communications Commission
Declaration of Conformity . . . . . . . . . 73
Заява про відповідність виробництва
стандартам випромінювання класу B в
Канаді . . . . . . . . . . . . . . . . 74
Відповідність стандартам Європейського
Союзу . . . . . . . . . . . . . . . . 74
German Class B compliance statement. . . . 74
Class 1 laser product compliance
statement . . . . . . . . . . . . . . . 75
Заява про відповідність класу B для
Кореї . . . . . . . . . . . . . . . . . 75
Заява про відповідність VCCI класу B для
Японії . . . . . . . . . . . . . . . . . 75
Заява про відповідність продуктів, які
підключаються до мережі
електроживлення з номінальною силою
струму щонайбільше 20 А на фазу (для
Японії) . . . . . . . . . . . . . . . . 75
Примітка для Японії щодо шнура живлення
змінного струму . . . . . . . . . . . . 76
Інформація про обслуговування виробів
Lenovo для Тайваню. . . . . . . . . . . 76
Позначка відповідності євразійським
стандартам . . . . . . . . . . . . . . . . 76
Аудіопримітка для Бразилії. . . . . . . . . . 76
Додаток B. Інформація про
переробку й відпрацьоване електричне
та електронне обладнання. . . . . . 77
Загальна інформація про переробку . . . . . . 77
Важлива інформація про відпрацьоване
електричне та електронне обладнання . . . . . 77
Інформація про переробку для Японії . . . . . 78
Інформація про переробку для Бразилії . . . . 79
Інформація про утилізацію акумуляторів у
Європейському Союзі. . . . . . . . . . . . 79
Інформація про утилізацію акумуляторів у
Тайвані . . . . . . . . . . . . . . . . . . 80
Інформація про утилізацію акумуляторів у
Сполучених Штатах і Канаді . . . . . . . . . 80
Інформація про переробку для Китаю . . . . . 80
Додаток C. Обмеження директиви
про поводження з небезпечними
речовинами (RoHS) . . . . . . . . . . 81
Додаток D. ENERGY STAR model
information. . . . . . . . . . . . . . . 85
Додаток E. Юридичні
зауваження . . . . . . . . . . . . . . 87
Додаток F. Trademarks. . . . . . . . 89
ii ThinkPad 11e Chromebook 4th Gen and ThinkPad Yoga 11e Chromebook 4th Gen User Guide
Важлива інформація про техніку безпеки
Примітка: Спочатку прочитайте важливу інформацію про безпеку.
Перед початком роботи
Ця інформація допоможе вам безпечно користуватися ноутбуком. Збережіть документи, надані з
комп'ютером, і дотримуйтеся наданих у них інструкцій. Наведена в цьому документі інформація не
змінює умови договору про придбання або обмеженої гарантії. Додаткову інформацію див. у розділі
"Інформація про гарантії" Посібника з техніки безпеки, гарантії та налаштування, що надається з
комп'ютером.
Безпека покупця дуже важлива для нас. Під час розробки продуктів ми приділяємо особливу увагу їх
безпечності та ефективності. Однак персональні комп'ютери все ж є електронними пристроями.
Шнури й адаптери живлення, а також інші компоненти ноутбуків, особливо за неналежного
використання, можуть створювати загрозу безпеки, яка може призвести до травм або ушкодження
майна. Щоб зменшити ризик такої загрози, дотримуйтеся наданих із продуктом інструкцій,
дослухайтеся до попереджень на продукті та в інструкції з експлуатації, а також уважно прочитайте
інформацію, наведену в цьому документі. Ретельно дотримуючись інструкцій, що наведені в цьому
документі або надаються з продуктом, ви зможете захистити себе від потенційних загроз і створити
безпечніше середовище для роботи за комп'ютером.
Примітка: Така інформація включає посилання на адаптери живлення та акумуляторні батареї. У
комплект ноутбуків і деяких інших продуктів (як-от динаміків і моніторів) входить зовнішній адаптер
живлення. Якщо ви власник такого продукту, то ця інформація стосується його. Крім того, у
комп'ютерах міститься пласка кругла батарея, яка живить системний годинник, навіть коли комп'ютер
не підключено до електромережі. Тому інформація про безпечність цієї батареї стосується всіх
комп'ютерів.
Important information about using your computer
Ensure that you follow the important tips given here to get the most use and enjoyment out of your computer.
Failure to do so might lead to discomfort or injury, or cause the computer to fail.
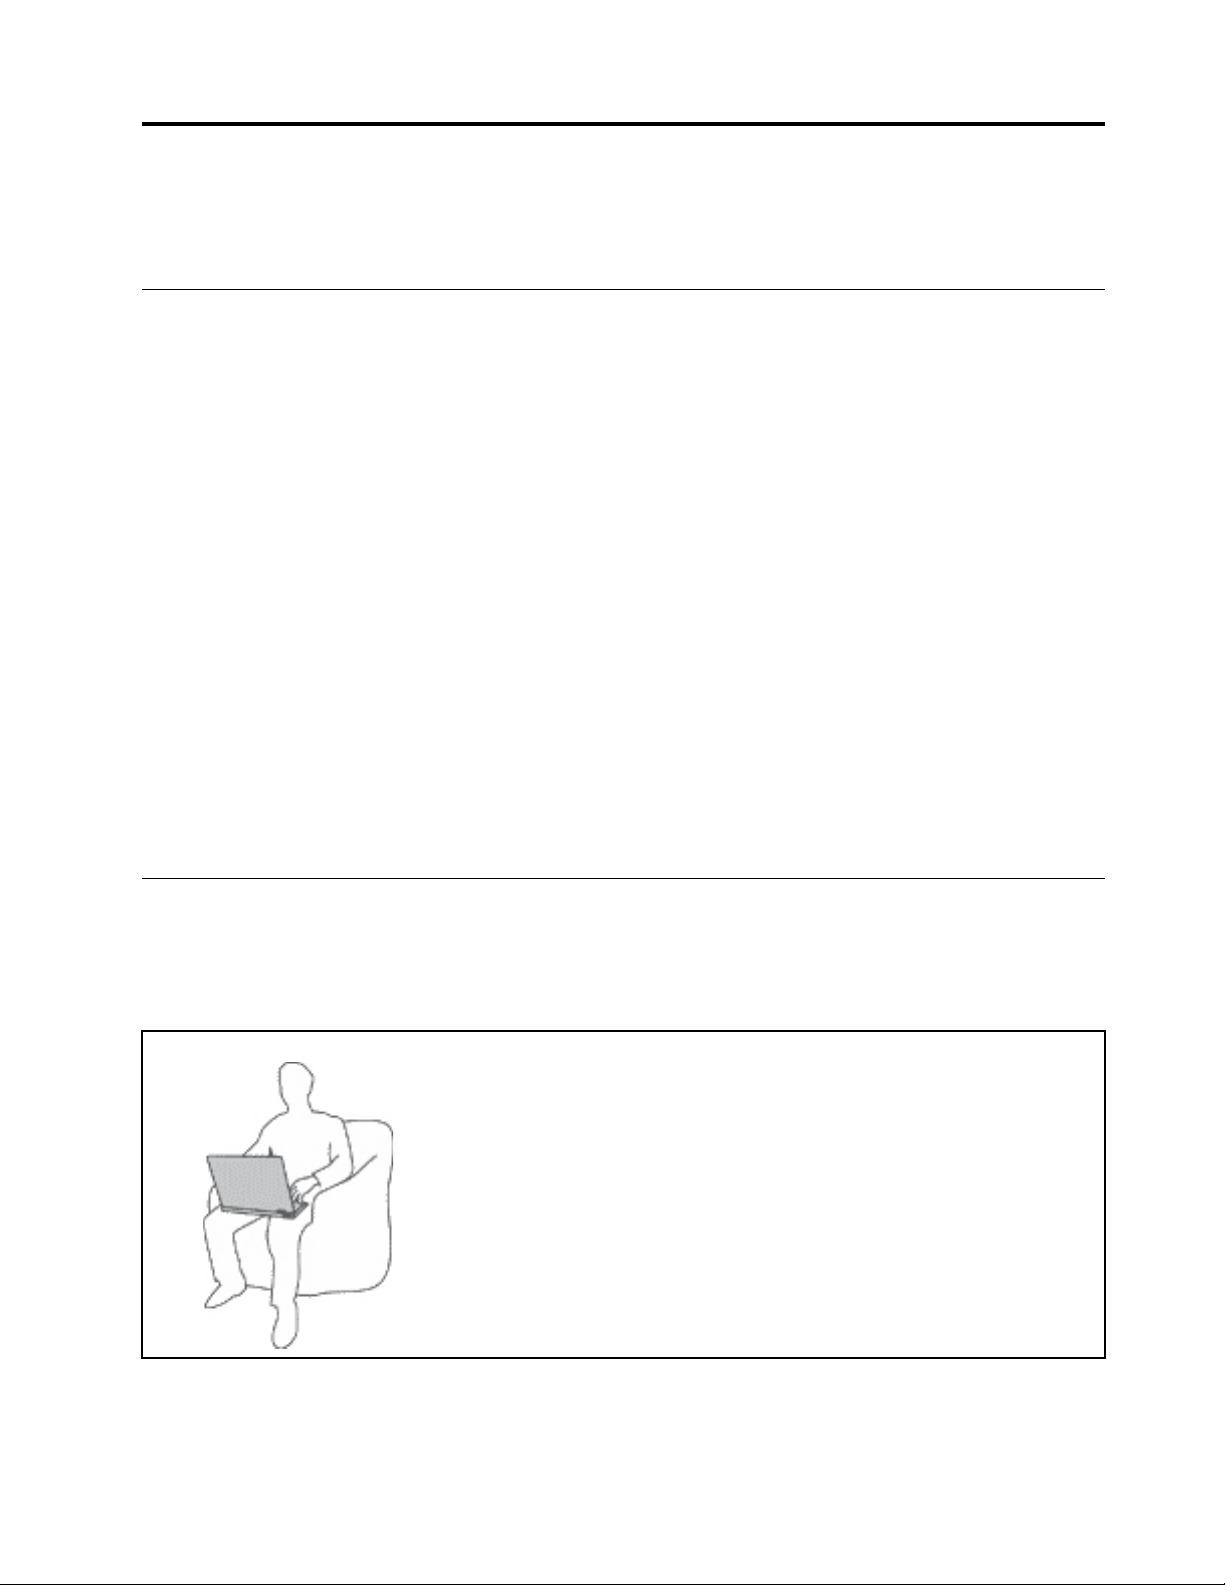
Protect yourself from the heat that your computer generates.
When your computer is turned on or the battery is charging, the base, the palm
rest, and some other parts may become hot. The temperature they reach
depends on the amount of system activity and the level of charge in the
battery.
Extended contact with your body, even through clothing, could cause
discomfort or even a skin burn.
• Avoid keeping your hands, your lap, or any other part of your body in
contact with a hot section of the computer for any extended time.
• Periodically take hands from using the keyboard by lifting your hands from
the palm rest.
© Copyright Lenovo 2017 iii
Protect yourself from the heat generated by the ac power adapter.
When the ac power adapter is connected to an electrical outlet and your
computer, it generates heat.
Extended contact with your body, even through clothing, may cause a skin
burn.
• Do not place the ac power adapter in contact with any part of your body
while it is in use.
• Never use it to warm your body.
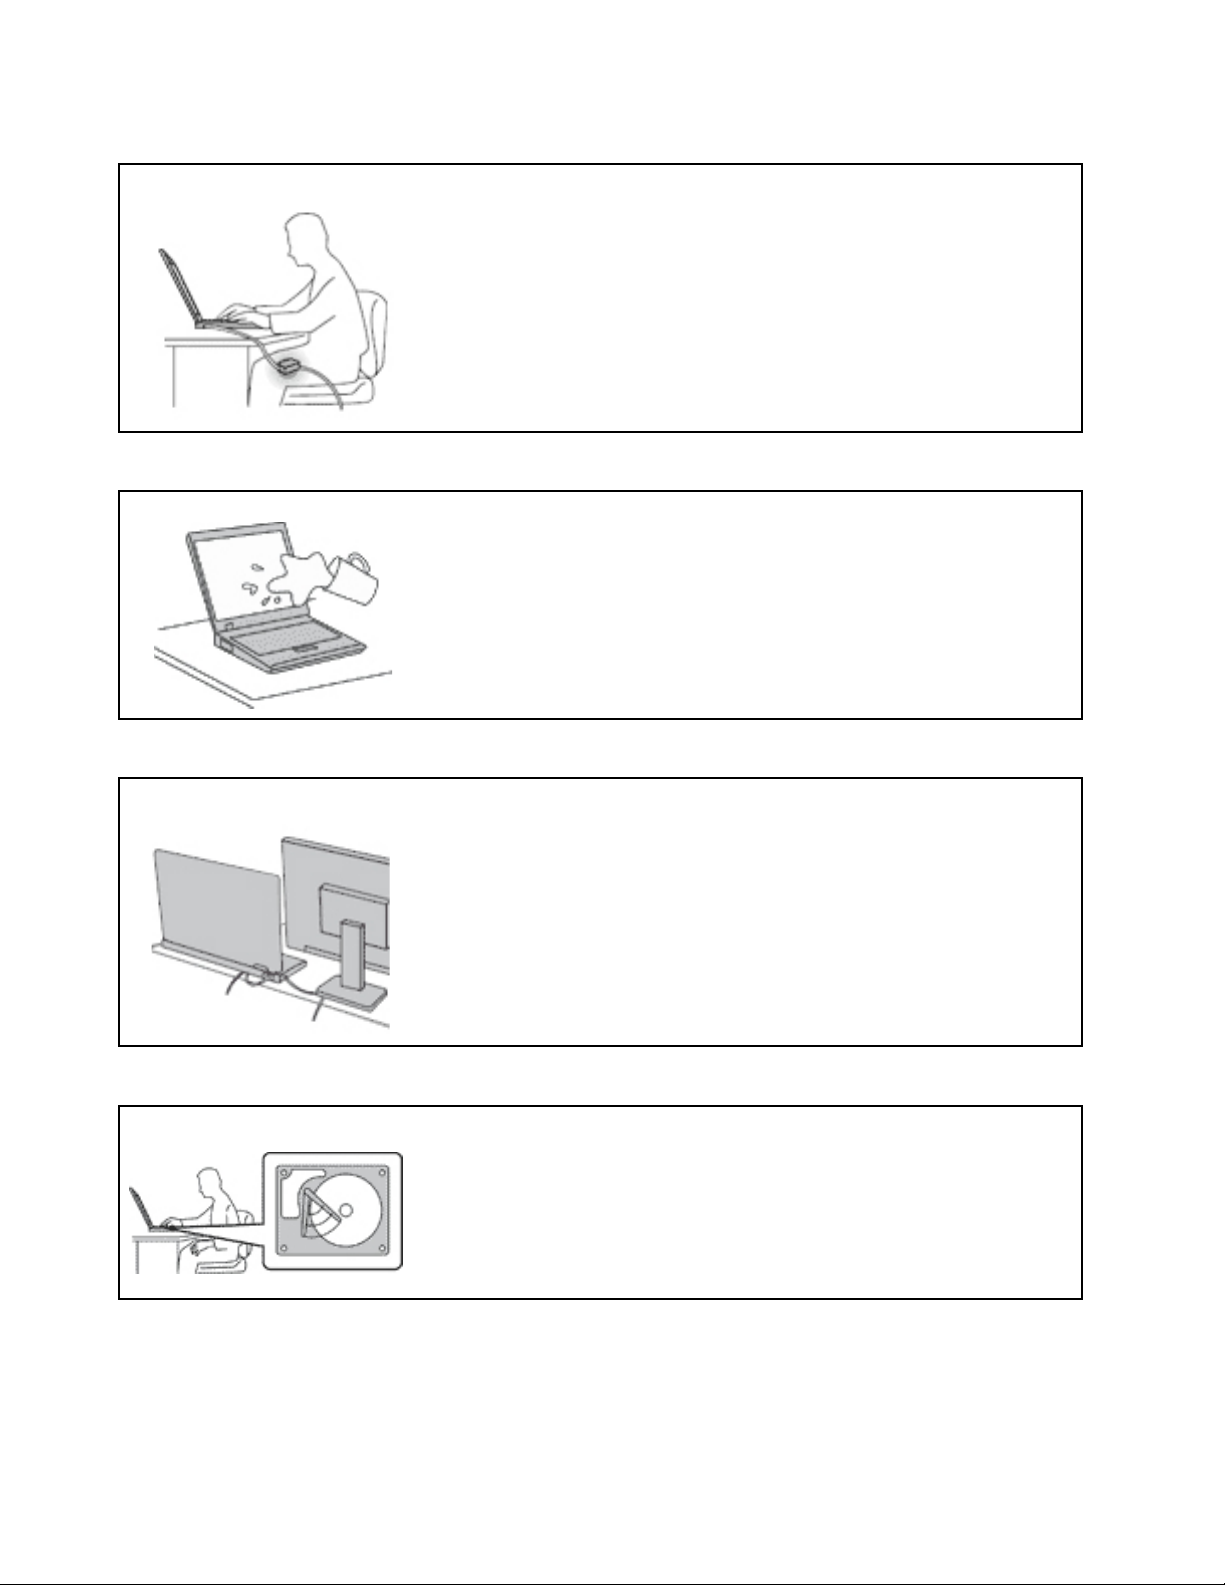
Prevent your computer from getting wet.
To avoid spills and the danger of electrical shock, keep liquids away from your
computer.
Protect the cables from being damaged.
Applying strong force to cables may damage or break them.
Route communication lines, or the cables of an ac power adapter, a mouse, a
keyboard, a printer, or any other electronic device, so that they cannot be
walked on, tripped over, pinched by your computer or other objects, or in any
way subject to treatment that could interfere with the operation of your
computer.
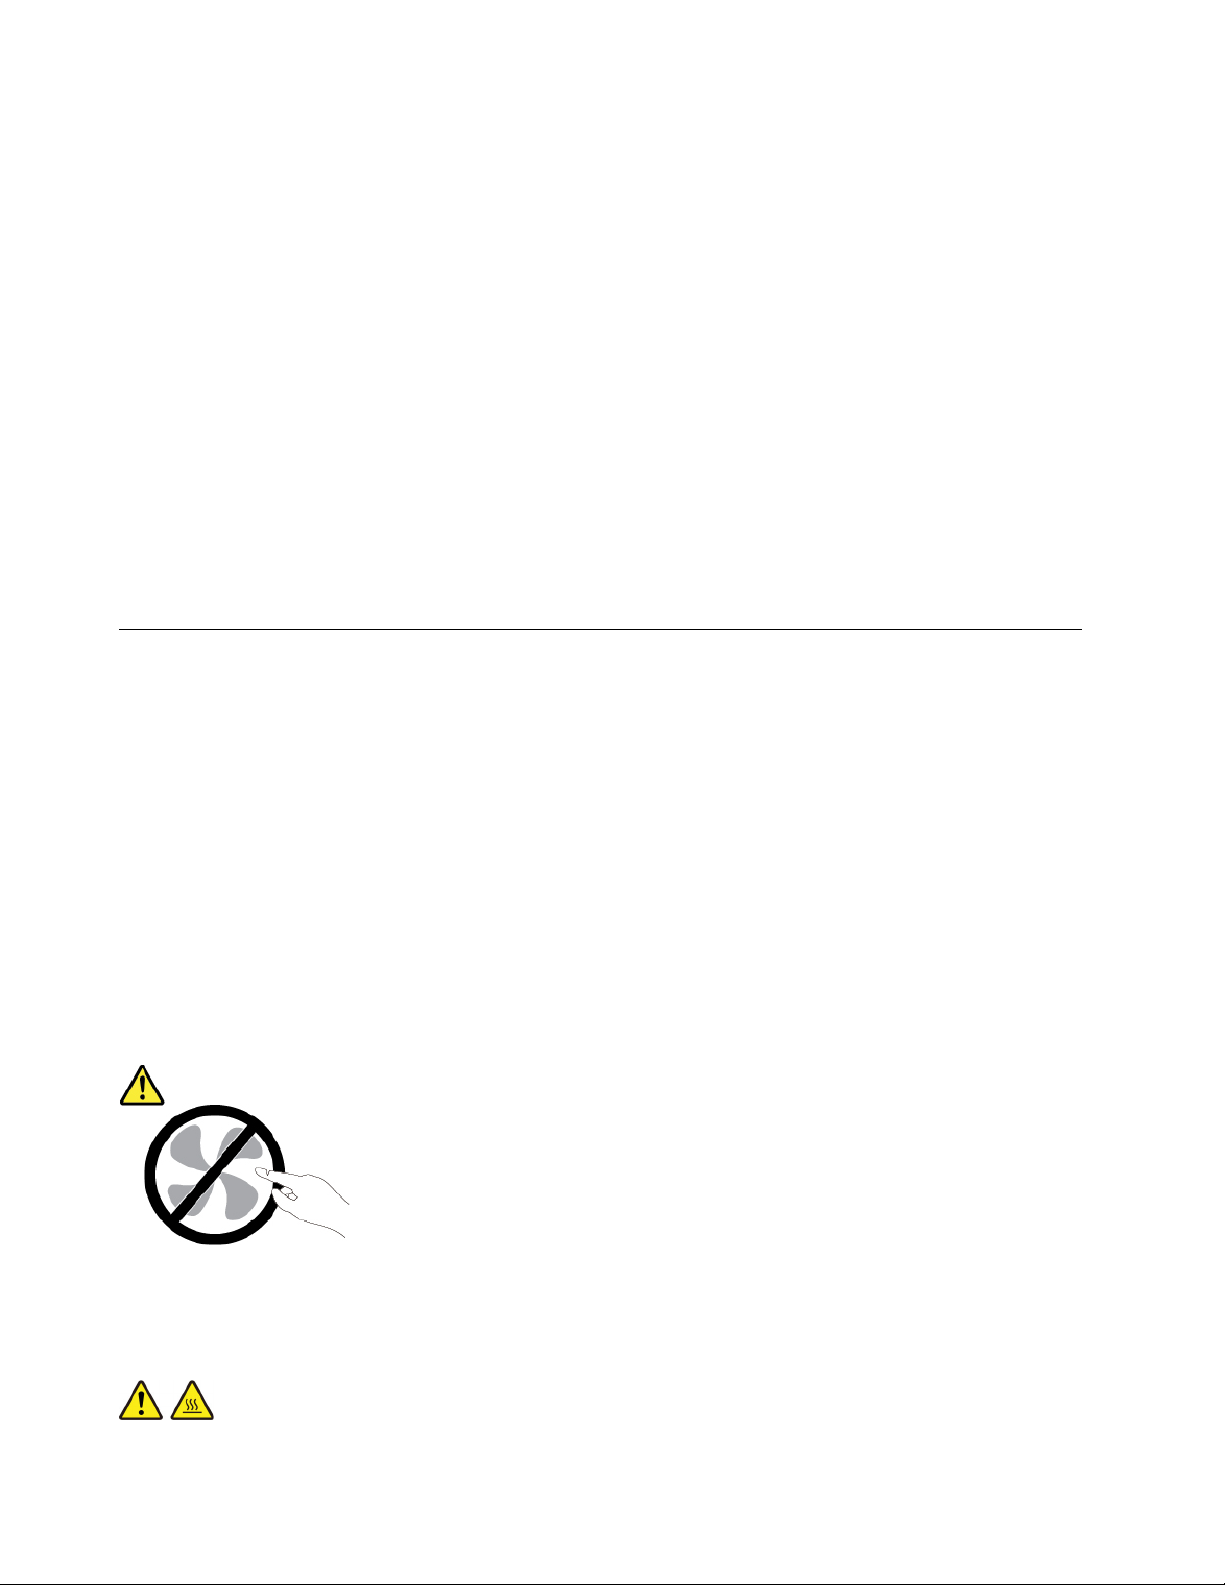
Protect your computer and data when moving it.
Before moving a computer equipped with a hard disk drive, do one of the
following:
• Turn it off.
• Put it in sleep mode.
• Put it in hibernation mode.
This helps to prevent damage to the computer, and possible loss of data.
iv ThinkPad 11e Chromebook 4th Gen and ThinkPad Yoga 11e Chromebook 4th Gen User Guide

Handle your computer gently.
Carry your computer carefully.
Do not drop, bump, scratch, twist, hit, vibrate, push, or place heavy objects on
your computer, display, or external devices.
• Use a quality carrying case that provides adequate cushioning and protection.
• Do not pack your computer in a tightly packed suitcase or bag.
• Before putting your computer in a carrying case, make sure that it is off, in sleep
mode, or in hibernation mode. Do not put a computer in a carrying case while it is
turned on.
Умови, що потребують негайних дій
Продукти можуть отримати пошкодження внаслідок неналежного або недбалого використання.
Деякі пошкодження можуть бути достатньо серйозними. Тому потрібно припинити
використовувати продукт і передати його в авторизований сервіс-центр для огляду та ремонту
(за необхідності).
Будьте особливо уважні, коли продукт увімкнуто, як і з будь-яким іншим електронним
пристроєм. Рідко ви можете відчути запах диму або побачити, як із вентиляційного отвору
виходить дим або іскри. Крім того, ви можете почути хлопання, тріскотіння або шипіння. Такі
ознаки можуть указувати на те, що сталася контрольована та безпечна відмова електронної
деталі продукту. Але вони можуть указувати й на загрозу безпеки. Не ігноруйте їх і не
намагайтесь оцінити стан продукту самостійно. Зверніться до Центру підтримки клієнтів по
інструкції щодо подальших дій. Номери телефону центрів обслуговування та підтримки див. на
цій веб-сторінці:
http://www.lenovo.com/support/phone
Регулярно оглядайте комп'ютер і його компоненти на ознаки пошкодження, зношення або
небезпеки. Якщо ви не впевнені в стані компонента, не використовуйте продукт. Зверніться до
Центру підтримки клієнтів або до виробника, щоб отримати інструкції щодо обстеження та
ремонту продукту (за необхідності).
Якщо раптом ви помітите будь-яку з наведених нижче ознак або якщо ви не впевнені в
безпечності продукту, припиніть користуватися ним і відключіть його від джерела живлення й
© Copyright Lenovo 2017 v
телекомунікаційних ліній. Після цього зверніться до Центру підтримки клієнтів по інструкції
щодо подальших дій.
• Шнур живлення, штекер, адаптер живлення, подовжувач, мережевий фільтр або блок живлення
має тріщину, зламаний або ушкоджений.
• Наявні ознаки перегріву, дим, іскри або вогонь.
• Акумулятор ушкоджено (наявні тріщини, вм'ятини або заломи), спостерігається викид із нього чи
відкладення на його контактах сторонніх речовин.
• Ви чуєте тріскотіння, шипіння або хлопання або відчуваєте сильний запах від продукту.
• Наявні ознаки того, що на комп'ютер, шнур або адаптер живлення було пролито рідину або впав
предмет.
• Комп'ютер, шнур або адаптер живлення піддавався впливу води.
• Продукт упав або був якимось чином пошкоджений.
• Продукт не працює належним чином, коли ви дотримуєтесь інструкцій з експлуатації.
Примітка: Якщо вказані вище ознаки спостерігаються з продуктом, виготовленим не компанією
Lenovo
зверніться до виробника по інструкції щодо подальших дій. Або замініть цей продукт на належний.
®
і не на її замовлення (наприклад, з подовжувачем), припиніть його використовувати та
Обслуговування та оновлення
Не намагайтеся проводити обслуговування продукту самостійно, за винятком ситуацій, коли це
доручає представник Центру підтримки клієнтів або коли цього вимагають наведені в документації
інструкції. Ремонтуйте продукт лише в сервіс-центрі, що має відповідну авторизацію.
Примітка: Деякі деталі комп'ютера користувач може оновлювати або замінювати самостійно.
Оновлення зазвичай називаються "допоміжними апаратними засобами". Деталі, які користувач може
замінити самостійно, називаються "компонентами, що замінюються користувачем" (CRU). Компанія
Lenovo надає документацію з інструкціями щодо встановлення клієнтом допоміжних апаратних
засобів або CRU. Під час заміни або встановлення деталей необхідно точно дотримуватись усіх
інструкцій. Якщо індикатор живлення не світиться, це не означає, що на деталях продукту немає
напруги. Перш ніж зняти захисні кришки з продукту, у який вставлено кабель живлення,
переконайтеся, що продукт вимкнуто та відключено від джерела живлення. Якщо у вас є запитання
або виникли проблеми, зверніться до Центру підтримки клієнтів.
У вашому комп'ютері немає рухомих деталей, окрім від'єднаного шнура живлення, проте вам усе одно
слід звернути увагу на зазначені нижче попередження.
Застереження:
Небезпечні рухомі деталі. Тримайте пальці та інші частини тіла подалі.
Застереження:
vi ThinkPad 11e Chromebook 4th Gen and ThinkPad Yoga 11e Chromebook 4th Gen User Guide
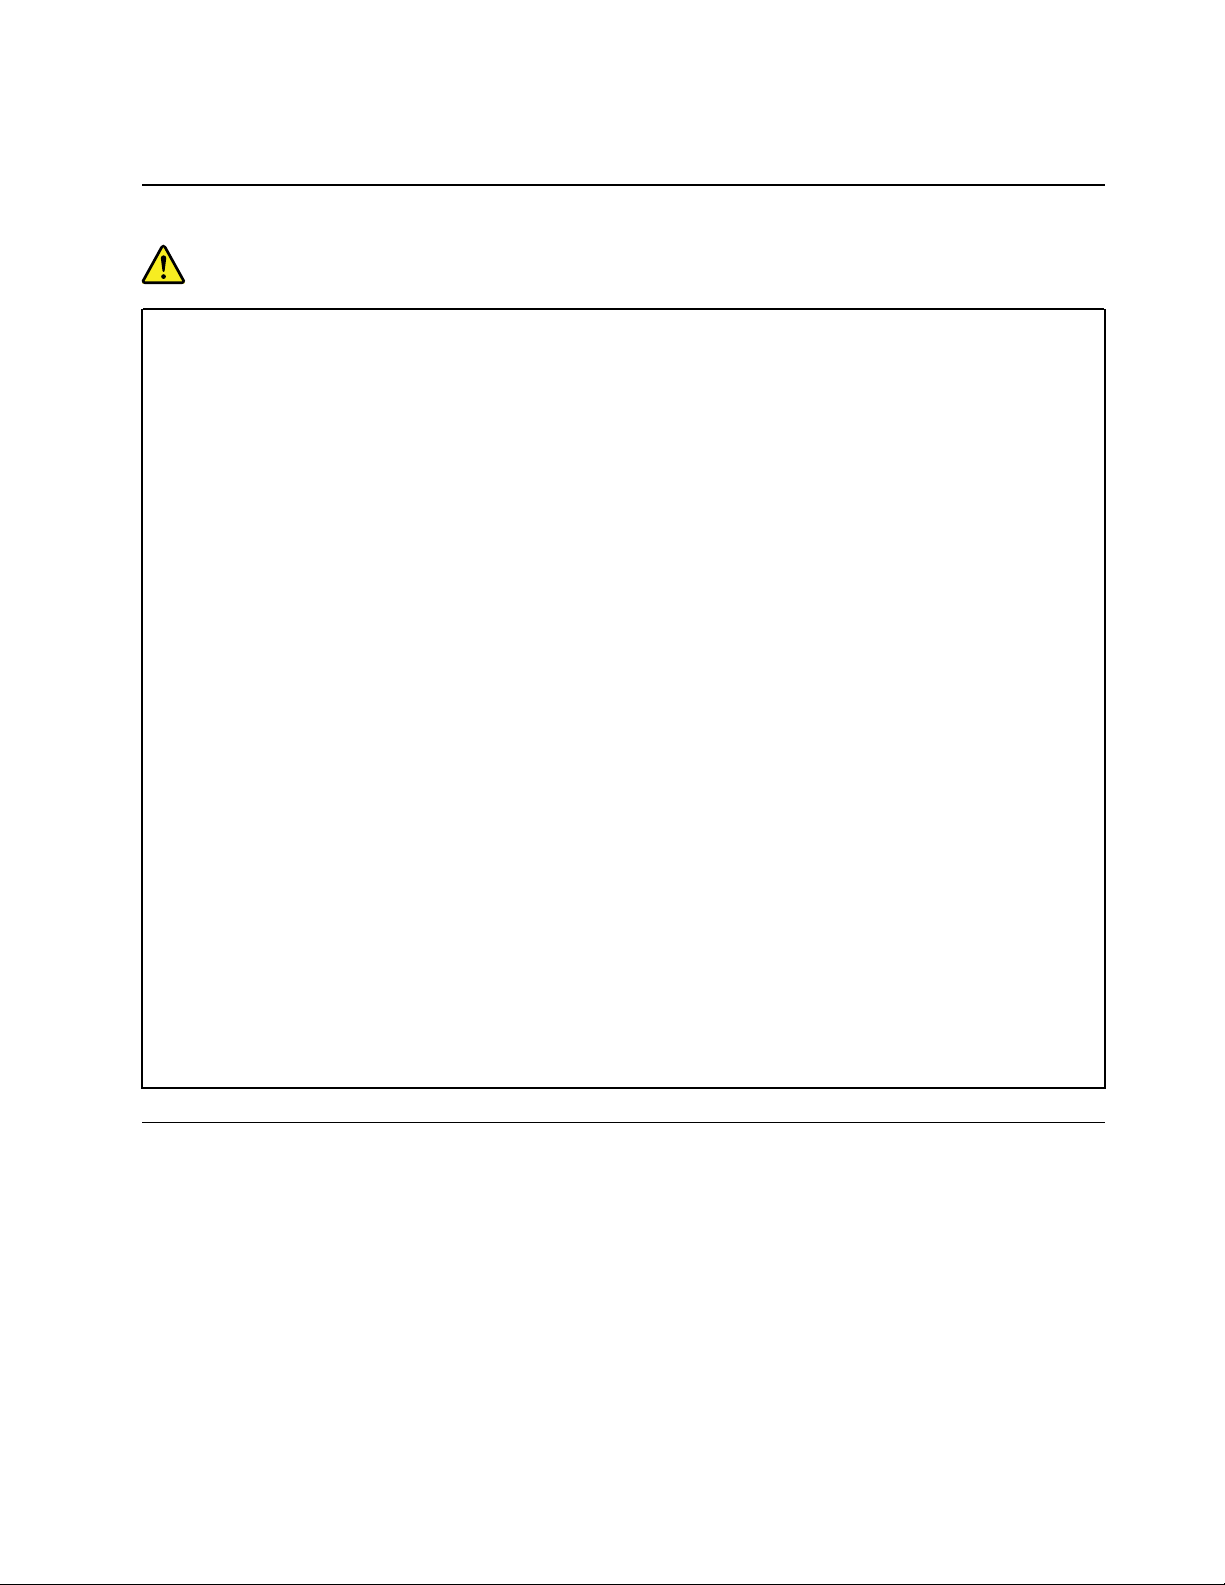
Перш ніж зняти кришку комп'ютера, вимкніть його та зачекайте кілька хвилин, доки він охолоне.
Шнури та адаптери живлення
НЕБЕЗПЕЧНО
Використовуйте лише надані виробником продукту шнури та адаптери живлення.
Шнури живлення повинні мати сертифікати безпеки. Для Німеччини це має бути кабель
H03VV-F, трижильний із площею перерізу 0,75 мм
країн слід використовувати сертифіковані в них кабелі.
Не накручуйте шнур живлення на адаптер живлення або інший предмет. Це може спричинити
механічне напруження, внаслідок якого він може протертися, тріснути або зламатися. Це, у
свою чергу, може становити загрозу безпеці.
Прокладіть шнури живлення так, щоб на них не наступили, не перечепилися через них і не
затиснули їх.
Захистіть шнури й адаптери живлення від потрапляння рідин. Наприклад, не залишайте шнур
або адаптер живлення поблизу раковини, ванни, туалету чи на підлозі, вимитій рідким миючим
засобом. Якщо рідина потрапить на шнур або адаптер живлення, може статися коротке
замикання, особливо якщо шнур або адаптер використовували неналежним чином. Крім того,
потрапляння рідини може з часом спричинити корозію контактів шнура живлення та/або
роз'ємів адаптера живлення, що, у свою чергу, може спричинити їх перегрівання.
Слідкуйте за тим, щоб усі штекери кабелю надійно та щільно входили до призначених для них
роз'ємів.
Не використовуйте адаптер живлення, якщо контакти вхідного роз'єму змінного струму мають
ознаки корозії або якщо поблизу цих контактів чи будь-де ще на адаптері наявні ознаки
перегріву (наприклад, деформовано пластик).
2
або з кращими параметрами. Для інших
Не використовуйте шнур живлення, якщо будь-які з його електричних контактів мають ознаки
корозії чи перегріву або якщо шнур живлення має будь-які ознаки ушкодження.
Щоб запобігти перегріванню, не накривайте тканиною підключений до електричної розетки
адаптер живлення та не кладіть на нього жодних предметів.
Подовжувачі та пов'язані пристрої
Переконайтеся, що номінальні параметри подовжувачів, мережевих фільтрів і джерел безперебійного
живлення, які ви використовуєте, відповідають вимогам вашого продукту до електроживлення. Не
перенавантажуйте ці пристрої. Якщо ви використовуєте подовжувач, навантаження на нього не має
перевищувати номінальну вхідну потужність. Якщо у вас є запитання щодо навантаження, вимог до
електроживлення та номінальної вхідної потужності, зверніться до електрика.
© Copyright Lenovo 2017 vii
Штекери та розетки
НЕБЕЗПЕЧНО
Якщо розетка має ознаки пошкодження чи корозії, не використовуйте її та зверніться до
кваліфікованого електрика.
Не згинайте штекер і не замінюйте його деталі. Якщо штекер ушкоджено, зверніться по заміну
до виробника.
Не підключайте комп'ютер до розетки, до якої вже підключено побутові або промислові
прилади, що споживають значну кількість електроенергії, оскільки спричинені ними перепади
напруги можуть пошкодити комп'ютер, дані на ньому або підключені до нього пристрої.
Деякі продукти мають штекер із трьома контактами. Такий штекер можна підключати лише до
заземленої розетки. Він допомагає захистити ваш продукт. Не підключайте такий штекер до
незаземленої розетки. Якщо ви не можете вставити штекер у розетку, зверніться до
електрика, щоб отримати відповідний адаптер або щоб замінити розетку на заземлену. Не
перенавантажуйте електричну розетку. Загальне навантаження на систему не має
перевищувати 80 % номінальної потужності електромережі. Якщо у вас є запитання щодо
навантаження та номінальної потужності мережі, зверніться до електрика.
Переконайтеся, що розетка, яку ви використовуєте, встановлена належним чином, легко
доступна та розташована поблизу обладнання. Не розтягуйте шнури живлення повністю, щоб
не спричиняти механічне напруження.
Переконайтеся, що напруга й сила струму в розетці підходять для вашого продукту.
Підключаючи обладнання до електромережі та відключаючи його, будьте обережні.
Заява про блок живлення
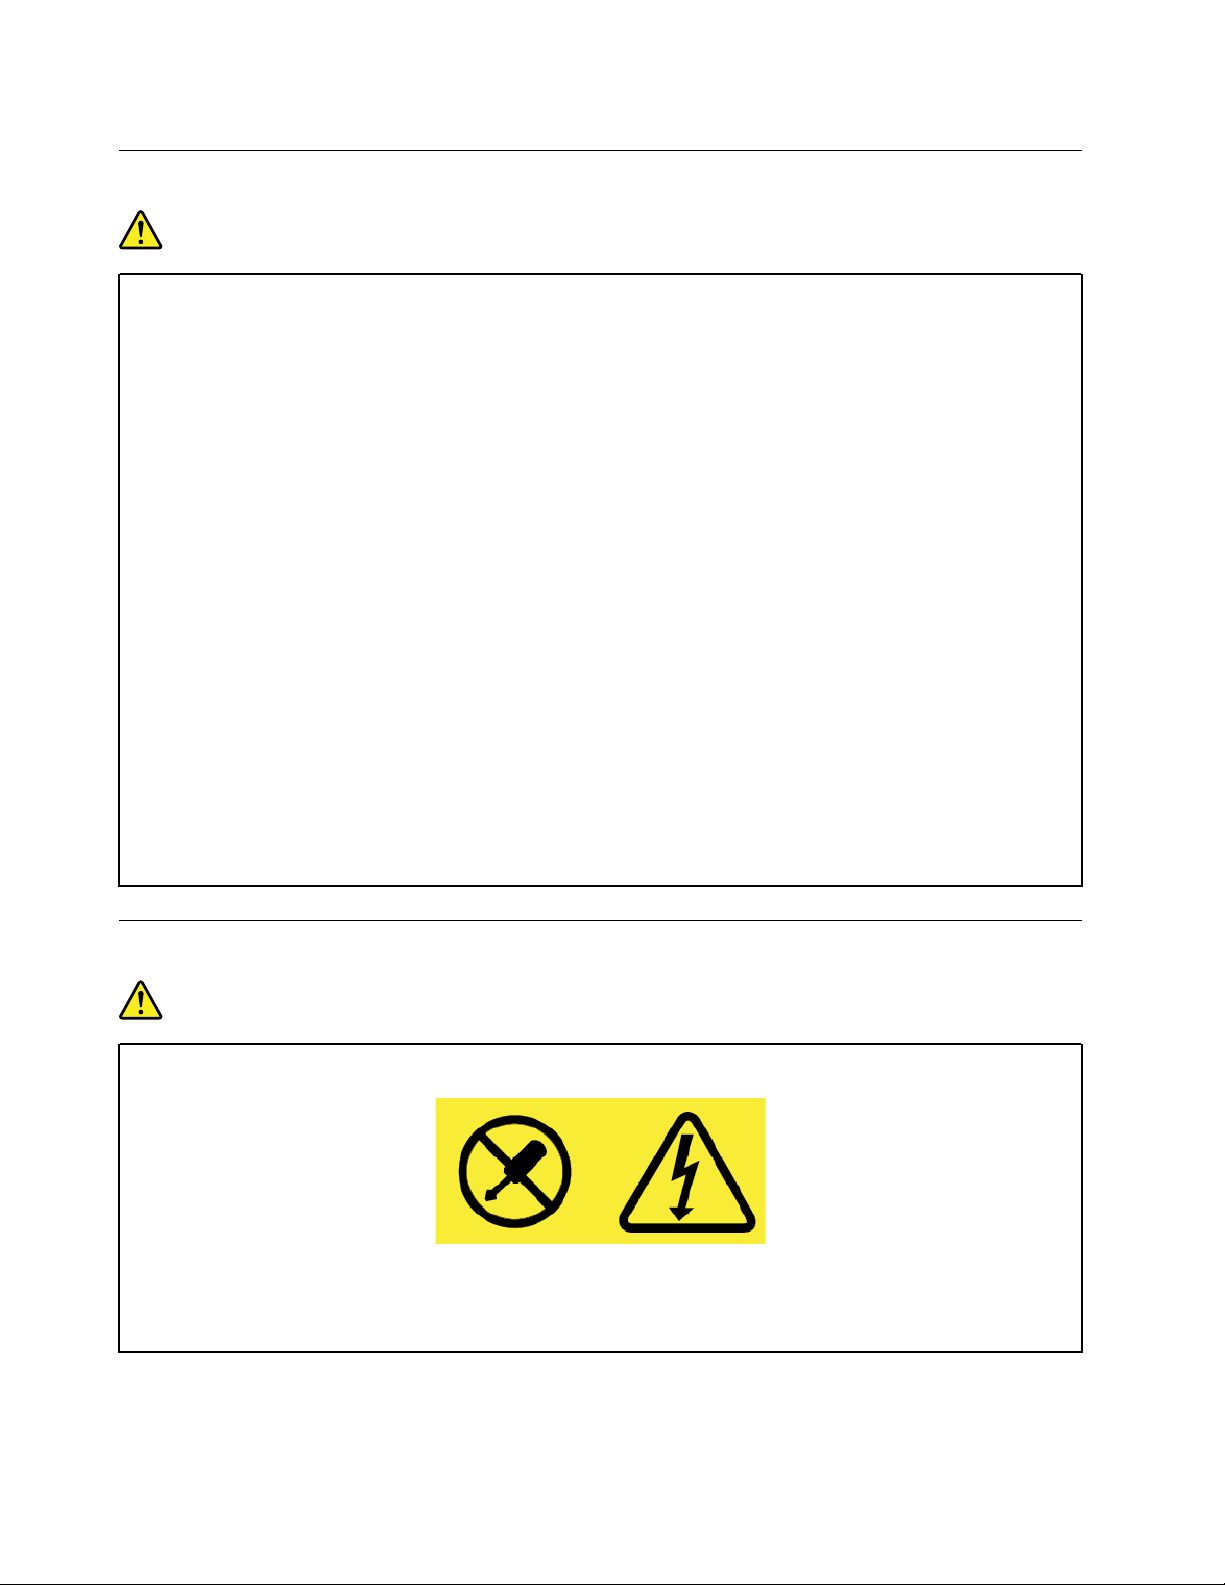
НЕБЕЗПЕЧНО
Не знімайте кришку блока живлення та будь-яких деталей із показаною нижче етикеткою.
Усередині деталі, позначеної цією етикеткою, спостерігається небезпечна напруга чи сила
струму. Усередині цих компонентів немає деталей, що підлягають обслуговуванню. Якщо ви
вважаєте, що з однією з цих деталей виникли проблеми, зверніться до сервіс-центру.
viii
ThinkPad 11e Chromebook 4th Gen and ThinkPad Yoga 11e Chromebook 4th Gen User Guide
Зовнішні пристрої
Застереження:
Коли комп'ютер увімкнуто, не підключайте до нього та не відключайте від нього кабелі
зовнішніх пристроїв, окрім кабелів USB та IEEE 1394. Інакше комп'ютер може бути пошкоджено.
Після завершення роботи комп'ютера зачекайте принаймні 5 секунд, перш ніж відключати
зовнішні пристрої, щоб уникнути їх пошкодження.
Загальні зауваження щодо елементів живлення
НЕБЕЗПЕЧНО
Акумулятори, що постачаються компанією Lenovo для використання з вашим продуктом,
перевірені на сумісність, і замінювати їх слід на такі самі або інші, схвалені Lenovo. Якщо
використовувався акумулятор, який не входить у рекомендований список Lenovo, якщо
акумулятор розбирався або замінювалися його внутрішні елементи, тоді гарантія
скасовується.
Неналежне поводження з акумулятором може призвести до його перегріву, витікання з нього
рідини або вибуху. Щоб уникнути можливого поранення, дотримуйтеся наведених нижче
порад.
• Не розкривайте, не розбирайте та не обслуговуйте акумулятор.
• Не стискайте й не проколюйте акумулятор.
• Не припускайте короткого замикання акумулятора та його контакту з водою або іншими
рідинами.
• Тримайте акумулятор у недоступному для дітей місці.
• Тримайте акумулятор подалі від вогню.
Якщо акумулятор пошкоджено, спостерігається викид чи відкладення на його контактах
сторонніх речовин, негайно припиніть користуватися ним.
Зберігайте перезаряджувані акумулятори та продукти, що їх містять, при кімнатній
температурі зарядженими приблизно на 30–50 %. Рекомендується заряджати акумулятор
приблизно раз на рік, щоб запобігти його глибокому розрядженню.
Не викидайте акумулятор у кошик для сміття, яке утилізується на полігонах загального
призначення. Утилізуйте акумулятор згідно з місцевими правилами та нормативами.
© Copyright Lenovo 2017 ix
Зауваження щодо вбудованого перезаряджуваного акумулятора
НЕБЕЗПЕЧНО
Не намагайтеся самостійно видалити або замінити вбудований акумулятор. Її заміна має
виконуватися в авторизованих сервіс-центрах Lenovo.
Заряджайте акумулятор лише відповідно до інструкцій, що постачаються разом із продуктом.
Авторизовані сервіс-центри Lenovo утилізують акумулятори Lenovo відповідно до місцевого
законодавства та нормативних вимог.
x
ThinkPad 11e Chromebook 4th Gen and ThinkPad Yoga 11e Chromebook 4th Gen User Guide
Виділення тепла та вентиляція продукту
НЕБЕЗПЕЧНО
Комп'ютери, адаптери живлення змінного струму та більшість аксесуарів виділяють тепло,
коли їх увімкнуто або під час заряджання акумулятора. Ноутбуки можуть виділяти значну
кількість тепла через їх компактні розміри. Завжди дотримуйтеся наведених нижче основних
застережних заходів.
• Коли комп'ютер увімкнуто або акумулятор заряджається, нижня частина комп'ютера,
опора для долонь і деякі інші частини можуть нагріватися. Уникайте тривалого контакту
рук, колін та інших частин тіла з гарячими частинами комп'ютера. Використовуючи
клавіатуру, не тримайте долоні на опорі протягом тривалого часу. Під час роботи у
звичайному режимі комп'ютер виділяє певну кількість тепла, що залежить від активності
системи та рівня заряду акумулятора. Тривалий контакт із тілом, навіть крізь одяг, може
спричиняти дискомфорт або навіть призвести до опіків шкіри. Час від часу прибирайте руки
з опори для долонь. Намагайтеся не використовувати клавіатуру протягом тривалого часу
без перерви.
• Не використовуйте комп'ютер і не заряджайте акумулятор поблизу займистих матеріалів
або у вибухонебезпечному середовищі.
• Задля безпечної, зручної та надійної роботи продукт має вентиляційні отвори, вентилятори
та/або тепловідводи. Їх можна випадково закрити, якщо поставити продукт на ліжко, диван,
килим або іншу м'яку поверхню. Не закривайте й не блокуйте вентиляційні отвори,
вентилятори та/або тепловідводи.
• Коли адаптер змінного струму підключено до розетки та комп'ютера, він виділяє тепло.
Використовуючи адаптер змінного струму, уникайте його контакту з тілом. Не
використовуйте адаптер змінного струму, щоб зігрітися. Тривалий контакт із тілом, навіть
крізь одяг, може призвести до опіків шкіри.
Задля вашої безпеки завжди дотримуйтеся наведених нижче основних застережних заходів.
• Не відкривайте кришку комп'ютера, коли його підключено до електромережі.
• Регулярно перевіряйте, чи не накопичився пил на зовнішніх поверхнях комп'ютера.
• Видаляйте пил із вентиляційних отворів і отворів на передній панелі. Комп'ютери, що
використовуються в пильних місцях або місцях з інтенсивним дорожнім рухом, слід
очищувати частіше.
• Не закривайте вентиляційні отвори.
• Не залишайте комп'ютер, що працює, на м'яких меблях, оскільки це може призвести до
перегріву.
• Температура повітря на вході в комп'ютер не має перевищувати 35 °C.
© Copyright Lenovo 2017 xi
Техніка безпеки під час роботи з електричним струмом
НЕБЕЗПЕЧНО
Електричний струм, що подається на шнур живлення, телефонний або комунікаційний кабель,
небезпечний.
Щоб уникнути ураження електричним струмом, дотримуйтеся вказівок нижче.
• Не використовуйте продукт під час грози.
• Не приєднуйте до продукту та не від'єднуйте від нього кабелі, не виконуйте встановлення,
обслуговування або повторне налаштування під час грози.
• Підключайте кабелі живлення до правильно встановленої та заземленої розетки.
• Обладнання, що буде приєднано до продукту, підключайте до правильно встановлених
розеток.
• Коли можливо, приєднуйте сигнальні кабелі до продукту та від'єднуйте їх від нього однією
рукою.
• Не вмикайте обладнання, якщо воно має ознаки впливу вогню, води або структурних
ушкоджень.
• Якщо в процедурах зі встановлення та налаштування не вказано інше, від'єднайте
підключені шнури живлення, акумулятор і всі кабелі, перш ніж відкривати кришку
пристрою.
• Не використовуйте комп'ютер, доки всі внутрішні деталі не будуть зафіксовані на місці, а
їхні корпуси не будуть закриті. Не використовуйте комп'ютер, якщо його внутрішні деталі та
схеми відкриті та не захищені від стороннього впливу.
НЕБЕЗПЕЧНО
Установлюючи, переміщуючи або відкриваючи кришки цього продукту або підключених до
нього пристроїв, приєднуйте та від'єднуйте кабелі, як описано в процедурах нижче.
Підключення
1. Вимкніть усі пристрої.
2. Приєднайте до пристроїв усі кабелі.
3. Вставте сигнальні кабелі у відповідні роз'єми.
4. Вставте шнури живлення в розетки.
5. Увімкніть пристрої.
Відключення
1. Вимкніть усі пристрої.
2. Вийміть шнури живлення з розеток.
3. Вийміть сигнальні кабелі з роз'ємів.
4. Від'єднайте від пристроїв усі кабелі.
Перш ніж приєднувати до комп'ютера електричні кабелі, необхідно вийняти шнур живлення з розетки.
Шнур живлення можна буде знову вставити в розетку тільки після того, як до комп'ютера буде
приєднано всі інші електричні кабелі.
xii
ThinkPad 11e Chromebook 4th Gen and ThinkPad Yoga 11e Chromebook 4th Gen User Guide
НЕБЕЗПЕЧНО
Не виконуйте заміну, не вставляйте в телефонну розетку кабель і не виймайте його з неї під
час грози.
Зауваження щодо РК-дисплея
Застереження:
РК-дисплей виготовлений зі скла, тому він може розбитися, якщо з комп'ютером необережно
поводитись або якщо комп'ютер впаде. Якщо РК-дисплей розіб'ється та рідина з нього
потрапить в очі або на руки, негайно промийте їх водою протягом не менш ніж 15 хвилин. Якщо
після промивання ви відчуєте будь-які незручності, зверніться до лікаря.
Примітка: Якщо в продукті, наприклад в РК-дисплеї, використовується люмінесцентна лампа, що
містить ртуть (до таких не належать світлодіодні лампи), утилізуйте цей продукт відповідно до вимог
місцевих, державних і федеральних законів.
Використання навушників
Застереження:
Надмірний звуковий тиск із навушників може спричинити втрату слуху. Встановлення значень
еквалайзера на максимальний рівень збільшує потужність на виході навушників і гарнітури та,
відповідно, рівень звукового тиску. Тому слід встановлювати належний рівень гучності, щоб не
ушкодити слух.
Надмірне використання навушників упродовж тривалого періоду з гучним звуком може становити
загрозу, якщо вихідний сигнал роз'ємів для навушників не відповідає специфікаціям стандарту
EN 50332-2. Вихідний сигнал роз'єму для навушників на цьому комп'ютері відповідає пункту 7
стандарту EN 50332-2. Ця специфікація обмежує максимальну напругу вихідного сигналу широкого
діапазону справжнім середньоквадратичним значенням 150 мВ. Задля додаткового захисту проти
погіршення слуху переконайтеся, що використовувані навушники також відповідають стандарту EN
50332-2 (граничні значення пункту 7) стосовно характеристики напруги широкого діапазону 75 мВ.
Використання навушників, які не відповідають стандарту EN 50332-2, може становити загрозу через
надмірний рівень звукового тиску.
Якщо до комплекту постачання комп'ютера Lenovo входять навушники, у поєднанні з цим
комп'ютером вони відповідають специфікаціям стандарту EN 50332-1. Якщо використовуються інші
навушники, переконайтеся, що вони відповідають стандарту EN 50332-1 (пункт 6.5 "Обмежувальні
значення"). Використання навушників, які не відповідають стандарту EN 50332-1, може становити
загрозу через надмірний рівень звукового тиску.
Зауваження щодо дрібних деталей
ОБЕРЕЖНО! ДРІБНІ ДЕТАЛІ. Продукт містить дрібні деталі.
Тримайте його подалі від дітей у віці до 3 років.
© Copyright Lenovo 2017 xiii

Зауваження щодо пластикових пакетів
НЕБЕЗПЕЧНО
Пластикові пакети можуть становити загрозу. Тримайте пластикові пакети подалі від
немовлят і дітей, щоб уникнути небезпеки задушення.
Зауваження щодо скляних деталей
Застереження:
Ваш продукт може містити скляні деталі. Вони можуть розбитися, якщо продукт впаде на
жорстку поверхню або отримає сильний удар. Якщо скляна деталь розбилася, не торкайтеся її
та не намагайтеся вийняти. Припиніть використовувати продукт, доки скляну деталь не замінить
кваліфікований спеціаліст сервіс-центру.
xiv
ThinkPad 11e Chromebook 4th Gen and ThinkPad Yoga 11e Chromebook 4th Gen User Guide
Глава 1. Огляд продукту
У цьому розділі наведено основну інформацію, яка допоможе вам ознайомитися з комп'ютером.
Елементи керування, роз'єми та індикатори комп'ютера
У цьому розділі описано функції апаратного забезпечення комп'ютера.
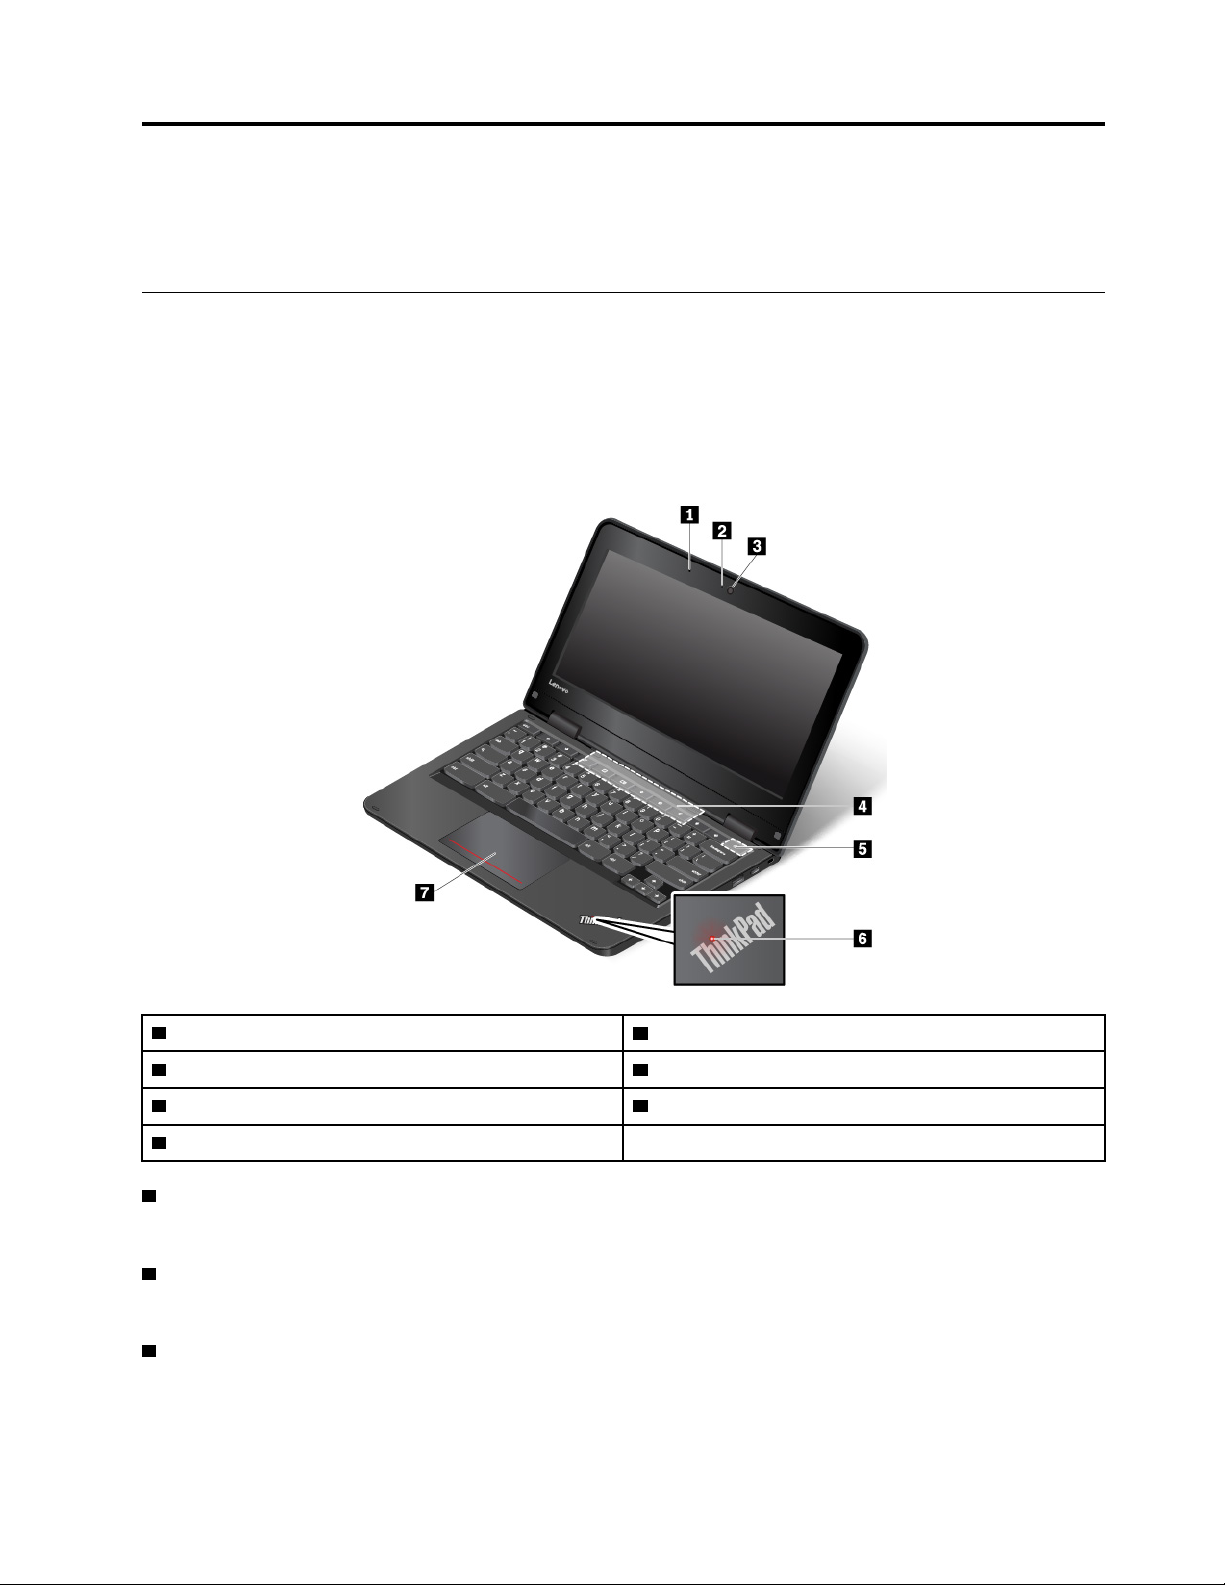
Front view
ThinkPad 11e Chromebook 4th Gen
1 Microphone
3 Camera 4 Speakers
5 Power key
7 Touch pad
1 Microphone
2 Camera status indicator
6 System status indicator
The microphone captures sound and voice when used with a program capable of handling audio.
2 Camera status indicator
When this indicator is on, the camera is in use.
3 Camera
The camera enables you to take pictures or hold a video conference. For more information, see "Using the
camera" на сторінці 27.The multi-touch screen enables you to use your computer with simple touch
gestures. For more information, see "Using the multi-touch screen" на сторінці 18.
© Copyright Lenovo 2017 1
4 Speakers
Your computer is equipped with a pair of stereo speakers.
5 Power key
Press the power key to turn on the computer.
To turn off the computer, do the following:
• If you are not logged in to the operating system, click the power icon
in the lower-left corner of the
screen.
• If you are logged in to the operating system, click the status area in the lower-right corner of the screen,
and then click the power icon
.
If the computer stops responding, press and hold the power key for about eight seconds to turn off the
computer. If the computer still does not respond, press the refresh key
and the power key at the
same time to turn off the computer.
6 System status indicator
The illuminated dot on the ThinkPad logo functions as a system status indicator.
7 Touch pad
Your computer is equipped with a touch pad. The touch pad enables you to move the pointer and perform
click actions, without the use of a conventional mouse.
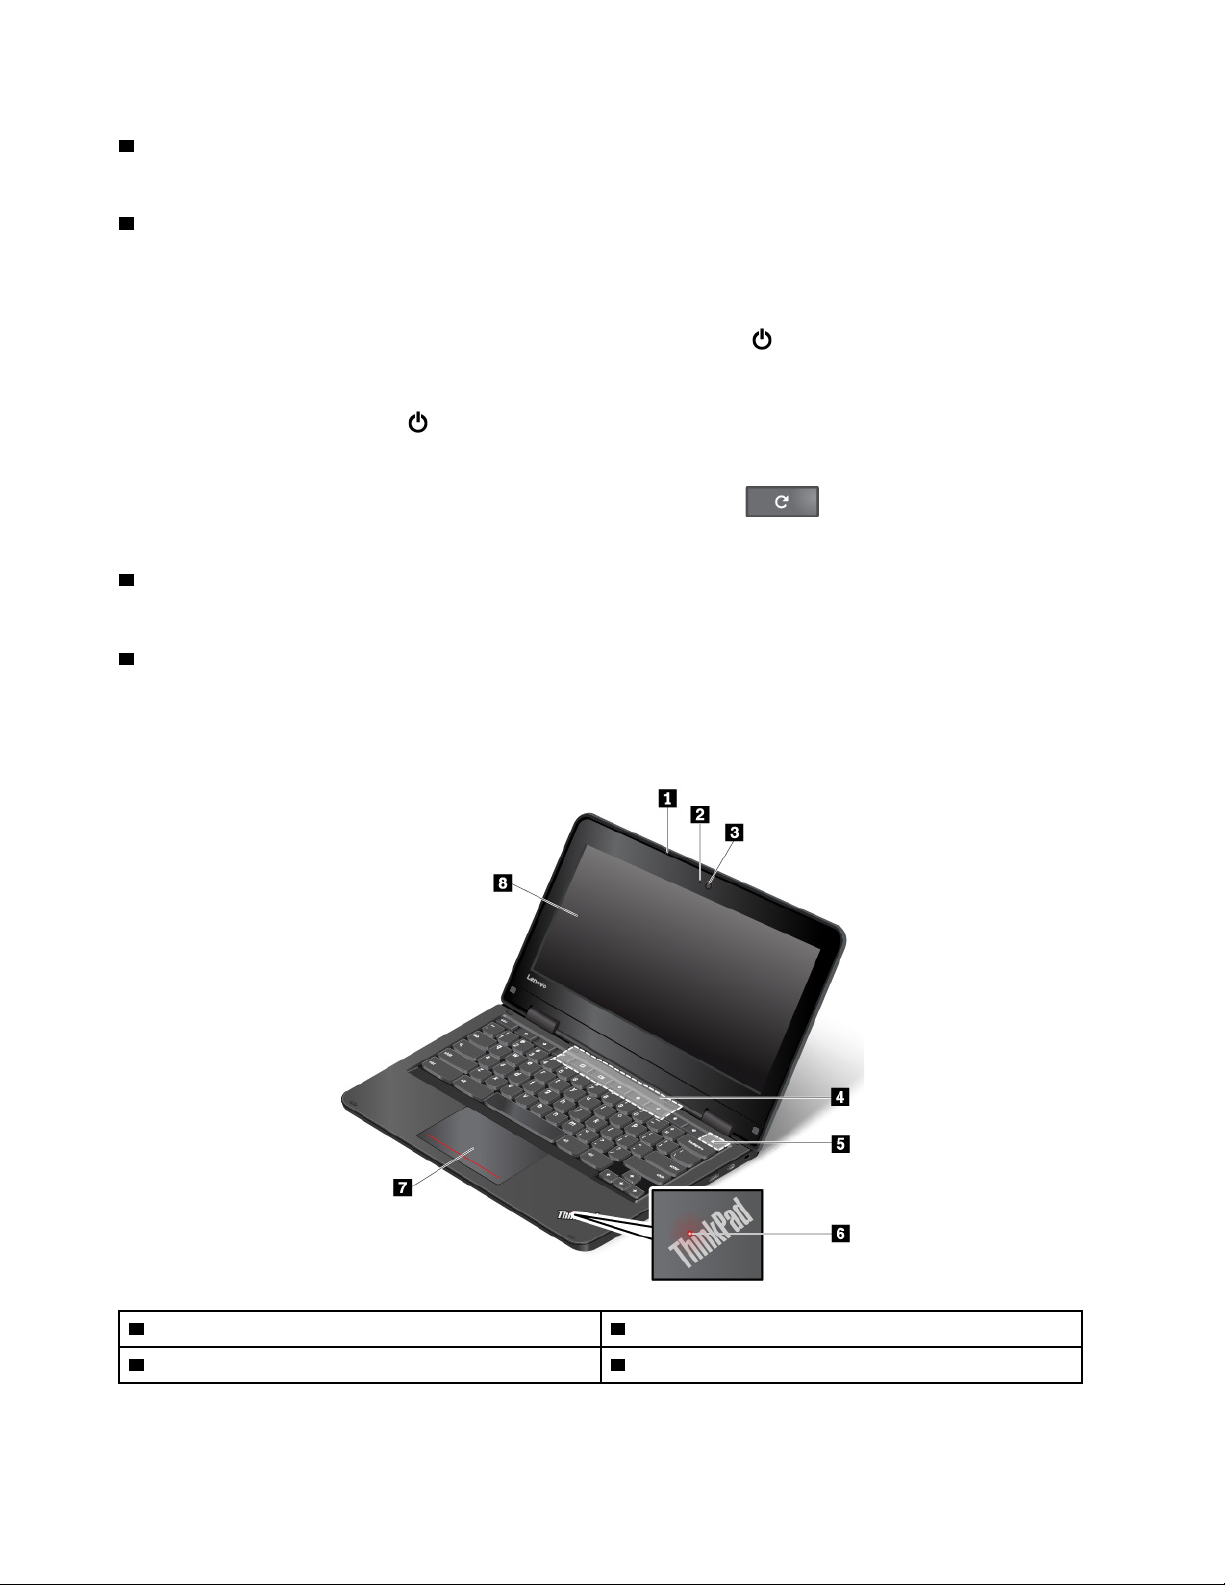
ThinkPad Yoga 11e Chromebook 4th Gen
1 Microphone
3 Camera 4 Speakers
2 Camera status indicator
2 ThinkPad 11e Chromebook 4th Gen and ThinkPad Yoga 11e Chromebook 4th Gen User Guide
5 Power key
7 Trackpad 8 Multi-touch screen
1 Microphone
6 System status indicator
The microphone captures sound and voice when used with a program capable of handling audio.
2 Camera status indicator
When this indicator is on, the camera is in use.
3 Camera
The camera enables you to take pictures or hold a video conference. For more information, see "Using the
camera" на сторінці 27.The multi-touch screen enables you to use your computer with simple touch
gestures. For more information, see "Using the multi-touch screen" на сторінці 18.
4 Speakers
Your computer is equipped with a pair of stereo speakers.
5 Power key
Press the power key to turn on the computer.
To turn off the computer, do the following:
• If you are not logged in to the operating system, click the power icon
in the lower-left corner of the
screen.
• If you are logged in to the operating system, click the status area in the lower-right corner of the screen,
and then click the power icon
.
If the computer stops responding, press and hold the power key for about eight seconds to turn off the
computer. If the computer still does not respond, press the refresh key
and the power key at the
same time to turn off the computer.
6 System status indicator
The illuminated dot on the ThinkPad logo functions as a system status indicator.
7 Touch pad
Your computer is equipped with a touch pad. The touch pad enables you to move the pointer and perform
click actions, without the use of a conventional mouse.
8 Multi-touch screen
The multi-touch screen enables you to use your computer with simple touch gestures. For more information,
see "Using the multi-touch screen" на сторінці 18.
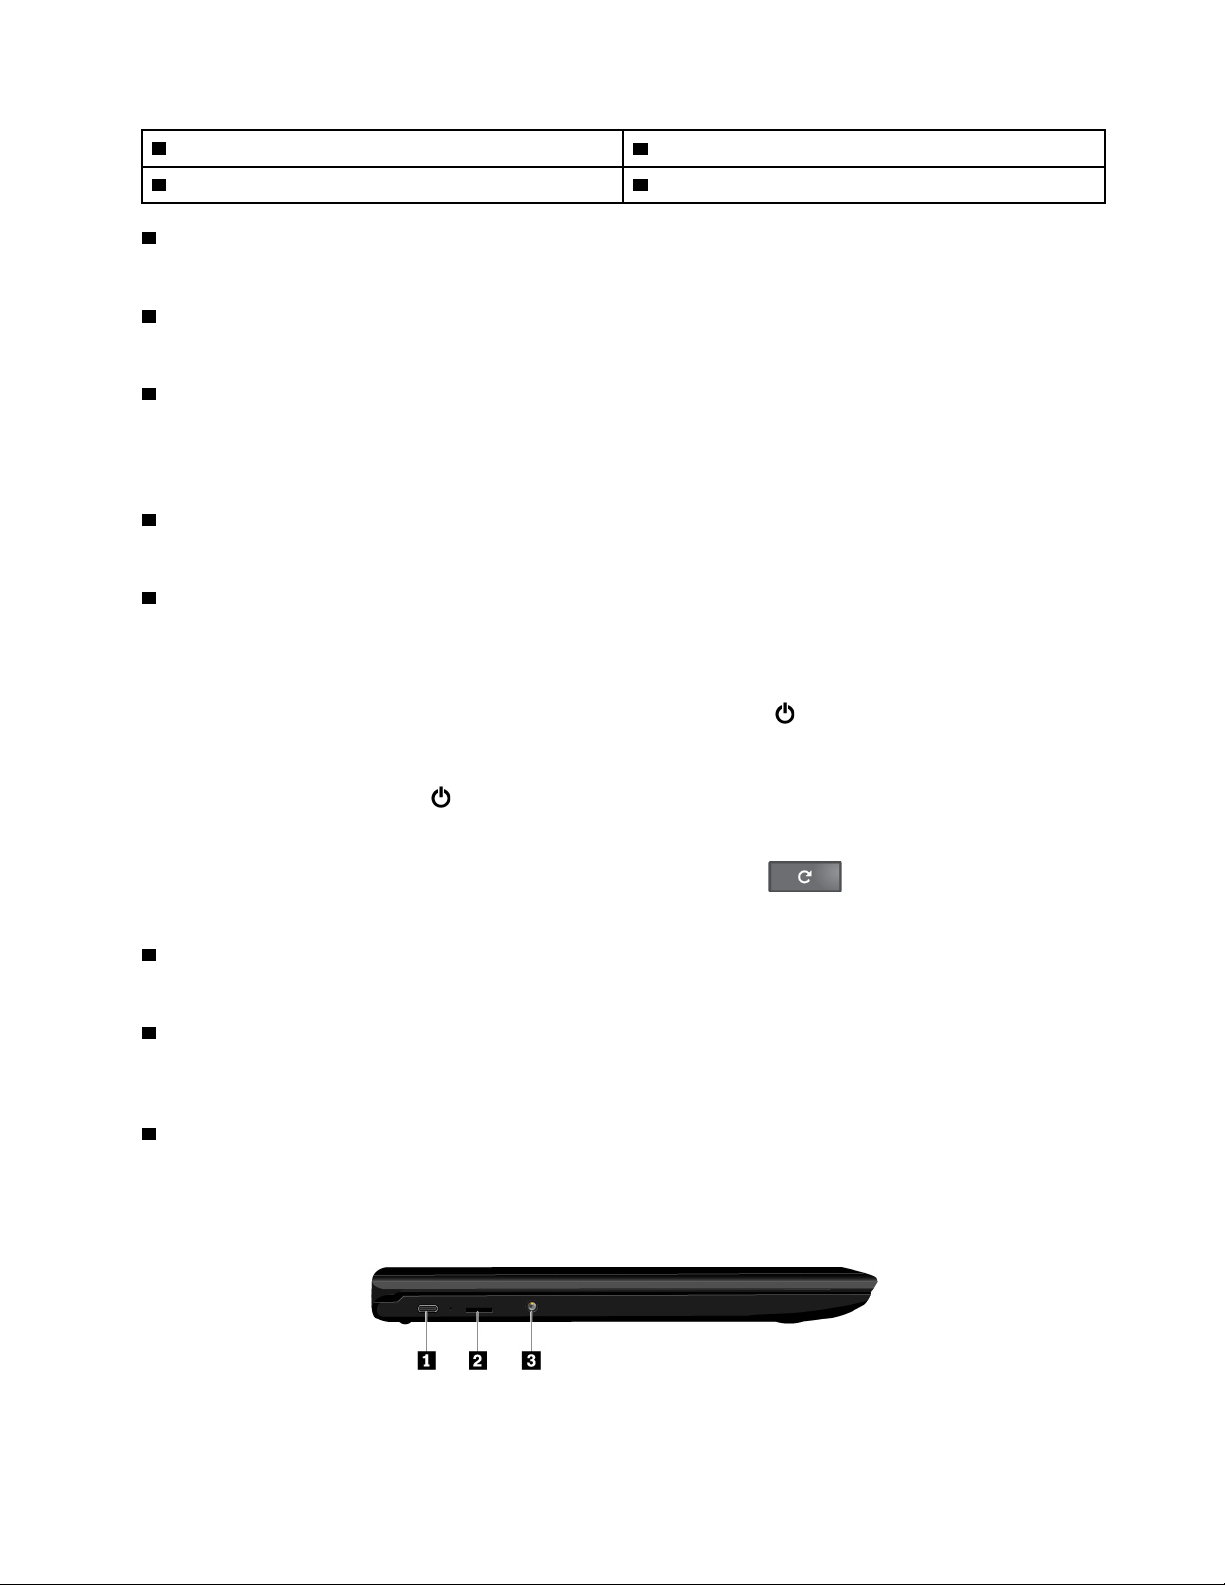
Left-side view
Глава 1. Огляд продукту 3
1 USB-C™ connector 2 microSD card slot
3 Audio connector
1 USB-C connector
USB-Cis a new USB standard that supports power, data transfer, and video output at the same time.
The following Lenovo accessories do not come with your computer. You can purchase the following
accessories from Lenovo
http://www.lenovo.com/essentialsto connect your computer to power or other
devices through the USB-C connector.
• Lenovo USB-C 45W AC Adapter: Used to provide ac power to your computer and charge the battery.
• Lenovo USB-C to HDMI Adaptor: Used to connect your computer to an HDMI-compatible audio device
or video monitor.
• Lenovo USB-C to VGA Adaptor: Used to connect your computer to a video graphics array (VGA) monitor
or other VGA-compatible video device.
2 microSD card slot
Your computer is equipped with a microSD card reader. Insert a microSD card into the microSD card slot for
data access or storage.
3 Audio connector
You can connect headphones or a headset with a 3.5-mm (0.14-inch), 4-pole plug to the audio connector to
listen to the sound from the computer.
Примітка: If you are using a headset with a function switch, the audio connector might not fully support the
function switch.
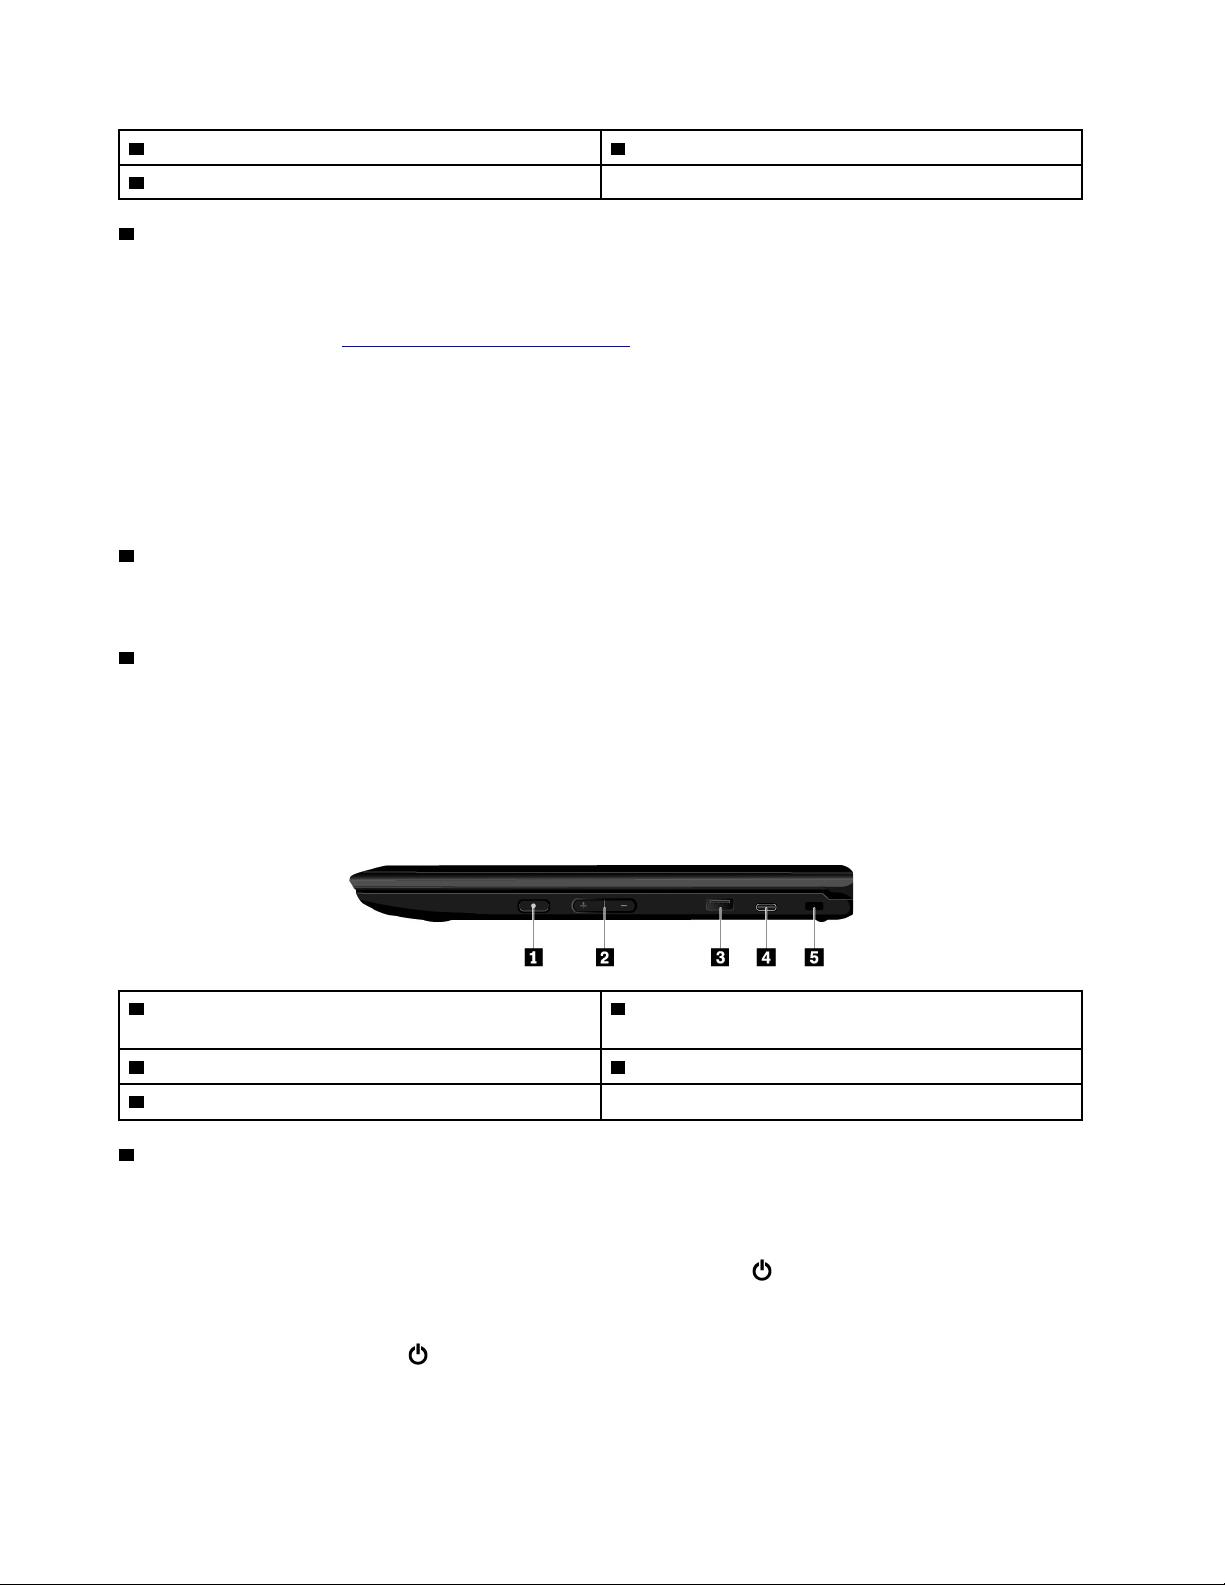
Right-side view
1 Power button (available on computer models with
multi-touch screen)
3 USB 3.0 connector 4 USB-C connector
5 Security-lock slot
1 Power button (available on computer models with multi-touch screen)
Use the power button to turn on the computer. To turn off the computer, do the following:
To turn off the computer, do the following:
• If you are not logged in to the operating system, click the power icon
screen.
• If you are logged in to the operating system, click the status area in the lower-right corner of the screen,
and then click the power icon
.
2 Volume-control buttons (available on computer models
with multi-touch screen)
in the lower-left corner of the
4
ThinkPad 11e Chromebook 4th Gen and ThinkPad Yoga 11e Chromebook 4th Gen User Guide

If the computer stops responding, press and hold the power key for about eight seconds to turn off the
computer. If the computer still does not respond, press the refresh key
and the power key at the
same time to turn off the computer.
2 Volume-control buttons (available on computer models with multi-touch screen)
Use the volume-control buttons to adjust the volume.
3 USB 3.0 connector
The USB 3.0 connector is used for connecting USB-compatible devices, such as a USB mouse, a USB
storage drive, a USB printer, or a digital camera.
Увага: When you attach a USB cable to this connector, ensure that the USB mark is facing upward.
Otherwise the connector might get damaged.
4 USB-C connector
USB-Cis a new USB standard that supports power, data transfer, and video output at the same time.
The following Lenovo accessories do not come with your computer. You can purchase the following
accessories from Lenovo
http://www.lenovo.com/essentialsto connect your computer to power or other
devices through the USB-C connector.
• Lenovo USB-C 45W AC Adapter: Used to provide ac power to your computer and charge the battery.
• Lenovo USB-C to HDMI Adaptor: Used to connect your computer to an HDMI-compatible audio device
or video monitor.
• Lenovo USB-C to VGA Adaptor: Used to connect your computer to a video graphics array (VGA) monitor
or other VGA-compatible video device.
5 Security-lock slot
To protect your computer from theft, lock your computer to a desk, table, or other fixture through a security
cable lock that fits this security-lock slot.
Примітка: You are responsible for evaluating, selecting, and implementing the locking device and security
feature. Lenovo makes no comments, judgments, or warranties about the function, quality, or performance
of the locking device and security feature.
Status indicators
This topic provides information about locating and identifying the various status indicators on your computer.
Примітка: Depending on the model, your computer might look different from the following illustrations.
Глава 1. Огляд продукту 5
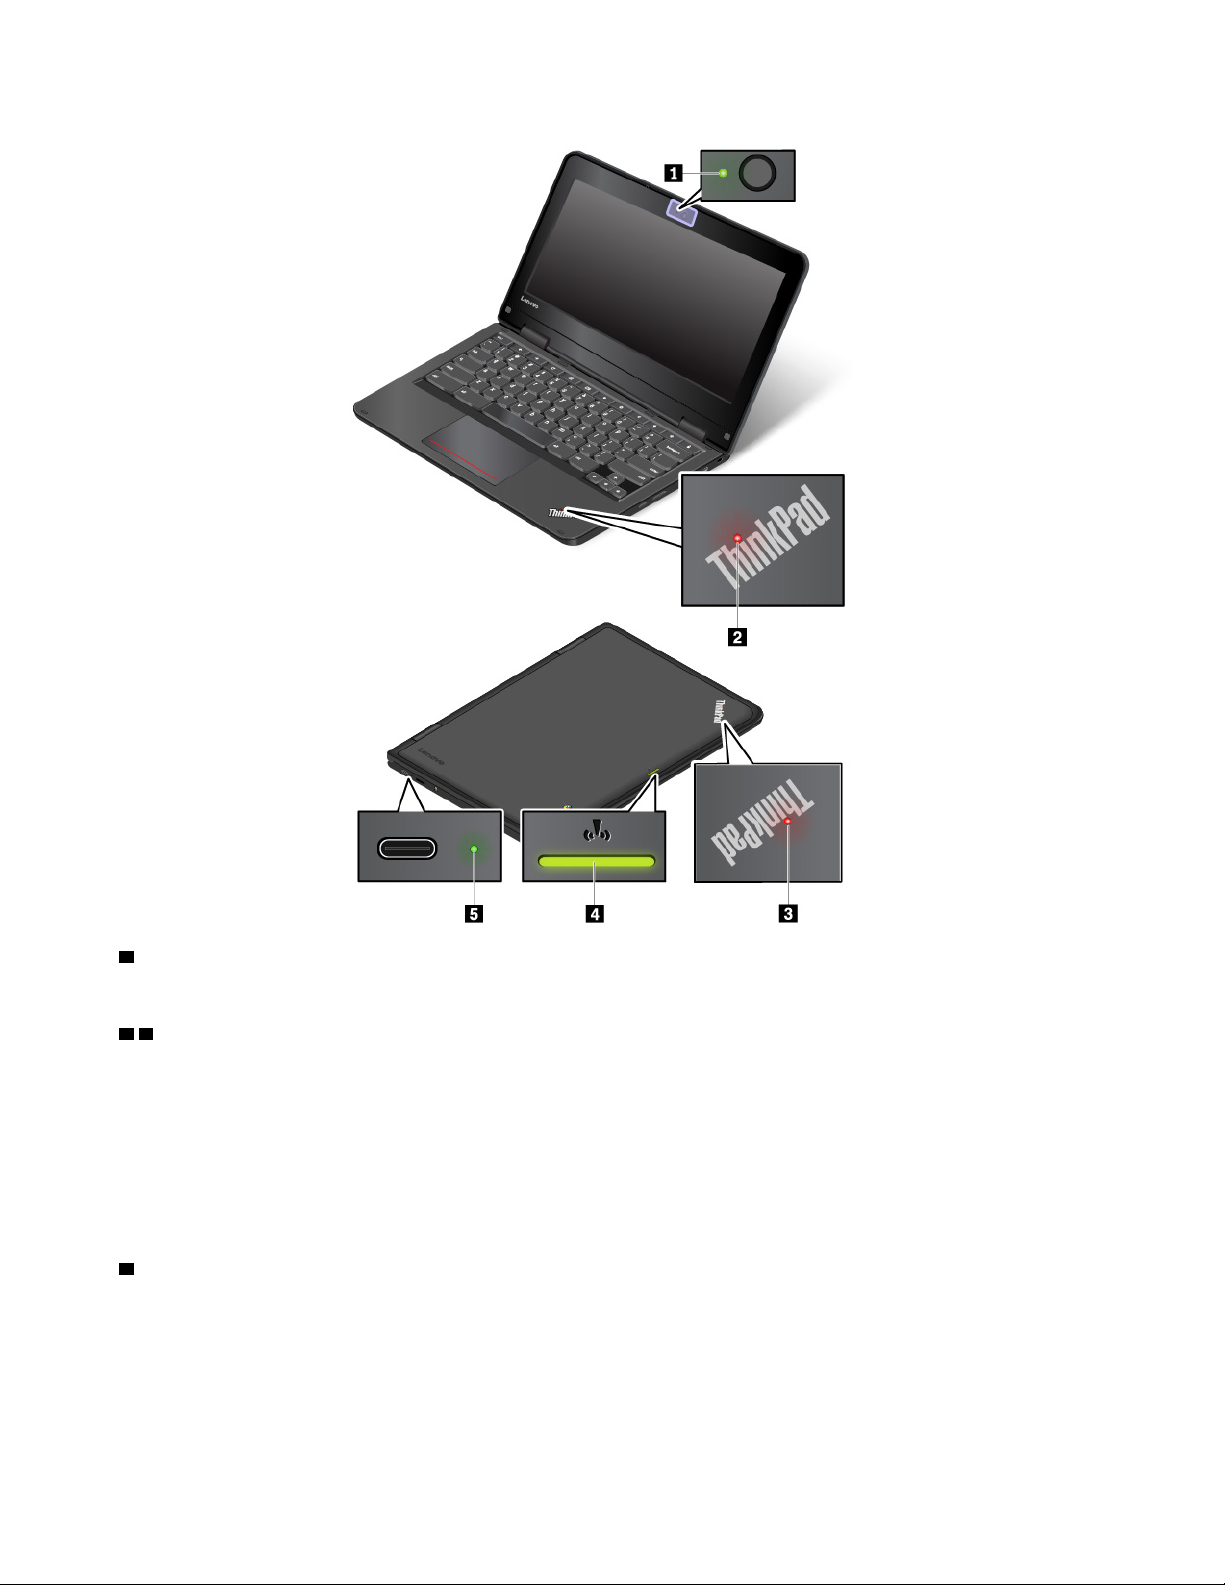
1 Camera status indicator
When this indicator is on, the camera is in use.
2 3 System status indicators
The indicator in the ThinkPad logo on the computer lid and the indicator in the power button show the
system status of your computer.
• Solid on: The computer is on (in normal mode).
• Blinks for three times: The computer is initially connected to power.
• Blinks slowly: The computer is in sleep mode.
• Off: The computer is off or in hibernation mode.
4 Wireless-status indicator
The wireless-status indicator is located on the outer lid of the computer and it helps you identify the wireless
status of your computer.
• Solid green: The wireless features of the computer are on.
• Off: The wireless features of the computer are off.
6
ThinkPad 11e Chromebook 4th Gen and ThinkPad Yoga 11e Chromebook 4th Gen User Guide
5 ac power status indicator
This indicator shows the ac power and battery power status of the computer.
• Green: connected to ac power (battery power 80%–100%)
• Yellow: connected to ac power (battery power 1%–80%)
• Off: not connected to ac power
Important product information labels
This section provides information to help you locate the following labels:
• Machine type and model label
• FCC ID and IC Certification label
• Labels for the Windows operating systems
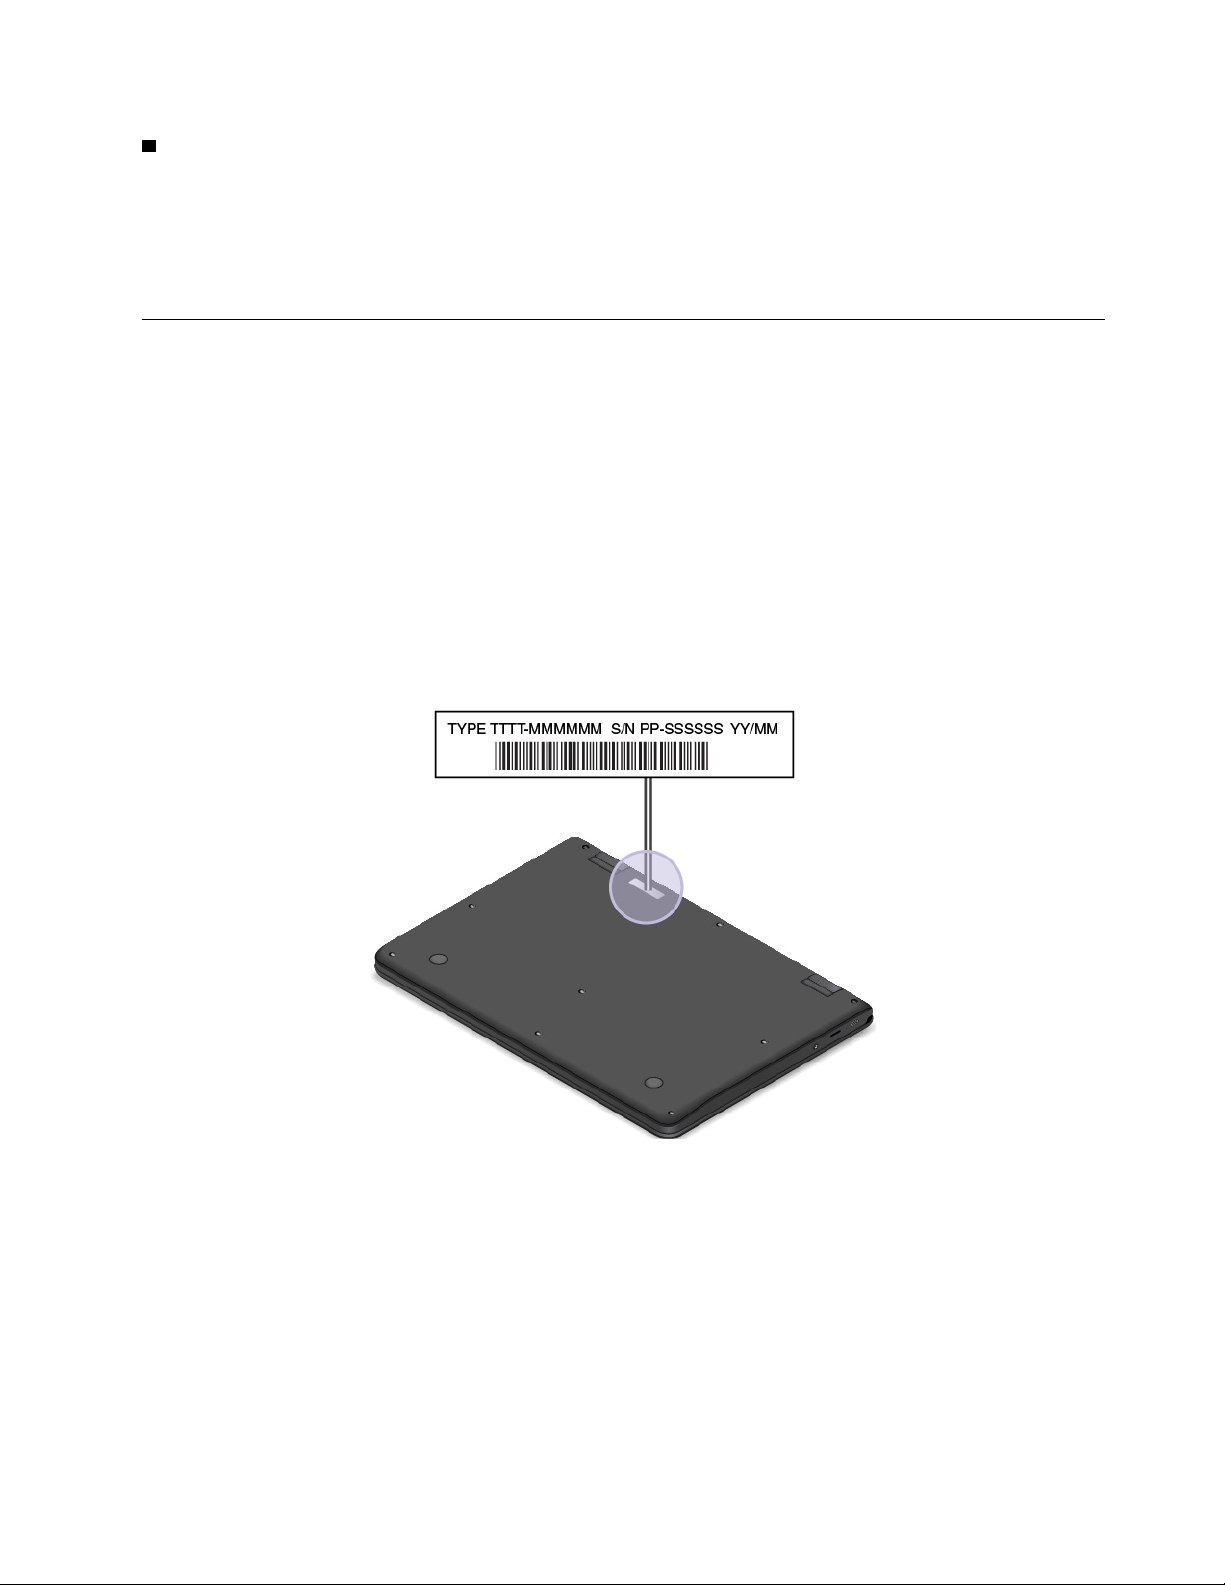
Machine type and model label
When you contact Lenovo for help, the machine type and model information helps the technicians to identify
your computer and provide faster service.
The following illustration shows where to find the label that contains the machine type and model information
of your computer.
FCC ID and IC Certification number
The FCC and IC Certification information is identified by a label on the computer as shown in the following
illustration.
Примітка: Depending on the model, your computer might look different from the following illustration.
Глава 1. Огляд продукту 7
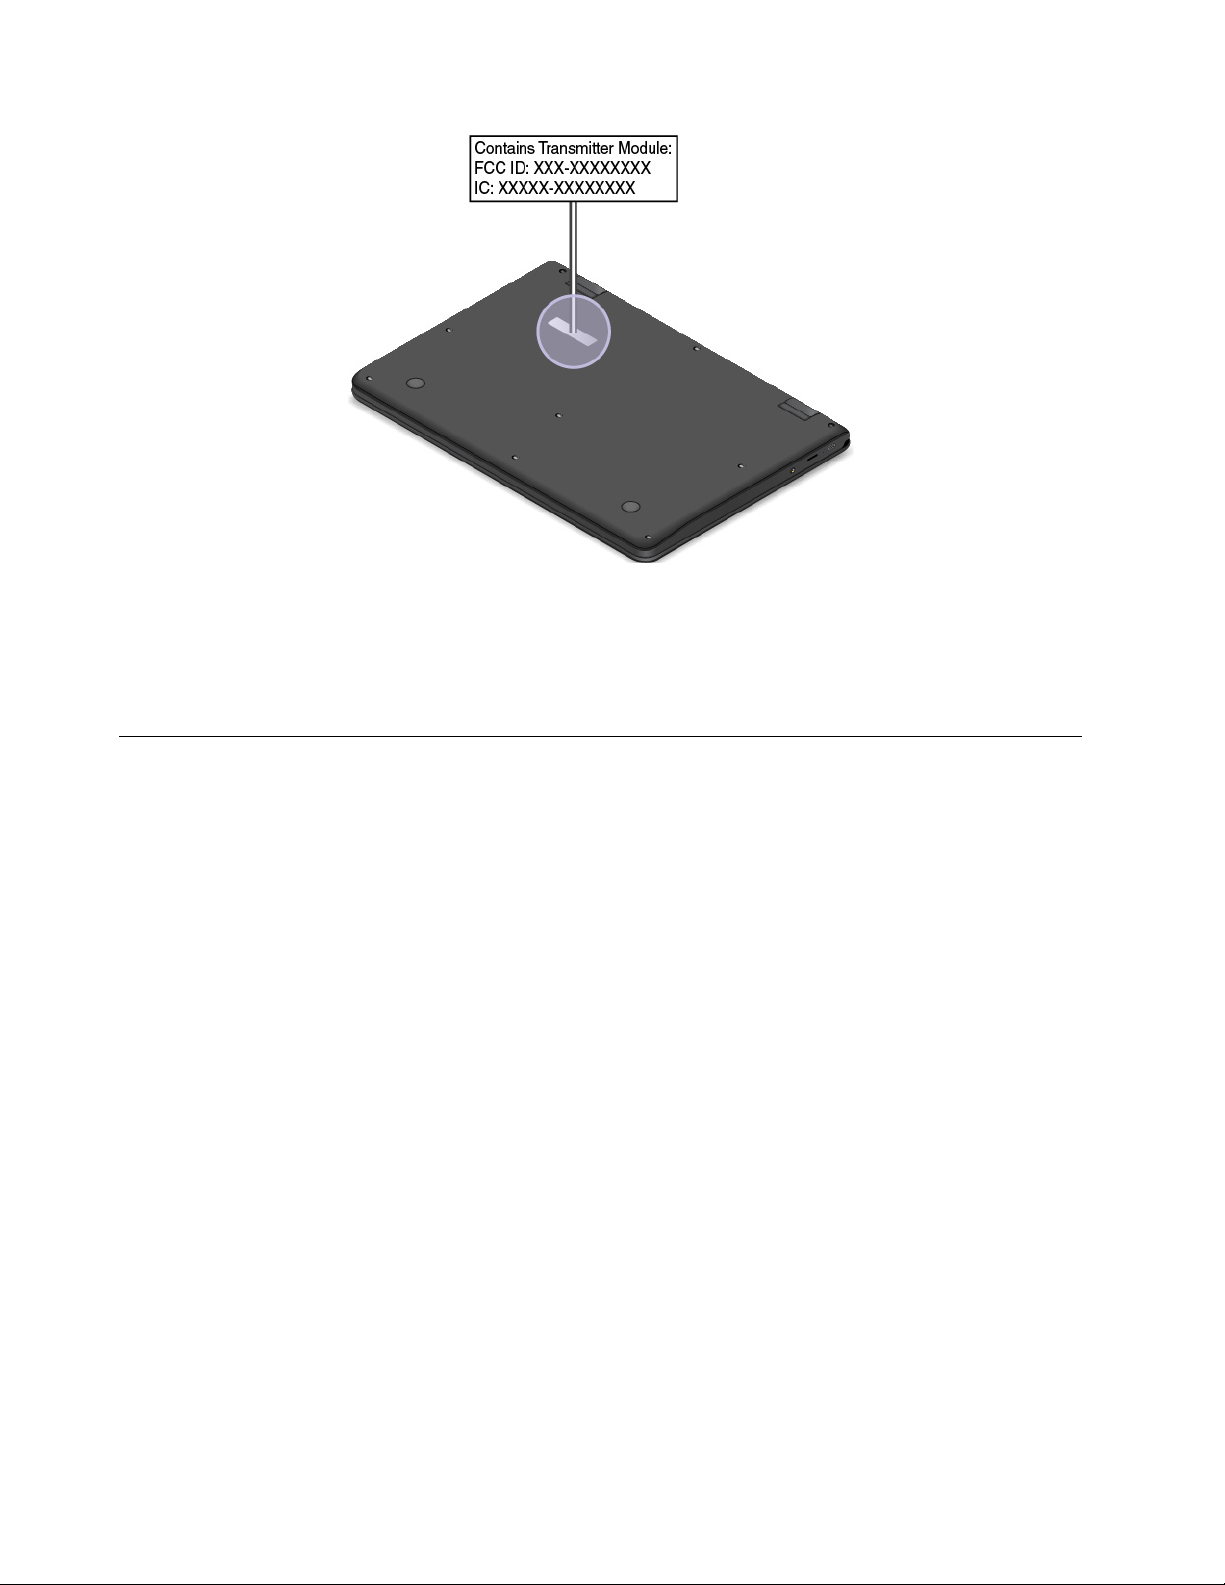
For a preinstalled wireless module, this label identifies the actual FCC ID and IC certification number for the
wireless module installed by Lenovo.
Примітка: Do not remove or replace a preinstalled wireless module by yourself. For replacement, you must
contact Lenovo service first. Lenovo is not responsible for any damage caused by unauthorized replacement.
Computer features
The computer features introduced in this topic cover various models. Some computer features might be
available only on specific models.
Microprocessor
To view the microprocessor information of your computer, right-click the Start button and then select
System.
Memory
• Double data rate 4 (DDR4) small outline dual in-line memory module (SODIMM)
Storage device
• 2.5-inch form factor, 7-mm (0.28-inch) height hard disk drive
• M.2 solid-state drive (available on some models)
• Intel
®
Optane™ memory (available on some models)
Display
• Brightness control
• Color display with Thin Film Transistor (TFT) technology
• Display size: 439.42 mm (17.3 inches)
• Display resolution: 1920 x 1080 pixels or 3840 x 2160 pixels
• Multi-touch technology (available on some models)
• NVIDIA
8
®
Optimus Graphics or discrete graphics
ThinkPad 11e Chromebook 4th Gen and ThinkPad Yoga 11e Chromebook 4th Gen User Guide

Keyboard
• Six-row keyboard (traditional or backlight)
• Function keys
• Numeric keypad
• ThinkPad pointing device (including the TrackPoint pointing device and trackpad with buttons)
Connectors and slots
• ac power connector
• Audio connector
• Docking-station connector
• Ethernet connector
• ExpressCard slot
• Four USB 3.0 connectors (including one Always On USB 3.0 connector)
• HDMI connector
• Media-card slot
• Micro-SIM-card slot (inside the battery compartment)
• Mini DisplayPort connector
• Optical drive bay (available on some models)
• Smart-card slot (available on some models)
• Two Thunderbolt 3 connectors
Security features
• Fingerprint reader
• Security-lock slot
• Trusted Platform Module (TPM) (available on some models)
Wireless features
• Bluetooth
• Wireless LAN
• Wireless WAN (available on some models)
Others
• Camera (available on some models)
• Color sensor (available on some models)
• Microphones
Computer specifications
Size
• Width: 416 mm (16.4 inches)
• Depth: 275.5 mm (10.8 inches)
• Thickness:
– Non-touch models: 29.9 mm to 34.2 mm (1.18 inches to 1.35 inches)
Глава 1. Огляд продукту 9

– Touch models: 30.65 mm to 34.95 mm (1.21 inches to 1.38 inches)
Maximum heat output (depending on the model)
• 170 W (580 Btu/hr)
• 230 W (786 Btu/hr)
Power source (ac power adapter)
• Sine-wave input at 50 Hz to 60 Hz
• Input rating of the ac power adapter: 100 V to 240 V ac, 50 Hz to 60 Hz
Умови експлуатації
Максимальна висота над рівнем моря (без підпору повітря)
• 3048 м
Температура
• На висоті до 2438 м
– Робоча: від 5 до 35 °C
– Зберігання: від 5 до 43 °C
• На висоті понад 2438 м
– Максимальна робоча температура для умов без підпору повітря: 31,3 °C
Примітка: Коли ви заряджаєте акумулятор, його температура має бути не менше 10 °C.
Відносна вологість
• Робоча: від 8 до 95 % при температурі 23 °C за вологим термометром
• Зберігання: від 5 до 95 % при температурі 27 °C за вологим термометром
За можливості розмістіть комп'ютер у добре вентильованому сухому місці, захищеному від сонячних
променів.
Увага:
• Тримайте комп'ютер подалі від електричних приладів, як-от електровентиляторів, радіо,
кондиціонерів і мікрохвильових печей. Сильні магнітні поля, що утворюються цими пристроями,
можуть пошкодити монітор і дані на внутрішньому диску комп'ютера.
• На ставте напої на комп'ютер, підключені пристрої або поблизу них. Якщо на комп'ютер або
підключений пристрій проллється рідина, може статися коротке замикання або інше ушкодження.
• Не вживайте їжу та не паліть над клавіатурою. Частинки їжі або попелу можуть впасти на клавіатуру
та пошкодити її.
10
ThinkPad 11e Chromebook 4th Gen and ThinkPad Yoga 11e Chromebook 4th Gen User Guide

Глава 2. Використання комп'ютера
У цьому розділі наведено інформацію про різні функції комп'ютера та особливості користування ними.
Реєстрація комп'ютера
Під час реєстрації комп'ютера інформація про його власника вноситься до бази даних. Завдяки цьому
компанія Lenovo зможе зв'язатися з вами, якщо певні продукти буде вилучено з продажу або виникне
інша серйозна проблема. Крім того, у деяких регіонах користувачам, які зареєстрували свої пристрої,
надаються додаткові привілеї та послуги.
Зареєструвавши комп'ютер у базі даних компанії Lenovo, ви отримаєте вказані нижче переваги.
• Швидше обслуговування, якщо ви звернетеся до Lenovo по допомогу
• Автоматичні сповіщення про безкоштовне програмне забезпечення та спеціальні пропозиції
Щоб зареєструвати комп'ютер у базі даних компанії Lenovo, перейдіть на веб-сторінку
www.lenovo.com/register
і дотримуйтесь інструкцій на екрані.
http://
Frequently asked questions
This topic provides a few tips to help you optimize the use of your ThinkPad notebook computers.
To ensure the best computer performance, go to the following Web site to find information such as aids for
troubleshooting and answers to frequently asked questions:
http://www.lenovo.com/support/faq
Can I get my user guide in another language?
To download the user guide in another language, go to
instructions on the screen.
How to turn off my computer?
Open the Start menu, click
How do I access Control Panel?
Right-click the Start button, and then click Control Panel.
How do I use battery power more effectively when I am on the go?
• To conserve power, or to suspend operation without exiting programs or saving files, see "Power-saving
modes" на сторінці 23.
• To achieve the best balance between performance and power saving, create and apply an appropriate
power plan. See "Managing the battery power" на сторінці 23.
• If your computer will be turned off for an extended period of time, you can prevent battery power from
draining by removing the battery.
Power, and then click Shut down.
http://www.lenovo.com/support. Then follow the
How do I attach an external display?
• Refer to "Using an external display" на сторінці 28.
© Copyright Lenovo 2017 11
• With the Extend desktop function, you can display output on both the computer display and an external
display.
How do I attach or replace a device?
Refer to the appropriate topic in "Replacing devices" на сторінці 61.
Print the following topics and keep them with your computer in case you are unable to access this
electronic user guide when necessary.
• "Power problems" на сторінці 57
Operating modes
The ThinkPad Yoga 11e Chromebook 4th Gen computer features four operating modes: notebook mode,
stand mode, tablet mode, and tent mode. You can switch between different modes according to your
preference and working convenience.
Примітка: Depending on the model, your computer might look different from the illustrations in this topic.
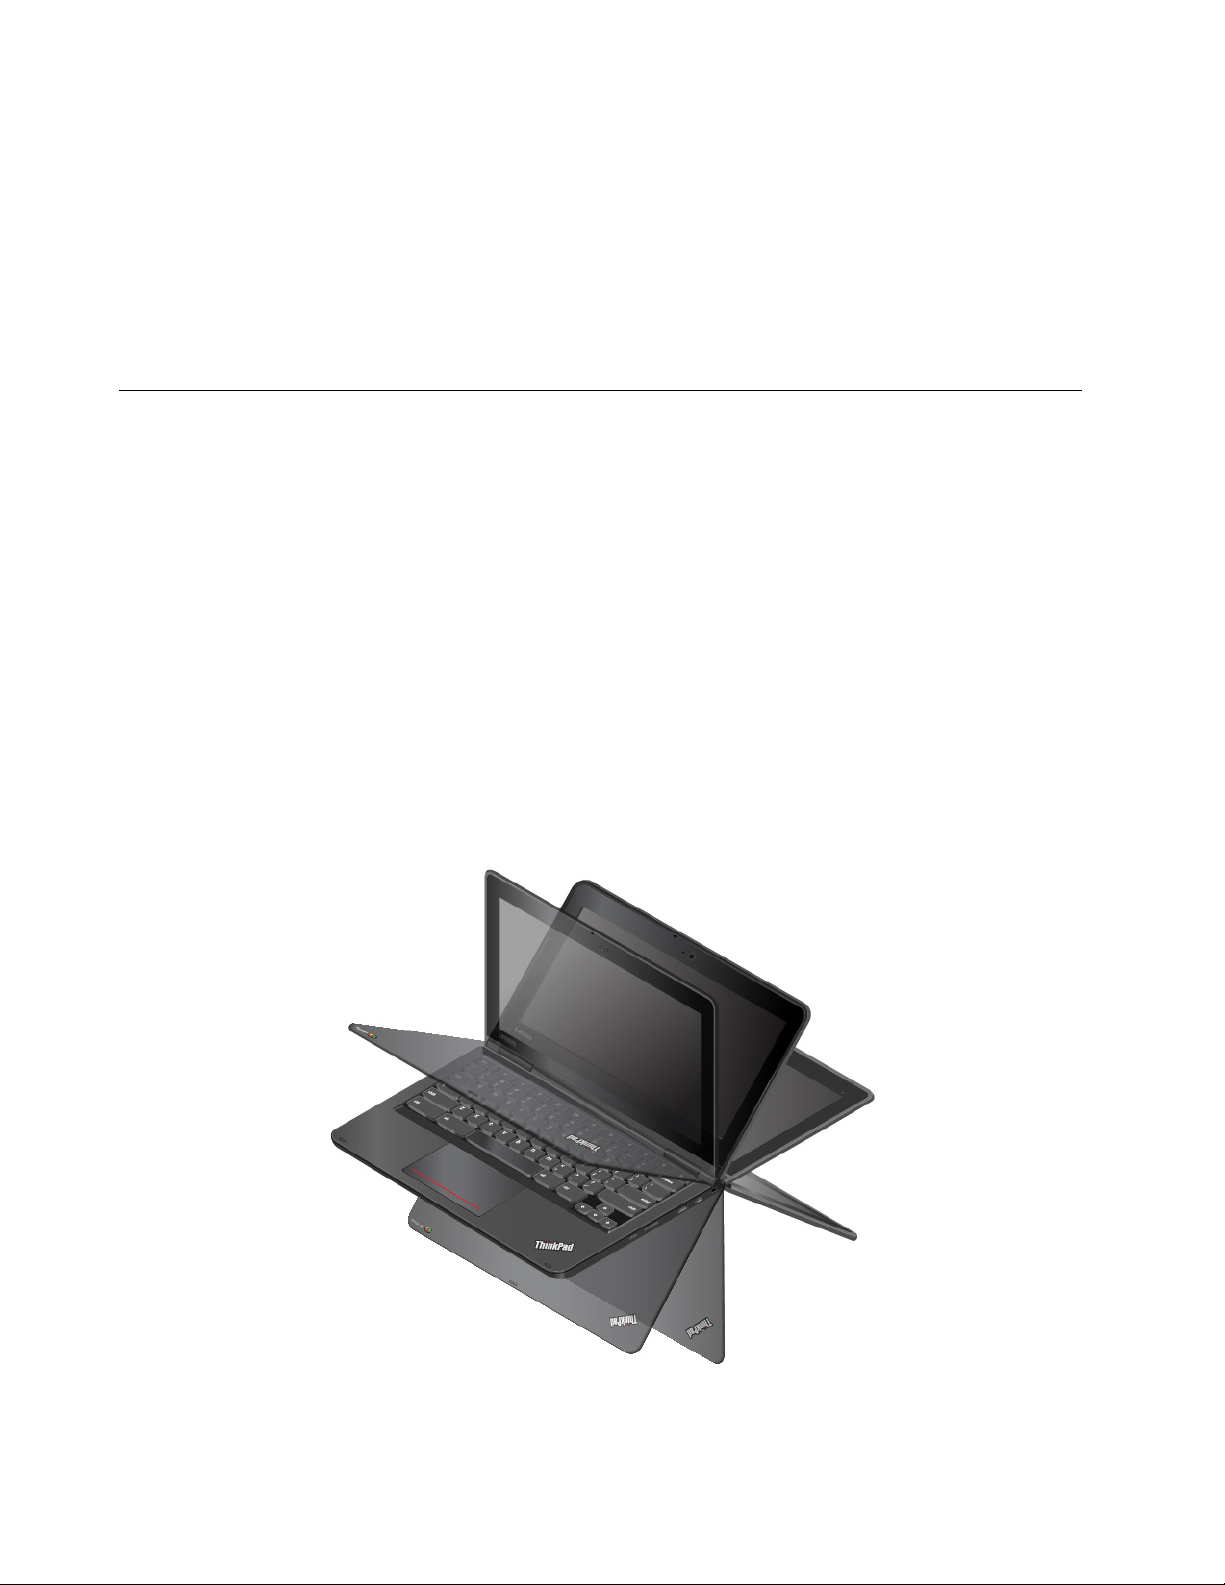
Rotating the computer display
This topic provides instructions on how to rotate the display of your computer properly. This topic also
provides information about the operating modes of your computer and corresponding display angle ranges.
You can open the computer display to any angle within a range of up to 360 degrees as shown in the
following illustration.
Увага: Do not rotate the computer display with too much force, otherwise the computer display or hinges
might get damaged. Do not apply too much force to the upper-right or upper-left corner of the computer
display.
12 ThinkPad 11e Chromebook 4th Gen and ThinkPad Yoga 11e Chromebook 4th Gen User Guide

Notebook mode
You can use the computer in the notebook mode in scenarios that require using a keyboard and a mouse,
such as editing documents and writing e-mails.
Увага: The angle between the front of the computer display and the keyboard for the notebook mode is at
most 190 degrees. Do not rotate the computer display with too much force, otherwise the computer display
or hinges might get damaged. Do not apply too much force to the upper-right or upper-left corner of the
computer display.
Open the computer display slowly as shown in the following illustration. Your computer is now in the
notebook mode.
In the notebook mode, the keyboard, the trackpad, the TrackPoint buttons, and the TrackPoint pointing stick
are automatically enabled.
Stand mode
You can use your computer in the stand mode in scenarios that require limited interaction with the screen,
such as viewing photos and playing videos.
Увага: The angle between the front of the computer display and the keyboard for the stand mode is above
190 degrees and below 350 degrees. Do not rotate the computer display with too much force, otherwise the
computer display or hinges might get damaged. Do not apply too much force to the upper-right or upper-left
corner of the computer display.
If your computer is in the notebook mode, do the following to turn the computer from the notebook mode
into the stand mode:
1. Slowly rotate the display clockwise until the back of the display is facing the base cover.
Глава 2. Використання комп'ютера 13

2. Position your computer as shown. Your computer is now in the stand mode.
In the stand mode, the keyboard, the trackpad, the TrackPoint buttons, and the TrackPoint pointing stick are
automatically disabled. However, you can control some functions of your computer through the special
buttons and the multi-touch screen, without the use of the keyboard and the trackpad. For more information,
see "Using the special buttons" на сторінці 19 and "Using the multi-touch screen" на сторінці 18.
Tablet mode
You can use the computer in the tablet mode in scenarios that require frequent interaction with the screen,
such as browsing the Web site.
Увага: The angle between the front of the computer display and the keyboard for the tablet mode is 360
degrees. Do not rotate the computer display with too much force, otherwise the computer display or hinges
might get damaged. Do not apply too much force to the upper-right or upper-left corner of the computer
display.
If your computer is in the stand mode, do the following to turn the computer from the stand mode into the
tablet mode:
1. Position your computer as shown and slowly rotate the computer display clockwise.
14
ThinkPad 11e Chromebook 4th Gen and ThinkPad Yoga 11e Chromebook 4th Gen User Guide

2. Position your computer as shown. Your computer is now in the tablet mode. By default, the autorotate
feature is enabled.
In the tablet mode, the keyboard, the trackpad, the TrackPoint buttons, and the TrackPoint pointing stick are
automatically disabled. However, you can control some functions of your computer through the special
buttons and the multi-touch screen, without the use of the keyboard and the trackpad. For more information,
see "Using the special buttons" на сторінці 19 and "Using the multi-touch screen" на сторінці 18.
Tent mode
You can use your computer in the tent mode in scenarios that require limited interaction with the screen,
such as viewing photos and making a presentation.
Увага: The angle between the front of the computer display and the keyboard for the tent mode is at least
270 degrees and at most 340 degrees. Do not rotate the computer display with too much force, otherwise
the computer display or hinges might get damaged. Do not apply too much force to the upper-right or upperleft corner of the computer display.
If your computer is in the tablet mode, do the following to turn the computer from the tablet mode into the
tent mode:
1. Slowly rotate your computer display counterclockwise to any angle within a range of 270 degrees to 340
degrees.
Примітка: The degrees refer to the angle degrees between the computer display and the keyboard.
Глава 2. Використання комп'ютера 15

2. Position your computer as shown. Your computer is now in the tent mode.
In the tent mode, the keyboard, the trackpad, the TrackPoint buttons, and the TrackPoint pointing stick are
automatically disabled. However, you can control some functions of your computer through the special
buttons and the multi-touch screen, without the use of the keyboard and the trackpad. For more information,
see "Using the special buttons" на сторінці 19 and "Using the multi-touch screen" на сторінці 18.
Keyboard frame travel function
Your computer keyboard features the frame travel function. This topic provides information about the
behavior of the keyboard.
16
ThinkPad 11e Chromebook 4th Gen and ThinkPad Yoga 11e Chromebook 4th Gen User Guide

• The frame of the keyboard does not travel when you rotate the computer display from 10 degrees to 190
degrees. The following illustration shows the keyboard when the keyboard frame does not travel.
• When you rotate the computer display from 190 degrees to 360 degrees, the frame of the keyboard
travels upward for about 2.0 mm (0.08 inches). The following illustration shows the keyboard after the
keyboard frame travels upward.
Примітка: In the notebook mode, the keyboard, the ThinkPad trackpad, the TrackPoint buttons, and the
TrackPoint pointing stick are automatically enabled. In the stand mode, tablet mode, and tent mode, the
keyboard, the ThinkPad trackpad, and the TrackPoint pointing stick are automatically disabled.
Глава 2. Використання комп'ютера 17

Using the multi-touch screen
This topic provides instructions on how to use the multi-touch screen that is available on some models.
Примiтки:
• Your computer screen might look different from the following illustrations.
• Depending on the program you use, some gestures might not be available.
The following table introduces some frequently used gestures.
Touch gesture (touch models
only)
Description
Touch: Tap.
Mouse action: Click.
Function: Open an app or perform an action on an open app, such as Copy, Save,
and Delete, depending on the app.
Touch: Tap and hold.
Mouse action: Right-click.
Function: Open a menu with multiple options.
Touch: Slide.
Mouse action: Scroll the mouse wheel, move the scroll bar, or click the scroll
arrow.
Function: Scroll through items, such as lists, pages, and photos.
Touch: Drag an item to the location you want.
Mouse action: Click, hold, and drag an item.
Function: Move an object.
Touch: Move two fingers closer together.
Mouse action: Press the Ctrl key while scrolling the mouse wheel backward.
Function: Zoom out.
Touch: Move two fingers farther apart.
Mouse action: Press the Ctrl key while scrolling the mouse wheel forward.
Function: Zoom in.
18 ThinkPad 11e Chromebook 4th Gen and ThinkPad Yoga 11e Chromebook 4th Gen User Guide

Touch gesture (touch models
only)
Description
Touch: Swipe in from the right edge.
Mouse action: Click the action center icon
Function: Open the action center to see your notifications and quick actions.
Touch: Swipe in from the left edge.
Mouse action: Click the task-view icon
Function: View all your open windows in task view.
• Short swipe for full-screened app or when your computer is in the tablet
mode
Touch: Swipe downwards shortly from the top edge.
Mouse action: Move your pointer to the top edge of the screen.
Function: Show a hidden title bar.
• Long swipe when your computer is in the tablet mode
Touch: Swipe in from the top edge to the bottom edge.
Mouse action: From the top edge of the screen, click and hold, move the
pointer to the bottom of the screen, and then release.
Function: Close the current app.
in the Windows notification area.
on the taskbar.
Tips on using the multi-touch screen
• The multi-touch screen is a glass panel covered with a plastic film. Do not apply pressure or place any
metallic object on the screen, which might damage the touch panel or cause it to malfunction.
• Do not use fingernails, gloved fingers, or inanimate objects for input on the screen.
• Regularly calibrate the accuracy of the finger input to avoid a discrepancy.
Tips on cleaning the multi-touch screen
• Turn off the computer before cleaning the multi-touch screen.
• Use a dry, soft, and lint-free cloth or a piece of absorbent cotton to remove fingerprints or dust from the
multi-touch screen. Do not apply solvents to the cloth.
• Gently wipe the screen using a top-down motion. Do not apply any pressure on the screen.
Using the special buttons
The ThinkPad Yoga 11e Chromebook 4th Gen computer is equipped with special buttons as shown in the
following illustration. You can control some functions of your computer through the special buttons, without
the use of the keyboard.
Глава 2. Використання комп'ютера 19

1 Power button: Press the power button to turn on the computer.
2 Volume-up button: Press the volume-up button to increase the speaker volume.
3 Volume-down button: Press the volume-down button to decrease the speaker volume.
Using the special keys
Your computer has several special keys to help you work more easily and effectively.
Goes to the previous page.
Goes to the next page.
Reloads the current page.
Views the current page in full-screen mode.
Switches between windows.
Decreases the screen brightness.
20
ThinkPad 11e Chromebook 4th Gen and ThinkPad Yoga 11e Chromebook 4th Gen User Guide

Increases the screen brightness.
Mutes the volume.
Decreases the volume.
Increases the volume.
Locks the computer screen. This key is available on computer models with a multi-touch screen.
Turns on the computer. This key is available on computer models without a multi-touch screen.
Searches applications and the Web.
For more information about customizing and using the keyboard, go to the Chrome OS Web site at
support.google.com/chromeos
.
http://
Using the ThinkPad pointing device
This section provides information about using the ThinkPad pointing device.
Using the touch pad
Your computer is equipped with a touch pad1 . To move the pointer 2 on the screen, slide your fingertip over
the trackpad in the corresponding direction.
Customizing the touch pad
You can customize the touch pad as follows:
• Enable the tap-to-click function.
• Enable the simple scrolling function.
To change your touch pad settings, click the status area in the lower-right corner of the screen. Then go to
Settings ➙ Device ➙ Touchpad and mouse settings. Change the settings as desired.
Глава 2. Використання комп'ютера 21

If the trackpad surface is stained with oil, turn off the computer first. Then gently wipe the trackpad surface
with a soft and lint-free cloth moistened with lukewarm water or computer cleaner.
Керування живленням
У цьому розділі пояснюється, як досягти оптимального балансу між живленням від мережі й
акумулятора задля максимально продуктивної роботи.
Використання адаптера змінного струму
Ваш комп'ютер може працювати від акумулятора або від мережі змінного струму. Коли його
підключено до мережі, акумулятор автоматично заряджається.
До комплекту вашого комп'ютера входить адаптер змінного струму та шнур живлення.
• Адаптер змінного струму: перетворює електроенергію з мережі на таку, що споживає ноутбук.
• Шнур живлення: з'єднує розетку та адаптер змінного струму.
Підключення адаптера змінного струму
Щоб підключити комп'ютер до мережі змінного струму, виконайте вказані нижче дії.
Увага: Використання невідповідного шнура живлення може призвести до серйозних ушкоджень
комп'ютера.
1. Підключіть кабель живлення до адаптера змінного струму.
2. Підключіть адаптер живлення змінного струму до роз'єму живлення на комп'ютері.
3. Підключіть шнур живлення до електричної розетки.
Поради щодо використання адаптера змінного струму
• Відключайте адаптер змінного струму від розетки, коли не використовуєте його.
• Не накручуйте шнур живлення на трансформатор адаптера живлення, коли шнур підключено до
трансформатора.
Using the battery
When you use your computer away from electrical outlets, you depend on battery power to keep your
computer running. Different computer components consume power at different rates. The more you use the
power-intensive components, the faster you consume battery power.
Spend more time unplugged with ThinkPad batteries. Mobility has revolutionized business by enabling you to
take your work wherever you go. With ThinkPad batteries, you are able to work longer without being tied to
an electrical outlet.
Checking the battery status
Move your pointer to the battery-status icon in the Windows notification area to check the battery status. The
battery-status icon displays the percentage of battery power remaining and how long you can use your
computer before you must charge the battery.
The rate at which you use battery power determines how long you can use the battery of your computer
between charges. Because every computer user has individual habits and needs, it is difficult to predict how
long a battery charge lasts. There are two main factors:
• How much energy is stored in the battery when you begin to work
• The way you use your computer, for example:
22
ThinkPad 11e Chromebook 4th Gen and ThinkPad Yoga 11e Chromebook 4th Gen User Guide

– How often you access the storage drive
– How bright you make the computer display
– How often you use the wireless feature
Charging the battery
When you find that the remaining battery power is low, charge your battery or replace the battery with a
charged battery.
If an ac outlet is convenient, connect the computer to ac power. The battery is fully charged in about four to
eight hours. The actual charging time depends on the battery size, the physical environment, and whether
you are using the computer. You can check the battery charging status at any time through the batterystatus icon in the Windows notification area.
Примітка: To maximize the life of the battery, the computer does not start recharging the battery if the
remaining power is greater than 95%.
Tips on charging the battery
• Before you charge the battery, ensure that the battery temperature is lower than 10°C (50°F).
• Charge the battery in any of the following conditions:
– A new battery is installed.
– The percentage of power remaining is low.
– The battery has not been used for a long time.
Maximizing the battery life
To maximize the life of the battery, do the following:
• Use the battery until the charge is depleted.
• Recharge the battery completely before using it. You can see whether the battery is fully charged from the
battery-status icon in the Windows notification area.
• Always use power management features such as power-saving modes.
Managing the battery power
To achieve the best balance between performance and power saving, adjust your power plan settings. To
adjust power plan settings, do the following:
1. Go to Control Panel, and then change the view of Control Panel from Category to Large icons or Small
icons.
2. Click Power Options.
3. Follow the instructions on the screen.
For more information, see the Windows help information system.
Power-saving modes
There are several modes that you can use at any time to conserve power. This section introduces each mode
and gives tips on the effective use of battery power.
• Sleep mode
In sleep mode, your work is saved to memory, and then the storage drive and the computer display are
turned off. When your computer wakes up, your work is restored within seconds.
Глава 2. Використання комп'ютера 23

To put your computer into sleep mode, open the Start menu, click Power, and then click Sleep.
• Hibernation mode
By using this mode, you can turn off your computer completely without saving files or exiting any
programs that are running. When the computer enters hibernation mode, all open programs, folders, and
files are saved to the storage drive, and then the computer turns off.
To put the computer into hibernation mode, define what the power button does first, and then press the
power button to put the computer into hibernation mode.
If you put your computer into hibernation mode with the wake-up function disabled, the computer does
not consume any power. The wake-up function is disabled by default. If you put your computer into
hibernation mode with the wake-up function enabled, the computer consumes a small amount of power.
To enable the wake-up function, do the following:
1. Open Control Panel, view Control Panel by Category, and then click System and Security.
2. Click Administrative Tools.
3. Double-click Task Scheduler. If you are prompted for an administrator password or confirmation,
type the password or provide confirmation.
4. From the left pane, select the task folder for which you want to enable the wake-up function. The
scheduled tasks are displayed.
5. Click a scheduled task, and then click the Conditions tab.
6. Under Power, select Wake the computer to run this task.
• Wireless off
When you are not using the wireless features, such as Bluetooth or wireless LAN, turn them off to help
conserve power.
Безпровідні з'єднання
Безпровідне з'єднання надає можливість передавати дані без кабелів — лише за допомогою
радіохвиль.
Using the wireless-LAN connection
A wireless local area network (LAN) covers a relatively small geographic area, such as an office building or a
house. Devices based on the 802.11 standards can connect to this type of network.
Your computer comes with a built-in wireless network card to help you establish wireless connections and
monitor the connection status.
To establish a wireless-LAN connection, do the following:
1. Turn on the wireless feature. See "Using the special keys" на сторінці 20.
2. Click the wireless-network-connection-status icon in the Windows notification area. A list of available
wireless networks is displayed.
3. Double-click a network to connect to it. Provide required information if needed.
The computer automatically connects to an available and remembered wireless network when the location
changes. If the available wireless network is secured, provide the password as required. For more
information, see the Windows help information system.
Tips on using the wireless-LAN feature
To achieve the best connection, use the following guidelines:
24
ThinkPad 11e Chromebook 4th Gen and ThinkPad Yoga 11e Chromebook 4th Gen User Guide

• Place your computer so that there are as few obstacles as possible between the wireless-LAN access
point and the computer.
• Open your computer cover to an angle of slightly more than 90 degrees.
Checking the wireless-LAN connection status
You can check the wireless-LAN connection status through the wireless-network-connection-status icon in
the Windows notification area. The more bars encompassed, the better the signal is.
Using the Bluetooth connection
Bluetooth can connect devices that are within a short distance from one another. Bluetooth is commonly
used in the following scenarios:
• Connecting peripheral devices to a computer
• Transferring data between hand-held devices and a personal computer
• Remotely controlling and communicating with devices such as mobile phones
Depending on the model, your computer might support the Bluetooth feature. To transfer data through the
Bluetooth feature, do the following:
Примітка: It is not recommended to use the wireless feature (the 802.11 standards) of your computer
simultaneously with a Bluetooth option. The data transmission speed can be delayed and the performance of
the wireless feature can be degraded.
1. Do one of the following:
• Press the Bluetooth-control key
• Open the Start menu, and then click Settings ➙ Devices ➙ Bluetooth & other devices. Turn on the
Bluetooth switch to enable the Bluetooth feature.
2. Right-click the data that you want to send.
3. Select Send To ➙ Bluetooth Devices.
4. Select a Bluetooth device, and then follow the instructions on the screen.
For more information, see the Windows help information system and the help information system of the
Bluetooth device.
and turn on the Bluetooth feature.
Using the NFC devices
If your computer supports the near field communication (NFC) feature, you will see an NFC icon or label
around the trackpad area.
NFC is a high-frequency and short-range wireless communication technology. By using NFC, you can
establish the radio communications between your computer and another NFC-enabled device over a few
centimeters or inches.
This section provides instructions on how to pair your computer with an NFC device. For more information
about data transfer, see the documentation of the NFC device.
Глава 2. Використання комп'ютера 25

Увага:
• Before handling the NFC card, touch a metal table or a grounded metal object. Otherwise the card might
get damaged by the static electricity from your body.
• During the data transfer, do not put your computer or NFC-enabled smartphone into sleep mode;
otherwise, your data might get damaged.
Enabling the NFC feature
By default, the NFC feature is enabled. If the NFC feature of your computer is disabled, do the following to
enable the NFC feature:
1. Open the Start menu and then click Settings ➙ Network & Internet ➙ Airplane mode.
2. Turn off the Airplane mode.
3. Turn on the NFC function.
Pairing your computer with an NFC card
Before you start, ensure that the card is in NFC Data Exchange Format (NDEF), otherwise the card cannot be
detected. Then do the following:
1. Position the card closely above the NFC label as shown. Align the shorter edge of the card with the
horizontal extension line for the center of the NFC label.
2. Slowly move the card a distance within 0.5 cm (0.20 inches) to the direction of the computer display.
Then hold the card for seconds until you are prompted that the card has been successfully detected.
Pairing your computer with an NFC-enabled smartphone
Before you start, ensure that the smartphone screen is facing upward. Then do the following:
1. Position the smartphone closely above the NFC label as shown. Align the shorter edge of the
smartphone with the horizontal extension line for the center of the NFC label.
2. Slowly move the smartphone a distance within 5 cm (1.97 inches) to the direction of the computer
display. Then hold the smartphone for seconds until you are prompted that the smartphone has been
successfully detected.
26 ThinkPad 11e Chromebook 4th Gen and ThinkPad Yoga 11e Chromebook 4th Gen User Guide

Using the Airplane mode
The Airplane mode is supported on the Windows 10 operating system. If the Airplane mode is enabled, all
wireless features are disabled.
To enable or disable the Airplane mode, do the following:
1. Open the Start menu.
2. Click Settings ➙ Network & Internet ➙ Airplane mode.
3. Slide the control for Airplane mode to turn it on or off.
Using the NVIDIA Optimus Graphics feature
Some ThinkPad notebook computers support NVIDIA Optimus Graphics.
The running program and power plan settings that you use on your computer have specific graphics quality
demand. To achieve the best balance between the computer performance and a long battery life, the NVIDIA
Optimus Graphics feature automatically switches between High Performance Graphics and Energy Saving
Graphics. You do not have to restart your computer, close programs, or intervene manually.
Using audio features
Your computer is equipped with the following items:
• Audio connector, 3.5 mm (0.14 inches) in diameter
• Microphones
• Speakers
Your computer also has an audio chip that enables you to enjoy various multimedia audio features, such as
the following:
• Compliant with High Definition Audio
• Playback of MIDI and MP3 files
• Recording and playback of PCM and WAV files
• Recording from various sound sources, such as a headset attached
The following list provides information about supported functions of the audio devices attached to the
connectors on your computer or the docking station.
• Headset with a 3.5-mm (0.14-inch), 4-pole plug: Headphone and microphone functions
• Conventional headphone: Headphone function
Примітка: The conventional microphone is not supported.
Using the camera
If your computer has a camera, you can use the camera to preview your video image and take a snapshot of
your current image.
To start the camera, open the Start menu and click Camera.
When the camera is started, the indicator is turned on in green, indicating that the camera is in use.
Глава 2. Використання комп'ютера 27

You also can use the integrated camera with other programs that provide features such as photographing,
video capturing, and video conferencing. To use the integrated camera with other programs, open one of the
programs and start the photographing, video capturing, or video conferencing function. Then, the camera
starts automatically and the green camera status indicator turns on. For more information about using the
camera with a program, see the help information system of the program.
Configuring camera settings
You can configure the camera settings to meet your needs, such as adjusting the quality of the video output.
To configure the camera settings, do one of the following:
• Open the Camera app, and click the settings icon in the upper-right corner. Follow the instructions on the
screen to configure the camera settings as desired.
• Open the Start menu and then click Lenovo Companion ➙ Hardware Settings ➙ Display, Camera &
Audio/Media. Locate the Camera section and then follow the instructions on the screen to configure the
camera settings.
Using an external display
This section provides instructions on how to connect an external display, choose display modes, and change
display settings.
You can use an external display such as a projector or a monitor to give presentations or to expand your
workspace.
Your computer supports the following video resolution, if the external display also supports that resolution.
• Up to 3840 x 2160 pixels / 60 Hz, with an external display connected to the Thunderbolt 3 connector or
the Mini DisplayPort connector
• Up to 3840 x 2160 pixels / 30 Hz, with an external display connected to the HDMI connector
For more information about the external display, see the manuals that come with it.
Connecting an external display
You can use either a wired display or a wireless display. The wired display can be connected to a video
connector such as the HDMI connector and Mini DisplayPort connector by a cable. The wireless display can
be added through the Miracast
®
function.
• Connecting a wired display
Примітка: When you connect an external monitor, a video interface cable with a ferrite core is required.
1. Connect the external display to an appropriate video connector on your computer, such as the HDMI
connector or Mini DisplayPort connector.
2. Connect the external display to an electrical outlet.
3. Turn on the external display.
If your computer cannot detect the external display, right-click on the desktop, and then click Screen
resolution/Display settings ➙ Detect.
• Connecting a wireless display
Примітка: To use a wireless display, ensure that both your computer and the external display support
the Miracast feature.
Do one of the following:
28
ThinkPad 11e Chromebook 4th Gen and ThinkPad Yoga 11e Chromebook 4th Gen User Guide

– Open the Start menu, and then click Settings ➙ Devices ➙ Connected devices ➙ Add a device.
– Click the action center icon
in the Windows notification area. Click Connect. Select the wireless
display and follow the instructions on the screen.
For more information, see the Windows help information system.
Choosing a display mode
You can display your desktop and apps on the computer display, the external display, or both. To choose
how to display the video output, press the display-mode switching key
and then select a display mode
you prefer.
There are four display modes:
• Disconnect: Displays the video output only on your computer screen.
Примітка: Depending on the situation, you might see Disconnect, PC screen only, Computer only, or
Disconnect projector.
• Duplicate: Displays the same video output on both your computer screen and an external display.
• Extend: Extends the video output from your computer display to an external display. You can drag and
move items between the two displays.
• Projector only: Shows the video output only on an external display.
Примітка: Depending on the situation, you might see Projector only or Second screen only.
If you show programs using DirectDraw or Direct3D
®
in full-screen mode, only the main display shows the
video output.
Changing display settings
You can change the settings for both the computer display and the external display. For example, you can
define which one is the main display and which one is the secondary display. You also can change the
resolution and orientation.
To change display settings, do the following:
1. Right-click on the desktop and select Display settings.
2. Select the display that you want to configure.
3. Change display settings as you want.
Примітка: If you set a higher resolution for the computer display than the external display, only part of the
screen can be shown on the external display.
Traveling with your computer
This topic provides information to help you work with your computer when you are traveling.
Use the following travel tips to travel more confidently and efficiently with your computer.
• When your computer goes through the x-ray machines at airport security stations, it is important to keep
your eyes on the computer at all times to prevent theft.
• Consider bringing an electrical adapter for use on an airplane or automobile.
• If you carry an ac power adapter, detach the ac cord from it to avoid damaging the cord.
Глава 2. Використання комп'ютера 29

Travel tips on airplanes
If you carry your computer onto an airplane, observe the following tips:
• Be careful about the seat in front of you on airplanes. Angle your computer display so that it does not get
caught when the person in front of you leans back.
• When taking off, remember to turn off your computer or put it into hibernation mode.
• If you intend to use your computer or wireless services (such as Internet and Bluetooth), check with the
airline for restrictions and availability of services before boarding the airplane. If there are restrictions on
the use of computers with wireless features on the airplane, you must abide by those restrictions.
The Airplane mode is supported on the Windows 10 operating system. In the Airplane mode, all wireless
features are disabled.
To enable the Airplane mode, do the following:
1. Open the Start menu, and then click Settings ➙ Network & Internet ➙ Airplane mode.
2. Slide the Airplane mode control to turn it on.
Travel accessories
If you are traveling to another country or region, you might want to consider an appropriate ac power adapter
for the country or region to which you are traveling.
To purchase travel accessories, go to:
http://www3.lenovo.com/us/en/accessories-and-upgrades/c/ACCESSORY?menu-id=Accessories_Upgrades
30 ThinkPad 11e Chromebook 4th Gen and ThinkPad Yoga 11e Chromebook 4th Gen User Guide

Глава 3. Enhancing your computer
This chapter provides instructions on how to use hardware devices to expand your computer capabilities.
Finding ThinkPad options
If you want to expand the capabilities of your computer, Lenovo has a number of hardware accessories and
upgrades to meet your needs. Options include memory modules, storage devices, network cards, port
replicators or docking stations, batteries, power adapters, keyboards, mice, and more.
To shop at Lenovo, go to:
http://www3.lenovo.com/us/en/accessories-and-upgrades/c/ACCESSORY?menu-id=Accessories_Upgrades
ThinkPad Pen Pro
Some computer models are equipped with the ThinkPad Pen Pro (an electronic pen). The ThinkPad Pen Pro
enables you to input text in a natural manner when you are:
• Taking notes
• Annotating Portable Document Format (PDF) files
• Drawing graphics with applications capable of editing and sketching
When you draw or write with the ThinkPad Pen Pro, keep it perpendicular to the computer display to achieve
the best line quality.
Use the ThinkPad Pen Pro instead of your finger in conditions such as the following:
• You need precise and detailed input, such as drawing a picture or using the handwriting mode.
• Too many elements are crowded on the screen, for example, when you are playing games.
• You want to keep your screen free from smudges.
• You have long fingernails and it is difficult for you to type.
Примiтки:
• The ThinkPad Pen Pro is not waterproof. Take care not to soak it or dip it in water.
• If your computer does not come with a ThinkPad Pen Pro, your computer does not support the use of the
pen.
• To purchase the ThinkPad Pen Pro, go to:
http://www3.lenovo.com/us/en/accessories-and-upgrades/c/ACCESSORY?menu-id=Accessories_Upgrades
© Copyright Lenovo 2017 31

Using the ThinkPad Pen Pro
The following illustration shows the ThinkPad Pen Pro.
1 Tip
2 Eraser button
3 Click button
You can perform the following operations with the ThinkPad Pen Pro:
• To click or make a selection, tap the display once with the pen.
• To double-click, tap twice without pausing.
• To right-click, tap the tip
press and hold the click button
• To erase ink, press and hold the eraser button
1 on the display and hold the pen there for one second. Alternatively, you can
3 while tapping the tip 1 on the display.
2 , tap the tip 1 on the display, and drag the pen across the
ink you want to erase.
The ThinkPad Pen Pro is stored in the slot on the bottom side of the computer. To remove the pen from the
slot, slide the tab of the pen a little bit out, and then completely pull out the pen.
Charging the ThinkPad Pen Pro
To charge the pen, insert the pen slightly into the slot until it snaps into position. The pen will be 80%
charged in about 15 seconds and 100% charged in about five minutes.
32
ThinkPad 11e Chromebook 4th Gen and ThinkPad Yoga 11e Chromebook 4th Gen User Guide

The following illustration is an example. You can insert the pen into the slot for charging no matter the
computer is in the notebook mode, stand mode, tent mode, or tablet mode.
Примітка: Ensure that your computer is on or in sleep mode. Otherwise, the pen will not be charged.
ThinkPad Pen Pro
Some computer models are equipped with a ThinkPad Pen Pro. The ThinkPad Pen Pro enables you to input
text in a natural manner when you are:
• Taking notes
• Annotating Portable Document Format (PDF) files
• Drawing graphics with applications capable of editing and sketching
When you draw or write with the pen, keep it perpendicular to the display to achieve the best line quality.
Use the ThinkPad Pen Pro instead of your finger in conditions such as the following:
• You need precise and detailed input, such as drawing a picture or using the handwriting mode.
• Too many elements are crowded on the screen, for example, when you are playing games.
• You want to keep your screen free from smudges.
• You have long fingernails and it is difficult for you to type.
Примiтки:
• The ThinkPad Pen Pro is not waterproof. Take care not to soak it or dip it in water.
• The ThinkPad Pen Pro does not apply to computer models equipped with the Tablet Digitizer Pen, and
vice versa.
• If your computer does not come with a ThinkPad Pen Pro, your computer does not support the use of a
pen.
• To purchase the ThinkPad Pen Pro, go to:
http://www3.lenovo.com/us/en/accessories-and-upgrades/c/ACCESSORY?menu-id=Accessories_Upgrades
Using the ThinkPad Pen Pro
The ThinkPad Pen Pro is battery-powered and used with one AAAA alkaline battery.
To install a battery into the ThinkPad Pen Pro, do the following:
1. Unscrew and remove the end cap of the ThinkPad Pen Pro.
Глава 3. Enhancing your computer 33

2. Insert an AAAA alkaline battery into the battery compartment with the negative polarity facing outward.
3. Reinstall the end cap and tighten it into position.
When the battery power runs out, the ThinkPad Pen Pro stops functioning. In this case, replace the battery.
The following illustration shows the ThinkPad Pen Pro.
1 Tip
2 Eraser button
3 Click button
4 End cap
You can perform the following operations with the ThinkPad Pen Pro:
• To click or make a selection, tap the display once with the pen.
• To double-click, tap twice without pausing.
• To right-click, tap the tip on the display and hold the pen for one second. Alternatively, you can press the
click button and tap the tip on the display.
34
ThinkPad 11e Chromebook 4th Gen and ThinkPad Yoga 11e Chromebook 4th Gen User Guide

• To erase ink, press and hold the eraser button, tap the tip on the display, and drag the pen across the ink
you want to erase.
The ThinkPad Pen Pro is delivered with a pen holder. To store the ThinkPad Pen Pro on the computer, do the
following:
1. Insert the pen holder into an available USB connector on the computer.
2. Insert the ThinkPad Pen Pro into the pen holder in any ways as shown in the following illustrations:
Tablet Digitizer Pen
Some computer models are equipped with a Tablet Digitizer Pen. The Tablet Digitizer Pen enables you to
input text in a natural manner when you are:
• Taking notes
• Annotating Portable Document Format (PDF) files
• Drawing graphics with applications capable of editing and sketching
When you draw or write with the pen, keep it perpendicular to the display to achieve the best line quality.
Use the Tablet Digitizer Pen instead of your finger in conditions such as the following:
• You need precise and detailed input, such as drawing a picture or using the handwriting mode.
• Too many elements are crowded on the screen, for example, when you are playing games.
• You want to keep your screen free from smudges.
• You have long fingernails and it is difficult for you to type.
Глава 3. Enhancing your computer 35

Примiтки:
• The Tablet Digitizer Pen is not waterproof. Take care not to soak it or dip it in water.
• The Tablet Digitizer Pen does not apply to computer models equipped with the ThinkPad Pen Pro, and
vice versa.
• If your computer does not come with a Tablet Digitizer Pen , your computer does not support the use of a
pen.
• To purchase the Tablet Digitizer Pen, go to:
http://www3.lenovo.com/us/en/accessories-and-upgrades/c/ACCESSORY?menu-id=Accessories_Upgrades
Using the Tablet Digitizer Pen
The Tablet Digitizer Pen functions without batteries.
1 Tip
2 Click button
You can perform the following operations with the Tablet Digitizer Pen:
• To click or make a selection, tap the display once with the pen.
• To double-click, tap twice without pausing.
• To right-click, tap the tip on the display and hold the pen for one second. Alternatively, you can press the
click button and tap the tip on the display.
36
ThinkPad 11e Chromebook 4th Gen and ThinkPad Yoga 11e Chromebook 4th Gen User Guide

The Tablet Digitizer Pen is stored in the slot on the right side of the computer. To remove the pen from the
slot, slide the tab of the pen a little bit out, and then completely pull out the pen.
Глава 3. Enhancing your computer 37

38 ThinkPad 11e Chromebook 4th Gen and ThinkPad Yoga 11e Chromebook 4th Gen User Guide

Глава 4. Інформація про спеціальні можливості, ергономіку та обслуговування
У цьому розділі наведено інформацію про спеціальні можливості, ергономіку, очищення та
обслуговування.
Accessibility information
Lenovo is committed to providing users who have hearing, vision, and mobility limitations with greater
access to information and technology. This section provides information about the ways these users can get
the most out of their computer experience. You also can get the most up-to-date accessibility information
from the following Web site:
http://www3.lenovo.com/us/en/lenovo/accessibility/
Keyboard shortcuts
The following list contains keyboard shortcuts that can help make your computer easier to use.
Примітка: Depending on your keyboard, some of the following keyboard shortcuts might not be available.
• Windows logo key + U: Open Ease of Access Center
• Right Shift for eight seconds: Turn on or turn off Filter Keys
• Shift five times: Turn on or turn off Sticky Keys
• Num Lock for five seconds: Turn on or turn off Toggle Keys
• Left Alt+Left Shift+Num Lock: Turn on or turn off Mouse Keys
• Left Alt+Left Shift+PrtScn (or PrtSc): Turn on or turn off High Contrast
For more information, go to
keywords: keyboard shortcuts, key combinations, shortcut keys.
Ease of Access Center
Ease of Access Center on the Windows operating system enables you to configure your computers to suit
their physical and cognitive needs.
To access Ease of Access Center, do the following:
1. Go to Control Panel, and ensure that you view Control Panel using Category.
2. Click Ease of Access ➙ Ease of Access Center.
3. Choose the appropriate tool by following the instructions on the screen.
Ease of Access Center mainly includes the following tools:
• Magnifier
Magnifier is a useful utility that enlarges the entire screen or part of the screen so that you can see the
items better.
• Narrator
Narrator is a screen reader that reads what is displayed on the screen aloud and describes events such as
error messages.
• On-Screen Keyboard
https://windows.microsoft.com/, and then search using any of the following
© Copyright Lenovo 2017 39

If you prefer to type or enter data into your computer using a mouse, joystick, or other pointing device
instead of a physical keyboard, you can use On-Screen Keyboard. On-Screen Keyboard displays a visual
keyboard with all the standard keys. You can select keys using the mouse or another pointing device, or
you can tap to select the keys if your computer supports multi-touch screen.
• High Contrast
High Contrast is a feature that heightens the color contrast of some text and images on your screen. As a
result, those items are more distinct and easier to identify.
• Personalized keyboard
Adjust keyboard settings to make your keyboard easier to use. For example, you can use your keyboard
to control the pointer and make the keyboard easier to type certain key combinations.
• Personalized mouse
Adjust mouse settings to make your mouse easier to use. For example, you can change the pointer
appearance and make your mouse easier to manage windows.
Speech Recognition
Speech Recognition enables you to control your computer by voice.
Using only your voice, you can start programs, open menus, click objects on the screen, dictate text into
documents, and write and send e-mails. Everything you do with the keyboard and mouse can be done with
only your voice.
To use Speech Recognition, do the following:
1. Go to Control Panel, and ensure that you view Control Panel by Category.
2. Click Ease of Access ➙ Speech Recognition.
3. Follow the instructions on the screen.
Screen-reader technologies
Screen-reader technologies are primarily focused on software program interfaces, help systems, and various
online documents. For additional information about screen readers, see the following:
• Using PDFs with screen readers:
https://www.adobe.com/accessibility.html?promoid=DJGVE
• Using the JAWS screen reader:
https://www.freedomscientific.com/Products/Blindness/JAWS
• Using the NVDA screen reader:
https://www.nvaccess.org/
Screen resolution
You can make the text and images on your screen easier to read by adjusting the screen resolution of your
computer.
To adjust the screen resolution, do the following:
1. Right-click an empty area of the desktop and then click Display settings ➙ Display.
2. Follow the instructions on the screen.
Примітка: Setting a resolution too low might prevent some items from fitting on the screen.
40
ThinkPad 11e Chromebook 4th Gen and ThinkPad Yoga 11e Chromebook 4th Gen User Guide

Customizable item size
You can make the items on your screen easier to read by changing the item size.
• To change the item size temporarily, use the Magnifier tool in Ease of Access Center.
• To change the item size permanently, do the following:
– Change the size of all the items on your screen.
1. Right-click an empty area of the desktop and then click Display settings ➙ Display.
2. Change the item size by following the instructions on the screen. For some applications, your
configuration might not take effect until you sign out and then sign in again.
– Change the size of the items on a Web page.
Press and hold Ctrl, and then press the plus-sign key (+) to enlarge or the minus-sign key (–) to reduce
the text size.
– Change the size of the items on the desktop or a window.
Примітка: This function might not work on some windows.
If your mouse has a wheel, press and hold Ctrl, and then scroll the wheel to change the item size.
Industry-standard connectors
Your computer provides industry-standard connectors that enable you to connect assistive devices.
Documentation in accessible formats
Lenovo provides electronic documentation in accessible formats, such as properly tagged PDF files or
HyperText Markup Language (HTML) files. Lenovo electronic documentation is developed to ensure that
visually impaired users can read the documentation through a screen reader. Each image in the
documentation also includes adequate alternative text so that visually impaired users can understand the
image when they use a screen reader.
Інформація про ергономіку
Щоб максимально ефективно використовувати комп'ютер і уникнути дискомфорту, дуже важливо під
час роботи враховувати рекомендації з ергономіки. Організуйте робоче місце та потрібне обладнання
відповідно до своїх потреб і типу роботи. Крім того, щоб користуватися комп'ютером якомога
продуктивніше та з найбільшим комфортом, застосовуйте навички здорової роботи.
Робота у віртуальному офісі може потребувати від вас адаптації до частих змін у навколишніх умовах.
Адаптація до джерел світла, активне сидіння та правильне розміщення апаратного забезпечення
комп'ютера можуть допомогти вам підвищити продуктивність і працювати комфортніше.
На зображенні нижче показано рекомендовані умови роботи. Навіть якщо такі умови недоступні, ви
можете скористатися багатьма з цих порад. Розвивайте в собі хороші навички, і вони добре
служитимуть вам.
Глава 4. Інформація про спеціальні можливості, ергономіку та обслуговування 41

Загальна поза. Потроху змінюйте позу під час роботи, щоб уникнути дискомфорту, спричиненого
тривалою роботою в одній позі. Попередити дискомфорт від роботи в одній позі також допоможуть
регулярні короткі перерви.
Екран. Розмістіть екран на комфортній для перегляду відстані — від 510 до 760 мм. Намагайтесь
уникнути відблисків чи дзеркальних відображень верхнього освітлення або зовнішніх джерел світла
на екрані. Регулярно чистьте екран і налаштуйте рівень яскравості, за якого зображення буде чітким
(за допомогою клавіш регулювання яскравості).
Положення голови. Тримайте голову та шию зручно в нейтральному положенні (прямо).
Стілець. Стілець має забезпечувати хорошу підтримку спини, а висота сидіння має регулюватися.
Відрегулюйте стілець так, щоб вам було якомога зручніше на ньому сидіти.
Положення рук і кистей. Якщо можливо, спирайте руки на підлокітники стільця або на робочу
поверхню. Передпліччя, зап'ястя та кисті мають бути розслаблені та перебувати в нейтральному
положенні (горизонтально). Під час друку торкайтеся клавіш м'яко, не стукаючи по них.
Положення ніг. Стегна мають бути паралельні підлозі, а ступні мають повністю стояти на підлозі або
на підставці для ніг.
Робоче положення під час подорожі
Якщо ви подорожуєте або працюєте не на своєму робочому місці, дотримуватися всіх рекомендацій
щодо ергономіки може бути неможливо. Незалежно від умов, намагайтеся дотримуватися якомога
більшої кількості рекомендацій. Наприклад, сидіння в правильній позі за достатнього освітлення
допоможе вам зберегти бажаний рівень комфорту й продуктивності. Якщо ви працюєте не в офісі,
приділіть увагу активному сидінню та робіть перерви в роботі. Щоб допомогти вам модифікувати
комп'ютер і розширити його можливості відповідно до ваших потреб, ми пропонуємо значну кількість
рішень ThinkPad. Деякі з доступних опцій ви можете переглянути за адресою
essentials
налаштовувати ваш комп'ютер для різних умов роботи та розширити його функціональні можливості.
. Дізнайтеся про доступні док-станції та зовнішні продукти, які допоможуть краще
http://www.lenovo.com/
Запитання щодо зору?
Екрани ноутбуків ThinkPad розроблені відповідно до найвищих стандартів. Чітке та різке зображення
на цих великих і яскравих екранах не перенапружує очі. Будь-яка робота, що потребує тривалої
візуальної концентрації, може втомлювати очі. Якщо у вас є запитання щодо втоми очей або
візуального дискомфорту, зверніться до офтальмолога.
Очищення й обслуговування
За належного догляду та обслуговування комп'ютер надійно служитиме вам. У наведених нижче
розділах повідомляється, як підтримувати комп'ютер у найкращому робочому стані.
42
ThinkPad 11e Chromebook 4th Gen and ThinkPad Yoga 11e Chromebook 4th Gen User Guide

Основні поради щодо обслуговування
Ось деякі основні поради щодо підтримки належної роботи вашого комп'ютера.
• Зберігайте пакувальні матеріали подалі від дітей, щоб уникнути небезпеки задушення.
• Тримайте комп'ютер подалі від магнітів, ввімкнутих стільникових телефонів, електричних приладів і
динаміків (на відстані не менше 13 см).
• Не піддавайте комп'ютер впливу екстремальних температур (нижче 5 °C або вище 35 °C).
• Не кладіть між дисплеєм і клавіатурою або опорою для долонь жодних предметів (зокрема, папір).
• Дисплей комп'ютера варто відкривати трохи більше ніж на 90°. Не відкривайте дисплей більше ніж
на 180°. Це може призвести до ушкодження петель.
• Не перевертайте комп'ютер, коли до нього підключено адаптер змінного струму. Інакше це може
призвести до пошкодження штекера адаптера.
• Перш ніж переміщувати комп'ютер, вийміть із нього всі носії, вимкніть підключені пристрої та
від'єднайте шнури та кабелі.
• Піднімаючи відкритий комп'ютер, тримайте його за нижню частину. Не піднімайте та не тримайте
комп'ютер за дисплей.
• Розбирати й ремонтувати комп'ютер має лише спеціаліст авторизованого сервіс-центру ThinkPad.
• Не змінюйте та не кріпіть клейкою стрічкою фіксатори, щоб тримати дисплей відкритим або
закритим.
• Уникайте контакту комп'ютера та периферійних пристроїв із повітрям, що виходить із пристрою,
який може утворювати негативно заряджені іони. Якщо це можливо, заземлюйте комп'ютер, щоб
забезпечити безпечний електростатичний розряд.
Очищення комп'ютера
Щоб захистити поверхні комп'ютера та забезпечити безпроблемну роботу, рекомендовано
періодично його чистити.
Очищення кришки комп'ютера. Протріть тканиною без ворсу, змоченою водою з м'яким милом. Не
наносьте рідину безпосередньо на кришку.
Очищення клавіатури. Протріть клавіші по черзі тканиною без ворсу, змоченою водою з м'яким
милом. Якщо протирати кілька клавіш одночасно, тканина може зачепитися за сусідню клавішу та
пошкодити її. Не розпилюйте рідину для очищення безпосередньо на клавіатуру. Видуйте пил або
крихти з-під клавіш за допомогою груші для очищення камери із щіточкою або холодним повітрям із
фена.
Очищення екрана комп'ютера. Подряпини, жир, пил, хімікати та ультрафіолетове випромінювання
можуть погіршити зображення на екрані комп'ютера. Обережно протирайте екран сухою м'якою
тканиною без ворсу. Якщо ви бачите на екрані відмітку, схожу на подряпину, вона може виявитися
плямою. Обережно зітріть пляму м'якою сухою тканиною без ворсу. Якщо пляма не зникне, змочіть
м'яку тканину без ворсу водою або засобом для очищення лінз. Не наносьте рідину безпосередньо на
екран комп'ютера. Перш ніж закрити кришку комп'ютера, переконайтеся, що екран сухий.
Глава 4. Інформація про спеціальні можливості, ергономіку та обслуговування 43

44 ThinkPad 11e Chromebook 4th Gen and ThinkPad Yoga 11e Chromebook 4th Gen User Guide

Глава 5. Advanced configuration
This chapter provides information to help you further configure the computer:
Installing device drivers
Device drivers are programs that contain instructions for the operating system about how to operate or
“drive” a certain piece of hardware. Each hardware component on your computer has its own specific driver.
If you add a component, the operating system must be instructed on how to operate that piece of hardware.
After you install the driver, the operating system can recognize the hardware component and understand
how to use it.
Примітка: Because drivers are programs, like any other file on your computer, they are susceptible to
corruption and might not perform properly if corruption occurs.
It is not always necessary to download the latest drivers. However, you should download the latest driver for
a component when you notice poor performance from that component or when you added a component.
This action might eliminate the driver as the potential cause of a problem.
Getting the latest drivers from the Web site
You can download and install updated device drivers from the Lenovo Support Web site by doing the
following:
1. Go to
2. Select the entry for your computer and then follow the instructions on the screen to download and install
http://www.lenovo.com/support.
necessary software.
Getting the latest drivers using Lenovo Companion
The system update function of Lenovo Companion helps you keep the software on your computer up-todate. Update packages are stored on Lenovo servers and can be downloaded from the Lenovo Support Web
site. Update packages can contain applications, device drivers, UEFI BIOS flashes, or software updates.
When Lenovo Companion connects to the Lenovo Support Web site, the program automatically recognizes
the following information and determines what updates are available for your computer:
• Machine type and model of your computer
• Installed operating system
• Language of the operating system
Lenovo Companion then displays a list of update packages and categorizes each update as critical,
recommended, or optional to help you understand the importance. You have complete control of which
updates to download and install. After you select the update packages you want, Lenovo Companion
automatically downloads and installs the updates.
Lenovo Companion is preinstalled on your computer and is ready to run. The only prerequisite is an active
Internet connection. You can start the program manually, or you can use the schedule feature to enable the
program to search for updates automatically at specified intervals. You also can predefine scheduled
updates to search by the critical severity level so the list you choose from contains only those update types
that you need.
For more information about how to use Lenovo Companion, see the help system of the program.
© Copyright Lenovo 2017 45

Using system management
This topic is primarily intended for the network administrators.
Your computer is designed for manageability, so that you can redirect more resources to better meet your
business objectives.
This manageability, known as total cost of ownership (TCO), enables you to remotely operate client
computers in the same way as you operate your own computer, such as turning on a client computer,
formatting a storage drive, and installing a program.
Once the computer is configured and operational, you can manage it by using the software and the
manageability features that are already integrated into the client computer and the network.
Desktop Management Interface
The UEFI BIOS of your computer supports an interface called System Management BIOS (SMBIOS)
Reference Specification, version 2.8 or later. SMBIOS provides information about the hardware components
of your computer. It is the responsibility of the UEFI BIOS to provide information about itself and the devices
on the system board. This specification documents the standards for getting access to this BIOS
information.
Preboot eXecution Environment
The Preboot eXecution Environment (PXE) technology makes the computer more manageable by enabling
the computer to start from a server. Your computer supports the personal computer functions that PXE
requires. For example, with the appropriate LAN card, your computer can be started from the PXE server.
Примітка: The Remote Initial Program Load (RIPL or RPL) function cannot be used with your computer.
Wake on LAN
The network administrator can turn on a computer from a management console by using the Wake on LAN
feature.
When the Wake on LAN feature is enabled, many operations, such as data transfer, software updates, and
flash updates of the UEFI BIOS, can be done remotely without remote attendance. The updating process can
perform after normal working hours and on weekends, so that the users are not interrupted during work, and
the LAN traffic is kept to a minimum. It saves time and increases productivity.
If the computer is turned on through Wake on LAN, the computer starts follow the Network Boot sequence.
Asset ID EEPROM
The Asset ID EEPROM contains information about the computer configuration and the serial numbers of the
key components. It also includes a number of blank fields where you can record information about the end
users in your network.
To enable a network administrator to remotely control your computer, set the following system-management
features in the ThinkPad Setup program:
• Wake on LAN
• Network Boot sequence
Примітка: If a supervisor password has been set, you are required to enter the supervisor password when
you start the ThinkPad Setup program.
46
ThinkPad 11e Chromebook 4th Gen and ThinkPad Yoga 11e Chromebook 4th Gen User Guide

Enabling or disabling the Wake on LAN feature
When the Wake on LAN feature is enabled and the computer is connected to a LAN, the network
administrator can start the computer remotely from a management console, using a remote networkmanagement program.
To enable or disable the Wake on LAN feature, do the following:
1. Restart the computer. When the logo screen is displayed, press F1 to start the ThinkPad Setup program.
2. Select Config ➙ Network. The Network submenu is displayed.
3. Select a corresponding option for the Wake on LAN feature.
4. Press F10 to save the settings and exit.
Defining a Network Boot sequence
When the computer wakes on LAN, the computer boots from the device as specified on the Network Boot
menu, and then follow the boot order list on the Boot menu.
To define a Network Boot sequence, do the following:
1. Restart the computer. When the logo screen is displayed, press F1 to start the ThinkPad Setup program.
2. Select Startup ➙ Network Boot. The boot device list is displayed.
3. Select a boot device to make it as the top boot priority.
4. Press F10 to save the settings and exit.
You can press F9 to restore to the factory default settings.
Глава 5. Advanced configuration 47

48 ThinkPad 11e Chromebook 4th Gen and ThinkPad Yoga 11e Chromebook 4th Gen User Guide

Глава 6. Виправлення неполадок комп'ютера
У цьому розділі пояснюється, як вирішувати проблеми з комп'ютером.
Виправлення неполадок
Якщо під час роботи комп'ютера сталася помилка, на екрані має з'явитися повідомлення з
відповідним кодом або пролунати звуковий сигнал під час увімкнення. Якщо у вас виникла проблема з
комп'ютером, перегляньте інформацію про ознаки неполадки та способи її усунення, наведену в
цьому розділі, і спробуйте вирішити цю проблему самостійно.
Computer stops responding
Print these instructions now and keep them with your computer for reference later.
Problem: My computer is unresponsive (I cannot use the ThinkPad pointing device or the keyboard).
Solution: Do the following:
1. Press and hold the power button until the computer turns off. If you cannot turn off the computer by
pressing the power button, remove the ac power adapter and the removable battery. After the computer
is turned off, reconnect the ac power adapter and reinstall the removable battery, and then restart the
computer by pressing the power button. If the computer does not turn on, continue with step 2.
2. While the computer is turned off, remove all power sources from the computer (removable battery and
the ac power adapter). Plug in the ac power adapter while keeping the removable battery out of the
computer. If the computer does not turn back on, continue with step 3.
Примітка: When the computer starts up and enters the Windows environment, use the proper
shutdown procedure to turn off the computer. When the computer is off, reattach the removable battery
and restart the computer. If the computer does not start with the removable battery reattached, remove
the removable battery and again start with step 2. If the computer starts with ac power but does not start
when the removable battery is attached, call the Customer Support Center for support.
3. While the computer is off, remove all sources of power (removable battery and the ac power adapter).
Remove all external devices that are attached to your computer (keyboard, mouse, printer, scanner, and
so on). Repeat step 2. If step 2 is unsuccessful, continue with step 4.
Примітка: The following steps involve removing static sensitive components from your computer.
Make sure that you are properly grounded and remove all sources of power attached to the computer. If
you are uncomfortable or unsure about removing components, call the Customer Support Center for
assistance.
4. While the computer is off, remove all sources of power and external hardware. Remove any non-original
memory module added to your computer. After removing the extra memory module and reinstalling the
original memory module, repeat step 2. If the computer still does not turn on, consult the user manual for
other customer-replaceable components that are attached to your computer.
If the computer still does not start up, call the Customer Support Center and a Customer Support Specialist
will assist you.
Пролиття рідини на клавіатуру
Проблема. На комп'ютер було пролито рідину.
© Copyright Lenovo 2017 49

Рішення. Більшість рідин проводять електрику, тому пролита на клавіатуру рідина може спричинити
численні короткі замикання та пошкодити комп'ютер. Щоб вирішити цю проблему, виконайте описані
нижче дії.
1. Переконайтеся, що рідина не може спричинити коротке замикання між вами та адаптером
змінного струму (якщо він використовується).
2. Негайно відключіть адаптер змінного струму, але будьте при цьому обережні.
3. Негайно вимкніть комп'ютер. Якщо комп'ютер не вимикається, вийміть знімний акумулятор. Що
швидше ви припините проходження струму через комп'ютер, то більше вірогідність знизити
рівень ушкоджень від коротких замикань.
Увага: Якщо ви негайно вимкнете комп'ютер, то можете втратити певні дані чи роботу. Проте
якщо цього не зробити, комп'ютер може отримати невиправні пошкодження.
4. Перш ніж знову ввімкнути комп'ютер, зачекайте, доки рідина не висохне повністю.
Ethernet problems
• Problem: My computer cannot connect to the network.
Solution:
Ensure that:
– The cable is installed correctly.
The network cable must be securely connected both to the Ethernet connector of your computer and to
the RJ45 connector of the hub. The maximum allowable distance from the computer to hub is 100 m
(328 ft). If the cable is connected and the distance is within the acceptable limits but the problem
persists, try a different cable.
– You are using the correct device driver. To install the correct driver, do the following:
1. Go to Control Panel, and ensure that you view Control Panel by Category.
2. Click Hardware and Sound ➙ Device Manager. If you are prompted for an administrator
password or confirmation, type the password or provide confirmation.
3. Double-click Network adapters to view all network adapters. If an exclamation mark ! is displayed
next to the adapter name, you might not be using the correct driver or the driver might have been
disabled.
4. Right-click the highlighted adapter, click Update driver, and then follow the instructions on the
screen to update the driver.
– The switch port and the adapter have the same duplex setting.
If you configured the adapter for full duplex, ensure that the switch port also is configured for full
duplex. Setting a wrong duplex mode can degrade performance, cause data loss, or result in lost
connections.
– You have installed all networking software that is necessary for your network environment.
Check with your LAN administrator for the necessary networking software.
• Problem: The adapter stops working for no apparent reason.
Solution: The network driver files might be corrupt or missing.
• Problem: My computer is a Gigabit Ethernet model and I use a speed of 1000 Mbps, the connection fails
or errors occur.
Solution:
– Use Category 5 wiring and ensure that the network cable is securely connected.
– Connect to a 1000 BASE-T hub/switch (not 1000 BASE-X).
50
ThinkPad 11e Chromebook 4th Gen and ThinkPad Yoga 11e Chromebook 4th Gen User Guide

• Problem: The Wake on LAN feature is not working.
Solution: Ensure that Wake on LAN is enabled in ThinkPad Setup. If it is, check with your LAN
administrator for the necessary settings.
• Problem: My computer is a Gigabit Ethernet model, but it cannot connect to the network at 1000 Mbps.
Instead, it connects at 100 Mbps.
Solution:
– Try another Ethernet cable.
– Ensure that the link partner is set to auto-negotiate.
– Ensure that the switch is 802.3ab-compliant (gigabit over copper).
Wireless-LAN problem
Problem: I cannot connect to the network using the built-in wireless network card.
Solution: Ensure that:
• The Airplane mode is off.
• Your wireless-LAN driver is the latest version.
• Your computer is within the range of a wireless access point.
• The wireless radio is enabled.
Bluetooth problem
Примітка: Check your connection anytime and ensure that no other Bluetooth-enabled device is searching
for the device to which you want to connect. Simultaneous searching is not allowed in the Bluetooth
connection.
Problem: Sound does not come from the Bluetooth headset/headphones but comes from the local speaker
even though the Bluetooth headset/headphones is connected using a Headset profile or AV profile.
Solution: Do the following:
1. Exit the program that uses the sound device (for example, Windows Media Player).
2. Go to Control Panel, and ensure that you view Control Panel by Category.
3. Click Hardware and Sound ➙ Sound ➙ Playback.
4. If you are using a Headset profile, select Bluetooth Hands-free Audio and click Set Default. If you are
using an AV profile, select Stereo Audio and click Set Default.
5. Click OK to close the Sound window.
Keyboard problems
• Problem: All or some keys on the keyboard do not work.
Solution: If an external numeric keypad is connected:
1. Turn off the computer.
2. Remove the external numeric keypad.
3. Turn on the computer and try using the keyboard again.
If the keyboard problem is resolved, carefully reconnect the external numeric keypad.
If the problem persists, ensure that the correct device driver is installed by doing the following:
Глава 6. Виправлення неполадок комп'ютера 51

1. Go to Control Panel, and then change the view of Control Panel from Category to Large icons or
Small icons.
2. Click Keyboard.
3. Click the Hardware tab. In the Device Properties section, ensure that you see this message: Device
Status: This device is working properly.
If keys on the keyboard still do not work, have the computer serviced.
• Problem: All or some keys on the external numeric keypad do not work.
Solution: Ensure that the external numeric keypad is correctly connected to the computer.
• Problem: The keys on the top row of the numeric keypad might not function the same as the icon printed
on each key.
Solution: Do the following:
1. Go to Control Panel, and then change the view of Control Panel from Category to Large icons or
Small icons.
2. Click Keyboard. In the Keyboard Properties window, click the Fn and function keys tab.
Примітка: If the Fn and function keys tab is not displayed, connect your computer to the Internet.
Then download and install the ThinkPad Hotkey Features program from the Lenovo Support Web
site. For more information, see "Installing device drivers" на сторінці 45.
3. In the How to use Fn key combinations section, select your preferred option.
4. If you select Fn sticky method, press Fn to reset the Fn sticky status.
5. Try to press keys on the top row of the numeric keypad again to check if the problem is resolved.
Computer screen problems
• Problem: My screen keeps blanking when I do not want it to.
Solution: Do the following:
1. Go to Control Panel, and ensure that you view Control Panel by Category.
2. Click Hardware and Sound ➙ Power Options.
3. Show the additional plans, and then select High performance.
• Problem: When I turn on the computer, nothing is displayed on the screen and the computer does not
beep while starting up.
Примітка: If you are not sure whether you heard any beeps, turn off the computer by pressing and
holding the power button for four seconds or more. Then turn on the computer and listen again.
Solution: Ensure that:
– The battery is installed correctly.
– The ac power adapter is connected to the computer and the power cord is plugged into a working
electrical outlet.
– The computer is turned on. (Press the power button again for confirmation.)
– The brightness level of the screen is appropriately set.
If a power-on password is set, press any key to display the prompt for the power-on password and then
type the correct password and press Enter.
If these items are correctly set, and the screen remains blank, have the computer serviced.
• Problem: When I turn on the computer, only a white cursor is displayed on a blank screen.
Solution: If you have modified a partition on your hard disk drive by using partition software, information
about that partition, or the master boot record might have been destroyed.
52
ThinkPad 11e Chromebook 4th Gen and ThinkPad Yoga 11e Chromebook 4th Gen User Guide

Do the following to try to solve the problem:
1. Turn off the computer, and then turn it on again.
2. If you still see only the cursor on the screen, do the following:
– If you have used partition software, examine the partition on the hard disk drive by using the
software, and recover the partition if required.
If the problem persists, have the computer serviced.
• Problem: The screen goes blank while the computer is on.
Solution: Your screen saver or power management might have been enabled. Do one of the following:
– Touch the TrackPoint pointing device or the trackpad, or press a key to exit the screen saver.
– Press the power button to resume the computer from sleep or hibernation mode.
• Problem: The screen is blank.
Solution: Do the following:
1. Press the display-mode switching key
to bring up the image.
2. If you are using the ac power adapter, or using the battery and the battery gauge shows that the
battery is not depleted, press the brightness-up key
to make the screen brighter.
3. If your computer is in sleep mode, press Fn to resume the computer from sleep mode.
4. If the problem persists, follow the solution for the following problem.
• Problem: The screen is unreadable or distorted.
Solution: Ensure that:
– The display device driver is installed correctly.
– The screen resolution and color quality are correctly set.
– The monitor type is correct.
To check these settings, do the following:
1. Right-click on the desktop, and click Display settings ➙ Advanced display settings.
Примітка: If your computer cannot detect the external monitor, click Detect in the Display window.
2. Select the external monitor and set Resolution.
3. Click Display adapter properties.
4. Click the Monitor tab. Check the monitor information to make sure that the monitor type is correct. If
it is, click OK to close the window; otherwise proceed with the following steps.
5. If more than two monitor types are displayed, select Generic PnP Monitor or Generic Non-PnP
Monitor.
6. Click Properties. If you are prompted for an administrator password or confirmation, type the
password or provide confirmation.
7. Click the Driver tab.
8. Click Update Driver.
9. Click Browse my computer for driver software, and then click Let me pick from a list of device
drivers on my computer.
10. Clear the Show compatible hardware check box.
11. Select the correct manufacturer and model for the external monitor. If you cannot find your monitor
on the list, stop the installation of this driver and use the driver shipped with your monitor.
12. After updating the driver, click Close.
Глава 6. Виправлення неполадок комп'ютера 53

• Problem: Incorrect characters are displayed on the screen.
Solution: Ensure that you install the operating system and program correctly. If the problem persists, have
the computer serviced.
• Problem: I try to turn off my computer but the screen stays on and I cannot completely turn off my
computer.
Solution: Press and hold the power button for four seconds or more to turn off the computer.
• Problem: Missing, discolored, or bright dots appear on the screen every time I turn on my computer.
Solution: This is an intrinsic characteristic of the TFT technology. Your computer display contains multiple
thin-film transistors (TFTs). Only a very small number of missing, discolored, or bright dots on the screen
might exist all the time.
External monitor problems
• Problem: The external monitor is blank.
Solution: To bring up the image, press the display-mode switching key
want. If the problem persists, do the following:
1. Connect the external monitor to another computer to ensure that it works.
2. Reconnect the external monitor to your computer.
3. See the manual shipped with the external monitor to check the resolutions and refresh rates that are
supported.
– If the external monitor supports the same resolution as the computer display or a higher resolution,
view output on the external monitor or on both the external monitor and the computer display.
– If the external monitor supports a lower resolution than the computer display, view output on the
external monitor only. (If you view output on both the computer display and the external monitor,
the external monitor screen will be blank or distorted.)
• Problem: I cannot set a higher resolution than the present one on my external monitor.
Solution: Ensure that the monitor information is correct. If necessary, update the monitor driver.
• Problem: The screen is unreadable or distorted.
Solution: Ensure that:
– The monitor information is correct and the appropriate monitor type is selected. If necessary, update
the monitor driver.
– Ensure that an appropriate refresh rate is selected by doing the following:
1. Connect the external monitor to the monitor connector, and then connect the monitor to an
electrical outlet.
2. Turn on the external monitor and the computer.
3. Right-click on the desktop, and then click Display settings ➙ Display.
and select the monitor you
Примітка: If your computer cannot detect the external monitor, click Detect in the Display
window.
4. Click the icon for the appropriate monitor (Monitor-2 icon is for the external monitor).
5. Click Display adapter properties.
6. Click the Monitor tab.
7. Select the correct screen refresh rate.
• Problem: Wrong characters are displayed on the screen.
54
ThinkPad 11e Chromebook 4th Gen and ThinkPad Yoga 11e Chromebook 4th Gen User Guide

Solution: Ensure that you follow the correct procedure when installing the operating system and program.
If they are installed and configured correctly, but the problem still persists, have the external monitor
serviced.
• Problem: The Extend desktop function does not work.
Solution: Enable the Extend desktop function. See "Using an external display" на сторінці 28.
• Problem: I am using the Extend desktop function, but I cannot set a higher resolution or higher refresh
rate on the secondary display.
Solution: Change the resolution and the color depth to lower settings for the primary display. See "Using
an external display" на сторінці 28.
• Problem: Display switching does not work.
Solution: If you use the Extend desktop function, disable it, and change the display output location. If a
DVD movie or a video clip is playing, stop the playback, close the program, and then change the display
output location.
• Problem: The screen position on the external monitor is incorrect when that monitor is set for a high
resolution.
Solution: Sometimes, when you use a high resolution such as 1600 x 1200 pixels, the image is shifted to
the left or right on the screen. To correct this, first ensure that your external monitor supports the display
mode (the resolution and the refresh rate) that you have set. If it does not, set a display mode that the
monitor supports. If it does support the display mode you have set, go to the setup menu for the monitor
itself and adjust the settings there. Usually the external monitor has buttons for access to the setup menu.
For more information, see the documentation that comes with the monitor.
Audio problems
• Problem: Wave or MIDI sound does not play properly.
Solution: Ensure that the built-in audio device is configured correctly.
1. Go to Control Panel, and ensure that you view Control Panel by Category.
2. Click Hardware and Sound.
3. Click Device Manager. If you are prompted for an administrator password or confirmation, type the
password or provide confirmation.
4. Double-click Sound, video and game controllers.
5. Ensure that the device following Sound, video and game controllers is enabled and configured
correctly.
• Problem: Recordings made by using the microphone input are not loud enough.
Solution: Ensure that the Microphone Boost function is turned on and set by doing the following:
1. Go to Control Panel, and ensure that you view Control Panel by Category.
2. Click Hardware and Sound.
3. Click Sound.
4. Click the Recording tab in the Sound window.
5. Select Internal Microphone, and click Properties.
6. Click the Levels tab, and move the Microphone Boost slider upwards.
7. Click OK.
Примітка: For more information about controlling volume, see your Windows online help.
• Problem: I cannot move the volume slider or balance slider.
Глава 6. Виправлення неполадок комп'ютера 55

Solution: The slider might be grayed out. This means that its position is fixed by the hardware and cannot
be changed.
• Problem: The volume sliders do not stay in place when some audio programs are used.
Solution: It is normal for the sliders to change position when certain sound programs are used. The
programs are aware of the settings in the Volume Mixer window and are enabled to change the settings
themselves. An example is the Windows Media Player program. Usually the program has sliders available
to control the sound from within the program.
• Problem: The balance slider cannot completely mute one channel.
Solution: The control is designed to compensate for minor differences in balance and does not
completely mute either channel.
• Problem: There is no volume control for MIDI sound in the Volume Mixer window.
Solution: Use the hardware volume control. This is because the built-in synthesizer software does not
support the control.
• Problem: The sound cannot be turned off even if I set the Master volume control at minimum.
Solution: You still can hear some sound even though you have set the Master volume control at minimum.
To turn off the sound completely, go to the Master volume control and select Mute Speaker/HP.
• Problem: When I connect headphones to my computer while playing sound, a speaker does not produce
sound.
Solution: When the headphones are attached, the streaming is automatically redirected to it. If you want
to listen to sound from the speakers again, ensure that you set those speakers as the default device. For
more information, see the help information system for Realtek HD Audio Manager.
• Problem: Sound does not come from a headphone or a speaker, or the computer cannot record sounds.
Solution: To switch from one device to another (for example, from a speaker to a headphone, or from an
external microphone to a built-in microphone), do the following:
1. Go to Control Panel, and ensure that you view Control Panel by Category.
2. Click Hardware and Sound.
3. Click the SmartAudio icon.
4. Ensure that the computer is in MULTI-STREAM mode in the Device advanced settings window.
5. In the Volume Mixer window, select the device you want, for example, speakers.
6. Play any sound through a music program (for example, Windows Media Player). Ensure that sound
comes from the speakers now.
7. Then, if you would like to switch to a headphone, close the music program.
8. Go to the Volume Mixer window. Then select another device (for example, the headphone).
9. Play any sound through the music program. Ensure that sound comes from the headphone attached
directly to the system. For more information, see the help information system of the SmartAudio
program.
Примітка: The Volume Mixer window of SmartAudio displays all audio devices detected in the
system, such as speakers for a playback device, or a built-in microphone for a recording device. A
check mark beside the audio device shows that the device has been selected.
Battery problems
• Problem: The battery cannot be fully charged in the standard charge time when the computer is powered
off.
Solution: The battery might be over-discharged. Do the following:
1. Turn off the computer.
56
ThinkPad 11e Chromebook 4th Gen and ThinkPad Yoga 11e Chromebook 4th Gen User Guide

2. Ensure that the over-discharged battery is in the computer.
3. Connect the ac power adapter to the computer and let it charge.
If a quick charger is available, use it to charge the over-discharged battery.
If the battery cannot be fully charged in 24 hours, use a new battery.
• Problem: The computer shuts down before the battery status icon shows that the battery is empty.
Solution: Discharge and recharge the battery.
• Problem: The computer operates after the battery status icon shows that the battery is empty.
Solution: Discharge and recharge the battery.
• Problem: The operating time for a fully charged battery is short.
Solution: Discharge and recharge the battery. If your battery operating time is still short, use a new
battery.
• Problem: The computer does not operate with a fully charged battery.
Solution: The surge protector in the battery might be active. Turn off the computer for one minute to reset
the protector; then turn on the computer again.
• Problem: The battery cannot get charged.
Solution: You cannot charge the battery when it is too hot. If the battery feels hot, remove it from the
computer and wait for a while to let it cool to room temperature. After it cools, reinstall it and recharge the
battery. If it still cannot be charged, have it serviced.
ac power adapter problem
Problem: The ac power adapter is connected to the computer and the working electrical outlet, but the
power adapter (power plug) icon is not displayed in the Windows notification area. The ac power indicator
also does not light up.
Solution: Do the following:
1. Ensure that the connection of the ac power adapter is correct. For instructions on how to connect the ac
power adapter, see "Використання адаптера змінного струму" на сторінці 22.
2. If the connection of the ac power adapter is correct, turn off the computer, and then disconnect the ac
power adapter and remove the removable battery.
3. Reinstall the battery and reconnect the ac power adapter, and then turn on the computer.
4. If the power adapter icon still is not displayed in the Windows notification area, have the ac power
adapter and your computer serviced.
Power problems
Print these instructions now and keep them with your computer for reference later.
• Problem: My computer is getting no power at all.
Solution: Check the following items:
1. Verify the power button. The power button is illuminated whenever the computer is on.
2. Check all power connections. Remove any power strips and surge protectors to connect the ac
power adapter directly to the ac power outlet.
3. Inspect the ac power adapter. Check for any physical damage, and ensure that the power cable is
firmly attached to the adapter brick and the computer.
4. Verify that the ac power source is working by attaching another device to the outlet.
• Problem: My computer does not run on battery power.
Глава 6. Виправлення неполадок комп'ютера 57

Solution: Check the following items:
1. Remove and reinstall the removable battery to ensure that it is properly connected.
2. If the battery runs out of power, attach the ac power adapter to recharge the battery.
3. If the battery is charged but the computer does not run, replace the battery with a new one.
• Problem: The system does not respond, and I cannot turn off the computer.
Solution: Turn off the computer by pressing and holding the power button for four seconds or more. If the
computer still does not respond, remove the ac power adapter and the battery.
Power button problem
Problem: The system does not respond, and I cannot turn off the computer.
Solution: Turn off the computer by pressing and holding the power button for four seconds or more. If the
system still does not respond, remove the ac power adapter and reset the system by inserting one end of a
needle or a straightened paper clip into the emergency-reset hole.
Boot problems
Print these instructions now and keep them with your computer for reference later.
• Problem: I receive an error message before the operating system loads.
Solution: Follow the appropriate corrective actions for power-on self-test (POST) error messages.
• Problem: I receive an error message while the operating system is loading the desktop configuration after
the POST is completed.
Solution: Find solutions by searching for the error message at the following Web sites:
–
http://www.lenovo.com/support
– https://support.microsoft.com/
Sleep and hibernation problems
• Problem: The computer enters sleep mode unexpectedly.
Solution: If the microprocessor overheats, the computer automatically enters sleep mode to allow the
computer to cool and to protect the microprocessor and other internal components. Check the settings
for sleep mode.
• Problem: The computer enters sleep mode immediately after the power-on self-test.
Solution: Ensure that:
– The battery is charged.
– The operating temperature is within the acceptable range. See "Умови експлуатації" на сторінці 10.
If the problem persists, have the computer serviced.
• Problem: A critical low-battery error occurs, and the computer immediately turns off.
Solution: The battery power is getting low. Plug the ac power adapter into an electrical outlet and then
into the computer. Alternatively, replace the battery with a charged one.
• Problem: The computer display remains blank after you press Fn to resume from sleep mode.
Solution: Check whether an external monitor was disconnected or turned off while the computer was in
sleep mode. If you disconnected or turned off the external monitor, connect it or turn it on before resuming
the computer from sleep mode. When resuming the computer from sleep mode without attaching the
58
ThinkPad 11e Chromebook 4th Gen and ThinkPad Yoga 11e Chromebook 4th Gen User Guide

external monitor or turning it on, and the computer display remains blank, press the display-mode
switching key
• Problem: The computer does not resume from sleep mode, or the system status indicator blinks slowly
and the computer does not work.
Solution: If the system does not resume from sleep mode, it might have entered sleep or hibernation
mode automatically because the battery is depleted. Check the system status indicator.
– If the system status indicator blinks slowly, your computer is in sleep mode. Connect the ac power
adapter to the computer; then press Fn.
– If the system status indicator is off, your computer has no power or is in hibernation mode. Connect the
ac power adapter to the computer; then press the power button to resume operation.
If the system still does not resume from sleep mode, your system might stop responding and you might
not be able to turn off the computer. In this case, you must reset the computer. If you have not saved your
data, it might be lost. To reset the computer, press and hold the power button for four seconds or more. If
the system still does not respond, remove the ac power adapter and the battery.
• Problem: Your computer does not enter sleep or hibernation mode.
Solution: Check whether any option has been selected to disable your computer from entering sleep or
hibernation mode.
If your computer tries to enter sleep mode but the request is rejected, the device attached to the USB
connector might have been disabled. If this occurs, do a hot-unplug-and-plug operation for the USB
device.
• Problem: The battery discharges slightly while the computer is in hibernation mode.
Solution: If the wakeup function is enabled, the computer consumes a small amount of power. This is not
a defect. For more information, see "Power-saving modes" на сторінці 23.
to bring up the computer display.
ThinkPad Pen Pro problem
Problem: The ThinkPad Pen Pro does not perform well.
Solution: The battery power for the pen might be low. Ensure that your computer is on. Then insert the pen
into the pen slot to charge the pen for about five minutes.
Software problem
Problem: A program does not run properly.
Solution: Ensure that the problem is not being caused by the program.
Check that your computer has the minimum required memory to run the program. See the manuals supplied
with the program.
Check the following:
• The program is designed to operate with your operating system.
• Other programs run properly on your computer.
• The necessary device drivers are installed.
• The program works when it is run on some other computer.
If an error message is displayed while you are using the program, see the manuals or help system supplied
with the program.
Глава 6. Виправлення неполадок комп'ютера 59

If the program still does not run properly, contact your place of purchase or a service representative for help.
USB problem
Problem: A device connected to the USB connector does not work.
Solution: Ensure that the USB port is enabled in the ThinkPad Setup. Open the Device Manager window.
Ensure that the USB device setup is correct, and that the assignment of computer resource and the
installation of the device driver are correct. To open the Device Manager window, go to Control Panel and
ensure that you view Control Panel by Category, and click Hardware and Sound ➙ Device Manager. If you
are prompted for an administrator password or confirmation, type the password or provide confirmation.
60
ThinkPad 11e Chromebook 4th Gen and ThinkPad Yoga 11e Chromebook 4th Gen User Guide

Глава 7. Заміна обладнання
У цьому розділі наведено інструкції зі встановлення та заміни апаратного забезпечення комп'ютера.
Запобігання утворенню статичної електрики
Статична електрика безпечна для людей, проте може серйозно пошкодити компоненти комп'ютера та
допоміжні апаратні засоби. Неправильне поводження з деталями, що чутливі до розрядів статичної
електрики, може призвести до їх пошкодження. Розпаковуючи допоміжний апаратний засіб або
компонент, замінюваний користувачем (CRU), не відкривайте антистатичний пакет, доки згідно з
інструкціями не знадобиться встановити його.
Щоб уникнути ушкодження розрядом статичної електрики під час установлення допоміжного
апаратного засобу чи CRU або під час виконання будь-яких дій із внутрішніми компонентами
комп'ютера, дотримуйтеся наведених нижче застережних заходів.
• Менше рухайтеся. Під час руху навколо вас може накопичуватися статична електрика.
• Будьте обережні з компонентами. Тримайте адаптери, модулі пам'яті та інші монтажні плати за краї.
Не торкайтеся незахищених схем.
• Не дозволяйте іншим людям торкатися компонентів.
• Перш ніж установити допоміжний апаратний засіб або CRU, чутливий до розрядів статичної
електрики, виконайте будь-яку із зазначених нижче дій, щоб зменшити кількість статики, що
накопичилася на пакеті й на вашому тілі.
– Торкніться антистатичним пакетом із деталлю металевої кришки роз'єму для розширення
принаймні на 2 секунди.
– Торкніться антистатичним пакетом із деталлю іншої нефарбованої металевої поверхні
комп'ютера принаймні на 2 секунди.
• Якщо це можливо, вийміть з антистатичного пакета чутливу до розрядів статичної електрики деталь
і відразу встановіть її, нікуди не кладучи. Якщо це неможливо, покладіть антистатичний пакет на
гладку рівну поверхню, а зверху на нього покладіть деталь.
• Не кладіть деталь на кришку комп'ютера або інші металеві поверхні.
Disabling the built-in battery
Before replacing any CRU, ensure that you disable Fast Startup first and then disable the built-in battery.
To disable Fast Startup, do the following:
1. From the desktop, type Power in the search box on the taskbar, and select Power Options.
2. Click Choose what the power buttons do on the left pane.
3. Click Change settings that are currently unavailable at the top.
4. If prompted by User Account Control (UAC), click Yes.
5. Clear the Turn on fast startup check box, and then click Save changes.
To disable the built-in battery, do the following:
1. Restart your computer. When the logo screen is displayed, immediately press F1 to enter ThinkPad
Setup.
2. Select Config ➙ Power. The Power submenu is displayed.
© Copyright Lenovo 2017 61

3. Select Disable built-in battery and press Enter.
4. Select Yes in the Setup Confirmation window. The built-in battery is disabled and the computer turns off
automatically. Wait three to five minutes to let the computer cool.
Replacing the bottom cover
Before you start, read "Important safety information" на сторінці iii and print the following instructions.
To replace the bottom cover, do the following:
1. Disable the built-in battery. See "Disabling the built-in battery" на сторінці 61.
2. Ensure that the computer is turned off and disconnected from ac power and all cables.
3. Close the computer display and turn the computer over.
4. Loosen the screws that secure the bottom cover.
5. Slightly lift the left side of the bottom cover with your finger. Remove the bottom cover in the direction as
shown by the arrow.
6. Install the new bottom cover as shown. Ensure that the latches of the bottom cover are secured under
the base cover assembly.
62
ThinkPad 11e Chromebook 4th Gen and ThinkPad Yoga 11e Chromebook 4th Gen User Guide

7. Tighten the screws to secure the bottom cover.
8. Reinstall the removable battery.
9. Turn the computer over. Connect the ac power adapter and all cables to the computer.
Replacing the base cover assembly
Before you start, read "Important safety information" на сторінці iii and print the following instructions.
Примiтки:
• Depending on the model, your computer might look slightly different from the illustrations in this topic.
• There might be a risk of short circuits if you remove the base cover assembly in the following situations:
– When your computer has the removable battery installed
– When your computer is connected to ac power
Besides, the computer will not start after you reinstall the base cover assembly. To start the computer,
disconnect the ac power adapter and then reconnect it to the computer.
To replace the base cover assembly, do the following:
1. Disable the built-in battery. See "Disabling the built-in battery" на сторінці 61.
2. Ensure that the computer is turned off and disconnected from ac power and all cables.
3. Close the computer display and turn the computer over.
4. Loosen the screws that secure the base cover assembly in ascending alphabetical order (a to h) as
illustrated.
Глава 7. Заміна обладнання 63

5. Pry up the latches 1 in ascending alphabetical order (a to h) as illustrated, and then remove the base
cover assembly
2 .
6. Install the new base cover assembly 1 and tighten the screws 2 in ascending alphabetical order (a to h)
as illustrated.
64
ThinkPad 11e Chromebook 4th Gen and ThinkPad Yoga 11e Chromebook 4th Gen User Guide

7. Reinstall the removable battery.
8. Turn the computer over. Connect the ac power adapter and all cables to the computer.
Глава 7. Заміна обладнання 65

66 ThinkPad 11e Chromebook 4th Gen and ThinkPad Yoga 11e Chromebook 4th Gen User Guide

Глава 8. Отримання підтримки
У цьому розділі повідомляється, як отримати довідку та підтримку від компанії Lenovo.
Before you contact Lenovo
Often, you can solve your computer problems by referring to the information in the explanations of error
codes, running diagnostic programs, or by consulting the Lenovo Support Web site.
Registering your computer
Register your computer with Lenovo. For more information, see "Реєстрація комп'ютера" на сторінці 11.
Downloading system updates
Downloading updated software might resolve problems you experience with your computer.
To download updated software, go to the following Web site and follow the instructions on the screen:
http://www.lenovo.com/support
Recording information
Before you talk to a Lenovo representative, record the following important information about your computer.
Recording problem symptoms and details
Collect the answers to the following questions before you call for help. Then, you are able to get help as
quickly as possible.
• What is the problem? Is it continuous or intermittent?
• Is there an error message? What is the error code, if any?
• What operating system are you using? Which version?
• Which software applications were running at the time of the problem?
• Can the problem be reproduced? If so, how?
Recording system information
The serial number label is on the bottom of your computer. Record the machine type and the serial number.
• What is the name of your Lenovo product?
• What is the machine type?
• What is the serial number?
Getting help and service
If you need help, service, technical assistance, or more information about Lenovo products, you will find a
wide variety of sources available from Lenovo to assist you.
Information about your computer and preinstalled software, if any, is available in the documentation that
comes with your computer or on the Lenovo Support Web site at
documentation includes printed books, online books, readme files, and help files.
http://www.lenovo.com/support. The
© Copyright Lenovo 2017 67

Microsoft Service Packs are the latest software source for Windows product updates. They are available
through Web download (connection charges might apply) or through discs. For more specific information
and links, go to
questions related to, Service Packs for your Lenovo-preinstalled Microsoft Windows product. For more
information, contact the Customer Support Center.
https://www.microsoft.com. Lenovo offers technical assistance with installation of, or
Lenovo Support Web site
Technical support information is available on the Lenovo Support Web site at http://www.lenovo.com/support.
This Web site is updated with the latest support information such as the following:
• Drivers and software
• Diagnostic solutions
• Product and service warranty
• Product and parts details
• User guides and manuals
• Knowledge base and frequently asked questions
Calling Lenovo
If you have tried to correct the problem yourself and still need help, during the warranty period, you can get
help and information by telephone through the Customer Support Center. The following services are
available during the warranty period:
• Problem determination - Trained personnel are available to assist you with determining if you have a
hardware problem and deciding what action is necessary to fix the problem.
• Lenovo hardware repair - If the problem is determined to be caused by Lenovo hardware under warranty,
trained service personnel are available to provide the applicable level of service.
• Engineering change management - Occasionally, there might be changes that are required after a product
has been sold. Lenovo or your reseller, if authorized by Lenovo, will make selected Engineering Changes
(ECs) that apply to your hardware available.
The following items are not covered:
• Replacement or use of parts not manufactured for or by Lenovo or nonwarranted parts
• Identification of software problem sources
• Configuration of UEFI BIOS as part of an installation or upgrade
• Changes, modifications, or upgrades to device drivers
• Installation and maintenance of network operating systems (NOS)
• Installation and maintenance of programs
For the terms and conditions of the Lenovo Limited Warranty that apply to your Lenovo hardware product,
see “Warranty information” in the Safety, Warranty, and Setup Guide that comes with your computer.
If possible, be near your computer when you make your call. Ensure that you have downloaded the most
current drivers and system updates, run diagnostics, and recorded information before you call. When calling
for technical assistance, have the following information available:
• Machine type and model
• Serial numbers of your computer, monitor, and other components, or your proof of purchase
• Description of the problem
• Exact wording of any error messages
• Hardware and software configuration information for your system
68
ThinkPad 11e Chromebook 4th Gen and ThinkPad Yoga 11e Chromebook 4th Gen User Guide

Telephone numbers
For a list of the Lenovo Support phone numbers for your country or region, go to
support/phone
or refer to the Safety, Warranty, and Setup Guide that comes with your computer.
http://www.lenovo.com/
Примітка: Phone numbers are subject to change without notice. The latest phone numbers are available at
http://www.lenovo.com/support/phone. If the number for your country or region is not provided, contact your
Lenovo reseller or Lenovo marketing representative.
Придбання додаткових послуг
Під час і після гарантійного періоду можна придбати додаткові послуги. Доступність гарантійного
обслуговування та назва послуги можуть відрізнятися в різних країнах або регіонах.
Інформацію про послуги можна знайти за адресою:
http://www.lenovo.com/essentials.
Глава 8. Отримання підтримки 69

70 ThinkPad 11e Chromebook 4th Gen and ThinkPad Yoga 11e Chromebook 4th Gen User Guide

Додаток A. Відомості про нормативи
У цій темі наведено відомості про нормативні вимоги та їх виконання для продуктів Lenovo.
Certification-related information
Product name: ThinkPad 11e Chromebook 4th Gen and ThinkPad Yoga 11e Chromebook 4th Gen
Compliance ID: TP00066D and TP00066E
Machine types: 20HW, 20HX, 20HY, and 20J0
The latest compliance information is available at:
http://www.lenovo.com/compliance
Відомості про безпровідний зв'язок
У цій темі наведено відомості про безпровідний зв'язок для продуктів Lenovo.
Wireless interoperability
Wireless-LAN card is designed to be interoperable with any wireless-LAN product that is based on Direct
Sequence Spread Spectrum (DSSS), Complementary Code Keying (CCK), and/or Orthogonal Frequency
Division Multiplexing (OFDM) radio technology, and is compliant to:
• The 802.11b/g Standard, 802.11a/b/g, 802.11n, or 802.11ac on wireless-LANs, as defined and approved
by the Institute of Electrical and Electronics Engineers.
• The Wireless Fidelity (Wi-Fi
Your Bluetooth card supports Windows 10 in-box Bluetooth profiles. Some computer models might be
equipped with a Bluetooth card compliant with the Bluetooth Specification version 4.2 as defined by the
Bluetooth Special Interest Group SIG. However, the Windows operating system might limit the support only
on the Bluetooth Specification version 4.1.
®
) certification as defined by the Wi-Fi Alliance®.
Середовище використання та ваше здоров'я
Цей комп'ютер має вбудовані карти безпровідного зв'язку, що працюють відповідно до рекомендацій і
стандартів безпеки для радіочастот, тому компанія Lenovo вважає, що продукт безпечний для
використання. Ці стандарти й рекомендації відображають консенсус світової наукової спільноти в
результаті обговорень експертних груп і комітетів учених, які постійно переглядають і аналізують
результати всебічних наукових досліджень.
У деяких ситуаціях чи умовах власник будівлі або відповідальні представники певної організації
можуть заборонити використання безпровідних пристроїв. Зокрема, у таких ситуаціях і місцях:
• На борту літака, у лікарні, поблизу АЗС, зон підриву (з електропідривними пристроями), поруч із
медичними імплантатами або натільними електронними медичними пристроями, як-от
кардіостимуляторами.
• У будь-якому іншому середовищі, де ризик утворення перешкод у роботі інших пристроїв чи послуг
вважається чи є шкідливим.
© Copyright Lenovo 2017 71

Якщо ви не впевнені, яка політика щодо використання безпровідних пристроїв застосовується в
певному місці (наприклад, в аеропорту або в лікарні), рекомендовано спитати дозволу на
використання такого пристрою, перш ніж увімкнути комп'ютер.
Locating the UltraConnect wireless antennas
ThinkPad notebook computers feature an integrated UltraConnect™ wireless antenna system built into the
display for optimal reception, enabling wireless communication wherever you are.
The following illustration shows the antennas locations of your computer:
1 Wireless-LAN antenna (auxiliary)
2 Wireless-WAN antenna (auxiliary, available on some models)
3 Wireless-WAN antenna (main, available on some models)
4 Wireless-LAN antenna (main)
Інформація про виконання вимог до безпровідних пристроїв
Моделі комп'ютерів, обладнані засобами безпровідного зв'язку, відповідають стандартам щодо
радіочастот і стандартам безпеки країни або регіону, де їх було схвалено для безпровідного
використання.
Інформація про виконання вимог до безпровідних пристроїв (Бразилія)
Este equipamento opera em caráter secundário, isto é, não tem direito a proteção contra interferência
prejudicial, mesmo de estações do mesmo tipo, e não pode causar interferência a sistemas operando em
caráter primário.
This equipment is a secondary type device, that is, it is not protected against harmful interference, even if the
interference is caused by a device of the same type, and it also cannot cause any interference to primary
type devices.
Інформація про виконання вимог до безпровідних пристроїв (Мексика)
Advertencia: En Mexico la operación de este equipo estásujeta a las siguientes dos condiciones: (1) es
posible que este equipo o dispositivo no cause interferencia perjudicial y (2) este equipo o dispositivo debe
aceptar cualquier interferencia, incluyendo la que pueda causar su operación no deseada.
72
ThinkPad 11e Chromebook 4th Gen and ThinkPad Yoga 11e Chromebook 4th Gen User Guide

Розташування відомостей про нормативи використання безпровідних пристроїв
Додаткову інформацію про нормативи використання безпровідних пристроїв див. у документі
Regulatory Notice із комплекту постачання комп'ютера.
Якщо разом із комп'ютером не постачався документ Regulatory Notice, з ним можна ознайомитися на
цій веб-сторінці:
http://www.lenovo.com/support
Зауваження щодо експортної класифікації
Цей продукт відповідає Правилам експортного контролю (EAR) США та має класифікаційний номер
експортного контролю (ECCN) 5A992.c. Цей продукт може бути реекспортовано до будь-якої країни,
за винятком країн зі списку EAR E1, на які накладено ембарго.
Зауваження щодо електронного випромінювання
Federal Communications Commission Declaration of Conformity
The following information refers to ThinkPad 11e Chromebook 4th Gen and ThinkPad Yoga 11e Chromebook
4th Gen, machine types: 20HW, 20HX, 20HY, and 20J0.
This equipment has been tested and found to comply with the limits for a Class B digital device, pursuant to
Part 15 of the FCC Rules. These limits are designed to provide reasonable protection against harmful
interference in a residential installation. This equipment generates, uses, and can radiate radio frequency
energy and, if not installed and used in accordance with the instructions, may cause harmful interference to
radio communications. However, there is no guarantee that interference will not occur in a particular
installation. If this equipment does cause harmful interference to radio or television reception, which can be
determined by turning the equipment off and on, the user is encouraged to try to correct the interference by
one or more of the following measures:
• Reorient or relocate the receiving antenna.
• Increase the separation between the equipment and receiver.
• Connect the equipment into an outlet on a circuit different from that to which the receiver is connected.
• Consult an authorized dealer or service representative for help.
Lenovo is not responsible for any radio or television interference caused by using other than specified or
recommended cables and connectors or by unauthorized changes or modifications to this equipment.
Unauthorized changes or modifications could void the user's authority to operate the equipment.
This device complies with Part 15 of the FCC Rules. Operation is subject to the following two conditions: (1)
this device may not cause harmful interference, and (2) this device must accept any interference received,
including interference that may cause undesired operation.
Responsible Party:
Lenovo (United States) Incorporated
1009 Think Place - Building One
Morrisville, NC 27560
Phone Number: 919-294-5900
Додаток A. Відомості про нормативи 73

Заява про відповідність виробництва стандартам випромінювання класу B в Канаді
CAN ICES-3(B)/NMB-3(B)
Відповідність стандартам Європейського Союзу
Контактні дані в Європі: Lenovo, Einsteinova 21, 851 01 Bratislava, Slovakia
Моделі без радіопристрою. Цей продукт відповідає вимогам до захисту, викладеним у Директиві
Ради Європейського Союзу 2014/30/EU про електромагнітну сумісність, у якій описано зближення
законів держав-учасниць про електромагнітну сумісність.
Моделі з радіопристроєм. Цей продукт відповідає вимогам і основним нормам, викладеним у
Директивах Ради Європейського Союзу 1999/5/EC про радіо- та телекомунікаційне обладнання (до
12 червня 2017 р.) і 2014/53/EU про радіообладнання (від 13 червня 2017 р.), у яких описано зближення
законів держав-учасниць про радіообладнання. Повний текст декларації про відповідність систем і
безпровідного модуля директивам ЄС наведено на веб-сторінці:
• Для ноутбуків:
• Для планшетів: http://www.lenovo.com/social_responsibility/us/en/eu_doc_tablets/
Компанія Lenovo не несе відповідальності за будь-які невідповідності вимогам до захисту в результаті
несанкціонованої зміни продукту, зокрема встановлення додаткових карток інших виробників. Цей
продукт випробувано й визнано таким, що відповідає обмеженням для обладнання класу B згідно з
європейськими стандартами, узгодженими в директивах. Обмеження для обладнання класу B
розроблено для типових середовищ населених місць, щоб забезпечити прийнятний захист
ліцензованих засобів зв'язку від перешкод.
http://www.lenovo.com/social_responsibility/us/en/eu_doc_notebooks/
German Class B compliance statement
Deutschsprachiger EU Hinweis:
Hinweis für Geräte der Klasse B EU-Richtlinie zur Elektromagnetischen Verträglichkeit
Dieses Produkt entspricht den Schutzanforderungen der EU-Richtlinie 2014/30/EU zur Angleichung der
Rechtsvorschriften über die elektromagnetische Verträglichkeit in den EU-Mitgliedsstaaten und hält die
Grenzwerte der Klasse B der Norm gemäß Richtlinie.
Um dieses sicherzustellen, sind die Geräte wie in den Handbüchern beschrieben zu installieren und zu
betreiben. Des Weiteren dürfen auch nur von der Lenovo empfohlene Kabel angeschlossen werden. Lenovo
übernimmt keine Verantwortung für die Einhaltung der Schutzanforderungen, wenn das Produkt ohne
Zustimmung der Lenovo verändert bzw. wenn Erweiterungskomponenten von Fremdherstellern ohne
Empfehlung der Lenovo gesteckt/eingebaut werden.
Deutschland:
Einhaltung des Gesetzes über die elektromagnetische Verträglichkeit von Betriebsmitteln
Dieses Produkt entspricht dem „Gesetz über die elektromagnetische Verträglichkeit von Betriebsmitteln“
EMVG (früher „Gesetz über die elektromagnetische Verträglichkeit von Geräten“). Dies ist die Umsetzung der
EMV EU-Richtlinie 2014/30/EU in der Bundesrepublik Deutschland.
74
ThinkPad 11e Chromebook 4th Gen and ThinkPad Yoga 11e Chromebook 4th Gen User Guide

Zulassungsbescheinigung laut dem Deutschen Gesetz über die elektromagnetische Verträglichkeit
von Betriebsmitteln, EMVG vom 20. Juli 2007 (früher Gesetz über die elektromagnetische
Verträglichkeit von Geräten), bzw. der EMV EU Richtlinie 2014/30/EU, für Geräte der Klasse B.
Dieses Gerät ist berechtigt, in Übereinstimmung mit dem Deutschen EMVG das EG-Konformitätszeichen CE - zu führen. Verantwortlich für die Konformitätserklärung nach Paragraf 5 des EMVG ist die Lenovo
(Deutschland) GmbH, Meitnerstr. 9, D-70563 Stuttgart.
Informationen in Hinsicht EMVG Paragraf 4 Abs. (1) 4:
Das Gerät erfüllt die Schutzanforderungen nach EN 55024 und EN 55032 Klasse B.
Class 1 laser product compliance statement
This product is classified as Class 1 under the IEC 60825-1 edition 2, 2007 in the US and is classified as
Class 1 under the EN/IEC60825-1 edition 3, 2014 in the EU and other countries, at the time of publication.
This device also complies with US FDA performance standards for laser products except for deviations
pursuant to Laser notice No. 50, dated June 24, 2007.
Manufactured by Intel Corporation
2200 Mission College Blvd., Santa Clara, CA 95054
Model: Intel RealSense™ Camera (R200)
Заява про відповідність класу B для Кореї
Заява про відповідність VCCI класу B для Японії
Заява про відповідність продуктів, які підключаються до мережі електроживлення з номінальною силою струму щонайбільше 20 А на фазу (для Японії)
Додаток A. Відомості про нормативи 75

Примітка для Японії щодо шнура живлення змінного струму
The ac power cord shipped with your product can be used only for this specific product. Do not use the ac
power cord for other devices.
Інформація про обслуговування виробів Lenovo для Тайваню
Позначка відповідності євразійським стандартам
Аудіопримітка для Бразилії
Ouvir sons com mais de 85 decibéis por longos períodos pode provocar danos ao sistema auditivo.
76
ThinkPad 11e Chromebook 4th Gen and ThinkPad Yoga 11e Chromebook 4th Gen User Guide

Додаток B. Інформація про переробку й відпрацьоване електричне та електронне обладнання
У цьому розділі наведено відомості про захист навколишнього середовища внаслідок використання
продуктів Lenovo.
Загальна інформація про переробку
Компанія Lenovo закликає власників обладнання галузі інформаційних технологій (IT) відповідально
ставитися до переробки обладнання, коли воно стає непотрібним. Lenovo пропонує різноманітні
програми та послуги, що допомагають власникам виробів галузі IT у переробці. Інформацію про
переробку продуктів Lenovo можна знайти за цією адресою:
http://www.lenovo.com/recycling
Актуальні відомості про захист навколишнього середовища, пов'язані з нашими продуктами, можна
знайти на цій веб-сторінці:
http://www.lenovo.com/ecodeclaration
Важлива інформація про відпрацьоване електричне та електронне обладнання
Позначка WEEE на продуктах Lenovo застосовується до країн із нормативними вимогами щодо
відпрацьованого електричного та електронного обладнання й електронних відходів (наприклад,
Директива ЄС щодо WEEE, Правила поводження з електронними відходами Індії). Пристрої
маркуються відповідно до місцевих нормативних вимог щодо відпрацьованого електричного та
електронного обладнання (WEEE). Цими нормативними вимогами визначається порядок повернення
та переробки відпрацьованих пристроїв у всіх країнах світу. Ця позначка застосовується до різних
продуктів і вказує на те, що продукт потрібно не викидати, а сортувати й утилізувати після закінчення
терміну його служби.
Електричне та електронне обладнання (EEE) з позначкою WEEE не можна викидати як несортовані
побутові відходи. Натомість потрібно діяти згідно з наявним порядком збору для повернення,
переробки, відновлення WEEE та мінімізації потенційного впливу на навколишнє середовище та
здоров'я людей через вміст небезпечних речовин. Електричне та електронне обладнання (EEE) Lenovo
може містити деталі та компоненти, які після закінчення терміну їхньої служби можуть
класифікуватися як небезпечні відходи.
© Copyright Lenovo 2017 77

EEE та відпрацьоване електричне та електронне обладнання (WEEE) може безкоштовно доставлятися
в місця продажу або дистриб'юторам, які займаються продажем електричного та електронного
обладнання, подібного за виглядом і функціональним призначенням до використаного EEE або WEEE.
Додаткову інформацію про WEEE можна знайти за цією адресою:
http://www.lenovo.com/recycling
Інформація про WEEE для Угорщини
Як виробник, компанія Lenovo оплачує витрати, пов'язані з виконанням її зобов'язань згідно із
Законом Угорщини № 197/2014 (VIII.1.), розділ 12, підрозділи (1)–(5).
Інформація про переробку для Японії
Collecting and recycling a disused Lenovo computer or monitor
If you are a company employee and need to dispose of a Lenovo computer or monitor that is the property of
the company, you must do so in accordance with the Law for Promotion of Effective Utilization of Resources.
Computers and monitors are categorized as industrial waste and should be properly disposed of by an
industrial waste disposal contractor certified by a local government. In accordance with the Law for
Promotion of Effective Utilization of Resources, Lenovo Japan provides, through its PC Collecting and
Recycling Services, for the collecting, reuse, and recycling of disused computers and monitors. For details,
visit the Lenovo Web site at:
http://www.lenovo.com/recycling/japan
Pursuant to the Law for Promotion of Effective Utilization of Resources, the collecting and recycling of homeused computers and monitors by the manufacturer was begun on October 1, 2003. This service is provided
free of charge for home-used computers sold after October 1, 2003. For details, go to:
http://www.lenovo.com/recycling/japan
Disposing of Lenovo computer components
Some Lenovo computer products sold in Japan may have components that contain heavy metals or other
environmental sensitive substances. To properly dispose of disused components, such as a printed circuit
board or drive, use the methods described above for collecting and recycling a disused computer or monitor.
Disposing of disused lithium batteries from Lenovo computers
A button-shaped lithium battery is installed inside your Lenovo computer to provide power to the computer
clock while the computer is off or disconnected from the main power source. If you need to replace it with a
new one, contact your place of purchase or contact Lenovo for service. If you need to dispose of a disused
lithium battery, insulate it with vinyl tape, contact your place of purchase or an industrial-waste-disposal
operator, and follow their instructions.
Disposal of a lithium battery must comply with local ordinances and regulations.
Disposing of a disused battery from Lenovo notebook computers
Your Lenovo notebook computer has a lithium ion battery or a nickel metal hydride battery. If you are a
company employee who uses a Lenovo notebook computer and need to dispose of a battery, contact the
proper person in Lenovo sales, service, or marketing, and follow that person's instructions. You also can
refer to the instructions at:
https://www.lenovo.com/jp/ja/environment/recycle/battery/
78 ThinkPad 11e Chromebook 4th Gen and ThinkPad Yoga 11e Chromebook 4th Gen User Guide

If you use a Lenovo notebook computer at home and need to dispose of a battery, you must comply with
local ordinances and regulations. You also can refer to the instructions at:
https://www.lenovo.com/jp/ja/environment/recycle/battery/
Інформація про переробку для Бразилії
Declarações de Reciclagem no Brasil
Descarte de um Produto Lenovo Fora de Uso
Equipamentos elétricos e eletrônicos não devem ser descartados em lixo comum, mas enviados à pontos de
coleta, autorizados pelo fabricante do produto para que sejam encaminhados e processados por empresas
especializadas no manuseio de resíduos industriais, devidamente certificadas pelos orgãos ambientais, de
acordo com a legislação local.
A Lenovo possui um canal específico para auxiliá-lo no descarte desses produtos. Caso você possua um
produto Lenovo em situação de descarte, ligue para o nosso SAC ou encaminhe um e-mail para:
reciclar@lenovo.com, informando o modelo, número de série e cidade, a fim de enviarmos as instruções
para o correto descarte do seu produto Lenovo.
Інформація про утилізацію акумуляторів у Європейському Союзі
Примітка. Ця позначка застосовується тільки до країн, які входять до складу Європейського Союзу
(ЄС).
Акумулятори або пакування для акумуляторів маркуються відповідно до вимог Директиви ЄС 2006/66/
EC про справні та відпрацьовані акумулятори та інші елементи живлення. Директива визначає
порядок повернення та переробки відпрацьованих акумуляторів і елементів живлення й
застосовується на території Європейського Союзу. Ця позначка ставиться на різних акумуляторах і
вказує на те, що згідно з цією Директивою акумулятор потрібно не викидати, а утилізувати після
закінчення терміну його служби.
Згідно з вимогами Директиви ЄС 2006/66/EC відпрацьовані акумулятори та інші елементи живлення
підлягають утилізації окремо від інших відходів і позначаються відповідним чином. Позначка на
акумуляторі також може вказувати на хімічний елемент, присутній у його складі (Pb позначає свинець,
Hg — ртуть, Cd — кадмій). Заборонено викидати акумулятори й елементи живлення як несортовані
побутові відходи. Натомість слід дотримуватися вимог із їх повернення, переробки та подальшої
утилізації. Таким чином користувачі можуть мінімізувати ймовірний шкідливий вплив акумуляторів і
елементів живлення, що містять небезпечні речовини, на довкілля та здоров'я людей.
Додаток B. Інформація про переробку й відпрацьоване електричне та електронне обладнання 79

Перш ніж передавати електричне й електронне обладнання (EEE) на утилізацію або в пункт збору
відходів, кінцевий користувач обладнання, яке містить акумулятори та/або інші елементи живлення
повинен вийняти їх і сортувати окремо.
Утилізація літієвих і акумуляторних батарей від продуктів Lenovo
У продукт Lenovo може бути встановлена пласка кругла літієва батарея. У документації до продукту
можна знайти додаткову інформацію про акумулятори. Якщо акумулятор потрібно замінити,
зверніться в місце купівлі продукту або до сервіс-центру компанії Lenovo. Якщо потрібно викинути
літієву батарею, оберніть її вініловою стрічкою, зверніться до місцевого дилера або оператора з
вилучення відходів і виконайте їхні вказівки.
Утилізація акумуляторних батарей від продуктів Lenovo
Пристрій Lenovo може містити літій-іонний акумулятор або нікель-метал-гідридні батареї. У
документації до продуктів можна знайти додаткову інформацію про акумуляторні батареї. Якщо
потрібно викинути акумуляторну батарею, оберніть її вініловою стрічкою, зверніться в пункт продажу
або обслуговування компанії Lenovo, у місце придбання продукту або до оператора з вилучення
відходів, і виконайте їхні вказівки. Ви також можете ознайомитися з інструкціями, наведеними в
Посібнику користувача для вашого продукту.
Інформацію про належний збір і переробку див. на цій веб-сторінці:
http://www.lenovo.com/lenovo/environment
Інформація про утилізацію акумуляторів у Тайвані
Інформація про утилізацію акумуляторів у Сполучених Штатах і Канаді
Інформація про переробку для Китаю
80 ThinkPad 11e Chromebook 4th Gen and ThinkPad Yoga 11e Chromebook 4th Gen User Guide

Додаток C. Обмеження директиви про поводження з небезпечними речовинами (RoHS)
Актуальні відомості про захист навколишнього середовища, пов'язані з продуктами Lenovo, містяться
на цій веб-сторінці:
http://www.lenovo.com/ecodeclaration
RoHS для Євросоюзу
Цей продукт Lenovo в комплекті з кабелями, шнурами тощо відповідає вимогам Директиви 2011/65/EU
щодо обмеження використання певних небезпечних речовин в електричному та електронному
обладнанні (RoHS recast або RoHS 2).
Докладні відомості про відповідність продуктів Lenovo, що продаються в різних країнах світу,
стандартам RoHS див. у цьому документі:
https://www.lenovo.com/social_responsibility/us/en/RoHS_Communication.pdf
RoHS для Туреччини
The Lenovo product meets the requirements of the Republic of Turkey Directive on the Restriction of the Use
of Certain Hazardous Substances in Waste Electrical and Electronic Equipment (WEEE).
RoHS для України
RoHS для Індії
RoHS compliant as per E-Waste (Management) Rules.
RoHS для Китаю
Інформація в наведеній нижче таблиці стосується продуктів, виготовлених 1 січня 2015 року або після
цієї дати для продажу в Китаї.
© Copyright Lenovo 2017 81

82 ThinkPad 11e Chromebook 4th Gen and ThinkPad Yoga 11e Chromebook 4th Gen User Guide
 Loading...