

Page 1

ThinkCentreM900z
UserGuide
MachineTypes:10F2,10F3,10F4,and10F5
Page 2

Note:Beforeusingthisinformationandtheproductitsupports,besuretoreadandunderstandthe“Read
thisfirst:Importantsafetyinformation”onpageiii
andAppendixF“Notices”onpage79.
FourthEdition(September2016)
©CopyrightLenovo2015,2016.
LIMITEDANDRESTRICTEDRIGHTSNOTICE:IfdataorsoftwareisdeliveredpursuantaGeneralServicesAdministration
“GSA”contract,use,reproduction,ordisclosureissubjecttorestrictionssetforthinContractNo.GS-35F-05925.
Page 3

Contents
Readthisfirst:Importantsafety
information..............iii
Beforeusingthismanual............iii
Serviceandupgrades.............iii
Staticelectricityprevention...........iv
Powercordsandpoweradapters........iv
Extensioncordsandrelateddevices.......v
Plugsandoutlets...............v
Externaldevices...............v
Heatandproductventilation..........v
Operatingenvironment............vi
Lasercompliancestatement..........vi
Powersupplystatement...........vii
Cleaningandmaintenance..........vii
Glasspartsnotice.............vii
Tip-overhazardpreventionnotice.......vii
Chapter1.Productoverview......1
Hardwarelocations..............1
Frontview................1
Rearview................3
Computercomponents..........5
Machinetypeandmodellabel........6
Features..................6
Specifications................9
Programs..................9
Accessingaprogramonthecomputer....9
Installingaprogramthatisreadytobe
installed...............10
AnintroductiontoLenovoprograms....10
Chapter2.Usingyourcomputer...13
Adjustingthecomputerstand.........13
Adjustingthetilt-onlymonitorstand....13
AdjustingtheUltraFlexIIStand......14
Registeringthecomputer..........16
Settingthecomputervolume.........16
AddinganicontotheWindowsnotificationarea.16
Usingadisc................17
Guidelinesaboutusingtheopticaldrive...17
Handlingandstoringadisc........17
Playingandremovingadisc.......17
Recordingadisc............18
Connectingtoanetwork...........18
ConnectingtoanEthernetLAN......18
ConnectingtoawirelessLAN.......19
ConnectingtoaBluetooth-enableddevice..19
Usingthesingle-touchormulti-touchfeature...19
Chapter3.Y ouandyourcomputer..21
Arrangingyourworkspace..........21
Glareandlighting............21
Aircirculation.............21
Electricaloutletlocationsandcablelengths.21
Comfort...............21
Accessibilityinformation...........22
Cleaningthecomputer...........25
Maintenance...............25
Basicmaintenancetips.........25
Goodmaintenancepractices.......25
Keepingthecomputercurrent.......26
Movingthecomputer............27
Chapter4.Security..........29
Lockingthecomputer............29
AttachingaKensington-stylecablelock...30
Viewingandchangingsecuritysettingsinthe
SetupUtilityprogram............30
Preventingunauthorizedaccesstothecomputer.30
Usingfingerprintauthentication........31
Usingthecoverpresenceswitch.......31
Usingandunderstandingfirewalls.......31
Protectingdataagainstviruses........32
ComputraceAgentsoftwareembeddedin
firmware.................32
TrustedPlatformModule(TPM)........32
Chapter5.Advancedconfiguration..33
UsingtheSetupUtilityprogram........33
StartingtheSetupUtilityprogram.....33
Enablingordisablingadevice.......33
EnablingordisablingtheAutomaticPowerOn
features...............33
EnablingordisablingtheErPLPScompliance
mode................34
ChangingtheICEperformancemode....34
EnablingordisablingtheICEThermalAlert
feature................34
EnablingordisablingtheConfiguration
ChangeDetectionfeature........35
UsingBIOSpasswords.........35
Selectingastartupdevice........36
ExitingtheSetupUtilityprogram......37
UpdatingtheBIOS.............37
©CopyrightLenovo2015,2016
i
Page 4

Chapter6.T roubleshooting,
diagnostics,andrecovery......39
Basicprocedureforresolvingcomputer
problems.................39
Troubleshooting..............39
Startupproblems............39
Audioproblems............40
CDproblems.............41
DVDproblems.............41
Intermittentproblems..........42
Storagedriveproblems.........42
Screenproblems............43
Networkingproblems..........43
Performanceproblems..........45
Serialconnectorcannotbeaccessed....47
USBdeviceproblems..........47
Softwareanddriverproblems.......47
Diagnostics................48
LenovoSolutionCenter.........48
Recoveryinformation............48
RecoveryinformationforWindows7....48
RecoveryinformationforWindows10....49
Chapter7.Installingorreplacing
hardware...............51
Handlingstatic-sensitivedevices.......51
Installingorreplacinghardware........51
Installingexternaloptions........51
Replacingthecomputerstand.......52
Removingthebackcover........54
Replacingthememorymoduleshield....55
Replacingamemorymodule.......56
Replacingthestoragedrive........57
Completingthepartsreplacement.....59
Chapter8.Gettinginformation,help,
andservice..............61
Informationresources............61
Accessingtheuserguideinvarious
languages...............61
Windowshelpsystem..........61
Safetyandwarranty...........61
LenovoWebsite............61
LenovoSupportWebsite.........62
Frequentlyaskedquestions........62
Helpandservice..............62
Callingforservice............62
Usingotherservices..........63
Purchasingadditionalservices......63
AppendixA.Regulatory
information..............65
Exportclassificationnotice..........65
Electronicemissionsnotices.........65
FederalCommunicationsCommission
DeclarationofConformity........65
Eurasiancompliancemark..........67
Brazilaudionotice.............67
Mexicowireless-radiocomplianceinformation..67
Taiwanvisionprecautionnotice........68
Additionalregulatoryinformation.......68
AppendixB.WEEEandrecycling
information..............69
ImportantWEEEinformation.........69
RecyclinginformationforJapan........69
RecyclinginformationforBrazil........70
BatteryrecyclinginformationforTaiwan.....70
BatteryrecyclinginformationfortheEuropean
Union..................71
AppendixC.RestrictionofHazardous
Substances(RoHS)Directive.....73
EuropeanUnionRoHS...........73
TurkishRoHS...............73
UkraineRoHS...............73
IndiaRoHS................73
ChinaRoHS................74
TaiwanRoHS...............74
AppendixD.ChinaEnergyLabel...75
AppendixE.ENERGYSTARmodel
information..............77
AppendixF .Notices..........79
Trademarks................80
iiThinkCentreM900zUserGuide
Page 5
Readthisfirst:Importantsafetyinformation
CAUTION:
Beforeusingthecomputer,besuretoreadandunderstandalltherelatedsafetyinformationforthis
product.RefertothesafetyinformationinthissectionandintheSafetyandWarrantyGuidethatyou
receivedwiththisproduct.Readingandunderstandingallthesafetyinformationreducestheriskof
personalinjuryanddamagetoyourproduct.IfyounolongerhaveacopyoftheSafetyandWarranty
Guide,youcanobtainaPortableDocumentFormat(PDF)versionfromtheLenovo
siteathttp://www.lenovo.com/UserManuals.
Beforeusingthismanual
CAUTION:
Beforeusingthismanual,besuretoreadandunderstandalltherelatedsafetyinformationforthis
product.RefertotheinformationinthissectionandthesafetyinformationintheSafetyandWarranty
Guidethatyoureceivedwiththisproduct.Readingandunderstandingthissafetyinformationreduces
theriskofpersonalinjuryanddamagetoyourproduct.
®
SupportWeb
IfyounolongerhaveacopyoftheSafetyandWarrantyGuide,youcanobtainaPortableDocumentFormat
(PDF)versionfromtheLenovo
®
SupportWebsiteathttp://www.lenovo.com/UserManuals.
Serviceandupgrades
DonotattempttoserviceaproductyourselfunlessinstructedtodosobytheCustomerSupportCenteror
yourdocumentation.OnlyuseaServiceProviderwhoisapprovedtorepairyourparticularproduct.
Note:Somecomputerpartscanbeupgradedorreplacedbythecustomer.Upgradestypicallyare
referredtoasoptions.ReplacementpartsapprovedforcustomerinstallationarereferredtoasCustomer
ReplaceableUnits,orCRUs.Lenovoprovidesdocumentationwithinstructionswhenitisappropriatefor
customerstoinstalloptionsorreplaceCRUs.Youmustcloselyfollowallinstructionswheninstallingor
replacingparts.TheOffstateofapowerindicatordoesnotnecessarilymeanthatvoltagelevelsinsidea
productarezero.Beforeyouremovethecoversfromaproductequippedwithapowercord,alwaysensure
thatthepoweristurnedoffandthattheproductisunpluggedfromanypowersource.Ifyouhaveany
questionsorconcerns,contacttheCustomerSupportCenter.
Althoughtherearenomovingpartsinthecomputerafterthepowercordhasbeendisconnected,the
followingwarningsarerequiredforyoursafety.
CAUTION:
Hazardousmovingparts.Keepfingersandotherbodypartsaway.
CAUTION:
©CopyrightLenovo2015,2016
iii
Page 6

Beforeyouopenthecomputercover,turnoffthecomputerandwaitseveralminutesuntilthe
computeriscool.
Staticelectricityprevention
Staticelectricity,althoughharmlesstoyou,canseriouslydamagecomputercomponentsandoptions.
Improperhandlingofstatic-sensitivepartscancausedamagetothepart.Whenyouunpackanoption
orCRU,donotopenthestatic-protectivepackagecontainingthepartuntiltheinstructionsdirectyou
toinstallit.
WhenyouhandleoptionsorCRUs,orperformanyworkinsidethecomputer,takethefollowingprecautions
toavoidstatic-electricitydamage:
•Limityourmovement.Movementcancausestaticelectricitytobuilduparoundyou.
•Alwayshandlecomponentscarefully.Handleadapters,memorymodules,andothercircuitboardsbythe
edges.Nevertouchexposedcircuitry.
•Preventothersfromtouchingcomponents.
•Whenyouinstallastatic-sensitiveoptionorCRU,touchthestatic-protectivepackagecontainingthe
parttoametalexpansion-slotcoverorotherunpaintedmetalsurfaceonthecomputerforatleasttwo
seconds.Thisreducesstaticelectricityinthepackageandyourbody.
•Whenpossible,removethestatic-sensitivepartfromthestatic-protectivepackagingandinstallthepart
withoutsettingitdown.Whenthisisnotpossible,placethestatic-protectivepackagingonasmooth,
levelsurfaceandplacethepartonit.
•Donotplacethepartonthecomputercoverorothermetalsurface.
Powercordsandpoweradapters
Useonlythepowercordsandpoweradapterssuppliedbytheproductmanufacturer.Donotusetheac
powercordforotherdevices.
Thepowercordsshallbesafetyapproved.ForGermany,itshallbeH03VV-F,3G,0.75mm
connectedtothepoweradapter),H05VV-F,3G,0.75mm
supplyassembly),orbetter.Forothercountries,thesuitabletypesshallbeusedaccordingly.
Neverwrapapowercordaroundapoweradapterorotherobject.Doingsocanstressthecordinwaysthat
cancausethecordtofray,crack,orcrimp.Thiscanpresentasafetyhazard.
Alwaysroutepowercordssothattheywillnotbewalkedon,trippedover,orpinchedbyobjects.
Protectpowercordandpoweradaptersfromliquids.Forinstance,donotleaveyourpowercordorpower
adapternearsinks,tubs,toilets,oronfloorsthatarecleanedwithliquidcleansers.Liquidscancausea
shortcircuit,particularlyifthepowercordorpoweradapterhasbeenstressedbymisuse.Liquidsalsocan
causegradualcorrosionofpowercordterminalsand/ortheconnectorterminalsonapoweradapter,
whichcaneventuallyresultinoverheating.
Ensurethatallpowercordconnectorsaresecurelyandcompletelypluggedintoreceptacles.
Donotuseanypoweradapterthatshowscorrosionattheacinputpinsorshowssignsofoverheating(such
asdeformedplastic)attheacinputoranywhereonthepoweradapter.
2
(thepowercordconnectedtotheinternalpower
2
(thepowercord
Donotuseanypowercordswheretheelectricalcontactsoneitherendshowsignsofcorrosionor
overheatingorwherethepowercordappearstohavebeendamagedinanyway.
ivThinkCentreM900zUserGuide
Page 7

Extensioncordsandrelateddevices
Ensurethatextensioncords,surgeprotectors,uninterruptiblepowersupplies,andpowerstripsthatyouuse
areratedtohandletheelectricalrequirementsoftheproduct.Neveroverloadthesedevices.Ifpowerstrips
areused,theloadshouldnotexceedthepowerstripinputrating.Consultanelectricianformoreinformation
ifyouhavequestionsaboutpowerloads,powerrequirements,andinputratings.
Plugsandoutlets
Ifareceptacle(poweroutlet)thatyouintendtousewiththecomputerequipmentappearstobedamagedor
corroded,donotusetheoutletuntilitisreplacedbyaqualifiedelectrician.
Donotbendormodifytheplug.Iftheplugisdamaged,contactthemanufacturertoobtainareplacement.
Donotshareanelectricaloutletwithotherhomeorcommercialappliancesthatdrawlargeamountsof
electricity;otherwise,unstablevoltagemightdamagethecomputer,data,orconnecteddevices.
Someproductsareequippedwithathree-prongedplug.Thisplugfitsonlyintoagroundedelectricaloutlet.
Thisisasafetyfeature.Donotdefeatthissafetyfeaturebytryingtoinsertitintoanon-groundedoutlet.If
youcannotinserttheplugintotheoutlet,contactanelectricianforanapprovedoutletadapterortoreplace
theoutletwithonethatenablesthissafetyfeature.Neveroverloadanelectricaloutlet.Theoverallsystem
loadshouldnotexceed80percentofthebranchcircuitrating.Consultanelectricianformoreinformation
ifyouhavequestionsaboutpowerloadsandbranchcircuitratings.
Besurethatthepoweroutletyouareusingisproperlywired,easilyaccessible,andlocatedclosetothe
equipment.Donotfullyextendpowercordsinawaythatwillstressthecords.
Besurethatthepoweroutletprovidesthecorrectvoltageandcurrentfortheproductyouareinstalling.
Carefullyconnectanddisconnecttheequipmentfromtheelectricaloutlet.
Externaldevices
DonotconnectordisconnectanyexternaldevicecablesotherthanUniversalSerialBus(USB)cableswhile
thecomputerpowerison;otherwise,youmightdamagethecomputer.Toavoidpossibledamageto
connecteddevices,waitatleastfivesecondsafterthecomputerisshutdowntodisconnectexternaldevices.
Heatandproductventilation
Computers,poweradapters,andmanyaccessoriescangenerateheatwhenturnedonandwhenbatteries
arecharging.Alwaysfollowthesebasicprecautions:
•Donotleavethecomputer,poweradapter,oraccessoriesincontactwithyourlaporanypartofyour
bodyforanextendedperiodwhentheproductsarefunctioningorwhenthebatteryischarging.The
computer,poweradapter,andmanyaccessoriesproducesomeheatduringnormaloperation.Extended
contactwiththebodycouldcausediscomfortor,potentially,askinburn.
•Donotchargethebatteryoroperatethecomputer,poweradapter,oraccessoriesnearflammable
materialsorinexplosiveenvironments.
•Ventilationslots,fans,andheatsinksareprovidedwiththeproductforsafety,comfort,andreliable
operation.Thesefeaturesmightinadvertentlybecomeblockedbyplacingtheproductonabed,sofa,
carpet,orotherflexiblesurface.Neverblock,cover,ordisablethesefeatures.
©CopyrightLenovo2015,2016
v
Page 8

Inspectyourdesktopcomputerfordustaccumulationatleastonceeverythreemonths.Beforeinspecting
thecomputer,turnoffthepowerandunplugthecomputer'spowercordfromtheelectricaloutlet;then
removeanydustfromventsandperforationsinthebezel.Ifyounoticeexternaldustaccumulation,then
examineandremovedustfromtheinsideofthecomputerincludingheatsinkinletfins,powersupplyvents,
andfans.Alwaysturnoffandunplugthecomputerbeforeopeningthecover.Ifpossible,avoidoperatingthe
computerwithintwofeetofhigh-trafficareas.Ifyoumustoperatethecomputerinornearahigh-traffic
area,inspectand,ifnecessary,cleanthecomputermorefrequently.
Foryoursafetyandtomaintainoptimumcomputerperformance,alwaysfollowthesebasicprecautions
withyourdesktopcomputer:
•Keepthecoverclosedwheneverthecomputerispluggedin.
•Regularlyinspecttheoutsideofthecomputerfordustaccumulation.
•Removedustfromventsandanyperforationsinthebezel.Morefrequentcleaningsmightberequiredfor
computersindustyorhigh-trafficareas.
•Donotrestrictorblockanyventilationopenings.
•Donotstoreoroperatethecomputerinsidefurniture,asthismightincreasetheriskofoverheating.
•Airflowtemperaturesintothecomputershouldnotexceed35°C(95°F).
•Donotinstallairfiltrationdevices.Theymayinterferewithpropercooling.
Operatingenvironment
Theoptimalenvironmentinwhichtousethecomputeris10°C–35°C(50°F–95°F)withhumidityranging
between35%and80%.Ifthecomputerisstoredortransportedintemperatureslessthan10°C(50°F),allow
thecoldcomputertoriseslowlytoanoptimaloperatingtemperatureof10°C–35°C(50°F–95°F)beforeuse.
Thisprocesscouldtaketwohoursinextremeconditions.Failuretoallowthecomputertorisetoanoptimal
operatingtemperaturebeforeusecouldresultinirreparabledamagetothecomputer.
Ifpossible,placethecomputerinawell-ventilatedanddryareawithoutdirectexposuretosunshine.
Keepelectricalappliancessuchasanelectricfan,radio,high-poweredspeakers,airconditioner,and
microwaveovenawayfromthecomputerbecausethestrongmagneticfieldsgeneratedbytheseappliances
candamagethemonitoranddataonthestoragedrive.
Donotplaceanybeveragesontopoforbesidethecomputerorotherconnecteddevices.Ifliquidisspilled
onorinthecomputeroraconnecteddevice,ashortcircuitorotherdamagemightoccur.
Donoteatorsmokeoveryourkeyboard.Particlesthatfallintoyourkeyboardcancausedamage.
Lasercompliancestatement
CAUTION:
Whenlaserproducts(suchasCD-ROMs,DVDdrives,fiberopticdevices,ortransmitters)are
installed,notethefollowing:
•Donotremovethecovers.Removingthecoversofthelaserproductcouldresultinexposureto
hazardouslaserradiation.Therearenoserviceablepartsinsidethedevice.
•Useofcontrolsoradjustmentsorperformanceofproceduresotherthanthosespecifiedherein
mightresultinhazardousradiationexposure.
viThinkCentreM900zUserGuide
Page 9
DANGER
SomelaserproductscontainanembeddedClass3AorClass3Blaserdiode.Notethefollowing:
Laserradiationwhenopen.Donotstareintothebeam,donotviewdirectlywithoptical
instruments,andavoiddirectexposuretothebeam.
Powersupplystatement
Neverremovethecoveronapowersupplyoranypartthathasthefollowinglabelattached.
Hazardousvoltage,current,andenergylevelsarepresentinsideanycomponentthathasthislabelattached.
Therearenoserviceablepartsinsidethesecomponents.Ifyoususpectaproblemwithoneoftheseparts,
contactaservicetechnician.
Cleaningandmaintenance
Keepthecomputerandworkspaceclean.Shutdownthecomputerandthendisconnectthepower
cordbeforecleaningthecomputer.Donotsprayanyliquiddetergentdirectlyonthecomputeroruse
anydetergentcontainingflammablematerialtocleanthecomputer.Spraythedetergentonasoftcloth
andthenwipethecomputersurfaces.
Glasspartsnotice
CAUTION:
Somepartsofyourproductmaybemadeofglass.Thisglasscouldbreakiftheproductisdropped
onahardsurfaceorreceivesasubstantialimpact.Ifglassbreaks,donottouchorattempttoremove
it.Stopusingyourproductuntiltheglassisreplacedbytrainedservicepersonnel.
Tip-overhazardpreventionnotice
•Placethecomputeronasturdyandlowbase,oranchorthefurnitureandpositionthecomputeras
farbackonthefurnitureaspossible.
•Keepremotecontrols,toys,andotheritemsthatmightattractchildrenoffthecomputer.
•Keepthecomputer,cables,andcordsoutofthereachofchildren.
•Supervisechildreninroomswherethesesafetytipshavenotbeenfollowed.
©CopyrightLenovo2015,2016
vii
Page 10

viiiThinkCentreM900zUserGuide
Page 11
Chapter1.Productoverview
Thischapterprovidesinformationaboutthefollowingtopics:
•“Hardwarelocations”onpage1
•“Features”onpage6
•“Specifications”onpage9
•“Programs”onpage9
Hardwarelocations
Thissectionprovidesinformationaboutthelocationsofthecomputerhardware.
Note:Thecomputerhardwaremightlookslightlydifferentfromtheillustrations.
Frontview
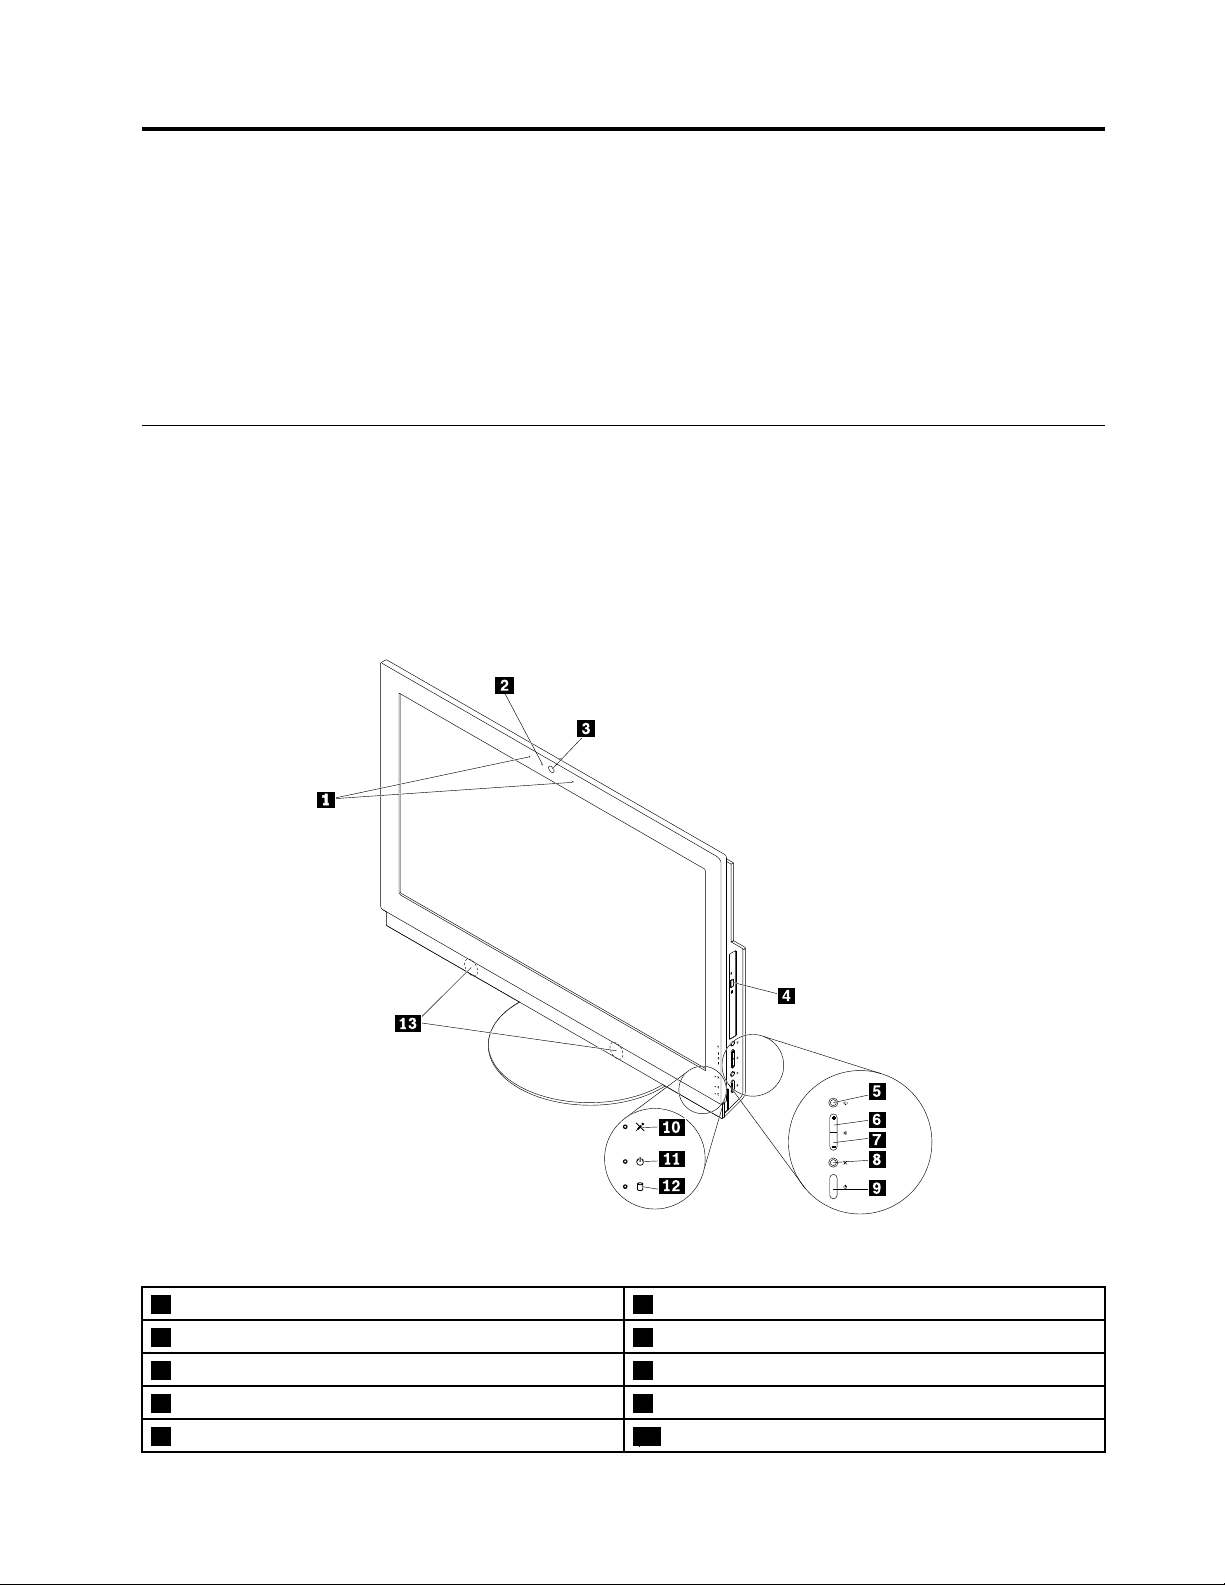
Figure1.Frontview
1Integratedmicrophones(2)(somemodels)2Integratedcameraactivityindicator(somemodels)
3Integratedcamera(somemodels)4Opticaldriveeject/closebutton(somemodels)
5Monitor/computermodeswitch6Brightness-upcontrol(computermode)
7Brightness-downcontrol(computermode)8Microphonemute/unmutecontrol(computermode)
9Powerbutton
©CopyrightLenovo2015,2016
10Microphonemute/unmuteindicator
1
Page 12

11Powerindicator
13Internalspeakers(2)
12Storagedriveactivityindicator
•Brightness-downcontrol
Usedtoreducethescreenbrightness.
•Brightness-upcontrol
Usedtoenhancethescreenbrightness.
•Integratedcamera
Usedtotakepicturesorholdavideoconference.
•Integratedcameraactivityindicator
Whentheintegratedcameraactivityindicatorison,thecameraisinuse.
•Integratedmicrophone
Usedtorecordsoundsorusespeech-recognitionsoftwarewithoutusingamicrophone.
•Internalspeaker
Usedtolistentothesoundsfromyourcomputerwithoutusingaheadsetorheadphones.
•Microphonemute/unmutecontrol
Usedtomuteorunmutetheintegratedmicrophones.
•Microphonemute/unmuteindicator
Whenthemicrophonemute/unmuteindicatorison,themicrophonesaremuted.
•Monitor/computermodeswitch
Usedtoswitchbetweenthemonitormodeandcomputermodemanually.
•Opticaldriveeject/closebutton
Usedtoejectthetrayoftheopticaldrivefromthedrive.Afteryouinsertadiscintothetray,press
theeject/closebuttontoclosethetray.
•Powerbutton
Usedtoturnonyourcomputer.Y oualsocanusethepowerbuttontoturnoffyourcomputeronlywhen
youcannotuseanyMicrosoft
®
Windows
®
shutdownproceduretoturnoffyourcomputer.
•Powerindicator
Whenthepowerindicatorison,thecomputerison.
•Storagedriveactivityindicator
Whenthestoragedriveactivityindicatorison,thestoragedrivesareinuse.
2ThinkCentreM900zUserGuide
Page 13
Rearview
Note:Thecomputerstandisavailableonlyonsomemodels.
•Ifyourcomputercomeswithacomputerstand,ensurethatyouusethecomputerwiththestandinstalled.
Ifyouwanttousethecomputerwiththestandremoved,donotturnonthecomputerbeforecontacting
theLenovoCustomerSupportCenterfortheadditionalthermalsolution.
•Ifyourcomputerdoesnotcomewithacomputerstand,donottearofftheMylarontherearofthe
computer.Afterinitialsetup,youcanusethecomputer.
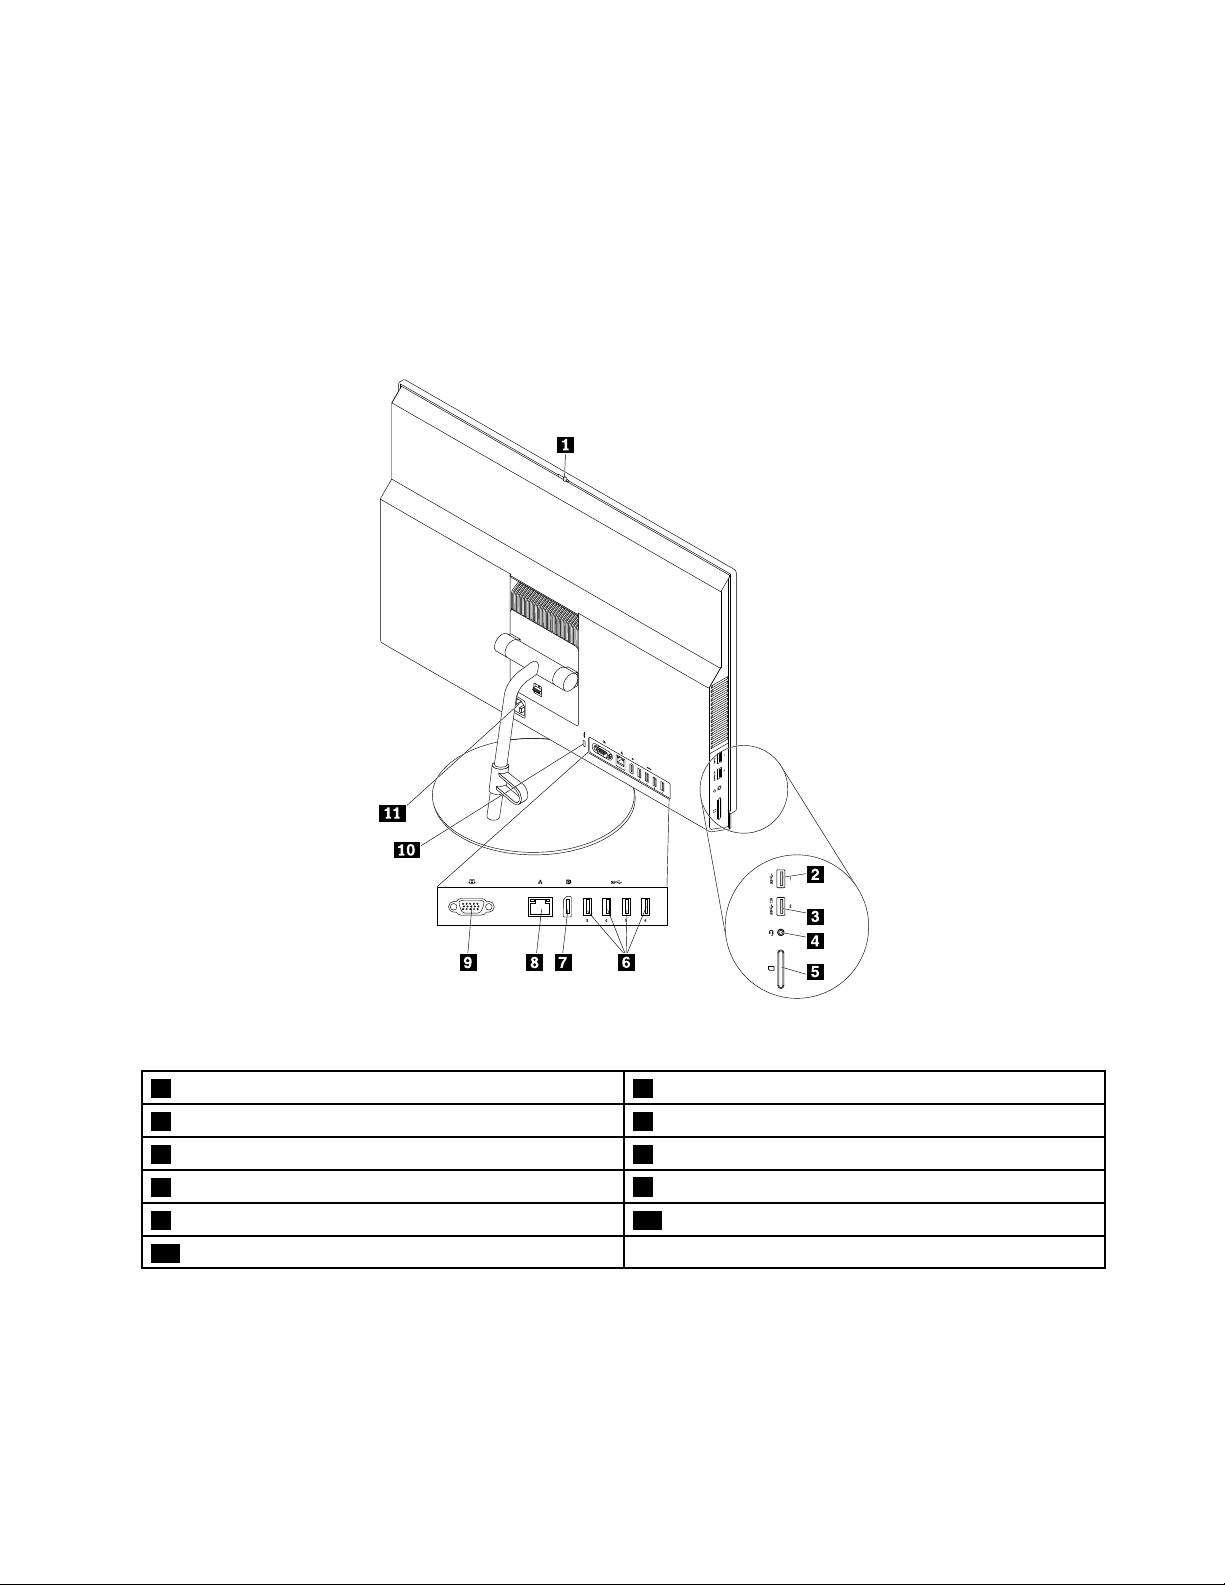
Figure2.Rearview
1Integratedcamerashieldcontrolslider(somemodels)2USB3.0connector
3AlwaysOnUSB3.0connector(forrapidcharge)4Headsetconnector(alsoknownascomboaudiojack)
5Cardreaderslot(somemodels)6USB3.0connectors(4)
7DisplayPort
9Serialconnector(somemodels)10Security-lockslot
11Powercordconnector
®
in/outconnector
8Ethernetconnector
•AlwaysOnUSB3.0connector
UsedtoconnectadevicethatrequiresaUSB2.0orUSB3.0connection,suchasakeyboard,amouse,a
scanner,aprinter,orapersonaldigitalassistant(PDA).Withtheacpoweradapterconnected,youcan
chargetheautomaticallydetecteddeviceevenwhenthecomputerisinhibernationmodeorturnedoff.
ToenabletheAlwaysOnUSBfunction,openthePowerManagerprogram.See“Accessingaprogramon
thecomputer”onpage9
.Then,followtheinstructionsonthescreen.
Chapter1.Productoverview3
Page 14

•Cardreaderslot
Usedtoholdacard-shapedstoragemediumsothatthecardreadercanreadthedataonthestorage
medium.
•DisplayPortin/outconnector
Usedtoreceiveorsendaudioandvideosignals.Whenahigh-performancemonitorisattachedtothis
connector,thecomputerautomaticallychangestothecomputermode.Whenanothercomputeris
attachedtothisconnector,thecomputerautomaticallychangestothemonitormode.
Note:WhenanotherM900zcomputerisattachedtothisDisplayPortin/outconnector,disabletheDP
Input/OutputDeviceAutoDetectionfeature.See“Enablingordisablingadevice”onpage33
.Then,
usethemonitor/computermodeswitchesonboththecomputerstoswitchtothemonitormodeor
computermode.
•Ethernetconnector
UsedtoconnectanEthernetcableforalocalareanetwork(LAN).
Note:TooperatethecomputerwithinFederalCommunicationsCommission(FCC)ClassBlimits,usea
Category5eorbetterEthernetcable.
•Headsetconnector
Usedtoconnectearphones,headphones,oraheadsettoyourcomputer.
•Integratedcamerashieldcontrolslider
Usedtodisabletheintegratedcameraphysically.
•Powercordconnector
Usedtoconnectthepowercordtoyourcomputerforpowersupply.
•Security-lockslot
UsedtosecureaKensington-stylecablelock.Formoreinformation,see“AttachingaKensington-style
cablelock”onpage30
.
•Serialconnector
Usedtoconnectanexternalmodem,aserialprinter,orotherdevicesthatuseaserialconnector.
•USB3.0connector
UsedtoconnectadevicethatrequiresaUSB2.0orUSB3.0connection,suchasakeyboard,amouse,a
scanner,aprinter,oraPDA.
4ThinkCentreM900zUserGuide
Page 15
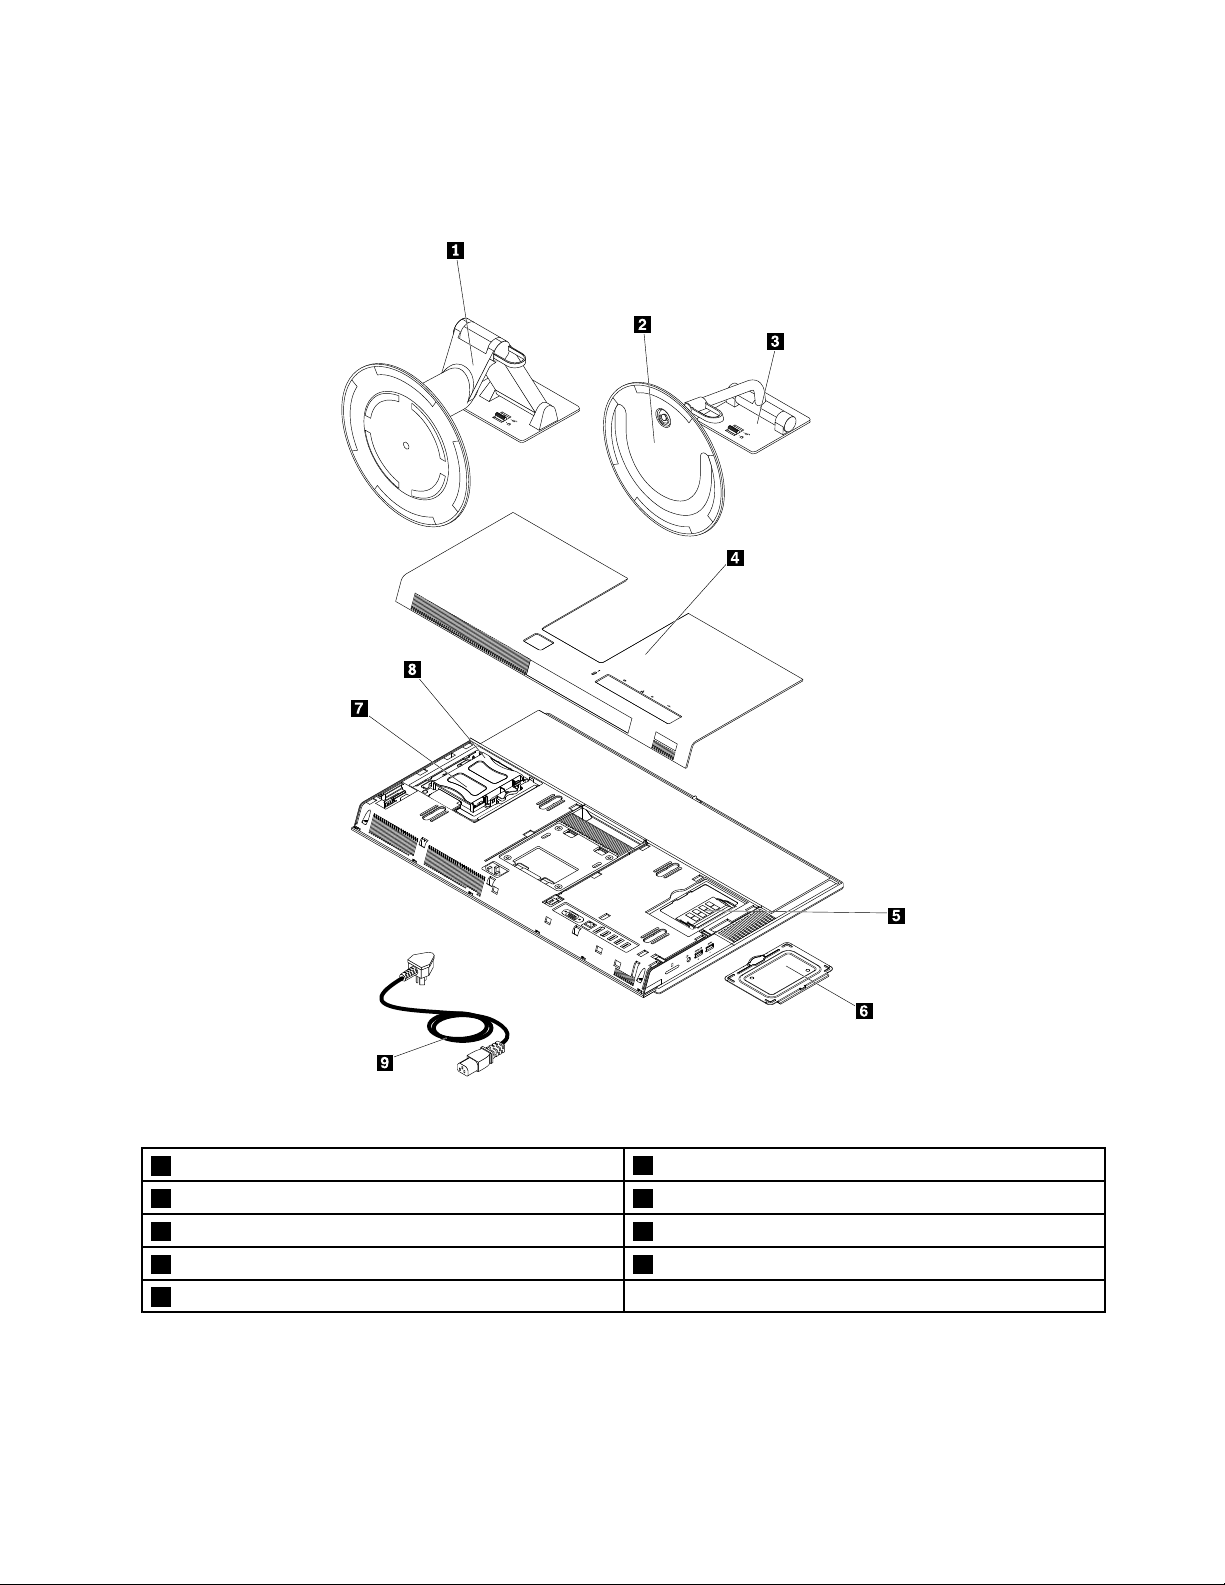
Computercomponents
Note:Dependingonyourcomputermodel,someofthefollowingcomponentsmightnotbeavailable.
Figure3.Computercomponents
1UltraFlexIIStand
3Tilt-onlymonitorstand4Backcover
5Memorymodule6Memorymoduleshield
7Storagedrive8Storagedrivebracket
9Powercord
2Tilt-onlymonitorstandbase
Chapter1.Productoverview5
Page 16

Machinetypeandmodellabel
MT-M XXXX-XXXXXX
S/N XXXXXXXX
Themachinetypeandmodellabelidentifiesyourcomputer.WhenyoucontactLenovoforhelp,themachine
typeandmodelinformationhelpssupporttechnicianstoidentifyyourcomputerandprovidefasterservice.
Themachinetypeandmodellabelisattachedonthesideofyourcomputerasshown.
Figure4.Machinetypeandmodellabel
Features
Thecomputerfeaturesintroducedinthissectionapplytovariousmodels.
Informationaboutyourcomputer
•Toviewbasicinformation(suchasmicroprocessorandmemoryinformation)aboutyourcomputer,
dothefollowing:
1.ClicktheStartbuttontoopentheStartmenu.
2.DependingonyourWindowsversion,dooneofthefollowing:
–ForWindows7:Right-clickComputer,andthenclickProperties.
–ForWindows10:ClickSettings➙System➙About.
•Toviewdetailedinformationaboutthedevices(suchastheopticaldriveandnetworkadapters)onyour
computer,dothefollowing:
1.DependingonyourWindowsversion,dooneofthefollowing:
–ForWindows7:ClicktheStartbuttontoopentheStartmenu.Right-clickComputer,andthen
clickProperties.
–ForWindows10:Right-clicktheStartbuttontoopentheStartcontextmenu.
2.ClickDeviceManager.Typetheadministratorpasswordorprovideconfirmationifprompted.
6ThinkCentreM900zUserGuide
Page 17

Preinstalledoperatingsystem
YourcomputerispreinstalledwithWindows7orWindows10operatingsystem.Additionaloperating
systemsmightbeidentifiedbyLenovoascompatiblewithyourcomputer.T odetermineifanoperating
systemhasbeencertifiedortestedforcompatibility,checktheWebsiteoftheoperatingsystemprovider.
Powersupply
150-wattautomaticvoltage-sensingpowersupply
Storagedrives
Yourcomputersupportsonestoragedrive.
Toviewtheamountofstoragedrivespace,dothefollowing:
1.DependingonyourWindowsversion,dooneofthefollowing:
•ForWindows7:ClicktheStartbuttontoopentheStartmenu.Right-clickComputer,andthenclick
Manage.
•ForWindows10:Right-clicktheStartbuttontoopentheStartcontextmenu.
2.ClickDiskManagement.
Videofeatures
TheintegratedgraphicscardsupportstheDisplayPortin/outconnectoronyourcomputer.
Audiofeatures
Theintegratedaudiocardsupportsthefollowingaudioconnectorsanddevicesonyourcomputer:
•Headsetconnector(alsoknownascomboaudiojack)
•Integratedmicrophone(availableonsomemodels)
•Internalspeaker
Input/Output(I/O)features
•Cardreaderslot(availableonsomemodels)
•DisplayPortin/outconnector
•Ethernetconnector
•Headsetconnector(alsoknownascomboaudiojack)
•Serialconnector(availableonsomemodels)
•USBconnector
Expansion
•Cardreader(availableonsomemodels)
•Memoryslot
•Opticaldrive(availableonsomemodels)
•Storagedrivebay
Networkfeatures
•EthernetLAN
TheintegratednetworkinterfacecardsupportstheEthernetconnectoronyourcomputer.
•WirelessLAN(availableonsomemodels)
•Bluetooth(availableonsomemodels)
Chapter1.Productoverview7
Page 18

Securityfeatures
Formoreinformation,seeChapter4“Security”onpage29.
Systemmanagementfeatures
•Abilitytostorepower-onself-test(POST)hardwaretestresults
•DesktopManagementInterface(DMI)
DesktopManagementInterfaceprovidesacommonpathforuserstoaccessinformationaboutall
aspectsofacomputer.Theinformationincludesprocessortype,installationdate,connectedprintersand
otherperipherals,powersources,maintenancehistory,andsoon.
•ErPLPScompliancemode
Theenergy-relatedproductsdirective(ErP)lowestpowerstate(LPS)compliancemodereducesthe
consumptionofelectricitywhenyourcomputerisinsleeporoffmode.Formoreinformation,see
“EnablingordisablingtheErPLPScompliancemode”onpage34.
•IntelligentCoolingEngine(ICE)
TheIntelligentCoolingEngineisasystemthermalmanagementsolutionthatenablesyourcomputer
torunwithbetterthermalandacousticperformance.TheICEfunctionalsomonitorsthethermal
performanceofyourcomputertoidentifythermalproblems.Formoreinformation,see“ChangingtheICE
performancemode”onpage34
•Intel
®
StandardManageability
and“EnablingordisablingtheICEThermalAlertfeature”onpage34.
IntelStandardManageabilityishardware-andfirmware-basedtechnologythatmakescomputerseasier
andlessexpensiveforbusinessestomonitor,maintain,update,upgrade,andrepair.
•IntelActiveManagementT echnology(AMT)(availableonsomemodels)
IntelActiveManagementTechnologyishardware-andfirmware-basedtechnologythatmakescomputers
easierandlessexpensiveforbusinessestomonitor,maintain,update,upgrade,andrepair.
•PrebootExecutionEnvironment(PXE)
PrebootExecutionEnvironmentenablescomputerstostartthroughanetworkinterfaceindependentof
datastoragedrives(suchasharddiskdrives)orinstalledoperatingsystems.
•SystemManagement(SM)BasicInput/OutputSystem(BIOS)andSMsoftware
TheSMBIOSspecificationdefinesdatastructuresandaccessmethodsthatcanbeusedtoread
managementdatastoredintheBIOSofacomputer.
•WakeonLAN
WakeonLANisanEthernetcomputernetworkingstandardthatallowsacomputertobeturnedon
orwokenupbyanetworkmessage.Themessageusuallyissentbyaprogramrunningonanother
computeronthesameLAN.
•WakeonRing
WakeonRing,sometimesreferredtoasWakeonModem,isaspecificationthatallowssupported
computersanddevicestoresumefromsleeporhibernationmode.
•WindowsManagementInstrumentation(WMI)
WindowsManagementInstrumentationisasetofextensionstotheWindowsDriverModel.Itprovidesan
operatingsysteminterfacethroughwhichinstrumentedcomponentsprovideinformationandnotification.
8ThinkCentreM900zUserGuide
Page 19

Specifications
Thissectionliststhephysicalspecificationsforyourcomputer.
Dimensions(withoutacomputerstand)
Width:584mm(23.0inches)
Height:390mm(15.4inches)
Depth:45mm(1.8inches)
Weight(withoutthepackage)
Maximumconfigurationasshipped:10.9kg(24.0lb)
Environment
•Airtemperature:
Operating:From10°C(50°F)to35°C(95°F)
Storageinoriginalshippingpackage:From-40°C(-40°F)to60°C(140°F)
Storagewithoutpackage:From-10°C(14°F)to60°C(140°F)
•Humidity:
Operating:20%–80%(non-condensing)
Storage:20%–90%(non-condensing)
•Altitude:
Operating:From-15.2m(-50ft)to3048m(10000ft)
Storage:From-15.2m(-50ft)to10668m(35000ft)
Electricalinput
Inputvoltage:From100Vacto240Vac
Inputfrequency:50/60Hz
Programs
Thissectionprovidesinformationabouttheprogramsonthecomputer.
Accessingaprogramonthecomputer
Toaccessaprogramonthecomputer,dooneofthefollowing:
•FromWindowsSearch:
1.DependingonyourWindowsversion,dooneofthefollowing:
–ForWindows7:ClicktheStartbuttontoopentheStartmenu,andthentypetheprogramname
intothesearchbox.
–ForWindows10:TypetheprogramnameintothesearchboxnexttotheStartbutton.
2.Inthesearchresults,clickthenameofthedesiredprogramtolaunchtheprogram.
•FromtheStartmenuorControlPanel:
1.ClicktheStartbuttontoopentheStartmenu.
2.DependingonyourWindowsversion,dooneofthefollowing:
–ForWindows7:ClickAllProgramstodisplaytheprogramlist.Fromthelistorafolderinthelist,
clickthenameofthedesiredprogramtolaunchtheprogram.
Chapter1.Productoverview9
Page 20

–ForWindows10:Fromtheprogramlistorafolderinthelist,clickthenameofthedesiredprogram
tolaunchtheprogram.
3.IftheprogramnameisnotdisplayedontheStartmenu,dooneofthefollowing:
–ForWindows7:ClickControlPanelontheStartmenu.
–ForWindows10:Right-clicktheStartbuttontoopentheStartcontextmenu,andthenclick
ControlPanel.
4.ViewControlPanelusinglargeiconsorsmallicons,andthenclickthenameofthedesiredprogram
tolaunchtheprogram.
Installingaprogramthatisreadytobeinstalled
Note:ForWindows7,dependingonthecomputermodel,someoftheLenovoprogramsmightbereadyto
beinstalled,soyouneedtoinstallthemmanually.Then,youcanaccessandusetheseprograms.
Toinstallaprogramthatisreadytobeinstalled,dothefollowing:
1.OpentheLenovoThinkVantage
2.ViewtheprogramiconsusingTiles.
3.Followtheinstructionsundergreyed-outiconstolocatetheiconforthedesiredprogram.Then,
double-clicktheicontoinstalltheprogram.
®
Toolsprogram.See“Accessingaprogramonthecomputer”onpage9.
AnintroductiontoLenovoprograms
ThissectionprovidesinformationaboutthemajorLenovoprogramsavailableonyouroperatingsystem.
Note:Dependingonyourcomputermodel,someofthefollowingprogramsmightnotbeavailable.
•ForWindows7only:
–CreateRecoveryMedia
TheCreateRecoveryMediaprogramenablesyoutorestoreonlytheCdriveortheentirestorage
drivetothefactory-defaultsettings.
–FingerprintManagerProorThinkVantageFingerprintSoftware
TheFingerprintManagerProorThinkVantageFingerprintSoftwareprogramenablesyoutousea
fingerprintreader.Theintegratedfingerprintreaderprovidedonsomekeyboardsenablesyoutoenroll
yourfingerprintandassociateitwithyourpower-onpassword,harddiskpassword,andWindows
password.Asaresult,fingerprintauthenticationcanreplacepasswordsandenablesimpleandsecure
useraccess.
–LenovoBluetoothLock
TheLenovoBluetoothLockprogramenablesyoutouseaBluetoothdevice(suchasyoursmartphone)
asaproximity-basedunitforlockingorunlockingyourcomputerautomatically.Bydetectingthe
distancebetweenyourcomputerandthepredefinedBluetoothdevicethatyouarecarrying,theLenovo
BluetoothLockprogramautomaticallylocksyourcomputerwhenyouwalkawayandunlocksyour
computerwhenyoucomeback.Thisisasimplewaytoprotectyourcomputeragainstunauthorized
accessincasethatyouforgettolockyourcomputer.
–LenovoPowerENGAGE
TheLenovoPowerENGAGEprogramenablesyoutoregisteryourcomputerwithLenovo.
–PasswordManager
ThePasswordManagerprogramautomaticallycapturesandfillsinauthenticationinformationfor
WindowsprogramsandWebsites.
10ThinkCentreM900zUserGuide
Page 21

–PowerManager
ThePowerManagerprogramprovidesconvenient,flexible,andcompletepowermanagementfor
yourcomputer.Itenablesyoutoadjustyourcomputerpowersettingstoachievethebestbalance
betweenperformanceandpowersaving.
–RescueandRecovery
®
TheRescueandRecoveryprogramisaone-buttonrecoveryandrestoresolution.Itincludesaset
ofself-recoverytoolstohelpyoudiagnosecomputerproblems,gethelp,andrecoverfromsystem
crashes,evenifyoucannotstarttheWindowsoperatingsystem.
–SystemUpdate
TheSystemUpdateprogramprovidesregularaccesstothesystemupdatesforyourcomputer,such
asdevicedriverupdates,softwareupdates,andBIOSupdates.Theprogramgathersinformationfrom
theLenovoHelpCenteraboutnewupdatesforyourcomputer,thensortsanddisplaystheupdatesfor
downloadandinstallation.Youhavecompletecontrolofwhichupdatestodownloadandinstall.
•ForWindows10only:
–LenovoCompanion
Yourcomputer’sbestfeaturesandcapabilitiesshouldbeeasytoaccessandunderstand.WithLenovo
Companion,theyare.UseLenovoCompaniontodothefollowing:
–Optimizeyourcomputer’sperformance,monitoryourcomputer’shealth,andmanageupdates.
–Accessyouruserguide,checkwarrantystatus,andviewaccessoriescustomizedforyourcomputer.
–Readhow-toarticles,exploreLenovoforums,andstayup-to-dateontechnologynewswitharticles
andblogsfromtrustedsources.
LenovoCompanionisfilledwithexclusiveLenovocontenttohelpyoulearnmoreaboutwhatyou
candowithyourcomputer.
–LenovoID
TheLenovoIDprogramenablesyoutocreateyourLenovoIDandaccessallsupportedLenovo
programsandwebportalswithsinglesign-on.
–LenovoSettings
TheLenovoSettingsprogramistheonestopshopforyoutocontrolhardwarefeatures,sensors
andprogramsonyourcomputer.LenovoSettingsenablesyoutooptimizedeviceperformanceby
customizingkeyfunctions,suchaspowerplans,audio,camera,andnetworks.
•ForWindows7andWindows10:
–LenovoDeviceExperienceorLenovoPCExperience
TheLenovoDeviceExperienceorLenovoPCExperienceprogramhelpsyouworkmoreeasilyand
securely.TheprogramprovideseasyaccesstoLenovoThinkVantageToolsorLenovoTools,important
settingsandinformationaboutyourcomputer,theLenovoSupportWebsite,andsoon.
–LenovoSolutionCenter
TheLenovoSolutionCenterprogramenablesyoutotroubleshootandresolvecomputerproblems.It
combinesdiagnostictests,systeminformationcollection,securitystatus,andsupportinformation,
alongwithhintsandtipsformaximumsystemperformance.
–LenovoVisionGuard
TheLenovoVisionGuardprogramreducesthebluelightemittedfromthedisplayandthuscreatesa
lessstimulatingimageandmorerelaxingvisionexperienceforyoureyes.
Chapter1.Productoverview11
Page 22

12ThinkCentreM900zUserGuide
Page 23
Chapter2.Usingyourcomputer
Thischaptercontainsthefollowingtopics:
•“Adjustingthecomputerstand”onpage13
•“Registeringthecomputer”onpage16
•“Settingthecomputervolume”onpage16
•“AddinganicontotheWindowsnotificationarea”onpage16
•“Usingadisc”onpage17
•“Connectingtoanetwork”onpage18
•“Usingthesingle-touchormulti-touchfeature”onpage19
Adjustingthecomputerstand
Youcanusethecomputerstandtoadjustthecomputertoapositioncomfortableforyou.
Note:Thecomputerstandisavailableonlyonsomemodels.
•Ifyourcomputercomeswithacomputerstand,ensurethatyouusethecomputerwiththestandinstalled.
Ifyouwanttousethecomputerwiththestandremoved,donotturnonthecomputerbeforecontacting
theLenovoCustomerSupportCenterfortheadditionalthermalsolution.
•Ifyourcomputerdoesnotcomewithacomputerstand,donottearofftheMylarontherearofthe
computer.Afterinitialsetup,youcanusethecomputer.
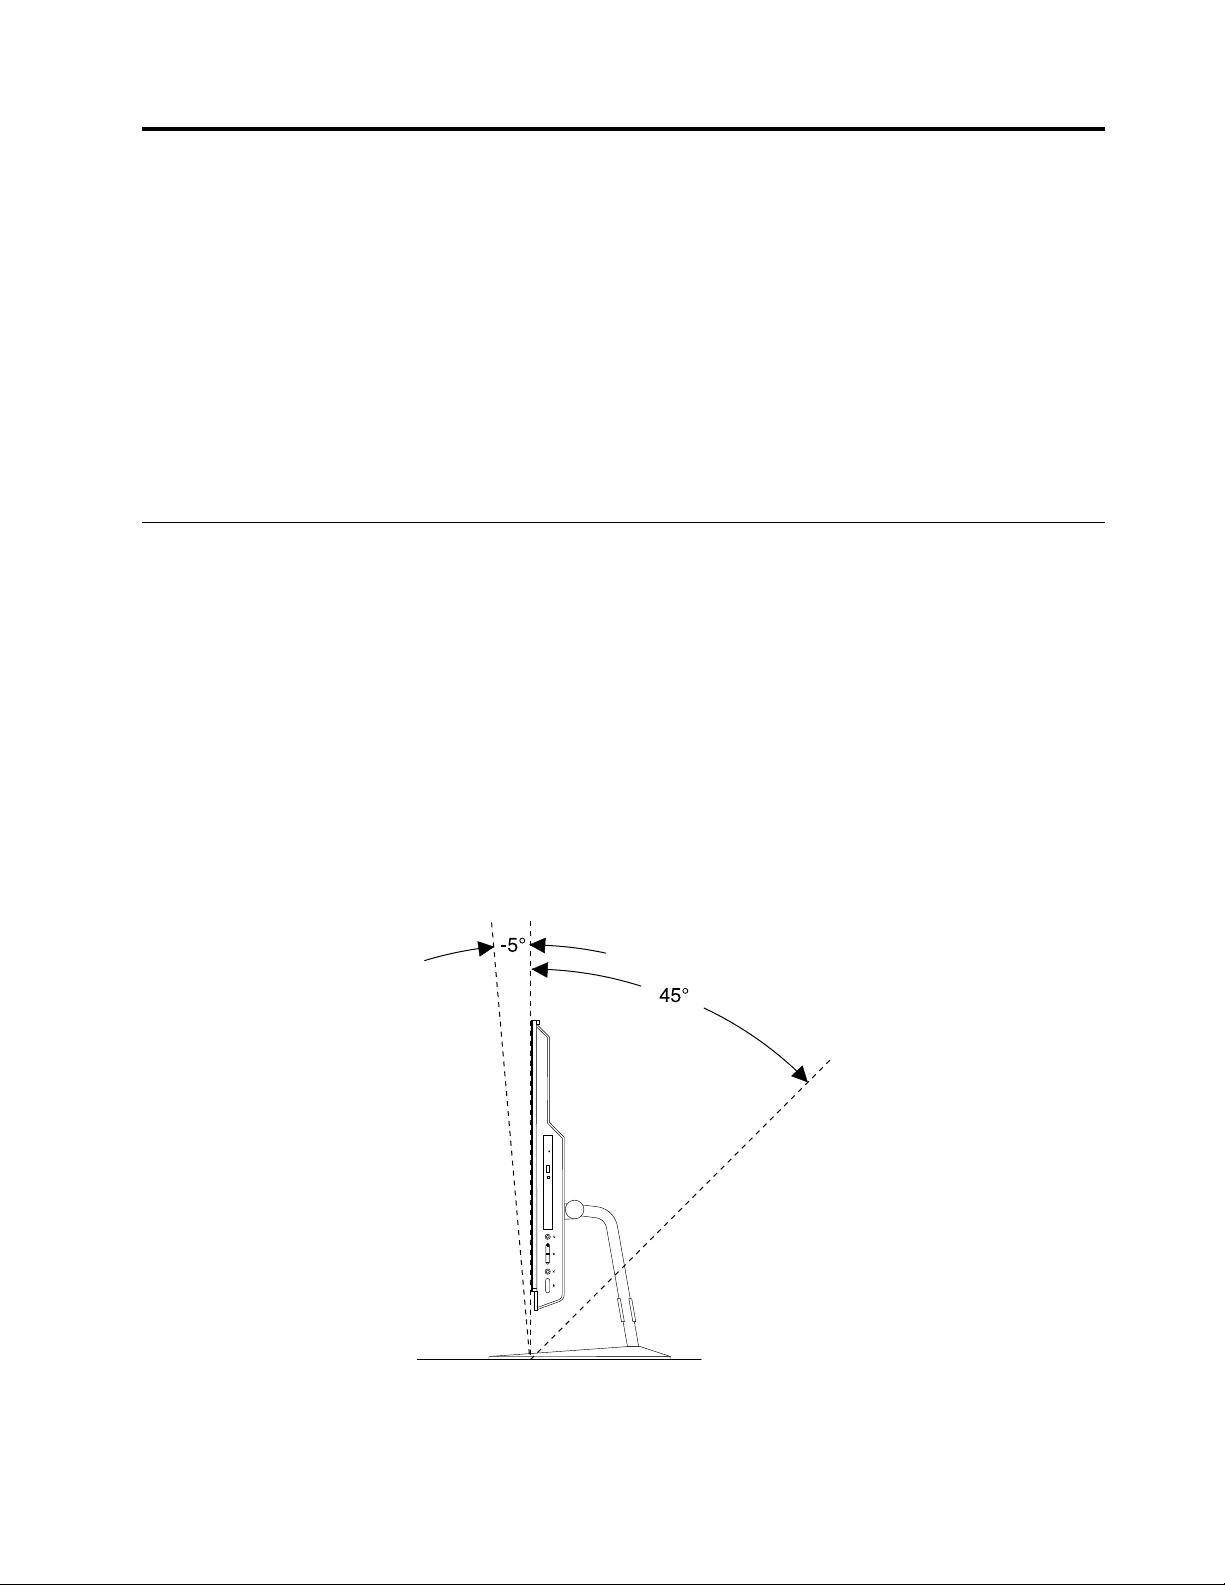
Adjustingthetilt-onlymonitorstand
Youcanadjusttheverticalpositionofthecomputerbetween5°tothefrontand45°totherearasshown.
Figure5.Adjustingthetilt-onlymonitorstand
©CopyrightLenovo2015,2016
13
Page 24
Youcanmanagecables(suchascablesofthekeyboardandmouse)byroutingthecablesthroughthecable
looponthestandasshown.
Figure6.Cablelooponthetilt-onlymonitorstand
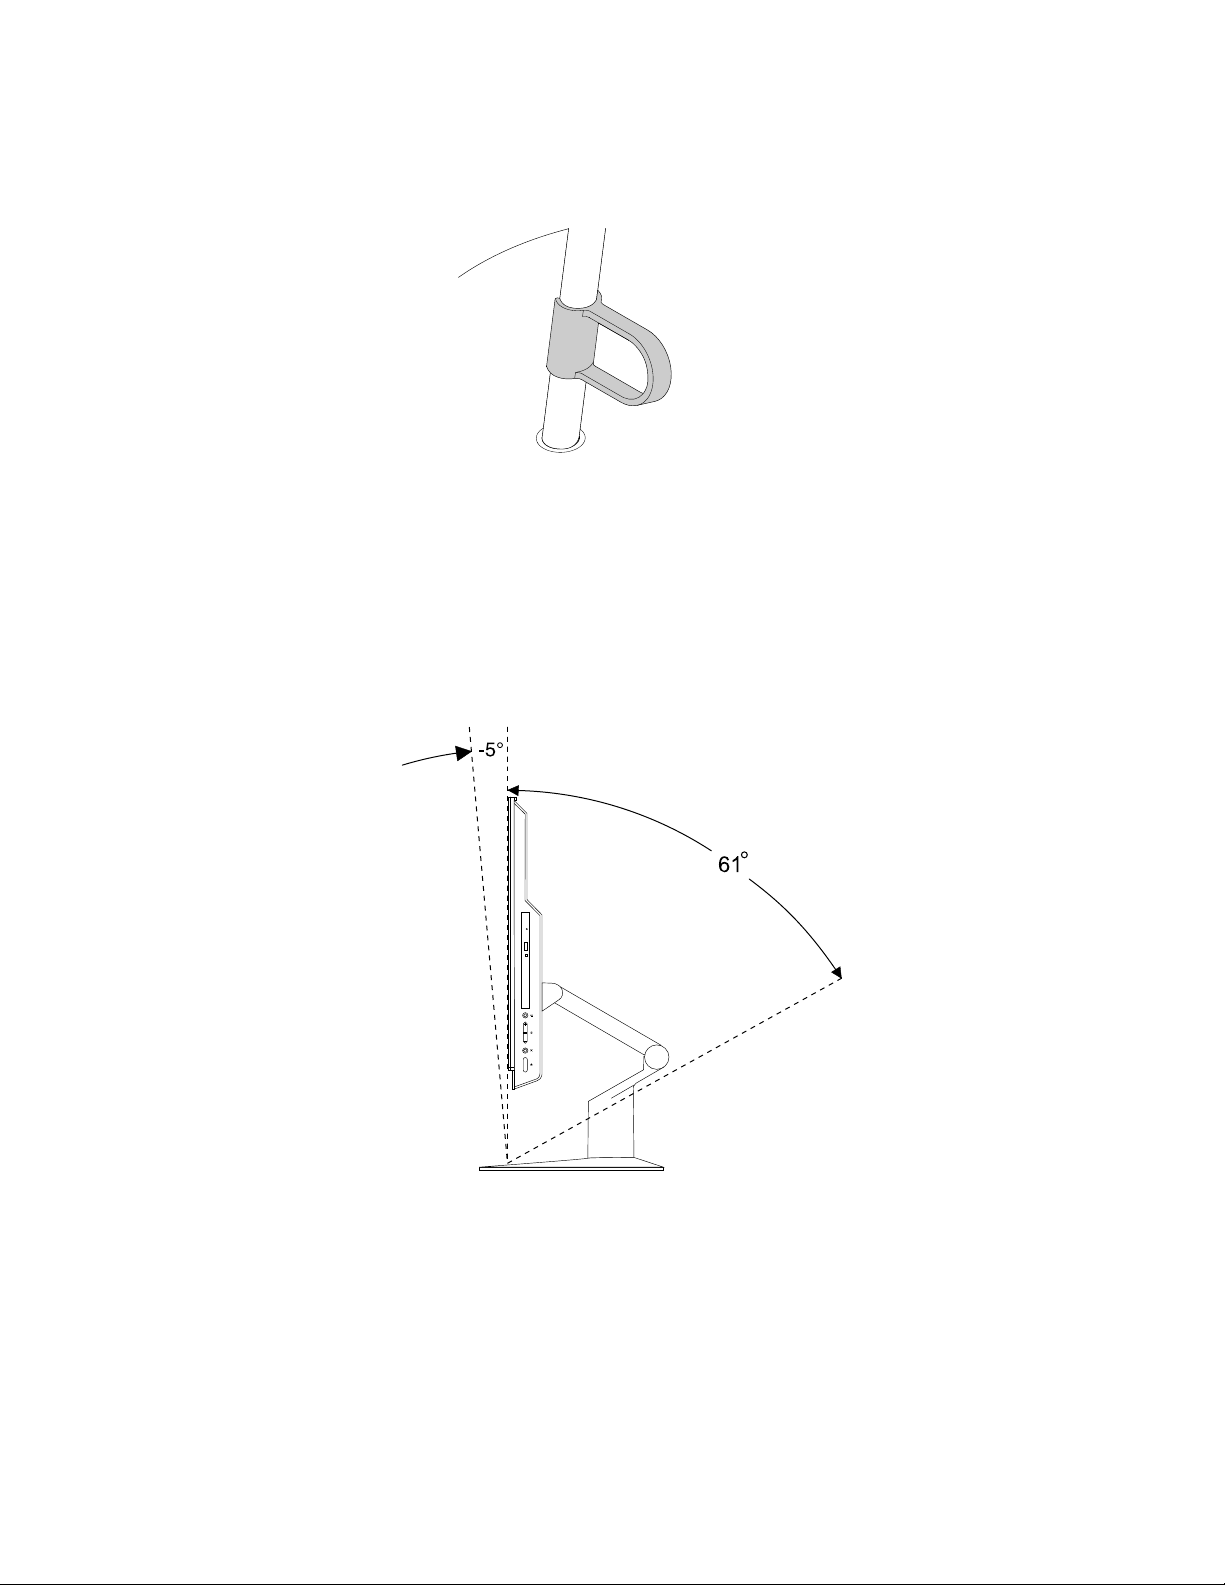
AdjustingtheUltraFlexIIStand
YoucanusetheUltraFlexIIStandtoadjustthecomputerbydoingthefollowing:
1.Y oucanadjusttheverticalpositionofthecomputerbetween5°tothefrontand61°totherearasshown.
Figure7.Adjustingtheverticalpositionofthecomputertothefrontortotherear
14ThinkCentreM900zUserGuide
Page 25
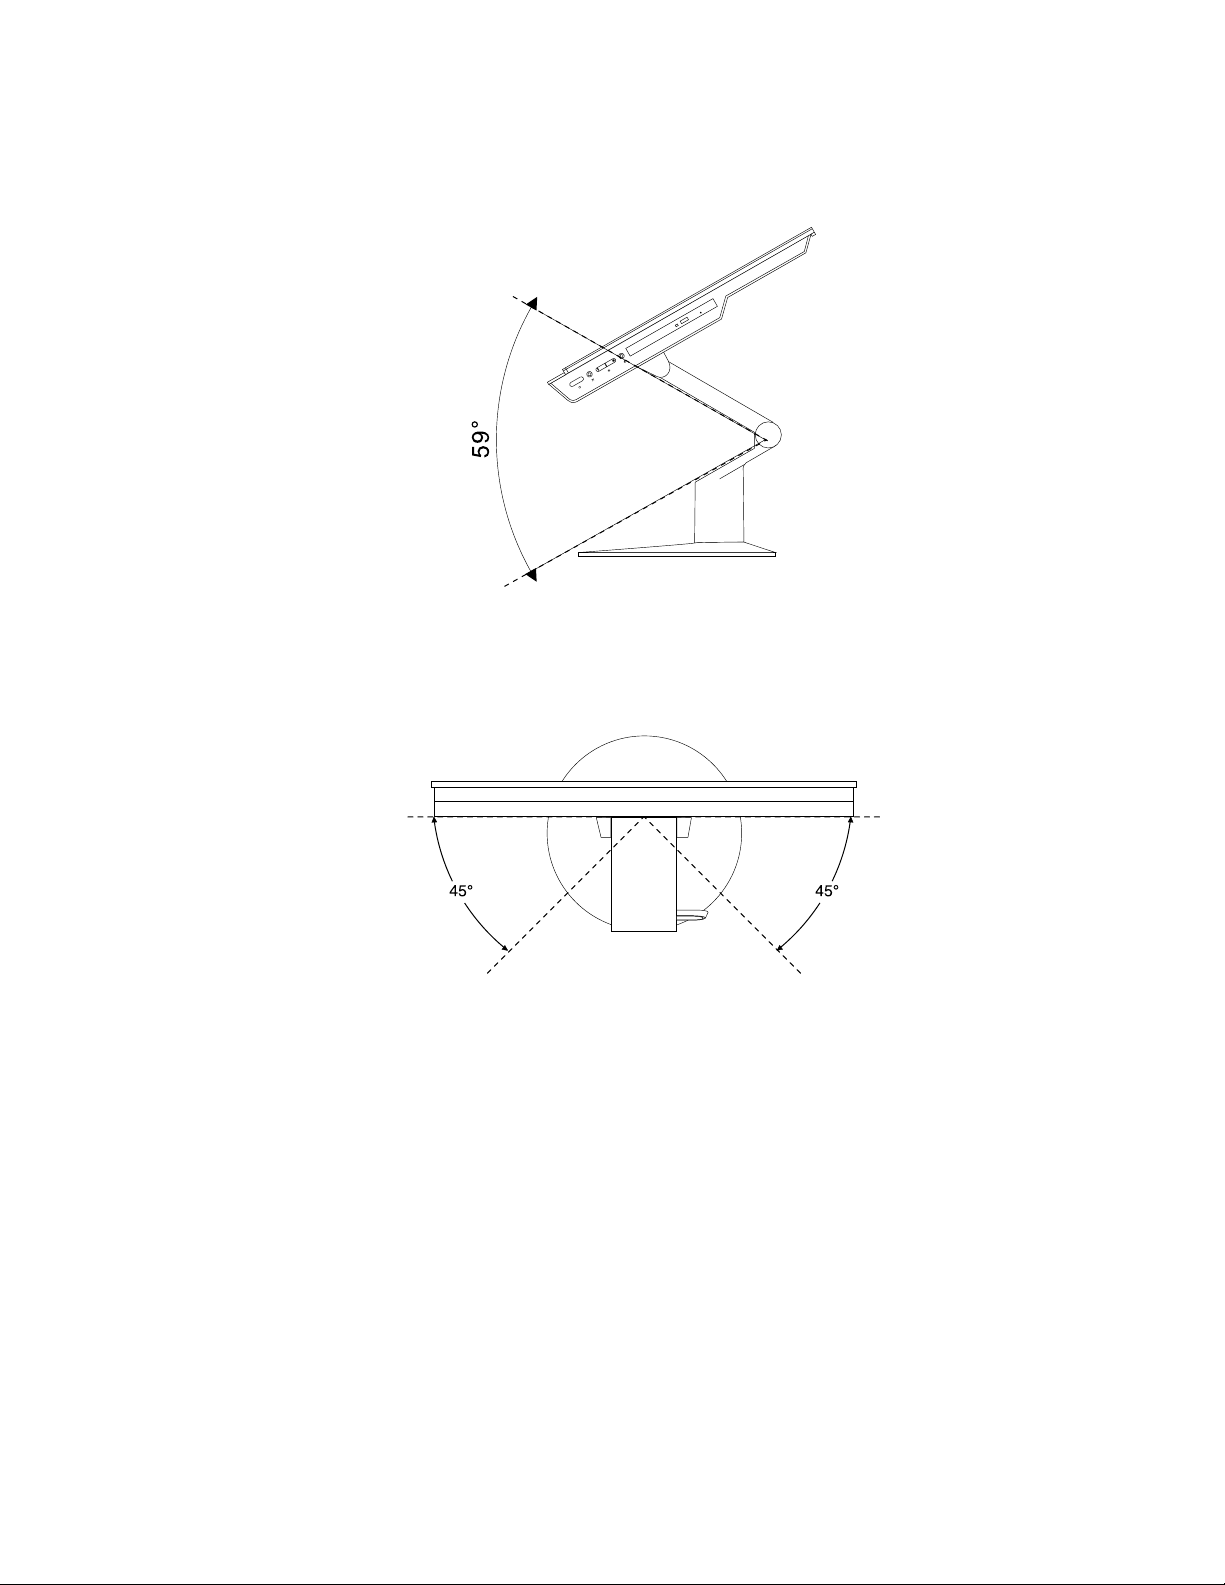
2.Afteryouadjustyourcomputertotherear,youcanadjusttheUltraFlexIIStanddownwardwithina
rangeof59°asshown.
Figure8.AdjustingtheUltraFlexIIStanddownward
3.Y oucanadjusttheangleofthecomputerbetween45°totheleftand45°totherightasshown.
Figure9.Adjustingthecomputertotheleftortotheright
Chapter2.Usingyourcomputer15
Page 26

Youcanmanagecables(suchascablesofthekeyboardandmouse)byroutingthecablesthroughthecable
looponthestandasshown.
Figure10.CableloopontheUltraFlexIIStand
Registeringthecomputer
WhenyouregisterthecomputerwithLenovo,youenterrequiredinformationintoaLenovodatabase.The
informationenablesLenovotocontactyouwhenthereisarecallorothersevereproblemandprovide
quickerservicewhenyoucallLenovoforhelp.Inaddition,somelocationsofferextendedprivilegesand
servicestoregisteredusers.
ToregisterthecomputerwithLenovo,ensurethatthecomputerisconnectedtotheInternet.Then,goto
http://www.lenovo.com/registerandfollowtheinstructionsonthescreen.
Settingthecomputervolume
Tosetthecomputervolume,dothefollowing:
1.ClickthevolumeiconintheWindowsnotificationareaonthetaskbar.
Note:IfthevolumeiconisnotdisplayedintheWindowsnotificationarea,addtheicontothe
notificationarea.See“AddinganicontotheWindowsnotificationarea”onpage16.
2.Followtheinstructionsonthescreentoadjustthevolume.Clickthespeakericontomutetheaudio.
AddinganicontotheWindowsnotificationarea
ToaddanicontotheWindowsnotificationarea,dothefollowing:
1.Clickthearrownexttothenotificationareatoviewhiddenicons.Then,clickthedesirediconand
dragittothenotificationarea.
2.Iftheiconisnotdisplayed,turnontheicon.
a.ClicktheStartbuttontoopentheStartmenu.
b.DependingonyourWindowsversion,dooneofthefollowing:
•ForWindows7:ClickControlPanel.ViewControlPanelusinglargeiconsorsmallicons,and
thenclickNotificationAreaIcons➙T urnsystemiconsonoroff.
•ForWindows10:ClickSettings➙Personalization➙T askbar➙Turnsystemiconsonoroff.
c.Turnonthedesiredicon.
3.IftheiconisstillnotdisplayedintheWindowsnotificationarea,repeatstep1.
16ThinkCentreM900zUserGuide
Page 27

Usingadisc
Thissectionprovidesinformationaboutusingadiscandtheopticaldrive.
Guidelinesaboutusingtheopticaldrive
Whenusingtheopticaldrive,followtheseguidelines:
•Donotplacethecomputerinalocationwherethedriveisexposedtoanyofthefollowingconditions:
–Hightemperature
–Highhumidity
–Excessivedust
–Excessivevibrationorsuddenshock
–Aninclinedsurface
–Directsunlight
•Donotinsertanyobjectotherthanadiscintothedrive.
•Donotinsertdamageddiscsintothedrive.Warped,scratched,ordirtydiscscandamagethedrive.
•Beforemovingthecomputer,removethediscfromthedrive.
Handlingandstoringadisc
Whenhandlingandstoringadisc,followtheseguidelines:
•Holdthediscbyitsedges.Donottouchthesurfaceofthesidethatisnotlabeled.
•Toremovedustorfingerprints,wipethediscwithaclean,softclothfromthecentertotheoutside.Wiping
thediscinacirculardirectionmightcauselossofdata.
•Donotwriteorstickpaperonthedisc.
•Donotscratchormarkthedisc.
•Donotplaceorstorethediscindirectsunlight.
•Donotusebenzene,thinners,orothercleanerstocleanthedisc.
•Donotdroporbendthedisc.
Playingandremovingadisc
Toplayadisc,dothefollowing:
1.Withthecomputeron,presstheeject/closebuttononthefrontoftheopticaldrive.Thetrayslides
outofthedrive.
2.Insertadiscintothetray.Someopticaldrivehasasnaphubinthecenterofthetray.Ifyourdrivehasa
snaphub,supportthetraywithonehandandthenpushcenterofthediscuntilitsnapsintoplace.
3.Presstheeject/closebuttonagainorgentlypushthetrayforwardtoclosethetray.Thediscplayer
programstartsautomatically.Formoreinformation,refertothehelpsystemofthediscplayerprogram.
Toremoveadiscfromtheopticaldrive,dothefollowing:
1.Withthecomputeron,presstheeject/closebuttononthefrontoftheopticaldrive.Thetrayslides
outofthedrive.
2.Carefullyremovethediscfromthetray.
3.Presstheeject/closebuttonagainorgentlypushthetrayforwardtoclosethetray.
Chapter2.Usingyourcomputer17
Page 28

Note:Ifthetraydoesnotslideoutofthedrivewhenyoupresstheeject/closebutton,turnoffthecomputer.
Then,insertastraightenedpaperclipintotheemergency-ejectholeadjacenttotheeject/closebutton.
Usetheemergencyejectonlyinanemergency.
Recordingadisc
Ifyouropticaldrivesupportsrecording,youcanrecordadisc.
RecordingadiscusingWindowstools
TorecordadiscusingWindowstools,dooneofthefollowing:
•BurnadiscusingtheAutoPlaywindow.
1.Ensurethatthediscisplayedautomatically.
a.ClicktheStartbuttontoopentheStartmenu.
b.DependingonyourWindowsversion,dooneofthefollowing:
–ForWindows7:ClickControlPanel.ViewControlPanelusinglargeiconsorsmallicons,
andthenclickAutoPlay.
–ForWindows10:ClickSettings➙Devices➙AutoPlay.
c.SelectorturnonUseAutoPlayforallmediaanddevices.
2.Insertarecordablediscintotheopticaldrivethatsupportsrecording.TheAutoPlaywindowopens.
3.Followtheinstructionsonthescreen.
•BurnadiscusingWindowsMedia
1.Insertarecordablediscintotheopticaldrivethatsupportsrecording.
2.OpenWindowsMediaPlayer.See“Accessingaprogramonthecomputer”onpage9.
3.Followtheinstructionsonthescreen.
•BurnadiscfromanISOfile.
1.Insertarecordablediscintotheopticaldrivethatsupportsrecording.
2.Double-clicktheISOfile.
3.Followtheinstructionsonthescreen.
®
Player.
Recordingadiscusingpreinstalledprograms
Torecordadiscusingpreinstalledprograms,dothefollowing:
1.Insertarecordablediscintotheopticaldrivethatsupportsrecording.
2.OpenthePowerDVDCreate,PowerProducer,orPower2Goprogram.See“Accessingaprogramonthe
computer”onpage9.
3.Followtheinstructionsonthescreen.
Connectingtoanetwork
Thissectionprovidesinformationaboutconnectingtoanetwork.Ifyoucannotconnectthecomputertoa
network,see“Networkingproblems”onpage43.
ConnectingtoanEthernetLAN
YoucanconnectthecomputertoanEthernetLANbyconnectinganEthernetcabletotheEthernetconnector.
18ThinkCentreM900zUserGuide
Page 29

DANGER
Toavoidtheriskofelectricalshock,donotconnectthetelephonecabletotheEthernetconnector.
ConnectingtoawirelessLAN
YoucanconnectthecomputertoawirelessLANwithouttheuseofanEthernetcablebutbymeansof
radiowavesonly.
Note:ThewirelessLANfeatureisoptional.
Toestablishawireless-LANconnection,dothefollowing:
1.EnsurethatawirelessLANisavailableandthewirelessLANfeatureonthecomputerisworking.
2.Clickthewireless-network-connection-statusiconintheWindowsnotificationareatodisplayavailable
wirelessnetworks.
Note:Ifthewireless-network-connection-statusiconisnotdisplayedintheWindowsnotificationarea,
addtheicontothenotificationarea.See“AddinganicontotheWindowsnotificationarea”onpage16
3.ClickawirelessLAN,andthenclickConnecttoconnectthecomputertoit.Providerequired
informationifneeded.
ConnectingtoaBluetooth-enableddevice
Bluetoothisashort-rangewirelesscommunicationstechnology.UseBluetoothtoestablishawireless
connectionbetweenthecomputerandanotherBluetooth-enableddevicewithinadistanceofabout10
m(32.8ft).
.
Note:TheBluetoothfeatureisoptional.
ToconnecttoaBluetooth-enableddevice,dothefollowing:
1.EnsurethattheBluetoothfeatureonthecomputerisworkingandtheBluetooth-enableddeviceis
locatedwithinadistanceofabout10m(32.8ft)fromthecomputer.
2.ClicktheBluetoothiconintheWindowsnotificationareaonthetaskbar.Then,clickAddaDeviceand
followtheinstructionsonthescreen.
Note:IftheBluetoothiconisnotdisplayedintheWindowsnotificationarea,addtheicontothe
notificationarea.See“AddinganicontotheWindowsnotificationarea”onpage16
.
Usingthesingle-touchormulti-touchfeature
Dependingonthecomputermodel,thesingle-touchorthemulti-touchfeatureisavailable.Thesingle-touch
featureenablesyoutouseonlyonefingeratatimetointeractwiththecomputer.Themulti-touchfeature
enablesyoutouseoneortwofingerstointeractwiththecomputer.
Note:Thesingle-touchandmulti-touchfeaturesareoptional.
Tousethesingle-touchormulti-touchfeature,dothefollowing:
•Tomakeasingleclick,tapthetouchscreenoncewithyourfinger.
•Tomakeadouble-click,taptwicewithoutpausing.
•Tomakearight-click,tapthetouchscreenonceandthenholdyourfingeronthetouchscreenuntila
roundcircleisdisplayed.Then,liftyourfingeroffthetouchscreensothatacontextmenuisdisplayed.
Youcanmakeyourselectiononthemenu.
Chapter2.Usingyourcomputer19
Page 30

•Tomakeiteasiertoreadoreditadocument,usetwofingerstozoomin,zoomout,scroll,orrotate
onthetouchscreen.
20ThinkCentreM900zUserGuide
Page 31

Chapter3.Youandyourcomputer
Thischaptercontainsthefollowingtopics:
•“Arrangingyourworkspace”onpage21
•“Accessibilityinformation”onpage22
•“Cleaningthecomputer”onpage25
•“Maintenance”onpage25
•“Movingthecomputer”onpage27
Arrangingyourworkspace
Arrangeyourworkspacetosuityourneedsandthekindofworkyoudo.Thissectionprovidesinformation
aboutthefactorsthataffectthewayyouarrangeyourworkspace.
Glareandlighting
Positionthecomputertominimizeglareandreflectionsfromoverheadlights,windows,andotherlight
sources.Reflectedlightfromshinysurfacescancauseannoyingreflectionsonyourscreen.Whenpossible,
placethecomputeratrightanglestowindowsandotherlightsources.Ifnecessary,reduceoverhead
lightingbyturningofflightsorusinglowerwattagebulbs.Ifyouinstallthecomputernearawindow,use
curtainsorblindstoblockthesunlight.Youcanadjustthebrightnessandcontrastcontrolsonthecomputer
astheroomlightingchangesthroughouttheday.
Whereitisimpossibletoavoidreflectionsortoadjustthelighting,anantiglarefilterplacedoverthescreen
mightbehelpful.However,thesefiltersmightaffecttheclarityoftheimageonthescreen;trythemonlyafter
youhaveexhaustedothermethodsofreducingglare.
Aircirculation
Thecomputerproducesheat.Thecomputerhasafanthatpullsinfreshairandforcesouthotairthrough
theairvents.Blockingtheairventscancauseoverheating,whichmightresultinamalfunctionordamage.
Positionthecomputersothatnothingblockstheairvents;usually,51mm(2inches)ofairspaceissufficient.
Ensurethattheventedairisnotblowingonpeople.
Electricaloutletlocationsandcablelengths
Thefollowingfactorsmightdeterminethefinalplacementofthecomputer:
•Locationsofelectricaloutlets
•Lengthofpowercordsorpoweradapters
•Lengthofthecablesthatareconnectedtootherdevices
Formoreinformationaboutpowercordsorpoweradapters,see“Powercordsandpoweradapters”on
pageiv
.
Comfort
Althoughnosingleworkingpositionisidealforeveryone,hereareafewguidelinestohelpyoufindaposition
thatsuitsyoubest.Thefollowingfiguresetsanexampleforyourreference.
©CopyrightLenovo2015,2016
21
Page 32

•Screenposition:Keepthescreenatacomfortableviewingdistance,usually51-61cm(20-24inches).
Then,adjustthescreensothatthetopofthescreenisatorslightlybeloweyelevelandyoucanviewit
withouttwistingyourbody.
•Chairposition:Useachairthatgivesyougoodbacksupportandseatheightadjustment.Usechair
adjustmentstobestsuityourdesiredposture.
•Headposition:Keepyourheadandneckinacomfortableandneutral(verticalorupright)position.
•Armandhandpositions:Keepyourforearms,wrists,andhandsinarelaxedandneutral(horizontal)
position.Typewithasofttouchwithoutpoundingthekeys.
•Legposition:Keepyourthighsparalleltothefloorandyourfeetflatonthefloororonafootrest.
Makeminormodificationsinyourworkingposturetodetertheonsetofdiscomfortcausedbylongperiodsof
workinginthesameposition.Frequent,shortbreaksfromyourworkalsohelptopreventminordiscomfort
associatedwithyourworkingposture.
Accessibilityinformation
Lenovoiscommittedtoprovidinguserswhohavehearing,vision,andmobilitylimitationswithgreater
accesstoinformationandtechnology.Thissectionprovidesinformationaboutthewaystheseuserscanget
themostoutoftheircomputerexperience.Youalsocangetthemostup-to-dateaccessibilityinformation
fromthefollowingWebsite:
http://www.lenovo.com/accessibility
Keyboardshortcuts
Thefollowingtablecontainskeyboardshortcutsthatcanhelpmakethecomputereasiertouse.
Note:Dependingonyourkeyboard,someofthefollowingkeyboardshortcutsmightnotbeavailable.
KeyboardshortcutFunction
Windowslogokey+U
RightShiftforeightseconds
ShiftfivetimesTurnonorturnoffStickyKeys
NumLockforfivesecondsTurnonorturnoffToggleKeys
LeftAlt+LeftShift+NumLock
LeftAlt+LeftShift+PrtScn(orPrtSc)TurnonorturnoffHighContrast
OpenEaseofAccessCenter
TurnonorturnoffFilterKeys
TurnonorturnoffMouseKeys
Formoreinformation,gotohttp://windows.microsoft.com/,andthenperformasearchusinganyofthe
followingkeywords:keyboardshortcuts,keycombinations,shortcutkeys.
22ThinkCentreM900zUserGuide
Page 33

EaseofAccessCenter
EaseofAccessCenterontheWindowsoperatingsystemenablesuserstoconfiguretheircomputersto
suittheirphysicalandcognitiveneeds.
TouseEaseofAccessCenter,dothefollowing:
1.ClicktheStartbuttontoopentheStartmenu.
2.DependingonyourWindowsversion,dooneofthefollowing:
•ForWindows7:ClickControlPanel.ViewControlPanelusinglargeiconsorsmallicons,and
thenclickEaseofAccessCenter.
•ForWindows10:ClickSettings➙EaseofAccess.
3.Choosetheappropriatetoolbyfollowingtheinstructionsonthescreen.
EaseofAccessCentermainlyincludesthefollowingtools:
•Magnifier
Magnifierisausefulutilitythatenlargestheentirescreenorpartofthescreensothatyoucansee
theitemsbetter.
•Narrator
Narratorisascreenreaderthatreadsaloudwhatisdisplayedonthescreenanddescribeseventssuchas
errormessages.
•On-ScreenKeyboard
Ifyouprefertotypeorenterdataintothecomputerusingamouse,joystick,orotherpointingdevice
insteadofaphysicalkeyboard,youcanuseOn-ScreenKeyboard.On-ScreenKeyboarddisplaysavisual
keyboardwithallthestandardkeys.
•HighContrast
HighContrastisafeaturethatheightensthecolorcontrastofsometextandimagesonyourscreen.Asa
result,thoseitemsaremoredistinctandeasiertoidentify.
•Personalizedkeyboard
Adjustkeyboardsettingstomakeyourkeyboardeasiertouse.Forexample,youcanuseyourkeyboard
tocontrolthepointerandtypecertainkeycombinationseasier.
•Personalizedmouse
Adjustmousesettingstomakeyourmouseeasiertouse.Forexample,youcanchangethepointer
appearanceandmakeiteasiertomanagewindowswiththemouse.
SpeechRecognition
SpeechRecognitionenablesyoutocontrolthecomputerbyvoice.
Usingonlyyourvoice,youcanstartprograms,openmenus,clickobjectsonthescreen,dictatetextinto
documents,andwriteandsende-mails.Everythingyoudowiththekeyboardandmousecanbedonewith
onlyyourvoice.
TouseSpeechRecognition,dothefollowing:
1.DependingonyourWindowsversion,dooneofthefollowing:
•ForWindows7:ClicktheStartbuttontoopentheStartmenu.
•ForWindows10:Right-clicktheStartbuttontoopentheStartcontextmenu.
2.ClickControlPanel.ViewControlPanelusinglargeiconsorsmallicons,andthenclickSpeech
Recognition.
Chapter3.Youandyourcomputer23
Page 34

3.Followtheinstructionsonthescreen.
Screen-readertechnologies
Screen-readertechnologiesareprimarilyfocusedonsoftwareprograminterfaces,helpinformationsystems,
andvariousonlinedocuments.Foradditionalinformationaboutscreenreaders,seethefollowing:
•UsingPDFswithscreenreaders:
http://www.adobe.com/accessibility.html?promoid=DJGVE
•UsingtheJAWSscreenreader:
http://www.freedomscientific.com/jaws-hq.asp
•UsingtheNVDAscreenreader:
http://www.nvaccess.org/
Screenresolution
Youcanmakethetextandimagesonyourscreeneasiertoreadbyadjustingthescreenresolutionofthe
computer.
Toadjustthescreenresolution,dothefollowing:
1.Right-clickablankareaonthedesktop.
2.DependingonyourWindowsversion,dooneofthefollowing:
•ForWindows7:ClickScreenresolution.
•ForWindows10:ClickDisplaysettings.OntheDisplaytab,clickAdvanceddisplaysettings.
3.Followtheinstructionsonthescreen.
Note:Settingtheresolutiontoolowmightpreventsomeitemsfromfittingonthescreen.
Customizableitemsize
Youcanmaketheitemsonyourscreeneasiertoreadbychangingtheitemsize.
•Tochangetheitemsizetemporarily,usetheMagnifiertoolinEaseofAccessCenter.See“Easeof
AccessCenter”onpage23.
•Tochangetheitemsizepermanently,dothefollowing:
–Changethesizeofalltheitemsonyourscreen.
1.Right-clickablankareaonthedesktop.
2.DependingonyourWindowsversion,dooneofthefollowing:
–ForWindows7:ClickScreenresolution➙Maketextandotheritemslargerorsmaller.
–ForWindows10:ClickDisplaysettings.
3.Changetheitemsizebyfollowingtheinstructionsonthescreen.
–ChangethesizeoftheitemsonaWebpage.
PressandholdCtrl,andthenpresstheplus-signkey(+)toenlargeortheminus-signkey(-)to
reducethetextsize.
–Changethesizeoftheitemsonthedesktoporawindow.
Note:Thisfunctionmightnotworkonsomewindows.
Ifyourmousehasawheel,pressandholdCtrl,andthenscrollthewheeltochangetheitemsize.
Industry-standardconnectors
Thecomputerprovidesindustry-standardconnectorsthatenableyoutoconnectassistivedevices.
24ThinkCentreM900zUserGuide
Page 35

TTY/TDDconversionmodem
Thecomputersupportstheuseofatexttelephone(TTY)orthetelecommunicationsdeviceforthedeaf(TDD)
conversionmodem.ThemodemmustbeconnectedbetweenthecomputerandaTTY/TDDtelephone.
Then,youcantypeamessageonthecomputerandsendittothetelephone.
Documentationinaccessibleformats
Lenovoprovideselectronicdocumentationinaccessibleformats,suchasproperlytaggedPDFfilesor
HyperTextMarkupLanguage(HTML)files.Lenovoelectronicdocumentationisdevelopedtoensure
thatvisuallyimpaireduserscanreadthedocumentationthroughascreenreader.Eachimageinthe
documentationalsoincludesadequatealternativetextsothatvisuallyimpaireduserscanunderstandthe
imagewhentheyuseascreenreader.
Cleaningthecomputer
CAUTION:
Removeanymediafromthedrivesandturnoffallconnecteddevicesandthecomputer.Then,
disconnectallpowercordsfromelectricaloutletsanddisconnectallcablesthatareconnected
tothecomputer.
Itisagoodpracticetocleanthecomputerperiodicallytoprotectthesurfacesandensuretrouble-free
operation.Useonlymildcleaningsolutionsandadampclothtocleanthepaintedsurfacesofthecomputer.
Dustbuildupcompoundsproblemsassociatedwithglare,soremembertocleanthescreenperiodically.
Wipethescreensurfacegentlywithasoft,drycloth,orblowonthescreentoremovegritandotherloose
particles.Dependingonthetypeofthescreen,moistenasoft,lint-freeclothwithanLCDcleanerorliquid
glasscleanerandthenwipethescreensurface.
Maintenance
Withappropriatecareandmaintenance,thecomputerwillserveyoureliably.Thissectionprovides
informationaboutmaintainingthecomputersothatitcankeepworkingintoporder.
Basicmaintenancetips
Herearesomebasicpointsaboutkeepingthecomputerfunctioningproperly:
•Keepthecomputerinaclean,dryenvironment.Ensurethatthecomputerrestsonaflat,steadysurface.
•Donotcoveranyofairvents.Theseairventsprovideairflowtokeepthecomputerfromoverheating.
•Keepfoodanddrinksawayfromallpartsofthecomputer.Foodparticlesandspillsmightmakethe
keyboardandmousestickandunusable.
•Donotgetthepowerswitchesorothercontrolswet.Moisturecandamagethesepartsandcausean
electricalhazard.
•Alwaysdisconnectapowercordbygraspingthepluginsteadofthecord.
Goodmaintenancepractices
Byperformingafewgoodmaintenancepractices,youcanmaintaingoodcomputerperformance,protect
yourdata,andbepreparedincaseofacomputerfailure.
•Keepthecomputersoftware,devicedrivers,andoperatingsystemup-to-date.See“Keepingthe
computercurrent”onpage26
•Emptyyourrecyclebinonaregularbasis.
•CleanoutyourInbox,SentItems,andDeletedItemsfoldersinyoure-mailapplicationonaregularbasis.
.
Chapter3.Youandyourcomputer25
Page 36

•Cleanupfilesandfreeupstoragedrivespaceandmemoryspaceoccasionallytopreventperformance
problems.See“Performanceproblems”onpage45
•Keepalogbook.Entriesmightincludemajorsoftwareorhardwarechanges,device-driverupdates,
intermittentproblemsandwhatyoudidtoresolvethem,andotherissuesyoumighthaveexperienced.
Thecauseofaproblemmightbechangeinhardware,changeinsoftware,oranyotheractionsthatmight
havetakenplace.AlogbookcanhelpyouoraLenovotechniciandeterminethecauseofaproblem.
•Backupyourdataonthestoragedriveregularly.Youcanrestorethestoragedrivefromabackup.
Tobackupyourdata,dooneofthefollowing:
–ForWindows7:OpentheRescueandRecoveryprogram.See“Accessingaprogramonthecomputer”
onpage9
–ForWindows10:Right-clicktheStartbuttontoopentheStartcontextmenu,andthenclickControl
Panel.ViewControlPanelusinglargeiconsorsmallicons,andthenclickFileHistory.Followthe
instructionsonthescreen.
•Createarecoverymediumasearlyaspossible.Youcanusetherecoverymediumtorecoveryour
operatingsystemevenifWindowsfailstostartup.
Tocreatearecoverymedium,dooneofthefollowing:
–ForWindows7:OpentheCreateRecoveryMediaprogram.See“Accessingaprogramonthe
computer”onpage9
systemoftheprogram.
–ForWindows10:Right-clicktheStartbuttontoopentheStartcontextmenu,andthenclickControl
Panel.ViewControlPanelusinglargeiconsorsmallicons,andthenclickRecovery.Followthe
instructionsonthescreen.
•ForWindows7,createarescuemediumasearlyaspossible.Youcanusetherescuemediumto
recoverfromfailuresthatpreventyoufromgainingaccesstotheRescueandRecoveryworkspace
onyourstoragedrive.
Tocreatearescuemedium,opentheRescueandRecoveryprogram.See“Accessingaprogramonthe
computer”onpage9
oftheprogram.
.Formoreinformationaboutbackingupyourdata,refertothehelpsystemoftheprogram.
.Formoreinformationaboutcreatingarecoverymedium,refertothehelp
.Formoreinformationaboutcreatingarescuemedium,refertothehelpsystem
.
Keepingthecomputercurrent
Inmostcases,itisagoodpracticetohavethemostup-to-dateoperatingsystemupdatepatches,software
programs,anddevicedrivers.Thissectionprovidesinformationabouthowtogetthelatestupdatesforthe
computer.
Gettingthelatestdevicedrivers
Attention:Reinstallingdevicedriverswillchangethecurrentconfigurationofthecomputer.
Togetthelatestdevicedriversforthecomputer,dooneofthefollowing:
•Downloadthedevicedriversthatarepreinstalledonthecomputer.Gotohttp://www.lenovo.com/drivers.
•UsetheLenovoprogramorWindowsUpdate.See“Gettingthelatestsystemupdates”onpage26.
Note:ThedevicedriversprovidedbyWindowsUpdatemightnotbetestedbyLenovo.Itisrecommended
thatyougetdevicedriversfromLenovo.
Gettingthelatestsystemupdates
Togetthelatestsystemupdatesforthecomputer,ensurethatthecomputerisconnectedtotheInternet
anddooneofthefollowing:
•UseoneofthefollowingLenovoprogramstogetthesystemupdates:
26ThinkCentreM900zUserGuide
Page 37

–ForWindows7:UsetheSystemUpdateprogram.
–ForWindows10:UsetheLenovoCompanionprogram.
ToopentheSystemUpdateorLenovoCompanionprogram,see“Accessingaprogramonthecomputer”
onpage9.Formoreinformationaboutusingtheprogram,refertothehelpsystemoftheprogram.
•UseWindowsUpdatetogetthesystemupdates.
1.ClicktheStartbuttontoopentheStartmenu.
2.DependingonyourWindowsversion,dooneofthefollowing:
–ForWindows7:ClickControlPanel.ViewControlPanelusinglargeiconsorsmallicons,and
thenclickWindowsUpdate.
–ForWindows10:ClickSettings➙Update&security➙WindowsUpdate.
3.Followtheinstructionsonthescreen.
Movingthecomputer
Beforemovingthecomputer,takethefollowingprecautions:
1.Backupyourdataonthestoragedrive.See“Goodmaintenancepractices”onpage25.
2.Removeanymediafromthedrivesandturnoffallconnecteddevicesandthecomputer.Then,
disconnectallpowercordsfromelectricaloutletsanddisconnectallcablesthatareconnectedtothe
computer.
3.Ifyousavedtheoriginalshippingcartonsandpackingmaterials,usethemtopacktheunits.Ifyouare
usingdifferentcartons,cushiontheunitstoavoiddamage.
Movingthecomputertoanothercountryorregion
Whenyoumovethecomputertoanothercountryorregion,youmusttakelocalelectricalstandardsinto
consideration.Ifthelocalelectricaloutletstyleisdifferentfromthetypeyouarecurrentlyusing,contactthe
LenovoCustomerSupportCentertopurchaseeitheranelectricalplugadapteroranewpowercord.Fora
listofLenovoSupportphonenumbers,gotohttp://www.lenovo.com/support/phone.Ifyoucannotfindthe
supporttelephonenumberforyourcountryorregion,contactyourLenovoreseller.
Chapter3.Youandyourcomputer27
Page 38

28ThinkCentreM900zUserGuide
Page 39

Chapter4.Security
Thischaptercontainsthefollowingtopics:
•“Lockingthecomputer”onpage29
•“ViewingandchangingsecuritysettingsintheSetupUtilityprogram”onpage30
•“Preventingunauthorizedaccesstothecomputer”onpage30
•“Usingfingerprintauthentication”onpage31
•“Usingthecoverpresenceswitch”onpage31
•“Usingandunderstandingfirewalls”onpage31
•“Protectingdataagainstviruses”onpage32
•“ComputraceAgentsoftwareembeddedinfirmware”onpage32
•“TrustedPlatformModule(TPM)”onpage32
Lockingthecomputer
Thissectionprovidesinformationaboutlockingthecomputerwiththelockingdevicestokeepthecomputer
safe.
©CopyrightLenovo2015,2016
29
Page 40

AttachingaKensington-stylecablelock
YoucanuseaKensington-stylecablelocktosecureyourcomputertoadesk,table,orothernon-permanent
fixture.Thecablelockconnectstothesecurity-lockslotattherearofyourcomputer.Dependingonthetype
selected,thecablelockcanbeoperatedwithakeyorcombination.Thecablelockalsolocksthebuttons
usedtoopenthecomputercover.Thisisthesametypeoflockusedwithmanynotebookcomputers.You
canordersuchacablelockdirectlyfromLenovobysearchingforKensingtonat:
http://www.lenovo.com/support
Figure11.Kensington-stylecablelock
ViewingandchangingsecuritysettingsintheSetupUtilityprogram
ToviewandchangesecuritysettingsintheSetupUtilityprogram,dothefollowing:
1.StarttheSetupUtilityprogram.See“StartingtheSetupUtilityprogram”onpage33.
2.SelectSecurity.
3.Followtheinstructionsontherightsideofthescreentoviewandchangesecuritysettings.Y oucan
referto“UsingtheSetupUtilityprogram”onpage33togetbasicinformationaboutsomemajor
securitysettings.
4.ExittheSetupUtilityprogram.See“ExitingtheSetupUtilityprogram”onpage37.
Preventingunauthorizedaccesstothecomputer
YoucanuseBIOSpasswordsandWindowsaccountstopreventunauthorizedaccesstothecomputerand
data.
•TouseBIOSpasswords,see“UsingBIOSpasswords”onpage35.
•TouseWindowsaccounts,dothefollowing:
30ThinkCentreM900zUserGuide
Page 41

1.ClicktheStartbuttontoopentheStartmenu.
2.DependingonyourWindowsversion,dooneofthefollowing:
–ForWindows7:ClickControlPanel➙UserAccounts.
–ForWindows10:ClickSettings➙Accounts.
3.Followtheinstructionsonthescreen.
Usingfingerprintauthentication
Ifyourkeyboardhasafingerprintreader,youcanusefingerprintauthenticationtoreplacepasswordsfor
simpleandsecureuseraccess.T ousefingerprintauthentication,firstenrollyourfingerprintsandassociate
themwithyourpasswords(suchasthepower-onpassword,harddiskpassword,andWindowspassword).
Usethefingerprintreaderandthefingerprintprogramtocompletethisprocedure.
Tousefingerprintauthentication,dooneofthefollowing:
•ForWindows7:OpentheFingerprintManagerProorThinkVantageFingerprintSoftwareprogram
providedbyLenovo.See“Accessingaprogramonthecomputer”onpage9.Formoreinformationabout
usingtheprogram,refertothehelpsystemoftheprogram.
•ForWindows10:ClicktheStartbuttontoopentheStartmenu,andthenclickSettings➙Accounts➙
Sign-inoptions.Followtheinstructionsonthescreen.
Tousethefingerprintreader,refertothedocumentationshippedwiththefingerprintkeyboardorlocatedon
theLenovoSupportWebsiteathttp://www.lenovo.com/support/keyboards.
Usingthecoverpresenceswitch
Thecoverpresenceswitchpreventsthecomputerfromloggingintotheoperatingsystemwhenthe
computercoverisnotproperlyinstalledorclosed.
Toenablethecover-presence-switchconnectoronthesystemboard,dothefollowing:
1.StarttheSetupUtilityprogram.See“StartingtheSetupUtilityprogram”onpage33.
2.SelectSecurity➙ChassisIntrusionDetectionandpressEnter.
3.SelectEnabledandpressEnter.
4.ExittheSetupUtilityprogram.See“ExitingtheSetupUtilityprogram”onpage37.
Whenthecover-presence-switchconnectoronthesystemboardisenabled,ifthecoverpresenceswitch
detectsthatthecomputercoverisnotcorrectlyinstalledorclosed,anerrormessagewillbedisplayedwhen
youturnonthecomputer.Tobypasstheerrormessageandlogintotheoperatingsystem,dothefollowing:
1.Properlyinstallorclosethecomputercover.
2.StartandthenexittheSetupUtilityprogram.See“StartingtheSetupUtilityprogram”onpage33and
“ExitingtheSetupUtilityprogram”onpage37.
Usingandunderstandingfirewalls
Afirewallcanbehardware,software,oracombinationofbothdependingonthelevelofsecurityrequired.
Firewallsworkonasetofrulestodeterminewhichinboundandoutboundconnectionsareauthorized.Ifthe
computerispreinstalledwithafirewallprogram,ithelpsprotectagainstcomputerInternetsecuritythreats,
unauthorizedaccess,intrusions,andInternetattacks.Italsoprotectsyourprivacy.Formoreinformation
abouthowtousethefirewallprogram,refertothehelpsystemofyourfirewallprogram.
Chapter4.Security31
Page 42

TouseWindowsFirewall,dothefollowing
1.DependingonyourWindowsversion,dooneofthefollowing:
•ForWindows7:ClicktheStartbuttontoopentheStartmenu.
•ForWindows10:Right-clicktheStartbuttontoopentheStartcontextmenu.
2.ClickControlPanel.ViewControlPanelusinglargeiconsorsmallicons,andthenclickWindows
Firewall.
3.Followtheinstructionsonthescreen.
Protectingdataagainstviruses
Thecomputerispreinstalledwithanantivirusprogramtohelpyouguardagainst,detect,andeliminate
viruses.
Lenovoprovidesafullversionofantivirussoftwareonthecomputerwithafree30-daysubscription.After30
days,youmustrenewthelicensetocontinuereceivingtheantivirussoftwareupdates.
Note:Virusdefinitionfilesmustbekeptup-to-datetoguardagainstnewviruses.
Formoreinformationabouthowtouseyourantivirussoftware,refertothehelpsystemofyourantivirus
software.
ComputraceAgentsoftwareembeddedinfirmware
TheComputraceAgentsoftwareisanITassetmanagementandcomputertheftrecoverysolution.The
softwaredetectsifchangeshavebeenmadeonthecomputer,suchashardware,software,orthecomputer
call-inlocation.YoumighthavetopurchaseasubscriptiontoactivatetheComputraceAgentsoftware.
TrustedPlatformModule(TPM)
TPMisasecurecryptoprocessorthatcanstorecryptographickeysthatprotectinformationstoredinthe
computer.
32ThinkCentreM900zUserGuide
Page 43

Chapter5.Advancedconfiguration
Thischaptercontainsthefollowingtopics:
•“UsingtheSetupUtilityprogram”onpage33
•“UpdatingtheBIOS”onpage37
UsingtheSetupUtilityprogram
TheSetupUtilityprogramisusedtoviewandchangetheconfigurationsettingsofthecomputer.This
sectionprovidesinformationaboutonlythemajorconfigurationsettingsavailableintheprogram.
Note:TheoperatingsystemsettingsmightoverrideanysimilarsettingsintheSetupUtilityprogram.
StartingtheSetupUtilityprogram
TostarttheSetupUtilityprogram,dothefollowing:
1.T urnonorrestartthecomputer.
2.BeforeWindowsstartsup,repeatedlypressandreleasetheF1keyuntiltheSetupUtilityprogram
opens.IfaBIOSpasswordhasbeenset,theSetupUtilityprogramwillnotopenuntilyouenterthe
correctpassword.Formoreinformation,see“UsingBIOSpasswords”onpage35
Note:Forsomekeyboards,youmightneedtopressFn+F1toopentheSetupUtilityprogram.
.
Toviewandchangetheconfigurationsettings,followtheinstructionsontherightsideofthescreen.The
keysusedtoperformvarioustasksaredisplayedatthebottomofthescreen.
Enablingordisablingadevice
Thissectionprovidesinformationabouthowtoenableordisableuseraccesstohardwaredevices(such
asUSBconnectorsorstoragedrives).
Toenableordisableadevice,dothefollowing:
1.StarttheSetupUtilityprogram.See“StartingtheSetupUtilityprogram”onpage33.
2.SelectDevices.
3.SelectthedeviceyouwanttoenableordisableandpressEnter.
4.SelectthedesiredsettingandpressEnter.
5.ExittheSetupUtilityprogram.See“ExitingtheSetupUtilityprogram”onpage37.
EnablingordisablingtheAutomaticPowerOnfeatures
IfyouenabletheAutomaticPowerOnfeatures,thecomputerwillstartupautomatically.
ToenableordisabletheAutomaticPowerOnfeatures,dothefollowing:
1.StarttheSetupUtilityprogram.See“StartingtheSetupUtilityprogram”onpage33.
2.SelectPower➙AutomaticPowerOnandpressEnter.
3.SelectthefeatureyouwanttoenableordisableandpressEnter.
4.SelectthedesiredsettingandpressEnter.
5.ExittheSetupUtilityprogram.See“ExitingtheSetupUtilityprogram”onpage37.
©CopyrightLenovo2015,2016
33
Page 44

EnablingordisablingtheErPLPScompliancemode
Lenovocomputersmeettheeco-designrequirementsoftheErPLot3regulation.Formoreinformation,go
to:
http://www.lenovo.com/ecodeclaration
YoucanenabletheErPLPScompliancemodeintheSetupUtilityprogramtoreducetheconsumptionof
electricitywhenthecomputerisofforinsleepmode.
ToenableordisabletheErPLPScompliancemode,dothefollowing:
1.StarttheSetupUtilityprogram.See“StartingtheSetupUtilityprogram”onpage33.
2.SelectPower➙EnhancedPowerSavingModeandpressEnter.
3.DependingonwhetheryouselectEnabledorDisabled,dooneofthefollowing:
•IfyouselectEnabled,pressEnter.Then,disabletheWakeonLANfeature.See“Enablingor
disablingtheAutomaticPowerOnfeatures”onpage33.
•IfyouselectDisabled,pressEnter.Then,gotothenextstep.
4.ExittheSetupUtilityprogram.See“ExitingtheSetupUtilityprogram”onpage37.
WhentheErPLPScompliancemodeisenabled,youcanwakeupthecomputerbydoingoneofthe
following:
•Pressthepowerbutton.
•EnabletheWakeUponAlarmfeaturetomakethecomputerwakeupatasettime.See“Enablingor
disablingtheAutomaticPowerOnfeatures”onpage33.
•EnabletheAfterPowerLossfeaturetomakethecomputerwakeupwhenthepowersupplyresumesafter
asuddenlossofelectricity.
1.StarttheSetupUtilityprogram.See“StartingtheSetupUtilityprogram”onpage33.
2.SelectPower➙AfterPowerLossandpressEnter.
3.SelectPowerOnandpressEnter.
4.ExittheSetupUtilityprogram.See“ExitingtheSetupUtilityprogram”onpage37.
ChangingtheICEperformancemode
YoucanadjusttheacousticandthermalperformanceofthecomputerbychangingtheICEperformance
mode.
TochangetheICEperformancemode,dothefollowing:
1.StarttheSetupUtilityprogram.See“StartingtheSetupUtilityprogram”onpage33.
2.SelectPower➙IntelligentCoolingEngine(ICE)andpressEnter.
3.SelectICEPerformanceModeandpressEnter.
4.FollowtheinstructionsonthescreentochoosetheappropriateICEperformancemode.
5.ExittheSetupUtilityprogram.See“ExitingtheSetupUtilityprogram”onpage37.
EnablingordisablingtheICEThermalAlertfeature
IfyouenabletheICEthermalalertfeature,whencriticalthermalsituationsoccur,suchasmalfunctioning
fans,abnormallyhightemperature,orpoorcoolingperformances,analertlogwillbewrittenintothe
Windowssystemlog.Thealertlogcanhelpyouidentifythethermalproblems.
ToenableordisabletheICEThermalAlertfeature,dothefollowing:
34ThinkCentreM900zUserGuide
Page 45

1.StarttheSetupUtilityprogram.See“StartingtheSetupUtilityprogram”onpage33.
2.SelectPower➙IntelligentCoolingEngine(ICE)andpressEnter.
3.SelectICEThermalAlertandpressEnter.
4.SelectthedesiredsettingandpressEnter.
5.ExittheSetupUtilityprogram.See“ExitingtheSetupUtilityprogram”onpage37.
EnablingordisablingtheConfigurationChangeDetectionfeature
IfyouenabletheConfigurationChangeDetectionfeature,whenthePOSTdetectstheconfigurationchanges
ofsomehardwaredevices(suchasstoragedrivesormemorymodules),anerrormessagewillbedisplayed
whenyouturnonthecomputer.
ToenableordisabletheConfigurationChangeDetectionfeature,dothefollowing:
1.StarttheSetupUtilityprogram.See“StartingtheSetupUtilityprogram”onpage33.
2.SelectSecurity➙ConfigurationChangeDetectionandpressEnter.
3.SelectthedesiredsettingandpressEnter.
4.ExittheSetupUtilityprogram.See“ExitingtheSetupUtilityprogram”onpage37.
Tobypasstheerrormessageandlogintotheoperatingsystem,dooneofthefollowing:
•PresstheF2key.
Note:Forsomekeyboards,youmightneedtopressFn+F2tobypasstheerrormessage.
•StartandthenexittheSetupUtilityprogram.See“StartingtheSetupUtilityprogram”onpage33and
“ExitingtheSetupUtilityprogram”onpage37
.
UsingBIOSpasswords
ByusingtheSetupUtilityprogram,youcansetpasswordstopreventunauthorizedaccesstothecomputer
anddata.
Youdonothavetosetanypasswordstousethecomputer.However,usingpasswordsimprovescomputer
security.Ifyoudecidetosetanypasswords,readthefollowingtopics.
SetupUtilityprogrampasswordtypes
Thefollowingtypesofpasswordsareavailable:
•Power-onpassword
Whenapower-onpasswordisset,youarepromptedtoenteravalidpasswordeachtimethecomputeris
turnedon.Thecomputercannotbeuseduntilthevalidpasswordisentered.
•Administratorpassword
Settinganadministratorpassworddetersunauthorizedusersfromchangingconfigurationsettings.Ifyou
areresponsibleformaintainingtheconfigurationsettingsofseveralcomputers,youmightwanttoset
anadministratorpassword.
Whenanadministratorpasswordisset,youarepromptedtoenteravalidpasswordeachtimeyou
trytoaccesstheSetupUtilityprogram.TheSetupUtilityprogramcannotbeaccesseduntilavalid
passwordisentered.
Ifboththepower-onpasswordandadministratorpasswordareset,youcanentereitherpassword.
However,youmustuseyouradministratorpasswordtochangeanyconfigurationsettings.
•Harddiskpassword
Settingaharddiskpasswordpreventsunauthorizedaccesstothedataonthestoragedrive.Whena
Chapter5.Advancedconfiguration35
Page 46

harddiskpasswordisset,youarepromptedtoenteravalidpasswordeachtimeyoutrytoaccess
thestoragedrive.
Notes:
–Afteryousetaharddiskpassword,yourdataonthestoragedriveisprotectedevenifthestoragedrive
isremovedfromonecomputerandinstalledinanother.
–Iftheharddiskpasswordisforgotten,thereisnowaytoresetthepasswordorrecoverdatafrom
thestoragedrive.
Passwordconsiderations
Apasswordcanbeanycombinationofupto64alphabeticandnumericcharacters.Forsecurityreasons,it
isrecommendedtouseastrongpasswordthatcannotbeeasilycompromised.
Note:TheSetupUtilityprogrampasswordsarenotcasesensitive.
Tosetastrongpassword,considerthefollowingguidelines:
•Haveatleasteightcharactersinlength
•Containatleastonealphabeticcharacterandonenumericcharacter
•Notbeyournameoryourusername
•Notbeacommonwordoracommonname
•Besignificantlydifferentfromyourpreviouspasswords
Setting,changing,anddeletingapassword
Toset,change,ordeleteapassword,dothefollowing:
1.StarttheSetupUtilityprogram.See“StartingtheSetupUtilityprogram”onpage33.
2.SelectSecurity.
3.Dependingonthepasswordtype,selectSetPower-OnPassword,SetAdministratorPassword,or
HardDiskPasswordandpressEnter.
4.Followtheinstructionsontherightsideofthescreentoset,change,ordeleteapassword.
Note:Apasswordcanbeanycombinationofupto64alphabeticandnumericcharacters.Formore
information,see“Passwordconsiderations”onpage36.
5.ExittheSetupUtilityprogram.See“ExitingtheSetupUtilityprogram”onpage37.
Selectingastartupdevice
Ifthecomputerdoesnotstartupfromadeviceasexpected,youcanchoosetochangethestartupdevice
sequencepermanentlyorselectatemporarystartupdevice.
Changingthestartupdevicesequencepermanently
Tochangethestartupdevicesequencepermanently,dothefollowing:
1.Dependingonthetypeofthestoragedevice,dooneofthefollowing:
•Ifthestoragedeviceisinternal,gotostep2.
•Ifthestoragedeviceisadisc,ensurethatthecomputerisonorturnonthecomputer.Then,insert
thediscintotheopticaldrive.
•Ifthestoragedeviceisanexternaldeviceotherthanadisc,connectthestoragedevicetothe
computer.
2.StarttheSetupUtilityprogram.See“StartingtheSetupUtilityprogram”onpage33.
3.SelectStartup.
36ThinkCentreM900zUserGuide
Page 47

4.Followtheinstructionsontherightsideofthescreentochangethestartupdevicesequence.
5.ExittheSetupUtilityprogram.See“ExitingtheSetupUtilityprogram”onpage37.
Selectingatemporarystartupdevice
Note:Notalldiscsandstoragedrivesarebootable.
Toselectatemporarystartupdevice,dothefollowing:
1.Dependingonthetypeofthestoragedevice,dooneofthefollowing:
•Ifthestoragedeviceisinternal,gotostep2.
•Ifthestoragedeviceisadisc,ensurethatthecomputerisonorturnonthecomputer.Then,insert
thediscintotheopticaldrive.
•Ifthestoragedeviceisanexternaldeviceotherthanadisc,connectthestoragedevicetothe
computer.
2.T urnonorrestartthecomputer.BeforeWindowsstartsup,repeatedlypressandreleasetheF12key
untilStartupDeviceMenuisdisplayed.
Note:Forsomekeyboards,youmightneedtopressFn+F12todisplayStartupDeviceMenu.
3.SelectthedesiredstoragedeviceandpressEnter.Thecomputerwillstartupfromthedeviceyouselect.
Ifyouwanttoselectapermanentstartupdevice,selectEnterSetuponStartupDeviceMenuandpress
EntertostarttheSetupUtilityprogram.Formoreinformationabouthowtoselectapermanentstartup
device,see“Changingthestartupdevicesequencepermanently”onpage36
.
ExitingtheSetupUtilityprogram
ToexittheSetupUtilityprogram,dooneofthefollowing:
•Ifyouwanttosavethenewsettings,presstheF10key.Then,selectY esinthewindowdisplayed
andpressEnter.
Note:Forsomekeyboards,youmightneedtopressFn+F10toexittheSetupUtilityprogram.
•Ifyoudonotwanttosavethenewsettings,selectExit➙DiscardChangesandExitandpressEnter.
Then,selectY esinthewindowdisplayedandpressEnter.
UpdatingtheBIOS
Whenyouinstallanewprogram,hardwaredevice,ordevicedriver,youmightbeinformedtoupdate
theBIOS.Y oucanupdatetheBIOSfromyouroperatingsystemoraflashupdatedisc(supportedonly
onsomemodels).
ToupdatetheBIOS,dothefollowing:
1.Gotohttp://www.lenovo.com/drivers.
2.DownloadtheflashBIOSupdatedriverfortheoperatingsystemversionortheISOimageversion(used
tocreateaflashupdatedisc).Then,downloadtheinstallationinstructionsfortheflashBIOSupdate
driveryoudownload.
3.PrinttheinstallationinstructionsyoudownloadandfollowtheinstructionstoupdatetheBIOS.
Note:IfyouwanttoupdatetheBIOSfromaflashupdatedisc,theinstallationinstructionsmightnotprovide
theinformationabouthowtorecordtheupdatedisc.See“Usingadisc”onpage17
.
Chapter5.Advancedconfiguration37
Page 48

38ThinkCentreM900zUserGuide
Page 49

Chapter6.Troubleshooting,diagnostics,andrecovery
Thischapterprovidessolutionstoresolvethecomputerproblems.Followthestepsinthebasicprocedure
forresolvingcomputerproblems,whichhelpsyoumakegooduseofthetroubleshooting,diagnostics,
andrecoveryinformation.
•“Basicprocedureforresolvingcomputerproblems”onpage39
•“T roubleshooting”onpage39
•“Diagnostics”onpage48
•“Recoveryinformation”onpage48
Basicprocedureforresolvingcomputerproblems
Itisrecommendedthatyouusethefollowingproceduretoresolvecomputerproblemsyouareexperiencing:
1.Ensurethat:
a.Thecablesforallconnecteddevicesareconnectedcorrectlyandsecurely.
b.Allconnecteddevicesthatrequireacpowerareconnectedtoproperlygrounded,functioning
electricaloutlets.
c.AllconnecteddevicesareenabledintheBIOSsettingsofthecomputer.See“Enablingordisabling
adevice”onpage33
Iftheseactionsdonotresolveyourproblem,continuewiththenextstep.
2.Useanantivirusprogramtoseeifthecomputerhasbeeninfectedbyavirus.Iftheprogramdetects
avirus,removethevirus.Iftheantivirusprogramdoesnotresolveyourproblem,continuewiththe
nextstep.
3.Goto“Troubleshooting”onpage39andfollowtheinstructionsforthetypeofproblemyouare
experiencing.Ifthesetroubleshootinginstructionsdonotresolveyourproblem,continuewiththe
nextstep.
4.Runthediagnosticprogram.See“Diagnostics”onpage48.Ifthediagnosticprogramdoesnotresolve
yourproblem,continuewiththenextstep.
5.Recoveryouroperatingsystem.See“Recoveryinformation”onpage48.
6.Ifnoneoftheseactionssolveyourproblem,contacttheLenovoCustomerSupportCenter.Foralistof
LenovoSupportphonenumbers,gotohttp://www.lenovo.com/support/phone.Formoreinformation
abouthelp,service,andtechnicalassistance,seeChapter8“Gettinginformation,help,andservice”
onpage61.
.
Troubleshooting
Attention:Donotopenthecomputerorattemptanyrepairbeforereadingandunderstanding“Readthis
first:Importantsafetyinformation”inthisdocument.
Usethetroubleshootinginformationtofindsolutionstoproblemsthathavedefinitesymptoms.
Startupproblems
Thissectionprovidessolutionstostartup-relatedproblems.
Thecomputerdoesnotstartupwhenyoupressthepowerbutton
Solutions:Ensurethat:
•Thepowercordiscorrectlyconnectedtotherearofthecomputerandtoaworkingelectricaloutlet.
©CopyrightLenovo2015,2016
39
Page 50

•Ifthecomputerhasasecondarypowerswitchontherearofthecomputer,ensurethatitisswitchedon.
•Thepowerindicatoronthefrontofthecomputerison.
•Thecomputervoltagematchesthevoltageavailableattheelectricaloutletforyourcountryorregion.
Theoperatingsystemfailstostartup
Solution:Ensurethatthestartupsequenceincludesthedevicewheretheoperatingsystemresides.Usually,
theoperatingsystemisonthestoragedrive.Formoreinformation,see“Changingthestartupdevice
sequencepermanently”onpage36.
Thecomputerbeepsmultipletimesbeforetheoperatingsystemstartsup
Solution:Ensurethatnokeysarestuck.
Audioproblems
Thissectionprovidessolutionstoaudio-relatedproblems.
NoaudioinWindows
Solutions:
•IfyouareusingpoweredexternalspeakersthathaveanOn/Offcontrol,ensurethat:
–TheOn/OffcontrolissettotheOnposition.
–Thespeakerpowercableisconnectedtoaproperlygrounded,functionalacelectricaloutlet.
•Ifyourexternalspeakershaveavolumecontrol,ensurethatthevolumeisnotsettoolow.
•ClickthevolumeiconintheWindowsnotificationareaonthetaskbar.Ensurethatthemutespeakers
settingsarenotselectedandnoneofthevolumesettingsissettoolow.
Note:IfthevolumeiconisnotdisplayedintheWindowsnotificationarea,addtheicontothenotification
area.See“AddinganicontotheWindowsnotificationarea”onpage16.
•Somemodelshaveafrontaudiopanelyoucanusetoadjustvolume.Ifyouhaveafrontaudiopanel,
ensurethatthevolumeisnotsettoolow.
•Ensurethatyourexternalspeakers(andheadphones,ifused)areconnectedtothecorrectaudio
connectoronthecomputer.Mostspeakercablesarecolor-codedtomatchtheconnector.
Note:Whenexternal-speakerorheadphonecablesareconnectedtotheaudioconnector,theinternal
speaker,ifpresent,isdisabled.Inmostcases,ifanaudioadapterisinstalledinoneoftheexpansion
slots,theaudiofunctionbuiltintothesystemboardisdisabled.Therefore,youmustusetheaudio
connectorsontheaudioadapter.
•EnsurethattheprogramyouarerunningisdesignedforuseintheMicrosoftWindowsoperatingsystem.
IftheprogramisdesignedtoruninDOS,theprogramdoesnotusetheWindowssoundfeature.The
programmustbeconfiguredtouseSoundBlasterProorSoundBlasteremulation.
•Ensurethattheaudiodevicedriversarecorrectlyinstalled.
Soundcomesonlyfromoneexternalspeaker
Solutions:
•Ensurethatthespeakercableisinsertedcompletelyintotheconnectoronthecomputer.
•Ensurethatthecablethatconnectstheleftspeakertotherightspeakerissecurelyconnected.
•ClickthevolumeiconintheWindowsnotificationareaonthetaskbar.Then,clickthespeakericonontop
ofthevolumecontrol.ClicktheLevelstabandensurethattheBalancesettingsaresetcorrectly.
40ThinkCentreM900zUserGuide
Page 51

Note:IfthevolumeiconisnotdisplayedintheWindowsnotificationarea,addtheicontothenotification
area.See“AddinganicontotheWindowsnotificationarea”onpage16
.
CDproblems
ThissectionprovidessolutionstoCD-relatedproblems.
ACDorDVDdoesnotwork
Solutions:
•IfyouhavemultipleCDorDVDdrivesinstalled(oracombinationofCDandDVDdrives),tryinsertingthe
discintotheotherdrive.Insomecases,onlyoneofthedrivesisconnectedtotheaudiosubsystem.
•Ensurethatthediscisinsertedcorrectly,withitslabelup.
•Ensurethatthediscyouareusingisclean.Toremovedustorfingerprints,wipethedisccleanwithasoft
clothfromthecentertotheoutside.Wipingadiscinacircularmotionmightcauselossofdata.
•Ensurethatthediscyouareusingisnotscratchedordamaged.Tryinsertinganotherdiscthatyou
knowisgood.Ifyoucannotreadfromaknown-gooddisc,youmighthaveaproblemwithyouroptical
driveorthecablingtoyouropticaldrive.Ensurethatthepowercableandsignalcablearesecurely
connectedtothedrive.
Unabletouseabootablerecoverymedium,suchastheProductRecoveryCD,to
startthecomputer
Solution:EnsurethattheCDorDVDdriveisinthestartupsequencebeforethestoragedrive.Referto
“Selectingatemporarystartupdevice”onpage37forinformationonviewingandchangingthestartup
sequence.Notethatonsomemodelsthestartupsequenceispermanentlysetandcannotbechanged.
DVDproblems
ThissectionprovidessolutionstoDVD-relatedproblems.
BlackscreeninsteadofDVDvideo
Solutions:
•RestarttheDVDplayerprogram.
•Tryalowerscreenresolutionorcolordepth.
•Closeanyopenfiles,andthenrestartthecomputer.
DVDmoviedoesnotplay
Solutions:
•Ensurethatthediscsurfaceiscleanandnotscratched.
•Checkthediscorpackageforregionalcoding.Y oumightneedtopurchaseadiscwithcodingforthe
regionwhereyouareusingthecomputer.
NoaudioorintermittentaudiowhileplayingaDVDmovie
Solutions:
•Checkthevolumecontrolsettingsonthecomputerandonyourspeakers.
•Ensurethatthediscsurfaceiscleanandnotscratched.
•Checkallcableconnectionstoandfromthespeakers.
•UsetheDVDmenuforthevideotoselectadifferentaudiotrack.
Chapter6.Troubleshooting,diagnostics,andrecovery41
Page 52

Playbackissloworchoppy
Solutions:
•Disableanybackgroundprograms,suchasAntiVirusorDesktopThemes.
•Ensurethatvideoresolutionissettolessthan1152x864pixels.
Invaliddiscornodiscfoundmessage
Solutions:
•EnsurethataDVDdiscisinthedrivewiththeshinysideofthediscfacingdown.
•Ensurethatvideoresolutionissettolessthan1152x864pixels.
•OncomputersthathaveaCD-ROMorCD-RWdriveinadditiontoaDVD-ROMdrive,ensurethatthe
DVDdiscisinthedrivelabeled“DVD”.
Intermittentproblems
Someproblemsoccuronlyoccasionallyandaredifficulttorepeat.
Solutions:
•Ensurethatallcablesandcordsaresecurelyconnectedtothecomputerandconnecteddevices.
•Ensurethatwhenthecomputerison,thefangrillisnotblocked(thereisairflowaroundthegrill),andthe
fansareworking.Ifairflowisblockedorthefansarenotworking,thecomputermightoverheat.
•IfSmallComputerSystemInterface(SCSI)devicesareinstalled,ensurethatthelastexternaldevicein
eachSCSIchainisterminatedcorrectly.Formoreinformation,seeyourSCSIdocumentation.
Storagedriveproblems
Selectyoursymptomfromthefollowinglist:
•“SomeorallstoragedrivesmissingfromtheSetupUtilityprogram”onpage42
•“"NoOperatingSystemFound"messageorthesystemnotstartingupfromthecorrectstoragedrive”
onpage42
SomeorallstoragedrivesmissingfromtheSetupUtilityprogram
Symptom:SomeorallstoragedrivesmissingfromtheSetupUtilityprogram
Solutions:
•Ensurethatallstoragedrivesignalcablesandpowercablesareconnectedcorrectly.
•Ensurethatthecomputerisconfiguredcorrectlytosupportthestoragedrives.
–IfthecomputerisinstalledwithfiveSATAstoragedrives,ensurethattheSATAstoragedrive
enablementmodule(onetofivestoragedrives)isinstalled.
–IfthecomputerisinstalledwithSASstoragedrives,ensurethattheSASstoragedriveenablement
module(onetofivestoragedrives)ortheLSIMegaRAIDSASadapterisinstalled.
"NoOperatingSystemFound"messageorthesystemnotstartingupfromthe
correctstoragedrive
Symptom:"NoOperatingSystemFound"messageorthesystemnotstartingupfromthecorrectstorage
drive
Solutions:
•Ensurethatallstoragedrivesignalcablesandpowercablesareconnectedcorrectly.
42ThinkCentreM900zUserGuide
Page 53

•EnsurethatthestoragedrivethecomputerstartsupfromislistedasthefirststartupdeviceintheSetup
Utilityprogram.Referto“Changingthestartupdevicesequencepermanently”onpage36
Note:Inrarecases,thestoragedrivewiththeoperatingsystemmightgetcorruptedordamaged.Insuch
cases,youmightneedtoreplacethestoragedrive.
.
Screenproblems
Thissectionprovidessolutionstoscreen-relatedproblems.
Myscreengoesblankwhilethecomputerison
Solutions:
•Thecomputervoltagematchesthevoltageavailableattheelectricaloutletforyourcountryorregion.
•Pressakeytoexitthescreensaver.
•Pressthepowerbuttontoresumethecomputerfromsleeporhibernationmode.
•Thebrightnessandcontrastissetcorrectly.
•IfthescreengoesblankwhenIstartsomeapplicationprograms,installthedevicedriversforthe
applicationprograms.Refertothedocumentationfortheaffectedapplicationprogramtocheckwhether
anydevicedriversarerequired.
Theimageappearstobeflickering
Solutions:
•Thescreenmightbeaffectedbyinterferencefromnearbyequipment.Magneticfieldsaroundother
devices,suchastransformers,appliances,fluorescentlights,andothermonitorsmightbecausingthe
problem.Movefluorescentdesklightingoranyequipmentthatproducesmagneticfieldsfartheraway
fromthescreen.Ifthisdoesnotcorrecttheproblem,turnoffthecomputer.Then,adjusttheplacementof
thecomputerandotherdevicessothattheyareatleast305mm(12inches)apart.Turnonthecomputer.
•Resettherefreshratesupportedbythecomputer.
1.Right-clickablankareaonthedesktop.
2.DependingonyourWindowsversion,dooneofthefollowing:
–ForWindows7:ClickScreenresolution➙Advancedsettings.
–ForWindows10:ClickDisplaysettings.OntheDisplaytab,clickAdvanceddisplaysettings➙
Displayadapterproperties.
3.ClicktheMonitortab,andthenresettherefreshratetobethehighestandnoninterlaced.
Theimageisdiscolored
Solution:Thescreenmightbeaffectedbyinterferencefromnearbyequipment.Movefluorescentdesk
lightingoranyequipmentthatproducesmagneticfieldsfurtherawayfromthescreen.Iftheproblem
persists,dothefollowing:
1.T urnoffthecomputer.
2.Adjusttheplacementofthecomputerandotherdevicessothattheyareatleast305mm(12inches)
apart.
3.T urnonthecomputer.
Networkingproblems
Thissectionprovidessolutionstonetworking-relatedproblems.
Chapter6.Troubleshooting,diagnostics,andrecovery43
Page 54

EthernetLANproblems
MycomputercannotbeconnectedtoanEthernetLAN
Solutions:
•ConnectthecablefromtheEthernetconnectortotheRJ45connectorofthehub.
•EnabletheEthernetLANfeatureintheSetupUtilityprogram.See“StartingtheSetupUtilityprogram”on
page33
•EnabletheEthernetLANadapter.
•UpdateorreinstalltheEthernetLANdriver.See“Keepingthecomputercurrent”onpage26.
•Installallnetworkingsoftwarethatisnecessaryforyournetworkenvironment.CheckwithyourLAN
administratorforthenecessarynetworkingsoftware.
•Setthesameduplexfortheswitchportandtheadapter.Ifyouconfiguredtheadapterforfullduplex,
ensurethattheswitchportisalsoconfiguredforfullduplex.Settingthewrongduplexmodemight
degradeperformance,causedataloss,orresultinlostconnections.
.Then,followtheinstructionsonthescreen.
1.DependingonyourWindowsversion,dooneofthefollowing:
–ForWindows7:ClicktheStartbuttontoopentheStartmenu.
–ForWindows10:Right-clicktheStartbuttontoopentheStartcontextmenu.
2.ClickControlPanel.ViewControlPanelusinglargeiconsorsmallicons,andthenclickNetwork
andSharingCenter➙Changeadaptersettings.
3.Right-clicktheEthernetLANadaptericonandclickEnable.
MycomputerisaGigabitEthernetmodelandIuseaspeedof1000Mbps,buttheconnectionfails
orerrorsoccur
Solution:ConnectthenetworkcabletotheEthernetconnectorusingCategory5wiringanda100BASE-T
hub/switch(not100BASE-X).
MycomputerisaGigabitEthernetmodel,butitcannotbeconnectedtothenetworkat1000Mbps,
butatonly100Mbps
Solutions:
•Tryanothercable.
•Setthelinkpartnertoauto-negotiate.
•Settheswitchtobe802.3ab-compliant(gigabitovercopper).
TheWakeOnLANfeaturedoesnotwork
Solution:EnabletheWakeOnLAN(WOL)featureintheSetupUtilityprogram.See“StartingtheSetupUtility
program”onpage33
.Then,followtheinstructionsonthescreen.
WirelessLANproblem
Note:ThewirelessLANfeatureisoptional.
ThewirelessLANfeaturedoesnotwork
Solutions:
•EnablethewirelessLANfeatureintheSetupUtilityprogram.See“StartingtheSetupUtilityprogram”on
page33
•ForWindows10,enablethewirelessLANfeatureinWindowsSettings.ClicktheStartbuttontoopenthe
Startmenu,andthenclickSettings➙Network&Internet➙Wi-Fi.TurnontheWi-Fifeature.
•EnablethewirelessLANadapter.
.Then,followtheinstructionsonthescreen.
44ThinkCentreM900zUserGuide
Page 55

1.DependingonyourWindowsversion,dooneofthefollowing:
–ForWindows7:ClicktheStartbuttontoopentheStartmenu.
–ForWindows10:Right-clicktheStartbuttontoopentheStartcontextmenu.
2.ClickControlPanel.ViewControlPanelusinglargeiconsorsmallicons,andthenclickNetwork
andSharingCenter➙Changeadaptersettings.
3.Right-clickthewirelessLANadaptericonandclickEnable.
•UpdateorreinstallthewirelessLANdriver.See“Keepingthecomputercurrent”onpage26.
Bluetoothproblems
Note:TheBluetoothfeatureisoptional.
TheBluetoothfeaturedoesnotwork
Solutions:
•EnabletheBluetoothfeatureintheSetupUtilityprogram.See“StartingtheSetupUtilityprogram”on
page33.Then,followtheinstructionsonthescreen.
•TurnontheBluetoothradios.
1.DependingonyourWindowsversion,dooneofthefollowing:
–ForWindows7:ClicktheStartbuttontoopentheStartmenu.Right-clickComputer,andthen
clickProperties.
–ForWindows10:Right-clicktheStartbuttontoopentheStartcontextmenu.
2.ClickDeviceManager.Typetheadministratorpasswordorprovideconfirmationifprompted.
3.Right-clicktheBluetoothradiosunderBluetoothorBluetoothRadios,andthenclickEnable.
•EnabletheBluetoothadapter.
1.DependingonyourWindowsversion,dooneofthefollowing:
–ForWindows7:ClicktheStartbuttontoopentheStartmenu.
–ForWindows10:Right-clicktheStartbuttontoopentheStartcontextmenu.
2.ClickControlPanel.ViewControlPanelusinglargeiconsorsmallicons,andthenclickNetwork
andSharingCenter➙Changeadaptersettings.
3.Right-clicktheBluetoothadaptericonandclickEnable.
•UpdateorreinstalltheBluetoothdriver.See“Keepingthecomputercurrent”onpage26.
SounddoesnotcomefromtheBluetoothheadsetorheadphones
Solution:SettheBluetoothheadsetorheadphonesasthedefaultdevice.
1.Exittheapplicationthatusesthesounddevice(forexample,WindowsMediaPlayer).
2.Right-clickthevolumeiconintheWindowsnotificationareaonthetaskbar.
Note:IfthevolumeiconisnotdisplayedintheWindowsnotificationarea,addtheicontothe
notificationarea.See“AddinganicontotheWindowsnotificationarea”onpage16.
3.ClickPlaybackdevices.
4.IfyouareusingtheHeadsetprofile,selectBluetoothHands-freeAudio,andthenclickSetDefault.If
youareusingtheAVprofile,selectStereoAudio,andthenclickSetDefault.
5.ClickOK.
Performanceproblems
Thissectionprovidessolutionstoperformance-relatedproblemsofthecomputer.
Chapter6.Troubleshooting,diagnostics,andrecovery45
Page 56

Excessivenumberoffragmentedfiles
Solution:UsetheWindowsdiskdefragmentationordiskoptimizationfeaturetocleanupthefiles.
Note:Dependingonthevolumeofthestoragedrivesandamountofdatastoredonthestoragedrives,the
disk-defragmentationprocessmighttakeuptoseveralhours.
1.Closeanyopenprogramsandwindows.
2.ClicktheStartbuttontoopentheStartmenu.
3.DependingonyourWindowsversion,dooneofthefollowing:
•ForWindows7:ClickComputer.
•ForWindows10:ClickFileExplorer➙ThisPC.
4.Right-clickyourCdriveandthenclickProperties.
5.ClicktheT oolstab.
6.DependingonyourWindowsversion,dooneofthefollowing:
•ForWindows7:ClickDefragmentnow.
•ForWindows10:ClickOptimize.Selectthedesireddrive,andthenclickOptimize.
7.Followtheinstructionsonthescreen.
Insufficientfreestoragedrivespace
Solutions:Freeupstoragedrivespace.
•CleanoutyourInbox,SentItems,andDeletedItemsfoldersfromyoure-mailapplication.
•CleanupyourCdrive.
1.ClicktheStartbuttontoopentheStartmenu.
2.DependingonyourWindowsversion,dooneofthefollowing:
–ForWindows7:ClickComputer.
–ForWindows10:ClickFileExplorer➙ThisPC.
3.Right-clickyourCdriveandthenclickProperties.
4.Checktheamountoffreespace,andthenclickDiskCleanup.
5.Alistofunnecessaryfilecategoriesisdisplayed.Selecteachfilecategoryyouwanttodelete,
andthenclickOK.
•TurnsomeWindowsfeaturesofforremovesomeunnecessaryprograms.
1.DependingonyourWindowsversion,dooneofthefollowing:
–ForWindows7:ClicktheStartbuttontoopentheStartmenu.
–ForWindows10:Right-clicktheStartbuttontoopentheStartcontextmenu.
2.ClickControlPanel.ViewControlPanelusinglargeiconsorsmallicons,andthenclickPrograms
andFeatures.
3.Dooneofthefollowing:
–ToturnsomeWindowsfeaturesoff,clickTurnWindowsfeaturesonoroff.Followthe
instructionsonthescreen.
–Toremovesomeunnecessaryprograms,selecttheprogramyouwanttoremove,andthenclick
Uninstall/ChangeorUninstall.
Insufficientfreememoryspace
Solutions:
46ThinkCentreM900zUserGuide
Page 57

•Right-clickablankareaonthetaskbarandopenTaskManager.Then,endsometasksyouarenot
performing.
•Installadditionalmemorymodules.Topurchasememorymodules,goto
http://www.lenovo.com.
Serialconnectorcannotbeaccessed
Solutions:
•Connecttheserialcabletotheserialconnectoronthecomputerandtotheserialdevice.Iftheserial
devicehasitsownpowercord,connectthepowercordtoagroundedelectricaloutlet.
•Turnontheserialdeviceandkeepthedeviceonline.
•Installanyapplicationprogramssuppliedwiththeserialdevice.Refertothedocumentationthatcomes
withtheserialdeviceformoreinformation.
•Ifyouaddedoneserial-connectoradapter,installtheadaptercorrectly.
USBdeviceproblems
ThissectionprovidessolutionstoUSBdevice-relatedproblems.
MyUSBdevicecannotbeaccessed
Solutions:
•ConnecttheUSBcablefromtheUSBconnectortotheUSBdevice.IftheUSBdevicehasitsownpower
cord,connectthepowercordtoagroundedelectricaloutlet.
•TurnontheUSBdeviceandkeepthedeviceonline.
•InstallanydevicedriversorapplicationprogramssuppliedwiththeUSBdevice.Refertothe
documentationthatcomeswiththeUSBdeviceformoreinformation.
•DetachandreconnecttheUSBconnectortoresettheUSBdevice.
IcannotinstalltheWindows7operatingsystemusinganexternalUSBdevice
Solution:Gotohttp://www.lenovo.com/supporttodownloadandinstallUSBdrivers.
Softwareanddriverproblems
Thissectionprovidessolutionstosoftware-anddriver-relatedproblems.
Forsomeprograms,datescannotbesortedincorrectorder
Solution:Someprogramsdevelopedbeforetheyear2000useonlythelasttwodigitsofayeartosortdates,
assumingthefirsttwodigitsare19.Consequently,datescannotbesortedincorrectordernowadays.
Checkwithyoursoftwaremanufacturertoseeifanyupdatesareavailable.Manysoftwaremanufacturers
makeupdatesavailablefromtheWorldWideWeb.
Someapplicationprogramsdonotworkasexpected
Solutions:
1.Checkwhethertheproblemiscausedbyanapplicationprogram.
a.Ensurethatthesoftwareiscompatiblewiththecomputer.Refertotheinformationsuppliedwith
thesoftwareformoreinformation.
b.Verifythatothersoftwareworkscorrectlyonthecomputer.
c.Verifythatthesoftwareyouareusingworksonanothercomputer.
2.Iftheproblemiscausedbyanapplicationprogram:
Chapter6.Troubleshooting,diagnostics,andrecovery47
Page 58

•Refertotheprinteddocumentationthatcomeswiththeprogramorthehelpsystemoftheprogram.
•Updatetheprogram.See“Keepingthecomputercurrent”onpage26.
•Uninstalltheprogramandthenreinstallit.T odownloadaprogramthatispreinstalledonthe
computer,gotohttp://www.lenovo.com/supportandfollowtheinstructionsonthescreen.
Adevicedoesnotworknormallyduetodevicedriverproblems
Solution:Updatethedevicedriver.See“Keepingthecomputercurrent”onpage26.
Diagnostics
Note:IfyouareusingaWindowsoperatingsystemotherthanWindows7orWindows10,goto
http://www.lenovo.com/diagsforthediagnosticsinformationforthecomputer.
Thediagnosticprogramisusedtotesthardwarecomponentsofthecomputer.Thediagnosticprogramalso
canreportoperating-system-controlledsettingsthatinterferewiththecorrectoperationofthecomputer.
LenovoSolutionCenter
TheLenovoSolutionCenterprogramisthediagnosticprogrampreinstalledonthecomputer.Theprogram
enablesyoutotroubleshootandresolvecomputerproblems.Itcombinesdiagnostictests,system
informationcollection,securitystatus,andsupportinformation,alongwithhintsandtipsformaximum
systemperformance.
ToopentheLenovoSolutionCenterprogram,see“Accessingaprogramonthecomputer”onpage9.For
moreinformationaboutusingtheprogram,refertothehelpsystemoftheprogram.
IfyouareunabletoisolateandrepairtheproblemyourselfafterrunningLenovoSolutionCenter,save
andprintthelogfilescreatedbytheprogram.YoumightneedthelogfileswhenyouspeaktoaLenovo
technicalsupportrepresentative.
Recoveryinformation
Thissectionprovidesinstructionsabouthowtorecoveryouroperatingsystem.
Note:Ifadevicedoesnotworknormallyafterrecoveringtheoperatingsystem,updatethedevicedriver.
See“Keepingthecomputercurrent”onpage26
.
RecoveryinformationforWindows7
TorecoveryourWindows7operatingsystem,usethefollowingsolutions:
•UseWindowsrecoverysolutions.
–UseSystemRestoretorestoresystemfilesandsettingstoanearlierpoint.
1.ClicktheStartbuttontoopentheStartmenu.
2.ClickControlPanel.ViewControlPanelusinglargeiconsorsmallicons,andthenclickRecovery
➙OpenSystemRestore.
3.Followtheinstructionsonthescreen.
–UsetheWindowsrecoveryenvironmentbydoingoneofthefollowing:
–Afterseveralconsecutivefailedbootattempts,theWindowsrecoveryenvironmentmightstart
automatically.Followtheinstructionsonthescreentochoosetheappropriaterecoverysolution.
48ThinkCentreM900zUserGuide
Page 59

–Turnonorrestartthecomputer.Then,repeatedlypressandreleasetheF8keyuntiltheAdvanced
BootOptionswindowopens.SelectRepairYourComputer,pressEnter,andfollowtheinstructions
onthescreentochoosetheappropriaterecoverysolution.
Note:Forsomekeyboards,youmightneedtopressFn+F8toopentheAdvancedBootOptions
window.
•UsetheRescueandRecoveryprogramtorestorethestoragedrivefromabackup,orrestoretheC
drivetothefactory-defaultsettings.
Notes:
–Dependingonthecomputermodel,theRescueandRecoveryprogrammightnotbepreinstalled.You
needtoinstalleditmanuallyearlier.
–IfyouusetheRescueandRecoveryprogramtorestorethestoragedrivefromabackup,ensurethat
youbackedupyourdataearlierwiththeprogram.
TousetheRescueandRecoveryprogram,dooneofthefollowing:
–OpentheRescueandRecoveryprogram.See“Accessingaprogramonthecomputer”onpage9
moreinformationaboutusingtheprogram,refertothehelpsystemoftheprogram.
–OpentheRescueandRecoveryworkspace.
1.T urnoffthecomputer.PressandholdtheEnterkeyandthenturnonthecomputer.Releasethe
EnterkeywhenStartupInterruptMenuisdisplayed.Then,pressF11toopentheRescueand
Recoveryworkspace.
2.IftheRescueandRecoveryworkspacefailstoopen,usetherescuemediumyoucreatedearlierto
resolvetheproblem.Selecttherescuemediumasthestartupdevice.See“Selectingatemporary
startupdevice”onpage37.Whentherescuemediumstarts,theRescueandRecoveryworkspace
opens.Followtheinstructionsonthescreen.
•UsetherecoverymediumyoucreatedearlierwiththeCreateRecoveryMediaprogramtorestoreonly
theCdriveortheentirestoragedrivetothefactory-defaultsettings.
Note:Tocreatearecoverymedium,see“Goodmaintenancepractices”onpage25
1.Selecttherecoverymediumasthestartupdevice.See“Selectingatemporarystartupdevice”
onpage37.
2.Followtheinstructionsonthescreentochoosetheappropriaterecoverysolution.
•UsetherecoverydiscsetprovidedbyLenovotorestoretheentirestoragedrivetothefactory-default
settings.
–Ifthecomputercomeswiththerecoverydiscset,followtheinstructionsshippedwiththediscset.
–Ifthecomputerdoesnotcomewiththerecoverydiscset,contacttheLenovoCustomerSupport
Centertoorderarecoverydiscset.See“Callingforservice”onpage62
.
.
.For
RecoveryinformationforWindows10
TorecoveryourWindows10operatingsystem,usethefollowingsolutions:
•UseWindowsrecoverysolutions.
–UserecoverysolutionsinWindowsSettings.
1.ClicktheStartbuttontoopentheStartmenu.
2.ClickSettings➙Update&security➙Recovery.
3.Choosetheappropriaterecoverysolutionbyfollowingtheinstructionsonthescreen.
–UseSystemRestoretorestoresystemfilesandsettingstoanearlierpoint.
Chapter6.Troubleshooting,diagnostics,andrecovery49
Page 60

1.Right-clicktheStartbuttontoopentheStartcontextmenu.
2.ClickControlPanel.ViewControlPanelusinglargeiconsorsmallicons,andthenclickRecovery
➙OpenSystemRestore.
3.Followtheinstructionsonthescreen.
–UsetheFileHistorytooltorestoreyourfilesfromabackup.
Note:IfyouusetheFileHistorytooltorestoreyourfilesfromabackup,ensurethatyoubackedup
yourdataearlierwiththetool.
1.Right-clicktheStartbuttontoopentheStartcontextmenu.
2.ClickControlPanel.ViewControlPanelusinglargeiconsorsmallicons,andthenclickFile
History➙Restorepersonalfiles.
3.Followtheinstructionsonthescreen.
–UsetheWindowsrecoveryenvironmentbydoingoneofthefollowing:
–Afterseveralconsecutivefailedbootattempts,theWindowsrecoveryenvironmentmightstart
automatically.Followtheinstructionsonthescreentochoosetheappropriaterecoverysolution.
–SelecttherecoverymediumyoucreatedearlierwiththeWindowstoolasthestartupdevice.See
“Selectingatemporarystartupdevice”onpage37
.Then,followtheinstructionsonthescreen
tochoosetheappropriaterecoverysolution.
Note:Tocreatearecoverymedium,see“Goodmaintenancepractices”onpage25.
•UsetherecoveryUSBkeyprovidedbyLenovotorestoretheentirestoragedrivetothefactory-default
settings.
–IfthecomputercomeswiththerecoveryUSBkey,followtheinstructionsshippedwiththeUSBkey.
–IfthecomputerdoesnotcomewiththerecoveryUSBkey,contacttheLenovoCustomerSupport
CentertoorderarecoveryUSBkey.See“Callingforservice”onpage62.
50ThinkCentreM900zUserGuide
Page 61

Chapter7.Installingorreplacinghardware
Thischaptercontainsthefollowingtopics:
•“Handlingstatic-sensitivedevices”onpage51
•“Installingorreplacinghardware”onpage51
Handlingstatic-sensitivedevices
Donotopenthestatic-protectivepackagecontainingthenewpartuntilthedefectiveparthasbeenremoved
andyouarereadytoinstallthenewpart.Staticelectricity,althoughharmlesstoyou,canseriouslydamage
computercomponentsandparts.
Whenyouhandlepartsandothercomputercomponents,taketheseprecautionstoavoidstatic-electricity
damage:
•Limityourmovement.Movementcancausestaticelectricitytobuilduparoundyou.
•Alwayshandlepartsandothercomputercomponentscarefully.HandlePCI/PCI-Expresscards,memory
modules,systemboards,andmicroprocessorsbytheedges.Nevertouchanyexposedcircuitry.
•Preventothersfromtouchingthepartsandothercomputercomponents.
•Touchthestatic-protectivepackagecontainingtheparttoametalexpansion-slotcoverorother
unpaintedmetalsurfaceonthecomputerforatleasttwoseconds.Thisreducesstaticelectricityfrom
thepackageandyourbodybeforeyouinstallorreplaceanewpart.
•Whenpossible,removethenewpartfromthestatic-protectivepackage,andinstallitdirectlyinthe
computerwithoutsettingthepartdown.Whenthisisnotpossible,placethestatic-protectivepackage
thatthepartcameinonasmooth,levelsurfaceandplacethepartonthepackage.
•Donotplacethepartonthecomputercoverorothermetalsurface.
Installingorreplacinghardware
Thissectionprovidesinstructionsonhowtoinstallorreplacehardwareforthecomputer.Y oucanexpand
thecapabilitiesofthecomputerandmaintainthecomputerbyinstallingorreplacinghardware.
Attention:Donotopenthecomputerorattemptanyrepairbeforereadingandunderstandingthe“Read
thisfirst:Importantsafetyinformation”onpageiii
Notes:
•Someofthehardwarepartsinthissectionareoptional.
•UsecomputerpartsprovidedonlybyLenovo.
•Wheninstallingorreplacinganoption,usetheappropriateinstructionsinthissectionalongwiththe
instructionsthatcomewiththeoption.
•Inmostareasoftheworld,LenovorequiresthereturnofthedefectiveCRU.Informationaboutthiswill
comewiththeCRUorwillcomeafewdaysaftertheCRUarrives.
.
Installingexternaloptions
Youcanconnectexternaloptionstothecomputer,suchasexternalspeakers,aprinter,orascanner.For
someexternaloptions,youmustinstalladditionalsoftwareinadditiontomakingthephysicalconnection.
Wheninstallinganexternaloption,see“Hardwarelocations”onpage1toidentifytherequiredconnector.
©CopyrightLenovo2015,2016
51
Page 62

Usetheinstructionsshippedwiththeoptiontohelpyoumaketheconnectionandinstallanysoftware
ordevicedriversthatarerequiredfortheoption.
Replacingthecomputerstand
Attention:Donotopenyourcomputerorattemptanyrepairbeforereadingandunderstandingthe“Read
thisfirst:Importantsafetyinformation”onpageiii.
Toreplacethecomputerstand,refertothefollowingtopics:
•“Replacingthetilt-onlymonitorstand”onpage52
•“ReplacingtheUltraFlexIIStand”onpage53
Replacingthetilt-onlymonitorstand
Toreplacethetilt-onlymonitorstand,dothefollowing:
1.Removeanymediafromthedrivesandturnoffallconnecteddevicesandthecomputer.Then,
disconnectallpowercordsfromelectricaloutletsanddisconnectallcablesthatareconnectedtothe
computer.
2.Placeasoft,cleantowelorclothonthedeskorsurface.Holdthesidesofyourcomputerandgentlylay
itdownsothatthescreenisagainstthesurfaceandthecomputercoverisfacingup.
3.Presstheretaininglatch1onthetilt-onlymonitorstandasshowntodisengagethelatch.Then,remove
thetilt-onlymonitorstandfromthecomputercover.
Figure12.Removingthetilt-onlymonitorstandfromthecomputercover
4.Loosenthescrew1onthebase,andthenremovethetilt-onlymonitorstandfromthebaseasshown.
Figure13.Removingthetilt-onlymonitorstandfromthebase
52ThinkCentreM900zUserGuide
Page 63

5.Insertthescrew1onthebaseintothecorrespondingholeinthenewtilt-onlymonitorstand.Then,
tightenthescrewtosecurethemonitorstand.
Figure14.Installingthetilt-onlymonitorstandtothebase
6.Insertthetwohooks1onthenewtilt-onlymonitorstandintothecorrespondingholesinthecomputer
coverasshown.Then,pivotthetilt-onlymonitorstanddownwarduntilitsnapsintoposition.
Figure15.Installingthetilt-onlymonitorstandtothecomputercover
ReplacingtheUltraFlexIIStand
ToreplacetheUltraFlexIIStand,dothefollowing:
1.Removeanymediafromthedrivesandturnoffallconnecteddevicesandthecomputer.Then,
disconnectallpowercordsfromelectricaloutletsanddisconnectallcablesthatareconnectedtothe
computer.
2.Placeasoft,cleantowelorclothonthedeskorsurface.Holdthesidesofyourcomputerandgentlylay
itdownsothatthescreenisagainstthesurfaceandthecomputercoverisfacingup.
Chapter7.Installingorreplacinghardware53
Page 64

3.Presstheretaininglatch1ontheUltraFlexIIStandasshowntodisengagethelatch.Then,remove
theUltraFlexIIStandfromthecomputercover.
Figure16.RemovingtheUltraFlexIIStandfromthecomputercover
4.Insertthetwohooks1onthenewUltraFlexIIStandintothecorrespondingholesinthecomputercover
asshown.Then,pivottheUltraFlexIIStanddownwarduntilitsnapsintoposition.
Figure17.InstallingtheUltraFlexIIStandtothecomputercover
Removingthebackcover
Attention:Donotopenyourcomputerorattemptanyrepairbeforereadingandunderstandingthe“Read
thisfirst:Importantsafetyinformation”onpageiii.
CAUTION:
Beforeyouopenthebackcover,turnoffthecomputerandwaitseveralminutesuntilthecomputeris
cool.
Toremovethebackcover,dothefollowing:
1.Removeanymediafromthedrivesandturnoffallconnecteddevicesandthecomputer.Then,
disconnectallpowercordsfromelectricaloutletsanddisconnectallcablesthatareconnectedtothe
computer.
2.Unlockanylockingdevicethatsecuresthebackcover.
54ThinkCentreM900zUserGuide
Page 65

3.Placeasoft,cleantowelorclothonthedeskorsurface.Holdthesidesofyourcomputerandgentlylay
itdownsothatthescreenisagainstthesurfaceandthecomputercoverisfacingup.
4.Removethecomputerstand.See“Replacingthecomputerstand”onpage52.
5.Slidethebackcoverasshowntoremoveitfromthechassis.
Figure18.Removingthebackcover
Replacingthememorymoduleshield
Attention:Donotopenyourcomputerorattemptanyrepairbeforereadingandunderstandingthe“Read
thisfirst:Importantsafetyinformation”onpageiii.
Toreplacethememorymoduleshield,dothefollowing:
1.Removeanymediafromthedrivesandturnoffallconnecteddevicesandthecomputer.Then,
disconnectallpowercordsfromelectricaloutletsanddisconnectallcablesthatareconnectedtothe
computer.
2.Removethebackcover.See“Removingthebackcover”onpage54.
3.Locatethememorymoduleshield.See“Computercomponents”onpage5.
4.Pullthetab1onthememorymoduleshieldasshowntoremoveitfromthechassis.
Figure19.Removingthememorymoduleshield
Chapter7.Installingorreplacinghardware55
Page 66

5.Insertthestraightedgeofthenewmemorymoduleshieldintotheholeasshown.Then,pivotit
downwarduntilitsnapsintoposition.
Figure20.Installingthememorymoduleshield
Whattodonext:
•Toworkwithanotherpieceofhardware,gototheappropriatesection.
•Tocompletetheinstallationorreplacement,goto“Completingthepartsreplacement”onpage59.
Replacingamemorymodule
Attention:Donotopenyourcomputerorattemptanyrepairbeforereadingandunderstandingthe“Read
thisfirst:Importantsafetyinformation”onpageiii.
Note:Ifyouhavetwomemorymodules,ensurethatyouinstallthememorymodulesfirstintothelower
memoryslotandthentheupperone.
Toreplaceamemorymodule,dothefollowing:
1.Removeanymediafromthedrivesandturnoffallconnecteddevicesandthecomputer.Then,
disconnectallpowercordsfromelectricaloutletsanddisconnectallcablesthatareconnectedtothe
computer.
2.Removethebackcover.See“Removingthebackcover”onpage54.
3.Removethememorymoduleshieldtoexposethememorymodule.See“Replacingthememory
moduleshield”onpage55
4.Opentheretainingclipsandgentlypullthememorymoduleoutofthememoryslot.
Figure21.Removingamemorymodule
.
56ThinkCentreM900zUserGuide
Page 67

5.Insertthenotchedend2ofthenewmemorymoduleintotheslot1.Pressthememorymodulefirmly
andpivotthememorymoduleuntilitsnapsintoposition.Ensurethatthememorymoduleissecured
intheslotanddoesnotmoveeasily.
Figure22.Installingamemorymodule
6.Installthememorymoduleshield.See“Replacingthememorymoduleshield”onpage55.
Whattodonext:
•Toworkwithanotherpieceofhardware,gototheappropriatesection.
•Tocompletetheinstallationorreplacement,goto“Completingthepartsreplacement”onpage59.
Replacingthestoragedrive
Attention:Donotopenyourcomputerorattemptanyrepairbeforereadingandunderstandingthe“Read
thisfirst:Importantsafetyinformation”onpageiii.
Toreplacethestoragedrive,dothefollowing:
1.Removeanymediafromthedrivesandturnoffallconnecteddevicesandthecomputer.Then,
disconnectallpowercordsfromelectricaloutletsanddisconnectallcablesthatareconnectedtothe
computer.
2.Removethebackcover.See“Removingthebackcover”onpage54.
3.Locatethestoragedrive.See“Computercomponents”onpage5.
4.Pressthehandle1asshown,andthenpivotthestoragedrivebracketandthestoragedriveasshown
toremovethemfromthechassis.
Figure23.Removingthestoragedrivebracketandthestoragedrive
5.Disconnectthestoragedrivecablefromthestoragedrive.
Chapter7.Installingorreplacinghardware57
Page 68

6.Flexthesidesofthestoragedrivebrackettoremovethestoragedrivefromthebracket.
Figure24.Removingthestoragedrivefromthebracket
7.Flexthesidesofthestoragedrivebracketandinsertthefourpins1onthebracketintothe
correspondingholesinthenewstoragedrive.
Figure25.Installingthestoragedriveintothebracket
8.Connectthestoragedrivecabletothestoragedrive.
58ThinkCentreM900zUserGuide
Page 69

9.Insertthetwotabs1onthestoragedrivebracketintothecorrespondingholesinthechassis.Then,
pivotthestoragedrivebracketdownwarduntilitsnapsintoposition.
Figure26.Installingthestoragedrivebracketandthestoragedrive
Whattodonext:
•Toworkwithanotherpieceofhardware,gototheappropriatesection.
•Tocompletetheinstallationorreplacement,goto“Completingthepartsreplacement”onpage59.
Completingthepartsreplacement
Aftercompletingtheinstallationorreplacementforallparts,reinstallthebackcoverandreconnectcables.
Dependingonthepartsyouinstalledorreplaced,youmightneedtoconfirmtheupdatedinformationinthe
SetupUtilityprogram.Referto“UsingtheSetupUtilityprogram”onpage33.
Toreinstallthebackcoverandreconnectcablestoyourcomputer,dothefollowing:
1.Ensurethatallcomponentshavebeenreassembledcorrectlyandthatnotoolsorloosescrewsareleft
insideyourcomputer.See“Computercomponents”onpage5forthelocationsofvariouscomponents.
2.Slidethebackcoverasshowntoinstallittothechassis.
Figure27.Installingthebackcover
3.Installthecomputerstand.See“Replacingthecomputerstand”onpage52.
4.Placethecomputerinanuprightposition.
5.Ifalockingdeviceisavailable,useittolockthecomputer.See“Lockingthecomputer”onpage29.
Chapter7.Installingorreplacinghardware59
Page 70

6.Reconnecttheexternalcablesandpowercordstothecorrespondingconnectorsonthecomputer.
See“Hardwarelocations”onpage1
7.Updateyourconfiguration.See“UsingtheSetupUtilityprogram”onpage33.
8.Ifanewlyinstalledhardwarecomponentdoesnotworknormally,updatethedevicedriver.See
“Keepingthecomputercurrent”onpage26
.
.
60ThinkCentreM900zUserGuide
Page 71

Chapter8.Gettinginformation,help,andservice
Thischaptercontainsthefollowingtopics:
•“Informationresources”onpage61
•“Helpandservice”onpage62
Informationresources
Youcanusetheinformationinthissectiontoaccessusefulresourcesrelatingtoyourcomputingneeds.
Accessingtheuserguideinvariouslanguages
Toaccesstheuserguideinvariouslanguages,goto:
http://www.lenovo.com/UserManuals
Windowshelpsystem
Note:IfyouusetheonlinehelpforWindows7orthehelpforWindows10,ensurethatthecomputer
isconnectedtotheInternet.
TheWindowshelpsystemprovidesyouwithdetailedinformationaboutusingtheWindowsoperatingsystem.
ToaccesstheWindowshelpsystem,dothefollowing:
1.ClicktheStartbuttontoopentheStartmenu.
2.DependingonyourWindowsversion,dooneofthefollowing:
•ForWindows7:ClickHelpandSupport.Youcanchoosetousetheonlineorofflinehelpatthe
bottomofthescreen.
•ForWindows10:ClickGetstarted.
Safetyandwarranty
•TheSafetyandWarrantyGuideprovidedwiththecomputercontainsimportantsafetyinformation,
productwarrantyterms,andlegalnotices.
•Theprefaceinthisdocumentcontainsadditionalsafetyinformationthatappliestotopicsandtasks
describedinthisdocument.
Ensurethatyoureadandunderstandallsafetyinformationbeforeusingthecomputer.
LenovoWebsite
TheLenovoWebsite(http://www.lenovo.com)providesup-to-dateinformationandservicestohelpyoubuy,
upgrade,andmaintainthecomputer.Youalsocandothefollowing:
•Shopfordesktopandnotebookcomputers,monitors,projectors,upgradesandaccessoriesforthe
computer,andspecialoffers.
•Purchaseadditionalservices,suchassupportforhardware,operatingsystems,applicationprograms,
networksetupandconfiguration,andcustominstallations.
•Purchaseupgradesandextendedhardwarerepairservices.
•Accesstroubleshootingandsupportinformationforthecomputermodelandothersupportedproducts.
©CopyrightLenovo2015,2016
61
Page 72

•FindaServiceProviderlocatednearyou.
LenovoSupportWebsite
TechnicalsupportinformationisavailableontheLenovoSupportWebsiteat:
http://www.lenovo.com/support
ThisWebsiteisupdatedwiththelatestsupportinformationsuchasthefollowing:
•Diagnosticsolutions
•Driversandsoftware
•Knowledgebaseandfrequentlyaskedquestions
•Latestelectronicmanuals
•LenovoSupportphonenumbers
•Productandpartsdetails
•Productandservicewarranty
Frequentlyaskedquestions
Fortheanswerstofrequentlyaskedquestionsaboutthecomputer,goto:
http://www.lenovo.com/support/faq
Helpandservice
Thissectionprovidesinformationaboutobtaininghelpandservice.
Callingforservice
Duringthewarrantyperiod,youcangethelpandinformationbytelephonethroughtheCustomerSupport
Center.Forthewarrantyperiodofthecomputer,gotohttp://www.lenovo.com/warranty-status.Foralistof
LenovoSupportphonenumbers,gotohttp://www.lenovo.com/support/phone.
Note:Phonenumbersaresubjecttochangewithoutnotice.Ifthenumberforyourcountryorregionisnot
provided,contactyourLenovoresellerorLenovomarketingrepresentative.
Thefollowingservicesareavailableduringthewarrantyperiod:
•Problemdetermination-Trainedservicepersonnelareavailabletoassistyouwithdetermininga
hardwareproblemanddecidingwhatactionisnecessarytofixtheproblem.
•Hardwarerepair-Iftheproblemiscausedbyhardwareunderwarranty,trainedservicepersonnelare
availabletoprovidetheapplicablelevelofservice.
•EngineeringChangemanagement-Theremightbechangesthatarerequiredafteraproducthas
beensold.LenovooryourresellerwillmakeselectedEngineeringChanges(ECs)thatapplytoyour
hardwareavailable.
Theseitemsarenotcoveredbythewarranty:
•ReplacementoruseofpartsnotmanufacturedfororbyLenovoornon-warrantedLenovoparts
•Identificationofsoftwareproblemsources
•ConfigurationofBIOSaspartofaninstallationorupgrade
•Changes,modifications,orupgradestodevicedrivers
•Installationandmaintenanceofnetworkoperatingsystems(NOS)
•Installationandmaintenanceofapplicationprograms
Ifpossible,beatthecomputerwhenyoucall.Havethefollowinginformationavailable:
62ThinkCentreM900zUserGuide
Page 73

•Machinetypeandmodel
•Serialnumbersofyourhardwareproducts
•Descriptionoftheproblem
•Exactwordingofanyerrormessages
•Hardwareandsoftwareconfigurationinformation
Usingotherservices
Youmighttravelwiththecomputerorrelocateittoacountryorregionwherethemachinetypeforyour
desktopornotebookcomputerissold.Insuchasituation,thecomputermightbeeligibleforInternational
WarrantyService,whichautomaticallyentitlesyoutoobtainwarrantyservicethroughoutthewarrantyperiod.
Servicewillbeperformedbyserviceprovidersauthorizedtoperformwarrantyservice.
Servicemethodsandproceduresvarybycountry,andsomeservicesmightnotbeavailableinallcountries.
InternationalWarrantyServiceisdeliveredthroughthemethodofservice(suchasdepot,carry-in,or
on-siteservice)thatisprovidedintheservicingcountry.Servicecentersincertaincountriesmightnotbe
abletoserviceallmodelsofaparticularmachinetype.Insomecountries,feesandrestrictionsmight
applyatthetimeofservice.
TodeterminewhetherthecomputeriseligibleforInternationalWarrantyServiceandtoviewalistofthe
countriesorregionswhereserviceisavailable,gotohttp://www.lenovo.com/support.
FortechnicalassistancewiththeinstallationoforquestionsrelatedtoServicePacksforyourpreinstalled
MicrosoftWindowsproduct,gototheMicrosoftProductSupportWebsiteathttp://support.microsoft.com.
YoualsocancontacttheLenovoCustomerSupportCenterforhelp.Somefeesmightapply.
Purchasingadditionalservices
Duringandafterthewarrantyperiod,youcanpurchaseadditionalservices.Examplesoftheseadditional
servicesinclude:
•Supportforhardware,operatingsystems,andapplicationprograms
•Networksetupandconfigurationservices
•Upgradedorextendedhardwarerepairservices
•Custominstallationservices
Serviceavailabilityandservicenamemightvarybycountryorregion.Formoreinformationaboutthese
services,gototheLenovoWebsiteat:
http://www.lenovo.com
Chapter8.Gettinginformation,help,andservice63
Page 74

64ThinkCentreM900zUserGuide
Page 75

AppendixA.Regulatoryinformation
Thelatestcomplianceinformationisavailableathttp://www.lenovo.com/compliance.
Exportclassificationnotice
ThisproductissubjecttotheUnitedStatesExportAdministrationRegulations(EAR)andhasanExport
ClassificationControlNumber(ECCN)of5A992.c.Itcanbere-exportedexcepttoanyoftheembargoed
countriesintheEARE1countrylist.
Electronicemissionsnotices
ThefollowinginformationreferstoLenovopersonalcomputermachinetypes10F2,10F3,10F4,and10F5.
FederalCommunicationsCommissionDeclarationofConformity
ThisequipmenthasbeentestedandfoundtocomplywiththelimitsforaClassBdigitaldevice,pursuant
toPart15oftheFCCRules.Theselimitsaredesignedtoprovidereasonableprotectionagainstharmful
interferenceinaresidentialinstallation.Thisequipmentgenerates,uses,andcanradiateradiofrequency
energyand,ifnotinstalledandusedinaccordancewiththeinstructions,maycauseharmfulinterference
toradiocommunications.However,thereisnoguaranteethatinterferencewillnotoccurinaparticular
installation.Ifthisequipmentdoescauseharmfulinterferencetoradioortelevisionreception,whichcanbe
determinedbyturningtheequipmentoffandon,theuserisencouragedtotrytocorrecttheinterferenceby
oneormoreofthefollowingmeasures:
•Reorientorrelocatethereceivingantenna.
•Increasetheseparationbetweentheequipmentandreceiver.
•Connecttheequipmentintoanoutletonacircuitdifferentfromthattowhichthereceiverisconnected.
•Consultanauthorizeddealerorservicerepresentativeforhelp.
Lenovoisnotresponsibleforanyradioortelevisioninterferencecausedbyusingotherthanspecifiedor
recommendedcablesandconnectorsorbyunauthorizedchangesormodificationstothisequipment.
Unauthorizedchangesormodificationscouldvoidtheuser'sauthoritytooperatetheequipment.
ThisdevicecomplieswithPart15oftheFCCRules.Operationissubjecttothefollowingtwoconditions:(1)
thisdevicemaynotcauseharmfulinterference,and(2)thisdevicemustacceptanyinterferencereceived,
includinginterferencethatmaycauseundesiredoperation.
ResponsibleParty:
Lenovo(UnitedStates)Incorporated
1009ThinkPlace-BuildingOne
Morrisville,NC27560
PhoneNumber:919-294-5900
IndustryCanadaClassBemissioncompliancestatement
CANICES-3(B)/NMB-3(B)
EuropeanUnion-CompliancetoDirectivesforITE(InformationTechnologyEquipment)andRadio
Equipment
©CopyrightLenovo2015,2016
65
Page 76

Modelswithoutaradiodevice:ThisproductisinconformitywiththeprotectionrequirementsofEUCouncil
Directive2004/108/EC(until19April,2016)andCouncilDirective2014/30/EU(from20April,2016)onthe
approximationofthelawsoftheMemberStatesrelatingtoelectromagneticcompatibility.
Modelswitharadiodevice:Thisproductisinconformitywithalltherequirementsandessentialnormsthat
applytoEUCouncilR&TTEDirective1999/5/EContheapproximationofthelawsoftheMemberStates
relatingtoradioequipment.
Lenovocannotacceptresponsibilityforanyfailuretosatisfytheprotectionrequirementsresultingfrom
anon-recommendedmodificationoftheproduct,includingtheinstallationofoptioncardsfromother
manufacturers.ThisproducthasbeentestedandfoundtocomplywiththelimitsforClassBequipment
accordingtoEuropeanStandardsharmonizedintheDirectivesincompliance.ThelimitsforClassB
equipmentwerederivedfortypicalresidentialenvironmentstoprovidereasonableprotectionagainst
interferencewithlicensedcommunicationdevices.
Lenovo,Einsteinova21,85101Bratislava,Slovakia
GermanClassBcompliancestatement
DeutschsprachigerEUHinweis:
HinweisfürGerätederKlasseBEURichtliniezurElektromagnetischenVerträglichkeit
DiesesProduktentsprichtdenSchutzanforderungenderEURichtlinie2014/30/EU(früher2004/108/EC)zur
AngleichungderRechtsvorschriftenüberdieelektromagnetischeVerträglichkeitindenEU-Mitgliedsstaaten
undhältdieGrenzwertederKlasseBderNormgemäßRichtlinie.
Umdiesessicherzustellen,sinddieGerätewieindenHandbüchernbeschriebenzuinstallierenundzu
betreiben.DesWeiterendürfenauchnurvonderLenovoempfohleneKabelangeschlossenwerden.
LenovoübernimmtkeineVerantwortungfürdieEinhaltungderSchutzanforderungen,wenndasProdukt
ohneZustimmungderLenovoverändertbzw.wennErweiterungskomponentenvonFremdherstellernohne
EmpfehlungderLenovogesteckt/eingebautwerden.
Deutschland:
EinhaltungdesGesetzesüberdieelektromagnetischeVerträglichkeitvonBetriebsmitteln
DiesesProduktentsprichtdem„GesetzüberdieelektromagnetischeVerträglichkeitvonBetriebsmitteln“
EMVG(früher„GesetzüberdieelektromagnetischeVerträglichkeitvonGeräten“).DiesistdieUmsetzungder
EMVEURichtlinie2014/30/EU(früher2004/108/EWG)inderBundesrepublikDeutschland.
ZulassungsbescheinigunglautdemDeutschenGesetzüberdieelektromagnetischeVerträglichkeit
vonBetriebsmitteln,EMVGvom20.Juli2007(früherGesetzüberdieelektromagnetische
VerträglichkeitvonGeräten),bzw.derEMVEURichtlinie2014/30/EU(früher2004/108/EC),für
GerätederKlasseB.
DiesesGerätistberechtigt,inÜbereinstimmungmitdemDeutschenEMVGdasEG-Konformitätszeichen
-CE-zuführen.VerantwortlichfürdieKonformitätserklärungnachParagraf5desEMVGistdieLenovo
(Deutschland)GmbH,Meitnerstr.9,D-70563Stuttgart.
InformationeninHinsichtEMVGParagraf4Abs.(1)4:
DasGeräterfülltdieSchutzanforderungennachEN55024undEN55022KlasseB.
66ThinkCentreM900zUserGuide
Page 77

KoreaClassBcompliancestatement
JapanVCCIClassBcompliancestatement
Japancompliancestatementforproductswhichconnecttothepowermainswithratedcurrent
lessthanorequalto20Aperphase
Japannoticeforacpowercord
Theacpowercordshippedwithyourproductcanbeusedonlyforthisspecificproduct.Donotusetheac
powercordforotherdevices.
LenovoproductserviceinformationforT aiwan
KeyboardandmousecompliancestatementforT aiwan
Eurasiancompliancemark
Brazilaudionotice
Ouvirsonscommaisde85decibéisporlongosperíodospodeprovocardanosaosistemaauditivo.
Mexicowireless-radiocomplianceinformation
Advertencia:EnMexicolaoperacióndeesteequipoestásujetaalassiguientesdoscondiciones:(1)es
posiblequeesteequipoodispositivonocauseinterferenciaperjudicialy(2)esteequipoodispositivodebe
aceptarcualquierinterferencia,incluyendolaquepuedacausarsuoperaciónnodeseada.
AppendixA.Regulatoryinformation67
Page 78

Taiwanvisionprecautionnotice
Additionalregulatoryinformation
Foradditionalregulatoryinformation,refertotheRegulatoryNoticeshippedwiththecomputer.Depending
ontheconfigurationofthecomputerandthecountryorregionwherethecomputerwaspurchased,you
mighthavereceivedadditionalprintedregulatorynotices.Allregulatorynoticesareavailableonthe
LenovoSupportWebsiteinelectronicformat.Toaccesselectroniccopiesofthedocumentation,goto
http://www.lenovo.com/UserManuals.
68ThinkCentreM900zUserGuide
Page 79

AppendixB.WEEEandrecyclinginformation
Lenovoencouragesownersofinformationtechnology(IT)equipmenttoresponsiblyrecycletheir
equipmentwhenitisnolongerneeded.Lenovooffersavarietyofprogramsandservicestoassist
equipmentownersinrecyclingtheirITproducts.ForinformationonrecyclingLenovoproducts,goto
http://www.lenovo.com/recycling.Thelatestenvironmentalinformationaboutourproductsisavailableat
http://www.lenovo.com/ecodeclaration.
ImportantWEEEinformation
TheWEEEmarkingonLenovoproductsappliestocountrieswithWEEEande-wasteregulations(for
example,theEuropeanWEEEDirective,IndiaE-WasteManagement&HandlingRules).Appliancesare
labeledinaccordancewithlocalregulationsconcerningwasteelectricalandelectronicequipment(WEEE).
Theseregulationsdeterminetheframeworkforthereturnandrecyclingofusedappliancesasapplicable
withineachgeography.Thislabelisappliedtovariousproductstoindicatethattheproductisnottobe
thrownaway,butratherputintheestablishedcollectionsystemsforreclaimingtheseendoflifeproducts.
Usersofelectricalandelectronicequipment(EEE)withtheWEEEmarkingmustnotdisposeofendoflife
EEEasunsortedmunicipalwaste,butusethecollectionframeworkavailabletothemforthereturn,recycle,
andrecoveryofWEEEandtominimizeanypotentialeffectsofEEEontheenvironmentandhumanhealth
duetothepresenceofhazardoussubstances.Lenovoelectricalandelectronicequipment(EEE)maycontain
partsandcomponents,whichatend-of-lifemightqualifyashazardouswaste.
EEEandwasteelectricalandelectronicequipment(WEEE)canbedeliveredfreeofchargetotheplaceof
saleoranydistributorthatsellselectricalandelectronicequipmentofthesamenatureandfunctionas
theusedEEEorWEEE.
ForadditionalWEEEinformation,goto:
http://www.lenovo.com/recycling
WEEEinformationforHungary
Lenovo,asaproducer,bearsthecostincurredinconnectionwiththefulfillmentofLenovo’sobligations
underHungaryLawNo.197/2014(VIII.1.)subsections(1)-(5)ofsection12.
RecyclinginformationforJapan
CollectingandrecyclingadisusedLenovocomputerormonitor
IfyouareacompanyemployeeandneedtodisposeofaLenovocomputerormonitorthatistheproperty
ofthecompany,youmustdosoinaccordancewiththeLawforPromotionofEffectiveUtilizationof
Resources.Computersandmonitorsarecategorizedasindustrialwasteandshouldbeproperlydisposed
ofbyanindustrialwastedisposalcontractorcertifiedbyalocalgovernment.InaccordancewiththeLaw
©CopyrightLenovo2015,2016
69
Page 80

forPromotionofEffectiveUtilizationofResources,LenovoJapanprovides,throughitsPCCollecting
andRecyclingServices,forthecollecting,reuse,andrecyclingofdisusedcomputersandmonitors.For
details,visittheLenovoWebsiteathttp://www.lenovo.com/recycling/japan.PursuanttotheLawfor
PromotionofEffectiveUtilizationofResources,thecollectingandrecyclingofhome-usedcomputers
andmonitorsbythemanufacturerwasbegunonOctober1,2003.Thisserviceisprovidedfreeof
chargeforhome-usedcomputerssoldafterOctober1,2003.Fordetails,visittheLenovoWebsiteat
http://www.lenovo.com/recycling/japan.
DisposingofLenovocomputercomponents
SomeLenovocomputerproductssoldinJapanmayhavecomponentsthatcontainheavymetalsorother
environmentalsensitivesubstances.T oproperlydisposeofdisusedcomponents,suchasaprintedcircuit
boardordrive,usethemethodsdescribedaboveforcollectingandrecyclingadisusedcomputerormonitor.
DisposingofdisusedlithiumbatteriesfromLenovocomputers
Abutton-shapedlithiumbatteryisinstalledinsideyourLenovocomputertoprovidepowertothecomputer
clockwhilethecomputerisoffordisconnectedfromthemainpowersource.Ifyouneedtoreplaceitwitha
newone,contactyourplaceofpurchaseorcontactLenovoforservice.Ifyouneedtodisposeofadisused
lithiumbattery,insulateitwithvinyltape,contactyourplaceofpurchaseoranindustrial-waste-disposal
operator,andfollowtheirinstructions.Disposalofalithiumbatterymustcomplywithlocalordinances
andregulations.
RecyclinginformationforBrazil
DeclaraçõesdeReciclagemnoBrasil
DescartedeumProdutoLenovoForadeUso
Equipamentoselétricoseeletrônicosnãodevemserdescartadosemlixocomum,masenviadosàpontosde
coleta,autorizadospelofabricantedoprodutoparaquesejamencaminhadoseprocessadosporempresas
especializadasnomanuseioderesíduosindustriais,devidamentecertificadaspelosorgãosambientais,de
acordocomalegislaçãolocal.
ALenovopossuiumcanalespecíficoparaauxiliá-lonodescartedessesprodutos.Casovocêpossua
umprodutoLenovoemsituaçãodedescarte,ligueparaonossoSACouencaminheume-mailpara:
reciclar@lenovo.com,informandoomodelo,númerodesérieecidade,afimdeenviarmosasinstruções
paraocorretodescartedoseuprodutoLenovo.
BatteryrecyclinginformationforTaiwan
70ThinkCentreM900zUserGuide
Page 81

BatteryrecyclinginformationfortheEuropeanUnion
Notice:ThismarkappliesonlytocountrieswithintheEuropeanUnion(EU).
BatteriesorpackagingforbatteriesarelabeledinaccordancewithEuropeanDirective2006/66/EC
concerningbatteriesandaccumulatorsandwastebatteriesandaccumulators.TheDirectivedeterminesthe
frameworkforthereturnandrecyclingofusedbatteriesandaccumulatorsasapplicablethroughoutthe
EuropeanUnion.Thislabelisappliedtovariousbatteriestoindicatethatthebatteryisnottobethrown
away,butratherreclaimeduponendoflifeperthisDirective.
InaccordancewiththeEuropeanDirective2006/66/EC,batteriesandaccumulatorsarelabeledtoindicate
thattheyaretobecollectedseparatelyandrecycledatendoflife.Thelabelonthebatterymayalso
includeachemicalsymbolforthemetalconcernedinthebattery(Pbforlead,Hgformercury,andCdfor
cadmium).Usersofbatteriesandaccumulatorsmustnotdisposeofbatteriesandaccumulatorsasunsorted
municipalwaste,butusethecollectionframeworkavailabletocustomersforthereturn,recycling,and
treatmentofbatteriesandaccumulators.Customerparticipationisimportanttominimizeanypotential
effectsofbatteriesandaccumulatorsontheenvironmentandhumanhealthduetothepotentialpresenceof
hazardoussubstances.
Beforeplacingelectricalandelectronicequipment(EEE)inthewastecollectionstreamorinwastecollection
facilities,theenduserofequipmentcontainingbatteriesand/oraccumulatorsmustremovethosebatteries
andaccumulatorsforseparatecollection.
DisposingoflithiumbatteriesandbatterypacksfromLenovoproducts
Acoin-celltypelithiumbatterymightbeinstalledinsideyourLenovoproduct.Youcanfinddetailsaboutthe
batteryintheproductdocumentation.Ifthebatteryneedstobereplaced,contactyourplaceofpurchaseor
contactLenovoforservice.Ifyouneedtodisposeofalithiumbattery,insulateitwithvinyltape,contact
yourplaceofpurchaseorawaste-disposaloperator,andfollowtheirinstructions.
DisposingofbatterypacksfromLenovoproducts
YourLenovodevicemightcontainalithium-ionbatterypackoranickelmetalhydridebatterypack.Y oucan
finddetailsonthebatterypackintheproductdocumentation.Ifyouneedtodisposeofabatterypack,
insulateitwithvinyltape,contactLenovosales,service,oryourplaceofpurchase,orawaste-disposal
operator,andfollowtheirinstructions.Youalsocanrefertotheinstructionsprovidedinthemanualsfor
yourproduct.
Forpropercollectionandtreatment,goto:
http://www.lenovo.com/lenovo/environment
AppendixB.WEEEandrecyclinginformation71
Page 82

72ThinkCentreM900zUserGuide
Page 83

AppendixC.RestrictionofHazardousSubstances(RoHS) Directive
Thelatestenvironmentalinformationisavailableathttp://www.lenovo.com/ecodeclaration.
EuropeanUnionRoHS
ThisLenovoproduct,withincludedparts(cables,cords,andsoon)meetstherequirementsofDirective
2011/65/EUontherestrictionoftheuseofcertainhazardoussubstancesinelectricalandelectronic
equipment(“RoHSrecast”or“RoHS2”).
FormoreinformationaboutLenovoworldwidecomplianceonRoHS,goto:
http://www.lenovo.com/social_responsibility/us/en/RoHS_Communication.pdf
TurkishRoHS
TheLenovoproductmeetstherequirementsoftheRepublicofTurkeyDirectiveontheRestrictionoftheUse
ofCertainHazardousSubstancesinWasteElectricalandElectronicEquipment(WEEE).
UkraineRoHS
IndiaRoHS
RoHScompliantasperE-Waste(Management&Handling)Rules.
©CopyrightLenovo2015,2016
73
Page 84

ChinaRoHS
TaiwanRoHS
74ThinkCentreM900zUserGuide
Page 85

AppendixD.ChinaEnergyLabel
©CopyrightLenovo2015,2016
75
Page 86

76ThinkCentreM900zUserGuide
Page 87

AppendixE.ENERGYSTARmodelinformation
ENERGYSTAR
®
isajointprogramoftheU.S.EnvironmentalProtectionAgencyandtheU.S.Department
ofEnergyaimedatsavingmoneyandprotectingtheenvironmentthroughenergyefficientproductsand
practices.
LenovoisproudtoofferourcustomersproductswithanENERGYSTARcompliantdesignation.Some
modelsofthefollowingmachinetypeshavebeendesignedandtestedtoconformtotheENERGYSTAR
programrequirementforcomputersatthetimeofmanufacture:10F2,10F3,10F4,and10F5.Formore
informationaboutENERGYSTARratingsforLenovocomputers,gotohttp://www.lenovo.com.
ByusingENERGYSTARcompliantproductsandtakingadvantageofthepower-managementfeaturesof
yourcomputer,youreducetheconsumptionofelectricity.Reducedelectricalconsumptioncontributesto
potentialfinancialsavings,acleanerenvironment,andthereductionofgreenhousegasemissions.
FormoreinformationaboutENERGYSTAR,goto:
http://www.energystar.gov
Lenovoencouragesyoutomakeefficientuseofenergyanintegralpartofyourday-to-dayoperations.To
helpinthisendeavor,setthefollowingpower-managementfeaturestotakeeffectwhenyourcomputerhas
beeninactiveforaspecifiedduration:
Table1.ENERGYSTARpower-managementfeatures
Windows7orWindows10operatingsystem
Powerplan:Default
•Turnoffthedisplay:After10minutes
•Putthecomputertosleep:After25minutes
•Advancedpowersettings:
–Turnoffharddiskdrives:After20minutes
–Hibernate:Never
ToawakenyourcomputerfromaSleepmode,pressanykeyonyourkeyboard.
Tochangepowersettings,dothefollowing:
1.OpenControlPanelbydoingoneofthefollowing:
•ForWindows7:ClicktheStartbuttontoopentheStartmenu.
•ForWindows10:Right-clicktheStartbuttontoopentheStartcontextmenu.
2.ClickControlPanel.ViewControlPanelusingLargeiconsorSmallicons,andthenclickPower
Options.
3.Followtheinstructionsonthescreen.
©CopyrightLenovo2015,2016
77
Page 88

78ThinkCentreM900zUserGuide
Page 89

AppendixF .Notices
Lenovomaynotoffertheproducts,services,orfeaturesdiscussedinthisdocumentinallcountries.Consult
yourlocalLenovorepresentativeforinformationontheproductsandservicescurrentlyavailableinyour
area.AnyreferencetoaLenovoproduct,program,orserviceisnotintendedtostateorimplythatonlythat
Lenovoproduct,program,orservicemaybeused.Anyfunctionallyequivalentproduct,program,orservice
thatdoesnotinfringeanyLenovointellectualpropertyrightmaybeusedinstead.However,itistheuser's
responsibilitytoevaluateandverifytheoperationofanyotherproduct,program,orservice.
Lenovomayhavepatentsorpendingpatentapplicationscoveringsubjectmatterdescribedinthis
document.Thefurnishingofthisdocumentdoesnotgiveyouanylicensetothesepatents.Youcansend
licenseinquiries,inwriting,to:
Lenovo(UnitedStates),Inc.
1009ThinkPlace-BuildingOne
Morrisville,NC27560
U.S.A.
Attention:LenovoDirectorofLicensing
LENOVOPROVIDESTHISPUBLICATION“ASIS”WITHOUTWARRANTYOFANYKIND,EITHEREXPRESS
ORIMPLIED,INCLUDING,BUTNOTLIMITEDTO,THEIMPLIEDWARRANTIESOFNON-INFRINGEMENT,
MERCHANTABILITYORFITNESSFORAPARTICULARPURPOSE.Somejurisdictionsdonotallow
disclaimerofexpressorimpliedwarrantiesincertaintransactions,therefore,thisstatementmaynotapply
toyou.
Thisinformationcouldincludetechnicalinaccuraciesortypographicalerrors.Changesareperiodically
madetotheinformationherein;thesechangeswillbeincorporatedinneweditionsofthepublication.
Lenovomaymakeimprovementsand/orchangesintheproduct(s)and/ortheprogram(s)describedinthis
publicationatanytimewithoutnotice.
Theproductsdescribedinthisdocumentarenotintendedforuseinimplantationorotherlifesupport
applicationswheremalfunctionmayresultininjuryordeathtopersons.Theinformationcontainedinthis
documentdoesnotaffectorchangeLenovoproductspecificationsorwarranties.Nothinginthisdocument
shalloperateasanexpressorimpliedlicenseorindemnityundertheintellectualpropertyrightsofLenovo
orthirdparties.Allinformationcontainedinthisdocumentwasobtainedinspecificenvironmentsandis
presentedasanillustration.Theresultobtainedinotheroperatingenvironmentsmayvary.
Lenovomayuseordistributeanyoftheinformationyousupplyinanywayitbelievesappropriatewithout
incurringanyobligationtoyou.
Anyreferencesinthispublicationtonon-LenovoWebsitesareprovidedforconvenienceonlyanddonotin
anymannerserveasanendorsementofthoseWebsites.ThematerialsatthoseWebsitesarenotpartof
thematerialsforthisLenovoproduct,anduseofthoseWebsitesisatyourownrisk.
Anyperformancedatacontainedhereinwasdeterminedinacontrolledenvironment.Therefore,theresult
obtainedinotheroperatingenvironmentsmayvarysignificantly.Somemeasurementsmayhavebeen
madeondevelopment-levelsystemsandthereisnoguaranteethatthesemeasurementswillbethesame
ongenerallyavailablesystems.Furthermore,somemeasurementsmayhavebeenestimatedthrough
extrapolation.Actualresultsmayvary.Usersofthisdocumentshouldverifytheapplicabledatafortheir
specificenvironment.
©CopyrightLenovo2015,2016
79
Page 90

Trademarks
ThefollowingtermsaretrademarksofLenovointheUnitedStates,othercountries,orboth:
Lenovo
TheLenovologo
ThinkCentre
TheThinkCentrelogo
RescueandRecovery
ThinkVantage
Microsoft,Windows,andWindowsMediaaretrademarksoftheMicrosoftgroupofcompanies.
IntelisatrademarkofIntelCorporationoritssubsidiariesintheU.S.and/orothercountries.
DisplayPortisatrademarkoftheVideoElectronicsStandardsAssociation.
Othercompany,product,orservicenamesmaybetrademarksorservicemarksofothers.
80ThinkCentreM900zUserGuide
Page 91

Page 92

 Loading...