

Page 1

ThinkCentreE73z
UserGuide
MachineTypes:10BDand10BL
Page 2

Note:Beforeusingthisinformationandtheproductitsupports,besuretoreadandunderstandthe
“Importantsafetyinformation”onpagev
andAppendixA“Notices”onpage83.
FifthEdition(September2015)
©CopyrightLenovo2013,2015.
LIMITEDANDRESTRICTEDRIGHTSNOTICE:IfdataorsoftwareisdeliveredpursuantaGeneralServicesAdministration
“GSA”contract,use,reproduction,ordisclosureissubjecttorestrictionssetforthinContractNo.GS-35F-05925.
Page 3

Contents
Importantsafetyinformation......v
Serviceandupgrades.............v
Staticelectricityprevention...........v
Powercordsandpoweradapters........vi
Extensioncordsandrelateddevices.......vi
Plugsandoutlets..............vii
Externaldevices..............vii
Heatandproductventilation.........vii
Operatingenvironment...........viii
Lasercompliancestatement.........viii
Powersupplystatement............ix
Cleaningandmaintenance...........ix
Glasspartsnotice..............ix
Tip-overhazardpreventionnotice........ix
Chapter1.Productoverview......1
Features..................1
Specifications................4
Lenovoprograms..............4
Accessingaprogramonyourcomputer....4
AnintroductiontoLenovoprograms.....5
Locations..................7
Locatingconnectors,controls,andindicators
onthefrontofyourcomputer........8
Locatingconnectorsontherearofyour
computer................9
Adjustingtheframestand........10
Adjustingthemonitorstand........11
Machinetypeandmodellabel.......12
Chapter2.Usingyourcomputer...13
Frequentlyaskedquestions.........13
NavigatingamongscreensontheWindows8and
Windows8.1operatingsystems........13
NavigatingonWindows8........13
NavigatingonWindows8.1........15
AccessingControlPanelontheWindows8or
Windows8.1operatingsystem........16
UsingWindowsshortcutkeys.........16
Usingthewheelmouse...........17
Settingthecomputervolume.........17
AddinganicontotheWindowsnotificationarea.17
UsingCDsandDVDs............18
HandlingandstoringCDandDVDmedia..18
PlayingaCDorDVD..........19
RecordingaCDorDVD.........19
Usingthesingle-touchormulti-touchfeature...19
Chapter3.Y ouandyourcomputer..21
Accessibilityandcomfort..........21
Arrangingyourworkspace........21
Comfort...............21
Glareandlighting............22
Aircirculation.............22
Electricaloutletsandcablelengths.....22
Accessibilityinformation.........22
Registeringyourcomputer..........25
Movingyourcomputertoanothercountryor
region..................25
Chapter4.Security..........27
Securityfeatures..............27
AttachingaKensington-stylecablelock.....28
Preventingunauthorizedaccesstoyour
computer.................28
Usingfingerprintauthentication........29
Usingandunderstandingfirewalls.......29
Protectingdataagainstviruses........29
Chapter5.Installingorreplacing
hardware...............31
Handlingstatic-sensitivedevices.......31
Installingorreplacinghardware........31
Installingexternaloptions........31
Replacingthekeyboardormouse.....31
Replacingthewirelesskeyboard......32
Replacingthewirelessmouse.......33
Obtainingdevicedrivers.........35
Chapter6.Recoveryinformation...37
RecoveryinformationfortheWindows7operating
system..................37
Creatingandusingrecoverymedia.....37
Performingbackupandrecoveryoperations.38
UsingtheRescueandRecoveryworkspace.39
Creatingandusingarescuemedium....40
Reinstallingpreinstalledapplicationsand
devicedrivers.............41
Reinstallingsoftwareprograms......42
Reinstallingdevicedrivers........42
Solvingrecoveryproblems........42
RecoveryinformationfortheWindows8or
Windows8.1operatingsystem........43
Refreshingyourcomputer........43
Resettingyourcomputertothefactorydefault
settings................43
©CopyrightLenovo2013,2015
i
Page 4

Usingtheadvancedstartupoptions....43
RecoveringyouroperatingsystemifWindows
8orWindows8.1failstostart.......44
RecoveryinformationfortheWindows10operating
system..................44
Chapter7.UsingtheSetupUtility
program................47
StartingtheSetupUtilityprogram.......47
Viewingandchangingsettings........47
UsingBIOSpasswords...........47
Passwordconsiderations.........48
Power-OnPassword..........48
AdministratorPassword.........48
HardDiskPassword...........48
Setting,changing,anddeletingapassword.48
Enablingordisablingadevice........49
Selectingastartupdevice..........49
Selectingatemporarystartupdevice....49
Selectingorchangingthestartupdevice
sequence...............49
EnablingErPLPScompliancemode......50
ExitingtheSetupUtilityprogram.......50
Chapter8.Updatingsystem
programs...............53
Usingsystemprograms...........53
UpdatingtheBIOS.............53
Chapter9.Preventingproblems...55
Keepingyourcomputercurrent........55
Gettingthelatestdevicedriversforyour
computer...............55
Gettingthelatestsystemupdates.....55
Cleaningandmaintenance..........56
Basics................56
Cleaningyourcomputer.........56
Goodmaintenancepractices.......57
Movingyourcomputer...........58
Chapter10.Troubleshootingand
diagnostics..............61
Basictroubleshooting............61
Troubleshootingprocedure..........62
Troubleshooting..............63
Audioproblems............63
CDproblems.............64
DVDproblems.............65
Intermittentproblems..........67
Keyboard,mouse,orpointingdevice
problems...............67
Monitorproblems............68
Networkingproblems..........70
Optionproblems............73
Performanceandlockupproblems.....74
Printerproblems............75
Serialconnectorproblems........75
Softwareproblems...........76
USBproblems.............77
LenovoSolutionCenter...........77
Chapter11.Gettinginformation,help,
andservice..............79
Informationresources............79
Windowshelpsystem..........79
SafetyandWarranty...........79
LenovoWebsite............79
LenovoSupportWebsite.........80
Helpandservice..............80
Usingthedocumentationanddiagnostic
program...............80
Callingforservice............80
Usingotherservices..........81
Purchasingadditionalservices......81
AppendixA.Notices..........83
Trademarks................84
AppendixB.Regulatory
information..............85
Exportclassificationnotice..........85
Electronicemissionsnotices.........85
FederalCommunicationsCommission
DeclarationofConformity........85
Eurasiancompliancemark..........87
Brazilaudionotice.............87
Mexicowireless-radiocomplianceinformation..87
Additionalregulatoryinformation.......87
AppendixC.WEEEandrecycling
information..............89
ImportantWEEEinformation.........89
RecyclinginformationforJapan........89
RecyclinginformationforBrazil........90
BatteryrecyclinginformationforT aiwan.....90
BatteryrecyclinginformationfortheEuropean
Union..................90
AppendixD.RestrictionofHazardous
SubstancesDirective(RoHS).....93
EuropeanUnionRoHS...........93
ChinaRoHS................93
TurkishRoHS...............93
UkraineRoHS...............94
iiThinkCentreE73zUserGuide
Page 5

IndiaRoHS................94
AppendixE.ChinaEnergyLabel...95
AppendixF .ENERGYSTARmodel
information..............97
Index..................99
©CopyrightLenovo2013,2015
iii
Page 6

ivThinkCentreE73zUserGuide
Page 7
Importantsafetyinformation
CAUTION:
Beforeusingthismanual,besuretoreadandunderstandalltherelatedsafetyinformationforthis
product.RefertotheinformationinthissectionandthesafetyinformationintheSafety,Warranty,and
SetupGuidethatyoureceivedwiththisproduct.Readingandunderstandingthissafetyinformation
reducestheriskofpersonalinjuryanddamagetoyourproduct.
IfyounolongerhaveacopyoftheSafety,Warranty,andSetupGuide,youcanobtainaPortableDocument
Format(PDF)versionfromtheLenovo
SupportWebsitealsoprovidestheSafety,Warranty,andSetupGuideandthisUserGuideinadditional
languages.
®
SupportWebsiteathttp://www.lenovo.com/support.TheLenovo
Serviceandupgrades
DonotattempttoserviceaproductyourselfunlessinstructedtodosobytheCustomerSupportCenteror
yourdocumentation.OnlyuseaServiceProviderwhoisapprovedtorepairyourparticularproduct.
Note:Somecomputerpartscanbeupgradedorreplacedbythecustomer.Upgradestypicallyare
referredtoasoptions.ReplacementpartsapprovedforcustomerinstallationarereferredtoasCustomer
ReplaceableUnits,orCRUs.Lenovoprovidesdocumentationwithinstructionswhenitisappropriatefor
customerstoinstalloptionsorreplaceCRUs.Y oumustcloselyfollowallinstructionswheninstallingor
replacingparts.TheOffstateofapowerindicatordoesnotnecessarilymeanthatvoltagelevelsinsidea
productarezero.Beforeyouremovethecoversfromaproductequippedwithapowercord,alwaysensure
thatthepoweristurnedoffandthattheproductisunpluggedfromanypowersource.Formoreinformation
onCRUs,refertoChapter5“Installingorreplacinghardware”onpage31
concerns,contacttheCustomerSupportCenter.
Althoughtherearenomovingpartsinyourcomputerafterthepowercordhasbeendisconnected,the
followingwarningsarerequiredforyoursafety.
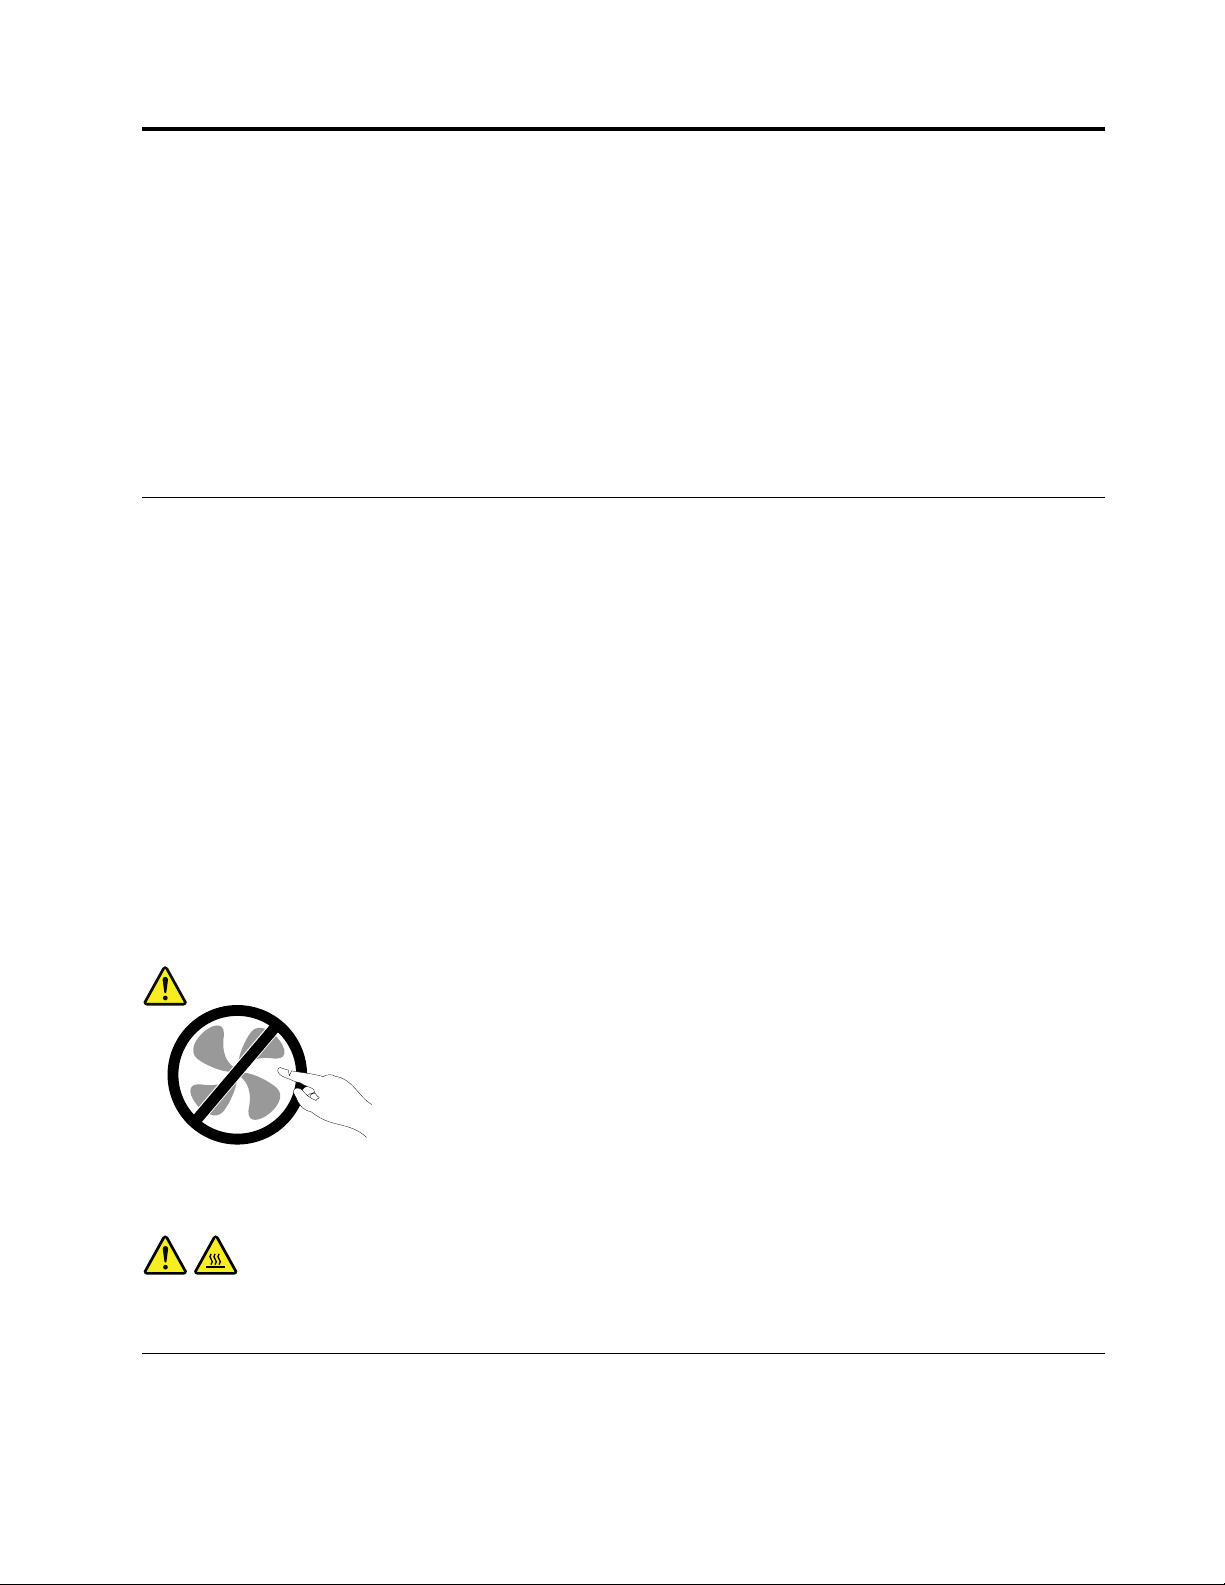
CAUTION:
.Ifyouhaveanyquestionsor
Hazardousmovingparts.Keepfingersandotherbodypartsaway.
CAUTION:
Beforeyouopenthecomputercover,turnoffthecomputerandwaitseveralminutesuntilthe
computeriscool.
Staticelectricityprevention
Staticelectricity,althoughharmlesstoyou,canseriouslydamagecomputercomponentsandoptions.
Improperhandlingofstatic-sensitivepartscancausedamagetothepart.Whenyouunpackanoption
©CopyrightLenovo2013,2015
v
Page 8

orCRU,donotopenthestatic-protectivepackagecontainingthepartuntiltheinstructionsdirectyou
toinstallit.
WhenyouhandleoptionsorCRUs,orperformanyworkinsidethecomputer,takethefollowingprecautions
toavoidstatic-electricitydamage:
•Limityourmovement.Movementcancausestaticelectricitytobuilduparoundyou.
•Alwayshandlecomponentscarefully.Handleadapters,memorymodules,andothercircuitboardsbythe
edges.Nevertouchexposedcircuitry.
•Preventothersfromtouchingcomponents.
•Whenyouinstallastatic-sensitiveoptionorCRU,touchthestatic-protectivepackagecontainingthe
parttoametalexpansion-slotcoverorotherunpaintedmetalsurfaceonthecomputerforatleasttwo
seconds.Thisreducesstaticelectricityinthepackageandyourbody.
•Whenpossible,removethestatic-sensitivepartfromthestatic-protectivepackagingandinstallthepart
withoutsettingitdown.Whenthisisnotpossible,placethestatic-protectivepackagingonasmooth,
levelsurfaceandplacethepartonit.
•Donotplacethepartonthecomputercoverorothermetalsurface.
Powercordsandpoweradapters
Useonlythepowercordsandpoweradapterssuppliedbytheproductmanufacturer.Donotusetheac
powercordforotherdevices.
Thepowercordsshallbesafetyapproved.ForGermany,itshallbeH05VV-F,3G,0.75mm
othercountries,thesuitabletypesshallbeusedaccordingly.
Neverwrapapowercordaroundapoweradapterorotherobject.Doingsocanstressthecordinwaysthat
cancausethecordtofray,crack,orcrimp.Thiscanpresentasafetyhazard.
Alwaysroutepowercordssothattheywillnotbewalkedon,trippedover,orpinchedbyobjects.
Protectpowercordandpoweradaptersfromliquids.Forinstance,donotleaveyourpowercordorpower
adapternearsinks,tubs,toilets,oronfloorsthatarecleanedwithliquidcleansers.Liquidscancausea
shortcircuit,particularlyifthepowercordorpoweradapterhasbeenstressedbymisuse.Liquidsalsocan
causegradualcorrosionofpowercordterminalsand/ortheconnectorterminalsonapoweradapter,
whichcaneventuallyresultinoverheating.
Ensurethatallpowercordconnectorsaresecurelyandcompletelypluggedintoreceptacles.
Donotuseanypoweradapterthatshowscorrosionattheacinputpinsorshowssignsofoverheating(such
asdeformedplastic)attheacinputoranywhereonthepoweradapter.
Donotuseanypowercordswheretheelectricalcontactsoneitherendshowsignsofcorrosionor
overheatingorwherethepowercordappearstohavebeendamagedinanyway.
2
,orbetter.For
Extensioncordsandrelateddevices
Ensurethatextensioncords,surgeprotectors,uninterruptiblepowersupplies,andpowerstripsthatyouuse
areratedtohandletheelectricalrequirementsoftheproduct.Neveroverloadthesedevices.Ifpowerstrips
areused,theloadshouldnotexceedthepowerstripinputrating.Consultanelectricianformoreinformation
ifyouhavequestionsaboutpowerloads,powerrequirements,andinputratings.
viThinkCentreE73zUserGuide
Page 9

Plugsandoutlets
Ifareceptacle(poweroutlet)thatyouintendtousewithyourcomputerequipmentappearstobedamaged
orcorroded,donotusetheoutletuntilitisreplacedbyaqualifiedelectrician.
Donotbendormodifytheplug.Iftheplugisdamaged,contactthemanufacturertoobtainareplacement.
Donotshareanelectricaloutletwithotherhomeorcommercialappliancesthatdrawlargeamountsof
electricity;otherwise,unstablevoltagemightdamageyourcomputer,data,orattacheddevices.
Someproductsareequippedwithathree-prongedplug.Thisplugfitsonlyintoagroundedelectricaloutlet.
Thisisasafetyfeature.Donotdefeatthissafetyfeaturebytryingtoinsertitintoanon-groundedoutlet.If
youcannotinserttheplugintotheoutlet,contactanelectricianforanapprovedoutletadapterortoreplace
theoutletwithonethatenablesthissafetyfeature.Neveroverloadanelectricaloutlet.Theoverallsystem
loadshouldnotexceed80percentofthebranchcircuitrating.Consultanelectricianformoreinformation
ifyouhavequestionsaboutpowerloadsandbranchcircuitratings.
Besurethatthepoweroutletyouareusingisproperlywired,easilyaccessible,andlocatedclosetothe
equipment.Donotfullyextendpowercordsinawaythatwillstressthecords.
Besurethatthepoweroutletprovidesthecorrectvoltageandcurrentfortheproductyouareinstalling.
Carefullyconnectanddisconnecttheequipmentfromtheelectricaloutlet.
Externaldevices
DonotconnectordisconnectanyexternaldevicecablesotherthanUniversalSerialBus(USB)and1394
cableswhilethecomputerpowerison;otherwise,youmightdamageyourcomputer.Toavoidpossible
damagetoattacheddevices,waitatleastfivesecondsafterthecomputerisshutdowntodisconnect
externaldevices.
Heatandproductventilation
Computers,poweradapters,andmanyaccessoriescangenerateheatwhenturnedonandwhenbatteries
arecharging.Alwaysfollowthesebasicprecautions:
•Donotleaveyourcomputer,poweradapter,oraccessoriesincontactwithyourlaporanypartofyour
bodyforanextendedperiodwhentheproductsarefunctioningorwhenthebatteryischarging.Your
computer,poweradapter,andmanyaccessoriesproducesomeheatduringnormaloperation.Extended
contactwiththebodycouldcausediscomfortor,potentially,askinburn.
•Donotchargethebatteryoroperateyourcomputer,poweradapter,oraccessoriesnearflammable
materialsorinexplosiveenvironments.
•Ventilationslots,fans,andheatsinksareprovidedwiththeproductforsafety,comfort,andreliable
operation.Thesefeaturesmightinadvertentlybecomeblockedbyplacingtheproductonabed,sofa,
carpet,orotherflexiblesurface.Neverblock,cover,ordisablethesefeatures.
Inspectyourdesktopcomputerfordustaccumulationatleastonceeverythreemonths.Beforeinspecting
yourcomputer,turnoffthepowerandunplugthecomputer'spowercordfromtheelectricaloutlet;then
removeanydustfromventsandperforationsinthebezel.Ifyounoticeexternaldustaccumulation,then
examineandremovedustfromtheinsideofthecomputerincludingheatsinkinletfins,powersupplyvents,
andfans.Alwaysturnoffandunplugthecomputerbeforeopeningthecover.Ifpossible,avoidoperating
yourcomputerwithintwofeetofhigh-trafficareas.Ifyoumustoperateyourcomputerinornearahigh-traffic
area,inspectand,ifnecessary,cleanyourcomputermorefrequently.
©CopyrightLenovo2013,2015
vii
Page 10

Foryoursafetyandtomaintainoptimumcomputerperformance,alwaysfollowthesebasicprecautions
withyourdesktopcomputer:
•Keepthecoverclosedwheneverthecomputerispluggedin.
•Regularlyinspecttheoutsideofthecomputerfordustaccumulation.
•Removedustfromventsandanyperforationsinthebezel.Morefrequentcleaningsmightberequiredfor
computersindustyorhigh-trafficareas.
•Donotrestrictorblockanyventilationopenings.
•Donotstoreoroperateyourcomputerinsidefurniture,asthismightincreasetheriskofoverheating.
•Airflowtemperaturesintothecomputershouldnotexceed35°C(95°F).
•Donotinstallairfiltrationdevices.Theymayinterferewithpropercooling.
Operatingenvironment
Theoptimalenvironmentinwhichtouseyourcomputeris10°C-35°C(50°F-95°F)withhumidityranging
between35%and80%.Ifyourcomputerisstoredortransportedintemperatureslessthan10°C(50°F),
allowthecoldcomputertoriseslowlytoanoptimaloperatingtemperatureof10°C-35°C(50°F-95°F)before
use.Thisprocesscouldtaketwohoursinextremeconditions.Failuretoallowyourcomputertorisetoan
optimaloperatingtemperaturebeforeusecouldresultinirreparabledamagetoyourcomputer.
Ifpossible,placeyourcomputerinawell-ventilatedanddryareawithoutdirectexposuretosunshine.
Keepelectricalappliancessuchasanelectricfan,radio,high-poweredspeakers,airconditioner,and
microwaveovenawayfromyourcomputerbecausethestrongmagneticfieldsgeneratedbythese
appliancescandamagethemonitoranddataontheharddiskdrive.
Donotplaceanybeveragesontopoforbesidethecomputerorotherattacheddevices.Ifliquidisspilledon
orinthecomputeroranattacheddevice,ashortcircuitorotherdamagemightoccur.
Donoteatorsmokeoveryourkeyboard.Particlesthatfallintoyourkeyboardcancausedamage.
Lasercompliancestatement
CAUTION:
Whenlaserproducts(suchasCD-ROMs,DVDdrives,fiberopticdevices,ortransmitters)are
installed,notethefollowing:
•Donotremovethecovers.Removingthecoversofthelaserproductcouldresultinexposureto
hazardouslaserradiation.Therearenoserviceablepartsinsidethedevice.
•Useofcontrolsoradjustmentsorperformanceofproceduresotherthanthosespecifiedherein
mightresultinhazardousradiationexposure.
DANGER
SomelaserproductscontainanembeddedClass3AorClass3Blaserdiode.Notethefollowing:
Laserradiationwhenopen.Donotstareintothebeam,donotviewdirectlywithoptical
instruments,andavoiddirectexposuretothebeam.
viiiThinkCentreE73zUserGuide
Page 11

Powersupplystatement
Neverremovethecoveronapowersupplyoranypartthathasthefollowinglabelattached.
Hazardousvoltage,current,andenergylevelsarepresentinsideanycomponentthathasthislabelattached.
Therearenoserviceablepartsinsidethesecomponents.Ifyoususpectaproblemwithoneoftheseparts,
contactaservicetechnician.
Cleaningandmaintenance
Keepyourcomputerandworkspaceclean.Shutdownthecomputerandthendisconnectthepower
cordbeforecleaningthecomputer.Donotsprayanyliquiddetergentdirectlyonthecomputeroruse
anydetergentcontainingflammablematerialtocleanthecomputer.Spraythedetergentonasoftcloth
andthenwipethecomputersurfaces.
Glasspartsnotice
CAUTION:
Somepartsofyourproductmaybemadeofglass.Thisglasscouldbreakiftheproductisdropped
onahardsurfaceorreceivesasubstantialimpact.Ifglassbreaks,donottouchorattempttoremove
it.Stopusingyourproductuntiltheglassisreplacedbytrainedservicepersonnel.
Tip-overhazardpreventionnotice
•Placethecomputeronasturdyandlowbase,oranchorthefurnitureandpositionthecomputeras
farbackonthefurnitureaspossible.
•Keepremotecontrols,toys,andotheritemsthatmightattractchildrenoffthecomputer.
•Keepthecomputer,cables,andcordsoutofthereachofchildren.
•Supervisechildreninroomswherethesesafetytipshavenotbeenfollowed.
©CopyrightLenovo2013,2015
ix
Page 12

xThinkCentreE73zUserGuide
Page 13

Chapter1.Productoverview
Thischapterprovidesinformationaboutthecomputerfeatures,specifications,softwareprogramsprovided
byLenovo,andlocationsofconnectors.
Features
Thissectionintroducesthecomputerfeatures.Theinformationcoversavarietyofmodels.
Toviewtheinformationaboutyourspecificmodel,dooneofthefollowing:
•OntheMicrosoft
toviewtheinformation.
•OntheMicrosoftWindows8orWindows8.1operatingsystem,gotothedesktopandmoveyourpointer
tothetop-rightorbottom-rightcornerofthescreentodisplaythecharms.ThenclickSettings➙PC
infotoviewtheinformation.
•OntheMicrosoftWindows10operatingsystem,clicktheStartbuttontoopentheStartmenu.Then,click
Settings➙System➙Abouttoviewtheinformation.
Microprocessor
Toviewthemicroprocessorinformationofyourcomputer,dothefollowing:
•OntheMicrosoftWindows7operationsystem,clickStart,right-clickComputer,andselectProperties
toviewtheinformation.
•OntheMicrosoftWindows8orWindows8.1operatingsystem,gotothedesktopandmoveyourpointer
tothetop-rightorbottom-rightcornerofthescreentodisplaythecharms.ThenclickSettings➙PC
infotoviewtheinformation.
•OntheMicrosoftWindows10operatingsystem,clicktheStartbuttontoopentheStartmenu.Then,click
Settings➙System➙Abouttoviewtheinformation.
®
Windows
®
7operationsystem,clickStart,right-clickComputer,andselectProperties
Memory
Yourcomputersupportsuptotwodoubledatarate3smalloutlinedualinlinememorymodules(DDR3
SODIMMs)
Internaldrives
•Cardreader(availableinsomemodels)
•Hybriddrive(availableinsomemodels)
•OneslimSerialAdvancedTechnologyAttachment(SATA)opticaldrive
•Oneharddiskdrive(standardSATAharddiskdrive);onesolid-statedrive(availableinsomemodels)
Display
•20-inchLEDpanel
Videosubsystem
•OneVGA-outconnector
Audiosubsystem
©CopyrightLenovo2013,2015
1
Page 14

•Integratedhigh-definition(HD)audio
•Microphoneconnectorandheadphoneconnectoronthesideofthecomputer
Note:Anintegratedmicrophoneisinstalledinthecomputer.Whenanexternalmicrophoneisconnected
tothemicrophoneconnectoronthefrontpanel,clickstart➙ControlPanel➙Soundtoenterthe
Soundwindow.OntheRecordingtab,twooptions2–HighDefinitionAudioDeviceandIntegrated
Microphonewillbedisplayed.Right-click2–HighDefinitionAudioDeviceandselectSetasDefault
Devicestoenabletheexternalmicrophone.
•Internalspeaker(installedinsomemodels)
Connectivity
•10/100/1000MbpsintegratedEthernetcontroller
Systemmanagementfeatures
•Abilitytostorepower-onself-test(POST)hardwaretestresults
•DesktopManagementInterface(DMI)
DesktopManagementInterfaceprovidesacommonpathforuserstoaccessinformationaboutall
aspectsofacomputer,includingprocessortype,installationdate,attachedprintersandotherperipherals,
powersources,andmaintenancehistory.
•ErPLPScompliancemode
Theenergy-relatedproductsdirective(ErP)lowestpowerstate(LPS)compliancemodereducesthe
consumptionofelectricitywhenyourcomputerisinsleeporoffmode.Formoreinformation,see
“EnablingErPLPScompliancemode”onpage50
•Intel
®
StandardManageability
.
IntelStandardManageabilityishardwareandfirmwaretechnologythatbuildscertainfunctionality
intocomputersinordertomakethemeasierandlessexpensiveforbusinessestomonitor,maintain,
update,upgrade,andrepair.
•PrebootExecutionEnvironment(PXE)
ThePrebootExecutionEnvironmentisanenvironmenttostartcomputersusinganetworkinterface
independentofdatastoragedevices(suchastheharddiskdrive)orinstalledoperatingsystems.
•SystemManagement(SM)BasicInput/OutputSystem(BIOS)andSMsoftware
TheSMBIOSspecificationdefinesdatastructuresandaccessmethodsinaBIOSthatallowsauseror
applicationtostoreandretrieveinformationspecificaboutthecomputerinquestion.
•WakeonLAN
WakeonLANisanEthernetcomputernetworkingstandardthatallowsacomputertobeturnedon
orwokenupbyanetworkmessage.Themessageisusuallysentbyaprogramrunningonanother
computeronthesamelocalareanetwork.
•WakeonRing
WakeonRing,sometimesreferredtoasWakeonModem,isaspecificationthatallowssupported
computersanddevicestoresumefromsleeporhibernationmode.
•WindowsManagementInstrumentation(WMI)
WindowsManagementInstrumentationisasetofextensionstotheWindowsDriverModel.Itprovidesan
operatingsysteminterfacethroughwhichinstrumentedcomponentsprovideinformationandnotification.
2ThinkCentreE73zUserGuide
Page 15

Input/Output(I/O)features
•9-pinserialconnector(optional)
•SixUniversalSerialBus(USB)connectors(twoonthesidepanelandfourontherearpanel)
•OneEthernetconnector
•OneVGA-outconnector
•Twoaudioconnectors(microphoneconnectorandheadphoneconnector)
Formoreinformation,see“Locatingconnectors,controls,andindicatorsonthefrontofyourcomputer”on
page8
and“Locatingconnectorsontherearofyourcomputer”onpage9.
Expansion
•Oneharddiskdrivebay
•Oneopticaldrivebay
Powersupply
Yourcomputercomeswitha150-wattautomaticvoltage-sensingpowersupply.
Securityfeatures
•ComputraceAgentsoftwareembeddedinfirmware
•Abilitytoenableordisableadevice
•AbilitytoenableanddisableUSBconnectorsindividually
•Power-onpassword(POP),administratorpassword,andharddiskdrivepasswordtodeterunauthorized
useofyourcomputer
•Startupsequencecontrol
•Startupwithoutkeyboardormouse
•SupportforaKensington-stylecablelock
Formoreinformation,seeChapter4“Security”onpage27
.
Preinstalledsoftwareprograms
Yourcomputerispreinstalledwithsoftwareprogramstohelpyouworkmoreeasilyandsecurely.Formore
information,see“Lenovoprograms”onpage4
.
Preinstalledoperatingsystem
Yourcomputerispreinstalledwithoneofthefollowingoperatingsystems:
•MicrosoftWindows7operatingsystem
•MicrosoftWindows8operatingsystem
•MicrosoftWindows8.1operatingsystem
•MicrosoftWindows10operatingsystem
Chapter1.Productoverview3
Page 16

Operatingsystem(s),certifiedortestedforcompatibility
•Linux
®
1
Specifications
Thissectionliststhephysicalspecificationsforyourcomputer.
Table1.Dimensionsandweight
(variesbymodeltype)
DimensionNon-touchwithframestandNon-touchwithmonitor
stand
Height
Width
Depth
Weight
(maximum)
Environment
•Airtemperature:
Operating:10°Cto35°C(50°Fto95°F)
Storageinoriginalshippingpackage:-40°Cto60°C(-40°Fto140°F)
Storagewithoutpackage:-10°Cto60°C(14°Fto140°F)
•Humidity:
Operating:20%to80%(non-condensing)
Storage:20%to80%(non-condensing)
•Altitude:
Operating:-15.2to3048m(-50to10000ft)
Storage:-15.2to10668m(-50to35000ft)
Electricalinput
Inputvoltage:From100Vacto240Vac
Inputfrequency:50/60Hz
371.5mm(14.63inches)404.5mm(15.93inches)362mm(14.25inches)
506mm(19.92inches)506mm(19.92inches)506mm(19.92inches)
95mm(9.74inches)175.5mm(6.91inches)66mm(2.60inches)
6.7kg(14.77lbs)8.5kg(18.74lbs)6.3kg(13.89lbs)
Non-touchwithoutstand
Lenovoprograms
YourcomputercomeswithLenovoprogramstohelpyouworkmoreeasilyandsecurely.Dependingon
theWindowsoperatingsystempreinstalled,theprogramsmightvary.
Accessingaprogramonyourcomputer
Note:ForWindows7,someoftheLenovoprogramsmightbereadytobeinstalled,soyouneedtoinstall
themmanually.Then,youcanaccessandusetheseprograms.T oinstallaprogramthatisreadytobe
installed,opentheLenovoThinkVantage
Followtheinstructionsundergreyed-outiconstolocatetheiconforthedesiredprogram.Double-click
theicontoinstalltheprogram.
1.Theoperatingsystem(s)listedherearebeingcertifiedortestedforcompatibilityatthetimethispublicationgoesto
press.AdditionaloperatingsystemsmightbeidentifiedbyLenovoascompatiblewithyourcomputerfollowingthe
publicationofthismanual.Thislistissubjecttochange.Todetermineifanoperatingsystemhasbeencertifiedor
testedforcompatibility,checktheWebsiteoftheoperatingsystemvendor.
4ThinkCentreE73zUserGuide
®
Toolsprogram,andthenviewtheprogramiconsusingTiles.
Page 17

Toaccessaprogramonyourcomputer,dooneofthefollowing:
•ForWindows7orWindows10:
–FromWindowsSearch:
1.DependingonyourWindowsversion,dooneofthefollowing:
–ForWindows7:ClicktheStartbuttontoopentheStartmenu,andthentypetheprogram
nameintothesearchbox.
–ForWindows10:TypetheprogramnameintothesearchboxnexttotheStartbutton.
2.Inthesearchresults,clickthenameofthedesiredprogramtolaunchtheprogram.
–FromtheStartmenuorControlPanel:
1.ClicktheStartbuttontoopentheStartmenu.Then,clickthenameofthedesiredprogramto
launchtheprogram.
2.Iftheprogramnameisnotdisplayed,clickAllProgramsforWindows7orAllappsforWindows
10todisplaytheprogramlist.Fromthelistorafolderinthelist,clickthenameofthedesired
programtolaunchtheprogram.
3.IftheprogramnameisnotdisplayedontheStartmenu,accesstheprogramfromControlPanel.
a.DependingonyourWindowsversion,dooneofthefollowing:
–ForWindows7:ClickControlPanelontheStartmenu.
–ForWindows10:Right-clicktheStartbuttontoopentheStartcontextmenu,andthen
clickControlPanel.
b.ViewControlPanelusingLargeiconsorSmallicons,andthenclickthenameofthedesired
programtolaunchtheprogram.
•ForWindows8.1:
1.PresstheWindowskeytogototheStartscreen.Clickthenameofthedesiredprogramto
launchtheprogram.
2.Ifyoucannotfindtheprogramyouneed,clickthearrowiconinthebottom-leftcornerofthe
screentogototheAppsscreen.Findthedesiredprogramintheappslistorsearchforitinthe
searchboxinthetop-rightcornerofthescreen.
AnintroductiontoLenovoprograms
ThissectionprovidesinformationaboutthemajorLenovoprogramsavailableonyouroperatingsystem.
Note:Dependingonyourcomputermodel,someofthefollowingprogramsmightnotbeavailable.
•ForWindows7only:
–CreateRecoveryMedia
TheCreateRecoveryMediaprogramenablesyoutorestoreonlytheCdriveortheentirestorage
drivetothefactory-defaultsettings.
–LenovoPowerENGAGE
TheLenovoPowerENGAGEprogramenablesyoutoregisteryourcomputerwithLenovo.
–MessageCenterPlus
TheMessageCenterPlusprogramautomaticallydisplaysmessagesinformingyouaboutimportant
noticesfromLenovo,suchasalertsonsystemupdatesandalertsonconditionsthatrequireyour
attention.
Chapter1.Productoverview5
Page 18

–RescueandRecovery
®
TheRescueandRecoveryprogramisaone-buttonrecoveryandrestoresolution.Itincludesaset
ofself-recoverytoolstohelpyoudiagnosecomputerproblems,gethelp,andrecoverfromsystem
crashes,evenifyoucannotstarttheWindowsoperatingsystem.
•ForWindows10only:
–LenovoID
TheLenovoIDprogramenablesyoutocreateyourLenovoIDandaccessallsupportedLenovo
programsandwebportalswithsinglesign-on.
–LenovoSettings
TheLenovoSettingsprogramistheonestopshopforyoutocontrolhardwarefeatures,sensors
andprogramsonyourcomputer.LenovoSettingsenablesyoutooptimizedeviceperformanceby
customizingkeyfunctions,suchaspowerplans,audio,camera,andnetworks.
•ForWindows8andWindows8.1:
–LenovoSupport
TheLenovoSupportprogramenablesyoutoregisteryourcomputerwithLenovo,checkthecomputer
healthconditionandbatterystatus,downloadandviewusermanualsforyourcomputer,getthe
warrantyinformationofyourcomputer,andexplorehelpandsupportinformation.
•ForWindows7,Windows8,andWindows8.1:
–FingerprintManagerProorThinkVantageFingerprintSoftware
TheFingerprintManagerProorThinkVantageFingerprintSoftwareprogramenablesyoutousea
fingerprintreader.Theintegratedfingerprintreaderprovidedonsomekeyboardsenablesyoutoenroll
yourfingerprintandassociateitwithyourpower-onpassword,harddiskpassword,andWindows
password.Asaresult,fingerprintauthenticationcanreplacepasswordsandenablesimpleandsecure
useraccess.
–PasswordManager
ThePasswordManagerprogramautomaticallycapturesandfillsinauthenticationinformationfor
WindowsprogramsandWebsites.
–SystemUpdate
TheSystemUpdateprogramprovidesregularaccesstothesystemupdatesforyourcomputer,such
asdevicedriverupdates,softwareupdates,andBIOSupdates.Theprogramgathersinformationfrom
theLenovoHelpCenteraboutnewupdatesforyourcomputer,thensortsanddisplaystheupdatesfor
downloadandinstallation.Y ouhavecompletecontrolofwhichupdatestodownloadandinstall.
•ForWindows7,Windows8.1,andWindows10:
–LenovoBluetoothLock
TheLenovoBluetoothLockprogramenablesyoutouseaBluetoothdevice(suchasyoursmartphone)
asaproximity-basedunitforlockingorunlockingyourcomputerautomatically.Bydetectingthe
distancebetweenyourcomputerandthepredefinedBluetoothdevicethatyouarecarrying,theLenovo
BluetoothLockprogramautomaticallylocksyourcomputerwhenyouwalkawayandunlocksyour
computerwhenyoucomeback.Thisisasimplewaytoprotectyourcomputeragainstunauthorized
accessincasethatyouforgettolockyourcomputer.
–PCCloudManager
ThePCCloudManager(PCM)programisabrowser-basedsolutionforclient-computermanagement.
ThePCMprogramhastwocomponents:PCMServerandPCMClient.PCMServerisinstalledon
thecomputer,wheretheadministratorperformsmanagementwork,suchaspowermanagement
andsecuritymanagement.PCMClientisinstalledontheclientcomputerstobemanaged.The
administratorcanlogintoPCMServertomanagecomputerswithPCMClientinstalled,throughthe
InternetWebbrowser.
6ThinkCentreE73zUserGuide
Page 19

•ForWindows8,Windows8.1,andWindows10:
–LenovoCompanion
Yourcomputer’sbestfeaturesandcapabilitiesshouldbeeasytoaccessandunderstand.WithLenovo
Companion,theyare.UseLenovoCompaniontodothefollowing:
–Optimizeyourcomputer’sperformance,monitoryourcomputer’shealth,andmanageupdates.
–Accessyouruserguide,checkwarrantystatus,andviewaccessoriescustomizedforyourcomputer.
–Readhow-toarticles,exploreLenovoforums,andstayup-to-dateontechnologynewswitharticles
andblogsfromtrustedsources.
LenovoCompanionisfilledwithexclusiveLenovocontenttohelpyoulearnmoreaboutwhatyou
candowithyourcomputer.
•ForWindows7,Windows8,Windows8.1,andWindows10:
–LenovoDeviceExperienceorLenovoPCExperience
TheLenovoDeviceExperienceorLenovoPCExperienceprogramhelpsyouworkmoreeasilyand
securely.TheprogramprovideseasyaccesstoLenovoThinkVantageToolsorLenovoTools,important
settingsandinformationaboutyourcomputer,theLenovoSupportWebsite,andsoon.
–LenovoSolutionCenter
TheLenovoSolutionCenterprogramenablesyoutotroubleshootandresolvecomputerproblems.It
combinesdiagnostictests,systeminformationcollection,securitystatus,andsupportinformation,
alongwithhintsandtipsformaximumsystemperformance.
–PowerManager
ThePowerManagerprogramprovidesconvenient,flexible,andcompletepowermanagementfor
yourcomputer.Itenablesyoutoadjustyourcomputerpowersettingstoachievethebestbalance
betweenperformanceandpowersaving.
–REACHitorLenovoReach
TheREACHitorLenovoReachprogramenhancesyourcloudexperience.Thisprogramkeepsyou
connectedatalltimesandenablesyoutoaccessallyourfavoriteitemsfrompersonalcomputers,
smartphones,ortablets.Asaresult,youcanaccess,edit,andshareyourfilesfromanywhere.You
alsocanaddyourfavoriteWebservicestoyourclouddesktopandstaylogged-intoWebsiteswith
thecloudpasswordmanager.
–SHAREitorLenovoSHAREit
TheSHAREitorLenovoSHAREitprogramprovidesaquickandeasywaytosharefilesandfolders
amongcomputers,smartphones,tablets,orsmartTVswiththeAndroidortheWindowsoperating
systeminstalled.SHAREitorLenovoSHAREitusesanytypeofnetworkorevennonetworkatallto
sharefilesandfolders.
Locations
Thissectionprovidesinformationtohelpyoulocatetheconnectorsonthefrontandrearofyourcomputer.
Note:Thecomponentsinyourcomputermightlookslightlydifferentfromtheillustrations.
Chapter1.Productoverview7
Page 20
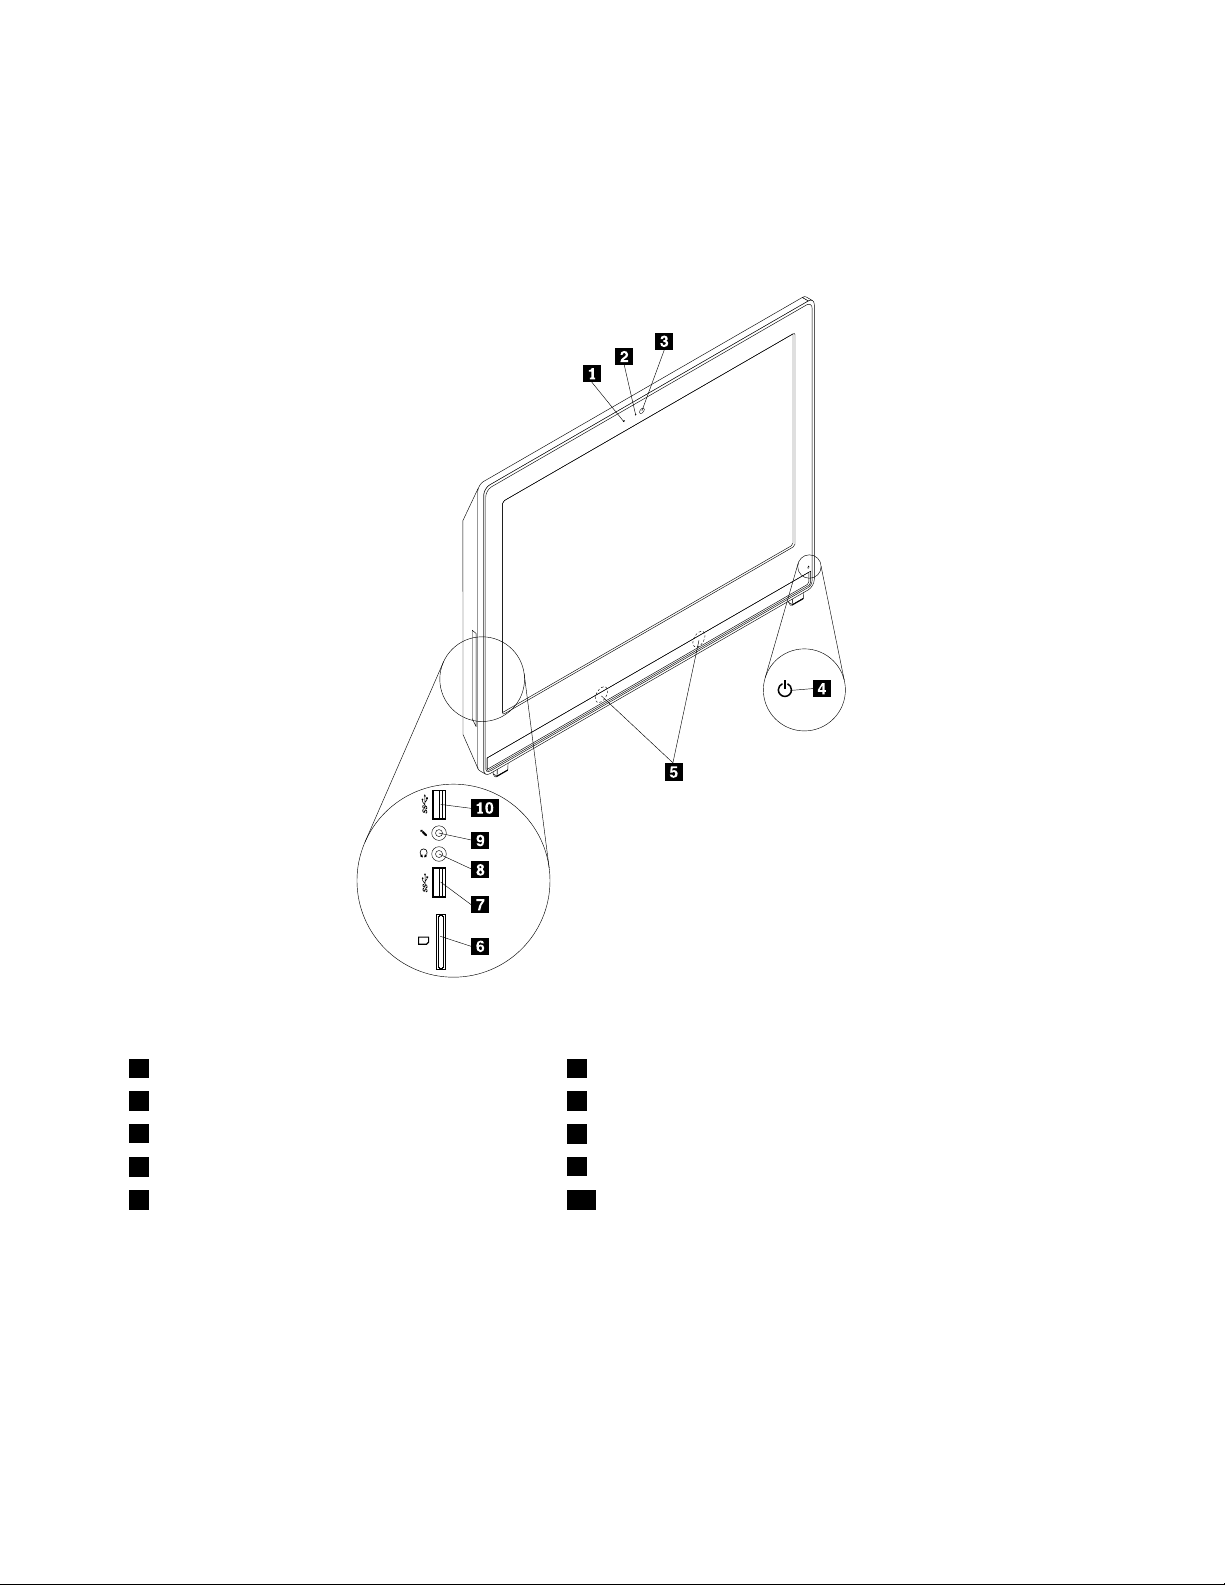
Locatingconnectors,controls,andindicatorsonthefrontofyour computer
Figure1“Frontconnector,control,andindicatorlocations”onpage8showsthelocationsoftheconnectors,
controls,andindicatorsonthefrontofyourcomputer.
Figure1.Frontconnector,control,andindicatorlocations
1Integratedmicrophone2Integratedcameraindicator
3Integratedcamera4Poweronindicator
5Internalspeaker
7USB3.0connector(USBconnector2)
9Microphoneconnector
6Cardreader(availableinsomemodels)
8Headphoneconnector
10USB3.0connector(USBconnector1)
8ThinkCentreE73zUserGuide
Page 21

Locatingconnectorsontherearofyourcomputer
Figure2“Rearconnectorlocations”onpage9showsthelocationsoftheconnectorsontherearofyour
computer.Someconnectorsontherearofyourcomputerarecolor-codedtohelpyoudeterminewhereto
connectthecablesonyourcomputer.
Figure2.Rearconnectorlocations
1Powercordconnector2Ethernetconnector
3VGA-outconnector4USB2.0connectors(USBconnectors3to6)
5Serialconnector(availableinsomemodels)
7Brightness-downcontrol8Brightness-upcontrol
9Security-lockslot10Opticaldrive
ConnectorDescription
Ethernetconnector
Serialconnector
USB2.0connectorUsedtoattachadevicethatrequiresaUSB2.0connection,suchasakeyboard,a
VGA-inconnectorUsedtoattachaVideoGraphicsArray(VGA)monitororotherdevicesthatuse
UsedtoattachanEthernetcableforalocalareanetwork(LAN).
Note:T ooperatethecomputerwithinFCCClassBlimits,useaCategory5Ethernet
cable.
Usedtoattachanexternalmodem,aserialprinter,orotherdevicesthatusea
9-pinserialconnector.
mouse,ascanner,aprinter,orapersonaldigitalassistant(PDA).
aVGA-inmonitorconnector.
6Powerbutton
Chapter1.Productoverview9
Page 22

Adjustingtheframestand
Yourcomputermightcomewithaframestandthatyoucanusetoadjustthecomputertoyourcomfortable
position.Pullthestandopenandadjustthepositionofthecomputeratananglebetween10°and25°
asshowninthefollowingillustration.
Note:Theframestandisavailableonlyinsomemodels.
CAUTION:
Makesurethattheangleisatleast10°fromtheverticalposition;otherwise,thecomputermightbe
unstableandtipover.
Figure3.Adjustingtheframestand
10ThinkCentreE73zUserGuide
Page 23
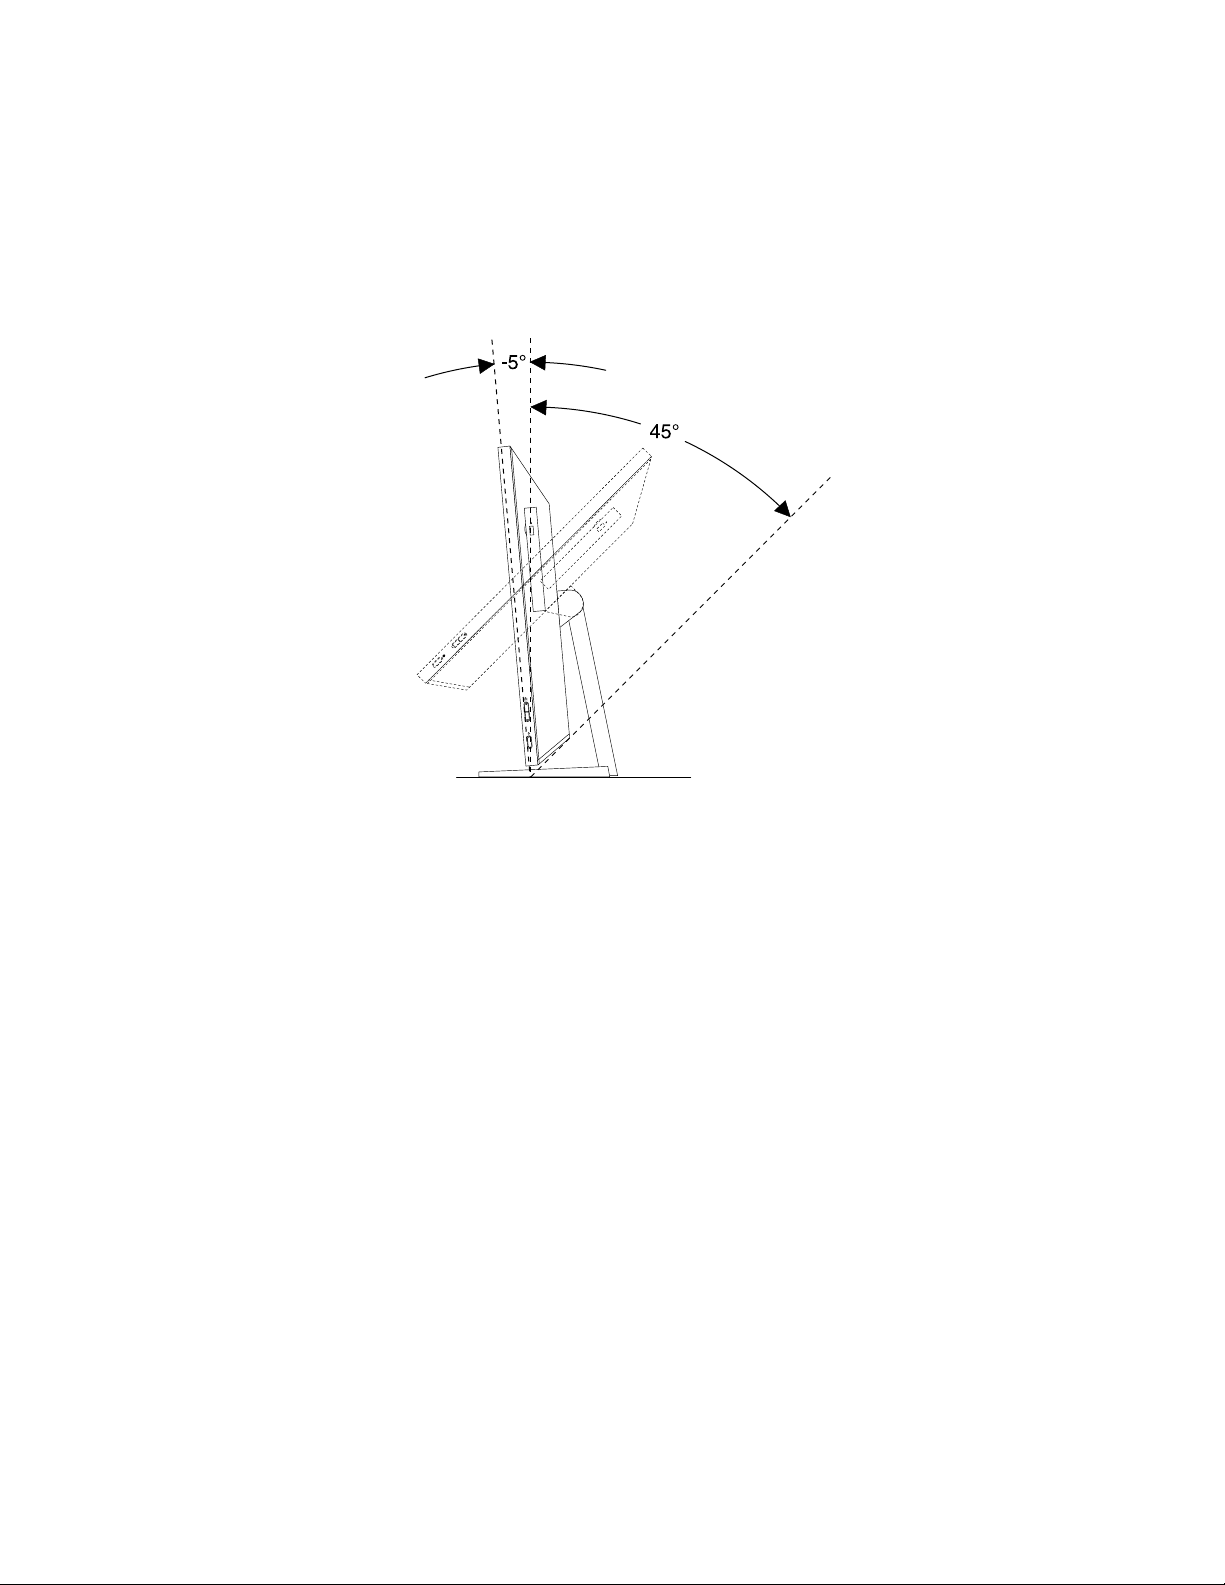
Adjustingthemonitorstand
Yourcomputermightcomewithamonitorstandthatyoucanusetoadjustthecomputertoyourcomfortable
position.
Thefollowingillustrationshowsthatyoucanadjustthepositionofthecomputeratanangleof5°tothe
frontand45°totherear.
Figure4.Adjustingtheverticalpositionofthecomputertothefrontortotherear
Chapter1.Productoverview11
Page 24
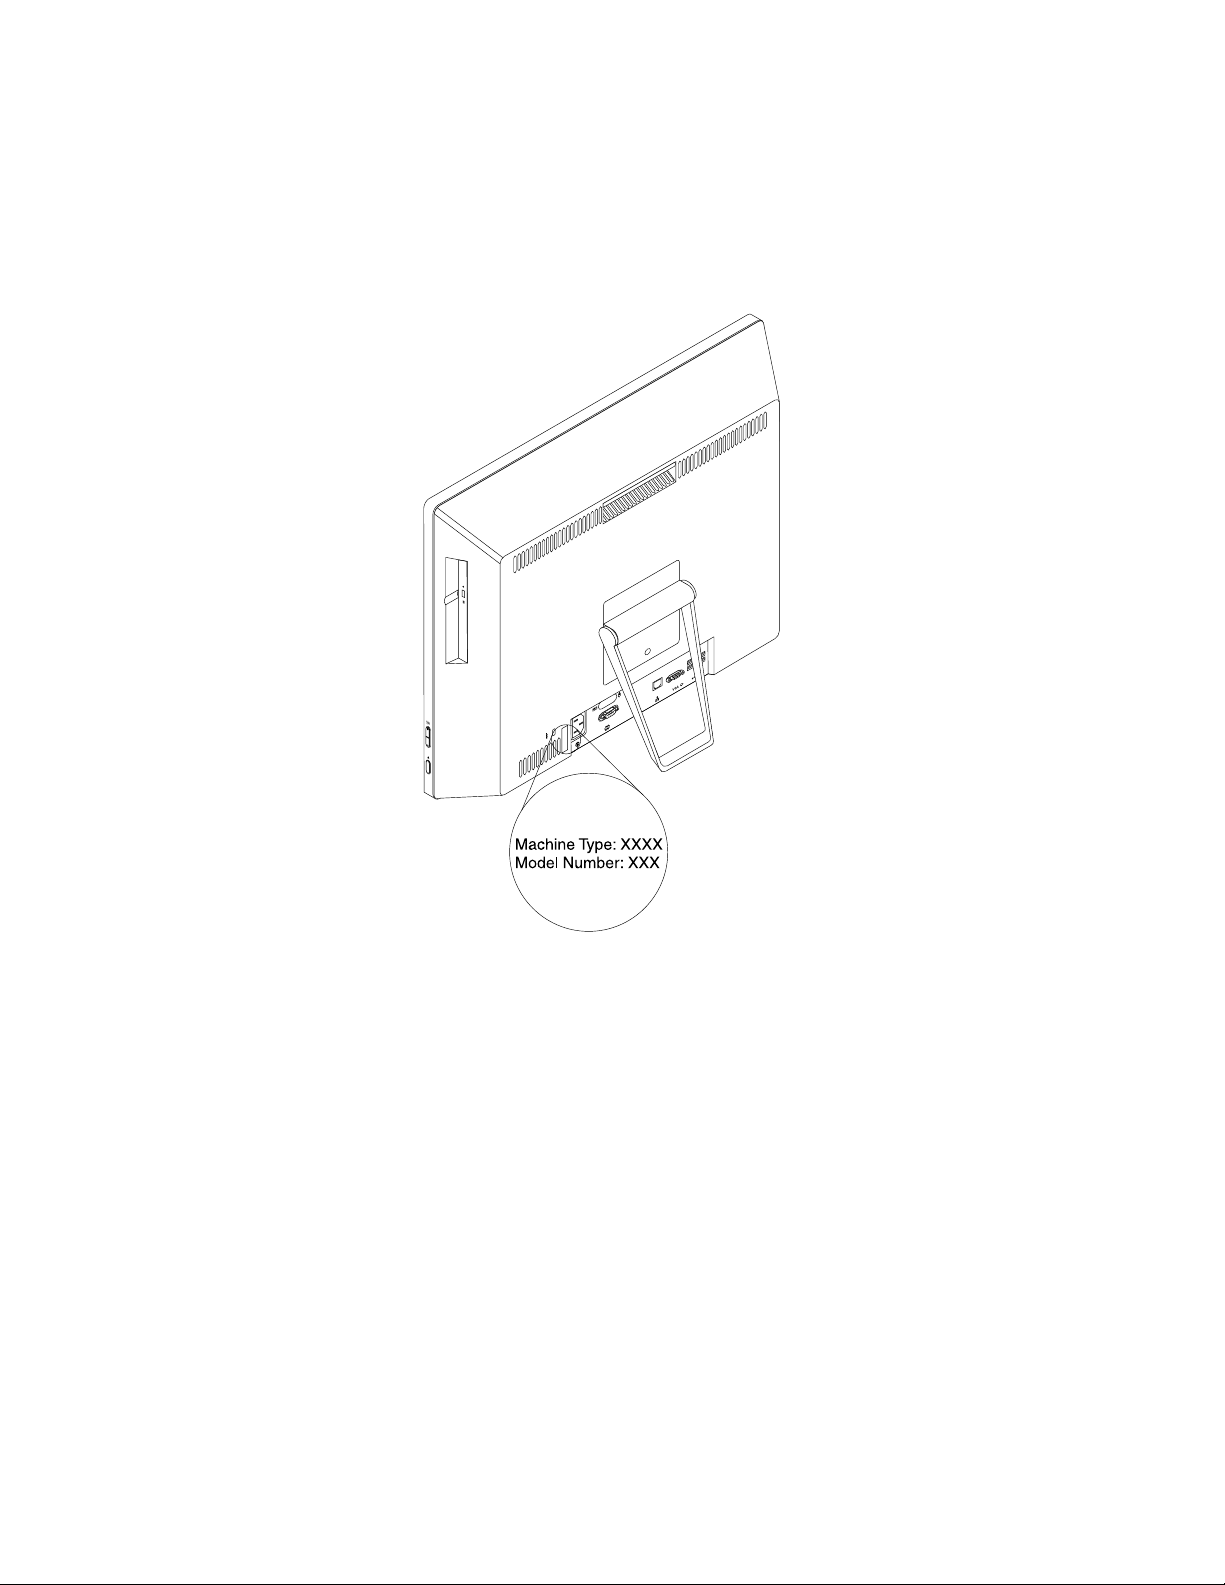
Machinetypeandmodellabel
Themachinetypeandmodellabelidentifiesyourcomputer.WhenyoucontactLenovoforhelp,themachine
typeandmodelinformationhelpssupporttechnicianstoidentifyyourcomputerandprovidefasterservice.
Thefollowingisasampleofthemachinetypeandmodellabel.
Figure5.Machinetypeandmodellabel
12ThinkCentreE73zUserGuide
Page 25

Chapter2.Usingyourcomputer
Thischapterprovidesinformationonusingsomeofthecomputercomponents.
Frequentlyaskedquestions
Thefollowingareafewtipsthatwillhelpyouoptimizetheuseofyourcomputer.
CanIgetmyuserguideinanotherlanguage?
TheuserguideisavailableinvariouslanguagesontheLenovoSupportWebsiteat:
http://www.lenovo.com/UserManuals
WhereismyrecoverydiscsetorrecoveryUSBkey?
DependingonyourWindowsversion,yourcomputercomeswitharecoverydiscsetorrecovery
USBkey.Ifyourcomputerdoesnotcomewithit,contacttheLenovoCustomerSupportCenterto
orderarecoverydiscsetorrecoveryUSBkey.ForalistofLenovoSupportphonenumbers,goto
http://www.lenovo.com/support/phone.Ifyoucannotfindthesupporttelephonenumberforyourcountry
orregion,contactyourLenovoreseller.
WherecanIfindhelpabouttheWindowsoperatingsystem?
See“Windowshelpsystem”onpage79.
CanIchangetheWindows8.1startupbehaviortoopeneitherthedesktoportheStartscreen?
OntheWindows8.1operatingsystem,youcansetthecomputertoopeneitherthedesktoportheStart
screenbydefault.Tosetthedefaultstartupscreen,dothefollowing:
1.Onthedesktop,moveyourpointertothetaskbaratthebottomofthescreenandright-clickonthe
taskbar.
2.ClickProperties.TheTaskbarandNavigationpropertieswindowisdisplayed.
3.OntheNavigationtab,locatetheStartscreensection,andthendooneofthefollowing:
•Tosetthedesktopasyourdefaultstartupscreen,selectWhenIsigninorcloseallappsona
screen,gotothedesktopinsteadofStartsoacheckisvisible.
•TosettheStartscreenasyourdefaultstartupscreen,removethecheckfromtheWhenIsigninor
closeallappsonthescreen,gotodesktopinsteadofStartcheckbox.
4.ClickOKtosavethenewsetting.
ThisfeatureisnotavailableontheWindows8operatingsystem.
NavigatingamongscreensontheWindows8andWindows8.1operating systems
Thissectionprovidesinstructionsonhowtonavigateamongthedesktop,theStartscreen,andapplications
thatwereopenedfromtheStartscreenontheWindows8andWindows8.1operatingsystems.Fordetailed
instructions,see“NavigatingonWindows8”onpage13
or“NavigatingonWindows8.1”onpage15.
NavigatingonWindows8
Tonavigateamongthedesktop,theStartscreen,andapplicationsthatwereopenedfromtheStartscreen
ontheWindows8operatingsystem,dooneofthefollowing:
©CopyrightLenovo2013,2015
13
Page 26

•FromtheStartscreen,dooneofthefollowingtonavigatetothemostrecentlyaccessedworkspace
(application,PCsettings,ordesktop):
–Usingapointingdevice:Movethepointertotheextremebottom-leftcornerofthescreenuntilasmall
representationoftheworkspaceisdisplayed;thenclicktherepresentation.
–Usingatouchscreen:Swipeinandoutontheleftedgeofthescreen.Representationsofallavailable
workspacesaredisplayedalongtheleftedgeofthescreen.Taptherepresentationoftheworkspaceat
thebottom.
Note:Therepresentationofaworkspaceisdisplayedonlyifyouhaveatleastoneactiveworkspacein
thebackgroundofthesystem.
•FromthedesktoporanyotherworkspacethatisopenedfromtheStartscreen,dooneofthefollowingto
navigatetotheStartscreen:
–Usingapointingdevice:Movethepointertotheextremebottom-leftcornerofthescreenuntilasmall
representationoftheStartscreenisdisplayed;thenclicktherepresentation.
–Usingatouchscreen:Dooneofthefollowing:
–Swipeinandoutontheleftedgeofthescreen.Representationsofallavailableworkspacesare
displayedalongtheleftedgeofthescreen.T aptherepresentationoftheStartscreenatthebottom.
–Swipeinfromtherightedgeofthescreentodisplaythecharms;thentapStart.
•Fromanyworkspace(Startscreen,desktop,PCsettings,orapplicationopenedfromtheStartscreen),
useanyofthefollowingprocedurestogotoanotherworkspacethatyouhavepreviouslyopened:
–Tonavigatetoapreviouslyaccessedworkspace(application,PCsettings,ordesktop),dooneofthe
following:
–Usingapointingdevice:
1.Dooneofthefollowing:
•Movethepointertotheextremetop-leftcornerofthescreenandthenmovethepointer
downwardalongtheleftedgeofthescreen.
•Movethepointertotheextremebottom-leftcornerofthescreenandthenmovethepointer
upwardalongtheleftedgeofthescreen.
Representationsofallavailableworkspacesaredisplayedalongtheleftedgeofthescreen.
Note:OnlyactiveworkspacesthatyouhaveaccessedduringthecurrentWindowssession
aredisplayedalongtheleftedge.Ifyoucloseanactiveworkspace,itsrepresentationdoes
notdisplayalongtheleftedgeofthescreen.
2.Clicktherepresentation.
–Usingatouchscreen:
•Method1
1.Swipeinandoutontheleftedgeofthescreen.Representationsofallavailableworkspaces
aredisplayedalongtheleftedgeofthescreen.
2.Tapthedesiredworkspace.
•Method2
1.Swipeinfromtheleftedgeofthescreentonavigatetothenextavailableworkspace.
2.Repeatstep1untilyounavigatetothedesiredworkspace.
–Tonavigatetothemostrecentlyaccessedworkspace(application,PCsettings,ordesktop),doone
ofthefollowing:
–Usingapointingdevice:Movethepointertotheextremetop-leftcornerofthescreenuntilasmall
representationoftheworkspaceisdisplayed;thenclicktherepresentation.
14ThinkCentreE73zUserGuide
Page 27

–Usingatouchscreen:Swipeinfromtheleftedgeofthescreen.
ForinformationaboutusingotherfeaturesoftheWindows8operatingsystem,refertotheWindowshelp
system.Formoreinformation,see“Windowshelpsystem”onpage79.
NavigatingonWindows8.1
Tonavigateamongthedesktop,theStartscreen,andapplicationsthatwereopenedfromtheStartscreen
ontheWindows8.1operatingsystem,dooneofthefollowing:
•FromtheStartscreen,dooneofthefollowingtonavigatetothemostrecentlyaccessedworkspace
(application,setting,ordesktop):
–Usingapointingdevice:Movethepointertotheextremebottom-leftcornerofthescreenuntilthe
Windowsscreen-controlicon
–Usingatouchscreen:Swipeinandoutontheleftedgeofthescreen.Representationsofallavailable
workspacesaredisplayedalongtheleftedgeofthescreen.T aptheWindowsscreen-controlicon
atthebottom.
Note:TheWindowsscreen-controliconisdisplayedonlyifyouhaveatleastoneactiveworkspace
inthebackgroundofthesystem.
•FromthedesktoporanyotherworkspacethatisopenedfromtheStartscreen,dooneofthefollowingto
navigatetotheStartscreen:
–Usingapointingdevice:
isdisplayed;thenclicktheicon.
–Fromthedesktop,clicktheWindowsscreen-controlicon
–Fromanyotherworkspace,movethepointertotheextremebottom-leftcornerofthescreenuntil
theWindowsscreen-controlicon
–Usingatouchscreen:Dooneofthefollowing:
–Fromthedesktop,taptheWindowsscreen-controliconinthebottom-leftcornerofthescreen.
–Fromanyotherworkspace,dooneofthefollowing:
•Swipeinandoutontheleftedgeofthescreen.Representationsofallavailableworkspaces
aredisplayedalongtheleftedgeofthescreen.TaptheWindowsscreen-controlicon
thebottom.
•Swipeinfromtherightedgeofthescreentodisplaythecharms;thentapStart.
•Fromanyworkspace(Startscreen,desktop,PCsettings,orapplicationopenedfromtheStartscreen),
useanyofthefollowingprocedurestogotoanotherworkspacethatyouhavepreviouslyopened:
–Tonavigatetoapreviouslyaccessedworkspace(application,setting,ordesktop),dooneofthe
following:
–Usingapointingdevice:
1.Dooneofthefollowing:
•Movethepointertotheextremetop-leftcornerofthescreenandthenmovethepointer
downwardalongtheleftedgeofthescreen.
•Movethepointertotheextremebottom-leftcornerofthescreenandthenmovethepointer
upwardalongtheleftedgeofthescreen.
isdisplayed;thenclicktheicon.
inthebottom-leftcornerofthescreen.
at
Representationsofallavailableworkspacesaredisplayedalongtheleftedgeofthescreen.
Chapter2.Usingyourcomputer15
Page 28

Note:OnlyactiveworkspacesthatyouhaveaccessedduringthecurrentWindowssession
aredisplayedalongtheleftedge.Ifyoucloseanactiveworkspace,itsrepresentationdoes
notdisplayalongtheleftedgeofthescreen.
2.Clicktherepresentation.
–Usingatouchscreen:
•Method1
1.Swipeinandoutontheleftedgeofthescreen.Representationsofallavailableworkspaces
aredisplayedalongtheleftedgeofthescreen.
2.Tapthedesiredworkspace.
•Method2
1.Swipeinfromtheleftedgeofthescreentonavigatetothenextavailableworkspace.
2.Repeatstep1untilyounavigatetothedesiredworkspace.
–Tonavigatetothemostrecentlyaccessedworkspace(application,PCsettings,ordesktop),doone
ofthefollowing:
–Usingapointingdevice:Movethepointertotheextremetop-leftcornerofthescreenuntilthe
Windowsscreen-controlicon
–Usingatouchscreen:Swipeinfromtheleftedgeofthescreen.
ForinformationaboutusingotherfeaturesoftheWindows8.1operatingsystem,opentheHelp+Tips
applicationfromtheStartscreenorAppsscreen,orrefertotheWindowshelpsystem.Formoreinformation,
see“Windowshelpsystem”onpage79.
isdisplayed;thenclicktheicon.
AccessingControlPanelontheWindows8orWindows8.1operating system
OntheWindowsoperatingsystem,youcanviewandchangecomputersettingsthroughControlPanel.To
accessControlPanelontheWindows8orWindows8.1operatingsystem,dooneofthefollowing:
•Fromthedesktop
1.Movethepointertothetop-rightorbottom-rightcornerofthescreentodisplaythecharms.
2.ClickSettings.
3.ClickControlPanel.
•FromtheStartscreen
–ForWindows8:
1.Movethepointertothetop-rightorbottom-rightcornerofthescreentodisplaythecharms.
2.ClickSearch.
3.OntheAppsscreen,scrolltotherightside,andclickControlPanelintheWindowsSystem
section.
–ForWindows8.1:
1.Clickthearrowiconinthebottom-leftcornerofthescreentogototheAppsscreen.
2.Scrolltotherightside,andclickControlPanelintheWindowsSystemsection.
UsingWindowsshortcutkeys
Boththestandardkeyboardandthefingerprintreaderkeyboardprovidethreekeysyoucanusewithyour
MicrosoftWindowsoperatingsystem.
16ThinkCentreE73zUserGuide
Page 29
•ThetwoWindowslogokeysarelocatedbesidetheAltkeyoneithersideofthespacebar.Theyfeature
theWindowslogo.OntheWindows7orWindows10operatingsystem,presstheWindowskeyto
opentheStartmenu.OntheWindows8orWindows8.1operatingsystem,presstheWindowskey
toswitchbetweenthecurrentworkspaceandtheStartscreen.ThestyleoftheWindowslogovaries
dependingonthekeyboardtype.
•Thecontext-menukeyislocatednexttotheCtrlkeyontherightsideoftheSpacebar.Pressingthe
context-menukeyopensthecontextmenufortheactiveprogram,icon,orobject.
Note:YoucanusethemouseortheUpandDownarrowkeystohighlightmenuselections.
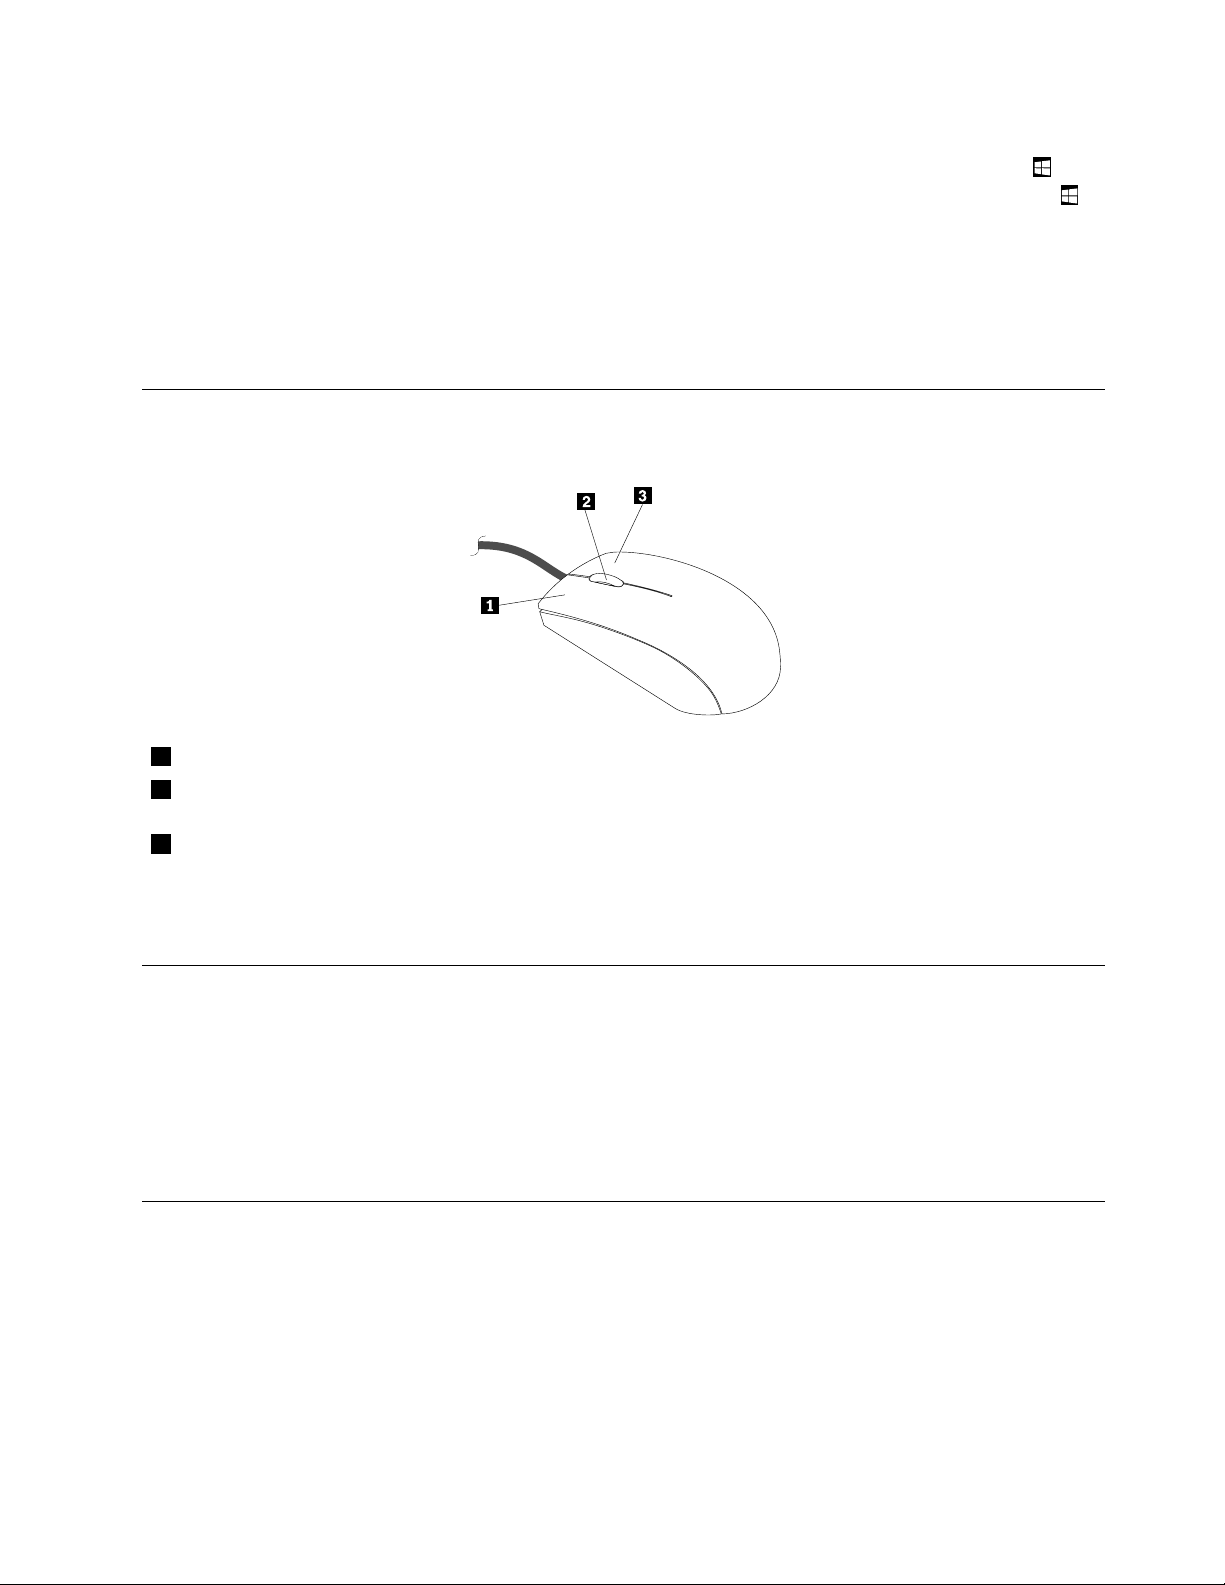
Usingthewheelmouse
Thewheelmousehasthefollowingcontrols:
1PrimarymousebuttonUsethisbuttontoselectorstartaprogramormenuitem.
2Wheel
3Secondarymousebutton
Youcanswitchthefunctionoftheprimaryandsecondarymousebuttonsandchangeotherdefaultbehavior
throughthemousepropertiesfunctionintheWindowsControlPanel.
Usethewheeltocontrolthescrollingactionofthemouse.Thedirectioninwhichyou
rotatethewheelcontrolsthedirectionofthescrollingaction.
Usethisbuttontodisplayamenufortheactiveprogram,icon,orobject.
Settingthecomputervolume
Tosetthecomputervolume,dothefollowing:
1.ClickthevolumeiconintheWindowsnotificationareaonthetaskbar.
Note:IfthevolumeiconisnotdisplayedintheWindowsnotificationarea,addtheicontothe
notificationarea.See“AddinganicontotheWindowsnotificationarea”onpage17
2.Followtheinstructionsonthescreentoadjustthevolume.Clickthespeakericontomutetheaudio.
.
AddinganicontotheWindowsnotificationarea
ToaddanicontotheWindowsnotificationarea,dothefollowing:
1.Clickthearrownexttothenotificationareatoviewhiddenicons.Then,clickthedesirediconand
dragittothenotificationarea.
2.Iftheiconisnotdisplayed,turnontheicon.
a.DependingonyourWindowsversion,dooneofthefollowing:
Chapter2.Usingyourcomputer17
Page 30

•ForWindows7:ClicktheStartbuttontoopentheStartmenu,andthenclickControlPanel.
ViewControlPanelusingLargeiconsorSmallicons,andthenclickNotificationAreaIcons➙
Turnsystemiconsonoroff.
•ForWindows8orWindows8.1:OpenControlPanel.ViewControlPanelusingLargeiconsor
Smallicons,andthenclickNotificationAreaIcons➙Turnsystemiconsonoroff.
Note:FordetailedinformationonhowtoopenControlPanelonWindows8andWindows8.1,
see“AccessingControlPanelontheWindows8orWindows8.1operatingsystem”onpage16
•ForWindows10:ClicktheStartbuttontoopentheStartmenu.Then,clickSettings➙System
➙Notifications&actions➙Turnsystemiconsonoroff.
b.T urnonthedesiredicon.
3.IftheiconisstillnotdisplayedintheWindowsnotificationarea,repeatstep1.
UsingCDsandDVDs
YourcomputermighthaveaDVDROMdriveorrecordableDVDdriveinstalled.DVDdrivesuse
industry-standard,12cm(4.75-inch)CDmediaorDVDmedia.IfyourcomputercomeswithaDVDdrive,
thedrivecanreadDVD-ROMdiscs,DVD-Rdiscs,DVD-RAMdiscs,DVD-RWdiscs,andalltypesofCDs,
suchasCD-ROMdiscs,CD-RWdiscs,CD-Rdiscs,andaudioCDs.IfyouhavearecordableDVDdrive,
itcanalsorecordonDVD-Rdiscs,DVD-RWdiscs,typeIIDVD-RAMdiscs,CD-RWstandardandhigh
speeddiscs,andCD-Rdiscs.
FollowtheseguidelineswhenusingtheDVDdrive:
.
•Donotplacethecomputerinalocationwherethedriveisexposedtothefollowing:
–Hightemperature
–Highhumidity
–Excessivedust
–Excessivevibrationorsuddenshock
–Aninclinedsurface
–Directsunlight
•DonotinsertanyobjectotherthanaCDorDVDintothedrive.
•Beforemovingthecomputer,removetheCDorDVDfromthedrive.
HandlingandstoringCDandDVDmedia
CDandDVDmediaaredurableandreliable,buttheydorequiresomecareandspecialhandling.When
handlingandstoringaCDorDVD,followtheseguidelines:
•Holdthediscbyitsedges.Donottouchthesurfaceofthesidethatisnotlabeled.
•Toremovedustorfingerprints,wipethediscwithaclean,softclothfromthecentertotheoutside.Wiping
thediscinacirculardirectionmightcauselossofdata.
•Donotwriteorstickpaperonthedisc.
•Donotscratchormarkthedisc.
•Donotplaceorstorethediscindirectsunlight.
•Donotusebenzene,thinners,orothercleanerstocleanthedisc.
•Donotdroporbendthedisc.
•Donotinsertdamageddiscsintothedrive.Warped,scratched,ordirtydiscscandamagethedrive.
18ThinkCentreE73zUserGuide
Page 31

PlayingaCDorDVD
IfyourcomputercomeswithaDVDdrive,youcanlistentoaudioCDsorwatchDVDmovies.Toplaya
CDorDVD,dothefollowing:
1.PresstheEject/LoadbuttonontheDVDdrivetoopenthetray.
2.Withthetrayfullyextended,inserttheCDorDVDintothetray.SomeDVDdriveshaveasnaphubinthe
centerofthetray.Ifyourdrivehasasnaphub,supportthetraywithonehandandthenpushonthe
centeroftheCDorDVDuntilitsnapsintoplace.
3.PresstheEject/Loadbuttonagainorgentlypushthetrayforwardtoclosethetray.TheCDorDVD
playerprogramstartsautomatically.Foradditionalinformation,refertotheCDorDVDplayerprogram
helpsystem.
ToremoveaCDorDVDfromtheDVDdrive,dothefollowing:
1.Withthecomputeron,presstheEject/Loadbutton.Whenthetrayslidesoutautomatically,carefully
removethedisc.
2.ClosethetraybypressingtheEject/Loadbuttonorbygentlypushingthetrayforward.
Note:IfthetraydoesnotslideoutofthedrivewhenyoupresstheEject/Loadbutton,insertastraightened
paperclipintotheemergency-ejectholelocatedonthefrontoftheDVDdrive.Besurethedriveispowered
offwhenusingtheemergencyeject.UsetheEject/Loadbuttoninsteadoftheemergencyejectexcept
inanemergency.
RecordingaCDorDVD
Ifyouropticaldrivesupportsrecording,youcanrecordaCDorDVD.
TorecordaCDorDVD,dothefollowing:
1.Insertarecordablediscintotheopticaldrivethatsupportsrecording.
2.OpenthePowerDVDCreate,PowerProducer,orPower2Goprogram.See“Accessingaprogramon
yourcomputer”onpage4.
3.Followtheinstructionsonthescreen.
Usingthesingle-touchormulti-touchfeature
Note:Thesingle-touchfeatureormulti-touchfeatureisonlyavailableonsomecomputermodels.
Yourcomputermightcomewiththesingle-touchfeatureormulti-touchfeaturedependingonyourmodel.
Ifthesingle-touchfeatureorthemulti-touchfeatureisavailableonyourcomputer,youcantapthetouch
screenoncewithyourfingertomakeasingleclick.T omakeadouble-click,taptwicewithoutpausing.
Tomakearight-click,tapthetouchscreenonceandthenholdyourfingeronthetouchscreenuntila
roundcircleisdisplayed.Then,liftyourfingeroffthetouchscreen.Acontextmenuwillbedisplayed,
whereyoucanmakeselections.
Usingthesingle-touchfeature
Thesingle-touchfeatureenablesyoutouseonlyonefingeratatimetointeractwithyourcomputer.
Usingthemulti-touchfeature
Themulti-touchfeatureenablesyoutouseoneortwofingerstointeractwithyourcomputer.Forexample,
youcanzoomin,zoomout,scroll,orrotateonthetouchscreenwithtwofingerswhilebrowsingtheInternet
orreadingoreditingadocument.
Chapter2.Usingyourcomputer19
Page 32

Thefollowingtableshowsthesupportedtouchfeatureoneachoperatingsystemedition.
Table2.Operatingsystemeditionandsupportedtouchfeature
OperatingsystemeditionSupportedtouchfeature
Windows7StarterSingle-touch
Windows7HomeBasic
Windows7HomePremium
Windows7Professional
Windows7Ultimate
Single-touch
Single-touchormulti-touch
Single-touchormulti-touch
Single-touchormulti-touch
20ThinkCentreE73zUserGuide
Page 33

Chapter3.Youandyourcomputer
Thischapterprovidesinformationaboutaccessibility,comfort,andrelocatingyourcomputertoother
countriesorregions.
Accessibilityandcomfort
Goodergonomicpracticeisimportanttogetthemostfromyourpersonalcomputerandtoavoiddiscomfort.
Arrangeyourworkplaceandtheequipmentyouusetosuityourindividualneedsandthekindofwork
thatyouperform.Inaddition,usehealthyworkhabitstomaximizeyourperformanceandcomfortwhile
usingyourcomputer.
Thefollowingtopicsprovideinformationaboutarrangingyourworkarea,settingupyourcomputer
equipment,andestablishinghealthyworkhabits.
Arrangingyourworkspace
Togetthemostfromyourcomputer,arrangeboththeequipmentyouuseandyourworkareatosuityour
needsandthekindofworkyoudo.Yourcomfortisofforemostimportance,butlightsources,aircirculation,
andthelocationofelectricaloutletscanalsoaffectthewayyouarrangeyourworkspace.
Comfort
Althoughnosingleworkingpositionisidealforeveryone,hereareafewguidelinestohelpyoufinda
positionthatsuitsyoubest.
Sittinginthesamepositionforalongtimecancausefatigue.Thebackrestandseatofyourchairshould
adjustindependentlyandprovidegoodsupport.Theseatshouldhaveacurvedfronttorelievepressureon
thethighs.Adjusttheseatsothatyourthighsareparalleltothefloorandyourfeetareeitherflatonthe
floororonafootrest.
Whenusingthekeyboard,keepyourforearmsparalleltothefloorandyourwristsinacomfortableposition.
Usealighttouchonthekeyboardandyourhandsandfingersrelaxed.Changetheangleofthekeyboard
formaximumcomfortbyadjustingthepositionofthekeyboardfeet.
Adjustthemonitorsothetopofthescreenisat,orslightlybelow,eyelevel.Placethemonitorata
comfortableviewingdistance,usually51to61cm(20to24inches),andpositionitsoyoucanviewit
withouthavingtotwistyourbody.Also,positionotherequipmentyouuseregularly,suchasthetelephoneor
amouse,withineasyreach.
©CopyrightLenovo2013,2015
21
Page 34

Glareandlighting
Positionthemonitortominimizeglareandreflectionsfromoverheadlights,windows,andotherlightsources.
Reflectedlightfromshinysurfacescancauseannoyingreflectionsonyourmonitorscreen.Placethe
monitoratrightanglestowindowsandotherlightsources,whenpossible.Reduceoverheadlighting,if
necessary,byturningofflightsorusinglowerwattagebulbs.Ifyouinstallthemonitornearawindow,use
curtainsorblindstoblockthesunlight.Y oucanadjustthebrightnessandcontrastcontrolsonthemonitor
astheroomlightingchangesthroughouttheday.
Whereitisimpossibletoavoidreflectionsortoadjustthelighting,anantiglarefilterplacedoverthescreen
mightbehelpful.However,thesefiltersmightaffecttheclarityoftheimageonthescreen;trythemonlyafter
youhaveexhaustedothermethodsofreducingglare.
Dustbuildupcompoundsproblemsassociatedwithglare.Remembertocleanyourmonitorscreen
periodicallyusingasoftclothasdirectedinyourmonitordocumentation.
Aircirculation
Yourcomputerandmonitorproduceheat.Thecomputerhasafanthatpullsinfreshairandforcesouthot
air.Themonitorletshotairescapethroughvents.Blockingtheairventscancauseoverheating,whichmight
resultinamalfunctionordamage.Placethecomputerandmonitorsothatnothingblockstheairvents;
usually,51mm(2inches)ofairspaceissufficient.Also,makesuretheventedairisnotblowingonpeople.
Electricaloutletsandcablelengths
Thelocationofelectricaloutlets,thelengthofpowercordsandcablesthatconnecttothemonitor,printer,
andotherdevicesmightdeterminethefinalplacementofyourcomputer.
Whenarrangingyourworkspace:
•Avoidtheuseofextensioncords.Whenpossible,plugthecomputerpowercorddirectlyintoanelectrical
outlet.
•Keeppowercordsandcablesneatlyroutedawayfromwalkwaysandotherareaswheretheymight
getkickedaccidentally.
Formoreinformationaboutpowercords,see“Powercordsandpoweradapters”onpagevi.
Accessibilityinformation
Lenovoiscommittedtoprovidinguserswhohavehearing,vision,andmobilitylimitationswithgreater
accesstoinformationandtechnology.Thissectionprovidesinformationaboutthewaystheseuserscanget
themostoutoftheircomputerexperience.Youalsocangetthemostup-to-dateaccessibilityinformation
fromthefollowingWebsite:
http://www.lenovo.com/accessibility
Keyboardshortcuts
Thefollowingtablecontainskeyboardshortcutsthatcanhelpmakeyourcomputereasiertouse.
Note:Dependingonyourkeyboard,someofthefollowingkeyboardshortcutsmightnotbeavailable.
KeyboardshortcutFunction
Windowslogokey+U
RightShiftforeightseconds
ShiftfivetimesTurnonorturnoffStickyKeys
22ThinkCentreE73zUserGuide
OpenEaseofAccessCenter
TurnonorturnoffFilterKeys
Page 35

KeyboardshortcutFunction
NumLockforfivesecondsTurnonorturnoffToggleKeys
LeftAlt+LeftShift+NumLock
LeftAlt+LeftShift+PrtScn(orPrtSc)TurnonorturnoffHighContrast
TurnonorturnoffMouseKeys
Formoreinformation,gotohttp://windows.microsoft.com/,andthenperformasearchusinganyofthe
followingkeywords:keyboardshortcuts,keycombinations,shortcutkeys.
EaseofAccessCenter
EaseofAccessCenterontheWindowsoperatingsystemenablesuserstoconfiguretheircomputersto
suittheirphysicalandcognitiveneeds.
TouseEaseofAccessCenter,dothefollowing:
1.DependingonyourWindowsversion,dooneofthefollowing:
•ForWindows7:ClicktheStartbuttontoopentheStartmenu,andthenclickControlPanel.View
ControlPanelusingLargeiconsorSmallicons,andthenclickEaseofAccessCenter.
•ForWindows8orWindows8.1:Movethepointertothetop-rightorbottom-rightcornerofthescreen
todisplaythecharms.Then,clickSettings➙ChangePCsettings➙EaseofAccess.
•ForWindows10:ClicktheStartbuttontoopentheStartmenu.Then,clickSettings➙Easeof
Access.
2.Choosetheappropriatetoolbyfollowingtheinstructionsonthescreen.
EaseofAccessCentermainlyincludesthefollowingtools:
•Magnifier
Magnifierisausefulutilitythatenlargestheentirescreenorpartofthescreensothatyoucansee
theitemsbetter.
•Narrator
Narratorisascreenreaderthatreadsaloudwhatisdisplayedonthescreenanddescribeseventssuchas
errormessages.
•On-ScreenKeyboard
Ifyouprefertotypeorenterdataintoyourcomputerusingamouse,joystick,orotherpointingdevice
insteadofaphysicalkeyboard,youcanuseOn-ScreenKeyboard.On-ScreenKeyboarddisplaysavisual
keyboardwithallthestandardkeys.
•HighContrast
HighContrastisafeaturethatheightensthecolorcontrastofsometextandimagesonyourscreen.Asa
result,thoseitemsaremoredistinctandeasiertoidentify.
•Personalizedkeyboard
Adjustkeyboardsettingstomakeyourkeyboardeasiertouse.Forexample,youcanuseyourkeyboard
tocontrolthepointerandtypecertainkeycombinationseasier.
•Personalizedmouse
Adjustmousesettingstomakeyourmouseeasiertouse.Forexample,youcanchangethepointer
appearanceandmakeiteasiertomanagewindowswiththemouse.
SpeechRecognition
SpeechRecognitionenablesyoutocontrolyourcomputerbyvoice.
Chapter3.Youandyourcomputer23
Page 36

Usingonlyyourvoice,youcanstartprograms,openmenus,clickobjectsonthescreen,dictatetextinto
documents,andwriteandsende-mails.Everythingyoudowiththekeyboardandmousecanbedonewith
onlyyourvoice.
TouseSpeechRecognition,dothefollowing:
1.DependingonyourWindowsversion,dooneofthefollowing:
•ForWindows7:ClicktheStartbuttontoopentheStartmenu,andthenclickControlPanel.
•ForWindows8orWindows8.1:OpenControlPanel.See“AccessingControlPanelontheWindows
8orWindows8.1operatingsystem”onpage16.
•ForWindows10:Right-clicktheStartbuttontoopentheStartcontextmenu,andthenclickControl
Panel.
2.ViewControlPanelusingLargeiconsorSmallicons,andthenclickSpeechRecognition.
3.Followtheinstructionsonthescreen.
Screen-readertechnologies
Screen-readertechnologiesareprimarilyfocusedonsoftwareprograminterfaces,helpinformationsystems,
andvariousonlinedocuments.Foradditionalinformationaboutscreenreaders,seethefollowing:
•UsingPDFswithscreenreaders:
http://www.adobe.com/accessibility.html?promoid=DJGVE
•UsingtheJAWSscreenreader:
http://www.freedomscientific.com/jaws-hq.asp
•UsingtheNVDAscreenreader:
http://www.nvaccess.org/
Screenresolution
Youcanmakethetextandimagesonyourscreeneasiertoreadbyadjustingthescreenresolutionofyour
computer.
Toadjustthescreenresolution,dothefollowing:
1.Right-clickablankareaonthedesktop.
2.DependingonyourWindowsversion,dooneofthefollowing:
•ForWindows7,Windows8,orWindows8.1:ClickScreenresolution.
•ForWindows10:ClickDisplaysettings.OntheDisplaytab,clickAdvanceddisplaysettings.
3.Followtheinstructionsonthescreen.
Note:Settingtheresolutiontoolowmightpreventsomeitemsfromfittingonthescreen.
Customizableitemsize
Youcanmaketheitemsonyourscreeneasiertoreadbychangingtheitemsize.
•Tochangetheitemsizetemporarily,usetheMagnifiertoolinEaseofAccessCenter.See“Easeof
AccessCenter”onpage23
.
•Tochangetheitemsizepermanently,dothefollowing:
–Changethesizeofalltheitemsonyourscreen.
1.Right-clickablankareaonthedesktop.
2.DependingonyourWindowsversion,dooneofthefollowing:
24ThinkCentreE73zUserGuide
Page 37

–ForWindows7,Windows8,orWindows8.1:ClickScreenresolution➙Maketextandother
itemslargerorsmaller.
–ForWindows10:ClickDisplaysettings.
3.Changetheitemsizebyfollowingtheinstructionsonthescreen.
4.ClickApply.Thischangewilltakeeffectthenexttimeyoulogintotheoperatingsystem.
–ChangethesizeoftheitemsonaWebpage.
PressandholdCtrl,andthenpresstheplus-signkey(+)toenlargeortheminus-signkey(-)to
reducethetextsize.
–Changethesizeoftheitemsonthedesktoporawindow.
Note:Thisfunctionmightnotworkonsomewindows.
Ifyourmousehasawheel,pressandholdCtrl,andthenscrollthewheeltochangetheitemsize.
Industry-standardconnectors
Yourcomputerprovidesindustry-standardconnectorsthatenableyoutoconnectassistivedevices.
Formoreinformationaboutthelocationandfunctionoftheconnectors,see“Locations”onpage7.
TTY/TDDconversionmodem
Yourcomputersupportstheuseofatexttelephone(TTY)orthetelecommunicationsdeviceforthedeaf
(TDD)conversionmodem.ThemodemmustbeconnectedbetweenyourcomputerandaTTY/TDD
telephone.Then,youcantypeamessageonyourcomputerandsendittothetelephone.
Documentationinaccessibleformats
Lenovoprovideselectronicdocumentationinaccessibleformats,suchasproperlytaggedPDFfilesor
HyperTextMarkupLanguage(HTML)files.Lenovoelectronicdocumentationisdevelopedtoensure
thatvisuallyimpaireduserscanreadthedocumentationthroughascreenreader.Eachimageinthe
documentationalsoincludesadequatealternativetextsothatvisuallyimpaireduserscanunderstandthe
imagewhentheyuseascreenreader.
Registeringyourcomputer
WhenyouregisteryourcomputerwithLenovo,youenterrequiredinformationintoaLenovodatabase.The
informationenablesLenovotocontactyouwhenthereisarecallorothersevereproblemandprovide
quickerservicewhenyoucallLenovoforhelp.Inaddition,somelocationsofferextendedprivilegesand
servicestoregisteredusers.
ToregisteryourcomputerwithLenovo,ensurethatyourcomputerisconnectedtotheInternet.Then,goto
http://www.lenovo.com/registerandfollowtheinstructionsonthescreen.
Movingyourcomputertoanothercountryorregion
Whenyoumoveyourcomputertoanothercountryorregion,youmusttakelocalelectricalstandards
intoconsideration.
Ifyourelocateyourcomputertoacountryorregionthatusesanelectricaloutletstyledifferentfromthe
typeyouarecurrentlyusing,youwillhavetopurchaseeitherelectricalplugadaptersornewpowercords.
YoucanorderpowercordsdirectlyfromLenovo.
Forpowercordinformationandpartnumbers,goto:
http://www.lenovo.com/powercordnotice
Chapter3.Youandyourcomputer25
Page 38

26ThinkCentreE73zUserGuide
Page 39

Chapter4.Security
Thischapterprovidesinformationabouthowtoprotectyourcomputerfromtheftandunauthorizeduse.
Securityfeatures
Thefollowingsecurityfeaturesareavailableonyourcomputer:
•ComputraceAgentsoftwareembeddedinfirmware
TheComputraceAgentsoftwareisanITassetmanagementandcomputertheftrecoverysolution.
Thesoftwaredetectsifchangeshavebeenmadeonthecomputer,suchashardware,software,or
thecomputercall-inlocation.
Note:YoumighthavetopurchaseasubscriptiontoactivatetheComputraceAgentsoftware.
•AbilitytoenableanddisabledevicesandUSBconnectors
Formoreinformation,see“Enablingordisablingadevice”onpage49
•Startupsequencecontrol
Formoreinformation,see“Selectingorchangingthestartupdevicesequence”onpage49
•Startupwithoutkeyboardormouse
Yourcomputerisabletologintotheoperatingsystemwithoutkeyboardormouseconnected.
.
.
©CopyrightLenovo2013,2015
27
Page 40
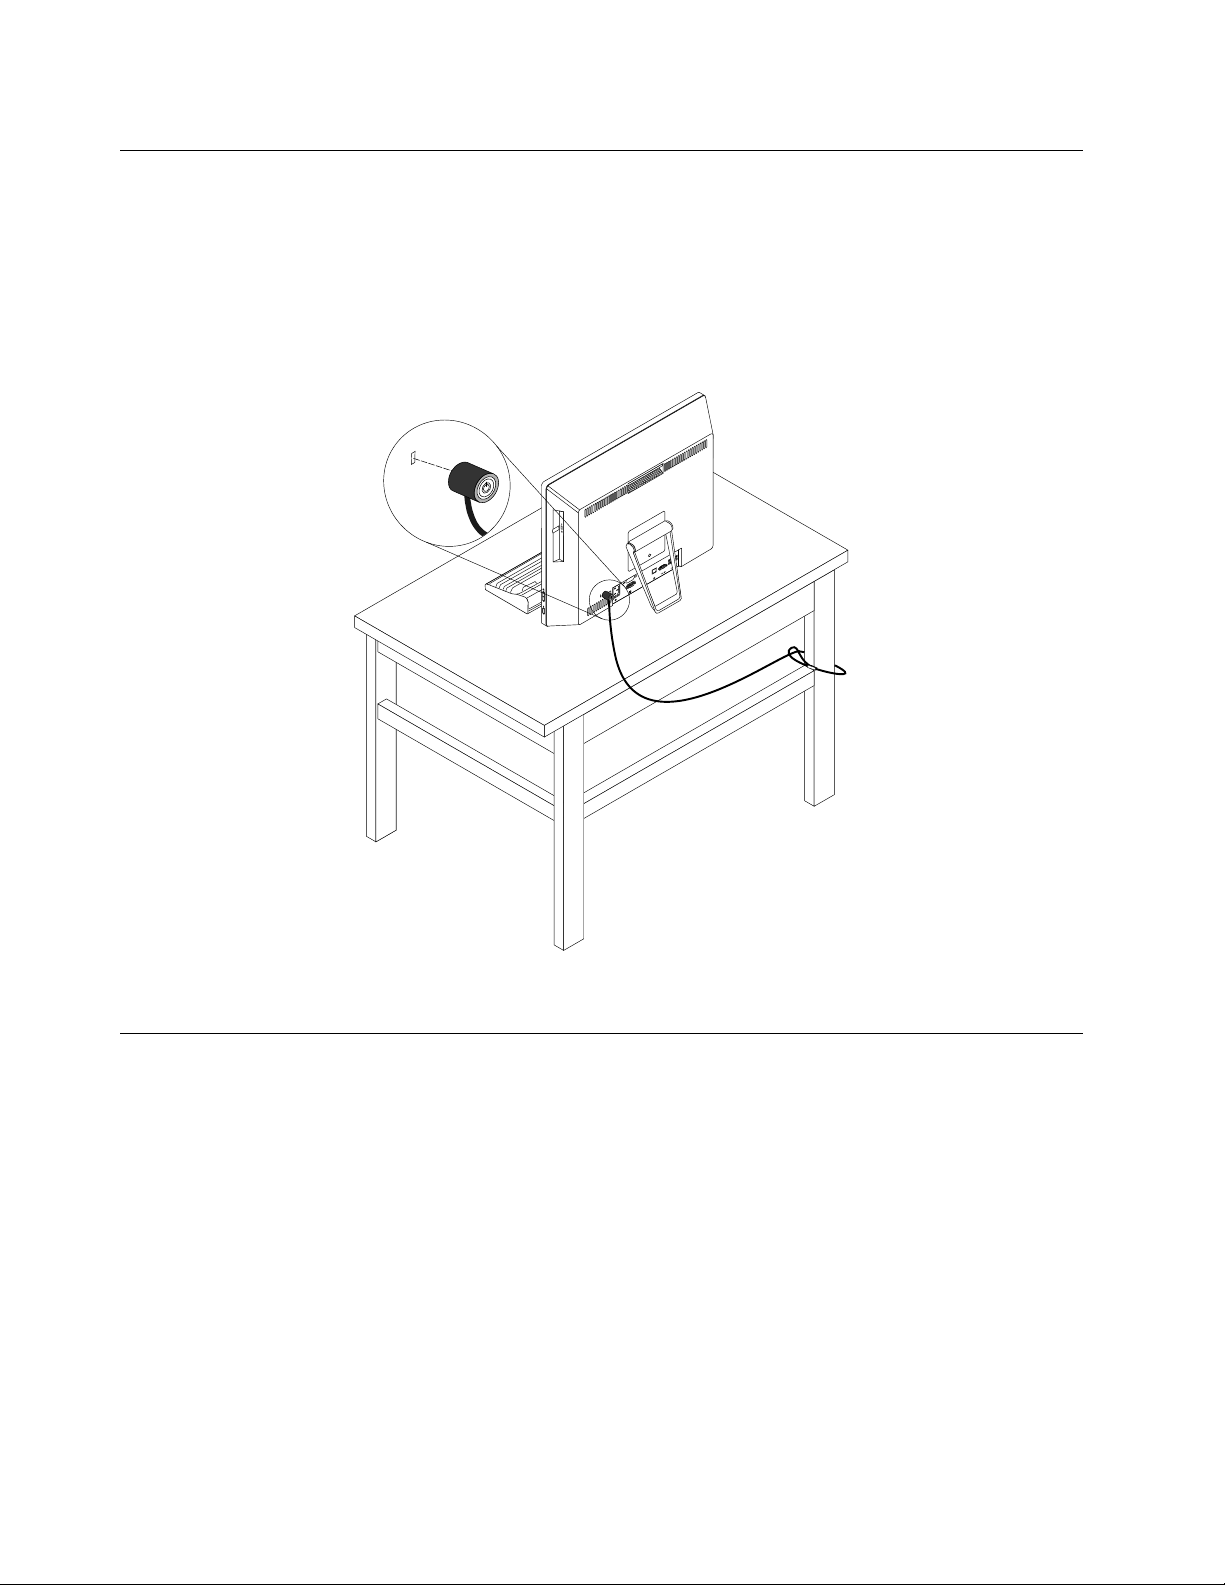
AttachingaKensington-stylecablelock
YoucanuseaKensington-stylecablelocktosecureyourcomputertoadesk,table,orothernon-permanent
fixture.Thecablelockattachestothesecurity-lockslotattherearofyourcomputerandisoperatedwitha
keyorcombinationdependingonthetypeselected.Thecablelockalsolocksthebuttonsusedtoopenthe
computercover.Thisisthesametypeoflockusedwithmanynotebookcomputers.Y oucanordersucha
cablelockdirectlyfromLenovobysearchingforKensingtonat:
http://www.lenovo.com/support
Figure6.Kensington-stylecablelock
Preventingunauthorizedaccesstoyourcomputer
YoucanuseBIOSpasswordsandWindowsaccountstopreventunauthorizedaccesstoyourcomputerand
data.
•TouseBIOSpasswords,see“UsingBIOSpasswords”onpage47
•TouseWindowsaccounts,dothefollowing:
1.DependingonyourWindowsversion,dooneofthefollowing:
–ForWindows7:ClicktheStartbuttontoopentheStartmenu,andthenclickControlPanel➙
UserAccounts.
–ForWindows8orWindows8.1:Movethepointertothetop-rightorbottom-rightcornerofthe
screentodisplaythecharms.Then,clickSettings➙ChangePCsettings➙Accounts.
–ForWindows10:ClicktheStartbuttontoopentheStartmenu,andthenclickSettings➙
Accounts.
2.Followtheinstructionsonthescreen.
28ThinkCentreE73zUserGuide
.
Page 41

Usingfingerprintauthentication
Ifyourkeyboardhasafingerprintreader,youcanusefingerprintauthenticationtoreplacepasswordsfor
simpleandsecureuseraccess.Tousefingerprintauthentication,firstenrollyourfingerprintsandassociate
themwithyourpasswords(suchasthepower-onpassword,harddiskpassword,andWindowspassword).
Usethefingerprintreaderandthefingerprintprogramtocompletethisprocedure.
Tousefingerprintauthentication,dooneofthefollowing:
•ForWindows7,Windows8,orWindows8.1:UsetheFingerprintManagerProorThinkVantage
FingerprintSoftwareprogramprovidedbyLenovo.Toopentheprogram,see“Accessingaprogramon
yourcomputer”onpage4.Formoreinformationaboutusingtheprogram,refertothehelpsystem
oftheprogram.
•ForWindows10:UsethefingerprinttoolprovidedbyWindows.ClicktheStartbuttontoopentheStart
menu,andthenclickSettings➙Accounts➙Sign-inoptions.Followtheinstructionsonthescreen.
Tousethefingerprintreader,refertothedocumentationshippedwiththefingerprintkeyboardorlocatedon
theLenovoSupportWebsiteathttp://www.lenovo.com/support/keyboards.
Usingandunderstandingfirewalls
Afirewallcanbehardware,software,oracombinationofbothdependingonthelevelofsecurityrequired.
Firewallsworkonasetofrulestodeterminewhichinboundandoutboundconnectionsareauthorized.If
yourcomputerispreinstalledwithafirewallprogram,ithelpsprotectagainstcomputerInternetsecurity
threats,unauthorizedaccess,intrusions,andInternetattacks.Italsoprotectsyourprivacy.Formore
informationabouthowtousethefirewallprogram,refertothehelpsystemofyourfirewallprogram.
TheWindowsoperatingsystempreinstalledonyourcomputerprovidestheWindowsFirewall.Fordetailson
usingtheWindowsFirewall,referto“Windowshelpsystem”onpage79
.
Protectingdataagainstviruses
Yourcomputerispreinstalledwithanantivirusprogramtohelpyouguardagainst,detect,andeliminate
viruses.
Lenovoprovidesafullversionofantivirussoftwareonyourcomputerwithafree30-daysubscription.After
30days,youmustrenewthelicensetocontinuereceivingtheantivirussoftwareupdates.
Note:Virusdefinitionfilesmustbekeptup-to-datetoguardagainstnewviruses.
Formoreinformationabouthowtouseyourantivirussoftware,refertothehelpsystemofyourantivirus
software.
Chapter4.Security29
Page 42

30ThinkCentreE73zUserGuide
Page 43

Chapter5.Installingorreplacinghardware
Thischapterprovidesinstructionsonhowtoinstallorreplacehardwareforyourcomputer.
Handlingstatic-sensitivedevices
Donotopenthestatic-protectivepackagecontainingthenewpartuntilthedefectiveparthasbeenremoved
fromthecomputerandyouarereadytoinstallthenewpart.Staticelectricity,althoughharmlesstoyou,can
seriouslydamagecomputercomponentsandparts.
Whenyouhandlepartsandothercomputercomponents,taketheseprecautionstoavoidstatic-electricity
damage:
•Limityourmovement.Movementcancausestaticelectricitytobuilduparoundyou.
•Alwayshandlepartsandothercomputercomponentscarefully.HandlePCIcards,memorymodules,
systemboards,andmicroprocessorsbytheedges.Nevertouchanyexposedcircuitry.
•Preventothersfromtouchingthepartsandothercomputercomponents.
•Beforeyoureplaceanewpart,touchthestatic-protectivepackagecontainingtheparttoametal
expansion-slotcoverorotherunpaintedmetalsurfaceonthecomputerforatleasttwoseconds.This
reducesstaticelectricityfromthepackageandyourbody.
•Whenpossible,removethenewpartfromthestatic-protectivepackaging,andinstallitdirectlyinthe
computerwithoutsettingthepartdown.Whenthisisnotpossible,placethestatic-protectivepackage
thatthepartcameinonasmooth,levelsurfaceandplacethepartonit.
•Donotplacethepartonthecomputercoverorothermetalsurface.
Installingorreplacinghardware
Thissectionprovidesinstructionsonhowtoinstallorreplacehardwareforyourcomputer.Youcanexpand
thecapabilitiesofyourcomputerandmaintainyourcomputerbyinstallingorreplacinghardware.
Attention:Donotopenyourcomputerorattemptanyrepairbeforereadingandunderstandingthe
“Importantsafetyinformation”onpagev.
Notes:
•UseonlycomputerpartsprovidedbyLenovo.
•Wheninstallingorreplacinganoption,usetheappropriateinstructionsinthissectionalongwiththe
instructionsthatcomewiththeoption.
Installingexternaloptions
Youcanconnectexternaloptionstoyourcomputer,suchasexternalspeakers,aprinter,orascanner.For
someexternaloptions,youmustinstalladditionalsoftwareinadditiontomakingthephysicalconnection.
Wheninstallinganexternaloption,see“Locatingconnectors,controls,andindicatorsonthefrontofyour
computer”onpage8
requiredconnector.Then,usetheinstructionsthatcomewiththeoptiontohelpyoumaketheconnection
andinstallanysoftwareordevicedriversthatarerequiredfortheoption.
and“Locatingconnectorsontherearofyourcomputer”onpage9toidentifythe
Replacingthekeyboardormouse
Attention:Donotopenyourcomputerorattemptanyrepairbeforereadingandunderstandingthe
“Importantsafetyinformation”onpagev
.
©CopyrightLenovo2013,2015
31
Page 44

Thissectionprovidesinstructionsonhowtoreplacethekeyboardormouse.
Toreplacethekeyboardormouse,dothefollowing:
1.Disconnecttheoldkeyboardcableormousecablefromthecomputer.
2.ConnectanewkeyboardormousetooneoftheUSBconnectorsonthecomputer.Dependingonwhere
youwanttoconnectthenewkeyboardormouse,see“Locatingconnectors,controls,andindicatorson
thefrontofyourcomputer”onpage8or“Locatingconnectorsontherearofyourcomputer”onpage9.
Figure7.ConnectingtheUSBkeyboardormouse
Replacingthewirelesskeyboard
Toreplacethewirelesskeyboard,dothefollowing:
1.Takeawayyourfailingwirelesskeyboard.
2.Removethenewwirelesskeyboardfromthepackage.
3.InstallthekeyboardbyopeningthebatterycompartmentcoverandinstallingtwoAAAbatteries
accordingtothepolarityindicators.
Figure8.Installingthekeyboardbatteries
4.RemovetheUSBdonglefromthekeyboardcompartmentorfromthewirelessmousecompartment
andconnectittoanavailableUSBconnectorsonthecomputer.See“Replacingthewirelessmouse”
onpage33.
5.Closethecompartmentcover.Thekeyboardisreadyforuse.
32ThinkCentreE73zUserGuide
Page 45

Replacingthewirelessmouse
Toreplacethewirelessmouse,dothefollowing:
1.DisconnecttheUSBdonglefromyourcomputer.Then,takeawayyourfailingwirelessmouse.
2.Removethenewwirelessmousefromthepackage.
3.Pressthebatterycompartmentreleasebutton.
Figure9.Openingthebatterycompartment
4.RemovetheUSBdonglefromthecompartmentofthenewwirelessmouseorfromthecompartmentof
thewirelesskeyboard.
Figure10.T akingouttheUSBdongle
5.Then,connecttheUSBdongletoanavailableUSBconnectoronyourcomputer.
Figure11.ConnectingtheUSBdongletoanUSBconnector
6.Correctlyinstallthebatteriesforthemouse.
Chapter5.Installingorreplacinghardware33
Page 46

Figure12.Installingthemousebatteries
7.Closethebatterycompartmentcoverandslideitforwarduntilitclicksintoplace.
Figure13.Closingthebatterycompartmentcover
8.Switchonthepowerbuttononthebottomofthewirelessmouse,andthenitisreadytouse.
Figure14.Pushingthepowerswitchon
Notes:
•ThegreenLEDindicatesthatthemouseisreadyforuse.
•TheflashingamberLEDindicatesalowbatterypowerlevel.
34ThinkCentreE73zUserGuide
Page 47

•Pushthepowerswitchtotheoffpositionwhenyouarenotusingthemouse.Thisextendsthebatterylife.
•DisconnecttheUSBdonglefromyourcomputerandstoreitinthewirelessmousecompartmentorin
thewirelesskeyboardcompartment.
Obtainingdevicedrivers
Youcanobtaindevicedriversthatarenotpreinstalledinyouroperatingsystemat
http://www.lenovo.com/support.Installationinstructionsareprovidedinreadmefileswiththedevice-driver
files.
Chapter5.Installingorreplacinghardware35
Page 48

36ThinkCentreE73zUserGuide
Page 49

Chapter6.Recoveryinformation
ThischapterprovidesinformationabouttherecoverysolutionsprovidedbyLenovo.
•“RecoveryinformationfortheWindows7operatingsystem”onpage37
•“RecoveryinformationfortheWindows8orWindows8.1operatingsystem”onpage43
•“RecoveryinformationfortheWindows10operatingsystem”onpage44
RecoveryinformationfortheWindows7operatingsystem
Thissectioncontainsthefollowingtopics:
•Creatingandusingrecoverymedia
•Performingbackupandrecoveryoperations
•UsingtheRescueandRecoveryworkspace
•Creatingandusingarescuemedium
•Installingorreinstallingdevicedrivers
•Solvingrecoveryproblems
Notes:
1.TherecoveryinformationinthischapteronlyappliestothecomputersthathavetheRescueand
RecoveryprogramortheProductRecoveryprograminstalled.IftheEnhancedBackupandRestore
iconintheLenovoThinkVantageToolsprogramisdimmed,itindicatesthatyouneedtoinstall
theRescueandRecoveryprogrammanuallybeforeenablingitsfeatures.T oinstalltheRescueand
Recoveryprogram,dothefollowing:
a.ClickStart➙AllPrograms➙LenovoThinkVantageTools,anddouble-clickEnhancedBackup
andRestore.
b.Followtheinstructionsonthescreen.
c.Whentheinstallationprocesscompletes,theEnhancedBackupandRestoreiconisactivated.
2.Thereareavarietyofmethodstochoosefromwhenconsideringhowtorecoverintheeventofa
software-orhardware-relatedproblem.Somemethodsvarydependingonthetypeofoperatingsystem
thatisinstalled.
3.Theproductontherecoverymediamaybeusedonlyforthefollowingpurposes:
•Restoretheproductpreinstalledonyourcomputer
•Reinstalltheproduct
•ModifytheproductusingtheAdditionalFiles
Creatingandusingrecoverymedia
Youcanuserecoverymediatorestoretheharddiskdrivetothefactorydefaultstate.Recoverymediaare
usefulifyoutransferthecomputertoanotherarea,sellthecomputer,recyclethecomputer,orputthe
computerinanoperationalstateafterallothermethodsofrecoveryhavefailed.Asaprecautionarymeasure,
itisimportanttocreaterecoverymediaasearlyaspossible.
Note:Therecoveryoperationsyoucanperformusingrecoverymediavarydependingontheoperating
systemfromwhichtherecoverymediawerecreated.Therecoverymediamightcontainabootmedium
andadatamedium.YourMicrosoftWindowslicensepermitsyoutocreateonlyonedatamedium,soitis
importantthatyoustoretherecoverymediainasafeplaceafteryouhavemadethem.
©CopyrightLenovo2013,2015
37
Page 50

Creatingrecoverymedia
Thissectionprovidesinstructionsonhowtocreaterecoverymedia.
Note:OntheWindows7operatingsystem,youcancreaterecoverymediausingdiscsorexternalUSB
storagedevices.
TocreaterecoverymediaontheWindows7operatingsystem,clickStart➙AllPrograms➙Lenovo
ThinkVantageTools➙FactoryRecoveryDisks.Then,followtheinstructionsonthescreen.
Usingrecoverymedia
Thissectionprovidesinstructionsonhowtouserecoverymedia.
OntheWindows7operatingsystem,youcanuserecoverymediatorestorethecontentsoftheharddisk
drivetothefactorydefaultstate.Also,youcanuserecoverymediatoputthecomputerinanoperational
stateafterallothermethodsofharddiskdriverecoveryhavefailed.
Attention:Whenyouuserecoverymediatorestorethecontentsoftheharddisktothefactorydefaultstate,
allthefilescurrentlyontheharddiskdrivewillbedeletedandreplacedbythefactorydefaultfiles.
TouserecoverymediaontheWindows7operatingsystem,dothefollowing:
1.Dependingonthetypeofyourrecoverymedia,connectthebootmedium(memorykeyorotherUSB
storagedevice)tothecomputer,orinsertthebootdiscintotheopticaldrive.
2.RepeatedlypressandreleasetheF12keywhenturningonthecomputer.WhenthePleaseselect
bootdevicewindowopens,releasetheF12key.
3.SelectthedesiredstartupdeviceandpressEnter.Therestoreprocessbegins.
4.Followtheinstructionsonthescreentocompletetheoperation.
Note:Afterrestoringyourcomputerharddiskdrivetothefactorydefaultstate,youmighthavetoreinstall
devicedriversforsomedevices.See“Reinstallingdevicedrivers”onpage42.
Performingbackupandrecoveryoperations
TheRescueandRecoveryprogramenablesyoutobackupallyourharddiskdrivecontentsincludingthe
operatingsystem,datafiles,softwareprograms,andpersonalsettings.Youcandesignatewherethe
RescueandRecoveryprogramstoresthebackup:
•Inaprotectedareaofyourharddiskdrive
•Onthesecondaryharddiskdriveifasecondaryharddiskdriveisinstalledinyourcomputer
•OnanattachedexternalUSBharddiskdrive
•Onanetworkdrive
•Onrecordablediscs(arecordableopticaldriveisrequiredforthisoption)
Afteryouhavebackedupthecontentsoftheharddiskdrive,youcanrestorethecompletecontentsofthe
harddiskdrive,restoreselectedfilesonly,orrestoretheWindowsoperatingsystemandapplicationsonly
whilekeepingtheotherdataonyourharddiskdrive.
Performingabackupoperation
ThissectionprovidesinstructionsonhowtoperformabackupoperationusingtheRescueandRecovery
program.
ToperformabackupoperationusingtheRescueandRecoveryprogramontheWindows7operating
system,dothefollowing:
38ThinkCentreE73zUserGuide
Page 51

1.FromtheWindowsdesktop,clickStart➙AllPrograms➙LenovoThinkVantageTools➙Enhanced
BackupandRestore.TheRescueandRecoveryprogramopens.
2.IntheRescueandRecoverymainwindow,clicktheLaunchadvancedRescueandRecoveryarrow.
3.ClickBackupyourharddriveandselectbackupoperationoptions.Then,followtheinstructionson
thescreentocompletethebackupoperation.
Performingarecoveryoperation
ThissectionprovidesinstructionsonhowtoperformarecoveryoperationusingtheRescueandRecovery
program.
ToperformarecoveryoperationusingtheRescueandRecoveryprogramontheWindows7operating
system,dothefollowing:
1.FromtheWindowsdesktop,clickStart➙AllPrograms➙LenovoThinkVantageTools➙Enhanced
BackupandRestore.TheRescueandRecoveryprogramopens.
2.IntheRescueandRecoverymainwindow,clicktheLaunchadvancedRescueandRecoveryarrow.
3.ClicktheRestoreyoursystemfromabackupicon.
4.Followtheinstructionsonthescreentocompletetherecoveryoperation.
FormoreinformationaboutperformingarecoveryoperationfromtheRescueandRecoveryworkspace,see
“UsingtheRescueandRecoveryworkspace”onpage39.
UsingtheRescueandRecoveryworkspace
TheRescueandRecoveryworkspaceresidesinaprotected,hiddenareaofyourharddiskdrivethat
operatesindependentlyfromtheWindowsoperatingsystem.Thisenablesyoutoperformrecovery
operationsevenifyoucannotstarttheWindowsoperatingsystem.Youcanperformthefollowingrecovery
operationsfromtheRescueandRecoveryworkspace:
•Rescuefilesfromyourharddiskdriveorfromabackup:TheRescueandRecoveryworkspaceenables
youtolocatefilesonyourharddiskdriveandtransferthemtoanetworkdriveorotherrecordablemedia,
suchasaUSBdeviceoradisc.Thissolutionisavailableevenifyoudidnotbackupyourfilesorif
changesweremadetothefilessinceyourlastbackupoperation.Youcanalsorescueindividualfilesfrom
aRescueandRecoverybackuplocatedonyourlocalharddiskdrive,aUSBdevice,oranetworkdrive.
•RestoreyourharddiskdrivefromaRescueandRecoverybackup:Ifyouhavebackedupyourharddisk
driveusingtheRescueandRecoveryprogram,youcanrestoretheharddiskdrivefromaRescueand
Recoverybackup,evenifyoucannotstarttheWindowsoperatingsystem.
•Restoreyourharddiskdrivetothefactorydefaultstate:TheRescueandRecoveryworkspaceenables
youtorestorethecompletecontentsofyourharddiskdrivetothefactorydefaultstate.Ifyouhave
multiplepartitionsonyourharddiskdrive,youhavetheoptiontorestoretheC:partitionandleavethe
otherpartitionsintact.BecausetheRescueandRecoveryworkspaceoperatesindependentlyfrom
theWindowsoperatingsystem,youcanrestoretheharddiskdrivetothefactorydefaultstateevenif
youcannotstarttheWindowsoperatingsystem.
Attention:IfyourestoretheharddiskdrivefromaRescueandRecoverybackuporrestoretheharddisk
drivetothefactorydefaultsettings,allfilesontheprimaryharddiskdrivepartition(usuallydriveC:)willbe
deletedintherecoveryprocess.Ifpossible,makecopiesofimportantfiles.Ifyouareunabletostartthe
Windowsoperatingsystem,youcanusetherescuefilesfeatureoftheRescueandRecoveryworkspaceto
copyfilesfromyourharddiskdrivetoothermedia.
TostarttheRescueandRecoveryworkspace,dothefollowing:
1.Makesurethecomputeristurnedoff.
Chapter6.Recoveryinformation39
Page 52

2.Turnonyourcomputer.Whenyouseethelogoscreen,pressEnter,andthenpressF11toenterthe
RescueandRecoveryworkspace.
3.IfyouhavesetaRescueandRecoverypassword,typeyourpasswordwhenprompted.TheRescue
andRecoveryworkspaceopensafterashortdelay.
Note:IftheRescueandRecoveryworkspacefailstoopen,see“Solvingrecoveryproblems”onpage42
4.Dooneofthefollowing:
•Torescuefilesfromyourharddiskdrive,clickRescuefilesandfollowtheinstructionsonthescreen.
•TorestoreyourharddiskdrivefromaRescueandRecoverybackuportorestoreyourharddiskdrive
tothefactorydefaultsettings,clickFullRestoreandfollowtheinstructionsonthescreen.
FormoreinformationaboutthefeaturesoftheRescueandRecoveryworkspace,clickHelp.
Note:Afterrestoringyourharddiskdrivetothefactorydefaultstate,youmighthavetoreinstalldevice
driversforsomedevices.See“Reinstallingdevicedrivers”onpage42.
Creatingandusingarescuemedium
Witharescuemedium,suchasadiscoraUSBharddiskdrive,youcanrecoverthecomputerfromfailures
thatpreventyoufromgainingaccesstotheRescueandRecoveryworkspaceonyourharddiskdrive.
Notes:
•Therecoveryoperationsyoucanperformusingarescuemediumvarydependingontheoperatingsystem.
•Therescuedisccanbestartedinalltypesofopticaldrives.
Creatingarescuemedium
Thissectionprovidesinstructionsonhowtocreatearescuemedium.
.
TocreatearescuemediumontheWindows7operatingsystem,dothefollowing:
1.FromtheWindowsdesktop,clickStart➙AllPrograms➙LenovoThinkVantageTools➙Enhanced
BackupandRestore.TheRescueandRecoveryprogramopens.
2.IntheRescueandRecoverymainwindow,clicktheLaunchadvancedRescueandRecoveryarrow.
3.ClicktheCreateRescueMediaicon.TheCreateRescueandRecoveryMediawindowopens.
4.IntheRescueMediaarea,selectthetypeoftherescuemediumyouwanttocreate.Youcancreatea
rescuemediumusingadisc,aUSBharddiskdrive,orasecondaryinternalharddiskdrive.
5.ClickOKandfollowtheinstructionsonthescreentocreatearescuemedium.
Usingarescuemedium
Thissectionprovidesinstructionsonhowtousetherescuemediumyouhavecreated.
•Ifyouhavecreatedarescuemediumusingadisc,usethefollowinginstructionstousetherescuemedium:
1.Turnoffyourcomputer.
2.RepeatedlypressandreleasetheF12keywhenturningonthecomputer.WhenthePleaseselect
bootdevicewindowopens,releasetheF12key.
3.InthePleaseselectbootdevicewindow,selectthedesiredopticaldriveasthefirstbootdevice.
Then,inserttherescuediscintotheopticaldriveandpressEnter.Therescuemediumstarts.
•IfyouhavecreatedarescuemediumusingaUSBharddiskdrive,usethefollowinginstructionsto
usetherescuemedium:
1.AttachtheUSBharddiskdrivetooneoftheUSBconnectorsonyourcomputer.
40ThinkCentreE73zUserGuide
Page 53

2.RepeatedlypressandreleasetheF12keywhenturningonthecomputer.WhenthePleaseselect
bootdevicewindowopens,releasetheF12key.
3.InthePleaseselectbootdevicewindow,selecttheUSBharddiskdriveasthefirstbootdeviceand
pressEnter.Therescuemediumstarts.
Whentherescuemediumstarts,theRescueandRecoveryworkspaceopens.Thehelpinformationfor
eachfeatureisavailablefromtheRescueandRecoveryworkspace.Followtheinstructionstocomplete
therecoveryprocess.
Reinstallingpreinstalledapplicationsanddevicedrivers
Yourcomputerhasprovisionsthatenableyoutoreinstallselectedfactory-installedapplicationsanddevice
drivers.
Reinstallingpreinstalledapplications
Thissectionprovidesinstructionsonhowtoreinstallpreinstalledapplications.
ToreinstalltheselectedapplicationspreinstalledonyourLenovocomputer,dothefollowing:
1.Turnonthecomputer.
2.GototheC:\SWTOOLSdirectory.
3.Opentheappsfolder.Withintheappsfolder,thereareseveralsubfoldersnamedforvariousapplications
installedinyourcomputer.
4.Opentheappropriateapplicationsubfolder.
5.Intheapplicationsubfolder,lookforaSETUP.EXEfileorotherappropriateEXEfilesforsetup.
Double-clickthefileandfollowtheinstructionsonthescreentocompletetheinstallation.
Reinstallingpreinstalleddevicedrivers
Thissectionprovidesinstructionsonhowtoreinstallpreinstalleddevicedrivers.
Attention:Whenyoureinstalldevicedrivers,youarechangingthecurrentconfigurationofyourcomputer.
Reinstalldevicedriversonlywhenitisnecessarytocorrectaproblemwithyourcomputer.
Toreinstallthedevicedriverforafactory-installeddevice,dothefollowing:
1.Turnonthecomputer.
2.GototheC:\SWTOOLSdirectory.
3.OpentheDRIVERSfolder.WithintheDRIVERSfolder,thereareseveralsubfoldersnamedforvarious
devicesinstalledinyourcomputer,suchasAUDIOorVIDEO.
4.Opentheappropriatedevicesubfolder.
5.Dooneofthefollowing:
•Inthedevicesubfolder,lookforaSETUP .exefile.Double-clickthefileandfollowtheinstructionson
thescreentocompletetheinstallation.
•Inthedevicesubfolder,lookforaREADME.txtfileorafilewiththe.txtextension.Thisfilemightbe
namedaftertheoperatingsystem,suchasWIN98.txt.TheTXTfilecontainsinformationabouthowto
installthedevicedriver.Followtheinstructionstocompletetheinstallation.
•Ifthedevicesubfoldercontainsafilewiththe.infextensionandyouwanttoinstallthedevicedriver
usingtheINFfile,refertotheWindowshelpsystemfordetailedinformationabouthowtoinstall
thedevicedriver.
Note:Ifyouneedupdateddevicedrivers,see“Gettingthelatestdevicedriversforyourcomputer”on
page55
formoreinformation.
Chapter6.Recoveryinformation41
Page 54

Reinstallingsoftwareprograms
Ifasoftwareprogramyouinstalledonyourcomputerisnotworkingcorrectly,youmightneedtoremove
andreinstallit.Reinstallingoverwritestheexistingprogramsfilesandusuallyfixesanyproblemsthat
youmighthavehadwiththatprogram.
Toremoveaprograminyoursystem,seeMicrosoftWindowshelpsystemfordetailedinformation.
Toreinstalltheprogram,dooneofthefollowing:
Note:Themethodofreinstallingaprogramvariesfromprogramtoprogram.Refertothedocumentation
providedwiththeprogramtoseeifyourprogramhasspecialinstallationinstructions.
•Toreinstallmostcommerciallyavailableprogramsinyoursystem,seeMicrosoftWindowshelpsystem
formoreinformation.
•ToreinstallselectedapplicationprogramsthatcamepreinstalledfromLenovo,dothefollowing:
1.Turnonthecomputer.
2.GototheC:\SWTOOLSdirectory.
3.OpentheAPPSfolder.WithintheAPPSfolder,thereareseveralsubfoldersnamedforvarious
applicationsinstalledinyourcomputer.
4.Opentheappropriateapplicationsubfolder.
5.Intheapplicationsubfolder,lookforaSETUP.EXEfileorotherappropriateEXEfilesforsetup.
Double-clickthefileandfollowtheinstructionsonthescreentocompletetheinstallation.
Reinstallingdevicedrivers
Toreinstalladevicedriverforanoptionyouinstalled,refertothedocumentationthatcomeswiththeoption.
Whenyoureinstalldevicedrivers,youarechangingthecurrentconfigurationofyourcomputer.Reinstall
devicedriversonlywhenitisnecessarytocorrectaproblemwithyourcomputer.
Formoreinformationaboutreinstallingdevicedriversthatcamewithyourcomputer,see“Reinstalling
preinstalledapplicationsanddevicedrivers”onpage41.
Solvingrecoveryproblems
IfyouareunabletoaccesstheRescueandRecoveryworkspaceortheWindowsenvironment,doone
ofthefollowing:
•UsearescuemediumtostarttheRescueandRecoveryworkspace.See“Creatingandusingarescue
medium”onpage40.
•Userecoverymediaifallothermethodsofrecoveryhavefailedandyouneedtorestoretheharddisk
drivetothefactorydefaultsettings.See“Creatingandusingrecoverymedia”onpage37.
Note:IfyouareunabletoaccesstheRescueandRecoveryworkspaceortheWindowsenvironmentfrom
arescuemediumorrecoverymedia,youmightnothavetherescuedevice(aninternalharddiskdrive,a
disc,aUSBharddiskdrive,orotherexternaldevices)setasthefirstbootdeviceinthestartupdevice
sequence.Y oumustfirstmakesurethatyourrescuedeviceissetasthefirstbootdeviceinthestartup
devicesequenceintheSetupUtilityprogram.See“Selectingastartupdevice”onpage49
informationabouttemporarilyorpermanentlychangingthestartupdevicesequence.Formoreinformation
abouttheSetupUtilityprogram,seeChapter7“UsingtheSetupUtilityprogram”onpage47.
fordetailed
Itisimportanttocreatearescuemediumandasetofrecoverymediaasearlyaspossibleandstorethem
inasafeplaceforfutureuse.
42ThinkCentreE73zUserGuide
Page 55

RecoveryinformationfortheWindows8orWindows8.1operating system
Thissectionprovidesinformationabouttherecoverysolutionsprovidedoncomputerspreinstalledwith
theWindows8orWindows8.1operatingsystem.
Refreshingyourcomputer
Ifyourcomputerdoesnotperformwellandtheproblemmightbecausedbyarecentlyinstalledprogram,
youcanrefreshyourcomputerwithoutlosingyourpersonalfilesorchangingyoursettings.
Attention:Ifyourefreshyourcomputer,theprogramsthatcamewithyourcomputerandtheprogramsthat
youinstalledfromWindowsStorewillbereinstalled,butallotherprogramswillberemoved.
Torefreshyourcomputer,dooneofthefollowing:
•ForWindows8:
1.Movethepointertothetop-rightorbottom-rightcornerofthescreentodisplaythecharms.Click
Settings➙ChangePCsettings➙General.
2.IntheRefreshyourPCwithoutaffectingyourfilessection,clickGetstarted.
•ForWindows8.1:
1.Movethepointertothetop-rightorbottom-rightcornerofthescreentodisplaythecharms.Click
Settings➙ChangePCsettings➙Updateandrecovery➙Recovery.
2.IntheRefreshyourPCwithoutaffectingyourfilessection,clickGetstarted.
Resettingyourcomputertothefactorydefaultsettings
Youcanresetyourcomputertothefactorydefaultsettings.Resettingthecomputerwillreinstallthe
operatingsystem,andreinstallalltheprogramsandsettingsthatcamewithyourcomputer.
Attention:Ifyouresetyourcomputer,allyourpersonalfilesandsettingswillbedeleted.T oavoiddataloss,
makeabackupcopyofallthedatathatyouwanttokeep.
Toresetyourcomputer,dooneofthefollowing:
•ForWindows8:
1.Movethepointertothetop-rightorbottom-rightcornerofthescreentodisplaythecharms.Click
Settings➙ChangePCsettings➙General.
2.IntheRemoveeverythingandreinstallWindowssection,clickGetstarted.
•ForWindows8.1:
1.Movethepointertothetop-rightorbottom-rightcornerofthescreentodisplaythecharms.Click
Settings➙ChangePCsettings➙Updateandrecovery➙Recovery.
2.IntheRemoveeverythingandreinstallWindowssection,clickGetstarted.
Usingtheadvancedstartupoptions
AdvancedstartupoptionsenableyoutochangethestartupsettingsofyourWindowsoperatingsystem,
startthecomputerfromanexternaldevice,orrestoretheWindowsoperatingsystemfromasystemimage.
Tousetheadvancedstartupoptions,dothefollowing:
•ForWindows8:
Chapter6.Recoveryinformation43
Page 56

1.Movethepointertothetop-rightorbottom-rightcornerofthescreentodisplaythecharms.Click
Settings➙ChangePCsettings➙General.
2.IntheAdvancedstartupsection,clickRestartnow➙Troubleshoot➙Advancedoptions.
3.Restartyourcomputerfollowingtheinstructionsonthescreen.
•ForWindows8.1:
1.Movethepointertothetop-rightorbottom-rightcornerofthescreentodisplaythecharms.Click
Settings➙ChangePCsettings➙Updateandrecovery➙Recovery.
2.IntheAdvancedstartupsection,clickRestartnow➙Troubleshoot➙Advancedoptions.
3.Restartyourcomputerfollowingtheinstructionsonthescreen.
RecoveringyouroperatingsystemifWindows8orWindows8.1fails tostart
TheWindowsrecoveryenvironmentonyourcomputeriscapableofoperatingindependentlyfromthe
Windows8orWindows8.1operatingsystem.Thisenablesyoutorecoverorrepairtheoperatingsystem
eveniftheWindows8orWindows8.1operatingsystemfailstostart.
Aftertwoconsecutivefailedbootattempts,theWindowsrecoveryenvironmentstartsautomatically.Then
youcanchooserepairandrecoveryoptionsbyfollowingtheinstructionsonthescreen.
Note:Ensurethatyourcomputerisconnectedtoacpowerduringtherecoveryprocess.
FormoredetailsabouttherecoverysolutionsprovidedoncomputerspreinstalledwiththeWindows8
orWindows8.1operatingsystem,refertothehelpinformationsystemoftheWindows8orWindows
8.1operatingsystem.
RecoveryinformationfortheWindows10operatingsystem
TorecoveryourWindows10operatingsystem,usethefollowingsolutions:
•UseWindowsrecoverysolutions.
–UserecoverysolutionsinWindowsSettings.
1.ClicktheStartbuttontoopentheStartmenu.
2.ClickSettings➙Update&security➙Recovery.
3.Choosetheappropriaterecoverysolutionbyfollowingtheinstructionsonthescreen.
–UseSystemRestoretorestoresystemfilesandsettingstoanearlierpoint.
1.Right-clicktheStartbuttontoopentheStartcontextmenu.
2.ClickControlPanel.ViewControlPanelusingLargeiconsorSmallicons,andthenclick
Recovery➙OpenSystemRestore.
3.Followtheinstructionsonthescreen.
–UsetheFileHistorytooltorestoreyourfilesfromabackup.
Note:IfyouusetheFileHistorytooltorestoreyourfilesfromabackup,ensurethatyoubackedup
yourdataearlierwiththetool.
1.Right-clicktheStartbuttontoopentheStartcontextmenu.
2.ClickControlPanel.ViewControlPanelusingLargeiconsorSmallicons,andthenclickFile
History➙Restorepersonalfiles.
3.Followtheinstructionsonthescreen.
–UsetheWindowsrecoveryenvironmentbydoingoneofthefollowing:
44ThinkCentreE73zUserGuide
Page 57

–Afterseveralconsecutivefailedbootattempts,theWindowsrecoveryenvironmentmightstart
automatically.Followtheinstructionsonthescreentochoosetheappropriaterecoverysolution.
–SelecttherecoverymediumyoucreatedearlierwiththeWindowstoolasthestartupdevice.See
“Selectingatemporarystartupdevice”onpage49
.Then,followtheinstructionsonthescreen
tochoosetheappropriaterecoverysolution.
Note:Tocreatearecoverymedium,see“Goodmaintenancepractices”onpage57.
•UsetherecoveryUSBkeyprovidedbyLenovotorestoretheentirestoragedrivetothefactory-default
settings.
–IfyourcomputercomeswiththerecoveryUSBkey,followtheinstructionsshippedwiththeUSBkey.
–IfyourcomputerdoesnotcomewiththerecoveryUSBkey,contacttheLenovoCustomer
SupportCentertoorderarecoveryUSBkey.ForalistofLenovoSupportphonenumbers,goto
http://www.lenovo.com/support/phone.Ifyoucannotfindthesupporttelephonenumberforyour
countryorregion,contactyourLenovoreseller.
Chapter6.Recoveryinformation45
Page 58

46ThinkCentreE73zUserGuide
Page 59

Chapter7.UsingtheSetupUtilityprogram
TheSetupUtilityprogramisusedtoviewandchangetheconfigurationsettingsofyourcomputer,regardless
ofwhichoperatingsystemyouareusing.However,theoperatingsystemsettingsmightoverrideanysimilar
settingsintheSetupUtilityprogram.
StartingtheSetupUtilityprogram
TostarttheSetupUtilityprogram,dothefollowing:
1.Makesureyourcomputeristurnedoff.
2.RepeatedlypressandreleasetheF1keywhenturningonthecomputer.Whenyouhearmultiple
beepsorseealogoscreen,releasetheF1key.
Note:IfaPower-OnPasswordoranAdministratorPasswordhasbeenset,theSetupUtilityprogram
menuwillnotbedisplayeduntilyoutypethecorrectpassword.Formoreinformation,see“Using
BIOSpasswords”onpage47
WhenthePOSTdetectsthattheharddiskdrivehasbeenremovedfromyourcomputerorthememory
modulesizehasdecreased,anerrormessagewillbedisplayedwhenyoustartthecomputerandyouwillbe
promptedtodooneofthefollowing:
•PressF1toentertheSetupUtilityprogram.
Note:AfteryouentertheSetupUtilityprogram,pressF10tosavechangesandexittheSetupUtility
program.PressEnterwhenpromptedtoconfirmtheexit.Theerrormessagewillnotbedisplayedagain.
•PressF2tobypasstheerrormessageandlogintotheoperatingsystem.
.
Note:YouhavetoenabletheconfigurationchangedetectionfeatureforthePOSTtodetecttheremovalof
theharddiskdrive.Toenabletheconfigurationchangedetectionfeature,dothefollowing:
1.StarttheSetupUtilityprogram.
2.FromtheSetupUtilityprogrammainmenu,selectSecurity➙ConfigurationChangeDetection,
andpressEnter.
3.SelectEnabledandpressEnter.
4.PressF10tosavechangesandexittheSetupUtilityprogram.PressEnterwhenpromptedtoconfirm
theexit.
Viewingandchangingsettings
TheSetupUtilityprogrammenulistsvariousitemsaboutthesystemconfiguration.T ovieworchange
settings,starttheSetupUtilityprogram.See“StartingtheSetupUtilityprogram”onpage47.Then,follow
theinstructionsonthescreen.
YoucanuseeitherthekeyboardorthemousetonavigatethroughBIOSmenuchoices.Thekeysusedto
performvarioustasksaredisplayedatthebottomofeachscreen.
UsingBIOSpasswords
ByusingtheSetupUtilityprogram,youcansetpasswordstopreventunauthorizedaccesstoyourcomputer
anddata.
©CopyrightLenovo2013,2015
47
Page 60

Youdonothavetosetanypasswordstouseyourcomputer.However,usingpasswordsimproves
computingsecurity.Ifyoudecidetosetanypasswords,readthefollowingsections.
Passwordconsiderations
Apasswordcanbeanycombinationofupto64alphabeticandnumericcharacters.Forsecurityreasons,it
isrecommendedtouseastrongpasswordthatcannotbeeasilycompromised.Tosetastrongpassword,
usethefollowingguidelines:
•Haveatleasteightcharactersinlength
•Containatleastonealphabeticcharacterandonenumericcharacter
•SetupUtilityprogramandharddiskdrivepasswordsarenotcasesensitive
•Notbeyournameoryourusername
•Notbeacommonwordoracommonname
•Besignificantlydifferentfromyourpreviouspasswords
Power-OnPassword
WhenaPower-OnPasswordisset,youarepromptedtotypeavalidpasswordeachtimethecomputeris
turnedon.Thecomputercannotbeuseduntilthevalidpasswordistypedin.
AdministratorPassword
SettinganAdministratorPassworddetersunauthorizedusersfromchangingconfigurationsettings.Ifyou
areresponsibleformaintainingtheconfigurationsettingsofseveralcomputers,youmightwanttosetan
AdministratorPassword.
WhenanAdministratorPasswordisset,youarepromptedtotypeavalidpasswordeachtimeyoutryto
accesstheSetupUtilityprogram.TheSetupUtilityprogramcannotbeaccesseduntilavalidpassword
istypedin.
IfboththePower-OnPasswordandAdministratorPasswordareset,youcantypeeitherpassword.However,
youmustuseyourAdministratorPasswordtochangeanyconfigurationsettings.
HardDiskPassword
SettingaHardDiskPasswordpreventsunauthorizedaccesstothedataontheharddiskdrive.Whena
HardDiskPasswordisset,youarepromptedtotypeavalidpasswordeachtimeyoutrytoaccessthe
harddiskdrive.
Notes:
•AfteryousetaHardDiskPassword,yourdataontheharddiskdriveisprotectedeveniftheharddisk
driveisremovedfromonecomputerandinstalledinanother.
•IftheHardDiskPasswordisforgotten,thereisnowaytoresetthepasswordorrecoverdatafromthe
harddiskdrive.
Setting,changing,anddeletingapassword
Toset,change,ordeleteapassword,dothefollowing:
1.StarttheSetupUtilityprogram.See“StartingtheSetupUtilityprogram”onpage47.
2.FromtheSetupUtilityprogrammainmenu,selectSecurity.
3.Dependingonthepasswordtype,selectSetPower-OnPassword,SetAdministratorPassword,or
HardDiskPassword.
48ThinkCentreE73zUserGuide
Page 61

4.Followtheinstructionsontherightsideofthescreentoset,change,ordeleteapassword.
Note:Apasswordcanbeanycombinationofupto64alphabeticandnumericcharacters.Formore
information,see“Passwordconsiderations”onpage48.
Enablingordisablingadevice
Thissectionprovidesinformationonhowtoenableordisableuseraccesstothefollowingdevices:
USBSetupUsethisoptiontoenableordisableaUSBconnector.WhenaUSBconnectoris
disabled,thedeviceconnectedtotheUSBconnectorcannotbeused.
SATAControllerWhenthisfeatureissettoDisable,alldevicesconnectedtotheSATAconnectors
(suchasharddiskdrivesortheopticaldrive)aredisabledandcannotbeaccessed.
Toenableordisableadevice,dothefollowing:
1.StarttheSetupUtilityprogram.See“StartingtheSetupUtilityprogram”onpage47.
2.FromtheSetupUtilityprogrammainmenu,selectDevices.
3.Dependingonthedeviceyouwanttoenableordisable,dooneofthefollowing:
•SelectUSBSetuptoenableordisableaUSBdevice.
•SelectATADriveSetuptoenableordisableaninternalorexternalSATAdevice.
4.SelectthedesiredsettingsandpressEnter.
5.PressF10tosavechangesandexittheSetupUtilityprogram.See“ExitingtheSetupUtilityprogram”
onpage50.
Selectingastartupdevice
Ifyourcomputerdoesnotstartupfromadevicesuchasthediscorharddiskdriveasexpected,dooneof
thefollowingtoselectthestartupdeviceyouwant.
Selectingatemporarystartupdevice
Usethisproceduretoselectatemporarystartupdevice.
Note:Notalldiscsandharddiskdrivesarebootable.
1.Turnoffyourcomputer.
2.RepeatedlypressandreleasetheF12keywhenturningonthecomputer.WhenthePleaseselect
bootdevicewindowdisplays,releasetheF12key.
3.SelectthedesiredstartupdeviceandpressEnter.Thecomputerwillstartupfromthedeviceyou
selected.
Note:SelectingastartupdevicefromthePleaseselectbootdevicewindowdoesnotpermanentlychange
thestartupsequence.
Selectingorchangingthestartupdevicesequence
Tovieworpermanentlychangetheconfiguredstartupdevicesequence,dothefollowing:
1.StarttheSetupUtilityprogram.See“StartingtheSetupUtilityprogram”onpage47.
2.FromtheSetupUtilityprogrammainmenu,selectStartup.
3.SelectthedevicesforthePrimaryStartupSequence,theAutomaticStartupSequence,andtheError
StartupSequence.Readtheinformationdisplayedontherightsideofthescreen.
Chapter7.UsingtheSetupUtilityprogram49
Page 62

4.PressF10tosavechangesandexittheSetupUtilityprogram.See“ExitingtheSetupUtilityprogram”
onpage50.
EnablingErPLPScompliancemode
Lenovocomputersmeettheeco-designrequirementsoftheErPLot3regulation.Formoreinformation,go
to:
http://www.lenovo.com/ecodeclaration
YoucanenableErPLPScompliancemodeintheSetupUtilityprogramtoreducetheconsumptionof
electricitywhenyourcomputerisofforinsleepmode.
ToenableErPLPScompliancemodeintheSetupUtilityprogram,dothefollowing:
1.StarttheSetupUtilityprogram.See“StartingtheSetupUtilityprogram”onpage47.
2.FromtheSetupUtilityprogrammainmenu,selectPower➙EnhancedPowerSavingMode,and
pressEnter.
3.SelectEnabledandpressEnter.
4.FromthePowermenu,selectAutomaticPowerOnandpressEnter.
5.SelectWakeonLanandpressEnter.
6.SelectDisabledandpressEnter.
7.PressF10tosavechangesandexittheSetupUtilityprogram.PressEnterwhenpromptedtoconfirm
theexit.
WhenErPLPScompliancemodeisenabled,youcanwakeupyourcomputerbydoingoneofthefollowing:
•Pressthepowerbutton
•Enablethewakeuponalarmfeature
Thewakeuponalarmfeatureenablesyourcomputertowakeupatasettime.T oenablethewake
uponalarmfeature,dothefollowing:
1.StarttheSetupUtilityprogram.
2.FromtheSetupUtilityprogrammainmenu,selectPower➙AutomaticPowerOn,andpressEnter.
3.SelectWakeUponAlarmandpressEnter.Thenfollowtheinstructionsonthescreen.
4.PressF10tosavechangesandexittheSetupUtilityprogram.PressEnterwhenpromptedto
confirmtheexit.
•Enabletheafterpowerlossfeature
Theafterpowerlossfeatureenablesyourcomputertowakeupwhenthepowersupplyresumesaftera
suddenlossofelectricity.Toenabletheafterpowerlossfeature,dothefollowing:
1.StarttheSetupUtilityprogram.
2.FromtheSetupUtilityprogrammainmenu,selectPower➙AfterPowerLoss,andpressEnter.
3.SelectPowerOnandpressEnter.
4.PressF10tosavechangesandexittheSetupUtilityprogram.PressEnterwhenpromptedto
confirmtheexit.
ExitingtheSetupUtilityprogram
Afteryoufinishviewingorchangingsettings,pressEsctoreturntotheSetupUtilityprogrammainmenu.
YoumighthavetopressEscseveraltimes.Dooneofthefollowing:
•Ifyouwanttosavethenewsettings,pressF10tosavechangesandexittheSetupUtilityprogram.
50ThinkCentreE73zUserGuide
Page 63

•Ifyoudonotwanttosavethesettings,selectExit➙DiscardChangesandExit,andthenpressEnter.
WhentheResetWithoutSavingwindowshows,selectYes,andthenpressEntertoexittheSetup
Utilityprogram.
•Ifyouwanttoreturntothedefaultsettings,pressF9toloadthedefaultsettings,andthenpressF10to
saveandexittheSetupUtilityprogram.
Chapter7.UsingtheSetupUtilityprogram51
Page 64

52ThinkCentreE73zUserGuide
Page 65

Chapter8.Updatingsystemprograms
ThischapterprovidesinformationaboutupdatingthePOSTandBIOS,andhowtorecoverfromaPOST
andBIOSupdatefailure.
Usingsystemprograms
Systemprogramsarethebasiclayerofsoftwarebuiltintoyourcomputer.Systemprogramsincludethe
POST,theBIOS,andtheSetupUtilityprogram.ThePOSTisasetoftestsandproceduresthatare
performedeachtimeyouturnonyourcomputer.TheBIOSisalayerofsoftwarethattranslatesinstructions
fromotherlayersofsoftwareintoelectricalsignalsthatthecomputerhardwarecanexecute.Youcanuse
theSetupUtilityprogramtovieworchangetheconfigurationsettingsofyourcomputer.SeeChapter7
“UsingtheSetupUtilityprogram”onpage47
Yourcomputersystemboardhasamodulecalledelectricallyerasableprogrammableread-onlymemory
(EEPROM,alsoreferredtoasflashmemory).YoucaneasilyupdatethePOST,theBIOS,andtheSetup
Utilityprogrambystartingyourcomputerwithasystem-program-updatediscorrunningaspecialupdate
programfromyouroperatingsystem.
LenovomightmakechangesandenhancementstothePOSTandBIOS.Whenupdatesarereleased,they
areavailableasdownloadablefilesontheLenovoWebsiteathttp://www.lenovo.com.Instructionsforusing
thePOSTandBIOSupdatesareavailableinaTXTfilethatisincludedwiththeupdatefiles.Formost
models,youcandownloadeitheranupdateprogramtocreateasystem-program-updatediscoranupdate
programthatcanberunfromtheoperatingsystem.
fordetailedinformation.
UpdatingtheBIOS
Whenyouinstallanewprogram,hardwaredevice,ordevicedriver,youmightbeinformedtoupdate
theBIOS.YoucanupdatetheBIOSfromyouroperatingsystemoraflashupdatedisc(supportedonly
onsomemodels).
ToupdatetheBIOS,dothefollowing:
1.Gotohttp://www.lenovo.com/drivers.
2.DownloadtheflashBIOSupdatedriverfortheoperatingsystemversionortheISOimageversion(used
tocreateaflashupdatedisc).Then,downloadtheinstallationinstructionsfortheflashBIOSupdate
driveryoudownload.
3.PrinttheinstallationinstructionsyoudownloadandfollowtheinstructionstoupdatetheBIOS.
Note:IfyouwanttoupdatetheBIOSfromaflashupdatedisc,theinstallationinstructionsmightnotprovide
theinformationabouthowtorecordtheupdatedisc.See“RecordingaCDorDVD”onpage19.
©CopyrightLenovo2013,2015
53
Page 66

54ThinkCentreE73zUserGuide
Page 67

Chapter9.Preventingproblems
Thischapterprovidesinformationthatcanhelpyouavoidcommonproblemsandkeepyourcomputer
runningsmoothly.
Keepingyourcomputercurrent
Inmostcases,itisagoodpracticetohavethemostup-to-dateoperatingsystemupdatepatches,software
programs,anddevicedrivers.Thissectionprovidesinformationabouthowtogetthelatestupdatesforyour
computer.
Gettingthelatestdevicedriversforyourcomputer
Note:LenovomakesconstantimprovementstoitsWebsites.ThecontentsontheWebpagearesubjectto
changewithoutnotice,includingthecontentsreferencedinthefollowingprocedure.
Togetthelatestdevicedriversforyourcomputer,dothefollowing:
1.Gotohttp://www.lenovo.com/supportandfollowtheinstructionsonthescreen.
2.Selectyourproductbydoingoneofthefollowing:
•Enteryourmachineinformationinthequickpath.
•Choosefromtheproductoptions.
3.Selectthecategoryofdeviceandtheoperatingsystemforwhichyouneedthedevicedriver.
4.Inthefilteredlist,downloadandinstalltheappropriatedevicedriver.
Attention:DonotdownloadthelatestdevicedriversfromtheWindowsUpdateWebsite.Thedevicedrivers
providedontheWindowsUpdateWebsitehavenotbeentestedbyLenovoandusingthemmightcause
unexpectedproblems.ObtainthelatestdevicedriversfromLenovo.
Gettingthelatestsystemupdates
Togetthelatestsystemupdatesforyourcomputer,ensurethatyourcomputerisconnectedtotheInternet
anddooneofthefollowing:
•UseoneofthefollowingLenovoprogramstogetthesystemupdates,suchasdevicedriverupdates,
softwareupdates,andBIOSupdates:
–ForWindows7orWindows8.1:UsetheSystemUpdateprogram.
–ForWindows10:UsetheLenovoCompanionprogram.
ToopentheSystemUpdateorLenovoCompanionprogram,see"Accessingaprogramonyourcomputer"
onpage4.Formoreinformationaboutusingtheprogram,refertothehelpsystemoftheprogram.
•UseWindowsUpdatetogetthesystemupdates,suchassecurityfixes,newversionsofWindows
components,anddevicedriverupdates.
1.DependingonyourWindowsversion,dooneofthefollowing:
–ForWindows7:ClicktheStartbuttontoopentheStartmenu,andthenclickControlPanel.View
ControlPanelusingLargeiconsorSmallicons,andthenclickWindowsUpdate.
–ForWindows8.1:Movethepointertothetop-rightorbottom-rightcornerofthescreento
displaythecharms.Then,clickSettings➙ChangePCsettings➙Updateandrecovery➙
WindowsUpdate.
©CopyrightLenovo2013,2015
55
Page 68

–ForWindows10:ClicktheStartbuttontoopentheStartmenu.Then,clickSettings➙Update&
security➙WindowsUpdate.
2.Followtheinstructionsonthescreen.
Cleaningandmaintenance
Withappropriatecareandmaintenanceyourcomputerwillserveyoureliably.Thefollowingtopicsoffer
informationtohelpyoukeepyourcomputerintopworkingorder.
•“Basics”onpage56
•“Cleaningyourcomputer”onpage56
–“Computer”onpage56
–“Keyboard”onpage56
–“Opticalmouse”onpage57
–“Displayscreen”onpage57
•“Goodmaintenancepractices”onpage57
Basics
Herearesomebasicpointsaboutkeepingyourcomputerfunctioningproperly:
•Keepyourcomputerinaclean,dryenvironment.Makesureitrestsonaflat,steadysurface.
•Donotplaceitemsontopofthemonitororcoveranyoftheventsinthemonitororcomputer.These
ventsprovideairflowtokeepyourcomputerfromoverheating.
•Keepfoodanddrinksawayfromallpartsofyourcomputer.Foodparticlesandspillsmightmakethe
keyboardandmousestickandunusable.
•Donotgetthepowerswitchesorothercontrolswet.Moisturecandamagethesepartsandcausean
electricalhazard.
•Alwaysdisconnectapowercordbygraspingtheplug,butnotthecord.
Cleaningyourcomputer
Itisagoodpracticetocleanyourcomputerperiodicallytoprotectthesurfacesandensuretrouble-free
operation.
CAUTION:
Besuretoturnoffthecomputerandmonitorpowerswitchesbeforecleaningthecomputerand
monitorscreen.
Computer
Useonlymildcleaningsolutionsandadampclothtocleanthepaintedsurfacesofthecomputer.
Keyboard
Tocleanyourcomputerkeyboard,dothefollowing:
1.Applysomeisopropylrubbingalcoholtoasoft,dust-freecloth.
2.Wipeeachkeytopsurfacewiththecloth.Wipethekeysonebyone;ifyouwipeseveralkeysatatime,
theclothmayhookontoanadjacentkeyandpossiblydamageit.Makesurethatnoliquiddripsonto
orbetweenthekeys.
3.Toremoveanycrumbsordustfrombeneaththekeys,youcanuseacamerablowerwithabrush
orcoolairfromahairdryer.
56ThinkCentreE73zUserGuide
Page 69

Note:Avoidsprayingcleanerdirectlyontothedisplayorthekeyboard.
Opticalmouse
Thissectionprovidesinstructionsonhowtocleananopticalmouse.
Anopticalmouseusesalight-emittingdiode(LED)andanopticalsensortonavigatethepointer.Ifthe
pointeronthescreendoesnotmovesmoothlywiththeopticalmouse,youmightneedtocleanthemouse.
Tocleananopticalmouse,dothefollowing:
1.Turnoffyourcomputer.
2.Disconnectthemousecablefromthecomputer.
3.Turnthemouseupsidedowntocheckthelens.
a.Ifthereisasmudgeonthelens,gentlycleantheareawithaplaincotton-tippedswab.
b.Ifthereisdebrisinthelens,gentlyblowthedebrisawayfromthearea.
4.Checkthesurfaceonwhichyouareusingthemouse.Ifyouhaveaveryintricatepictureorpattern
beneaththemouse,itmaybedifficultforthedigitalsignalprocessor(DSP)todeterminechanges
inthemouseposition.
5.Reconnectthemousecabletothecomputer.
6.Turnyourcomputerbackon.
Displayscreen
Dustbuildupcompoundsproblemsassociatedwithglare.Remembertocleanyourmonitorscreen
periodically.See“Cleaningaflat-panelmonitorsurface”onpage57or“Cleaningaglass-screensurface”
onpage57.
Cleaningaflat-panelmonitorsurface
Ifyouhaveaflat-panelcomputerdisplaythathasaflexiblefilmsurface,dothefollowingtocleanthespecial
surface.Wipeitgentlywithasoft,drycloth,orblowonthescreentoremovegritandotherlooseparticles.
ThenmoistenaclothwithLCDcleanerandwipethescreensurface.
Manycomputersupplystorescarrythespecialcleaningfluidsfordisplays.Usecleaningfluidsdevelopedfor
LCDdisplaysonly.Firstapplythefluidtoalint-free,softcloth,thencleantheLCDdisplay.Somecomputer
supplystorescarrypre-moistenedtowelettesforLCDmaintenance.
Cleaningaglass-screensurface
Tocleanaglass-screensurface,wipeitgentlywithasoft,drycloth,orblowonthescreentoremovegritand
otherlooseparticles.Thenuseasoftclothmoistenedwithanonabrasiveliquidglasscleaner.
Goodmaintenancepractices
Byperformingafewgoodmaintenancepractices,youcanmaintaingoodcomputerperformance,protect
yourdata,andbepreparedincaseofacomputerfailure.
•Keepyourcomputersoftware,devicedrivers,andoperatingsystemup-to-date.See“Keepingyour
computercurrent”onpage55
•Emptyyourrecyclebinonaregularbasis.
•CleanoutyourInbox,SentItems,andDeletedItemsfoldersinyoure-mailapplicationonaregularbasis.
•Cleanupfilesandfreeupstoragedrivespaceandmemoryspaceoccasionallytopreventperformance
problems.See“Performanceandlockupproblems”onpage74.
.
Chapter9.Preventingproblems57
Page 70

•Keepalogbook.Entriesmightincludemajorsoftwareorhardwarechanges,device-driverupdates,
intermittentproblemsandwhatyoudidtoresolvethem,andotherissuesyoumighthaveexperienced.
Thecauseofaproblemmightbechangeinhardware,changeinsoftware,oranyotheractionsthatmight
havetakenplace.AlogbookcanhelpyouoraLenovotechniciandeterminethecauseofaproblem.
•Backupyourdataonthestoragedriveregularly.Y oucanrestorethestoragedrivefromabackup.
Tobackupyourdata,dooneofthefollowing:
–ForWindows7:OpentheRescueandRecoveryprogram.See“Accessingaprogramonyour
computer”onpage4
oftheprogram.
–ForWindows8orWindows8.1:OpenControlPanel.ViewControlPanelusingLargeiconsorSmall
icons,andthenclickFileHistory.Followtheinstructionsonthescreen.
Note:FordetailedinformationonhowtoopenControlPanelonWindows8andWindows8.1,see
“AccessingControlPanelontheWindows8orWindows8.1operatingsystem”onpage16.
–ForWindows10:Right-clicktheStartbuttontoopentheStartcontextmenu,andthenclickControl
Panel.ViewControlPanelusingLargeiconsorSmallicons,andthenclickFileHistory.Followthe
instructionsonthescreen.
•Createarecoverymediumasearlyaspossible.Y oucanusetherecoverymediumtorecoveryour
operatingsystemevenifWindowsfailstostartup.
Tocreatearecoverymedium,dooneofthefollowing:
–ForWindows7:OpentheCreateRecoveryMediaprogram.See“Accessingaprogramonyour
computer”onpage4
systemoftheprogram.
–ForWindows8orWindows8.1:OpenControlPanel.ViewControlPanelusingLargeiconsorSmall
icons,andthenclickRecovery.Followtheinstructionsonthescreen.
.Formoreinformationaboutbackingupyourdata,refertothehelpsystem
.Formoreinformationaboutcreatingarecoverymedium,refertothehelp
Note:FordetailedinformationonhowtoopenControlPanelonWindows8andWindows8.1,see
“AccessingControlPanelontheWindows8orWindows8.1operatingsystem”onpage16.
–ForWindows10:Right-clicktheStartbuttontoopentheStartcontextmenu,andthenclickControl
Panel.ViewControlPanelusingLargeiconsorSmallicons,andthenclickRecovery.Followthe
instructionsonthescreen.
•ForWindows7,createarescuemediumasearlyaspossible.Youcanusetherescuemediumto
recoverfromfailuresthatpreventyoufromgainingaccesstotheRescueandRecoveryworkspace
onyourstoragedrive.
Tocreatearescuemedium,opentheRescueandRecoveryprogram.See“Accessingaprogramonyour
computer”onpage4
oftheprogram.
.Formoreinformationaboutcreatingarescuemedium,refertothehelpsystem
Movingyourcomputer
Takethefollowingprecautionsbeforemovingyourcomputer.
1.Backupallfilesanddatafromtheharddiskdrive.Thereareavarietyofbackupprogramsavailable
commercially.Youroperatingsystemalsomighthaveabackupprogramthatyoucanuse.Lenovo
providestheRescueandRecoveryprogramtohelpyoubackupandrestoredata.See“Performing
backupandrecoveryoperations”onpage38formoreinformation.
2.Removeallmedia(diskettes,compactdiscs,tapes,andsoon)fromthedrives.
3.Turnoffthecomputerandallattacheddevices.Yourharddiskdriveautomaticallyparkstheread/write
headinanondataarea.Thispreventsdamagetotheharddiskdrive.
4.Unplugthepowercordsfromelectricaloutlets.
58ThinkCentreE73zUserGuide
Page 71

5.Disconnectcommunicationcables,suchasmodemornetworkcables,fromtheoutletsfirst,andthen
disconnecttheotherendsfromthecomputer.
6.Notewhereanyremainingcablesareattachedtothecomputer;then,removethem.
7.Ifyousavedtheoriginalshippingcartonsandpackingmaterials,usethemtopacktheunits.Ifyouare
usingdifferentcartons,cushiontheunitstoavoiddamage.
Chapter9.Preventingproblems59
Page 72

60ThinkCentreE73zUserGuide
Page 73

Chapter10.Troubleshootinganddiagnostics
Thischapterprovidesinformationaboutdiagnosingandtroubleshootingcomputerproblems.Ifyour
computerproblemisnotdescribedhere,seeChapter11“Gettinginformation,help,andservice”onpage79
foradditionaltroubleshootingresources.
Basictroubleshooting
Thefollowingtableprovidesinformationtohelpyoutroubleshootyourcomputerproblems.
Note:Ifyoucannotcorrecttheproblem,havethecomputerserviced.Foralistofserviceandsupport
telephonenumbers,refertotheSafety,Warranty,andSetupGuidethatcomeswithyourcomputerorgoto
theLenovoSupportWebsiteathttp://www.lenovo.com/support/phone.
SymptomAction
Thecomputerdoesnotstart
whenyoupressthepower
switch.
Themonitorscreenisblank.
Thekeyboarddoesnotwork.
Themousedoesnotwork.
Verifythat:
•Thepowercordiscorrectlyconnectedtotherearofthecomputerandtoa
workingelectricaloutlet.
•Ifyourcomputerhasasecondarypowerswitchontherearofthecomputer,
makesurethatitisswitchedon.
•Thepowerindicatoronthefrontofthecomputerison.
•Thecomputervoltagematchesthevoltageavailableattheelectricaloutletfor
yourcountryorregion.
Verifythat:
•Themonitorsignalcableiscorrectlyconnectedtothemonitorandtothe
appropriatemonitorconnectoronthecomputer.
•Themonitorpowercordiscorrectlyconnectedtothemonitorandtoaworking
electricaloutlet.
•Themonitoristurnedonandthebrightnessandcontrastcontrolsareset
correctly.
•Thecomputervoltagematchesthevoltageavailableattheelectricaloutletfor
yourcountryorregion.
•Ifyourcomputerhastwomonitorconnectors,besuretousetheconnector
onthegraphicscard.
Verifythat:
•Thecomputeristurnedon.
•ThekeyboardissecurelyconnectedtoaUSBconnectoronthecomputer.
•Nokeysarestuck.
Verifythat:
•Thecomputeristurnedon.
•ThemouseissecurelyconnectedtoaUSBconnectoronthecomputer.
•Themouseisclean.Referto“Opticalmouse”onpage57forfurtherinformation.
©CopyrightLenovo2013,2015
61
Page 74

SymptomAction
Theoperatingsystemdoesnot
start.
Thecomputerbeepsmultiple
timesbeforetheoperating
systemstarts.
Verifythat:
•Thestartupsequenceincludesthedevicewheretheoperatingsystemresides.
Usually,theoperatingsystemisontheharddiskdrive.Formoreinformation,
see“Selectingastartupdevice”onpage49
Verifythatnokeysarestuck.
.
Troubleshootingprocedure
Usethefollowingprocedureasastartingpointfordiagnosingproblemsyouareexperiencingwithyour
computer:
1.Verifythatthecablesforallattacheddevicesareconnectedcorrectlyandsecurely.
2.Verifythatallattacheddevicesthatrequireacpowerareconnectedtoproperlygrounded,functioning
electricaloutlets.
3.VerifythatallattacheddevicesareenabledintheBIOSsettingsofyourcomputer.Formoreinformation
aboutaccessingandchangingtheBIOSsettings,refertoyourChapter7“UsingtheSetupUtility
program”onpage47.
4.Gotothe“Troubleshooting”onpage63andfollowtheinstructionsforthetypeofproblemyouare
experiencing.IftheTroubleshootinginformationdoesnothelpyouresolveaproblem,continuewiththe
nextstep.
5.Tryusingapreviouslycapturedconfigurationtoseeifarecentchangetohardwareorsoftwaresettings
hascausedaproblem.Beforerestoringapreviousconfiguration,captureyourcurrentconfigurationin
casetheolderconfigurationsettingsdonotsolvetheproblemorhaveadverseeffects.T orestorea
capturedconfiguration,dothefollowing:
a.OpenControlPanelbydoingoneofthefollowing:
•ForWindows7:ClicktheStartbuttontoopentheStartmenu,andthenclickControlPanel.
•ForWindows8orWindows8.1:See“AccessingControlPanelontheWindows8orWindows
8.1operatingsystem”onpage16
.
•ForWindows10:Right-clicktheStartbuttontoopentheStartcontextmenu,andthenclick
ControlPanel.
b.ViewControlPanelusingLargeiconsorSmallicons,andthenclickRecovery➙OpenSystem
Restore.
c.Followtheinstructionsonthescreen.
Ifthisdoesnotcorrecttheproblem,continuewiththenextstep.
6.Runthediagnosticprogram.See“LenovoSolutionCenter”onpage77formoreinformation.
•Ifthediagnosticprogramdetectsahardwarefailure,contacttheLenovoCustomerSupportCenter.
SeeChapter11“Gettinginformation,help,andservice”onpage79formoreinformation.
•Ifyouareunabletorunthediagnosticprogram,contacttheLenovoCustomerSupportCenter.See
Chapter11“Gettinginformation,help,andservice”onpage79formoreinformation.
•Ifthediagnosticprogramdoesnotdetectahardwarefailure,continuewiththenextstep.
7.Useanantivirusprogramtoseeifyourcomputerhasbeeninfectedbyavirus.Iftheprogramdetectsa
virus,removethevirus.
8.Ifnoneoftheseactionssolvetheproblem,seektechnicalassistance.SeeChapter11“Getting
information,help,andservice”onpage79formoreinformation.
62ThinkCentreE73zUserGuide
Page 75

Troubleshooting
Usethetroubleshootinginformationtofindsolutionstoproblemsthathavedefinitesymptoms.
Ifthesymptomyourcomputerisexperiencingoccurredimmediatelyafteryouinstalledanewhardware
optionornewsoftware,dothefollowingbeforereferringtothetroubleshootinginformation:
1.Removethenewhardwareoptionorsoftware.Ifyoumustremovethecomputercovertoremovea
hardwareoption,makesureyoureviewandfollowtheelectricalsafetyinformationprovidedwithyour
computer.Foryoursafety,donotoperatethecomputerwiththecoverremoved.
2.Runthediagnosticprogramtoensureyourcomputerisoperatingcorrectly.
3.Reinstallthenewhardwareoptionorsoftwarefollowingthemanufacturer'sinstructions.
Selecttheproblemyourcomputerisexperiencingfromthefollowinglist:
•“Audioproblems”onpage63
•“CDproblems”onpage64
•“DVDproblems”onpage65
•“Intermittentproblems”onpage67
•“Keyboard,mouse,orpointingdeviceproblems”onpage67
•“Monitorproblems”onpage68
•“Networkingproblems”onpage70
•“Optionproblems”onpage73
•“Performanceandlockupproblems”onpage74
•“Printerproblems”onpage75
•“Serialconnectorproblems”onpage75
•“Softwareproblems”onpage76
•“USBproblems”onpage77
Audioproblems
Selectyoursymptomfromthefollowinglist:
•“NoaudioinWindows”onpage63
•“AnaudiodiscorAutoPlay-enableddiscdoesnotautomaticallyplaywhenitisinsertedintoadrive”
onpage64
•“Soundcomesfromoneexternalspeakeronly”onpage64
•“NoaudioinDOSapplicationsorgames”onpage64
NoaudioinWindows
Symptom:NoaudioinWindows
Actions:
•IfyouareusingpoweredexternalspeakersthathaveanOn/Offcontrol,verifythattheOn/Offcontrolis
settotheOnpositionandthespeakerpowercableisconnectedtoaproperlygrounded,functionalac
electricaloutlet.
•Ifyourexternalspeakershaveavolumecontrol,verifythatthevolumecontrolisnotsettoolow.
•Double-clickthespeakericonintheWindowsnotificationarea.Amastervolume-controlwindowopens.
VerifythattheMutesettingsarenotcheckedandnoneofthevolumesettingsissettoolow.
Chapter10.Troubleshootinganddiagnostics63
Page 76

•Somemodelshaveafrontaudiopanelyoucanusetoadjustvolume.Ifyouhaveafrontaudiopanel,
verifythatthevolumeisnotsettoolow.
•Verifythatyourexternalspeakers(andheadphones,ifused)areconnectedtothecorrectaudioconnector
onthecomputer.Mostspeakercablesarecolor-codedtomatchtheconnector.
Note:Whenexternal-speakerorheadphonecablesareattachedtotheaudioconnector,theinternal
speaker,ifpresent,isdisabled.Inmostcases,ifanaudioadapterisinstalledinoneoftheexpansionslots,
theaudiofunctionbuiltintothesystemboardisdisabled;usetheaudiojacksontheadapter.
•MakesurethattheprogramyouarerunningisdesignedforuseintheMicrosoftWindowsoperating
system.IftheprogramisdesignedtoruninDOS,theprogramdoesnotusetheWindowssoundfeature
andmustbeconfiguredtouseSoundBlasterProorSoundBlasteremulation.
•Verifythattheaudiodevicedriversarecorrectlyinstalled.SeeMicrosoftWindowshelpsystemfor
moreinformation.
Iftheseactionsdonotcorrecttheproblem,runtheLenovoSolutionCenterprogram.Ifyouneedtechnical
assistance,seeChapter11“Gettinginformation,help,andservice”onpage79.
AnaudiodiscorAutoPlay-enableddiscdoesnotautomaticallyplaywhenitis
insertedintoadrive
Symptom:AnaudiodiscorAutoPlay-enableddiscdoesnotautomaticallyplaywhenitisinsertedintoadrive
Action:See“CDproblems”onpage64.
Soundcomesfromoneexternalspeakeronly
Symptom:Soundcomesfromoneexternalspeakeronly.
Actions:
•Ensurethatthespeakercableisinsertedcompletelyintotheconnectoronthecomputer.
•Makesurethecablethatattachestheleftspeakertotherightspeakerissecurelyconnected.
•Double-clickthespeakericonintheWindowsnotificationarea.Amastervolume-controlwindowopens.
VerifythattheBalancesettingsaresetcorrectly.
Iftheseactionsdonotcorrecttheproblem,youmighthaveafailingspeaker.Havethespeakerserviced.If
youneedtechnicalassistance,seeChapter11“Gettinginformation,help,andservice”onpage79
.
NoaudioinDOSapplicationsorgames
Symptom:NoaudioinDOSapplicationsorgames
Actions:
•MakesuretheDOSapplicationorgameisconfiguredtouseSoundBlasterProorSoundBlaster
emulation.Refertothedocumentationthatcomeswiththeapplicationorgameforinstructionson
settingsound-cardsettings.
•Iftheseactionsdonotcorrecttheproblem,runtheLenovoSolutionCenterprogram.Ifyouneedtechnical
assistance,seeChapter11“Gettinginformation,help,andservice”onpage79
.
CDproblems
Selectyoursymptomfromthefollowinglist:
•“AnaudiodiscorAutoPlay-enableddiscdoesnotautomaticallyplaywhenitisinsertedintoaCD
drive”onpage65
64ThinkCentreE73zUserGuide
Page 77

•“ACDorDVDdoesnotwork”onpage65
•“Unabletouseastartable(bootable)recoverymedium,suchastheProductRecoveryCD,tostart
yourcomputer”onpage65
AnaudiodiscorAutoPlay-enableddiscdoesnotautomaticallyplaywhenitis
insertedintoaCDdrive
Symptom:AnaudiodiscorAutoPlay-enableddiscdoesnotautomaticallyplaywhenitisinsertedinto
aCDdrive.
Actions:
•IfyouhavemultipleCDorDVDdrivesinstalled(oracombinationofCDandDVDdrives),tryinsertingthe
discintotheotherdrive.Insomecases,onlyoneofthedrivesisconnectedtotheaudiosubsystem.
•IfyouareusingtheWindows7operatingsystem,followtheactionfor“ACDorDVDdoesnotwork”
onpage65
Ifthisdoesnotcorrecttheproblem,followtheactionfor“ACDorDVDdoesnotwork”onpage65.
.
ACDorDVDdoesnotwork
Symptom:ACDorDVDdoesnotwork.
Actions:
•Verifythatthediscisinsertedcorrectly,withitslabelup.
•Makesurethatthediscyouareusingisclean.Toremovedustorfingerprints,wipethedisccleanwitha
softclothfromthecentertotheoutside.Wipingadiscinacircularmotionmightcauselossofdata.
•Verifythatthediscyouareusingisnotscratchedordamaged.Tryinsertinganotherdiscthatyouknow
isgood.Ifyoucannotreadfromaknown-gooddisc,youmighthaveaproblemwithyourCDorDVD
driveorthecablingtoyourCDorDVDdrive.Makesurethatthepowercableandsignalcableare
securelyconnectedtothedrive.
Unabletouseastartable(bootable)recoverymedium,suchastheProductRecovery
CD,tostartyourcomputer
Symptom:Unabletouseastartable(bootable)recoverymedium,suchastheProductRecoveryCD,
tostartyourcomputer.
Action:MakesurethattheCDorDVDdriveisinthestartupsequencebeforetheharddiskdrive.Refer
toyour“Selectingorchangingthestartupdevicesequence”onpage49
changingthestartupsequence.Notethatonsomemodelsthestartupsequenceispermanentlysetand
cannotbechanged.
Iftheseactionsdonotcorrecttheproblem,runtheLenovoSolutionCenterprogram.Ifyouneedtechnical
assistance,seeChapter11“Gettinginformation,help,andservice”onpage79
forinformationonviewingand
.
DVDproblems
Selectyoursymptomfromthefollowinglist:
•“BlackscreeninsteadofDVDvideo”onpage66
•“DVDmoviewillnotplay”onpage66
•“NoaudioorintermittentaudiowhileplayingDVDmovie”onpage66
•“Playbackisverysloworchoppy”onpage66
•“Invaliddiscornodiscfoundmessage”onpage66
Chapter10.Troubleshootinganddiagnostics65
Page 78

BlackscreeninsteadofDVDvideo
Symptom:BlackscreeninsteadofDVDvideo
Actions:
•RestarttheDVDplayerprogram.
•Closeanyopenfiles,turnoffthecomputer,andthenrestartthecomputer.
•Tryalowerscreenresolutionorcolordepth.
Iftheseactionsdonotcorrecttheproblem,runtheLenovoSolutionCenterprogram.Ifyouneedtechnical
assistance,seeChapter11“Gettinginformation,help,andservice”onpage79
.
DVDmoviewillnotplay
Symptom:DVDmoviewillnotplay.
Actions:
•Makesurethatthediscsurfaceiscleanandnotscratched.
•Checkthediscorpackageforregionalcoding.Youmightneedtopurchaseadiscwithcodingfor
theregionwhereyouareusingyourcomputer.
Iftheseactionsdonotcorrecttheproblem,runtheLenovoSolutionCenterprogram.Ifyouneedtechnical
assistance,seeChapter11“Gettinginformation,help,andservice”onpage79.
NoaudioorintermittentaudiowhileplayingDVDmovie
Symptom:NoaudioorintermittentaudiowhileplayingDVDmovie.
Actions:
•Checkthevolumecontrolsettingsonyourcomputerandonyourspeakers.
•Makesurethatthediscsurfaceiscleanandnotscratched.
•Checkallcableconnectionstoandfromthespeakers.
•UsetheDVDmenuforthevideotoselectadifferentaudiotrack.
Iftheseactionsdonotcorrecttheproblem,runtheLenovoSolutionCenterprogram.Ifyouneedtechnical
assistance,seeChapter11“Gettinginformation,help,andservice”onpage79.
Playbackisverysloworchoppy
Symptom:Playbackisverysloworchoppy.
Actions:
•Disableanybackgroundprograms,suchasAntiVirusorDesktopThemes.
•Ensurethatvideoresolutionissettolessthan1152x864.
Iftheseactionsdonotcorrecttheproblem,runtheLenovoSolutionCenterprogram.Ifyouneedtechnical
assistance,seeChapter11“Gettinginformation,help,andservice”onpage79
.
Invaliddiscornodiscfoundmessage
Symptom:Invaliddiscornodiscfoundmessage
Actions:
66ThinkCentreE73zUserGuide
Page 79

•EnsurethataDVDdiscisinthedrivewiththeshinysideofthediscfacingdown.
•Ensurethatvideoresolutionissettolessthan1152x864.
•OncomputersthathaveaCD-ROMorCD-RWdriveinadditiontoaDVD-ROMdrive,makesurethatthe
DVDdiscisinthedrivelabeled“DVD”.
Iftheseactionsdonotcorrecttheproblem,runtheLenovoSolutionCenterprogram.Ifyouneedtechnical
assistance,seeChapter11“Gettinginformation,help,andservice”onpage79.
Intermittentproblems
Symptom:Aproblemoccursonlyoccasionallyandisdifficulttorepeat.
Actions:
•Verifythatallcablesandcordsaresecurelyconnectedtothecomputerandattacheddevices.
•Verifythatwhenthecomputerison,thefangrillisnotblocked(thereisairflowaroundthegrill),andthe
fansareworking.Ifairflowisblockedorthefansarenotworking,thecomputermightoverheat.
•IfSCSIdevicesareinstalled,verifythatthelastexternaldeviceineachSCSIchainisterminatedcorrectly.
(SeeyourSCSIdocumentation.)
Iftheseactionsdonotcorrecttheproblem,runtheLenovoSolutionCenterprogram.Ifyouneedtechnical
assistance,seeChapter11“Gettinginformation,help,andservice”onpage79.
Keyboard,mouse,orpointingdeviceproblems
Selectyoursymptomfromthefollowinglist:
•“Allorsomekeysonthekeyboarddonotwork”onpage67
•“Themouseorpointingdevicedoesnotwork”onpage68
•“Thepointeronthescreendoesnotmovesmoothlywiththemouse”onpage68
•“Thewirelesskeyboarddoesnotwork”onpage68
Allorsomekeysonthekeyboarddonotwork
Symptom:Allorsomekeysonthekeyboarddonotwork.
Actions:
•Verifythatthekeyboardcableissecurelyconnectedtothecorrectconnectoronthecomputer.
•IfyouareusinganEnhancedPerformanceUSBkeyboardandoneormoreoftheRapidAccessbuttons
aretheonlykeysthatarenotworking,thesebuttonsmighthavebeendisabledorhavenotbeenassigned
toafunction.UsethehelpsystemintheEnhancedPerformanceCustomizationKeyboardprogramto
helpdiagnoseproblemswiththeRapidAccessbuttons.
ToopentheEnhancedPerformanceCustomizationKeyboardprogram,dooneofthefollowing:
–OntheWindows7operatingsystem,dothefollowing:
1.ClickStart➙ControlPanel.
2.ClickHardwareandSound.
3.ClickDevicesandPrinters.
4.Double-clickUSBEnhancedPerformanceKeyboard.TheUSBEnhancedPerformance
KeyboardCustomizationprogramstarts.
–OntheWindows8orWindows8.1operatingsystem,dothefollowing:
1.OpenControlPanel.
Chapter10.Troubleshootinganddiagnostics67
Page 80

Note:FordetailedinformationonhowtoopenControlPanelonWindows8andWindows8.1,see
“AccessingControlPanelontheWindows8orWindows8.1operatingsystem”onpage16
2.ClickHardwareandSound.
3.ClickDevicesandPrinters.
4.Double-clickUSBEnhancedPerformanceKeyboard.TheUSBEnhancedPerformance
KeyboardCustomizationprogramstarts.
Iftheseactionsdonotcorrecttheproblem,havethecomputerandkeyboardserviced.SeeChapter11
“Gettinginformation,help,andservice”onpage79fordetails.
Themouseorpointingdevicedoesnotwork
Symptom:Themouseorpointingdevicedoesnotwork.
Actions:
•Verifythatthemouseorpointing-devicecableissecurelyattachedtothecorrectconnectoronthe
computer.Dependingonthetypeofmouseyouhave,themousecablewillconnecttoeitherthe
mouse,serial,orUSBconnector.SomekeyboardshaveintegratedUSBconnectorsthatcanbeused
foraUSBmouseorpointingdevice.
•Verifythatthedevicedriversforthemouseorpointingdeviceareinstalledcorrectly.
•IfyouareusingaUSBkeyboardormouse,verifythattheUSBconnectorsareenabledintheBIOS
settings.See“Enablingordisablingadevice”onpage49
.
.
Iftheseactionsdonotcorrecttheproblem,runtheLenovoSolutionCenterprogram.Ifyouneedtechnical
assistance,seeChapter11“Gettinginformation,help,andservice”onpage79.
Thepointeronthescreendoesnotmovesmoothlywiththemouse
Symptom:Thepointeronthescreendoesnotmovesmoothlywiththemouse.
Action:Erraticmovementofthemousepointerisgenerallycausedbyabuildupofdirt,oils,andother
contaminantsontheballinsidethemouse.Cleanthemouse.See“Opticalmouse”onpage57for
instructions.
Thewirelesskeyboarddoesnotwork
Symptom:Thewirelesskeyboarddoesnotwork.
Action:IftheT ransceiverCommunicationsLEDisonandthewirelessKeyboarddoesnotwork,restartyour
computer.Ifrestartingyourcomputerdoesnotsolvetheproblem,verifythatthefollowingconditionsaremet:
•Thebatteriesareproperlyinstalled.
•Thebatteriesstillretaintheircurrent.
•ThewirelessKeyboardislocatedlessthantenmetersawayfromthetransceiver.
•Thetransceiverisfullyinstalled.
Action:IftheT ransceiverCommunicationsLEDisnoton,reconnectthetransceiverandthekeyboard.
Monitorproblems
Note:Manymonitorshavestatus-indicatorlightsandbuilt-incontrolsforadjustingbrightness,contrast,
width,height,andotherpictureadjustments.However,thecontrolsvaryfrommonitortypetomonitortype.
Forinformationaboutthestatuslightsandusingthecontrols,refertothedocumentationthatcomes
withyourmonitor.
68ThinkCentreE73zUserGuide
Page 81

Selectyoursymptomfromthefollowinglist:
•“Wrongcharactersappearonthescreen”onpage69
•“Themonitorworkswhenyouturnonthecomputer,butgoesblankaftersomeperiodofcomputer
inactivity”onpage69
•“Themonitorworkswhenyouturnonthecomputer,butgoesblankwhenyoustartsomeapplication
programs”onpage69
•“Theimageappearstobeflickering”onpage69
•“Theimageisdiscolored”onpage70
Wrongcharactersappearonthescreen
Symptom:Wrongcharactersappearonthescreen.
Action:Havethecomputerserviced.Fordetails,seeChapter11“Gettinginformation,help,andservice”
onpage79
.
Themonitorworkswhenyouturnonthecomputer,butgoesblankaftersomeperiod
ofcomputerinactivity
Symptom:Themonitorworkswhenyouturnonthecomputer,butgoesblankaftersomeperiodofcomputer
inactivity.
Action:Thecomputerisprobablysetforenergysavingswiththepower-managementfeature.Ifthe
power-managementfeatureisenabled,disablingitorchangingthesettingsmightsolvetheproblem.
Iftheseactionsdonotcorrecttheproblem,runtheLenovoSolutionCenterprogram.Ifyouneedtechnical
assistance,seeChapter11“Gettinginformation,help,andservice”onpage79
.
Themonitorworkswhenyouturnonthecomputer,butgoesblankwhenyoustart
someapplicationprograms
Symptom:Themonitorworkswhenyouturnonthecomputer,butgoesblankwhenyoustartsome
applicationprograms.
Actions:
•Makesurethemonitorsignalcableissecurelyconnectedtothemonitorandthemonitorconnectoron
thecomputer.Aloosecablecancauseintermittentproblems.
•Verifythatthenecessarydevicedriversfortheapplicationprogramsareinstalled.Refertothe
documentationfortheaffectedapplicationprogramtoseeifdevicedriversarerequired.
Iftheseactionsdonotcorrecttheproblem,runtheLenovoSolutionCenterprogram.Ifyouneedtechnical
assistance,seeChapter11“Gettinginformation,help,andservice”onpage79.
Theimageappearstobeflickering
Solutions:
•Thescreenmightbeaffectedbyinterferencefromnearbyequipment.Magneticfieldsaroundother
devices,suchastransformers,appliances,fluorescentlights,andothermonitorsmightbecausingthe
problem.Movefluorescentdesklightingoranyequipmentthatproducesmagneticfieldsfartheraway
fromthescreen.Ifthisdoesnotcorrecttheproblem,turnoffthecomputer.Then,adjusttheplacementof
thecomputerandotherdevicessothattheyareatleast305mm(12inches)apart.Turnonthecomputer.
•Resettherefreshratesupportedbyyourcomputer.
1.Right-clickablankareaonthedesktop.
Chapter10.Troubleshootinganddiagnostics69
Page 82

2.DependingonyourWindowsversion,dooneofthefollowing:
–ForWindows7,Windows8,orWindows8.1:ClickScreenresolution➙Advancedsettings.
–ForWindows10:ClickDisplaysettings.OntheDisplaytab,clickAdvanceddisplaysettings➙
Displayadapterproperties.
3.ClicktheMonitortab,andthenresettherefreshratetobethehighestandnoninterlaced.
Theimageisdiscolored
Symptom:Theimageisdiscolored.
Action:Themonitormightbeaffectedbyinterferencefromnearbyequipment.Magneticfieldsaroundother
devices,suchastransformers,appliances,fluorescentlights,andothermonitorsmightbecausingthe
problem.Movefluorescentdesklightingoranyequipmentthatproducesmagneticfieldsfurtherawayfrom
themonitor.Ifthisdoesnotcorrecttheproblem,dothefollowing:
1.Turnoffthemonitor.(Movingacolormonitorwhileitisturnedonmightcausescreendiscoloration.)
2.Adjusttheplacementofthemonitorandotherdevicessothattheyareatleast305mm(12inches)apart.
3.Turnonthemonitor.
Iftheseactionsdonotcorrecttheproblem,yourmonitormightneedservice.SeeChapter11“Getting
information,help,andservice”onpage79fordetails.
Networkingproblems
Thefollowingarethemostcommonnetworkingproblems.Selectyournetworkingproblemfromthe
followinglist:
•“Ethernetproblems”onpage70
•“AwirelessLANproblem”onpage72
•“AwirelessWANproblem”onpage72
•“Bluetoothproblem”onpage72
Formoreinformation,see“Windowshelpsystem”onpage79.
Ethernetproblems
ForEthernetproblems,selectyoursymptomfromthefollowinglist:
•“Y ourcomputercannotconnecttothenetwork”onpage70
•“Theadapterstopsworkingfornoapparentreason”onpage71
•“IfyourcomputerisaGigabitEthernetmodelandyouuseaspeedof1000Mbps,theconnectionfails
orerrorsoccur”onpage72
•“IfyourcomputerisaGigabitEthernetmodel,itcannotconnecttothenetworkat1000Mbps.Instead,
itconnectsat100Mbps”onpage72
Formoreinformationaboutthenetworkproblems,see“Networkingproblems”onpage70.
Yourcomputercannotconnecttothenetwork
Symptom:Yourcomputercannotconnecttothenetwork.
Actions:Ensurethat:
•Thecableisinstalledproperly.
70ThinkCentreE73zUserGuide
Page 83

ThenetworkcablemustbesecurelyconnectedtoboththeEthernetconnectorofyourcomputerand
theRJ45connectorofthehub.Themaximumallowabledistancefromthecomputertohubis100
meters.Ifthecableisconnectedandthedistanceiswithinacceptablelimitsbuttheproblempersists,try
adifferentcable.
•Thecableisinstalledproperly.
•Youareusingthecorrectdevicedriver.
OntheWindows7operatingsystem,dothefollowing:
1.ClickStart➙ControlPanel.
2.ClickHardwareandSound.
3.ClickDeviceManager.Ifyouarepromptedforanadministratorpasswordorconfirmation,typethe
passwordorprovideconfirmation.
4.IfanexclamationmarkisdisplayednexttoanadapternameunderNetworkadapters,youmight
notbeusingthecorrectdriverorthedriverisnotenabled.T oupdatethedriver,right-clickthe
highlightedadapter.
5.ClickUpdateDriverSoftware,andthenfollowtheinstructionsonthescreen.
OntheWindows8orWindows8.1operatingsystem,dothefollowing:
1.OpenControlPanel.
Note:FordetailedinformationonhowtoopenControlPanelonWindows8andWindows8.1,see
“AccessingControlPanelontheWindows8orWindows8.1operatingsystem”onpage16
.
2.ClickHardwareandSound.
3.ClickDeviceManager.Ifyouarepromptedforanadministratorpasswordorconfirmation,typethe
passwordorprovideconfirmation.
4.IfanexclamationmarkisdisplayednexttoanadapternameunderNetworkadapters,youmight
notbeusingthecorrectdriverorthedriverisnotenabled.T oupdatethedriver,right-clickthe
highlightedadapter.
5.ClickUpdateDriverSoftware,andthenfollowtheinstructionsonthescreen.
•Theswitchportandtheadapterhavethesameduplexsetting.
Ifyouconfiguredtheadapterforfullduplex,ensurethattheswitchportisalsoconfiguredforfullduplex.
Settingthewrongduplexmodecandegradeperformance,causedataloss,orresultinlostconnections.
•Youhaveinstalledallnetworkingsoftwarethatisnecessaryforyournetworkenvironment.
CheckwithyourLANadministratorforthenecessarynetworkingsoftware.
Theadapterstopsworkingfornoapparentreason
Symptom:Theadapterstopsworkingfornoapparentreason.
Action:Thenetworkdriverfilesmaybecorruptormissing.Updatethedriverbyreferringtothe“Solution”
descriptionfortheproceduretomakesurethatthecorrectdevicedriverisinstalled.
TheWakeonLANfeatureisnotworking
Symptom:TheWakeonLAN(WOL)featureisnotworking.
Actions:
•MakesurethatWOLisenabledintheBIOSSetupUtilityprogram.
•Ifitis,checkwithyourLANadministratorforthenecessarysettings.
Chapter10.Troubleshootinganddiagnostics71
Page 84

IfyourcomputerisaGigabitEthernetmodelandyouuseaspeedof1000Mbps,theconnection
failsorerrorsoccur
Symptom:IfyourcomputerisaGigabitEthernetmodelandyouuseaspeedof1000Mbps,theconnection
failsorerrorsoccur.
Actions:
•UseCategory5wiringandmakesurethatthenetworkcableissecurelyconnected.
•Connecttoa1000BASE-Thub/switch(not1000BASE-X).
IfyourcomputerisaGigabitEthernetmodel,itcannotconnecttothenetworkat1000Mbps.Instead,
itconnectsat100Mbps
Symptom:IfyourcomputerisaGigabitEthernetmodel,itcannotconnecttothenetworkat1000Mbps.
Instead,itconnectsat100Mbps.
Actions:
•Tryanothercable.
•Makesurethatthelinkpartnerissettoauto-negotiate.
•Makesurethattheswitchis802.3ab-compliant(gigabitovercopper).
AwirelessLANproblem
Symptom:Youcannotconnectusingthebuilt-inwirelessnetworkingcard.
Actions:
•MakesurethatyourwirelessLANdriveristhelatestversion.ChecktheWebsiteandverifythedriver
versionsupportedbyAccessConnectionsisthelatestdocumentedinthereadmefile.
•Makesurethatyourcomputeriswithinrangeofawirelessaccesspoint.
•Makesurethatthewirelessradioisenabledbydouble-clickingtheAccessConnectionsiconinthe
Windowsnotificationarea.
•CheckNetworkName(SSID),andyourencryptioninformation.UseAccessConnectionstoverifythis
case-sensitiveinformation.
Formoreinformationaboutthenetworkproblems,see“Networkingproblems”onpage70
.
AwirelessWANproblem
Message:UnauthorizedWANcardispluggedin-PoweroffandremovetheWANcard.
Action:TheWANcardisnotsupportedonthiscomputer.Removeit.
Note:SomecomputermodelsdonothaveawirelessWAN.
Formoreinformationaboutthenetworkproblems,see“Networkingproblems”onpage70.
Bluetoothproblem
Symptom:SounddoesnotcomefromtheBluetoothheadsetorheadphonebutcomesfromthelocal
speakereventhoughtheheadsetorheadphoneisconnectedusingtheHeadsetprofileorAVprofile.
Action:Dothefollowing:
1.Exittheapplicationthatusesthesounddevice(forexample,WindowsMediaPlayer).
2.OpenControlPanel.
72ThinkCentreE73zUserGuide
Page 85

3.ClickHardwareandSound➙Sound.
4.SelectthePlaybacktab.
5.IfyouareusingtheHeadsetprofile,selectBluetoothHands-freeAudioandclicktheSetDefault
button.IfyouareusingtheAVprofile,selectStereoAudioandclicktheSetDefaultbutton.
6.ClickOKtoclosetheSoundwindow.
Formoreinformationaboutthenetworkproblems,see“Networkingproblems”onpage70.
Optionproblems
UsethisinformationtodiagnoseproblemswithLenovohardwareoptionsthatdonothavetheirown
troubleshootinginformation.
Selectyoursymptomfromthefollowinglist:
•“Anoptionthatwasjustinstalleddoesnotwork”onpage73
•“Anoptionthatpreviouslyworkeddoesnotworknow”onpage73
Anoptionthatwasjustinstalleddoesnotwork
Symptom:Anoptionthatwasjustinstalleddoesnotwork.
Action:Verifythat:
•Theoptionisdesignedforyourcomputer.
•Youfollowedtheinstallationinstructionssuppliedwiththeoptionandtheinstallationinstructionsprovided
withyourcomputer,andalloptionfiles(suchasdevicedrivers,ifrequired)areinstalledcorrectly.
•Youhavenotloosenedotherinstalledoptionsorcables.
•Iftheoptionisanadapter,youhaveprovidedenoughhardwareresourcesfortheadaptertofunction
correctly.Seethedocumentationsuppliedwiththeadapter(aswellasthedocumentationforanyother
installedadapters)todeterminetheresourcesrequiredforeachadapter.
Iftheseactionsdonotcorrecttheproblem,runtheLenovoSolutionCenterprogram.Ifyouneedtechnical
assistance,seeChapter11“Gettinginformation,help,andservice”onpage79
.
Anoptionthatpreviouslyworkeddoesnotworknow
Symptom:Anoptionthatpreviouslyworkeddoesnotworknow.
Actions:
•Verifythatalloptionhardwareandcableconnectionsaresecure.
•Iftheoptioncomeswithitsowntestinstructions,usethoseinstructionstotesttheoption.
•IfthefailingoptionisaSCSIoption,verifythat:
–ThecablesforallexternalSCSIoptionsareconnectedcorrectly.
–ThelastoptionineachSCSIchain,ortheendoftheSCSIcable,isterminatedcorrectly.
–AllexternalSCSIoptionsareturnedon.ExternalSCSIoptionsmustbeturnedonbeforethecomputer
isturnedon.Formoreinformation,seeyourSCSIdocumentation.
•Verifythattheoptionandanyrequireddevicedriversareinstalledcorrectly.
Iftheseactionsdonotcorrecttheproblem,runtheLenovoSolutionCenterprogram.Ifyouneedtechnical
assistance,seeChapter11“Gettinginformation,help,andservice”onpage79
Chapter10.Troubleshootinganddiagnostics73
.
Page 86

Performanceandlockupproblems
Poorperformanceandlockupproblemscanbearesultofanyofthefollowing:
•“Insufficientfreeharddiskdrivespace”onpage74
•“Excessivenumberoffragmentedfiles”onpage74
Makeaselectionfromtheabovelisttofindoutmoreaboutthecorrectiveactionsyoucantake.
Insufficientfreeharddiskdrivespace
Solutions:Freeupharddiskdrivespace.
•CleanoutyourInbox,SentItems,andDeletedItemsfoldersfromyoure-mailapplication.
•CleanupyourCdrive.
1.DependingonyourWindowsversion,dooneofthefollowing:
–ForWindows7:ClicktheStartbuttontoopentheStartmenu,andthenclickComputer.
–ForWindows8:OpenFileExplorer,andthenclickComputer.
–ForWindows8.1:OpenFileExplorer.
–ForWindows10:ClicktheStartbuttontoopentheStartmenu,andthenclickFileExplorer➙
ThisPC.
2.Right-clickyourCdriveandthenclickProperties.
3.Checktheamountoffreespace,andthenclickDiskCleanup.
4.Alistofunnecessaryfilecategoriesisdisplayed.Selecteachfilecategoryyouwanttodelete,
andthenclickOK.
•TurnsomeWindowsfeaturesofforremovesomeunnecessaryprograms.
1.OpenControlPanelbydoingoneofthefollowing:
–ForWindows7:ClicktheStartbuttontoopentheStartmenu,andthenclickControlPanel.
–ForWindows8orWindows8.1:See“AccessingControlPanelontheWindows8orWindows
8.1operatingsystem”onpage16
–ForWindows10:Right-clicktheStartbuttontoopentheStartcontextmenu,andthenclick
ControlPanel.
2.ViewControlPanelusingLargeiconsorSmallicons,andthenclickProgramsandFeatures.
3.Dooneofthefollowing:
–ToturnsomeWindowsfeaturesoff,clickT urnWindowsfeaturesonoroff.Followthe
instructionsonthescreen.
–Toremovesomeunnecessaryprograms,selecttheprogramyouwanttoremove,andthenclick
Uninstall/ChangeorUninstall.
.
Excessivenumberoffragmentedfiles
Symptom:Excessivenumberoffragmentedfiles
Action:RuntheWindowsDiskDefragmenterprogram.
Note:Dependingonthesizeoftheharddiskdriveandamountofdatacurrentlystoredontheharddisk
drive,thedisk-defragmentationprocessmighttakeuptoseveralhourstocomplete.
OntheWindows7operatingsystem,dothefollowing:
1.Closeanyprogramsthatarecurrentlyrunningandcloseanyopenwindows.
74ThinkCentreE73zUserGuide
Page 87

2.ClickStart➙Computer.
3.Right-clickyourCdriveentryandthenclickProperties.
4.ClicktheToolstab.
5.ClickDefragmentNow,thenclickContinue.
6.ClickDefragmentNowagaintostartadisk-defragmentationprocess.
OntheWindows8orWindows8.1operatingsystem,dothefollowing:
1.Closeanyprogramsthatarecurrentlyrunningandcloseanyopenwindows.
2.OnWindows8,openFileExplorerandclickComputer.OnWindows8.1,openFileExplorer.
3.Right-clickyourCdriveentryandthenclickProperties.
4.ClicktheToolstabandthenclickOptimize.
5.ClickOptimizeintheOptimizeDriveswindowthatisdisplayedtostartadisk-defragmentationprocess.
Printerproblems
Symptom:Theprinterdoesnotwork.
Actions:Verifythat:
1.Theprinteristurnedonandisonline.
2.Paperisloadedcorrectly.
3.Theprintersignalcableissecurelyconnectedtothecorrectparallel,serial,orUSBconnectoronthe
computer.
Note:Non-IEEE-approvedprintersignalcablesmightcauseunpredictableproblems.
1.Anydevicedriversandothersoftwarethatcamewiththeprinterarecorrectlyinstalled.
2.Youhaveassignedtheprinterportcorrectlyinyouroperatingsystem,applicationprogram,orBIOS
settings.FormoreinformationaboutBIOSsettings,seeChapter7“UsingtheSetupUtilityprogram”
onpage47.
Iftheproblempersists,runthetestsdescribedinthedocumentationthatcomeswithyourprinter.Ifyou
cannotcorrecttheproblem,havethecomputerserviced.SeeChapter11“Gettinginformation,help,
andservice”onpage79.
Serialconnectorproblems
Usethisinformationtotroubleshoottheserialconnectoranddevicesattachedtotheserialconnector.
Symptom:Serialconnectorcannotbeaccessed.
Actions:
•Makesuretheserialcableissecurelyconnectedtotheserialconnectoronthecomputerandtotheserial
device.Iftheserialdevicehasitsownpowercord,makesureitisattachedtoaproperlygrounded
electricaloutlet.
•IftheserialdevicehasitsownOn/Offswitch,makesureitisintheOnposition.
•IftheserialdevicehasanOnlineswitch,makesureitisintheOnlineposition.
•Iftheserialdeviceisaprinter,makesurepaperisloadedcorrectly.
•Verifythatanysoftwaresuppliedwiththeserialdeviceiscorrectlyinstalled.Refertothedocumentation
fortheserial-deviceoption.
•Makesurethattheserial-connectoradapter,ifyouaddedone,isproperlyinstalledandfirmlyseated.
Chapter10.Troubleshootinganddiagnostics75
Page 88

Iftheseactionsdonotcorrecttheproblem,runtheLenovoSolutionCenterprogram.Ifyouneedtechnical
assistance,seeChapter11“Gettinginformation,help,andservice”onpage79
.
Softwareproblems
Selectyoursymptomfromthefollowinglist:
•“Whenusingasortfeature,datesdonotsortinthecorrectorder”onpage76
•“Softwaredoesnotworkasexpected”onpage76
Whenusingasortfeature,datesdonotsortinthecorrectorder
Symptom:Whenusingasortfeature,datesdonotsortinthecorrectorder.
Action:Somesoftwaredevelopedbeforetheyear2000usedonlythelasttwodigitsofayeartosort
dates,alwaysassumingthefirsttwodigitswere19.Consequently,theseprogramssortdatesoutoforder.
Checkwithyoursoftwaremanufacturertoseeifanyupdatesareavailable.Manysoftwaremanufacturers
makeupdatesavailablefromtheWorldWideWeb.
Softwaredoesnotworkasexpected
Symptom:Softwaredoesnotworkasexpected.
Actions:
•Mostsoftwareprogramshavebuilt-inhelpsystemsthatprovideinstructionsformosttasks.Ifyouare
havingdifficultyperformingaspecifictaskwithinasoftwareprogram,refertothehelpsystemforthat
program.Helpsystemsaretypicallyaccessiblefromamenuorbuttonintheprogram,andfrequently
fromtheF1key.
•IfyouhavedifficultywiththeWindowsoperatingsystemoroneofitscomponents,refertotheWindows
helpsystem.
•Todetermineifproblemsarecausedbynewlyinstalledsoftware,verifythat:
–Yourcomputerhastheminimummemoryrequirementsneededtousethesoftware.Seethe
informationsuppliedwiththesoftwaretoverifymemoryrequirements.(Ifyoujustinstalledanadapter
ormemory,youmighthaveamemory-addressconflict.)
–Thesoftwareisdesignedtooperateonyourcomputer.
–Othersoftwareworksonyourcomputer.
–Thesoftwareyouareusingworkscorrectlyonanothercomputer.
•Ifyoureceivedanyerrormessageswhileusingthesoftwareprogram,seetheprinteddocumentation
suppliedwiththesoftwareorthehelpsystemforthatsoftwareforadescriptionofthemessagesand
solutionstotheproblem.
•Checkwithyoursoftwaremanufacturertoseeifanyupdatesareavailable.Manysoftwaremanufacturers
makeupdatesavailablefromtheWorldWideWeb.
•Ifthesoftwareprogramusedtoworkcorrectly,butdoesnotworkcorrectlynow,dothefollowing:
1.OpenControlPanelbydoingoneofthefollowing:
–ForWindows7:ClicktheStartbuttontoopentheStartmenu,andthenclickControlPanel.
–ForWindows8orWindows8.1:See“AccessingControlPanelontheWindows8orWindows
8.1operatingsystem”onpage16
–ForWindows10:Right-clicktheStartbuttontoopentheStartcontextmenu,andthenclick
ControlPanel.
2.ViewControlPanelusingLargeiconsorSmallicons,andthenclickRecovery➙OpenSystem
Restore.
.
76ThinkCentreE73zUserGuide
Page 89

3.Followtheinstructionsonthescreen.
•Ifyouareunabletoresolvetheproblemthroughothermethods,uninstallthesoftwareprogramand
reinstallit.
Iftheseactionsdonotcorrecttheproblem,youmightneedtechnicalassistance.Contactyoursoftware
manufacturerorseeChapter11“Gettinginformation,help,andservice”onpage79fordetails.
USBproblems
Symptom:TheUSBconnectorscannotbeaccessed.
Actions:
•MakesuretheUSBcableissecurelyconnectedtotheUSBconnectorandtotheUSBdevice.IftheUSB
devicehasitsownpowercord,makesureitisattachedtoaproperlygroundedelectricaloutlet.
•IftheUSBdevicehasitsownOn/Offswitch,makesureitisintheOnposition.
•IftheUSBdevicehasanOnlineswitch,makesureitisintheOnlineposition.
•IftheUSBdeviceisaprinter,makesurepaperisloadedcorrectly.
•MakesureanydevicedriversorothersoftwaresuppliedwiththeUSBdeviceiscorrectlyinstalled.
RefertothedocumentationfortheUSBdevice.
•ResetthedevicebydetachingandreattachingtheUSBconnector.
Iftheseactionsdonotcorrecttheproblem,runtheLenovoSolutionCenterprogramtotesttheUSB
connector.IftheUSBdevicecamewithitsowndiagnostics,runthosediagnosticsagainsttheUSBdevice.
Ifyouneedtechnicalassistance,seeChapter11“Gettinginformation,help,andservice”onpage79.
LenovoSolutionCenter
TheLenovoSolutionCenterprogramenablesyoutotroubleshootandresolvecomputerproblems.It
combinesdiagnostictests,systeminformationcollection,securitystatus,andsupportinformation,along
withhintsandtipsformaximumsystemperformance.
Notes:
•TheLenovoSolutionCenterprogramcanbedownloadedfromhttp://www.lenovo.com/diags.
•IfyouareusingaWindowsoperatingsystemotherthanWindows7,Windows8,Windows8.1,orWindows
10,gotohttp://www.lenovo.com/diagsforthelatestinformationondiagnosticsforyourcomputer.
ToruntheLenovoSolutionCenterprogram,see“Lenovoprograms”onpage4
Foradditionalinformation,refertotheLenovoSolutionCenterhelpsystem.
Note:Ifyouareunabletoisolateandrepairtheproblemyourselfafterrunningtheprogram,saveandprint
thelogfiles.Y ouwillneedthelogfileswhenyouspeaktoaLenovotechnicalsupportrepresentative.
.
Chapter10.Troubleshootinganddiagnostics77
Page 90

78ThinkCentreE73zUserGuide
Page 91

Chapter11.Gettinginformation,help,andservice
Thischaptercontainsinformationabouthelp,service,andtechnicalassistanceforproductsmanufactured
byLenovo.
Informationresources
Youcanusetheinformationinthissectiontoaccessusefulresourcesrelatingtoyourcomputingneeds.
Windowshelpsystem
Note:IfyouusetheonlinehelpforWindows7,Windows8,orWindows8.1,orthehelpforWindows10,
ensurethatyourcomputerisconnectedtotheInternet.
TheWindowshelpsystemprovidesyouwithdetailedinformationaboutusingtheWindowsoperatingsystem.
ToaccesstheWindowshelpsystem,dooneofthefollowing:
•ForWindows7:ClicktheStartbuttontoopentheStartmenu,andthenclickHelpandSupport.Youcan
choosetousetheonlineorofflinehelpatthebottomofthescreen.
•ForWindows8orWindows8.1:Movethepointertothetop-rightorbottom-rightcornerofthescreen
todisplaythecharms.Then,clickSettings➙Help.Y oucanchoosetousetheonlineorofflinehelp
atthebottomofthescreen.
•ForWindows10:ClicktheStartbuttontoopentheStartmenu,andthenclickGetstarted.
SafetyandWarranty
TheSafety,Warranty,andSetupGuidethatisprovidedwithyourcomputercontainsinformationonsafety,
setup,warranty,andnotices.Readandunderstandallsafetyinformationbeforeusingthisproduct.
LenovoWebsite
TheLenovoWebsite(http://www.lenovo.com)providesup-to-dateinformationandservicestohelpyoubuy,
upgrade,andmaintainyourcomputer.Youcanalsodothefollowing:
•Shopfordesktopandnotebookcomputers,monitors,projectors,upgradesandaccessoriesforyour
computer,andspecialoffers.
•Purchaseadditionalservices,suchassupportforhardware,operatingsystems,applicationprograms,
networksetupandconfiguration,andcustominstallations.
•Purchaseupgradesandextendedhardwarerepairservices.
•Downloadthelatestdevicedriversandsoftwareupdatesforyourcomputermodel.
•Accesstheonlinemanualsforyourproducts.
•AccesstheLenovoLimitedWarranty.
•Accesstroubleshootingandsupportinformationforyourcomputermodelandothersupportedproducts.
•Findtheserviceandsupportphonenumbersforyourcountryorregion.
•FindaServiceProviderlocatednearyou.
©CopyrightLenovo2013,2015
79
Page 92

LenovoSupportWebsite
TechnicalsupportinformationisavailableontheLenovoSupportWebsiteat:
http://www.lenovo.com/support
ThisWebsiteisupdatedwiththelatestsupportinformationsuchasthefollowing:
•Driversandsoftware
•Diagnosticsolutions
•Productandservicewarranty
•Productandpartsdetails
•Userguidesandmanuals
•Knowledgebaseandfrequentlyaskedquestions
Helpandservice
Thissectioncontainsinformationaboutobtaininghelpandservice.
Usingthedocumentationanddiagnosticprogram
Ifyouexperienceaproblemwithyourcomputer,seeChapter10“Troubleshootinganddiagnostics”
onpage61.Forinformationonadditionalresourcestohelpyoutroubleshootyourcomputerproblem,
see“Informationresources”onpage79.
Ifyoususpectasoftwareproblem,seethedocumentationthatcomeswiththeoperatingsystemorsoftware
program,includingreadmefilesandonlinehelp.
Mostcomputerscomewithadiagnosticprogramthathelpyouidentifyhardwareproblems.
YoucanalsogetthelatesttechnicalinformationanddownloaddevicedriversandupdatesfromLenovo
SupportWebsiteat:
http://www.lenovo.com/support
Callingforservice
Duringthewarrantyperiod,youcangethelpandinformationbytelephonethroughtheCustomerSupport
Center.
Thefollowingservicesareavailableduringthewarrantyperiod:
•Problemdetermination-Trainedservicepersonnelareavailabletoassistyouwithdetermininga
hardwareproblemanddecidingwhatactionisnecessarytofixtheproblem.
•Hardwarerepair-Iftheproblemiscausedbyhardwareunderwarranty,trainedservicepersonnelare
availabletoprovidetheapplicablelevelofservice.
•EngineeringChangemanagement-Theremightbechangesthatarerequiredafteraproducthas
beensold.LenovooryourresellerwillmakeselectedEngineeringChanges(ECs)thatapplytoyour
hardwareavailable.
Theseitemsarenotcoveredbythewarranty:
•ReplacementoruseofpartsnotmanufacturedfororbyLenovoornon-warrantedLenovoparts
•Identificationofsoftwareproblemsources
•ConfigurationofBIOSaspartofaninstallationorupgrade
•Changes,modifications,orupgradestodevicedrivers
•Installationandmaintenanceofnetworkoperatingsystems(NOS)
80ThinkCentreE73zUserGuide
Page 93

•Installationandmaintenanceofapplicationprograms
RefertotheSafety,Warranty,andSetupGuidethatcomeswithyourcomputerforinformationaboutyour
warrantytypeandduration.Y oumustretainyourproofofpurchasetoobtainwarrantyservice.
ForalistoftheLenovoSupportphonenumbersforyourcountryorregion,goto
http://www.lenovo.com/support/phoneorrefertotheSafety,Warranty,andSetupGuidethatcomeswith
yourcomputer.
Note:Phonenumbersaresubjecttochangewithoutnotice.Ifthenumberforyourcountryorregionisnot
provided,contactyourLenovoresellerorLenovomarketingrepresentative.
Ifpossible,beatyourcomputerwhenyoucall.Havethefollowinginformationavailable:
•Machinetypeandmodel
•Serialnumbersofyourhardwareproducts
•Descriptionoftheproblem
•Exactwordingofanyerrormessages
•Hardwareandsoftwareconfigurationinformation
Usingotherservices
Ifyoutravelwithyourcomputerorrelocateittoacountrywhereyourdesktopornotebookcomputer
machinetypeissold,yourcomputermightbeeligibleforInternationalWarrantyService,whichautomatically
entitlesyoutoobtainwarrantyservicethroughoutthewarrantyperiod.Servicewillbeperformedbyservice
providersauthorizedtoperformwarrantyservice.
Servicemethodsandproceduresvarybycountry,andsomeservicesmightnotbeavailableinallcountries.
InternationalWarrantyServiceisdeliveredthroughthemethodofservice(suchasdepot,carry-in,or
on-siteservice)thatisprovidedintheservicingcountry.Servicecentersincertaincountriesmightnotbe
abletoserviceallmodelsofaparticularmachinetype.Insomecountries,feesandrestrictionsmight
applyatthetimeofservice.
TodeterminewhetheryourcomputeriseligibleforInternationalWarrantyServiceandtoviewalistof
thecountrieswhereserviceisavailable,gotohttp://www.lenovo.com/support,clickProduct&Service
Warranty,andfollowtheinstructionsonthescreen.
FortechnicalassistancewiththeinstallationoforquestionsrelatedtoServicePacksforyour
preinstalledMicrosoftWindowsproduct,refertotheMicrosoftProductSupportServicesWebsiteat
http://support.microsoft.com/directoryoryoucancontacttheCustomerSupportCenter.Somefeesmight
apply.
Purchasingadditionalservices
Duringandafterthewarrantyperiod,youcanpurchaseadditionalservices,suchassupportforhardware,
operatingsystems,andapplicationprograms;networksetupandconfigurationservices;upgradedor
extendedhardwarerepairservices;andcustominstallationservices.Serviceavailabilityandservicename
mightvarybycountryorregion.Formoreinformationabouttheseservices,gototheLenovoWebsiteat:
http://www.lenovo.com
Chapter11.Gettinginformation,help,andservice81
Page 94

82ThinkCentreE73zUserGuide
Page 95

AppendixA.Notices
Lenovomaynotoffertheproducts,services,orfeaturesdiscussedinthisdocumentinallcountries.Consult
yourlocalLenovorepresentativeforinformationontheproductsandservicescurrentlyavailableinyour
area.AnyreferencetoaLenovoproduct,program,orserviceisnotintendedtostateorimplythatonlythat
Lenovoproduct,program,orservicemaybeused.Anyfunctionallyequivalentproduct,program,orservice
thatdoesnotinfringeanyLenovointellectualpropertyrightmaybeusedinstead.However,itistheuser's
responsibilitytoevaluateandverifytheoperationofanyotherproduct,program,orservice.
Lenovomayhavepatentsorpendingpatentapplicationscoveringsubjectmatterdescribedinthis
document.Thefurnishingofthisdocumentdoesnotgiveyouanylicensetothesepatents.Youcansend
licenseinquiries,inwriting,to:
Lenovo(UnitedStates),Inc.
1009ThinkPlace-BuildingOne
Morrisville,NC27560
U.S.A.
Attention:LenovoDirectorofLicensing
LENOVOPROVIDESTHISPUBLICATION“ASIS”WITHOUTWARRANTYOFANYKIND,EITHEREXPRESS
ORIMPLIED,INCLUDING,BUTNOTLIMITEDTO,THEIMPLIEDWARRANTIESOFNON-INFRINGEMENT,
MERCHANTABILITYORFITNESSFORAPARTICULARPURPOSE.Somejurisdictionsdonotallow
disclaimerofexpressorimpliedwarrantiesincertaintransactions,therefore,thisstatementmaynotapply
toyou.
Thisinformationcouldincludetechnicalinaccuraciesortypographicalerrors.Changesareperiodically
madetotheinformationherein;thesechangeswillbeincorporatedinneweditionsofthepublication.
Lenovomaymakeimprovementsand/orchangesintheproduct(s)and/ortheprogram(s)describedinthis
publicationatanytimewithoutnotice.
Theproductsdescribedinthisdocumentarenotintendedforuseinimplantationorotherlifesupport
applicationswheremalfunctionmayresultininjuryordeathtopersons.Theinformationcontainedinthis
documentdoesnotaffectorchangeLenovoproductspecificationsorwarranties.Nothinginthisdocument
shalloperateasanexpressorimpliedlicenseorindemnityundertheintellectualpropertyrightsofLenovo
orthirdparties.Allinformationcontainedinthisdocumentwasobtainedinspecificenvironmentsandis
presentedasanillustration.Theresultobtainedinotheroperatingenvironmentsmayvary.
Lenovomayuseordistributeanyoftheinformationyousupplyinanywayitbelievesappropriatewithout
incurringanyobligationtoyou.
Anyreferencesinthispublicationtonon-LenovoWebsitesareprovidedforconvenienceonlyanddonotin
anymannerserveasanendorsementofthoseWebsites.ThematerialsatthoseWebsitesarenotpartof
thematerialsforthisLenovoproduct,anduseofthoseWebsitesisatyourownrisk.
Anyperformancedatacontainedhereinwasdeterminedinacontrolledenvironment.Therefore,theresult
obtainedinotheroperatingenvironmentsmayvarysignificantly.Somemeasurementsmayhavebeen
madeondevelopment-levelsystemsandthereisnoguaranteethatthesemeasurementswillbethesame
ongenerallyavailablesystems.Furthermore,somemeasurementsmayhavebeenestimatedthrough
extrapolation.Actualresultsmayvary.Usersofthisdocumentshouldverifytheapplicabledatafortheir
specificenvironment.
©CopyrightLenovo2013,2015
83
Page 96

Trademarks
ThefollowingtermsaretrademarksofLenovointheUnitedStates,othercountries,orboth:
Lenovo
TheLenovologo
RescueandRecovery
TheThinkCentrelogo
ThinkCentre
ThinkVantage
Microsoft,Windows,andWindowsMediaaretrademarksoftheMicrosoftgroupofcompanies.
IntelisatrademarkofIntelCorporationintheU.S.and/orothercountries.
LinuxisaregisteredtrademarkofLinusTorvalds.
Othercompany,product,orservicenamesmaybetrademarksorservicemarksofothers.
84ThinkCentreE73zUserGuide
Page 97

AppendixB.Regulatoryinformation
Exportclassificationnotice
ThisproductissubjecttotheUnitedStatesExportAdministrationRegulations(EAR)andhasanExport
ClassificationControlNumber(ECCN)of4A994.b.Itcanbere-exportedexcepttoanyoftheembargoed
countriesintheEARE1countrylist.
Electronicemissionsnotices
ThefollowinginformationreferstoLenovopersonalcomputermachinetypes10BDand10BL.
FederalCommunicationsCommissionDeclarationofConformity
ThisequipmenthasbeentestedandfoundtocomplywiththelimitsforaClassBdigitaldevice,pursuant
toPart15oftheFCCRules.Theselimitsaredesignedtoprovidereasonableprotectionagainstharmful
interferenceinaresidentialinstallation.Thisequipmentgenerates,uses,andcanradiateradiofrequency
energyand,ifnotinstalledandusedinaccordancewiththeinstructions,maycauseharmfulinterference
toradiocommunications.However,thereisnoguaranteethatinterferencewillnotoccurinaparticular
installation.Ifthisequipmentdoescauseharmfulinterferencetoradioortelevisionreception,whichcanbe
determinedbyturningtheequipmentoffandon,theuserisencouragedtotrytocorrecttheinterferenceby
oneormoreofthefollowingmeasures:
•Reorientorrelocatethereceivingantenna.
•Increasetheseparationbetweentheequipmentandreceiver.
•Connecttheequipmentintoanoutletonacircuitdifferentfromthattowhichthereceiverisconnected.
•Consultanauthorizeddealerorservicerepresentativeforhelp.
Lenovoisnotresponsibleforanyradioortelevisioninterferencecausedbyusingotherthanspecifiedor
recommendedcablesandconnectorsorbyunauthorizedchangesormodificationstothisequipment.
Unauthorizedchangesormodificationscouldvoidtheuser'sauthoritytooperatetheequipment.
ThisdevicecomplieswithPart15oftheFCCRules.Operationissubjecttothefollowingtwoconditions:(1)
thisdevicemaynotcauseharmfulinterference,and(2)thisdevicemustacceptanyinterferencereceived,
includinginterferencethatmaycauseundesiredoperation.
ResponsibleParty:
Lenovo(UnitedStates)Incorporated
1009ThinkPlace-BuildingOne
Morrisville,NC27560
PhoneNumber:919-294-5900
IndustryCanadaClassBemissioncompliancestatement
ThisClassBdigitalapparatuscomplieswithCanadianICES-003.
CetappareilnumériquedelaclasseBestconformeàlanormeNMB-003duCanada.
EuropeanUnion-CompliancetotheElectromagneticCompatibilityDirective
©CopyrightLenovo2013,2015
85
Page 98

ThisproductisinconformitywiththeprotectionrequirementsofEUCouncilDirective2004/108/EConthe
approximationofthelawsoftheMemberStatesrelatingtoelectromagneticcompatibility.Lenovocannot
acceptresponsibilityforanyfailuretosatisfytheprotectionrequirementsresultingfromanon-recommended
modificationoftheproduct,includingtheinstallationofoptioncardsfromothermanufacturers.
ThisproducthasbeentestedandfoundtocomplywiththelimitsforClassBInformationTechnology
EquipmentaccordingtoEuropeanStandardEN55022.ThelimitsforClassBequipmentwerederived
fortypicalresidentialenvironmentstoprovidereasonableprotectionagainstinterferencewithlicensed
communicationdevices.
Lenovo,Einsteinova21,85101Bratislava,Slovakia
GermanClassBcompliancestatement
DeutschsprachigerEUHinweis:
HinweisfürGerätederKlasseBEU-RichtliniezurElektromagnetischenVerträglichkeit
DiesesProduktentsprichtdenSchutzanforderungenderEU-Richtlinie2004/108/EG(früher89/336/EWG)zur
AngleichungderRechtsvorschriftenüberdieelektromagnetischeVerträglichkeitindenEU-Mitgliedsstaaten
undhältdieGrenzwertederEN55022KlasseBein.
Umdiesessicherzustellen,sinddieGerätewieindenHandbüchernbeschriebenzuinstallierenundzu
betreiben.DesWeiterendürfenauchnurvonderLenovoempfohleneKabelangeschlossenwerden.
LenovoübernimmtkeineVerantwortungfürdieEinhaltungderSchutzanforderungen,wenndasProdukt
ohneZustimmungderLenovoverändertbzw.wennErweiterungskomponentenvonFremdherstellernohne
EmpfehlungderLenovogesteckt/eingebautwerden.
Deutschland:
EinhaltungdesGesetzesüberdieelektromagnetischeVerträglichkeitvonBetriebsmitteln
DiesesProduktentsprichtdem„GesetzüberdieelektromagnetischeVerträglichkeitvonBetriebsmitteln“
EMVG(früher„GesetzüberdieelektromagnetischeVerträglichkeitvonGeräten“).DiesistdieUmsetzungder
EU-Richtlinie2004/108/EG(früher89/336/EWG)inderBundesrepublikDeutschland.
ZulassungsbescheinigunglautdemDeutschenGesetzüberdieelektromagnetischeVerträglichkeit
vonBetriebsmitteln,EMVGvom20.Juli2007(früherGesetzüberdieelektromagnetische
VerträglichkeitvonGeräten),bzw.derEMVEGRichtlinie2004/108/EC(früher89/336/EWG),für
GerätederKlasseB.
DiesesGerätistberechtigt,inÜbereinstimmungmitdemDeutschenEMVGdasEG-Konformitätszeichen
-CE-zuführen.VerantwortlichfürdieKonformitätserklärungnachParagraf5desEMVGistdieLenovo
(Deutschland)GmbH,Gropiusplatz10,D-70563Stuttgart.
InformationeninHinsichtEMVGParagraf4Abs.(1)4:
DasGeräterfülltdieSchutzanforderungennachEN55024undEN55022KlasseB.
KoreaClassBcompliancestatement
86ThinkCentreE73zUserGuide
Page 99
JapanVCCIClassBcompliancestatement
Japancompliancestatementforproductswhichconnecttothepowermainswithratedcurrent
lessthanorequalto20Aperphase
Japannoticeforacpowercord
Theacpowercordshippedwithyourproductcanbeusedonlyforthisspecificproduct.Donotusetheac
powercordforotherdevices.
LenovoproductserviceinformationforTaiwan
KeyboardandmousecompliancestatementforTaiwan
Eurasiancompliancemark
Brazilaudionotice
Ouvirsonscommaisde85decibéisporlongosperíodospodeprovocardanosaosistemaauditivo.
Mexicowireless-radiocomplianceinformation
Advertencia:EnMexicolaoperacióndeesteequipoestásujetaalassiguientesdoscondiciones:(1)es
posiblequeesteequipoodispositivonocauseinterferenciaperjudicialy(2)esteequipoodispositivodebe
aceptarcualquierinterferencia,incluyendolaquepuedacausarsuoperaciónnodeseada.
Additionalregulatoryinformation
Foradditionalregulatoryinformation,refertotheRegulatoryNoticeshippedwithyourcomputer.Depending
ontheconfigurationofyourcomputerandthecountryorregionwherethecomputerwaspurchased,
youmighthavereceivedadditionalprintedregulatorynotices.Allregulatorynoticesareavailableonthe
LenovoSupportWebsiteinelectronicformat.Toaccesselectroniccopiesofthedocumentation,goto
http://www.lenovo.com/UserManuals.
AppendixB.Regulatoryinformation87
Page 100

88ThinkCentreE73zUserGuide
 Loading...