

Page 1

ThinkCentreE73
UserGuide
MachineTypes:10AU,10AW,10BF,10BG,10DU,and10DT
Page 2

Note:Beforeusingthisinformationandtheproductitsupports,besuretoreadandunderstandthe
“Importantsafetyinformation”onpagev
andAppendixA“Notices”onpage127.
FifthEdition(July2015)
©CopyrightLenovo2013,2015.
LIMITEDANDRESTRICTEDRIGHTSNOTICE:IfdataorsoftwareisdeliveredpursuantaGeneralServicesAdministration
“GSA”contract,use,reproduction,ordisclosureissubjecttorestrictionssetforthinContractNo.GS-35F-05925.
Page 3

Contents
Importantsafetyinformation......v
Serviceandupgrades.............v
Staticelectricityprevention...........v
Powercordsandpoweradapters........vi
Extensioncordsandrelateddevices.......vi
Plugsandoutlets..............vii
Externaldevices..............vii
Heatandproductventilation.........vii
Operatingenvironment...........viii
Lasercompliancestatement.........viii
Powersupplystatement............ix
Cleaningandmaintenance...........ix
Chapter1.Productoverview......1
Features..................1
Specifications................5
Lenovoprograms..............5
Accessingaprogramonyourcomputer....5
AnintroductiontoLenovoprograms.....6
Locations..................8
Locatingconnectors,controls,andindicators
onthefrontofyourcomputer........9
Locatingconnectorsontherearofyour
computer...............10
Locatingcomponents..........12
Locatingpartsonthesystemboard....13
Locatinginternaldrives.........14
Machinetypeandmodellabel.......15
Chapter2.Usingyourcomputer...17
Frequentlyaskedquestions.........17
NavigatingamongscreensontheWindows8and
Windows8.1operatingsystems........17
NavigatingonWindows8........17
NavigatingonWindows8.1........19
AccessingControlPanelontheWindows8or
Windows8.1operatingsystem........20
UsingWindowsshortcutkeys.........20
Usingthewheelmouse...........21
Settingthecomputervolume.........21
AddinganicontotheWindowsnotificationarea.21
UsingCDsandDVDs............22
HandlingandstoringCDandDVDmedia..22
PlayingaCDorDVD..........23
RecordingaCDorDVD.........23
Chapter3.Y ouandyourcomputer..25
Accessibilityandcomfort..........25
Arrangingyourworkspace........25
Comfort...............25
Glareandlighting............26
Aircirculation.............26
Electricaloutletsandcablelengths.....26
Accessibilityinformation.........26
Registeringyourcomputer..........29
Movingyourcomputertoanothercountryor
region..................29
Chapter4.Security..........31
Securityfeatures..............31
Lockingthecomputercover.........32
AttachingaKensington-stylecablelock.....33
Preventingunauthorizedaccesstoyour
computer.................33
Usingfingerprintauthentication........34
Usingandunderstandingfirewalls.......34
Protectingdataagainstviruses........34
Chapter5.Installingorreplacing
hardware...............35
Handlingstatic-sensitivedevices.......35
Installingorreplacinghardware........35
Installingexternaloptions........35
Removingthecomputercover.......35
Removingandreinstallingthefrontbezel..36
Accessingthesystemboardcomponentsand
drives................37
InstallingorreplacingaPCIExpresscard..39
Installingorreplacingamemorymodule...41
Replacingthebattery..........42
Replacingtheharddiskdrive.......43
Replacingtheopticaldrive........45
Replacingthesolid-statedrive......49
Replacingthepowersupplyassembly...54
Replacingtheheatsinkandfanassembly..58
Replacingthemicroprocessor.......61
Replacingthesystemfanassembly....64
ReplacingthefrontaudioandUSB
assembly...............65
ReplacingtheWiFiunits.........66
InstallingorremovingtherearWiFiantenna.71
InstallingorremovingthefrontWiFiantenna.73
Replacingthekeyboardormouse.....75
Completingthepartsreplacement.....76
Chapter6.Recoveryinformation...79
©CopyrightLenovo2013,2015
i
Page 4

RecoveryinformationfortheWindows7operating
system..................79
Creatingandusingrecoverymedia.....79
Performingbackupandrecoveryoperations.80
UsingtheRescueandRecoveryworkspace.81
Creatingandusingarescuemedium....82
Reinstallingpreinstalledapplicationsand
devicedrivers.............83
Reinstallingsoftwareprograms......84
Reinstallingdevicedrivers........84
Solvingrecoveryproblems........84
RecoveryinformationfortheWindows8or
Windows8.1operatingsystem........85
Refreshingyourcomputer........85
Resettingyourcomputertothefactorydefault
settings................85
Usingtheadvancedstartupoptions....85
RecoveringyouroperatingsystemifWindows
8orWindows8.1failstostart.......86
RecoveryinformationfortheWindows10operating
system..................86
Chapter7.UsingtheSetupUtility
program................89
StartingtheSetupUtilityprogram.......89
Viewingandchangingsettings........89
UsingBIOSpasswords...........89
Passwordconsiderations.........90
Power-OnPassword..........90
AdministratorPassword.........90
HardDiskPassword...........90
Setting,changing,anddeletingapassword.90
Erasinglostorforgottenpasswords(clearing
CMOS)................91
Enablingordisablingadevice........91
Selectingastartupdevice..........91
Selectingatemporarystartupdevice....92
Selectingorchangingthestartupdevice
sequence...............92
EnablingErPLPScompliancemode......92
ExitingtheSetupUtilityprogram.......93
Chapter8.Updatingsystem
programs...............95
Usingsystemprograms...........95
UpdatingtheBIOS.............95
RecoveringfromaPOST/BIOSupdatefailure..95
Cleaningandmaintenance..........98
Basics................98
Cleaningyourcomputer.........98
Goodmaintenancepractices.......99
Movingyourcomputer...........100
Chapter10.T roubleshootingand
diagnostics.............103
Basictroubleshooting............103
Troubleshootingprocedure..........104
Troubleshooting..............105
Audioproblems............105
CDproblems.............106
DVDproblems.............107
Intermittentproblems..........109
Keyboard,mouse,orpointingdevice
problems...............109
Monitorproblems............111
Networkingproblems..........113
Optionproblems............115
Performanceandlockupproblems.....116
Printerproblems............118
Serialconnectorproblems........118
Softwareproblems...........118
USBproblems.............120
Diagnosticprograms............120
LenovoSolutionCenter.........120
LenovoThinkVantageToolbox.......121
PC-DoctorforDOS...........121
Chapter11.Gettinginformation,help,
andservice.............123
Informationresources............123
Windowshelpsystem..........123
SafetyandWarranty...........123
LenovoWebsite............123
LenovoSupportWebsite.........124
Helpandservice..............124
Usingthedocumentationanddiagnostic
programs...............124
Callingforservice............124
Usingotherservices..........125
Purchasingadditionalservices......125
AppendixA.Notices.........127
Trademarks................128
Chapter9.Preventingproblems...97
Keepingyourcomputercurrent........97
Gettingthelatestdevicedriversforyour
computer...............97
Gettingthelatestsystemupdates.....97
iiThinkCentreE73UserGuide
AppendixB.Regulatory
information.............129
Exportclassificationnotice..........129
Televisionoutputnotice...........129
Page 5

Electronicemissionsnotices.........129
FederalCommunicationsCommission
DeclarationofConformity........129
Eurasiancompliancemark..........131
Brazilaudionotice.............131
Mexicowireless-radiocomplianceinformation..131
Additionalregulatoryinformation.......132
AppendixD.RestrictionofHazardous
SubstancesDirective(RoHS)....137
EuropeanUnionRoHS...........137
ChinaRoHS................137
TurkishRoHS...............137
UkraineRoHS...............138
IndiaRoHS................138
AppendixC.WEEEandrecycling
information.............133
ImportantWEEEinformation.........133
RecyclinginformationforJapan........133
RecyclinginformationforBrazil........134
BatteryrecyclinginformationforT aiwan.....134
BatteryrecyclinginformationfortheEuropean
Union..................134
AppendixE.ChinaEnergyLabel..139
AppendixF.ENERGYSTARmodel
information.............141
Index.................143
©CopyrightLenovo2013,2015
iii
Page 6

ivThinkCentreE73UserGuide
Page 7

Importantsafetyinformation
CAUTION:
Beforeusingthismanual,besuretoreadandunderstandalltherelatedsafetyinformationforthis
product.RefertotheinformationinthissectionandthesafetyinformationintheSafety,Warranty,and
SetupGuidethatyoureceivedwiththisproduct.Readingandunderstandingthissafetyinformation
reducestheriskofpersonalinjuryanddamagetoyourproduct.
IfyounolongerhaveacopyoftheSafety,Warranty,andSetupGuide,youcanobtainaPortableDocument
Format(PDF)versionfromtheLenovo
LenovoSupportWebsitealsoprovidestheSafety,Warranty,andSetupGuideandthisUserGuidein
additionallanguages.
®
SupportWebsiteathttp://www.lenovo.com/UserManuals.The
Serviceandupgrades
DonotattempttoserviceaproductyourselfunlessinstructedtodosobytheCustomerSupportCenteror
yourdocumentation.OnlyuseaServiceProviderwhoisapprovedtorepairyourparticularproduct.
Note:Somecomputerpartscanbeupgradedorreplacedbythecustomer.Upgradestypicallyare
referredtoasoptions.ReplacementpartsapprovedforcustomerinstallationarereferredtoasCustomer
ReplaceableUnits,orCRUs.Lenovoprovidesdocumentationwithinstructionswhenitisappropriatefor
customerstoinstalloptionsorreplaceCRUs.Youmustcloselyfollowallinstructionswheninstallingor
replacingparts.TheOffstateofapowerindicatordoesnotnecessarilymeanthatvoltagelevelsinsidea
productarezero.Beforeyouremovethecoversfromaproductequippedwithapowercord,alwaysmake
surethatthepoweristurnedoffandthattheproductisunpluggedfromanypowersource.Formore
informationonCRUs,refertoChapter5“Installingorreplacinghardware”onpage35
questionsorconcerns,contacttheCustomerSupportCenter.
Althoughtherearenomovingpartsinyourcomputerafterthepowercordhasbeendisconnected,the
followingwarningsarerequiredforyoursafety.
CAUTION:
.Ifyouhaveany
Hazardousmovingparts.Keepfingersandotherbodypartsaway.
CAUTION:
Beforeyouopenthecomputercover,turnoffthecomputerandwaitseveralminutesuntilthe
computeriscool.
Staticelectricityprevention
Staticelectricity,althoughharmlesstoyou,canseriouslydamagecomputercomponentsandoptions.
Improperhandlingofstatic-sensitivepartscancausedamagetothepart.Whenyouunpackanoption
©CopyrightLenovo2013,2015
v
Page 8

orCRU,donotopenthestatic-protectivepackagecontainingthepartuntiltheinstructionsdirectyou
toinstallit.
WhenyouhandleoptionsorCRUs,orperformanyworkinsidethecomputer,takethefollowingprecautions
toavoidstatic-electricitydamage:
•Limityourmovement.Movementcancausestaticelectricitytobuilduparoundyou.
•Alwayshandlecomponentscarefully.Handleadapters,memorymodules,andothercircuitboardsbythe
edges.Nevertouchexposedcircuitry.
•Preventothersfromtouchingcomponents.
•Whenyouinstallastatic-sensitiveoptionorCRU,touchthestatic-protectivepackagecontainingthe
parttoametalexpansion-slotcoverorotherunpaintedmetalsurfaceonthecomputerforatleasttwo
seconds.Thisreducesstaticelectricityinthepackageandyourbody.
•Whenpossible,removethestatic-sensitivepartfromthestatic-protectivepackagingandinstallthepart
withoutsettingitdown.Whenthisisnotpossible,placethestatic-protectivepackagingonasmooth,
levelsurfaceandplacethepartonit.
•Donotplacethepartonthecomputercoverorothermetalsurface.
Powercordsandpoweradapters
Useonlythepowercordsandpoweradapterssuppliedbytheproductmanufacturer.Donotusetheac
powercordforotherdevices.
Thepowercordsshallbesafetyapproved.ForGermany,itshallbeH05VV-F,3G,0.75mm
othercountries,thesuitabletypesshallbeusedaccordingly.
Neverwrapapowercordaroundapoweradapterorotherobject.Doingsocanstressthecordinwaysthat
cancausethecordtofray,crack,orcrimp.Thiscanpresentasafetyhazard.
Alwaysroutepowercordssothattheywillnotbewalkedon,trippedover,orpinchedbyobjects.
Protectpowercordandpoweradaptersfromliquids.Forinstance,donotleaveyourpowercordorpower
adapternearsinks,tubs,toilets,oronfloorsthatarecleanedwithliquidcleansers.Liquidscancausea
shortcircuit,particularlyifthepowercordorpoweradapterhasbeenstressedbymisuse.Liquidsalsocan
causegradualcorrosionofpowercordterminalsand/ortheconnectorterminalsonapoweradapter,
whichcaneventuallyresultinoverheating.
Ensurethatallpowercordconnectorsaresecurelyandcompletelypluggedintoreceptacles.
Donotuseanypoweradapterthatshowscorrosionattheacinputpinsorshowssignsofoverheating(such
asdeformedplastic)attheacinputoranywhereonthepoweradapter.
Donotuseanypowercordswheretheelectricalcontactsoneitherendshowsignsofcorrosionor
overheatingorwherethepowercordappearstohavebeendamagedinanyway.
2
,orbetter.For
Extensioncordsandrelateddevices
Ensurethatextensioncords,surgeprotectors,uninterruptiblepowersupplies,andpowerstripsthatyouuse
areratedtohandletheelectricalrequirementsoftheproduct.Neveroverloadthesedevices.Ifpowerstrips
areused,theloadshouldnotexceedthepowerstripinputrating.Consultanelectricianformoreinformation
ifyouhavequestionsaboutpowerloads,powerrequirements,andinputratings.
viThinkCentreE73UserGuide
Page 9

Plugsandoutlets
Ifareceptacle(poweroutlet)thatyouintendtousewithyourcomputerequipmentappearstobedamaged
orcorroded,donotusetheoutletuntilitisreplacedbyaqualifiedelectrician.
Donotbendormodifytheplug.Iftheplugisdamaged,contactthemanufacturertoobtainareplacement.
Donotshareanelectricaloutletwithotherhomeorcommercialappliancesthatdrawlargeamountsof
electricity;otherwise,unstablevoltagemightdamageyourcomputer,data,orattacheddevices.
Someproductsareequippedwithathree-prongedplug.Thisplugfitsonlyintoagroundedelectricaloutlet.
Thisisasafetyfeature.Donotdefeatthissafetyfeaturebytryingtoinsertitintoanon-groundedoutlet.If
youcannotinserttheplugintotheoutlet,contactanelectricianforanapprovedoutletadapterortoreplace
theoutletwithonethatenablesthissafetyfeature.Neveroverloadanelectricaloutlet.Theoverallsystem
loadshouldnotexceed80percentofthebranchcircuitrating.Consultanelectricianformoreinformation
ifyouhavequestionsaboutpowerloadsandbranchcircuitratings.
Besurethatthepoweroutletyouareusingisproperlywired,easilyaccessible,andlocatedclosetothe
equipment.Donotfullyextendpowercordsinawaythatwillstressthecords.
Besurethatthepoweroutletprovidesthecorrectvoltageandcurrentfortheproductyouareinstalling.
Carefullyconnectanddisconnecttheequipmentfromtheelectricaloutlet.
Externaldevices
DonotconnectordisconnectanyexternaldevicecablesotherthanUniversalSerialBus(USB)and1394
cableswhilethecomputerpowerison;otherwise,youmightdamageyourcomputer.Toavoidpossible
damagetoattacheddevices,waitatleastfivesecondsafterthecomputerisshutdowntodisconnect
externaldevices.
Heatandproductventilation
Computers,poweradapters,andmanyaccessoriescangenerateheatwhenturnedonandwhenbatteries
arecharging.Alwaysfollowthesebasicprecautions:
•Donotleaveyourcomputer,poweradapter,oraccessoriesincontactwithyourlaporanypartofyour
bodyforanextendedperiodwhentheproductsarefunctioningorwhenthebatteryischarging.Your
computer,poweradapter,andmanyaccessoriesproducesomeheatduringnormaloperation.Extended
contactwiththebodycouldcausediscomfortor,potentially,askinburn.
•Donotchargethebatteryoroperateyourcomputer,poweradapter,oraccessoriesnearflammable
materialsorinexplosiveenvironments.
•Ventilationslots,fans,andheatsinksareprovidedwiththeproductforsafety,comfort,andreliable
operation.Thesefeaturesmightinadvertentlybecomeblockedbyplacingtheproductonabed,sofa,
carpet,orotherflexiblesurface.Neverblock,cover,ordisablethesefeatures.
Inspectyourdesktopcomputerfordustaccumulationatleastonceeverythreemonths.Beforeinspecting
yourcomputer,turnoffthepowerandunplugthecomputer'spowercordfromtheelectricaloutlet;then
removeanydustfromventsandperforationsinthebezel.Ifyounoticeexternaldustaccumulation,then
examineandremovedustfromtheinsideofthecomputerincludingheatsinkinletfins,powersupplyvents,
andfans.Alwaysturnoffandunplugthecomputerbeforeopeningthecover.Ifpossible,avoidoperating
yourcomputerwithintwofeetofhigh-trafficareas.Ifyoumustoperateyourcomputerinornearahigh-traffic
area,inspectand,ifnecessary,cleanyourcomputermorefrequently.
©CopyrightLenovo2013,2015
vii
Page 10

Foryoursafetyandtomaintainoptimumcomputerperformance,alwaysfollowthesebasicprecautions
withyourdesktopcomputer:
•Keepthecoverclosedwheneverthecomputerispluggedin.
•Regularlyinspecttheoutsideofthecomputerfordustaccumulation.
•Removedustfromventsandanyperforationsinthebezel.Morefrequentcleaningsmightberequiredfor
computersindustyorhigh-trafficareas.
•Donotrestrictorblockanyventilationopenings.
•Donotstoreoroperateyourcomputerinsidefurniture,asthismightincreasetheriskofoverheating.
•Airflowtemperaturesintothecomputershouldnotexceed35°C(95°F).
•Donotinstallairfiltrationdevices.Theymayinterferewithpropercooling.
Operatingenvironment
Theoptimalenvironmentinwhichtouseyourcomputeris10°C-35°C(50°F-95°F)withhumidityranging
between35%and80%.Ifyourcomputerisstoredortransportedintemperatureslessthan10°C(50°F),
allowthecoldcomputertoriseslowlytoanoptimaloperatingtemperatureof10°C-35°C(50°F-95°F)before
use.Thisprocesscouldtaketwohoursinextremeconditions.Failuretoallowyourcomputertorisetoan
optimaloperatingtemperaturebeforeusecouldresultinirreparabledamagetoyourcomputer.
Ifpossible,placeyourcomputerinawell-ventilatedanddryareawithoutdirectexposuretosunshine.
Keepelectricalappliancessuchasanelectricfan,radio,high-poweredspeakers,airconditioner,and
microwaveovenawayfromyourcomputerbecausethestrongmagneticfieldsgeneratedbythese
appliancescandamagethemonitoranddataontheharddiskdrive.
Donotplaceanybeveragesontopoforbesidethecomputerorotherattacheddevices.Ifliquidisspilledon
orinthecomputeroranattacheddevice,ashortcircuitorotherdamagemightoccur.
Donoteatorsmokeoveryourkeyboard.Particlesthatfallintoyourkeyboardcancausedamage.
Lasercompliancestatement
CAUTION:
Whenlaserproducts(suchasCD-ROMs,DVDdrives,fiberopticdevices,ortransmitters)are
installed,notethefollowing:
•Donotremovethecovers.Removingthecoversofthelaserproductcouldresultinexposureto
hazardouslaserradiation.Therearenoserviceablepartsinsidethedevice.
•Useofcontrolsoradjustmentsorperformanceofproceduresotherthanthosespecifiedherein
mightresultinhazardousradiationexposure.
DANGER
SomelaserproductscontainanembeddedClass3AorClass3Blaserdiode.Notethefollowing:
Laserradiationwhenopen.Donotstareintothebeam,donotviewdirectlywithoptical
instruments,andavoiddirectexposuretothebeam.
viiiThinkCentreE73UserGuide
Page 11

Powersupplystatement
Neverremovethecoveronapowersupplyoranypartthathasthefollowinglabelattached.
Hazardousvoltage,current,andenergylevelsarepresentinsideanycomponentthathasthislabelattached.
Therearenoserviceablepartsinsidethesecomponents.Ifyoususpectaproblemwithoneoftheseparts,
contactaservicetechnician.
Cleaningandmaintenance
Keepyourcomputerandworkspaceclean.Shutdownthecomputerandthendisconnectthepower
cordbeforecleaningthecomputer.Donotsprayanyliquiddetergentdirectlyonthecomputeroruse
anydetergentcontainingflammablematerialtocleanthecomputer.Spraythedetergentonasoftcloth
andthenwipethecomputersurfaces.
©CopyrightLenovo2013,2015
ix
Page 12

xThinkCentreE73UserGuide
Page 13

Chapter1.Productoverview
Thischapterprovidesinformationaboutthecomputerfeatures,specifications,softwareprogramsprovided
byLenovo,andlocationsofconnectors,components,partsonthesystemboard,andinternaldrives.
Features
Thissectionintroducesthecomputerfeatures.Theinformationcoversavarietyofmodels.
Toviewtheinformationaboutyourspecificmodel,dooneofthefollowing:
•OntheMicrosoft
toviewtheinformation.
•OntheMicrosoftWindows8orWindows8.1operatingsystem,gotothedesktopandmoveyourpointer
tothetop-rightorbottom-rightcornerofthescreentodisplaythecharms.ThenclickSettings➙PC
infotoviewtheinformation.
•OntheMicrosoftWindows10operatingsystem,clicktheStartbuttontoopentheStartmenu.Then,click
Settings➙System➙Abouttoviewtheinformation.
Microprocessor
Toviewthemicroprocessorinformationofyourcomputer,dothefollowing:
•OntheMicrosoftWindows7operationsystem,clickStart,right-clickComputer,andselectProperties
toviewtheinformation.
•OntheMicrosoftWindows8orWindows8.1operatingsystem,gotothedesktopandmoveyourpointer
tothetop-rightorbottom-rightcornerofthescreentodisplaythecharms.ThenclickSettings➙PC
infotoviewtheinformation.
•OntheMicrosoftWindows10operatingsystem,clicktheStartbuttontoopentheStartmenu.Then,click
Settings➙System➙Abouttoviewtheinformation.
®
Windows
®
7operationsystem,clickStart,right-clickComputer,andselectProperties
Memory
Yourcomputersupportsuptotwodoubledatarate3unbuffereddualinlinememorymodules(DDR3
UDIMMs).
Internaldrives
•Opticaldrive:DVD-ROMorDVD-R(availableinsomemodels)
•Hybriddrive(availableinsomemodels)
•SerialAdvancedTechnologyAttachment(SATA)harddiskdrive
•SATAsolid-statedrive(availableinsomemodels)
Videosubsystem
•IntegratedgraphicsforaVideoGraphicsArray(VGA)connectorandaDisplayPort®connector
•PeripheralComponentInterconnect(PCI)Expressx16graphicscardslotonthesystemboardfora
discretegraphicscard
Audiosubsystem
•Integratedhigh-definition(HD)audio
©CopyrightLenovo2013,2015
1
Page 14

•Audioline-inconnector,audioline-outconnector,andmicrophoneconnectorontherearpanel
•Microphoneconnectorandheadphoneconnectoronthefrontpanel
•Internalspeaker(installedinsomemodels)
Connectivity
•PCIExpressFaxmodem(somemodels)
Systemmanagementfeatures
•Abilitytostorepower-onself-test(POST)hardwaretestresults
•DesktopManagementInterface(DMI)
DesktopManagementInterfaceprovidesacommonpathforuserstoaccessinformationaboutall
aspectsofacomputer,includingprocessortype,installationdate,attachedprintersandotherperipherals,
powersources,andmaintenancehistory.
•ErPLPScompliancemode
Theenergy-relatedproductsdirective(ErP)lowestpowerstate(LPS)compliancemodereducesthe
consumptionofelectricitywhenyourcomputerisinsleeporoffmode.Formoreinformation,see
“EnablingErPLPScompliancemode”onpage92
.
•PrebootExecutionEnvironment(PXE)
ThePrebootExecutionEnvironmentisanenvironmenttostartcomputersusinganetworkinterface
independentofdatastoragedevices(suchastheharddiskdrive)orinstalledoperatingsystems.
•SystemManagement(SM)BasicInput/OutputSystem(BIOS)andSMsoftware
TheSMBIOSspecificationdefinesdatastructuresandaccessmethodsinaBIOSthatallowsauseror
applicationtostoreandretrieveinformationspecificaboutthecomputerinquestion.
•WakeonLAN
WakeonLANisanEthernetcomputernetworkingstandardthatallowsacomputertobeturnedon
orwokenupbyanetworkmessage.Themessageisusuallysentbyaprogramrunningonanother
computeronthesamelocalareanetwork.
•WakeonRing
WakeonRing,sometimesreferredtoasWakeonModem,isaspecificationthatallowssupported
computersanddevicestoresumefromsleeporhibernationmode.
•WindowsManagementInstrumentation(WMI)
WindowsManagementInstrumentationisasetofextensionstotheWindowsDriverModel.Itprovidesan
operatingsysteminterfacethroughwhichinstrumentedcomponentsprovideinformationandnotification.
2ThinkCentreE73UserGuide
Page 15

Input/Output(I/O)features
•OneDisplayPortconnector
•OneEthernetconnector
•One9-pinserialconnector(optional)
•OneVGAmonitorconnector
•SixUniversalSerialBus(USB)connectors
–TwoUSB2.0connectorsonthefrontpanel
–TwoUSB2.0connectorsontherearpanel
–TwoUSB3.0connectorsontherearpanel
•Threeaudioconnectorsontherearpanel(audioline-inconnector,audioline-outconnector,and
microphoneconnector)
•Twoaudioconnectorsonthefrontpanel(microphoneconnectorandheadphoneconnector)
Formoreinformation,see“Locatingconnectors,controls,andindicatorsonthefrontofyourcomputer”on
page9
and“Locatingconnectorsontherearofyourcomputer”onpage10.
Expansion
•Oneopticaldrivebay
•OnePCIExpressx16graphicscardslot
•Onesecondarysolid-statedrivebay(optional)
•Oneslimcardreaderdrivebay
•Twoharddiskdrivebays(onestandardandoneoptional)
•TwoPCIExpressx1cardslots
Powersupply
Yourcomputercomeswithoneofthefollowingpowersupplies:
•180-wattautomaticvoltage-sensingpowersupply
•240-wattautomaticvoltage-sensingpowersupply
Securityfeatures
•ComputraceAgentsoftwareembeddedinfirmware
•Abilitytoenableordisableadevice
•AbilitytoenableanddisableUSBconnectorsindividually
•Power-onpassword(POP),administratorpassword,andharddiskdrivepasswordtodeterunauthorized
useofyourcomputer
•Startupsequencecontrol
•Startupwithoutkeyboardormouse
•SupportforaKensington-stylecablelock
•Supportforapadlock
Formoreinformation,seeChapter4“Security”onpage31
.
Preinstalledsoftwareprograms
Chapter1.Productoverview3
Page 16

Yourcomputerispreinstalledwithsoftwareprogramstohelpyouworkmoreeasilyandsecurely.Formore
information,see“Lenovoprograms”onpage5
.
Preinstalledoperatingsystem
Yourcomputerispreinstalledwithoneofthefollowingoperatingsystems:
•MicrosoftWindows7operatingsystem
•MicrosoftWindows8operatingsystem
•MicrosoftWindows8.1operatingsystem
•MicrosoftWindows10operatingsystem
Operatingsystem(s),certifiedortestedforcompatibility
•Linux
®
1
(variesbymodeltype)
1.Theoperatingsystem(s)listedherearebeingcertifiedortestedforcompatibilityatthetimethispublicationgoesto
press.AdditionaloperatingsystemsmightbeidentifiedbyLenovoascompatiblewithyourcomputerfollowingthe
publicationofthismanual.Thislistissubjecttochange.Todetermineifanoperatingsystemhasbeencertifiedor
testedforcompatibility,checktheWebsiteoftheoperatingsystemvendor.
4ThinkCentreE73UserGuide
Page 17

Specifications
Thissectionliststhephysicalspecificationsforyourcomputer.
Dimensions
Width:97mm(3.8inches)
Height:333mm(13.1inches)
Depth:368mm(14.5inches)
Weight
Maximumconfigurationasshipped:6kg(13.2lb)(withoutpackage)
Maximumconfigurationasshipped:8.5kg(18.7lb)(withpackage)
Environment
•Airtemperature:
Operating:10°Cto35°C(50°Fto95°F)
Storageinoriginalshippingpackage:-40°Cto60°C(-40°Fto140°F)
Storagewithoutpackage:-10°Cto60°C(14°Fto140°F)
•Humidity:
Operating:20%to80%(non-condensing)
Storage:20%to90%(non-condensing)
•Altitude:
Operating:-50to10000ft(-15.2to3048m)
Storage:-50to35000ft(-15.2to10668m)
Electricalinput
•Inputvoltage:
–Lowrange:
Minimum:100Vac
Maximum:127Vac
Inputfrequencyrange:50/60Hz
Voltage-selectionswitchsetting:115Vac
–Highrange:
Minimum:200Vac
Maximum:240Vac
Inputfrequencyrange:50/60Hz
Voltage-selectionswitchsetting:230Vac
Lenovoprograms
YourcomputercomeswithLenovoprogramstohelpyouworkmoreeasilyandsecurely.Dependingon
theWindowsoperatingsystempreinstalled,theprogramsmightvary.
Accessingaprogramonyourcomputer
Note:ForWindows7,someoftheLenovoprogramsmightbereadytobeinstalled,soyouneedtoinstall
themmanually.Then,youcanaccessandusetheseprograms.Toinstallaprogramthatisreadytobe
installed,opentheLenovoThinkVantage
®
Toolsprogram,andthenviewtheprogramiconsusingTiles.
Chapter1.Productoverview5
Page 18

Followtheinstructionsundergreyed-outiconstolocatetheiconforthedesiredprogram.Double-click
theicontoinstalltheprogram.
Toaccessaprogramonyourcomputer,dooneofthefollowing:
•ForWindows7orWindows10:
–FromWindowsSearch:
1.DependingonyourWindowsversion,dooneofthefollowing:
–ForWindows7:ClicktheStartbuttontoopentheStartmenu,andthentypetheprogram
nameintothesearchbox.
–ForWindows10:TypetheprogramnameintothesearchboxnexttotheStartbutton.
2.Inthesearchresults,clickthenameofthedesiredprogramtolaunchtheprogram.
–FromtheStartmenuorControlPanel:
1.ClicktheStartbuttontoopentheStartmenu.Then,clickthenameofthedesiredprogramto
launchtheprogram.
2.Iftheprogramnameisnotdisplayed,clickAllProgramsforWindows7orAllappsforWindows
10todisplaytheprogramlist.Fromthelistorafolderinthelist,clickthenameofthedesired
programtolaunchtheprogram.
3.IftheprogramnameisnotdisplayedontheStartmenu,accesstheprogramfromControlPanel.
a.DependingonyourWindowsversion,dooneofthefollowing:
–ForWindows7:ClickControlPanelontheStartmenu.
–ForWindows10:Right-clicktheStartbuttontoopentheStartcontextmenu,andthen
clickControlPanel.
b.ViewControlPanelusingLargeiconsorSmallicons,andthenclickthenameofthedesired
programtolaunchtheprogram.
•ForWindows8orWindows8.1:
1.PresstheWindowskeytogototheStartscreen.Clickthenameofthedesiredprogramto
launchtheprogram.
2.Ifyoucannotfindtheprogramyouneed,dependingonyourWindowsversion,dooneofthefollowing:
–ForWindows8:Movethepointertothebottom-rightcornerofthescreentodisplaythecharms.
ThenclicktheSearchcharmtosearchforthedesiredprogram.
–ForWindows8.1:Clickthearrowiconinthebottom-leftcornerofthescreentogotothe
Appsscreen.Findthedesiredprogramintheappslistorsearchforitinthesearchboxinthe
top-rightcornerofthescreen.
AnintroductiontoLenovoprograms
ThissectionprovidesinformationaboutthemajorLenovoprogramsavailableonyouroperatingsystem.
Note:Dependingonyourcomputermodel,someofthefollowingprogramsmightnotbeavailable.
•ForWindows7only:
–CreateRecoveryMedia
TheCreateRecoveryMediaprogramenablesyoutorestoreonlytheCdriveortheentirestorage
drivetothefactory-defaultsettings.
–LenovoPowerENGAGE
TheLenovoPowerENGAGEprogramenablesyoutoregisteryourcomputerwithLenovo.
6ThinkCentreE73UserGuide
Page 19

–MessageCenterPlus
TheMessageCenterPlusprogramautomaticallydisplaysmessagesinformingyouaboutimportant
noticesfromLenovo,suchasalertsonsystemupdatesandalertsonconditionsthatrequireyour
attention.
–RescueandRecovery
®
TheRescueandRecoveryprogramisaone-buttonrecoveryandrestoresolution.Itincludesaset
ofself-recoverytoolstohelpyoudiagnosecomputerproblems,gethelp,andrecoverfromsystem
crashes,evenifyoucannotstarttheWindowsoperatingsystem.
•ForWindows10only:
–LenovoID
TheLenovoIDprogramenablesyoutocreateyourLenovoIDandaccessallsupportedLenovo
programsandwebportalswithsinglesign-on.
•ForWindows8andWindows8.1:
–LenovoSupport
TheLenovoSupportprogramenablesyoutoregisteryourcomputerwithLenovo,checkthecomputer
healthconditionandbatterystatus,downloadandviewusermanualsforyourcomputer,getthe
warrantyinformationofyourcomputer,andexplorehelpandsupportinformation.
•ForWindows7,Windows8,andWindows8.1:
–FingerprintManagerProorThinkVantageFingerprintSoftware
TheFingerprintManagerProorThinkVantageFingerprintSoftwareprogramenablesyoutousea
fingerprintreader.Theintegratedfingerprintreaderprovidedonsomekeyboardsenablesyoutoenroll
yourfingerprintandassociateitwithyourpower-onpassword,harddiskpassword,andWindows
password.Asaresult,fingerprintauthenticationcanreplacepasswordsandenablesimpleandsecure
useraccess.
–PasswordManager
ThePasswordManagerprogramautomaticallycapturesandfillsinauthenticationinformationfor
WindowsprogramsandWebsites.
•ForWindows7,Windows8.1,andWindows10:
–LenovoBluetoothLock
TheLenovoBluetoothLockprogramenablesyoutouseaBluetoothdevice(suchasyoursmartphone)
asaproximity-basedunitforlockingorunlockingyourcomputerautomatically.Bydetectingthe
distancebetweenyourcomputerandthepredefinedBluetoothdevicethatyouarecarrying,theLenovo
BluetoothLockprogramautomaticallylocksyourcomputerwhenyouwalkawayandunlocksyour
computerwhenyoucomeback.Thisisasimplewaytoprotectyourcomputeragainstunauthorized
accessincasethatyouforgettolockyourcomputer.
–PCCloudManager
ThePCCloudManager(PCM)programisabrowser-basedsolutionforclient-computermanagement.
ThePCMprogramhastwocomponents:PCMServerandPCMClient.PCMServerisinstalledon
thecomputer,wheretheadministratorperformsmanagementwork,suchaspowermanagement
andsecuritymanagement.PCMClientisinstalledontheclientcomputerstobemanaged.The
administratorcanlogintoPCMServertomanagecomputerswithPCMClientinstalled,throughthe
InternetWebbrowser.
•ForWindows8,Windows8.1,andWindows10:
Chapter1.Productoverview7
Page 20

–LenovoCompanion
Yourcomputer’sbestfeaturesandcapabilitiesshouldbeeasytoaccessandunderstand.WithLenovo
Companion,theyare.UseLenovoCompaniontodothefollowing:
–Optimizeyourcomputer’sperformance,monitoryourcomputer’shealth,andmanageupdates.
–Accessyouruserguide,checkwarrantystatus,andviewaccessoriescustomizedforyourcomputer.
–Readhow-toarticles,exploreLenovoforums,andstayup-to-dateontechnologynewswitharticles
andblogsfromtrustedsources.
LenovoCompanionisfilledwithexclusiveLenovocontenttohelpyoulearnmoreaboutwhatyou
candowithyourcomputer.
•ForWindows7,Windows8,Windows8.1,andWindows10:
–LenovoDeviceExperienceorLenovoPCExperience
TheLenovoDeviceExperienceorLenovoPCExperienceprogramhelpsyouworkmoreeasilyand
securely.TheprogramprovideseasyaccesstoLenovoThinkVantageToolsorLenovoT ools,important
settingsandinformationaboutyourcomputer,theLenovoSupportWebsite,andsoon.
–LenovoSolutionCenter
TheLenovoSolutionCenterprogramenablesyoutotroubleshootandresolvecomputerproblems.It
combinesdiagnostictests,systeminformationcollection,securitystatus,andsupportinformation,
alongwithhintsandtipsformaximumsystemperformance.
–PowerManager
ThePowerManagerprogramprovidesconvenient,flexible,andcompletepowermanagementfor
yourcomputer.Itenablesyoutoadjustyourcomputerpowersettingstoachievethebestbalance
betweenperformanceandpowersaving.
–REACHitorLenovoReach
TheREACHitorLenovoReachprogramenhancesyourcloudexperience.Thisprogramkeepsyou
connectedatalltimesandenablesyoutoaccessallyourfavoriteitemsfrompersonalcomputers,
smartphones,ortablets.Asaresult,youcanaccess,edit,andshareyourfilesfromanywhere.You
alsocanaddyourfavoriteWebservicestoyourclouddesktopandstaylogged-intoWebsiteswith
thecloudpasswordmanager.
–SHAREitorLenovoSHAREit
TheSHAREitorLenovoSHAREitprogramprovidesaquickandeasywaytosharefilesandfolders
amongcomputers,smartphones,tablets,orsmartTVswiththeAndroidortheWindowsoperating
systeminstalled.SHAREitorLenovoSHAREitusesanytypeofnetworkorevennonetworkatallto
sharefilesandfolders.
–SystemUpdate
TheSystemUpdateprogramprovidesregularaccesstothesystemupdatesforyourcomputer,such
asdevicedriverupdates,softwareupdates,andBIOSupdates.Theprogramgathersinformationfrom
theLenovoHelpCenteraboutnewupdatesforyourcomputer,thensortsanddisplaystheupdatesfor
downloadandinstallation.Youhavecompletecontrolofwhichupdatestodownloadandinstall.
Locations
Thissectionprovidesinformationtohelpyoulocatetheconnectorsonthefrontandrearofyourcomputer,
partsonthesystemboard,andcomponentsandinternaldrivesinyourcomputer.
8ThinkCentreE73UserGuide
Page 21

Locatingconnectors,controls,andindicatorsonthefrontofyour computer
Figure1“Frontconnector,control,andindicatorlocations”onpage9showsthelocationsoftheconnectors,
controls,andindicatorsonthefrontofyourcomputer.
Figure1.Frontconnector,control,andindicatorlocations
1Opticaldriveeject/closebutton
3Harddiskdriveactivityindicator4Powerindicator
5USB2.0connector
7Headphoneconnector
2Powerbutton
6Microphoneconnector
8USB2.0connector
Chapter1.Productoverview9
Page 22

Locatingconnectorsontherearofyourcomputer
3
4
5 6
3
4
5
6
Figure2“Rearconnectorlocations”onpage10showsthelocationsoftheconnectorsontherearofyour
computer.Someconnectorsontherearofyourcomputerarecolor-codedtohelpyoudeterminewhereto
connectthecablesonyourcomputer.
Figure2.Rearconnectorlocations
1Powercordconnector2DisplayPortconnector
3VGAmonitorconnector4USB3.0connectors
5USB2.0connectors
6Microphoneconnector
7Audioline-outconnector8Audioline-inconnector
9PCIExpressx16graphicscardslot10PCIExpressx1cardslots(2)
11Ethernetconnector
12Security-lockslot
13Padlockloop
Note:Ifyourcomputerisinstalledwithagraphicscard,ensurethatyouusethemonitorconnectorson
thegraphicscard.
ConnectorDescription
Audioline-inconnector
Audioline-outconnector
Usedtoreceiveaudiosignalsfromanexternalaudiodevice,suchasastereo
system.Whenyouattachanexternalaudiodevice,acableisconnectedbetween
theaudioline-outconnectorofthedeviceandtheaudioline-inconnectorofthe
computer.
Usedtosendaudiosignalsfromthecomputertoexternaldevices,suchaspowered
stereospeakers(speakerswithbuilt-inamplifiers),headphones,multimedia
keyboards,ortheaudioline-inconnectoronastereosystemorotherexternal
recordingdevice.
10ThinkCentreE73UserGuide
Page 23

ConnectorDescription
DisplayPortconnector
Usedtoattachahigh-performancemonitor,adirect-drivemonitor,orotherdevices
thatuseaDisplayPortconnector.
Ethernetconnector
UsedtoattachanEthernetcableforalocalareanetwork(LAN).
Note:T ooperatethecomputerwithinFederalCommunicationsCommission(FCC)
ClassBlimits,useaCategory5eorbetterEthernetcable.
Microphoneconnector
Usedtoattachamicrophonetoyourcomputerwhenyouwanttorecordsoundorif
youusespeech-recognitionsoftware.
USB2.0connectorUsedtoattachadevicethatrequiresaUSB2.0connection,suchasakeyboard,a
mouse,ascanner,aprinter,orapersonaldigitalassistant(PDA).
USB3.0connectorUsedtoattachadevicethatrequiresaUSB2.0or3.0connection,suchasa
keyboard,amouse,ascanner,aprinter,orapersonaldigitalassistant(PDA).A
USB3.0connectorprovideshightransmissionspeedstoreducethetimethatis
requiredfordatatransmission.
VGAmonitorconnectorUsedtoattachaVGAmonitororotherdevicesthatuseaVGAmonitorconnector.
Chapter1.Productoverview11
Page 24

Locatingcomponents
Figure3“Componentlocations”onpage12showsthelocationsofthevariouscomponentsinyour
computer.Toremovethecomputercover,see“Removingthecomputercover”onpage35.
Figure3.Componentlocations
1Heatsinkandfanassembly
3Memorymodules(2)4Opticaldrive
5FrontaudioandUSBassembly
7Systemfanassembly
9Harddiskdrive
11Heatsinkfanduct
2Powersupplyassembly
6Frontbezel
8Thermalsensor
10PCIExpresscard(installedinsomemodels)
12ThinkCentreE73UserGuide
Page 25

Locatingpartsonthesystemboard
Figure4“Systemboardpartlocations”onpage13showsthelocationsofthepartsonthesystemboard.
Figure4.Systemboardpartlocations
14-pinpowerconnector2Microprocessor
3Microprocessorfanconnector
5Memoryslot2(DIMM2)
7Powerfanconnector
4Memoryslot1(DIMM1)
6Thermalsensorconnector
8Harddiskdrive/Opticaldrivepowerconnectors(numberand
locationvarybymodel)
914-pinpowerconnector
11SATA3.0connectors
13SATA2.0connector14Frontpanelconnector(forconnectingLEDindicatorsand
10BIOSROM
12Powersupplyfanconnector
thepowerbutton)
15FrontUSBconnector1(forconnectingUSB
ports1and2onthefrontbezel)
17ClearCMOS(ComplementaryMetalOxide
16FrontUSBconnector2(forconnectinganadditionalUSB
device)
18Serial(COM2)connector
Semiconductor)/Recoveryjumper
19Frontaudioconnector20Internalspeakerconnector
21PCIExpressx1cardslots(2)22PCIExpressx16graphicscardslot
23Systemfanconnector
24Battery
Chapter1.Productoverview13
Page 26

Locatinginternaldrives
Internaldrivesaredevicesthatyourcomputerusestoreadandstoredata.Y oucanadddrivestoyour
computertoincreasestoragecapacityandenableyourcomputertoreadothertypesofmedia.Internal
drivesareinstalledinbays.Inthismanual,thebaysarereferredtoasbay1,bay2,andsoon.
Wheninstallingorreplacinganinternaldrive,itisimportanttonotethetypeandsizeofthedrivethatyou
caninstallorreplaceineachbayandcorrectlyconnectthecablestothedriveinstalled.Refertothe
appropriatesectionin“Installingorreplacinghardware”onpage35
replaceinternaldrivesforyourcomputer.
Figure5“Drivebaylocations”onpage14showsthelocationsofthedrivebays.
forinstructionsonhowtoinstallor
Figure5.Drivebaylocations
1Secondaryharddiskdrivebay(withaSATAsolid-statedriveorahybriddriveinstalledinsomemodels)
2Opticaldrivebay(withanopticaldriveinstalledinsomemodels)
3Slimcardreaderdrivebay(withaslimcardreaderinstalledinsomemodels)
4Harddiskdrivebay(witha2.5-inchor3.5-inchSATAharddiskdriveinstalled)
14ThinkCentreE73UserGuide
Page 27

Machinetypeandmodellabel
Machine Type: XXXX
Model Number: XXX
Themachinetypeandmodellabelidentifiesyourcomputer.WhenyoucontactLenovoforhelp,themachine
typeandmodelinformationhelpssupporttechnicianstoidentifyyourcomputerandprovidefasterservice.
Thefollowingisasampleofthemachinetypeandmodellabel.
Figure6.Machinetypeandmodellabel
Chapter1.Productoverview15
Page 28

16ThinkCentreE73UserGuide
Page 29

Chapter2.Usingyourcomputer
Thischapterprovidesinformationonusingsomeofthecomputercomponents.
Frequentlyaskedquestions
Thefollowingareafewtipsthatwillhelpyouoptimizetheuseofyourcomputer.
CanIgetmyuserguideinanotherlanguage?
TheuserguideisavailableinvariouslanguagesontheLenovoSupportWebsiteat:
http://www.lenovo.com/UserManuals
WhereismyrecoverydiscsetorrecoveryUSBkey?
DependingonyourWindowsversion,yourcomputercomeswitharecoverydiscsetorrecovery
USBkey.Ifyourcomputerdoesnotcomewithit,contacttheLenovoCustomerSupportCenterto
orderarecoverydiscsetorrecoveryUSBkey.ForalistofLenovoSupportphonenumbers,goto
http://www.lenovo.com/support/phone.Ifyoucannotfindthesupporttelephonenumberforyourcountry
orregion,contactyourLenovoreseller.
WherecanIfindhelpabouttheWindowsoperatingsystem?
See“Windowshelpsystem”onpage123.
CanIchangetheWindows8.1startupbehaviortoopeneitherthedesktoportheStartscreen?
OntheWindows8.1operatingsystem,youcansetthecomputertoopeneitherthedesktoportheStart
screenbydefault.Tosetthedefaultstartupscreen,dothefollowing:
1.Onthedesktop,moveyourpointertothetaskbaratthebottomofthescreenandright-clickonthe
taskbar.
2.ClickProperties.TheTaskbarandNavigationpropertieswindowisdisplayed.
3.OntheNavigationtab,locatetheStartscreensection,andthendooneofthefollowing:
•Tosetthedesktopasyourdefaultstartupscreen,selectWhenIsigninorcloseallappsona
screen,gotothedesktopinsteadofStartsoacheckisvisible.
•TosettheStartscreenasyourdefaultstartupscreen,removethecheckfromtheWhenIsigninor
closeallappsonthescreen,gotodesktopinsteadofStartcheckbox.
4.ClickOKtosavethenewsetting.
ThisfeatureisnotavailableontheWindows8operatingsystem.
NavigatingamongscreensontheWindows8andWindows8.1operating systems
Thissectionprovidesinstructionsonhowtonavigateamongthedesktop,theStartscreen,andapplications
thatwereopenedfromtheStartscreenontheWindows8andWindows8.1operatingsystems.Fordetailed
instructions,see“NavigatingonWindows8”onpage17
or“NavigatingonWindows8.1”onpage19.
NavigatingonWindows8
Tonavigateamongthedesktop,theStartscreen,andapplicationsthatwereopenedfromtheStartscreen
ontheWindows8operatingsystem,dooneofthefollowing:
©CopyrightLenovo2013,2015
17
Page 30

•FromtheStartscreen,dooneofthefollowingtonavigatetothemostrecentlyaccessedworkspace
(application,PCsettings,ordesktop):
–Usingapointingdevice:Movethepointertotheextremebottom-leftcornerofthescreenuntilasmall
representationoftheworkspaceisdisplayed;thenclicktherepresentation.
–Usingatouchscreen:Swipeinandoutontheleftedgeofthescreen.Representationsofallavailable
workspacesaredisplayedalongtheleftedgeofthescreen.T aptherepresentationoftheworkspaceat
thebottom.
Note:Therepresentationofaworkspaceisdisplayedonlyifyouhaveatleastoneactiveworkspacein
thebackgroundofthesystem.
•FromthedesktoporanyotherworkspacethatisopenedfromtheStartscreen,dooneofthefollowingto
navigatetotheStartscreen:
–Usingapointingdevice:Movethepointertotheextremebottom-leftcornerofthescreenuntilasmall
representationoftheStartscreenisdisplayed;thenclicktherepresentation.
–Usingatouchscreen:Dooneofthefollowing:
–Swipeinandoutontheleftedgeofthescreen.Representationsofallavailableworkspacesare
displayedalongtheleftedgeofthescreen.TaptherepresentationoftheStartscreenatthebottom.
–Swipeinfromtherightedgeofthescreentodisplaythecharms;thentapStart.
•Fromanyworkspace(Startscreen,desktop,PCsettings,orapplicationopenedfromtheStartscreen),
useanyofthefollowingprocedurestogotoanotherworkspacethatyouhavepreviouslyopened:
–Tonavigatetoapreviouslyaccessedworkspace(application,PCsettings,ordesktop),dooneofthe
following:
–Usingapointingdevice:
1.Dooneofthefollowing:
•Movethepointertotheextremetop-leftcornerofthescreenandthenmovethepointer
downwardalongtheleftedgeofthescreen.
•Movethepointertotheextremebottom-leftcornerofthescreenandthenmovethepointer
upwardalongtheleftedgeofthescreen.
Representationsofallavailableworkspacesaredisplayedalongtheleftedgeofthescreen.
Note:OnlyactiveworkspacesthatyouhaveaccessedduringthecurrentWindowssession
aredisplayedalongtheleftedge.Ifyoucloseanactiveworkspace,itsrepresentationdoes
notdisplayalongtheleftedgeofthescreen.
2.Clicktherepresentation.
–Usingatouchscreen:
•Method1
1.Swipeinandoutontheleftedgeofthescreen.Representationsofallavailableworkspaces
aredisplayedalongtheleftedgeofthescreen.
2.T apthedesiredworkspace.
•Method2
1.Swipeinfromtheleftedgeofthescreentonavigatetothenextavailableworkspace.
2.Repeatstep1untilyounavigatetothedesiredworkspace.
–Tonavigatetothemostrecentlyaccessedworkspace(application,PCsettings,ordesktop),doone
ofthefollowing:
–Usingapointingdevice:Movethepointertotheextremetop-leftcornerofthescreenuntilasmall
representationoftheworkspaceisdisplayed;thenclicktherepresentation.
18ThinkCentreE73UserGuide
Page 31

–Usingatouchscreen:Swipeinfromtheleftedgeofthescreen.
ForinformationaboutusingotherfeaturesoftheWindows8operatingsystem,refertotheWindowshelp
system.Formoreinformation,see“Windowshelpsystem”onpage123.
NavigatingonWindows8.1
Tonavigateamongthedesktop,theStartscreen,andapplicationsthatwereopenedfromtheStartscreen
ontheWindows8.1operatingsystem,dooneofthefollowing:
•FromtheStartscreen,dooneofthefollowingtonavigatetothemostrecentlyaccessedworkspace
(application,setting,ordesktop):
–Usingapointingdevice:Movethepointertotheextremebottom-leftcornerofthescreenuntilthe
Windowsscreen-controlicon
–Usingatouchscreen:Swipeinandoutontheleftedgeofthescreen.Representationsofallavailable
workspacesaredisplayedalongtheleftedgeofthescreen.TaptheWindowsscreen-controlicon
atthebottom.
Note:TheWindowsscreen-controliconisdisplayedonlyifyouhaveatleastoneactiveworkspace
inthebackgroundofthesystem.
•FromthedesktoporanyotherworkspacethatisopenedfromtheStartscreen,dooneofthefollowingto
navigatetotheStartscreen:
–Usingapointingdevice:
isdisplayed;thenclicktheicon.
–Fromthedesktop,clicktheWindowsscreen-controlicon
–Fromanyotherworkspace,movethepointertotheextremebottom-leftcornerofthescreenuntil
theWindowsscreen-controlicon
–Usingatouchscreen:Dooneofthefollowing:
–Fromthedesktop,taptheWindowsscreen-controliconinthebottom-leftcornerofthescreen.
–Fromanyotherworkspace,dooneofthefollowing:
•Swipeinandoutontheleftedgeofthescreen.Representationsofallavailableworkspaces
aredisplayedalongtheleftedgeofthescreen.TaptheWindowsscreen-controlicon
thebottom.
•Swipeinfromtherightedgeofthescreentodisplaythecharms;thentapStart.
•Fromanyworkspace(Startscreen,desktop,PCsettings,orapplicationopenedfromtheStartscreen),
useanyofthefollowingprocedurestogotoanotherworkspacethatyouhavepreviouslyopened:
–Tonavigatetoapreviouslyaccessedworkspace(application,setting,ordesktop),dooneofthe
following:
–Usingapointingdevice:
1.Dooneofthefollowing:
•Movethepointertotheextremetop-leftcornerofthescreenandthenmovethepointer
downwardalongtheleftedgeofthescreen.
•Movethepointertotheextremebottom-leftcornerofthescreenandthenmovethepointer
upwardalongtheleftedgeofthescreen.
isdisplayed;thenclicktheicon.
inthebottom-leftcornerofthescreen.
at
Representationsofallavailableworkspacesaredisplayedalongtheleftedgeofthescreen.
Chapter2.Usingyourcomputer19
Page 32

Note:OnlyactiveworkspacesthatyouhaveaccessedduringthecurrentWindowssession
aredisplayedalongtheleftedge.Ifyoucloseanactiveworkspace,itsrepresentationdoes
notdisplayalongtheleftedgeofthescreen.
2.Clicktherepresentation.
–Usingatouchscreen:
•Method1
1.Swipeinandoutontheleftedgeofthescreen.Representationsofallavailableworkspaces
aredisplayedalongtheleftedgeofthescreen.
2.T apthedesiredworkspace.
•Method2
1.Swipeinfromtheleftedgeofthescreentonavigatetothenextavailableworkspace.
2.Repeatstep1untilyounavigatetothedesiredworkspace.
–Tonavigatetothemostrecentlyaccessedworkspace(application,PCsettings,ordesktop),doone
ofthefollowing:
–Usingapointingdevice:Movethepointertotheextremetop-leftcornerofthescreenuntilthe
Windowsscreen-controlicon
–Usingatouchscreen:Swipeinfromtheleftedgeofthescreen.
ForinformationaboutusingotherfeaturesoftheWindows8.1operatingsystem,opentheHelp+Tips
applicationfromtheStartscreenorAppsscreen,orrefertotheWindowshelpsystem.Formoreinformation,
see“Windowshelpsystem”onpage123.
isdisplayed;thenclicktheicon.
AccessingControlPanelontheWindows8orWindows8.1operating system
OntheWindowsoperatingsystem,youcanviewandchangecomputersettingsthroughControlPanel.To
accessControlPanelontheWindows8orWindows8.1operatingsystem,dooneofthefollowing:
•Fromthedesktop
1.Movethepointertothetop-rightorbottom-rightcornerofthescreentodisplaythecharms.
2.ClickSettings.
3.ClickControlPanel.
•FromtheStartscreen
–ForWindows8:
1.Movethepointertothetop-rightorbottom-rightcornerofthescreentodisplaythecharms.
2.ClickSearch.
3.OntheAppsscreen,scrolltotherightside,andclickControlPanelintheWindowsSystem
section.
–ForWindows8.1:
1.Clickthearrowiconinthebottom-leftcornerofthescreentogototheAppsscreen.
2.Scrolltotherightside,andclickControlPanelintheWindowsSystemsection.
UsingWindowsshortcutkeys
Boththestandardkeyboardandthefingerprintreaderkeyboardprovidethreekeysyoucanusewithyour
MicrosoftWindowsoperatingsystem.
20ThinkCentreE73UserGuide
Page 33

•ThetwoWindowslogokeysarelocatedbesidetheAltkeyoneithersideofthespacebar.Theyfeature
theWindowslogo.OntheWindows7orWindows10operatingsystem,presstheWindowskeyto
opentheStartmenu.OntheWindows8orWindows8.1operatingsystem,presstheWindowskey
toswitchbetweenthecurrentworkspaceandtheStartscreen.ThestyleoftheWindowslogovaries
dependingonthekeyboardtype.
•Thecontext-menukeyislocatednexttotheCtrlkeyontherightsideoftheSpacebar.Pressingthe
context-menukeyopensthecontextmenufortheactiveprogram,icon,orobject.
Note:YoucanusethemouseortheUpandDownarrowkeystohighlightmenuselections.OntheWindows
7operatingsystem,youcanclosetheStartmenuorthecontextmenubyclickingthemouseorpressingEsc.
Usingthewheelmouse
Thewheelmousehasthefollowingcontrols:
1PrimarymousebuttonUsethisbuttontoselectorstartaprogramormenuitem.
2Wheel
3Secondarymousebutton
Youcanswitchthefunctionoftheprimaryandsecondarymousebuttonsandchangeotherdefaultbehavior
throughthemousepropertiesfunctionintheWindowsControlPanel.
Usethewheeltocontrolthescrollingactionofthemouse.Thedirectioninwhichyou
rotatethewheelcontrolsthedirectionofthescrollingaction.
Usethisbuttontodisplayamenufortheactiveprogram,icon,orobject.
Settingthecomputervolume
Tosetthecomputervolume,dothefollowing:
1.ClickthevolumeiconintheWindowsnotificationareaonthetaskbar.
Note:IfthevolumeiconisnotdisplayedintheWindowsnotificationarea,addtheicontothe
notificationarea.See“AddinganicontotheWindowsnotificationarea”onpage21.
2.Followtheinstructionsonthescreentoadjustthevolume.Clickthespeakericontomutetheaudio.
AddinganicontotheWindowsnotificationarea
ToaddanicontotheWindowsnotificationarea,dothefollowing:
1.Clickthearrownexttothenotificationareatoviewhiddenicons.Then,clickthedesirediconand
dragittothenotificationarea.
2.Iftheiconisnotdisplayed,turnontheicon.
a.DependingonyourWindowsversion,dooneofthefollowing:
Chapter2.Usingyourcomputer21
Page 34

•ForWindows7:ClicktheStartbuttontoopentheStartmenu,andthenclickControlPanel.
ViewControlPanelusingLargeiconsorSmallicons,andthenclickNotificationAreaIcons➙
Turnsystemiconsonoroff.
•ForWindows8orWindows8.1:OpenControlPanel.ViewControlPanelusingLargeiconsor
Smallicons,andthenclickNotificationAreaIcons➙T urnsystemiconsonoroff.
Note:FordetailedinformationonhowtoopenControlPanelonWindows8andWindows8.1,
see“AccessingControlPanelontheWindows8orWindows8.1operatingsystem”onpage20
•ForWindows10:ClicktheStartbuttontoopentheStartmenu.Then,clickSettings➙System
➙Notifications&actions➙Turnsystemiconsonoroff.
b.Turnonthedesiredicon.
3.IftheiconisstillnotdisplayedintheWindowsnotificationarea,repeatstep1.
UsingCDsandDVDs
YourcomputermighthaveaDVDROMdriveorrecordableDVDdriveinstalled.DVDdrivesuse
industry-standard,12cm(4.75-inch)CDmediaorDVDmedia.IfyourcomputercomeswithaDVDdrive,
thedrivecanreadDVD-ROMdiscs,DVD-Rdiscs,DVD-RAMdiscs,DVD-RWdiscs,andalltypesofCDs,
suchasCD-ROMdiscs,CD-RWdiscs,CD-Rdiscs,andaudioCDs.IfyouhavearecordableDVDdrive,
itcanalsorecordonDVD-Rdiscs,DVD-RWdiscs,typeIIDVD-RAMdiscs,CD-RWstandardandhigh
speeddiscs,andCD-Rdiscs.
FollowtheseguidelineswhenusingtheDVDdrive:
.
•Donotplacethecomputerinalocationwherethedriveisexposedtothefollowing:
–Hightemperature
–Highhumidity
–Excessivedust
–Excessivevibrationorsuddenshock
–Aninclinedsurface
–Directsunlight
•DonotinsertanyobjectotherthanaCDorDVDintothedrive.
•Beforemovingthecomputer,removetheCDorDVDfromthedrive.
HandlingandstoringCDandDVDmedia
CDandDVDmediaaredurableandreliable,buttheydorequiresomecareandspecialhandling.When
handlingandstoringaCDorDVD,followtheseguidelines:
•Holdthediscbyitsedges.Donottouchthesurfaceofthesidethatisnotlabeled.
•Toremovedustorfingerprints,wipethediscwithaclean,softclothfromthecentertotheoutside.Wiping
thediscinacirculardirectionmightcauselossofdata.
•Donotwriteorstickpaperonthedisc.
•Donotscratchormarkthedisc.
•Donotplaceorstorethediscindirectsunlight.
•Donotusebenzene,thinners,orothercleanerstocleanthedisc.
•Donotdroporbendthedisc.
•Donotinsertdamageddiscsintothedrive.Warped,scratched,ordirtydiscscandamagethedrive.
22ThinkCentreE73UserGuide
Page 35

PlayingaCDorDVD
IfyourcomputercomeswithaDVDdrive,youcanlistentoaudioCDsorwatchDVDmovies.T oplaya
CDorDVD,dothefollowing:
1.PresstheEject/LoadbuttonontheDVDdrivetoopenthetray.
2.Withthetrayfullyextended,inserttheCDorDVDintothetray.SomeDVDdriveshaveasnaphubin
thecenterofthetray.Ifyourdrivehasasnaphub,supportthetraywithonehandandthenpushthe
centeroftheCDorDVDuntilitsnapsintoplace.
3.PresstheEject/Loadbuttonagainorgentlypushthetrayforwardtoclosethetray.TheCDorDVD
playerprogramstartsautomatically.Foradditionalinformation,refertotheCDorDVDplayerprogram
helpsystem.
ToremoveaCDorDVDfromtheDVDdrive,dothefollowing:
1.Withthecomputeron,presstheEject/Loadbutton.Whenthetrayslidesoutautomatically,carefully
removethedisc.
2.ClosethetraybypressingtheEject/Loadbuttonorbygentlypushingthetrayforward.
Note:IfthetraydoesnotslideoutofthedrivewhenyoupresstheEject/Loadbutton,insertastraightened
paperclipintotheemergency-ejectholeonthefrontoftheDVDdrive.Makesurethatthedriveispowered
offwhenusingtheemergencyeject.UsetheEject/Loadbuttoninsteadoftheemergencyejectexcept
inanemergency.
RecordingaCDorDVD
Ifyouropticaldrivesupportsrecording,youcanrecordaCDorDVD.
TorecordaCDorDVD,dothefollowing:
1.Insertarecordablediscintotheopticaldrivethatsupportsrecording.
2.OpenthePowerDVDCreate,PowerProducer,orPower2Goprogram.See“Accessingaprogramon
yourcomputer”onpage5.
3.Followtheinstructionsonthescreen.
Chapter2.Usingyourcomputer23
Page 36

24ThinkCentreE73UserGuide
Page 37

Chapter3.Youandyourcomputer
Thischapterprovidesinformationaboutaccessibility,comfort,andrelocatingyourcomputertoother
countriesorregions.
Accessibilityandcomfort
Goodergonomicpracticeisimportanttogetthemostfromyourpersonalcomputerandtoavoiddiscomfort.
Arrangeyourworkplaceandtheequipmentyouusetosuityourindividualneedsandthekindofwork
thatyouperform.Inaddition,usehealthyworkhabitstomaximizeyourperformanceandcomfortwhile
usingyourcomputer.
Thefollowingtopicsprovideinformationaboutarrangingyourworkarea,settingupyourcomputer
equipment,andestablishinghealthyworkhabits.
Arrangingyourworkspace
Togetthemostfromyourcomputer,arrangeboththeequipmentyouuseandyourworkareatosuityour
needsandthekindofworkyoudo.Yourcomfortisofforemostimportance,butlightsources,aircirculation,
andthelocationofelectricaloutletscanalsoaffectthewayyouarrangeyourworkspace.
Comfort
Althoughnosingleworkingpositionisidealforeveryone,hereareafewguidelinestohelpyoufinda
positionthatsuitsyoubest.
Sittinginthesamepositionforalongtimecancausefatigue.Thebackrestandseatofyourchairshould
adjustindependentlyandprovidegoodsupport.Theseatshouldhaveacurvedfronttorelievepressureon
thethighs.Adjusttheseatsothatyourthighsareparalleltothefloorandyourfeetareeitherflatonthe
floororonafootrest.
Whenusingthekeyboard,keepyourforearmsparalleltothefloorandyourwristsinacomfortableposition.
Usealighttouchonthekeyboardandyourhandsandfingersrelaxed.Changetheangleofthekeyboard
formaximumcomfortbyadjustingthepositionofthekeyboardfeet.
Adjustthemonitorsothetopofthescreenisat,orslightlybelow,eyelevel.Placethemonitorata
comfortableviewingdistance,usually51to61cm(20to24inches),andpositionitsoyoucanviewit
withouthavingtotwistyourbody.Also,positionotherequipmentyouuseregularly,suchasthetelephoneor
amouse,withineasyreach.
©CopyrightLenovo2013,2015
25
Page 38

Glareandlighting
Positionthemonitortominimizeglareandreflectionsfromoverheadlights,windows,andotherlightsources.
Reflectedlightfromshinysurfacescancauseannoyingreflectionsonyourmonitorscreen.Placethe
monitoratrightanglestowindowsandotherlightsources,whenpossible.Reduceoverheadlighting,if
necessary,byturningofflightsorusinglowerwattagebulbs.Ifyouinstallthemonitornearawindow,use
curtainsorblindstoblockthesunlight.Y oucanadjustthebrightnessandcontrastcontrolsonthemonitor
astheroomlightingchangesthroughouttheday.
Whereitisimpossibletoavoidreflectionsortoadjustthelighting,anantiglarefilterplacedoverthescreen
mightbehelpful.However,thesefiltersmightaffecttheclarityoftheimageonthescreen;trythemonlyafter
youhaveexhaustedothermethodsofreducingglare.
Dustbuildupcompoundsproblemsassociatedwithglare.Remembertocleanyourmonitorscreen
periodicallyusingasoftclothasdirectedinyourmonitordocumentation.
Aircirculation
Yourcomputerandmonitorproduceheat.Thecomputerhasafanthatpullsinfreshairandforcesouthot
air.Themonitorletshotairescapethroughvents.Blockingtheairventscancauseoverheating,whichmight
resultinamalfunctionordamage.Placethecomputerandmonitorsothatnothingblockstheairvents;
usually,51mm(2inches)ofairspaceissufficient.Also,makesurethattheventedairisnotblowing
onpeople.
Electricaloutletsandcablelengths
Thelocationofelectricaloutlets,thelengthofpowercordsandcablesthatconnecttothemonitor,printer,
andotherdevicesmightdeterminethefinalplacementofyourcomputer.
Whenarrangingyourworkspace:
•Avoidtheuseofextensioncords.Whenpossible,plugthecomputerpowercorddirectlyintoanelectrical
outlet.
•Keeppowercordsandcablesneatlyroutedawayfromwalkwaysandotherareaswheretheymight
getkickedaccidentally.
Formoreinformationaboutpowercords,see“Powercordsandpoweradapters”onpagevi
.
Accessibilityinformation
Lenovoiscommittedtoprovidinguserswhohavehearing,vision,andmobilitylimitationswithgreater
accesstoinformationandtechnology.Thissectionprovidesinformationaboutthewaystheseuserscanget
themostoutoftheircomputerexperience.Youalsocangetthemostup-to-dateaccessibilityinformation
fromthefollowingWebsite:
http://www.lenovo.com/accessibility
Keyboardshortcuts
Thefollowingtablecontainskeyboardshortcutsthatcanhelpmakeyourcomputereasiertouse.
Note:Dependingonyourkeyboard,someofthefollowingkeyboardshortcutsmightnotbeavailable.
KeyboardshortcutFunction
Windowslogokey+U
RightShiftforeightseconds
26ThinkCentreE73UserGuide
OpenEaseofAccessCenter
TurnonorturnoffFilterKeys
Page 39

KeyboardshortcutFunction
ShiftfivetimesTurnonorturnoffStickyKeys
NumLockforfivesecondsTurnonorturnoffToggleKeys
LeftAlt+LeftShift+NumLock
LeftAlt+LeftShift+PrtScn(orPrtSc)TurnonorturnoffHighContrast
TurnonorturnoffMouseKeys
Formoreinformation,gotohttp://windows.microsoft.com/,andthenperformasearchusinganyofthe
followingkeywords:keyboardshortcut s,keycombinations,shortcutkeys.
EaseofAccessCenter
EaseofAccessCenterontheWindowsoperatingsystemenablesuserstoconfiguretheircomputersto
suittheirphysicalandcognitiveneeds.
TouseEaseofAccessCenter,dothefollowing:
1.DependingonyourWindowsversion,dooneofthefollowing:
•ForWindows7:ClicktheStartbuttontoopentheStartmenu,andthenclickControlPanel.View
ControlPanelusingLargeiconsorSmallicons,andthenclickEaseofAccessCenter.
•ForWindows8orWindows8.1:Movethepointertothetop-rightorbottom-rightcornerofthescreen
todisplaythecharms.Then,clickSettings➙ChangePCsettings➙EaseofAccess.
•ForWindows10:ClicktheStartbuttontoopentheStartmenu.Then,clickSettings➙Easeof
Access.
2.Choosetheappropriatetoolbyfollowingtheinstructionsonthescreen.
EaseofAccessCentermainlyincludesthefollowingtools:
•Magnifier
Magnifierisausefulutilitythatenlargestheentirescreenorpartofthescreensothatyoucansee
theitemsbetter.
•Narrator
Narratorisascreenreaderthatreadsaloudwhatisdisplayedonthescreenanddescribeseventssuchas
errormessages.
•On-ScreenKeyboard
Ifyouprefertotypeorenterdataintoyourcomputerusingamouse,joystick,orotherpointingdevice
insteadofaphysicalkeyboard,youcanuseOn-ScreenKeyboard.On-ScreenKeyboarddisplaysavisual
keyboardwithallthestandardkeys.
•HighContrast
HighContrastisafeaturethatheightensthecolorcontrastofsometextandimagesonyourscreen.Asa
result,thoseitemsaremoredistinctandeasiertoidentify.
•Personalizedkeyboard
Adjustkeyboardsettingstomakeyourkeyboardeasiertouse.Forexample,youcanuseyourkeyboard
tocontrolthepointerandtypecertainkeycombinationseasier.
•Personalizedmouse
Adjustmousesettingstomakeyourmouseeasiertouse.Forexample,youcanchangethepointer
appearanceandmakeiteasiertomanagewindowswiththemouse.
SpeechRecognition
SpeechRecognitionenablesyoutocontrolyourcomputerbyvoice.
Chapter3.Youandyourcomputer27
Page 40

Usingonlyyourvoice,youcanstartprograms,openmenus,clickobjectsonthescreen,dictatetextinto
documents,andwriteandsende-mails.Everythingyoudowiththekeyboardandmousecanbedonewith
onlyyourvoice.
TouseSpeechRecognition,dothefollowing:
1.DependingonyourWindowsversion,dooneofthefollowing:
•ForWindows7:ClicktheStartbuttontoopentheStartmenu,andthenclickControlPanel.
•ForWindows8orWindows8.1:OpenControlPanel.See“AccessingControlPanelontheWindows
8orWindows8.1operatingsystem”onpage20.
•ForWindows10:Right-clicktheStartbuttontoopentheStartcontextmenu,andthenclickControl
Panel.
2.ViewControlPanelusingLargeiconsorSmallicons,andthenclickSpeechRecognition.
3.Followtheinstructionsonthescreen.
Screen-readertechnologies
Screen-readertechnologiesareprimarilyfocusedonsoftwareprograminterfaces,helpinformationsystems,
andvariousonlinedocuments.Foradditionalinformationaboutscreenreaders,seethefollowing:
•UsingPDFswithscreenreaders:
http://www.adobe.com/accessibility.html?promoid=DJGVE
•UsingtheJAWSscreenreader:
http://www.freedomscientific.com/jaws-hq.asp
•UsingtheNVDAscreenreader:
http://www.nvaccess.org/
Screenresolution
Youcanmakethetextandimagesonyourscreeneasiertoreadbyadjustingthescreenresolutionofyour
computer.
Toadjustthescreenresolution,dothefollowing:
1.Right-clickablankareaonthedesktop.
2.DependingonyourWindowsversion,dooneofthefollowing:
•ForWindows7,Windows8,orWindows8.1:ClickScreenresolution.
•ForWindows10:ClickDisplaysettings.OntheDisplaytab,clickAdvanceddisplaysettings.
3.Followtheinstructionsonthescreen.
Note:Settingtheresolutiontoolowmightpreventsomeitemsfromfittingonthescreen.
Customizableitemsize
Youcanmaketheitemsonyourscreeneasiertoreadbychangingtheitemsize.
•Tochangetheitemsizetemporarily,usetheMagnifiertoolinEaseofAccessCenter.See“Easeof
AccessCenter”onpage27
.
•Tochangetheitemsizepermanently,dothefollowing:
–Changethesizeofalltheitemsonyourscreen.
1.Right-clickablankareaonthedesktop.
2.DependingonyourWindowsversion,dooneofthefollowing:
28ThinkCentreE73UserGuide
Page 41

–ForWindows7,Windows8,orWindows8.1:ClickScreenresolution➙Maketextandother
itemslargerorsmaller.
–ForWindows10:ClickDisplaysettings.
3.Changetheitemsizebyfollowingtheinstructionsonthescreen.
4.ClickApply.Thischangewilltakeeffectthenexttimeyoulogintotheoperatingsystem.
–ChangethesizeoftheitemsonaWebpage.
PressandholdCtrl,andthenpresstheplus-signkey(+)toenlargeortheminus-signkey(-)to
reducethetextsize.
–Changethesizeoftheitemsonthedesktoporawindow.
Note:Thisfunctionmightnotworkonsomewindows.
Ifyourmousehasawheel,pressandholdCtrl,andthenscrollthewheeltochangetheitemsize.
Industry-standardconnectors
Yourcomputerprovidesindustry-standardconnectorsthatenableyoutoconnectassistivedevices.
Formoreinformationaboutthelocationandfunctionoftheconnectors,see“Locations”onpage8.
TTY/TDDconversionmodem
Yourcomputersupportstheuseofatexttelephone(TTY)orthetelecommunicationsdeviceforthedeaf
(TDD)conversionmodem.ThemodemmustbeconnectedbetweenyourcomputerandaTTY/TDD
telephone.Then,youcantypeamessageonyourcomputerandsendittothetelephone.
Documentationinaccessibleformats
Lenovoprovideselectronicdocumentationinaccessibleformats,suchasproperlytaggedPDFfilesor
HyperTextMarkupLanguage(HTML)files.Lenovoelectronicdocumentationisdevelopedtoensure
thatvisuallyimpaireduserscanreadthedocumentationthroughascreenreader.Eachimageinthe
documentationalsoincludesadequatealternativetextsothatvisuallyimpaireduserscanunderstandthe
imagewhentheyuseascreenreader.
Registeringyourcomputer
WhenyouregisteryourcomputerwithLenovo,youenterrequiredinformationintoaLenovodatabase.The
informationenablesLenovotocontactyouwhenthereisarecallorothersevereproblemandprovide
quickerservicewhenyoucallLenovoforhelp.Inaddition,somelocationsofferextendedprivilegesand
servicestoregisteredusers.
ToregisteryourcomputerwithLenovo,ensurethatyourcomputerisconnectedtotheInternet.Then,goto
http://www.lenovo.com/registerandfollowtheinstructionsonthescreen.
Movingyourcomputertoanothercountryorregion
Whenyoumoveyourcomputertoanothercountryorregion,youmusttakelocalelectricalstandards
intoconsideration.
Ifyourelocateyourcomputertoacountryorregionthatusesanelectricaloutletstyledifferentfromthe
typeyouarecurrentlyusing,youwillhavetopurchaseeitherelectricalplugadaptersornewpowercords.
YoucanorderpowercordsdirectlyfromLenovo.
Forpowercordinformationandpartnumbers,goto:
http://www.lenovo.com/powercordnotice
Chapter3.Youandyourcomputer29
Page 42

30ThinkCentreE73UserGuide
Page 43

Chapter4.Security
Thischapterprovidesinformationabouthowtoprotectyourcomputerfromtheftandunauthorizeduse.
Securityfeatures
Thefollowingsecurityfeaturesareavailableonyourcomputer:
•ComputraceAgentsoftwareembeddedinfirmware
TheComputraceAgentsoftwareisanITassetmanagementandcomputertheftrecoverysolution.
Thesoftwaredetectsifchangeshavebeenmadeonthecomputer,suchashardware,software,or
thecomputercall-inlocation.
Note:YoumighthavetopurchaseasubscriptiontoactivatetheComputraceAgentsoftware.
•AbilitytoenableanddisabledevicesandUSBconnectors
Formoreinformation,see“Enablingordisablingadevice”onpage91
•Startupsequencecontrol
Formoreinformation,see“Selectingorchangingthestartupdevicesequence”onpage92
•Startupwithoutkeyboardormouse
Yourcomputerisabletologintotheoperatingsystemwithoutkeyboardormouseconnected.
.
.
©CopyrightLenovo2013,2015
31
Page 44

Lockingthecomputercover
3
4
5
6
Lockingthecomputercoverhelpspreventunauthorizedpeoplefromgainingaccesstotheinsideofyour
computer.Y ourcomputercomeswithapadlockloopsothatthecomputercovercannotberemoved
whenapadlockisinstalled.
Figure7.Installingapadlock
32ThinkCentreE73UserGuide
Page 45

AttachingaKensington-stylecablelock
3
4
5
6
YoucanuseaKensington-stylecablelocktosecureyourcomputertoadesk,table,orothernon-permanent
fixture.Thecablelockattachestothesecurity-lockslotattherearofyourcomputerandisoperatedwitha
keyorcombinationdependingonthetypeselected.Thecablelockalsolocksthebuttonsusedtoopenthe
computercover.Thisisthesametypeoflockusedwithmanynotebookcomputers.Y oucanordersucha
cablelockdirectlyfromLenovobysearchingforKensingtonat:
http://www.lenovo.com/support
Figure8.Kensington-stylecablelock
Preventingunauthorizedaccesstoyourcomputer
YoucanuseBIOSpasswordsandWindowsaccountstopreventunauthorizedaccesstoyourcomputerand
data.
•TouseBIOSpasswords,see“UsingBIOSpasswords”onpage89
•TouseWindowsaccounts,dothefollowing:
1.DependingonyourWindowsversion,dooneofthefollowing:
–ForWindows7:ClicktheStartbuttontoopentheStartmenu,andthenclickControlPanel➙
UserAccounts.
–ForWindows8orWindows8.1:Movethepointertothetop-rightorbottom-rightcornerofthe
screentodisplaythecharms.Then,clickSettings➙ChangePCsettings➙Accounts.
–ForWindows10:ClicktheStartbuttontoopentheStartmenu,andthenclickSettings➙
Accounts.
2.Followtheinstructionsonthescreen.
.
Chapter4.Security33
Page 46

Usingfingerprintauthentication
Ifyourkeyboardhasafingerprintreader,youcanusefingerprintauthenticationtoreplacepasswordsfor
simpleandsecureuseraccess.Tousefingerprintauthentication,firstenrollyourfingerprintsandassociate
themwithyourpasswords(suchasthepower-onpassword,harddiskpassword,andWindowspassword).
Usethefingerprintreaderandthefingerprintprogramtocompletethisprocedure.
Tousefingerprintauthentication,dooneofthefollowing:
•ForWindows7,Windows8,orWindows8.1:UsetheFingerprintManagerProorThinkVantageFingerprint
SoftwareprogramprovidedbyLenovo.Toopentheprogram,see“Accessingaprogramonyour
computer”onpage5.Formoreinformationaboutusingtheprogram,refertothehelpsystemofthe
program.
•ForWindows10:UsethefingerprinttoolprovidedbyWindows.ClicktheStartbuttontoopentheStart
menu,andthenclickSettings➙Accounts➙Sign-inoptions.Followtheinstructionsonthescreen.
Tousethefingerprintreader,refertothedocumentationshippedwiththefingerprintkeyboardorlocatedon
theLenovoSupportWebsiteathttp://www.lenovo.com/support/keyboards.
Usingandunderstandingfirewalls
Afirewallcanbehardware,software,oracombinationofbothdependingonthelevelofsecurityrequired.
Firewallsworkonasetofrulestodeterminewhichinboundandoutboundconnectionsareauthorized.If
yourcomputerispreintalledwithafirewallprogram,ithelpsprotectagainstcomputerInternetsecurity
threats,unauthorizedaccess,intrusions,andInternetattacks.Italsoprotectsyourprivacy.Formore
informationabouthowtousethefirewallprogram,refertothehelpsystemofyourfirewallprogram.
TheWindowsoperatingsystempreinstalledonyourcomputerprovidestheWindowsFirewall.Fordetailson
usingtheWindowsFirewall,referto“Windowshelpsystem”onpage123
.
Protectingdataagainstviruses
Yourcomputerispreinstalledwithanantivirusprogramtohelpyouguardagainst,detect,andeliminate
viruses.
Lenovoprovidesafullversionofantivirussoftwareonyourcomputerwithafree30-daysubscription.After
30days,youmustrenewthelicensetocontinuereceivingtheantivirussoftwareupdates.
Note:Virusdefinitionfilesmustbekeptup-to-datetoguardagainstnewviruses.
Formoreinformationabouthowtouseyourantivirussoftware,refertothehelpsystemofyourantivirus
software.
34ThinkCentreE73UserGuide
Page 47

Chapter5.Installingorreplacinghardware
Thischapterprovidesinstructionsonhowtoinstallorreplacehardwareforyourcomputer.
Handlingstatic-sensitivedevices
Donotopenthestatic-protectivepackagecontainingthenewpartuntilthedefectiveparthasbeenremoved
fromthecomputerandyouarereadytoinstallthenewpart.Staticelectricity,althoughharmlesstoyou,can
seriouslydamagecomputercomponentsandparts.
Whenyouhandlepartsandothercomputercomponents,taketheseprecautionstoavoidstatic-electricity
damage:
•Limityourmovement.Movementcancausestaticelectricitytobuilduparoundyou.
•Alwayshandlepartsandothercomputercomponentscarefully.HandlePCIExpresscards,memory
modules,systemboards,andmicroprocessorsbytheedges.Nevertouchanyexposedcircuitry.
•Preventothersfromtouchingthepartsandothercomputercomponents.
•Beforeyoureplaceanewpart,touchthestatic-protectivepackagecontainingtheparttoametal
expansion-slotcoverorotherunpaintedmetalsurfaceonthecomputerforatleasttwoseconds.This
reducesstaticelectricityfromthepackageandyourbody.
•Whenpossible,removethenewpartfromthestatic-protectivepackaging,andinstallitdirectlyinthe
computerwithoutsettingthepartdown.Whenthisisnotpossible,placethestatic-protectivepackage
thatthepartcameinonasmooth,levelsurfaceandplacethepartonit.
•Donotplacethepartonthecomputercoverorothermetalsurface.
Installingorreplacinghardware
Thissectionprovidesinstructionsonhowtoinstallorreplacehardwareforyourcomputer.Y oucanexpand
thecapabilitiesofyourcomputerandmaintainyourcomputerbyinstallingorreplacinghardware.
Attention:Donotopenyourcomputerorattemptanyrepairbeforereadingandunderstandingthe
“Importantsafetyinformation”onpagev.
Notes:
1.UseonlycomputerpartsprovidedbyLenovo.
2.Wheninstallingorreplacinganoption,usetheappropriateinstructionsinthissectionalongwiththe
instructionsthatcomewiththeoption.
Installingexternaloptions
Youcanconnectexternaloptionstoyourcomputer,suchasexternalspeakers,aprinter,orascanner.For
someexternaloptions,youmustinstalladditionalsoftwareinadditiontomakingthephysicalconnection.
Wheninstallinganexternaloption,see“Locatingconnectors,controls,andindicatorsonthefrontofyour
computer”onpage9
requiredconnector.Then,usetheinstructionsthatcomewiththeoptiontohelpyoumaketheconnection
andinstallanysoftwareordevicedriversthatarerequiredfortheoption.
and“Locatingconnectorsontherearofyourcomputer”onpage10toidentifythe
Removingthecomputercover
Attention:Donotopenyourcomputerorattemptanyrepairbeforereadingandunderstandingthe
“Importantsafetyinformation”onpagev.
©CopyrightLenovo2013,2015
35
Page 48

Thissectionprovidesinstructionsonhowtoremovethecomputercover.
3
4
5
6
CAUTION:
Beforeyouopenthecomputercover,turnoffthecomputerandwaitseveralminutesuntilthe
computeriscool.
Toremovethecomputercover,dothefollowing:
1.Removeanymediafromthedrivesandturnoffallattacheddevicesandthecomputer.
2.Disconnectallpowercordsfromelectricaloutlets.
3.Disconnectthepowercords,Input/Outputcables,andanyothercablesthatareconnectedtothe
computer.See“Locatingconnectors,controls,andindicatorsonthefrontofyourcomputer”onpage9
and“Locatingconnectorsontherearofyourcomputer”onpage10.
4.Removeanylockingdevicethatsecuresthecomputercover,suchasapadlockoraKensington-style
cablelock.See“Lockingthecomputercover”onpage32
and“AttachingaKensington-stylecable
lock”onpage33.
5.Removethetwoscrewsthatsecurethecomputercoverandslidethecomputercovertotherearto
removeit.
Figure9.Removingthecomputercover
Removingandreinstallingthefrontbezel
Attention:Donotopenyourcomputerorattemptanyrepairbeforereadingandunderstandingthe
“Importantsafetyinformation”onpagev
Thissectionprovidesinstructionsonhowtoremoveandreinstallthefrontbezel.
Toremoveandreinstallthefrontbezel,dothefollowing:
1.T urnoffthecomputeranddisconnectallpowercordsfromelectricaloutlets.
2.Removethecomputercover.See“Removingthecomputercover”onpage35.
36ThinkCentreE73UserGuide
.
Page 49

3.Removethefrontbezelbyreleasingthethreeplastictabsonthetopofthefrontbezelandpivoting
thefrontbezeloutwardtoremoveitfromthecomputer.Carefullylaythefrontbezelasidewithout
disconnectingthepowerswitchandlight-emittingdiode(LED)assemblycable.
Figure10.Removingthefrontbezel
4.T oreinstallthefrontbezel,aligntheotherthreeplastictabsonthebottomofthefrontbezelwiththe
correspondingholesinthechassis,thenpivotthefrontbezelinwarduntilitsnapsintoposition.
Figure11.Reinstallingthefrontbezel
Whattodonext:
•Toworkwithanotherpieceofhardware,gototheappropriatesection.
•Tocompletetheinstallationorreplacement,goto“Completingthepartsreplacement”onpage76
Accessingthesystemboardcomponentsanddrives
Attention:Donotopenyourcomputerorattemptanyrepairbeforereadingandunderstandingthe
“Importantsafetyinformation”onpagev.
Chapter5.Installingorreplacinghardware37
.
Page 50
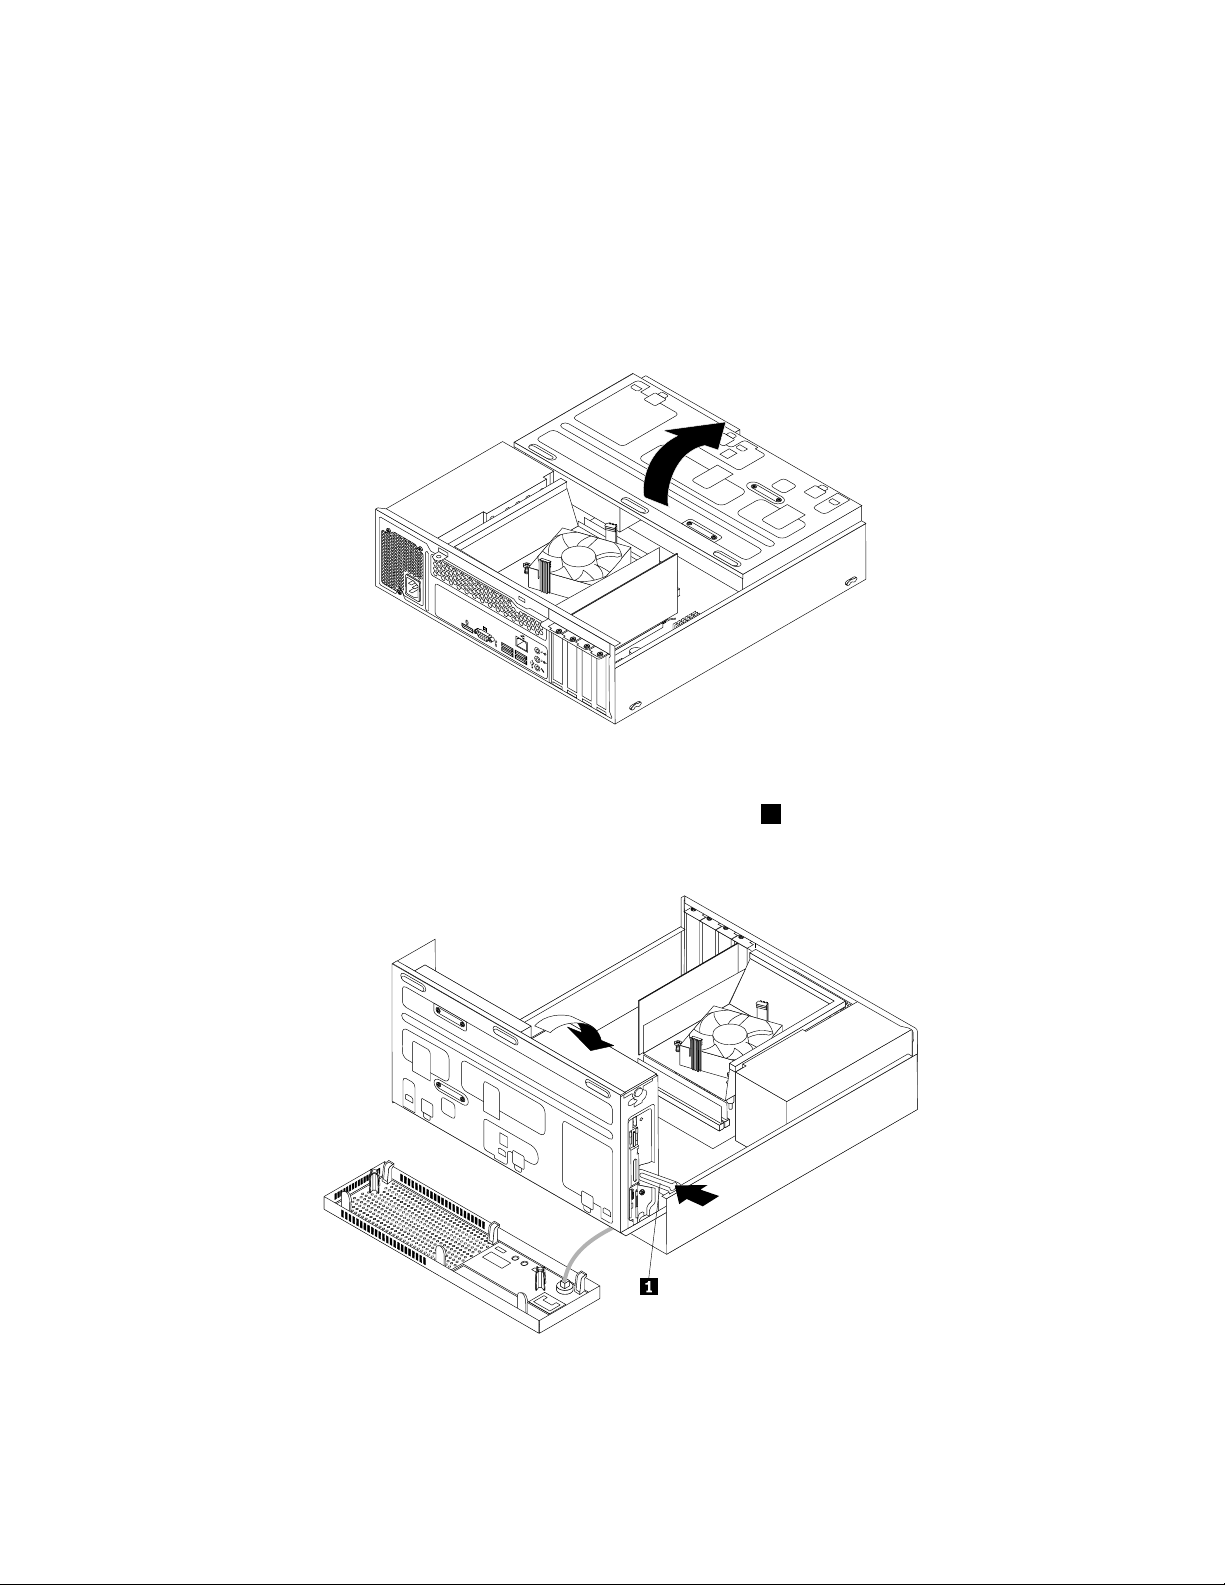
Thissectionprovidesinstructionsonhowtoaccessthesystemboardcomponentsanddrives.
3
4
5
6
Toaccessthesystemboardcomponentsanddrives,dothefollowing:
1.T urnoffthecomputeranddisconnectallpowercordsfromelectricaloutlets.
2.Removethecomputercover.See“Removingthecomputercover”onpage35.
3.Removethefrontbezel.See“Removingandreinstallingthefrontbezel”onpage36.
4.Pivotthedrivebayassemblyupwardtoaccessalltheinternaldrives,cables,andothercomponents.
Figure12.Pivotingthedrivebayassemblyupward
5.T olowerthedrivebayassembly,pressthedrivebayassemblyclip1inwardandpivotthedrivebay
assemblydownwardasshown.
Figure13.Loweringthedrivebayassembly
38ThinkCentreE73UserGuide
Page 51

InstallingorreplacingaPCIExpresscard
Attention:Donotopenyourcomputerorattemptanyrepairbeforereadingandunderstandingthe
“Importantsafetyinformation”onpagev.
ThissectionprovidesinstructionsonhowtoinstallorreplaceaPCIExpresscard.Yourcomputerhastwo
PCIExpressx1cardslotsandonePCIExpressx16graphicscardslot.
ToinstallorreplaceaPCIExpresscard,dothefollowing:
1.T urnoffthecomputeranddisconnectallpowercordsfromelectricaloutlets.
2.Removethecomputercover.See“Removingthecomputercover”onpage35.
3.DependingonwhetheryouareinstallingorreplacingaPCIExpresscard,dooneofthefollowing:
•IfyouareinstallingaPCIExpresscard,removethescrewthatsecurestheappropriatemetalslot
cover.Then,removethemetalslotcover.
Chapter5.Installingorreplacinghardware39
Page 52

•IfyouarereplacinganoldPCIExpresscard,removethescrewthatsecurestheoldPCIExpress
3
4
5
6
card,grasptheoldcardthatiscurrentlyinstalled,andgentlypullitoutoftheslot.
Figure14.RemovingaPCIExpresscard
Notes:
a.Thecardfitstightlyintothecardslot.Ifnecessary,alternatemovingeachsideofthecardasmall
amountuntilitisremovedfromthecardslot.
b.Ifthecardisheldinplacebyaretaininglatch,pressthecardretaininglatch1asshownto
disengagethelatch.Graspthecardandgentlypullitoutoftheslot.
4.RemovethenewPCIExpresscardfromitsstatic-protectivepackage.
5.InstallthenewPCIExpresscardintotheappropriateslotonthesystemboard.See“Locatingpartson
thesystemboard”onpage13.
Note:IfyouareinstallingaPCIExpressx16graphicscard,makesurethatthememoryslotretaining
clipsareclosedbeforeyouinstallthegraphicscard.
6.InstallthescrewtosecurethenewPCIExpresscardinplace.
40ThinkCentreE73UserGuide
Page 53
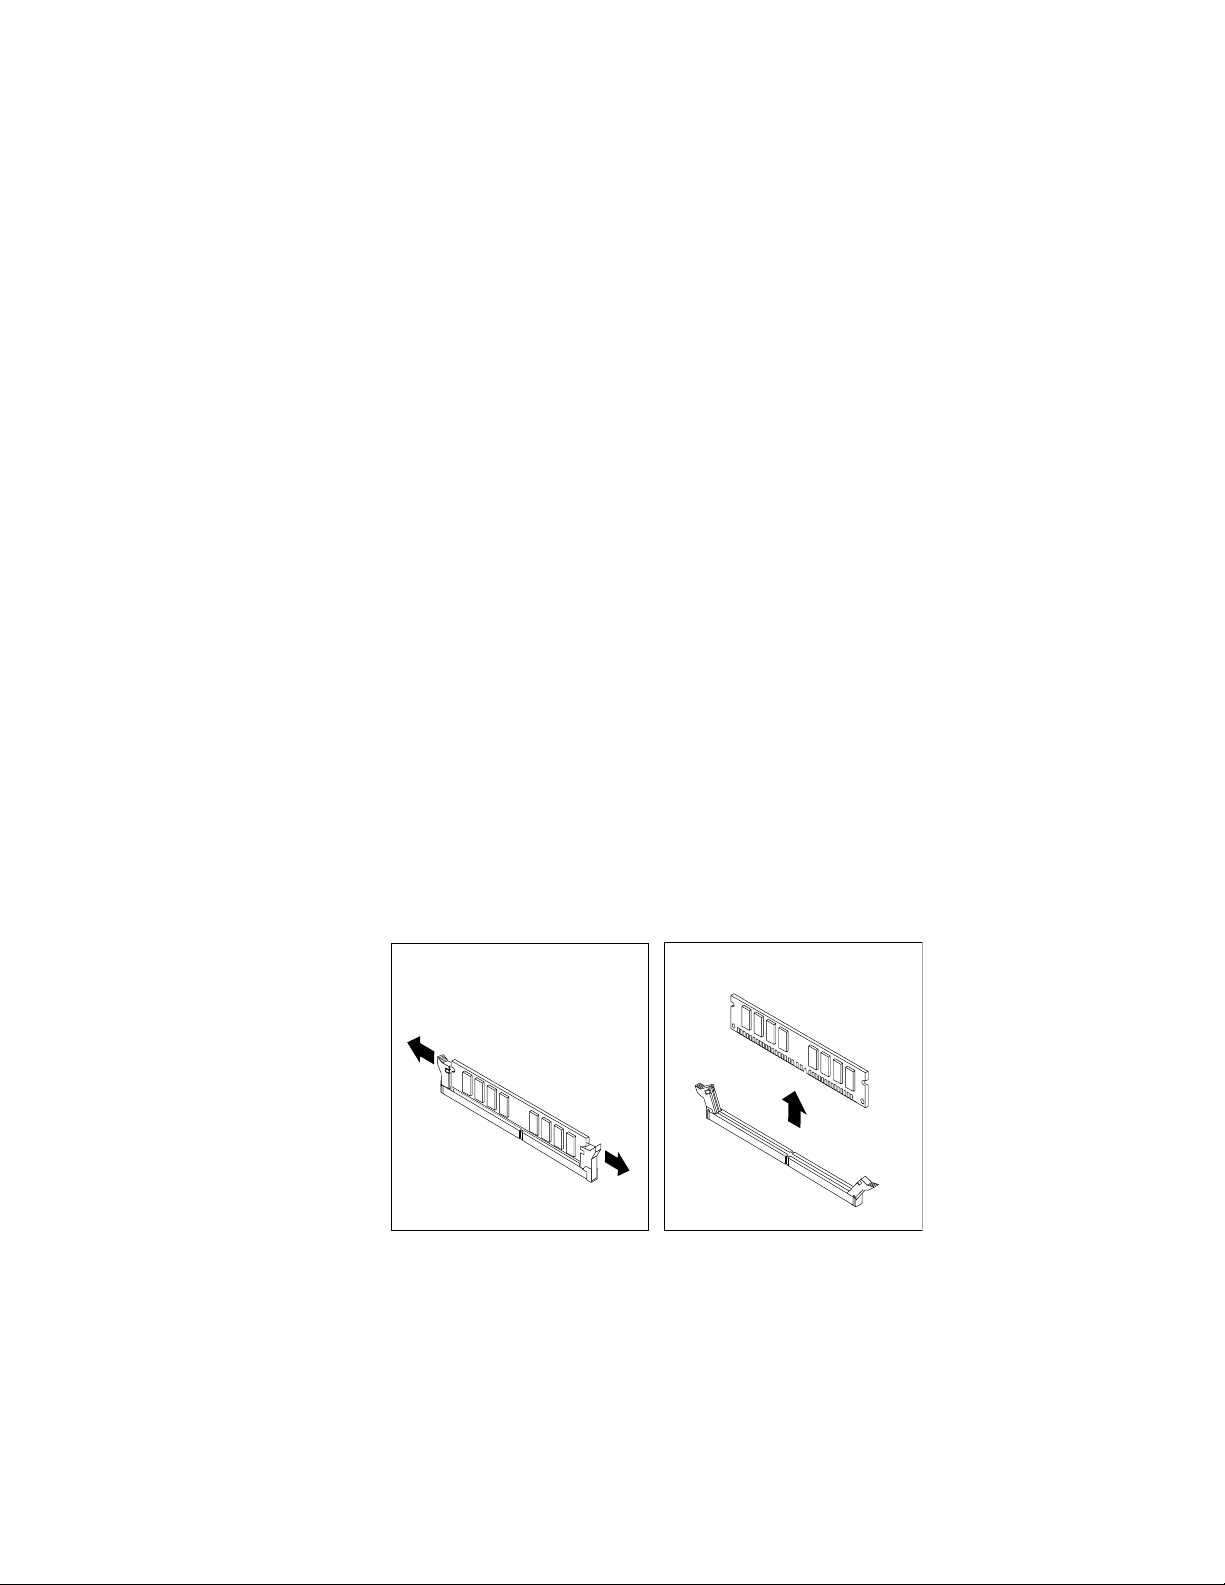
Whattodonext:
•Toworkwithanotherpieceofhardware,gototheappropriatesection.
•Tocompletetheinstallationorreplacement,goto“Completingthepartsreplacement”onpage76.
Installingorreplacingamemorymodule
Attention:Donotopenyourcomputerorattemptanyrepairbeforereadingandunderstandingthe
“Importantsafetyinformation”onpagev.
Thissectionprovidesinstructionsonhowtoinstallorreplaceamemorymodule.
YourcomputerhastwoslotsforinstallingorreplacingDDR3UDIMMsthatprovideuptoamaximumof8
GBsystemmemory.Wheninstallingorreplacingamemorymodule,use1GB,2GB,or4GBDDR3
UDIMMsinanycombinationuptoamaximumof8GB.
Toinstallorreplaceamemorymodule,dothefollowing:
1.T urnoffthecomputeranddisconnectallpowercordsfromelectricaloutlets.
2.Removethecomputercover.See“Removingthecomputercover”onpage35.
3.Removethefrontbezel.See“Removingandreinstallingthefrontbezel”onpage36.
4.Pivotthedrivebayassemblyupwardtogainaccesstothememoryslots.See“Accessingthesystem
boardcomponentsanddrives”onpage37.
5.Removetheheatsinkfanduct.See“Replacingtheheatsinkandfanassembly”onpage58.
6.Locatethememoryslots.See“Locatingpartsonthesystemboard”onpage13.
7.Removeanypartsthatmightpreventyouraccesstothememoryslots.Dependingonyourcomputer
model,youmightneedtoremovethePCIExpressx16graphicscardforeasieraccesstothememory
slots.See“InstallingorreplacingaPCIExpresscard”onpage39.
8.Dependingonwhetheryouareinstallingorreplacingamemorymodule,dooneofthefollowing:
•Ifyouarereplacinganoldmemorymodule,opentheretainingclipsandgentlypullthememory
moduleoutofthememoryslot.
Figure15.Removingamemorymodule
Chapter5.Installingorreplacinghardware41
Page 54
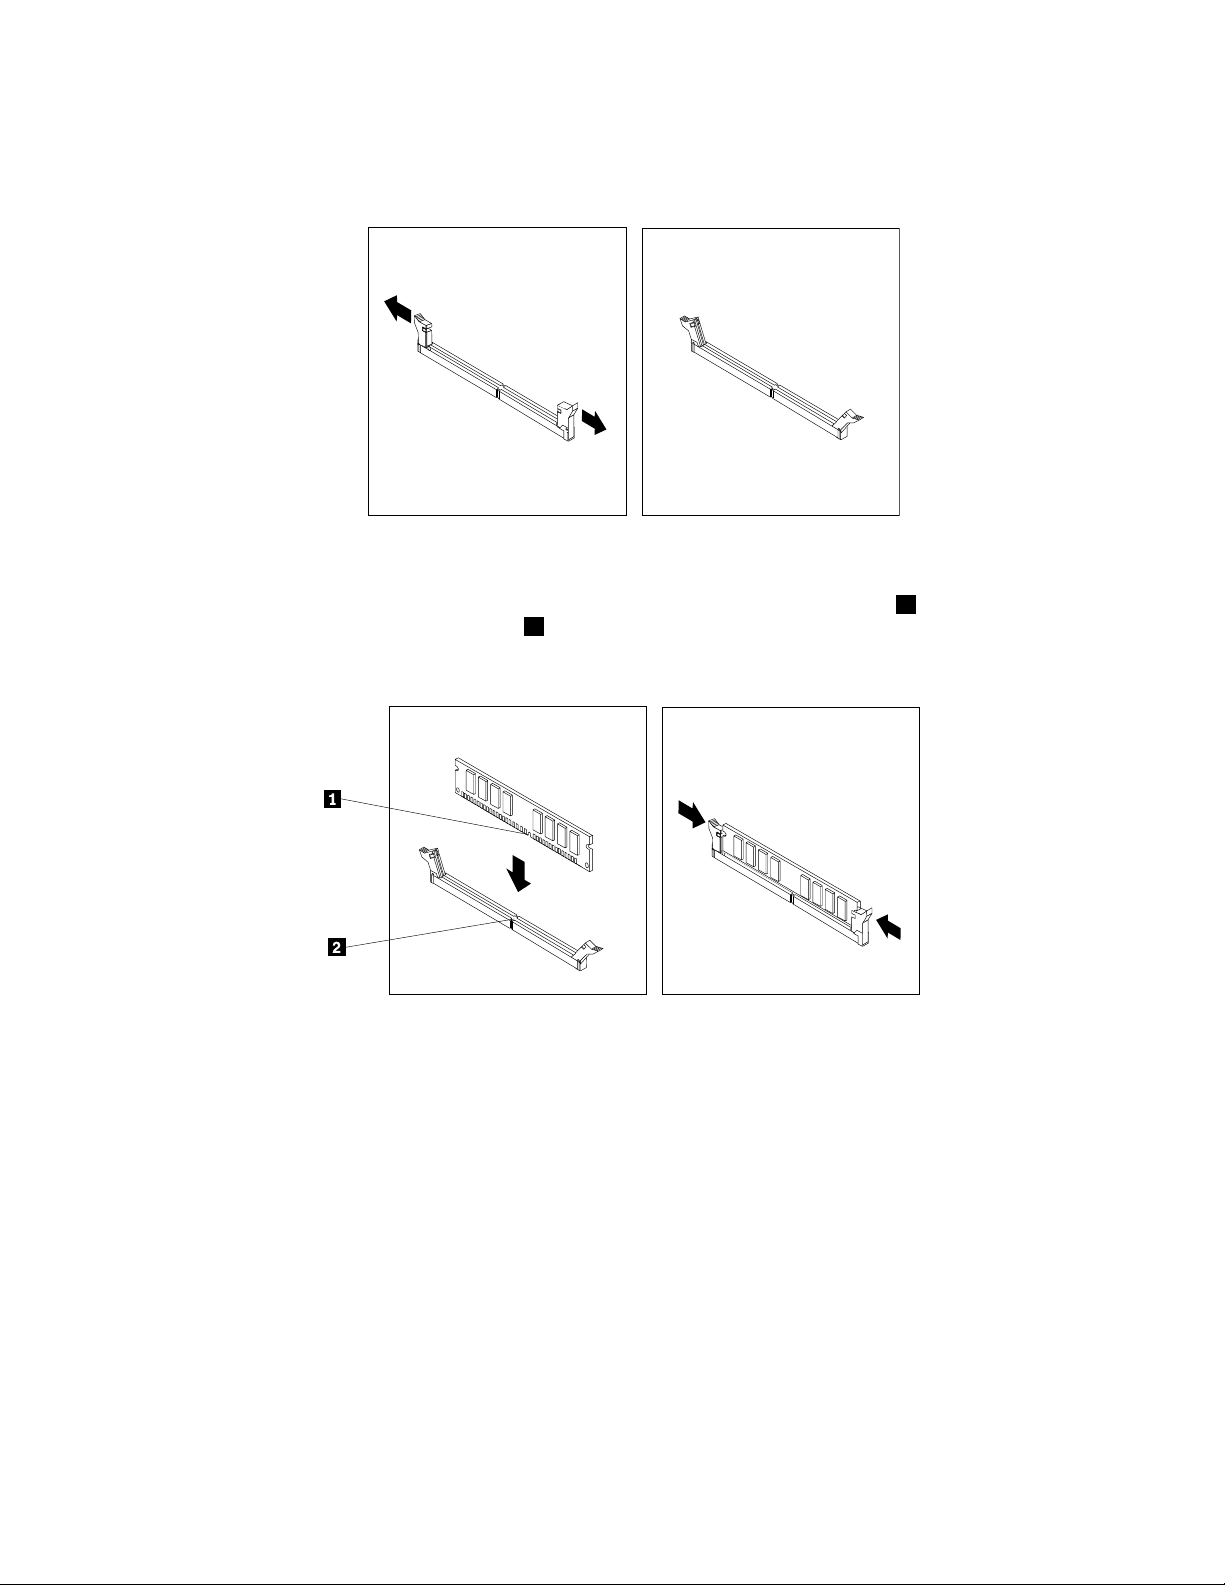
•Ifyouareinstallingamemorymodule,opentheretainingclipsofthememoryslotintowhichyou
wanttoinstallthememorymodule.
Figure16.Openingtheretainingclips
9.Positionthenewmemorymoduleoverthememoryslot.Makesurethatthenotch1onthememory
modulealignscorrectlywiththeslotkey2onthesystemboard.Pushthememorymodulestraight
downintotheslotuntiltheretainingclipsclose.
Figure17.Installingamemorymodule
10.ReinstallthePCIExpressx16graphicscardifyouhaveremovedit.
Whattodonext:
•Toworkwithanotherpieceofhardware,gototheappropriatesection.
•Tocompletetheinstallationorreplacement,goto“Completingthepartsreplacement”onpage76.
Replacingthebattery
Attention:Donotopenyourcomputerorattemptanyrepairbeforereadingandunderstandingthe
“Importantsafetyinformation”onpagev.
Yourcomputerhasaspecialtypeofmemorythatmaintainsthedate,time,andsettingsforbuilt-infeatures,
suchasparallel-connectorassignments(configuration).Abatterykeepsthisinformationactivewhenyou
turnoffthecomputer.
42ThinkCentreE73UserGuide
Page 55

Thebatterynormallyrequiresnochargingormaintenancethroughoutitslife;however,nobatterylasts
forever.Ifthebatteryfails,thedate,time,andconfigurationinformation(includingpasswords)arelost.An
errormessageisdisplayedwhenyouturnonthecomputer.
Refertothe“Lithiumbatterynotice”intheSafety,Warranty,andSetupGuideforinformationaboutreplacing
anddisposingofthebattery.
Toreplacethebattery,dothefollowing:
1.T urnoffthecomputeranddisconnectallpowercordsfromelectricaloutlets.
2.Removethecomputercover.See“Removingthecomputercover”onpage35.
3.Locatethebattery.See“Locatingpartsonthesystemboard”onpage13.
4.Removetheoldbattery.
Figure18.Removingtheoldbattery
5.Installanewbattery.
Figure19.Installinganewbattery
6.Reinstallthecomputercoverandconnectthecables.See“Completingthepartsreplacement”on
page76
Note:Whenthecomputeristurnedonforthefirsttimeafterreplacingthebattery,anerrormessage
mightbedisplayed.Thisisnormalafterreplacingthebattery.
7.T urnonthecomputerandallattacheddevices.
8.UsetheSetupUtilityprogramtosetthedate,time,andanypasswords.SeeChapter7“UsingtheSetup
Utilityprogram”onpage89.
Whattodonext:
•Toworkwithanotherpieceofhardware,gototheappropriatesection.
•Tocompletetheinstallationorreplacement,goto“Completingthepartsreplacement”onpage76.
.
Replacingtheharddiskdrive
Attention:Donotopenyourcomputerorattemptanyrepairbeforereadingandunderstandingthe
“Importantsafetyinformation”onpagev.
Chapter5.Installingorreplacinghardware43
Page 56

Thissectionprovidesinstructionsonhowtoreplacetheharddiskdrive.
3
4
5
6
3
4
5
6
Toreplacetheharddiskdrive,dothefollowing:
1.T urnoffthecomputeranddisconnectallpowercordsfromelectricaloutlets.
2.Removethecomputercover.See“Removingthecomputercover”onpage35.
3.Removethefrontbezel.See“Removingandreinstallingthefrontbezel”onpage36.
4.Notethelocationofthefourscrews1thatsecuretheharddiskdrive.Then,pivotthedrivebay
assemblyupward.
Figure20.Pivotingthedrivebayassembly
5.Holdtheharddiskdriveandremovethefourscrewsthatsecuretheharddiskdrive.Then,remove
theharddiskdrivefromthedrivebayassembly.
Figure21.Removingtheharddiskdrive
44ThinkCentreE73UserGuide
Page 57
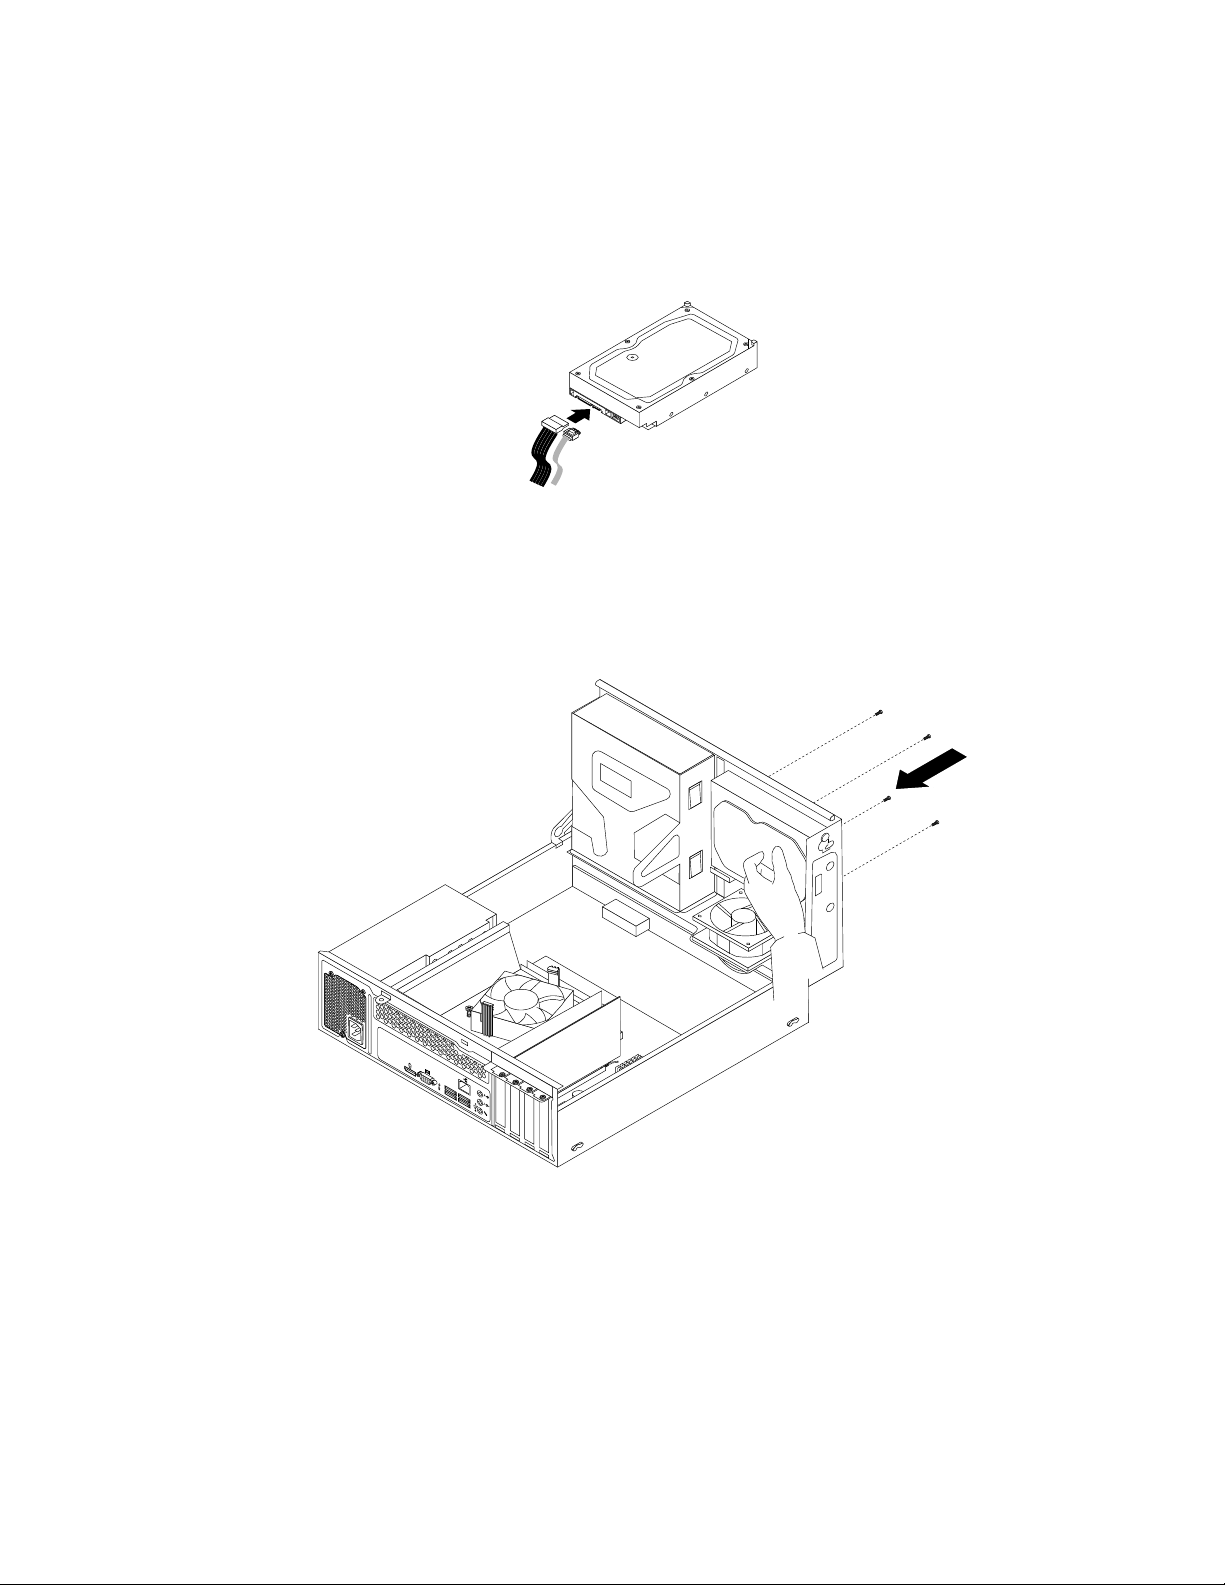
6.Disconnectthesignalcableandthepowercablefromtheharddiskdrivetocompletelyremovethehard
3
4
5
6
diskdrivefromthechassis.
7.Connectoneendofthesignalcabletotherearofthenewharddiskdriveandtheotherendtoan
availableSATAconnectoronthesystemboard.See“Locatingpartsonthesystemboard”onpage13.
Then,locateanavailablefive-wirepowerconnectorandconnectittotherearofthenewharddiskdrive.
Figure22.ConnectingaSA TAharddiskdrive
8.Positionthenewharddiskdriveintotheharddiskdrivebayandalignthescrewholesinthenewhard
diskdrivewiththecorrespondingholesinthedrivebay.Then,installthefourscrewstosecurethe
newharddiskdriveinplace.
Figure23.Installingtheharddiskdrive
Whattodonext:
•Toworkwithanotherpieceofhardware,gototheappropriatesection.
•Tocompletetheinstallationorreplacement,goto“Completingthepartsreplacement”onpage76.
Replacingtheopticaldrive
Attention:Donotopenyourcomputerorattemptanyrepairbeforereadingandunderstandingthe
“Importantsafetyinformation”onpagev.
Chapter5.Installingorreplacinghardware45
Page 58

Thissectionprovidesinstructionsonhowtoinstallorreplacetheopticaldrive.
Note:Theopticaldriveisonlyavailableinsomemodels.
Toreplaceanopticaldrive,dothefollowing:
1.T urnoffthecomputeranddisconnectallpowercordsfromelectricaloutlets.
2.Removethecomputercover.See“Removingthecomputercover”onpage35.
3.Removethefrontbezel.See“Removingandreinstallingthefrontbezel”onpage36.
4.Pivotthedrivebayassemblyupward.See“Accessingthesystemboardcomponentsanddrives”
onpage37
5.Disconnectthesignalcableandthepowercablefromtheopticaldrive.
6.Holdtheopticaldriveandremovethetwoscrewsthatsecuretheopticaldrive.
Figure24.Removingtheopticaldrive
46ThinkCentreE73UserGuide
Page 59

7.Pressthedrivebayassemblyclip1inwardandpivotthedrivebayassemblydownwardasshown.
Figure25.Loweringthedrivebayassembly
8.Slidetheopticaldriveoutofthefrontofthecomputer.
Figure26.Removingtheopticaldrive
Chapter5.Installingorreplacinghardware47
Page 60

9.Slidethenewopticaldriveintotheopticaldrivebayfromthefrontofthecomputer.
Figure27.Installinganewopticaldrive
10.Holdthenewopticaldriveandpivotthedrivebayassemblyupward.Alignthescrewholesinthenew
opticaldrivewiththecorrespondingholesinthedrivebay.Then,installthetwoscrewstosecure
thenewopticaldriveinplace.
Figure28.Installingtheopticaldrive
48ThinkCentreE73UserGuide
Page 61

11.Connectoneendofthesignalcabletotherearofthenewopticaldriveandtheotherendtoanavailable
SATAconnectoronthesystemboard.See“Locatingpartsonthesystemboard”onpage13.Then,
locateanavailablefive-wirepowerconnectorandconnectittotherearofthenewopticaldrive.
Figure29.Connectingtheopticaldrive
12.Lowerthedrivebayassembly.
Whattodonext:
•Toworkwithanotherpieceofhardware,gototheappropriatesection.
•Tocompletetheinstallationorreplacement,goto“Completingthepartsreplacement”onpage76.
Replacingthesolid-statedrive
Attention:Donotopenyourcomputerorattemptanyrepairbeforereadingandunderstandingthe
“Importantsafetyinformation”onpagev.
Thissectionprovidesinstructionsonhowtoreplacethesolid-statedrive.
Thesolid-statedriveisonlyavailableinsomemodels.Itmightbeinstalledintheharddiskdrivebayor
onthebottomoftheopticaldrivebay.
•Toreplacethesolid-statedriveintheharddiskdrivebay,see“Replacingthesolid-statedriveinthehard
diskdrivebay”onpage49
•Toreplacethesolid-statedriveonthebottomoftheopticaldrivebay,see“Replacingthesolid-statedrive
onthebottomoftheopticaldrivebay”onpage51.
Replacingthesolid-statedriveintheharddiskdrivebay
Toreplacethestorageconverterwiththesolid-statedriveinstalledinit,youmightfollowthestepsof
replacingtheharddiskdrive.See“Replacingtheharddiskdrive”onpage43
Toreplacethesolid-statedriveinthestorageconverter,dothefollowing:
.
.
Chapter5.Installingorreplacinghardware49
Page 62

1.Removethefourscrewsthatsecurethesolid-statedrivetothestorageconverter.Then,removethe
drivefromtheconverterasshown.
Figure30.Removingthesolid-statedrivefromthestorageconverter
2.T akethenewsolid-statedriveoutofthestatic-protectivepackage.
3.Positionthesolid-statedriveintothestorageconvertersothattheholesinthedrivearealignedwith
thecorrespondingholesintheconverter.Then,installthefourscrewstosecurethesolid-statedrive
totheconverter.
Figure31.Installingthesolid-statedriveintothestorageconverter
50ThinkCentreE73UserGuide
Page 63

Replacingthesolid-statedriveonthebottomoftheopticaldrivebay
3
4
5
6
Toreplacethesolid-statedriveonthebottomoftheopticaldrivebay,dothefollowing:
1.Removeallmediafromthedrivesandturnoffallattacheddevicesandthecomputer.Then,disconnect
allpowercordsfromelectricaloutletsanddisconnectallcablesthatareconnectedtothecomputer.
2.Removethecomputercover.See“Removingthecomputercover”onpage35.
3.Removethefrontbezel.See“Removingandreinstallingthefrontbezel”onpage36.
4.Pivotthedrivebayassemblyupward.See“Accessingthesystemboardcomponentsanddrives”
onpage37.
5.Notethecableroutinganddisconnectthesignalcableandthepowercablefromthesolid-statedrive.
See“Locatingpartsonthesystemboard”onpage13.
6.Removethescrew1andthencarefullyslidethesolid-statedrivebracketupwardtoremovethebracket
fromthebottomoftheopticaldrivebay.
Figure32.Removingthesolid-statedrivebracket
Chapter5.Installingorreplacinghardware51
Page 64

7.Removethefourscrewsthatsecurethesolid-statedrivetothebracket.Then,slidethedriveasshown
toremoveitfromthebracket.
Figure33.Removingthesolid-statedrivefromthebracket
8.T akethenewsolid-statedriveoutofthestatic-protectivepackage.
9.Slidethenewsolid-statedriveintothesolid-statedrivebracketasshownuntilthefourholesinthe
drivearealignedwiththecorrespondingholesinthebracket.Then,installthefourscrewstosecurethe
newsolid-statedrivetothebracket.
Figure34.Installingthesolid-statedriveintothebracket
52ThinkCentreE73UserGuide
Page 65
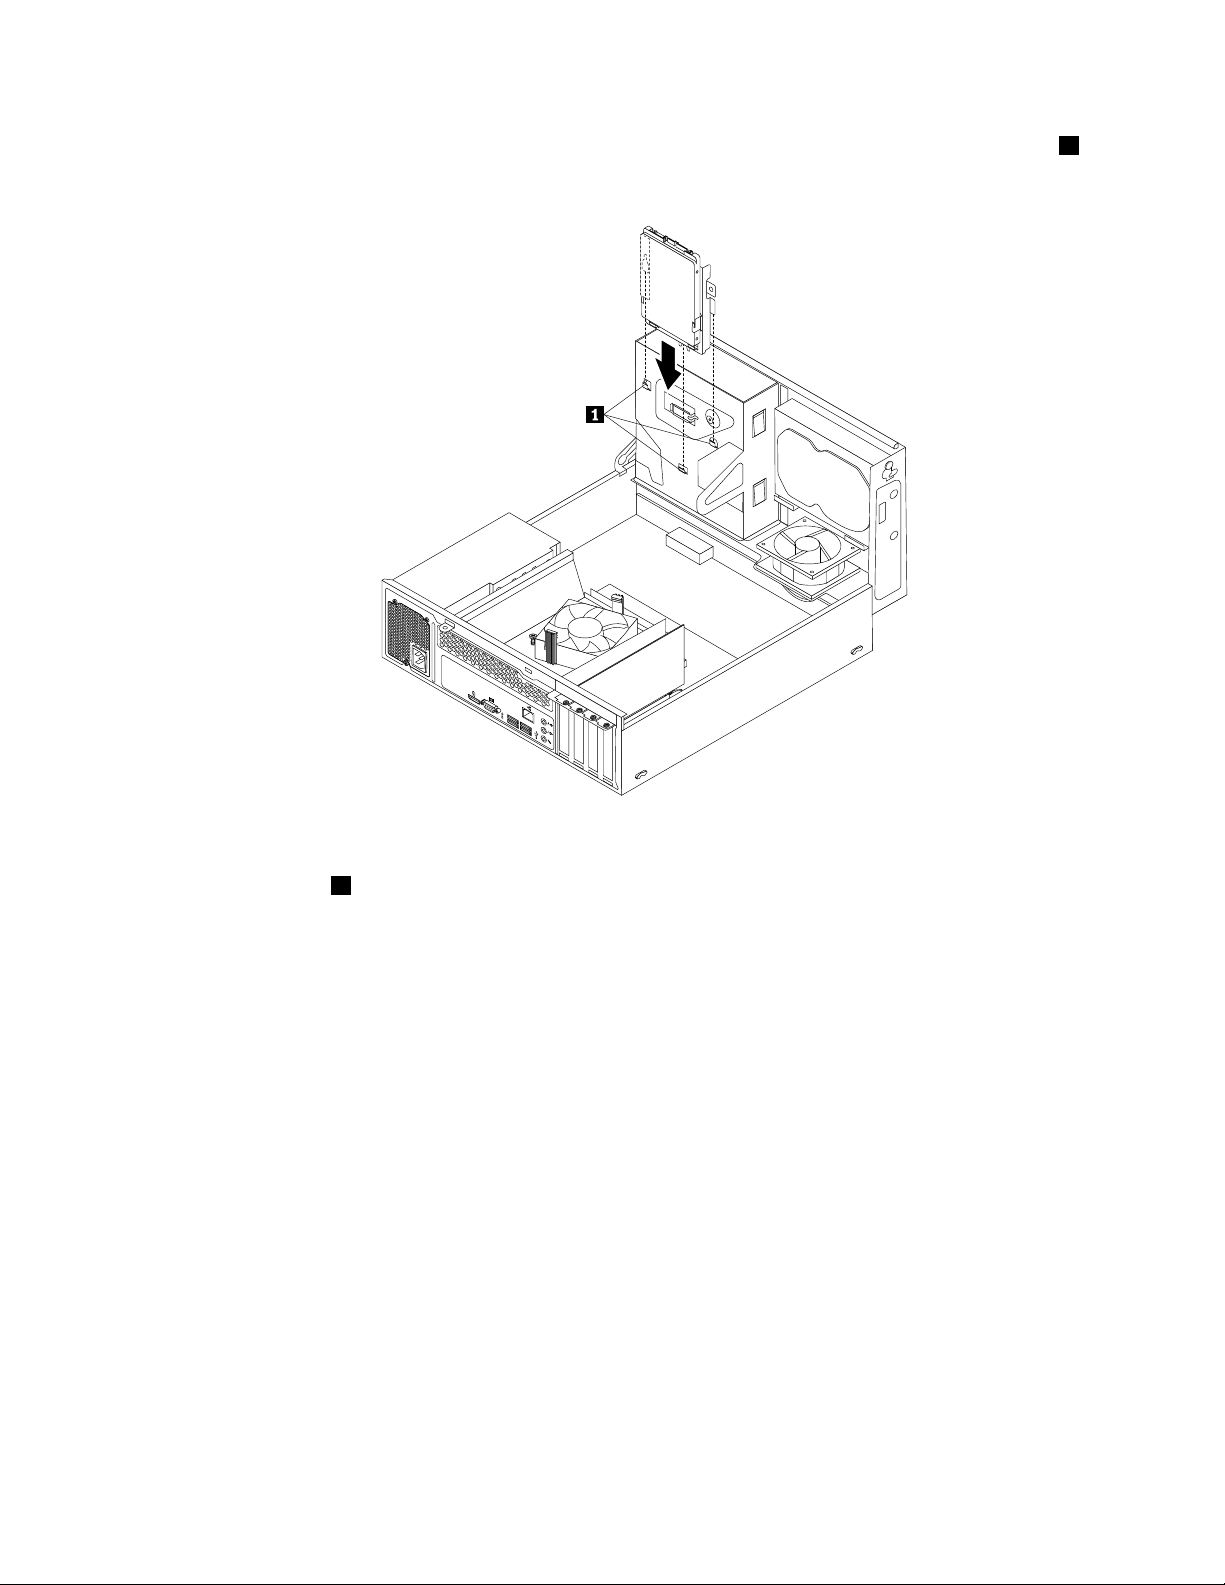
10.Carefullyslidethesolid-statedrivebracketdownwarduntilitissecuredbythethreeretainingclips1on
3
4
5
6
thebottomoftheopticaldrivebay.
Figure35.Installingthesolid-statedrivebracket
11.Installthescrew1tosecurethebracketonthebottomoftheopticaldrivebay.
Chapter5.Installingorreplacinghardware53
Page 66

3
4
5
6
Figure36.Installingthescrewtosecurethebracketonthebottomoftheopticaldrivebay
12.Connectoneendofthesignalcabletothebottomofthenewsolid-statedriveandtheotherendto
anavailableSATAconnectoronthesystemboard.See“Locatingpartsonthesystemboard”on
page13.Then,locateanavailablefour-wirepowerconnectorandconnectittothebottomofthe
newsolid-statedrive.
Whattodonext:
•Toworkwithanotherpieceofhardware,gototheappropriatesection.
•Tocompletetheinstallationorreplacement,goto“Completingthepartsreplacement”onpage76.
Replacingthepowersupplyassembly
Attention:Donotopenyourcomputerorattemptanyrepairbeforereadingandunderstandingthe
“Importantsafetyinformation”onpagev.
Thissectionprovidesinstructionsonhowtoreplacethepowersupplyassembly.
Althoughtherearenomovingpartsinyourcomputerafterthepowercordhasbeendisconnected,the
followingwarningsarerequiredforyoursafetyandproperUnderwritersLaboratories(UL)certification.
CAUTION:
54ThinkCentreE73UserGuide
Page 67

Hazardousmovingparts.Keepfingersandotherbodypartsaway.
3
4
5
6
CAUTION:
Neverremovethecoveronapowersupplyoranypartthathasthefollowinglabelattached.
Hazardousvoltage,current,andenergylevelsarepresentinsideanycomponentthathasthislabel
attached.Therearenoserviceablepartsinsidethesecomponents.Ifyoususpectaproblemwith
oneoftheseparts,contactaservicetechnician.
Toreplacethepowersupplyassembly,dothefollowing:
1.T urnoffthecomputeranddisconnectallpowercordsfromelectricaloutlets.
2.Removethecomputercover.See“Removingthecomputercover”onpage35.
3.Removethefrontbezel.See“Removingandreinstallingthefrontbezel”onpage36.
4.Pivotthedrivebayassemblyupward.Then,pivotthetwoplasticretainingclipsoutwardtoremove
theheatsinkfanductfromthefailingheatsinkandfanassembly.
Figure37.Removingtheheatsinkfanduct
5.Disconnectthepowersupplyassemblycablesfromalldrivesandfromthe24-pinpowerconnectorand
4-pinpowerconnectoronthesystemboard.See“Locatingpartsonthesystemboard”onpage13
Note:Youmightalsoneedtoreleasethepowersupplyassemblycablesfromsomecableclipsorties
thatsecurethecablestothechassis.Makesurethatyounotethecableroutingbeforedisconnecting
thecables.
Chapter5.Installingorreplacinghardware55
.
Page 68

6.Attherearofthecomputer,removethethreescrewsthatsecurethepowersupplyassembly.Pressthe
3
4
5
6
powersupplyclip
1downwardtoreleasethepowersupplyassemblyandthenslidethepowersupply
assemblytothefrontofthecomputer.Liftthepowersupplyassemblyoutofthecomputer.
Figure38.Removingthepowersupplyassembly
7.Makesurethatthenewpowersupplyassemblyisthecorrectreplacement.
56ThinkCentreE73UserGuide
Page 69
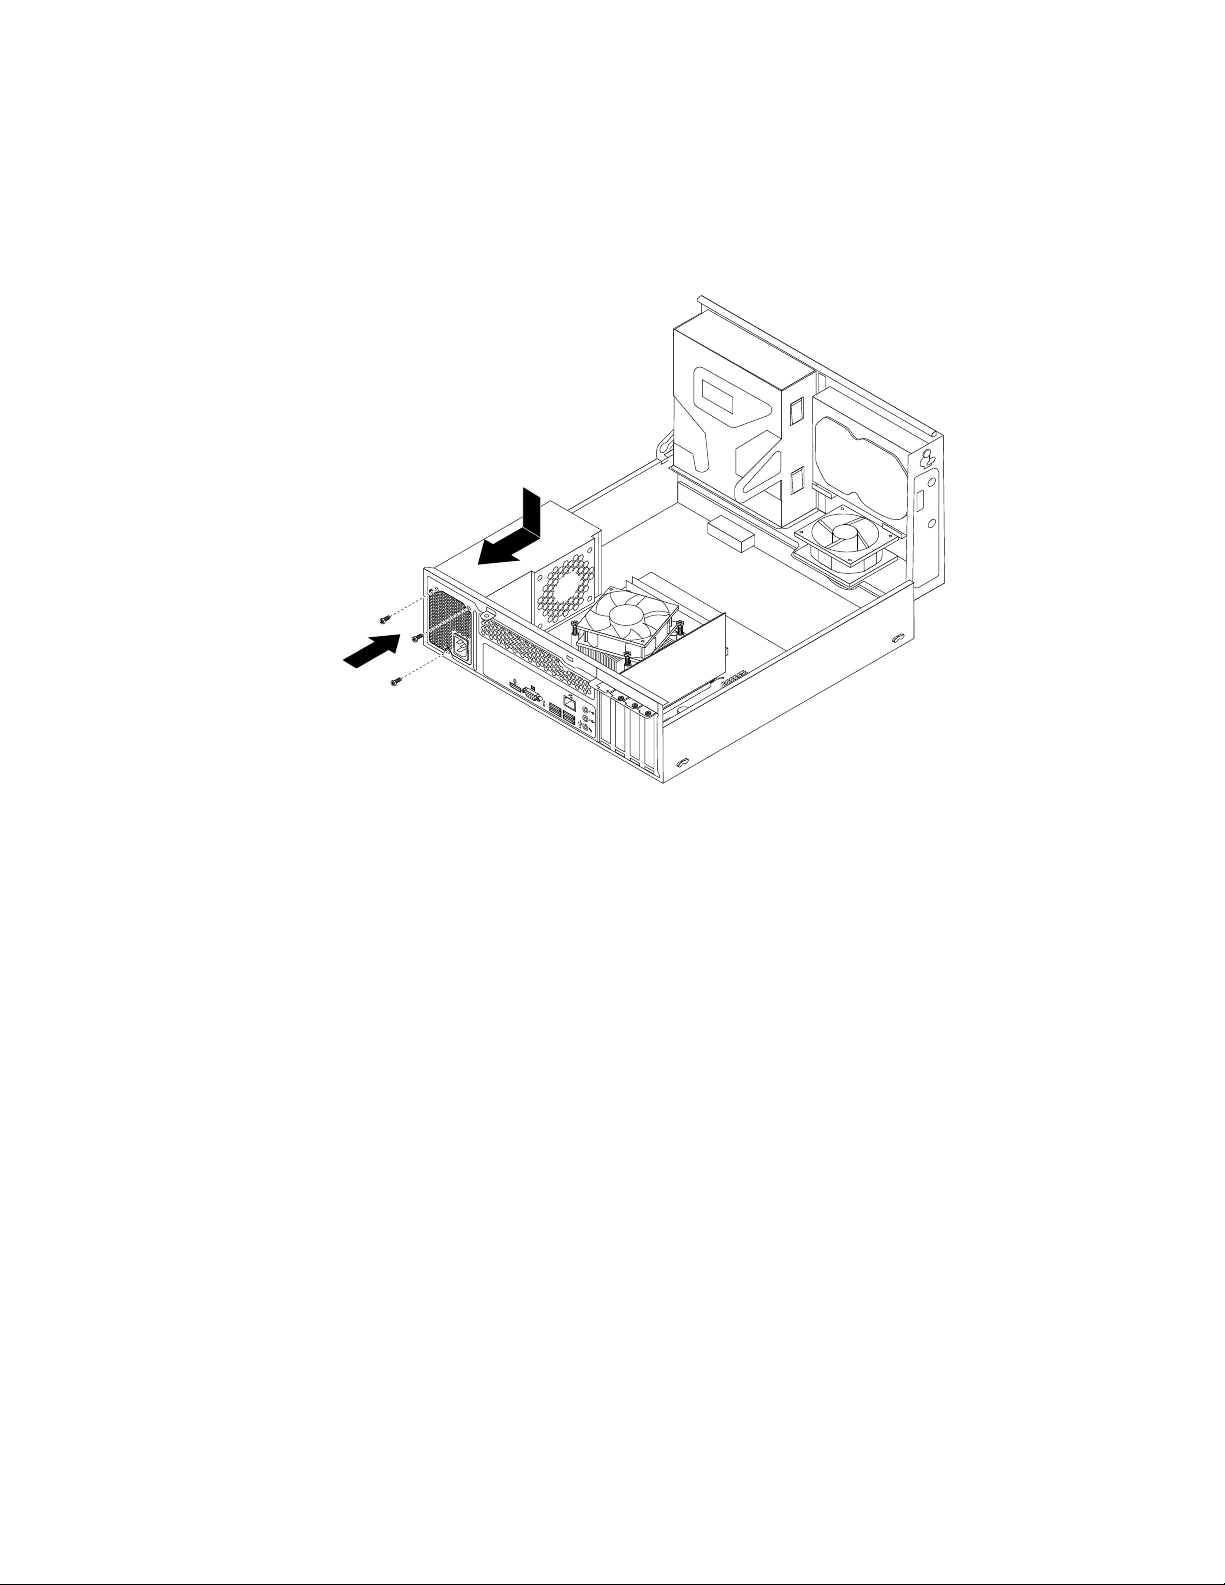
8.Installthenewpowersupplyassemblyintothechassissothatthescrewholesinthenewpowersupply
3
4
5
6
assemblyarealignedwiththecorrespondingholesintherearofthechassis.Then,installthethree
screwstosecurethenewpowersupplyassemblyinplace.
Note:UseonlyscrewsprovidedbyLenovo.
Figure39.Installingthepowersupplyassembly
9.Connectthenewpowersupplyassemblycablestoalldrivesandthesystemboard.See“Locating
partsonthesystemboard”onpage13.
Chapter5.Installingorreplacinghardware57
Page 70

10.Lowerandpositiontheheatsinkfanductonthetopoftheheatsinkandfanassemblyuntilitsnaps
3
4
5
6
intoposition.
Figure40.Installingtheheatsinkfanduct
11.Securethepowersupplyassemblycableswiththecableclipsandtiesinthechassis.
Whattodonext:
•Toworkwithanotherpieceofhardware,gototheappropriatesection.
•Tocompletetheinstallationorreplacement,goto“Completingthepartsreplacement”onpage76.
Replacingtheheatsinkandfanassembly
Attention:Donotopenyourcomputerorattemptanyrepairbeforereadingandunderstandingthe
“Importantsafetyinformation”onpagev.
Thissectionprovidesinstructionsonhowtoreplacetheheatsinkandfanassembly.
CAUTION:
Theheatsinkandfanassemblymightbeveryhot.Beforeyouopenthecomputercover,turnoffthe
computerandwaitseveralminutesuntilthecomputeriscool.
Toreplacetheheatsinkandfanassembly,dothefollowing:
1.T urnoffthecomputeranddisconnectallpowercordsfromelectricaloutlets.
2.Removethecomputercover.See“Removingthecomputercover”onpage35.
3.Removethefrontbezel.See“Removingandreinstallingthefrontbezel”onpage36.
58ThinkCentreE73UserGuide
Page 71

4.Pivotthedrivebayassemblyupward.Then,pivotthetwoplasticretainingclipsoutwardtoremove
3
4
5
6
theheatsinkfanductfromthefailingheatsinkandfanassembly.
Figure41.Removingtheheatsinkfanduct
5.Disconnecttheheatsinkandfanassemblycablefromthemicroprocessorfanconnectoronthesystem
board.See“Locatingpartsonthesystemboard”onpage13.
Chapter5.Installingorreplacinghardware59
Page 72

6.Followthissequencetoremovethefourscrewsthatsecuretheheatsinkandfanassemblytothe
systemboard:
a.Partiallyremovescrew1,thenfullyremovescrew2,andthenfullyremovescrew1.
b.Partiallyremovescrew3,thenfullyremovescrew4,andthenfullyremovescrew3.
Note:Carefullyremovethefourscrewsfromthesystemboardtoavoidanypossibledamagetothe
systemboard.Thefourscrewscannotberemovedfromtheheatsinkandfanassembly.
Figure42.Removingtheheatsinkandfanassembly
7.Liftthefailingheatsinkandfanassemblyoffthesystemboard.
Notes:
a.Youmighthavetogentlytwisttheheatsinkandfanassemblytofreeitfromthemicroprocessor.
b.Whenhandlingtheheatsinkandfanassembly,donottouchthethermalgreaseonthebottom
oftheheatsinkandfanassembly.
8.Placethenewheatsinkandfanassemblyonthesystemboardsothatthefourscrewsarealignedwith
thecorrespondingholesinthesystemboard.
Note:Positionthenewheatsinkandfanassemblysothattheheatsinkandfanassemblycableis
towardthemicroprocessorfanconnectoronthesystemboard.
9.Followthefollowingsequencetoinstallthefourscrewstosecurethenewheatsinkandfanassembly.
Donotover-tightenthescrews.
a.Partiallytightenscrew1,thenfullytightenscrew2,andthenfullytightenscrew1.
b.Partiallytightenscrew3,thenfullytightenscrew4,andthenfullytightenscrew3.
10.Connectthenewheatsinkandfanassemblycabletothemicroprocessorfanconnectoronthesystem
board.See“Locatingpartsonthesystemboard”onpage13.
11.Lowerandpositiontheheatsinkfanductonthetopoftheheatsinkandfanassemblyuntilitsnaps
intoposition.
60ThinkCentreE73UserGuide
Page 73
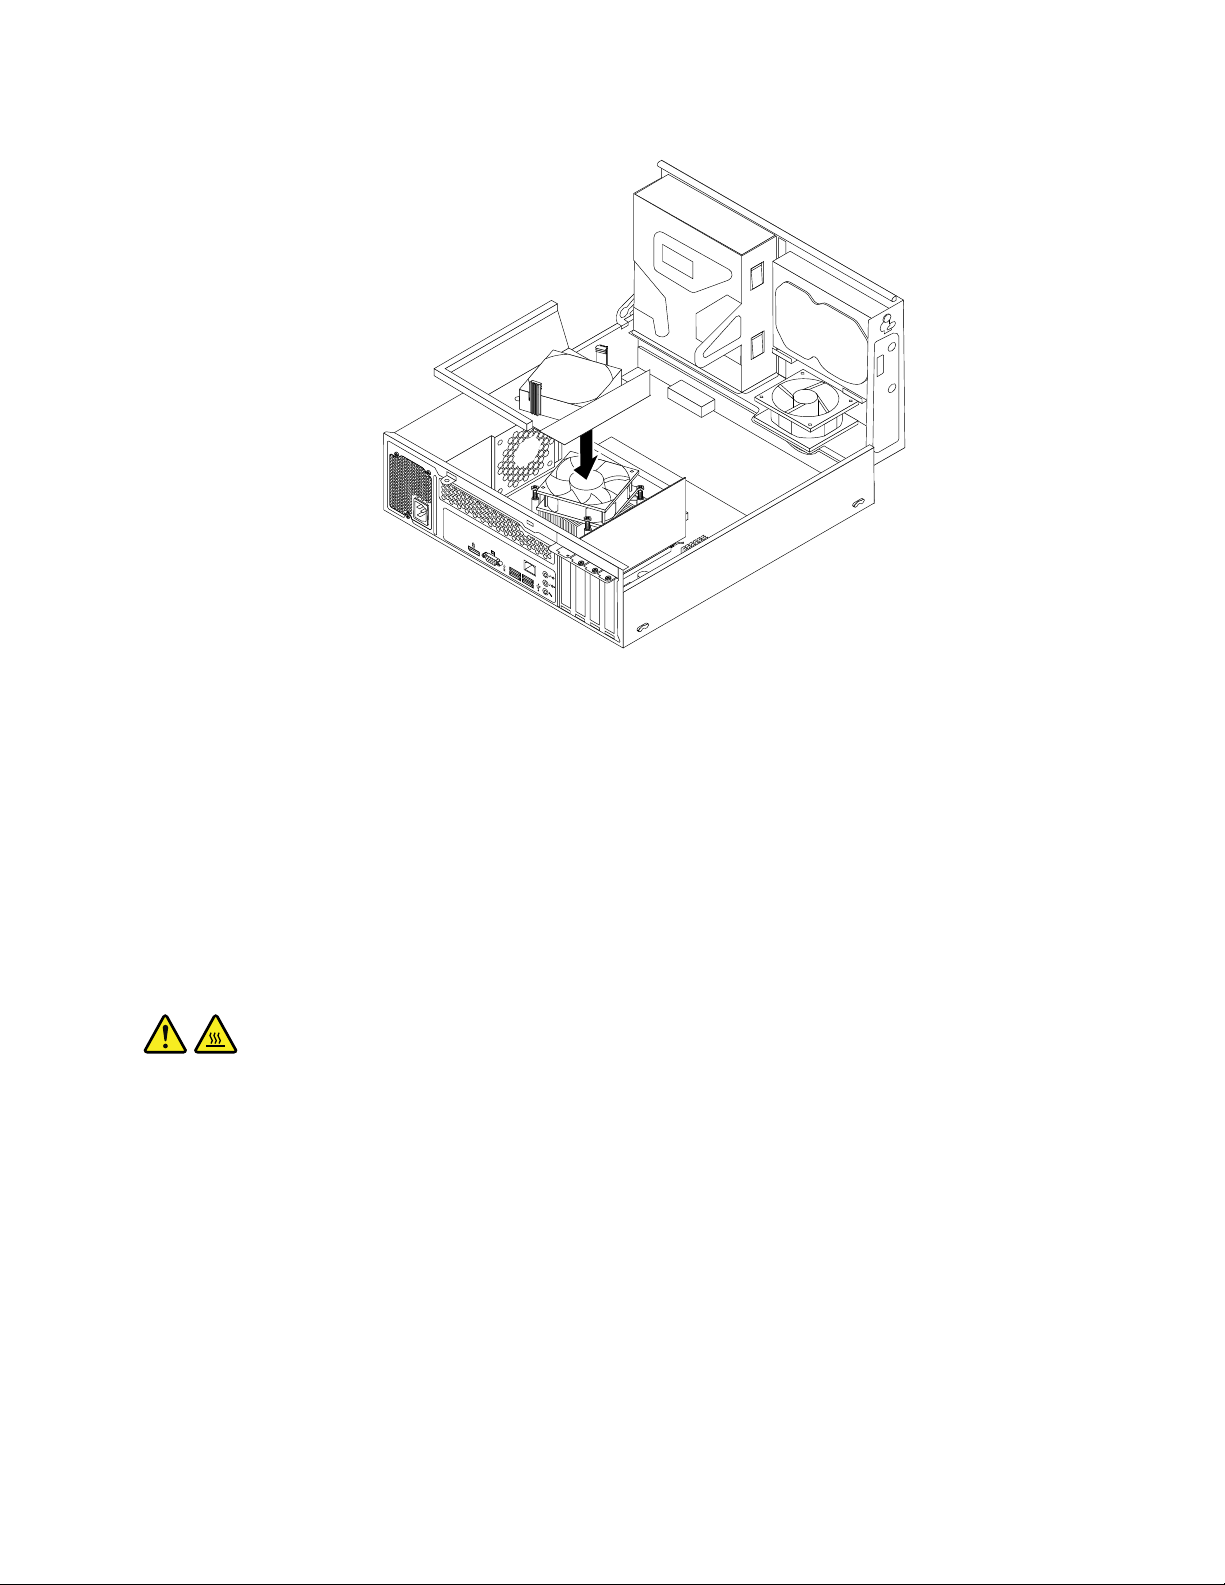
3
4
5
6
Figure43.Installingtheheatsinkfanduct
Whattodonext:
•Toworkwithanotherpieceofhardware,gototheappropriatesection.
•Tocompletetheinstallationorreplacement,goto“Completingthepartsreplacement”onpage76.
Replacingthemicroprocessor
Attention:Donotopenyourcomputerorattemptanyrepairbeforereadingandunderstandingthe
“Importantsafetyinformation”onpagev.
Thissectionprovidesinstructionsonhowtoreplacethemicroprocessor.
CAUTION:
Theheatsinkandmicroprocessormightbeveryhot.Beforeyouopenthecomputercover,turnoff
thecomputerandwaitseveralminutesuntilthecomputeriscool.
Toreplacethemicroprocessor,dothefollowing:
1.T urnoffthecomputeranddisconnectallpowercordsfromelectricaloutlets.
2.Removethecomputercover.See“Removingthecomputercover”onpage35.
3.Removetheheatsinkandfanassembly.See“Replacingtheheatsinkandfanassembly”onpage58.
Note:Placetheheatsinkandfanassemblyonitssidesothatthethermalgreaseonthebottomofit
doesnotgetincontactwithanything.
4.Locatethesystemboardanddisconnectallcablesconnectedtothesystemboard.See“Locating
partsonthesystemboard”onpage13.
Chapter5.Installingorreplacinghardware61
Page 74

5.Liftthesmallhandle1andopentheretainer2toaccessthemicroprocessor3.
Figure44.Accessingthemicroprocessor
6.Liftthemicroprocessorstraightupandoutofthemicroprocessorsocket.
Figure45.Removingthemicroprocessor
Notes:
a.Yourmicroprocessorandsocketmightlookdifferentfromtheoneillustrated.
62ThinkCentreE73UserGuide
Page 75

b.Notetheorientationofthemicroprocessorinthesocket.Y oucaneitherlookforthesmalltriangle1
ononecornerofthemicroprocessorornotetheorientationofthenotches2onthemicroprocessor.
Thisisimportantwheninstallingthenewmicroprocessoronthesystemboard.
c.Touchonlytheedgesofthemicroprocessor.Donottouchthegoldcontactsonthebottom.
d.Donotdropanythingontothemicroprocessorsocketwhileitisexposed.Thesocketpinsmustbe
keptascleanaspossible.
7.Makesurethatthesmallhandleisintheraisedpositionandthemicroprocessorretainerisfullyopen.
8.Removetheprotectivecoverthatprotectsthegoldcontactsofthenewmicroprocessor.
9.Holdthenewmicroprocessorbyitssidesandalignthesmalltriangleononecornerofthenew
microprocessorwiththecorrespondingsmalltriangleononecornerofthemicroprocessorsocket.
10.Lowerthenewmicroprocessorstraightdownintothemicroprocessorsocketonthesystemboard.
Figure46.Installingthemicroprocessor
11.Closethemicroprocessorretainerandlockitintopositionwiththesmallhandletosecurethenew
microprocessorinthesocket.
12.Reinstalltheheatsinkandfanassembly.See“Replacingtheheatsinkandfanassembly”onpage58.
13.Reconnectallcablesthatweredisconnectedfromthesystemboard.
Chapter5.Installingorreplacinghardware63
Page 76

Whattodonext:
3
4
5
6
•Toworkwithanotherpieceofhardware,gototheappropriatesection.
•Tocompletethereplacement,goto“Completingthepartsreplacement”onpage76.
Replacingthesystemfanassembly
Attention:Donotopenyourcomputerorattemptanyrepairbeforereadingandunderstandingthe
“Importantsafetyinformation”onpagev.
Thissectionprovidesinstructionsonhowtoreplacethesystemfanassembly.
Toreplacethesystemfanassembly,dothefollowing:
1.T urnoffthecomputeranddisconnectallpowercordsfromelectricaloutlets.
2.Removethecomputercover.See“Removingthecomputercover”onpage35.
3.Removethefrontbezel.See“Removingandreinstallingthefrontbezel”onpage36.
4.Pivotthedrivebayassemblyupwardtogainaccesstothesystemfanassembly.See“Accessingthe
systemboardcomponentsanddrives”onpage37.
5.Removetheharddiskdriveforeasieraccesstothesystemfanassembly.See“Replacingthehard
diskdrive”onpage43.
6.Removetheheatsinkfanduct.See“Replacingtheheatsinkandfanassembly”onpage58.
7.Notethecableroutinganddisconnectthesystemfanassemblycablefromthepowerfanconnectoron
thesystemboard.See“Locatingpartsonthesystemboard”onpage13.
8.Thesystemfanassemblyisattachedtothechassisbyfourrubbermounts.Removethesystemfan
assemblybycuttingthefourrubbermounts1andliftingthesystemfanassemblyoutofthechassis.
Note:Thenewsystemfanassemblywillhavefournewrubbermountsattached.
Figure47.Removingthesystemfanassembly
64ThinkCentreE73UserGuide
Page 77

9.Installthenewsystemfanassemblybyaligningthenewrubbermountsthatcamewiththenewsystem
3
4
5
6
fanassemblywiththecorrespondingholesinthechassis,andthenpushtherubbermountsthroughthe
holes.Then,carefullypullonthetipsoftherubbermountsfromthebottomuntilthenewsystemfan
assemblyissecuredinplace.
Figure48.Installingthesystemfanassembly
10.Connectthenewsystemfanassemblycabletothesystemfanconnectoronthesystemboard.See
“Locatingpartsonthesystemboard”onpage13.
11.Reinstalltheheatsinkfanduct.See“Replacingtheheatsinkandfanassembly”onpage58.
12.Reinstalltheharddiskdrive.See“Replacingtheharddiskdrive”onpage43.
Whattodonext:
•Toworkwithanotherpieceofhardware,gototheappropriatesection.
•Tocompletetheinstallationorreplacement,goto“Completingthepartsreplacement”onpage76.
ReplacingthefrontaudioandUSBassembly
Attention:Donotopenyourcomputerorattemptanyrepairbeforereadingandunderstandingthe
“Importantsafetyinformation”onpagev
ThissectionprovidesinstructionsonhowtoreplacethefrontaudioandUSBassembly.
ToreplacethefrontaudioandUSBassembly,dothefollowing:
1.T urnoffthecomputeranddisconnectallpowercordsfromelectricaloutlets.
2.Removethecomputercover.See“Removingthecomputercover”onpage35.
3.Removethefrontbezel.See“Removingandreinstallingthefrontbezel”onpage36.
.
Chapter5.Installingorreplacinghardware65
Page 78

4.Pivotthedrivebayassemblyupward.See“Accessingthesystemboardcomponentsanddrives”
onpage37.
5.DisconnectthefrontaudioandUSBassemblycablesfromthesystemboard.See“Locatingpartson
thesystemboard”onpage13.
Note:Makesurethatyounotethelocationsofthecableswhenyoudisconnectthecablesfromthe
systemboard.
6.RemovethescrewthatsecuresthefrontaudioandUSBassemblybrackettothechassistoremove
thebracketfromthechassis.
Figure49.RemovingthefrontaudioandUSBassembly
7.InstallthefrontaudioandUSBassemblybracketintothechassisandalignthescrewholeinthe
bracketwiththecorrespondingholeinthechassis.
8.Installthescrewtosecurethebrackettothechassis.
9.PivotthedrivebayassemblyupwardandreconnectthefrontUSBandfrontaudiocablestothesystem
board.See“Locatingpartsonthesystemboard”onpage13.
10.ReconnectthefrontaudioandUSBassemblycablestothefrontaudioconnectorandthefrontUSB
connectoronthesystemboard.See“Locatingpartsonthesystemboard”onpage13
11.Lowerthedrivebayassembly.See“Accessingthesystemboardcomponentsanddrives”onpage37.
12.Reinstallthefrontbezel.See“Removingandreinstallingthefrontbezel”onpage36.
Whattodonext:
•Toworkwithanotherpieceofhardware,gototheappropriatesection.
•Tocompletetheinstallationorreplacement,goto“Completingthepartsreplacement”onpage76.
.
ReplacingtheWiFiunits
Attention:Donotopenyourcomputerorattemptanyrepairbeforereadingandunderstandingthe
“Importantsafetyinformation”onpagev.
ThissectionprovidesinstructionsonhowtoreplacetheWiFiunits.TheWiFiunitsincludeaWiFiadapter
card,aWiFicardmodule,andarearWiFiantennacable.
66ThinkCentreE73UserGuide
Page 79

ReplacingtheWiFiunitsinvolvesthefollowingoperations:
•“RemovingtheWiFiadaptercard”onpage67
•“RemovingtheWiFicardmodule”onpage67
•“InstallingtheWiFiunits”onpage69
RemovingtheWiFiadaptercard
ToremovetheWiFiadaptercard,dothefollowing:
1.T urnoffthecomputeranddisconnectallpowercordsfromelectricaloutlets.
2.Removethecomputercover.See“Removingthecomputercover”onpage35.
3.RemovethescrewthatsecurestheWiFiadaptercard.
4.GrasptheWiFiadaptercardthatisinstalledandgentlypullitoutoftheslot.
Figure50.RemovingtheWiFiadaptercard
Note:Thecardfitstightlyintothecardslot.Ifnecessary,alternatemovingeachsideofthecarda
smallamountuntilitisremovedfromthecardslot.
RemovingtheWiFicardmodule
ToremovetheWiFicardmodule,dothefollowing:
Chapter5.Installingorreplacinghardware67
Page 80

1.RemovetheWiFiadaptercardfromthecomputer,andthendisconnectthefrontandrearWiFiantenna
cablesfromtheWiFicardmodule.
Figure51.RemovingtheWiFiantennacables
2.RemovethetwoscrewsthatsecuretheWiFicardmoduletotheWiFiadaptercard.
Figure52.RemovingthescrewsthatsecuretheWiFicardmodule
68ThinkCentreE73UserGuide
Page 81

3.PulltheWiFicardmoduleoutoftheminiPCIExpressslottoremoveitfromtheWiFiadaptercard.
Figure53.RemovingtheWiFicardmodule
InstallingtheWiFiunits
ToinstalltheWiFiunits,dothefollowing:
Chapter5.Installingorreplacinghardware69
Page 82
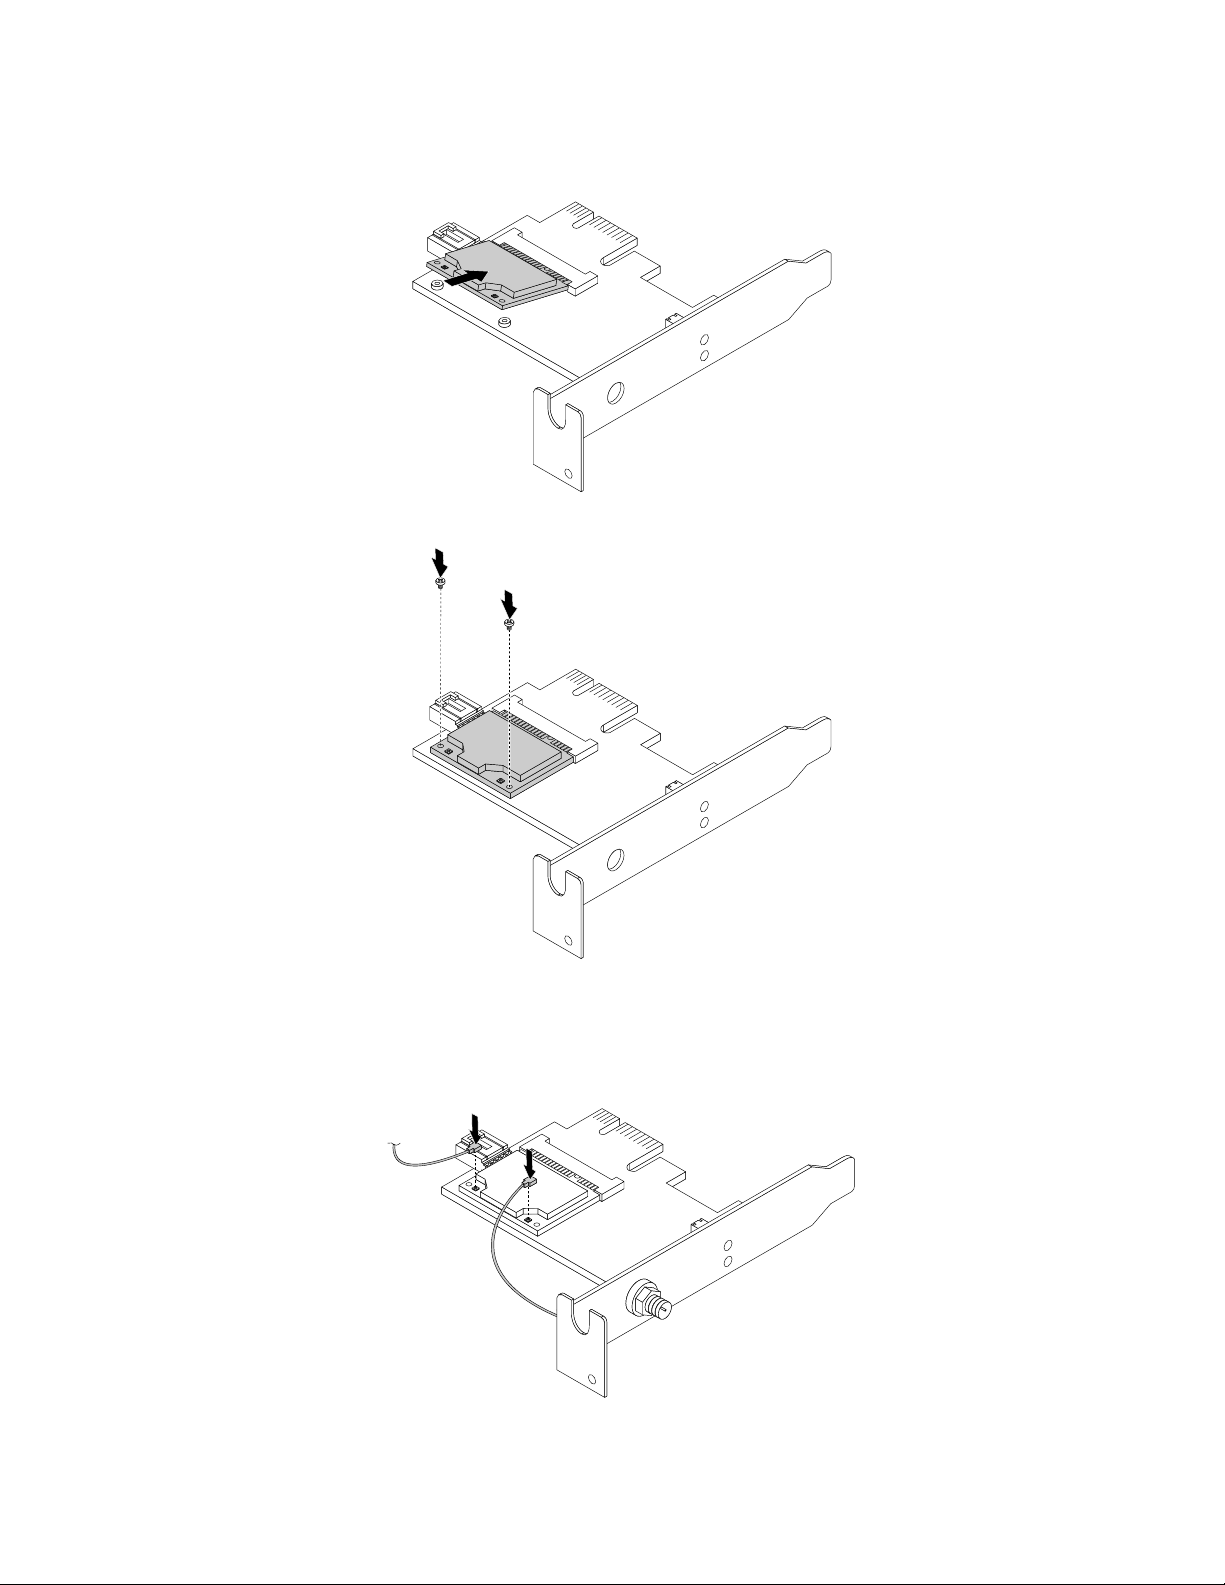
1.InserttheWiFicardmoduleintotheminiPCIExpressslot,andtheninstallthetwoscrewstosecure
theWiFicardmoduletotheWiFiadaptercard.
Figure54.InstallingtheWiFicardmodule
2.ConnectthefrontantennacableandrearantennacabletotheWiFicardmodule.
Figure55.ConnectingtheWiFiantennacables
70ThinkCentreE73UserGuide
Page 83
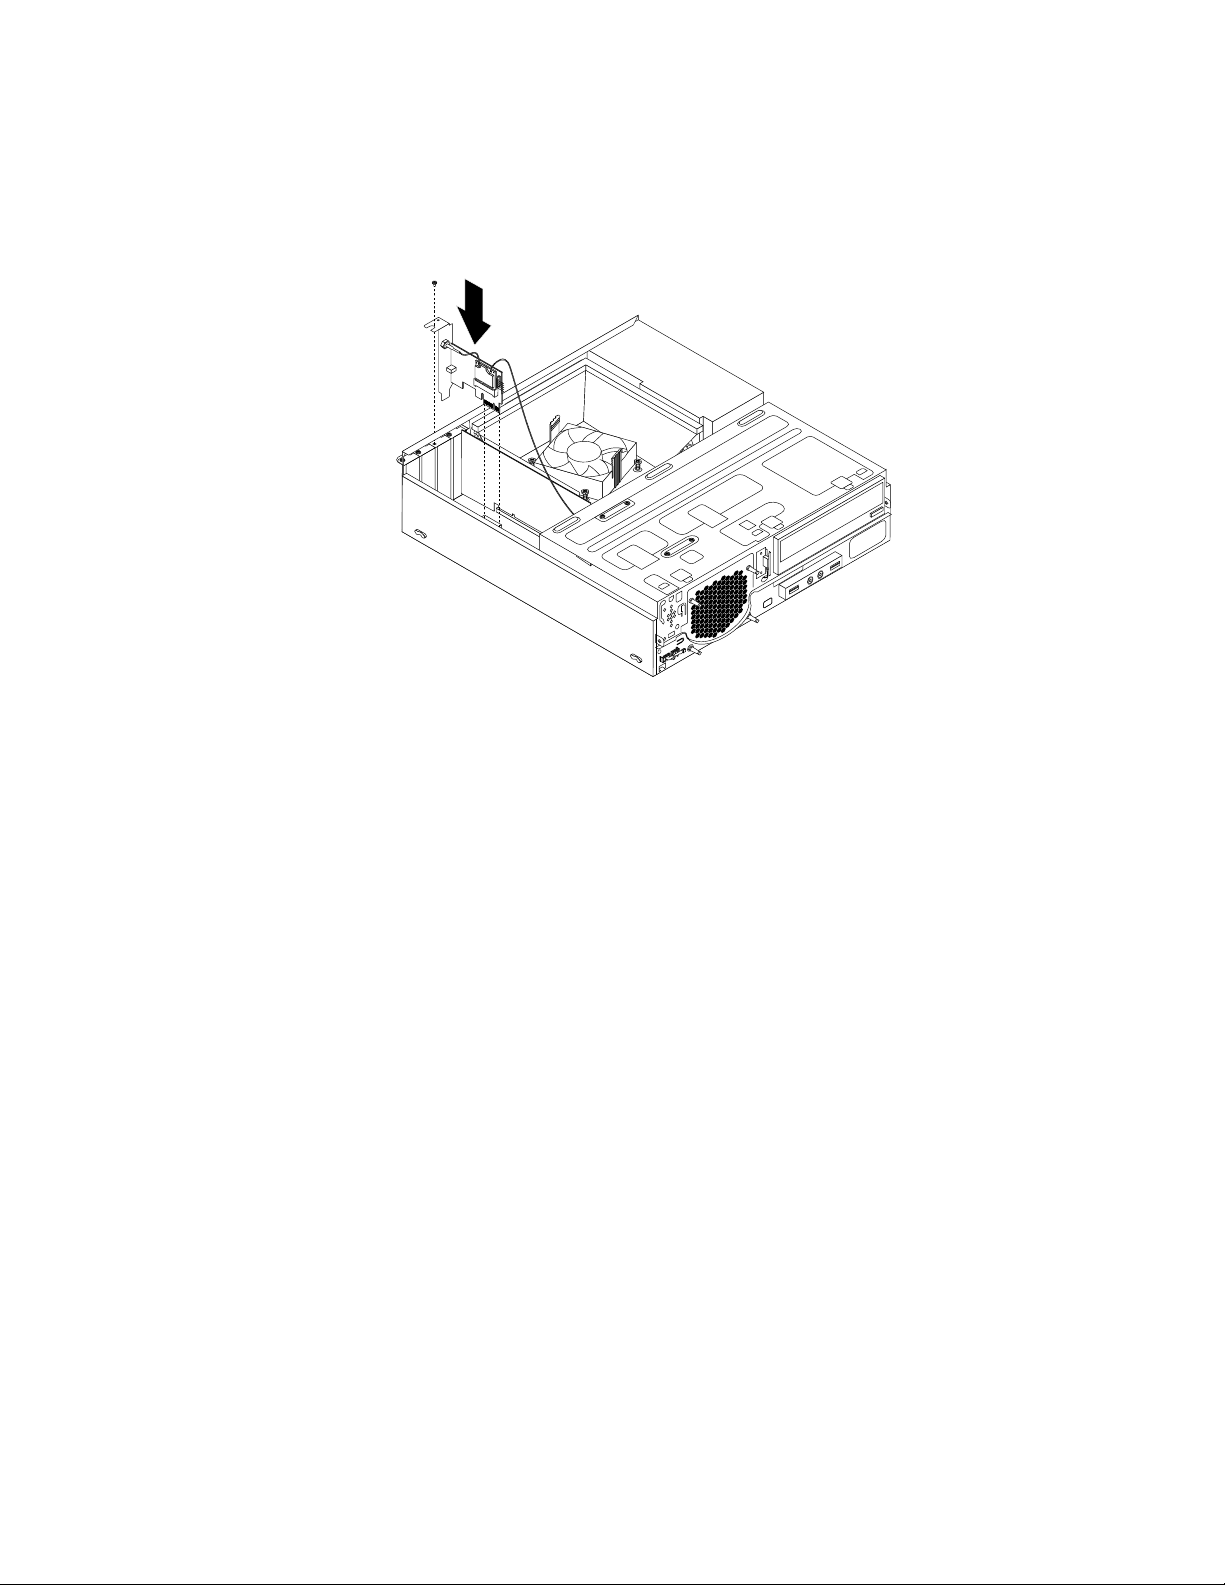
3.LocatethetwoPCIExpressx1slotsonthesystemboard.See“Locatingpartsonthesystemboard”
onpage13.
4.InstalltheWiFiadaptercardintooneofthetwoPCIExpressx1slots.Theninstallthescrewtosecure
theWiFiadaptercardinplace.
Figure56.InstallingtheWiFiadaptercard
Whattodonext:
•Toworkwithanotherpieceofhardware,gototheappropriatesection.
•Tocompletetheinstallationorreplacement,goto“Completingthepartsreplacement”onpage76.
InstallingorremovingtherearWiFiantenna
Attention:Donotopenyourcomputerorattemptanyrepairbeforereadingandunderstandingthe
“Importantsafetyinformation”onpagev.
ThissectionprovidesinstructionsonhowtoinstallorremovetherearWiFiantenna.
InstallingtherearWiFiantenna
ToinstalltherearWiFiantenna,dothefollowing:
1.T urnoffthecomputeranddisconnectallpowercordsfromelectricaloutlets.
2.InstalltherearWiFiantennatotherearWiFiantennacableconnectorattachedontherearofthe
computer.
Chapter5.Installingorreplacinghardware71
Page 84
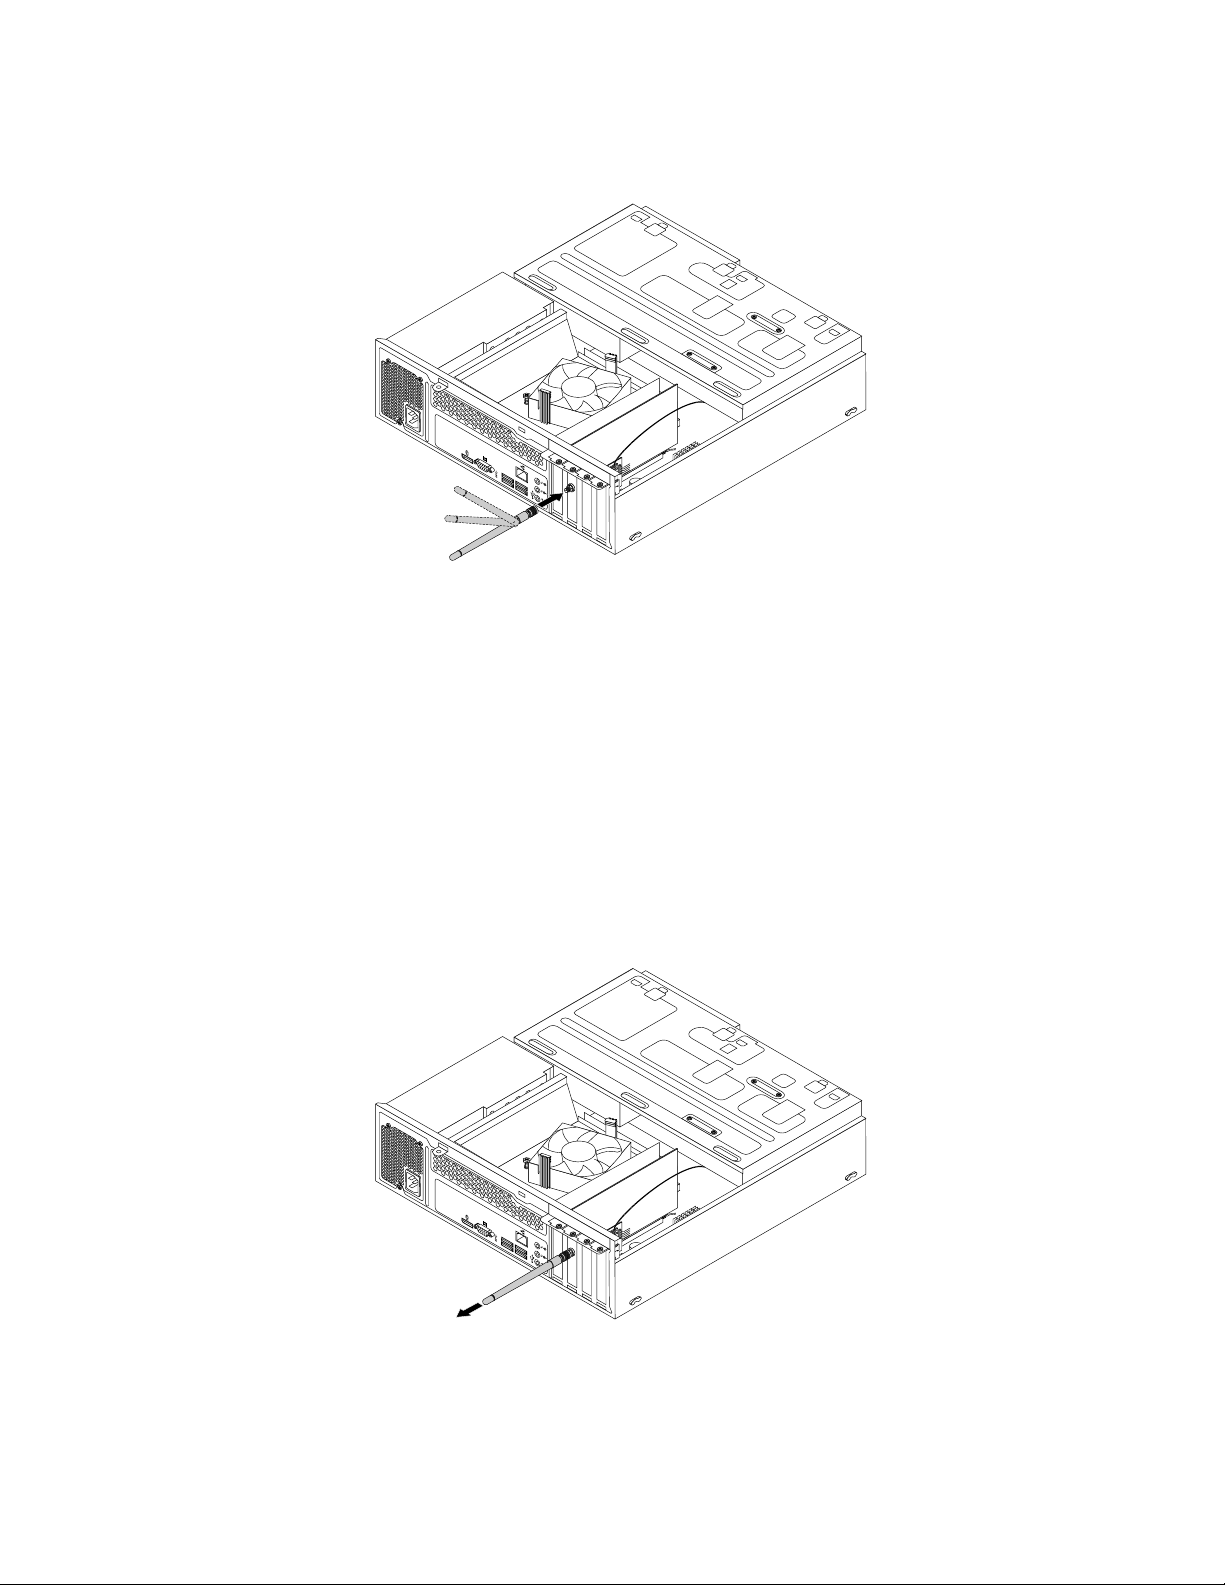
3.Adjusttheangleoftherearantennatolowertheriskofbreakingtheantennabyaccident.
3
4
5
6
3
4
5
6
Figure57.InstallingtherearWiFiantenna
Whattodonext:
•Toworkwithanotherpieceofhardware,gototheappropriatesection.
•Tocompletetheinstallationorreplacement,goto“Completingthepartsreplacement”onpage76
.
RemovingtherearWiFiantenna
ToremovetherearWiFiantenna,dothefollowing:
1.T urnoffthecomputeranddisconnectallpowercordsfromelectricaloutlets.
2.StraightentherearWiFiantennasothatitcanbemoreeasilytwisted.
3.HoldthethickerendoftherearWiFiantennaandunscrewtheWiFiantennafromtherearofthe
computer.
Figure58.RemovingtherearWiFiantenna
Whattodonext:
•Toworkwithanotherpieceofhardware,gototheappropriatesection.
72ThinkCentreE73UserGuide
Page 85
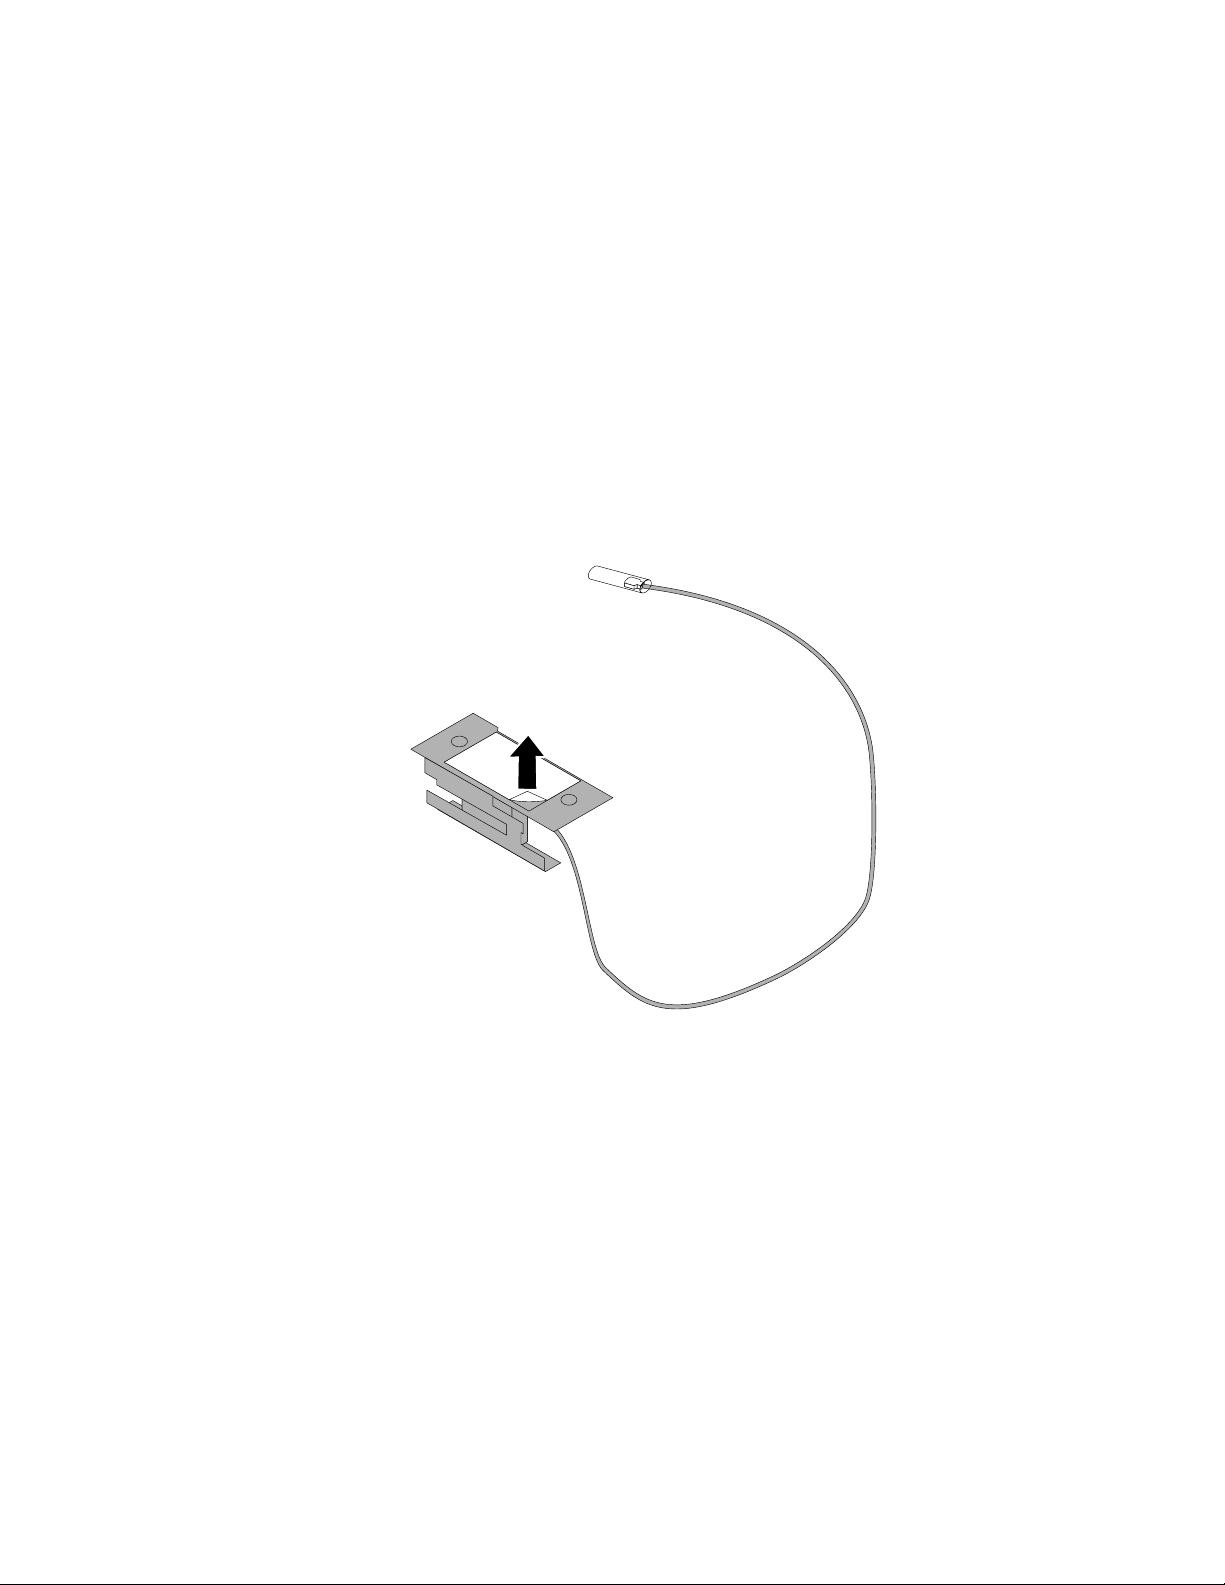
•Tocompletetheinstallationorreplacement,goto“Completingthepartsreplacement”onpage76.
InstallingorremovingthefrontWiFiantenna
Attention:Donotopenyourcomputerorattemptanyrepairbeforereadingandunderstandingthe
“Importantsafetyinformation”onpagev
ThissectionprovidesinstructionsonhowtoinstallorremovethefrontWiFiantenna.
InstallingthefrontWiFiantenna
ToinstallthefrontWiFiantenna,dothefollowing:
1.T urnoffthecomputeranddisconnectallpowercordsfromelectricaloutlets.
2.Removethecomputercover.See“Removingthecomputercover”onpage35.
3.Removethefrontbezel.See“Removingandreinstallingthefrontbezel”onpage36.
4.Peeloffthepaperthatprotectsthestickersonthefrontantenna.
.
Figure59.Peelingoffthepaperthatprotectsthestickers
Chapter5.Installingorreplacinghardware73
Page 86

5.Stickthefrontantennatothefrontpanelasshown.Theninsertthefrontantennacablethroughthe
holeinthefrontpanel.
Figure60.InstallingthefrontWiFiantenna
6.ConnectthefrontantennacabletotheWiFicardmodule.
Whattodonext:
•Toworkwithanotherpieceofhardware,gototheappropriatesection.
•Tocompletetheinstallationorreplacement,goto“Completingthepartsreplacement”onpage76.
RemovingthefrontWiFiantenna
ToremovethefrontWiFiantenna,dothefollowing:
1.T urnoffthecomputeranddisconnectallpowercordsfromelectricaloutlets.
2.Removethecomputercover.See“Removingthecomputercover”onpage35.
3.Removethefrontbezel.See“Removingandreinstallingthefrontbezel”onpage36.
4.DisconnectthefrontantennacablefromtheWiFicardmodule.
74ThinkCentreE73UserGuide
Page 87
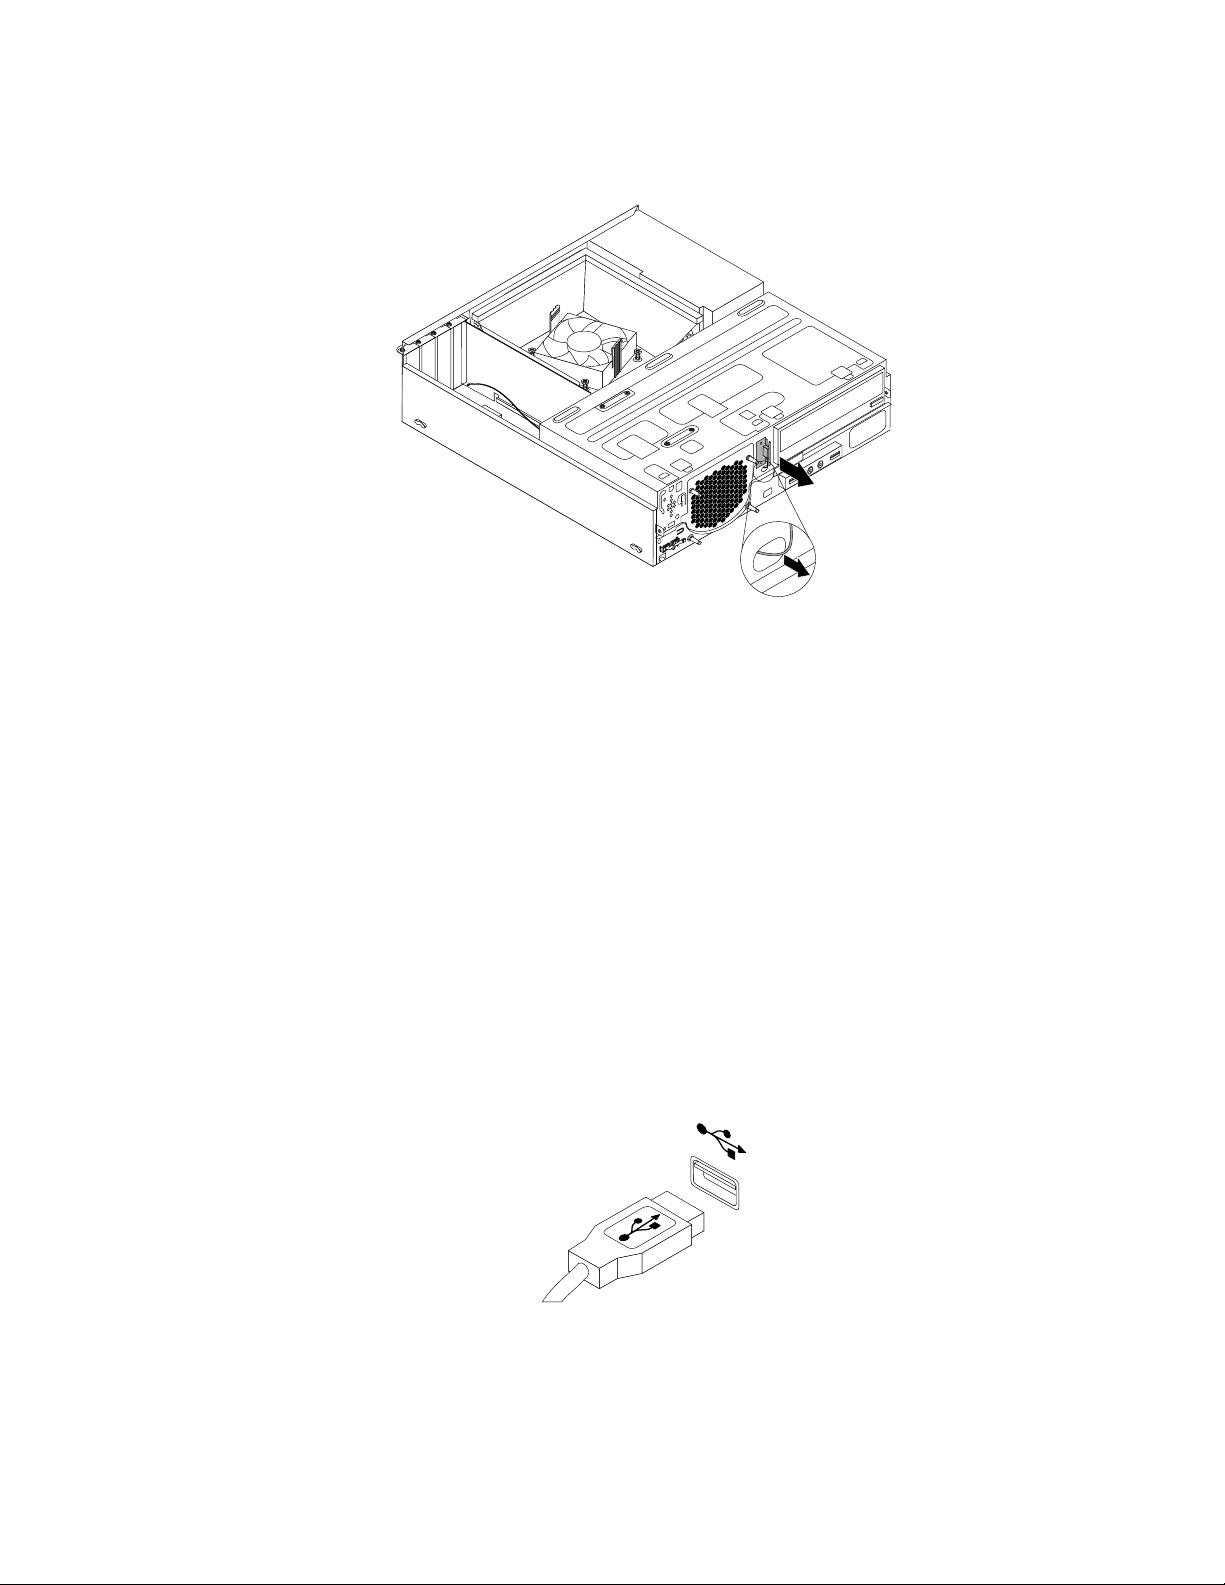
5.Removethefrontantennaandcablefromthefrontofthecomputer.
Figure61.RemovingthefrontWiFiantenna
Whattodonext:
•Toworkwithanotherpieceofhardware,gototheappropriatesection.
•Tocompletetheinstallationorreplacement,goto“Completingthepartsreplacement”onpage76.
Replacingthekeyboardormouse
Attention:Donotopenyourcomputerorattemptanyrepairbeforereadingandunderstandingthe
“Importantsafetyinformation”onpagev.
Thissectionprovidesinstructionsonhowtoreplacethekeyboardormouse.
Toreplacethekeyboardormouse,dothefollowing:
1.Disconnecttheoldkeyboardcableormousecablefromthecomputer.
2.ConnectanewkeyboardormousetooneoftheUSBconnectorsonthecomputer.Dependingonwhere
youwanttoconnectthenewkeyboardormouse,see“Locatingconnectors,controls,andindicatorson
thefrontofyourcomputer”onpage9or“Locatingconnectorsontherearofyourcomputer”onpage10.
Figure62.ConnectingtheUSBkeyboardormouse
Whattodonext:
•Toworkwithanotherpieceofhardware,gototheappropriatesection.
Chapter5.Installingorreplacinghardware75
Page 88
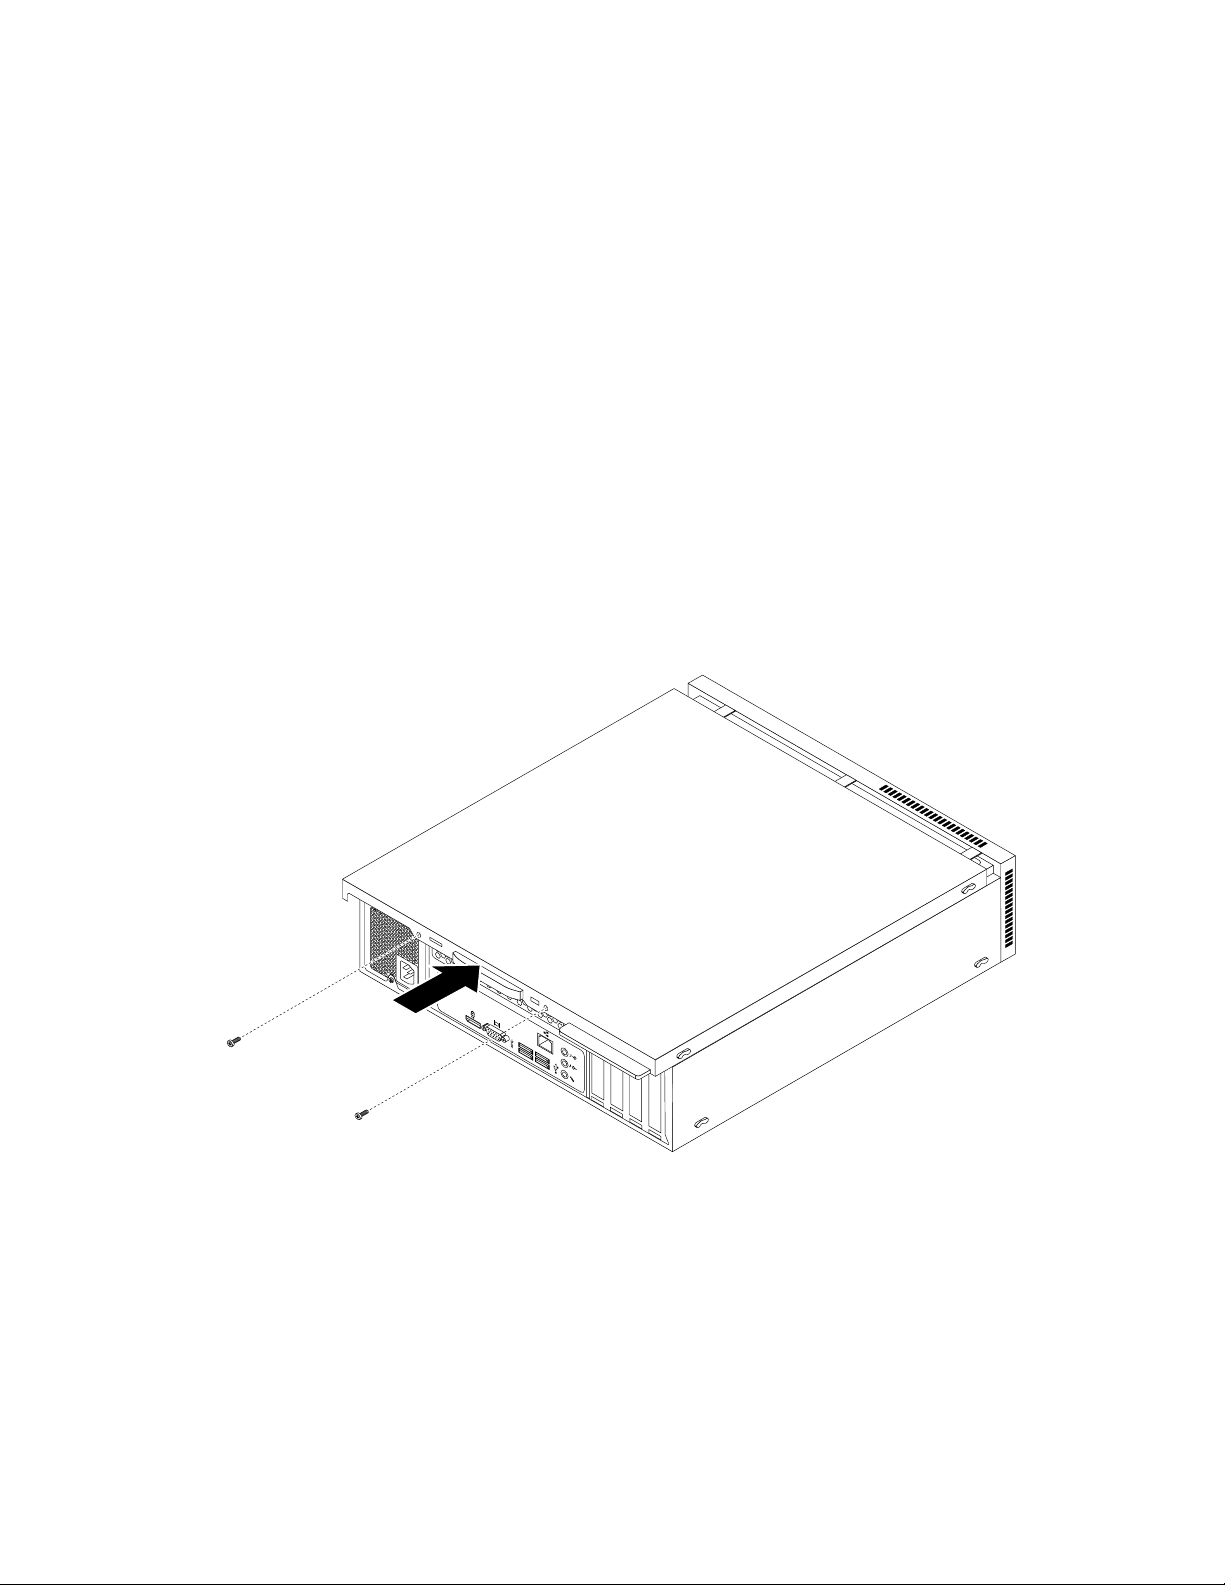
•Tocompletetheinstallationorreplacement,goto“Completingthepartsreplacement”onpage76.
3
4
5
6
Completingthepartsreplacement
Aftercompletingtheinstallationorreplacementforallparts,youneedtoreinstallthecomputercoverand
reconnectcables.Dependingonthepartsyouinstalledorreplaced,youmightneedtoconfirmtheupdated
informationintheSetupUtilityprogram.RefertoChapter7“UsingtheSetupUtilityprogram”onpage89.
Toreinstallthecomputercoverandreconnectcablestoyourcomputer,dothefollowing:
1.Makesurethatallcomponentshavebeenreassembledcorrectlyandthatnotoolsorloosescrews
areleftinsideyourcomputer.See“Locatingcomponents”onpage12forthelocationsofvarious
componentsinyourcomputer.
2.Makesurethatthecablesareroutedcorrectly.Keepcablesclearofthehingesandsidesofthe
computerchassistoavoidinterferencewithclosingthecomputercover.
3.Lowerthedrivebayassembly.See“Accessingthesystemboardcomponentsanddrives”onpage37.
4.Ifyouhaveremovedthefrontbezel,reinstallit.
5.Positionthecomputercoveronthechassissothattherailguidesonthecomputercoverengagethe
railsonthechassis.Then,slidethecomputercovertothefrontofthecomputeruntilitsnapsinto
positionandisclosed.Then,installthetwoscrewstosecurethecomputercover.
Figure63.Reinstallingthecomputercover
6.Ifthereisapadlockavailable,lockthecomputercover.See“Lockingthecomputercover”onpage32.
7.IfthereisaKensington-stylecablelockavailable,lockthecomputer.See“AttachingaKensington-style
cablelock”onpage33
.
8.Reconnecttheexternalcablesandpowercordstothecomputer.See“Locatingconnectorsonthe
rearofyourcomputer”onpage10.
9.T oupdateyourconfiguration,refertoChapter7“UsingtheSetupUtilityprogram”onpage89.
76ThinkCentreE73UserGuide
Page 89

Note:Inmostareasoftheworld,LenovorequiresthereturnofthedefectiveCustomerReplaceableUnit
(CRU).InformationaboutthiswillcomewiththeCRUorwillcomeafewdaysaftertheCRUarrives.
Obtainingdevicedrivers
Youcanobtaindevicedriversthatarenotpreinstalledinyouroperatingsystemat
http://www.lenovo.com/support.Installationinstructionsareprovidedinreadmefileswiththedevice-driver
files.
Chapter5.Installingorreplacinghardware77
Page 90

78ThinkCentreE73UserGuide
Page 91

Chapter6.Recoveryinformation
ThischapterprovidesinformationabouttherecoverysolutionsprovidedbyLenovo.
•“RecoveryinformationfortheWindows7operatingsystem”onpage79
•“RecoveryinformationfortheWindows8orWindows8.1operatingsystem”onpage85
•“RecoveryinformationfortheWindows10operatingsystem”onpage86
RecoveryinformationfortheWindows7operatingsystem
Thissectioncontainsthefollowingtopics:
•Creatingandusingrecoverymedia
•Performingbackupandrecoveryoperations
•UsingtheRescueandRecoveryworkspace
•Creatingandusingarescuemedium
•Installingorreinstallingdevicedrivers
•Solvingrecoveryproblems
Notes:
1.TherecoveryinformationinthischapteronlyappliestothecomputersthathavetheRescueand
RecoveryprogramortheProductRecoveryprograminstalled.IftheEnhancedBackupandRestore
iconintheLenovoThinkVantageToolsprogramisdimmed,itindicatesthatyouneedtoinstall
theRescueandRecoveryprogrammanuallybeforeenablingitsfeatures.ToinstalltheRescueand
Recoveryprogram,dothefollowing:
a.ClickStart➙AllPrograms➙LenovoThinkVantageT ools,anddouble-clickEnhancedBackup
andRestore.
b.Followtheinstructionsonthescreen.
c.Whentheinstallationprocesscompletes,theEnhancedBackupandRestoreiconisactivated.
2.Thereareavarietyofmethodstochoosefromwhenconsideringhowtorecoverintheeventofa
software-orhardware-relatedproblem.Somemethodsvarydependingonthetypeofoperatingsystem
thatisinstalled.
3.Theproductontherecoverymediamaybeusedonlyforthefollowingpurposes:
•Restoretheproductpreinstalledonyourcomputer
•Reinstalltheproduct
•ModifytheproductusingtheAdditionalFiles
Creatingandusingrecoverymedia
Youcanuserecoverymediatorestoretheharddiskdrivetothefactorydefaultstate.Recoverymediaare
usefulifyoutransferthecomputertoanotherarea,sellthecomputer,recyclethecomputer,orputthe
computerinanoperationalstateafterallothermethodsofrecoveryhavefailed.Asaprecautionarymeasure,
itisimportanttocreaterecoverymediaasearlyaspossible.
Note:Therecoveryoperationsyoucanperformusingrecoverymediavarydependingontheoperating
systemfromwhichtherecoverymediawerecreated.Therecoverymediamightcontainabootmedium
andadatamedium.YourMicrosoftWindowslicensepermitsyoutocreateonlyonedatamedium,soitis
importantthatyoustoretherecoverymediainasafeplaceafteryouhavemadethem.
©CopyrightLenovo2013,2015
79
Page 92

Creatingrecoverymedia
Thissectionprovidesinstructionsonhowtocreaterecoverymediaondifferentoperatingsystems.
Note:OntheWindows7operatingsystem,youcancreaterecoverymediausingdiscsorexternalUSB
storagedevices.OntheWindowsVistaoperatingsystem,youcancreaterecoverymediausingonlydiscs,
sothisoperationisalsocalled“creatingProductRecoverydiscs.”
TocreaterecoverymediaontheWindows7operatingsystem,clickStart➙AllPrograms➙Lenovo
ThinkVantageT ools➙FactoryRecoveryDisks.Then,followtheinstructionsonthescreen.
Usingrecoverymedia
Thissectionprovidesinstructionsonhowtouserecoverymediaondifferentoperatingsystems.
OntheWindows7operatingsystem,youcanuserecoverymediatorestorethecontentsoftheharddisk
drivetothefactorydefaultstate.Also,youcanuserecoverymediatoputthecomputerinanoperational
stateafterallothermethodsofharddiskdriverecoveryhavefailed.
Attention:Whenyouuserecoverymediatorestorethecontentsoftheharddisktothefactorydefaultstate,
allthefilescurrentlyontheharddiskdrivewillbedeletedandreplacedbythefactorydefaultfiles.
TouserecoverymediaontheWindows7operatingsystem,dothefollowing:
1.Dependingonthetypeofyourrecoverymedia,connectthebootmedium(memorykeyorotherUSB
storagedevice)tothecomputer,orinsertthebootdiscintotheopticaldrive.
2.RepeatedlypressandreleasetheF12keywhenturningonthecomputer.WhenthePleaseselect
bootdevicewindowopens,releasetheF12key.
3.SelectthedesiredstartupdeviceandpressEnter.Therestoreprocessbegins.
4.Followtheinstructionsonthescreentocompletetheoperation.
Note:Afterrestoringyourcomputerharddiskdrivetothefactorydefaultstate,youmighthavetoreinstall
devicedriversforsomedevices.See“Reinstallingdevicedrivers”onpage84.
Performingbackupandrecoveryoperations
TheRescueandRecoveryprogramenablesyoutobackupallyourharddiskdrivecontentsincludingthe
operatingsystem,datafiles,softwareprograms,andpersonalsettings.Youcandesignatewherethe
RescueandRecoveryprogramstoresthebackup:
•Inaprotectedareaofyourharddiskdrive
•Onthesecondaryharddiskdriveifasecondaryharddiskdriveisinstalledinyourcomputer
•OnanattachedexternalUSBharddiskdrive
•Onanetworkdrive
•Onrecordablediscs(arecordableopticaldriveisrequiredforthisoption)
Afteryouhavebackedupthecontentsoftheharddiskdrive,youcanrestorethecompletecontentsofthe
harddiskdrive,restoreselectedfilesonly,orrestoretheWindowsoperatingsystemandapplicationsonly
whilekeepingtheotherdataonyourharddiskdrive.
Performingabackupoperation
ThissectionprovidesinstructionsonhowtoperformabackupoperationusingtheRescueandRecovery
programondifferentoperatingsystems.
•ToperformabackupoperationusingtheRescueandRecoveryprogramontheWindows7operating
system,dothefollowing:
80ThinkCentreE73UserGuide
Page 93

1.FromtheWindowsdesktop,clickStart➙AllPrograms➙LenovoThinkVantageT ools➙
EnhancedBackupandRestore.TheRescueandRecoveryprogramopens.
2.IntheRescueandRecoverymainwindow,clicktheLaunchadvancedRescueandRecoveryarrow.
3.ClickBackupyourharddriveandselectbackupoperationoptions.Then,followtheinstructionson
thescreentocompletethebackupoperation.
Performingarecoveryoperation
ThissectionprovidesinstructionsonhowtoperformarecoveryoperationusingtheRescueandRecovery
programondifferentoperatingsystems.
ToperformarecoveryoperationusingtheRescueandRecoveryprogramontheWindows7operating
system,dothefollowing:
1.FromtheWindowsdesktop,clickStart➙AllPrograms➙LenovoThinkVantageT ools➙Enhanced
BackupandRestore.TheRescueandRecoveryprogramopens.
2.IntheRescueandRecoverymainwindow,clicktheLaunchadvancedRescueandRecoveryarrow.
3.ClicktheRestoreyoursystemfromabackupicon.
4.Followtheinstructionsonthescreentocompletetherecoveryoperation.
FormoreinformationaboutperformingarecoveryoperationfromtheRescueandRecoveryworkspace,see
“UsingtheRescueandRecoveryworkspace”onpage81.
UsingtheRescueandRecoveryworkspace
TheRescueandRecoveryworkspaceresidesinaprotected,hiddenareaofyourharddiskdrivethat
operatesindependentlyfromtheWindowsoperatingsystem.Thisenablesyoutoperformrecovery
operationsevenifyoucannotstarttheWindowsoperatingsystem.Youcanperformthefollowingrecovery
operationsfromtheRescueandRecoveryworkspace:
•Rescuefilesfromyourharddiskdriveorfromabackup:TheRescueandRecoveryworkspaceenables
youtolocatefilesonyourharddiskdriveandtransferthemtoanetworkdriveorotherrecordablemedia,
suchasaUSBdeviceoradisc.Thissolutionisavailableevenifyoudidnotbackupyourfilesorif
changesweremadetothefilessinceyourlastbackupoperation.Y oucanalsorescueindividualfilesfrom
aRescueandRecoverybackuponyourlocalharddiskdrive,aUSBdevice,oranetworkdrive.
•RestoreyourharddiskdrivefromaRescueandRecoverybackup:Ifyouhavebackedupyourharddisk
driveusingtheRescueandRecoveryprogram,youcanrestoretheharddiskdrivefromaRescueand
Recoverybackup,evenifyoucannotstarttheWindowsoperatingsystem.
•Restoreyourharddiskdrivetothefactorydefaultstate:TheRescueandRecoveryworkspaceenables
youtorestorethecompletecontentsofyourharddiskdrivetothefactorydefaultstate.Ifyouhave
multiplepartitionsonyourharddiskdrive,youhavetheoptiontorestoretheC:partitionandleavethe
otherpartitionsintact.BecausetheRescueandRecoveryworkspaceoperatesindependentlyfrom
theWindowsoperatingsystem,youcanrestoretheharddiskdrivetothefactorydefaultstateevenif
youcannotstarttheWindowsoperatingsystem.
Attention:IfyourestoretheharddiskdrivefromaRescueandRecoverybackuporrestoretheharddisk
drivetothefactorydefaultsettings,allfilesontheprimaryharddiskdrivepartition(usuallydriveC:)willbe
deletedintherecoveryprocess.Ifpossible,makecopiesofimportantfiles.Ifyouareunabletostartthe
Windowsoperatingsystem,youcanusetherescuefilesfeatureoftheRescueandRecoveryworkspaceto
copyfilesfromyourharddiskdrivetoothermedia.
TostarttheRescueandRecoveryworkspace,dothefollowing:
1.Makesurethatthecomputeristurnedoff.
Chapter6.Recoveryinformation81
Page 94

2.T urnonyourcomputer.Whenyouseethelogoscreen,pressEnter,andthenpressF11toenterthe
RescueandRecoveryworkspace.
3.IfyouhavesetaRescueandRecoverypassword,typeyourpasswordwhenprompted.TheRescue
andRecoveryworkspaceopensafterashortdelay.
Note:IftheRescueandRecoveryworkspacefailstoopen,see“Solvingrecoveryproblems”onpage84
4.Dooneofthefollowing:
•Torescuefilesfromyourharddiskdrive,clickRescuefilesandfollowtheinstructionsonthescreen.
•TorestoreyourharddiskdrivefromaRescueandRecoverybackuportorestoreyourharddiskdrive
tothefactorydefaultsettings,clickFullRestoreandfollowtheinstructionsonthescreen.
FormoreinformationaboutthefeaturesoftheRescueandRecoveryworkspace,clickHelp.
Note:Afterrestoringyourharddiskdrivetothefactorydefaultstate,youmighthavetoreinstalldevice
driversforsomedevices.See“Reinstallingdevicedrivers”onpage84.
Creatingandusingarescuemedium
Witharescuemedium,suchasadiscoraUSBharddiskdrive,youcanrecoverthecomputerfromfailures
thatpreventyoufromgainingaccesstotheRescueandRecoveryworkspaceonyourharddiskdrive.
Notes:
1.Therecoveryoperationsyoucanperformusingarescuemediumvarydependingontheoperating
system.
2.Therescuedisccanbestartedinalltypesofopticaldrives.
Creatingarescuemedium
Thissectionprovidesinstructionsonhowtocreatearescuemediumondifferentoperatingsystems.
.
TocreatearescuemediumontheWindows7operatingsystem,dothefollowing:
1.FromtheWindowsdesktop,clickStart➙AllPrograms➙LenovoThinkVantageT ools➙Enhanced
BackupandRestore.TheRescueandRecoveryprogramopens.
2.IntheRescueandRecoverymainwindow,clicktheLaunchadvancedRescueandRecoveryarrow.
3.ClicktheCreateRescueMediaicon.TheCreateRescueandRecoveryMediawindowopens.
4.IntheRescueMediaarea,selectthetypeoftherescuemediumyouwanttocreate.Y oucancreatea
rescuemediumusingadisc,aUSBharddiskdrive,orasecondaryinternalharddiskdrive.
5.ClickOKandfollowtheinstructionsonthescreentocreatearescuemedium.
Usingarescuemedium
Thissectionprovidesinstructionsonhowtousetherescuemediumyouhavecreated.
•Ifyouhavecreatedarescuemediumusingadisc,usethefollowinginstructionstousetherescuemedium:
1.T urnoffyourcomputer.
2.RepeatedlypressandreleasetheF12keywhenturningonthecomputer.WhenthePleaseselect
bootdevicewindowopens,releasetheF12key.
3.InthePleaseselectbootdevicewindow,selectthedesiredopticaldriveasthefirstbootdevice.
Then,inserttherescuediscintotheopticaldriveandpressEnter.Therescuemediumstarts.
•IfyouhavecreatedarescuemediumusingaUSBharddiskdrive,usethefollowinginstructionsto
usetherescuemedium:
1.AttachtheUSBharddiskdrivetooneoftheUSBconnectorsonyourcomputer.
82ThinkCentreE73UserGuide
Page 95

2.RepeatedlypressandreleasetheF12keywhenturningonthecomputer.WhenthePleaseselect
bootdevicewindowopens,releasetheF12key.
3.InthePleaseselectbootdevicewindow,selecttheUSBharddiskdriveasthefirstbootdeviceand
pressEnter.Therescuemediumstarts.
Whentherescuemediumstarts,theRescueandRecoveryworkspaceopens.Thehelpinformationfor
eachfeatureisavailablefromtheRescueandRecoveryworkspace.Followtheinstructionstocomplete
therecoveryprocess.
Reinstallingpreinstalledapplicationsanddevicedrivers
Yourcomputerhasprovisionsthatenableyoutoreinstallselectedfactory-installedapplicationsanddevice
drivers.
Reinstallingpreinstalledapplications
Thissectionprovidesinstructionsonhowtoreinstallpreinstalledapplications.
ToreinstalltheselectedapplicationspreinstalledonyourLenovocomputer,dothefollowing:
1.T urnonthecomputer.
2.GototheC:\SWTOOLSdirectory.
3.Opentheappsfolder.Withintheappsfolder,thereareseveralsubfoldersnamedforvariousapplications
installedinyourcomputer.
4.Opentheappropriateapplicationsubfolder.
5.Intheapplicationsubfolder,lookforaSETUP .EXEfileorotherappropriateEXEfilesforsetup.
Double-clickthefileandfollowtheinstructionsonthescreentocompletetheinstallation.
Reinstallingpreinstalleddevicedrivers
Thissectionprovidesinstructionsonhowtoreinstallpreinstalleddevicedrivers.
Attention:Whenyoureinstalldevicedrivers,youarechangingthecurrentconfigurationofyourcomputer.
Reinstalldevicedriversonlywhenitisnecessarytocorrectaproblemwithyourcomputer.
Toreinstallthedevicedriverforafactory-installeddevice,dothefollowing:
1.T urnonthecomputer.
2.GototheC:\SWTOOLSdirectory.
3.OpentheDRIVERSfolder.WithintheDRIVERSfolder,thereareseveralsubfoldersnamedforvarious
devicesinstalledinyourcomputer,suchasAUDIOorVIDEO.
4.Opentheappropriatedevicesubfolder.
5.Dooneofthefollowing:
•Inthedevicesubfolder,lookforaSETUP .exefile.Double-clickthefileandfollowtheinstructionson
thescreentocompletetheinstallation.
•Inthedevicesubfolder,lookforaREADME.txtfileorafilewiththe.txtextension.Thisfilemightbe
namedaftertheoperatingsystem,suchasWIN98.txt.TheTXTfilecontainsinformationabouthowto
installthedevicedriver.Followtheinstructionstocompletetheinstallation.
•Ifthedevicesubfoldercontainsafilewiththe.infextensionandyouwanttoinstallthedevicedriver
usingtheINFfile,refertotheWindowshelpsystemfordetailedinformationabouthowtoinstall
thedevicedriver.
Note:Ifyouneedupdateddevicedrivers,see“Gettingthelatestdevicedriversforyourcomputer”on
page97
formoreinformation.
Chapter6.Recoveryinformation83
Page 96

Reinstallingsoftwareprograms
Ifasoftwareprogramyouinstalledonyourcomputerisnotworkingcorrectly,youmightneedtoremove
andreinstallit.Reinstallingoverwritestheexistingprogramsfilesandusuallyfixesanyproblemsthat
youmighthavehadwiththatprogram.
Toremoveaprograminyoursystem,seeMicrosoftWindowshelpsystemfordetailedinformation.
Toreinstalltheprogram,dooneofthefollowing:
Note:Themethodofreinstallingaprogramvariesfromprogramtoprogram.Refertothedocumentation
providedwiththeprogramtoseeifyourprogramhasspecialinstallationinstructions.
•Toreinstallmostcommerciallyavailableprogramsinyoursystem,seeMicrosoftWindowshelpsystem
formoreinformation.
•ToreinstallselectedapplicationprogramsthatcamepreinstalledfromLenovo,dothefollowing:
1.T urnonthecomputer.
2.GototheC:\SWTOOLSdirectory.
3.OpentheAPPSfolder.WithintheAPPSfolder,thereareseveralsubfoldersnamedforvarious
applicationsinstalledinyourcomputer.
4.Opentheappropriateapplicationsubfolder.
5.Intheapplicationsubfolder,lookforaSETUP .EXEfileorotherappropriateEXEfilesforsetup.
Double-clickthefileandfollowtheinstructionsonthescreentocompletetheinstallation.
Reinstallingdevicedrivers
Toreinstalladevicedriverforanoptionyouinstalled,refertothedocumentationthatcomeswiththeoption.
Whenyoureinstalldevicedrivers,youarechangingthecurrentconfigurationofyourcomputer.Reinstall
devicedriversonlywhenitisnecessarytocorrectaproblemwithyourcomputer.
Formoreinformationaboutreinstallingdevicedriversthatcamewithyourcomputer,see“Reinstalling
preinstalledapplicationsanddevicedrivers”onpage83.
Solvingrecoveryproblems
IfyouareunabletoaccesstheRescueandRecoveryworkspaceortheWindowsenvironment,doone
ofthefollowing:
•UsearescuemediumtostarttheRescueandRecoveryworkspace.See“Creatingandusingarescue
medium”onpage82.
•Userecoverymediaifallothermethodsofrecoveryhavefailedandyouneedtorestoretheharddisk
drivetothefactorydefaultsettings.See“Creatingandusingrecoverymedia”onpage79.
Note:IfyouareunabletoaccesstheRescueandRecoveryworkspaceortheWindowsenvironmentfrom
arescuemediumorrecoverymedia,youmightnothavetherescuedevice(aninternalharddiskdrive,a
disc,aUSBharddiskdrive,orotherexternaldevices)setasthefirstbootdeviceinthestartupdevice
sequence.Youmustfirstmakesurethatyourrescuedeviceissetasthefirstbootdeviceinthestartup
devicesequenceintheSetupUtilityprogram.See“Selectingastartupdevice”onpage91
informationabouttemporarilyorpermanentlychangingthestartupdevicesequence.Formoreinformation
abouttheSetupUtilityprogram,seeChapter7“UsingtheSetupUtilityprogram”onpage89.
fordetailed
Itisimportanttocreatearescuemediumandasetofrecoverymediaasearlyaspossibleandstorethem
inasafeplaceforfutureuse.
84ThinkCentreE73UserGuide
Page 97

RecoveryinformationfortheWindows8orWindows8.1operating system
Thissectionprovidesinformationabouttherecoverysolutionsprovidedoncomputerspreinstalledwith
theWindows8orWindows8.1operatingsystem.
Refreshingyourcomputer
Ifyourcomputerdoesnotperformwellandtheproblemmightbecausedbyarecentlyinstalledprogram,
youcanrefreshyourcomputerwithoutlosingyourpersonalfilesorchangingyoursettings.
Attention:Ifyourefreshyourcomputer,theprogramsthatcamewithyourcomputerandtheprogramsthat
youinstalledfromWindowsStorewillbereinstalled,butallotherprogramswillberemoved.
Torefreshyourcomputer,dooneofthefollowing:
•ForWindows8:
1.Movethepointertothetop-rightorbottom-rightcornerofthescreentodisplaythecharms.Click
Settings➙ChangePCsettings➙General.
2.IntheRefreshyourPCwithoutaffectingyourfilessection,clickGetstarted.
•ForWindows8.1:
1.Movethepointertothetop-rightorbottom-rightcornerofthescreentodisplaythecharms.Click
Settings➙ChangePCsettings➙Updateandrecovery➙Recovery.
2.IntheRefreshyourPCwithoutaffectingyourfilessection,clickGetstarted.
Resettingyourcomputertothefactorydefaultsettings
Youcanresetyourcomputertothefactorydefaultsettings.Resettingthecomputerwillreinstallthe
operatingsystem,andreinstallalltheprogramsandsettingsthatcamewithyourcomputer.
Attention:Ifyouresetyourcomputer,allyourpersonalfilesandsettingswillbedeleted.Toavoiddataloss,
makeabackupcopyofallthedatathatyouwanttokeep.
Toresetyourcomputer,dooneofthefollowing:
•ForWindows8:
1.Movethepointertothetop-rightorbottom-rightcornerofthescreentodisplaythecharms.Click
Settings➙ChangePCsettings➙General.
2.IntheRemoveeverythingandreinstallWindowssection,clickGetstarted.
•ForWindows8.1:
1.Movethepointertothetop-rightorbottom-rightcornerofthescreentodisplaythecharms.Click
Settings➙ChangePCsettings➙Updateandrecovery➙Recovery.
2.IntheRemoveeverythingandreinstallWindowssection,clickGetstarted.
Usingtheadvancedstartupoptions
AdvancedstartupoptionsenableyoutochangethestartupsettingsofyourWindowsoperatingsystem,
startthecomputerfromanexternaldevice,orrestoretheWindowsoperatingsystemfromasystemimage.
Tousetheadvancedstartupoptions,dothefollowing:
•ForWindows8:
Chapter6.Recoveryinformation85
Page 98

1.Movethepointertothetop-rightorbottom-rightcornerofthescreentodisplaythecharms.Click
Settings➙ChangePCsettings➙General.
2.IntheAdvancedstartupsection,clickRestartnow➙T roubleshoot➙Advancedoptions.
3.Restartyourcomputerfollowingtheinstructionsonthescreen.
•ForWindows8.1:
1.Movethepointertothetop-rightorbottom-rightcornerofthescreentodisplaythecharms.Click
Settings➙ChangePCsettings➙Updateandrecovery➙Recovery.
2.IntheAdvancedstartupsection,clickRestartnow➙T roubleshoot➙Advancedoptions.
3.Restartyourcomputerfollowingtheinstructionsonthescreen.
RecoveringyouroperatingsystemifWindows8orWindows8.1fails tostart
TheWindowsrecoveryenvironmentonyourcomputeriscapableofoperatingindependentlyfromthe
Windows8orWindows8.1operatingsystem.Thisenablesyoutorecoverorrepairtheoperatingsystem
eveniftheWindows8orWindows8.1operatingsystemfailstostart.
Aftertwoconsecutivefailedbootattempts,theWindowsrecoveryenvironmentstartsautomatically.Then
youcanchooserepairandrecoveryoptionsbyfollowingtheinstructionsonthescreen.
Note:Ensurethatyourcomputerisconnectedtoacpowerduringtherecoveryprocess.
FormoredetailsabouttherecoverysolutionsprovidedoncomputerspreinstalledwiththeWindows8
orWindows8.1operatingsystem,refertothehelpinformationsystemoftheWindows8orWindows
8.1operatingsystem.
RecoveryinformationfortheWindows10operatingsystem
TorecoveryourWindows10operatingsystem,usethefollowingsolutions:
•UseWindowsrecoverysolutions.
–UserecoverysolutionsinWindowsSettings.
1.ClicktheStartbuttontoopentheStartmenu.
2.ClickSettings➙Update&security➙Recovery.
3.Choosetheappropriaterecoverysolutionbyfollowingtheinstructionsonthescreen.
–UseSystemRestoretorestoresystemfilesandsettingstoanearlierpoint.
1.Right-clicktheStartbuttontoopentheStartcontextmenu.
2.ClickControlPanel.ViewControlPanelusingLargeiconsorSmallicons,andthenclick
Recovery➙OpenSystemRestore.
3.Followtheinstructionsonthescreen.
–UsetheFileHistorytooltorestoreyourfilesfromabackup.
Note:IfyouusetheFileHistorytooltorestoreyourfilesfromabackup,ensurethatyoubackedup
yourdataearlierwiththetool.
1.Right-clicktheStartbuttontoopentheStartcontextmenu.
2.ClickControlPanel.ViewControlPanelusingLargeiconsorSmallicons,andthenclickFile
History➙Restorepersonalfiles.
3.Followtheinstructionsonthescreen.
–UsetheWindowsrecoveryenvironmentbydoingoneofthefollowing:
86ThinkCentreE73UserGuide
Page 99

–Afterseveralconsecutivefailedbootattempts,theWindowsrecoveryenvironmentmightstart
automatically.Followtheinstructionsonthescreentochoosetheappropriaterecoverysolution.
–SelecttherecoverymediumyoucreatedearlierwiththeWindowstoolasthestartupdevice.See
“Selectingatemporarystartupdevice”onpage92
.Then,followtheinstructionsonthescreen
tochoosetheappropriaterecoverysolution.
Note:Tocreatearecoverymedium,see“Goodmaintenancepractices”onpage99.
•UsetherecoveryUSBkeyprovidedbyLenovotorestoretheentirestoragedrivetothefactory-default
settings.
–IfyourcomputercomeswiththerecoveryUSBkey,followtheinstructionsshippedwiththeUSBkey.
–IfyourcomputerdoesnotcomewiththerecoveryUSBkey,contacttheLenovoCustomer
SupportCentertoorderarecoveryUSBkey.ForalistofLenovoSupportphonenumbers,goto
http://www.lenovo.com/support/phone.Ifyoucannotfindthesupporttelephonenumberforyour
countryorregion,contactyourLenovoreseller.
Chapter6.Recoveryinformation87
Page 100

88ThinkCentreE73UserGuide
 Loading...