


ThinkCentreE63z
UserGuide
MachineTypes:10D4,10D5,10D6,10D7,10E0,10E1,10E2,10E3,
10EJ,10EK,10EL,and10EM

Note:Beforeusingthisinformationandtheproductitsupports,besuretoreadandunderstandthe“Read
thisfirst:Importantsafetyinformation”onpageiii
andAppendixF“Notices”onpage87.
FourthEdition(May2016)
©CopyrightLenovo2014,2016.
LIMITEDANDRESTRICTEDRIGHTSNOTICE:IfdataorsoftwareisdeliveredpursuanttoaGeneralServices
Administration“GSA”contract,use,reproduction,ordisclosureissubjecttorestrictionssetforthinContractNo.
GS-35F-05925.

Contents
Readthisfirst:Importantsafety
information..............iii
Beforeusingthismanual............iii
Serviceandupgrades.............iii
Staticelectricityprevention...........iv
Powercordsandpoweradapters........iv
Extensioncordsandrelateddevices.......v
Plugsandoutlets...............v
Externaldevices...............v
Heatandproductventilation..........v
Operatingenvironment............vi
Powersupplystatement............vi
Cleaningandmaintenance..........vii
Glasspartsnotice.............vii
Tip-overhazardpreventionnotice.......vii
Chapter1.Productoverview......1
Locations..................1
Locatingconnectors,controls,andindicators
onthefrontofyourcomputer........2
Locatingconnectorsontherearofyour
computer................3
Locatingthemachinetypeandmodellabel..4
Adjustingtheframestand...........5
Features..................5
Specifications................9
Lenovoprograms..............9
Accessingaprogramonyourcomputer...10
AnintroductiontoLenovoprograms....10
Chapter2.Usingyourcomputer...13
Registeringyourcomputer..........13
UsingWindowsshortcutkeys.........13
Usingthewheelmouse...........14
Settingthecomputervolume.........14
AddinganicontotheWindowsnotificationarea.14
Managingpower..............15
Advancedconfigurationandpowerinterface
(ACPI)BIOS..............15
AutomaticPower-onfeatures.......15
Usingthesingle-touchormulti-touchfeature...15
NavigatingamongscreensontheWindows8.1
operatingsystem..............16
AccessingControlPanelontheWindows8.1
operatingsystem..............17
Frequentlyaskedquestions.........17
Chapter3.Y ouandyourcomputer..19
Accessibilityandcomfort..........19
Arrangingyourworkspace........19
Comfort...............19
Glareandlighting............20
Aircirculation.............20
Electricaloutletsandcablelengths.....20
Accessibilityinformation.........20
Movingyourcomputertoanothercountryor
region..................23
Chapter4.Security..........25
Securityfeatures..............25
AttachingaKensington-stylecablelock.....26
Usingpasswords..............26
BIOSpasswords............26
Windowspasswords..........27
Usingandunderstandingfirewalls.......27
Protectingdataagainstviruses........27
Chapter5.Advancedconfiguration..29
UsingtheSetupUtilityprogram........29
StartingtheSetupUtilityprogram.....29
Viewingandchangingsettings......29
UsingBIOSpasswords.........30
Enablingordisablingadevice.......31
Selectingastartupdevice........31
EnablingErPLPScompliancemode....32
ExitingtheSetupUtilityprogram......32
UpdatingorrecoveringtheBIOS.......33
BIOSlevels..............33
Usingsystemprograms.........33
ChangingtheBIOSsettingsbeforeinstallinga
newoperatingsystem..........34
UpdatingtheBIOS...........34
Chapter6.Preventingproblems...35
Keepingyourcomputercurrent........35
Gettingthelatestdevicedriversforyour
computer...............35
Gettingthelatestsystemupdates.....35
Cleaningandmaintenance..........35
Basics................36
Cleaningyourcomputer.........36
Goodmaintenancepractices.......37
Movingyourcomputer...........38
Chapter7.T roubleshootingand
diagnostics..............39
©CopyrightLenovo2014,2016
i

Basictroubleshooting............39
Troubleshootingprocedure..........40
Troubleshooting..............40
Audioproblems............41
Intermittentproblems..........41
Harddiskdriveproblems.........42
Problemswiththekeyboardormouse...42
Monitorproblems............43
Networkingproblems..........44
Ihaveconnectedanoptiontomycomputer,
butitdoesnotwork...........46
Performanceandlockupproblems.....46
Theprinterdoesnotwork........47
Serialconnectorcannotbeaccessed....47
Softwareproblems...........47
USBdeviceproblems..........48
Diagnostics................49
LenovoSolutionCenter.........49
Chapter8.Recoveryinformation...51
RecoveryinformationfortheWindows7operating
system..................51
Creatingandusingrecoverymedia.....51
Performingbackupandrecoveryoperations.52
Creatingandusingarescuemedium....54
Reinstallingprogramsanddevicedrivers..54
Solvingrecoveryproblems........56
RecoveryinformationfortheWindows8.1
operatingsystem..............56
Refreshingyourcomputer........56
Resettingyourcomputertothefactory-default
settings................56
Usingtheadvancedstartupoptions....57
RecoveringyouroperatingsystemifWindows
8.1failstostart.............57
RecoveryinformationfortheWindows10operating
system..................58
Chapter9.Installingorreplacing
hardware...............61
Handlingstatic-sensitivedevices.......61
Installingorreplacinghardware........61
Installingexternaloptions........61
Installingorremovingtheacpoweradapter.61
Replacingthekeyboardormouse.....63
Replacingthewirelesskeyboardormouse..64
Obtainingdevicedrivers.........67
Chapter10.Gettinginformation,help,
andservice..............69
Informationresources............69
Windowshelpsystem..........69
SafetyandWarranty...........69
LenovoWebsite............69
LenovoSupportWebsite.........70
Helpandservice..............70
Usingthedocumentationanddiagnostic
program...............70
Callingforservice............70
Usingotherservices..........71
Purchasingadditionalservices......71
AppendixA.Regulatory
information..............73
Exportclassificationnotice..........73
Electronicemissionsnotices.........73
FederalCommunicationsCommission
DeclarationofConformity........73
Eurasiancompliancemark..........75
Brazilaudionotice.............75
Mexicowireless-radiocomplianceinformation..75
Taiwanvisionprecautionnotice........76
Additionalregulatoryinformation.......76
AppendixB.WEEEandrecycling
information..............77
ImportantWEEEinformation.........77
RecyclinginformationforJapan........77
RecyclinginformationforBrazil........78
BatteryrecyclinginformationforTaiwan.....78
BatteryrecyclinginformationfortheEuropean
Union..................79
AppendixC.RestrictionofHazardous
Substances(RoHS)Directive.....81
EuropeanUnionRoHS...........81
ChinaRoHS................81
TurkishRoHS...............81
UkraineRoHS...............82
IndiaRoHS................82
TaiwanRoHS...............82
AppendixD.ChinaEnergyLabel...83
AppendixE.ENERGYSTARmodel
information..............85
AppendixF .Notices..........87
Trademarks................88
Index..................89
iiThinkCentreE63zUserGuide
Readthisfirst:Importantsafetyinformation
Thischaptercontainsthesafetyinformationthatyoumustbefamiliarwith.
Beforeusingthismanual
CAUTION:
Beforeusingthismanual,besuretoreadandunderstandalltherelatedsafetyinformationforthis
product.RefertotheinformationinthissectionandthesafetyinformationintheSafety,Warranty,and
SetupGuidethatyoureceivedwiththisproduct.Readingandunderstandingthissafetyinformation
reducestheriskofpersonalinjuryanddamagetoyourproduct.
IfyounolongerhaveacopyoftheSafety,Warranty,andSetupGuide,youcanobtainaPortableDocument
Format(PDF)versionfromtheLenovo
LenovoSupportWebsitealsoprovidestheSafety,Warranty,andSetupGuideandthisUserGuidein
additionallanguages.
®
SupportWebsiteathttp://www.lenovo.com/UserManuals.The
Serviceandupgrades
DonotattempttoserviceaproductyourselfunlessinstructedtodosobytheCustomerSupportCenteror
yourdocumentation.OnlyuseaServiceProviderwhoisapprovedtorepairyourparticularproduct.
Note:Somecomputerpartscanbeupgradedorreplacedbythecustomer.Upgradestypicallyare
referredtoasoptions.ReplacementpartsapprovedforcustomerinstallationarereferredtoasCustomer
ReplaceableUnits,orCRUs.Lenovoprovidesdocumentationwithinstructionswhenitisappropriatefor
customerstoinstalloptionsorreplaceCRUs.Youmustcloselyfollowallinstructionswheninstallingor
replacingparts.TheOffstateofapowerindicatordoesnotnecessarilymeanthatvoltagelevelsinsidea
productarezero.Beforeyouremovethecoversfromaproductequippedwithapowercord,alwaysensure
thatthepoweristurnedoffandthattheproductisunpluggedfromanypowersource.Formoreinformation
onCRUs,refertoChapter9“Installingorreplacinghardware”onpage61
concerns,contacttheCustomerSupportCenter.
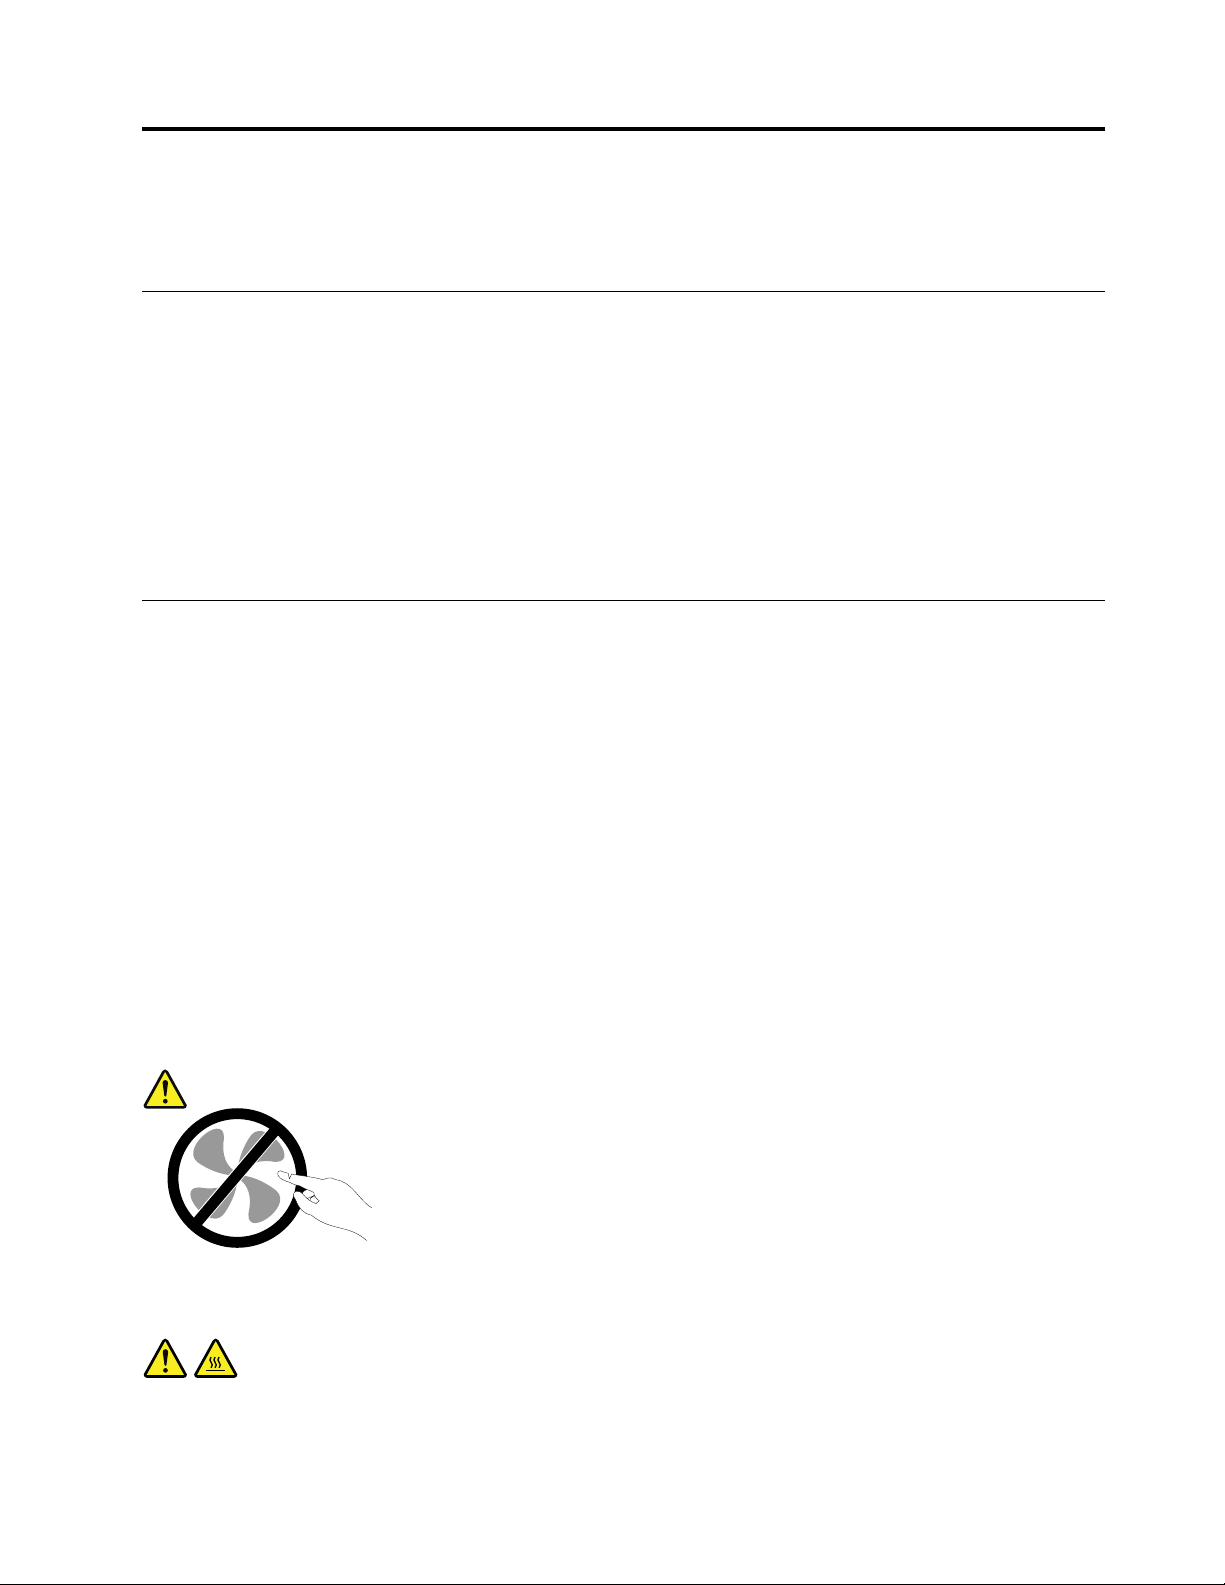
Althoughtherearenomovingpartsinyourcomputerafterthepowercordhasbeendisconnected,the
followingwarningsarerequiredforyoursafety.
CAUTION:
.Ifyouhaveanyquestionsor
Hazardousmovingparts.Keepfingersandotherbodypartsaway.
CAUTION:
Beforeyouopenthecomputercover,turnoffthecomputerandwaitseveralminutesuntilthe
computeriscool.
©CopyrightLenovo2014,2016
iii

Staticelectricityprevention
Staticelectricity,althoughharmlesstoyou,canseriouslydamagecomputercomponentsandoptions.
Improperhandlingofstatic-sensitivepartscancausedamagetothepart.Whenyouunpackanoption
orCRU,donotopenthestatic-protectivepackagecontainingthepartuntiltheinstructionsdirectyou
toinstallit.
WhenyouhandleoptionsorCRUs,orperformanyworkinsidethecomputer,takethefollowingprecautions
toavoidstatic-electricitydamage:
•Limityourmovement.Movementcancausestaticelectricitytobuilduparoundyou.
•Alwayshandlecomponentscarefully.Handleadapters,memorymodules,andothercircuitboardsbythe
edges.Nevertouchexposedcircuitry.
•Preventothersfromtouchingcomponents.
•Whenyouinstallastatic-sensitiveoptionorCRU,touchthestatic-protectivepackagecontainingthe
parttoametalexpansion-slotcoverorotherunpaintedmetalsurfaceonthecomputerforatleasttwo
seconds.Thisreducesstaticelectricityinthepackageandyourbody.
•Whenpossible,removethestatic-sensitivepartfromthestatic-protectivepackagingandinstallthepart
withoutsettingitdown.Whenthisisnotpossible,placethestatic-protectivepackagingonasmooth,
levelsurfaceandplacethepartonit.
•Donotplacethepartonthecomputercoverorothermetalsurface.
Powercordsandpoweradapters
Useonlythepowercordsandpoweradapterssuppliedbytheproductmanufacturer.Donotusetheac
powercordforotherdevices.
Thepowercordsshallbesafetyapproved.ForGermany,itshallbeH03VV-F,3G,0.75mm
connectedtothepoweradapter),H05VV-F,3G,0.75mm
supplyassembly),orbetter.Forothercountries,thesuitabletypesshallbeusedaccordingly.
Neverwrapapowercordaroundapoweradapterorotherobject.Doingsocanstressthecordinwaysthat
cancausethecordtofray,crack,orcrimp.Thiscanpresentasafetyhazard.
Alwaysroutepowercordssothattheywillnotbewalkedon,trippedover,orpinchedbyobjects.
Protectpowercordandpoweradaptersfromliquids.Forinstance,donotleaveyourpowercordorpower
adapternearsinks,tubs,toilets,oronfloorsthatarecleanedwithliquidcleansers.Liquidscancausea
shortcircuit,particularlyifthepowercordorpoweradapterhasbeenstressedbymisuse.Liquidsalsocan
causegradualcorrosionofpowercordterminalsand/ortheconnectorterminalsonapoweradapter,
whichcaneventuallyresultinoverheating.
Ensurethatallpowercordconnectorsaresecurelyandcompletelypluggedintoreceptacles.
Donotuseanypoweradapterthatshowscorrosionattheacinputpinsorshowssignsofoverheating(such
asdeformedplastic)attheacinputoranywhereonthepoweradapter.
Donotuseanypowercordswheretheelectricalcontactsoneitherendshowsignsofcorrosionor
overheatingorwherethepowercordappearstohavebeendamagedinanyway.
2
(thepowercordconnectedtotheinternalpower
2
(thepowercord
ivThinkCentreE63zUserGuide

Extensioncordsandrelateddevices
Ensurethatextensioncords,surgeprotectors,uninterruptiblepowersupplies,andpowerstripsthatyouuse
areratedtohandletheelectricalrequirementsoftheproduct.Neveroverloadthesedevices.Ifpowerstrips
areused,theloadshouldnotexceedthepowerstripinputrating.Consultanelectricianformoreinformation
ifyouhavequestionsaboutpowerloads,powerrequirements,andinputratings.
Plugsandoutlets
Ifareceptacle(poweroutlet)thatyouintendtousewithyourcomputerequipmentappearstobedamaged
orcorroded,donotusetheoutletuntilitisreplacedbyaqualifiedelectrician.
Donotbendormodifytheplug.Iftheplugisdamaged,contactthemanufacturertoobtainareplacement.
Donotshareanelectricaloutletwithotherhomeorcommercialappliancesthatdrawlargeamountsof
electricity;otherwise,unstablevoltagemightdamageyourcomputer,data,orattacheddevices.
Someproductsareequippedwithathree-prongedplug.Thisplugfitsonlyintoagroundedelectricaloutlet.
Thisisasafetyfeature.Donotdefeatthissafetyfeaturebytryingtoinsertitintoanon-groundedoutlet.If
youcannotinserttheplugintotheoutlet,contactanelectricianforanapprovedoutletadapterortoreplace
theoutletwithonethatenablesthissafetyfeature.Neveroverloadanelectricaloutlet.Theoverallsystem
loadshouldnotexceed80percentofthebranchcircuitrating.Consultanelectricianformoreinformation
ifyouhavequestionsaboutpowerloadsandbranchcircuitratings.
Besurethatthepoweroutletyouareusingisproperlywired,easilyaccessible,andlocatedclosetothe
equipment.Donotfullyextendpowercordsinawaythatwillstressthecords.
Besurethatthepoweroutletprovidesthecorrectvoltageandcurrentfortheproductyouareinstalling.
Carefullyconnectanddisconnecttheequipmentfromtheelectricaloutlet.
Externaldevices
DonotconnectordisconnectanyexternaldevicecablesotherthanUniversalSerialBus(USB)cableswhile
thecomputerpowerison;otherwise,youmightdamageyourcomputer.Toavoidpossibledamageto
attacheddevices,waitatleastfivesecondsafterthecomputerisshutdowntodisconnectexternaldevices.
Heatandproductventilation
Computers,poweradapters,andmanyaccessoriescangenerateheatwhenturnedonandwhenbatteries
arecharging.Alwaysfollowthesebasicprecautions:
•Donotleaveyourcomputer,poweradapter,oraccessoriesincontactwithyourlaporanypartofyour
bodyforanextendedperiodwhentheproductsarefunctioningorwhenthebatteryischarging.Your
computer,poweradapter,andmanyaccessoriesproducesomeheatduringnormaloperation.Extended
contactwiththebodycouldcausediscomfortor,potentially,askinburn.
•Donotchargethebatteryoroperateyourcomputer,poweradapter,oraccessoriesnearflammable
materialsorinexplosiveenvironments.
•Ventilationslots,fans,andheatsinksareprovidedwiththeproductforsafety,comfort,andreliable
operation.Thesefeaturesmightinadvertentlybecomeblockedbyplacingtheproductonabed,sofa,
carpet,orotherflexiblesurface.Neverblock,cover,ordisablethesefeatures.
©CopyrightLenovo2014,2016
v

Inspectyourdesktopcomputerfordustaccumulationatleastonceeverythreemonths.Beforeinspecting
yourcomputer,turnoffthepowerandunplugthecomputer'spowercordfromtheelectricaloutlet;then
removeanydustfromventsandperforationsinthebezel.Ifyounoticeexternaldustaccumulation,then
examineandremovedustfromtheinsideofthecomputerincludingheatsinkinletfins,powersupplyvents,
andfans.Alwaysturnoffandunplugthecomputerbeforeopeningthecover.Ifpossible,avoidoperating
yourcomputerwithintwofeetofhigh-trafficareas.Ifyoumustoperateyourcomputerinornearahigh-traffic
area,inspectand,ifnecessary,cleanyourcomputermorefrequently.
Foryoursafetyandtomaintainoptimumcomputerperformance,alwaysfollowthesebasicprecautions
withyourdesktopcomputer:
•Keepthecoverclosedwheneverthecomputerispluggedin.
•Regularlyinspecttheoutsideofthecomputerfordustaccumulation.
•Removedustfromventsandanyperforationsinthebezel.Morefrequentcleaningsmightberequiredfor
computersindustyorhigh-trafficareas.
•Donotrestrictorblockanyventilationopenings.
•Donotstoreoroperateyourcomputerinsidefurniture,asthismightincreasetheriskofoverheating.
•Airflowtemperaturesintothecomputershouldnotexceed35°C(95°F).
•Donotinstallairfiltrationdevices.Theymayinterferewithpropercooling.
Operatingenvironment
Theoptimalenvironmentinwhichtouseyourcomputeris10°C–35°C(50°F–95°F)withhumidityranging
between35%and80%.Ifyourcomputerisstoredortransportedintemperatureslessthan10°C(50°F),
allowthecoldcomputertoriseslowlytoanoptimaloperatingtemperatureof10°C–35°C(50°F–95°F)before
use.Thisprocesscouldtaketwohoursinextremeconditions.Failuretoallowyourcomputertorisetoan
optimaloperatingtemperaturebeforeusecouldresultinirreparabledamagetoyourcomputer.
Ifpossible,placeyourcomputerinawell-ventilatedanddryareawithoutdirectexposuretosunshine.
Keepelectricalappliancessuchasanelectricfan,radio,high-poweredspeakers,airconditioner,and
microwaveovenawayfromyourcomputerbecausethestrongmagneticfieldsgeneratedbythese
appliancescandamagethemonitoranddataontheharddiskdrive.
Donotplaceanybeveragesontopoforbesidethecomputerorotherattacheddevices.Ifliquidisspilledon
orinthecomputeroranattacheddevice,ashortcircuitorotherdamagemightoccur.
Donoteatorsmokeoveryourkeyboard.Particlesthatfallintoyourkeyboardcancausedamage.
Powersupplystatement
Neverremovethecoveronapowersupplyoranypartthathasthefollowinglabelattached.
viThinkCentreE63zUserGuide

Hazardousvoltage,current,andenergylevelsarepresentinsideanycomponentthathasthislabelattached.
Therearenoserviceablepartsinsidethesecomponents.Ifyoususpectaproblemwithoneoftheseparts,
contactaservicetechnician.
Cleaningandmaintenance
Keepyourcomputerandworkspaceclean.Shutdownthecomputerandthendisconnectthepower
cordbeforecleaningthecomputer.Donotsprayanyliquiddetergentdirectlyonthecomputeroruse
anydetergentcontainingflammablematerialtocleanthecomputer.Spraythedetergentonasoftcloth
andthenwipethecomputersurfaces.
Glasspartsnotice
CAUTION:
Somepartsofyourproductmaybemadeofglass.Thisglasscouldbreakiftheproductisdropped
onahardsurfaceorreceivesasubstantialimpact.Ifglassbreaks,donottouchorattempttoremove
it.Stopusingyourproductuntiltheglassisreplacedbytrainedservicepersonnel.
Tip-overhazardpreventionnotice
•Placethecomputeronasturdyandlowbase,oranchorthefurnitureandpositionthecomputeras
farbackonthefurnitureaspossible.
•Keepremotecontrols,toys,andotheritemsthatmightattractchildrenoffthecomputer.
•Keepthecomputer,cables,andcordsoutofthereachofchildren.
•Supervisechildreninroomswherethesesafetytipshavenotbeenfollowed.
©CopyrightLenovo2014,2016
vii

viiiThinkCentreE63zUserGuide

Chapter1.Productoverview
Thischapterprovidesthefollowinginformation:
•Locationsofconnectors
•Computerfeatures
•SoftwareprogramsprovidedbyLenovo
Locations
Thissectionprovidesthefollowingtopics:
•“Locatingconnectors,controls,andindicatorsonthefrontofyourcomputer”onpage2
•“Locatingconnectorsontherearofyourcomputer”onpage3
•“Locatingthemachinetypeandmodellabel”onpage4
Note:Thecomponentsinyourcomputermightlookslightlydifferentfromtheillustrations.
©CopyrightLenovo2014,2016
1
Locatingconnectors,controls,andindicatorsonthefrontofyour computer
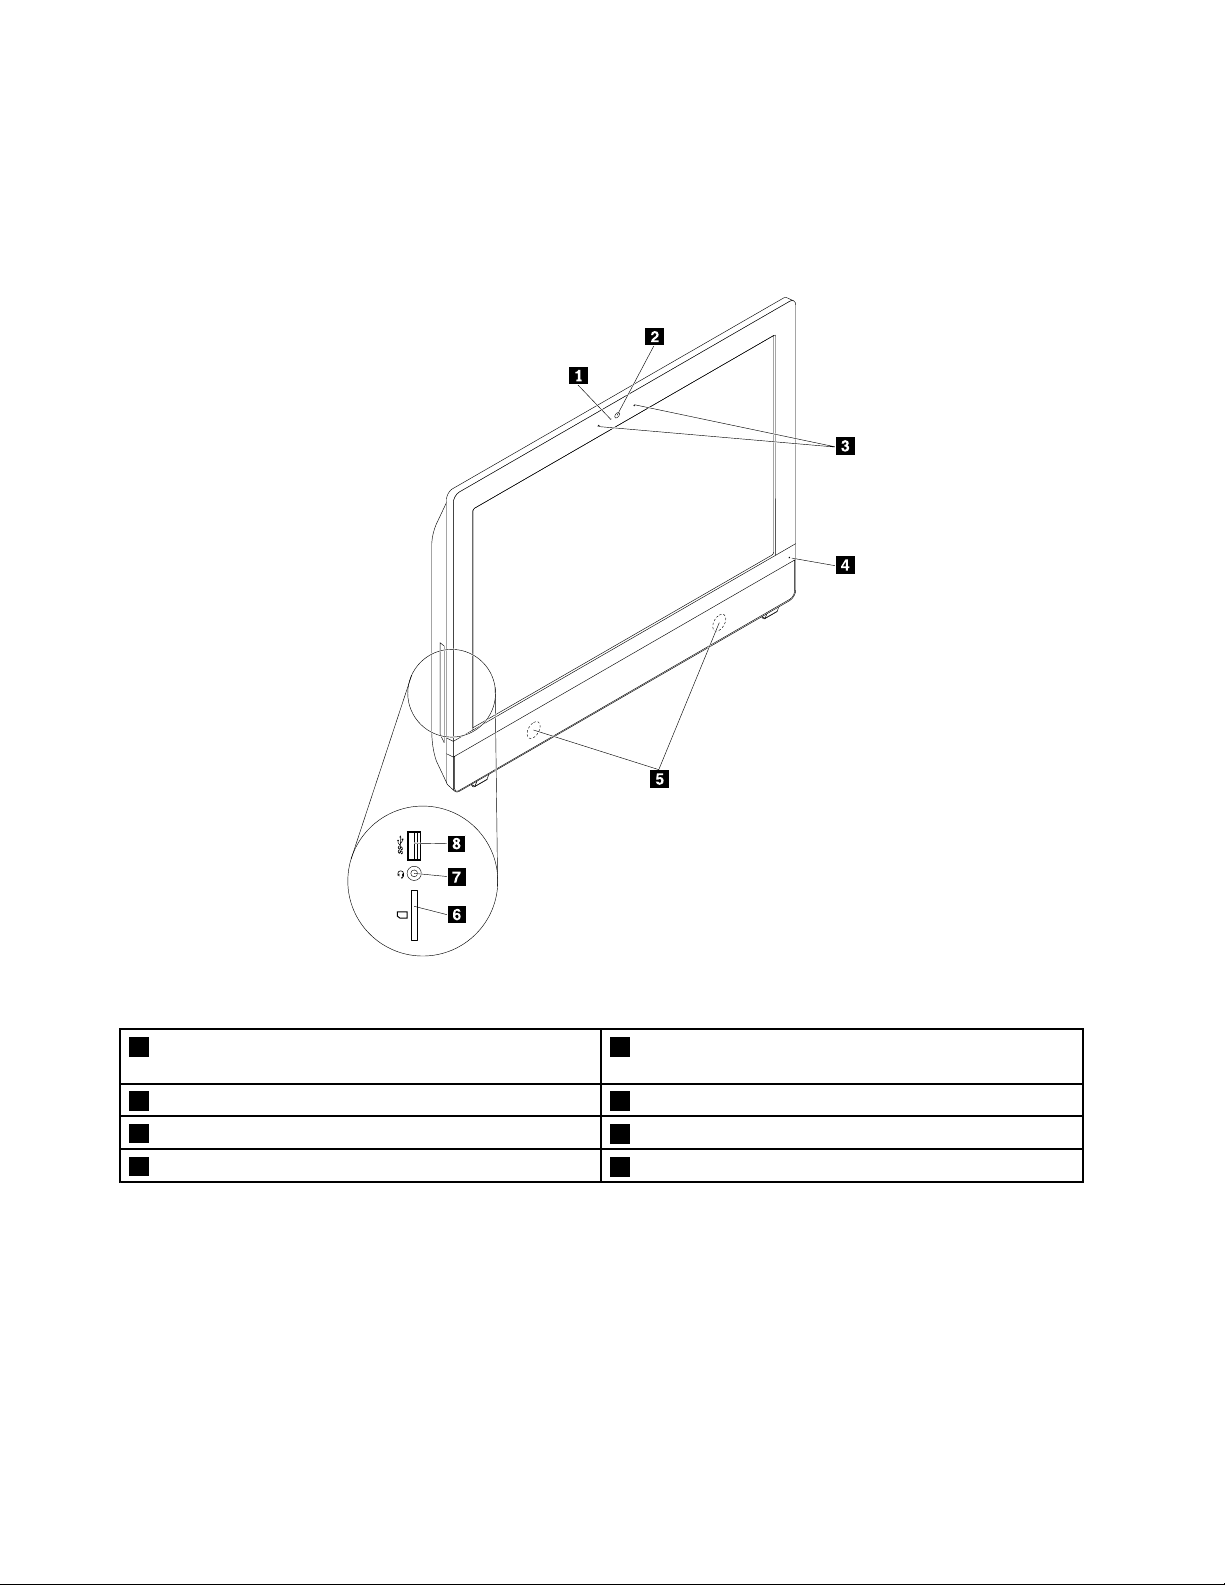
Thefollowingillustrationshowsthelocationsoftheconnectors,controls,andindicatorsonthefrontofyour
computer.
Figure1.Frontconnector,control,andindicatorlocations
1Integratedcameraactivityindicator(availableonsome
models)
3Integratedmicrophones4Powerindicator
5Internalspeakers
7Headsetconnector
2Integratedcamera(availableonsomemodels)
6Cardreaderslot(availableonsomemodels)
8USB3.0connectororAlwaysOnUSBconnector
2ThinkCentreE63zUserGuide
Locatingconnectorsontherearofyourcomputer
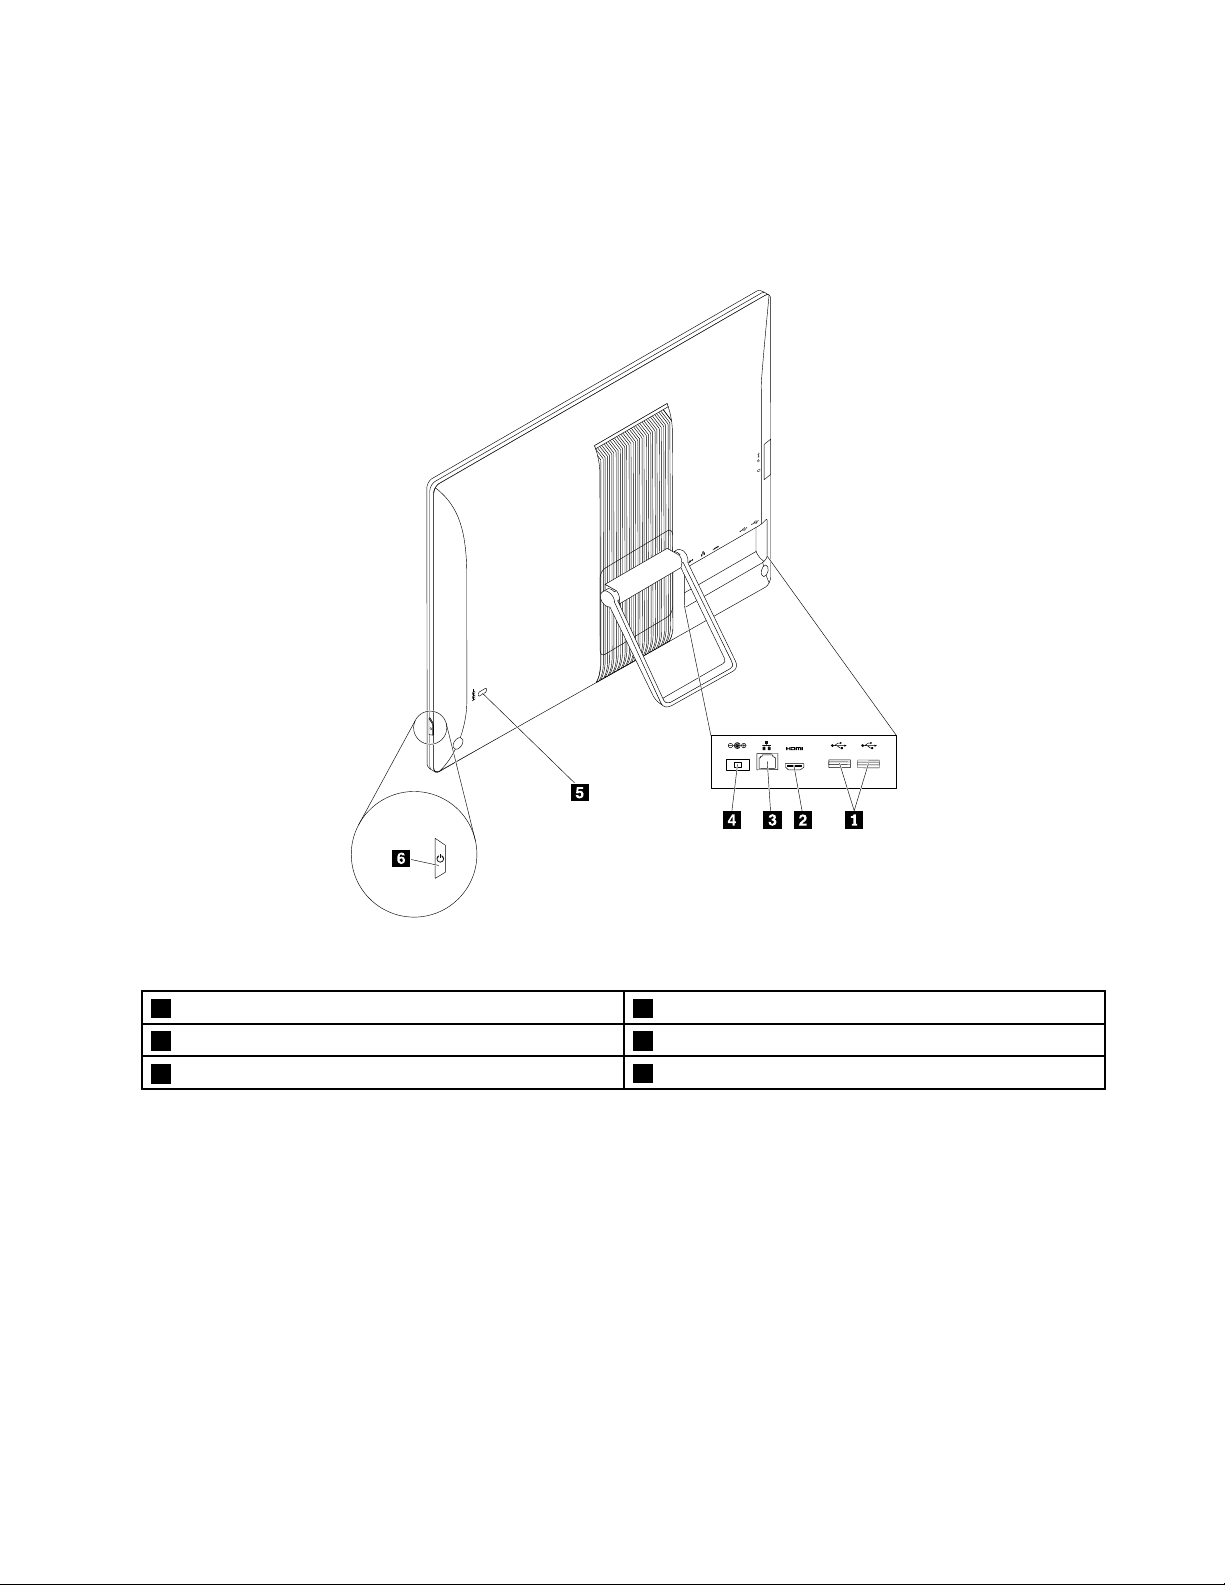
Thefollowingillustrationshowsthelocationsoftheconnectorsontherearofyourcomputer.Some
connectorsontherearofyourcomputerarecolor-codedtohelpyoudeterminewheretoconnectthe
cablesonyourcomputer.
Figure2.Rearconnectorlocations
1USB2.0connectors(2)2HDMIconnector(availableonsomemodels)
3Ethernetconnector4acpoweradapterconnector
5Security-lockslot
ConnectorDescription
acpoweradapterconnector
Ethernetconnector
HDMIconnector
USB2.0connectorUsedtoattachadevicethatrequiresaUSB2.0connection,suchasakeyboard,a
Usedtoattachtheacpoweradaptertoyourcomputerforpowersupply.
UsedtoattachanEthernetcableforalocalareanetwork(LAN).
Note:TooperatethecomputerwithinFCCClassBlimits,useaCategory5eor
betterEthernetcable.
Usedtodeliveruncompressedhigh-definitionvideoandmultichanneldigitalaudio
signalsthroughasinglecable.Ahigh-performancemonitor,adirectdrivemonitor,
oranotheraudioorvideodevicethatusesaHigh-DefinitionMultimediaInterface
(HDMI)connectorcanbeattachedtothisHDMIconnector.
mouse,ascanner,aprinter,orapersonaldigitalassistant(PDA).
6Powerbutton
Chapter1.Productoverview3
Locatingthemachinetypeandmodellabel
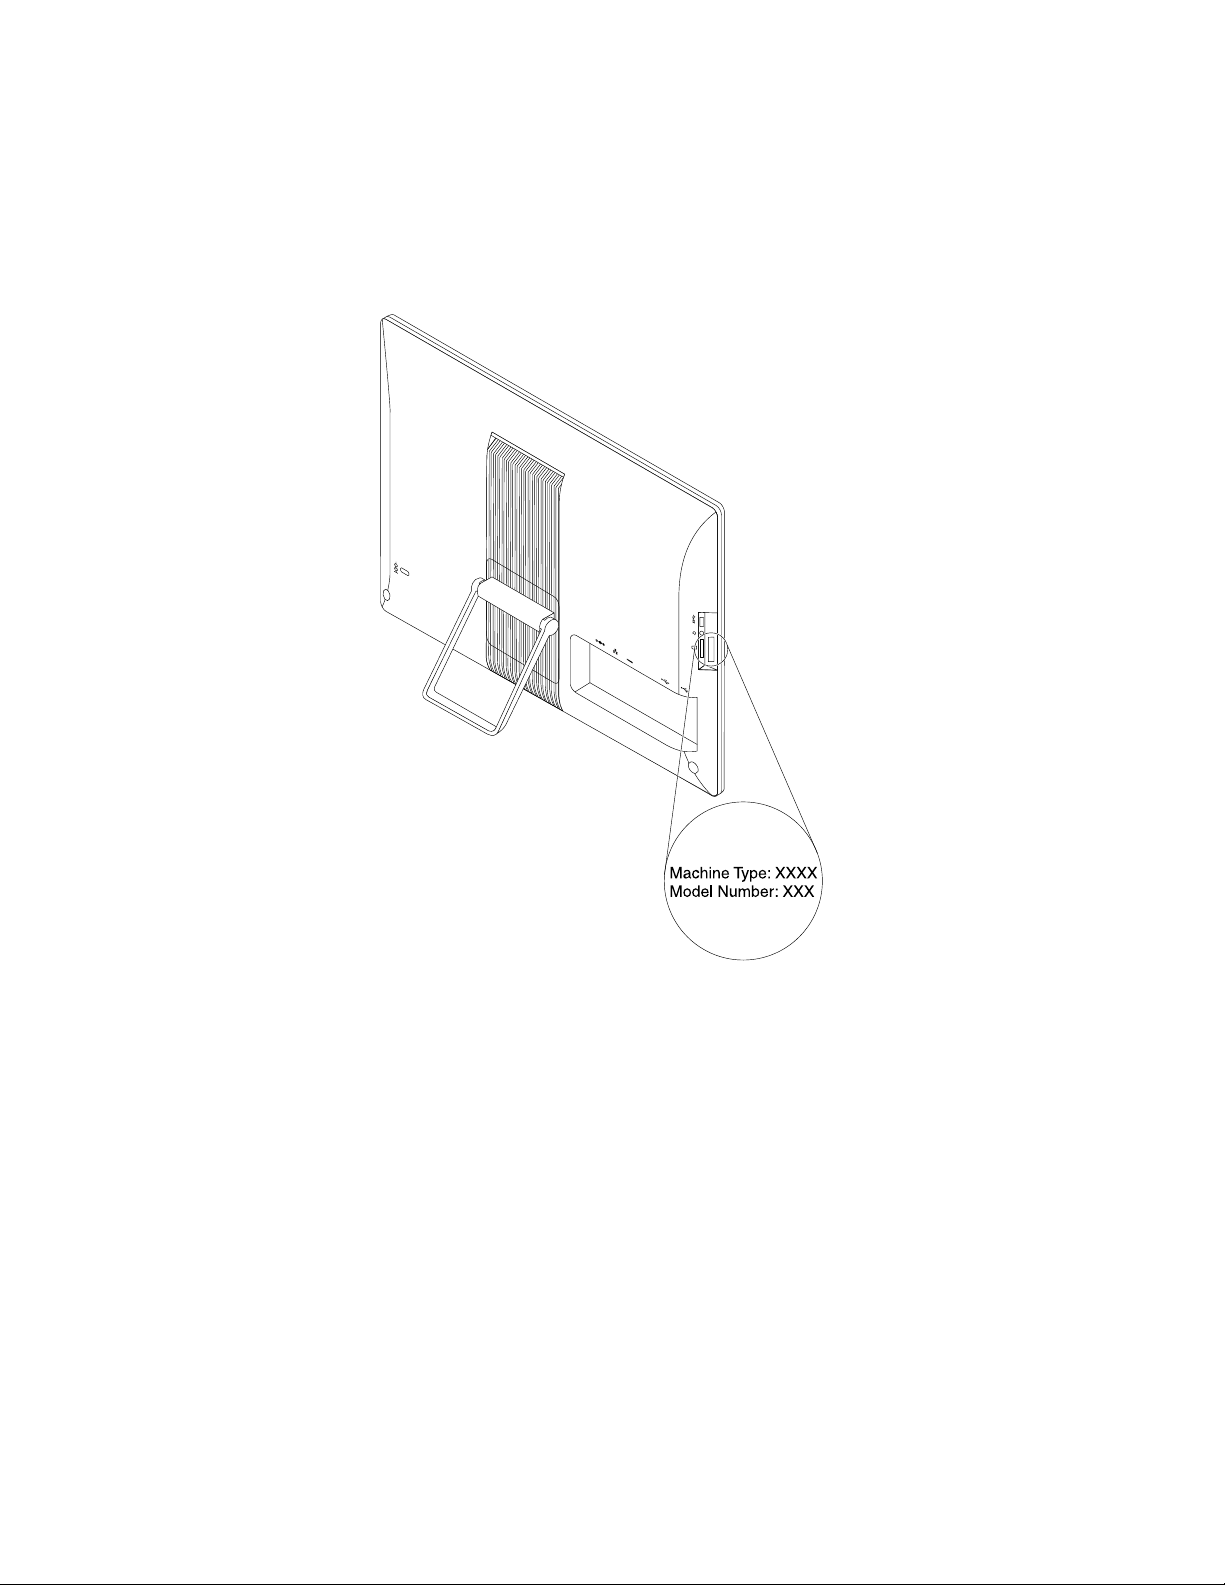
Themachinetypeandmodellabelidentifiesyourcomputer.WhenyoucontactLenovoforhelp,themachine
typeandmodelinformationhelpssupporttechnicianstoidentifyyourcomputerandprovidefasterservice.
Themachinetypeandmodellabelisattachedonthebottomofyourcomputerasshown.
Figure3.Machinetypeandmodellabel
4ThinkCentreE63zUserGuide

Adjustingtheframestand
60
Yourcomputermightcomewithaframestandthatyoucanusetoadjustthecomputertoyourcomfortable
position.Pullthestandopenandadjustthepositionofthecomputeratanangleofbetween10°and60°
asshowninthefollowingillustration.
CAUTION:
Ensurethattheangleisatleast10°fromtheverticalposition;otherwise,thecomputermightbe
unstableandtipover.
Figure4.Adjustingtheframestand
Features
Thecomputerfeaturesintroducedinthissectioncoversavarietyofmodels.
Toviewtheinformationaboutyourspecificmodel,dooneofthefollowing:
•OntheMicrosoft
®
Windows
toviewtheinformation.
•OntheMicrosoftWindows8.1operatingsystem,gotothedesktopandmoveyourpointertothe
top-rightorbottom-rightcornerofthescreentodisplaythecharms.ThenclickSettings➙PCinfoto
viewtheinformation.
•OntheMicrosoftWindows10operatingsystem,clicktheStartbuttontoopentheStartmenu.Then,click
Settings➙System➙Abouttoviewtheinformation.
Microprocessor
Toviewthemicroprocessorinformationofyourcomputer,dothefollowing:
•OntheMicrosoftWindows7operationsystem,clickStart,right-clickComputer,andselectProperties
toviewtheinformation.
®
7operationsystem,clickStart,right-clickComputer,andselectProperties
Chapter1.Productoverview5

•OntheMicrosoftWindows8.1operatingsystem,gotothedesktopandmoveyourpointertothe
top-rightorbottom-rightcornerofthescreentodisplaythecharms.ThenclickSettings➙PCinfoto
viewtheinformation.
•OntheMicrosoftWindows10operatingsystem,clicktheStartbuttontoopentheStartmenu.Then,click
Settings➙System➙Abouttoviewtheinformation.
Memory
Yourcomputersupportsuptotwodoubledatarate3unbuffereddualinlinememorymodules(DDR3
UDIMMs).
Todeterminetheamountofmemoryinstalledonyourcomputer,dothefollowing:
•OntheMicrosoftWindows7operatingsystem,clickStart,right-clickComputer,andselectProperties
toviewtheinformation.
•OntheMicrosoftWindows8.1operatingsystem,gotothedesktopandmoveyourpointertothe
top-rightorbottom-rightcornerofthescreentodisplaythecharms.ThenclickSettings➙PCinfoto
viewtheinformation.
•OntheMicrosoftWindows10operatingsystem,clicktheStartbuttontoopentheStartmenu.Then,click
Settings➙System➙Abouttoviewtheinformation.
Internaldrives
•Cardreader(availableonsomemodels)
•StandardSerialAdvancedTechnologyAttachment(SATA)harddiskdrive
•SATAsolid-statedrive(availableonsomemodels)
•SATAhybriddrive(availableonsomemodels)
Videofeatures
Onsomemodels,theintegratedgraphicssupportsHDMIconnectoronyourcomputer.
Audiofeatures
•Headsetconnector
•Integratedhigh-definition(HD)audio
•Internalspeakers
Input/Output(I/O)features
•Headsetconnector
•Ethernetconnector
•USBconnectors
•AlwaysOnUSBconnector(availableonsomemodels)
Formoreinformation,see“Locatingconnectors,controls,andindicatorsonthefrontofyourcomputer”on
page2
and“Locatingconnectorsontherearofyourcomputer”onpage3.
Powersupply
65-wattautomaticvoltage-sensingpowersupply
Wirelessfeatures
Dependingonyourcomputermodel,thefollowingwirelessfeaturesaresupported:
•Wirelesslocalareanetwork(LAN)
6ThinkCentreE63zUserGuide

•Bluetooth
Systemmanagementfeatures
•Abilitytostorepower-onself-test(POST)hardwaretestresults
•DesktopManagementInterface(DMI)
DesktopManagementInterfaceprovidesacommonpathforuserstoaccessinformationaboutall
aspectsofacomputer.Theinformationincludesprocessortype,installationdate,attachedprintersand
otherperipherals,powersources,maintenancehistory,andsoon.
•ErPLPScompliancemode
Theenergy-relatedproductsdirective(ErP)lowestpowerstate(LPS)compliancemodereducesthe
consumptionofelectricitywhenyourcomputerisinsleeporoffmode.Formoreinformation,see
“EnablingErPLPScompliancemode”onpage32.
•PrebootExecutionEnvironment(PXE)
PrebootExecutionEnvironmentenablescomputerstostartthroughanetworkinterfaceindependentof
datastoragedevices(suchastheharddiskdrive)orinstalledoperatingsystems.
•SystemManagement(SM)BasicInput/OutputSystem(BIOS)andSMsoftware
TheSMBIOSspecificationdefinesdatastructuresandaccessmethodsthatcanbeusedtoread
managementdatastoredintheBIOSofacomputer.
•WakeonLAN
WakeonLANisanEthernetcomputernetworkingstandardthatallowsacomputertobeturnedon
orwokenupbyanetworkmessage.Themessageusuallyissentbyaprogramrunningonanother
computeronthesameLAN.
•WindowsManagementInstrumentation(WMI)
WindowsManagementInstrumentationisasetofextensionstotheWindowsDriverModel.Itprovidesan
operatingsysteminterfacethroughwhichinstrumentedcomponentsprovideinformationandnotification.
Securityfeatures
•AbilitytoenableanddisabledevicesandUSBconnectors
Formoreinformation,see“Enablingordisablingadevice”onpage31
.
•Avarietyofpasswordstodeterunauthorizeduseofyourcomputer
Formoreinformation,see“Usingpasswords”onpage26.
•ComputraceAgentsoftwareembeddedinfirmware
TheComputraceAgentsoftwareisanITassetmanagementandcomputertheftrecoverysolution.
Thesoftwaredetectsifchangeshavebeenmadeonthecomputer,suchashardware,software,or
thecomputercall-inlocation.Y oumighthavetopurchaseasubscriptiontoactivatetheComputrace
Agentsoftware.
•Startupsequencecontrol
Formoreinformation,see“Selectingorchangingthestartupdevicesequence”onpage31.
•Startupwithoutkeyboardormouse
Yourcomputerisabletologintotheoperatingsystemwithoutkeyboardormouseconnected.
•SupportforaKensington-stylecablelock
Formoreinformation,see“AttachingaKensington-stylecablelock”onpage26
.
Preinstalledoperatingsystem
Yourcomputerispreinstalledwithoneofthefollowingoperatingsystems:
Chapter1.Productoverview7

•MicrosoftWindows7operatingsystem
•MicrosoftWindows8.1operatingsystem
•MicrosoftWindows10operatingsystem
Operatingsystem(s),certifiedortestedforcompatibility(variesbymodeltype)
Theoperatingsystem(s)listedherearebeingcertifiedortestedforcompatibilityatthetimethispublication
goestopress.AdditionaloperatingsystemsmightbeidentifiedbyLenovoascompatiblewithyourcomputer
followingthepublicationofthismanual.Thislistissubjecttochange.Todetermineifanoperatingsystem
hasbeencertifiedortestedforcompatibility,checktheWebsiteoftheoperatingsystemprovider.
•Linux
®
8ThinkCentreE63zUserGuide

Specifications
Thissectionliststhephysicalspecificationsforyourcomputer.
Dimensionsandweightwithoutpackage
Width:488mm(19.21inches)
Height:346mm(13.62inches)
Depth:62mm(2.44inches)
Maximumconfigurationasshipped:4.8kg(12.86lb)
Dimensionsandweightwithpackage
Width:590mm(23.23inches)
Height:449mm(17.68inches)
Depth:140mm(5.51inches)
Maximumconfigurationasshipped:7.23kg(19.37lb)
Environment
•Airtemperature:
Operating:From10°C(50°F)to35°C(95°F)
Storageinoriginalshippingpackage:From-40°C(-40°F)to60°C(140°F)
Storagewithoutpackage:From-10°C(14°F)to60°C(140°F)
•Humidity:
Operating:20%–80%(non-condensing)
Storage:20%–90%(non-condensing)
•Altitude:
Operating:From-15.2m(-50ft)to3048m(10000ft)
Storage:From-15.2m(-50ft)to10668m(35000ft)
Electricalinput
Inputvoltage:
•Lowrange:
Minimum:100Vac
Maximum:127Vac
Inputfrequency:50/60Hz
•Highrange:
Minimum:200Vac
Maximum:240Vac
Inputfrequency:50/60Hz
Lenovoprograms
YourcomputercomeswithLenovoprogramstohelpyouworkmoreeasilyandsecurely.Dependingon
theWindowsoperatingsystempreinstalled,theprogramsmightvary.
Chapter1.Productoverview9

Accessingaprogramonyourcomputer
Note:ForWindows7,someoftheLenovoprogramsmightbereadytobeinstalled,soyouneedtoinstall
themmanually.Then,youcanaccessandusetheseprograms.T oinstallaprogramthatisreadytobe
installed,opentheLenovoThinkVantage
Followtheinstructionsundergreyed-outiconstolocatetheiconforthedesiredprogram.Double-click
theicontoinstalltheprogram.
Toaccessaprogramonyourcomputer,dooneofthefollowing:
•ForWindows7orWindows10:
–FromWindowsSearch:
1.DependingonyourWindowsversion,dooneofthefollowing:
–ForWindows7:ClicktheStartbuttontoopentheStartmenu,andthentypetheprogram
nameintothesearchbox.
–ForWindows10:TypetheprogramnameintothesearchboxnexttotheStartbutton.
2.Inthesearchresults,clickthenameofthedesiredprogramtolaunchtheprogram.
–FromtheStartmenuorControlPanel:
1.ClicktheStartbuttontoopentheStartmenu.Then,clickthenameofthedesiredprogramto
launchtheprogram.
2.Iftheprogramnameisnotdisplayed,clickAllProgramsforWindows7orAllappsforWindows
10todisplaytheprogramlist.Fromthelistorafolderinthelist,clickthenameofthedesired
programtolaunchtheprogram.
3.IftheprogramnameisnotdisplayedontheStartmenu,accesstheprogramfromControlPanel.
a.DependingonyourWindowsversion,dooneofthefollowing:
®
Toolsprogram,andthenviewtheprogramiconsusingTiles.
–ForWindows7:ClickControlPanelontheStartmenu.
–ForWindows10:Right-clicktheStartbuttontoopentheStartcontextmenu,andthen
clickControlPanel.
b.ViewControlPanelusingLargeiconsorSmallicons,andthenclickthenameofthedesired
programtolaunchtheprogram.
•ForWindows8.1:
1.PresstheWindowskeytogototheStartscreen.Clickthenameofthedesiredprogramto
launchtheprogram.
2.Ifyoucannotfindtheprogramyouneed,clickthearrowiconinthebottom-leftcornerofthe
screentogototheAppsscreen.Findthedesiredprogramintheappslistorsearchforitinthe
searchboxinthetop-rightcornerofthescreen.
AnintroductiontoLenovoprograms
ThissectionprovidesinformationaboutthemajorLenovoprogramsavailableonyouroperatingsystem.
Note:Dependingonyourcomputermodel,someofthefollowingprogramsmightnotbeavailable.
•ForWindows7only:
–LenovoPowerENGAGE
TheLenovoPowerENGAGEprogramenablesyoutoregisteryourcomputerwithLenovo.
10ThinkCentreE63zUserGuide

–MessageCenterPlus
TheMessageCenterPlusprogramautomaticallydisplaysmessagesinformingyouaboutimportant
noticesfromLenovo,suchasalertsonsystemupdatesandalertsonconditionsthatrequireyour
attention.
–RescueandRecovery
®
TheRescueandRecoveryprogramisaone-buttonrecoveryandrestoresolution.Itincludesaset
ofself-recoverytoolstohelpyoudiagnosecomputerproblems,gethelp,andrecoverfromsystem
crashes,evenifyoucannotstarttheWindowsoperatingsystem.
•ForWindows8.1only:
–LenovoSupport
TheLenovoSupportprogramenablesyoutoregisteryourcomputerwithLenovo,checkthecomputer
healthconditionandbatterystatus,downloadandviewusermanualsforyourcomputer,getthe
warrantyinformationofyourcomputer,andexplorehelpandsupportinformation.
•ForWindows10only:
–LenovoID
TheLenovoIDprogramenablesyoutocreateyourLenovoIDandaccessallsupportedLenovo
programsandwebportalswithsinglesign-on.
–LenovoSettings
TheLenovoSettingsprogramistheonestopshopforyoutocontrolhardwarefeatures,sensors
andprogramsonyourcomputer.LenovoSettingsenablesyoutooptimizedeviceperformanceby
customizingkeyfunctions,suchaspowerplans,audio,camera,andnetworks.
•ForWindows7andWindows8.1:
–CreateRecoveryMedia
TheCreateRecoveryMediaprogramenablesyoutorestoreonlytheCdriveortheentirestorage
drivetothefactory-defaultsettings.
–FingerprintManagerProorThinkVantageFingerprintSoftware
TheFingerprintManagerProorThinkVantageFingerprintSoftwareprogramenablesyoutousea
fingerprintreader.Theintegratedfingerprintreaderprovidedonsomekeyboardsenablesyoutoenroll
yourfingerprintandassociateitwithyourpower-onpassword,harddiskpassword,andWindows
password.Asaresult,fingerprintauthenticationcanreplacepasswordsandenablesimpleandsecure
useraccess.
–PasswordManager
ThePasswordManagerprogramautomaticallycapturesandfillsinauthenticationinformationfor
WindowsprogramsandWebsites.
–SystemUpdate
TheSystemUpdateprogramprovidesregularaccesstothesystemupdatesforyourcomputer,such
asdevicedriverupdates,softwareupdates,andBIOSupdates.Theprogramgathersinformationfrom
theLenovoHelpCenteraboutnewupdatesforyourcomputer,thensortsanddisplaystheupdatesfor
downloadandinstallation.Y ouhavecompletecontrolofwhichupdatestodownloadandinstall.
•ForWindows8.1andWindows10:
Chapter1.Productoverview11

–LenovoCompanion
Yourcomputer’sbestfeaturesandcapabilitiesshouldbeeasytoaccessandunderstand.WithLenovo
Companion,theyare.UseLenovoCompaniontodothefollowing:
–Optimizeyourcomputer’sperformance,monitoryourcomputer’shealth,andmanageupdates.
–Accessyouruserguide,checkwarrantystatus,andviewaccessoriescustomizedforyourcomputer.
–Readhow-toarticles,exploreLenovoforums,andstayup-to-dateontechnologynewswitharticles
andblogsfromtrustedsources.
LenovoCompanionisfilledwithexclusiveLenovocontenttohelpyoulearnmoreaboutwhatyou
candowithyourcomputer.
•ForWindows7,Windows8.1,andWindows10:
–LenovoBluetoothLock
TheLenovoBluetoothLockprogramenablesyoutouseaBluetoothdevice(suchasyoursmartphone)
asaproximity-basedunitforlockingorunlockingyourcomputerautomatically.Bydetectingthe
distancebetweenyourcomputerandthepredefinedBluetoothdevicethatyouarecarrying,theLenovo
BluetoothLockprogramautomaticallylocksyourcomputerwhenyouwalkawayandunlocksyour
computerwhenyoucomeback.Thisisasimplewaytoprotectyourcomputeragainstunauthorized
accessincasethatyouforgettolockyourcomputer.
–LenovoDeviceExperienceorLenovoPCExperience
TheLenovoDeviceExperienceorLenovoPCExperienceprogramhelpsyouworkmoreeasilyand
securely.TheprogramprovideseasyaccesstoLenovoThinkVantageToolsorLenovoTools,important
settingsandinformationaboutyourcomputer,theLenovoSupportWebsite,andsoon.
–LenovoSolutionCenter
TheLenovoSolutionCenterprogramenablesyoutotroubleshootandresolvecomputerproblems.It
combinesdiagnostictests,systeminformationcollection,securitystatus,andsupportinformation,
alongwithhintsandtipsformaximumsystemperformance.
–PowerManager
ThePowerManagerprogramprovidesconvenient,flexible,andcompletepowermanagementfor
yourcomputer.Itenablesyoutoadjustyourcomputerpowersettingstoachievethebestbalance
betweenperformanceandpowersaving.
12ThinkCentreE63zUserGuide

Chapter2.Usingyourcomputer
Thischapterprovidesinformationaboutthefollowingtopics:
•“Registeringyourcomputer”onpage13
•“UsingWindowsshortcutkeys”onpage13
•“Usingthewheelmouse”onpage14
•“Settingthecomputervolume”onpage14
•“AddinganicontotheWindowsnotificationarea”onpage14
•“Managingpower”onpage15
•“Usingthesingle-touchormulti-touchfeature”onpage15
•“NavigatingamongscreensontheWindows8.1operatingsystem”onpage16
•“AccessingControlPanelontheWindows8.1operatingsystem”onpage17
•“Frequentlyaskedquestions”onpage17
Registeringyourcomputer
WhenyouregisteryourcomputerwithLenovo,youenterrequiredinformationintoaLenovodatabase.The
informationenablesLenovotocontactyouwhenthereisarecallorothersevereproblemandprovide
quickerservicewhenyoucallLenovoforhelp.Inaddition,somelocationsofferextendedprivilegesand
servicestoregisteredusers.
ToregisteryourcomputerwithLenovo,ensurethatyourcomputerisconnectedtotheInternet.Then,goto
http://www.lenovo.com/registerandfollowtheinstructionsonthescreen.
UsingWindowsshortcutkeys
Boththestandardkeyboardandthefingerprintreaderkeyboardprovidethreekeysyoucanusewithyour
MicrosoftWindowsoperatingsystem.
•ThetwoWindowslogokeysarelocatedbesidetheAltkeyoneithersideofthespacebar.Theyfeature
theWindowslogo.OntheWindows7orWindows10operatingsystem,presstheWindowskey
toopentheStartmenu.OntheWindows8.1operatingsystem,presstheWindowskeytoswitch
betweenthecurrentworkspaceandtheStartscreen.ThestyleoftheWindowslogovariesdepending
onthekeyboardtype.
•Thecontext-menukeyislocatednexttotheCtrlkeyontherightsideoftheSpacebar.Pressingthe
context-menukeyopensthecontextmenufortheactiveprogram,icon,orobject.
Note:YoucanusethemouseortheUpandDownarrowkeystohighlightmenuselections.
©CopyrightLenovo2014,2016
13
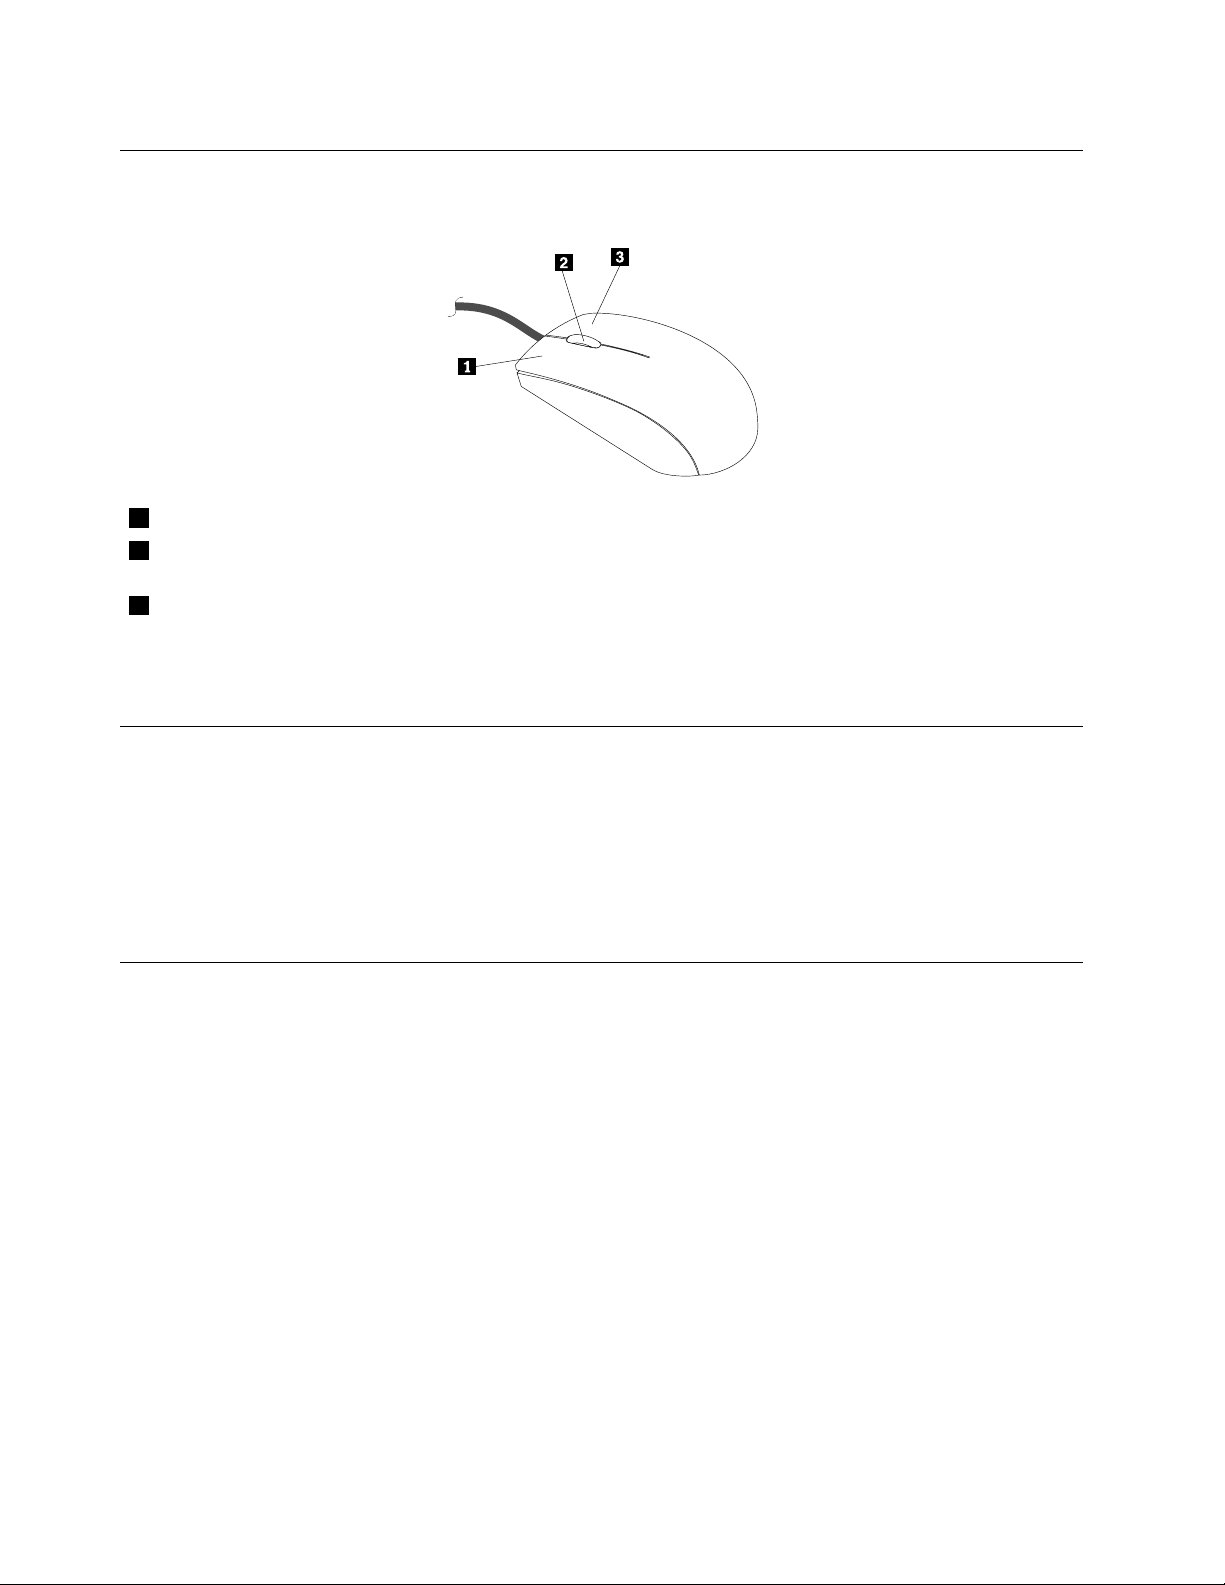
Usingthewheelmouse
Thewheelmousehasthefollowingcontrols:
1PrimarymousebuttonUsethisbuttontoselectorstartaprogramormenuitem.
2Wheel
3Secondarymousebutton
Youcanswitchthefunctionoftheprimaryandsecondarymousebuttonsandchangeotherdefaultbehavior
throughthemousepropertiesfunctionintheWindowsControlPanel.
Usethewheeltocontrolthescrollingactionofthemouse.Thedirectioninwhichyou
rotatethewheelcontrolsthedirectionofthescrollingaction.
Usethisbuttontodisplayamenufortheactiveprogram,icon,orobject.
Settingthecomputervolume
Tosetthecomputervolume,dothefollowing:
1.ClickthevolumeiconintheWindowsnotificationareaonthetaskbar.
Note:IfthevolumeiconisnotdisplayedintheWindowsnotificationarea,addtheicontothe
notificationarea.See“AddinganicontotheWindowsnotificationarea”onpage14.
2.Followtheinstructionsonthescreentoadjustthevolume.Clickthespeakericontomutetheaudio.
AddinganicontotheWindowsnotificationarea
ToaddanicontotheWindowsnotificationarea,dothefollowing:
1.Clickthearrownexttothenotificationareatoviewhiddenicons.Then,clickthedesirediconand
dragittothenotificationarea.
2.Iftheiconisnotdisplayed,turnontheicon.
a.DependingonyourWindowsversion,dooneofthefollowing:
•ForWindows7:ClicktheStartbuttontoopentheStartmenu,andthenclickControlPanel.
ViewControlPanelusingLargeiconsorSmallicons,andthenclickNotificationAreaIcons➙
Turnsystemiconsonoroff.
•ForWindows8.1:OpenControlPanel.ViewControlPanelusingLargeiconsorSmallicons,and
thenclickNotificationAreaIcons➙T urnsystemiconsonoroff.
Note:FordetailedinformationonhowtoopenControlPanelonWindows8.1,see“Accessing
ControlPanelontheWindows8.1operatingsystem”onpage17
•ForWindows10:ClicktheStartbuttontoopentheStartmenu.Then,clickSettings➙System
➙Notifications&actions➙T urnsystemiconsonoroff.
b.Turnonthedesiredicon.
.
14ThinkCentreE63zUserGuide

3.IftheiconisstillnotdisplayedintheWindowsnotificationarea,repeatstep1.
Managingpower
Powermanagementreducesthepowerconsumptionofcertaincomponentsofthecomputersuchasthe
systempowersupply,processor,harddiskdrives,andsomemonitors.
Advancedconfigurationandpowerinterface(ACPI)BIOS
BeinganACPIBIOSsystem,theoperatingsystemisallowedtocontrolthepowermanagementfeatures
ofthecomputerandthesettingforAdvancedPowerManagement(APM)BIOSmodeisignored.Not
alloperatingsystemssupportACPIBIOSmode.
AutomaticPower-onfeatures
TheAutomaticPower-OnfeatureswithinthePowerManagementmenuallowyoutoenableanddisable
featuresthatturnonthecomputerautomatically.
•WakeUponAlarm:Y oucanspecifyadateandtimeatwhichthecomputerwillbeturnedon
automatically.Thiscanbeeitherasingleeventoradailyevent.
•WakeonLAN:Ifthecomputerhasaproperlyconfiguredtoken-ringorEthernetLANadaptercardthatis
WakeonLAN-enabledandthereisremotenetworkmanagementsoftware,youcanusetheWakeonLAN
feature.WhenyousetWakeonLANtoEnabled,thecomputerwillturnonwhenitreceivesaspecific
signalfromanothercomputeronthelocalareanetwork(LAN).
ToenabletheWakeonLANfunctionortheWakeUponAlarmfunctionontheWindows8.1operating
system,dothefollowing:
1.OpenControlPanel.
2.ClickHardwareandSound➙PowerOptions.
3.Intheleftpanel,clickChoosewhatthepowerbuttondoes.
4.IntheShutdownsettingsection,clearT urnonfaststartup.
Note:Ifthesettingsareunavailable,clickChangesettingsthatarecurrentlyunavailable.
5.ClickSavechanges.
Usingthesingle-touchormulti-touchfeature
Note:Thesingle-touchandmulti-touchfeaturesareavailableonlyonsomemodels.
Dependingonyourcomputermodel,yourcomputercomeswiththesingle-touchormulti-touchfeature.
Thesingle-touchfeatureenablesyoutouseonlyonefingeratatimetointeractwithyourcomputer.The
multi-touchfeatureenablesyoutouseoneortwofingerstointeractwithyourcomputer.Forexample,you
canzoomin,zoomout,scroll,orrotateonthetouchscreenwithtwofingerswhilereadingoreditinga
document.
Tousethesingle-touchormulti-touchfeature,dothefollowing:
•Tomakeasingleclick,tapthetouchscreenoncewithyourfinger.
•Tomakeadouble-click,taptwicewithoutpausing.
•Tomakearight-click,tapthetouchscreenonceandthenholdyourfingeronthetouchscreenuntila
roundcircleisdisplayed.Then,liftyourfingeroffthetouchscreensothatacontextmenuisdisplayed.
Youcanmakeyourselectiononthemenu.
Chapter2.Usingyourcomputer15

NavigatingamongscreensontheWindows8.1operatingsystem
Tonavigateamongthedesktop,theStartscreen,andapplicationsopenedfromtheStartscreenonthe
Windows8.1operatingsystem,dooneofthefollowing:
•FromtheStartscreen,dooneofthefollowingtonavigatetothemostrecentlyaccessedworkspace
(application,setting,ordesktop):
–Usingapointingdevice:Movethepointertotheextremebottom-leftcornerofthescreenuntilthe
Windowsscreen-controlicon
–Usingatouchscreen:Swipeinandoutontheleftedgeofthescreen.Representationsofallavailable
workspacesaredisplayedalongtheleftedgeofthescreen.T aptheWindowsscreen-controlicon
atthebottom.
Note:TheWindowsscreen-controliconisdisplayedonlywhenyouhaveatleastoneactive
workspaceinthebackgroundofthesystem.
•FromthedesktoporanyotherworkspacethatisopenedfromtheStartscreen,dooneofthefollowingto
navigatetotheStartscreen:
–Usingapointingdevice:
isdisplayed;thenclicktheicon.
–Fromthedesktop,clicktheWindowsscreen-controlicon
–Fromanyotherworkspace,movethepointertotheextremebottom-leftcornerofthescreenuntil
theWindowsscreen-controlicon
–Usingatouchscreen:Dooneofthefollowing:
–Fromthedesktop,taptheWindowsscreen-controliconinthebottom-leftcornerofthescreen.
–Fromanyotherworkspace,dooneofthefollowing:
•Swipeinandoutontheleftedgeofthescreen.Representationsofallavailableworkspaces
aredisplayedalongtheleftedgeofthescreen.TaptheWindowsscreen-controlicon
thebottom.
•Swipeinfromtherightedgeofthescreentodisplaythecharms;thentapStart.
•Fromanyworkspace(Startscreen,desktop,PCsettings,orapplicationopenedfromtheStartscreen),go
toanotherpreviously-openedworkspaceusinganyofthefollowingprocedures:
–Tonavigatetoapreviouslyaccessedworkspace(application,setting,ordesktop),dooneofthe
following:
–Usingapointingdevice:
1.Dooneofthefollowing:
•Movethepointertotheextremetop-leftcornerofthescreenandthenmovethepointer
downwardalongtheleftedgeofthescreen.
•Movethepointertotheextremebottom-leftcornerofthescreenandthenmovethepointer
upwardalongtheleftedgeofthescreen.
isdisplayed;thenclicktheicon.
inthebottom-leftcornerofthescreen.
at
Representationsofallavailableworkspacesaredisplayedalongtheleftedgeofthescreen.
Note:OnlyactiveworkspacesthatyouhaveaccessedduringthecurrentWindowssessionare
displayedalongtheleftedge.Ifyoucloseanactiveworkspace,itsrepresentationwillnotbe
displayedalongtheleftedgeofthescreen.
2.Clicktherepresentation.
–Usingatouchscreen:
16ThinkCentreE63zUserGuide

•Method1
1.Swipeinandoutontheleftedgeofthescreen.Representationsofallavailableworkspaces
aredisplayedalongtheleftedgeofthescreen.
2.T apthedesiredworkspace.
•Method2
1.Swipeinfromtheleftedgeofthescreentonavigatetothenextavailableworkspace.
2.Repeatstep1untilyounavigatetothedesiredworkspace.
–Tonavigatetothemostrecentlyaccessedworkspace(application,PCsettings,ordesktop),doone
ofthefollowing:
–Usingapointingdevice:Movethepointertotheextremetop-leftcornerofthescreenuntilthe
Windowsscreen-controlicon
–Usingatouchscreen:Swipeinfromtheleftedgeofthescreen.
ForinformationaboutusingotherfeaturesoftheWindows8.1operatingsystem,opentheHelp+Tips
applicationfromtheStartscreenorAppsscreen,orrefertotheWindowshelpsystem.Formoreinformation,
see“Windowshelpsystem”onpage69.
isdisplayed;thenclicktheicon.
AccessingControlPanelontheWindows8.1operatingsystem
OntheWindowsoperatingsystem,youcanviewandchangecomputersettingsthroughControlPanel.To
accessControlPanelontheWindows8.1operatingsystem,dooneofthefollowing:
•Fromthedesktop
1.Movethepointertothetop-rightorbottom-rightcornerofthescreentodisplaythecharms.
2.ClickSettings.
3.ClickControlPanel.
•FromtheStartscreen
1.Clickthedownarrowinthebottom-leftcornerofthescreentogototheAppsscreen.
2.Scrolltotherightside,andclickControlPanelintheWindowsSystemsection.
Frequentlyaskedquestions
Thefollowingareafewtipsthatwillhelpyouoptimizetheuseofyourcomputer.
CanIgetmyuserguideinanotherlanguage?
TheuserguideisavailableinvariouslanguagesontheLenovoSupportWebsiteat:
http://www.lenovo.com/UserManuals
WhereismyrecoverydiscsetorrecoveryUSBkey?
DependingonyourWindowsversion,yourcomputercomeswitharecoverydiscsetorrecovery
USBkey.Ifyourcomputerdoesnotcomewithit,contacttheLenovoCustomerSupportCenterto
orderarecoverydiscsetorrecoveryUSBkey.ForalistofLenovoSupportphonenumbers,goto
http://www.lenovo.com/support/phone.Ifyoucannotfindthesupporttelephonenumberforyourcountry
orregion,contactyourLenovoreseller.
WherecanIfindhelpabouttheWindowsoperatingsystem?
See“Windowshelpsystem”onpage69.
Chapter2.Usingyourcomputer17

CanIchangetheWindows8.1startupbehaviortoopeneitherthedesktoportheStartscreen?
OntheWindows8.1operatingsystem,youcansetthecomputertoopeneitherthedesktoportheStart
screenbydefault.Tosetthedefaultstartupscreen,dothefollowing:
1.Onthedesktop,moveyourpointertothetaskbaratthebottomofthescreenandright-clickonthe
taskbar.
2.ClickProperties.TheTaskbarandNavigationpropertieswindowisdisplayed.
3.OntheNavigationtab,locatetheStartscreensection,andthendooneofthefollowing:
•Tosetthedesktopasyourdefaultstartupscreen,selectWhenIsigninorcloseallappsona
screen,gotothedesktopinsteadofStartsoacheckisvisible.
•TosettheStartscreenasyourdefaultstartupscreen,removethecheckfromtheWhenIsigninor
closeallappsonthescreen,gotodesktopinsteadofStartcheckbox.
4.ClickOKtosavethenewsetting.
18ThinkCentreE63zUserGuide
Chapter3.Youandyourcomputer
Thischapterprovidesinformationaboutaccessibility,comfort,andrelocatingyourcomputertoother
countriesorregions.
Accessibilityandcomfort
Goodergonomicpracticeisimportanttogetthemostfromyourpersonalcomputerandtoavoiddiscomfort.
Arrangeyourworkplaceandtheequipmentyouusetosuityourindividualneedsandthekindofwork
thatyouperform.Inaddition,usehealthyworkhabitstomaximizeyourperformanceandcomfortwhile
usingyourcomputer.
Thefollowingtopicsprovideinformationaboutarrangingyourworkarea,settingupyourcomputer
equipment,andestablishinghealthyworkhabits.
Arrangingyourworkspace
Togetthemostfromyourcomputer,arrangeboththeequipmentyouuseandyourworkareatosuityour
needsandthekindofworkyoudo.Y ourcomfortisofforemostimportance,butlightsources,aircirculation,
andthelocationofelectricaloutletscanalsoaffectthewayyouarrangeyourworkspace.
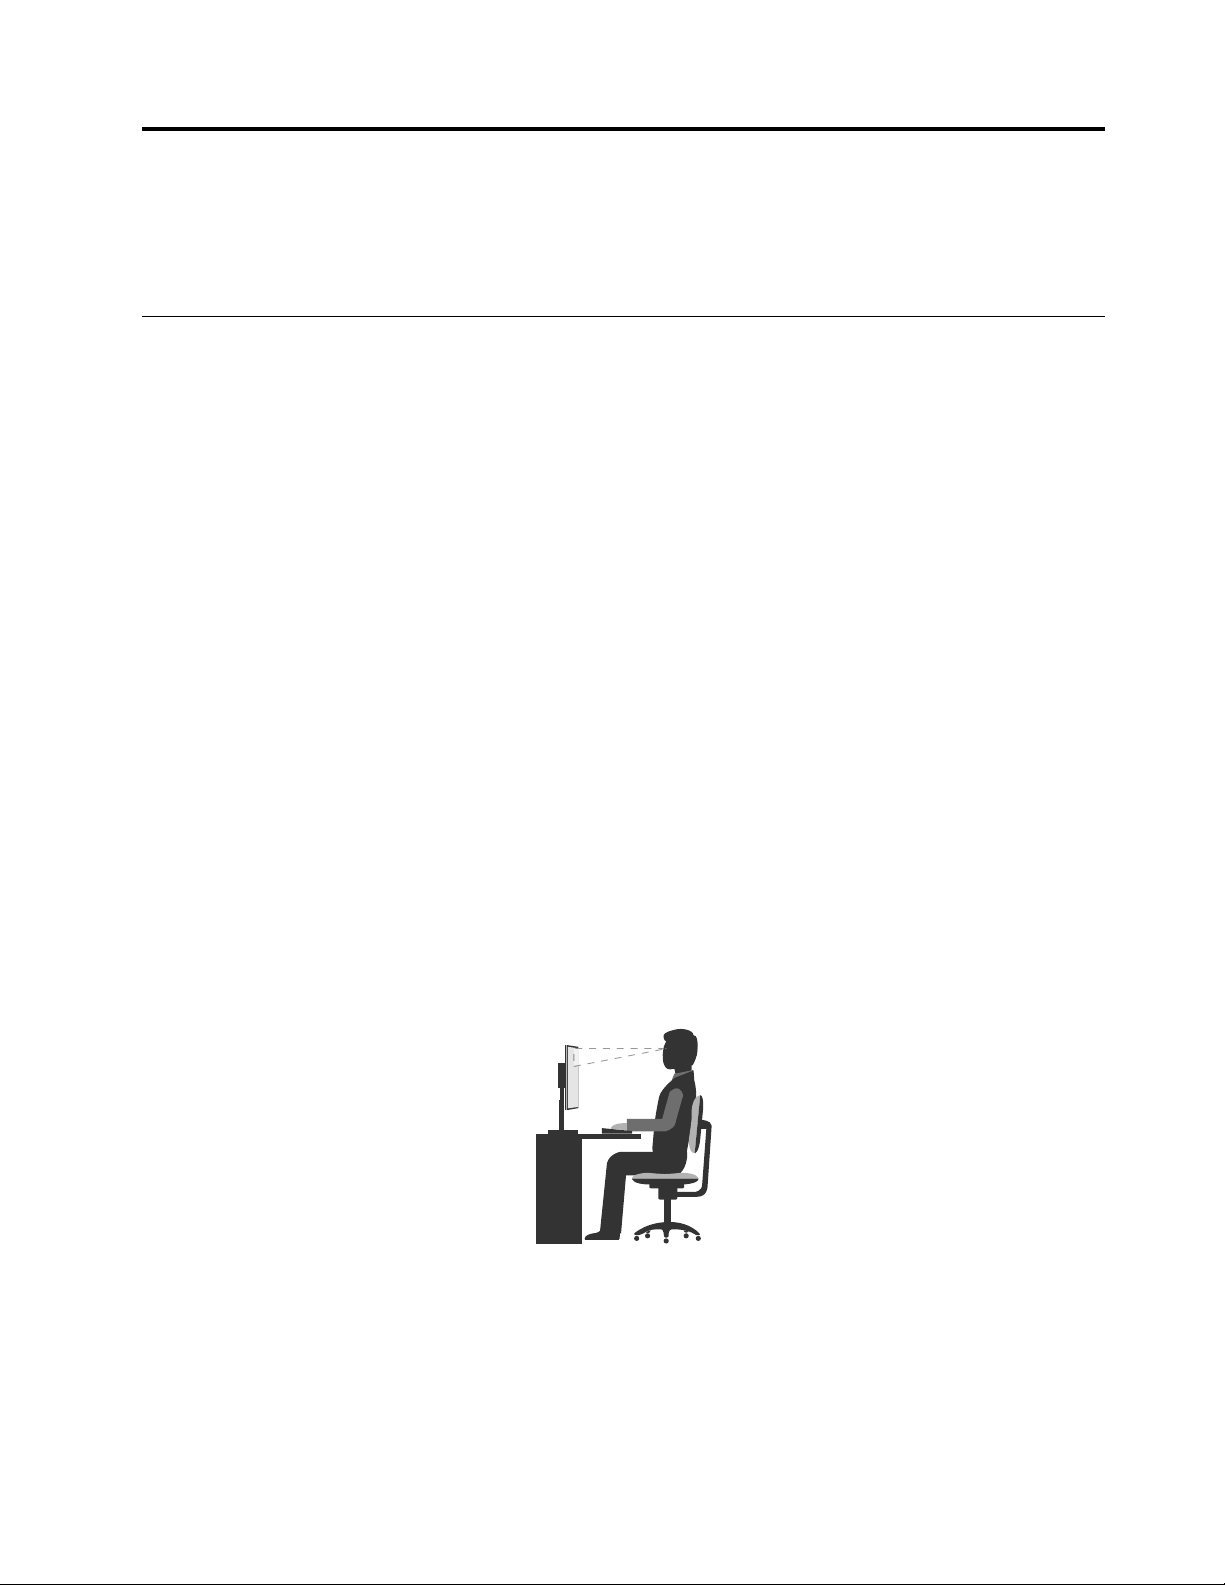
Comfort
Althoughnosingleworkingpositionisidealforeveryone,hereareafewguidelinestohelpyoufinda
positionthatsuitsyoubest.
Sittinginthesamepositionforalongtimecancausefatigue.Thebackrestandseatofyourchairshould
adjustindependentlyandprovidegoodsupport.Theseatshouldhaveacurvedfronttorelievepressureon
thethighs.Adjusttheseatsothatyourthighsareparalleltothefloorandyourfeetareeitherflatonthe
floororonafootrest.
Whenusingthekeyboard,keepyourforearmsparalleltothefloorandyourwristsinacomfortableposition.
Usealighttouchonthekeyboardandyourhandsandfingersrelaxed.Changetheangleofthekeyboard
formaximumcomfortbyadjustingthepositionofthekeyboardfeet.
Adjustthemonitorsothetopofthescreenisat,orslightlybelow,eyelevel.Placethemonitorata
comfortableviewingdistance,usually51–61cm(20–24inches).Then,positionthemonitorsothatyoucan
viewitwithouttwistingyourbody.Also,positionotherequipmentyouuseregularly,suchasthetelephone
oramouse,withineasyreach.
©CopyrightLenovo2014,2016
19

Glareandlighting
Positionthemonitortominimizeglareandreflectionsfromoverheadlights,windows,andotherlightsources.
Reflectedlightfromshinysurfacescancauseannoyingreflectionsonyourmonitorscreen.Placethe
monitoratrightanglestowindowsandotherlightsources,whenpossible.Reduceoverheadlighting,if
necessary,byturningofflightsorusinglowerwattagebulbs.Ifyouinstallthemonitornearawindow,use
curtainsorblindstoblockthesunlight.Youcanadjustthebrightnessandcontrastcontrolsonthemonitor
astheroomlightingchangesthroughouttheday.
Whereitisimpossibletoavoidreflectionsortoadjustthelighting,anantiglarefilterplacedoverthescreen
mightbehelpful.However,thesefiltersmightaffecttheclarityoftheimageonthescreen;trythemonlyafter
youhaveexhaustedothermethodsofreducingglare.
Dustbuildupcompoundsproblemsassociatedwithglare.Remembertocleanyourmonitorscreen
periodicallyusingasoftclothasdirectedinyourmonitordocumentation.
Aircirculation
Yourcomputerandmonitorproduceheat.Thecomputerhasafanthatpullsinfreshairandforcesouthot
air.Themonitorletshotairescapethroughvents.Blockingtheairventscancauseoverheating,whichmight
resultinamalfunctionordamage.Placethecomputerandmonitorsothatnothingblockstheairvents;
usually,51mm(2inches)ofairspaceissufficient.Also,ensurethattheventedairisnotblowingonpeople.
Electricaloutletsandcablelengths
Thefollowingfactorsmightdeterminethefinalplacementofyourcomputer:
•Locationofelectricaloutlets
•Lengthofpowercords
•Lengthofthecablesthatareconnectedtothemonitorandotherdevices
Whenarrangingyourworkspace:
•Avoidtheuseofextensioncords.Whenpossible,plugthecomputerpowercorddirectlyintoanelectrical
outlet.
•Keeppowercordsandcablesneatlyroutedawayfromwalkwaysandotherareaswheretheymight
getkickedaccidentally.
Formoreinformationaboutpowercords,see“Powercordsandpoweradapters”onpageiv
.
Accessibilityinformation
Lenovoiscommittedtoprovidinguserswhohavehearing,vision,andmobilitylimitationswithgreater
accesstoinformationandtechnology.Thissectionprovidesinformationaboutthewaystheseuserscanget
themostoutoftheircomputerexperience.Y oualsocangetthemostup-to-dateaccessibilityinformation
fromthefollowingWebsite:
http://www.lenovo.com/accessibility
Keyboardshortcuts
Thefollowingtablecontainskeyboardshortcutsthatcanhelpmakeyourcomputereasiertouse.
Note:Dependingonyourkeyboard,someofthefollowingkeyboardshortcutsmightnotbeavailable.
20ThinkCentreE63zUserGuide

KeyboardshortcutFunction
Windowslogokey+U
RightShiftforeightseconds
ShiftfivetimesTurnonorturnoffStickyKeys
NumLockforfivesecondsTurnonorturnoffToggleKeys
LeftAlt+LeftShift+NumLock
LeftAlt+LeftShift+PrtScn(orPrtSc)TurnonorturnoffHighContrast
OpenEaseofAccessCenter
TurnonorturnoffFilterKeys
TurnonorturnoffMouseKeys
Formoreinformation,gotohttp://windows.microsoft.com/,andthenperformasearchusinganyofthe
followingkeywords:keyboardshortcuts,keycombinations,shortcutkeys.
EaseofAccessCenter
EaseofAccessCenterontheWindowsoperatingsystemenablesuserstoconfiguretheircomputersto
suittheirphysicalandcognitiveneeds.
TouseEaseofAccessCenter,dothefollowing:
1.DependingonyourWindowsversion,dooneofthefollowing:
•ForWindows7:ClicktheStartbuttontoopentheStartmenu,andthenclickControlPanel.View
ControlPanelusingLargeiconsorSmallicons,andthenclickEaseofAccessCenter.
•ForWindows8.1:Movethepointertothetop-rightorbottom-rightcornerofthescreentodisplaythe
charms.Then,clickSettings➙ChangePCsettings➙EaseofAccess.
•ForWindows10:ClicktheStartbuttontoopentheStartmenu.Then,clickSettings➙Easeof
Access.
2.Choosetheappropriatetoolbyfollowingtheinstructionsonthescreen.
EaseofAccessCentermainlyincludesthefollowingtools:
•Magnifier
Magnifierisausefulutilitythatenlargestheentirescreenorpartofthescreensothatyoucansee
theitemsbetter.
•Narrator
Narratorisascreenreaderthatreadsaloudwhatisdisplayedonthescreenanddescribeseventssuchas
errormessages.
•On-ScreenKeyboard
Ifyouprefertotypeorenterdataintoyourcomputerusingamouse,joystick,orotherpointingdevice
insteadofaphysicalkeyboard,youcanuseOn-ScreenKeyboard.On-ScreenKeyboarddisplaysavisual
keyboardwithallthestandardkeys.
•HighContrast
HighContrastisafeaturethatheightensthecolorcontrastofsometextandimagesonyourscreen.Asa
result,thoseitemsaremoredistinctandeasiertoidentify.
•Personalizedkeyboard
Adjustkeyboardsettingstomakeyourkeyboardeasiertouse.Forexample,youcanuseyourkeyboard
tocontrolthepointerandtypecertainkeycombinationseasier.
•Personalizedmouse
Adjustmousesettingstomakeyourmouseeasiertouse.Forexample,youcanchangethepointer
appearanceandmakeiteasiertomanagewindowswiththemouse.
Chapter3.Youandyourcomputer21

SpeechRecognition
SpeechRecognitionenablesyoutocontrolyourcomputerbyvoice.
Usingonlyyourvoice,youcanstartprograms,openmenus,clickobjectsonthescreen,dictatetextinto
documents,andwriteandsende-mails.Everythingyoudowiththekeyboardandmousecanbedonewith
onlyyourvoice.
TouseSpeechRecognition,dothefollowing:
1.DependingonyourWindowsversion,dooneofthefollowing:
•ForWindows7:ClicktheStartbuttontoopentheStartmenu,andthenclickControlPanel.
•ForWindows8.1:OpenControlPanel.See“AccessingControlPanelontheWindows8.1operating
system”onpage17.
•ForWindows10:Right-clicktheStartbuttontoopentheStartcontextmenu,andthenclickControl
Panel.
2.ViewControlPanelusingLargeiconsorSmallicons,andthenclickSpeechRecognition.
3.Followtheinstructionsonthescreen.
Screen-readertechnologies
Screen-readertechnologiesareprimarilyfocusedonsoftwareprograminterfaces,helpinformationsystems,
andvariousonlinedocuments.Foradditionalinformationaboutscreenreaders,seethefollowing:
•UsingPDFswithscreenreaders:
http://www.adobe.com/accessibility.html?promoid=DJGVE
•UsingtheJAWSscreenreader:
http://www.freedomscientific.com/jaws-hq.asp
•UsingtheNVDAscreenreader:
http://www.nvaccess.org/
Screenresolution
Youcanmakethetextandimagesonyourscreeneasiertoreadbyadjustingthescreenresolutionofyour
computer.
Toadjustthescreenresolution,dothefollowing:
1.Right-clickablankareaonthedesktop.
2.DependingonyourWindowsversion,dooneofthefollowing:
•ForWindows7orWindows8.1:ClickScreenresolution.
•ForWindows10:ClickDisplaysettings.OntheDisplaytab,clickAdvanceddisplaysettings.
3.Followtheinstructionsonthescreen.
Note:Settingtheresolutiontoolowmightpreventsomeitemsfromfittingonthescreen.
Customizableitemsize
Youcanmaketheitemsonyourscreeneasiertoreadbychangingtheitemsize.
•Tochangetheitemsizetemporarily,usetheMagnifiertoolinEaseofAccessCenter.See“Easeof
AccessCenter”onpage21
.
•Tochangetheitemsizepermanently,dothefollowing:
–Changethesizeofalltheitemsonyourscreen.
22ThinkCentreE63zUserGuide

1.Right-clickablankareaonthedesktop.
2.DependingonyourWindowsversion,dooneofthefollowing:
–ForWindows7orWindows8.1:ClickScreenresolution➙Maketextandotheritemslarger
orsmaller.
–ForWindows10:ClickDisplaysettings.
3.Changetheitemsizebyfollowingtheinstructionsonthescreen.
4.ClickApply.Thischangewilltakeeffectthenexttimeyoulogintotheoperatingsystem.
–ChangethesizeoftheitemsonaWebpage.
PressandholdCtrl,andthenpresstheplus-signkey(+)toenlargeortheminus-signkey(-)to
reducethetextsize.
–Changethesizeoftheitemsonthedesktoporawindow.
Note:Thisfunctionmightnotworkonsomewindows.
Ifyourmousehasawheel,pressandholdCtrl,andthenscrollthewheeltochangetheitemsize.
Industry-standardconnectors
Yourcomputerprovidesindustry-standardconnectorsthatenableyoutoconnectassistivedevices.
Formoreinformationaboutthelocationandfunctionoftheconnectors,see“Locations”onpage1.
TTY/TDDconversionmodem
Yourcomputersupportstheuseofatexttelephone(TTY)orthetelecommunicationsdeviceforthedeaf
(TDD)conversionmodem.ThemodemmustbeconnectedbetweenyourcomputerandaTTY/TDD
telephone.Then,youcantypeamessageonyourcomputerandsendittothetelephone.
Documentationinaccessibleformats
Lenovoprovideselectronicdocumentationinaccessibleformats,suchasproperlytaggedPDFfilesor
HyperTextMarkupLanguage(HTML)files.Lenovoelectronicdocumentationisdevelopedtoensure
thatvisuallyimpaireduserscanreadthedocumentationthroughascreenreader.Eachimageinthe
documentationalsoincludesadequatealternativetextsothatvisuallyimpaireduserscanunderstandthe
imagewhentheyuseascreenreader.
Movingyourcomputertoanothercountryorregion
Whenyoumoveyourcomputertoanothercountryorregion,youmusttakelocalelectricalstandards
intoconsideration.
Ifyourelocateyourcomputertoacountryorregionthatusesanelectricaloutletstyledifferentfromthe
typeyouarecurrentlyusing,youhavetopurchaseeitheranelectricalplugadapteroranewpowercord.
YoucanorderapowercorddirectlyfromLenovo.
Forpowercordinformationandpartnumbers,goto:
http://www.lenovo.com/powercordnotice
Chapter3.Youandyourcomputer23

24ThinkCentreE63zUserGuide

Chapter4.Security
Thischapterprovidesinformationabouthowtoprotectyourcomputerfromtheftandunauthorizeduse.
Securityfeatures
Thefollowingsecurityfeaturesareavailableonyourcomputer:
•ComputraceAgentsoftwareembeddedinfirmware
TheComputraceAgentsoftwareisanITassetmanagementandcomputertheftrecoverysolution.
Thesoftwaredetectsifchangeshavebeenmadeonthecomputer,suchashardware,software,or
thecomputercall-inlocation.
Note:YoumighthavetopurchaseasubscriptiontoactivatetheComputraceAgentsoftware.
•AbilitytoenableanddisabledevicesandUSBconnectors
Formoreinformation,see“Enablingordisablingadevice”onpage31
.
©CopyrightLenovo2014,2016
25

AttachingaKensington-stylecablelock
YoucanuseaKensington-stylecablelocktosecureyourcomputertoadesk,table,orothernon-permanent
fixture.Connectthelocktothesecurity-lockslotattherearofyourcomputer.Dependingonthetype
selected,thelockcanbeoperatedwithakeyorcombination.Thelockalsolocksthebuttonsusedtoopen
thecomputercover.Thisisthesametypeoflockusedonmanynotebookcomputers.Y oucanordersucha
lockdirectlyfromLenovobysearchingforKensingtonat:
http://www.lenovo.com/support
Figure5.Kensington-stylecablelock
Usingpasswords
YoucansetavarietyofpasswordsthroughtheMicrosoftWindowsoperatingsystemandthroughtheBIOS
ofyourcomputertohelpdeterunauthorizeduseofyourcomputer.
BIOSpasswords
YoucanusetheBIOSSetupUtilityprogramtosetpasswordstopreventunauthorizedaccesstoyour
computeranddata.Thefollowingtypesofpasswordsareavailable:
•Power-onpassword
•Harddiskpassword
•Administratorpassword
FormoreinformationaboutBIOSpasswords,see“UsingBIOSpasswords”onpage30
setanypasswordstouseyourcomputer.However,usingpasswordsimprovescomputingsecurity.
26ThinkCentreE63zUserGuide
.Youdonothaveto

Windowspasswords
DependingonyourversionoftheWindowsoperatingsystem,youcanuseWindowspasswordsfora
varietyoffeatures,includingaccesscontrolandindividualusersettings.Formoreinformation,seethe
Windowshelpsystem.
Usingandunderstandingfirewalls
Afirewallcanbehardware,software,oracombinationofbothdependingonthelevelofsecurityrequired.
Firewallsworkonasetofrulestodeterminewhichinboundandoutboundconnectionsareauthorized.If
yourcomputerispreinstalledwithafirewallprogram,ithelpsprotectagainstcomputerInternetsecurity
threats,unauthorizedaccess,intrusions,andInternetattacks.Italsoprotectsyourprivacy.Formore
informationabouthowtousethefirewallprogram,refertothehelpsystemofyourfirewallprogram.
TheWindowsoperatingsystempreinstalledonyourcomputerprovidestheWindowsFirewall.Fordetailson
usingtheWindowsFirewall,referto“Windowshelpsystem”onpage69
.
Protectingdataagainstviruses
Yourcomputerispreinstalledwithanantivirusprogramtohelpyouguardagainst,detect,andeliminate
viruses.
Lenovoprovidesafullversionofantivirussoftwareonyourcomputerwithafree30-daysubscription.After
30days,youmustrenewthelicensetocontinuereceivingtheantivirussoftwareupdates.
Note:Virusdefinitionfilesmustbekeptup-to-datetoguardagainstnewviruses.
Formoreinformationabouthowtouseyourantivirussoftware,refertothehelpsystemofyourantivirus
software.
Chapter4.Security27

28ThinkCentreE63zUserGuide

Chapter5.Advancedconfiguration
Thischapterprovidesthefollowinginformationtohelpyouconfigurethecomputer:
•“UsingtheSetupUtilityprogram”onpage29
•“UpdatingorrecoveringtheBIOS”onpage33
UsingtheSetupUtilityprogram
TheSetupUtilityprogramisusedtoviewandchangetheconfigurationsettingsofyourcomputer,regardless
ofwhichoperatingsystemyouareusing.However,theoperatingsystemsettingsmightoverrideanysimilar
settingsintheSetupUtilityprogram.
StartingtheSetupUtilityprogram
TostarttheSetupUtilityprogram,dothefollowing:
1.Ensurethatyourcomputeristurnedoff.
2.RepeatedlypressandreleasetheF1keywhenturningonthecomputer.Whenyouhearmultiple
beepsorseealogoscreen,releasetheF1key.
Note:Ifapower-onpasswordoranadministratorpasswordhasbeenset,theSetupUtilityprogram
menuwillnotbedisplayeduntilyouenterthecorrectpassword.Formoreinformation,see“Using
BIOSpasswords”onpage30
.
WhenthePOSTdetectsthattheharddiskdrivehasbeenremovedfromyourcomputerorthememorysize
hasdecreased,anerrormessagewillbedisplayed.Youmustdooneofthefollowing:
•PressF1toentertheSetupUtilityprogram.
Note:AfteryouentertheSetupUtilityprogram,pressF10tosavechangesandexittheSetupUtility
program.PressEnterwhenpromptedtoconfirmtheexit.Theerrormessagewillnotbedisplayedagain.
•PressF2tobypasstheerrormessageandlogintotheoperatingsystem.
Note:YouhavetoenabletheconfigurationchangedetectionfeatureforthePOSTtodetecttheremovalof
theharddiskdrive.Toenabletheconfigurationchangedetectionfeature,dothefollowing:
1.StarttheSetupUtilityprogram.
2.FromtheSetupUtilityprogrammainmenu,selectSecurity➙ConfigurationChangeDetection,
andpressEnter.
3.SelectEnabledandpressEnter.
4.PressF10tosavechangesandexittheSetupUtilityprogram.PressEnterwhenpromptedtoconfirm
theexit.
Viewingandchangingsettings
TheSetupUtilityprogrammenulistsvariousitemsaboutthesystemconfiguration.Tovieworchange
settings,starttheSetupUtilityprogram.See“StartingtheSetupUtilityprogram”onpage29.Then,follow
theinstructionsonthescreen.
Youcanuseeitherthekeyboardorthemousetonavigatethroughmenuchoices.Thekeysusedtoperform
varioustasksaredisplayedatthebottomofeachscreen.
©CopyrightLenovo2014,2016
29

UsingBIOSpasswords
ByusingtheSetupUtilityprogram,youcansetpasswordstopreventunauthorizedaccesstoyourcomputer
anddata.
Youdonothavetosetanypasswordstouseyourcomputer.However,usingpasswordsimproves
computingsecurity.Ifyoudecidetosetanypasswords,readthefollowingsections.
Passwordconsiderations
Apasswordcanbeanycombinationofupto64alphabeticandnumericcharacters.Forsecurityreasons,it
isrecommendedtouseastrongpasswordthatcannotbeeasilycompromised.Tosetastrongpassword,
usethefollowingguidelines:
•Haveatleasteightcharactersinlength
•Containatleastonealphabeticcharacterandonenumericcharacter
•SetupUtilityprogramandharddiskpasswordsarenotcasesensitive
•Notbeyournameoryourusername
•Notbeacommonwordoracommonname
•Besignificantlydifferentfromyourpreviouspasswords
Power-OnPassword
WhenaPower-OnPasswordisset,youarepromptedtotypeavalidpasswordeachtimethecomputeris
turnedon.Thecomputercannotbeuseduntilthevalidpasswordistypedin.
AdministratorPassword
SettinganAdministratorPassworddetersunauthorizedusersfromchangingconfigurationsettings.Ifyou
areresponsibleformaintainingtheconfigurationsettingsofseveralcomputers,youmightwanttosetan
AdministratorPassword.
WhenanAdministratorPasswordisset,youarepromptedtotypeavalidpasswordeachtimeyoutryto
accesstheSetupUtilityprogram.TheSetupUtilityprogramcannotbeaccesseduntilavalidpassword
istypedin.
IfboththePower-OnPasswordandAdministratorPasswordareset,youcantypeeitherpassword.However,
youmustuseyourAdministratorPasswordtochangeanyconfigurationsettings.
HardDiskPassword
SettingaHardDiskPasswordpreventsunauthorizedaccesstothedataontheharddiskdrive.Whena
HardDiskPasswordisset,youarepromptedtotypeavalidpasswordeachtimeyoutrytoaccessthe
harddiskdrive.
Notes:
•AfteryousetaHardDiskPassword,yourdataontheharddiskdriveisprotectedeveniftheharddisk
driveisremovedfromonecomputerandinstalledinanother.
•IftheHardDiskPasswordisforgotten,thereisnowaytoresetthepasswordorrecoverdatafromthe
harddiskdrive.
Setting,changing,anddeletingapassword
Toset,change,ordeleteapassword,dothefollowing:
1.StarttheSetupUtilityprogram.See“StartingtheSetupUtilityprogram”onpage29.
2.FromtheSetupUtilityprogrammainmenu,selectSecurity.
30ThinkCentreE63zUserGuide

3.Dependingonthepasswordtype,selectSetPower-OnPassword,SetAdministratorPassword,or
HardDiskPassword.
4.Followtheinstructionsontherightsideofthescreentoset,change,ordeleteapassword.
Note:Apasswordcanbeanycombinationofupto64alphabeticandnumericcharacters.Formore
information,see“Passwordconsiderations”onpage30
.
Enablingordisablingadevice
Thissectionprovidesinformationonhowtoenableordisableuseraccesstothefollowingdevices:
USBSetupUsethisoptiontoenableordisableaUSBconnector.WhenaUSBconnectoris
disabled,thedeviceconnectedtotheUSBconnectorcannotbeused.
SATAControllerWhenthisoptionissettoDisable,alldevicesconnectedtotheSATAconnectors
(suchasharddiskdrivesoropticaldrives)aredisabledandcannotbeaccessed.
Toenableordisableadevice,dothefollowing:
1.StarttheSetupUtilityprogram.See“StartingtheSetupUtilityprogram”onpage29.
2.FromtheSetupUtilityprogrammainmenu,selectDevices.
3.Dependingonthedeviceyouwanttoenableordisable,dooneofthefollowing:
•SelectUSBSetuptoenableordisableaUSBdevice.
•SelectATADriveSetuptoenableordisableaninternalorexternalSATAdevice.
4.SelectthedesiredsettingsandpressEnter.
5.PressF10tosavechangesandexittheSetupUtilityprogram.See“ExitingtheSetupUtilityprogram”
onpage32.
Selectingastartupdevice
Ifyourcomputerdoesnotstartupfromadeviceasexpected,dooneofthefollowingtoselectthestartup
deviceyouwant.
Selectingatemporarystartupdevice
Usethisproceduretoselectatemporarystartupdevice.
Note:Notalldiscsandharddiskdrivesarebootable.
1.T urnonorrestartyourcomputer.
2.Whenyouseethelogoscreen,repeatedlypressandreleasetheF12key.Thestartupdevicemenu
windowisdisplayed.
3.SelectthedesiredstartupdeviceandpressEnter.Thecomputerwillstartupfromthedeviceyou
selected.
Note:Selectingastartupdevicefromthestartupdevicemenuwindowdoesnotpermanentlychange
thestartupsequence.
Selectingorchangingthestartupdevicesequence
Tovieworpermanentlychangetheconfiguredstartupdevicesequence,dothefollowing:
1.StarttheSetupUtilityprogram.See“StartingtheSetupUtilityprogram”onpage29.
2.FromtheSetupUtilityprogrammainmenu,selectStartup.
3.SelectthedevicesforthePrimaryStartupSequence,theAutomaticStartupSequence,andtheError
StartupSequence.Readtheinformationdisplayedontherightsideofthescreen.
Chapter5.Advancedconfiguration31

4.PressF10tosavechangesandexittheSetupUtilityprogram.See“ExitingtheSetupUtilityprogram”
onpage32.
EnablingErPLPScompliancemode
Lenovocomputersmeettheeco-designrequirementsoftheErPLot3regulation.Formoreinformation,go
to:
http://www.lenovo.com/ecodeclaration
YoucanenableErPLPScompliancemodeintheSetupUtilityprogramtoreducetheconsumptionof
electricitywhenyourcomputerisofforinsleepmode.
ToenableErPLPScompliancemodeintheSetupUtilityprogram,dothefollowing:
1.StarttheSetupUtilityprogram.See“StartingtheSetupUtilityprogram”onpage29.
2.FromtheSetupUtilityprogrammainmenu,selectPower➙EnhancedPowerSavingMode,and
pressEnter.
3.SelectEnabledandpressEnter.
4.FromthePowermenu,selectAutomaticPowerOnandpressEnter.
5.SelectWakeonLanandpressEnter.
6.SelectDisabledandpressEnter.
7.PressF10tosavechangesandexittheSetupUtilityprogram.PressEnterwhenpromptedtoconfirm
theexit.
WhenErPLPScompliancemodeisenabled,youcanwakeupyourcomputerbydoingoneofthefollowing:
•Pressthepowerbutton
•Enablethewakeuponalarmfeature
Thewakeuponalarmfeatureenablesyourcomputertowakeupatasettime.Toenablethewake
uponalarmfeature,dothefollowing:
1.StarttheSetupUtilityprogram.
2.FromtheSetupUtilityprogrammainmenu,selectPower➙AutomaticPowerOn,andpressEnter.
3.SelectWakeUponAlarmandpressEnter.Thenfollowtheinstructionsonthescreen.
4.PressF10tosavechangesandexittheSetupUtilityprogram.PressEnterwhenpromptedto
confirmtheexit.
•Enabletheafterpowerlossfeature
Theafterpowerlossfeatureenablesyourcomputertowakeupwhenthepowersupplyresumesaftera
suddenlossofelectricity.Toenabletheafterpowerlossfeature,dothefollowing:
1.StarttheSetupUtilityprogram.
2.FromtheSetupUtilityprogrammainmenu,selectPower➙AfterPowerLoss,andpressEnter.
3.SelectPowerOnandpressEnter.
4.PressF10tosavechangesandexittheSetupUtilityprogram.PressEnterwhenpromptedto
confirmtheexit.
ExitingtheSetupUtilityprogram
Afteryoufinishviewingorchangingsettings,pressEsctoreturntotheSetupUtilityprogrammainmenu.
YoumighthavetopressEscseveraltimes.Dooneofthefollowing:
•Ifyouwanttosavethenewsettings,pressF10tosavechangesandexittheSetupUtilityprogram.
32ThinkCentreE63zUserGuide

•Ifyoudonotwanttosavethesettings,selectExit➙DiscardChangesandExit,andthenpressEnter.
WhentheResetWithoutSavingwindowdisplays,selectY es,andthenpressEntertoexittheSetup
Utilityprogram.
•Ifyouwanttoreturntothedefaultsettings,pressF9toloadthedefaultsettings,andthenpressF10to
saveandexittheSetupUtilityprogram.
UpdatingorrecoveringtheBIOS
LenovomightmakechangesandenhancementstotheBIOS.Whenupdatesarereleased,theyareavailable
asdownloadablefilesontheLenovoWebsiteathttp://www.lenovo.com/drivers.Instructionsforusingthe
BIOSupdatesareavailableinaTXTfilethatisincludedwiththeupdatefiles.Formostmodels,youcan
downloadeitheranupdateprogramtocreateasystem-program-updatediscoranupdateprogramthat
canberunfromtheoperatingsystem.
ThischapterprovidesinformationaboutupdatingtheBIOSandhowtorecoverfromaBIOSupdatefailure.
BIOSlevels
AnincorrectlevelofBIOScancausefalseerrorsandunnecessaryFRUreplacement.Usethefollowing
informationtodeterminethecurrentlevelofBIOSinstalledinthecomputer,thelatestBIOSavailableforthe
computer,andwheretoobtainthelatestlevelofBIOS.
•TodeterminethecurrentLevelofBIOS:
–StarttheSetupUtility.
–SelectBIOSRevisionLevel.
•SourcesforobtainingthelatestlevelBIOSavailable
1.Lenovosupportwebsite:http://www.lenovo.com/support
2.LenovoCustomerSupportCenter
3.Levels1and2Support
ToupdatetheBIOS,see“UpdatingorrecoveringtheBIOS”onpage33.
Note:BIOSsettingsvarybyoperatingsystem.ChangetheBIOSsettingsbeforeinstallinganewoperating
system.See“ChangingtheBIOSsettingsbeforeinstallinganewoperatingsystem”onpage34
.
Usingsystemprograms
Systemprogramsarethebasiclayerofsoftwarebuiltintoyourcomputer.Systemprogramsincludethe
POST,theBIOS,andtheSetupUtilityprogram.ThePOSTisasetoftestsandproceduresthatare
performedeachtimeyouturnonyourcomputer.TheBIOSisalayerofsoftwarethattranslatesinstructions
fromotherlayersofsoftwareintoelectricalsignalsthatthecomputerhardwarecanexecute.Youcanusethe
SetupUtilityprogramtovieworchangetheconfigurationsettingsofyourcomputer.See“UsingtheSetup
Utilityprogram”onpage29
Thesystemboardofyourcomputerhasamodulecalledelectricallyerasableprogrammableread-only
memory(EEPROM,alsoreferredtoasflashmemory).ItenablesyoutoupdatethePOST,theBIOS,and
theSetupUtilityprogrameasily.T operformsuchanupdate,youcaneitherstartyourcomputerwitha
system-program-updatediscorrunaspecialupdateprogramfromyouroperatingsystem.
LenovomightmakechangesandenhancementstothePOSTandBIOS.Whenupdatesarereleased,they
areavailableasdownloadablefilesontheLenovoWebsiteathttp://www.lenovo.com.Instructionsforusing
thePOSTandBIOSupdatesareavailableinaTXTfilethatisincludedwiththeupdatefiles.Formost
models,youcandownloadanupdateprogramthatcanbeusedtocreateasystem-program-updatedisc
orberunfromtheoperatingsystem.
fordetailedinformation.
Chapter5.Advancedconfiguration33

ChangingtheBIOSsettingsbeforeinstallinganewoperatingsystem
BIOSsettingsvarybyoperatingsystem.ChangetheBIOSsettingsbeforeinstallinganewoperatingsystem.
TochangetheBIOSsettings,dothefollowing:
1.StarttheSetupUtilityprogram.See“StartingtheSetupUtilityprogram”onpage29.
2.FromtheSetupUtilityprogrammainmenu,selectExit➙OSOptimizedDefault.
3.Dependingontheoperatingsystemtobeinstalled,dooneofthefollowing:
•ToinstalltheWindows8.1(64-bit)operatingsystem,selectEnabled.
•ToinstallanoperatingsystemotherthanWindows8.1(64-bit),selectDisabled.
4.SelectYesinthewindowdisplayedandpressEntertoconfirmyourselection.
5.PressF10tosavechangesandexittheSetupUtilityprogram.See“ExitingtheSetupUtilityprogram”
onpage32.
UpdatingtheBIOS
Whenyouinstallanewprogram,hardwaredevice,ordevicedriver,youmightbeinformedtoupdate
theBIOS.Y oucanupdatetheBIOSfromyouroperatingsystemoraflashupdatedisc(supportedonly
onsomemodels).
ToupdatetheBIOS,dothefollowing:
1.Gotohttp://www.lenovo.com/drivers.
2.DownloadtheflashBIOSupdatedriverfortheoperatingsystemversionortheISOimageversion(used
tocreateaflashupdatedisc).Then,downloadtheinstallationinstructionsfortheflashBIOSupdate
driveryoudownload.
3.PrinttheinstallationinstructionsyoudownloadandfollowtheinstructionstoupdatetheBIOS.
Note:IfyouwanttoupdatetheBIOSfromaflashupdatedisc,theinstallationinstructionsmightnotprovide
theinformationabouthowtorecordtheupdatedisc.
34ThinkCentreE63zUserGuide

Chapter6.Preventingproblems
Thischapterprovidesinformationthatcanhelpyouavoidcommonproblemsandkeepyourcomputer
runningsmoothly.
Keepingyourcomputercurrent
Insomesituationsyoumightfinditnecessarytohavethemostcurrentsoftwareprograms,devicedrivers,or
operatingsystem.Thissectionexplainshowtogetthelatestupdatesforyourcomputer.
Gettingthelatestdevicedriversforyourcomputer
Attention:Reinstallingdevicedriverswillchangethecurrentconfigurationofyourcomputer.
Togetthelatestdevicedriversforyourcomputer,dooneofthefollowing:
•Downloadthedevicedriversthatarepreinstalledonyourcomputer.Gotohttp://www.lenovo.com/drivers.
•UsetheLenovoprogramorWindowsUpdate.See“Gettingthelatestsystemupdates”onpage35.
Note:ThedevicedriversprovidedbyWindowsUpdatemightnotbetestedbyLenovo.Itisrecommended
thatyougetdevicedriversfromLenovo.
Gettingthelatestsystemupdates
Togetthelatestsystemupdatesforyourcomputer,ensurethatyourcomputerisconnectedtotheInternet
anddooneofthefollowing:
•UseoneofthefollowingLenovoprogramstogetthesystemupdates,suchasdevicedriverupdates,
softwareupdates,andBIOSupdates:
–ForWindows7orWindows8.1:UsetheSystemUpdateprogram.
–ForWindows10:UsetheLenovoCompanionprogram.
ToopentheSystemUpdateorLenovoCompanionprogram,see"Accessingaprogramonyourcomputer"
onpage4.Formoreinformationaboutusingtheprogram,refertothehelpsystemoftheprogram.
•UseWindowsUpdatetogetthesystemupdates,suchassecurityfixes,newversionsofWindows
components,anddevicedriverupdates.
1.DependingonyourWindowsversion,dooneofthefollowing:
–ForWindows7:ClicktheStartbuttontoopentheStartmenu,andthenclickControlPanel.View
ControlPanelusingLargeiconsorSmallicons,andthenclickWindowsUpdate.
–ForWindows8.1:Movethepointertothetop-rightorbottom-rightcornerofthescreento
displaythecharms.Then,clickSettings➙ChangePCsettings➙Updateandrecovery➙
WindowsUpdate.
–ForWindows10:ClicktheStartbuttontoopentheStartmenu.Then,clickSettings➙Update&
security➙WindowsUpdate.
2.Followtheinstructionsonthescreen.
Cleaningandmaintenance
Withappropriatecareandmaintenanceyourcomputerwillserveyoureliably.Thefollowingtopicsoffer
informationtohelpyoukeepyourcomputerintopworkingorder.
©CopyrightLenovo2014,2016
35

Basics
Herearesomebasicpointsaboutkeepingyourcomputerfunctioningproperly:
•Keepyourcomputerinaclean,dryenvironment.Ensurethatthecomputerrestsonaflat,steadysurface.
•Donotcoveranyoftheventsinthecomputerormonitor.Theseventsprovideairflowtokeepyour
computerfromoverheating.
•Keepfoodanddrinksawayfromallpartsofyourcomputer.Foodparticlesandspillsmightmakethe
keyboardandmousestickandunusable.
•Donotgetthepowerswitchesorothercontrolswet.Moisturecandamagethesepartsandcausean
electricalhazard.
•Alwaysdisconnectapowercordbygraspingthepluginsteadofthecord.
Cleaningyourcomputer
Itisagoodpracticetocleanyourcomputerperiodicallytoprotectthesurfacesandensuretrouble-free
operation.
CAUTION:
Besuretoturnoffthecomputerandmonitorbeforecleaningthecomputerandmonitorscreen.
Computer
Useonlymildcleaningsolutionsandadampclothtocleanthepaintedsurfacesofthecomputer.
Keyboard
Tocleanyourcomputerkeyboard,dothefollowing:
1.Applysomeisopropylrubbingalcoholtoasoft,dust-freecloth.
2.Wipeeachkeytopsurfacewiththecloth.Wipethekeysonebyone;ifyouwipeseveralkeysatatime,
theclothmayhookontoanadjacentkeyandpossiblydamageit.Ensurethatnoliquiddripsonto
orbetweenthekeys.
3.T oremoveanycrumbsordustfrombeneaththekeys,youcanuseacamerablowerwithabrush
orcoolairfromahairdryer.
Note:Avoidsprayingcleanerdirectlyontothekeyboard.
Opticalmouse
Anopticalmouseusesalight-emittingdiode(LED)andanopticalsensortonavigatethepointer.Ifthe
pointeronthescreendoesnotmovesmoothlywiththeopticalmouse,youmightneedtocleanthemouse.
Tocleananopticalmouse,dothefollowing:
1.T urnoffyourcomputer.
2.Disconnectthemousecablefromthecomputer.
3.T urnthemouseupsidedowntocheckthelens.
•Ifthereisasmudgeonthelens,gentlycleantheareawithaplaincotton-tippedswab.
•Ifthereisdebrisinthelens,gentlyblowthedebrisawayfromthearea.
4.Checkthesurfaceonwhichyouareusingthemouse.Ifyouhaveaveryintricatepictureorpattern
beneaththemouse,itmightbedifficultforthedigitalsignalprocessortodeterminechangesinthe
mouseposition.
5.Reconnectthemousecabletothecomputer.
6.T urnyourcomputerbackon.
36ThinkCentreE63zUserGuide

Displayscreen
Dustbuildupcompoundsproblemsassociatedwithglare.Remembertocleanyourmonitorscreen
periodically.
Cleaningaflat-panelmonitorsurface
Tocleantheflexiblefilmsurfaceofaflat-panelcomputerdisplay,wipeitgentlywithasoft,drycloth,or
blowonthescreentoremovegritandotherlooseparticles.ThenmoistenaclothwithLCDcleanerand
wipethescreensurface.
Manycomputersupplystorescarrythespecialcleaningfluidsfordisplays.Usecleaningfluidsdevelopedfor
LCDdisplaysonly.Firstapplythefluidtoalint-free,softcloth,thencleantheLCDdisplay.Somecomputer
supplystorescarrypre-moistenedtowelettesforLCDmaintenance.
Cleaningaglass-screensurface
Tocleanaglass-screensurface,wipeitgentlywithasoft,drycloth,orblowonthescreentoremovegritand
otherlooseparticles.Thenuseasoftclothmoistenedwithanonabrasiveliquidglasscleaner.
Goodmaintenancepractices
Byperformingafewgoodmaintenancepractices,youcanmaintaingoodcomputerperformance,protect
yourdata,andbepreparedincaseofacomputerfailure.
•Keepyourcomputersoftware,devicedrivers,andoperatingsystemup-to-date.See“Keepingyour
computercurrent”onpage35.
•Emptyyourrecyclebinonaregularbasis.
•CleanoutyourInbox,SentItems,andDeletedItemsfoldersinyoure-mailapplicationonaregularbasis.
•Cleanupfilesandfreeupstoragedrivespaceandmemoryspaceoccasionallytopreventperformance
problems.See“Performanceandlockupproblems”onpage46.
•Keepalogbook.Entriesmightincludemajorsoftwareorhardwarechanges,device-driverupdates,
intermittentproblemsandwhatyoudidtoresolvethem,andotherissuesyoumighthaveexperienced.
Thecauseofaproblemmightbechangeinhardware,changeinsoftware,oranyotheractionsthatmight
havetakenplace.AlogbookcanhelpyouoraLenovotechniciandeterminethecauseofaproblem.
•Backupyourdataonthestoragedriveregularly.Y oucanrestorethestoragedrivefromabackup.
Tobackupyourdata,dooneofthefollowing:
–ForWindows7:OpentheRescueandRecoveryprogram.See“Accessingaprogramonyour
computer”onpage10
oftheprogram.
–ForWindows8.1:OpenControlPanel.ViewControlPanelusingLargeiconsorSmallicons,andthen
clickFileHistory.Followtheinstructionsonthescreen.
Note:FordetailedinformationonhowtoopenControlPanelonWindows8.1,see“AccessingControl
PanelontheWindows8.1operatingsystem”onpage17
–ForWindows10:Right-clicktheStartbuttontoopentheStartcontextmenu,andthenclickControl
Panel.ViewControlPanelusingLargeiconsorSmallicons,andthenclickFileHistory.Followthe
instructionsonthescreen.
•Createarecoverymediumasearlyaspossible.Y oucanusetherecoverymediumtorecoveryour
operatingsystemevenifWindowsfailstostartup.
Tocreatearecoverymedium,dooneofthefollowing:
–ForWindows7:OpentheCreateRecoveryMediaprogram.See“Accessingaprogramonyour
computer”onpage10
systemoftheprogram.
.Formoreinformationaboutbackingupyourdata,refertothehelpsystem
.
.Formoreinformationaboutcreatingarecoverymedium,refertothehelp
Chapter6.Preventingproblems37

–ForWindows8.1:OpenControlPanel.ViewControlPanelusingLargeiconsorSmallicons,andthen
clickRecovery.Followtheinstructionsonthescreen.
Note:FordetailedinformationonhowtoopenControlPanelonWindows8.1,see“AccessingControl
PanelontheWindows8.1operatingsystem”onpage17
–ForWindows10:Right-clicktheStartbuttontoopentheStartcontextmenu,andthenclickControl
Panel.ViewControlPanelusingLargeiconsorSmallicons,andthenclickRecovery.Followthe
instructionsonthescreen.
•ForWindows7,createarescuemediumasearlyaspossible.Youcanusetherescuemediumto
recoverfromfailuresthatpreventyoufromgainingaccesstotheRescueandRecoveryworkspace
onyourstoragedrive.
Tocreatearescuemedium,opentheRescueandRecoveryprogram.See“Accessingaprogramonyour
computer”onpage10
oftheprogram.
.Formoreinformationaboutcreatingarescuemedium,refertothehelpsystem
.
Movingyourcomputer
Takethefollowingprecautionsbeforemovingyourcomputer:
1.Backupallfilesanddatafromtheharddiskdrive.Thereareavarietyofbackupprogramsavailable
commercially.IfyouusetheWindows7operatingsystem,LenovoprovidestheRescueandRecovery
programtohelpyoubackupandrestoredata.See“Performingbackupandrecoveryoperations”
onpage52.
2.Removeallmediafromyourcomputer,suchasdiscs,USBstoragedevices,memorycards,andsoon.
3.T urnoffthecomputerandallattacheddevices.Yourharddiskdriveautomaticallyparkstheread/write
headinanondataarea.Thispreventsdamagetotheharddiskdrive.
4.Unplugthepowercordsfromelectricaloutlets.
5.Disconnectcommunicationcables,suchasmodemornetworkcables,fromtheoutletsfirst,andthen
disconnecttheotherendsfromthecomputer.
6.Notewhereanyremainingcablesareattachedtothecomputer;then,removethem.
7.Ifyousavedtheoriginalshippingcartonsandpackingmaterials,usethemtopacktheunits.Ifyouare
usingdifferentcartons,cushiontheunitstoavoiddamage.
38ThinkCentreE63zUserGuide

Chapter7.Troubleshootinganddiagnostics
Thischapterprovidesinformationaboutdiagnosingandtroubleshootingcomputerproblems.Ifyour
computerproblemisnotdescribedhere,seeChapter10“Gettinginformation,help,andservice”onpage69
foradditionaltroubleshootingresources.
Basictroubleshooting
Thefollowingtableprovidessomebasicinstructionstohelpyoutroubleshootyourcomputerproblems.
Note:Ifyoucannotcorrecttheproblem,havethecomputerserviced.Foralistofserviceandsupport
telephonenumbers,refertotheSafety,Warranty,andSetupGuidethatcomeswithyourcomputerorgoto
theLenovoSupportWebsiteat:
http://www.lenovo.com/support/phone
SymptomAction
Thecomputerdoesnotstart
whenyoupressthepower
button.
Themonitorscreenisblank.Ensurethat:
Thekeyboarddoesnotwork.Ensurethat:
Themousedoesnotwork.Ensurethat:
Ensurethat:
•Thepowercordiscorrectlyconnectedtotherearofthecomputerandtoa
workingelectricaloutlet.
•Ifyourcomputerhasasecondarypowerswitchontherearofthecomputer,
ensurethatitisswitchedon.
•Thepowerindicatoronthefrontofthecomputerison.
•Thecomputervoltagematchesthevoltageavailableattheelectricaloutletfor
yourcountryorregion.
•Themonitorsignalcableiscorrectlyconnectedtothemonitorandtothe
appropriatemonitorconnectoronthecomputer.
•Themonitorpowercordiscorrectlyconnectedtothemonitorandtoaworking
electricaloutlet.
•Themonitoristurnedonandthebrightnessandcontrastissetcorrectly.
•Thecomputervoltagematchesthevoltageavailableattheelectricaloutletfor
yourcountryorregion.
•Ifyourcomputerhasadiscretegraphicscardinstalled,besuretouseamonitor
connectoronthediscretegraphicscard.
•Thecomputeristurnedon.
•ThekeyboardissecurelyconnectedtoaPS/2keyboardconnectororaUSB
connectoronthecomputer.
•Nokeysarestuck.
•Thecomputeristurnedon.
•ThemouseissecurelyconnectedtoaPS/2mouseconnectororaUSB
connectoronthecomputer.
•Themouseisclean.Referto“Opticalmouse”onpage36forfurtherinformation.
©CopyrightLenovo2014,2016
39

SymptomAction
Theoperatingsystemdoesnot
start.
Thecomputerbeepsmultiple
timesbeforetheoperating
systemstarts.
Ensurethatthestartupsequenceincludesthedevicewheretheoperatingsystem
resides.Usually,theoperatingsystemisontheharddiskdrive.Formore
information,see“Selectingastartupdevice”onpage31
Ensurethatnokeysarestuck.
.
Troubleshootingprocedure
Usethefollowingprocedureasastartingpointfordiagnosingproblemsyouareexperiencingwithyour
computer:
1.Ensurethatthecablesforallattacheddevicesareconnectedcorrectlyandsecurely.
2.Ensurethatallattacheddevicesthatrequireacpowerareconnectedtoproperlygrounded,functioning
electricaloutlets.
3.EnsurethatallattacheddevicesareenabledintheBIOSsettingsofyourcomputer.Formoreinformation
aboutaccessingandchangingtheBIOSsettings,referto“UsingtheSetupUtilityprogram”onpage29.
4.Goto“T roubleshooting”onpage40andfollowtheinstructionsforthetypeofproblemyouare
experiencing.Ifthetroubleshootinginformationdoesnothelpyousolvetheproblem,continuewiththe
nextstep.
5.T ryusingapreviouslycapturedconfigurationtoseeifarecentchangetohardwareorsoftwaresettings
hascausedaproblem.Beforerestoringapreviousconfiguration,captureyourcurrentconfigurationin
casetheolderconfigurationsettingsdonotsolvetheproblemorhaveadverseeffects.Torestorea
capturedconfiguration,dothefollowing:
a.OpenControlPanelbydoingoneofthefollowing:
•ForWindows7:ClicktheStartbuttontoopentheStartmenu,andthenclickControlPanel.
•ForWindows8.1:See“AccessingControlPanelontheWindows8.1operatingsystem”on
page17.
•ForWindows10:Right-clicktheStartbuttontoopentheStartcontextmenu,andthenclick
ControlPanel.
b.ViewControlPanelusingLargeiconsorSmallicons,andthenclickRecovery➙OpenSystem
Restore.
c.Followtheinstructionsonthescreen.
Iftheproblempersists,continuewiththenextstep.
6.Runthediagnosticprogram.See“LenovoSolutionCenter”onpage49formoreinformation.
•Ifthediagnosticprogramdetectsahardwarefailureorifyouareunabletorunthediagnostic
program,contacttheLenovoCustomerSupportCenter.SeeChapter10“Gettinginformation,help,
andservice”onpage69formoreinformation.
•Ifthediagnosticprogramdoesnotdetectahardwarefailure,continuewiththenextstep.
7.Useanantivirusprogramtoseeifyourcomputerhasbeeninfectedbyavirus.Iftheprogramdetectsa
virus,removethevirus.
8.Ifnoneoftheseactionssolvetheproblem,seektechnicalassistance.SeeChapter10“Getting
information,help,andservice”onpage69
formoreinformation.
Troubleshooting
Usethetroubleshootinginformationtofindsolutionstoproblemsthathavedefinitesymptoms.
40ThinkCentreE63zUserGuide

Ifthesymptomoccurredimmediatelyafteryouinstallednewsoftwareoranewhardwareoption,dothe
followingbeforereferringtothetroubleshootinginformation:
1.Removethenewhardwareoptionorsoftware.Ifyoumustremovethecomputercovertoremovea
hardwareoption,ensurethatyoureviewandfollowtheelectricalsafetyinformationprovidedwithyour
computer.Foryoursafety,donotoperatethecomputerwiththecoverremoved.
2.Runthediagnosticprogramtoensureyourcomputerisoperatingcorrectly.
3.Reinstallthenewhardwareoptionorsoftwarefollowingtheinstructionsprovidedbythemanufacturer.
Audioproblems
Thissectionprovidessolutionstoaudio-relatedproblems.
NoaudioinWindows
Solutions:
•IfyouareusingpoweredexternalspeakersthathaveanOn/Offcontrol,ensurethefollowing:
–TheOn/OffcontrolissettotheOnposition.
–Thespeakerpowercableisconnectedtoaproperlygrounded,functionalacelectricaloutlet.
•Ifyourexternalspeakershaveavolumecontrol,ensurethatthevolumeisnotsettoolow.
•OntheWindowsdesktop,clickthespeakericonintheWindowsnotificationarea.ThenclickMixer.
Ensurethatthemutespeakerssettingsarenotselectedandnoneofthevolumesettingsissettoolow.
•Somemodelshaveafrontaudiopanelyoucanusetoadjustvolume.Ifyouhaveafrontaudiopanel,
ensurethatthevolumeisnotsettoolow.
•Ensurethatyourexternalspeakers(andheadphones,ifused)areconnectedtothecorrectaudio
connectoronthecomputer.Mostspeakercablesarecolor-codedtomatchtheconnector.
Note:Whenexternal-speakerorheadphonecablesareattachedtotheaudioconnector,theinternal
speaker,ifpresent,isdisabled.Inmostcases,ifanaudioadapterisinstalledinoneoftheexpansion
slots,theaudiofunctionbuiltintothesystemboardisdisabled.Therefore,youmustusetheaudio
connectorsontheaudioadapter.
•EnsurethattheprogramyouarerunningisdesignedforuseintheMicrosoftWindowsoperatingsystem.
IftheprogramisdesignedtoruninDOS,theprogramdoesnotusetheWindowssoundfeature.The
programmustbeconfiguredtouseSoundBlasterProorSoundBlasteremulation.
•Ensurethattheaudiodevicedriversarecorrectlyinstalled.SeeWindowshelpsystemformore
information.
Soundcomesonlyfromoneexternalspeaker
Solutions:
•Ensurethatthespeakercableisinsertedcompletelyintotheconnectoronthecomputer.
•Ensurethatthecablethatattachestheleftspeakertotherightspeakerisconnectedfirmly.
•ClickthespeakericonintheWindowsnotificationarea.Thenclickthespeakericonontopofthevolume
control.ClicktheLevelstabandensurethattheBalancesettingsaresetcorrectly.
Intermittentproblems
Someproblemsoccuronlyoccasionallyandaredifficulttorepeat.
Solutions:
•Ensurethatallcablesandcordsaresecurelyconnectedtothecomputerandattacheddevices.
Chapter7.Troubleshootinganddiagnostics41

•Ensurethatwhenthecomputerison,thefangrillisnotblocked(thereisairflowaroundthegrill),andthe
fansareworking.Ifairflowisblockedorthefansarenotworking,thecomputermightoverheat.
•IfSmallComputerSystemInterface(SCSI)devicesareinstalled,ensurethatthelastexternaldevicein
eachSCSIchainisterminatedcorrectly.Formoreinformation,seeyourSCSIdocumentation.
Harddiskdriveproblems
Selectyoursymptomfromthefollowinglist:
•“SomeorallharddiskdrivesmissingfromtheSetupUtilityprogram”onpage42
•““NoOperatingSystemFound”messageorthesystemnotstartingfromthecorrectharddiskdrive”
onpage42
SomeorallharddiskdrivesmissingfromtheSetupUtilityprogram
Symptom:SomeorallharddiskdrivesmissingfromtheSetupUtilityprogram
Actions:
•Ensurethatallharddiskdrivesignalcablesandpowercablesareconnectedcorrectly.
•Ensurethatyourcomputerisconfiguredcorrectlytosupporttheharddiskdrives.
–IfyourcomputerisinstalledwithfiveSAT Aharddiskdrives,ensurethattheSATAharddiskdrive
enablementmodule(onetofiveharddiskdrives)isinstalled.
–IfyourcomputerisinstalledwithSASharddiskdrives,ensurethattheSASharddiskdriveenablement
module(onetofiveharddiskdrives)ortheLSIMegaRAIDSASadapterisinstalled.
Iftheseactionsdonotcorrecttheproblem,runthediagnosticprogramLenovoSolutionCenter.See
“LenovoSolutionCenter”onpage49
help,andservice”onpage69.
.Ifyouneedtechnicalassistance,seeChapter10“Gettinginformation,
“NoOperatingSystemFound”messageorthesystemnotstartingfromthecorrect
harddiskdrive
Symptom:“NoOperatingSystemFound”messageorthesystemnotstartingfromthecorrectharddiskdrive
Action:Ensurethattheharddiskdriveyourcomputerstartsfromislistedasthefirststartupdeviceinthe
SetupUtilityprogram.Referto“Selectingastartupdevice”onpage31.
Problemswiththekeyboardormouse
Thissectionprovidessolutionstokeyboard-relatedandmouse-relatedproblems.
Keysonthekeyboarddonotwork
Solutions:
•ConnectthekeyboardcabletoaUSBconnectororPS/2keyboardconnector.
•IfyouareusingaUSBkeyboard,enabletheUSBconnectorsintheBIOSsettings.Formoreinformation,
see“Enablingordisablingadevice”onpage31
•IfyouareusinganEnhancedPerformanceUSBkeyboard,usethehelpsystemintheEnhanced
PerformanceCustomizationKeyboardprogramtohelpdiagnoseproblems.
ToopentheEnhancedPerformanceCustomizationKeyboardprogram,dooneofthefollowing:
.
–OnWindows7:
1.ClickStart➙ControlPanel.
42ThinkCentreE63zUserGuide

2.ClickHardwareandSound.
3.ClickDevicesandPrinters.
4.Double-clickUSBEnhancedPerformanceKeyboard.
–OnWindows8.1:
1.OpenControlPanel.Formoreinformation,see“AccessingControlPanelontheWindows8.1
operatingsystem”onpage17.
2.ClickHardwareandSound.
3.ClickDevicesandPrinters.
4.Double-clickUSBEnhancedPerformanceKeyboard.
Themousedoesnotwork
Solutions:
•ConnectthemousecabletoaUSBconnectororPS/2mouseconnector.
Note:Dependingonyourkeyboard,integratedUSBconnectorsmightbeavailabletobeusedto
connectaUSBmouse.
•Installthedevicedriversforthemouse.
•IfyouareusingaUSBmouse,enabletheUSBconnectorsintheBIOSsettings.Formoreinformation,
see“Enablingordisablingadevice”onpage31
.
Thepointeronthescreendoesnotmovesmoothlywiththemouse
Solution:Cleanthemouse.Formoreinformation,see“Opticalmouse”onpage36.
Thewirelesskeyboarddoesnotwork
Solutions:
•IfthetransceivercommunicationsLEDisnoton,reconnectthetransceiverandthekeyboard.
•IfthewirelesskeyboarddoesnotworkwhenthetransceivercommunicationsLEDison,restartyour
computer.
Iftheproblempersistsaftertherestart,ensurethat:
•Thebatteriesareinstalledcorrectly.
•Thebatteriesstillretaintheircurrent.
•Thedistancefromthewirelesskeyboardtothetransceiverislessthan10m(393.7inches).
•Thetransceiverisinstalledfully.
Monitorproblems
Thissectionprovidessolutionstomonitor-relatedproblems.
Myscreengoesblankwhilethecomputerison
Solutions:Yourscreensaverorpowermanagementmighthavebeenenabled.Dooneofthefollowing:
•Pressakeytoexitthescreensaver.
•Pressthepowerbuttontoresumethecomputerfromsleeporhibernationmode.
Chapter7.Troubleshootinganddiagnostics43

ThemonitorworkswhenIturnonthecomputer,butgoesblankwhenIstartsome
applicationprograms
Solutions:
•Connectthemonitorsignalcablefromyourmonitortoanappropriateconnectoronthecomputer.A
loosecablemightcauseintermittentproblems.
•Installthedevicedriversfortheapplicationprograms.Refertothedocumentationfortheaffected
applicationprogramtocheckwhetheranydevicedriversarerequired.
Theimageappearstobeflickering
Solutions:
•Thescreenmightbeaffectedbyinterferencefromnearbyequipment.Magneticfieldsaroundother
devices,suchastransformers,appliances,fluorescentlights,andothermonitorsmightbecausingthe
problem.Movefluorescentdesklightingoranyequipmentthatproducesmagneticfieldsfartheraway
fromthescreen.Ifthisdoesnotcorrecttheproblem,turnoffthecomputer.Then,adjusttheplacementof
thecomputerandotherdevicessothattheyareatleast305mm(12inches)apart.Turnonthecomputer.
•Resettherefreshratesupportedbyyourcomputer.
1.Right-clickablankareaonthedesktop.
2.DependingonyourWindowsversion,dooneofthefollowing:
–ForWindows7orWindows8.1:ClickScreenresolution➙Advancedsettings.
–ForWindows10:ClickDisplaysettings.OntheDisplaytab,clickAdvanceddisplaysettings➙
Displayadapterproperties.
3.ClicktheMonitortab,andthenresettherefreshratetobethehighestandnoninterlaced.
Theimageisdiscolored
Solution:Themonitormightbeaffectedbyinterferencefromnearbyequipment.Movefluorescentdesk
lightingoranyequipmentthatproducesmagneticfieldsfurtherawayfromthemonitor.Iftheproblem
persists,dothefollowing:
1.T urnoffthemonitor.
2.Adjusttheplacementofthemonitorandotherdevicessothattheyareatleast305mm(12inches)apart.
3.T urnonthemonitor.
Networkingproblems
Thissectionprovidessolutionstonetworking-relatedproblems.
Ethernetproblems
Yourcomputercannotconnecttothenetwork
Symptom:Y ourcomputercannotconnecttothenetwork.
Actions:Ensurethat:
•Thecableisinstalledproperly.
ThenetworkcablemustbesecurelyconnectedtoboththeEthernetconnectorofyourcomputerand
theRJ45connectorofthehub.Themaximumallowabledistancefromthecomputertohubis100
meters.Ifthecableisconnectedandthedistanceiswithinacceptablelimitsbuttheproblempersists,try
adifferentcable.
•Thecableisinstalledproperly.
•UpdateorreinstalltheEthernetLANdriver.See“Keepingyourcomputercurrent”onpage35
.
44ThinkCentreE63zUserGuide

•Theswitchportandtheadapterhavethesameduplexsetting.
Ifyouconfiguredtheadapterforfullduplex,ensurethattheswitchportisalsoconfiguredforfullduplex.
Settingthewrongduplexmodecandegradeperformance,causedataloss,orresultinlostconnections.
•Youhaveinstalledallnetworkingsoftwarethatisnecessaryforyournetworkenvironment.
CheckwithyourLANadministratorforthenecessarynetworkingsoftware.
Theadapterstopsworkingfornoreason
Solution:Thenetworkdriverfilesmightbecorruptormissing.Updatethedriverbyreferringtothe“Solution”
descriptionforthepreviousproblemtoensurethatthelatestdevicedriverisinstalled.
TheWakeOnLANfeatureisnotworking
Solution:EnabletheWakeOnLAN(WOL)featureintheBIOSprogram.
MycomputerisaGigabitEthernetmodelandIuseaspeedof1000Mbps,buttheconnectionfails
orerrorsoccur
Solution:ConnectthenetworkcabletotheEthernetconnectorusingCategory5wiringanda100BASE-T
hub/switch(not100BASE-X).
MycomputerisaGigabitEthernetmodel,butitcannotbeconnectedtothenetworkat1000Mbps,
butatonly100Mbps
Solutions:
•Tryanothercable.
•Setthelinkpartnertoauto-negotiate.
•Settheswitchtobe802.3ab-compliant(gigabitovercopper).
AwirelessLANproblem
Symptom:Y oucannotconnectusingthebuilt-inwirelessnetworkingcard.
Actions:
•EnsurethatyourwirelessLANdriveristhelatestversion.ChecktheWebsiteandverifythedriverversion
supportedbyAccessConnectionsisthelatestdocumentedinthereadmefile.
•Ensurethatyourcomputeriswithinrangeofawirelessaccesspoint.
•Ensurethatthewirelessradioisenabledbydouble-clickingtheAccessConnectionsiconintheWindows
notificationarea.
•CheckNetworkName(SSID),andyourencryptioninformation.UseAccessConnectionstoverifythis
case-sensitiveinformation.
SounddoesnotcomefromtheBluetoothheadsetorheadphonebutcomesfrom
thelocalspeakereventhoughtheheadsetorheadphoneisconnectedusingthe
HeadsetprofileorAVprofile
Solution:
1.Exittheapplicationthatusesthesounddevice(forexample,WindowsMediaPlayer).
2.OpenControlPanel.
Note:FordetailedinformationonhowtoopenControlPanelonWindows8.1,see“AccessingControl
PanelontheWindows8.1operatingsystem”onpage17
3.ClickHardwareandSound➙Sound.
4.SelectthePlaybacktab.
.
Chapter7.Troubleshootinganddiagnostics45

5.IfyouareusingtheHeadsetprofile,selectBluetoothHands-freeAudio,andthenclickSetDefault.If
youareusingtheAVprofile,selectStereoAudio,andthenclickSetDefault.
6.ClickOK.
Note:Bluetoothissupportedonlyonsomecomputermodels.
Ihaveconnectedanoptiontomycomputer,butitdoesnotwork
Solution:Refertothedocumentationthatcomeswiththeoptiontoensurethatyouhaveconnectedthe
optioncorrectly.
Performanceandlockupproblems
Thissectionprovidessolutionstoperformance-relatedproblemsofyourcomputer.
Insufficientfreeharddiskdrivespace
Solutions:Freeupharddiskdrivespace.
•CleanoutyourInbox,SentItems,andDeletedItemsfoldersfromyoure-mailapplication.
•CleanupyourCdrive.
1.DependingonyourWindowsversion,dooneofthefollowing:
–ForWindows7:ClicktheStartbuttontoopentheStartmenu,andthenclickComputer.
–ForWindows8.1:OpenFileExplorer.
–ForWindows10:ClicktheStartbuttontoopentheStartmenu,andthenclickFileExplorer➙
ThisPC.
2.Right-clickyourCdriveandthenclickProperties.
3.Checktheamountoffreespace,andthenclickDiskCleanup.
4.Alistofunnecessaryfilecategoriesisdisplayed.Selecteachfilecategoryyouwanttodelete,
andthenclickOK.
•TurnsomeWindowsfeaturesofforremovesomeunnecessaryprograms.
1.OpenControlPanelbydoingoneofthefollowing:
–ForWindows7:ClicktheStartbuttontoopentheStartmenu,andthenclickControlPanel.
–ForWindows8.1:See“AccessingControlPanelontheWindows8.1operatingsystem”onpage
17.
–ForWindows10:Right-clicktheStartbuttontoopentheStartcontextmenu,andthenclick
ControlPanel.
2.ViewControlPanelusingLargeiconsorSmallicons,andthenclickProgramsandFeatures.
3.Dooneofthefollowing:
–ToturnsomeWindowsfeaturesoff,clickTurnWindowsfeaturesonoroff.Followthe
instructionsonthescreen.
–Toremovesomeunnecessaryprograms,selecttheprogramyouwanttoremove,andthenclick
Uninstall/ChangeorUninstall.
Excessivenumberoffragmentedfiles
Solution:UsetheWindowsdiskdefragmentationordiskoptimizationfeaturetocleanupthefiles.
Note:Dependingonthevolumeofthestoragedrivesandamountofdatastoredonthestoragedrives,the
disk-defragmentationprocessmighttakeuptoseveralhours.
46ThinkCentreE63zUserGuide

1.Closeanyopenprogramsandwindows.
2.DependingonyourWindowsversion,dooneofthefollowing:
•ForWindows7:ClicktheStartbuttontoopentheStartmenu,andthenclickComputer.
•ForWindows8.1:OpenFileExplorer.
•ForWindows10:ClicktheStartbuttontoopentheStartmenu,andthenclickFileExplorer➙
ThisPC.
3.Right-clickyourCdriveandthenclickProperties.
4.ClicktheT oolstab.
5.DependingonyourWindowsversion,dooneofthefollowing:
•ForWindows7:ClickDefragmentnow.
•ForWindows8.1orWindows10:ClickOptimize.Selectthedesireddrive,andthenclickOptimize.
6.Followtheinstructionsonthescreen.
Theprinterdoesnotwork
Solutions:
•IfyouareusingIEEE-approvedprintersignalcables,dothefollowing:
1.Connecttheprintersignalcablefirmlytothecorrectparallel,serial,orUSBconnectoronthe
computer.
2.Loadthepapercorrectly.
3.T urnontheprinterandkeeptheprinteronline.
•Ifyouareusingnon-IEEE-approvedprintersignalcables,dothefollowing:
1.Correctlyinstalldevicedriversandsoftwarethatcomewiththeprinter.
2.Assigntheprinterportcorrectlyinyouroperatingsystem,applicationprogram,orBIOSsettings.For
moreinformationaboutBIOSsettings,see“UsingtheSetupUtilityprogram”onpage29
.
Iftheproblempersists,runthetestsdescribedinthedocumentationthatcomeswithyourprinter.Ifyou
cannotcorrecttheproblem,havethecomputerserviced.SeeChapter10“Gettinginformation,help,
andservice”onpage69
.
Serialconnectorcannotbeaccessed
Solutions:
•Connecttheserialcabletotheserialconnectoronthecomputerandtotheserialdevice.Iftheserial
devicehasitsownpowercord,attachthepowercordtoagroundedelectricaloutlet.
•Turnontheserialdeviceandkeepthedeviceonline.
•Installanyapplicationprogramssuppliedwiththeserialdevice.Refertothedocumentationthatcomes
withtheserialdeviceformoreinformation.
•Ifyouaddedoneserial-connectoradapter,installtheadaptercorrectly.
Softwareproblems
Thissectionprovidessolutionstosoftware-relatedproblems.
Whenusingasortfeature,datescannotbesortedinthecorrectorder
Solution:Someprogramsdevelopedbeforetheyear2000usedonlythelasttwodigitsofayeartosort
dates,assumingthefirsttwodigitswere19.Consequently,datescannotbesortedinthecorrectorder.
Chapter7.Troubleshootinganddiagnostics47

Checkwithyoursoftwaremanufacturertoseeifanyupdatesareavailable.Manysoftwaremanufacturers
makeupdatesavailablefromtheWorldWideWeb.
Someapplicationprogramsdonotworkasexpected
Solutions:
•Ifyouarehavingdifficultywithperformingaspecifictaskwithinanapplicationprogram,refertothe
helpsystemfortheprogram.
•IfyouarehavingdifficultywiththeWindowsoperatingsystemoroneofitscomponents,refertothe
Windowshelpsystem.
•Checkwhethertheproblemsarecausedbyanewly-installedapplicationprogram.
1.Ensurethatthesoftwareiscompatiblewithyourcomputer.Refertotheinformationsuppliedwiththe
softwareformoreinformation.
2.Verifythatothersoftwareworkscorrectlyonyourcomputer.
3.Verifythatthesoftwareyouareusingworksonanothercomputer.
•Ifyoureceivedanyerrormessageswhileusingtheprogram,seetheprinteddocumentationthatcomes
withtheprogramorthehelpsystemforsolutions.
•CheckifanyupdatesareavailablefromyourmanufacturerorWebsite.Manysoftwaremanufacturers
makeupdatesavailablefromtheWorldWideWeb.
•Ifthesoftwareprogramusedtoworkcorrectly,butdoesnotworkcorrectlynow,dothefollowing:
1.OpenControlPanelbydoingoneofthefollowing:
–ForWindows7:ClicktheStartbuttontoopentheStartmenu,andthenclickControlPanel.
–ForWindows8.1:See“AccessingControlPanelontheWindows8.1operatingsystem”onpage
17
.
–ForWindows10:Right-clicktheStartbuttontoopentheStartcontextmenu,andthenclick
ControlPanel.
2.ViewControlPanelusingLargeiconsorSmallicons,andthenclickRecovery➙OpenSystem
Restore.
3.Followtheinstructionsonthescreen.
USBdeviceproblems
ThissectionprovidessolutionstoUSBdevice-relatedproblems.
MyUSBdevicecannotbeaccessed
Solutions:
•ConnecttheUSBcablefromtheUSBconnectortotheUSBdevice.IftheUSBdevicehasitsownpower
cord,connectthepowercordtoagroundedelectricaloutlet.
•TurnontheUSBdeviceandkeepthedeviceonline.
•InstallanydevicedriversorapplicationprogramssuppliedwiththeUSBdevice.Refertothe
documentationthatcomeswiththeUSBdeviceformoreinformation.
•DetachandreconnecttheUSBconnectortoresettheUSBdevice.
IcannotinstalltheWindows7operatingsystemusinganexternalUSBdevice
Solution:Gotohttp://www.lenovo.com/supporttodownloadandinstallUSBdrivers.
48ThinkCentreE63zUserGuide

Diagnostics
Thediagnosticprogramisusedtotesthardwarecomponentsofyourcomputer.Thediagnosticprogramcan
alsoreportoperating-system-controlledsettingsthatinterferewiththecorrectoperationofyourcomputer.
Youcanusethepreinstalleddiagnosticprogramtodiagnosecomputerproblems,ifyourcomputeris
runningtheWindowsoperatingsystem.
Notes:
1.Y ourcomputerispreinstalledwiththeLenovoSolutionCenterprogramfordiagnosticpurposes.For
moreinformationabouttheLenovoSolutionCenterprogram,see“LenovoSolutionCenter”onpage49.
2.Ifyouareunabletoisolateandrepairtheproblemyourselfafterrunningthediagnosticprogram,save
andprintthelogfilescreatedbythediagnosticprogram.Y ouwillneedthelogfileswhenyouspeaktoa
Lenovotechnicalsupportrepresentative.
LenovoSolutionCenter
TheLenovoSolutionCenterprogramenablesyoutotroubleshootandresolvecomputerproblems.It
combinesdiagnostictests,systeminformationcollection,securitystatus,andsupportinformation,along
withhintsandtipsformaximumsystemperformance.
•YourcandownloadtheLenovoSolutionCenterprogramfromhttp://www.lenovo.com/diags.
•IfyouareusingaWindowsoperatingsystemotherthanWindows7,Windows8.1,orWindows10,goto
http://www.lenovo.com/diagsforthelatestinformationondiagnosticsforyourcomputer.
ToruntheLenovoSolutionCenterprogram,see“Lenovoprograms”onpage9
Note:Ifyoucannotisolateandrepairtheproblemyourselfafterrunningtheprogram,saveandprintthelog
files.Y ouwillneedthelogfileswhenyouspeaktoaLenovotechnicalsupportrepresentative.
Foradditionalinformation,refertotheLenovoSolutionCenterhelpsystem.
.
Chapter7.Troubleshootinganddiagnostics49

50ThinkCentreE63zUserGuide

Chapter8.Recoveryinformation
Thischapterprovidesinformationabouttherecoverysolutions.Thereareavarietyofmethodstochoose
fromwhenconsideringhowtorecoverfromasoftware-orhardware-relatedproblem.Somemethods
varydependingonthetypeofoperatingsystemthatisinstalled.Y oucanrestorethecomputersettings
usingaprogramortherecoverydiscset.Formoreinformationaboutusingtherecoverydiscset,see
thedocumentationthatcomeswiththediscset.
Thischaptercontainsthefollowingtopics:
•“RecoveryinformationfortheWindows7operatingsystem”onpage51
•“RecoveryinformationfortheWindows8.1operatingsystem”onpage56
•“RecoveryinformationfortheWindows10operatingsystem”onpage58
RecoveryinformationfortheWindows7operatingsystem
TherecoveryinformationinthissectiononlyappliestothecomputersthathavetheRescueandRecovery
programortheProductRecoveryprograminstalled.IftheEnhancedBackupandRestoreiconinthe
LenovoThinkVantageToolsprogramisdimmed,itindicatesthatyoumustinstalltheRescueandRecovery
programmanuallybeforeenablingitsfeatures.T oinstalltheRescueandRecoveryprogram,dothefollowing:
1.ClickStart➙AllPrograms➙LenovoThinkVantageTools,anddouble-clickEnhancedBackup
andRestore.
2.Followtheinstructionsonthescreen.
3.Whentheinstallationprocessfinishes,theEnhancedBackupandRestoreiconisactivated.
Thissectioncontainsthefollowingtopics:
•“Creatingandusingrecoverymedia”onpage51
•“Performingbackupandrecoveryoperations”onpage52
•“Creatingandusingarescuemedium”onpage54
•“Reinstallingprogramsanddevicedrivers”onpage54
•“Solvingrecoveryproblems”onpage56
Creatingandusingrecoverymedia
Recoverymediaenableyoutorestorethestoragedrivetothefactory-defaultstateandputthecomputerin
anoperationalstateafterallotherrecoverymethodsfailed.Recoverymediaareusefulifyoutransferthe
computertoanotherarea,sellthecomputer,orrecyclethecomputer.Asaprecautionarymeasure,itis
importanttocreaterecoverymediaasearlyaspossible.Thedataontherecoverymediacanbeusedfor
thefollowingpurposes:
•Reinstallingtheprogramsanddevicedriversonyourcomputer
•Reinstallingtheoperatingsystem
•ModifyingthedatafilesonthestoragedriveusingtheAdditionalFiles
Note:Therecoveryoperationsyoucanperformusingrecoverymediavarydependingontheoperating
systemfromwhichtherecoverymediawerecreated.Therecoverymediamightcontainabootmedium
andadatamedium.YourMicrosoftWindowslicensepermitsyoutocreateonlyonedatamedium.Itis
recommendedthatyoustoretherecoverymediainasafeplaceafteryouhavemadethem.
©CopyrightLenovo2014,2016
51

Creatingrecoverymedia
Note:OntheWindows7operatingsystem,youcancreaterecoverymediausingdiscsorexternalUSB
storagedevices.
TocreaterecoverymediaontheWindows7operatingsystem,clickStart➙AllPrograms➙Lenovo
ThinkVantageT ools➙FactoryRecoveryDisks.Then,followtheinstructionsonthescreen.
Usingrecoverymedia
Attention:Whenyouuserecoverymediatorestorethestoragedrivetothefactory-defaultstate,allthefiles
currentlyonthestoragedrivewillbedeleted.Thesefileswillbereplacedbythefactory-defaultfiles.
TouserecoverymediaontheWindows7operatingsystem,dothefollowing:
1.Dependingonthetypeofyourrecoverymedia,connectthebootUSBstoragedevicetothecomputer,
orinsertthebootdiscintotheopticaldrive.
2.T urnonorrestartyourcomputer.
3.Whenyouseethelogoscreen,repeatedlypressandreleasetheF12key.Thestartupdevicemenu
windowisdisplayed.
4.SelectthedesiredstartupdeviceandpressEnter.Therestoreprocessbegins.
5.Followtheinstructionsonthescreentocompletetheoperation.
Note:Afterrestoringyourcomputerstoragedrivetothefactory-defaultstate,youmighthavetoreinstall
devicedriversforsomedevices.See“Reinstallingprogramsanddevicedrivers”onpage54.
Performingbackupandrecoveryoperations
TheRescueandRecoveryprogramenablesyoutobackupallyourstoragedrivecontentsincludingthe
operatingsystem,datafiles,softwareprograms,andpersonalsettings.Youcanstorethebackupatthe
followinglocations:
•TheRescueandRecoveryworkspace
•Thesecondarystoragedriveifasecondarystoragedriveisinstalledinyourcomputer
•AnexternalUSBstoragedriveconnectedtoyourcomputer
•Anetworkdrive
•Recordablediscs(arecordableopticaldriveisrequiredforthisoption)
Afteryouhavecompletedthebackupoperation,youcanrestorepartsorwholeofthedataonthestorage
drive.
Performingabackupoperation
ToperformabackupoperationusingtheRescueandRecoveryprogramontheWindows7operating
system,dothefollowing:
1.FromtheWindowsdesktop,clickStart➙AllPrograms➙LenovoThinkVantageT ools➙Enhanced
BackupandRestore.TheRescueandRecoveryprogramopens.
2.IntheRescueandRecoverymainwindow,clicktheLaunchadvancedRescueandRecoveryarrow.
3.ClickBackupyourharddriveandselectbackupoperationoptions.Then,followtheinstructionson
thescreentocompletethebackupoperation.
Performingarecoveryoperation
Thissectionprovidesthefollowingtopics:
•“PerformingarecoveryoperationfromWindows7”onpage53
52ThinkCentreE63zUserGuide

•“PerformingarecoveryoperationfromtheRescueandRecoveryworkspace”onpage53
PerformingarecoveryoperationfromWindows7
ToperformarecoveryoperationusingtheRescueandRecoveryprogramontheWindows7operating
system,dothefollowing:
1.FromtheWindowsdesktop,clickStart➙AllPrograms➙LenovoThinkVantageT ools➙Enhanced
BackupandRestore.TheRescueandRecoveryprogramopens.
2.IntheRescueandRecoverymainwindow,clicktheLaunchadvancedRescueandRecoveryarrow.
3.ClicktheRestoreyoursystemfromabackupicon.
4.Followtheinstructionsonthescreentocompletetherecoveryoperation.
PerformingarecoveryoperationfromtheRescueandRecoveryworkspace
TheRescueandRecoveryworkspaceresidesinaprotectedandhiddenareaofyourstoragedrivethat
operatesindependentlyfromtheWindowsoperatingsystem.TheRescueandRecoveryworkspaceenables
youtoperformrecoveryoperationsevenifyoucannotstarttheWindowsoperatingsystem.Y oucanperform
thefollowingrecoveryoperationsfromtheRescueandRecoveryworkspace:
•Rescuefilesfromyourstoragedriveorfromabackup:
Youcanlocatefilesonyourstoragedriveandtransferthemtoanetworkdriveorotherrecordablemedia,
suchasaUSBdeviceoradisc.Thissolutionisavailableevenifyoudidnotbackupyourfilesorif
changesweremadetothefilessinceyourlastbackupoperation.Y oualsocanrescueindividualfiles
fromaRescueandRecoverybackuplocatedonyourlocalstoragedrive,anexternalUSBdevice,or
anetworkdrive.
•RestoreyourstoragedrivefromaRescueandRecoverybackup:
IfyouhavebackedupyourstoragedriveusingtheRescueandRecoveryprogram,youcanrestorethe
storagedrivefromaRescueandRecoverybackup,evenifyoucannotstarttheWindowsoperating
system.
•Restoreyourstoragedrivetothefactory-defaultstate:
Youcanrestorethecompletecontentsofyourstoragedrivetothefactory-defaultstateevenifyoucannot
starttheWindowsoperatingsystem.Ifyouhavemultiplepartitionsonyourstoragedrive,youhavethe
optiontorestoretheC:partitionandleavetheotherpartitionsintact.
Attention:YoucanrestorethestoragedrivefromaRescueandRecoverybackuporrestorethestorage
drivetothefactory-defaultsettings.Duringeitherprocess,allfilesontheprimarystoragedrivepartition
(usuallydriveC:)willbedeleted.Ifpossible,makecopiesofimportantfiles.IfyoucannotstarttheWindows
operatingsystem,youcanusetherescuefilesfeatureoftheRescueandRecoveryworkspacetocopyfiles
fromyourstoragedrivetoothermedia.
ToperformarecoveryoperationfromtheRescueandRecoveryworkspace,dothefollowing:
1.T urnonorrestartyourcomputer.
2.Whenyouseethelogoscreen,pressEnter,andthenpressF11toentertheRescueandRecovery
workspace.
3.IfyouhavesetaRescueandRecoverypassword,enteryourpasswordwhenprompted.TheRescue
andRecoveryworkspaceopensafterashortdelay.
Note:IftheRescueandRecoveryworkspacefailstoopen,see“Solvingrecoveryproblems”onpage56
4.Dooneofthefollowing:
•Torescuefilesfromyourstoragedrive,clickRescuefilesandfollowtheinstructionsonthescreen.
•TorestoreyourstoragedrivefromaRescueandRecoverybackuportorestoreyourstoragedriveto
thefactory-defaultstate,clickFullRestoreandfollowtheon-screeninstructions.
Chapter8.Recoveryinformation53
.

Note:Afterrestoringyourcomputerstoragedrivetothefactory-defaultstate,youmighthaveto
reinstalldevicedriversforsomedevices.See“Reinstallingprogramsanddevicedrivers”onpage54
FormoreinformationaboutthefeaturesoftheRescueandRecoveryworkspace,clickHelp.
Creatingandusingarescuemedium
CreaterescuemediausingdiscsorUSBstoragedevicesasearlyaspossible.Y oucanusearescuemedium
torecoverfromfailuresthatpreventyoufromgainingaccesstotheWindowsenvironmentortheRescue
andRecoveryworkspaceonyourstoragedrive.
Notes:
•Therecoveryoperationsyoucanperformusingarescuemediumvarydependingontheoperatingsystem.
•Therescuedisccanbestartedinalltypesofopticaldrives.
Creatingarescuemedium
TocreatearescuemediumontheWindows7operatingsystem,dothefollowing:
1.FromtheWindowsdesktop,clickStart➙AllPrograms➙LenovoThinkVantageT ools➙Enhanced
BackupandRestore.TheRescueandRecoveryprogramopens.
2.IntheRescueandRecoverymainwindow,clicktheLaunchadvancedRescueandRecoveryarrow.
3.ClicktheCreateRescueMediaicon.The“CreateRescueandRecoveryMedia”windowopens.
4.IntheRescueMediaarea,selectthetypeoftherescuemediumyouwanttocreate.Youcancreatea
rescuemediumusingadisc,aUSBstoragedevicewithsufficientcapacity,orasecondaryinternal
storagedrive.
5.ClickOKandfollowtheinstructionsonthescreentocreatearescuemedium.
.
Usingarescuemedium
DependingonwhetheryouhavecreatedarescuemediumusingadiscoraUSBstoragedrive,doone
ofthefollowing:
•Ifyouhavecreatedarescuemediumusingadisc,dothefollowing:
1.T urnonorrestartyourcomputer.
2.Whenyouseethelogoscreen,repeatedlypressandreleasetheF12key.Thestartupdevicemenu
windowisdisplayed.
3.Selectthedesiredopticaldriveasthefirstbootdevice.Then,inserttherescuediscintotheoptical
driveandpressEnter.Therescuemediumstarts.
•IfyouhavecreatedarescuemediumusingaUSBstoragedrive,dothefollowing:
1.ConnecttheUSBstoragedrivetooneoftheUSBconnectorsonyourcomputer.
2.T urnonorrestartyourcomputer.
3.Whenyouseethelogoscreen,repeatedlypressandreleasetheF12key.Thestartupdevicemenu
windowisdisplayed.
4.SelecttheUSBstoragedriveasthefirstbootdeviceandpressEnter.Therescuemediumstarts.
Whentherescuemediumstarts,theRescueandRecoveryworkspaceopens.Thehelpinformationfor
eachfeatureisavailablefromtheRescueandRecoveryworkspace.Followtheinstructionstocomplete
therecoveryprocess.
Reinstallingprogramsanddevicedrivers
Thissectionprovidesthefollowingitems:
54ThinkCentreE63zUserGuide

•“Reinstallingpreinstalledprogramsanddevicedrivers”onpage55
•“Reinstallingprogramsanddevicedriversthatarenotpreinstalled”onpage55
Reinstallingpreinstalledprogramsanddevicedrivers
Yourcomputerenablesyoutoreinstallpreinstalledprogramsanddevicedrivers.
Reinstallingpreinstalledprograms
ToreinstallprogramspreinstalledonyourLenovocomputer,dothefollowing:
1.T urnonthecomputer.
2.GotoC:\SWTOOLS.
3.Opentheappsfolderandlocatethesubfolderthatisnamedaftertheprogrampreinstalledonyour
computer.
4.OpenthesubfolderandlocatetheEXEfile.
5.Double-clicktheEXEfileandfollowtheinstructionsonthescreentocompletetheinstallation.
Reinstallingpreinstalleddevicedrivers
Attention:Reinstallingdevicedriverswillchangethecurrentconfigurationofyourcomputer.Reinstall
devicedriversonlywhenitisnecessarytosolveaproblemonyourcomputer.
Toreinstallthedevicedriverforafactory-installeddevice,dothefollowing:
1.T urnonthecomputer.
2.GotoC:\SWTOOLS.
3.OpentheDRIVERSfolderandlocatethesubfolderthatisnamedafterthefactory-installeddevicein
yourcomputer,suchasAUDIOorVIDEO.
4.Openthesubfolder.
5.Dooneofthefollowing:
•LocatetheEXEfile.Double-clicktheEXEfileandfollowtheinstructionsonthescreentocomplete
theinstallation.
•Locatethereadmefilewiththe.txtextension.Thedevicedriverinstallationinformationisincludedin
thereadmefile.Followtheinstructionstocompletetheinstallation.
•Ifthedevicesubfoldercontainsafilewiththe.infextensionandyouwanttoinstallthedevicedriver
usingtheINFfile,refertotheWindowshelpsystemfordetailedinformationabouthowtoinstall
thedevicedriver.
Note:Formoreinformationaboutthelatestdevicedrivers,see“Gettingthelatestdevicedriversforyour
computer”onpage35.
Reinstallingprogramsanddevicedriversthatarenotpreinstalled
Yourcomputerenablesyoutoreinstallprogramsanddevicedriversthatarenotpreinstalled.
Reinstallingprogramsthatarenotpreinstalled
Ifasoftwareprogramyouinstalledonyourcomputerisnotworkingcorrectly,youmightneedtouninstall
andthenreinstallit.Reinstallingaprogramoverwritestheexistingprogramfilesandusuallyfixesany
problemsthatyoumighthavehadwiththeprogram.
Touninstallaprogramfromyoursystem,refertotheMicrosoftWindowshelpsystem.
Chapter8.Recoveryinformation55

Toreinstallmostcommerciallyavailableprogramsonyoursystem,refertotheMicrosoftWindowshelp
systemtogetherwiththedocumentationprovidedwiththeprogram.
Reinstallingdevicedriversthatarenotpreinstalled
Toreinstalladevicedriverforanoptionyouinstalled,refertothedocumentationthatcomeswiththeoption.
Note:Reinstallingdevicedriverswillchangethecurrentconfigurationofyourcomputer.Reinstalldevice
driversonlywhenitisnecessarytosolveaproblemonyourcomputer.
Solvingrecoveryproblems
Note:Ensurethatyourrescuedeviceissetasthefirstbootdeviceinthestartupdevicesequencein
theSetupUtilityprogram.See“Selectingastartupdevice”onpage31fordetailedinformationabout
temporarilyorpermanentlychangingthestartupdevicesequence.FormoreinformationabouttheSetup
Utilityprogram,see“UsingtheSetupUtilityprogram”onpage29.
IfyoucannotaccesstheRescueandRecoveryworkspaceortheWindowsenvironment,dooneofthe
following:
•UsearescuemediumtostarttheRescueandRecoveryworkspace.See“Creatingandusingarescue
medium”onpage54.
•Userecoverymediaifallothermethodsofrecoveryhavefailedandyoumustrestorethestoragedriveto
thefactory-defaultsettings.See“Creatingandusingrecoverymedia”onpage51.
Itisimportanttocreatearescuemediumandasetofrecoverymediaasearlyaspossibleandstorethem
inasafeplaceforfutureuse.
RecoveryinformationfortheWindows8.1operatingsystem
Thissectioncontainsthefollowingtopics:
•“Refreshingyourcomputer”onpage56
•“Resettingyourcomputertothefactory-defaultsettings”onpage56
•“Usingtheadvancedstartupoptions”onpage57
•“RecoveringyouroperatingsystemifWindows8.1failstostart”onpage57
Refreshingyourcomputer
Ifyourcomputerdoesnotperformwellandtheproblemmightbecausedbyarecentlyinstalledprogram,
youcanrefreshyourcomputer.
Attention:Ifyourefreshyourcomputer,theprogramspreinstalledonyourcomputerandtheprogramsthat
youinstalledfromWindowsStorewillbereinstalled.However,allotherprogramswillbeuninstalled.
Torefreshyourcomputer,dothefollowing:
1.Movethepointertothetop-rightorbottom-rightcornerofthescreentodisplaythecharms.Click
Settings➙ChangePCsettings➙Updateandrecovery➙Recovery.
2.IntheRefreshyourPCwithoutaffectingyourfilessection,clickGetstarted.
Resettingyourcomputertothefactory-defaultsettings
Youcanresetyourcomputertothefactory-defaultsettings.Resettingthecomputerwillreinstallthe
operatingsystemandalltheprogramsthatcomewithyourcomputer.
56ThinkCentreE63zUserGuide

Attention:Ifyouresetyourcomputer,allyourpersonalfilesandsettingswillbedeleted.T oavoiddata
loss,backupallthedatathatyouwanttokeep.
Toresetyourcomputer,dothefollowing:
1.Movethepointertothetop-rightorbottom-rightcornerofthescreentodisplaythecharms.Click
Settings➙ChangePCsettings➙Updateandrecovery➙Recovery.
2.IntheRemoveeverythingandreinstallWindowssection,clickGetstarted.
Usingtheadvancedstartupoptions
AdvancedstartupoptionsenableyoutochangethestartupsettingsofyourWindowsoperatingsystem,
startthecomputerfromanexternaldevice,orrestoretheWindowsoperatingsystemfromasystemimage.
Tousetheadvancedstartupoptions,dothefollowing:
1.Movethepointertothetop-rightorbottom-rightcornerofthescreentodisplaythecharms.Click
Settings➙ChangePCsettings➙Updateandrecovery➙Recovery.
2.IntheAdvancedstartupsection,clickRestartnow➙Troubleshoot➙Advancedoptions.
3.Restartyourcomputerfollowingtheinstructionsonthescreen.
RecoveringyouroperatingsystemifWindows8.1failstostart
TheWindowsrecoveryenvironmentonyourcomputeriscapableofoperatingindependentlyfromthe
Windows8.1operatingsystem.ItenablesyoutorecoverorrepairtheoperatingsystemeveniftheWindows
8.1operatingsystemfailstostart.
Note:Ensurethatyourcomputerisconnectedtoacpowerduringtherecoveryprocess.
Youcanrecoveryouroperatingsystembyonethefollowingrecoverysolutions:
•“RecoverysolutionsprovidedbytheWindows8.1operatingsystem”onpage57
•“RecoverysolutionsprovidedbytheLenovoprogram”onpage57
RecoverysolutionsprovidedbytheWindows8.1operatingsystem
Aftertwoconsecutivefailedbootattempts,theWindowsrecoveryenvironmentstartsautomatically.Then
youcanchooserepairandrecoveryoptionsbyfollowingtheinstructionsonthescreen.
FormoredetailsabouttherecoverysolutionsprovidedbytheWindows8.1operatingsystem,refertothe
helpinformationsystemoftheWindows8.1operatingsystem.
RecoverysolutionsprovidedbytheLenovoprogram
CreateRecoveryMediaenablesyoutorestoreyourcomputertothefactory-defaultsettings.Itis
recommendedthatyoucreaterecoverymediatobackupyourcomputersettingswithCreateRecovery
Mediaasearlyaspossible.
Creatingrecoverymedia
YoucancreaterecoverymediausingopticaldiscsorexternalUSBstoragedevices.Ifaninternaloptical
driveisnotavailableonyourcomputer,useanexternalopticaldrivetoperformanyrecoveryoperations
thatrequireadisc.
TocreaterecoverymediaontheWindows8.1operatingsystem,dothefollowing:
Note:Dependingonyourcomputermodel,therecoverymediamightcontainseveralmedia.Itis
recommendedthatyoustoretherecoverymediainasafeplaceforfutureuse.
Chapter8.Recoveryinformation57

1.ConnectaUSBstoragedevicetoyourcomputerorinsertanopticaldiscintotheopticaldrive.
2.OpenCreateRecoveryMediafromtheStartscreen.Ifyoucannotfindthetileoftheprogramonthe
screen,clickortapthearrowiconinthebottom-leftcornerofthescreentoopenCreateRecovery
MediafromtheAppsscreen.
3.ClickortapOK.
4.Selectortapthedeviceonwhichyouwanttocreaterecoverymediafromthedrop-downlistboxand
thenclickortapOK.
Note:ClickortapRefreshifyoucannotfindthedeviceonwhichyouwanttocreaterecoverymedia.
5.ClickortapY eswhenyouarepromptedwhetheryouwanttoformatthedevice.Then,followthe
on-screeninstructionstocreaterecoverymedia.
Usingrecoverymedia
Attention:Whenyouuserecoverymediatorestorethecomputertothefactory-defaultsettings,all
yourpersonaldatastoredonthestoragedriveswillbedeleted.Toavoiddataloss,backupallthedata
thatyouwanttokeep.
Torestorethecomputertothefactory-defaultsettingsthroughrecoverymedia,dothefollowing:
1.Connectthebootmediumtothecomputer.
2.T urnonorrestartthecomputer.
3.StarttheSetupUtilityprogram.See“StartingtheSetupUtilityprogram”onpage29.Dependingon
yourcomputermodel,dooneofthefollowing:
•For10D4,10D5,10D6,10D7,10EJ,and10EKmodels:SelectortapExit➙OSOptimizedDefaults
➙DisabledandAdvanced➙OSSelection➙Windwos8.x.
•For10E0,10E1,10E2,10E3,10EL,and10EMmodels:SelectortapExit➙OSOptimizedDefaults
➙Disabled.
4.PressF10tosaveyoursettingsandrestartthecomputer.
5.Whenyouseethelogoscreen,repeatedlypressandreleasetheF12keyuntilthestartupdevicemenu
windowisdisplayed.
6.SelectortapthedesiredstartupdeviceandpressEnter.Then,followtheinstructionsonthescreento
completetherecoveryprocess.
7.Disconnecttherecoverymediumfromyourcomputer.Then,clickortapRestart.
8.StarttheSetupUtilityprogram.See“StartingtheSetupUtilityprogram”onpage29.Dependingon
yourcomputermodel,dooneofthefollowing:
•For10D4,10D5,10D6,10D7,10EJ,and10EKmodels:SelectortapExit➙OSOptimizedDefaults
➙EnabledandAdvanced➙OSSelection➙Windwos8.x.
•For10E0,10E1,10E2,10E3,10EL,and10EMmodels:SelectortapExit➙OSOptimizedDefaults
➙Enabled.
RecoveryinformationfortheWindows10operatingsystem
TorecoveryourWindows10operatingsystem,usethefollowingsolutions:
•UseWindowsrecoverysolutions.
–UserecoverysolutionsinWindowsSettings.
1.ClicktheStartbuttontoopentheStartmenu.
2.ClickSettings➙Update&security➙Recovery.
58ThinkCentreE63zUserGuide

3.Choosetheappropriaterecoverysolutionbyfollowingtheinstructionsonthescreen.
–UseSystemRestoretorestoresystemfilesandsettingstoanearlierpoint.
1.Right-clicktheStartbuttontoopentheStartcontextmenu.
2.ClickControlPanel.ViewControlPanelusingLargeiconsorSmallicons,andthenclick
Recovery➙OpenSystemRestore.
3.Followtheinstructionsonthescreen.
–UsetheFileHistorytooltorestoreyourfilesfromabackup.
Note:IfyouusetheFileHistorytooltorestoreyourfilesfromabackup,ensurethatyoubackedup
yourdataearlierwiththetool.
1.Right-clicktheStartbuttontoopentheStartcontextmenu.
2.ClickControlPanel.ViewControlPanelusingLargeiconsorSmallicons,andthenclickFile
History➙Restorepersonalfiles.
3.Followtheinstructionsonthescreen.
–UsetheWindowsrecoveryenvironmentbydoingoneofthefollowing:
–Afterseveralconsecutivefailedbootattempts,theWindowsrecoveryenvironmentmightstart
automatically.Followtheinstructionsonthescreentochoosetheappropriaterecoverysolution.
–SelecttherecoverymediumyoucreatedearlierwiththeWindowstoolasthestartupdevice.See
“Selectingatemporarystartupdevice”onpage31
.Then,followtheinstructionsonthescreen
tochoosetheappropriaterecoverysolution.
Note:Tocreatearecoverymedium,see“Goodmaintenancepractices”onpage37.
•UsetherecoveryUSBkeyprovidedbyLenovotorestoretheentirestoragedrivetothefactory-default
settings.
–IfyourcomputercomeswiththerecoveryUSBkey,followtheinstructionsshippedwiththeUSBkey.
–IfyourcomputerdoesnotcomewiththerecoveryUSBkey,contacttheLenovoCustomer
SupportCentertoorderarecoveryUSBkey.ForalistofLenovoSupportphonenumbers,goto
http://www.lenovo.com/support/phone.Ifyoucannotfindthesupporttelephonenumberforyour
countryorregion,contactyourLenovoreseller.
Chapter8.Recoveryinformation59

60ThinkCentreE63zUserGuide

Chapter9.Installingorreplacinghardware
Thischapterprovidesinstructionsonhowtoinstallorreplacehardwareforyourcomputer.
Handlingstatic-sensitivedevices
Donotopenthestatic-protectivepackagecontainingthenewpartuntilthedefectiveparthasbeenremoved
andyouarereadytoinstallthenewpart.Staticelectricity,althoughharmlesstoyou,canseriouslydamage
computercomponentsandparts.
Whenyouhandlepartsandothercomputercomponents,taketheseprecautionstoavoidstatic-electricity
damage:
•Limityourmovement.Movementcancausestaticelectricitytobuilduparoundyou.
•Alwayshandlepartsandothercomputercomponentscarefully.HandlePCIcards,memorymodules,
systemboards,andmicroprocessorsbytheedges.Nevertouchanyexposedcircuitry.
•Preventothersfromtouchingthepartsandothercomputercomponents.
•Touchthestatic-protectivepackagecontainingtheparttoametalexpansion-slotcoverorother
unpaintedmetalsurfaceonthecomputerforatleasttwoseconds.Thisreducesstaticelectricityfrom
thepackageandyourbodybeforeyouinstallorreplaceanewpart.
•Whenpossible,removethenewpartfromthestatic-protectivepackage,andinstallitdirectlyinthe
computerwithoutsettingthepartdown.Whenthisisnotpossible,placethestatic-protectivepackage
thatthepartcameinonasmooth,levelsurfaceandplacethepartonthepackage.
•Donotplacethepartonthecomputercoverorothermetalsurface.
Installingorreplacinghardware
Thissectionprovidesinstructionsonhowtoinstallorreplacehardwareforyourcomputer.Y oucanexpand
thecapabilitiesofyourcomputerandmaintainyourcomputerbyinstallingorreplacinghardware.
Attention:Donotopenyourcomputerorattemptanyrepairbeforereadingandunderstandingthe“Read
thisfirst:Importantsafetyinformation”onpageiii.
Notes:
•UseonlycomputerpartsprovidedbyLenovo.
•Wheninstallingorreplacinganoption,usetheappropriateinstructionsinthissectionalongwiththe
instructionsthatcomewiththeoption.
Installingexternaloptions
Youcanconnectexternaloptionstoyourcomputer,suchasexternalspeakers,aprinter,orascanner.For
someexternaloptions,youmustinstalladditionalsoftwareinadditiontomakingthephysicalconnection.
Wheninstallinganexternaloption,see“Locatingconnectors,controls,andindicatorsonthefrontofyour
computer”onpage2
requiredconnector.Usetheinstructionsshippedwiththeoptiontohelpyoumaketheconnectionandinstall
anysoftwareordevicedriversthatarerequiredfortheoption.
and“Locatingconnectorsontherearofyourcomputer”onpage3toidentifythe
Installingorremovingtheacpoweradapter
Attention:Donotopenyourcomputerorattemptanyrepairbeforereadingandunderstandingthe“Read
thisfirst:Importantsafetyinformation”onpageiii
.
©CopyrightLenovo2014,2016
61

Thissectionprovidesinstructionsonhowtoinstallorremovetheacpoweradapter.
Toinstalltheacpoweradapter,connecttheacpoweradaptercabletotheacpoweradapterconnectorat
therearofyourcomputer.Then,connectthepowercordontheotherendtoaworkableelectricaloutlet.
Figure6.Connectingtheacpoweradapter
Toremovetheacpoweradapter,dothefollowing:
1.Removeallmediafromthedrivesandturnoffallattacheddevicesandthecomputer.Then,disconnect
allpowercordsfromelectricaloutletsanddisconnectallcablesthatareconnectedtothecomputer.
62ThinkCentreE63zUserGuide

2.Disconnecttheacpoweradaptercablefromthecomputer.
Figure7.Disconnectingtheacpoweradapter
Replacingthekeyboardormouse
Attention:Donotopenyourcomputerorattemptanyrepairbeforereadingandunderstandingthe“Read
thisfirst:Importantsafetyinformation”onpageiii
Toreplacethekeyboardormouse,dothefollowing:
1.Disconnecttheoldkeyboardcableormousecablefromthecomputer.
2.ConnectanewkeyboardormousetooneoftheUSBconnectorsonthecomputer.Dependingonwhere
youwanttoconnectthenewkeyboardormouse,see“Locatingconnectors,controls,andindicatorson
thefrontofyourcomputer”onpage2or“Locatingconnectorsontherearofyourcomputer”onpage3.
Figure8.ConnectingtheUSBkeyboardormouse
.
Chapter9.Installingorreplacinghardware63

Replacingthewirelesskeyboardormouse
Attention:Donotopenyourcomputerorattemptanyrepairbeforereadingandunderstandingthe“Read
thisfirst:Importantsafetyinformation”onpageiii.
Replacingthewirelesskeyboard
Toreplacethewirelesskeyboard,dothefollowing:
1.Removeyourfailingwirelesskeyboard.
2.T akeoutthenewwirelesskeyboardfromthepackage.
3.Openthebatterycompartmentcover,andInstalltwoAAAbatteriesaccordingtothepolarityindicators.
Figure9.Installingthekeyboardbatteries
4.T akeawaytheUSBdonglefromthekeyboardcompartmentorfromthewirelessmousecompartment
andconnectittoanavailableUSBconnectoronthecomputer.See“Replacingthewirelessmouse”
onpage64.
5.Closethecompartmentcover.Thekeyboardisreadyforuse.
Replacingthewirelessmouse
Toreplacethewirelessmouse,dothefollowing:
1.DisconnecttheUSBdonglefromyourcomputer.Then,takeawayyourfailingwirelessmouse.
2.Removethenewwirelessmousefromthepackage.
3.Pressthebatterycompartmentreleasebuttontoopenthebatterycompartment.
64ThinkCentreE63zUserGuide

Figure10.Openingthebatterycompartment
4.RemovetheUSBdonglefromthecompartmentofthenewwirelessmouseorfromthecompartmentof
thewirelesskeyboard.
Figure11.T akingouttheUSBdongle
5.ConnecttheUSBdongletoanavailableUSBconnectoronyourcomputer.
Figure12.ConnectingtheUSBdongletoaUSBconnector
6.InserttwoAAbatteriesintothemousecompartmentaccordingtothepolarityindicators.
Chapter9.Installingorreplacinghardware65

Figure13.Installingthemousebatteries
7.Closethebatterycompartmentcoverandslideitforwarduntilitclicksintoplace.
Figure14.Closingthebatterycompartmentcover
8.PushthepowerswitchtotheonpositiononthebottomofthewirelessmouseuntiltheLED
(light-emittingdiode)ison.
Figure15.Pushingthepowerswitchtotheonposition
66ThinkCentreE63zUserGuide

Notes:
•ThegreenLEDindicatesthatthemouseisreadyforuse.
•TheflashingamberLEDindicatesalowbatterypowerlevel.
•Pushthepowerswitchtotheoffpositionwhenyouarenotusingthemousetoextendthebatterylife.
•AfterdisconnectingtheUSBdonglefromyourcomputer,storeitinthewirelessmousecompartmentorin
thewirelesskeyboardcompartment.
Obtainingdevicedrivers
Youcanobtaindevicedriversthatarenotpreinstalledinyouroperatingsystemat
http://www.lenovo.com/support.Installationinstructionsareprovidedinreadmefileswiththedevice-driver
files.
Chapter9.Installingorreplacinghardware67

68ThinkCentreE63zUserGuide

Chapter10.Gettinginformation,help,andservice
Thischaptercontainsinformationabouthelp,service,andtechnicalassistanceforproductsmanufactured
byLenovo.
Informationresources
Youcanusetheinformationinthissectiontoaccessusefulresourcesrelatingtoyourcomputingneeds.
Windowshelpsystem
Note:IfyouusetheonlinehelpforWindows7orWindows8.1,orthehelpforWindows10,ensurethatyour
computerisconnectedtotheInternet.
TheWindowshelpsystemprovidesyouwithdetailedinformationaboutusingtheWindowsoperatingsystem.
ToaccesstheWindowshelpsystem,dooneofthefollowing:
•ForWindows7:ClicktheStartbuttontoopentheStartmenu,andthenclickHelpandSupport.Y oucan
choosetousetheonlineorofflinehelpatthebottomofthescreen.
•ForWindows8.1:Movethepointertothetop-rightorbottom-rightcornerofthescreentodisplaythe
charms.Then,clickSettings➙Help.Youcanchoosetousetheonlineorofflinehelpatthebottomof
thescreen.
•ForWindows10:ClicktheStartbuttontoopentheStartmenu,andthenclickGetstarted.
SafetyandWarranty
TheSafety,Warranty,andSetupGuidethatisprovidedwithyourcomputercontainsinformationonsafety,
setup,warranty,andnotices.ThesafetyinformationintheSafety,Warranty,andSetupGuideprovides
informationyouneedtoknowbeforesettingupandusingthisproduct.Readandunderstandallsafety
informationprovidedintheSafety,Warranty,andSetupGuidebeforeusingthisproduct.
Theinformationin“Readthisfirst:Importantsafetyinformation”onpageiiiofthisUserGuideprovides
additionalsafetyinformationthatappliestotopicsandtasksdescribedinthispublication.Readand
understandallsafetyinformationprovidedinthatsectionbeforedisassemblingorupgradingthisproduct.
LenovoWebsite
TheLenovoWebsite(http://www.lenovo.com)providesup-to-dateinformationandservicestohelpyoubuy,
upgrade,andmaintainyourcomputer.Youcanalsodothefollowing:
•Shopfordesktopandnotebookcomputers,monitors,projectors,upgradesandaccessoriesforyour
computer,andspecialoffers.
•Purchaseadditionalservices,suchassupportforhardware,operatingsystems,applicationprograms,
networksetupandconfiguration,andcustominstallations.
•Purchaseupgradesandextendedhardwarerepairservices.
•Downloadthelatestdevicedriversandsoftwareupdatesforyourcomputermodel.
•Accesstheonlinemanualsforyourproducts.
•AccesstheLenovoLimitedWarranty.
•Accesstroubleshootingandsupportinformationforyourcomputermodelandothersupportedproducts.
•Findtheserviceandsupportphonenumbersforyourcountryorregion.
©CopyrightLenovo2014,2016
69

•FindaServiceProviderlocatednearyou.
LenovoSupportWebsite
TechnicalsupportinformationisavailableontheLenovoSupportWebsiteat:
http://www.lenovo.com/support
ThisWebsiteisupdatedwiththelatestsupportinformationsuchasthefollowing:
•Driversandsoftware
•Diagnosticsolutions
•Productandservicewarranty
•Productandpartsdetails
•Userguidesandmanuals
•Knowledgebaseandfrequentlyaskedquestions
Helpandservice
Thissectioncontainsinformationaboutobtaininghelpandservice.
Usingthedocumentationanddiagnosticprogram
Ifyouexperienceaproblemwithyourcomputer,seeChapter7“Troubleshootinganddiagnostics”on
page39.Forinformationonadditionalresourcestohelpyoutroubleshootyourcomputerproblem,see
“Informationresources”onpage69
.
Ifyoususpectasoftwareproblem,seethedocumentationthatcomeswiththeoperatingsystemorsoftware
program,includingreadmefilesandonlinehelp.
Mostcomputerscomewithadiagnosticprogramthathelpsyouidentifyhardwareproblems.
YoucanalsogetthelatesttechnicalinformationanddownloaddevicedriversandupdatesfromLenovo
SupportWebsiteat:
http://www.lenovo.com/support
Callingforservice
Duringthewarrantyperiod,youcangethelpandinformationbytelephonethroughtheCustomerSupport
Center.
Thefollowingservicesareavailableduringthewarrantyperiod:
•Problemdetermination-Trainedservicepersonnelareavailabletoassistyouwithdetermininga
hardwareproblemanddecidingwhatactionisnecessarytofixtheproblem.
•Hardwarerepair-Iftheproblemiscausedbyhardwareunderwarranty,trainedservicepersonnelare
availabletoprovidetheapplicablelevelofservice.
•EngineeringChangemanagement-Theremightbechangesthatarerequiredafteraproducthas
beensold.LenovooryourresellerwillmakeselectedEngineeringChanges(ECs)thatapplytoyour
hardwareavailable.
Theseitemsarenotcoveredbythewarranty:
•ReplacementoruseofpartsnotmanufacturedfororbyLenovoornon-warrantedLenovoparts
•Identificationofsoftwareproblemsources
•ConfigurationofBIOSaspartofaninstallationorupgrade
70ThinkCentreE63zUserGuide

•Changes,modifications,orupgradestodevicedrivers
•Installationandmaintenanceofnetworkoperatingsystems(NOS)
•Installationandmaintenanceofapplicationprograms
RefertotheSafety,Warranty,andSetupGuidethatcomeswithyourcomputerforinformationaboutyour
warrantytypeandduration.Y oumustretainyourproofofpurchasetoobtainwarrantyservice.
ForalistofLenovoSupportphonenumbers,gotohttp://www.lenovo.com/support/phoneorrefertothe
Safety,Warranty,andSetupGuidethatcomeswithyourcomputer.
Note:Phonenumbersaresubjecttochangewithoutnotice.Ifthenumberforyourcountryorregionisnot
provided,contactyourLenovoresellerorLenovomarketingrepresentative.
Ifpossible,beatyourcomputerwhenyoucall.Havethefollowinginformationavailable:
•Machinetypeandmodel
•Serialnumbersofyourhardwareproducts
•Descriptionoftheproblem
•Exactwordingofanyerrormessages
•Hardwareandsoftwareconfigurationinformation
Usingotherservices
Youmighttravelwithyourcomputerorrelocateittoacountryorregionwherethemachinetypeforyour
desktopornotebookcomputerissold.Insuchasituation,yourcomputermightbeeligibleforInternational
WarrantyService,whichautomaticallyentitlesyoutoobtainwarrantyservicethroughoutthewarrantyperiod.
Servicewillbeperformedbyserviceprovidersauthorizedtoperformwarrantyservice.
Servicemethodsandproceduresvarybycountry,andsomeservicesmightnotbeavailableinallcountries.
InternationalWarrantyServiceisdeliveredthroughthemethodofservice(suchasdepot,carry-in,or
on-siteservice)thatisprovidedintheservicingcountry.Servicecentersincertaincountriesmightnotbe
abletoserviceallmodelsofaparticularmachinetype.Insomecountries,feesandrestrictionsmight
applyatthetimeofservice.
TodeterminewhetheryourcomputeriseligibleforInternationalWarrantyServiceandtoviewalistofthe
countriesorregionswhereserviceisavailable,gotohttp://www.lenovo.com/support.
FortechnicalassistancewiththeinstallationoforquestionsrelatedtoServicePacksforyourpreinstalled
MicrosoftWindowsproduct,gototheMicrosoftProductSupportWebsiteathttp://support.microsoft.com.
YoualsocancontacttheLenovoCustomerSupportCenterforhelp.Somefeesmightapply.
Purchasingadditionalservices
Duringandafterthewarrantyperiod,youcanpurchaseadditionalservices.Examplesoftheseadditional
servicesinclude:
•Supportforhardware,operatingsystems,andapplicationprograms
•Networksetupandconfigurationservices
•Upgradedorextendedhardwarerepairservices
•Custominstallationservices
Serviceavailabilityandservicenamemightvarybycountryorregion.Formoreinformationaboutthese
services,gototheLenovoWebsiteat:
http://www.lenovo.com
Chapter10.Gettinginformation,help,andservice71

72ThinkCentreE63zUserGuide

AppendixA.Regulatoryinformation
Thelatestcomplianceinformationisavailableathttp://www.lenovo.com/compliance.
Exportclassificationnotice
ThisproductissubjecttotheUnitedStatesExportAdministrationRegulations(EAR)andhasanExport
ClassificationControlNumber(ECCN)of5A992.c.Itcanbere-exportedexcepttoanyoftheembargoed
countriesintheEARE1countrylist.
Electronicemissionsnotices
ThefollowinginformationreferstoLenovopersonalcomputermachinetypes10D4,10D5,10D6,10D7,
10E0,10E1,10E2,10E3,10EJ,10EK,10EL,and10EM.
FederalCommunicationsCommissionDeclarationofConformity
ThisequipmenthasbeentestedandfoundtocomplywiththelimitsforaClassBdigitaldevice,pursuant
toPart15oftheFCCRules.Theselimitsaredesignedtoprovidereasonableprotectionagainstharmful
interferenceinaresidentialinstallation.Thisequipmentgenerates,uses,andcanradiateradiofrequency
energyand,ifnotinstalledandusedinaccordancewiththeinstructions,maycauseharmfulinterference
toradiocommunications.However,thereisnoguaranteethatinterferencewillnotoccurinaparticular
installation.Ifthisequipmentdoescauseharmfulinterferencetoradioortelevisionreception,whichcanbe
determinedbyturningtheequipmentoffandon,theuserisencouragedtotrytocorrecttheinterferenceby
oneormoreofthefollowingmeasures:
•Reorientorrelocatethereceivingantenna.
•Increasetheseparationbetweentheequipmentandreceiver.
•Connecttheequipmentintoanoutletonacircuitdifferentfromthattowhichthereceiverisconnected.
•Consultanauthorizeddealerorservicerepresentativeforhelp.
Lenovoisnotresponsibleforanyradioortelevisioninterferencecausedbyusingotherthanspecifiedor
recommendedcablesandconnectorsorbyunauthorizedchangesormodificationstothisequipment.
Unauthorizedchangesormodificationscouldvoidtheuser'sauthoritytooperatetheequipment.
ThisdevicecomplieswithPart15oftheFCCRules.Operationissubjecttothefollowingtwoconditions:(1)
thisdevicemaynotcauseharmfulinterference,and(2)thisdevicemustacceptanyinterferencereceived,
includinginterferencethatmaycauseundesiredoperation.
ResponsibleParty:
Lenovo(UnitedStates)Incorporated
1009ThinkPlace-BuildingOne
Morrisville,NC27560
PhoneNumber:919-294-5900
IndustryCanadaClassBemissioncompliancestatement
CANICES-3(B)/NMB-3(B)
©CopyrightLenovo2014,2016
73

EuropeanUnion-CompliancetoDirectivesforITE(InformationTechnologyEquipment)andRadio
Equipment
Modelswithoutaradiodevice:ThisproductisinconformitywiththeprotectionrequirementsofEUCouncil
Directive2004/108/EC(until19April,2016)andCouncilDirective2014/30/EU(from20April,2016)onthe
approximationofthelawsoftheMemberStatesrelatingtoelectromagneticcompatibility.
Modelswitharadiodevice:Thisproductisinconformitywithalltherequirementsandessentialnormsthat
applytoEUCouncilR&TTEDirective1999/5/EContheapproximationofthelawsoftheMemberStates
relatingtoradioequipment.
Lenovocannotacceptresponsibilityforanyfailuretosatisfytheprotectionrequirementsresultingfrom
anon-recommendedmodificationoftheproduct,includingtheinstallationofoptioncardsfromother
manufacturers.ThisproducthasbeentestedandfoundtocomplywiththelimitsforClassBequipment
accordingtoEuropeanStandardsharmonizedintheDirectivesincompliance.ThelimitsforClassB
equipmentwerederivedfortypicalresidentialenvironmentstoprovidereasonableprotectionagainst
interferencewithlicensedcommunicationdevices.
Lenovo,Einsteinova21,85101Bratislava,Slovakia
GermanClassBcompliancestatement
DeutschsprachigerEUHinweis:
HinweisfürGerätederKlasseBEURichtliniezurElektromagnetischenVerträglichkeit
DiesesProduktentsprichtdenSchutzanforderungenderEURichtlinie2014/30/EU(früher2004/108/EC)zur
AngleichungderRechtsvorschriftenüberdieelektromagnetischeVerträglichkeitindenEU-Mitgliedsstaaten
undhältdieGrenzwertederKlasseBderNormgemäßRichtlinie.
Umdiesessicherzustellen,sinddieGerätewieindenHandbüchernbeschriebenzuinstallierenundzu
betreiben.DesWeiterendürfenauchnurvonderLenovoempfohleneKabelangeschlossenwerden.
LenovoübernimmtkeineVerantwortungfürdieEinhaltungderSchutzanforderungen,wenndasProdukt
ohneZustimmungderLenovoverändertbzw.wennErweiterungskomponentenvonFremdherstellernohne
EmpfehlungderLenovogesteckt/eingebautwerden.
Deutschland:
EinhaltungdesGesetzesüberdieelektromagnetischeVerträglichkeitvonBetriebsmitteln
DiesesProduktentsprichtdem„GesetzüberdieelektromagnetischeVerträglichkeitvonBetriebsmitteln“
EMVG(früher„GesetzüberdieelektromagnetischeVerträglichkeitvonGeräten“).DiesistdieUmsetzungder
EMVEURichtlinie2014/30/EU(früher2004/108/EWG)inderBundesrepublikDeutschland.
ZulassungsbescheinigunglautdemDeutschenGesetzüberdieelektromagnetischeVerträglichkeit
vonBetriebsmitteln,EMVGvom20.Juli2007(früherGesetzüberdieelektromagnetische
VerträglichkeitvonGeräten),bzw.derEMVEURichtlinie2014/30/EU(früher2004/108/EC),für
GerätederKlasseB.
DiesesGerätistberechtigt,inÜbereinstimmungmitdemDeutschenEMVGdasEG-Konformitätszeichen
-CE-zuführen.VerantwortlichfürdieKonformitätserklärungnachParagraf5desEMVGistdieLenovo
(Deutschland)GmbH,Meitnerstr.9,D-70563Stuttgart.
74ThinkCentreE63zUserGuide

InformationeninHinsichtEMVGParagraf4Abs.(1)4:
DasGeräterfülltdieSchutzanforderungennachEN55024undEN55022KlasseB.
KoreaClassBcompliancestatement
JapanVCCIClassBcompliancestatement
Japancompliancestatementforproductswhichconnecttothepowermainswithratedcurrent
lessthanorequalto20Aperphase
Japannoticeforacpowercord
Theacpowercordshippedwithyourproductcanbeusedonlyforthisspecificproduct.Donotusetheac
powercordforotherdevices.
LenovoproductserviceinformationforT aiwan
KeyboardandmousecompliancestatementforT aiwan
Eurasiancompliancemark
Brazilaudionotice
Ouvirsonscommaisde85decibéisporlongosperíodospodeprovocardanosaosistemaauditivo.
Mexicowireless-radiocomplianceinformation
Advertencia:EnMexicolaoperacióndeesteequipoestásujetaalassiguientesdoscondiciones:(1)es
posiblequeesteequipoodispositivonocauseinterferenciaperjudicialy(2)esteequipoodispositivodebe
aceptarcualquierinterferencia,incluyendolaquepuedacausarsuoperaciónnodeseada.
AppendixA.Regulatoryinformation75

Taiwanvisionprecautionnotice
Additionalregulatoryinformation
Foradditionalregulatoryinformation,refertotheRegulatoryNoticeshippedwithyourcomputer.Depending
ontheconfigurationofyourcomputerandthecountryorregionwherethecomputerwaspurchased,
youmighthavereceivedadditionalprintedregulatorynotices.Allregulatorynoticesareavailableonthe
LenovoSupportWebsiteinelectronicformat.Toaccesselectroniccopiesofthedocumentation,goto
http://www.lenovo.com/UserManuals.
76ThinkCentreE63zUserGuide

AppendixB.WEEEandrecyclinginformation
Lenovoencouragesownersofinformationtechnology(IT)equipmenttoresponsiblyrecycletheir
equipmentwhenitisnolongerneeded.Lenovooffersavarietyofprogramsandservicestoassist
equipmentownersinrecyclingtheirITproducts.ForinformationonrecyclingLenovoproducts,goto
http://www.lenovo.com/recycling.Thelatestenvironmentalinformationaboutourproductsisavailableat
http://www.lenovo.com/ecodeclaration.
ImportantWEEEinformation
TheWEEEmarkingonLenovoproductsappliestocountrieswithWEEEande-wasteregulations(for
example,theEuropeanWEEEDirective,IndiaE-WasteManagement&HandlingRules,2011).Appliancesare
labeledinaccordancewithlocalregulationsconcerningwasteelectricalandelectronicequipment(WEEE).
Theseregulationsdeterminetheframeworkforthereturnandrecyclingofusedappliancesasapplicable
withineachgeography.Thislabelisappliedtovariousproductstoindicatethattheproductisnottobe
thrownaway,butratherputintheestablishedcollectionsystemsforreclaimingtheseendoflifeproducts.
Usersofelectricalandelectronicequipment(EEE)withtheWEEEmarkingmustnotdisposeofendoflife
EEEasunsortedmunicipalwaste,butusethecollectionframeworkavailabletothemforthereturn,recycle,
andrecoveryofWEEEandtominimizeanypotentialeffectsofEEEontheenvironmentandhumanhealth
duetothepresenceofhazardoussubstances.Lenovoelectricalandelectronicequipment(EEE)maycontain
partsandcomponents,whichatend-of-lifemightqualifyashazardouswaste.
EEEandwasteelectricalandelectronicequipment(WEEE)canbedeliveredfreeofchargetotheplaceof
saleoranydistributorthatsellselectricalandelectronicequipmentofthesamenatureandfunctionas
theusedEEEorWEEE.
ForadditionalWEEEinformation,goto:
http://www.lenovo.com/recycling
WEEEinformationforHungary
Lenovo,asaproducer,bearsthecostincurredinconnectionwiththefulfillmentofLenovo’sobligations
underHungaryLawNo.197/2014(VIII.1.)subsections(1)-(5)ofsection12.
RecyclinginformationforJapan
CollectingandrecyclingadisusedLenovocomputerormonitor
IfyouareacompanyemployeeandneedtodisposeofaLenovocomputerormonitorthatistheproperty
ofthecompany,youmustdosoinaccordancewiththeLawforPromotionofEffectiveUtilizationof
Resources.Computersandmonitorsarecategorizedasindustrialwasteandshouldbeproperlydisposed
ofbyanindustrialwastedisposalcontractorcertifiedbyalocalgovernment.InaccordancewiththeLaw
©CopyrightLenovo2014,2016
77

forPromotionofEffectiveUtilizationofResources,LenovoJapanprovides,throughitsPCCollecting
andRecyclingServices,forthecollecting,reuse,andrecyclingofdisusedcomputersandmonitors.For
details,visittheLenovoWebsiteathttp://www.lenovo.com/recycling/japan.PursuanttotheLawfor
PromotionofEffectiveUtilizationofResources,thecollectingandrecyclingofhome-usedcomputers
andmonitorsbythemanufacturerwasbegunonOctober1,2003.Thisserviceisprovidedfreeof
chargeforhome-usedcomputerssoldafterOctober1,2003.Fordetails,visittheLenovoWebsiteat
http://www.lenovo.com/recycling/japan.
DisposingofLenovocomputercomponents
SomeLenovocomputerproductssoldinJapanmayhavecomponentsthatcontainheavymetalsorother
environmentalsensitivesubstances.Toproperlydisposeofdisusedcomponents,suchasaprintedcircuit
boardordrive,usethemethodsdescribedaboveforcollectingandrecyclingadisusedcomputerormonitor.
DisposingofdisusedlithiumbatteriesfromLenovocomputers
Abutton-shapedlithiumbatteryisinstalledinsideyourLenovocomputertoprovidepowertothecomputer
clockwhilethecomputerisoffordisconnectedfromthemainpowersource.Ifyouneedtoreplaceitwitha
newone,contactyourplaceofpurchaseorcontactLenovoforservice.Ifyouneedtodisposeofadisused
lithiumbattery,insulateitwithvinyltape,contactyourplaceofpurchaseoranindustrial-waste-disposal
operator,andfollowtheirinstructions.Disposalofalithiumbatterymustcomplywithlocalordinances
andregulations.
RecyclinginformationforBrazil
DeclaraçõesdeReciclagemnoBrasil
DescartedeumProdutoLenovoForadeUso
Equipamentoselétricoseeletrônicosnãodevemserdescartadosemlixocomum,masenviadosàpontosde
coleta,autorizadospelofabricantedoprodutoparaquesejamencaminhadoseprocessadosporempresas
especializadasnomanuseioderesíduosindustriais,devidamentecertificadaspelosorgãosambientais,de
acordocomalegislaçãolocal.
ALenovopossuiumcanalespecíficoparaauxiliá-lonodescartedessesprodutos.Casovocêpossua
umprodutoLenovoemsituaçãodedescarte,ligueparaonossoSACouencaminheume-mailpara:
reciclar@lenovo.com,informandoomodelo,númerodesérieecidade,afimdeenviarmosasinstruções
paraocorretodescartedoseuprodutoLenovo.
BatteryrecyclinginformationforT aiwan
78ThinkCentreE63zUserGuide

BatteryrecyclinginformationfortheEuropeanUnion
Notice:ThismarkappliesonlytocountrieswithintheEuropeanUnion(EU).
BatteriesorpackagingforbatteriesarelabeledinaccordancewithEuropeanDirective2006/66/EC
concerningbatteriesandaccumulatorsandwastebatteriesandaccumulators.TheDirectivedeterminesthe
frameworkforthereturnandrecyclingofusedbatteriesandaccumulatorsasapplicablethroughoutthe
EuropeanUnion.Thislabelisappliedtovariousbatteriestoindicatethatthebatteryisnottobethrown
away,butratherreclaimeduponendoflifeperthisDirective.
InaccordancewiththeEuropeanDirective2006/66/EC,batteriesandaccumulatorsarelabeledtoindicate
thattheyaretobecollectedseparatelyandrecycledatendoflife.Thelabelonthebatterymayalso
includeachemicalsymbolforthemetalconcernedinthebattery(Pbforlead,Hgformercury,andCdfor
cadmium).Usersofbatteriesandaccumulatorsmustnotdisposeofbatteriesandaccumulatorsasunsorted
municipalwaste,butusethecollectionframeworkavailabletocustomersforthereturn,recycling,and
treatmentofbatteriesandaccumulators.Customerparticipationisimportanttominimizeanypotential
effectsofbatteriesandaccumulatorsontheenvironmentandhumanhealthduetothepotentialpresenceof
hazardoussubstances.
Beforeplacingelectricalandelectronicequipment(EEE)inthewastecollectionstreamorinwastecollection
facilities,theenduserofequipmentcontainingbatteriesand/oraccumulatorsmustremovethosebatteries
andaccumulatorsforseparatecollection.
DisposingoflithiumbatteriesandbatterypacksfromLenovoproducts
Acoin-celltypelithiumbatterymightbeinstalledinsideyourLenovoproduct.Youcanfinddetailsaboutthe
batteryintheproductdocumentation.Ifthebatteryneedstobereplaced,contactyourplaceofpurchaseor
contactLenovoforservice.Ifyouneedtodisposeofalithiumbattery,insulateitwithvinyltape,contact
yourplaceofpurchaseorawaste-disposaloperator,andfollowtheirinstructions.
DisposingofbatterypacksfromLenovoproducts
YourLenovodevicemightcontainalithium-ionbatterypackoranickelmetalhydridebatterypack.Y oucan
finddetailsonthebatterypackintheproductdocumentation.Ifyouneedtodisposeofabatterypack,
insulateitwithvinyltape,contactLenovosales,service,oryourplaceofpurchase,orawaste-disposal
operator,andfollowtheirinstructions.Youalsocanrefertotheinstructionsprovidedinthemanualsfor
yourproduct.
Forpropercollectionandtreatment,goto:
http://www.lenovo.com/lenovo/environment
AppendixB.WEEEandrecyclinginformation79

80ThinkCentreE63zUserGuide

AppendixC.RestrictionofHazardousSubstances(RoHS) Directive
Thelatestenvironmentalinformationisavailableathttp://www.lenovo.com/ecodeclaration.
EuropeanUnionRoHS
ThisLenovoproduct,withincludedparts(cables,cords,andsoon)meetstherequirementsofDirective
2011/65/EUontherestrictionoftheuseofcertainhazardoussubstancesinelectricalandelectronic
equipment(“RoHSrecast”or“RoHS2”).
FormoreinformationaboutLenovoworldwidecomplianceonRoHS,goto:
http://www.lenovo.com/social_responsibility/us/en/RoHS_Communication.pdf
ChinaRoHS
TurkishRoHS
TheLenovoproductmeetstherequirementsoftheRepublicofTurkeyDirectiveontheRestrictionoftheUse
ofCertainHazardousSubstancesinElectricalandElectronicEquipment(EEE).
©CopyrightLenovo2014,2016
81

UkraineRoHS
IndiaRoHS
RoHScompliantasperE-Waste(Management&Handling)Rules,2011.
TaiwanRoHS
82ThinkCentreE63zUserGuide

AppendixD.ChinaEnergyLabel
©CopyrightLenovo2014,2016
83

84ThinkCentreE63zUserGuide

AppendixE.ENERGYSTARmodelinformation
ENERGYSTAR
®
isajointprogramoftheU.S.EnvironmentalProtectionAgencyandtheU.S.Department
ofEnergyaimedatsavingmoneyandprotectingtheenvironmentthroughenergyefficientproductsand
practices.
LenovoisproudtoofferourcustomersproductswithanENERGYSTARcompliantdesignation.Some
modelsofthefollowingmachinetypeshavebeendesignedandtestedtoconformtotheENERGYSTAR
programrequirementforcomputersatthetimeofmanufacture:10D4,10D5,10D6,10D7,10E0,10E1,
10E2,10E3,10EJ,10EK,10EL,and10EM.FormoreinformationaboutENERGYSTARratingsforLenovo
computers,gotohttp://www.lenovo.com.
ByusingENERGYSTARcompliantproductsandtakingadvantageofthepower-managementfeaturesof
yourcomputer,youreducetheconsumptionofelectricity.Reducedelectricalconsumptioncontributesto
potentialfinancialsavings,acleanerenvironment,andthereductionofgreenhousegasemissions.
FormoreinformationaboutENERGYSTAR,goto:
http://www.energystar.gov
Lenovoencouragesyoutomakeefficientuseofenergyanintegralpartofyourday-to-dayoperations.T o
helpinthisendeavor,setthefollowingpower-managementfeaturestotakeeffectwhenyourcomputerhas
beeninactiveforaspecifiedduration:
Table1.ENERGYSTARpower-managementfeatures
Windows7,Windows8.1,orWindows10operatingsystem
Powerplan:ThinkCentre®Default
•Turnoffthedisplay:After10minutes
•Putthecomputertosleep:After25minutes
•Advancedpowersettings:
–Turnoffharddiskdrives:After20minutes
–Hibernate:Never
ToawakenyourcomputerfromaSleepmode,pressanykeyonyourkeyboard.
Tochangepowersettings,dothefollowing:
1.OpenControlPanelbydoingoneofthefollowing:
•ForWindows7:ClicktheStartbuttontoopentheStartmenu,andthenclickControlPanel.
•ForWindows8.1:See“AccessingControlPanelontheWindows8.1operatingsystem”onpage17
•ForWindows10:Right-clicktheStartbuttontoopentheStartcontextmenu,andthenclickControl
Panel.
2.ViewControlPanelusingLargeiconsorSmallicons,andthenclickPowerOptions.
©CopyrightLenovo2014,2016
.
85

3.Followtheinstructionsonthescreen.
86ThinkCentreE63zUserGuide

AppendixF .Notices
Lenovomaynotoffertheproducts,services,orfeaturesdiscussedinthisdocumentinallcountries.Consult
yourlocalLenovorepresentativeforinformationontheproductsandservicescurrentlyavailableinyour
area.AnyreferencetoaLenovoproduct,program,orserviceisnotintendedtostateorimplythatonlythat
Lenovoproduct,program,orservicemaybeused.Anyfunctionallyequivalentproduct,program,orservice
thatdoesnotinfringeanyLenovointellectualpropertyrightmaybeusedinstead.However,itistheuser's
responsibilitytoevaluateandverifytheoperationofanyotherproduct,program,orservice.
Lenovomayhavepatentsorpendingpatentapplicationscoveringsubjectmatterdescribedinthis
document.Thefurnishingofthisdocumentdoesnotgiveyouanylicensetothesepatents.Y oucansend
licenseinquiries,inwriting,to:
Lenovo(UnitedStates),Inc.
1009ThinkPlace-BuildingOne
Morrisville,NC27560
U.S.A.
Attention:LenovoDirectorofLicensing
LENOVOPROVIDESTHISPUBLICATION“ASIS”WITHOUTWARRANTYOFANYKIND,EITHEREXPRESS
ORIMPLIED,INCLUDING,BUTNOTLIMITEDTO,THEIMPLIEDWARRANTIESOFNON-INFRINGEMENT,
MERCHANTABILITYORFITNESSFORAPARTICULARPURPOSE.Somejurisdictionsdonotallow
disclaimerofexpressorimpliedwarrantiesincertaintransactions,therefore,thisstatementmaynotapply
toyou.
Thisinformationcouldincludetechnicalinaccuraciesortypographicalerrors.Changesareperiodically
madetotheinformationherein;thesechangeswillbeincorporatedinneweditionsofthepublication.
Lenovomaymakeimprovementsand/orchangesintheproduct(s)and/ortheprogram(s)describedinthis
publicationatanytimewithoutnotice.
Theproductsdescribedinthisdocumentarenotintendedforuseinimplantationorotherlifesupport
applicationswheremalfunctionmayresultininjuryordeathtopersons.Theinformationcontainedinthis
documentdoesnotaffectorchangeLenovoproductspecificationsorwarranties.Nothinginthisdocument
shalloperateasanexpressorimpliedlicenseorindemnityundertheintellectualpropertyrightsofLenovo
orthirdparties.Allinformationcontainedinthisdocumentwasobtainedinspecificenvironmentsandis
presentedasanillustration.Theresultobtainedinotheroperatingenvironmentsmayvary.
Lenovomayuseordistributeanyoftheinformationyousupplyinanywayitbelievesappropriatewithout
incurringanyobligationtoyou.
Anyreferencesinthispublicationtonon-LenovoWebsitesareprovidedforconvenienceonlyanddonotin
anymannerserveasanendorsementofthoseWebsites.ThematerialsatthoseWebsitesarenotpartof
thematerialsforthisLenovoproduct,anduseofthoseWebsitesisatyourownrisk.
Anyperformancedatacontainedhereinwasdeterminedinacontrolledenvironment.Therefore,theresult
obtainedinotheroperatingenvironmentsmayvarysignificantly.Somemeasurementsmayhavebeen
madeondevelopment-levelsystemsandthereisnoguaranteethatthesemeasurementswillbethesame
ongenerallyavailablesystems.Furthermore,somemeasurementsmayhavebeenestimatedthrough
extrapolation.Actualresultsmayvary.Usersofthisdocumentshouldverifytheapplicabledatafortheir
specificenvironment.
©CopyrightLenovo2014,2016
87

Trademarks
ThefollowingtermsaretrademarksofLenovointheUnitedStates,othercountries,orboth:
Lenovo
RescueandRecovery
TheLenovologo
TheThinkCentrelogo
ThinkCentre
ThinkVantage
Microsoft,Windows,andWindowsMediaaretrademarksoftheMicrosoftgroupofcompanies.
LinuxisaregisteredtrademarkofLinusTorvalds.
Othercompany,product,orservicenamesmaybetrademarksorservicemarksofothers.
88ThinkCentreE63zUserGuide

Index
A
arescuemedium,creatingandusing54
acpoweradapterconnector3
acpoweradapter,replacing61
Administrator,password30
Advanceconfiguration29
audiofeatures6
B
backupandrecoveryoperations52
basictroubleshooting39
BIOSpasswords,using30
BIOSsettings,changing34
C
cablelock,security26
changing
password30
startupdevicesequence31
cleaninganopticalmouse36
connector3
connectors
rear3
connectors,controls,indicators
front2
considerations,passwords30
creating
andusingarescuemedium54
creatingandusing
recoverymedia51
customersupportcenter70
F
features5
front
connectors,controls,indicators2
G
getting
help69
information69
service69
H
HDMIconnector3
help
andservice70
getting69
I
importantsafetyinformationiii
information
getting69
importantsafetyiii
resources69
safety69
warranty69
Input/Output(I/O)features6
installing
operatingsystem34
internaldrives6
D
deletingapassword30
Description3
devicedrivers67
devices,handlingstatic-sensitive61
diagnosticprogram49
diagnosticsprogram,using70
diagnostics,troubleshooting39
documentation,using70
drivers,device67
E
environment,operating9
Ethernetconnector3
exiting,SetupUtility32
externaloptions,installing61
©CopyrightLenovo2014,2016
K
Kensington-style
cablelock26
keyboard,replacing63–64
L
LenovoSolutionCenter49
M
media,creatingandusingrecoverymedia51
memory6
mouse,replacing63–64
N
notices87
89

O
operations,backupandrecovery52
opticalmouse
cleaning36
P
password
Administrator30
considerations30
Power-OnPassword30
setting,changing,deleting30
physicalspecifications9
power
features6
power-onself-test(POST)33
Power-On,Password30
programs,updatingsystem33
purchasingadditionalservices71
SetupUtility,exiting32
software
recovering51
solvingrecoveryproblems56
startingtheSetupUtilityprogram29
startupdevice31
sequence,changing31
temporary,selecting31
static-sensitivedevices,handling61
system
management7
programs33
T
temporarystartupdevice31
trademarks88
troubleshooting,basic39
troubleshooting,diagnostics39
R
rearconnectors3
recovering
software51
recovery
operations,backupand52
problems,solving56
recoverymedia,creatingandusing51
RescueandRecovery51
workspace,RescueandRecovery53
RescueandRecoveryworkspace53
resources,information69
S
safetyiii
safetyinformation69
security
enablingordisabling31
features7
selecting
startupdevice31
temporarystartupdevice31
service
andhelp70
customersupportcenter70
getting69
services
other71
purchasingadditional71
setting
password30
settings
changing29
viewing29
SetupUtility29
SetupUtilityprogram,starting29
U
updating
systemprograms33
USB2.0connector3
using
arescuemedium,creatingand54
BIOSpasswords30
diagnosticprogram70
documentation70
otherservices71
SetupUtility29
V
videofeatures6
viewingandchangingsettings29
W
warrantyinformation69
wireless
features6
workspace,backupandrecovery53
90ThinkCentreE63zUserGuide
 Loading...