

Lenovo px12-400r User Manual

px12-400r Network Storage
with LifeLine 4.1
User Guide

© 2014 LenovoEMC, Ltd. All rights reserved.
Lenovo and the Lenovo logo are registered trademarks of Lenovo in the United States, other countries, or
both. The EMC logo is a registered trademark of EMC Corporation in the United States and/or other
countries. LenovoEMC and LifeLine are registered trademarks or trademarks of LenovoEMC, Ltd. in the
United States, other countries, or both. Windows is a trademark of the Microsoft group of companies. Mac
is a trademark of Apple Inc., registered in the United States and other countries. Linux® is the registered
trademark of Linus Torvalds in the U.S. and other countries. Certain other product names, brand names,
and company names may be trademarks or designations of their respective owners.

CONTENTS
Setting up Your px12-400r Network Storage 1
Setup Overview 2
About the px12-400r Device Components 3
Front Panel 3
Drive Bay Detail 4
Rear Panel 5
Default Settings 5
Connecting the px12-400r to Your Network 6
Check Package Contents 6
Connecting the px12-400r 6
Important Rackmount Instructions 7
Safety Information 9
Accessing Your Device If It's Not Discovered 10
Direct Access Using the Device IP Address or Model Name 10
Discovery Using LenovoEMC Storage Manager 10
Discovering the px12-400r Using Your Computer OS 10
Setting Up Favorite Features 12
Setting Up Additional Features 13
Device Setup 14
Device Configuration Options 15
Network Settings 16
Manually Configuring Network Settings 17
Bonding NICs 18
VLAN Settings 19
Adding NICs to Your px12-400r Network Storage 20
Naming Your px12-400r Network Storage 22
Configuring Your px12-400r Network Storage to Use Active Directory 23
Enabling Active Directory Trusted Domains 24
Customizing Access to Features on Your px12-400r Network Storage 25
Enabling the Display of Features 25
Enabling Access Permissions to Features 25
Non-Administrator User Log In 26
Obtaining Alerts About Your px12-400r Network Storage 27
iii

Tracing Events on Your px12-400r Network Storage 28
Downloading the complete event log file 28
Obtaining System Status for Your px12-400r Network Storage 29
Space Usage 29
Control Panel 29
Device Information 29
Using Your px12-400r Network Storage in Various Time Zones 31
Setting the Display Language for Your px12-400r Network Storage 32
Printing Documents 33
Securing Your px12-400r Network Storage and Contents 34
How Do I Secure My px12-400r Network Storage? 35
Security Settings 36
Users and Groups 37
Users and Groups Overview 38
Users 38
Groups 38
How Access Rights Are Granted Using Groups in Workgroup Mode 38
Adding Users 39
Managing Users 40
Changing User Information 40
Changing User Access Permissions 41
Setting Quotas 41
Deleting Users 41
Adding Groups 42
Managing Groups 43
Removing a User from the Group 43
Changing Group Access Permissions 43
Deleting Groups 44
Using Active Directory Domain 45
Active Directory Users and Groups Overview 46
Managing Active Directory Users and Groups 47
Importing Users and Groups from Active Directory 47
Synchronizing with the Active Directory Controller 47
Changing Access Permissions 48
iv

Setting Quotas 48
Deleting an Active Directory User or Group 48
Managing Your px12-400r Network Storage with Local and Active Directory Users 49
Enabling Active Directory after Creating Users in Workgroup Mode 49
Logging in to Your px12-400r 49
Creating Local Users and Groups in Active Directory Mode 49
Creating Share Permissions for AD Users and Local Users 50
Switching to Workgroup Mode from Active Directory 50
Sharing Files 51
Sharing Overview 52
Interfaces for Sharing 52
Shares 53
What are Shares and How Do I Organize Content with Them? 53
Adding Shares 54
Managing Shares 55
Deleting Shares 57
Using Protocols to Share Files 58
What Are Protocols and How Do I Use Them to Share Files? 58
AFP File Sharing for Macs 58
Bluetooth File Sharing 58
FTP File Sharing 59
TFTP 59
NFS File Sharing 59
rsync: Synchronizing Files with Another Storage Device or Other Computers 60
Monitoring Your Device with an SNMP Management Tool 61
Managing File Sharing with Web Access (http/https) 62
WebDAV: Managing Files Using HTTP or HTTPS 62
Windows DFS: Creating a Distributed Windows File System 62
Windows File Sharing 63
Sharing Content through the Home Page 64
Sharing Your Content with the World 64
Adding a Custom Home Page 64
Automatically Sending Content to Multiple People at Once 66
How to Set Up an Email Distribution Active Folder 66
Sharing Content Using Social Media: Overview 67
Managing Your Content 68
v

Transferring Content to and from Your px12-400r Network Storage with Copy Jobs 69
Copy Jobs Limitations 69
Getting Content from a USB External Storage Device 70
Safely removing external storage 70
Drive Management 71
Managing Drives 72
Write Caching 72
Global Drive Management Settings 72
Storage Pool Information 73
Drive Status 73
Adding New Drives to Your px12-400r Network Storage 74
Storage Pool Management 76
Understanding How Your Content Is Stored 77
Storage Pools 77
Volumes 77
Adding and Managing Storage Pools 78
Adding a Data Storage Pool 78
Improving Performance with a Cache Storage Pool 80
Creating a Cache Storage Pool 80
Assigning a Cache Pool to a Volume 81
Volumes 82
Snapshots 82
Exposing/Unexposing the Snapshot 83
Restoring a Snapshot 83
Deleting a Snapshot 83
Displaying Shares in the Snapshot 83
Make the Snapshot Read-only 83
Changing Expose Mode 83
Adding and Managing Volumes 84
Deleting a Storage Pool 86
Changing RAID Protection Types 87
iSCSI: Creating IP-Based Storage Area Networks (SAN) 88
iSCSI Overview 89
Adding iSCSI Drives 90
vi

Enabling iSCSI Drives 90
Connecting to iSCSI Drives 90
Managing iSCSI Drives 91
Adding CHAP User Access to an iSCSI Drive 91
Deleting iSCSI Drives 92
Backing up and Restoring Your Content 93
Backup and Restore Overview 94
Backup of Data through RAID Protection 94
Backing up to and Restoring from Your px12-400r Network Storage 95
Backing up Macs with Time Machine 95
Copy Jobs Overview 95
Backing up Your px12-400r Network Storage 96
Copy Jobs 96
From: Settings 97
To: Settings 98
Setting a Schedule 98
Registering with Avamar for Backup and Restore 100
Backing up with Amazon S3 101
Restoring Files with Amazon S3 101
Backing up with LenovoEMC Personal Cloud 102
Restoring Files with Personal Cloud 102
Remote Access: Accessing Your px12-400r Network Storage From Anywhere in the
World 103
Remote Access Overview 104
Enabling Remote Access 105
Basic Option: Completing the Enable Remote Access Process 105
Premium Option: Completing the Enable Remote Access Process 105
Accessing Your px12-400r Network Storage Remotely 107
Personal Cloud: Accessing Your LenovoEMC Personal Cloud From Anywhere in the
World 108
What Is LenovoEMC Personal Cloud ? 109
LenovoEMC Personal Cloud Key Terms 109
Is My Content Secure? 110
Creating a LenovoEMC Personal Cloud 111
vii

Configuring Router Port Forwarding for Personal Cloud 112
Router Port Forwarding 112
Configuring Your LenovoEMC Personal Cloud 113
Enabling Internet Access to the px12-400r 113
Changing Personal Cloud Settings 113
Inviting People onto Your LenovoEMC Personal Cloud 114
Joining a Trusted Device to LenovoEMC Personal Cloud 115
Managing Trusted Devices on a Personal Cloud 116
Disconnecting Trusted Devices 116
Deleting Trusted Devices 116
Using Copy Jobs with a LenovoEMC Personal Cloud 117
Disabling or Deleting Your LenovoEMC Personal Cloud 118
Accessing Content Using Your LenovoEMC Personal Cloud 119
Informing Users What to Do with LenovoEMC Personal Cloud 120
Sharing Content Using Social Media 121
Sharing Content Using Social Media: Overview 122
Facebook 123
Flickr 124
YouTube 125
Share Content through LenovoEMC Personal Cloud 126
Media Management 127
Media Management Overview 128
Scanning for Media Content 128
Media Services Capabilities and Limitations 129
Sharing Media Content over the Internet 130
Enabling Internet Access from the Media Server Page 130
Media Aggregation 131
Enabling Media Aggregation 131
Social Media Sharing 132
Streaming Music, Movies, and Pictures 133
Example: Setting up iTunes 133
Example: Setting up Xbox 360 133
Photos 134
Photos Overview 134
Streaming Pictures 134
viii

Creating a Slideshow on the Device Home Page 134
Automatically Resizing Your Photos 134
Getting Pictures from Your Camera 135
Music 136
Music Overview 136
Streaming Music 136
Videos 137
Video Capabilities Overview 137
Streaming Movies 137
Adding Applications to Your px12-400r Network Storage 138
Application Overview 139
Application Installation 140
Application Manager 141
Starting or stopping an application 141
Adding applications 141
Removing applications 141
Software Updates 142
Auto-update process: installing a device software update 142
Manual update process: installing a device software update 142
Backing up and Recovering Your px12-400r Network Storage Settings 144
Backing Up Your px12-400r Network Storage Settings 145
Backing up Device Configuration 145
Restoring a Configuration Backup 145
Hardware Management 146
Energy Saving 147
Power Down Drives 147
Wake On LAN 147
Creating a Power Schedule 147
Factory Reset 148
UPS Management 149
Troubleshooting Routers 150
Enabling the DMZ 150
Configuring Port Forwarding on Double NAT Networks 151
Bridging the Secondary Router 151
ix

Bridging the Primary Router 151
Additional Support 153
How to Get Help 154
Support 155
Legal 156
Open Source 157
Warranty Information 158
Limited Warranty Notice 158
Limited Warranty for Iomega Products 158
Regulatory Information 159
Federal Communication Commission Interference Statement 159
Canadian Verification 159
European Union conformity 159
Important WEEE Information 160
European Union RoHS 160
India RoHS 160
California Perchlorate Information 160
Polyvinyl Chloride (PVC) Cable and Cord Notice 160
Recycling and environmental information 161
Export classification notice 161
Copyright and Trademark Information 162
x

CHAPTER 1
Setting up Your px12-400r
Network Storage
Setting up Your px12-400r Network Storage 1

Setting up Your px12-400r Network Storage
Setup Overview
It's easy to set up your px12-400r Network Storage:
● Remove it from the box, connect it to your network switch or hub, and then power it up.
● Launch a web browser and either enter the Setup URL, http://setup.lenovoemc.com, or use the
device IP address or model name to access the device directly.
● Device Setup launches automatically the first time you access your device and guides you
through selecting the configuration options that best meet your needs.
Refer to the following sections for information on the device components and connection instructions.
About the px12-400r Components
Connecting the px12-400r to Your Network
Safety Information
Accessing Your Device If It Is Not Discovered
By default, the px12-400r will attempt to acquire an IP address from DHCP, If there is not a
DHCP server available on the network, the px12-400r will use an IP address in the self-assigned
APIPA range (169.254.x.x).
2 Setup Overview
Setting up Your px12-400r Network Storage
About the px12-400r Device Components
Front Panel
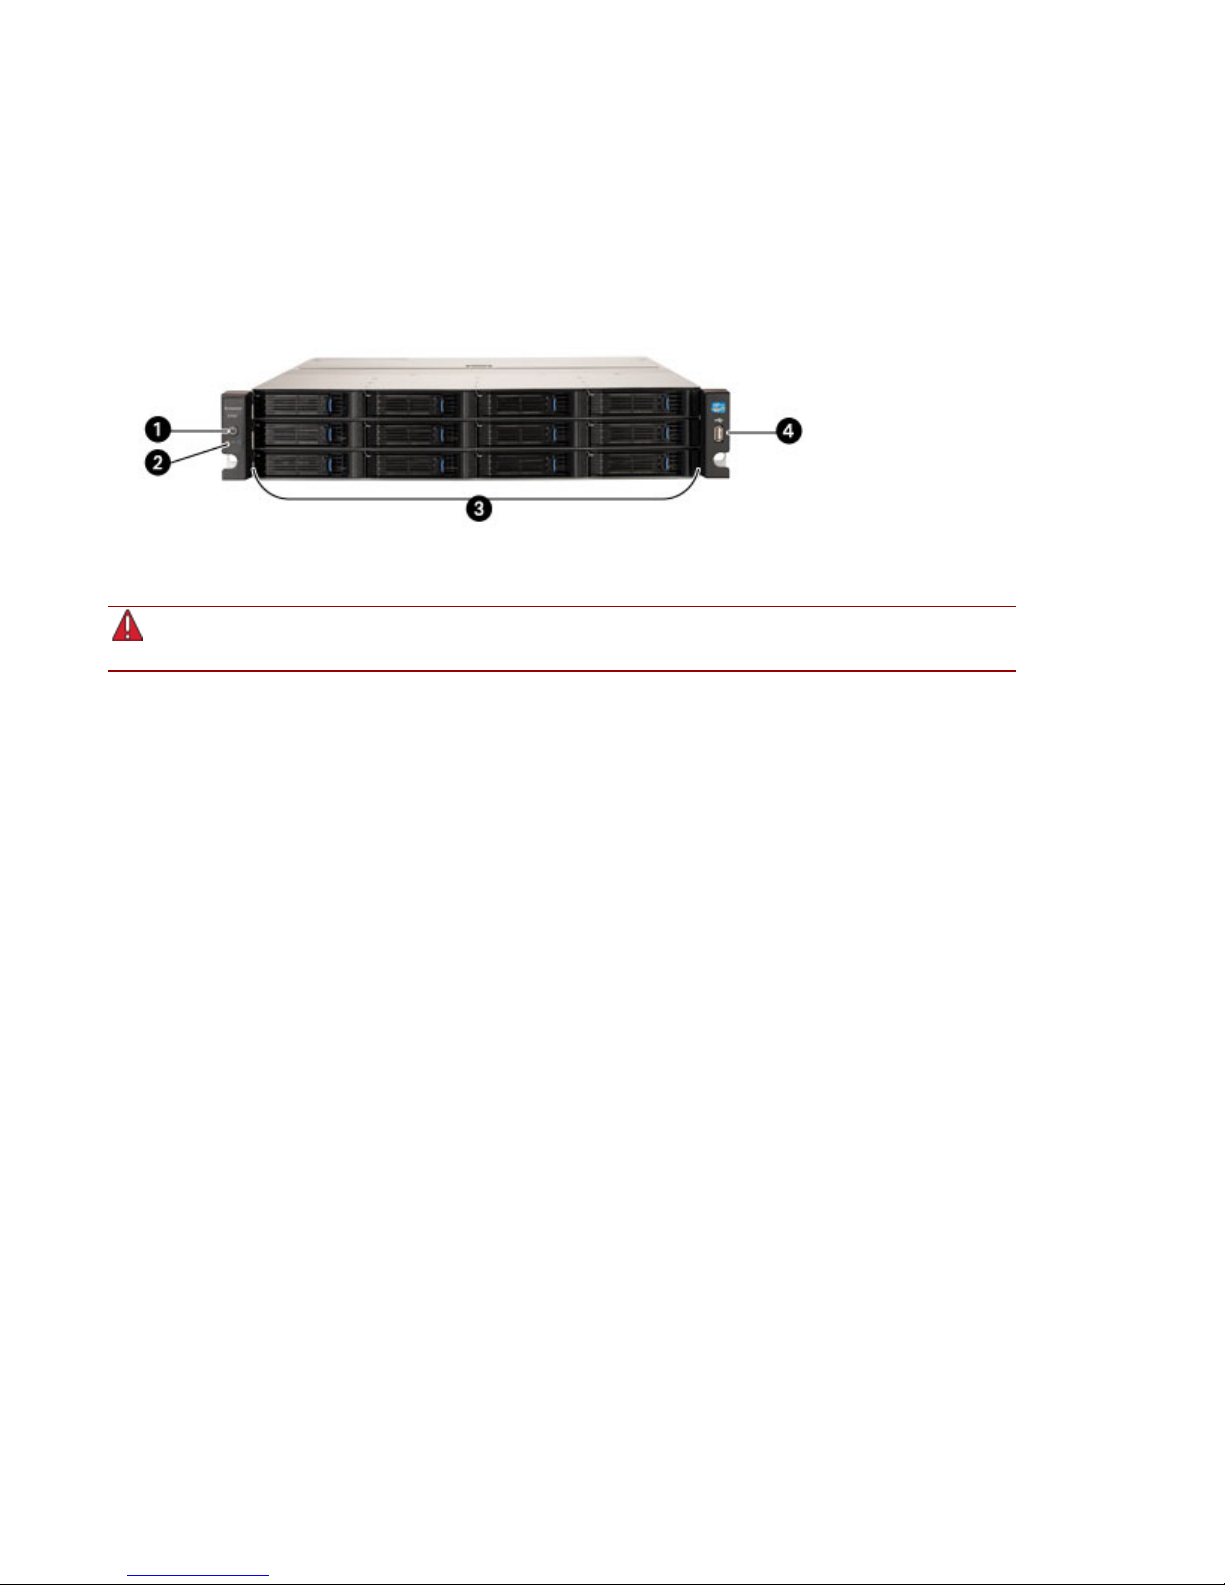
Status Indicators, Buttons and Ports
1. Power button — Press and release to power the px12-400r on or off. When the px12-400r is powered up,
pressing the power button for less than 4 seconds will result in a graceful system shutdown.
Holding the power button for 4 seconds will result in a forced shutdown and could cause data loss
if data transfers are in process.
2. Power / Status Indicator —
● Solid blue — unit is powered on; no faults
● Flashing blue — unit is initializing/booting or shutting down
● Flashing amber — indicates a system failure: power supply, fan failure, or drive failure. Use the
px12-400r Management Console to view details.
3. Drive bays — The px12-400r Network Storage has 12 user-serviceable drive bays. See Drive Bay Detail
below for additional information.
4. USB 2.0 connector — Supports devices such as USB storage devices and printers.
About the px12-400r Device Components 3
Setting up Your px12-400r Network Storage
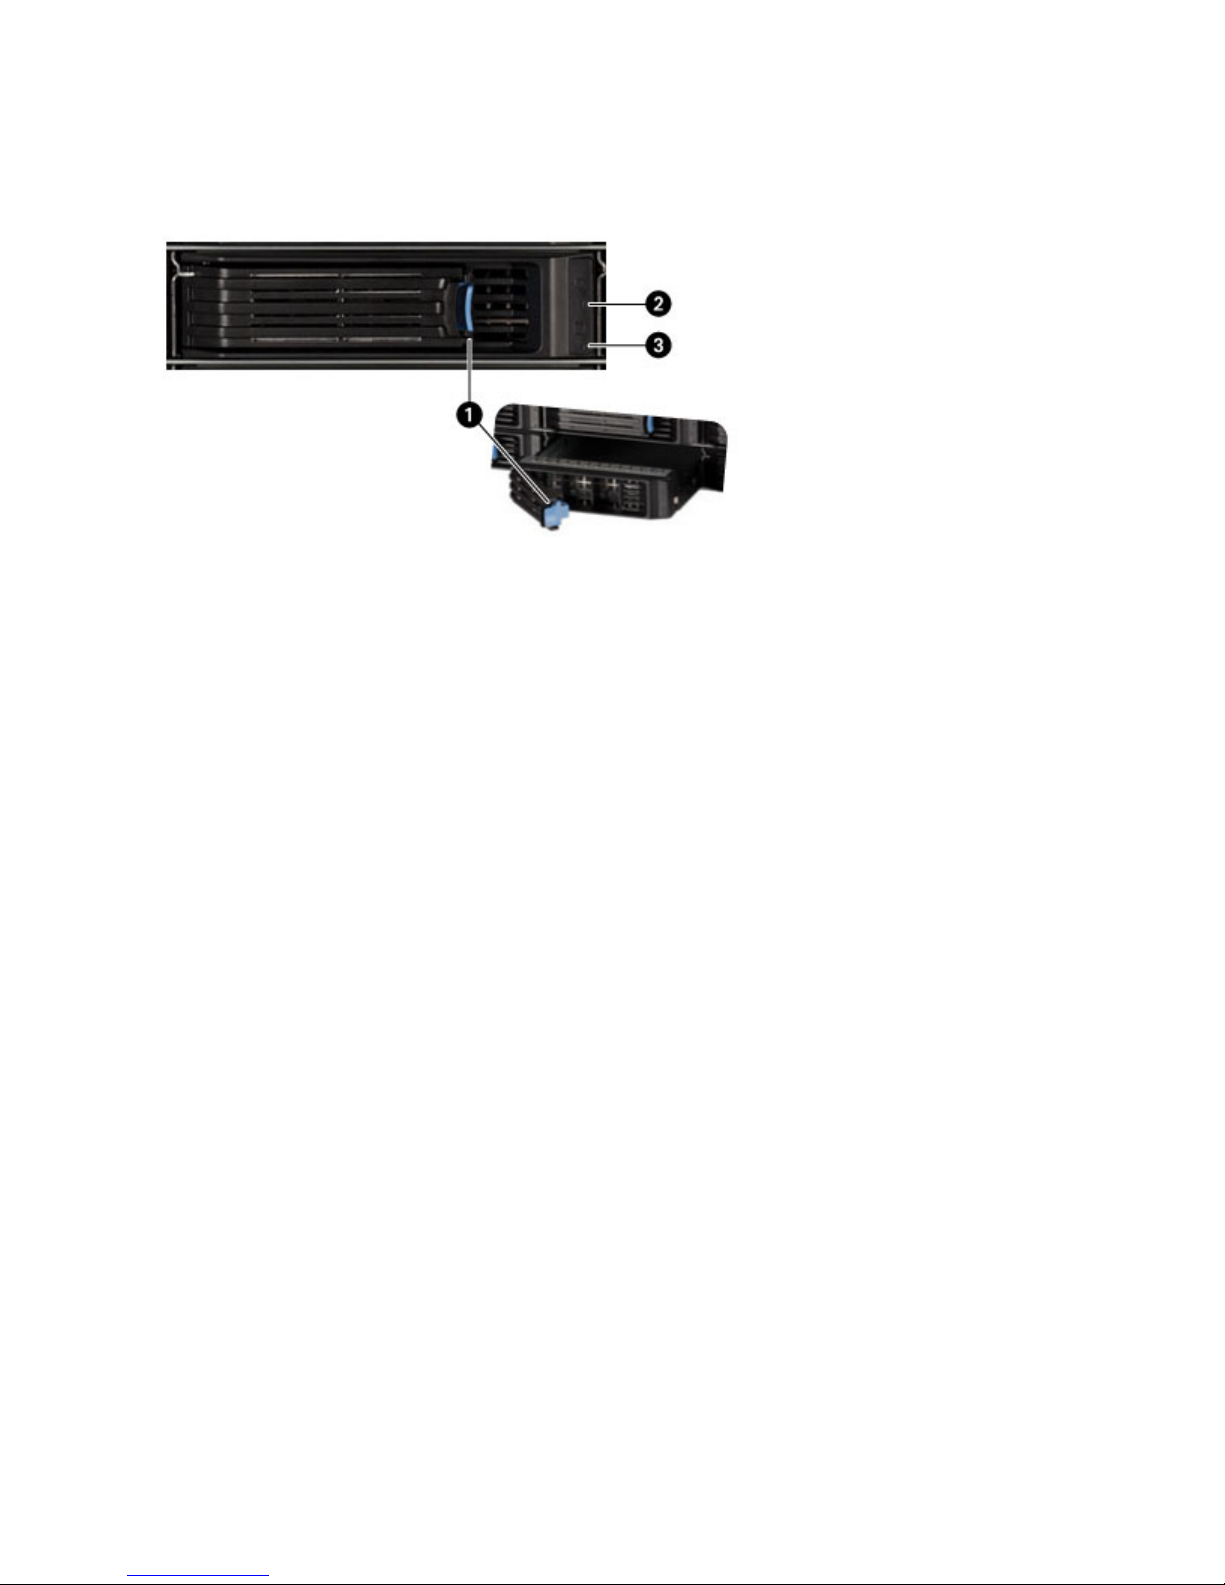
Drive Bay Detail
1. Drive Sled Release Latch — Press the release button and pull the latch to release the drive sled.
Refer to the list of qualified hard disks on the LenovoEMC support site at
www.iomega.com/nasdisks before adding new drives.
2. Drive Status Indicator —
● Solid blue — drive is functioning normally; no faults
● Flashing blue — drive is in RAID rebuild mode
● Solid red — drive failure.
3. Drive Activity Indicator —
● Flashing white — activity in process for the drive’s RAID set
● Off — no activity to the drive’s RAID set
4 About the px12-400r Device Components
Setting up Your px12-400r Network Storage
Rear Panel
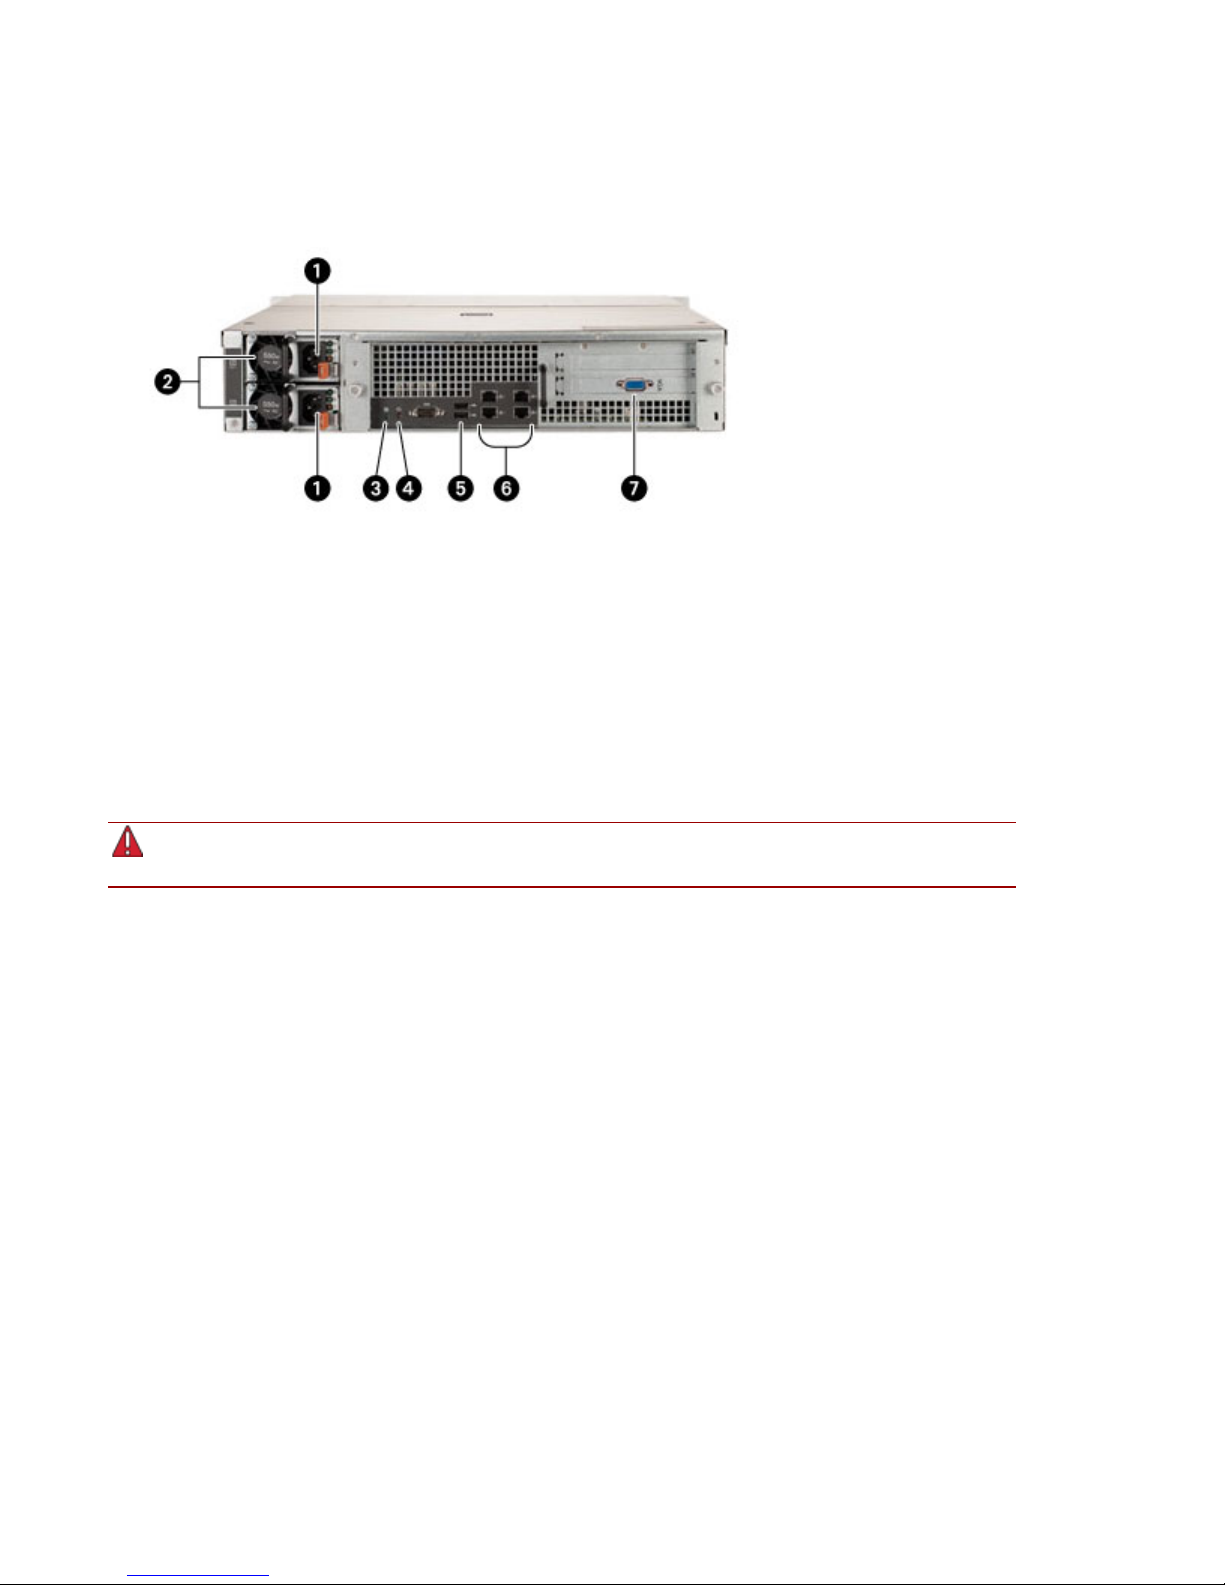
1. AC Power Connectors — Connect both AC power connectors to an Uninterruptible Power Supply
(UPS) to provide redundant power for your px12-400r. The AC power supply will automatically switch to
the correct voltage for your region.
2. Power Supply — The px12-400r has redundant hot-swappable power supplies. If one power supply
fails, the other power supply will immediately take over. For maximum time-up, a failed power supply can
be replaced while the px12-400r is running.
3. System ID LED — Flashes blue when the Blink Lights feature is enabled in the px12-400r Management
Console. This light is used to identify a specific px12-400r in installations with multiple devices.
4. Reset Button — Hold the Reset button for four seconds to reset security and network settings. This
allows you to regain access if network settings are incorrect or you’ve forgotten your password.
The reset button does not initiate a full factory reset. To perform a full factory reset, select Factory
Reset from the System page in the px12-400r Management Console.
5. USB 2.0 connectors — Supports devices such as USB storage devices and printers.
6. Gigabit Ethernet Ports — High-speed Ethernet connectors that automatically detect your network
speed (10/100/1000Base-T).
7. VGA output connector — Connect a monitor for video surveillance applications.
Default Settings
● IP Address — If no DHCP server is found on your network the px12-400r will get a self-assigned
IP address in the 169.254.x.x range.
● Device Name — The default name for your px12-400r Network Storage is px12-400r. If there is
more than one px12-400r on your network, a number is added to the name, such as px12-400r-1
px12-400r-2, and so on.
● Default Shares — Device setup will create default Shares on your px12-400r. The specific default
Shares will vary depending on the options you select during device setup. You can create
additional Shares as desired.
About the px12-400r Device Components 5
Setting up Your px12-400r Network Storage
Connecting the px12-400r to Your Network
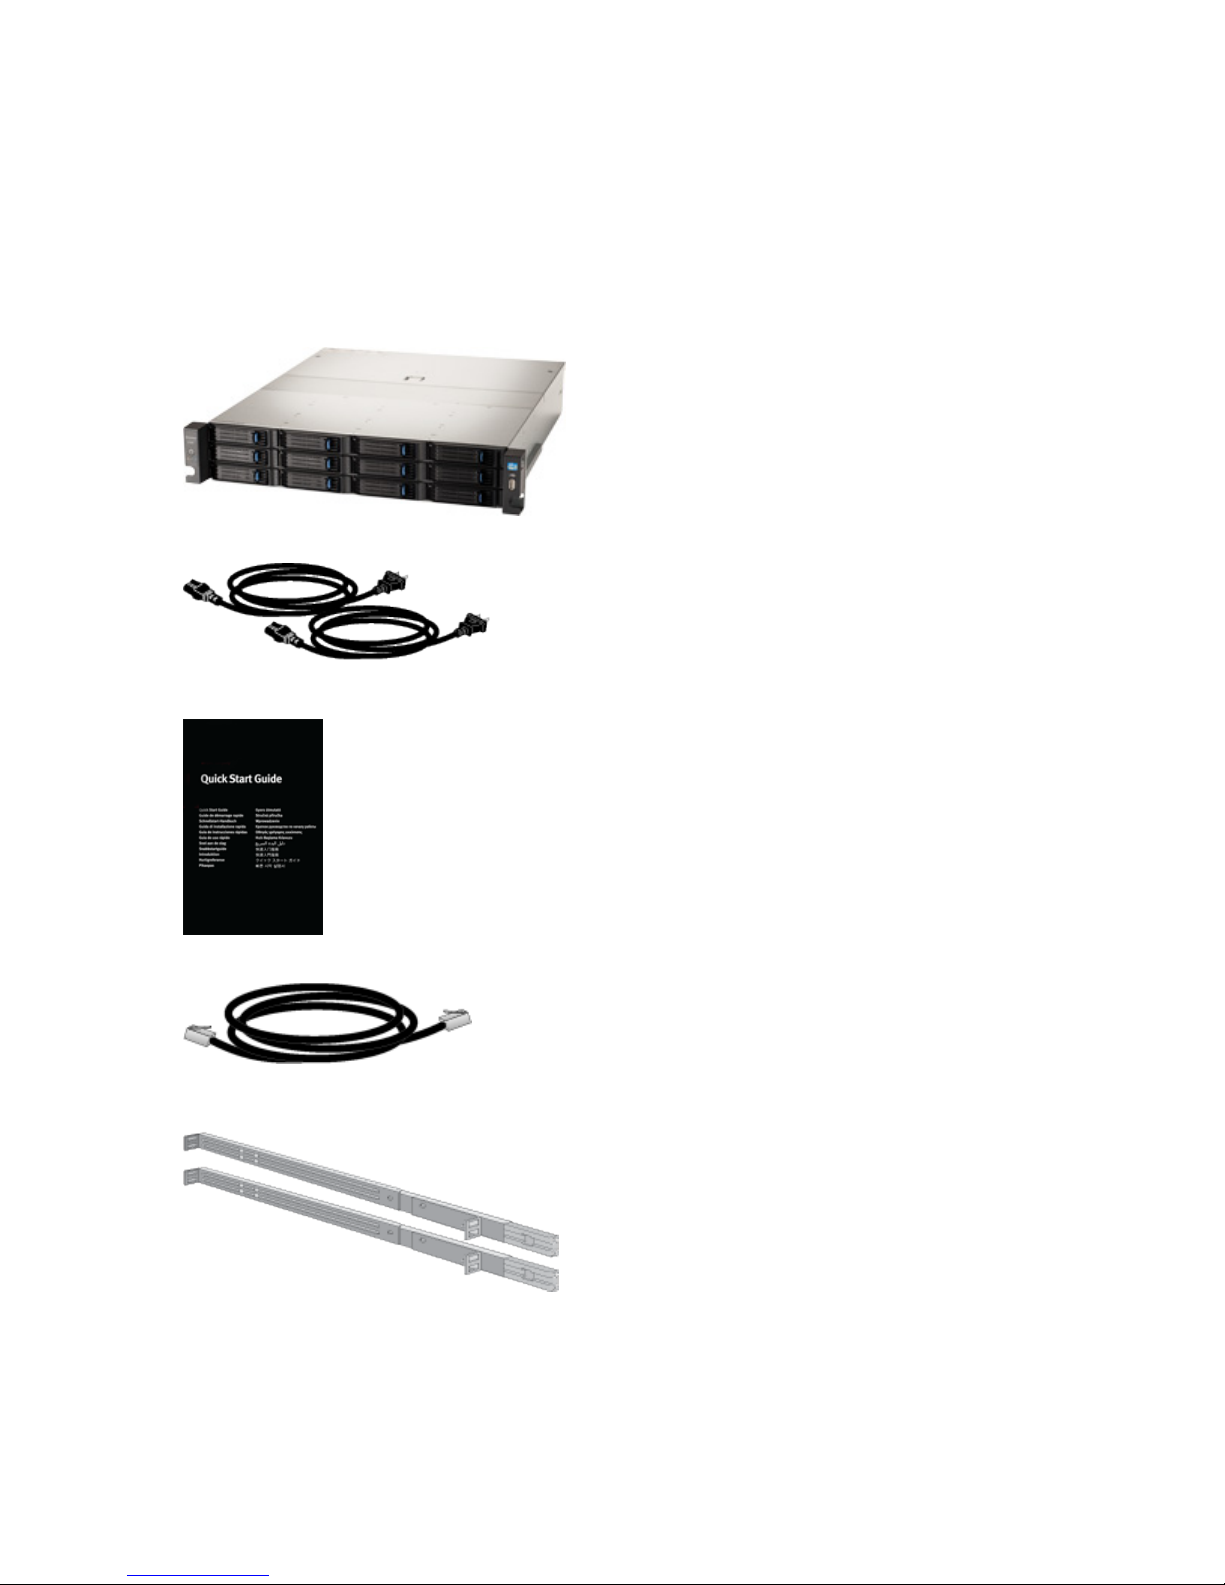
Check Package Contents
Verify that the box contains the following items:
1. px12-400r (models may vary)
2. Power Cables
3. Quick Start Guide
4. Ethernet Cable
5. Rail Kit (models may vary)
Package contents may vary.
Connecting the px12-400r
If you have purchased more than one px12-400r, complete all steps on one device before setting up
additional devices.
6 Connecting the px12-400r to Your Network

Setting up Your px12-400r Network Storage
1. Make sure at least one hard drive is installed in the px12-400r. Refer to
http://support.lenovoemc.com for a list of drives approved for use with the px12-400r.
2. Use the included network cable to connect the px12-400r to a network hub or switch.
3. Connect the included power cords to the power supply connectors on the back of the px12-400r
and to an Uninterruptible Power Supply (UPS). This provides redundant power for your px12-400r.
4. Power on the px12-400r.
5. Your px12-400r should power on automatically.
6. To set up your px12-400r, open a web browser and go to http://setup.lenovoemc.com, or enter the
device IP address or the model name "px12-400r" in your computer's web browser. Device Setup
will launch automatically the first time you access your px12-400r and guide you through
configuring basic setup options.
On a Mac use "local.px12-400r" to access Device Setup using the model name. For best results,
use a computer that is connected to the same subnet or network segment as the px12-400r. If
Device Setup doesn't launch, see Accessing Your Device If It's Not Discovered.
7. OPTIONAL: if desired, install the LenovoEMC Storage Manager and Twonky Media Server
software.
LenovoEMC Storage Manager will automatically scan your network and connect to available
Shares on the px12-400r.
Installing the Twonky Media Server software enables you to manage media aggregation on your
client computer.
Mac Users: When you install LenovoEMC Storage Manager, its icon will appear on the Menu
Bar. Shares on the px12-400r will mount and appear on the Mac Desktop.
NOTE: If the px12-400r Shares do not appear on the Mac Desktop, open Finder Preferences
and check Connected Servers under "Show these items...". You can also find the Shares listed
under Shared when you open a Finder window.
PC Users: When you install LenovoEMC Storage Manager, its icon will appear in the System
Tray. Shares on the px12-400r will automatically be assigned a drive letter and will be available in
the Network section in Windows Explorer or under Computer Network Locations.
If you receive a message from your operating system's firewall alerting you of network activity
while installing the software, be sure to unblock communications.
If you do not install the LenovoEMC Storage Manager, see Discovering the px12-400r Using Your
Computer OS for information on how to manually connect Shares on the device.
Important Rackmount Instructions
Please observe the following requirements when the px12-400r is installed in a closed or multi-unit rack
assembly:
● Elevated Operating Ambient - The operating ambient temperature of the rack environment may
be greater than room ambient. Ensure the installation environment does not exceed the maximum
ambient temperature specified for the px12-400r.
● Reduced Air Flow - Installation of the px12-400r in a rack should be such that the amount of air
flow required for safe operation of the equipment is not compromised.
Connecting the px12-400r to Your Network 7

Setting up Your px12-400r Network Storage
● Mechanical Loading - Mounting of the px12-400r in the rack should avoid uneven mechanical
loading that could result in a hazardous condition.
● Circuit Overloading - Consideration should be given to the connection of the px12-400r to the
supply circuit and the effect that overloading of the circuits might have on over-current protection
and supply wiring. Appropriate consideration of equipment nameplate ratings should be used
when addressing this concern.
● Reliable Grounding - Ensure the installation maintains reliable grounding of rack-mounted
equipment. Particular attention should be given to supply connections other than direct
connections to the branch circuit (e.g. use of power strips).
8 Connecting the px12-400r to Your Network

Setting up Your px12-400r Network Storage
Safety Information
Observe the following guidelines when using your px12-400r Network Storage:
● Follow all instructions marked on the px12-400r and in the documentation.
● Use only the power supply cables provided with the px12-400r. Always use the appropriate power
supply cables for your country.
● Unplug the px12-400r before cleaning. Do not use liquid or aerosol cleaners. Use a damp cloth for
cleaning.
● Do not use the px12-400r near water. Do not spill liquid on or into the px12-400r.
● Do not place the px12-400r on an unstable surface.
● Do not place the px12-400r near or on a radiator or heat register.
● Openings in the px12-400r are provided for fans and air ventilation and should not be blocked or
covered. Make sure the px12-400r has ample ventilation (at least 6 inches or 127 mm) in front and
behind the unit.
● Do not walk on the power cord or allow anything to rest on it.
● There is a danger of explosion if the coin cell lithium battery is incorrectly replaced. Replace only
with the same or equivalent type recommended by the equipment manufacturer. Dispose of used
batteries according to local, state, regional, and federal regulations.
Under any of the following conditions, unplug the px12-400r from the wall outlet and contact technical
support:
● The power cord or plug is damaged.
● Liquid has been spilled into the device.
● The device does not function properly when the operating instructions are followed.
● The device was dropped or the exterior enclosure is damaged.
Safety Information 9

Setting up Your px12-400r Network Storage
Accessing Your Device If It's Not Discovered
If your px12-400r is not discovered when you enter the Setup URL, you can use one of the following
options to access it. Device Setup will launch automatically the first time you access your device.
Direct Access Using the Device IP Address or Model Name
You can access the device management interface directly using your computer's web browser by entering
either the device IP address or the model name in the URL bar.
● The default name for your px12-400r Network Storage is px12-400r. If there is more than one
px12-400r on your network, a number is added to the name, such as px12-400r-1 px12-400r-2, and
so on.
Discovery Using LenovoEMC Storage Manager
You can install LenovoEMC Storage Manager from the LenovoEMC web support site. Select your px12-
400r from the LenovoEMC products on the support home page, and then look for LenovoEMC Storage
Manager under Downloads and Updates.
Installing LenovoEMC Storage Manager on your client computer helps you discover the px12-400r on your
network. It also makes it allows multiple computers on your network to interact with the px12-400r.
Discovering the px12-400r Using Your Computer OS
You can access the management interface for your px12-400r using your client computer's operating
system as described by these methods for Windows PCs or Macs.
Windows 8:
1. Click File Explorer on the task bar.
2. You should see your px12-400r listed under Other Devices.
3. Right-click on the icon for your px12-400r and select View device webpage to launch the webbased device management interface.
4. You can also select Properties from the right-click menu to see the device webpage URL. Click
the URL to launch the device management interface.
The webpage URL shows the IP address assigned to your px12-400r.
Windows 7 and Vista:
1. Click Start > Computer > Network.
2. You should see your px12-400r listed under Other Devices.
3. Double-click the device icon to access the px12-400r device management console.
10 Accessing Your Device If It's Not Discovered

Setting up Your px12-400r Network Storage
Windows XP:
1. If you have not enabled UPnP Discovery, click Start > Help and Support.
2. In the Help and Support browser, search for UPnP and follow the steps from “Install the UPnP
framework”.
3. After UPnP is enabled, open Windows Explorer and in the Folders view, expand My Network
Places.
4. You should see your px12-400r listed.
5. Double-click the device icon to access the px12-400r device management console.
Mac:
1. Open a new Finder window.
2. Select All... under Shared on the left side of the Finder window,
3. Double-click your px12-400r to login to the device management console.
After you complete setup for your px12-400r, you can connect to device Shares by selecting
Go > Connect to Server and entering either afp://<device IP address> or smb://<device
IP address>.
Accessing Your Device If It's Not Discovered 11

Setting up Your px12-400r Network Storage
Setting Up Favorite Features
After you complete device setup, the px12-400r management console will open and display default
Favorite Features based on options you selected during setup.
Select All Features to see additional features available on your px12-400r. If you want to add any of these
to your Favorites, just click and drag the icon from the All Features screen to the Favorite Features tab.
You can access the user interface, setup options, and help information for any feature by clicking its icon
under either Favorite Features or All Features. You can find information in this user guide on any available
feature by searching for the feature name using the PDF Find feature:
1. If your PDF Reader doesn't display a Find box by default, press Ctrl-F under Windows or Apple-F
on a Mac.
2. Enter a feature name, keyword, or text string for the information you want to find.
3. Select Next or use the drop-down menu for advanced search options.
12 Setting Up Favorite Features

Setting up Your px12-400r Network Storage
Setting Up Additional Features
After completing device setup, you may want to configure additional features of your px12-400r. Refer to
the sections under Device Configuration Options for information on configuring many basic features.
More complex features are covered by other sections of this manual.
LenovoEMC Personal Cloud
You can set up a Personal Cloud to allow invited users access to content on your px12-400r. This content
can be in private Shares that are exclusive to the users who join the Personal Cloud, which adds an
additional layer of security. In addition, you may want to join other trusted devices to the Personal Cloud,
so that content on those devices can be made available to Personal Cloud users. For more information
about Personal Cloud, refer to the Personal Cloud overview.
File Sharing
Setting up File Sharing enables you to add content to your px12-400r and make it available in a wide variety
of ways, including content features such as Active Folders and media sharing. For more information, refer
to the Sharing Overview.
Security is automatically enabled when you setup your px12-400r and all Shares are secured by
default.You can create users on your device and set access privileges as desired to limit data
access to Shares. You can also make Shares public if you want them to be accessible by
everyone. See Securing Your Device for more information.
Setting Up Additional Features 13

Setting up Your px12-400r Network Storage
Device Setup
Device Setup runs automatically when you first access the px12-400r and steps you through configuring
basic device options. If you want to change these configuration settings later on, you can run setup again
by selecting the Device Setup icon under All Features in the px12-400r device management console.
You can also manually configure options for any feature on your px12-400r by selecting that feature's icon.
Other sections in this manual provide information on settings options for the features available on your
px12-400r.
If you run Device Setup after completing initial setup, it will not affect any content stored on your
px12-400r or change other configuration options you have set.
Some processes on your px12-400r also use the setup steps to confirm administrator
authorization and configure basic storage options, such as file system and RAID protection. This
will not affect other settings or data on your px12-400r.
14 Device Setup

CHAPTER 2
Device Configuration Options
Device Configuration Options 15

DeviceConfiguration Options
Network Settings
The Network feature enables you to view and change the network configuration settings on your px12400r. You can use Network to identify your DNS servers and WINS servers and how your system's IP
address is determined. Most system IP addresses and other network settings can normally be configured
automatically.
If you want to change the default network settings for your px12-400r, refer to Manually Configuring
Network Settings.
You can also use the Network feature to configure the following features on your px12-400r.
Bonded NICs
If your px12-400r has multiple network interface cards (NICs), you can bond those NICs. Refer to Bonding
NICs.
VLAN
Each NIC in your px12-400r can be added to up to four Virtual LANs (VLAN). For information on adding a
NIC to a VLAN, refer to VLAN Settings.
Enabling Jumbo Frame Support
You can enable jumbo frames for each NIC in your px12-400r by expanding the Information section for a
NIC and entering a jumbo frame size in the Jumbo Frame field. If you do not want jumbo frame support,
leave the field blank. Jumbo frame support is useful for transferring large files, such as multimedia files,
over a network. Jumbo frame support increases transfer speed by placing large files in fewer data packets.
It also reduces the demand on the device hardware by having the CPU process more data in fewer data
packets.
Jumbo frame support should only be enabled if you are sure your network is jumbo-frame compatible and
all network devices have been configured to support jumbo frames. It is recommended that you confirm all
network interface cards (NICs) are configured to support jumbo frames before enabling this feature.
16 Network Settings

DeviceConfiguration Options
Manually Configuring Network Settings
Changing Network Configuration Settings
1. Click the Network icon to open the Network feature.
2. Click Modify network settings to manually configure settings that apply to all network
interfaces.
3. To manually set static IP addresses, remove the check mark for Automatically configure DNS,
WINS, and all IP addresses (DHCP).
DNS Servers — enter the IP addresses of the DNS (Domain Name System) servers. DNS is
used for translating the domain name to IP addresses.
WINS Servers — enter the IP addresses of the WINS server.
4. Bonding Mode applies if you want to bond two or more network interfaces on your px12-400r.
The default setting is Adaptive Load Balance. Refer to Bonding NICs for additional information on
bonding modes.
5. To connect your px12-400r to a proxy server, check Use proxy settings and enter proxy IP
address, port number, and the proxy username and password.
6. Click Apply to save your settings.
7. To set a static IP address, expand the Network Interface section and remove the check mark for
Automatically acquire network addresses (DHCP).
If this box is checked and a DHCP server is not available on the network, the device will autoassign an IP address in the 169.254.x.x range.
8. Complete the following settings to assign a static IP address for the selected network interface:
● IP Address — the static IP address for the px12-400r. Use an available IP address in the range
used by the LAN.
● Subnet Mask — the subnet that the IP address belongs to. The default value is 255.255.255.0.
● Gateway — enter the gateway IP address in this field.
9. Click Apply to save your settings.
Additional Network Configuration Options
For information on adding a NIC to a VLAN (Virtual LAN), refer to VLAN Settings.
For information on bonding multiple network interface cards (NICs), refer to Bonding NICs.
Network Settings 17

DeviceConfiguration Options
Bonding NICs
Bonding network interface cards (NICs) is a way to provide redundancy for your px12-400r on the network.
If one NIC should fail, your px12-400r will remain accessible on the network if that NIC is bonded to others.
Depending on the bonding mode selected, it can also increase bandwidth.
You can bond two or more network interface cards (NICs) in your px12-400r.
Use the following procedure to bond NICs:
1. Open the Network feature and click Modify network settings.
2. Use the drop-down menu to select the Bonding Mode you want to use:
● Adaptive Load Balance:
This mode increases bandwidth by distributing the load across the bonded NICs. Adaptive
Load Balance does not require any switch or router support because the bonding is done by
the px12-400r, and LifeLine's bonding driver takes care of network traffic to support the
bonding. Adaptive Load Balance is the default bonding mode.
● Link Aggregation:
This mode increases bandwidth by distributing the load across multiple ports in a switch. Link
Aggregation requires an 802.3ad compatible network switch.
● Failover:
Failover mode protects network connectivity for your px12-400r in case a NIC fails. In Failover
mode, only one NIC in the bond is active; other NICs in the bond are passive. If the active NIC
fails, another NIC in the bond becomes active and maintains network connectivity. Failover
mode does not require any switch support, and it does not provide any bandwidth increase.
3. Click Apply to save your setting.
4. In the Network Interface table, expand the number for one of the NICs you want to bond, and then
expand the Bond Network Interface section.
5. Check the box under Bond next to each NIC you want to bond to the selected NIC. For example,
if you expanded NIC 1, and your configuration includes four NICs, you could bond NIC 1 to NIC 2,
3, and/or 4.
6. Click Apply to save your settings.
The section updates and displays the NICs that are bonded to the selected NIC.
Unbonding NICs
1. To unbond a NIC, uncheck the box next to the bonded NIC.
2. Click Apply to save your settings.
18 Network Settings

DeviceConfiguration Options
VLAN Settings
A VLAN (Virtual Local Area Network) is a network of devices that are joined into one broadcast domain,
even if the devices are not physically connected to each other. VLANs are useful for creating smaller
networks within a larger LAN; for example, a legal department in a company might be on its own VLAN
because it has sensitive documents that only certain personnel should have access to. The smaller
networks that VLANs create do not require any additional physical resources, such as additional cabling.
Your px12-400r Network Storage can be configured to support VLANs by connecting the corresponding
physical NIC to the trunk port of an L2/L3 switch.
VLAN is configured for each NIC, but it is not supported on bonded NICs. If a NIC is bonded, you must
unbind it first to configure it for a VLAN.
Adding a VLAN
1. To add a VLAN, expand the VLAN Settings section of a NIC.
2. Click Add VLAN.
3. Enter a VLAN ID value between 2 and 4094. You can enter up to 4 VLAN IDs for each NIC. A
VLAN can obtain its network settings from DHCP, or you can uncheck DHCP and enter the IP
address, subnet mask, and gateway manually.
4. Refer to Network Settings on page 16 for information about jumbo frames.
5. Click Apply to save your changes.
Deleting a VLAN
In the VLAN Settings section click Delete to delete the VLAN.
Network Settings 19

DeviceConfiguration Options
Adding NICs to Your px12-400r Network Storage
You can add an accessory high performance (10GbE) network interface card to your px12-400r, which
provides two additional NICs. This provides more ports you can connect to different physical networks and
increases flexibility when connecting to a single network or multiple networks. The additional external
NICs can be bonded with each other or with internal NIC ports. You can also use the added NICs to
configure your px12-400r to have multiple IP addresses and create more VLANs.
Wake on LAN is not supported for add-on NICs. For more information on that setting, refer to
Energy Saving
To add an accessory network interface card, follow this procedure:
1. Shut down your px12-400r and remove its cover.
2. Locate a vacant expansion slot at the back of the px12-400r and remove the expansion slot cover.
Save the expansion slot cover screw.
3. Insert the Ethernet card into the expansion slot and push the connector on the card firmly into the
slot until it is completely seated. Make sure the card bracket is flush against the px12-400r
chassis.
4. Replace the slot cover screw.
5. Replace the cover on the px12-400r and power it on.
The px12-400r Network Storage automatically recognizes the new network interface and lists the added
NICs on the Network page.
Special Considerations when Bonding 10GbE NICs
The two 10Gb ports are the only connected (active) NICs:
● All bonding modes are fully supported. As with any bonded NIC, you can select only one bonding
mode (Adaptive Load Balance, Link Aggregation, or Failover).
● 10Gb transfer speed will always be used for the bonded NIC (if supported by a 10Gb network
switch).
● If the selected bonding mode is Adaptive Load Balance or Link Aggregation, the bonded NIC will
provide 2 x 10Gb bandwidth, so it will be able to transfer twice as many network packets
simultaneously. (Network transfer speed remains 10Gb.)
10Gb and 1Gb ports connected and bonded in failover mode:
When bonding multiple 10Gb and 1Gb ports, Failover is the only supported bonding mode. In Failover
mode, only one of the bonded NICs is active. All other connected NIC ports will be used as backup for the
primary NIC.
● Network transfer speed for the px12-400r will be determined by the primary NIC in the bonded
configuration. This means the transfer speed will be 1Gb if a 1Gb port is the primary NIC, even if
the bonded configuration includes a 10Gb port.
The primary NIC is the first network interface selected when configuring the bonded NIC.
● If the primary 10Gb NIC fails, one of the backup NICs will become the active (primary) interface.
If this is a 1Gb NIC, the network speed for the px12-400r will be reduced to 1Gb.
Some 10Gb and 1Gb ports bonded in Failover mode with other 1Gb ports also connected:
20 Network Settings
 Loading...