

Lenovo PHAB2 Safety, Warranty & Quick Start Guide [en, ar, bg, cs, da, de, el, es, et, fi, fr, he, hr, hu, id, it, kk, ko, lt, lv, nb, nl, pl, pt, ro, ru, sk, sl, sr, sv, th, tr, uk, ur, vi, zh]

Lenovo PHAB2
Safety, Warranty & Quick Start Guide
Lenovo PB2-650M
Read thi s guide c areful ly before u sing you r device.

Reading before using your device
Reading first - regulatory information
Be sure to re ad the Regu latory Notice for your country or region before using the
wirele ss devi ces con tained i n your dev ice. To obtain a PD F versi on of the Regulatory
Notice, refer to the “Downloading publications” sectio n below. Some regulatory
information is also available in Settings > About phone > Regulatory information on
your tablet.
Getting support
To get support on network services and billing, contact your wireless network
operato r. To learn how to use you r devic e and view i ts techn ical sp ecific ations, g o to
http://support.lenovo.com.
Downloading publications
Electronic versions of your publications are available from http://support.lenovo.com.
To download the publications for your device, go to http://support.lenovo.com and
follow the instructions on the screen.
Accessing your User Guide
You r Use r Guide c ontai ns detai led info rmatio n about yo ur devic e. Go to
http://support.lenovo.com and follow the instructions on the screen.
Legal notices
Lenovo an d the Leno vo logo are t radem arks of Le novo in the Un ited Sta tes, other
countr ies, or bo th.
Other c ompany, prod uct, or se rvic e names m ay be trad emarks o r serv ice mar ks of
others.
Manufa ctured u nder li cense f rom Dolby L aboratories. D olby, Dolby Atm os, and th e
double-D symbol are trademarks of Dolby Laboratories.
LIMITED A ND RESTR ICTED RIG HTS NOTICE: I f data or so ftwa re is deli vered pu rsuan t
a General Services Administration “GSA” contract, use, reproduction, or disclosure is
subjec t to restri ctions s et fort h in Contr act No. GS- 35F-05925.
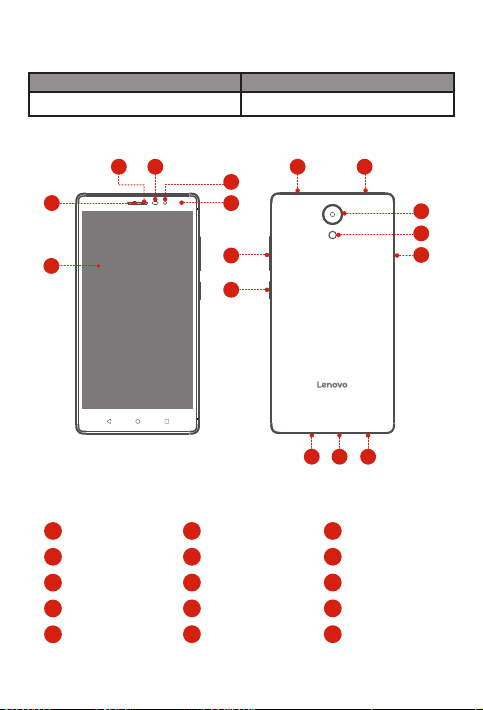
Lenovo PHAB2 overview
Model Version
Lenovo PB2-650M
WLAN + LTE (Voice)
1
2
Receiver
1
Front camera
4
Volume buttons
7
Microphone
10
Flash
13
5 66
4
3
7
8
Touch screen
2
Light/Proximity sensor
5
8
On/Off button
Speaker
11
Rear camera
14 15
1
11 10
9
Indicator
3
Anti-noise microphones
6
Micro USB connector
9
Card tray
12
Headset jack
15
14
13
12
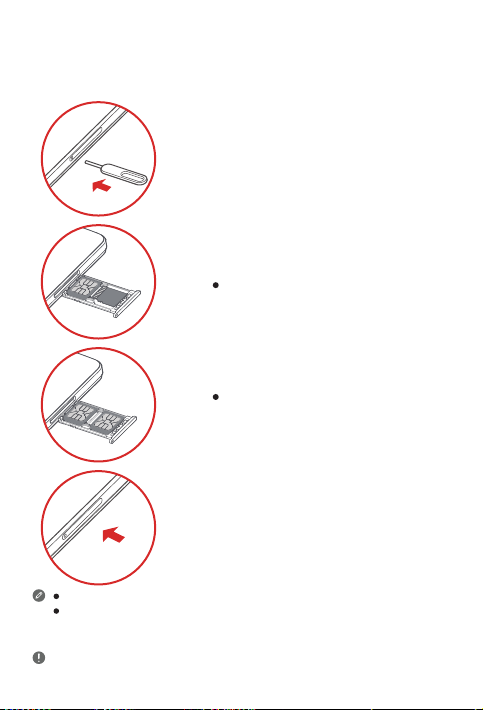
Preparing your device
Install the Micro-SIM and the microSD cards as shown.
Step 1. Insert the eject tool that comes with your device
into the hole in the card tray.
Step 2.
Micro-SIM
microSD
Pull out the card tray and do one of the following:
Insert the Micro-SIM and microSD cards
into the corresponding card slot.
Micro-SIM1
Micro-SIM2
Insert the Micro-SIM1 and Micro-SIM2
cards into the corresponding card slot.
Step 3. Carefully insert the card tray with the installed
cards back into the slot.
Only Mi cro-SI M cards wor k with you r devic e.
Only microSD cards formated with FAT32 work with your device. You might need
to format your microSD card before using by following the instructions on the
screen.
Do not ins ert or re move the M icro-SI M card wh ile your d evice is o n. Doing s o can
perma nently d amage yo ur Micro -SIM ca rd or devi ce.
2
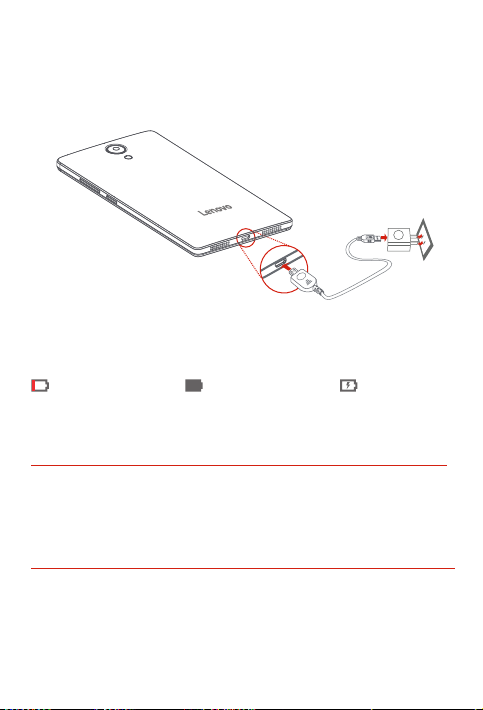
Starting to use your device
You might need to charge the battery before using your device.
Charge the battery as shown.
Connect your device to a power outlet using the cable and USB power adapter
provided.
Low battery Fully charged
Turning on/off
Turn on: Press and hold th e On/Off button u ntil the Le novo log o appea rs.
Tur n off : Press and hold th e On/Off button f or a few sec onds, th en tap Power of f.
Restart: Press an d hold the O n/Of f button fo r a few seco nds, the n tap Reboot.
Taking screenshots
Press and hold the On/Off button and the Volume down button at the same time.
Charging
3
 Loading...