

Page 1

ThinkCentreM83,M93/p
UserGuide
MachineTypes:10A0,10A1,10A6,10A7,10AG,10AK,10AL,and
10BE
Page 2

Note:Beforeusingthisinformationandtheproductitsupports,besuretoreadandunderstandthe
“Importantsafetyinformation”onpagev
andAppendixA“Notices”onpage145.
FourthEdition(June2014)
©CopyrightLenovo2013,2014.
LIMITEDANDRESTRICTEDRIGHTSNOTICE:IfdataorsoftwareisdeliveredpursuantaGeneralServicesAdministration
“GSA”contract,use,reproduction,ordisclosureissubjecttorestrictionssetforthinContractNo.GS-35F-05925.
Page 3

Contents
Importantsafetyinformation......v
Serviceandupgrades.............v
Staticelectricityprevention...........v
Powercordsandpoweradapters........vi
Extensioncordsandrelateddevices.......vi
Plugsandoutlets..............vii
Externaldevices..............vii
Heatandproductventilation.........vii
Operatingenvironment...........viii
Modemsafetyinformation..........viii
Lasercompliancestatement..........ix
Powersupplystatement............ix
Cleaningandmaintenance...........ix
Chapter1.Productoverview......1
Features..................1
Specifications................5
Lenovoprograms..............5
AccessingLenovoprogramsontheWindows
7operatingsystem............5
AccessingLenovoprogramsontheWindows
8orWindows8.1operatingsystem.....6
AnintroductiontoLenovoprograms.....7
Locations..................9
Locatingconnectors,controls,andindicators
onthefrontofyourcomputer........9
Locatingconnectorsontherearofyour
computer...............10
Locatingcomponents..........12
Locatingpartsonthesystemboard....13
Locatinginternaldrives.........16
Machinetypeandmodellabel.......17
Chapter2.Usingyourcomputer...19
Frequentlyaskedquestions.........19
NavigatingamongscreensontheWindows8and
Windows8.1operatingsystems........20
NavigatingonWindows8........20
NavigatingonWindows8.1........21
AccessingControlPanelontheWindows8or
Windows8.1operatingsystem........22
Usingthekeyboard.............23
UsingWindowsshortcutkeys.......23
Usingthefingerprintreader........23
Usingthewheelmouse...........24
Adjustingaudio..............24
Aboutyourcomputeraudio........24
Settingthevolumefromthedesktop....24
SettingthevolumefromControlPanel...25
UsingCDsandDVDs............25
HandlingandstoringCDandDVDmedia..26
PlayingaCDorDVD..........26
RecordingaCDorDVD.........26
Chapter3.Youandyourcomputer..29
Accessibilityandcomfort..........29
Arrangingyourworkspace........29
Comfort...............29
Glareandlighting............30
Aircirculation.............30
Electricaloutletsandcablelengths.....30
Accessibilityinformation.........30
Registeringyourcomputer..........34
Movingyourcomputertoanothercountryor
region..................34
Chapter4.Security..........35
Securityfeatures..............35
Lockingthecomputercover.........36
AttachingaKensington-stylecablelock.....37
Attachingacablelock............38
Usingpasswords..............38
BIOSpasswords............38
Windowspasswords..........39
Configuringthefingerprintreader.......39
Usingandunderstandingfirewalls.......39
Protectingdataagainstviruses........39
Chapter5.Installingorreplacing
hardware...............41
Handlingstatic-sensitivedevices.......41
Installingorreplacinghardware........41
Installingexternaloptions........41
Removingthecomputercover.......42
Removingandreinstallingthefrontbezel..43
InstallingorreplacingaPCIcard......44
Installingorreplacingamemorymodule...47
Installingorreplacingtheopticaldrive...49
Installingorreplacingthecardreader....51
InstallingorreplacingthefrontUSB
assembly...............55
Replacingthebattery..........59
Replacingthepowersupplyassembly...61
Replacingtheheatsinkandfanassembly..62
Replacingthemicroprocessor.......64
©CopyrightLenovo2013,2014
i
Page 4

InstallingorreplacingthemSATAsolid-state
drive.................66
Replacingtheprimaryharddiskdrive....72
Replacingthesecondaryharddiskdrive...74
Installingthesolid-statedrive.......76
Replacingthefrontfanassembly.....77
Replacingtherearfanassembly......79
ReplacingthefrontaudioandUSB
assembly...............81
Replacingtheinternalspeaker.......84
Replacingthethermalsensor.......86
Replacingthecoverpresenceswitch....88
ReplacingtheWi-Fiunits.........90
InstallingorremovingtherearWi-Fiantenna.97
InstallingorremovingthefrontWi-Fi
antenna...............98
Replacingthekeyboardormouse.....100
Completingthepartsreplacement.....101
Chapter6.Recoveryinformation..103
RecoveryinformationfortheWindows7operating
system..................103
Creatingandusingrecoverymedia.....103
Performingbackupandrecovery
operations..............104
UsingtheRescueandRecovery
workspace..............105
Creatingandusingarescuemedium....106
Reinstallingpreinstalledapplicationsand
devicedrivers.............107
Reinstallingsoftwareprograms......108
Reinstallingdevicedrivers........108
Solvingrecoveryproblems........108
RecoveryinformationfortheWindows8or
Windows8.1operatingsystem........109
Refreshingyourcomputer........109
Resettingyourcomputertothefactorydefault
settings................109
Usingtheadvancedstartupoptions....109
RecoveringyouroperatingsystemifWindows
8orWindows8.1failstostart.......110
Chapter7.UsingtheSetupUtility
program...............111
StartingtheSetupUtilityprogram.......111
Viewingandchangingsettings........111
Usingpasswords..............111
Passwordconsiderations.........112
Power-OnPassword..........112
AdministratorPassword.........112
HardDiskPassword...........112
Setting,changing,anddeletingapassword..112
Erasinglostorforgottenpasswords(clearing
CMOS)................113
Enablingordisablingadevice........113
Selectingastartupdevice..........114
Selectingatemporarystartupdevice....114
Selectingorchangingthestartupdevice
sequence...............114
EnablingErPLPScompliancemode......114
ICEperformancemode...........115
ICEthermalalert..............115
ExitingtheSetupUtilityprogram.......116
Chapter8.Updatingsystem
programs..............117
Usingsystemprograms...........117
Updating(flashing)theBIOSfromadisc....117
Updating(flashing)theBIOSfromyouroperating
system..................118
RecoveringfromaPOST/BIOSupdatefailure..118
Chapter9.Preventingproblems..119
Keepingyourcomputercurrent........119
Gettingthelatestdevicedriversforyour
computer...............119
Updatingyouroperatingsystem......119
UsingSystemUpdate..........120
Cleaningandmaintenance..........120
Basics................120
Cleaningyourcomputer.........121
Goodmaintenancepractices.......122
Movingyourcomputer...........122
Chapter10.Troubleshootingand
diagnostics.............123
Basictroubleshooting............123
Troubleshootingprocedure..........124
Troubleshooting..............124
Audioproblems............125
CDproblems.............126
DVDproblems.............127
Intermittentproblems..........129
Keyboard,mouse,orpointingdevice
problems...............129
Monitorproblems............131
Networkingproblems..........132
Optionproblems............135
Performanceandlockupproblems.....136
Printerproblems............138
Serialportproblems...........138
Softwareproblems...........139
USBproblems.............140
LenovoSolutionCenter...........140
iiThinkCentreM83,M93/pUserGuide
Page 5

Chapter11.Gettinginformation,help,
andservice.............141
Informationresources............141
LenovoThinkVantageT ools........141
HelpandSupport............141
SafetyandWarranty...........141
LenovoWebsite............141
LenovoSupportWebsite.........142
Helpandservice..............142
Usingthedocumentationanddiagnostic
program...............142
Callingforservice............142
Usingotherservices..........143
Purchasingadditionalservices......143
AppendixA.Notices.........145
Trademarks................146
AppendixB.Regulatory
information.............147
Exportclassificationnotice..........147
Electronicemissionsnotices.........147
FederalCommunicationsCommission
DeclarationofConformity........147
Eurasiancompliancemark..........149
Brazilregulatorynotice...........149
Mexicoregulatorynotice...........149
Additionalregulatoryinformation.......149
AppendixC.WEEEandrecycling
information.............151
ImportantWEEEinformation.........151
RecyclinginformationforJapan........151
RecyclinginformationforBrazil........152
BatteryrecyclinginformationforTaiwan.....152
BatteryrecyclinginformationfortheEuropean
Union..................152
AppendixD.RestrictionofHazardous
SubstancesDirective(RoHS)....155
EuropeanUnionRoHS...........155
ChinaRoHS................155
TurkishRoHS...............155
UkraineRoHS...............156
IndiaRoHS................156
AppendixE.ChinaEnergyLabel..157
AppendixF .ENERGYSTARmodel
information.............159
Index.................161
©CopyrightLenovo2013,2014
iii
Page 6

ivThinkCentreM83,M93/pUserGuide
Page 7
Importantsafetyinformation
CAUTION:
Beforeusingthismanual,besuretoreadandunderstandalltherelatedsafetyinformationforthis
product.RefertotheinformationinthissectionandthesafetyinformationintheSafety,Warranty,and
SetupGuidethatyoureceivedwiththisproduct.Readingandunderstandingthissafetyinformation
reducestheriskofpersonalinjuryanddamagetoyourproduct.
IfyounolongerhaveacopyoftheSafety,Warranty,andSetupGuide,youcanobtainaPortableDocument
Format(PDF)versionfromtheLenovo
SupportWebsitealsoprovidestheSafety,Warranty,andSetupGuideandthisUserGuideinadditional
languages.
®
SupportWebsiteathttp://www.lenovo.com/support.TheLenovo
Serviceandupgrades
DonotattempttoserviceaproductyourselfunlessinstructedtodosobytheCustomerSupportCenteror
yourdocumentation.OnlyuseaServiceProviderwhoisapprovedtorepairyourparticularproduct.
Note:Somecomputerpartscanbeupgradedorreplacedbythecustomer.Upgradestypicallyare
referredtoasoptions.ReplacementpartsapprovedforcustomerinstallationarereferredtoasCustomer
ReplaceableUnits,orCRUs.Lenovoprovidesdocumentationwithinstructionswhenitisappropriatefor
customerstoinstalloptionsorreplaceCRUs.Y oumustcloselyfollowallinstructionswheninstallingor
replacingparts.TheOffstateofapowerindicatordoesnotnecessarilymeanthatvoltagelevelsinsidea
productarezero.Beforeyouremovethecoversfromaproductequippedwithapowercord,alwaysmake
surethatthepoweristurnedoffandthattheproductisunpluggedfromanypowersource.Formore
informationonCRUs,refertoChapter5“Installingorreplacinghardware”onpage41
questionsorconcerns,contacttheCustomerSupportCenter.
Althoughtherearenomovingpartsinyourcomputerafterthepowercordhasbeendisconnected,the
followingwarningsarerequiredforyoursafety.
CAUTION:
.Ifyouhaveany
Hazardousmovingparts.Keepfingersandotherbodypartsaway.
CAUTION:
Beforeyouopenthecomputercover,turnoffthecomputerandwaitseveralminutesuntilthe
computeriscool.
Staticelectricityprevention
Staticelectricity,althoughharmlesstoyou,canseriouslydamagecomputercomponentsandoptions.
Improperhandlingofstatic-sensitivepartscancausedamagetothepart.Whenyouunpackanoption
©CopyrightLenovo2013,2014
v
Page 8

orCRU,donotopenthestatic-protectivepackagecontainingthepartuntiltheinstructionsdirectyou
toinstallit.
WhenyouhandleoptionsorCRUs,orperformanyworkinsidethecomputer,takethefollowingprecautions
toavoidstatic-electricitydamage:
•Limityourmovement.Movementcancausestaticelectricitytobuilduparoundyou.
•Alwayshandlecomponentscarefully.Handleadapters,memorymodules,andothercircuitboardsbythe
edges.Nevertouchexposedcircuitry.
•Preventothersfromtouchingcomponents.
•Whenyouinstallastatic-sensitiveoptionorCRU,touchthestatic-protectivepackagecontainingthe
parttoametalexpansion-slotcoverorotherunpaintedmetalsurfaceonthecomputerforatleasttwo
seconds.Thisreducesstaticelectricityinthepackageandyourbody.
•Whenpossible,removethestatic-sensitivepartfromthestatic-protectivepackagingandinstallthepart
withoutsettingitdown.Whenthisisnotpossible,placethestatic-protectivepackagingonasmooth,
levelsurfaceandplacethepartonit.
•Donotplacethepartonthecomputercoverorothermetalsurface.
Powercordsandpoweradapters
Useonlythepowercordsandpoweradapterssuppliedbytheproductmanufacturer.
Thepowercordsshallbesafetyapproved.ForGermany,itshallbeH05VV-F,3G,0.75mm
othercountries,thesuitabletypesshallbeusedaccordingly.
Neverwrapapowercordaroundapoweradapterorotherobject.Doingsocanstressthecordinwaysthat
cancausethecordtofray,crack,orcrimp.Thiscanpresentasafetyhazard.
Alwaysroutepowercordssothattheywillnotbewalkedon,trippedover,orpinchedbyobjects.
Protectpowercordandpoweradaptersfromliquids.Forinstance,donotleaveyourpowercordorpower
adapternearsinks,tubs,toilets,oronfloorsthatarecleanedwithliquidcleansers.Liquidscancausea
shortcircuit,particularlyifthepowercordorpoweradapterhasbeenstressedbymisuse.Liquidsalsocan
causegradualcorrosionofpowercordterminalsand/ortheconnectorterminalsonapoweradapter,
whichcaneventuallyresultinoverheating.
Ensurethatallpowercordconnectorsaresecurelyandcompletelypluggedintoreceptacles.
Donotuseanypoweradapterthatshowscorrosionattheacinputpinsorshowssignsofoverheating(such
asdeformedplastic)attheacinputoranywhereonthepoweradapter.
Donotuseanypowercordswheretheelectricalcontactsoneitherendshowsignsofcorrosionor
overheatingorwherethepowercordappearstohavebeendamagedinanyway.
2
,orbetter.For
Extensioncordsandrelateddevices
Ensurethatextensioncords,surgeprotectors,uninterruptiblepowersupplies,andpowerstripsthatyouuse
areratedtohandletheelectricalrequirementsoftheproduct.Neveroverloadthesedevices.Ifpowerstrips
areused,theloadshouldnotexceedthepowerstripinputrating.Consultanelectricianformoreinformation
ifyouhavequestionsaboutpowerloads,powerrequirements,andinputratings.
viThinkCentreM83,M93/pUserGuide
Page 9

Plugsandoutlets
Ifareceptacle(poweroutlet)thatyouintendtousewithyourcomputerequipmentappearstobedamaged
orcorroded,donotusetheoutletuntilitisreplacedbyaqualifiedelectrician.
Donotbendormodifytheplug.Iftheplugisdamaged,contactthemanufacturertoobtainareplacement.
Donotshareanelectricaloutletwithotherhomeorcommercialappliancesthatdrawlargeamountsof
electricity;otherwise,unstablevoltagemightdamageyourcomputer,data,orattacheddevices.
Someproductsareequippedwithathree-prongedplug.Thisplugfitsonlyintoagroundedelectricaloutlet.
Thisisasafetyfeature.Donotdefeatthissafetyfeaturebytryingtoinsertitintoanon-groundedoutlet.If
youcannotinserttheplugintotheoutlet,contactanelectricianforanapprovedoutletadapterortoreplace
theoutletwithonethatenablesthissafetyfeature.Neveroverloadanelectricaloutlet.Theoverallsystem
loadshouldnotexceed80percentofthebranchcircuitrating.Consultanelectricianformoreinformation
ifyouhavequestionsaboutpowerloadsandbranchcircuitratings.
Besurethatthepoweroutletyouareusingisproperlywired,easilyaccessible,andlocatedclosetothe
equipment.Donotfullyextendpowercordsinawaythatwillstressthecords.
Besurethatthepoweroutletprovidesthecorrectvoltageandcurrentfortheproductyouareinstalling.
Carefullyconnectanddisconnecttheequipmentfromtheelectricaloutlet.
Externaldevices
DonotconnectordisconnectanyexternaldevicecablesotherthanUniversalSerialBus(USB)and1394
cableswhilethecomputerpowerison;otherwise,youmightdamageyourcomputer.Toavoidpossible
damagetoattacheddevices,waitatleastfivesecondsafterthecomputerisshutdowntodisconnect
externaldevices.
Heatandproductventilation
Computers,poweradapters,andmanyaccessoriescangenerateheatwhenturnedonandwhenbatteries
arecharging.Alwaysfollowthesebasicprecautions:
•Donotleaveyourcomputer,poweradapter,oraccessoriesincontactwithyourlaporanypartofyour
bodyforanextendedperiodwhentheproductsarefunctioningorwhenthebatteryischarging.Your
computer,poweradapter,andmanyaccessoriesproducesomeheatduringnormaloperation.Extended
contactwiththebodycouldcausediscomfortor,potentially,askinburn.
•Donotchargethebatteryoroperateyourcomputer,poweradapter,oraccessoriesnearflammable
materialsorinexplosiveenvironments.
•Ventilationslots,fans,andheatsinksareprovidedwiththeproductforsafety,comfort,andreliable
operation.Thesefeaturesmightinadvertentlybecomeblockedbyplacingtheproductonabed,sofa,
carpet,orotherflexiblesurface.Neverblock,cover,ordisablethesefeatures.
Inspectyourdesktopcomputerfordustaccumulationatleastonceeverythreemonths.Beforeinspecting
yourcomputer,turnoffthepowerandunplugthecomputer'spowercordfromtheelectricaloutlet;then
removeanydustfromventsandperforationsinthebezel.Ifyounoticeexternaldustaccumulation,then
examineandremovedustfromtheinsideofthecomputerincludingheatsinkinletfins,powersupplyvents,
andfans.Alwaysturnoffandunplugthecomputerbeforeopeningthecover.Ifpossible,avoidoperating
yourcomputerwithintwofeetofhigh-trafficareas.Ifyoumustoperateyourcomputerinornearahigh-traffic
area,inspectand,ifnecessary,cleanyourcomputermorefrequently.
©CopyrightLenovo2013,2014
vii
Page 10

Foryoursafetyandtomaintainoptimumcomputerperformance,alwaysfollowthesebasicprecautions
withyourdesktopcomputer:
•Keepthecoverclosedwheneverthecomputerispluggedin.
•Regularlyinspecttheoutsideofthecomputerfordustaccumulation.
•Removedustfromventsandanyperforationsinthebezel.Morefrequentcleaningsmightberequiredfor
computersindustyorhigh-trafficareas.
•Donotrestrictorblockanyventilationopenings.
•Donotstoreoroperateyourcomputerinsidefurniture,asthismightincreasetheriskofoverheating.
•Airflowtemperaturesintothecomputershouldnotexceed35°C(95°F).
•Donotinstallairfiltrationdevices.Theymayinterferewithpropercooling.
Operatingenvironment
Theoptimalenvironmentinwhichtouseyourcomputeris10°C-35°C(50°F-95°F)withhumidityranging
between35%and80%.Ifyourcomputerisstoredortransportedintemperatureslessthan10°C(50°F),
allowthecoldcomputertoriseslowlytoanoptimaloperatingtemperatureof10°C-35°C(50°F-95°F)before
use.Thisprocesscouldtaketwohoursinextremeconditions.Failuretoallowyourcomputertorisetoan
optimaloperatingtemperaturebeforeusecouldresultinirreparabledamagetoyourcomputer.
Ifpossible,placeyourcomputerinawell-ventilatedanddryareawithoutdirectexposuretosunshine.
Keepelectricalappliancessuchasanelectricfan,radio,high-poweredspeakers,airconditioner,and
microwaveovenawayfromyourcomputerbecausethestrongmagneticfieldsgeneratedbythese
appliancescandamagethemonitoranddataontheharddiskdrive.
Donotplaceanybeveragesontopoforbesidethecomputerorotherattacheddevices.Ifliquidisspilledon
orinthecomputeroranattacheddevice,ashortcircuitorotherdamagemightoccur.
Donoteatorsmokeoveryourkeyboard.Particlesthatfallintoyourkeyboardcancausedamage.
Modemsafetyinformation
CAUTION:
Toreducetheriskoffire,useonlyNo.26AWGorlarger(forexample,No.24AWG)telecommunication
linecordlistedbyUnderwritersLaboratories(UL)orcertifiedbytheCanadianStandardsAssociation
(CSA).
Toreducetheriskoffire,electricalshock,orinjurywhenusingtelephoneequipment,alwaysfollowbasic
safetyprecautions,suchas:
•Neverinstalltelephonewiringduringalightningstorm.
•Neverinstalltelephonejacksinwetlocationsunlessthejackisspecificallydesignedforwetlocations.
•Nevertouchuninsulatedtelephonewiresorterminalsunlessthetelephonelinehasbeendisconnectedat
thenetworkinterface.
•Usecautionwheninstallingormodifyingtelephonelines.
•Avoidusingatelephone(otherthanacordlesstype)duringanelectricalstorm.Theremaybearemote
riskofelectricshockfromlightning.
•Donotusethetelephonetoreportagasleakinthevicinityoftheleak.
viiiThinkCentreM83,M93/pUserGuide
Page 11
Lasercompliancestatement
CAUTION:
Whenlaserproducts(suchasCD-ROMs,DVDdrives,fiberopticdevices,ortransmitters)are
installed,notethefollowing:
•Donotremovethecovers.Removingthecoversofthelaserproductcouldresultinexposureto
hazardouslaserradiation.Therearenoserviceablepartsinsidethedevice.
•Useofcontrolsoradjustmentsorperformanceofproceduresotherthanthosespecifiedherein
mightresultinhazardousradiationexposure.
DANGER
SomelaserproductscontainanembeddedClass3AorClass3Blaserdiode.Notethefollowing:
Laserradiationwhenopen.Donotstareintothebeam,donotviewdirectlywithoptical
instruments,andavoiddirectexposuretothebeam.
Powersupplystatement
Neverremovethecoveronapowersupplyoranypartthathasthefollowinglabelattached.
Hazardousvoltage,current,andenergylevelsarepresentinsideanycomponentthathasthislabelattached.
Therearenoserviceablepartsinsidethesecomponents.Ifyoususpectaproblemwithoneoftheseparts,
contactaservicetechnician.
Cleaningandmaintenance
Keepyourcomputerandworkspaceclean.Shutdownthecomputerandthendisconnectthepower
cordbeforecleaningthecomputer.Donotsprayanyliquiddetergentdirectlyonthecomputeroruse
anydetergentcontainingflammablematerialtocleanthecomputer.Spraythedetergentonasoftcloth
andthenwipethecomputersurfaces.
©CopyrightLenovo2013,2014
ix
Page 12

xThinkCentreM83,M93/pUserGuide
Page 13

Chapter1.Productoverview
Thischapterprovidesinformationaboutthecomputerfeatures,specifications,softwareprogramsprovided
byLenovo,andlocationsofconnectors,components,partsonthesystemboard,andinternaldrives.
Features
Thissectionintroducesthecomputerfeatures.Theinformationcoversavarietyofmodels.
Microprocessor
Toviewthemicroprocessorinformationofyourcomputer,dothefollowing:
•OntheMicrosoft
toviewtheinformation.
•OntheMicrosoftWindows8.1operatingsystem,gotothedesktopandmoveyourpointertothe
top-rightorbottom-rightcornerofthescreentodisplaythecharms.ThenclickSettings➙PCinfoto
viewtheinformation.
Memory
Yourcomputersupportsuptofourdoubledatarate3unbuffereddualinlinememorymodules(DDR3
UDIMMs).
®
Windows
®
7operationsystem,clickStart,right-clickComputer,andselectProperties
Internaldrives
•mSATAsolid-statedrive(optional)
•Opticaldrive:DVD-ROMorDVD-Rambo(optional)
•SerialAdvancedT echnologyAttachment(SATA)harddiskdrive
•SATAsolid-statedrive(optional)
Note:YourcomputersupportseSATAandSATA3.0devices.Formoreinformation,see“Locatingparts
onthesystemboard”onpage13.
Videosubsystem
•IntegratedgraphicsforaVideoGraphicsArray(VGA)connectorandtwoDisplayPort®connectors
•PeripheralComponentInterconnect(PCI)Expressx16graphicscardslotonthesystemboardfora
discretegraphicscard
Audiosubsystem
•Integratedhigh-definition(HD)audio
•Audioline-inconnector,audioline-outconnector,andmicrophoneconnectorontherearpanel
•Microphoneconnectorandheadphoneconnectoronthefrontpanel
•Internalspeaker(availableinsomemodels)
Connectivity
•100/1000MbpsintegratedEthernetcontroller
•PCIFaxmodem(availableinsomemodels)
©CopyrightLenovo2013,2014
1
Page 14

ystemmanagementfeatures
S
•Abilitytostorepower-onself-test(POST)hardwaretestresults
•DesktopManagementInterface(DMI)
DesktopManagementInterfaceprovidesacommonpathforuserstoaccessinformationaboutall
aspectsofacomputer,includingprocessortype,installationdate,attachedprintersandotherperipherals,
powersources,andmaintenancehistory.
ErPLPScompliancemode
•
Theenergy-relatedproductsdirective(ErP)lowestpowerstate(LPS)compliancemodereducesthe
consumptionofelectricitywhenyourcomputerisinsleeporoffmode.Formoreinformation,see
“EnablingErPLPScompliancemode”onpage94.
•Intel
®
StandardManageability
IntelStandardManageabilityishardwareandfirmwaretechnologythatbuildscertainfunctionality
intocomputersinordertomakethemeasierandlessexpensiveforbusinessestomonitor,maintain,
update,upgrade,andrepair.
•IntelActiveManagementTechnology(AMT)(availableonsomemodels)
IntelActiveManagementTechnologyishardwareandfirmwaretechnologythatbuildscertainfunctionality
intocomputersinordertomakethemeasierandlessexpensiveforbusinessestomonitor,maintain,
update,upgrade,andrepair.
•IntelMatrixStorageManager
IntelMatrixStorageManagerisadevicedriverthatprovidessupportforSATARAID5arraysandSATA
RAID10arraysonspecificIntelchipsetsystemboardstoenhanceharddiskperformance.
•PrebootExecutionEnvironment(PXE)
ThePrebootExecutionEnvironmentisanenvironmenttostartcomputersusinganetworkinterface
independentofdatastoragedevices(suchastheharddiskdrive)orinstalledoperatingsystems.
•IntelligentCoolingEngine(ICE)
TheIntelligentCoolingEngineisasystemthermalmanagementsolutionthatenablesyourcomputer
torunwithbetterthermalandacousticperformance.TheICEfunctionalsomonitorsthethermal
performanceofyourcomputertoidentifythermalproblems.Formoreinformation,see“ICEperformance
mode”onpage115and“ICEthermalalert”onpage115.
•SystemManagement(SM)BasicInput/OutputSystem(BIOS)andSMsoftware
TheSMBIOSspecificationdefinesdatastructuresandaccessmethodsinaBIOSthatallowsauseror
applicationtostoreandretrieveinformationspecificaboutthecomputerinquestion.
•WakeonLAN
WakeonLANisanEthernetcomputernetworkingstandardthatallowsacomputertobeturnedon
orwokenupbyanetworkmessage.Themessageisusuallysentbyaprogramrunningonanother
computeronthesamelocalareanetwork.
•WakeonRing
WakeonRing,sometimesreferredtoasWakeonModem,isaspecificationthatallowssupported
computersanddevicestoresumefromsleeporhibernationmode.
•WindowsManagementInstrumentation(WMI)
WindowsManagementInstrumentationisasetofextensionstotheWindowsDriverModel.Itprovidesan
operatingsysteminterfacethroughwhichinstrumentedcomponentsprovideinformationandnotification.
2ThinkCentreM83,M93/pUserGuide
Page 15

Input/Output(I/O)features
•9-pinserialport(onestandardandoneoptional)
•EightUniversalSerialBus(USB)connectors(twoonthefrontpanelandsixontherearpanel)
•OneEthernetconnector
•OnePersonalSystem/2(PS/2)keyboardconnector(optional)
•OnePS/2mouseconnector(optional)
•OneVGAmonitorconnector
•Threeaudioconnectorsontherearpanel(audioline-inconnector,audioline-outconnector,and
microphoneconnector)
•Twoaudioconnectorsonthefrontpanel(microphoneconnectorandheadphoneconnector)
•TwoDisplayPortconnectors
Formoreinformation,see“Locatingconnectors,controls,andindicatorsonthefrontofyourcomputer”on
page9
and“Locatingconnectorsontherearofyourcomputer”onpage10.
Expansion
•OnePCIcardslot(availableinThinkCentre®M93/pcomputers)
•OnePCIExpressx1cardslot
•OnePCIExpressx16graphicscardslot
•OnePCIExpresscardslot(physicallinkwidthx16;negotiablelinkwidthx4,x1)
•Twoharddiskdrivebays
•Twoopticaldrivebays
Formoreinformation,see“Locatinginternaldrives”onpage16
and“Locatingpartsonthesystemboard”
onpage13.
Powersupply
Yourcomputercomeswithoneofthefollowingtypesofpowersupply:
•280-wattautomaticvoltage-sensingpowersupply
•320-wattautomaticvoltage-sensingpowersupply
Securityfeatures
•Abilitytoenableordisableadevice
•AbilitytoenableordisableUSBconnectorsindividually
•ComputraceAgentsoftwareembeddedinfirmware
•Coverpresenceswitch(alsocalledintrusionswitch)
•Keyboardwithfingerprintreader(shippedwithsomemodels)
•Power-onpassword(POP),administratorpassword,andharddiskdrivepasswordtodeterunauthorized
useofyourcomputer
•SupportforaKensington-stylecablelock
•Supportforapadlock
•Startupsequencecontrol
•Startupwithoutkeyboardormouse
•TrustedPlatformModule(TPM)
Chapter1.Productoverview3
Page 16

Formoreinformation,seeChapter4“Security”onpage35.
Preinstalledsoftwareprograms
Yourcomputerispreinstalledwithsoftwareprogramstohelpyouworkmoreeasilyandsecurely.Formore
information,see“Lenovoprograms”onpage5.
Preinstalledoperatingsystem
Yourcomputerispreinstalledwithoneofthefollowingoperatingsystems:
•MicrosoftWindows7operatingsystem
•MicrosoftWindows8operatingsystem
•MicrosoftWindows8.1operatingsystem
Operatingsystem(s),certifiedortestedforcompatibility
•Linux
®
1
(variesbymodeltype)
1.Theoperatingsystem(s)listedherearebeingcertifiedortestedforcompatibilityatthetimethispublicationgoesto
press.AdditionaloperatingsystemsmightbeidentifiedbyLenovoascompatiblewithyourcomputerfollowingthe
publicationofthismanual.Thislistissubjecttochange.Todetermineifanoperatingsystemhasbeencertifiedor
testedforcompatibility,checktheWebsiteoftheoperatingsystemvendor.
4ThinkCentreM83,M93/pUserGuide
Page 17

Specifications
Thissectionliststhephysicalspecificationsforyourcomputer.
Dimensions
Width:175mm(6.89inches)
Height:414mm(16.30inches)
Depth:442mm(17.40inches)
Weight
Maximumconfigurationasshipped:11.2kg(24.69lb)
Environment
•Airtemperature:
Operating:10°Cto35°C(50°Fto95°F)
Storageinoriginalshippingpackage:-40°Cto60°C(-40°Fto140°F)
Storagewithoutpackage:-10°Cto60°C(14°Fto140°F)
•Humidity:
Operating:20%to80%(non-condensing)
Storage:20%to90%(non-condensing)
•Altitude:
Operating:-15.2to3048m(-50to10000ft)
Storage:-15.2to10668m(-50to35000ft)
Electricalinput
•Inputvoltage:
–Lowrange:
Minimum:100Vac
Maximum:127Vac
Inputfrequency:50/60Hz
–Highrange:
Minimum:200Vac
Maximum:240Vac
Inputfrequency:50/60Hz
Lenovoprograms
YourcomputercomeswithLenovoprogramstohelpyouworkmoreeasilyandsecurely.Dependingon
theWindowsoperatingsystempreinstalled,theprogramsmightvary.
AccessingLenovoprogramsontheWindows7operatingsystem
YoucanaccessLenovoprogramsontheWindows7operatingsystemthroughWindowsSearchorfrom
ControlPanel.TheiconnamedisplayedinthesearchresultorControlPanelmightbedifferentfromthe
programname.Y oucanfindtheprogrambyitsprogramnameoriconnameasshownintheLenovo
programsavailableontheWindows7operatingsystemtable.
Chapter1.Productoverview5
Page 18

Note:Ifyoudonotfindtheprogramyouneed,opentheLenovoThinkVantage
®
Toolsprogramtofindthe
dimmediconfortheprogram.Thendouble-clicktheicontoinstalltheprogram.
ToaccessLenovoprogramsthroughWindowsSearch,dothefollowing:
1.ClicktheStartbuttonandthentypetheprogramnameortheiconnameintothesearchbox.
2.Locatetheprogrambytheprogramnameortheiconnameandthenclicktheprogramtolaunchit.
ToaccessLenovoprogramsfromControlPanel,dothefollowing:
Note:SomeLenovoprogramsmightnotbedisplayedinControlPanel.Tofindtheseprograms,use
WindowsSearch.
1.ClickStart➙ControlPanel.ChangetheviewofControlPanelfromCategorytoLargeiconsorSmall
icons.
2.Locatetheprogrambytheiconnameandthenclicktheprogramtolaunchit.
ThefollowingtableliststheprogramsavailableontheWindows7operatingsystem.
Note:Dependingonyourcomputermodel,someoftheLenovoprogramsmightnotbeavailable.
Table1.LenovoprogramsavailableontheWindows7operatingsystem
ProgramnameIconname
CommunicationsUtilityLenovo-WebConferencing
FingerprintManagerProor
ThinkVantageFingerprintSoftware
LenovoBluetoothLockLenovoBluetoothLock
LenovoReachLenovoReach
LenovoSHAREitLenovoSHAREit
LenovoSolutionCenterLenovo-SystemHealthandDiagnostics
LenovoThinkVantagetoolsLenovoThinkvantagetools
PasswordManagerLenovo-PasswordVault
PCCloudManagerPCCloudManager
PowerManager
RecoveryMedia
RescueandRecovery
SystemUpdate
ViewManagementUtilityLenovo-ViewManagementUtility
®
Lenovo-FingerprintManagerProorLenovo-FingerprintReader
Lenovo-PowerControls
Lenovo-FactoryRecoveryDisksorCreateRecoveryMedia
Lenovo-EnhancedBackupandRestore
Lenovo-UpdateandDrivers
AccessingLenovoprogramsontheWindows8orWindows8.1operating system
IfyourcomputerispreinstalledwiththeWindows8orWindows8.1operatingsystem,youcanaccess
Lenovoprogramsbydoingoneofthefollowing:
•OntheWindows8operatingsystem,presstheWindowskeytogototheStartscreen.ClickaLenovo
programtolaunchit.Ifyoucannotfindtheprogramyouneed,movethepointertothebottom-rightcorner
ofthescreentodisplaythecharms.ThenclicktheSearchcharmtosearchforthedesiredprogram.
6ThinkCentreM83,M93/pUserGuide
Page 19

•OntheWindows8.1operatingsystem,presstheWindowskeytogototheStartscreen.Clicka
Lenovoprogramtolaunchit.Ifyoucannotfindtheprogramyouneed,clickthearrowiconinthe
bottom-leftcornerofthescreentogototheAppsscreen.Findthedesiredprogramintheappslistor
searchforitinthesearchboxinthetop-rightcornerofthescreen.
YourcomputersupportsthefollowingLenovoprograms:
•FingerprintManagerProorThinkVantageFingerprintSoftware
•LenovoBluetoothLock
•LenovoCompanion
•LenovoReach
•LenovoSHAREit
•LenovoSolutionCenter
•LenovoSupport
•LenovoTools
•PasswordManager
•PCCloudManager
•PowerManager
•SystemUpdate
AnintroductiontoLenovoprograms
ThistopicprovidesabriefintroductiontosomeLenovoprograms.
Note:Dependingonyourcomputermodel,someoftheprogramsmightnotbeavailable.
•CommunicationsUtility(Windows7)
TheCommunicationsUtilityprogramprovidesacentrallocationforintegratedcameraandmicrophone
settings.ItcontrolsadvancedsettingsfortheintegratedmicrophoneandcameratooptimizeWeb
conferencingandVoiceoverIP(VOIP)experience.
•FingerprintManagerProorThinkVantageFingerprintSoftware(Windows7,Windows8,and
Windows8.1)
Theintegratedfingerprintreaderprovidedonsomekeyboardsenablesyoutoenrollyourfingerprint
andassociateitwithyourpower-onpassword,harddiskpassword,andWindowspassword.Asa
result,fingerprintauthenticationcanreplacepasswordsandenablesimpleandsecureuseraccess.A
fingerprintreaderkeyboardisavailablewithselectcomputersorcanbepurchasedforcomputersthat
supportthisoption.
•LenovoBluetoothLock(Windows7andWindows8.1)
TheLenovoBluetoothLockprogramenablesyoutouseaBluetoothdevice(suchasyoursmartphone)as
aproximity-basedunitforlockingorunlockingyourcomputerautomatically.Bydetectingthedistance
betweenyourcomputerandthepredefinedBluetoothdevicethatyouarecarrying,theLenovoBluetooth
Lockprogramautomaticallylocksyourcomputerwhenyouwalkawayandunlocksyourcomputerwhen
youcomeback.Thisisasimplewaytoprotectyourcomputeragainstunauthorizedaccessincase
thatyouforgettolockyourcomputer.
•LenovoCompanion(Windows8andWindows8.1)
ThroughtheLenovoCompanionprogram,youcangettheinformationabouttheaccessoriesforyour
computer,viewblogsandarticlesaboutyourcomputer,andcheckforotherrecommendedprograms.
•LenovoReach(Windows7,Windows8,andWindows8.1)
Chapter1.Productoverview7
Page 20

UsetheLenovoReachprogramtoenhanceyourcloudexperience.LenovoReachkeepsyouconnected
atalltimesandenablesyoutoaccessallyourfavoriteitemsfrompersonalcomputers,smartphones,
ortablets.Asaresult,youcanaccess,edit,andshareyourfilesfromanywhere.WithLenovoReach,
youalsocanaddyourfavoriteWebservicestoyourclouddesktopandstaylogged-intoWebsiteswith
thecloudpasswordmanager.
•LenovoSHAREit(Windows7,Windows8,andWindows8.1)
TheLenovoSHAREitprogramprovidesaquickandeasywaytosharefilesandfoldersamongcomputers,
smartphones,tablets,orsmartTVswiththeAndroidortheWindowsoperatingsysteminstalled.SHAREit
usesanytypeofnetworkorevennonetworkatalltosharefilesandfolders.
•LenovoSolutionCenter(Windows7,Windows8,andWindows8.1)
TheLenovoSolutionCenterprogramenablesyoutotroubleshootandresolvecomputerproblems.It
combinesdiagnostictests,systeminformationcollection,securitystatus,andsupportinformation,along
withhintsandtipsformaximumsystemperformance.
•LenovoSupport(Windows8andWindows8.1)
TheLenovoSupportprogramenablesyoutoregisteryourcomputerwithLenovo,checkthecomputer
healthconditionandbatterystatus,downloadandviewusermanualsforyourcomputer,getthewarranty
informationofyourcomputer,andexplorehelpandsupportinformation.
•LenovoThinkVantageTools(Windows7)
TheLenovoThinkVantageToolsprogramguidesyoutoahostofinformationsourcesandprovideseasy
accesstovarioustoolstohelpyouworkmoreeasilyandsecurely.
•LenovoTools(Windows8andWindows8.1)
TheLenovoToolsprogramguidesyoutoahostofinformationsourcesandprovideseasyaccessto
varioustoolstohelpyouworkmoreeasilyandsecurely.
•PasswordManager(Windows7,Windows8,andWindows8.1)
ThePasswordManagerprogramautomaticallycapturesandfillsinauthenticationinformationfor
WindowsprogramsandWebsites.
•PCCloudManager(Windows7andWindows8.1)
ThePCCloudManager(PCM)programisabrowser-basedsolutionforclient-computermanagement.
ThePCMprogramhastwocomponents:PCMServerandPCMClient.PCMServerisinstalledonthe
computer,wheretheadministratorperformsmanagementwork,suchaspowermanagementandsecurity
management.PCMClientisinstalledontheclientcomputerstobemanaged.Theadministratorcanlog
intoPCMServertomanagecomputerswithPCMClientinstalled,throughtheInternetWebbrowser.
•PowerManager(Windows7,Windows8,andWindows8.1)
ThePowerManagerprogramprovidesconvenient,flexible,andcompletepowermanagementforyour
computer.Itenablesyoutoadjustyourcomputerpowersettingstoachievethebestbalancebetween
performanceandpowersaving.
•RecoveryMedia(Windows7)
TheRecoveryMediaprogramenablesyoutorestorethecontentsoftheharddiskdrivetothefactory
defaultsettings.
•RescueandRecovery(Windows7)
TheRescueandRecoveryprogramisaone-buttonrecoveryandrestoresolutionthatincludesasetof
self-recoverytoolstohelpyoudiagnosecomputerproblems,gethelp,andrecoverfromsystemcrashes,
evenifyoucannotstarttheWindowsoperatingsystem.
•SystemUpdate(Windows7,Windows8,andWindows8.1)
TheSystemUpdateprogramhelpsyoukeepthesoftwareonyourcomputerup-to-datebydownloading
andinstallingsoftwareupdatepackages(Lenovoprograms,devicedrivers,UEFIBIOSupdates,and
otherthirdpartyprograms).
8ThinkCentreM83,M93/pUserGuide
Page 21
•ViewManagementUtility(Windows7)
1 2
TheViewManagementUtilityprogramenablesyoutoeasilyorganizeyouropenwindows.Itdividesyour
screenintomultiplepartsandthenresizesandpositionsopenwindowsintodifferentpartstomakethe
bestuseofyourdesktop.Theprogramalsoisabletoworkacrossmultiplemonitorstoimproveyour
productivity.
Locations
Thissectionprovidesinformationtohelpyoulocatetheconnectorsonthefrontandrearofyourcomputer,
partsonthesystemboard,andcomponentsandinternaldrivesinyourcomputer.
Note:Thecomponentsinyourcomputermightlookslightlydifferentfromtheillustrations.
Locatingconnectors,controls,andindicatorsonthefrontofyour computer
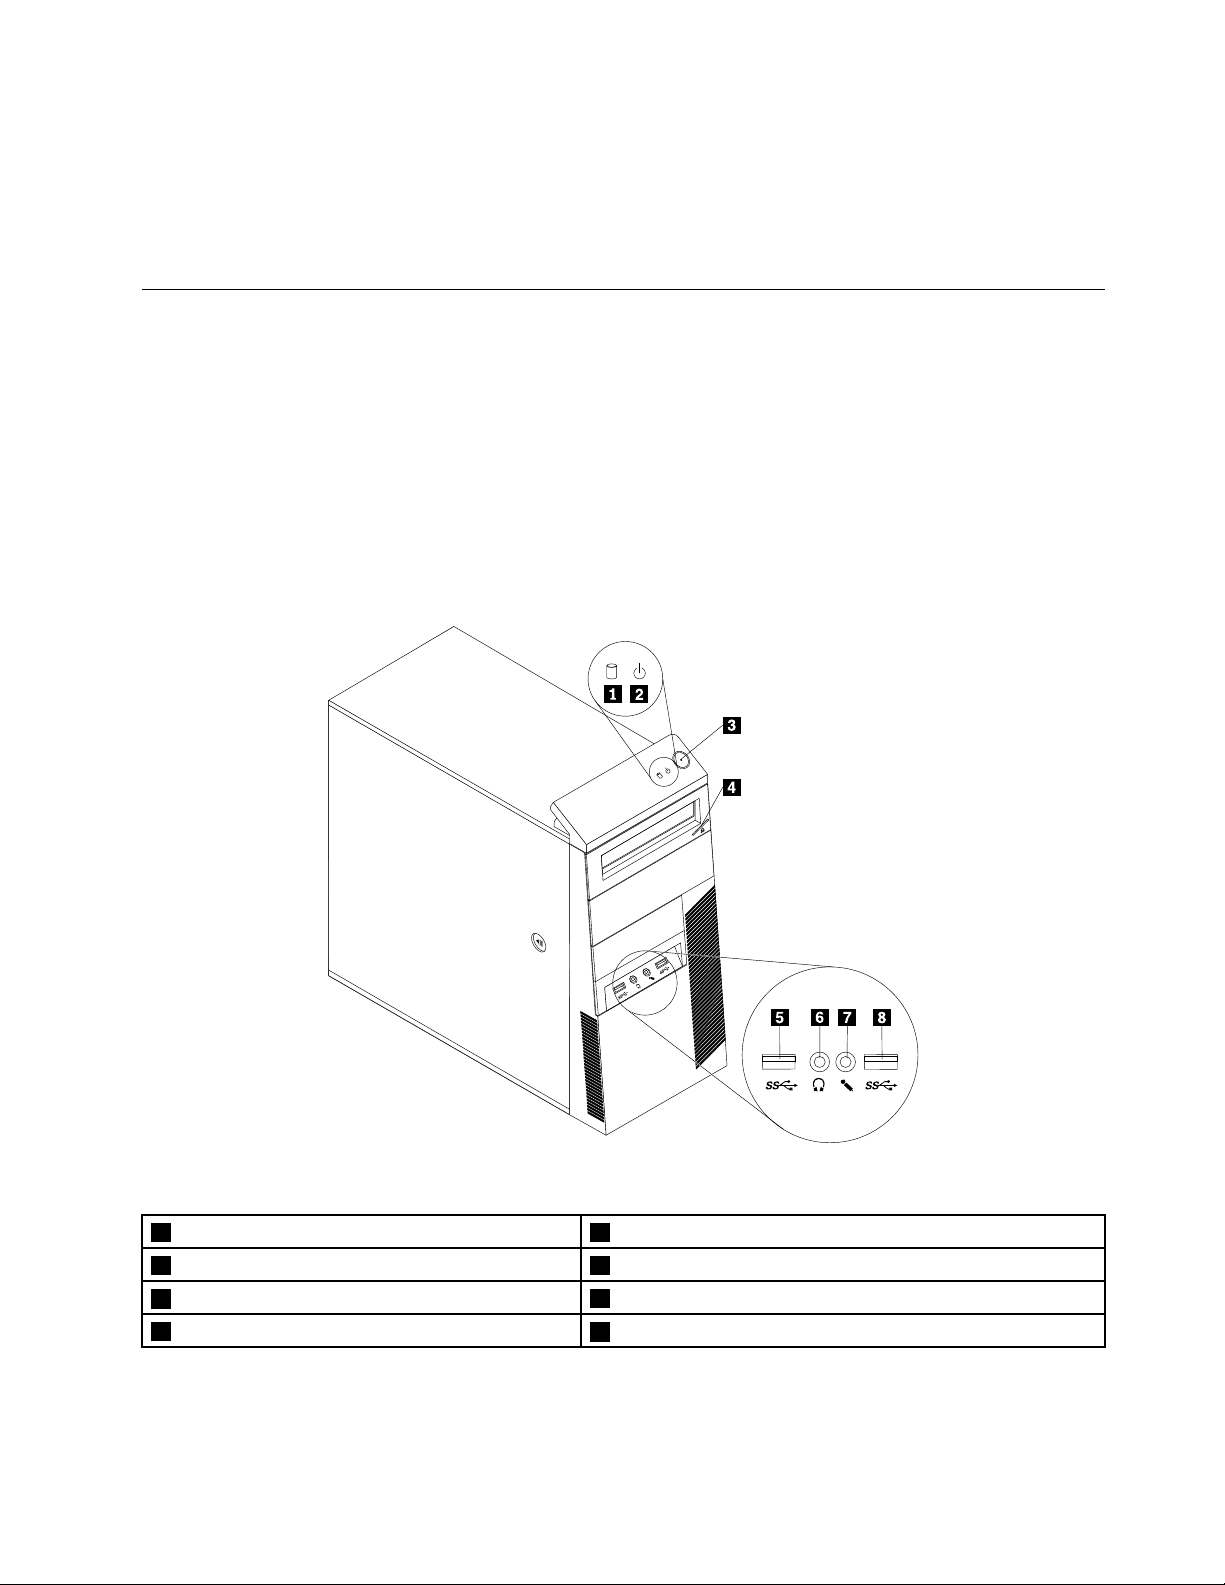
Figure1“Frontconnector,control,andindicatorlocations”onpage9showsthelocationsoftheconnectors,
controls,andindicatorsonthefrontofyourcomputer.
Figure1.Frontconnector,control,andindicatorlocations
1Harddiskdriveactivityindicator2Powerindicator
3Powerbutton
5USB3.0connector(USBport1)
7Microphoneconnector
4Opticaldriveeject/closebutton
6Headphoneconnector
8USB3.0connector(USBport2)
Chapter1.Productoverview9
Page 22
Locatingconnectorsontherearofyourcomputer
®
5 6 7 8
3 4
®
®
HDMI
®
5
6
7
8
3
4
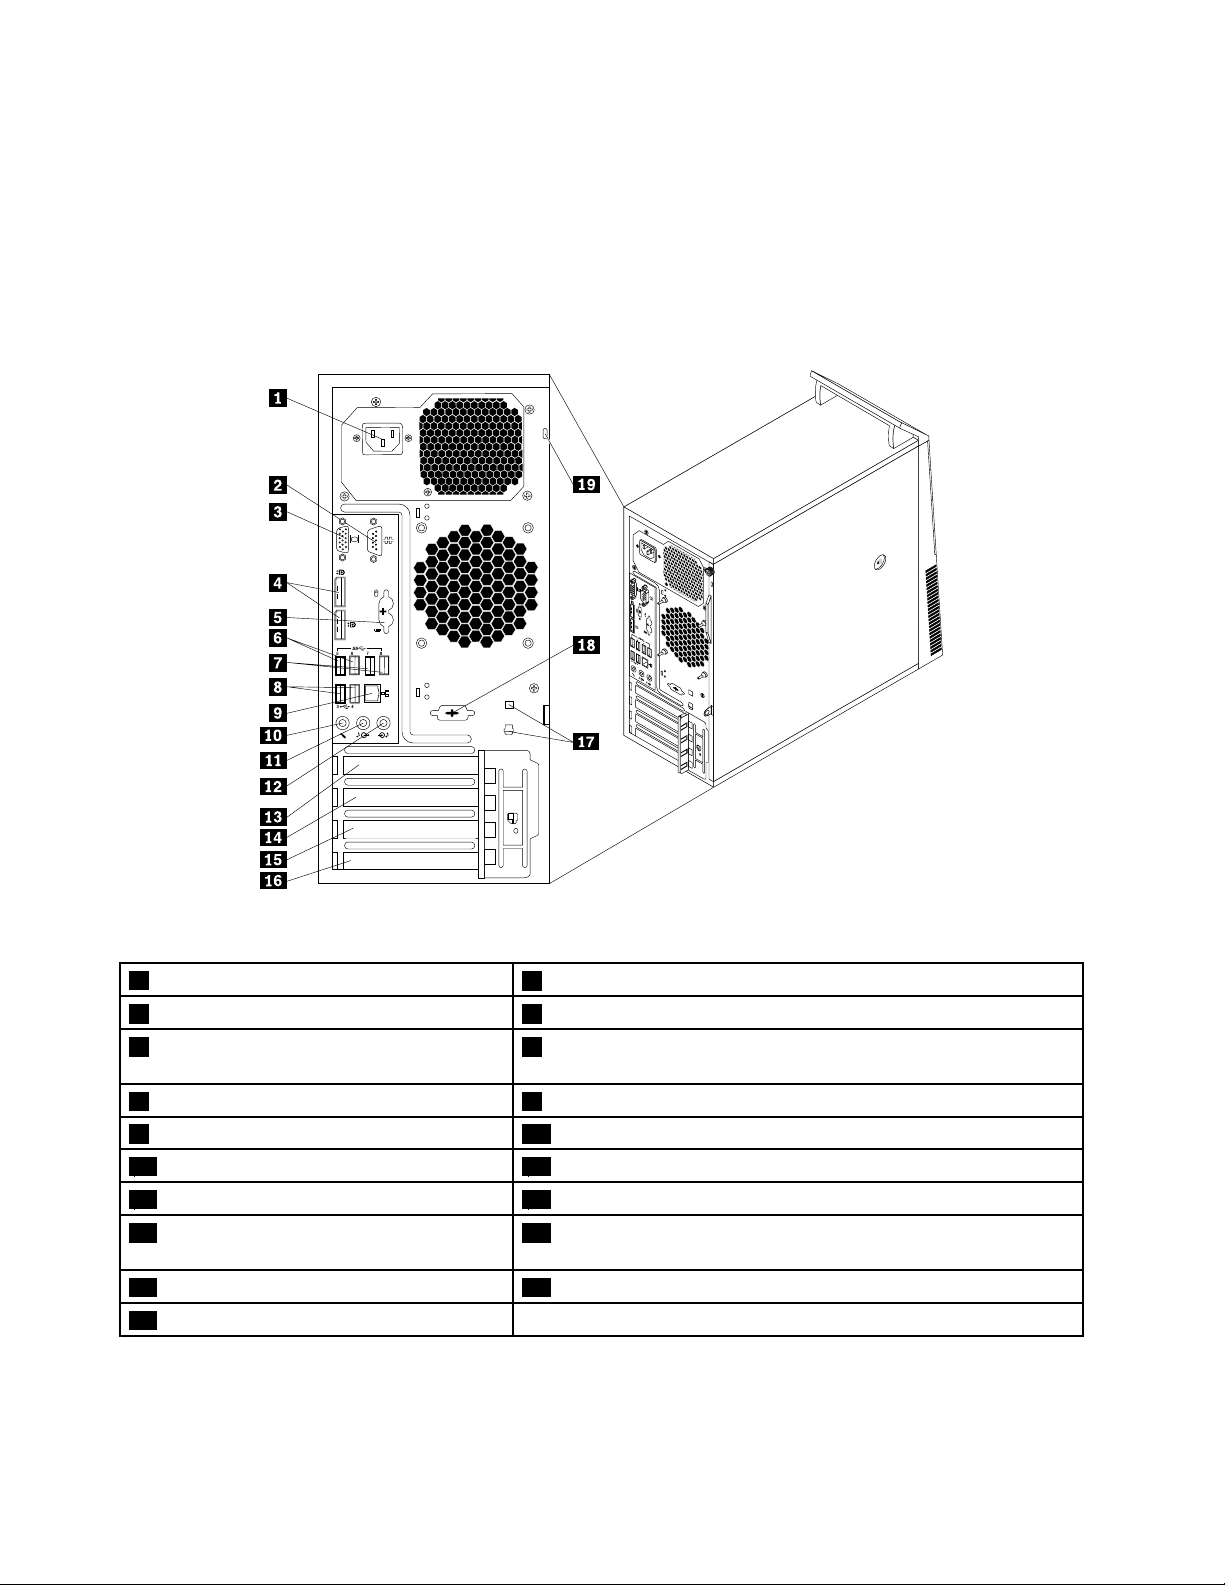
•Figure2“ThinkCentreM93/prearconnectorlocations”onpage10showsthelocationsoftheconnectors
ontherearofThinkCentreM93/pcomputer.Someconnectorsontherearofyourcomputerare
color-codedtohelpyoudeterminewheretoconnectthecablesonyourcomputer.
•Figure3“ThinkCentreM83rearconnectorlocations”onpage11
ontherearofThinkCentreM83computer.Someconnectorsontherearofyourcomputerarecolor-coded
tohelpyoudeterminewheretoconnectthecablesonyourcomputer.
showsthelocationsoftheconnectors
Figure2.ThinkCentreM93/prearconnectorlocations
1Powercordconnector
3VGAmonitorconnector4DisplayPortconnectors(2)
5PS/2keyboardandmouseconnectors
2Serialport1
6USB3.0connectors(USBports5and6)
(optional)
7USB3.0connectors(USBports7and8)8USB2.0connectors(USBports3and4)
9Ethernetconnector10Microphoneconnector
11Audioline-outconnector12Audioline-inconnector
13PCIExpressx16graphicscardslot14PCIExpressx1cardslot
15PCIExpresscardslot(physicallinkwidth
x16;negotiablelinkwidthx4,x1)
17Cable-lockslots(2)18Optionalserialport(serialport2)
19Security-lockslot
16PCIcardslot
10ThinkCentreM83,M93/pUserGuide
Page 23

®
5 6 7 8
3 4
®
®
HDMI
®
5
6
7
8
3
4
Figure3.ThinkCentreM83rearconnectorlocations
1Powercordconnector
2Serialport1
3VGAmonitorconnector4DisplayPortconnectors(2)
5PS/2keyboardandmouseconnectors
6USB3.0connectors(USBports5and6)
(optional)
7USB2.0connectors(USBports7and8)8USB2.0connectors(USBports3and4)
9Ethernetconnector10Microphoneconnector
11Audioline-outconnector12Audioline-inconnector
13PCIExpressx16graphicscardslot14PCIExpressx1cardslot
15PCIExpresscardslot(physicallinkwidth
16Cable-lockslots(2)
x16;negotiablelinkwidthx4,x1)
17Optionalserialport(serialport2)18Security-lockslot
ConnectorDescription
Audioline-inconnector
Usedtoreceiveaudiosignalsfromanexternalaudiodevice,suchasastereo
system.Whenyouattachanexternalaudiodevice,acableisconnectedbetween
theaudioline-outconnectorofthedeviceandtheaudioline-inconnectorofthe
computer.
Audioline-outconnector
DisplayPortconnector
Usedtosendaudiosignalsfromthecomputertoexternaldevices,suchaspowered
stereospeakers(speakerswithbuilt-inamplifiers),headphones,multimedia
keyboards,ortheaudioline-inconnectoronastereosystemorotherexternal
recordingdevice.
Usedtoattachahigh-performancemonitor,adirect-drivemonitor,orotherdevices
thatuseaDisplayPortconnector.
Chapter1.Productoverview11
Page 24

ConnectorDescription
Ethernetconnector
Microphoneconnector
PS/2keyboardconnector
(optional)
PS/2mouseconnector
(optional)
Serialport
USBconnectorUsedtoattachadevicethatrequiresaUSBconnector,suchasaUSBkeyboard,a
VGAmonitorconnectorUsedtoattachaVGAmonitororotherdevicesthatuseaVGAmonitorconnector.
UsedtoattachanEthernetcableforalocalareanetwork(LAN).
Note:T ooperatethecomputerwithinFCCClassBlimits,useaCategory5Ethernet
cable.
Usedtoattachamicrophonetoyourcomputerwhenyouwanttorecordsoundorif
youusespeech-recognitionsoftware.
UsedtoattachakeyboardthatusesaPS/2keyboardconnector.
Usedtoattachamouse,atrackball,orotherpointingdevicesthatuseaPS/2
mouseconnector.
Usedtoattachanexternalmodem,aserialprinter,orotherdevicesthatusea
9-pinserialport.
USBmouse,aUSBscanner,oraUSBprinter.IfyouhavemorethaneightUSB
devices,youcanpurchaseaUSBhub,whichyoucanusetoconnectadditional
USBdevices.
Locatingcomponents
Figure4“Componentlocations”onpage12showsthelocationsofthevariouscomponentsinyour
computer.Toremovethecomputercover,see“Removingthecomputercover”onpage42
.
Figure4.Componentlocations
12ThinkCentreM83,M93/pUserGuide
Page 25
1Heatsinkandfanassembly
3Opticaldrive4FrontaudioandUSBassembly
5Thermalsensor
7Frontfanassembly(availableinsomemodels)8Secondaryharddiskdrive(availableinsomemodels)
9Secondaryharddiskdrivebay
11PCIcard(availableinThinkCentreM93/p
computers)
13Rearfanassembly
15Microprocessor
2Memorymodules
6Internalspeaker(availableinsomemodels)
10Primaryharddiskdrive
12Coverpresenceswitch(intrusionswitch)(availableinsome
models)
14Powersupplyassembly
Locatingpartsonthesystemboard
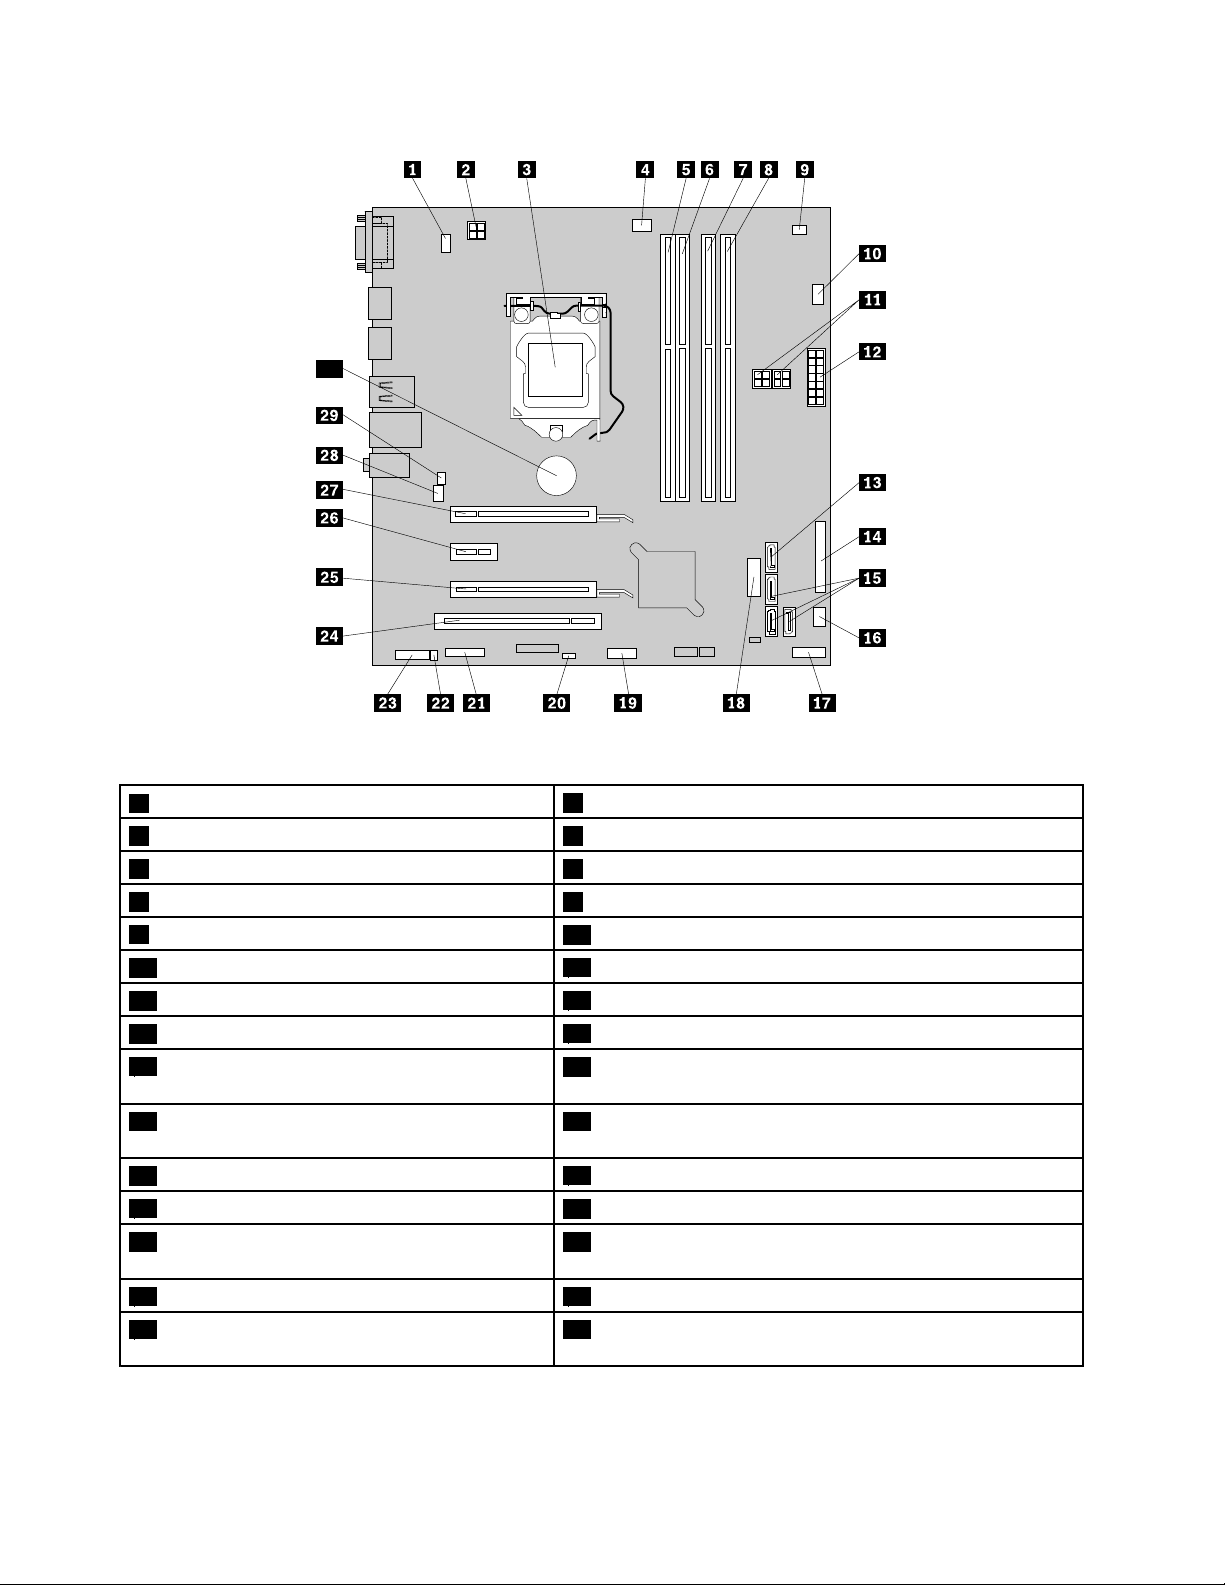
•Figure5“ThinkCentreM93/psystemboardpartlocations”onpage14showsthelocationsoftheparts
onthesystemboardofThinkCentreM93/pcomputer.
•Figure6“ThinkCentreM83systemboardpartlocations”onpage15showsthelocationsofthepartson
thesystemboardofThinkCentreM83computer.
Chapter1.Productoverview13
Page 26
30
Figure5.ThinkCentreM93/psystemboardpartlocations
1PS/2keyboardandmouseconnector
3Microprocessor
5Memoryslot1(DIMM1)6Memoryslot2(DIMM2)
7Memoryslot3(DIMM3)8Memoryslot4(DIMM4)
9Thermalsensorconnector
114-pinpowerconnectors(2)
13eSATAconnector
15SATA3.0connectors(3)
17Frontpanelconnector
24-pinpowerconnector
4Microprocessorfanconnector
10Harddiskdrivefanconnector
1214-pinpowerconnector
14Parallelconnector
16Powerfanconnector
18FrontUSBconnector2(forconnectingUSBports1and2
onthefrontbezel)
19FrontUSBconnector1(forconnecting
additionalUSBdevices)
21Serial(COM2)connector
23Frontaudioconnector
25PCIExpresscardslot(physicallinkwidthx16;
20ClearCMOS(ComplementaryMetalOxideSemiconductor)
/Recoveryjumper
22Internalspeakerconnector
24PCIcardslot
26PCIExpressx1cardslot
negotiablelinkwidthx4,x1)
27PCIExpressx16graphicscardslot28Systemfanconnector
29Coverpresenceswitchconnector(intrusion
30Battery
switchconnector)
14ThinkCentreM83,M93/pUserGuide
Page 27
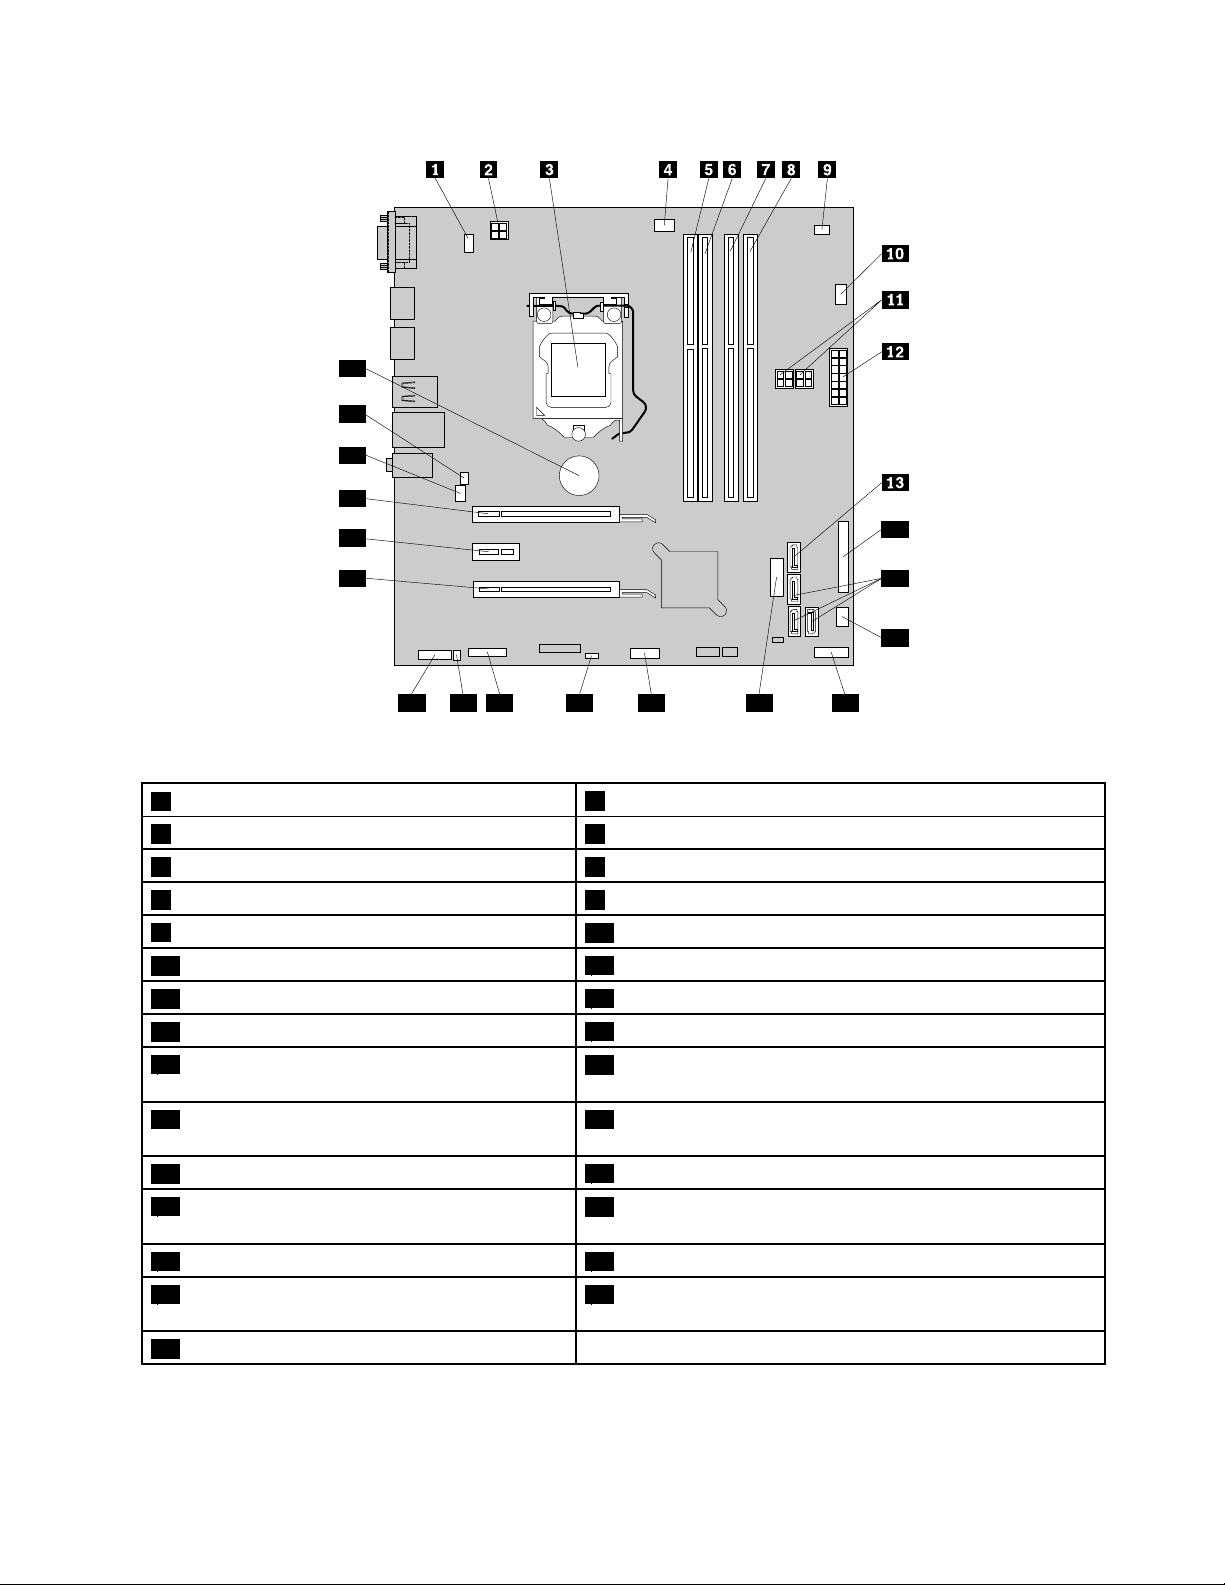
14
15
16
17181920212223
24
25
26
27
28
29
Figure6.ThinkCentreM83systemboardpartlocations
1PS/2keyboardandmouseconnector
3Microprocessor
5Memoryslot1(DIMM1)6Memoryslot2(DIMM2)
7Memoryslot3(DIMM3)8Memoryslot4(DIMM4)
9Thermalsensorconnector
114-pinpowerconnectors(2)
13eSATAconnector
15SATA3.0connectors(3)
17Frontpanelconnector
24-pinpowerconnector
4Microprocessorfanconnector
10Harddiskdrivefanconnector
1214-pinpowerconnector
14Parallelconnector
16Powerfanconnector
18FrontUSBconnector2(forconnectingUSBports1and2
onthefrontbezel)
19FrontUSBconnector1(forconnecting
additionalUSBdevices)
21Serial(COM2)connector
23Frontaudioconnector
20ClearCMOS(ComplementaryMetalOxideSemiconductor)
/Recoveryjumper
22Internalspeakerconnector
24PCIExpresscardslot(physicallinkwidthx16;negotiable
linkwidthx4,x1)
25PCIExpressx1cardslot26PCIExpressx16graphicscardslot
27Systemfanconnector28Coverpresenceswitchconnector(intrusionswitch
connector)
29Battery
Chapter1.Productoverview15
Page 28

Locatinginternaldrives
Internaldrivesaredevicesthatyourcomputerusestoreadandstoredata.Y oucanadddrivestoyour
computertoincreasestoragecapacityandenableyourcomputertoreadothertypesofmedia.Internal
drivesareinstalledinbays.
Wheninstallingorreplacinganinternaldrive,itisimportanttonotethetypeandsizeofthedrivethatyou
caninstallorreplaceineachbayandcorrectlyconnectthecablestothedriveinstalled.Refertothe
appropriatesectionin“Installingorreplacinghardware”onpage41
replaceinternaldrivesforyourcomputer.
Figure7“Drivebaylocations”onpage16showsthelocationsofthedrivebays.
forinstructionsonhowtoinstallor
Figure7.Drivebaylocations
1Bay1-Primaryopticaldrivebay(withanopticaldriveavailableinsomemodels)
2Bay2-Secondaryopticaldrivebay
3Bay3-CardreaderdrivebayormSATAsolid-statedrivebay
4Bay4-PrimarySATAharddiskdrivebay(forinstallinga3.5-inchSATAharddiskdriveora2.5-inchSA TA
solid-statedrive)
5Bay5-SecondarySATAharddiskdrivebay(forinstallinga3.5-inchSATAharddiskdriveora2.5-inchSAT A
solid-statedrive)
16ThinkCentreM83,M93/pUserGuide
Page 29

Machinetypeandmodellabel
5
6 7 8
3
4
HDMI
®
3 4
5 6 7 8
5 6
7
8
3 4
®
Machine Type: XXXX
Model Number: XXX
Themachinetypeandmodellabelidentifiesyourcomputer.WhenyoucontactLenovoforhelp,themachine
typeandmodelinformationhelpssupporttechnicianstoidentifyyourcomputerandprovidefasterservice.
Thefollowingisasampleofthemachinetypeandmodellabel.
Figure8.Machinetypeandmodellabel
Chapter1.Productoverview17
Page 30

18ThinkCentreM83,M93/pUserGuide
Page 31

Chapter2.Usingyourcomputer
Thischapterprovidesinformationonusingsomeofthecomputercomponents.
Frequentlyaskedquestions
Thefollowingareafewtipsthatwillhelpyouoptimizetheuseofyourcomputer.
CanIgetmyuserguideinanotherlanguage?
TheuserguideisavailableinvariouslanguagesontheLenovoSupportWebsiteat:
http://www.lenovo.com/ThinkCentreUserGuides
Wherearemyrecoverydiscs?
Lenovoprovidesaprogramthatenablesyoutocreaterecoverydiscs.Fordetailsaboutcreatingrecovery
discs,see“Creatingrecoverymedia”onpage104
Additionally,incaseofaharddiskfailure,youcanorderProductRecoverydiscsfromtheLenovoCustomer
SupportCenter.ForinformationaboutcontactingtheCustomerSupportCenter,seeChapter11“Getting
information,help,andservice”onpage141.BeforeusingtheProductRecoverydiscs,refertothe
documentationthatcomeswiththediscs.
Attention:AProductRecoverydiscpackagemightcontainmultiplediscs.Makesureyouhaveallofthe
discsreadybeforestartingtherecoveryprocess.Duringtherecoveryprocess,youmightbeprompted
tochangediscs.
.
WherecanIfindhelpabouttheWindowsoperatingsystem?
TheWindowsHelpandSupportinformationsystemprovidesyouwithdetailedinformationaboutusingthe
Windowsoperatingsystemtohelpyougetthemostofyourcomputer.ToaccesstheWindowsHelpand
Supportinformationsystem,dooneofthefollowing:
•OntheWindows7operatingsystem,clickStart➙HelpandSupport.
•OntheWindows8orWindows8.1operatingsystem,moveyourpointertothetop-rightorbottom-right
cornerofthescreentodisplaythecharms.ThenclickSettings➙Help.Additionally,theWindows8.1
operatingsystemprovidesaHelp+TipsapplicationthatyoucanopenfromtheStartscreenorApps
screen.
CanIchangetheWindows8.1startupbehaviortoopenthedesktopinsteadoftheStartscreen?
OntheWindows8.1operatingsystem,youcansetthecomputertoopenthedesktopinsteadoftheStart
screenbydefault.Tosetthedefaultstartupscreen,dothefollowing:
1.Onthedesktop,moveyourpointertothetaskbaratthebottomofthescreenandright-clickonthe
taskbar.
2.ClickProperties.TheT askbarandNavigationpropertieswindowisdisplayed.
3.OntheNavigationtab,locatetheStartscreensection,andthenselectWhenIsigninorcloseall
appsonascreen,gotothedesktopinsteadofStart.
4.ClickOKtosavethenewsetting.
ThisfeatureisnotavailableontheWindows8operatingsystem.
©CopyrightLenovo2013,2014
19
Page 32

NavigatingamongscreensontheWindows8andWindows8.1operating systems
Thissectionprovidesinstructionsonhowtonavigateamongthedesktop,theStartscreen,andapplications
thatwereopenedfromtheStartscreenontheWindows8andWindows8.1operatingsystems.Fordetailed
instructions,see“NavigatingonWindows8”onpage20
or“NavigatingonWindows8.1”onpage21.
NavigatingonWindows8
Tonavigateamongthedesktop,theStartscreen,andapplicationsthatwereopenedfromtheStartscreen
ontheWindows8operatingsystem,dooneofthefollowing:
•FromtheStartscreen,dooneofthefollowingtonavigatetothemostrecentlyaccessedworkspace
(application,PCsettings,ordesktop):
–Usingapointingdevice:Movethepointertotheextremebottom-leftcornerofthescreenuntilasmall
representationoftheworkspaceisdisplayed;thenclicktherepresentation.
–Usingatouchscreen:Swipeinandoutontheleftedgeofthescreen.Representationsofallavailable
workspacesaredisplayedalongtheleftedgeofthescreen.Taptherepresentationoftheworkspaceat
thebottom.
Note:Therepresentationofaworkspaceisdisplayedonlyifyouhaveatleastoneactiveworkspacein
thebackgroundofthesystem.
•FromthedesktoporanyotherworkspacethatisopenedfromtheStartscreen,dooneofthefollowingto
navigatetotheStartscreen:
–Usingapointingdevice:Movethepointertotheextremebottom-leftcornerofthescreenuntilasmall
representationoftheStartscreenisdisplayed;thenclicktherepresentation.
–Usingatouchscreen:Dooneofthefollowing:
–Swipeinandoutontheleftedgeofthescreen.Representationsofallavailableworkspacesare
displayedalongtheleftedgeofthescreen.T aptherepresentationoftheStartscreenatthebottom.
–Swipeinfromtherightedgeofthescreentodisplaythecharms;thentapStart.
•Fromanyworkspace(Startscreen,desktop,PCsettings,orapplicationopenedfromtheStartscreen),
useanyofthefollowingprocedurestogotoanotherworkspacethatyouhavepreviouslyopened:
–Tonavigatetoapreviouslyaccessedworkspace(application,PCsettings,ordesktop),dooneofthe
following:
–Usingapointingdevice:
1.Dooneofthefollowing:
•Movethepointertotheextremetop-leftcornerofthescreenandthenmovethepointer
downwardalongtheleftedgeofthescreen.
•Movethepointertotheextremebottom-leftcornerofthescreenandthenmovethepointer
upwardalongtheleftedgeofthescreen.
Representationsofallavailableworkspacesaredisplayedalongtheleftedgeofthescreen.
Note:OnlyactiveworkspacesthatyouhaveaccessedduringthecurrentWindowssession
aredisplayedalongtheleftedge.Ifyoucloseanactiveworkspace,itsrepresentationdoes
notdisplayalongtheleftedgeofthescreen.
2.Clicktherepresentation.
–Usingatouchscreen:
•Method1
20ThinkCentreM83,M93/pUserGuide
Page 33

1.Swipeinandoutontheleftedgeofthescreen.Representationsofallavailableworkspaces
aredisplayedalongtheleftedgeofthescreen.
2.T apthedesiredworkspace.
•Method2
1.Swipeinfromtheleftedgeofthescreentonavigatetothenextavailableworkspace.
2.Repeatstep1untilyounavigatetothedesiredworkspace.
–Tonavigatetothemostrecentlyaccessedworkspace(application,PCsettings,ordesktop),doone
ofthefollowing:
–Usingapointingdevice:Movethepointertotheextremetop-leftcornerofthescreenuntilasmall
representationoftheworkspaceisdisplayed;thenclicktherepresentation.
–Usingatouchscreen:Swipeinfromtheleftedgeofthescreen.
ForinformationaboutusingotherfeaturesoftheWindows8operatingsystem,refertotheWindowsHelp
andSupportinformationsystem.Formoreinformation,see“HelpandSupport”onpage141
.
NavigatingonWindows8.1
Tonavigateamongthedesktop,theStartscreen,andapplicationsthatwereopenedfromtheStartscreen
ontheWindows8.1operatingsystem,dooneofthefollowing:
•FromtheStartscreen,dooneofthefollowingtonavigatetothemostrecentlyaccessedworkspace
(application,setting,ordesktop):
–Usingapointingdevice:Movethepointertotheextremebottom-leftcornerofthescreenuntilthe
Windowsscreen-controlicon
–Usingatouchscreen:Swipeinandoutontheleftedgeofthescreen.Representationsofallavailable
workspacesaredisplayedalongtheleftedgeofthescreen.TaptheWindowsscreen-controlicon
atthebottom.
Note:TheWindowsscreen-controlicon
inthebackgroundofthesystem.
•FromthedesktoporanyotherworkspacethatisopenedfromtheStartscreen,dooneofthefollowingto
navigatetotheStartscreen:
–Usingapointingdevice:
–Fromthedesktop,clicktheWindowsscreen-controliconinthebottom-leftcornerofthescreen.
–Fromanyotherworkspace,movethepointertotheextremebottom-leftcornerofthescreenuntil
theWindowsscreen-controliconisdisplayed;thenclicktheicon.
–Usingatouchscreen:Dooneofthefollowing:
–Fromthedesktop,taptheWindowsscreen-controliconinthebottom-leftcornerofthescreen.
–Fromanyotherworkspace,dooneofthefollowing:
•Swipeinandoutontheleftedgeofthescreen.Representationsofallavailableworkspaces
aredisplayedalongtheleftedgeofthescreen.TaptheWindowsscreen-controliconat
thebottom.
•Swipeinfromtherightedgeofthescreentodisplaythecharms;thentapStart.
•Fromanyworkspace(Startscreen,desktop,PCsettings,orapplicationopenedfromtheStartscreen),
useanyofthefollowingprocedurestogotoanotherworkspacethatyouhavepreviouslyopened:
isdisplayed;thenclicktheicon.
isdisplayedonlyifyouhaveatleastoneactiveworkspace
–Tonavigatetoapreviouslyaccessedworkspace(application,setting,ordesktop),dooneofthe
following:
Chapter2.Usingyourcomputer21
Page 34

–Usingapointingdevice:
1.Dooneofthefollowing:
•Movethepointertotheextremetop-leftcornerofthescreenandthenmovethepointer
downwardalongtheleftedgeofthescreen.
•Movethepointertotheextremebottom-leftcornerofthescreenandthenmovethepointer
upwardalongtheleftedgeofthescreen.
Representationsofallavailableworkspacesaredisplayedalongtheleftedgeofthescreen.
Note:OnlyactiveworkspacesthatyouhaveaccessedduringthecurrentWindowssession
aredisplayedalongtheleftedge.Ifyoucloseanactiveworkspace,itsrepresentationdoes
notdisplayalongtheleftedgeofthescreen.
2.Clicktherepresentation.
–Usingatouchscreen:
•Method1
1.Swipeinandoutontheleftedgeofthescreen.Representationsofallavailableworkspaces
aredisplayedalongtheleftedgeofthescreen.
2.T apthedesiredworkspace.
•Method2
1.Swipeinfromtheleftedgeofthescreentonavigatetothenextavailableworkspace.
2.Repeatstep1untilyounavigatetothedesiredworkspace.
–Tonavigatetothemostrecentlyaccessedworkspace(application,PCsettings,ordesktop),doone
ofthefollowing:
–Usingapointingdevice:Movethepointertotheextremetop-leftcornerofthescreenuntilthe
Windowsscreen-controliconisdisplayed;thenclicktheicon.
–Usingatouchscreen:Swipeinfromtheleftedgeofthescreen.
ForinformationaboutusingotherfeaturesoftheWindows8.1operatingsystem,opentheHelp+Tips
applicationfromtheStartscreenorAppsscreen,orrefertotheWindowsHelpandSupportinformation
system.Formoreinformation,see“HelpandSupport”onpage141.
AccessingControlPanelontheWindows8orWindows8.1operating system
OntheWindowsoperatingsystem,youcanviewandchangecomputersettingsthroughControlPanel.To
accessControlPanelontheWindows8orWindows8.1operatingsystem,dooneofthefollowing:
•Fromthedesktop
1.Movethepointertothetop-rightorbottom-rightcornerofthescreentodisplaythecharms.
2.ClickSettings.
3.ClickControlPanel.
•FromtheStartscreen
–ForWindows8:
1.Movethepointertothetop-rightorbottom-rightcornerofthescreentodisplaythecharms.
2.ClickSearch.
3.OntheAppsscreen,scrolltotherightside,andclickControlPanelintheWindowsSystem
section.
22ThinkCentreM83,M93/pUserGuide
Page 35

–ForWindows8.1:
1.Clickthearrowiconinthebottom-leftcornerofthescreentogototheAppsscreen.
2.Scrolltotherightside,andclickControlPanelintheWindowsSystemsection.
Usingthekeyboard
Dependingonyourmodel,yourcomputercomeswitheitherastandardkeyboardorafingerprintreader
keyboard.TheMicrosoftWindowsshortcutkeysareprovidedonbothkeyboardtypes.
Thissectionprovidesinformationaboutthefollowingtopics:
•“UsingWindowsshortcutkeys”onpage23
•“Usingthefingerprintreader”onpage23
UsingWindowsshortcutkeys
Boththestandardkeyboardandthefingerprintreaderkeyboardprovidethreekeysyoucanusewithyour
MicrosoftWindowsoperatingsystem.
•ThetwoWindowslogokeysarelocatedbesidetheAltkeyoneithersideofthespacebar.Theyfeature
theWindowslogo.OntheWindows7operatingsystem,presstheWindowskeytoopentheStart
menu.OntheWindows8orWindows8.1operatingsystem,presstheWindowskey
betweenthecurrentworkspaceandtheStartscreen.ThestyleoftheWindowslogovariesdepending
onthekeyboardtype.
•Thecontext-menukeyislocatednexttotheCtrlkeyontherightsideoftheSpacebar.Pressingthe
context-menukeyopensthecontextmenufortheactiveprogram,icon,orobject.
toswitch
Note:YoucanusethemouseortheUpandDownarrowkeystohighlightmenuselections.OntheWindows
7operatingsystem,youcanclosetheStartmenuorthecontextmenubyclickingthemouseorpressingEsc.
Usingthefingerprintreader
Theintegratedfingerprintreaderprovidedonsomekeyboardsenablesyoutoenrollyourfingerprintand
associateitwithyourpower-onpassword,harddiskpassword,andWindowspassword.Asaresult,
fingerprintauthenticationcanreplacepasswordsandenablesimpleandsecureuseraccess.Afingerprint
readerkeyboardisavailablewithselectcomputersorcanbepurchasedforcomputersthatsupportthis
option.
ToopenFingerprintManagerProorThinkVantageFingerprintSoftwareandusethefingerprintreader,
dothefollowing:
•OntheWindows7operatingsystem,see“AccessingLenovoprogramsontheWindows7operating
system”onpage5
•OntheWindows8.1operatingsystem,see“AccessingLenovoprogramsontheWindows8orWindows
8.1operatingsystem”onpage6
Followtheon-screeninstruction.Formoreinformationaboutusingthefingerprintreader,refertothehelp
systemofFingerprintManagerProorThinkVantageFingerprintSoftware.
.
.
Chapter2.Usingyourcomputer23
Page 36

Usingthewheelmouse
Thewheelmousehasthefollowingcontrols:
1PrimarymousebuttonUsethisbuttontoselectorstartaprogramormenuitem.
2Wheel
3Secondarymousebutton
Youcanswitchthefunctionoftheprimaryandsecondarymousebuttonsandchangeotherdefaultbehavior
throughthemousepropertiesfunctionintheWindowsControlPanel.
Usethewheeltocontrolthescrollingactionofthemouse.Thedirectioninwhichyou
rotatethewheelcontrolsthedirectionofthescrollingaction.
Usethisbuttontodisplayamenufortheactiveprogram,icon,orobject.
Adjustingaudio
Soundisanimportantpartofthecomputerexperience.Y ourcomputerhasadigitalaudiocontrollerbuilt
intothesystemboard.Somemodelsalsohaveahigh-performanceaudioadapterinstalledinoneofthePCI
cardslots.
Aboutyourcomputeraudio
Ifafactory-installed,high-performanceaudioadapterisinstalledinyourcomputer,thesystem-board
audioconnectorsontherearofthecomputeraretypicallydisabled;usetheconnectorsprovidedonthe
audioadapter.
Eachaudiosolutionprovidesatleastthreeaudioconnectors:audioline-inconnector,audioline-out
connector,andMicrophoneconnector.Onsomemodels,afourthconnectorisprovidedfortheattachment
ofunpoweredstereospeakers(speakersthatdonotrequireanacpowersource).Theaudioadapter
providesyouwiththeabilitytorecordandplaybacksoundandmusic,aswellastoenjoysoundwith
multimediaapplicationsandworkwithspeech-recognitionsoftware.
Optionally,youcanconnectasetofpoweredstereospeakerstotheaudioline-outconnectortoenjoy
bettersoundwithmultimediaapplications.
Settingthevolumefromthedesktop
Thedesktopvolumecontrolisaccessiblethroughthevolumeiconinthetaskbar,whichislocatedatthe
bottom-rightcorneroftheWindowsdesktop.Clickthevolumeiconandmovethesliderupordownto
controlthevolume,orclicktheMuteicontoturntheaudiooff.Ifthevolumeiconisnotinthetaskbar,see
“Addingthevolumeicontothetaskbar”onpage24.
Addingthevolumeicontothetaskbar
ToaddthevolumeicontothetaskbarontheWindows7operatingsystem,dothefollowing:
24ThinkCentreM83,M93/pUserGuide
Page 37

1.FromtheWindowsdesktop,clickStart➙ControlPanel➙AppearanceandPersonalization.
2.IntheTaskbarandStartMenusection,clickCustomizeiconsonthetaskbar.
3.ClickTurnsystemiconsonoroffandchangethevolumebehaviorsfromOfftoOn.
4.ClickOKtosavethenewsettings.
ToaddthevolumeicontothetaskbarontheWindows8orWindows8.1operatingsystem,dothefollowing:
1.OpenControlPanel,andclickAppearanceandPersonalization.
Note:FordetailedinformationonhowtoopenControlPanelonWindows8andWindows8.1,see
“AccessingControlPanelontheWindows8orWindows8.1operatingsystem”onpage22.
2.Dooneofthefollowing:
•ForWindows8:
IntheT askbarsection,clickCustomizeiconsonthetaskbar.
•ForWindows8.1:
IntheT askbarandNavigationsection,clickCustomizeiconsonthetaskbar.
3.ClickTurnsystemiconsonoroffandchangethevolumebehaviorfromOfftoOn.
4.ClickOKtosavethenewsettings.
SettingthevolumefromControlPanel
YoucansetthecomputervolumefromControlPanel.TosetthecomputervolumefromControlPanel,
dothefollowing:
1.OntheWindows7operatingsystem,clickStart➙ControlPanel➙HardwareandSound.Onthe
Windows8orWindows8.1operatingsystem,openControlPanel,andclickHardwareandSound.
Note:FordetailedinformationonhowtoopenControlPanelonWindows8andWindows8.1,see
“AccessingControlPanelontheWindows8orWindows8.1operatingsystem”onpage22
2.IntheSoundsection,clickAdjustsystemvolume.
3.Movetheslidersupordowntoraiseorlowerthevolumeofyourcomputer.
UsingCDsandDVDs
YourcomputermighthaveaDVDROMdriveorrecordableDVDdriveinstalled.DVDdrivesuse
industry-standard,12cm(4.75-inch)CDmediaorDVDmedia.IfyourcomputercomeswithaDVDdrive,
thedrivecanreadDVD-ROMdiscs,DVD-Rdiscs,DVD-RAMdiscs,DVD-RWdiscs,andalltypesofCDs,
suchasCD-ROMdiscs,CD-RWdiscs,CD-Rdiscs,andaudioCDs.IfyouhavearecordableDVDdrive,
itcanalsorecordonDVD-Rdiscs,DVD-RWdiscs,typeIIDVD-RAMdiscs,CD-RWstandardandhigh
speeddiscs,andCD-Rdiscs.
FollowtheseguidelineswhenusingtheDVDdrive:
•Donotplacethecomputerinalocationwherethedriveisexposedtothefollowing:
–Hightemperature
–Highhumidity
–Excessivedust
–Excessivevibrationorsuddenshock
–Aninclinedsurface
–Directsunlight
.
Chapter2.Usingyourcomputer25
Page 38

•DonotinsertanyobjectotherthanaCDorDVDintothedrive.
•Beforemovingthecomputer,removetheCDorDVDfromthedrive.
HandlingandstoringCDandDVDmedia
CDandDVDmediaaredurableandreliable,buttheydorequiresomecareandspecialhandling.When
handlingandstoringaCDorDVD,followtheseguidelines:
•Holdthediscbyitsedges.Donottouchthesurfaceofthesidethatisnotlabeled.
•Toremovedustorfingerprints,wipethediscwithaclean,softclothfromthecentertotheoutside.Wiping
thediscinacirculardirectionmightcauselossofdata.
•Donotwriteorstickpaperonthedisc.
•Donotscratchormarkthedisc.
•Donotplaceorstorethediscindirectsunlight.
•Donotusebenzene,thinners,orothercleanerstocleanthedisc.
•Donotdroporbendthedisc.
•Donotinsertdamageddiscsintothedrive.Warped,scratched,ordirtydiscscandamagethedrive.
PlayingaCDorDVD
IfyourcomputercomeswithaDVDdrive,youcanlistentoaudioCDsorwatchDVDmovies.Toplaya
CDorDVD,dothefollowing:
1.PresstheEject/LoadbuttonontheDVDdrivetoopenthetray.
2.Withthetrayfullyextended,inserttheCDorDVDintothetray.SomeDVDdriveshaveasnaphubinthe
centerofthetray.Ifyourdrivehasasnaphub,supportthetraywithonehandandthenpushonthe
centeroftheCDorDVDuntilitsnapsintoplace.
3.PresstheEject/Loadbuttonagainorgentlypushthetrayforwardtoclosethetray.TheCDorDVD
playerprogramstartsautomatically.Foradditionalinformation,refertotheCDorDVDplayerprogram
helpsystem.
ToremoveaCDorDVDfromtheDVDdrive,dothefollowing:
1.Withthecomputeron,presstheEject/Loadbutton.Whenthetrayslidesoutautomatically,carefully
removethedisc.
2.ClosethetraybypressingtheEject/Loadbuttonorbygentlypushingthetrayforward.
Note:IfthetraydoesnotslideoutofthedrivewhenyoupresstheEject/Loadbutton,insertastraightened
paperclipintotheemergency-ejectholelocatedonthefrontoftheDVDdrive.Besurethedriveispowered
offwhenusingtheemergencyeject.UsetheEject/Loadbuttoninsteadoftheemergencyejectexcept
inanemergency.
RecordingaCDorDVD
IfyourcomputercomeswitharecordableDVDdrive,youcanusethedrivetorecordCDsorDVDs.
TorecordaCDorDVD,dooneofthefollowing:
•OntheWindows7operatingsystem,youhaveeithertheCorelDVDMovieFactoryLenovoEditionprogram
orthePower2Goprograminstalledonyourcomputer.
–ToruntheCorelDVDMovieFactoryLenovoEditionprogram,clickStart➙AllPrograms➙Corel
DVDMovieFactoryLenovoEdition➙CorelDVDMovieFactoryLenovoEdition.Followthe
instructionsonthescreen.
26ThinkCentreM83,M93/pUserGuide
Page 39

–TorunthePower2Goprogram,clickStart➙AllPrograms➙PowerDVDCreate➙Power2Go.
Followtheinstructionsonthescreen.
•OntheWindows8operatingsystem,runthePower2Goprogrambydoingthefollowing:
1.Movethepointertothetop-rightorbottom-rightcornerofthescreentodisplaythecharms.Then
clickSearchandtypePower2Go.
2.ClickPower2Gointheleftpaneltoopentheprogram.
3.Followtheinstructionsonthescreen.
•OntheWindows8.1operatingsystem,runthePower2Goprogrambydoingthefollowing:
1.Onthestartscreen,clickthearrowiconinthebottom-leftcornertogototheAppsscreen.Then
typePower2Gointhesearchboxinthetop-rightcornerofthescreen.
2.ClickPower2Gointhesearchresulttoopentheprogram.
3.Followtheinstructionsonthescreen.
YoualsocanuseWindowsMedia
®
Windowsshortcutkeys”onpage23.
PlayertorecordCDsanddataDVDs.Formoreinformation,see“Using
Chapter2.Usingyourcomputer27
Page 40

28ThinkCentreM83,M93/pUserGuide
Page 41

Chapter3.Y ouandyourcomputer
Thischapterprovidesinformationaboutaccessibility,comfort,andrelocatingyourcomputertoother
countriesorregions.
Accessibilityandcomfort
Goodergonomicpracticeisimportanttogetthemostfromyourpersonalcomputerandtoavoiddiscomfort.
Arrangeyourworkplaceandtheequipmentyouusetosuityourindividualneedsandthekindofwork
thatyouperform.Inaddition,usehealthyworkhabitstomaximizeyourperformanceandcomfortwhile
usingyourcomputer.
Thefollowingtopicsprovideinformationaboutarrangingyourworkarea,settingupyourcomputer
equipment,andestablishinghealthyworkhabits.
Arrangingyourworkspace
Togetthemostfromyourcomputer,arrangeboththeequipmentyouuseandyourworkareatosuityour
needsandthekindofworkyoudo.Yourcomfortisofforemostimportance,butlightsources,aircirculation,
andthelocationofelectricaloutletscanalsoaffectthewayyouarrangeyourworkspace.
Comfort
Althoughnosingleworkingpositionisidealforeveryone,hereareafewguidelinestohelpyoufinda
positionthatsuitsyoubest.
Sittinginthesamepositionforalongtimecancausefatigue.Thebackrestandseatofyourchairshould
adjustindependentlyandprovidegoodsupport.Theseatshouldhaveacurvedfronttorelievepressureon
thethighs.Adjusttheseatsothatyourthighsareparalleltothefloorandyourfeetareeitherflatonthe
floororonafootrest.
Whenusingthekeyboard,keepyourforearmsparalleltothefloorandyourwristsinacomfortableposition.
Usealighttouchonthekeyboardandyourhandsandfingersrelaxed.Changetheangleofthekeyboard
formaximumcomfortbyadjustingthepositionofthekeyboardfeet.
Adjustthemonitorsothetopofthescreenisat,orslightlybelow,eyelevel.Placethemonitorata
comfortableviewingdistance,usually51to61cm(20to24inches),andpositionitsoyoucanviewit
withouthavingtotwistyourbody.Also,positionotherequipmentyouuseregularly,suchasthetelephoneor
amouse,withineasyreach.
©CopyrightLenovo2013,2014
29
Page 42

Glareandlighting
Positionthemonitortominimizeglareandreflectionsfromoverheadlights,windows,andotherlightsources.
Reflectedlightfromshinysurfacescancauseannoyingreflectionsonyourmonitorscreen.Placethe
monitoratrightanglestowindowsandotherlightsources,whenpossible.Reduceoverheadlighting,if
necessary,byturningofflightsorusinglowerwattagebulbs.Ifyouinstallthemonitornearawindow,use
curtainsorblindstoblockthesunlight.Y oucanadjustthebrightnessandcontrastcontrolsonthemonitor
astheroomlightingchangesthroughouttheday.
Whereitisimpossibletoavoidreflectionsortoadjustthelighting,anantiglarefilterplacedoverthescreen
mightbehelpful.However,thesefiltersmightaffecttheclarityoftheimageonthescreen;trythemonlyafter
youhaveexhaustedothermethodsofreducingglare.
Dustbuildupcompoundsproblemsassociatedwithglare.Remembertocleanyourmonitorscreen
periodicallyusingasoftclothasdirectedinyourmonitordocumentation.
Aircirculation
Yourcomputerandmonitorproduceheat.Thecomputerhasafanthatpullsinfreshairandforcesouthot
air.Themonitorletshotairescapethroughvents.Blockingtheairventscancauseoverheating,whichmight
resultinamalfunctionordamage.Placethecomputerandmonitorsothatnothingblockstheairvents;
usually,51mm(2inches)ofairspaceissufficient.Also,makesuretheventedairisnotblowingonpeople.
Electricaloutletsandcablelengths
Thelocationofelectricaloutlets,thelengthofpowercordsandcablesthatconnecttothemonitor,printer,
andotherdevicesmightdeterminethefinalplacementofyourcomputer.
Whenarrangingyourworkspace:
•Avoidtheuseofextensioncords.Whenpossible,plugthecomputerpowercorddirectlyintoanelectrical
outlet.
•Keeppowercordsandcablesneatlyroutedawayfromwalkwaysandotherareaswheretheymight
getkickedaccidentally.
Formoreinformationaboutpowercords,see“Powercordsandpoweradapters”onpagevi.
Accessibilityinformation
Lenovoiscommittedtoprovidingpeoplewithdisabilitiesgreateraccesstoinformationandtechnology.
Sometechnologiesarealreadyprovidedinyouroperatingsystem.Otherscanbepurchasedthrough
vendors.
UsersalsocanusetheEaseofAccessCenterprovidedintheWindowsoperatingsystemtoconfiguretheir
computerstosuittheirphysicalandcognitiveneeds.TheEaseofAccessCenterisacentrallocationthat
youcanusetoconfiguretheaccessibilitysettingsandprogramsavailableintheWindowsoperatingsystem.
TousetheEaseofAccessCenter,openControlPanelandclickEaseofAccess➙EaseofAccessCenter.
Thefollowinginformationprovideswaystohelpuserswhohavehearing,vision,andmobilitylimitationsget
themostoutoftheircomputerexperience.
On-screennotification
On-screennotificationhelpshearing-impairedpeoplebeawareofthestatusoftheircomputer.On-screen
notificationreplacessoundswithvisualcuesortextcaptionstoindicatethatactivityishappeningonthe
computer.Asaresult,systemalertsarenoticeableevenwhentheyarenotheard.Forexample,whenyou
30ThinkCentreM83,M93/pUserGuide
Page 43

selectoneobjectwithyourkeyboard,theobjectishighlighted.Whenyoumovethepointertooneobject
withyourmouse,theintroductorytextoftheobjectisdisplayed.
Touseon-screennotification,openControlPanel,clickEaseofAccess➙EaseofAccessCenter,and
thenclickUsetextorvisualalternativesforsounds.
Audionotification
Audionotificationhelpsvisuallyimpairedpeopleorpeoplewithweaksightbeawareofthestatusoftheir
computer.
Touseaudionotification,openControlPanel,clickEaseofAccess➙EaseofAccessCenter➙Usethe
computerwithoutadisplay,andthenselectTurnonAudioDescription.
Narrator
Narratorisascreenreaderthatreadswhatisdisplayedonthescreenaloudanddescribeseventslike
errormessages.
ToopenNarrator,dothefollowing:
•ForWindows7:ClicktheStartbutton.Then,typeNarratorintothesearchfield.Inthelistofresults,
clickNarrator.
•ForWindows8orWindows8.1:Moveyourpointertothetop-rightorbottom-rightcornerofthescreen
todisplaythecharmsandclickSearch.Then,typeNarratorintothesearchfield.Inthelistofresults,
clickNarrator.
FormoreinformationabouthowtouseandconfigureNarrator,seetheWindowsHelpandSupport
informationsystem.
Screen-readertechnologies
Screen-readertechnologiesareprimarilyfocusedonsoftwareprograminterfaces,helpinformationsystems,
andavarietyofonlinedocuments.Foradditionalinformationaboutscreenreaders,seethefollowing:
•UsingPDFswithscreenreaders:
http://www.adobe.com/accessibility.html?promoid=DJGVE
•UsingtheJAWSscreenreader:
http://www.freedomscientific.com/jaws-hq.asp
•UsingtheNVDAscreenreader:
http://www.nvaccess.org/
SpeechRecognition
SpeechRecognitionenablesyoutocontrolyourcomputerbyvoice.
Usingonlyyourvoice,youcanstartprograms,openmenus,clickbuttonsandotherobjectsonthescreen,
dictatetextintodocuments,andwriteandsende-mails.Everythingyoudowiththekeyboardandmouse
canbedonewithonlyyourvoice.
ToopenSpeechRecognition,dothefollowing:
•ForWindows7:ClicktheStartbutton.Then,typeSpeechRecognitionintothesearchfield.Inthelist
ofresults,clickSpeechRecognition.
•ForWindows8orWindows8.1:Moveyourpointertothetop-rightorbottom-rightcornerofthescreen
todisplaythecharmsandclickSearch.Then,typeSpeechRecognitionintothesearchfield.Inthelist
ofresults,clickSpeechRecognition.
Chapter3.Youandyourcomputer31
Page 44

FormoreinformationabouthowtouseandconfigureSpeechRecognition,seetheWindowsHelpand
Supportinformationsystem.
Customizabletextsize
Dependingonyourpreference,youcanchangeonlythetextsizeinsteadofchangingthesizeofeverything
onthedesktop.Tochangethetextsize,openControlPanelandclickAppearancesandPersonalization➙
Display.Then,gotoChangeonlythetextsizeandsetatextsizethatmeetsyourneeds.
Magnifier
YourcomputerisequippedwiththeMicrosoftMagnifiertohelpvisuallyimpairedpeopleusethecomputer
morecomfortably.Magnifierisausefulutilitythatenlargestheentirescreenorpartofthescreensothatyou
canseethewordsandimagesbetter.YoucanopenMagnifierfromtheEaseofAccessCenter.
ToopenMagnifier,dothefollowing:
•ForWindows7:ClicktheStartbutton,clickAllPrograms➙Accessories➙EaseofAccess,and
thenclickMagnifier.
•ForWindows8orWindows8.1:Moveyourpointertothetop-rightorbottom-rightcornerofthescreen
todisplaythecharmsandclickSearch.Then,typeMagnierintothesearchfield.Inthelistofresults,
clickMagnifier.
FormoreinformationabouthowtouseandconfigureMagnifier,seetheWindowsHelpandSupport
informationsystem.
Note:Fortouch-screencomputermodels,youalsocanzoominandzoomoutbyusingtouchgestures
insteadofthekeyboard.See“Zoom”onpage32
.
Zoom
Youcanusethezoomfeaturetoenlargeorreducethesizeoftext,pictures,maps,orotherobjects.
•Fromthekeyboard:
–Zoomin:PresstheWindowslogokey+theplus-signkey(+)toenlargethesizeoftext,pictures,
maps,orotherobjects.
–Zoomout:PresstheWindowslogokey+theminus-sign(-)keytoreducethesizeoftext,pictures,
maps,orotherobjects.
•Fromthetouchscreen:
–Zoomin:Movetwofingersfartherapartonthetouchscreentoenlargethesizeoftext,pictures,
maps,orotherobjects.
–Zoomout:Movetwofingersclosertogetheronthetouchscreentoreducethesizeoftext,pictures,
maps,orotherobjects.
Screenresolution
Youcanmakeyourdocumentseasiertoreadbyadjustingthescreenresolutionofyourcomputer.Toadjust
thescreenresolution,rightclickanywhereonthedesktop,clickScreenresolution,andthenadjustthe
settingsasyouprefer.
Note:Settingtoolowofaresolutionmightpreventsomeitemsfromfittingonthescreen.
Foralternativesonincreasingthesizeoftextandotherobjects,seethefollowing:
•“Customizabletextsize”onpage32
•“Magnifier”onpage32
32ThinkCentreM83,M93/pUserGuide
Page 45

•“Zoom”onpage32
EaseofAccesskeyboardshortcuts
Keyboardshortcutsarecombinationsoftwoormorekeysthatyoucanusetoperformataskthatwould
typicallyrequireamouseorotherpointingdevices.Keyboardshortcutsprovideaneasieralternativeto
interactwithyourcomputerasyouworkwiththeWindowsoperatingsystemandmostapplications.
Thefollowingtablecontainskeyboardshortcutsthatcanhelpmakeyourcomputereasiertouse.
KeyboardshortcutFunction
Windowslogokey+U
RightShiftforeightseconds
ShiftfivetimesTurnStickyKeysonoroff
NumLockforfivesecondsTurnT oggleKeysonoroff
LeftAlt+LeftShift+NumLock
LeftAlt+LeftShift+PrtScn(orPrtSc)TurnHighContrastonoroff
OpentheEaseofAccessCenter
TurnFilterKeysonoroff
TurnMouseKeysonoroff
Formoreinformation,gotohttp://windows.microsoft.com/,andthentypeanyofthefollowingkeywords
forsearching:keyboardshortcuts,keycombinations,shortcutkeys.
On-ScreenKeyboard
Ifyouprefertotypeorenterdataintoyourcomputerwithoutusingaphysicalkeyboard,youcanuse
On-ScreenKeyboard.On-ScreenKeyboarddisplaysavisualkeyboardwithallthestandardkeys.Youcan
selectkeysusingthemouseoranotherpointingdevice,oryoucantaptoselectthekeysifyourcomputer
supportsmulti-touchscreen.
ToopenOn-ScreenKeyboard,dothefollowing:
•ForWindows7:ClicktheStartbutton.Then,typeOn-ScreenKeyboardintothesearchfield.Inthelistof
results,clickOn-ScreenKeyboard.
•ForWindows8orWindows8.1:Moveyourpointertothetop-rightorbottom-rightcornerofthescreento
displaythecharmsandclickSearch.Then,typeOn-ScreenKeyboardintothesearchfield.Inthelistof
results,clickOn-ScreenKeyboard.
FormoreinformationabouthowtouseandconfigureOn-ScreenKeyboard,seetheWindowsHelpand
Supportinformationsystem.
Personalizedkeyboard
Thetactilebumpsonthekeyboardprovideareferencepointfromwhichyoucaneasilylocateallkeyson
thekeyboardwithoutvisualassistance.
Toadjustyourkeyboardsettings,openControlPanel,clickEaseofAccess➙EaseofAccessCenter,
andthenclickMakethekeyboardeasiertouse.
Industry-standardconnectors
Yourcomputerprovidesindustry-standardconnectorsthatenableyoutoconnectassistivedevices,
ifneeded.
Formoreinformationaboutthelocationandfunctionoftheconnectors,see“Locatingconnectors,controls,
andindicatorsonthefrontofyourcomputer”onpage9and“Locatingconnectorsontherearofyour
computer”onpage10.
Chapter3.Youandyourcomputer33
Page 46

TTY/TDDconversionmodem
Yourcomputersupportstheuseofthetexttelephone(TTY)orthetelecommunicationsdeviceforthe
deaf(TDD)conversionmodem.ThemodemmustbeconnectedbetweenyourcomputerandaTTY/TDD
telephone.Then,youcantypeamessageonyourcomputerandsendittothetelephone.
Documentationinaccessibleformats
Lenovoprovideselectronicdocumentationinaccessibleformats.Lenovoelectronicdocumentation,suchas
properlytaggedPDFfilesorHyperTextMarkupLanguage(HTML)files,isdevelopedtoensurethatvisually
impaireduserscanreadthedocumentationthroughascreenreader.Eachimageinthedocumentationalso
includesadequatealternativetexttoexplaintheimagesothatvisuallyimpaireduserscanunderstandthe
imagewhentheyuseascreenreader.
Registeringyourcomputer
Whenyouregisteryourcomputer,informationisenteredintoadatabase,whichenablesLenovotocontact
youincaseofarecallorothersevereproblem.AfteryouregisteryourcomputerwithLenovo,youwillreceive
quickerservicewhenyoucallLenovoforhelp.Inaddition,somelocationsofferextendedprivilegesand
servicestoregisteredusers.
ToregisteryourcomputerwithLenovo,dooneofthefollowing:
•Gotohttp://www.lenovo.com/registerandfollowtheinstructionsonthescreentoregisteryourcomputer.
•ConnectyourcomputertotheInternetandregisteryourcomputerthroughapreinstalledregistration
program:
–ForWindows7:ThepreinstalledLenovoProductRegistrationprogramlaunchesautomaticallyafteryou
haveusedyourcomputerforatime.Followtheinstructionsonthescreentoregisteryourcomputer.
–ForWindows8orWindows8.1:OntheStartscreen,opentheLenovoSupportprogram.Thenclick
Registrationandfollowtheinstructionsonthescreentoregisteryourcomputer.
Movingyourcomputertoanothercountryorregion
Whenyoumoveyourcomputertoanothercountryorregion,youmusttakelocalelectricalstandards
intoconsideration.
Ifyourelocateyourcomputertoacountryorregionthatusesanelectricaloutletstyledifferentfromthe
typeyouarecurrentlyusing,youwillhavetopurchaseeitherelectricalplugadaptersornewpowercords.
YoucanorderpowercordsdirectlyfromLenovo.
Forpowercordinformationandpartnumbers,goto:
http://www.lenovo.com/powercordnotice
34ThinkCentreM83,M93/pUserGuide
Page 47

Chapter4.Security
Thischapterprovidesinformationabouthowtoprotectyourcomputerfromtheftandunauthorizeduse.
Securityfeatures
Thefollowingsecurityfeaturesareavailableonyourcomputer:
•ComputraceAgentsoftwareembeddedinfirmware
TheComputraceAgentsoftwareisanITassetmanagementandcomputertheftrecoverysolution.
Thesoftwaredetectsifchangeshavebeenmadeonthecomputer,suchashardware,software,or
thecomputercall-inlocation.
Note:YoumighthavetopurchaseasubscriptiontoactivatetheComputraceAgentsoftware.
•Coverpresenceswitch(alsocalledintrusionswitch)
Thecoverpresenceswitchpreventsyourcomputerfromloggingintotheoperatingsystemwhenthe
computercoverisnotproperlyinstalledorclosed.Toenablethecoverpresenceswitchconnector
onthesystemboard,tothefollowing:
1.StarttheSetupUtilityprogram.See“StartingtheSetupUtilityprogram”onpage111.
2.SettheAdministratorPassword.See“Setting,changing,anddeletingapassword”onpage112.
3.FromtheSecuritysubmenu,selectChassisIntrusionDetection➙Enabled.Thecoverpresence
switchconnectoronthesystemboardisenabled.
Whenthecoverpresenceswitchdetectsthatyourcomputercoverisnotproperlyinstalledorclosed
whenyouturnonthecomputer,anerrormessagewillbedisplayed.Tobypasstheerrormessageand
logintotheoperatingsystem,dothefollowing:
1.Properlyinstallorcloseyourcomputercover.See“Completingthepartsreplacement”onpage101.
2.PressF1toentertheSetupUtilityprogram.ThenpressF10tosaveandexittheSetupUtility
program.Theerrormessagewillnotbedisplayedagain.
•AbilitytoenableanddisabledevicesandUSBconnectors
Formoreinformation,see“Enablingordisablingadevice”onpage113.
•Integratedfingerprintreader(availableonsomemodels)
Dependingonthemodelsofyourcomputer,thekeyboardmayhaveanintegratedfingerprintreader.
ByenrollingyourfingerprintandassociatingitwithaPower-onPassword,aHardDiskPassword,or
bothpasswordsbeforehand,youcanstartthecomputer,logontothesystem,andentertheSetup
Utilityprogrambyswipingyourfingeroverthereader,withouttypingapassword.Thusfingerprint
authenticationcanreplacepasswordsandenablesimpleandsecureuseraccess.
•Startupsequencecontrol
Formoreinformation,see“Selectingorchangingthestartupdevicesequence”onpage114
•Startupwithoutkeyboardormouse
Yourcomputerisabletologintotheoperatingsystemwithoutkeyboardormouseconnected.
•TrustedPlatformModule(TPM)
TrustedPlatformModuleisasecurecryptoprocessorthatcanstorecryptographickeysthatprotect
informationstoredinyourcomputer.
.
©CopyrightLenovo2013,2014
35
Page 48

Lockingthecomputercover
Lockingthecomputercoverhelpspreventunauthorizedpeoplefromgainingaccesstotheinsideofyour
computer.Yourcomputercomeswithapadlockloopsothatthecomputercovercannotberemoved
whenapadlockisinstalled.
Figure9.Lockingthecomputercover
36ThinkCentreM83,M93/pUserGuide
Page 49

AttachingaKensington-stylecablelock
YoucanuseaKensington-stylecablelocktosecureyourcomputertoadesk,table,orothernon-permanent
fixture.Thecablelockattachestothesecurity-lockslotattherearofyourcomputerandisoperatedwitha
keyorcombinationdependingonthetypeselected.Thecablelockalsolocksthebuttonsusedtoopenthe
computercover.Thisisthesametypeoflockusedwithmanynotebookcomputers.Youcanordersucha
cablelockdirectlyfromLenovobysearchingforKensingtonat:
http://www.lenovo.com/support
Figure10.AttachingaKensington-stylecablelock
Chapter4.Security37
Page 50

Attachingacablelock
Youcanuseacablelocktosecuredevices,suchasthekeyboardandthemouse,bylockingthedevice
cablestoyourcomputer.Thecablelockattachestothecable-lockslotsontherearofyourcomputer.See
“Locatingconnectorsontherearofyourcomputer”onpage10.
Toinstallacablelock,dothefollowing:
1.Inserttheclip1intothecable-lockslot4.
2.Pullthecablesyouwanttolockthroughthedentsinthecablelock.
3.Presstheclip2intothecable-lockslot3untilitsnapsintoposition.
Figure11.Attachingacablelock
Usingpasswords
YoucansetavarietyofpasswordsthroughtheMicrosoftWindowsoperatingsystemandthroughtheBIOS
ofyourcomputertohelpdeterunauthorizeduseofyourcomputer.
BIOSpasswords
YoucanusetheBIOSSetupUtilityprogramtosetpasswordstopreventunauthorizedaccesstoyour
computeranddata.Thefollowingtypesofpasswordsareavailable:
•Power-OnPassword:WhenaPower-OnPasswordisset,youarepromptedtotypeavalidpassword
eachtimethecomputeristurnedon.Thecomputercannotbeuseduntilthevalidpasswordistyped
in.Formoreinformation,see“Power-OnPassword”onpage112
38ThinkCentreM83,M93/pUserGuide
.
Page 51

•HardDiskPassword:SettingaHardDiskPasswordpreventsunauthorizedaccesstothedataonthehard
diskdrive.WhenaHardDiskPasswordisset,youarepromptedtotypeavalidpasswordeachtimeyou
trytoaccesstheharddiskdrive.Formoreinformation,see“HardDiskPassword”onpage112
•AdministratorPassword:SettinganAdministratorPassworddetersunauthorizedusersfromchanging
configurationsettings.Ifyouareresponsibleformaintainingtheconfigurationsettingsofseveral
computers,youmightwanttosetanAdministratorPassword.Formoreinformation,see“Administrator
Password”onpage112
Youdonothavetosetanypasswordstouseyourcomputer.However,usingpasswordsimproves
computingsecurity.
.
.
Windowspasswords
DependingonyourversionoftheWindowsoperatingsystem,youcanusepasswordsforavarietyof
features,includingcontrollingloginaccess,accesstosharedresources,networkaccess,andindividualuser
settings.Formoreinformation,see“HelpandSupport”onpage141
.
Configuringthefingerprintreader
Ifyourkeyboardhasafingerprintreader,youcanconfigurethefingerprintreaderintheSetupUtilityprogram.
TheFingerprintSetupsubmenuundertheSecuritymenuoftheSetupUtilityprogramprovidesthe
followingoptions:
•PrebootAuthentication:enablesordisablesthefingerprintauthenticationforaccessingtheBIOS.
•EraseFingerprintData:clearsthefingerprintdatastoredinafingerprintreader.
Toconfigurethefingerprintreader,dothefollowing:
1.StarttheSetupUtilityprogram.See“StartingtheSetupUtilityprogram”onpage111.
2.FromtheSetupUtilityprogrammainmenu,selectSecurity➙FingerprintSetup,andpressEnter.
TheFingerprintSetupwindowopens.
3.SelectPrebootAuthenticationorEraseFingerprintDataasdesired,andpressEnter.
4.SelectthedesiredsettingsandpressEnter.
5.PressF10tosavechangesandexittheSetupUtilityprogram.PressEnterwhenpromptedtoconfirm
theexit.
Usingandunderstandingfirewalls
Afirewallcanbehardware,software,oracombinationofbothdependingonthelevelofsecurityrequired.
Firewallsworkonasetofrulestodeterminewhichinboundandoutboundconnectionsareauthorized.If
yourcomputerispreinstalledwithafirewallprogram,ithelpsprotectagainstcomputerInternetsecurity
threats,unauthorizedaccess,intrusions,andInternetattacks.Italsoprotectsyourprivacy.Formore
informationabouthowtousethefirewallprogram,refertothehelpsystemofyourfirewallprogram.
TheWindowsoperatingsystempreinstalledonyourcomputerprovidestheWindowsFirewall.Fordetailson
usingtheWindowsFirewall,referto“HelpandSupport”onpage141
.
Protectingdataagainstviruses
Yourcomputerispreinstalledwithanantivirusprogramtohelpyouguardagainst,detect,andeliminate
viruses.
Chapter4.Security39
Page 52

Lenovoprovidesafullversionofantivirussoftwareonyourcomputerwithafree30-daysubscription.After
30days,youmustrenewthelicensetocontinuereceivingtheantivirussoftwareupdates.
Note:Virusdefinitionfilesmustbekeptup-to-datetoguardagainstnewviruses.
Formoreinformationabouthowtouseyourantivirussoftware,refertothehelpsystemofyourantivirus
software.
40ThinkCentreM83,M93/pUserGuide
Page 53

Chapter5.Installingorreplacinghardware
Thischapterprovidesinstructionsonhowtoinstallorreplacehardwareforyourcomputer.
Note:Dependingonthemodel,yourcomputermightlookslightlydifferentfromtheillustrationsinthis
chapter.
Handlingstatic-sensitivedevices
Donotopenthestatic-protectivepackagecontainingthenewpartuntilthedefectiveparthasbeenremoved
fromthecomputerandyouarereadytoinstallthenewpart.Staticelectricity,althoughharmlesstoyou,can
seriouslydamagecomputercomponentsandparts.
Whenyouhandlepartsandothercomputercomponents,taketheseprecautionstoavoidstatic-electricity
damage:
•Limityourmovement.Movementcancausestaticelectricitytobuilduparoundyou.
•Alwayshandlepartsandothercomputercomponentscarefully.HandlePCIcards,memorymodules,
systemboards,andmicroprocessorsbytheedges.Nevertouchanyexposedcircuitry.
•Preventothersfromtouchingthepartsandothercomputercomponents.
•Beforeyoureplaceanewpart,touchthestatic-protectivepackagecontainingtheparttoametal
expansion-slotcoverorotherunpaintedmetalsurfaceonthecomputerforatleasttwoseconds.This
reducesstaticelectricityfromthepackageandyourbody.
•Whenpossible,removethenewpartfromthestatic-protectivepackage,andinstallitdirectlyinthe
computerwithoutsettingthepartdown.Whenthisisnotpossible,placethestatic-protectivepackage
thatthepartcameinonasmooth,levelsurfaceandplacethepartonthepackage.
•Donotplacethepartonthecomputercoverorothermetalsurface.
Installingorreplacinghardware
Thissectionprovidesinstructionsonhowtoinstallorreplacehardwareforyourcomputer.Youcanexpand
thecapabilitiesofyourcomputerandmaintainyourcomputerbyinstallingorreplacinghardware.
Attention:
Donotopenyourcomputerorattemptanyrepairbeforereadingandunderstandingthe“Importantsafetyinformation”
onpagev.
Notes:
•UseonlycomputerpartsprovidedbyLenovo.
•Wheninstallingorreplacinganoption,usetheappropriateinstructionsinthissectionalongwiththe
instructionsthatcomewiththeoption.
Installingexternaloptions
Youcanconnectexternaloptionstoyourcomputer,suchasexternalspeakers,aprinter,orascanner.For
someexternaloptions,youmustinstalladditionalsoftwareinadditiontomakingthephysicalconnection.
Wheninstallinganexternaloption,see“Locatingconnectors,controls,andindicatorsonthefrontofyour
computer”onpage9
requiredconnector.Then,usetheinstructionsthatcomewiththeoptiontohelpyoumaketheconnection
andinstallanysoftwareordevicedriversthatarerequiredfortheoption.
and“Locatingconnectorsontherearofyourcomputer”onpage10toidentifythe
©CopyrightLenovo2013,2014
41
Page 54

Removingthecomputercover
Attention:
Donotopenyourcomputerorattemptanyrepairbeforereadingandunderstandingthe“Importantsafetyinformation”
onpagev.
Thissectionprovidesinstructionsonhowtoremovethecomputercover.
CAUTION:
Beforeyouopenthecomputercover,turnoffthecomputerandwaitseveralminutesuntilthe
computeriscool.
Toremovethecomputercover,dothefollowing:
1.Removeanymediafromthedrivesandturnoffallattacheddevicesandthecomputer.
2.Disconnectallpowercordfromelectricaloutlets.
3.Disconnectthepowercords,Input/Outputcables,andanyothercablesthatareconnectedtothe
computer.See“Lockingthecomputercover”onpage36“Locatingconnectors,controls,andindicators
onthefrontofyourcomputer”onpage9
onpage10.
4.Removeanylockingdevicethatsecuresthecomputercover,suchasapadlockoranintegrated
cablelock.See“Lockingthecomputercover”onpage36“Attachingacablelock”onpage38and
“AttachingaKensington-stylecablelock”onpage37.
5.Removeanyscrewsthatsecurethecomputercover.
and“Locatingconnectorsontherearofyourcomputer”
42ThinkCentreM83,M93/pUserGuide
Page 55

6.Pressthecover-releasebuttononthesideofthecomputerandslidethecovertotherearofthe
3
4
5 6 7
8
®
HDMI
®
5
6
7
8
3
4
computertoremovethecover.
Figure12.Removingthecomputercover
Removingandreinstallingthefrontbezel
Attention:
Donotopenyourcomputerorattemptanyrepairbeforereadingandunderstandingthe“Importantsafetyinformation”
onpagev.
Thissectionprovidesinstructionsonhowtoremoveandreinstallthefrontbezel.
Toremoveandreinstallthefrontbezel,dothefollowing:
1.T urnoffthecomputeranddisconnectallpowercordsfromelectricaloutlets.
2.Removethecomputercover.See“Removingthecomputercover”onpage42.
Chapter5.Installingorreplacinghardware43
Page 56

3.Removethefrontbezelbyreleasingthethreeplastictabsontheleftsideandpivotingthefrontbezel
outward.
Figure13.Removingthefrontbezel
4.T oreinstallthefrontbezel,alignthethreeplastictabsontherightsideofthefrontbezelwiththe
correspondingholesinthechassis.Then,pivotthefrontbezelinwardsuntilitsnapsintoposition
ontheleftside.
Whattodonext:
•Toworkwithanotherpieceofhardware,gototheappropriatesection.
•Tocompletetheinstallationorreplacement,goto“Completingthepartsreplacement”onpage101
InstallingorreplacingaPCIcard
Attention:
Donotopenyourcomputerorattemptanyrepairbeforereadingandunderstandingthe“Importantsafetyinformation”
onpagev.
ThissectionprovidesinstructionsonhowtoinstallorreplaceaPCIcard.YourcomputerhasvariousPCI
cardslots.Formoreinformation,see“Features”onpage1.
ToinstallorreplaceaPCIcard,dothefollowing:
1.Removeallmediafromthedrivesandturnoffallattacheddevicesandthecomputer.Then,disconnect
allpowercordsfromelectricaloutletsanddisconnectallcablesthatareconnectedtothecomputer.
2.Removethecomputercover.See“Removingthecomputercover”onpage42.
.
44ThinkCentreM83,M93/pUserGuide
Page 57

3.Attherearofthecomputer,pressthereleasebutton1toopenthecardlatch2.
Figure14.OpeningthePCIcardlatch
Chapter5.Installingorreplacinghardware45
Page 58

4.DependingonwhetheryouareinstallingorreplacingaPCIcard,dooneofthefollowing:
•IfyouareinstallingaPCIcard,removetheappropriatemetalslotcover.
•IfyouarereplacinganoldPCIcard,grasptheoldcardthatiscurrentlyinstalledandgentlypullit
outoftheslot.
Figure15.RemovingaPCIcard
Notes:
–Thecardfitstightlyintothecardslot.Ifnecessary,alternatemovingeachsideofthecardasmall
andequalamountuntilthecardisremovedfromtheslot.
–Ifthecardisheldinplacebyaretaininglatch,presstheretaininglatch1asshowntodisengage
thelatch.Graspthecardandgentlypullitoutoftheslot.
5.RemovethenewPCIcardfromitsstatic-protectivepackage.
46ThinkCentreM83,M93/pUserGuide
Page 59

6.Installthenewcardintotheappropriateslotonthesystemboard.See“Locatingpartsonthesystem
board”onpage13.
Note:IfyouareinstallingaPCIExpressx16graphicscard,makesurethatthememoryslotretaining
clipsareclosedbeforeyouinstallthegraphicscard.
7.PivotthecardlatchtotheclosedpositiontosecurethePCIcard.
Figure16.InstallingaPCIcard
Whattodonext:
•Toworkwithanotherpieceofhardware,gototheappropriatesection.
•Tocompletetheinstallationorreplacement,goto“Completingthepartsreplacement”onpage101.
Installingorreplacingamemorymodule
Attention:
Donotopenyourcomputerorattemptanyrepairbeforereadingandunderstandingthe“Importantsafetyinformation”
onpagev.
Thissectionprovidesinstructionsonhowtoinstallorreplaceamemorymodule.
YourcomputerhasfourmemoryslotsforinstallingorreplacingDDR3UDIMMsthatprovideuptoa
maximumof32GBsystemmemory.Wheninstallingorreplacingamemorymodule,use2GB,4GBor8
GBDDR3UDIMMsinanycombinationuptoamaximumof32GB.
Thefollowingtableprovidesinformationaboutthememorymoduleinstallationrulesthatyoushould
considerwheninstallingorremovingamemorymodule.The“X”markindicatesthememoryslotsintowhich
thememorymodulesshouldbeinstalledindifferentsituations.Thenumbers1,2,3,and4indicatethe
installationsequence.T olocatethememorymoduleslots,see“Locatingpartsonthesystemboard”
onpage13
.
Chapter5.Installingorreplacinghardware47
Page 60

UDIMMDIMM1DIMM2DIMM3DIMM4
OneUDIMM
TwoUDIMMsX,1X,2
ThreeUDIMMsX,3X,1X,2
FourUDIMMsX,3X,1X,4X,2
X
Toinstallorreplaceamemorymodule,dothefollowing:
1.Removeallmediafromthedrivesandturnoffallattacheddevicesandthecomputer.Then,disconnect
allpowercordsfromelectricaloutletsanddisconnectallcablesthatareconnectedtothecomputer.
2.Removethecomputercover.See“Removingthecomputercover”onpage42.
3.Laythecomputeronitssideforeasieraccesstothesystemboard.
4.Locatethememoryslots.See“Locatingpartsonthesystemboard”onpage13.
5.Removeanypartsthatmightpreventyouraccesstothememoryslots.Dependingonyourcomputer
model,youmightneedtoremovethePCIExpressx16graphicscardforeasieraccesstothememory
slots.See“InstallingorreplacingaPCIcard”onpage44.
6.Dependingonwhetheryouareinstallingorreplacingamemorymodule,dooneofthefollowing:
•Ifyouarereplacinganoldmemorymodule,opentheretainingclipsandgentlypullthememory
moduleoutofthememoryslot.
Figure17.Removingamemorymodule
48ThinkCentreM83,M93/pUserGuide
Page 61

•Ifyouareinstallingamemorymodule,opentheretainingclipsofthememoryslotintowhichyou
wanttoinstallthememorymodule.
Figure18.Openingtheretainingclips
7.Positionthenewmemorymoduleoverthememoryslot.Makesurethatthenotch1onthememory
modulealignscorrectlywiththeslotkey2onthesystemboard.Pushthememorymodulestraight
downintotheslotuntiltheretainingclipsclose.
Figure19.Installingamemorymodule
8.ReinstallthePCIExpressx16graphicscardifyouhaveremovedit.
Whattodonext:
•Toworkwithanotherpieceofhardware,gototheappropriatesection.
•Tocompletetheinstallationorreplacement,goto“Completingthepartsreplacement”onpage101.
Installingorreplacingtheopticaldrive
Attention:
Donotopenyourcomputerorattemptanyrepairbeforereadingandunderstandingthe“Importantsafetyinformation”
onpagev.
Thissectionprovidesinstructionsonhowtoinstallorreplacetheopticaldrive.
Toinstallorreplaceanopticaldrive,dothefollowing:
Chapter5.Installingorreplacinghardware49
Page 62

1.Removeallmediafromthedrivesandturnoffallattacheddevicesandthecomputer.Then,disconnect
allpowercordsfromelectricaloutletsanddisconnectallcablesthatareconnectedtothecomputer.
2.Removethecomputercover.See“Removingthecomputercover”onpage42.
3.Removethefrontbezel.See“Removingandreinstallingthefrontbezel”onpage43.
4.Dependingonwhetheryouareinstallingorreplacinganopticaldrive,dooneofthefollowing:
•Ifyouareinstallingasecondaryopticaldrive,removetheplasticpanelinthefrontbezelforthe
drivebayyouwanttouse.Ifthereisametalstaticshieldinstalledinthedrivebay,removethe
metalstaticshield.
•Ifyouarereplacinganopticaldrive,disconnectthesignalcableandthepowercablefromtherear
oftheopticaldrive,pressthebluereleasebutton,andthenslidetheopticaldriveoutofthefront
ofthecomputer.
Figure20.Removingtheopticaldrive
5.Installtheopticaldriveretaineronthesideofthenewopticaldrive.
Figure21.Installingtheopticaldriveretainer
50ThinkCentreM83,M93/pUserGuide
Page 63

6.Slidethenewopticaldriveintothedrivebayfromthefrontofthecomputeruntiltheopticaldrive
snapsintoposition.
Figure22.Installingtheopticaldrive
7.Connectthesignalcableandthepowercabletothenewopticaldrive.
Figure23.Connectingtheopticaldrive
8.Reinstallthefrontbezel.See“Removingandreinstallingthefrontbezel”onpage43.
Whattodonext:
•Toworkwithanotherpieceofhardware,gototheappropriatesection.
•Tocompletetheinstallationorreplacement,goto“Completingthepartsreplacement”onpage101.
Installingorreplacingthecardreader
Thissectionprovidesinstructionsonhowtoinstallorreplacethecardreader.
Note:Thecardreaderisonlyavailableinsomemodels.
Chapter5.Installingorreplacinghardware51
Page 64

Installingthecardreader
Attention:
Donotopenyourcomputerorattemptanyrepairbeforereadingandunderstandingthe“Importantsafetyinformation”
onpagev.
Toinstallthecardreader,dothefollowing:
1.Removeallmediafromthedrivesandturnoffallattacheddevicesandthecomputer.Then,disconnect
allpowercordsfromelectricaloutletsanddisconnectallcablesthatareconnectedtothecomputer.
2.Removethecomputercover.See“Removingthecomputercover”onpage42.
3.Removethefrontbezel.See“Removingandreinstallingthefrontbezel”onpage43.
4.Locatethecardreaderdrivebay.See“Locatinginternaldrives”onpage16.
5.Carefullypivotthecardreaderretainerasshowntoremoveitfromthechassis.
Figure24.Removingthecardreaderretainer
6.Installthecardreaderretaineronthesideofthenewcardreader.
Figure25.Installingthecardreaderretainer
52ThinkCentreM83,M93/pUserGuide
Page 65

7.Slidethenewcardreaderwithretainerintothecardreaderdrivebayuntilitsnapsintoposition.
Figure26.Installingthecardreader
8.ConnectthecardreadercabletothefrontUSBconnector2onthesystemboard.See“Locating
partsonthesystemboard”onpage13.
9.Locatetheprotectivecoverforthecardreaderdrivebayonthefrontbezel.Removetheprotective
coverbypressingthesmalltabs1totheleft,andthenpullingthetabstocompletelydisengage
thecoverfromthefrontbezel.
Figure27.Removingthecardreadercover
10.Reinstallthefrontbezel.See“Removingandreinstallingthefrontbezel”onpage43.
Chapter5.Installingorreplacinghardware53
Page 66

Whattodonext:
•Toworkwithanotherpieceofhardware,gototheappropriatesection.
•Tocompletetheinstallationorreplacement,goto“Completingthepartsreplacement”onpage101.
Replacingthecardreader
Attention:
Donotopenyourcomputerorattemptanyrepairbeforereadingandunderstandingthe“Importantsafetyinformation”
onpagev.
Toreplacethecardreader,dothefollowing:
1.Removeallmediafromthedrivesandturnoffallattacheddevicesandthecomputer.Then,disconnect
allpowercordsfromelectricaloutletsanddisconnectallcablesthatareconnectedtothecomputer.
2.Removethecomputercover.See“Removingthecomputercover”onpage42.
3.Removethefrontbezel.See“Removingandreinstallingthefrontbezel”onpage43.
4.Locatethecardreader.See“Locatingcomponents”onpage12.
5.DisconnectthecardreadercablefromthefrontUSBconnector2onthesystemboard.See“Locating
partsonthesystemboard”onpage13.
6.Presstheblueretainingclip1andslidethecardreaderoutofthechassis.
Figure28.Removingthecardreader
54ThinkCentreM83,M93/pUserGuide
Page 67

7.Removethecardreaderretainerfromtheoldcardreaderandinstallitonthesideofthenewcardreader.
Figure29.Installingthecardreaderretainer
8.Slidethenewcardreaderwithretainerintothedrivebayuntilitsnapsintoposition.
Figure30.Installingthecardreader
9.ReconnectthecardreadercabletothefrontUSBconnector2onthesystemboard.See“Locating
partsonthesystemboard”onpage13.
10.Reinstallthefrontbezel.See“Removingandreinstallingthefrontbezel”onpage43.
Whattodonext:
•Toworkwithanotherpieceofhardware,gototheappropriatesection.
•Tocompletetheinstallationorreplacement,goto“Completingthepartsreplacement”onpage101.
InstallingorreplacingthefrontUSBassembly
ThissectionprovidesinstructionsonhowtoinstallorreplacethefrontUSBassembly.
Note:ThefrontUSBassemblyisonlyavailableinsomemodels.
Chapter5.Installingorreplacinghardware55
Page 68

InstallingthefrontUSBassembly
Attention:
Donotopenyourcomputerorattemptanyrepairbeforereadingandunderstandingthe“Importantsafetyinformation”
onpagev.
ToinstallthefrontUSBassembly,dothefollowing:
1.Removeallmediafromthedrivesandturnoffallattacheddevicesandthecomputer.Then,disconnect
allpowercordsfromelectricaloutletsanddisconnectallcablesthatareconnectedtothecomputer.
2.Removethecomputercover.See“Removingthecomputercover”onpage42.
3.Removethefrontbezel.See“Removingandreinstallingthefrontbezel”onpage43.
4.Locatethecardreaderdrivebay.See“Locatinginternaldrives”onpage16.
5.Carefullypivotthecardreaderretainerasshowntoremoveitfromthechassis.
Figure31.Removingthecardreaderretainer
6.InstallthecardreaderretaineronthesideofthenewfrontUSBassembly.
Figure32.Installingthecardreaderretainer
56ThinkCentreM83,M93/pUserGuide
Page 69

7.SlidethenewfrontUSBassemblywithretainerintothecardreaderdrivebayuntilitsnapsintoposition.
Figure33.InstallingthefrontUSBassembly
8.ConnectthefrontUSBassemblycabletothefrontUSBconnector2onthesystemboard.See
“Locatingpartsonthesystemboard”onpage13.
9.Locatetheprotectivecoverforthecardreaderdrivebayonthefrontbezel.Removetheprotective
coverbypressingthesmalltabs1totheleft,andthenpullingthetabstocompletelydisengage
thecoverfromthefrontbezel.
Figure34.Removingthecardreadercover
10.Reinstallthefrontbezel.See“Removingandreinstallingthefrontbezel”onpage43.
Chapter5.Installingorreplacinghardware57
Page 70

Whattodonext:
•Toworkwithanotherpieceofhardware,gototheappropriatesection.
•Tocompletetheinstallationorreplacement,goto“Completingthepartsreplacement”onpage101.
ReplacingthefrontUSBassembly
Attention:
Donotopenyourcomputerorattemptanyrepairbeforereadingandunderstandingthe“Importantsafetyinformation”
onpagev.
ToreplacethefrontUSBassembly,dothefollowing:
1.Removeallmediafromthedrivesandturnoffallattacheddevicesandthecomputer.Then,disconnect
allpowercordsfromelectricaloutletsanddisconnectallcablesthatareconnectedtothecomputer.
2.Removethecomputercover.See“Removingthecomputercover”onpage42.
3.Removethefrontbezel.See“Removingandreinstallingthefrontbezel”onpage43.
4.LocatethefrontUSBassembly.See“Locatingcomponents”onpage12.
5.DisconnectthefrontUSBassemblycable.
6.Presstheretainingclip1andslidethefrontUSBassemblyoutofthechassis.
Figure35.RemovingthefrontUSBassembly
58ThinkCentreM83,M93/pUserGuide
Page 71

7.RemovethecardreaderretainerfromtheoldfrontUSBassemblyandinstallitonthesideofthenew
frontUSBassembly.
Figure36.Installingthecardreaderretainer
8.SlidethenewfrontUSBassemblywithretainerintothecardreaderdrivebayuntilitsnapsintoposition.
Figure37.InstallingthefrontUSBassembly
9.ConnectthecableofthenewfrontUSBassemblytothefrontUSBconnector2onthesystemboard.
See“Locatingpartsonthesystemboard”onpage13.
10.Reinstallthefrontbezel.See“Removingandreinstallingthefrontbezel”onpage43.
Whattodonext:
•Toworkwithanotherpieceofhardware,gototheappropriatesection.
•Tocompletetheinstallationorreplacement,goto“Completingthepartsreplacement”onpage101.
Replacingthebattery
Attention:
Donotopenyourcomputerorattemptanyrepairbeforereadingandunderstandingthe“Importantsafetyinformation”
onpagev.
Chapter5.Installingorreplacinghardware59
Page 72

Yourcomputerhasaspecialtypeofmemorythatmaintainsthedate,time,andsettingsforbuilt-infeatures,
suchasparallel-portassignments(configuration).Abatterykeepsthisinformationactivewhenyouturn
offthecomputer.
Thebatterynormallyrequiresnochargingormaintenancethroughoutitslife;however,nobatterylasts
forever.Ifthebatteryfails,thedate,time,andconfigurationinformation(includingpasswords)arelost.An
errormessageisdisplayedwhenyouturnonthecomputer.
Refertothe“Lithiumcoincellbatterynotice”intheSafety,Warranty,andSetupGuideforinformationabout
replacinganddisposingofthebattery.
Toreplacethebattery,dothefollowing:
1.Removeallmediafromthedrivesandturnoffallattacheddevicesandthecomputer.Then,disconnect
allpowercordsfromelectricaloutletsanddisconnectallcablesthatareconnectedtothecomputer.
2.Removethecomputercover.See“Removingthecomputercover”onpage42.
3.Locatethebattery.See“Locatingpartsonthesystemboard”onpage13.
4.Removetheoldbattery.
Figure38.Removingtheoldbattery
5.Installanewbattery.
Figure39.Installinganewbattery
6.Reinstallthecomputercoverandconnectthecables.See“Completingthepartsreplacement”on
page101.
Note:Whenthecomputeristurnedonforthefirsttimeafterreplacingthebattery,anerrormessage
mightbedisplayed.Thisisnormalafterreplacingthebattery.
7.T urnonthecomputerandallattacheddevices.
8.UsetheSetupUtilityprogramtosetthedate,time,andanypasswords.SeeChapter7“Usingthe
SetupUtilityprogram”onpage111.
Whattodonext:
•Toworkwithanotherpieceofhardware,gototheappropriatesection.
•Tocompletetheinstallationorreplacement,goto“Completingthepartsreplacement”onpage101.
60ThinkCentreM83,M93/pUserGuide
Page 73

Replacingthepowersupplyassembly
Attention:
Donotopenyourcomputerorattemptanyrepairbeforereadingandunderstandingthe“Importantsafetyinformation”
onpagev.
Thissectionprovidesinstructionsonhowtoreplacethepowersupplyassembly.
Althoughtherearenomovingpartsinyourcomputerafterthepowercordhasbeendisconnected,the
followingwarningsarerequiredforyoursafetyandproperUnderwritersLaboratories(UL)certification.
CAUTION:
Hazardousmovingparts.Keepfingersandotherbodypartsaway.
CAUTION:
Neverremovethecoveronapowersupplyoranypartthathasthefollowinglabelattached.
Hazardousvoltage,current,andenergylevelsarepresentinsideanycomponentthathasthislabel
attached.Therearenoserviceablepartsinsidethesecomponents.Ifyoususpectaproblemwith
oneoftheseparts,contactaservicetechnician.
Toreplacethepowersupplyassembly,dothefollowing:
1.Removeallmediafromthedrivesandturnoffallattacheddevicesandthecomputer.Then,disconnect
allpowercordsfromelectricaloutletsanddisconnectallcablesthatareconnectedtothecomputer.
2.Removethecomputercover.See“Removingthecomputercover”onpage42.
3.Disconnectthepowersupplyassemblycablesfromthesystemboardandalldrives.See“Locating
partsonthesystemboard”onpage13
.
4.Releasethepowersupplyassemblycablesfromthecableclipsandtiesinthechassis.
Chapter5.Installingorreplacinghardware61
Page 74

5.Laythecomputeronitssideandremovethefourscrewsattherearofthechassisthatsecurethe
5
6 7 8
3
4
HDMI
®
3 4
5 6 7 8
5 6
7
8
3 4
®
powersupplyassembly.
Figure40.Removingthescrewsforthepowersupplyassembly
6.Slidethepowersupplyassemblytothefrontofthecomputer,andthenliftitoutofthechassis.
7.Ensurethatthenewpowersupplyassemblyisthecorrectreplacement.
8.Installthenewpowersupplyassemblyintothechassissothatthescrewholesinthepowersupply
assemblyalignwiththoseinthechassis.
9.Installandtightenthefourscrewstosecurethepowersupplyassembly.
Note:UseonlyscrewsprovidedbyLenovo.
10.Reconnectthepowersupplyassemblycablestothesystemboardandeachofthedrives.
11.Securethepowersupplyassemblycableswiththecableclipsandtiesinthechassis.
Whattodonext:
•Toworkwithanotherpieceofhardware,gototheappropriatesection.
•Tocompletetheinstallationorreplacement,goto“Completingthepartsreplacement”onpage101
Replacingtheheatsinkandfanassembly
Attention:
Donotopenyourcomputerorattemptanyrepairbeforereadingandunderstandingthe“Importantsafetyinformation”
onpagev.
Thissectionprovidesinstructionsonhowtoreplacetheheatsinkandfanassembly.
CAUTION:
.
Theheatsinkandfanassemblymightbeveryhot.Beforeyouopenthecomputercover,turnoffthe
computerandwaitseveralminutesuntilthecomputeriscool.
62ThinkCentreM83,M93/pUserGuide
Page 75

Toreplacetheheatsinkandfanassembly,dothefollowing:
1.Removeallmediafromthedrivesandturnoffallattacheddevicesandthecomputer.Then,disconnect
allpowercordsfromelectricaloutletsanddisconnectallcablesthatareconnectedtothecomputer.
2.Removethecomputercover.See“Removingthecomputercover”onpage42.
3.Laythecomputeronitssideforeasieraccesstothesystemboard.
4.Locatetheheatsinkandfanassembly.See“Locatingpartsonthesystemboard”onpage13.
5.Disconnecttheheatsinkandfanassemblycablefromthemicroprocessorfanconnectoronthesystem
board.See“Locatingpartsonthesystemboard”onpage13.
6.Followthissequencetoremovethefourscrewsthatsecuretheheatsinkandfanassemblytothe
systemboard:
a.Partiallyremovescrew1,thenfullyremovescrew2,andthenfullyremovescrew1.
b.Partiallyremovescrew3,thenfullyremovescrew4,andthenfullyremovescrew3.
Note:Carefullyremovethefourscrewsfromthesystemboardtoavoidanypossibledamagetothe
systemboard.Thefourscrewscannotberemovedfromtheheatsinkandfanassembly.
Figure41.Removingtheheatsinkandfanassembly
7.Liftthefailingheatsinkandfanassemblyoffthesystemboard.
Notes:
•Youmighthavetogentlytwisttheheatsinkandfanassemblytofreeitfromthemicroprocessor.
•Donottouchthethermalgreasewhilehandlingtheheatsinkandfanassembly.
8.Positionthenewheatsinkandfanassemblyonthesystemboardsothatthefourscrewsarealigned
withtheholesonthesystemboard.
Note:Positionthenewheatsinkandfanassemblysothattheheatsinkandfanassemblycableis
towardthemicroprocessorfanconnectoronthesystemboard.
Chapter5.Installingorreplacinghardware63
Page 76

9.Followthefollowingsequencetoinstallthefourscrewstosecurethenewheatsinkandfanassembly.
Donotover-tightenthescrews.
a.Partiallytightenscrew1,thenfullytightenscrew2,andthenfullytightenscrew1.
b.Partiallytightenscrew3,thenfullytightenscrew4,andthenfullytightenscrew3.
10.Connecttheheatsinkandfanassemblycabletothemicroprocessorfanconnectoronthesystem
board.See“Locatingpartsonthesystemboard”onpage13.
Whattodonext:
•Toworkwithanotherpieceofhardware,gototheappropriatesection.
•Tocompletetheinstallationorreplacement,goto“Completingthepartsreplacement”onpage101.
Replacingthemicroprocessor
Attention:
Donotopenyourcomputerorattemptanyrepairbeforereadingandunderstandingthe“Importantsafetyinformation”
onpagev.
Thissectionprovidesinstructionsonhowtoreplacethemicroprocessor.
CAUTION:
Theheatsinkandmicroprocessormightbeveryhot.Beforeyouopenthecomputercover,turnoff
thecomputerandwaitseveralminutesuntilthecomputeriscool.
Toreplacethemicroprocessor,dothefollowing:
1.Removeallmediafromthedrivesandturnoffallattacheddevicesandthecomputer.Then,disconnect
allpowercordsfromelectricaloutletsanddisconnectallcablesthatareconnectedtothecomputer.
2.Removethecomputercover.See“Removingthecomputercover”onpage42.
3.Laythecomputeronitssideforeasieraccesstothesystemboard.
4.Locatethesystemboardanddisconnectallcablesconnectedtothesystemboard.See“Locating
partsonthesystemboard”onpage13
5.Removetheheatsinkandfanassembly.See“Replacingtheheatsinkandfanassembly”onpage62.
Note:Placetheheatsinkandfanassemblyonitssidesothatthethermalgreaseonthebottomofit
doesnotgetincontactwithanything.
.
64ThinkCentreM83,M93/pUserGuide
Page 77

6.Liftthesmallhandle1andopentheretainer2toaccessthemicroprocessor3.
Figure42.Accessingthemicroprocessor
7.Liftthemicroprocessorstraightupandoutofthemicroprocessorsocket.
Figure43.Removingthemicroprocessor
Notes:
•Yourmicroprocessorandsocketmightlookdifferentfromtheoneillustrated.
•Touchonlytheedgesofthemicroprocessor.Donottouchthegoldcontactsonthebottom.
•Donotdropanythingontothemicroprocessorsocketwhileitisexposed.Thesocketpinsmustbe
keptascleanaspossible.
8.Ensurethatthesmallhandleisintheraisedpositionandthemicroprocessorretainerisfullyopen.
9.Removetheprotectivecoverthatprotectsthegoldcontactsofthenewmicroprocessor.
10.Notetheorientationofthenewmicroprocessor.Holdthenewmicroprocessorbyitsedgesandalign
thenotches1onitwiththetabs2inthemicroprocessorsocket.Then,carefullylowerthenew
microprocessorstraightdownintothemicroprocessorsocket.
Chapter5.Installingorreplacinghardware65
Page 78

Note:Thesmalltriangle3ononecornerofthenewmicroprocessoristhemicroprocessororientation
indicator.Thenewmicroprocessorisinthecorrectorientationwhenthisindicatorfacesthebeveled
corner
4ofthemicroprocessorsocket.
Figure44.Installingthemicroprocessor
11.Closethemicroprocessorretainerandlockitintopositionwiththesmallhandletosecurethenew
microprocessorinthesocket.
12.Reinstalltheheatsinkandfanassembly.See“Replacingtheheatsinkandfanassembly”onpage62.
13.Reconnectallcablesthatweredisconnectedfromthesystemboard.
Whattodonext:
•Toworkwithanotherpieceofhardware,gototheappropriatesection.
•Tocompletetheinstallationorreplacement,goto“Completingthepartsreplacement”onpage101.
InstallingorreplacingthemSATAsolid-statedrive
Attention:
Donotopenyourcomputerorattemptanyrepairbeforereadingandunderstandingthe“Importantsafetyinformation”
onpagev.
ThissectionprovidesinstructionsonhowtoinstallorreplacethemSATAsolid-statedrive.
Note:ThemSATAsolid-statedriveisonlyavailableinsomemodels.Fornewinstallation,see“Installing
themSATAsolid-statedrive”onpage66.Forreplacement,see“ReplacingthemSATAsolid-statedrive”
onpage68.
InstallingthemSATAsolid-statedrive
ToinstallthemSATAsolid-statedrive,dothefollowing:
66ThinkCentreM83,M93/pUserGuide
Page 79

1.InsertthemSATAsolid-statedriveintotheminiPCIExpressslotonthestorageconverter,andthen
pressthemSATAsolid-statedrivedownward.
Figure45.InstallingthemSAT Asolid-statedriveintothestorageconverter
2.InstallthetwoscrewstosecurethemSAT Asolid-statedrivetothestorageconverter.
Figure46.InstallingthescrewsthatsecurethemSATAsolid-statedrive
Chapter5.Installingorreplacinghardware67
Page 80

3.SlidethemSATAsolid-statedrivestorageconverterintothecardreaderdrivebayuntilitsnapsinto
position.
Figure47.InstallingthemSATAsolid-statedrive
4.ConnectthesignalcableandthepowercabletothemSATAsolid-statedrive.
Whattodonext:
•Toworkwithanotherpieceofhardware,gototheappropriatesection.
•Tocompletetheinstallationorreplacement,goto“Completingthepartsreplacement”onpage101.
ReplacingthemSATAsolid-statedrive
ToreplacethemSATAsolid-statedrive,dothefollowing:
1.Removeallmediafromthedrivesandturnoffallattacheddevicesandthecomputer.Then,disconnect
allpowercordsfromelectricaloutletsanddisconnectallcablesthatareconnectedtothecomputer.
2.Removethecomputercover.See“Removingthecomputercover”onpage42.
3.Removethefrontbezel.See“Removingandreinstallingthefrontbezel”onpage43.
4.Locatethecardreader.See“Locatingcomponents”onpage12.
5.DisconnectthesignalcableandpowercablefromthemSATAsolid-statedrive.
68ThinkCentreM83,M93/pUserGuide
Page 81

6.PresstheblueretainingcliptoremovethemSATAsolid-statedrivestorageconverteroutofthechassis.
Figure48.RemovingthemSA TAsolid-statedrivestorageconverter
7.RemovethetwoscrewsthatsecurethemSATAsolid-statedrivefromthestorageconverter.
Figure49.RemovingthescrewsthatsecurethemSATAsolid-statedrive
Chapter5.Installingorreplacinghardware69
Page 82

8.PullthemSATAsolid-statedrivefromtheminiPCIExpressslotonthestorageconverter.
Figure50.RemovingthemSATAsolid-statedrive
9.T oinstallanewmSATAsolid-statedrive,insertthemSATAsolid-statedriveintotheminiPCIExpress
slotonthestorageconverter,andthenpressthemSATAsolid-statedrivedownward.
Figure51.InstallingthemSAT Asolid-statedriveintothestorageconverter
70ThinkCentreM83,M93/pUserGuide
Page 83

10.InstallthetwoscrewstosecurethemSAT Asolid-statedrivetothestorageconverter.
Figure52.InstallingthescrewsthatsecurethemSATAsolid-statedrive
11.SlidethemSATAsolid-statedrivestorageconverterintothecardreaderdrivebayuntilitsnapsinto
position.
Figure53.InstallingthemSATAsolid-statedrive
12.ConnectthesignalcableandthepowercabletothemSATAsolid-statedrive.
Whattodonext:
•Toworkwithanotherpieceofhardware,gototheappropriatesection.
•Tocompletetheinstallationorreplacement,goto“Completingthepartsreplacement”onpage101.
Chapter5.Installingorreplacinghardware71
Page 84

Replacingtheprimaryharddiskdrive
Attention:
Donotopenyourcomputerorattemptanyrepairbeforereadingandunderstandingthe“Importantsafetyinformation”
onpagev.
Thissectionprovidesinstructionsonhowtoreplacetheprimaryharddiskdrive.
Note:Dependingonyourmodeltype,yourcomputermightcomewitha2.5-inchsolid-statedrive.Toinstall
thesolid-statedrive,see“Installingthesolid-statedrive”onpage76
Toreplacetheprimaryharddiskdrive,dothefollowing:
1.Removeallmediafromthedrivesandturnoffallattacheddevicesandthecomputer.Then,disconnect
allpowercordsfromelectricaloutletsanddisconnectallcablesthatareconnectedtothecomputer.
2.Removethecomputercover.See“Removingthecomputercover”onpage42.
3.Locatetheprimaryharddiskdrive.See“Locatinginternaldrives”onpage16.
4.Disconnectthesignalcableandthepowercablefromtheharddiskdrive.
5.Pullthebluehandletoreleaseandremovetheharddiskdrivefromthebracket.
Figure54.Removingtheprimaryharddiskdrive
6.Flexthesidesofthebluebrackettoremovetheharddiskdrivefromthebracket.
72ThinkCentreM83,M93/pUserGuide
Page 85

7.T oinstallanewharddiskdriveintothebluebracket,flexthebracketandalignpin1,pin2,pin3,
andpin4onthebracketwiththecorrespondingholesintheharddiskdrive.Donottouchthecircuit
board5onthebottomoftheharddiskdrive.
Figure55.Installingtheharddiskdriveintothebracket
8.Slidethenewharddiskdriveintothebracketuntilitsnapsintoposition.
Figure56.Installingtheprimaryharddiskdrive
9.Connectthesignalcableandthepowercabletothenewharddiskdrive.
Whattodonext:
•Toworkwithanotherpieceofhardware,gototheappropriatesection.
•Tocompletetheinstallationorreplacement,goto“Completingthepartsreplacement”onpage101.
Chapter5.Installingorreplacinghardware73
Page 86

Replacingthesecondaryharddiskdrive
Attention:
Donotopenyourcomputerorattemptanyrepairbeforereadingandunderstandingthe“Importantsafetyinformation”
onpagev.
Note:Yourcomputercomeswithasecondaryharddiskdrivebayforinstallingorreplacingasecondary
3.5-inchharddiskdriveora2.5-inchsolid-statedrive.Toinstallthesolid-statedrive,see“Installingthe
solid-statedrive”onpage76.
Thissectionprovidesinstructionsonhowtoreplacethesecondaryharddiskdrive.
Toreplacethesecondaryharddiskdrive,dothefollowing:
1.Removeallmediafromthedrivesandturnoffallattacheddevicesandthecomputer.Then,disconnect
allpowercordsfromelectricaloutletsanddisconnectallcablesthatareconnectedtothecomputer.
2.Removethecomputercover.See“Removingthecomputercover”onpage42.
3.Removethefrontbezel.See“Removingandreinstallingthefrontbezel”onpage43.
4.Disconnectthesignalcableandthepowercablefromtheharddiskdrive.
5.Pullthebluehandletoreleaseandremovetheharddiskdrivefromtheharddiskbracket.
Figure57.Removingthesecondaryharddiskdrive
6.Flexthesidesofthebluebrackettoremovetheharddiskdrivefromthebracket.
74ThinkCentreM83,M93/pUserGuide
Page 87

7.T oinstallanewharddiskdriveintothebluebracket,flexthebracketandalignpin1,pin2,pin3,
andpin4onthebracketwiththecorrespondingholesintheharddiskdrive.Donottouchthecircuit
board5onthebottomoftheharddiskdrive.
Figure58.Installingtheharddiskdriveintothebracket
8.Slidethenewharddiskdriveintotheharddiskbracketuntilitsnapsintoposition.
Figure59.Installingthesecondaryharddiskdrive
9.Connectthesignalcableandthepowercabletothenewharddiskdrive.
Whattodonext:
•Toworkwithanotherpieceofhardware,gototheappropriatesection.
•Tocompletetheinstallationorreplacement,goto“Completingthepartsreplacement”onpage101.
Chapter5.Installingorreplacinghardware75
Page 88

Installingthesolid-statedrive
Attention:
Donotopenyourcomputerorattemptanyrepairbeforereadingandunderstandingthe“Importantsafetyinformation”
onpagev.
Thissectionprovidesinstructionsonhowtoinstallthe2.5-inchsolid-statedrive.
Toinstallthesolid-statedrive,dothefollowing:
1.Installthesolid-statedriveintothestorageconverter.Then,installthefourscrewstosecurethe
solid-statedrivetothestorageconverter.
Figure60.Installingthesolid-statedriveintothestorageconverter
76ThinkCentreM83,M93/pUserGuide
Page 89

2.T oinstallthesolid-statedrivewiththestorageconverterintothe3.5-inchharddiskdrivebracket,flex
thebracketandalignpin1,pin2,pin3,andpin4onthebracketwiththecorrespondingholesin
thestorageconverter.
Figure61.Installingthesolid-statedrivewiththestorageconverterintotheharddiskdrivebracket
3.Installthesolid-statedriveintothedesiredharddiskdrivebay.See“Replacingtheprimaryharddisk
drive”onpage72
or“Replacingthesecondaryharddiskdrive”onpage74.
Whattodonext:
•Toworkwithanotherpieceofhardware,gototheappropriatesection.
•Tocompletetheinstallationorreplacement,goto“Completingthepartsreplacement”onpage101.
Replacingthefrontfanassembly
Attention:
Donotopenyourcomputerorattemptanyrepairbeforereadingandunderstandingthe“Importantsafetyinformation”
onpagev.
Thissectionprovidesinstructionsonhowtoreplacethefrontfanassembly.
Note:Thefrontfanassemblyisonlyavailableinsomemodels.
Toreplacethefrontfanassembly,dothefollowing:
1.Removeallmediafromthedrivesandturnoffallattacheddevicesandthecomputer.Then,disconnect
allpowercordsfromelectricaloutletsanddisconnectallcablesthatareconnectedtothecomputer.
2.Removethecomputercover.See“Removingthecomputercover”onpage42.
3.Disconnectthefrontfanassemblycablefromthepowerfanconnectoronthesystemboard.See
“Locatingpartsonthesystemboard”onpage13
.
Chapter5.Installingorreplacinghardware77
Page 90

4.Thefrontfanassemblyisattachedtothechassisbyfourrubbermounts.Removethefrontfanassembly
bybreakingorcuttingtherubbermountsandgentlypullingthefrontfanassemblyoutofthechassis.
Note:Thenewfrontfanassemblywillhavefournewrubbermountsattached.
Figure62.Removingthefrontfanassembly
5.Removethefrontbezel.See“Removingandreinstallingthefrontbezel”onpage43.
6.Installthenewfrontfanassemblybyaligningthenewrubbermountswiththecorrespondingholesin
thechassisandpushtherubbermountsthroughtheholes.
78ThinkCentreM83,M93/pUserGuide
Page 91

7.Pullthetipsoftherubbermountsuntilthefrontfanassemblyissecuredinplace.
Figure63.Installingthefrontfanassembly
8.Connectthefrontfanassemblycabletothepowerfanconnectoronthesystemboard.
9.Reinstallthefrontbezel.See“Removingandreinstallingthefrontbezel”onpage43
Whattodonext:
•Toworkwithanotherpieceofhardware,gototheappropriatesection.
•Tocompletetheinstallationorreplacement,goto“Completingthepartsreplacement”onpage101.
Replacingtherearfanassembly
Attention:
Donotopenyourcomputerorattemptanyrepairbeforereadingandunderstandingthe“Importantsafetyinformation”
onpagev.
Thissectionprovidesinstructionsonhowtoreplacetherearfanassembly.
Toreplacetherearfanassembly,dothefollowing:
1.Removeallmediafromthedrivesandturnoffallattacheddevicesandthecomputer.Then,disconnect
allpowercordsfromelectricaloutletsanddisconnectallcablesthatareconnectedtothecomputer.
2.Removethecomputercover.See“Removingthecomputercover”onpage42.
3.Locatetherearfanassembly.See“Locatingcomponents”onpage12.
4.Disconnecttherearfanassemblycablefromthesystemfanconnectoronthesystemboard.See
“Locatingpartsonthesystemboard”onpage13
.
Chapter5.Installingorreplacinghardware79
Page 92

5.Therearfanassemblyisattachedtothechassisbyfourrubbermounts.Removetherearfanassembly
bybreakingorcuttingtherubbermountsandgentlypullingtherearfanassemblyoutofthechassis.
Note:Thenewrearfanassemblywillhavefournewrubbermountsattached.
Figure64.Removingtherearfanassembly
6.Installthenewrearfanassemblybyaligningthenewrubbermountswiththecorrespondingholesinthe
chassisandpushtherubbermountsthroughtheholes.
80ThinkCentreM83,M93/pUserGuide
Page 93

7.Pullonthetipsoftherubbermountsuntiltherearfanassemblyissecuredinplace.
Figure65.Installingtherearfanassembly
8.Connecttherearfanassemblycabletothesystemfanconnectoronthesystemboard.
Whattodonext:
•Toworkwithanotherpieceofhardware,gototheappropriatesection.
•Tocompletetheinstallationorreplacement,goto“Completingthepartsreplacement”onpage101
ReplacingthefrontaudioandUSBassembly
Attention:
Donotopenyourcomputerorattemptanyrepairbeforereadingandunderstandingthe“Importantsafetyinformation”
onpagev.
ThissectionprovidesinstructionsonhowtoreplacethefrontaudioandUSBassembly.
ToreplacethefrontaudioandUSBassembly,dothefollowing:
1.Removeallmediafromthedrivesandturnoffallattacheddevicesandthecomputer.Then,disconnect
allpowercordsfromelectricaloutletsanddisconnectallcablesthatareconnectedtothecomputer.
2.Removethecomputercover.See“Removingthecomputercover”onpage42.
3.Removethefrontbezel.See“Removingandreinstallingthefrontbezel”onpage43.
.
Chapter5.Installingorreplacinghardware81
Page 94

4.LocatethefrontaudioandUSBassembly.See“Locatingcomponents”onpage12.
5.Notethecableroutingandconnections.Then,disconnectthefrontaudioandUSBassemblycables
fromthesystemboard.
6.RemovethescrewthatsecuresthefrontaudioandUSBassembly.Then,removethefrontaudio
andUSBassemblyfromthechassis.
Figure66.RemovingthefrontaudioandUSBassembly
82ThinkCentreM83,M93/pUserGuide
Page 95

7.RoutethecablesofthenewfrontaudioandUSBassemblythroughthecorrespondingsquareholein
thefrontofthechassis.ThenpositionthenewfrontaudioandUSBassemblyonthechassisasshown.
Figure67.InstallingthefrontaudioandUSBassembly
Chapter5.Installingorreplacinghardware83
Page 96

8.InstallthescrewtosecurethenewfrontaudioandUSBassemblyinplace.
Figure68.InstallingthescrewtosecurethefrontaudioandUSBassembly
9.ConnectthecablesofthenewfrontaudioandUSBassemblytothefrontaudioconnectorandthefront
USBconnector1onthesystemboard.See“Locatingpartsonthesystemboard”onpage13.
10.Reinstallthefrontbezel.See“Removingandreinstallingthefrontbezel”onpage43.
Whattodonext:
•Toworkwithanotherpieceofhardware,gototheappropriatesection.
•Tocompletetheinstallationorreplacement,goto“Completingthepartsreplacement”onpage101.
Replacingtheinternalspeaker
Attention:
Donotopenyourcomputerorattemptanyrepairbeforereadingandunderstandingthe“Importantsafetyinformation”
onpagev.
Thissectionprovidesinstructionsonhowtoreplacetheinternalspeaker.
Note:Theinternalspeakerisonlyavailableinsomemodels.
Toreplacetheinternalspeaker,dothefollowing:
1.Removeallmediafromthedrivesandturnoffallattacheddevicesandthecomputer.Then,disconnect
allpowercordsfromelectricaloutletsanddisconnectallcablesthatareconnectedtothecomputer.
2.Removethecomputercover.See“Removingthecomputercover”onpage42.
3.Locatetheinternalspeakerconnectoronthesystemboard.See“Locatingpartsonthesystemboard”
onpage13.
4.Disconnecttheinternalspeakercablefromthesystemboard.
84ThinkCentreM83,M93/pUserGuide
Page 97

5.Pushthemetaltab1ontherightsideoftheinternalspeakerandslidetheinternalspeakertowardthe
righttocompletelyremoveitfromthechassis.
Figure69.Removingtheoldinternalspeaker
Chapter5.Installingorreplacinghardware85
Page 98

6.Positionthenewinternalspeakerintothefourmetalclips1andpushtheinternalspeakertowardthe
leftuntilitissecuredinplace.
Figure70.Installinganewinternalspeaker
7.Connecttheinternalspeakercabletothesystemboard.See“Locatingpartsonthesystemboard”
onpage13.
Whattodonext:
•Toworkwithanotherpieceofhardware,gototheappropriatesection.
•Tocompletetheinstallationorreplacement,goto“Completingthepartsreplacement”onpage101
Replacingthethermalsensor
Attention:
Donotopenyourcomputerorattemptanyrepairbeforereadingandunderstandingthe“Importantsafetyinformation”
onpagev.
Thissectionprovidesinstructionsonhowtoreplacethethermalsensor.
Toreplacethethermalsensor,dothefollowing:
1.Removeallmediafromthedrivesandturnoffallattacheddevicesandthecomputer.Then,disconnect
allpowercordsfromelectricaloutletsanddisconnectallcablesthatareconnectedtothecomputer.
2.Removethecomputercover.See“Removingthecomputercover”onpage42.
3.Removethefrontbezel.See“Removingandreinstallingthefrontbezel”onpage43.
4.Locatethethermalsensor.See“Locatingcomponents”onpage12.
5.Disconnectthethermalsensorcablefromthethermalsensorconnectoronthesystemboard.See
“Locatingpartsonthesystemboard”onpage13.
.
86ThinkCentreM83,M93/pUserGuide
Page 99

6.Frominsidethechassis,pivottheupperretainingclip1thatsecurestheplasticholderofthethermal
sensordownwardandthenpushtheclipoutwardtoreleasetheclip.Thendisengagetheplastic
holderholdingthethermalsensorfromthechassis.
Figure71.Removingthethermalsensor
7.Pulltheentirethermalsensoroutofthechassis.
Chapter5.Installingorreplacinghardware87
Page 100

8.Inserttheconnectorandcableofthenewthermalsensorintothelowerhole1inthechassis.Then
alignthetwotabsontheplasticholderholdingthethermalsensorwiththetwoholes1and2inthe
chassis,andpushtheplasticholderuntilitsnapsintoposition.
Figure72.Installingthenewthermalsensor
9.Reconnectthethermalsensorcabletothesystemboard.See“Locatingpartsonthesystemboard”
onpage13.
10.Reinstallthefrontbezel.See“Removingandreinstallingthefrontbezel”onpage43.
Whattodonext:
•Toworkwithanotherpieceofhardware,gototheappropriatesection.
•Tocompletetheinstallationorreplacement,goto“Completingthepartsreplacement”onpage101.
Replacingthecoverpresenceswitch
Attention:
Donotopenyourcomputerorattemptanyrepairbeforereadingandunderstandingthe“Importantsafetyinformation”
onpagev.
Thissectionprovidesinstructionsonhowtoreplacethecoverpresenceswitch(intrusionswitch).
Toreplacethecoverpresenceswitch,dothefollowing:
1.Removeallmediafromthedrivesandturnoffallattacheddevicesandthecomputer.Then,disconnect
allpowercordsfromelectricaloutletsanddisconnectallcablesthatareconnectedtothecomputer.
2.Removethecomputercover.See“Removingthecomputercover”onpage42.
3.Locatethecoverpresenceswitch.See“Locatingcomponents”onpage12.
4.Disconnectthecoverpresenceswitchcablefromthecoverpresenceswitchconnectoronthesystem
board.See“Locatingpartsonthesystemboard”onpage13
.
88ThinkCentreM83,M93/pUserGuide
 Loading...