

Page 1
PN: SP40F55813
Printed in China
Safety, Warranty, and Setup Guide
http://www.lenovo.com/support
Lenovo® electronic manuals... for a greener planet!
adapter
connector
connector
connector (optional)
connector
connector
connector (optional)
connector
Audio line-in connector: Used to receive audio signals from an
external audio device, such as a stereo system.
Audio line-out connector: Used to send audio signals from the
Microphone connector: Used to attach a microphone to your
Headphone connector: Used to attach headphones to your
Headset connector: Used to attach a supported headset to your
USB 2.0 connector: Used to attach a device that requires a
USB 3.0 connector: Used to attach a device that requires a
Serial connector: Used to attach an external modem, a serial
Ethernet connector: Used to attach the computer to an
connected to an Ethernet network, use a Category 5 Ethernet
cable.
desktop computers
computers
Brief user notices
Refer to the electronic User Guide for detailed product information:
http://www.lenovo.com/UserManuals
ThinkCentre M83
Unpack
Note: Recovery discs are not provided. Instead, everything needed for recovering factory-installed files and applications is
provided in the Lenovo_Recovery partition on your hard disk drive. If you decide to remove the Lenovo_Recovery partition, be
ThinkCentre
®
computer
Mouse
Keyboard
Power cord or power
Documentation
sure to create a recovery disc first. For more information, see "Recovery information" in the User Guide. See “Accessing your
User Guide” for instructions on opening the electronic User Guide provided on your computer.
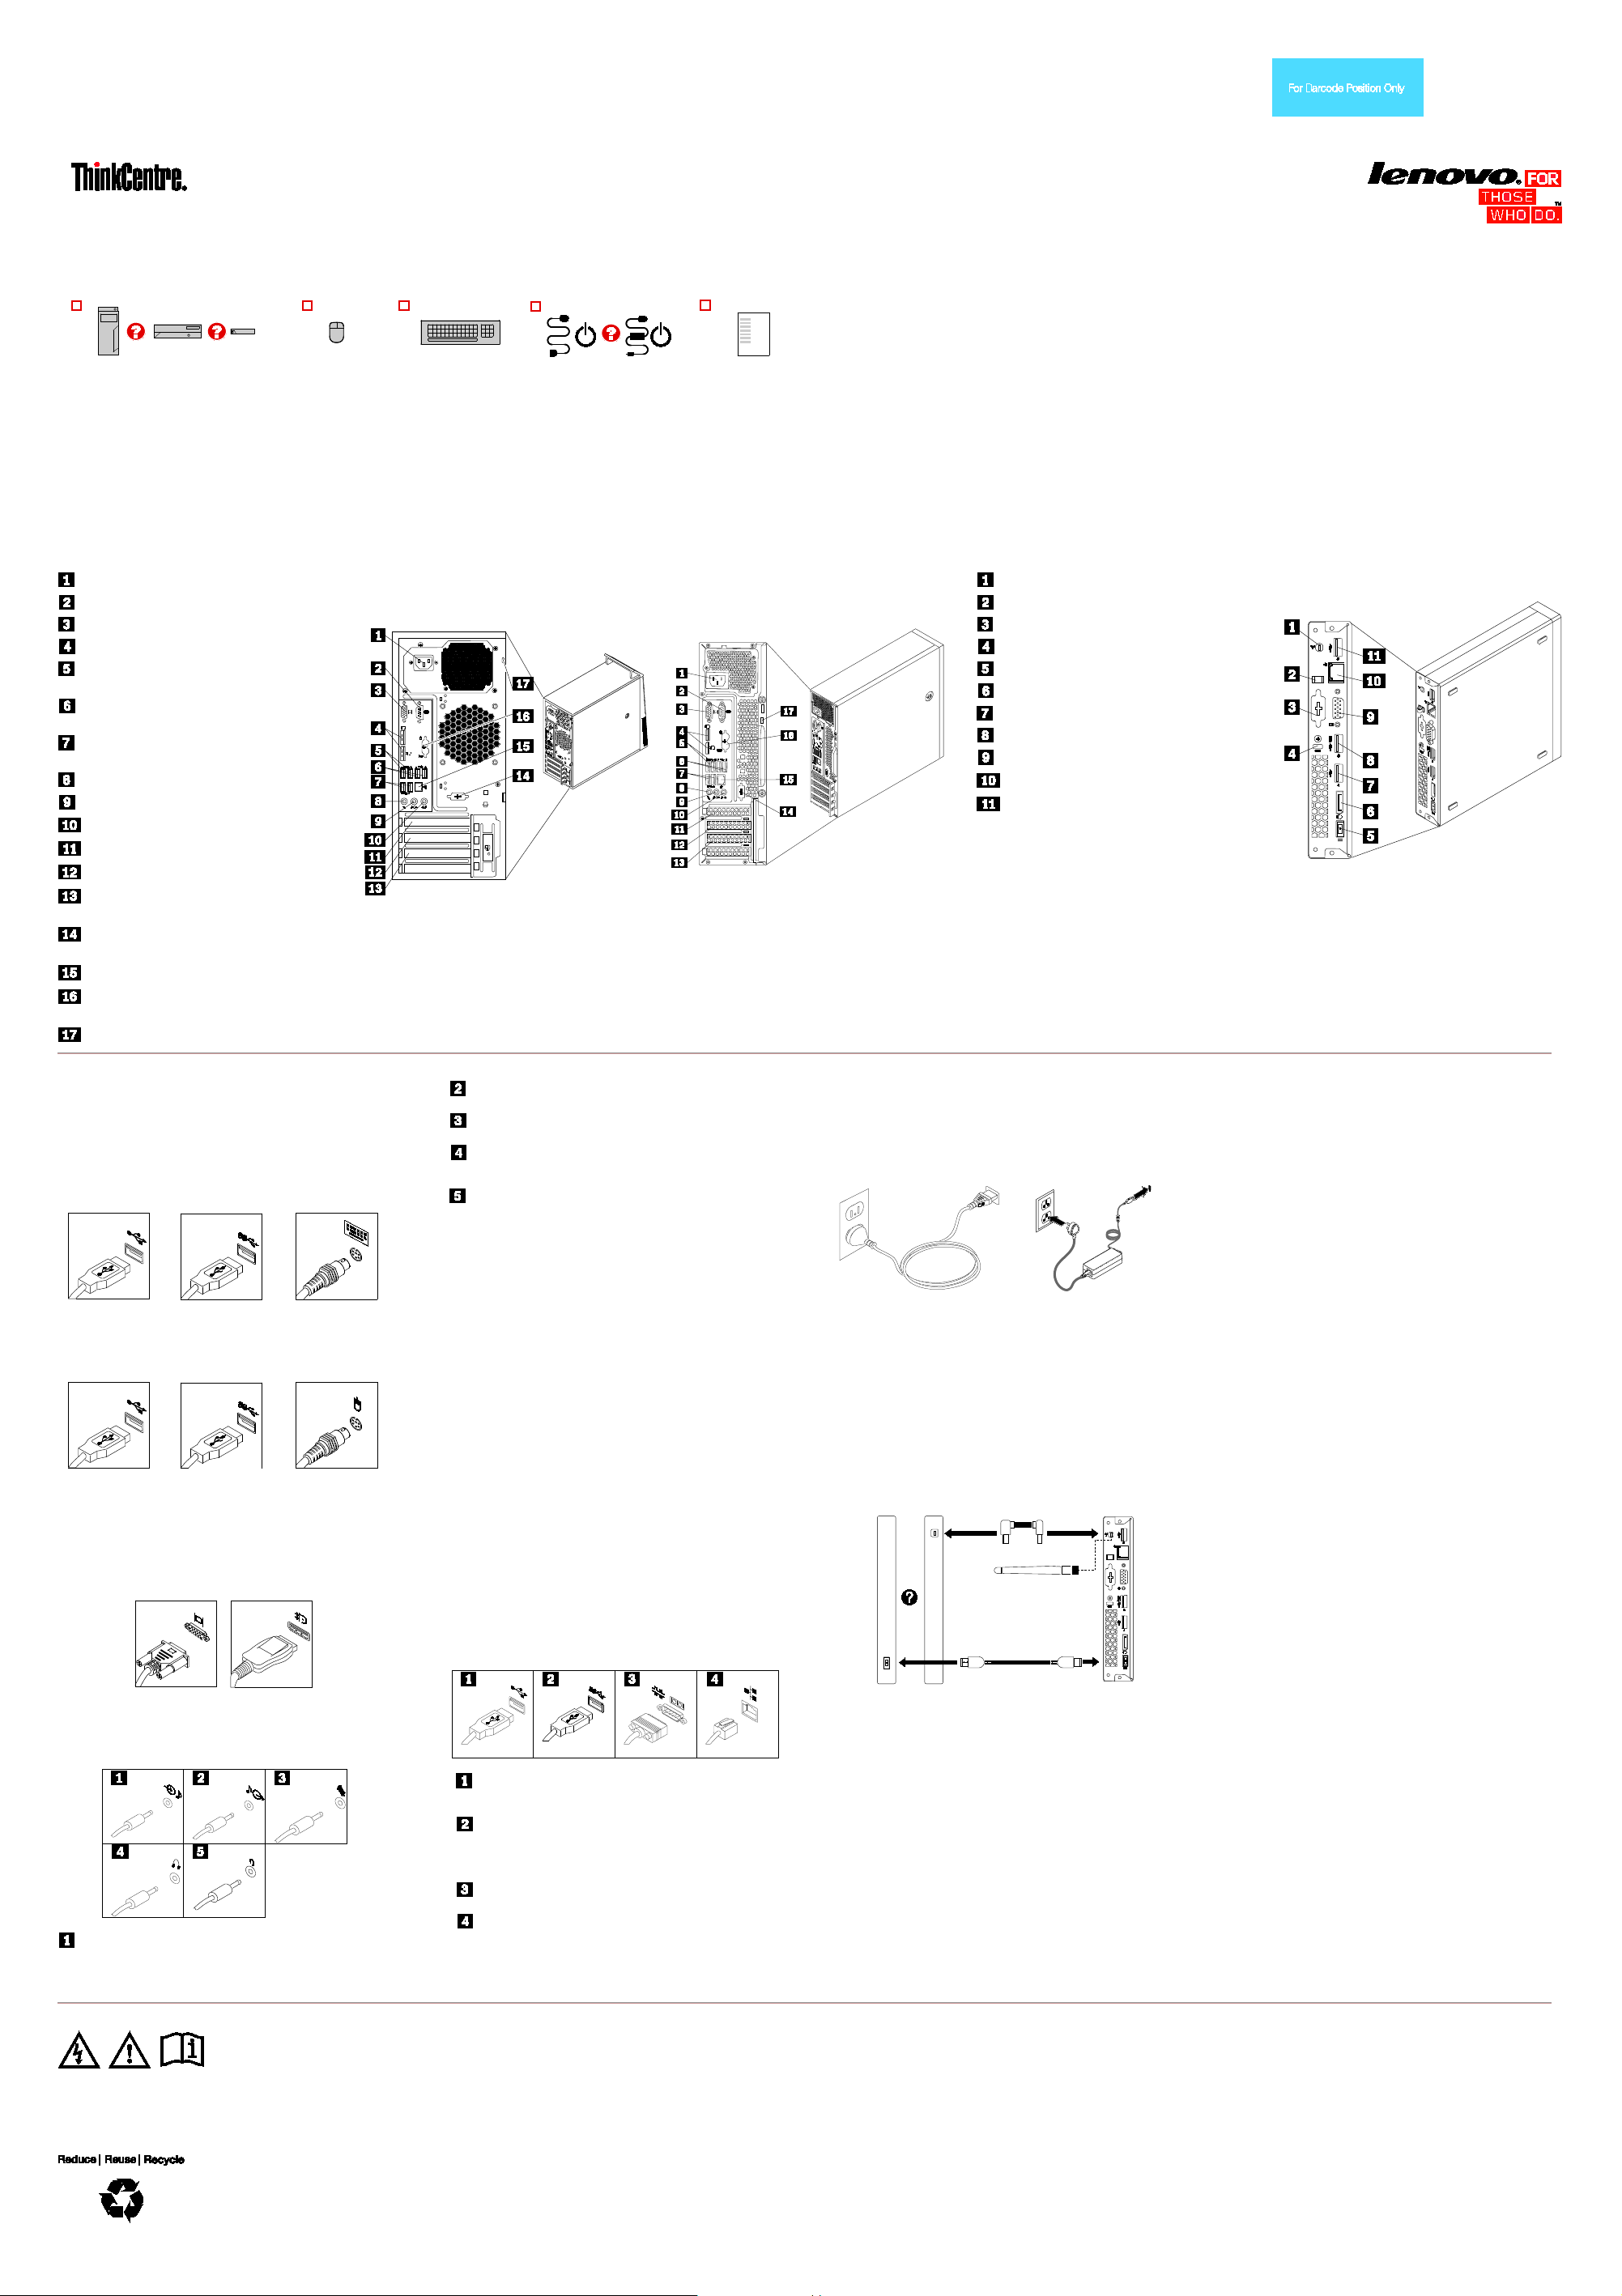
Connector locations
Notes:
1. The locations of the connectors, controls, and indicators on your computer might be slightly different from the illustrations.
2. For tiny desktop: If you use the optional port for installing a serial port, the serial port and the adjacent VGA connector might interfere with each other when you connect cables. To avoid the interference, ensure that you use the serial port convert cable that
comes with the computer when you connect a device to the serial port.
3. For tiny desktop: The Video Electronics Standards Association (VESA
install the vertical stand. For more information, see "Installing or replacing hardware" in the User Guide.
Tower and small desktop, rear view
Power cord connector
Serial connector (Serial connector 1)
Tower
VGA connector
DisplayPort® connectors (2)
USB 3.0 connectors (USB connectors 5 and
6)
USB 2.0 connectors (USB connectors 7 and
8)
USB 2.0 connectors (USB connectors 3 and
4)
Microphone connector
Audio line-out connector
Audio line-in connector
PCI Express x16 graphics card slot
PCI Express x1 card slot
PCI Express card slot (physical link width
x16; negotiable link width x4, x1)
Optional serial connector (Serial connector
2)
Ethernet connector
PS/2 keyboard and mouse connectors
(optional)
Security-lock slot
®
) mount bracket and the vertical stand are optional parts. If your computer comes with the VESA mount bracket installed, ensure that you remove the VESA mount bracket before you
Small desktop
Tiny desktop, rear view
Wi-Fi antenna slot
ac power adapter cable loop
Tiny desktop
Optional connector
Security-lock slot
ac power adapter connector
DisplayPort connector
USB 3.0 connector (USB connector 4)
USB 3.0 connector (USB connector 3)
VGA connector
Ethernet connector
USB 3.0 connector (USB connector 5)
Initial setup instructions
Note: Depending on the model type, your computer might
not have all of the connectors that are described in this
section.
1. Connect the keyboard cable to an appropriate
keyboard connector.
USB 2.0
USB 3.0
PS/2 keyboard
2. Connect the mouse cable to an appropriate mouse
connector.
USB 2.0
USB 3.0
PS/2 mouse
3. Connect the display cable to an appropriate video
connector.
Note: If your computer is installed with a graphics card,
ensure that you use the monitor connectors on the
graphics card.
VGA connector
DisplayPort
4. If you have audio devices, attach them using the
following instructions.
computer to external devices, such as powered stereo speakers.
computer to record sound or use speech-recognition software.
computer to listen to music or other sounds without disturbing
anyone.
computer to record sound, use speech-recognition software, listen
to music, or other sounds without disturbing anyone. The headset
connector is also known as audio jack.
5. If you have powered speakers with an ac power
adapter, do the following:
a. Connect the cable that runs between the
speakers, if necessary. On some speakers, this
cable is permanently attached.
b. Connect the ac power adapter cable to the
speakers.
c. Connect the speakers to the audio line-out
connector or the headphone connector on the
computer.
d. Connect the ac power adapter to an ac power
source.
6. If you have unpowered speakers with no ac power
adapter, do the following:
a. Connect the cable that runs between the
speakers, if necessary. On some speakers, this
cable is permanently attached.
b. Connect the speakers to the audio line-out
connector or the headphone connector on the
computer.
7. If you have any additional devices, connect them to
the appropriate connectors. Your computer might not
have all connectors that are shown.
USB 2.0 connector, such as a keyboard, a mouse, a scanner, a
printer, or a personal digital assistant (PDA).
USB 2.0 or 3.0 connector, such as a keyboard, a mouse, a
scanner, a printer, or a personal digital assistant (PDA). A USB
3.0 connector provides high transmission speeds to reduce the
time that is required for data transmission.
printer, or other devices that use a 9-pin serial connector.
Ethernet-type local area network or to a cable modem.
Important: To operate the computer within FCC limits when it is
8. Connect the power cord or the power adapter to the
computer first and then to a properly-grounded
electrical outlet. Ensure that all power cord
connectors are securely and completely plugged into
receptacles.
Power cord for tower and small
Power adapter for tiny desktop
9. Press the power button on the front of the computer.
10. Follow the on-screen instructions to complete the
setup.
Note: If your tiny desktop computer comes with an
external optical drive, an external hard disk drive, an
external battery, or an I/O box, ensure that you install the
cable that connects your computer and the external
device. If your computer comes with the Wi-Fi feature,
ensure that you install the Wi-Fi antenna stick to your
computer.
Accessing your user guide
Your User Guide contains detailed information about your
computer. To access your User Guide, do the following:
Microsoft
• Method 1
®
Windows® 8.1:
1. Go to the Start screen.
2. Click the arrow icon in the bottom-left corner of
the screen to go to the Apps screen. If you are
using a touch screen, swipe up to go to the Apps
screen.
3. Scroll to the right side of the screen, and click or
tap Help and Support. The Windows Help and
Support window opens.
4. Click or tap Lenovo User Guide.
• Method 2
1. Go to the Start screen.
2. Click or tap Lenovo Support. The Lenovo
Support window opens.
3. Click or tap User Guide.
Microsoft Windows 8:
• From the desktop or the Start screen
1. Move the pointer to the top-right or bottom-right
corner of the screen to display the charms, and
then click Search. If you are using a touch screen,
swipe in from the right edge of the screen to
display the charms, and then tap Search.
2. On the Apps screen, scroll to the right side, and
click or tap Help and Support. The Windows
Help and Support window opens.
3. Click or tap Lenovo User Guide.
• From the Start screen
1. Click or tap Lenovo Support. The Lenovo
Support window opens.
2. Click or tap User Guide.
Microsoft Windows 7:
1. From the Windows desktop, click Start and then click
Help and Support. The Help and Support application
opens.
2. Click Lenovo User Guide.
3. In the Lenovo User Guide window, click the link for
your model and the User Guide opens.
Models without preinstalled operating s ystems and
Virtual Desktop Infrastructure (VDI) clients:
Go to the Lenovo Support Web site to access your User
Guide. See “Downloading publications” for additional
information.
User Guides are available in additional languages from
the Lenovo Web site. See “Downloading publications” for
additional information.
Read this flyer before using your computer
This flyer provides critical safety and regulatory information for Lenovo computers
and instructions on how to access electronic versions of the publications developed
for your computer.
Read first — regulatory information
Computer models equipped with wireless communications comply with the radio
frequency and safety standards of any country or region in which it has been
approved for wireless use.
Be sure to read the Regulatory Notice for your country or region before using the
wireless devices contained in your computer. To obtain a PDF version of the
Regulatory Notice, refer to the “Downloading publications” section below.
Brazil regulatory notice
Ouvir sons com mais de 85 decibéis por longos períodos pode provocar danos ao
sistema auditivo.
Mexico regulatory notice
Advertencia: En Mexico la operación de este equipo está sujeta a las siguientes
dos condiciones: (1) es posible que este equipo o dispositivo no cause interferencia
perjudicial y (2) este equipo o dispositivo debe aceptar cualquier interferencia,
incluyendo la que pueda causar su operación no deseada.
Downloading publications
Electronic versions of your computer publications are available from the Lenovo
Support Web site. To download the publications for your computer, go to
http://www.lenovo.com/UserManuals and follow the instructions on the screen.
Third Edition (October 2014)
© Copyright Lenovo 2013, 2014.
LIMITED AND RESTRICTED RIGHTS NOTICE: If data or software is delivered pursuant a General Services Administration “GSA” contract, use, reproduction, or disclosure is subject to
restrictions set forth in Contract No. GS-35F-05925.
Service and Support information
The following information describes the technical support that is available for your
product, during the warranty period or throughout the life of your product. Refer to
the Lenovo Limited Warranty for a full explanation of Lenovo warranty terms. See
“Lenovo Limited Warranty notice” later in this document for details on accessing the
full warranty.
If you purchased Lenovo services, refer to the following terms and conditions for
detailed information:
• For Lenovo Warranty Service Upgrades or Extensions, go to:
Page 2
http://support.lenovo.com/lwsu
http://www.lenovo.com/support/phone
Country or region
Telephone number
Africa South Africa: 0800110756 (English, Afrikaans)
Central Africa: Contact the nearest Lenovo Business Partner
Algeria
+33 6 7348 1739 (French, English)
Argentina
0800-666-0011 (Spanish)
Australia
1800 041 267 (English)
Austria
01-24592-5901 (German)
Bahrain
Kanoo IT: 00 973 1771 1722
Bahrain Business Machine LLC: 00 973 1758 4302
Belgium
02-210-9820
(French)
Bolivia
0800-10-0189 (Spanish)
Brazil
Calls made from within the Sao Paulo region: (11) 3889-8986
(Brazilian Portuguese)
Brunei
Dial 800-1111, and then dial 866-273-5446
(English, Bahasa Melayu)
Canada
1-800-565-3344 (English, French)
Caribbean
Tortola)
1-800 426 7378
Chile
800-361-213 (Spanish)
China
Technical Support Line
400-100-6000 (Mandarin)
Colombia
1-800-912-3021 (Spanish)
Costa Rica
0-800-011-1029 (Spanish)
Croatia
0800-0426
Cyprus
80092537 (Greek)
Czech Republic
+420-2-7213-1316
Denmark
4520-8200
(Danish)
Dominican Republic
1-866-434-2080 (Spanish)
Ecuador
1-800-426911 OPCION 4 (Spanish)
Egypt
800-0000-418 (Toll free)
(English, Arabic)
El Salvador
800-6264 (Spanish)
Estonia
+372 66 00 800
+372 6776793
Finland
09-459-6960
(Finnish)
France
0238-557-450
(French)
Germany
01805-00 46 18 (Warranty service and support)
(German)
Greece
Contact the nearest Lenovo Business Partner
Guatemala
1800-624-0051 (Spanish)
Honduras
Tegucigalpa: 232-4222
(Spanish)
Hong Kong
(852) 3071-3561
(Cantonese, English, Mandarin)
Hungary
+36 1 3825716
(English, Hungarian)
India
1800 3000 THINK 1800 3070 8465 (Reliance)
(English, Hindi)
Indonesia
+6221 2992 5823
(English, Bahasa Indonesia)
Ireland
01-815-9202
(English)
Israel
Givat Shmuel Service Center: +972-3-531-3900
Italy
02-7031-6101
(Italian)
Japan
0120-000-817
Jordan
Jordan Business Systems: 00 962 6 5000999 Ext 713/127
General Computer & Electronic (GCE): 00 962 6 551 3879
Kazakhstan
+77273231427
(Russian, English)
Korea
080-513-0880 (Toll Free)
(Korean)
Kuwait
Easa Hussain Al Yousifi: 00 965 2244 5280
Redington Kuwait: 00 965 2433 3203; 25456250 / 25456251
Latvia
+371 7070360
Lebanon
Quantech: 00 961 1999 500
El Haceb S.A.L: 00 961 1771 300
Lithuania
+370 5 278 66 00
Libya
+33 6 7348 1739 (French, English)
Luxembourg
+352 360 385 222 (French)
Macao
0800-807 / (852) 3071-3559
(Cantonese, English, Mandarin)
Macedonia
+389 23090625 (Macedonia)
Malaysia
1800-88-0013 (English, Bahasa Melayu)
Malta
+35621445566
Mexico
001-866-434-2080 (Spanish)
Middle East
+44 (0)1475-555-055
Morocco
+212 5 22 509035
+212 5 22 509017
Netherlands
+31 (0)20 513 3939 (Dutch)
New Zealand
0508 770 506 (English)
Nicaragua
001-800-220-1830 (Spanish)
Norway
6681-1100
(Norwegian)
Oman
Khimji Ramdas Computer Communication Systems:
00 968 2455 9831
Pakistan
INFO TECH (pvt) Ltd.: 00 924 2111 427 427
Selling Business Systems: 00 92 21 568 9823
Panama
206-6047
Country or region
Telephone number
001-866-434-2080 (Lenovo Customer Support Center- toll free)
(Spanish)
Paraguay
009-800-52-10026 (Spanish)
Peru
0-800-50-866 OPCION 2 (Spanish)
Philippines
180089086454 (Domestic Toll Free)
(Tagalog, English)
Poland
+48 22 760 7300 (Polish)
Portugal
+351 21 892 7046 (Portuguese)
Qatar
Al Mana Computer Services: 00 974 4489 966 (ext. 1992)
Gulf Business Machines: 00-974 462 1395
Romania
+4-021-224-4015
Russia
8-800-555-0317 (Toll free number)
(Russian)
Saudi Arabia
800 85 000 52 (Standard charges apply)
(English, Arabic)
Singapore
800 6011 343 (Local number only)
(English)
Slovakia
+421 2 4974 8888
Slovenia
+386-1-200-50-60 (Slovenian)
Spain
0901-100-000 (Spanish)
Sri Lanka
+9411 2493547
(English)
Sweden
08-477-4420
(Swedish)
Switzerland
058-333-0900
(German, French, Italian)
Taiwan
0800-000-702 (Mandarin)
Thailand
001 800 4415 734 (Thai, English)
Turkey
0212 336 03 66
(Turkish)
Ukraine
044 362 42 81
(Ukrainian, Russian, English)
United Arab
Emirates
800035702810 (Standard charges apply)
(English, Arabic)
United Kingdom
01475-897-163
(English)
United States
1-800-426-7378 (Select “Option #1”)
(English)
Uruguay
000-411-005-6649 (Spanish)
Venezuela
0-800-100-2011 (Spanish)
Vietnam
120-11072 (Toll Free)
+(84) 8 3521 8000 (Standard charges apply) (Vietnamese, English)
Yeman
Al Khirbash and Agencies:
00-967 3 213909
beam.
and children to avoid danger of suffocation.
Danger of explosion if battery is incorrectly replaced.
Self-service CRUs
Optional-service CRUs
• Coin cell battery
Rear Wi-Fi antenna*
• Front audio and USB assembly
• Wi-Fi card module*
Self-service CRUs
Optional-service CRUs
• Coin cell battery
• Card reader*
• Wi-Fi card module*
Self-service CRUs
Optional-service CRUs
• ac power adapter
• Rear Wi-Fi antenna*
• External hard disk drive*
• Wi-Fi card module*
• For Lenovo Accidental Damage Protection Services, go to:
http://support.lenovo.com/ladps
Online technical support
Online technical support is available during the lifetime of a product at:
http://www.lenovo.com/support
Telephone technical support
Where applicable, you can get help and information from the Customer Support
Center by telephone. Before contacting a Lenovo technical support representative,
please have the following information available: model and serial number, the exact
wording of any error message, and a description of the problem. Your technical
support representative might want to walk you through the problem while you are at
your computer during the call.
Worldwide Lenovo support telephone list
Important: Telephone numbers are subject to change without notice. The most up-
to-date telephone list for the Customer Support Center is always available at:
If the telephone number for your country or region is not listed, contact your Lenovo
reseller or Lenovo marketing representative.
+32 (0)2 339 3611 (Warranty service and support)
(Dutch)
02-210-9800
Calls made from outside the Sao Paulo region: 0800-701-4815
(Bermuda, Jamaica,
(English)
7010-5150 (Warranty service and support)
002-02-2594-8500 (Standard charges apply)
+358-800-1-4260 (Warranty service and support)
Hardware: 0810-631-213 (Warranty service and support)
Software: 0810-631-020 (Warranty service and support)
San Pedro Sula: 552-2234
+36 1 3825720
1800-419-4666 (Tata)
Email: Commercialts@lenovo.com
001-803-606-282 (Local number only)
+603 8315 6859 (DID)
01-881-1444 (Warranty service and support)
+39-800-820094 (Warranty service and support)
(Standard charges apply)
0234834817 (Standard charges apply)
AM. KHORAFI: 00 965 2200 1100 1127
Khorafi Business Machines (KBM): 00 965 2259 4611
Diyar United Company: 00 965 4378 383
Computer Business Machine (CBM): 00 961 1680 180
8152-1550 (Warranty service and support)
00 968 2469 6255
Overseas Business Machines (OBM):
00 968 2460 1072, 2460 5018
Gulf Business Machines Services (GBMS):
International Office Products (pvt) Ltd.:
00 92 212 422 569, 00 92 213 241 2023
180014410719 (International Toll Free)
Qatar Computer Services W.L.L: 00 974 4441 212
+603 8315 6856 (DID)
+9411 2493548
077-117-1040 (Warranty service and support)
0800-55-54-54 (Warranty service and support)
00800 448 825 165
08705-500-900 (Standard warranty support)
00 967 1209 8278
Yemen Business Machines (YBM):
00-967 3 213324
00-967 3 214655
Lenovo product service information for Taiwan
Safety information
This section contains important safety information for Lenovo products. Additional
safety information is provided in the User Guide for your product. See “Accessing
your User Guide” for additional information.
Laser compliance statement
CAUTION:
When laser products (such as CD-ROMs, DVD drives, fiber optic devices, or
transmitters) are installed, note the following:
• Do not remove the covers. Removing the covers of the laser product could
result in exposure to hazardous laser radiation. There are no serviceable
parts inside the device.
• Use of controls or adjustments or performance of procedures other than
those specified herein might result in hazardous radiation exposure.
DANGER
Some laser products contain an embedded Class 3A or Class 3B laser
diode. Note the following:
Laser radiation when open. Do not stare into the beam, do not view
directly with optical instruments, and avoid direct exposure to the
Plastic bag notice
DANGER
Plastic bags can be dangerous. Keep plastic bags away from babies
Lithium coin cell battery notice
DANGER
When replacing the lithium coin cell battery, use only the same type or equivalent
type that is recommended by the manufacturer. The battery contains lithium and can
explode if not properly used, handled, or disposed of.
Do not:
• Throw or immerse into water
• Heat to more than 100°C (212°F)
• Repair or disassemble
Dispose of the battery as required by local ordinances or regulations.
The following statement applies to users in the state of California, U.S.A.
California Perchlorate Information:
Products containing manganese dioxide lithium coin cell batteries may contain
perchlorate.
Perchlorate Material - special handling may apply, See
www.dtsc.ca.gov/hazardouswaste/perchlorate
Polyvinyl Chloride (PVC) cable and cord notice
Warning: Handling the cord on this product or cords associated with accessories
sold with this product will expose you to lead, a chemical known to the State of
California to cause cancer, and birth defects or other reproductive harm. Wash
hands after handling.
Using headphones or earphones
If your computer has both a headphone connector and an audio line-out connector,
always use the headphone connector for headphones (also called a headset) or
earphones.
CAUTION:
Excessive sound pressure from earphones and headphones can cause
hearing loss. Adjustment of the equalizer to maximum increases the earphone
and headphone output voltage and the sound pressure level. Therefore, to
protect your hearing, adjust the equalizer to an appropriate level.
Excessive use of headphones or earphones for a long period of time at high volume
can be dangerous if the output of the headphone or earphone connectors do not
comply with specifications of EN 50332-2. The headphone output connector of your
computer complies with EN 50332-2 Sub clause 7. This specification limits the
computer’s maximum wide band true RMS output voltage to 150 mV. To help
protect against hearing loss, ensure that the headphones or earphones you use also
comply with EN 50332-2 (Clause 7 Limits) or a wide band characteristic voltage of
75 mV. Using headphones that do not comply with EN 50332-2 can be dangerous
due to excessive sound pressure levels.
If your Lenovo computer came with headphones or earphones in the package, as a
set, the combination of the headphones or earphones and the computer already
complies with the specifications of EN 50332-1. If different headphones or
earphones are used, ensure that they comply with EN 50332-1 (Clause 6.5
Limitation Values). Using headphones that do not comply with EN 50332-1 can be
dangerous due to excessive sound pressure levels.
Lenovo Limited Warranty notice
This product is covered by the terms of the Lenovo Limited Warranty, version L5050010-02 08/2011. Read the Lenovo Limited Warranty (LLW) at
http://www.lenovo.com/warranty/llw_02. You can view the LLW in a number of
languages from this Web site. The LLW also is displayed on your computer during
the initial setup. After the initial setup has completed, you can view the warranty on
your computer by doing the following:
Windows 8.1:
• Method 1
1. Go to the Start screen.
2. Click the arrow icon in the bottom-left corner of the screen to go to the Apps
screen. If you are using a touch screen, swipe up to go to the Apps screen.
3. Click or tap Warranty Information.
• Method 2
1. Go to the Start screen.
2. Click or tap Lenovo Support. The Lenovo Support window opens.
3. Click or tap Service and Warranty.
Windows 8:
• From the desktop or the Start screen
1. Move the pointer to the top-right or bottom-right corner of the screen to
display the charms, and then click Search. If you are using a touch screen,
swipe in from the right edge of the screen to display the charms, and then
tap Search.
2. From the Apps screen, click or tap Warranty Information.
• From the Start screen
1. Click or tap Lenovo Support. The Lenovo Support window opens.
2. Click or tap Service & Warranty.
Windows 7:
From the Windows desktop, click Start
Experience
If you cannot view the LLW either from the Web site or from your computer, contact
your local Lenovo office or reseller to obtain a printed version of the LLW.
Lenovo Warranty.
All Programs Lenovo Device
Warranty information
To check the warranty status of your computer, go to
http://www.lenovo.com/warranty-status, and then follow the instructions on the
screen.
Customer Replaceable Units
Customer Replaceable Units (CRUs) are parts that can be upgraded or replaced by
the customer. If a CRU is determined to be defective during the warranty period, a
replacement CRU will be provided to the customer. Customers are responsible for
installing the self-service CRUs for this product. Customers also can install optionalservice CRUs, which might require some technical skills or tools, or request that a
technician install the optional-service CRU under the terms of the applicable
warranty service type for your country or region. The following tables list CRUs for
your computer and tell where to find the replacement instructions.
Machine types 10AG, 10AK, 10AL, and 10BE.
• Cover presence switch (intrusion
switch)
• Hard disk drive
• Internal speaker
• Keyboard
• Memory module
• Mouse
• Optical drive
• Peripheral Component Interconnect
(PCI) card*
•
• Front USB assembly*
• Front Wi-Fi antenna*
• Heat sink and fan assembly
• Microprocessor
• mSATA solid state drive*
• mSATA solid state drive converter*
• Power supply assembly
• Rear fan assembly
• Thermal sensor*
• Wi-Fi adapter card*
Machine types 10AH, 10AJ, 10AM, and 10AN.
• Cover presence switch (intrusion
switch)
• Hard disk drive
• Keyboard
• Memory module
• Mouse
• mSATA solid state drive*
• Optical drive
• PCI card*
• Sec on dar y hard disk drive*
• Front audio and USB assembly
• Front fan assembly
• Front USB assembly*
• Front Wi-Fi antenna*
• Heat sink and fan assembly
• Internal speaker
• Microprocessor
• mSATA solid state drive converter*
• Power supply assembly
• Rear Wi-Fi antenna*
• Thermal sensor*
• Wi-Fi adapter card*
Machine types 10E8, 10E9, 10EA, and 10EB.
• Coin cell battery
• Front Wi-Fi antenna*
• Keyboard
• Memory module
• Mouse
• Power adapter bracket*
• Power cord
• Vertical stand*
• External I/O box
• External optical drive*
• Thermal module
• Internal speaker
• Microprocessor
• Power switch board
• System fan
• VESA mount bracket*
Note: * denotes optional parts, which are available in some models.
CRU installation instructions are in the User Guide for the respective product. See
“Accessing your User Guide” for additional information.
Electronic emission notices
This device has been tested and found to comply with the limits for a Class B digital
device. The User Guide for this product provides the complete Class B compliance
statements that are applicable for this device. See “Accessing your User Guide” for
additional information.
Korean Class B compliance statement
European Union conformity
Radio and Telecommunications Terminal Equipment
Directive
This product is in compliance with the essential requirements and other relevant
provisions of the Radio and Telecommunications Terminal Equipment Directive,
1999/5/EC. The Declaration of Conformity information is located in the Regulatory
Notice, which you can download from the Lenovo Support Web site. See
“Downloading publications” for additional information.
Recycling and environmental information
Lenovo encourages owners of information technology (IT) equipment to responsibly
recycle their equipment when it is no longer needed. Lenovo offers a variety of
programs and services to assist equipment owners in recycling their IT products.
For information on recycling Lenovo products, go to:
http://www.lenovo.com/recycling
Important WEEE information
Electrical and electronic equipment marked with the symbol of a
crossed-out wheeled bin may not be disposed as unsorted
municipal waste. Waste of electrical and electronic equipment
(WEEE) shall be treated separately using the collection
framework available to customers for the return, recycling, and
treatment of WEEE.
Country-specific information is available at:
http://www.lenovo.com/recycling
Recycling information for Japan
Recycling and disposal information for Japan is available at:
http://www.lenovo.com/recycling/japan
Recycling information for China
Additional recycling statements
Additional information about recycling computer components and batteries is in your
User Guide. See “Accessing your User Guide” for details.
Restriction of Hazardous Substances Directive (RoHS)
European Union RoHS
Lenovo products sold in the European Union, on or after 3 January 2013 meet the
requirements of Directive 2011/65/EU on the restriction of the use of certain
hazardous substances in electrical and electronic equipment (“RoHS recast” or
“RoHS 2”).
For more information about Lenovo progress on RoHS, go to:
http://www.lenovo.com/social_responsibility/us/en/RoHS_Communication.pdf
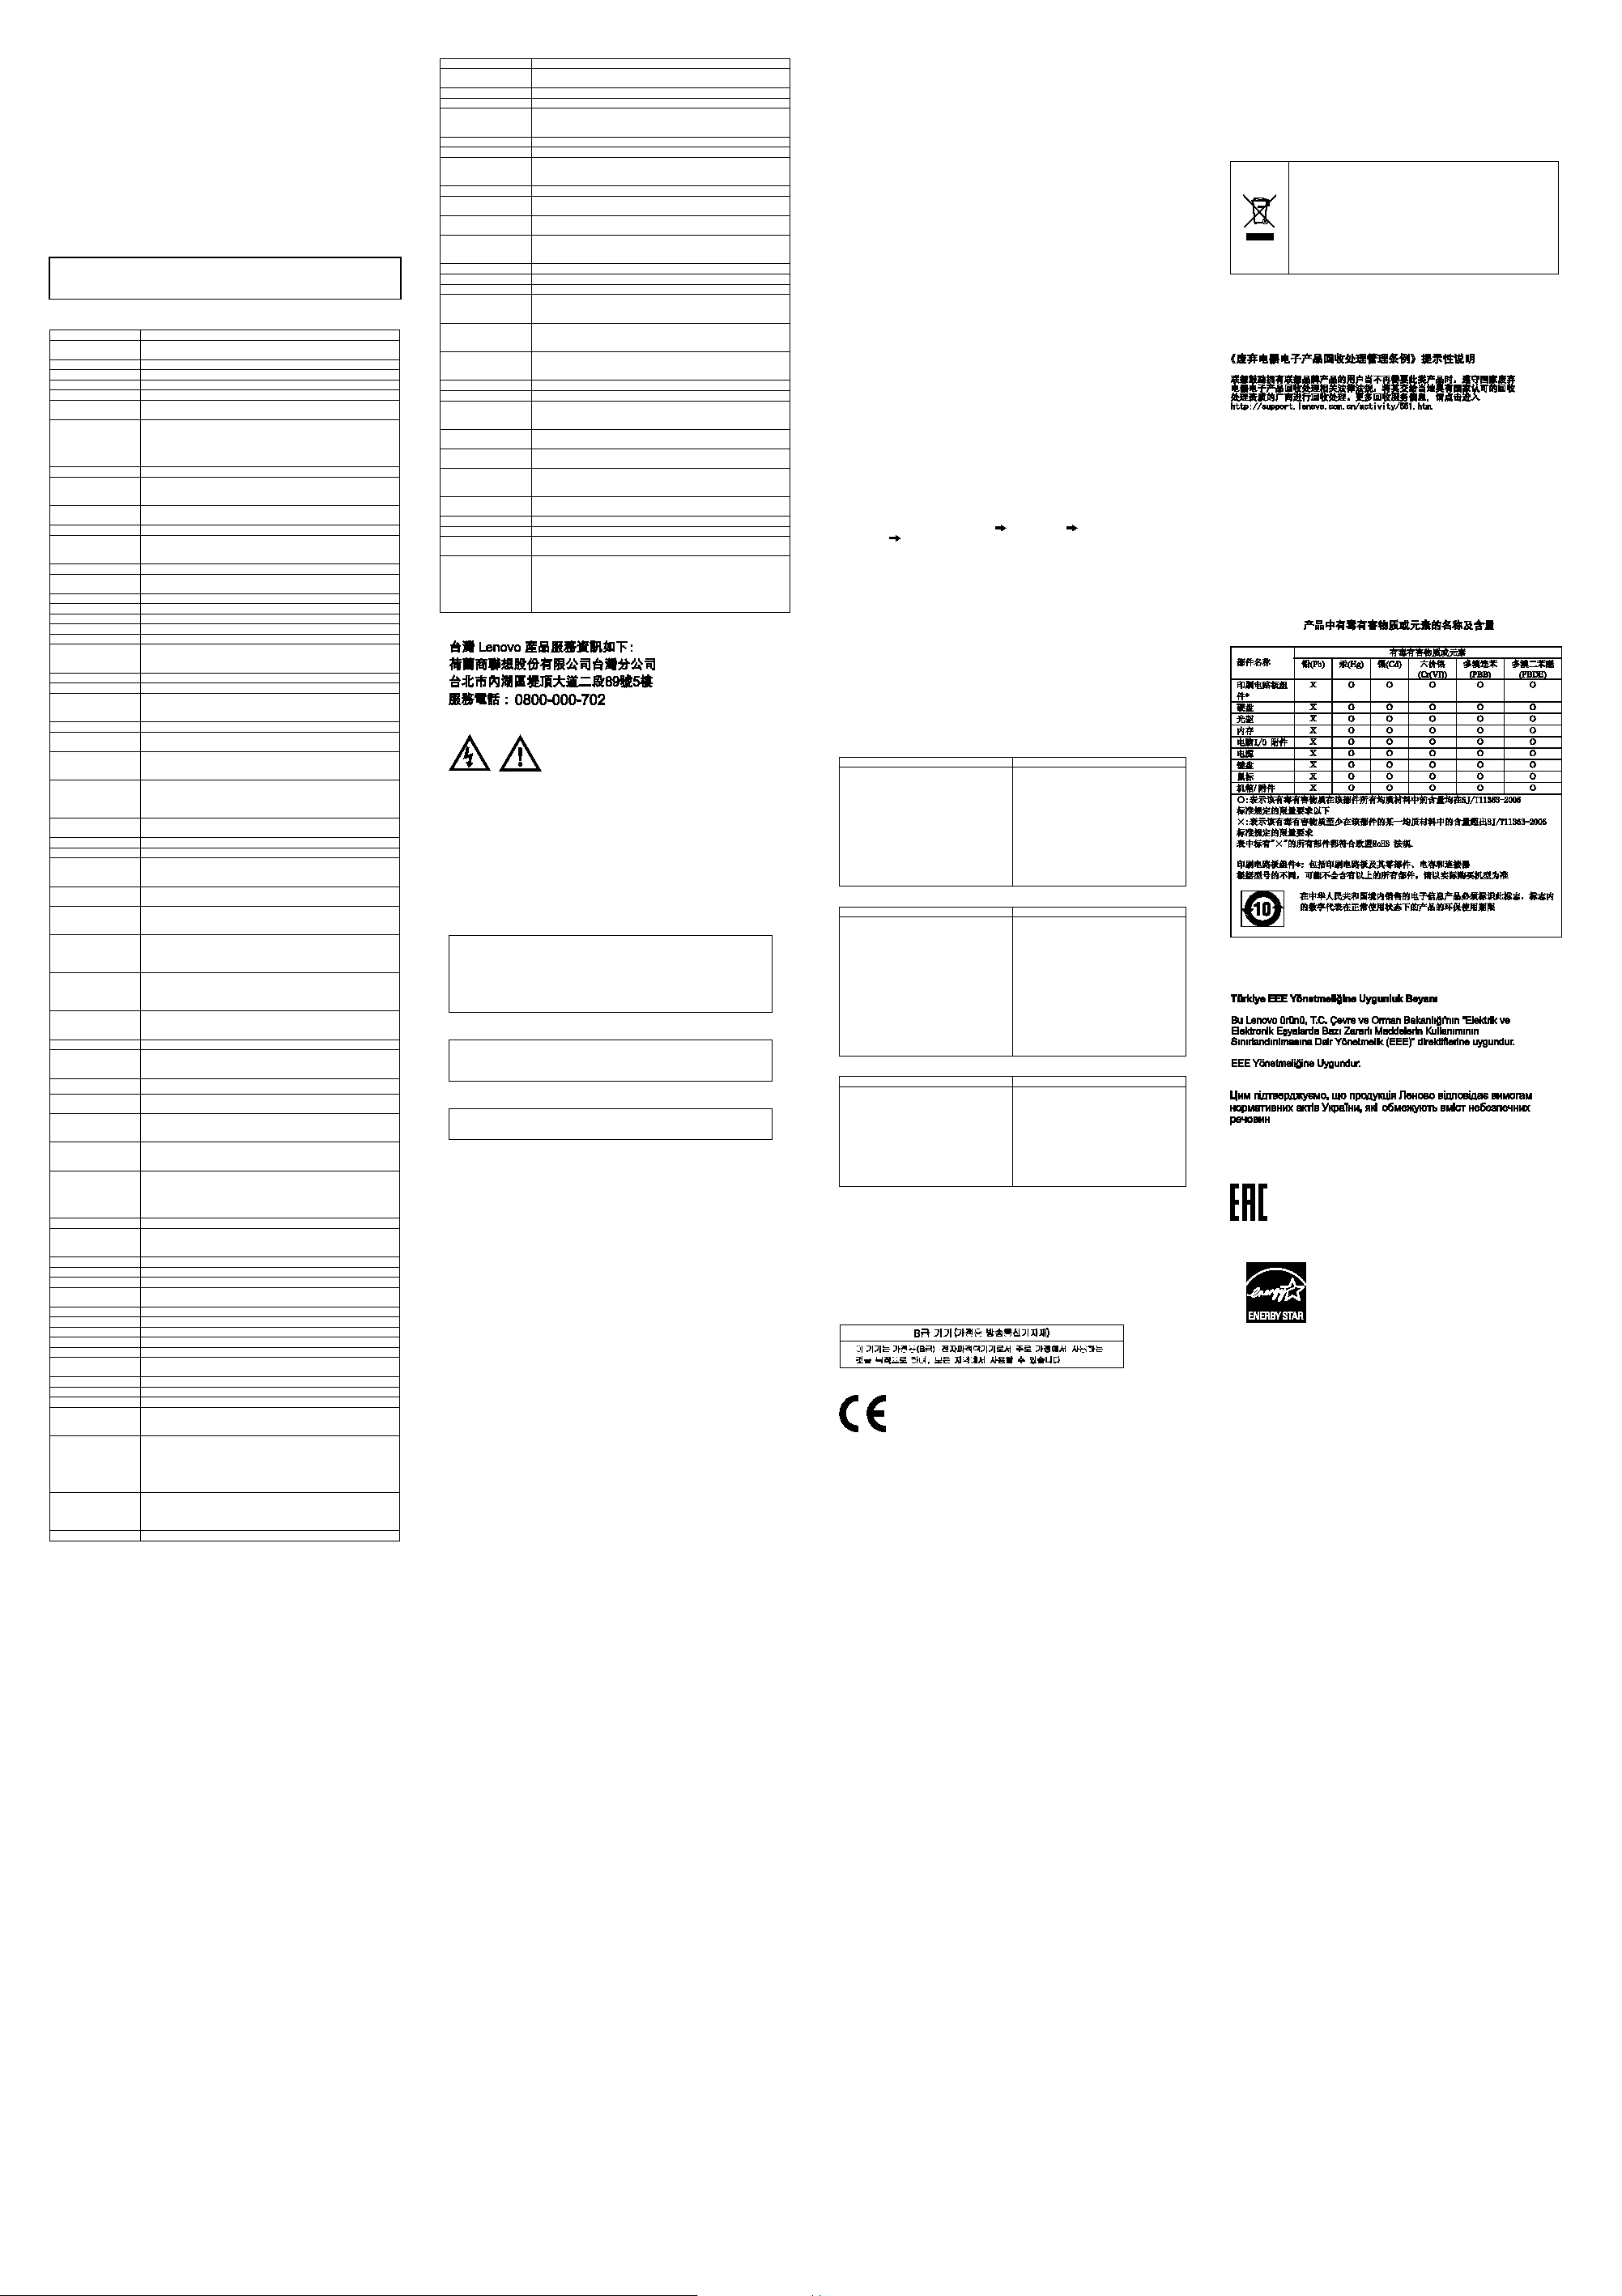
China RoHS
The information in the following table is applicable for products manufactured on or
after March 1, 2007 for sale in the People’s Republic of China.
Turkish RoHS
The Lenovo product meets the requirements of the Republic of Turkey Directive on
the Restriction of the Use of Certain Hazardous Substances in Electrical and
Electronic Equipment (EEE).
Ukraine RoHS
India RoHS
RoHS compliant as per E-Waste (Management & Handling) Rules, 2011.
Eurasian compliance mark
ENERGY STAR
Select models conform to ENERGY STAR®
requirements. Additional ENERGY STAR information is
in your User Guide. See “Accessing your User Guide”.
Legal notices
For Those Who Do., Lenovo, the Lenovo logo, the ThinkCentre logo, and
ThinkCentre are trademarks of Lenovo in the United States, other countries, or both.
Microsoft and Windows are trademarks of the Microsoft group of companies.
DisplayPort and VESA are trademarks of the Video Electronics Standards
Association.
Other company, product, or service names may be trademarks or service marks of
others.
For additional legal notices, refer to the User Guide for your computer. See
“Accessing your User Guide” for additional information.
 Loading...