

Page 1

Thank you for purchasing a
Lenovo M820.
Read and keep this guide.
Adobe and the Acrobat
logo are either
registered trademarks
or trademarks of Adobe
Systems Incorporated in
the United States and/or
other countries.
Windows
Windows ME
and Windows 2000
®
, Windows NT®,
®
, Windows XP®,
®
are
U.S.-registered trademarks of
Microsoft Corporation.
Intel® and Pentium® are registered
trademarks of Intel Corporation.
Lenovo assumes no
responsibility for any errors
that may appear in this
document, nor does it make
expressed or implied warranty
of any kind with regard to this
material, including, but not
limited to, the implied
warranties of merchantability
and fitness for a particular
purpose.
The Lenovo (Beijing) Limited
shall not be liable for incidental
or consequential damages in
connection with, or arising out of
the furnishing, performance, or
use of this document and the
program material which it
describes.
Note:
Regulatory information can
be found in the “Technical
information” section of this guide.
Note
It is not lawful in many places to
make copies of the following
items. When in doubt, check
with a legal representative first.
• Governmental paper or
documents:
-Passports
- Immigration papers
- Selective service papers
- Identification badges, cards, or
insignias
• Governmental stamps:
-Postage stamps
- Food stamps
• Checks or drafts drawn on
Governmental agencies
• Paper currency, traveler’s checks,
or money orders
• Certificates of deposit
•Copyrighted works
safety information
Warning! T o prevent fire or
shock hazard, do not
expose this product to rain
or any type of moisture.
Always follow basic safety
precautions when using this
product to reduce risk of injury
from fire or electric shock.
Warning! Potential shock
hazard
1 Read and understand all
instructions in the quick setup
guide.
2 Use only a grounded electrical
outlet when connecting the unit
to a power source. If you do not
know whether the outlet is
grounded, check with a qualified
electrician.
3 Observe all warnings and
instructions marked on the
product.
4 Unplug this product from wall
outlets before cleaning.
5 Do not install or use this product
near water or when you are wet.
6 Install the product securely on a
stable surface.
7 Install the product in a protected
location where no one can step
on or trip over the line cord, and
where the line cord will not be
damaged.
8 If the product does not operate
normally, see the online
Troubleshooting help.
9 No operator-serviceable parts
inside. Refer servicing to
qualified service personnel.
10 Use in a well-ventilated area.
Lenovo (Beijing) Limited
Page 2

Page 3

contents
1 get help. . . . . . . . . . . . . . . . . . . . . . . . . . . . . . . . . . . . . . . . . . . . 1-1
2 quick start. . . . . . . . . . . . . . . . . . . . . . . . . . . . . . . . . . . . . . . . . . 2-1
2-1 front panel overview . . . . . . . . . . . . . . . . . . . . . . . . . . . . . . . . . 2-2
2-2 PictBridge camera port overview . . . . . . . . . . . . . . . . . . . . . . . . . 2-4
2-3 front panel status lights . . . . . . . . . . . . . . . . . . . . . . . . . . . . . . . 2-5
2-4 use your Lenovo M820 with a computer. . . . . . . . . . . . . . . . . . . . 2-9
3 load originals and load paper. . . . . . . . . . . . . . . . . . . . . . . . . . . 3-1
3-1 load originals. . . . . . . . . . . . . . . . . . . . . . . . . . . . . . . . . . . . . . 3-2
3-2 load an original photo on the glass. . . . . . . . . . . . . . . . . . . . . . . 3-3
3-3 load letter or A4 paper . . . . . . . . . . . . . . . . . . . . . . . . . . . . . . . 3-4
3-4 load envelopes . . . . . . . . . . . . . . . . . . . . . . . . . . . . . . . . . . . . 3-6
3-5 load postcards, Hagaki cards,
or 4 by 6 inch (10 by 15 cm) photo paper . . . . . . . . . . . . . . . . . 3-7
3-6 recommended papers . . . . . . . . . . . . . . . . . . . . . . . . . . . . . . . . 3-8
3-7 set the paper type . . . . . . . . . . . . . . . . . . . . . . . . . . . . . . . . . . 3-9
3-8 avoid jams. . . . . . . . . . . . . . . . . . . . . . . . . . . . . . . . . . . . . . . 3-10
4 print from a camera . . . . . . . . . . . . . . . . . . . . . . . . . . . . . . . . . . 4-1
4-1 connect a camera. . . . . . . . . . . . . . . . . . . . . . . . . . . . . . . . . . . 4-2
4-2 print photos from your camera . . . . . . . . . . . . . . . . . . . . . . . . . .4-3
5 use the copy features. . . . . . . . . . . . . . . . . . . . . . . . . . . . . . . . .5-1
5-1 make copies . . . . . . . . . . . . . . . . . . . . . . . . . . . . . . . . . . . . . . 5-2
5-2 perform special copy jobs . . . . . . . . . . . . . . . . . . . . . . . . . . . . .5-4
5-3 stop copying . . . . . . . . . . . . . . . . . . . . . . . . . . . . . . . . . . . . . .5-6
6 use the scan features. . . . . . . . . . . . . . . . . . . . . . . . . . . . . . . . .6-1
6-1 scan an original . . . . . . . . . . . . . . . . . . . . . . . . . . . . . . . . . . . .6-3
6-2 stop scanning. . . . . . . . . . . . . . . . . . . . . . . . . . . . . . . . . . . . . .6-4
7 maintain your Lenovo M820. . . . . . . . . . . . . . . . . . . . . . . . . . . . 7-1
7-1 clean the glass . . . . . . . . . . . . . . . . . . . . . . . . . . . . . . . . . . . . . 7-2
7-2 clean the lid backing . . . . . . . . . . . . . . . . . . . . . . . . . . . . . . . . . 7-3
7-3 clean the exterior . . . . . . . . . . . . . . . . . . . . . . . . . . . . . . . . . . . 7-4
7-4 work with print cartridges . . . . . . . . . . . . . . . . . . . . . . . . . . . . . 7-5
7-5 self-maintenance sounds . . . . . . . . . . . . . . . . . . . . . . . . . . . . . 7-14
8 get Lenovo M820 support. . . . . . . . . . . . . . . . . . . . . . . . . . . . . . 8-1
8-1 get support and other information from the Internet . . . . . . . . . . . .8-3
8-2 Lenovo customer support . . . . . . . . . . . . . . . . . . . . . . . . . . . . . . 8-4
8-3 prepare your Lenovo M820 for shipment . . . . . . . . . . . . . . . . . . 8-5
v
Page 4

9 technical information. . . . . . . . . . . . . . . . . . . . . . . . . . . . . . . . . .9-1
9-1 paper specifications. . . . . . . . . . . . . . . . . . . . . . . . . . . . . . . . . .9-2
9-2 physical specifications . . . . . . . . . . . . . . . . . . . . . . . . . . . . . . . 9-3
9-3 power specifications . . . . . . . . . . . . . . . . . . . . . . . . . . . . . . . . 9-4
9-4 environmental specifications . . . . . . . . . . . . . . . . . . . . . . . . . . . 9-5
9-5 regulatory notices . . . . . . . . . . . . . . . . . . . . . . . . . . . . . . . . . . 9-6
10 troubleshooting information. . . . . . . . . . . . . . . . . . . . . . . . . . . .10-1
10-1 installation troubleshooting . . . . . . . . . . . . . . . . . . . . . . . . . . 10-2
10-2 operational troubleshooting . . . . . . . . . . . . . . . . . . . . . . . . . 10-9
Important PictBridge Feature Information
Index
vi
Page 5

1
get help
1-1
Page 6
get help
get help
This User Guide contains information on using your Lenovo M820 and provides
additional troubleshooting assistance for the installation process. The User Guide also
contains information on accessories, technical specifications and support.
The table below lists additional sources of information for your Lenovo M820.
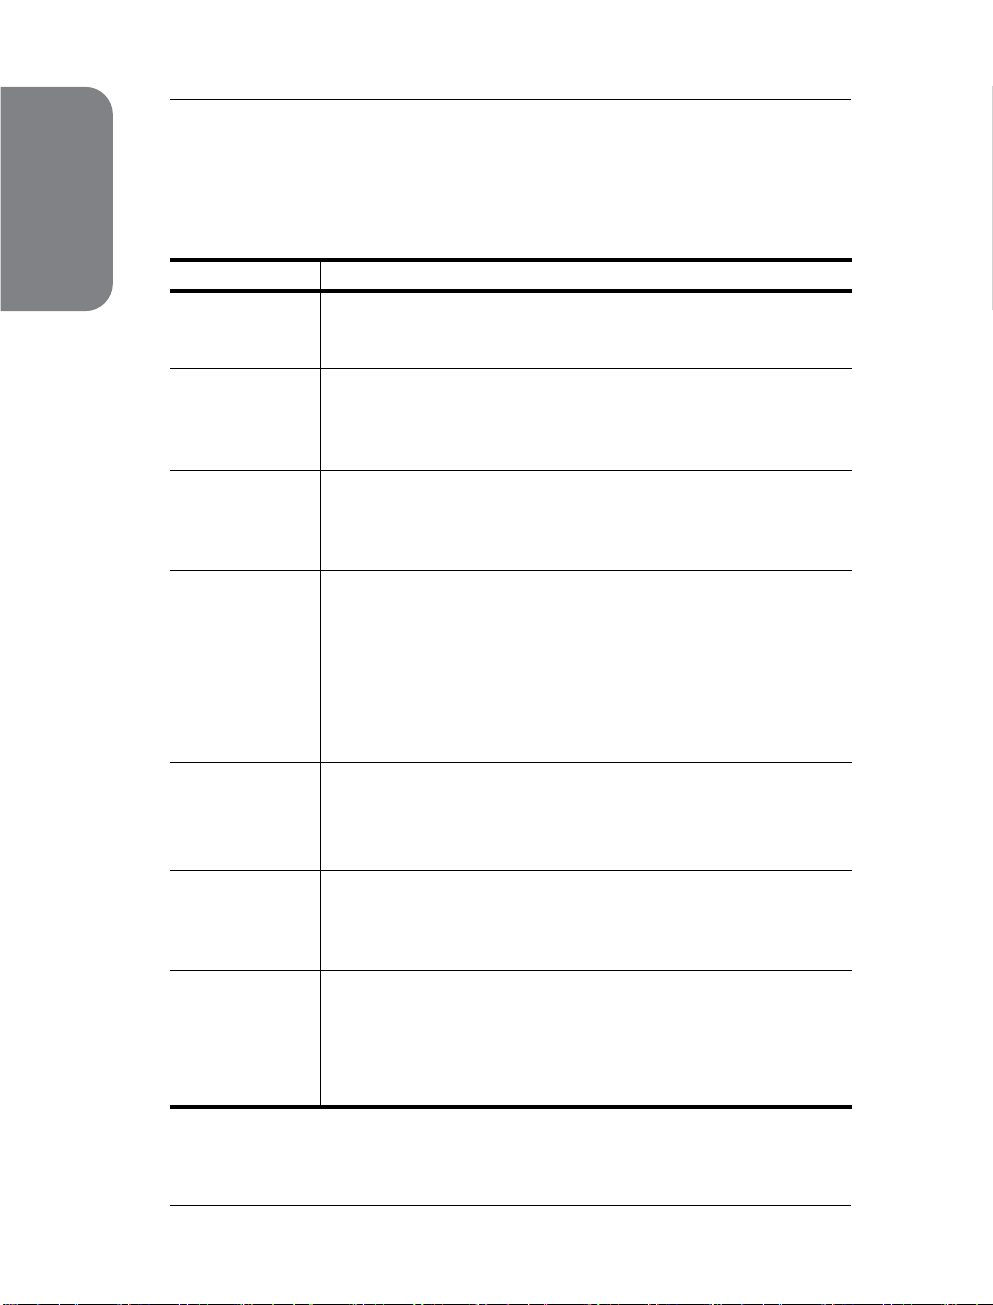
help description
Setup Guide The Setup Poster provides instructions for setting up and configuring
your Lenovo M820. Make sure you use the correct setup information
for your operating system (Windows).
Photo & Imaging
Help
User Guide The User Guide you have in your hands contains information on
Troubleshooting
help
Internet help and
technical support
Readme file After you install your software, you can access the Readme file (if
Dialog-box help
(Windows only)
The Photo & Imaging Help provides detailed information on using
the software for your Lenovo M820.
For Windows users: Go to the Lenovo MFP Solution Center, and click
Help.
using your Lenovo M820 and provides additional troubleshooting
assistance for the installation process. The User Guide also contains
information on accessories, technical specifications and support.
To access troubleshooting information:
For Windows users: In the Lenovo MFP Solution Center, click Help.
Open the Troubleshooting book in the Photo & Imaging Help, then
follow the links to general troubleshooting as well as links to
Troubleshooting help that is specific to your Lenovo M820.
Troubleshooting is also available from the Help button that appears
on some error messages.
There is also a Troubleshooting chapter available in this User Guide.
If you have Internet access, you can get more information from the
Lenovo website at:
www.lenovo.com
The website also provides answers to frequently asked questions.
any) from either the Lenovo M820 CD-ROM or the Lenovo M820
program folder. A Readme file contains late-breaking information
that does not appear in the User Guide or the online help.
For Windows: Use one of the following ways to find information on
a specific feature:
• Right-click on the feature
• Select the feature and press F1
• Select the ? in the upper-right corner then click on the feature
1-2
Page 7

2
2-1 front panel overview . . . . . . . . . . . . . . . . . . . . . . . . . . . . . . . . .2-2
2-2 PictBridge camera port overview . . . . . . . . . . . . . . . . . . . . . . . . 2-4
2-3 front panel status lights . . . . . . . . . . . . . . . . . . . . . . . . . . . . . . .2-5
2-4 use your Lenovo M820 with a computer. . . . . . . . . . . . . . . . . . . .2-9
quick start
2-1
Page 8
quick start
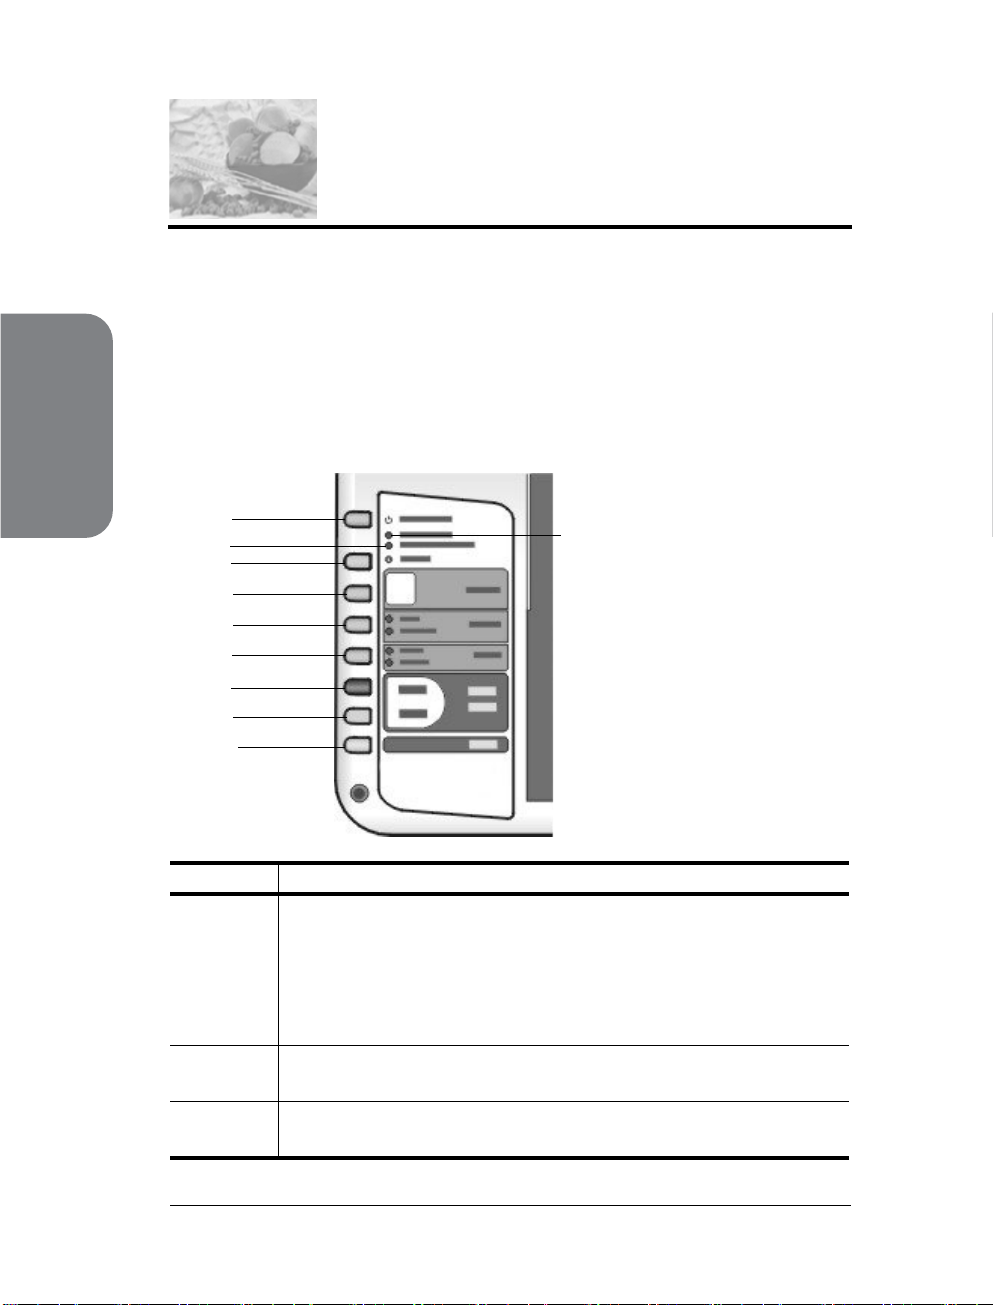
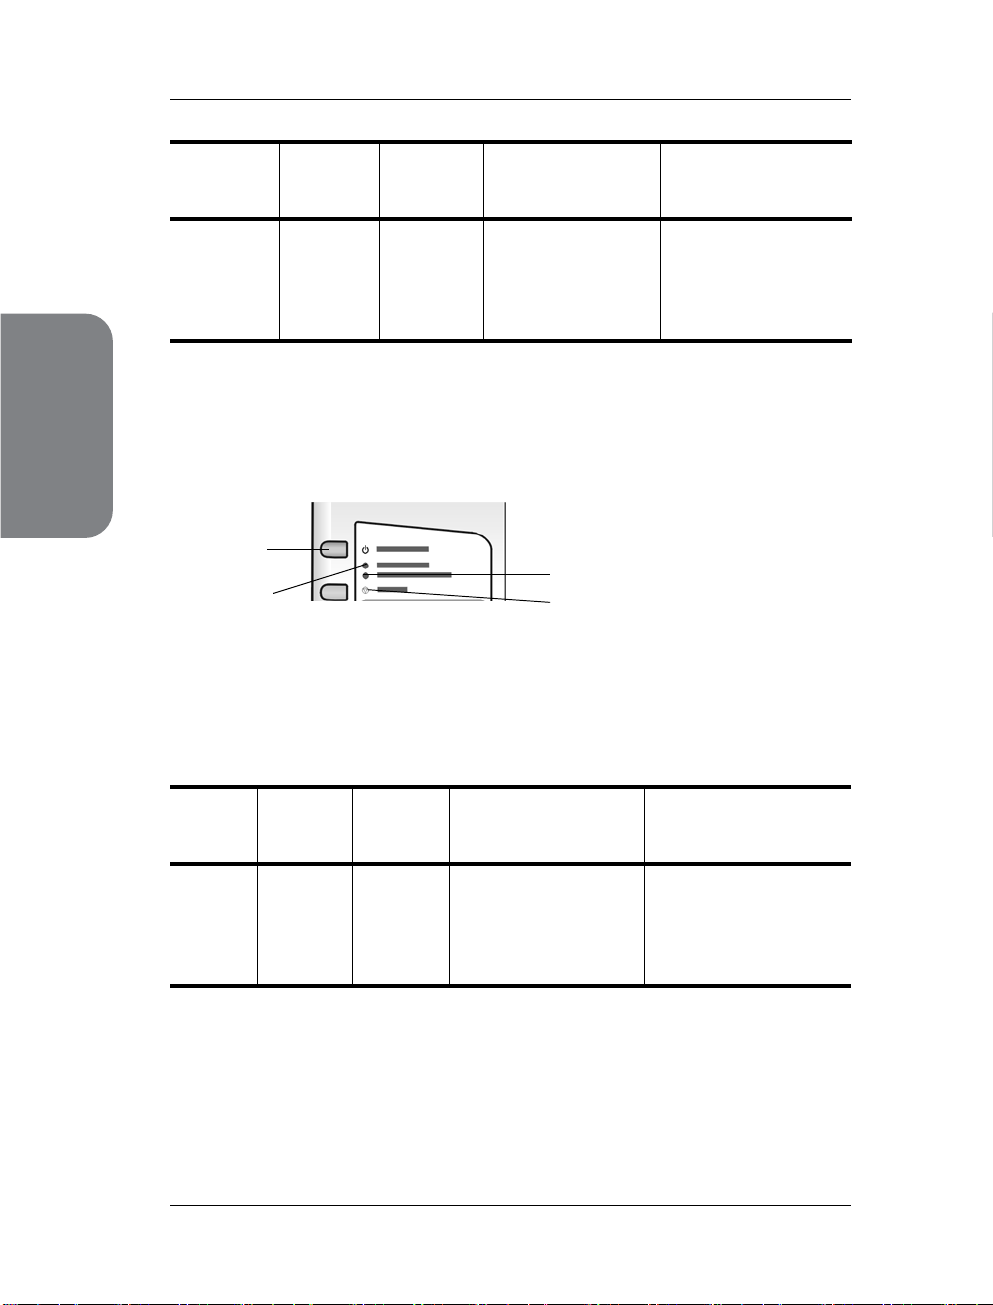
2.1 front panel overview
Use the graphic and table below to become familiar with the front panel features of your
Lenovo M820.
Note: The front panel cover must be attached to the Lenovo M820 by removing the
adhesive backing and placing the cover in the appropriate location. The Lenovo
M820 will not operate unless the front panel cover is attached properly. If your
Lenovo M820 is not operating properly, refer to the setup instructions for information
about attaching the front panel cover.
1
3
4
5
6
7
8
9
10
2
feature purpose
1 On/Resume: turns the Lenovo M820 on and off. Also, resumes a copy or
print job after a jam or other error. If the Lenovo M820 is in an error state,
you can turn it off by pressing On/Resume for 3 seconds.
Warning! When the Lenovo M820 is off, a minimal amount of
power is still supplied to the device. Unplug the power cord to
completely disconnect the power supply to the Lenovo M820.
2 Check Paper: lights up to indicate the need to load paper or remove a
paper jam.
3 Check Print Cartridge: lights up to indicate the need to reinsert or replace
the print cartridge or close the print carriage access door.
2-2
Page 9
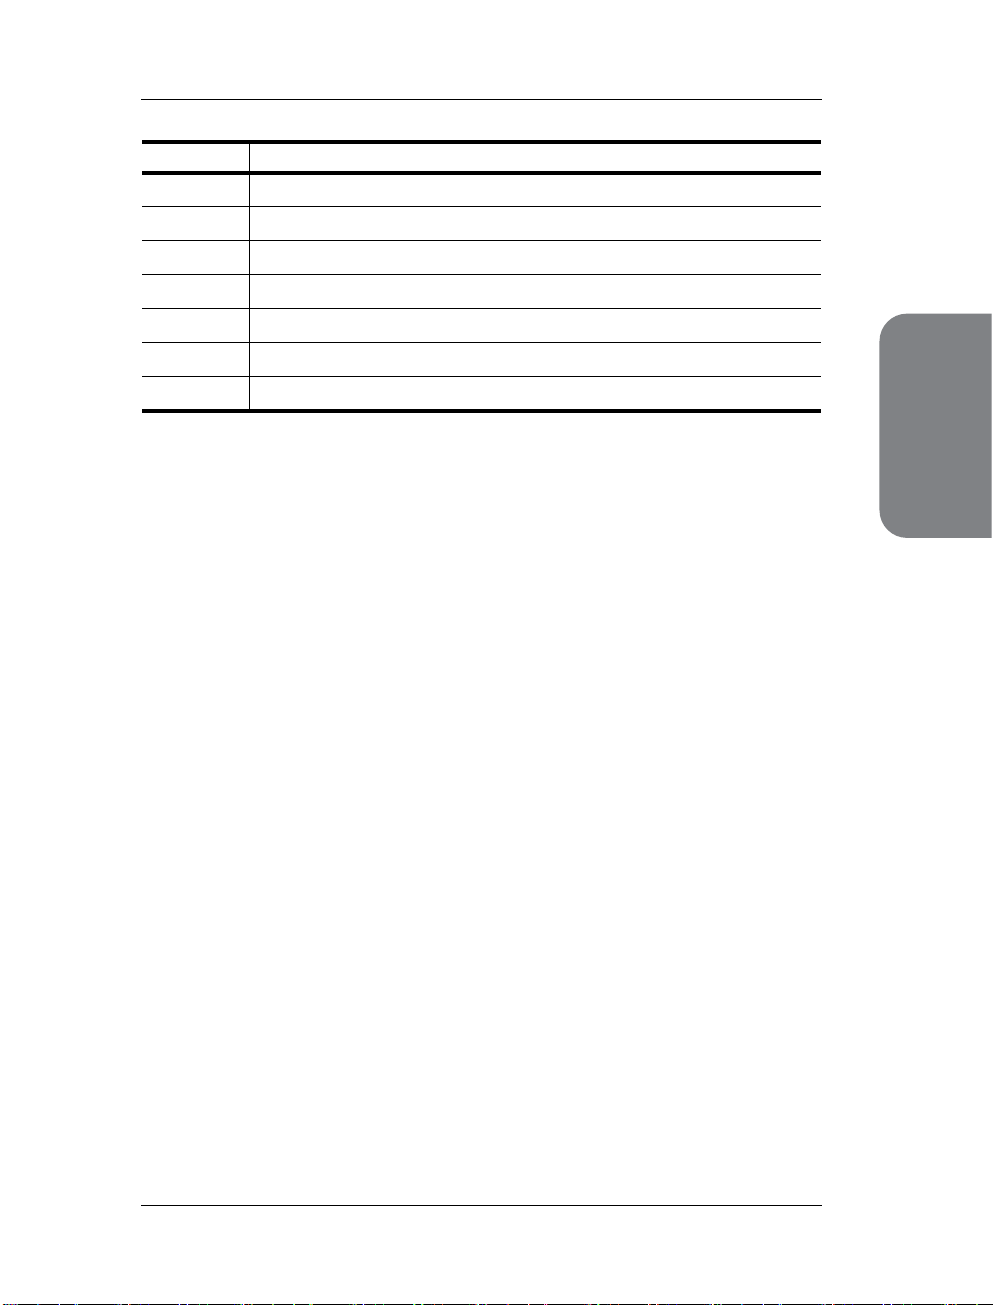
feature purpose
4 Cancel: stops a job or exits button settings.
5 Copies (1-9): changes the number of copies for a copy job.
6 Size: changes the copy image size to either 100% or Fit to Page.
7 Paper Type: changes the paper type to Plain or Photo.
8 Start Copy, Black: starts a black-and-white copy.
9 Start Copy, Color: starts a color copy.
10 Scan: starts a scan of an original from the glass.
quick start
quick start
2-3
Page 10

quick start
2.2 PictBridge camera port overview
Your Lenovo M820 supports the PictBridge standard. The PictBridge port allows you to
connect any PictBridge-compliant camera to the Lenovo M820 with a USB cable and print
your photos without using the computer.
Note: Do not use this port to connect your Lenovo M820 to your computer. Also, do
not connect any other USB device, such as a mouse, keyboard, or photo card reader
to this port.
For more information on printing from your PictBridge camera, see print from a camera
on page 4-1.
2-4
Page 11
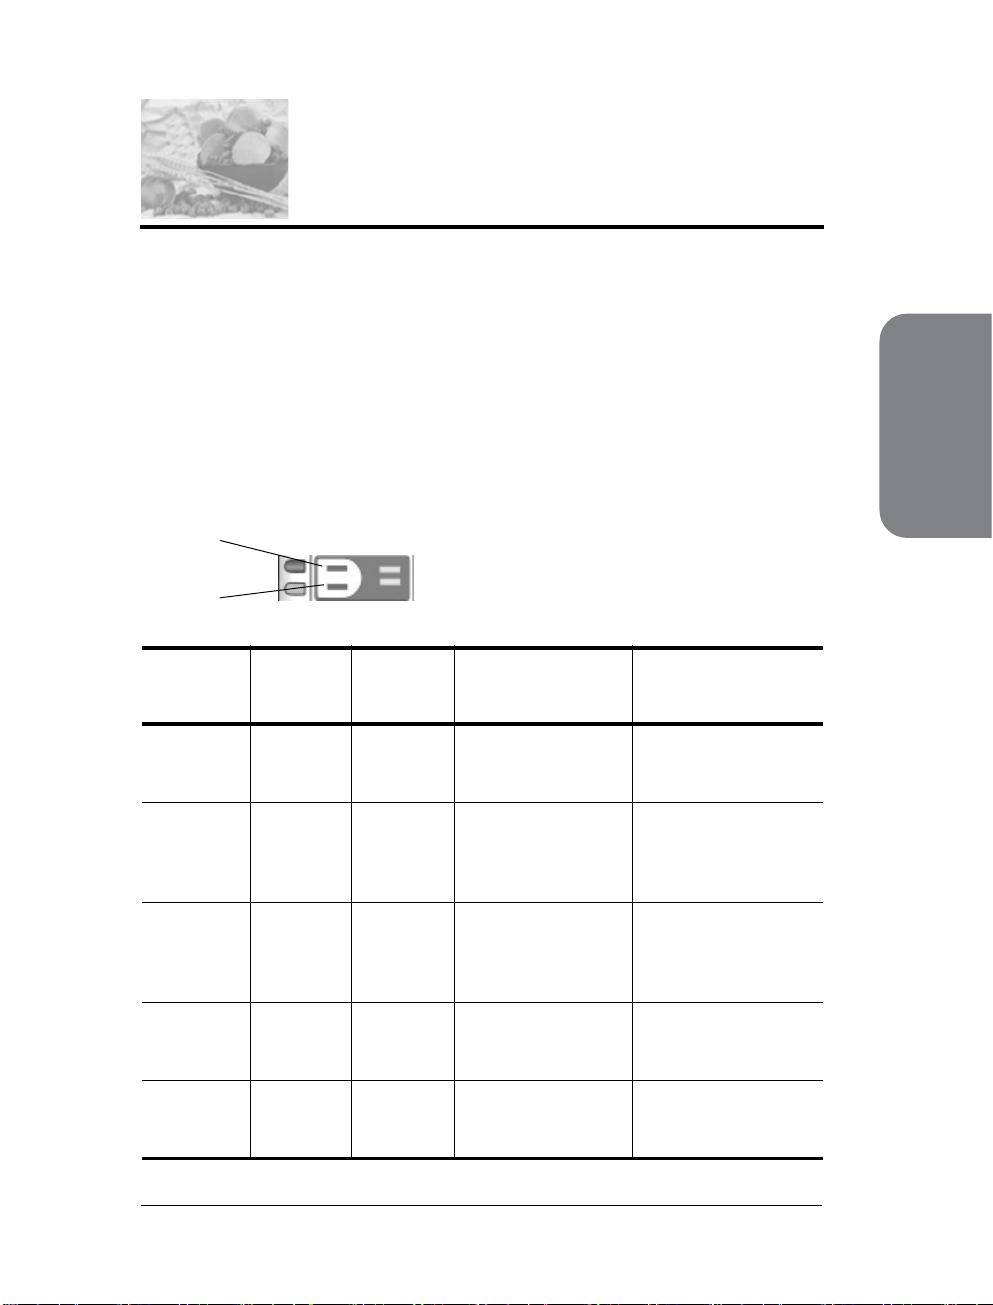
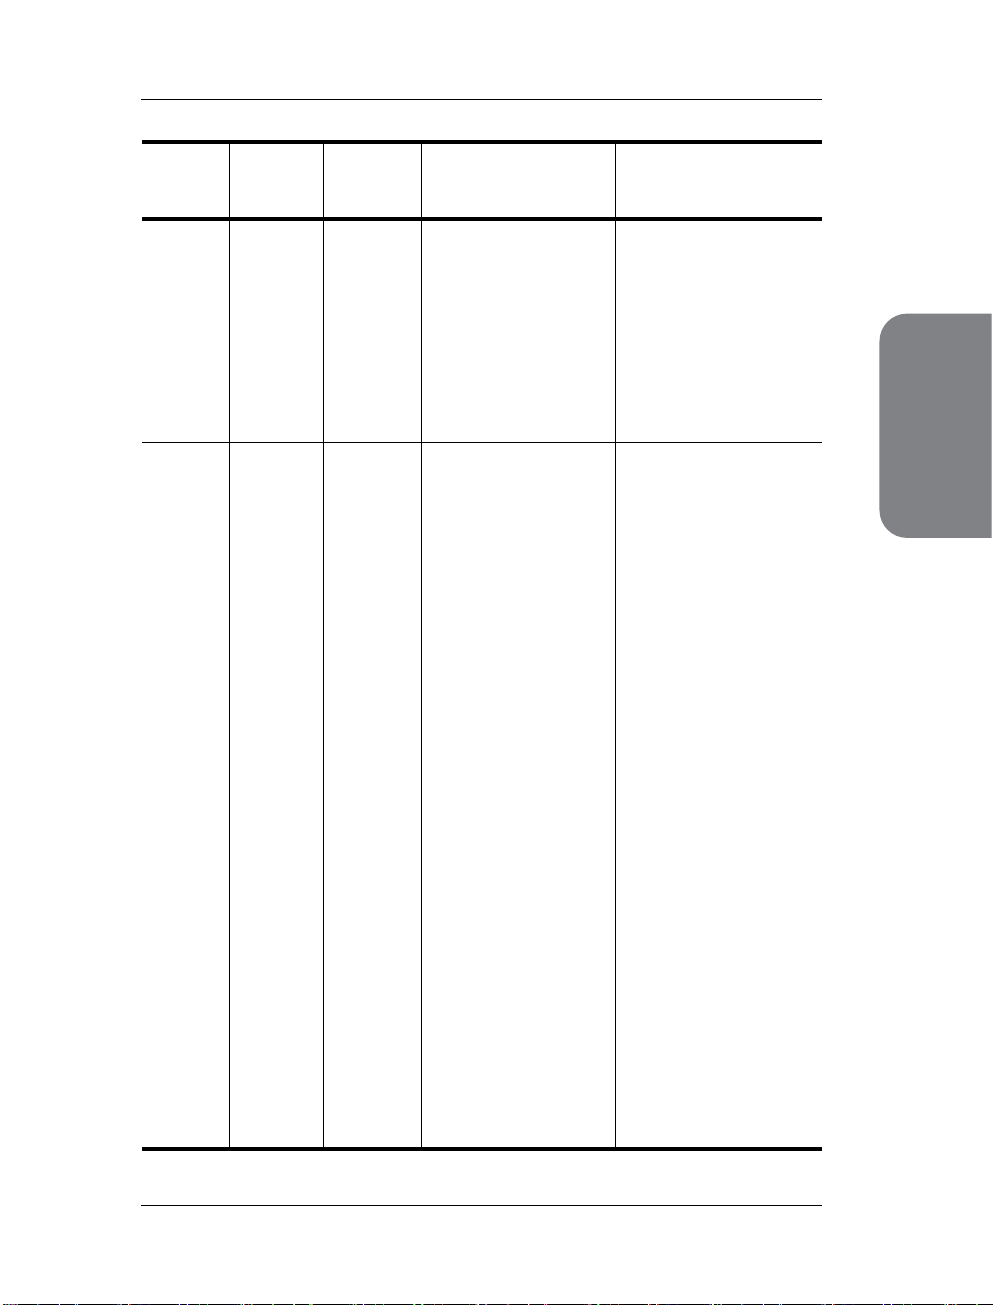
2.3 front panel status lights
Status lights on the front panel provide information about tasks that your Lenovo M820 is
currently performing or about maintenance tasks that you need to perform on the device.
For example, you can tell if the device is on or off, if it is processing a black-and-white or
color copy, if it is out of paper, or if there is a paper jam.
All status lights on the front panel are reset to the default display after two minutes unless
there is an error.
Review the graphic and the table on the next page to become familiar with the front-panel
status lights that provide information about tasks that your Lenovo M820 is currently
performing.
black copy
area
color copy
area
quick start
on light
(green)
Light is off. Light is off. Light is off. Your Lenovo M820 is
Light is on. Light is on. Light is on. Your Lenovo M820 is
Light is
blinking.
Light is
blinking.
Light is
blinking.
black copy
area
(backlight)
Light is on. Light is on. Your Lenovo M820 is
Light is
blinking.
Light is on. Light is
color copy
explanation what to do?
area
(backlight)
turned off.
turned on and is
ready for use.
processing a print,
scan, or maintenance
job.
Light is on. Your Lenovo M820 is
processing a blackand-white copy job.
Your Lenovo M82 0 i s
blinking.
processing a color
copy job.
Press the On/Resume
button to turn your
Lenovo M820 on.
Begin a scan, copy, or
print job from the front
panel or from the
software.
Wait for your Lenovo
M820 to finish
processing the job.
Wait for your Lenovo
M820 to finish
processing the job.
Wait for your Lenovo
M820 to finish
processing the job.
2-5
Page 12
quick start
quick start
on light
(green)
Blinks faster
for 3
seconds a nd
then stays
illuminated.
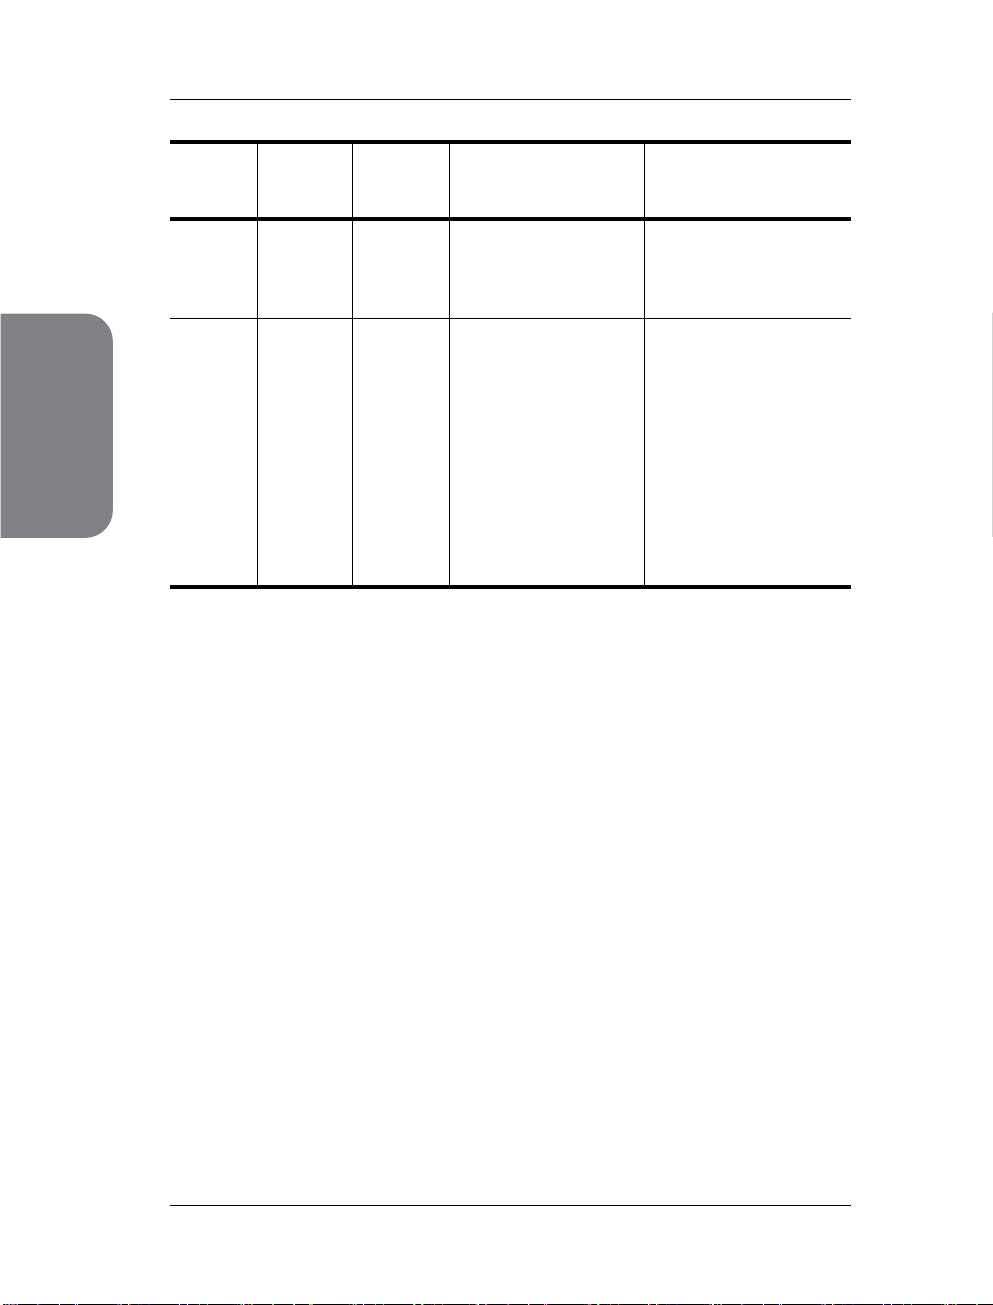
In addition to providing information about current tasks, the lights on the front panel can
also indicate error conditions.
Review the graphic and the table below to become familiar with the front-panel status
lights that provide information about error conditions that your Lenovo M820 is currently
experiencing.
On/Resume
Check Paper
If the On light, Check Print Cartridge light, Check Paper light, and Start Copy, Black and
Start Copy, Color lights are all flashing, do the following:
1 Verify that the front-panel overlay is attached to the Lenovo M820.
2 Turn your Lenovo M820 off and on by disconnecting the power cord and
reconnecting.
black copy
area
(backlight)
Light is on
or blinking.
color copy
area
(backlight)
Light is on
or blinking.
explanation what to do?
You r Lenovo M820 is
busy doing another
task.
Check Print Cartridge
Cancel
Wait for the current job
to be completed before
starting another job.
on light
(green)
Rapid
blinking
for 20
seconds.
2-6
check
paper
light
Light is off. Light is off. The Lenovo M820 is
check print
cartridge
light
explanation what to do?
trying to scan and there
is a communication
problem.
Verify that your computer
is on and is connected to
the Lenovo M820. Verify
that the Lenovo M820
software is installed.
Page 13
quick start
on light
(green)
Light is
on.
Light is
on.
check
paper
light
Light is
blinking.
Light is off. Light is
check print
cartridge
light
Light is off. The paper tray is empty,
blinking.
explanation what to do?
• Load paper, or remove
the Lenovo M820 has a
paper jam, or the paper
size setting and paper
in paper tray are not the
same.
• Print cartridge access
door might be open.
• Print cartridges might
be missing or not
installed properly.
• Tape might not have
been removed from
the print cartridges.
• There might be a
problem with the
print cartridge.
the paper jam.
• Change paper in
paper tray to correct
size.
• Change paper size on
the computer software.
Then press On/ Resume
to continue.
1 Remove the print
cartridges and make
sure the tape has
been removed.
2 Re-insert the print
cartridges and make
sure they are
properly seated.
3 Close the access
door.
If the light continues to
blink, one of the print
cartridges is defective. Do
the following:
1 Remove the black
print cartridge.
2 Close the access
door.
If the light blinks, the tri-
color print cartridge is
defective and must be
replaced. If the light does
not blink, the black
cartridge is defective.
For more information on
this condition, click the
Lenovo M820 status icon
in the system tray on your
computer (Windows
only).
quick start
2-7
Page 14
quick start
quick start
on light
(green)
Light is
on.
Light is
blinking.
check
paper
light
Light is
blinking.
Light is
blinking.
check print
cartridge
light
Light is
blinking.
Light is
blinking.
explanation what to do?
The print carriage is
stalled.
An error caused the
Lenovo M820 to stop
functioning.
Open the print carriage
access door and make
sure the carriage is not
obstructed.
1 Turn the Lenovo
M820 off and then
on.
2 Restart your
computer.
3 If the problem is not
corrected, unplug the
Lenovo M820 and
plug it in again.
If the problem persists,
contact Lenovo.
2-8
Page 15

2.4 use your Lenovo M820 with a computer
If you insta l led th e Lenovo M82 0 software on you r compute r according to the Se t up Poster,
you can access all the features of the Lenovo M820 using the Lenovo MFP Solution Center.
open the Lenovo MFP Solution Center for Windows users
1 Do one of the following to open the Lenovo MFP Solution Center:
– Double-click the Lenovo MFP Solution Center icon on the desktop.
– In the Windows taskbar, click Start, point to Programs or All Programs (XP),
point to Lenovo, then select Lenovo MFP Solution Center.
2 In the Select Device box, click to see a list of installed devices supported by this
software.
3 Select Lenovo M820.
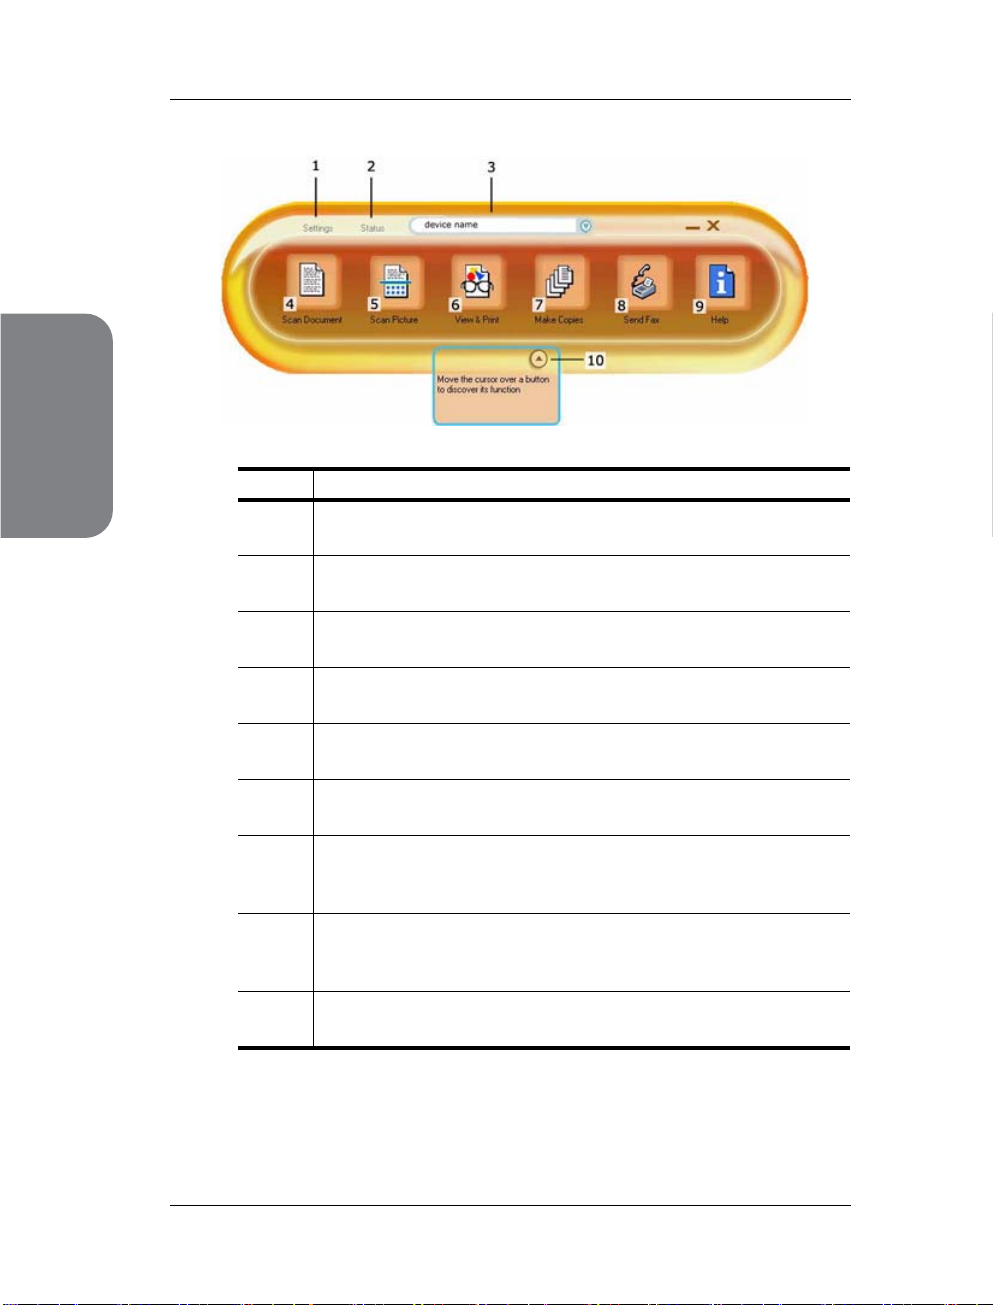
Note: The Lenovo MFP Solution Center graphic below might appear differently on
your computer. The Lenovo MFP Solution Center is customized based on the device
that is selected. If your device is not equipped with a particular feature (such as fax
capability), then the icon for that feature will not display in the Lenovo MFP Solution
Center on your computer. Some devices might show additional buttons that are not
shown below.
Tip: If the Lenovo MFP Solution Center on your computer does not contain
any icons, an error might have occurred during the software installation. To
correct this, use the Control Panel in Windows to completely uninstall the
Lenovo MFP Solution Center software, and then reinstall the Lenovo MFP
Solution Center.
quick start
2-9
Page 16
quick start
quick start
feature purpose
1 Settings: select this feature to view or change various settings for your
Lenovo M820, such as print, scan, or copy.
2 Status: select this feature to display the current status of your Lenovo
M820.
3 Select Device: use this feature to select the device you want to use
from the list of installed devices.
4 Scan Document: use this feature to scan text and display it in the
selected text editing software program.
5 Scan Picture: use this feature to scan an image and display it in the
Photo & Imaging Gallery.
6 View & Print: Opens the Photo & Imaging Gallery, where you can
view, edit, print, and share your images.
7 Make Copies: use this feature to display the Copy dialog box where
you can select the copy quality, number of copies, color, size, and
then start a copy.
8 Help: select this feature to access the Photo & Imaging Help, which
provides software help, a product tour, troubleshooting information
for your Lenovo M820, and Lenovo M820 product-specific help.
12 Click this arrow to display tool tips that explain each of the Lenovo
MFP Solution Center options.
2-10
Page 17

3
load originals and load paper
3-1 load originals. . . . . . . . . . . . . . . . . . . . . . . . . . . . . . . . . . . . . .3-2
3-2 load an original photo on the glass. . . . . . . . . . . . . . . . . . . . . . 3-3
3-3 load letter or A4 paper . . . . . . . . . . . . . . . . . . . . . . . . . . . . . . 3-4
3-4 load envelopes . . . . . . . . . . . . . . . . . . . . . . . . . . . . . . . . . . . 3-6
3-5 load postcards, Hagaki cards,
or 4 by 6 inch (10 by 15 cm) photo paper . . . . . . . . . . . . . . . . 3-7
3-6 recommended papers . . . . . . . . . . . . . . . . . . . . . . . . . . . . . . . 3-8
3-7 set the paper type . . . . . . . . . . . . . . . . . . . . . . . . . . . . . . . . . 3-9
3-8 avoid jams. . . . . . . . . . . . . . . . . . . . . . . . . . . . . . . . . . . . . . 3-10
3-1
Page 18
load paper
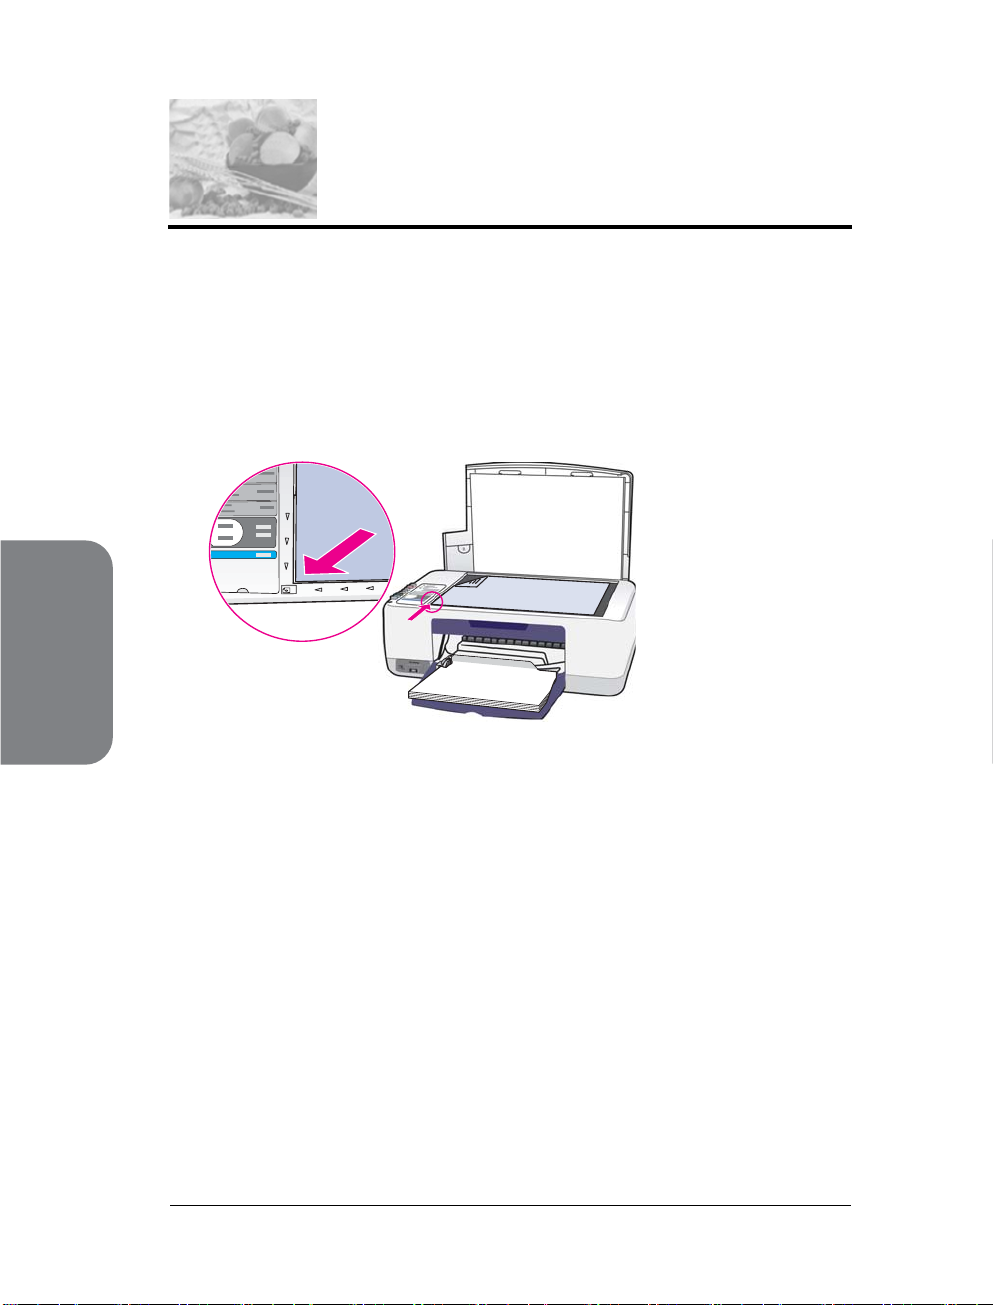
3.1 load originals
Review the procedure below for loading originals on the glass of your Lenovo M820.
Note: Some copy options, such as Fit to Page, will not work correctly if the glass and
lid backing are not clean. For more information, see clean the glass and clean the
lid backing on page 7-3.
1 To load an original, lift the lid and place the original face down on the left front
corner of the glass with the sides of the original touching the left and bottom edges.
lid
Top ed ge of
original
load originals and
2 Close the lid.
For information on making a copy, see make copies on page 5-2. For more information
on scanning a document, see scan an original on page 6-3.
3-2
Page 19

3.2 load an original photo on the glass
You can make a copy of an original photo from the glass of your Lenovo M820. It is
important that you load the original photo on the glass properly to get the best possible
copy.
1 Load your original photo face down on the left front corner of the glass.
Position the photo on the glass so the long edge of the photo is along the front edge
of the glass.
load originals and
load paper
2 Close the lid.
For more information on special copy jobs, or making borderless copies of photos, see
perform special copy jobs on page 5-4.
3-3
Page 20
load paper
3.3 load letter or A4 paper
The following describes the basic procedure for loading letter or A4 paper into the Lenovo
M820. For best results, adjust the paper settings each time you change paper types or
paper sizes. For more information, see set the paper type on page 3-9, and avoid jams
on page 3-10.
Note: There are specific considerations for loading certain types of paper,
postcards, and envelopes. After you review the procedure for loading letter and A4
paper, see load envelopes on page 3-6, and load postcards, Hagaki cards, or 4 by
6 inch (10 by 15 cm) photo paper on page 3-7, and set the paper type on page 3-9.
1 Lower the paper tray, and if necessary, slide the paper-width guide to the outermost
position.
2 Fold out the paper-tray extender to catch paper as it exits the device.
Tip: For best results when loading legal-size paper, fold in the paper-tray
extender before loading the paper to avoid a paper jam.
load originals and
3 Tap the stack on a flat surface to align the edges of the paper, and then check the
paper for the following:
– Make sure it is free of rips, dust, wrinkles, and curled or bent edges.
– Make sure all the paper in the stack is the same size and type.
4 Insert paper into the paper tray with the print side down until it stops. To avoid
bending the paper, make sure you do not push the paper in too far, or push too
hard. If you are using letterhead, insert the top of the page first.
Do not use too much paper. Check that the stack of paper contains several sheets
but is no higher than the top of the paper-width guide.
Note: Forcing the paper too far into the Lenovo M820 might cause multiple sheets
of paper to be fed through the print mechanism, or cause a paper jam.
3-4
Page 21

load originals and load paper
5 Slide the paper-width guide in until it stops at the edge of the paper. Make sure that
the paper stack lies flat in the paper tray and fits under the tab of the paper-width
guide.
load originals and
load paper
3-5
Page 22
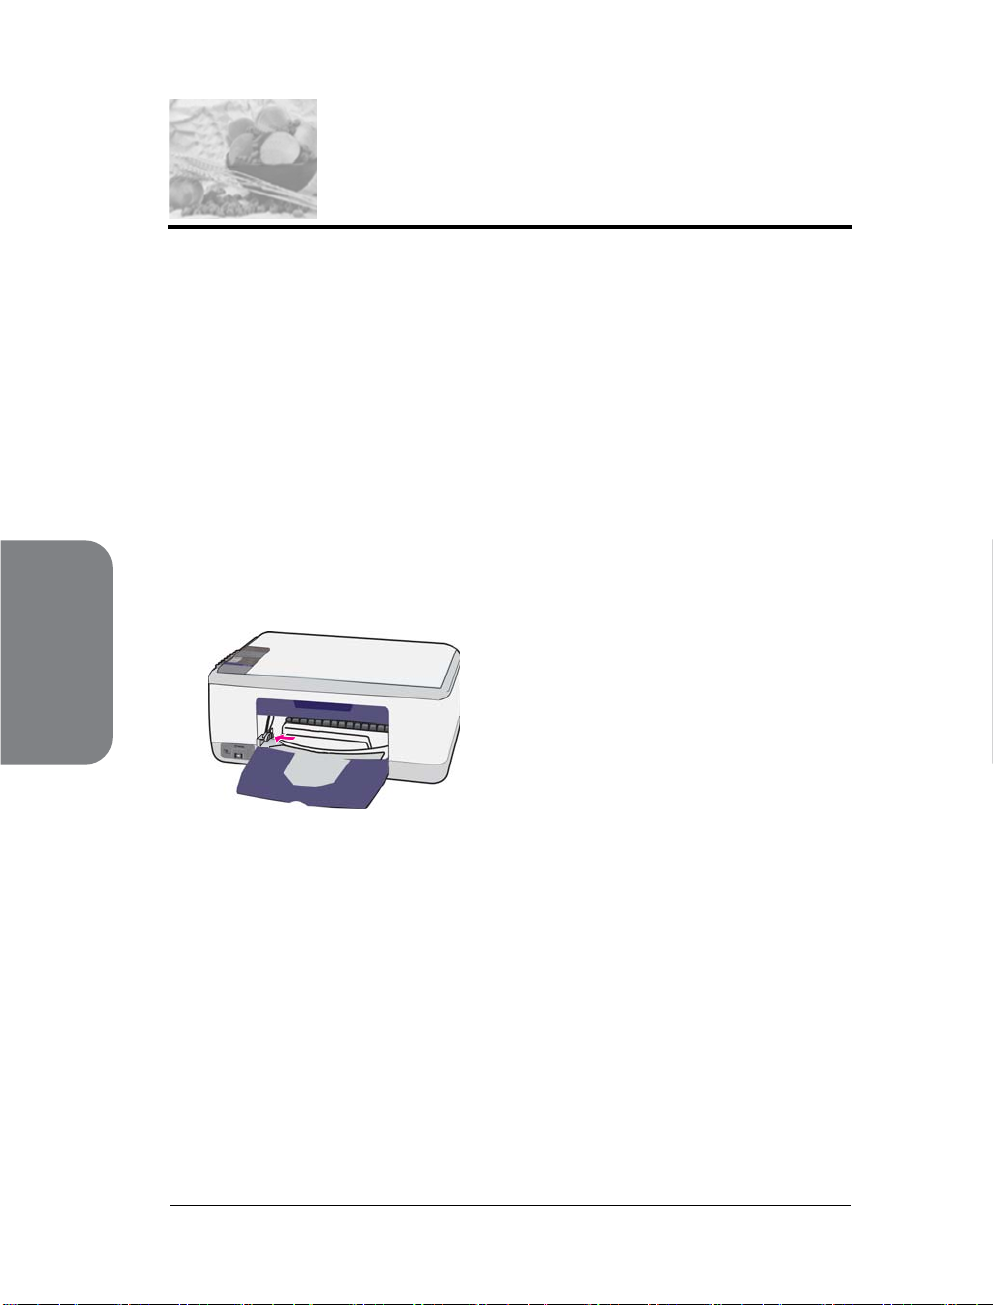
3.4 load envelopes
Use the print feature of your word processing software to print to envelopes with your
Lenovo M820. Use envelopes for printing only; copying on to an envelope is not
recommended. Do not use shiny or embossed envelopes, or envelopes that have clasps
or windows. You can load the paper tray with one or multiple envelopes.
Note: Consult the help files in your word processing software for details on how to
format text for printing on envelopes.
1 Remove all paper from the paper tray.
2 Slide an envelope into the tray, with the envelope flap up and to the left (print side
down), until it stops. Do not force the envelope in too far.
load paper
load originals and
3 Adjust the paper-width guide against the envelope.
Be careful not to bend the envelope.
Do not overload the paper tray when loading multiple envelopes. Make sure the
stack of envelopes is no higher than the top of the paper-width guide.
3-6
Page 23
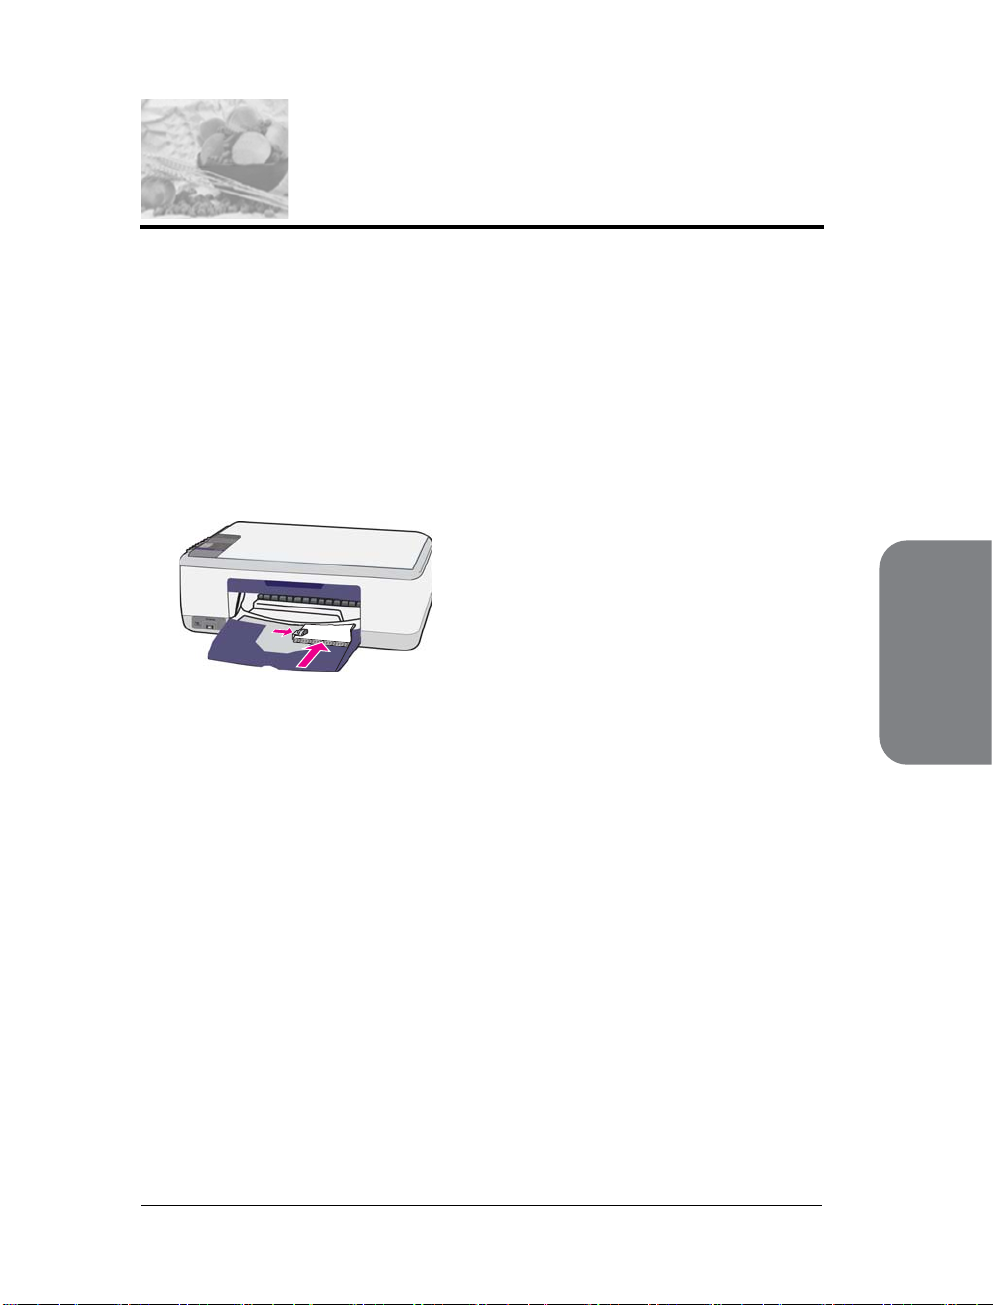
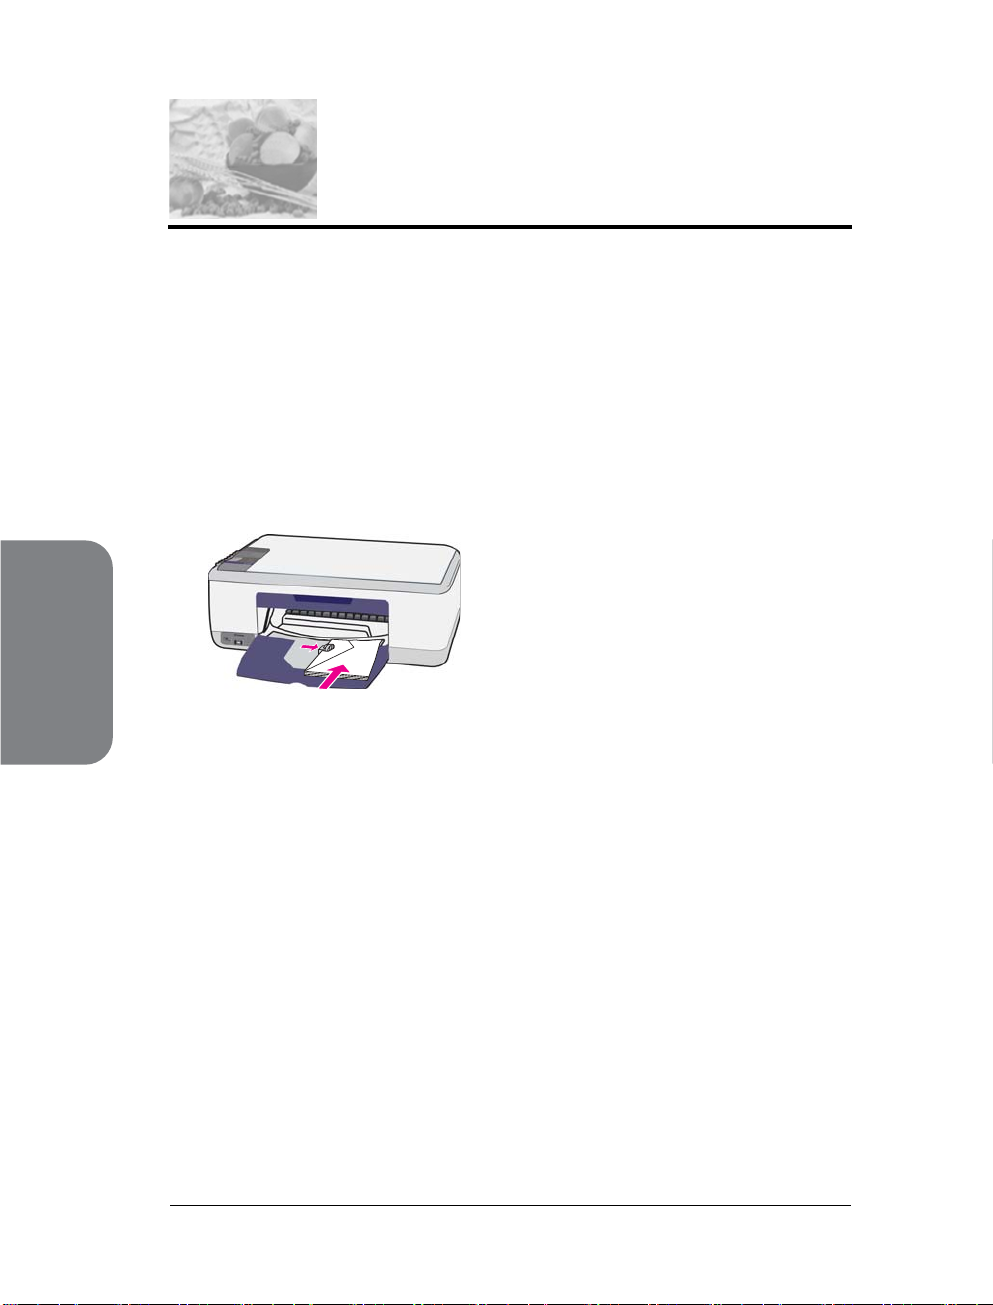
3.5 load postcards, Hagaki cards, or 4 by 6 inch (10 by 15 cm) photo paper
The following is the procedure for loading postcards, Hagaki cards, or 4 by 6 inch (10
by 15 cm) photo paper.
1 Remove all paper from the paper tray, and then slide a stack of cards into the tray
until it stops. Insert the short edge of the card into the Lenovo M820 first.
Make sure the print side faces down.
Note: If you are using photo paper with perforated tabs, load the photo paper so
that the tabs face out towards you.
2 Adjust the paper-width guide against the cards until it stops.
Make sure the cards fit within the tray. Do not overload it. The stack should be no
higher than the top of the paper-width guide.
load originals and
load paper
3-7
Page 24
3.6 recommended papers
For the best print quality, use Inkjet papers. Paper that is too thin, paper that has a slick
texture, or paper that stretches easily can cause paper jams. Paper that has a heavy
texture or does not accept ink can cause printed images to smear, bleed, or not be filled
in completely. load other types of paper in the paper tray
The following table provides guidelines for loading nonstandard types of paper. For best
results, adjust the paper settings each time you change the paper type or paper size. For
more information, see set the paper type on page 3-9.
Note: Some paper types might not be available in your country/region.
Note: Photo paper might curl when you remove it from the box. If this occurs, curl the
paper the opposite way to flatten it before inserting it into the Lenovo M820.
paper tips
Inkjet papers
load paper
load originals and
Labels
(works only with
printing)
• Premium Paper: locate the gray arrow on the nonprinting side of
the paper, and then load paper with the arrow side facing up.
• Greeting Card Paper, Glossy Greeting Card Paper, or Textured
Greeting Cards: insert a small stack of greeting cards with the
print side down, into the paper tray until it stops.
• Always use letter or A4 label sheets designed for use with inkjet
products (like Avery Inkjet Labels), and make sure that the labels
are not over two years old.
• Fan the stack of labels to make sure none of the pages are sticking
together.
• Place a stack of label sheets on top of standard paper in the
paper tray, print side down. Do not insert labels one sheet at a
time.
3-8
Page 25

3.7 set the paper type
If you want to use a different type of paper, load that paper in the paper tray. You should
then change the paper type settings to ensure the best print quality. This setting refers to
copy settings only. If you want to set the paper type for printing, set the properties from
the Print dialog box in the software program on your computer.
The following procedure describes how to change the paper type setting on your Lenovo
M820.
1 Load paper into the Lenovo M820.
2 Press Paper Type on the front panel to change the setting to Plain or Photo.
load originals and
load paper
3-9
Page 26

load paper
3.8 avoid jams
To avoid jams, remove papers from completed print or copy jobs frequently from the paper
tray. Excessive amounts of paper from completed print or copy jobs in the paper tray
might back up into the Lenovo M820 and cause a paper jam. Also, for best results, use
recommended papers, and load paper correctly. For more information see,
recommended papers on page 3-8, and load letter or A4 paper on page 3-4.
load originals and
3-10
Page 27

4
print from a camera
4-1 connect a camera. . . . . . . . . . . . . . . . . . . . . . . . . . . . . . . . . . 4-2
4-2 print photos from your camera . . . . . . . . . . . . . . . . . . . . . . . . . 4-3
4-1
Page 28

4.1 connect a camera
After you take photos with your PictBridge-compliant camera, you can print them
immediately. We recommend you connect your camera’s power cable to the camera to
conserve battery power.
1 Turn on your camera and be sure it is in PictBridge mode. Refer to your camera’s
user guide.
2 Connect the PictBridge-compliant camera to the front USB port of the Lenovo M820
by using the USB cable that came with your camera.
When the camera is connected correctly, the Read Status LED is illuminated. The
Read Status LED next to the card slots blinks green when printing from the camera.
If the camera is not PictBridge-compliant or is not in PictBridge mode, the Photo
Error LED blinks amber. Disconnect the camera, correct the problem on the camera
and reconnect.
Read Status LED
Photo Error LED
camera
print from a
4-2
Page 29

4.2 print photos from your camera
After you successfully connect your PictBridge-compliant camera to the Lenovo M820, you
can print your photos. Print functionality is managed by the camera settings, if any. Refer
to your camera’s user guide for more information.
If your camera does not allow you to make settings, your Lenovo M820 uses the following
default settings:
• Paper type is set to photo paper. Use letter or A4,or 4 by 6 inch (10 by 15 cm)
tabbed photo paper when printing from the PictBridge port.
• Paper size is detected by the Lenovo M820.
• Number of images printed on each page is 1.
Refer to your camera’s user guide for more information.
4-3
print from a
camera
Page 30

print from a camera
camera
print from a
4-4
Page 31

5
use the copy features
5-1 make copies . . . . . . . . . . . . . . . . . . . . . . . . . . . . . . . . . . . . . .5-2
5-2 perform special copy jobs . . . . . . . . . . . . . . . . . . . . . . . . . . . . 5-4
5-3 stop copying . . . . . . . . . . . . . . . . . . . . . . . . . . . . . . . . . . . . . 5-6
5-1
Page 32

You can make copies by using the front panel of your Lenovo M820 or by using the
Lenovo MFP Solution Center software on your computer. Copy features are available
through either method. However, the software offers additional copy features that are not
available from the front panel.
All copy settings that you select on the front panel are reset two minutes after the Lenovo
M820 completes the copy.
This section contains the following topics:
•make a copy on page 5-2
• adjust copy speed or quality on page 5-2
• set the number of copies on page 5-3
make a copy
1 Load your original face down on the left front corner of the glass.
2 Press Start Copy, Black or Start Copy, Color.
features
use the copy
adjust copy speed or quality
5.1 make copies
If you are copying a photo, position the photo on the glass so the long edge of the
photo is along the front edge of the glass. For more information, see load originals
on page 3-2.
The Lenovo M820 makes an exact copy of your original using Best quality mode.
Tip: You can also use the Paper Type and Scan buttons to make Fast draft-
quality copies or you can use the Size button to reduce or enlarge an
original to fit a specific paper size.
For more information on these options, see the following topics:
– adjust copy speed or quality on page 5-2
– reduce or enlarge an original to fit the paper loaded on page 5-5
The Lenovo M820 automatically copies in Best mode. This produces the highest quality
copies for all paper. However, you can manually override this setting to copy in Fast
mode. This produces copies more quickly and saves ink. The text is of comparable quality
to copies produced using Best mode, but the graphics might be of lower quality.
5-2
Page 33

use the copy features
to make a copy from the front panel using the fast setting
1 Load your original face down on the left front corner of the glass.
2 Press the Paper Type button to select Plain.
Note: In order to make a copy using Fast mode, you must select Plain as the Paper
Type. If the Paper Type is set to Photo, the Lenovo M820 will always copy in Best
mode.
3 Press and hold down the Scan button, and then press Start Copy, Black or Start
Copy, Color.
set the number of copies
1 Load your original face down on the left front corner of the glass.
2 Press Copies to increase the number of copies, up to a maximum of 9, and then
press Start Copy, Black or Start Copy, Color.
5-3
use the copy
features
Page 34

5.2 perform special copy jobs
In addition to standard copying, your Lenovo M820 can copy photos and automatically
enlarge or reduce your original to fit a specific paper size.
This section contains the following topics:
• make a 4 by 6 inch (10 by 15 cm) borderless copy of a photo on page 5-4
• reduce or enlarge an original to fit the paper loaded on page 5-5
For information on copy options that are available in the Lenovo MFP Solution Center, see
the onscreen Photo & Imaging help that came with your software.
make a 4 by 6 inch (10 by 15 cm) borderless copy of a photo
For the best quality when copying a photo, load photo paper in the paper tray, and then
use the Paper Type button to select Photo.
1 Load your original photo face down on the left front corner of the glass.
Position the photo on the glass so the long edge of the photo is along the front edge
of the glass.
features
use the copy
2 Load 4 by 6 inch (10 by 15 cm) tabbed photo paper print side down in the paper
3 If your original is not 4 by 6 inches (10 by 15 cm), press the Size button to select Fit
5-4
tray, with the tab facing out towards you.
to Page.
The Lenovo M820 will resize the original to 4 by 6 inches (10 by 15 cm) to create a
borderless copy.
Page 35

use the copy features
4 Press the Paper Type button to select Photo.
This tells the Lenovo M820 that you have photo paper loaded in the paper tray.
When printing onto photo paper, the Lenovo M820 automatically copies your
original in Best quality mode.
5 Press Start Copy, Black or Start Copy, Color.
reduce or enlarge an original to fit the paper loaded
Use Fit to Page when you want to automatically enlarge or reduce your original to fill the
printable area of the paper size loaded in the paper tray.
For example, you can use Fit to Page to enlarge a small photo to fit within the margins of
a full-size page (as shown below), reduce an original to prevent unwanted cropping of
text o r i m a ges aro u n d the margins, or re d u c e or enlarge an orig i nal to crea t e a borderless
4 by 6 inch (10 by 15 cm) photo.
1 Make sure that the glass and lid backing are clean.
2 Load your original face down on the left front corner of the glass.
If you are copying a photo, position the photo on the glass so the long edge of the
photo is along the front edge of the glass, as shown below.
3 Press the Size button to select Fit to Page.
4 Press Start Copy, Black or Start Copy, Color.
use the copy
features
5-5
Page 36

5.3 stop copying
` To stop copying, press Cancel on the front panel.
The Lenovo M820 immediately stops printing and releases the paper.
features
use the copy
5-6
Page 37

6
use the scan features
6-1 scan an original . . . . . . . . . . . . . . . . . . . . . . . . . . . . . . . . . . . 6-3
6-2 stop scanning. . . . . . . . . . . . . . . . . . . . . . . . . . . . . . . . . . . . . 6-4
6-1
Page 38

use the scan features
Scanning is the process of converting pictures and text into an electronic format for your
computer. You can scan photos and text documents.
Because the scanned image or text is in an electronic format, you can bring it into your
word processor or graphics software program and modify it to suit your needs. You can
do the following:
• Scan photos of your kids and e-mail them to relatives, create a photographic
• Scan text from an article into your word processor and quote it in a report, saving
To use the scan features, your Lenovo M820 and computer must be connected and turned
on. The Lenovo M820 software must also be installed and running on your computer prior
to scanning. To verify that the Lenovo M820 software is running on a Windows PC, look
for the Lenovo M820 icon in the system tray at the lower right side of your screen, next to
the time.
You can start a scan from your computer or from your Lenovo M820 . This section explai ns
how to scan from the front panel of the Lenovo M820 only.
For information about how to scan from the computer, and how to adjust, resize, rotate,
crop, and sharpen your scans, see the onscreen Photo & Imaging help that came with
your software.
features
use the scan
inventory of your house or office, or create an electronic scrapbook.
you a lot of retyping.
Note: Bright direct sunlight on your Lenovo M820, or halogen desk lamps placed
close to your Lenovo M820, might affect the quality of scanned images.
Note: High resolution scanning (600 dpi or higher) requires a large amount of hard
disk space. If there is not enough hard disk space available, your system might stall.
6-2
Page 39

6.1 scan an original
1 Load your original face down in the left front corner of the glass.
2 Press Scan.
A preview image of the scan appears in the Scan window on the computer, where
you can edit it.
For more information about editing a preview image, see the onscreen Photo &
Imaging help that came with your software.
3 Make any edits to the preview image in the Scan window. When you have finished,
click Accept.
The Lenovo M820 sends the scan to the Photo & Imaging Gallery, which
automatically opens and displays the image.
The Photo & Imaging Gallery has many tools that you can use to edit your scanned
image. You can improve the overall image quality by adjusting the brightness,
sharpness, color tone, or saturation. You can also crop, straighten, rotate, or resize
the image.
When the scanned image looks just the way you want it, you can open it in another
application, send it via e-mail, save it to a file, or print it. For more information
about using the Photo & Imaging Gallery, see the onscreen Photo & Imaging help
that came with your software.
use the scan
features
6-3
Page 40

` To stop scanning, press Cancel on the front panel.
features
use the scan
6.2 stop scanning
6-4
Page 41

7
maintain your Lenovo M820
7-1 clean the glass . . . . . . . . . . . . . . . . . . . . . . . . . . . . . . . . . . . . . 7-2
7-2 clean the lid backing . . . . . . . . . . . . . . . . . . . . . . . . . . . . . . . . .7-3
7-3 clean the exterior . . . . . . . . . . . . . . . . . . . . . . . . . . . . . . . . . . 7-4
7-4 work with print cartridges . . . . . . . . . . . . . . . . . . . . . . . . . . . . .7-5
7-5 self-maintenance sounds . . . . . . . . . . . . . . . . . . . . . . . . . . . . .7-14
7-1
Page 42

maintain your
Lenovo M820
7.1 clean the glass
Dirty glass from fingerprints, smudges, hair, and so on slows down performance and
affects the accuracy of features such as Fit to Page.
1 Turn off the Lenovo M820, unplug the power cord, and raise the lid.
2 Clean the glass with a soft cloth or sponge slightly moistened with a nonabrasive
glass cleaner.
Caution! Do not use abrasives, acetone, benzene, or carbon tetrachloride
on the glass; these can damage it. Do not place or spray liquids directly on
the glass. They might seep under it and damage the Lenovo M820.
3 Dry the glass with a chamois or cellulose sponge to prevent spotting.
7-2
Page 43

7.2 clean the lid backing
Minor debris can accumulate on the white document backing located underneath the lid
of the Lenovo M820. This can cause problems during scan or copy tasks.
1 Turn off the Lenovo M820, unplug the power cord, and raise the lid.
2 Clean the white document backing with a soft cloth or sponge slightly moistened
with a mild soap and warm water.
3 Wash the backing gently to loosen debris; do not scrub the backing.
4 Dry the backing with a chamois or soft cloth.
Caution! Do not use paper-based wipes as these might scratch the backing.
5 If this does not clean the backing well enough, repeat the previous steps using
isopropyl (rubbing) alcohol, and wipe the backing thoroughly with a damp cloth to
remove any residual alcohol.
Lenovo M820
maintain your
7-3
Page 44

maintain your
Lenovo M820
7.3 cl e an t h e ex terio r
Use a soft cloth or slightly moistened sponge to wipe dust, smudges, and stains off the
case. The interior of the Lenovo M820 does not require cleaning. Keep fluids away from
the interior of the Lenovo M820 as well as the front panel.
7-4
Page 45

7.4 work with print cartridges
To ensure the best print quality from your Lenovo M820, you will need to perform some
simple maintenance procedures.
This section contains the following topics:
•check the ink levels on page 7-5
• print a self-test report on page 7-5
• handle print cartridges on page 7-6
• replace the print cartridges on page 7-7
• use a print cartridge protector on page 7-10
•align the print cartridges on page 7-10
• clean the print cartridge contacts on page 7-12
check the ink levels
You can easily check the ink supply level to determine how soon you might need to
replace a print cartridge. The ink level supply shows an approximation of the amount of
ink remaining in the print cartridges. Checking the ink levels can only be done from the
Lenovo MFP Solution Center.
Lenovo M820
maintain your
to check the ink level for Windows users
1 From the Lenovo MFP Solution Center, choose Settings, choose Print Settings, and
then choose Printer Toolbox.
2 Click the Estimated Ink Levels tab.
The estimated ink levels appear for the print cartridges.
print a self-test report
If you are experiencing problems with printing, print a Self-Test Report before you replace
the print cartridges.
1 Press and hold down Cancel.
2 Press Start Copy, Color.
The Lenovo M820 prints a Self-Test Report, which might indicate the source of any
problems you might be having.
7-5
Page 46

maintain your
Lenovo M820
maintain your Lenovo M820
Black bar
Color bars
Black and tri-color cartridges installed
3 Check the color blocks for streaking or white lines.
– Missing color blocks might indicate that the tri-color print cartridge is out of ink.
You might need to clean or replace your print cartridges.
– Streaks might indicate clogged nozzles or dirty contacts. You might need to
clean the print cartridges. Do not clean with alcohol.
For information on replacing ink cartridges, see replace the print cartridges on page 7-7
and for information on cleaning print cartridges, see clean the print cartridge contacts on
page 7-12.
handle print cartridges
Before you replace a print cartridge, you should know the part names and how to handle
the print cartridge.
Copper-colored
contacts
Plastic tape with
pink pull tab
Ink nozzles
under tape
Do not touch the copper-colored contacts or the ink nozzles
(must be removed)
7-6
Page 47

maintain your Lenovo M820
replace the print cartridges
The Lenovo M820 notifies you when you need to replace your print cartridges. Replace
the print cartridges when you see faded text or if you experience print quality issues
related to the print cartridges.
1 Turn on the Lenovo M820 and then lower the paper tray to access the print-carriage
access door.
2 Open the print-carriage access door by lowering the handle.
The print carriage moves to the center of the Lenovo M820.
Push down
Lenovo M820
maintain your
Paper tray
3 After the carriage stops moving, push down on the print cartridge to release it, and
then pull it toward you out of its slot.
Note: It is normal to see ink buildup in the print cartridge slots.
4 Remove the new print cartridge from its packaging and, being careful to touch only
the bright pink plastic tab, gently remove the plastic tape to uncover the ink nozzles.
Print-carriage
access door
7-7
Page 48

maintain your
Lenovo M820
maintain your Lenovo M820
Caution! Do not touch the copper-colored contacts or ink nozzles.
After you have removed the plastic tape, install the print cartridge immediately to
prevent the ink from drying in the nozzles.
5 Hold the black print cartridge with the Lenovo label on top. Slide the print cartridge
at a slight angle into the right side of the print carriage.
Press firmly until the print cartridge snaps into place.
Caution! Do not attempt to push the cartridge straight into the slot. It must
slide in at a slight angle.
6 Hold the tri-color print cartridge with the Lenovo label on top. Slide the print
cartridge at a slight angle into the left side of the print carriage.
Press firmly until the print cartridge snaps into place.
Caution! Do not attempt to push the cartridge straight into the slot. It must
slide in at a slight angle.
Note: You must install both print cartridges in order for your Lenovo M820 to work.
7-8
Page 49

maintain your Lenovo M820
You can also refer to the label that is located on the inside of the print-carriage
access door for information on installing the print cartridges.
7 Close the print-carriage access door. Within a few minutes, a print cartridge
alignment page prints. You will need to align the print cartridges.
For information on aligning the print cartridges, see align the print cartridges on
page 7-10.
Lenovo M820
maintain your
7-9
Page 50

maintain your
Lenovo M820
maintain your Lenovo M820
use a print cartridge protector
When you purchase a print cartridge, you will receive a print cartridge protector.
The print cartridge protector is designed to keep your print cartridge secure when it is not
being used. It also prevents the ink from drying out. Whenever you remove a print
cartridge from the Lenovo M820, store it in the print cartridge protector.
` To insert a print cartridge into the print cartridge protector, slide the print cartridge
into the print cartridge protector at a slight angle and snap it securely into place.
` To remove the print cartridge from the print cartridge protector, press down and
back on the top of the print cartridge protector to release the print cartridge, then
slide the print cartridge out of the print cartridge protector.
align the print cartridges
After you install or replace a print cartridge, the Lenovo M820 automatically prints a print
cartridge alignment sheet. This might take a few moments. You can also align the print
cartridges at any time from the Lenovo MFP Solution Center. For information on accessing
the Lenovo MFP Solution Center, see use your Lenovo M820 with a computer on page 2-
9. Aligning the print cartridges ensures high-quality output.
7-10
Page 51

maintain your Lenovo M820
to align the print cartridges after installing a new print cartridge
1 Place the print cartridge alignment sheet face down on the left front corner of the
glass. Make sure the top of the sheet is on the left side as shown below.
2 Press Scan.
The Lenovo M820 aligns the print cartridges.
Note: During alignment the button LED blinks until the procedure is finished. This
takes about 30 seconds.
to align the print cartridges from the Lenovo MFP Solution Center for Windows users
1 From the Lenovo MFP Solution Center, choose Settings, choose Print Settings, and
then choose Printer Toolbox.
2 Click the Device Services tab.
3 Click Align the Print Cartridges.
A print cartridge alignment sheet is printed.
4 Place the print cartridge alignment sheet face down on the left front corner of the
glass. Make sure the top of the sheet is on the left side as shown below.
Lenovo M820
maintain your
7-11
Page 52

maintain your
Lenovo M820
maintain your Lenovo M820
5 Press Scan.
The Lenovo M820 aligns the print cartridges.
Note: During alignment the button LED blinks until the procedure is finished. This
takes about 30 seconds.
clean the print cartridge contacts
Clean the print cartridge contacts only if the Self-Test Report shows streaks.
Caution! Do not remove both print cartridges at the same time. Remove and
clean each print cartridge one at a time.
Make sure you have the following materials available:
• Dry foam rubber swabs, lint-free cloth, or any soft material that will not come apart
or leave fibers.
• Distilled, filtered, or bottled water (tap water might contain contaminants that can
damage the print cartridges).
Caution! Do not use platen cleaners or alcohol to clean the print cartridge
contacts. These can damage the print cartridge or the Lenovo M820.
1 Turn the Lenovo M820 on and open the print-carriage access door.
The print carriage moves to the center.
2 After the print carriage has moved to the center, unplug the power cord from the
back of the Lenovo M820.
3 Push down on the print cartridge to release it, and then pull it out of its slot.
4 Inspect the print cartridge contacts for ink and debris buildup.
5 Dip a clean foam rubber swab or lint-free cloth into distilled water, and squeeze any
excess water from it.
6 Hold the print cartridge by its sides.
7 Clean only the contacts. Do not clean the nozzles.
7-12
Contacts
Nozzles - do not clean
Page 53

maintain your Lenovo M820
8 Place the print cartridge back into the holder.
9 Repeat if necessary for the other print cartridge.
10 Close the door and plug in the Lenovo M820.
Because you removed a print cartridge from its holder, the Lenovo M820
automatically prints a print cartridge alignment sheet.
11 Place the print cartridge alignment sheet face down on the left front corner of the
glass. Make sure the top of the sheet is on the left side as shown below.
12 Press Scan.
The Lenovo M820 aligns the print cartridges.
Note: During alignment the button LED blinks until the procedure completes. This
takes about 30 seconds.
Lenovo M820
maintain your
7-13
Page 54

maintain your
Lenovo M820
7.5 self-maintenance sounds
During the life of your product you might hear various mechanical sounds. This is a normal
part of your device’s self-maintenance.
7-14
Page 55

8
get Lenovo M820 support
8-1 get support and other information from the Internet . . . . . . . . . . . 8-3
8-2 Lenovo customer support . . . . . . . . . . . . . . . . . . . . . . . . . . . . . 8-4
8-3 prepare your Lenovo M820 for shipment . . . . . . . . . . . . . . . . . 8-5
8-1
Page 56

get Lenovo M820 support
If you are unable to find the answer you need in the printed or onscreen documentation
supplied with your product, you can contact one of the Lenovo support services listed in
the following sections. If a support service number is not listed for your country/region,
contact your nearest authorized Lenovo dealer for help.
support
get Lenovo M820
8-2
Page 57

get Lenovo M820
8.1 get support and other information from the Internet
If you have Internet access, you can get more information from the Lenovo website at:
www.lenovo.com/Support/Channel/
This website offers technical support, drivers and ordering information.
support
8-3
Page 58

support
8.2 Lenovo customer support
get Lenovo M820
Software programs from other companies might be included with your Lenovo M820. If
you experience problems with any of those programs, you will receive the best technical
assistance by calling the experts at that company.
If you need to contact Lenovo Customer Support, do the following before you call.
1 Make sure that:
a. Your Lenovo M820 is plugged in and turned on.
b. The specified print cartridges are installed correctly.
c. The recommended paper is properly loaded in the paper tray.
2 Reset your Lenovo M820:
a. Turn off the Lenovo M820 by using the On/Resume button located on the front
b. Unplug the power cord from the back of the Lenovo M820.
c. Plug the power cord back into the device.
d. Turn on the Lenovo M820 by using the On/Resume button.
3 For more information, go to the Lenovo website at:
www.lenovo.com
4 If you are still experiencing problems and need to speak with an Lenovo Customer
Support Representative:
– Have the specific name of your Lenovo M820, as it appears on the device,
– Have your serial number and service ID ready. To view your serial number and
– Be prepared to describe your problem in detail.
5 Call Lenovo Customer Support. Be near your Lenovo M820 when you call.
Lenovo Technical Hotline: 400-810-1234. If number 400 is not accessible in your
area, please call 010-82879600 from your mobile phone.
panel.
available.
service ID, print a Self-Test Report, which contains this information. To print a
Self-Test Report, press and hold the Cancel button, and then press the Start Copy,
Color button.
8-4
Page 59

get Lenovo M820
8.3 prepare your Lenovo M820 for shipment
If after contacting Lenovo Customer Support or returning to the point of purchase, you are
requested to send your Lenovo M820 in for service, please follow the power off and repackage steps below to avoid further damage to the device.
Note: When transporting your Lenovo M820, make sure that the print cartridges
have been removed, the Lenovo M820 has been properly shut down by pressing the
On/Resume button, and you have allowed time for the print carriage to return to the
home position and for the scanner to return to its parked position.
1 Turn on the Lenovo M820.
Disregard steps 1 through 7 if your Lenovo M820 will not turn on. You will not be
able to remove the print cartridges. Proceed to step 8.
2 Open the print-carriage access door.
The print carriage moves to the center of the Lenovo M820.
3 Remove the print cartridges. See replace the print cartridges on page 7-7 for
information on removing the print cartridges.
Caution! Remove both print cartridges. Failure to do so might damage your
Lenovo M820.
4 Place the print cartridges in an airtight bag so they will not dry out, and put them
aside. Do not send them with the Lenovo M820, unless instructed to by the
Lenovo customer support call agent.
5 Close the print-carriage access door.
6 Wait for the print carriage to park (stop moving) in the home position on the left
side of the Lenovo M820. This might take a few seconds.
7 Turn off the Lenovo M820.
8 If available, pack the Lenovo M820 for shipment by using the original packing
materials or the packaging materials that came with your exchange device.
support
8-5
Page 60

get Lenovo M820 support
support
get Lenovo M820
If you do not have the original packaging materials, please use other adequate
packaging materials.
9 Place the return shipping label on the outside of the box.
10 Include the following items in the box:
– A brief description of symptoms for service personnel (samples of print quality
– A copy of the sales slip or other proof of purchase.
– Your name, address, and a phone number where you can be reached during
problems are helpful).
the day.
8-6
Page 61

9
technical information
9-1 paper specifications . . . . . . . . . . . . . . . . . . . . . . . . . . . . . . . . .9-2
9-2 physical specifications . . . . . . . . . . . . . . . . . . . . . . . . . . . . . . . 9-3
9-3 power specifications . . . . . . . . . . . . . . . . . . . . . . . . . . . . . . . . 9-4
9-4 environmental specifications . . . . . . . . . . . . . . . . . . . . . . . . . . 9-5
9-5 regulatory notices . . . . . . . . . . . . . . . . . . . . . . . . . . . . . . . . . . 9-6
9-1
Page 62

technical
information
9.1 paper specifications
paper-tray capacity
type paper weight quantity
Plain paper 20 to 24 lb. (75 to 90 gsm) 100
Legal paper 20 to 24 lb. (75 to 90 gsm) 100
Cards 110 lb. index max (200 gsm) 20
Envelopes 20 to 24 lb. (75 to 90 gsm) 10
Transparency film N/A 20
Labels N/A 20
4 by 6 inch
(10 by 15 cm) Photo
*.Maximum capacity
145 lb. (236 gsm) 20
print margin specifications
top
(leading edge)
sheet paper or transparency film
U.S. (Letter,
Legal)
ISO (A4) .07 inch (1.8
Envelopes .13 inch (3.2
.06 inch (1.5
mm)
mm)
mm)
bottom
(trailing edge)
.50 inch (12.7
mm)
.50 inch (12.7
mm)
.13 inch (3.2 mm) .25 inch (6.4
left right
*
.25 inch (6.4
mm)
.13 inch (3.2
mm)
mm)
.25 inch (6.4
mm)
.13 inch (3.2
mm)
.50 inch (12.7
mm)
*
Cards .07 inch (1.8
mm)
*.The writing area is offset from center by .21 inches (5.4 mm), which causes
asymmetric top and bottom margins.
.46 inch (11.7
mm)
.13 inch (3.2
mm)
9-2
.13 inch (3.2
mm)
Page 63

9.2 physical specifications
• Height: 6.68 inch (16.97 cm)
• Width: 16.76 inch (42.57 cm)
• Depth: 10.20 inch (25.91 cm)
• Weight: 10 lb. (4.53 kg)
information
technical
9-3
Page 64

technical
information
9.3 power specifications
• Power consumption: 80 W maximum
• Input Voltage: AC 100 to 240 V ~ 1 A 50–60 Hz, grounded
• Output Voltage: DC 32 V===940 mA, 16 V===625 mA
9-4
Page 65

9.4 environmental specifications
• Recommended Operating Temperature Range: 15º to 32º C (59º to 90º F)
• Allowable Operating Temperature Range: 5º to 40º C (41º to 104º F)
• Humidity: 15% to 85% RH non-condensing
• Non-operating (Storage) Temperature Range: -4º to 60º C (-40º to 140º F)
• In the presence of high electromagnetic fields, it is possible the output from the
Lenovo M820 might be slightly distorted
• Lenovo recommends using a USB cable less than or equal to 3 m (10 feet) in length
to minimize injected noise due to potential high electromagnetic fields
information
technical
9-5
Page 66

technical
information
9.5 regulatory notices
This product complies with:
GB 4943
GB 9254
GB 17625.1
9-6
Page 67

10
troubleshooting information
10-1 installation troubleshooting. . . . . . . . . . . . . . . . . . . . . . . . . . 10-2
10-2 operational troubleshooting . . . . . . . . . . . . . . . . . . . . . . . . . 10-9
10-1
Page 68

Installation and configuration troubleshooting tips are included in this section for some of
the most common issues associated with Lenovo M820 software and hardware
installation.
This section contains the following topics:
• hardware and software installation troubleshooting on page 10-2
hardware and software installation troubleshooting
information
troubleshooting
If you encounter a software or hardware problem during installation, see the topics below
for a possible solution.
During a normal installation of the Lenovo M820 software, the following things occur:
• The Lenovo M820 CD-ROM runs automatically when the CD-ROM is inserted
• The software installs
• Files are copied to your hard drive
• You are requested to plug in the Lenovo M820
• A green OK and check mark appear on an installation wizard screen
• You are requested to restart your computer (might not occur in all cases)
• The registration process runs
If any of these things do occur, there might be a problem with the installation. To check
the installation on a PC, verify the following:
• Start the director and check to make sure the following icons appear: scan picture,
• Open the Printers dialog box and check to see that the Lenovo M820 is listed.
• Look at the task tray for an Lenovo M820 icon. This indicates that the Lenovo M820
10.1 installation troubleshooting
scan document, and Photo & Imaging Gallery. For information about starting
Lenovo MFP Solution Center, see use your Lenovo M820 with a computer on
page 2-9. If the icons do not appear immediately, you might need to wait a few
minutes for the Lenovo M820 to connect to your computer. Otherwise, see Some of
the icons are missing in the Lenovo MFP Solution Center on page 10-5.
is ready.
10-2
Page 69

troubleshooting information
Task Tray
software installation troubleshooting
Use this section to solve any problems you might encounter while installing the Lenovo
M820 software.
problem possible cause and solution
When I insert the CDROM into my
computer’s CD-ROM
drive, nothing
happens
The minimum system
checks screen
appears during
installation
follow these steps
1 From the Windows Start menu, choose Run.
2 In the Run dialog box, enter d:\setup.exe (if your CD-ROM
drive is not assigned to drive letter d, use the appropriate
drive letter), and then click OK.
Your system does not meet the minimum requirements to install the
software. Click Details to see what the specific problem is. Then
correct the problem before attempting to install the software.
troubleshooting
information
10-3
Page 70

troubleshooting information
problem possible cause and solution
A red X or yellow
triangle appears on
the USB connect
prompt
information
troubleshooting
I received a message
that an unknown
error has occurred
do the following
1 Verify that the front panel cover is firmly adhered to the
device, then unplug the Lenovo M820 and plug it in again.
For more information on how to attach the front panel cover,
see I received a message to attach the front panel cover on
page 10-7.
2 Verify that the USB and power cables are plugged in.
3 Verify that the USB cable is set up properly as follows:
– Unplug the USB cable and plug it in again.
– Do not attach the USB cable to a keyboard or non
powered hub.
– Verify that the USB cable is 3 meters or less in length.
– If you have several USB devices attached to your
computer, you might want to unplug the other devices
during the installation.
4 Continue with the installation and reboot the computer when
prompted. Then open director and check for the essential
icons (scan picture, scan document, and Photo & Imaging
Gallery [Windows]).
If the essential icons do not appear, remove the software
and then reinstall it as described in Some of the icons are
missing in the Lenovo MFP Solution Center on page 10-5.
Try to continue with the installation. If that doesn’t work, stop and
then restart the installation.
10-4
Page 71

problem possible cause and solution
troubleshooting information
Some of the icons are
missing in the Lenovo
MFP Solution Center
If the essential icons do not appear, your installation might not be
complete. The essential icons are scan picture, scan document,
and Photo & Imaging Gallery (Windows).
If your installation is incomplete you might need to uninstall and
then reinstall the software. Do not simply delete the Lenovo M820
program files from your hard drive. Be sure to remove them
properly using the uninstall utility provided in the Lenovo M820
program group.
to uninstall from a Windows computer
1 Disconnect your Lenovo M820 from your computer.
2 On the Windows task bar, click Start, Programs or All
Programs (XP), Lenovo, Lenovo MFP Solution Center,
Uninstall.
3 Finally, make sure that the print driver is installed.
4 Follow the directions on the screen.
Note: Make sure the Lenovo M820 is disconnected from
your computer before continuing with uninstall procedure.
5 If you are asked whether you would like to remove shared
files, click No.
Other programs that use these files might not work properly
if the files are deleted.
6 After the software is uninstalled, restart your computer.
7 To reinstall the software, insert the Lenovo M820 CD-ROM
into your computer’s CD-ROM drive, and follow the
onscreen instructions.
8 After the software is installed, connect the Lenovo M820 to
your computer. Turn on the Lenovo M820 by pressing the
On/Resume button. To continue with the installation, follow
the onscreen instructions and the instructions provided in
the Setup Poster that came with your Lenovo M820.
After connecting and turning on your Lenovo M820, you
might have to wait several minutes for all of the Plug and
Play events to complete.
When the software installation is complete, you will see a
Digital Imaging Monitor icon in the task tray.
9 To verify that the software is properly installed, double-click
the Lenovo MFP Solution Center icon on the desktop. If the
Lenovo MFP Solution Center shows the essential icons, the
software has been properly installed.
troubleshooting
information
10-5
Page 72

troubleshooting information
problem possible cause and solution
The Digital Imaging
Monitor does not
appear in the Task
Tray
information
troubleshooting
The installation stops
when the additional
setup instruction
screen appears, even
though the USB
cable is plugged in.
If the Digital Imaging Monitor does not appear in the Task Tray,
wait several minutes. If it still doesn’t appear, start the director to
check whether or not essential icons are there. For more
information, see Some of the icons are missing in the Lenovo MFP
Solution Center on page 10-5.
The Task Tray normally appears in the lower-right corner of the
Windows desktop.
Task Tray
Lenovo Digital
Imaging Monitor icon
The front panel cover might not be properly attached.
follow these steps
1 Check the front panel for an error message about attaching
the front panel cover.
2 If necessary, attach the front panel cover. For more
information, see I received a message to attach the front
panel cover on page 10-7.
3 Turn off the product and then turn it back on again.
10-6
Page 73

troubleshooting information
hardware installation troubleshooting
Use this section to solve any problems you might encounter while installing the Lenovo
M820 hardware.
problem possible cause and solution
I received a message
to attach the front
panel cover
My Lenovo M820
does not turn on
The front panel cover is not attached, or it is attached incorrectly.
to attach the front panel cover
1 Remove the adhesive backing from the front panel cover.
step 1
2 Raise the lid of the Lenovo M820. Place the front panel
cover into the recess and stick it into place.
Note: The Lenovo M820 will not work until you attach the
front panel cover.
Make s ure eac h of t he p owe r co rds is firmly conn ected , and wait
a few seconds for the Lenovo M820 to turn on. Also, if the
Lenovo M820 is plugged in to a power strip, make sure the strip
is turned on.
step 2
troubleshooting
information
10-7
Page 74

troubleshooting information
problem possible cause and solution
The USB port is not
connected
information
troubleshooting
Connecting your computer to your Lenovo M820 with a USB
cable is straightforward. Simply plug one end of the USB cable
in to the back of your computer and the ot h er into the back of t h e
Lenovo M820. You can connect to any USB port on the back of
your computer.
10-8
Page 75

10.2 operational troubleshooting
The Lenovo M820 troubleshooting section in the Photo & Imaging help contains
troubleshooting tips for some of the most common issues associated with your Lenovo
M820. To access the troubleshooting information from a Windows computer, go to the
Lenovo MFP Solution Center, click Help, and then choose Troubleshooting and Support.
Troubleshooting is also available through the Help button that appears on some error
messages.
If you have Internet access, you can get help from the Lenovo website at:
www.lenovo.com/Support/Channel/
The website also provides answers to frequently asked questions.
PictBridge port troubleshooting
The functionality of the PictBridge port is managed by the PictBridge-compliant camera
you connect. Most solutions will be found in your camera user guide. Here are some
problems you might encounter using the PictBridge port.
problem possible cause and solution
You connect a
camera and nothing
happens
The camera is not
responding
Printing stopped in
the middle of a
photo
• The camera is not PictBridge-compliant or is not in PictBridge
mode. Disconnect your camera and refer to your camera’s
user guide to determine if it is PictBridge-compliant. If it is, the
user guide should tell you how to set the camera in PictBridge
mode. If your camera is not PictBridge-compliant, you may
need to connect your camera directly to your computer in
order to print photos.
• The Lenovo M820 still recognizes the presence of the camera,
but the camera is not responding. Disconnect the camera.
Turn off the camera, then turn it on again. Be sure it is in
PictBridge mode. Reconnect the camera.
• The camera lost power or was disconnected. Some cameras
turn themselves off after a few minutes if not connected to a
power source. Reconnect power to the camera and be sure it
is in PictBridge mode. Restart printing.
troubleshooting
information
10-9
Page 76

troubleshooting information
problem possible cause and solution
A photo is corrupted
or not supported
No photos are
printing
information
troubleshooting
• You are trying to print an image from the camera that has
become corrupted or is not a supported image type on the
Lenovo M820. Check the image on the camera and refer to
your camera’s user guide for supported image types. The
Lenovo M820 accepts photos in jpeg format. Refer to your
camera’s user guide to set the image type for your photos.
• You may need to select photos on your camera before you
can print them. Refer to your camera’s user guide and select
the photos you want to print.
10-10
Page 77

Page 78

Important PictBridge Feature Information
The following lists the PictBridge features your PictBridge-compliant camera can use to
print photos on the Lenovo M820 without using your computer. (Your camera may have
other features, but they are not supported on the Lenovo M820.)
Note: The maximum size of a photo printed directly from a PictBridge camera is
3,300 x 3,300 pixels.
• File Types - Exif/JPEG, JPEG, DPOF (TIFF and RAW image formats not supported)
• Image Crop and Print - Yes
• Paper Type and Size -
– Plain paper: Letter, A4
– Photo paper (default): Letter, A4, 4 x 6 inch*, 10 x 15 cm*
(* You must use tabbed photo paper in the Lenovo M820.)
• Layout - Index prints and the following layouts are supported.
Layout Letter A4
1/page
2/page 5 x 7 inch 13 x 18 cm
3/page 4 x 6 inch 10 x 15 cm
4/page 3.5 x 5 inch 9 x 13 cm
6/page 3 x 4 inch 7 x 10 cm
9/page 2.5 x 3.25 inch 6 x 8 cm
*
*.Default setting
8 x 10 inch 20 x 25 cm
Print functionality is managed by the features your camera supports. Refer to your
PictBridge-compliant camera's user guide to determine which features are supported by
your camera.
Page 79

index
Numerics
4 by 6 inch (10 by 15 cm)
borderless copies, 5-4
photo paper, 3-7
A
align print cartridges, 7-10
B
best copy quality, 5-2
borderless photos
copy, 5-4
C
camera, PictBridge
connect, 4-2
print, 4-3
cancel
copy, 5-6
scan, 6-4
cartridges, 7-5
align, 7-10
clean contacts, 7-12
handle, 7-6
ink level, 7-5
replace, 7-7
store, 7-10
clean
exterior, 7-4
glass, 7-2
lid backing, 7-3
print cartridge contacts, 7-12
copy
black-and-white originals, 5-2
borderless photos, 5-4
color originals, 5-2
enlarge, 5-5
number of copies, 5-3
photos, 5-4
photos onto letter paper, 5-5
quality, 5-2
reduce, 5-5
speed, 5-2
customer support, 8-4
web site, 8-3
D
Digital Imaging Monitor icon, 10-6
E
enlarge copies, 5-5
envelopes
load, 3-6
essential icons, 10-4, 10-5, 10-6
F
fast copy quality, 5-2
fit to page, 5-5
front panel
overview, 2-2
status lights, 2-5
G
glass cleaning, 7-2
greeting cards, load, 3-8
H
Hagaki cards, 3-7
I
ink cartridges, 7-5
ink level, 7-5
L
labels
load, 3-8
Lenovo MFP Solution Center
use your Lenovo M820 with a
computer, 2-9
lid backing, clean, 7-3
lights, status, 2-5
load
A4 paper, 3-4
avoid paper jams, 3-10
envelopes, 3-6
greeting cards, 3-8
Hagaki cards, 3-7
labels, 3-8
Index
Index-1
Page 80

Index
letter paper, 3-4
originals, 3-2
postcards, 3-7
Premium Paper, 3-8
recommended papers, 3-8
M
maintenance
align print cartridges, 7-10
clean glass, 7-2
clean the exterior, 7-4
clean the lid backing, 7-3
ink level, 7-5
replace print cartridges, 7-7
self-test report, 7-5
sounds, 7-14
N
notices
regulatory, 9-6
number of copies
copy, 5-3
P
paper
recommended types, 3-8
Index
set type, 3-9
phone numbers, customer support, 8-4
photos
borderless copies, 5-4
postcards, 3-7
print
from a camera, 4-3
self-test report, 7-5
print cartridges, 7-5
align, 7-10
clean contacts, 7-12
handle, 7-6
ink level, 7-5
protector, 7-10
replace, 7-7
store, 7-10
protector, print cartridge, 7-10
Q
quality
copies, 5-2
R
reduce copies, 5-5
regulatory notices, 9-6
replace print cartridges, 7-7
report, self-test, 7-5
return your Lenovo M820, 8-5
S
scan
cancel, 6-4
from the front panel, 6-3
self-test report, 7-5
ship your Lenovo M820, 8-5
size
copies, 5-5
software
use your Lenovo M820 with a
computer, 2-9
sounds from the Lenovo M820, 7-14
speed
copy, 5-2
status lights, 2-5
stop
copy, 5-6
scan, 6-4
T
technical information
copy specifications, 9-3
environmental specifications, 9-5
paper specifications, 9-2
photo memory card specifications, 9-3
physical specifications, 9-3
power specifications, 9-4
print margin specifications, 9-2
telephone numbers, customer support, 8-4
troubleshooting
essential icons, 10-4, 10-5, 10-6
hardware and software installation, 10-2
hardware installation, 10-7
installation, 10-2
operations, 10-9
software installation, 10-3
U
USB cable installation, 10-8
Index-2
 Loading...