

Page 1

User Guide
Lenovo Legion 5 (15″, 6) and Lenovo Legion 5 (17″, 6)
Page 2

Read this first
Before using this documentation and the product it supports, ensure that you read and understand the
following:
•
Generic Safety and Compliance Notices
• Safety and Warranty Guide
• Setup Guide
First Edition (July 2021)
© Copyright Lenovo 2021.
LIMITED AND RESTRICTED RIGHTS NOTICE: If data or software is delivered pursuant to a General Services
Administration “GSA” contract, use, reproduction, or disclosure is subject to restrictions set forth in Contract No. GS35F-05925.
Page 3

Contents
About this guide . . . . . . . . . . . . . iii
Chapter 1. Meet your computer. . . . . 1
Front . . . . . . . . . . . . . . . . . . . . 1
Base . . . . . . . . . . . . . . . . . . . . 3
Left . . . . . . . . . . . . . . . . . . . . 5
Right . . . . . . . . . . . . . . . . . . . . 6
Rear . . . . . . . . . . . . . . . . . . . . 7
Bottom . . . . . . . . . . . . . . . . . . . 8
Features and specifications . . . . . . . . . . . 9
Statement on USB transfer rate . . . . . . . 11
Operating environment . . . . . . . . . . 12
Avoid constant body contact with specific hot
sections . . . . . . . . . . . . . . . . 12
Chapter 2. Get started with your
computer . . . . . . . . . . . . . . . . 13
Work with Windows . . . . . . . . . . . . . 13
Windows help information . . . . . . . . . 13
Lenovo Vantage and Lenovo PC Manager . . . . 14
The Novo Button menu . . . . . . . . . . . . 14
Open the Novo Button menu . . . . . . . . 14
The Fn key and hotkeys. . . . . . . . . . . . 14
The Fn key . . . . . . . . . . . . . . . 14
Hotkeys . . . . . . . . . . . . . . . . 15
Dual-function keys without printed icons . . . 15
The FnLock switch . . . . . . . . . . . . 16
Chapter 3. Explore your computer . . 17
Manage power . . . . . . . . . . . . . . . 17
Check the battery status . . . . . . . . . 17
Charge the battery . . . . . . . . . . . . 17
Power input through a USB-C port . . . . . 17
Set power button behavior. . . . . . . . . 18
A power plan . . . . . . . . . . . . . . 18
Set performance mode . . . . . . . . . . 19
Change settings in UEFI/BIOS setup utility . . . . 19
What is UEFI/BIOS setup utility . . . . . . . 19
Open the UEFI/BIOS setup utility . . . . . . 19
Enable or disable Fool Proof Fn Ctrl . . . . . 19
Enable or disable always-on . . . . . . . . 19
Enable or disable Flip to Boot . . . . . . . 19
Set passwords in UEFI/BIOS setup utility . . . . . 20
Password types . . . . . . . . . . . . . 20
Set administrator password . . . . . . . . 20
Change or remove administrator password . . 20
Set user password . . . . . . . . . . . . 21
Enable power-on password . . . . . . . . 21
Set hard disk password . . . . . . . . . . 21
Change or remove hard disk password . . . . 22
Chapter 4. Help and support . . . . . 23
Frequently asked questions . . . . . . . . . . 23
Self-help resources . . . . . . . . . . . . . 23
What is a CRU? . . . . . . . . . . . . . . . 24
CRUs for your product model . . . . . . . . . 25
Call Lenovo . . . . . . . . . . . . . . . . 25
Before you contact Lenovo . . . . . . . . 25
Lenovo Customer Support Center . . . . . . 25
Purchase additional services. . . . . . . . . . 26
Appendix A. Notices and
trademarks . . . . . . . . . . . . . . . 27
© Copyright Lenovo 2021 i
Page 4

ii User Guide
Page 5

About this guide
• This guide applies to Lenovo product model(s) listed below. Illustrations in this guide may look slightly
different from your product model.
Model size Model name
15-inch models Legion 5 15ACH6H 82JU
Lenovo Legion 5 15ACH6H
Legion 5 15ACH6 82JW, 82QJ
Lenovo Legion 5 15ACH6
Legion 5 15ACH6A 82NW
Lenovo Legion 5 15ACH6A
Legion 5 15ITH6 82JK
Lenovo Legion 5 15ITH6
Legion 5 15ITH6H 82JH, 82MH
Lenovo Legion 5 15ITH6H
17-inch models
Legion 5 17ACH6H
Lenovo Legion 5 17ACH6H
Legion 5 17ACH6
Lenovo Legion 5 17ACH6
Legion 5 17ITH6H 82JM
Machine type (MT)
82JY
82K0
Lenovo Legion 5 17ITH6H
Legion 5 17ITH6 82JN
Lenovo Legion 5 17ACH6H D1 /
Lenovo Legion 5 17ACH6H D2 /
Lenovo Legion 5 17ACH6 D1 /
• For further compliance information, refer to the Generic Safety and Compliance Notices at https://
pcsupport.lenovo.com/docs/generic_notices
.
• This guide may contain information about accessories, features, and software that are not available on all
models.
• This guide contains instructions that are based on the Windows operating system. These instructions are
not applicable if you install and use other operating systems.
• Microsoft
®
makes periodic feature changes to the Windows® operating system through Windows Update.
As a result, the operating system related instructions may become outdated. Refer to Microsoft resources
for the latest information.
• The content of the guide is subject to change without notice. To obtain the latest version, go to
support.lenovo.com
.
https://
© Copyright Lenovo 2021 iii
Page 6

iv User Guide
Page 7

Chapter 1. Meet your computer
Front
Figure 1. Front view—15-inch models
Figure 2. Front view—17-inch models
© Copyright Lenovo 2021 1
Page 8

1. Microphones Capture or record sound and voice.
2. Camera Capture still and moving images for taking photos, recording videos,
and video chatting.
3. Camera switch Turn the camera on or off.
4. Camera light If the light is on, the camera is in use.
5. Screen
Display text, graphics, and videos.
2 User Guide
Page 9

Base
Figure 3. Base view—15-inch models
Figure 4. Base view—17-inch models
1. Charging light Indicate whether the computer is connected to ac power.
• Solid white: Connected to ac power; battery capacity 91%–100%
• Solid amber: Connected to ac power; battery capacity 1%–90%
• Off: Not connected to ac power
2. Power button Press the button to turn on the computer or put the computer into
sleep mode.
Note: You can turn on the computer by flipping open the LCD screen
if Flip to Boot is enabled.
Chapter 1. Meet your computer 3
Page 10

3. Power light Indicate the power status of the computer. The color of the power
light also reflects the currently activated performance mode. Refer to
“Set performance mode” on page 19 for how to switch performance
modes.
• Solid on: The computer is turned on.
– White: in balance mode
– Red: in performance mode
– Blue: in quiet mode
• Blinking: The computer is in sleep mode.
• Off: The computer is turned off or in hibernation mode.
4. Numeric keypad To enable or disable the numeric keypad, press the Num Lock key.
5. Wireless antennas
6. Touchpad Perform finger touch and all the functions of a traditional mouse.
7. Keyboard Enter characters and interact with programs.
Send and receive radio waves for the built-in wireless LAN (local area
network) and Bluetooth module.
Notes:
• The antennas are not visible from the outside of the computer.
• If the location of the antennas is close to the user’s body (< 20 cm),
you can find the Specific Absorption Rate (SAR) values in the Setup
Guide that comes with your computer.
Note: The touchpad also supports multi-touch function.
Note: The keyboard also includes hotkeys and function keys for
changing settings and performing tasks quickly.
4 User Guide
Page 11
Left
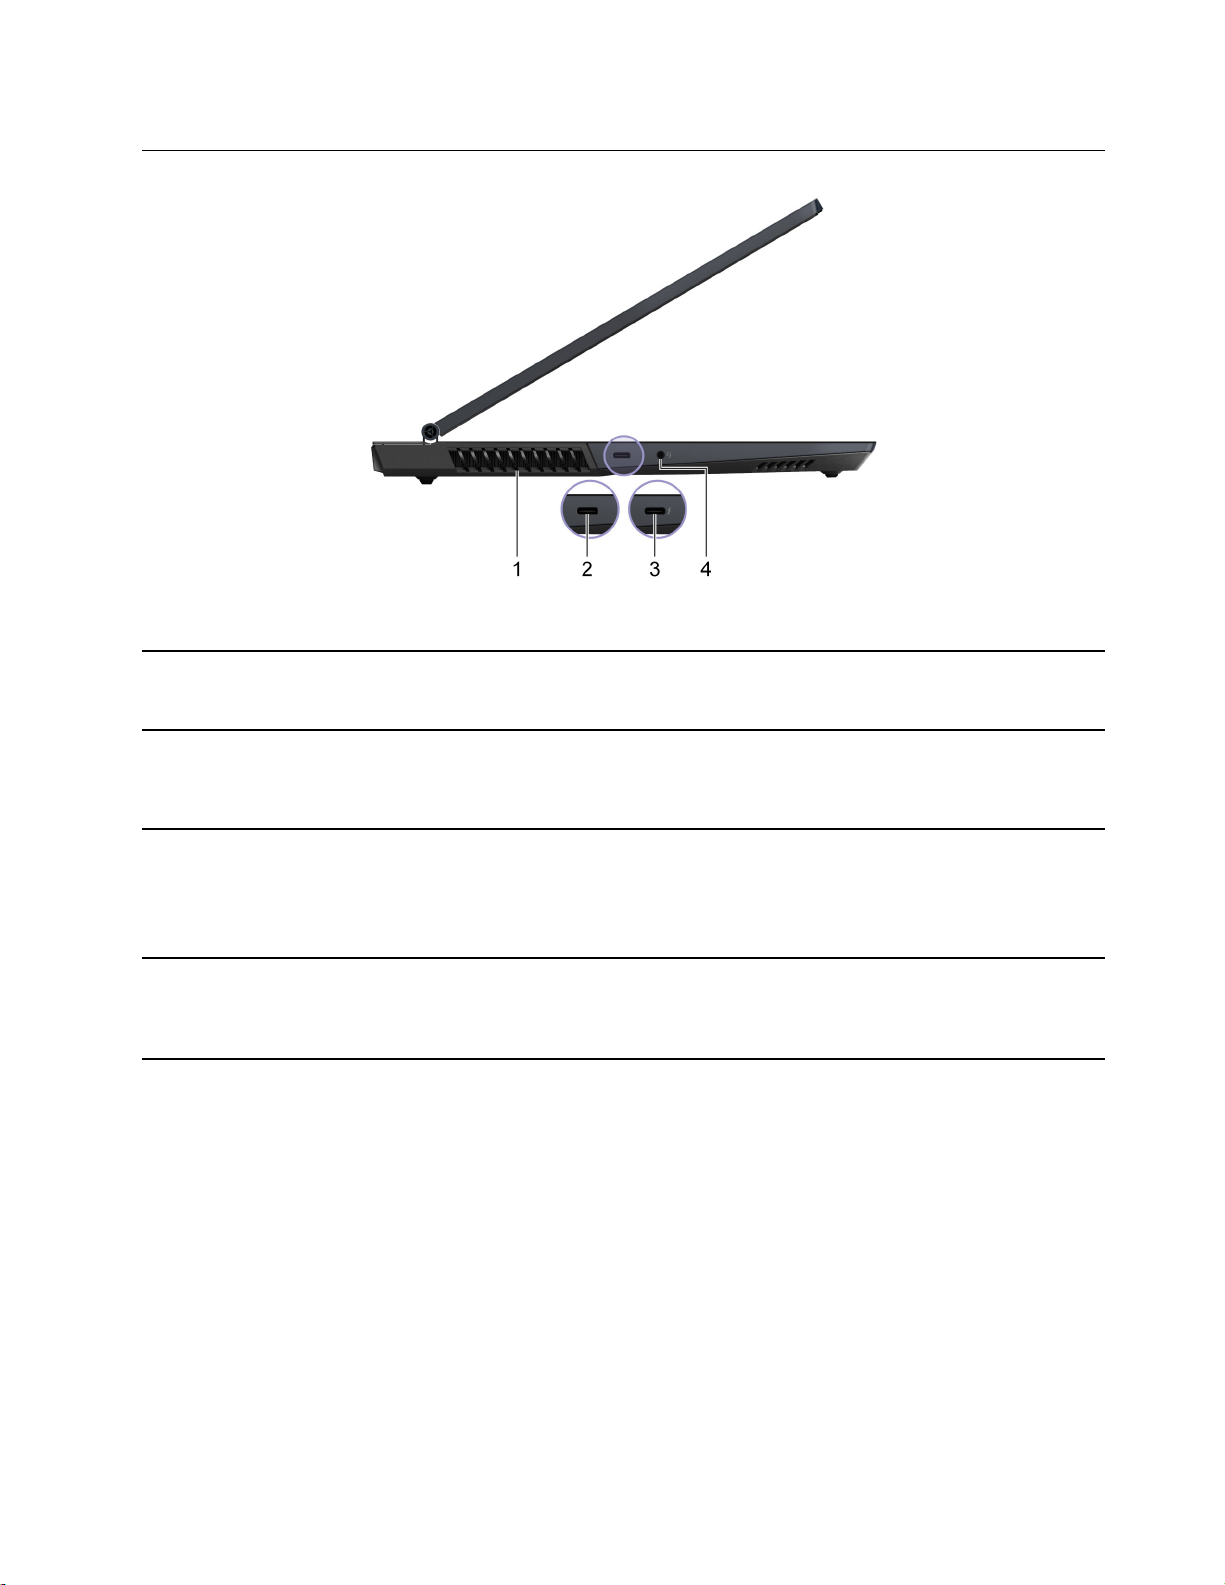
Figure 5. Left-side view
1. Ventilation slots (outlet) Maintain the outgoing airflow to dissipate internal heat.
Attention: Do not block the ventilation slots. Otherwise, the
computer may overheat.
2. USB-C
3. USB-C (Thunderbolt
connector*
®
connector A multi-purpose connector for:
• Connecting USB data devices.
• Connecting display devices.
™
4 enabled)
A multi-purpose connector for:
• Connecting USB data devices.
• Connecting display devices.
• Connecting Thunderbolt-enabled docks, eGPUs, or other devices.
4. Combo audio jack Connect to headphones or headsets with a 3.5 mm (0.14 inch), 4-pole
plug.
Note: This jack does not support standalone external microphones. If
you use headsets, choose one with a single plug.
* for Legion 5 15ITH6, Lenovo Legion 5 15ITH6, Legion 5 15ITH6H, Lenovo Legion 5 15ITH6H, Legion 5
17ITH6, Legion 5 17ITH6H and Lenovo Legion 5 17ITH6H only
Chapter 1. Meet your computer 5
Page 12

Right
Figure 6. Right-side view—15-inch models
Figure 7. Right-side view—17-inch models
1. Camera switch Turn the camera on or off.
2. Power light
3. SD card slot Insert an SD card or a MultiMediaCard (MMC) into the slot for data
4. USB (3.2 Gen 1) Type-A connector Connect to a USB-compatible device, such as a USB keyboard, a
5. Ventilation slots (outlet) Maintain the outgoing airflow to dissipate internal heat.
• Solid white: The computer is turned on; battery charge percentage
21% - 100%
• Blinking fast: The computer is turned on; battery charge
percentage 1% - 20%
• Blinking slowly: The computer is in sleep mode.
• Off: The computer is turned off or in hibernation mode.
transfer or storage.
USB mouse, a USB storage device, or a USB printer.
Attention: Do not block the ventilation slots. Otherwise, the
computer may overheat.
6 User Guide
Page 13

Rear
Figure 8. Rear view
1. Ventilation slots (outlet) Maintain the outgoing airflow to dissipate internal heat.
Attention: Do not block the ventilation slots. Otherwise, the
computer may overheat.
2. Ethernet connector Connect to a local area network (LAN).
3. USB-C connector A multi-purpose connector for:
• Receiving power input.
Note: Refer to “Power input through a USB-C port” on page 17.
• Connecting USB data devices.
• Connecting display devices.
4. USB-C (Thunderbolt 4 enabled) connector* A multi-purpose connector for:
• Receiving power input.
Note: Refer to “Power input through a USB-C port” on page 17.
• Connecting USB data devices.
• Connecting display devices.
• Connecting Thunderbolt-enabled docks, eGPUs, or other devices.
5. USB (3.2 Gen 1) Type-A connector (2) Connect to a USB-compatible device, such as a USB keyboard, a
USB mouse, a USB storage device, or a USB printer.
6. HDMI
7. USB (3.2 Gen 1) Type-A connector
(always-on)
8. Power connector Connect to power with the included power cord and ac power
™
connector
Connect to a compatible digital audio device or video monitor, such
as an HDTV.
The always-on connector can charge external devices when the
computer is turned off, in sleep or hibernation mode. The always-on
function can be turned on or off in the UEFI/BIOS setup utility.
Note: If Lenovo Vantage is pre-installed on your computer, you can
also set always-on function from within that software.
adapter.
* for Legion 5 15ITH6, Lenovo Legion 5 15ITH6, Legion 5 15ITH6H, Lenovo Legion 5 15ITH6H, Legion 5
17ITH6, Legion 5 17ITH6H and Lenovo Legion 5 17ITH6H only
Chapter 1. Meet your computer 7
Page 14

Bottom
Figure 9. Bottom view
1. Ventilation slots (inlet) Maintain the incoming airflow to dissipate internal heat.
Attention: Do not block the ventilation slots. Otherwise, the
computer may overheat.
2. Speakers
Produce sound.
8 User Guide
Page 15

Features and specifications
Dimensions
ac power adapter
Battery pack
• 15-inch models
– Width: 362.56 mm (14.27 inches)
– Depth: 260.61 mm (10.26 inches)
– Thickness
– Thinnest: 22.5 mm (0.89 inches)
– Thickest: 25.75 mm (1.01 inches)
• 17-inch models
– Width: 398.6 mm (15.69 inches)
– Depth: 290 mm (11.41 inches)
– Thickness
– Thinnest: 24.3 mm (0.95 inches)
– Thickest: 26.2 mm (1.03 inches)
• Legion 5 15ACH6, Lenovo Legion 5 15ACH6, Legion 5 17ACH6, Lenovo Legion 5 17ACH6,
Lenovo Legion 5 17ACH6 D1, Legion 5 15ITH6, Lenovo Legion 5 15ITH6 and Legion 5
17ITH6
– Input: 100 V ac–240 V ac, 50 Hz–60 Hz
– Output: 20 V dc, 8.5 A/20 V dc, 11.5 A
– Power: 170 W/230 W
• Legion 5 15ACH6H, Lenovo Legion 5 15ACH6H, Legion 5 17ACH6H, Lenovo Legion 5
17ACH6H, Lenovo Legion 5 17ACH6H D1 Lenovo Legion 5 17ACH6H D2, Legion 5
15ITH6H, Lenovo Legion 5 15ITH6H, Legion 5 17ITH6H, Lenovo Legion 5 17ITH6H, Legion
5 15ACH6A and Lenovo Legion 5 15ACH6A
– Input: 100 V ac–240 V ac, 50 Hz–60 Hz
– Output: 20 V dc, 11.5 A/20 V dc, 15 A
– Power: 230 W/300 W
• 15-inch models
– Capacity: 60 Wh/80 Wh
– Number of cells: 4
• 17-inch models
– Capacity: 80 Wh
– Number of cells: 4
Note: The battery capacity is the typical or average capacity as measured in a specific test
environment. Capacities measured in other environments may differ but are no lower than the
rated capacity (see product label).
Microprocessor To view the microprocessor information of your computer, type system information in the
Windows search box and then press Enter.
Memory
• Type: Double data rate 4 (DDR4) small outline dual in-line memory module (SODIMM)
• Number of slots: 2
Chapter 1. Meet your computer 9
Page 16

Storage device
Screen
• Type:
– solid-state drive (SSD)
– hard disk drive (HDD) *
• Form factor:
– SSD: M.2 (2242 or 2280)
– HDD: 2.5-inch (7 mm) *
• Bus:
– SSD: PCI Express
– HDD: SATA3 *
• 15-inch models
– Size: 396.24 mm (15.6 inches)
– Display resolution
– 1920 × 1080 pixels (FHD model)
– 2560 × 1440 pixels (QHD model)
• 17-inch models
– Size: 439.42 mm (17.3 inches)
– Display resolution: 1920 × 1080 pixels (FHD model)
Keyboard
• Function keys
• Hotkeys
• Numeric keypad
• Keyboard backlight
10 User Guide
Page 17

Connectors and slots
• Power connector
• Combo audio jack
• HDMI 2.1 connector/HDMI 2.0 connector
• Ethernet connector
• USB Type-A connector × 3
• USB Type-A connector (with Always-On function)
– Power output up to 5 V and 2 A
• USB-C connector
– Power input up to 20 V and 5 A (rear-side only)
– Power output up to 5 V and 3 A
– USB data transfer rate up to 10 Gbps for USB 3.2 Gen 2
– DisplayPort 1.4. Supports maximum output resolution of 5120 × 3200, at 60 Hz frame
rate and color depth of 24 bpp (bits per pixel).
• USB-C (Thunderbolt 4 enabled) connector
– Power input up to 20 V and 5 A (rear-side only)
– Power output up to 5 V and 3 A
– Up to 40 Gbps bi-directional data transfer rate in Thunderbolt mode.
– DisplayPort 1.4. Supports maximum output resolution of 5120 × 3200, at 60 Hz frame
rate and color depth of 24 bpp (bits per pixel).
• SD card slot **
Note: Data rates and performance ratings are dependent on connected devices and cables if
they are used. For DisplayPort connection through a USB-C port, the listed maximum output
capacity is only available on external displays with a DisplayPort, a Mini DisplayPort, or a
USB-C port that supports DisplayPort Alternate Mode. For connections using a converter or
an adapter, the actual output resolution may be lower.
Security features
Wireless features
• UEFI/BIOS passwords
– Administrator password
– User password
– Master hard disk password
– User hard disk password
• Ethernet (10/100/1000 Mbps) network adapter
• Bluetooth and Wi-Fi combo adapter
* for Legion 5 17ACH6, Lenovo Legion 5 17ACH6, Legion 5 17ITH6 only
** for 17-inch models only
Statement on USB transfer rate
Depending on many factors such as the processing capability of the host and peripheral devices, file
attributes, and other factors related to system configuration and operating environments, the actual transfer
rate using the various USB connectors on this device will vary and will be slower than the data rate listed
below for each corresponding device.
Chapter 1. Meet your computer 11
Page 18

USB device Data rate (Gbit/s)
3.2 Gen 1
3.2 Gen 2
5
10
Operating environment
Maximum altitude (without pressurization)
3048 m (10 000 ft)
Temperature
• At altitudes up to 2438 m (8000 ft)
– Operating: 5°C to 35°C (41°F to 95°F)
– Storage: 5°C to 43°C (41°F to 109°F)
• At altitudes above 2438 m (8000 ft)
– Maximum temperature when operating under the unpressurized condition: 31.3°C (88°F)
Note: When you charge the battery, its temperature must be no lower than 10°C (50°F).
Relative humidity
• Operating: 8% to 95% at wet-bulb temperature 23°C (73°F)
• Storage: 5% to 95% at wet-bulb temperature 27°C (81°F)
Avoid constant body contact with specific hot sections
CAUTION:
When the computer is operating, it should be placed on a hard and flat surface with its bottom area
not in contact with user’s bare skin. Under normal operating conditions, the temperature of the
bottom surface will remain within an acceptable range as defined in IEC 62368-1, but such
temperatures can still be high enough to cause discomfort or harm to the user if directly touched for
over 10 seconds at a time. As such, it is recommended that users avoid prolonged direct contact with
the bottom of the computer.
12
User Guide
Page 19

Chapter 2. Get started with your computer
Work with Windows
The following table contains Windows frequently used settings. You can learn the basics and start working
with Windows right away.
To configure settings, type the corresponding keywords in the Windows search box and select the best
match. Follow the on-screen instructions to customize settings.
Table 1. Basic settings
Functions Descriptions
Control Panel View or change Windows settings, including hardware and software setup
and configuration.
Connect to Wi-Fi
networks
Connect to wired
networks
Airplane mode Airplane mode is a convenient setting to turn all wireless communications of
Night light mode Night light is a switch in Windows that you can turn on and off. When it is
Adjust color
temperature
Windows
Updates
For models with a wireless LAN module, you can connect your computer to
®
a Wi-Fi
and then select a network for connection.
Note: The wireless LAN module on your computer may support different
standards. For some countries or regions, use of 802.11ax may be disabled
according to local regulations.
For models with an Ethernet (RJ-45) connector, you can use an Ethernet
cable to connect your computer to a wired network.
your computer on and off. You may need to turn it on when boarding an
airplane.
turned on, your screen shows warmer colors and the amount of emitted
blue light is reduced. Enabling night light reduces the chances of developing
eye fatigue or eye strain.
Note: For more guidance on reducing eye fatigue or eye strain, go to
https://www.lenovo.com/us/en/compliance/visual-fatigue.
If night light mode is turned on, you can adjust the color temperature of the
screen.
Note: Selected Lenovo computers are low blue light certified. These
computers are tested with night light turned on and color temperature set to
the default value of 48.
Microsoft periodically releases feature and security updates to the Windows
operating system. Updates that are applicable to your Windows version are
downloaded automatically when your computer is connected to the
Internet. When updates are downloaded, you are prompted to restart the
computer to install these updates. You can also manually check if there are
available updates for the installed version of Windows.
Attention: Only use Windows Update to download and install updates.
Updates downloaded from other sources may include security risks.
network. Click the network icon in the Windows notification area,
Search by
keywords
Control Panel
Wi-Fi
—
Airplane mode
Night light
Night light
Windows Updates
Windows help information
If the on-screen instructions cannot solve your problem, refer to the following to get the online Windows help
information.
© Copyright Lenovo 2021 13
Page 20

• Type Get Help or Tips in the Windows search box and then press Enter. When the app opens, type the
problem description and select the matched result.
• Visit Microsoft support Web site:
search box and get search results.
https://support.microsoft.com. Enter what you are looking for in the
Lenovo Vantage and Lenovo PC Manager
They are both apps developed by Lenovo. Using either of them, you can:
• View product information and system status
• Manage and change device settings
• Check for and perform system update
Note: This feature is only available on Lenovo Vantage. In Lenovo PC Manager, you can check for and
perform driver update.
Depending on the country or region in which your computer is purchased, one of the apps may be preinstalled on your computer. To open it, type its name in the Windows Search box and select the matched
result. If neither of the apps is pre-installed, you may install one on your own. Lenovo Vantage is available for
download free of charge from the Microsoft Store.
Note: App features are subject to change with updates and specific features may not be available on all
Lenovo products.
The Novo Button menu
The Novo Button menu can be displayed before the operating system starts. From the menu, you can
choose to
• Open the BIOS/UEFI setup utility
• Open the boot device selection menu
• Open the Windows startup options screen
Note: From the Windows startup options screen, you can then choose to
Start your computer using a recovery drive
Reset your computer
Open advanced options screen
Open the Novo Button menu
Step 1. Turn on or restart the computer.
Step 2. Press the hotkey
repeatedly.
The Fn key and hotkeys
The Fn key
Many keys on a Lenovo keyboard have dual functions: a default function and a hidden function. The Fn key is
used to modify a dual-function key to activate its hidden function.
Note: The Fn key is located in the lower left corner on a Lenovo keyboard.
14
User Guide
Page 21

Hotkeys
Hotkeys are dual-function keys with an icon printed on the key. The icons indicate the hidden functions of the
hotkeys. To use the hidden function, hold down the Fn key.
Hotkey Function
Mute/Unmute sound.
Decrease/Increase system volume.
Mute/Unmute the microphone.
Increase/Decrease screen brightness.
Switch display devices.
Turn airplane mode on and off.
• Open Lenovo Vantage, Lenovo PC Manager, or an app launch bar.
• Bring up the Novo Button menu when the computer is turned on.
Enable/Disable the touchpad.
Display thumbnails of all open apps.
Open the Windows Calculator app.
Open the Windows Snipping tool.
Play or pause playback of media.
Stop playback of media.
Go to the previous media file in the playlist or folder.
Go the next media file in the playlist or folder.
Turn on/off or adjust the brightness of the keyboard backlight.
Note: Selected models include a RGB keyboard. For such a keyboard, this
hotkey switches the color and effect of the keyboard backlight. Additional control
is available in Lenovo Vantage or Lenovo PC Manager.
Dual-function keys without printed icons
Some dual-function keys share keys with letter keys and numeric keys. Such keys do not have a dedicated
printed icon. The following table lists the hidden functions for these keys.
Key combination Hidden function
Fn + B Break
Fn + P Pause
Fn + S SysRq
Fn + K
Fn + Q Switch performance modes
Fn + L Turn the front cover LED on and off
Fn + R * Adjust display refresh rate
ScrLk
Chapter 2. Get started with your computer 15
Page 22

Key combination Hidden function
Fn + 4 Put the computer to sleep mode
Fn + U Turn the rear port LED on and off
* for selected models
The FnLock switch
The FnLock is a switch that reverses the default and hidden function of a hotkey. The FnLock switch shares
the ESC key (in the upper left corner of the keyboard). To turn it on or off, press Fn + ESC. The following table
provides an example of how the FnLock switch changes the default function of the F1 key.
FnLock FnLock light Default function of the F1 key
Off Off F1 function *
On On Mute/Unmute sound
* The F1 function is application-dependent. It may have no function if the active application does not have a
definition for the key.
16
User Guide
Page 23

Chapter 3. Explore your computer
Manage power
Use the information in this section to achieve the best balance between performance and power efficiency.
Check the battery status
The battery status icon or is in the Windows notification area. You can check the battery status, view
the current power plan, and access battery settings quickly.
Click the battery status icon to display the percentage of battery power remaining and change the power
mode. A warning message is displayed when the battery is low.
Charge the battery
When the remaining battery power is low, charge your battery by connecting your computer to ac power.
The battery is fully charged in about two to four hours. The actual charging time depends on the battery
capacity, the physical environment, and whether you are using the computer.
Battery charging is also affected by its temperature. The recommended temperature range for charging the
battery is between 10°C (50°F) and 35°C (95°F).
Note:
You can check the battery temperature in Lenovo Vantage or Lenovo PC Manager.
To maximize the life of the battery, once the battery is fully charged, it must discharge to 94% or lower
before it will be allowed to recharge again.
To extend your battery’s lifespan, the battery may optimize its full charge capacity based on your usage.
After prolonged periods of limited use, full battery capacity may not be available until you discharge to as
low as 20% and recharge completely. For more information, refer to the power section of Lenovo
Vantage.
Power input through a USB-C port
The USB-C port on the rear side of your computer supports power input up to 20 V and 5 A. Some external
devices, such as a dock or display, may include a USB-C port that supports power output greater than 20 V
and 2.25 A. If such a device is connected to this rear USB-C port, it is capable of providing power to your
computer.
In another scenario, if you carry your computer around without the included ac power adapter, you may use
a capable USB-C charger to provide power through the rear USB-C port. In both scenarios, the output
power of a USB-C charger or the USB-C port on a dock or display should be at least 20 V and 2.25 A in order
© Copyright Lenovo 2021 17
Page 24

to provide power to your computer. The following table lists the charging capability of a USB-C port on a
charger or an external device based on its maximum output power.
Table 2. Maximum output power of a USB-C port and its capability of charging the computer
Maximum output power of a USB-C port Capability
20 V, 3.25 A and 20 V, 5 A Capable of charging the computer
20 V, 2.25 A and 20 V, 3.25 A
Less than 20 V, 2.25 A Cannot provide power to the computer or charge the
Capable of charging the computer in sleep, hibernation,
or powered-off state
battery
Note: If the computer is already connected to an electrical outlet using the included power adapter, the
computer will not receive power through the USB-C port.
The rear USB-C port is not designed as the primary power input port. If it is used as the only external power
source, the computer may not operate at its full capacity and battery charging may be longer than expected.
Whenever possible, use the included ac power adapter to provide power to your computer.
Set power button behavior
By default, pressing the power button puts the computer to sleep mode. However, you can change the
power button behavior in Windows Control Panel.
Step 1. Type Control Panel in the Windows search box and then press Enter. Open the control panel and
view by large or small icons.
Step 2. Select the power options and then click choose what the power button does.
A power plan
A power plan is a collection of power-saving settings made available by an operating system. With a power
plan, you can set idle time-outs for different hardware components to enter a low-power state. The default
power plan and some of its idle time-out settings are listed below for computer models pre-installed with
Windows.
The listed settings are active when the computer is connected to an electrical outlet. If your computer include
a built-in battery pack, a different collection of time-out settings is set to take effect when the computer is
operating on battery power.
• Default power plan: Balanced
• Turn off the display: after 10 minutes
• Put the computer to sleep: after 30 minutes
Note: To wake the computer from the sleep state, press the power button or any key on the keyboard.
Change or customize a power plan
This operation is applicable to computers with pre-installed Windows.
Step 1. Type power plan in the Windows search box and then press Enter.
Step 2. Customize a power plan of your preference.
18
User Guide
Page 25

Set performance mode
Your computer can work in different performance modes. The performance and power consumption of the
computer vary in different performance modes. Press Fn + Q to cycle through different performance modes.
Note: Performance mode is not available when your computer runs on battery power.
Change settings in UEFI/BIOS setup utility
This section introduces what is UEFI/BIOS and the operations you can perform in its setup utility.
What is UEFI/BIOS setup utility
UEFI/BIOS is the first program that runs when a computer starts. UEFI/BIOS initializes hardware components
and loads the operating system and other programs. Your computer may include a setup program (setup
utility) with which you can change certain UEFI/BIOS settings.
Open the UEFI/BIOS setup utility
Step 1. Turn on or restart the computer.
Step 2. Press F2 repeatedly.
Step 3. On the welcome screen, select More Settings.
Enable or disable Fool Proof Fn Ctrl
Step 1. Open the UEFI/BIOS setup utility.
Step 2. Select Configuration.
Step 3. Change the Fool Proof Fn Ctrl setting to Enabled or Disabled.
Step 4. Select Exit ➙ Exit Saving Changes.
When enabled, the Fn key and the Ctrl key can be used interchangeably for key combinations involving the
Ctrl key. For example, you can press either Ctrl + A or Fn + A to select all text in a text editing application.
Enable or disable always-on
For some Lenovo computers with always-on connectors, the always-on function can be enabled or disabled
in the UEFI/BIOS setup utility.
Step 1. Open the UEFI/BIOS setup utility.
Step 2. Select Configuration ➙ Always On USB and press Enter.
Step 3. Change the setting to Disabled or Enabled.
Step 4. Select Exit ➙ Exit Saving Changes.
Enable or disable Flip to Boot
When Flip to Boot is enabled, you can turn on the computer by flipping open the screen.
Step 1. Open the UEFI/BIOS setup utility.
Step 2. Select Configuration.
Step 3. Change the setting for Flip to Boot.
Note: You may also set Flip to Boot in Lenovo Vantage or Lenovo PC Manager.
Chapter 3. Explore your computer 19
Page 26

Set passwords in UEFI/BIOS setup utility
This section introduces the types of passwords that you can set in the UEFI (Unified Extensible Firmware
Interface) or BIOS (Basic Input/Output System) setup utility.
Password types
You can set various types of passwords in the UEFI/BIOS setup utility.
Password type Pre-requisite Usage
Administrator password No You must enter it to start the setup
utility.
User password The administrator password must be
set.
Master hard disk password No You must enter it to start the
User hard disk password The master hard disk password must
be set.
You can use the user password to
start the setup utility.
operating system.
You can use the user hard disk
password to start the operating
system.
Notes:
• All passwords set in the setup utility consist of alphanumeric characters only.
• If you start the setup utility using the user password, you can only change a few settings.
Set administrator password
You set the administrator password to prevent unauthorized access to the UEFI/BIOS setup utility.
Attention: If you forget the administrator password, a Lenovo authorized service personnel cannot reset
your password. You must take your computer to a Lenovo authorized service personnel to have the system
board replaced. Proof of purchase is required and a fee will be charged for parts and service.
Step 1. Open the UEFI/BIOS setup utility.
Step 2. Select Security ➙ Set Administrator Password and press Enter.
Step 3. Enter a password string that contains only letters and numbers and then press Enter
Step 4. Enter the password again and press Enter.
Step 5. Select Exit ➙ Exit Saving Changes.
Next time you start the computer, you must enter the administrator password to open the setup utility. If
Power on Password is enabled, you must enter the administrator password or the user password to start
the computer.
Change or remove administrator password
Only the administrator can change or remove the administrator password.
Step 1. Open the UEFI/BIOS setup utility using the administrator password.
Step 2. Select Security ➙ Set Administrator Password and press Enter.
Step 3. Enter the current password.
20
User Guide
Page 27

Step 4. In the Enter New Password text box, enter the new password.
Step 5. In the Confirm New Password text box, enter the new password again.
Note: If you want to remove the password, press Enter in both text boxes without entering any
character.
Step 6. Select Exit ➙ Exit Saving Changes.
If you remove the administrator password, the user password is also removed.
Set user password
You must set the administrator password before you can set the user password.
The administrator of the setup utility might need to set a user password for use by others.
Step 1. Open the UEFI/BIOS setup utility using the administrator password.
Step 2. Select Security ➙ Set User Password and press Enter.
Step 3. Enter a password string that contains only letters and numbers and then press Enter. The user
password must be different from the administrator password.
Step 4. Enter the password again and press Enter.
Step 5. Select Exit ➙ Exit Saving Changes.
Enable power-on password
If the administrator password has been set, you can enable power-on password to enforce greater security.
Step 1. Open the UEFI/BIOS setup utility.
Step 2. Select Security ➙ Power on Password and press Enter.
Note: The administrator password must be set in advance.
Step 3. Change the setting to Enabled.
Step 4. Select Exit ➙ Exit Saving Changes.
If power-on password is enabled, a prompt appears on the screen every time you turn on the computer. You
must enter the administrator or user password to start the computer.
Set hard disk password
You can set a hard disk password in the setup utility to prevent unauthorized access to your data.
Attention: Be extremely careful when setting a hard disk password. If you forget the hard disk password, a
Lenovo authorized service personnel cannot reset your password or recover data from the hard disk. You
must take your computer to a Lenovo authorized service personnel to have the hard disk drive replaced.
Proof of purchase is required and a fee will be charged for parts and service.
Step 1. Open the UEFI/BIOS setup utility.
Step 2. Select Security ➙ Set Hard Disk Password and press Enter.
Note: If you start the setup utility using the user password, you cannot set hard disk password.
Step 3. Follow on-screen instructions to set both master and user passwords.
Note: The master and user hard disk passwords must be set at the same time.
Chapter 3. Explore your computer 21
Page 28

Step 4. Select Exit ➙ Exit Saving Changes.
If the hard disk password is set, you must provide the correct password to start the operating system.
Change or remove hard disk password
Step 1. Open the UEFI/BIOS setup utility.
Step 2. Select Security.
Step 3. Change or remove the hard disk password.
To change or remove master password, select Change Master Password and press Enter.
Note: If you remove the master hard disk password, the user hard disk password is also removed.
To change user password, select Change User Password and press Enter.
Note: The user hard disk password cannot be removed separately.
Step 4. Select Exit ➙ Exit Saving Changes.
22
User Guide
Page 29

Chapter 4. Help and support
Frequently asked questions
How do I partition my storage
drive?
What should I do if my computer
stops responding.
What should I do if I spill liquid on
the computer?
Where can I get the latest device
drivers and UEFI/BIOS?
Self-help resources
Refer to
Press and hold the power button until the computer turns off. Then restart the
computer.
• Lenovo Vantage or Lenovo PC Manager
• Lenovo Support Web site at
https://support.lenovo.com/solutions/ht503851
1. Carefully unplug the ac power adapter and turn off the computer immediately.
The more quickly you stop the current from passing through the computer the
more likely you will reduce damage from short circuits.
Attention: Although you might lose some data or work by turning off the
computer immediately, leaving the computer on might make your computer
unusable.
2. Wait until you are certain that all the liquid is dry before turning on your
computer.
CAUTION:
Do not try to drain out the liquid by turning over the computer. If your
computer has keyboard drainage holes on the bottom, the liquid will be
drained out through the holes.
https://support.lenovo.com
Use the following self-help resources to learn more about the computer and troubleshoot problems.
Resources How to access?
•
Troubleshooting and frequently asked questions
Accessibility information
Reset or restore Windows
https://www.lenovo.com/tips
• https://forums.lenovo.com
https://www.lenovo.com/accessibility
• Use Lenovo recovery options.
1. Go to
2. Follow the on-screen instructions.
• Use Windows recovery options.
1. Go to
2. Detect your computer or manually select your
3. Click Diagnostics ➙ Operating System
https://support.lenovo.com/
HowToCreateLenovoRecovery
https://pcsupport.lenovo.com.
computer model.
Diagnostics and then follow the on-screen
instructions.
.
© Copyright Lenovo 2021 23
Page 30

Resources How to access?
Use Lenovo Vantage or Lenovo PC Manager to:
• Download and install the latest drivers and firmware.
• Configure hardware settings
• Diagnose computer hardware problems.
• Check the computer warranty status.
Product documentation:
•
Generic Safety and Compliance Notices
• Safety and Warranty Guide
• Setup Guide
• This User Guide
• Regulatory Notice
Lenovo Support Web site with the latest support
information of the following:
• Drivers and software
• Diagnostic solutions
• Product and service warranty
• Product and parts details
• Knowledge base and frequently asked questions
Use Windows Search.
1. Go to
2. Detect your computer or select computer model
3. Select Documentation and filter out the
Visit
https://support.lenovo.com.
manually.
documentation you want.
https://support.lenovo.com
• Use Get Help or Tips.
®
Windows help information
• Use Windows Search or the Cortana
assistant.
• Microsoft support Web site:
support.microsoft.com
https://
personal
What is a CRU?
Customer replaceable units (CRUs) are parts that can be upgraded or replaced by the customer. A Lenovo
computer may contain the following types of CRUs:
Self-service CRU
Optional-service CRU
If you intend to install a CRU, Lenovo will ship the CRU to you. You might be required to return the defective
part that is replaced by the CRU. When return is required: (1) return instructions, a prepaid shipping label,
and a container will be included with the replacement CRU; and (2) you might be charged for the
replacement CRU if Lenovo does not receive the defective CRU within thirty (30) days of your receipt of the
replacement CRU. For full details, see the Lenovo Limited Warranty at
02
.
Parts that can be installed or replaced easily by
customer themselves or by trained service
technicians at an additional cost.
Parts that can be installed or replaced by customers
with a greater skill level. Trained service technicians
can also provide service to install or replace the
parts under the type of warranty designated for the
customer’s machine.
https://www.lenovo.com/warranty/llw_
24
User Guide
Page 31

CRUs for your product model
The table below lists the CRUs and CRU types that are defined for your product model.
Part
Power cord X
ac power adapter X
Self-service CRU Optional-service CRU
Notes:
• CRU replacement instruction is provided in one or more of the following publications and are available
from Lenovo at any time upon your request.
the product User Guide
the printed publications that came with the product
• Replacement of any parts not listed above, including the built-in rechargeable battery, must be done by a
Lenovo-authorized repair facility or technician. Go to
https://support.lenovo.com/partnerlocation for more
information.
Call Lenovo
If you have tried to correct the problem yourself and still need help, you can call Lenovo Customer Support
Center.
Before you contact Lenovo
Record product information and problem details before you contact Lenovo.
Product information Problem symptoms and details
• Product name
• Machine type and serial number
• What is the problem? Is it continuous or intermittent?
• Any error message or error code?
• What operating system are you using? Which version?
• Which software applications were running at the time
of the problem?
• Can the problem be reproduced? If so, how?
Note: The product name and serial number can usually be found on the bottom of the computer, either
printed on a label or etched on the cover.
Lenovo Customer Support Center
During the warranty period, you can call Lenovo Customer Support Center for help.
Telephone numbers
For a list of the Lenovo Support phone numbers for your country or region, go to
pcsupport.lenovo.com/supportphonelist
.
Note: Phone numbers are subject to change without notice. If the number for your country or region is not
provided, contact your Lenovo reseller or Lenovo marketing representative.
https://
Chapter 4. Help and support 25
Page 32

Services available during the warranty period
• Problem determination - Trained personnel are available to assist you with determining if you have a
hardware problem and deciding what action is necessary to fix the problem.
• Lenovo hardware repair - If the problem is determined to be caused by Lenovo hardware under warranty,
trained service personnel are available to provide the applicable level of service.
• Engineering change management - Occasionally, there might be changes that are required after a product
has been sold. Lenovo or your reseller, if authorized by Lenovo, will make selected Engineering Changes
(ECs) that apply to your hardware available.
Services not covered
• Replacement or use of parts not manufactured for or by Lenovo or nonwarranted parts
• Identification of software problem sources
• Configuration of UEFI/BIOS as part of an installation or upgrade
• Changes, modifications, or upgrades to device drivers
• Installation and maintenance of network operating systems (NOS)
• Installation and maintenance of programs
For the terms and conditions of the Lenovo Limited Warranty that apply to your Lenovo hardware product,
see “Warranty information” in the Safety and Warranty Guide that comes with your computer.
Purchase additional services
During and after the warranty period, you can purchase additional services from Lenovo at https://
pcsupport.lenovo.com/warrantyupgrade
.
Service availability and service name might vary by country or region.
26
User Guide
Page 33

Appendix A. Notices and trademarks
Notices
Lenovo may not offer the products, services, or features discussed in this document in all countries. Consult
your local Lenovo representative for information on the products and services currently available in your
area. Any reference to a Lenovo product, program, or service is not intended to state or imply that only that
Lenovo product, program, or service may be used. Any functionally equivalent product, program, or service
that does not infringe any Lenovo intellectual property right may be used instead. However, it is the user's
responsibility to evaluate and verify the operation of any other product, program, or service.
Lenovo may have patents or pending patent programs covering subject matter described in this document.
The furnishing of this document does not give you any license to these patents. You can send license
inquiries, in writing, to:
Lenovo (United States), Inc.
8001 Development Drive
Morrisville, NC 27560
U.S.A.
Attention: Lenovo Director of Licensing
LENOVO PROVIDES THIS PUBLICATION "AS IS" WITHOUT WARRANTY OF ANY KIND, EITHER EXPRESS
OR IMPLIED, INCLUDING, BUT NOT LIMITED TO, THE IMPLIED WARRANTIES OF NON-INFRINGEMENT,
MERCHANTABILITY OR FITNESS FOR A PARTICULAR PURPOSE. Some jurisdictions do not allow
disclaimer of express or implied warranties in certain transactions, therefore, this statement may not apply to
you.
Changes are made periodically to the information herein; these changes will be incorporated in new editions
of the publication. To provide better service, Lenovo reserves the right to improve and/or modify the
products and software programs described in the manuals included with your computer, and the content of
the manual, at any time without additional notice.
The software interface and function and hardware configuration described in the manuals included with your
computer might not match exactly the actual configuration of the computer that you purchase. For the
configuration of the product, refer to the related contract (if any) or product packing list, or consult the
distributor for the product sales. Lenovo may use or distribute any of the information you supply in any way it
believes appropriate without incurring any obligation to you.
The products described in this document are not intended for use in implantation or other life support
applications where malfunction may result in injury or death to persons. The information contained in this
document does not affect or change Lenovo product specifications or warranties. Nothing in this document
shall operate as an express or implied license or indemnity under the intellectual property rights of Lenovo or
third parties. All information contained in this document was obtained in specific environments and is
presented as an illustration. The result obtained in other operating environments may vary.
Lenovo may use or distribute any of the information you supply in any way it believes appropriate without
incurring any obligation to you.
Any references in this publication to non-Lenovo Web sites are provided for convenience only and do not in
any manner serve as an endorsement of those Web sites. The materials at those Web sites are not part of the
materials for this Lenovo product, and use of those Web sites is at your own risk.
© Copyright Lenovo 2021 27
Page 34

Any performance data contained herein was determined in a controlled environment. Therefore, the result
obtained in other operating environments may vary significantly. Some measurements may have been made
on development-level systems and there is no guarantee that these measurements will be the same on
generally available systems. Furthermore, some measurements may have been estimated through
extrapolation. Actual results may vary. Users of this document should verify the applicable data for their
specific environment.
This document is copyrighted by Lenovo and is not covered by any open source license, including any Linux
agreement(s) which may accompany software included with this product. Lenovo may update this document
at any time without notice.
For the latest information or any questions or comments, contact or visit the Lenovo Web site:
https://support.lenovo.com
Trademarks
Lenovo, the Lenovo logo and Lenovo Legion are trademarks of Lenovo. Thunderbolt is a trademark of Intel
Corporation or its subsidiaries. Microsoft, Windows, OneDrive, Outlook, Skype, Office 365 and Cortana are
trademarks of the Microsoft group of companies. DisplayPort is a trademark of the Video Electronics
Standards Association. The terms HDMI and HDMI High-Definition Multimedia Interface, and the HDMI logo
are trademarks or registered trademarks of HDMI Licensing Administrator, Inc. in the United States and other
countries. Wi-Fi is a registered trademark of Wi-Fi Alliance. USB-C is a trademark of USB Implementers
Forum. All other trademarks are the property of their respective owners.
28
User Guide
 Loading...