


ThinkVision E22-20
User Guide
Machine Types:
62A4-MAR4-WW

Product No.
H20215FE0
62A4-MAR4-WW
First Edition (April 2020)
© Copyright Lenovo 2020.
LENOVO products, data, computer software, and services have been developed exclusively at private expense
restricted rights to use, reproduction and disclosure.
LIMITED AND RESTRICTED RIGHTS NOTICE: If products, data, computer software, or services are
delivered pursuant a General Services Administration "GSA" contract, use, reproduction, or disclosure is
subject to restrictions set forth in Contract No. GS-35F-05925.

Accessibility information
Power Management Modes
Serice information
Customer responsibilities
Service parts
Safety information
General Safety guidelines
For tips to help you use your computer safely, go to:
http://www.lenovo.com/safety
Before installing this product, read the Safety Information.
DANGER
To avoid shock hazard:
• Do not remove the covers.
• Do not operate this product unless the stand is attached.
• Do not connect or disconnect this product during an electrical storm.
• The power cord plug must be connected to a properly wired and grounded power outlet.
• Any equipment to which this product will be attached must also be connected to
properly wired and grounded power outlets.
• To isolate the monitor from the electrical supply, you must remove the plug from the
power outlet. The power outlet should be easily accessible.
To take special precautions to avoid the introduction of hazards when operating, installing,
servicing, transporting or storing equipment, the necessary instructions shall be made
available.
iii
To reduce the risk of electric shock, do not perform any servicing other than that contained
Handling:
• If your monitor weighs more than 18 kg (39.68 lb), it is recommended that it be moved
or lifted by two people.
Make sure the light bar is located downside when you install in the way of VESA.
To prevent possible hearing damage, do not listen at high volume levels for long periods.
Warning for excessive sound pressure from earphones and headphones. Excessive sound
pressure fromearphones and headphones can cause hearing loss. Adjustment of the equalizer
to maximum increases the earphones and headphones output voltage and therefore the sound
pressure level.
A third-party certification according to ISO 14024
Toward sustainable IT products
Say hello
to a more sustainable product
IT products are associated with a wide range of sustainability risks
throughout their life cycle. Human rights violations are common in the
factories. Harmful substances are used both in products and their
manufacture. Products can often have a short lifespan because of poor
ergonomics, low quality and when they are not able to be repaired or
upgraded.
This product is a better choice. It meets all the criteria in TCO Certified,
the world’s most comprehensive sustainability certification for IT
products. Thank you for making a responsible product choice, that help
drive progress towards a more sustainable future!
Criteria in TCO Certified have a life-cycle perspective and balance
environmental and social responsibility. Conformity is verified by
independent and approved verifiers that specialize in IT products, social
responsibility or other sustainability issues. Verification is done both
before and after the certificate is issued, covering the entire validity
period. The process also includes ensuring that corrective actions are
implemented in all cases of factory non-conformities. And last but not
least, to make sure that the certification and independent verification is
accurate, both TCO Certified and the verifiers are reviewed regularly.
Want to know more?
Read information about TCO Certified, full criteria documents, news and
updates at tcocertified.com. On the website you’ll also find our Product
Finder, which presents a complete, searchable listing of certified
products.
iv

v
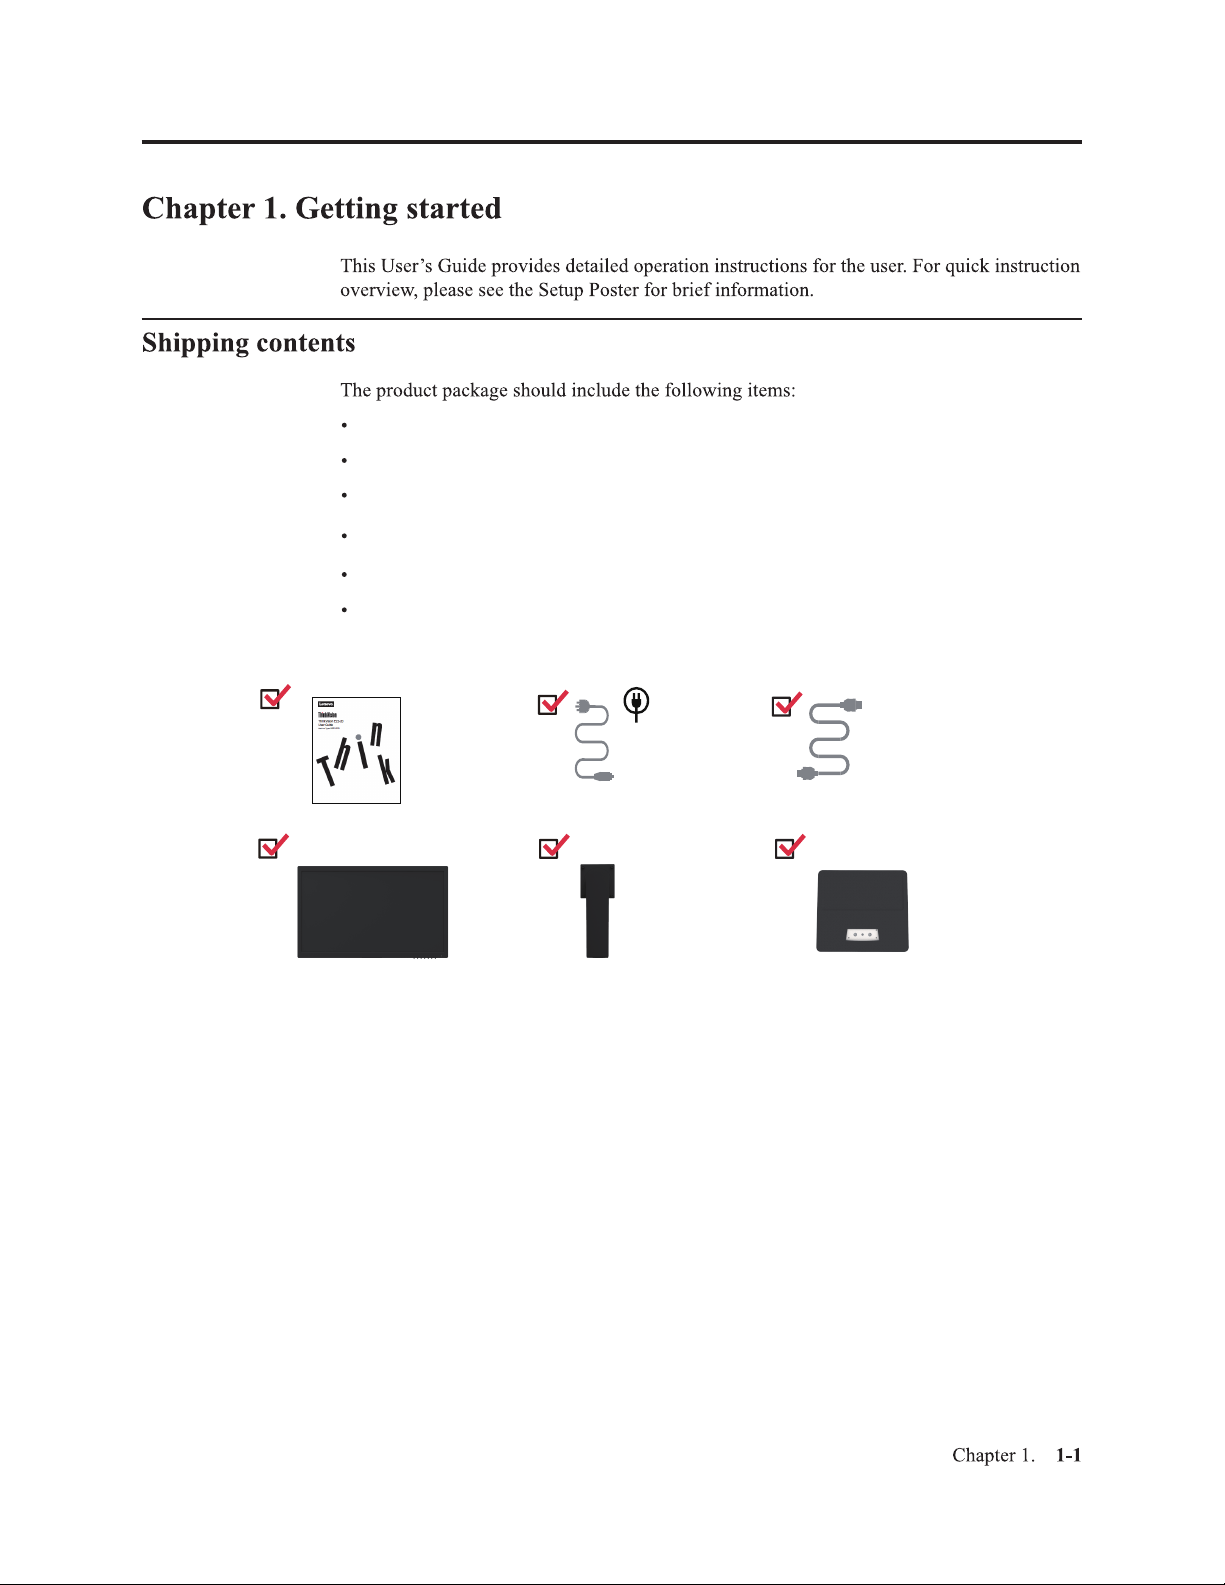
Information Flyer
Flat Panel Monitor
Power Cord
HDMI Cable
Stand (with four screws)
Base
HDMI
Notice for use
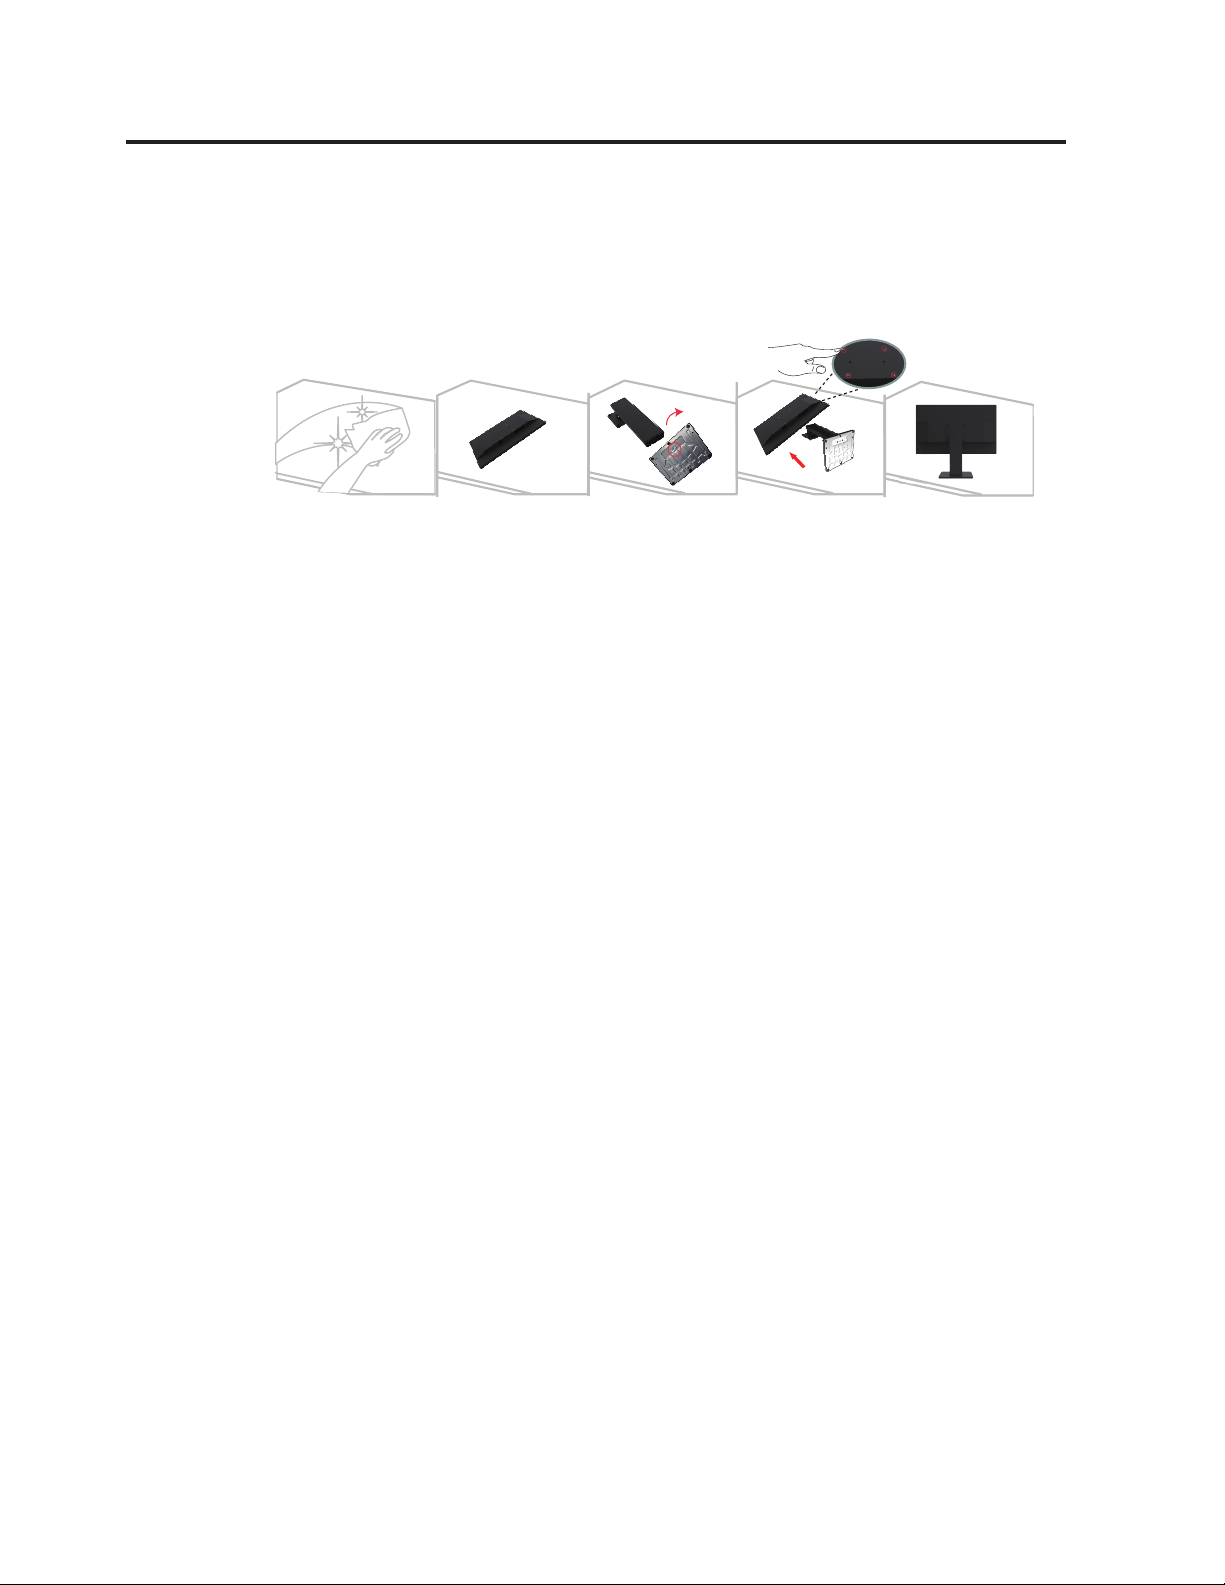
To set up your monitor, please see the illustrations below.
Note: Do not touch the screen of monitor, which can be damaged easily by rub or pressure
because it is made of glass.
1.
Put your monitor with the screen face down on a soft flat surface.
2. Assemble the bracket on the base and tighten the screws on the base.
3. Assemble the bracket base on the back of the monitor, align the screw hole and tighten the screw.
Notes: To install a VESA mount, please see "Wall Mounting (Optional)" on page 2-9.
Don’t press hard screen(screen arch up).
Chapter 1. 1-2
Product overview
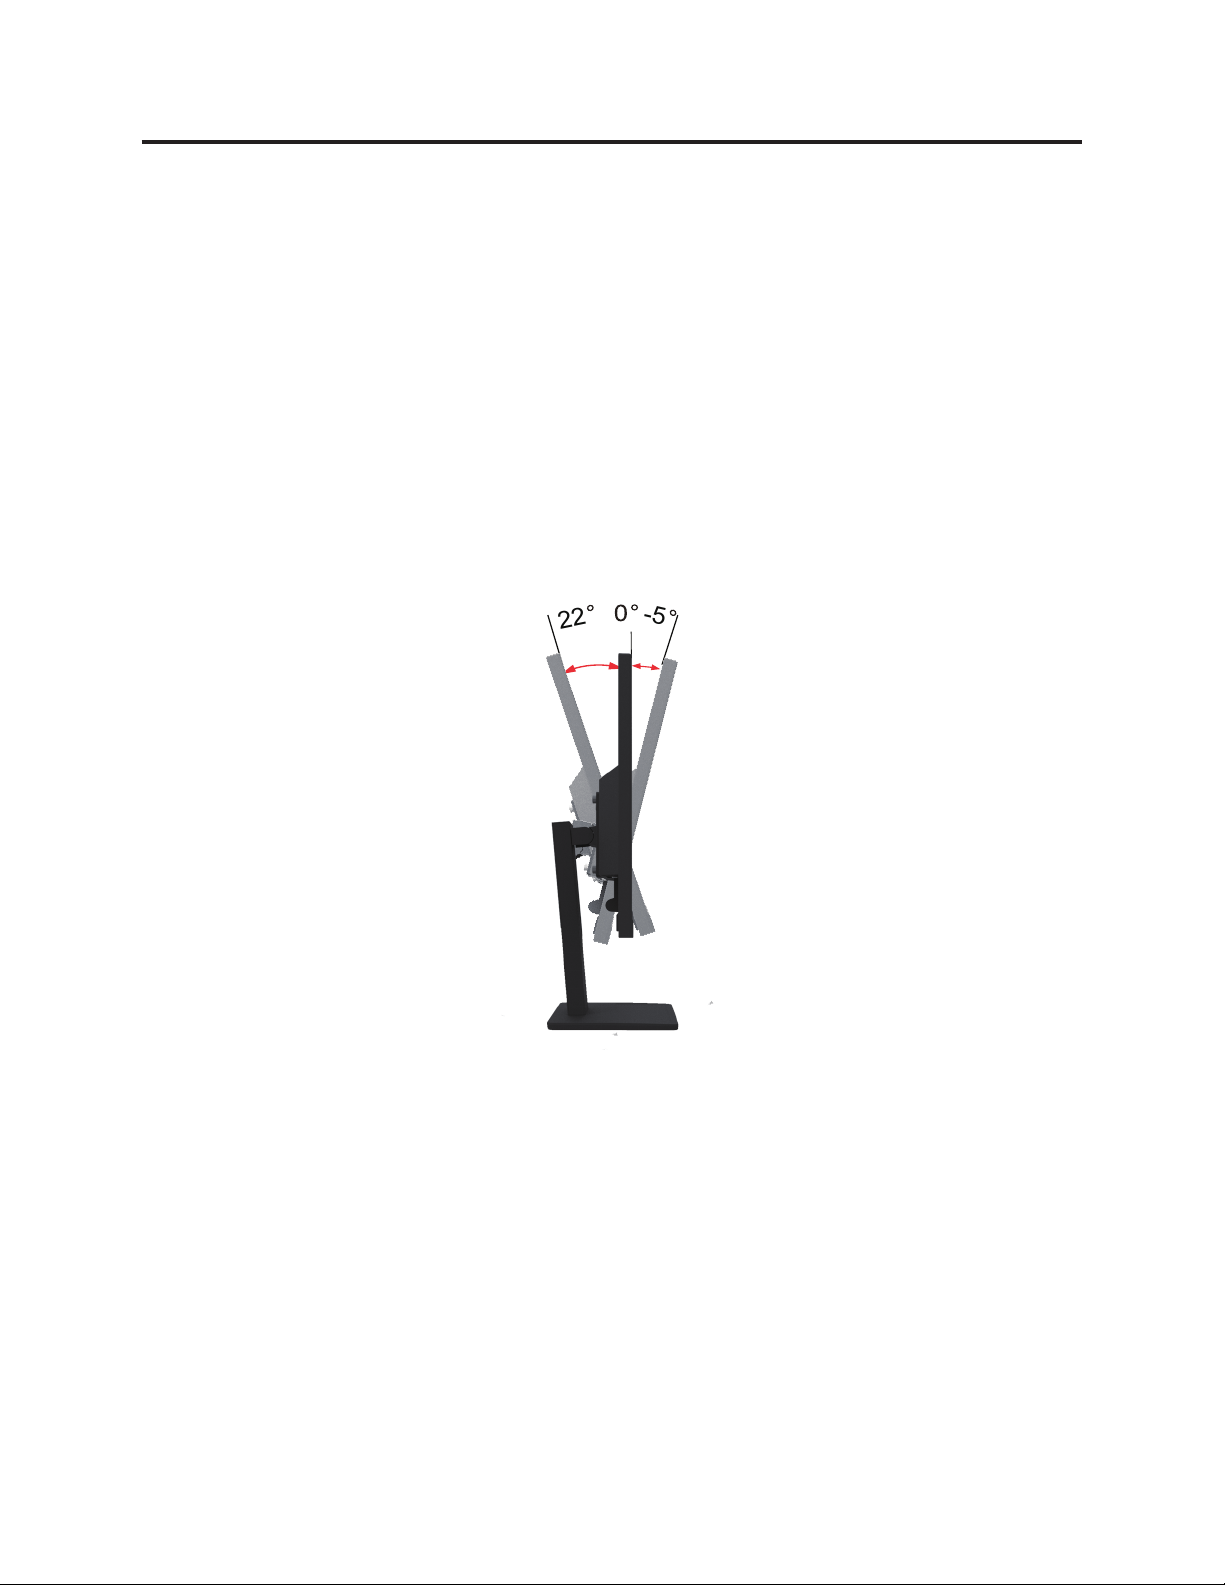
Types of adjustments
Tilt
This section will provide information on adjusting monitor positions, setting user controls,
and using the cable lock slot.
Please see the illustration below for an example of the tilt range.
22
-5
Chapter 1. 1-3
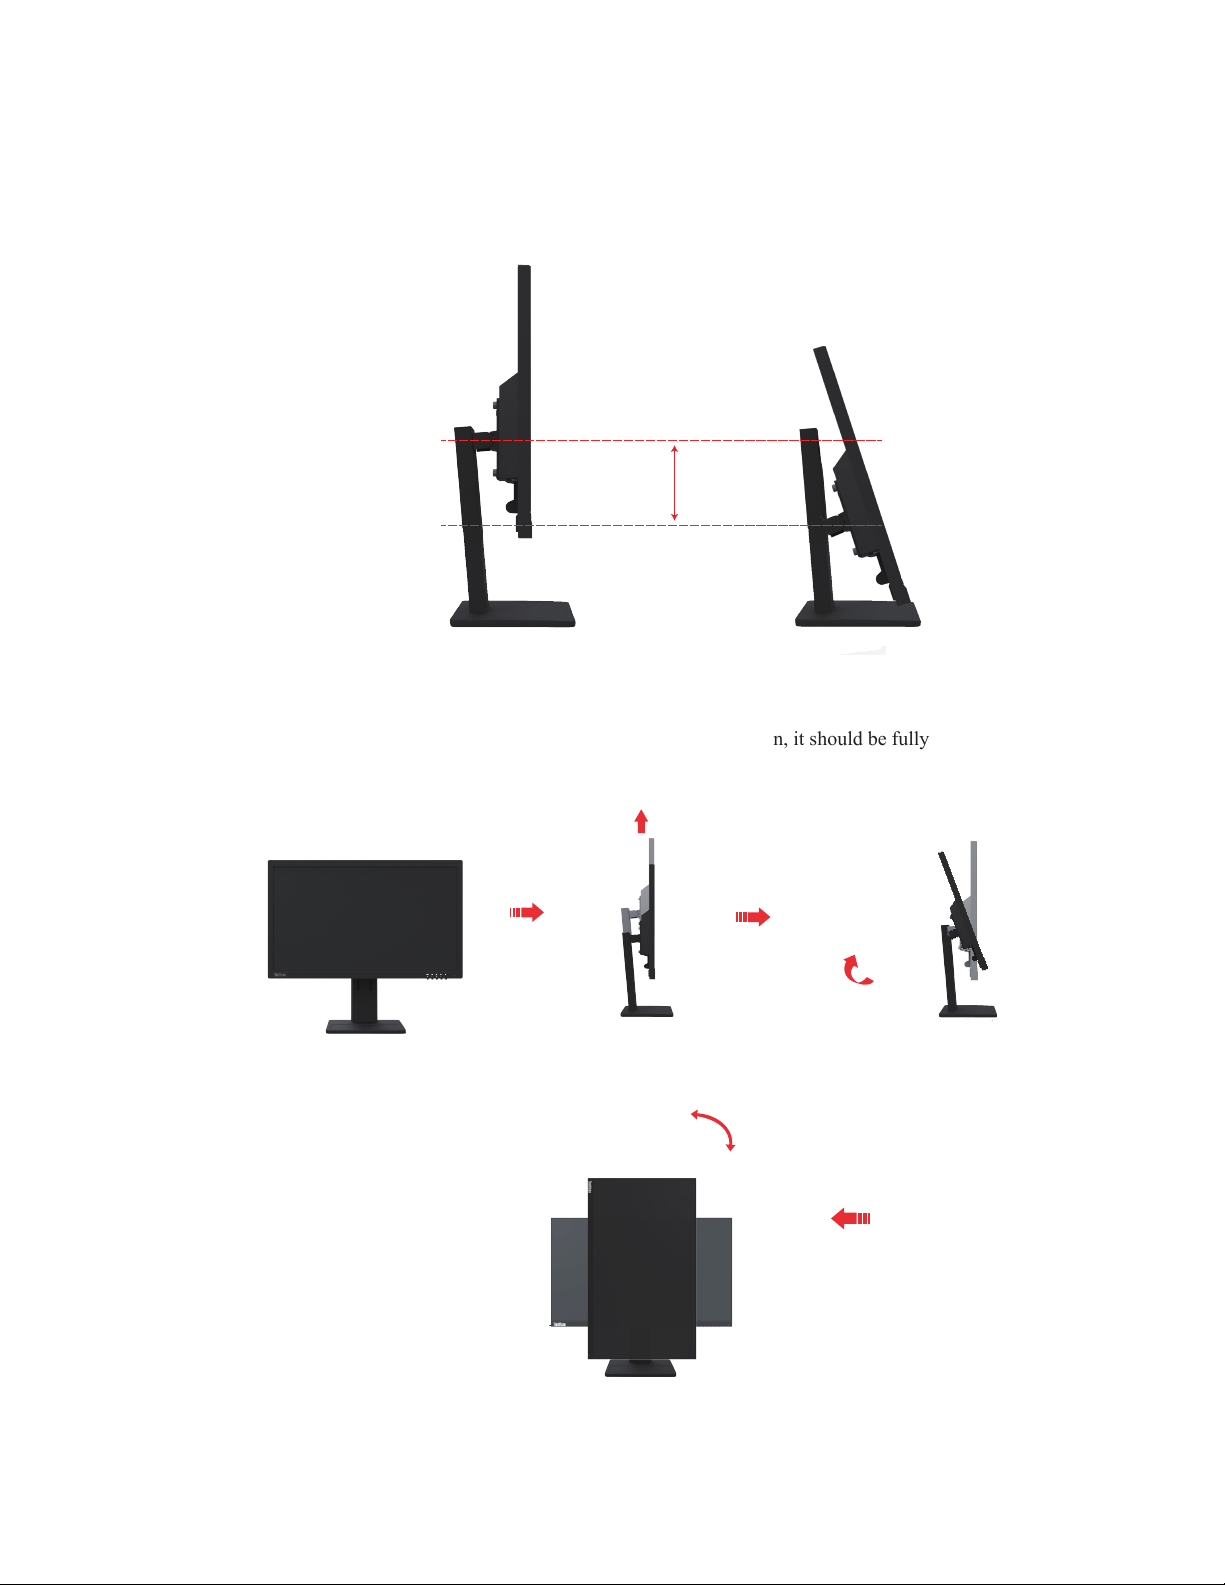
Height Adjustment
For height adjustment, user needs to press down or lift up the monitor.
Pivot
155mm
Before the monitor is displayed in the vertical direction, it should be fully lift up and fully
tilted to avoid collisions.
90°
Chapter 1. 1-4
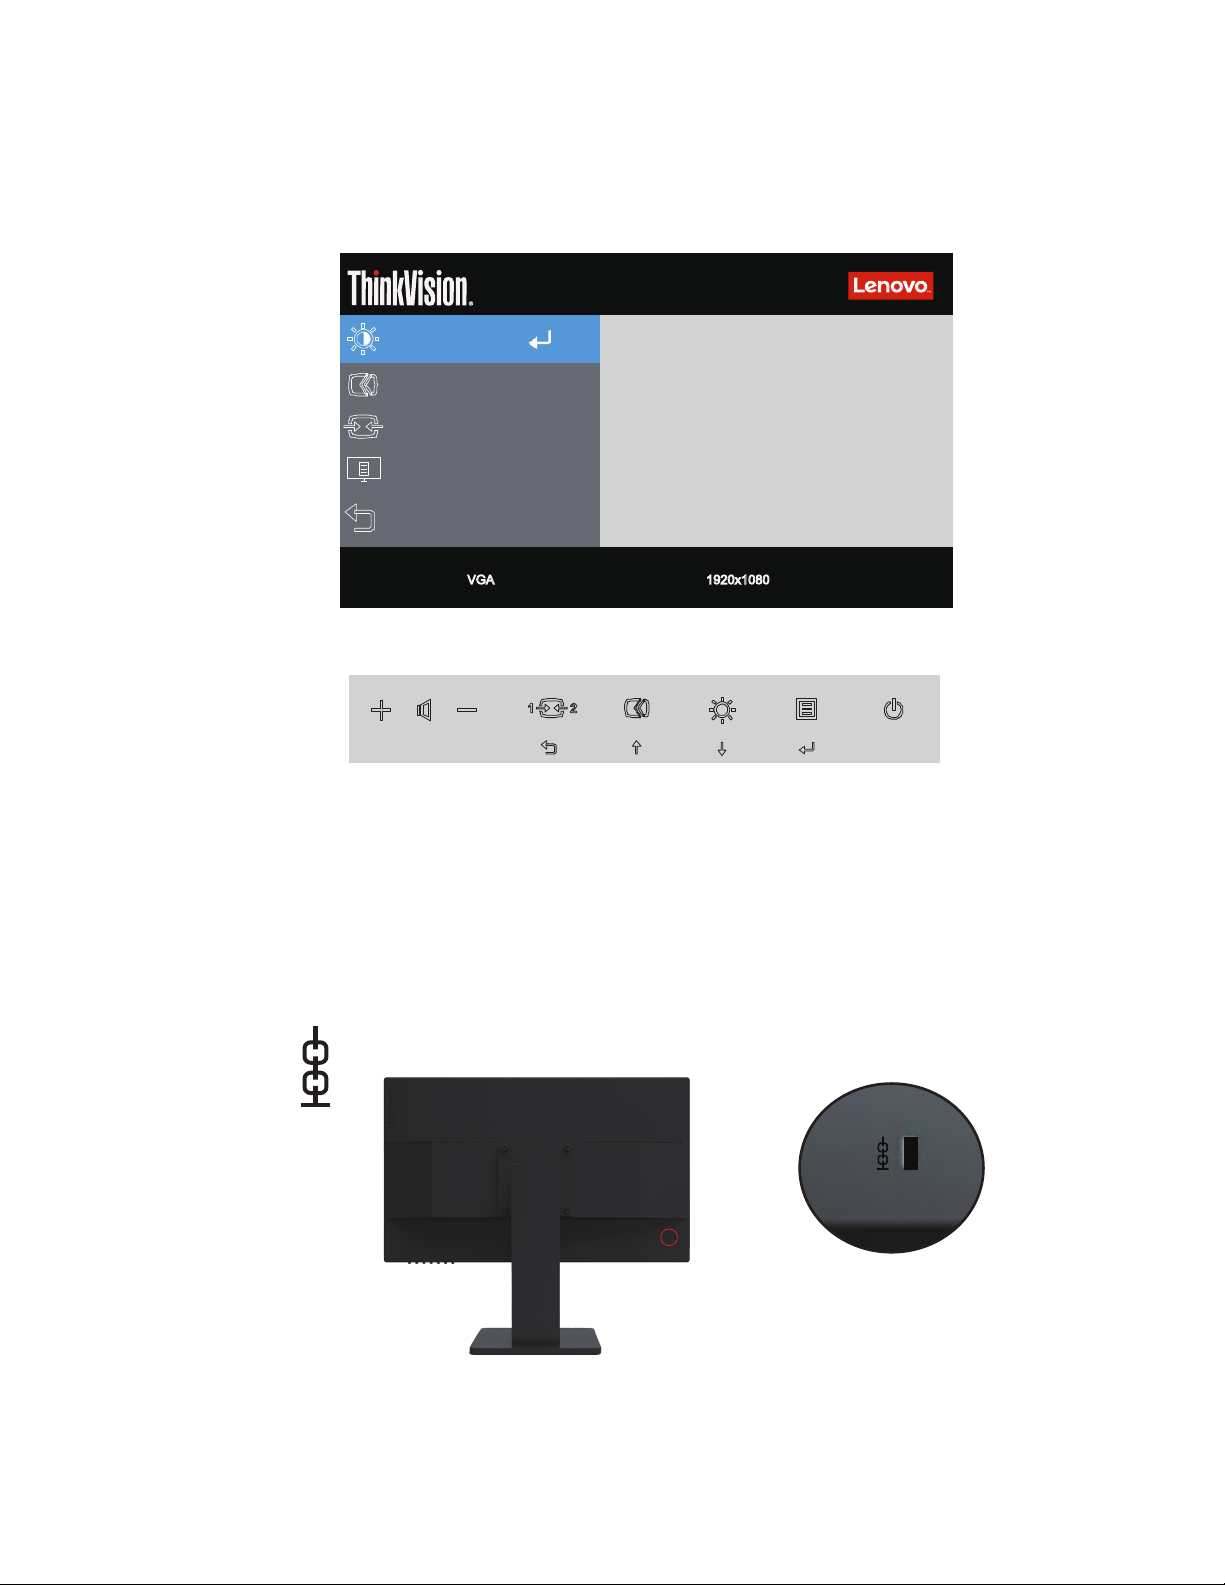
Monitor controls
The keypad controls on the panel frame are accesses to various functions.
E22-20
For information on how to utilize these keypad controls, please see "Adjusting your monitor
image" on page 2-3.
Cable lock slot
Monitor Controls
Advanced Settings
Port Settings
Menu Settings
Exit
Input Signal: VGA Resolusion: 1920x1080
Brightness
Contrast
Volume
75
75
50
RefreshRate:60Hz
Your monitor is equipped with a cable lock slot located on the rear of your monitor.
Chapter 1. 1-5
Setting up your monitor
This section provides information on how to set up your monitor.
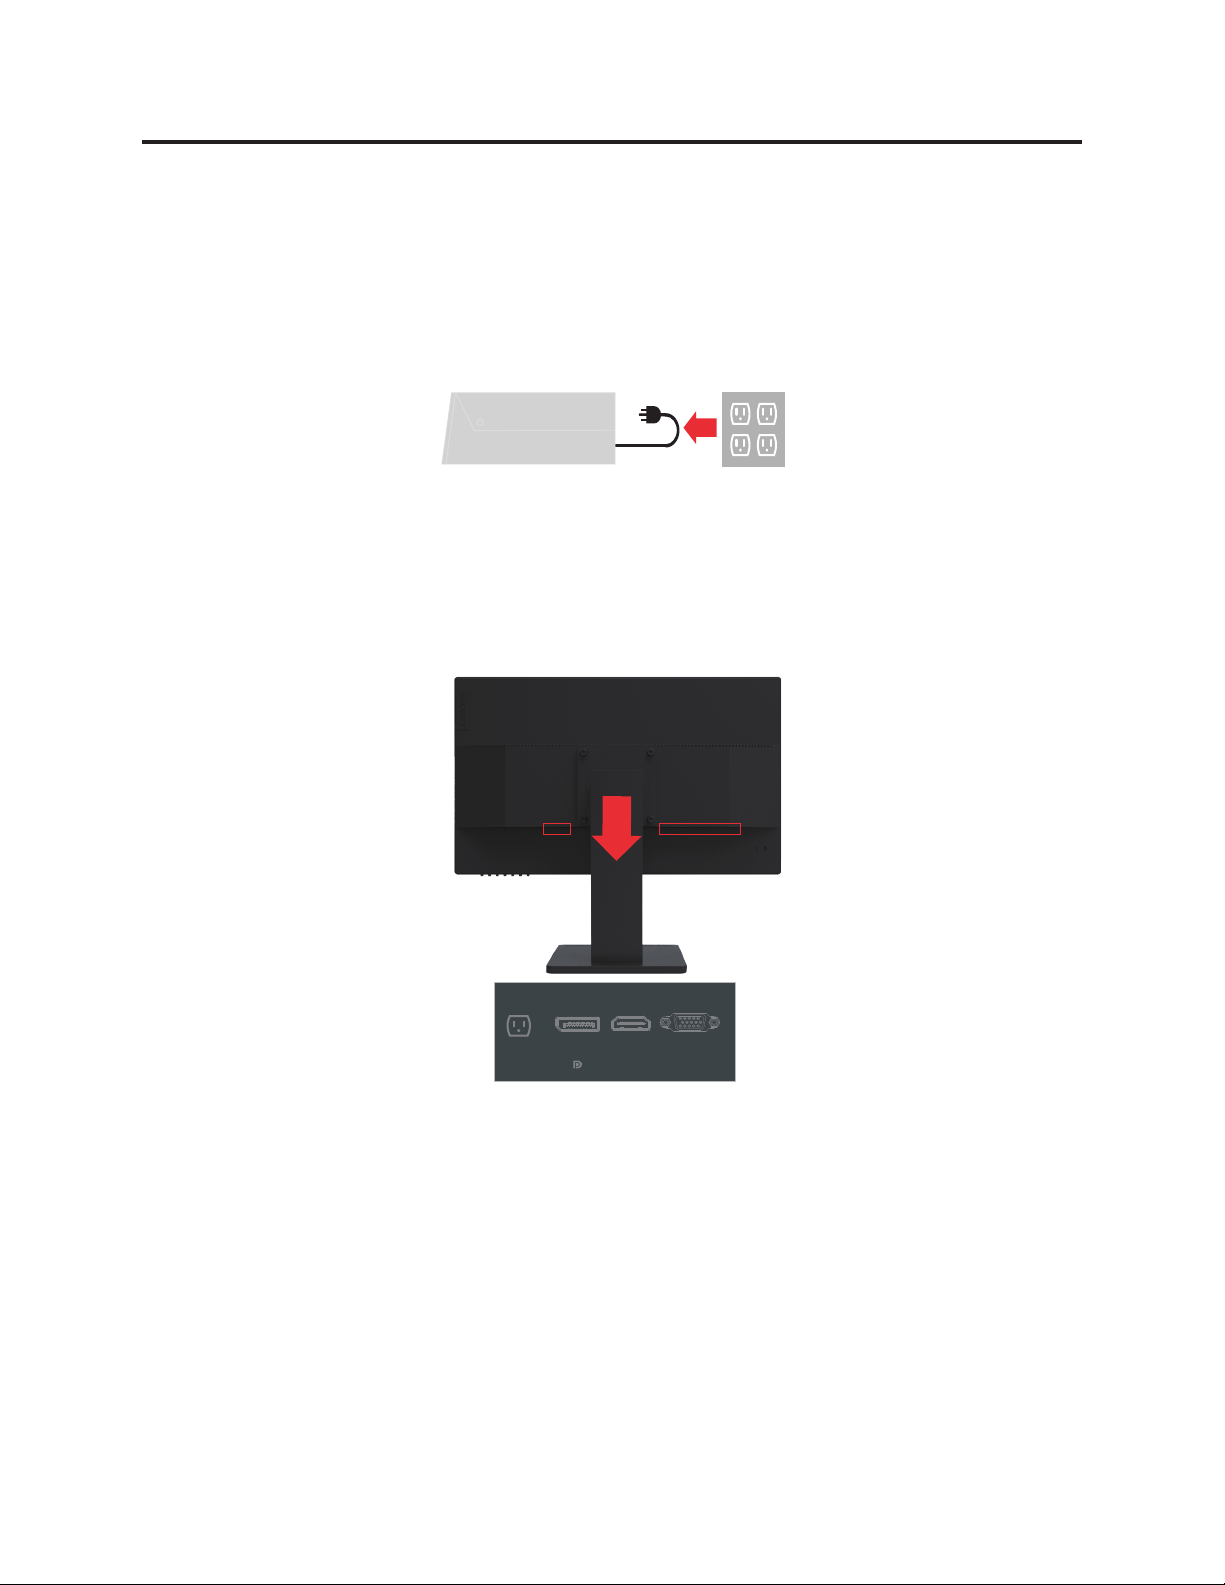
Connecting and turning on your monitor
Note: Be sure to read the safety information on page iii before operation.
1. Power off your computer and all attached devices, then unplug the computer power cord.
2. Connect the cables according to the following symbols.
HDMIAC VGA
Chapter 1. 1-6
 Loading...