

Lenovo Chromebook C340-15 User Guide [en, ar, bg, da, el, es, fi, he, hr, hu, id, nb, pt, pt, sk, sl, sr, sv, th, tr, uk, zc]
Lenovo Chromebook C340-15
User Guide
About this documentation
• Illustrations in this documentation might look different from your product.
• Depending on the model, some features and software programs might not be available on your computer.
• Documentation content is subject to change without notice. Lenovo makes constant improvement on the
documentation of your computer, including this User Guide. To get the latest documentation, go to
support.lenovo.com
.
https://
• This documentation applies to the following product model:
Model Name Machine Type (MT)
Lenovo Chromebook C340-15 81T9
First edition (May 2019)
© Copyright Lenovo 2019.
LIMITED AND RESTRICTED RIGHTS NOTICE: If data or software is delivered pursuant to a General Services
Administration “GSA” contract, use, reproduction, or disclosure is subject to restrictions set forth in Contract No. GS35F-05925.

Contents
Chapter 1. Meet your Chromebook . . . 1
Front . . . . . . . . . . . . . . . . . . . . 1
Base . . . . . . . . . . . . . . . . . . . . 2
Left . . . . . . . . . . . . . . . . . . . . 3
Right . . . . . . . . . . . . . . . . . . . . 4
Bottom . . . . . . . . . . . . . . . . . . . 5
Features and specifications . . . . . . . . . . . 6
Statement on USB transfer rate . . . . . . . . 7
Operating environment . . . . . . . . . . . . . 7
Chapter 2. Get started with your
Chromebook . . . . . . . . . . . . . . . 9
Charge your Chromebook. . . . . . . . . . . . 9
User interface . . . . . . . . . . . . . . . 10
Connect to Wi-Fi . . . . . . . . . . . . . . 10
Get to know modes . . . . . . . . . . . . . 11
Use the power button . . . . . . . . . . . . 12
Connect to Bluetooth devices . . . . . . . . . 12
Set the power plan . . . . . . . . . . . . . 12
Use the mini security-lock slot . . . . . . . . . 12
Chapter 3. Navigate the screen . . . . 15
Use the multi-touch screen . . . . . . . . . . 15
Use the special keys . . . . . . . . . . . . . 16
Use the touchpad . . . . . . . . . . . . . . 17
Chapter 4. Use multimedia . . . . . . 19
Use the camera . . . . . . . . . . . . . . . 19
Use audio . . . . . . . . . . . . . . . . . 19
Connect to an external display . . . . . . . . . 19
Chapter 5. Account, login, and
logout . . . . . . . . . . . . . . . . . 21
Types of user account for logging into Chrome . . 21
Become your Chromebook’s owner . . . . . . . 21
Sign in with a Google Account other than the
owner’s . . . . . . . . . . . . . . . . . . 21
Browse as a guest . . . . . . . . . . . . . . 22
Create a supervised account. . . . . . . . . . 22
Sign out . . . . . . . . . . . . . . . . . . 22
Control who can use your Chromebook . . . . . 22
Check a Chromebook’s owner . . . . . . . . . 23
Disable guest login . . . . . . . . . . . . . 23
Lock your Chromebook. . . . . . . . . . . . 23
Shut down your Chromebook . . . . . . . . . 23
Reset your Chromebook . . . . . . . . . . . 23
Get help from Google . . . . . . . . . . . . 24
Chapter 6. Manage files and
folders . . . . . . . . . . . . . . . . . 25
What is Google Drive. . . . . . . . . . . . . 25
Your local storage space . . . . . . . . . . . 25
The Files app. . . . . . . . . . . . . . . . 25
Create folders using the Files app
Delete unused files . . . . . . . . . . . . . 25
Check the amount of available storage. . . . . . 25
Expand the local storage . . . . . . . . . . . 26
. . . . . . . . 25
Chapter 7. Language settings. . . . . 27
Change display language . . . . . . . . . . . 27
Add an input method. . . . . . . . . . . . . 27
Switch among input methods . . . . . . . . . 27
Chapter 8. Add and manage apps. . . 29
What is Chrome Web Store . . . . . . . . . . 29
Add apps or extensions. . . . . . . . . . . . 29
Install Android apps . . . . . . . . . . . . . 29
Pin apps to shelf . . . . . . . . . . . . . . 30
Pin Web pages to shelf . . . . . . . . . . . . 30
Chapter 9. Lenovo help and
support . . . . . . . . . . . . . . . . . 31
Lenovo support Web site . . . . . . . . . . . 31
Call Lenovo customer support center . . . . . . 31
Before calling customer support . . . . . . 31
Services supported by Lenovo customer
support center . . . . . . . . . . . . . 31
Services not supported by Lenovo customer
support center . . . . . . . . . . . . . 31
Support phone numbers . . . . . . . . . 31
Appendix A. Important safety
information . . . . . . . . . . . . . . . 33
Appendix B. Compliance
information . . . . . . . . . . . . . . . 43
Appendix C. Accessibility,
ergonomic, and maintenance
information . . . . . . . . . . . . . . . 53
Trademarks . . . . . . . . . . . . . . . . lvii
© Copyright Lenovo 2019 i

ii Lenovo Chromebook C340-15 User Guide
Chapter 1. Meet your Chromebook
Note: Your computer might look different from the illustrations in this chapter.
Front
1. Microphones
2. Camera
3. Camera
4. Camera Take pictures or record videos by clicking Camera from the Start menu.
5. Multi-touch screen
light
cover slider
Capture or record sound and voice.
If the light is on, the camera is in use.
Move the slider to cover or uncover the camera lens.
Note: The camera cover helps you better protect your privacy.
Note: If you
video conference, the camera starts automatically when you enable the camerarequired feature from the app.
Display text, graphics, and videos and support multi-touch function.
use other apps that support photographing, video chatting, and
© Copyright Lenovo 2019 1
Base
1. Keyboard Enter characters and interact with programs.
Note: The keyboard also includes numeric keypad, hotkeys, and function keys
for changing settings and performing tasks quickly.
2. Touchpad Perform finger touch and all the functions of a traditional mouse.
Note: The touchpad also supports multi-touch function.
2 Lenovo Chromebook C340-15 User Guide
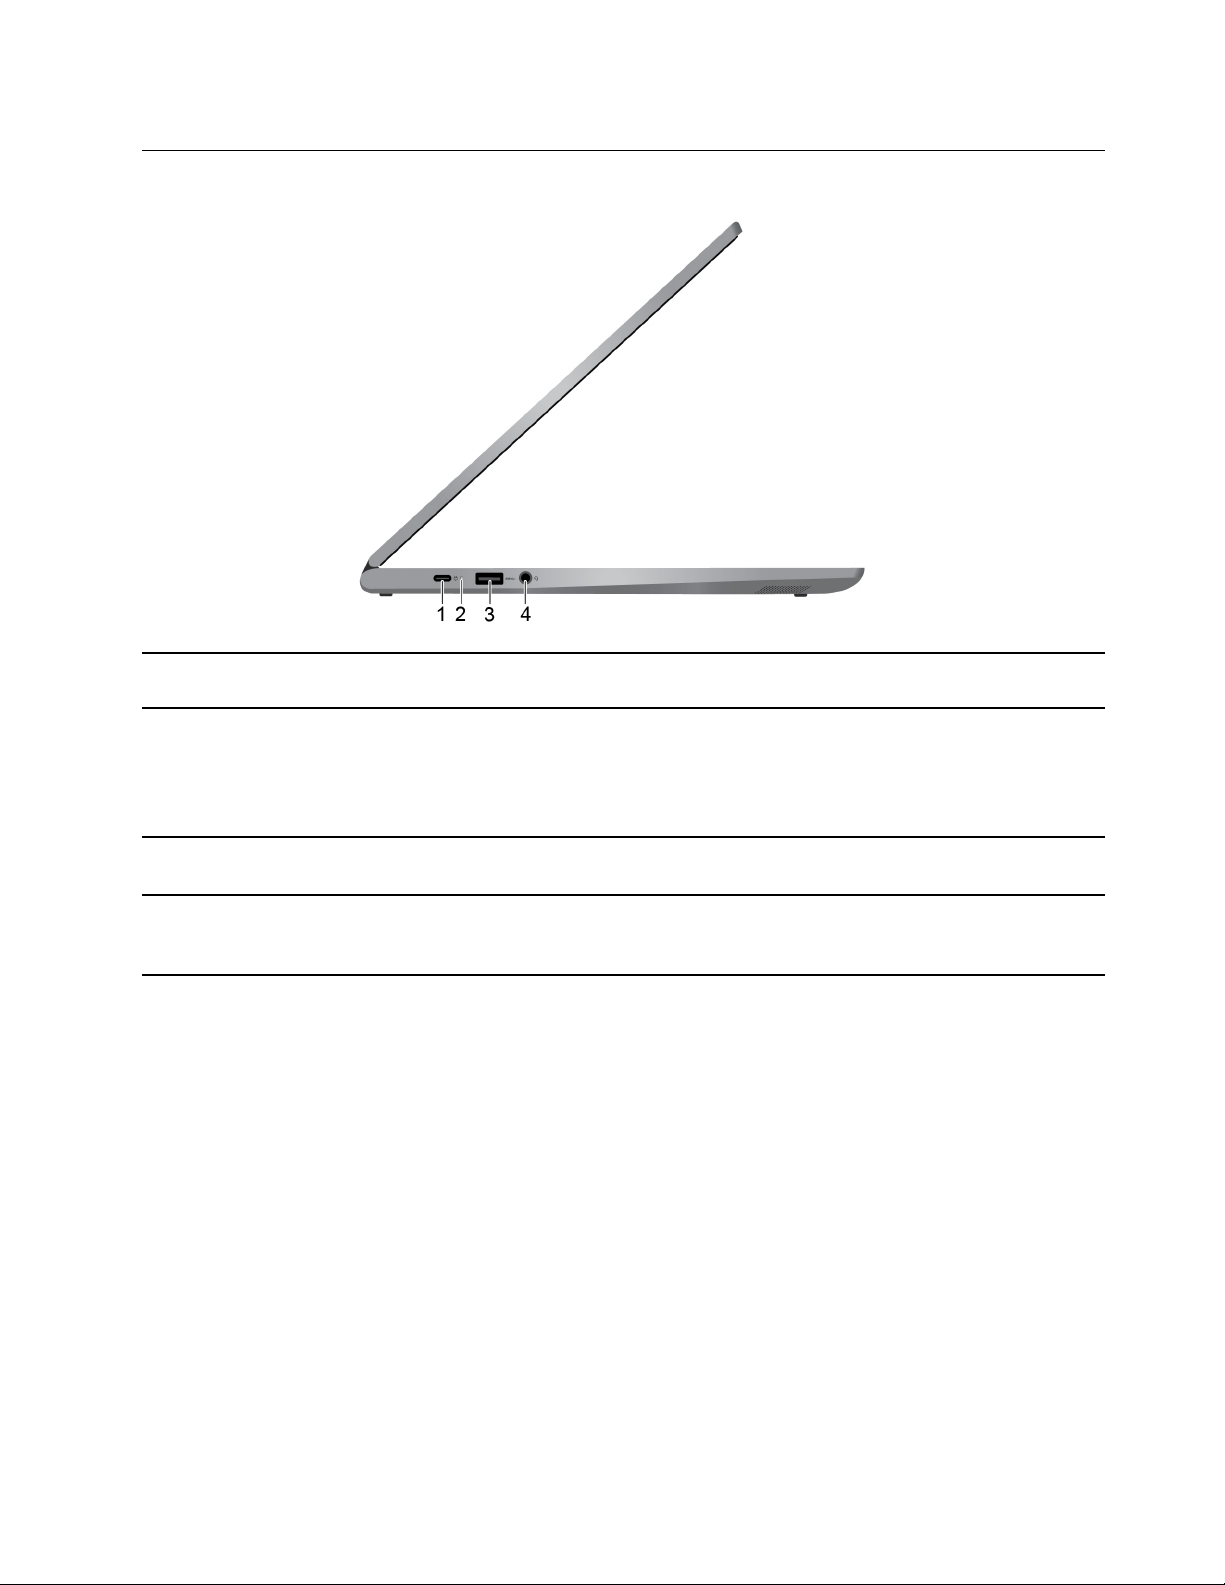
Left
1. Power connector/ USB-C™
connector
2. ac
power status indicator
3. USB
connector
4. Combo audio jack
(3.1 Gen 1) Type-A
Connect to power with the included power cord and ac power adapter.
Indicate whether the computer is connected to ac power.
• On (orange): connected to ac power; battery capacity 1% – 99%
• On (white): connected to ac power; fully charged
• Off: not connected to ac power
Connect a USB-compatible device, such as a USB keyboard, a USB mouse, a
USB storage device, or a USB printer.
Connect headphones or headsets with a 3.5-mm (0.14-inch), 4-pole plug.
Note: This jack does not support standalone external microphones. If you use
headsets, choose one with a single plug.
Chapter 1. Meet your Chromebook 3
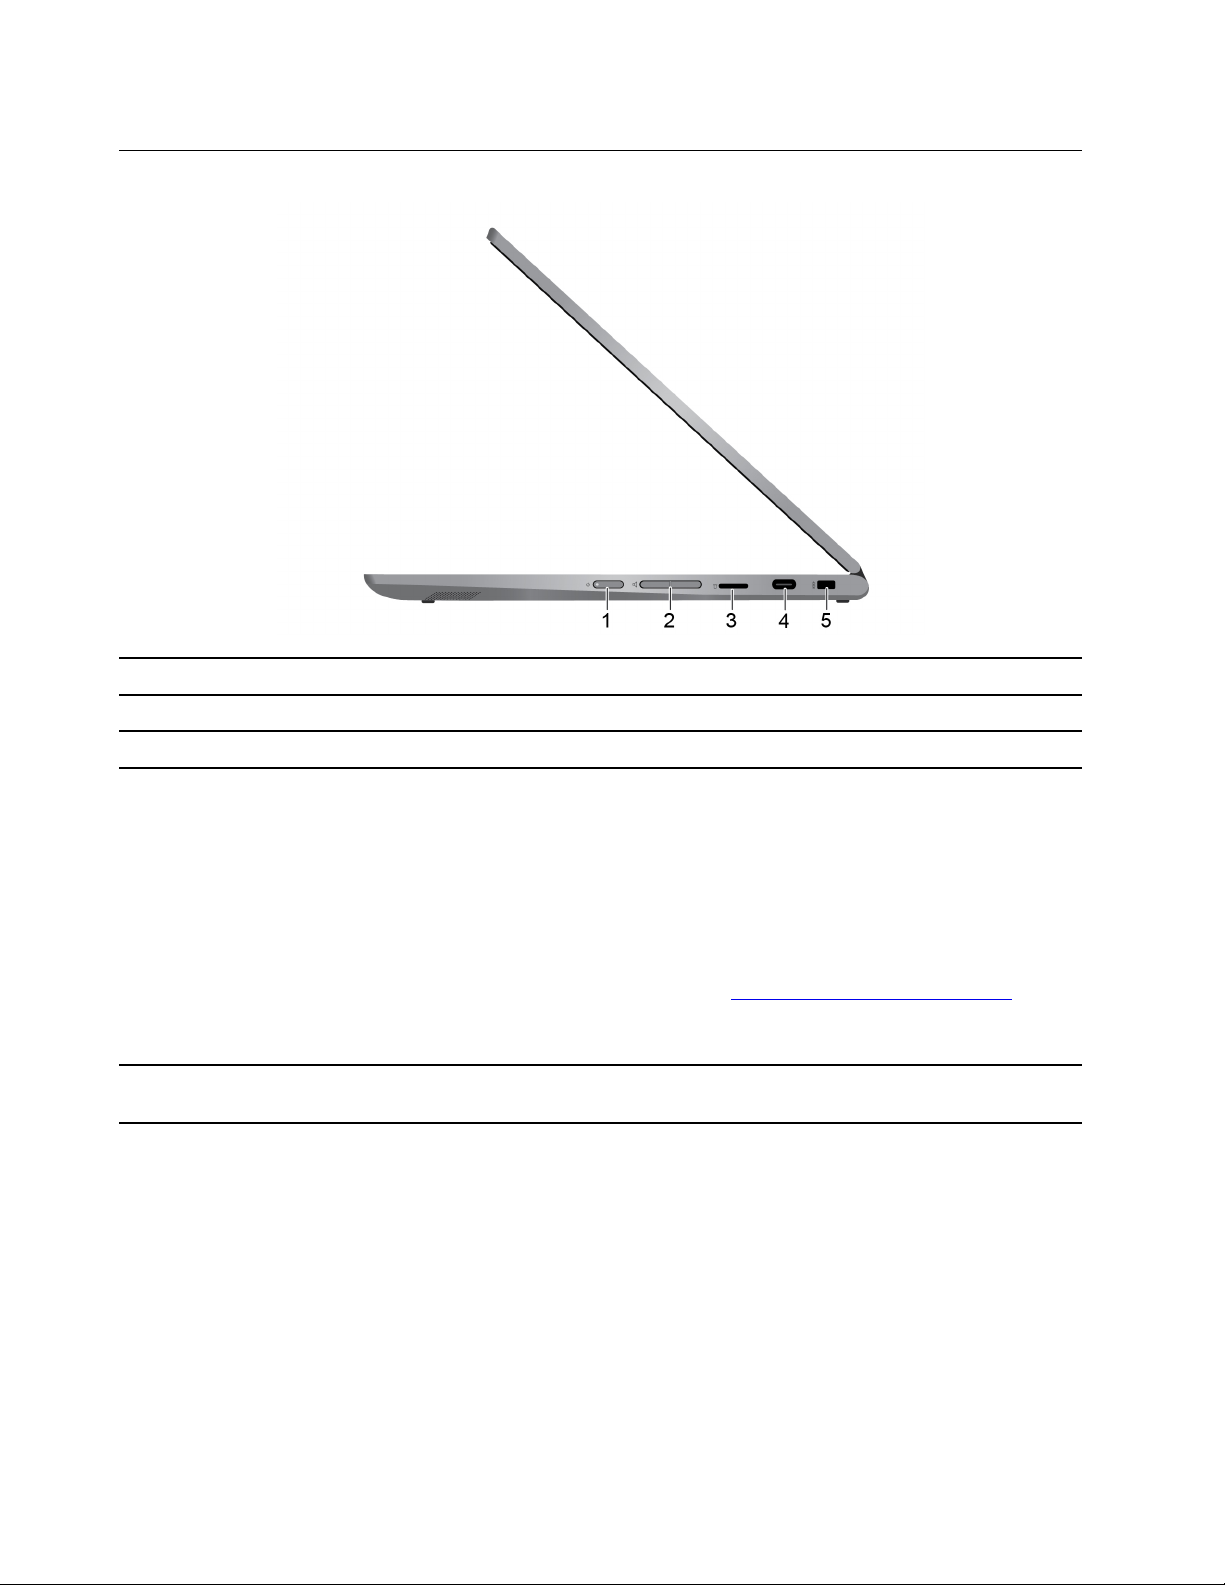
Right
1. Power button Press the button to turn on the computer or put the computer to sleep mode.
2.
Volume button
microSD card slot
3.
4.
USB-C connector (USB 3.1
Gen 1)
5. Mini security-lock slot Lock your computer to a desk, table, or other fixtures through a compatible
Increase or decrease system volume.
Insert a microSD card for data transfer or storage.
• Charge USB-C compatible devices with the output voltage and current of 5 V
and 3 A.
• Transfer data at USB 3.1 speed, up to 5 Gbps.
•
Connect
– USB-C to VGA: 1900 x 1200 pixels, 60 Hz
– USB-C to DP: 3840 x 2160 pixels, 60 Hz
• Connect to USB-C accessories to help expand your computer functionality. To
purchase USB-C accessories, go to
Note: When the battery power is below 10%, the connected USB-C accessories
might not work correctly.
security cable lock.
to an external display:
https://www.lenovo.com/accessories.
4 Lenovo Chromebook C340-15 User Guide
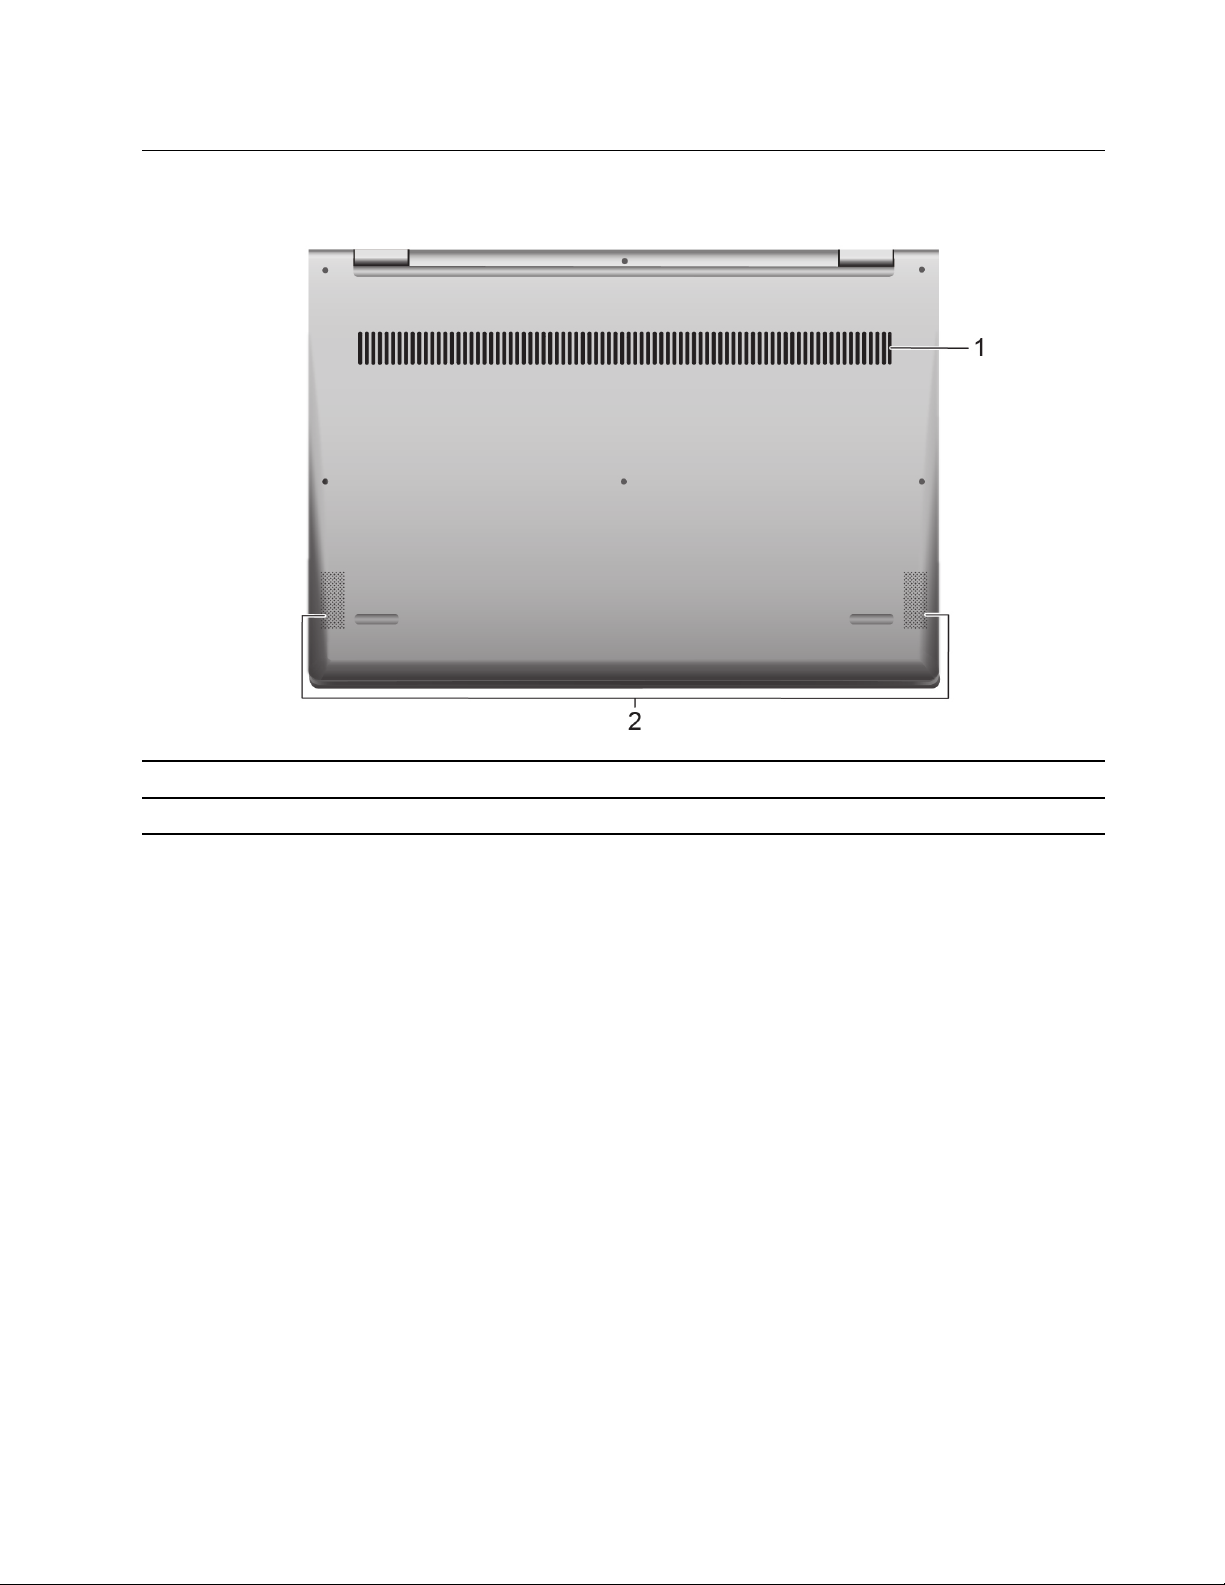
Bottom
1. Ventilation slots Dissipate heat.
Speakers
2.
Produce sound.
Chapter 1. Meet your Chromebook 5
Features and specifications
Dimensions
Weight
Screen
Memory
Storage device
Connectors and slots
Wireless features
Security
Approximately 361.5 mm x 248.85 mm x 18.95 mm (14.2 inches x 9.8 inches x 0.7
inches)
Approximately 2 kg (4.4 lb)
• Color display with In-Plane Switching (IPS) technology
• Multi-touch screen
• Resolution: 1920 x 1080 pixels
• Size: 396.2 mm (15.6 inches)
• Type: Double data rate 4 (DDR4)
• Capacity: 4 GB
• Type: Embedded multi media card (eMMC)
• Capacity: 32 GB, 64 GB, or 128 GB
Note: The capacity of the storage device displayed in the operating system is
typically lower than the nominal capacity.
• Audio connector
• microSD card slot
• Two USB-C connectors
• USB 3.1 connector Gen 1
• Bluetooth
• Wireless LAN
• Mini security-lock slot
• Trusted Platform Module (TPM)
Others
Battery pack
ac power adapter
• Camera
• Microphones
• Speakers
• Type: Built-in Li-Polymer battery
• Number of cells: 4
• Capacity: 56 Wh
Note: The capacity listed here is the typical or average capacity as measured
in a specific test environment. Capacities measured in other environments may
differ but are no lower than the rated capacity (see product label).
• Input: 100 V to 240 V, 50 Hz to 60 Hz
• Output: 15 V
• Power: 45 W
Note: Specifications might change without notice. Some specifications are model-specific and might not
apply to the computer model that you purchased.
6
Lenovo Chromebook C340-15 User Guide

Statement on USB transfer rate
Depending on many factors such as the processing capability of the host and peripheral devices, file
attributes, and other factors related to system configuration and operating environments, the actual transfer
rate using the various USB connectors on this device will vary and will be slower than the data rate listed
below for each corresponding device.
USB device Data rate (Gbit/s)
3.1 Gen 1
3.1 Gen 2
3.2 20
5
10
Operating environment
Maximum altitude
3048 m (10 000 ft) (without pressurization)
Temperature
• Operating : 5 ℃ – 35 ℃ (41 ℉ – 95 ℉)
• Storage: 5 ℃ – 43 ℃ (41 ℉ – 109 ℉)
Note: When the battery pack is under charge, the environment temperature must be no lower than 10 ℃ (50
℉).
Relative humidity
• Operating: 8% – 95% at wet-bulb temperature 23 ℃ (73 ℉)
• Storage: 5% – 95% at wet-bulb temperature 27 ℃ (81 ℉)
Note: If possible, place your computer in a well-ventilated and dry area without direct exposure to sunshine.
Chapter 1. Meet your Chromebook 7

8 Lenovo Chromebook C340-15 User Guide
Chapter 2. Get started with your Chromebook
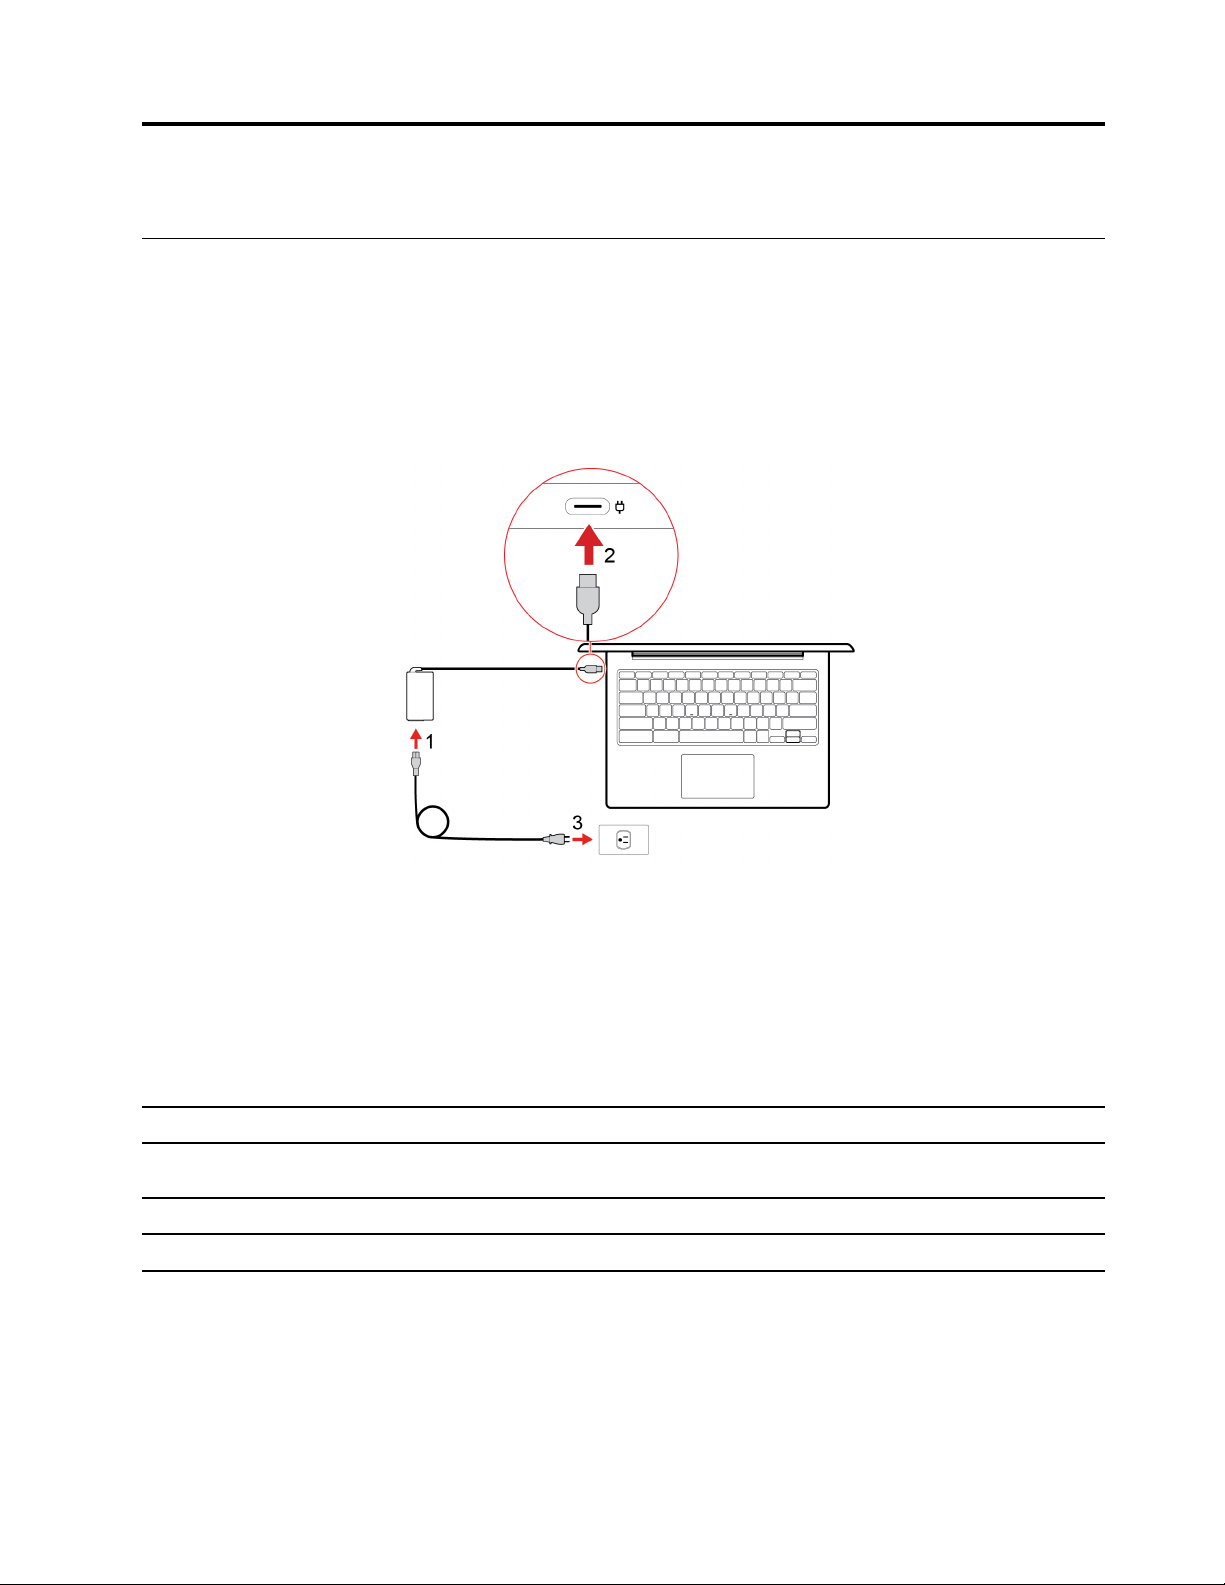
Charge your Chromebook
The USB-C connector on your Chromebook works as the power connector. Plug in the ac power adapter to
charge the built-in battery pack and provide power to the Chromebook.
Connect to ac power
CAUTION:
All plugs must be firmly and securely inserted into receptacles.
1. Connect the power cord to the ac power adapter.
2. Plug the power adapter into the power connector of the Chromebook.
3. Plug the power cord into an electrical outlet.
ac power status indicator behavior
The ac power status indicator is next to the power connector. The following table shows the indicator
behaviors and the indicated power and battery status.
ac power status indicator Power status Battery status
on (orange)
on (white)
off unplugged discharging
plugged in being charged, remaining power
between 1% and 99%
plugged in fully charged
© Copyright Lenovo 2019 9
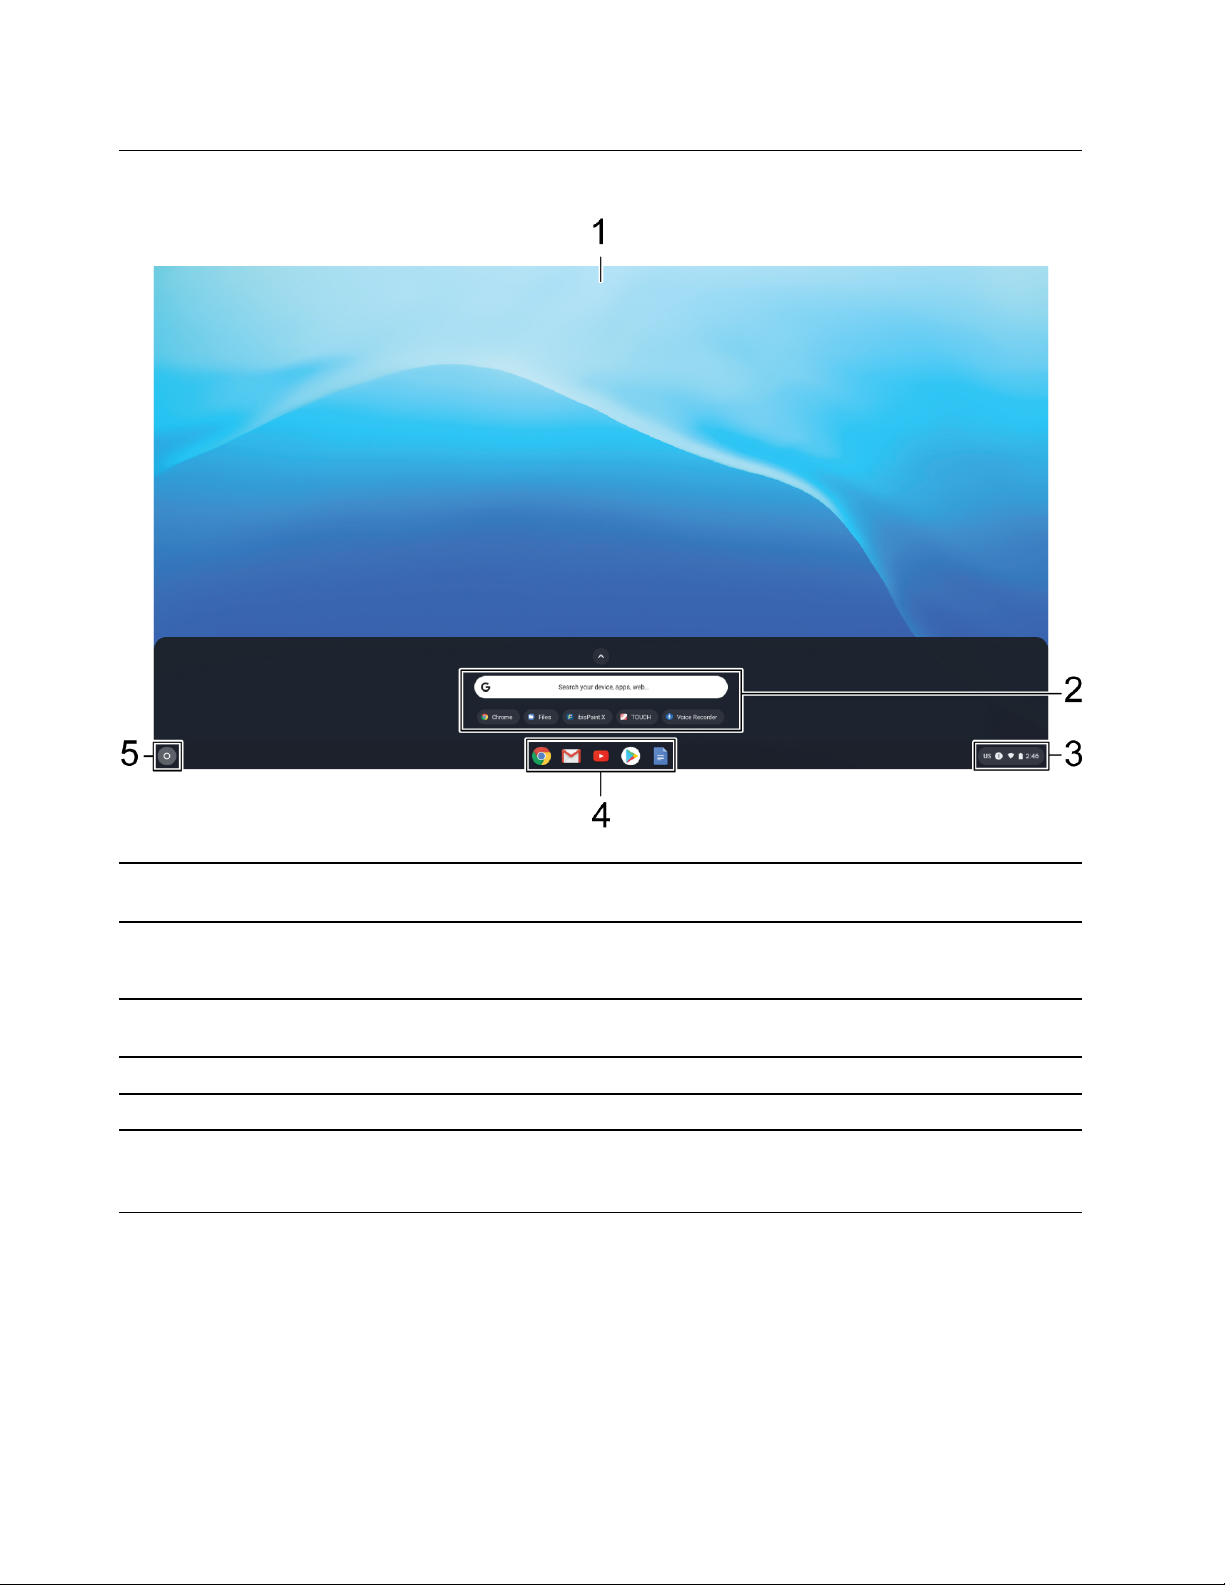
User interface
1. Wallpaper Your wallpaper might look different. To change the wallpaper, right-click a blank
area of your desktop and select Set Wallpaper.
2.
Search box and App Launcher
3. Status tray
App shelf
4.
5.
The Launcher button
• Type the name of your device, app, or Web page in the search box.
• Open an app quickly from the App Launcher.
Manage connections, updates, and settings. By default, the time, network
connection status, battery status, and your account picture are displayed.
Pin your frequently-used app or Web page to the app shelf for easy access.
Open the search box and App Launcher.
To discover more features and get help, click your account picture and select the question mark ?.
Connect to Wi-Fi
To connect your Chromebook to Wi-Fi:
1. Click your account picture.
2. Click the network icon and turn on the wireless feature.
3. Select an available network to connect. Provide required information if needed.
10
Lenovo Chromebook C340-15 User Guide
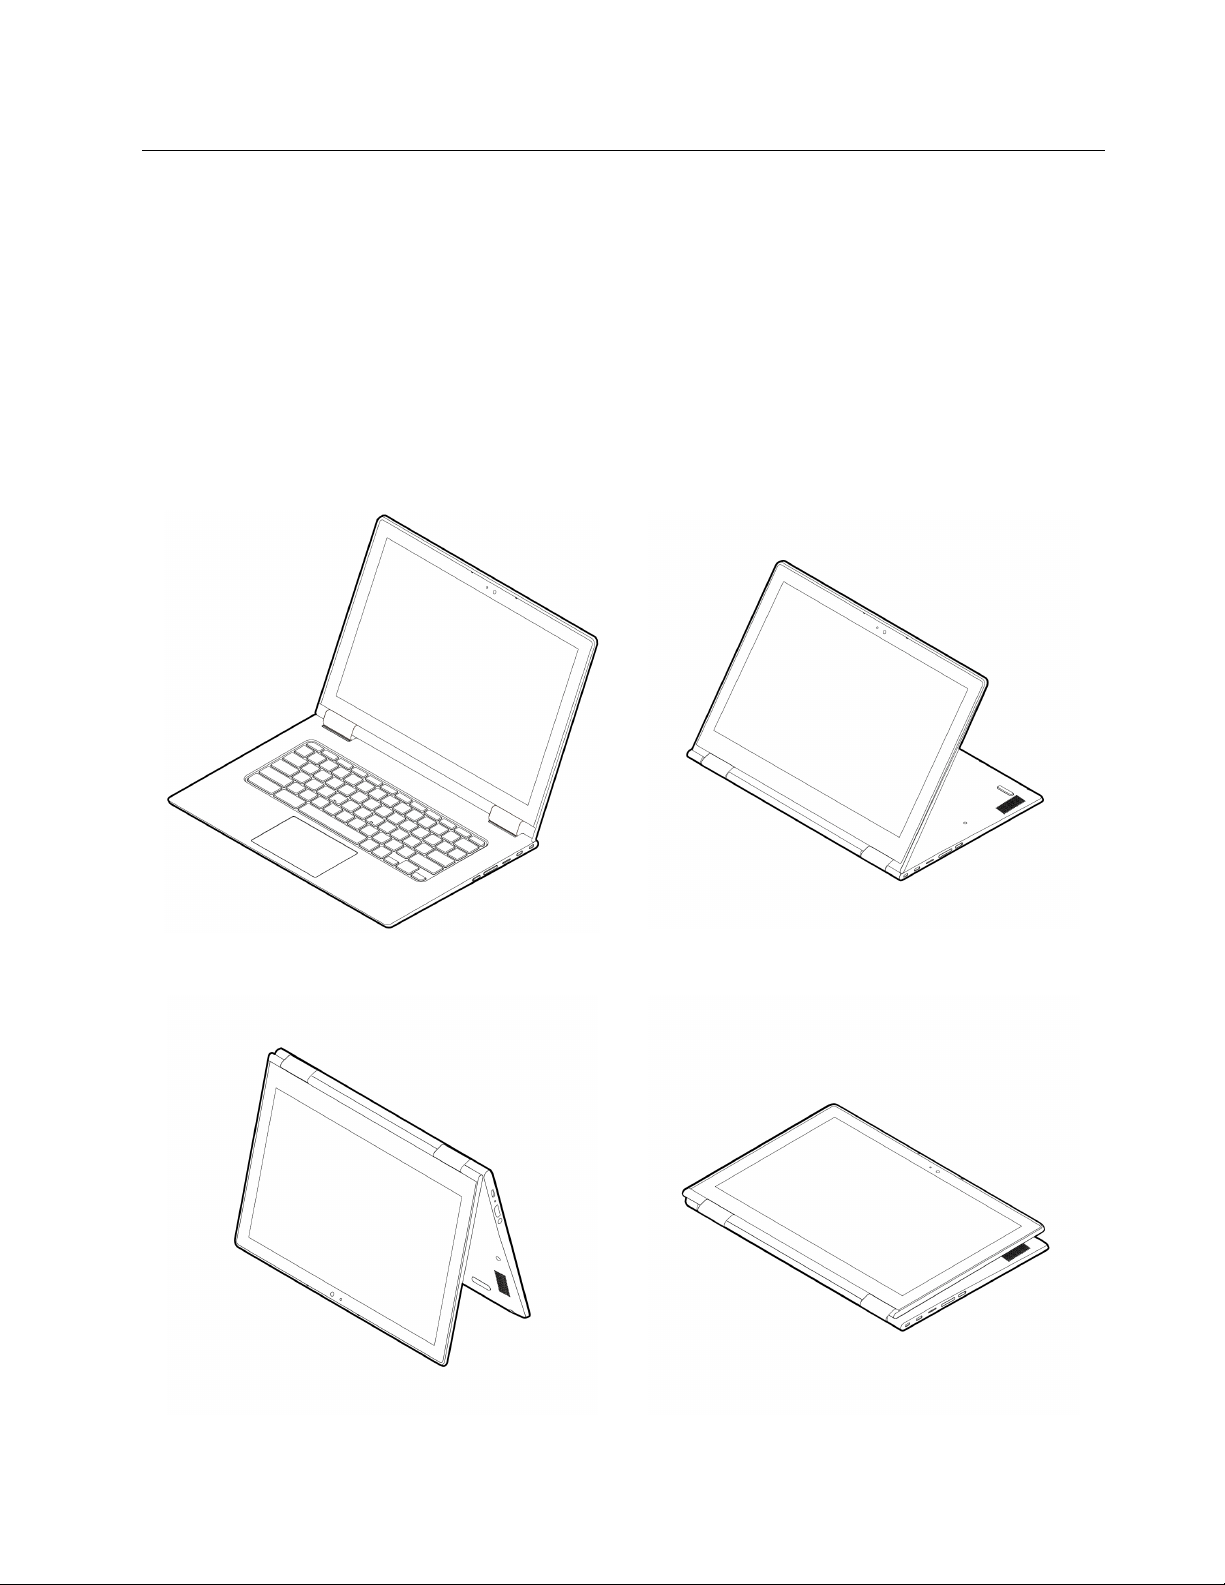
Get to know modes
Your computer display can be rotated to any angle up to 360 degrees.
Attention:
• Do not rotate the computer display with too much force, or apply too much force to the upper-right or
upper-left corner of the computer display. Otherwise, the computer display or hinges might get damaged.
• The keyboard and the pointing devices are automatically disabled in stand mode, tent mode, and tablet
mode. Use the touch screen to control your computer instead.
Your Chromebook features the following four modes. You can switch among different modes according to
your preference.
Notebook mode
Tent mode Tablet mode
Chapter 2. Get started with your Chromebook 11
Stand mode
Use the power button
When you open the computer screen, the Chromebook automatically starts. If it doesn’t, press the power
button. You also can use the power button to put your Chromebook to sleep or wake your Chromebook.
For Lenovo Chromebook C340-15, the power button is on the right side of the computer. The power button
has an integrated indicator to show the power status.
Table 1. Lenovo Chromebook C340-15 power status indicator behavior
Indicator status Power status
on (white)
powered on
blinking (white)
off powered off
in sleep mode
Connect to Bluetooth devices
Your Chromebook supports Bluetooth feature. You can connect your Chromebook to a Bluetooth keyboard,
mouse, speakers, or other Bluetooth devices.
Note: The Bluetooth devices must be within a short distance, usually 10 meters (33 feet), from the
Chromebook.
1. Click your account picture, and then click the Bluetooth icon.
2. Turn on Bluetooth.
3. Select the device you want to pair and follow the on-screen instructions.
Set the power plan
For ENERGY STAR® compliant computers, the following power plan takes effect when your computers have
been idle for a specified duration:
Table 2. Default power plan (when plugged into ac power)
• Turn off the display: After 7 minutes
• Put Chromebook into sleep: After 30 minutes
To change the power plan settings:
1. Click your account picture, and then click the settings icon.
2. Click Settings ➙ Device ➙ Power.
3. Follow the on-screen instruction to change the settings as you desire.
To wake your Chromebook from sleep mode, press the power button or any key on the keyboard.
Use the mini security-lock slot
Lock your computer to a desk, table, or other fixtures through a compatible security cable lock.
®
The slot supports cable locks that conform to the Kensington MiniSaver
locking technology. Do not attempt to use other types of cable locks that use a rotating T-bar™ locking
12
Lenovo Chromebook C340-15 User Guide
lock standards using Cleat™

mechanism. You are responsible for evaluating, selecting, and implementing the locking device and security
feature. Lenovo makes no comments, judgments, or warranties about the function, quality, or performance
of the locking device and security feature. Cable locks for your product are available from Lenovo at https://
www.lenovoquickpick.com/.
Chapter 2. Get started with your Chromebook 13

14 Lenovo Chromebook C340-15 User Guide
Chapter 3. Navigate the screen
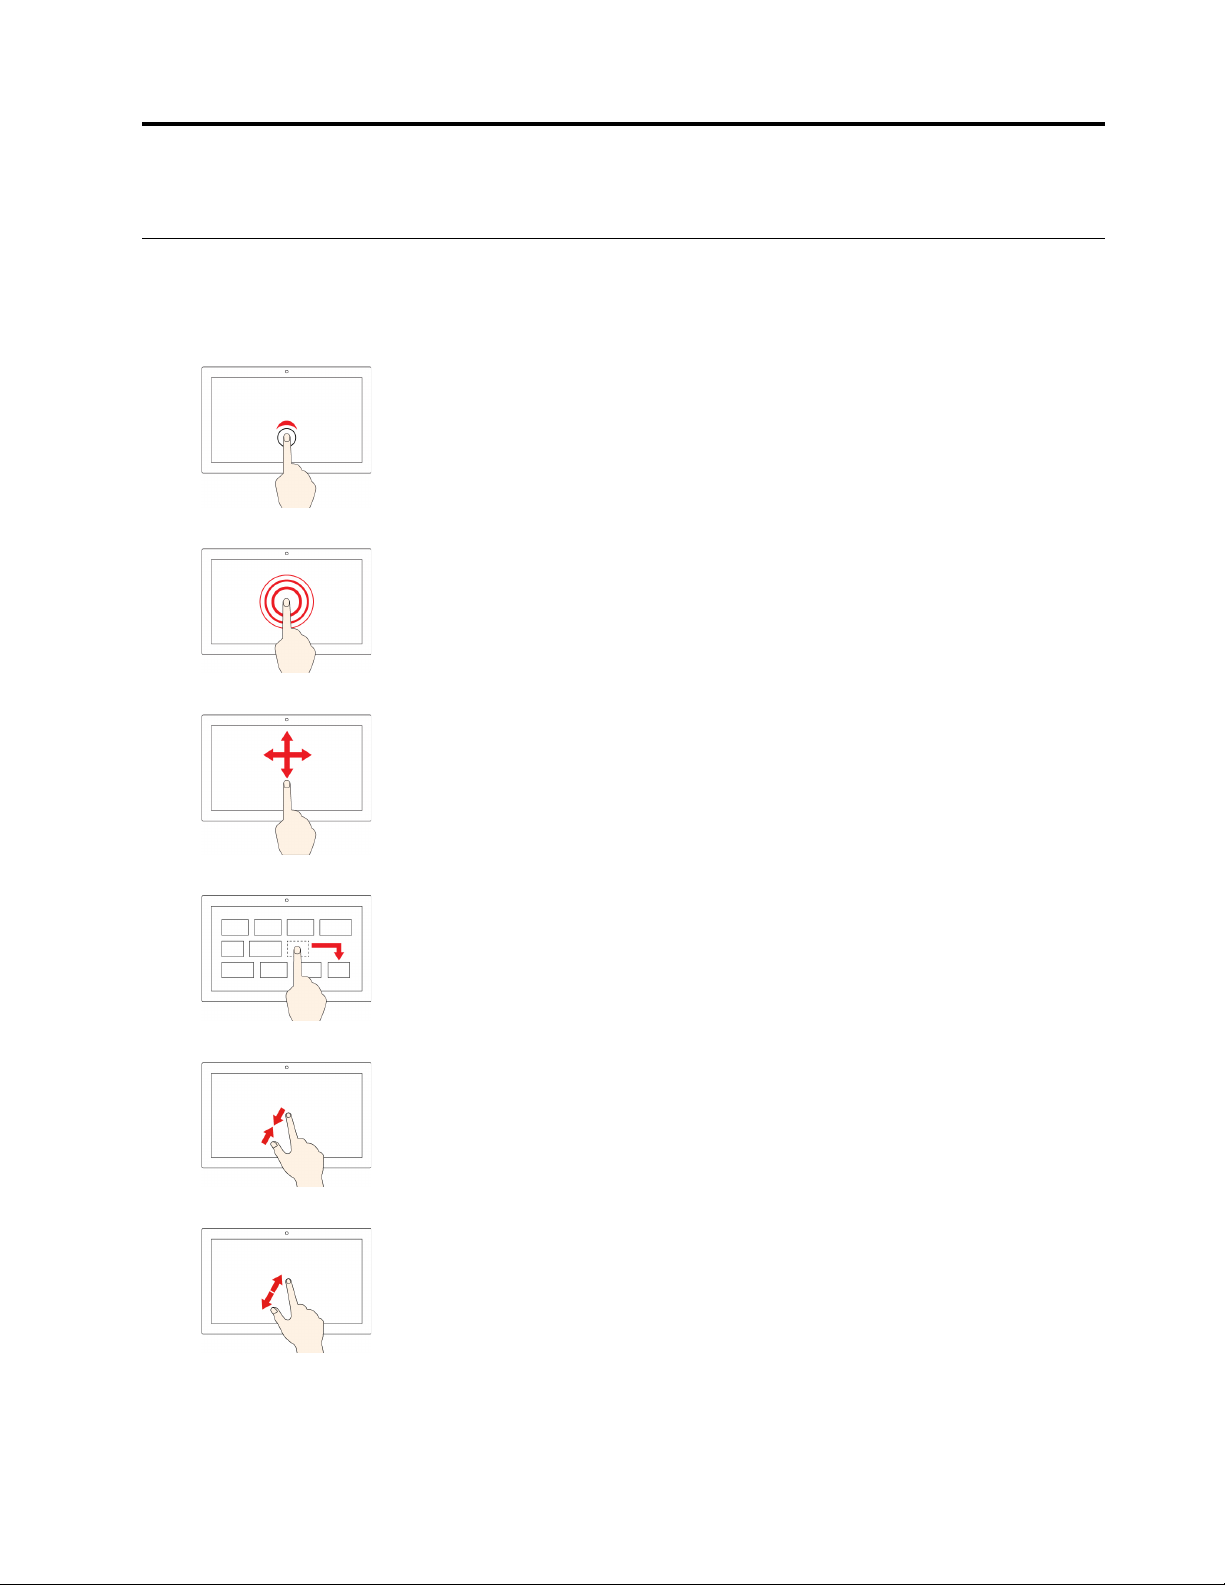
Use the multi-touch screen
Note: Some gestures might not be available depending on the app you use.
Tap
Open an app or perform an action on an open app, such as Copy, Save, and
Delete, depending on the app.
Tap and hold
Open a shortcut menu.
Slide
Scroll through items, such as lists, pages, and photos.
Drag an item to the location you want
Move an object.
Move two fingers closer together
Zoom out.
Move two fingers farther apart
Zoom in.
© Copyright Lenovo 2019 15
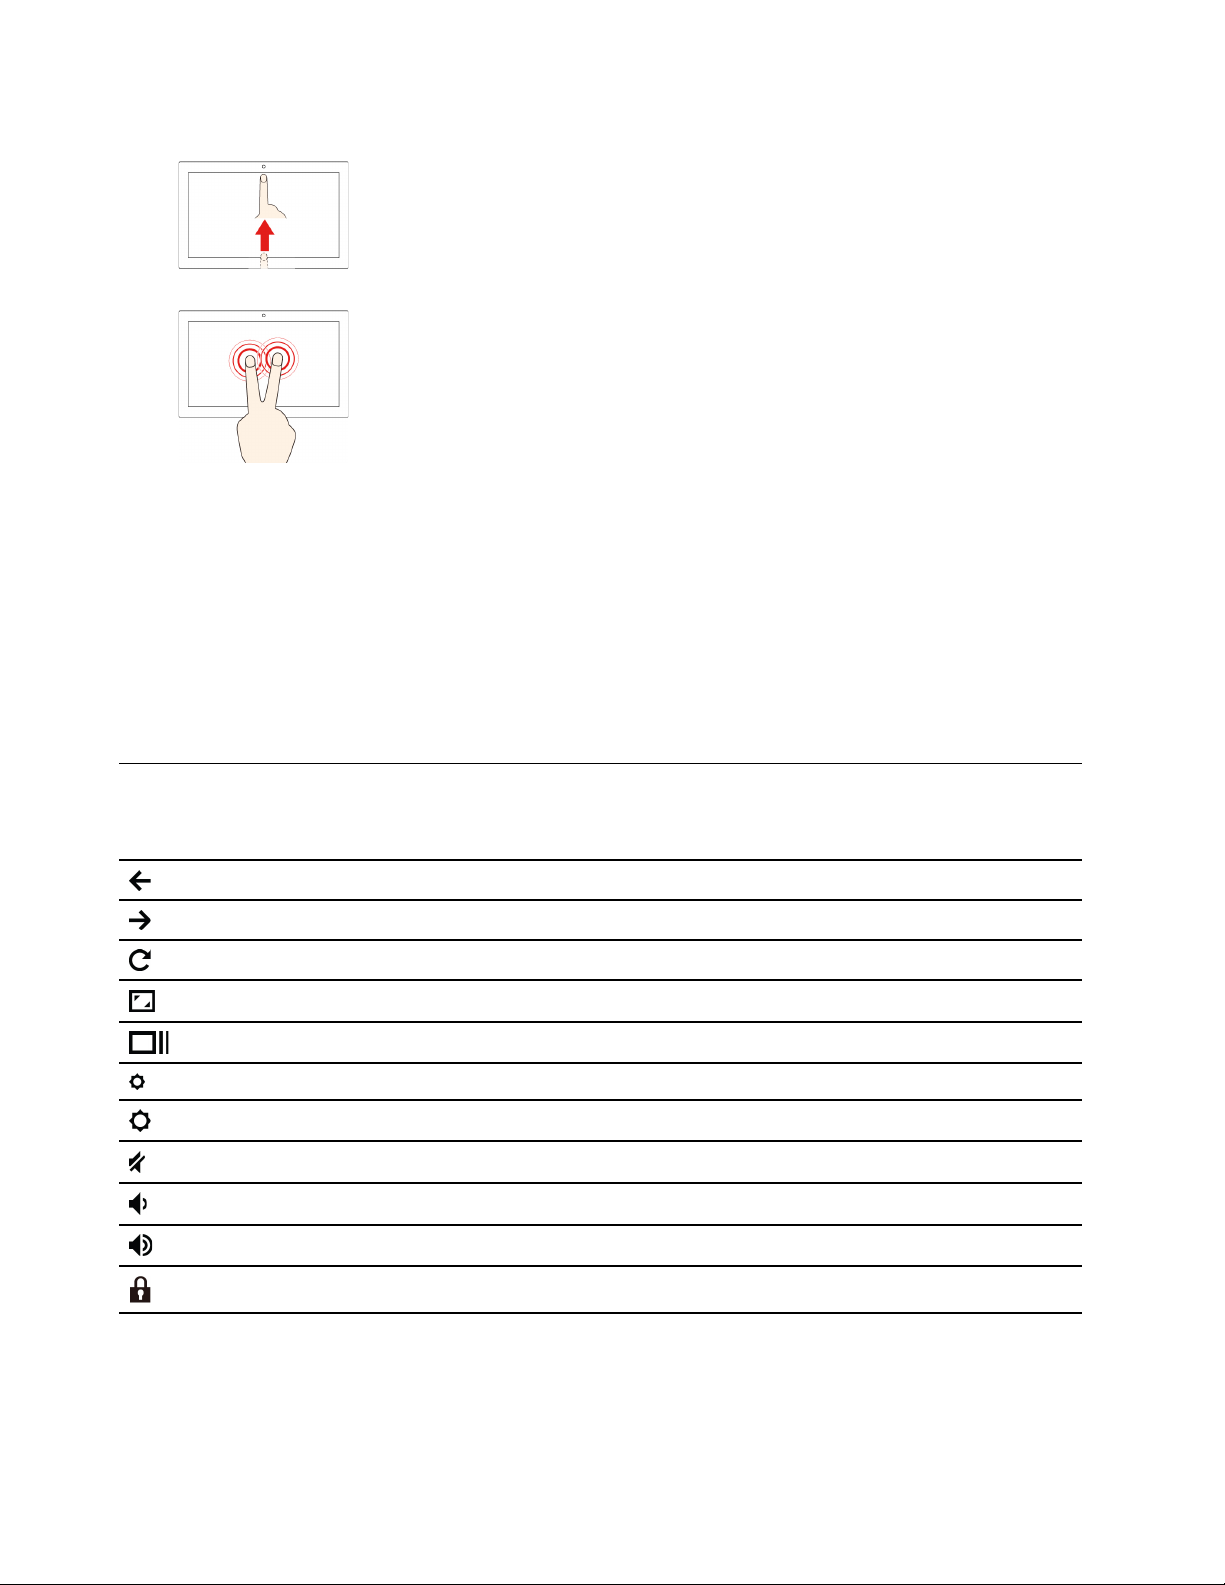
Swipe up from the bottom
Show or hide the app shelf.
Tap with two fingers
Open a shortcut menu.
Tips
• Turn off the computer before cleaning the multi-touch screen.
• Use a dry, soft, and lint-free cloth or a piece of absorbent cotton to remove fingerprints or dust from the
multi-touch screen. Do not apply solvents to the cloth.
• The multi-touch screen is a glass panel covered with a plastic film. Do not apply pressure or place any
metallic object on the screen, which might damage the touch panel or cause it to malfunction.
• Do not use fingernails, gloved fingers, or inanimate objects for input on the screen.
• Regularly calibrate the accuracy of the finger input to avoid a discrepancy.
Use the special keys
Your Chromebook keyboard works just like a conventional keyboard but with a few special keys.
Go to the previous page
Go to the next page
Reload your current page
Hide the tabs and the App Launcher in full-screen mode
Show all windows in overview mode
Decrease the brightness of the computer screen
Increase the brightness of the computer screen
Mute the speakers
Decrease the volume
Increase the volume
Lock the computer screen
Your Chromebook also supports the following key combinations:
16
Lenovo Chromebook C340-15 User Guide
 Loading...