

Page 1

Color Monitor
C190
User’s Guide English
Page 2

Contents
Contents ..........................................................................................................1
Safety: Read first..........................................................................................2
Attaching the stand.......................................................................................3
Connecting your monitor..............................................................................4
Workplace preparation.................................................................................4
Positioning the monitor.............................................................................4
Height .......................................................................................................5
Orientation................................................................................................5
Working Practices ........................................................................................5
Rest..........................................................................................................5
Back..........................................................................................................5
Hands .......................................................................................................5
Eyesight....................................................................................................5
Screen settings.........................................................................................5
Caring for Monitor.....................................................................................6
Installing the Device Driver...........................................................................7
Installing the Device Driver for Windows 95 or Windows 98 ........................7
Installing the Device Driver for Windows 2000 or Windows Me ...................8
Installing the device driver in Windows XP...................................................9
User Controls..........................................................................................10
On-Screen-Display.....................................................................................11
Activating the On-Screen-Display...........................................................11
Main OSD menu controls ........................................................................11
OSD functions.........................................................................................11
Further information.....................................................................................15
Display modes........................................................................................15
Power Management................................................................................15
Troubleshooting..........................................................................................16
Further help ............................................................................................17
Specifications.............................................................................................19
Service Information ....................................................................................20
Notices and Trademarks............................................................................21
Trademarks.............................................................................................23
1
Page 3
Safety: Read first
2
Page 4
Important: Before connecting the monitor, turn off the computer and attached devices. Also
ensure the power at the electrical outlet matches the power requirements of the monitor.
Refer to the Specifications section on page 18 for more details.
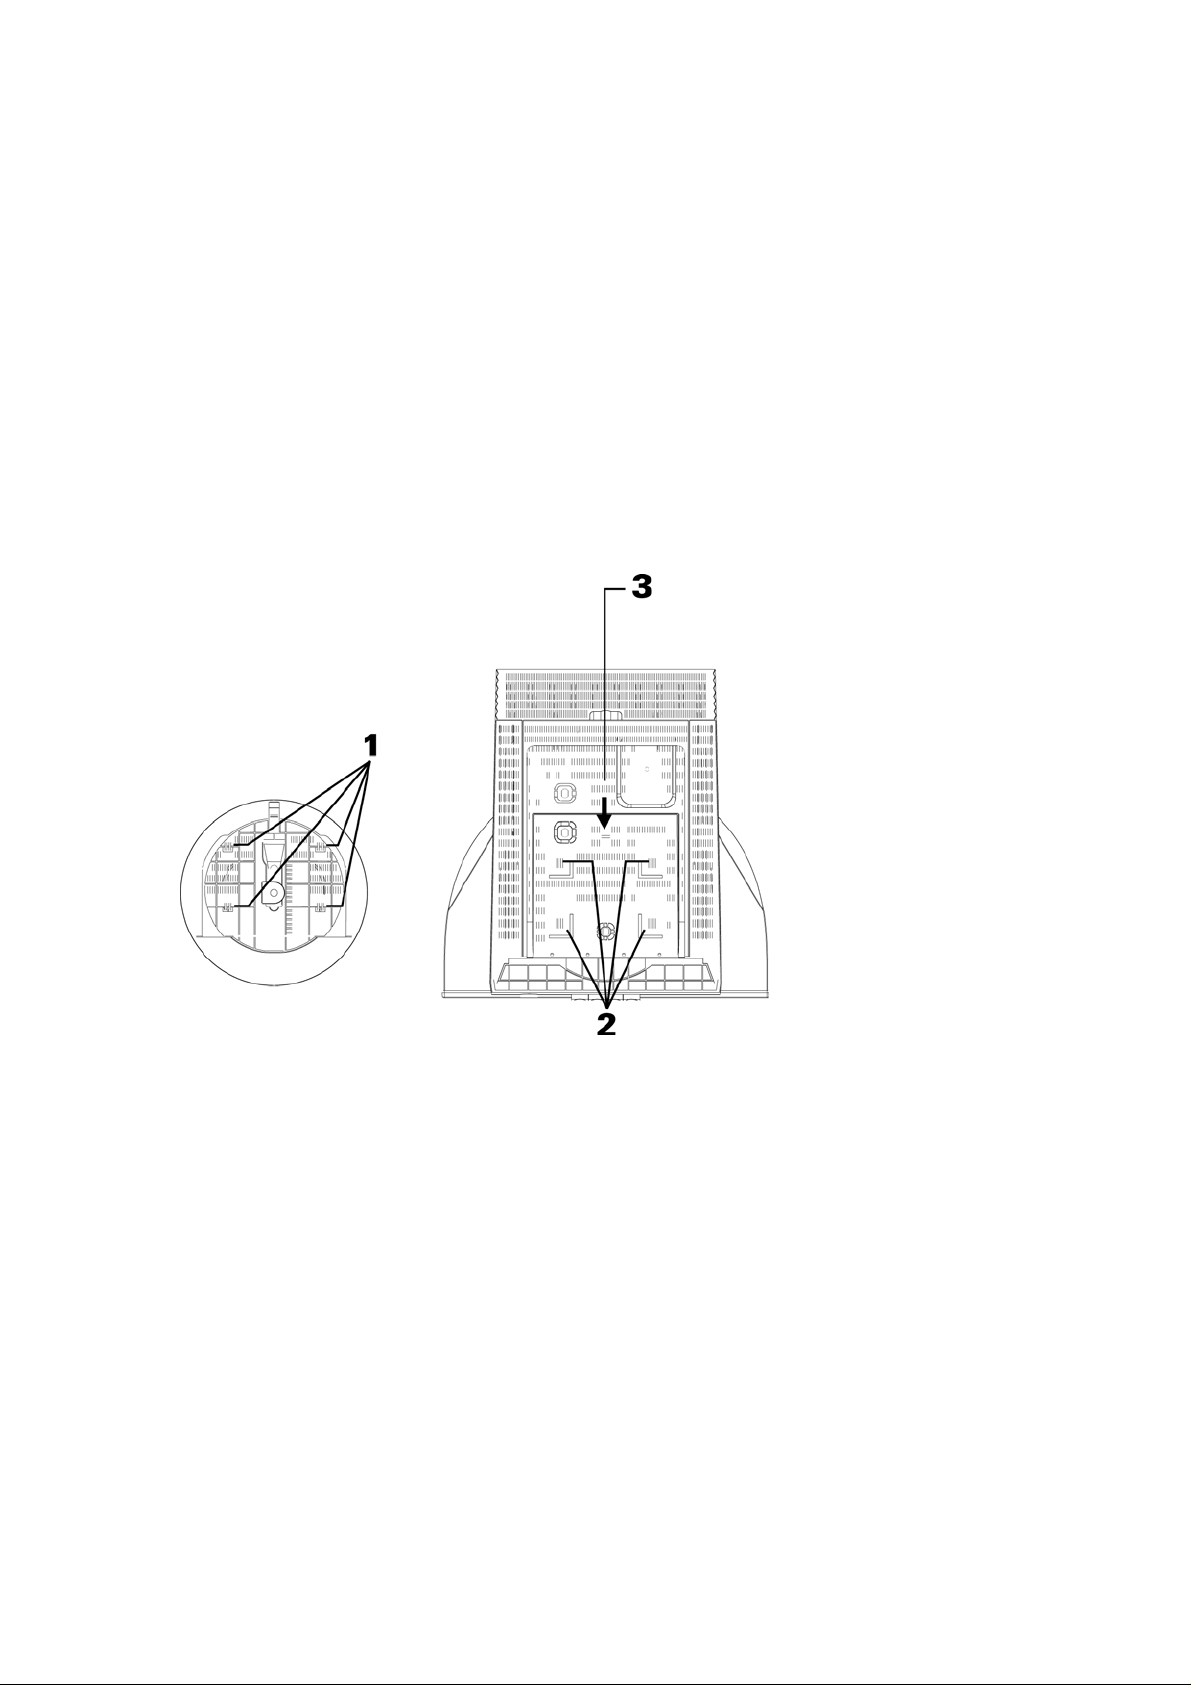
Attaching the stand
1. Place the monitor face down on a soft surface to prevent the screen being scratched.
2. Insert the hook (1) into the matching slots on the underside of the monitor (2).
3. Slide the base towards the front of the monitor until the latch (3) clicks into the locked
position.
3
Page 5

Connecting your monitor
1. Power off your computer and all attached devices, and unplug the computer power
cord.
2. Connect the signal cable to the video port on the back of your computer (figure A).
Your computer may have a video adapter card installed. In this case, attach the
signal cable to the connector on the video adapter card (figure B).
3. Connect the power cord to the monitor first, and then firmly insert the plug into a
properly grounded electrical outlet. Plug the computer cord into a properly grounded
electrical outlet.
4. Turn on the monitor, and then the computer.
If your monitor does not seem to be working correctly, refer to the Troubleshooting section for
help.
Workplace preparation
Positioning the monitor
Choose a suitable place to position the monitor where it is not near fluorescent desk lighting
or any equipment that produces magnetic fields that could cause interference. Ensure that the
furniture or equipment can support the weight of the monitor. Allow at least 2 inches (50mm)
ventilation space around the monitor.
4
Page 6

Height
Position the monitor so that the top of the screen is slightly below your eye level when you sit
at your workstation
.
Orientation
Choose a position that gives the least reflection form lights and windows, usually at a right
angle to any windows. Position the monitor directly in front of you so that you do not have to
twist your body. Tilt the monitor to a comfortable viewing angle.
Working Practices
Rest
Take regular breaks. Vary your posture, and stand up and stretch occasionally, as prolonged
use of computer workstations can be tiring.
Back
Sit back in the chair and use the backrest.
Hands
Use a light touches on the keyboard, keeping your hands and fingers relaxed. Allow a space
in front of the keyboard to rest your wrists when not typing. Consider using a wrist pad.
Eyesight
Working with monitors, in common with any prolonged close work, can be visually demanding.
Look away from the screen, periodically and have your eyesight checked regularly
.
Screen settings
Set the screen brightness and contrast to a comfortable level. You may have to adjust this as
the lighting changes during the day. Many application programs let you select color
combinations, which can help you to view in comfort.
5
Page 7

Caring for Monitor
Be sure to disconnect the power cord from your monitor before you perform any maintenance
on the monitor. Clean your monitor as follows:
• Gently wipe the covers and the screen with a soft cloth, do not use solvents or
abrasives.
• Never drop water or other liquid into your monitor.
• Remove finger marks and grease with a damp cloth and mild detergent.
• Never use flammable cleaning materials to clean your Lenovo monitor or any other
electrical apparatus.
• Do not rub, touch, or tap the surface of the screen with sharp or abrasive items such
as a ballpoint pen or screwdriver. This type of contact may result in a scratched
picture tube.
• Do not use any type of cleaner containing an anti-static solution or similar additive as
this may scratch the screen's coating.
• Never apply detergent or other liquid directly to the screen. Dampen the cloth and
then wipe.
6
Page 8

Installing the Device Driver
Installing the Device Driver for Windows 95 or Windows 98
To install the device driver in Microsoft® Windows®95 or Windows98, do the following:
Note: You must download files from the Lenovo Monitor CD to use the Plug and Play feature in
Windows 95 or Windows 98.
1. Turn off the computer and all attached devices.
2. Ensure that the monitor is connected correctly.
3. Turn on the monitor and then the system unit. Allow your computer to start the
Windows 95 or Windows 98 operating system.
Your computer’s Plug and Play code might warn you that your system
hardware has changed. This means that it has detected your new
monitor for the first time.
4. Open the
Control Panel and then double clicking on the Display icon.
5. Click the
If you are using Windows 95:
6. 1. Click the
2. Click the
• If you are using Windows 98:
6. 1. Click the
2. Click the
3. Open the
on
4. Click “Display a list of the known drivers for this device so that
I can choose a specific driver” and then select the Next button.
7. Insert the Lenovo Monitor CD into the CD drive and click the
Display Properties window by clicking Start, Settings,
Settings tab.
Change Display Type button.
Change Monitor Type button.
Advanced button.
Monitor tab.
Upgrade Device Wizard window by clicking
Change button and then select the Next button.
Have Disk button.
8. Click OK.
9. Ensure that the CD drive letter is selected, and then select “DRIVERS” folder.
10. Select ThinkVision C190 CRT monitor and click OK. The files will be copied from
the CD to your hard disk drive.
11. Close all open windows and remove the CD.
12. Restart the computer.
The system will automatically select the maximum refresh rate and
corresponding Color Matching Profiles.
7
Page 9

Installing the Device Driver for Windows 2000 or Windows Me
To install the device driver in Microsoft® Windows®2000 Professional or Microsoft Windo ws
Millennium Edition (Me), do the following:
Note: You must download files from the Lenovo Monitor CD to use the Plug and Play feature
in Windows 2000 or Windows Me.
1. Turn off the computer and all attached devices.
2. Ensure that the monitor is connected correctly.
3. Turn on the monitor and then the system unit. Allow your computer to start the Windows
2000 or Windows Me operating system.
4. Open the
Control Panel and then double-clicking the Display icon.
Display Properties window by clicking Start, Settings,
5. Click the
6. Click the
7. Click the
8. Click the
9. Click the
10. Open the
Update Driver and then click the Next button.
Settings tab.
Advanced button.
Monitor tab.
Properties button.
Driver tab.
Upgrade Device Driver Wizard window by clicking on
11. Select “Display a list of the known drivers for this device so that I can
choose a specific driver” and then click the Next button.
12. Insert the Lenovo Monitor CD into the CD drive and click the
Have Disk button.
13. Click OK.
14. Ensure that the CD drive letter is selected, and then select the “DRIVERS”
folder.
15. Select ThinkVision C190 CRT monitor and click OK. The files will be copied from
the CD to your hard disk drive.
16. Close all open windows and remove the CD.
17. Restart the computer.
The system will automatically select the maximum refresh rate and
corresponding Color Matching Profiles.
8
Page 10

Installing the device driver in Windows XP
To install the device driver in Microsoft® Windows XP, do the following:
Note: You must download files from the Lenovo Monitor CD to use the Plug and Play feature
in XP.
1. Turn off the computer and all attached devices.
2. Ensure that the monitor is connected correctly.
3. Turn on the monitor and then the system unit. Allow your computer to start the Windows
XP operating system.
4. Open the
Control Panel
5. Click the Settings tab.
6. Click the
7. Click the
8. Click the
9. Click the Driver
10. Open the Hardware Update Wizard window by clicking on
the Next button.
11. Select “Install from a list or Specific location (Advanced)” and then click the Next button.
12. Insert the Lenovo Monitor CD into the CD drive and click the
13. Click OK.
14. Ensure that the CD drive letter is selected, and then select the “DRIVERS”
folder.
15. Select ThinkVision C190 CRT monitor and click OK. The files will be copied from
the CD to your hard disk drive.
16. Close all open windows and remove the CD.
Display Properties window by clicking Start, Settings,
and then double-clicking the Display icon.
Advanced button.
Monitor tab.
Properties button.
tab.
Update Driver and then click
Have Disk button.
17. Restart the computer.
The system will automatically select the maximum refresh rate and
corresponding Color Matching Profiles.
9
Page 11

User Controls
The image is already optimised for many display modes. However, the cont rols can be used
to adjust the image to your linking.
OSD Key Function
Icon
Control Description
Power switch Switches the monitor on and off.
OSD/OK
Move right;
Brightness adjustment
selection
Move left;
Contrast adjustment
selection
Exit Exit OSD control.
Activates the On-Screen-Display/ Select control icon /
Save Adjustment
Moves the highlight to the icon to the right, or on
adjustment screens increases the effect of the
adjustment.
Moves the highlight to the icon to the left, or on
adjustment screens decrease the effect of the
adjustment.
Hotkey Functions
Brightness and contrast can be adjusted as follows, without the need to display the OSD:
Select the function and use the buttons to adjust. If adjustment is not made within 15 seconds, the
current settings will be saved and the control screen will disappear automatically.
Icon Control Description
BRIGHTNESS Adjusts the background brightness
CONTRAST Adjusts the contrast between foreground and background
10
Page 12

On-Screen-Display
Activating the On-Screen-Display
The monitor controls are accessed by pressing button to enable OSD (On-Screen-Display).
The main menu will be displayed as follows.
Each Sub-Menu icon is selected by highlighting it via the “
button “
” to select. To exit the main or Sub-Menu then press the exit button “ ”.
” “ ” control and pressing
Main OSD menu controls
ICON Control Function instruction
Image Quality Adjusts Brightness, Contrast, Moiré, and Degauss.
Image Position/Size Adjusts Horizontal / Vertical Position,
Image Shape Adjusts Parallelogram, Trapezoid, Pincushion,
Color Adjusts Preset color point, Custom, Reset User color.
Options
Exit Closes the OSD menu.
Horizontal/Vertical Size, Zoom and Rotation.
Pincushion balance, and Geometry reset.
Adjusts Information, Menu Languages, Accessibility,
Factory Default, Menu Position
OSD functions
Note: After a function is selected, use the “ ” “ ” buttons to increase or decrease the
adjustment. If the OK
the current setup will be saved and the control screen will disappear automatically.
or Cancel button is not pushed within the menu time out period,
11
Page 13

Image Quality
Image Quality
Sub menu
Icon Control Function Sub menu function
Brightness Adjusts overall screen
Contrast Adjusts difference
Moiré Reduces elliptical
Degauss Demagnetizes screen
Left
brightness.
between light and dark
areas.
or wavy interference
patterns.
to reduce image distortion.
Right
Left
Right
Horizontal
Vertical
Save
Yes/No Option
Image Position/Size
Image
Position/Size
Sub menu
Icon Control Function Sub menu function
Horizontal
Position
Moves image left or right
Left
Right
/
/
Vertical Position Moves image up or down
Horizontal Size
Adjusts image width
Vertical Size Adjusts image height
Zoom Adjusts imag e width and
Rotation Turns image clockwise or
height
counterclockwise.
Left
Right
Left
Right
Left
Right
/
/
12
Page 14

Image shape
Image Shape
Sub menu
Icon Control Function Sub menu function
Parallelogram Leans image to the left or
Trapezoid Adjusts top or bottom
Pincushion Expands or contracts
Pincushion
balance
Geometry reset Resets image shape to
Left
right.
image width.
image sides.
Moves image center left or
right.
original settings
Right
Left
Right
/
/
Yes/No Option
Color
Color
Sub menu
Icon Control Function Sub menu function
Preset Color
Point
Select from standard white
color
With three choices
9300K / 6500K / 5500K
Custom Adjusts red green and blue
Reset User
Color
intensity
Resets custom
color to original value
Red / Green / Blue / Save
Yes / No Option
13
Page 15

Options
Options
Sub menu
Icon Control Function Sub menu function
Information Shows resolution, refresh
Menu Language Changes language of
Accessibility Changes Menu timings
Factory Default Resets monitor to original
Menu Position Adjusts menu location.
Exit. Closes the OSD menu.
rate, product details.
English, French, Italian, German,
menu.
settings
Spanish.
Button repeat
rate
Menu time out 5/10/15/20/25/30
Yes / No Option
Horizontal
Vertical
Save
Off /Default/Slow
Option
second options
/
/
14
Page 16

Further information
Display modes
The display mode and monitor uses are controlled by the computer. Therefore, refer to your
computer documentation for details on how to change display modes.
The image size, position and shape may change when the display mode chan ges. This is
normal and the image can be readjusted using the monitor controls.
To ensure flicker-free operation, select the highest (non-interlaced) refresh rate both the
computer and the monitor can support, (generally 75 Hz or higher), for the addressability that
your application requires.
For the display modes listed below, the screen image has been optimised during manufacture.
Resolution Refresh Rate Horizontal Frequency
720 x 400 70Hz 31.5kHz
640 x 480 60Hz 31.5kHz
640 x 480 85Hz 43.3kHz
800 x 600 75Hz 46.9kHz
800 x 600 85Hz 53.7kHz
1024 x 768 75Hz 60.0kHz
1024 x 768 85Hz 68.6kHz
1280 x 1024 75Hz 80.0kHz
1280 x 1024 85Hz 91.1kHz
1600 x 1200 75Hz 93.8kHz
Table1. Factory Preset Mode
Power Management
To benefit from power management, the monitor must be used in conjunction with a computer
that implements the Video Electronics Standards Association (VESA) Display Power
Management Signalling (DPMS) Standard.
The power management feature is invoked when the computer recognizes that you have not
used your mouse or keyboard for a user-definable period of time. There are several states as
described in the table below.
State Power
indicator
On (Active) Green Normal
Off (Sleep) Amber Blank
Switch Off Off Blank
Screen Restoring Operation
Press a key or move the mouse.
15
Page 17

Troubleshooting
If you have a problem setting up or using your monitor, you may be able to solve it yourself.
Before calling your retailer or Lenovo you should try the suggested actions that are
appropriate to your problem.
Problem Possible Cause Suggested Action Reference
Screen is blank and
power indicator is off.
Screen is blank and
power indicator is
steady green.
SIGNAL OUT OF
RANGE message is
displayed.
CHECK SIGNAL
CABLE message is
displayed.
power indicator is
amber.
Image appears to be
flickering.
No power to monitor. • Ensure the ele ctrical
outlet and the monitor
are both switched on.
• Check power cord is
firmly plugged into the
monitor and the
electrical outlet.
• If the power cord plug
has a removable fuse,
replace it.
• Try another power
cord.
• Try another electrical
outlet.
Brightness and
Contrast may be too
• Adjust brightn ess and
contrast.
low.
Display mode of the
computer is outside
the range of the
monitor.
Video cable
connection.
• Reconfigure the
computer to use a
supported display
mode.
• Check the sig nal
cable is firmly
connected to the
computer.
• Check no pins are
bent in the signal
cable connector.
The monitor is in
Power Management
Standby/Suspend or
Off state.
No video signal from
the computer.
• Press any key on the
keyboard or move the
mouse to restore
operation.
• Check the computer is
powered on.
• Check the sig nal
cable is firmly
connected to the
computer.
• Check no pins are
bent in the signal
cable connector.
The monitor is
operating in an
interlaced or low
refresh rate display
mode.
• Reconfigure the
computer to use a
non-interlaced display
mode with a refresh
rate of at least 75 Hz.
Connecting you
monitor starting
on page4.
User controls
section starting
on page 10.
Further
information
section starting
on page 15.
Screen is blank and
Further
information
section starting
on page 15.
16
Page 18

Problem Possible Cause Suggested Action Reference
The monitor may be
affected by
interference from
nearby equipment.
Image appears to be
discolored.
The monitor may be
affected by
interference form
nearby equipment.
Magnetization of
monitor components
has built up.
• Move fluorescent
desk lighting or any
equipment that
produces magnetic
fields further away
from the monitor.
• If another monitor is
close by, separate the
two monitors by at
least 300mm (12 in.)
for optimal
performance.
• Move any equipment
that produces
magnetic fields (For
example, sub woofer
loud speakers) further
away form the
monitor.
• If another monitor is
close by, separate the
two monitors by at
least 300mm (12 in.)
for optimal
performance.
Degauss the monitor using
OSD manual demagnetize
function. This function can
only be used once in a 30
minute period.
Further help
If you are unable to correct the problem yourself, you may seek further help as follows:
Call CUSTOMER SUPPORT CENTER.
In the US call 1-800-426-7378
In Canada (Toronto only) call 416-383-3344
(All other areas) call 1-800-565-3344
In other countries, contact your dealer, retailer, or other Lenovo authorized servicer.
Before calling please have available as much of the following information as possible:
1. Type, model and serial number form the label on the back of your monitor.
2. Purchase receipt.
3. Description of problem.
4. Computer type and model.
5. System configuration (additional hardware etc.).
6. System BIOS version number.
7. Operating System and version number.
8. Display driver version number.
9. Video Adapter Type
17
Page 19

If possible, stay by your computer system. Your technical support representative might want
to go through the problem with you during the call.
18
Page 20

Specifications
The C190 (MT6739) color monitor uses a 19-inch FFSM CRT with a viewable image size of
457.3mm (18.0 in.).
Dimensions Width:
Depth:
Height:
Weight Packing:
Unpacking:
Tilt Swivel Forward tilt:
Backward tilt:
Swivel:
Image Maximum Height:
Maximum Width:
Dot Pitch:
Power Input Supply Voltage:
Max Supply Current:
Video Input Input Signal:
Horiz. Addressability:
Vert. Addressability:
Clock Rate
Communications VESA DDC 2B
Synchronization Range Horiz. Frequency:
Vert. Frequency:
Power Consumption
(Typical)
Normal Operation:
Off:
456 mm (17.95 in.)
458 mm (18.03 in.)
468 mm (18.42 in.)
24.6 kg (54.23 lb)
21.25 kg (46.85 lb)
4.5°
15°
+90°/-90°
274.5 mm (10.80 in.)
365.8 mm (14.40 in.)
0.25 mm (0.0098 in.)
100-240 V ac, 60-50Hz
1.8A at 100 V ac
Analog Direct Drive,
75 ohm 0-0.7 V
1600 pels (maximum)
1200 lines (maximum)
202.5 Mhz
30 kHz-96 kHz
50 Hz-160 Hz
<100 W
<2 W
Environment Operating Temperature:
Storage Temperature:
Shipping Temperature:
Operating Humidity:
Storage Humidity:
Shipping Humidity:
Emissions:
5 to 40 °C (41 to 104 °F)
-20 to 65 °C (-4 to 149 °F)
-20 to 65 °C (-4 to 149 °F)
10 to 90 %
10 to 95 %
10 to 95 %
TCO03/TCO99
19
Page 21

Service Information
The following parts are for use by Lenovo Service, or Lenovo authorized dealers, to support
the customer warranty. Parts are for service use only.
Part Number Machine type-6739 Description
30R4978 6739 Q0N Two Tone Black
30R4979 6739 P0N Business Black
30R5157 6739 Q0N Two Tone Black
30R5158 6739 P0N Business Black
30R4981 6739 Q0E Two Tone Black
30R4982 6739 P0E Business Black
30R4983 6739 Q0S Two Tone Black
30R4984 6739 P0S Business Black
30R4985 6739 Q0N Two Tone Black, FRU
30R4986 6739 P0N Business Black, FRU
30R5159 6739 Q0N Two Tone Black, FRU
30R5160 6739 P0N Business Black, FRU
30R4988 6739 Q0E Two Tone Black, FRU
30R4989 6739 P0E Business Black, FRU
30R4990 6739 Q0S Two Tone Black, FRU
30R4991 6739 P0S Business Black, FRU
30R4992 6739 F0N Pearl White, FRU
30R4993 6739 F0E Pearl White, FRU
30R4994 6739 F0S Pearl White, FRU
31P9696 Tilt/Swivel Business Black, FRU
31P9747 Tilt/Swivel Pearl White, FRU
20
Page 22

Notices and Trademarks
This section contains information on notices and trademarks.
Lenovo may not offer the products, services, or features discussed in this document in all
countries. Consult your local Lenovo representative for information on the products and
services currently available in your area. Any reference to a Lenovo product, program, or
service is not intended to state or imply that only that Lenovo product, program, or service
may be used. Any functionally equivalent product, program, or service that does not infringe
any Lenovo intellectual property right may be used instead. However, it is the user’s
responsibility to evaluate and verify the operation of any other product, program, or service.
Lenovo may have patents or pending patent applications covering subject matter described in
this document. The furnishing of this document does not give you any license to these
patents. You can send license inquiries, in writing, to:
Lenovo (United States), Inc.
500 Park Offices Drive, Hwy. 54
Research Triangle Park, NC 27709
U.S.A.
Attention: Lenovo Director of Licensing
LENOVO GROUP LTD. PROVIDES THIS PUBLICATION “AS IS” WITHOUT WARRANTY
OF ANY KIND, EITHER EXPRESS OR IMPLIED, INCLUDING, BUT NOT LIMITED TO, THE
IMPLIED WARRANTIES OF NON-INFRINGEMENT, MERCHANTABILITY OR FITNESS
FOR A PARTICULAR PURPOSE. Some jurisdictions do not allow disclaimer of express or
implied warranties in certain transactions, therefore, this statement may not apply to you.
This information could include technical inaccuracies or typographical errors. Ch anges are
periodically made to the information herein; these changes will be incorporated in new
editions of the publication. Lenovo may make improvements and/or changes in the product(s)
and/or the program(s) described in this publication at any time without notice.
The products described in this document are not intended for use in implantation or other life
support applications where malfunction may result in injury or death to persons. The
information contained in this document does not affect or change Lenovo product
specifications or warranties. Nothing in this document shall operate as an express or implied
license or indemnity under the intellectual property rights of Lenovo or third parties. All
information contained in this document was obtained in specific environments and is
presented as an illustration. The result obtained in other operating environments may vary.
Lenovo may use or distribute any of the information you supply in any way it believes
appropriate without incurring any obligation to you.
Any references in this publication to non-Lenovo Web sites are provided for convenience only
and do not in any manner serve as an endorsement of those Web sites. The materials at
those Web sites are not part of the materials for this Lenovo product, and use of those Web
sites is at your own risk.
21
Page 23

Any performance data contained herein was determined in a controlled enviro nment.
Therefore, the result obtained in other operating environments may vary significantly. Some
measurements may have been made on development-level systems and there is no
guarantee that these measurements will be the same on generally available systems.
Furthermore, some measurements may have been estimated through extrapolation. Actual
results may vary. Users of this document should verify the applicable data for their specific
environment.
22
Page 24

Trademarks
The following terms are trademarks of Lenovo in the United States, other countries, or both:
Lenovo
ThinkVision"
IBM is a tradeamrk of the IBM Corporation in the United States, other countries, or both
E
NERGY STAR is a U.S. Govt. registered trademark.
Microsoft Windows, and Windows NT are trademarks of Microsoft
Corporation in the United States, other countries, or both.
Other company, product, and service names may be trademarks or service
marks of others.
© Copyright Lenovo 2005; portion © IBM Corp. 2004. All rights reserved.
23
 Loading...